
10-0533 7/08
These insTrucTions should only be prinTed using Adobe
AcrobAT And should noT be fAxed or reproduced on A
digiTAl copier. AmericAn WoodmArk corporATion provides
These insTrucTions on An “As is” bAsis And disclAims Any
And All liAbiliTy for Any inAccurAcies, omissions or
TypogrAphicAl errors cAused by The user’s equipmenT or
by Any Third pArTy’s equipmenT.
esTAs insTrucciones sÓlo se deben imprimir usAndo Adobe
AcrobAT y no se deben enviAr por fAx ni se deben
reproducir en unA copiAdorA digiTAl. AmericAn WoodmArk
corporATion proporcionA esTAs insTrucciones “TAl como
esTAn” y renunciA A cuAlquier y A TodA responsAbilidAd por
cuAlquier fAlTA de precisiÓn, omisiÓn o error TipogrÁfico
cAusAdo por el equipo del usuArio o por el equipo de
TercerAs personAs.

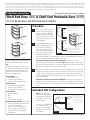
This kit provides space for exposed storage
beside base and peninsula base cabinets.
Fits
Shelf End Base (SEB) can be installed next
to any base or peninsula base cabinet. SEB
toe kick can be installed for left or right
application. SEPB can be installed next to
any peninsula base cabinet.
SEB Contents
• ShelfEndBase(SEB)
• ToeKickUnit(notattached)
• (2)#8x1-1/8”MountingScrews
SEPB Contents
• ShelfEndPeninsulaBase(SEPB)
• ToeKickUnit(notattached)
• (2)#8x1-1/8”MountingScrews
Tools Needed
• PhillipsScrewdriver
• Drill
• Pencil
• 3/32”and5/32”DrillBits
Additional Items Needed (not included)
• (4)#8x7/8”PhillipsPanHeadScrews
for1/2”thickSidePanels
• (4)#8X1-1/8”PhillipsPanHead
Screwsfor3/4”thickSidePanels
• 3/4”WireBrads(forextendedSEB
configuration)
Shelf End Base (SEB) & Shelf End Peninsula Base (SEPB)
For Use Beside Base and Peninsula Base Cabinets
Place toekick so that it lines up
withthetoekickoftheadjacent
cabinet.PositiontheSEB/SEPB
againsttheadjacentcabinetand
on top of the toe kick. Trace the
edge of the toekick on the bottom
oftheSEB/SEPB.
TurntheSEB/SEPBupsidedown
and put aside temporarily. In the
topofthetoekick,drilltwo
5/32”holesoppositethelarge
holes in the bottom. Next, place
the toekick onto the overturned
SEB/SEPBandalignwiththe
previouslytracedmarks.ThenmarktheholelocationsontheSEB/SEPBbottom.Drillpilot
holesatthemarkedpositions,3/32”diameterx3/8”deep.
CAUTION: BE CAREFUL NOT TO DRILL THROUGH! Use#8x1-1/8”screws
(provided)andattachtoekickunittoSEB/SEPB.HINT: Wrapping a piece of tape around
thedrillbit7/8”fromtheend(1/2”fortoekicktopthicknessplus3/8”notedabove)will
give a visual stopping point for the correct depth to drill.
Drillfour5/32”diameterholesthroughthesideofthecabinetadjacenttotheshelfunit.
They should be evenly spaced top to bottom and side to side near each corner. Put SEB
orSEPBintoplace,aligningthetoekickwithtoekickofadjacentcabinet.Markdrilled
locationsthroughcabinetsidesanddrillpilotholes3/32”diameterx3/8”deepinshelf
unit at these positions.
CAUTION: BE CAREFUL NOT TO DRILL THROUGH! Use(4)#8x7/8”screws(not
includedfor1/2”SidePanels)or#8X1-1/8”screws(notincludedfor3/4”SidePanels)
toattachtheSEB/SEPBtotheadjacentcabinet,andyournewSEB/SEPBcabinetisready
to use.
1
2
3
Procedure
Shelf End Base (SEB)
Shelf End Peninsula Base (SEPB)
NOTE: TwoSEBunitsare
needed for this configuration
and they must be attached to
eachotheraswellastothe
adjacentcabinet.
SeeSteps1–3forattachment
totheadjacentcabinet.
Use(3)3/4”wirebrads(not
included) to attach the SEB
units together.
Extended SEB Configuration
999211/10
Installation Instructions
Read carefully before you begin installation
THESE INSTRUCTIONS SHOULD NOT BE FAXED OR REPRODUCED ON A DIGITAL COPIER. AMERICAN WOODMARK CORPORATION PROVIDES THESE INSTRUCTIONS ON AN “AS IS” BASIS AND DISCLAIMS ANY AND
ALL LIABILITY FOR ANY INACCURACIES, OMISSIONS OR TYPOGRAPHICAL ERRORS CAUSED BY ANY THIRD PARTY’S EQUIPMENT. When you use these instructions, you are consenting to be bound by the provisions
inthisparagraph.TheseinstructionsprovideanillustrativemethodforinstallingAmericanWoodmarkCorporation(“AWC”)cabinetsand/oraccessories.AWC’sinstructionsarenotintendedtoaddresseverypossible
contingency that might be encountered during installation or to endorse the use of any particular tools. AWC HEREBY EXPRESSLY DISCLAIMS ALL LIABILITY FOR ANY CLAIMS FOR INJURY OR DEATH RELATED TO OR
BASED UPON THE USE OF THESE INSTALLATION INSTRUCTIONS AND ANY INSTALLATION INSTRUCTIONS OTHERWISE PROVIDED BY AWC.
Shelf End Base
Figure 1
Adjacent
Peninsula
Base Cabinet
3/4" Wire Brads
Figure 2
SEB
SEB
Top View
Shelf End Base
Figure 2
Figure 1
Adjacent
Base
Cabinet
SEB
SEPB
Adjacent
Peninsula
Base Cabinet
#8 x 7/8" Screw (4 required per unit
for 1/2" thick Side Panel)
#8 x 1-1/8" Screw (4 required per
unit for 3/4" thick Side Panel)
Adjacent
Base
Cabinet
SEB
Toe Kick Unit
Top View
Top View
#8 x 7/8" Screw (4 required per
unit for 1/2" thick Side Panel)
#8 x 1-1/8" Screw (4 required per
unit for 3/4" thick Side Panel)
#8 x 7/8" Screw
(4 required per unit for
1/2" thick Side Panel)
#8 x 1-1/8" Screw
(4 required per unit for
3/4" thick Side Panel)

Instrucciones de instalación
Lea con cuidado antes de comenzar la instalación
999211/10
ESTAS INSTRUCCIONES NO SE DEBEN ENVIAR POR FAX NI SE DEBEN REPRODUCIR EN UNA COPIADORA DIGITAL. AMERICAN WOODMARK CORPORATION PROPORCIONA ESTAS INSTRUCCIONES “TAL COMO ESTAN”
Y RENUNCIA A CUALQUIER Y A TODA RESPONSABILIDAD POR CUALQUIER FALTA DE PRECISION, OMISION O ERROR TIPOGRAFICO CAUSADO POR EL EQUIPO DE TERCERAS PERSONAS. Al utilizar estas instrucciones,
ustedestáaceptandoestarsujetoalasdisposicionescontenidasenestepárrafo.Estasinstruccionesproporcionanunmétodoilustrativoparainstalarlosgabinetesy/oaccesoriosdeAmericanWoodmarkCorporation
(“AWC”).LasinstruccionesdeAWCnotienenporobjetoresolvertodacontingenciaposiblequepudierapresentarsedurantelainstalaciónnirecomendarelusodeunaherramientaenparticular.PORLAPRESENTE,
AWC RENUNCIA EXPRESAMENTE A TODA RESPONSABILIDAD POR CUALQUIER RECLAMACION POR LESIONES O FALLECIMIENTO DERIVADOS DEL USO DE ESTAS INSTRUCCIONES DE INSTALACION Y DE OTRAS
INSTRUCCIONES DE INSTALACION QUE AWC HAYA PROPORCIONADO DE ALGUNA OTRA FORMA.
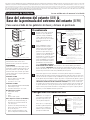
Estejuegoleproporcionaespaciode
almacenamiento abierto al lado de los
gabinetes de base y de base de la península.
Compatibilidad
La base del extremo del estante (SEB) se puede
instalarjuntoacualquiergabinetedebaseode
base de la península. El pie del SEB se puede
instalarenamboslados,mientrasqueelSEPB
sepuedeinstalarjuntoacualquiergabinetede
base de la península.
Contenido del SEB
• Basedelextremodelestante(SEB)
• Unidaddelpie(nofija)
• (2)Tornillosn.º8x1-1/8”
Contenido del SEPB
• Baseenpenínsuladelextremodelestante(SEPB)
• Unidaddelpie(nofija)
• (2)Tornillosdemontajen.º8x1-1/8”
Herramientas necesarias
• DestornilladorPhillips
• Taladro
• Lápiz
• Brocasde3/32”y5/32”
Otros objetos necesarios (no incluidos)
• (4)tornillosdecabezaplanaPhillips,de
#8x7/8”,paralospaneleslateralesde
1,27cmdegrosor
• (4)tornillosdecabezaplanaPhillips,de
#8X1-1/8”,paralospaneleslaterales
de1,91cmdegrosor
• Clavossincabezaparaalambrede3/4”
(ParalaconfiguraciónextendidadelSEB)
Base del extremo del estante (SEB) &
Base de la península del extremo del estante (SEPB)
Para usarse al lado de los gabinetes de base y de base en península
Coloqueelpiedemodoquequede
alineado con el pie del gabinete
adyacente.ColoqueelSEB/SEPB
contra el gabinete adyacente y la
parte superior del pie. Trace el borde
del pie en la parte inferior del
SEB/SEPB.
VolteeelSEB/SEPBbocaabajoy
póngaloaunlado.Enlaparte
superiordelpie,hagadosagujeros
de5/32”enfrentedelosagujeros
grandes de la parte inferior. Luego,
coloqueelpieenelSEB/SEPBvolteado
yalinéeloconlasmarcasquetrazó
anteriormente.Acontinuación,marque
ellugardelosagujerosenlaparte
inferiordelSEB/SEPB.Perforeagujeros
guíade3/32”dediámetroX3/8”de
profundidadenlasposicionesque
marcó.PRECAUCION: ASEGURESE
DE NO ATRAVESAR LA UNIDAD.Uselostornillosn.º8X1-1/8”(incluidos)yfijelaunidad
delpiealSEB/SEPB. SUGERENCIA:Enrolleunpedazodecintaalrededordelabrocaa7/8”de
distanciadelextremo(a1/2”enelcasodelapartesuperiordelpiemáslos3/8”quesemencionan)
paraquetengaunareferenciavisualdelaprofundidadquedebeperforar.
Perforecuatroagujerosde5/32”dediámetroenelladodelgabineteadyacentealaunidaddel
estantedeformaquequedenespaciadosdemanerauniformedearribahaciaabajoydeladoalado
cercadecadaunadelasesquinas.ColoqueelSEB/SEPBensulugar,alineandoelpiedeéstosconel
piedelgabineteadyacente.Marqueloslugaresqueperforóenlapartelateraldelgabineteyperfore
agujerosguíade3/32”dediámetroX3/8”deprofundidadenlaunidaddelestanteenestoslugares.
PRECAUCION: ASEGURESE DE NO ATRAVESAR LA UNIDAD.Use(4)tornillosde#8x7/8”
(noincluidosparalospaneleslateralesde1,27cm),otornillosde#8X1-1/8”(noincluidospara
lospaneleslateralesde1,91cm),parafijarlabasedeextremoderepisa(SEB,porsussiglasen
inglés)olabaseparapenínsuladeextremoderepisa(SEPB,porsussiglaseninglés)algabinete
adyacenteysunuevaSEB/SEPBestarálistaparausarse.
1
2
3
Procedimiento
NOTA:Paraestáconfiguración
se necesitan dos unidades SEB
quedebenirfijasentresí,así
como al gabinete adyacente.
Vealospasos1a3parafijarlas
unidades al gabinete adyacente.
Use(3)clavossincabezapara
alambrede3/4”(noincluidos)
parafijarlasunidadesSEB.
Configuración extendida del SEB
Shelf End Base
Figure 1
Gabinete
de basede
península
adyacente
Clavos sin cabeza para alambre
de 3/4"
SEB
SEB
Tornillos de #8 x 7/8”
(se necesitan 4 por
unidad para los paneles
laterales de 1,27 cm de
grosor)
Tornillos de #8 x 1-1/8”
(se necesitan 4 por
unidad para los paneles
laterales de 1,91 cm de
grosor)
Vista superior
Figura 2
Base del extremo del estante (SEB)
Base de península del extremo del estante (SEPB)
Shelf End Base
Figure 2
Figura 1
Gabinete
debase
adyacente
SEB
SEPB
Gabinete
debase de
península
adyacente
Tornillos de #8 x 7/8” (se necesitan 4
por unidad para los paneles laterales de
1,27 cm de grosor)
Tornillos de #8 x 1-1/8” (se necesitan 4
por unidad para los paneles laterales de
1,91 cm de grosor)
Gabinete
de base
adyacente
SEB
Unidad del pie
Top View
Top View
Tornillos de #8 x 7/8” (se necesitan
4 por unidad para los paneles laterales
de 1,27 cm de grosor)
Tornillos de #8 x 1-1/8” (se necesitan
4 por unidad para los paneles laterales
de 1,91 cm de grosor)
-
 1
1
-
 2
2
-
 3
3


En otros idiomas
- English: Allen + Roth SEB Installation guide
Documentos relacionados
Otros documentos
-
Accuride CBERGO-TRAY 200 Guía de instalación
-
 American Woodmark Corporation SEW Guía de instalación
-
 American Woodmark Corporation SUC36T Guía de instalación
-
 American Woodmark Corporation SGH36U Guía de instalación
-
Hampton Bay KADRTA18 Guía de instalación
-
 American Woodmark Corporation 99868 Guía de instalación
-
 Hampton Bay KW3624-SW Guía de instalación
-
Tefal GC750812 Manual de usuario
-
Tefal GC750D40 Manual de usuario
-
 American Woodmark Corporation DEP Guía de instalación


