Audibax Sidney 1250 A El manual del propietario
- Categoría
- Equipo musical
- Tipo
- El manual del propietario
Este manual también es adecuado para

11
Sidney 1250 A / Sidney 1250 B
Please read the manual before using the product
Por favor, lea el manual antes de usar el producto
USER´S
MANUAL
MANUAL
DE USUARIO
Sidney 1250 A
Sidney 1250 B
Notes / Notas:

1 10
Sidney 1250 A / Sidney 1250 B USER´S
MANUAL
MANUAL
DE USUARIO
Safety and environment protection
1. To avoid electric shock risk, do not open the box. No accessories can be change in the
box.
2. Before the using, make sure the National standard voltage match the receiver. For long
time no using, please move out the power plug from the power outlet.
3. In order to fully ventilation, the hold set system should keep minimum
30CM from other things. Bad ventilation environment will result the system getting hot and
damage or even result in fire. Newspaper. dishcloth. curtain and other things should move
out from the hold set system for fully ventilation.
Do not put some blaze headstream on the system such as the candle.
Keep away the whole set system from the dusty. wet or the direct sunlight place.
Move out the liquid from the system to escape getting electric shock.
Do not put it in a mechanical shock and vulnerable place to avoid damage, and do not
knock and huff the microphone head
4. In order to obtain good results, as far as possible keep away from the high-voltage
transmission valve, large metal objects, as well as computers, high-power interphone, radar
and other equipment.
5. Please use the professional alkaline battery or rechargeable battery, fix up the batteries in
the right direction, turn off the transmitter after the use to save the power, and for long time
no use, remember to move out the batteries.
6. For long time no use, move out the power adapter from the outlet.
7. Throw the scrap batteries into the specifically place.
Brief introduction of the performance
These series products adopt UHF frequency and use the international standard common
frequency which can be used in all over the world. Due to the low frequency and many
reasons, traditional wireless microphone usually disturbed by many factors especially by the
variety of harmonic which send off by the CD/CD/LD and other digital equipment. Squelch
circuit usually analysis the intensity of the RF frequency channel instead of the noise and the
needed signal. Using the low traditional wireless microphone in the complex environment or
when the signal of the microphone is weak or the microphone is closured, the squelch circuit
may suddenly open which result the receiver send out a strong burst of noise
Do not change the frequency when using one set system.
Using more than one set system at the same time, make sure the transmitter and the receiver
of each system have the same frequency channel.
Using many transmitters or receivers in the same time, choosing the best frequency channel
is recommended.
Main performances
1. UHF 500-900 MHz, avoid the disturb frequency.
2. Adopts multilevel and narrowband high and mid frequency technology, the system can
search the best channel and eliminate the disturbing signal.
3. Thick undertone, light mediant and clear alt.
4. ALC circuit, avoid sound distortion by large sound.
5. Low power consumption components, long battery life.
6. Shield antenna for the handheld microphone, practical and beautiful.
7. Low power indicator for the handheld microphone, indicate change the battery in time.
8. With audio compressing-expanding technology, the system can avoid noise and increase
the dynamic range.
Especificación de la tecnología del receptor
1. Modo de recepción:
Conversión doble superheterodina
2. Sensibilidad: -93dBm
3. Salida de audio:
Salida de balance XLR: 0~500mV
Salida de desequilibrio Ф6.35: 0~500mV
4. Potencia: 220V/50Hz o 110V/60Hz
5. Potencia nominal: 5 W
6. Consumo de energía nominal: 3W
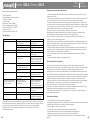
Solución de problemas
La información de este manual está sujeta a cambios sin previo aviso. Este manual contiene toda la
información sobre el producto, cualquier cosa que no sea clara o sea falsa o se pierda, contáctenos y solicite
información. Sin la confirmación, no podemos aceptar ninguna responsabilidad por cualquier pérdida o daño
causado por el servicio, mantenimiento o reparación por parte de personal no autorizado.
Fenómeno
Razones
Solución
Indicador sin luz
Configuración de la batería en
polaridad invertida direccional
Restablezca la batería en la
dirección de polaridad correcta
Falta de poder
Cambiar la batería de potencia
completa
El clip conectado de la batería
está sucio o se ha corroído
Limpie o cambie el clip del pin
de conexión
Indicador centelleo durante el
uso
Falta de poder
Cambiar la batería de potencia
completa
La ventana VDF del receptor se
apaga
No conectar la electricidad
Compruebe el adaptador de
alimentación de CA y el voltaje
La alimentación del receptor no
está bien conectada
Compruebe si el adaptador de
alimentación de CC está
insertado un extremo en la toma
de corriente, mientras que el otro
extremo está insertado en el
receptor.
El receptor no tiene recepción
Sin girar el micrófono
Encienda el micrófono de
trabajo
La frecuencia del micrófono no
coincide con el receptor.
Usar el mismo sistema de
frecuencia
El micrófono excede la distancia
de trabajo
Volver a la distancia de trabajo
El receptor recibe recepción
pero no hay sonido
El volumen debe estar en el nivel
más bajo
Ajustar el volumen del transmisor
y del amplificador
Conexión mala o incorrecta con
la línea de audio
Conecte la línea de audio de la
manera correcta
El receptor tiene recepción antes
de encender el micrófono, algo
de ruido en la caja de
resonancia
Algún equipo de la misma
frecuencia aparece en el rango
de trabajo
Cambie el lugar de trabajo para
evitar la interrupción, mantenga
cierta distancia con la
computadora, el teléfono móvil
que funciona
Caja de sonido enviar sonido
Comentario
Baje el volumen, no apunte el
micrófono directamente a la
caja de sonido
El sonido no es consecutivo.
Superar la distancia efectiva
Volver a la distancia de trabajo
Distancia de trabajo demasiado
corta
El entorno es demasiado
complejo.
Evite el entorno complejo y,
posiblemente, para evitar el gran
tema de metal, la pared, la
multitud

9 2
Sidney 1250 A / Sidney 1250 B USER´S
MANUAL
MANUAL
DE USUARIO
1. Connect one end of "XLR to a XLR" cable to the Receiver balance audio OUTPUT and the
other end to the other KARAOKE EQUIPMENTS.
2. Connect one end of a " 1/4 cable to the receiver's UNBALANCE AUDIO OUTPUT and the
other end to a karaoke power amplifier" microphone input.
3. Connect the DC POWER ADAPTER to the receivers DC INPUT 110/220V then plug the other
end of DC POWER ADAPTER into the WALL OUTLET.
4. Install the antenna to each antenna socket on rear panel, then fasten the antenna
towards the right side till the antenna is vertical with ground.
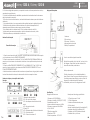
Part name and function description
Receiver
Front Panel
9. Weaken feedback function, it can lower the feedback effectively during the receiving.
10. Unique mute-sound function, refuse the outside interference to open the mute system.
11. Excellent wafer and high quality components make the sound quality better.
12. Professional audio output: XL balance output, Φ 6.3 unbalance output, suitable for all
occasion to connect the system
13. The maximum effective distance up to 100 M and the ideal distance is 60M.
14. Suitable for small stage. song and dance ball conference room.
15. teaching room and family amusement etc.
Receiver Installation
1. Power Switch
2. CH. A Volume Control
3. CH. A Audio level signal lamp
4. CH. A Radio wave
5. LCD Panel
6. CH. B Audio Level Signal Lamp
7. CH. B Radio Wave
8. CH. B Volume Control
Especificación
Desempeño integrador
1. Frecuencia: Frecuencia ultraelevada:
500-900MHz
2. Estabilidad de frecuencia: ± 0.005%(-10°C~50°C)
3. Modo de modulación: FM
4. Frecuencia máxima de modulación: ± 40 KHz
5. Respuesta de frecuencia: 40Hz~20KHz
6.S/N: =100dB
7. Alcance efectivo: 60m
8. Distorsión: ≤ 0,5%
9. Temperatura de trabajo: -10°C~50°C
Especificación de tecnología de
micrófono
1. Potencia de salida de RF: ≤ 10 mW
2. Supresión de desorden
3. Antena: potencia externa oculta
4. Cabezal de recogida:
directividad cardioide dinámica
(micrófono de mano)
directividad del condensador
(micrófono de cintura)
5. Pilas: pilas alcalinas AA1.5VX2
6. Duración de las baterías: hasta 6
horas
Micrófono de petaca
1. Antena
2. Lámpara de encendido
3. Interruptores de encendido/apagado
4. Conector de entrada de micrófono
5. Compartimiento de la batería
Cómo llevar puesto el transmisor bodypack:
Abroche el clip del transmisor al cinturón 1 como se
muestra en el diagrama de la izquierda. Si se debe
lograr el mejor efecto, el transmisor debe empujarse
hacia abajo.
Cambio de batería:
La esperanza de vida de dos pilas alcalinas es de
unas 8 horas. Cuando el símbolo de indicación de
energía en la pantalla sigue parpadeando como se
muestra en el diagrama de la izquierda, las baterías
deben reemplazarse inmediatamente, como se
muestra en el diagrama de la izquierda.

3
8
Sidney 1250 A / Sidney 1250 B USER´S
MANUAL
MANUAL
DE USUARIO
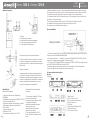
Rear Panel
Handheld Transmitter
Battery Replacement
The life expectancy of two alkaline batteries is about six hours. When the power indication
symbol on the display screen keeps flashing as shown in the diagram, the batteries should be
replaced immediately, as shown in the diagram.
1. CH. B Antenna
2. ¼” unbalanced output jack
3. CH. B XLR balanced microphone output
jack
4. CH. A XLR balanced microphone output
jack
5. CH. A Antenna
6.DC Adapter jack
7. CH. A ¼” unbalanced output jack
8. CH. B ¼” unbalanced output jack
Function:
1. Interchangeable microphone head
2. LED Power Signal lamp
3. Power Control switch
4. Battery compartment
5. MUTE
Panel trasero
Transmisor de mano
Cambio de batería
La esperanza de vida de dos pilas alcalinas es de unas seis horas. Cuando el símbolo de
indicación de energía en la pantalla sigue parpadeando como se muestra en el diagrama,
las baterías deben reemplazarse inmediatamente, como se muestra en el diagrama.
1. CH. Antena B
2. Toma de salida no balanceada de ¼”
3. CH. B Toma de salida de micrófono
balanceada XLR
4. CH. Un conector de salida de micrófono
balanceado XLR
5. CH. una antena
6. Conector del adaptador de CC
7. CH. Un jack de salida no balanceado de ¼”
8. CH. B Toma de salida no balanceada de ¼”
Función:
1. Cabezal de micrófono intercambiable
2. Lámpara de señal de alimentación LED
3. Interruptor de control de potencia
4. Compartimento de la batería
5. MUTE

8. Con la tecnología de expansión y compresión de audio, el sistema puede evitar el ruido y
aumentar el rango dinámico.
9. Función de retroalimentación debilitada, puede reducir la retroalimentación de manera
efectiva durante la recepción.
10. Función única de sonido silencioso, rechaza la interferencia externa para abrir el sistema
de silencio.
11. La excelente oblea y los componentes de alta calidad mejoran la calidad del sonido.
12. Salida de audio profesional: salida de balance XL, salida de desequilibrio Φ 6.3,
adecuada para todas las ocasiones para conectar el sistema
13. La distancia efectiva máxima hasta 100 M y la distancia ideal es de 60 M.
14. Adecuado para escenarios pequeños. sala de conferencias de canto y baile.
15 Sala de enseñanza y entretenimiento familiar, etc.
Instalación del receptor
1. Interruptor de encendido
2. CH. Un control de volumen
3. CH. Una lámpara de señal de nivel de
audio
4. CH. Una onda de radio
5. Panel LCD
6. CH. B Lámpara de señal de nivel de audio
7. CH. Onda de radio B
8. CH. Control de volumen B
Specification
Integrative Performance
1. Frequency: UHF:500-900MHz
2. Frequency stability: ± 0.005%(-10°C~50°C)
3. Modulation mode: FM
4. Max modulation frequency: ± 40KHz
5. Frequency response: 40Hz~20KHz
6. S/N: =100 dB
7. Effective range: 60m
8. Distortion: ≤ 0.5%
9. Work temperature: -10°C~50°C
Microphone technology specification
1. RF output power: ≤ 10 mW
2. Clutter Suppression
3. Antenna: hidden external power
4. Pickup head:
dynamic cardioid directivity (handheld MIC)
condenser directivity (waistband MIC)
5. Batteries: AA1.5VX2 alkaline batteries
6. Batteries life: up to 6 hours
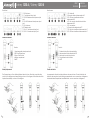
Bodypack Microphone
7 4
Sidney 1250 A / Sidney 1250 B USER´S
MANUAL
MANUAL
DE USUARIO
1. Antenna
2. Power Lamp
3. Power on / off switchs
4. Microphone input socket
5. Battery Compartment
How to wear the bodypack transmitter:
Buckle the transmitter clip to the belt 1 as show in the
left diagram. If best effect must be achieved, the
transmitter should be pushed down.
Battery replacement:
The life of expectancy of two alkaline batteries is
about 8 hours. When the power indication symbol on
the display screen keeps flashing as shown is the left
diagram, the batteries should be replaced
immediately, as shown in the diagram on the left
Conexión del receptor
1. Conecte un extremo del cable "XLR a XLR" a la SALIDA de audio del balance del receptor
y el otro extremo a los otros EQUIPOS DE KARAOKE.
2. Conecte un extremo de un cable de "1/4" a la SALIDA DE AUDIO DESBALANCEADA del
receptor y el otro extremo a la entrada de micrófono de un amplificador de potencia de
karaoke.
3. Conecte el ADAPTADOR DE CORRIENTE DE CC a la ENTRADA DE CC de 110/220 V del
receptor y luego enchufe el otro extremo del ADAPTADOR DE CORRIENTE DE CC en el
TOMA DE CORRIENTE DE PARED.
4. Instale la antena en cada enchufe de antena en el panel trasero, luego sujete la antena
hacia el lado derecho hasta que la antena esté vertical con respecto a tierra.
Nombre de la pieza y descripción de la función
Receptor
Panel frontal

Seguridad y protección del medio ambiente
1. Para evitar el riesgo de descargas eléctricas, no abra la caja. No se pueden cambiar
accesorios en la caja.
2. Antes de usar, asegúrese de que el voltaje estándar nacional coincida con el receptor. Si
no lo usa durante mucho tiempo, desconecte el enchufe de la toma de corriente.
3. Para una ventilación completa, el sistema de sujeción debe mantener un mínimo de 30
cm de otras cosas. Un ambiente de mala ventilación hará que el sistema se caliente y dañe
o incluso provoque un incendio. Periódico. paño de cocina. la cortina y otras cosas deben
salir del sistema de espera para una ventilación completa.
No ponga un flujo de cabeza de llama en el sistema, como la vela.
Mantenga todo el sistema alejado del polvo. mojado o el lugar de la luz solar directa.
Saque el líquido del sistema para evitar recibir una descarga eléctrica.
No lo coloque en un lugar vulnerable y de choque mecánico para evitar daños, y no
golpee ni sople la cabeza del micrófono.
4. Para obtener buenos resultados, en la medida de lo posible, manténgase alejado de la
válvula de transmisión de alto voltaje, objetos metálicos grandes, así como computadoras,
interfonos de alta potencia, radares y otros equipos.
5. Utilice la batería alcalina profesional o la batería recargable, coloque las baterías en la
dirección correcta, apague el transmisor después del uso para ahorrar energía y, durante
mucho tiempo sin uso, recuerde sacar las baterías.
6. Si no lo usa durante mucho tiempo, retire el adaptador de corriente de la toma de
corriente.
7. Tire las baterías de desecho en el lugar específico.
Breve introducción de la actuación.
Estos productos de la serie adoptan la frecuencia UHF y utilizan la frecuencia común
estándar internacional que se puede utilizar en todo el mundo. Debido a la baja frecuencia
y muchas razones, los micrófonos inalámbricos tradicionales generalmente se ven
afectados por muchos factores, especialmente por la variedad de armónicos que emiten
los CD/CD/LD y otros equipos digitales. El circuito de silenciamiento generalmente analiza la
intensidad del canal de frecuencia de RF en lugar del ruido y la señal necesaria. Usando el
micrófono inalámbrico tradicional bajo en el entorno complejo o cuando la señal del
micrófono es débil o el micrófono está cerrado, el circuito de silenciamiento puede abrirse
repentinamente, lo que hace que el receptor envíe una fuerte ráfaga de ruido.
No cambie la frecuencia cuando utilice un sistema establecido.
Si usa más de un sistema configurado al mismo tiempo, asegúrese de que el transmisor y el
receptor de cada sistema tengan el mismo canal de frecuencia.
Si se utilizan muchos transmisores o receptores al mismo tiempo, se recomienda elegir el
mejor canal de frecuencia.
Actuaciones principales
1. UHF 500-900 MHz, evite la frecuencia perturbadora.
2. Adopta tecnología multinivel y de banda estrecha de alta y media frecuencia, el sistema
puede buscar el mejor canal y eliminar la señal perturbadora.
3. Subtono grueso, medio claro y alt claro.
4. Circuito ALC, evita la distorsión del sonido por un sonido grande.
5. Componentes de bajo consumo de energía, batería de larga duración.
6. Antena de escudo para el micrófono de mano, práctica y hermosa.
7. Indicador de baja potencia para el micrófono de mano, indica cambiar la batería a
tiempo.
5 6
Sidney 1250 A / Sidney 1250 B USER´S
MANUAL
MANUAL
DE USUARIO
Receiver technology specification
1. Receiving mode:
Superheterodyne double-conversion
2. Sensitivity: -93dBm
3. Audio output:
XLR balance output: 0~500mV
Ф6.35 unbalance output: 0~500mV
4. Power: 220V/50Hz or 110V/60Hz
5. Rated power: 5 W
6. Rated power consumption: 3W
Troubleshooting
The information in this manual is subject to change without notice. This manual contains all
information about the product, anything which are not clear or false or lose, please contact
us and ask for information. Without the confirmation we cannot accept any liability
whatsoever for any loss or damage caused by service, maintenance or repair by
unauthorized personnel.
Phenomenon
Reasons
Solution
Indicator no light
Setting the battery in reversed
polarity directional
Reset the battery in the right
polarity direction
Lack of power
Change full power battery
Connected clip of the battery is
dirty or have been corroded
Clean or change the connect
pin clip
Indicator twinkle during the use
Lack of power
Change full power battery
The VDF window of the receiver
turn off
Fail to connect the electricity
Check the AC power adapter
and the voltage
The power of the receiver is not
connected well
Check the DC power adapter
whether is that one end inserted
into the outlet, while the other
one inserted into the receiver
Receiver has no reception
No turn of the microphone
Turn on the working microphone
The frequency of the microphone
is not match with the receiver
Use the same frequency system
Microphone exceeds the working
distance
Return to the working distance
Receiver gets reception but no
sound
Volume be in the lowest level
Adjust the volume of the
transmitter and the amplifier
Bad or wrong connection with
the audio line
Connect the audio line in the
right way
Receiver has reception before
turn on the microphone, some
noise in the sound-box
Some same frequency
equipment appears in the
working range
Change the working place to
avoid the interruption, keep
certain distance with the
computer, working mobile phone
Sound box send out sound
Feedback
Turn down the volume, do not
point the microphone directly to
the sound box
The sound is not consecutive
Exceed the effective distance
Return to the working distance
Working distance too short
The environment is too complex
Avoid the complex environment,
and possibly to avoid the big
metal subject, wall, crowded
-
 1
1
-
 2
2
-
 3
3
-
 4
4
-
 5
5
-
 6
6


Audibax Sidney 1250 A El manual del propietario
- Categoría
- Equipo musical
- Tipo
- El manual del propietario
- Este manual también es adecuado para
en otros idiomas
- English: Audibax Sidney 1250 A Owner's manual
Artículos relacionados

Otros documentos
-
Gemini UZ-1128 Manual de usuario
-
Gemini UF-I064H Manual de usuario
-
AKG DMS700 El manual del propietario
-
-
Work-pro WRD 280 AF/1 Manual de usuario
-
-
-
AKG Acoustics HT 40 PRO Manual de usuario
-