audizio Cuneo Clock Radio DAB+ El manual del propietario
- Categoría
- Radios
- Tipo
- El manual del propietario

Ref. nr.: 102.502
INSTRUCTION MANUAL
GEBRUIKSAANWIJZING
BEDIENUNGSANLEITUNG
MANUAL DE INSTRUCCIONES
MANUEL D'INSTRUCTIONS
INSTRUKCJA OBSŁUGI
NÁVOD K POUŽITÍ
V1.2

2
INDEX
ENGLISH ................................................................................................................................................................................. 4
UNPACKING INSTRUCTION .................................................................................................................................................................................... 5
POWERSUPPLY ........................................................................................................................................................................................................ 5
CONTROLS AND CONNECTIONS .......................................................................................................................................................................... 5
DISPLAY ..................................................................................................................................................................................................................... 5
GETTING STARTED................................................................................................................................................................................................... 6
DAB + ......................................................................................................................................................................................................................... 6
FM RADIO .................................................................................................................................................................................................................. 6
BT PLAYBACK ........................................................................................................................................................................................................... 6
SET ALARM ................................................................................................................................................................................................................ 6
SLEEP TIMER ............................................................................................................................................................................................................. 7
KITCHEN TIMER ........................................................................................................................................................................................................ 7
SETTINGS ................................................................................................................................................................................................................... 7
WIRELESS CHARGE.................................................................................................................................................................................................. 8
NEDERLANDS .......................................................................................................................................................................... 9
UITPAKKEN ............................................................................................................................................................................................................ 10
AANSLUITSPANNING ........................................................................................................................................................................................... 10
BEDIENING ............................................................................................................................................................................................................. 10
DISPLAY .................................................................................................................................................................................................................. 10
AAN DE SLAG GAAN ............................................................................................................................................................................................. 11
DAB + ...................................................................................................................................................................................................................... 11
FM RADIO ............................................................................................................................................................................................................... 11
BT STREAMING ...................................................................................................................................................................................................... 11
WEKALARM INSTELLEN ....................................................................................................................................................................................... 11
SLEEP TIMER .......................................................................................................................................................................................................... 12
KEUKEN TIMER ...................................................................................................................................................................................................... 12
INSTELLINGEN ....................................................................................................................................................................................................... 12
DRAADLOOS OPLADEN ....................................................................................................................................................................................... 13
DEUTSCH .............................................................................................................................................................................. 14
AUSPACKEN ........................................................................................................................................................................................................... 15
NETZANSCHLUSS ................................................................................................................................................................................................. 15
BEDIENUNG ........................................................................................................................................................................................................... 15
ANZEIGE ................................................................................................................................................................................................................. 15
ERSTE SCHRITTE ................................................................................................................................................................................................... 16
DAB + ...................................................................................................................................................................................................................... 16
FM RADIO (UKW) .................................................................................................................................................................................................. 16
BT WIEDERGABE ................................................................................................................................................................................................... 16
WECKALARM EINSTELLEN .................................................................................................................................................................................. 16
SCHLAFZEITSCHALTER (SLEEP TIMER) ............................................................................................................................................................. 17
KÜCHEN-TIMER ..................................................................................................................................................................................................... 17
EINSTELLUNGEN ................................................................................................................................................................................................... 17
KABELLOSES LADEN ............................................................................................................................................................................................ 19
ESPAÑOL .............................................................................................................................................................................. 20
INSTRUCCIONES DE DESEMBALAJE ................................................................................................................................................................. 21
FUENTE DE ALIMENTACIÓN................................................................................................................................................................................ 21
CONTROLES Y CONEXIONES .............................................................................................................................................................................. 21
PANTALLA .............................................................................................................................................................................................................. 21
PRIMEROS PASOS ................................................................................................................................................................................................. 22
RADIO DAB + ......................................................................................................................................................................................................... 22
RADIO FM ............................................................................................................................................................................................................... 22
TRANSMISIÓN BT .................................................................................................................................................................................................. 22
CONFIGURAR ALARMA ........................................................................................................................................................................................ 22
TEMPORIZADOR DE SUEÑO (SLEEP TIMER) .................................................................................................................................................... 23
TEMPORIZADOR DE COCINA (KITCHEN TIMER) ............................................................................................................................................. 23
CONFIGURACIÓN .................................................................................................................................................................................................. 23
CARGA INALÁMBRICA .......................................................................................................................................................................................... 24
FRANÇAIS ............................................................................................................................................................................. 25
DEBALLAGE ............................................................................................................................................................................................................ 26
ALIMENTATION ..................................................................................................................................................................................................... 26
REGLAGES ET BRANCHEMENTS ......................................................................................................................................................................... 26
AFFICHAGE ............................................................................................................................................................................................................. 26
DÉMARRAGE .......................................................................................................................................................................................................... 27
DAB + ...................................................................................................................................................................................................................... 27
FM RADIO ............................................................................................................................................................................................................... 27
LECTURE BT ........................................................................................................................................................................................................... 27
REGLAGE DE L'ALARME ....................................................................................................................................................................................... 27
MINUTERIE DU SOMMEIL (SLEEP TIMER) ......................................................................................................................................................... 28

3
MINUTERIE DE CUISINE (KITCHEN TIMER)....................................................................................................................................................... 28
PARAMÈTRES ......................................................................................................................................................................................................... 28
CHARGE SANS FIL ................................................................................................................................................................................................. 29
POLSKI ................................................................................................................................................................................. 30
INSTRUKCJA ROZPAKOWANIA .......................................................................................................................................................................... 31
ZASILANIE .............................................................................................................................................................................................................. 31
STEROWANIE I POŁĄCZENIA .............................................................................................................................................................................. 31
WYŚWIETLACZ ...................................................................................................................................................................................................... 31
ROZPOCZĘCIE PRACY .......................................................................................................................................................................................... 32
DAB + ...................................................................................................................................................................................................................... 32
FM RADIO ............................................................................................................................................................................................................... 32
ODTWARZANIE PRZEZ BT ................................................................................................................................................................................... 32
USTAWIENIE ALARMU ......................................................................................................................................................................................... 32
WYŁĄCZNIK CZASOWY SNU (SLEEP TIMER) ................................................................................................................................................... 33
KUCHENNY WŁĄCZNIK CZASOWY (KITCHEN TIMER) ................................................................................................................................... 33
USTAWIENIA .......................................................................................................................................................................................................... 33
BEZPRZEWODOWE ŁADOWANIE ...................................................................................................................................................................... 34
ČESKY ................................................................................................................................................................................... 35
POKYNY PO VYBALENÍ ........................................................................................................................................................................................ 36
NAPÁJENÍ ............................................................................................................................................................................................................... 36
OVLÁDACÍ PRVKY A PŘIPOJENÍ ......................................................................................................................................................................... 36
DISPLEJ ................................................................................................................................................................................................................... 36
ZAČÍNÁME .............................................................................................................................................................................................................. 37
DAB + ...................................................................................................................................................................................................................... 37
FM RADIO ............................................................................................................................................................................................................... 37
BT PŘEHRÁVÁNÍ .................................................................................................................................................................................................... 37
NASTAVENÍ ALARMU ........................................................................................................................................................................................... 37
ČASOVAČ SPÁNKU (SLEEP TIMER)..................................................................................................................................................................... 38
ČASOVAČ KUCHYNĚ (KITCHEN TIMER) ............................................................................................................................................................. 38
NASTAVENÍ ............................................................................................................................................................................................................ 38
BEZDRÁTOVÉ NABÍJENÍ ....................................................................................................................................................................................... 39
TECHNICAL SPECIFICATION / TECHNISCHE SPECIFICATIE / TECHNISCHE DATEN / SPECIFICACIONES TÉCNICAS / SPÉCIFICATIONS
TECHNIQUES / SPECYFIKACJA TECHNICZNA / TECHNICKÁ SPECIFIKACE ................................................................................. 40

4
Congratulations to the purchase of this Audizio product. Please read this manual thoroughly prior to using the unit in order to
benefit fully from all features.
Read the manual prior to using the unit. Follow the instructions in order not to invalidate the warranty. Take all precautions to
avoid fire and/or electrical shock. Repairs must only be carried out by a qualified technician in order to avoid electrical shock.
Keep the manual for future reference.
- Prior to using the unit, please ask advice from a
specialist. When the unit is switched on for the first
time, some smell may occur. This is normal and will
disappear after a while.
- The unit contains voltage carrying parts. Therefore do
NOT open the housing.
- Do not place metal objects or pour liquids into the unit
This may cause electrical shock and malfunction.
- Do not place the unit near heat sources such as
radiators, etc. Do not place the unit on a vibrating
surface. Do not cover the ventilation holes.
- The unit is not suitable for continuous use.
- Be careful with the mains lead and do not damage it. A
faulty or damaged mains lead can cause electrical shock
and malfunction.
- When unplugging the unit from a mains outlet, always
pull the plug, never the lead.
- Do not plug or unplug the unit with wet hands.
- If the plug and/or the mains lead are damaged, they
need to be replaced by a qualified technician.
- If the unit is damaged to such an extent that internal
parts are visible, do NOT plug the unit into a mains
outlet and DO NOT switch the unit on. Contact your
dealer. Do NOT connect the unit to a rheostat or
dimmer.
- To avoid fire and shock hazard, do not expose the unit
to rain and moisture.
- All repairs should be carried out by a qualified
technician only.
- Connect the unit to an earthed mains outlet (220-
240Vac/50Hz) protected by a 10-16A fuse.
- During a thunderstorm or if the unit will not be used for
a longer period of time, unplug it from the mains. The
rule is: Unplug it from the mains when not in use.
- If the unit has not been used for a longer period of time,
condensation may occur. Let the unit reach room
temperature before you switch it on. Never use the unit
in humid rooms or outdoors.
- To prevent accidents in companies, you must follow the
applicable guide lines and follow the instructions.
- Do not repeatedly switch the fixture on and off. This
shortens the life time.
- Keep the unit out of the reach of children. Do not leave
the unit unattended.
- Do not use cleaning sprays to clean switches. The
residues of these sprays cause deposits of dust and
grease. In case of malfunction, always seek advice from
a specialist.
- Do not force the controls.
- This unit is with speaker inside which can cause
magnetic field. Keep this unit at least 60cm away from
computer or TV.
- If this product have a built-in lead-acid rechargeable
battery. Please recharge the battery every 3 months if
you are not going to use the product for a long period of
time. Otherwise the battery may be permanently
damaged.
- If the battery is damaged please replace with same
specifications battery. And dispose the damaged
battery environment friendly.
- If the unit has fallen, always have it checked by a
qualified technician before you switch the unit on
again.
- Do not use chemicals to clean the unit. They damage
the varnish. Only clean the unit with a dry cloth.
- Keep away from electronic equipment that may cause
interference.
- Only use original spares for repairs, otherwise serious
damage and/or dangerous radiation may occur.
- Switch the unit off prior to unplugging it from the mains
and/or other equipment. Unplug all leads and cables
prior to moving the unit.
- Make sure that the mains lead cannot be damaged when
people walk on it. Check the mains lead before every
use for damages and faults!
- The mains voltage is 220-240Vac/50Hz. Check if power
outlet match. If you travel, make sure that the mains
voltage of the country is suitable for this unit.
- Keep the original packing material so that you can
transport the unit in safe conditions.
This mark attracts the attention of the user to high voltages that are present inside the housing and that are of
sufficient magnitude to cause a shock hazard.
This mark attracts the attention of the user to important instructions that are contained in the manual and that he
should read and adhere to.
The unit has been certified CE. It is prohibited to make any changes to the unit. They would invalidate the CE certificate and
their guarantee!
NOTE: To make sure that the unit will function normally, it must be used in rooms with a temperature between 5°C/41°F and
35°C/95°F.
Electric products must not be put into household waste. Please bring them to a recycling centre. Ask your local authorities or your
dealer about the way to proceed. The specifications are typical. The actual values can slightly change from one unit to the other.
Specifications can be changed without prior notice.
Do not attempt to make any repairs yourself. This would invalid your warranty. Do not make any changes to the unit. This would also invalid
your warranty. The warranty is not applicable in case of accidents or damages caused by inappropriate use or disrespect of the warnings
contained in this manual. Audizio cannot be held responsible for personal injuries caused by a disrespect of the safety recommendations and
warnings. This is also applicable to all damages in whatever form.

5
CAUTION! Carefully unpack the box upon receipt. Check the contents to ensure that all parts are present and have been
received in good condition. Notify the shipper immediately and retain packaging material if any parts appear damaged from
shipping or the package itself shows signs of mishandling. Save the package and all packaging materials. If the product must
be returned, it is important that the product is returned in the original factory box and packaging. If the device has been
exposed to drastic temperature fluctuation (e.g. after transportation), do not switch it on immediately. The arising
condensation water might damage your device. Leave the device switched off until it has reached room temperature.
The label on the back/under side of the product indicates the mains voltage to which it must be connected. Check that the
mains voltage corresponds to this. Any other voltage than the one indicated may cause irreparable damage to the unit. The
unit must also be connected directly to the mains voltage and no dimmer or adjustable power supply may be used.
Always connect the device to a protected circuit (circuit breaker or fuse). Make sure the device has an appropriate
electrical ground to avoid the risk of electrocution or fire.
1. Power / Source
Press to switch modes
Press and hold to turn the device on or enter standby mode
2. Alarm
Press to set an alarm
3. Preset
Press to open the preset list
Press and hold to save a station as preset
4. Snooze / Station / Select
Press, when an alarm is ringing, to snooze
Press to confirm listening to a chosen station
Press to select/input
5. Sleep
Press to set sleep timer
6. Menu / Info
Press to cycle through station information
Press and hold to open the menu
7. Volume - / <
Press to lower volume during playback
Press in menu’s to scroll
8. Volume + / >
Press to increase volume during playback
Press in menu’s to scroll
9. Wireless charging pad
Depending on your smartphone’s design, the charging area may be positioned differently, requiring some positional
adjustment when placed on the charging surface to be functional
10. USB charge
5V USB charging port
11. DC power adapter input
9V 3.0A DC power input connector
12. Headphone jack
3.5mm jack for inserting headphones
13. Battery compartment
The radio is equipped with a battery powered back-up system, which requires 2 x AAA batteries (not included).
Open the battery compartment. Insert the batteries, making sure the positive and negative (+ or -) poles of the batteries
are in contact with the corresponding terminals within the battery compartment. Close the battery compartment by
inserting the cover. If a power cut/outage occurs, the radio automatically switches to the battery power supply and keeps
the clock and timer settings. When replacing the battery: keep the power adapter connected, otherwise all clock and
alarm settings will be lost
1. Current station and time
2. Sleep timer indicator
3. Set alarm indicator
4. PM indicator
5. Snooze indicator
6. Charging smartphone indicator
7. Volume
8. Signal strength
9. DAB mode indicator
10. FM mode indicator
11. BT mode indicator

6
• Remove the radio from the package box.
• Plug in the power adapter and press [Power].
Caution: Use only the adapter supplied with the radio. Connecting a power supply with a different rating can cause
permanent damage to the radio and may be hazardous.
Note: Make sure to fully extend the antenna (located at the back of the unit) to ensure the best possible FM and DAB
reception.
If there is Digital Audio Broadcasting (DAB) in your area, the Radio can pick up the DAB stations as well. The radio supports
both DAB and DAB+. Place the radio close to the window and extend the antenna as far as it can go to get the best reception.
Sometimes you may need to adjust the direction of the antenna to improve reception.
Press [Source] to select DAB mode. The first time DAB mode is selected, the unit will automatically search for available
stations.
Auto scan: In DAB-mode, press and hold [Menu/Info]. Press [Volume +/>] or [Volume -/<] to select ‘FULL Scan’ and press
[Snooze / Station / Select] to confirm. The number of found stations will be displayed during the automatic scan.
When finished, the device will tune into the last listened to station.
Station presetting: While playing in DAB mode, press and hold [Preset]. Press [Volume +/>] or [Volume -/<] to select the
desired preset slot (1-30), press [Snooze / Station / Select] to store.
Press [Preset] to recall memory. Press [Volume +/>] or [Volume -/<] to select the stored station you want to listen to. Press
[Snooze / Station / Select] to confirm.
Show channel information: Press [Menu/Info] repeatedly to show various forms of information regarding the station that is
being played.
To receive the ordinary FM stations, place the radio close to a window and extend the antenna as far as it can go to get the
best reception. You may need to adjust the direction of the antenna to improve reception.
Press [Source] to select FM mode.
Auto scan: Press [Snooze / Station / Select], “<” and “>” are shown on the display. Press and hold [Volume +/>] or [Volume -
/<], the device will start scanning for the next strong station automatically.
Manual scan: Press [Snooze / Station / Select], “<” and “>” are shown on the display. Press [Volume +/>] or [Volume -/<] to
scroll the frequency value.
Station presetting: While playing in FM mode, press and hold [Preset]. Press [Volume +/>] or [Volume -/<] to select the
desired preset slot (1-30), press [Snooze / Station / Select] to store.
Press [Preset] to recall memory. Press [Volume +/>] or [Volume -/<] to select the stored station you want to listen to. Press
[Snooze / Station / Select] to confirm.
Show channel information: Press [Menu/Info] repeatedly to show various forms of information regarding the station that is
being played.
Before transmission between your BT device and the radio is possible, both devices must be coupled. This process is called
"pairing". The radio is served as a receiver, to receive the music stream to be played on the radio.
If you have already coupled to a BT device before, this connection will be restored automatically when both devices are in
range and BT operation has been selected on the radio. "Pairing" does not have to be repeated. This function may need to be
activated in your BT device, however.
• Press [Source] to enter BT mode.
• Turn on BT streaming on your device. The device will scan for pairable BT devices in the reception range.
• Select “Audizio Cuneo” from the list with found devices. Enter “0000” if a pass code is required.
• Start playback on your BT device. Playback now takes place emitting sound from the radio.
Setting an alarm will switch the radio on (if in standby mode) and tune into a DAB- or an FM radio station or sound a buzzer-
type tone. To set an alarm:
• Press [Alarm1] or [Alarm2].
• Press [Volume +/>] or [Volume -/<] to set the hour value for the alarm and press [Snooze / Station / Select] to confirm.
• Press [Volume +/>] or [Volume -/<] to set the minute value for the alarm and press [Snooze / Station / Select] to confirm.
• Press [Volume +/>] or [Volume -/<] to set the duration of the alarm (in minutes) and press [Snooze / Station / Select] to
confirm.
• Press [Volume +/>] or [Volume -/<] to select Buzzer, DAB or FM and press [Snooze / Station / Select] to confirm.

7
• Press [Volume +/>] or [Volume -/<] to select the radio station that you want to sound when the alarm goes off (when FM or
DAB has been selected). It’s possible to select one of the saved preset stations or you can select ‘Last listened’ to select the
station that you were last listening to. Press [Snooze / Station / Select] to confirm.
• Press [Volume +/>] or [Volume -/<] to select one of the following alarm frequency options: “Daily”, “Weekdays”,
“Weekends” and “Once” and press [Snooze / Station / Select] to confirm.
• Press [Volume +/>] or [Volume -/<] to set the volume of the alarm and press [Snooze / Station / Select] to confirm.
• Press [Volume +/>] or [Volume -/<] to select “on” or “off” and press [Snooze / Station / Select] to save.
• The alarm icon will appear on the display.
Switching an alarm on/off
Press [Alarm1] or [Alarm2] to toggle on/off an alarm. The alarm icon will appear/disappear to indicate the input.
Snoozing
You can activate the snooze function by pressing [Snooze / Station / Select] when the alarm sounds. The alarm sound will
then be muted and triggered again after 10 minutes. During snooze, the count-down time will be displayed. To stop the
snooze function, press [Power].
This function allows programming the device to switch into standby mode by itself after a set period of time.
Press [Sleep] to enter the sleep mode, press [Sleep] repeatedly to set the desired sleep time. When the timer reaches zero,
the unit will go in standby mode automatically. To cancel the sleep timer, press [Sleep] repeatedly to select “Sleep off”.
This function allows programming the device to sound an alarm after a set period of time (countdown timer).
• Press and hold [Menu/Info].
• Press [Volume +/>] or [Volume -/<] and select “System”. Press [Snooze / Station / Select] to confirm.
• Press [Volume +/>] or [Volume -/<] and select “Kitchen timer”. Press [Snooze / Station / Select] to confirm.
• Press [Volume +/>] or [Volume -/<] to change the minutes. Press [Snooze / Station / Select] to confirm and start the
countdown timer. The alarm will sound after the time period you have set has elapsed, both in “On”- and “Standby” modes.
Clock settings
Setting the time and date: The time and date are automatically synchronized with the FM- or DAB signal.
Manual time-/date setting:
Press and hold [Menu/info].
Press [Volume +/>] or [Volume -/<] to select ‘System’ and press [Snooze / Station / Select] to confirm.
Press [Volume +/>] or [Volume -/<] to select ‘Time’ and press [Snooze / Station / Select] to confirm.
Press [Volume +/>] or [Volume -/<] to select ‘Set time/date’, press [Snooze / Station / Select] to confirm.
Press [Volume +/>] or [Volume -/<] to set the hour, press [Snooze / Station / Select] to confirm. Repeat to set the minutes.
Press [Volume +/>] or [Volume -/<] to set the day, press [Snooze / Station / Select] to confirm. Repeat to set the month and
the year.
Changing the time format:
Press and hold [Menu/info].
Press [Volume +/>] or [Volume -/<] to select ‘System’ and press [Snooze / Station / Select] to confirm.
Press [Volume +/>] or [Volume -/<] to select ‘Time’ and press [Snooze / Station / Select] to confirm.
Press [Volume +/>] or [Volume -/<] to select ‘Set 12/24 hour’ and press [Snooze / Station / Select] to confirm.
Press [Volume +/>] or [Volume -/<] to choose between ‘12 hour’ and ‘24 hour’ and press [Snooze / Station / Select] to
confirm.
Changing the date format:
Press and hold [Menu/info].
Press [Volume +/>] or [Volume -/<] to select ‘System’ and press [Snooze / Station / Select] to confirm.
Press [Volume +/>] or [Volume -/<] to select ‘Time’ and press [Snooze / Station / Select] to confirm.
Press [Volume +/>] or [Volume -/<] to select ‘Set date format’ and press [Snooze / Station / Select] to confirm.
Press [Volume +/>] or [Volume -/<] to choose between ‘DD-MM-YYYY’ and ‘MM-DD-YYYY’. Press [Snooze / Station / Select]
to confirm.
Changing the language
Press and hold [Menu/info].
Press [Volume +/>] or [Volume -/<] to select ‘System’ and press [Snooze / Station / Select] to confirm.
Press [Volume +/>] or [Volume -/<] to select ‘Language’ and press [Snooze / Station / Select] to confirm.
Press [Volume +/>] or [Volume -/<] to select the desired language and press [Snooze / Station / Select] to confirm.
Factory settings
Resetting removes all presets, clears the station list and resets all options to the default setting.
Press and hold [Menu/info].
Press [Volume +/>] or [Volume -/<] to select ‘System’ and press [Snooze / Station / Select] to confirm.
Press [Volume +/>] or [Volume -/<] to select ‘Factory reset’ and press [Snooze / Station / Select] to confirm.

8
Press [Volume +/>] or [Volume -/<] to select ‘YES’ and [Snooze / Station / Select] to confirm.
Audio settings
Use this menu to adjust the bass and treble settings.
Press and hold [Menu/info].
Press [Volume +/>] or [Volume -/<] to select ‘System’ and press [Snooze / Station / Select] to confirm.
Press [Volume +/>] or [Volume -/<] to select ‘Bass’ or ‘Treble’ and press [Snooze / Station / Select] to confirm.
Press [Volume +/>] or [Volume -/<] to adjust the bass or treble levels. You can choose a level between ‘-3’ and ‘+3’, press
[Snooze / Station / Select] to confirm.
Backlight
Adjust the brightness and the duration of the screen illumination.
On level
Press and hold [Menu/info].
Press [Volume +/>] or [Volume -/<] to select ‘System’ > ‘Backlight’ and press [Snooze / Station / Select] to confirm.
Press [Volume +/>] or [Volume -/<] to select ‘On level’ and press [Snooze / Station / Select] to confirm.
Press [Volume +/>] or [Volume -/<] to choose between ‘High’, ‘Medium’ or ‘Low’ and press [Snooze / Station / Select] to
confirm.
Timeout
Press and hold [Menu/info].
Press [Volume +/>] or [Volume -/<] to select ‘System’ > ‘Backlight’ and press [Snooze / Station / Select] to confirm.
Press [Volume +/>] or [Volume -/<] to select ‘Time out’ and press [Snooze / Station / Select] to confirm.
Press [Volume +/>] or [Volume -/<] to choose the timeout setting. To specify that the backlight should always remain on,
choose ‘On’.
Dynamic range control
Dynamic Range Control (DRC): DRC can make quieter sounds easier to hear when the unit is used in a noisy environment. The
DRC level of a broadcast is set by the broadcaster and is transmitted with the service. Changing the DRC value on the unit
enables you to apply a scaling factor to this level. Choose between 3 levels of compression.
Press and hold [Menu/info] for 2 seconds to view the main menu.
Press [Volume +/>] or [Volume -/<] to choose ‘DRC’ and press [Snooze / Station / Select] to confirm.
DRC high: Applies maximum compression to the DRC level.
DRC low: Applies reduced compression to the DRC level.
DRC off: Removes DRC compression.
Depending on your smartphone’s design, the charging area may be positioned differently, requiring some positional
adjustment when placed on the charging surface to be functional.
CAUTION:
Remove metal protective or magnetic case from the smartphone before initiating charging. When charging, do not place any
magnetic-striped or other metal objects on the charger. Doing so could damage the smartphone and/or the radio.

9
Hartelijk dank voor de aanschaf van dit Audizio product. Neemt u a.u.b. een paar momenten de tijd om deze handleiding
zorgvuldig te lezen, aangezien wij graag willen dat u onze producten snel en volledig gebruikt.
Lees deze handleiding eerst door alvorens het product te gebruiken. Volg de instructies op anders zou de garantie wel eens
kunnen vervallen. Neem ook altijd alle veiligheidsmaatregelen om brand en/of een elektrische schok te voorkomen. Tevens
is het ook raadzaam om reparaties / modificaties e.d. over te laten aan gekwalificeerd personeel om een elektrische schok te
voorkomen. Bewaar deze handleiding ook voor toekomstig gebruik.
- Bewaar de verpakking zodat u indien het apparaat defect is,
dit in de originele verpakking kunt opsturen om
beschadigingen te voorkomen.
- Voordat het apparaat in werking wordt gesteld, altijd eerst
een deskundige raadplegen. Bij het voor de eerste keer
inschakelen kan een bepaalde reuk optreden. Dit is normaal
en verdwijnt na een poos.
- In het apparaat bevinden zich onder spanning staande
onderdelen; open daarom NOOIT dit apparaat.
- Plaats geen metalen objecten en mors geen vloeistof in het
effect. Dit kan leiden tot elektrische schokken of defecten.
- Toestel niet opstellen in de buurt van warmtebronnen zoals
radiatoren etc. en niet op een vibrerende onder- grond
plaatsen. Dek ventilatieopeningen nooit af.
- Het apparaat is niet geschikt voor continu gebruik.
- Wees voorzichtig met het netsnoer en beschadig deze niet.
Als het snoer kapot of beschadigd is, kan dit leiden tot
elektrische schokken of defecten.
- Als u de stekker uit het stopcontact neemt, trek dan niet aan
het snoer, maar aan de stekker.
- Om brand of elektrische schok te voorkomen, dient u dit
apparaat niet bloot te stellen aan regen of vocht.
- Verwijder of plaats een stekker nooit met natte handen
resp. uit en in het stopcontact.
- Indien zowel de stekker en/of netsnoer als snoeringang in
het apparaat beschadigd zijn dient dit door een vakman
hersteld te worden.
- Indien het apparaat zo beschadigd is dat inwendige
(onder)delen zichtbaar zijn mag de stekker NOOIT in het
stopcontact worden geplaatst en het apparaat NOOIT
worden ingeschakeld. Neem in dit geval contact op met de
dealer.
- Sluit het apparaat nooit op een dimmer aan.
- Reparatie aan het apparaat dient te geschieden door een
vakman of een deskundige.
- Sluit het apparaat alleen aan op een 220-240VAC / 50Hz
(geaard) stopcontact, verbonden met een 10-16A
meterkastgroep.
- Bij onweer altijd de stekker uit het stopcontact halen, zo ook
wanneer het apparaat voor een langere tijd niet gebruikt
wordt. Stelregel: Bij geen gebruik stekker verwijderen.
- Als u het apparaat lang niet gebruikt heeft en het weer wil
gebruiken kan er condens ontstaan; laat het apparaat eerst
op kamertemperatuur komen alvorens het weer in
werking te stellen.
- Apparaat nooit in vochtige ruimten en buiten gebruiken.
- Om ongevallen in bedrijven te voorkomen moet rekening
worden gehouden met de daarvoor geldende richtlijnen
en moeten de aanwijzingen/waarschuwingen worden
gevolgd.
- Het apparaat buiten bereik van kinderen houden.
Bovendien mag het apparaat nooit onbeheerd gelaten
worden.
- Gebruik geen schoonmaakspray om de schakelaars te
reinigen. Restanten van deze spray zorgen ervoor dat
smeer en stof ophopen. Raadpleeg bij storing te allen
tijde een deskundige.
- Gebruik geen overmatige kracht bij het bedienen van het
apparaat.
- Dit apparaat kan magnetisch veld veroorzaken. Houd dit
apparaat ten minste 60 cm afstand van de computer of tv.
- Indien dit apparaat beschikt over een loodaccu, dient deze
tenminste elke 3 maanden opgeladen te worden indien
deze voor een langere periode niet wordt gebruikt anders
bestaat de kans dat de accu permanent beschadigd.
- Bij een ongeval met dit product altijd eerst een des-
kundige raadplegen alvorens opnieuw te gebruiken.
- Tracht het apparaat niet schoon te maken met chemische
oplossingen. Dit kan de lak beschadigen. Gebruik een
droge doek om schoon te maken.
- Blijf uit de buurt van elektronische apparatuur die
bromstoringen zouden kunnen veroorzaken.
- Bij reparatie dienen altijd originele onderdelen te worden
gebruikt om onherstelbare beschadigingen en/of
ontoelaatbare straling te voorkomen.
- Schakel eerst het toestel uit voordat u het netsnoer
verwijdert. Verwijder netsnoer en aansluitsnoeren
voordat u dit product gaat verplaatsen.
- Zorg ervoor dat het netsnoer niet beschadigd/defect kan
raken wanneer mensen erover heen lopen. Het netsnoer
vóór ieder gebruik controleren op breuken/defecten!
- In Nederland/België is de netspanning 220-240Vac/50Hz.
Indien u reist (en u neemt het apparaat mee) informeer
dan naar de netspanning in het land waar u verblijft.
Deze markering wordt weergegeven om u erop attent te maken dat een levensgevaarlijke spanning in het product
aanwezig is en dat bij aanraking van deze delen een elektrische schok wordt verkregen.
Deze instructiemarkering wordt weergegeven om u erop te wijzen dat de instructie zeer belangrijk is om te lezen
en/of op te volgen.
OPMERKING: Om zeker te zijn van een correcte werking, dient u dit apparaat in een ruimte te gebruiken waar de temperatuur
tussen de 5°C/41°F en 35°C/95°F ligt.
Raadpleeg eventueel www.wecycle.nl en/of www.vrom.nl v.w.b. het afdanken van elektronische apparaten in het kader van de
WEEE-regeling. Vele artikelen kunnen worden gerecycled, gooi ze daarom niet bij het huisvuil maar lever ze in bij een gemeentelijk
depot of uw dealer. Lever ook afgedankte batterijen in bij uw gemeentelijk depot of bij de dealer, zie www.stibat.nl
Alle (defecte) artikelen dienen gedurende de garantieperiode altijd retour te worden gezonden in de originele verpakking. Voer zelf geen reparaties uit aan het
toestel; in élk geval vervalt de totale garantie. Ook mag het toestel niet eigenmachtig worden gemodificeerd, ook in dit geval vervalt de totale garantie. Ook
vervalt de garantie bij ongevallen en beschadigingen in élke vorm t.g.v. onoordeelkundig gebruik en het niet in achtnemen van het gestelde in deze
gebruiksaanwijzing. Tevens aanvaardt Audizio geen enkele aansprakelijkheid in geval van persoonlijke ongelukken als gevolg van het niet naleven van
veiligheidsinstructies en waarschuwingen . Dit geldt ook voor gevolgschade in wélke vorm dan ook.

10
LET OP! Pak na ontvangst de doos zorgvuldig uit. Controleer of alle onderdelen aanwezig- en in goede staat ontvangen zijn.
Bij transportschade of bij het ontbreken van onderdelen onmiddellijk de verkopende partij inlichten. Bewaar de verpakking
en het verpakkingsmateriaal. Indien het product moet worden teruggestuurd, is het belangrijk dat het product in originele
verpakking wordt geretourneerd. Schakel het apparaat niet onmiddellijk in als het apparaat is blootgesteld aan drastische
temperatuurverschillen (bv. na het transport). De ontstane condensatie kan het apparaat beschadigen. Zorg ervoor dat het
apparaat eerst op kamertemperatuur komt alvorens het aan te sluiten.
Op het label aan de achterzijde van het product staat aangegeven op welke netspanning deze moet worden aangesloten.
Controleer of de netspanning hiermee overeenkomt, bij alle andere netspanningen dan aangegeven kan het apparaat
onherstelbaar worden beschadigd. Tevens moet het apparaat direct op de netspanning worden aangesloten en mag géén
dimmer of regelbare voeding worden gebruikt.
Sluit het apparaat altijd aan op een beschermd circuit (aardlekschakelaar of zekering). Zorg ervoor dat het apparaat
voldoende elektrisch is geaard om het risico op elektrocutie of brand te vermijden.
1. Power / Source
Indrukken om van modus te veranderen
Ingedrukt houden om het apparaat aan te zetten of in stand-by
te gaan
2. Alarm
Indrukken om een alarm in te stellen
3. Preset
Indrukken om de voorkeurslijst te openen
Ingedrukt houden om een zender op te slaan als
voorkeuzezender
4. Snooze / Station / Select
Druk, wanneer een alarm afgaat, om te snoozen
Druk om het luisteren naar een gekozen zender te bevestigen
Druk om een ingang te selecteren/in te voeren
5. Sleep
Druk om de slaaptimer in te stellen
6. Menu / Info
Indrukken om door zenderinformatie te bladeren
Ingedrukt houden om het menu te openen
7. Volume - / <
Druk om het volume te verlagen tijdens het afspelen
Druk in menu's om te scrollen
8. Volume + / >
Druk om het volume te verhogen tijdens het afspelen
Druk in menu's om te scrollen
9. Draadloos opladen
Afhankelijk van het ontwerp van uw smartphone, kan het oplaadgedeelte anders gepositioneerd zijn, waardoor enige
positieaanpassing nodig is wanneer het op het oplaadoppervlak wordt geplaatst
10. USB charge
5V USB oplaadpoort
11. DC power adapteringang
9V 3,0A DC stroomaansluiting
12. Headphone jack-ingang
3,5 mm aansluiting voor een hoofdtelefoon
13. Batterijcompartiment
De radio is uitgerust met een back-upsysteem op batterijen, waarvoor 2 x AAA-batterijen nodig zijn (niet meegeleverd).
Open het batterijvak. Plaats de batterijen en zorg ervoor dat de positieve en negatieve (+ of -) polen van de batterijen in
contact zijn met de corresponderende polen in het batterijvak. Sluit het batterijvak door het deksel te plaatsen. Als de
stroom uitvalt, schakelt de radio automatisch over op de batterijvoeding en blijven de klok- en timerinstellingen
behouden. Bij het vervangen van de batterij: houd de stroomadapter aangesloten, anders gaan alle klok- en
alarminstellingen verloren
1. Huidig station en tijd
2. Slaaptimer-indicator
3. Wekalarm-indicator
4. PM indicator
5. Snooze indicator
6. Opladen smartphone indicator
7. Volume
8. Signaalsterkte

11
9. DAB-modus indicator
10. FM-mode indicator
11. BT-mode indicator
• Haal de radio uit de verpakking.
• Sluit de voedingsadapter aan en druk op [Power].
Let op: Gebruik alleen de bij de radio geleverde adapter. Het aansluiten van een voeding met een andere rating kan
permanente schade aan de radio veroorzaken en kan gevaarlijk zijn.
Opmerking: Zorg ervoor dat u de antenne (aan de achterkant van het apparaat) volledig uitschuift voor de best mogelijke FM-
en DAB-ontvangst.
Als er Digital Audio Broadcasting (DAB) in uw omgeving is, kan de radio ook de DAB-zenders ophalen. De radio ondersteunt
zowel DAB als DAB+. Plaats de radio dicht bij het raam en strek de antenne zo ver mogelijk uit om de beste ontvangst te
krijgen. Soms moet u de richting van de antenne aanpassen om de ontvangst te verbeteren.
Druk op [Source] en kies de DAB-functie. De eerste keer dat de DAB-modus wordt geselecteerd, zoekt het toestel
automatisch naar beschikbare zenders.
Automatische scan: Houd in DAB-modus [Menu/Info] ingedrukt. Druk op [Volume +/>] of [Volume -/<] om "FULL Scan" te
kiezen en druk op [Snooze / Station / Select] om te bevestigen. Het aantal gevonden zenders wordt tijdens de automatische
scan weergegeven. Na afloop stemt het apparaat af op de laatst beluisterde zender.
Voorkeurszenders: Houd tijdens het afspelen in de DAB-modus [Preset] ingedrukt. Druk op [Volume +/>] of [Volume -/<] om
de gewenste voorkeurszender (1-30) te kiezen en druk op [Snooze / Station / Select] om deze op te slaan.
Druk op [Preset] om het geheugen op te roepen. Druk op [Volume +/>] of [Volume -/<] om de opgeslagen zender te kiezen
waarnaar u wilt luisteren. Druk op [Snooze / Station / Select] om te bevestigen.
Toon zenderinformatie: Druk herhaaldelijk op [Menu/Info] om verschillende vormen van informatie weer te geven over de
zender die wordt afgespeeld.
Om de gewone FM-zenders te ontvangen, plaatst u de radio dicht bij het raam en steekt u de antenne zover mogelijk uit om
de beste ontvangst te krijgen. Mogelijk moet u de richting van de antenne aanpassen om de ontvangst te verbeteren.
Druk op [Source] en kies de FM-functie.
Automatische scan: Druk op [Snooze / Station / Select], "<" en ">" worden op het display weergegeven. Houd [Volume +/>]
of [Volume -/<] ingedrukt, het apparaat begint automatisch te scannen naar de volgende sterke zender.
Handmatige scan: Druk op [Snooze / Station / Select], "<" en ">" worden op het display weergegeven. Druk op [Volume +/>]
of [Volume -/<] om de frequentiewaarde te verschuiven.
Voorkeurszenders: Houd tijdens het afspelen in de FM-modus [Preset] ingedrukt. Druk op [Volume +/>] of [Volume -/<] om
de gewenste voorkeurszender (1-30) te kiezen en druk op [Snooze / Station / Select] om deze op te slaan.
Druk op [Preset] om het geheugen op te roepen. Druk op [Volume +/>] of [Volume -/<] om de opgeslagen zender te kiezen
waarnaar u wilt luisteren. Druk op [Snooze / Station / Select] om te bevestigen.
Toon zenderinformatie: Druk herhaaldelijk op [Menu/Info] om verschillende vormen van informatie weer te geven over de
zender die wordt afgespeeld.
Voordat transmissie tussen uw BT-apparaat en de radio mogelijk is, moeten beide apparaten gekoppeld worden. Dit proces
wordt "pairing" genoemd. De radio dient als ontvanger, om de muziekstroom te ontvangen die op de radio moet worden
afgespeeld. Als u al eerder met een BT-apparaat hebt gekoppeld, wordt deze verbinding automatisch hersteld wanneer beide
apparaten binnen bereik zijn en de BT-bediening op de radio is geselecteerd. "Koppelen" hoeft niet te worden herhaald. Deze
functie moet mogelijk wel geactiveerd worden op uw BT-apparaat.
• Druk op [Source] om naar BT-modus te gaan.
• Zet BT-streaming op uw apparaat aan. Het apparaat zal scannen naar koppelbare BT-apparaten in het ontvangstbereik.
• Selecteer "Audizio Cuneo" in de lijst met gevonden apparaten. Voer "0000" in als een wachtwoord vereist is.
• Start de weergave op uw BT-apparaat. Het afspelen vindt nu plaats via de luidsprekers van de radio.
Als u een wekalarm instelt, wordt de radio ingeschakeld (als hij in stand-by staat) en wordt er afgestemd op een DAB- of een
FM-zender of klinkt er een zoemtoon (afhankelijk van de gekozen instelling). Een wekalarm instellen:
• Druk op [Alarm1] of [Alarm2].
• Druk op [Volume +/>] of [Volume -/<] om het uur in te stellen en druk op [Snooze / Station / Select] om te bevestigen.
• Druk op [Volume +/>] of [Volume -/<] om de minuten in te stellen en druk op [Snooze / Station / Select] om te bevestigen.

12
• Druk op [Volume +/>] of [Volume -/<] om de duur van het alarm in te stellen (in minuten) en druk op [Snooze / Station /
Select] om te bevestigen.
• Druk op [Volume +/>] of [Volume -/<] om Buzzer, DAB of FM te kiezen en druk op [Snooze / Station / Select] om te
bevestigen.
• Druk op [Volume +/>] of [Volume -/<] om de radiozender te selecteren die u wilt laten horen wanneer het alarm afgaat
(wanneer FM of DAB is geselecteerd). U kunt een van de opgeslagen voorkeuzezenders selecteren of u kunt ‘Last listened’
selecteren om de zender te kiezen waar u het laatst naar luisterde. Druk op [Snooze / Station / Select] om te bevestigen.
• Druk op [Volume +/>] of [Volume -/<] om een van de volgende alarmfrequenties te kiezen: "Daily", "Weekdays",
"Weekends" en "Once" en druk op [Snooze / Station / Selecteren] om te bevestigen.
• Druk op [Volume +/>] of [Volume -/<] om het volume van het alarm in te stellen en druk op [Snooze / Station / Select] om
te bevestigen.
• Druk op [Volume +/>] of [Volume -/<] om "on" of "off" te kiezen en druk op [Snooze / Station / Select] om op te slaan.
• Het “wekker-icoon” verschijnt op het display.
Wekalarm in-/uitschakelen
Druk op [Alarm1] of [Alarm2] om een wekker aan of uit te zetten. Het wekkerpictogram verschijnt/verdwijnt om uw ingave te
bevestigen.
Snoozen
U kunt de sluimerfunctie activeren door op [Snooze / Station / Select] te drukken wanneer de wekker afgaat. Het alarmgeluid
wordt dan gedempt en gaat na 10 minuten opnieuw af. Tijdens de sluimerfunctie wordt de afteltijd weergegeven. Om de
sluimerfunctie te stoppen, drukt u op [Power].
Met deze functie kan het apparaat worden geprogrammeerd om na een ingestelde tijd zelf in de stand-by modus over te
schakelen. Druk op [Sleep] om de slaapstand in te schakelen, druk herhaaldelijk op [Sleep] om de gewenste slaaptijd in te
stellen. Wanneer de timer nul bereikt, zal het toestel automatisch in standby modus gaan. Om de slaaptimer te annuleren,
drukt u herhaaldelijk op [Sleep] om "Sleep off" te selecteren.
Met deze functie kan het apparaat worden geprogrammeerd om na een bepaalde tijd een alarm af te laten gaan (afteltimer).
• Houd [Menu/Info] ingedrukt.
• Druk op [Volume +/>] of [Volume -/<] en kies "System". Druk op [Snooze / Station / Select] om te bevestigen.
• Druk op [Volume +/>] of [Volume -/<] en kies "Kitchen timer". Druk op [Snooze / Station / Select] om te bevestigen.
• Druk op [Volume +/>] of [Volume -/<] om de minuten te veranderen. Druk op [Snooze / Station / Select] om te bevestigen
en de afteltimer te starten. Het alarm zal afgaan nadat de door u ingestelde tijdsperiode is verstreken, zowel in de "Aan"-
als in de "Standby" stand.
Klok instellingen
Tijd en datum instellen: De tijd en datum worden automatisch gesynchroniseerd met het FM- of DAB-signaal.
Handmatige tijd-/datuminstelling:
Houd [Menu/Info] ingedrukt.
Druk op [Volume +/>] of [Volume -/<] en kies "System". Druk op [Snooze / Station / Select] om te bevestigen.
Druk op [Volume +/>] of [Volume -/<] en kies "Time". Druk op [Snooze / Station / Select] om te bevestigen.
Druk op [Volume +/>] of [Volume -/<] en kies "Set time/date". Druk op [Snooze / Station / Select] om te bevestigen.
Druk op [Volume +/>] of [Volume -/<] om het uur in te stellen, druk op [Snooze / Station / Select] om te bevestigen.
Herhaal dit om de minuten in te stellen.
Druk op [Volume +/>] of [Volume -/<] om de dag in te stellen, druk op [Snooze / Station / Select] om te bevestigen. Herhaal
dit om de maand en het jaar in te stellen.
De tijdnotatie wijzigen:
Houd [Menu/Info] ingedrukt.
Druk op [Volume +/>] of [Volume -/<] en kies "System". Druk op [Snooze / Station / Select] om te bevestigen.
Druk op [Volume +/>] of [Volume -/<] en kies "Time". Druk op [Snooze / Station / Select] om te bevestigen.
Druk op [Volume +/>] of [Volume -/<] om "Set 12/24 hour" te kiezen en druk op [Snooze / Station / Select] om te
bevestigen.
Druk op [Volume +/>] of [Volume -/<] om te kiezen tussen "12 uur" en "24 uur" en druk op [Snooze / Station / Select] om te
bevestigen.
De datumnotatie wijzigen:
Houd [Menu/Info] ingedrukt.
Druk op [Volume +/>] of [Volume -/<] en kies "System". Druk op [Snooze / Station / Select] om te bevestigen.
Druk op [Volume +/>] of [Volume -/<] en kies "Time". Druk op [Snooze / Station / select] om te bevestigen.
Druk op [Volume +/>] of [Volume -/<] om "Set date format" te kiezen en druk op [Snooze / Station / Select] om te
bevestigen.
Druk op [Volume +/>] of [Volume -/<] om te kiezen tussen "DD-MM-JJJJ" en "MM-DD-JJJJ". Druk op [Snooze / Station /
Select] om te bevestigen.

13
De taal veranderen
Houd [Menu/Info] ingedrukt.
Druk op [Volume +/>] of [Volume -/<] en kies "System". Druk op [Snooze / Station / Select] om te bevestigen.
Druk op [Volume +/>] of [Volume -/<] en kies "Language". Druk op [Snooze / Station / Select] om te bevestigen.
Druk op [Volume +/>] of [Volume -/<] om de gewenste taal te kiezen en druk op [Snooze / Station / Select] om te bevestigen.
Fabrieksinstellingen (Factory reset)
Resetten verwijdert alle voorinstellingen, wist de zenderlijst en zet alle opties terug op de standaardinstelling.
Houd [Menu/Info] ingedrukt.
Druk op [Volume +/>] of [Volume -/<] en kies "System". Druk op [Snooze / Station / Select] om te bevestigen.
Druk op [Volume +/>] of [Volume -/<] en kies "Factory reset". Druk op [Snooze / Station / Select] om te bevestigen.
Druk op [Volume +/>] of [Volume -/<] om "YES" te kiezen en [Snooze / Station / Select] om te bevestigen.
Audio instellingen
Gebruik dit menu om de lage en hoge tonen in te stellen.
Houd [Menu/Info] ingedrukt.
Druk op [Volume +/>] of [Volume -/<] en kies "System". Druk op [Snooze / Station / Select] om te bevestigen.
Druk op [Volume +/>] of [Volume -/<] om "Bass" of "Treble" te kiezen en druk op [Snooze / Station / Select] om te
bevestigen.
Druk op [Volume +/>] of [Volume -/<] om de lage of hoge tonen in te stellen. U kunt een niveau kiezen tussen "-3" en "+3",
druk op [Snooze / Station / Select] om te bevestigen.
Backlight
De helderheid en de duur van de schermverlichting aanpassen.
Niveau bij aan (On level)
Houd [Menu/Info] ingedrukt.
Druk op [Volume +/>] of [Volume -/<] om "System" > "Backlight" te kiezen en druk op [Snooze / Station / Select] om te
bevestigen.
Druk op [Volume +/>] of [Volume -/<] om "On level" te kiezen en druk op [Snooze / Station / Select] om te bevestigen.
Druk op [Volume +/>] of [Volume -/<] om te kiezen tussen "High", "Medium" of "Low" en druk op [Snooze / Station / Select]
om te bevestigen.
Timeout
Houd [Menu/Info] ingedrukt.
Druk op [Volume +/>] of [Volume -/<] om "System" > "Backlight" te kiezen en druk op [Snooze / Station / Select] om te
bevestigen.
Druk op [Volume +/>] of [Volume -/<] om "Time out" te kiezen en druk op [Snooze / Station / Select] om te bevestigen.
Druk op [Volume +/>] of [Volume -/<] om de time-out instelling te kiezen. Om aan te geven dat de achtergrondverlichting
altijd aan moet blijven, kiest u "On".
Dynamic range control
Dynamic Range Control (DRC): DRC kan stillere geluiden beter hoorbaar maken wanneer het toestel in een lawaaierige
omgeving wordt gebruikt. Het DRC-niveau van een uitzending is ingesteld door de omroep en wordt met de dienst
meegezonden. Als u de DRC-waarde op het toestel wijzigt, kunt u een schaalfactor op dit niveau toepassen. U kunt kiezen uit
3 compressieniveaus. Houd [Menu/info] 2 seconden ingedrukt om het hoofdmenu weer te geven.
Druk op [Volume +/>] of [Volume -/<] om "DRC" te kiezen en druk op [Snooze / Station / Select] om te bevestigen.
DRC high: Past maximale compressie toe op het DRC-niveau.
DRC low: Past verminderde compressie toe op het DRC-niveau.
DRC off: Verwijdert DRC-compressie.
Afhankelijk van het ontwerp van uw smartphone kan het oplaadgedeelte anders gepositioneerd zijn, waardoor de positie van
de telefoon moet worden aangepast om te kunnen functioneren.
PAS OP:
Verwijder de metalen beschermhoes of het magnetische hoesje van de smartphone voordat u begint met opladen. Plaats
tijdens het opladen geen magnetische of andere metalen voorwerpen op de oplader. Dit kan de smartphone en/of de radio
beschadigen.

14
Vielen Dank für den Kauf dieses Audizio gerat. Nehmen Sie sich einen Augenblick Zeit, um diese Anleitung sorgfältig
durchzulesen, damit sie die Möglichkeiten, die unser Produkt bietet, sofort voll ausnutzen können.
Lesen Sie erst die Anleitung vollständig vor der ersten Inbetriebnahme durch. Befolgen Sie die Anweisung, da sonst jeglicher
Garantieanspruch verfällt. Treffen Sie stets alle Sicherheits-vorkehrungen um Feuer und/oder Stromschlag zu vermeiden.
Reparaturen dürfen nur von qualifiziertem Fachpersonal ausgeführt werden, um Stromschlag zu vermeiden. Bewahren Sie
diese Anleitung für spätere Bezugnahme auf.
- Bewahren Sie die Verpackung auf, um das Gerät im
Bedarfsfall sicher transportieren zu können.
- Bevor das Gerät in Betrieb genommen wird, muss es erst
von einem Fachmann überprüft werden. Bei der ersten
Benutzung kann etwas Geruch auftreten. Das ist normal und
verschwindet nach einer Weile
- Das Gerät enthält unter Spannung stehende Teile. Daher
NIEMALS das Gehäuse öffnen.
- Keine Metallgegenstände oder Flüssigkeiten ins Gerät
dringen lassen. Sie können zu Stromschlag und Defekten
führen.
- Gerät nicht in der Nähe von Wärmequellen wie Heizkörpern
aufstellen. Nicht auf eine vibrierende Oberfläche stellen.
Niemals die Belüftungsschlitze abdecken.
- Das Gerät ist nicht für Dauerbetrieb geeignet.
- Gehen Sie vorsichtig mit dem Netzkabel um und
beschädigen Sie es nicht. Eine beschädigte Netzschnur kann
zu Stromschlag und Defekten führen.
- Wenn Sie das Gerät vom Netz trennen, immer am Stecker
ziehen, niemals an der Schnur.
- Um Feuer und Stromschlag zu vermeiden, das Gerät vor
Regen und Feuchtigkeit schützen.
- Den Stecker nie mit nassen Händen in eine Netzsteckdose
stecken oder abziehen.
- Wenn sowohl der Stecker und/oder die Netzschnur bzw. der
Kabeleintritt ins Gerät beschädigt sind, müssen sie von
einem Fachmann repariert werden.
- Wenn das Gerät so beschädigt ist, dass Innenteile sichtbar
sind, darf der Stecker NICHT in eine Steckdose gesteckt
werden und das Gerät darf NICHT eingeschaltet werden.
Wenden Sie sich in dem Fall an Ihren Fachhändler. Das Gerät
darf nicht an einen Dimmer angeschlossen werden.
- Reparaturen dürfen nur von einem Fachmann oder
Sachverständigen ausgeführt werden.
- Das Gerät nur an eine geerdete 10-16A Netzsteckdose mit
220-240V AC/50Hz Spannung anschließen.
- Bei Gewitter oder längerem Nichtgebrauch den Netzstecker
abziehen. Die Regel gilt: Bei Nichtgebrauch Netzstecker
abziehen.
- Wenn das Gerät längere Zeit nicht benutzt wurde, kann sich
Kondenswasser gebildet haben. Lassen Sie das Gerät erst
auf Zimmertemperatur kommen, bevor Sie es einschalten.
Das Gerät nicht in feuchten Räumen oder im Freien
benutzen.
- Um Unfällen in der Öffentlichkeit vorzubeugen, müssen
die geltenden Richtlinien beachtet und die
Anweisungen/Warnungen befolgt werden.
- Niemals das Gerät kurz hintereinander ein- und
ausschalten. Dadurch verkürzt sich die Lebensdauer
erheblich.
- Das Gerät außerhalb der Reichweite von Kindern halten.
Das Gerät niemals unbeaufsichtigt lassen.
- Die Regler nicht mit Reinigungssprays reinigen. Diese
hinterlassen Rückstände, die zu Staub- und
Fettansammlungen führen. Bei Störungen immer einen
Fachmann um Rat fragen.
- Das Gerät nur mit sauberen Händen bedienen.
- Das Gerät nicht mit Gewalt bedienen.
- Dieses Gerät kann dazu führen Magnetfeld. Halten Sie das
Gerät mindestens 60 cm vom Computer oder Fernseher.
- Wenn dieses Gerät eine Blei-Säure-Batterie hat, soll dies
jede 3 Monate zumindest wieder aufgeladen werden,
wenn es nicht für eine längere Zeit nicht benutzt wird,
sonst ist es möglich, dass die Batterie dauerhaft
beschädigt.
- Fachmann um Rat fragen, bevor Sie es wieder einschalten.
- Keine chemischen Reinigungsmittel benutzen, die den
Lack beschädigen. Das Gerät nur mit einem trockenen
Tuch abwischen.
- Nicht in der Nähe von elektronischen Geräten benutzen,
die Brummstörungen verursachen können.
- Bei Reparaturen nur die Original-Ersatzteile verwenden,
um starke Schäden und/oder gefährliche Strahlungen zu
vermeiden.
- Bevor Sie das Netz- und/oder Anschlusskabel abziehen,
erst das Gerät ausschalten. Netz- und Anschlusskabel
abziehen, bevor Sie das Gerät umstellen.
- Sorgen Sie dafür, dass das Netzkabel nicht beschädigt
werden kann, wenn Menschen darüber laufen. Das
Netzkabel vor jedem Einsatz auf Brüche/Schadstellen
überprüfen.
- In Deutschland beträgt die Netzspannung 220-240V AC /
50Hz. Wenn Sie das Gerät auf Reisen mitnehmen, prüfen
Sie, ob die örtliche Netzspannung den Anforderungen des
Geräts entspricht.
Dieses Zeichen weist den Benutzer darauf hin, dass lebensgefährliche Spannungen im Gerät anliegen, die bei
Berührung einen Stromschlag verursachen.
Dieses Zeichen lenkt die Aufmerksamkeit des Benutzers auf wichtige Hinweise in der Anleitung hin, die unbedingt
eingehalten werden müssen.
HINWEIS: Um einen einwandfreien Betrieb zu gewährleisten, muss die Raumtemperatur zwischen 5° und 35°C.
liegen.
Tronios BV Registrierungsnummer : DE51181017 (ElektroG).
Dieses Produkt darf am Ende seiner Lebensdauer nicht über den normalen Haushaltsabfall entsorgt werden, sondern muss an einem Sammelpunkt für
das Recycling abgegeben werden. Hiermit leisten Sie einen wichtigen Beitrag zum Schutze unserer Umwelt.
Tronios BV Registrierungsnummer : 21003000 (BatterieG).
Lithiumbatterien und Akkupacks sollten nur im entladenen Zustand in die Altbatteriesammelgefäße bei Handel und bei öffentlich-rechtlichen
Entsorgungsträgern gegeben werden. Bei nicht vollständig entladenen Batterien Vorsorge gegen Kurzschlüß treffen durch Isolieren der Pole mit Klebestreifen.
Der Endnutzer ist zur Rückgabe von Altbatterien gesetzlich verpflichtet.
Reparieren Sie das Gerät niemals selbst und nehmen Sie niemals eigenmächtig Veränderungen am Gerät vor. Sie verlieren dadurch den Garantieanspruch. Der
Garantieanspruch verfällt ebenfalls bei Unfällen und Schäden in jeglicher Form, die durch unsachgemäßen Gebrauch und Nichtbeachtung der Warnungen und
Sicherheitshinweise in dieser Anleitung entstanden sind. Audizio ist in keinem Fall verantwortlich für persönliche Schäden in Folge von Nichtbeachtung der
Sicherheitsvorschriften und Warnungen. Dies gilt auch für Folgeschäden jeglicher Form.

15
Packen Sie das Gerät sofort nach Empfang aus und prüfen Sie den Inhalt. Wenn Teile fehlen oder beschädigt sind,
benachrichtigen Sie sofort den Spediteur und bewahren Sie die Verpackung auf. Falls ein Gerät ins Werk zurückgeschickt
werden muss, ist es wichtig, dass es in der Originalverpackung versandt wird. Das Gerät darf nicht in Betrieb genommen
werden, nachdem es von einem kalten in einen warmen Raum gebracht wurde. Das dabei entstehende Kondenswasser kann
unter Umständen Ihr Gerät zerstören. Lassen Sie das Gerät solange ausgeschaltet, bis es Zimmertemperatur erreicht hat!
Die benötigte Versorgungsspannung steht auf dem Typenschild auf der Rückseite des Geräts. Die angegebenen Stromwerte
entsprechen einem Durchschnittswert bei normalem Betrieb. Alle Geräte müssen direkt ans Netz angeschlossen werden und
dürfen nicht über Dimmerpacks geschaltet werden. Bevor Sie eine Spannung anlegen, prüfen Sie, ob der Wert der zulässigen
Spannung entspricht.
Verbinden Sie immer das Gerät an einem geschützten Schaltkreis (Leistungsschalter oder Sicherung). Stellen Sie
sicher, das Gerät ist elektrisch geerdet, um das Risiko eines Stromschlags oder Feuer zu vermeiden.
1. Power / Source
Drücken, um den Modus zu wechseln
Gedrückt halten, um einzuschalten oder in den Standby-Modus zu
wechseln
2. Alarm
Drücken, um einen Alarm einzustellen
3. Preset
Drücken Sie , um die Voreinstellungsliste zu öffnen
Gedrückt halten, um einen Sender als Voreinstellung zu speichern
4. Snooze / Station / Select
Wenn ein Alarm ertönt, drücken Sie auf , um die Schlummer-funktion zu
aktivieren
Drücken Sie diese Taste, um den Empfang eines ausgewählten Senders
zu bestätigen
Drücken Sie zur Auswahl/Eingabe eines Eingangs
5. Sleep
Drücken, um den Sleep-Timer einzustellen
6. Menu / Info
Drücken Sie diese Taste, um durch die Kanalinformationen zu blättern
Gedrückt halten, um das Menü zu öffnen
7. Volume - / <
Drücken, um die Lautstärke während der Wiedergabe zu verringern
Drücken Sie in den Menüs, um zu blättern
8. Volume + / >
Drücken, um die Lautstärke während der Wiedergabe zu erhöhen
Drücken Sie in den Menüs, um zu blättern
9. Kabelloses Laden
Je nach Design Ihres Smartphones kann der Ladebereich unterschiedlich positioniert sein, was eine gewisse
Positionsanpassung beim Auflegen auf die Ladefläche erfordert
10. USB charge
5V USB-Ladeanschluss
11. DC power Adapter-Eingang
9V 3.0A DC Stromanschluss
12. Kopfhöreranschluss-Eingang
3,5 mm Klinke für Kopfhörer
13. Batteriefach
Das Funkgerät ist mit einem Batterie-Backup-System ausgestattet, das 2 x AAA-Batterien benötigt (nicht im Lieferumfang
enthalten). Öffnen Sie das Batteriefach. Legen Sie die Batterien ein und achten Sie darauf, dass die Plus (+)- und
Minuspole (-) der Batterien mit den entsprechenden Polen im Batteriefach in Kontakt sind. Schließen Sie das Batteriefach,
indem Sie den Deckel aufsetzen. Bei einem Stromausfall schaltet das Radio automatisch auf Batteriebetrieb um, wobei die
Uhr- und Timer-Einstellungen erhalten bleiben. Beim Auswechseln der Batterie: Lassen Sie den Netzadapter
angeschlossen, da sonst alle Uhr- und Weckeinstellungen verloren gehen
1. Aktuelle Station und Uhrzeit
2. Schlaf-Timer-Anzeige
3. Weckalarm-Anzeige
4. PM-Anzeige
5. Schlummer-Anzeige (snooze)
6. Anzeige für das Aufladen des Smartphones
7. Lautstärke
8. Signalstärke

16
9. DAB-Modus-Anzeige
10. FM-Modus-Anzeige
11. BT-Modus-Anzeige
• Nehmen Sie das Radio aus der Verpackung.
• Schließen Sie den Netzadapter an und drücken Sie [Power].
Achtung: Verwenden Sie nur den mit dem Funkgerät gelieferten Netzadapter. Der Anschluss eines Netzteils mit einem
anderen Nennwert kann zu dauerhaften Schäden am Funkgerät führen und ist möglicherweise gefährlich.
Hinweis: Achten Sie darauf, die Antenne (an der Rückseite des Geräts) vollständig auszufahren, um den bestmöglichen UKW-
und DAB-Empfang zu gewährleisten.
Wenn in Ihrer Region Digital Audio Broadcasting (DAB) verfügbar ist, kann das Radio auch DAB-Sender empfangen. Das Radio
unterstützt sowohl DAB als auch DAB+. Stellen Sie das Radio in der Nähe des Fensters auf und fahren Sie die Antenne so weit
wie möglich aus, um einen optimalen Empfang zu gewährleisten.
Drücken Sie [Source], um den DAB-Modus zu wählen.
Automatischer Suchlauf: Halten Sie im DAB-Modus [Menu/Info] gedrückt. Drücken Sie [Volume +/>] oder [Volume -/<], um
"FULL Scan" auszuwählen, und drücken Sie zur Bestätigung [Snooze / Station / Select]. Die Anzahl der gefundenen Sender
wird während des automatischen Suchlaufs angezeigt. Danach stellt das Gerät den zuletzt gehörten Sender ein.
Voreingestellte Sender: Halten Sie während der Wiedergabe im DAB-Modus [Preset] gedrückt. Drücken Sie [Volume +/>]
oder [Volume -/<], um den gewünschten voreingestellten Sender (1-30) auszuwählen, und drücken Sie [Snooze / Station /
Select], um ihn zu speichern.
Drücken Sie [Preset], um den Speicher abzurufen. Drücken Sie [Volume +/>] oder [Volume -/<], um den gespeicherten
Sender auszuwählen, den Sie hören möchten. Drücken Sie zur Bestätigung [Snooze / Station / Select].
Anzeige von Senderinformationen: Drücken Sie wiederholt [Menu/Info], um verschiedene Informationen über den
wiedergegebenen Sender anzuzeigen.
Um reguläre UKW-Sender zu empfangen, stellen Sie das Radio in der Nähe des Fensters auf und fahren Sie die Antenne so
weit wie möglich aus, um einen optimalen Empfang zu gewährleisten. Möglicherweise müssen Sie die Richtung der Antenne
anpassen, um den Empfang zu verbessern.
Drücken Sie [Source] und wählen Sie den FM-Modus.
Automatischer Suchlauf: Drücken Sie [Snooze / Station / Select], "<" und ">" werden auf dem Display angezeigt. Halten Sie
[Volume +/>] oder [Volume -/<] gedrückt, das Gerät beginnt automatisch mit der Suche nach dem nächsten starken Sender.
Manueller Suchlauf: Drücken Sie [Snooze / Station / Select], "<" und ">" erscheinen auf dem Display. Drücken Sie [Volume
+/>] oder [Volume -/<], um den Frequenzwert zu ändern.
Voreingestellte Sender: Halten Sie während der Wiedergabe im FM-Modus [Preset] gedrückt. Drücken Sie [Volume +/>] oder
[Volume -/<], um den gewünschten voreingestellten Sender (1-30) auszuwählen, und drücken Sie [Snooze / Station / Select],
um ihn zu speichern.
Drücken Sie [Preset], um den Speicher abzurufen. Drücken Sie [Volume +/>] oder [Volume -/<], um den gespeicherten
Sender auszuwählen, den Sie hören möchten. Drücken Sie zur Bestätigung [Snooze / Station / Select].
Anzeige von Senderinformationen: Drücken Sie wiederholt [Menu/Info], um verschiedene Informationen über den
wiedergegebenen Sender anzuzeigen.
Bevor eine Übertragung zwischen Ihrem BT-Gerät und dem Funkgerät möglich ist, müssen beide Geräte gekoppelt werden.
Dieser Vorgang wird als "Pairing" bezeichnet. Das Radio dient als Empfänger, um den Musikstrom für die Wiedergabe im
Radio zu empfangen. Wenn Sie schon einmal mit einem BT-Gerät gekoppelt haben, wird diese Verbindung automatisch
wiederhergestellt, wenn beide Geräte in Reichweite sind und der BT-Betrieb am Radio ausgewählt wurde. Das "Pairing" muss
nicht wiederholt werden. Diese Funktion muss jedoch möglicherweise in Ihrem BT-Gerät aktiviert werden.
• Drücken Sie [Source], um den BT-Modus aufzurufen.
• Aktivieren Sie das BT-Streaming auf Ihrem Gerät. Das Gerät sucht nach koppelbaren BT-Geräten im Empfangsbereich.
• Wählen Sie "Audizio Cuneo" aus der Liste der gefundenen Geräte. Geben Sie "0000" ein, wenn ein Passwort erforderlich ist.
• Starten Sie die Wiedergabe auf Ihrem BT-Gerät. Die Wiedergabe erfolgt nun über die Lautsprecher des Radios.
Wenn Sie einen Alarm einstellen, schaltet sich das Radio ein (wenn es sich im Standby-Modus befindet) und stellt einen DAB-
oder UKW-Sender ein oder es ertönt ein akustisches Signal (je nach gewählter Einstellung). Alarm einstellen:
• Drücken Sie [Alarm1] oder [Alarm2].

17
• Drücken Sie [Volume +/>] oder [Volume -/<], um die Stunde einzustellen, und drücken [Snooze / Station / Select] zur
Bestätigung.
• Drücken Sie [Volume +/>] oder [Volume -/<], um die Minuten einzustellen, und drücken [Snooze / Station / Select] zur
Bestätigung.
• Drücken Sie [Volume +/>] oder [Volume -/<], um die Dauer des Alarms (in Minuten) einzustellen, und drücken Sie zur
Bestätigung [Snooze / Station / Select].
• Drücken Sie [Volume +/>] oder [Volume -/<], um "Buzzer", "DAB" oder "FM" auszuwählen, und drücken Sie zur Bestätigung
[Snooze / Station / Select].
• Drücken Sie [Volume +/>] oder [Volume -/<], um den Radiosender auszuwählen, der beim Ertönen des Alarms
wiedergegeben werden soll (wenn UKW oder DAB ausgewählt ist). Sie können einen der gespeicherten Sender auswählen,
oder Sie wählen "Last listened", um den zuletzt gehörten Sender auszuwählen. Drücken Sie zur Bestätigung [Snooze /
Station / Select].
• Drücken Sie [Volume +/>] oder [Volume -/<], um eine der folgenden Weckfrequenzen auszuwählen: "Daily", "Weekdays",
"Weekends" und "Once", und drücken Sie zur Bestätigung [Snooze / Station / Select].
• Drücken Sie [Volume +/>] oder [Volume -/<], um die Lautstärke des Weckers einzustellen, und drücken Sie zur Bestätigung
[Snooze / Station / Select].
• Drücken Sie [Volume +/>] oder [Volume -/<], um "On" oder "Off" zu wählen, und drücken Sie [Snooze / Station / Select], um
zu speichern.
• Auf dem Display erscheint das "Weckersymbol".
Alarm ein-/ausschalten
Drücken Sie [Alarm1] oder [Alarm2], um einen Alarm ein- oder auszuschalten. Das Weckersymbol erscheint/verschwindet zur
Bestätigung Ihrer Eingabe.
Schlummern (snooze)
Sie können die Schlummerfunktion aktivieren, indem Sie beim Ertönen des Alarms auf [Snooze / Station / Select] drücken.
Der Alarmton wird dann stummgeschaltet und ertönt nach 10 Minuten erneut. Während der Snooze-Funktion wird die
Countdown-Zeit angezeigt. Um die Schlummerfunktion zu beenden, drücken Sie [Power].
Mit dieser Funktion kann das Gerät so programmiert werden, dass es nach einer bestimmten Zeit von selbst in den Standby-
Modus wechselt. Drücken Sie [Sleep], um den Schlafmodus zu aktivieren, und drücken Sie wiederholt [Sleep], um die
gewünschte Schlafzeit einzustellen. Wenn der Timer Null erreicht, schaltet das Gerät automatisch in den Standby-Modus. Um
den Sleep-Timer abzubrechen, drücken Sie wiederholt [Sleep], um "Sleep aus" zu wählen.
Mit dieser Funktion kann das Gerät so programmiert werden, dass es nach einer bestimmten Zeit einen Alarm auslöst
(Countdown-Timer).
• Halten Sie [Menu/Info] gedrückt.
• Drücken Sie [Volume +/>] oder [Volume -/<] und wählen Sie "System". Drücken Sie zur Bestätigung [Snooze / Station /
Select].
• Drücken Sie [Volume +/>] oder [Volume -/<], und wählen Sie "Küchen-Timer". Drücken Sie zur Bestätigung [Snooze /
Station / Select].
• Drücken Sie [Volume +/>] oder [Volume -/<], um die Minuten zu ändern. Drücken Sie [Snooze / Station / Select], um zu
bestätigen und den Countdown-Timer zu starten. Der Alarm ertönt sowohl im "Ein"- als auch im "Standby"-Modus nach
Ablauf der von Ihnen eingestellten Zeitspanne.
Einstellungen der Uhr
Uhrzeit und Datum einstellen: Uhrzeit und Datum werden automatisch mit dem UKW- oder DAB-Signal synchronisiert.
Manuelle Einstellung von Uhrzeit und Datum:
Halten Sie [Menu/Info] gedrückt.
Drücken Sie [Volume +/>] oder [Volume -/<] und wählen Sie "System". Drücken Sie zur Bestätigung [Snooze / Station /
Select].
Drücken Sie [Volume +/>] oder [Volume -/<] und wählen Sie "Time". Drücken Sie zur Bestätigung [Snooze / Station /
Select].
Drücken Sie [Volume +/>] oder [Volume -/<] und wählen Sie "Set time/date". Drücken Sie zur Bestätigung [Snooze / Station
/ Select].
Drücken Sie [Volume +/>] oder [Volume -/<], um die Stunde einzustellen, und drücken Sie zur Bestätigung [Snooze /
Station / Select]. Wiederholen Sie den Vorgang, um die Minuten einzustellen.
Drücken Sie [Volume +/>] oder [Volume -/<], um den Tag einzustellen, und drücken Sie zur Bestätigung [Snooze / Station /
Select]. Wiederholen Sie den Vorgang, um den Monat und das Jahr einzustellen.
Ändern des Zeitformats:
Halten Sie [Menu/Info] gedrückt.
Drücken Sie [Volume +/>] oder [Volume -/<] und wählen Sie "System". Drücken Sie zur Bestätigung [Snooze / Station /
Select].

18
Drücken Sie [Volume +/>] oder [Volume -/<] und wählen Sie "Time". Drücken Sie zur Bestätigung [Snooze / Station /
Select].
Drücken Sie [Volume +/>] oder [Volume -/<] und wählen Sie "Set 12/24 hour". Drücken Sie zur Bestätigung [Snooze /
Station / Select].
Drücken Sie [Volume +/>] oder [Volume -/<], um zwischen "12 Stunden" und "24 Stunden" zu wählen, und drücken Sie zur
Bestätigung [Snooze / Station / Select].
Ändern des Datumsformats:
Halten Sie [Menu/Info] gedrückt.
Drücken Sie [Volume +/>] oder [Volume -/<] und wählen Sie "System". Drücken Sie zur Bestätigung [Snooze / Station /
Select].
Drücken Sie [Volume +/>] oder [Volume -/<] und wählen Sie "Time". Drücken Sie zur Bestätigung [Snooze / Station /
Select].
Drücken Sie [Volume +/>] oder [Volume -/<] und wählen Sie "Set date format". Drücken Sie zur Bestätigung [Snooze /
Station / Select].
Drücken Sie [Volume +/>] oder [Volume -/<], um zwischen "TT-MM-JJJJ" und "MM-TT-JJJJ" zu wählen. Drücken Sie zur
Bestätigung [Snooze / Station / Select].
Ändern der Sprache
Halten Sie [Menu/Info] gedrückt.
Drücken Sie [Volume +/>] oder [Volume -/<] und wählen Sie "System". Drücken Sie zur Bestätigung [Snooze / Station /
Select].
Drücken Sie [Volume +/>] oder [Volume -/<] und wählen Sie "Language". Drücken Sie zur Bestätigung [Snooze / Station /
Select].
Drücken Sie [Volume +/>] oder [Volume -/<], um die gewünschte Sprache auszuwählen, und drücken Sie zur Bestätigung
[Snooze / Station / Select].
Zurücksetzen auf Werkseinstellungen (Factory reset)
Zurücksetzen löscht alle Voreinstellungen, löscht die Kanalliste und setzt alle Optionen auf die Standardeinstellungen
zurück.
Halten Sie [Menu/Info] gedrückt.
Drücken Sie [Volume +/>] oder [Volume -/<] und wählen Sie "System". Drücken Sie zur Bestätigung [Snooze / Station /
Select].
Drücken Sie [Volume +/>] oder [Volume -/<] und wählen Sie "Factory reset". Drücken Sie zur Bestätigung [Snooze / Station /
Select].
Drücken Sie [Volume +/>] oder [Volume -/<], um "JA" auszuwählen, und [Snooze / Station / Select] zur Bestätigung.
Audio-Einstellungen
In diesem Menü können Sie die Bass- und Höhenpegel einstellen.
Halten Sie [Menu/Info] gedrückt.
Drücken Sie [Volume +/>] oder [Volume -/<] und wählen Sie "System". Drücken Sie zur Bestätigung [Snooze / Station /
Select].
Drücken Sie [Volume +/>] oder [Volume -/<], um "Bass" oder "Treble" auszuwählen, und drücken Sie zur Bestätigung [Snooze
/ Station / Select].
Drücken Sie [Volume +/>] oder [Volume -/<], um den Bass- oder Höhenpegel einzustellen. Sie können eine Stufe zwischen "-
3" und "+3" wählen, drücken Sie zur Bestätigung [Snooze / Station / Select].
Hintergrundbeleuchtung (Backlight)
Einstellen der Helligkeit und Dauer der Hintergrundbeleuchtung.
Pegel auf Ein (On level)
Halten Sie [Menu/Info] gedrückt.
Drücken Sie [Volume +/>] oder [Volume -/<], um "System" > "Backlight" auszuwählen, und drücken Sie zur Bestätigung
[Snooze / Station / Select].
Drücken Sie [Volume +/>] oder [Volume -/<], um "On level" auszuwählen, und drücken Sie zur Bestätigung [Snooze /
Station / Select].
Drücken Sie [Volume +/>] oder [Volume -/<], um zwischen "High", "Medium" oder "Low" zu wählen, und drücken Sie zur
Bestätigung [Snooze / Station / Select].
Zeitlimit (Timeout)
Halten Sie [Menu/Info] gedrückt.
Drücken Sie [Volume +/>] oder [Volume -/<], um "System" > "Backlight" auszuwählen, und drücken Sie zur Bestätigung
[Snooze / Station / Select].
Drücken Sie [Volume +/>] oder [Volume -/<], um "Timeout" auszuwählen, und drücken Sie zur Bestätigung [Snooze /
Station / Select].
Drücken Sie [Volume +/>] oder [Volume -/<], um die Einstellung für die Zeitüberschreitung auszuwählen. Um festzulegen,
dass die Hintergrundbeleuchtung immer eingeschaltet bleiben soll, wählen Sie "On".

19
Dynamic range control
Dynamic Range Control (DRC): DRC kann leise Töne in lauten Umgebungen hörbarer machen. Der DRC-Pegel einer Sendung
wird von der Sendeanstalt festgelegt und mit dem Dienst übertragen. Wenn Sie den DRC-Wert auf dem Gerät ändern, können
Sie einen Skalierungsfaktor auf diese Stufe anwenden. Sie können zwischen 3 Kompressionsstufen wählen.
Halten Sie [Menu/Info] 2 Sekunden lang gedrückt, um das Hauptmenü anzuzeigen.
Drücken Sie [Volume +/>] of [Volume -/<], um "DRC" auszuwählen, und drücken Sie zur Bestätigung [Snooze / Station /
Select].
DRC high: Wendet maximale Kompression auf die DRC-Stufe an.
DRC low: Wendet eine reduzierte Kompression auf die DRC-Ebene an.
DRC off: Entfernt DRC-Kompression.
Je nach dem Design Ihres Smartphones kann der Ladeabschnitt anders positioniert sein, so dass die Position des Telefons
angepasst werden muss, um zu funktionieren.
VORSICHT!:
Entfernen Sie die Metallschutzhülle oder das magnetische Gehäuse vom Smartphone, bevor Sie mit dem Laden beginnen.
Stellen Sie während des Ladevorgangs keine magnetischen oder anderen Metallgegenstände auf das Ladegerät. Dies kann
das Smartphone und/oder das Radio beschädigen.

20
Felicitaciones a la compra de este producto Audizio. Por favor lea atentamente este manual antes de usar el aparato para
disfrutar al completo de sus prestaciones.
Seguir las instrucciones le permite no invalidar la garantía. Tome todas las precauciones para evitar que se produzca fuego o
una descarga eléctrica. Las reparaciones solo deben llevarse a cabo por técnicos cualificados para evitar descargas eléctricas.
Guarde el manual para futuras consultas.
sentirse cierto olor. Esto es normal y desaparece al poco tiempo.
- Este aparato contiene piezas que llevan voltaje. Por lo
tanto NO abra la carcasa.
- No coloque objetos metálicos o vierta líquidos dentro
del aparato Podría producir descargas eléctricas y fallos
en el funcionamiento.
- No coloque el aparato cerca de fuentes de calor tipo
radiadores, etc. No coloque el aparato en superficies
vibratorias. No tape los agujeros de ventilación.
- Este aparato no está preparado para un uso continuado.
- Tenga cuidado con el cable de alimentación y no lo
dañe. Un daño o defecto en el cable de alimentación
puede producir una descarga eléctrica o fallo en el
funcionamiento.
- Cuando desconecte el aparato de la toma de corriente,
siempre tire de la clavija, nunca del cable.
- No enchufe o desenchufe el aparato con las manos
mojadas.
- Si la clavija y/o el cable de alimentación están dañados,
necesitan reemplazarse por un técnico cualificado.
- Si el aparato está dañado de modo que puedan verse
sus partes internas, NO conecte el aparato a la toma de
corriente y NO lo encienda. Contacte con su
distribuidor. NO conecte el aparato a un reostato o
dimmer.
- Para evitar un fuego o peligro de descarga, no exponga
el aparato a la lluvia y a la humedad.
- Todas las reparaciones deben llevarse a cabo
exclusivamente por técnicos cualificados.
- Conecte el aparato a una toma de corriente con toma de
tierra (220-240Vca/50Hz) protegida por un fusible de
10-16A.
- Durante una tormenta o si el aparato no va a usarse
durante un periodo largo de tiempo, desconéctelo de la
toma de corriente. La regla es: Desconéctelo si no lo va
a usar.
- Si el aparato no se ha usado en mucho tiempo puede
producirse condensación. Deje el aparato a temperatura
ambiente antes de encenderlo. Nunca utilice el aparato
en ambientes húmedos o en el exterior.
- Para prevenir accidentes en las empresas, debe seguir
las directrices aplicables y seguir las instrucciones.
- No lo apague y encienda repetidamente. Esto acorta su
tiempo de vida.
- Mantenga el aparato fuera del alcance de los niños. No
deje el aparato sin vigilancia.
- No utilice sprays limpiadores para limpiar los
interruptores. Los residuos de estos sprays producen
depósitos de polvo y grasa. En caso de mal
funcionamiento, siempre consulte a un profesional.
- No fuerce los controles.
- Si el aparato se ha caído, siempre haga que lo verifique
un técnico cualificado antes de encenderlo otra vez.
- NO utilice productos químicos para limpiar el aparato.
Dañan el barniz. Tan solo límpielo con un trapo seco.
- Manténgalo lejos de equipos electrónicos ya que
pueden producir interferencias.
- Si este producto incorpora una batería recargable con
base ácida, por favor recarge bateria cada 3 meses si no
va a usar la unidad por un tiempo prolongado. En caso
contrario la batería podría dañarse.
- Solo utilice recambios originales para las reparaciones,
de otro modo pueden producirse daños serios y/o
radiaciones peligrosas.
- Apague el aparato antes de desconectarlo de la toma de
corriente y/o de otros equipos. Desconecte todos los
cables y conexiones antes de mover el aparato.
- Asegúrese de que el cable de alimentación no puede
dañarse cuando la gente lo pise. Compruebe el cable de
alimentación antes de cada uso por si hay daños o
defectos.
- El voltaje de funcionamiento es 220-240Vca/50Hz.
Compruebe que la toma de corriente coincide. Si tiene
que viajar, asegúrese de que el voltaje del país es el
adecuado para este aparato.
- Guarde el embalaje original para poder transportar el
aparato en condiciones seguras.
Esta señal advierte al usuario de la presencia de alto voltaje en el interior de la carcasa y que es de la suficiente
magnitud como para producir una descarga eléctrica.
Esta señal advierte al usuario de que el manual contiene instrucciones importantes que han de leerse y seguirse al pie
de la letra.
NOTA: Para asegurarse de que el aparato funcione correctamente, debe usarse en ambientes a una temperatura de entre
5°C/41°F y 35°C/95°F.
Los productos electrónicos no pueden tirarse a la basura normal. Por favor lleve este producto a un centro de reciclaje. Pregunte a
la autoridad local en caso de duda. Las especificaciones son generales. Los valores actuales pueden variar de una unidad a otra. Las
especificaciones pueden variar sin previo aviso.
Nunca intente reparar usted mismo este equipo. Esta manipulación anulará la garantía. No realice cambios en la unidad. Esta manipulación
anulará la garantía. Esta garantía no es aplicable en caso de accidente o daños ocasionados por uso indebido del aparato o mal uso del
mismo. Audizio no se hace responsable de daños personales causados por el no seguimiento de las normas e instrucciones de este manual.
Esto es aplicable también a los daños de cualquier tipo.

21
ATENCIÓN! Inmediatamente después de recibir un dispositivo, desempaque cuidadosamente la caja de cartón, compruebe el
contenido para asegurarse de que todas las partes están presentes, y se han recibido en buenas condiciones. Notifique
inmediatamente al transportista y conserve el material de embalaje para la inspección por si aparecen daños causados por el
transporte o el propio envase muestra signos de mal manejo. Guarde el paquete y todos los materiales de embalaje. En el
caso de que deba ser devuelto a la fábrica, es importante que el aparato sea devuelto en la caja de la fábrica y embalaje
originales. Si el aparato ha estado expuesto a grandes cambios de temperatura (tras el transporte), no lo enchufe
inmediatamente. La condensación de agua producida podría dañar su aparato. Deje el dispositivo apagado hasta que se haya
alcanzado la temperatura ambiente.
En la etiqueta de la parte trasera del controlador se indica el tipo de fuente de alimentación que debe ser conectado.
Compruebe que la tensión de red corresponda a esto, todos los otros voltajes a la especificada, puede causar efectos
irreparable. El producto también debe estar conectado directamente a la red para ser utilizado. No en ninguna fuente de
alimentación o dimmer ajustable.
Conecte siempre el producto a un circuito protegido (disyuntor o fusible). Asegúrese de qu’el producto tiene una
toma de tierra adecuada para evitar el riesgo de electrocución o incendio.
1. Power / Source
Pulse para cambiar de modo
Manténgalo pulsado para encender el dispositivo o entrar en
modo de espera
2. Alarm
Pulse aquí para activar una alarma
3. Preset
Pulse aquí para abrir la lista de presintonías
Mantén pulsado para guardar una emisora como presintonía
4. Snooze / Station / Select
Pulse aquí, cuando suene una alarma, para posponerla
Pulse aquí para confirmar la escucha de una emisora elegida
Pulse aquí para seleccionar/introducir la entrada
5. Sleep
Pulse para activar el temporizador de apagado
6. Menu / Info
Pulse para recorrer la información de la estación
Mantenga pulsado para abrir el menú
7. Volume - / <
Pulse para bajar el volumen durante la reproducción
Pulse en los menús para desplazarse
8. Volume + / >
Pulse para subir el volumen durante la reproducción
Pulse en los menús para desplazarse
9. Almohadilla de carga inalámbrica
Dependiendo del diseño de su smartphone, la zona de carga puede estar colocada de forma diferente, lo que requiere un
cierto ajuste de la posición cuando se coloca en la superficie de carga para que sea funcional
10. USB charge
Puerto de carga USB de 5 V
11. Entrada del adaptador
Conector de entrada de alimentación de 9 V 3,0A CC
12. Toma de auriculares
Toma de 3,5 mm para insertar auriculares
13. Compartimento de las pilas
La radio está equipada con un sistema de batería de reserva, que requiere 2 pilas AAA (no incluidas).
Abra el compartimento de las pilas. Inserte las pilas, asegurándose de que los polos positivo y negativo (+ o -) de las pilas
están en contacto con los terminales correspondientes dentro del compartimento de las pilas. Cierre el compartimento de
las pilas colocando la tapa. Si se produce un corte de corriente, la radio cambia automáticamente a la alimentación por
pilas y mantiene los ajustes del reloj y del temporizador. Cuando sustituya la pila: mantenga conectado el adaptador de
corriente, de lo contrario se perderán todos los ajustes del reloj y la alarma
1. Estación y hora actuales
2. Indicador del temporizador de reposo
3. Ajustar indicador de alarma
4. Indicador PM
5. Indicador de repetición
6. Indicador de carga del smartphone
7. Volumen

22
8. Intensidad de la señal
9. Indicador del modo DAB
10. Indicador de modo FM
11. Indicador de modo BT
• Retire la radio de la caja del paquete.
• Enchufe el adaptador de corriente y presione [Power].
Precaución: utilice únicamente el adaptador suministrado con la radio. Conectar una fuente de alimentación con una
clasificación diferente puede causar daños permanentes a la radio y puede ser peligroso.
Nota: Asegúrese de extender completamente la antena (situada en la parte posterior de la unidad) para garantizar la mejor
recepción posible de FM y DAB.
Si hay transmisión de audio digital (DAB) en su área, la radio también puede captar las estaciones DAB. La radio es compatible
con DAB y DAB+. Coloque la radio cerca de la ventana y extienda la antena todo lo que pueda para obtener la mejor
recepción. En ocasiones, es posible que deba ajustar la dirección de la antena para mejorar la recepción.
Pulse [Source] para seleccionar el modo DAB.
Búsqueda automática: En modo DAB, mantenga pulsado [Menu/Info]. Pulse [Volume +/>] o [Volume -/<] para seleccionar
"FULL Scan" y pulse [Snooze / Station / Select] para confirmar. El número de emisoras encontradas se mostrará durante la
búsqueda automática. Cuando finalice, el dispositivo sintonizará la última emisora escuchada.
Presintonización de emisoras: Mientras reproduce en modo DAB, mantenga pulsado [Preset]. Pulse [Volume +/>] o [Volume -
/<] para seleccionar la ranura de presintonía deseada (1-30), pulse [Snooze / Station / Select] para almacenar.
Pulse [Preset] para recuperar la memoria. Pulse [Volume +/>] o [Volume -/<] para seleccionar la emisora almacenada que
desea escuchar. Pulse [Snooze / Station / Select] para confirmar.
Mostrar información del canal: Pulse [Menu/Info] repetidamente para mostrar diversas formas de información sobre la
emisora que se está reproduciendo.
Para recibir las emisoras de FM ordinarias, coloque la radio cerca de la ventana y extienda la antena todo lo que pueda para
obtener la mejor recepción. Es posible que deba ajustar la dirección de la antena para mejorar la recepción.
Pulse [Source] para seleccionar el modo FM.
Búsqueda automática: Pulse [Snooze / Station / Select], "<" y ">" se muestran en la pantalla. Mantenga pulsado [Volume +/>]
o [Volume -/<], el dispositivo empezará a buscar automáticamente la siguiente emisora con señal fuerte.
Exploración manual: Pulse [Snooze / Station / Select], "<" y ">" se muestran en la pantalla. Pulse [Volume +/>] o [Volume -
/<] para desplazarse por el valor de frecuencia.
Presintonización de emisoras: Mientras reproduce en modo FM, mantenga pulsado [Preset]. Pulse [Volume +/>] o [Volume -
/<] para seleccionar la ranura de presintonía deseada (1-30), pulse [Snooze / Station / Select] para almacenar.
Pulse [Preset] para recuperar la memoria. Pulse [Volume +/>] o [Volume -/<] para seleccionar la emisora almacenada que
desea escuchar. Pulse [Snooze / Station / Select] para confirmar.
Mostrar información del canal: Pulse [Menu/Info] repetidamente para mostrar diversas formas de información sobre la
emisora que se está reproduciendo.
Antes de que sea posible la transmisión entre su dispositivo BT y la radio, ambos dispositivos deben estar acoplados. Este
proceso se llama "emparejamiento".
Si ya se ha acoplado a un dispositivo BT anteriormente, esta conexión se restablecerá automáticamente cuando ambos
dispositivos estén dentro del alcance y se haya seleccionado la operación BT en la radio. No es necesario repetir el
"emparejamiento". Sin embargo, es posible que deba activar esta función en su dispositivo BT.
• Presione [Source] para ingresar al modo BT.
• Active la transmisión por BT en su dispositivo. El dispositivo buscará dispositivos BT emparejables en el rango de recepción.
• Seleccione “Audizio Cuneo” de la lista de dispositivos encontrados. Introduzca "0000" si necesita un código de acceso.
• Inicie la reproducción en su dispositivo BT. La reproducción ahora tiene lugar emitiendo sonido desde la radio.
Al programar una alarma, la radio se encenderá (si está en modo de espera) y sintonizará una emisora de radio DAB o FM o
emitirá un tono de timbre. Para activar una alarma:
• Pulse [Alarm1] o [Alarm2].
• Pulse [Volume +/>] o [Volume -/<] para ajustar el valor de la hora de la alarma y pulse [Snooze / Station / Select] para
confirmar.

23
• Pulse [Volume +/>] o [Volume -/<] para ajustar el valor en minutos de la alarma y pulse [Snooze / Station / Select] para
confirmar.
• Pulse [Volume +/>] o [Volume -/<] para ajustar la duración de la alarma (en minutos) y pulse [Snooze / Station / Select]
para confirmar.
• Pulse [Volume +/>] o [Volume -/<] para seleccionar Buzzer, DAB o FM y pulse [Snooze / Station / Select] para confirmar.
• Pulse [Volume +/>] o [Volume -/<] para seleccionar la emisora de radio que desea que suene cuando suene la alarma
(cuando se ha seleccionado FM o DAB). Es posible seleccionar una de las emisoras presintonizadas guardadas o puede
seleccionar ‘Last listened’ para seleccionar la emisora que estaba escuchando por última vez. Pulse [Snooze / Station /
Select] para confirmar.
• Pulse [Volume +/>] o [Volume -/<] para seleccionar una de las siguientes opciones de frecuencia de alarma: “Daily”,
“Weekdays”, “Weekends” y “Once” y pulse [Snooze / Station / Select] para confirmer.
• Pulse [Volume +/>] o [Volume -/<] para ajustar el volumen de la alarma y pulse [Snooze / Station / Select] para confirmar.
• Pulse [Volume +/>] o [Volume -/<] para seleccionar "on" o "off" y pulse [Snooze / Station / Select] para guardar.
• El icono de alarma aparecerá en la pantalla.
Activar/desactivar una alarma
Pulse [Alarm1] o [Alarm2] para activar o desactivar una alarma. El icono de alarma aparecerá/desaparecerá para indicar la
entrada.
Dormir
Puede activar la función snooze pulsando [Snooze / Station / Select] cuando suene la alarma. El sonido de la alarma se
silenciará y se activará de nuevo transcurridos 10 minutos. Durante el snooze, se mostrará el tiempo de cuenta atrás. Para
detener la función de repetición, pulsa [Power].
Esta función permite programar el aparato para que pase por sí solo al modo de reposo tras un periodo de tiempo
determinado. Pulse [Sleep] para entrar en el modo de reposo, pulse [Sleep] repetidamente para ajustar el tiempo de reposo
deseado. Cuando el temporizador llegue a cero, el aparato pasará automáticamente al modo de espera. Para cancelar el
temporizador de apagado automático, pulse [Sleep] repetidamente para seleccionar "Sleep off".
Esta función permite programar el aparato para que emita una alarma tras un periodo de tiempo determinado (temporizador
de cuenta atrás).
• Mantén pulsado [Menu/Info].
• Pulse [Volume +/>] o [Volume -/<] y seleccione "System". Pulse [Snooze / Station / Select] para confirmer.
• Pulse [Volume +/>] o [Volume -/<] y seleccione “Kitchen timer”. Pulse [Snooze / Station / Select] para confirmer.
• Pulse [Volume +/>] o [Volume -/<] para cambiar los minutos. Pulse [Snooze / Station / Select] para confirmar e iniciar el
temporizador de cuenta atrás. La alarma sonará una vez transcurrido el periodo de tiempo que haya ajustado, tanto en
modo "On" como en modo "Standby".
Configuración del reloj
Ajustar la hora y la fecha: La hora y la fecha se sincronizan automáticamente con la señal FM o DAB.
Ajuste manual de la hora y la fecha:
Mantén pulsado [Menu/Info].
Pulse [Volume +/>] o [Volume -/<] para seleccionar “System” y pulse [Snooze / Station / Select] para confirmar.
Pulse [Volume +/>] o [Volume -/<] para seleccionar “Time” y pulse [Snooze / Station / Select] para confirmar.
Pulse [Volume +/>] o [Volume -/<] para seleccionar “Set time/date”, pulse [Snooze / Station / Select] para confirmar.
Pulse [Volume +/>] o [Volume -/<] para ajustar la hora, pulse [Snooze / Station / Select] para confirmar. Repita el
procedimiento para ajustar los minutos.
Pulse [Volume +/>] o [Volume -/<] para ajustar el día, pulse [Snooze / Station / Select] para confirmar. Repita el
procedimiento para ajustar el mes y el año.
Cambiar el formato de la hora:
Mantén pulsado [Menu/Info].
Pulse [Volume +/>] o [Volume -/<] para seleccionar “System” y pulse [Snooze / Station / Select] para confirmar.
Pulse [Volume +/>] o [Volume -/<] para seleccionar “Time” y pulse [Snooze / Station / Select] para confirmar.
Pulse [Volume +/>] o [Volume -/<] para seleccionar “Set 12/24 hour” y pulse [Snooze / Station / Select] para confirmar.
Pulse [Volume +/>] o [Volume -/<] para elegir entre "12 hour" y "24 hour" y pulse [Snooze / Station / Select] para
confirmar.
Cambiar el formato de la fecha:
Mantén pulsado [Menu/Info].
Pulse [Volume +/>] o [Volume -/<] para seleccionar “System” y pulse [Snooze / Station / Select] para confirmar.
Pulse [Volume +/>] o [Volume -/<] para seleccionar “Time” y pulse [Snooze / Station / Select] para confirmar.
Pulse [Volume +/>] o [Volume -/<] para seleccionar "Set date format" y pulse [Snooze / Station / Select] para confirmer.
Pulse [Volume +/>] o [Volume -/<] para elegir entre "DD-MM-AAAA" y "MM-DD-AAAA". Pulse [Snooze / Station / Select]
para confirmar.

24
Cambiar la lengua
Mantén pulsado [Menu/Info].
Pulse [Volume +/>] o [Volume -/<] para seleccionar “System” y pulse [Snooze / Station / Select] para confirmar.
Pulse [Volume +/>] o [Volume -/<] para seleccionar “Language” y pulse [Snooze / Station / Select] para confirmar.
Pulse [Volume +/>] o [Volume -/<] para seleccionar el idioma deseado y pulse [Snooze / Station / Select] para confirmar.
Configuración de fábrica (Factory settings/reset)
El restablecimiento elimina todas las presintonías, borra la lista de emisoras y restablece todas las opciones a la
configuración predeterminada
Mantén pulsado [Menu/Info].
Pulse [Volume +/>] o [Volume -/<] para seleccionar “System” y pulse [Snooze / Station / Select] para confirmar.
Pulse [Volume +/>] o [Volume -/<] para seleccionar “Factory reset” y pulse [Snooze / Station / Select] para confirmar.
Pulse [Volume +/>] o [Volume -/<] para seleccionar "YES" y [Snooze / Station / Select] para confirmar.
Configuración de audio
Utilice este menú para ajustar los graves y agudos.
Mantén pulsado [Menu/Info].
Pulse [Volume +/>] o [Volume -/<] para seleccionar “System” y pulse [Snooze / Station / Select] para confirmar.
Pulse [Volume +/>] o [Volume -/<] para seleccionar “Bass” o “Treble” y pulse [Snooze / Station / Select] para confirmar.
Pulse [Volume +/>] o [Volume -/<] para ajustar los niveles de graves o agudos. Puede elegir un nivel entre '-3' y '+3', pulse
[Snooze / Station / Select] para confirmar.
Luz de fondo (Backlight)
Ajuste el brillo y la duración de la iluminación de la pantalla.
Nivel encendida (On level)
Mantén pulsado [Menu/Info].
Pulse [Volume +/>] o [Volume -/<] para seleccionar "System" > "Backlight" y pulse [Snooze / Station / Select] para
confirmar.
Pulse [Volume +/>] o [Volume -/<] para seleccionar "On level" y pulse [Snooze / Station / Select] para confirmar.
Pulse [Volume +/>] o [Volume -/<] para elegir entre "High", "Medium" o "Low" y pulse [Snooze / Estación / Seleccionar]
para confirmar.
Tiempo de espera (Timeout)
Mantén pulsado [Menu/Info].
Pulse [Volume +/>] o [Volume -/<] para seleccionar "System" > "Backlight" y pulse [Snooze / Station / Select] para
confirmar.
Pulse [Volume +/>] o [Volume -/<] para seleccionar "Timeout" y pulse [Snooze / Station / Select] para confirmar.
Pulsa [Volume +/>] o [Volume -/<] para elegir el ajuste de tiempo de espera. Para especificar que la retroiluminación
permanezca siempre encendida, elija "On".
Dynamic range control
Dynamic Range Control (DRC): El DRC puede facilitar la audición de sonidos más bajos cuando la unidad se utiliza en un
entorno ruidoso. El nivel de DRC de una emisión lo establece la emisora y se transmite con el servicio. Cambiar el valor de
DRC en la unidad le permite aplicar un factor de escala a este nivel. Elija entre 3 niveles de compresión.
Mantenga pulsado [Menu/info] durante 2 segundos para ver el menú principal.
Pulse [Volume +/>] o [Volume -/<] para elegir "DRC" y pulse [Snooze / Station / Select] para confirmar.
DRC high: Aplica la máxima compresión al nivel DRC.
DRC low: Aplica una compresión reducida al nivel DRC.
DRC off: Elimina la compresión DRC.
Dependiendo del diseño de su smartphone, el área de carga puede estar colocada de forma diferente, lo que requiere un
cierto ajuste de posición cuando se coloca en la superficie de carga para que sea funcional.
PRECAUCIÓN:
Retire la funda metálica protectora o magnética del smartphone antes de iniciar la carga. Durante la carga, no coloque ningún
objeto con bandas magnéticas u otros objetos metálicos sobre el cargador. De lo contrario, podría dañar el smartphone y/o la
radio.

25
Nous vous remercions d’avoir acheté un produit Audizio. Veuillez lire la présente notice avant l’utilisation afin de pouvoir en
profiter pleinement. Veuillez lire la notice avant toute utilisation. Respectez impérativement les instructions afin de
continuer à bénéficier de la garantie. Prenez toutes les précautions nécessaires pour éviter tout incendie ou décharge
électrique. Seul un technicien spécialisé peut effectuer les réparations. Nous vous conseillons de conserver la présente
notice pour pouvoir vous y reporter ultérieurement.
- Avant d’utiliser l’appareil, prenez conseil auprès d’un
spécialiste. Lors de la première mise sous tension, il est
possible qu’une odeur soit perceptible. C’est normal,
l’odeur disparaîtra peu de temps après.
- L’appareil contient des composants porteurs de tension.
N’OUVREZ JAMAIS le boîtier.
- Ne placez pas des objets métalliques ou du liquide sur
l’appareil, cela pourrait causer des décharges
électriques et dysfonctionnements.
- Ne placez pas l’appareil à proximité de sources de
chaleur, par exemple radiateur. Ne positionnez pas
l’appareil sur une surface vibrante. N’obturez pas les
ouïes de ventilation.
- L’appareil n’est pas conçu pour une utilisation en
continu.
- Faites attention au cordon secteur, il ne doit pas être
endommagé.
- Lorsque vous débranchez l’appareil de la prise secteur,
tenez-le par la prise, ne tirez jamais sur le cordon.
- Ne branchez pas et ne débranchez pas l’appareil avec
les mains mouillées.
- Seul un technicien spécialisé peut remplacer la fiche
secteur et / ou le cordon secteur.
- Si l’appareil est endommagé et donc les éléments
internes sont visibles, ne branchez pas l’appareil, NE
L’ALLUMEZ PAS. Contactez votre revendeur. NE
BRANCHEZ PAS l’appareil à un rhéostat ou un dimmer.
- Pour éviter tout risque d’incendie ou de décharge
électrique, n’exposez pas l’appareil à la pluie ou à
l’humidité.
- Seul un technicien habilité et spécialisé peut effectuer
les réparations
- Branchez l’appareil à une prise secteur 220-240 Vac/50
Hz avec terre, avec un fusible 10-16 A.
- Pendant un orage ou en cas de non-utilisation
prolongée de l’appareil, débranchez l’appareil du
secteur.
- En cas de non-utilisation prolongée de l’appareil, de la
condensation peut être créée. Avant de l’allumer,
laissez l’appareil atteindre la température ambiante. Ne
l’utilisez jamais dans des pièces humides ou en
extérieur.
- Afin d’éviter tout accident en entreprise, vous devez
respecter les conseils et instructions.
- N’allumez pas et n’éteignez pas l’appareil de manière
répétée. Cela réduit sa durée de vie.
- Conservez l’appareil hors de la portée des enfants. Ne
laissez pas l’appareil sans surveillance.
- N’utilisez pas d’aérosols pour nettoyer les
interrupteurs. Les résidus créent des dépôts et de la
graisse. En cas de dysfonctionnement, demandez
conseil à un spécialiste.
- Ne forcez pas les réglages.
- L’appareil contient un haut-parleur pouvant engendrer
des champs magnétiques. Tenez cet appareil à 60 cm au
moins d’un téléviseur ou ordinateur.
- Si le produit comprend un accumulateur intégré plomb-
acide, rechargez l'accumulateur tous les 3 mois en cas
de non-utilisation prolongée de l'appareil. Sinon,
l'accumulateur pourrait être endommagé de manière
permanente.
- Si l’accumulateur est endommagé, remplacez-le par un
accumulateur de même type et déposez l’ancien
accumulateur dans un container de recyclage adapté.
- Si l’appareil est tombé, faites-le toujours vérifier par un
technicien avant de le rallumer.
- Pour nettoyer l’appareil, n’utilisez pas de produits
chimiques qui abîment le revêtement, utilisez
uniquement un tissu sec.
- Tenez toujours l’appareil éloigné de tout équipement
électrique pouvant causer des interférences.
- Pour toute réparation, il faut impérativement utiliser
des pièces d’origine, sinon il y a risque de dommages
graves et / ou de radiations dangereuses.
- Eteignez toujours l’appareil avant de le débrancher du
secteur et de tout autre appareil. Débranchez tous les
cordons avant de déplacer l’appareil.
- Assurez-vous que le cordon secteur n’est pas abîmé si
des personnes viennent à marcher dessus. Avant toute
utilisation, vérifiez son état.
- La tension d’alimentation est de 220-240Vac/50 Hz.
Vérifiez la compatibilité. Si vous voyagez, vérifiez que
la tension d’alimentation du pays est compatible avec
l’appareil.
- Conservez l’emballage d’origine pour pouvoir
transporter l’appareil en toute sécurité.
Ce symbole doit attirer l’attention de l’utilisateur sur les tensions élevées présentes dans le boîtier de l’appareil,
pouvant engendrer une décharge électrique.
Ce symbole doit attirer l’attention de l’utilisateur sur des instructions importantes détaillées dans la notice, elles
doivent être lues et respectées.
Cet appareil porte le symbole CE. Il est interdit d’effectuer toute modification sur l’appareil. La certification CE et la garantie
deviendraient caduques !
NOTE: Pour un fonctionnement normal de l’appareil, il doit être utilisé en intérieur avec une plage de température maximale
autorisée entre 5°C/41°F et 35°C/95°F.
Ne jetez pas les produits électriques dans la poubelle domestique. Déposez-les dans une décharge. Demandez conseil aux
autorisés ou à votre revendeur. Données techniques réservées. Les valeurs actuelles peuvent varier d’un produit à l’autre. Tout
droit de modification réservé sans notification préalable.
N’essayez pas de réparer l’appareil vous-même. Vous perdriez tout droit à la garantie. Ne faites aucune modification sur l’appareil. Vous
perdriez tout droit à la garantie La garantie deviendrait également caduque en cas d’accidents ou dommages causes par une utilisation
inappropriée de l’appareil ou un non-respect des consignes présentes dans cette notice. Audizio ne pourrait être tenu responsable en cas
de dommages matériels ou corporels causés par un non-respect des consignes de sécurité et avertissements. Cela est également valable
pour tous les dommages quelle que soit la forme.

26
ATTENTION ! Immédiatement après réception, vérifiez le contenu du carton et assurez-vous que tous les éléments sont bien
présents et en bon état. Si besoin, faites les réserves nécessaires si le matériel ou les cartons sont endommagés. SI l’appareil
doit être retourné, faites-le dans l’emballage d’origine. Si l’appareil a été exposé à des fluctuations importantes de
températures (par exemple après le transport), ne l’allumez pas immédiatement. De la condensation peut survenir. Laissez
l’appareil éteint le temps qu’il atteigne la température ambiante.
Vous trouvez sur l’étiquette à l’arrière de l’appareil, le type d’alimentation à utiliser. Vérifiez que la tension d’alimentation
corresponde à celle mentionnée. Toute autre alimentation peut endommager l’appareil. Reliez l’appareil au secteur, il est
prêt à être utilisé. En aucun cas, vous ne devez utiliser de dimmer ou d’alimentation réglable.
Connectez toujours l'appareil à un circuit protégé (disjoncteur ou fusible). Assurezvous que l'appareil soit
correctement relié à la terre afin d'éviter tout risque d'électrocution ou d'incendie.
1. Power / Source
Appuyez pour changer de mode
Maintenez la touche enfoncée pour allumer l'appareil ou passer
en mode veille
2. Alarm
Appuyez pour régler une alarme
3. Preset
Appuyez pour ouvrir la liste des présélections
Maintenez la touche enfoncée pour sauvegarder une station
comme présélection
4. Snooze / Station / Select
Appuyez sur cette touche, lorsqu'une alarme sonne, pour faire
une sieste
Appuyer pour confirmer l'écoute d'une station choisie
Appuyez pour sélectionner/entrer une entrée
5. Sleep
Appuyez pour régler la minuterie de sommeil
6. Menu / Info
Appuyez pour faire défiler les informations sur la station
Appuyez et maintenez pour ouvrir le menu
7. Volume - / <
Appuyez pour réduire le volume pendant la lecture
Appuyez sur dans les menus pour les faire défiler
8. Volume + / >
Appuyez pour augmenter le volume pendant la lecture
Appuyez sur dans les menus pour les faire défiler
9. Pavé de recharge sans fil
Selon la conception de votre smartphone, la zone de chargement peut être positionnée différemment, ce qui nécessite un
certain ajustement de la position lorsqu'elle est placée sur la surface de chargement pour être fonctionnelle
10. USB charge
Port de charge USB 5V
11. Entrée de l'adaptateur d'alimentation
Connecteur d'entrée d'alimentation 9V 3.0A DC
12. Prise pour casque d'écoute
Prise jack 3,5 mm pour insérer des écouteurs
13. Compartiment de la batterie
La radio est équipée d'un système de secours à piles, qui nécessite 2 piles AAA (non incluses).
Ouvrez le compartiment à piles. Insérez les piles en vous assurant que les pôles positif et négatif (+ ou -) des piles sont en
contact avec les bornes correspondantes dans le compartiment à piles. Fermez le compartiment des piles en insérant le
couvercle. En cas de coupure/coupure de courant, la radio passe automatiquement sur l'alimentation par piles et conserve
les réglages de l'horloge et de la minuterie. Lors du remplacement de la pile : gardez l'adaptateur d'alimentation
connecté, sinon tous les réglages de l'horloge et de l'alarme seront perdus
1. Station et heure actuelles
2. Indicateur de la minuterie de sommeil
3. Définir l'indicateur d'alarme
4. Indicateur PM
5. Indicateur de répétition
6. Indicateur de chargement du smartphone
7. Volume
8. L'intensité du signal
9. Indicateur du mode DAB

27
10. Indicateur du mode FM
11. Indicateur du mode BT
• Retirez la radio de la boîte d'emballage.
• Branchez l'adaptateur d'alimentation et appuyez sur [Power].
Attention: Utilisez uniquement l'adaptateur fourni avec la radio. La connexion d'une alimentation électrique d'une valeur
différente peut causer des dommages permanents à la radio et peut être dangereuse.
Remarque: Veillez à déployer complètement l'antenne (arrière de l'appareil) pour garantir une réception FM et DAB optimale.
Si la radiodiffusion audio numérique (DAB) est présente dans votre région, la radio peut également capter les stations DAB. La
radio prend en charge la DAB et la DAB+. Placez la radio près de la fenêtre et déployez l'antenne au maximum pour obtenir la
meilleure réception. Il peut parfois être nécessaire d'ajuster la direction de l'antenne pour améliorer la réception.
Appuyez sur [Source] pour sélectionner le mode DAB. La première fois que le mode DAB est sélectionné, l'appareil recherche
automatiquement les stations disponibles.
Balayage automatique : En mode DAB, appuyez sur [Menu/Info] et maintenez-le enfoncé. Appuyez sur [Volume +/>] ou
[Volume -/<] pour sélectionner 'FULL Scan' et appuyez sur [Snooze / Station / Select] pour confirmer. Le nombre de stations
trouvées s'affiche pendant le balayage automatique. Une fois terminé, l'appareil se règle sur la dernière station écoutée.
Présélection de stations : Pendant la lecture en mode DAB, appuyez et maintenez [Preset]. Appuyez sur [Volume +/>] ou
[Volume -/<] pour sélectionner l'emplacement de présélection souhaité (1-30), appuyez sur [Snooze / Station / Select] pour
mémoriser. Appuyez sur [Preset] pour rappeler la mémoire. Appuyez sur [Volume +/>] ou [Volume -/<] pour sélectionner la
station mémorisée que vous souhaitez écouter. Appuyez sur [Snooze / Station / Select] pour confirmer.
Afficher les informations sur les chaînes: Appuyez plusieurs fois sur [Menu/Info] pour afficher différentes formes
d'informations concernant la station en cours de lecture.
Pour recevoir les stations FM ordinaires, placez la radio près d'une fenêtre et déployez l'antenne au maximum pour obtenir la
meilleure réception. Vous devrez peut-être ajuster la direction de l'antenne pour améliorer la réception.
Appuyez sur [Source] pour sélectionner le mode FM.
Balayage automatique : Appuyez sur [Snooze / Station / Select], "<" et ">" s'affichent à l'écran. Maintenez la touche [Volume
+/>] ou [Volume -/<] enfoncée, l'appareil commence à rechercher automatiquement la prochaine station forte.
Balayage manuel : Appuyez sur [Snooze / Station / Select], "<" et ">" s'affichent à l'écran. Appuyez sur [Volume +/>] ou
[Volume -/<] pour faire défiler la valeur de la fréquence.
Présélection de station : Pendant la lecture en mode FM, maintenez la touche [Preset] enfoncée. Appuyez sur [Volume +/>]
ou [Volume -/<] pour sélectionner l'emplacement de préréglage souhaité (1-30), appuyez sur [Snooze / Station / Select] pour
mémoriser. Appuyez sur [Preset] pour rappeler la mémoire. Appuyez sur [Volume +/>] ou [Volume -/<] pour sélectionner la
station mémorisée que vous souhaitez écouter. Appuyez sur [Snooze / Station / Select] pour confirmer.
Afficher les informations sur les chaînes: Appuyez plusieurs fois sur [Menu/Info] pour afficher différentes formes
d'informations concernant la station en cours de lecture.
Pour que la transmission entre votre appareil BT et la radio soit possible, les deux appareils doivent être appairés. Ce
processus est appelé "appairage". La radio sert de récepteur pour recevoir le flux musical à diffuser sur la radio.
Si vous avez déjà appairé un appareil BT auparavant, cette connexion sera rétablie automatiquement lorsque les deux
appareils sont à portée et que le fonctionnement BT a été sélectionné sur la radio. Il n'est pas nécessaire de répéter
l'opération d’appairage. Toutefois, il peut être nécessaire d'activer cette fonction sur votre appareil BT.
• Appuyez sur [Source] pour accéder au mode BT.
• Activez le BT sur votre appareil. Il va rechercher des appareils BT appairables dans la zone de réception.
• Sélectionnez “Audizio Cuneo” dans la liste des appareils trouvés. Entrez "0000" si un code d'accès est requis.
• Démarrez la lecture sur votre appareil BT. La lecture se fait maintenant depuis la radio.
Le réglage d'une alarme permet d'allumer la radio (si elle est en mode veille) et de syntoniser une station de radio DAB ou FM
ou de faire retentir une sonnerie. Pour régler une alarme:
• Appuyez sur [Alarm 1] ou [Alarm 2].
• Appuyez sur [Volume +/>] ou [Volume -/<] pour régler la valeur de l'heure de l'alarme et appuyez sur [Snooze / Station /
Select] pour confirmer.
• Appuyez sur [Volume +/>] ou [Volume -/<] pour régler la valeur des minutes de l'alarme et appuyez sur [Snooze / Station /
Select] pour confirmer.

28
• Appuyez sur [Volume +/>] ou [Volume -/<] pour régler la durée de l'alarme (en minutes) et appuyez sur [Snooze / Station /
Select] pour confirmer.
• Appuyez sur [Volume +/>] ou [Volume -/<] pour sélectionner Buzzer, DAB ou FM et appuyez sur [Snooze / Station / Select]
pour confirmer.
• Appuyez sur [Volume +/>] ou [Volume -/<] pour sélectionner la station de radio que vous souhaitez entendre lorsque
l'alarme se déclenche (lorsque FM ou DAB a été sélectionné). Il est possible de sélectionner l'une des stations préréglées
enregistrées ou de choisir "Last listened" pour sélectionner la dernière station écoutée. Appuyez sur [Snooze / Station /
Select] pour confirmer.
• Appuyez sur [Volume +/>] ou [Volume -/<] pour sélectionner l'une des options de fréquence d'alarme suivantes : “Daily”,
“Weekdays”, “Weekends” et “Once” et appuyez sur [Snooze / Station / Select] pour confirmer.
• Appuyez sur [Volume +/>] ou [Volume -/<] pour régler le volume de l'alarme et appuyez sur [Snooze / Station / Select]
pour confirmer.
• Appuyez sur [Volume +/>] ou [Volume -/<] pour sélectionner "on" ou "off" et appuyez sur [Snooze / Station / Select] pour
enregistrer.
• L'icône d'alarme apparaît sur l'écran.
Activation/désactivation d'une alarme
Appuyez sur [Alarm1] ou [Alarm2] pour activer/désactiver une alarme. L'icône d'alarme s'affiche ou disparaît pour indiquer
l'alarme en cours.
Snooze
Vous pouvez activer la fonction de répétition de réveil en appuyant sur [Snooze / Station / Select] lorsque l'alarme retentit.
Le son de l'alarme sera alors coupé et se déclenchera à nouveau après 10 minutes. Pendant la répétition du réveil, le compte
à rebours s'affiche. Pour arrêter la fonction de répétition de réveil, appuyez sur [Power].
Cette fonction permet de programmer l'appareil pour qu'il se mette en veille de lui-même après une période de temps
définie. Appuyez sur [Sleep] pour entrer dans le mode veille, appuyez plusieurs fois sur [Sleep] pour définir la durée de veille
souhaitée. Lorsque la minuterie atteint zéro, l'appareil se met automatiquement en mode veille. Pour annuler la minuterie de
mise en veille, appuyez plusieurs fois sur [Sleep] pour sélectionner "Sleep off".
Cette fonction permet de programmer l'appareil pour qu'il déclenche une alarme après un laps de temps déterminé (compte
à rebours).
• Appuyez et maintenez enfoncé [Menu/Info].
• Press [Volume +/>] or [Volume -/<] and select “System”. Press [Snooze / Station / Select] to confirm.
• Appuyez sur [Volume +/>] ou [Volume -/<] et sélectionnez "System". Appuyez sur [Snooze / Station / Select] pour
confirmer.
• Appuyez sur [Volume +/>] ou [Volume -/<] et sélectionnez “Kitchen timer”. Appuyez sur [Snooze / Station / Select] pour
confirmer.
• Appuyez sur [Volume +/>] ou [Volume -/<] pour modifier les minutes. Appuyez sur [Snooze / Station / Select] pour
confirmer et lancer le compte à rebours. L'alarme se déclenchera après l'écoulement de la période que vous avez définie,
en mode “On” et “Standby”.
Réglages de l'horloge
Réglage de l'heure et de la date : L'heure et la date sont automatiquement synchronisées avec le signal FM ou DAB.
Réglage manuel de l'heure et de la date :
Appuyez et maintenez enfoncé [Menu/Info].
Appuyez sur [Volume +/>] ou [Volume -/<] et sélectionnez “System”. Appuyez sur [Snooze / Station / Select] pour
confirmer.
Appuyez sur [Volume +/>] ou [Volume -/<] et sélectionnez “Time”. Appuyez sur [Snooze / Station / Select] pour confirmer.
Appuyez sur [Volume +/>] ou [Volume -/<] et sélectionnez “Set time/date”. Appuyez sur [Snooze / Station / Select] pour
confirmer.
Appuyez sur [Volume +/>] ou [Volume -/<] pour régler l'heure, puis appuyez sur [Snooze / Station / Select] pour confirmer.
Répétez l'opération pour régler les minutes.
Appuyez sur [Volume +/>] ou [Volume -/<] pour régler le jour, appuyez sur [Snooze / Station / Select] pour confirmer.
Répétez l'opération pour régler le mois et l'année.
Modification du format de l'heure:
Appuyez et maintenez enfoncé [Menu/Info].
Appuyez sur [Volume +/>] ou [Volume -/<] et sélectionnez “System”. Appuyez sur [Snooze / Station / Select] pour
confirmer.
Appuyez sur [Volume +/>] ou [Volume -/<] et sélectionnez “Time”. Appuyez sur [Snooze / Station / Select] pour confirmer.
Appuyez sur [Volume +/>] ou [Volume -/<] et sélectionnez “ Set 12/24 hour ”. Appuyez sur [Snooze / Station / Select] pour
confirmer.
Appuyez sur [Volume +/>] ou [Volume -/<] pour choisir entre "12 hour" et "24 hour" et appuyez sur [Snooze / Station /
Select] pour confirmer.

29
Modification du format de la date:
Appuyez et maintenez enfoncé [Menu/Info].
Appuyez sur [Volume +/>] ou [Volume -/<] et sélectionnez “System”. Appuyez sur [Snooze / Station / Select] pour
confirmer.
Appuyez sur [Volume +/>] ou [Volume -/<] et sélectionnez “Time”. Appuyez sur [Snooze / Station / Select] pour confirmer.
Appuyez sur [Volume +/>] ou [Volume -/<] pour sélectionner "Set date format" et appuyez sur [Snooze / Station / Select]
pour confirmer.
Appuyez sur [Volume +/>] ou [Volume -/<] pour choisir entre 'DD-MM-YYYY' et 'MM-DD-YYYY'. Appuyez sur [Snooze /
Station / Select] pour confirmer.
Changement de langue
Appuyez et maintenez enfoncé [Menu/Info].
Appuyez sur [Volume +/>] ou [Volume -/<] et sélectionnez “System”. Appuyez sur [Snooze / Station / Select] pour confirmer.
Appuyez sur [Volume +/>] ou [Volume -/<] et sélectionnez “Language”. Appuyez sur [Snooze / Station / Select] pour
confirmer.
Appuyez sur [Volume +/>] ou [Volume -/<] pour sélectionner la langue souhaitée et appuyez sur [Snooze / Station / Select]
pour confirmer.
Paramètres d'origine (Factory settings)
La réinitialisation supprime toutes les présélections, efface la liste des stations et remet toutes les options au réglage par
défaut.
Appuyez et maintenez enfoncé [Menu/Info].
Appuyez sur [Volume +/>] ou [Volume -/<] et sélectionnez “System”. Appuyez sur [Snooze / Station / Select] pour confirmer.
Appuyez sur [Volume +/>] ou [Volume -/<] et sélectionnez “Factory reset”. Appuyez sur [Snooze / Station / Select] pour
confirmer.
Appuyez sur [Volume +/>] ou [Volume -/<] pour sélectionner "YES" et sur [Snooze / Station / Select] pour confirmer.
Paramètres audio
Utilisez ce menu pour régler les basses et les aigus.
Appuyez et maintenez enfoncé [Menu/Info].
Appuyez sur [Volume +/>] ou [Volume -/<] et sélectionnez “System”. Appuyez sur [Snooze / Station / Select] pour confirmer.
Appuyez sur [Volume +/>] ou [Volume -/<] et sélectionnez “Bass” ou “Treble”. Appuyez sur [Snooze / Station / Select] pour
confirmer.
Appuyez sur [Volume +/>] ou [Volume -/<] pour régler le niveau des graves ou des aigus. Vous pouvez choisir un niveau
entre '-3' et '+3', appuyez sur [Snooze / Station / Select] pour confirmer.
Rétroéclairage (Backlight)
Réglez la luminosité et la durée de l'éclairage de l'écran.
On level (niveau avec lumière allumée)
Appuyez et maintenez enfoncé [Menu/Info].
Appuyez sur [Volume +/>] ou [Volume -/<] pour sélectionner "System" > "Backlight" et appuyez sur [Snooze / Station /
Select] pour confirmer.
Appuyez sur [Volume +/>] ou [Volume -/<] pour sélectionner 'On level' et appuyez sur [Snooze / Station / Select] pour
confirmer.
Pulse [Volume +/>] o [Volume -/<] para elegir entre "High", "Medium" ou "Low" y pulse [Snooze / Estación / Seleccionar]
para confirmar.
Timeout (Délai d'attente)
Appuyez et maintenez enfoncé [Menu/Info].
Appuyez sur [Volume +/>] ou [Volume -/<] pour sélectionner "System" > "Backlight" et appuyez sur [Snooze / Station /
Select] pour confirmer.
Appuyez sur [Volume +/>] ou [Volume -/<] pour sélectionner "Time out" et appuyez sur [Snooze / Station / Select] pour
confirmer.
Appuyez sur [Volume +/>] ou [Volume -/<] pour choisir le paramètre de délai. Pour spécifier que le rétroéclairage doit
toujours rester allumé, choisissez "On".
Dynamic range control
Dynamic Range Control (DRC): Le DRC peut rendre les sons plus faibles plus faciles à entendre lorsque l'appareil est utilisé
dans un environnement bruyant. Le niveau de DRC d'une émission est défini par le diffuseur et est transmis avec le service.
La modification de la valeur DRC sur l'appareil vous permet d'appliquer un facteur d'échelle à ce niveau. Choisissez entre 3
niveaux de compression. Appuyez et maintenez [Menu/info] pendant 2 secondes pour afficher le menu principal.
Appuyez sur [Volume +/>] ou [Volume -/<] pour choisir "DRC" et appuyez sur [Snooze / Station / Select] pour confirmer.
DRC high: Applique une compression maximale au niveau DRC.
DRC low: Applique une compression réduite au niveau DRC.
DRC off: Supprime la compression DRC.
Selon la conception de votre smartphone, la zone de chargement peut être positionnée différemment, ce qui nécessite un
certain ajustement de la position lorsqu'elle est placée sur la surface de chargement pour être fonctionnelle.
ATTENTION : Retirez la protection métallique ou l'étui magnétique du smartphone avant de lancer la charge. Lors du
chargement, ne placez pas d'objets magnétiques ou autres objets métalliques sur le chargeur. Cela pourrait endommager le
smartphone et/ou la radio.

30
Gratulujemy zakupu tego produktu firmy Audizio. Prosimy o dokładne zapoznanie się z niniejszą instrukcją przed
rozpoczęciem korzystania z urządzenia, aby w pełni wykorzystać wszystkie jego funkcje. Przeczytaj instrukcję przed
rozpoczęciem korzystania z urządzenia. Postępuj zgodnie z instrukcjami, aby nie unieważnić gwarancji. Podjąć wszelkie
środki ostrożności, aby uniknąć pożaru i/lub porażenia prądem. Naprawy mogą być wykonywane wyłącznie przez
wykwalifikowanego technika, aby uniknąć porażenia prądem. Instrukcję należy zachować do wykorzystania w przyszłości.
- Przed rozpoczęciem użytkowania urządzenia należy
zasięgnąć porady specjalisty. Przy pierwszym włączeniu
urządzenia może pojawić się nieprzyjemny zapach. Jest
to normalne i po chwili zniknie.
- Urządzenie zawiera części przewodzące napięcie.
Dlatego NIE należy otwierać obudowy.
- Nie należy umieszczać metalowych przedmiotów ani
wlewać płynów do urządzenia. Może to spowodować
porażenie prądem elektrycznym i nieprawidłowe
działanie.
- Nie należy umieszczać urządzenia w pobliżu źródeł
ciepła, takich jak grzejniki itp. Nie umieszczać urządzenia
na wibrującej powierzchni. Nie zakrywać otworów
wentylacyjnych.
- Urządzenie nie nadaje się do pracy ciągłej.
- Należy zachować ostrożność z przewodem zasilającym i
nie wolno go uszkodzić. Wadliwy lub uszkodzony
przewód sieciowy może spowodować porażenie prądem
elektrycznym i wadliwe działanie.
- Podczas odłączania urządzenia od gniazdka sieciowego
należy zawsze wyciągać wtyczkę, a nie przewód.
- Nie należy podłączać ani odłączać urządzenia mokrymi
rękami.
- Jeśli wtyczka i/lub przewód sieciowy są uszkodzone,
należy je wymienić przez wykwalifikowanego technika.
- Jeśli urządzenie jest uszkodzone w takim stopniu, że
widoczne są części wewnętrzne, NIE podłączać
urządzenia do gniazdka sieciowego i NIE włączać
urządzenia. Skontaktować się ze sprzedawcą.
- Aby uniknąć zagrożenia pożarem i porażeniem prądem,
nie wystawiać urządzenia na działanie deszczu i wilgoci.
- Wszystkie naprawy powinny być wykonywane wyłącznie
przez wykwalifikowanego technika.
- Podłączyć urządzenie do uziemionego gniazdka
sieciowego (220-240Vac/50Hz) zabezpieczonego
bezpiecznikiem 10-16A.
- Podczas burzy z piorunami lub jeśli urządzenie nie
będzie używane przez dłuższy okres czasu, należy
odłączyć je od sieci elektrycznej. Zasada jest taka sama:
Gdy urządzenie nie jest używane, należy je odłączyć od
sieci zasilającej.
- Jeśli urządzenie nie było używane przez dłuższy okres
czasu, może dojść do kondensacji pary wodnej. Przed
włączeniem urządzenie powinno osiągnąć temperaturę
pokojową.
- Nigdy nie używać urządzenia w wilgotnych
pomieszczeniach lub na zewnątrz.
- Aby zapobiec wypadkom w firmach, należy postępować
zgodnie z obowiązującymi wytycznymi i instrukcjami.
- Nie należy wielokrotnie włączać i wyłączać urządzenia.
Skraca to żywotność urządzenia.
- Przechowywać urządzenie w miejscu niedostępnym dla
dzieci. Nie pozostawiać urządzenia bez nadzoru.
- Do czyszczenia przełączników nie używać sprayów
czyszczących. Pozostałości tych sprayów powodują
osadzanie się kurzu i smaru. W przypadku awarii należy
zawsze zasięgnąć porady specjalisty.
- Nie wolno wymuszać używania elementów sterujących.
- Wewnątrz urządzenia znajduje się głośnik, który może
powodować pole magnetyczne. Urządzenie należy
trzymać w odległości co najmniej 60 cm od komputera
lub telewizora.
- Jeśli ten produkt ma wbudowany akumulator kwasowo-
ołowiowy. Jeśli nie zamierzasz używać produktu przez
dłuższy okres czasu, ładuj go co 3 miesiące. W
przeciwnym razie bateria może ulec trwałemu
uszkodzeniu.
- Jeśli bateria jest uszkodzona, należy wymienić ją na
baterię o tej samej specyfikacji. Uszkodzoną baterię
należy utylizować w sposób przyjazny dla środowiska.
- Jeśli urządzenie upadło, przed ponownym włączeniem
należy je sprawdzić przez wykwalifikowanego technika.
- Do czyszczenia urządzenia nie należy używać środków
chemicznych. Uszkodzą one lakier. Urządzenie należy
czyścić wyłącznie suchą ściereczką.
- Trzymać z dala od sprzętu elektronicznego, który może
powodować zakłócenia.
- Do napraw należy używać wyłącznie oryginalnych części
zamiennych, w przeciwnym razie może dojść do
poważnych uszkodzeń i/lub niebezpiecznego
promieniowania.
- Przed odłączeniem urządzenia od sieci elektrycznej i/lub
innych urządzeń należy je wyłączyć. Przed
przeniesieniem urządzenia należy odłączyć wszystkie
przewody i kable.
- Upewnić się, że przewód zasilający nie może zostać
uszkodzony, gdy ludzie chodzą po nim. Przed każdym
użyciem należy sprawdzić przewód sieciowy pod kątem
uszkodzeń i usterek!
- Napięcie sieciowe wynosi 220-240Vac/50Hz. Sprawdź,
czy gniazdo zasilania pasuje. W przypadku podróży
należy upewnić się, że napięcie sieciowe w danym kraju
jest odpowiednie dla tego urządzenia.
- Należy zachować oryginalne opakowanie, aby umożliwić
bezpieczny transport urządzenia.
Ten znak zwraca uwagę użytkownika na wysokie napięcie, które jest obecne w środku obudowy urządzenia. Napięcie jest wystarczające,
aby porazić użytkownika.
Ten znak zwraca uwagę użytkownika do ważnych informacji, które znajdują się w instrukcji. Informacje te powinny być przeczytane oraz
uwzględnione w codziennym użytkowaniu
Urządzenie posiada certyfikat CE. Nie wolno wprowadzać żadnych zmian w urządzeniu. Każda modyfikacja sprzętu spowoduje utratę
certyfikatu CE oraz gwarancji!
UWAGA: Urządzenie może funkcjonować w pomieszczeniach o temperaturze pomiędzy 5°C/41°F oraz 35°C/95°F.
WAŻNA INFORMACJA: Urządzenia elektryczne muszą być składowane w miejscach do tego przeznaczonych. Sprawdź, gdzie w Twojej
okolicy znajduje się najbliższe centrum recyklingu. Specyfikacja techniczna poszczególnych urządzeniach może się nieznacznie różnić.
Specyfikacja może ulec zmian bez powiadomień.
Nie próbuj dokonywać żadnych napraw samodzielnie, to spowoduje unieważnienie gwarancji. Gwarancja nie dotyczy uszkodzeń
spowodowanych niewłaściwym użytkowaniem sprzętu, niezgodnie z instrukcją. Power Dynamics nie jest odpowiedzialny za uszczerbek
na zdrowiu oraz kontuzje spowodowane niestosowaniem się do zaleceń bezpieczeństwa. Dotyczy to wszelakich uszkodzeń.

31
UWAGA! Po otrzymaniu przesyłki należy ostrożnie ją rozpakować. Sprawdzić zawartość, aby upewnić się, że wszystkie części
są obecne i zostały dostarczone w dobrym stanie. Jeśli jakiekolwiek części wyglądają na uszkodzone podczas transportu lub
opakowanie nosi ślady niewłaściwego obchodzenia się z nimi, należy natychmiast powiadomić dostawcę i zachować
materiały opakowaniowe. Należy zachować opakowanie i wszystkie materiały opakowaniowe. Jeśli produkt musi zostać
zwrócony, ważne jest, aby był zwrócony w oryginalnym fabrycznym pudełku i opakowaniu. Jeśli urządzenie zostało narażone
na drastyczne zmiany temperatury (np. po transporcie), nie należy go od razu włączać. Powstająca woda kondensacyjna może
uszkodzić urządzenie. Pozostawić urządzenie wyłączone, aż osiągnie temperaturę pokojową.
Na etykiecie znajdującej się na tylnej stronie produktu podany jest typ zasilania, który należy podłączyć. Sprawdź, czy
napięcie sieciowe odpowiada temu, wszystkie inne napięcia niż podane, urządzenie może zostać nieodwracalnie uszkodzone.
Produkt musi być również bezpośrednio podłączony do sieci i może być używany. Brak ściemniacza lub regulowanego
zasilania.
Zawsze podłączaj urządzenie do zabezpieczonego obwodu (wyłącznik automatyczny lub bezpiecznik). Upewnij się,
że urządzenie ma odpowiednie uziemienie elektryczne, aby uniknąć ryzyka porażenia prądem lub pożaru.
1. Power / Source
Naciśnij, aby przełączyć tryby
Naciśnij i przytrzymaj, aby włączyć urządzenie lub przejść do
trybu czuwania
2. Alarm
Naciśnij, aby ustawić alarm
3. Preset
Naciśnij, aby otworzyć listę zaprogramowanych ustawień
Naciśnij i przytrzymaj, aby zapisać stację jako zaprogramowaną
4. Snooze / Station / Select
Naciśnij, gdy dzwoni alarm, aby się zdrzemnąć
Naciśnij, aby potwierdzić słuchanie wybranej stacji
Naciśnij, aby wybrać/wprowadzić wejście
5. Sleep
Naciśnij, aby ustawić timer snu
6. Menu / Info
Naciśnij, aby przeglądać informacje o stacji
Naciśnij i przytrzymaj, aby otworzyć menu
7. Volume - / <
Naciśnij, aby zmniejszyć głośność podczas odtwarzania
Naciśnij w menu, aby przewijać
8. Volume + / >
Naciśnij, aby zwiększyć głośność podczas odtwarzania
Naciśnij w menu, aby przewijać
9. Bezprzewodowa podkładka do ładowania
W zależności od konstrukcji smartfona, obszar ładowania może być inaczej umiejscowiony, co wymaga pewnej korekty
położenia po umieszczeniu na powierzchni ładowania, aby był funkcjonalny
10. USB charge
Port ładowania USB 5V
11. Wejście zasilacza prądu stałego
Złącze wejściowe zasilania 9V 3,0A DC
12. Gniazdo słuchawkowe
Gniazdo 3,5 mm do włożenia słuchawek
13. Komora baterii
Radiotelefon jest wyposażony w system podtrzymywania zasilania bateryjnego, który wymaga baterii 2 x AAA (brak w
zestawie). Otwórz komorę baterii. Włóż baterie, upewniając się, że bieguny dodatni i ujemny (+ lub -) baterii stykają się z
odpowiednimi zaciskami w komorze baterii. Zamknij komorę baterii, zakładając pokrywę. Jeśli nastąpi przerwa w dostawie
prądu/wyłączenie zasilania, radio automatycznie przełączy się na zasilanie bateryjne i zachowa ustawienia zegara i
timera. Podczas wymiany baterii: należy pamiętać o podłączeniu zasilacza, w przeciwnym razie wszystkie ustawienia
zegara i alarmu zostaną utracone
1. Aktualna stacja i czas
2. Wskaźnik timera snu
3. Ustawić wskaźnik alarmu
4. Wskaźnik PM
5. Wskaźnik drzemki
6. Wskaźnik ładowania smartfona
7. Tom
8. Siła sygnału

32
9. Wskaźnik trybu DAB
10. Wskaźnik trybu FM
11. Wskaźnik trybu BT
• Wyjmij radio z opakowania.
• Podłącz zasilacz i naciśnij przycisk [Power].
Ostrożnie: Należy używać wyłącznie zasilacza dostarczonego z radiem. Podłączenie zasilacza o innej wartości znamionowej
może spowodować trwałe uszkodzenie radia i może być niebezpieczne.
Uwaga: Należy pamiętać o całkowitym wysunięciu anteny (znajdującej się z tyłu urządzenia), aby zapewnić jak najlepszy
odbiór FM i DAB.
Jeśli w Twojej okolicy działa Digital Audio Broadcasting (DAB), radio może odbierać również stacje DAB. Radio obsługuje
zarówno DAB, jak i DAB+. Umieść radio w pobliżu okna i wysuń antenę tak daleko, jak to możliwe, aby uzyskać najlepszy
odbiór. Czasami może być konieczne dostosowanie kierunku anteny, aby poprawić odbiór.
Naciśnij przycisk [Source], aby wybrać tryb DAB. Przy pierwszym wyborze trybu DAB urządzenie automatycznie wyszuka
dostępne stacje.
Automatyczne skanowanie: W trybie DAB, naciśnij i przytrzymaj [Menu/Info]. Naciśnij [Volume +/>] lub [Volume -/<], aby
wybrać 'FULL Scan' i naciśnij [Snooze / Station / Select], aby potwierdzić. Liczba znalezionych stacji będzie wyświetlana
podczas automatycznego skanowania. Po zakończeniu urządzenie dostroi się do ostatnio słuchanej stacji.
Wstępne ustawianie stacji: Podczas odtwarzania w trybie DAB, naciśnij i przytrzymaj [Preset]. Naciśnij [Volume +/>] lub
[Volume -/<], aby wybrać żądany slot presetu (1-30), naciśnij [Snooze / Station / Select], aby zapisać.
Naciśnij [Preset], aby przywołać pamięć. Naciśnij [Volume +/>] lub [Volume -/<], aby wybrać zapisaną stację, której chcesz
słuchać. Naciśnij [Snooze / Station / Select], aby potwierdzić.
Pokaż informacje o kanale: Naciśnij kilkakrotnie przycisk [Menu/Info], aby wyświetlić różne formy informacji dotyczące
odtwarzanej stacji.
Aby odbierać zwykłe stacje FM, należy umieścić radio w pobliżu okna i wysunąć antenę tak daleko, jak to możliwe, aby
uzyskać najlepszy odbiór. Może być konieczne dostosowanie kierunku anteny, aby poprawić odbiór.
Naciśnij przycisk [Source], aby wybrać tryb FM.
Automatyczne skanowanie: Naciśnij [Snooze / Station / Select], "<" i ">" są wyświetlane na wyświetlaczu. Naciśnij i
przytrzymaj [Volume +/>] lub [Volume -/<], urządzenie zacznie automatycznie skanować w poszukiwaniu następnej silnej
stacji.
Skanowanie ręczne: Naciśnij [Snooze / Station / Select], "<" i ">" są wyświetlane na wyświetlaczu. Naciśnij [Volume +/>] lub
[Volume -/<], aby przewinąć wartość częstotliwości.
Wstępne ustawianie stacji: Podczas odtwarzania w trybie FM, naciśnij i przytrzymaj [Preset]. Naciśnij [Volume +/>] lub
[Volume -/<], aby wybrać żądany slot presetu (1-30), naciśnij [Snooze / Station / Select], aby zapisać.
Naciśnij [Preset], aby przywołać pamięć. Naciśnij [Volume +/>] lub [Volume -/<], aby wybrać zapisaną stację, której chcesz
słuchać. Naciśnij [Snooze / Station / Select], aby potwierdzić.
Pokaż informacje o kanale: Naciśnij kilkakrotnie przycisk [Menu/Info], aby wyświetlić różne formy informacji dotyczące
odtwarzanej stacji.
Zanim możliwa będzie transmisja pomiędzy urządzeniem BT a radiem, oba urządzenia muszą zostać sparowane. Proces ten
nazywany jest "parowaniem". Radio służy jako odbiornik, do odbioru strumienia muzyki, który ma być odtwarzany w radiu.
Jeśli już wcześniej sparowałeś się z urządzeniem BT, połączenie to zostanie przywrócone automatycznie, gdy oba urządzenia
znajdą się w zasięgu, a w radiu wybrano obsługę BT. "Parowanie" nie musi być powtarzane. Funkcja ta może jednak wymagać
aktywacji w urządzeniu BT.
• Naciśnij [Source], aby wejść w tryb BT.
• Włącz strumieniowanie BT w swoim urządzeniu. Urządzenie będzie skanować w poszukiwaniu sparowanych urządzeń BT w
zasięgu odbioru.
• Wybierz "Audizio Cuneo" z listy znalezionych urządzeń. Wprowadź "0000", jeśli wymagany jest kod dostępu.
• Uruchom odtwarzanie na urządzeniu BT. Odtwarzanie odbywa się teraz poprzez emisję dźwięku z radia.
Ustawienie alarmu spowoduje włączenie radia (jeśli znajduje się w trybie gotowości) i dostrojenie do stacji radiowej DAB- lub
FM, albo wyemituje sygnał dźwiękowy typu brzęczyk. Aby ustawić alarm:
• Naciśnij [Alarm1] lub [Alarm2].

33
• Naciśnij [Volume +/>] lub [Volume -/<], aby ustawić wartość godziny dla alarmu i naciśnij [Snooze / Station / Select], aby
potwierdzić.
• Naciśnij [Volume +/>] lub [Volume -/<], aby ustawić wartość minutową dla alarmu i naciśnij [Snooze / Station / Select], aby
potwierdzić.
• Naciśnij [Volume +/>] lub [Volume -/<], aby ustawić czas trwania alarmu (w minutach) i naciśnij [Snooze / Station / Select],
aby potwierdzić.
• Naciśnij [Volume +/>] lub [Volume -/<], aby wybrać Buzzer, DAB lub FM i naciśnij [Snooze / Station / Select], aby
potwierdzić.
• Naciśnij [Volume +/>] lub [Volume -/<], aby wybrać stację radiową, której dźwięk ma być odtwarzany po włączeniu się
alarmu (gdy wybrano FM lub DAB). Możliwe jest wybranie jednej z zapisanych zaprogramowanych stacji lub można wybrać
"Last listened", aby wybrać stację, która była ostatnio słuchana. Naciśnij [Snooze / Station / Select], aby potwierdzić.
• Naciśnij [Volume +/>] lub [Volume -/<], aby wybrać jedną z następujących opcji częstotliwości alarmu: "Daily", "Weekdays",
"Weekends" i "Once" i naciśnij [Snooze / Station / Select], aby potwierdzić.
• Naciśnij [Volume +/>] lub [Volume -/<], aby ustawić głośność alarmu i naciśnij [Snooze / Station / Select], aby potwierdzić.
• Naciśnij [Volume +/>] lub [Volume -/<], aby wybrać "on" lub "off" i naciśnij [Snooze / Station / Select], aby zapisać.
• Na wyświetlaczu pojawi się ikona alarmu.
Włączanie/wyłączanie alarmu
Naciśnij przycisk [Alarm1] lub [Alarm2], aby włączyć/wyłączyć alarm. Ikona alarmu pojawi się/zniknie, aby wskazać wejście.
Drzemka (Snooze)
Funkcję drzemki można aktywować, naciskając [Snooze / Station / Select], gdy zabrzmi alarm. Dźwięk alarmu zostanie
wówczas wyciszony i uruchomiony ponownie po 10 minutach. Podczas drzemki będzie wyświetlany odliczany czas. Aby
zatrzymać funkcję drzemki, naciśnij [Power].
Funkcja ta pozwala zaprogramować urządzenie tak, aby po ustawionym czasie samo przełączało się w tryb czuwania.
Naciśnij [Sleep], aby wejść w tryb uśpienia, naciśnij kilkakrotnie [Sleep], aby ustawić żądany czas uśpienia. Gdy timer osiągnie
zero, urządzenie automatycznie przejdzie w tryb czuwania. Aby anulować timer uśpienia, naciśnij wielokrotnie przycisk
[Sleep], aby wybrać opcję "Sleep off".
Funkcja ta pozwala zaprogramować urządzenie tak, aby po upływie ustawionego czasu (timer odliczający) włączył się alarm.
• Naciśnij i przytrzymaj [Menu/Info].
• Naciśnij [Volume +/>] lub [Volume -/<] i wybierz "System". Naciśnij [Snooze / Station / Select], aby potwierdzić.
• Naciśnij [Volume +/>] lub [Volume -/<] i wybierz "Kitchen Timer". Naciśnij [Snooze / Station / Select], aby potwierdzić.
• Naciśnij [Volume +/>] lub [Volume -/<], aby zmienić minuty. Naciśnij [Snooze / Station / Select], aby potwierdzić i
rozpocząć odliczanie czasu. Alarm włączy się po upływie ustawionego czasu, zarówno w trybie "On", jak i "Standby".
Ustawienia zegara
Ustawianie godziny i daty: Godzina i data są automatycznie synchronizowane z sygnałem FM- lub DAB.
Ręczne ustawianie czasu/daty:
Naciśnij i przytrzymaj [Menu/Info].
Naciśnij [Volume +/>] lub [Volume -/<] i wybierz "System". Naciśnij [Snooze / Station / Select], aby potwierdzić.
Naciśnij [Volume +/>] lub [Volume -/<] i wybierz "Time". Naciśnij [Snooze / Station / Select], aby potwierdzić.
Naciśnij [Volume +/>] lub [Volume -/<], aby wybrać "Set time/date", naciśnij [Snooze / Station / Select], aby potwierdzić.
Naciśnij [Volume +/>] lub [Volume -/<], aby ustawić godzinę, naciśnij [Snooze / Station / Select], aby potwierdzić. Powtórz,
aby ustawić minuty.
Naciśnij [Volume +/>] lub [Volume -/<], aby ustawić dzień, naciśnij [Snooze / Station / Select], aby potwierdzić. Powtórz,
aby ustawić miesiąc i rok.
Zmiana formatu czasu:
Naciśnij i przytrzymaj [Menu/Info].
Naciśnij [Volume +/>] lub [Volume -/<] i wybierz "System". Naciśnij [Snooze / Station / Select], aby potwierdzić.
Naciśnij [Volume +/>] lub [Volume -/<] i wybierz "Time". Naciśnij [Snooze / Station / Select], aby potwierdzić.
Naciśnij [Volume +/>] lub [Volume -/<] i wybierz "Set 12/24 hour". Naciśnij [Snooze / Station / Select], aby potwierdzić.
Naciśnij [Volume +/>] lub [Volume -/<], aby wybrać pomiędzy '12 godzin' i '24 godziny' i naciśnij [Snooze / Station /
Select], aby potwierdzić.
Zmiana formatu daty:
Naciśnij i przytrzymaj [Menu/Info].
Naciśnij [Volume +/>] lub [Volume -/<] i wybierz "System". Naciśnij [Snooze / Station / Select], aby potwierdzić.
Naciśnij [Volume +/>] lub [Volume -/<] i wybierz "Time". Naciśnij [Snooze / Station / Select], aby potwierdzić.
Naciśnij [Volume +/>] lub [Volume -/<] i wybierz "Set date format". Naciśnij [Snooze / Station / Select], aby potwierdzić.
Naciśnij [Volume +/>] lub [Volume -/<], aby wybrać pomiędzy 'DD-MM-YYYY' i 'MM-DD-YYY'. Naciśnij [Snooze / Station /
Select], aby potwierdzić.

34
Zmiana języka
Naciśnij i przytrzymaj [Menu/Info].
Naciśnij [Volume +/>] lub [Volume -/<] i wybierz "System". Naciśnij [Snooze / Station / Select], aby potwierdzić.
Naciśnij [Volume +/>] lub [Volume -/<] i wybierz "Language". Naciśnij [Snooze / Station / Select], aby potwierdzić.
Naciśnij [Volume +/>] lub [Volume -/<], aby wybrać żądany język i naciśnij [Snooze / Station / Select], aby potwierdzić.
Ustawienia fabryczne
Resetowanie powoduje usunięcie wszystkich zaprogramowanych stacji, wyczyszczenie listy stacji i przywrócenie wszystkich
opcji do ustawień domyślnych.
Naciśnij i przytrzymaj [Menu/Info].
Naciśnij [Volume +/>] lub [Volume -/<] i wybierz "System". Naciśnij [Snooze / Station / Select], aby potwierdzić.
Naciśnij [Volume +/>] lub [Volume -/<] i wybierz "Factory reset". Naciśnij [Snooze / Station / Select], aby potwierdzić.
Naciśnij [Volume +/>] lub [Volume -/<], aby wybrać 'YES' i [Snooze / Station / Select], aby potwierdzić.
Ustawienia audio
To menu służy do regulacji ustawień tonów niskich i wysokich.
Naciśnij i przytrzymaj [Menu/Info].
Naciśnij [Volume +/>] lub [Volume -/<] i wybierz "System". Naciśnij [Snooze / Station / Select], aby potwierdzić.
Naciśnij [Volume +/>] lub [Volume -/<], aby wybrać 'Bass' lub 'Treble' i naciśnij [Snooze / Station / Select], aby potwierdzić.
Naciśnij [Volume +/>] lub [Volume -/<], aby dostosować poziom tonów niskich lub wysokich. Możesz wybrać poziom
pomiędzy '-3' a '+3', naciśnij [Snooze / Station / Select], aby potwierdzić.
Podświetlenie
Regulacja jasności i czasu trwania podświetlenia ekranu.
On level
Naciśnij i przytrzymaj [Menu/Info].
Press [Volume +/>] or [Volume -/<] to select ‘System’ > ‘Backlight’ and press [Snooze / Station / Select] to confirm.
Naciśnij [Volume +/>] lub [Volume -/<], aby wybrać 'System' > 'Backlight' i naciśnij [Snooze / Station / Select], aby
potwierdzić.
Naciśnij [Volume +/>] lub [Volume -/<], aby wybrać 'On level' i naciśnij [Snooze / Station / Select], aby potwierdzić.
Naciśnij [Volume +/>] lub [Volume -/<], aby wybrać pomiędzy 'High', 'Medium' lub 'Low' i naciśnij [Snooze / Station /
Select], aby potwierdzić.
Timeout
Naciśnij i przytrzymaj [Menu/Info].
Press [Volume +/>] or [Volume -/<] to select ‘System’ > ‘Backlight’ and press [Snooze / Station / Select] to confirm.
Naciśnij [Volume +/>] lub [Volume -/<], aby wybrać 'System' > 'Time out' i naciśnij [Snooze / Station / Select], aby
potwierdzić.
Naciśnij [Volume +/>] lub [Volume -/<], aby wybrać ustawienie limitu czasu. Aby określić, że podświetlenie ma pozostać
zawsze włączone, wybierz 'On'.
Dynamic range control
Dynamic Range Control (DRC): DRC może sprawić, że cichsze dźwięki będą lepiej słyszalne, gdy urządzenie jest używane w
głośnym otoczeniu. Poziom DRC audycji jest ustawiany przez nadawcę i jest przesyłany wraz z usługą. Zmiana wartości DRC w
urządzeniu umożliwia zastosowanie współczynnika skalowania do tego poziomu. Wybór pomiędzy 3 poziomami kompresji.
Naciśnij i przytrzymaj [Menu/info] przez 2 sekundy, aby wyświetlić menu główne.
Naciśnij [Volume +/>] lub [Volume -/<], aby wybrać 'DRC' i naciśnij [Snooze / Station / Select], aby potwierdzić.
DRC high: Stosuje maksymalną kompresję do poziomu DRC.
DRC low: Stosuje zmniejszoną kompresję do poziomu DRC.
DRC off: Usuwa kompresję DRC.
W zależności od konstrukcji smartfona, obszar ładowania może być inaczej umiejscowiony, co wymaga pewnej korekty
położenia po umieszczeniu na powierzchni ładowania, aby był funkcjonalny.
UWAGA:
Przed rozpoczęciem ładowania zdejmij ze smartfona metalowe etui ochronne lub magnetyczne. Podczas ładowania nie
umieszczaj na ładowarce żadnych przedmiotów z paskiem magnetycznym lub innych metalowych przedmiotów. Takie
postępowanie może spowodować uszkodzenie smartfona i/lub radia.

35
Č
Gratulujeme ke koupi tohoto produktu Audizio. Před použitím výrobku si pečlivě přečtěte tento návod, abyste mohli plně
využívat všechny jeho funkce.
Před použitím přístroje si přečtěte tuto příručku. Postupujte podle pokynů, aby nedošlo ke zneplatnění záruky. Přijměte
veškerá preventivní opatření, abyste zabránili požáru nebo úrazu elektrickým proudem. Opravy smí provádět pouze
kvalifikovaný technik, aby nedošlo k úrazu elektrickým proudem. Návod si uschovejte pro budoucí použití.
- Před použitím přístroje se poraďte s prodávajícím. Při
prvním zapnutí jednotky může dojít k zápachu. To je
normální a po chvíli to zmizí.
- Přístroj obsahuje části pod napětím. Proto neotvírejte
jeho kryt.
- Neumisťujte do přístroje kovové předměty a nelijte na
ni tekutiny. Mohlo by dojít k úrazu elektrickým proudem
a poruše.
- Neumisťujte jednotku do blízkosti zdrojů tepla, jako
jsou radiátory apod.
- Neumisťujte jednotku na vibrující povrch. Nezakrývejte
ventilační otvory.
- Jednotka není vhodná pro trvalé používání.
- S napájecím kabelem buďte opatrní a nepoškozujte jej.
Vadný nebo poškozený napájecí kabel může způsobit
úraz elektrickým proudem, nebo poruchu.
- Při odpojování zařízení od zásuvky vždy tahejte za
zástrčku, nikdy ne za kabel.
- Nezapojujte a neodpojujte přístroj mokrýma rukama.
- Pokud je poškozena zástrčka a / nebo napájecí kabel,
musí být opraveny kvalifikovaným technikem.
- Pokud je jednotka poškozena do takové míry, že jsou
vidět vnitřní části, NEZAPOJUJTE jednotku do zásuvky
ani ji NEZAPÍNEJTE. Kontaktujte svého prodejce.
NEPŘIPOJUJTE jednotku k reostatu nebo stmívači.
- Aby nedošlo k požáru, nebo úrazu elektrickým proudem,
nevystavujte jednotku dešti a vlhkosti.
- Všechny opravy musí provádět pouze kvalifikovaný
technik.
- Připojte přístroj k uzemněné síťové zásuvce (220 - 240
V, střídavý / 50 Hz) chráněné pojistkou 10 - 16 A.
- Během bouřky nebo pokud nebudete jednotku delší
dobu používat, odpojte ji od elektrické sítě. Pokud
zařízení nepoužíváte, odpojte jej od elektrické sítě.
- Pokud jednotku nebudete delší dobu používat, může
dojít ke kondenzaci vlhkosti. Než přístroj zapnete,
nechejte jej dosáhnout pokojovou teplotu. Nikdy
nepoužívejte jednotku ve vlhkých místnostech nebo
venku.
- Abyste předešli nehodám na veřejnosti, musíte
postupovat podle příslušných pokynů a instrukcí.
- Zařízení opakovaně nezapínejte a nevypínejte. Tím se
zkracuje jeho životnost.
- Uchovávejte jednotku mimo dosah dětí. Nenechávejte
jednotku bez dozoru.
- K čištění spínačů nepoužívejte čisticí spreje. Zbytky
těchto sprejů způsobují, že se na spínačích usazuje
prach a mastnota. V případě poruchy vždy vyhledejte
radu od odborníka.
- Na ovládací prvky netlačte silou.
- Tato jednotka má uvnitř reproduktor, který může
způsobit magnetické pole. Udržujte proto toto zařízení
ve vzdálenosti alespoň 60 cm od počítače nebo
televize.
- Pokud má tato jednotka vestavěnou dobíjecí baterii, tak
ji dobijte alespoň 1x za 3 měsíce. Jinak může dojít k
poškození baterie.
- Pokud je baterie poškozená, vyměňte ji za baterii se
stejnými specifikacemi. Poškozenou baterii zlikvidujte
ekologicky.
- Pokud Vám přístroj upadnul, nechte ho před opětovným
zapnutím zkontrolovat kvalifikovaným technikem.
- K čištění jednotky nepoužívejte chemikálie. Poškozují
lak. Jednotku čistěte pouze suchým hadříkem.
- Uchovávejte mimo dosah elektronických zařízení, která
mohou způsobovat rušení.
- K opravám používejte pouze originální náhradní díly,
jinak může dojít k vážnému poškození nebo
nebezpečnému záření.
- Před odpojením od sítě nebo od jiného zařízení přístroj
vypněte. Před přemisťováním přístroje odpojte všechny
napájecí i jiné kabely.
- Zajistěte, aby nemohlo dojít k poškození síťového
kabelu, když po něm lidé kráčí. Před každým použitím
zkontrolujte přívodní kabel, zda není poškozený nebo
vadný!
- Síťové napětí je 220 – 240 V, AC / 50Hz. Zkontrolujte,
zda se napětí v zásuvce shoduje. Pokud cestujete,
zkontrolujte, zda je v dané zemi pro tuto jednotku
vhodné síťové napětí.
- Uschovejte originální obalový materiál, abyste mohli
jednotku v případě potřeby přepravit v bezpečných
podmínkách.
Tento znak upozorňuje uživatele na vysokému napětí, které je uvnitř přístroje a které je dostatečně velké, aby
způsobilo nebezpečí úrazu elektrickým proudem.
Tento znak upozorňuje uživatele na důležité pokyny obsažené v této příručce, kterou by si měl před používáním
přečíst a dodržovat.
Jednotka má certifikát CE. Na jednotce je zakázáno provádět jakékoli změny. Certifikát CE by tím pozbyl platnost a zboží by přišlo o záruku!
POZNÁMKA: Aby bylo zajištěno, že jednotka bude fungovat normálně, musí být používána v místnostech s teplotou mezi 5 °C a 35 °C.
Elektrické výrobky se nesmí ukládat do domácího odpadu. Přineste je, prosím, do recyklačního centra. Zeptejte se
místních úřadů nebo prodejce na postup. Specifikace jsou typické. Skutečné hodnoty se mohou z jedné jednotky na
druhou mírně změnit. Specifikace lze změnit bez předchozího upozornění.
Nepokoušejte se sami provádět žádné opravy. To by zneplatnilo vaši záruku. Na jednotce neprovádějte žádné změny. Tím by také zanikla
vaše záruka. Záruka se nevztahuje na nehody nebo škody způsobené nevhodným použitím nebo nerespektováním varování obsažených v
této příručce. Power dynamics nemůže nést odpovědnost za zranění osob způsobená nerespektováním bezpečnostních doporučení a
varování. To platí také pro všechny škody v jakékoli formě.

36
POZOR! Ihned po obdržení produktu pečlivě vybalte krabici, zkontrolujte obsah, zda jsou všechny součásti přítomny a zda
jsou v bezvadném stavu. Okamžitě informujte přepravce i prodejce a uschovejte obal ke kontrole, pokud se objeví nějaké
známky poškození, nebo pokud obal samotný vykazuje známky nesprávné manipulace. Ponechte si veškerý původní balicí
materiál. V případě, že produkt bude muset být vrácen do továrny, je důležité, aby byl vrácen a zabalen v původní krabici.
Pokud bylo zařízení vystaveno drastickým výkyvům teploty (např. v rámci přepravy), nezapínejte jej okamžitě. Vznikající
kondenzovaná voda může poškodit vaše zařízení. Nechejte zařízení vypnuté, dokud nedosáhne pokojové teploty.
Štítek na zadní/spodní straně výrobku udává síťové napětí, ke kterému musí být výrobek připojen. Zkontrolujte, zda síťové
napětí odpovídá tomuto napětí. Jiné než uvedené napětí může způsobit neopravitelné poškození přístroje. Přístroj musí být
také připojen přímo k síťovému napětí a nesmí být použit žádný stmívač nebo nastavitelný zdroj napájení.
Přístroj vždy připojujte k chráněnému obvodu (jistič nebo pojistka). Ujistěte se, že má zařízení vhodné elektrické
uzemnění, abyste předešli riziku úrazu elektrickým proudem nebo požáru.
Ř
1. Power / Source
Stisknutím přepnete režimy
Stisknutím a podržením zapnete zařízení nebo přejdete do
pohotovostního režimu
2. Alarm
Stisknutím nastavíte budík
3. Preset
Stisknutím otevřete seznam předvoleb
Stisknutím a podržením tlačítka uložíte stanici jako předvolbu
4. Snooze / Station / Select
Stisknutím tlačítka při zvonění budíku odložíte budík
Stisknutím potvrdíte poslech zvolené stanice
Stisknutím vyberete/vložíte vstup
5. Sleep
Stisknutím nastavíte časovač spánku
6. Menu / Info
Stisknutím tlačítka procházíte informace o stanici
Stisknutím a podržením otevřete nabídku
7. Volume - / <
Stisknutím snížíte hlasitost během přehrávání
Stisknutím v nabídce procházejte
8. Volume + / >
Stisknutím zvýšíte hlasitost během přehrávání
Stisknutím v nabídce procházejte
9. Bezdrátová nabíjecí podložka
V závislosti na konstrukci smartphonu může být nabíjecí plocha umístěna odlišně, což vyžaduje určité přizpůsobení
polohy při umístění na nabíjecí plochu, aby byla funkční
10. USB charge
Nabíjecí port USB 5V
11. Vstup stejnosměrného napájecího adaptéru
Vstupní napájecí konektor 9V 3,0A DC
12. Konektor pro sluchátka
3,5mm jack pro připojení sluchátek
13. Přihrádka na baterie
Vysílačka je vybavena záložním systémem na baterie, který vyžaduje 2 x AAA baterie (nejsou součástí dodávky).
Otevřete přihrádku na baterie. Vložte baterie a ujistěte se, že se kladný a záporný (+ nebo -) pól baterií dotýkají
příslušných pólů v prostoru pro baterie. Zavřete přihrádku na baterie zasunutím krytu. Pokud dojde k přerušení/výpadku
napájení, rádio se automaticky přepne na napájení z baterií a zachová nastavení hodin a časovače. Při výměně baterie:
nechte připojený napájecí adaptér, jinak dojde ke ztrátě všech nastavení hodin a budíku
1. Aktuální stanice a čas
2. Indikátor časovače spánku
3. Nastavení indikátoru alarmu
4. Indikátor PM
5. Indikátor odložení
6. Indikátor nabíjení smartphonu
7. Svazek
8. Síla signálu
9. Indikátor režimu DAB
10. Indikátor režimu FM
11. Indikátor režimu BT

37
Č
• Vyjměte rádio z krabice.
• Připojte napájecí adaptér a stiskněte tlačítko [Power].
Upozornění: Používejte pouze adaptér dodaný s rádiem. Připojení napájecího adaptéru s jinou jmenovitou hodnotou může
způsobit trvalé poškození rádia a může být nebezpečné.
Poznámka: Ujistěte se, že jste zcela vysunuli anténu (umístěnou na zadní straně přístroje), abyste zajistili co nejlepší příjem
FM a DAB.
Pokud je ve vaší oblasti dostupné digitální rozhlasové vysílání (DAB), rádio může přijímat i stanice DAB. Rádio podporuje jak
DAB, tak DAB+.
Umístěte rádio blízko k oknu a natáhněte anténu tak daleko, jak to jen jde, abyste dosáhli nejlepšího příjmu. Někdy může být
nutné upravit směr antény, aby se příjem zlepšil.
Stisknutím tlačítka [Source] vyberte režim DAB. Při prvním výběru režimu DAB přístroj automaticky vyhledá dostupné stanice.
Automatické skenování: V režimu DAB stiskněte a podržte tlačítko [Menu/Info]. Stisknutím tlačítka [Volume +/>] nebo
[Volume -/<] vyberte možnost "FULL Scan" a potvrďte stisknutím tlačítka [Snooze / Station / Select]. Během automatického
skenování se zobrazí počet nalezených stanic. Po dokončení přístroj naladí naposledy poslouchanou stanici.
Předvolba stanice: Při přehrávání v režimu DAB stiskněte a podržte tlačítko [Preset]. Stisknutím tlačítka [Volume +/>] nebo
[Volume -/<] vyberte požadovaný slot předvolby (1-30), stisknutím tlačítka [Snooze / Station / Select] uložte.
Stisknutím tlačítka [Preset] vyvoláte paměť. Stisknutím tlačítka [Volume +/>] nebo [Volume -/<] vyberte uloženou stanici,
kterou chcete poslouchat. Stiskněte tlačítko [Snooze / Station / Select] pro potvrzení.
Zobrazení informací o kanálu: Stisknutím tlačítka [Menu/Info] zobrazíte různé formy informací o přehrávané stanici.
Chcete-li přijímat běžné stanice FM (bez nutnosti připojení k internetu), umístěte rádio blízko okna a natáhněte anténu tak
daleko, abyste dosáhli nejlepšího příjmu. Pro zlepšení příjmu může být nutné upravit směr antény.
Stisknutím tlačítka [Source] vyberte režim FM.
Automatické skenování: Stiskněte [Snooze / Station / Select], na displeji se zobrazí "<" a ">". Stiskněte a podržte [Volume
+/>] nebo [Volume -/<], přístroj začne automaticky vyhledávat další silnou stanici.
Ruční skenování: Stiskněte [Snooze / Station / Select], na displeji se zobrazí "<" a ">". Stisknutím tlačítka [Volume +/>] nebo
[Volume -/<] procházejte hodnotou frekvence.
Předvolba stanice: Při přehrávání v režimu FM stiskněte a podržte tlačítko [Preset]. Stisknutím tlačítka [Volume +/>] nebo
[Volume -/<] vyberte požadovaný slot předvolby (1-30), stisknutím tlačítka [Snooze / Station / Select] uložte.
Stisknutím tlačítka [Preset] vyvoláte paměť. Stisknutím tlačítka [Volume +/>] nebo [Volume -/<] vyberte uloženou stanici,
kterou chcete poslouchat. Stiskněte tlačítko [Snooze / Station / Select] pro potvrzení.
Zobrazení informací o kanálu: Stisknutím tlačítka [Menu/Info] zobrazíte různé formy informací o přehrávané stanici.
Ř
Než je možný přenos mezi vaším BT zařízením a rádiem, musí být obě zařízení propojena. Tento proces se nazývá „párování“.
Rádio slouží jako přijímač pro příjem hudebního proudu přehrávaného v rádiu. Pokud jste se již dříve připojili k zařízení BT,
toto připojení se automaticky obnoví, když budou obě zařízení v dosahu a na rádiu byl zvolen provoz BT. "Párování" se
nemusí opakovat. Tuto funkci však může být nutné aktivovat ve vašem BT zařízení.
• Stiskněte [Source] pro vstup do režimu BT.
• Zapněte na svém zařízení streamování BT. Zařízení vyhledá spárovatelná zařízení BT v dosahu příjmu.
• Vyberte „Audizio Cuneo“ ze seznamu s nalezenými zařízeními. Pokud je vyžadován přístupový kód, zadejte "0000".
• Spusťte přehrávání na vašem BT zařízení. Přehrávání nyní probíhá z rádia (připojených reproduktorů).
Nastavením budíku se zapne rádio (pokud je v pohotovostním režimu) a naladí se rozhlasová stanice DAB nebo FM nebo zazní
zvukový signál. Nastavení budíku:
• Stiskněte tlačítko [Alarm1] nebo [Alarm2].
• Stisknutím tlačítka [Volume +/>] nebo [Volume -/<] nastavte hodnotu hodiny pro budík a stisknutím tlačítka [Snooze /
Station / Select] potvrďte.
• Stisknutím tlačítka [Volume +/>] nebo [Volume -/<] nastavte minutovou hodnotu budíku a stisknutím tlačítka [Snooze /
Station / Select] potvrďte.
• Stisknutím tlačítka [Volume +/>] nebo [Volume -/<] nastavte dobu trvání budíku (v minutách) a stisknutím tlačítka [Snooze
/ Station / Select] potvrďte.
• Stisknutím tlačítka [Volume +/>] nebo [Volume -/<] vyberte Bzučák, DAB nebo FM a stiskněte tlačítko [Snooze / Station /
Select] pro potvrzení.

38
• Stisknutím tlačítka [Volume +/>] nebo [Volume -/<] vyberte rozhlasovou stanici, která má znít při spuštění budíku (pokud je
vybráno FM nebo DAB). Je možné zvolit jednu z uložených přednastavených stanic nebo můžete zvolit "Last listened" a
vybrat stanici, kterou jste poslouchali naposledy. Stisknutím tlačítka [Snooze / Station / Select] potvrdíte volbu.
• Stisknutím tlačítka [Volume +/>] nebo [Volume -/<] vyberte jednu z následujících možností frekvence budíků: “Daily”,
“Weekdays”, “Weekends” a “Once” a stiskněte [Snooze / Station / Select] pro potvrzení.
• Stisknutím tlačítka [Volume +/>] nebo [Volume -/<] nastavte hlasitost budíku a potvrďte stisknutím tlačítka [Snooze /
Station / Select].
• Stisknutím tlačítka [Volume +/>] nebo [Volume -/<] vyberte možnost "on" nebo "off" a stiskněte tlačítko [Snooze / Station /
Select] pro uložení.
• Na displeji se zobrazí ikona alarmu.
Zapnutí/vypnutí alarmu
Stisknutím tlačítka [Alarm1] nebo [Alarm2] zapnete/vypnete alarm. Ikona alarmu se zobrazí/zmizí a označí vstup.
Snoozing
Funkci odložení můžete aktivovat stisknutím tlačítka [Snooze / Station / Select], když zazní budík. Zvuk budíku se pak ztlumí
a znovu se spustí po 10 minutách. Během funkce snooze se zobrazí odpočítávaný čas. Chcete-li funkci odložení zastavit,
stiskněte tlačítko [Power].
Č Č
Tato funkce umožňuje naprogramovat zařízení tak, aby se po uplynutí nastavené doby samo přepnulo do pohotovostního
režimu. Stisknutím tlačítka [Sleep] přejděte do režimu spánku, opakovaným stisknutím tlačítka [Sleep] nastavte požadovanou
dobu spánku. Jakmile časovač dosáhne nuly, přístroj automaticky přejde do pohotovostního režimu. Chcete-li zrušit časovač
spánku, opakovaným stisknutím tlačítka [Sleep] vyberte možnost "Sleep off" (Vypnout režim spánku).
Č Č Ě
Tato funkce umožňuje naprogramovat zařízení tak, aby po uplynutí nastavené doby spustilo alarm (časovač odpočítávání).
• Stiskněte a podržte tlačítko [Menu/Info].
• Stiskněte tlačítko [Volume +/>] nebo [Volume -/<] a vyberte možnost "System". Stiskněte tlačítko [Snooze / Station /
Select] pro potvrzení.
• Stiskněte tlačítko [Volume +/>] nebo [Volume -/<] a vyberte možnost "Kitchen timer". Stiskněte tlačítko [Snooze / Station /
Select] pro potvrzení.
• Stisknutím tlačítka [Volume +/>] nebo [Volume -/<] změníte minuty. Stisknutím tlačítka [Snooze / Station / Select] potvrďte
a spusťte časovač odpočítávání. Po uplynutí nastaveného časového úseku zazní budík, a to jak v režimu "On", tak v režimu
"Standby".
Nastavení hodin
Nastavení času a data: Čas a datum se automaticky synchronizují se signálem FM nebo DAB.
Ruční nastavení času a data:
Stiskněte a podržte tlačítko [Menu/Info].
Stiskněte tlačítko [Volume +/>] nebo [Volume -/<] a vyberte možnost "System". Stiskněte tlačítko [Snooze / Station /
Select] pro potvrzení.
Stisknutím tlačítka [Volume +/>] nebo [Volume -/<] vyberte "Time" a stisknutím tlačítka [Snooze / Station / Select]
potvrďte výběr.
Stisknutím tlačítka [Volume +/>] nebo [Volume -/<] vyberte možnost "Set time/date", potvrďte stisknutím tlačítka [Snooze
/ Station / Select].
Stisknutím tlačítka [Volume +/>] nebo [Volume -/<] nastavte hodinu, stisknutím tlačítka [Snooze / Station / Select]
potvrďte. Opakujte pro nastavení minut.
Stisknutím tlačítka [Volume +/>] nebo [Volume -/<] nastavte den, stisknutím tlačítka [Snooze / Station / Select] potvrďte.
Opakujte nastavení měsíce a roku.
Změna formátu času:
Stiskněte a podržte tlačítko [Menu/Info].
Stiskněte tlačítko [Volume +/>] nebo [Volume -/<] a vyberte možnost "System". Stiskněte tlačítko [Snooze / Station /
Select] pro potvrzení.
Stisknutím tlačítka [Volume +/>] nebo [Volume -/<] vyberte "Time" a stisknutím tlačítka [Snooze / Station / Select]
potvrďte výběr.
Stisknutím tlačítka [Volume +/>] nebo [Volume -/<] vyberte možnost "Set 12/24 hour", potvrďte stisknutím tlačítka
[Snooze / Station / Select].
Stisknutím tlačítka [Volume +/>] nebo [Volume -/<] vyberte mezi "12 hour" a "24 hour" a potvrďte stisknutím tlačítka
[Snooze / Station / Select].
Změna formátu data:
Stiskněte a podržte tlačítko [Menu/Info].
Stiskněte tlačítko [Volume +/>] nebo [Volume -/<] a vyberte možnost "System". Stiskněte tlačítko [Snooze / Station /
Select] pro potvrzení.
Stisknutím tlačítka [Volume +/>] nebo [Volume -/<] vyberte "Time" a stisknutím tlačítka [Snooze / Station / Select]
potvrďte výběr.

39
Stisknutím tlačítka [Volume +/>] nebo [Volume -/<] vyberte možnost "Set date format" a potvrďte stisknutím tlačítka
[Snooze / Station / Select].
Stisknutím tlačítka [Volume +/>] nebo [Volume -/<] vyberte mezi "DD-MM-RRRR" a "MM-DD-RRRR". Stiskněte tlačítko
[Snooze / Station / Select] pro potvrzení.
Změna jazyka
Stiskněte a podržte tlačítko [Menu/Info].
Stiskněte tlačítko [Volume +/>] nebo [Volume -/<] a vyberte možnost "System". Stiskněte tlačítko [Snooze / Station / Select]
pro potvrzení.
Stisknutím tlačítka [Volume +/>] nebo [Volume -/<] vyberte "Language" a stisknutím tlačítka [Snooze / Station / Select]
potvrďte výběr.
Stisknutím tlačítka [Volume +/>] nebo [Volume -/<] vyberte požadovaný jazyk a stiskněte tlačítko [Snooze / Station / Select]
pro potvrzení.
Tovární nastavení
Resetování odstraní všechny předvolby, vymaže seznam stanic a obnoví všechny možnosti na výchozí nastavení.
Stiskněte a podržte tlačítko [Menu/Info].
Stiskněte tlačítko [Volume +/>] nebo [Volume -/<] a vyberte možnost "System". Stiskněte tlačítko [Snooze / Station / Select]
pro potvrzení.
Stiskněte tlačítko [Volume +/>] nebo [Volume -/<] a vyberte možnost "Factory reset". Stiskněte tlačítko [Snooze / Station /
Select] pro potvrzení.
Stisknutím tlačítka [Volume +/>] nebo [Volume -/<] vyberte "YES" a stisknutím tlačítka [Snooze / Station / Select] potvrďte
volbu.
Nastavení zvuku
Tato nabídka slouží k úpravě nastavení basů a výšek.
Stiskněte a podržte tlačítko [Menu/Info].
Stiskněte tlačítko [Volume +/>] nebo [Volume -/<] a vyberte možnost "System". Stiskněte tlačítko [Snooze / Station / Select]
pro potvrzení.
Stisknutím tlačítka [Volume +/>] nebo [Volume -/<] vyberte "Bass" nebo "Treble" a stisknutím tlačítka [Snooze / Station /
Select] potvrďte výběr.
Stisknutím tlačítka [Volume +/>] nebo [Volume -/<] nastavte úroveň basů nebo výšek. Můžete zvolit úroveň mezi "-3" a "+3",
stiskněte [Snooze / Station / Select] pro potvrzení.
Podsvícení
Nastavení jasu a doby trvání osvětlení obrazovky.
On level
Stiskněte a podržte tlačítko [Menu/Info].
Stisknutím tlačítka [Volume +/>] nebo [Volume -/<] vyberte "System" > "Backlight" a stisknutím tlačítka [Snooze / Station /
Select] potvrďte výběr.
Stisknutím tlačítka [Volume +/>] nebo [Volume -/<] vyberte možnost "On level" a stiskněte tlačítko [Snooze / Station /
Select] pro potvrzení.
Stisknutím tlačítka [Volume +/>] nebo [Volume -/<] vyberte mezi "High", "Medium" nebo "Low" a potvrďte stisknutím
tlačítka [Snooze / Station / Select].
Časový limit (Timeout)
Stiskněte a podržte tlačítko [Menu/Info].
Stisknutím tlačítka [Volume +/>] nebo [Volume -/<] vyberte "System" > "Backlight" a stisknutím tlačítka [Snooze / Station /
Select] potvrďte výběr.
Stisknutím tlačítka [Volume +/>] nebo [Volume -/<] vyberte možnost "Time out" a stiskněte tlačítko [Snooze / Station /
Select] pro potvrzení.
Stisknutím tlačítka [Volume +/>] nebo [Volume -/<] zvolte nastavení časového limitu. Chcete-li určit, že podsvícení má
zůstat stále zapnuté, zvolte "On".
Dynamic range control
Dynamic Range Control (DRC): Při použití jednotky v hlučném prostředí mohou být díky DRC lépe slyšet tišší zvuky. Úroveň
DRC vysílání nastavuje provozovatel vysílání a je přenášena spolu se službou. Změna hodnoty DRC na jednotce umožňuje
použít na tuto úroveň škálovací faktor. Můžete si vybrat mezi 3 úrovněmi komprese.
Stisknutím a podržením tlačítka [Menu/info] na 2 sekundy zobrazíte hlavní nabídku.
Stisknutím tlačítka [Volume +/>] nebo [Volume -/<] vyberte možnost "DRC" a stisknutím tlačítka [Snooze / Station / Select]
potvrďte volbu.
DRC high: Aplikuje maximální kompresi na úroveň DRC.
DRC low: Použije sníženou kompresi na úroveň DRC.
DRC off: Odstraní kompresi DRC.
V závislosti na konstrukci smartphonu může být nabíjecí plocha umístěna odlišně, což vyžaduje určité přizpůsobení polohy
při umístění na nabíjecí plochu, aby byla funkční.
POZOR:
Před zahájením nabíjení sejměte ze smartphonu kovové ochranné nebo magnetické pouzdro. Při nabíjení nepokládejte na
nabíječku žádné předměty s magnetickými proužky ani jiné kovové předměty. Mohlo by dojít k poškození smartphonu a/nebo
rádia.

40
Playback options : BT streaming, DAB+ tuner, FM radio
Input connections : 3.5mm Jack
Output connections : USB
Power supply : 100-240VAC 50/60Hz (9V Adapter)
Dimensions (L x W x H) : 170 x 105 x 58mm
Weight : 0,45kg
The specifications are typical. The actual values can slightly change from one unit to the other. Specifications can be changed
without prior notice.
The products referred to in this manual conform to the European Community Directives to which they are subject:
European Union
United Kingdom
Tronios B.V.,
Bedrijvenpark Twente Noord 18,
7602KR Almelo, The Netherlands
Tronios Ltd.,
130 Harley Street,
London W1G 7JU, United Kingdom
2014/35/EU
S.I. 2016:1101
2014/30/EU
S.I. 2016:1091
2011/65/EC
S.I. 2012:3032
2014/53/EU
S.I. 2017:1206
Specifications and design are subject to change without prior notice.
www.audizio.com
Copyright © 2023 by Tronios The Netherlands
-
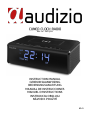 1
1
-
 2
2
-
 3
3
-
 4
4
-
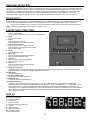 5
5
-
 6
6
-
 7
7
-
 8
8
-
 9
9
-
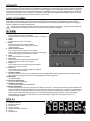 10
10
-
 11
11
-
 12
12
-
 13
13
-
 14
14
-
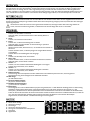 15
15
-
 16
16
-
 17
17
-
 18
18
-
 19
19
-
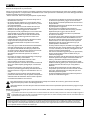 20
20
-
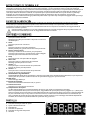 21
21
-
 22
22
-
 23
23
-
 24
24
-
 25
25
-
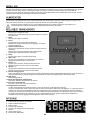 26
26
-
 27
27
-
 28
28
-
 29
29
-
 30
30
-
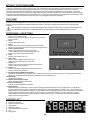 31
31
-
 32
32
-
 33
33
-
 34
34
-
 35
35
-
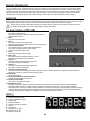 36
36
-
 37
37
-
 38
38
-
 39
39
-
 40
40


audizio Cuneo Clock Radio DAB+ El manual del propietario
- Categoría
- Radios
- Tipo
- El manual del propietario
en otros idiomas
Artículos relacionados
-
audizio Modena Portable DAB+ Radio El manual del propietario
-
-
-
-
-