Grand Hall MFA05ALP El manual del propietario
- Categoría
- Barbacoas
- Tipo
- El manual del propietario

Ÿ
Ÿ
NOTE TO ASSEMBLER / INSTALLER:
Leave this manual with the consumer.
NOTE TO CONSUMER:
Keep this manual for future reference.
RECORD YOUR SERIAL # __________________
(see silver CSA label on main body of grill)
Note: This product is packaged in 2 boxes.
Ÿ
Manual # P80164001H - Date:2005/04/01
Grill Information Center:
Call us first if you have any problem with this
product. We can help you with questions about
assembly and grill operation or if there are
damaged or missing parts when you unpack
this unit from the shipping box. Please call
before returning to the store.
1-800-770-9769
8am-4:30pm CST, Monday through Friday
Failure to comply with these instructions could
result in a fire or explosion that could cause
serious bodily injury, death or property damage.
Whether this grill was assembled by you or
someone else, you must read this entire manual
before using your grill to ensure the grill is
properly assembled, installed and maintained.
Use your grill at least 3 feet away from any
wall or surface. Use your grill at least 3 feet
away from combustible objects that can melt or
catch fire (such as vinyl or wood siding, fences
and overhangs) or sources of ignition including
pilot lights on water heaters and live electrical
appliances.
THIS GAS APPLIANCE IS DESIGNED FOR
OUTDOOR USE ONLY.
Combustion byproducts produced when using
this product contain chemicals known to the
State of California to cause cancer, birth defects,
or other reproductive harm.
Ÿ
Ÿ
Ÿ
Ÿ
Ÿ
WARNING
! !
OPERATOR'S MANUAL
IMPORTANT:
Ÿ
Liquid Propane Gas (LPG) Grill
Model MFA05ALP
Downloaded from www.Manualslib.com manuals search engine

2
Limited Warranty
Table of Contents
Full 1-Year Warranty on Grill
For one year from the date of purchase, the
Manufacturer will repair or replace, at our option,
any grill part (except for paint loss, paint fading,
discoloration, rusting, ignitor battery, texture
coating chipping, scratches and dents on texture
and granite surfaces).
Lifetime Warranty
Tube Burners and Stainless Steel parts (except
for discoloration due to normal use or excessive
heat, or scratches or dents caused by normal
use or improper maintenance).
Grill Installation Codes
The installation must conform with local codes or, in the
absence of local codes, with either the National Fuel Gas
Code, ANSI Z223.1/NFPA 54, or CAN/CGA-B149.1, Natural
Gas and Propane Installation Code.
Primary Safety Warnings...........................1-3
Warranty Terms and Conditions.........2, A8
Pre-Assembly Instructions..............................3
Part Diagrams and Lists..........................4-7
Assembly Instructions...............................8-15
Use & Care Instructions:
• Gas Safety and Leak Tests...........16-18
• Lighting Instructions.................................19
• Troubleshooting..........................................20
• Cleaning and Maintenance................21-22
• Cooking Guide...................................A1-A5
• Frequently Asked Questions............A6-A7
1.
2
3.
4.
IF YOU SMELL GAS:
Shut off gas to the appliance.
Extinguish any open flame.
Open lid.
If odor continues, keep away from
the appliance and immediately call
your gas supplier or your fire
department.
DANGER
! !
1.
2.
3.
WARNING
! !
Do not store spare LP cylinder
within 10 feet (3m) of this appliance.
Do not store or use gasoline or
other flammable liquids and
vapors within 25 feet (8m) of this
appliance.
When cooking with oil/grease, do
not allow the oil/grease to get
hotter 350°F (117°C).
Do not leave oil/grease unattended.
4.
Warranty Information
Warranty Information is available by contacting
customer support at 1-800-770-9769
Monday thru Friday 8 AM to 4:30 PM CST.
Manufacturer:
Grand Hall Enterprise Co., Ltd.
9th Fl., No.298, Rueiguang Rd., Neihu,
Taipei, Taiwan (114)
Warranty Restrictions
•
•
•
This warranty is void if grill is used for
commercial or rental purposes.
This grill is safety certified for use only in the
country where purchased. Modification for
use in any other location is a safety hazard
and will void the warranty.
This warranty gives you specific legal rights,
and you may also have other rights which
vary from state to state.
WARNING
!
!
•
•
•
LPG grill models must be used with Liquid
Propane Gas and the regulator assembly
supplied. Natural Gas models must be used
with Natural Gas only. Any attempt to convert
the grill from one fuel type to another is
extremely hazardous and will void the
warranty.
Never use your gas grill in a garage, porch, shed,
breezeway or any other enclosed area.
Never obstruct the flow of ventilation air around
your gas grill housing.
Keep gas regulator hose away from hot grill
surfaces and dripping grease. Avoid unneces-
sary twisting of hose. Visually inspect hose
prior to each use for cuts, cracks, excessive
wear or other damage. If the hose appears
damaged do not use the gas grill. Call:
1-800-770-9769 for an authorized replacement
hose.
•
Downloaded from www.Manualslib.com manuals search engine

3
Pre-Assembly Instructions For Your Safety
Spiders and small insects can spin webs and
nest in the grill Burner Tubes during transit and
warehousing which can lead to a gas flow
obstruction resulting in a fire in and around the
Burner Tubes. This type of "FLASHBACK FIRE"
can cause serious grill damage and create an
unsafe operating condition for the user.
To reduce the chance of FLASHBACK
FIRE you must clean the Burner Tubes
as follows before assembling your grill.
Also do this at least once a month in summer
and fall or whenever spiders are active in your
area, and if your grill has not been used for an
extended period of time.
CAUTION
! !
Failure to comply with these instructions may
result in a hazardous situation which, if not
avoided, may result in injury.
WARNING
! !
For safe operation ensure the Gas Valve Assembly
Orifice is inside the Burner Tube before using your
grill. See figure. If the Orifice is not inside the Burner
Tube, lighting the Burner may cause explosion
and/or fire resulting in serious bodily injury and/or
property damage.
METHOD 1: Bend a stiff wire or wire coat
hanger into a small hook as shown and run
the hook through the Burner Tube and inside
the Burner several times to remove debris.
METHOD 2: Use a bottle brush with a flexible
handle and run the brush through the Burner
Tube and inside the Burner several times to
remove any debris.
METHOD 3: Use an air hose to force air
through each Burner Tube. The forced air
should pass debris or obstructions through the
Burner and out the Ports.
TO CLEAN BURNER TUBE, INSERT HOOK
HERE
1. Remove the screw from the rear of each Burner
using a Phillips Head Screwdriver.
2. Carefully lift each Burner up and away from the
Gas Valve Orifice.
3. Check and clean Burner/Venturi Tubes for insects
and insect nests. A clogged tube can lead to a fire
beneath the grill.
4. Refer to the figure below and perform one of
these 3 cleaning methods:
9
Tools Required for Assembly include:
protective work gloves
protective eyewear
Phillips Head Screwdriver
While it is possible for one person to unpack this gas
grill, obtain assistance from another person when
handling the large pieces.
Use the Hardware and Part Diagrams to ensure all
items are included and free of damage.
Do not assemble or operate the grill if it appears
damaged. If there are damaged or missing parts when
you unpack the shipping box or you have questions
during the assembly process, call the:
To expedite the assembly process follow these
general guidelines:
•
•
Grill Information Center 1-800-770-9769
8am-4:30pm CST, Monday through Friday
•
Orifice
Burner TubeGas Valve Assembly
Burner Tube
Downloaded from www.Manualslib.com manuals search engine

4
Hardware Pack Parts List for Model MFA05ALP
KEY #PART DESCRIPTIONQTYPURPOSE OF PART
P06002021AHardware Pack1For use in assembly
S112G0408APhillips Head Screw 1/4"x1/2"8Attaches Panel Brackets to Extension Panel Brackets
S112G0306APhillips Head Screw 3/16"x3/8"8Attaches Middle Panels to Left and Right Panels
P05322003ALevel Adjuster4Attaches Island Leg
P05515017LWrench1Tighten Level Adjuster
S142G0306A
Countersink Flat Head Screw 3/16"x3/8"
4Attaches Partition Panel Brackets to Front and Rear Panels
S112G0306APhillips Head Screw 3/16"x3/8"4Attaches Bottom Shelf to Left Panels
S112G0306APhillips Head Screw 3/16"x3/8"4Attaches Tank Tray to Right Panels
S112G0306APhillips Head Screw 3/16"x3/8"4Attaches Partition Panel to Left Panels
S112G0306APhillips Head Screw 3/16"x3/8"2Attaches Spice Basket to Left Side Panel
S112G0306APhillips Head Screw 3/16"x3/8"4Attaches Partition Panel to Right Panels
S112G0408APhillips Head Screw 1/4"x1/2"4Attaches Bowl Support Bracket to Left and Right Panels
S112G0306APhillips Head Screw 3/16"x3/8"4Attaches Wind Shield to Left and Right Panels
S142G03061
Countersink Flat Head Screw 3/16"x3/8"
8Attaches Door Stop Plates to Left and Right Panels
S112G04081Phillips Head Screw 1/4"x1/2"2Attaches Grill Bowl to Bowl Support Bracket
S112G0406APhillips Head Screw 1/4"x3/8"8
S431G0406ASpring Washer 1/4"8
S411G04093Plain Washer 1/4"8
S112G0304APhillips Head Screw 3/16"x1/4"4Attaches Door Handles to Door Panels
P00201001CDoor Handle2Attaches to Door Panels
S112G0408APhillips Head Screw 1/4"x1/2"2Attaches Table Trim Plate to Grill Bowl
S235G0534AWing Bolt 5/16"x3"1Secures the Gas Tank
Attaches Granite Table Top Panels
* One Battery/AA included in the Hardware Pack.
Door Handle (scale: 1/2)
Qty. 2
Key# P00201001C
Level Adjuster (scale: 1/2)
Qty. 4
Key# P05322003A
Phillips Head Screw
3/16"x3/8"
Qty. 30
Key# S112G0306A
Phillips Head Screw
1/4"x3/8"
Qty. 8
Key# S112G0406A
Spring Washer 1/4"
Qty. 8
Key# S431G0406A
Plain Washer 1/4"
Qty. 8
Key# S411G04093
Wing Bolt 5/16"x3"
Qty. 1
Key# S235G0534A
Wrench (scale: 1/2)
QTY. 1
Key# P05515017L
Countersink Flat Head
Screw 3/16"x3/8"
Qty. 4
Key# S142G0306A
Countersink Flat Head
Screw 3/16"x3/8"
Qty. 8
Key# S142G03061
(Stainless Steel)
Phillips Head Screw
1/4"x1/2"
Qty. 14
Key# S112G0408A
Phillips Head Screw
1/4"x1/2"
Qty. 2
Key# S112G04081
(Stainless Steel)
Hardware already installed in Door Handle
Phillips Head Screw 3/16" x 1/4"
Qty. 4
Key# S112G0304A
Downloaded from www.Manualslib.com manuals search engine


6
Parts List for Model MFA05ALP
KEYDESCRIPTIONPART#QTY
1Lid AssemblyY01100371
2Temperature GaugeP00601061A1
3Lid Handle P00205014B1
4Lid HingeP05501018A2
5Protective PadP05518011I2
6Cooking Rack/SecondaryP01514004A1
7Cooking GridP01602011E4
8Burner/Main P02008016A4
9Savor PlateP01708004A4
10Savor Plate Bracket, FrontP03328015A4
11Savor Plate Bracket, RearP03328017A4
12Burner BracketP0220406ED1
13Lighting TubeP05530003A1
14Grease Tray Heat Shield, UpperP06903033A1
15Bowl Wind ShieldP06905022A1
16Bowl Panel, LeftP0072031EC1
17Bowl Panel, RightP0072131EC1
18Grease Draining PlateP06902005C2
19Bowl Panel, RearP0072541DC1
20Bowl Panel, FrontP0073841FC1
21Gas Collector Box with Electrode P02609001B4
22Electric Wire SetP02615077A1
23Gas Valve/Manifold AssemblyY00602281
24Control Panel, UpperP02907446A1
25Control Panel, LowerP02907456A1
26Control KnobP03424231L4
27Control Knob SpringP05504021A4
28Control Knob SeatP03413011J4
29Electric Ignitor, 4-portP02502134C1
30Table Top/Granite, Left IslandP07804001B1
31Table Top/Granite, Right IslandP07804002B1
32Table Trim PlateP07515016B1
33Grease Tray Heat Shield, LowerP06903031A1
34Grease TrayP02717085B1
35Grease Tray Front PanelP00213004B1
36Grease Tray HandleP00203005H1
37Bowl Support BracketP01306016D2
38Partition Panel BracketP03327019D2
39Regulator with Hose (LPG)P03631001A1
40Wind ShieldP06905023B1
™
™
™
Downloaded from www.Manualslib.com manuals search engine

7
Parts List for Model MFA05ALP
To obtain the correct replacement parts for your gas grill, please refer to the part numbers in this parts
list. The following information is required to ensure you receive the correct parts:
1. Model and Serial Number (see CSA label on grill)
2. Part Number
3. Part Description
4. Quantity of parts needed
Important: Use only factory authorized parts. The use of any part that is not factory authorized can be
dangerous and will also void your product warranty. Keep this Operator's Manual for convenient referral
and for part replacement.
For the repair or replacement parts you need:
Call our Grill Information Center at 1-800-770-9769
KEYDESCRIPTIONPART #QTY
41Panel, Front/Right, Rear/LeftP07702040M2
42Panel, Front/Left, Rear/RightP07702038M2
43Door MagnetP05523001K4
44Door Hinge Bracket, LeftP03314011D1
45Door Hinge Bracket, RightP03314012D1
46 Extension Panel BracketP00922003C2
47 Spice BasketP05204004B1
48 Partition PanelP07604008B2
49 Bottom Shelf P01001007D1
50 Door Stop PlateP03305017D2
51 Door HandleP00201001C2
52 Door Panel, LeftP04305002F1
53 Door Panel, RightP04306002F1
54 Tank Tray P04021001C1
55 Panel, MiddleP07702039M2
56 Level AdjusterP05322003A4
Operator's ManualP80164001H1
Hardware PackP06002021A1
Downloaded from www.Manualslib.com manuals search engine

8
Assembly Instructions
1
Install Panels and Panel Brackets
Lay cardboard sheet on floor and use as a work
surface to protect floor and grill parts from scratches.
Install Left Rear Panel Bracket and Right Rear Panel
Bracket to Extension Panel Bracket using screws
S112G0408A. Do not tighten the screws.
Note: There are 2 Door Hinge Brackets attached to
the Left and Right Rear Panels.
Repeat the steps for installation of the Front Panels.
Phillips Head Screw 1/4"x1/2"
Qty. 8
Key# S112G0408A
2-1
Install Middle Panel
Place the assembled Rear Panels over the Middle
Panel. Snap the Rear Panel Brackets into the cutouts
of the Middle Panel.
Door Hinge Bracket
Screws loosely attached
Downloaded from www.Manualslib.com manuals search engine

9
Level Adjuster (scale: 1/2)
Qty. 4
Key# P05322003A
Wrench (scale: 1/2)
QTY. 1
Key# P05515017L
2-2
Install Panels and Level Adjusters
3
Install Partition Panel Brackets
Countersink Flat Head Screw
3/16"x3/8"
Qty. 4
Key# S142G0306A
Secure the Middle Panel between Left and Right Rear
Panels using screws S112G0306A. Tighten the screws
S112G0408A in step 1.
Repeat the steps for installation of the Middle Panel to
the Front Panels.
Install Level Adjusters using the Wrench provided.
Phillips Head Screw 3/16"x3/8"
Qty. 8
Key# S112G0306A
With an assistant, install Partition Panel
Brackets to Front and Rear Panels.
Downloaded from www.Manualslib.com manuals search engine

10
4
Install Bottom Shelf
Install Bottom Shelf to Left Panels.
Phillips Head Screw 3/16"x3/8"
Qty. 4
Key# S112G0306A
Install Tank Tray to Right Panels.
Phillips Head Screw 3/16"x3/8"
Qty. 4
Key# S112G0306A
5
Install Tank Tray
6
Install Partition Panel and Spice Basket
Install Partition Panel inside left cabinet.
Install Spice Basket to Partition Panel
inside left cabinet.
Phillips Head Screw
3/16"x3/8"
Qty. 6
Key# S112G0306A
Downloaded from www.Manualslib.com manuals search engine

11
Phillips Head Screw 3/16"x3/8"
Qty. 4
Key# S112G0306A
7
Install Partition Panel
Install Partition Panel inside right cabinet
using screws S112G0306A.
8
Install Wind Shield
Phillips Head Screw 3/16"x3/8"
Qty. 4
Key# S112G0306A
Install Wind Shield to Rear Panels
using screws S112G0306A.
Downloaded from www.Manualslib.com manuals search engine

12
9
Install Grill Bowl and Bowl Support Brackets
Phillips Head Screw
1/4"x1/2"
Qty. 2
Key# S112G04081
(Stainless Steel)
Remove cooking components from Grill Bowl.
With an assistant lift and position Grill Bowl on
the Island.
Install Bowl Support Brackets to Left and Right
Panels using screws S112G0408A.
Insert screws through the holes on Bowl Support
Brackets and into the holes on Grill Bowl.
Tighten securely using screws S112G04081.
CAUTION: Be sure the Regulator is positioned
between the Bowl and inside panel as shown.
Phillips Head Screw
1/4"x1/2"
Qty. 4
Key# S112G0408A
Countersink Flat Head
Screw 3/16"x3/8"
Qty. 8
Key# S142G03061
(Stainless Steel)
10
Install Door Stop Plates
Place the Door Stop Plates over the Left and Right
Panels. Snap the Door Stop Plates into the cutouts
of the Panels as shown. Tighten securely using
screws S142G03061.
Downloaded from www.Manualslib.com manuals search engine

13
12
Install Door Panels
Install Door Handles to Doors using screws S112G0304A.
Insert Door bottom post into Bottom Door Hinge Bracket.
Then, tilt and slide Door until the top post aligns with the
hole on the Door Stop Plate. Loosen the Door Stop Plate
if necessary to align post with hole.
Phillips Head Screw 3/16" x 1/4"
Qty. 4
Key# S112G0304A
(Hardware already installed
in Door Handle)
Door Handle
Qty. 2
Key# P00201001C
11
Install Table Top Panels
Phillips Head Screw 1/4"x3/8"
Qty. 8
Key# S112G0406A
Spring Washer 1/4"
Qty. 8
Key# S431G0406A
Plain Washer 1/4"
Qty. 8
Key# S411G04093
Spring Washer
1/4"
Plain Washer
1/4"
Phillips Head Screw
1/4"x3/8"
With an assistant, place the Table Top Panels
on the Island. Tighten the Screws with Spring
and Plain Washers.
CAUTION: Do not overtighten the screws or you
can crack the granite Table Top Panels.
Downloaded from www.Manualslib.com manuals search engine

14
14
Install Table Trim Plate
Insert screws through the holes on inner side
of Table Trim Plate and into the Grill Bowl.
Tighten securely.
Phillips Head Screw 1/4"x1/2"
Qty. 2
Key# S112G0408A
13
Install Grease Tray
From the front of the grill, slide the Grease Tray
over the side rails underneath the Grill Bowl.
Downloaded from www.Manualslib.com manuals search engine

15
Install Ignitor Battery
15
Unscrew Ignitor Cap from Control Panel.
Place supplied AA battery into the Ignitor
Slot with positive pole facing you.
Position the Cap and Spring over the AA
battery and tighten onto Control Panel.
WARNING
!
Failure to read and follow the Use and Care
Instructions could result in a fire or explosion
that could cause serious bodily injury, death or
property damage.
!
Final Grill Assembly Step
When you have finished assembling your
grill be sure that all screws are tightened
for safe operation of your grill.
Install Cooking Components
17
With the assistance of another person,
perform this Electrode Check before
proceeding.
16
Be sure all Control Knobs are set to
"OFF" and open the Grill Lid.
Have your assistant stand behind to the
right of the grill and look toward the front
of the grill bowl. Never put your face
inside the Grill Head.
Press the Ignitor Cap. You should hear
a "clicking" sound. Your assistant should
see a blue spark within each Gas
Collector Box. If a spark is present the
Electrode Tips are properly positioned.
If no spark is seen, the Spark Gap
needs to be adjusted as follows:
This test will ensure that the Spark Electrode Tips
are properly positioned so your grill lights easily
and properly.
•
•
•
Using an adjustable wrench, loosen the
Inside Nut until the Gas Collector Box can
be turned upward.
If the gap between the Spark Elec-
trode Tip and Receiver is more than
3/16" use long nose pliers to gently
squeeze the Gas Collector Box to
narrow gap.
Return the Gas Collector Box to its
original position, secure the Inside Nut
and try the Electrode Check again. If no
"clicking" sound is heard:
AA Battery may be installed backwards.
Electric wires may be loose. Remove
the AA Battery and inspect the Ignitor
Junction Box found behind the Control
Panel and reconnect any loose wires.
•
•
IGNITOR SLOT
AA BATTERY
IGNITOR CAP
+
_
SPRING
Spark Gap
Gas Collector Box
Spark Electrode Tip
Spark Receiver
Inside Nut
Savor Plates™
Cooking Grids
Secondary Cooking Rack
Place the Savor Plates™ above the
Burners.
Place the Cooking Grids on the ledge
above the Savor Plates™.
Place the Secondary Cooking Rack on
the slots on either side of the Grill
Bowl.
Downloaded from www.Manualslib.com manuals search engine

16
USE AND CARE INSTRUCTIONS
CORRECT LP GAS TANK USE
LP Gas grill models are designed for use with a
standard 20 lb. Liquid Propane Gas (LP Gas) tank,
not included with grill. Never connect your gas grill to
an LP Gas tank that exceeds this capacity. A tank of
approximately 12 inches in diameter by 18-1/2 inches
high is the maximum size LP Gas tank to use. You
must use an "OPD" gas tank which offers a listed
Overfill Prevention Device. This safety feature
prevents tank from being overfilled which can cause
malfunction of LP Gas tank, regulator and/or grill.
Never connect an unregulated LP gas tank to your
gas grill. The gas regulator assembly supplied with
your gas grill is adjusted to have an outlet pressure
of 11" water column (W.C.) for connection to an LP
gas tank. Only use the regulator and hose assembly
supplied with your gas grill. Replacement regulators
and hose assemblies must be those specified by
the Manufacturer.
Have your LP Gas dealer check the release valve
after every filling to ensure it remains free of defects.
Always keep LP Gas tank in upright position.
Do not subject the LP Gas tank to excessive heat.
Never store an LP Gas tank indoors. If you store
your gas grill in the garage always disconnect the
LP Gas tank first and store it safely outside.
LP Gas tanks must be stored outdoors in a well-
ventilated area and out of the reach of children.
Disconnected LP Gas tanks must not be stored in a
building, garage or any other enclosed area.
The regulator and hose assembly can be seen after
opening the doors (if applicable) and must be
inspected before each use of the grill. If there is
excessive abrasion or wear or if the hose is cut, it
must be replaced prior to using the grill again.
Never light your gas grill with the lid closed or
before checking to ensure the burner tubes are fully
seated over the gas valve orifices.
Never allow children to operate your grill. Do not
allow children or pets to play near your grill.
The LP Gas tank must be constructed and marked
in accordance with the Specifications for LP-Gas
Cylinders of the U.S. Department of Transportation
(D.O.T.) or the National Standard of Canada, CAN/
CSA-B339, Cylinders, Spheres and Tubes for
Transportation of Dangerous Goods; and
Commission, as applicable.
The LP Gas tank must have a shutoff valve,
terminating in an LP Gas supply tank valve outlet,
that is compatible with a Type 1 tank connection
device. The LP Gas tank must also have a safety
relief device that has a direct connection with the
vapor space of the tank.
The tank supply system must be arranged for vapor
withdrawal.
The LP Gas tank used must have a collar
to protect the tank valve.
WARNING
!!
Do not store a spare LP-Gas tank under or near
this appliance.
Never fill the tank beyond 80 percent full; and
If the information in "(a)" and "(b)" is not followed
exactly, a fire causing death or serious injury may
occur.
A.
B.
C.
Use of alcohol or drugs may impair the ability to
assemble and operate the appliance.
Keep fire extinguisher readily accessible. In the
event of a oil/grease fire, do not attempt to
extinguish with water. Use type B extinguisher
or smother with dirt, sand or baking soda.
In the event of rain, cover the grill and turn off
the burner and gas supply.
Use your grill on a level, stable surface in an
area clear of combustible materials.
Do not leave grill unattended when in use.
Do not move the appliance when in use.
Allow the grill to cool before moving or storing.
Do not use your grill as a heater.
This grill is not intended to be installed in
or on recreational vehicles and/or boats.
•
•
•
WARNING
!
!
Use your grill at least 3 feet away from any
wall or surface. Use your grill at least 3 feet
away from combustible objects that can melt
or catch fire (such as vinyl or wood siding,
fences and overhangs) or sources of ignition
including pilot lights on water heaters and live
electrical appliances.
Never use your gas grill in a garage, porch, shed,
breezeway or any other enclosed area.
Never obstruct the flow of ventilation air around
your gas grill housing.
Downloaded from www.Manualslib.com manuals search engine

17
USE AND CARE INSTRUCTIONS
NOTE about LP Gas Tank Exchange Programs
Many retailers that sell grills offer you the option of
replacing your empty LP Gas tank through an exchange
service. Use only those reputable exchange compa-
nies that inspect, precision fill, test and certify their
tanks. Exchange your tank only for an OPD safety
feature-equipped tank as described in the LP Gas tank
section of this manual.
Ÿ
How to Leak Test your LP Gas Tank
LP Gas Model only:
Connect Regulator with Hose to your LPG Tank
LP Gas Model only:
Secure a 20lb LP Gas Tank to Gas Grill
Turn your LP Gas Tank Valve clockwise to the
closed or OFF positon.
Place LP Gas tank into tank hole on Tank Tray.
Install the tank so the Tank Valve faces the rear
right corner of cabinet.
Screw the Wing Bolt in to secure the gas tank.
If growing bubbles appear do not use or move
the LP Gas tank. Contact an LP Gas Supplier
or your fire department!
WARNING
!
!
Use a clean paintbrush and a 50/50 mild soap and
water solution.
Brush soapy solution onto LP Gas tank in the areas
indicated by the arrows. See diagram.
If growing bubbles appear do not use or move the
LP Gas tank. Call an LP Gas Supplier or your Fire
Department.
All leak tests must be repeated each time your LP Gas
tank is exchanged or refilled.
When checking for gas leaks do not smoke.
Do not use an open flame to check for gas leaks.
Your grill must be leak tested outdoors in a well-
ventilated area, away from ignition sources such as
gas fired or electrical appliances. During the leak test,
keep your grill away from open flames or sparks.
Do not use household cleaning agents. Damage to
gas assembly components can result.
Ÿ
Ÿ
Ÿ
Ÿ
Ÿ
Ÿ
Ÿ
For your safety:
Leak test new and exchanged LP Gas tanks BEFORE
connecting one to your grill.
Always keep new and exchanged LP Gas tanks in an
upright position during use, transit or storage.
Turn all Burner Valves to the OFF position.
Inspect the valve connection port and regulator
assembly for damage or debris. Remove any
debris. Never use damaged or plugged equipment.
Connect the regulator assembly to the tank valve
and HAND TIGHTEN nut clockwise to a full stop.
DO NOT use a wrench to tighten because it could
damage the Quick Coupling Nut and result in a
hazardous condition.
Open the tank valve 1/4 to 1/2 (counterclockwise)
and use a soapy water solution to check all
connections for leaks before attempting to light
your grill. See "Checking for LP Gas Leaks". If
a leak is found, turn the tank valve off and do not
use your grill until the leak is repaired.
CAUTION: When the appliance is not in use the gas
must be turned off at the tank.
Wing Bolt 5/16"x3"
Qty. 1
Key# S235G0534A
Type 1 connection per
ANSI Z21.58b-2002
Quick
Coupling Nut
Downloaded from www.Manualslib.com manuals search engine

18
USE AND CARE INSTRUCTIONS
Disconnecting A Liquid Propane Gas (LPG)
Tank From Your Grill
Make sure the Burner Valves and LP Gas tank
valve are off. (Turn clockwise to close.)
Detach the hose and regulator assembly from
the LP Gas tank valve by turning the Quick
Coupling Nut counterclockwise.
WARNING
!!
If you have a gas leak that cannot be repaired
by tightening, turn off the gas at the source,
disconnect fuel line from your grill and call
1-800-770-9769
or your gas supplier for repair
assistance.
Check all connections for LP Gas Leaks
Never test for leaks with a flame. Prior to first use,
at the beginning of each season, or every time
your LP Gas tank is changed, you must check for
gas leaks. Follow these three steps:
Make a soap solution by mixing one part liquid
detergent and one part water.
Turn the grill Control Knobs to the full OFF
position, then turn the gas ON at source.
Apply the soap solution to all gas connections
indicated by the arrows. See diagram. If
bubbles appear in the soap solution the
connections are not properly sealed. Check
each fitting and tighten or repair as necessary.
Regulator with Hose (LPG)
Gas Valve / Manifold Assembly
LP Gas Tank
Downloaded from www.Manualslib.com manuals search engine

19
USE AND CARE INSTRUCTIONS
Grill Lighting Instructions
5.
4.
3.
2.
1.
Failure to replace a faulty hose, secure gas supply
connections or to open the Lid before proceeding
to the Lighting Procedures could result in a fire
or explosion that could cause serious bodily injury,
death, or property damage.
WARNING
!
!
Set Control Knobs to OFF and open the LP Gas
SLOWLY 1/4 of a turn.
Push and turn Left Control Knob to HIGH.
Immediately press the Electric Ignitor for 3-4
seconds to light the Burner.
If ignition does not occur in 5 seconds, turn the
burner Control Knob(s) and gas source OFF and
conduct a leak test of ALL gas connections and gas
sources as explained in the Use and Care section
of this manual. If no leaks are detected, wait 5
minutes for any gas to clear and repeat the lighting
procedure.
After Burner is lit, turn the tank valve SLOWLY one
more 1/4 of a turn for 1/2 of one complete turn.
Once one Burner is lit, the adjacent Burner can be lit
by turning its Control Knob to HIGH.
6.
tank valve
7.
10.
9.
8.
OFF
Open LP
gas tank
PRESS
11.
Burner Control Knobs on Control Panel
MAIN BURNER
Manually Lighting Your Grill By Paper Match
To light your gas grill by match, Follow steps 1 through 6
of the Basic Lighting Procedures. Then, light the match
and place near the top end of Lighting Tube on the right
side of the grill. Turn the nearest Burner Control Knob
to the HIGH setting to release gas. The Burner should
light immediately.
Never lean over the grill cooking area while
lighting your gas grill. Keep your face and body
a safe distance (at least 18 inches) from the
Lighting Tube or Burners when lighting your grill
by match.
WARNING
!
!
LIGHTING
TUBE
MATCH
If ignition does not occur in 5 seconds, turn the Control
Knob(s) and gas source OFF and conduct a leak test
as explained in the Use and Care section of this manual.
If no leaks are detected, wait 5 minutes for any gas
to clear and repeat the lighting procedure.
WARNING
!
!
LOW
OFF
HI
Before each use, check all hoses for cracks, nicks, cuts,
burns or abrasions. If a hose is damaged in any way, do
not use your grill before replacing the hose with an
authorized part from the Parts List. Also make sure all
gas supply connections are securely tightened.
Familiarize yourself with the safety and Use and Care
instructions in this manual. Do not smoke while lighting
grill or checking gas supply connections.
Be sure the LP Gas tank is filled.
Open the Grill Lid.
Check that the end of each Burner Tube is properly
located over each Valve Orifice.
Downloaded from www.Manualslib.com manuals search engine

20
USE AND CARE INSTRUCTIONS
Troubleshooting
WARNING
Turn gas off at source and turn Control Knobs to
OFF. Wait at least 5 minutes for gas to clear, then
retry.
If your grill still fails to light, check gas supply
and connections.
Repeat lighting procedure. If your grill still fails
to operate, turn the gas off at source, turn the
Control Knobs to OFF, then check the following:
If the grill fails to light :
1.
2.
3.
Misalignment of Burner Tubes over Orifices
Correction: Reposition Burner Tubes over Orifices.
Obstruction in gas line
Correction: Remove fuel line from grill. Do not
smoke! Open gas supply for one second to clear
any obstruction from fuel line. Close off gas supply
at source and reconnect fuel line to grill.
Plugged Orifice
Correction: Remove Burners from grill by
removing the screw from the rear of each Burner
using a Phillips Head Screwdriver. Carefully lift
each Burner up and away from gas valve Orifice.
Remove the Orifice from gas valve and gently clear
any obstruction with a fine wire. Then reinstall all
Orifices, Burners, screws and cooking
components.
If an obstruction is suspected in Gas Valves or
Manifold, call the Grill Information Center.
Obstruction in Burner Tubes
Correction: Follow the Burner Tube cleaning
procedure on page 22 of this Operator's Manual.
Misalignment of Ignitor on Burner
Correction: Check for proper position of the
Electrode Tip as shown in step 16 page 15. The
gap between the Spark Electrode Tip and Spark
Receiver should be approximately 3/16". Adjust
if necessary. With the gas supply closed and all
Control Knobs set to OFF press the Electric
Ignitor cap and check for the presence of a spark
at the Electrode.
Disconnected Electric Wires
Correction: Inspect the Electric Ignitor (see Parts
List) found behind the Control Panel. Connect loose
Electric wires to Junction Box and try to light the grill.
Weak AA battery
Correction: Unscrew the Ignitor Cap and replace
the battery.
If the grill still does not light you may need to
purge air from the gas line or reset the
regulator excess gas flow device. Note: This
procedure should be done every time a new
LP Gas tank is connected to your grill.
To purge air from your gas line and/or reset
the regulator excess gas flow device:
Turn Control Knobs to the OFF position.
Turn off the gas at the tank valve.
Disconnect regulator from LP Gas tank.
Let unit stand 5 minutes to allow air to purge.
Reconnect regulator to the LP Gas tank.
Turn tank valve on SLOWLY 1/4 of a turn.
Open the Grill Lid.
Push and turn the LEFT Control Knob to HIGH.
Press Electric Ignitor for 3-4 seconds to light
the burners.
GRILL INFORMATION CENTER
Call 8am to 4:30pm CST 1-800-770-9769 Monday through Friday
WARNING
!
Should a FLASHBACK fire occur in or around
the Burner Tubes, follow the instructions below.
Failure to comply with these instructions could
result in a fire or explosion that could cause
serious bodily injury, death, or property damage.
!
Shut off gas supply to the gas grill.
Turn the Control Knobs to OFF position.
Open the Grill Lid.
Put out any flame with a Class B fire
extinguisher.
Once the grill has cooled down, clean
the Burner Tubes and Burners according
to the cleaning instructions in this
Operator's Manual.
Ÿ
Ÿ
Ÿ
Ÿ
Ÿ
Downloaded from www.Manualslib.com manuals search engine

21
Proper care and maintenance will keep your grill in top
operating condition and prolong its life. Follow these
cleaning procedures on a timely basis and your grill will
stay clean and operate with minimum effort.
CAUTION: Be sure your grill is OFF and cool before cleaning.
Cleaning The Cooking Grids
Before initial use, and periodically, wash your
Cooking Grids in a mild soap and warm water
solution. You can use a wash cloth or vegetable
brush to clean your Cooking Grids.
Cleaning The Savor Plates™
Periodically you should wash the Savor Plates™
in a soap and warm water solution. Use a vegetable
brush to remove stubborn burnt-on cooking residue.
Dry the Savor Plates™ thoroughly before you
reinstall them into the cooking bowl.
Cleaning The Grease Tray and Receptacle
To reduce the chance of fire, the Grease Draining
Tray and Grease Receptacle (some models)
should be visually inspected before each grill use.
Remove any grease and wash Grease Tray and
Receptacle with a mild soap and warm water
solution.
Cleaning the Inside of the Grill Lid
Grease can have a tendency to build up on the
inside of the Grill Lid and could drip onto deck or
patio when the lid is opened. Visually inspect the
inside of the Grill Lid before each grill use. Remove
any grease and wash with a mild soap and warm
water solution.
Annual Cleaning of The Grill Interior
Burning-off excess food after every cookout will
keep it ready for instant use. However,at least every
3 months you must give the entire grill a thorough
cleaning to minimize your risk of grease fire and
keep the grill in top shape. Follow these steps:
Turn all Burner Valves to the full OFF position.
Turn the LP gas tank valve to the full OFF position.
Disconnect the regulator from the gas tank. Inspect
the hose with regulator assembly for cracking, cuts
or any other damage, and replace as neccessary.
Refer to the Parts List in this Operator's Manual.
Remove and clean the Savor Plates™, Cooking
Grids, Cooking Rack and Grill Burners.
Cover each Gas Valve Orifice with aluminum foil.
Brush the inside and bottom of the grill with a fiber
pad or nylon brush and wash with a mild soap and
warm water solution. Rinse thoroughly and let dry.
Remove aluminum foil from Orifices and check
each Orifice for obstruction.
Check each Spark Electrode, adjusting as needed.
The space between the Spark Electrode Tip and
Spark Receiver should be approximately 3/16".
Replace the Burners and adjust the Gas
Collector Box. The edge of the collector box should
be overlapping the Burner Port.
CLEANING AND MAINTENANCE
1.
2.
3.
4.
5.
6.
7.
8.
9.
10.
11.
Cleaning Exterior Surfaces:
Before initial use, and periodically thereafter, we
suggest you wash your grill using a mild soap and
warm water solution. You can use a wash cloth or
sponge for this process. Do not use a stiff wire or
brass brush. These will scratch stainless steel and
chip painted surfaces (varies by model) during the
cleaning process.
Cleaning Exterior Stainless Steel Surfaces:
Weathering and extreme heat can cause exterior
stainless steel surfaces to turn tan in color. Machine
oils used in the manufacturing process of stainless
steel can also cause this tanning color. After remov-
ing any protective PVC film from the Grill Lid and
Control Panel use a Stainless Steel Cleaner to polish
the stainless steel surfaces of your grill. Never use
abrasive cleaners or scrubbers because they will
scratch and damage your grill. Follow these steps for
the best results.
1. Turn the LP Gas tank valve (clockwise) to the full
OFF position. Disconnect the regulator and hose
assembly from LP Gas tank. Cover exposed gas
fitting with aluminum foil.
2. Remove dirt or grease using a soft cloth and
polish stainless surfaces. Wipe with a soft cloth.
3. Remove aluminum foil from exposed gas fitting
and allow grill to air dry before attaching the
regulator and hose to your LP Gas tank.
Replace Savor Plates™ and Cooking Grids.
Reconnect the gas source and observe the
Burner flame for correct operation.
Keep grill area clear and free from combustible
materials, gasoline and other flammable vapors
and liquids.
Do not obstruct the flow of air for combustion
and ventilation.
Keep the ventilation openings of the tank enclosure
cabinet free and clear of debris.
Failure to comply with these instructions may
result in a hazardous situation which, if not
avoided, may result in injury.
CAUTION
! !
Downloaded from www.Manualslib.com manuals search engine

22
Figure 1
TO CLEAN BURNER TUBE,
INSERT HOOK AS INDICATED BY THE ARROW
CLEANING THE BURNER TUBES AND BURNER PORTS
To reduce the chance of FLASHBACK FIRE you must
clean the Burner Tubes as follows at least once a month
in summer and fall or whenever spiders are active in your
area, and if your grill has not been used for an extended
period of time.
1. Turn all Burner Valves to the full OFF position.
2. Turn the LP Gas tank valve to the full OFF position.
3. Detach the LP Gas regulator assembly from your
gas grill.
4. Remove the Cooking Grids, Savor Plates™ and
Grease Trays from your grill.
5. Remove the screw from the rear of each Burner
using a Phillips Head Screwdriver.
6. Carefully lift each Burner up and away from the
Gas Valve Orifice.
7. Check and clean burner/venturi tubes for insects
and insect nests. A clogged tube can lead to a fire
beneath the grill.
8. Refer to Figure 1 and perform one of these
three cleaning methods:
Regardless of which Burner cleaning procedure you
use, we recommend you also complete the following
steps to help prolong Burner life.
1. Use a fiber pad or nylon brush to clean the entire
outer surface of each Burner until free of food
residue and dirt.
2. Clean any clogged ports with a stiff wire, such as
an open paper clip.
3. Inspect each Burner for damage (cracks or
holes) and if such damage is found, order and
install a new Burner. After installation, check
to ensure that the Gas Valve Orifices are
correctly placed inside the ends of the Burner
Tubes. Also check the position of your Spark
Electrode.
METHOD 1: Bend a stiff wire or wire coat
hanger into a small hook as shown and
run the hook through the Burner Tube and
inside the Burner several times to remove
debris.
METHOD 2: Use a bottle brush with a
flexible handle and run the brush through
the Burner Tube and inside the Burner
several times to remove any debris.
METHOD 3: Use an air hose to force air
through each Burner Tube. The forced air
should pass debris or obstructions through
the Burner and out the Ports.
WARNING
!!
For safe operation ensure the Gas Valve Assembly
Orifice is inside the Burner Tube before using your
grill. See figure. If the Orifice is not inside the
Burner Tube, lighting the Burner may cause
explosion and/or fire resulting in serious bodliy
injury and/or property damage.
9
Orifice
Burner TubeGas Valve Assembly
Burner Tube
Downloaded from www.Manualslib.com manuals search engine

23
A-1
Cooking Instructions
Burn-Off
Before cooking on your gas grill for the first time, you
should "burn off" the grill to eliminate any odor or
foreign matter. Ignite the main burners, lower the Lid,
andoperate grill on HIGH setting for 3 to 5 minutes.
CAUTION: Operating your grill on the HIGH setting for
longer than five minutes may damage certain parts of
your grill. Do not leave your grill unattended when in use.
To preheat main burners, light your grill on HIGH,
lower the Lid and follow this timetable.
For high temperature cooking, preheat grill 3 to 5
minutes.
For low temperature cooking, preheat grill 3 minutes.
To slow cook, preheating is not necessary.
Cooking Temperatures
High setting: The HIGH Control Knob setting should
only be used to pre-heat your grill the first 3-5 minutes
and for burning food residue off the grill for 3-5 minutes
after cooking is complete. Never use the HIGH setting
for extended cooking.
Medium to Low Settings: Most recipes specify
medium to low settings, including all smoking,
rotisserie cooking and cooking lean cuts such as fish.
An Important Note About Cooking Temperatures
The suggested heat settings and cooking times
shown in the following pages are approximate.
Unlike the controlled environment inside your kitchen,
variables including outside temperatures, direction
and conditions of wind, as well as grill location will
affect your grill's heat distribution. Because these
condition vary, and no two backyards are alike, we
offer this guide as a convenience. We recommend
you monitor your grill closely and rotate foods as
needed to prevent overcooking and ensure the most
delicious results every time.
The middle and back primary cooking areas offer
high heat for grilling.
The Secondary Cooking Rack offers medium heat for
preparing breads and firm vegetables.
The front primary cooking area offers less heat and is
ideal for preparing delicate foods and for keeping
cooked foods warm.
Direct Cooking using Main Burners
The direct cooking method can be used with the
supplied Cooking Grids and food placed directly over
the lit grill Burners. Direct Cooking requires the Grill
Lid to be open. This method is ideal for searing and
grilling when you want an open-flame barbecued taste.
Indirect Cooking using Main Burners
The indirect cooking method can also be used with
the supplied Cooking Grids. To cook indirectly, the
food should be placed on the left or right side of your
grill with the main Burner lit on the opposite side. Or
place your food on the Secondary Cooking Rack and
light the outer main Burners. Either way, indirect
cooking must be done with the Lid down.
Prepare Cooking Grids for Grilling
Flare-Ups
WARNING
! !
Preheating
Ÿ
Ÿ
Ÿ
Ÿ
Ÿ
Ÿ
The fats and juices dripping from grilled food can
cause flare-ups which impart a favorably, distinctive
taste and color to food. They should be accepted up to
a point. To minimize flare-ups:
Use a drip pan under foods that produce a lot of grease
Trim excess fat from meats and poultry
Preheat the grill properly
Clean grill regularly to remove food and grease build-up
Reposition your food often to avoid flare-ups
Greasing the cooking surface will help keep foods
from sticking during the cookout and reduces the
amount of cleanup required. Use a brush to apply a
thin layer of cooking oil or vegetable shortening onto
each Cooking Grid before each cookout. We do not
suggest spray type oils unless they are specified for
high-temperature cooking. Be sure to coat the entire
cooking surface.
Ÿ
Ÿ
Ÿ
Ÿ
Ÿ
Failure to comply with these instructions could
result in a fire or explosion that could cause
serious bodily injury, death or property damage.
Never line the bottom of the grill housing or
Savor Plates™ with aluminum foil, sand or any
substance that will restrict the flow of grease
into the Grease Draining Tray and Receptacle.
Before each use of your grill: Pull out the Grease
Tray and remove all grease and food debris to
prevent grease fire hazard.
Use your grill at least 3 feet away from any
wall or surface. Use your grill at least 3 feet
away from combustible objects that can melt or
catch fire (such as vinyl or wood siding, fences
and overhangs) or sources of ignition including
pilot lights on water heaters and live electrical
appliances.
Never use your gas grill in a garage, porch, shed,
breezeway or any other enclosed area.
Your grill will get very hot. Always wear a flame
retardant BBQ Mitt when cooking on your grill.
Never lean over cooking areas while using grill.
Do not touch cooking surfaces, Lid, grill housing
or other parts while grill is in operation, or until
the grill has cooled down after use.
Ÿ
Ÿ
Ÿ
Ÿ
Ÿ
Ÿ
Downloaded from www.Manualslib.com manuals search engine

24
A-2
Guide to Grilling using the Main Burners and Direct Cooking Method
Grilling Steak and Ribs
Turn the grill Burners on HIGH, close the Lid and preheat
your grill 3 to 5 minutes. Open Lid and place the meat on
the Cooking Grid directly above the lit Burners. Cook the
meat on both sides until seared. Reduce the heat to
MEDIUM and cook meat until done. Grilling times will vary
according to meat thickness.
Grilling Hamburgers and Sausages
Turn the grill Burners on HIGH, close Lid and preheat your
grill 3 to 5 minutes. Open Lid and place the meat on the
Cooking Grid directly above the lit Burners. Cook the meat
on both sides until seared. Reduce the heat to MEDIUM
and cook the meat until done. Grilling times will vary
according to meat thickness.
Grilling Poultry
Turn the grill Burners on HIGH, close Lid and preheat your
grill 2 to 3 minutes. Then raise the Lid, reduce heat to
MEDIUM and cook poultry directly over lit Burners until
done. Poultry skin is fatty so you should expect some
flare-ups when using this direct method.
To minimize flare-ups, try grilling poultry using the indirect
method. Place the poultry on one side of the grill with the
opposing Burners on MEDIUM heat, and lower the grill
Lid. Grilling times will vary based on the size of your
poultry.
Grilling Pork
Turn Burners on HIGH and preheat your grill 3 to 5
minutes with the Lid closed. Raise Lid, place pork on
Cooking Grid and cook until seared. Reduce heat to
MEDIUM and cook until done. Grilling times will vary
according to meat thickness.
Whole Fish and Whole Fillets
Preheat your grill on HIGH for 2-3 minutes with the Lid
down. Raise lid and turn Burners to MEDIUM heat. Place
fish (skin down) on grill and cook over direct heat until
done. Use cooking time as a guide or until fish is opaque
but still moist.
Smaller Fish Fillets and Cubes
Follow the directions from above, using approximate
cooking times shown at right. Place a small piece of
aluminum foil on the Cooking Grids if the fish pieces are
small enough to drop between the Cooking Grids.
Vegetables and Fruit
Prepare your fruit or vegetables and brush with butter or
basting sauce if desired. To cook indirectly, the food
should be placed on the left or right side of your grill with
the Burner lit on the opposite side and the grill lid down.
Or center your food on the Secondary Cooking Rack and
light the outer grill Burners. Either way, indirect cooking
must be done with the Lid down.
In some instances, you may want to grill vegetables and
fruit directly over the heat, using the supplied Cooking
Grids. Foods that work best with direct heat are relatively
soft and require a short cooking time: mushrooms,
zucchini, tomatoes and skewered fruit such as apricots,
peaches, pineapple, strawberries and kiwis. Remember
the Grill Lid must remain up when cooking directly.
Cut of Meat
T-bone steak
Sirloin steak
Beef spare ribs
Porterhouse steak
New York strip steak
Hamburgers
Sausages
Chicken breast
(cook with bone down)
Chicken wings
Drumsticks
Whole bird
(cook with breast up)
Chops
Loins
Cutlets
Whole fish
Whole fish fillets
Fish fillets
Boneless cubes
Approximate Cooking Times
Rare: 4-8 minutes
Medium: 10-14 minutes
Well done: 15-20 minutes
Rare: 4-6 minutes
Medium: 8-10 minutes
Well done: 10-15 minutes
Direct method:
approximately 15 minutes
Indirect method:
up to 30 minutes
Indirect method:
approximately 1 hour
Medium: 10-14 minutes
Well done: 15-20 minutes
10 - 12 minutes per pound or
until fish is opaque
4 - 5 minutes each side
or until fish is opaque
For very firm vegetables—particularly potatoes and yams,
we recommend that you partially boil until almost cooked,
before placing them on the grill. Cooking times using the
indirect method with the lid down will be similar to those
for your kitchen oven. However, there are many factors
such as outside temperature, wind conditions and
location of grill that affect your grill performance so we
suggest you watch the temperature gauge and adjust the
heat accordingly.
Cooking times for foods prepared with the direct method
will be much shorter mainly because of the direct heat
source and softness of the food. Timing will be compa-
rable to normal pan frying or grilling.
Downloaded from www.Manualslib.com manuals search engine

25
A-3
Type of Food
Beef
Lamb
Veal
Pork
Chicken
Duck
Fish
Turkey, under 16 pounds
Turkey, over 16 pounds
How Cooked
Rare
Medium
Well done
Medium
Well done
Approximate Cooking Times
18 minutes per pound
23 minutes per pound
27 minutes per pound
18 minutes per pound
23 minutes per pound
27 minutes per pound
30-33 minutes per pound
20-25 minutes per pound
25 minutes per pound
10 minutes per pound
20-25 per pound + 30 minutes
18-23 per pound + 15 minutes
Guide to Slow Roasting and Baking Techniques
An Important Note About Heat Settings
The suggested heat settings shown are approximate.
There are many factors such as outside temperature,
wind conditions and grill location that affect your grill
performance. We offer these cooking times as a
convenience, but suggest you watch the temperature
gauge and adjust the heat accordingly.
Preparing to Roast
Roasting uses the indirect cooking method. Therefore, the
food should be placed on the left or right side of your grill
with the Burner lit on the opposite side. You can also use
the supplied Cooking Grid with an aluminum drip pan
underneath allowing you to collect juices for making
gravies. Remember, indirect cooking requires the Lid of
your grill to be down.
Preheating your grill is not required for slow cooking
methods such as roasting. If you do choose to preheat your
grill before roasting, turn the Burners on HIGH and close Lid
for approximately 2-3 minutes.
Food preparation
Trim meat of excess fat. Truss meat and poultry with
cooking string to retain shape if desired. Bacon strips can
be used to cover the outside surface of lean meat and
poultry to help prevent it from drying out. Another method
for keeping food moist during roasting is to put water in a
cooking pan, then cover with foil. The foil should be
removed for the first or the last part of the cooking time to
ensure proper browning.
Tips for roasting
Except when roasting with water in a roasting pan, the
juices that collect in the pan can be used as the base for a
tasty sauce or gravy. Place a cooking pan directly over the
heat, add extra butter if needed, then add several spoon-
fuls of flour to thicken sauce. Finally, add sufficient chicken
or beef stock to obtain the desired consistency.
Once the meat is cooked, remove it from your grill and
cover with a piece of foil. Allow it to stand for 10-15
minutes which allows the juices to settle. This will make
carving easier and ensure a tender, juicy roast.
BAKING TECHNIQUES
From casseroles and cornbread to delicious desserts like
fondue fruit skewers or crumb cake, baking on the grill is as
easy as baking in the kitchen.
Preparing to Bake
To bake in your new grill you'll need a baking dish or cast-
iron cooking pan, and a pair of flame retardant BBQ Mitts. If
the cooking pan is cast-iron be sure to season the pan
before use.
Preheat your grill 3-5 minutes, then lower heat to achieve
the baking temperature desired. Baking uses the indirect
cooking method. Therefore, your cooking pan should be
Oven Temperature
Slow300° - 340° F
Moderate355° - 390° F
High410° - 480° F
Recommended Grill Setting
Both outside Burners on LOW
1 outside Burner on HIGH and 1 outside Burner on LOW
Both outside Burners on HIGH
placed on the left or right side of your grill with the burner lit
on the opposite side.
Tips for Baking
Prepare your favorite recipe as you would in the kitchen.
Foods cooked in the grill for long periods of time should
always be covered in aluminum foil to retain moisture. You
will need to stir the food several times as it bakes, and add
additional liquid if required.
Watch the temperature, and adjust to cook according to
your recipe directions.
Downloaded from www.Manualslib.com manuals search engine

26
A-4
Slow Cooking with a Rotisserie
A Rotisserie kit is made to fit your grill model.
Rotisserie cooking produces foods that are moist,
flavorful and attractive. The optional rotisserie system
is most commonly used for cooking meat or poultry
and is designed to cook food slowly. You can place a
cooking pan beneath the food to collect juices for
basting and gravy. To flavor the contents of the cooking
pan you may add herbs, onions, or other spices of your
choice.
The cooking times on a rotisserie will be approximately
the same as for oven cooking.
Balancing the Food
In rotisserie cooking, balancing the food is of utmost
importance. The rotisserie must turn evenly or the
stopping and starting action will cause the food to cook
unevenly and possibly burn the heavier side.
The easiest foods to balance are those of uniform
shape and texture. To test if the food is balanced
correctly when secured, place the ends of the rotis-
serie spit loosely in the palms of your hands. If there is
no tendency to roll, give the spit a quarter turn. If it is
still stable, give it a final quarter turn. It should rest
without turning in each of these positions. It can then
be attached to your grill.
Food Preparation
When preparing poultry, truss the birds tightly so that
wings and drumsticks are close to the body of the bird.
The cavity of the bird may be stuffed prior to this. Pull the
neck skin down and, using a small skewer, fix it to the
back of the bird. Push the rotisserie spit through
lengthwise, catching the bird in the fork of the wishbone.
Center the bird and tighten with the holding forks. Test the
balance as described before.
A rolled piece of meat requires the rotisserie skewer to be
inserted through the center of the length of meat, then
secured and balanced.
For meats that contain bones, it is best to secure the
rotisserie skewer diagonally through the meaty sections. If
protruding bones or wings brown too quickly, cover with
pieces of foil.
Guide to Rotisserie Cooking
Preparing to Smoke
Smoking gives food a distinctive, delicious flavor. You will
find a variety of wood chips or pellets available for use in
smoking grilled foods. Pre-soaking of wood chips may
be required so read and follow the manufacturers
instructions for preparing smoking chips prior to use.
Note: It is our experience that many smoking chip
and pellet products do not actually produce a smoke but
instead infuses the food with flavor. Please read product
labels carefully and if in doubt, ask your retailer for
details.
Using A Smoker Box
There are many optional smoker boxes available for
purchase. Follow these guidelines and always refer to
the label of your smoking chips or pellets for specific
directions.
Raise your Grill Lid and light the grill. Lower the Grill Lid
allowing your grill to reach the desired cooking tempera-
ture for the food you are grilling. Fill your smoker box with
your prepared smoking chips or pellets. Dried herbs and
spices may also be added to produce different flavors.
Wear a flame retardant BBQ Mitt and place your smoker
box on a Cooking Grid or Savor Plate™ directly above a lit
grill Burner. The heated smoking chips or pellets will
flavor your foods.
Tips for Smoking
You can reduce the strength of the smoke flavor by only
smoking for half or three quarters of the cooking time.
The heat required for smoking is normally LOW to
MEDIUM.
Foods naturally high in oils lend themselves well to
smoking, while drier foods benefit from a marinade.
Guide to Smoking
Vegetables are generally easy to cook on the grill. The
Cooking Rack makes it convenient because you can still
use the main cooking area while the vegetables are
suspended above the grids.
Pre-cook hard vegetables by briefly boiling or
microwaving them before cooking on the grill. Wrap
vegetables in a double thickness of foil to protect them
while cooking on the grill. Then, remove the foil if desired,
10-15 minutes before the end of cooking, brush veg-
etables with butter or oil and finish cooking.
Guide to Using the Cooking Rack
The Cooking Rack can be used for purposes other than
just the obvious. Consider using the rack for warming
French bread, garlic bread, croissants or even bagels.
A small whole fish wrapped in foil also cooks well on the
Cooking Rack. Parcels of seafood such as scallops,
prawns and sliced fish fillets prepared in a sauce and
portioned into small foil wraps cook well this way, too.
•
•
•
•
•
•
•
•
•
Tuna steaks, marinated in Asian flavors of sesame
oil, soy sauce and sherry.
Pork fillets, rubbed with ginger, orange rind and
brushed with maple syrup.
Mussels, brushed with lemon rind and chili oil.
Lamb cutlets, marinated in virgin olive oil, lemon,
oregano and black pepper. The same marinade can
be used for a whole leg or rack of lamb.
Chicken, boneless chicken pieces—especially sliced
breasts.
Fish, sliced fillets of firm fish, assorted seafood such
as prawns, scallops and calamari.
Pork, sliced fillets, diced or minced pork, sliced leg
steak, sliced chops.
Beef, sliced fillet, rib-eye, round, rump, sirloin.
Lamb, sliced fillet, round, loin.
Downloaded from www.Manualslib.com manuals search engine

27
Optional Grill Accessories for Model MFA05ALP
PROTECTIVE GRILL COVER
Protect your investment from rain, snow and seasonal debris
with style using this quality made grill cover. Constructed of
Black vinyl, lined with cloth, and tailored to fit your Stainless
Steel Built-in Grill so it looks beautiful, even when covered.
Measures: 66" x 42-3/4" x 27-1/2" depth
CHROME
ROTISSERIE KIT
Rotisserie cooking produces foods
that are moist and flavorful be-
cause the slowly rotated food self-
bastes to seal in meat's natural
juices. The optional Rotisserie Kit
can be used to slow cook foods
using the burners farthest from the
Rotisserie (indirect cooking
method) with a pan placed directly
under your food to catch the
drippings.
Includes: Motor, Mounting
Hardware, Handle, 31-1/2" Chrome
Spit, Bushing and 2 Skewers
P07007022B
Order using Grand Hall
Item #
Anything you enjoy cooking indoors can be prepared outdoors as well. These optional
accessories make it easy to use your new grill as an outdoor kitchen.
To order by phone, call 1-800-770-9769 Monday - Friday, 8:00am to 4:30pm CST and mention
MKT CODE: MFA050M.
P80A1A
Order using Grand Hall
Item #
CAST-IRON COOKING PAN WITH LID
This heavy-duty Pan and Lid set offers
a porcelain matte finish with handles
for lifting. Cast iron heats better and
cooks evenly, making this the ideal
accessory for preparing deep dish pizza, potatoes,
corn bread, casseroles and deserts.
P5731D / P80G4A
Order using Grand Hall
Item #
Measures: 16 3/4" long x
11 1/4" wide x 2 1/2" pan
depth and includes a pot
support.
REVERSIBLE CAST-IRON GRIDDLE
Substitute two cooking grids with this Cast-Iron Griddle & Hot Plate and ex-
pand your outdoor cooking abilities. The flat hot plate side is ideal for eggs,
pancakes, sandwiches, fish and
fajitas while the ribbed side
(shown) is great for cooking
sausages and burgers.
Measures: 19" x 10 1/2" x 1/2" depth
P5722C
Order using Grand Hall
Item #
A-5
Downloaded from www.Manualslib.com manuals search engine

28
FREQUENTLY ASKED QUESTIONS (FAQ'S)
A-6
No, your gas grill is manufactured to exact
specifications and is certified for LPG (Liquid Propane
Gas) or NG (Natural Gas) use only. For your safety,
conversion kits are not available, nor will we sell or
otherwise provide parts or information to be used to
convert your grill. Any attempt to convert your grill is
dangerous and will void your warranty.
Question:
Are the serial and model numbers of my grill listed
somewhere for reference?
The serial and model numbers are listed on a silver
CSA label placed on the grill. Depending on the grill
model the silver CSA label will be located on the left or
right side bowl panel underneath the side shelf,
underneath the right side of the control panel, outside
left or right of control panel or on the back of the grill
cabinet.
Question:
My grill will not light properly. Why?
Answer:
Always light the Main Burner farthest from the fuel
source first. This will draw gas across the manifold
helping prevent air pockets which obstruct gas-flow and
prevent proper grill lighting. Also try this procedure:
1. Turn gas off at source and turn Control Knobs OFF.
Wait at least 5 minutes for gas to clear, then retry.
2. If your grill still fails to light, turn the Burner Control
Knob(s) and gas source OFF and conduct a leak test
of ALL gas connections and gas sources as
explained in the Use and Care section of this manual.
3. If no leaks are detected, wait 5 minutes for any gas to
clear and repeat the lighting procedure.
Question:
If my ignitor or battey is not working how can I light
Answer:
If your ignition fails to work or your battery needs
replacing, you can light your grill by match through the
Lighting Tube on the right side of the grill bowl. Never
remove the Cooking Grids or Savor Plates™ and
attempt to light the grill from above. To light your gas grill
manually, follow steps 1 through 6 of the Basic Lighting
Procedures. Then, light the match and place it through
the Lighting Tube on the right side of the grill. Turn the
nearest Burner Control Knob to the High setting to
release gas. The Burner should light immediately.
Question:
Can I convert my grill from one fuel type to another in
other words from LPG to NG or vice versa?
Answer:
Answer:
my grill manually?
Question:
Sometimes I hear a humming sound coming from my
regulator. What causes this? And - My grill has a low
flame and sometimes will not light. Why?
Answer:
The humming sound is gas flowing through the
regulator. A low volume of sound is normal and will not
interfere with the operation of your grill. Loud or
excessive regulator humming and/or low flow and
intermittent lighting may be caused by the regulator's
excess gas flow device. Opening the tank valve all the
way or too quickly is what triggers the regulator's
safety device to restrict gas flow, preventing excess
gas flow to your grill. Lighting the main Burner farthest
from the fuel source every time will help eliminate air
pockets in the manifold. Note: This procedure should
be done every time a new LP Gas tank is connected to
your grill.
Turn all Control Knobs to the OFF position.
Turn off the LP Gas tank at the tank valve.
Disconnect regulator from LP Gas tank.
Let unit stand for 5 minutes.
Reconnect regulator to the LP Gas tank.
Open grill Lid (or Side Burner Lid if you are lighting
the Side Burner).
Turn the tank valve slowly ¼ of one turn.
Light main Burner farthest from fuel source.
Turn the tank valve slowly one more ¼ of one turn
for ½ of one complete turn.
Continue to light Burners moving towards the fuel
source.
Do not turn tank valve more than ½ of one turn on
LPG models.
Question:
Where do I use my grill for safer operation and
better performance?
Answer:
Strong winds and low temperatures can affect the
heating and performance of your gas grill so
factor in these elements when positioning your
grill outdoors for cooking.
Use your grill at least 3 feet away from any wall or
surface.
Use your grill at least 3 feet away from
combustible objects that can melt or catch fire
(such as vinyl or wood siding, fences and
overhangs) or sources of ignition including pilot
lights on water heaters and live electrical
appliances.
Never use your gas grill in a garage, porch, shed,
breezeway or any other enclosed area.
Never obstruct the flow of ventilation air around
your gas grill housing.
Downloaded from www.Manualslib.com manuals search engine

29
A-7
Question:
The Regulator and Hose supplied with my gas grill
does not fit the older LP Gas tank I’ve used for
years. Why not?
Answer:
The U.S. Government regulates gas appliances and
LP Gas tanks. When regulations are changed the LP
Gas tank fittings are altered to insure compliance. If
your LP Gas tank does not fit the Regulator and Hose
supplied with your new grill, the tank is outdated and
must be replaced. Note: Effective April 1, 2002 all LP
Gas tanks sold must include an “OPD” Overfill
Prevention Device. The OPD tanks are identified by
their triangular-shaped valve wheel. This internal
device prevents the LP Gas tank from being overfilled.
Tanks without an OPD valve can not be refilled.
Question:
Is it safe to clean my porcelain coated cooking grids
in the dishwasher?
Answer:
Clean your cooking grids by hand if there are any chips
or cracks in the porcelain finish and dry them thoroughly.
If no chips or cracks are present it should be safe to use
the dishwasher. Remember to dry the cooking grids
thoroughly before placing back onto your grill to
minimize rusting.
Question:
What causes grill parts to rust and what affect does
it have on my grill?
Answer:
Rusting is a natural oxidation process and may
appear on cast-iron and steel parts. Rust will not
affect the short term performance of your grill.
To slow the rusting process on steel Cooking Grids
(select models) we recommend greasing the
Cooking Grids before and after each cookout. Use a
brush to apply a thin layer of cooking oil or vegetable
shortening onto each Cooking Grid. We do not
suggest spray type oils unless they are specified for
high-temperature cooking. Be sure to coat the entire
cooking surface including edges and any areas with
chipped porcelain.
Question:
Which is a better cooking surface to grill on;
porcelain coated steel / cast-iron cooking grids or
stainless steel grids?
Answer:
They all have their advantages. For traditional grilling
and searing meats, cast-iron or steel grids offer
better heat conductivity. To protect against the natural
rusting process, steel or cast-iron cooking grids offer
a porcelain finish which requires routine
maintenance to keep the grids well seasoned.
Stainless steel is popular with those who prefer less
maintenance.
A new innovative solution is available on select
models called stainless Therma-Core™. This
Cooking Grid combines a heat conducting steel core
with an easy-to-clean stainless outer shell.
Question:
Some stainless steel grills specify 304 grade
construction while others do not mention a grade at
all? What is the difference?
Answer:
All stainless grades are not created equal. The 304
grade, also called 18-8 stainless steel, is prized for its
excellent resistance to rust and corrosion and good
performance at high temperatures, which makes it ideal
for grill construction.
304 grade stainless steel is by far the most popular
stainless steel and contains 18-20% chromium and
8-10% nickel, making it non-magnetic.
Some stainless steel grills are constructed of Type 430
stainless steel which contains 16-18% chromium but
generally less than 1% nickel. It is magnetic with less
corrosion and rust resistance and designed for limited
temperature use. Beware of stainless steel grills that
offer no claim of grade because what looks shiny on the
sales floor could become a problem on your patio.
How can you tell if a product is made of 304 grade
stainless? Take the simple magnet test. If a magnet
sticks to the stainless steel it is 430 grade. If a magnet
does not stick you can trust its 304 grade quality.
F
R
E
Q
U
E
N
T
L
Y
A
S
K
E
D
Q
U
E
S
T
I
O
N
S
(
F
A
Q
'
S
)
Downloaded from www.Manualslib.com manuals search engine

30
Grand Hall Enterprise Co., Ltd. warrants to the original
owner that this product is free from defects in
workmanship and materials under conditions of
normal residential use. Grand Hall Enterprise Co., Ltd.
will replace warranty parts according to the part list
of this manual. There will be a charge for shipping
and handling.
The extent of any liability of Grand Hall Enterprise Co.,
Ltd. under this limited warranty is limited to
replacement. The limited warranty period is not
extended by such replacement. Grand Hall Enterprise
Co.,Ltd. is not liable for any labor or other costs
related to the removal and/or installation of any
Warranty Part, installation of replacement parts,
product assembly, and/or delivery costs.
Grand Hall Enterprise Co., Ltd. requires reasonable
proof of your date of purchase. Therefore, you should
retain your sales slip or invoice and register your
new product immediately. Register online at
www.grandhall.com or use the Product Registration
Card included with this product.
This limited warranty does not apply to any damage
due to transportation, installation, purchaser servicing,
accident, abuse, fire, alteration of the product in any
way, act of God, or failure to read and/or abide by any
product warnings, or any parts or labor used to replace
any part or parts covered under this limited warranty.
This limited Warranty is in lieu of any other express or
implied Warranty that may apply to this product. This
disclaimer of implied warranties may not apply to you
because some states do not allow disclaimer of
implied Warranties.
LIMITED WARRANTY
Grand Hall Enterprise Co., Ltd.
9th Fl., No.298, Rueiguang Rd., Neihu,
Taipei, Taiwan (114)
If you live in a state that does not allow disclaimer of
implied Warranties, your state may allow a partial
limitation of implied Warranties to limit the duration of
such Warranties to the duration of an express Warranty.
In such states the duration of the implied Warranties
is hereby expressly limited to the duration of this
Limited Warranty.
In no event, whether as a result of breach of Warranty
or Contract, negligence, strict liabitity, or misrepresen-
tation, will Grand Hall Enterprise Co., Ltd. be liable for
any incidental and/or consequential damages. Grand
Hall Enterprise Co., Ltd.'s liability is limited to the
purchase price of the covered product. This exclusion
of liability is not allowed in some states. Therefore,
this exclusion may not apply to you.
Grand Hall Enterprise Co., Ltd. does not assume, or
authorize any other person to assume for Grand Hall
Enterprise Co., Ltd. any liability from the sale of this
product beyond that expressly set forth in this Limited
Warranty.
This Limited Warranty gives you specific rights.The
laws of your state may give you additional rights.
For Warranty Information, please
call our Grill Information Center at
1-800-770-9769, Monday through Friday,
8 AM TO 4:30 PM CST.
A-8
Downloaded from www.Manualslib.com manuals search engine

Manual de Operación
Parrilla de Gas Propano
Líquido(LPG)
Modelo MFA05ALP
Llámenos primero si tiene cualquier problema
con el producto. Nosotros podemos ayudarle con
sus preguntas del ensamblaje y operación de la
parrilla, o si hay daños o partes que faltan
cuando desempaca esta unidad de la caja de
envío. Favor de llamar antes de devolver el
producto a la tienda.
1-800-770-9769
8am a 4:30pm CST, lunes a viernes
Fallo en cumplir con estas instrucciones puede producir
una explosión o incendio que pueden causar lesiones
serias, muerte o daños a la propiedad.
Aunque usted u otra peprsona hayan ensamblado esta
parrilla, usted debe leer el manual por entero antes de
usarla para asegurarse que la parrilla esté correctamente
ensamblada, instalada y mantenida.
Ÿ
Ÿ
Ÿ
Ÿ
Ÿ
ADVERTENCIA
! !
Centro de información de parrillas:
Use su parrilla por lo menos a 3 pies de distancia
de cualquier pared o superficie. Use su parrilla
por lo menos 3 pies de distancia de objetos
combustibles que pueden derretirse o incendiarse
(como vinilo o tablas de madera forrada, cercas
y techos) o fuentes inflamables incluyendo
lámparas, llamas del piloto de calentadores de
agua y aparatos eléctricos encedidos.
ESTE APARATO DE GAS HA SIDO DISEÑADO
PARA USO AL AIRE LIBRE SOLAMENTE.
Los subproductos de combustión producidos al
usar este producto contienen agentes químicos
conocidos por el Estado de California por causar
cáncer, defectos congénitos, u otros daños al
sistema reproductor.
NOTA AL ENSAMBLADOR/ INSTALADOR:
Deje este manual con el consumidor.
NOTA AL CONSUMIDOR:
Guarde este manual para futuras consultas.
Escriba su # de serie:__________________
(Vea la placa CSA de identificación en la
parrilla.
Nota: Este producto está empacado en
dos cajas.
Ÿ
Ÿ
IMPORTANTE:
Ÿ
Manual # P80164001H - Date:2005/04/01
Ÿ
Downloaded from www.Manualslib.com manuals search engine

2
Tabla de Contenido
Códigos de instalación de la parrilla
La instalación debe estar conforme a los códigos locales,
y en ausencia de ellos, al código de National Fuel Gas
Code, ANSI Z223.1/NFPA 54, o el Código de instalación
de gas propano o gas natural CAN-CGA B149.1.
•
•
•
1.
2
3.
4.
SI HAY OLOR A GAS:
Cierre la fuente de gas.
Apague cualquier llama.
Habra la tapa.
Si el olor continua, aléjese del
aparato y llame inmediatamente a
su suplidor de gas o al
departamento de bomberos.
PELIGRO
!
!
ADVERTENCIA
!
!
•
Los modelos de la parrilla de LPG deben usarse
con Gas Propano Líiquido y el regulador del
ensamble proporcionado con la parrilla. Los
modelos de gas natural deben ser usados con
gas natural. Cualquier intento de cambiar la
parrilla de un tipo de combustible a otro es
sumamente peligroso y anulará la garantía.
Nunca use su parrilla de gas en un garaje,
porche, cobertizo, pasajes o cualquier otra área
cerrada.
Nunca obstruya la circulación de aire alrededor
de la armazón de la parrilla de gas.
Mantenga la manguera del regulador fuera de
superficies calientes y goteos de grasa. Evite
retorcer la manguera. Inspeccione visualmente
las mangueras antes de cada uso por cortes,
rajaduras y daños causador por uso excesivo.
Si la manguera aparece dañada no use la
parrilla de gas. Llame: 1-800-770-9769 para
obtener una manguera de reemplazo.
•
•
•
Advertencias de seguridad principales.............1-3
Términos y condiciones de la garantía....2, A8
Instrucciones para antes del ensamblaje...3
Diagramas de partes y listas.................4-7
Instrucciones para el ensamblaje............8-15
Instrucciones para uso y cuidado:
• Seguridad del gas y escapes........16-18
• Instrucciones para encender...................19
• Reparación técnica..................................20
• Limpieza y mantenimiento................21-22
• Guía para Asar.................................A1-A5
• Preguntas Frecuentes........................A6-A7
Garantía Limitada
Garantía por vida:
Tubos de los fogones y partes de acero inoxidable
(excepto por decoloración debido a uso normal o
calor excesivo, rayones o abolladuras causadas
por uso normal o mantenimiento incorrecto.
Un año completo de garantía en la parrilla
Por un año de la fecha de compara, el fabricante
hará reparaciones o reemplazará, a nuestra opción,
cualquier parte de la parrilla (excepto por pérdida
de pintura, desteñido de la pintura, decoloración
corrosión, batería del encendedor, descascarado
de la capa de textura, rayones y abolladuras en la
textura y superficies de granito.)
Servicio de información sobre la garantía
El servicio de información sobre la garantía está
disponible al ponerse en contacto con el Servicio
al cliente 1-800-770-9769 de lunes a viernes entre
las 8:00am - 4:30pm CST.
Restricciones de la garantía
Esta garantía se anula si la parrilla es alquilada
o usada en una manera comercial.
Esta parrilla está certificada por seguridad para
ser usada sólo en el país donde se ha comprado.
Modificación para usarse en cualquier otro sitio
representa un peligro hacia su seguridad y anula
la garantía.
Esta garantía le confiere derechos legales
específicos y pueda ser que tenga otros derechos
los cuales varían de un Estado al otro.
Fabricante:
Grand Hall Enterprise Co., Ltd.
9
th
Fl., No. 298 Rueiguang Rd., Neihu,
Taipei, Taiwan (114)
1.
2.
3.
4.
ADVERTENCIA
!
!
No almacene el tanque extra de LP a
menos de una distancia de 10 pies (3m)
de este aparato.
No almacene o use gasolina u otros
líquidos con vapores inflamables dentro
25 pies (8m) de este aparato.
Cuando cocina con aceite/grasa no
permita que caliente más de 350F
(117C).
No deje desatendido el aceite caliente.
Downloaded from www.Manualslib.com manuals search engine

3
Instrucciones para antes del ensamblaje
!
CUIDADO
!
Fallo en cumplir con estas instrucciones puede
resultar en una situación peligrosa, la cual si no se
evita, puede resultar en lesiones.
Arańas e insectos pequeńos pueden tejer y anidar
telarańas en los tubos del fogón durante el
trįnsito resultando en una obstrucción de la
circulación del gas causando un fuego alrededor
de los tubos del fogón. Este tipo de fuego se
llama "RETROCESO DE LLAMA"puede causar
dańos serios a la parrilla y crear una función que
puede ser peligrosa para el usuario.
Para reducir la oportunidad de tener RETROCESO
DE LLAMA usted debe limpiar los tubos del
fogón de la siguiente manera antes del montaje
de su parrilla. También haga esto por lo menos
una vez al mes en verano y otoño, y si su parrilla
no ha sido usada por un período de tiempo
prolongado.
1. Retire el tornillo de la parte trasera de cada fogón
usando un destornillador de cabeza de Phillips.
2. Levante cada fogón hacia arriba alejándolo
cuidadosamente del orificio de la válvula de gas.
3. Verifique y limpie los tubos del fogón y los tubos
Venturi por nidos e insectos. Un tubo obstruido
puede resultar en un fuego debajo de la parrilla.
4. Refiérase a la figura de abajo y oficie uno
de los 3 métodos de limpieza:
MÉTODO 1: Use un alambre rígido, o una
percha de alambre, dóblada en forma de
gancho pequeño como se muestra en el
dibujo y entre el gancho por el tubo de fogón
varias veces para limpiar losescombros.
MÉTODO 2: Use un cepillo de botella con un
mango flexible y còrralo dentro del tubo del
fogón varias veces para sacar los escombros.
MÉTODO 3: Use una manguera de aire a presión
para forzar aire dentro de los tubos de cada fogón
hasta asegurarse que estén completamente
limpios y que los escombros hayan salido de los
tubos a través de los puertos.
PARA LIMPIAR EL TUBO DEL
FOGÓN INSERTE EL
GANCHO AQUÍ
9
Herramientas requeridas para el ensamble:
Guantes de trabajo protectivos
Gafas protectivas para trabajo industrial
Destornillador con cabeza Phillips
Mientras que es posible que una persona pueda
desempacar este aparato, es mejor tener la ayuda de
otra persona para levantar las piezas pesadas.
Use el diagramas de partes y ferretería to ensure all
items are included and free of damage.
No ensamble u opere la parrilla si parece que algo
iestá dañado. Si hay daños o partes que faltan
cuando desempaca la parrilla de la caja de envío o
usted tiene preguntas sobre el proceso del
ensamblaje, llame al:
Para acelerar el proceso de ensamblaje siga estas
las siguientes instrucciones.
•
•
Centro de información de Parrillas
1-800-770-9769
8am a 4:30pm CST, lunes a viernes
ADVERTENCIA
!
Para una operación sin peligro asegúrese que el
orificio del ensamble de la válvula de gas esté
dentro del tubo de fogón antes de usar su parrilla.
Vea la figura. Si el orificio no está dentro del tubo
del fogón, al encender el fogón podría causar una
explosión y/o incendio resultando en lesiones
corporales serias y/o daños materiales.
!
•
Tubo del fogón
Ensamble / Válvula de gas
Orificio Tubo del fogón
Downloaded from www.Manualslib.com manuals search engine

4
CÓDIGODESCRIPCIÓN DE LAS PARTES
UNIDADES
USO DE LAS PARTES
P06002021APaquete de ferretería1Para uso y ensamblaje
S112G0408ATornillo de cabeza Phillips 1/4"x1/2"8
Adjunta los soportes de los paneles a la extensión del soporte de los paneles
S112G0306ATornillo de cabeza Phillips 3/16"x3/8"8
Adjunta los paneles del medio a los paneles izquierdo y derecho
P05322003AAjustador de nivel4Adjunta la pata de la isla
P05515017LLlave inglesa1
Aprieta el ajustador de nivel
S142G0306A
Tornillo avellanado de cabeza plana 3/16"x3/8"
4
Adjunta el panel-tabique al soporte de los paneles frontales y posteriores
S112G0306ATornillo de cabeza Phillips 3/16"x3/8"4Adjunta la repisa inferior al panel izquierdo
S112G0306ATornillo de cabeza Phillips 3/16"x3/8"4Adjunta la bandeja del tanque a los paneles de la derecha
S112G0306ATornillo de cabeza Phillips 3/16"x3/8"4
Adjunta el panel-tabique a los paneles de la izquierda
S112G0306ATornillo de cabeza Phillips 3/16"x3/8"2Adjunta la canasta para condimentos al panel lateral izquierdo
S112G0306ATornillo de cabeza Phillips 3/16"x3/8"4Adjunta el panel-tabique a los paneles de la derecha
S112G0408ATornillo de cabeza Phillips1/4"x1/2"4
Adjunta el refuerzo del soporte del tazón a los paneles izquierdo y derecho
S112G0306ATornillo de cabeza Phillips 3/16"x3/8"4Adjunta el protector de viento a los paneles izquierdo y derecho
S142G03061
Tornillo avellanado de cabeza plana 3/16"x3/8"
8Adjunta los topes de la puerta a los paneles izquierdo y derecho
S112G04081Tornillo de cabeza Phillips 1/4"x1/2"2Adjunta el tazón de la parrilla al refuerzo del soporte de la parrilla
S112G0406ATornillo de cabeza Phillips 1/4"x3/8"8
S431G0406A
Arandela resorte 1/4"
8
S411G04093
Arandela simple 1/4"
8
S112G0304ATornillo de cabeza Phillips 3/16"x1/4"4Adjunta la manija de la puerta al panel de la puerta.
P00201001C
Manija de la puerta
2Adjunta a los paneles de la puerta
S112G0408ATornillo de cabeza Phillips 1/4"x1/2"2Adjunta la moldura de la mesa al tazón de la parrilla
S235G0534ATuerca mariposa 5/16"x3"1Asegura el tanque de gas
Adjunta los paneles de granito de la superficie de la mesa
Lista de partes del paquete de ferretería Modelo MFA05ALP
Tuerca mariposa
5/16"x3"
Unidad 1
Código S235G0534A
Tornillo de cabeza
Phillips 1/4"x1/2"
Unidades 14
Código S112G0408A
Tornillo de cabeza
Phillips 3/16"x3/8"
Unidades 30
Código S112G0306A
Tornillo de cabeza
Phillips 1/4"x3/8"
Unidades 8
Código S112G0406A
Arandela resorte 1/4"
Unidades 8
Código S431G0406A
Arandela simple 1/4"
Unidades 8
Código S411G04093
Ajustador de nivel (scale: 1/2)
Unidades 4
Código P05322003A
Tornillo avellanado de
cabeza plana 3/16"x3/8"
Unidades 4
Código S142G0306A
Llave inglesa (scale: 1/2)
Unidad 1
Código P05515017L
* Una batería /AA incluída en el paquete de ferretería
Las partes de ferretería ya están instaladas en
la manija de la puerta
Tornillo de cabeza Phillips 3/16" x 1/4"
Unidades 4
Código S112G0304A
Manija de la puerta (scale: 1/2)
Unidades 2
Código P00201001C
Tornillo avellanado de
cabeza plana 3/16"x3/8"
Unidades 8
Código S142G03061
Tornillo de cabeza
Phillips 1/4"x1/2"
Unidades 2
Código S112G04081
Downloaded from www.Manualslib.com manuals search engine


6
CódigoDescripción#De ParteUnidades
1Montaje de la tapaY01100371
2Indicador de temperaturaP00601061A1
3Manija de la puertaP00205014B1
4Bisagra de la tapaP05501018A2
5Material protectorP05518011I2
6Reja secundaria para asarP01514004A1
7Reja para asarP01602011E4
8Fogón principalP02008016A4
9Savor Plate™ P01708004A4
10Soporte frontal del Savor Plate™ P03328015A4
11Soporte trasero del Savor Plate™ P03328017A4
12Soporte del fogónP0220406ED1
13Tubo para encenderP05530003A1
14Protector susperior para el calor de la bandeja de grasaP06903033A1
15Protector de viento del tazónP06905022A1
16Panel del tazón, izquierdoP0072031EC1
17Panel del tazón, derechoP0072131EC1
18Plato para drenaje de grasa P06902005C2
19Panel del tazón, posteriorP0072541DC1
20Panel del tazón, frontalP0073841FC1
21Caja colectora de gas con electrodoP02609001B4
22Juego de cables eléctricosP02615077A1
23Válvula de gas/ensamble del múltipleY00602281
24Control del panel, superiorP02907446A1
25Control del panel, inferiorP02907456A1
26Perilla de controlP03424231L4
27Resorte de la perilla de controlP05504021A4
28Base de la perilla de controlP03413011J4
29Encendedor eléctrico, 4-puertosP02502134C1
30Superficie de la mesa, granito/isla/izquierdaP07804001B1
31Superficie de la mesa, granito/isla/derechaP07804002B1
32Moldura de la mesaP07515016B1
33Protector inferior para el calor de la bandeja de grasaP06903031A1
34Bandeja para la grasaP02717085B1
35Panel frontal de la bandeja para la grasaP00213004B1
36Manija de la bandeja de grasaP00203005H1
37Soporte del tazónP01306016D2
38Soporte del panel tabiqueP03327019D2
39Regulador con manguera (LPG)P03631001A1
40Protector de vientoP06905023B1
Lista de partes del modelo MFA05ALP
Downloaded from www.Manualslib.com manuals search engine

7
CódigoDescripción#De ParteUnidades
41Soporte del panel frontal/derecho, trasero/izquierdoP07702040M2
42Soporte del panel frontal/izquierdo, trasero/derechoP07702038M2
43Imán de la puertaP05523001K4
44Soporte de la bisagra de la puerta, izquierdaP03314011D1
45Soporte de la bisagra de la puerta, derechaP03314012D1
46 Extensión del soporte del panel P00922003C2
47 Canasta para condimentosP05204004B1
48 Panel, tabiqueP07604008B2
49 Repisa Inferior P01001007D1
50 Placa del tope de la puertaP03305017D2
51 Manija de la puertaP00201001C2
52 Panel de la puerta, izquierdoP04305002F1
53 Panel de la puerta, derechoP04306002F1
54 Bandeja para el tanqueP04021001C1
55 Panel del medioP07702039M2
56 Ajustador de nivelP05322003A4
Manual de OperaciónP80164001H1
Paquete de ferreteríaP06002021A1
Lista de partes del modelo MFA05ALP
Para obtener las partes correctas de reemplazo para su parrilla de gas, refiérase por favor a los
números de partes indicados en esta lista. La siguiente información es requerida para asegurarse que
recibe las partes correctas:
1. Modelo y Número de Serie (Ver la placa CSA en la parrilla)
2. Número de la parte
3. Descripción de la parte
4. Cantidad de partes requeridas
Importante: Sólo use partes autorizadas por la fábrica. El uso de cualquier parte que no sea autorizada
puede ser peligroso y le anulará la garantía del producto. Mantenga el Manual de Operación en un lugar
conveniente para su referencia y lista de partes.
Para el reparo o reemplazo de partes, Usted necesita:
Llamar a nuestro Centro de Información de Parrillas al 1-800-770-9769
Downloaded from www.Manualslib.com manuals search engine

8
1
2-1
Coloque los paneles traseros ya ensamblados sobre
el panel del medio. Encaje los soportes del panel
trasero dentro de las ranuras del panel del medio.
Instala los Paneles y los soportes del panel
Instrucciones del Ensamblaje
Instala los paneles de en medio
Coloque la hoja de cartón en el piso y úsela como superficie
para trabajar para proteger el piso y las partes de la parrilla
de ralladuras.
Instale el soporte del panel trasero izquierdo y el soporte
del panel trasero derecho al soporte de la extensión del
panel usando los tornillos S112G0408A. No apriete los
tornillos.
Nota: Hay dos soportes de las bisagras de las puerta adjuntos
a los paneles traseros izquierdo y derecho.
Repita los pasos de la instalación de los paneles frontales.
Tornillo de cabeza Phillips 1/4"x1/2"
Unidades 8
Código S112G0408A
Soporte de la bisagra de la puerta
Tornillos puestos flojos
Downloaded from www.Manualslib.com manuals search engine

9
2-2
3
Instale los soportes del panel-tabique
Asegure el panel del medio entre los paneles traseros
izquierdo y derecho usando los tornillos S112G0306A.
Apriete los tornillos S112G0408A indicados en el paso 1.
Repita los pasos para la instgalación del Panel del Medio a
los paneles frontales.
Instale los ajustadores de nivel usando la llave inglesa que
vino con el producto.
Con un ayudante, instale los soportes del
panel-tabique a los paneles frontales y
traseros.
Instale los paneles y los ajustadores de nivel
Tornillo de cabeza Phillips 3/16"x3/8"
Unidades 8
Código S112G0306A
Ajustador de nivel (scale: 1/2)
Unidades 4
Código P05322003A
Llave inglesa (scale: 1/2)
Unidad 1
Código P05515017L
Tornillo avellanado de cabeza plana
3/16"x3/8"
Unidades 4
Código S142G0306A
Downloaded from www.Manualslib.com manuals search engine

10
4
Instale la repisa inferior
Instale la repisa inferior al panel izquierdo.
Tornillo de cabeza Phillips 3/16"x3/8"
Unidades 4
Código S112G0306A
Tornillo de cabeza Phillips 3/16"x3/8"
Unidades 4
Código S112G0306A
Instale la bandeja del tanque al panel derecho.
5
Instale la bandeja del tanque
Tornillo de cabeza Phillips
3/16"x3/8"
Unidades 6
Código S112G0306A
6
Instale el panel-tabique y la canasta para condimentos
Instale el panel-tabique dentro del gabinete izquierdo.
Instale la canasta para condimentos al panel-tabique
dentro del gabinete izquierdo.
Downloaded from www.Manualslib.com manuals search engine

11
8
7
Instale el panel-tabique
Instale el panel-tabique dentro del gabinete
derecho usando los tornillos S112G0306A.
Tornillo de cabeza Phillips 3/16"x3/8"
Unidades 4
Código S112G0306A
Instale el protector de viento
Instale el protector de viento a los paneles
traseros usando los tornillos S112G0306A.
Tornillo de cabeza Phillips
3/16"x3/8"
Unidades 4
Código S112G0306A
Downloaded from www.Manualslib.com manuals search engine

12
9
Instale el tazón de la parrilla y los refuerzos
de los soportes del tazón
Remueva los componentes de cocinar del tazón
de la parrilla.
Con un ayudante eleve y posicione el tazón
sobre la isla.
Instale los refuerzos de los soportes del tazón a
los paneles izquierdo y derechos usando los
tornillos S112G0408A.
Inserte los tornillos a través de los huecos en el
refuerzo del soporte y dentro de los huecos en el
tazón de la parrilla. Usando los tornillos
S112G04081 apriételos con seguridad.
CUIDADO: Asegúrese que el Regulador está
posicionado entre el tazón de la parrilla y el
panel de adentro como se muestra.
Tornillo de cabeza Phillips
1/4"x1/2"
Unidades 2
Código S112G04081
Tornillo de cabeza Phillips
1/4"x1/2"
Unidades 4
Código S112G0408A
Tornillo avellanado de
cabeza plana 3/16"x3/8"
Unidades 8
Código S142G03061
10
Instale los topes de la puerta
Coloque las placas del tope de la puerta encima de
los paneles izquierdo y derecho. Encaje las placas
del tope de la puerta dentro de las ranuras de los
paneles como se muestra. Usando los tornillos
S142G03061 apriételos con seguridad.
Downloaded from www.Manualslib.com manuals search engine

13
11
Instale los paneles de la parte superior de
la mesa
Tornillo de cabeza Phillips 1/4"x3/8"
Unidades 8
Código S112G0406A
Arandela resorte 1/4"
Unidades 8
Código S431G0406A
Arandela simple 1/4"
Unidades 8
Código S411G04093
Arandela
resorte 1/4"
Arandela
simple 1/4"
Tornillo de cabeza
Phillips 1/4"x3/8"
Con un ayudante, coloque los paneles de la
parte superior de la mesa sobre la isla.
Apriete los tornillos con las arandelas resorte
y las arandelas simples.
CUIDADO: No apriete los tornillos demasiado
o puede rajar los paneles de granito de la
parte superior de la mesa.
12
Instale los paneles de las puertas
Instale las manijas de las puertas usando los tornillos S112G0304A.
Inserte el poste inferior de la puerta dentro de la parte inferior del
soporte de la bisagra. Luego incline y deslice la puerta hasta que
el poste superior se alinée con el hueco en el tope de la puerta.
Afloje la placa del tope de la puerta si es necesario para alinear el
poste con el hueco.
Tornillo de cabeza Phillips
3/16" x 1/4"
Unidades 4
Código S112G0304A
(Las partes de ferretería ya
están instaladas en la manija
de la puerta)
Manija de la puerta
Unidades 2
Código P00201001C
Downloaded from www.Manualslib.com manuals search engine

14
13
Instale la bandeja para la grasa
Por el frente de la parrilla, deslice la bandeja
para la grasa sobre los carriles laterales debajo
del tazón de la parrilla.
14
Instale la moldura de la mesa
Inserte los tornillos a través de los huecos
por el lado de adentro de la moldura de la
mesa y hacia dentro del tazón de la parrilla.
Apriételos con seguridad.
Tornillo de cabeza Phillips 1/4"x1/2"
Unidades 2
Código S112G0408A
Downloaded from www.Manualslib.com manuals search engine

15
15
Remueva la tapa del encendedor del panel
de control.
Coloque las baterías AA en la ranura del
encendedor con el polo positivo cara a
usted.
Posicione la tapa y el resorte por encima
de las baterías AA y apriételo hacia el
panel de control.
Fallo en leer y seguir las instrucciones del uso
y cuidado de la parrilla puede causar una
explosión que puede producir serias lesiones
al cuerpo, muerte o daños a la propiedad.
Instale los componentes para cocinar
17
Asegúrese que las perillas de Control
están todas puestas en "OFF" y abra la
tapa de la parrilla.
Su ayudante debe pararse detrás a la
derecha de la parrilla y mirar hacia el
frente del tazón de la parrilla. Nunca
ponga la cara dentro del cabezal de la
parrilla.
Presione la tapa del encendedor. Debe
escuchar un sonido de "clic". Su
ayudante debe ver una chispa azul
dentro de cada caja colectora de gas.
Si hay chispa, las puntas del electrodo
están correctamente posicionadas.
Si NO ve una chispa, la distancia entre
los electrodos tiene que ser ajustada
en la siguiente manera:
Con la ayuda de otra persona
ejecute el chequeo de este
electrodo antes de proseguir.
Esta prueba le asegura que las puntas del
electrodo de chispa estén correctamente
posicionadas para que su parrilla encienda
sin dificultad.
ADVERTENCIA
!
!
Instale la batería del encendedor
+
_
Tapa del
encendeddor
Resorte
Raja del
encendedor
Baterías AA
Coloque los Savor Plates™ por encima de
los fogones.
Coloque las rejas de asar sobre el reborde
encima de los Savor Plates™.
Coloque las rejas secundarias de asar
dentro de las ranuras en ambos lados del
tazón de la parrilla.
•
•
•
Usando una llave inglesa graduable,
afloje la tuerca interior hasta que la caja
colectora de gas puede girarse hacia
arriba.
Si el espacio entre la punta del electrodo
de chispa y el recibidor es más de
3/16" use un alicate de boca larga para
apretar delicadamente la caja colectora
de gas para reducir el espacio.
Devuelva la caja colectora de gas a su
puesto original, asegure la tuerca interna
y pruebe la chispa del electrodo de
nuevo. Si no escucha ningún sonido de
un "clic":
Las baterías AA están al revés.
Los alambres electrónicos están
sueltos. Remueva las baterías AA e
inspeccione la caja de juntura del
encendedor que se encuentra detrás
del Panel de control y vuelva a
reconectar cualquier alambre suelto.
•
16
Savor Plates™
Rejas secundarias
Rejas para asar
•
Tuerca interna
Espacio de
la chispa
Caja colectora de gas
Recibidor de chispa
Punta del electrodo de chispa
Cuando haya terminado de ensamblar su
parrilla asegúrese que todos los tornillos
estén bien apretados para una operación
segura.
Paso final del ensamblaje
de la parrilla
Downloaded from www.Manualslib.com manuals search engine

16
INSTRUCCIONES PARA USO Y CUIDADO
USO CORRECTO DEL TANQUE DE GAS LP
El tanque de gas LP debe ser construido y marcado
en conformidad con las especificaciones de cilindros
LP de gas del Ministerio de Transporte (D.O.T) de
U.S.A. o el Estándar nacional del Canadá, Canada/CSA
- B339, cilindros, esferas y tubos para el transporte de
artículos peligrosos; y Comisión como sea aplicable.
El tanque de gas LP debe tener una válvula de cierre,
terminando en la salida de la válvula del tanque de
suministro de gas LP, que sea compatible con un
dispositivo de conexión Tipo 1. El tanque de gas LP
debe tener un dispositivo de seguridad con una
conexión directa con el espacio de vapor del tanque.
El sistema de suministro de tanque debe estar
organizado para el retraimiento de vapor.
El tanque de gas LP usado debe tener un cuello para
proteger la válvula de tanque.
Nunca conecte un tanque de gas LP irregulado a su
parrilla de gas. El regulador de gas proporcionado
con su parrilla está ajustado para una presión de
tomacorriente de columna de agua 11 " (W.C.) para
la conexión a un tanque de gas LP. Solamente use
el regulador y el ensamble de manguera
proporcionadas con su parrilla de gas. Sustitución
de reguladores y ensambles de manguera deben
ser los especifi- cados por el fabricante.
Haga que su comerciante de gas LP chequee la
válvula de llenamiento después de cada llenado y que
le asegure que está libre de defectos.
Almacene siempre el tanque de Gas LP en una
posición vertical.
No sujete el tanque de gas LP a un calor excesivo.
Nunca guarde un tanque de gas LP dentro de la casa.
Si usted guarda su parrilla de gas en el garaje, primero
desconecte el tanque de gas LP y almacénelo afuera.
Los tanques de gas LP deben ser guardados fuera en
una área bien ventilada y fuera del alcance de niños.
Los tanques de gas LP desconectados no deben
guardarse en edificios, garajes o cualquier otra área
cerrada.
El regulador y el ensamble de las mangueras deben
ser inspeccionados antes de cada uso de la parrilla.
Si hay cortadas, daños excesivos o si la manguera ha
sido muy doblada, deben ser reemplazado antes de
usar la parrilla otra vez.
Nunca encienda su parrilla de gas con la tapa cerrada
o antes de asegurarse que los tubos de los fogones
estén bien colocados dentro del orificio de la válvula
de gas.
Nunca permita que niños operen su parrilla. No permita
que niños o mascotas jueguen cerca de su parrilla.
El uso de alcohol o drogas podría afectar la habilidad
de montar y operar el aparato.
•
•
•
ADVERTENCIA
! !
Use su parrilla por lo menos a distancia de 3 pies
de cualquier pared o superficie. Use su parrilla
por menos a distancia de 3 pies de objetos
combustibles que pueden derretirse o incendiarse
(como vinilo o tabla de forro de madera, cercas
y salientes) u otros orígenes de encendido
incluyendo llamas del piloto de calentadores de
agua y aparatos eléctricos.
Nunca use su parrila de gas dentro de un garaje,
porche, cobertizo, pasabrisas o cualquier área
encerrada.
Nunca obstruya la circulación de aire al rededor
de su parrilla.
Los modelos de la parrilla de gas LP están diseñados
para uso con un tanque estándar de 20 libras. El tanque
de gas LP líquido, (no incluído con la parrilla). No conecte
su parrilla de gas a un tanque de gas de LP que
sobrepasa esta capacidad. Un tanque de approximately
12 pulgadas de diámetro y 18-1/2 pulgadas de altura es
el tanque de gas LP de tamaño máximo para usarse.
Usted debe usar un tanque de gas "OPD" que brinda un
dispositivo de prevención de sobrellenado. Este control
impide que el tanque se sobrellene lo cual puede causar
mal funcionamiento del tanque de Gas LP del regulador
y/o la parrilla.
Mantenga el extintor fácilmente accesible. En caso de
un fuego de grasa, no trate de extinguirlo con agua.
Use un extintor tipo B o use tierra, arena o bicarbonato.
En caso de lluvia apague el fogón en OFF y el suministro
de gas.
Use su parrilla sobre una superficie horizontal y
estable en una área lejos de materiales
combustibles.
No deje la parrilla desatentida cuando está en
uso.
No mueva el aparato cuando está en uso.
Cubra su parrilla cuando no está en uso.
Permita que la parrilla se enfríe antes de la
moverla o almacenarla.
No use su parrilla como un calentador.
Esta parrilla no es para ser instalada en
caravanas, botes y/o vehículos de recreo.
ADVERTENCIA
!!
No almacene su tanque extra de Gas LP debajo
o cercano a este aparato;
Nunca llene el tanque más del 80% de lleno;
Si la información en "(A)" y "(B)" no se sigue con
exactitud, un incendio causando muerte o lesiones
serias puede ocurrir.
A.
B.
C.
Downloaded from www.Manualslib.com manuals search engine

17
INSTRUCCIONES PARA USO Y CUIDADO
NOTA: Programas para tanques de gas LP
Ÿ
Como hacer pruebas de escapes en su tanque LP
Gire la válvula de gas LP hacia la derecha a la
pósición OFF.
Coloque el tanque de gas dentro del hueco de la
bandeja del tanque.
Instale el tanque de manera que la válvula del
tanque mire hacia la esquina derecha de atrás del
gabinete.
Atornille la tuerca mariposa hasta que el tanque de
gas quede bien asegurado.
Las pruebas de escapes deben ser repetidas cada vez
que su tanque de gas LP se cambia o es vuelto a
llenar.
No fume cuando está buscando escapes de gas.
No use llama viva cuando esta buscando escapes de gas.
Su parrilla debe ser probada por escapes fuera de la
casa en una área bien ventilada, alejadas de origenes
de encendido como aparatos de gas o eléctricos.
Mantenga la parrilla alejada de llamas vivas o chispas.
No use limpiadores domésticos. Puede resultar en
daño a los ensambles y sus componentes.
Ÿ
Ÿ
Para su seguridad:
Muchos vendedores de parrillas al por menor le ofrecen
la alternativa de reemplazar su tanque de gas LP vacío a
través de un servicio de intercambio. Use solamente
esas compañías de intercambio reputables que
inspeccionan, llenan a presición, evalúan y certifican su
tanque. Cambie su tanque solamente por un tanque de
seguridad OPD - equipado como se describe en la
sección de tanque de gas LP de este manual.
Mantenga su tanque de gas LP en una posición vertical
durante su uso, tránsito o almacenamiento.
Haga pruebas de escape en su nuevo tanque antes de
conectarlo a su parrilla.
Use una brocha limpia y una solución enjabonada
de 50/50 jabón/agua.
Pinte la solución enjabonada en el tanque de gas
LP en las áreas demostradas por las flechas. Vea
el diagrama.
Si se forman burbujas no use o cambie de lugar
el tanque de gas LP. Llame a un proveedor de
gas de LP o al Departamento de Bomberos.
Modelo para gas LP solamente:
Asegure a la parrilla un tanque de gas LP
de 20lbs.
Ÿ
Ÿ
Ÿ
Ÿ
Ÿ
CUIDADO: Cuando el aparato no está en uso debe
apagarse (ponerse en OFF) en el tanque de gas.
Tuerca mariposa 5/16"x3"
Unidad 1
Código S235G0534A
Solamente para el modelo de gas LP:
Conecte el regulador con la manguera a
su tanque LPG
Conexión tipo 1 por
ANSI Z21.58b-2002
Rosca de
acoplamiento
rápido
Gire todas las válvulas del fogón hacia OFF.
Inspeccione el puerto de conexión de la válvula y el
ensamble del regulador por daños o escombros.
Retire cualquier escombro. Nunca use equipo dañado
o obstruido.
Conecte el ensamble del regulador a la válvula del
tanque y a la rosca de acoplamiento rápido
APRIÉTELA A MANO hacia la derecha. NO USE una
llave inglesa para apretar porque podría dañar la
rosca de acoplamiento-rápido y resultar en una
situación peligrosa.
Abra la válvula del tanque 1/4 a 1/2 (girando hacia
la izquierda) y use una solución de agua enjabonada
para examinar todas las conexiones en busca de
escapes antes de intentar encender su parrilla. Vea
"Buscando escapes de gas LP". Si un escape es
encontrado, cierre la válvula de tanque y no use su
parrilla hasta que el escape sea arreglado.
Si se forman burbujas y siguen aumentando no
use o mueva el tanque de gas LP ¡Póngase en
contacto con su proveedor de gas LP o el
Departamento de Bomberos!
ADVERTENCIA
!
!
Downloaded from www.Manualslib.com manuals search engine

18
INSTRUCCIONES PARA USO Y CUIDADO
Desconectando el tanque de gas propano
líquido (LPG) de su parrilla
Asegúrese que las válvulas del fogón y del
tanque de gas LP estén cerradas (Gírelas
hacia la derecha para cerrarlas).
Separe el ensamble de la manguera de la
válvula del tanque de gas LP girando la rosca
de acoplamiento-rápido hacia la izquierda.
Nunca use una llama viva para hacer pruebas de
escapes. Haga la prueba en el primer uso y luego en
cada estación anual, o cuando cambia el tanque de
gas LP, Asegúrese que no hayan escapes de gas. Siga
estos tres pasos:
Debe chequear todas las conexiones por
escapes de gas
ADVERTENCIA
!!
Si usted tiene un escape de gas que no se puede
reparar apretando la tuerca, cierre el gas en
su punto de origen, desconecte la línea del
combustible a su parrilla y llame 1-800-770-9769
o a su suplidor de gas para que le ayude.
Válvula de gas / Ensamble del múltiple
Regulador con manguera (LPG)
Tanque de gas LP
Haga una solución de jabón mezclando
detergente líquido con agua una parte jabon:
a una de agua.
Gire las perillas de Control del fogòn por
completo a la posición OFF, luego encienda
el gas (ON) en su punto de origen.
Aplique la solución de jabón a todas las
conexiones de gas indicadas por las flechas.
Vea el diagrama.
Si se forman burbujas en las conexiones debe
apretar mejor la conexión porque no está bien
sellada. Verifique cada juntura y apriete o
repare como sea necesario.
Downloaded from www.Manualslib.com manuals search engine

19
Para encender su parrilla de gas con fósforo de papel,
siga los pasos del 1 al 6 descritas en la sección de
Procedimientos Básicos para Encender. Luego
encienda el fósforo y colóquelo cerca del final del tubo
para encender situado al lado derecho de la parrilla.
Gire la perilla de control del fogón más cercano a HIGH
para dejar salir el gas. El fogón debe encenderse
inmediatamente.
Tubo para
encender
5.
4.
3.
2.
1.
7.
10.
9.
8.
6.
Empuje y gire la perilla de control izquierda a HIGH.
Inmediatamente presione el encendedor electrónico
entre 3-4 segundos para encender el fogón.
PRESIONE
11.
Cuando el fogón se haya encendido, gire la válvula
del tanque DESPACIO otro 1/4 de vuelta para
completar (media) 1/2 vuelta.
Una vez que un fogón se haya encendido, el fogón
adyacente se puede encender girando su perilla
de control a HIGH.
INSTRUCCIONES DE USO Y CUIDADO
Instrucciones para encender la parrilla
Perillas de control del panel de control de los fogones
Antes de usarse, examine todas mangueras en
busca de rajaduras, cortes, reducciones,
quemaduras o rasguños. Si una manguera está
dañada, no use su parrilla antes de reemplazar la
manguera con una pieza autorizada. También
asegúrese que todas conexiones de suministro de
gas estén bien apretadas.
Familiarícese con la seguridad, uso y cuidado en
este manual. No fume mientras enciende la parrilla o
està chequeándo las conexiones de gas.
Asegúrese que el tanque de gas está lleno.
Abra la tapa de la parrilla.
Verifique que el final de cada tubo del fogón estè
apropiadamente ubicado sobre cada orificio de la
válvula.
Fallo en reemplazar una manguera defectuosa,
asegurar las conexiones del suministro de gas o
abrir la tapa antes de seguir el proceso para encender
pueden resultar en un fuego o explosión que pueden
causar lesiones serias y/o daños materiales.
ADVERTENCIA
!
!
Empuje y gire las perillas de control a OFF y abra la
válvula de gas DESPACIO 1/4 de vuelta.
Abra el tanque
de gas LP hacia
la izquierda
Si no se enciende en 5 segundos, gire la perilla de
Control del fogón y la fuente de gas a OFF y haga
una prueba de escapes en todas las conexiones de
gas y orígenes de gas como se explica en la sección
de "Uso y Cuidado" en este manual. Si no hay
escapes, espere 5 minutos para aclarar el gas y
repita el procedimiento del alumbrado.
FOGÓN PRINCIPAL
Encendiendo la parrilla manualmente con fósforos
Fósforo
Nunca se recline sobre el área de cocinar de la
parrilla mientras enciende el gas. Mantenga su
cara y cuerpo a una distancia segura (al menos
18 pulgadas) de los fogones cuando enciende
la parrilla con un fósforo.
ADVERTENCIA
!
!
Si no se enciende en 5 segundos, gire la perilla de
Control a OFF y la salida de la fuente de gas a OFF y haga
una prueba de escapes como se indica en la sección
de este manual de Uso y Cuidado. Si no hay
escapes espere 5 minutos y trate de nuevo.
ADVERTENCIA
!
!
OFF
LOW
OFF
HI
Downloaded from www.Manualslib.com manuals search engine

20
WARNING
1.
Centro de información de parrillas
8am a 4:30pm CST 1-800-770-9769 lunes a viernes
INSTRUCCIONES DE USO Y CUIDADO
Reparación técnica -
Si la parrilla no enciende
Apague el gas en la fuente y gire las perillas de
control a OFF. Espérese al menos cinco minutos
para que se disperse el gas, y vuelva a tratar.
Si su parrilla todavía no enciende, verifique el
suministro de gas y las conexiones.
Repita el procedimiento para encender. Si su
parrilla todavía no opera, apague el gas en la fuente,
gire las perillas de Control a OFFy verifique lo
siguiente:
3.
2.
Mala alineación de los tubos de los fogones sobre los
orificos
Corrección: Reposicione los tubos sobre los orificios.
Obstrucción en la línea de gas:
Corrección: Retire la línea de combustible de la parrilla.
¡No fume! Abra el suministro de gas por un segundo para
despejar cualquier obstáculo de la línea de combustible.
Cierre el suministro de gas en el punto de origen y
reconecte la línea de combustible a la parrilla.
Orificio obstruido
Corrección: Remueva los fogones de la parrilla
sacando el tornillo de la parte de atrás de cada fogón
usando un destornillador de cabeza Phillips. Con
cuidado levante cada fogón hacia arriba alejándolo
con cuidado del orificio de la válvula de gas.
Remueva el orificio de la válvula de gas y con
delicadeza despeje cualquier obstrucción usando un
alambre bien delgado. Luego reinstale todos los
orificios, fogones, tornillos y componentes para
cocinar.
Si sospecha que hay un obstáculo en las válvulas de gas
o en el múltiple, llame al Centro de Información de
Parrillas.
Obstáculo dentro de los tubos de los fogones
Corrección: Proceda a limpiar el tubo del fogón usando el
procedimiento en la página 22 del manual de Operación.
Mala aliniación del encendedor sobre el fogón
Corrección: examine la punta y busque el sitio correcto del
electrodo como se muestra en la página 15 paso 16. El
espacio entre la Punta del electrodo y el recibidor debe ser
approximadamente de 3/16". Debe cambiarlo si necesita
ajustarse. Con el suministro de gas cerrado y todos los
controles puestos en OFF presione la tapa del
encendedor y esté atento a la presencia de una chispa del
electrodo.
Cables eléctricos desconectados
Corrección: inspeccione la caja del encendedor (Ver la
lista de partes) que se encuentra detrás del panel de
control. Conecte cualquier cable desconectado a la caja y
trate de nuevo de encender la parrilla.
Baterías AA débiles
Correction: Destape el encendedor y reemplaze las
baterías.
Si la parrilla todavía no se enciende usted puede necesitar
purgar el aire de la tubería de gas o volver a poner el
dispositivo regulador del exceso de circulación de gas.
Nota: este procedimiento debe ser hecho cada vez que un
nuevo tanque de gas LP se conecta a su parrilla.
Purgando el aire de la línea de gas y/o ajustando
el dispositivo del regulador por exceso de gas:
Gire las perillas de control a la posición OFF.
Apague el gas en la válvula del tanque.
Desconecte el regulador del tanque de gas
LP.
Deje la unidad descansar 5 minutos para
permitir que el aire se purgue.
Reconecte el regulador al tanque de gas LP.
Gire DESPACIO la válvula del tanque un 1/4
de vuelta.
Abra la tapa de la parrilla.
Empuje y gire la perilla de control izquierda a
HIGH.
Inmediatamente presione el encendedor
electrónico entre 3-4 segundos para encender
el fogón.
ADVERTENCIA
!!
Si ocurriese un RETROCESO DE LLAMA en o
alrededor de los tubos del fogón, debe seguir las
instrucciones de abajo. Fallo en obedecer estas
instrucciones podría resultar en un fuego o una
explosión que podría causar lesiones serias,
muerte, o daños materiales.
Cierre el suministro de gas que va a la parrilla.
Gire las perillas de Control hacia la posición
OFF.
Abra la tapa de la parrilla.
Apague cualquier llama con un extintor clase B.
Una vez que la parrilla se haya enfriado,
limpie los tubos de fogón y los fogones de
acuerdo con las instrucciones indicadas en
este manual.
Ÿ
Ÿ
Ÿ
Ÿ
Ÿ
Downloaded from www.Manualslib.com manuals search engine

21
Cuidado correcto y mantenimiento mantendrán su parrilla
en una condición operativa superior y prolongarán su vida.
Siga estos procedimientos de limpieza en un momento
oportuno y su parrilla se mantendrá limpia y trabajará con
mínimo esfuerzo.
PRECAUCIÒN: Asegúrese que su parrilla esté en OFF antes
de limpiarla.
LIMPIEZA Y MANTENIMIENTO
1.
Limpiando las superficies exteriores
Antes del uso inicial, y periódicamente de allí en
adelante, sugerimos que usted lave su parrilla
usando una solución enjabonada. Usted puede
usar un paño de lavado o esponja para este
proceso. No use un alambre rígido o cepillo de
latón. Éstos rayan la superficie del acero inoxidable
y descascara las superficies pintadas (varía por
modelo) durante el proceso de la limpieza.
Limpiando el exterior del acero inoxidable
La intemperie y calor extremo pueden causar que
el exterior de las superficies de acero inoxidable
cambien de color. Aceites de máquina usados en
el proceso de fabricación también pueden causar
cambios de color. Después de retirar la película
protectora de PVC del panel de control, use un
limpiador de acero inoxidable, luego brille la
superficie de acero inoxidable. No use limpiadores
abrasivos porque pueden dañar la superficie de su
parrilla. Siga estos pasos para los mejores
resultados.
1. Gire la válvula de tanque de gas LP (hacia la
derecha) a la posición OFF. Desconecte el
regulador y ensamble de mangueras del tanque
de gas. Cubra las partes expuestas del tanque
de gas con papel de aluminio.
2. Remueva tierra o grasa usando un paño suave
y sáquele lustre a las superficies.
3. Remova el papel de aluminio y deje que la
parrilla se ventile y seque al aire libre antes de
ajustar el regulador y mangueras al tanque de
gas LP.
Limpiando las rejas de cocinar
Antes de su uso inicial y periodicamente, lave las rejas
con una solución de jabón y agua tibia. Usando un trapo
o una cepillo de verduras.
Limpiando los Savor Plates ™
Periódicamente usted debe lavar los Savor Plates™ en
una solución de agua enjabonada. Puede usar un trapo
para lavar o un cepillo para verduras y secarlos totalmente
antes de volverlos a colocar y reinstalar en el tazón de la
parrilla.
Limpiando la bandeja de grasa y el recipiente
Para reducir la oportunidad de fuego, la bandeja para la
grasa y el recipiente de grasa (algunos modelos) deben
ser inspeccionados visualmente antes de cada uso de
la parrilla. Retire cualquier grasa y lave la bandeja de
grasa y recipiente con una solución enjabonada con
agua caliente.
Limpiar el interior de la tapa de la parrilla
La grasa puede tener una tendencia de aumentar sobre
el interior de la tapa de la parrilla y podía gotear en la
terraza o patio cuando la tapa está abierta. Inspeccione
el interior de la tapa de la parrilla visualmente antes de
cada uso. Retire cualquier grasa y lave con una solución
de agua tibia enjabonada.
Limpieza anual del interior de la parrilla
Quemando el exceso de comida después de cada asado
al aire libre dejará la parrilla lista para otro uso. Sin
embargo, por lo menos cada 3 meses usted debe dar
una limpieza minuciosa a la parrilla entera para minimizar
su riesgo de fuego por grasa y mantener la parrilla en la
mejor forma. Siga estos pasos:
Gire todas las válvulas de los fogones a la posición OFF.
Gire la válvula del tanque de gas LP a la posición cerrada
de OFF.
Desconecte el regulador del tanque de gas. Inspeccione
la manguera y ensamble del regulador por grietas,
cortadas o cualquier otro daño, y reemplaze como sea
necesario. Consulte la lista de partes en este Manual de
operación.
Retire y limpie los Savor Plates ™, rejas para asar y
fogones de la parrilla.
Cubra cada orificio de la válvula de gas con papel de
aluminio.
Cepille el interior y la parte inferior de la parrilla con una
almohadilla de fibra o cepillo de nilón y lávelo con agua
enjabonada tibia y debe enjuagarlo y dejarlo secar.
Retire el papel de aluminio de los orificios y examine cada
orificio en busca de obstrucciones.
Verifique cada electrodo de chispa, ajustándolo como
sea necesario. El espacio entre la punta del Electrodo de
chispa y el recibidor de chispa debe ser aproximadamente
3/16 ".
4.
Reemplace los fogones y ajuste la caja colectora de
gas. El borde de la caja colectora de gas debe estar
traslapando el puerto de fogón.
Reemplace los Savor Plates™ y las rejas.
Reconecte el origen de gas y observe la llama de
fogón para una operación correcta.
11.
10.
5.
9.
8.
3.
2.
6.
7.
Mantenga el área de la parrilla libre de materiales
combustibles, gasolina, otros vapores y líquidos
inflamables.
No obstruya la circulación de aire para buena
ventilación.
Mantenga las aperturas de ventilación del gabinete
del tanque libres y despejadas de escombros.
Fallo en cumplir con estas instrucciones puede
causar una situación peligrosa la que si no se
impide puede resultar en lesiones.
ADVERTENCIA
! !
Downloaded from www.Manualslib.com manuals search engine

22
LIMPIANDO LOS TUBOS Y PUERTOS DE LOS FOGONES
Para reducir el chance de FUEGO DE RETROCESO debe
limpiar los tubos de los fogones de la siguiente manera por
lo menos una vez al mes en el verano y otoño o cuando las
arañas esten activas en su área, o si su parrilla no ha sido
usada por un tiempo.
1. Gire todas las válvulas del fogón a la posición OFF.
2. Gire la válvula de tanque de gas LP a la posición OFF.
3. Remueva el ensamble del regulador de gas LP.
4. Remueva las rejas de cocinar, los Savor Plates™ y
las bandejad para la grasa de su parrilla.
5. Remueva el tornillo en la parte de atrás de cada
fogón usando un destornillador con cabeza Phillips.
6. Levante con cuidado cada fogón y aléjelos del orificio
de la válvula de gas.
7. Fíjese que estén limpios o limpie los tubos Venturi
de los fogones de insecto y nidos de insecto. Un
tubo obstruido puede causar un fuego debajo de la
parrilla.
8. Refiérase a la Figura 1 y lleve a cabo uno de
estos tres métodos de limpieza:
Sin importar que tipo de limpieza de los fogones usa,
le recomendamos que también complete los siguientes
pasos para ayudarle a prolongar la vida del fogón.
MÉTODO 1: Doble un alambre rígido o
percha de alambre en forma de gancho
pequeño como se muestra en el dibujo
y entre el gancho por el tubo del fogón
varias veces para limpiar los escombros.
MÉTODO 2: Use un cepillo de botella con
un mango flexible y dirija el cepillo a través
del tubo del fogón y entrándolo y sacándolo
varias veces para remover cualquier
escombro.
MÉTODO 3: Use una manguera de aire a
presión para forzar aire a través del tubo
del fogón.El aire debe forzar los escombros
a través del fogón y fuera de los puertos.
1. Use una almohadilla de fibra o un cepillo de nilón
para limpiar cada fogón hasta que estén libres de
incrustaciones y suciedad.
2. Limpie cualquier puerto que esté obstruido con un
alambre tieso, como un sujetapapeles.
3. Inspeccione cada fogón por daños (rajaduras o
huecos) y si se encuentran debe ordenar e instalar
un nuevo fogón. Después de la instalación, verifique
para asegurarse que los orificios de la válvula de gas
estén corractamente posicionados dentro de los
finales de los tubos de los fogones. Debe verificar
también la posición del electrodo de chispa.
Para una operación sin peligro asegúrese que el
orificio del ensamble de la válvula de gas está
dentro del tubo del fogón antes de usar su parrilla.
Vea la figura 1. Si el orificio no está dentro del tubo
del fogón, al encender el fogón podría causar una
explosión, incendio que resultarían en lesiones
corporales serias y/o daños materiales.
ADVERTENCIA
!
!
9
Figura 1
PARA LIMPIAR EL TUBO DEL FOGÓN,
INSERTE EL GANCHO DONDE INDICA
LA FLECHA.
Ensamble de la válvula
de gas
Orificio
Tubo del fogón
Tubo del fogòn
Downloaded from www.Manualslib.com manuals search engine

23
A-1
Instrucciones para Asar
Quemando los residuos
Antes de cocinar en su parrilla por primera vez, debe
quemar los residuos para eliminar cualquier olor o
o aceites de la fábrica. Encienda el fogón principal,
baje la tapa y opere la parrilla en HIGH entre 3 y 5
minutos.
CUIDADO : Operando su parrilla en HIGH por más
tiempo de 5 minutos puede dañar ciertas partes de su
parrilla. No deje la parrilla desatendida cuando está en
uso.
Precalentado
Para precalentar los fogones principales, encienda su
parrilla en HIGH, baje la tapa y siga las instrucciones.
Para cocinar con temperaturas altas, caliente la
parrilla entre 3 y 5 minutos.
Para cocinar a bajas temperaturas, precaliente la
parrilla por 3 minutos.
Para cocinar lentamente el precalentdo no es
necesario.
Temperaturas para asar
Temperaturas altas: La perilla puesta en HIGH, sólo
debe usarse para precalentar la parrilla entre 3-5
minutos y para quemar los residuos de comidas.
Nunca use HIGH para cocinar por largo tiempo.
Temperaturas medianas: La mayoría de las recetas
piden el calor entre medio y bajo, incluyendo las
carnes ahumadas, cocinando con el rotisor, carnes
sin grasa o pescado.
Una nota importante sobre las temperturas para asar
Los ajustes de calor indicados y las épocas de cocina
mostradas en las siguientes páginas son aproximados.
Hay algunas diferencia en el ambiente controlado dentro
de su cocina, y variables incluyendo las temperaturas
exteriores, dirección y condiciones del viento, tanto como
la ubicación de la parrilla que pueden afectar la
distribución de calor de su parrilla. Porque estas
condiciones varían, y no hay dos jardínes o patios
iguales, ofrecemos estas guías para su conveniencia.
Recomendamos que usted vigile su parrilla atentamente
y le de vuelta a la comida como se necesita para prevenir
cocinarla demasiado y asegurar los mejores resultados
todo el tiempo.
Las áreas de cocina principales de en medio y
traseras brindan un calor alto para asar a la parrilla.
Las rejas secundarias para asar brindan unl calor
mediano para preparar panes y verduras firmes.
El área del frente es la primaria para cocinar comidas
delicadas y para mantener la comida caliente.
Cocinando indirecto, usando los fogones principales
El método de cocina indirecto también puede ser
usado con las rejas de cocinar proporcionadas.
Para cocinar indirectamente, la comida debe ser
puesta sobre el lado izquierdo o derecho de su
parrilla con el fogón principal encendido al lado
opuesto. Debe colocar la comida sobre las rejas
secundarias y encender los fogones principales
exteriores. De cualquier manera, para cocinar de
una manera indirecta la tapa tiene que estar
cerrada.
Preparando las rejas para asar
Ÿ
Ÿ
Ÿ
Ÿ
Ÿ
Ÿ
Engrasando la superficie de cocinar ayudará a
prevenir que las comidas se peguen durante la
cocinada y reducirá la cantidad de la limpieza a
fondo requerida. Use un cepillo para aplicar una
capa fina de aceite de cocina o manteca vegetal en
cada reja de asar antes de cada comida al aire
libre. No sugerimos aceites de tipo de aerosol a
menos que sean especificadas para cocinar en
tempuratura alta. Asegúrese cubrir con aceite todas
las partes para asar.
ADVERTENCIA
! !
Fallo en cumplir con estas instrucciones puede
causar un incendio o explosión que pueden causar
lesiones serias, muerte o daños a la propiedad.
Nunca forre el fondo de la parrilla o los Savor Plates™
con papel de aluminio, arena ni nada que pueda
obstruir la circulación de la grasa hacia la bandeja
de grasa y sus recipientes.
Antes de cada uso de su parrilla: remueva la bandeja
de grasa y retire toda la grasa y comida para prevenir
un peligroso fuego de grasa.
Use su parrilla por lo menos a 3 pies de distancia
de cualquier pared o superficie. Use su parrilla por
lo menos a 3 pies de distancia de objetos combus-
tibles que pueden derretirse o captar incendios (como
vinilo o tabla de forro de madera, cercas y salientes)
o fuentes encendidas como la llama del piloto de
calentadores de agua y aparatos eléctricos
encendidos.
Nunca use su parrilla de gas en un garaje, porche,
cobertizo, pasabrisas o cualquier otra área cercada.
Su parrilla se pondrá muy caliente. Use un guante
para parrillas protector de llamas siempre que va a
cocinar en su parrilla. No se recline sobre la superficie
de la parrilla cuando está cocinando. Todas las
superficies guardan mucho calor cuando la parrila
está en operación. Para limpiarla espere que la
parrilla se enfrie.
Ÿ
Ÿ
Ÿ
Ÿ
Ÿ
Ÿ
Asando directo usando los fogones principales
El método directo para cocinar se puede usar con las
rejas que vienen con la parrilla, y colocando la comida
directamente sobre los fogones encendidos. El
cocinado directo requiere que la tapa de la parrilla
esté abierta. Este método es ideal para sazonar y
sellar las presas cuando usted desea darles un
sabor de barbacoa a llama viva.
Las grasas y los jugos que gotean de la comida a la
parrilla pueden causar llamaradas que dan un buen
sabor y color a la comida. Para disminuir las
llamaradas:
Use una bandeja para el goteo debajo de las carnes
que está asando.
Remueva la grasa excesiva de las carnes y las aves.
Precaliente la parrilla apropiadamente.
Limpie la parrilla con regularidad para remover
comida y acumulación de grasa.
Voltee la comida con regularidad.Ÿ
Ÿ
Ÿ
Ÿ
Llamaradas
Ÿ
Downloaded from www.Manualslib.com manuals search engine

24A-2
Guìa para asar usando los fogones principales y cocinado directo
Asando Bistecs y costillas
Gire el control de los fogones a HIGH, cierre la tapa y
precaliente su parrilla entre 3 y 5 minutos. Abra la tapa y
coloque la carne sobre las rejas directamente por encima
del fogón encendido. Cocine la carne en ambos lados
hasta que se dore. Reduzca el calor a MEDIO y cocine
hasta que esté al punto deseado. El tiempo de asar
depende del grosor de la carne.
Asando hamburguesas y salchichas
Gire el control de los fogones a HIGH, cierre la tapa y
precaliente su parrilla entre 3 y 5 minutos. Abra la tapa y
coloque la carne sobre las rejas directamente por encima
del fogón encendido. Cocine la carne en ambos lados
hasta que se dore. Reduzca el calor a MEDIO y cocine
hasta que esté al punto deseado. El tiempo de asar
depende del grosor de la carne.
Asando Pollo
Gire el control de los fogones a HIGH, cierre la tapa y
precaliente su parrilla entre 2 y 3 minutos. luego abra la
tapa y reduzca el calor a MEDIO, y cocine las aves
directamente sobre los fogones hasta que estén
cocinadas. La piel de las aves es muy grasosa asi es
que debe esperar una que otra llamarada al usar este
método directo.
Para minimizar las llamaradas, trate de asar el pollo
usando el método indirecto. Coloque el pollo en un lado
de la parrilla usando el fogón opuesto en calor MEDIO, y
baje la tapa de la parrilla. El tiempo de asar varía
dependiendo del tamaño de la presa.
Asando Puerco
Ponga el fogón en HIGH, y precaliente la parrilla de
3-5 minutos con la tapa cerrada. Abra la tapa, coloque el
puerco sobre las rejas y dore hasta cellar los jubos.
Reduzca el calor a MEDIO cocinándose hasta que esté
hecho. El tiempo de asar cambia de acuerdo con el
tamaño y grosor de la presa.
Pescado y filetes enteros
Precaliente la parrilla de 3-5 minutos con la tapa cerrada.
Luego abra la tapa y baje la temperatura a MEDIO.
Coloque el pescado (piel hacia abajo) en la parrilla sobre
el calor directo hasta que se cocine. Use el tiempo para
cocinarlo como una guía, o hasta que el pescado esté
opaco pero todavìa jugoso.
Filetes pequeños y cubitos de pescado
Siga las direcciones de arriba usando aproximadamente
los tiempos de cocinar indicados a la derecha. Coloque
un pedazo pequeño de papel de aluminio sobre las rejas
de asar si los pedazos de pescado son tan pequeños
que se pueden caer a través de las rejas.
Verduras y Frutas
Prepare las verduras y frutas pintándolas con mantequilla
o con alguna salsa si lo desea. Para cocinar con el
método indirecto la comida se debe colocar al lado
derecho o izquierdo del fogón encendido al lado
opuesto con la tapa baja. Or centrar la comida en las
rejas secundarias encendiendo los fogones de afuera.
De cualquier manera el asado indirecto se debe hacer
con la tapa cerrada.
Corte de carne
Bistec T-bone
Bistec Sirloin
Costillas de res
Bistec Porterhouse
Bistec New York strip
Hamburgusas
Salchichas
Pechuga de pollo
(asar con el hueso hacia
abajo)
Alas de pollo
Patas
Pollo entero
(Cocinar con la pechuga
hacia arriba)
Costillas
Solomo de res
Chuletas
Pescado entero
Filetes enteros
de pescado
Filete de pescado
Cubos sin huesos
Tiempo aproximado para
asar
Casi crudo: 4-8 minutos
Mediano: 10-14 minutos
Bien cocinado: 15-20 minutos
Casi crudo: 4-6 minutos
Mediano: 8-10 minutos
Bien cocinado: 10-15 minutos
Método directo:
Aproximadamente 15 minutos
Método indirecto:
hasta 30 minutos
Método indirecto:
Aproximadamente una hora
Medio: 10-14 minutos
Bien cocinado: 15-20 minutos
10 - 12 minutos por libra o
hasta que el pescado se vea
bien cocinado
4 - 5 minutos cada lado
hasta que el pescado se vea
opaco.
En algunos casos usted desea asar las verdudras y las
frutas directamente sobre el fuego. Usando las rejas de
cocinar que vinieron con el aparato. La mejor comida
para asar con el método directo son verduras y frutas
relativamente blandas que requieren poco tiempo: como
setas, zucchini, tomates y frutas en brocheta como
duraznos, melocotones, piña, fresas, y kiwis.
RECUERDE QUE PARA ASAR DIRECTAMENTE DEBE
MANTENER LA TAPA ABIERTA.
Para verduras firmes—en especial papas, yuca, camote,
recomendamos hervir parcialmente hasta que estén
casi cocinadas, antes de colocarlas en la parrilla. El
tiempo de cocinar con la tapa baja es aproximadamente
lo mismo que en su cocina regular. Sin embargo, hay
muchos factores como la temperatura de afuera,
condiciones de viento, y donde esté situada la parrilla,
por eso sugerimos que mantenga el ojo en la
temperatura de la parrilla. Tiempo para cocinar con el
método directo siempre es más corto debido a que la
temperatura es más alta y la comida es más blanda.
Downloaded from www.Manualslib.com manuals search engine

25A-3
Tipo de comida
Res
Cordero
Ternera
Puerco
Pollo
Pato
Pescado
Pavo, menos de 16 libras
Pavo, más de 16 libras
¿Cómo le gusta?
Casi Crudo
Medio
Bien cocinado
Medio
Bien cocinado
Tiempo aproximado
18 minutos por libra
23 minutos por libra
27 minutos por libra
18 minutos por libra
23 minutos por libra
27 minutos por libra
30-33 minutos por libra
20-25 minutos por libra
25 minutos por libra
10 minutos por libra
20-25 por libra + 30 minutos
18-23 por libra + 15 minutos
TÉCNICAS PARA HORNEAR
Desde caserolas a pan de maíz, a deliciosos postres,
como un fondue de frutas o biscocho se pueden hornear
en su parrilla tan fácil como en su propia cocina.
Preparándose para hornear
Para hornear en su nueva parrilla usted necesitará un
utensilio para poner dentro de la parrilla, y un par de
guantes para protegerse del calor de la parrilla. Debe
secar la caserola antes de usarla. Si es de hierro fundido
debe secarla muy bien antes de usarla.
Precaliente su parrilla que 3-5 minutos, luego baje el calor
para conseguir la temperatura de hornear deseada. Para
Temperatura del Horno
Baja300° -340°
Moderada355° - 390° F
Alta410° - 480° F
Niveles de calor recomendados
Ambos fogones exteriores en LOW
1 fogón exterior en HIGH y un fogón exterior en LOW
Ambos fogones exteriores en HIGH
hornear use el método de cocinar indirecto. Por lo tanto,
el utensilio para hornear debe colocarse al lado derecho
o izquierdo opuesto al fogón encendido.
Consejos para hornear
Prepare su receta favorita como usted lo haría en la
cocina. Las comidas cocinadas en la parrilla por largos
períodos de tiempo deben estar cubiertas con papel de
aluminio para conservar la humedad. Usted necesitará
revolver la comida varias veces cuando cocina al horno,
y añadir líquido adicional para obtener el espesor
deseado.
Vea la temperatura, y adáptese para cocinar de acuerdo
con las instrucciones de su receta.
Guías y técnicas para asar despacio
Una nota importante sobre el calor deseado
Los ajustes de calor indicados son aproximados. Hay
muchos factores como la temperatura exterior, las
condiciones de viento y la ubicación de la parrilla que
afectan el rendimiento de su parrilla. Ofrecemos las
indicaciones de calor como un mecanismo útil, pero
sugerimos que usted mire el calibrador de temperatura y
ajuste el calor como desea.
Preparándose para asar
Para asar se usa el método de cocinar indirecto. Por lo
tanto, la comida debe ser puesta sobre el equipo
izquierdo o derecho de su parrilla con un fogón encendido
en el lado opuesto. Usted también puede usar las rejas
para asar colocando un utensilio para el goteo debajo de
las rejas para colectar los jugos para hacer salsas.
Recuerde, la cocina indirecta requiere que la tapa de su
parrilla esté cerrada.
Precalentar su parrilla no es requerido para los métodos
de cocina lentos como asar. Si usted decide precalentar
su parrilla antes de usarla, ponga los fogones en High y
la parrilla con la tapa cerrada más o menos de 2-3
minutos.
Preparación de la comida
Remueva la grasa excesiva de la carne. Ate las aves
con una cuerda para conservar la forma deseada.
Puede usar tiras de tocino para cubrir la carne de ave
impidiendo que se seque. Otro método para mantener
la comida sin secarse durante el asado, es poner agua
en una olla y cubrirla con papel de aliminio. El papel se
debe remover al principio o al final de del cocinado, para
asegurar que la carne se ha dorado lo suficiente.
Consejos para asar
Excepto cuando se está asando con líquido en una
utensilio para asar, los jugos se reúnen en el utensilio
para ser usados como la base para una salsa sabrosa
o jugo de carne. Ponga olla de cocinar directamente
sobre el calor, añadir mantequilla adicional si la
necesita, añada varias cucharaditas de harina para
espesar la salsa. Finalmente, añada pollo suficiente o
caldo de carne de res para obtener la regularidad
deseada.
Una vez cocinada la carne, retírela del fuego y tápela
con un pedazo de papel de aluminio. Déje la carne
descansar entre 10-15 minutos para permitir que los
jugos se asienten.
Downloaded from www.Manualslib.com manuals search engine

26
A-4
Asar despacio con el rotisor
El juego del rotisor está manufacturado para que encaje
en el modelo de su parrilla. El asado por rotisor produce
comidas jugosas, con mucho sabor y con muy buena
presentación. El sistema opcional del rotisor es
comúnmente utilizado para cocinar carnes y aves y está
designado para cocinar las presas despacio. Usted
puede colocar una cazuela debajo de la comida para
colectar los jugos para rociar la comida o preparar
salsas. Para darles sabor al contenido de la cazuela
puede añadirles hierbas, cebollas, o cualquier especie
que guste. Cocinando con el rotisor se demora lo mismo
que asando al horno.
Balanceando las carnes en el rotisor
Poner el peso de la carne de una manera bien
balanceada en la brocheta del rotisor es de mucha
importancia. La carne se debe colocar de tal manera que
esl peso esté bien distribuido. El rotisor debe girar
uniformemente o cuando para y la acción de arranque
causarán que la comida se cocine desigualmente y
puede quemarse el lado más pesado.
Las comidas más fáciles para balancear son ésas de
forma uniforme y textura. Evaluar si la comida se
balanceada correctamente antes de asegurarla a la
brocheta. Coloque los finales de la brocheta en cada
palma de sus manos. Si no hay ninguna tendencia de
rodar, déle 1/4 de vuelta. Si todavía está estable, déle otro
cuarto de vuelta. Debe descansar sin girar en cada uno
de estas posiciones. Después de esta prueba puede
colocarla la brocheta en su parrilla.
Preparación de comida
Cuando está preparando aves, amarre bien todas las
partes contra el cuerpo del ave, de tal manera que
parezca una bola. La cavidad del ave se puede rellenar
antes de esto. Jale la piel del cuello y usando una
brocheta pequeña, amárrela a la parte posterior del ave.
Arregle los dos tenedores y métalos dentro del cuerpo
del
ave para sostener bien la presa. Antes de entrar los
tenedores haga la aprueba de balance.
Un pedazo de carne enrollado requiere que la brocheta
del rotisor sea insertada a través del centro a lo largo del
rollo de la carne, luego siendo asegurado su balance.
Para carnes que contienen huesos, es mejor asegurar la
brocheta del rotisor diagonalmente a través de las
secciones con más carne. Si los huesos sobresalientes
o las alas se broncean demasiado rápido, puede
cubrirlas con papel de aluminio.
GUÍA PARA ASAR CON EL ROTISOR
Pollo, sin huesos, piezas cortadas en filetes o cortes
pequeños, ahumadas con sabores orientales.
Pescado, de carne firmes y mariscos surtidos como
langostinos, mejillones y calamari.
Puerco, cortado en dados o cerdo picado, filete,
pierna, costillas ahumadas.
Carne de res filete cortado en chuletas, costillas,
lomo, bistec
Cordero, lomo de cordero, filete, pierna y costillas.
•
•
•
Filetes de atún, adobado en los sabores asiáticos de
aceite de ajonjolí, salsa de soy y jeréz.
Filetes de cerdo, adobado con cáscara de jengibre,
naranja y pintado con sabor de "Maple".
Mejillones, enjugados con cáscara de limón y aceite
de chile.
Chuletas de cordero, adobado en aceite de oliva
virgen, limón, orégano y pimienta negra. El mismo
escabeche puede ser usado para una pierna entera o
un lomo de cordero.
•
•
•
Las verduras son en general fáciles cocinar sobre la
parrilla. El enrejado para asar lo hace conveniente porque
usted todavía puede usar el área de asar principal
mientras las verduras están puestas encima de las rejas.
Precocine las verduras firmes hirviendo brevemente o
cocinándolas en horno de microondas antes de cocinarlas
sobre la parrilla. Envuelva verduras en un grosor doble de
papel de aluminio para protegerlas mientras se cocinan
sobre la parrilla. Lluego, sáquelas del envoltorio de papel
si desea, 10-15 minutos antes del finalizar el tiempo de
cocinar, pinte las verduras con mantequilla o aceite y
termine de cocinarlas. Las rejas de asar pueden ser
usadas con otro propósito que el de cocinar. Considere
usar las rejas para calentar el pan francés, hacer pan
de ajo, medialunas o incluso rosquillas de pan.
Un pez entero pequeño envuelto en papel de aluminio
se puede asar sobre las rejas. Los paquetes de
mariscos como mejillones, langostinos y filetes de pez
cortados colocados en envoltorios de papel individuales
Suba la tapa de su parrilla y encienda la parrilla. Baje la
tapa de la parrilla hasta que llegue a la temperatura
deseada para la comida que usted piensa asar.
•
•
•
GUÍA PARA AHUMAR
El ahumador da un sabor distintivo y delicioso a comida.
Usted encontrará una variedad de astillas
de madera disponible para uso en el ahumador. Hay que
remojar las astillas de madera con anterioridad, siga las
instrucciones del fabricante. Nota: Es nuestra
experiencia que muchas de los productos para ahumar
no producen humo, pero inculcan sabor a la comida. Lea
las etiquetas con cuidado y si tiene dudas pregúntele
pídale detalles a minorista.
Usando una caja ahumadora
Hay muchas cajas ahumadoras disponibles en el
mercado. Siga estas pautas y siempre refiérase a la
etiqueta de sus astillas ahumadoras para los detalles
del ahumado. Llene la caja para ahumar con las astillas
o el producto que haya comprado. Puede añádir hierbas
secas y especies para producir diferentes sabores. Use
un guante de BBQ que retarda las llamas y coloque la
caja de ahumar sobre las rejas para cocinar o sobre los
Savor Plates™ directamente encima de un fogón
encendido. Las astillas le prestarán sabor a su comida.
Consejos para ahumar
Usted puede reducir la fuerza del sabor a humo
cocinando en el ahumador la mitad o tres cuartos del
tiempo.
La temperatura que se requiere para ahumar es
normalmente LOW a MEDIO.
Comidas naturales altas en aceite se prestan bien para
ahumar. Mioentras que comidas más secas se
benefician se un adobado líquido.
GUIA PARA USAR LAS REJAS DE ASAR
Downloaded from www.Manualslib.com manuals search engine

27
Accesorios opcionales para la parrilla Modelo MFA05ALP
P5731D / P80G4A
P5722C
A-5
Ordene usando el # de la
Unidad de Grand Hall
Ordene usando el # de la
Unidad de Grand Hall
CAZUELA DE HIERRO FUNDIDO
CON TAPA
Esta cazuela con tapa para uso pesado,
tiene un acabado de porcelana mate y asas
para levantarla. El hierro fundido es un buen
conductor de calor que calienta con uniformidad,
haciendo de este un accesorio ideal para preparar comidas
como pizza profunda, papas, pan de maíz, cacerolas y
postres.
Mide: 16 3/4" largo x 11 1/4"
ancho x 2 1/2" profundidad, e
incluye un soporte para la
cazuela.
PLANCHA REVERSIBLE DE HIERRO FUNDIDO
Sustituya 2 rejas con esta plancha reversible de hierro fundido que sirve como
asador & Plato caliente para expandir sus habilidades como cocinero al aire
libre. El lado liso es ideal para preparar huevos, pancakes, emparedados
de queso derretido, pescado, y fajitas
mientras que el lado
acanalado (mostrado en la foto) es
perfecto para cocinar salchichas, y
hamburguesas.
Mide: 19" x 10-1/2" x1/2" profundidad
COBERTOR PARA PROTEGER LA PARRILLA
Proteja su inversión de la lluvia, nieve y los daños causados
por escombros que traen los cambios de estaciones, con el
uso de este cobertor de parrillas hecho de alta calidad de
vinilo negro, forrado en tela, y hecho a la medida de su parrilla
de acero inoxidable, para cubrirla y que se vea elegante y
bella aún cuando esté cubierta.
Mide: 66" x 42-3/4" x 27-1/2" profundidad
P07007022B
Ordene usando el # de la
Unidad de Grand Hall
Cualquier cosa que usted goza cocinando dentro de su casa también la puede preparar al aire libre.
Estos accesorios opcionales le facilitan usar su nueva parrilla como si fuese una estufa por fuera.
Para ordenar por teléfono, llame al 1-800-770-9769 de lunes a viernes, 8:00am a 4:30pm CST y
refiérase al CÓDIGO MKT: MFA050M.
JUEGO ROTISOR DE CROMO
P80A1A
Cocinando con un rotisor produce
comidas que son jugosas y con
mucho sabor, debido a la
despaciosa rotación de la brocheta
que hace que el calor selle los
jugos naturales dentro de la carne.
El Juego de Rotisor opcional se
puede usar para cocinar
lentamente usando el fogón más
lejano al rotisor (método de cocinar
indirecto) colocando una cazuela
directamente bajo la presa para
recoger todo el delicioso goteo.
Incluye: Motor, herramientas para
el montaje, manguillo, una
brocheta de cromo de 31-1/2",
cojinetes y 2 tenedores.
Ordene usando el # de la
Unidad de Grand Hall
Downloaded from www.Manualslib.com manuals search engine

28
PREGUNTAS FRECUENTES
A-6
Respuesta:
No, su parrilla de gas está fabricada con ciertas
especificaciones y está certificada solamente para LPG
(Gas Propano Líquido) o NG (Gas Natural). Para su
seguridad no hay equipos disponibles de conversión,
ni nosotros los podemos vender o suministrar como
partes o proveer información para transformar su
parrilla. Cualquier intento de transformar su parrilla es
peligroso y anulará su garanía.
Pregunta:
¿Están plos números de Serie y modelo listados en algún
lugar en la parrilla para mi referencia?
Respuesta:
La serie y los números del modelo están puestos en
en la placa color plateado de CSA que se encuentra en
la parrilla. Dependiendo del modelo la placa CSA
estará ubicada a la izquierda o derecha del tazón
debajo de la repisa del lado o abajo o los lados
derecho o izquierdo del panel de control o detrás del
gabinete de la parrilla.
Pregunta:
Mi parrilla no enciende bien. ¿por qué?
Respuesta:
Siempre encienda primero el fogón principal más lejos
de la fuente de combustible. Esto atraerá el gas al otro
lado del grupo colector que ayuda a prevenir espacios
de aire que obstruyen la circulación de gas y previenen
el encender la parrilla correctamente. También pruebe
usar este procedimiento:
1. Apague el gas en la fuente y gire las perillas de
control a OFF. Espere por lo menos 5 minutos
para que se disperse el gas, y vuelva a tratar.
2. Si su parrilla todavía no enciende, ponga todos los
controles y el suministro de gas en OFF.Inspeccione
por escapes de gas como se indica en la Sección
“Uso y Cuidado” de este manual.
3. Si no encuentra escapes de gas espere 5 minutos y
vuelva a tratar de encender la parrilla.
Pregunta:
¿Si el encendedor o baterías no están trabajando,
cómo puedo encender my parrilla manualmente?
Respuesta:
Pregunta:
¿Puedo convertir mi parrilla de un tipo de gas a otro,
es decir, de Gas LPG a NG o vice-versa?
Pregunta:
Aveces oigo un murmullo que sale de mi regulador.
¿Cúal es la causa? y - mi parrilla tiene una llama baja y
aveces no enciende. ¿Porqué?
Respuesta:
El sonido activo es gasolina que fluye a través del
regulador. Un volúmen bajo de sonido es normal y no
obstruirá la operación de su parrilla. El regulador con
un volúmen de sonido fuerte o excesivo y un
encendido irregular podría ser causado por el
dispositivo de circulación con gas excesivo del
regulador. Puede ser causado al abrir la válvula de
tanque muy rápido o demasiado lo cual causa que el
dispositivo de seguridad del regulador retenga la
circulación de gas, impidiendo la circulación de gas a
su parrilla. Siempre encienda el fogón principal más
lejos de la fuente de combustible que le ayudará a
eliminar los espacios de aire en la manguera del
colector. Nota: este procedimiento debe ser hecho
cada vez que un tanque nuevo de gas LP se conecta a
su parrilla.
Gire las perillas de control a la posición OFF.
Cierre el tanque de gas por la válvula de gas.
Desconecte el regulador del tanque de gas LP.
Deje que el aparato descanse por 5 minutos.
Reconecte el regulador al tanque de gas LP.
Abra la puerta de la parrilla (o la puerta del fogón
lateral si usted está encendiendo el fogón lateral).
Gire DESPACIO la válvula a 1/4 de vuelta.
Encienda el fogón más lejano a la fuente de gas.
Gire la válvula de gas otro 1/4 de vuelta para
completar media vuelta completa.
Continúe encendiendo los fogones moviéndose
hacia la fuente de gas.
No gire la válvula del tanque más 1/2 de una vuelta
en modelos LPG.
Pregunta:
¿A dónde uso mi parrilla para una mejor seguridad
y funcionamiento?
Respuesta:
Los vientos fuertes y las temperaturas bajas
pueden afectar la calefacción y el rendimiento de
su parrilla de gas lo cual es un factor en los
elementos cuando coloca su parrilla de cocinar al
aire libre.
Use su parrilla por lo menos 3 pies alejada de
cualquier pared o superficie.
Use su parrilla por lo menos a 3 pies de objetos
combustibles que se pueden derretir o incendiar.
(como vinilo o tablas de madera forrada, cercas y
techos)
Nunca use use su paprrilla en un garaje, porche,
pasabrisas, o cualquier otra área cerrada.
Nunca obstruya la corriente de aire que ventila al
rededor de su parrilla.
Si su encendedor falla en encender o sus baterías
necesitan ser reemplazadas, usted todavía puede
encender su parrilla con un fósforo de papel a través
del tubo encendedor ubicado al lado derecho del
tazón de su parrilla. Nunca remueva las rejas o los
Savor Plates™ y nunca trate de encender la parrilla
por arriba. Para encender la parrilla de gas
manualmente, siga los pasos del 1 al 6 de
Procedimiento básico para encender. Luego, encienda
el fósforo dentro del tubo encendedor a la derecha
de la parrilla. Gire la perilla de control del fogón más
cercano a HIGH para dejar salir el gas. El fogón debe
encender inmediatamente.
Downloaded from www.Manualslib.com manuals search engine

29A-7
Pregunta:
¿Por qué no le quedan a mi tanque viejo de gas LP el
regulador y la manguera proporcionadas con mi
nueva parrilla de gas?
Respuesta:
El gobierno de EE.UU. regula los aparatos de gas y
tanques de gas LP. Cuando las reglas cambian los
accesorios de tanque de gas de LP son modificados
para asegurar el cumplimiento de la ley. Si a su tanque
de gas LP no le queda el regulador y la manguera
proporcionada con su nueva parrilla, el tanque es
anticuado y debe ser reemplazado. Nota: en vigencia
a partir de 1 de abril de 2002 todos los tanques de gas
LP vendidos deben incluir el dispositivo de prevención
de sobrellenado "OPD". Los tanques de OPD se
pueden identificar por la rueda de la válvula en forma
triangular. Este dispositivo interno impide que el
tanque de gas LP sea sobrellenado. Los tanques que
no tienen una válvula de OPD no se pueden volver a
llenar.
Pregunta:
¿Podría limpiar las rejas de porcelana en mi
máquina de lavar platos sin hacerles daño?
Respuesta:
Limpie sus rejas de cocinar a mano si hay cualquier
astilla o rajaduras en el terminado de la porcelana y
séquelos muy bien. Si no hay rajaduras o astillados
puede lavarlas en la máquina de lavar platos sin
ningún problema. Recuerde secar las rejas de
cocinar muy bien antes de volverlas a colocar en la
parrilla para minimizar la posibilidad de oxidación.
Pregunta:
Algunas de las rejas fabricadas de acero
inoxidable especifican 304 grado de
construcción, mientras que otras no mencionan
el grado del todo. ¿Cuál es la diferencia?
Respuesta:
Todos los grados de acero inoxidable no son
creados igual. El grado 304 también llamado18-8
acero inoxidable, es apreciado por su resitencia a la
oxidación y buen rendimiento bajo temperaturas altas
lo que le hace ideal para la construcción de
parrillas.
Acero inoxidable 304 es el más popular entre los
aceros inoxidables el cuál contiene entre 18-20 %
de cromo y 8-10 % de níquel, haciéndolo no
magnético.
Algunas rejas de acero inoxidable son construídas
con acero inoxidable tipo 430 que contiene 16-18%
de cromo pero generalmente menos del 1 % de
níquel. Es magnético con menos resistencia a la
corrosión y herrumbre y diseñado para resistir
temperaturas limitadas. Tenga cuidado con rejas
de acero inoxidable que no ofrecen ningún reclamo
sobre la categoría de acero inoxidable, porque lo
que parece brillar en el piso de ventas podía ser un
problema en el piso de su patio.
¿Cómo puede saber si un producto está hecho de
grado 304 de acero inoxidable? Haga la simple
prueba del imán. Si un imán se pega al acero
inoxidable es tipo 430. Si un imán no
se pega al acero, puede estar seguro que debe ser
grado 304 de calidad de acero inoxidable.
Pregunta:
¿Qué causa que se oxíden ciertas partes de la
parrilla y que efecto tienen?
Respuesta:
El herrumbre es un proceso natural y puede aparecer
en partes de hierro fundido y de acero inoxidable las
partes no afectarán la operación de tiempo corto de
su parrilla.
Para reducir el proceso de oxidación en las rejas
para cocinar en (modelos selectos) recomendamos
engrasar las las rejas para cocinar antes y después
de cada comida al aire libre.
Use un cepillo para aplicar una capa fina de aceite
de cocina o manteca vegetal en cada reja para
cocinar. No sugerimos aceites de tipo de rociador a
menos que sean especificadospara cocinar en altas
temperaturas. Asegúrese de engrasar la superficie
de cocinar incluyendo bordes y cualquier áreas con
porcelana escarchada.
Pregunta:
¿Cúal es la mejor superficie para asar; Acero
cubierto en porcelana / rejas hechas de hierro
fundido o de acero inoxidable?
Respuesta:
Todos tienen sus ventajas. Para asado tradicional
de carne a la parrilla, hierro fundido o rejas de acero
brindan el mejor conducto de calor. Para proteger
contra el proceso natural de oxidación, acero o rejas
para cocinar de hierro fundido poséen un terminado
de porcelana que requiere un mantenimiento
rutinario de las rejas las cuales hay que secarlas
muy bien.
El acero inoxidable es popular con aquellos que
prefieren hacer menos mantenimiento.
Una nueva solución innovativa está disponible para
ciertos modelos llamado Therma - Core™
inoxidable. Esta rejas para cocinar combinan un
centro de acero inoxidable con una capa de acero
inoxidable fácil de limpiar.
Downloaded from www.Manualslib.com manuals search engine

30
GARANTÌA LIMITADA
Grand Hall Enterprise Co., Ltd. garantiza al propietario
original que este producto de está libre de defectos
de mano de obra y la calidad de los materiales
bajo el uso normal residencial. Grand Hall Enter-
prise Co., Ltd. reemplazará piezas garantizadas de
acuerdo con la lista de partes de este manual.
Habrán cargos de manejo y flete.
La extensión de cualquier responsabilidad de Grand
Hall Enterprise Co., Ltd. bajo esta garantía limitada
se limita a reemplazo. El período de garantía
limitado no se extiende debido al dicho reemplazo.
Grand Hall Enterprise Co., Ltd. no es responsable
por mano de obra u otros costos relacionados al
remover y/o instalación de las partes de reemplazo,
ensamble del producto,y costos de entrega.
Grand Hall Enterprise Co., Ltd. requiere una prueba
razonable de la fecha de su compra. Por lo tanto,
usted debe conservar su recibo de ventas o factura
y registrar su nuevo producto inmediatamente.
Regístrese en línea en www.grandhall.com o use
la tarjeta de registro incluída con este producto.
Esta garantía limitada no es aplicable a ningún daño
debido al transporte, instalación, servicio al
comprador, accidente, abuso, fuego, alteración del
producto en cualquier manera, la obra de Dios, o
fallo en leer y/o cumplir con todas las advertencias
del producto, o cualquier parte o trabajo usado en
reemplazar cualquier parte o partes cubiertas bajo
esta garantía limitada.
Esta garantía limitada se sobrepone a cualquier otra
garantía expresa o implícita que puede aplicarse a
este producto. Este descargo de responsabilidad
de las garantías implícitas puede no ser aplicable
(a usted) debido a que algunos estados federales
no admiten el descargo de responsabilidad de las
garantías.
Si usted vive en un estado que no admite el
descargo de responsabilidad de las Garantías
implícitas, su estado puede permitir que una
limitación parcial de las garantías implícitas limite
la duración de tales garantías a la duración de una
garantía expresa. En tales estados la duración de
las garantías implícitas es por lo tanto expresamente
limitada a la duración de esta Garantía de Limitada.
En ningún evento, ya sea como consecuencia de
incumplimiento de la garantía o contrato, negligencia,
responsabilidad estricta, o tergiversación, Grand Hall
Enterprise Co., Ltd. será responsable de
indemnización por daños y perjuicios incidentales
y/o consecuenciales. La responsabilidad de Grand
Hall Enterprise Co., Ltd. se limita al precio de
compra del producto. Esta exclusión de la
responsabilidad no es admitida en algunos estados.
Por lo tanto, esta exclusión no podría serle aplicable
(a usted).
Grand Hall Enterprise Co., Ltd. no asume, o autoriza
a ninguna otra persona para que asuma por Grand
Hall Enterprise Co., Ltd.ninguna responsabilidad por
la venta de este producto más allá de lo expresado
aquí en esta garantía limitada.
Esta garantía Limitada le concede derechos
específicos. La ley de su estado puede concederle
derechos adicionales.
Grand Hall Enterprise Co., Ltd.
9th Fl., No.298, Rueiguang Rd., Neihu,
Taipei, Taiwan (114)
A-8
Para Información sobre la garantía, favor
de llamar a nuestro Centro de Servicio al
cliente 1-800-770-9769 de lunes a viernes
entre las 8:00 AM - 4:30 PM CST.
Downloaded from www.Manualslib.com manuals search engine
-
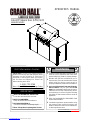 1
1
-
 2
2
-
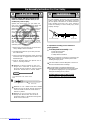 3
3
-
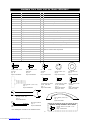 4
4
-
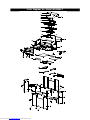 5
5
-
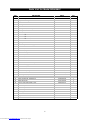 6
6
-
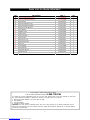 7
7
-
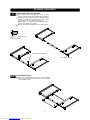 8
8
-
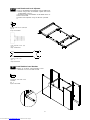 9
9
-
 10
10
-
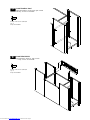 11
11
-
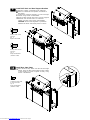 12
12
-
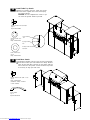 13
13
-
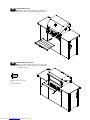 14
14
-
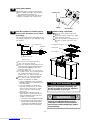 15
15
-
 16
16
-
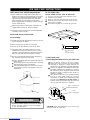 17
17
-
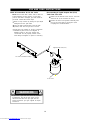 18
18
-
 19
19
-
 20
20
-
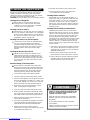 21
21
-
 22
22
-
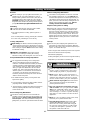 23
23
-
 24
24
-
 25
25
-
 26
26
-
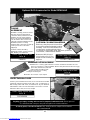 27
27
-
 28
28
-
 29
29
-
 30
30
-
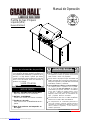 31
31
-
 32
32
-
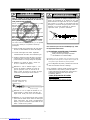 33
33
-
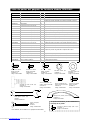 34
34
-
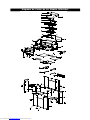 35
35
-
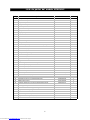 36
36
-
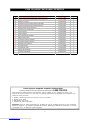 37
37
-
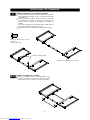 38
38
-
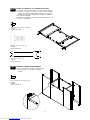 39
39
-
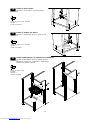 40
40
-
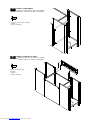 41
41
-
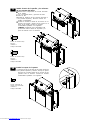 42
42
-
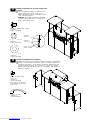 43
43
-
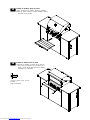 44
44
-
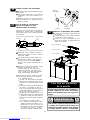 45
45
-
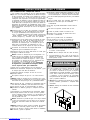 46
46
-
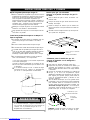 47
47
-
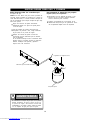 48
48
-
 49
49
-
 50
50
-
 51
51
-
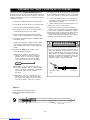 52
52
-
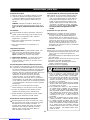 53
53
-
 54
54
-
 55
55
-
 56
56
-
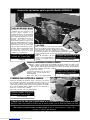 57
57
-
 58
58
-
 59
59
-
 60
60


Grand Hall MFA05ALP El manual del propietario
- Categoría
- Barbacoas
- Tipo
- El manual del propietario
En otros idiomas
- English: Grand Hall MFA05ALP Owner's manual
Otros documentos
-
Members Mark MG3208SLP El manual del propietario
-
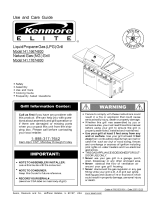 Kenmore Elite 14117674800 El manual del propietario
-
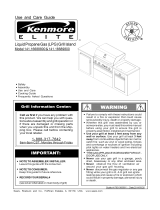 Kenmore Elite 14116689800 El manual del propietario
-
Kenmore 141.17638900 El manual del propietario
-
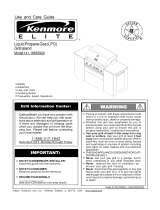 Kenmore Elite 141.16655900 El manual del propietario
-
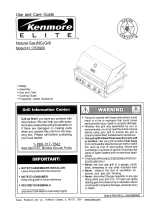 Kenmore Elite 141.17638900 El manual del propietario
-
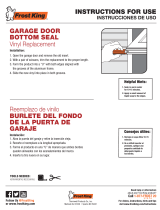 Frost King Vinyl Garage Door Bottom Weatherseal Replacement Guía de instalación
-
Member's Mark M3206ANG El manual del propietario
-
-
KitchenAid FREESTANDING OUTDOOR GRILL El manual del propietario


