
Owner's Manual
Manual del Propietario
®
ROOM AIR CONDITIONER
ACONDICIONADOR DE AIRE DE VENTANA
Model, Modelo 580.74053_o_
Sears, Roebuck and Co., Hoffman Estates, IL 60179 U.S.A.
www.sears.com

TABLE OF CONTENTS ........................2
WARRANTY ..............................................2
SAFETY .....................................................3
ImportantSafety instructions...................... 3
ELECTRICAL REQUIREMENTS .......4
INSTALLATION ........................................5
Installation Requirements ......................... 5
installation................................................ 6
How to Install............................................ 6
Removal from Window ............................. 7
OPERATION .............................................8
How and Why ........................................... 8
Normal Sounds ........................................ 8
Capacity and Running Time ..................... 8
Features ................................................... 9
Using the Air Conditioner ......................... 9
Air Conditioner Features ........................ 10
MAINTENANCE .....................................11
Air Filter Cleaning ................................... 11
Air Conditioner Cleaning ........................ 11
How to Remove the Front Grille............. 11
How to Replace the FrontGrille ............. 11
TROUBLESHOOTING .........................12
Before Calling for Service ...................... 12
ESPANOL ................................................14
SERVICE NUMBERS ............BackCover
FULL ONE YEAR WARRANTY ON
ROOM AIR CONDITIONER
Foroneyearfromthedateofpurchase,whenthis
air conditioner isoperatedandmaintainedfor
normalroomcoolingaccording toinstructionsinthis
owner'smanual,Searswillrepairthisair
conditioner,free ofcharge,itdefectiveinmatedalor
workmanship.
FULL FIVE-YEAR WARRANTY ON
SEALED REFRIGERATION SYSTEM
For five years from the date of purchase, when this
air conditioner is operated and maintained for
normal room cooling according to instructionsin this
owner's manual, Sears will repair the sealed
refdgeration system (consisting of refdgerant,
connecting tubing, and compressor), free of charge,
if defective in matedal or workmanship.
WARRANTY SERVICE IS AVAILABLE BY
CONTACTING SEARS SERVICE AT
1-800-4-MY-HOME I.
Warranty coverage applies only to air conditioners
.usedfor non-commercial, pdvate household
purposes.
This warranty applies only while this product is in
use in the United States.
This warranty gives you specific legal rights, and
you may also have other fights which vary from
state to state.
Sears, Roebuck and Co., D/817WA,
Hoffman Estates, IL 60179 U.S.A.
-2-

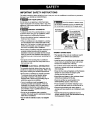
IMPORTANT SAFETY INSTRUCTIONS
The safety instructions below will tell you how to use your room air conditioner to avoid harm to yourself or
damageto yourROOM AIR CONDITIONER.
FOR YOUR SAFETY
Do not store or use gasoline or other flammable
vapors and liquids in the vicinity of this or any other
appliance. Read product labels for flammability and
other warnings.
_ PREVENT ACCIDENTS
To reduce the dsk of fire, electrical shock, or injury
to persons when using your air conditioner, follow
basic precautions, including the following:
• Be sure the electrical service is adequate for the
model you have chosen.
• If the air conditioner is to be installed in a window,
you will probably want to clean both sides of the
glass first. If the window is a triple-track type with a
screen panel included, you may want to remove
the screen completely before installation.
• Be sure the air conditioner has been securely and
correctly installed according to the separate
installation instructions provided with this manual.
Save this manual and installation instructions for
possible future use in removing or reinstalling this
unit.
• Use gloves when handling the air conditioner.
Be careful to avoid cuts from sharp metal fins on
front and roar coils.
ELECTRICAL INFORMATION
The complete electrical rating of your new room air
conditioner is stated on the sedal plate. Refer to the
rating when checking the electdcal requirements.
• Be sure the air conditioner is propody grounded.
To minimize shock and fire hazards, proper
grounding is important. The power cord is
equipped with a three-prong grounding plug for
protection against shock hazards.
• Your air conditioner must be plugged into a
propedy grounded wall receptacle. If the wall
receptacle you intend to use is not adequately
grounded or protected by a time delay fuse or
circuit breaker, have a qualified electrician install
the proper receptacle.
• Do not run air conditioner with a protective
covering. This could result in mechanical damage
within the air conditioner.
• Do not use an extension cord or an adapter
plug.
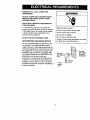
_ Avoid fire hazard or electric shock.
Do not use an extension cord or an adapter plug.
Do not remove any prong from the power cord.
Grounding type
,%
wall receptacle Do not under any |
circumstances cut,
/
remove, or bypass
the grounding prong
from this plug.
Power supply cord
with 3-prong
\grounding plug
ENERGY SAVING IDEAS
• The capacity ofthe room air conditioner must fit
the room size forefficient and satisfactory
operation.
• Install the room air conditioner on the shady side
of your home. A window that faces north is best
because it is shaded most of the day.
• Do not block air flow inside with blinds, curtains, or
furniture; or outside with shrubs, enclosures, or
other buildings.
• Close the floor and wall registers and the fireplace
damper so cool air does not escape up the
chimney and into the duct work.
• Keep blinds and drapes in other windows closed
dudng the sunniest part of the day.
• Clean the air filter as recommended in the
MAINTENANCE section of this manual.
• Proper insulation and weather stripping in your
home will help keep warm air out and cool air in.
• Extemal house shading with trees, plants or
awnings will help reduce the air conditioner's work
load,
• Operate heat producing appliances such as
ranges, washers, dryers, and dishwashers dudng
the coolest part of the day.
-3-

OBSERVE ALL LOCAL CODES AND
ORDINANCES.
DO NOT, UNDER ANY CIRCUMSTANCES,
REMOVE THE POWER SUPPLY CORD
GROUND PRONG.
ELECTRICAL GROUND IS REQUIRED ON
THIS APPLIANCE.
A 1!5-volt 60 Hz, AC only, 15A fused and
properly grounded electrical supply is required.
A time delay fuse or time delay circuit breaker
is recommended. Use a dedicated circuit,
serving only this appliance.
DO NOT USE AN EXTENSION CORD.
RECOMMENDED GROUNDING METHOD
For your personal safety, this appliance must
be grounded. This appliance has a power
supply cord with a 3-prong grounding plug. To
minimize possible shock hazard, the cord must
be plugged into a mating grounding type wall
receptacle and grounded in accordance with
the National Electrical Code (ANSI/NFPA 70)
latest edition and all local codes and
ordinances. If a mating wall receptacle is not
available, it is the personal responsibility and
obligation of the customer to have a properly
grounded 3-prong wall receptacle installed by a
qualified electrician.
Electrical Shock Hazard
Plug into a grounded 3 prong outlet.
Do not remove ground prong.
Do not use an adapter.
Do not use an extension cord.
Failure to follow these instructionscan result
in death, fire, or electrical shock.
_3-prong
3-prong _ IIF:_ Ill grounding
grounding-'_------_ I1\ . /Frltype wall.
plug _ I_'_]_ _J recepzacle
L_ Ground
Power _ prong
supply
cord
-4-

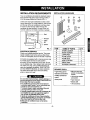
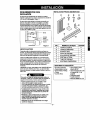
INSTALLATION REQUIREMENTS
Your air conditioner will install into standard double
hung windows with actual clear opening widths of
22 to 36 inches (558mm to 914mm) (FIG. 1).
Lower sash must open sufficiently to allow a clear
vertical opening of 14 inches (356mm). Side louvers
and the rear of the air conditioner must have clear
air space to allow enough airflow through the
condenser for heat removal. The rear of the unit
must be outdoors, not inside a building or garage.
I I
FIG. 1
ELECTRICAL SERVICE
Check your available electrical service, The power
supply available must be the same as that shown
on the unit nameplate (found on left side of cabinet).
All models are equipped with a 3-prong service plug
to provide proper service and safe positive
grounding. Do not change plug in any way. Do not
use an adapter plug. If your present wall outlet does
not match your plug, call a qualified electrician to
make the necessary corrections. SAVE CARTON
and this OWNER'S MANUAL for future reference.
The carton is the best way to store unit during
winter or when not in use.
To avoid riskof personalinjury, propertydamage,or
)roductdamagedue totheweightof this device and
sharp edgesthat may be exposed:
• Air conditionerscovered in this manualposean
excessiveweight hazard.Two or morepeopleare
neededto move and installthe unit.
To preventinjuryor strain,use properlifting and
carryingtechniqueswhenmoving unit.
• Carefullyinspectlocationwhereair conditionerwill
beinstalled.Besureitwillsupporttheweightof
the unitoveranextendedpedodoftime.
• Handleairconditionerwithcare.Wearprotective
gloveswheneverliftingorcarryingtheunit.AVOID
thesharpmetalfinsoffrontand rearcoils.
• Makesureairconditionerdoesnotfallduring
installation.
INSTALLATION HARDWARE
ITEM NAME OF PARTS Q'TY
A SHORT SCREW 11
B WOOD SCREW 5
C L BRACKET 3
D FOAM STRIP 1
E FOAM SEAL 1
F SIDE CURTAIN 2
G DRAIN PIPE 1
H SUPPORT BRACKET 1
REQUIREDTOOLS:
•Tight Fitting gloves
• Standard screwdriver
• Phillips screwdriver
• Pliers
• Sharp knife
• 3/8-inch open end
wrench or adjustable
wrench
* 1/4-inch hex socket
and ratcher
•Tape measure
• Electdcdrill
• 1/4-inch drill bit
-5-

INSTALLATION
Pick a location whichwill allow you to blow the cold
air into the area you want. Windows used for
installation must be strong enough to support the
weight of the air conditioner. Good installation with
special attention to the proper position of the unit will
lessen the chance that service will be needed.
If air conditioner is blocked by a storm window frame,
see step 9 on page 7 before beginning to install.
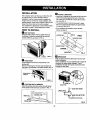
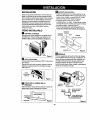
HOW TO INSTALL
LIsIDE CURTAINS
Insert the side curtains into the guides of the air
conditioner. Fasten the curtains to the unitwith
screws (ITEM A), as shown in FIG. 2.
ITEMA FIG. 2
_'_ FOAM STRIP
Cutthe adhesive-backedfoam strip (ITEM D) to the
window width.
Remove the backing from the foam strip and attach the
foam strip to the underside of the bottom window.(FIG. 3)
_1 LOCATING UNIT IN WINDOW
Open the window and mark center line with pencil
on the center of the inner sill, as shown in FIG. 4.
L_ A'B'ACH L BRACKET
• Install the L brackets on the outer sillwith the short
side of the bracket against the back of the inner
sill. Install one L bracket 8" to each side of center
line. See FIG. 5.
• The bracket helps to hold unit securely in place.
Be sure to place bracket edge flush against back
of inner sill. See FIG. 5.
• Ifair conditioner is blocked by storm window
frame, see step 9.
INNER SILL
OUTER SILL ITEMA INSIDE
LINE
SHORT SIDE
OUTSIDE
L BRACKET FIG. 5
_'_DRAINAGE
First, be sure to insert the drain pipe intobase pan
before installation.
The air conditioner must be installed with a slight tilt
downward for proper water drainage. The air
conditioner will drain the excess condensed water
through the drain pipe.
DRAIN CAP
DRAIN PIPE
DRAINPIPE_BASE PANREAR
"_'lv';tJ BASE PANBoI-rOM
• "_/_J////////////!
FIG. 6
-6-

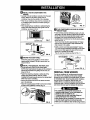
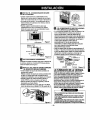
O INSTALL THE AIR CONDITIONER IN THE
WINDOW
• Carefullylifttheair conditionerand slideitintothe open
window.Make surethebottomguideof theair
conditionerdropsintothe notchesofthe Lbrackets.
• When theairconditionerdropsintothe Lbrackets,the
air conditionerwillbe centeredinwindowopeningas
shownin FIG. 7.
• While steadyingthe airconditioner, carefullybringthe
windowsashdownbehindthe upperguideof the air
conditioner,as shownin FIG.8.
m
\ i
CENTER LINE FIG. 7
W1NOOWFRMAE_...
UPPERGUIDE_ _STRIP 1
ABOUT 1/4_
m SECURE THE GUIDE PANELS
FIG. 8
Extendthe guidepanels(ITEM F) tofillthe window
openingusing4 screws(ITEM B)to securethem,as
showninFIG. 9.
[_J INSTALL THE FOAM SEAL AND SASH LOCK
• Cut the foamseal(ITEM E) tothewindowwidth.
Stuffthefoam sealbetweenthe glassand the windowto
preventairand insectsfromgettingintothe room,as
shownin FIG. 9.
• Fastenthe remainingL bracketoneithersideofthe
windowusingscrew (ITEM A).See FIG. 9 inset.
Installingthisbracketpreventswindowfrombeing raised
whichmay resultinunitfalling.
• Removethe screws thatsecurethe cabinetand base
pan inthe rightside.
• Attachthe supportbracket(ITEM H) inthe innerwindow
sillwitha screw (ITEM B),as shownFig. 10.
FIG. 10
I_'] IF AIR CONDITIONER IS BLOCKED BY STORM
WINDOW FRAME
• If storm windowpresents interference,fastena 2" wide
woodstdp to the innerwindow sillacross the full width of
the sill. The wood stripshouldbe thick enough to raise
the height of thewindow sill so that the unit canbe
installedwithout interferencefrom the the storm window
frame. See FIG. t 1.
Top of wood stdpshould be approximately 3/4" higher
than the storm window frame to help condensation to
drain propedy to the outside.
• Install a second woodstdp(approximately 6" long by
11/2"wideandsame thickness as firststdp)in the center
oftheoutersillflush againstthe beck ofthe innersill.
Screwthe Lbrackets intothis stdp.
Thiswillraisethe L bracket as shownin FIG. 11.
WOOD STRIP MOUNTED 1' MAX.
ON TOP OF tNNER'SILL -_- 3/4"
INNE_ FRAME
OUTER
SILL
N,SIO FIG. 11
REMOVAL FROM WINDOW
Turnthe air conditioneroff,and disconnectthe bower
cord.Removethe L bracketandthe screws installed
throughthetopand bottomofthe guidepanels,and save
for reinstallationlater. Closethe guidepanels.Keepinga
firmgdp_n theairconditioner,raisethe sash,and
carefullytiltthe airconditionerbackward,drainingany
condensatewater. Liftthe air conditioner fromthe window
and removethe foam sealfrom between thewindows.
L BRACKET
FIG. 9
• Airconditionerscoveredinthismanualposean
excessiveweighthazard.Twoormorepeopleare
neededtomoveandinstalltheunit.
To preventinjuryorstrain,useproperliftingand
carryingtechniqueswhenmovingunit.
• Whenhandlingtheairconditioner,becarefultoavoid
cutsfromsharpmetalfinsonfrontandrearcoils.
• Makesureairconditionerdoesnotfalldudngremoval.
-7-

HOW AND WHY
Your room air conditioner provides the following
functions to make hot weather living more
comfortable:
• Cools and circulates room air.
• Lowers humidity by removing excess moisture.
• Filters out summertime dust, dirt, and some
airborne impurities.
The air conditioner performs these functions by
drawing room air through a filter which traps dust
and dirt particles. The air then passes over a
cooling coil which refrigerates the air and removes
excess moisture. The same air is then returned to
the room-cooler, drier, and cleaner. Moisture
removed from the room air is carried to the outside
and evaporated.
Your air conditioner is designed to be easy to
operate and to provide plenty of cooling power.
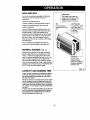
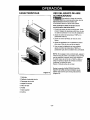
NORMAL SOUNDS FIG.12
Aside from the regular fan motor and compressor
sounds coming from your airconditioner, you will
once in a while hear a pinging sound. This isthe
result of moisture being picked up from the air in the
room and thrown against the airconditioner's fan.
This is normal and should not be cause for concern.
Also, do not be alarmed ifyou hear a slighthissing or
gurgling sound coming from your air conditioner after
it is off.These are normalcoolant noises.
CAPACITY AND RUNNING TIME
Proper unit size is important in deciding the desired
comfort for the area you want to cool. The proper
size is determined by the number of square feet in
the area to be cooled.
Whenever the heat or humidity load is above normal
the air conditioner must run longer and more often
to keep the desired temperature you have selected,
Under heavy heat load conditions the air conditioner
may need to run constantly to keep the temperature
you want.
At times using the HIGH FAN setting to circulate the
room air may make it comfortable even though you
do not have the air conditioner set to cool the air.
This willdecrease your cost of use.
f ompressor
The modern high efficiency
compressor may have a high
pitched hum or pulsating
noise that cycles on and off.
-Fan - Unit VibraUon
You may hear air The unit may vibrate
movement from the and make noise
fan. because of poor wall
or window
construction.
Condensel
You may hear
droplets of water
hittingthe condenser,
causing a pinging or
clicking sound.
FIG. 12
-8-

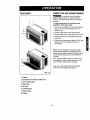
FEATURES
7 1
3
2
6
8
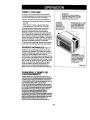
USING THE AIR CONDITIONER
_To reduce the risk of fire, electric
shock, or injury to persons, read the important
SAFETY instructions section before operating this
appliance.
To begin operating the air conditioner after
installation, follow these steps:
1. Plug in the air conditioner. (To prevent electrical
hazards, do not use an extension cord or an
adapter plug.)
2. Set the TEMP control to the coolest setting.
3. Set the MODE control at the highest COOL level.
4. Adjust the louvers for comfortable air flow with
control tab.
5. Once the room has cooled, adjust the TEMP and
MODE control to the setting you find most
comfortable.
NOTE : If the air conditioner is turned off, wait 3
minutes before restarting. This allows pressure
inside the compressor to equalize. Failure to wait 3
minutes before restarting may cause inefficient
operation.
If you move the TEMP control to a warmer, then
immediately back to a cooler setting, the unitwill
shut off. Wait 3 minutes before restarting.
Refer to the AIR CONDITIONER FEATURES
section for other setUngs.(Seepage 10)
FIG. 13
1. Cabinet
2. Horizontal Air Direction Control Tab
3. Cool Air Discharge
4. Inlet Grille
5. Air Filter
6. Control Knobs
7. Upper Guide
8. Curtain
+9-

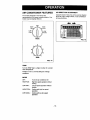
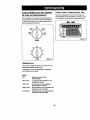
AIR CONDITIONER FEATURES
The controlsfeatured in this manual are
representative of the many models available. Your
model may look slightly different.
AIR DIRECTION ADJUSTMENT
Using the Control Tabs, the air flow can be directed
to the left, right, straight ahead, or any combination
of these directions.
OFF
HIGH _ HIGH
F,.iF coo,
LOWfl II I\ \\ LOW
FANo_OCOOL
MODE
5
3e 4 o6 o7
2°_ )8
TEMP
FIG. 14
FIG. 15
TEMP
Turn the TEMP dial to a higher number for a cooler
room temperature.
Position 5 or 6 is a normal setting for average
conditions.
MODE
OFF : Turns the air conditioner off.
HIGH FAN : High fan speed operation without
cooling.
LOW FAN : Low fan speed operation without
cooling.
HIGH COOL : Cooling with high fan speed
operation.
LOW COOL : Cooling with low fan speed
operation,
-10-

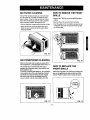
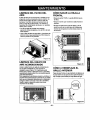
AIR FILTER CLEANING
The Air Filter will become dirty as it removes dust
from the inside air. It should be washed at least
every 2 weeks. If the Air Filter remains full of dust,
the air flow will decrease and the cooling capacity
will be reduced, possibly damaging the unit.
• Pull the inlet grille forward and pull out the air filter.
• Wash the Air Filter under the faucet with warm
water. Be sure to shake off all the water before
replacing the filter.
HOW TO REMOVE THE FRONT
GRILLE
• Remove the TEMP knob and the MODE knob by
pulling.
• Remove the screw securing the Front Grille.
• Push the grille up from the bottom and pull the top
of the grille away from the case to lift the top tabs
out of their slots.
FIG. 16
AIR CONDITIONER CLEANING
Clean the front grille and inlet grille by wiping with a
cloth dampened in a mild detergent solution (FIG. 17).
The cabinet may be washed with mild soap or
detergent and lukewarm water, then polished with
liquid appliance wax.
To ensure continued peak efficiency, the condenser
coils (outdoor side of the unit) should be checked
periodically and cleaned if they become clogged
with soot or dirt from the atmosphere. Brush or
vacuum exterior coils to remove debris from fins.
FIG. 17
FIG. 18
HOW TO REPLACE THE
FRONT GRILLE
Attach the front grille to the cabinet by inserting the
tabs on the gdlle into the slotson the front of the
cabinet, Push the grille in until it snaps into place,
I:l
o
o
FIG. 19
-11 -

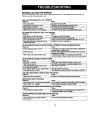
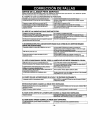
BEFORE CALLING FOR SERVICE
Check the following listto be sure a service call is really necessary. A quick reference tothis manual may
help you avoid an unneeded service call.
THE AIR CONDITIONER WILL NOT OPERATE
Check if... Then.,.
Wallplugdisconnected.
Housefuseblownorcircuitbreakertitpl:_d.
MODEselectorisOFFposition
Unitwasfumedoffandthenontooquickly.
TEMPControlsetwarmerthanroomtemperature.
Pushplugfirmlyintowallouter,
Replacefusewithtimedelaytypeorresetcircuitbreaker.
TurnMODEselectortothedesiredCOOLsetting.
Turnunitoffandwait3minutesbeforerestarting.
TurnTEMPControlclockwisetoacoolersetting(highernumber).
AIR FROM UNIT DOES NOT FEEL COLD ENOUGH.
Check if... Then...
MODEselectorina LOWCOOLpesition,
TEMPControlsettoowarm(lowernumber).
Reamtemperaturebelow70°F(21°C).
Temperaturesensingtubetouchingevaporatorcoil,
locatedbehindfrontgnlle.
Turnselectortoa HIGHCOOLPos_ion
Turn"FEMPcontrol_ise toa coder_.
Coolingmaynotoccuruntilroomtemperaturerisesabove70°F(21°C).
Straightentubeawayfromevaporatorcoil.
1HEAIRCONDmONERCOOUNG,BUTROOMISTO0W/_RM- ICEFORMINGONCOOUNGCOILBEHIND_ _
Check If... Then...
Outdoortemperaturebelow70°F(21°C). Todefrostthecoil,setselectortoFANpotion.Then,turnTEMPcontrol
counterclockwisetoa wannerset_ng.
Airfiltermaybedirty. Cleanfilter.RefertoMaintenancesectionofmvnetsmanual.Todefrost,
setcelectortoFANposition,
TEMPControlsettoncoldfornight-timecooling. Todefrostthecoil,setselectortoaFANpseilJon.Tnsn,settheMODE
codcrolatFAN_ or"HighCool"withtheTEMPcontroltoawarmerposition.
11"1EAIRCONDmONERCOOUNG,BUTROOMISTOOWARM
Check if...
Dirtyairfilter- airrestdeted
TEMPContro_settoowarm.
Frontofunitisblockedbydrapes,blinds,furniture,
etc.AirdistitbulJonisrestncted.
Doors,windows,registers,etc.open.Coldairescapes.
Unitrecentlyturnedonin hotroom.
Then..,
Cleanairfilter.RefertoMaintenancesectionofowneCsmanual.
TurnTEMPcontrolclesk_setoacoolersetting(highernumber).
Clearblockageinfro_ofunit.
Closedoors,windows,[egistem,etc.
Aik_adG_ceal_T,etcremo_,est_edhealfromwalls,_Iorj,II_,_',dfurniture.
THE AIR CONDITIONER TURNS ON AND OFF RAPIDLY.
Check if... Then...
[ Outsidetemperatureisextremelybet. I SetMODEonHIGHsbeedtobdngalrpastconlingceiisfestar.
NOISE WHEN UNIT IS COOLING.
Check if... Then...
Soundofbnt'_ngwater- fromthemoistureremovalsystem. Thisisnormelwhenhumk_r¢/ishlgh.clseedeors,windows,andre_iisters.I
Windowvibration- poorinstallation. RefertoinstallaBoni_ ercheckwithinstaller. I
WATER DRIPPING INSIDE ROOM WHEN UNIT IS COOLING.
Check if... Then,..
,I "l]'=ealrconditionerisimpropeityinstalled,ninstallationinstrucitonsorcheckwithinefalk_'.T=ltalronndiltonerslighltytotheoutaldetoallowwaterdreinage.Referto I
WATER DRIPPING OUTSIDE WHEN UNIT IS COOLING.
Check if... Then...
Theunitisremow';glargequanttlasofmolatum Thislanoffnaldunngexcese_valyhurolddays.
fTOmhumk:lroem.
-12-


INDICE DE MATERIAS ............................. 14
GARANT|A ................................................ 14
SEGURIDAD .............................................. 15
Importantesinstruccionesde seguridad.....15
REQUERIMIENTOS ELI_CTRICOS ......... 16
INSTALACI(_N ........................................... 17
Requerimientos para instalaci6n .......... 17
Instalaci6n ............................................. 18
C6mo instalarlo ..................................... 18
La eliminacibn de la ventana ................. 19
OPERACION .............................................. 20
C6mo y por qu_ ..................................... 20
Sonidos normales.................................. 20
Capacidad y tiempode funcionamiento ...20
Caracterfsticas ..................................... 21
Use del equipo de aire acondicionado ..21
Caracterfsticas del equipo de aire
acOndicionado ....................................... 22
MANTENIMIENTO .................................... 23
Limpieza del filtro del aire ...................... 23
Limpiezadelequipodeaireacondicionade....23
C6mo sacar la rejilla frontal ................... 23
Cbmo a reemplaza el grilleanterior ......23
CORRECCION DE FALLAS ...................... 24
AntesdeUamarparaServicio...................... 24
PARA PEDIR SERVICIO ......CubiertaTrasera
GARANT|A DE UN ANO POR EL
EQUIPO DE A!RE ACONDICIONADO
DE HABITACION
Durante un afio completo a partir de la fecha de
compra, sieste equipo de aire acondicionado recibe
mantenimiento y se utiliza para a! enfriamiento
normal de habitaci6n seg_n las instrucciones
indicadas en este manual del propietario, Sears
reparard gratuitamente este aquipo de aire
acondicionado, si tiene algt_n defecto en materiales
o fabdcaci6n.
GARANT|A TOTAL DE ClNCO ANOS
POR EL SISTEMA DE REFRIGERACION
HERMETICAMENTE SELLADO
Durante cinco afios a partir de la fecha de compra,
sieste equipo de aire acondicionado recibe
mantenimiento y se utiliza para el enfdamianto
normal de habitaci6n segl_n las instruccionas
indicadas enaste manual del propietado, Sears
reparard gratuitamente el sistema de raffigaraci6n
hermdticamente sellado (qua consiste en el agente
retdgerante, los tubos de conexi6n y el compresor),
si tiene algdn defecto en materiales o fabdcaci6n.
EL SERVIClO DE GARANT[A EST.&.A SU
DISPOSICI(_N CON SOLO PONERSE EN
CONTACTO CON EL CENTRO DE SERVIClO
SEARS AL 1-800-4-MY-HOME'.
La protaccion de garantfa cubre unicamente a los
equipos de aire acondicionado usados para uso
demestico y no para usa comercial,
Esta garantfa s61otiene validez mientras el producto
se est_ usando en los Estades Unidos.
Esta garantia le da derechos legales especfficos y
usted puede tener otros derechos que varfan de
estado en estado.
Sears, Roebuck and Co., D/817WA,
Hoffman Estates, IL 60179 U.S.A.
-14-

IMPORTANTES INSTRUCCIONES DE SEGURIDAD
Las siguientes instrucoiones de seguddad le indicar_n c6mo usar su equipo de aire acondielonado de
habitacibn para evitar dafios para usted mismo y para su EQUIPO DE AIRE ACONDICIONADO.
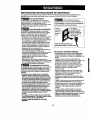
_POR SU SEGURIDAD
No almacene ni use gasolina u otros vapores y
iiquidos inflamables cerca de _ste o cualquier otro
electrodom_stico. Lea las etiquetas de los
productos para ver si contienen advertencias sobre
el cardcter inflamable de los mismos y otras
advertencias.
ARA PREVENIR ACCIDENTES
Para reducir el riesgo de incendios, descargas
elbctricas o lesiones personales al usar su equipo
de aire acondicionado, tome las precauciones
bdsicas, entre las que estdn las siguientes:
• Asegdrese de que la alimentaci6n eldctrica sea la
apropiada para el modelo que usted ha etegido.
• Si eJequipo de aire acondicionado debe instalarse
en una ventana, a usted probablemente le
conviene llmpiar primero ambos lados del viddo,
Si la ventana es del tipo de tres paneles con un
panel incluido de pantafla, le conviene sacar la
ventana completamente antes de la instalaci6n.
• Aseg_rese de que el equipo de aire
acondicionado ha sJdoinstalado correctamente y
con seguridad seg_n se sefiala en las
instrucoionesseparadas de inatalacibn que vienen
en este manual. Conserve este manual y las
inatrucciones de instalaci6n para usarlos
posiblemente en el future al sacar o volver a
instalar esta unidad,
• UtUiceguantes al manejar el equipo de aire
acondicionado; tenga cuidado para evitar cortadas
con las afiladas aletas metdlicas que se hallan en
los serpentines frontales y postreiores.
_ INFORMACII_N ELECTRICA
En la placa de serie del fabdcante se indica cudl es
la capacidad ek_ctricanominalcompletade sunuevo
equipode aimacondicionadopara habitacibn.Consulte
estaplacacuandovaya a veriflcarlosrequerimientos
e_tricos.
• AsegSresede que el_luipa de aimacondidonado
tenga unaconexi6ncorrectaatierra.Para reduciral
mfnimolosriesgo6de descargaseldctdcas • incendio,
es importantecone(tarelequipoconectarnentea lJerm.
Elcordonde alimentad6neldctrk:aestdequipadecon
unenchufede ties espigascon conexi(Yla liena para
protegedecontra dpsgos de descargas el_eldcas.
• Su aireacondicicododebeser enchufadoen unatoma
de la pareddebidamenteconectadoala_erra. Sila
tomade cordentede paredque ustedpiensausarno
estdconactada correctamente atiena o no estd
protegidacon un fusible de acci6n relardada o conun
interruptorde circuito,hagaque unelectdcistacaJificado
le instalelatoma de cordente de pareden fomla
correcta.
• Nopongaa funcionarai equipode aire acondicionado
con la cobierta protectora.Esto poddacoasionar defios
mecdnicos dentro del aire acondicionade.
• NOuse un nable de extensk_nnl unenchufe
adaptador.
Evitelos peligrosdeincendiosy
descargasel_,-'tncas.Nouseuncable deextensi6nni un
enchufeadaptador.No elimineningunade lasespK_asdel
enchufedelcorddndealimentad6nel_trica.
Toma de En ninguna "]
cordente de circunstancia corte,
J
_aredcon extraiga o intente
eliminar la espiga de
conexi6n a conexi6n atierra de
tierra, este enchufe,
C_,o_ de_mentaci_ ek_c_icacon _,
de sencone a \\
IDEAS PARA AHORRAR ENERG|A
• La capacidad del equipo de aim acondicionado
debe corresponder al tamafio de la habitacibn
para el funcionamiento eficiente y satisfaetorio del
equipo.
• Instale el equipo de aire acondicionado de
habitacibn en el lado sombreado de su hogar. Una
ventana orientada hacia el norte es la mejor
porque tiene sombra la mayor parte del dfa.
• No bloquee el flujo de aire haela el interior con
persianas, cortinas o muebles; o la parte de
afuera con arbustos, paredes u otras
construccion_es.
• Cierre el regulador de tiro de la chimenea, las
rejillas de calefaccibn del piso y la pared, de tar
modo que el aim fdo no se escape ni por la
chimenea ni por los conductos.
• Mantenga las persianas y las cortinas de otras
ventanas cerradas durante la parte mds soleada
del dia.
• Limpie el filtro del aire como se recomienda en la
secci6n =MANTENIMIENTO" de este manual.
• El aislamiento corre_o y las juntas hermdticas en
puertas y ventanas en su hogar le ayudardn a
mantener el a_reca}iente afuera y el aire frio
adentro.
• AI darle sombra externamente a la casa con
drboles, plantas o toldos ayudard a reducir la
carga de trabajo del equipo de aire acondicionado.
• Opere los aparatos que producen calor como, por
e emplo, homos, lavadoras, secadoras y
lavap atos durante la parte m&s fr{a del dfa.
-15-

RESPETE TODOS LOS CODIGOS Y
REGLAMENTOS.
BAJO NINGUNA ClRCUNSTANCIA CORTE,
QUITE O EVITE EL USO DE LA CONEXl6N
A TIERRA DE ESTA CLAVIJA.
ESTE APARATO NECESITA SER
CONECTADO A TIERRA.
Se requiere una alimentaci6n el6ctrica CA,
adecuadamente conectada a tierra con un
fusible de 15 A, de 60 Hz y de 115 V. Se
recomienda un fusible de retardo o un
disyuntor de circuito que alimente solamente a
este aparato.
NO USE CABLE ELI_CTRICO DE
EXTENSION.
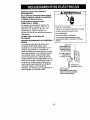
METODO RECOMENDADO DE CONEXlON A
TIERRA
Per su propia seguridad este aparato debe
conectarse a tierra. Este aparato viene
equipado con un cabte de alimentaci6n y una
clavija de tresterminales. Para reduciral
mdximo el peUgrode choque el6ctrico, el cable
debe estar conectado a una conexi6n de pared
con conexi6n a tierra, y esta conexi6n debe
hacerse de acuerdo con la 61timaedici6n del
C6digo EI6ctrico Nacional (ANSI/NFPA 70), as{
come con losc6digos y reglamentos locales. Si
no existe una cenexi6n de pared adecuada, el
cliente tiene ia responsabilidady la obligaci6n
de mandar instalar, con un electricista
calificade, una conexi6n de pared adecuada de
tres terminales con conexi6n a tierra.
Peligrodechoqueel6ctrico
Conecteenunaconexi6ndeparedde 3terminales
Noquitelaterminalde conexi6na tierra
No useadaptadores
No usecableel6ctricodeextensi6n
Sino sesiguenestasinstrucciones,puede
ocasionarsela muerte,unincendioo un choque
el_ctrico.
Cable de-
alimentaci6n con
clavija dotada de
conexi6n a tierra
de 3 terminales.
Toma de corriente _ ill
de pared con _._ _111
conexi6n a tierra. "'--JI I
Terminal de
--T_ conexi6n a tierra.
I
H
Bajo ninguna
circunstancia code, quite o
evite el uso de la conexi6n
a tierra de eata clavija.
-16-

REQUERIMI,ENTOSPARA
INSTALACION
Suequipodeaireacondicionadeseinstslar&enventanas
est_ndsrdedoblepanelconanchosdeaberturalibrede558mm
a914mm(22a 36pulgadas).(Figura1)
ElmarcoinferiordebesbrirseIosuficienteparapermitiruna
aberturaverticallibrede356mm(14pulgadas).Lasrejillas
desviadoraslateralesyla parleposteriorde1equipode aire
econdicionadodebentenerunespaciolibredeaireparapermitir
suficienteflujodesirea tray,s delcondensadorparaasfeliminar
el calor.Laparteposteriorde launidaddebequedaral sirelibre,
nodentrodeunedificioogaraje.
--Banda
Pared interior "-----" Figura 1
SERVIClOELECTRICO
Compruebecudlesla alimentaci6nel_ctricaqueIlegaa su
domicilio.Laalimentaci6nelL,ctricadisponibledebesetla misma
quese muestraenla placadelfabdcantede launided(quese
hallaenelladeizquierdodelgabinetedecorrientealtema).
Todoslosmodelosestdnequipadosconunenchufedetres
espigssparasuministrarunserviciocorrectoyunaconexidna
tierraseguray positivs.Nocambieelenchufedeningunaforma.
Nouseunenchufeadaptador.Sisu tomadecorrientedepared
actualnopuedeusarseconelenchufedelequipo,Ilameaun
electricistacalificadeparaque efect_elascorrecciones
necesarias.
CONSERVELACAJAyesteMANUALDELPROPIETARIOpara
deele sirracomoreferenciaenel futuro.Lacajaeslamejor
maneradeconservarla unidadduranteelinviernoocuandono
estaenuse.
Paraevitarel desgode heridaspersonales,daSosen
losbienes,odaSoen elproducto debe set expuestoel
agudez de losbordeey el peso aptodel aparato:
• El aireacondicionadodel que se hablaen este
manualafirma peligro de pesoexcesivo.
Dos omas personasse requiem paramover e instalar
la unidad.Para evitar heddas oagotamlento, use
tecnicas apropiadaspara levntar y mover launidad.
• Cuidadosamenteinspeccione el lugardonde el aire
acondicionado sera puesto.Asegurese queel lugar
sostengaelpesode la unidadsobreunpedodode
tiempoprolongado.
• Mantengasu aireacondieionadoconcuidado,Use
guantesprotectorescuandolevanteo muevala
unidad,EVITE lasaletasfilosasde metalen el
serpentindelanteroyde atras,
• Aseguresequeet aireacondieionado nosecaiga
durantelainstalacion.
INSTALACION PIEZAS DE MONTAJE
TIP0 NOMBREDEI.ASPIEZAS CANTIDAD
A TORNILLO CORTO 11
B TORNILLOMEDIANO 5
C SUPPORT EN L 3
D CINTA DE ESPUMA 1
E SELLADOR DE ESPUMA 1
F CORTINA LATERAL 2
G TUBO DE DRENAJE 1
H SOSTENGA PARC:NTESIS !
HERRAMIENTASREQUERIDAS
• Guantes apretados
• Destomillador normal
• Destomillador Phillips
• Pinsas
• Cuchillo filoso
• Llave inglesao Ilave
abierta de 3/8"
• Uave hexagonalde cube
y trinquete de 1/4 de
pulgada
• Cinta para medir
• Taladro electdco
• Brocade taladro de 1/4"
-17-

INSTALACION
Escojaunlugarquele permitaIlevarelaim fr{oal _reaque
desea.Lasventanasque seusenparala instalaci6ndeben
tener laresisteneiasuficientepara soportarel pesodelequipo
deaireaeondicionado.Unabuenainstalaei6nconatenci6n
especiala la correctaposici6nde launidaddisminuir_la
probabilidadde quesea necesarioefectuarrepareciones.
Si elaireacondicionadoest&bloqueadoporel marcode la
contraventana,yeaelpaso9 de lapdgina7 antesde
comenzara instalar.
COMO INSTALARLO
_IcoRTINAS LATERALES
Introduzca las cortinas laterales en las guias del aire
acondicionado. Fije las cortinas a la unidad con los
tomillos (TIPO A) como se muestra en la Figura 2.
TIPOA
TIPOA
Ftgura 2
_ ClNTA DE ESPUMA
Corte la cinta de espuma adhesiva (IIPO D)a la anchura
de la ventana.
Quite el dorso de la cinta de espuma y peque la cinta de
espuma a la superficie inferior de la ventana de abajo.
Vea la figura 3.
ClNTA _ I I
Figura 3
COLOCARLAUNIDADENLA
J_IvENTAN A
Abrala ventanay marquela lineacentralen elcentro del
alfdizar interior como se muestra en la Figura 4.
ANTEPECHO
INTERIOR
TABURETE Flgura 4
O SOPORTE DE FIJACI(_N L
• Instale los sopol_es L en la solera extema con el
lado corto del soporte contra la parte trasera de la
solera interna. Instale un soporte L de 8" a cada
lado de la Ifnea central. V_ase la Figura 5.
• El soporte ayuda a mantener la unidad
correctamente en su lugar. Asegerese de colocar
el borde del soporte nivelado con la parte de atr&s
del alfeizar interior• V6ase la Figura 5.
• Si el aire acondicionado esta bloqueado por el
marco de la ventana de tormenta, v6a el paso 9.
DESCANSO
INTERIOR
DESCANSO
EXTERIOR TIPO A INTERIOR
LINEA DEL CENTRO
EXTERIOR
MENSULA EN L
Figura 5
I_'_DRENAJ E
Primero, asegt3rese de insertar el tubo de drenaje
en el recipiente de base antes de ta instalaci6n. El
equipo de aire acondicionado debe instalarse con
una ligera inclinaci6n hacia la parte exterior para
permitir el drenaje del agua. El equipo de aire
acondicionado puede drenar el agua condensada a
tray,s de le tuber{a de drenaje.
TUYAU
DRENAJE D'EVACUATIO_
PARTEPOSTERIOR
TUSODE DELRECIPIENTE
DRENAJE DEBASE
__EI_N'_ INFERIORDEL
Figure 6
-18-

r_ INSTALE EL ACONDICIONADOR DE AIRE
EN LA VENTANA
• Levantecuidadosamenteel acondicionadorde airey
deslfceloen laventanaabierta.Aseg_resede quelagula
inferiordelacondicioosdorde aireencajeen delsoporteL.
• AIencajaren del soporteL, elacondicionadorde aire
estardcentradoen laaberturade laventana,comose
muestra en la Figura7.
• Mientrassujetael acondicionedorde aire,baje
cuidadosamenteel marco corredizode la ventana
detrasde la guia supedordel acondicionadorde aim,
comose muestraen la Figura8.
Lineacentral Figure 7
8L)RDE DE LA VENTANA
SUpERK3_
GUb.SURERK)R_*_ _lt_TA
fl
Figura 8
_FIJE LOS PANELES CORREDIZOS
Extienda los panelescorredizospara Ilenar laabertura de
la ventana,usandolos 4tomillos(TIPO B)parafijados,
como semuestraen la Figura9.
[_11 INSTALE EL SELLADOR DE ESPUMACORREDIZA
Y EL SEGURODE VENTANA CORREDIZA
• CorteelseUadorde espumade ventanacorredizaala
anchuradela ventana.
Relieneelselladerdeespumadeventanacorredizaentre
el viddoy laventanaparaevitarel ingresode airee
insectosen la habitacibn,comosemuestraenla Figura9,
• Atomilleelsegurode ventanacorrediza,usandeun
tomillo(TIPO A),comose muestraen la Figure9.
• Quitelostomillosqueaseguranelgabinetey cacerola
despreclablaen el ladecorrecto.
• Conecteelparentesisde support(TIPO H)en elalfdizal
interiordeventanaconuntomiUo(TIPOB),cuandofig.10
CERRADURA OEL MARCO
SEU.AOORDE
ESPU_
mPOE)
Flgura 9
1POH}
"'- _""_- Figure 10
I
I[_lsl ELACONDIClONADORDEAIREESTABLOQUEADO
PORELMARCODELA CONTRAVENTANA
•SiLacontraventanaintedie_e,_jeunList6ndemaderade2"de
anchoalaff_izarinteriordelaventana,queatraviesela
anchuratotaldelalf6izar.Ellistbndemaderadebeser
suficientementegruosoparalevantarla alturadelalf6izardela
ventaosdetatmaneraquela uni(:ladpuedasetinstaladesinla
interferenciadelmarcodela contraventana.Veala Figura11.
La partesuperiordellist6ndemaderadebeser
aproximademente3/4"rn_saltoqueel marcodela
osntraventanaoel[istdndemadera(fueradela case)pare
queelvaporemanadodela unidadpuedadrenar
adecuadamentehaciaelexterior.
• Instaleunsegundolist6ndemadera(deaproximademente6"
de largoy 1"deanchoy delmismogrosordelprimerliston)en
elcentrodelalf_izarexteriorniveladoconlaparteposteriordel
alf_izarinterior.AtomillelossoportosLentrelafaja,Esto
levantar_elsoporteLcomosernuestraenla Rgura11.
1" M.Ay,
FRANJADE MADERA 3/4-PULG
MONTAD,SOBRE_ _"1 r,_- DESEPARACION _r
LA PARTE SUPER1OR |
OELDESCANSO
ANI_F_3HO HOJAOOeLE
ANI_PECNO
FIgure 11
LA ELIMINACI( N DE LA VENTANA
Apagueetequipode aireacondicionado,desosnecteel
cordbnde alimentaci6neldctdca,saqueelsegurodemarco
ylostomillos instaladosa trav_ de lapartesuperiore
inferiorde lospanelesdeslizantesy guardetodalaspara
volvera instalarlosrndstarde.Cierrelospaneles
deslizantes.Agarrefirmementeelsquipode aire
acondicionado,eleveelmarcoe inclinecuidadesamenteel
equipode aireacondicionadohaciaarras,drenande
cualquieraguaque sehayacondensado.Desticeel equipo
deaire acondicionado1"pulgadahaeialaderechay
seguidamentelevanteelequipodeaireacondicionadode la
ventanay saquelajuntaherm61icadeentrelas ventanas.
,Ela_ acor_cionadoddquesehablaenestemanu_alirmape_m
depesoexcedvo.
Dosomaspersoossserequiereparamovereinstalarlaunidad.Para
evitarheridasoagotamle_to,usetec_ apropiadasparelevntary
moverlaunidad.
_ afiladasqueest_enlosseq_fl_esfrontalyposterkx,
oAsegureseqoselaireaco_ nosecaigadurantelainstaladon.
-19-

C( MO Y POR QUI
Su equipo de aire acondicionado de habitaci6n
brinda las siguientes funciones para hacer que la
vida en climas cdlidos sea rods confortable:
• Enfr{a y hace circular el aire por la habitaci6n
• Disminuye la humedad eliminando la humeclad
excesiva.
• Filtra el polvo, el sucio y algunas impurezas
transportadas en el aire del clima veraniego.
El equipo de aire acondicionado realiza estas
funciones haciendo pasar el aire del medio
ambiente a trav(_s de un filtroque atrapa las
partfculas de polvo y sucio. El aire pasa entonces
por un serpentin de enfriamiento que refrigera el
aire y elimina el exceso de humedad. El mismo aire
regresa entonces al enfriador, secador y limpiador
del aire del ambiente. La humedad extra(da del aire
ambiente es Ilevada al exterior y evaporada.
Su aire acondicionado est& disefiado para operar y
suministrar una enorme potencia de enfriamiento.
SONIDOS NORMALES Fi .r 1=
Ademds de los sonidos regulates del motordel
ventilador y el compresor que salen de su equipo
de aire acondicionado, usted escuchard de vez en
cuando un sonido metdlico. Este sonido es
producido pot la humedad que es recogida del aim
en el ambiente yes lanzada contra el ventilador del
equipo de aire acondicionado. Esto es algo normal
que no debe ser motivo de preocupaci6n. De igual
modo, no se alarme si usted escucha un ligero
sonido de silbido o borboteo proveniente de su
equipo de aire acondicionado despues que Io
apaga. Estos son ruidos normales del refrigerante.
- Compresor
El modemo compresorde gran
eficienciapuecleproducirun ruido
agudo demurmulloo un mido de
pulsaci6nque viene yse va.
Ventilador
Usted puede
escucharel
movimiento del
aire proveniente
delventilador.
Vlbraciones de la unidad
La unidad puede vibrary
hacer ruidodebido a la
deficiente construcci6n
de la pared o la ventana.
Condensador
Usted puede escuchar
gotas de agua que caen
sobre el condensador
causando unsonido
metdlico o un sonido
de chasquido.
Figura 12
CAPAClDAD Y TIEMPO DE
FUNClONAMIENTO
AJdeddircu_ldebeserlacomodidaddeseadaparaelEreaque
ustedquiereenfdar,esimpodantedeterminareltama_oconectode
launidad.Eltama_ adecuado_ determinadoporeln0merode
metroscuadradesquetieneehtreaquesedeseaenfriar,asicomo
porlatemperaturainterioryexterioryporlahumedad.
Siemprequelacargat_rmicadelventiladorest_potenornadeIo
normal,elequipodeaireacondicionadodebefundonarm_sliempo
paramantenerlatemperaturadeseadaqueustedhaselec_nado.
Bajoconddonesdeuflacargat_mtcamuypesada,puedeser
necesanoqueelequipodeaireaconddonadofuncione
constantementeparamantenerlatempet_radeseada.
Enocasiones,elusodeHIGHFANparahace_dtcularel_repotla
habitadbnhacequee_ambienteseam_ confortableauncua'_oel
equiponoest_edriandoelaJre._ rr_slJempoyconmayor
frecuendalundoneelequipodeaireaconddonado,rods
elecUiddedconsu_ntrdy rnayoress_"anloscostosdesuuso.
- 20 -

CARACTERJSTICAS
7 1
8
Figura 13
1. Gabinete
2. Deflector horizontal de aire
3, Descarga de aire fdo
4. Rejilla de entrada
5. Filtro del aire
6. Perilla
7. Guia superior
8. Cortina
USO DEL EQUIPO DE AIRE
ACONDICIONADO
Y_ Para reducir el desgo de incendio,
descargas el/actdca o lesiones personales, lea las
IMPORTANTES INSTRUCCIONES DE
SEGURIDAD antes de operar este aparato.
Para comenzar a utilizer el equipo de aire
acondicionado, eiga estos pasos:
1. Enchufe el equipo de aire acondicionado. (Pare
prevenir riesgos de descargas e{dctdcas, no use
un cable de extensibn ni un enchufe adaptador.)
2. Ajuste el control de temperatura TEMP en {a
graduaci6n m_s fda.
3. Ajuste el control de MODE al m_s alto nivel
fresco.
4. Ajuste las persianas con {a pesta_a de control
para que el flujo de aire sea de su agrado,
5. Una vez que la habitacibn se haya enfdado,
ajuste el control de temperatura TEMP a la
graduadbn que usted considere rods confortable.
NOTA: Si se apaga el aire acondicionado, espere 3
minutos antes de volver a encendedc. Esto permite
que se estabilice la presibn dentro del compresor.
Si usted mueve el contro{ de {a TEMP a cdlido, y
luego Io regresa al ajuste de enfdador de forma
irtmediata, ta unidad se apart.
Espere 3 minutos antes de reiniciar.
Revise la secci_bnCARACTERJSTICAS DEL
EQUIPO DE AIRE ACONDICIONADO donde
hallar_ instrucciones para otras graduaciones.
(PSgina 32)
-21 -

CARACTERJSTICAS DEL EQUIPO
DE AIRE ACONDICIONADO
Los controles que se explican en este manual son
representativos de muchos rnodelos disponibles a
la venta en el mercado. Su modelo puede tener un
aspecto ligeramente diferente.
OFF
HIGH _ HIGH
LOWII It I\ \_ LOW
FANe_eCOOL
MODE
5
3e 4 e6 e7
2e_ _8
TEMP
Figure 14
AJUSTE PARA LA DIRECClON DEL AIRE
Usando las leng_3etasde control, el flujode aim
puede dirigirse hacia la izquierda, la derecha, recto,
o en cualquier combinacibn de estas direcciones.
Flgura 15
TEMPERATURA
Gire el dial de TEMP al n_mero m_s alto para una
temperatura ambiente mds fmsca.
La posicibn 5 o 6 es una graduaci6n normal para
las condiciones promedios.
MODO
OFF :
HIGH FAN:
LOW FAN:
HIGH COOL:
LOW COOL:
Apaga el equipo de aire
acondicionado.
Laoperacibndel ventiladora alta
velocidadsinenfriar.
La operaci6n de del ventilador a
baja velocidad sin enfriar.
El enffiamiento con la opemcibn del
ventilador a alta velocidad.
El enfdamiento con la operaci6n del
ventilador a baja velocidad.
- 22 -

LIMPIEZA DEL FILTRO DEL
AIRE
El filtro det aire se ird ensuciando a medida que va
atrapando el polvo proveniente del aire interior. Es
preciso lavar el filtro del aire al menos eada dos
semanas. Si el filtro del aire permanece Ileno de
polvo, el flujo de aire disminuird y se reducird la
capacidad de enfriamiento del equipo, con posibles
dahos para la unidad.
• Tire de la rejilla de entrada hacia delante
agarrando ambas lengL_etasy tire del filtro del aire
hasta sacarlo.
• Lave el filtrodel aire en agua tibia a. AsegOrese de
eliminar toda el agua sacudiendo el filtro antes de
volver a ponerlo en su posici6n.
Figura 16
LIMPIEZA DEL EQUIPO DE
AIRE ACONDICIONADO
Limpiela rejillafrontaly la rejillade entrada del aire
con un patio humedecidoen una soluci6n de
detergente suave (Figura 17). El gabinete puede
lavarse con un jab6n odetergente suave y agua tibia,
seguidamente puede pulirsecon cera Iiquida especial
para electrodomdsticos.
Para asegurarse de la eficiencia maxima y contfnua,el
serpentin delcondensor(lado de enfrente de la unidad)
tiene que set chequeado periodicamente ylimpiarse si
se Ilega a obstruircon tizne o tierra de la atm6sfera.
Cepille o aspire el serpentinexteriorpara sacar
escombrosde las aletas.
Figura 17
COMO SACAR LA REJILLA
FRONTAL
• Saque laperilia TEMP y la perilla MODEtirando
de elias,
• Saque el tomillo que mantiene la rejilla frontal en
posici6n.
• Empuje la rejilla hacia ardba de abajo y jale la
parte de ardba de la rejilla lejos de la base para
levantar las lenguetas de arriba hacia afuera de
tas ranuras.
Figura 18
COMO A REEMPLAZA EL
GRILLE ANTERIOR
Pegue el panelfrontala la caja insertandolos fijadoresen
el panel adentro de las aperturas de laperle frontal de la
caja. Empuje elpanel hasta que crujedentro del lugar.
Flgura 19
- 23 -

ANTES DE LLAMAR PARA SERVICIO
Cheque Fasiguiente Usta para asegurarse si en realidad es necesario Ilamar para servicio, Una referencia rapida a
este manuat puede evitar una Ilamada para servicio innecesada.
EL EQUIPO DE AIRE ACONDIClONADO NO FUNCIONA.
Elenchufenoes_ conectadoenlatomadecorrientedepared.
Elfusibleestaquemadoo elinterruptordedrcuitosehadisparade,
ElselectordelventiladorMODEestaenlaposid6ndeOFF.
Launidedseapag6ysevok,i6aencenderdemaslader_oido.
ElcontroldetemperaturaTEMPseajust6m_sc_lidoquela
temperaturaambiente.
Co_ecteelencl'_ufefirmementeenlatomadecomentedepared.
ReemplaceelfvsibledahadoconunfiJelbledeacc_nretardadaoreatusteel
inte_ptordedrcuito.
PongaelselectorenlaI:X_ deCOOL.
Apaguelaunidadyespore3minutosantesdevolveraencenderb.
Gireel c_troldetemperaturaenelsentidedelasagujasdelrelcjhastauna
graduaci6nrnasfria(numeromasalto).
EL AIRE DE LA UNIDAD NO SALE BASTANTE FRiO.
Elselectoraunaposici6nrn_sLOWCOOL
Bcorf_deten_oeraturaTEMPseajus_deTeS_dec_ilde(runeomasI:_o).
Latemperaturaamb[enteesldperdebajodelos70" F (21°C)
ELtubosensordetemperaturaestdtocandoelsefioentinevaporador
queest_situadodetrdsdelpanelfrontal
Gireelselectora unapos_ HIGHCOOL.
GireelcontroldetemperatoraenelsenSdedelasagujasdelrelojpara
Nopuedeprodudrseel_iento basraque latemperaturaarnbientesuba
porendrnadelos70° F(21°C).
Encenderel tubealej&ndelodelserpentinevaporade_.
ELAIREACONDICIONADOENFRL_PEROLAHABITAClONSESIENTEDEMASIADOC_DA;SEFORMAHIELOENELSERPEN_NDEENFRIAMIENTO
DEmAsDELPANELDECORAI1VOFRONTAL
Lalefq:_'_:lxaambianteenelextedores_potdeha}odebs70°F(21_C),
Elflltrodel aimpuedeestarsucio.
Elcontroldetemperaturase ajusl6demasiadoIdoparael
enfrmmienlonoclumo.
Paredesconge_arelsepentinIleveelselectoralapos_ci6nFAN.
Seguidarnente,_re elcontroldetemperatura"_MPenel santidede[asagulas
delm_ paraIlevadehastausegraduad__s _ide.
Limpieel flltro.Cu_ulte lasecci_ "Mantenimiento'.Paradescongelar,Ileveel
selectora la_ FAN.
Paradescongelarelserpentin,Ileveelsek3ctoralapoelel_nFAN.
Seguidamenteajusteelcontroldetemperaturaaunaposi_ rndsc_lida.
EL AIRE ACONDICIONADO ENFRJA, PERO LA HABITACION SE SIENTE DEMASIADO CALIDA;
ElfinmdelelreestasudosenIoquesepss1dngeelfluiodelelre.
[] controldetemperatura]SMPse gradu6enpoelci<_demasiadocelide.
Lapartelronta]delaunidedeotabloqseadeporsennas,persBnas,
mueb_ etc.quer_-trin_enla¢islr_ delaire.
Laspuertse,ventanas,rejiUasdecalefacel<_n,etc_tera,es_nabiertascon
Ioquesepenniteelsecapedelelrefn'o
Launidadasebadeenc_x_rseenunalk_bitac_calmnte.
Umpieel filtrodelelre.Consultelasection_Ma_teelmiento".
Gireelcofllroldetemperaturaenelsenlidedelasagdjasdelrelojparallevadea
una_radeaci_m_sIria.IN_imeromasalto)
Elimineelbloqseoenfrentedelauelded.
Cierre!asl_ertas,ve_, rejiliasdecalefacci_,etc_era.
PerrnitaqseItanscorraunpocorndsdetiempoparaeliminarel"caloralmasenade"
enlasporedes,eltecho,elDIsey IsemudYes.
EL EQUIPO DE AIRE ACONDICIONADO SE APAGA Y SE ENCIENDE RAPIDAMENTE.
I I I
SE ESCUCHAN RUIDOS CUANDO LA UNIDAD ESTA ENFRIANDO.
B sonidodelvenf_ladoralchosercontraelaguadelsisternade Estoesnormalcuandolahumedadesalta.Cierrelaspuorias,ventanasyre_lbs
eli_naci_ldehumedad, dese_facck_.
V_rad_ deb velitana;instelaciOndefidente. Lealasi_s deinstabcihaoconsultealinstalador.
EL AGUA GOTEA DENTRO DE LA HABITACI(_N CUANDO LA UNIDAD EST._ ENFRIANDO,
JIse_ac_md_ad_ I mc_Igeoma__e_oodea_aco_lcise_dohadeia_ e_o_ pmerel
d_-,aieddagua.Lealasind_.o:ixesde_ oconsulleelinelabder.
EL AGUA GOTEA AFUERA CUANDO LA UNIDAD EST.&.ENFRIANDO.
I Launidedest_extraye_d°g_ c_lidadesdehamededdeunahab_ l'_seda. ] Esf°esalg°_ dera_tei°sdfasex°esk'amsr_eh_medes"
- 24 -

- 25 -

o26-

Your Home
For repair - in your home-of all major brand appliances,
lawn and garden equipment, or heating and cooling systems,
no matter who made it, no matter who sold it!
For the replacement parts, accessories and
owner's manuals that you need to do-it-yourself.
For Sears professional installation of home appliances
and items like garage door openers and water heaters.
1-800-4-MY-HOME ® (1-800-469-4663)
Call anytime, day or night (U.S.A. and Canada)
www.sears.com www.sears.ca
Our Home
For repair of carry-in items like vacuums, lawn equipment,
and electronics, call or go on-line for the location of your nearest
Sears Parts & Repair Center,
1-800-488-1222
Call anytime, day or night (U.S.A. only)
www.sears.com
To purchase a protection agreement on a product serviced by Sears:
1-800-827-6655 (U.S.A.) 1-800-361-6885 (Canada)
Para pedir serviciode reparaci6n
a domicilio,y para ordenar piezas:
1-888-SU-HOGAR _
(1-888-784-6427)
Au Canada pour service en fran_ais:
1-800-LE-FOYER "c
(1-800-533-6937)
www.sears.ca
SE/A/ 8
® Registered Trndemark / _ Traden_rk / sa Service Mark of Sears, Roebuck and CO.
® Marca Registtade f:U Marca de F_bdca l SaMarca de Servicio de Sears, Roebuck and co.
uc Marque de commerce / MoMaKlue ddposde de Sears, Roebuck and Co. © Sears, Roebuck and Co.
Part No.: 3828A20126E
-
 1
1
-
 2
2
-
 3
3
-
 4
4
-
 5
5
-
 6
6
-
 7
7
-
 8
8
-
 9
9
-
 10
10
-
 11
11
-
 12
12
-
 13
13
-
 14
14
-
 15
15
-
 16
16
-
 17
17
-
 18
18
-
 19
19
-
 20
20
-
 21
21
-
 22
22
-
 23
23
-
 24
24
-
 25
25
-
 26
26
-
 27
27


Kenmore 580.74053 El manual del propietario
- Tipo
- El manual del propietario
- Este manual también es adecuado para
en otros idiomas
- English: Kenmore 580.74053 Owner's manual
Artículos relacionados
-
Kenmore 580.74054400 El manual del propietario
-
Kenmore 580.74121300 El manual del propietario
-
-
-
-
-
Kenmore 75151 15,000 El manual del propietario
-
-
Kenmore 58074259400 El manual del propietario
-