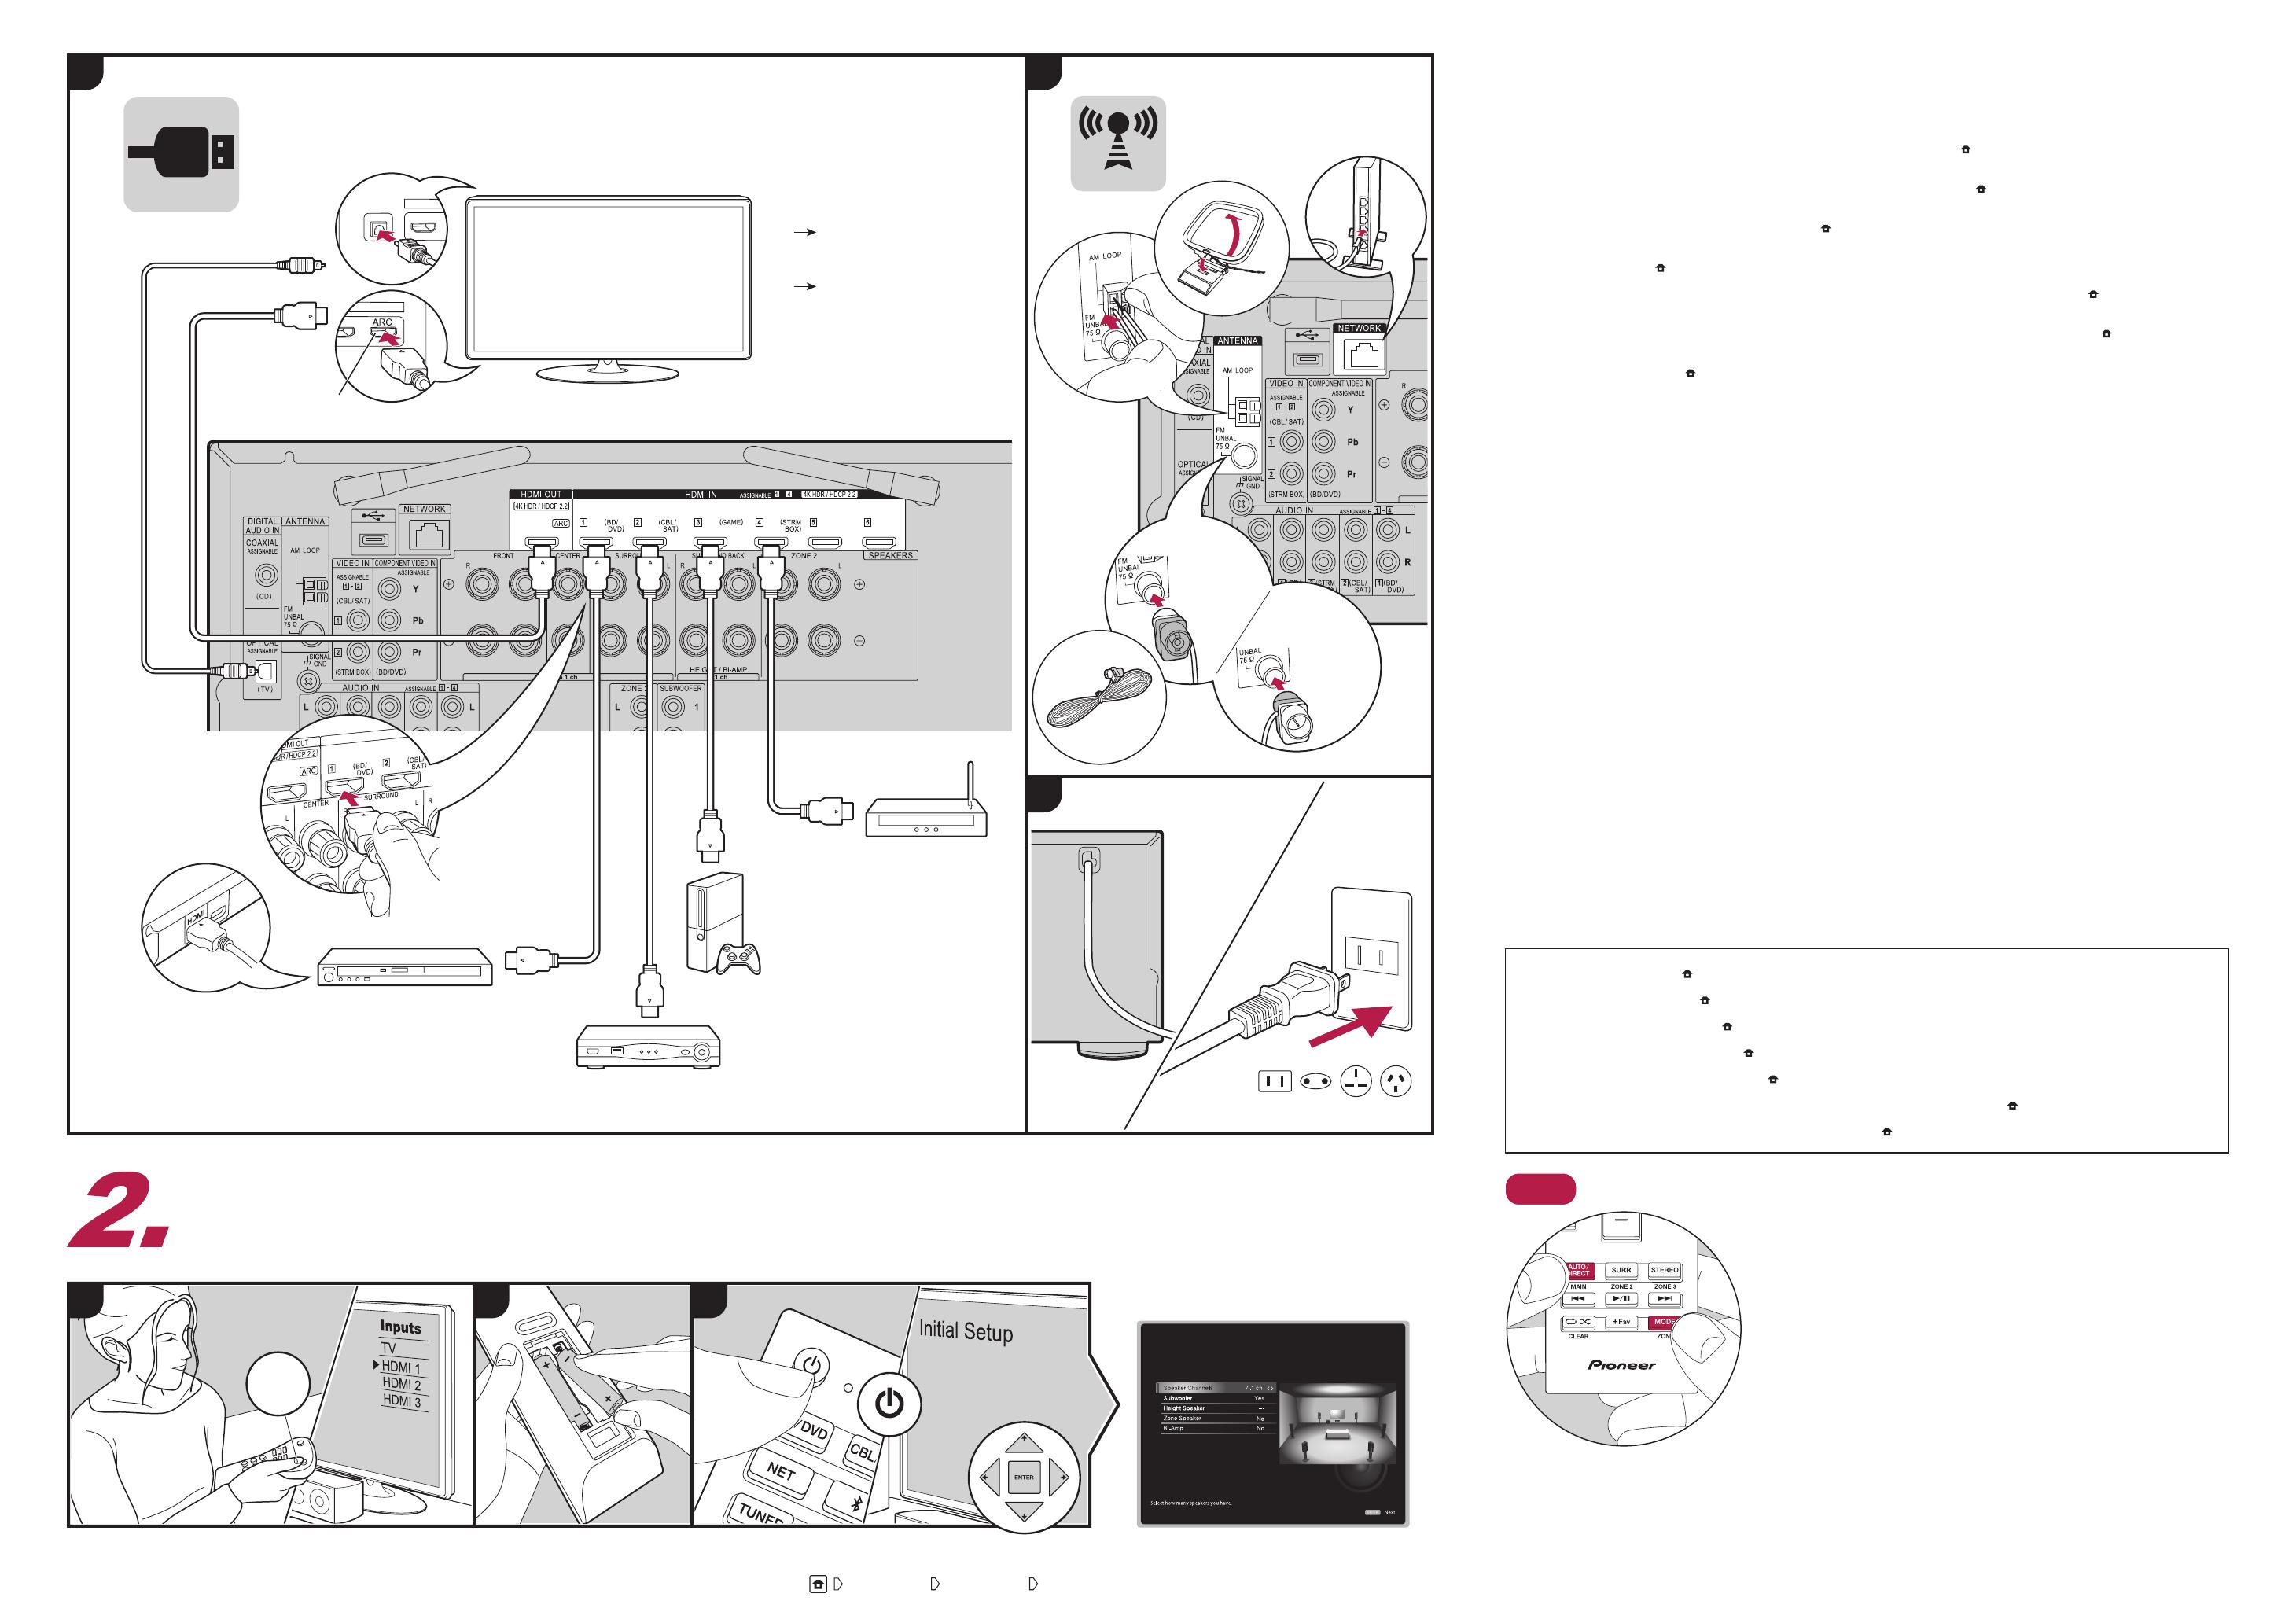
ARC TV
c
Non-ARC TV
c + d
4
BD/DVD
Cable/Satellite set-top box
Streaming
media player
GAME
d
c
ARC
5
6
HDMI
ANTENNA, etc
Initial Setup with Auto Start-up Wizard
Conguration avec l'assistant de démarrage automatique / Conguración con el asistente de arranque automático / Setup con installazione guidata / Einrichtung mit dem
automatischen Startup-Assistenten / Instellen met Automatische Opstart Wizard / Grundinställning med den automatiska startguiden
TV
INPUT
6
Speaker Setup
To redo the initial setup / Pour refaire la conguration initiale / Para rehacer la conguración inicial / Per ripetere l'Initial Setup /
Erneutes Vornehmen der ersten Einrichtung (Initial Setup) / Opnieuw uitvoeren van Initial Setup / Att göra om Initial Setup
“System Setup”
“Miscellaneous”
“Initial Setup”
“Pioneer” is a trademark of Pioneer Corporation, and is used under license.
«
1
En : Used during Initial Setup. / Fr : Utilisé durant la conguration initiale. / Es : Utilizado durante la conguración inicial. / It : Usato durante il Setup
Iniziale. / De : Wird bei der ersten Einrichtung verwendet. / Nl : Gebruikt tijdens de Begininstelling. / Sv : Används under grundinställningen.
«
2
En : Connect speakers with 4 Ω to 16 Ω impedance. If any of the connected speakers have an impedance of 4 Ω or more to less than 6 Ω, after
completing "Initial Setup", you need to make some settings in the System Setup menu. Press
on the remote controller, select "System Setup" -
"Speaker" - "Conguration" and set "Speaker Impedance" to "4ohms".
/
Fr : Raccordez des enceintes de valeur d'impédance comprise entre 4 Ω
et 16 Ω. Si l'une des enceintes raccordées possède une impédance située entre 4 Ω et moins de 6 Ω, après la réalisation de la "Initial Setup", vous
devrez effectuer quelques réglages dans le menu Configuration système. Appuyez sur la touche
de la télécommande, sélectionnez "System
Setup" - "Speaker" - "Configuration" et réglez "Speaker Impedance" sur "4ohms".
/
Es : Conecte altavoces con una impedancia de entre 4 Ω y 16
Ω. Si cualquiera de los altavoces conectados tiene una impedancia de 4 Ω a 6 Ω, después de completar la "Initial Setup", es necesario que realice
algunos ajustes en el menú de Configuración del sistema. Pulse
en el mando a distancia, seleccione "System Setup" - "Speaker" - "Conguration"
y coloque la "Speaker Impedance" en "4ohms".
/
It : Collegare i diffusori con impedenza da 4 Ω a 16 Ω. Se uno qualsiasi dei diffusori collegati
ha un’impedenza uguale o superiore a 4 Ω e inferiore a 6 Ω, dopo aver completato "Initial Setup", è necessario effettuare alcune impostazioni nel
menu System Setup. Premere
sul telecomando, selezionare "System Setup" - "Speaker" - "Configuration" e impostare "Speaker Impedance" su
"4ohms".
/
De : Schließen Sie Lautsprecher mit 4 Ω bis 16 Ω Impedanz an. Wenn einer der angeschlossenen Lautsprecher eine Impedanz von 4 Ω
bis 6 Ω aufweist, müssen Sie nach "Initial Setup" einige Einstellungen im System Setup-Menü vornehmen. Drücken Sie
auf der Fernbedienung,
wählen Sie "System Setup" - "Speaker" – "Conguration" aus und stellen Sie "Speaker Impedance" auf "4ohms" ein.
/
Nl : Sluit luidsprekers aan
met 4 Ω tot 16 Ω impedantie. Als een van de verbonden luidsprekers een impedantie van 4 Ω of meer heeft, tot minder dan 6 Ω, dient u na de
voltooiing van "Initial Setup" enkele instellingen in het System Setup-menu uit te voeren. Druk op de afstandsbediening op
, selecteer "System
Setup" - "Speaker" - "Configuration" en zet "Speaker Impedance" op "4ohms ".
/
Sv : Anslut högtalare med en impedans på 4 Ω till 16 Ω. Om någon
av de anslutna högtalarna har en impedans på 4 Ω eller mer upp till högst 6 Ω, behöver du, efter att ha slutfört "Initial Setup", göra några inställningar
i Systeminställningsmenyn. Tryck på
på fjärrkontrollen, välj "System Setup" - "Speaker" - "Conguration" och ställ in "Speaker Impedance" på
"4ohms ".
«
3
En : Make sure the exposed wires of the speakers do not stick out of the speaker terminals when connecting. If the exposed wires of the speakers
touch the rear panel or the + and – wires touch each other, the protection circuit will be activated.
/
Fr : Vériez que les ls dénudés des enceintes
ne dépassent pas des bornes d'enceinte lors du raccordement. Si les ls dénudés des enceintes entrent en contact avec le panneau arrière ou si
les ls + et – se touchent, le circuit de protection sera activé. /
Es : Asegúrese de que los cables expuestos de los altavoces no sobresalgan de los
terminales de los altavoces al conectarlos. Si los cables expuestos de los altavoces tocan el panel trasero o los cables + y – se tocan entre sí, el
circuito de protección se activará.
/
It : Nell'effettuare il collegamento, accertarsi che i conduttori spellati dei cavi dei diffusori non fuoriescano dai
terminali dei diffusori. Se i conduttori spellati dei cavi dei diffusori toccano il pannello posteriore o i conduttori + e – si toccano tra loro, il circuito di
protezione si attiva.
/
De : Vergewissern Sie sich, dass beim Anschließen der Kabel die freiliegenden Drähte nicht aus den Lautsprecheranschlüssen
herausragen. Wenn die freiliegenden Lautsprecherdrähte die Geräterückwand berühren oder das (+)- und das (–)-Kabel einander berühren, wird
die Schutzschaltung aktiviert.
/
Nl : Controleer bij het verbinden of de draaduiteinden van de luidsprekers niet uit de luidsprekeraansluitingen naar
buiten steken. Als de naar buiten stekende draaduiteinden van de luidsprekers het achterpaneel raken of als de + en – draden elkaar raken, zal het
veiligheidscircuit geactiveerd worden.
/
Sv : Se till att högtalarnas oskyddade kablar inte sticker ut från högtalaruttagen när du ansluter dem. Om de
oskyddade högtalarkablarna rör vid den bakre panelen eller om kablarna för + och – rör vid varandra, kommer skyddskretsen att aktiveras.
«
4
En : Choose an HDMI IN jack on the TV that supports ARC when connecting.
/
Fr : Pour raccorder, choisissez sur le téléviseur une prise HDMI
IN qui prend en charge la fonctionnalité ARC.
/
Es : Elija un conector HDMI IN en el TV compatible con ARC al realizar la conexión.
/
It : Quando
si effettua la connessione scegliere un terminale HDMI IN sul televisore che supporta la funzione ARC.
/
De : Wählen Sie beim Anschließen eine
HDMI IN-Buchse am Fernseher aus, von der ARC unterstützt wird.
/
Nl : Kies een HDMI IN-aansluiting op de TV die ARC ondersteunt wanneer u de
verbinding maakt.
/
Sv : Välj ett HDMI IN-uttag på tv:n som stöder ARC när du ansluter.
«
5
En : If you connect this unit to the network using wired LAN, connect an LAN cable to the NETWORK port.
/
Fr : Si vous connectez cet appareil
au réseau à l'aide du LAN filaire, branchez un câble LAN au port NETWORK.
/
Es : Si conecta esta unidad a la red usando una LAN con cable,
conecte un cable de LAN al puerto NETWORK.
/
It : Se si collega questa unità alla rete utilizzando una LAN cablata, collegare un cavo LAN
alla porta NETWORK.
/
De : Wenn Sie dieses Gerät über kabelgebundenes LAN mit dem Netzwerk verbinden, verwenden Sie ein LAN-Kabel
und den NETWORK-Anschluss.
/
Nl : Als u dit toestel met het netwerk verbindt met gebruik van een bedraad LAN, verbind dan een LANkabel
met de NETWORK-poort.
/
Sv : Om du ansluter den här apparaten till nätverket med en trådbunden anslutning, ska du ansluta en LAN-kabel till
NETWORK-porten.
«
6
En : Switch the input on the TV to that assigned to the unit. Complete the Initial Setup according to the guidance displayed on the screen.
/
Fr :
Réglez l'entrée du téléviseur sur celle assignée à l'appareil. Effectuez la Configuration initiale en fonction du guide qui s'affiche sur l'écran.
/
Es :
Cambie la entrada en la TV a aquella asignada a la unidad. Complete la Configuración inicial de acuerdo con la guía mostrada en la pantalla.
/
It
: Spostare l’ingresso sul televisore a quello assegnato all’unità. Completare Initial Setup seguendo le indicazioni visualizzate sullo schermo.
/
De
: Schalten Sie den Eingang des Fernsehers auf denjenigen, der mit dem Gerät belegt ist. Schließen Sie die erste Einrichtung entsprechend den
angezeigten Anweisungen ab.
/
Nl : Schakel de ingang op de TV naar die is toegewezen aan de unit. Voltooi de Begininstelling al naargelang de
richtlijnen die op het scherm weergegeven worden.
/
Sv : Växla ingångskällan på TV:n till den som har tilldelats enheten. Slutför Initial Setup med
hjälp av vägledningen som visas i skärmen.
En : Enable HDMI CEC & HDMI Standby Through function: If you selected "No, Skip" in "ARC Setup" of "Initial Setup", after completing "Initial
Setup", it is necessary to press the
button on the remote controller and execute "System Setup" - "Hardware" - "HDMI" setting.
/
Fr : Activez la
fonction HDMI CEC & HDMI Standby Through: Si vous sélectionnez "No, Skip" dans "ARC Setup" de "Initial Setup", après avoir effectué "Initial
Setup", il faudra appuyer sur la touche
de la télécommande et effectuez le réglage "System Setup" - "Hardware" - "HDMI".
/
Es : Habilite
HDMI CEC y la función de HDMI Standby Through: Si ha seleccionado "No, Skip" en "ARC Setup" de "Initial Setup", después de completar
"Initial Setup", es necesario pulsar el botón
en el mando a distancia y ejecutar "System Setup" - "Hardware" - configuración de "HDMI".
/
It :
Abilitare HDMI CEC e la funzione HDMI Standby Through: Selezionando "No, Skip" in "ARC Setup" di "Initial Setup", dopo aver completato
"Initial Setup", è necessario premere il pulsante
sul telecomando ed eseguire l’impostazione "System Setup" - "Hardware" - "HDMI".
/
De :
Aktivieren der HDMI CEC & HDMI Standby Through-Funktion: Wenn "No, Skip" unter "ARC Setup" bei "Initial Setup" ausgewählt wurde, ist es
nach Abschließen von "Initial Setup" erforderlich, die
-Taste auf der Fernbedienung zu drücken und die Einstellung "System Setup" - "Hardware"
- "HDMI" auszuführen.
/
Nl : Schakel de functie HDMI CEC & HDMI Standby Through in: Als u "No, Skip" in "ARC Setup" van "Initial Setup"
selecteerde, na het voltooien van "Initial Setup", dan is het nodig op de afstandsbediening op de knop
te drukken en de instelling "System
Setup" - "Hardware" - "HDMI" uit te voeren.
/
Sv : Aktivera HDMI CEC & HDMI Standby Through-funktionen: Om du valde "No, Skip" i "ARC
Setup" i "Initial Setup", efter att ha slutfört "Initial Setup", måste du trycka på
-knappen på fjärrkontrollen och göra inställningen "System Setup" -
"Hardware" - "HDMI".
(North American
models)
(European,
Australian and Asian
models)
c HDMI cable
d Digital optical cable
Dépannez votre télécommande / Resolver problemas de su mando a distancia
/ Il telecomando non funziona / Die Fernbedienung funktioniert nicht /
Afstandsbediening werkt niet / Fjärrkontrollen fungerar inte
En : The remote control may have switched to the mode for controlling ZONE 2. While holding down MODE,
press MAIN until the remote indicator ashes once to switch it to the mode to control the main room. / Fr : La
télécommande peut avoir été passée sur le mode contrôlant la ZONE 2. Tout en appuyant sur MODE, appuyez
sur MAIN jusqu’à ce que le témoin à distance clignote une fois, pour la passer sur le mode qui contrôle la pièce
principale. / Es : Puede que el mando distancia haya pasado al modo para controlar la ZONE 2. Para cambiarlo
al modo de control de la habitación principal, mientras mantiene pulsado MODE, pulse MAIN hasta que el
indicador remoto parpadee una vez. / It : Il telecomando potrebbe essere stato messo in modalità di comando
di ZONE2. Tenendo premuto MODE, premere MAIN no a quando l’indicatore remoto lampeggia una volta
per cambiare la modalità in comando della stanza principale. / De : Möglicherweise wurde die Fernbedienung
in den Modus zum Bedienen von ZONE2 geschaltet. Halten Sie MODE gedrückt und drücken Sie MAIN, bis
die Fernbedienungsanzeige einmal blinkt, um die Fernbedienung wieder in den Modus zum Bedienen des
Hauptraums zu schalten. / Nl : De afstandsbediening is mogelijk naar de modus voor de bediening van ZONE2
geschakeld. Druk terwijl u MODE ingedrukt houdt op MAIN, tot het remote-controlelampje één keer knippert,
om hem naar de modus voor de bediening van de hoofdkamer te schakelen. / Sv : Fjärrkontrollen kan ha
växlat till läget som styr ZONE2. Tryck på MAIN medan du håller ned MODE tills fjärrkontrollslampan blinkar en
gång för att växla den till läget som styr huvudrummet.
Troubleshoot your remote control
SN29403359_VSX-933_QSG_U7_171221.indd 2 2017/12/21 9:21:02

