Continental Electric KU33430 Manual de usuario
- Categoría
- Ventiladores domésticos
- Tipo
- Manual de usuario

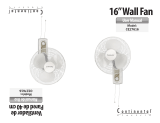
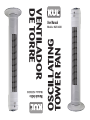
OSCILLATING
TOWER FAN
VENTILADOR
DE TORRE
User Manual
Manual de Uso
Models: KU33430
Modelos: KU33430
La página se está cargando...

CONTENTS
For Your Safety
2
Parts 3
Assembly 4
Operation 5
Fuse Replacement 5
Cleaning and Storage 6
CONTENIDOS
Para su seguridad 2
Partes 3
Armado 4
Instrucciones de Funcionamiento 5
Remplazo del Fusible 5
Limpieza y Almacenamiento 6

2
FOR YOUR SAFETY
IMPORTANT INSTRUCTIONS
Read and save these important safety instructions before using this fan.
When using electrical appliances, basic safety precautions should
always be followed including the following:
1) Use this fan only as described in this manual. Other uses not recommended
may cause fire or electric shock.
2) This product is intended for household use ONLY and not for commercial,
industrial or outdoor use.
3) To protect against electrical shock, do not place fan in window, immerse
unit, plug or cord in water, or spray with liquids.
4) Close supervision is necessary when any appliance is used near
children.
5) Unplug the fan from the outlet when not in use, when moving fan from one
location to another and before cleaning.
6) Do not operate the fan in the presence of explosive and/or flammable fumes.
7) Do not place the fan or any parts near an open flame, cooking or other
heating appliance.
8) Do not operate the fan with a damaged cord, plug, after a malfunction or if
dropped or damaged in any manner.
9) Avoid contact with moving fan parts.
10) To disconnect, grip the plug and pull it from the wall outlet. Never yank the cord.
11) The use of attachments is not recommended and may cause hazards.
12) Always use on a dry, level surface.
13) Do not operate if the fan housing is removed or damaged.
14) THIS PRODUCT IS EQUIPPED WITH A POLARIZED A.C. (Alternating Current)
PLUG — a plug having one prong wider than the other. This plug will fit into the
power outlet only one way. This is the safety feature. If you are unable to insert
the plug fully into the outlet, try reversing the plug. If the plug should still fail to
fit, contact an electrician to replace the obsolete outlet.
WARNING: TO REDUCE THE RISK OF FIRE OR ELECTRICAL
SHOCK AND INJURY TO PERSONS, DO NOT USE IN A WINDOW.
WARNING: DO NOT USE THIS FAN WITH ANY ADDITIONAL
DEVICES TO ALTER/CHANGE THE
SPEED OF THIS FAN (EX:
SOLID STATE SPEED CONTROL DEVICE).
SAVE THESE INSTRUCTIONS
READ CAREFULLY BEFORE ATTEMPTING TO ASSEMBLE, INSTALL,
OPERATE OR MAINTAIN THE PRODUCT DESCRIBED. PROTECT YOURSELF
AND OTHERS BY OBSERVING ALL SAFETY INFORMATION.
FAILURE TO COMPLY WITH INSTRUCTIONS COULD RESULT IN
PERSONAL INJURY AND/OR PROPERTY DAMAGE!
PARA SU SEGURIDAD
INSTRUCCIONES IMPORTANTES
Lea y guarde estas instrucciones de seguridad importantes antes de utilizar este venti-
lador.
Al momento de utilizar cualquier electrodoméstico, se recomienda seguir las siguientes
precauciones de seguridad básicas:
1) Utilice este ventilador sólo como se describe en el presente manual. Otro tipo de usos
no recomendados podría ocasionar un incendio o una descarga eléctrica.
2) Este producto ha sido diseñado sólo para uso doméstico y no para usos comerciales
o industriales o para usos en exteriores.
3) Conelndeevitarunadescargaeléctrica,nocoloqueelventiladorenlaventana,no
sumerja el electrodoméstico, el enchufe o el cordón en agua ni le aplique ningún tipo
de líquido.
4) Debe supervisarse a los niños constantemente si se utiliza el electrodoméstico en su
presencia.
5) Desconecte el ventilador del tomacorriente mientras no se encuentre en uso, a la hora
de trasladarlo de un lugar a otro y antes de proceder con la limpieza.
6) Noutiliceesteventiladorenlapresenciadevaporesexplosivosoinamables.
7) No coloque el ventilador ni ninguna de sus partes cerca a una llama viva, a un electro-
doméstico de cocina o cualquier otro electrodoméstico de calentamiento.
8) No utilice el ventilador si el cordón o el enchufe se encuentran dañados ni después de
que presente algún tipo de desperfecto o haya sufrido una caída o cualquier otro tipo
de daño.
9) Evite el contacto con las partes en movimiento del ventilador.
10) Para desconectar, sujete el enchufe y tire para sacarlo del tomacorriente. Nunca tire
del cordón.
11) El uso de accesorios no es recomendable y además podría causar situaciones de
peligro.
12)Siempreutiliceelventiladorsobreunasuperciesecaynivelada.
13) No utilice el ventilador si el motor ha sido retirado o si éste se encuentra dañado.
14) Este producto viene equipado con un enchufe polarizado AC (corriente alterna). Este
tipo de enchufe cuenta con una extremidad más ancha que la otra. Este enchufe deberá
encajar dentro de un tomacorriente solamente de una manera. Esta es una medida de
seguridad. Si no se puede insertar el enchufe totalmente dentro del tomacorriente, in-
tente dándole la vuelta. Si el enchufe aún así no encajara, póngase en contacto con un
electricista para remplazar el tomacorriente obsoleto.
Advertencia: Conelndereducirelriesgodequeseproduzcaunincendio,unadescarga
eléctrica o lesiones personales, no utilice el ventilador en una ventana.
Advertencia: Noutiliceesteventiladorconalgúntipodedispositivoadicionalconeln
de alterar o cambiar la velocidad del producto (por ejemplo, un dispositivo de control de
velocidad de estado sólido).
GUARDE ESTAS INSTRUCCIONES
Lea el manual con cuidado antes de intentar armar, instalar, poner a funcionar o efectuar
cualquier tipo de mantenimiento al producto. Protéjase a usted mismo y a los demás pre-
stando atención a toda la información de seguridad. ¡El incumplimiento con estas instruc-
ciones podría originar lesiones personales y daños a la propiedad!

1
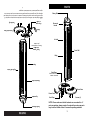
PARTS
3
Recessed
Handle
Rotary Dial
Body
Front Grill
Back Base
Cord Weave and Groove
located underneath
Screws (4)
Front Base
Power Cord
Cord Clasp
Air Inlet
NOTE: Please make sure that all contents are accounted for. If
parts are missing, please empty all contents from carton as parts
may be at the bottom of box or secured to packing materials.
Agarradera
Perilla Giratoria
Cuepo
Rejilla del Frente
Parte Trasera
de la Base
Ranura y compartimiento
para el cable
Tornillos (4)
Frente de la Base
Cable
Cierre para
el cable
Entrada de Aire
3
PARTES
NOTA:Asegúresedevericarquetodosloscontenidosseencuentrencompletos.Si
alguna de las piezas se encontrara faltante, proceda a vaciar todos los contenidos del
empaque ya que algunas de las piezas podrían encontrarse en la parte inferior de la
caja o aseguradas entre los materiales de empaque.

0
1
2
2
3
4
Peg
Peg
Tubes
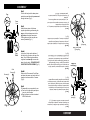
ASSEMBLY
Step 4)
The assembly is now complete for use.
a) Turn the unit right-side up and place
it on a dry, level surface.
b) Plug the power cord into a standard
120VAC wall outlet.
Step 2)
Attach the two pieces of the base
together by matching and inserting the
pegs on the front base piece into the
peg tubes on the back base piece.
Push together until the two parts are
securely attached (Fig. 1).
Step 1)
Turn the fan body and the base pieces
upside down and thread the power cord
through the base (Fig. 1).
Step 3a)
Line up the 4 holes on the bottom of
the body to the 4 holes on the top of the
base. Use a Phillips head screwdriver
to tighten the screws (4) to secure the
base to the fan body. PLEASE DO NOT
OVER TIGHTEN THE SCREWS (Fig. 2).
Step 3b)
Remove the 2 Screws and Cord Clasp
and place the power cord under the cord
clasp and re-secure with the 2 screws.
(Fig. 2).
Power
Cord
Screws (4)
Cord
Screws (2)
Fig. 1
Fig. 2
ARMADO
Paso 1
Coloque el armazón del ventilador y las piezas
de la base de cabeza y proceda a enroscar o
pasar el cordón a través de la base (Fig. 1)
Paso 2
Acople las dos piezas de la base juntándo-
las una con otra haciendo que concuerden e
insertando las clavijas en la pieza de la base
delantera con los tubos para las clavijas en la
pieza de la base posterior. Presione hasta que
ambaspartesquedenjamenteaseguradas.
(Fig. 1).
Paso 3a
Alinee los cuatro agujeros en la parte inferior
del armazón con los cuatro agujeros en la parte
superior de la base. Utilice un destornillador
de cabezal Phillips para ajustar los tornillos (4)
y asegurar la base al armazón del ventilador.
NO AJUSTE DEMASIADO LOS TORNILLOS.
(Fig. 2).
Paso 3b
Retire los dos tornillos y el sujetador del cordón
y coloque el cordón por debajo del sujetador
volviendo a colocar y a ajustar los dos tornillos.
(Fig. 2).
Paso 4
Con este paso se ha terminado el armado y ya
se puede utilizar el ventilador.
a) Vuelva a colocar el aparato en posición verti-
calycolóquelosobreunasuperciesecay
nivelada.
b) Conecte el enchufe a un tomacorriente de
pared estándar de 120V AC.
1
Clavija
Clavija para
los tubos
Cable de
Corriente
Tornillos (4)
para fijar el Cable
Tornillos (2)
Fig. 1
Fig. 2
4

5
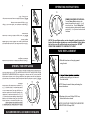
OPERATING INSTRUCTIONS
POWER/FAN SPEED ROTARY DIAL
Turn the Rotary Dial clockwise to the
desired fan speed on the right (1, 2, or 3)
to turn the fan on. Turn the Rotary Dial
counter clockwise to the desired fan speed
on the left (1, 2, or 3) to turn the fan on with
Oscillation
NOTE: The oscillation radius can be changed by gently turning the
body of the fan either clockwise or counter-clockwise, (either when
the unit is on or off) until the body can no longer turn. DO NOT
FORCE THE FAN BODY TO TURN PAST IT'S LIMIT.
0
1
1
2
2
3
3
0
FUSE REPLACEMENT
1. Slide the fuse door on the plug upward
using the tab.
(smallest one) gently pry the fuse out
from the bottom.
NOTE: Please be careful when performing the
above instructions.
3. Replace with a new 2.5Amp/125V fuse,
then slide the door closed.
NOTE: DO NOT USE FUSES THAT ARE RATED
HIGHER THAN 2.5Amps/125V
Tab
0
1
1
2
2
3
3
0
Pestaña
INSTRUCCIONES DE FUNCIONAMIENTO
REMPLAZO DEL FUSIBLE
PERILLA GIRATORIA DE ENCENDIDO Y
DE VELOCIDAD DEL VENTILADOR
Gire la perilla giratoria en el sentido de las
agujas del reloj hasta alcanzar la velocidad
del ventilador deseada en el lado derecho (1,
2 ó 3) y así también encender el ventilador.
Gire la perilla giratoria en el sentido contrario
a las agujas del reloj hasta alcanzar la ve-
locidad deseada en el lado izquierdo (1, 2 ó
3) y encender el ventilador bajo la función de
oscilación.
1. Deslice la tapa del fusible en el enchufe hacia arriba
utilizando la lengüeta.
2. Utilice un destornillador de joyería de cabeza plana (el
más pequeño) para con cuidado retirar el fusible desde
la parte inferior.
NOTA: Por favor tenga cuidado al llevar a cabo estas
instrucciones.
3. Reemplace colocando un fusible nuevo de 2.5Amp.
/125V. Luego proceda a cerrar la tapa.
NOTA: No utilice fusibles con una potencia nominal may-
or a 2.5Amp. / 125V.
NOTA: El radio de oscilación puede cambiarse girando suavemente el armazón del
ventilador bien sea en el sentido de las agujas del reloj o en el sentido contrario a las
agujas del reloj (ya sea mientras el ventilador se encuentre apagado o encendido)
hasta el punto cuando ya no se lo pueda girar más. NO FUERCE EL ARMAZÓN DEL
VENTILADOR PARA GIRARLO MÁS ALLÁ DE SU LÍMITE.
5

1. Turn the unit OFF and unplug the unit before cleaning.
2. Use only a soft, damp cloth to clean the exterior. A can of
compressed air or a vacuum cleaner can be used to clean
the interior.
3. Do not immerse the unit in water and never allow water to drip into
the motor housing.
4. Do not use gasoline, paint thinner or other chemicals to clean the fan.
5. Store unit in its original box and store in a cool, dry place.
NOTE: If you experience a problem, please return the unit to the
place of the original purchase or see your warranty. Do not attempt
to open the motor housing yourself. Doing so may void your
warranty and cause damage to the fan or personal injury.
BEFORE DISPOSING OF THE UNIT, PLEASE FOLLOW
THESE INSTRUCTIONS:
This product must be disposed of
6
at an authorized place for recycling
electronic appliances. By collecting and recycling waste, you help save
our natural resources. We suggest that you please contact your local
recycling center or City/State Dept. of Sanitation to help find the proper
facility near you.
CLEANING AND STORAGE
LIMPIEZA Y ALMACENAMIENTO
1. Apague el electrodoméstico y desenchúfelo antes de proceder con la limpieza.
2. Utilice solamente un paño suave y humedecido para limpiar la parte externa. Se puede
utilizar una lata de aire comprimido o una aspiradora para limpiar la parte interna.
3. No sumerja el equipo en agua ni permita que ingrese agua dentro del motor.
4. No utilice gasolina, diluyente de pintura u otros químicos para limpiar el ventilador.
5. Almacene el electrodoméstico dentro de su caja original y guárdelo en un lugar fresco
y seco.
NOTA: Si se experimentara algún tipo de problema, devuelva el electrodoméstico al lugar
de donde lo adquirió originalmente o consulte con su garantía. No intente abrir el motor
usted mismo ya que esto anulará la garantía y podía causar daños al ventilador o lesiones
personales.
ANTES DE DESECHAR EL PRODUCTO, SIGA LAS SIGUIENTES INSTRUCCIONES:
Este producto debe desecharse en un lugar autorizado para el reciclaje de electrodomé-
sticos. La recolección y reciclaje de desperdicios ayuda a preservar nuestros recursos
naturales. Sugerimos que se ponga en contacto con su centro de reciclaje local o con el
organismo encargado de saneamiento de su ciudad o provincia para ayudarlo encontrar
un lugar indicado para el reciclaje cercano a su hogar.
6
Transcripción de documentos
OSCILLATING TOWER FAN Manual de Uso Modelos: KU33430 VENTILADOR DE TORRE Models: KU33430 User Manual For Your Safety 2 Parts 3 Assembly 4 Operation 5 Fuse Replacement 5 Cleaning and Storage 6 CONTENIDOS Para su seguridad 2 Partes 3 Armado 4 Instrucciones de Funcionamiento 5 Remplazo del Fusible 5 Limpieza y Almacenamiento 6 CONTENTS PARA SU SEGURIDAD INSTRUCCIONES IMPORTANTES Lea y guarde estas instrucciones de seguridad importantes antes de utilizar este ventilador. Al momento de utilizar cualquier electrodoméstico, se recomienda seguir las siguientes precauciones de seguridad básicas: 1) Utilice este ventilador sólo como se describe en el presente manual. Otro tipo de usos no recomendados podría ocasionar un incendio o una descarga eléctrica. 2) Este producto ha sido diseñado sólo para uso doméstico y no para usos comerciales o industriales o para usos en exteriores. 3) Con el fin de evitar una descarga eléctrica, no coloque el ventilador en la ventana, no sumerja el electrodoméstico, el enchufe o el cordón en agua ni le aplique ningún tipo de líquido. 4) Debe supervisarse a los niños constantemente si se utiliza el electrodoméstico en su presencia. 5) Desconecte el ventilador del tomacorriente mientras no se encuentre en uso, a la hora de trasladarlo de un lugar a otro y antes de proceder con la limpieza. 6) No utilice este ventilador en la presencia de vapores explosivos o inflamables. 7) No coloque el ventilador ni ninguna de sus partes cerca a una llama viva, a un electrodoméstico de cocina o cualquier otro electrodoméstico de calentamiento. 8) No utilice el ventilador si el cordón o el enchufe se encuentran dañados ni después de que presente algún tipo de desperfecto o haya sufrido una caída o cualquier otro tipo de daño. 9) Evite el contacto con las partes en movimiento del ventilador. 10) Para desconectar, sujete el enchufe y tire para sacarlo del tomacorriente. Nunca tire del cordón. 11) El uso de accesorios no es recomendable y además podría causar situaciones de peligro. 12) Siempre utilice el ventilador sobre una superficie seca y nivelada. 13) No utilice el ventilador si el motor ha sido retirado o si éste se encuentra dañado. 14) Este producto viene equipado con un enchufe polarizado AC (corriente alterna). Este tipo de enchufe cuenta con una extremidad más ancha que la otra. Este enchufe deberá encajar dentro de un tomacorriente solamente de una manera. Esta es una medida de seguridad. Si no se puede insertar el enchufe totalmente dentro del tomacorriente, intente dándole la vuelta. Si el enchufe aún así no encajara, póngase en contacto con un electricista para remplazar el tomacorriente obsoleto. Advertencia: Con el fin de reducir el riesgo de que se produzca un incendio, una descarga eléctrica o lesiones personales, no utilice el ventilador en una ventana. Advertencia: No utilice este ventilador con algún tipo de dispositivo adicional con el fin de alterar o cambiar la velocidad del producto (por ejemplo, un dispositivo de control de velocidad de estado sólido). GUARDE ESTAS INSTRUCCIONES Lea el manual con cuidado antes de intentar armar, instalar, poner a funcionar o efectuar cualquier tipo de mantenimiento al producto. Protéjase a usted mismo y a los demás prestando atención a toda la información de seguridad. ¡El incumplimiento con estas instrucciones podría originar lesiones personales y daños a la propiedad! 2 READ CAREFULLY BEFORE ATTEMPTING TO ASSEMBLE, INSTALL, OPERATE OR MAINTAIN THE PRODUCT DESCRIBED. PROTECT YOURSELF AND OTHERS BY OBSERVING ALL SAFETY INFORMATION. FAILURE TO COMPLY WITH INSTRUCTIONS COULD RESULT IN PERSONAL INJURY AND/OR PROPERTY DAMAGE! SAVE THESE INSTRUCTIONS WARNING: DO NOT USE THIS FAN WITH ANY ADDITIONAL DEVICES TO ALTER/CHANGE THE SPEED OF THIS FAN (EX: SOLID STATE SPEED CONTROL DEVICE). WARNING: TO REDUCE THE RISK OF FIRE OR ELECTRICAL SHOCK AND INJURY TO PERSONS, DO NOT USE IN A WINDOW. 14) THIS PRODUCT IS EQUIPPED WITH A POLARIZED A.C. (Alternating Current) PLUG — a plug having one prong wider than the other. This plug will fit into the power outlet only one way. This is the safety feature. If you are unable to insert the plug fully into the outlet, try reversing the plug. If the plug should still fail to fit, contact an electrician to replace the obsolete outlet. 1) Use this fan only as described in this manual. Other uses not recommended may cause fire or electric shock. 2) This product is intended for household use ONLY and not for commercial, industrial or outdoor use. 3) To protect against electrical shock, do not place fan in window, immerse unit, plug or cord in water, or spray with liquids. 4) Close supervision is necessary when any appliance is used near children. 5) Unplug the fan from the outlet when not in use, when moving fan from one location to another and before cleaning. 6) Do not operate the fan in the presence of explosive and/or flammable fumes. 7) Do not place the fan or any parts near an open flame, cooking or other heating appliance. 8) Do not operate the fan with a damaged cord, plug, after a malfunction or if dropped or damaged in any manner. 9) Avoid contact with moving fan parts. 10) To disconnect, grip the plug and pull it from the wall outlet. Never yank the cord. 11) The use of attachments is not recommended and may cause hazards. 12) Always use on a dry, level surface. 13) Do not operate if the fan housing is removed or damaged. Read and save these important safety instructions before using this fan. When using electrical appliances, basic safety precautions should always be followed including the following: IMPORTANT INSTRUCTIONS FOR YOUR SAFETY 1 3 Agarradera Cord Clasp Perilla Giratoria NOTE: Please make sure that all contents are accounted for. If parts are missing, please empty all contents from carton as parts may be at the bottom of box or secured to packing materials. Screws (4) PARTES Power Cord Front Base Entrada de Aire Cord Weave and Groove located underneath Back Base Rejilla del Frente Cuepo Body Front Grill Parte Trasera de la Base Ranura y compartimiento para el cable Air Inlet Frente de la Base Cable Recessed Handle Cierre para el cable Rotary Dial Tornillos (4) NOTA: Asegúrese de verificar que todos los contenidos se encuentren completos. Si alguna de las piezas se encontrara faltante, proceda a vaciar todos los contenidos del empaque ya que algunas de las piezas podrían encontrarse en la parte inferior de la caja o aseguradas entre los materiales de empaque. 3 PARTS Clavija ARMADO 1 Paso 1 Coloque el armazón del ventilador y las piezas de la base de cabeza y proceda a enroscar o pasar el cordón a través de la base (Fig. 1) Cable de Corriente Paso 2 Acople las dos piezas de la base juntándolas una con otra haciendo que concuerden e insertando las clavijas en la pieza de la base delantera con los tubos para las clavijas en la pieza de la base posterior. Presione hasta que ambas partes queden fijamente aseguradas. (Fig. 1). Remove the 2 Screws and Cord Clasp and place the power cord under the cord clasp and re-secure with the 2 screws. (Fig. 2). Step 3b) Paso 3a Alinee los cuatro agujeros en la parte inferior del armazón con los cuatro agujeros en la parte superior de la base. Utilice un destornillador de cabezal Phillips para ajustar los tornillos (4) y asegurar la base al armazón del ventilador. NO AJUSTE DEMASIADO LOS TORNILLOS. (Fig. 2). Clavija para los tubos Line up the 4 holes on the bottom of the body to the 4 holes on the top of the base. Use a Phillips head screwdriver to tighten the screws (4) to secure the base to the fan body. PLEASE DO NOT OVER TIGHTEN THE SCREWS (Fig. 2). Step 3a) Tornillos (2) para fijar el Cable Paso 3b Retire los dos tornillos y el sujetador del cordón y coloque el cordón por debajo del sujetador volviendo a colocar y a ajustar los dos tornillos. (Fig. 2). Tornillos (4) Paso 4 Con este paso se ha terminado el armado y ya se puede utilizar el ventilador. a) Vuelva a colocar el aparato en posición vertical y colóquelo sobre una superficie seca y nivelada. b) Conecte el enchufe a un tomacorriente de pared estándar de 120V AC. Fig. 2 3 0 Turn the fan body and the base pieces upside down and thread the power cord through the base (Fig. 1). 4 Fig. 1 Fig. 1 4 Fig. 2 The assembly is now complete for use. a) Turn the unit right-side up and place it on a dry, level surface. b) Plug the power cord into a standard 120VAC wall outlet. Step 4) Screws (4) Cord Screws (2) Peg Tubes Attach the two pieces of the base together by matching and inserting the pegs on the front base piece into the peg tubes on the back base piece. Push together until the two parts are securely attached (Fig. 1). Step 2) Power Cord 1 Peg Step 1) 2 2 ASSEMBLY 5 NOTE: DO NOT USE FUSES THAT ARE RATED HIGHER THAN 2.5Amps/125V 3. Replace with a new 2.5Amp/125V fuse, then slide the door closed. INSTRUCCIONES DE FUNCIONAMIENTO 3 0 1 2 NOTE: Please be careful when performing the above instructions. 2 1 0 3 PERILLA GIRATORIA DE ENCENDIDO Y DE VELOCIDAD DEL VENTILADOR Gire la perilla giratoria en el sentido de las agujas del reloj hasta alcanzar la velocidad del ventilador deseada en el lado derecho (1, 2 ó 3) y así también encender el ventilador. Gire la perilla giratoria en el sentido contrario a las agujas del reloj hasta alcanzar la velocidad deseada en el lado izquierdo (1, 2 ó 3) y encender el ventilador bajo la función de oscilación. NOTA: El radio de oscilación puede cambiarse girando suavemente el armazón del ventilador bien sea en el sentido de las agujas del reloj o en el sentido contrario a las agujas del reloj (ya sea mientras el ventilador se encuentre apagado o encendido) hasta el punto cuando ya no se lo pueda girar más. NO FUERCE EL ARMAZÓN DEL VENTILADOR PARA GIRARLO MÁS ALLÁ DE SU LÍMITE. REMPLAZO DEL FUSIBLE Pestaña Tab (smallest one) gently pry the fuse out from the bottom. 1. Slide the fuse door on the plug upward using the tab. 1. Deslice la tapa del fusible en el enchufe hacia arriba utilizando la lengüeta. FUSE REPLACEMENT NOTE: The oscillation radius can be changed by gently turning the body of the fan either clockwise or counter-clockwise, (either when the unit is on or off) until the body can no longer turn. DO NOT FORCE THE FAN BODY TO TURN PAST IT'S LIMIT. 2. Utilice un destornillador de joyería de cabeza plana (el más pequeño) para con cuidado retirar el fusible desde la parte inferior. 0 NOTA: Por favor tenga cuidado al llevar a cabo estas instrucciones. 1 3 2 3. Reemplace colocando un fusible nuevo de 2.5Amp. /125V. Luego proceda a cerrar la tapa. 2 Turn the Rotary Dial clockwise to the desired fan speed on the right (1, 2, or 3) to turn the fan on. Turn the Rotary Dial counter clockwise to the desired fan speed on the left (1, 2, or 3) to turn the fan on with Oscillation POWER/FAN SPEED ROTARY DIAL 1 NOTA: No utilice fusibles con una potencia nominal mayor a 2.5Amp. / 125V. 3 0 OPERATING INSTRUCTIONS 5 LIMPIEZA Y ALMACENAMIENTO 1. Apague el electrodoméstico y desenchúfelo antes de proceder con la limpieza. 2. Utilice solamente un paño suave y humedecido para limpiar la parte externa. Se puede utilizar una lata de aire comprimido o una aspiradora para limpiar la parte interna. 3. No sumerja el equipo en agua ni permita que ingrese agua dentro del motor. 4. No utilice gasolina, diluyente de pintura u otros químicos para limpiar el ventilador. 5. Almacene el electrodoméstico dentro de su caja original y guárdelo en un lugar fresco y seco. 6 NOTA: Si se experimentara algún tipo de problema, devuelva el electrodoméstico al lugar de donde lo adquirió originalmente o consulte con su garantía. No intente abrir el motor usted mismo ya que esto anulará la garantía y podía causar daños al ventilador o lesiones personales. ANTES DE DESECHAR EL PRODUCTO, SIGA LAS SIGUIENTES INSTRUCCIONES: Este producto debe desecharse en un lugar autorizado para el reciclaje de electrodomésticos. La recolección y reciclaje de desperdicios ayuda a preservar nuestros recursos naturales. Sugerimos que se ponga en contacto con su centro de reciclaje local o con el organismo encargado de saneamiento de su ciudad o provincia para ayudarlo encontrar un lugar indicado para el reciclaje cercano a su hogar. This product must be disposed of at an authorized place for recycling electronic appliances. By collecting and recycling waste, you help save our natural resources. We suggest that you please contact your local recycling center or City/State Dept. of Sanitation to help find the proper facility near you. BEFORE DISPOSING OF THE UNIT, PLEASE FOLLOW THESE INSTRUCTIONS: NOTE: If you experience a problem, please return the unit to the place of the original purchase or see your warranty. Do not attempt to open the motor housing yourself. Doing so may void your warranty and cause damage to the fan or personal injury. 1. Turn the unit OFF and unplug the unit before cleaning. 2. Use only a soft, damp cloth to clean the exterior. A can of compressed air or a vacuum cleaner can be used to clean the interior. 3. Do not immerse the unit in water and never allow water to drip into the motor housing. 4. Do not use gasoline, paint thinner or other chemicals to clean the fan. 5. Store unit in its original box and store in a cool, dry place. 6 CLEANING AND STORAGE-
 1
1
-
 2
2
-
 3
3
-
 4
4
-
 5
5
-
 6
6
-
 7
7
-
 8
8


Continental Electric KU33430 Manual de usuario
- Categoría
- Ventiladores domésticos
- Tipo
- Manual de usuario