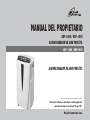
Royal Sovereign Air Conditioner ARP-1008 Manual de usuario
- Categoría
- Acondicionadores de aire móviles
- Tipo
- Manual de usuario

Royal Centurian Inc.
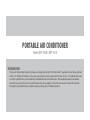
PORTABLE AIR CONDITIONER
ACONDICIONADOR DE AIRE PORTÁTIL
Read and retain these instructions for future reference
For any Customer Support needs, please choose
the Support tab on
www.royalsovereign.com
ARP- 1008 / ARP-1010
OWNER’S MANUAL
ARP-1008 / ARP-1010
PORTABLE AIR CONDITIONER

PORTABLE AIR CONDITIONER
Model ARP-1008 / ARP-1010
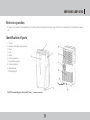
INTRODUCTION
Thank you for choosing Royal Sovereign to provide you and your family with all of the “Home Comfort” requirements for your home, apartment,
or office. This Portable Air Conditioner can be set-up in just minutes and can be easily moved from room to room. It is a multi-functional room
air comfort system that offers you Air Conditioning, Dehumidification and Air circulation modes. This manual will provide you with valuable
information necessary for the proper care and maintenance for your new appliance. Please take a few moments and read the instructions
thoroughly. If properly maintained, your appliance will give you many years of troublefree operation.

Page
Precautions for use 4
Notes on operation and identification of parts 5
Installation instructions 6~7
Operation 8~9
Remote control 10~11
Maintenance 12
Troubleshooting 13
Specifications 14
Warranty 15
Contact information 16
CONTENTS

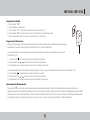
Precautions for use
Electrical Specifications and Power Cord
Check to ensure that the electrical service being used is adequate for the model you’ve chosen. The electrical rating of your new air conditioner is
defined on the serial plate of the unit. Please refer to the rating when checking electrical requirements to ensure they meet the electrical codes of
your location.
qualified electrician install the proper outlet.
General Use
4

ARP-1008 / ARP-1010
Notes on operation
If you turn the air conditioner off and immediately restart it, allow 3 minutes for the compressor to restart cooling. In the event of a power failure, wait 3 minutes before restarting
unit.
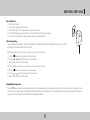
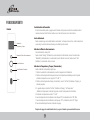
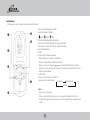
Identification of parts
1. Air outlet
3. Handle
4. Caster
5. Air filter
9. Water outlet drain
10. Power supply cord
Note: Please manually open the air outlet (item 1) to desired position.
5

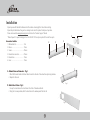
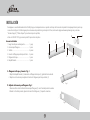
Installation
Unpack your new Portable Air Conditioner and let the machine stand upright for 2 hours before starting.
Unpack all parts listed below. If any parts are missing do not return this product to the place of purchase.
Please visit our website www.royalsovereign.com and click on the “Customer Support” tab and
“Make a Request” to request missing parts or call 1-800-397-1025 and press option #4 to order these parts.
Accessories Include
1. Window slider kit1 Set
1 Piece
3. Screws4 Pieces
2 Pieces
1 Piece
6. Cover1 Piece
➃
➀
➁
➂
➃
➅
➄
A. Exhaust Hose and Connector : Fig 1.
2. Repeat for other end.
B. Attach Hose Fixture : Fig 2.
Fig 1.
Fig 2.
6

ARP-1008 / ARP-1010
C. Install the Window Slider Kit : Fig 3.
1. Op en the window and place the Window Slider Kit on the inside edge of the window.
2. Adjust the Window Slider by adjusting it to the width of the window.
3. Close the window to secure.
4. Tighten the two screws to lock the window slider in palce.
D. Connecting the Exhaust Hose to the PAC : Fig 4.
1. Co n nect the hose connector to the air outlet by aligning the tabs on the hose to the PAC and snap it into place.
E. Connect the Exhaust Hose to Window Slider Kit : Fig 5.
1. Move the Portable Air Conditioner within 4 feet of the window.
Fig 3.
Fig 4.
Fig 5.
7

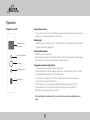
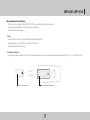
Operation
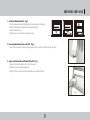
Display Panel on PAC
Auxiliary Power Control
The power control turns the unit on and off. When you press power control, the unit begins to operate. Note: You
will not have access to all functions without the remote control.
Warning Light
Condensed water may accumulate in the unit. If the internal tank fills, the warning light will shine and the unit will
not operate until the unit has been drained.
Operating Mode Indicator
When cooling mode is selected, the indicator light will shine blue. When the dehumidify mode is selected, indicator
light will shine blue. When fan mode is selected, indicator light will shine green.
Temperature and time setting indicator
1. During operation, the unit displays “present room temperature. ”
2. When setting temperature, the unit will display the temperature. Temperature setting range is 61°F to 89°F.
3. When setting the time it displays “set time” and indicator flashes.
4. 5 Seconds after “set temperature” and “set time”, display will return to “present room temperature.”
5. Temperature display ranges from 32°F to 89°F.
6. When temperature of the room is higher than temperature display range, the display shows “HI.”
7. When temperature of the room is lower than temperature display range, the display shows “LO.”
8. When the unit stops operating, indicator light goes off.
After switching the air conditioner off, you must wait 3 minutes before switching it back on
again.
Temperature and time
setting indicator
Operating mode indicator
Warning light
Receiving sensor
8

ARP-1008 / ARP-1010
Power Plug Check
2. Insert the power plug into the electrical outlet.
5. Do not use the air conditioner if the above procedure cannot be successfully performed.
Timer Programming
There are 2 different timer programs. You can set the number of hours before the air conditioner automatically turns OFF or you can set the
number of hours that will elapse before the unit turns ON.
When the air conditioner is turned off, you can choose to turn it on in one hour intervals.
1. Press the
button on the remote to turn on the timer function
2. Press the or button on the remote to set the desired hour.
3. The unit will turn on when the set time elapses.
When the air conditioner is turned on, you can choose to turn it off in one hour intervals.
1. Press the
button on the remote to turn on the timer function
2. Press the or button on the remote to set the desired hour.
3. The unit will turn off when the set time elapses.
Dehumidification Operation
Press the button on remote to select the dehumidify mode. When the dehumidify mode is on, the temperature buttons and the fan speed buttons do not function and the fan
will operate on low or medium speed. The dehumidify indicator light will illuminate and stay lit while the unit is dehumidifying. When the humidity in the room is 50% or lower the
compressor will not run, the unit will not dehumidify, and the dehumidify light will blink.
9

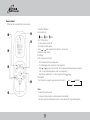
Remote Control
All functions can be accessed from the remote control.
➊
➎
➏
➐
➋
➌
➍
1. Power ON / OFF Button
2. Fan Speed Control
:HIGH :LOW
3. On / Off Timer Control
In running mode: Auto switch off
In stand-by mode: Auto switch on
Press
or button to adjust the time setting for 1 hour intervals.
4. Fahrenheit / Celsius Selector
5. LCD Display
6. Timer / Temperature Set Control
- Used for adjusting the timer and temperature.
- The default display on the control panel is room temperature.
- When
or key is pressed in cool mode, the set temperature is displayed and may be adjusted.
After 15 seconds the display will revert back to room temperature.
- Timer setting is available from 1~24 hours by pressing the key or
7. Mode Control
Press this button to change the operation mode in the order of :
Notes
- Do not drop the remote control.
Cool Dehumidify
Fan
10

ARP-1008 / ARP-1010
Remote Control Operation
- Remove the battery cover on back of the remote.
- Replace the battery cover.
Notes:
-When replacing batteries, always change both batteries at the same time.
-Remove the batteries if the remote control is not used for a month or longer.
-Do not dispose of batteries in a fire.
Battery replacement
Battery compartmentBattery compartment lid
11

Maintenance
Drainage
Occasionally, you may need to drain the unit.
1. Drain the unit if the Warning Light on the display panel of the air conditioner is on.
2. Turn off the power to the unit and unplug.
3. Place a shallow dish under the drainage plug to collect water.
4. Remove the drainage plug.
5. Replace the plug, when drainage water stops flowing.
Cleaning the filter
The filter should be cleaned every 2 weeks or 100 hours of use in order to maintain proper airflow.
1. Remove the filter. Gently pull the filter assembly from the back of the unit and then remove the filter from the assembly.
2. Cle an the filter by vacuuming or a soft cloth. If the filter is very dirty, it can be easily washed with a mild detergent and rinsed thoroughly with clean water. Dry the filter before
replacement.
3. Reinstall the filter in the filter assembly.
4. Replace the filter assembly on the back of the machine.
Note : Never operate the air conditioner without the filter in place. This may damage the unit.
Cleaning and maintaining the air conditioner
Turn the air conditioner off and remove the electrical plug. Wipe with a soft, dry, or damp cloth. A mild detergent can be used. Be sure to remove any residue and dry completely.
Storing the air conditioner
If the unit will not be used for a long time, be sure to drain the air conditioner, clean the air filter, pull out the power supply plug, and remove the batteries from the remote control
before storage. After draining, keep the air conditioner running on FAN mode for at least 8 hours to dry the unit completely to prevent mold.
12

ARP-1008 / ARP-1010
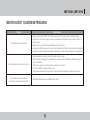
Troubleshooting
Problem Possible Reasons
Air Conditioner does not operate
- Check and reset the power plug. Wait 3 minutes and try to run the unit again.
- The batteries in the remote may need to be replaced. Replace the batteries and try to run the unit again.
- Make sure the plug is properly inserted into the outlet.
- The set temperature may be too close to room temperature. Lower the set temperature.
- The air outlet may be blocked. Check the air outlet and remove any items that may be found.
Air Conditioner runs but does not cool
- Check the room for open doors or windows and close them.
- There may be another appliance in the room giving off heat. Check the room and turn off the appliance.
- The air filter may be dirty. Check the filter and clean if necessary.
- The set temperature may be too high. Check the set temperature and reduce it if necessary.
Air Conditioner does not run
and water full indicator is lit
13

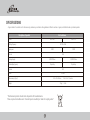
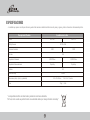
SPECIFICATIONS
- Figures noted in the contents are for reference only; variation may result due to the application in different countries or regions, and shall be based on practical operation.
Description of product Air Conditioner
Model ARP-1008 ARP-1010
Input power 900W 950W
Current 8.0A
Cooling Capacity 8,000 BTU/hour 10,000 BTU/hour
Dehumidifying Capacity 81 pints/day 91 pints/day
Coolant R-22
Timer 24 hour
Weight 30 kg / 66 lbs
14

ARP-1008 / ARP-1010
FULL ONE YEAR WARRANTY
Royal Sovereign warrants each Portable Air Conditioner to be free from defects in material and workmanship. Our obligation under this warranty is limited to the repair or
in effect to the original purchaser, for a period of one year from the date of purchase and is not transferable. This warranty shall apply only if the air conditioner is used on
LIMITED FIVE YEAR WARRANTY (COMPRESSOR)
For a period of five years from the date of purchase, when this Royal Sovereign Portable Air Conditioner is operated and maintained according to the instruction manual provided
material. If repair becomes necessary, please contact our customer service center. You will be responsible for all freight, insurance, and any other transportation charges to get the
unit to our factory or service center. If shipping is required, be sure to pack the unit properly to avoid shipping damages, as we will not be responsible for such damages.
EXCLUSIONS
centers, mishandling, improper installation, modification or unreasonable use including incorrect voltage, acts of God, or failure to provide reasonable and necessary maintenance.
rights which vary from state to state.
15

ROYAL SOVEREIGN INTERNATIONAL, INC.
ROYAL SOVEREIGN INC.
RS INTERNATIONAL AUSTRALIA PTY. LTD.
30 Prime Drive, Seven Hills, NSW 2147, AUSTRALIA
RS CANADA INC.
164 Oakdale Road, Toronto, Ontario M3N 2S5 CANADA
RS Holland B.V.
Industrieweg 6K, 4104AR, Culemborg, The Netherlands
Royal Sovereign Mexico, S.A. de C.V.

Royal Centurian Inc.
ACONDICIONADOR DE AIRE PORTÁTIL
Lea y guarde estas instrucciones para referencia en el futuro.
Para Servicio al Cliente por favor diríjase a nuestra página web
www.royalsovereign.com
y seleccione “Support Tab”
ARP- 1008 / ARP-1010
MANUAL DEL PROPIETARIO
ARP-1008 / ARP-1010
ACONDICIONADOR DE AIRE PORTÁTIL

ACONDICIONADOR DE AIRE PORTÁTIL
Modelo ARP-1008 / ARP-1010
INTRODUCCIÓN
Gracias por escoger este acondicionador de aire Royal Sovereign para proveerle a usted y a su familia lo requerido para tener esa “Comodidad

Precauciones de Uso 20
Notas Sobre el Funcionamiento 21
22~23
Funcionamiento 24~25
Control Remoto 26~27
Mantenimiento 28
29
30
Garantía 31
Contactos 32
CONTENIDO

PRECAUCIONES DE USO
Especificaciones Eléctricas y Cable de Electricidad
contactar a un electricista calificado para instalar el tomacorriente correcto.
Uso General
20

ARP-1008 / ARP-1010
NOTAS SOBRE EL FUNCIONAMIENTO
Deje pasar 3 minutos para que el compresor reinicie el enfriado. Si usted apaga el acondicionador de aire e inmediatamente lo reinicia, deje pasar 3 minutos para que el
IDENTIFICACIÓN DE LAS PARTES
1. Salida de Aire
3. Manija
4. Ruedas
5. Filtro de Aire
9. Salida para drenaje de agua
10. Cable de electricidad
Nota: Por favor, abra manualmente la salida de Aire (1) a la posición deseada.
21

INSTALACIÓN
“Consumer Support” y “Make a Request” para ordenar las partes que falten,
Accesorios Incluidos
1 juego
2. Accesorio para Manguera
3. Tornillos
6. Boquilla Roscada
➃
➀
➁
➂
➃
➅
➄
A. Manguera de Escape y Conector: Fig. 1
B. Adjuntar el Accesorio para Manguera: Fig. 2
Fig 1.
Fig 2.
22

ARP-1008 / ARP-1010
C. Instalar el Juego Corredizo para ventana: Fig. 3
de la ventana.
3. Cierre la ventana para asegurarlo.
D. Conectar la Manguera de Escape al Acondicionador de Aire Portátil (AAP): Fig. 4
encaje en su sitio.
E. Conectar la Manguera de Escape al Juego Corredizo para Ventana: Fig. 5
2. Abra la manguera y estírela hasta que tenga la longitud necesaria.
3. Alinee las uñetas de la manguera con las del panel de la ventana y presione hasta que encaje en su sitio.
Fig 3.
Fig 4.
Fig 5.
23

FUNCIONAMIENTO
Pantalla
Control Auxiliar de Encendido
Luz de Advertencia
Indicador de Modo de Funcionamiento
Indicador de Temperatura y Tiempo (Sincronizador)
establecer la temperatura en un rango de 32° F a 89° F.
indicador parpadea.
8. Cuando la unidad deja de funcionar, el indicador se apaga.
Después de apagar el acondicionador de aire, espere 3 minutos para encenderlo de nuevo.
Indicador de
Temperatura y Tiempo
Indicador de Modo de Funcionamiento
Sensor
24

ARP-1008 / ARP-1010
Comprobación del Enchufe
2. Inserte el enchufe en el tomacorriente.
Programación del Sincronizador
incrementos de 1 hora.
2. Presione los botones de o hasta que se muestre el numero de horas deseado.
2. Presione los botones de o hasta que se muestre el numero de horas deseado.
Funcionamiento del Deshumedecedor
25

Control Remoto
Usted puede tener acceso a todas las funciones desde el control remoto.
➊
➎
➏
➐
➋
➌
➍
:ALTA
4. Selector Fahrenheit/Celsius
5. Pantalla
6. Control de Ajuste de Temperatura/Tiempo
- Cuando se presionan los botones de
o
7. Control de Modo
uncionamiento de la siguiente manera:
Notas:
- No deje caer el control remoto.
Deshumedecedor
26

ARP-1008 / ARP-1010
Funcionamiento del Control Remoto
- No tire las baterías usadas al fuego.
Notas:
- Cuando reemplace las baterías, cambie siempre ambas baterías al mismo tiempo.
- No bote las baterías usadas en el fuego.
Reemplazo de Baterías
Tapa del compartimiento para bateríasCompartimiento para baterías
27

MANTENIMIENTO
Drenaje
Ocasionalmente, usted puede necesitar drenar la unidad.
3. Remueva la tapa de drenaje.
4. Cuando el agua drenada pare de fluir, reponga la tapa de drenaje.
Limpieza del Filtro
1. Remueva el filtro. Cuidadosamente jale el ensamblaje del filtro desde la parte posterior de la unidad, y luego remueva el filtro del ensamblaje.
antes de reponerlo.
3. Reinstale el filtro en el ensamblaje.
Nota: Nunca haga funcionar el acondicionador de aire sin el filtro en su lugar. Podría dañarlo.
Limpiando y Manteniendo el acondicionador de aire
puede dañar la unidad seriamente.
Guardando el Acondicionador de Aire
28

ARP-1008 / ARP-1010
IDENTIFICACIÓN Y SOLUCIÓN DE PROBLEMAS
Problema Posible Solución
unidad de nuevo.
- La entrada o salida de aire puede estar bloqueada.
- Puede haber demasiada agua en la unidad. Drene la unidad
29

ESPECIFICACIONES
Por favor, recicle cuando sea posible. Contacte a las autoridades locales por consejos referentes al reciclaje.”
Descripción del Producto Acondicionador de Aire
Modelo ARP-1008 ARP-1010
900W 950W
Corriente 8.0A
8,000 BTU/hour 10,000 BTU/hour
Capacidad de Deshumedecimiento 81 pints/day 91 pints/day
R-22
Control de Tiempo 24 horas
Peso 30 kg / 66 lbs
30

ARP-1008 / ARP-1010
GARANTÍA COMPLETA POR UN AÑO
GARANTÍA LIMITADA POR CINCO AÑOS (COMPRESOR)
evitar daños en el transporte, pues nosotros no seremos responsables por aquellos daños.
EXCLUSIONES
le da derechos legales específicos y usted podría tener otros derechos los cuales varían de estado a estado.
31

ROYAL SOVEREIGN INTERNATIONAL, INC.
ROYAL SOVEREIGN INC.
RS INTERNATIONAL AUSTRALIA PTY. LTD.
30 Prime Drive, Seven Hills, NSW 2147, AUSTRALIA
RS CANADA INC.
164 Oakdale Road, Toronto, Ontario M3N 2S5 CANADA
RS Holland B.V.
Industrieweg 6K, 4104AR, Culemborg, The Netherlands
Royal Sovereign Mexico, S.A. de C.V.
-
 1
1
-
 2
2
-
 3
3
-
 4
4
-
 5
5
-
 6
6
-
 7
7
-
 8
8
-
 9
9
-
 10
10
-
 11
11
-
 12
12
-
 13
13
-
 14
14
-
 15
15
-
 16
16
-
 17
17
-
 18
18
-
 19
19
-
 20
20
-
 21
21
-
 22
22
-
 23
23
-
 24
24
-
 25
25
-
 26
26
-
 27
27
-
 28
28
-
 29
29
-
 30
30
-
 31
31
-
 32
32


Royal Sovereign Air Conditioner ARP-1008 Manual de usuario
- Categoría
- Acondicionadores de aire móviles
- Tipo
- Manual de usuario
en otros idiomas
Artículos relacionados
-
Royal Sovereign ARP- 1008 Manual de usuario
-
Royal Sovereign ARP-6012X Manual de usuario
-
-
-
-
Royal Sovereign ARP-9409 Guía de instalación
-
-
Royal Sovereign ARP-1003E Manual de usuario
-
-