
Manual
English ...................................... 2 English
/
Español ....................... 3 Warranty
/
Garantía ......................... 4
Weather-Resistant Mushroom-Cap
Request-to-Exit Plates
Placas de Solicitud de Salida de Tapa
de Hongo Resistentes a la Intemperie

ENFORCER Pushbutton Request-to-Exit Plates
2 SECO-LARM U.S.A., Inc.
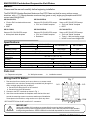
Specifications:
Models:
1x Request-to-exit plate 2x Wall-plate screws 1x Installation manual
Parts List:
SD-7201GC-PEQ SD-7201GCPE1Q SD-7201GFPE1Q
"Push to Exit" brushed stainless steel
faceplate
SPDT
Same as SD-7201GC-PEQ except:
"Exit" and "Salida" faceplate
Same as SD-7201GC-PEQ except:
"Exit" and "Salida" faceplate
DPDT
SD-7217GWQ SD-7201RCPE1Q SD-7201GAPT1Q
Same as SD-7201GC-PEQ except:
White plastic blank faceplate
Same as SD-7201GC-PEQ except:
"Exit" and "Salida" faceplate
Red button
Same as SD-7201GC-PEQ except:
"Exit" and "Salida" faceplate
Timer (1~180s) and buzzer output
NO/NC contact rated 3A@24VDC
Model
SD-7201GC-PEQ SD-7201GCPE1Q
SD-7201GAPT1Q SD-7217GWQ
SD-7201GFPE1Q SD-7201RCPE1Q
Operating voltage N/A 12 or 24VDC N/A
Current rating 50A@24VAC 3A@24VDC 50A@24VAC
Faceplate Brushed stainless White plastic
Operating
temperature
-40°~167° F (-40°~75° C)
IP rating IP65
Built-in timer No Yes No
Dimensions 4
1
/
2
"x2
3
/
4
"x2
3
/
4
" (114x70x70 mm)
Weight 3.7-oz (105g) 2.2-oz (62g) 4.7-oz (133g) 5.1-oz (144g)
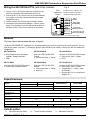
Wiring the RTE Button:
IMPORTANT
Users and installers of this product are responsible for ensuring that the installation and
configuration of this product complies with all national, state, and local laws and codes related to
locking and egress devices. SECO-LARM will not be held responsible for the use of this product
COM
N.O N.C.
COM
1. Run two wires from a device (such as an alarm or an access control
system which can unlock an electronically-controlled lock) through the
wall to a single-gang back-box as follows:
a. One wire from either the NO or NC terminal
b. One wire from the COM terminal
2. Connect to the RTE
terminals as shown in Fig. 1.
3. Use silicone sealant where the faceplate meets the back box and
around the mounting screws to ensure a weather-proof installation.
Screw plate to the back box, using caution not to pinch any wires.
Fig. 1*
*SD-7201GFPE1Q has 2x N.O. and 2x N.C. connectors.
Please read the manual carefully before beginning installation.
The ENFORCER Weather-Resistant Mushroom-Cap RTE Plates are ideal for many outdoor access
situations, with a 1
1
/
2
" (38mm) diameter mushroom-cap (green or red), single-gang faceplate and NO/NC
contact rated 50A@24VAC.

ENFORCER Pushbutton Request-to-Exit Plates
SECO-LARM U.S.A., Inc. 3
Wiring the SD-7201GA-PT1Q (with timer module):
Buzzer
Output
Relay Output
(3A@24VDC)
Trigger Input
(Factory prewired)
Power Input 12 or 24
VDC (non-polarized)
(N.O.)
(N.C.)
(COM)
(COM)
(N.O.)
(N.C.)
(+)
(–)
Note: Terminal legend can be found on back of PCB.
To adjust time (1~180 sec), turn
trimpot clockwise to increase, or
counterclockwise to decrease.
Timer
Adjustment
Trimpot
Fig. 2
1. Connect 12 or 24 VDC power supply (non-polarized) to the
power input terminals of the timer module (see Fig. 2).
2. Connect an N.O. or N.C. device, such as an electromagnetic
lock or alarm, to the relay output terminal block as desired
(3A@24VDC max.).
3. Connect a buzzer to the buzzer output terminal if desired.
4. Set the time of the timer module between 1~180 sec via the
trimpot. Turn clockwise to increase and counterclockwise to
decrease the time. Test to ensure the timer is set correctly.
Modelos:
Especificaciones:
Lista de partes:
Modelo
SD-7201GC-PEQ SD-7201GCPE1Q
SD-7201GAPT1Q SD-7217GWQ
SD-7201GFPE1Q SD-7201RCPE1Q
Voltaje operativo N/A 12 o 24V C.C. N/A
Consumo de corriente 50A@24VCA 3A@24V C.C. 50A@24VCA
Placa frontal Inoxidable cepillado Plastico blanco
Temperatura de
operación
-40°~167° F (-40°~75° C)
Classificatión IP IP65
Temporizador
incorporado
No Si No
Dimensiones 4
1
/
2
"x2
3
/
4
"x2
3
/
4
" (114x70x70 mm)
Peso 3.7-oz (105g) 2.2-oz (62g) 4.7-oz (133g) 5.1-oz (144g)
1x Placa de botón para salida 2x Tornillos de placa de pared 1x Manual de instalación
SD-7201GC-PEQ SD-7201GCPE1Q SD-7201GFPE1Q
Placa frontal de acero inoxidable
cepillado "Empujar para salir"
SPDT
Igual que el SD-7201GC-PEQ
excepto:
Placa frontal "Salir" y "Salida"
Igual que el SD-7201GC-PEQ excepto:
Placa frontal "Salir" y "Salida"
DPDT
SD-7217GWQ SD-7201RCPE1Q SD-7201GAPT1Q
Igual que el SD-7201GC-PEQ excepto:
Placa frontal de plástico blanco
Igual que el SD-7201GC-PEQ
excepto:
Placa frontal "Salir" y "Salida"
Botón rojo
Igual que el SD-7201GC-PEQ excepto:
Placa frontal "Salir" y "Salida"
Temporizador (1 ~ 180s) y salida
de zumbador
Contacto NA / NC con clasificación
3A@24V C.C.
Por favor lea el manual antes de usar el equipo.
Las placas ENFORCER RTE resistentes a LA intemperie ideales para muchas situaciones de acceso al exterior, con una
tapa de seta (verde o roja) de 1
1
/
2
" (38 mm) de diámetro, placa frontal de una unidad y contacto NA / NC con clasificación
50A@24VCA.

ENFORCER Pushbutton Request-to-Exit Plates
4 SECO-LARM U.S.A., Inc.
Cableando el botón RTE :
IMPORTANTE
Usuarios y instaladores de este producto son responsables de asegurar que la instalación y configuración de este
producto cumpla con todas leyes y códigos nacionales, de estado y locales relacionadas a dispositivos de bloqueo y
salida. SECO-LARM no se hace responsable del uso de este producto en violación de cualquier ley
o código actual.
Cableado de SD-7201GA-PT1Q (con temporizador):
1. Conecte 12 o 24V C.C. (sin polaridad) a los terminales de entrada
de poder del temporizador (vea la Fig. 2).
2. Conecte un dispositivo N.A. o N.C. al bloque de terminal de salida
del relevador como se desee (3A@24V C.C. max.).
3. Conecte zumbador al terminal de salida de zumbador si se desea.
4. Establezca el tiempo de temporizador entre 1~180 seg a través
del potenciómetro. Gire el potenciómetro hacia la derecha para
aumentar, hacia la izquierda para disminuir. Pruébelo para
asegurarse que el temporizador se haya establecido.
Nota: Leyenda de terminales se puede encontrar en la parte
posterior del PCB.
Potenciómetro
de ajuste del
temporizador
Fig. 2
(
N.A.
)
(
N.C.
)
(
COM
(
COM
(
N.A.
)
(
N.C.
)
(
+
)
(
–
)
Para ajustar el tiempo (1~180
seg), gire el potenciómetro hacia
la derecha para aumentar, hacia
la izquierda para disminuir.
Salida de relevador
(3A@24V C.C.)
Salida de zumbador
Entrada de interruptor
(Cableado en fabrica)
Entrada de poder
12 o 24V C.C.
(sin polaridad)
NOTICE: The SECO-LARM policy is one of continual development and improvement. For that reason, SECO-LARM reserves the right to change specifications without notice. SECO-LARM is also
not responsible for misprints. All trademarks are the property of SECO-LARM U.S.A., Inc. or their respective owners. Copyright © 2019 SECO-LARM U.S.A., Inc. All rights reserved.
WARRANTY: This SECO-LARM product is warranted against defects in material and workmanship while used in normal service for one (1) year from the date of sale to the original customer.
SECO-LARM’s obligation is limited to the repair or replacement of any defective part if the unit is returned, transportation prepaid, to SECO-LARM. This Warranty is void if damage is caused by or
attributed to acts of God, physical or electrical misuse or abuse, neglect, repair or alteration, improper or abnormal usage, or faulty installation, or if for any other reason SECO-LARM determines
that such equipment is not operating properly as a result of causes other than defects in material and workmanship. The sole obligation of SECO-LARM and the purchaser’s exclusive remedy, shall
be limited to the replacement or repair only, at SECO-LARM’s option. In no event shall SECO-LARM be liable for any special, collateral, incidental, or consequential personal or property damage of
any kind to the purchaser or anyone else.
GARANTÍA: Este producto SECO-LARM tiene garantía en contra de defectos de material y mano de obra siempre y cuando se utilice en un servicio normal por un periodo de un (1) año a partir de la fecha de venta al
cliente consumidor final. La obligación de SECO-LARM está limitada a reparar o reemplazar cualquier parte defectuosa si la unidad se regresa a SECO-LARM, con el costo de transporte pagado por adelantado. Esta
Garantía se invalidará si se causa algún daño o se atribuye a actos de Dios, mal uso o abuso físicoión, uso no apropiado o anormal, o por una instalación defectuosa, o si por cualquier otra razón que SECO-LARM
establezca que determinado equipo no está operando de manera apropiada como resultado de causas distintas a los defectos del material o la mano de obra. La única obligación de SECO-LARM y el resarcimiento
exclusivo del comprador deberá limitarse sólo al reemplazo o reparación, de acuerdo con la opción que brinde SECO-LARM. Bajo ninguna circunstancia, SECO-LARM será responsable de cualquier daño especial,
colateral, incidental o consecuencial personal o daños de propiedad de cualquier tipo al comprador o a cualquier otro.
NOTA: La póliza de SECO-LARM es una que se continúa a desarrollar y mejorar; por lo tanto, SECO-LARM se reserva el derecho a cambiar las especificaciones sin previo aviso. SECO-LARM tampoco es responsable
por los errores de impresión. Todas las Marcas registradas son propiedad de SECO-LARM U.S.A., Inc. o de sus respectivos propietarios. Copyright © 2019 SECO-LARM U.S.A., Inc. Todos los derechos reservados.
SECO-LARM
®
U.S.A., Inc.
16842 Millikan Avenue, Irvine, CA 92606 Website: www.seco-larm.com
Phone: (949) 261-2999 | (800) 662-0800 Email: [email protected]
®
PITSW1
Order Part# 763-155-3%
MI_SD-7201series_190705_ML.docx
N.A.
COM
COM
N.C.
*SD-7201GFPE1Q tiene 2x N.A. y N.C conectores.
Fig. 1*
1. Pase dos cables desde un dispositivo (como una alarma o un sistema de control
de acceso que puede desbloquear un bloqueo controlado electrónicamente) a
través de la pared a una caja posterior de una unidad como sigue:
a. Un cable desde el terminal NO o NC
b. Un cable de la terminal COM
2. Conecte a los terminales RTE como se muestra en la Fig. 1
3. Use sellador de silicona donde la placa frontal se encuentra con la caja posterior y
alrededor de los tornillos de montaje para garantizar una instalación a prueba de
intemperie. Atornille la placa a la caja posterior, teniendo cuidado de no pellizcar
ningún cable.
IMPORTANT: Users and installers of this product are responsible for ensuring that the installation and configuration of this product complies with all national, state, and local laws and codes related
to locking and egress devices. SECO-LARM will not be held responsible for the use of this product in violation of any current laws or codes.
IMPORTANT WARNING: For a weatherproof installation, ensure the unit is installed in a waterproof back box, and that the faceplate and faceplate screws are properly sealed. Incorrect mounting
may lead to exposure to rain or moisture in the enclosure which could cause a dangerous electric shock, damage the device, and void the warranty. Users and installers of this product are
responsible for ensuring this product is properly installed and sealed.
ADVERTENCIA IMPORTANTE: Para una instalación resistente a la intemperie, asegúrese de que la unidad esté instalada en una caja posterior impermeable, y que los tornillos de la placa frontal y la placa frontal
estén correctamente sellados. El montaje incorrecto puede provocar la exposición a la lluvia o la exposición al interior del recinto, lo que podría provocar una descarga eléctrica peligrosa, dañar el dispositivo y anular la
garantía. Los usuarios e instaladores de este producto son responsables de garantizar que el producto esté correctamente instalado y sellado.
IMPORTANTE: Los usuarios e instaladores de este producto son responsables de garantizar que la instalación y configuración de este producto cumpla con todas las leyes y códigos nacionales, estatales y locales
relacionados con los dispositivos de cierre y egreso. SECO-LARM no será responsable por el uso de este producto en violación de las leyes o códigos vigentes.
-
 1
1
-
 2
2
-
 3
3
-
 4
4


ENFORCER SD-7201GCPE1Q El manual del propietario
- Tipo
- El manual del propietario
- Este manual también es adecuado para
en otros idiomas
Artículos relacionados


Otros documentos
-
SECO-LARM SD-7103GC-PTQ El manual del propietario
-
SECO-LARM SS-075CQ El manual del propietario
-
-
-
-
-
SECO-LARM SK-910RB2Q El manual del propietario
-
 Marshalltown Company Enforcer E400 Manual de usuario
-
SECO-LARM SK-91ERSD El manual del propietario
-
