Hampton Bay EL2040OBR Guía de instalación
- Tipo
- Guía de instalación

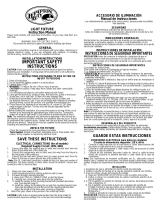
ACCESORIO DE ILUMINACION DE JARDIN
Manual de instrucciones
Lea cuidadosamente y guarde estas instrucciones, porque puede necesitarlas mas adelante.
SEGURIDAD
ADVERTENCIA:
Asegurese de que la alimentacion electrica de los cables en los que esta trabajando este
desconectada, ya sea con el fusible retirado o el interruptor general desconectado.
PRECAUCION:
Antes de armar su accesorio luminoso, consulte las secciones tituladas Codigos de colores de
cables y Conexiones electricas. Si piensa que no tiene sufi
ciente experiencia en cableados electricos, consulte
un manual de cableado tipo §hagal o usted mism¡¨ o solici te que un electricista califi cado y matri cul ado instale s
accesorio.
INSTRUCCIONES RELATIVAS AL RIESGO DE INCENDIO O LESIONES A PERSONAS
.
INSTRU
CCIONES DE SEGURIDAD IMPORTANTES
1.
Apague / desconecte el accesorio y deje que se enfrie antes de cambiar la bombilla.
2.
!la bombilla se calienta rapidamente!
Toque solo el interruptor o el enchufe al encenderlo.
3.
No toque el cristal, el protector ni la envuelt
a caliente.
4.
No mire directamente a la luz.
5.
Mantenga la lampara alejada de materiales combustibles.
6.
No exceda el vatiaje maximo de la lampara indicado en el accesorio.
7.
No toque la lampara en ningun momento. Use un pano suave, ya que la grasitud de la piel p
uede danar la
lampara/bombilla.
8.
No opere el accesorio con un protector/cristal faltante o danado.
9.
No se debe instalar los accesorios a menos de 5 pies (1.50 m) de una piscina, spa o fuente.
Nota: el cableado del secundario de la unidad se debe proteger ten
diendo el cable en estrecha proximidad del accesorio, o
encaminandolo cerca de la estructura de un edificio, tal como una casa o plataforma. El cable se debe cortar a una longitud
tal que se conecte a un conector a menos de 6 pulgadas (15 cm) de la estruct ura de un edificio o un accesorio luminoso.
CONSERVE ESTAS INSTRUCCIONES
DESEMBALAJE DEL PRODUCTO
Verifique el contenido para asegurarse de que esten todos los elementos.
Herramientas necesarias:
Destornillador Phillips, llave ajustable, pinza para cor
tar cables, elementos de
cableado requeridos por el codigo de electricidad.
GARDEN LIGHT FIXTURE
Instruction Manual
Please read carefully and save these instructions as you m
a
y need them at a later date.
SAFETY
WARNING:
Be sure the electricity to the wires you are working on is shut off; either the fuse removed or the
circuit breaker off.
CAUTION:
Before assembling your lighting fixture, refer to the sections titled Wiring Color Codes and Electrical
Connections. If you feel you do not have enough ele
ctrical wiring experience, either refer to a do
-
it yourself wiring
handbook or have your fixture
installed
by a qualified, licensed electrician.
INSTRUCTIONS PERTAINING TO A RISK OF FIRE, OR INJURY TO PERSONS
IMPORTANT SAFETY INSTRUCTIONS
1.
Turn off/unplug
and allow fixture to cool before replacing lamp.
2.
Lamp gets hot quickly!
Contact only switch/plug when turning on
.
3.
Do not touch hot lens, guard or enclosure.
4.
Do not look directly into the light.
5.
Keep lamp away form combustible materials.
6.
Do not exceed maxi
mum lamp wattage marked on fixture.
7.
Do not touch the lamp at anytime. Use a soft cloth, as oil from skin may damage the lamp/bulb.
8.
Do not operate the fixture with a missing or damaged shield /lens.
9.
Fixtures must not be installed within 5 feet of a pool, sp
a or fountain.
Note: the unit secondary wiring shall be protected by routing in close proximity to the luminaire or fitting, or next to a
building structure such as a house or deck. The wire shall have the length cut off so that it is connected to a connec
tor
within 6 inches from a building structure, a luminaire, or fitting
.
SAVE THESE INSTRUCTIONS
UNPACK THE PACKAGE
Check the contents to be sure everything is included.
Tools Needed: Slotted screwdriver, adjustable wrench, wire cutters,
wiring
supplies as required by electrical
code
.

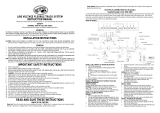
ELECTRICAL CONNECTIONS AS SHOWN IN DIAGRAMS
Connect the white wire(s) from the fixture to the white wire of the supply circuit. Connect the black wire(s) from
the fixture to the black wire of the supply circuit. Connect the green (or bare copper) wire from the supply circuit
to the green or bare copper wire from the fixture, and then to the green screw. Use UL listed wire connectors
suitable for the size, type and number of conductors. No loose strands or loose wired should be present. Secure
wire connectors with UL electrical tape.
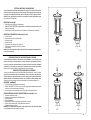
INSTALLATION: (refer to the fig1)
1.
Hold the
fixture
;
raise the fixture up to the mounting pipe.
2.
Make ELECTRICAL CONNECTIONS as directed above. Then carefully tuck connected wires back into the
ou
tlet box of mounting pipe.
3.
Insert the fixture to the mounting pipe,
use the screw provided to secure the fixture to the mounting pipe
.
INSTALLATION OR RELAMPING
BULB :( Refer
to the fig 2
, 3, and 4
)
1.
Turn main power off.
2.
Remove the decorative nut from the
fixture shade.
3.
Remove the top cover.
4.
Remove the old bulb
5.
Insert new
bulb into socket using a tissue or soft cloth
.
6.
Replace the top cover and decorative nut back on the fixture.
7.
Restore electricity.
Caution:
Refer to the relamping label located near the
la
mp holder for recommended maximum wattage. Do no
exceed recommended wattage.
CONEXIONES ELECTRICAS TAL COMO SE MUESTARAN EN LOS DIAGRAMS
Conectar el cable blanco del artefacto, al cable blanco del circuito de alimentacio
n.
Conectar
el cable
Negro
del
ar
tefacto, al cable
Negro
del circuito de alimentacio
n.
Conectar el cable verde (o cable desnudo) del circuito de
alimentaci
on, al cable verde o desnudo del artefacto, y despues al tornillo verde. Usar conectores de empalme
normalizados por UL. De acuerdo con el tamano, el tipo y la cantidad de
conductors
. No dejar ningun conductor
expuesto sin aislar.
Aplicar cinta aisladora normalizada sobre los conectores de empalme.
CONEXIONES ELECTRICAS (INDICADAS EN LOS DIAGRAMAS)
Conecte el o los cables blancos del acc
esorio al cable blanco del circuito de alimentacion. Conecte el o los cables
negros del accesorio al cable negro del circuito de alimentacion. Conecte el cable verde (o cable desnudo) del
circuito de alimentacion al cable verde o desnudo del accesorio, y despues al tornillo verde Use capuchones de
empalme certificados por UL, adecuados para el tamano, tipo y cantidad de conductores. No deben quedar
conductores o cables sueltos. Asegure los capuchones de empalme con cinta aisladora certificada por UL.
INSTAL
ACION: (vea la figura 1)
1.
Sostenga el accesorio y levantelo hasta el cano de montaje
2.
Haga las CONEXIONES ELECTRICAS como se indica arriba.
Luego, introduzca cuidadosamente los cables
conectados en la caja de empalme del cano de montaje.
3.
Inserte el acceso
rio en el cano de montaje y use el tornillo provisto para fijar el accesorio al cano.
INSTALACION DE BOMBILLAS NUEVAS O CAMBIO DE BOMBILLAS: (vea las figuras 2, 3 y 4)
1.
Desconecte la alimentacion principal.
2.
Desmonte la tuerca decorativa de la pantalla del
accesorio.
3.
Retire la tapa superior.
4.
Retire la bombilla usada
5.
Inserte la bombilla nueva en el zocalo usando un papel tisu o un pano blando.
6.
Vuelva a colocar la cubierta superior y la tuerca decorativa en el accesorio.
7.
Restablezca la alimentacion electrica.
Precaucion:
Para el vatiaje maximo recomendado, consulte la etiqueta sobre el cambio de bombillas situada
cerca del portalamparas. No exceda el vatiaje recomendado.
FIG1
FIG2
FIG3
FIG4
440
Transcripción de documentos
ACCESORIO DE ILUMINACION DE JARDIN Manual de instrucciones Lea cuidadosamente y guarde estas instrucciones, porque puede necesitarlas mas adelante. SEGURIDAD GARDEN LIGHT FIXTURE Instruction Manual Please read carefully and save these instructions as you may need them at a later date. SAFETY ADVERTENCIA: Asegurese de que la alimentacion electrica de los cables en los que esta trabajando este desconectada, ya sea con el fusible retirado o el interruptor general desconectado. PRECAUCION: Antes de armar su accesorio luminoso, consulte las secciones tituladas Codigos de colores de cables y Conexiones electricas. Si piensa que no tiene suficiente experiencia en cableados electricos, consulte un manual de cableado tipo §hagal o ust ed m i s m¡¨ o sol ici te que un el ectricista calif i cado y m atri cul ado i nstale s accesorio. WARNING: Be sure the electricity to the wires you are working on is shut off; either the fuse removed or the circuit breaker off. CAUTION: Before assembling your lighting fixture, refer to the sections titled Wiring Color Codes and Electrical Connections. If you feel you do not have enough electrical wiring experience, either refer to a do-it yourself wiring handbook or have your fixture installed by a qualified, licensed electrician. INSTRUCCIONES RELATIVAS AL RIESGO DE INCENDIO O LESIONES A PERSONAS. INSTRUCTIONS PERTAINING TO A RISK OF FIRE, OR INJURY TO PERSONS INSTRUCCIONES DE SEGURIDAD IMPORTANTES 1. Apague / desconecte el accesorio y deje que se enfrie antes de cambiar la bombilla. 2. !la bombilla se calienta rapidamente! Toque solo el interruptor o el enchufe al encenderlo. 3. No toque el cristal, el protector ni la envuelta caliente. 4. No mire directamente a la luz. 5. Mantenga la lampara alejada de materiales combustibles. 6. No exceda el vatiaje maximo de la lampara indicado en el accesorio. 7. No toque la lampara en ningun momento. Use un pano suave, ya que la grasitud de la piel puede danar la lampara/bombilla. 8. No opere el accesorio con un protector/cristal faltante o danado. 9. No se debe instalar los accesorios a menos de 5 pies (1.50 m) de una piscina, spa o fuente. Nota: el cableado del secundario de la unidad se debe proteger tendiendo el cable en estrecha proximidad del accesorio, o encaminandolo cerca de la estructura de un edificio, tal como una casa o plataforma. El cable se debe cortar a una longitud tal que se conecte a un conector a menos de 6 pulgadas (15 cm) de la estructura de un edificio o un accesorio luminoso. CONSERVE ESTAS INSTRUCCIONES DESEMBALAJE DEL PRODUCTO Verifique el contenido para asegurarse de que esten todos los elementos. Herramientas necesarias: Destornillador Phillips, llave ajustable, pinza para cortar cables, elementos de cableado requeridos por el codigo de electricidad. IMPORTANT SAFETY INSTRUCTIONS 1. Turn off/unplug and allow fixture to cool before replacing lamp. 2. Lamp gets hot quickly! Contact only switch/plug when turning on. 3. Do not touch hot lens, guard or enclosure. 4. Do not look directly into the light. 5. Keep lamp away form combustible materials. 6. Do not exceed maximum lamp wattage marked on fixture. 7. Do not touch the lamp at anytime. Use a soft cloth, as oil from skin may damage the lamp/bulb. 8. Do not operate the fixture with a missing or damaged shield /lens. 9. Fixtures must not be installed within 5 feet of a pool, spa or fountain. Note: the unit secondary wiring shall be protected by routing in close proximity to the luminaire or fitting, or next to a building structure such as a house or deck. The wire shall have the length cut off so that it is connected to a connector within 6 inches from a building structure, a luminaire, or fitting. SAVE THESE INSTRUCTIONS UNPACK THE PACKAGE Check the contents to be sure everything is included. Tools Needed: Slotted screwdriver, adjustable wrench, wire cutters, wiring supplies as required by electrical code. ELECTRICAL CONNECTIONS AS SHOWN IN DIAGRAMS Connect the white wire(s) from the fixture to the white wire of the supply circuit. Connect the black wire(s) from the fixture to the black wire of the supply circuit. Connect the green (or bare copper) wire from the supply circuit to the green or bare copper wire from the fixture, and then to the green screw. Use UL listed wire connectors suitable for the size, type and number of conductors. No loose strands or loose wired should be present. Secure wire connectors with UL electrical tape. INSTALLATION: (refer to the fig1) 1. Hold the fixture; raise the fixture up to the mounting pipe. 2. Make ELECTRICAL CONNECTIONS as directed above. Then carefully tuck connected wires back into the outlet box of mounting pipe. 3. Insert the fixture to the mounting pipe, use the screw provided to secure the fixture to the mounting pipe. INSTALLATION OR RELAMPING BULB :( Refer to the fig 2, 3, and 4) 1. Turn main power off. 2. Remove the decorative nut from the fixture shade. 3. Remove the top cover. 4. Remove the old bulb 5. Insert new bulb into socket using a tissue or soft cloth. 6. Replace the top cover and decorative nut back on the fixture. 7. Restore electricity. Caution: Refer to the relamping label located near the lamp holder for recommended maximum wattage. Do no exceed recommended wattage. FIG1 FIG2 CONEXIONES ELECTRICAS TAL COMO SE MUESTARAN EN LOS DIAGRAMS Conectar el cable blanco del artefacto, al cable blanco del circuito de alimentacion. Conectar el cable Negro del artefacto, al cable Negro del circuito de alimentacion. Conectar el cable verde (o cable desnudo) del circuito de alimentacion, al cable verde o desnudo del artefacto, y despues al tornillo verde. Usar conectores de empalme normalizados por UL. De acuerdo con el tamano, el tipo y la cantidad de conductors. No dejar ningun conductor expuesto sin aislar. Aplicar cinta aisladora normalizada sobre los conectores de empalme. CONEXIONES ELECTRICAS (INDICADAS EN LOS DIAGRAMAS) Conecte el o los cables blancos del accesorio al cable blanco del circuito de alimentacion. Conecte el o los cables negros del accesorio al cable negro del circuito de alimentacion. Conecte el cable verde (o cable desnudo) del circuito de alimentacion al cable verde o desnudo del accesorio, y despues al tornillo verde Use capuchones de empalme certificados por UL, adecuados para el tamano, tipo y cantidad de conductores. No deben quedar conductores o cables sueltos. Asegure los capuchones de empalme con cinta aisladora certificada por UL. INSTALACION: (vea la figura 1) 1. Sostenga el accesorio y levantelo hasta el cano de montaje 2. Haga las CONEXIONES ELECTRICAS como se indica arriba. Luego, introduzca cuidadosamente los cables conectados en la caja de empalme del cano de montaje. 3. Inserte el accesorio en el cano de montaje y use el tornillo provisto para fijar el accesorio al cano. INSTALACION DE BOMBILLAS NUEVAS O CAMBIO DE BOMBILLAS: (vea las figuras 2, 3 y 4) 1. Desconecte la alimentacion principal. 2. Desmonte la tuerca decorativa de la pantalla del accesorio. 3. Retire la tapa superior. 4. Retire la bombilla usada 5. Inserte la bombilla nueva en el zocalo usando un papel tisu o un pano blando. 6. Vuelva a colocar la cubierta superior y la tuerca decorativa en el accesorio. 7. Restablezca la alimentacion electrica. Precaucion: Para el vatiaje maximo recomendado, consulte la etiqueta sobre el cambio de bombillas situada cerca del portalamparas. No exceda el vatiaje recomendado. FIG3 FIG4 440-
 1
1
-
 2
2