
READ ALL INSTRUCTIONS BEFORE ASSEMBLY AND USE OF CHAIR.
KEEP INSTRUCTIONS FOR FUTURE USE.
LEA TODAS LAS INSTRUCCIONES ANTES DE ENSAMBLAR Y USAR LA SILLA.
CONSERVE LAS INSTRUCCIONES PARA USO FUTURO.
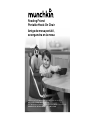
Feeding Friend
Portable Hook-On Chair
Amigo de mesa portátil,
se engancha en la mesa

IMPORTANT SAFETY NOTICES
Your child is ready for this product if:
• He/She is at least 6 months old.
• He/She weighs less than 37 pounds.
• He/She is able to sit upright without help.
Failure to follow these warnings could result in serious injury or death.
Read these instructions carefully before assembling and using this product. Keep
these instructions for future reference.
Your child’s safety is very important to us, so we urge you to take the following
precautions when using this product:
• Never leave child unattended in this product or in the near vicinity. Keep your
child in view at all times.
• Ensure that the table is stable before and after you place your child in the chair.
• When the chair is attached to the table, ensure that the table & chair are
secure before placing your child in it.
• Ensure that your child is secured in the chair at all times with the safety
belt provided.
• Always ensure that all hazards such as electrical devices, knives and hot
liquids are kept out of reach of your child in the chair.
• Before removing your child from the chair, be sure your child’s legs are
free from clip-on chair supports.
• Do not use on glass, crystal, or similar table surfaces. Do not use on tables
with rough or uneven surfaces. Do not use on tables with a single leg, card
tables, or camping tables. Do not use on table extensions or table leaves.
• Do not use the chair on a table that has a tablecloth on it. Be sure to keep the
chair and table surfaces clean and dry.
• The table top must be at least 5/8” (16mm) thick and not more than 2” (51mm)
thick.
• Do not place an ordinary chair under the seat or attach the seat where
your child can use his/her feet to push against the table, chairs, or other
objects. This can cause the seat to shift or lift up and become unstable.
• Do not hang objects on the seat that could cause the seat to become unstable.
• Do not attach or detach the chair when your child is in it.
• Do not allow children or animals to play near or walk under the chair while
it is in use.
• Do not use if the arms and table locks are not securely fastened to the table.
• Do not use without tab locks or other locking/latching mechanisms attached
securely to table surface.
• Do not use the table seat for more than one child at a time.
• Discontinue use if your child can move the chair arms on the table while he/she
is in the chair.
Never leave child unattended in this
product. Use only on tables 5/8” to
2” thick (16-51 mm).
WARNING
2
English

Safety precautions for parts and accessories:
• Ensure that the joints are securely screwed to the table before placing your
child in the seat.
• Do not use the seat if it is broken or damaged. Contact manufacturer
immediately for replacement parts or service.
• Do not use spare parts that are not supplied by the manufacturer.
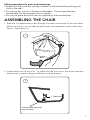
ASSEMBLING THE CHAIR
1. Slide the U-shaped backrest bar through the sleeve at the back of the seat cover.
Make sure the pins on the tube (at both ends) are exposed on either side of the
sleeve. See diagram A.
2. Inspect both arms of the chair. To make sure the arms are in the correct position,
the two items noted in diagram B below must be present:
3
Back
A
B
2. Round Red cap must
face outward
1. Table lock

4
3. Slide each arm through the cover of each sleeve located on the side of the seat.
Start from the back of the sleeve. See diagram C.
4. Attach both arms onto the backrest bar. Push the tab locks in as you slide the
arms over the backrest bar. Make sure you click the tab locks into place so that
the bar does not rotate. See diagram D.
D
Tab lock
C

5. Attach the table-grips (paw, hoof or hand) on the end of the arm. The table-grips
must be pushed all the way up to the indicated line. Next attach the two rubber
stops to the front of the frame. See diagram E.
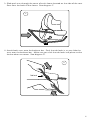
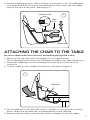
ATTACHING THE CHAIR TO THE TABLE
Be sure to attach and secure the chair first before placing child in seat.
1. Make sure the two table locks (see diagram F) are angled forward.
This can be done by pressing in the red button located on the sides of both arms.
2. Check that rubber feet are not interfering with anything that could cause an
insecure fit.
3. Fit onto a table or safe, suitable flat surface as indicated in diagram F.
4. Pull the table locks in the direction shown in diagram G until you hear a clicking
sound. Make sure the table locks are perpendicular to the table top.
5. Rotate the plastic knobs in the direction shown in diagram G until the rubber
5
Table lock
F
E
Table-
Grips
Indicator mark
Rubber stops

6
stopper locked tight against the under surface of the table.
If the chair is securely fastened to the table, you should not be able to move it
by pushing on it.
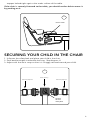
SECURING YOUR CHILD IN THE CHAIR
1. Unfasten the safety belt and place your child in the chair.
2. Push buckle tongue into buckle housing. See diagram H.
3. Adjust with the waist strap so that it is snuggly secured around your child.
G
Plastic knob
H
Waist Strap Adjusters
Buckle Housing
Waist Strap Adjusters
Push to
Release
Safety Belt

7
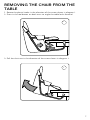
REMOVING THE CHAIR FROM THE
TABLE
1. Rotate the plastic knobs in the direction of the arrow shown in diagram I.
2. Press in the red button on both arms to angle the table locks forward.
3. Pull the chair out in the direction of the arrow shown in diagram J.
J
I

8
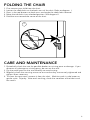
FOLDING THE CHAIR
1. First remove your child from the chair.
2. Loosen the table locks on the both arms of the chair. Refer to diagram I.
3. Press in the red buttons on both arms and angle the table locks forward.
4. Move the tab locks into unlocked position. See diagram K.
5. Fold the arms toward the center of the chair.
CARE AND MAINTENANCE
1. Periodically check the seat for possible broken or missing parts or damage. If you
discover any damage or missing parts, do not use the seat.
2. Dry the metal parts on the seat carefully to avoid rusting.
3. Regularly check the securing screws to ensure that they are securely tightened and
tighten when necessary.
4. To clean the seat cover, remove it from the chair. Machine wash in cold water on
gentle cycle. Drip dry. After each washing, check the condition of the fabric and
the seams.
K

AVISOS IMPORTANTES DE SEGURIDAD
Su niño(a) ya está listo(a) para usar este producto si cumple las siguientes
condiciones:
• Ya tiene al menos 6 meses de nacido.
• Pesa menos de 37 libras (16.8 kg).
• Ya se puede sentar erguido sin ayuda.
El incumplimiento de estas advertencias puede resultar en lesiones graves o la
muerte.
Lea cuidadosamente estas instrucciones antes de ensamblar y usar este producto.
Conserve estas instrucciones para uso futuro.
La seguridad de su niño es muy importante para nosotros, por eso le instamos a
tomar las precauciones siguientes cuando use este producto:
• Nunca deje desatendido al niño sentado en este producto ni cuando se encuentre
cerca del mismo. Mantenga el niño a la vista en todo momento.
• Cerciórese de que la mesa sea estable antes y después de sentar al niño en la silla.
• Cuando la silla esté enganchada en la mesa, cerciórese de que la mesa y la silla
estén seguras antes de sentar al niño en la silla.
• Verifique que el niño esté restringido en la silla en todo momento por medio del
arnés de cinturón de seguridad.
• Asegúrese siempre de que todos los peligros como los aparatos eléctricos,
cuchillos y líquidos calientes estén lejos del alcance del niño sentado en la silla.
• Antes de sacar de la silla al niño, cerciórese de que las piernas del niño no estén
atoradas en los soportes de enganchar de la silla.
• No use este producto en mesas con superficies de vidrio, cristal o materiales
similares. No use este producto en mesas con superficies ásperas o irregulares. No
use este producto en mesas con un pedestal, mesas para juegos de cartas ni
mesas para acampar. No use este producto en extensiones de mesa ni en paneles
de mesa.
• No use la silla en mesas que tengan un mantel sobre ellas. Cerciórese de mantener
limpias y secas las superficies de la silla y de la mesa.
• La cubierta de la mesa debe tener un grosor mínimo de 5/8” (16mm) o un grosor
máximo de 2 pulgadas (51 mm).
• No coloque una silla regular debajo del asiento ni enganche el asiento en puntos
donde el niño pueda usar sus pies para empujarse contra la mesa, sillas, u otros
objetos. Esto puede causar que el asiento se desplace o se levante y se vuelva
inestable.
• No cuelgue objetos en el asiento que puedan causar que el asiento se vuelva
inestable.
• No enganche ni desprenda la silla cuando su niño esté en ella.
• No permita que niños o animales jueguen cerca ni caminen debajo de la silla
mientras esté en uso.
9
Español
Nunca deje desatendido a un niño en
esta silla. Para el uso solamente en mesas
con cubierta de 5/8 a 2 pulgadas (16 a 51
mm) de grosor.
ADVERTENCIA

• No use la silla si los brazos y las clavijas no están sujetadas firmemente a la mesa.
• No use la silla sin tener trabas de lengüeta u otros mecanismos de bloqueo y
trabas acoplados fijamente a la superficie de la mesa.
• No use el asiento de mesa para más de un niño a la vez.
• Deje de usar el producto si su niño puede mover los brazos de la silla en la mesa
mientras se encuentra en sentado en ella.
Precauciones de seguridad para las piezas y accesorios:
• Verifique que las juntas estén firmemente atornilladas a la mesa antes de colocar
al niño en el asiento.
• No use el asiento si éste esta roto o dañado. Comuníquese inmediatamente con el
fabricante para obtener piezas de repuesto o servicio.
• No use piezas de repuesto que no sean suministradas por el fabricante.
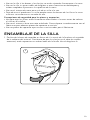
ENSAMBLAJE DE LA SILLA
1. Deslice de la barra de respaldo en forma de U a través de la funda en el respaldo
de la cubierta del asiento. Cerciórese de que las clavijas en el tubo (en ambos
extremos) estén expuestas en ambos lados de la funda. Vea el diagrama A.
10
Respaldo
A

11
2. Inspeccione ambos brazos de la silla. Para cerciorarse de que los brazos estén en
la posición correcta, deben estar presentes los dos artículos indicados en el
diagrama B a continuación:
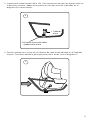
3. Deslice cada brazo a través de la cubierta de cada funda ubicada en el lado del
asiento. Comience desde la parte posterior de la funda. Vea el diagrama C.
B
2. El tapón rojo circular debe
quedar hacia afuera
1. Traba de
mesa
C

4. Acople ambos brazos en la barra de respaldo. Empuje las trabas de lengüeta
hacia adentro mientras desliza la barra de respaldo. Cerciórese de enganchar
hasta escuchar el chasquido de las trabas de lengüetas en posición para que la
barra no gire. Vea el diagrama D.
5. Acople los sujetadores de mesa (patas, pezuñas o manos) en el extremo del
brazo. Los sujetadores de mesa deben quedar empujados hasta el tope según lo
indica la línea. Enseguida, fije los dos topes de goma en la frente del bastidor.
Vea el diagrama E.
12
D
Traba de lengüeta
E
Sujetadores
de mesa
Marca indicadora
Tope
de goma

13
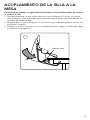
ACOPLAMIENTO DE LA SILLA A LA
MESA
Cerciórese de acoplar y enganchar firmemente la silla primero antes de colocar
al niño en la silla.
1. Cerciórese de que las dos trabas de mesa (ver el diagrama F) estén inclinadas
hacia adelante. Esto se puede realizar presionando el botón rojo ubicado en los
costados de ambos brazos.
2. Verifique que las patas de goma no interfieran con nada que pudiese causar una
instalación insegura.
3. Coloque la silla en una mesa o en una superficie plana, segura y adecuada según
se indica en el diagrama F.
Traba de mesa
F

14
4. Tire de las trabas de mesa en la dirección que se muestra en el diagrama G hasta
escuchar un chasquido. Cerciórese de que las trabas de mesa queden perpen-
diculares a la cubierta de la mesa.
5. Gire las perillas plásticas en la dirección que se muestra en el diagrama G hasta
que el tope de goma quede firmemente ajustado contra la superficie inferior de
la mesa.
Si la silla está firmemente sujetada a la mesa, no podrá moverse cuando se la
empuje.
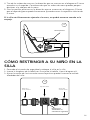
CÓMO RESTRINGIR A SU NIÑO EN LA
SILLA
1. Destrabe el cinturón de seguridad y coloque al niño en la silla.
2. Inserte la lengüeta de la hebilla en la caja de la hebilla. Vea el diagrama H.
3. Ajuste la correa de la cintura de manera que ésta quede firmemente ceñida
alrededor del niño.
G
Perilla plástica
H
Ajustes de la
correa de cintura
Caja de la hebilla
Ajustes de la
correa de cintura
Empuje para
desabrochar el
cinturón de seguridad

15
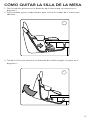
CÓMO QUITAR LA SILLA DE LA MESA
1. Gire las perillas plásticas en la dirección de la flecha que se muestra en el
diagrama I.
2. Pulse el botón rojo en ambos brazos para inclinar las trabas de la mesa hacia
adelante.
3. Tire de la silla hacia afuera en la dirección de la flecha según se indica en el
diagrama J.
J
I

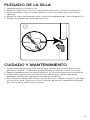
PLEGADO DE LA SILLA
1. Saque primero al niño de la silla.
2. Afloje las trabas de la mesa en ambos brazos de la silla. Consulte el diagrama I.
3. Pulse los botones rojos en ambos brazos e incline las trabas de la mesa hacia
adelante.
4. Mueva las trabas de lengüeta hacia la posición desbloqueada. Vea el diagrama K.
5. Pliegue los brazos hacia el centro de la silla.
CUIDADO Y MANTENIMIENTO
1. Inspeccione periódicamente el asiento para verificar que no haya piezas rotas,
dañadas o faltantes. Si descubre piezas dañadas o faltantes, no use el asiento.
2. Seque cuidadosamente las piezas metálicas en el asiento para evitar la corrosión.
3. Inspeccione regularmente los tornillos de sujeción para verificar que estén
apretados firmemente y apriételos cuando sea necesario.
4. Para limpiar la cubierta del asiento, retírela de la silla. Lávelo a máquina, con agua
fría, en ciclo suave. Deje secar al aire. Después de lavarlo, inspeccione el estado
de la tela y de las costuras en las juntas.
K
16

Amigo de mesa portátil,
se engancha en la mesa
Feeding Friend
Portable Hook-On Chair
Product design is TM & ©2007 Munchkin, Inc.
16689 Schoenborn St., North Hills, CA 91343.
Munchkin is a trademark of Munchkin, Inc.
Made in China.
800.344.BABY (2229)
www.munchkin.com
El diseño del producto es una marca comercial.
© 2007 Munchkin, Inc. 16689 Schoenborn St.,
North Hills, CA 91343. Munchkin es una marca
comercial de Munchkin, Inc.
Hecho en China.
-
 1
1
-
 2
2
-
 3
3
-
 4
4
-
 5
5
-
 6
6
-
 7
7
-
 8
8
-
 9
9
-
 10
10
-
 11
11
-
 12
12
-
 13
13
-
 14
14
-
 15
15
-
 16
16
-
 17
17


Munchkin Portable Hook-On Chair Manual de usuario
- Tipo
- Manual de usuario
- Este manual también es adecuado para
en otros idiomas
Artículos relacionados
Otros documentos
-
Chicco TravelSeat Hook-On Chair Manual de usuario
-
-
-
BABYTREND MUV HC57 E Series El manual del propietario
-
-
-
BABYTREND IC38780A El manual del propietario
-
 BABYTREND HC57B El manual del propietario
