
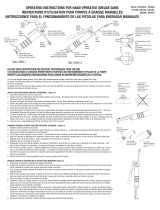
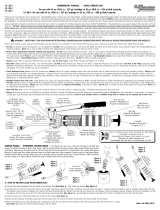
5.Screwtheheadbackontothe
barrel.
6.Unlocktherodhandlefrom
theendcap.Makesurethat
therodandrubberplunger
assemblyarestillconnected.
(Youshouldfeelsome
resistancewhenyoupushon
therodhandle.)
7.Toprimethegreasegun:
Applypressuretotherod
handleby
standingthe
greasegunon
aworkbench
andpulling
downonthe
barrelwhile
pumpingthe
leverhandleat
thesametime.
(seeFigure
5)Ifyourgun
hasanairventvalve,pressit;
ifnot,slightlyloosenthehead
asyoupulldownonthebarrel.
8.Whileapplyingpressure,rotate
handletodisconnectthe
rodfromtherubberplunger
assembly.Thenpressthe
quickreleaseandtherodwill
goallthewayintothebarrel.
9.Pumptheleverhandleseveral
timesuntilgreaseowsfrom
thecoupler.
10.Formoreinformationon
Lucasgreasegunsorto
viewavideoonloadingyour
Lucasgreasegungotowww.
pellindustrial.com.
Figure 5
Figura 5
SPECIAL NOTE: When
greasegunisbeingusedfor
thersttime,removeplunger
assemblyandapplyaheavy
layerofgreaseallaroundthe
outsideoftherubberplunger.
NOTES SPÉCIALES:Lorsque
vousutilisezunepompeà
graissepourlapremièrefois,
retirezIepistonetappliquez
unecoucheépaissedegraisse
autourdelapartieexlerieure
dupistondecaoutchouc.
NOTA ESPECIAL: Cuando
lapistolaengrasadorasea
utilizadaporprimeravez,
retireelconjuntodeémbolo
yapliqueunacapagruesa
degrasaentadoelperimetro
exlernodelémbolodegoma.
GREASEGUN
OPERATING
INSTRUCTIONS
Thisisageneralinstruction
sheet.Itcoversavarietyof
models.Theillustrationsshown
maynotmatchyourgunexactly.
FOLLOWTHESESTEPS
CAREFULLYBEFOREUSING
THISGUN
MODED’EMPLOIDUPISTOLET
GRAISSEUR
Cemoded’emploigénéral
couvreplusieursmodèles.Ilest
possiblequelesillustrationsne
correspondentpasexactement
aupistoletdontondispose.
AVANTD’UTILISERCE
PISTOLET,SUIVREATTENTIVE
MENTLES
INSTRUCTIONSSUIVANTES
INSTRUCCIONESDEUSODE
LAPISTOLAENGRASADORA
Estaesunahojadeinstrucciones
generalesquedescribeauna
variedaddemodelos.Las
ilustracionespuedenmostrarun
modeladepistoladiferenteal
suyo.
SIGAESTOSPASOS
CUIDADOSMENTEANTESDE
USARLAPISTOLA
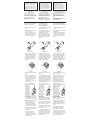
HOWTOLOADYOURGREASE
GUNWITHACARTRIDGE:
1.Unscrewtheheadfromthe
barrel.
2.Pullbacktherodhandleand
lockintoposition.
3.Removetheplasticcapfrom
theendofgreasecartridge,
andinsert,openendrst,into
thebarrel.(Seegure3)
Figure 5 Figura 5
Figure3
Plastic
Cap
Grease
Cartridge
Barrel
4.Pushthegreasecartridgeinto
thebarreluntiltherimofthe
pull-tabendcontactstherim
ofthebarrel(seegure4).
Thenremovethepull-tabseal
fromtheendofthegrease
cartridge.
Figure 5 Figura 5
Figure4
Barrel
5.RevisserlapartieavantsurIe
cylindre.
6.Déverrouillerlapoignéedela
tigepourlaséparerducapuchon
d’extrémité.S’assurerquelatige
esttoujoursreliéeaupistonen
caoutchouc.(Unerésistancedoit
sefairesentirquandonappuie
surlapoignéedelatige.)
7.Amorçagedupistolet
graisseur:Exercerunepression
surlapoignée
delatigeen
posantIepistolet
deboutsurun
établietentirant
Iecylindre,tout
enactionnant
Ielevier(voir
gure5).SiIe
pistoletestmun;
d’unevalve
dedecharge
d’air,appu-yer
dessus;dansIecascontraire,
desserrerlégèrementlapartie
avanttoutentirantIecylindre.
8.Déconnecterlatigedupiston
encaoutchouc.Pousseralorsla
tigeàfonddansIecylindre.
9.ActionnerIelevierplusieurs
foisjusqu’àcequedelagraisse
couleparIeraccord.
10.Pourplusd’informationssur
lespistoletsàgraisseLucasou
pourvisionnerunevidéosurle
chargementdevotrepistolet
àgraisseLucas,visitezwww.
pellindustrial.com.
Figure 5
Figura 5
CHARGEMENTD’UNE
CARTOUCHEDANSLE
PISTOLETGRAISSEUR:
1.Dévisserlapartieavantpourla
sépa-rerducylindre.
2.Tirerlapoignéeàfondet
bloquerenposilionverrouillée.
3.RetirerIecapuchonen
plastiquedel’extrémitédela
cartouchedegraisse.lnsérerla
cartouche,extremiteouverteen
premier,dansIecylindre(voir
gure3).
Figure 5 Figura 5
Figure3
Capuchon
en
plastique
Cylindre
4.Pousserlacartouchede
graissedansIecylindrejusqu’à
cequeIebarddeI’extrémitéà
jointàlanguettetoucheIebard
ducylindre(voirgure4).Retirer
alarsIejointàlanguettede
I’extrémitédelacartouche.
Figure 5 Figura 5
Figure4
Cylindre
5.Atornillelatapasuperiorensu
lugarenelcilindro.
6.Desenganchelamanijadela
varilladelatapadelextremo.
Asegúresequelavarillasiga
conectadaalconjuntodel
émbolodecaucho.(Sedebe
sentiralgoderesistenciaal
empujarlamanijadelavarilla.)
7.Paracebarlapistola
engrasadora:Apliquepresiónala
manijadelavarilla
apoyandolapistola
engrasadora
sabreunbancode
trabajoytirando
elcilindrohacia
abajomientrasse
bombealapalanca
(vealaFigura5).Si
lapistolatieneuna
válvuladepurga
deaire,oprímala;si
nolatiene,aojela
tapasuperiorlevementealtirarel
cilindrohaciaabajo.
8.Desconectelavarilladel
conjuntodelémbolodecaucho.
Despuésempujelavarillahasta
insertarlacompletamenteenel
cilindro.
9.Bombeelapalancadela
pistolavariasveceshaslaque
salgagrasaparelacoplador.
10.Paraobtenermásinformación
sobrelaspistolasdegrasaLucas
oparaverunvideosobrelacarga
desupistoladegrasaLucas
visitewww.pellindustrial.com.
Figure 5
Figura 5
COMOCARGARLAPISTOLA
CONUNCARTUCHODEGRASA:
1.Destornillelatapasuperiordel
cilindro.
2.Extraigalamanijayasegúrela
ensuposición.
3.Quitelatapadeplásticodel
extremadelcartuchodegrasae
insértelo,conelextremoabierta
primero,enelcilindro(veala
Figura3).
Figure 5 Figura 5
Figura3
Tapade
plastico
Cartucho
degrasa
Cilindro
4.Empujeelcartuchodegrasa
dentrodelcilindrohastaqueel
bordedesulerigüetaretirable
toqueelrebordedelcilindro
(vealaFigura4).Despuésquite
elselladelengüetaretirabledel
extremodecartuchodegrasa.
Figure 5 Figura 5
Figura4
Cilindro
Cartouche
degraisse

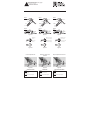
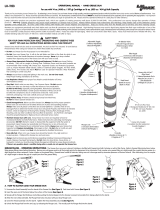
Figure 5 Figura 5
Style1
Style2
Handle
Head
Barrel
EndCap
RodHandle
Extension
PipeorHose
Coupler
Figure1
Figure2
Handle
Barrel
EndCap
RodHandle Head
Coupler
Extension
PipeorHose
LoaderFitting
or
FillerPlug
AirVentValve
or
FillerPlug
-or-
Figure 5 Figura 5
Style1
Style2
Levier
Partieavant
Cylindre
Capuchon
d’extrémité
Poignée
detige
Tuyauou
exible
d’extension
Raccord
Figure1
Figure2
Raccorddechargement
ou
Bouchonderemplissage
Valvededécharged’air
ou
Bouchonderemplissage
-ou-
Raccord
Tuyauou
exible
d’extension
Partieavant
Cylindre
Capuchon
d’extrémité
Poignée
detige
Figure 5 Figura 5
Estilo1
Estilo2
Palanca
Tapasuperior
Cilindro
Tapade
extremo
Manija
devarilla
Tuboo
manguerade
extensión
Acoplador
Figura1
Figura2
Adaptadordecarga
o
Tapóndelienado
Válvuladepurgadeaire
o
Tapóndelienado
-o-
Acoplador
Tuboo
manguerade
extensión
Tapasuperior
Cilindro
Palanca
Levier
Tapade
extremo
Manija
devarilla
Work safely with tools by wearing safety goggles.
Use lentes de seguridad para trabajar de
manera segura con las herramientas.
Travaillez en sécurité. Portez des lunettes de
sécurité lorsque vous utilisez des outils.
Problem:
Couplerwillnotsealordisengage
fromZerktting.
Solution:
•LoosencouplerasperFigure8.
TROUBLE SHOOTING
Loosen coupler before use Desserrer le coupleur avant
de l’utiliser
Aoje el acoplador antes de su uso
Problème:
Coupleurnesontpasétanchesouse
désengagerdeZerkraccord.
Solution:
1.Desserrercoupleurselonlagure8.
DÉPANNAGE
Problema:
AcopladordenosellaroretirarsedeZerk
ajuste.
Solución:
1.AojeacopladorsegúnlaFigura8.
LOCALIZACION DE AVERlAS
Figure8 Figure8 Figura8
Turncouplercounterclockwiseto
loosenbeforeuse.
Tournerlecoupleurdanslesens
antihorairepourdesserreravantutilisation.
Girealaizquierdaparaaojarel
acopladorantesdesuuso.
*DO NOT OVER LOOSEN *NE PAS TROP DESSERRER *NO MÁS NO AFLOJAR
Transcripción de documentos
SPECIAL NOTE: When grease gun is being used for the first time, remove plunger assembly and apply a heavy layer of grease all around the outside of the rubber plunger. NOTES SPÉCIALES: Lorsque vous utilisez une pompe à graisse pour la première fois, retirez Ie piston et appliquez une couche épaisse de graisse autour de la partie exlerieure du piston de caoutchouc. NOTA ESPECIAL: Cuando la pistola engrasadora sea utilizada por primera vez, retire el conjunto de émbolo y aplique una capa gruesa de grasa en tado el perimetro exlerno del émbolo de goma. GREASE GUN OPERATING INSTRUCTIONS MODE D’EMPLOI DU PISTOLET GRAISSEUR INSTRUCCIONES DE USO DE LA PISTOLA ENGRASADORA This is a general instruction sheet. It covers a variety of models. The illustrations shown may not match your gun exactly. Ce mode d’emploi général couvre plusieurs modèles. Il est possible que les illustrations ne correspondent pas exactement au pistolet dont on dispose. Esta es una hoja de instrucciones generales que describe a una variedad de modelos. Las ilustraciones pueden mostrar un modela de pistola diferente al suyo. FOLLOW THESE STEPS CAREFULLY BEFORE USING THIS GUN AVANT D’UTILISER CE PISTOLET, SUIVRE ATTENTIVE ME NT LES INSTRUCTIONS SUIVANTES HOW TO LOAD YOUR GREASE GUN WITH A CARTRIDGE: CHARGEMENT D’UNE CARTOUCHE DANS LE PISTOLET GRAISSEUR: COMO CARGAR LA PISTOLA CON UN CARTUCHO DE GRASA: 1. Unscrew the head from the barrel. 1. Dévisser la partie avant pour la sé pa-rer du cylindre. 1. Destornille la tapa superior del cilindro . 2. Pull back the rod handle and lock into position. 2. Tirer la poignée à fond et bloquer en posilion verrouillée. 2. Extraiga la manija y asegúrela en su posición. 3. Remove the plastic cap from the end of grease cartridge, and insert, open end first, into the barrel. (See figure 3) 3. Retirer Ie capuchon en plastique de l’extrémité de la cartouche de graisse. lnsérer la cartouche, extremite ouverte en premier, dans Ie cylindre (voir figure 3). 3. Quite la tapa de plástico del extrema del cartucho de grasa e insértelo, con el extremo abierta primero, en el cilindro (vea la Figura 3). Plastic Cap SIGA ESTOS PASOS CUIDADOSMENTE ANTES DE USAR LA PISTOLA Capuchon en plastique Tapa de plastico Grease Cartridge Barrel Cartouche de graisse Cartucho de grasa Cylindre Cilindro Figure 3 Figure 3 4. Push the grease cartridge into the barrel until the rim of the pull-tab end contacts the rim of the barrel (see figure 4). Then remove the pull-tab seal from the end of the grease cartridge. 4. Pousser la cartouche de graisse dans Ie cylindre jusqu’à ce que Ie bard de I’extrémité à joint à languette touche Ie bard du cylindre (voir figure 4). Retirer alars Ie joint à languette de I’extrémité de la cartouche. Barrel Figure 4 Figura 3 4. Empuje el cartucho de grasa dentro del cilindro hasta que el borde de su lerigüeta retirable toque el reborde del cilindro (vea la Figura 4). Después quite el sella de lengüeta retirable del extremo de cartucho de grasa. Cylindre Cilindro Figure 4 Figura 4 5. Screw the head back onto the barrel. 5. Revisser la partie avant sur Ie cylindre . 5. Atornille la tapa superior en su lugar en el cilindro. 6. Unlock the rod handle from the end cap. Make sure that the rod and rubber plunger assembly are still connected. (You should feel some resistance when you push on the rod handle.) 6. Déverrouiller la poignée de la tige pour la séparer du capuchon d’extrémité. S’assurer que la tige est toujours reliée au piston en caoutchouc. (Une résistance doit se faire sentir quand on appuie sur la poignée de la tige.) 6. Desenganche la manija de la varilla de la tapa del extremo. Asegúrese que la varilla siga conectada al conjunto del émbolo de caucho. (Se debe sentir algo de resistencia al empujar la manija de la varilla.) 7. To prime the grease gun: Apply pressure Figureto5the rod handle by standing the Figure 5 grease gun on a workbench and pulling down on the barrel while pumping the lever handle at the same time. (see Figure Figure 5 5) If your gun has an air vent valve, press it; if not, slightly loosen the head as you pull down on the barrel. 7. Amorçage du pistolet graisseur: FiguraFigure 5Exercer une 5 pression sur la poignée de la tige en FiguraFigure 5 5 posant Ie pistolet deb out sur un établi et en tirant Ie cylindre, tout en actionnant Ie levier (voir figure 5). Si Ie pistolet est mun; d’une valve Figura 5 Figure 5 de decharge d’air, appu-yer dessus; dans Ie cas contraire, desserrer légèrement la partie avant tout en tirant Ie cylindre. 8. While applying pressure, rotate handle to disconnect the rod from the rubber plunger assembly. Then press the quick release and the rod will go all the way into the barrel. 9. Pump the lever handle several times until grease flows from the coupler. 10.For more information on Lucas grease guns or to view a video on loading your Lucas grease gun go to www. pellindustrial.com. 8. Déconnecter la tige du piston en caoutchouc. Pousser alors la tige à fond dans Ie cylindre. 9. Actionner Ie levier plusieurs fois jusqu’à ce que de la graisse coule par Ie raccord. 10. Pour plus d’informations sur les pistolets à graisse Lucas ou pour visionner une vidéo sur le chargement de votre pistolet à graisse Lucas, visitez www. pellindustrial.com. 7. Para cebar la pistola engrasadora: FiguraFigure 5 Aplique 5 presión a la manija de la varilla apoyando la pistola FiguraFigure 5 5 engrasadora sabre un banco de trabajo y tirando el cilindro hacia abajo mientras se bombea la palanca (vea la Figura 5). Si la pistola tiene una válvula de purga Figura 5si Figura 5 Figure de 5 aire, oprímala; no la tiene, afloje la tapa superior levemente al tirar el cilindro hacia abajo. 8. Desconecte la varilla del conjunto del émbolo de caucho. Después empuje la varilla hasta insertarla completamente en el cilindro. 9. Bombee la palanca de la pistola varias veces hasla que salga grasa par el acoplador. 10. Para obtener más información sobre las pistolas de grasa Lucas o para ver un video sobre la carga de su pistola de grasa Lucas visite www.pellindustrial.com. Figura 5 Figura 5 Work safely with tools by wearing safety goggles. Use lentes de seguridad para trabajar de manera segura con las herramientas. Travaillez en sécurité. Portez des lunettes de sécurité lorsque vous utilisez des outils. Style 1 Style 1 Head Handle Barrel Cylindre Extension Pipe or Hose End Cap Coupler Rod Handle Style 2 Estilo 1 Partie avant Levier Tuyau ou flexible d’extension Capuchon d’extrémité Raccord Style 2 Handle Capuchon d’extrémité Barrel Head Coupler Figure 1 Poignée de tige Estilo 2 Levier Tuyau ou flexible d’extension Cylindre Air Vent Valve or Filler Plug Partie avant Palanca Tapa de extremo Manija de varilla Raccord Figure 1 Loader Fitting or Filler Plug -or- Tubo o manguera de extensión Acoplador Manija de varilla Extension Pipe or Hose Rod Handle Cilindro Tapa de extremo Poignée de tige End Cap Tapa superior Palanca Tubo o manguera de extensión Cilindro Raccord de chargement ou Bouchon de remplissage Adaptador de carga o Tapón de lienado Valve de décharge d’air ou Bouchon de remplissage -ou- Tapa superior Acoplador Figura 1 Válvula de purga de aire o Tapón de lienado -o- Figure 5 Figura 5 Figure 5 Figure 2 Figure 2 Figura 2 Loosen coupler before use Desserrer le coupleur avant de l’utiliser Afloje el acoplador antes de su uso Turn coupler counterclockwise to loosen before use. Tourner le coupleur dans le sens antihoraire pour desserrer avant utilisation. Gire a la izquierda para aflojar el acoplador antes de su uso. *DO NOT OVER LOOSEN *NE PAS TROP DESSERRER *NO MÁS NO AFLOJAR Figure 8 TROUBLE SHOOTING Figure 8 DÉPANNAGE Figura 8 LOCALIZACION DE AVERlAS Problem: Coupler will not seal or disengage from Zerk fitting. Problème: Coupleur ne sont pas étanches ou se désengager de Zerk raccord. Problema: Acoplador de no sellar o retirarse de Zerk ajuste. Solution: • Loosen coupler as per Figure 8. Solution: 1. Desserrer coupleur selon la figure 8. Solución: 1. Afloje acoplador según la Figura 8. Figura 5 Figure 5 Figura 5-
 1
1
-
 2
2


en otros idiomas
- français: Lucas Oil LSS314 Manuel utilisateur
- English: Lucas Oil LSS314 User manual
Artículos relacionados
Otros documentos
-
Ega Master 57099 El manual del propietario
-
 Powerbuilt 648755 Guía del usuario
-
 Workforce L1355FZ Manual de usuario
-
Lumax LX-1161 Manual de usuario
-
 Lumax LX-1142 Manual de usuario
-
DeWalt DCGG571M1 Manual de usuario
-
DeWalt DCGG570K Manual de usuario
-
 Lumax LX-1153 Manual de usuario
-
Lumax LX-1120 Manual de usuario


