Roadstar HIF-1580BT Manual de usuario
- Categoría
- Radios de CD
- Tipo
- Manual de usuario

www.roadstar.com
HIF-1580BT
User manual
Bedienungsanleitung
Manuel d’instructions
Manuale d’istruzioni
Manual de instrucciones
Gebruiksaanwijzing

INDEX
English Page 1
Deutsch Seite 5
Français Page 9
Italiano Pagina 13
Español Página 17
Nederlands Pagina 21
Your new unit was manufactured and
assembled under strict ROADSTAR quality
control. Thank-you for purchasing our
product for your music enjoyment. Before
operating the unit, please read this
instruction manual carefully. Keep it also
handy for further future references.
Votre nouvel appareil a été fabriqué et monté
en étant soumis aux nombreaux tests
ROADSTAR. Nous espérons que cet
appareil vous donnera entière satisfaction.
Avant de vous adonner à ces activités,
veuillez lire attentivement ce manuel
d’instructions. Conservez-le à portée de main
à fin de référence ultérieure.
Vuestro nuevo sistema ha sido construido
según las normas estrictas de control de
calidad ROADSTAR. Le felicitamos y le
damos las gracias por su elección de este
aparado. Por favor leer el manual antes de
poner en funcionamiento el equipo y guardar
esta documentación en case de que se
necesite nuevamente.
Ihr neues Gerät wurde unter Beachtung der
strengen ROADSTAR Qualitätsvorschriften
gefertigt. Wir danken Ihnen für den Kauf
unseres Produktes und wünschen Ihnen
optimalen Hörgenuss. Bitte lesen Sie diese
Bedienungsanleitung durch, und heben Sie sie
auf, um jederzeit darin nachschlagen zu
können.
Il vostro nuovo apparecchio é stato prodotto ed
assemblato sotto lo stretto controllo di qualità
ROADSTAR. Vi ringraziamo di aver acquistato
un nostro prodotto per il vostro piacere
d’ascolto. Prima di procedere all'utilizzo
dell'apparecchio, leggete attentamente il
manuale d’istruzioni e tenetelo sempre a
portata di mano per futuri riferimenti.
Seu novo aparelho foi construido e montado
sob o estrito controle de qualidade da
ROADSTAR. Agradecemos por ter comprado
nosso produto para a sua diversão. Antes de
usar esta unidade é necessário ler com atençâo
este manual de instruções pare que possa ser
usada apropriadamente; mantenha o manual
ao seu alcance para outras informações.


HIF-1580BT
1
2
3
4
5
6
7
13 15 14 16
10
11 12
8
9

17
19
18
20
21
22
23 24

1 English
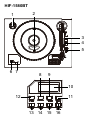
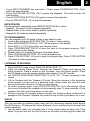
LOCATION OF CONTROLS
1. SPINDLE ADAPTOR
2. CD DOOR OPEN/CLOSE BUTTON
3. 33/45/78 RPM SPEED SELECTOR
4. AUTOSTOP SWITCH
5. ON/OFF SWITCH
6. USB SOCKET
7. SD SOCKET
8. PROGRAM BUTTON
9. REPEAT BUTTON
10. LCD DISPLAY
11. RECORD BUTTON
12. FOLDER BUTTON
13. SKIP- BUTTON
14. SKIP+ BUTTON
15. STOP BUTTON
16. PLAY/PAUSE BUTTON
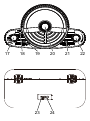
17. FUNCTION SELECTOR
18. FM/MW SELECTOR
19. AUXILIARY INPUT
20. TUNING KNOB
21. HEADPHONE OUTPUT
22. VOLUME KNOB
23. AC POWER SOCKET
24. LINE OUT SOCKET
POWER SUPPLY
Connect the unit to the power supply. Switch ON/OFF SWITCH (5) to ON position to
turn the unit ON. Switch ON/OFF SWITCH (5) to OFF position to switch the unit OFF.
When no sound is produced, the unit will switch OFF automatically after 15 minutes.
To resume playback, switch the unit OFF and then switch it ON again.
FM/MW RADIO OPERATIONS
1. Select TUNER mode using FUNCTION SELECTOR (17).
2. Select between FM/MW using FM/MW SELECTOR (18).
3. Turn TUNING KNOB (20) to select your favourite radio station.
4. Turn the VOLUME KNOB (22) to the desired volume level.
PLAYING COMPACT DISC
1. Select CD mode using FUNCTION SELECTOR (17).
2. Press CD DOOR OPEN/CLOSE BUTTON (2) to open the cd door. Place a cd with
the printed side facing up inside the tray, then close the cd door. The total number
of tracks will be shown on the display. The first track will start playback.
Press SKIP -/+ (13)/(14) to select your favorite tunes.
If you hold SKIP -/+ (13)/(14), the playing track will go fast backward or forward until
you release the button.

2 English
If your MP3 CD/USB/SD has more than 1 folder, press FOLDER BUTTON (12) to
select the desired folder.
Press PLAY/PAUSE BUTTON (16) to pause the playback. The track number will
start blinking.
Press PLAY/PAUSE BUTTON (16) again to resume the playback.
Press STOP BUTTON (15) to stop the playback.
REPEAT MODE
During playback, repeatedly press REPEAT BUTTON (9) to select:
Repeat1: The current track is played repeatedly.
RepeatFolder: The current folder is played repeatedly.
RepeatAll: All tracks are played repeatedly.
CD PROGRAMMING
You can program up to 20 tracks to play in any desired order.
1. Insert a disc and press STOP BUTTON (15) when it starts playing.
2. Press PROGRAM BUTTON (8). “P01” will be shown on the display.
3. Press SKIP -/+ (13)/(14) to select your favorite tunes.
4. Press PROGRAM BUTTON (8) to store the track in the program memory. “P02”
will be shown on the display.
5. Repeat steps 3-4 to select and store all desired tracks.
6. Press PLAY/PAUSE BUTTON (16) to start program play.
7. Press STOP BUTTON (15) once to stop the program play. Press STOP BUTTON
(15) twice to clear programme.
LISTENING TO RECORDS
1. Select AUX/PH mode using FUNCTION SELECTOR (17).
2. Open the Record Player Cover. Release the Tonearm Clamp, and remove the
stylus protector. Place a record on the turntable, over the central spindle. Place
the EP adapter over the central spindle when playing 17cm EP records.
3. Set 33/45/78 RPM SPEED SELECTOR (3) to 33 / 45 / 78 rpm according to the
record.
4. Lift the Tonearm with the Tonearm Lift Lever. Move the tonearm to the beginning
of the record, or to the start of a particular track. Gently lower the tone arm onto
the record with the Tonearm Lift lever to start playing.
5. To select autostop mode, move AUTOSTOP SWITCH (4) to ON position. When
the record is finished the tonearm will automatically stop. To stop manually, lift the
tonearm from the record and return it to the rest.
6. Moving or jarring the turntable without securing the Tonearm clamp could result in
damage to the Tonearm. Replace the protective cap on the stylus when not in use.
AUX-IN
This unit provides an auxiliary audio input jack for connecting external audio device
like MP3 players, CD players and allow playback of your external source through the
system speakers.
1. Use an audio cable (not included) with 3.5 mm stereo plugs on each end of the
cable. Plug one end into the AUX-IN jack on the main unit and plug the other end

3 English
of the cable into the LINE OUT or HEADPHONE Jack of your external audio
device. Turn ON the unit and your external audio device.
2. Select AUX/PH mode using FUNCTION SELECTOR (17).
3. Start to play the external device (see the user manual of the external device).
4. Turn the VOLUME KNOB (22) to the desired volume level.
BLUETOOTH OPERATION
1. Select BT mode using FUNCTION SELECTOR (17). An intermittent sound will
start playing while Bluetooth is searching a source.
2. Select from your portable device (Smartphone, Tablet...) the ID Bluetooth tagged
as HIF-1580BT, then confirm connection. You will hear a sound when the pairing
is successful.
3. Now you can transfer the music to the HIF-1580BT and all operations can only be
operated from your mobile device.
PLAYBACK FROM USB/SD
1. Insert the USB/SD device's plug into the USB/SD socket.
2. Select USB/SD mode using FUNCTION SELECTOR (17). The unit will start
reading the device automatically after the connection.
3. If both USB and SD devices are inserted, you need to press and hold PLAY/
PAUSE BUTTON (16) to select between them.
4. Use the same procedure as CD to listen to your USB/SD device.
DELETE USB/SD
1. During playback, press and hold RECORD BUTTON (11). “ONE” will be shown on
the display.
2. Press SKIP -/+ (13)/(14) repeatedly to select between ONE/FOL/ALL.
3. Press RECORD BUTTON (11) again to confirm.
RECORDING FUNCTION
1. While listening to RECORDS/AUX-IN/BLUETOOTH, press RECORD BUTTON
(11). If both USB and SD devices are inserted, you need to press SKIP -/+ (13)/
(14) to select between them.
2. Press RECORD BUTTON (11) once more to start recording. Encoding is
performing now. Note that the encoding speed is 1:1.
3. Press STOP BUTTON (15) to stop recording. The unit will create a folder in the
USB/SD device, that contain all recorded tracks.
CD
1. While listening to CD, press RECORD BUTTON (11).
2. Press SKIP -/+ (13)/(14) repeatedly to select between ONE/FOL/ALL.
3. Press RECORD BUTTON (11) once more to start recording.

4 English
USB/SD
1. Insert both the USB and SD devices in their socket and start playing the one you
want to encode.
2. Press RECORD BUTTON (11). “ONE” will be shown on the display.
3. Press SKIP -/+ (13)/(14) repeatedly to select between ONE/FOL/ALL.
4. Press RECORD BUTTON (11) once more to start recording.
EARPHONE
Headphones should have a 3.5 mm diameter stereo plug and an impedance of 8-32
ohms, and should be connected to HEADPHONE OUTPUT (21). When headphones
are connected, the speaker is automatically disconnected.
LINE-OUT
You can connect the unit to an external audio device (speakers or amplifier) through
LINE OUT SOCKET (24) using an RCA audio cable (not included).
SPECIFICATIONS
DC: 12V
FM: 87.5 - 108 MHz
MW: 530 - 1620 kHz
Specifications and the design are subject to possible modifications without notice due
to improvement.
This marking shown on the product or its literature, indicates that it should not be disposed with
other household wastes at the end of its working life. To prevent possible harm to the environment
or human health from uncontrolled waste disposal, please separate this from other types of
wastes and recycle it responsibly to promote the sustainable reuse of material resources.
Household users should contact the retailer where they purchased this product, or their local
government office, for details of where and how they can take this item for environmentally safe
recycling. Business users should contact their supplier and check the terms and conditions of the
purchase contract. This product should not be mixed with other commercial wastes for disposal.
CORRECT DISPOSAL OF THIS PRODUCT
(Waste Electrical & Electronic Equipment)
WARNINGS
Ensure all connections are properly made before operating the unit.
This unit must not be exposed to moisture or rain.
This unit should be positioned so that it is properly ventilated. Avoid placing it,
for example, close to curtains, on the carpet or in a built-in installation such as
a bookcase.
Do not expose this unit to direct sunlight or heat radiating sources.

5 Deutsch
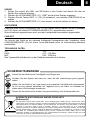
LAGE DER BEDIENELEMENTE
1. ACHSADAPTER
2. TASTE ZUM ÖFFNEN/SCHLIESSEN DES CD-FACHS
3. 33/45/78 RPM DREHZAHLWÄHLER
4. AUTOSTOP-SCHALTER
5. AN/AUS-TASTE
6. USB-EINGANG
7. SD-BUCHSE
8. PROGRAMM-TASTE
9. WIEDERHOLEN-TASTE
10. LCD-DISPLAY
11. AUFNAHMETASTE
12. MAPPE-TASTE
13. SKIP- TASTE
14. SKIP+ TASTE
15. STOP-TASTE
16. PLAY/PAUSE-TASTE
17. FUNKTIONSAUSWAHL-SCHALTER
18. FM/MW-WÄHLSCHALTER
19. ZUSATZEINGANG
20. TUNING-KNOP
21. KOPFHÖRERAUSGANG
22. LAUTSTÄRKEREGLER
23. AC-STECKDOSE
24. AUSGANGSBUCHSE
ENERGIEVERSORGUNG
Schließen Sie das Gerät an die Stromversorgung. Schalter AN/AUS-TASTE (5) auf ON um
das Gerät einzuschalten. Schalter AN/AUS-TASTE (5) auf OFF das Gerät auszuschalten.
Wenn kein Ton zu hören ist, schaltet sich das Gerät automatisch nach 15 Minuten AUS. Um
die Wiedergabe fortzusetzen, schalten Sie das Gerät aus und dann wieder einschalten.
MW/UKW RADIO-BETRIEB
1. Wählen TUNER-Modus durch die FUNKTIONSAUSWAHL-SCHALTER (17) verwenden.
2. Mit FM/MW-WÄHLSCHALTER (18) können Sie zwischen FM/MWA wählen..
3. Drehen Sie am TUNING-KNOP (20), um Ihren gewünschten Radiosender auszuwählen.
4. Drehen Sie LAUTSTÄRKEREGLER (22) die Lautstärke einzustellen.
ABSPIELEN VON CDS
1. Wählen CD-Modus durch die FUNKTIONSAUSWAHL-SCHALTER (17) verwenden.
2. Drücken TASTE ZUM ÖFFNEN/SCHLIESSEN DES CD-FACHS (2), um das CD-Fach
zu öffnen. Legen Sie eine CD mit der bedruckten Seite nach oben in das Fach und
schließen Sie es dann. Die Gesamtanzahl der Titel wird auf dem Display angezeigt. Die
Wiedergabe des ersten Titels beginnt.
Drücken Sie SKIP -/+ (13)/(14), um Ihre Lieblingstitel auszuwählen.
Wenn Sie SKIP -/+ (13)/(14) halten, wird der momentan abgespielte Titel schnell vorwärts
oder rückwärts laufen, bis Sie die Taste loslassen.
Wenn Ihr MP3-CD / USB/SD mehr als einem Ordner hat, drücken MAPPE-TASTE (12)
den gewünschten Ordner auszuwählen.
Drücken PLAY/PAUSE-TASTE (16) um die Wiedergabe zu pausieren. Die Titelnummer

6 Deutsch
beginnt zu blinken.
Drücken die PLAY/PAUSE-TASTE (16) Wiedergabe fortzusetzen wieder.
Drücken Sie STOP-TASTE (15), um die Wiedergabe zu stoppen.
WIEDERHOLEN MODUS
Während der Wiedergabe drücken Sie die WIEDERHOLEN-TASTE (9) wiederholt die
folgenden Einstellungen:
Repeat1: Der aktuelle Titel wird wiederholt abgespielt.
RepeatFolder: Der aktuelle Ordner wird wiederholt abgespielt.
RepeatAll: Alle Titel werden wiederholt.
CD-DISC PROGRAMMIEREN
Sie können bis zu 20 Titel einprogrammieren, um sie in jeder gewünschten Reihenfolge
abzuspielen.
1. Legen Sie eine Disc ein und drücken Sie STOP-TASTE (15), wenn sie zu spielen
beginnt.
2. Drücken Sie PROGRAMM-TASTE (8). "P01" wird auf dem Display angezeigt.
3. Drücken Sie SKIP -/+ (13)/(14), um Ihre Lieblingstitel auszuwählen.
4. Drücken Sie PROGRAMM-TASTE (8), um den Titel im Programmspeicher zu speichern.
"P02" wird auf dem Display angezeigt.
5. Wiederholen Sie die Schritte 3-4, um alle gewünschten Titel auszuwählen und sie zu
speichern.
6. Drücken Sie PLAY/PAUSE-TASTE (16) die geprogrammeerdeafspelente zu starten.
7. Drücken Sie STOP-TASTE (15) einmal, um die Programmwiedergabe zu stoppen.
Drücken Sie STOP-TASTE (15) zweimal, um das Programm zu löschen.
SCHALLPLATTEN ANHÖREN
1. Wählen AUX/PH-Modus durch die FUNKTIONSAUSWAHL-SCHALTER (17)
verwenden.
2. Öffnen Sie den Deckel des Plattenspielers. Lösen Sie die Sperre des Tonarms und
entfernen Sie die Schutzkappe von der Nadel. Legen Sie eine Platte auf den
Plattenteller über die Spindel in der Mitte. Platzieren Sie den EP-Adapter über die
Spindel, wenn Sie EPs mit 17 cm Durchmesser abspielen.
3. Stellen Sie den 33/45/78 RPM DREHZAHLWÄHLER (3) je nach Art der Platte auf
33/78/45 rpm ein.
4. Heben Sie den Tonarm mit dem Heber für dem Tonarm an. Bewegen Sie den Tonarm
zum Anfang der Platte oder zum Anfang eines bestimmten Titels. Senken Sie den
Tonarm mit Hilfe des Tonarm-Hebers langsam auf die Platte, um mit der Wiedergabe zu
beginnen.
5. So wählen Sie Auto-Stop-Modus, um AUTOSTOP-SCHALTER (4)-Bewegung in die
Position ON. Wenn die Platte das Ende erreicht haben, wird der Datensatz automatisch
gestoppt. Um das Abspielen manuell zu stoppen, heben Sie den Tonarm von der Platte
und legen Sie ihn wieder in seine Halterung.
6. Wenn Sie den Plattenteller verschieben oder erschüttern den Plattenspieler, ohne daß
der Tonarm gesichert ist, kann das Schäden am Tonarm zur Folge haben. Setzen Sie
die Schutzkappe auf die Nadel, wenn Sie den Plattenspieler nicht benützen.
AUX-IN
Dieses Gerät bietet einen zusätzlichen Audioeingang zum Anschluss externer Audiogeräte
wie MP3-Player, CD-Player und ermöglicht die Wiedergabe aus Ihrer externen Quelle über
die Lautsprecher der Anlage.

7 Deutsch
1. Verwenden Sie ein Audiokabel (nicht im Lieferumfang enthalten) mit 3,5 mm Stereo-
Steckern an beiden Enden des Kabels. Stecken Sie ein Ende in die AUX IN-Buchse am
Hauptgerät und das andere Ende des Kabels in den Ausgang oder die Kopfhörerbuchse
Ihres externen Audiogeräts. Schalten Sie das Gerät und Ihr externes Audiogerät EIN.
2. Wählen AUX/PH-Modus durch die FUNKTIONSAUSWAHL-SCHALTER (17)
verwenden.
3. Beginnen Sie, das externe Gerät abzuspielen (siehe Benutzerhandbuch des externen
Gerätes).
4. Drehen Sie LAUTSTÄRKEREGLER (22) die Lautstärke einzustellen.
BLUETOOTH-BETRIEB
1. Wählen BT-Modus durch die FUNKTIONSAUSWAHL-SCHALTER (17) verwenden. Ein
intermittierender Ton wird abgespielt, während Bluetooth eine Quelle sucht.
2. Wählen Sie eines Ihrer tragbaren Geräte aus (Smartphone, Tablet ...), markieren die
Bluetooth-ID, die als HIF-1580BT bezeichnet ist und bestätigen die Verbindung.
3. Sie hören einen Ton, wenn die Paarung erfolgreich war. Jetzt können Sie die Musik in
die HIF-1580BT übertragen und alles nur noch von Ihrem mobilen Gerät aus
durchführen.
WIEDERGABE AUS EINEM USB/SD-GERÄT
1. Stecken Sie das USB/SD-Gerät an den USB/SD-Anschluss.
2. Wählen USB/SD-Modus durch die FUNKTIONSAUSWAHL-SCHALTER (17)
verwenden. Das Gerät beginnt automatisch, das USB/SD-Gerät auszulesen, nachdem
es verbunden ist.
3. Wenn beide USB- und SD-Geräte eingesetzt werden, müssen Sie PLAY/PAUSE-TASTE
(16) drücken und halten, um zwischen ihnen zu wählen.
4. Verwenden Sie die gleiche Vorgehensweise wie bei CDS, um Musik aus Ihrem USB/SD-
Gerät zu hören.
LÖSCHEN
1. Während der Wiedergabe, drücken und halten Sie die AUFNAHMETASTE (11).
2. "ONE" wird auf dem Display angezeigt.
3. Drücken Sie die Tasten SKIP -/+ (13)/(14) wiederholt, um zwischen ONE/FOL/ALLA zu
wählen.
4. Drücken Sie die AUFNAHMETASTE (11) erneut, um zu bestätigen.
CODIERUNG
1. Während Sie eine RECORDS/AUX-IN/BLUETOOTH anhören, drücken Sie
AUFNAHMETASTE (11). Wenn beide USB und SD-Geräten eingesetzt werden, müssen
Sie SKIP -/+ (13)/(14) zu drücken, um zwischen ihnen zu wählen.
2. Drücken Sie AUFNAHMETASTE (11) noch einmal, um die Aufnahme zu starten. Die
Verschlüsselung ist nun im Gange. Man beachte, dass die Codierungsrate ist 1: 1.
3. Drücken Sie STOP-TASTE (15), um die Aufnahme zu stoppen. Das Gerät wird mit einer
AA-Ordner auf dem USB/SD-Gerät erstellen, die alle aufgezeichneten Spuren enthält.
CD
1. Während Sie eine CD anhören, drücken Sie AUFNAHMETASTE (11).
2. Drücken Sie die Tasten SKIP -/+ (13)/(14) wiederholt, um zwischen ONE/FOL/ALLA zu
wählen.
3. Drücken Sie AUFNAHMETASTE (11) noch einmal, um die Aufnahme zu starten.

8 Deutsch
USB/SD
1. Setzen Sie sowohl die USB- und SD-Geräte in ihre Sockel und starten Sie das ein
Spielen Sie kodieren möchten.
2. Drücken Sie AUFNAHMETASTE (11). "ONE" wird auf dem Display angezeigt.
3. Drücken Sie die Tasten SKIP -/+ (13)/(14) wiederholt, um zwischen ONE/FOL/ALLA zu
wählen.
4. Drücken Sie AUFNAHMETASTE (11) noch einmal, um die Aufnahme zu starten.
KOPFHÖRER
Kopfhörer sollte einen Durchmesser von 3,5 mm Stereo-Stecker haben und eine Impedanz
von 8-32 Ohm und sollte KOPFHÖRERAUSGANG (21) angeschlossen werden.
Wenn Kopfhörer angeschlossen sind, wird der Lautsprecher automatisch abgeschaltet.
LINE-OUT
Sie können das Gerät an ein externes Audiogerät (Lautsprecher oder Verstärker) durch
AUSGANGSBUCHSE (24) mit einem Cinch-Audiokabel (nicht im Lieferumfang enthalten)
anschließen.
TECHNISCHE DATEN
DC: 12V
UKW: 87.5 - 108 MHz
MW: 530 - 1620 kHz
Das Typenschild befindet sich an der Gehäuseunterseite des Gerätes.
Die Kennzeichnung auf dem Produkt bzw. auf der dazugehörigen Literatur gibt an, dass es nach seiner
Lebensdauer nicht zusammen mit dem normalen HaushaltsmüIl entsorgt werden darf. Entsorgen Sie dieses
Gerat bitte getrennt von anderen Abfallen, um der Umwelt bzw. der menschl i chen Gesundhei t ni cht durch
unkontrol l i erte Mül l besei ti gung zu schaden. Recycel n Si e das Gerät, um di e nachhaltige
Wiederverwertung von stofflichen Ressourcen zu fördern. Private Nutzer sollten den Händler, bei dem das
Produkt gekauft wurde, oder die zuständigen Behörden kontaktieren, um in Erfahrung zu bringen, wie sie
das Gerät auf umweltfreundliche Weise recyceln können. Gewerbliche Nutzer sollten sich an Ihren
Lieferanten wenden und die Bedingungen des Verkaufsvertrags konsultieren. Dieses Produkt darf nicht
zusammen mit anderem Gewerbemüll entsorgt werden.
KORREKTE ENTSORGUNG DIESES PRODUKTS
(Elektromüll)
SICHERHEITSHINWEISE
Setzen Sie das Gerät weder Feuchtigkeit noch Regen aus.
Schalten Sie das System erst dann ein, wenn Sie alle Verbindungen genau geprüft
haben.
Stellen Sie das Gerät so auf, dass immer eine ungestörte Frischluftzufuhr sichergestellt
ist. Es ist zum beispiel keinesfalls auf Teppiche und in der Nähe von Gardinen zu
stellen oder in Bücherregale einzubauen.
Setzen Sie das Gerät weder direkter Sonneneinstrahlung noch Wärmequellen aus.

9 Français
CONTRÔLE DE POSITION
1. ADAPTER DISC
2. OPEN/CLOSE CD
3. SPEED SELECTOR 33/45/78 RPM
4. AUTOSTOP INTERRUPTEUR
5. INTERRUPTEUR ON/OFF
6. ENTRÉE USB
7. ENTRÉE SD
8. BOUTON PROGRAMME
9. BOUTON REPEAT
10. ECRAN LCD
11. ENREGISTREMENT
12. BOUTON DOSSIER
13. BOUTON SKIP-
14. BOUTON SKIP+
15. TOUCHE STOP
16. TOUCHE PLAY / PAUSE
17. FONCTION DIAL
18. COMMUTATEUR FM / MW
19. AUX-IN
20. FRÉQUENCE REGULATEUR
21. PRISE CASQUE
22. VOLUME KNOB
23. CABLE D'ENTRÉE PUISSANCE
24. SORTIE AUDIO
PUISSANCE
Branchez l'appareil au pouvoir. Placez INTERRUPTEUR ON/OFF (5) en position ON
pour allumer l'appareil. Placez INTERRUPTEUR ON/OFF (5) dans la position OFF
pour éteindre l'appareil.
Si aucun son pendant 15 minutes, l'appareil se met automatiquement hors tension.
Pour reprendre la lecture, le cycle d'alimentation de l'unité.
FONCTION RADIO AM / FM
1. Sélectionnez le mode TUNER utilisant FONCTION DIAL (17).
2. Sélectionnez entre FM / MW utilisant COMMUTATEUR FM/MW (18).
3. Tournez FRÉQUENCE REGULATEUR (20) pour sélectionner la station de radio
souhaitée.
4. Tourner VOLUME KNOB (22) au volume désiré.
LECTURE CD
1. Sélectionnez le mode de CD en utilisant FONCTION DIAL (17).
2. Appuyez sur OPEN/CLOSE CD (2) pour ouvrir le compartiment CD. Placez un CD
avec la face imprimée vers le haut dans le compartiment, puis fermez-le. Le
nombre total de pistes est affiché. La première piste est lue automatiquement.
Appuyez sur SKIP -/+ (13)/(14) pour sélectionner les pistes souhaitées.
Si vous maintenez SKIP -/+ (13)/(14), la piste en cours de lecture circule rapidement

10 Français
dans la direction choisie jusqu'à ce que le bouton est relâché.
Si le MP3 / USB CD / SD a plus d'un dossier, appuyez sur BOUTON DOSSIER (12)
pour sélectionner le dossier souhaité.
Appuyez sur TOUCHE PLAY/PAUSE (16) pour interrompre la lecture. Le numéro de
piste clignote.
Appuyez TOUCHE PLAY/PAUSE (16) à nouveau pour continuer à jouer
Appuyez sur TOUCHE STOP (15) pour arrêter la lecture.
MODE REPEAT
Pendant la lecture, appuyez plusieurs fois sur BOUTON REPEAT (9) pour
sélectionner:
Repeat1: La piste en cours est lu en boucle.
RepeatFolder: Le dossier en cours de lecture en continu.
RepeatAll: Toutes les pistes seront lues en continu.
PROGRAMMATION CD
Vous pouvez programmer jusqu'à 20 pistes à jouer dans un ordre quelconque.
1. Insérez un CD et appuyez sur TOUCHE STOP (15) quand il commence à jouer.
2. Appuyez sur BOUTON PROGRAMME (8). L'écran affiche "P01".
3. Appuyez sur SKIP -/+ (13)/(14) pour sélectionner les pistes souhaitées.
4. Appuyez sur BOUTON PROGRAMME (8) pour accéder à la piste dans la ligne de
programmation. L'écran affiche "P02".
5. Répétez les étapes 3-4 pour sélectionner et programmer toutes les pistes que vous
voulez.
6. Appuyez sur TOUCHE PLAY/PAUSE (16) pour lancer la lecture du programme.
7. Appuyez TOUCHE STOP (15) une fois pour arrêter la lecture du programme.
Appuyez sur TOUCHE STOP (15) à nouveau pour annuler le programme en cours.
FONCTION RECORD
1. Sélectionnez le mode AUX / PH en utilisant FONCTION DIAL (17).
2. Ouvrez le couvercle de la platine. Retirez la clé de bras et le protecteur de stylet.
Placez un disque sur la platine. Placez l'adaptateur dans le cas d'utilisation d'un
disque de 17cm.
3. Réglez SPEED SELECTOR 33/45/78 RPM (3) sur 33/45/78 rpm en fonction du
disque à jouer.
4. Levez le bras à l'aide du levier. Déplacer le début du bras de disque, ou le début
d'une piste particulière. Abaissez lentement l'aiguille sur le disque en utilisant le
levier.
5. Pour sélectionner la fonction auto-stop, déplacer AUTOSTOP INTERRUPTEUR (4)
ON. Lorsque le disque se termine, la lecture s'arrêtera automatiquement. Pour
arrêter la lecture manuellement, soulever le bras du dossier et de le ramener à la
position de départ.
6. Déplacer ou secouer l'appareil sans bloquer le bras pourrait endommager le
mécanisme. Mettez le cap sur le stylet lorsqu'il ne sert pas.

11 Français
AUX-IN
Cette unité est équipée d'un 3,5 mm entrée AUX permet de connecter des
périphériques audio externes et écouter de la musique à travers les haut-parleurs de
cet appareil.
1. Utilisez un câble audio avec les fiches de 3,5 mm sur les deux extrémités du câble.
Branchez une extrémité dans la sortie audio de l'appareil externe et l'autre
extrémité à l'entrée AUX de cet appareil. Mettez cet appareil et le périphérique
externe.
2. Sélectionnez le mode AUX / PH en utilisant FONCTION DIAL (17).
3. A commencé à jouer de la musique à partir du périphérique externe (voir le mode
d'emploi de l'appareil).
4. Tourner VOLUME KNOB (22) au volume désiré.
FONCTION BLUETOOTH
1. Sélectionnez le mode BT en utilisant FONCTION DIAL (17). Un son intermittent
jouera lors de la recherche d'une source Bluetooth.
2. Sélectionnez à partir de votre appareil mobile (Smartphone, tablette ...) le Bluetooth
nom du périphérique HIF-1580BT, puis confirmer la connexion. Vous entendrez un
son lorsque la connexion est terminée
3. Maintenant, vous pouvez transférer de la musique sur votre HIF-1580BT et toutes
les opérations peuvent être effectuées directement à partir de votre appareil.
LECTURE USB / SD
1. Insérez le périphérique USB / SD dans la prise.
2. Sélectionnez le mode USB / SD en utilisant FONCTION DIAL (17). Le dispositif de
lecture démarre automatiquement après la connexion.
3. Si les deux périphériques USB et SD sont insérées, maintenez TOUCHE PLAY/
PAUSE (16) de choisir entre les deux.
4. Utilisez les mêmes étapes pour afficher le CD pour jouer un périphérique USB /
SD.
SUPPRESSION USB / SD
1. Pendant la lecture, maintenez la touche ENREGISTREMENT (11). L'écran affiche
"ONE".
2. Appuyez plusieurs fois sur SKIP -/+ (13)/(14) pour choisir entre ONE / FOL / ALL.
3. Appuyez ENREGISTREMENT (11) à nouveau pour confirmer.
ENREGISTREMENT
1. Pendant la lecture RECORDS / AUX-IN / BLUETOOTH, appuyez sur
ENREGISTREMENT (11). Si les deux périphériques USB et SD sont insérés,
appuyez sur SKIP -/+ (13)/(14) pour choisir entre les deux.
2. Appuyez ENREGISTREMENT (11) à nouveau pour démarrer l'enregistrement.
L'inscription est maintenant en cours. A noter que la vitesse d'enregistrement est
de 1: 1.
3. Appuyez sur TOUCHE STOP (15) pour arrêter l'enregistrement. L'unité va créer un
dossier dans le périphérique USB / SD qui contient toutes les pistes enregistrées.

12 Français
CD
1. Pendant la lecture de CD, appuyez sur ENREGISTREMENT (11).
2. Appuyez plusieurs fois sur SKIP -/+ (13)/(14) pour choisir entre ONE / FOL / ALL.
3. Appuyez sur ENREGISTREMENT (11) à nouveau pour démarrer l'enregistrement.
USB / SD
1. Branchez les deux appareils SD USB et dans leurs entrées et commencer à jouer
celui à partir duquel vous souhaitez copier.
2. Appuyez sur ENREGISTREMENT (11). L'écran affiche "ONE".
3. Appuyez plusieurs fois sur SKIP -/+ (13)/(14) pour choisir entre ONE / FOL / ALL.
4. Appuyez sur ENREGISTREMENT (11) à nouveau pour démarrer l'enregistrement.
CASQUE
Le casque doit avoir une fiche de 3,5 mm, une impédance de 8-32 ohms et sont
connectés all'PRISE CASQUE (21). Lorsque le casque est branché, les haut-parleurs
sont automatiquement déconnectés.
LINE-OUT
Vous pouvez connecter l'appareil à un périphérique externe (haut-parleurs ou un
amplificateur) à travers SORTIE AUDIO (24) en utilisant un câble RCA (non inclus).
CARACTERISTIQUES TECHNIQUES
DC: 12V
FM: 87.5 - 108 MHz
MW: 530 - 1620 kHz
Ce symbole sur le produit ou sa documentation indique qu'il ne doit pas être éliminé en fin de vie avec
les autres déchets ménagers. L' élimination incontrôlée des déchetspouvant porter préjudice a
l'environnement ou a la santé humaine, veuillez le séparer des autres types de déchets et le recycler
defaçon responsable. Vous favoriserez ainsi la réutilisation durable desressources matérielles. Les
particuliers sont invites a contacter le distributeur leur ayant vendu le produit ou a se renseigner auprès
de leur mairie pour savoir ou et comment ils peuvent se débarrasser de ce produit afin qu'il soit recycle
en respectant l'environnement. Les entreprises sont invitées a contacter leurs fournisseurs et aconsulter
les conditions de leur contrat de vente. Ce produit ne doit pas être éliminé avec les autres déchets
commerciaux.
COMMENT ÉLIMINER CE PRODUIT
(déchets d'équipements électriques et électroniques)
ATTENTION
Mettez l’appareil sous tension seulement après avoir vérifié que tous les raccordements
soient corrects.
L’unité ne doit pas être exposée à l’humidité ou à la pluie.
L’appareil doit être gardé dans un endroit suffisamment ventilé. Ne le gardez jamais par
exemple près des rideaux, sur un tapis ou dans des meubles, tels qu’une bibliothèque.
L’unité ne doit pas être exposée à la lumière directe du soleil ou à des sources de
chaleur.

13 Italiano
POSIZIONE DEI COMANDI
1. ADATTATORE DISCO
2. APRI/CHIUDI PORTA CD
3. SELETTORE DI VELOCITÀ 33/45/78 RPM
4. INTERRUTTORE DI AUTOSTOP
5. INTERRUTTORE ON/OFF
6. INGRESSO USB
7. INGRESSO SD
8. TASTO PROGRAMMA
9. TASTO REPEAT
10. DISPLAY LCD
11. REGISTRAZIONE
12. CARTELLA
13. TASTO SKIP-
14. TASTO SKIP+
15. TASTO STOP
16. TASTO PLAY/PAUSA
17. SELETTORE DI FUNZIONE
18. SELETTORE FM/MW
19. INGRESSO AUX-IN
20. REGOLATORE DI FREQUENZA
21. USCITA CUFFIE
22. MANOPOLA VOLUME
23. INGRESSO CAVO DI ALIMENTAZIONE
24. USCITA AUDIO
ALIMENTAZIONE
Connettere l'unità all'alimentazione. Posizionare INTERRUTTORE ON/OFF (5) in
posizione ON per accendere l'unità. Posizionare INTERRUTTORE ON/OFF (5) in
posizione OFF per spegnere l'unità.
Se non viene riprodotto alcun suono per 15 minuti, l'unità si spegnerà
automaticamente. Per ricominciare la riproduzione, spegnere e riaccendere l'unità.
FUNZIONE RADIO AM/FM
1. Selezionare la modalità TUNER usando SELETTORE DI FUNZIONE (17).
2. Selezionare un'opzione tra FM/MW usando SELETTORE FM/MW (18).
3. Ruotare REGOLATORE DI FREQUENZA (20) per selezionare la stazione radio
desiderata.
4. Ruotare MANOPOLA VOLUME (22) fino al volume desiderato.
RIPRODUZIONE DA CD
1. Selezionare la modalità CD usando SELETTORE DI FUNZIONE (17).
2. Premere APRI/CHIUDI PORTA CD (2) per aprire lo scompartimento CD.
Posizionare un CD con il lato stampato rivolto verso l'alto all'interno dello
scompartimento, quindi chiuderlo. Il numero totale di tracce viene visualizzato sul
display. La prima traccia verrà riprodotta in automatico.

14 Italiano
Premere SKIP -/+ (13)/(14) per selezionare le tracce desiderate.
Se si tiene premuto SKIP -/+ (13)/(14), la traccia in riproduzione scorrerà
velocemente nella direzione selezionata fino a che non si rilascia il tasto.
Se il CD MP3/USB/SD ha più di una cartella, premere CARTELLA (12) per
selezionare la cartella desiderata.
Premere TASTO PLAY/PAUSA (16) per mettere in pausa la riproduzione. Il numero
di traccia inizierà a lampeggiare.
Premere nuovamente TASTO PLAY/PAUSA (16) per continuare la riproduzione
Premere TASTO STOP (15) per interrompere la riproduzione.
MODALITÀ RIPETIZIONE
Durante la riproduzione, premere ripetutamente TASTO REPEAT (9) per selezionare:
Repeat1: La traccia corrente sarà riprodotta continuamente.
RepeatFolder: La cartella corrente sarà riprodotta continuamente.
RepeatAll: Tutte le tracce saranno riprodotte continuamente.
PROGRAMMAZIONE CD
Si possono programmare fino a 20 tracce da riprodurre in qualsiasi ordine.
1. Inserire un CD e premere TASTO STOP (15) quando inizia la riproduzione.
2. Premere TASTO PROGRAMMA (8). Sul display viene visualizzato "P01".
3. Premere SKIP -/+ (13)/(14) per selezionare le tracce desiderate.
4. Premere TASTO PROGRAMMA (8) per inserire la traccia nella linea di
programmazione. Sul display viene visualizzato "P02".
5. Ripetere i passaggi 3-4 per selezionare e programmare tutte le tracce desiderate.
6. Premere TASTO PLAY/PAUSA (16) per iniziare la riproduzione programmata.
7. Premere TASTO STOP (15) una volta per interrompere la riproduzione
programmata. Premere TASTO STOP (15) di nuovo per cancellare la
programmazione attuale.
FUNZIONE GIRADISCHI
1. Selezionare la modalità AUX/PH usando SELETTORE DI FUNZIONE (17).
2. Aprire il coperchio del giradischi. Rimuovere il blocco del braccio e la protezione
della puntina. Posizionare un disco sul giradischi. Posizionare l'adattatore nel
caso di utilizzo di un disco da 17cm.
3. Impostare SELETTORE DI VELOCITÀ 33/45/78 RPM (3) su 33 / 45 / 78 giri a
seconda del disco da riprodurre.
4. Sollevare il braccio utilizzando l'apposita leva. Spostare il braccio all'inizio del
disco, o all'inizio di una traccia particolare. Abbassare lentamente la puntina sul
disco utilizzando l'apposita leva.
5. Per selezionare la funzione autostop, spostare INTERRUTTORE DI AUTOSTOP
(4) in posizione ON. Quando il disco terminerà, la riproduzione si fermerà
automaticamente. Per fermare la riproduzione manualmente, sollevare il braccio
dal disco e riportarlo alla posizione di partenza.
6. Spostare o scuotere il dispositivo senza bloccare il braccio potrebbe danneggiare
il meccanismo. Rimettere la protezione sulla puntina quando non viene utilizzata.

15 Italiano
AUX-IN
Questa unità è dotata di un ingresso AUX da 3,5 mm che consente di connettere
dispositivi audio esterni e riprodurre la musica tramite le casse di questa unità.
1. Utilizzare un cavo audio con degli spinotti da 3,5 mm su entrambi gli estremi del
cavo. Connettere un'estremità nell'uscita audio del dispositivo esterno e l'altra
estremità nell'ingresso AUX di questa unità. Accendere questa unità e il
dispositivo esterno.
2. Selezionare la modalità AUX/PH usando SELETTORE DI FUNZIONE (17).
3. Iniziare a riprodurre musica dal dispositivo esterno (vedi manuale d'uso del
dispositivo).
4. Ruotare MANOPOLA VOLUME (22) fino al volume desiderato.
FUNZIONE BLUETOOTH
1. Selezionare la modalità BT usando SELETTORE DI FUNZIONE (17). Un suono
intermittente verrà riprodotto durante la ricerca di una fonte Bluetooth.
2. Selezionare dal vostro dispositivo portatile (Smartphone, Tablet…) il dispositivo
Bluetooth con nome HIF-1580BT, quindi confermare la connessione. Si sentirà un
suono quando la connessione è completa
3. Adesso potrete trasferire musica al vostro HIF-1580BT e tutte le operazioni
potranno essere realizzate direttamente dal vostro dispositivo.
RIPRODUZIONE DA USB/SD
1. Inserire il dispositivo USB/SD nell'apposita presa.
2. Selezionare la modalità USB/SD usando SELETTORE DI FUNZIONE (17). La
lettura del dispositivo inizierà automaticamente in seguito alla connessione.
3. Se entrambi i dispositivi USB e SD sono inseriti, occorre tenere premuto TASTO
PLAY/PAUSA (16) per scegliere tra i due.
4. Utilizzare le stesse procedure viste per il CD per riprodurre un dispositivo USB/
SD.
CANCELLAZIONE USB/SD
1. Durante la riproduzione, tenere premuto REGISTRAZIONE (11). Sul display viene
visualizzato "ONE".
2. Premere SKIP -/+ (13)/(14) ripetutamente per selezionare tra ONE/FOL/ALL.
3. Premere REGISTRAZIONE (11) di nuovo per confermare.
REGISTRAZIONE
1. Durante la riproduzione di RECORDS/AUX-IN/BLUETOOTH, premere
REGISTRAZIONE (11). Se entrambi i dispositivi USB e SD sono inseriti, occorre
premere SKIP -/+ (13)/(14) per scegliere tra i due.
2. Premere REGISTRAZIONE (11) di nuovo per iniziare la registrazione. La
registrazione è ora in corso. Notare che la velocità di registrazione è 1:1.
3. Premere TASTO STOP (15) per interrompere la registrazione. L'unità creerà una
cartella nel dispositivo USB/SD, contenente tutte le tracce registrate.

16 Italiano
CD
1. Durante la riproduzione di CD, premere REGISTRAZIONE (11).
2. Premere SKIP -/+ (13)/(14) ripetutamente per selezionare tra ONE/FOL/ALL.
3. Premere REGISTRAZIONE (11) di nuovo per iniziare la registrazione.
USB/SD
1. Inserire entrambi i dispositivi USB e SD nei loro ingressi e iniziare a riprodurre
quello da cui si vuole copiare.
2. Premere REGISTRAZIONE (11). Sul display viene visualizzato "ONE".
3. Premere SKIP -/+ (13)/(14) ripetutamente per selezionare tra ONE/FOL/ALL.
4. Premere REGISTRAZIONE (11) di nuovo per iniziare la registrazione.
USCITA CUFFIE
Le cuffie devono avere una spina da 3,5 mm, un'impedenza di 8-32 ohm e vanno
connesse all'USCITA CUFFIE (21). Quando le cuffie vengono connesse, gli
altoparlanti vengono automaticamente disconnessi.
LINE-OUT
È possibile connettere l'unità a un dispositivo esterno (altoparlanti o amplificatore)
attraverso USCITA AUDIO (24) utilizzando un cavo RCA (non incluso).
SPECIFICHE TECNICHE
DC: 12V
FM: 87.5 - 108 MHz
MW: 530 - 1620 kHz
Caratteristiche soggette a variazioni senza preavviso.
II marchio riportato sul prodotto e sulla sua documentazione indica che il prodotto non deve essere
smaltito can altri rifiuti domestici al termine del ciclo di vita. Per evitare eventuali danni all'ambiente o alla
salute causati dall'inopportuno smaltimento dei rifiuti, si invita l'utente a separare questo prodotto da altri
tipi di rifiuti e di riciclarlo in maniera responsabile per favorire il riutilizzo sostenibile delle risorse materiali.
Gli utenti domestici sono invitati a contattare il rivenditore presso il quale e stato acquistato il prodotto a
l'ufficio locale preposto per tutte le informazioni relative alla raccolta differenziata e al riciclaggio per
questo tipo di prodotto. Gli utenti aziendali sono invitati a contattare il proprio fornitore e verificare i
termini e le condizioni del contratto di acquisto. Questo prodotto non deve essere smaltito unitamente ad
altri rifiuti commerciali.
CORRETTO SMALTIMENTO DEL PRODOTTO
(rifiuti elettrici ed elettronici)
ATTENZIONE
Utilizzare l’apparecchio solo dopo aver verificato che tutte le connessioni siano state
eseguite correttamente.
Non esporre l’apparecchio alla pioggia o all’umidità.
Posizionare l’apparecchio in un luogo sufficientemente ventilato. Evitare di sistemarlo
vicino a tende, sul tappeto o all’interno di un mobile quale, ad esempio, una libreria.
Non esporre l’apparecchio alla luce diretta del sole o a fonti di calore.

17 Español
CONTROL DE POSICIÓN
1. ADAPTADOR DE DISCO
2. PORTE DE CD OPEN / CLOSE
3. SELECTOR DE VELOCIDAD 33/45/78 RPM
4. CONMUTADOR AUTOSTOP
5. SWITCH ON / OFF
6. ENTRADA USB
7. ENTRADA SD
8. PROGRAMA CLAVE
9. BOTÓN DE REPETICIÓN
10. PANTALLA LCD
11. REGISTRO
12. MALETIN
13. BOTÓN SKIP-
14. BOTÓN SKIP+
15. TECLA STOP
16. BOTÓN PLAY/PAUSA
17. FUNCIÓN DIAL
18. INTERRUPTOR FM / MW
19. AUX-IN
20. REGULADOR DE FRECUENCIA
21. SALIDA DE AURICULARES
22. BOTÓN DE VOLUMEN
23. ENTRADA CABLE DE ALIMENTACIÓN
24. SALIDA DE AUDIO
POTENCIA
Conecte la unidad a la corriente. Coloque SWITCH ON/OFF (5) en la posición ON
para encender la unidad. Coloque SWITCH ON/OFF (5) en la posición OFF para
apagar la unidad.
Si no hay sonido durante 15 minutos, la unidad se apagará automáticamente. Para
reanudar la reproducción, apagar y encender la unidad.
FUNCIÓN DE RADIO AM / FM
1. Seleccione el modo de sintonizador usando FUNCIÓN DIAL (17).
2. Seleccionar entre FM / MW utilizando INTERRUPTOR FM/MW (18).
3. Gire REGULADOR DE FRECUENCIA (20) para seleccionar la emisora de radio
deseada.
4. Gire BOTÓN DE VOLUMEN (22) hasta el volumen deseado.
LA REPRODUCCIÓN DE CD
1. Seleccionar el modo de CD con FUNCIÓN DIAL (17).
2. Pulse PORTE DE CD OPEN/CLOSE (2) para abrir la bandeja del CD. Coloque un
CD con la cara impresa hacia arriba en el interior del compartimento, a
continuación, cerrarla. Se muestra el número total de pistas. La primera pista se
reproducirá automáticamente.
Presione SKIP -/+ (13)/(14) para seleccionar las pistas deseadas.

18 Español
Si mantiene pulsado SKIP -/+ (13)/(14), la pista que se está reproduciendo fluirá
rápidamente en la dirección seleccionada hasta que se suelta el botón.
Si el CD MP3 / USB / SD tiene más de una carpeta, pulse MALETIN (12) para
seleccionar la carpeta deseada.
Prensa BOTÓN PLAY/PAUSA (16) para hacer una pausa en la reproducción. El
número de pista parpadeará.
Pulse de nuevo BOTÓN PLAY/PAUSA (16) para continuar jugando
Prensa TECLA STOP (15) para detener la reproducción.
MODO REPETICIÓN
Durante la reproducción, pulse varias veces para seleccionar BOTÓN DE
REPETICIÓN (9):
Repeat1: La pista actual se reproducirá repetidamente.
RepeatFolder: La carpeta actual se reproducirá continuamente.
RepeatAll: Todas las pistas se reproducirá continuamente.
PROGRAMACIÓN
Puede programar hasta 20 pistas para reproducirlas en cualquier orden.
1. Inserte un CD y pulse TECLA STOP (15) cuando se inicia la reproducción.
2. Presione PROGRAMA CLAVE (8). En la pantalla aparece "P01".
3. Presione SKIP -/+ (13)/(14) para seleccionar las pistas deseadas.
4. Presione PROGRAMA CLAVE (8) para entrar en la pista en la línea de
programación. En la pantalla aparece "P02".
5. Repita los pasos 3-4 para seleccionar y programar todas las pistas que desee.
6. Pulse BOTÓN PLAY/PAUSA (16) para iniciar la reproducción del programa.
7. Pulse TECLA STOP (15) una vez para detener la reproducción del programa.
Pulse de nuevo TECLA STOP (15) para cancelar la programación actual.
FUNCIÓN TOCADISCOS
1. Seleccione el modo AUX / PH usando FUNCIÓN DIAL (17).
2. Abra la cubierta de la torreta. Retire la llave de brazo y el protector de la aguja.
Coloque un disco en el plato. Coloque el adaptador en el caso de utilizar un disco
de 17 cm.
3. Establecer SELECTOR DE VELOCIDAD 33/45/78 RPM (3) el 33/45/78 rpm
dependiendo del disco para jugar.
4. Levantar el brazo con la palanca. Mueva el principio del brazo del disco, o el
comienzo de una pista particular. Lentamente baje la aguja en el disco mediante el
uso de la palanca.
5. Para seleccionar la función de auto-stop, mover CONMUTADOR AUTOSTOP (4)
ON. Cuando termina el disco, la reproducción se detendrá automáticamente. Para
detener la reproducción manualmente, levante el brazo del registro y traerlo de
vuelta a la posición inicial.
6. Mover o agitar el dispositivo sin bloquear el brazo podría dañar el mecanismo.
Ponga la tapa en el lápiz cuando no esté en uso.

19 Español
AUX-IN
Esta unidad está equipada con un 3,5 mm de entrada AUX permite conectar
dispositivos externos de audio y reproducir música a través de los altavoces de esta
unidad.
1. Utilice un cable de audio con los conectores de 3,5 mm en ambos extremos del
cable. Conecte un extremo a la salida de audio del dispositivo externo y el otro
extremo a la toma AUX de esta unidad. Encienda esta unidad y el dispositivo
externo.
2. Seleccione el modo AUX / PH usando FUNCIÓN DIAL (17).
3. Iniciado la reproducción de música desde el dispositivo externo (consulte el manual
del usuario del dispositivo).
4. Gire BOTÓN DE VOLUMEN (22) hasta el volumen deseado.
FUNCIÓN BLUETOOTH
1. Seleccione el modo de BT usando FUNCIÓN DIAL (17). Un sonido intermitente
jugará en la búsqueda de una fuente de Bluetooth.
2. Seleccionar desde su dispositivo móvil (smartphone, tablet ...) el nombre del
dispositivo Bluetooth HIF-1580BT, a continuación, confirmar la conexión. Se
escuchará un sonido cuando la conexión se haya completado
3. Ahora se puede transferir música al HIF-1580BT y todas las operaciones se
pueden realizar directamente desde el dispositivo.
REPRODUCCIÓN DE USB / SD
1. Inserte el dispositivo USB / SD en la ranura.
2. Seleccione el modo USB / SD con FUNCIÓN DIAL (17). El dispositivo de lectura se
iniciará automáticamente después de la conexión.
3. Si se insertan los dos dispositivos USB y SD, mantenga presionada BOTÓN PLAY/
PAUSA (16) para elegir entre los dos.
4. Utilice los mismos pasos para ver el CD para reproducir un dispositivo USB / SD.
CANCELACIÓN USB / SD
1. Durante la reproducción, mantenga pulsado REGISTRO (11). En la pantalla
aparece "UNO".
2. Presione SKIP -/+ (13)/(14) varias veces para seleccionar entre uno / FOL / ALL.
3. Pulse REGISTRO (11) de nuevo para confirmar.
REGISTRO
1. Si bien la reproducción de discos / AUX-IN / BLUETOOTH, REGISTRO (11)
prensa. Si se insertan los dos dispositivos USB y SD, pulse SKIP -/+ (13)/(14) para
elegir entre los dos.
2. Pulse de nuevo REGISTRO (11) para iniciar la grabación. Las inscripciones ya
están en marcha. Tenga en cuenta que la velocidad de grabación es de 1: 1.
3. Prensa TECLA STOP (15) para detener la grabación. La unidad creará una
carpeta en el dispositivo USB / SD que contiene todas las pistas grabadas.

20 Español
CD
1. Durante la reproducción de CD, pulse REGISTRO (11).
2. Presione SKIP -/+ (13)/(14) varias veces para seleccionar entre uno / FOL / ALL.
3. Pulse de nuevo REGISTRO (11) para iniciar la grabación.
USB / SD
1. Conecte ambos dispositivos USB y SD en sus entradas y comenzar a jugar el uno
del que desea copiar.
2. Pulse REGISTRO (11). En la pantalla aparece "UNO".
3. Presione SKIP -/+ (13)/(14) varias veces para seleccionar entre uno / FOL / ALL.
4. Pulse de nuevo REGISTRO (11) para iniciar la grabación.
SALIDA DE AURICULARES
Los auriculares deben tener un conector de 3,5 mm, una impedancia de 8-32 ohmios y
están conectadas all'SALIDA DE AURICULARES (21). Cuando se conectan los
auriculares, los altavoces se desconectan automáticamente.
LINE-OUT
Puede conectar la unidad a un dispositivo externo (altavoces o amplificador) a través
SALIDA DE AUDIO (24) mediante un cable RCA (no incluido).
ESPECIFICACIONES TÉCNICAS
DC: 12V
FM: 87.5 - 108 MHz
La presencia de esta marca en el producto o en el materiál informativo que lo acompaña, indica que al
finalizar su vida útil no deberá eliminarse junto con otros residuos domésticos. Para evitar los posi bl es
daños al medi o ambi ente o a l a sal ud humane que representa la eliminación incontrolada de residuos,
separe este producto de otros tipos de residuos y reciclelo correctamente para promover la reutilización
sostenible de recursos materiales. Los usuarios particulares pueden contactar con el establecimiento
donde adqui ri eron el producto, o con l as autori dades l ocal es pertinentes, para informarse sobre
cómo y dónde pueden lIevario para que sea sometido a un reciclaje ecológico y seguro. Los usuarios
comerciales pueden contactar con su proveedor y consultar las condiciones del contrato de compra.
Este produco no debe eliminarse mezclado con otros residuos comerciales.
ELIMINACIÓN CORRECTA DE ESTE PRODUCTO
(material electrico y electrónico de descarte)
ATTENTIÓN
No conecte la unidad hasta que no se hayan efectuado todas las otras conexiones.
La unidad no debería ser expuesta a lluvia o humedad.
La unidad se debe instalar de forma que su posición no le impida tener ventilación
adecuada. Por ejemplo, el equipo no se debe colocar cerca de cortinas o sobre el
tapete, ni en una instalación como puede ser un armario.
La unidad no debería ser expuesta a la luz solar directa ni a fuentes emisora de calor.

21 Nederlands
PLAATS VAN DE CONTROLES
1. AS ADAPTOR
2. CD GLEUF OPEN/DICHT KNOP
3. 33/45/78 TOEREN KIEZER
4. AUTO STOP SWITCH
5. ON / OFF KNOP
6. USB POORT
7. SD POORT
8. PROGRAMMEERKNOP
9. HERHAALKNOP
10. LCD DISPLAY
11. OPNAMEKNOP
12. MAP KNOP
13. SKIP- KNOP
14. SKIP+ KNOP
15. STOPKNOP
16. SPEEL/PAUSE KNOP
17. FUNCTIEKEUZE
18. FM/MW SELECTOR
19. AUX INPUT
20. AFSTELKNOP
21. KOPTELEFOON OUT
22. VOLUMEKNOP
23. AC OUTLET
24. OUTPUT JACK
STROOMVOORZIENING
Sluit het apparaat aan op de voeding. Schakel ON/OFF KNOP (5) ON positie om het
apparaat aan te zetten. Schakel ON/OFF KNOP (5) op OFF om het toestel uit te
schakelen.
Als er geen geluid wordt geproduceerd, wordt het apparaat automatisch na 15 minuten
uitgeschakeld. Om het afspelen te hervatten, zet u het toestel uit en dan weer aan.
AM / FM-RADIO WERKZAAMHEDEN
1. Kies TUNER mode door FUNCTIEKEUZE (17) te gebruiken.
2. Kies uit FM/MW door FM/MW SELECTOR (18) te gebruiken.
3. Draai AFSTELKNOP (20) om je favoriete radiostation te kiezen.
4. Draai VOLUMEKNOP (22) om het volume bij te stellen.
CD'S
1. Kies CD mode door FUNCTIEKEUZE (17) te gebruiken.
2. Druk op de CD GLEUF OPEN/DICHT KNOP (2) om de Cd lade te openen. Voer een
Cd in met de bedrukte zijde naar boven gericht en sluit de lade. Het totale aantal
tracks zal worden getoond op het display. De eerste track zal beginnen met
afspelen.
Druk op SKIP -/+ (13)/(14) om uw favoriete liedjes te selecteren.
Als je SKIP -/+ (13)/(14) te houden, de huidige nummer zal snel vooruit of achteruit
totdat u de toets loslaat.

22 Nederlands
Als uw MP3 CD/USB/SD meer dan 1 map heeft, druk dan MAP KNOP (12) om de
gewenste map te kiezen.
Druk SPEEL/PAUSE KNOP (16) om het afspelen te onderbreken.
Het nummer begint te knipperen.
Druk nogmaals op SPEEL/PAUSE KNOP (16) om de weergave te hervatten.
Druk STOPKNOP (15) om het afspelen te stoppen.
HERHAALFUNCTIE
Tijdens het afspelen drukt u herhaaldelijk op de HERHAALKNOP (9) om het volgende in
te stellen:
Repeat1: Het huidige nummer wordt herhaald.
Repeatmap: De huidige map wordt herhaaldelijk afgespeeld.
RepeatAll: Alle nummers worden herhaald.
CD DISC PROGRAMMERING
U kunt tot 20 nummers programmeren zodat deze worden afgespeeld in elke gewenste
volgorde.
1. Plaats een disk en druk op de STOPKNOP (15) wanneer het afspelen start.
2. Druk op de PROGRAMMEERKNOP (8). Zal het scherm het woord te geven P01.
3. Druk op SKIP -/+ (13)/(14) om uw favoriete liedjes te selecteren.
4. Druk PROGRAMMEERKNOP (8) om de track op te slaan in het
programmageheugen. Zal het scherm het woord te geven P02.
5. Herhaal de stappen 3-4 en sla aile gewenste nummers op.
6. Druk op SPEEL/PAUSE KNOP (16) om het geprogrammeerdeafspelente starten.
7. Drukeenmaal op de STOPKNOP (15) om het geprogrammeerdeafspelente stoppen.
Druk tweemaalop de STOPKNOP (15) om het programmate wissen.
LUISTER VERSLAGEN
1. Kies AUX/PH mode door FUNCTIEKEUZE (17) te gebruiken.
2. Open de kap van de platenspeler. Draai de veiligheid-overbrengingsschroef, die zich
bovenop de platenspeler bevindt, los. Plaats een plaat op de centrale as van de
platenspeler. Plaats de EP-adapter op de centrale as bij het beluisteren van EP’s
van 17 cm (45 toeren).
3. Stel de 33/45/78 TOEREN KIEZER (3) af op 33/45 of op 78 toeren, in overeenkomst
met de plaat die wordt afgespeeld.
4. Hef de afspeelarm op met de hendel van de arm. Plaats de afspeelarm aan het
begin van de plaat of aan het begin van een bepaalde track. Laat de arm uiterst
voorzichtig op de plaat zakken met de hendel van de arm om te beginnen met het
afspelen.
5. Om de automatische stop-modus te selecteren, te verplaatsen naar ON zal de
positie van AUTO STOP SWITCH (4). Als de plaat het einde heeft bereikt, zal de
platenspeler automatisch stoppen. Om de plaat te stoppen tijdens het afspelen, hef
de afspeelarm op en plaats deze op de steun.
6. Het verplaatsen of schudden van de platenspeler zonder de beschermkap van de
punt en de sluiting van de afspeelarm, kan leiden tot schade aan het apparaat.
Plaats de beschermkap op de punt, wanneer deze niet in gebruik is.

23 Nederlands
AUX-IN
Dit apparaat biedt ook een aanvullende audio-jackingang om externe apparaten zoals
MP3-spelers of CD-spelers te kunnen aansluiten en door de systeemluidsprekers te
kunnen afspelen.
1. Gebruik een audiosnoer (niet inbegrepen) met 3,5 mm stereostekkers aan beide
kanten van het snoer. Steek de ene kant van de kabel in de AUX-IN-ingang van het
apparaat en de andere kant in de LINE OUT of HEADPHONE-uitgang van uw
externe audioapparaat. Zet het apparaat en uw externe audioapparaat aan.
2. Kies AUX/PH mode door FUNCTIEKEUZE (17) te gebruiken.
3. Start met afspelen vanaf het externe apparaat (zie de handleiding van het externe
apparaat).
4. Draai VOLUMEKNOP (22) om het volume bij te stellen.
DE WERKING VAN BLUETOOTH
1. Kies BT mode door FUNCTIEKEUZE (17) te gebruiken. Een onderbroken geluid
wordt afgespeeld terwijl Bluetooth zoekt een bron.
2. Kies een van uw draagbare apparaten (smartphone, tablet, ...), selecteert u het
Bluetooth-ID, die wordt aangeduid als HIF-1580BT en bevestig de verbinding. U zult
een geluid horen wanneer de koppeling is.
3. Nu kun je de muziek over te zetten in het HIF-1580BT en het uitvoeren van alles
gewoon vanaf uw mobiele apparaat.
AFSPELEN VANAF EEN USB/SD-APPARAAT
1. Steek de stekker van het USB/SD-apparaat in de USB/SD aansluiting.
2. Kies USB/SD mode door FUNCTIEKEUZE (17) te gebruiken. Het apparaat start
automatisch op het USB/SD-apparaat te lezen nadat deze is aangesloten.
3. Als zowel USB en SD-apparaten worden ingevoegd, moet u ingedrukt houden
SPEEL/PAUSE KNOP (16) om te kiezen tussen hen.
4. Gebruik dezelfde procedure als bij CD om naar uw USB/SD-apparaat te luisteren.
VERWIJDEREN
1. Tijdens afspelen, houd de OPNAMEKNOP (11) ingedrukt. Zal het scherm het woord
te geven ONE.
2. Druk herhaaldelijk op SKIP -/+ (13)/(14) om te kiezen uit ONE/FOL/ALL.
3. Druk opnieuw OPNAMEKNOP (11) om te bevestigen.
OPNAME
1. Tijdens het luisteren naar een RECORDS/AUX-IN/BLUETOOTH, drukt
OPNAMEKNOP (11). Als zowel USB en SD-apparaten worden ingevoegd, moet u
SKIP -/+ (13)/(14) drukken om te kiezen tussen hen.
2. Druk OPNAMEKNOP (11) nogmaals op om de opname te starten. Codering wordt
nu uitgevoerd. Let op: de coderingssnelheid is 1:1.
3. Druk STOPKNOP (15) om de opname te stoppen. De unit zal een map in het USB/
SD-apparaat aanmaken, die alle opgenomen tracks bevat.

24 Nederlands
CD
1. Tijdens het luisteren naar een CD, drukt OPNAMEKNOP (11).
2. Druk herhaaldelijk op SKIP -/+ (13)/(14) om te kiezen uit ONE/FOL/ALL.
3. Druk OPNAMEKNOP (11) nogmaals op om de opname te starten.
USB/SD
1. Plaats zowel de USB en SD-apparaten in hun socket en beginnen te spelen degene
die je wilt coderen.
2. Druk op de OPNAMEKNOP (11). Zal het scherm het woord te geven ONE.
3. Druk herhaaldelijk op SKIP -/+ (13)/(14) om te kiezen uit ONE/FOL/ALL.
4. Druk OPNAMEKNOP (11) nogmaals op om de opname te starten.
KOPTELEFOON
Hoofdtelefoon moet een 3,5 mm stereo plug en een impedantie van 8-32 Ohm hebben,
en moet worden aangesloten op KOPTELEFOON OUT (21). Wanneer een
hoofdtelefoon is aangesloten, wordt de luidspreker automatisch verbroken.
LINE-OUT
U kunt het apparaat aansluiten op een extern audio-apparaat (luidsprekers of
versterker) door middel van OUTPUT JACK (24) met behulp van een RCA-kabel (niet
meegeleverd).
TECHNISCHE SPECIFICATIES
DC: 12V
FM: 88 - 108 MHz
MW: 530 - 1620 kHz
Kenmerken zijn zonder voorafgaande kennisgeving onderhevig aan veranderingen.
Dit symbool dat staat weergegeven op het product en in de documentatie ervan, duidt erop dat het product
niet kan worden weggegooid met het gewone huisvuil aan het einde van de levensduur. Om schade aan het
milieu of aan de gezondheid door ongepaste afvalverwijdering te voorkomen, dient de gebruiker dit product
te scheiden van andere soorten afval op verantwoorde wijze ter bevordering van duurzaam hergebruik van
de materiële hulpbronnen. De thuisgebruiker dient contact op te nemen met de verkoper van het apparaat of
met de lokale gemeente voor informatie met betrekking tot het scheiden en recyclen van dit type product.
Zakelijke gebruikers dienen contact op te nemen met hun leverancier en de algemene voorwaarden van de
verkoopovereenkomst te raadplegen. Dit product dient niet te worden gemengd met ander bedrijfsafval voor
de verwijdering.
CORRECTE AFVALVERWERKING VAN HET PRODUCT
(elektrisch en elektronisch afval)
WAARSCHUWING
Stel het apparaat niet bloot aan regen of vocht.
Gebruik het apparaat uitsluitend nadat is gecontroleerd dat alle aansluitingen correct
zijn uitgevoerd.
Plaats het apparaat op een voldoende geventileerde plek. Plaats het apparaat niet in de
buurt van gordijnen, op het tapijt of in in een stuk meubilair, zoals bijvoorbeeld een
boekenkast.
Stel het apparaat niet bloot aan direct zonlicht of aan warmtebronnen.


is a registered Trademark of Roadstar S.A. - Switzerland. All rights reserved.
Roadstar Management SA, via Passeggiata 7 CH 6883 Novazzano (Switzerland)
VER.2
Hereby, Roadstar Management SA declares that the radio equipment type HIF-1580BT
is in compliance with Directive 2014/53/EU.
The full text of the EU declaration of conformity is available at the following internet
address: http://roadstar.com/images/ce/HIF-1580BT.pdf.
-
 1
1
-
 2
2
-
 3
3
-
 4
4
-
 5
5
-
 6
6
-
 7
7
-
 8
8
-
 9
9
-
 10
10
-
 11
11
-
 12
12
-
 13
13
-
 14
14
-
 15
15
-
 16
16
-
 17
17
-
 18
18
-
 19
19
-
 20
20
-
 21
21
-
 22
22
-
 23
23
-
 24
24
-
 25
25
-
 26
26
-
 27
27
-
 28
28
-
 29
29
-
 30
30
-
 31
31
-
 32
32


Roadstar HIF-1580BT Manual de usuario
- Categoría
- Radios de CD
- Tipo
- Manual de usuario
en otros idiomas
- français: Roadstar HIF-1580BT Manuel utilisateur
- italiano: Roadstar HIF-1580BT Manuale utente
- Deutsch: Roadstar HIF-1580BT Benutzerhandbuch
- Nederlands: Roadstar HIF-1580BT Handleiding
Artículos relacionados
-
Roadstar HIF-5988 Manual de usuario
-
Roadstar TT-380BT-T Manual de usuario
-
Roadstar HIF-8899BT Manual de usuario
-
Roadstar HIF-1996BT Manual de usuario
-
Roadstar HIF-1896TUMPK Manual de usuario
-
Roadstar HRA-1345US/WD Manual de usuario
-
Roadstar HIF-1996D+BT Manual de usuario
-
Roadstar HIF-1850TUMPK Manual de usuario
-
Roadstar TTR-9645EBT Manual de usuario
-