Carson 510002517 Instrucciones de operación
- Tipo
- Instrucciones de operación

1
1
Tornado ECR
instruction sheet
scale
échelle
1:32
model kit
modéle réduit
No 2517

Tornado ECR
No 2517
Conservare il presente
indirizzo per futuro
riferimento
Retain this address
for future
reference
Made in Italy
The Tornado arose from a collaborative project between Italy, Germany, and the United
Kingdom to produce a multi-role high-performance combat aircraft. The primary requirement
however was to develop a ‘state of the art’ modern aircraft able to perform low-altitude
penetrating strike missions. This need was met by the development of a twin-engine combat
aircraft with a variable-sweep wing. The Tornado IDS (Interdictor / strike) was the rst version
to be released by the British Royal Air Force and designated GR.1 Tornado IDS (Interdictor
/ strike), an aircraft ideally suited to attack roles, was the initial version used by the Flight
Squadrons of the three countries that developed the plane, the Italian Aeronautica Militare ,
the German Luftwaffe and the UK RAF. The Tornado ECR (Electronic Combat / Reconnaissance)
was developed by Italy and Germany and was equipped to carry out missions that suppressed
enemy air defences (SEAD), and to conduct electronic warfare and advanced reconnaissance.
Il progetto del Tornado è nato dalla collaborazione di Italia, Germania e Regno Unito per la
realizzazione di un aereo da combattimento multiruolo dalle alte prestazioni di volo. Venne
così sviluppato un aereo bimotore, con congurazione biposto ed ali a geometria variabile
per meglio rispondere al suo ruolo principale: caccia bombardiere supersonico a bassa quota
in grado di “seguire” il prolo del terreno. Il Tornado IDS (Interdictor/strike), ideale per le
missioni di attacco, è stato il primo ad essere impiegato dai reparti operativi di volo dei tre
Paesi che svilupparono il progetto. Dal progetto originario venne realizzata anche la versione
ECR (Electronic Combat/ Reconaissance), impiegata dall’Aeronautica Militare Italiana e dalla
Luftwaffe tedesca, equipaggiata per svolgere missioni di soppressione delle difese aeree
nemiche (SEAD), guerra elettronica e ricognizione avanzata.
Das Projekt Tornado ist aus der Zusammenarbeit von Italien, Deutschland und Großbritannien
entstanden, um ein Mehrzweckkampfugzeug mit hoher Flugleistung zu bauen. So wurde ein
zweimotoriges Flugzeug mit einer zweisitzigen Konguration und Schwenkügeln entwickelt,
um seiner Hauptanforderung besser gerecht zu werden: Ein Überschalljagdbomber, der im
tiefst Flug in der Lage ist, dem Geländeprol zu „folgen“. Der für Angriffseinsätze ideale
Tornado IDS (Interdictor/Strike) ist der erste, der von den Flugbetriebsabteilungen der drei
Länder, die das Projekt entwickelt haben, eingesetzt wurde. Aus dem ursprünglichen Projekt
wurde auch die ECR-Version (Electronic Combat / Reconnaissance) entwickelt, die von den
italienischen Luftstreitkräften und der deutschen Luftwaffe eingesetzt wird, um Missionen zur
Unterdrückung der feindlichen Luftabwehr (SEAD), der elektronischen Kriegsführung und der
fortgeschrittenen Erkundung durchzuführen.
Le projet du Tornado est né de la collaboration entre l’Italie, l’Allemagne et le Royaume-Uni
pour réaliser un avion de combat multifonction avec des performances de vol élevées. C’est
ainsi qu’a été développé un avion bimoteur, avec une conguration biplace et des ailes à
géométrie variable pour mieux répondre à son rôle principal : un chasseur-bombardier
supersonique de basse altitude en mesure de « suivre » le prol du terrain Le Tornado IDS
(Interdictor/Strike), idéal pour les missions d’attaque, a été le premier à être utilisé par les
services opérationnels de vol des trois pays qui ont développé le projet. À partir du projet
initial, la version ECR (Electronic Combat/Reconnaissance) a également été créée, utilisée par
l’Aéronautique Militaire Italienne et par la Luftwaffe allemande, équipée pour effectuer des
missions de suppression des défenses aériennes ennemies (SEAD), de guerre électronique et
de reconnaissance avancée.
Проект «Торнадо» (Tornado) родился в результате сотрудничества Италии, Германии и
Великобритании по созданию многоцелевого истребителя с высокими летно-техническими
характеристиками. Таким образом, был разработан двухмоторный самолет с двухместной
конфигурацией и изменяемой геометрией крыльев, чтобы лучше выполнять его основную
задачу: маловысотный сверхзвуковой истребитель-бомбардировщик, способный
«следовать» контурам местности. «Торнадо» IDS (изоляция сил противника и нанесение
удара), идеально подходящий для атакующих миссий, был первым, который использовался
летными подразделениями трех стран, разработавших этот проект. Из первоначального
проекта также была создана версия ECR (ведение разведки и радиоэлектронной борьбы),
используемая итальянскими ВВС и немецкими Люфтваффе, оснащенная для выполнения
задач по подавлению противовоздушной обороны (SEAD), радиоэлектронной борьбы и
расширенной разведки.
EN IT DE
FR RU ES
1:32
scale
El proyecto del Tornado nació de la colaboración de Italia, Alemania y Reino Unido para la
realización de un avión de combate multiusos con elevadas prestaciones de vuelo. De esta
manera se desarrolló un avión bimotor con conguración de dos puestos y alas de geometría
variable, para cumplir mejor con su papel principal: cazabombardero supersónico de baja
cota capaz de «seguir» el perl del terreno. El Tornado IDS (Interdictor/strike), ideal para las
misiones de ataque, fue el primero en ser utilizado por los departamentos de operaciones de
vuelo de los tres países que desarrollaron el proyecto. A partir del proyecto original, también se
creó la versión ECR (Electronic Combat/Reconnaissance), utilizada por la Aeronáutica militar
italiana y la Luftwaffe alemana, equipada para llevar a cabo misiones de supresión de las
defensas aéreas enemigas (SEAD), guerra electrónica y reconocimiento avanzado.
NL WAARSCHWING: Geschikt voor 14 jaar en ouder.
EN WARNING: Model for adult modelers age 14 and over
IT ATTENZIONE: Modello per collezionisti adulti di età superiore ai 14 anni
FR ATTENTION: Modèle pour modélistes de 14 and et plus.
DE ACHTUNG: Modellbausatze Für Modellbauer über 14 Jahre.
ES ATENCION: Modelo para modelistas mayors de 14 anõs.
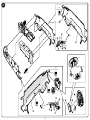
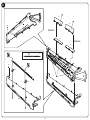
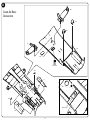
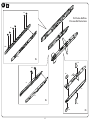
ATTENTION - Useful advice!
Study the instructions carefully prior to assembly. Remove parts from frame with a sharp knife or a pair of scissor and trim
away excess plastic. Do not pull ol parts. Assemble the parts in numerical sequence. Use plastlc cement ONLY and use cement
sparingly to avoid damaging the model. Black arrows indicate parts to be glued together. White arrows indicate on which frame
the parts must be assembled WITHOUT using cement. These letters (A -B - C…) indicate on which frame the parts will be found.
Paint small parts before detaching them from frame. Remove paint-where parts are to be cemented. Crossed out parts must
not be used.
ATTENZIONE - Consigli utlili!
Prima di iniziare il montaggio studiare attentamente il disegno. Staccare con molta cura i pezzi dalle stampate, usando un
taglia-balsa oppure un paio di forbici e togliere con una piccola lima o con carta vetro ne eventuali sbavature. Mai staccare
i pezzl con le mani. Montarli seguendo l’ordine delle numerazione delle tavole. Eliminare dalla stampata il numero del pezzo
appena montato facendogli sopra una croce. Le frecce nere indicano i pezzi da incollare, le frecce bianche indicano i pezzi da
montare senza colla. Usare solo colla per polistirolo. Le lettere (A - B - C…) ai lati dei numeri indicano la stampata ove si trova il
pezzo da montare. I pezzl sbarrati da una croce non sono da utilizzare.
ACHTUNG - Ein nützlicher Rat!
Vor der Montage die Zeichnung aufmerksam studieren. Die einzeinen Montageteile mit einem Messer oder einer Schere vom
Spritzling sorfälling entfernen. Eventuelle Grate werden mit eicer Klinge oder feinem Schmirgelpapier beseitigt. Keinesfalls
die Montageteile mit den Händen entfernen. Bei der Montage der Tafelnumerieung folgen. Pfeile zeigen die zu klebenden
Teile während die weissen Pfeile die ohne Leim zu montierenden Teile anzeigen. Bitte nur Plastikklebstoff verwenden. Die
Buchstaben (A - B - C…) neben den Nummeren zeigt,auf welchem Spritzling der zu montierende Tèil zu nden ist. Die mit einem
Kreuz markierten Teile sind nicht zu verwenden.
ATTENTION - Conseils utiles!
Avant de commencer le montage, étudier attentivement le dessin. Détacher avec beacoup de soin les morceaux des moules
en usant un massicot ou bien un pair de cisaux et couper avec une petite lame avec de papier de vitre n ébarbagés eventuels.
Jamais détacher les morceaux avec le mains Monter les en suivant l’ordre de la numération des tables. Eliminer de la moule
le numéro de la pièce qui vient d’être montée, en le biffant avec une croix. Les éches noires indiquent les pièces à coller, les
éches blanches indiquent les pièces à monter sans colle. Employer seulement de la colle pour polystirol. Les lettres (A - B - C…)
aux côtés des numéros indiquent la moule où se trouve la pièces a monter. Les pièces marquèes par une croix ne sont pas a
utiliser
предупреждение - чаевые!
Перед тем, как приступить к сборке, внимательно изучить чертёж. Очень осторожно отсоединить распечатанные
элементы, использовать для этого канцелярский нож или пару ножниц, снять неровности с помощью тонкого лезвия или с
помощью абразивной бумаги. Не отсоединять элементы руками. Выполнить сборку согласно порядку нумерации таблиц.
Удалить из списка только что собранную деталь, перечёркивая её. Чёрные стрелки указывают детали для склеивания,
белые стрелки указывают детали, которые собираются без клея. Использовать только клей для пенопласта. Буквы (A - B -
C…) на пронумерованных сторона указывают лист, где находится деталь. Перечёркнутые детали не используются.
ATENCION - Consejos útiles!
Estudiar las instrucciones cuidadosamente antes de comenzar el montaje. Separar las piezas de las bandejas con un
cuchillo alado o un par de tijeras y retirar el exceso de plástico o rebada. No arrancar las piezes. Montar las piezas en orden
numérico. Utilizar SOLAMENTE pegamento para plástico y en poca cantidad para evitar que se dane el modelo. Las echas
negras indican las piezas que se deben pegar juntas. Las echas blancas indican las piezas que deben ensamblarse SIN
usar pegamento. Las letras (A - B - C…) indican en que bándeja se encuentran las piezas. Pintar las piezas pequeñas antes de
separarlas de la bandeja. Retirar la pintura de los lugares por donde se deban pegar las piezas.
EN IT DE
FR RU ES
Via Pradazzo, 6/b
40012 Calderara di Reno
Bologna - Italy
www.italeri.com
2

3
A B
C
1
D
4
2
10
3
11
5
6
14
13
19 12
16
7
8
15
9
17
18
20
1
2
4
3
5 6
7
8
9
10
1211
1413
16
15
17
18
19
21 22
20
23
25
24
26
1
7
8
4
2
3
5
11
9
10 12
18
19 20 21
23
24
13
22
25
28
29
27
26
14
15 16
17
30
31
32
33
34
35
36
1
2
3
4
5
38
6
8
10
15 16 14
17
18 19
26 27
41
39
40
53 54
55 58
56 57
59 60
61 63
66
64
62
65
47
51
46
50
48
52
49
34
28
29
32
33
67
69
68
70
71 72
73 74
75
77
35
76
36 37
42
27 28
11
12
13
20 21
22 23
24 25
12

4
F G
FG
12
5
3
4
67
8
17
18 20
16
15 19
27
39 40
28
42 43 45
30
29 31
46
24
25 26
22
32
23
33 34 35 36 37 38
49 50 51
72
47 48
73 74
63
62
52
54
64
75
56 58
57
65 67
6866
76
77
69
71
70
61
60
59
12
5
3
4
67
8
17
18 20
16
15 19
27
39 40
28
42 43 45
30
29 31
46
24
25 26
22
32
23
33 34 35 36 37 38
49 50 51
72
47 48
73 74
63
62
52
54
64
75
56 58
57
65 67
6866
76
77
69
71
70
61
60
59
6
7
9 9 10 11
35
42
41
44
9 9 10 11
35
42
41
44
6
7
78
80
79
9192
93
98
100
102
95
94
101
99
104
103
96 97
78
80
79
9192
93
98
100
102
101
99
104
103
96 97
15
18
12
13
14
16
17
15
18
12
13
14
16
17
10 12 13 14
21 21 21
10 12 13 14
21 21 21
53
53
44
44
105
105

5
Flat Black
F.S.37038
Italeri AcrylicPaint 4768AP
A
Flat White
F.S.37875
Italeri AcrylicPaint 4769AP
E
Flat Gun Metal
F.S.37200
Italeri AcrylicPaint 4681 AP
R
Flat Red
F.S.31400
Italeri AcrylicPaint 4606AP
F
Metal. Flat Steel
F.S.37178
Italeri AcrylicPaint 4679AP
Q
Flat GReen
F.S.34102
Italeri AcrylicPaint 4862AP
M
Flat MediuM Blue
F.S.35095
Italeri AcrylicPaint 4307AP
D
Metal. Flat aluMiniuM
F.S.31178
Italeri AcrylicPaint 4677AP
L
Flat daRk Gull GRay
F.S.36231
Italeri AcrylicPaint 4755AP
B
Flat Middle Stone
F.S.30266
Italeri AcrylicPaint 4304AP
I
PE
E
H J
Parti da non utilizzare
Parts not for use
Pièces à ne pas utilizer
Telle werden nicht verwenden
Partes a no utilizar
Onderdelen niet te gebruiken
Aprire i fori
Drill holes
Ouvrir les trous
Die Locher Ausbhoren
Perforar los agujeros
Open gaten
Separare
Cut
Retirer
Entfernen
Separar
Gesneden
SuggeSted ColorS
3
1
13 2
14
5
16
15
12
10
4
7
6
17 18
21
22
23
24 25
34
38
37
39
35
36
40
55
54
52
53
49
48
50
51 56 60
61
73
72
71
69
70
68
66
67
6564
63
41
42
43
47
46
4544
1
2
3
21
4
5
6
78
9
10
12
11
13
14
15
16
17
1 2 4
1 2 3
15 16 17
35
35
24
26 26
232221
18 19 20
27
8
1 1
8
5
4
9
22
33
6
10
11 13 33 34
28 28 28
29 29
30 30
31 32
Flat liGht GReen
F.S.34230
Italeri AcrylicPaint 4309AP
C
Flat oRanGe
F.S.32197
Italeri AcrylicPaint 4302AP
G
Flat yelloW
F.S.33538
Italeri AcrylicPaint 4721AP
H
Flat liGht GRay
F.S.36495
Italeri AcrylicPaint 4765AP
J
Flat GunShip GRay
F.S.36118
Italeri AcrylicPaint 4752AP
K
Metal. GloSS Gold
F.S.17043
Italeri AcrylicPaint 4671AP
N
Flat inteRioR GReen
F.S.34151
Italeri AcrylicPaint 4736 AP
O
Flat liGht GhoSt GRay
F.S.36375
P
Vite
Screw
Vis
Schraube
Tornillo
Schroef
SCrew 14
1,4 x 8mm
Aggiungere un peso
Add a weight
Ajouter un poids
Fügen Sie ein Gewicht
Añadir un peso
Voeg een gewicht
26
27
28
76
18
ChooSe verSion before aSSembly
57
19
9
11

6
1pe
2pe
35pe
35pe
Bend
Bend
Bend
2x
A
A
A
A
L O A
O
M
verSion b
1
46f
Bend
2x
A
K
K
K
K
K K
O
H
H
A
K
O
31f
59f
45f
71f
70f
69f
28f
27f
60f
29f
61f
26pe
verSionS a-C verSionS a-C
2
Version A
Version A
Version C
Version C
CoCkpit deCAl
11
CoCkpit deCAl
10
CoCkpit deCAl
13
CoCkpit deCAl
12

7
3verSion b verSion b
4
Bend
26pe
2x
2x
1pe
2pe
35pe
35pe
Bend
Bend
Bend
A
A
A
A
L O A
O
M
A
K
K
K
K
K K
O
H
H
A
K
O
CoCkpit deCAl
10
CoCkpit deCAl
11
44f
80f
79f
78f
28f
31f
59f
27f
60f
29f
61f
46f

remoVe for Version A
8
71e
22e
69e
70e
73e
23e
5h
57e
66e
67e
45e
30f
30f
B
B
A
for CoCkpit pAinting And deCAls positioning see the pAinting guide (pAg.8)
22e
5
68e
72e
A
A
B
23e

6
11C
24C
20C
23C
19C
25C
22C
21C
15h
34d
17d
36d
27d
35d
37d
A
A
opened front lAnding geAr ConfigurAtion
E
E
L
E
E
L
J
E
J
E
J
J
J
A
9

34d
36d
27d
35d
37d
15d
14d
16d
14d
Closed front lAnding geAr ConfigurAtion
43e
43e
opened front lAnding geAr ConfigurAtion
10
7 8
only Version A
Versions A - B
only Version C
only
Version A
Versions A - B
only Version C

16d
10d
58f
AlternAtiVe C
56f
1
j
15d
C
16h
C
6d
10pe
9pe
14dAlternAtiVe B
56f
58f
67f
68f
2x
2x
J
E
A
E
E
J
J
E
11
9
only
Versions A - B

B
G A
A
A
F
K
KGA
H
B
KF
A
14e
2e
21e
3e
64e
5e
16e
12e
15e
63e
64e
65e65e
4h
P
G
C
A
60gr
B
12
10
only
Versions B - C
only
Versions B - C

12
2x
D
E
D
D
E
11
Bend
13C
19B
A
AA
A
J
A
3pe
19f
20f
60e
44e
24e
25e
6h
61e
for pAinting And deCAls positioning see the pAinting guide
A
instrument
deCAl 5
instrument
deCAl 6
J
7h
18B
28e
CoCkpit deCAl
10
AlternAtiVes
19e
56e
18e
17e17e
18e
17e
18e
13

J
A
J
JJ
JA
13
J
JF
58d
66d
53d
55d
63d
54d
70d
16A11A
49d
67d
68d
1A
7A
3A
69d
G
F
GA
L
E
L
only for opened
lAnding geAr ConfigurAtion
only for opened
lAnding geAr ConfigurAtion
14

15
12A
76d
1d
4d
4A
4j
3j
14
2d
42d
40d
3d
38d
39d
27pe
J
J
J
15

16
22B
77d
16B
32f
32f
Cut only for Closed Version
Cut only for Closed Version
L
J
J
J
J
16

17
31C
30C
3C
2C
1C
4C
17

18
52e
54e
55e
53e
28pe
28pe
28pe
28pe
H1
I1
2x
72f
63f
62f
52f
74f
73f
retrACted thrust reVerser ConfigurAtion
Q
Q
Q
Q
Q
Q
Q
Q
R
R
R
18

50e
48e
51e
49e
28pe
28pe
28pe
28pe
H2
I2
2x
73f
Q
Q
Q
Q
19 extrACted thrust reVerser ConfigurAtion
72f
63f
62f
52f
74f
R
Q
R
Q
Q
Q
R
19

AlternAtiVe
AlternAtiVe
64f
13e
64f
H1 H2
I1
I2
B
B
B
B
L
Q
L
75d
L
two engine ConfigurAtion
20
20

AlternAtiVe
75d
13e
64f
H1
H2
L
B
B
Q
L
one engine ConfigurAtion
21
21

16pe
K
J
K
J
32pe
73d
29C
17pe
15pe
30pe
6A
retrACted thrust reVerser ConfigurAtion Bend
29pe
34pe
14A
Bend
R
Q
Q
R
22
22

retrACted thrust reVerser ConfigurAtion
L
29pe
33pe
13A
M
30pe
15pe
Bend M
L
74d
27C
R
Q
Q
Bend
16pe 17pe
31pe
5A
23
23

74d
extrACted thrust reVerser ConfigurAtion
L
M
29d
73d
27C
K
J
Q
R
Q
R
Q
R
R
Q
24
24

AlternAtiVe
L
B
13pe
51f
51f11pe
I1
I2
Q
Q
26
25f
25f
26f
24f
24f
26f
18f
17f
18f
17f
71d
18f
18f
72d
17f
17f
25
25

extrACted thrust reVerser ConfigurAtion retrACted thrust reVerser ConfigurAtion
L
M
L
M
Q
R
R
Q
DD
R
Q
R
27
26

28
AlternAtiVe
AlternAtiVe
top
5f
23B
11h
12h
1B
12B
27B
5f
10B
8B
10B
8B
J
J
J
27

J
AlternAtiVe
extended flAps ConfigurAtion
35C
34C
35C
retrACted flAp Version
30
extended slAts ConfigurAtion
retrACted slAt ConfigurAtion
AlternAtiVe
1h
2B
38f
36f
33f
35f
34f
37f
49f
50f
48f
47f
2B
J
29
F
28

14h
4B
13h
11B
28B
24B
5f
7B
9B
7B
9B
AlternAtiVe
AlternAtiVe
top 5f
31
J
J
J
29

36C
36C
33C
AlternAtiVe
extended flAps ConfigurAtion
J
retrACted flAp ConfigurAtion
33
2h
38f
36f
33f
35f
34f
37f
25B
47f
48f
50f
49f
25B
J
AlternAtiVe
extended slAts ConfigurAtion
J
retrACted slAt ConfigurAtion
32
F
30

Closed Air BrAke
ConfigurAtion
J
J
41d
18d
19d
18A
5d
50d
9A
17A
46d
34
11d
extended flAps ConfigurAtion only Version A
11d positioning
31

opened Air BrAke
ConfigurAtion 17A
46d
15A
E
E
E
E
41d
18d
19d
18A
5d
9A
50d
8A
7f
7f
L
L
35
11d
only Version A
11d positioning
32

sCrew 14
sCrew 14
36
33

37
34

A
8C
8pe
48d
52d
38
N1
N5
N2
N4
N6
N3
N7
35
28C
26C
A
7C
8pe
remoVe only Version C
21d
23d
10f
M
10h24d
10h
remoVe only Version C
10h
22d
10h
20d
10f
Versions A - B
Version C
Version C
for rudder Coloring
see pAinting guide
remoVe only
Version A
remoVe only
Version A

N
39
I
25d
N1
N2
N3
N4
N5
N6
N7
K
I
K
36
Version
C
Versions
A - B
Version
C
Versions
A - B
right side
23f
23pe
22pe
21pe
20pe
19pe
18pe
only
Version A
23f
5C
23pe
22pe
21pe
20pe
19pe
18pe
A
left side
only
Version A

17h
18h
37
right side
only
Version A
8d
40
Version
A
Versions
B - C
AlternAtiVe
AlternAtiVe
only
Version B
12d
20A
N

Cut only for Closed Version
O
15B
8h
3B
75f
6B
J
J
J
L
AlternAtiVe
22f
17B
41
38
O

20B
Cut only for Closed Version
J
L
J
J
P22f
26B
75f
5B
21B
8h
AlternAtiVe
P
42
39

29d
44
28d
32d
J
43
33d
J
40

Q
76f
66f
57f
2j
65f
77f
60d
62d
64d
56d
AlternAtiVe
Q
A
L
E
E
45
deCAl 80
deCAl 81
deCAl 82
E
E
41

L
57d
61d
65d
66f
57f
2j
65f
76f
77f
E
L
E
A
AlternAtiVe
46
59d
E
deCAl 80
deCAl 81
deCAl 82
42

6f
10A
4pe
39f9h
E
E
Bend
4pe
6f
5pe
47
5pe
9h
39f
E
L
E
2A
Bend
5pe
L
L
L
E
E
48
43

49 Closed mAin lAnding geAr ConfigurAtion
44
10A
2A

only Versions
A - B
only Versions
A - B
only Version C
only Versions
A - B
only Versions
B - C only Version
A
12d
26e9e
50
76e
6e
13d
27e
45
51
P
AlternAtiVe
51d
47d
47d
26d
51d
19A
10e
11e

52
46
2x
R
for pAinting And deCAl
positioning see pAinting guide
2x
2x
2x
104f
103f
21f
21f
105f
96f
97f
18g
17g
15g
16g
15g
18g

S
S
R
R
53
95f
94f
47

2x
2x
2x
T U
V1 V2
right side left side
J
L
J
L
9g
9g
6g
7g
9g9g
10g
11g
24pe
10g
9g
9g
9g
9g
7g
6g
54
12g13g
14g
12g
for pAinting And deCAl
positioning see pAinting guide
for pAinting And deCAl
positioning see pAinting guide
48
91f
92f
93f
98f
100f
101f
99f

W1 W2
X1 X2 2x
Y
41e
8f
16f
41g
41g
35g
35g
44g
42g
42e
8f
16f
2x
55
1f
2f
14f
102f
14f
102f
1f
2f
3f
4f
13f
for pAinting And deCAl
positioning see pAinting guide
49

50
U
Y
W2
X2
V1 T
56
AlternAtiVe
front
only Version C

AlternAtiVe
V2
T
X1
W1
Y
U
57
only Version C
front
51

extrACted refueling Boom ConfigurAtion
retrACted refueling Boom ConfigurAtion
35e
36e
40e
38e
37e
38e
37e
35e
40e
36e
34e
39e
P
P
P
P
P
L
58
39e
52
AlternAtiVe

54f
40f
L
59
53
7e
40f
54f
L
L
only Version C
only Version A - B53f

A
A
L
M
K
K
14B
13B
3h
43f
43f
47e
42f
42f
46e
1e
4e
A
A
AlternAtiVe
60 Closed CAnopy ConfigurAtion
54

13B
14B
43f
43f
47e
42f
42f
46e
3h
21h
1e
4e
6pe
14C
17C
32C
15C
16C
10C
9C
12C
15f
15f
18C
B
61
AlternAtiVe
L
opened CAnopy ConfigurAtion
55
A
K
A
A
M
J
F

Revision 1 842002517
56
-
 1
1
-
 2
2
-
 3
3
-
 4
4
-
 5
5
-
 6
6
-
 7
7
-
 8
8
-
 9
9
-
 10
10
-
 11
11
-
 12
12
-
 13
13
-
 14
14
-
 15
15
-
 16
16
-
 17
17
-
 18
18
-
 19
19
-
 20
20
-
 21
21
-
 22
22
-
 23
23
-
 24
24
-
 25
25
-
 26
26
-
 27
27
-
 28
28
-
 29
29
-
 30
30
-
 31
31
-
 32
32
-
 33
33
-
 34
34
-
 35
35
-
 36
36
-
 37
37
-
 38
38
-
 39
39
-
 40
40
-
 41
41
-
 42
42
-
 43
43
-
 44
44
-
 45
45
-
 46
46
-
 47
47
-
 48
48
-
 49
49
-
 50
50
-
 51
51
-
 52
52
-
 53
53
-
 54
54
-
 55
55
-
 56
56


Carson 510002517 Instrucciones de operación
- Tipo
- Instrucciones de operación
En otros idiomas
- français: Carson 510002517 Mode d'emploi
- italiano: Carson 510002517 Istruzioni per l'uso
- Deutsch: Carson 510002517 Bedienungsanleitung
Documentos relacionados
-
Carson 510001459 Instrucciones de operación
-
-
-
-
-
-
-
-

