
CVP
-
609 / CVP-605
EN
Reference Manual
This manual explains about the functions called up by touching each icon shown in the Menu display.
Please read the Owner’s Manual first for basic operations, before reading this Reference Manual.
Using the PDF manual
• To quickly jump to items and topics of interest, click on the desired items in the “Bookmarks” index to the left of
the main display window. (Click the “Bookmarks” tab to open the index if it is not displayed.)
• Click the page numbers that appear in this manual to go directly to the corresponding page.
• Select “Find” or “Search” from the Adobe Reader “Edit” menu and enter a keyword to locate related information
anywhere in the document.
NOTE The names and positions of menu items may vary according to the version of Adobe Reader being used.


CVP-609/605 Reference Manual 3
Adjusting the Tempo........................4
Transposing the Pitch in Semitones 5
Changing the Split Point and
Fingering Type..................................6
Learning How To Play Specific
Chords (Chord Tutor)......................7
Adjusting the Volume Balance.........8
Editing the Volume and Tonal
Balance (Mixer).................................9
Editing Music Notation (Score)
Settings............................................16
Editing Lyrics Display Settings ......18
Editing Text Display Settings.........19
Using Keyboard Harmony .............20
Microphone Settings.......................22
Vocal Harmony Settings.................24
Creating/Editing a Record of the
Music Finder ...................................31
Calling Up Registration Memory
Numbers in Order (Registration
Sequence) ........................................34
Disabling Recall of Specific Items
(Freeze) ...........................................36
Assigning a Specific Function to Each
Pedal or ASSIGNABLE button...... 37
Editing a Voice (Voice Edit) .......... 41
Editing an Organ Flutes Voice (Voice
Edit)................................................ 45
Creating/Editing Styles (Style
Creator).......................................... 47
Creating/Editing MIDI Songs (Song
Creator).......................................... 59
Voice Settings................................. 71
Style Playback Related Settings ..... 76
Song Settings Related to Playback/
Recording ....................................... 79
Fine Tuning the Pitch .................... 84
Setting the Touch Sensitivity of the
Keyboard ........................................ 86
Metronome Settings....................... 87
MIDI Settings................................. 88
Making Global Settings (Utility) ... 94
Wireless LAN Settings ................... 98
Index............................................... 99
• Unless indicated otherwise, the illustrations and displays as shown in this manual are based on the CVP-609 (in English). These are
for instructional purposes only, and may appear somewhat different from those on your instrument.
• The explanations in this Owner’s Manual apply to the firmware version 1.10. Yamaha may from time to time update firmware of the
product without notice for improvement. We recommend that you check our website for later releases and upgrade your firmware.
http://download.yamaha.com/
• The company names and product names in this manual are the trademarks or registered trademarks of their respective companies.

CVP-609/605 Reference Manual 4
Adjusting the Tempo
NOTE The tempo value of an Audio Song is set via the Time Stretch function. Refer to the Owner’s Manual.
Indicates the tempo value during playback of the metronome, Style and MIDI Song.
Indicates the tempo value of the current Style. The Style will be started at this tempo.
Indicates the tempo value of the current MIDI Song. The Song will be started at this tempo.
These are basically equivalent to the TEMPO [-]/[+] buttons on the panel. If you want to call up the default
tempo of the current Style and MIDI Song, touch and hold any area in – .
Equivalent to the [TAP TEMPO] button on the panel.

CVP-609/605 Reference Manual 5
Transposing the Pitch in Semitones
You can transpose the overall pitch of the instrument (the keyboard sound, Style playback, MIDI Song playback, and so
on) in semitone steps.
NOTE The pitch of an Audio Song is adjusted via the Pitch Shift function. Refer to the Owner’s Manual.
NOTE Transpose is not applied to the Drum Kits and SFX Kits Voice.
Master
Transposes the overall pitch of the instrument, except for the Audio Songs and input sound from a
microphone or the [AUX IN] jack.
Keyboard
Transposes the pitch of keyboard including Style playback (controlled via the chord section of the
keyboard).
Song
Transposes only the pitch of MIDI Song playback.

CVP-609/605 Reference Manual 6
Changing the Split Point and Fingering
Type
For information about Split Point, refer to the Owner’s Manual.
For information about Fingering Types, refer to the Owner’s Manual.
Split Point
Fingering Type

CVP-609/605 Reference Manual 7
Learning How To Play Specific Chords
(Chord Tutor)
If you know the name of a chord but don’t know how to play it, this function indicates you the notes you should press.
NOTE Depending on the chord, some notes may be omitted.
Root
Lets you select the desired Chord Root.
Type
Lets you select the desired Chord Type.

CVP-609/605 Reference Manual 8
Adjusting the Volume Balance
For information about this display, refer to the Owner’s Manual.

CVP-609/605 Reference Manual 9
Editing the Volume and Tonal Balance
(Mixer)
The “Panel” – “Song Ch9-16” Part Selection tabs at the top of the Mixer display let you adjust the sound for each
corresponding part, while “Master” lets you make overall sound adjustments for the entire instrument.
NOTE When an Audio Song is selected, you cannot set the parameters related to the Song part or channels.
For a visual indication of the signal flow and configuration of the Mixer, refer to the Block Diagram on page 15.
This function modifies the tonal characteristics (brightness, etc.) of the sound by cutting the output of a specific
frequency portion of the sound. This is not available when you select “Master” from among the tabs at the top of the
Mixer display.
Filter
Harmonic Content
Allows you to adjust the Resonance effect (page 43) for each part. This can be used in
combination with the “Brightness” parameter to add further character to the sound.
Brightness
Determines the brightness of the sound for each part by adjusting the cutoff frequency
(page 43).

Editing the Volume and Tonal Balance (Mixer)
CVP-609/605 Reference Manual
10
Equalizer (also called “EQ”) is a sound processor that divides the frequency spectrum into multiple bands that can be
boosted or cut as required to tailor the overall frequency response. The “Panel” – “Song Ch9-16” Part Selection tabs at the
top of the Mixer display let you adjust the EQ for each corresponding part, while “Master” lets you make overall EQ
adjustments for the entire instrument.
Part EQ (when one of the “Panel” – “Song Ch 9-16” tabs is selected)
Master EQ (when the “Master” tab is selected)
This instrument possesses a high grade five-band digital EQ. With this function, a final effect — tone control — can be
applied to the output of your instrument. You can select one of the five preset EQ types in the “Master” display. You can
even create your own custom EQ settings by adjusting the frequency bands, and save the settings to one of two User
Master EQ types.
NOTE Master EQ cannot be applied to an Audio Song or the Metronome sound.
EQ (Equalizer)
High
Boosts or attenuates the high EQ band for each part.
Low
Boosts or attenuates the low EQ band for each part.
1
2
3
4
0
80Hz 500Hz
1.0kHz 4.0kHz 8.0kHz
Bandwidth (also called “Shape” or “Q”)
Frequency
Gain
5 bands (default)

Editing the Volume and Tonal Balance (Mixer)
CVP-609/605 Reference Manual
11
1 Select the desired EQ type to be edited.
• FLAT: Flat EQ settings. The gain of each frequency is set to 0dB.
•
HOME: Standard EQ settings for optimum sound in the home.
•
CONCERT: Optimum EQ settings for performing in a public space using the instrument’s speakers.
•
AUXOUT PA: Optimum EQ settings for sending the instrument's sound to external PA devices through the
AUX OUT [L/L+R]/[R] jacks.
•
AUXOUT HIFI: Optimum EQ settings for sending the instrument's sound to studio monitors through the
AUX OUT [L/L+R]/[R] jacks.
•
USER1/2: Your own custom EQ settings saved in step 4.
2 Adjust the Q (bandwidth) and the Center Frequency of each band.
The available Frequency range is different for each band. The higher the value of Q, the narrower the bandwidth.
3 Boost or cut each of the five bands as desired.
4 Touch (Save) then save the settings as a User Master EQ type.
Up to two EQ types can be created and saved.
NOTICE
The settings will be lost if you turn the power to the instrument off without executing the Save operation.
NOTE If you want to save the Master EQ settings to the USB flash memory, save as a User Effect file. To do this: From the display
called up via [Menu] [Utility] [Factory Reset/Backup] page 2/2, touch [Backup] of “User Effect” to execute the
Save operation (page 97).
This instrument features the following Effect Blocks.
•
System Effect (Chorus, Reverb): These Effects are applied to the entire sound of this instrument. For each part, you
can adjust the depth of the System Effect. Refer to “Chorus/Reverb” (page 13).
•
Insertion Effect 1 – 8 (CVP-609) / Insertion Effect 1 – 3 (CVP-605): These Effects are applied only to a specific
part. For each of these Effects, select an Effect type specifically for the desired part (for example, Distortion, which
would be applied only to the Guitar part).
•
Vari ation Effe ct: This Block can be used both as System Effects and Insertion Effects, and you can switch between
them.
These explanations covers the settings related to the Insertion Effects and Variation Effects on the Effect display. This
display is not available when the “Master” tab is selected at the top of the Mixer display.
Effects

Editing the Volume and Tonal Balance (Mixer)
CVP-609/605 Reference Manual
12
NOTE For details about the Effect types, refer to the Data List.
Editing and Saving the Effect settings
You can edit the settings of the System Effects (Chorus, Reverb), Insertion Effects and Variation Effect. The edits can be
saved as a User Effect type.
1 From the Mixer display, touch the desired Effect type to call up the Effect Type Selection
display.
2 Select the Effect type if necessary, then touch (Setting) to call up the Effect Parameter
display.
3 Make the necessary setting for each parameter.
The available parameters differ depending on the Effect type.
4 Touch (Save), then save the settings as a User Effect type.
Up to 3 Effect types can be stored for each of the Reverb, Chorus and Variation Effect Blocks while up to 10 Effect
types can be stored for the Insertion Effect Blocks.
NOTICE
The settings will be lost if you turn the power to the instrument off without executing the Save operation.
NOTE If you want to save the Effect settings to the USB flash memory, save as a User Effect file. To do this: From the display
called up via [Menu] [Utility] [Factory Reset/Backup] page 2/2, touch [Backup] of “User Effect” to execute the
Save operation (page 97).
Insertion Effect
Lets you assign the desired Insertion Effect Type for each part by touching the area above each
knob. You can adjust the degree to which each Effect is applied by using the knobs.
If you want to assign each of the Insertion Effects to a specific Part and select an Effect Type,
touch (Setting) at the upper right of this area and make necessary settings in the window.
The assignable Parts for each Insertion Effect are as follows:
CVP-609
• Insertion Effect 1 – 5: Keyboard Parts, Song channels 1 – 16
•Insertion Effect 6: Microphone, Song channels 1 – 16
• Insertion Effect 7 – 8: Style Parts
CVP-605
• Insertion Effect 1 – 2: Keyboard Parts, Song channels 1 – 16
•Insertion Effect 3: Microphone, Keyboard Parts, Song channels 1 – 16
NOTE For CVP-605, the Insertion Effect cannot be applied to the Style part.
Variation E ffect
Touch [INSERTION] or [SYSTEM] to switch the Effect Connection between the Insertion Effect
and System Effect, then touch the right end of this line to select the desired Effect type.
When “SYSTEM” is selected, this Effect is applied to all parts of the Song and Style as the System
Effect. When “INSERTION” is selected, this Effect is applied only to the specified Song/Style
part.
To adjust the degree to which the Effect is applied, use the knob of each part.
3
4
2

Editing the Volume and Tonal Balance (Mixer)
CVP-609/605 Reference Manual
13
As described in the previous section, Chorus and Reverb are System Effects which are applied to the entire sound of the
instrument. They are not available when the “Master” tab is selected at the top of the mixer display.
NOTE For details about the Chorus and Reverb types, refer to the Data List (Effect Type List).
Editing and Saving the Chorus/Reverb settings
Same as the operation on the “Effect” display (page 12).
You can adjust the Pan (stereo position of the sound) and Volume for each Part. This display is not available when the
“Master” tab is selected at the top of the Mixer display.
Chorus/Reverb
Chorus
Touch the Chorus type name at the top right of this row to select the desired Chorus type. After
selecting, return to the Mixer display then use each knob to adjust the Chorus depth for each part.
Reverb
Touch the Reverb type name at the top right of this row to select the desired Reverb type. After
selecting, return to the Mixer display then use each knob to adjust the Reverb depth for each part.
Pan/Volume
Pan
Determines the stereo position of each part (channel).
Vol um e
Determines the level of each part or channel, giving you fine control over the balance of all the
parts.

Editing the Volume and Tonal Balance (Mixer)
CVP-609/605 Reference Manual
14
Compressor is an effect commonly used to limit and compress the dynamics (softness/loudness) of an audio signal. For
signals that vary widely in dynamics, such as vocals and guitar parts, it “squeezes” the dynamic range, effectively making
soft sounds louder and loud sounds softer. When used with gain to boost the overall level, this creates a more powerful,
more consistently high-level sound.
This instrument features the Master Compressor applied to the entire sound of this instrument. Although the preset
Master Compressor settings are provided, you can create and save your original Master Compressor by adjusting the
related parameters. This display is available only when the “Master” tab is selected at the top of the Mixer display.
NOTE Master Compressor cannot be applied to an Audio Song or the Metronome sound.
1 Set the Compressor to “On.”
2 Select the Master Compressor type to be edited.
3 Edit the parameters related to the Master Compressor.
The indication “GR” shows the Gain Reduction (compressed level) while “Output” shows the output level according
to the instrument sound in real time.
4 Touch (Save), then save the settings as a User Master Compressor type.
Up to five Master Compressor types can be created and saved.
NOTICE
The settings will be lost if you turn the power to the instrument off without executing the Save operation.
NOTE If you want to save the Master Compressor settings to the USB flash memory, save as a User Effect file. To do this: From
the display called up via [Menu] [Utility] [Factory Reset/Backup] page 2/2, touch [Backup] of “User Effect” to
execute the Save operation (page 97).
Master Compressor (only for CVP-609)
Threshold
Determines the threshold (minimum level at which compression starts).
Ratio
Determines the ratio of compression (how much the dynamic range is compressed).
Gain
Determines the output level.
12
3
4

Editing the Volume and Tonal Balance (Mixer)
CVP-609/605 Reference Manual
15
CVP-609
* MIC EFFECT = 3 Band EQ/Noise Gate/Compressor, VH = Vocal Harmony, VE = Vocal Harmony Effect
CVP-605
* MIC EFFECT = 3 Band EQ/Noise Gate/Compressor, VH = Vocal Harmony
Block Diagram

CVP-609/605 Reference Manual 16
Editing Music Notation (Score) Settings
Select a MIDI Song then touch [Score] to call up the music notation of the current MIDI Song. You can change the
notation indication as desired to suit your personal preferences.
From the display called up via (Play Setting), you can set the parameters related to playback of the current MIDI
Song. The parameters explained here can also be set on the Song area (with expanded) of the Home display.
Indicates the name of the current Song. Also, the tempo value is shown at the right end. If you want to
change the Song, touch the Song name to call up the Song Selection display.
Lets you set the parameters related to playback Parts of the MIDI Song. For details, refer to “Play Setting”
(page 16).
Lets you set the notation indication parameters, including notation size, chord display, etc. For details, refer
to “View Setting” (page 17).
Lets you set more detailed parameters related to the notation indication. Refer to “Detail Setting” (page 17).
Play Setting
Extra
Turns playback of all Channels on or off, except for those assigned to the Left and Right Hand Parts
described below.
Left
Turns playback on or off for the Left Hand Part, to which you can assign the desired channel on the Song
Setting display (page 80).
Right
Turns playback on or off for the Right Hand Part, to which you can assign the desired channel on the
Song Setting display (page 80).
Guide
Turns the Guide function on or off. For details, refer to the Owner’s Manual.
AB
Turns Repeat playback on or off and lets you specify the Repeat playback range. For details, refer to the
Owner’s Manual.

Editing Music Notation (Score) Settings
CVP-609/605 Reference Manual
17
From the display called up via (View Setting), you can set the parameters related to the view of the notation.
From the display called up via (Detail Setting), you can set more detailed parameters.
View Setting
Size
Determines the display resolution (or zoom level) of the notation.
Left
Turns indication of the left-hand notation on or off. If an “-” indication appears at this parameter and is
unavailable, go to the “Detail Setting” display (page 17) , then set the Left Ch to any channel except
“Auto.” Or, on the display called up via [Menu] → [Song Setting] → [Part Ch], then set the Left to any
channel except “Off” (page 80).
NOTE Both Right (below) and Left cannot be turned off at the same time.
Right
Turns indication of the right-hand notation on or off.
NOTE Both Right and Left (above) cannot be turned off at the same time.
Chord
Turns indication of the chords on or off. If the current Song does not contain chord data, no chord
information is shown even if this is checked.
Lyrics
Turns indication of the Lyrics on or off. If the current Song does not contain lyrics data, no lyrics are
shown even if this is checked. If the Song contains Pedal events, touching here switches between “Lyrics”
and “Pedal.” When “Pedal” is checked, Pedal events are shown instead of Lyrics on the display.
Note
Turns indication of the Note names on or off. When this is checked, each note name is shown at the left
side of each note. If the Song contains Fingering events, touching here switches between “Note” and
“Fingering.” When “Fingering” is checked, Fingering events are shown instead of Note names on the
display.
Color
When this is checked, the notes in the display appear in identifying colors (C: red, D: yellow, E: green, F:
orange, G: blue, A: purple, and B: gray).
Detail Setting
Right Ch
Determines which MIDI channel in the MIDI Song data is used for the right-hand/left-hand part.
This setting returns to “Auto” when a different Song is selected.
•Auto:
The MIDI channels in the MIDI Song data for the right- and left-hand parts are assigned
automatically — setting each part to the channel which has been specified at the Part Ch (page 80) on
the Song Setting display.
•1–16: Assigns a specified MIDI channel (1–16) to each of the right- and left-hand parts.
•Off (Left Ch only): No channel assignment. This disables display of the left-hand notation.
Left Ch
Key
Signature
Lets you enter the Key Signature at the current stopped position of the MIDI Song. This menu is
useful when the current MIDI Song contains no Key Signature settings.
Quantize
This gives you control over the note resolution in the notation, letting you shift or correct the timing
of all displayed notes so that they line up to a particular note value. Make sure to select the smallest
note value used in the Song.
Note Name
Selects the type of the note name indicated at the left of the note in the notation from among the
following three types. The settings here are available when the Note parameter (page 17) is checked.
•A, B, C:
Note names are indicated as letters (C, D, E, F, G, A, B).
•Fixed Do: Note names are indicated in solfeggio and differ depending on the selected language.
•Movable Do: Note names are indicated in solfeggio according to the scale intervals, and as such are
relative to the key. The root note is indicated as Do. For example, in the key of G major the root note of
“Sol” would be indicated as “Do.” As with “Fixed Do,” the indication differs depending on the selected
language.

CVP-609/605 Reference Manual 18
Editing Lyrics Display Settings
Select a MIDI Song, and then touch [Lyrics] to call up the lyrics of the current MIDI Song. You can change the lyrics
indication as desired to suit your personal preferences.
NOTE When the lyrics are garbled or unreadable, you may need to change the Lyrics Language setting on the display called up via
[Menu] [Song Setting] [Lyrics].
Indicates the name of the current Song. Also, the current measure number is shown at the right end. If you
want to change the Song, touch the Song name here to call up the Song Selection display.
Lets you set the parameters related to playback Parts of the MIDI Song. For details, refer to “Play Setting”
(page 16).
Allows you to change the background picture of the Lyrics display and Text display.
As well as various pictures provided in the Preset tab, you can select an original picture file (a bitmap file
with no greater than 800 x 480 pixels) in the USB flash memory. The original picture file can be copied from
the USB flash memory to the internal User memory.
NOTE The setting here is applied also to the Text display.

CVP-609/605 Reference Manual 19
Editing Text Display Settings
The display of this instrument can show text files (extension: .txt and less than 60 KB) created on a computer.
NOTE Line breaks are not automatically entered in the instrument. If a sentence is not displayed in its entirety because of limitations in
the screen space, enter line breaks manually on your computer by using a text editor, etc. beforehand.
NOTE When the text is garbled or unreadable, you may need to change the language setting on the display called up via [Menu]
[Utility] [System].
Indicates the current text file which is shown on the display. Touching here calls up the text File Selection
display which lets you select an original text file in the USB flash memory or copy it from the USB flash
memory to the internal User memory.
Clears the text from the display. This operation does not delete the text file itself, but simply leaves the
display empty of any text file.
Lets you set the parameters related to playback Parts of the MIDI Song. For details, refer to “Play Setting”
(page 16).
Allows you to change the background picture of the Lyrics display and Text display.
As well as various pictures provided in the Preset tab, you can select your original picture file (a bitmap file
with no greater than 800 x 480 pixels) in the USB flash memory. Your original picture file can be copied
from the USB flash memory to the internal User memory.
NOTE The setting here is applied also to the Lyrics display.
Lets you select the font size or type. “Small,” “Medium,” or “Large” keeps each character at the same width,
and is suitable for displaying lyrics with chord names above, etc. “Proportional Small,” “Proportional
Medium,” and “Proportional Large” are suitable for displaying lyrics without chord names or explanatory
notes.

CVP-609/605 Reference Manual 20
Using Keyboard Harmony
1 Set the Keyboard Harmony function to “On.”
When this is set to “On,” Harmony or Echo is applied to your keyboard performance automatically.
2 Adjust related parameters such as Harmony type and volume.
NOTE The available parameters differ depending on the Harmony type.
Type
Lets you select one of the Harmony types, which are divided into the following groups.
Harmony Type (Standard Duet — Strum)
These types apply the harmony effect to notes played in the right-hand section of the
keyboard according to the chord specified in the left-hand section of the keyboard. (Note that
the “1+5” and “Octave” settings are not affected by the chord.)
If you want to use these Types with the Style stopped, set the “Stop ACMP” parameter
(page 76) to a setting other than “Disabled.”
When [ACMP ON/OFF] is turned on:
When the Left part is on:
When [ACMP ON/OFF] and
the Left part are on:
1
Split Point
Chord section for Style playback and Harmony effect
Split Point
Main and Layer Voices
Left Voice and chord section for Harmony effect
Style Split Point Left Split Point
Left Voice
Main and Layer Voices
Chord section for Style playback and Harmony effect

Using Keyboard Harmony
CVP-609/605 Reference Manual
21
Type Multi Assign
The Multi Assign effect automatically assigns notes played simultaneously on the right-hand
section of the keyboard to separate parts (Voices). Both of the keyboard parts [Main] and
[Layer] should be turned on when using the Multi Assign effect. The Main and Layer Voices
are alternately assigned to the notes in the order you play.
Echo Type (Echo, Tremolo and Trill)
When one of the Echo Types is selected, the corresponding effect (echo, tremolo, trill) is
applied to the note played in the right-hand section of the keyboard in time with the currently
set tempo, regardless of the [ACMP ON/OFF] and the Left part on/off status. Keep in mind
that Trill works when you hold down two notes on the keyboard simultaneously (last two
notes if more than two notes are held), and it plays those notes alternately.
Volu me
This parameter is available for all types with the exception of “Multi Assign.” It determines the
level of the harmony/echo notes generated by the Harmony/Echo effect.
Speed
This parameter is only available when Echo, Tremolo, or Trill is selected in Type above. It
determines the speed of the Echo, Tremolo, and Trill effects.
Assign
This parameter is available for all types with the exception of “Multi Assign.” This lets you
determine the keyboard part via which the harmony/echo notes will be sounded.
•Auto:
Applies the effect to the part which is turned on. When the both parts are on, the Main
part is given priority over the Layer part.
•Multi: When both parts are on, the note played on the keyboard is sounded by Main part and
the harmonies (effect) are divided to the Main and Layer parts. When only one part is on, the
note played on the keyboard and effect are sounded by that part.
•Main, Layer: Applies the effect to the selected part (Main or Layer).
Chord Note
Only
This parameter is available when one of the Harmony Types is selected. When this is set to
“On,” the Harmony effect is applied only to the note (played in the right-hand section of the
keyboard) that belongs to a chord played in the chord section of the keyboard.
Minimum
Vel oc it y
This parameter is available for all types with the exception of “Multi Assign.” It determines the
lowest velocity value at which the harmony note will sound. This allows you to selectively
apply the harmony by your playing strength, letting you create harmony accents in the
melody. The harmony effect is applied when you play the key strongly (above the set value).

CVP-609/605 Reference Manual 22
Microphone Settings
This section lets you set parameters for various Effects that are applied to the microphone sound. You should make both
“Vocal” and “Talk” settings — “Vocal,” for your singing performance, and “Talk,” for making announcements between
songs, for example.
Microphone
On/Off
Turns on or off the microphone sound. When set to On, the microphone sound will be input to
the instrument
NOTE The setting here is equivalent to that in the Vocal Harmony display (page 24).
Voc al /Tal k
Switching
When you sing into the microphone for your performance, set this to “Vocal.” When you talk
normally or need to make announcements between songs of your performance, set this to
“Talk.” This lets you instantly change the microphone settings depending on the situation.
NOTE The setting here is equivalent to that in the Vocal Harmony display (page 24).
Vol um e
Adjustment
Adjusts the input volume of the microphone sound. The input level is shown at the right.
NOTE The setting here is equivalent to that in the Vocal Harmony display (page 24).
3 Band EQ
EQ (Equalizer) is a processor that divides the frequency spectrum into multiple bands which
can be boosted or cut as required to tailor the overall frequency response. The instrument
features a three-band (Low, Mid and High) digital equalizer function for the microphone
sound. For each of three bands, you can adjust the center frequency (Hz) and level (dB) via the
corresponding knobs on the display.
Noise Gate
This effect mutes the input signal when the input from the microphone falls below a specified
level. This effectively cuts off extraneous noise, allowing the desired signal (vocal, etc.) to pass.
On/Off
Turns Noise Gate on or off.
Th.
(Threshold)
Adjusts the input level above which the gate begins to open.
Compressor
This effect holds down the output when the input signal from the microphone exceeds a
specified level. This is especially useful for smoothing out vocals that have widely varying
dynamics. It effectively “compresses” the signal, making loud parts softer.
On/Off
Turns Compressor on or off.
Th.
(Threshold)
Adjusts the input level above which compression begins to be applied.
Ratio
Adjusts the compression ratio. Higher ratios result in a more compressed
sound, with a reduced dynamic range.
Output
Adjusts the final output level.
When “Vocal” is selected: When “Talk” is selected:
Only for CVP-609

Microphone Settings
CVP-609/605 Reference Manual
23
NOTICE
The settings here are lost if you turn off the power without executing the Save operation.
You can store the microphone settings together with the Vocal Harmony settings by touching (Save) then selecting
one of 10 User Memories. For ease in future recall, you should assign a sufficiently descriptive name or one that matches
your performance.
To call up the microphone settings, touch the setting name at left of (Save) then select the desired file.
NOTE If you want to save the microphone settings to the USB flash memory, save as a User Effect file. To do this, on the display called
up via [Menu] [Utility] [Factory Reset/Backup] page 2/2, touch [Backup] of “User Effect” to execute the Save operation
(page 97).
Pitch Detect
(Only when
“Vocal” is
selected)
(only for CVP-
609)
Lets you set how the pitch of the microphone sound during performance is detected.
Vocal Type
Set this to obtain the most natural vocal harmony, depending on your voice.
•Low:
Setting for lower voices. This setting is also appropriate for growling
and shouting.
•Mid: Setting for mid-range voices.
•High: Setting for higher voices. This setting is also appropriate for singing
close to the microphone.
•Full: Setting for vocalists having a wide range, from low to high.
Speed
Adjusts the response speed of the Vocal Harmony effect, or how quickly
harmonies are generated in response to your voice. The larger the number,
the faster the response.
NOTE When one or both of LEAD PITCH DETECT SPEED and HARM. PITCH
DETECT SPEED of Vocal Harmony (page 27) are set to “as MIC SETTING,”
this parameter is effective. In other settings, the setting of the Vocal
Harmony’s Pitch Detect Speed is effective.
Background
Noise Cut
This allows you to filter out noises that would interfere with the pitch
detection. A setting of “Thru” turns the noise filter off.
Talk Mixing
(Only when
“Talk” is
selected)
Lets you make settings for talking or making announcements between songs during a performance.
Pan
Determines the stereo pan position of the microphone sound.
Reverb Depth
Determines the depth of the reverb effects applied to the microphone sound.
Chorus Depth
Determines the depth of the chorus effects applied to the microphone sound.
Attenuator
Determines the amount of reduction to be applied to the overall sound
(excepting the microphone input) — allowing you to effectively adjust the
balance between your voice and the overall instrument sound.
Storing the Microphone Settings

CVP-609/605 Reference Manual 24
Vocal Harmony Settings
This section allows you to set various Vocal Harmony parameters, even though just selecting a Vocal Harmony Type will
call up the appropriate settings and you need not edit these parameters normally. If you want to make more detailed
settings for your performance, read this chapter.
The structure of the Vocal Harmony function differs between the CVP-609 and CVP-605. The explanation here applies to
both models. For information on other settings, refer to page 25 for the CVP-609 and refer to page 28 for the CVP-605.
NOTE The settings here are equivalent to those in the Microphone Setting display (page 22).
Basic Parameters
Microphone On/
Off
Turns the microphone sound on or off. When this is set to On, the microphone sound
is input to the instrument.
Voc a l/ Tal k
Switching
When you sing into the microphone, this should be set to “Vocal.” When you talk
normally or make announcements between songs, this should be set to “Talk.” If you
want to set the Vocal Harmony parameters, this should be set to “Vocal.”
Vol um e
Adjustment
Adjusts the input volume of the microphone sound. The input level is shown at the
right.
Vocal Harmony name

Vocal Harmony Settings
CVP-609/605 Reference Manual
25
By editing the parameters of the preset Vocal Harmony type, you can create your original Vocal Harmony type.
1 Touch the Vocal Harmony name to call up the Vocal Harmony Selection display.
2 Select the desired Vocal Harmony type.
3 Based on the settings of the selected Vocal Harmony type, edit them as desired.
Harmony
Lets you edit the Vocal Harmony parameters.
Editing the Vocal Harmony Type (CVP-609)
Harmony
On/Off
Turns Vocal Harmony on or off.
Mode
Although one of the three following Modes is automatically selected when a Vocal
Harmony type is selected, you can change the Mode.
Chordal
The harmony notes are determined by the following three chord
types: chords played in the chord section of the keyboard (with
[ACMP ON/OFF] turned on), chords played in the left hand
section of the keyboard (with the Left part turned on), and chords
contained in Song data for controlling the harmony. (Not available
if the Song does not contain any chord data.)
NOTE If you want to apply the Vocal Harmony by pressing the chords in
the chord section when the Style is stopped, you need to set the
“Stop ACMP” parameter to a setting other than “Disabled” in the
Style Setting display (page 76).
Vo co der
The microphone sound is output via the notes you play on the
keyboard or via the Song playback notes.
Vo co der-Mon o
Basically the same as the Vocoder. In this mode, only single-note
melodies or lines can be played back (with last-note priority).
When the Mode ( ) is set to “Chordal”:
When the Mode ( ) is set to “Vocoder” or “Vocoder-Mono”:

Vocal Harmony Settings
CVP-609/605 Reference Manual
26
(When the Mode is set to “Chordal”)
Chord
Source
Determines which data or event of a Song will be used for chord detection.
•Off:
Detects no chord from the Song data.
•XF: Chord data defined via XF will be used.
• 1 – 16: Detects a chord from notes of the MIDI channel specified here.
Type
Determines how the harmony notes are applied to the microphone sound by selecting
one of the Chordal Types. Almost all Types apply the harmony notes based on the chord
specified via the left hand section of the keyboard, chord section of the keyboard, or the
Song data, with the exception of the following two Types.
•ScaleDiatonic:
This generates harmony notes based on the Key Root and Key Type
specified in the Harmony Assign display ( ), meaning that the harmony notes do not
depend on the chord but match the diatonic scale of the current song’s key signature.
• Parallel: This adds a note to the lead note (microphone sound) with the interval specified
at , regardless of the chord.
NOTE “Abv” in the Chordal Type List means that the harmony notes are generated above the lead
note (microphone sound) while “Blw” means that the harmony notes are generated below
the lead note.
(When the Mode is set to “Vocoder” or “Vocoder -Mono”)
Song Ch
When set to one of 1 – 16, note data (played from a Song on this instrument or the
connected computer) of the corresponding channel is used to control the harmony.
When set to “Off,” Song data control over harmony is turned off.
Part
When set to “Mute,” the channel selected above (to control Harmony) is muted (turned
off) during Song playback.
Keyboard
•Off: Keyboard control over harmony is turned off.
•Upper: Notes played to the right of the Split Point control the harmony.
•Lower: Notes played to the left of the Split Point control the harmony.
Balance
Lets you set the balance between the lead vocal (the microphone sound) and Vocal
Harmony sound. Raising this value increases the volume of the Vocal Harmony and
decreases that of the lead vocal. When this is set to L<H63 (L: Lead Vocal, H: Vocal
Harmony), only the Vocal Harmony is output; when it is set to L63>H, only the lead
vocal is output.
Balance
adjustment
for each Lead
note and
Harmony
note
The following parameters can be adjusted for each Lead note (microphone sound) and
Harmony note.
• Transpose/Degree:
Lets you shift the pitch for each Harmony note and Lead note. The
range for all notes is the same; however, the lead note can only be adjusted in octaves.
When the Chordal Type is set to “ScaleDiatonic,” this parameter changes to Degree, letting
you shift the pitch in degree from -3 octaves (-22 scale degrees) – Unison (1 scale degree) –
+3 octaves (+22 scale degrees).
• Detune: Determines the fine pitch setting for each Harmony note from -50 cents to +50
cents.
•Formant: Determines the formant setting for each Harmony note. The higher the value,
the more “feminine” the harmony voice becomes. The lower the value, the more
“masculine” the voice.
•Pan: Determines the pan position setting for each Harmony note. Setting each Harmony
note to a different pan position, with the Lead vocal at center, for example, results in a
naturally wide stereo sound.
• Volume: Determines the volume setting for each Harmony note. Use this to adjust the
relative level balance among the Lead vocal and the Harmony notes.
NOTE When PITCH CORRECT MODE ( ) is set to OFF the Lead part is not available for the
Transpose, Degree, Detune and Formant parameters.
NOTE The Transpose values of the Harmonies are available only when the Mode ( ) is set to
“Chordal.”

Vocal Harmony Settings
CVP-609/605 Reference Manual
27
Effect
Lets you edit the parameters related to the Effects applied to the Vocal Harmony notes.
4 Touch (Save), then save the edits as an original Vocal Harmony type.
Up to 60 Vocal Harmony types can be saved to User memory. For ease in future recall, you should assign a
descriptive name that matches the settings.
NOTICE
The settings here are lost if you turn off the power without executing the Save operation.
NOTE If you want to save the Vocal Harmony settings to the USB flash memory, save as a User Effect file. To do this, on the
display called up via [Menu] [Utility] [Factory Reset/Backup] page 2/2, touch [Backup] of “User Effect” to
execute the Save operation (page 97).
Harmony
Assign
Lets you set how the Harmony notes are assigned or voiced to the Lead note
(microphone sound). For details, refer to the “MIDI Reference” (Vocal Harmony
Parameter List) on the website.
When the Harmony mode is set to “Chordal”
• Session Table: Determines how the harmonies will be voiced, or what type of chord will
be used in creating the harmonies, according to different musical styles.
NOTE This parameter is available only when the Chordal Type is set to something other than
ScaleDiatonic or Parallel.
•Key Root, Key Type: When the Chordal Type ( ) is set to “ScaleDiatonic,” this
parameter is available. Harmony notes based on the settings here do not depend on the
chord but match the diatonic scale of the current song’s key signature.
When the Harmony mode is set to “Vocoder” or “Vocoder-Mono”
•Transpose Mode: Determines the amount by which the harmony parts are transposed. A
setting of “0” results in no transposition, while the “Auto” setting results in automatic
transposition.
Detail
Setting
• PITCH CORRECT MODE: Corrects the pitch of the Lead note (microphone sound).
“Off” does not correct while “Hard” corrects the pitch most accurately.
• LEAD PITCH DETECT SPEED, HARM.PITCH DETECT SPEED: Determines how
fast the pitch of the Lead note and the harmony notes are detected in response to the signal
via the microphone. “1” responds most slowly, “4” is standard, “15” responds most quickly,
and “as MIC SETTING” gives priority to the speed specified at the Pitch Detect “Speed” of
the Microphone Setting display (page 23).
• HARMONY EFFECT: Determines the Effect type applied to the Harmony notes added
to the Lead note.
• HARMONY STABILITY: Determines the stability degree to which the Harmony is
applied to the Lead note. When set to “Stable,” this has a relatively stable sound with little
harmony motion. When set to “Dynamic,” this tends to add harmony with motion
according to the input sound.
•LEAD VIBRATO DEPTH: This specifies the vibrato depth of the lead sound.
•HARM.VIBRATO DEPTH: This specifies the vibrato depth of the harmony sound.
•VIBRATO SPEED: This specifies the vibrato speed of both the lead and harmony sounds.
•VIBRATO DELAY: This specifies the vibrato delay of both the lead and harmony sounds.
Effect On/Off
Turns on or off the Effects applied to the Vocal Harmony notes.
Type
Selects the Effect type applied to the Vocal Harmony notes. You can edit also the
detailed parameters of the selected type. For information about the Effect Parameters,
refer to the “MIDI Reference” (Vocal Harmony Parameter List) on the website.
To L e ad
Adjusts the Effect depth applied to the Lead note.
To Harmony
Adjusts the Effect depth applied to the Harmony notes.
Reverb Depth
Adjusts the Reverb depth applied to the microphone sound. This setting is equivalent to
that in the Mixer display (page 13).
Chorus Depth
Adjusts the Chorus depth applied to the microphone sound. This setting is equivalent
to that in the Mixer display (page 13).

Vocal Harmony Settings
CVP-609/605 Reference Manual
28
By editing the parameters of the preset Vocal Harmony type, you can create your original Vocal Harmony type.
1 Touch the Vocal Harmony name to call up the Vocal Harmony Selection display.
2 Select the desired Vocal Harmony type.
3 Based on the settings of the selected Vocal Harmony type, edit them as desired.
Editing the Vocal Harmony Type (CVP-605)
Harmony On/Off
Turns on or off the Vocal Harmony.
Mode
Although one of the three following Modes is automatically selected when a Vocal
Harmony type is selected, you can change the Mode.
NOTE Some Vocal Harmony types have no Mode. When such a type is selected, the
Harmony notes are applied to the microphone sound (Lead note) even if you do not
play any keys and no Song is played back.
Auto
(Vocoder/
Chordal)
When the [ACMP ON/OFF] or Left part is turned on, or a Song
contain chord data is being played back, the mode is automatically
set to “Chordal.” In all other cases, the mode is set to “Vocoder.”
Vo co der
The microphone sound is output via the notes you play on the
keyboard or via the Song playback notes.
Chordal
The harmony notes are determined by the following three chord
types: chords played in the chord section of the keyboard (with the
[ACMP ON/OFF] turned on), chords played in the left hand
section of the keyboard (with the Left part turned on), and chords
contained in Song data for controlling the harmony. (Not available
if the Song does not contain any chord data.)
NOTE If you want to apply the Vocal Harmony by pressing the chords in
the chord section when the Style is stopped, you need to set the
“Stop ACMP” parameter to a setting other than “Disabled” in the
Style Setting display (page 76).
Voc al R ange
Set this to obtain the most natural vocal harmony, depending on your voice.
•Normal:
Normal setting.
•Low: Setting for lower voice. This setting is also appropriate for growling and shouting.
•High: Setting for higher voice. This setting is also appropriate for singing close to the
microphone.
Song Ch
When set to one of 1 – 16, note data (played from a Song on this instrument or the
connected computer) of the corresponding channel is used to control the harmony.
When set to “Off,” Song data control over harmony is turned off.
4 4
When the Mode ( ) is set to “Chordal”: When the Mode ( ) is set to “Vocoder”:

Vocal Harmony Settings
CVP-609/605 Reference Manual
29
4 Set the parameters which determine how the Harmony notes are applied.
Balance Adjustment for each Lead note and Harmony note
You can make independent settings for the Lead note (microphone sound) and the Harmony notes.
•
Detune: Determines the fine pitch setting for each Harmony note from -50 cents to +50 cents.
•
Pan: Determines the pan position setting for each Harmony note. Setting each Harmony note to a different pan
position, with the Lead vocal at center, for example, results in a naturally wide stereo sound.
•
Volu me : Determines the volume setting for each Harmony note. Use this to adjust the relative level balance
among the Lead vocal and the Harmony notes.
Detail Setting
The available parameters differ depending on the Vocal Harmony type.
Balance
Lets you set the balance between the lead vocal (the microphone sound) and Vocal
Harmony sound. Raising this value increases the volume of the Vocal Harmony and
decreases that of the lead vocal. When this is set to L<H63 (L: Lead Vocal, H: Vocal
Harmony), only the Vocal Harmony is output; when it is set to L63>H, only the lead
vocal is output.
(When the Mode is set to “Chordal”)
Chord Source
Determines which data or event of a Song will be used for chord detection.
•Off:
Detects no chord from the Song data.
•XF: Chord data defined via XF will be used.
•1 – 16: Detects a chord from notes of the MIDI channel specified here.
(When the Mode is set to “Vocoder”)
Song Ch Mute/
Play
When set to “Mute,” the channel selected above ( ) is muted (turned off) during
Song playback.
Keyboard
•Off: Keyboard control over harmony is turned off.
•Upper: Notes played to the right of the Split Point control the harmony.
•Lower: Notes played to the left of the Split Point control the harmony.
VOCODER TYPE
Determines how the harmony notes are applied to the microphone sound when the
Harmony Mode (page 25) is set to “Vocoder.”
CHORDAL TYPE
Determines how the harmony notes are applied to the microphone sound when the
Harmony Mode (page 25) is set to “Chordal.”
CHROMATIC TYPE
Determines how the harmony notes are applied to the microphone sound when
“SpdyMouse,” “SingBass,” or “ChromatXG” is selected as the Vocal Harmony type.
DETUNE TYPE
Determines how the harmony notes are applied to the microphone sound when
“DetuneXG” is selected as the Vocal Harmony type.
HARM GENDER
TYPE
Determines whether the gender of the harmony sound is changed or not.
•Off:
The gender of the harmony sound is not changed.
•Auto: The gender of the harmony sound is changed automatically.
LEAD GENDER
TYPE
Determines whether and how the gender of the lead vocal sound (i.e., the direct
microphone sound) will be changed. Please note that the number of harmony notes
differs depending on the selected type. When set to “Off,” three harmony notes are
produced. Other settings produce two harmony notes.
•Off:
No gender change occurs.
•Unis: No gender change occurs. You can adjust the LEAD GENDER DEPTH
described below.
•Male: The gender change (to male) is applied to the lead vocal.
•Fem.: The gender change (to female) is applied to the lead vocal.

Vocal Harmony Settings
CVP-609/605 Reference Manual
30
5 On the displays in step 4, touch (Save), then save the edits as an original Vocal Harmony
type.
This Save operation covers the settings edited in step 4 and the Harmony on/off setting in step 3. The settings made
in the two displays can be saved as a single Vocal Harmony type. For ease in future recall, you should assign a
descriptive name that matches the settings.
NOTICE
The settings here are lost if you turn off the power without executing the Save operation.
NOTE At the left of the Save icon, the Vocal Harmony name is shown. By touching here to call up the Vocal Harmony Selection
display, you can select another Vocal Harmony type. This operation is equivalent to that of Step 1.
NOTE If you want to save the Vocal Harmony settings to the USB flash memory, save as a User Effect file. To do this, on the
display called up via [Menu] [Utility] [Factory Reset/Backup] page 2/2, touch [Backup] of “User Effect” to
execute the Save operation (page 97).
LEAD GENDER
DEPTH
Adjusts the degree of lead vocal gender change. This is available when LEAD
GENDER TYPE (above) is set to something other than “Off.” The higher the value,
the more “feminine” the harmony voice becomes. The lower the value, the more
“masculine” the voice.
LEAD PITCH
CORRECT
This parameter is only effective when LEAD GENDER TYPE (above) is set to
something other than “Off.” When “Smooth” or “Hard” is selected here, the pitch of
the lead vocal is shifted in precise semitone steps.
UPPER GNDR
THRESH
Gender change occurs when the harmony pitch reaches or exceeds the specified
number of semitones above the lead vocal pitch.
LOWER GNDR
THRESH
Gender change occurs when the harmony pitch reaches or exceeds the specified
number of semitones below the lead vocal pitch.
UPPER GNDR
DEPTH
Adjusts the degree of gender change applied to harmony notes higher than UPPER
GNDR THRESH (above). The higher the value, the more “feminine” the harmony
voice becomes. The lower the value, the more “masculine” the voice.
LOWER GNDR
DEPTH
Adjusts the degree of gender change applied to harmony notes lower than LOWER
GNDR THRESH (above). The higher the value, the more “feminine” the harmony
voice becomes. The lower the value, the more “masculine” the voice.
VIBRATO DEPTH
Sets the depth of vibrato applied to the harmony sound. This also affects the lead
vocal sound when LEAD GENDER TYPE (above) is set to something other than
“Off.”
VIBRATO RATE
Sets the speed of the vibrato effect. This also affects the lead vocal sound when
LEAD GENDER TYPE (above) is set to something other than “Off.”
VIBRATO DELAY
Specifies the length of the delay before the vibrato effect begins when a note is
produced. Higher values result in a longer delay.

CVP-609/605 Reference Manual 31
Creating/Editing a Record of the
Music Finder
You can create a new Record or edit the currently selected Record.
1 If you want to edit the existing Record, select the desired Record on the Music Finder display.
This operation is not necessary when you create a new Record from scratch.
2 Call up the operation display.
If you want to create a new Record from scratch, touch (Create). If you want to edit an existing Record, touch
(Edit).
3 Create a new Record or Edit the current Record.
Creating/Editing a Record
Music
Lets you enter the music title or Record name which will be shown on the Music Finder
display.
Style
Lets you enter the desired Style. This is not available for Song Records.
To create a new Record: To edit the current Record:

Creating/Editing a Record of the Music Finder
CVP-609/605 Reference Manual
32
If you want to abort your edits, touch [Cancel].
4 Touch [Create] or [Save] to save the created/edited Record.
Touching [Create] will add the new created Record to the Music Finder display. Touching [Save] will overwrite your
edits to the existing Record.
1 From the Music Finder display, select a Record to be deleted.
2 Touch (Delete) to delete the selected Record.
The Music Finder feature handles all the Records including the presets and additionally created records as a single file.
Keep in mind that individual records (panel settings and Song data) cannot be handled as separate files.
1 As necessary, connect the USB flash memory to this instrument.
2
Call up the operation display via [Menu] → [Utility] → [Factory Reset/Backup] → page 2/2.
3 Touch [Backup] of “Music Finder” to call up the File Selection display.
4 Select the location to which you want to save the file, then touch [Backup Here] to execute
the Save operation.
All Records are saved together as a single file.
Beat
Lets you enter the desired Beat which will be used for sorting the Records. This is not
available for Song Records.
NOTE The setting here is just for sorting the Records, and not affects the actual beat of the
specified Style.
Te mp o
Lets you enter the actual Tempo value. This is not available for Song Records.
Section
Lets you specify the Style Section setup which will be called up when this Record is
selected. This is not available for Song Records.
Genre
Lets you select the desired genre.
Keyword
Lets you enter the keyword for searching the Records.
Deleting a Record
Saving the Records as a Single File

Creating/Editing a Record of the Music Finder
CVP-609/605 Reference Manual
33
Calling Up Music Finder Records from User memory/USB flash memory
1 On the Music Finder display, touch (Load) to call up the File Selection display.
NOTE This display can also be called up by touching [Restore] of “Music Finder” at the display called up via [Menu] [Utility]
[Factory Reset/Backup] page 2/2.
2 Select a Music Finder file on the internal User memory or USB flash memory.
The confirmation dialog appears as follows:
•
Append: The Records in the selected file will be added to the existing Records.
•
Replace: The existing Records will be replaced with the Records in the selected file.
•
Cancel: Aborts the operation (the selected file is not called up).
NOTICE
Selecting “Replace” automatically deletes all your original Records from internal memory. Make sure that all the
Records including the important ones have been saved to a single file.
NOTE When you want to restore the initial default status, select “MusicFinderPreset” in the Preset tab then touch [Replace].

CVP-609/605 Reference Manual 34
Calling Up Registration Memory Numbers
in Order (Registration Sequence)
For changing the panel setup quickly during a live performance, this instrument features the Registration Sequence which
lets you call up the eight setups in any order you specify, by simply using the ASSIGNABLE buttons or the pedal as you
play.
1 Select the desired Registration Memory Bank to set a sequence.
2 Call up the Registration Sequence display via [Menu] → [RegistSeq].
3 If you intend to use a pedal to switch the Registration Memory number, specify here how the
pedal will be used.
The pedal assigned to “Regist +” will be used for advancing through the sequence. The pedal assigned to “Regist -”
will be used for reversing through the sequence.
NOTE You can also assign the other functions to the pedal — Punch In/Out of Song (page 81) and the function set in the
Assignable display (page 37). If you assign multiple functions to the pedal, the priority is: Punch In/Out of Song
Registration Sequence the function set in the Assignable display.
If you intend to use the ASSIGNABLE button to switch the Registration Memory number, assign “Regist +” or
“Regist -” in the display called up via [Menu] → [Assignable] → [Assignable] (page 40).
4 Program a Sequence order in which the Registration Memory number is to be called up.
Basically, press the desired Registration Memory number button on the panel, then touch [Insert] to enter the
selected number.
, , , I
Moves the cursor.
NOTE If you want to move the cursor directly to an already entered number, touch the desired
number.
Replace
Replaces the number of the cursor location with the currently selected Registration
Memory number.
Insert
Inserts the number of the currently selected Registration Memory number before the
cursor position.
Delete
Deletes the number at the cursor position.
Clear
Deletes all numbers in the sequence.
36
7
5
4
Indicates the Registration
Memory numbers, in the
order of the current
Registration Sequence.
Current Registration
Bank name

Calling Up Registration Memory Numbers in Order (Registration Sequence)
CVP-609/605 Reference Manual
35
5 Set the behavior when the Registration Sequence reaches the end.
• Stop: Pressing the ASSIGNABLE button or the “advance” pedal has no effect. The sequence is “stopped.”
•
Top : The sequence starts again at the beginning.
•
Next: The sequence automatically moves to the beginning of the next Registration Memory Bank in the same
folder.
6 Set the Registration Sequence to “On.”
The Registration Sequence programmed here is shown in the Registration area of the Home display. Press the pedal
or the ASSIGNABLE button to check whether or not the Registration Memory number is called up in the order as
programmed.
7 Touch (Save) to call up the File Selection display, then save the sequence program as a
Registration Memory Bank file.
NOTICE
Settings in the Registration Sequence display will be lost if you select another Registration Bank without
executing the Save operation.

CVP-609/605 Reference Manual 36
Disabling Recall of Specific Items
(Freeze)
Registration Memory lets you recall all the panel setups you made with a single button press. However, there may be times
that you want certain items to remain the same, even when switching Registration Memory setups. For example, you may
want to switch Voice settings while keeping the same Style. This is where the Freeze function comes in handy. It lets you
maintain the settings of certain items and leave them unchanged, even when selecting other Registration Memory
buttons.
1 Enter the checkmark of the item to be “frozen.”
2 Set the Registration Freeze to “On.”
1
2

CVP-609/605 Reference Manual 37
Assigning a Specific Function to Each
Pedal or ASSIGNABLE button
To the three pedals of this instrument, you can assign one of various functions instead of the original functions (damper,
sostenuto and soft). To the Footswitch or Foot Controller connected to the [AUX PEDAL] jack, likewise, you can assign
one of various functions.
1 Select the function for each pedal.
For information about each function, refer to pages 38 - 39.
NOTE You can also assign the other functions to the pedal — Punch In/Out of Song (page 81) and Registration Sequence
(page 34). If you assign multiple functions to the pedal, the priority is: Punch In/Out of Song Registration Sequence
Functions assigned here.
2 Touch (Setting), then make the detailed settings of the selected functions.
For each Part, you can turn on or off the selected function and adjust the degree to which the selected function is
applied. Depending on the function selected in Step 1, the available parameters differ, or (Setting) is gray out
indicating that there is no available parameters.
3 If necessary, set the polarity of the footswitch or foot controller connected to the [AUX
PEDAL] jack.
Depending on the Footswitch or Foot Controller, it may work in the opposite way (i.e., pressing it has no effect, but
releasing it does). If such a case occurs, use this setting to reverse the polarity.
4 If you change the functions of the Center and Left pedals from the default settings, turn
“Depend On Main Voice(Center & Left)” on or off as desired.
When this is set to off, the function assignments of the Center and Left pedals are maintained even if the Main Voice
is changed (page 44).
Pedal
12
3
4

Assigning a Specific Function to Each Pedal or ASSIGNABLE button
CVP-609/605 Reference Manual
38
Assignable Pedal Functions
For functions indicated with “*”, use only the Foot Controller; proper operation cannot be done with a Footswitch.
For functions indicated with “**”, they can be assigned also to the ASSIGNABLE [1] – [4] buttons.
Articulation 1/2**
When you use a Super Articulation Voice that has an effect assigned to the pedal/
footswitch, you can enable the effect by pressing the pedal/footswitch.
Vol um e*
Controls the volume. This function is available only for the foot controller connected
to the instrument’s [AUX PEDAL] jack.
Sustain
Controls the sustain. When you press and hold the pedal, all notes played on the
keyboard have a longer sustain. Releasing the pedal immediately stops (damps) any
sustained notes. The “Half Pedal Point” parameter allows you to specify how far down
you should press on the pedal until the damper effect starts working. This can be set
for all pedals on the CVP-609, as well as the right pedal and the foot controller
connected to the [AUX PEDAL] jack on the CVP-605.
Sostenuto
Controls the Sostenuto effect. If you play a note or chord on the keyboard and press the
pedal while holding the note(s), the notes will sustain as long as the pedal is held.
However, all subsequent notes will not sustain. This makes it possible to sustain a
chord, for example, while other notes are played staccato.
NOTE This function will not affect any of the Organ Flutes and only some of the Super
Articulation Voices.
Soft
Controls the Soft effect. Pressing this pedal reduces the volume and changes the timbre
of the notes you play. This is effective only for certain appropriate Voices. The “Half
Pedal Point” parameter allows you to specify how far down you should press on the
pedal until the soft effect starts working. This can be set for all pedals on the CVP-609,
as well as the right pedal and the foot controller connected to the [AUX PEDAL] jack
on the CVP-605.
Glide
When the pedal is pressed, the pitch changes, and then returns to normal pitch when
the pedal is released.
•Up/Down:
Determines whether the pitch change goes up (is raised) or down (is
lowered).
•Range: Determines the range of the pitch change, in semitones.
• On Speed: Determines the speed of the pitch change when the pedal is pressed.
• Off Speed: Determines the speed of the pitch change when the pedal is released.
Portamento
The portamento effect (a smooth slide between notes) can be produced while the pedal
is pressed. Portamento is produced when notes are played legato style (i.e., a note is
played while the preceding note is still held). The portamento time can also be adjusted
form the Voice Edit display (page 42). This function does not affect certain Natural
Voices, which would not sound appropriately with this function.
NOTE This function will not affect any of the Organ Flutes, Super Articulation 2 Voices and only
some of the Super Articulation Voices.
Pitch Bend*
Allows you to bend the pitch of notes up or down by using the pedal. This function can
be assigned to all pedals on the CVP-609, as well as the right pedal and the foot
controller connected to the [AUX PEDAL] jack on the CVP-605.
•Up/Down:
Determines whether the pitch change goes up (is raised) or down (is
lowered).
•Range: Determines the range of the pitch change, in semitones.
Modulation*
Applies a vibrato effect to notes played on the keyboard. Moreover, various effects can
be added to the Super Articulation Voice. The effect becomes deeper when pressing
down the foot controller.
Modulation (Alt)
Unlike the Modulation above, pressing the pedal or footswitch alternates the on/off
status of the vibrato effect.
Effect Variation On/Off**
Switches the Insertion Effect Variation (page 44) on and off.

Assigning a Specific Function to Each Pedal or ASSIGNABLE button
CVP-609/605 Reference Manual
39
Vibe Rotor On/Off**
Switches the Vibe Rotor on and off when the Insertion Effect Type (page 44) is set to
“VIBE VIBRATE” in the “TREMOLO” category.
Keyboard Harmony On/
Off**
Switches the Keyboard Harmony (page 20) function on and off.
Vocal Harmony On/Off**
Switches the “Harmony” in the Vocal Harmony display on and off (pages 25, 28).
Vocal Harmony Effe ct
On/Off**
(only for CVP-609)
Switches the “Effect” in the Vocal Harmony display on and off (page 27).
Talk On/Off**
Switches between “Vocal” and “Talk” in the Microphone Setting display (page 22).
Score Page +/-**
While the Song is stopped, you can turn to the next/previous score page (one page at a
time).
Lyrics Page +/-**
While the Song is stopped, you can turn to the next/previous lyrics page (one page at a
time).
Text Page +/-**
You can turn to the next/previous text page (one page at a time).
Song Play/Pause
Same as the SONG CONTROL [ / ] (PLAY/PAUSE) button.
Style Start/Stop
Same as the STYLE CONTROL [ / ](START/STOP) button.
Tap Tempo
Same as the [TAP TEMPO] button.
Synchro Start
Same as the [SYNC START] button.
Synchro Stop
Same as the [SYNC STOP] button.
Intro 1 – 3
Same as the INTRO [I]–[III] buttons.
Main A – D
Same as the MAIN VARIATION [A]–[D] buttons
Fill Down
Plays a fill-in, which is automatically followed by the Main section of the button on the
immediate left.
Fill Self
Plays a fill-in.
Fill Break
Plays a break.
Fill Up
Plays a fill-in, which is automatically followed by the Main section of the button on the
immediate right.
Ending 1 – 3
Same as the ENDING/rit. [I]–[III] buttons.
Fade In/Out**
Switches Fade In /Fade Out function on and off.
Fingered/
Fingered On Bass**
The pedal alternately switches between the Fingered and On Bass modes (page 6).
Bass Hold
While the pedal is pressed, the Style bass note will be held even if the chord is changed
during Style playback. If the fingering is set to “AI Full Keyboard,” the function does
not work.
Percussion
The pedal plays a percussion instrument selected in the window called up via
(Setting). In this window, you can use the keyboard to select an instrument.
NOTE When you select the percussion instrument by pressing a key on the keyboard, the
velocity with which you press the key determines the percussion volume.
Main Voice On/Off**
Turns on or off the Main Voice.
Layer Voice On/Off**
Turns on or off the Layer Voice.
Left Voice On/Off**
Turns on or off the Left Voice.
OTS +/-
Calls up the next/previous One Touch Setting.

Assigning a Specific Function to Each Pedal or ASSIGNABLE button
CVP-609/605 Reference Manual
40
You can assign a specific function to each of the ASSIGNABLE [1] – [4] buttons, letting you call up often used functions
quickly. Likewise, you can also assign each of the icons shown in the Menu display to each of these buttons.
1 Select the item for each of ASSIGNABLE buttons.
You can assign the icons shown in the Menu display (with the exception of Assignable and Wireless LAN), Pedal
Functions marked with ** (page 38), and the following functions. If you want no function to be assigned, select “No
Assign.”
2 If necessary, touch (Setting) then make the detailed settings.
You can turn on or off the specified function for each Part. Depending on the selected function, (Setting) is
grayed out, indicating that there are no available parameters.
Assignable
Left Hold On/Off
Turns on or off the Left Hold.
Effect On/Off
Turns on or off the Effects.
Mono/Poly
Switches between the Mono (in which the Keyboard Voice is played monophonically with
the last note priority) and Poly (in which the Keyboard Voice is played polyphonically).
Depending on the Voice, Portamento may be produced when notes are played with legato.
Regist +/-
Calls up the next/previous Registration Memory number of the Registration Sequence.
12

CVP-609/605 Reference Manual 41
Editing a Voice (Voice Edit)
The Voice Edit feature allows you to create your own Voices by editing some parameters of the existing Voice. Once you’ve
created a Voice, you can save it as a User Voice for future recall. Here covers the Voices other than Organ Flutes Voices
because the Edit manner is different between them. For instructions on editing an Organ Flutes Voice, refer to page 45.
1 Select the desired Voice (other than an Organ Flutes Voice).
2 On the Voice Edit display called up via [Menu] → [Voice Edit], select the desired parameter
then edit the value.
For information about the editable parameters, refer to page 42.
By touching (Compare) repeatedly, you can compare the sound of the edited Voice with the original (unedited)
Voice.
3 Touch (Save) to save the edited Voice.
NOTICE
The settings will be lost if you select another Voice or turn the power to the instrument off without executing the
Save operation.
NOTE If you want to edit another Voice, touch the Voice name at the top of the Voice Edit display. Or, press the VOICE [MAIN/
LAYER/LEFT] button to select the Keyboard part to which the desired Voice is assigned, confirm the Voice name at the
top of the Voice Edit display, make the edits as desired, then execute the Save operation.

Editing a Voice (Voice Edit)
CVP-609/605 Reference Manual
42
Editable Parameters in the Voice Edit display
Common
Volu me
Adjusts the volume of the current edited Voice.
Tou ch S en s e Depth
Adjusts the touch sensitivity (velocity sensitivity), or how greatly the volume
responds to your playing strength.
•Depth:
Determines the velocity sensitivity, or how much the level of the Voice
changes in response to your playing strength (velocity).
•Offset: Determines the amount by which received velocities are adjusted for the
actual velocity effect.
Offset
Part Octave Main/Layer
Shifts the octave range of the edited Voice up or down in octaves. When the edited
Voice is used as any of the Main and Layer parts, the Main/Layer parameter is
available; when the edited Voice is used as the Left part, the Left parameter is
available.
Left
Mono Mono/Poly
Determines whether the edited Voice is played monophonically or polyphonically.
Portamento
Time
Sets the portamento time (pitch transition time) when the edited Voice is set to
“Mono” above.
NOTE The Portamento Time determines the pitch transition time. Portamento is a function
that creates a smooth transition in pitch from the first note played on the keyboard to
the next.
127
127
64
64
0
64
127
0
127
64
Touch Sense Depth
Changes the velocity curve according to
Velocity Depth (with Offset set to 64)
Touch Sense Offset
Changes to velocity curve according to Velocity
Offset (with Depth set to 64)
Actual Velocity for
tone generator
Depth = 127 (twice)
Depth = 64 (normal)
Depth = 32 (half)
Depth = 0
Received Velocity
(Actual Key-on speed)
Actual Velocity for
tone generator
Depends on
offset
Depends on
offset
Offset = 96 (+64) Offset = 127 (+127)
Offset = 64
(normal)
Offset = 32 (-64)
Received Velocity
(Actual Key-on speed)
Offset = 0 (-127)

Editing a Voice (Voice Edit)
CVP-609/605 Reference Manual
43
Sound
Filter
Filter is a processor that changes the timbre or tone of a sound by either blocking or passing a specific
frequency range. The parameters below determine the overall timbre of the sound by boosting or
cutting a certain frequency range. In addition to making the sound either brighter or mellower, Filter
can be used to produce electronic, synthesizer-like effects.
Brightness
Determines the cutoff frequency or effective
frequency range of the filter (see diagram).
Higher values result in a brighter sound.
Harmonic
Cont.
(Harmonic
Content)
Determines the emphasis given to the cutoff
frequency (resonance), set in Brightness
above (see diagram). Higher values result in
a more pronounced effect.
EG
The EG (Envelope Generator) settings determine how the
level of the sound changes in time. This lets you reproduce
many sound characteristics of natural acoustic instruments
— such as the quick attack and decay of percussion sounds,
or the long release of a sustained piano tone.
Attack
Determines how quickly the sound reaches its maximum level after the key is played.
The lower the value, the quicker the attack.
Decay
Determines how quickly the sound reaches its sustain level (a slightly lower level than
maximum). The lower the value, the quicker the decay.
Release
Determines how quickly the sound decays to silence after the key is released. The
lower the value, the quicker the decay.
Vibrato
Vibrato is a quavering, vibrating sound effect that is
produced by regularly modulating the pitch of the Voice.
Depth
Determines the intensity of the Vibrato effect. Higher settings result in a more
pronounced Vibrato.
Speed
Determines the speed of the Vibrato effect.
Delay
Determines the amount of time that elapses between the playing of a key and the start
of the Vibrato effect. Higher settings increase the delay of the Vibrato onset.
Modulation
When the Modulation function is assigned to a pedal (page 38), the pedal can be used to modulate the
parameters below as well as the pitch (vibrato). Here, you can set the degree to which the pedal
modulates each of the following parameters.
Filter
Determines the degree to which the pedal modulates the Filter Cutoff Frequency. For
details about the filter, refer to page 43.
Volume
Cutoff Frequency
These frequencies are
“passed” by the filter.
Cutoff
range
Frequency
(pitch)
Frequency (pitch)
Volume
Resonance
Level
Attack Decay Release
Sustain
Level
Key-on Key-off
Time
Pitch
Speed
Delay
Depth
Time

Editing a Voice (Voice Edit)
CVP-609/605 Reference Manual
44
Determines the Frequency and Gain of the EQ bands. For information about EQ, refer to page 10.
From this display, you can set the same parameters as those in the Keyboard Harmony display (step 2 on page 20). Before
making any settings, make sure that the current part is set to Main; in other words, you should select the Main part by
touching the Voice name at the top of the Voice Edit display, or by pressing the VOICE [MAIN/LAYER/LEFT] button.
The settings here are called up automatically simply by selecting the corresponding Voice.
This section allows you to select the function to be assigned to the center or left pedal. Before making any settings, make
sure that the current part is set to Main; in other words, you should select the Main part by touching the Voice name at the
top of the Voice Edit display, or by pressing the VOICE [MAIN/LAYER/LEFT] button. The settings here are called up
automatically simply by selecting the corresponding Voice. For details about the pedal function, refer to page 38.
Modulation
Amplitude
Determines the degree to which the pedal modulates the amplitude (volume).
LFO Pitch
Determines the degree to which the pedal modulates the pitch, or the vibrato effect.
LFO Filter
Determines the degree to which the pedal modulates the Filter Cutoff Frequency, or
the wah effect.
LFO
Amplitude
Determines the degree to which the pedal modulates the amplitude, or the tremolo
effect.
Effect
Insertion
Effect
On/Off
Turns the Insertion Effects on or off.
Type
Selects the Insertion Effect Type. Select the Category then select the Type.
Depth
Adjusts the Insertion Effect Depth.
Va ri at io n
Each Insertion Effect Type features the Variation which is turned off by default. You can use this
Variation by turning it on, and adjust the depth of this Variation Effect. (See below.)
(Variation
name)
This indicates the Variation name of the Insertion Effect Type, and lets you set the Insertion Effect
Depth when the Variation (above) is turned on.
Vibe Rotor
Available only if “VIBE VIBRATE” in the “TREMOLO” category is selected as the Insertion Effect
Type explained above. Determines whether VIBE VIBRATE should be set to on or off when
selecting the Voice.
Reverb Depth
Adjusts the Reverb Depth.
Chorus Depth
Adjusts the Chorus Depth.
EQ
Keyboard Harmony
Pedal

CVP-609/605 Reference Manual 45
Editing an Organ Flutes Voice (Voice Edit)
The Organ Flute Voices can be edited by adjusting the footage levers, adding the attack sound, applying effect and
equalizer, etc.
1 Select the desired Organ Flutes Voice.
From the [Organ] Category, touch [Organ Flutes], then select the desired Organ Flutes Voice.
2 On the Voice Edit display called up via [Menu] → [Voice Edit], select the desired parameter
then edit the value.
NOTE The Voice Edit display for the Organ Flutes Voices can also be called up by touching the Organ Flutes icon at upper right
of the Organ Flutes Voice name in the Home display. This is useful for adjusting footage settings and controlling the rotary
speaker while you play.
Footage
Determines the basic sound of the organ flutes.
Organ Type
Specifies the type of organ tone generation to be simulated.
•Sine:
Produces a clean, clear sound.
•Vintage: Produces a gritty, slightly distorted sound.
•Euro (only for CVP-609): Produces the sound of the transistor electronic organ
equipped with the electronic tremolo.
Vol um e
Adjusts the overall volume of the Organ Flutes.
Rotary Speaker
Turns on or off the Rotary Speaker and switches the Rotary Speaker speed between
the “Slow” and “Fast.” This is available only when an Effect Type of the ROTARY SP
Category is selected.
Vibrato
Turns on or off the vibrato, and adjusts its depth and speed.
Response
Affects both the attack and release (page 43) portion of the sound, increasing or
decreasing the response time of the initial swell and release, based on the Footage
controls. The higher the value, the slower the swell and release.
Attack
Selects “First” or “Each” as the Attack mode and adjusts the Attack length of the
sound.
In the First mode, attack (percussive sound) is applied only to the first notes played
and held simultaneously; while the first notes are held, any subsequently played
notes have no attack applied. In the Each mode, attack is applied equally to all notes.
The Attack length produces a longer or shorter decay immediately after the initial
attack. The longer the value, the longer the decay time.

Editing an Organ Flutes Voice (Voice Edit)
CVP-609/605 Reference Manual
46
3 As necessary, touch (Setting) then set the parameters related to the Effects and EQ.
The parameters are same as those in the Effect display and EQ display of the previous chapter “Editing a Voice
(Voice Edit)” (page 44).
4 Touch (Save) to save the created Organ Flutes Voice.
NOTICE
The settings will be lost if you select another Voice or turn the power to the instrument off without executing the
Save operation.
NOTE If you want to edit another Voice, touch the Voice name at the top of the Voice Edit display. Or, press the VOICE [MAIN/
LAYER/LEFT] button to select the Keyboard part to which the desired Voice is assigned, confirm the Voice name at the
top of the Voice Edit display, make the edits as desired, then execute the Save operation.

CVP-609/605 Reference Manual 47
Creating/Editing Styles (Style Creator)
The Style Creator function lets you create your original Style by recording the rhythm pattern via the keyboard
performance and using the already-recorded Style data. Basically, select a preset Style that is closest to the type you want
to create, then record the rhythm pattern, bass line, chord backing, or phrase (referred to as “Source Pattern” in the Style
Creator) for each channel of each Section. Like the Song, two Recording methods are available: Realtime Recording and
Step Recording (page 48).
Style Data Structure – Consisting of Source Patterns
A Style is made up of the different Sections (Intro, Main, Ending, etc.) and each Section has eight separate channels, each
of which is referred to as “Source Pattern.” With the Style Creator feature, you can create a Style by separately recording
the Source Pattern for each channel, or by importing pattern data from other existing Styles.
Basic Procedure for creating a Style
The detailed instructions are described on the reference page of each step.
1 Select the desired Style as starting data.
2 Call up the Style Creator display via [Menu] → [StyleCreator].
3 On the “Basic” display, select a Section (page 48).
As necessary, make the following settings.
• If you create a Style entirely from scratch, touch [Initialize Style] to make the current Style empty.
• If you initialize the Style, set the length (measure amount) of the Source Pattern.
• Set the overall parameters such as Tempo and Beat.
Main A
Main B
Fill In
Intro
Ending 2
Ending 3
Rhythm 1
Rhythm 2
Bass
Chord 1
Chord 2
Pad
Phrase 1
Phrase 2
Recording or copying from another Style
Recording or copying from another Style
Recording or copying from another Style
Recording or copying from another Style
Recording or copying from another Style
Recording or copying from another Style
Recording or copying from another Style
Recording or copying from another Style
Creating a Source
Pattern for each channel
separately

Creating/Editing Styles (Style Creator)
CVP-609/605 Reference Manual
48
4 Create the Source Pattern for each channel.
• Realtime Recording (page 49)
Lets you record the Style by simply playing the keyboard.
• Step Recording (page 52)
Lets you enter each note individually.
•Style Assembly (page 52)
Lets you copy various patterns from another preset Styles or Styles you have already created.
5 Edit the already recorded channel data.
• Channel Edit (page 53)
Lets you edit the MIDI data of the already recorded channels.
•SFF Edit (page 55)
Lets you edit the SFF (Style File Format) related parameters of the already recorded channels other than Rhythm
channels.
6 Repeat steps 3 – 5 as desired.
7 Touch (Save) at the top of the display to save the created Style.
The explanations here apply to step 3 on page 47. This display lets you set the basic parameters such as Section selection.
Basic
Initialize Style
Initializes all channel data of all Sections belonging to make the current Style empty. Touch here
when you want to create the Style data from scratch.
Section
Selects a Section for creating or editing.
Pattern length
Selects the length (in measures) of the current Section. After inputting the value, touch
[Execute] to actually enter the changes.
Te mp o
Sets the tempo of the Style. The setting here commonly applies to all Sections.
Beat
Sets the beat of the Style. The setting here commonly applies to all Sections. After inputting the
value, touch [Execute] to actually enter the changes.

Creating/Editing Styles (Style Creator)
CVP-609/605 Reference Manual
49
The explanations here apply to step 4 on page 48. In the “Rec Channel” display, you can create the channel data via the
Realtime Recording.
Recording Rhythm Channels 1 – 2
1 On the “Rec Channel” display, touch and hold the desired channel until it turns red.
The selected channel becomes the Recording target whether the channel already contains data or not. If recorded
data is already included, you should record the additional notes to the selected channel as Overdub Recording.
2 If necessary, select a Voice then practice the rhythm pattern to be recorded.
Touch the instrument icon (illustration) to call up the Voice Selection display then select the desired Voice such as
Drum Kit. After selecting, touch [Close] to return to the original display. With the selected Voice, practice the
rhythm pattern to be recorded.
Realtime Recording
Realtime Recording Characteristics in the Style Creator
Loop Recording
Style playback repeats the rhythm patterns of several measures in a “loop,” and Style recording is also done using
loops. For example, if you start recording with a two-measure Main section, the two measures are repeatedly
recorded. Notes that you record will play back from the next repetition (loop), letting you record while hearing
previously recorded material.
Overdub Recording
This method records new material to a channel already containing recorded data, without deleting the original data.
In Style recording, the recorded data is not deleted, except when using functions such as “Clear Drum Inst” (page 50)
“Delete” (pages 50, 51) and “Remove Event” (page 54). For example, if you start recording with a two-measure Main
section, the two measures are repeated many times. Notes that you record will play back from the next repetition,
letting you overdub new material to the loop while hearing previously recorded material. When creating a Style
based on an existing internal Style, overdub recording is applied only to the rhythm channels. For all other channels
(except rhythm), you need to delete the original data before recording.
Available Voices for recording
For the Rhythm1 channel, any except Organ Flutes Voices can be used for recording.
For the Rhythm2 channel, only Drum/SFX kits can be used for recording.
1
2

Creating/Editing Styles (Style Creator)
CVP-609/605 Reference Manual
50
3 Press the STYLE CONTROL [ / ](START/STOP) button to start recording.
Since already recorded data plays back, turn each channel on or off by touching as desired.
If necessary, delete a channel by touching [Delete] located under the desired channel.
4 As soon as loop playback returns to the first beat in the first measure, start playing the
rhythm pattern to be recorded.
If you feel difficult to play, it is a good idea to play as follows, for example.
If you make a mistake or play any wrong notes:
You can delete notes of a specific drum instrument. Touch [Clear Drum Inst] to call up a message, then press the
corresponding key on the keyboard while the message is shown. After deleting the desired drum instrument, touch
[Exit] to close the message.
5 Press the STYLE CONTROL [ / ](START/STOP) button to stop playback.
If you want to add more notes, press the [ / ] (START/STOP) button again to continue recording.
6 Touch and hold the Recording channel for a while (until the button changes color) to exit
from the Recording mode.
Recording Bass, Chord 1 – 2, Pad and Phrase 1 – 2
1 On the “Rec Channel” display, touch and hold the desired channel until it turns red.
If the selected channel already contains data, a confirmation message appears, prompting you whether or not to
delete the existing data of the selected channel. Touch [Yes] to delete data and the selected channel is specified as
Record target. Note that channel data other than the Rhythm channels of the preset Style cannot be overdubbed.
2 If necessary, select a Voice then practice the bass line, chord backing, or phrase to be
recorded.
Touch the instrument icon (illustration) to call up the Voice Selection display then select the desired Voice. After
selecting, touch [Close] to return to the original display. With the selected Voice, practice the phrase or chord
backing to be recorded.
Loop 1st round
Bass Drum
Loop 2nd round
Snare Drum
Bass Drum
Loop 3rd round
Hi-Hat
Snare Drum
Bass Drum

Creating/Editing Styles (Style Creator)
CVP-609/605 Reference Manual
51
Record a phrase in CM7 which will play appropriate notes as change chords during
performance
Rules when recording a Main or Fill-in
With the default initial settings, the Source Root/Chord is set to CM7. This means that you should record a Source
Pattern which is to be triggered by specifying CM7 during normal performance. Record a bass line, phrase or chord
backing which you want to hear when CM7 is specified. More concretely, see below.
• Use only the CM7 scale tones when recording the Bass and Phrase channels (i.e., C, D, E, G, A, and B).
• Use only the chord tones when recording the Chord and Pad channels (i.e., C, E, G, and B).
If you observe this rule, Style playback notes are appropriately converted depending on the chord changes you make
during your performance.
Rules when recording an Intro or Ending
These Sections are designed assuming that the chord is not changed during playback. This is why you need not
observe the rule for Main and Fill-In Sections described above, and you can make the chord progression in
recording. However, follow the rule below since the Source Root/Chord is set to CM7.
• When recording the Intro, make sure that the recorded phrase should lead to CM7 scale music.
• When recording the Ending, make sure that CM7 scale music should lead to the recorded phrase.
Setting the Source Root/Chord if necessary
Although the default Source Root/Chord is set to CM7 as described above, you can change this to your favorite one
which lets you play easily. Call up the “SFF Edit” display, set the Source Root and Chord to the favorite or desired
Root and Chord type. Keep in mind that when you change the Source Chord from the default CM7 to another
chord, the chord notes and recommended notes will also change. For details, refer to page 56.
3 Press the STYLE CONTROL [ / ](START/STOP) button to start recording.
With the already recorded data playing back, turn each channel on or off by touching as desired.
If necessary, delete a channel by touching [Delete] located under the desired channel.
4 As soon as loop playback returns to the first beat in the first measure, start playing the bass
line, chord backing or phrase to be recorded.
5 Press the [ / ](START/STOP) button to stop playback.
If you want to add more notes, press the [ / ](START/STOP) button again to continue recording.
To hear the playback sound of the already recorded channels with another Source Chord/
Root:
1) Call up the “SFF Edit” display, then set the “Target Ch” at the top of the display to “Rhythm1” or “Rhythm2.”
2) Touch [Play Root/Chord] to call up the operation display.
3) Press the STYLE CONTROL [ / ](START/STOP) button to start playback.
4) On the display, set the “Play Root/Chord” to the desired Chord root and Chord type.
This operation lets you hear how the Source Pattern is played back via the chord change during normal
performance.
6 Touch and hold the Recording channel for a while (until the button changes color) to exit
from the Recording mode.
Available Voices for recording
Any except for the Organ Flutes/Drum kit/SFX kit Voices can be used for recording.
C R C C R C
C = Chord note
C, R = Recommended note

Creating/Editing Styles (Style Creator)
CVP-609/605 Reference Manual
52
The explanations here apply to step 4 on page 48. In the Step Recording (Style Edit) display called up by touching
(Edit) at the upper right of the display, you can record or edit notes one by one. This Step Recording procedure is
essentially the same as that for Song Recording (page 60) with the exception of the points listed below:
• In the Song Creator, the “End” mark position can be changed freely; in the Style Creator, it cannot be changed. This is
because the length of the Style is fixed for all channels as you set in the “Basic” display (page 48). For example, if you
create a Style of four measures length, the “End” mark position is automatically set to the end of fourth measure, and
cannot be changed in the Style Edit display.
• Recording channels can be changed in the Song Creator’s Edit display; however, they cannot be changed in the Style
Creator. Select the Recording channel in the “Rec channel” display.
• In the Style Creator, Chord, Lyrics, and System Exclusive data cannot be entered. The Channel data can be entered and
System Exclusive data can be edited (delete, copy or move).
The explanations here apply to step 4 on page 48. The “Assembly” display shows that each channel data of the current
Section has been copied from which Style, which Section, and which channel. For each channel, touch the Style name,
Section name, or Channel name as necessary to select the desired one.
Step Recording
Assembly — Assigning the Source Pattern to Each Channel

Creating/Editing Styles (Style Creator)
CVP-609/605 Reference Manual
53
The explanations here apply to step 5 on page 48. The “Channel Edit” display lets you edit the already recorded channel
data. Select the Target channel then edit the desired parameters.
After editing the desired parameter, touch [Execute] to actually enter the edits for each setup window. When execution is
completed, this button changes to [Undo], letting you restore the original data if you are not satisfied with the results. The
Undo function only has one level; only the previous operation can be undone.
Channel Edit
Target Ch
Select the target channel to be edited. All items with the exception of the “Groove” are to be applied
to the channel specified here.
Groove
This lets you add swing to the music or change the “feel” of the beat by making subtle shifts in the
timing (clock) of the Style. The Groove settings are applied to all channels of the selected Section.
Original Beat
Specifies the beats to which Groove timing is to be applied. In other words, if “8
Beat” is selected, Groove timing is applied to the 8th notes; if “12 Beat” is
selected, Groove timing is applied to 8th-note triplets.
Beat Converter
Actually changes the timing of the beats (specified in the “Original Beat”
parameter above) to the selected value. For example, when Original Beat is set
to “8 Beat” and Beat Converter is set to “12,” all 8th notes in the section are
shifted to 8th-note triplet timing. The “16A” and “16B” Beat Converter which
appear when Original Beat is set to “12 Beat” are variations on a basic 16th-
note setting.
Swing
Produces a “swing” feel by shifting the timing of the back beats, depending on
the “Original Beat” parameter above. For example, if the specified Original
Beat value is “8 Beat”, the Swing parameter will selectively delay the 2nd, 4th,
6th, and 8th beats of each measure to create a swing feel. The settings “A”
through “E” produce different degrees of swing, with “A” being the most subtle
and “E” being the most pronounced.
Fine
Selects a variety of Groove “templates” to be applied to the selected section. The
“Push” settings cause certain beats to be played early, while “Heavy” settings
delay the timing of certain beats. The numbered settings (2, 3, 4, 5) determine
which beats are to be affected. All beats up to the specified beat — but not
including the first beat — will be played early or delayed (for example, the 2nd
and 3rd beats, if “3” is selected). In all cases, “A” types produce minimum effect,
“B” types produce medium effect, and “C” types produce maximum effect.

Creating/Editing Styles (Style Creator)
CVP-609/605 Reference Manual
54
Dynamics
This changes the velocity/volume (or accent) of certain notes in the Style playback. The Dynamics
settings are applied to each channel or all channels of the selected Style.
Accent Type
Determines the type of accent applied — in other words, which notes are
emphasized.
Strength
Determines how strongly the selected Accent Type (above) will be applied. The
higher the value, the stronger the effect.
Expand/
Compress
Expands or compresses the range of velocity values. Values higher than 100%
expand the dynamic range, while values lower than 100% compress it.
Boost/Cut
Boosts or cuts all velocity values. Values above 100% boost the overall velocity,
while values below 100% reduce it.
Apply To All
Channels
When set to “On,” the settings in this display will be applied to all the channels
of the current Section.
When set to “Off,” the settings in this display will be applied to the channel
specified at the “Target Ch” in the Channel Edit display.
Quantize
Same as in the Song Creator (page 69), with the exception of the two additional available parameters
below.
Eighth notes with swing
Sixteenth notes with swing
Vel oc it y
Boosts or cuts the velocity of all notes in the specified channel, according to the percentage specified
here.
Bar Copy
This function allows data to be copied from one measure or group of measures to another location
within the specified channel.
Source Top
Specifies the first (Source Top) and last (Source Last) measures in the region to
be copied.
Source Last
Destination
Specifies the first measure of the destination location, to which the data is to be
copied.
Bar Clear
This function clears all data from the specified range of measures within the selected channel.
Remove
Event
This function lets you remove specific events from the selected channel.

Creating/Editing Styles (Style Creator)
CVP-609/605 Reference Manual
55
The explanations here apply to step 5 on page 48. The Style File Format (SFF) combines all of Yamaha’s Style playback
know-how into a single unified format. Setting the SFF related parameters determines how the original notes are
converted to the actual sounded notes based on the chord you specify in the Chord area of the keyboard. The conversion
flow is shown below.
The parameters shown above can be set in the “SFF Edit” display.
SFF Edit — Making Style File Format Settings
Source Pattern settings
• Source Root
• Source Chord
Determines what key and what chord type are used for playing.
Note Conversion from the Source Pattern
• NTR (Conversion via the Chord Root change)....... page 56
• NTT (Conversion via the Chord Type change) ....... page 57
Octave Setting of the Converted Notes
• High Key (Upper octave limit of the Note Transposition)
• Note Limit (Note range between the highest and lowest notes)
Others
• RTR (How the note pitch changes in response to chord changes)
Set these parameters
before recording.
Set these parameters
after recording.
Actual Sounded Notes

Creating/Editing Styles (Style Creator)
CVP-609/605 Reference Manual
56
Target Ch
Select the target channel to be edited.
Source Root/
Chord
(Play Root/
Chord)
These settings determine the original key of the Source Pattern (i.e., the key used when recording
the pattern to the channel other than the Rhythm channels). If you set “Fm7” here, specifying
“Fm7” in the Chord section of the keyboard will play back the originally recorded data (Source
Pattern). The default setting is “CM7” (Source Root = C and Source Chord = M7). Depending on
the selected chord type specified here, the playable notes (scale notes and chord notes) differ. When
“Initialize Style” is executed in the “Basic” display, the default setting of CM7 is automatically
selected.
IMPORTANT
Make sure to set the parameters here before recording. If you change the settings after recording,
the recorded Source Pattern cannot be converted to the appropriate notes when changing the
chord during your keyboard performance.
NOTE When the parameters for the selected Target Ch are set to NTR: Root Fixed, NTT Type: Bypass, or NTT
Bass: Off, the parameters here are changed to “Play Root” and “Play Chord,” respectively. In this case,
you can change chords and hear the resulting sound for all channels.
NOTE The settings here are not applied when NTR is set to “Guitar.”
NTR/NTT
(Note
Transposition
Rule/Note
Transposition
Table)
The parameters here determine how the notes in the Source Pattern are converted according to the
chord changes during your keyboard performance.
NTR
Selects the Note Transposition Rule which determines how the notes in the Source
Pattern are transposed according to the Chord Root change.
Root Trans
When the root note is transposed, the interval between notes is
maintained. For example, the notes C3, E3 and G3 in the key of C
become F3, A3 and C4 when they are transposed to F. Use this setting for
channels that contain melody lines.
Root Fixed
The note is kept as close as possible to the previous note range. For
example, the notes C3, E3 and G3 in the key of C become C3, F3 and A3
when they are transposed to F. Use this setting for channels that contain
chord parts.
Guitar
This is exclusively for transposing guitar accompaniment. Notes are
transposed to approximate the chords played with natural guitar
fingering.
CR CR
C
Cm
CR CCR
C
Cm
6
CCR
CC
Cm
7
CR
RRCCC
Cm
ᅈ5
7
CC RC
CC
7
Cm
(9)
CR CC
CC
7
Cm
(11)
CR C CR
C
CmM
7
CC RC
C
Cm (9)
CCC
C
7
C
CC RC C
C
7
CmM
(9)
CR
CCR
Cdim
CR R RC
CCR
Cdim
7
CCC C
C
C
(9)
7
CRC
CC
C
ᅈ5
7
CRC CR
CC
C
(ᅊ11)
7
CCC
C
C sus
4
7
CRC CR
CMaj
CRC C CR
CM
7
CCC C CR
7
CM
(9)
CCC C RC
C
(9)
6
CRC
RCR
Caug
CRC C RC
CM
6
CRC C CR
C
7
CM
(ᅊ11)
CCC CR
CM add9
CRC CC
C
C
(13)
7
CCC
CC
C
(ᅈ9)
7
C
C
1+8
CC
C
1+5
CCC
RCC
C
(ᅊ9)
7
CRC
RCC
C aug
7
CRC CRR
C
CM aug
7
CCCR
RCC
C
(ᅈ13)
7
CR CC
Csus
4
CCR CR
C
1+2+5
Playable notes when Source Root is C:
C = Chord notes
C, R = Recommended notes
When playing a
C major chord.
When playing an
F major chord.
When playing a
C major chord.
When playing an
F major chord.

Creating/Editing Styles (Style Creator)
CVP-609/605 Reference Manual
57
NTR/NTT
(Note
Transposition
Rule/Note
Transposition
Table)
NTT
Type
Selects the Note Transposition Table which determines how the notes in the Source
Pattern are transposed according to the Chord Type change.
When NTR is set to “Root Trans” or “Root Fixed”:
Bypass
When NTR is set to Root Fixed, the transposition table used does not do
any note conversion. When NTR is set to Root Trans, the table used only
converts the notes by maintaining the pitch relationship between notes.
Melody
Suitable for melody line transposition. Use this for melody channels such
as “Phrase1” and “Phrase2.”
Chord
Suitable for chordal parts transposition. Use this for the “Chord1” and
“Chord2” channels, especially when they contain piano or guitar-like
chordal parts.
Melodic
Minor
When the played chord changes from a major to a minor chord, this table
lowers the third interval in the scale by a semitone. When the chord
changes from a minor to a major chord, the minor third interval is raised
by a semitone. Other notes are not changed. Use this for melody channels
of Sections which respond only to major/minor chords, such as Intros
and Endings.
Melodic
Minor 5th
In addition to the Melodic Minor transposition above, augmented and
diminished chords affect the 5th note of the Source Pattern.
Harmonic
Minor
When the played chord changes from a major to a minor chord, this table
lowers the third and sixth intervals in the scale by a semitone. When the
chord changes from a minor to a major chord, the minor third and flatted
sixth intervals are raised by a semitone. Other notes are not changed. Use
this for chord channels of Sections which respond only to major/minor
chords, such as Intros and Endings.
Harmonic
Minor 5th
In addition to the Harmonic Minor transposition above, augmented and
diminished chords affect the 5th note of the Source pattern.
Natural
Minor
When the played chord changes from a major to a minor chord, this
table lowers the third, sixth and seventh intervals in the scale by a
semitone. When the chord changes from a minor to a major chord, the
minor third, flatted sixth and flatted seventh intervals are raised by a
semitone. Other notes are not changed. Use this for chord channels of
Sections which respond only to a Major/minor chord such as Intros and
Endings.
Natural
Minor 5th
In addition to the Natural Minor transposition above, augmented and
diminished chords affect the 5th note of the Source pattern.
Dorian
When the played chord changes from a major to a minor chord, this
table lowers the third and seventh intervals in the scale by a semitone.
When the chord changes from a minor to a major chord, the minor third
and flatted seventh intervals are raised by a semitone. Other notes are
not changed. Use this for chord channels of Sections which respond only
to a Major/minor chord such as Intros and Endings.
Dorian 5th
In addition to the Dorian transposition above, augmented and
diminished chords affect the 5th note of the Source pattern.
When NTR is set to “Guitar”:
All Purpose
This table covers both stroke- and arpeggio-played sound.
Stroke
Suitable for stroke-played sound of the guitar. Some notes may sound as
if they are muted — this is normal condition when the chord is played on
guitar by stroke.

Creating/Editing Styles (Style Creator)
CVP-609/605 Reference Manual
58
NTR/NTT
(Note
Transposition
Rule/Note
Transposition
Table)
NTT
Type
Arpeggio
Suitable for arpeggio-played sound of the guitar, resulting in beautiful
four-note arpeggio sounds.
NTT
Bass
The channel for which this is set to “On” will be played back by the bass root note, when
the on-bass chord is recognized by the instrument. When NTR is set to Guitar and this
parameter is set to “On,” only the note which is assigned to bass will be played back by the
bass root note.
NTR/NTT Settings for the Rhythm Channels
Since the Rhythm channels should not be affected by Chord change, make sure to make the
following settings.
•
NTR = Root Fixed
• NTT = Bypass
• NTT Bass = Off
With the above settings, the “Source Root” and “Source Chord” parameters are changed to “Play
Root” and “Play Chord,” respectively.
High Key/Note
Limit
Adjusts the Octave of the notes converted via the NTT and NTR.
High Key
This sets the highest key (upper octave limit) of the note transposition
for the chord root change. Any notes calculated to be higher than the
highest key are transposed down to the next lowest octave. This setting is
available only when the NTR parameter (page 56) is set to “Root Trans.”
Note Limit Low
These set the note range (highest and lowest notes) for Voices recorded
to the Style channels. By judicious setting of this range, you can ensure
that the Voices sound as realistic as possible — in other words, that no
notes outside the natural range are sounded (e.g., high bass sounds or
low piccolo sounds).
Note Limit High
RTR
(Retrigger
Rule)
These settings determine whether notes stop sounding or not and how they change pitch in
response to chord changes.
Stop
The notes stop sounding.
Pitch Shift
The pitch of the note will bend without a new attack to match the type of
the new chord.
Pitch Shift to Root
The pitch of the note will bend without a new attack to match the root of
the new chord.
Retrigger
The note is retriggered with a new attack at a new pitch corresponding to
the next chord.
Retrigger to Root
The note is retriggered with a new attack at the root note of the next
chord. However, the octave of the new note remains the same.
CM
C3-E3-G3
FM
F3-A3-C4
FᅊM
Fᅊ2-Aᅊ2-Cᅊ3
CᅊM
Cᅊ3-F3-Gᅊ3
Root changes
Notes Played
Example — When the highest key is F.
CM
E3-G3-C4
FM
F3-A3-C4
CᅊM
F3-Gᅊ3-Cᅊ4
Root changes
Notes Played
Example — When the lowest note is C3 and the highest is D4.
High Limit
Low Limit

CVP-609/605 Reference Manual 59
Creating/Editing MIDI Songs (Song
Creator)
The Owner’s Manual covers how to create an original Song by recording your keyboard performance (see instructions of
Realtime Recording). This Reference Manual shows how to create an original Song by entering notes one by one
(instructions of the Step Recording) and how to improve the already created Song by editing the detailed parameters.
Realtime Recording and Step Recording
When creating a Song, these two Recording methods are available. With Realtime Recording, this instrument records the
performance data as it is played. With Step Recording, you can compose your performance by “writing” it down one event
at a time. For instructions about the Realtime Recording, refer to the Owner’s Manual. As the method of re-recording a
specific part of a Song in realtime, you can use the Punch In/Out (page 81).
This chapter covers mainly the instructions of Step Recording.
MIDI Song Data Structure
A MIDI Song consists of 16 MIDI channels. You can create data of a MIDI Song by recording your performance to a
specific channel or channels in realtime, or by executing the Step Recording.
Song
Channel 1
Channel 2
Channel 3
Channel 4
Channel 5
Channel 6
Channel 7
Channel 8
Channel 9
Channel 10
Channel 11
Channel 12
Channel 13
Channel 14
Channel 15
Channel 16
System Exclusive
Lyrics
Recording Part
(Default settings)
Main
Left
Layer
—
—
—
—
—
Rhythm 1
Rhythm 2
Bass
Chord 1
Chord 2
Pad
Phrase 1
Phrase 2
Keyboard Performance
• Realtime Recording:
By default, your keyboard performance will be
recorded to MIDI channels 1 – 3. You can also
record additional performances to channels 4 – 8.
•Step Recording:
Without specifying the keyboard part, you can
input the melodies or notes on the music notation
sheet one by one to the desired channel.
Style Playback
• Realtime Recording:
By default, Style playback will be recorded to MIDI
channels 9 – 16.
•Step Recording:
After inputting the Chord change/Section change
events, touch [Expand] to actually record the note
data to MIDI channels 9 – 16.

Creating/Editing MIDI Songs (Song Creator)
CVP-609/605 Reference Manual
60
Basic Procedure for creating a Song
This section covers the basic procedure for Step Recording.
1 Select the desired Song or call up a new empty Song.
If you want to call up an empty Song, press the [ ] (REC) button, then touch [New MIDI] and [Cancel] in order.
2 Call up the Song Creator display via [Menu] → [SongCreator].
3 Touch (Edit) at the top of this display to call up the Song Edit display.
4 Touch [Ch1] at the top left of this display to select the Recording Target channel.
• If you want to record the keyboard performance, select one of “Ch1” – “Ch8.” If you intend to not use Style playback for
the Song, “Ch9” – “Ch16” can be selected.
• If you want to edit the System Exclusive data, select “SysEx.”
• If you want to edit Lyrics, select “Lyrics.”
• If you want to record Style playback (Chord change and Section change events), select “Chord.”
5 According to selection in step 4, execute the Step Recording or data edits.
• When one of “Ch1” – “Ch16” is selected:
For instructions on editing already recorded data, refer to page 66.
For instructions on inputting melodies via Step Recording, touch [Step Rec] at the bottom left of the display then
refer to page 61.
• When “SysEx” is selected:
Edit the already recorded data, following the explanations on page 66. Step Recording is not available.
•When “Lyrics” is selected:
Edit the already recorded data, following the explanations on page 66. Step Recording is not available.
• When “Chord” is selected:
For instructions on editing already recorded data, refer to page 66.
For instructions on inputting Chord/Section Change events for Style playback via Step Recording, touch [Step
Rec] then refer to page 64.
6 If necessary, touch (Edit) to return to the portal display of the Song Creator, then
execute the Channel Edit function (page 69).
7 Touch (Save) at the top right of the display to save the created Song.
NOTICE
The recorded Song data will be lost if you select another Song or turn the power to the instrument off without
executing the Save operation.
4
3, 6 7

Creating/Editing MIDI Songs (Song Creator)
CVP-609/605 Reference Manual
61
The explanations here apply when one of “Ch1” – “Ch16” is selected in step 5 on page 60. With [Step Rec] turned on at
the bottom left of the display, you can input the notes one by one, using the controls below.
Control Names and Functions
Recording Melodies via Step Recording
Event List
Indicates events such as note and Voice selection which have been input. For details,
refer to page 67.
Song Position
(Measure: Beat:
Clock)
Indicates the current Song position. Events such as note and Voice selection you have
input are recorded at the position indicated here. You can change the current position
by touching [ ] or [ ] below the Measure, Beat, and Clock* respectively.
*Clock
Smallest unit for the Song position and note length. A quarter note consists of 1920 clocks.
Cursor
Lets you move the cursor position.
Step Rec
Turning this on shows the Step Recording display, and turning it off shows the Song
Edit display.
Vel oc it y
Determines the velocity (loudness) of the note to be entered. The velocity value can be
specified within a range from 1 to 127. The higher the velocity value, the louder the
sound becomes.
Kbd.Vel: Actual resulting velocity
Length
Determines the gate time (note length) of the note to be entered.
Manual: The gate time can be set to any desired percentage by using the Data dial.
127
111
95
79
63
47
31
15
80% 40%
99%
20%
Normal: Staccato:
Tenu to : Sta c c at i ss i mo :

Creating/Editing MIDI Songs (Song Creator)
CVP-609/605 Reference Manual
62
Example of Step Recording — Melodies
This section describes the instructions on inputting the melodies of the above notation via the Step Recording. Before
starting, note the following points:
• To input the note with the tie in step 4, you need to operate without releasing the key. Proceed with the operations,
reading the instructions carefully.
• Before inputting notes as described below, select the desired Voice by using the Voice buttons. Even if it has already
been selected, you need to re-select the same Voice to input the Voice number to the Event List. Keep in mind that only
note and Voice selection events can be input with Step Recording.
• Since the music score (called up via [Menu] → [Score]) is generated from the recorded MIDI data, it may not appear
exactly the same as shown above.
1 Enter the first and second notes with a slur.
1-1 Touch [Velocity] to select “ .”
1-2 Touch [Length] to select “99% (Tenuto).”
1-3 Touch [Note Type] once or twice to call up the dotted note type.
1-4 Touch the dotted quarter-note length ( ) to turn it on.
1-5 Press the C3 key.
With the operations above, the first note has been entered. Next, enter the second note.
1-6 Touch [Note Type] once or twice to call up the normal note indications.
1-7 Touch the eighth-note length ( ) to turn it on.
1-8 Press the D3 key.
The first and second notes are entered with a slur.
2 Enter the next notes with staccato.
2-1 Touch [Length] to select “40% (Staccato).”
2-2 Touch the quarter-note length ( ) to turn it on.
2-3 Play the keys E3 and F3 in order.
The first measure has been completed.
Note Type, Note
Indication
Touching [Note Type] repeatedly will alternate the type of the note indications at right
in order: normal, dotted, and triplet. Select one of three types, then select (turn on)
one of the note indications with which the next note is input. If you touch the selected
note indication (which is turned on) again, the rest will be input with the
corresponding length.
Delete
Deletes the selected data.
1234
* The numbers shown in the illustration correspond to the following operation step numbers.

Creating/Editing MIDI Songs (Song Creator)
CVP-609/605 Reference Manual
63
3 Enter a quarter-note rest.
Touch the quarter-note ( ) which is turned on only once to input a quarter-note rest.
Be careful not to touch the same note (which is turned on) several times. Doing so results in input the rests for the
corresponding times. The rests are not actually indicated as such in the Event List, but you can confirm whether it is
input or not by checking the Song Position.
4 Enter the next notes and apply a tie.
4-1 Touch [Velocity] to select “ .”
4-2 Touch [Length] to select “80% (Normal).”
4-3 While holding G3 key on the keyboard, touch quarter-note ( ).
Do not release the G3 key yet. Keep holding it while executing the following steps.
4-4 While holding the G3 key, press the C4 key.
Do not release the G3 and C4 keys yet. Keep holding the notes while executing the following step.
4-5 While holding the keys G3 and C4, touch half-note ( ).
After touching half-note ( ), release the keys.
The second measure has been completed.
5 Press the SONG CONTROL [ ](STOP) button to return to the top of the Song, then hear
the newly entered Song by pressing the [ / ](PLAY/PAUSE) button.

Creating/Editing MIDI Songs (Song Creator)
CVP-609/605 Reference Manual
64
The explanations here apply when “Chord” is selected in step 5 on page 60. With [Step Rec] turned on at the bottom left of
the display, you can input the Chord/Section Change events for Style playback one by one.
Control Names and Functions
Recording Chord/Section Change Events via Step Recording
Event List
Indicates events such as Chord change and Section change which have been input.
For details, refer to page 67.
Song Position
(Measure: Beat:
Clock)
Indicates the current Song position. Events such as Chord and Section change you
have input are recorded at the position indicated here. You can change the current
position by touching [ ] or [ ] below the Measure, Beat, and Clock* indications
respectively.
*Clock
Smallest unit for the Song position and note length. A quarter note consists of 1920 clocks.
Cursor
Lets you move the cursor position.
Step Rec
Turning this on shows the Step Recording display, and turning it off shows the Song
Edit display.
Note Indications
Select one of the four note indications with which the next event is input.
Delete
Deletes the selected data.

Creating/Editing MIDI Songs (Song Creator)
CVP-609/605 Reference Manual
65
Example of Step Recording — Chord/Section Events
These instructions show how to input the Chord/Section change events of the above notation via Step Recording. Before
starting, note the following points:
• Turn off the STYLE CONTROL [AUTO FILL IN] button on the panel.
• Select a conventional 4-beat Style.
1 Enter the chords for the Main A section.
1-1 Press the MAIN VARIATION [A] button.
1-2 Touch the half-note length ( ) to turn it on.
1-3 Play the chord C, F and G in the chord section of the keyboard.
2 Enter the chords for the Break section.
2-1 Press the [BREAK] button.
2-2 Touch the quarter-note length ( ) to turn it on.
2-3 Play the chords F and G7 in the chord section of the keyboard.
NOTE To enter fill-ins, turn the [AUTO FILL IN] button to on, and simply press the desired MAIN VARIATION [A]–[D] button.
C F G F G7 C
123
Main A Main BBreak
* The numbers shown in the illustration correspond to the following operation step numbers.
C
F
G
1-1
1-3
1-2
2-2
2-3
2-1
F
G7

Creating/Editing MIDI Songs (Song Creator)
CVP-609/605 Reference Manual
66
3 Enter the chords for the Main B section.
3-1 Press the MAIN VARIATION [B] button.
3-2 Touch the whole-note length ( ) to turn it on.
3-3 Play the chord C in the chord section of the keyboard.
The Chord change and Section change events are now entered.
4 Press the SONG CONTROL [ ](STOP) button to return to the top of the Song, then listen
to the newly entered Song by pressing the [ / ](PLAY/PAUSE) button.
5 Touch and turn off [Step Rec] to call up the Song Edit display.
6 Touch [Expand] at the upper left of the Song Edit display to convert the Chord/Section
change events to the Song data.
With the operations above (steps 1 – 3), only the events of Chord change and Section change are recorded, meaning
that the actual Song data has not been created and the Style part can produce no sound even if you start Song
playback after exiting from the Song Creator. Accordingly, make sure to execute the Expand function after you
finish inputting. If you have not finished inputting, save the Song to maintain the recorded events then continue
inputting in the future.
The explanations here apply to step 5 on page 60. From the Song Edit display, you can edit each of the events such as Note
data and Voice selection which are created via the Realtime Recording or Step Recording.
Editing the Recorded Data
C
3-1
3-2
3-3

Creating/Editing MIDI Songs (Song Creator)
CVP-609/605 Reference Manual
67
Recording
Targ et
Specifies the Recording Target.
• Ch 1 – Ch 16:
When one of these is selected, you can edit the channel data.
•SysEx: Lets you edit System Exclusive data which applies to all channels.
•Lyrics: Lets you edit Lyrics data.
•Chord: Lets you edit Chord/Section change events for Style playback.
Expand
This is shown only when “Chord” is selected above, and lets you convert the Chord/
Section Change events you input in the Step Recording display to the actual sounded note
data. Make sure to execute this function when finalizing Song data. If you exit from the
Song Creator without executing this function, starting Song playback produces no sound
of the Style part.
Event List
In this area, the events of the Song data are listed and can be edited. Each line shows one
event.
Depending on the Recording Target above ( ), the listed and editable events differ as
described below.
When the Recording Target is set to one of “Ch1” – “Ch16”:
Note
An individual note within a Song. Includes the note number
which corresponds to the key which was played, plus a velocity
value based on how hard the key is played, and the gate time
value (the length of a note).
Ctrl
(Control Change)
Settings to control the Voice, such as volume, pan, filter and effect
depth (edited via the Mixer), etc.
Prog
(Program Change)
MIDI program change number for selecting a Voice.
P. B n d
(Pitch Bend)
Data for changing the pitch of a Voice continuously.
A.T.
(Aftertouch)
This event is generated when pressure is applied to a key after the
key is pressed. Note that the keyboard of this instrument does not
feature Aftertouch.
When the Recording Target is set to “SysEx”:
ScBar
(Score Start Bar)
Determines the top measure number as the starting point of the
Song data.
Te mp o
Determines the tempo value.
Time
(Time signature)
Determines the time signature
Key
(Key signature)
Determines the key signature, as well as the major/minor setting,
for the music score shown on the display.
XGPrm
(XG parameters)
Allows you to make various detailed changes to the XG
parameters. Refer to the “MIDI Data Format” in the separate
Data List for details.
Indicates the Song position
(measure: beat: clock) of the
corresponding event.
Indicates the
event type.
Indicates the event value or detail.

Creating/Editing MIDI Songs (Song Creator)
CVP-609/605 Reference Manual
68
Event List Sys/Ex.
(System Exclusive)
Displays the System Exclusive data in the Song. Keep in mind that
you cannot create new data or change the contents of the data
here; however, you can delete, cut, copy, and paste the data.
Meta
(Meta event)
Displays the SMF meta events in the Song. Keep in mind that you
cannot create new data or change the contents of the data here;
however, you can delete, cut, copy, and paste the data.
When the Recording Target is set to “Lyrics”:
Name
Allows you to enter the Song name.
Lyrics
Allows you to enter lyrics.
Code
CR:
Enters a line break in the lyrics text.
LF: Clears the currently displayed lyrics and displays the next set
of lyrics.
When the Recording Target is set to “Chord”:
Style
Style name
Te mp o
Tempo setting
Chord
Chord root, Chord type, On Bass Chord
Sect (Section)
Style Section (Intro, Main, Fill In, Break, Ending)
OnOff
On/off status for each part (channel) of the Style
CH.Vol
(Channel Volume)
Volume for each part (channel) of the Style
S.Vol
(Style volume)
Overall volume of the Style
Song Position
(Measure: Beat:
Clock)
Indicates the current Song position. The events you input are recorded at the position
indicated here. You can change the current position by touching [ ] or [ ] below the
Measure, Beat, and Clock* indications respectively.
*Clock
Smallest unit for the Song position and note length. A quarter note consists of 1920 clocks.
Cursor
Lets you move the cursor position.
Step Rec
Turning this on shows the Step Recording display, and turning it off shows the Song Edit
display.
Event Filter
Calls up the Event Filter window, letting you select only the events you wish to be shown in
the event list.
: Checkmark all items.
: Remove checkmarks from all items.
: Invert checked/unchecked for all items.
Multi Select
After turning this on, use the Cursor buttons ( ) on the display to select multiple events.
Cut/Copy/Paste
Use these when you want to copy or move the selected events.
Insert
Adds a new event.
Delete
Deletes the selected events.
Cancel
Cancels editing and restores the original value.
-/+
Increases or decreases the value of the current cursor position by 1.

Creating/Editing MIDI Songs (Song Creator)
CVP-609/605 Reference Manual
69
The explanations here apply to step 6 on page 60. The Channel Edit display lets you correct or convert the specific portion
of the Song data.
After editing the desired parameter, touch [Execute] to actually enter the edits for each setup window. When execution is
completed, this button changes to [Undo], letting you restore the original data if you are not satisfied with the results. The
Undo function only has one level; only the previous operation can be undone.
Channel Edit — Editing Channel Data with a Single Touch
Target Ch
Select the target channel to be edited.
Quantize
The Quantize function allows you to align the timing of all the notes in a channel. For example, if
you record the musical phrase shown below, you may not play it with absolute precision, and your
performance may have been slightly ahead of or behind the precise timing. Quantize is a convenient
way of correcting for this.
Size
Selects the quantize size (resolution). For optimum results, you should set the
Quantize size to the shortest note value in the channel. For example, if eighth notes
are the shortest in the channel, you should use eighth note as the Quantize size.
Settings:
The three Quantize settings marked with asterisks (*) are exceptionally
convenient, since they allow you to quantize two different note values at the same
time. For example, when the straight eighth notes and eighth notes triplet are
contained in the same channel, if you quantize by the straight eighth notes, all
notes in the channel are quantized to straight eighth notes — completely
eliminating any triplet feel. However, if you use the eighth note + eighth note
triplet setting, both the straight and triplet notes will be quantized correctly.
After 1/8 note quantization
1/4 note
1/4 note
triplet
1/8 note 1/16 note 1/32 note 1/16 note+
1/8 note triplet*
1/8 note
triplet
1/16 note
triplet
1/8 note+
1/8 note triplet*
1/16 note+
1/16 note triplet*

Creating/Editing MIDI Songs (Song Creator)
CVP-609/605 Reference Manual
70
Quantize Strength
Determines how strongly the notes will be quantized. A setting of 100% produces
exact timing. If a value less than 100% is selected, notes will be moved toward the
specified quantization beats according to the specified percentage. Applying less
than 100% quantization lets you preserve some of the “human” feel in the
recording.
Delete
You can delete the data of the specified channel in the Song. Checkmark the desired channel whose
data you wish to delete by touching, then touch [Execute] to actually delete the data.
Mix
This function lets you mix the data of two channels and place the results in a different channel. It also
lets you copy the data from one channel to another.
Source 1 Ch
Determines the MIDI channel (1 – 16) to be mixed. All MIDI events of the channel
specified here are copied to the destination channel.
Source 2 Ch
Determines the MIDI channel (1 – 16) to be mixed. Only note events of the
channel specified here are copied to the destination channel. Besides the values 1 –
16, there is a “Copy” setting that allows you to copy the data from Source 1 to the
destination channel.
Destination
Ch
Determines the channel into which the mix or copy results will be placed.
Transp ose
This allows you to transpose the recorded data of individual channels up or down by a maximum of
two octaves in semitone increments.
1-16
Sets the Transpose value for each channel.
All -
Decreases the Transpose value for all channels by 1.
All +
Increases the Transpose value for all channels by 1.
NOTE Make sure not to transpose channels 9 and 10. In general, Drum kits are assigned to these channels. If
you transpose the channels of Drum kits, the instruments assigned to each key will be changed.
Setup
The current settings of the Mixer display and other panel settings can be recorded to the top position
of the Song as the Setup data. The Mixer and panel settings recorded here are automatically recalled
when the Song starts.
Checkmark the items of playback features and functions that you wish to automatically be called up
along with the selected Song.
NOTE Before executing the Setup operation, move the Song position to the top of the Song by pressing the
SONG [STOP] button.
Original data (assuming 4/4 meter)
Quantizing strength = 100%
Quantizing strength = 50%
Quarter-note length

CVP-609/605 Reference Manual 71
Voice Settings
Lets you adjust the pitch related parameters for each keyboard part.
Lets you set the Piano related parameters which are available only for some of the piano Voices in the “Piano” category
(listed in the “Target Voice List” on page 72).
Tune
Tun ing
Determines the pitch of each keyboard part.
Octave
Determines the range of the pitch change in octaves, over two octaves up or down for each keyboard
part.
Pitch Bend
Range
Determines the range of the Pitch Bend for each keyboard part in semitones when the “Pitch Bend”
or “Glide” function is assigned to a pedal (page 38).
Portamento
Time
Portamento is a function that creates a smooth transition in pitch from the first note played on the
keyboard to the next. The Portamento Time determines the pitch transition time. Higher values
result in a longer pitch change time. Setting this to “0” results in no effect. This parameter is available
for the keyboard part which is set to “Mono” (page 42).
Piano
Tuning Curve
Determines the tuning curve. Select “Flat” if you feel the tuning curve of the piano Voice does
not quite match that of other instruments Voices.
•Stretch:
Tuning curve particularly for pianos.
•Flat: Tuning curve in which the frequency is octave doubled over the entire keyboard range.
Key Off Sampling
Adjusts the volume of the key-off sound (the subtle sound that occurs when you release a key).
Sustain Sampling
Adjusts the depth of sustain sampling for the damper pedal.
String Resonance
Adjusts the depth of string resonance.

Voice Settings
CVP-609/605 Reference Manual
72
Target Voice List
: Available, —: Not available
Each Voice is linked to its default Voice Set parameter settings, equivalent to those in the Voice Edit display (page 41) for
the Voices other than the Organ Flutes Voices. Although usually these settings are automatically called up by selecting a
Voice, you can also disable this feature. For example, if you want to change the Voice yet keep the same Harmony effect,
remove the checkmark of “Keyboard Harmony.”
Voice Name Tun ing
Curve
Key Off
Sampling
Sustain
Sampling
String
Resonance
Concert Grand
Grand Piano ———
Mellow Piano
Pop Grand 1
Rock Piano
Grand 1 octave
Grand 2 octave
Bright Piano
Ballad Grand 1 —
Ballad Grand 2 —
Piano & Strings —
Grand Pad Layer —
Piano & EP1 (CVP-609) —
Piano & Choir (CVP-609) —
Piano & EP2 (CVP-609) —
Piano & Pad (CVP-609) —
Piano & EP (CVP-605) —
Voice Set
Setting
Category Button
Determines how the Voice Selection display is opened when one of the VOICE
category buttons is pressed.
•Open & Select:
Opens the Voice Selection display with the previously selected Voice
in the Voice category automatically selected (when one of the VOICE category
buttons is pressed).
• Open Only: Opens the Voice Selection display with the currently selected Voice
(when one of the VOICE category buttons is pressed).
S.Art2 Auto Articulation
(only for CVP-609)
Determines whether articulation is added to S.Articulation2! Voices automatically.

Voice Settings
CVP-609/605 Reference Manual
73
In the Voice Selection display, icons defining the Voice characteristics are indicated at left of the Voice name, and detailed
information for the selected Voice can be called up by touching (Information).
Voice Characteristics
Natural!
These rich and luscious Voices are comprised mostly of keyboard instrument sounds
and are especially intended for playing piano and other keyboard parts. They also take
full advantage of Yamaha’s advanced sampling technology such as Stereo Sampling,
Sustain Sampling, and Key-off Sampling.
S.Articulation!
S.Articulation2!
(only for CVP-609)
The word “articulation” in music usually refers to the transition or continuity between
notes. This is often reflected in specific performance techniques, such as staccato,
legato and slur. Two types of Voices — Super Articulation (S.Articulation!) Voices and
Super Articulation 2 (S.Articulation2!) Voices — enable you to create these subtle
musical expressions, simply by how you play.
Live!
These acoustic instrument sounds were sampled in stereo, to produce a truly
authentic, rich sound — full of atmosphere and ambience.
Cool!
These Voices capture the dynamic textures and subtle nuances of electric instruments
— thanks to a huge amount of memory and sophisticated programming.
Sweet!
These acoustic instrument sounds also benefit from Yamaha’s sophisticated
technology — and feature a finely detailed and natural sound.
Drums
Various drum and percussion sounds are assigned to individual keys, letting you play
the sounds from the keyboard. For information about what sound is assigned to each
key, refer to the separate “Data List” (Drum/key Assignment List).
Live!Drums
(only for CVP-609)
These are high-quality drum sounds taking full advantage of Stereo Sampled sounds
from acoustic instruments.
SFX
Various special effect sounds are assigned to individual keys, letting you play the
sounds from the keyboard. For information about what sound is assigned to each key,
refer to the separate “Data List” (Drum/key Assignment List).
Live!SFX
(only for CVP-609)
These are high-quality percussion or SFX sounds taking full advantage of Stereo
Sampled sounds from acoustic instruments. They give you a broader and more
versatile range of sounds than the normal Drum of SFX Voices.
Organ Flutes!
This authentic organ Voice lets you adjust the various footages and craft your own
original organ sounds. See page 45 for details.

Voice Settings
CVP-609/605 Reference Manual
74
MegaVoice
These Voices make special use of velocity switching. Normal Voices use velocity
switching, too — to change the sound quality and/or level of a Voice according to how
strongly or softly you play it. This makes the Voice sound authentic and natural. With
MegaVoices, however, each velocity range (the measure of your playing strength) has a
completely different sound. For example, a guitar MegaVoice includes the sounds of
various performance techniques. In conventional instruments, different Voices having
those sounds would be called up via MIDI and played in combination to achieve the
desired effect. However, now with MegaVoices, a convincing guitar part can be played
with just a single Voice, using specific velocity values to play the desired sounds.
Because of the complex nature of these Voices and the precise velocities need to play
the sounds, they’re not intended for playing from the keyboard. They are, however,
very useful and convenient when creating MIDI data — especially when you want to
avoid using several different Voices just for a single instrument part.
Actual sound maps for the MegaVoices are given in the separate Data List booklet.
NOTE MegaVoices are not compatible with other models. Any Song or Style data you’ve
created on this instrument using the MegaVoices will not sound properly when played
back on other instruments which do not feature the same MegaVoices.
NOTE MegaVoices will sound differently depending on the keyboard range, velocity, touch,
etc. Hence, if you apply the Keyboard Harmony effect, change the transpose setting or
change the Voice Set parameters, unexpected or undesired sounds may result.
Regular
Other Voices including GM Voices and XG Voices.
Converting the Voices of a MIDI Song to MegaVoices (MEGAEnhancer)
MEGAEnhancer is a software program that converts XG/GM song data (Standard MIDI File) to Song data specially
enhanced to be played back using an instrument or tone generator containing MegaVoices. With the use of the
sophisticated MegaVoices, MEGAEnhancer automatically makes conventional Song files — with guitar and bass
parts — sound much more realistic and authentic. MEGAEnhancer can be downloaded from the following website.
Yamaha Downloads
http://download.yamaha.com/

Voice Settings
CVP-609/605 Reference Manual
75
This instrument features GM Voices, XG Voices, and special Voices for Style playback. These Voices can be called up from
the “Others” category in the Voice Selection display.
1 From the Home display, touch the Voice name of the desired part to call up the Voice
Selection display.
2 Touch the tab of the “Others” category.
3 Touch (Upward) several times to call up the root directory of “Others.”
4 Touch the desired category such as “GM&XG” and “StyleVoices.”
NOTE You can find the “Legacy” folder in this display. This folder contains previous Yamaha Clavinova Voices (such as CVP-
509, 505 etc.) for data compatibility with other models.
5 Select the desired Voice.
Selecting GM/XG or Style Voices
12
3

CVP-609/605 Reference Manual 76
Style Playback Related Settings
Setting
Display Tempo
Turns on or off the tempo indication for each Style on the Style Selection display.
Stop ACMP
When the [ACMP ON/OFF] button is on, [SYNC START] is off, and this parameter is
set to the value other than “Disabled,” you can play chords in the chord section of the
keyboard with the Style stopped, and still hear the accompaniment chord. In this
condition — called “Stop Accompaniment” — any valid chord fingerings are
recognized and the chord root/type are shown in the Style area of the Home display.
Here, you can determine whether the chord played in the chord section will sound or
not in the Stop Accompaniment status.
•Disabled:
Disables the Stop Accompaniment feature. When Style playback is stopped,
any pressed notes in the chord section of the keyboard will not be recognized as chords.
•Off: The chord played in the chord section will not sound.
•Style: The chord played in the chord section will sound via the Voices for the Pad part
and the Bass channel of the selected Style.
•Fixed: The chord played in the chord section will sound via the specified Voice,
regardless of the selected Style.
NOTE When the selected Style contains MegaVoices, unexpected sounds may result when this
is set to “Style.”
NOTE If you record a Song using the Stop Accompaniment, both the Voice that is sounded and
the chord data will be recorded when set to “Style,” and only the chord data will be
recorded when set to “Off” or “Fixed.”
NOTE When this is set to “Disabled,” chords are not recognized while the Style is stopped. This
is why both Vocal Harmony (with the Chordal mode) and Keyboard Harmony are not
applied even if you play a chord in the chord section of the keyboard while the Style is
stopped.
ACMP On/Off Default
Determines whether the [ACMP ON/OFF] button is on or off when the power is
turned on.

Style Playback Related Settings
CVP-609/605 Reference Manual
77
OTS Link Timing
This applies to the OTS Link function. This parameter determines the timing in which
the One Touch Settings change with the MAIN VARIATION [A] – [D] change. (The
[OTS LINK] button must be on.)
•Real Time:
One Touch Setting is immediately called up when you press a MAIN
VARIATION button.
•Next Bar: One Touch Setting is called up at the next measure, after you press a MAIN
VARIATION button.
Synchro Stop Window
This determines how long you can hold a chord before the Synchro Stop function is
automatically cancelled. When the [SYNC STOP] button is turned on and this is set to
a value other than “Off,” this is automatically cancels the Synchro Stop function if you
hold a chord for longer than the time set here. This conveniently resets Style playback
control to normal, letting you release the keys and still have the Style play. In other
words, if you release the keys sooner than the time set here, the Synchro Stop function
works.
Style Touch Response
Turns touch response for the Style playback on/off. When this is set to “On,” the Style
volume changes in response to your playing strength in the chord section of the
keyboard.
Change Behavior
Section Set
Determines the default section that is automatically called up when selecting different
Styles (when Style playback is stopped). When set to “Off” and Style playback is
stopped, the active section is maintained even if the different Style is selected. When
any of the MAIN A–D sections is not included in the Style data, the nearest Section is
automatically selected. For example, when MAIN D is not contained in the selected
Style, MAIN C will be called up.
Te mp o
This determines whether the tempo changes or not when you change the Style.
•Lock:
Regardless of playback status, the tempo setting of the previous Style is
maintained.
•Hold: While the Style is playing back, the tempo setting of the previous Style is
maintained. While the Style is stopped, the tempo changes to that of the default tempo of
the selected Style.
• Reset: Regardless of playback status, the tempo changes to that of the default tempo for
the selected Style.
Part On/Off
This determines whether the Style Channel on/off status changes or not when you
change the Style.
•Lock:
Regardless of playback status, the Channel on/off status of the previous Style is
maintained.
•Hold: While the Style is playing back, the Channel on/off status of the previous Style is
maintained. While the Style is stopping, all Channels of the selected Style are set to on.
• Reset: Regardless of playback status, all Channels of the selected Style are set to on.
Music
Finder
Te mp o
This determines whether the tempo changes or not when you change the Style by
using the Music Finder.
•Lock:
Regardless of playback status, the tempo setting of the previous Style is
maintained.
•Hold: While the Style is playing back, the tempo setting of the previous Style is
maintained. While the Style is stopped, the tempo changes to that of the default tempo of
the selected Style.
• Reset: Regardless of playback status, the tempo changes to that of the default tempo of
the selected Style.

Style Playback Related Settings
CVP-609/605 Reference Manual
78
Style Characteristics
On the Style Selection display, icons defining the Style characteristics are indicated at left of the Style name.
•
Pro: These Styles provide professional and exciting arrangements combined with perfect playability. The resulting
accompaniment exactly follows the chords of the player. As a result, your chord changes and colorful harmonies
are instantly transformed into lifelike musical accompaniment.
•
Session: These Styles provide even greater realism and authentic backing by mixing in original chord types and
changes, as well as special riffs with chord changes, with the Main sections. These have been programmed to add
“spice” and a professional touch to your performances of certain songs and in certain genres. Keep in mind,
however, that the Styles may not necessarily be appropriate or even harmonically correct for all songs and for all
chord playing. In some cases for example, playing a simple major triad for a country song may result in a “jazzy”
seventh chord, or playing an on-bass chord may result in inappropriate or unexpected accompaniment.
•
Free Play: These Styles are characterized by rubato performance. You can perform freely with remarkably
expressive accompaniment without being constrained by a strict tempo.
•
Pianist: These special Styles provide piano-only accompaniment. Just by playing the proper chords with your left
hand, you can automatically add complicated, professional-sounding arpeggios and bass/chord patterns.

CVP-609/605 Reference Manual 79
Song Settings Related to Playback/Recording
If you use the Guide function, the keyboard guide lamps indicate the notes (location and timing) for you to play. Also,
when you sing along with a MIDI Song playback using a connected microphone, the instrument automatically adjusts the
timing of the MIDI Song playback to match your vocal performance.
The Guide function can be turned on from the Song area (with expanded) of the Home display, Score display, Lyrics
display and Text display. For instructions on how to use Guide function, refer to the Owner’s Manual. Here covers the
detailed parameters about the Guide function.
NOTE The Guide settings can be saved as a part of Song data (page 70). By selecting the saved Song next time, you can call up the
Guide settings.
Guide
Type
Lets you select the Guide type.
Guide menu for keyboard practice
•Follow Lights: With this function, the keyboard guide lamps indicate which notes you should play.
Song playback pauses and waits for you to play. When you play the correct notes, Song playback
continues.
•Any Key: With this function, you can play the melody of a Song just by pressing a single key (any key is
OK) in time with the rhythm. Song playback pauses and waits for you to play any key. Simply play a key
on the keyboard in time with the music and Song playback continues.
•Your Tempo: Basically the same as “Follow Lights.” In addition, playback tempo will change to match
the speed at which you are playing.
Guide menu for singing
•Karao-Key: This function lets you control the Song playback timing with just one finger, while you
sing along. This is useful for singing to your own performance. Song playback pauses, waiting for you to
sing. Simply play a key on the keyboard (any key is fine) and Song playback continues.
Lamp
Activates or deactivates the keyboard guide lamp.
NOTE If the Guide Lamps do not light as intended, in the “Part Ch” display, set the Right to “Ch1” then set the
Left to “Ch2.”
Lamp
Timing
Determines the timing by which the keyboard guide lamps light.
•Just:
The guide lamps light in time with the music, at the same timing you should play.
•Next: The guide lamps light slightly ahead of the music, indicating the notes you should play next. The
guide lamps flash if you fail to play the keys with the correct timing.

Song Settings Related to Playback/Recording
CVP-609/605 Reference Manual
80
Part Ch
Right
Determines which channel is assigned to the right-hand part.
Left
Determines which channel is assigned to the left-hand part.
Auto Set
When set to “On,” this automatically sets the proper MIDI channels for the right- and left hand parts
pre-programmed in the commercially available Song data. Normally, this should be set to “On.”
Lyrics
Language
Determines the language of the displayed lyrics.
•Auto:
When the language is specified in the Song data, the lyrics are displayed accordingly. When the
language is not specified in the Song data, the lyrics language is regarded as “International” below.
•International: Handles the displayed lyrics as a western language.
• Japanese: Handles the displayed lyrics as Japanese.
Play
Repeat Mode
Determines how playback of the current MIDI Song or Audio Song is repeated.
•Off:
Plays through the selected Song, then stops.
•Single: Plays through the selected Song repeatedly.
•All: Continues playback through all the Songs in the specified folder repeatedly.
•Random: Continues playback at random through all the Songs in the specified folder
repeatedly.
NOTE The preset Songs in the “Follow Lights” folder contain the Guide settings. These Songs are
inappropriate for use with All” or Random repeat.
Phrase Mark
Repeat
Phrase Mark is a pre-programmed part of some Song data, which specifies a certain location
(set of measures) in the Song. When this is “On,” the section corresponding to the specified
Phrase Mark number is repeatedly played back. This parameter is available only when the
MIDI Song containing Phrase Mark settings is selected.
Quick Start
On some commercially available MIDI Song data, certain settings related to the MIDI Song
(such as Voice selection, volume, etc.) are recorded to the first measure, before the actual note
data. When Quick Start is set to “On,” the instrument reads all initial non-note data of the
Song at the highest possible speed, then automatically switches to the appropriate tempo at
the first note. This allows you to start playback as quickly as possible, with a minimum pause
for reading of data.
MIDI Song Fast
Forward Type (*)
Determines the fast forward type of when pressing [ ] during MIDI Song playback.
•Jump:
Pressing [ ] once instantly sets the playback position to the next measure without
sounding. Holding [ ] scrolls forward continuously.
•Scrub: Pressing and holding [ ] plays and sounds the MIDI Song at high speed.
USB MIDI Song
Auto Open
When this is set to “On,” connecting the USB flash memory will call up the first MIDI Song in
the USB flash memory.
Performance
Assistant
Refer to page 81.

Song Settings Related to Playback/Recording
CVP-609/605 Reference Manual
81
*: Version 1.20 or later.
Playing Backing Parts with the Performance Assistant Technology
This feature lets you play your own backing parts on the keyboard along with MIDI Song playback, and have them sound
perfectly appropriate (even though the notes you play might be wrong).
1 Select a MIDI Song containing chord data.
The Performance Assistant Technology is applied only to MIDI Songs containing chord data. To confirm whether
the selected Song contains chord data or not, call up the Home display with the Style area shown then start playback
the Song. If the current Song contains chord data, the current chord type appears in the Style area. After stopping
playback, go to the next step.
2 Call up the operation display via [Menu] → [SongSetting] → [Play].
3 Set the Performance Assistant to “On.”
NOTE Selecting a Song will turn off the Performance Assistant.
4 Press the SONG CONTROL [ / ] (PLAY/PAUSE) button to start playback.
5 Play the keyboard.
Along with MIDI Song playback, try playing the bass line with the left hand area while playing various phrases or
chords with the right hand area. Even if you do not know what notes should be played, don’t worry and play any
keys as desired! Only the harmonically “correct” notes matching the current chord are sounded, regardless of the
notes you actually play.
6 Press the SONG CONTROL [ ](STOP) button to stop playback.
Re-Recording a Specific Section of the MIDI Song — Punch In/Out
When re-recording a specific section of an already-recorded MIDI Song, use the Punch In/Out function. In this method,
only the data between the Punch In point and the Punch Out point is overwritten with the newly recorded data. Keep in
mind that the notes before and after the Punch In/Out points are not recorded over, although you will hear them play
back normally to guide you in the Punch In/Out timing.
1 Call up the operation display via [Menu] → [SongSetting] → [Rec] → Page 1/2.
2 Set the parameters such as how the Recording starts/stops and Punch In/Out position.
NOTE The parameters here cannot be set while recording.
Chord Detection
Priority (*)
Determines the priority of the chords for accompaniment, either the ones contained in the
MIDI Song being played back or the chord you’ve just played in the chord section of the
keyboard.
•MIDI Song:
Gives priority to the chords contained in the MIDI Song.
•Keyboard: Gives priority to the chords you play in the chord section of the keyboard. Set this if
you want to practice playing chords with MIDI Song playback. Once you play in the chord
section during MIDI song playback, the instrument ignores the chords contained in the MIDI
Song until the playback ends.
Rec

Song Settings Related to Playback/Recording
CVP-609/605 Reference Manual
82
3 Select a MIDI Song to be re-recorded.
4 Press the [ ](REC) button to call up the Song Recording display.
If the Channel area is not shown, touch [ ] at the left of “Channel.”
5 Turn on the channel to be re-recorded.
NOTE For details about the recording channels, refer to the Owner’s Manual.
Mode Rec Start
Determines the Punch In timing.
•Normal:
Overwrite recording starts when the Song playback is started via
the SONG [ / ] (PLAY/PAUSE) button or when you play the keyboard in
the Synchro Standby mode.
•First Key On: The Song plays back normally, then starts overwrite recording
as soon as you play the keyboard.
•Punch In At: The Song plays back normally up to the beginning of the
“Punch In At” measure specified in the Punch In/Out parameter below, then
starts overwrite recording at that point.
Mode Rec Stop
Determines the Punch Out timing.
•Replace All:
This deletes all data after the point at which recording is
stopped.
•Punch Out: The Song position at which recording is stopped is regarded as
the Punch Out point. This setting maintains all data after the point at which
recording is stopped.
•Punch Out At: Actual overwrite recording continues until the beginning of
the “Punch Out” measure specified in the Punch In/Out parameter below, at
which point recording stops and normal playback continues. This setting
maintains all data after the point at which recording is stopped.
Punch In/
Out
Punch In At
Specifies the Punch In measure.
Punch Out At
Specifies the Punch Out measure.
Pedal Control
When this is set to “On,” you can use the center pedal to control the Punch
In and Punch Out points. While a Song is playing back, pressing (and
holding) the center pedal instantly enables Punch In recording, while
releasing the pedal stops recording (Punch Out). You can press and release
the center pedal as often as you want during playback. Note that the current
function assignment of the center pedal is cancelled when the Pedal Punch
In/Out function is set to “On.”
NOTE Pedal Punch In/Out operation may be reversed depending on the particular
pedal you’ve connected to the instrument. If necessary, change the pedal
polarity to reverse the control (page 37).

Song Settings Related to Playback/Recording
CVP-609/605 Reference Manual
83
6 Press the SONG CONTROL [ / ] (PLAY/PAUSE) button to start recording.
At the Punch In point specified in step 2, play the keyboard to start actual recording. At the Punch Out point
specified in step 2, stop playing the keyboard.
7 Touch (Save) which appears in the Song area of the Home display to save the recorded
Song.
NOTICE
The recorded Song data will be lost if you select another Song or turn the power to the instrument off without
executing the Save operation.
Examples of re-recording with various Punch In/Out settings
This instrument features several different ways you use the Punch In/Out function. The illustrations below indicate a
variety of situations in which selected measures in an eight-measure phrase are re-recorded.
Setting the Audio File Format saved via the Audio Recording
From the display called up via [Menu] → [SongSetting] → [Rec] → page 2/2, you can specify the Audio file format saved via
the Audio recording.
Audio Rec Format
•WAV: Your performance will be recorded in WAV format which features higher
audio quality than MP3, but the file size will be larger.
• MP3 64/96/128/256/320kbps: Your performance will be recorded in MP3 format
(MPEG-1 Audio Layer-3). The larger the value, the higher the quality, and the larger
the data size.
12345678
12345
12345678
12345678
12345
12345678
12345678
12345
12345678
6812345 7
Recording Start setting
Recording Stop setting
Normal
Replace All
Normal
Punch Out
Normal
Punch Out at 006
First Key On
Replace All
First Key On
Punch Out
First Key On
Punch Out at 006
Punch In at 003
Replace All
Punch In at 003
Punch Out
Punch In at 003
Punch Out at 006
Original data
Start overwrite recording *1
Play back original data
Play the keyboard to start
overwrite recording
Start overwrite recording
Stop recording *2
Stop overwrite recording/play original data
Deleted
*1 To avoid overwriting measures 1 – 2, start recording from measure 3.
*2 To stop recording, press the [REC] button at the end of measure 5.
Previously recorded data
Newly recorded data
Deleted data
Deleted
Deleted
Start overwrite recording *1 Stop recording *2
Start overwrite recording *1
Stop recording *2
Stop recording *2
Stop overwrite recording/play original data
Stop recording *2
Stop recording *2
Stop overwrite recording/play original data
Play back original data
Play back original data
Play back original data
Play back original data
Play back original data
Play the keyboard to start
overwrite recording
Play the keyboard to start
overwrite recording
Start overwrite recording
Start overwrite recording

CVP-609/605 Reference Manual 84
Fine Tuning the Pitch
You can fine-tune the pitch of the entire instrument in 0.2 Hz steps —useful when you play the Clavinova along with
other instruments or CD music. Please note that the Tune function does not affect the Drum Kit or SFX Kit Voices and
Audio Songs. To restore the default initial setting (440.0 Hz), touch and hold down the setting value for a while.
Master Tune – Fine Tuning the Pitch of the Entire Instrument –
Scale Tune – Selecting or Creating a Temperament –
1
2
Keyboard parts

Fine Tuning the Pitch
CVP-609/605 Reference Manual
85
1 Select the desired Scale type (temperament).
You can select one of various scales for playing in custom tunings for specific historical periods or music genres.
2 Change the following settings as necessary.
To store the Scale Tune settings:
If you want to store the Scale Tune settings, use the Registration Memory. Press the REGISTRATION MEMORY
[MEMORY] button, then checkmark “Scale Tune” and press one of the REGISTRATION MEMORY [1] – [8] buttons to
register the Scale Tune settings.
Type
•Equal: The pitch range of each octave is divided equally into twelve parts, with each half-
step evenly spaced in pitch. This is the most commonly used tuning in music today.
•Pure Major, Pure Minor: These tunings preserve the pure mathematical intervals of each
scale, especially for triad chords (root, third, fifth). You can hear this best in actual vocal
harmonies — such as choirs and a cappella singing.
•Pythagorean: This scale was devised by the famous Greek philosopher and is created from
a series of perfect fifths, which are collapsed into a single octave. The 3rd in this tuning are
slightly unstable, but the 4th and 5th are beautiful and suitable for some leads.
• Mean-Tone: This scale was created as an improvement on the Pythagorean scale, by making
the major third interval more “in tune.” It was especially popular from the 16th century to
the 18th century. Handel, among others, used this scale.
• Werckmeister, Kirnberger: This composite scale combines the Werckmeister and
Kirnberger systems, which were themselves improvements on the mean-tone and
Pythagorean scales. The main feature of this scale is that each key has its own unique
character. The scale was used extensively during the time of Bach and Beethoven, and even
now it is often used when performing period music on the harpsichord.
•Arabic1, Arabic2: Use these tunings when playing Arabic music.
Base Note
Determines the base note for each scale. When the base note is changed, the pitch of the
keyboard is transposed, yet maintains the original pitch relationship between the notes.
Tune [cent]
Select the desired note to be tuned and tune it in cents. If you edit this parameter,
“(Edited)” is shown at the right of “Type” in step 1.
NOTE In musical terms a “cent” is 1/100th of a semitone. (100 cents equal one semitone.)
(Parts)
Checkmark the part to which the Scale Tune setting is applied.

CVP-609/605 Reference Manual 86
Setting the Touch Sensitivity of the
Keyboard
You can adjust the touch response of the instrument (how the sound responds to the way you play the keys). This setting
does not change the weight of the keyboard.
For information about this display, refer to the Owner’s Manual.

CVP-609/605 Reference Manual 87
Metronome Settings
Metronome
Volu me
Determines the level of the metronome sound.
Sound
Determines which sound is used for the metronome.
•Bell Off:
Conventional metronome sound, with no bell.
•Bell On: Conventional metronome sound, with bell.
•English Voice: Count in English
• German Voice: Count in German
• Japanese Voice: Count in Japanese
•French Voice: Count in French
•Spanish Voice: Count in Spanish
Time Signature
Determines the time signature of the metronome sound.
Tap Tempo
Volu me
Adjusts the volume of the sound triggered when the [TAP TEMPO] button is pressed.
Sound
Selects the percussion instrument as sound triggered when the [TAP TEMPO] button is
pressed.

CVP-609/605 Reference Manual 88
MIDI Settings
In this section, you can make MIDI-related settings for the instrument. This instrument gives you a set of ten pre-
programmed templates that let you instantly and easily reconfigure the instrument to match your particular MIDI
application or external device. Also, you can edit the pre-programmed templates and save up to ten of your original
templates.
1 Touch the box (shown above), then select a pre-programmed MIDI template (below).
If you have already created an original MIDI template and saved it to the User memory (using the following steps 2
and 3), you can also select the template from the User memory.
2 If desired, edit the MIDI parameters based on the MIDI template selected in step 1 on the
relevant setting display.
• System: Lets you set the MIDI System related parameters.........................................................................page 89
•
Transmit: Lets you set the MIDI Transmission related parameters.........................................................page 90
•
Receive: Lets you set the MIDI Reception related parameters. .................................................................page 91
•
On Bass Note: Lets you select the MIDI channels of which the MIDI data coming from the external MIDI
device will be used for detecting the bass note for Style playback. .............................................................page 92
•
Chord Detect: Lets you select the MIDI channels of which the MIDI data coming from the external MIDI
device will be used for detecting the chord type for Style playback............................................................page 93
3 When you’ve finished editing on each display, touch (Save) to save the MIDI settings as
your original MIDI Template.
NOTE Your original MIDI templates can be saved as a single file to a USB flash memory. On the display called up via [Menu]
[Utility] [Factory Reset/Backup] page 2/2, touch [Backup] of “MIDI” to execute the Save operation (page 97).
Pre-programmed MIDI Templates
All Parts
Transmits all parts including the keyboard parts (Main, Layer and Left), with the
exception of Song parts.
KBD & STYLE
Basically the same as “All Parts” with the exception of how keyboard parts are managed.
The right-hand parts are handled as “Upper” instead of Main and Layer, and the left-hand
part is handled as “Lower.”
13

MIDI Settings
CVP-609/605 Reference Manual
89
The explanations here apply when you call up “System” display in step 2 on page 88.
Master KBD
(Master Keyboard)
In this setting, the instrument functions as a “master” keyboard, playing and controlling
one or more connected tone generators or other devices (such as a computer/sequencer).
Song
With this setting, only the Song channels 1 – 16 are transmitted from this instrument via
the corresponding channel numbers 1 – 16 respectively. This is used to play Song data
with an external tone generator and to record Song data to an external sequencer.
Clock Ext
(Clock External)
Playback or recording (Song, Style, etc.) synchronizes with an external MIDI clock instead
of the instrument’s internal clock. This template should be used when you wish to set the
tempo on the MIDI device connected to the instrument.
MIDI Accord1
(MIDI Accordion 1)
MIDI accordions allow you to transmit MIDI data and play connected tone generators
from the keyboard and bass/chord buttons of the accordion. This template lets you
control the keyboard performance and Style playback from the MIDI Accordion.
MIDI Accord2
(MIDI Accordion 2)
Basically the same as “MIDI Accord1” above, with the exception that the chord/bass notes
you play with your left hand on the MIDI Accordion are recognized also as MIDI note
events.
MIDI Pedal1
MIDI pedal units allow you play connected tone generators with your feet (especially
convenient for playing single note bass parts). This template lets you play/control the
chord root in Style playback with a MIDI pedal unit.
MIDI Pedal2
This template lets you play the bass part for Style playback by using a MIDI pedal unit.
MIDI OFF
No MIDI signals are sent or received.
System – MIDI System Related Settings –
Clock
Determines whether the instrument is controlled by its own internal clock (“Internal”) or
a MIDI clock (“MIDI,” “USB1,” “USB2,” and “Wireless LAN”) received from an external
device. “Internal” is the normal Clock setting when the instrument is being used alone or
as a master keyboard to control external devices. If you are using the instrument with an
external sequencer, MIDI computer, or other MIDI device, and you want to synchronize it
to that device, set this parameter to the appropriate setting: “MIDI,” “USB 1,” “USB 2,” or
“Wireless LAN.” In this case, make sure that the external device is connected properly
(e.g., to the instrument’s MIDI IN terminal), and that it is properly transmitting a MIDI
clock signal. When this is set for control by an external device (“MIDI,” “USB1,” “USB2,”
or “Wireless LAN”), the Tempo is indicated as “Ext.” in the Tempo display.
NOTE If the Clock is set other than “Internal,” the Style, Song, Metronome and Tempo cannot be
controlled by the buttons on this instrument.
NOTE “Wireless LAN” is shown only when the USB Wireless LAN adaptor is connected to this
instrument.
Transmit Clock
Turns MIDI clock (F8) transmission on or off. When set to “Off,” no MIDI clock or Start/
Stop data is transmitted even if a Song or Style is played back.
Transpose MIDI
Input
Determines whether or not the instrument’s transpose setting is applied to the note events
received from the external device via MIDI.
Start/Stop
Determines whether incoming FA (start) and FC (stop) messages affect Song or Style
playback.

MIDI Settings
CVP-609/605 Reference Manual
90
The explanations here apply when you call up “Transmit” display in step 2 on page 88. This determines which MIDI
channel is used for each part when the MIDI data is transmitted from this instrument.
1 For each Part, select the MIDI Transmit Channel with which the MIDI data of the
corresponding Part is to be transmitted.
With the exception of the two parts below, the configuration of the parts is the same as those already explained
elsewhere in the Owner’s Manual.
•
Upper: A keyboard part played on the right side of the keyboard from the Left Split Point.
•
Lower: A keyboard part played on the left side of the keyboard from the Left Split Point. This is not affected by
the on/off status of the [ACMP ON/OFF] button.
NOTE If the same transmit channel is assigned to several different parts, the transmitted MIDI messages are merged to a single
channel — resulting in unexpected sounds and possible glitches in the connected MIDI device.
NOTE Protected Songs cannot be transmitted even if the proper Song channels 1 – 16 are set to be transmitted.
Local Control
Turns the Local Control for each part on or off. When Local Control is set to “On,” the
keyboard of the instrument controls its own (local) internal tone generator, allowing the
internal Voices to be played directly from the keyboard. If you set Local to “Off,” the
keyboard and controllers are internally disconnected from the instrument’s tone
generator section so that no sound is output when you play the keyboard or use the
controllers. For example, this allows you to use an external MIDI sequencer to play the
instrument’s internal Voices, and use the instrument keyboard to record notes to the
external sequencer and/or play an external tone generator.
System
Exclusive
Message
Transmit
Determines whether the MIDI System Exclusive message is transmitted (On) or not (Off)
from this instrument.
Receive
Determines whether the MIDI System Exclusive message is recognized (On) or not (Off)
by this instrument.
Chord
System
Exclusive
Message
Transmit
Determines whether the MIDI chord exclusive data (chord detect. root and type) is
transmitted (On) or not (Off) from this instrument.
Receive
Determines whether the MIDI chord exclusive data (chord detect. root and type) is
recognized (On) or not (Off) by this instrument.
Transmit – MIDI Transmit Channel Settings –
12
Lets you alternate between two pages.
The dots corresponding to each channel (1–16) flash briefly whenever
any data is transmitted on the channel(s).

MIDI Settings
CVP-609/605 Reference Manual
91
2 Touch [ ] to call up the other page then select which MIDI messages are to be transmitted
for each Part.
The following MIDI messages can be set on the Transmit/Receive display.
•
Note (Note events) ............................ page 67
•
CC (Control Change)....................... page 67
•
PC (Program Change)..................... page 67
•
PB (Pitch Bend) ................................. page 67
•
AT (Aftertouch) ................................. page 67
The explanations here apply when you call up “Receive” display in step 2 on page 88. This determines which Part is used
for each MIDI channel when the MIDI data is recognized by this instrument.
1 For each Channel, select the Part which is to handle the MIDI data of the corresponding
channel received from the external MIDI device.
When connecting via USB, MIDI data of 32 channels (16 channels x 2 Ports) can be handled by this instrument.
With the exception of the two parts below, the configuration of the parts is the same as those already explained
elsewhere in the Owner’s Manual.
•
Keyboard: The received note messages control the instrument’s keyboard performance.
•
Extra Part 1 – 5: There are five parts specially reserved for receiving and playing MIDI data. Normally, these
parts are not used by the instrument itself. The instrument can be used as a 32-channel multi-timbral tone
generator by using these five parts in addition to the parts (except for the microphone sound).
2 Touch [ ] to call up the other page then select which MIDI messages are to be received for
each Channel.
Receive – MIDI Receive Channel Settings –
12
Lets you alternate between two pages.
The dots corresponding to each channel (1–16) flash briefly whenever any
data is received on the channel(s).

MIDI Settings
CVP-609/605 Reference Manual
92
The explanations here apply when you call up “On Bass Note” display in step 2 on page 88. The settings here let you
determine the bass note for Style playback, based on the note messages received via MIDI. The note on/off messages
received at the channel(s) set to on are recognized as the bass note of the chord for Style playback. The bass note will be
detected regardless of the [ACMP ON/OFF] or Split Point settings. When several channels are simultaneously set to on,
the bass note is detected from merged MIDI data received over the channels.
Touch the desired channel number to enter the checkmark. Touch the same location again to remove the checkmark.
MIDI transmission/reception via the USB terminal, Wireless LAN, and MIDI terminals
The relationship between the MIDI terminals, Wireless LAN and the [USB TO HOST] terminal which can be used
for transmitting/receiving 32 channels (16 channels x 2 ports) of the MIDI messages is as follows:
On Bass Note – Setting the Bass Note for Style Playback –
USB2
USB1
MIDI transmission
MIDI OUT
terminal
Wireless
LAN
USB TO HOST
terminal
Merge
MIDI/USB1/
Wireless LAN 1 – 16
MIDI reception
MIDI IN
terminal
Port handling
USB2
1 – 16
Wireless
LAN
USB TO HOST
terminal
MIDI/USB1/Wireless LAN 1 – 16

MIDI Settings
CVP-609/605 Reference Manual
93
The explanations here apply when you call up “Chord Detect” display in step 2 on page 88. The settings here let you
determine the chord type for Style playback, based on the note messages received via MIDI. The note on/off messages
received at the channel(s) set to on are recognized as the notes for detecting chords in Style playback. The chords to be
detected depend on the fingering type. The chord types will be detected regardless of the [ACMP ON/OFF] or split point
settings. When several channels are simultaneously set to on, the chord type is detected from merged MIDI data received
over the channels.
Touch the desired channel number to enter the checkmark. Touch the same location again to remove the checkmark.
Chord Detect – Setting the Chord Type for Style Playback –

CVP-609/605 Reference Manual 94
Making Global Settings (Utility)
Speaker/Connectivity
Speaker
Determines how the sound is output from the speaker of this instrument.
•Headphone Switch:
Speaker sounds normally, but is cut off when headphones are
inserted to the [PHONES] jack.
•On: Speaker sound is always on.
•Off: Speaker sound is off. You can only hear the instrument sound via the headphones
or an external device connected to the AUX OUT jacks.
IAC (Intelligent Acoustic
Control)
Turns on or off the IAC (Intelligent Acoustic Control). With this function, the sound
quality of this instrument is automatically adjusted and controlled according to the
overall volume. Even when the volume is low, this lets you hear both low sounds and
high sounds clearly.
IAC Depth
Adjusts the IAC depth.
AUX In Noise Gate
Turns on or off the Noise Gate which minimizes noise of the sound input via the
[AUX IN] jack.
Screen Out Monitor
Type
Selects the desired output monitor type (NTSC or PAL) to correspond to the standard
used by your video equipment connected to the instrument.
CVP-609 only: Select “RGB” when connecting to an external monitor.
NOTE When NTSC is selected, the lower part of the screen might not be shown for certain
displays.
NOTE When using a monitor on which display resolution cannot be set, the display may not be
able to be output to the monitor, even if you select the appropriate monitor type.
NOTE Transition effects on the instrument’s display cannot be output.
Content
Determines the contents of the Video Out signal.
•Lyrics/Text:
Only the lyrics of the Song or text files (whichever you used last time) are
output, regardless of the display that is called up on the instrument.
•LCD: The currently selected display is output.

Making Global Settings (Utility)
CVP-609/605 Reference Manual
95
This function is used to “lock” specific parameters (effect, split point, etc.) to make them selectable only via the panel
control — in other words, instead of being changed via Registration Memory, One Touch Setting, Music Finder, or Song
and sequence data.
To lock the desired parameter, touch the corresponding box to enter the checkmark. To unlock the parameter, touch the
box again.
This lets you execute the Format operation or check the memory capacity (approximate value) of the USB flash memory
connected to this instrument. For details on instructions, refer to the Owner’s Manual.
Page 1/2
For information about this display, refer to “Making the Basic Settings” in the Owner’s Manual.
Page 2/2 (*)
Display
Pop-up Display Time
Determines the time that elapses before the pop-up windows close. Pop-up windows
appear when you press buttons TEMPO [-]/[+], TRANSPOSE [-]/[+], SONG
CONTROL [ ](REW)/[ ](FF), or REGISTRATION BANK [-]/[+]. When
“Hold” is selected here, the pop-up window is shown until you touch [X].
Transition Effect
Turns on or off the Transition Effect which is applied when the display is changed.
Voice Are a
Determines which keyboard parts are shown in the Voice area of the Home display.
When “Show Active Parts Only” is selected, only the active keyboard parts are shown.
When “Show All Parts” is selected, all the keyboard parts are shown.
To u c h
Panel
Sound
Determines whether or not touching the display will trigger the click sound.
Calibration
Lets you calibrate the display when it does not respond properly to your touching
(Normally, you do not need this operation, since it is calibrated by factory default).
Touch here to call up the Calibration display, then touch the center of “+” in order.
Parameter Lock
USB Memory
System

Making Global Settings (Utility)
CVP-609/605 Reference Manual
96
To use Voice Guide, you need to download the Voice Guide (audio) file from the Yamaha website, and save it to USB flash
memory, which you then connect to this instrument. For information on using Voice Guide, refer to the Voice Guide
Tutorial Manual (simple text file).
The Voice Guide (audio) file and the Voice Guide Tutorial Manual are available via the following URL:
http://download.yamaha.com/
*: Version 1.20 or later.
Factory Reset — Restoring the Factory Programmed Settings
On page 1/2, checkmark the boxes of the desired parameters then touch [Factory Reset] to initialize the settings of the
parameters which are checkmarked.
Voice Guide
Determines whether or not Voice Guide is used (On/Off), when USB flash memory
containing the Voice Guide (audio) file is properly connected to this instrument. This
setting can also be changed by pressing and holding the [DEMO] button for longer
than three seconds.
Voice Guide Controller
By holding the controller set here and then pressing the panel button or touching the
item on the display, you can hear the corresponding name (with no execution of the
function).
Voice Guide Volume
Adjusts the volume of Voice Guide.
Factory Reset/Backup
System
Restores the System Setup parameters to the original factory settings. Refer to “Parameter Chart”
in the Data List for details about which parameters belong to the System Setup.
MIDI
Restores the MIDI settings including the MIDI templates saved in the internal User memory to
the original factory status.
User Effect
Restores the User Effect settings including the following data to the original factory settings.
•
User Effect types (page 12)
• User Master EQ types (page 11)
• User Master Compressor types (page 14)
• User Vocal Harmony types (pages 27, 30)
• User Microphone Settings (page 23)
Registration
Turns off all the REGISTRATION MEMORY [1]–[8] lamps, indicating that no Registration
Memory Bank is selected although all the Bank files are maintained. In this status, you can create
Registration Memory setups from the current panel settings. The same operation can be done by
turning the power on while holding the B6 key (right-most B key).
Music Finder
Restores the Music Finder data (all records) to the original factory settings.
Files&Folders
Deletes all files and folders saved in the internal User memory and reset the User memory to the
default status. This also deletes the registration to the Favorite () tab on the Voice or Style
Selection display.

Making Global Settings (Utility)
CVP-609/605 Reference Manual
97
Backup/Restore – Saving and Recalling Your Original Settings as a Single File –
For the items below, you can save your original settings to the internal User memory or USB flash memory as a single file
for future recall.
1 Make all desired settings on the instrument, then call up page 2/2 of the “Factory Reset/
Backup” display.
2 Touch [Backup] of the desired item.
If you want to save the backup file to the USB flash memory, make sure to connect the USB flash memory to the
instrument. When you select “All,” the backup file can only be saved to the USB flash memory.
3 Select the desired destination to save the Backup file, then touch [Backup here].
Assign the name if necessary, then touch [OK] to save the file.
To call up the Backup file:
Touch [Restore] of the desired item, then select the desired file.
You can restore the factory programmed status by selecting the Backup file in the “Preset” tab.
All
All settings and data in the User memory of this instrument (except for protected Song) are
handled as a single bulk file named “CVP-609.bup” or “CVP-605.bup.” Because just by
touching [Backup] of “All” will save the file to the root directory of the USB flash memory,
step 3 is not necessary.
System
Parameters set on the various displays such as “Utility” are handled as a single System Setup
file. Refer to “Parameter Chart” in the Data List for details on which parameters belong to
System Setup.
MIDI
The MIDI settings including the MIDI templates on the internal User memory are handled
as a single MIDI Setup file.
User Effect
The User Effect settings including the following data can be managed as a single file.
•
User Effect types (page 12)
• User Master EQ types (page 11)
• User Master Compressor types (page 14)
• User Vocal Harmony types (pages 27, 30)
• User Microphone Settings (page 23)
Music Finder
All the preset and created Records of the Music Finder are handled as a single file.

CVP-609/605 Reference Manual 98
Wireless LAN Settings
This icon is shown only when the USB Wireless LAN adaptor (which may not be included depending on your area) is
connected to the [USB TO DEVICE] terminal. Make sure connection before executing the operations.
For details on connections, refer to the “iPhone/iPad Connection Manual” on the website.
For information about the compatible smart devices and application tools, access the following page:
http://www.yamaha.com/kbdapps/
From the Networks listed on the display, select the desired one. For the network with the lock icon ( ), you need to
enter the password and touch [Connect], and for the network without the lock icon, you can connect the network only by
selecting it.
When connection is done successfully, “Connected” is shown at the top of the display, and the icon shown below appears
according to the signal strength.
If you do not find the desired network on the display or you want to execute the detailed settings, execute the following
operations as necessary.
Update Networks
Updates the Network List on the display.
Connect by WPS
Connects this instrument to the network via WPS. After touching [Start WPS] in the
window appeared by touching here, press the WPS button of the desired wireless LAN
access point within two minutes.
NOTE Make sure that your access point supports WPS. About the confirmation and changes in the
access point settings, refer to the manual of the access point.
Connect Manually
Connects this instrument to the network with closed or non-disclosure. Enter the SSID,
security method, and password as necessary, then touch [Connect].
Initialize
Initializes the connection setup to the default factory status.
Setting
Lets you set detailed parameters such as the static IP address. After setting, touch [OK].
Strong
Weak

CVP-609/605 Reference Manual 99
Index
Numerics
3 Band EQ ......................................... 22
A
Amplitude ......................................... 44
Any Key ............................................ 79
Articulation ...................................... 38
Assembly ........................................... 52
Assignable ......................................... 37
Attack ................................................ 43
Attenuator ........................................ 23
Audio File Format ........................... 83
Audio Rec Format ........................... 83
B
Backup ........................................96, 97
Backup file ........................................ 97
Balance ............................................ 8, 9
Bar Clear ........................................... 54
Bar Copy ........................................... 54
Bass Hold .......................................... 39
Beat Converter ................................. 53
Block Diagram ................................. 15
Brightness .....................................9, 43
Bypass ................................................ 57
C
Channel Edit ..............................53, 69
Chord ................................................ 17
Chord Detect ..............................81, 93
Chord Source .............................26, 29
Chord Tutor ....................................... 7
Chordal .......................................25, 28
Chorus ............................................... 13
Clock .............................. 61, 64, 68, 89
Color ................................................. 17
Compressor ................................14, 22
Cutoff Frequency ............................. 43
D
Decay ................................................. 43
Dorian ............................................... 57
Drums ............................................... 73
Dynamics .......................................... 54
E
Echo ................................................... 21
Effect ................................................. 11
Effect Variation ................................ 38
EG (Envelope Generator) ...............43
EQ (Equalizer) ..................................10
Equalizer ...........................................10
Euro ...................................................45
Event Filter ........................................68
Event List ............................. 61, 64, 67
F
Factory Reset ....................................96
Fade In/Out ......................................39
Filter ...............................................9, 43
Fingering Type ...................................6
Follow Lights ....................................79
Footage ..............................................45
Freeze .................................................36
G
Gain ...................................................14
Genre .................................................32
Glide ..................................................38
Groove ...............................................53
Guide .......................................... 16, 79
Guitar .................................................56
H
Harmonic Cont. ...............................43
Harmonic Content ......................9, 43
Harmonic Minor ..............................57
Harmony Assign ..............................27
Harmony Type .................................20
High Key ...........................................58
I
IAC (Intelligent Acoustic Control) 94
Insertion Effect .......................... 11, 12
J
Jump ..................................................80
K
Karao-Key .........................................79
Key Off Sampling .............................71
Key Signature ...................................17
Keyboard Harmony .........................20
Keyword ............................................32
L
Left Hold ...........................................40
LFO Amplitude ................................44
LFO Filter ......................................... 44
LFO Pitch ......................................... 44
Local Control ................................... 90
Loop Recording ............................... 49
Lyrics ...........................................17, 18
M
Master Compressor ......................... 14
Master EQ ........................................ 10
Master Tune ..................................... 84
MEGAEnhancer .............................. 74
MegaVoice ........................................ 74
Melodic Minor ................................. 57
Metronome ...................................... 87
Microphone ...................................... 22
MIDI ................................................. 88
MIDI Accordion .............................. 89
MIDI Pedal ....................................... 89
MIDI Receive Channel ................... 91
MIDI reception ................................ 92
MIDI Templates .............................. 88
MIDI transmission .......................... 92
MIDI Transmit Channel ................ 90
Mixer ................................................... 9
Modulation ...........................38, 43, 44
Mono ...........................................40, 42
MP3 ................................................... 83
Multi Assign ..................................... 21
Music Finder .................................... 31
Music Notation ................................ 16
N
Natural Minor .................................. 57
Noise Gate ........................................ 22
Note ................................................... 17
Note Limit ........................................ 58
Note Name ....................................... 17
NTR (Note Transposition Rule) ... 56
NTT (Note Transposition Table) .. 57
O
Octave ............................................... 71
On Bass Note ................................... 92
Organ Flutes ............................... 45, 73
Original Beat .................................... 53
OTS Link Timing ............................ 77
Overdub Recording ......................... 49

CVP-609/605 Reference Manual 100
P
Pan ..................................................... 13
Parameter Lock ................................ 95
Part EQ .............................................. 10
Pattern length ................................... 48
Pedal .................................................. 37
Performance Assistant .................... 81
Phrase Mark Repeat ........................ 80
Pitch Bend ........................................ 38
Pitch Bend Range ............................ 71
Pitch Detect ...................................... 23
Pitch Shift ......................................... 58
Play Root/Chord .............................. 56
Poly ..............................................40, 42
Portamento ....................................... 38
Portamento Time ......................42, 71
Punch In/Out ................................... 81
Punch Out ........................................ 82
Q
Quantize ...............................17, 54, 69
Quick Start ........................................ 80
R
Ratio ............................................14, 22
Realtime Recording ...................49, 59
Record ............................................... 31
Registration Freeze .......................... 36
Registration Memory ...................... 34
Registration Sequence ..................... 34
Release ............................................... 43
Repeat Mode .................................... 80
Resonance ......................................... 43
Restore .............................................. 97
Retrigger ........................................... 58
Reverb ............................................... 13
Root Fixed ........................................ 56
Root Trans (Root Transpose) ........ 56
Rotary Speaker ................................. 45
RTR (Retrigger Rule) ...................... 58
S
Scale Tune ........................................ 84
Scale type .......................................... 85
Score .................................................. 16
Scrub .................................................. 80
SFF Edit ............................................. 55
SFX .................................................... 73
Sine .................................................... 45
Soft ..................................................... 38
Song ................................................... 79
Song Creator .................................... 59
Song Position ....................... 61, 64, 68
Sostenuto ...........................................38
Source Patterns .................................47
Source Root/Chord ..........................56
Speaker ..............................................94
Split Point .....................................6, 20
Step Recording .......................... 52, 59
Stop ACMP .......................................76
String Resonance ..............................71
Stroke .................................................57
Style ....................................................76
Style Creator .....................................47
Style File Format ..............................55
Style Touch Response ......................77
Sustain ...............................................38
Sustain Sampling ..............................71
Swing .................................................53
Synchro Stop Window ....................77
System Effect ....................................11
T
Talk ............................................. 22, 24
Talk Mixing ......................................23
Tap Tempo .......................................87
Temperament ...................................84
Tempo .................................................4
Text ....................................................19
Threshold (Th.) ......................... 14, 22
Time Signature .................................87
Touch Panel ......................................95
Touch Sense ......................................42
Touch Sense Depth ..........................42
Touch Sense Offset ..........................42
Touch Sensitivity .............................86
Transpose ......................................5, 70
Tremolo .............................................21
Trill ....................................................21
Tuning ........................................ 71, 84
U
User Effect .................................. 96, 97
Utility .................................................94
V
Variation Effect ......................... 11, 12
Vibe Rotor .........................................39
Vibrato ..............................................43
Vintage ..............................................45
Vocal Harmony ................................24
Vocal Range ......................................28
Vocoder ...................................... 25, 28
Vocoder-Mono .................................25
Voice ................................................. 71
Voice Edit ................................... 41, 45
Voice Guide ..................................... 96
Volume ............................................. 13
W
WAV ................................................. 83
Wireless LAN ................................... 98
Y
Your Tempo ..................................... 79
C.S.G., Digital Musical Instruments Division
© 2012-2013 Yamaha Corporation
304MW-B0
Transcripción de documentos
C V P - 609 / CVP-605 Reference Manual This manual explains about the functions called up by touching each icon shown in the Menu display. Please read the Owner’s Manual first for basic operations, before reading this Reference Manual. Using the PDF manual • To quickly jump to items and topics of interest, click on the desired items in the “Bookmarks” index to the left of the main display window. (Click the “Bookmarks” tab to open the index if it is not displayed.) • Click the page numbers that appear in this manual to go directly to the corresponding page. • Select “Find” or “Search” from the Adobe Reader “Edit” menu and enter a keyword to locate related information anywhere in the document. NOTE The names and positions of menu items may vary according to the version of Adobe Reader being used. EN Contents Each chapter in this Reference Manual corresponds to each icons on the Menu display. Clicking one of the icons in the illustration below automatically jumps to the corresponding instruction page for the function. CVP-609/605 Reference Manual 2 Adjusting the Tempo........................4 Transposing the Pitch in Semitones 5 Changing the Split Point and Fingering Type..................................6 Learning How To Play Specific Chords (Chord Tutor) ......................7 Adjusting the Volume Balance.........8 Editing the Volume and Tonal Balance (Mixer).................................9 Assigning a Specific Function to Each Pedal or ASSIGNABLE button...... 37 Editing a Voice (Voice Edit) .......... 41 Editing an Organ Flutes Voice (Voice Edit)................................................ 45 Creating/Editing Styles (Style Creator) .......................................... 47 Creating/Editing MIDI Songs (Song Creator) .......................................... 59 Voice Settings................................. 71 Editing Music Notation (Score) Settings............................................16 Style Playback Related Settings ..... 76 Editing Lyrics Display Settings ......18 Song Settings Related to Playback/ Recording ....................................... 79 Editing Text Display Settings.........19 Using Keyboard Harmony .............20 Fine Tuning the Pitch .................... 84 Setting the Touch Sensitivity of the Keyboard ........................................ 86 Microphone Settings.......................22 Metronome Settings....................... 87 Vocal Harmony Settings.................24 MIDI Settings................................. 88 Creating/Editing a Record of the Music Finder ...................................31 Calling Up Registration Memory Numbers in Order (Registration Sequence) ........................................34 Making Global Settings (Utility) ... 94 Wireless LAN Settings ................... 98 Index............................................... 99 Disabling Recall of Specific Items (Freeze) ...........................................36 • Unless indicated otherwise, the illustrations and displays as shown in this manual are based on the CVP-609 (in English). These are for instructional purposes only, and may appear somewhat different from those on your instrument. • The explanations in this Owner’s Manual apply to the firmware version 1.10. Yamaha may from time to time update firmware of the product without notice for improvement. We recommend that you check our website for later releases and upgrade your firmware. http://download.yamaha.com/ • The company names and product names in this manual are the trademarks or registered trademarks of their respective companies. CVP-609/605 Reference Manual 3 Adjusting the Tempo 1 2 4 3 5 1 Indicates the tempo value during playback of the metronome, Style and MIDI Song. 2 Indicates the tempo value of the current Style. The Style will be started at this tempo. 3 Indicates the tempo value of the current MIDI Song. The Song will be started at this tempo. 4 These are basically equivalent to the TEMPO [-]/[+] buttons on the panel. If you want to call up the default tempo of the current Style and MIDI Song, touch and hold any area in 1 – 3. 5 Equivalent to the [TAP TEMPO] button on the panel. NOTE The tempo value of an Audio Song is set via the Time Stretch function. Refer to the Owner’s Manual. CVP-609/605 Reference Manual 4 Transposing the Pitch in Semitones You can transpose the overall pitch of the instrument (the keyboard sound, Style playback, MIDI Song playback, and so on) in semitone steps. Master Transposes the overall pitch of the instrument, except for the Audio Songs and input sound from a microphone or the [AUX IN] jack. Keyboard Transposes the pitch of keyboard including Style playback (controlled via the chord section of the keyboard). Song Transposes only the pitch of MIDI Song playback. NOTE The pitch of an Audio Song is adjusted via the Pitch Shift function. Refer to the Owner’s Manual. NOTE Transpose is not applied to the Drum Kits and SFX Kits Voice. CVP-609/605 Reference Manual 5 Changing the Split Point and Fingering Type Split Point For information about Split Point, refer to the Owner’s Manual. Fingering Type For information about Fingering Types, refer to the Owner’s Manual. CVP-609/605 Reference Manual 6 Learning How To Play Specific Chords (Chord Tutor) If you know the name of a chord but don’t know how to play it, this function indicates you the notes you should press. Root Lets you select the desired Chord Root. Type Lets you select the desired Chord Type. NOTE Depending on the chord, some notes may be omitted. CVP-609/605 Reference Manual 7 Adjusting the Volume Balance For information about this display, refer to the Owner’s Manual. CVP-609/605 Reference Manual 8 Editing the Volume and Tonal Balance (Mixer) The “Panel” – “Song Ch9-16” Part Selection tabs at the top of the Mixer display let you adjust the sound for each corresponding part, while “Master” lets you make overall sound adjustments for the entire instrument. NOTE When an Audio Song is selected, you cannot set the parameters related to the Song part or channels. For a visual indication of the signal flow and configuration of the Mixer, refer to the Block Diagram on page 15. Filter This function modifies the tonal characteristics (brightness, etc.) of the sound by cutting the output of a specific frequency portion of the sound. This is not available when you select “Master” from among the tabs at the top of the Mixer display. Harmonic Content Allows you to adjust the Resonance effect (page 43) for each part. This can be used in combination with the “Brightness” parameter to add further character to the sound. Brightness Determines the brightness of the sound for each part by adjusting the cutoff frequency (page 43). CVP-609/605 Reference Manual 9 Editing the Volume and Tonal Balance (Mixer) EQ (Equalizer) Equalizer (also called “EQ”) is a sound processor that divides the frequency spectrum into multiple bands that can be boosted or cut as required to tailor the overall frequency response. The “Panel” – “Song Ch9-16” Part Selection tabs at the top of the Mixer display let you adjust the EQ for each corresponding part, while “Master” lets you make overall EQ adjustments for the entire instrument. Part EQ (when one of the “Panel” – “Song Ch 9-16” tabs is selected) High Boosts or attenuates the high EQ band for each part. Low Boosts or attenuates the low EQ band for each part. Master EQ (when the “Master” tab is selected) This instrument possesses a high grade five-band digital EQ. With this function, a final effect — tone control — can be applied to the output of your instrument. You can select one of the five preset EQ types in the “Master” display. You can even create your own custom EQ settings by adjusting the frequency bands, and save the settings to one of two User Master EQ types. NOTE Master EQ cannot be applied to an Audio Song or the Metronome sound. Gain Bandwidth (also called “Shape” or “Q”) 0 Frequency 5 bands (default) 80Hz 500Hz 1.0kHz 4.0kHz 8.0kHz 1 4 2 3 CVP-609/605 Reference Manual 10 Editing the Volume and Tonal Balance (Mixer) 1 Select the desired EQ type to be edited. • • • • FLAT: Flat EQ settings. The gain of each frequency is set to 0dB. HOME: Standard EQ settings for optimum sound in the home. CONCERT: Optimum EQ settings for performing in a public space using the instrument’s speakers. AUXOUT PA: Optimum EQ settings for sending the instrument's sound to external PA devices through the AUX OUT [L/L+R]/[R] jacks. • AUXOUT HIFI: Optimum EQ settings for sending the instrument's sound to studio monitors through the AUX OUT [L/L+R]/[R] jacks. • USER1/2: Your own custom EQ settings saved in step 4. 2 Adjust the Q (bandwidth) and the Center Frequency of each band. The available Frequency range is different for each band. The higher the value of Q, the narrower the bandwidth. 3 4 Boost or cut each of the five bands as desired. Touch (Save) then save the settings as a User Master EQ type. Up to two EQ types can be created and saved. NOTICE The settings will be lost if you turn the power to the instrument off without executing the Save operation. NOTE If you want to save the Master EQ settings to the USB flash memory, save as a User Effect file. To do this: From the display called up via [Menu] [Utility] [Factory Reset/Backup] page 2/2, touch [Backup] of “User Effect” to execute the Save operation (page 97). Effects This instrument features the following Effect Blocks. • System Effect (Chorus, Reverb): These Effects are applied to the entire sound of this instrument. For each part, you can adjust the depth of the System Effect. Refer to “Chorus/Reverb” (page 13). • Insertion Effect 1 – 8 (CVP-609) / Insertion Effect 1 – 3 (CVP-605): These Effects are applied only to a specific part. For each of these Effects, select an Effect type specifically for the desired part (for example, Distortion, which would be applied only to the Guitar part). • Variation Effect: This Block can be used both as System Effects and Insertion Effects, and you can switch between them. These explanations covers the settings related to the Insertion Effects and Variation Effects on the Effect display. This display is not available when the “Master” tab is selected at the top of the Mixer display. CVP-609/605 Reference Manual 11 Editing the Volume and Tonal Balance (Mixer) Insertion Effect Lets you assign the desired Insertion Effect Type for each part by touching the area above each knob. You can adjust the degree to which each Effect is applied by using the knobs. If you want to assign each of the Insertion Effects to a specific Part and select an Effect Type, touch (Setting) at the upper right of this area and make necessary settings in the window. The assignable Parts for each Insertion Effect are as follows: CVP-609 • Insertion Effect 1 – 5: Keyboard Parts, Song channels 1 – 16 • Insertion Effect 6: Microphone, Song channels 1 – 16 • Insertion Effect 7 – 8: Style Parts CVP-605 • Insertion Effect 1 – 2: Keyboard Parts, Song channels 1 – 16 • Insertion Effect 3: Microphone, Keyboard Parts, Song channels 1 – 16 NOTE For CVP-605, the Insertion Effect cannot be applied to the Style part. Variation Effect Touch [INSERTION] or [SYSTEM] to switch the Effect Connection between the Insertion Effect and System Effect, then touch the right end of this line to select the desired Effect type. When “SYSTEM” is selected, this Effect is applied to all parts of the Song and Style as the System Effect. When “INSERTION” is selected, this Effect is applied only to the specified Song/Style part. To adjust the degree to which the Effect is applied, use the knob of each part. NOTE For details about the Effect types, refer to the Data List. Editing and Saving the Effect settings You can edit the settings of the System Effects (Chorus, Reverb), Insertion Effects and Variation Effect. The edits can be saved as a User Effect type. 1 From the Mixer display, touch the desired Effect type to call up the Effect Type Selection display. 2 Select the Effect type if necessary, then touch display. (Setting) to call up the Effect Parameter 3 4 2 3 Make the necessary setting for each parameter. The available parameters differ depending on the Effect type. 4 Touch (Save), then save the settings as a User Effect type. Up to 3 Effect types can be stored for each of the Reverb, Chorus and Variation Effect Blocks while up to 10 Effect types can be stored for the Insertion Effect Blocks. NOTICE The settings will be lost if you turn the power to the instrument off without executing the Save operation. NOTE If you want to save the Effect settings to the USB flash memory, save as a User Effect file. To do this: From the display called up via [Menu] [Utility] [Factory Reset/Backup] page 2/2, touch [Backup] of “User Effect” to execute the Save operation (page 97). CVP-609/605 Reference Manual 12 Editing the Volume and Tonal Balance (Mixer) Chorus/Reverb As described in the previous section, Chorus and Reverb are System Effects which are applied to the entire sound of the instrument. They are not available when the “Master” tab is selected at the top of the mixer display. Chorus Touch the Chorus type name at the top right of this row to select the desired Chorus type. After selecting, return to the Mixer display then use each knob to adjust the Chorus depth for each part. Reverb Touch the Reverb type name at the top right of this row to select the desired Reverb type. After selecting, return to the Mixer display then use each knob to adjust the Reverb depth for each part. NOTE For details about the Chorus and Reverb types, refer to the Data List (Effect Type List). Editing and Saving the Chorus/Reverb settings Same as the operation on the “Effect” display (page 12). Pan/Volume You can adjust the Pan (stereo position of the sound) and Volume for each Part. This display is not available when the “Master” tab is selected at the top of the Mixer display. 1 2 1 Pan Determines the stereo position of each part (channel). 2 Volume Determines the level of each part or channel, giving you fine control over the balance of all the parts. CVP-609/605 Reference Manual 13 Editing the Volume and Tonal Balance (Mixer) Master Compressor (only for CVP-609) Compressor is an effect commonly used to limit and compress the dynamics (softness/loudness) of an audio signal. For signals that vary widely in dynamics, such as vocals and guitar parts, it “squeezes” the dynamic range, effectively making soft sounds louder and loud sounds softer. When used with gain to boost the overall level, this creates a more powerful, more consistently high-level sound. This instrument features the Master Compressor applied to the entire sound of this instrument. Although the preset Master Compressor settings are provided, you can create and save your original Master Compressor by adjusting the related parameters. This display is available only when the “Master” tab is selected at the top of the Mixer display. NOTE Master Compressor cannot be applied to an Audio Song or the Metronome sound. 1 2 4 3 1 2 3 Set the Compressor to “On.” Select the Master Compressor type to be edited. Edit the parameters related to the Master Compressor. Threshold Determines the threshold (minimum level at which compression starts). Ratio Determines the ratio of compression (how much the dynamic range is compressed). Gain Determines the output level. The indication “GR” shows the Gain Reduction (compressed level) while “Output” shows the output level according to the instrument sound in real time. 4 Touch (Save), then save the settings as a User Master Compressor type. Up to five Master Compressor types can be created and saved. NOTICE The settings will be lost if you turn the power to the instrument off without executing the Save operation. NOTE If you want to save the Master Compressor settings to the USB flash memory, save as a User Effect file. To do this: From the display called up via [Menu] [Utility] [Factory Reset/Backup] page 2/2, touch [Backup] of “User Effect” to execute the Save operation (page 97). CVP-609/605 Reference Manual 14 Editing the Volume and Tonal Balance (Mixer) Block Diagram CVP-609 * MIC EFFECT = 3 Band EQ/Noise Gate/Compressor, VH = Vocal Harmony, VE = Vocal Harmony Effect CVP-605 * MIC EFFECT = 3 Band EQ/Noise Gate/Compressor, VH = Vocal Harmony CVP-609/605 Reference Manual 15 Editing Music Notation (Score) Settings Select a MIDI Song then touch [Score] to call up the music notation of the current MIDI Song. You can change the notation indication as desired to suit your personal preferences. 1 2 3 4 1 Indicates the name of the current Song. Also, the tempo value is shown at the right end. If you want to change the Song, touch the Song name to call up the Song Selection display. 2 Lets you set the parameters related to playback Parts of the MIDI Song. For details, refer to “Play Setting” (page 16). 3 Lets you set the notation indication parameters, including notation size, chord display, etc. For details, refer to “View Setting” (page 17). 4 Lets you set more detailed parameters related to the notation indication. Refer to “Detail Setting” (page 17). Play Setting From the display called up via (Play Setting), you can set the parameters related to playback of the current MIDI Song. The parameters explained here can also be set on the Song area (with expanded) of the Home display. Extra Turns playback of all Channels on or off, except for those assigned to the Left and Right Hand Parts described below. Left Turns playback on or off for the Left Hand Part, to which you can assign the desired channel on the Song Setting display (page 80). Right Turns playback on or off for the Right Hand Part, to which you can assign the desired channel on the Song Setting display (page 80). Guide Turns the Guide function on or off. For details, refer to the Owner’s Manual. AB Turns Repeat playback on or off and lets you specify the Repeat playback range. For details, refer to the Owner’s Manual. CVP-609/605 Reference Manual 16 Editing Music Notation (Score) Settings View Setting From the display called up via (View Setting), you can set the parameters related to the view of the notation. Size Determines the display resolution (or zoom level) of the notation. Left Turns indication of the left-hand notation on or off. If an “-” indication appears at this parameter and is unavailable, go to the “Detail Setting” display (page 17) , then set the Left Ch to any channel except “Auto.” Or, on the display called up via [Menu] → [Song Setting] → [Part Ch], then set the Left to any channel except “Off ” (page 80). NOTE Both Right (below) and Left cannot be turned off at the same time. Right Turns indication of the right-hand notation on or off. NOTE Both Right and Left (above) cannot be turned off at the same time. Chord Turns indication of the chords on or off. If the current Song does not contain chord data, no chord information is shown even if this is checked. Lyrics Turns indication of the Lyrics on or off. If the current Song does not contain lyrics data, no lyrics are shown even if this is checked. If the Song contains Pedal events, touching here switches between “Lyrics” and “Pedal.” When “Pedal” is checked, Pedal events are shown instead of Lyrics on the display. Note Turns indication of the Note names on or off. When this is checked, each note name is shown at the left side of each note. If the Song contains Fingering events, touching here switches between “Note” and “Fingering.” When “Fingering” is checked, Fingering events are shown instead of Note names on the display. Color When this is checked, the notes in the display appear in identifying colors (C: red, D: yellow, E: green, F: orange, G: blue, A: purple, and B: gray). Detail Setting From the display called up via Right Ch Left Ch (Detail Setting), you can set more detailed parameters. Determines which MIDI channel in the MIDI Song data is used for the right-hand/left-hand part. This setting returns to “Auto” when a different Song is selected. • Auto: The MIDI channels in the MIDI Song data for the right- and left-hand parts are assigned automatically — setting each part to the channel which has been specified at the Part Ch (page 80) on the Song Setting display. • 1–16: Assigns a specified MIDI channel (1–16) to each of the right- and left-hand parts. • Off (Left Ch only): No channel assignment. This disables display of the left-hand notation. Key Signature Lets you enter the Key Signature at the current stopped position of the MIDI Song. This menu is useful when the current MIDI Song contains no Key Signature settings. Quantize This gives you control over the note resolution in the notation, letting you shift or correct the timing of all displayed notes so that they line up to a particular note value. Make sure to select the smallest note value used in the Song. Note Name Selects the type of the note name indicated at the left of the note in the notation from among the following three types. The settings here are available when the Note parameter (page 17) is checked. • A, B, C: Note names are indicated as letters (C, D, E, F, G, A, B). • Fixed Do: Note names are indicated in solfeggio and differ depending on the selected language. • Movable Do: Note names are indicated in solfeggio according to the scale intervals, and as such are relative to the key. The root note is indicated as Do. For example, in the key of G major the root note of “Sol” would be indicated as “Do.” As with “Fixed Do,” the indication differs depending on the selected language. CVP-609/605 Reference Manual 17 Editing Lyrics Display Settings Select a MIDI Song, and then touch [Lyrics] to call up the lyrics of the current MIDI Song. You can change the lyrics indication as desired to suit your personal preferences. 1 2 3 1 Indicates the name of the current Song. Also, the current measure number is shown at the right end. If you want to change the Song, touch the Song name here to call up the Song Selection display. 2 Lets you set the parameters related to playback Parts of the MIDI Song. For details, refer to “Play Setting” (page 16). 3 Allows you to change the background picture of the Lyrics display and Text display. As well as various pictures provided in the Preset tab, you can select an original picture file (a bitmap file with no greater than 800 x 480 pixels) in the USB flash memory. The original picture file can be copied from the USB flash memory to the internal User memory. NOTE The setting here is applied also to the Text display. NOTE When the lyrics are garbled or unreadable, you may need to change the Lyrics Language setting on the display called up via [Menu] [Song Setting] [Lyrics]. CVP-609/605 Reference Manual 18 Editing Text Display Settings The display of this instrument can show text files (extension: .txt and less than 60 KB) created on a computer. NOTE Line breaks are not automatically entered in the instrument. If a sentence is not displayed in its entirety because of limitations in the screen space, enter line breaks manually on your computer by using a text editor, etc. beforehand. 1 2 3 4 5 1 Indicates the current text file which is shown on the display. Touching here calls up the text File Selection display which lets you select an original text file in the USB flash memory or copy it from the USB flash memory to the internal User memory. 2 Clears the text from the display. This operation does not delete the text file itself, but simply leaves the display empty of any text file. 3 Lets you set the parameters related to playback Parts of the MIDI Song. For details, refer to “Play Setting” (page 16). 4 Allows you to change the background picture of the Lyrics display and Text display. As well as various pictures provided in the Preset tab, you can select your original picture file (a bitmap file with no greater than 800 x 480 pixels) in the USB flash memory. Your original picture file can be copied from the USB flash memory to the internal User memory. NOTE The setting here is applied also to the Lyrics display. 5 Lets you select the font size or type. “Small,” “Medium,” or “Large” keeps each character at the same width, and is suitable for displaying lyrics with chord names above, etc. “Proportional Small,” “Proportional Medium,” and “Proportional Large” are suitable for displaying lyrics without chord names or explanatory notes. NOTE When the text is garbled or unreadable, you may need to change the language setting on the display called up via [Menu] [Utility] [System]. CVP-609/605 Reference Manual 19 Using Keyboard Harmony 1 1 Set the Keyboard Harmony function to “On.” When this is set to “On,” Harmony or Echo is applied to your keyboard performance automatically. 2 Adjust related parameters such as Harmony type and volume. NOTE The available parameters differ depending on the Harmony type. Type Lets you select one of the Harmony types, which are divided into the following groups. Harmony Type (Standard Duet — Strum) These types apply the harmony effect to notes played in the right-hand section of the keyboard according to the chord specified in the left-hand section of the keyboard. (Note that the “1+5” and “Octave” settings are not affected by the chord.) If you want to use these Types with the Style stopped, set the “Stop ACMP” parameter (page 76) to a setting other than “Disabled.” When [ACMP ON/OFF] is turned on: Split Point Chord section for Style playback and Harmony effect When the Left part is on: Split Point Main and Layer Voices Left Voice and chord section for Harmony effect When [ACMP ON/OFF] and the Left part are on: Style Split Point Left Split Point Main and Layer Voices Left Voice Chord section for Style playback and Harmony effect CVP-609/605 Reference Manual 20 Using Keyboard Harmony Type Multi Assign The Multi Assign effect automatically assigns notes played simultaneously on the right-hand section of the keyboard to separate parts (Voices). Both of the keyboard parts [Main] and [Layer] should be turned on when using the Multi Assign effect. The Main and Layer Voices are alternately assigned to the notes in the order you play. Echo Type (Echo, Tremolo and Trill) When one of the Echo Types is selected, the corresponding effect (echo, tremolo, trill) is applied to the note played in the right-hand section of the keyboard in time with the currently set tempo, regardless of the [ACMP ON/OFF] and the Left part on/off status. Keep in mind that Trill works when you hold down two notes on the keyboard simultaneously (last two notes if more than two notes are held), and it plays those notes alternately. Volume This parameter is available for all types with the exception of “Multi Assign.” It determines the level of the harmony/echo notes generated by the Harmony/Echo effect. Speed This parameter is only available when Echo, Tremolo, or Trill is selected in Type above. It determines the speed of the Echo, Tremolo, and Trill effects. Assign This parameter is available for all types with the exception of “Multi Assign.” This lets you determine the keyboard part via which the harmony/echo notes will be sounded. • Auto: Applies the effect to the part which is turned on. When the both parts are on, the Main part is given priority over the Layer part. • Multi: When both parts are on, the note played on the keyboard is sounded by Main part and the harmonies (effect) are divided to the Main and Layer parts. When only one part is on, the note played on the keyboard and effect are sounded by that part. • Main, Layer: Applies the effect to the selected part (Main or Layer). Chord Note Only This parameter is available when one of the Harmony Types is selected. When this is set to “On,” the Harmony effect is applied only to the note (played in the right-hand section of the keyboard) that belongs to a chord played in the chord section of the keyboard. Minimum Velocity This parameter is available for all types with the exception of “Multi Assign.” It determines the lowest velocity value at which the harmony note will sound. This allows you to selectively apply the harmony by your playing strength, letting you create harmony accents in the melody. The harmony effect is applied when you play the key strongly (above the set value). CVP-609/605 Reference Manual 21 Microphone Settings This section lets you set parameters for various Effects that are applied to the microphone sound. You should make both “Vocal” and “Talk” settings — “Vocal,” for your singing performance, and “Talk,” for making announcements between songs, for example. When “Vocal” is selected: When “Talk” is selected: 1 1 4 2 4 2 6 3 3 5 1 6 Microphone On/Off 7 Only for CVP-609 5 8 Turns on or off the microphone sound. When set to On, the microphone sound will be input to the instrument NOTE The setting here is equivalent to that in the Vocal Harmony display (page 24). 2 Vocal/Talk Switching When you sing into the microphone for your performance, set this to “Vocal.” When you talk normally or need to make announcements between songs of your performance, set this to “Talk.” This lets you instantly change the microphone settings depending on the situation. NOTE The setting here is equivalent to that in the Vocal Harmony display (page 24). Volume Adjustment Adjusts the input volume of the microphone sound. The input level is shown at the right. 4 3 Band EQ EQ (Equalizer) is a processor that divides the frequency spectrum into multiple bands which can be boosted or cut as required to tailor the overall frequency response. The instrument features a three-band (Low, Mid and High) digital equalizer function for the microphone sound. For each of three bands, you can adjust the center frequency (Hz) and level (dB) via the corresponding knobs on the display. 5 Noise Gate This effect mutes the input signal when the input from the microphone falls below a specified level. This effectively cuts off extraneous noise, allowing the desired signal (vocal, etc.) to pass. 3 6 Compressor NOTE The setting here is equivalent to that in the Vocal Harmony display (page 24). On/Off Turns Noise Gate on or off. Th. (Threshold) Adjusts the input level above which the gate begins to open. This effect holds down the output when the input signal from the microphone exceeds a specified level. This is especially useful for smoothing out vocals that have widely varying dynamics. It effectively “compresses” the signal, making loud parts softer. On/Off Turns Compressor on or off. Th. (Threshold) Adjusts the input level above which compression begins to be applied. Ratio Adjusts the compression ratio. Higher ratios result in a more compressed sound, with a reduced dynamic range. Output Adjusts the final output level. CVP-609/605 Reference Manual 22 Microphone Settings 7 Pitch Detect (Only when “Vocal” is selected) Lets you set how the pitch of the microphone sound during performance is detected. Vocal Type Set this to obtain the most natural vocal harmony, depending on your voice. • Low: Setting for lower voices. This setting is also appropriate for growling and shouting. • Mid: Setting for mid-range voices. • High: Setting for higher voices. This setting is also appropriate for singing close to the microphone. • Full: Setting for vocalists having a wide range, from low to high. Speed Adjusts the response speed of the Vocal Harmony effect, or how quickly harmonies are generated in response to your voice. The larger the number, the faster the response. (only for CVP609) NOTE When one or both of LEAD PITCH DETECT SPEED and HARM. PITCH DETECT SPEED of Vocal Harmony (page 27) are set to “as MIC SETTING,” this parameter is effective. In other settings, the setting of the Vocal Harmony’s Pitch Detect Speed is effective. Background Noise Cut 8 Talk Mixing (Only when “Talk” is selected) This allows you to filter out noises that would interfere with the pitch detection. A setting of “Thru” turns the noise filter off. Lets you make settings for talking or making announcements between songs during a performance. Pan Determines the stereo pan position of the microphone sound. Reverb Depth Determines the depth of the reverb effects applied to the microphone sound. Chorus Depth Determines the depth of the chorus effects applied to the microphone sound. Attenuator Determines the amount of reduction to be applied to the overall sound (excepting the microphone input) — allowing you to effectively adjust the balance between your voice and the overall instrument sound. NOTICE The settings here are lost if you turn off the power without executing the Save operation. Storing the Microphone Settings You can store the microphone settings together with the Vocal Harmony settings by touching (Save) then selecting one of 10 User Memories. For ease in future recall, you should assign a sufficiently descriptive name or one that matches your performance. To call up the microphone settings, touch the setting name at left of (Save) then select the desired file. NOTE If you want to save the microphone settings to the USB flash memory, save as a User Effect file. To do this, on the display called up via [Menu] [Utility] [Factory Reset/Backup] page 2/2, touch [Backup] of “User Effect” to execute the Save operation (page 97). CVP-609/605 Reference Manual 23 Vocal Harmony Settings This section allows you to set various Vocal Harmony parameters, even though just selecting a Vocal Harmony Type will call up the appropriate settings and you need not edit these parameters normally. If you want to make more detailed settings for your performance, read this chapter. Basic Parameters The structure of the Vocal Harmony function differs between the CVP-609 and CVP-605. The explanation here applies to both models. For information on other settings, refer to page 25 for the CVP-609 and refer to page 28 for the CVP-605. Vocal Harmony name 1 2 3 1 Microphone On/ Off Turns the microphone sound on or off. When this is set to On, the microphone sound is input to the instrument. 2 Vocal/Talk Switching When you sing into the microphone, this should be set to “Vocal.” When you talk normally or make announcements between songs, this should be set to “Talk.” If you want to set the Vocal Harmony parameters, this should be set to “Vocal.” 3 Volume Adjustment Adjusts the input volume of the microphone sound. The input level is shown at the right. NOTE The settings here are equivalent to those in the Microphone Setting display (page 22). CVP-609/605 Reference Manual 24 Vocal Harmony Settings Editing the Vocal Harmony Type (CVP-609) By editing the parameters of the preset Vocal Harmony type, you can create your original Vocal Harmony type. 1 2 3 Touch the Vocal Harmony name to call up the Vocal Harmony Selection display. Select the desired Vocal Harmony type. Based on the settings of the selected Vocal Harmony type, edit them as desired. When the Mode (2) is set to “Chordal”: 1 3 8 When the Mode (2) is set to “Vocoder” or “Vocoder-Mono”: 2 9 5 ) ! @ 1 4 2 5 6 6 7 7 # 8 9 ) ! @ # Harmony Lets you edit the Vocal Harmony parameters. 1 Harmony On/Off Turns Vocal Harmony on or off. 2 Mode Although one of the three following Modes is automatically selected when a Vocal Harmony type is selected, you can change the Mode. Chordal The harmony notes are determined by the following three chord types: chords played in the chord section of the keyboard (with [ACMP ON/OFF] turned on), chords played in the left hand section of the keyboard (with the Left part turned on), and chords contained in Song data for controlling the harmony. (Not available if the Song does not contain any chord data.) NOTE If you want to apply the Vocal Harmony by pressing the chords in the chord section when the Style is stopped, you need to set the “Stop ACMP” parameter to a setting other than “Disabled” in the Style Setting display (page 76). CVP-609/605 Reference Manual Vocoder The microphone sound is output via the notes you play on the keyboard or via the Song playback notes. Vocoder-Mono Basically the same as the Vocoder. In this mode, only single-note melodies or lines can be played back (with last-note priority). 25 Vocal Harmony Settings 3 (When the Mode is set to “Chordal”) Chord Source Determines which data or event of a Song will be used for chord detection. • Off: Detects no chord from the Song data. • XF: Chord data defined via XF will be used. • 1 – 16: Detects a chord from notes of the MIDI channel specified here. Type Determines how the harmony notes are applied to the microphone sound by selecting one of the Chordal Types. Almost all Types apply the harmony notes based on the chord specified via the left hand section of the keyboard, chord section of the keyboard, or the Song data, with the exception of the following two Types. • ScaleDiatonic: This generates harmony notes based on the Key Root and Key Type specified in the Harmony Assign display (7), meaning that the harmony notes do not depend on the chord but match the diatonic scale of the current song’s key signature. • Parallel: This adds a note to the lead note (microphone sound) with the interval specified at 6, regardless of the chord. NOTE “Abv” in the Chordal Type List means that the harmony notes are generated above the lead note (microphone sound) while “Blw” means that the harmony notes are generated below the lead note. 4 (When the Mode is set to “Vocoder” or “Vocoder -Mono”) Song Ch When set to one of 1 – 16, note data (played from a Song on this instrument or the connected computer) of the corresponding channel is used to control the harmony. When set to “Off,” Song data control over harmony is turned off. Part When set to “Mute,” the channel selected above (to control Harmony) is muted (turned off) during Song playback. Keyboard • Off: Keyboard control over harmony is turned off. • Upper: Notes played to the right of the Split Point control the harmony. • Lower: Notes played to the left of the Split Point control the harmony. 5 Balance Lets you set the balance between the lead vocal (the microphone sound) and Vocal Harmony sound. Raising this value increases the volume of the Vocal Harmony and decreases that of the lead vocal. When this is set to L<H63 (L: Lead Vocal, H: Vocal Harmony), only the Vocal Harmony is output; when it is set to L63>H, only the lead vocal is output. 6 The following parameters can be adjusted for each Lead note (microphone sound) and Balance Harmony note. adjustment for each Lead • Transpose/Degree: Lets you shift the pitch for each Harmony note and Lead note. The range for all notes is the same; however, the lead note can only be adjusted in octaves. note and When the Chordal Type is set to “ScaleDiatonic,” this parameter changes to Degree, letting Harmony you shift the pitch in degree from -3 octaves (-22 scale degrees) – Unison (1 scale degree) – note +3 octaves (+22 scale degrees). • Detune: Determines the fine pitch setting for each Harmony note from -50 cents to +50 cents. • Formant: Determines the formant setting for each Harmony note. The higher the value, the more “feminine” the harmony voice becomes. The lower the value, the more “masculine” the voice. • Pan: Determines the pan position setting for each Harmony note. Setting each Harmony note to a different pan position, with the Lead vocal at center, for example, results in a naturally wide stereo sound. • Volume: Determines the volume setting for each Harmony note. Use this to adjust the relative level balance among the Lead vocal and the Harmony notes. NOTE When PITCH CORRECT MODE (7) is set to OFF the Lead part is not available for the Transpose, Degree, Detune and Formant parameters. NOTE The Transpose values of the Harmonies are available only when the Mode (2) is set to “Chordal.” CVP-609/605 Reference Manual 26 Vocal Harmony Settings Harmony Assign 7 Lets you set how the Harmony notes are assigned or voiced to the Lead note (microphone sound). For details, refer to the “MIDI Reference” (Vocal Harmony Parameter List) on the website. When the Harmony mode is set to “Chordal” • Session Table: Determines how the harmonies will be voiced, or what type of chord will be used in creating the harmonies, according to different musical styles. NOTE This parameter is available only when the Chordal Type is set to something other than ScaleDiatonic or Parallel. • Key Root, Key Type: When the Chordal Type (3) is set to “ScaleDiatonic,” this parameter is available. Harmony notes based on the settings here do not depend on the chord but match the diatonic scale of the current song’s key signature. When the Harmony mode is set to “Vocoder” or “Vocoder-Mono” • Transpose Mode: Determines the amount by which the harmony parts are transposed. A setting of “0” results in no transposition, while the “Auto” setting results in automatic transposition. Detail Setting • PITCH CORRECT MODE: Corrects the pitch of the Lead note (microphone sound). “Off ” does not correct while “Hard” corrects the pitch most accurately. • LEAD PITCH DETECT SPEED, HARM.PITCH DETECT SPEED: Determines how fast the pitch of the Lead note and the harmony notes are detected in response to the signal via the microphone. “1” responds most slowly, “4” is standard, “15” responds most quickly, and “as MIC SETTING” gives priority to the speed specified at the Pitch Detect “Speed” of the Microphone Setting display (page 23). • HARMONY EFFECT: Determines the Effect type applied to the Harmony notes added to the Lead note. • HARMONY STABILITY: Determines the stability degree to which the Harmony is applied to the Lead note. When set to “Stable,” this has a relatively stable sound with little harmony motion. When set to “Dynamic,” this tends to add harmony with motion according to the input sound. • LEAD VIBRATO DEPTH: This specifies the vibrato depth of the lead sound. • HARM.VIBRATO DEPTH: This specifies the vibrato depth of the harmony sound. • VIBRATO SPEED: This specifies the vibrato speed of both the lead and harmony sounds. • VIBRATO DELAY: This specifies the vibrato delay of both the lead and harmony sounds. Effect Lets you edit the parameters related to the Effects applied to the Vocal Harmony notes. 4 8 Effect On/Off Turns on or off the Effects applied to the Vocal Harmony notes. 9 Type Selects the Effect type applied to the Vocal Harmony notes. You can edit also the detailed parameters of the selected type. For information about the Effect Parameters, refer to the “MIDI Reference” (Vocal Harmony Parameter List) on the website. ) To Lead Adjusts the Effect depth applied to the Lead note. ! To Harmony Adjusts the Effect depth applied to the Harmony notes. @ Reverb Depth Adjusts the Reverb depth applied to the microphone sound. This setting is equivalent to that in the Mixer display (page 13). # Chorus Depth Adjusts the Chorus depth applied to the microphone sound. This setting is equivalent to that in the Mixer display (page 13). Touch (Save), then save the edits as an original Vocal Harmony type. Up to 60 Vocal Harmony types can be saved to User memory. For ease in future recall, you should assign a descriptive name that matches the settings. NOTICE The settings here are lost if you turn off the power without executing the Save operation. NOTE If you want to save the Vocal Harmony settings to the USB flash memory, save as a User Effect file. To do this, on the display called up via [Menu] [Utility] [Factory Reset/Backup] page 2/2, touch [Backup] of “User Effect” to execute the Save operation (page 97). CVP-609/605 Reference Manual 27 Vocal Harmony Settings Editing the Vocal Harmony Type (CVP-605) By editing the parameters of the preset Vocal Harmony type, you can create your original Vocal Harmony type. 1 2 3 Touch the Vocal Harmony name to call up the Vocal Harmony Selection display. Select the desired Vocal Harmony type. Based on the settings of the selected Vocal Harmony type, edit them as desired. When the Mode (2) is set to “Chordal”: 1 3 When the Mode (2) is set to “Vocoder”: 2 1 5 3 2 5 4 4 4 6 4 1 Harmony On/Off Turns on or off the Vocal Harmony. 2 Mode 7 Although one of the three following Modes is automatically selected when a Vocal Harmony type is selected, you can change the Mode. NOTE Some Vocal Harmony types have no Mode. When such a type is selected, the Harmony notes are applied to the microphone sound (Lead note) even if you do not play any keys and no Song is played back. Auto (Vocoder/ Chordal) When the [ACMP ON/OFF] or Left part is turned on, or a Song contain chord data is being played back, the mode is automatically set to “Chordal.” In all other cases, the mode is set to “Vocoder.” Vocoder The microphone sound is output via the notes you play on the keyboard or via the Song playback notes. Chordal The harmony notes are determined by the following three chord types: chords played in the chord section of the keyboard (with the [ACMP ON/OFF] turned on), chords played in the left hand section of the keyboard (with the Left part turned on), and chords contained in Song data for controlling the harmony. (Not available if the Song does not contain any chord data.) NOTE If you want to apply the Vocal Harmony by pressing the chords in the chord section when the Style is stopped, you need to set the “Stop ACMP” parameter to a setting other than “Disabled” in the Style Setting display (page 76). 3 Vocal Range Set this to obtain the most natural vocal harmony, depending on your voice. • Normal: Normal setting. • Low: Setting for lower voice. This setting is also appropriate for growling and shouting. • High: Setting for higher voice. This setting is also appropriate for singing close to the microphone. 4 Song Ch When set to one of 1 – 16, note data (played from a Song on this instrument or the connected computer) of the corresponding channel is used to control the harmony. When set to “Off,” Song data control over harmony is turned off. CVP-609/605 Reference Manual 28 Vocal Harmony Settings Balance 6 (When the Mode is set to “Chordal”) Chord Source 7 4 Lets you set the balance between the lead vocal (the microphone sound) and Vocal Harmony sound. Raising this value increases the volume of the Vocal Harmony and decreases that of the lead vocal. When this is set to L<H63 (L: Lead Vocal, H: Vocal Harmony), only the Vocal Harmony is output; when it is set to L63>H, only the lead vocal is output. 5 Determines which data or event of a Song will be used for chord detection. • Off: Detects no chord from the Song data. • XF: Chord data defined via XF will be used. • 1 – 16: Detects a chord from notes of the MIDI channel specified here. (When the Mode is set to “Vocoder”) Song Ch Mute/ Play When set to “Mute,” the channel selected above (4) is muted (turned off) during Song playback. Keyboard • Off: Keyboard control over harmony is turned off. • Upper: Notes played to the right of the Split Point control the harmony. • Lower: Notes played to the left of the Split Point control the harmony. Set the parameters which determine how the Harmony notes are applied. Balance Adjustment for each Lead note and Harmony note You can make independent settings for the Lead note (microphone sound) and the Harmony notes. • Detune: Determines the fine pitch setting for each Harmony note from -50 cents to +50 cents. • Pan: Determines the pan position setting for each Harmony note. Setting each Harmony note to a different pan position, with the Lead vocal at center, for example, results in a naturally wide stereo sound. • Volume: Determines the volume setting for each Harmony note. Use this to adjust the relative level balance among the Lead vocal and the Harmony notes. Detail Setting The available parameters differ depending on the Vocal Harmony type. VOCODER TYPE Determines how the harmony notes are applied to the microphone sound when the Harmony Mode (page 25) is set to “Vocoder.” CHORDAL TYPE Determines how the harmony notes are applied to the microphone sound when the Harmony Mode (page 25) is set to “Chordal.” CHROMATIC TYPE Determines how the harmony notes are applied to the microphone sound when “SpdyMouse,” “SingBass,” or “ChromatXG” is selected as the Vocal Harmony type. DETUNE TYPE Determines how the harmony notes are applied to the microphone sound when “DetuneXG” is selected as the Vocal Harmony type. HARM GENDER TYPE Determines whether the gender of the harmony sound is changed or not. • Off: The gender of the harmony sound is not changed. • Auto: The gender of the harmony sound is changed automatically. LEAD GENDER TYPE Determines whether and how the gender of the lead vocal sound (i.e., the direct microphone sound) will be changed. Please note that the number of harmony notes differs depending on the selected type. When set to “Off,” three harmony notes are produced. Other settings produce two harmony notes. • Off: No gender change occurs. • Unis: No gender change occurs. You can adjust the LEAD GENDER DEPTH described below. • Male: The gender change (to male) is applied to the lead vocal. • Fem.: The gender change (to female) is applied to the lead vocal. CVP-609/605 Reference Manual 29 Vocal Harmony Settings 5 LEAD GENDER DEPTH Adjusts the degree of lead vocal gender change. This is available when LEAD GENDER TYPE (above) is set to something other than “Off.” The higher the value, the more “feminine” the harmony voice becomes. The lower the value, the more “masculine” the voice. LEAD PITCH CORRECT This parameter is only effective when LEAD GENDER TYPE (above) is set to something other than “Off.” When “Smooth” or “Hard” is selected here, the pitch of the lead vocal is shifted in precise semitone steps. UPPER GNDR THRESH Gender change occurs when the harmony pitch reaches or exceeds the specified number of semitones above the lead vocal pitch. LOWER GNDR THRESH Gender change occurs when the harmony pitch reaches or exceeds the specified number of semitones below the lead vocal pitch. UPPER GNDR DEPTH Adjusts the degree of gender change applied to harmony notes higher than UPPER GNDR THRESH (above). The higher the value, the more “feminine” the harmony voice becomes. The lower the value, the more “masculine” the voice. LOWER GNDR DEPTH Adjusts the degree of gender change applied to harmony notes lower than LOWER GNDR THRESH (above). The higher the value, the more “feminine” the harmony voice becomes. The lower the value, the more “masculine” the voice. VIBRATO DEPTH Sets the depth of vibrato applied to the harmony sound. This also affects the lead vocal sound when LEAD GENDER TYPE (above) is set to something other than “Off.” VIBRATO RATE Sets the speed of the vibrato effect. This also affects the lead vocal sound when LEAD GENDER TYPE (above) is set to something other than “Off.” VIBRATO DELAY Specifies the length of the delay before the vibrato effect begins when a note is produced. Higher values result in a longer delay. On the displays in step 4, touch type. (Save), then save the edits as an original Vocal Harmony This Save operation covers the settings edited in step 4 and the Harmony on/off setting in step 3. The settings made in the two displays can be saved as a single Vocal Harmony type. For ease in future recall, you should assign a descriptive name that matches the settings. NOTICE The settings here are lost if you turn off the power without executing the Save operation. NOTE At the left of the Save icon, the Vocal Harmony name is shown. By touching here to call up the Vocal Harmony Selection display, you can select another Vocal Harmony type. This operation is equivalent to that of Step 1. NOTE If you want to save the Vocal Harmony settings to the USB flash memory, save as a User Effect file. To do this, on the display called up via [Menu] [Utility] [Factory Reset/Backup] page 2/2, touch [Backup] of “User Effect” to execute the Save operation (page 97). CVP-609/605 Reference Manual 30 Creating/Editing a Record of the Music Finder Creating/Editing a Record You can create a new Record or edit the currently selected Record. 1 If you want to edit the existing Record, select the desired Record on the Music Finder display. This operation is not necessary when you create a new Record from scratch. 2 Call up the operation display. If you want to create a new Record from scratch, touch (Create). If you want to edit an existing Record, touch (Edit). 3 Create a new Record or Edit the current Record. To create a new Record: To edit the current Record: Music Lets you enter the music title or Record name which will be shown on the Music Finder display. Style Lets you enter the desired Style. This is not available for Song Records. CVP-609/605 Reference Manual 31 Creating/Editing a Record of the Music Finder Lets you enter the desired Beat which will be used for sorting the Records. This is not available for Song Records. Beat NOTE The setting here is just for sorting the Records, and not affects the actual beat of the specified Style. Tempo Lets you enter the actual Tempo value. This is not available for Song Records. Section Lets you specify the Style Section setup which will be called up when this Record is selected. This is not available for Song Records. Genre Lets you select the desired genre. Keyword Lets you enter the keyword for searching the Records. If you want to abort your edits, touch [Cancel]. 4 Touch [Create] or [Save] to save the created/edited Record. Touching [Create] will add the new created Record to the Music Finder display. Touching [Save] will overwrite your edits to the existing Record. Deleting a Record 1 2 From the Music Finder display, select a Record to be deleted. Touch (Delete) to delete the selected Record. Saving the Records as a Single File The Music Finder feature handles all the Records including the presets and additionally created records as a single file. Keep in mind that individual records (panel settings and Song data) cannot be handled as separate files. 1 2 3 4 As necessary, connect the USB flash memory to this instrument. Call up the operation display via [Menu] → [Utility] → [Factory Reset/Backup] → page 2/2. Touch [Backup] of “Music Finder” to call up the File Selection display. Select the location to which you want to save the file, then touch [Backup Here] to execute the Save operation. All Records are saved together as a single file. CVP-609/605 Reference Manual 32 Creating/Editing a Record of the Music Finder Calling Up Music Finder Records from User memory/USB flash memory 1 On the Music Finder display, touch (Load) to call up the File Selection display. NOTE This display can also be called up by touching [Restore] of “Music Finder” at the display called up via [Menu] [Utility] [Factory Reset/Backup] page 2/2. 2 Select a Music Finder file on the internal User memory or USB flash memory. The confirmation dialog appears as follows: • Append: The Records in the selected file will be added to the existing Records. • Replace: The existing Records will be replaced with the Records in the selected file. • Cancel: Aborts the operation (the selected file is not called up). NOTICE Selecting “Replace” automatically deletes all your original Records from internal memory. Make sure that all the Records including the important ones have been saved to a single file. NOTE When you want to restore the initial default status, select “MusicFinderPreset” in the Preset tab then touch [Replace]. CVP-609/605 Reference Manual 33 Calling Up Registration Memory Numbers in Order (Registration Sequence) For changing the panel setup quickly during a live performance, this instrument features the Registration Sequence which lets you call up the eight setups in any order you specify, by simply using the ASSIGNABLE buttons or the pedal as you play. 1 2 Select the desired Registration Memory Bank to set a sequence. Call up the Registration Sequence display via [Menu] → [RegistSeq]. 6 3 7 Current Registration Bank name Indicates the Registration Memory numbers, in the order of the current Registration Sequence. 5 4 3 If you intend to use a pedal to switch the Registration Memory number, specify here how the pedal will be used. The pedal assigned to “Regist +” will be used for advancing through the sequence. The pedal assigned to “Regist -” will be used for reversing through the sequence. NOTE You can also assign the other functions to the pedal — Punch In/Out of Song (page 81) and the function set in the Assignable display (page 37). If you assign multiple functions to the pedal, the priority is: Punch In/Out of Song Registration Sequence the function set in the Assignable display. If you intend to use the ASSIGNABLE button to switch the Registration Memory number, assign “Regist +” or “Regist -” in the display called up via [Menu] → [Assignable] → [Assignable] (page 40). 4 Program a Sequence order in which the Registration Memory number is to be called up. Basically, press the desired Registration Memory number button on the panel, then touch [Insert] to enter the selected number. T, L, R, RI Moves the cursor. NOTE If you want to move the cursor directly to an already entered number, touch the desired number. Replace Replaces the number of the cursor location with the currently selected Registration Memory number. Insert Inserts the number of the currently selected Registration Memory number before the cursor position. Delete Deletes the number at the cursor position. Clear Deletes all numbers in the sequence. CVP-609/605 Reference Manual 34 Calling Up Registration Memory Numbers in Order (Registration Sequence) 5 Set the behavior when the Registration Sequence reaches the end. • Stop: Pressing the ASSIGNABLE button or the “advance” pedal has no effect. The sequence is “stopped.” • Top: The sequence starts again at the beginning. • Next: The sequence automatically moves to the beginning of the next Registration Memory Bank in the same folder. 6 Set the Registration Sequence to “On.” The Registration Sequence programmed here is shown in the Registration area of the Home display. Press the pedal or the ASSIGNABLE button to check whether or not the Registration Memory number is called up in the order as programmed. 7 Touch (Save) to call up the File Selection display, then save the sequence program as a Registration Memory Bank file. NOTICE Settings in the Registration Sequence display will be lost if you select another Registration Bank without executing the Save operation. CVP-609/605 Reference Manual 35 Disabling Recall of Specific Items (Freeze) Registration Memory lets you recall all the panel setups you made with a single button press. However, there may be times that you want certain items to remain the same, even when switching Registration Memory setups. For example, you may want to switch Voice settings while keeping the same Style. This is where the Freeze function comes in handy. It lets you maintain the settings of certain items and leave them unchanged, even when selecting other Registration Memory buttons. 2 1 1 2 Enter the checkmark of the item to be “frozen.” Set the Registration Freeze to “On.” CVP-609/605 Reference Manual 36 Assigning a Specific Function to Each Pedal or ASSIGNABLE button Pedal To the three pedals of this instrument, you can assign one of various functions instead of the original functions (damper, sostenuto and soft). To the Footswitch or Foot Controller connected to the [AUX PEDAL] jack, likewise, you can assign one of various functions. 1 2 3 4 1 Select the function for each pedal. For information about each function, refer to pages 38 - 39. NOTE You can also assign the other functions to the pedal — Punch In/Out of Song (page 81) and Registration Sequence (page 34). If you assign multiple functions to the pedal, the priority is: Punch In/Out of Song Registration Sequence Functions assigned here. 2 Touch (Setting), then make the detailed settings of the selected functions. For each Part, you can turn on or off the selected function and adjust the degree to which the selected function is applied. Depending on the function selected in Step 1, the available parameters differ, or (Setting) is gray out indicating that there is no available parameters. 3 If necessary, set the polarity of the footswitch or foot controller connected to the [AUX PEDAL] jack. Depending on the Footswitch or Foot Controller, it may work in the opposite way (i.e., pressing it has no effect, but releasing it does). If such a case occurs, use this setting to reverse the polarity. 4 If you change the functions of the Center and Left pedals from the default settings, turn “Depend On Main Voice(Center & Left)” on or off as desired. When this is set to off, the function assignments of the Center and Left pedals are maintained even if the Main Voice is changed (page 44). CVP-609/605 Reference Manual 37 Assigning a Specific Function to Each Pedal or ASSIGNABLE button Assignable Pedal Functions For functions indicated with “*”, use only the Foot Controller; proper operation cannot be done with a Footswitch. For functions indicated with “**”, they can be assigned also to the ASSIGNABLE [1] – [4] buttons. Articulation 1/2** When you use a Super Articulation Voice that has an effect assigned to the pedal/ footswitch, you can enable the effect by pressing the pedal/footswitch. Volume* Controls the volume. This function is available only for the foot controller connected to the instrument’s [AUX PEDAL] jack. Sustain Controls the sustain. When you press and hold the pedal, all notes played on the keyboard have a longer sustain. Releasing the pedal immediately stops (damps) any sustained notes. The “Half Pedal Point” parameter allows you to specify how far down you should press on the pedal until the damper effect starts working. This can be set for all pedals on the CVP-609, as well as the right pedal and the foot controller connected to the [AUX PEDAL] jack on the CVP-605. Sostenuto Controls the Sostenuto effect. If you play a note or chord on the keyboard and press the pedal while holding the note(s), the notes will sustain as long as the pedal is held. However, all subsequent notes will not sustain. This makes it possible to sustain a chord, for example, while other notes are played staccato. NOTE This function will not affect any of the Organ Flutes and only some of the Super Articulation Voices. Soft Controls the Soft effect. Pressing this pedal reduces the volume and changes the timbre of the notes you play. This is effective only for certain appropriate Voices. The “Half Pedal Point” parameter allows you to specify how far down you should press on the pedal until the soft effect starts working. This can be set for all pedals on the CVP-609, as well as the right pedal and the foot controller connected to the [AUX PEDAL] jack on the CVP-605. Glide When the pedal is pressed, the pitch changes, and then returns to normal pitch when the pedal is released. • Up/Down: Determines whether the pitch change goes up (is raised) or down (is lowered). • Range: Determines the range of the pitch change, in semitones. • On Speed: Determines the speed of the pitch change when the pedal is pressed. • Off Speed: Determines the speed of the pitch change when the pedal is released. Portamento The portamento effect (a smooth slide between notes) can be produced while the pedal is pressed. Portamento is produced when notes are played legato style (i.e., a note is played while the preceding note is still held). The portamento time can also be adjusted form the Voice Edit display (page 42). This function does not affect certain Natural Voices, which would not sound appropriately with this function. NOTE This function will not affect any of the Organ Flutes, Super Articulation 2 Voices and only some of the Super Articulation Voices. Pitch Bend* Allows you to bend the pitch of notes up or down by using the pedal. This function can be assigned to all pedals on the CVP-609, as well as the right pedal and the foot controller connected to the [AUX PEDAL] jack on the CVP-605. • Up/Down: Determines whether the pitch change goes up (is raised) or down (is lowered). • Range: Determines the range of the pitch change, in semitones. Modulation* Applies a vibrato effect to notes played on the keyboard. Moreover, various effects can be added to the Super Articulation Voice. The effect becomes deeper when pressing down the foot controller. Modulation (Alt) Unlike the Modulation above, pressing the pedal or footswitch alternates the on/off status of the vibrato effect. Effect Variation On/Off** Switches the Insertion Effect Variation (page 44) on and off. CVP-609/605 Reference Manual 38 Assigning a Specific Function to Each Pedal or ASSIGNABLE button Vibe Rotor On/Off** Switches the Vibe Rotor on and off when the Insertion Effect Type (page 44) is set to “VIBE VIBRATE” in the “TREMOLO” category. Keyboard Harmony On/ Off** Switches the Keyboard Harmony (page 20) function on and off. Vocal Harmony On/Off** Switches the “Harmony” in the Vocal Harmony display on and off (pages 25, 28). Vocal Harmony Effect On/Off** Switches the “Effect” in the Vocal Harmony display on and off (page 27). (only for CVP-609) Talk On/Off** Switches between “Vocal” and “Talk” in the Microphone Setting display (page 22). Score Page +/-** While the Song is stopped, you can turn to the next/previous score page (one page at a time). Lyrics Page +/-** While the Song is stopped, you can turn to the next/previous lyrics page (one page at a time). Text Page +/-** You can turn to the next/previous text page (one page at a time). Song Play/Pause Same as the SONG CONTROL [R/K] (PLAY/PAUSE) button. Style Start/Stop Same as the STYLE CONTROL [R/J](START/STOP) button. Tap Tempo Same as the [TAP TEMPO] button. Synchro Start Same as the [SYNC START] button. Synchro Stop Same as the [SYNC STOP] button. Intro 1 – 3 Same as the INTRO [I]–[III] buttons. Main A – D Same as the MAIN VARIATION [A]–[D] buttons Fill Down Plays a fill-in, which is automatically followed by the Main section of the button on the immediate left. Fill Self Plays a fill-in. Fill Break Plays a break. Fill Up Plays a fill-in, which is automatically followed by the Main section of the button on the immediate right. Ending 1 – 3 Same as the ENDING/rit. [I]–[III] buttons. Fade In/Out** Switches Fade In /Fade Out function on and off. Fingered/ Fingered On Bass** The pedal alternately switches between the Fingered and On Bass modes (page 6). Bass Hold While the pedal is pressed, the Style bass note will be held even if the chord is changed during Style playback. If the fingering is set to “AI Full Keyboard,” the function does not work. Percussion The pedal plays a percussion instrument selected in the window called up via (Setting). In this window, you can use the keyboard to select an instrument. NOTE When you select the percussion instrument by pressing a key on the keyboard, the velocity with which you press the key determines the percussion volume. Main Voice On/Off** Turns on or off the Main Voice. Layer Voice On/Off** Turns on or off the Layer Voice. Left Voice On/Off** Turns on or off the Left Voice. OTS +/- Calls up the next/previous One Touch Setting. CVP-609/605 Reference Manual 39 Assigning a Specific Function to Each Pedal or ASSIGNABLE button Assignable You can assign a specific function to each of the ASSIGNABLE [1] – [4] buttons, letting you call up often used functions quickly. Likewise, you can also assign each of the icons shown in the Menu display to each of these buttons. 1 1 2 Select the item for each of ASSIGNABLE buttons. You can assign the icons shown in the Menu display (with the exception of Assignable and Wireless LAN), Pedal Functions marked with ** (page 38), and the following functions. If you want no function to be assigned, select “No Assign.” Left Hold On/Off Turns on or off the Left Hold. 2 Effect On/Off Turns on or off the Effects. Mono/Poly Switches between the Mono (in which the Keyboard Voice is played monophonically with the last note priority) and Poly (in which the Keyboard Voice is played polyphonically). Depending on the Voice, Portamento may be produced when notes are played with legato. Regist +/- Calls up the next/previous Registration Memory number of the Registration Sequence. If necessary, touch (Setting) then make the detailed settings. You can turn on or off the specified function for each Part. Depending on the selected function, grayed out, indicating that there are no available parameters. CVP-609/605 Reference Manual (Setting) is 40 Editing a Voice (Voice Edit) The Voice Edit feature allows you to create your own Voices by editing some parameters of the existing Voice. Once you’ve created a Voice, you can save it as a User Voice for future recall. Here covers the Voices other than Organ Flutes Voices because the Edit manner is different between them. For instructions on editing an Organ Flutes Voice, refer to page 45. 1 2 Select the desired Voice (other than an Organ Flutes Voice). On the Voice Edit display called up via [Menu] → [Voice Edit], select the desired parameter then edit the value. For information about the editable parameters, refer to page 42. By touching Voice. 3 Touch (Compare) repeatedly, you can compare the sound of the edited Voice with the original (unedited) (Save) to save the edited Voice. NOTICE The settings will be lost if you select another Voice or turn the power to the instrument off without executing the Save operation. NOTE If you want to edit another Voice, touch the Voice name at the top of the Voice Edit display. Or, press the VOICE [MAIN/ LAYER/LEFT] button to select the Keyboard part to which the desired Voice is assigned, confirm the Voice name at the top of the Voice Edit display, make the edits as desired, then execute the Save operation. CVP-609/605 Reference Manual 41 Editing a Voice (Voice Edit) Editable Parameters in the Voice Edit display Common Adjusts the volume of the current edited Voice. Volume Touch Sense Depth Offset Adjusts the touch sensitivity (velocity sensitivity), or how greatly the volume responds to your playing strength. Touch Sense Depth Touch Sense Offset Changes the velocity curve according to Velocity Depth (with Offset set to 64) Changes to velocity curve according to Velocity Offset (with Depth set to 64) Actual Velocity for tone generator Actual Velocity for tone generator Offset = 96 (+64) Depth = 127 (twice) Depth = 64 (normal) 127 Depth = 32 (half) 64 Offset = 127 (+127) Offset = 64 (normal) 127 Offset = 32 (-64) 64 Depends on offset Depth = 0 0 0 64 127 Received Velocity (Actual Key-on speed) 64 Depends on offset 127 Received Velocity (Actual Key-on speed) Offset = 0 (-127) • Depth: Determines the velocity sensitivity, or how much the level of the Voice changes in response to your playing strength (velocity). • Offset: Determines the amount by which received velocities are adjusted for the actual velocity effect. Part Octave Main/Layer Left Mono Shifts the octave range of the edited Voice up or down in octaves. When the edited Voice is used as any of the Main and Layer parts, the Main/Layer parameter is available; when the edited Voice is used as the Left part, the Left parameter is available. Mono/Poly Determines whether the edited Voice is played monophonically or polyphonically. Portamento Time Sets the portamento time (pitch transition time) when the edited Voice is set to “Mono” above. NOTE The Portamento Time determines the pitch transition time. Portamento is a function that creates a smooth transition in pitch from the first note played on the keyboard to the next. CVP-609/605 Reference Manual 42 Editing a Voice (Voice Edit) Sound Filter Filter is a processor that changes the timbre or tone of a sound by either blocking or passing a specific frequency range. The parameters below determine the overall timbre of the sound by boosting or cutting a certain frequency range. In addition to making the sound either brighter or mellower, Filter can be used to produce electronic, synthesizer-like effects. Brightness Determines the cutoff frequency or effective frequency range of the filter (see diagram). Higher values result in a brighter sound. Volume Cutoff Frequency These frequencies are “passed” by the filter. Harmonic Cont. (Harmonic Content) Determines the emphasis given to the cutoff frequency (resonance), set in Brightness above (see diagram). Higher values result in a more pronounced effect. Frequency (pitch) Cutoff range Volume Resonance Frequency (pitch) EG The EG (Envelope Generator) settings determine how the level of the sound changes in time. This lets you reproduce many sound characteristics of natural acoustic instruments — such as the quick attack and decay of percussion sounds, or the long release of a sustained piano tone. Level Sustain Level Time Attack Decay Key-on Vibrato Release Key-off Attack Determines how quickly the sound reaches its maximum level after the key is played. The lower the value, the quicker the attack. Decay Determines how quickly the sound reaches its sustain level (a slightly lower level than maximum). The lower the value, the quicker the decay. Release Determines how quickly the sound decays to silence after the key is released. The lower the value, the quicker the decay. Vibrato is a quavering, vibrating sound effect that is produced by regularly modulating the pitch of the Voice. Pitch Speed Depth Delay Time Modulation Depth Determines the intensity of the Vibrato effect. Higher settings result in a more pronounced Vibrato. Speed Determines the speed of the Vibrato effect. Delay Determines the amount of time that elapses between the playing of a key and the start of the Vibrato effect. Higher settings increase the delay of the Vibrato onset. When the Modulation function is assigned to a pedal (page 38), the pedal can be used to modulate the parameters below as well as the pitch (vibrato). Here, you can set the degree to which the pedal modulates each of the following parameters. Filter CVP-609/605 Reference Manual Determines the degree to which the pedal modulates the Filter Cutoff Frequency. For details about the filter, refer to page 43. 43 Editing a Voice (Voice Edit) Modulation Amplitude Determines the degree to which the pedal modulates the amplitude (volume). LFO Pitch Determines the degree to which the pedal modulates the pitch, or the vibrato effect. LFO Filter Determines the degree to which the pedal modulates the Filter Cutoff Frequency, or the wah effect. LFO Amplitude Determines the degree to which the pedal modulates the amplitude, or the tremolo effect. Effect Insertion Effect On/Off Turns the Insertion Effects on or off. Type Selects the Insertion Effect Type. Select the Category then select the Type. Depth Adjusts the Insertion Effect Depth. Variation Each Insertion Effect Type features the Variation which is turned off by default. You can use this Variation by turning it on, and adjust the depth of this Variation Effect. (See below.) (Variation name) This indicates the Variation name of the Insertion Effect Type, and lets you set the Insertion Effect Depth when the Variation (above) is turned on. Vibe Rotor Available only if “VIBE VIBRATE” in the “TREMOLO” category is selected as the Insertion Effect Type explained above. Determines whether VIBE VIBRATE should be set to on or off when selecting the Voice. Reverb Depth Adjusts the Reverb Depth. Chorus Depth Adjusts the Chorus Depth. EQ Determines the Frequency and Gain of the EQ bands. For information about EQ, refer to page 10. Keyboard Harmony From this display, you can set the same parameters as those in the Keyboard Harmony display (step 2 on page 20). Before making any settings, make sure that the current part is set to Main; in other words, you should select the Main part by touching the Voice name at the top of the Voice Edit display, or by pressing the VOICE [MAIN/LAYER/LEFT] button. The settings here are called up automatically simply by selecting the corresponding Voice. Pedal This section allows you to select the function to be assigned to the center or left pedal. Before making any settings, make sure that the current part is set to Main; in other words, you should select the Main part by touching the Voice name at the top of the Voice Edit display, or by pressing the VOICE [MAIN/LAYER/LEFT] button. The settings here are called up automatically simply by selecting the corresponding Voice. For details about the pedal function, refer to page 38. CVP-609/605 Reference Manual 44 Editing an Organ Flutes Voice (Voice Edit) The Organ Flute Voices can be edited by adjusting the footage levers, adding the attack sound, applying effect and equalizer, etc. 1 Select the desired Organ Flutes Voice. From the [Organ] Category, touch [Organ Flutes], then select the desired Organ Flutes Voice. 2 On the Voice Edit display called up via [Menu] → [Voice Edit], select the desired parameter then edit the value. NOTE The Voice Edit display for the Organ Flutes Voices can also be called up by touching the Organ Flutes icon at upper right of the Organ Flutes Voice name in the Home display. This is useful for adjusting footage settings and controlling the rotary speaker while you play. 4 5 6 7 2 3 1 1 Footage Determines the basic sound of the organ flutes. 2 Organ Type Specifies the type of organ tone generation to be simulated. • Sine: Produces a clean, clear sound. • Vintage: Produces a gritty, slightly distorted sound. • Euro (only for CVP-609): Produces the sound of the transistor electronic organ equipped with the electronic tremolo. 3 Volume Adjusts the overall volume of the Organ Flutes. 4 Rotary Speaker Turns on or off the Rotary Speaker and switches the Rotary Speaker speed between the “Slow” and “Fast.” This is available only when an Effect Type of the ROTARY SP Category is selected. 5 Vibrato Turns on or off the vibrato, and adjusts its depth and speed. 6 Response Affects both the attack and release (page 43) portion of the sound, increasing or decreasing the response time of the initial swell and release, based on the Footage controls. The higher the value, the slower the swell and release. 7 Attack Selects “First” or “Each” as the Attack mode and adjusts the Attack length of the sound. In the First mode, attack (percussive sound) is applied only to the first notes played and held simultaneously; while the first notes are held, any subsequently played notes have no attack applied. In the Each mode, attack is applied equally to all notes. The Attack length produces a longer or shorter decay immediately after the initial attack. The longer the value, the longer the decay time. CVP-609/605 Reference Manual 45 Editing an Organ Flutes Voice (Voice Edit) 3 As necessary, touch (Setting) then set the parameters related to the Effects and EQ. The parameters are same as those in the Effect display and EQ display of the previous chapter “Editing a Voice (Voice Edit)” (page 44). 4 Touch (Save) to save the created Organ Flutes Voice. NOTICE The settings will be lost if you select another Voice or turn the power to the instrument off without executing the Save operation. NOTE If you want to edit another Voice, touch the Voice name at the top of the Voice Edit display. Or, press the VOICE [MAIN/ LAYER/LEFT] button to select the Keyboard part to which the desired Voice is assigned, confirm the Voice name at the top of the Voice Edit display, make the edits as desired, then execute the Save operation. CVP-609/605 Reference Manual 46 Creating/Editing Styles (Style Creator) The Style Creator function lets you create your original Style by recording the rhythm pattern via the keyboard performance and using the already-recorded Style data. Basically, select a preset Style that is closest to the type you want to create, then record the rhythm pattern, bass line, chord backing, or phrase (referred to as “Source Pattern” in the Style Creator) for each channel of each Section. Like the Song, two Recording methods are available: Realtime Recording and Step Recording (page 48). Style Data Structure – Consisting of Source Patterns A Style is made up of the different Sections (Intro, Main, Ending, etc.) and each Section has eight separate channels, each of which is referred to as “Source Pattern.” With the Style Creator feature, you can create a Style by separately recording the Source Pattern for each channel, or by importing pattern data from other existing Styles. Ending 3 Ending 2 Intro Fill In Main B Main A Rhythm 1 Recording or copying from another Style Rhythm 2 Recording or copying from another Style Bass Recording or copying from another Style Chord 1 Recording or copying from another Style Chord 2 Recording or copying from another Style Pad Recording or copying from another Style Phrase 1 Recording or copying from another Style Phrase 2 Recording or copying from another Style Creating a Source Pattern for each channel separately Basic Procedure for creating a Style The detailed instructions are described on the reference page of each step. 1 2 3 Select the desired Style as starting data. Call up the Style Creator display via [Menu] → [StyleCreator]. On the “Basic” display, select a Section (page 48). As necessary, make the following settings. • If you create a Style entirely from scratch, touch [Initialize Style] to make the current Style empty. • If you initialize the Style, set the length (measure amount) of the Source Pattern. • Set the overall parameters such as Tempo and Beat. CVP-609/605 Reference Manual 47 Creating/Editing Styles (Style Creator) 4 Create the Source Pattern for each channel. • Realtime Recording (page 49) Lets you record the Style by simply playing the keyboard. • Step Recording (page 52) Lets you enter each note individually. • Style Assembly (page 52) Lets you copy various patterns from another preset Styles or Styles you have already created. 5 Edit the already recorded channel data. • Channel Edit (page 53) Lets you edit the MIDI data of the already recorded channels. • SFF Edit (page 55) Lets you edit the SFF (Style File Format) related parameters of the already recorded channels other than Rhythm channels. 6 7 Repeat steps 3 – 5 as desired. Touch (Save) at the top of the display to save the created Style. Basic The explanations here apply to step 3 on page 47. This display lets you set the basic parameters such as Section selection. Initialize Style Initializes all channel data of all Sections belonging to make the current Style empty. Touch here when you want to create the Style data from scratch. Section Selects a Section for creating or editing. Pattern length Selects the length (in measures) of the current Section. After inputting the value, touch [Execute] to actually enter the changes. Tempo Sets the tempo of the Style. The setting here commonly applies to all Sections. Beat Sets the beat of the Style. The setting here commonly applies to all Sections. After inputting the value, touch [Execute] to actually enter the changes. CVP-609/605 Reference Manual 48 Creating/Editing Styles (Style Creator) Realtime Recording The explanations here apply to step 4 on page 48. In the “Rec Channel” display, you can create the channel data via the Realtime Recording. Realtime Recording Characteristics in the Style Creator Loop Recording Style playback repeats the rhythm patterns of several measures in a “loop,” and Style recording is also done using loops. For example, if you start recording with a two-measure Main section, the two measures are repeatedly recorded. Notes that you record will play back from the next repetition (loop), letting you record while hearing previously recorded material. Overdub Recording This method records new material to a channel already containing recorded data, without deleting the original data. In Style recording, the recorded data is not deleted, except when using functions such as “Clear Drum Inst” (page 50) “Delete” (pages 50, 51) and “Remove Event” (page 54). For example, if you start recording with a two-measure Main section, the two measures are repeated many times. Notes that you record will play back from the next repetition, letting you overdub new material to the loop while hearing previously recorded material. When creating a Style based on an existing internal Style, overdub recording is applied only to the rhythm channels. For all other channels (except rhythm), you need to delete the original data before recording. 1 2 Recording Rhythm Channels 1 – 2 1 On the “Rec Channel” display, touch and hold the desired channel until it turns red. The selected channel becomes the Recording target whether the channel already contains data or not. If recorded data is already included, you should record the additional notes to the selected channel as Overdub Recording. 2 If necessary, select a Voice then practice the rhythm pattern to be recorded. Touch the instrument icon (illustration) to call up the Voice Selection display then select the desired Voice such as Drum Kit. After selecting, touch [Close] to return to the original display. With the selected Voice, practice the rhythm pattern to be recorded. Available Voices for recording For the Rhythm1 channel, any except Organ Flutes Voices can be used for recording. For the Rhythm2 channel, only Drum/SFX kits can be used for recording. CVP-609/605 Reference Manual 49 Creating/Editing Styles (Style Creator) 3 Press the STYLE CONTROL [R/J](START/STOP) button to start recording. Since already recorded data plays back, turn each channel on or off by touching as desired. If necessary, delete a channel by touching [Delete] located under the desired channel. 4 As soon as loop playback returns to the first beat in the first measure, start playing the rhythm pattern to be recorded. If you feel difficult to play, it is a good idea to play as follows, for example. Loop 1st round Bass Drum Loop 2nd round Snare Drum Bass Drum Loop 3rd round Hi-Hat Snare Drum Bass Drum If you make a mistake or play any wrong notes: You can delete notes of a specific drum instrument. Touch [Clear Drum Inst] to call up a message, then press the corresponding key on the keyboard while the message is shown. After deleting the desired drum instrument, touch [Exit] to close the message. 5 Press the STYLE CONTROL [R/J](START/STOP) button to stop playback. If you want to add more notes, press the [R/J] (START/STOP) button again to continue recording. 6 Touch and hold the Recording channel for a while (until the button changes color) to exit from the Recording mode. Recording Bass, Chord 1 – 2, Pad and Phrase 1 – 2 1 On the “Rec Channel” display, touch and hold the desired channel until it turns red. If the selected channel already contains data, a confirmation message appears, prompting you whether or not to delete the existing data of the selected channel. Touch [Yes] to delete data and the selected channel is specified as Record target. Note that channel data other than the Rhythm channels of the preset Style cannot be overdubbed. 2 If necessary, select a Voice then practice the bass line, chord backing, or phrase to be recorded. Touch the instrument icon (illustration) to call up the Voice Selection display then select the desired Voice. After selecting, touch [Close] to return to the original display. With the selected Voice, practice the phrase or chord backing to be recorded. CVP-609/605 Reference Manual 50 Creating/Editing Styles (Style Creator) Available Voices for recording Any except for the Organ Flutes/Drum kit/SFX kit Voices can be used for recording. Record a phrase in CM7 which will play appropriate notes as change chords during performance Rules when recording a Main or Fill-in With the default initial settings, the Source Root/Chord is set to CM7. This means that you should record a Source Pattern which is to be triggered by specifying CM7 during normal performance. Record a bass line, phrase or chord backing which you want to hear when CM7 is specified. More concretely, see below. • Use only the CM7 scale tones when recording the Bass and Phrase channels (i.e., C, D, E, G, A, and B). • Use only the chord tones when recording the Chord and Pad channels (i.e., C, E, G, and B). C R C C R C C = Chord note C, R = Recommended note If you observe this rule, Style playback notes are appropriately converted depending on the chord changes you make during your performance. Rules when recording an Intro or Ending These Sections are designed assuming that the chord is not changed during playback. This is why you need not observe the rule for Main and Fill-In Sections described above, and you can make the chord progression in recording. However, follow the rule below since the Source Root/Chord is set to CM7. • When recording the Intro, make sure that the recorded phrase should lead to CM7 scale music. • When recording the Ending, make sure that CM7 scale music should lead to the recorded phrase. Setting the Source Root/Chord if necessary Although the default Source Root/Chord is set to CM7 as described above, you can change this to your favorite one which lets you play easily. Call up the “SFF Edit” display, set the Source Root and Chord to the favorite or desired Root and Chord type. Keep in mind that when you change the Source Chord from the default CM7 to another chord, the chord notes and recommended notes will also change. For details, refer to page 56. 3 Press the STYLE CONTROL [R/J](START/STOP) button to start recording. With the already recorded data playing back, turn each channel on or off by touching as desired. If necessary, delete a channel by touching [Delete] located under the desired channel. 4 As soon as loop playback returns to the first beat in the first measure, start playing the bass line, chord backing or phrase to be recorded. 5 Press the [R/J](START/STOP) button to stop playback. If you want to add more notes, press the [R/J](START/STOP) button again to continue recording. To hear the playback sound of the already recorded channels with another Source Chord/ Root: 1) 2) 3) 4) 6 Call up the “SFF Edit” display, then set the “Target Ch” at the top of the display to “Rhythm1” or “Rhythm2.” Touch [Play Root/Chord] to call up the operation display. Press the STYLE CONTROL [R/J](START/STOP) button to start playback. On the display, set the “Play Root/Chord” to the desired Chord root and Chord type. This operation lets you hear how the Source Pattern is played back via the chord change during normal performance. Touch and hold the Recording channel for a while (until the button changes color) to exit from the Recording mode. CVP-609/605 Reference Manual 51 Creating/Editing Styles (Style Creator) Step Recording The explanations here apply to step 4 on page 48. In the Step Recording (Style Edit) display called up by touching (Edit) at the upper right of the display, you can record or edit notes one by one. This Step Recording procedure is essentially the same as that for Song Recording (page 60) with the exception of the points listed below: • In the Song Creator, the “End” mark position can be changed freely; in the Style Creator, it cannot be changed. This is because the length of the Style is fixed for all channels as you set in the “Basic” display (page 48). For example, if you create a Style of four measures length, the “End” mark position is automatically set to the end of fourth measure, and cannot be changed in the Style Edit display. • Recording channels can be changed in the Song Creator’s Edit display; however, they cannot be changed in the Style Creator. Select the Recording channel in the “Rec channel” display. • In the Style Creator, Chord, Lyrics, and System Exclusive data cannot be entered. The Channel data can be entered and System Exclusive data can be edited (delete, copy or move). Assembly — Assigning the Source Pattern to Each Channel The explanations here apply to step 4 on page 48. The “Assembly” display shows that each channel data of the current Section has been copied from which Style, which Section, and which channel. For each channel, touch the Style name, Section name, or Channel name as necessary to select the desired one. CVP-609/605 Reference Manual 52 Creating/Editing Styles (Style Creator) Channel Edit The explanations here apply to step 5 on page 48. The “Channel Edit” display lets you edit the already recorded channel data. Select the Target channel then edit the desired parameters. After editing the desired parameter, touch [Execute] to actually enter the edits for each setup window. When execution is completed, this button changes to [Undo], letting you restore the original data if you are not satisfied with the results. The Undo function only has one level; only the previous operation can be undone. Target Ch Select the target channel to be edited. All items with the exception of the “Groove” are to be applied to the channel specified here. Groove This lets you add swing to the music or change the “feel” of the beat by making subtle shifts in the timing (clock) of the Style. The Groove settings are applied to all channels of the selected Section. Original Beat Specifies the beats to which Groove timing is to be applied. In other words, if “8 Beat” is selected, Groove timing is applied to the 8th notes; if “12 Beat” is selected, Groove timing is applied to 8th-note triplets. Beat Converter Actually changes the timing of the beats (specified in the “Original Beat” parameter above) to the selected value. For example, when Original Beat is set to “8 Beat” and Beat Converter is set to “12,” all 8th notes in the section are shifted to 8th-note triplet timing. The “16A” and “16B” Beat Converter which appear when Original Beat is set to “12 Beat” are variations on a basic 16thnote setting. Swing Produces a “swing” feel by shifting the timing of the back beats, depending on the “Original Beat” parameter above. For example, if the specified Original Beat value is “8 Beat”, the Swing parameter will selectively delay the 2nd, 4th, 6th, and 8th beats of each measure to create a swing feel. The settings “A” through “E” produce different degrees of swing, with “A” being the most subtle and “E” being the most pronounced. Fine Selects a variety of Groove “templates” to be applied to the selected section. The “Push” settings cause certain beats to be played early, while “Heavy” settings delay the timing of certain beats. The numbered settings (2, 3, 4, 5) determine which beats are to be affected. All beats up to the specified beat — but not including the first beat — will be played early or delayed (for example, the 2nd and 3rd beats, if “3” is selected). In all cases, “A” types produce minimum effect, “B” types produce medium effect, and “C” types produce maximum effect. CVP-609/605 Reference Manual 53 Creating/Editing Styles (Style Creator) Dynamics Quantize This changes the velocity/volume (or accent) of certain notes in the Style playback. The Dynamics settings are applied to each channel or all channels of the selected Style. Accent Type Determines the type of accent applied — in other words, which notes are emphasized. Strength Determines how strongly the selected Accent Type (above) will be applied. The higher the value, the stronger the effect. Expand/ Compress Expands or compresses the range of velocity values. Values higher than 100% expand the dynamic range, while values lower than 100% compress it. Boost/Cut Boosts or cuts all velocity values. Values above 100% boost the overall velocity, while values below 100% reduce it. Apply To All Channels When set to “On,” the settings in this display will be applied to all the channels of the current Section. When set to “Off,” the settings in this display will be applied to the channel specified at the “Target Ch” in the Channel Edit display. Same as in the Song Creator (page 69), with the exception of the two additional available parameters below. Eighth notes with swing Sixteenth notes with swing Velocity Boosts or cuts the velocity of all notes in the specified channel, according to the percentage specified here. Bar Copy This function allows data to be copied from one measure or group of measures to another location within the specified channel. Source Top Source Last Destination Specifies the first (Source Top) and last (Source Last) measures in the region to be copied. Specifies the first measure of the destination location, to which the data is to be copied. Bar Clear This function clears all data from the specified range of measures within the selected channel. Remove Event This function lets you remove specific events from the selected channel. CVP-609/605 Reference Manual 54 Creating/Editing Styles (Style Creator) SFF Edit — Making Style File Format Settings The explanations here apply to step 5 on page 48. The Style File Format (SFF) combines all of Yamaha’s Style playback know-how into a single unified format. Setting the SFF related parameters determines how the original notes are converted to the actual sounded notes based on the chord you specify in the Chord area of the keyboard. The conversion flow is shown below. Source Pattern settings • Source Root • Source Chord Determines what key and what chord type are used for playing. Set these parameters before recording. Note Conversion from the Source Pattern • NTR (Conversion via the Chord Root change)....... page 56 • NTT (Conversion via the Chord Type change) ....... page 57 Octave Setting of the Converted Notes • High Key (Upper octave limit of the Note Transposition) • Note Limit (Note range between the highest and lowest notes) Set these parameters after recording. Others • RTR (How the note pitch changes in response to chord changes) Actual Sounded Notes The parameters shown above can be set in the “SFF Edit” display. CVP-609/605 Reference Manual 55 Creating/Editing Styles (Style Creator) Target Ch Select the target channel to be edited. Source Root/ Chord (Play Root/ Chord) These settings determine the original key of the Source Pattern (i.e., the key used when recording the pattern to the channel other than the Rhythm channels). If you set “Fm7” here, specifying “Fm7” in the Chord section of the keyboard will play back the originally recorded data (Source Pattern). The default setting is “CM7” (Source Root = C and Source Chord = M7). Depending on the selected chord type specified here, the playable notes (scale notes and chord notes) differ. When “Initialize Style” is executed in the “Basic” display, the default setting of CM7 is automatically selected. Playable notes when Source Root is C: CM 6 CMaj CM 7 (ᅊ11) CM 7 CM 7 (9) CM add9 C 6 (9) C C R C C R C R C C C R C R Cm 7 (11) C R C C C C 7 ᅈ5 R C C C 7 (9) C C C C C R C C C 1+8 C R R C C C R C R C C R R C C R C C C C 1+5 C R C C C C C C C R C C 7 sus 4 C C C C C 7 (ᅊ9) R C C C C 7 (ᅈ13) C C C R C C R C C C C R R C C C Cm 7 (9) C C C 7 (ᅈ9) C C R C C7 C C R C 7 (13) C C R C C C C Cm (9) Cdim 7 C R C C R C C C C R C C C R C C C 1+2+5 Csus 4 R C C C C R C R C C 7 aug CM 7 aug C C C R C Cdim C 7 (ᅊ11) C C R C C C C C C Cm 7 ᅈ5 C R C C CmM 7 (9) C C R C R C Cm 7 C R R C CmM 7 C C R C C C R C R C R C C R C Cm 6 Cm Caug C R C C R C C C C C R C C C C R C R C = Chord notes C, R = Recommended notes IMPORTANT Make sure to set the parameters here before recording. If you change the settings after recording, the recorded Source Pattern cannot be converted to the appropriate notes when changing the chord during your keyboard performance. NOTE When the parameters for the selected Target Ch are set to NTR: Root Fixed, NTT Type: Bypass, or NTT Bass: Off, the parameters here are changed to “Play Root” and “Play Chord,” respectively. In this case, you can change chords and hear the resulting sound for all channels. NOTE The settings here are not applied when NTR is set to “Guitar.” NTR/NTT (Note Transposition Rule/Note Transposition Table) The parameters here determine how the notes in the Source Pattern are converted according to the chord changes during your keyboard performance. NTR Selects the Note Transposition Rule which determines how the notes in the Source Pattern are transposed according to the Chord Root change. Root Trans When the root note is transposed, the interval between notes is maintained. For example, the notes C3, E3 and G3 in the key of C become F3, A3 and C4 when they are transposed to F. Use this setting for channels that contain melody lines. When playing a C major chord. Root Fixed The note is kept as close as possible to the previous note range. For example, the notes C3, E3 and G3 in the key of C become C3, F3 and A3 when they are transposed to F. Use this setting for channels that contain chord parts. When playing a C major chord. Guitar CVP-609/605 Reference Manual When playing an F major chord. When playing an F major chord. This is exclusively for transposing guitar accompaniment. Notes are transposed to approximate the chords played with natural guitar fingering. 56 Creating/Editing Styles (Style Creator) NTR/NTT (Note Transposition Rule/Note Transposition Table) NTT Type Selects the Note Transposition Table which determines how the notes in the Source Pattern are transposed according to the Chord Type change. When NTR is set to “Root Trans” or “Root Fixed”: Bypass When NTR is set to Root Fixed, the transposition table used does not do any note conversion. When NTR is set to Root Trans, the table used only converts the notes by maintaining the pitch relationship between notes. Melody Suitable for melody line transposition. Use this for melody channels such as “Phrase1” and “Phrase2.” Chord Suitable for chordal parts transposition. Use this for the “Chord1” and “Chord2” channels, especially when they contain piano or guitar-like chordal parts. Melodic Minor When the played chord changes from a major to a minor chord, this table lowers the third interval in the scale by a semitone. When the chord changes from a minor to a major chord, the minor third interval is raised by a semitone. Other notes are not changed. Use this for melody channels of Sections which respond only to major/minor chords, such as Intros and Endings. Melodic Minor 5th In addition to the Melodic Minor transposition above, augmented and diminished chords affect the 5th note of the Source Pattern. Harmonic Minor When the played chord changes from a major to a minor chord, this table lowers the third and sixth intervals in the scale by a semitone. When the chord changes from a minor to a major chord, the minor third and flatted sixth intervals are raised by a semitone. Other notes are not changed. Use this for chord channels of Sections which respond only to major/minor chords, such as Intros and Endings. Harmonic Minor 5th In addition to the Harmonic Minor transposition above, augmented and diminished chords affect the 5th note of the Source pattern. Natural Minor When the played chord changes from a major to a minor chord, this table lowers the third, sixth and seventh intervals in the scale by a semitone. When the chord changes from a minor to a major chord, the minor third, flatted sixth and flatted seventh intervals are raised by a semitone. Other notes are not changed. Use this for chord channels of Sections which respond only to a Major/minor chord such as Intros and Endings. Natural Minor 5th In addition to the Natural Minor transposition above, augmented and diminished chords affect the 5th note of the Source pattern. Dorian When the played chord changes from a major to a minor chord, this table lowers the third and seventh intervals in the scale by a semitone. When the chord changes from a minor to a major chord, the minor third and flatted seventh intervals are raised by a semitone. Other notes are not changed. Use this for chord channels of Sections which respond only to a Major/minor chord such as Intros and Endings. Dorian 5th In addition to the Dorian transposition above, augmented and diminished chords affect the 5th note of the Source pattern. When NTR is set to “Guitar”: All Purpose This table covers both stroke- and arpeggio-played sound. Stroke CVP-609/605 Reference Manual Suitable for stroke-played sound of the guitar. Some notes may sound as if they are muted — this is normal condition when the chord is played on guitar by stroke. 57 Creating/Editing Styles (Style Creator) NTR/NTT (Note Transposition Rule/Note Transposition Table) NTT Type Arpeggio NTT Bass The channel for which this is set to “On” will be played back by the bass root note, when the on-bass chord is recognized by the instrument. When NTR is set to Guitar and this parameter is set to “On,” only the note which is assigned to bass will be played back by the bass root note. Suitable for arpeggio-played sound of the guitar, resulting in beautiful four-note arpeggio sounds. NTR/NTT Settings for the Rhythm Channels Since the Rhythm channels should not be affected by Chord change, make sure to make the following settings. • NTR = Root Fixed • NTT = Bypass • NTT Bass = Off With the above settings, the “Source Root” and “Source Chord” parameters are changed to “Play Root” and “Play Chord,” respectively. High Key/Note Limit Adjusts the Octave of the notes converted via the NTT and NTR. High Key This sets the highest key (upper octave limit) of the note transposition for the chord root change. Any notes calculated to be higher than the highest key are transposed down to the next lowest octave. This setting is available only when the NTR parameter (page 56) is set to “Root Trans.” Example — When the highest key is F. Note Limit Low Note Limit High Root changes CM CᅊM FM FᅊM Notes Played C3-E3-G3 Cᅊ3-F3-Gᅊ3 F3-A3-C4 Fᅊ2-Aᅊ2-Cᅊ3 These set the note range (highest and lowest notes) for Voices recorded to the Style channels. By judicious setting of this range, you can ensure that the Voices sound as realistic as possible — in other words, that no notes outside the natural range are sounded (e.g., high bass sounds or low piccolo sounds). Example — When the lowest note is C3 and the highest is D4. Root changes CM CᅊM FM Notes Played E3-G3-C4 F3-Gᅊ3-Cᅊ4 F3-A3-C4 High Limit Low Limit RTR (Retrigger Rule) These settings determine whether notes stop sounding or not and how they change pitch in response to chord changes. Stop The notes stop sounding. Pitch Shift The pitch of the note will bend without a new attack to match the type of the new chord. Pitch Shift to Root The pitch of the note will bend without a new attack to match the root of the new chord. Retrigger The note is retriggered with a new attack at a new pitch corresponding to the next chord. Retrigger to Root The note is retriggered with a new attack at the root note of the next chord. However, the octave of the new note remains the same. CVP-609/605 Reference Manual 58 Creating/Editing MIDI Songs (Song Creator) The Owner’s Manual covers how to create an original Song by recording your keyboard performance (see instructions of Realtime Recording). This Reference Manual shows how to create an original Song by entering notes one by one (instructions of the Step Recording) and how to improve the already created Song by editing the detailed parameters. Realtime Recording and Step Recording When creating a Song, these two Recording methods are available. With Realtime Recording, this instrument records the performance data as it is played. With Step Recording, you can compose your performance by “writing” it down one event at a time. For instructions about the Realtime Recording, refer to the Owner’s Manual. As the method of re-recording a specific part of a Song in realtime, you can use the Punch In/Out (page 81). This chapter covers mainly the instructions of Step Recording. MIDI Song Data Structure A MIDI Song consists of 16 MIDI channels. You can create data of a MIDI Song by recording your performance to a specific channel or channels in realtime, or by executing the Step Recording. Song Recording Part (Default settings) Channel 1 Main Channel 2 Left Channel 3 Layer Channel 4 — Channel 5 — Channel 6 — Channel 7 — Channel 8 — Channel 9 Rhythm 1 Channel 10 Rhythm 2 Channel 11 Bass Style Playback Channel 12 Chord 1 • Realtime Recording: Channel 13 Chord 2 Channel 14 Pad Channel 15 Phrase 1 Channel 16 Phrase 2 Keyboard Performance • Realtime Recording: By default, your keyboard performance will be recorded to MIDI channels 1 – 3. You can also record additional performances to channels 4 – 8. • Step Recording: Without specifying the keyboard part, you can input the melodies or notes on the music notation sheet one by one to the desired channel. By default, Style playback will be recorded to MIDI channels 9 – 16. • Step Recording: After inputting the Chord change/Section change events, touch [Expand] to actually record the note data to MIDI channels 9 – 16. System Exclusive Lyrics CVP-609/605 Reference Manual 59 Creating/Editing MIDI Songs (Song Creator) Basic Procedure for creating a Song This section covers the basic procedure for Step Recording. 1 Select the desired Song or call up a new empty Song. If you want to call up an empty Song, press the [I] (REC) button, then touch [New MIDI] and [Cancel] in order. 2 3 Call up the Song Creator display via [Menu] → [SongCreator]. Touch (Edit) at the top of this display to call up the Song Edit display. 3, 6 7 4 4 Touch [Ch1] at the top left of this display to select the Recording Target channel. • If you want to record the keyboard performance, select one of “Ch1” – “Ch8.” If you intend to not use Style playback for the Song, “Ch9” – “Ch16” can be selected. • If you want to edit the System Exclusive data, select “SysEx.” • If you want to edit Lyrics, select “Lyrics.” • If you want to record Style playback (Chord change and Section change events), select “Chord.” 5 According to selection in step 4, execute the Step Recording or data edits. • When one of “Ch1” – “Ch16” is selected: For instructions on editing already recorded data, refer to page 66. For instructions on inputting melodies via Step Recording, touch [Step Rec] at the bottom left of the display then refer to page 61. • When “SysEx” is selected: Edit the already recorded data, following the explanations on page 66. Step Recording is not available. • When “Lyrics” is selected: Edit the already recorded data, following the explanations on page 66. Step Recording is not available. • When “Chord” is selected: For instructions on editing already recorded data, refer to page 66. For instructions on inputting Chord/Section Change events for Style playback via Step Recording, touch [Step Rec] then refer to page 64. 6 If necessary, touch (Edit) to return to the portal display of the Song Creator, then execute the Channel Edit function (page 69). 7 Touch (Save) at the top right of the display to save the created Song. NOTICE The recorded Song data will be lost if you select another Song or turn the power to the instrument off without executing the Save operation. CVP-609/605 Reference Manual 60 Creating/Editing MIDI Songs (Song Creator) Recording Melodies via Step Recording The explanations here apply when one of “Ch1” – “Ch16” is selected in step 5 on page 60. With [Step Rec] turned on at the bottom left of the display, you can input the notes one by one, using the controls below. 2 1 3 4 5 7 6 8 Control Names and Functions 1 Event List Indicates events such as note and Voice selection which have been input. For details, refer to page 67. 2 Song Position (Measure: Beat: Clock) Indicates the current Song position. Events such as note and Voice selection you have input are recorded at the position indicated here. You can change the current position by touching [U] or [D] below the Measure, Beat, and Clock* respectively. *Clock Smallest unit for the Song position and note length. A quarter note consists of 1920 clocks. 3 Cursor Lets you move the cursor position. 4 Step Rec Turning this on shows the Step Recording display, and turning it off shows the Song Edit display. 5 Velocity Determines the velocity (loudness) of the note to be entered. The velocity value can be specified within a range from 1 to 127. The higher the velocity value, the louder the sound becomes. Kbd.Vel: Actual resulting velocity 6 Length 127 63 111 47 95 31 79 15 Determines the gate time (note length) of the note to be entered. Normal: Staccato: 80% Tenuto: 40% Staccatissimo: 99% 20% Manual: The gate time can be set to any desired percentage by using the Data dial. CVP-609/605 Reference Manual 61 Creating/Editing MIDI Songs (Song Creator) 7 Note Type, Note Indication Touching [Note Type] repeatedly will alternate the type of the note indications at right in order: normal, dotted, and triplet. Select one of three types, then select (turn on) one of the note indications with which the next note is input. If you touch the selected note indication (which is turned on) again, the rest will be input with the corresponding length. 8 Delete Deletes the selected data. Example of Step Recording — Melodies 1 2 3 4 * The numbers shown in the illustration correspond to the following operation step numbers. This section describes the instructions on inputting the melodies of the above notation via the Step Recording. Before starting, note the following points: • To input the note with the tie in step 4, you need to operate without releasing the key. Proceed with the operations, reading the instructions carefully. • Before inputting notes as described below, select the desired Voice by using the Voice buttons. Even if it has already been selected, you need to re-select the same Voice to input the Voice number to the Event List. Keep in mind that only note and Voice selection events can be input with Step Recording. • Since the music score (called up via [Menu] → [Score]) is generated from the recorded MIDI data, it may not appear exactly the same as shown above. 1 Enter the first and second notes with a slur. 1-1 1-2 1-3 1-4 1-5 Touch [Velocity] to select “ .” Touch [Length] to select “99% (Tenuto).” Touch [Note Type] once or twice to call up the dotted note type. Touch the dotted quarter-note length ( ) to turn it on. Press the C3 key. With the operations above, the first note has been entered. Next, enter the second note. 1-6 1-7 1-8 Touch [Note Type] once or twice to call up the normal note indications. Touch the eighth-note length ( ) to turn it on. Press the D3 key. The first and second notes are entered with a slur. 2 Enter the next notes with staccato. 2-1 2-2 2-3 Touch [Length] to select “40% (Staccato).” Touch the quarter-note length ( ) to turn it on. Play the keys E3 and F3 in order. The first measure has been completed. CVP-609/605 Reference Manual 62 Creating/Editing MIDI Songs (Song Creator) 3 Enter a quarter-note rest. Touch the quarter-note ( ) which is turned on only once to input a quarter-note rest. Be careful not to touch the same note (which is turned on) several times. Doing so results in input the rests for the corresponding times. The rests are not actually indicated as such in the Event List, but you can confirm whether it is input or not by checking the Song Position. 4 Enter the next notes and apply a tie. 4-1 4-2 4-3 Touch [Velocity] to select “ 4-4 While holding the G3 key, press the C4 key. Do not release the G3 and C4 keys yet. Keep holding the notes while executing the following step. 4-5 While holding the keys G3 and C4, touch half-note ( ). .” Touch [Length] to select “80% (Normal).” While holding G3 key on the keyboard, touch quarter-note ( ). Do not release the G3 key yet. Keep holding it while executing the following steps. After touching half-note ( ), release the keys. The second measure has been completed. 5 Press the SONG CONTROL [J](STOP) button to return to the top of the Song, then hear the newly entered Song by pressing the [R/ K](PLAY/PAUSE) button. CVP-609/605 Reference Manual 63 Creating/Editing MIDI Songs (Song Creator) Recording Chord/Section Change Events via Step Recording The explanations here apply when “Chord” is selected in step 5 on page 60. With [Step Rec] turned on at the bottom left of the display, you can input the Chord/Section Change events for Style playback one by one. 2 1 3 4 5 6 Control Names and Functions 1 Event List Indicates events such as Chord change and Section change which have been input. For details, refer to page 67. 2 Song Position (Measure: Beat: Clock) Indicates the current Song position. Events such as Chord and Section change you have input are recorded at the position indicated here. You can change the current position by touching [U] or [D] below the Measure, Beat, and Clock* indications respectively. *Clock Smallest unit for the Song position and note length. A quarter note consists of 1920 clocks. 3 Cursor Lets you move the cursor position. 4 Step Rec Turning this on shows the Step Recording display, and turning it off shows the Song Edit display. 5 Note Indications Select one of the four note indications with which the next event is input. 6 Delete Deletes the selected data. CVP-609/605 Reference Manual 64 Creating/Editing MIDI Songs (Song Creator) Example of Step Recording — Chord/Section Events C 1 2 3 Main A Break Main B F G F G7 C * The numbers shown in the illustration correspond to the following operation step numbers. These instructions show how to input the Chord/Section change events of the above notation via Step Recording. Before starting, note the following points: • Turn off the STYLE CONTROL [AUTO FILL IN] button on the panel. • Select a conventional 4-beat Style. 1 Enter the chords for the Main A section. 1-1 1-2 1-3 Press the MAIN VARIATION [A] button. Touch the half-note length ( ) to turn it on. Play the chord C, F and G in the chord section of the keyboard. C F G 1-1 1-2 2 1-3 Enter the chords for the Break section. 2-1 2-2 2-3 Press the [BREAK] button. Touch the quarter-note length ( ) to turn it on. Play the chords F and G7 in the chord section of the keyboard. F G7 2-1 2-2 2-3 NOTE To enter fill-ins, turn the [AUTO FILL IN] button to on, and simply press the desired MAIN VARIATION [A]–[D] button. CVP-609/605 Reference Manual 65 Creating/Editing MIDI Songs (Song Creator) 3 Enter the chords for the Main B section. 3-1 3-2 3-3 Press the MAIN VARIATION [B] button. Touch the whole-note length ( ) to turn it on. Play the chord C in the chord section of the keyboard. C 3-1 3-3 3-2 The Chord change and Section change events are now entered. 4 Press the SONG CONTROL [J](STOP) button to return to the top of the Song, then listen to the newly entered Song by pressing the [R/ K](PLAY/PAUSE) button. 5 6 Touch and turn off [Step Rec] to call up the Song Edit display. Touch [Expand] at the upper left of the Song Edit display to convert the Chord/Section change events to the Song data. With the operations above (steps 1 – 3), only the events of Chord change and Section change are recorded, meaning that the actual Song data has not been created and the Style part can produce no sound even if you start Song playback after exiting from the Song Creator. Accordingly, make sure to execute the Expand function after you finish inputting. If you have not finished inputting, save the Song to maintain the recorded events then continue inputting in the future. Editing the Recorded Data The explanations here apply to step 5 on page 60. From the Song Edit display, you can edit each of the events such as Note data and Voice selection which are created via the Realtime Recording or Step Recording. 1 2 4 3 5 6 CVP-609/605 Reference Manual 7 8 9 ) ! @ # 66 Creating/Editing MIDI Songs (Song Creator) 1 Recording Target Specifies the Recording Target. • Ch 1 – Ch 16: When one of these is selected, you can edit the channel data. • SysEx: Lets you edit System Exclusive data which applies to all channels. • Lyrics: Lets you edit Lyrics data. • Chord: Lets you edit Chord/Section change events for Style playback. 2 Expand This is shown only when “Chord” is selected above, and lets you convert the Chord/ Section Change events you input in the Step Recording display to the actual sounded note data. Make sure to execute this function when finalizing Song data. If you exit from the Song Creator without executing this function, starting Song playback produces no sound of the Style part. 3 Event List In this area, the events of the Song data are listed and can be edited. Each line shows one event. Indicates the Song position (measure: beat: clock) of the corresponding event. Indicates the event type. Indicates the event value or detail. Depending on the Recording Target above (1), the listed and editable events differ as described below. When the Recording Target is set to one of “Ch1” – “Ch16”: Note An individual note within a Song. Includes the note number which corresponds to the key which was played, plus a velocity value based on how hard the key is played, and the gate time value (the length of a note). Ctrl (Control Change) Settings to control the Voice, such as volume, pan, filter and effect depth (edited via the Mixer), etc. Prog (Program Change) MIDI program change number for selecting a Voice. P.Bnd (Pitch Bend) Data for changing the pitch of a Voice continuously. A.T. (Aftertouch) This event is generated when pressure is applied to a key after the key is pressed. Note that the keyboard of this instrument does not feature Aftertouch. When the Recording Target is set to “SysEx”: CVP-609/605 Reference Manual ScBar (Score Start Bar) Determines the top measure number as the starting point of the Song data. Tempo Determines the tempo value. Time (Time signature) Determines the time signature Key (Key signature) Determines the key signature, as well as the major/minor setting, for the music score shown on the display. XGPrm (XG parameters) Allows you to make various detailed changes to the XG parameters. Refer to the “MIDI Data Format” in the separate Data List for details. 67 Creating/Editing MIDI Songs (Song Creator) 3 Event List Sys/Ex. (System Exclusive) Displays the System Exclusive data in the Song. Keep in mind that you cannot create new data or change the contents of the data here; however, you can delete, cut, copy, and paste the data. Meta (Meta event) Displays the SMF meta events in the Song. Keep in mind that you cannot create new data or change the contents of the data here; however, you can delete, cut, copy, and paste the data. When the Recording Target is set to “Lyrics”: Name Allows you to enter the Song name. Lyrics Allows you to enter lyrics. Code CR: Enters a line break in the lyrics text. LF: Clears the currently displayed lyrics and displays the next set of lyrics. When the Recording Target is set to “Chord”: 4 Song Position (Measure: Beat: Clock) Style Style name Tempo Tempo setting Chord Chord root, Chord type, On Bass Chord Sect (Section) Style Section (Intro, Main, Fill In, Break, Ending) OnOff On/off status for each part (channel) of the Style CH.Vol (Channel Volume) Volume for each part (channel) of the Style S.Vol (Style volume) Overall volume of the Style Indicates the current Song position. The events you input are recorded at the position indicated here. You can change the current position by touching [U] or [D] below the Measure, Beat, and Clock* indications respectively. *Clock Smallest unit for the Song position and note length. A quarter note consists of 1920 clocks. 5 Cursor Lets you move the cursor position. 6 Step Rec Turning this on shows the Step Recording display, and turning it off shows the Song Edit display. 7 Event Filter Calls up the Event Filter window, letting you select only the events you wish to be shown in the event list. : Checkmark all items. : Remove checkmarks from all items. : Invert checked/unchecked for all items. 8 Multi Select After turning this on, use the Cursor buttons (5) on the display to select multiple events. 9 Cut/Copy/Paste Use these when you want to copy or move the selected events. ) Insert Adds a new event. ! Delete Deletes the selected events. @ Cancel Cancels editing and restores the original value. # -/+ Increases or decreases the value of the current cursor position by 1. CVP-609/605 Reference Manual 68 Creating/Editing MIDI Songs (Song Creator) Channel Edit — Editing Channel Data with a Single Touch The explanations here apply to step 6 on page 60. The Channel Edit display lets you correct or convert the specific portion of the Song data. After editing the desired parameter, touch [Execute] to actually enter the edits for each setup window. When execution is completed, this button changes to [Undo], letting you restore the original data if you are not satisfied with the results. The Undo function only has one level; only the previous operation can be undone. Target Ch Select the target channel to be edited. Quantize The Quantize function allows you to align the timing of all the notes in a channel. For example, if you record the musical phrase shown below, you may not play it with absolute precision, and your performance may have been slightly ahead of or behind the precise timing. Quantize is a convenient way of correcting for this. Size Selects the quantize size (resolution). For optimum results, you should set the Quantize size to the shortest note value in the channel. For example, if eighth notes are the shortest in the channel, you should use eighth note as the Quantize size. After 1/8 note quantization Settings: 1/4 note 1/8 note 1/16 note 1/32 note 1/16 note+ 1/8 note triplet* 1/4 note triplet 1/8 note triplet 1/16 note triplet 1/8 note+ 1/8 note triplet* 1/16 note+ 1/16 note triplet* The three Quantize settings marked with asterisks (*) are exceptionally convenient, since they allow you to quantize two different note values at the same time. For example, when the straight eighth notes and eighth notes triplet are contained in the same channel, if you quantize by the straight eighth notes, all notes in the channel are quantized to straight eighth notes — completely eliminating any triplet feel. However, if you use the eighth note + eighth note triplet setting, both the straight and triplet notes will be quantized correctly. CVP-609/605 Reference Manual 69 Creating/Editing MIDI Songs (Song Creator) Quantize Strength Determines how strongly the notes will be quantized. A setting of 100% produces exact timing. If a value less than 100% is selected, notes will be moved toward the specified quantization beats according to the specified percentage. Applying less than 100% quantization lets you preserve some of the “human” feel in the recording. Quarter-note length Original data (assuming 4/4 meter) Quantizing strength = 100% Quantizing strength = 50% Delete You can delete the data of the specified channel in the Song. Checkmark the desired channel whose data you wish to delete by touching, then touch [Execute] to actually delete the data. Mix This function lets you mix the data of two channels and place the results in a different channel. It also lets you copy the data from one channel to another. Transpose Source 1 Ch Determines the MIDI channel (1 – 16) to be mixed. All MIDI events of the channel specified here are copied to the destination channel. Source 2 Ch Determines the MIDI channel (1 – 16) to be mixed. Only note events of the channel specified here are copied to the destination channel. Besides the values 1 – 16, there is a “Copy” setting that allows you to copy the data from Source 1 to the destination channel. Destination Ch Determines the channel into which the mix or copy results will be placed. This allows you to transpose the recorded data of individual channels up or down by a maximum of two octaves in semitone increments. 1-16 Sets the Transpose value for each channel. All - Decreases the Transpose value for all channels by 1. All + Increases the Transpose value for all channels by 1. NOTE Make sure not to transpose channels 9 and 10. In general, Drum kits are assigned to these channels. If you transpose the channels of Drum kits, the instruments assigned to each key will be changed. Setup The current settings of the Mixer display and other panel settings can be recorded to the top position of the Song as the Setup data. The Mixer and panel settings recorded here are automatically recalled when the Song starts. Checkmark the items of playback features and functions that you wish to automatically be called up along with the selected Song. NOTE Before executing the Setup operation, move the Song position to the top of the Song by pressing the SONG [STOP] button. CVP-609/605 Reference Manual 70 Voice Settings Tune Lets you adjust the pitch related parameters for each keyboard part. Tuning Determines the pitch of each keyboard part. Octave Determines the range of the pitch change in octaves, over two octaves up or down for each keyboard part. Pitch Bend Range Determines the range of the Pitch Bend for each keyboard part in semitones when the “Pitch Bend” or “Glide” function is assigned to a pedal (page 38). Portamento Time Portamento is a function that creates a smooth transition in pitch from the first note played on the keyboard to the next. The Portamento Time determines the pitch transition time. Higher values result in a longer pitch change time. Setting this to “0” results in no effect. This parameter is available for the keyboard part which is set to “Mono” (page 42). Piano Lets you set the Piano related parameters which are available only for some of the piano Voices in the “Piano” category (listed in the “Target Voice List” on page 72). Tuning Curve Determines the tuning curve. Select “Flat” if you feel the tuning curve of the piano Voice does not quite match that of other instruments Voices. • Stretch: Tuning curve particularly for pianos. • Flat: Tuning curve in which the frequency is octave doubled over the entire keyboard range. Key Off Sampling Adjusts the volume of the key-off sound (the subtle sound that occurs when you release a key). Sustain Sampling Adjusts the depth of sustain sampling for the damper pedal. String Resonance Adjusts the depth of string resonance. CVP-609/605 Reference Manual 71 Voice Settings Target Voice List Voice Name Tuning Curve Key Off Sampling Sustain Sampling String Resonance Concert Grand Grand Piano — — — Mellow Piano Pop Grand 1 Rock Piano Grand 1 octave Grand 2 octave Bright Piano Ballad Grand 1 — Ballad Grand 2 — Piano & Strings — Grand Pad Layer — Piano & EP1 (CVP-609) — Piano & Choir (CVP-609) — Piano & EP2 (CVP-609) — Piano & Pad (CVP-609) — Piano & EP (CVP-605) — : Available, —: Not available Voice Set Each Voice is linked to its default Voice Set parameter settings, equivalent to those in the Voice Edit display (page 41) for the Voices other than the Organ Flutes Voices. Although usually these settings are automatically called up by selecting a Voice, you can also disable this feature. For example, if you want to change the Voice yet keep the same Harmony effect, remove the checkmark of “Keyboard Harmony.” Setting Category Button Determines how the Voice Selection display is opened when one of the VOICE category buttons is pressed. • Open & Select: Opens the Voice Selection display with the previously selected Voice in the Voice category automatically selected (when one of the VOICE category buttons is pressed). • Open Only: Opens the Voice Selection display with the currently selected Voice (when one of the VOICE category buttons is pressed). S.Art2 Auto Articulation Determines whether articulation is added to S.Articulation2! Voices automatically. (only for CVP-609) CVP-609/605 Reference Manual 72 Voice Settings Voice Characteristics In the Voice Selection display, icons defining the Voice characteristics are indicated at left of the Voice name, and detailed information for the selected Voice can be called up by touching (Information). Natural! S.Articulation! S.Articulation2! (only for CVP-609) These rich and luscious Voices are comprised mostly of keyboard instrument sounds and are especially intended for playing piano and other keyboard parts. They also take full advantage of Yamaha’s advanced sampling technology such as Stereo Sampling, Sustain Sampling, and Key-off Sampling. The word “articulation” in music usually refers to the transition or continuity between notes. This is often reflected in specific performance techniques, such as staccato, legato and slur. Two types of Voices — Super Articulation (S.Articulation!) Voices and Super Articulation 2 (S.Articulation2!) Voices — enable you to create these subtle musical expressions, simply by how you play. Live! These acoustic instrument sounds were sampled in stereo, to produce a truly authentic, rich sound — full of atmosphere and ambience. Cool! These Voices capture the dynamic textures and subtle nuances of electric instruments — thanks to a huge amount of memory and sophisticated programming. Sweet! These acoustic instrument sounds also benefit from Yamaha’s sophisticated technology — and feature a finely detailed and natural sound. Drums Various drum and percussion sounds are assigned to individual keys, letting you play the sounds from the keyboard. For information about what sound is assigned to each key, refer to the separate “Data List” (Drum/key Assignment List). Live!Drums These are high-quality drum sounds taking full advantage of Stereo Sampled sounds from acoustic instruments. (only for CVP-609) SFX Live!SFX (only for CVP-609) Organ Flutes! CVP-609/605 Reference Manual Various special effect sounds are assigned to individual keys, letting you play the sounds from the keyboard. For information about what sound is assigned to each key, refer to the separate “Data List” (Drum/key Assignment List). These are high-quality percussion or SFX sounds taking full advantage of Stereo Sampled sounds from acoustic instruments. They give you a broader and more versatile range of sounds than the normal Drum of SFX Voices. This authentic organ Voice lets you adjust the various footages and craft your own original organ sounds. See page 45 for details. 73 Voice Settings MegaVoice These Voices make special use of velocity switching. Normal Voices use velocity switching, too — to change the sound quality and/or level of a Voice according to how strongly or softly you play it. This makes the Voice sound authentic and natural. With MegaVoices, however, each velocity range (the measure of your playing strength) has a completely different sound. For example, a guitar MegaVoice includes the sounds of various performance techniques. In conventional instruments, different Voices having those sounds would be called up via MIDI and played in combination to achieve the desired effect. However, now with MegaVoices, a convincing guitar part can be played with just a single Voice, using specific velocity values to play the desired sounds. Because of the complex nature of these Voices and the precise velocities need to play the sounds, they’re not intended for playing from the keyboard. They are, however, very useful and convenient when creating MIDI data — especially when you want to avoid using several different Voices just for a single instrument part. Actual sound maps for the MegaVoices are given in the separate Data List booklet. NOTE MegaVoices are not compatible with other models. Any Song or Style data you’ve created on this instrument using the MegaVoices will not sound properly when played back on other instruments which do not feature the same MegaVoices. NOTE MegaVoices will sound differently depending on the keyboard range, velocity, touch, etc. Hence, if you apply the Keyboard Harmony effect, change the transpose setting or change the Voice Set parameters, unexpected or undesired sounds may result. Regular Other Voices including GM Voices and XG Voices. Converting the Voices of a MIDI Song to MegaVoices (MEGAEnhancer) MEGAEnhancer is a software program that converts XG/GM song data (Standard MIDI File) to Song data specially enhanced to be played back using an instrument or tone generator containing MegaVoices. With the use of the sophisticated MegaVoices, MEGAEnhancer automatically makes conventional Song files — with guitar and bass parts — sound much more realistic and authentic. MEGAEnhancer can be downloaded from the following website. Yamaha Downloads http://download.yamaha.com/ CVP-609/605 Reference Manual 74 Voice Settings Selecting GM/XG or Style Voices This instrument features GM Voices, XG Voices, and special Voices for Style playback. These Voices can be called up from the “Others” category in the Voice Selection display. 1 From the Home display, touch the Voice name of the desired part to call up the Voice Selection display. 1 2 3 2 Touch the tab of the “Others” category. Touch (Upward) several times to call up the root directory of “Others.” 3 4 Touch the desired category such as “GM&XG” and “StyleVoices.” NOTE You can find the “Legacy” folder in this display. This folder contains previous Yamaha Clavinova Voices (such as CVP509, 505 etc.) for data compatibility with other models. 5 Select the desired Voice. CVP-609/605 Reference Manual 75 Style Playback Related Settings Setting Display Tempo Turns on or off the tempo indication for each Style on the Style Selection display. Stop ACMP When the [ACMP ON/OFF] button is on, [SYNC START] is off, and this parameter is set to the value other than “Disabled,” you can play chords in the chord section of the keyboard with the Style stopped, and still hear the accompaniment chord. In this condition — called “Stop Accompaniment” — any valid chord fingerings are recognized and the chord root/type are shown in the Style area of the Home display. Here, you can determine whether the chord played in the chord section will sound or not in the Stop Accompaniment status. • Disabled: Disables the Stop Accompaniment feature. When Style playback is stopped, any pressed notes in the chord section of the keyboard will not be recognized as chords. • Off: The chord played in the chord section will not sound. • Style: The chord played in the chord section will sound via the Voices for the Pad part and the Bass channel of the selected Style. • Fixed: The chord played in the chord section will sound via the specified Voice, regardless of the selected Style. NOTE When the selected Style contains MegaVoices, unexpected sounds may result when this is set to “Style.” NOTE If you record a Song using the Stop Accompaniment, both the Voice that is sounded and the chord data will be recorded when set to “Style,” and only the chord data will be recorded when set to “Off” or “Fixed.” NOTE When this is set to “Disabled,” chords are not recognized while the Style is stopped. This is why both Vocal Harmony (with the Chordal mode) and Keyboard Harmony are not applied even if you play a chord in the chord section of the keyboard while the Style is stopped. ACMP On/Off Default CVP-609/605 Reference Manual Determines whether the [ACMP ON/OFF] button is on or off when the power is turned on. 76 Style Playback Related Settings OTS Link Timing This applies to the OTS Link function. This parameter determines the timing in which the One Touch Settings change with the MAIN VARIATION [A] – [D] change. (The [OTS LINK] button must be on.) • Real Time: One Touch Setting is immediately called up when you press a MAIN VARIATION button. • Next Bar: One Touch Setting is called up at the next measure, after you press a MAIN VARIATION button. Synchro Stop Window This determines how long you can hold a chord before the Synchro Stop function is automatically cancelled. When the [SYNC STOP] button is turned on and this is set to a value other than “Off,” this is automatically cancels the Synchro Stop function if you hold a chord for longer than the time set here. This conveniently resets Style playback control to normal, letting you release the keys and still have the Style play. In other words, if you release the keys sooner than the time set here, the Synchro Stop function works. Style Touch Response Turns touch response for the Style playback on/off. When this is set to “On,” the Style volume changes in response to your playing strength in the chord section of the keyboard. Change Behavior Section Set Determines the default section that is automatically called up when selecting different Styles (when Style playback is stopped). When set to “Off ” and Style playback is stopped, the active section is maintained even if the different Style is selected. When any of the MAIN A–D sections is not included in the Style data, the nearest Section is automatically selected. For example, when MAIN D is not contained in the selected Style, MAIN C will be called up. Tempo This determines whether the tempo changes or not when you change the Style. • Lock: Regardless of playback status, the tempo setting of the previous Style is maintained. • Hold: While the Style is playing back, the tempo setting of the previous Style is maintained. While the Style is stopped, the tempo changes to that of the default tempo of the selected Style. • Reset: Regardless of playback status, the tempo changes to that of the default tempo for the selected Style. Part On/Off This determines whether the Style Channel on/off status changes or not when you change the Style. • Lock: Regardless of playback status, the Channel on/off status of the previous Style is maintained. • Hold: While the Style is playing back, the Channel on/off status of the previous Style is maintained. While the Style is stopping, all Channels of the selected Style are set to on. • Reset: Regardless of playback status, all Channels of the selected Style are set to on. Music Finder Tempo CVP-609/605 Reference Manual This determines whether the tempo changes or not when you change the Style by using the Music Finder. • Lock: Regardless of playback status, the tempo setting of the previous Style is maintained. • Hold: While the Style is playing back, the tempo setting of the previous Style is maintained. While the Style is stopped, the tempo changes to that of the default tempo of the selected Style. • Reset: Regardless of playback status, the tempo changes to that of the default tempo of the selected Style. 77 Style Playback Related Settings Style Characteristics On the Style Selection display, icons defining the Style characteristics are indicated at left of the Style name. • Pro: These Styles provide professional and exciting arrangements combined with perfect playability. The resulting accompaniment exactly follows the chords of the player. As a result, your chord changes and colorful harmonies are instantly transformed into lifelike musical accompaniment. • Session: These Styles provide even greater realism and authentic backing by mixing in original chord types and changes, as well as special riffs with chord changes, with the Main sections. These have been programmed to add “spice” and a professional touch to your performances of certain songs and in certain genres. Keep in mind, however, that the Styles may not necessarily be appropriate or even harmonically correct for all songs and for all chord playing. In some cases for example, playing a simple major triad for a country song may result in a “jazzy” seventh chord, or playing an on-bass chord may result in inappropriate or unexpected accompaniment. • Free Play: These Styles are characterized by rubato performance. You can perform freely with remarkably expressive accompaniment without being constrained by a strict tempo. • Pianist: These special Styles provide piano-only accompaniment. Just by playing the proper chords with your left hand, you can automatically add complicated, professional-sounding arpeggios and bass/chord patterns. CVP-609/605 Reference Manual 78 Song Settings Related to Playback/Recording Guide If you use the Guide function, the keyboard guide lamps indicate the notes (location and timing) for you to play. Also, when you sing along with a MIDI Song playback using a connected microphone, the instrument automatically adjusts the timing of the MIDI Song playback to match your vocal performance. The Guide function can be turned on from the Song area (with expanded) of the Home display, Score display, Lyrics display and Text display. For instructions on how to use Guide function, refer to the Owner’s Manual. Here covers the detailed parameters about the Guide function. Type Lets you select the Guide type. Guide menu for keyboard practice • Follow Lights: With this function, the keyboard guide lamps indicate which notes you should play. Song playback pauses and waits for you to play. When you play the correct notes, Song playback continues. • Any Key: With this function, you can play the melody of a Song just by pressing a single key (any key is OK) in time with the rhythm. Song playback pauses and waits for you to play any key. Simply play a key on the keyboard in time with the music and Song playback continues. • Your Tempo: Basically the same as “Follow Lights.” In addition, playback tempo will change to match the speed at which you are playing. Guide menu for singing • Karao-Key: This function lets you control the Song playback timing with just one finger, while you sing along. This is useful for singing to your own performance. Song playback pauses, waiting for you to sing. Simply play a key on the keyboard (any key is fine) and Song playback continues. Lamp Activates or deactivates the keyboard guide lamp. NOTE If the Guide Lamps do not light as intended, in the “Part Ch” display, set the Right to “Ch1” then set the Left to “Ch2.” Lamp Timing Determines the timing by which the keyboard guide lamps light. • Just: The guide lamps light in time with the music, at the same timing you should play. • Next: The guide lamps light slightly ahead of the music, indicating the notes you should play next. The guide lamps flash if you fail to play the keys with the correct timing. NOTE The Guide settings can be saved as a part of Song data (page 70). By selecting the saved Song next time, you can call up the Guide settings. CVP-609/605 Reference Manual 79 Song Settings Related to Playback/Recording Part Ch Right Determines which channel is assigned to the right-hand part. Left Determines which channel is assigned to the left-hand part. Auto Set When set to “On,” this automatically sets the proper MIDI channels for the right- and left hand parts pre-programmed in the commercially available Song data. Normally, this should be set to “On.” Lyrics Language Determines the language of the displayed lyrics. • Auto: When the language is specified in the Song data, the lyrics are displayed accordingly. When the language is not specified in the Song data, the lyrics language is regarded as “International” below. • International: Handles the displayed lyrics as a western language. • Japanese: Handles the displayed lyrics as Japanese. Play Repeat Mode Determines how playback of the current MIDI Song or Audio Song is repeated. • Off: Plays through the selected Song, then stops. • Single: Plays through the selected Song repeatedly. • All: Continues playback through all the Songs in the specified folder repeatedly. • Random: Continues playback at random through all the Songs in the specified folder repeatedly. NOTE The preset Songs in the “Follow Lights” folder contain the Guide settings. These Songs are inappropriate for use with All” or Random repeat. Phrase Mark Repeat Phrase Mark is a pre-programmed part of some Song data, which specifies a certain location (set of measures) in the Song. When this is “On,” the section corresponding to the specified Phrase Mark number is repeatedly played back. This parameter is available only when the MIDI Song containing Phrase Mark settings is selected. Quick Start On some commercially available MIDI Song data, certain settings related to the MIDI Song (such as Voice selection, volume, etc.) are recorded to the first measure, before the actual note data. When Quick Start is set to “On,” the instrument reads all initial non-note data of the Song at the highest possible speed, then automatically switches to the appropriate tempo at the first note. This allows you to start playback as quickly as possible, with a minimum pause for reading of data. MIDI Song Fast Forward Type (*) Determines the fast forward type of when pressing [RR] during MIDI Song playback. • Jump: Pressing [RR] once instantly sets the playback position to the next measure without sounding. Holding [RR] scrolls forward continuously. • Scrub: Pressing and holding [RR] plays and sounds the MIDI Song at high speed. USB MIDI Song Auto Open When this is set to “On,” connecting the USB flash memory will call up the first MIDI Song in the USB flash memory. Performance Assistant Refer to page 81. CVP-609/605 Reference Manual 80 Song Settings Related to Playback/Recording Chord Detection Priority (*) Determines the priority of the chords for accompaniment, either the ones contained in the MIDI Song being played back or the chord you’ve just played in the chord section of the keyboard. • MIDI Song: Gives priority to the chords contained in the MIDI Song. • Keyboard: Gives priority to the chords you play in the chord section of the keyboard. Set this if you want to practice playing chords with MIDI Song playback. Once you play in the chord section during MIDI song playback, the instrument ignores the chords contained in the MIDI Song until the playback ends. *: Version 1.20 or later. Playing Backing Parts with the Performance Assistant Technology This feature lets you play your own backing parts on the keyboard along with MIDI Song playback, and have them sound perfectly appropriate (even though the notes you play might be wrong). 1 Select a MIDI Song containing chord data. The Performance Assistant Technology is applied only to MIDI Songs containing chord data. To confirm whether the selected Song contains chord data or not, call up the Home display with the Style area shown then start playback the Song. If the current Song contains chord data, the current chord type appears in the Style area. After stopping playback, go to the next step. 2 3 Call up the operation display via [Menu] → [SongSetting] → [Play]. Set the Performance Assistant to “On.” NOTE Selecting a Song will turn off the Performance Assistant. 4 5 Press the SONG CONTROL [R/K] (PLAY/PAUSE) button to start playback. Play the keyboard. Along with MIDI Song playback, try playing the bass line with the left hand area while playing various phrases or chords with the right hand area. Even if you do not know what notes should be played, don’t worry and play any keys as desired! Only the harmonically “correct” notes matching the current chord are sounded, regardless of the notes you actually play. 6 Press the SONG CONTROL [J](STOP) button to stop playback. Rec Re-Recording a Specific Section of the MIDI Song — Punch In/Out When re-recording a specific section of an already-recorded MIDI Song, use the Punch In/Out function. In this method, only the data between the Punch In point and the Punch Out point is overwritten with the newly recorded data. Keep in mind that the notes before and after the Punch In/Out points are not recorded over, although you will hear them play back normally to guide you in the Punch In/Out timing. 1 2 Call up the operation display via [Menu] → [SongSetting] → [Rec] → Page 1/2. Set the parameters such as how the Recording starts/stops and Punch In/Out position. NOTE The parameters here cannot be set while recording. CVP-609/605 Reference Manual 81 Song Settings Related to Playback/Recording Mode Rec Start Determines the Punch In timing. • Normal: Overwrite recording starts when the Song playback is started via the SONG [R/ K] (PLAY/PAUSE) button or when you play the keyboard in the Synchro Standby mode. • First Key On: The Song plays back normally, then starts overwrite recording as soon as you play the keyboard. • Punch In At: The Song plays back normally up to the beginning of the “Punch In At” measure specified in the Punch In/Out parameter below, then starts overwrite recording at that point. Mode Rec Stop Determines the Punch Out timing. • Replace All: This deletes all data after the point at which recording is stopped. • Punch Out: The Song position at which recording is stopped is regarded as the Punch Out point. This setting maintains all data after the point at which recording is stopped. • Punch Out At: Actual overwrite recording continues until the beginning of the “Punch Out” measure specified in the Punch In/Out parameter below, at which point recording stops and normal playback continues. This setting maintains all data after the point at which recording is stopped. Punch In/ Out Punch In At Specifies the Punch In measure. Punch Out At Specifies the Punch Out measure. Pedal Control When this is set to “On,” you can use the center pedal to control the Punch In and Punch Out points. While a Song is playing back, pressing (and holding) the center pedal instantly enables Punch In recording, while releasing the pedal stops recording (Punch Out). You can press and release the center pedal as often as you want during playback. Note that the current function assignment of the center pedal is cancelled when the Pedal Punch In/Out function is set to “On.” NOTE Pedal Punch In/Out operation may be reversed depending on the particular pedal you’ve connected to the instrument. If necessary, change the pedal polarity to reverse the control (page 37). 3 4 Select a MIDI Song to be re-recorded. Press the [I](REC) button to call up the Song Recording display. If the Channel area is not shown, touch [R] at the left of “Channel.” 5 Turn on the channel to be re-recorded. NOTE For details about the recording channels, refer to the Owner’s Manual. CVP-609/605 Reference Manual 82 Song Settings Related to Playback/Recording 6 Press the SONG CONTROL [R/K] (PLAY/PAUSE) button to start recording. At the Punch In point specified in step 2, play the keyboard to start actual recording. At the Punch Out point specified in step 2, stop playing the keyboard. 7 Touch Song. (Save) which appears in the Song area of the Home display to save the recorded NOTICE The recorded Song data will be lost if you select another Song or turn the power to the instrument off without executing the Save operation. Examples of re-recording with various Punch In/Out settings This instrument features several different ways you use the Punch In/Out function. The illustrations below indicate a variety of situations in which selected measures in an eight-measure phrase are re-recorded. Recording Start setting Recording Stop setting Normal Replace All Original data 1 2 3 4 Start overwrite recording *1 First Key On Replace All First Key On Punch Out Play back original data 1 Play back original data 1 First Key On Punch Out at 006 Play back original data Punch In at 003 Replace All Play back original data Punch In at 003 Punch Out Play back original data Punch In at 003 Punch Out at 006 Play back original data 1 1 1 Previously recorded data Newly recorded data 1 6 7 8 5 Deleted Stop recording *2 2 3 4 5 6 7 8 Stop overwrite recording/play original data Start overwrite recording *1 1 5 Stop recording *2 2 1 Normal Punch Out at 006 4 Start overwrite recording *1 1 Normal Punch Out 3 2 3 4 Play the keyboard to start overwrite recording 2 3 2 3 2 3 4 3 4 3 Start overwrite recording 2 3 8 5 Deleted 5 6 7 8 Stop overwrite recording/play original data 4 5 6 7 8 Stop recording *2 4 Start overwrite recording 2 7 Stop recording *2 Start overwrite recording 2 6 Stop recording *2 Play the keyboard to start overwrite recording Play the keyboard to start overwrite recording 5 Deleted 5 Stop recording *2 4 5 6 7 8 Stop overwrite recording/play original data 4 5 6 7 8 *1 To avoid overwriting measures 1 – 2, start recording from measure 3. *2 To stop recording, press the [REC] button at the end of measure 5. Deleted data Setting the Audio File Format saved via the Audio Recording From the display called up via [Menu] → [SongSetting] → [Rec] → page 2/2, you can specify the Audio file format saved via the Audio recording. Audio Rec Format CVP-609/605 Reference Manual • WAV: Your performance will be recorded in WAV format which features higher audio quality than MP3, but the file size will be larger. • MP3 64/96/128/256/320kbps: Your performance will be recorded in MP3 format (MPEG-1 Audio Layer-3). The larger the value, the higher the quality, and the larger the data size. 83 Fine Tuning the Pitch Master Tune – Fine Tuning the Pitch of the Entire Instrument – You can fine-tune the pitch of the entire instrument in 0.2 Hz steps —useful when you play the Clavinova along with other instruments or CD music. Please note that the Tune function does not affect the Drum Kit or SFX Kit Voices and Audio Songs. To restore the default initial setting (440.0 Hz), touch and hold down the setting value for a while. Scale Tune – Selecting or Creating a Temperament – 1 2 Keyboard parts CVP-609/605 Reference Manual 84 Fine Tuning the Pitch 1 Select the desired Scale type (temperament). You can select one of various scales for playing in custom tunings for specific historical periods or music genres. Type 2 • Equal: The pitch range of each octave is divided equally into twelve parts, with each halfstep evenly spaced in pitch. This is the most commonly used tuning in music today. • Pure Major, Pure Minor: These tunings preserve the pure mathematical intervals of each scale, especially for triad chords (root, third, fifth). You can hear this best in actual vocal harmonies — such as choirs and a cappella singing. • Pythagorean: This scale was devised by the famous Greek philosopher and is created from a series of perfect fifths, which are collapsed into a single octave. The 3rd in this tuning are slightly unstable, but the 4th and 5th are beautiful and suitable for some leads. • Mean-Tone: This scale was created as an improvement on the Pythagorean scale, by making the major third interval more “in tune.” It was especially popular from the 16th century to the 18th century. Handel, among others, used this scale. • Werckmeister, Kirnberger: This composite scale combines the Werckmeister and Kirnberger systems, which were themselves improvements on the mean-tone and Pythagorean scales. The main feature of this scale is that each key has its own unique character. The scale was used extensively during the time of Bach and Beethoven, and even now it is often used when performing period music on the harpsichord. • Arabic1, Arabic2: Use these tunings when playing Arabic music. Change the following settings as necessary. Base Note Determines the base note for each scale. When the base note is changed, the pitch of the keyboard is transposed, yet maintains the original pitch relationship between the notes. Tune [cent] Select the desired note to be tuned and tune it in cents. If you edit this parameter, “(Edited)” is shown at the right of “Type” in step 1. NOTE In musical terms a “cent” is 1/100th of a semitone. (100 cents equal one semitone.) (Parts) Checkmark the part to which the Scale Tune setting is applied. To store the Scale Tune settings: If you want to store the Scale Tune settings, use the Registration Memory. Press the REGISTRATION MEMORY [MEMORY] button, then checkmark “Scale Tune” and press one of the REGISTRATION MEMORY [1] – [8] buttons to register the Scale Tune settings. CVP-609/605 Reference Manual 85 Setting the Touch Sensitivity of the Keyboard You can adjust the touch response of the instrument (how the sound responds to the way you play the keys). This setting does not change the weight of the keyboard. For information about this display, refer to the Owner’s Manual. CVP-609/605 Reference Manual 86 Metronome Settings Metronome Volume Determines the level of the metronome sound. Sound Determines which sound is used for the metronome. • Bell Off: Conventional metronome sound, with no bell. • Bell On: Conventional metronome sound, with bell. • English Voice: Count in English • German Voice: Count in German • Japanese Voice: Count in Japanese • French Voice: Count in French • Spanish Voice: Count in Spanish Time Signature Determines the time signature of the metronome sound. Tap Tempo Volume Adjusts the volume of the sound triggered when the [TAP TEMPO] button is pressed. Sound Selects the percussion instrument as sound triggered when the [TAP TEMPO] button is pressed. CVP-609/605 Reference Manual 87 MIDI Settings In this section, you can make MIDI-related settings for the instrument. This instrument gives you a set of ten preprogrammed templates that let you instantly and easily reconfigure the instrument to match your particular MIDI application or external device. Also, you can edit the pre-programmed templates and save up to ten of your original templates. 1 1 3 Touch the box (shown above), then select a pre-programmed MIDI template (below). If you have already created an original MIDI template and saved it to the User memory (using the following steps 2 and 3), you can also select the template from the User memory. 2 If desired, edit the MIDI parameters based on the MIDI template selected in step 1 on the relevant setting display. • System: Lets you set the MIDI System related parameters.........................................................................page 89 • Transmit: Lets you set the MIDI Transmission related parameters. ........................................................page 90 • Receive: Lets you set the MIDI Reception related parameters. .................................................................page 91 • On Bass Note: Lets you select the MIDI channels of which the MIDI data coming from the external MIDI device will be used for detecting the bass note for Style playback. .............................................................page 92 • Chord Detect: Lets you select the MIDI channels of which the MIDI data coming from the external MIDI device will be used for detecting the chord type for Style playback............................................................page 93 3 When you’ve finished editing on each display, touch your original MIDI Template. (Save) to save the MIDI settings as NOTE Your original MIDI templates can be saved as a single file to a USB flash memory. On the display called up via [Menu] [Utility] [Factory Reset/Backup] page 2/2, touch [Backup] of “MIDI” to execute the Save operation (page 97). Pre-programmed MIDI Templates All Parts Transmits all parts including the keyboard parts (Main, Layer and Left), with the exception of Song parts. KBD & STYLE Basically the same as “All Parts” with the exception of how keyboard parts are managed. The right-hand parts are handled as “Upper” instead of Main and Layer, and the left-hand part is handled as “Lower.” CVP-609/605 Reference Manual 88 MIDI Settings Master KBD (Master Keyboard) In this setting, the instrument functions as a “master” keyboard, playing and controlling one or more connected tone generators or other devices (such as a computer/sequencer). Song With this setting, only the Song channels 1 – 16 are transmitted from this instrument via the corresponding channel numbers 1 – 16 respectively. This is used to play Song data with an external tone generator and to record Song data to an external sequencer. Clock Ext (Clock External) Playback or recording (Song, Style, etc.) synchronizes with an external MIDI clock instead of the instrument’s internal clock. This template should be used when you wish to set the tempo on the MIDI device connected to the instrument. MIDI Accord1 (MIDI Accordion 1) MIDI accordions allow you to transmit MIDI data and play connected tone generators from the keyboard and bass/chord buttons of the accordion. This template lets you control the keyboard performance and Style playback from the MIDI Accordion. MIDI Accord2 (MIDI Accordion 2) Basically the same as “MIDI Accord1” above, with the exception that the chord/bass notes you play with your left hand on the MIDI Accordion are recognized also as MIDI note events. MIDI Pedal1 MIDI pedal units allow you play connected tone generators with your feet (especially convenient for playing single note bass parts). This template lets you play/control the chord root in Style playback with a MIDI pedal unit. MIDI Pedal2 This template lets you play the bass part for Style playback by using a MIDI pedal unit. MIDI OFF No MIDI signals are sent or received. System – MIDI System Related Settings – The explanations here apply when you call up “System” display in step 2 on page 88. Clock Determines whether the instrument is controlled by its own internal clock (“Internal”) or a MIDI clock (“MIDI,” “USB1,” “USB2,” and “Wireless LAN”) received from an external device. “Internal” is the normal Clock setting when the instrument is being used alone or as a master keyboard to control external devices. If you are using the instrument with an external sequencer, MIDI computer, or other MIDI device, and you want to synchronize it to that device, set this parameter to the appropriate setting: “MIDI,” “USB 1,” “USB 2,” or “Wireless LAN.” In this case, make sure that the external device is connected properly (e.g., to the instrument’s MIDI IN terminal), and that it is properly transmitting a MIDI clock signal. When this is set for control by an external device (“MIDI,” “USB1,” “USB2,” or “Wireless LAN”), the Tempo is indicated as “Ext.” in the Tempo display. NOTE If the Clock is set other than “Internal,” the Style, Song, Metronome and Tempo cannot be controlled by the buttons on this instrument. NOTE “Wireless LAN” is shown only when the USB Wireless LAN adaptor is connected to this instrument. Transmit Clock Turns MIDI clock (F8) transmission on or off. When set to “Off,” no MIDI clock or Start/ Stop data is transmitted even if a Song or Style is played back. Transpose MIDI Input Determines whether or not the instrument’s transpose setting is applied to the note events received from the external device via MIDI. Start/Stop Determines whether incoming FA (start) and FC (stop) messages affect Song or Style playback. CVP-609/605 Reference Manual 89 MIDI Settings Local Control Turns the Local Control for each part on or off. When Local Control is set to “On,” the keyboard of the instrument controls its own (local) internal tone generator, allowing the internal Voices to be played directly from the keyboard. If you set Local to “Off,” the keyboard and controllers are internally disconnected from the instrument’s tone generator section so that no sound is output when you play the keyboard or use the controllers. For example, this allows you to use an external MIDI sequencer to play the instrument’s internal Voices, and use the instrument keyboard to record notes to the external sequencer and/or play an external tone generator. System Exclusive Message Transmit Determines whether the MIDI System Exclusive message is transmitted (On) or not (Off) from this instrument. Receive Determines whether the MIDI System Exclusive message is recognized (On) or not (Off) by this instrument. Chord System Exclusive Message Transmit Determines whether the MIDI chord exclusive data (chord detect. root and type) is transmitted (On) or not (Off) from this instrument. Receive Determines whether the MIDI chord exclusive data (chord detect. root and type) is recognized (On) or not (Off) by this instrument. Transmit – MIDI Transmit Channel Settings – The explanations here apply when you call up “Transmit” display in step 2 on page 88. This determines which MIDI channel is used for each part when the MIDI data is transmitted from this instrument. 1 Lets you alternate between two pages. 2 The dots corresponding to each channel (1–16) flash briefly whenever any data is transmitted on the channel(s). 1 For each Part, select the MIDI Transmit Channel with which the MIDI data of the corresponding Part is to be transmitted. With the exception of the two parts below, the configuration of the parts is the same as those already explained elsewhere in the Owner’s Manual. • Upper: A keyboard part played on the right side of the keyboard from the Left Split Point. • Lower: A keyboard part played on the left side of the keyboard from the Left Split Point. This is not affected by the on/off status of the [ACMP ON/OFF] button. NOTE If the same transmit channel is assigned to several different parts, the transmitted MIDI messages are merged to a single channel — resulting in unexpected sounds and possible glitches in the connected MIDI device. NOTE Protected Songs cannot be transmitted even if the proper Song channels 1 – 16 are set to be transmitted. CVP-609/605 Reference Manual 90 MIDI Settings 2 Touch [R] to call up the other page then select which MIDI messages are to be transmitted for each Part. The following MIDI messages can be set on the Transmit/Receive display. • Note (Note events) ............................ page 67 • CC (Control Change)....................... page 67 • PC (Program Change) ..................... page 67 • PB (Pitch Bend) ................................. page 67 • AT (Aftertouch) ................................. page 67 Receive – MIDI Receive Channel Settings – The explanations here apply when you call up “Receive” display in step 2 on page 88. This determines which Part is used for each MIDI channel when the MIDI data is recognized by this instrument. 1 Lets you alternate between two pages. 2 The dots corresponding to each channel (1–16) flash briefly whenever any data is received on the channel(s). 1 For each Channel, select the Part which is to handle the MIDI data of the corresponding channel received from the external MIDI device. When connecting via USB, MIDI data of 32 channels (16 channels x 2 Ports) can be handled by this instrument. With the exception of the two parts below, the configuration of the parts is the same as those already explained elsewhere in the Owner’s Manual. • Keyboard: The received note messages control the instrument’s keyboard performance. • Extra Part 1 – 5: There are five parts specially reserved for receiving and playing MIDI data. Normally, these parts are not used by the instrument itself. The instrument can be used as a 32-channel multi-timbral tone generator by using these five parts in addition to the parts (except for the microphone sound). 2 Touch [R] to call up the other page then select which MIDI messages are to be received for each Channel. CVP-609/605 Reference Manual 91 MIDI Settings MIDI transmission/reception via the USB terminal, Wireless LAN, and MIDI terminals The relationship between the MIDI terminals, Wireless LAN and the [USB TO HOST] terminal which can be used for transmitting/receiving 32 channels (16 channels x 2 ports) of the MIDI messages is as follows: MIDI reception MIDI IN terminal Wireless LAN MIDI transmission USB TO HOST terminal MIDI OUT terminal Wireless LAN USB TO HOST terminal Port handling USB1 USB2 Merge MIDI/USB1/ Wireless LAN 1 – 16 USB2 1 – 16 MIDI/USB1/Wireless LAN 1 – 16 On Bass Note – Setting the Bass Note for Style Playback – The explanations here apply when you call up “On Bass Note” display in step 2 on page 88. The settings here let you determine the bass note for Style playback, based on the note messages received via MIDI. The note on/off messages received at the channel(s) set to on are recognized as the bass note of the chord for Style playback. The bass note will be detected regardless of the [ACMP ON/OFF] or Split Point settings. When several channels are simultaneously set to on, the bass note is detected from merged MIDI data received over the channels. Touch the desired channel number to enter the checkmark. Touch the same location again to remove the checkmark. CVP-609/605 Reference Manual 92 MIDI Settings Chord Detect – Setting the Chord Type for Style Playback – The explanations here apply when you call up “Chord Detect” display in step 2 on page 88. The settings here let you determine the chord type for Style playback, based on the note messages received via MIDI. The note on/off messages received at the channel(s) set to on are recognized as the notes for detecting chords in Style playback. The chords to be detected depend on the fingering type. The chord types will be detected regardless of the [ACMP ON/OFF] or split point settings. When several channels are simultaneously set to on, the chord type is detected from merged MIDI data received over the channels. Touch the desired channel number to enter the checkmark. Touch the same location again to remove the checkmark. CVP-609/605 Reference Manual 93 Making Global Settings (Utility) Speaker/Connectivity Speaker Determines how the sound is output from the speaker of this instrument. • Headphone Switch: Speaker sounds normally, but is cut off when headphones are inserted to the [PHONES] jack. • On: Speaker sound is always on. • Off: Speaker sound is off. You can only hear the instrument sound via the headphones or an external device connected to the AUX OUT jacks. IAC (Intelligent Acoustic Control) Turns on or off the IAC (Intelligent Acoustic Control). With this function, the sound quality of this instrument is automatically adjusted and controlled according to the overall volume. Even when the volume is low, this lets you hear both low sounds and high sounds clearly. IAC Depth Adjusts the IAC depth. AUX In Noise Gate Turns on or off the Noise Gate which minimizes noise of the sound input via the [AUX IN] jack. Screen Out Selects the desired output monitor type (NTSC or PAL) to correspond to the standard used by your video equipment connected to the instrument. CVP-609 only: Select “RGB” when connecting to an external monitor. Monitor Type NOTE When NTSC is selected, the lower part of the screen might not be shown for certain displays. NOTE When using a monitor on which display resolution cannot be set, the display may not be able to be output to the monitor, even if you select the appropriate monitor type. NOTE Transition effects on the instrument’s display cannot be output. Content CVP-609/605 Reference Manual Determines the contents of the Video Out signal. • Lyrics/Text: Only the lyrics of the Song or text files (whichever you used last time) are output, regardless of the display that is called up on the instrument. • LCD: The currently selected display is output. 94 Making Global Settings (Utility) Display Pop-up Display Time Determines the time that elapses before the pop-up windows close. Pop-up windows appear when you press buttons TEMPO [-]/[+], TRANSPOSE [-]/[+], SONG CONTROL [LL](REW)/[RR ](FF), or REGISTRATION BANK [-]/[+]. When “Hold” is selected here, the pop-up window is shown until you touch [X]. Transition Effect Turns on or off the Transition Effect which is applied when the display is changed. Voice Area Determines which keyboard parts are shown in the Voice area of the Home display. When “Show Active Parts Only” is selected, only the active keyboard parts are shown. When “Show All Parts” is selected, all the keyboard parts are shown. Touch Panel Sound Determines whether or not touching the display will trigger the click sound. Calibration Lets you calibrate the display when it does not respond properly to your touching (Normally, you do not need this operation, since it is calibrated by factory default). Touch here to call up the Calibration display, then touch the center of “+” in order. Parameter Lock This function is used to “lock” specific parameters (effect, split point, etc.) to make them selectable only via the panel control — in other words, instead of being changed via Registration Memory, One Touch Setting, Music Finder, or Song and sequence data. To lock the desired parameter, touch the corresponding box to enter the checkmark. To unlock the parameter, touch the box again. USB Memory This lets you execute the Format operation or check the memory capacity (approximate value) of the USB flash memory connected to this instrument. For details on instructions, refer to the Owner’s Manual. System Page 1/2 For information about this display, refer to “Making the Basic Settings” in the Owner’s Manual. Page 2/2 (*) CVP-609/605 Reference Manual 95 Making Global Settings (Utility) Voice Guide Determines whether or not Voice Guide is used (On/Off), when USB flash memory containing the Voice Guide (audio) file is properly connected to this instrument. This setting can also be changed by pressing and holding the [DEMO] button for longer than three seconds. Voice Guide Controller By holding the controller set here and then pressing the panel button or touching the item on the display, you can hear the corresponding name (with no execution of the function). Voice Guide Volume Adjusts the volume of Voice Guide. To use Voice Guide, you need to download the Voice Guide (audio) file from the Yamaha website, and save it to USB flash memory, which you then connect to this instrument. For information on using Voice Guide, refer to the Voice Guide Tutorial Manual (simple text file). The Voice Guide (audio) file and the Voice Guide Tutorial Manual are available via the following URL: http://download.yamaha.com/ *: Version 1.20 or later. Factory Reset/Backup Factory Reset — Restoring the Factory Programmed Settings On page 1/2, checkmark the boxes of the desired parameters then touch [Factory Reset] to initialize the settings of the parameters which are checkmarked. System Restores the System Setup parameters to the original factory settings. Refer to “Parameter Chart” in the Data List for details about which parameters belong to the System Setup. MIDI Restores the MIDI settings including the MIDI templates saved in the internal User memory to the original factory status. User Effect Restores the User Effect settings including the following data to the original factory settings. • User Effect types (page 12) • User Master EQ types (page 11) • User Master Compressor types (page 14) • User Vocal Harmony types (pages 27, 30) • User Microphone Settings (page 23) Registration Turns off all the REGISTRATION MEMORY [1]–[8] lamps, indicating that no Registration Memory Bank is selected although all the Bank files are maintained. In this status, you can create Registration Memory setups from the current panel settings. The same operation can be done by turning the power on while holding the B6 key (right-most B key). Music Finder Restores the Music Finder data (all records) to the original factory settings. Files&Folders Deletes all files and folders saved in the internal User memory and reset the User memory to the default status. This also deletes the registration to the Favorite () tab on the Voice or Style Selection display. CVP-609/605 Reference Manual 96 Making Global Settings (Utility) Backup/Restore – Saving and Recalling Your Original Settings as a Single File – For the items below, you can save your original settings to the internal User memory or USB flash memory as a single file for future recall. 1 Make all desired settings on the instrument, then call up page 2/2 of the “Factory Reset/ Backup” display. 2 Touch [Backup] of the desired item. If you want to save the backup file to the USB flash memory, make sure to connect the USB flash memory to the instrument. When you select “All,” the backup file can only be saved to the USB flash memory. 3 All All settings and data in the User memory of this instrument (except for protected Song) are handled as a single bulk file named “CVP-609.bup” or “CVP-605.bup.” Because just by touching [Backup] of “All” will save the file to the root directory of the USB flash memory, step 3 is not necessary. System Parameters set on the various displays such as “Utility” are handled as a single System Setup file. Refer to “Parameter Chart” in the Data List for details on which parameters belong to System Setup. MIDI The MIDI settings including the MIDI templates on the internal User memory are handled as a single MIDI Setup file. User Effect The User Effect settings including the following data can be managed as a single file. • User Effect types (page 12) • User Master EQ types (page 11) • User Master Compressor types (page 14) • User Vocal Harmony types (pages 27, 30) • User Microphone Settings (page 23) Music Finder All the preset and created Records of the Music Finder are handled as a single file. Select the desired destination to save the Backup file, then touch [Backup here]. Assign the name if necessary, then touch [OK] to save the file. To call up the Backup file: Touch [Restore] of the desired item, then select the desired file. You can restore the factory programmed status by selecting the Backup file in the “Preset” tab. CVP-609/605 Reference Manual 97 Wireless LAN Settings This icon is shown only when the USB Wireless LAN adaptor (which may not be included depending on your area) is connected to the [USB TO DEVICE] terminal. Make sure connection before executing the operations. For details on connections, refer to the “iPhone/iPad Connection Manual” on the website. For information about the compatible smart devices and application tools, access the following page: http://www.yamaha.com/kbdapps/ From the Networks listed on the display, select the desired one. For the network with the lock icon ( ), you need to enter the password and touch [Connect], and for the network without the lock icon, you can connect the network only by selecting it. When connection is done successfully, “Connected” is shown at the top of the display, and the icon shown below appears according to the signal strength. Strong Weak If you do not find the desired network on the display or you want to execute the detailed settings, execute the following operations as necessary. Update Networks Updates the Network List on the display. Connect by WPS Connects this instrument to the network via WPS. After touching [Start WPS] in the window appeared by touching here, press the WPS button of the desired wireless LAN access point within two minutes. NOTE Make sure that your access point supports WPS. About the confirmation and changes in the access point settings, refer to the manual of the access point. Connect Manually Connects this instrument to the network with closed or non-disclosure. Enter the SSID, security method, and password as necessary, then touch [Connect]. Initialize Initializes the connection setup to the default factory status. Setting Lets you set detailed parameters such as the static IP address. After setting, touch [OK]. CVP-609/605 Reference Manual 98 Index Numerics 3 Band EQ ......................................... 22 A Amplitude ......................................... 44 Any Key ............................................ 79 Articulation ...................................... 38 Assembly ........................................... 52 Assignable ......................................... 37 Attack ................................................ 43 Attenuator ........................................ 23 Audio File Format ........................... 83 Audio Rec Format ........................... 83 B Backup ........................................96, 97 Backup file ........................................ 97 Balance ............................................ 8, 9 Bar Clear ........................................... 54 Bar Copy ........................................... 54 Bass Hold .......................................... 39 Beat Converter ................................. 53 Block Diagram ................................. 15 Brightness ..................................... 9, 43 Bypass ................................................ 57 C Channel Edit ..............................53, 69 Chord ................................................ 17 Chord Detect ..............................81, 93 Chord Source .............................26, 29 Chord Tutor ....................................... 7 Chordal .......................................25, 28 Chorus ............................................... 13 Clock .............................. 61, 64, 68, 89 Color ................................................. 17 Compressor ................................14, 22 Cutoff Frequency ............................. 43 EG (Envelope Generator) ...............43 EQ (Equalizer) ..................................10 Equalizer ...........................................10 Euro ...................................................45 Event Filter ........................................68 Event List ............................. 61, 64, 67 M F Factory Reset ....................................96 Fade In/Out ......................................39 Filter ...............................................9, 43 Fingering Type ...................................6 Follow Lights ....................................79 Footage ..............................................45 Freeze .................................................36 G Gain ...................................................14 Genre .................................................32 Glide ..................................................38 Groove ...............................................53 Guide .......................................... 16, 79 Guitar .................................................56 H Harmonic Cont. ...............................43 Harmonic Content ......................9, 43 Harmonic Minor ..............................57 Harmony Assign ..............................27 Harmony Type .................................20 High Key ...........................................58 I IAC (Intelligent Acoustic Control) 94 Insertion Effect .......................... 11, 12 J Jump ..................................................80 K Decay ................................................. 43 Dorian ............................................... 57 Drums ............................................... 73 Dynamics .......................................... 54 Karao-Key .........................................79 Key Off Sampling .............................71 Key Signature ...................................17 Keyboard Harmony .........................20 Keyword ............................................32 E CVP-609/605 Reference Manual Master Compressor ......................... 14 Master EQ ........................................ 10 Master Tune ..................................... 84 MEGAEnhancer .............................. 74 MegaVoice ........................................ 74 Melodic Minor ................................. 57 Metronome ...................................... 87 Microphone ...................................... 22 MIDI ................................................. 88 MIDI Accordion .............................. 89 MIDI Pedal ....................................... 89 MIDI Receive Channel ................... 91 MIDI reception ................................ 92 MIDI Templates .............................. 88 MIDI transmission .......................... 92 MIDI Transmit Channel ................ 90 Mixer ................................................... 9 Modulation ...........................38, 43, 44 Mono ........................................... 40, 42 MP3 ................................................... 83 Multi Assign ..................................... 21 Music Finder .................................... 31 Music Notation ................................ 16 N D Echo ................................................... 21 Effect ................................................. 11 Effect Variation ................................ 38 LFO Filter ......................................... 44 LFO Pitch ......................................... 44 Local Control ................................... 90 Loop Recording ............................... 49 Lyrics ........................................... 17, 18 L Natural Minor .................................. 57 Noise Gate ........................................ 22 Note ................................................... 17 Note Limit ........................................ 58 Note Name ....................................... 17 NTR (Note Transposition Rule) ... 56 NTT (Note Transposition Table) .. 57 O Octave ............................................... 71 On Bass Note ................................... 92 Organ Flutes ............................... 45, 73 Original Beat .................................... 53 OTS Link Timing ............................ 77 Overdub Recording ......................... 49 Left Hold ...........................................40 LFO Amplitude ................................44 99 P Pan ..................................................... 13 Parameter Lock ................................ 95 Part EQ .............................................. 10 Pattern length ................................... 48 Pedal .................................................. 37 Performance Assistant .................... 81 Phrase Mark Repeat ........................ 80 Pitch Bend ........................................ 38 Pitch Bend Range ............................ 71 Pitch Detect ...................................... 23 Pitch Shift ......................................... 58 Play Root/Chord .............................. 56 Poly ..............................................40, 42 Portamento ....................................... 38 Portamento Time ......................42, 71 Punch In/Out ................................... 81 Punch Out ........................................ 82 Song Position ....................... 61, 64, 68 Sostenuto ...........................................38 Source Patterns .................................47 Source Root/Chord ..........................56 Speaker ..............................................94 Split Point .....................................6, 20 Step Recording .......................... 52, 59 Stop ACMP .......................................76 String Resonance ..............................71 Stroke .................................................57 Style ....................................................76 Style Creator .....................................47 Style File Format ..............................55 Style Touch Response ......................77 Sustain ...............................................38 Sustain Sampling ..............................71 Swing .................................................53 Synchro Stop Window ....................77 System Effect ....................................11 Voice ................................................. 71 Voice Edit ................................... 41, 45 Voice Guide ..................................... 96 Volume ............................................. 13 W WAV ................................................. 83 Wireless LAN ................................... 98 Y Your Tempo ..................................... 79 Q Quantize ...............................17, 54, 69 Quick Start ........................................ 80 R Ratio ............................................14, 22 Realtime Recording ...................49, 59 Record ............................................... 31 Registration Freeze .......................... 36 Registration Memory ...................... 34 Registration Sequence ..................... 34 Release ............................................... 43 Repeat Mode .................................... 80 Resonance ......................................... 43 Restore .............................................. 97 Retrigger ........................................... 58 Reverb ............................................... 13 Root Fixed ........................................ 56 Root Trans (Root Transpose) ........ 56 Rotary Speaker ................................. 45 RTR (Retrigger Rule) ...................... 58 S Scale Tune ........................................ 84 Scale type .......................................... 85 Score .................................................. 16 Scrub .................................................. 80 SFF Edit ............................................. 55 SFX .................................................... 73 Sine .................................................... 45 Soft ..................................................... 38 Song ................................................... 79 Song Creator .................................... 59 CVP-609/605 Reference Manual T Talk ............................................. 22, 24 Talk Mixing ......................................23 Tap Tempo .......................................87 Temperament ...................................84 Tempo .................................................4 Text ....................................................19 Threshold (Th.) ......................... 14, 22 Time Signature .................................87 Touch Panel ......................................95 Touch Sense ......................................42 Touch Sense Depth ..........................42 Touch Sense Offset ..........................42 Touch Sensitivity .............................86 Transpose ......................................5, 70 Tremolo .............................................21 Trill ....................................................21 Tuning ........................................ 71, 84 U User Effect .................................. 96, 97 Utility .................................................94 V Variation Effect ......................... 11, 12 Vibe Rotor .........................................39 Vibrato ..............................................43 Vintage ..............................................45 Vocal Harmony ................................24 Vocal Range ......................................28 Vocoder ...................................... 25, 28 Vocoder-Mono .................................25 C.S.G., Digital Musical Instruments Division © 2012-2013 Yamaha Corporation 304MW-B0 100-
 1
1
-
 2
2
-
 3
3
-
 4
4
-
 5
5
-
 6
6
-
 7
7
-
 8
8
-
 9
9
-
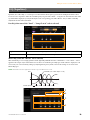 10
10
-
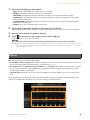 11
11
-
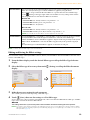 12
12
-
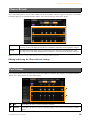 13
13
-
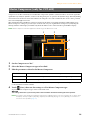 14
14
-
 15
15
-
 16
16
-
 17
17
-
 18
18
-
 19
19
-
 20
20
-
 21
21
-
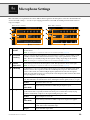 22
22
-
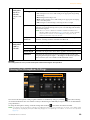 23
23
-
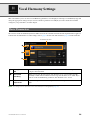 24
24
-
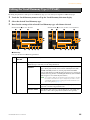 25
25
-
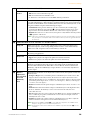 26
26
-
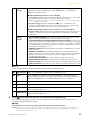 27
27
-
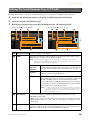 28
28
-
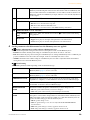 29
29
-
 30
30
-
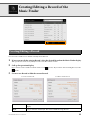 31
31
-
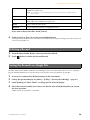 32
32
-
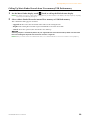 33
33
-
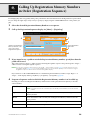 34
34
-
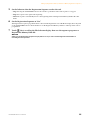 35
35
-
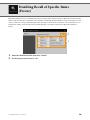 36
36
-
 37
37
-
 38
38
-
 39
39
-
 40
40
-
 41
41
-
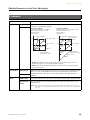 42
42
-
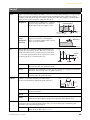 43
43
-
 44
44
-
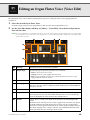 45
45
-
 46
46
-
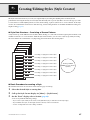 47
47
-
 48
48
-
 49
49
-
 50
50
-
 51
51
-
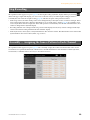 52
52
-
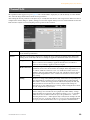 53
53
-
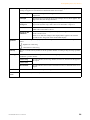 54
54
-
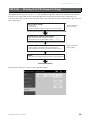 55
55
-
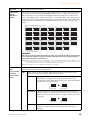 56
56
-
 57
57
-
 58
58
-
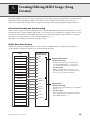 59
59
-
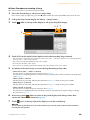 60
60
-
 61
61
-
 62
62
-
 63
63
-
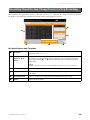 64
64
-
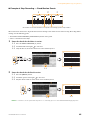 65
65
-
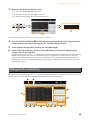 66
66
-
 67
67
-
 68
68
-
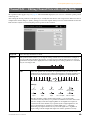 69
69
-
 70
70
-
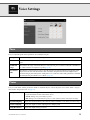 71
71
-
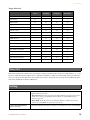 72
72
-
 73
73
-
 74
74
-
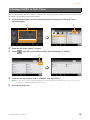 75
75
-
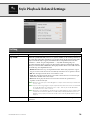 76
76
-
 77
77
-
 78
78
-
 79
79
-
 80
80
-
 81
81
-
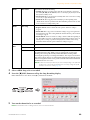 82
82
-
 83
83
-
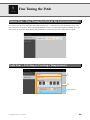 84
84
-
 85
85
-
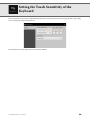 86
86
-
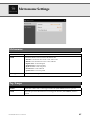 87
87
-
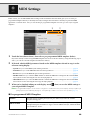 88
88
-
 89
89
-
 90
90
-
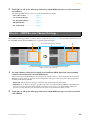 91
91
-
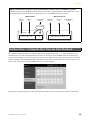 92
92
-
 93
93
-
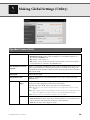 94
94
-
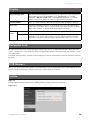 95
95
-
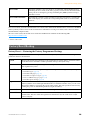 96
96
-
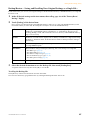 97
97
-
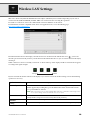 98
98
-
 99
99
-
 100
100


Yamaha CVP-605 El manual del propietario
- Categoría
- Sintetizador
- Tipo
- El manual del propietario
en otros idiomas
- français: Yamaha CVP-605 Le manuel du propriétaire
- italiano: Yamaha CVP-605 Manuale del proprietario
- English: Yamaha CVP-605 Owner's manual
- Deutsch: Yamaha CVP-605 Bedienungsanleitung
- русский: Yamaha CVP-605 Инструкция по применению
- Nederlands: Yamaha CVP-605 de handleiding
- português: Yamaha CVP-605 Manual do proprietário
- dansk: Yamaha CVP-605 Brugervejledning
- polski: Yamaha CVP-605 Instrukcja obsługi
- čeština: Yamaha CVP-605 Návod k obsluze
- svenska: Yamaha CVP-605 Bruksanvisning
- Türkçe: Yamaha CVP-605 El kitabı
- suomi: Yamaha CVP-605 Omistajan opas
- română: Yamaha CVP-605 Manualul proprietarului
Artículos relacionados
-
Yamaha CVP-601 El manual del propietario
-
-
Yamaha Clavinova CVP-705 El manual del propietario
-
-
-
Yamaha CVP-407 El manual del propietario
-
Yamaha CVP-601 El manual del propietario
-
-
Yamaha CVP-705 El manual del propietario
-