Haier QPCA08JAMW Manual de usuario
- Categoría
- Acondicionadores de aire móviles
- Tipo
- Manual de usuario
Este manual también es adecuado para

49-5000543 Rev. 1 01-21 GEA
Installation and User Manual
Instrucciones de instalación y
Manual del usuario
QPCA08
Portable Room Air Conditioner
Accondicionadores de Aire Para Sala
Design may vary by model number.
Some models may have an additional
letter after the model number.
El diseño puede variar según el número
de modelo
Algunos modelos pueden tener una
letra adicional después del número de
modelo.

2 49-5000543 Rev. 1
ENGLISH
ENGLISH

49-5000543 Rev. 1 3
ENGLISH
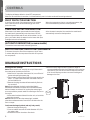
RECORD KEEPING
Thank you for purchasing this Haier product. This user manual will
help you get the best performance from your new air conditioner.
For future reference, record the model and serial number located on
the label on the side of your air conditioner, and the date of purchase.
Staple your proof of purchase to this manual to aid in obtaining
warranty service if needed.
_______________________________________
Model number
_______________________________________
Serial number
_______________________________________
Date of purchase
TABLE OF CONTENTS
SAFETY INFORMATION .......................................................................................................4
USING THE AIR CONDITIONER
Controls ............................................................................................................................5
Frost Protection .....................................................................................................................6
Drainage Instructions. . . . . . . . . . . . . . . . . . . . . . . . . . . . . . . . . . . . . . . . . . . . . . . . . . . . . . . . . . . . . . . . . . . . . . . . . . . . . . . . . . . . . . . . . . . . . . . . . . . . . . . . . . . . . . . .6
Remote Control .....................................................................................................................7
CARE AND CLEANING
Cleaning the Surface ................................................................................................................8
Air Filter .............................................................................................................................8
Storage .............................................................................................................................8
INSTALLATION INSTRUCTIONS
Before you begin ....................................................................................................................9
Electrical Requirements .............................................................................................................9
Parts Included ......................................................................................................................10
Window Panel Combinations ........................................................................................................11
Unpacking the Air Conditioner ......................................................................................................12
Install the Air Conditioner ...........................................................................................................12
TROUBLESHOOTING TIPS ..................................................................................................15
LIMITED WARRANTY. . . . . . . . . . . . . . . . . . . . . . . . . . . . . . . . . . . . . . . . . . . . . . . . . . . . . . . . . . . . . . . . . . . . . . . . . . . . . . . . . . . . . . . . . . . . . . . . . . . . . . . . . .16

4 49-5000543 Rev. 1
ENGLISH
READ AND SAVE THESE INSTRUCTIONS
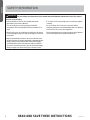
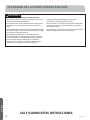
SAFETY INFORMATION
WARNING
For your safety, the information in this manual must be followed to minimize the risk of fire, electric
shock or personal injury.
• Use this appliance only for its intended purpose as
described in this Owner’s Manual.
• This air conditioner must be properly installed in
accordance with the Installation Instructions before it is
used.
• Never unplug your air conditioner by pulling on the power
cord. Always grip plug firmly and pull straight out from the
receptacle.
• Replace immediately all electric service cords that have
become frayed or otherwise damaged. A damaged power
supply cord must be replaced with a new power supply
cord obtained from the manufacturer and not repaired.
Do not use a cord that shows cracks or abrasion damage
along its length or at either the plug or connector end.
• Turn the unit OFF and unplug your air conditioner before
cleaning.
• For your safety…do not store or use combustible
materials, gasoline or other flammable vapors or liquids in
the vicinity of this or any other appliance.
• If the receptacle does not match the plug, the receptacle
must be changed out by a qualified electrician.

49-5000543 Rev. 1 5
ENGLISH
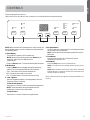
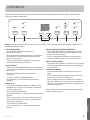
CONTROLS
Features and appearance will vary.
Lights next to the touch pads on the air conditioner control panel indicate the selected settings.
5 4
PowerMode
Sleep
Fan
Timer
Low
High
Timer
Water Full
Power
Cool
Fan
DrySleep
3 6 2 1
NOTE: When the machine is powered on for the first time, the
buzzer will play power-on music and then the machine will go
into standby status.
1. Power Button
Turns ON/OFF power to the air conditioner.
NOTE: Turning off power by pressing the Power button
does NOT disconnect the appliance from
power supply.
Press the Power button. The Power indicator will illuminate.
2. Mode Button
Press the Mode button to toggle among the operating
options. The corresponding indicator will illuminate:
Cool – Cools the room to the set temperature
DRY – Reduces the humidity in the room
Fan – Circulates the air in the room without cooling
3. + and – Buttons
Sets the Temperature when in Cooling Mode or sets the
Time when Timer is selected.
To Set the Temperature:
Press the + or – button to select the required temperature.
NOTE: The temperature cannot be set when the air
conditioner is in either Fan or DRY mode.
To Set the Time:
Press the + or – button to select the required time.
4. Fan Speed Button
The fan speed can be adjusted from Low to High speed when
the air conditioner is in operation.
NOTE: The fan speed cannot be adjusted when the unit is in
DRY mode.
5. Timer Button
Program a time from (1 hour to 24 hours) for the air
conditioner to turn Off or On.
6. Sleep Mode
Press the Sleep button to turn on Sleep Mode.
NOTE: You cannot turn on the Sleep mode in the Dry or Fan
Mode.
NOTE: When the inner unit chassis is full of water, the Water
Full light will turn on. A buzzer will sound for several seconds
and the compressor will stop.
Refer to the instructions on page 6 for draining the water from
the unit.

6 49-5000543 Rev. 1
ENGLISH
CONTROLS
FROST PROTECTION FUNCTION:
In cooling or dry mode, if the temperature of the exhaust
hose is too low, the AC will automatically go into a unit
protection state.
When the temperature rises to a normal temperature, the
unit will automatically resume normal operation.
OVERFLOW PROTECTION FUNCTION:
When water in the water pan exceeds the warning level,
the machine will automatically sound an alarm, the FULL
indicator light will flash and the unit will shut down. At this
point, you need to drain the water from the lower drain (See
Drainage instructions for details)
After the water is emptied, the machine the machine will
automatically resume normal operation.
AUTOMATIC DEFROSTING (on some models)
The machine has an automatic defrosting function.
PROTECTION FUNCTION OF THE COMPRESSOR
To increase the service life of the compressor, the AC has a
3-minute delay after the compressor has shut off to protect
the compressor.
The display will always default to show SET temperature.
When the air conditioner is turned on, it will automatically start in the last mode and fan settings selected.
DRAINAGE INSTRUCTIONS
Draining the unit manually:
Note: Please move the AC carefully, do not spill the water in
the water pan at the bottom of the unit.
1. When the AC stops after the water is full, turn off the AC
power and unplug the power plug.
2. Place a water container larger than the sump capacity (at
least 1-1/2 quart) below the lower rear water outlet on
the back side of unit.
3. Remove the plug, the water will automatically flow into
the container.
Note: During drainage, the body can be tilted slightly
backwards. If the water container cannot hold all the water,
before the water container is full, replace the water plug as
soon as possible to prevent water from flowing to the floor or
the carpet.
4. After water has been drained from the unit, re-install the
water plug securely.
Note: Restart the AC after the water plug is installed,
otherwise condensate water from the AC will drain onto the
floor or carpet.
Continuous drainage (optional, and only in dry mode)
1. Remove the upper drain plug.
2. Connect a drain hose with an inside diameter of 5/8” to
the water outlet.
3. Route drain hose to a bucket or floor drain.
4. Be sure to use a large container (3 gallons or larger is
recommended) and monitor the water level in the container
continuously. The unit will not shut off when the container
is full. An overflowing container can cause flooding and
damage to the floor.

49-5000543 Rev. 1 7
ENGLISH
CONTROLS
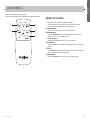
Features and appearance may vary.
Icons on the remote control indicate the selected settings
C
A
B
F
D
E
REMOTE CONTROL
1. Insert the two AAA batteries (provided).
2. Aim the remote control at the signal receiver on the
control panel to operate the air conditioner.
A. Power Button
Turns ON/OFF power to the air conditioner.
B. Mode Button
Press the Mode button to toggle among the operating
options, cooling, fan and dry mode.
C. + and – Button
Adjusts the Temperature or Timing set value.
D. Fan Button
Press the Fan button to adjust fan speed from Low to High
speed.
E. Timer
Press Timer button to activate the ON/OFF timer. Use the
+ and – buttons to adjust the timer.
F. Sleep Button
Press the Sleep button to turn on the sleep mode.

8 49-5000543 Rev. 1
ENGLISH
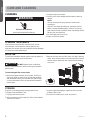
AIR FILTER
The air filters should be cleaned at least every two weeks for
your unit to operate at optimum efficiency.
CAUTION
DO NOT operate the air conditioner
without a filter because dirt and lint will clog it and reduce
performance.
To clean the upper filter screen frame:
1. Remove the upper and lower filter screens. On the top
filter, place finger in recess at top of filter and pull down
and outward to remove. On the lower filter, place finger
in recess at bottom of filter, pull upward and outward to
remove filter.
2. Remove the filter from the filter frame. It is held in place by
4 tabs. After removal, wash or vacuum the filter to remove
the dirt and lint. Make sure filter is dry before reinstalling
on the unit.
CARE AND CLEANING
CLEANING THE SURFACE
Clean surface of machine with a wet soft cloth. Do not
use chemicals, such as benzene, alcohol, gasoline, etc.;
otherwise, the surface of the air conditioner will be damaged
or the entire unit will be damaged.
CLEANING
1. Unplug or disconnect power.
2. Use only a soft cloth dampened with water to clean the
cabinet.
NOTE:
•Do not use a liquid or spray cleaner to clean the air
conditioner.
•DO NOT use chemicals, abrasives, ammonia, chlorine
bleach, concentrated detergents, solvents or scouring
pads. Some of these chemicals/items may damage and/or
discolor your air conditioner.
3. Dry thoroughly with a soft cloth.
4. Plug in or reconnect power.
WARNING
Electrical Shock Hazard
Disconnect power before cleaning.
STORAGE
If the unit is not being used for a long period of time:
To Empty the Internal Water Tank:
1. Unplug or disconnect power.
2. Drain the water from the water tank. (See “Internal Water
Tank section” above.)
3. Use the original packaging to repack the unit to avoid a
buildup of dust or dirt.
4. Store the air conditioner in a cool, dry location.

49-5000543 Rev. 1 9
ENGLISH
INSTALLATION INSTRUCTIONS
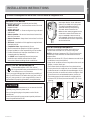
LOCATION REQUIREMENTS
• Place the air conditioner on a flat, level surface in a
location that is at least 20” (50 cm) from any wall.
NOTE: A minimum clearance of 20” (50 cm) from the air
conditioner to the wall must be maintained to ensure
proper airflow.
• Maintain a minimum 20” (50 cm) clearance around the air
conditioner to not block airflow.
• Keep the air conditioner free of any obstructions such as
drapes, curtains, blinds, etc.
• The exhaust hose should be free of any obstructions.
• Do not place the air conditioner on an unstable or raised
surface because it could fall and cause damage or injury.
•
Do not place the air conditioner in direct sunlight or near
a heat source such as baseboard heaters, stoves, etc.
• The window panel can be installed in a window with a
minimum 20” (50.8 cm) to a maximum 48” (121.9 cm)
opening.
Questions? Call GE Appliances at 866.907.1655 or visit our Website at: GEAppliances.com.
BEFORE YOU BEGIN
Read these instructions completely and carefully.
• IMPORTANT — Save these instructions for local
inspector’s use.
• IMPORTANT — Observe all governing codes and
ordinances.
• Note to Installer – Be sure to leave these instructions
with the Consumer.
• Note to Consumer – Keep these instructions for future
reference.
• Skill level – Installation of this appliance requires basic
mechanical skills.
• Completion time – Approximately 1 hour
• We recommend two people to install this product.
• Proper installation is the responsibility of the installer.
• Product failure due to improper installation is not
covered under the Warranty.
• You MUST use all supplied parts and use proper
installation procedures as described in these
instructions when installing this air conditioner.
CAUTION
Do not, under any circumstances, cut or remove the third
(ground) prong from the power cord.
Do not change the plug on the power cord of this air
conditioner.
Aluminium house wiring may present special problems—
consult a qualified electrician.
ÎÕÎÌÝÛÒÌÊÕÛÎÚÞÒÛÎÖÎ×ÝÜ
These models require a 115/120-volt AC,
60-Hz grounded outlet protected with a 15-amp
time-delay fuse or circuit breaker.
The 3-prong grounding plug minimizes the possibility of
electric shock hazard. If the wall outlet you plan to use is
only a 2-prong outlet, it is your responsibility to have it
replaced with a properly grounded 3-prong wall outlet.
Power cord includes a current
interrupter device. A test and reset
button is provided on the plug case.
The device should be tested on
a periodic basis by first pressing
÷ëèÝÎÜÝåø÷÷òñäñç÷ëèñ÷ëè
ÛÎÜÎÝåø÷÷òñúëìïèóïøêêèçìñ÷ò÷ëè
òø÷ïè÷Òé÷ëèÝÎÜÝåø÷÷òñçòèöñò÷
÷õìóòõìé÷ëèÛÎÜÎÝåø÷÷òñúìïïñò÷
stay engaged, discontinue use of the
air conditioner and contact a qualified
service technician.
RESET
TEST

10 49-5000543 Rev. 1
ENGLISH
INSTALLATION INSTRUCTIONS
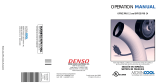
PARTS INCLUDED
(Appearance may vary)
1. Top Cover
2. Control Panel
3. Side Panel
4. Air Outlet / Louver
5. Front Housing
6. Rear Housing
7. Caster
8. Base Pan
9. Upper Filter
10. Upper Continuous Drain
11. Cord Wrapping Post
12. Exhaust Air Vent
13. Lower Filter
14. Lower Drain
2
1
3
7
8
5
4
9
6
10
12
11
13
14
Exhaust Hose Assembly
Remote Control
Batteries (2)
Phillips head screwdriver
(Not Included)
TOOLS YOU WILL NEED
Window Mounting Kit
1 pc – 20” Center Panel
1 pc – 5 ½” Entension
1 pc – 9” Extension
2 pc – 16” Extensions
Pointed Screws (7)
2 – Top Window Bracket
1 – Security Bracket
4 – Main Window Panel
Security BracketBottom Window Bracket (2)Top Window Bracket (2)
Top Foam Strip
Bottom Foam Strip
Foam Strip
Flat Tip Screw
For exhaust nozzle to
main window panel.

49-5000543 Rev. 1 11
ENGLISH
INSTALLATION INSTRUCTIONS
WINDOW PANEL COMBINATIONS TO FIT WINDOW OPENINGS
(Appearance may vary)
Window Opening 20” - Center Panel Only
Window Opening 20”- 23½” - Center Panel + 5½” Extension
Window Opening 23½”- 27” - Center Panel + 9” Extension
Window Opening 23½”- 30½” - Center Panel + 9” and 5½” Extensions
Window Opening 30½” - 34” - Center Panel + 16” Extension
Window Opening 34”- 41” - Center Panel + 9” and 16” Extensions
Window Opening 41”- 48” - Center Panel + (2) 16” Extensions

12 49-5000543 Rev. 1
ENGLISH
INSTALLATION INSTRUCTIONS
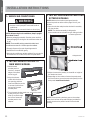
1. UNPACK AIR CONDITIONER
NOTE: Before using the air conditioner, keep it upright
for at least 2 hours.
• Remove packaging materials. Save the carton and the
foam packaging for storing the air conditioner when not
in use.
NOTE: There are NO packing materials inside the air
conditioner to remove—Do Not open the cabinet.
• Properly dispose of/recycle all packing material.
• Handle the air conditioner gently.
• Keep the air conditioner upright and level. Do not set the
air conditioner on its side, front, back or upside down.
Excessive Weight Hazard
• Use two or more people to move and install air
conditioner.
• Failure to do so can result in back or other injury.
WARNING
2. INSTALL EXHAUST NOZZLE TO
MAIN WINDOW PANEL
1. Hold the main
window panel so
that the L-shaped
edges of the panel
are facing you.
2. Align the exhaust
nozzle with the slots in
the opening, and then
insert and slide the nozzle
to access the hole from
the back of the main
window panel.
3. Turn the main window panel over, so that the nozzle
is away from you. Insert
a flat tip screw through
the hole to fasten the
window panel to the
adapter.
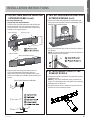
3. INSTALL MAIN WINDOW PANEL AND
EXTENSION PANELS
NOTE: Measure the window opening and use the
extension panels as referenced on page 10 to fit your
window.
1. Open the window and place the window kit assembly
into the window.
NOTE: The window assembly is designed to
accommodate either a double hung or sliding window.
2. Adjust the extension panel(s) to the width or height of
the window as shown.
3. Depending on the number of extension panels used,
turn the knobs to secure the extension panel(s) to the
main panel. Install from the back.
NOTE: There are many window types on the market
today. Use the foam strips and brackets (provided) to
secure the extension panels that will fit the window
opening.
Double Hung Window
Sliding Window

49-5000543 Rev. 1 13
ENGLISH
INSTALLATION INSTRUCTIONS
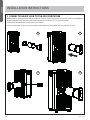
3. INSTALL MAIN WINDOW PANEL AND
EXTENSION PANELS (cont)
6. Place the window panel assembly in the window, and
using the screws provided, fasten the assembly to the
window sill and window frame.
7. Using one pointed screw, install the Security bracket to
the window.
NOTE: The security bracket prevents the window from
being opened from the outside.
B
A
4. ATTACH EXHAUST HOSE TO THE
EXHAUST NOZZLE
1. Grasp both ends of the exhaust hose and gently pull to
expand the hose.
NOTE: Do not attach additional hoses to extend the
length. This would decrease cooling efficiency and may
damage the air conditioner.
2. Using a clockwise motion, attach the open end of the
exhaust hose to the exhaust nozzle.
3. INSTALL MAIN WINDOW PANEL AND
EXTENSION PANELS (cont)
4. For vinyl windows only.
Skip to step 6 for wood windows.
Place the two top window brackets and two bottom
window brackets where they will best support the
extension panels. Use painted screws to attach top
bracket to the support panels.
5. Apply the top foam strip (provided) across the
top of the window panel assembly, and then
apply the bottom foam strip (provided) across the
bottom front edge of the window panel assembly, as
shown.
Use only for vinyl
A
B
A
B
Before Assembly
Attach with pointed screw(2).
After Assembly
A
B
C
D
E
Typical Vinyl Window Installation

14 49-5000543 Rev. 1
ENGLISH
INSTALLATION INSTRUCTIONS
5. CONNECT EXHAUST HOSE TO THE AIR CONDITIONER
NOTE: When connecting the hose, the air conditioner must be close enough to the window that you will not dislodge the
window seal plate. Once the hose is connected, move the air conditioner 20” (51 cm) from the wall.
1. Extend the flexible exhaust hose to reach out to the unit.
2. Aim the opening of the hose to the air exhaust outlet and push it hard straight into the outlet until it clicks.
1
2
3 4

49-5000543 Rev. 1 15
ENGLISH
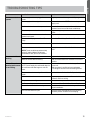
TROUBLESHOOTING TIPS
Problem Possible Causes Solution
Unit does not start or
operate
Power supply cord is not plugged into an
outlet.
Plug the power cord into a grounded 3 prong outlet.
Power supply cord has tripped. Press and release the RESET button on the power
supply cord.
The Power button has not been pressed. Press the Power button on the Control Panel or
Remote Control to turn ON the air conditioner.
There is no power to the electrical outlet. Plug a working lamp into the outlet to check for
power.
A household fuse has blown or a circuit
breaker has tripped.
Replace the fuse or reset the circuit breaker.
The control was programmed for a Time
Delay.
Cancel the Time Delay. See “Control Panel.”
The batteries in the remote control are dead. Replace the batteries.
The internal water tank is full.
NOTE: The air conditioner automatically
turns off, and the Water Full indicator
illuminates to alert you of this condition.
Empty the water tank. See “Air Conditioner
Care.”
Remote control is not
working
Batteries are dead. Replace the batteries.
Batteries are installed incorrectly. Make sure the batteries are inserted in the correct
position.
Air conditioner is
working but the room
is not cooling.
The room temperature is hot.
NOTE: On extremely hot and humid days,the
air conditioner will take longer to cool the
room.
Allow time for the room to cool when you first turn
on the unit.
Make sure the air conditioner has an adequate
BTU rating for the size of the room being cooled.
The control is set incorrectly to Fan or Dehum
mode.
Set the Mode to Cool and the Fan Speed to High.
Airflow is restricted. Remove any obstacles to the airflow and redirect
airflow for uniform cooling.
Temperature set too high. Lower the set temperature.
Air filters are dirty or restricted. Clean the air filter. See “Air Conditioner Care.”
Air conditioner installed incorrectly Check the exhaust hose and window panel for
proper installation.
Doors and windows are open. Close the doors and windows to the room being
cooled to prevent cooled air from escaping.

16 49-5000543 Rev. 1
ENGLISH
LIMITED WARRANTY
•
Service trips to your home to teach you how to use the
product.
•
Improper installation, delivery or maintenance. If you
have an installation problem, or if the air conditioner is of
improper cooling capacity for the intended use, contact
your dealer or installer. You are responsible for providing
adequate electrical connecting facilities.
•
Failure of the product resulting from modifications to the
product or due to unreasonable use including failure to
provide reasonable and necessary maintenance.
•
In commercial locations, labor necessary to move the unit to
a location where it is accessible for service by an individual
technician.
•
Replacement of house fuses or resetting of circuit breakers.
•
Failure due to corrosion on models not corrosion-protected.
•
Damage to the product caused by improper power supply
voltage, accident, fire, floods or acts of God.
•
Incidental or consequential damage caused by possible
defects with this air conditioner.
•
Damage caused after delivery.
What Haier Appliances Will Not Cover:
This limited warranty is extended to the original purchaser and any succeeding owner for products purchased
for home use within the USA. If the product is located in an area where service by a GE Authorized Servicer is not
available, you may be responsible for a trip charge or you may be required to bring the product to an Authorized
ÐÎÜèõùìæèïòæä÷ìòñéòõöèõùìæèÒñÊïäöîä÷ëèïìðì÷èçúäõõäñ÷üèûæïøçèö÷ëèæòö÷òéöëìóóìñêòõöèõùìæèæäïïö÷ò
your home.
Some states do not allow the exclusion or limitation of incidental or consequential damages. This limited warranty
gives you specific legal rights, and you may also have other rights which vary from state to state. To know what
your legal rights are, consult your local or state consumer affairs office or your state’s Attorney General.
Warrantor US:
GE Appliances, a Haier company
Louisville, KY 40225
To schedule service, visit us at Haierappliances.com/support/schedule-service. Have serial number and model
number available when calling for service.
EXCLUSION OF IMPLIED WARRANTIES—Your sole and exclusive remedy is product repair as provided in this Limited
Warranty. Any implied warranties, including the implied warranties of merchantability or fitness for a particular purpose,
are limited to one year or the shortest period allowed by law.
For The Period Of: Haier Appliances Will Replace:
One Year
From the date of the original
purchase
Any part of the air conditioner which fails due to a defect in materials or workmanship. During
this limited one-year warranty, GE Appliances will also provide, free of charge, all labor and
related service to replace the defective part.

49-5000543 Rev. 1 17
ESPAÑOL
INFORMACIÓN A TENER EN CUENTA
Le agradecemos la compra de este producto de marca Haier. Este
manual para el usuario le ayudará a obtener el mejor funcionamiento de
su nueva acondicionador de aire.
Para referencia futura, anote el modelo y número de serie en la etiqueta
en el lado de su acondicionador de aire, y la fecha de compra.
Engrape la prueba de compra a este manual para asistirle cuando
necesite obtener servicio bajo la garantía.
_______________________________________
Número de modelo
_______________________________________
Número de serie
_______________________________________
Fecha de compra
ÍNDICE
INFORMACIÓN DE SEGURIDAD ................................................................................................2
USO DEL ACONDICIONADOR DE AIRE
Controles ...........................................................................................................................3
Protección contra las heladas ........................................................................................................4
Instrucciones de Drenaje ............................................................................................................4
Control Remoto .....................................................................................................................5
CUIDADO Y LIMPIEZA
Limpieza de la superficie .............................................................................................................6
Filtro de Aire ........................................................................................................................6
Rangement .........................................................................................................................6
INSTRUCCIONES DE INSTALACIÓN
Antes de comenzar ..................................................................................................................7
Requisitos Eléctricos ................................................................................................................7
Partes Incluidas .....................................................................................................................8
Combinaciones del Panel de Ventana .................................................................................................9
Desembale el Acondicionador de Aire ...............................................................................................10
Instale el Aire Acondicionado. . . . . . . . . . . . . . . . . . . . . . . . . . . . . . . . . . . . . . . . . . . . . . . . . . . . . . . . . . . . . . . . . . . . . . . . . . . . . . . . . . . . . . . . . . . . . . . . . . . . . . . .10
CONSEJOS PARA LA SOLUCIÓN DE PROBLEMAS .........................................................................13
GARANTÍA LIMITADA .........................................................................................................15

18 49-5000543 Rev. 1
ESPAÑOL
LEA Y GUARDE ESTAS INSTRUCCIONES
SEGURIDAD DEL ACONDICIONADOR DE AIRE
Para su seguridad, siga las instrucciones de este manual a fin de minimizar riesgos de incendio, descargas
eléctricas o heridas personales.
• Use este electrodoméstico sólo para su propósito original, como
se describe en el Manual del Propietario.
• Este acondicionador de aire se debe instalar de forma apropiada
de acuerdo con las Instrucciones de Instalación antes de ser
usado.
• Nunca desenchufe su acondicionador de aire empujando el cable
de corriente. Siempre tome su enchufe de manera firme y empuje
el mismo hacia afuera del receptáculo.
• Reemplace de inmediato todos los cables del servicio de
electricidad pelados o con cualquier tipo de daño. Un cable del
servicio de corriente que esté dañado deberá ser reemplazado
por uno nuevo provisto por el fabricante, y no deberá ser
reparado. No use un cable con cortaduras o abrasión sobre su
extensión o en cualquiera de sus enchufes o extremos.
• Coloque la unidad en OFF (Apagado) y desenchufe el
acondicionador de aire antes de usar el mismo.
• Para su seguridad... no acumule ni use materiales combustibles,
gasolina u otros vapores o líquidos inflamables cerca de éste u
otro electrodoméstico.
• Si el receptáculo no coincide con el enchufe, el cambio del mismo
deberá ser realizado por un electricista calificado.
ADVERTENCIA

49-5000543 Rev. 1 19
ESPAÑOL
CONTROLES
Las luces al lado de las teclas de toque en el panel de control del acondicionador de aire indicarán los ajustes seleccionados. Las
funciones y el aspecto pueden variar.
5 4
Power
Mode
Sleep
Fan
Timer
Low
High
Timer
Water Full
Power
Cool
Fan
DrySleep
3 6 2 1
NOTA: Cuando se encienda el motor por primera vez, el indicador sonoro emitirá la música de encendido y luego el motor
quedará en el modo de espera.
1. Botón de Encendido
Activa ON/OFF (Encendido/ Apagado) en el
acondicionador de aire.
NOTA: Apagar el encendido presionando el botón Power
(Encendido) NO desconecta el electrodoméstico del
suministro de corriente.
Presione el botón Power (Encendido). El indicador del
botón Power (Encendido) se iluminará.
2. Botón de Modo
Presione el botón Mode (Modo) para pasar a través de las
opciones de funcionamiento. El indicador correspondiente
se iluminará:
Cool (Frío) – Refrigera la sala en la temperatura
configurada.
Dry (Seco) – Reduce la humedad de la sala.
Fan (Ventilación) – Hace circular el aire de la sala sin
refrigerar.
3. Botones + y –
Configuran la temperatura al estar en el Modo Cooling
(Refrigeración) o configura Time (Tiempo) cuando esta
función es seleccionada.
Para Configurar la Temperatura:
Presione los botones + o – para seleccionar la temperatura
deseada.
NOTA: La temperatura no se podrá configurar cuando el
acondicionador de aire se encuentre en los modos Fan
(Ventilación) o DRY (Seco).
Para Configurar el Temporizador:
Presione los botones + o – para seleccionar el tiempo
deseado.
4. Botón Fan Speed (Velocidad del Ventilador):
La velocidad del ventilador se podrá ajustar desde Low
(Baja) a High (Alta) cuando el acondicionador de aire se
encuentre en funcionamiento.
NOTA: La velocidad del ventilador no se podrá ajustar
cuando la unidad se encuentre en el modo DRY (Seco).
5. Botón del Temporizador
Programe un tiempo desde 1 hora hasta 24 horas para que
el acondicionador de aire se configure en Off (Apagado) u
On (Encendido).
6. Modo de Inactividad
Presione el botón Sleep (Inactividad) para iniciar dicho
modo.
NOTA: El modo Sleep (Inactividad) no se podrá activar en
los modos Dry (Seco) o Fan (Ventilación).
NOTA: Cuando el chasis de la unidad interior se llene de
agua, la luz de Water Full (Lleno de Agua) se encenderá. Un
indicador sonoro se activará durante varios segundos y el
compresor se detendrá.
Para acceder a instrucciones sobre el drenaje de agua de la
unidad, consulte la página 5.

20 49-5000543 Rev. 1
ESPAÑOL
CONTROLES
La pantalla siempre mostrará la temperatura ambiente por omisión.
Cuando el acondicionador de aire sea encendido, se iniciará de forma automática en las configuraciones de modo y ventilación que fueron usadas por
última vez.
FUNCIÓN DE PROTECCIÓN DE CONGELACIÓN:
En los modos de refrigeración o seco, si la temperatura de la
manguera de salida se encuentra demasiado baja, el acondicionador
de aire pasará de forma automática a un estado de protección de la
unidad. Cuando la temperatura se eleve a un nivel normal, la unidad
reiniciará de forma automática el funcionamiento normal
.
FUNCIÓN DE PROTECCIÓN CONTRA DESBORDES:
Cuando el agua de la bandeja supere el nivel de advertencia, el
motor activará de forma automática una alarma, la luz indicadora
FULL (Completo) parpadeará y la unidad se apagará. En este punto,
usted necesitará drenar el agua desde el drenaje inferior (para más
detalles, consulte las instrucciones sobre Drenaje). Una vez vaciada
el agua, el motor reiniciará de forma automática el funcionamiento
normal
.
DESCONGELACIÓN AUTOMÁTICA (EN ALGUNOS MODELOS)
El motor cuenta con una función de descongelación automática.
FUNCIÓN DE PROTECCIÓN DEL COMPRESOR
A fin de incrementar la vida útil del compresor, el acondicionador
de aire cuenta con un retraso de 3 minutos luego del apagado del
compresor que permite la protección del mismo.
INSTRUCCIONES DE DRENAJE
Drenaje manual de la unidad:
Nota: Por favor, mueva el acondicionador de aire con cuidado, no
derrame agua sobre la bandeja en la parte inferior de la unidad.
1. Cuando el acondicionador de aire se detenga una vez que el
agua llegue hasta el tope, apague el mismo y desenchufe el
cable de corriente.
2. Coloque un recipiente de agua con capacidad superior a aquella
del sumidero (por lo menos 1 ½ cuartos de galón) debajo de la
salida de agua inferior trasera, sobre el lado trasero de la unidad.
3. Retire el enchufe y el agua circulará de forma automática hacia
adentro del recipiente.
Nota: Durante el drenaje, el cuerpo se podrá inclinar levemente
hacia atrás. Si el recipiente de agua no logra contener toda el agua,
antes de que éste se llene, vuelva a colocar el tapón del agua tan
pronto como se posible para evitar que ésta circule hacia el piso o la
alfombra.
4. Una vez que el agua sea drenada de la unidad, vuelva a colocar el
tapón de agua de forma segura.
Nota: Reinicie el acondicionador de aire luego de haber colocado el
tapón de agua; de otro modo, el agua condensada del acondicionador
de aire será drenada sobre el piso o la alfombra.
Drenaje continuo (opción, y sólo en el modo seco)
1. Retire el tapón del drenaje superior.
2. Conecte una manguera de drenaje con un diámetro exterior de
5/8” en la salida de agua.
3. Haga circular una manguera de drenaje hasta un balde o el
drenaje en el piso.
4. Asegúrese de usar un recipiente grande (se recomienda uno de
3 galones o más) y monitoree el nivel de agua del recipiente de
forma continua. La unidad no se apagará cuando el recipiente
esté lleno. Un recipiente que se desborde podrá ocasionar una
inundación y daños sobre el piso.

49-5000543 Rev. 1 21
ESPAÑOL
CONTROLES
Las luces al lado de las teclas de toque en el panel de control del acondicionador de aire indicarán los ajustes seleccionados. Las
funciones y el aspecto pueden variar.
C
A
B
F
D
E
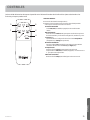
CONTROL REMOTO
1. Inserte las dos baterías AAA (provistas).
2. Apunte el control remoto hacia el receptor de señal del panel de
control para comandar el acondicionar de aire.
A. Botón de Encendido
Activa ON/OFF (Encendido/ Apagado) en el acondicionador
de aire.
B. Botón de Modo
Presione el botón Mode (Modo) para pasar a través de las opciones
de funcionamiento y los modos de refrigeración, ventilación y seco.
C. Botones + y -
Ajustan el valor de configuración de las funciones Temperature
(Temperatura) o Timing (Temporizador).
D. Botón de Ventilación
Presione el botón Fan (Ventilación) para ajustar la velocidad del
ventilador desde la velocidad Low (Baja) a High (Alta).
E. Temporizador
Presione el botón Timer (Temporizador) para activar el
temporizador en ON/OFF (Encendido/ Apagado). Use los botones +
o - para ajustar el temporizador.
F. Botón de Inactividad
Presione el botón Sleep (Inactividad) para activar este modo.

22 49-5000543 Rev. 1
ESPAÑOL
CUIDADO Y LIMPIEZA
LIMPIEZA
1. Desenchufe o desconecte el suministro de energía.
2. Útil solamente un paño dulce humedecido con agua para
limpiar el gabinete.
NOTA:
• No use un limpiador líquido o con rociador para limpiar el
acondicionador de aire.
• No usar productos químicos, abrasivos, amoníaco,
blanqueador con cloro, detergentes concentrados,
solventes o estropajos de metal. Algunos de estos
artículos / productos químicos pueden dañar y / o
decolorar su acondicionador de aire.
3. Ve bien con un paño dulce.
4. Enchufe o vuelva a conectar el suministro de energía..
Riesgo de descarga eléctrica
Desconecte la fuente de alimentación antes de limpiar.
ADVERTENCIA
Limpieza de la superficie
Limpie la superficie del motor con una tela suave y húmeda. No
use químicos, tales como benceno, alcohol, gasolina, etc.; de otro
modo, se dañará la superficie del acondicionador o la unidad en su
totalidad.
Filtro de Aire
Los filtros de aire se deberán limpiar por lo menos cada dos
semanas, a fin de que su unidad brinde un rendimiento óptimo.
CAUTION
NO utilice el acondicionador de aire sin un
filtro, ya que la suciedad y las pelusas producirán atascamientos y
reducirán su funcionamiento.
Para limpiar el marco de la pantalla del filtro superior:
1. Retire las pantallas de los filtros superior e inferior. Sobre el filtro
superior, coloque el dedo sobre el hueco en la parte superior del
filtro y empuje hacia abajo y afuera para retirar el mismo. Sobre el
filtro inferior, coloque el dedo sobre el hueco en la parte inferior
del filtro y empuje hacia arriba y afuera para retirar el mismo.
2. Retire el filtro de su correspondiente marco. El mismo está
posicionado sobre 4 lengüetas. Luego del retiro, lave o aspire el
filtro para eliminar la suciedad y pelusa. Asegúrese de que el filtro
esté seco antes de volver a colocarlo en la unidad.
RANGEMENT
Durante largos periodos de infantilización del dispositivo:
1 Desconecte o desconecte la fuente de alimentación eléctrica.
2. Drene el agua del tanque de agua. Consulte Mantenimiento de
laacondicionador de aire.
3. Coloque la unidad en su embalaje original para evitar la
acumulación de polvo o suciedad.
4. Guarde el aire acondicionado en un lugar fresco y seco.

49-5000543 Rev. 1 23
ESPAÑOL
INSTRUCCIONES DE INSTALACIÓN
REQUISITOS DE UBICACIÓN
• Coloque el acondicionador de aire sobre una supercie plana y
nivelada en una ubicación que esté al menos a 20” (50 cm) de la
pared.
NOTA: La distancia recomendada de la ventana para un
rendimiento óptimo es de 20” (50 cm).
• Mantenga un espacio libre mínimo de 20” (50 cm) alrededor del
acondicionador de aire para no bloquear el flujo de aire.
• Mantenga el acondicionador de aire libre de obstrucciones
como cortinas con pliegues, cortinas, persianas, etc.
• La manguera de escape debe estar libre de cualquier
obstrucción.
• No coloque el acondicionador de aire en una supercie inestable
o elevada, ya que podría caerse y provocar daños o lesiones.
• No exponga el acondicionador de aire a la luz directa del sol o
cerca una fuente de calor como zócalos radiantes, estufas, etc.
• El panel de la ventana puede instalarse en una ventana con
una abertura mínima de 20” (50.8 cm) hasta un máximo de 48”
(121.9 cm).
¿Preguntas? Llame a GE Appliances al 866.907.1655 o visite nuestro sitio web en: GEAppliances.com.
PRECAUCIÓN
Bajo ninguna circunstancia corte o remueva la tercera púa
(conexión a tierra) del cable eléctrico.
No cambie el enchufe en el cable eléctrico de este
acondicionador de aire.
Los cables caseros de aluminio podrían presentar problemas
especiales. Consulte a un técnico electricista calificado.
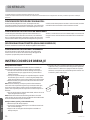
El cable de alimentación incluye un dispositivo para interrupción
de corriente. Se incluye un botón de prueba y de reinicio
en el dispositivo. El dispositivo debe ponerse a prueba
periódicamente: primero se presiona el botón de TEST (prueba)
y luego RESET (reinicio) mientras se encuentra enchufado al
tomacorriente. Si el botón TEST no se dispara o si el botón
RESET no queda enganchado, deje de utilizar el acondicionador
de aire y comuníquese con un técnico calificado.
Ê×ÝÎÜÍÎÒ×ÒÌÒÊÛ
Lea estas instrucciones completa y cuidadosamente.
• IMPORTANTE — Guarde estas instrucciones para
uso del inspector local.
• IMPORTANTE — Observe todos los códigos y
órdenes de ley.
• Nota al instalador – Asegúrese de dejar estas instrucciones
con el consumidor.
• Nota al consumidor – Conserve estas instrucciones para
referencia futura.
• Nivel de destreza – La instalación de este aparato requiere de
destrezas mecánicas básicas.
• Tiempo de ejecución – Aprox. 1 hora
• Recomendamos que el producto sea instalado por dos
personas.
• La instalación apropiada es la responsabilidad del instalador.
• La falla del producto debido a una instalación inadecuada no
está cubierta por la garantía.
• Cuando instale este acondicionador de aire, DEBE usar todas
las piezas suministradas y usar procedimientos adecuados de
instalación.
REQUISITOS ELÉCTRICOS
Estos modelos requieren un tomacorriente con conexión a
tierra de 115/120 voltios, CA, 60-Hz protegido con un fusible de
retraso de 15 amperes o un disyuntor.
El enchufe de tres púas con conexión a tierra minimiza la
posibilidad de descargas eléctricas. Si el tomacorriente de la
pared que usted planea usar solamente tiene 2 tomas, es su
responsabilidad hacer que un técnico lo reemplace por uno de
tres tomas con conexión a tierra.

24 49-5000543 Rev. 1
ESPAÑOL
INSTRUCCIONES DE INSTALACIÓN
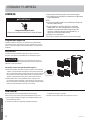
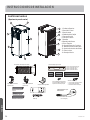
ÙÊÛÝÎÜÒ×ÌÕÞÒÍÊÜ
(Apariencia puede variar)
1. Cubierta Superior
2. Panel de Control
3. Panel Lateral
4. Salida de Aire/ Rejilla
5. Carcasa Frontal
6. Carcasa Trasera
7. Ruedita
8. Bandeja de la Base
9. Filtro Superior
10. Drenaje Superior Continuo
11. Base de Envoltura del Cable
12. Ventilación de Aire de Salida
13. Filtro Inferior
14. Drenaje Inferior
2
1
3
7
8
5
4
9
6
10
12
11
13
14
Kit de Montaje tipo Ventana
1 pieza – Panel Central de 20”
1 pieza – Extensión de 5 ½”
1 pieza – Extensión de 9”
2 pieza – Extensión de 16”
Soporte de Ventana
Superior (2)
Soporte de Ventana
Inferior (2)
Soporte de Seguridad
Banda de
Gomaespuma Inferior
Destornillador de Punta Plana
para la boquilla de salida hacia
el panel de ventana principal
Tornillos de Punta (7)
2 - Soporte de Ventana Superior
1 - Soporte de Seguridad
4 – Panel de Ventana Principal
Banda de Gomaespuma
Superior
Ensamble de la Manguera de Salida
Control Remoto
Pilas (2)
Un destornillador de estrella
(no incluyen)
HERRAMIENTAS QUE
NECESITARÁ
Banda de Gomaespuma

49-5000543 Rev. 1 25
ESPAÑOL
INSTRUCCIONES DE INSTALACIÓN
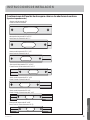
Combinaciones del Panel de Ventana para calzar en las aberturas de ventana
(Apariencia puede variar)
Abertura de Ventana de 20”
Panel Central Únicamente
Abertura de Ventana de 20” a 23 ½”
Panel Central + Extensión de 5 ½”
Abertura de Ventana de 23 ½” a 27”
Panel Central + Extensión de 9”
Abertura de Ventana de 23 ½” a 30 ½”
Panel Central + Extensiones de 9” a 5 ½”
Abertura de Ventana de 30 ½” a 34”
Panel Central + Extensión de 16”
Abertura de Ventana de 34” a 41”
Panel Central + Extensiones de 9” a 16”
Abertura de Ventana de 41” a 48”
Panel Central + Extensiones de 16” (2)

26 49-5000543 Rev. 1
ESPAÑOL
INSTRUCCIONES DE INSTALACIÓN
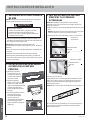
1. DESEMBALE EL ACONDICIONADOR
DE AIRE
NOTA: Antes de usar el acondicionador de aire, mantenga el
mismo erguido durante por lo menos 2 horas.
• Retire los materiales del embalaje. Conserve el cartón y el
embalaje de gomaespuma para guardar el acondicionador de
aire cuando no se encuentre en uso.
NOTA: NO hay materiales de embalaje dentro del
acondicionador de aire que sean necesarios retirar - No abra el
gabinete.
• Descarte/ recicle de forma adecuada todos los materiales de
embalaje.
• Manipule el acondicionador de aire de forma delicada.
• Mantenga el acondicionador de aire erguido y nivelado. No
ubique el acondicionador de aire sobre su lateral, frente, parte
trasera o dado vuelta.
Riesgo de Peso Excesivo
• Cuente con la ayuda de dos o más personas para
trasladar e instalar el acondicionador de aire.
• Si esto no se cumple, se podrán producir lesiones en
la espalda u otras heridas.
WARNING
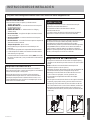
2. INSTALE LA BOQUILLA DE SALIDA
AL PANEL DE LA VENTANA
PRINCIPAL
1. Mantenga el panel de
la ventana principal de
modo que los extremos
con forma de L del panel
miren hacia usted.
2. Alinee la boquilla de
salida con las ranuras de
la abertura, y luego inserte y
deslice la boquilla para acceder
al agujero desde la parte
trasera del panel de ventana
principal.
3. Dé vuelta el panel de ventana
principal, de modo que
la boquilla quede alejada
de usted. Inserte un
destornillador de punta plana
a través del agujero para
ajustar el panel de ventana al
adaptador.
3. INSTALE EL PANEL DE VENTANA
PRINCIPAL Y LOS PANELES
EXTENSIBLES
NOTA: Mida la abertura de la ventana y use los paneles
extensibles como se hace referencia en la página 10 para que
calcen en su ventana.
1. Abra la ventana y coloque el ensamble del kit de ventana sobre
ésta.
NOTA: El ensamble de ventana fue diseñado para su ubicación
sobre dos ganchos o sobre una ventana corrediza.
2. Ajuste el panel(es) extensible sobre el ancho o la altura de la
ventana como se muestra.
3. Dependiendo de la cantidad de paneles extensibles usados,
utilice dos o cuatro tornillos con cabeza plana para ajustar el
panel(es) extensible al panel principal. Realice la instalación
desde la parte trasera.
NOTA: Existen muchos tipos de ventanas en el mercado hoy en
día. Use las bandas de gomaespuma y los soportes (provistos)
para asegurar los paneles extensibles que calzarán sobre la
abertura de la ventana.
Ventana con
Dos Ganchos
Ventana Corrediza
Panel de Ventana
Principal
Panel de Ventana
Principal

49-5000543 Rev. 1 27
ESPAÑOL
INSTRUCCIONES DE INSTALACIÓN
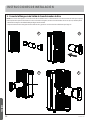
3. INSTALE EL PANEL DE VENTANA
PRINCIPAL Y LOS PANELES
EXTENSIBLES (cont)
6. Coloque el ensamble del panel de ventana en la ventana, y
usando los tornillos provistos, ajuste el ensamble al alféizar de
la ventana y al marco de la ventana.
7. Utilizando un tornillo de punta, instale el soporte de seguridad
a la ventana. NOTA: El soporte de seguridad impide que la
ventana sea abierta desde la parte exterior.
B
A
4. ADHIERA LA MANGUERA DE SALIDA
A LA BOQUILLA DE SALIDA
1. Tome ambos extremos de la manguera de salida y de forma
suave empuje hasta expandir la manguera. NOTA: No adhiera
las mangueras adicionales para extender la longitud. Esto
reduciría la eficiencia de la refrigeración y podría dañar el
acondicionador de aire.
2. Con un movimiento horario, adhiera el extremo abierto de la
manguera de salida a la boquilla de salida.
3. INSTALE EL PANEL DE VENTANA
PRINCIPAL Y LOS PANELES
EXTENSIBLES (cont)
4. Para ventanas de vinilo únicamente
Diríjase al paso 6 si se usarán ventanas de madera
Coloque los dos soportes de ventana superiores y los dos
soportes de ventana inferiores donde mejor sostengan los
paneles extensibles. Use tornillos pintados para adherir el
soporte superior a los paneles de soporte.
5. Coloque la banda de gomaespuma superior (provista) a través
de la parte superior del ensamble del panel de ventana, y luego
coloque la banda de gomaespuma inferior (provista) a través
del extremo frontal inferior del ensamble del panel de ventana,
como se muestra.
A
B
C
D
E
Typical Vinyl Window Installation
Instalación típica de una ventana de vinilo
A. Tira de espuma superior
B. Soporte superior
C. Panel de extensión
D. Pedalier
E. Tira de espuma inferior
Use only for vinyl
A
B
A
B
Before Assembly
A. Soportes de ventana superior
B. Soportes de ventana inferior
Usar solo para vinilo
Antes del montaje
Attach with pointed screw(2).
After Assembly
Después
del montaje
Fijar con tornillo
puntiagudo (2)
A. Soporte de seguridad
B. Tornillo puntiagudo (1)

28 49-5000543 Rev. 1
ESPAÑOL ESPAÑOL
INSTRUCCIONES DE INSTALACIÓN
5. Conecte la Manguera de Salida al Acondicionador de Aire
NOTA: Al conectar la manguera, el acondicionador de aire deberá estar lo suficientemente cerca de la ventana de modo que se pueda
retirar la placa de la junta de la ventana. Una vez conectada la manguera, mueva el acondicionador de aire 20” (51 cm) desde la pared.
1. Extienda la manguera de salida flexible para llegar hasta la unidad.
2. Apunte la abertura de la manguera hacia la salida de aire y presione con fuerza hacia la salida hasta que haga clic.
1 2
3 4

49-5000543 Rev. 1 29
ESPAÑOL ESPAÑOL
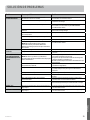
SOLUCIÓN DE PROBLEMAS
Problema Causas posibles Qué hacer
La unidad no se pone en
marcha ni funciona
El cable de suministro de energía no está
enchufado en un toma corriente.
Conecte el cable eléctrico a un toma corriente de
3 terminales con conexión a tierra.
El cable de suministro de energía se ha disparado. Presione y libere RESET (Restablecer) en el cable de
suministro de energía.
El botón Power (Encendido) no se ha presionado. Presione el botón Power (Encendido) en el panel
de control o el control remoto para ENCENDER el
acondicionador de aire.
El toma corriente eléctrico no recibe suministro
eléctrico.
Enchufe una lámpara de trabajo en el toma corriente
para verificar si hay energía.
Se ha fundido un fusible de la casa o se ha disparado
un cortacircuitos.
Reemplace el fusible o reposicione el cortacircuitos.
El control fue programado para un tiempo diferido. Cancele el tiempo diferido. Vea “Panel de control”.
Las pilas del control remoto están agotadas. Reemplace las pilas.
El tanque de agua interno está lleno.
NOTA: El acondicionador de aire se apaga
automáticamente y el indicador Water Full
(Máximo nivel de agua) se ilumina para avisarle de
este estado.
Vacíe el tanque de agua. Vea “Cuidado del
acondicionador de aire”.
El control remoto no
funciona
Las pilas están agotadas. Reemplace las pilas.
Las pilas están insertadas de forma incorrecta. Asegúrese de que las pilas se inserten en la posición
correcta.
El acondicionador de
aire está funcionando,
perola habitación no se
enfría.
La temperatura de la habitación está caliente.
NOTA: En días muy calurosos y húmedos,el
acondicionador de aire necesitará más tiempo para
enfriar la habitación.
Dé tiempo para que la habitación se enfríe cuando
enciende la unidad por primera vez.
Asegúrese de que el acondicionador de aire tenga una
categoría de BTU (Unidad Térmica
Británica) adecuada para el tamaño de la habitación que
desea enfriar.
El control se ha fijado incorrectamente en modo
Fan (Ventilador) o Dehum.
Fije el modo Cool (Enfriamiento) y la velocidad del
ventilador en High (Alta).
El flujo de aire ha disminuido. Quite los obstáculos que bloquean el flujo de aire
y redirija el flujo de aire para lograr un enfriamiento
uniforme.
La temperatura está fijada demasiada alta. Baje la temperatura fijada.
Los filtros de aire están sucios u obstruidos. Limpie el filtro de aire. Vea “Cuidado del acondicionador
de aire”.
El acondicionador de aire se ha instalado
incorrectamente.
Verifique que la manguera de escape y el panel de la
ventana estén correctamente instalados.
Las puertas y las ventanas están abiertas. Cierre las puertas y las ventanas de la habitación que
desea enfriar para evitar que el aire enfriado se escape.
Exhibe “E1” El sensor de temperatura de la manguera detecta
algo atípico.
Controle el sensor de temperatura de la manguera y los
circuitos relacionados.
Exhibe “E2” El sensor de temperatura de la manguera detecta
algo atípico.
Controle el sensor de temperatura de la manguera y los
circuitos relacionados.

30 49-5000543 Rev. 1
ESPAÑOL ESPAÑOL
NOTAS

49-5000543 Rev. 1 31
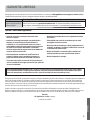
ESPAÑOL ESPAÑOL
• Viajes de servicio a su casa para mostrarle cómo
funciona el equipo.
• Instalación o entrega inapropiada, o mantenimiento
impropio. Si usted tiene un problema durante la
instalación, o si su acondicionador de aire no tiene la
capacidad de enfriamiento que usted necesita, póngase
en contacto con nuestro distribuidor o instalador.
Usted es responsable de proporcionar las facilidades de
conexión eléctrica necesarias.
• Fallo del producto resultante de modificaciones al
producto o debido a uso irrazonable incluyendo no
proporcionar mantenimiento razonable y necesario.
• En locales comerciales, la mano de obra necesaria para
retirar la unidad hacia un lugar para revisión por parte de
un técnico individual.
• Reemplazo de fusibles de la casa o reajuste del sistema
de circuitos.
• Fallos debido a la corrosión en modelos que no están
protegidos contra la corrosión.
• Daño al producto causado por voltaje inapropiado hacia
el equipo, accidentes, incendios, inundaciones o actos de
la naturaleza de fuerza mayor.
• Daños incidentales o consecuenciales causados por
defectos posibles con este acondicionador de aire.
• Daños después de la entrega.
Qué No Cubrirá Haier Appliances:
Esta garantía se extiende al comprador original y cualquier comprador posterior de productos comprados para uso residencial
dentro de Estados Unidos. Si el producto está situado en un área que no dispone de servicio por parte de un proveedor de
servicio autorizado de GE Appliances, podría tener que hacerse cargo de los costes de envío o bien podría solicitársele que
lleve el producto a una centro de servicio de GE Appliances autorizado para realizar la reparación. En Alaska, la garantía excluye
el costo de envío o las visitas de servicio a su casa.
Algunos estados no permiten la exclusión o las limitaciones de daños incidentales o consecuenciales. Esta garantía da
derechos legales específicos, y usted podría tener otros derechos que variarán de estado a estado. Para saber cuáles son sus
derechos legales, consulte a la oficina de asuntos del consumidor local o la oficina del Attorney General en su localidad.
Garante:
GE Appliances, a Haier company
Louisville, KY 40225
Para programar una visita del servicio técnico a través de Internet, visítenos en Haierappliances.com/support/schedule-service.
Cuando llame para solicitar el servicio, tenga los números de serie y modelo disponibles.
EXCLUSIÓN DE GARANTÍAS IMPLÍCITAS—Su único y exclusivo derecho es la reparación del producto, tal y como se indica
en esta Garantía limitada. Cualquier garantía implícita, incluyendo las garantías implícitas de comerciabilidad o adecuación
para un fin determinado, están limitadas a un año o el período de tiempo más breve permitido por la ley.
Por el período de: Haier Appliances Reemplazará:
Un año
A partir de la fecha de la
compra original
Cualquier parte del acondicionador de aire que falle debido a defectos en los materiales o en la
fabricación. Durante esta garantía limitada de un año, GE Appliances también proporcionará, sin
costo alguno, toda la mano de obra y el servicio relacionado—para reemplazar partes defectuosas.
GARANTÍA LIMITADA

32 49-5000543 Rev. 1
ESPAÑOL
Printed in China
IMPORTANTE
No regrese este producto a la tienda
Si tiene un problema con este producto, por favor comuníquese al 1-877-337-
3639 para solicitar el nombre y número telefónico del centro de servicio al cliente
autorizado más cercano.
NECESITA UNA PRUEBA DE COMPRA FECHADA, NÚMERO DE MODELO
Y DE SERIE PARA EL SERVICIO DE LA GARANTÍA
IMPORTANT
Do Not Return This Product To The Store
If you have a problem with this product, please call 1-877-337-3639 for the name
and telephone number of the nearest authorized service center.
DATED PROOF OF PURCHASE REQUIRED FOR WARRANTY SERVICE
ESPAÑOL
-
 1
1
-
 2
2
-
 3
3
-
 4
4
-
 5
5
-
 6
6
-
 7
7
-
 8
8
-
 9
9
-
 10
10
-
 11
11
-
 12
12
-
 13
13
-
 14
14
-
 15
15
-
 16
16
-
 17
17
-
 18
18
-
 19
19
-
 20
20
-
 21
21
-
 22
22
-
 23
23
-
 24
24
-
 25
25
-
 26
26
-
 27
27
-
 28
28
-
 29
29
-
 30
30
-
 31
31
-
 32
32


Haier QPCA08JAMW Manual de usuario
- Categoría
- Acondicionadores de aire móviles
- Tipo
- Manual de usuario
- Este manual también es adecuado para
en otros idiomas
- English: Haier QPCA08JAMW User manual
Artículos relacionados
-
Haier QPCA10-QPCA11 Portable Air Conditioner Manual de usuario
-
Haier QPCD05AXMWW1 El manual del propietario
-
-
Haier QPWA14YZMW El manual del propietario
-
-
-
-
Otros documentos
-
GE APFD05JASW El manual del propietario
-
 Frost King CC36XH Guía de instalación
-
GE APCD10AXWW El manual del propietario
-
GE APCD06AXWW El manual del propietario
-
GE Appliances APWD10JASG El manual del propietario
-
-
 Movincool OP24 El manual del propietario
-
GE APFD06JAWW El manual del propietario
-
Denso OFFICE PRO 24 Manual de usuario

