
© 2013 Samsung Electronics Co., Ltd. All rights reserved.
BN68-04822A-04
LED TV
user manual
Thank you for purchasing this Samsung product.
To receive more complete service, please register
your product at
www.samsung.com/register
Model _____________Serial No. _____________
Contact SAMSUNG WORLD WIDE
If you have any questions or comments relating to Samsung products, please contact the SAMSUNG customer care center.
Comuníquese con SAMSUNG WORLD WIDE
Si desea hacernos alguna pregunta o comentario en relación con los productos de Samsung, comuníquese con nuestro centro de
atención al cliente de SAMSUNG.
Country
Customer Care Center
Web Site
ARGENTINE 0800-333-3733 www.samsung.com
URUGUAY 40543733 www.samsung.com
PARAGUAY 98005420001 www.samsung.com
BRAZIL 0800-124-421
4004-0000
www.samsung.com
CHILE 800-SAMSUNG(726-7864)
From mobile 02-24 82 82 00
www.samsung.com/cl
BOLIVIA 800-10-7260 www.samsung.com
COLOMBIA 01-8000112112
Bogotá: 6001272
www.samsung.com/co
COSTA RICA 0-800-507-7267 www.samsung.com/latin (Spanish)
www.samsung.com/latin_en (English)
DOMINICA 1-800-751-2676 www.samsung.com/latin (Spanish)
www.samsung.com/latin_en (English)
ECUADOR 1-800-10-7267 www.samsung.com/latin (Spanish)
www.samsung.com/latin_en (English)
EL SALVADOR 800-6225 www.samsung.com/latin (Spanish)
www.samsung.com/latin_en (English)
GUATEMALA 1-800-299-0013 www.samsung.com/latin (Spanish)
www.samsung.com/latin_en (English)
HONDURAS 800-27919267 www.samsung.com/latin (Spanish)
www.samsung.com/latin_en (English)
JAMAICA 1-800-234-7267 www.samsung.com
NICARAGUA 00-1800-5077267 www.samsung.com/latin (Spanish)
www.samsung.com/latin_en (English)
PANAMA 800-7267 www.samsung.com/latin (Spanish)
www.samsung.com/latin_en (English)
PERU 0-800-777-08 (Only from landline)
336-8686 (From HHP & landline)
www.samsung.com
PUERTO RICO 1-800-682-3180 www.samsung.com
TRINIDAD & TOBAGO 1-800-SAMSUNG(726-7864) www.samsung.com
VENEZUELA 0-800-100-5303 www.samsung.com
[UF8000-ZL]BN68-04822A-04L02.indb 1 2013-05-20 �� 10:11:19

Important Safety Instructions
(Please read the appropriate section that corresponds to the marking on your Samsung
product before attempting to install the product.)
Warning! Important Safety Instructions
This symbol indicates that high voltage is
present inside. It is dangerous to make any kind
of contact with any internal part of this product.
This symbol alerts you that important literature
concerning operation and maintenance has
been included with this product.
CAUTION
CAUTION: TO REDUCE THE RISK OF ELECTRIC SHOCK, DO
NOT REMOVE COVER (OR BACK). THERE ARE NO USER
SERVICEABLE PARTS INSIDE. REFER ALL SERVICING TO
QUALIFIED PERSONNEL.
RISK OF ELECTRIC SHOCK DO NOT OPEN
• The slots and openings in the cabinet and in the back or bottom are provided for necessary ventilation. To ensure reliable operation of this
apparatus, and to protect it from overheating, these slots and openings must never be blocked or covered.
− Do not cover this apparatus in a confined space, such as a bookcase, or built-in cabinet, unless proper ventilation is provided.
− Do not place this apparatus near or over a radiator or heat resistor, or where it is exposed to direct sunlight.
− Do not place a water containing vessel(vases etc.) on this apparatus, as this can result in a risk of fire or electric shock.
• Do not expose this apparatus to rain or place it near water(near a bathtub, washbowl, kitchen sink, or laundry tub, in a wet basement, or
near a swimming pool etc.). If this apparatus accidentally gets wet, unplug it and contact an authorized dealer immediately. Make sure to
pull out the power cord from the outlet before cleaning.
• This apparatus use batteries. In your community there might be regulations that require you to dispose of these batteries properly under
environmental considerations. Please contact your local authorities for disposal or recycling information.
• Do not overload wall outlets, extension cords or adaptors beyond their capacity, since this can result in fire or electric shock.
• Power-supply cords should be routed so that they are not likely to be walked on or pinched by items placed upon or against them, paying
particular attention to cords at plug end, adaptors and the point where they exit from the appliance.
• To protect this apparatus from a lightning storm, or when it is left unattended and unused for long periods of time, unplug it from the wall
outlet and disconnect the antenna or cable system. This will prevent damage to the set due to lightning and power line surges.
• Before connecting the AC power cord to the DC adaptor outlet, make sure the voltage designation of the DC adaptor corresponds to the
local electrical supply.
• Never insert anything metallic into the open parts of this apparatus. Doing so many cr eate a danger of electric shock.
• To avoid electric shock, never touch the inside of this apparatus. Only a qualified technician should open this apparatus.
• Make sure to plug the power cord in until it is firmly inserted. When removing the power cord, make sure to hold the power plug when
pulling the plug from the outlet. Do not touch the power cord with wet hands.
• If this apparatus does not operate normally - in particular, if there are any unusual sounds or smells coming from it - unplug it immediately
and contact an authorized dealer or service center.
• Be sure to pull the power plug out of the outlet if the TV is to remain unused or if you are to leave the house for an extended period of time
(especially when children, elderly or disabled people will be left alone in the house).
− Accumulated dust can cause an electric shock, an electric leakage or a fire by causing the power cord to generate sparks and heat or
the insulation to deteriorate.
• Be sure to contact an authorized service center, when installing your set in a location with heavy dust, high or low temperatures, high
humidity, chemical substances and where it operates for 24 hours such as the airport, the train station etc.
• Failure to do so may cause serious damage to your set.
• Use only a properly grounded plug and receptacle.
− An improper ground may cause electric shock or equipment damage. (Class l Equipment only.)
• To disconnect the apparatus from the mains, the plug must be pulled out from the mains socket, therefore the mains plug shall be readily
operable.
• Do not allow children to hang onto the product.
• Store the accessories (battery, etc.) in a location safely out of the reach of children.
• Do not install the product in an unstable location such as a shaky self, a slanted floor or a location exposed to vibration.
• Do not drop or impart any shock to the product. If the product is damaged, disconnect the power cord and contact a service center.
• Unplug the power cord from the power outlet and wipe the product using a soft, dry cloth. Do not use any chemicals such as wax,
benzene, alcohol, thinners, insecticide, air freshener, lubricant or detergent. This may damage the appearance or erase the printing on the
product.
• Apparatus shall not be exposed to dripping or splashing.
• Do not dispose of batteries in a fire.
• Do not short circuit, disassemble or overheat the batteries.
• Danger of explosion if battery is incorrectly replaced. Replace only with the same or equivalent type.
• WARNING - TO PREVENT THE SPREAD OF FIRE, KEEP CANDLES OR OTHER OPEN FLAMES AWAY FROM THIS
PRODUCT AT ALL TIMES.
[UF8000-ZL]BN68-04822A-04L02.indb 2 2013-05-20 �� 10:11:19

English - 3
Contents
Basic Features
6 Using the Smart Touch Control
7 Inserting the Batteries (AAA X 2)
7 Pairing the Smart Touch to the TV
8 Battery Low Alarm
9 Using the touchpad
9 Changing Channels by Entering Numbers
10 Show Status and Notification Banner
10 History
10 Searching
10 Using the Virtual Remote Control
11 Turning on the TV
11 Built-in TV Camera
12 Extending the TV Camera
12 Retracting the Camera
13 Switching Between Video Sources
14 Universal Remote Control Setup
14 Add the External Device
15 Viewing the e-Manual
15 Scrolling a Page
15 Using the Top Icons
16 Searching Pages
16 Closing the e-Manual
16 Jumping to a Menu Item
16 Updating the e-Manual
Network Configuration
17 Connecting to a Network
17 Network Connection - Wireless
17 Wireless Network Precautions
17 Network Security Protocols
18 Network Connection - Wired
3D Basics
19 3D Active Glasses
19 Pairing 3D Active Glasses
21 Watching 3D Video
Troubleshooting and Other
Information
22 What is Remote Support?
23 Troubleshooting
24 Mounting the TV on the Wall Using
the Wall Mount Kit (Optional)
26 Eco Sensor and Screen Brightness
26 The Evolution Kit Slot (Kit Sold Separately)
27 Assembling the Stand Wire Holder
27 Assembling the Power inlet Cover
28 Storage and Maintenance
28 Providing Proper Ventilation for Your TV
29 Tip Prevention – Securing the TV to the Wall
Specifications
31 Specifications - TV
[UF8000-ZL]BN68-04822A-04L02.indb 3 2013-05-20 �� 10:11:19

English - 4
Figures and illustrations in this User Manual are provided for reference only and may differ from the actual
product appearance. Product design and specifications may change without notice.
Features for your new TV
• 3D: This new feature enables you to view 3D content.
• SMART HUB:
This TV features Smart Hub, a multi-purpose entertainment and family center. With Smart Hub, users
can surf the web, download applications, and stay in touch with family and friends through social
networking services. In addition, you can enjoy photo, video, and music files stored on external storage
devices.
Press the ™ button to launch Smart Hub. Choose a service using the icons displayed in the top part of
the screen.
Social: Watch the latest YouTube videos and you and your friends' video posts on Facebook and
Twitter. You can also make video calls to friends by the TV camera.
Apps: Samsung Apps offers an extensive collection of free and paid news, sports, weather, and
gaming content you can directly download to and enjoy on your TV.
Photos, Videos & Music: Play back photo, video, and music files from an external storage device.
• Anynet+ (HDMI-CEC): This allows you to control all connected Samsung devices that support
Anynet+ with your Samsung TV’s remote.
• e-Manual: Provides a detailed, on-screen user's manual built into your TV.
• SMART Interaction: Using this function, you can access and control menu options and functions using
motions. To use Smart Interaction Feature, TV camera should be connected the TV.
• Device Manager: Use the TV features with a USB or Bluetooth keyboard and mouse.
• MHL & Screen Mirroring: Displays mobile device screens on your TV using a wired or wireless
connection.
Licenses
[UF8000-ZL]BN68-04822A-04L02.indb 4 2013-05-20 �� 10:11:20

English - 5
Accessories
✎
Please make sure the following items are included with your TV. If any items are missing, contact your
dealer.
✎
The items’ colors and shapes may vary depending on the model.
✎
Check that there is no accessory hidden behind packing materials when you open the box.
• Smart Touch Control & Batteries (AAA x 2)
• Warranty Card / Regulatory Guide
• User Manual / Quick Setup Guide
• Power Cord
• Samsung 3D Active Glasses
Component Adapter AV Adapter Holder-Wire stand Power inlet cover
Wall mount adapter x 2 TV-Holder Kit IR Extender Cable
Warning: Screens can be damaged
from direct pressure when handled
incorrectly. We recommend lifting the
TV by the edges, as shown.
Don't Touch
This Screen!
[UF8000-ZL]BN68-04822A-04L02.indb 5 2013-05-20 �� 10:11:20

English - 6
Using the Smart Touch Control
TV
MIC
STB
SOURCE
VOICE
MORE
VOL
CH
INFO
MENU 3D
SMART HUB
GUIDERETURN
EXIT
MUTE
HISTORY SEARCH
MUTE Cuts
off the sound
temporarily.
TV
MIC
STB
SOURCE
VOICE
MORE
VOL
CH
INFO
MENU 3D
SMART HUB
GUIDERETURN
EXIT
MUTE
HISTORY SEARCH
Touch Pad
• Drag on the Touch Pad to move the
focus on the scr een.
• Press the Touch Pad to run, activate, or
select the highlighted item.
• Press and hold the touchpad to display
the Channel List.
VOICE Take your voice command and enter
a text using your voice.
Displays a virtual remote control on
the screen. See the e-Manual chapter,
Controlling the TV > Virtual Remote
Control.
Changes channels.
Displays the EPG (Electronic Program
Guide).
Turn on and off the satellite or cable set-top
box connected to the TV.
For this, the Smart Touch Control must be
configured as a universal remote control.
See the e-Manual chapter, Controlling the
TV > Universal Remote Control Setup.
Turns the TV on and off.
Displays and selects the available video
sources.
Adjusts the volume.
¥
: Enable Sports Mode for the optimal
sports viewing experience.
INFO: Displays information on the TV
screen.
MENU: Opens the OSD.
3D: Turns the 3D image on or off. See
e-Manual chapter, TV Viewing > 3D TV.
Brings up Smart Hub applications. See the
e-Manual chapter, SMART TV Features >
Smart Hub.
✎
To exit an application that is running
easily, press the
™
button.
You can use the MIC to give Voice
Recognition commands. Simply press the
VOICE button.
✎
Voice Recognition function can be
affected by unclear pronunciation,
voice level, or surrounding noise.
Returns to the previous menu.
Basic Features
[UF8000-ZL]BN68-04822A-04L02.indb 6 2013-05-20 �� 10:11:21

English - 7
Inserting the Batteries (AAA X 2)
1. Slightly lift the battery cover using a plastic card. Next, pull on the cover’s notch with a fi ngernail to
remove the cover completely.
✎
Check the location of the battery cover groove. The groove's location may vary depending on the
type of Smart Touch Control is provided with the product.
2. Insert 2 AAA batteries, making sure to align the positive and negative ends correctly.
3. Align the battery cover with the back of the remote control and press down along the edges until it is
cleanly attached to the remote control.
Pairing the Smart Touch to the TV
Before you pair the Smart Touch to the TV, insert 2 AAA batteries into the Smart Touch. To operate the TV
using the Smart Touch Control, you must fi rst pair it to the TV via Bluetooth.
1. To turn on the TV, point the Smart Touch Control at the remote control receiver of the TV, and then
press the TV button. The remote control receiver's location may vary depending on the model.
2. A Bluetooth icon will appear at the bottom left of the screen as shown below. The TV will then attempt
to connect to the Smart Touch Control automatically.
<Attempting to connect and completion icons>
3. When pairing is successful, the TV displays a small green circle between graphics representing the TV
and the Smart Touch. If the Smart Touch does not pair, use a pen tip to press and release the pairing
button on the back of the Smart Touch.
✎
The first time you turn on your TV, it will immediately start the initial setup.
[UF8000-ZL]BN68-04822A-04L02.indb 7 2013-05-20 �� 10:11:21

English - 8
Reconnecting the Smart Touch Control
If you need to reestablish the connection between the TV and the Smart Touch Control, press the pairing
button at the back of the Smart Touch Control.
<The Smart Touch Control's pairing button>
The pairing button can be accessed by removing the control's battery cover. Pressing the pairing button
automatically reestablishes the connection between the control and the TV.
Battery Low Alarm
When the Smart Touch Control’s battery power is low, the indicator shown (in the illustration) below
appears on the bottom left of the TV screen. If the alarm window pops up, replace the batteries of the
Smart Touch Control. Use alkaline batteries for longer usage.
<Low battery alarm window>
[UF8000-ZL]BN68-04822A-04L02.indb 8 2013-05-20 �� 10:11:21

English - 9
Using the touchpad
Use the touchpad to perform various commands. Navigate to Tutorial (System > Device Manager >
Smart Touch Control Settings > Tutorial) to view an on-screen guide to using the Smart Touch Control.
Dragging Pressing
HISTORY SEARCH
HISTORY SEARCH
ORY SEARC
ORY SEARC
HISTORY SEARCH
HISTORY SEARCH
RY
Y SEARCH
HISTORY SEARCH
HISTORY SEARCH
ORY SEARC
ORY SEARC
HISTORY SEARCH
HISTORY SEARCH
RY
Y SEARCH
Drag on the touchpad in the desired direction.
Move the focus or the pointer in the direction the finger is dragging.
Press and hold the touchpad while watching TV to display Channel
List on the screen. In addition, you can press and hold the touchpad
for 2 seconds or more while an application is running to access the
application's hidden features. (Not available with all applications.)
Changing Channels by Entering Numbers
While watching TV, tap on the protruding line on the left or right edge of
the touchpad to bring up the numerical input window on the screen. Use
your finger to enter the number for the channel you want to watch. The
recognized number is displayed on the screen and the TV switches to
the corresponding channel. However, the number you have entered may
not be recognized properly by the TV. Refer to the guide below to ensure
that your numerical entries are recognized accurately.
Numerical Input Guide
Refer to the diagrams below when entering numerical values. The TV may not recognize your entries if you
do not follow the sequences shown below.
[UF8000-ZL]BN68-04822A-04L02.indb 9 2013-05-20 �� 10:11:22

English - 10
Show Status and Notification Banner
Press the MORE button on the Smart Touch Control and then select STATUS on the virtual control panel
that appears on the screen. The status and notification banner is shown at the top of the screen. For more
information about using the status and alarm banner, refer to e-Manual > SMART TV Features > Status
and Notifications.
History
Press the HISTORY/SEARCH button. This displays an interactive list of recently accessed channels, media
content and applications.
Deleting History Data
You can delete the history information about recently viewed channels, content and applications.
Searching
Press the HISTORY/SEARCH button. The list appears at the bottom of the screen. Press the HISTORY/
SEARCH button again. Enter search criteria to search not only many apps and their contents on the TV
but also the Web.
Refer to e-Manual > SMART TV Features > Searching for more information.
Using the Virtual Remote Control
Press the MORE button to display the virtual remote control on the screen. The virtual remote control
consists of a number panel, a playback control panel, and a quick access panel. Use the touchpad to
select numbers and buttons.
Changing the Virtual Remote Control Panel
You can change which Virtual Remote Panel is displayed on the TV screen, To shift between panels, move
the focus highlight beyond the left or right edge of the displayed panel.
Changing a position of the Virtual Remote Panel
Press the MORE button on the Smart Touch Control. The virtual remote panel appears on the screen.
Press and hold the touch pad for one second. Users can change a position of the virtual remote panel of
the screen.
Using the Number Panel
Use the number panel to enter numbers on a keypad screen or webpage or to change the channel while
watching TV. Changing the channel using the number pad leaves a record, allowing you to easily return to
previous channels.
Using the Playback Control Panel
Use the playback control panel to pause, rewind, fast forward, skip to the next file, select a function with
the a, b, {, } buttons, and much more while enjoying media content.
Using the Quick Access Panel
Use the buttons on the quick access panel to bring up the TV's TOOLS, INFO screen, or e-Manual
screens. Note that the buttons that appear may vary depending on the operating mode of the Smart Touch
Control (with the TV only, as a universal remote, etc.).
[UF8000-ZL]BN68-04822A-04L02.indb 10 2013-05-20 �� 10:11:22

English - 11
Turning on the TV
Turn on the TV using the P button on the remote control or TV panel.
✎
The first time you turn on your TV, it will immediately start the initial setup.
✎
The product color and shape may vary depending on the model.
✎
The TV’s Controller, a small joy stick like button on the rear right side of the TV, lets you control the TV
without the remote control.
mR
P
TV
Function menu
TV Controller
The image is drawn by facing
the front side of the TV.
Camera
Remote control sensor
When you use the Smart Touch Control,
a standby LED does not work
(except
P
button).
Built-in TV Camera
This TV features a built-in TV camera that can be used for the Motion Control, Voice Recognition (built-in
microphone), and Face Recognition features. You can also use the knob for camera's angle adjustment to
change the camera's viewing angle.
From the Top From Behind
Microphone
Lens
Knob for camera's angle adjustment
Microphone
[UF8000-ZL]BN68-04822A-04L02.indb 11 2013-05-20 �� 10:11:22

English - 12
Do not touch the lens while operating the TV camera.
Leave fingerprints that may affect the image quality.
If the lens gets dirty, clean it using a soft piece of cloth.
Keep the microphone from being clogged by dirt or dust.
If it is clogged, voice commands may not be recognized.
Use a soft cloth to wipe the microphone.
Extending the TV Camera
In order to use the TV camera, you must first extend it.
Gently push the camera in without touching the lens until you hear a click.
Retracting the Camera
If you are not using the TV camera, keep it retracted inside the TV. The Motion Control and Face
Recognition features cannot be used while the TV camera is in the retracted state, but Voice Recognition
will still be available.
Gently push the camera in without touching the lens until you hear a click.
[UF8000-ZL]BN68-04822A-04L02.indb 12 2013-05-20 �� 10:11:24

English - 13
Switching Between Video Sources
Press the SOURCE button to switch between devices connected to the TV.
For example, to switch to a game console connected to the second HDMI connector, Press the SOURCE
button. From the Source list, select HDMI2. The connector names may vary depending on the product.
Select the Tools button from the Source screen to access the following options:
• Edit Name: You can rename devices connected to the TV to more easily identify external sources.
With a computer connected to the TV's HDMI (DVI) port via an HDMI cable, for example, you can
change Edit Name to PC.
With a computer connected to the TV's HDMI (DVI) port via an HDMI-to-DVI cable, for example, you
can change Edit Name to DVI PC.
With an AV device connected to the TV's HDMI (DVI) port via an HDMI-to-DVI cable, for example, you
can change Edit Name to DVI Devices.
• Information: View detailed information about the connected devices.
• Refresh: Select this if a connected device does not appear in the list. If the list does not show the
device after selecting Refresh, check the status of the TV-to-device connection.
• Remove USB: Remove the USB device from the list to safely. This function is only available when the
USB device selected.
• Universal Remote Setup: Use this to configure universal remote control settings. Using the universal
remote control, users can control external devices connected to the TV, such as a set-top box, Blu-ray
player, and AV receiver.
[UF8000-ZL]BN68-04822A-04L02.indb 13 2013-05-20 �� 10:11:24

English - 14
Universal Remote Control Setup
This TV has a universal remote control feature that lets you control cable boxes, Blu-ray players, home
theaters, and other third-party external devices connected to the TV using the TV's remote control.
✎
Some or new models of the external device connected to the TV, may not be supported the Universal
Remote Setup.
Keep a distance of 5cm at least between the IR EXTENDER CABLE and the external device, as the
illustration shows. Face the IR EXTENDER CABLE toward the external device’s remote control signal
receiver. Note that it should be no obstacle between IR EXTENDER CABLE and external device. The
presence of an obstacle will interfere with the transmission of the remote control signal.
Add the External Device
1. Turn on the external device you wish to set up universal remote function for and then press SOURCE
to bring up the Source screen.
2. Select Universal Remote Setup from the top of the screen. This initiates the universal remote setup
process.
3. Follow the on-screen instructions and set up the universal remote feature using the recommended
code set. If the recommended code set does not work, set up the remote control by entering the
model number manually.
[UF8000-ZL]BN68-04822A-04L02.indb 14 2013-05-20 �� 10:11:25

English - 15
Viewing the e-Manual
The embedded e-Manual contains information about your TV's key features. This TV has a built-in user
guide. To read it, use one of the following methods:
• Open the Support menu and choose e-Manual (Troubleshooting).
• Press the MORE button on the Smart Touch Control to display control buttons on the screen. Flick the
Touch Pad until e-Manual appears and select it.
✎
Words in blue refer to screen menu options and words in light blue refer to remote control buttons.
✎
A printable version of this guide is also available at www.samsung.com/support.
Scrolling a Page
To scroll a page, use of one of the following methods:
• Press the
or button on the scroll bar at the right edge of the screen.
• Drag or flick up or down from either edge of the touchpad.
• Place the focus on the
or at the right edge of the screen, drag or flick up or down on the
touchpad.
Using the Top Icons
Use the Back, Forward, and Opened pages icons on the top left of the screen to navigate through
pages. These icons are available when two or more pages are passed.
Returning to the Home Page
To return to the home page, select the a button or select on the top right of the screen.
✎
To select a letter button (a, b, { , }), press the MORE button on the Smart Touch Control to display
a panel of the Virtual Remote. Flick the Touch Pad until the Playback Control Panel appears, select the
a letter button, and then press the Touch Pad.
[UF8000-ZL]BN68-04822A-04L02.indb 15 2013-05-20 �� 10:11:25

English - 16
Searching the Index
Select the b button or select on the top right of the screen to display the index. Select a term to
display the page containing the term.
Searching Pages
Select the { button or select on the top right of the screen, and enter search criteria. Select a page
from the list of search results to display it.
Closing the e-Manual
To close the e-Manual, press hold the RETURN button or select at the upper-right corner of the
screen.
Jumping to a Menu Item
To directly jump to the menu item that is described in the current section, select . It is possible to
jump from a menu item directly to the related section in the e-Manual. On a menu screen, press the MORE
button on the Smart Touch Control and then select e-Manual on the virtual control panel that appears on
the screen.
✎
This feature may not be available, depending on the menu.
Updating the e-Manual
Press the ™ button and select Apps, and then select More Apps. The e-manual can be updated in the
same way with an application update.
On the More Apps screen, select Update Apps, and then select e-Manual from the list. The e-Manual
starts updating to the latest version. However, Update Apps appears on the screen only when the update
is required.
[UF8000-ZL]BN68-04822A-04L02.indb 16 2013-05-20 �� 10:11:25

English - 17
Network Configuration
Connecting to a Network
Connecting the TV to a network gives you access to online services such as the Smart Hub as well as
software updates.
Network Connection - Wireless
Connect the TV to the Internet using a standard router or modem.
Wireless IP Router or Modem
that has a DHCP Server
LAN Cable (Not Supplied)
The LAN Port on the Wall
Wireless Network Precautions
• This Smart TV supports the IEEE 802.11a/b/g /n communication protocols. Samsung recommends
using IEEE 802.11n. Otherwise when you play video over a network connection, the video may not play
smoothly.
• To use a wireless network, the TV must be connected to a wireless router or modem. If the wireless
router supports DHCP, the TV can use a DHCP or static IP address to connect to the wireless network.
• Select a channel that is not currently in use for the wireless router. If the channel set for the
wireless router is currently being used by another device, the result is usually interference and/or a
communications failure.
• Most wireless networks have an optional security system. To enable a wireless network's security
system, you need to create a security key using characters and numbers. This security key is then
needed to connect to the wireless network.
Network Security Protocols
The TV only supports the following wireless network security protocols and is unable to connect to non-
certified wireless routers:
• Authentication Modes: WEP, WPAPSK, WPA2PSK
• Encryption Types: WEP, TKIP, AES
If the wireless router has been set to Pure High-throughput (Greenfield) 802.11n mode and the Encryption
Type to WEP or TKIP, Samsung Smart TVs will not support the connection in compliance with the new Wi-
Fi certification specifications.
If the wireless router supports WPS (Wi-Fi Protected Setup), it is possible to connect to the network using
PBC (Push Button Configuration) or a PIN (Personal Identification Number). WPS automatically configures
the SSID and WPA key settings.
[UF8000-ZL]BN68-04822A-04L02.indb 17 2013-05-20 �� 10:11:26

English - 18
Network Connection - Wired
There are three main ways to connect your TV to your network using cable, depending on your network
setup. They are illustrated starting below:
The Modem Port on the Wall
Modem Cable (Not Supplied) LAN Cable (Not Supplied)
TV Rear Panel
External Modem
(ADSL / VDSL / Cable TV)
TV Rear Panel
The Modem Port on the Wall
Modem Cable
(Not Supplied)
LAN Cable
(Not Supplied)
LAN Cable
(Not Supplied)
External Modem
(ADSL / VDSL / Cable TV)
IP Router that has a
DHCP Server
TV Rear Panel
The LAN Port on the Wall
LAN Cable (Not Supplied)
✎
The TV does not support network speeds less than or equal to 10Mbps.
✎
Use Cat 7 cable for the connection.
[UF8000-ZL]BN68-04822A-04L02.indb 18 2013-05-20 �� 10:11:26

English - 19
3D Basics
3D Active Glasses
Features
Samsung's SSG-5100GB 3D glasses enable you to view 3D images on your 3D TV. The Samsung 3D
glasses communicate with Samsung 3D TVs via the 2.4GHz RF band.
✎
The Samsung 3D glasses are only compatible with Samsung D, E, and F series 3D TV's that are
released 2011, 2012 and 2013. These 3D glasses cannot be connected to other Bluetooth devices.
Parts
LED Indicator & Power Button
Liquid crystal shutter
Battery Cover
✎
For details on how to attach the glasses'
temples and how to pair the glasses with the
TV, refer to the separate 3D glasses manual.
Replacing the Battery
If the red LED blinks every two seconds continually, replace the battery with a new one.
✎
Insert the "+" side of the battery into the side marked with "+" in the battery compartment.
✎
To check the remaining battery capacity, refer to the pairing section in this manual.
Pull the battery cover
downward
Open the battery cover Remove the battery Replace the battery Push the battery cover
downward
Close the battery cover
Pairing 3D Active Glasses
✎
What is Pairing? Pairing is the process of connecting 3D glasses and a 3D TV so that the two devices
can exchange data.
✎
Ensure your Samsung TV and 3D glasses are no farther than 19.5 in (50 cm) apart from each other
while pairing is in progress.
[UF8000-ZL]BN68-04822A-04L02.indb 19 2013-05-20 �� 10:11:27

English - 20
• Turning the glasses on
Press the power button briefly. The green LED is turned on for 3 seconds.
(Make sure that 3D is activated on the TV before using the 3D glasses.)
• Turning the glasses off
Press the power button briefly. The red LED is turned on for 3 seconds.
• Performing the pairing process
Turn the TV on and let it power up completely. Press and hold the Power
button on the glasses. The green and the red LEDs blink alternately for 2
seconds.
• Operating range
2~6m
50cm
Recommended pairing distance
Recommended viewing distance
Recommended viewing distance Recommended pairing distance
2~6m (6.5 to 19.5 ft) 50 cm or less (19.5 in)
✎
Once the 3D glasses are paired, the remaining battery capacity is displayed on the TV screen. (This
feature only applies to Samsung F series 3D TVs and 3D glasses that have been available since 2013.)
✎
If you keep trying to pair the glasses and the TV, the battery level will decrease significantly. However,
the battery level will recover to a certain degree in about a minute.
✎
The working distance depends on the existence of obstacles (a person, metal, walls, etc.) between
the glasses and the TV and the strength of the Bluetooth signal.
✎
Turn off the 3D glasses while they are not in use. If you leave the 3D glasses on, the battery lifespan
decreases.
Pairing steps
1. Turn on the TV, and then move the glasses within 19.5 inches of the TV.
2. Press the power button on the 3D glasses briefly. The 3D glasses will power on and pairing will start.
3. The message “3D glasses are connected to TV.” will be displayed on the TV screen when the pairing is
successfully completed.
• If pairing fails, the 3D glasses will power off.
• If the first attempt to pair fails, power the TV off and on again and perform step 2.
• How to pair again: Press the power button on the 3D glasses for more than 1 second.
Pairing is needed again in the following situations:
− If the 3D glasses do not function, even when the power button is pressed, especially with a 3D TV
after a repair.
− If you want to play 3D content on another Samsung 3D TV model that belongs to the D, E, or F
series released in 2011 through 2013. You must pair the glasses with the other TV.
[UF8000-ZL]BN68-04822A-04L02.indb 20 2013-05-20 �� 10:11:27

English - 21
Watching 3D Video
Some 3D modes may not be available depending on the format of the image source.
To watch in 3D, you must wear 3D Active Glasses and turn the glasses on by pressing the power button.
1. Go to the 3D screen. (Picture > 3D)
2. Select the 3D Mode. The 3D Mode screen appears.
3. Set the 3D Mode of the image you want to view.
Troubleshooting
If you encounter... Try this...
My 3D glasses do not work.
Replace the battery.
The 3D glasses should be close to the TV. Make sure that the distance
between the TV and your 3D glasses is less than 19.5 feet (6m) in a
straight line.
Check the 3D function settings of your TV.
The LED keeps blinking The battery is dead. Replace the battery.
Specifications (Model Number: SSG-5100GB)
Optics
Shutters Liquid crystal Transmittance 36±2%
Recommended
operating
distance
2 ~ 6m (6.5 to 19.5 ft) Field Rate 120 fields/second
Weight Glasses 21.5g/.76 oz. (including the battery: 24.0±0.5g/.85.±.018oz. )
Power Glasses One 3V lithium/manganese dioxide battery 3V(CR2025)
Power
consumption
Glasses 0.85mA (Average)
Battery
Type 165mAh, 3.0V (CR2025)
Operating time 150 hours
Operating
conditions
Operating
temperature
50 °F ~ 104 °F (10°C ~ 40°C)
Custody
temperature
-4 °F ~ 113 °F (-20°C ~ 45°C)
✎
Product specifications may be changed without notice in order to enhance product performance.
✎
The continuous operating time may differ depending on the wireless communication environment and
usage conditions.
[UF8000-ZL]BN68-04822A-04L02.indb 21 2013-05-20 �� 10:11:27

English - 22
What is Remote Support?
Samsung Remote Support service offers you one-on-one support with a Samsung Technician who can
remotely.
• Diagnose your TV
• Adjust the TV settings for you
• Perform a factory reset your TV
• Install recommended firmware updates
How Does it Work?
Having a Samsung Tech remotely service your TV is really pretty simple
1. Call Samsung
Contact Center
and ask for remote
support.
2. Open the menu
on your TV and
go to the Support
section.
3. Select Remote
Management and
Provide the Pin# to
the agent.
4. The agent will then
access your TV.
That's it!
Troubleshooting and Other Information
[UF8000-ZL]BN68-04822A-04L02.indb 22 2013-05-20 �� 10:11:27

English - 23
Troubleshooting
If the TV seems to have a problem, first review this list of possible problems and solutions. Also, review the
Troubleshooting Section in the e-Manual. If none of the troubleshooting tips apply, visit www.samsung.
com/support or call Samsung Customer Service.
Issues Solutions and Explanations
Flickering and Dimming If your Samsung Television is flickering or dimming sporadically, you may need to disable some of the
energy efficiency features.
Disable Energy Saving (System > Eco Solution > Eco Sensor) and/or Energy Saving (System > Eco
Solution > Energy Saving) and check again.
Component Connections /Screen Color If you find that the color on your Samsung television screen is not correct or the black and white colors
are off, run Self Diagnosis (Support > Self Diagnosis > Picture Test).
If the test results are negative, check the following: Are the TV's video input connectors connected to the
correct external device video output connectors?
Check other connections as well. If the TV is connected to an external device via a component cable,
check that the Pb, Pr, and Y jacks are plugged into their proper connectors.
Screen Brightness If you find that the colors on your Samsung TV are correct but just a little too dark or bright, try adjusting
the following settings first.
Navigate to Picture and adjust Backlight, Contrast, Brightness, Sharpness, Color, Tint (G/R) and
other picture quality adjustment settings.
Auto Motion Plus/Blur If you find that there is a blur or “ghost” shadow to the images on your television screen, you might be
able to correct the issue using Auto Motion Plus (Picture > Picture Options > Auto Motion Plus).
Unwanted Powering Off If your Samsung TV appears to turn off by itself, try disabling some of the TV's energy efficiency features.
Check if Sleep Timer (System > Time > Sleep Timer) has been enabled. Sleep Timer automatically
turns off the TV to save energy after a specified period of inactivity. If the Sleep Timer has not been
enabled, see if No Signal Power Off (System > Eco Solution > No Signal Power Off) or Auto Power
Off (System > Eco Solution > Auto Power Off) has been enabled.
Trouble Powering On When the TV is turned on, the remote control receiver flashes 5 times before the screen turns on.
If you find that you are having problems powering on your Samsung television, there are a number of
things to check before calling the service department.
If the power cord is connected properly and the remote control is operating normally, the problem might
be with the antenna cable connection or the cable/satellite box not being turned on. Check the antenna
connection or turn on the cable/satellite box.
Stand Assembly If you have any trouble assembling the stand first, review Quick Start Guide.
Cannot Find a Channel Re-run Setup (Go to Menu > System > Setup) or run Auto Tuning. (Go to Menu > Broadcasting >
Auto Tuning.
[UF8000-ZL]BN68-04822A-04L02.indb 23 2013-05-20 �� 10:11:27

English - 24
Issues Solutions and Explanations
The TV won’t turn on. • Make sure the AC power cord is securely plugged in to the wall outlet and the TV.
• Make sure the wall outlet is working.
• Try pressing the
P
button on the TV to make sure the problem is not the remote. If the TV turns on,
refer to “The remote control does not work” below.
There is no picture/video. • Check the cable connections. Remove and reconnect all cables connected to the TV and external
devices.
• Set the video outputs of your external devices (Cable/Sat Box, DVD, Blu-ray etc) to match the TV's
input connections. For example, if an external device’s output is HDMI, it should be connected to an
HDMI input on the TV.
• Make sure your connected devices are powered on.
• Be sure to select the correct input source.
• Reboot the connected device by unplugging it, and then reconnecting the device’s power cable.
The remote control does not work. • Replace the remote control batteries. Make sure the batteries are installed with their poles (+/–) in the
correct direction.
• Clean the sensor’s transmission window on the remote.
• Try pointing the remote directly at the TV from 150~180cm away.
The cable/set top box remote control
doesn’t turn the TV on or off or adjust the
volume.
• Program the Cable/Set remote control to operate the TV. Refer to the Cable/Set-Top-Box user
manual for the SAMSUNG TV code.
✎
This TFT LED panel uses a panel consisting of sub pixels which require sophisticated technology to
produce. There may be, however, be a few bright or dark pixels on the screen. These pixels will have
no impact on the performance of the product.
✎
To keep your TV in optimum condition, upgrade to the latest firmware on the Samsung web site by
USB (Samsung.com > Support > Downloads).
Mounting the TV on the Wall Using the Wall Mount Kit
(Optional)
Wall or Ceiling Mounting
If you mount this product on a wall, it should be mounted only as recommended by the
manufacturer. Unless it is correctly mounted, the product may slide or fall, causing serious
injury to a child or adult, and serious damage to the product.
Installing the Wall Mount Kit
The wall mount kit (sold separately) lets you mount the TV on the wall.
For detailed information about installing the wall mount, see the instructions provided with the wall mount.
We recommend you contact a technician for assistance when installing the wall mount bracket. We do not
advise you to do it yourself. Samsung Electronics is not responsible for any damage to the product or injury
to yourself or others if you elect to install the wall mount on your own.
[UF8000-ZL]BN68-04822A-04L02.indb 24 2013-05-20 �� 10:11:27

English - 25
Installing a Wall Mount using the Wall mount adapter
✎
For more detailed information, refer to the User
Manual of the Wall Mount Kit when you purchase.
VESA Wall Mount Kit Notes and Specifications
✎
Install your wall mount on a solid wall perpendicular to the floor. Before attaching the wall mount to
surfaces other than plaster board, please contact your nearest dealer for additional information. If you
install the TV on a ceiling or slanted wall, it may fall and result in severe personal injury.
✎
NOTE
• Standard dimensions for wall mount kits are shown in the table below.
• Samsung wall mount kits contain a detailed installation manual, and all parts necessary for
assembly are provided.
• Do not use screws that do not comply with VESA standard screw specifications.
• Do not use screws that are longer than the standard length or do not comply with VESA standard
screw specifications. Screws that are too long may cause damage to the inside of the TV set.
• For wall mounts that do not comply with the VESA standard screw specifications, the length of the
screws may differ depending on the wall mount specifications.
• Do not fasten the screws too firmly. This may damage the product or cause the product to fall,
leading to personal injury. Samsung is not liable for these kinds of accidents.
• Samsung is not liable for product damage or personal injury when a non-VESA or non-specified
wall mount is used or the consumer fails to follow the product installation instructions.
• Do not mount the TV at more than a 15 degree tilt.
• Always have two people mount the TV on to a wall.
Product Family Model
VESA screw hole specs
(A * B) in millimeters
Standard Screw Quantity
LED-TV
[Slim Type]
UN46F8000 200 X 200
M8 4
UN55F8000
UN65F8000
400 X 400
Do not install your Wall Mount Kit while your TV is turned on. It may result in personal
injury from electric shock.
[UF8000-ZL]BN68-04822A-04L02.indb 25 2013-05-20 �� 10:11:28

English - 26
Eco Sensor and Screen Brightness
Eco Sensor measures the light in your room and optimizes the brightness of the TV automatically to reduce
power consumption. This causes the TV to brighten and dim automatically. If you want to turn this function
off, go to Menu > System > Eco Solution > Eco Sensor.
Do not block the sensor with any material. It can decrease picture brightness.
1. Eco sensor This power-saving feature automatically adjusts the screen brightness of the TV according
to the ambient light intensity detected by the Light Sensor.
2. To enable or disable Eco Sensor, go to System > Eco Solution > Eco Sensor and select On or Off.
3. Precaution: If you find the screen too dark while watching the TV in a dark area, this may be caused by
the Eco Sensor.
The Evolution Kit Slot (Kit Sold Separately)
TV Rear
Attaching the Evolution Kit to your Samsung TV upgrades the TV’s hardware and software without your
needing to purchase a new TV. With the Evolution Kit, you can keep your TV updated with the latest
features and services provided by Samsung Electronics.
✎
The Evolution Kit is sold separately. When users purchase an Evolution Kit released in 2014 or later,
the user's TV can be upgraded to match the software version of the Evolution Kit. However, an
Evolution Kit may not be available, depending on the product.
[UF8000-ZL]BN68-04822A-04L02.indb 26 2013-05-20 �� 10:11:28

English - 27
Assembling the Stand Wire Holder
Assembling the Power inlet Cover
Attach the power inlet cover to the TV as illustrated below.
[UF8000-ZL]BN68-04822A-04L02.indb 27 2013-05-20 �� 10:11:28

English - 28
Storage and Maintenance
✎
If a sticker was attached to the TV screen, some debris can remain after you remove the sticker.
Please clean the debris off before watching TV.
✎
The exterior and screen of the product can get scratched during cleaning. Be sure to wipe the exterior
and screen carefully using a soft cloth to prevent scratches.
Do not spray water directly onto the product. Any
liquid that goes into the product may cause a
failure, fire, or electric shock.
Clean the product with a soft cloth dampened with
a small amount of water. Do not use a flammable
liquid (e.g. benzene, thinners) or a cleaning agent.
Providing Proper Ventilation for Your TV
When you install your TV, maintain a distance of at least 10 cm between the TV and other objects (walls,
cabinet sides, etc.) to ensure proper ventilation. Failing to maintain proper ventilation may result in a fire or a
problem with the product caused by an increase in its internal temperature.
✎
Whether you install your TV using a stand or a wall-mount, we strongly recommend you use parts
provided by Samsung Electronics only.
• If you use parts provided by another manufacturer, it may cause difficulties with the product or result
in injury caused by the product falling.
Installation with a stand. Installation with a wall-mount.
10 cm
10 cm
10 cm
10 cm
10 cm
10 cm
10 cm
Other Warnings
✎
The actual appearance of the TV may differ from the images in this manual, depending on the model.
✎
Be careful when you touch the TV. Some parts can be somewhat hot.
[UF8000-ZL]BN68-04822A-04L02.indb 28 2013-05-20 �� 10:11:29

English - 29
Tip Prevention – Securing the TV to the Wall
Caution: Pulling, pushing, or climbing on the TV may cause the
TV to fall. In particular, ensure your children do not hang on or
destabilize the TV. Doing so may cause the TV to tip over, causing
serious injuries or death. Follow all safety precautions provided
in the Safety Flyer included with your TV. For added stability
and safety, you can purchase and install the anti-fall device as
described below.
Installing the TV-Holder Kit:
TV-Holder Holder Screw (M8 X L28) 2ea
1. Screw the provided wall mount adapters on the back of the TV.
2. Insert the screw into the center of the TV-holder, as shown
by the illustration.
Fastening
direction
Holder
Protrusion
3. Tighten the TV-holders on the wall mount adapters, as
shown by the illustration.
[UF8000-ZL]BN68-04822A-04L02.indb 29 2013-05-20 �� 10:11:29

English - 30
4. Fasten the Holder to the cabinet using a wood screw.
✎
Use an M5 x L35 or a larger screw.
5. Fasten the Holder with a screw the same way used when attaching it to a cabinet. Make sure to stretch
the Holder cord tight. If the rack is made of steel or glass, attach the holder onto the wall.
✎
When attaching the holder to a wall, use an anchor compatible with the wall's material. When
attaching the holder onto a wall, use an anchor compatible with the wall material.
Anchor
✎
Install the TV close to the wall so that it does not fall.
✎
When attaching the TV-Holder cord to the wall, tie the cord level with the ground or slanted
downwards for safety purposes.
✎
Check the cord occasionally to make sure it is secure.
✎
Before moving the TV, separate the connected cord first.
6. Verify all connections are properly secured. Periodically check the connections for any sign of fatigue or
failure. If you have any doubt about the security of your connections, contact a professional installer.
IMPORTANT INFORMATION
If a television is not positioned in a sufficiently stable location, it can be potentially hazardous due to
falling. Many injuries, particularly to children, can be avoided by taking simple precautions such as:
• Using cabinets or stands recommended by the manufacturer of the television.
• Only using furniture that can safely support the television.
• Ensuring the television is not overhanging the edge of the supporting furniture.
• Not placing the television on tall furniture (for example, cupboards or bookcases) without anchoring
both the furniture and the television to a suitable support.
• Not standing the televisions on cloth or other materials placed between the television and
supporting furniture.
• Educating children about the dangers of climbing on furniture to reach the television or its controls.
[UF8000-ZL]BN68-04822A-04L02.indb 30 2013-05-20 �� 10:11:30

English - 31
Specifications - TV
Display Resolution 1920 x 1080
Environmental Considerations
Operating Temperature
Operating Humidity
Storage Temperature
Storage Humidity
50°F to 104°F (10°C to 40°C)
10% to 80%, non-condensing
-4°F to 113°F (-20°C to 45°C)
5% to 95%, non-condensing
Stand Swivel (Left / Right) 0˚
Model Name UN46F8000 UN55F8000
Screen Size 116 cm 138 cm
Sound
(Output) 40W(10x2, woofer 10x2)
Dimensions (W x H x D)
Body
With stand
103.2 x 59.9 x 3.4 cm
103.2 x 63.4 x 25.7 cm
122.4 x 70.7 x 3.4 cm
122.4 x 74.1 x 31.0 cm
Weight
Without Stand
With Stand
12.8 Kg
14.0 Kg
16.8 Kg
18.3 Kg
✎
Design and specifications are subject to change without prior notice.
✎
The actual appearance of the TV may differ from the images in this manual, depending on the model.
✎
For information about the power supply, and more about power consumption, refer to the label
attached to the product.
Standby mode
To decrease power consumptionunplug the power cord when you don't use the TV for a long time.
Still image warning
Avoid displaying still images (such as jpeg picture files) or still image elements (such as TV channel logos,
panorama or 4:3 image format, stock or news bars at screen bottom etc.) on the screen. Constant
displaying of a still picture can cause ghosting of the LED screen, which will affect image quality. To reduce
risk of this effect, please follow the recommendations below:
• Avoid displaying the same TV channel for long periods.
• Always try to display a full screen image.
• Reducing brightness and contrast will help to avoid the appearance of after-images.
• Use all TV features designed to reduce image retention and screen burn, refer to e-Manual for details.
Specifications
[UF8000-ZL]BN68-04822A-04L02.indb 31 2013-05-20 �� 10:11:30

Instrucciones de seguridad importantes
• Las ranuras y aberturas existentes en la unidad y en la parte trasera o inferior se facilitan para proporcionar la ventilación necesaria. Para
garantizar el funcionamiento fiable de este aparato, y para protegerlo frente a sobrecalentamiento, estas ranuras y aberturas nunca deben
bloquearse ni cubrirse.
- No cubra las ranuras y aberturas con un paño o con cualquier otro material.
- No bloquee las ranuras ni aberturas colocando este aparato sobre la cama, sofá, alfombra o superficie similar.
- No coloque este aparato en un espacio cerrado, como una librería, o un armario empotrado, a menos que se proporcione una ventilación
correcta.
• No coloque este aparato cerca o sobre un radiador o una rejilla de aire caliente, o en lugares expuestos a luz solar directa.
• No coloque recipientes con agua sobre este aparato(jarros, etc.), ya que podría representar riesgo de incendio o descarga eléctrica.
• No exponga este aparato a la lluvia ni lo coloque cerca de agua (cerca de una bañera, lavabo, fregadero o lavadero, en un sótano húmedo
ni cerca de una piscina o similar). Si este aparato accidentalmente se moja, desenchúfelo y póngase en contacto inmediatamente con un
autorizado. Antes de limpiar el producto desconecte el cable de alimentación de la toma de corriente.
• Este aparato utiliza baterías. En su comunidad puede que existan normativas que requieran la disposición de estas baterías de forma
adecuada bajo consideraciones ambientales.
Póngase en contacto con las autoridades locales para obtener información sobre desecho y reciclaje.
• No sobrecargue las tomas murales, los alargadores ni los receptáculos correspondientes por encima de su capacidad, ya que esto puede
generar incendios o descargas eléctricas.
•
Los cables de alimentación y protección deben colocarse de forma que no puedan pisarse ni quedar atrapados por objetos encima o contra ellos,
poniendo especial atención en los cables cerca del enchufe, los receptáculos de los electrodomésticos y el punto en el que salen del aparato.
•
Para proteger este aparato durante una tormenta eléctrica o cuando no lo utilice durante largos periodos de tiempo, desenchúfelo de la toma
de la pared y desconecte la antena o el cable del sistema. Esto evitará que el equipo se dañe por rayos o picos de tensión de la línea eléctrica.
• Antes de conectar el cable de alimentación de CA a la toma del adaptador de CC, asegúrese de que la designación del voltaje del
adaptador de CC corresponde a la fuente eléctrica local.
• Nunca inserte nada metálico en las aberturas del aparato. Hacerlo así puede crear peligros de descarga eléctrica.
• Para evitar descarga eléctrica, no toque nunca el interior de este aparato. Sólo un técnico cualificado debe abrir el alojamiento del aparato.
•
Cuando conecte el cable de alimentación compruebe que el enchufe esté firmemente insertado. Para desenchufar el cable de alimentación, sujételo
por el enchufe y tire de éste para sacarlo de la toma de corriente. Nunca toque el cable de alimentación con las manos mojadas.
• Si este aparato no funciona normalmente, en concreto, si emite sonidos extraños o desprende olores desde el interior, desenchúfelo
inmediatamente y póngase en contacto con el distribuidor autorizado o el centro de servicio técnico.
• Asegúrese de desconectar el enchufe de alimentación de la toma de corriente si la TV ha dejado de utilizarse, o desea salir de casa, durante
un largo período de tiempo (especialmente cuando sea necesario dejar solos en casa a niños, ancianos o personas incapacitadas).
- El polvo acumulado puede provocar una descarga eléctrica, un cortocircuito o un fuego, haciendo que el cable eléctrico genere chispas y
calor, o deteriorando la funda protectora.
• Póngase en contacto con un centro de servicio técnico autorizado cuando instale el aparato en un lugar expuesto a gran cantidad de polvo,
temperaturas extremas, alto nivel de humedad y productos químicos, y en lugares donde se vaya a utilizar las 24 del día, como
aeropuertos, estaciones, etc. El incumplimiento de estas indicaciones puede causar serios desperfectos en el aparato.
• Cuando instale el equipo, procure guardar una distancia de más de 10 cm desde la pared para facilitar la ventilación.
• Use sólamente conectores y receptáculos apropiados para hacer la conexión a tierra.
- Una conexión a tierra inapropiada podría causar una descarga eléctrica o una avería en el equipo. (Sólo equipo de Clase l.)
• Para desconectar el aparato de la corriente, debe desenchufar el cable de la toma principal, por lo que el enchufe principal debe estar
siempre fácilmente accesible.
• No permita que los niños jueguen con el producto.
• Guarde los accesorios (pilas, etc.) en un lugar seguro fuera del alcance de los niños.
• No coloque el producto en un lugar inestable, inclinado o expuesto a vibraciones.
• No lo deje caer ni le dé golpes. Si el producto se estropea, desenchufe el cable de alimentación y póngase en contacto con un
centro de servicio.
• Desconecte el cable de alimentación de la toma de corriente y seque el aparato con un paño suave y seco. No utilice ningún producto
químico como cera, benzol, alcohol, disolventes, insecticida, ambientador de aire, lubricante o detergente. Se puede dañar el aspecto o
borrar las estampaciones del producto.
• Evite que cualquier líquido salpique el aparato o gotee sobre él.
• No tire las pilas al fuego.
• No cortocircuite, desmonte ni sobrecaliente las pilas.
• Si la pila no se coloca correctamente se corre el riesgo de una explosión. Reemplace la pila sólo por una igual o de
especificaciones equivalentes.
• ADVERTENCIA - PARA IMPEDIR QUE EL FUEGO SE PROPAGUE, MANTENGA LAS VELAS U OTRAS
LLAMAS EXPUESTAS SIEMPRE ALEJADAS DE ESTE PRODUCTO.
PRECAUCIÓN
PRECAUCIÓN:PARA REDUCIR EL PELIGRO DE DESCARGA
ELÉCTRICA, NO RETIRE LA CUBIERTA. NO HAY PIEZAS EN EL
INTERIOR QUE PUEDA REPARAR EL USUARIO.
CONSULTE AL PERSONAL CUALIFICADO DE SERVICIO TÉCNICO.
PELIGRO DE DESCARGA ELÉCTRICA. NO ABRIR
Este símbolo indica la presencia de alto voltaje en
el interior. Es peligroso entrar en contacto con cual-
quier pieza interior de este producto.
Este símbolo le alerta de que con este producto se
incluye documentación importante correspondiente al
funcionamiento y mantenimiento.
Advertencia! Instrucciones importantes de seguridad
(Lea la sección apropiada que corresponde a la
marca del producto Samsung antes de intentar instalar el producto.)
[UF8000-ZL]BN68-04822A-04L02.indb 2 2013-05-20 �� 10:11:30

Español - 3
Contenido
Funciones básicas
6 Uso del Smart Touch Control
7 Colocación de las pilas (AAA X 2)
7 Conexión del Smart Touch con el televisor
8 Alarma de carga baja de las pilas
9 Uso del panel táctil
9 Cambio de los canales
ingresando sus números
10 Mostrar banner de estado y notificación
10 Historial
10 Búsqueda
10 Uso del control remoto virtual
11 Encender el televisor
11 Cámara de TV incorporada
12 Extender la cámara de TV
12 Retraer la cámara
13 Cambiar entre fuentes de video
14 Configuración del control remoto universal
14 Agregar el dispositivo externo
15 Visualizar el e-Manual.
15 Desplazamiento de una página
15 Uso de los iconos de la parte superior
16 Búsqueda de páginas
16 Cierre del e-Manual
16 Salto a un elemento del menú
16 Actualización del e-Manual
Configuración de la red
17 Conexión a una red
17 Conexión de red inalámbrica
17 Precauciones para redes inalámbricas
17 Protocolos de seguridad de red
18 Conexión de red cableada
Conceptos básicos del 3D
19 Anteojos 3D Activos
19 Conectar los anteojos 3D Activos
21 Ver un video en 3D
Solución de problemas y
otra información
22 ¿Qué es el soporte remoto?
23 Solución de problemas
24 Montar el televisor en la pared con el
kit de montaje de pared (Opcional)
26 Sensor Eco y brillo de la pantalla
26 Ranura de Kit Evolution (se
vende por separado)
27 Ensamblar el soporte sujeta cables
27 Ensamblar la cubierta de
entrada de la alimentación
28 Almacenamiento y mantenimiento
28 Ventilación adecuada del televisor
29 Prevención de la inclinación -
Fijación del televisor a la pared
Especificaciones
31 Especificaciones - TV
[UF8000-ZL]BN68-04822A-04L02.indb 3 2013-05-20 �� 10:11:30

Español - 4
Las figuras e ilustraciones de este Manual del usuario se ofrecen como referencia solamente y pueden
ser distintas del aspecto real del producto. El diseño y las especificaciones del producto están sujetos a
cambios sin previo aviso.
Antes de usar el equipo lea este manual para evitar fallas y guarde para futuras referencias.
Funciones de su nuevo televisor
• 3D: Esta nueva función permite ver contenido en 3D.
• SMART HUB:
Este televisor presenta Smart Hub, un centro de entretenimiento multi propósito. Con Smart Hub,
los usuarios pueden navegar por la web, descargar aplicaciones y mantenerse en contacto con
sus familiares y amigos a través de los servicios de redes sociales. Además, puede disfrutar de sus
archivos de imágenes, video y música almacenados en dispositivos externos.
Pulse el botón ™ para abrir Smart Hub. Seleccione un servicio utilizando los iconos que aparecen en la
parte superior de la pantalla.
Social: Vea los últimos videos de YouTube y las publicaciones de video suyas y de sus amigos en
Facebook y Twitter. También puede hacer llamadas de video a los amigos con la cámara TV.
Aplicaciones: Samsung Apps ofrece una completa colección de contenidos de pago y gratuitos de
noticias, deportes, pronóstico del tiempo y juegos que se puede descargar y ver directamente en el
televisor.
Fotos, videos y música: Reproduzca archivos de fotos, video y música desde un dispositivo de
almacenamiento externo.
• Anynet+ (HDMI-CEC): Le permite con trolar todos los dispositivos Samsung conectados compatibles
con Anynet+ mediante el control remoto de su televisor Samsung.
• e-Manual: Proporciona un detallado manual del usuario en pantalla incorporado a su televisor.
• Interacción SMART: Con esta función, puede acceder a y controlar las opciones y funciones del
menú usando movimientos. Para usar la función Smart Interaction, la cámara de televisión debe estar
conectada al televisor.
• Admin. de disp.: Use las funciones del televisor con un teclado y un mouse USB o Bluetooth.
• MHL y Screen Mirroring: Muestra pantallas de dispositivos móviles en el televisor mediante una
conexión con o sin cable.
Licencias
[UF8000-ZL]BN68-04822A-04L02.indb 4 2013-05-20 �� 10:11:31

Español - 5
Accesorios
✎
Asegúrese de que los siguientes elementos estén incluidos con su televisor. Si falta algún elemento,
comuníquese con su distribuidor.
✎
Los colores y las formas pueden variar según el modelo.
✎
Verifique que no haya ningún accesorio oculto en los materiales de embalaje cuando abra la caja.
• Smart Touch Control y pilas (AAA x 2)
• Tarjeta de garantía / Guía de información legal
• Manual del usuario / Guía de configuración rápida
• Cable de alimentación
• Anteojos 3D Activos Samsung
Adaptador de componentes Adaptador AV Soporte sujetacables Cubierta de entrada de la
alimentación
Adaptador del montaje de pared x 2 Kit de soporte del televisor Cable de extensión para
infrarrojos
Advertencia: Las pantallas se
pueden dañar si se ejerce presión
directa sobre ellas al manejarlas
incorrectamente. Recomendamos
levantar el televisor por los bordes
como se muestra en la imagen.
¡No toque
esta pantalla!
[UF8000-ZL]BN68-04822A-04L02.indb 5 2013-05-20 �� 10:11:32

Español - 6
Uso del Smart Touch Control
TV
MIC
STB
SOURCE
VOICE
MORE
VOL
CH
INFO
MENU 3D
SMART HUB
GUIDERETURN
EXIT
MUTE
HISTORY SEARCH
MUTECorta
el sonido
temporalmente.
TV
MIC
STB
SOURCE
VOICE
MORE
VOL
CH
INFO
MENU 3D
SMART HUB
GUIDERETURN
EXIT
MUTE
HISTORY SEARCH
Panel táctil
• Pase el dedo por el panel táctil para
mover el enfoque en la pantalla.
• Pulse el panel táctil para ejecutar,
activar o seleccionar el elemento
resaltado.
• Mantenga oprimido el panel táctil para
mostrar la Lista de canales.
VOICE Tome su comando de voz e ingrese
texto utilizando su voz.
Muestra un control remoto virtual en la
pantalla. Consulte el capítulo del e-Manual,
Control del televisor > Control remoto
virtual.
Cambia los canales.
Muestra la EPG (Guía electrónica de
programas).
Enciende o apaga el receptor de cable o
satélite conectado al televisor.
Para esto, el Smart Touch Control se debe
configurar como control remoto universal.
Consulte el capítulo del e-Manual, Control
del televisor > Configuración del control
remoto universal.
Enciende y apaga el televisor.
Muestra y selecciona las fuentes de video
disponibles.
Ajusta el volumen.
¥
: Active el modo Fútbol para una
experiencia óptima al ver deportes.
INFO: Muestra información en la pantalla
del televisor.
MENU: Abre la OSD.
3D: Enciende y apaga la imagen 3D.
Consulte el capítulo del e-Manual,
Visualización de televisión > TV 3D.
Muestra las aplicaciones del Smart
Hub. Consulte el capítulo del e-Manual,
Funciones del SMART TV > Smart Hub
✎
Para salir fácilmente de una función
que se está ejecutando, pulse el
botón
™
.
Puede utilizar el micrófono para enviar
comandos con el Reconocimiento de voz.
Simplemente pulse el botón VOICE .
✎
La función Reconocimiento de voz
puede resultar afectada por una
pronunciación poco clara, el nivel de
la voz y el ruido ambiental.
Vuelve al menú anterior.
Funciones básicas
[UF8000-ZL]BN68-04822A-04L02.indb 6 2013-05-20 �� 10:11:32

Español - 7
Colocación de las pilas (AAA X 2)
1. Levante ligeramente la tapa de las pilas usando una tarjeta de plástico. Luego, con la uña tire de la
muesca para retirar la tapa completamente.
✎
Verifique la ubicación de la ranura de la tapa de la batería. La ubicación de la ranura puede variar
dependiendo del tipo de Smart Touch Control provisto con el producto
2. Inserte 2 baterías AAA asegurándose de alinear los extremos positivo y negativo correctamente.
3. Alinee la tapa de las pilas con la parte posterior del control remoto y presione los bordes hasta que
esté bien fi jada al control remoto.
Conexión del Smart Touch con el televisor
Antes de conectar el Smart Touch con el televisor, inserte 2 pilas AAA en el Smart Touch. Para controlar el
televisor con la Smart Touch Control, primero debe conectarla al televisor a través de Bluetooth.
1. Para encender el televisor, apunte el Smart Touch Control hacia el receptor del control remoto del
televisor y pulse el botón TV. La posición del receptor del control remoto puede variar según el modelo.
2. Aparecerá un icono Bluetooth en la parte inferior izquierda de la pantalla, tal como se indica a
continuación. El televisor intentará conectarse automáticamente a la unidad Smart Touch Control.
<Iconos de intento y terminación de la conexión>
3. Cuando se establece la conexión, el televisor muestra un pequeño círculo verde entre las imágenes
que representan el televisor y el Smart Touch. Si el Smart Touch no se conecta, utilice la punta de un
bolígrafo para pulsar y soltar el botón de conexión de la parte posterior del Smart Touch.
✎
La primera vez que encienda el televisor se iniciará inmediatamente la configuración inicial.
[UF8000-ZL]BN68-04822A-04L02.indb 7 2013-05-20 �� 10:11:32

Español - 8
Reconexión del Smart Touch Control
Si necesita restablecer la conexión entre el televisor y el Smart Touch Control, pulse el botón del proceso
de conexión de la parte posterior del Smart Touch Control.
<Botón del proceso de conexión del Smart Touch Control>
Al botón del proceso de conexión se puede acceder retirando la tapa de las pilas dela de control.
Pulsando el botón del proceso de conexión se restablece automáticamente la conexión entre la de control
y el televisor.
Alarma de carga baja de las pilas
Cuando la carga de las pilas del Smart Touch Control es baja, el indicador que se muestra abajo (en la
ilustración) aparece en el ángulo inferior izquierdo de la pantalla del televisor. Si aparece la ventana de
alarma, cambie las pilas del Smart Touch Control. Use pilas alcalinas para un uso más prolongado.
<Ventana de alarma de batería baja>
[UF8000-ZL]BN68-04822A-04L02.indb 8 2013-05-20 �� 10:11:33

Español - 9
Uso del panel táctil
Utilice el panel táctil para llevar a cabo diversos comandos. Navegue hasta Tutorial (Sistema > Admin.
de disp. > Configuración de Smart Touch Control > Tutorial) para ver una guía en pantalla para usar el
Smart Touch Control.
Arrastrar Al presionar el
HISTORY SEARCH
HISTORY SEARCH
ORY SEARC
ORY SEARC
HISTORY SEARCH
HISTORY SEARCH
RY
Y SEARCH
HISTORY SEARCH
HISTORY SEARCH
ORY SEARC
ORY SEARC
HISTORY SEARCH
HISTORY SEARCH
RY
Y SEARCH
Arrastre el dedo sobre el panel táctil en la dirección deseada.
Mueva el enfoque o el puntero en la dirección en la que se arrastra el
dedo.
Mantenga pulsado el panel táctil mientras mira televisión para que se
muestre la Lista de canales en la pantalla. Además, puede mantener
pulsado el panel táctil por 2 segundos o más mientras se ejecuta una
aplicación para acceder a sus funciones ocultas. (No disponible con
todas las aplicaciones.)
Cambio de los canales ingresando sus números
Mientras mira televisión, toque la línea resaltada del borde izquierdo
o derecho del panel táctil para acceder a la ventana de ingreso de
números de la pantalla. Utilice el dedo para ingresar el número del canal
que desee ver. El número reconocido se muestra en la pantalla y el
televisor cambia al canal correspondiente. Sin embargo, es posible que
el televisor no reconozca correctamente el número ingresado. Consulte
la siguiente guía para asegurar que los ingresos de los números se
reconozcan con precisión.
Guía de ingreso de números
Consulte el siguiente diagrama cuando ingrese valores numéricos. El televisor puede que no reconozca los
números ingresados si no sigue las siguientes secuencias.
[UF8000-ZL]BN68-04822A-04L02.indb 9 2013-05-20 �� 10:11:33

Español - 10
Mostrar banner de estado y notificación
Pulse el botón MORE del Smart Touch Control y, luego, seleccione STATUS en el panel de control virtual
que aparece en la pantalla. El banner de notificación y estado se muestra en la parte superior de la
pantalla. Para obtener más información sobre cómo usar el banner de estado y alarma, consulte e-Manual
> Funciones del SMART TV > Estado y Notificaciones.
Historial
Pulse el boton HISTORY/SEARCH. Se muestra una lista interactiva de canales, contenido multimedia y
aplicaciones vistos recientemente.
Eliminación de los datos del historial
Puede eliminar el historial de información sobre canales, contenidos y aplicaciones vistos recientemente.
Búsqueda
Pulse el botón HISTORY/SEARCH. La lista aparece en la parte inferior de la pantalla. Pulse el botón
HISTORY/SEARCH nuevamente. Ingrese los criterios de búsqueda para buscar no solamente muchas
aplicaciones y sus contenidos en el televisor, sino también en la Web.
Consulte e-Manual > Funciones del SMART TV > Búsqueda para obtener más información.
Uso del control remoto virtual
Pulse el botón MORE para visualizar el control remoto virtual en la pantalla. El control remoto virtual se
compone de un panel numérico, un panel de control de reproducción y un panel de acceso rápido. Use el
panel táctil para seleccionar números y botones.
Cambiar el panel del control remoto virtual
Puede cambiar el panel remoto virtual que se muestra en la pantalla del televisor. Para intercambiar
paneles, mueva el enfoque resaltado más allá del borde izquierdo o derecho de panel que se muestra.
Cambio de una posición del panel remoto virtual
Pulse el botón MORE en el Smart Touch Control. El panel remoto virtual aparece en la pantalla. Mantenga
pulsado el panel táctil durante un segundo. Los usuarios pueden cambiar la posición del panel remoto
virtual en la pantalla.
Uso del panel numérico
Utilice el panel numérico para ingresar números en una pantalla de teclado o página web o para cambiar
el canal mientras mira televisión. Cambiar el canal con el panel numérico deja un registro que le permite
volver rápidamente a los canales anteriores.
Uso del panel de control de reproducción
Utilice el panel de control de reproducción para pausar, rebobinar, adelantar en forma rápida o pasar al
archivo siguiente, seleccionar una función con los botones a, b, {, } y muchas cosas más mientras
disfruta del contenido multimedia.
Uso del panel de acceso directo
Use los botones en el panel de acceso rápido para que aparezca la pantalla TOOLS, INFO del televisor o
las pantallas del e-Manual. Tenga en cuenta que los botones que se muestran pueden variar dependiendo
del modo de operación de la Smart Touch Control (sólo con el televisor, como control remoto universal,
etc.).
[UF8000-ZL]BN68-04822A-04L02.indb 10 2013-05-20 �� 10:11:33

Español - 11
Encender el televisor
Encienda el televisor con el botón P del control remoto o panel del televisor.
✎
La primera vez que encienda el televisor se iniciará inmediatamente la configuración inicial.
✎
El color y la forma del producto pueden variar según el modelo.
✎
El controlador del televisor, un botón similar a un pequeño joystick ubicado en la parte trasera
derecha del televisor, le permite controlar el televisor sin utilizar el control remoto.
mR
P
TV
Menú de funciones
Controlador del televisor
La imagen se muestra vista desde
el lateral frontal del televisor.
Cámara
Sensor de control remoto
Cuando usa el Smart Touch Control,
no funciona el LED del modo suspensión
(excepto el botón
P
).
Cámara de TV incorporada
Este televisor presenta una cámara incorporada que puede usarse para las funciones Control de
movimiento, Reconocimiento de voz (micrófono incorporado) y Reconocimiento facial. También puede usar
la perilla para el ajuste del ángulo de la cámara para cambiar el ángulo de visualización de la cámara.
Desde la parte superior Desde la parte posterior
Micrófono
Lente
Perilla para el ajuste del ángulo de la cámara
Micrófono
[UF8000-ZL]BN68-04822A-04L02.indb 11 2013-05-20 �� 10:11:34

Español - 12
No toque la lente mientras opera la cámara de TV. Dejará
huellas digitales que pueden afectar la calidad de la
imagen.
Si la lente se ensucia, límpiela con un paño suave.
Procure que ni el polvo ni la suciedad obturen el
micrófono. Si se obtura, no se reconocerán los comandos
de voz. Use un paño suave para limpiar el micrófono.
Extender la cámara de TV
Para usar la cámara de televisión, primero debe extenderla.
Empuje suavemente la cámara sin tocar la lente hasta escuchar un clic.
Retraer la cámara
Si no está utilizando la cámara de televisión, manténgala retraída dentro del televisor. Las funciones de
control de movimiento y reconocimiento facial no pueden utilizarse con la cámara de televisión retraída,
pero el reconocimiento de voz se encuentra disponible.
Empuje suavemente la cámara sin tocar la lente hasta escuchar un clic.
[UF8000-ZL]BN68-04822A-04L02.indb 12 2013-05-20 �� 10:11:35

Español - 13
Cambiar entre fuentes de video
Presione el botón SOURCE para alternar entre los dispositivos conectados al televisor.
Por ejemplo, para cambiar a una consola de juego conectada al segundo conector HDMI, pulse el botón
SOURCE. Desde la lista Origen, seleccione HDMI2. Los nombres de los conectores pueden variar
dependiendo del producto.
Seleccione el botón Herram. desde la pantalla Origen para acceder a las siguientes opciones:
• Editar Nombre: Es posible renombrar los dispositivos conectados al televisor para identificar más
fácilmente las fuentes externas.
Con una computadora conectada al puerto HDMI (DVI) del televisor por medio de un cable HDMI, por
ejemplo, es posible cambiar Editar Nombre a PC.
Con una computadora conectada al puerto HDMI (DVI) del televisor por medio de un cable HDMI a
DVI, por ejemplo, es posible cambiar Editar Nombre a DVI PC.
Con un dispositivo AV conectado al puerto HDMI (DVI) del televisor por medio de un cable HDMI a DVI,
por ejemplo, es posible cambiar Editar Nombre a Dispositivos DVI.
• Información: Visualice información detallada acerca de los dispositivos conectados.
• Actualizar: Seleccione esto si un dispositivo conectado no aparece en la lista. Si la lista no muestra el
dispositivo tras seleccionar Actualizar, verifique el estado de la conexión del televisor al dispositivo.
• Eliminar USB: Retire el dispositivo USB de la lista de forma segura. Esta función sólo está disponible
cuando el dispositivo USB está seleccionado.
• Conf. control remoto uni.: Utilice esto para configurar el control remoto universal. Usando el control
remoto universal, los usuarios pueden controlar dispositivos externos conectados al televisor, tales
como un receptor, reproductor de Blu-ray y un receptor AV.
[UF8000-ZL]BN68-04822A-04L02.indb 13 2013-05-20 �� 10:11:36

Español - 14
Configuración del control remoto universal
Este televisor tiene una función de control remoto universal que permite controlar receptores de cable,
reproductores Blu-ray, sistemas Home Theater y dispositivos externos de terceros conectados al televisor
utilizando el control remoto del televisor.
✎
Algunos modelos o los nuevos modelos del dispositivo externo conectado al televisor pueden no ser
compatibles con la configuración del control remoto universal.
Mantenga una distancia mínima de 5 cm entre el CABLE DE EXTENSIÓN PARA INFRARROJOS y el
dispositivo externo, tal como se muestra en la ilustración. Dirija el CABLE DE EXTENSIÓN PARA INFRAR
ROJOS hacia el receptor de señal del control remoto del dispositivo externo. Tenga en cuenta que no debe
haber ningún obstáculo entre el CABLE DE EXTENSIÓN PARA INFRARROJOS y el dispositivo externo. La
presencia de un obstáculo interferirá la transmisión de la señal del control remoto.
Agregar el dispositivo externo
1. Encienda el dispositivo externo para el que desee configurar la función del control remoto universal y
luego pulse SOURCE para que aparezca la pantalla Origen.
2. Seleccione Conf. control remoto uni. en la parte superior de la pantalla. Esto inicia el proceso de
configuración del control remoto universal.
3. Siga las instrucciones en pantalla y configure el control remoto universal utilizando el conjunto de
códigos recomendado. Si el conjunto de códigos recomendado no funciona, configure el control
remoto ingresando el número de modelo manualmente.
[UF8000-ZL]BN68-04822A-04L02.indb 14 2013-05-20 �� 10:11:36

Español - 15
Visualizar el e-Manual.
El e-Manual incorporado contiene información sobre las funciones clave de su televisor. Para leerla, use
uno de los siguientes métodos:
• Abra el menú Soporte técnico y seleccione e-Manual (solución de problemas).
• Pulse el botón MORE del Smart Touch Control para visualizar los botones del control en la pantalla.
Desplace el panel táctil hasta que aparezca la opción e-Manual y selecciónela.
✎
El texto en celeste se refiere a las opciones del menú en pantalla y las palabras en azul se refieren a
los botones del control remoto.
✎
También hay una versión para imprimir de esta guía disponible en www.samsung.com/support.
Desplazamiento de una página
Para desplazar una página use uno de los siguientes métodos:
• Pulse el botón
o en la barra de desplazamiento del borde derecho de la pantalla.
• Arrastre o desplace hacia arriba o abajo desde uno de los bordes del panel táctil.
• Coloque el enfoque en
o en el borde derecho de la pantalla, arrastre o desplace hacia arriba o
abajo por el panel táctil.
Uso de los iconos de la parte superior
Use los iconos Volver, Adelante y Página abierta de la parte superior izquierda de la pantalla para
navegar por las páginas. Estos iconos están disponibles cuando se pasan dos o más páginas.
Regreso a la página de inicio
Para regresar a la página de inicio, seleccione el botón a o seleccione en la parte superior derecha de
la pantalla.
✎
Para seleccionar un botón de letra (a, b, {, }), pulse el botón MORE en el Smart Touch Control
para mostrar un panel del control remoto virtual. Desplace el panel táctil hasta que aparezca el panel
de control de reproducción, seleccione un botón de letra y luego pulse el panel táctil.
[UF8000-ZL]BN68-04822A-04L02.indb 15 2013-05-20 �� 10:11:36

Español - 16
Búsqueda en el Índice
Seleccione el botón b o seleccione en la parte superior derecha de la pantalla para visualizar el índice.
Seleccione un término para visualizar la página que lo contenga.
Búsqueda de páginas
Seleccione el botón { o seleccione en la parte superior derecha de la pantalla e ingrese los criterios de
búsqueda. Seleccione una página de la lista de resultados de búsqueda para visualizarla.
Cierre del e-Manual
Para cerrar el e-Manual, mantenga presionado el botón RETURN o seleccione en el ángulo superior
derecho de la pantalla.
Salto a un elemento del menú
Para saltar directamente al elemento del menú que se describe en la sección actual, seleccione .
Es posible saltar directamente desde un elemento del menú a la sección relacionada del e-Manual. En una
pantalla de menú, pulse el botón MORE del Smart Touch Control y luego seleccione e-Manual en el panel
de control virtual que aparece en la pantalla.
✎
Es posible que esta función no se admita, dependiendo del menú.
Actualización del e-Manual
Pulse el botón ™, seleccione Aplicaciones y, luego, seleccione Más aplicac.. El e-Manual se puede
actualizar de la misma manera que una aplicación.
En la pantalla Más aplicac., seleccione Actual. aplic.y luego seleccione el e-Manual desde la lista. Se
inicia la actualización del e-Manual a la última versión. Sin embargo, Actual. aplic. solo aparecerá en la
pantalla cuando se deba realizar una actualización.
[UF8000-ZL]BN68-04822A-04L02.indb 16 2013-05-20 �� 10:11:37

Español - 17
Configuración de la red
Conexión a una red
Conectar el televisor a una red le da acceso a servicios en línea tales como Smart Hub, así como
actualizaciones de software.
Conexión de red inalámbrica
Conecte el televisor a Internet utilizando un enrutador o módem estándar.
Enrutador IP inalámbrico o
Módem que tiene un servidor
DHCP
Cable LAN (no suministrado)
Puerto LAN en la pared
Precauciones para redes inalámbricas
• Este Smart TV admite los protocolos de comunicación IEEE 802.11a/b/g/n. Samsung recomienda el
uso de IEEE 802.11n. Si reproduce un video a través de una conexión de red, es posible que el vídeo
no se reproduzca correctamente.
• Para usar una red inalámbrica, el televisor debe estar conectado a un enrutador o módem inalámbrico.
Si el enrutador inalámbrico admite DHCP, el televisor puede usar una dirección IP estática o DHCP
para conectarse a la red inalámbrica.
• Seleccione un canal que no se utilice actualmente para el enrutador inalámbrico. Si el canal establecido
para el enrutador inalámbrico actualmente está siendo utilizado por otro dispositivo, se suelen producir
interferencias y/o fallas de comunicación.
• La mayoría de las redes inalámbricas cuentan con un sistema de seguridad opcional. Para activar
el sistema de seguridad de la red inalámbrica, debe crear una clave de seguridad usando letras y
números. Esta clave de seguridad será necesaria para conectarse a la red inalámbrica.
Protocolos de seguridad de red
El televisor sólo soporta los siguientes protocolos de seguridad inalámbrica y no es posible una conexión
con enrutadores inalámbricos no certificados:
• Modos de autenticación: WEP, WPAPSK, WPA2PSK
• Tipos de cifrado: WEP, TKIP, AES
Si el enrutador se configura en el modo 802.11n (Greenfield) "Pure High-throughput" y se configura el tipo
de codificación como WEP o TKIP, el televisor Samsung Smart TV no admitirá una conexión de acuerdo
con las nuevas especificaciones de la certificación Wi-Fi.
Si el enrutador inalámbrico admite WPS (configuración protegida de Wi-Fi), es posible conectarse a la red
a través de PBC (configuración del botón) o un PIN (número de identificación personal). WPS configurara
automáticamente la tecla SSID y WPA.
[UF8000-ZL]BN68-04822A-04L02.indb 17 2013-05-20 �� 10:11:37

Español - 18
Conexión de red cableada
Existen tres formas principales para conectar el televisor a la red utilizando un cable, dependiendo de su
configuración de red. Estos se ilustran a continuación:
Puerto de módem en la pared
Cable del módem (no suministrado) Cable LAN (no suministrado)
Panel posterior del TV
Módem externo
(ADSL / VDSL / TV por cable)
Panel posterior del TV
Puerto de módem en la pared
Cable del módem
(no suministrado)
Cable LAN
(no suministrado)
Cable LAN
(no suministrado)
Módem externo
(ADSL / VDSL / TV por cable)
Enrutador IP que tiene un
servidor DHCP
Panel posterior del TV
Puerto LAN en la pared
Cable LAN (no suministrado)
✎
El televisor no admite velocidades de red inferiores o iguales a 10 Mbps.
✎
Use un cable Cat 7 para la conexión.
[UF8000-ZL]BN68-04822A-04L02.indb 18 2013-05-20 �� 10:11:38

Español - 19
Conceptos básicos del 3D
Anteojos 3D Activos
Características
Los anteojos 3D SSG-5100GB de Samsung le permiten ver imágenes en 3D en su televisor 3D. Los
anteojos 3D de Samsung se comunican con los televisores 3D de Samsung a través de la banda 2.4 GHz
RF.
✎
Los anteojos 3D de Samsung son compatibles únicamente con los televisores 3D Samsung Series D,
E y F lanzados entre 2011, 2012 y 2013. Estos anteojos 3D no pueden conectarse a otros dispositivos
Bluetooth.
Piezas
Indicador LED & Botón de encendido
Obturador de cristal líquido
Tapa de las pilas
✎
Para obtener detalles sobre cómo colocar
las patillas y cómo conectar los anteojos al
televisor, consulte el manual separado de los
anteojos 3D.
Reemplazar la pila
Si el LED rojo titila constantemente cada dos segundos, reemplace la pila por una nueva.
✎
Inserte el lado marcado "+" de la pila en el lado marcado "+" del compartimiento de la pila.
✎
Para verificar la carga restante de los pilas, consulte la sección de conexión de este manual.
Tire de la tapa de la pila
hacia abajo
Abra la tapa de la pila Extraiga la pila Reemplace la pila Empuje la tapa de la pila
hacia abajo
Cierre la tapa de la pila
Conectar los anteojos 3D Activos
✎
¿Qué es el proceso de conexión? La conexión es el proceso de mediante el cual se conectan los
anteojos 3D y un televisor 3D de manera que los dos dispositivos puedan intercambiar datos.
✎
Verifique que durante el proceso de conexión la distancia entre el televisor Samsung y los anteojos
3D no sea superior a 19.5 pulg. (50 cm).
[UF8000-ZL]BN68-04822A-04L02.indb 19 2013-05-20 �� 10:11:38

Español - 20
• Encender los anteojos
Pulse el botón de encendido brevemente. El LED verde se enciende
durante 3 segundos. (Asegúrese de que la opción 3D del televisor esté
activada antes de usar los anteojos 3D.)
• Apagar los anteojos
Pulse el botón de encendido brevemente. El LED rojo se enciende
durante 3 segundos.
• Realización del proceso de conexión
Encienda el televisor y espere hasta que esté completamente encendido.
Mantenga oprimido el botón de encendido de los anteojos. Las LED
verde y rojo titilan alternativamente durante 2 segundos.
• Rango de funcionamiento
2~6m
50cm
Distancia recomendada para el proceso de conexión
Distancia de visualización recomendada
Distancia de visualización recomendada Distancia recomendada para el proceso de conexión
2~6 m (6.5 a 19.5 pies) 50 cm o menos (19.5 pulg.)
✎
Luego de conectar los anteojos 3D, en la pantalla del televisor se muestra la carga restante de la pila.
(Esta función sólo se aplica a los modelos de televisores 3D de Samsung de la serie F y a los anteojos
3D disponibles a partir de 2013.)
✎
Si sigue intentando efectuar el proceso de conexión de los anteojos con el televisor, el nivel de la
pila se reducirá significativamente. No obstante, se recuperará hasta un cierto grado después de un
minuto.
✎
La distancia de funcionamiento depende de la existencia de obstáculos (personas, objetos metálicos,
paredes, etc.) entre los anteojos y el televisor o de la intensidad de la señal Bluetooth.
✎
Apague los anteojos 3D cuando no estén en uso. Si deja los anteojos 3D encendidos, se acorta la
vida útil de las baterías.
Pasos para la conexión
1. Encienda el televisor y luego acerque los anteojos a 19.5 pulgadas del televisor.
2. Presione brevemente el botón de conexión de los anteojos 3D. Los anteojos 3D se activan y se inicia el
proceso de conexión.
3. Una vez completado con éxito el proceso de conexión, se muestra el mensaje “3D glasses are
connected to TV.” (“Anteojos 3D conectados al televisor”) en la pantalla del televisor.
• Si el proceso de conexión da error, los anteojos 3D se apagan.
• Si hay una falla en el primer intento de conexión, apague el televisor, enciéndalo nuevamente y
realice el paso 2.
• Cómo realizar nuevamente el proceso de conexión: Presione el botón de encendido de los anteojos
3D durante más de 1 segundo.
[UF8000-ZL]BN68-04822A-04L02.indb 20 2013-05-20 �� 10:11:38

Español - 21
La conexión es necesaria en las siguientes situaciones:
− Si los anteojos 3D no funcionan, incluso cuando se presiona el botón de encendido, en especial
con un televisor 3D después de una reparación.
− Si desea reproducir contenido 3D en otro modelo de televisor 3D de Samsung de las series D, E o
F lanzados entre 2011 y 2013, debe conectar los anteojos con el otro televisor.
Ver un video en 3D
Algunos modos 3D pueden no estar disponibles según el formato de la fuente de imagen.
Para mirar en 3D, debe usar los Anteojos 3D Activos y encender los anteojos pulsando el botón de
encendido.
1. Vaya a la pantalla 3D. (Imagen > 3D)
2. Seleccione el modo 3D. Aparece la pantalla del modo 3D.
3. Configure el modo 3D de la imagen que desea ver.
Solución de problemas
Problema Pruebe...
Mis anteojos 3D no
funcionan.
Reemplace la pila.
Los anteojos 3D deben estar cerca del televisor. Asegúrese de que la
distancia entre el televisor y sus anteojos 3D sea inferior a los 6 metros
(19.5 pies) en línea recta.
Verifique la configuración de la función 3D del televisor.
La LED sigue titilando La pila está descargada. Reemplace la pila.
Especificaciones (N.º de modelo: SSG-5100GB)
Óptica
Obturadores Cristal líquido Transmitancia 36±2%
Distancia de
funcionamiento
recomendada
2 ~ 6 m (6.5 a 19.5
pies)
Frecuencia de
campos
120 campos/segundo
Peso Anteojos 21.5 g/.76 oz. (incluyendo la pila: 24.0 ± 0.5 g/.85 ± .018 oz. )
Alimentación Anteojos Una pila de dióxido de litio/manganeso de 3V(CR2025)
Consumo de
energía
Anteojos 0.85mA (Promedio)
Pilas
Tipo 165mAh, 3.0V (CR2025)
Tiempo de
funcionamiento
150 Horas
Condiciones de
funcionamiento
Temperatura de
funcionamiento
50 °F ~ 104 °F (10°C ~ 40°C)
Temperatura de
almacenamiento
-4 °F ~ 113 °F (-20°C ~ 45°C)
✎
Las especificaciones del producto están sujetas a cambios sin previo aviso a fin de mejorar el
desempeño de dicho producto.
✎
El tiempo de funcionamiento continuo puede diferir dependiendo del amiente de comunicación
inalámbrico y las condiciones de uso.
[UF8000-ZL]BN68-04822A-04L02.indb 21 2013-05-20 �� 10:11:38

Español - 22
¿Qué es el soporte remoto?
El servicio de soporte remoto de Samsung le ofrece soporte personalizado con un técnico de Samsung
que de manera remota puede:
• Diagnosticar su televisor
• Ajustar la configuración de su televisor
• Restablecer los parámetros de fábrica de su televisor
• Instalar las actualizaciones de firmware recomendadas
¿Cómo funciona?
Obtener la asistencia remota de un técnico de Samsung es muy simple
1. Comuníquese
con el Centro
de contacto de
Samsung y solicite
soporte remoto.
2. Abra el menú de
su televisor y vaya
a la sección de
soporte.
3. Seleccione
Administración
remota e Indique
el No. de pin al
agente.
4. El agente accederá
a su televisor.
¡Listo!
Solución de problemas y otra información
[UF8000-ZL]BN68-04822A-04L02.indb 22 2013-05-20 �� 10:11:38

Español - 23
Solución de problemas
Si cree que el televisor tiene un problema, compruebe primero esta lista de posibles problemas y
soluciones. También analice la sección Solución de problemas en el e-Manual. Si no se aplica ninguna de
las sugerencias para la solución de problemas, visite www.samsung.com/support o llame al Servicio al
Cliente de Samsung.
Problemas Soluciones y explicaciones
Parpadeo y atenuación Si su televisor Samsung parpadea o se atenúa esporádicamente, quizá deba desactivar algunas de sus
características de eficiencia energética.
Desactive Ahorro de energía (Sistema > Solución Eco > Sensor Eco) y/o Ahorro de energía (Sistema
> Solución Eco > Ahorro de energía) y vuelva a verificar.
Conexiones de componentes /Color de
pantalla
Si descubre que el color de la pantalla de su televisor Samsung no es correcto o se ve sólo en blanco y
negro, ejecute Autodiagnóstico (Soporte técnico > Autodiagnóstico > Prueba de imagen).
Si los resultados de la prueba son negativos, compruebe lo siguiente: ¿Los conectores de entrada de
video del televisor están conectados a la salida de video correcta del dispositivo externo?
Verifique también el resto de las conexiones. Si el televisor está conectado a un dispositivo externo
mediante un cable de componentes, compruebe que las entradas Pb, Pr e Y estén enchufadas a los
conectores correspondientes.
Brillo de la pantalla Si descubre que los colores de su televisor Samsung son correctos pero están apenas un poco oscuros
o brillosos, intente ajustar los siguientes parámetros primero.
Navegue hasta Imagen y ajuste Luz de fondo, Contraste, Brillo, Definición, Color, Tinte (V/R) y otros
ajustes de la calidad de la imagen.
Auto Motion Plus/Borroso Si detecta que las imágenes de su televisor tienen un aspecto borroso o “fantasmagórico” puede
corregirlo usando Auto Motion Plus (Imagen > Opciones de imagen > Auto Motion Plus).
Apagado no deseado Si su televisor Samsung parece apagarse solo, intente deshabilitar algunas de las características de
eficiencia energética. Verifique si Temporizador (Sistema > Tiempo > Temporizador) está activado.
El Temporizador apaga automáticamente el televisor para ahorrar energía después de un periodo de
inactividad especificado. Si no está activado el temporizador, verifique si está activado Apagado por no
señal (Sistema > Solución Eco > Apagado por no señal) o Apagado autom. (Sistema > Solución
Eco > Apagado autom.).
Problemas de encendido Al encender el televisor, el receptor del control remoto parpadea 5 veces antes de que se
encienda la pantalla.
Si está teniendo problemas para encender su televisor Samsung, hay varias cosas para verificar antes de
llamar al departamento de servicio.
Si el cable de alimentación está conectado de manera correcta y el control remoto funciona normalmente,
el problema puede estar en la conexión del cable de la antena o en el receptor de cable/satélite que no
está encendido. Verifique la conexión de la antena o encienda el receptor de cable/satélite.
Montaje del soporte Si tiene problemas en el armado del soporte primero, revise la Guía de inicio rápido.
No se encuentra un canal Realice nuevamente la Configuración (Vaya al Menú > Sistema > Configuración) o realice la Ajuste
automático. (Vaya a Menú > Emisión > Ajuste automático.
[UF8000-ZL]BN68-04822A-04L02.indb 23 2013-05-20 �� 10:11:38

Español - 24
Problemas Soluciones y explicaciones
El televisor no se enciende. • Verifique que el cable de alimentación CA esté bien conectado en la toma de pared y en el televisor.
• Asegúrese de que la toma de pared funcione.
• Pruebe pulsar el botón
P
del televisor para asegurarse de que el problema no esté en el
control remoto. Si el televisor se enciende, consulte la sección "El control remoto no funciona" a
continuación.
No hay imagen ni video. • Compruebe las conexiones de los cables. Desconecte y vuelva a conectar todos los cables del
televisor y de los dispositivos externos.
• Establezca la salida de video del dispositivo externo (receptor de cable/satélite, DVD, Blu-ray, etc.)
de modo que coincida con las conexiones de la entrada del televisor. Por ejemplo, si la salida de un
dispositivo externo es HDMI, se debe conectar a una entrada HDMI en el televisor.
• Verifique que los dispositivos externos estén encendidos.
• Asegúrese de seleccionar la fuente de entrada correcta.
• Reinicie el dispositivo conectado desconectando y conectando nuevamente el cable de alimentación
del dispositivo.
El control remoto no funciona. • Cambie las pilas del control remoto. Asegúrese de que las pilas estén instaladas con sus polos (+/-)
en la dirección correcta.
• Limpie la ventana de transmisión del sensor en el control remoto.
• Pruebe apuntar el control remoto directamente a la TV con una distancia de 150~180cm metros.
El control remoto del receptor de cable/
satélite no enciende ni apaga el televisor,
ni ajusta el volumen.
• Programe el control remoto del receptor de cable/satélite para que haga funcionar el televisor.
Consulte el manual del usuario del receptor de cable/satélite para conocer el código del televisor
SAMSUNG.
✎
Este panel LED TFT utiliza un panel compuesto de subpíxeles que requieren una tecnología
sofisticada para producirse. No obstante, es posible que existan algunos píxeles brillantes u oscuros
en la pantalla. Estos píxeles no influirán en el rendimiento del producto.
✎
Para mantener su televisor en óptimas condiciones, actualice el último firmware en el sitio Web de
Samsung por USB (Samsung.com > Soporte técnico > Descargas).
Montar el televisor en la pared con el kit de montaje
de pared (Opcional)
Montaje en pared o techo
Si monta este producto en una pared, debe hacerlo únicamente según las
recomendaciones del fabricante. A menos que se instale correctamente, el producto
puede deslizarse o caerse, y provocar lesiones graves a niños o adultos, y daños
importantes en el producto.
Instalación del kit de montaje de pared
El kit de montaje de pared (se vende por separado) le permite instalar el televisor en una pared.
Si desea más información sobre la instalación del montaje de pared, consulte las instrucciones que se
facilitan con dichos elementos. Le sugerimos que se ponga en contacto con un técnico para obtener
asistencia al instalar el soporte de pared. No recomendamos que lo haga usted mismo. Samsung
Electronics no se hace responsable de los daños causados al producto o al usuario si éste ha optado por
instalar el montaje de pared por su cuenta.
[UF8000-ZL]BN68-04822A-04L02.indb 24 2013-05-20 �� 10:11:39

Español - 25
Instalación del montaje de pared con el adaptador
✎
Para obtener información más detallada, consulte el
Manual del Usuario del Kit para montaje de pared
cuando realice la compra.
Especificaciones y notas del kit de montaje de pared VESA
✎
Instale el montaje de pared en una pared sólida, perpendicular al suelo. Antes de conectar el montaje
de pared a superficies distintas de una placa de yeso, comuníquese con su distribuidor más cercano
para obtener información adicional. Si instala el televisor en el techo o en una pared inclinada, puede
caerse y causar graves lesiones personales.
✎
NOTA
• Las dimensiones estándar de los kits de montaje de pared se muestran en la tabla que sigue.
• El kit de montaje de pared Samsung, también se distribuye un manual de instalación detallado y
todas las piezas necesarias para el montaje.
• No use tornillos que no cumplan las especificaciones de tornillos estándar VESA.
• No use tornillos con una longitud superior a la longitud estándar o que no cumplan con
especificaciones de tornillos estándar VESA. Los tornillos que sean demasiado largos pueden
causar daños en el interior del televisor.
• Para montajes de pared que no cumplen las especificaciones de tornillos estándar VESA, la
longitud de éstos puede variar dependiendo de las especificaciones del montaje de pared.
• No apriete excesivamente los tornillos, ya que podría dañar el producto o provocar su caída
con riesgo de causar lesiones personales. Samsung no se hace responsable de este tipo de
accidentes.
• Samsung no se hace responsable de daños o lesiones personales cuando se usa un montaje
de pared que no cumple las especificaciones VESA o si el cliente no sigue las instrucciones de
instalación del producto.
• No monte el televisor con una inclinación de más de 15 grados.
• Siempre son necesarias dos personas para montar el televisor en la pared.
Familia de producto Modelo
Especificaciones VESA (A
* B) en milímetros
Tornillo estándar Cantidad
TV LED
[Tipo delgado]
UN46F8000 200 X 200
M8 4
UN55F8000
UN65F8000
400 X 400
No instale el equipo de montaje de pared mientras el televisor está encendido. Se
podría producir una descarga eléctrica con riesgo de causar lesiones personales.
[UF8000-ZL]BN68-04822A-04L02.indb 25 2013-05-20 �� 10:11:39

Español - 26
Sensor Eco y brillo de la pantalla
El sensor Eco mide el nivel de luz de la habitación y optimiza automáticamente el nivel de brillo del
televisor para reducir el consumo de energía. Hace que el nivel de brillo del televisor aumente y diminuya
automáticamente. Si desea desactivar esta función, vaya a Menú > Sistema > Solución Eco > Sensor
Eco.
No bloquee el sensor con ningún material. Puede disminuir el brillo de la imagen.
1. Eco sensor Este función de ahorro de energía ajusta automáticamente el nivel de brillo de la pantalla
del televisor de acuerdo con la intensidad de la luz ambiente detectada por el sensor de luz.
2. Para habilitar o deshabilitar Sensor Eco, vaya a Sistema > Solución Eco > Sensor Eco y seleccione
Encendido o Apagado.
3. Precaución: Si le parece que la pantalla está demasiado oscura mientras mira televisión en un sector
oscuro, puede deberse al sensor Eco.
Ranura de Kit Evolution (se vende por separado)
posterior del TV
Si monta el Evolution Kit en el Samsung TV puede actualizar el hardware y el software del televisor sin que
sea necesario comprar un nuevo televisor. Con el Evolution Kit puede tener el televisor actualizado con los
últimos servicios y funciones proporcionados por Samsung Electronics.
✎
El Evolution Kit se vende por separado. Cuando los usuarios adquieran un Evolution Kit lanzado en
2014 o posteriormente, el televisor del usuario se podrá actualizar para que se adapte a la versión
del software del Evolution Kit. Sin embargo, es posible que el Evolution Kit no esté disponible
dependiendo del producto.
[UF8000-ZL]BN68-04822A-04L02.indb 26 2013-05-20 �� 10:11:39

Español - 27
Ensamblar el soporte sujeta cables
Ensamblar la cubierta de entrada de la alimentación
Monte la cubierta de la entrada de alimentación del televisor como se muestra a continuación.
[UF8000-ZL]BN68-04822A-04L02.indb 27 2013-05-20 �� 10:11:40

Español - 28
Almacenamiento y mantenimiento
✎
Si colocó un autoadhesivo en la pantalla del televisor, al extraerlo pueden quedar restos. Limpie los
restos antes de mirar televisión.
✎
La parte exterior y la pantalla del producto podrían rayarse durante la limpieza. Asegúrese de limpiar
la parte exterior y la pantalla utilizando un paño suave para evitar que se rayen.
No rocíe agua directamente sobre el producto.
Cualquier líquido que ingrese al producto puede
ocasionar fallas, incendio o descarga eléctrica.
Limpie el producto con un paño suave humedecido
con una pequeña cantidad de agua. No utilice
líquidos inflamables (como benceno o solventes) ni
agentes limpiadores.
Ventilación adecuada del televisor
Al instalar el televisor, deje una distancia de al menos 10 cm entre el televisor y otros objetos (paredes,
laterales del gabinete, etc.) para asegurar una ventilación adecuada. No mantener una ventilación
adecuada puede tener como consecuencia un incendio o un problema con el producto causados por un
aumento en su temperatura interna.
✎
Cuando utiliza un soporte o un montaje de pared para instalar su televisor, le recomendamos que use
únicamente las piezas proporcionadas por Samsung Electronics.
• Si utiliza piezas proporcionadas por otro fabricante, podría tener problemas con el producto o sufrir
una lesión debido a la caída del producto.
Instalación con un soporte. Instalación con un montaje de pared.
10 cm
10 cm
10 cm
10 cm
10 cm
10 cm
10 cm
Otras advertencias
✎
El aspecto real de su televisor puede ser distinto de las imágenes de este manual, según el modelo.
✎
Tenga cuidado cuando toque el televisor. Algunas partes pueden estar calientes.
[UF8000-ZL]BN68-04822A-04L02.indb 28 2013-05-20 �� 10:11:40

Español - 29
Prevención de la inclinación - Fijación del televisor a
la pared
Precaución: Tirar del televisor, empujarlo o colgarse de él puede
provocar su caída. En especial, impida que los niños se cuelguen
del televisor o lo desestabilicen. El televisor podría caerse sobre
ellos y causarles lesiones graves o incluso la muerte. Siga las
precauciones de seguridad del folleto de seguridad incluido con
el televisor. Para mejorar la estabilidad y la seguridad puede
adquirir un dispositivo antivuelco e instalarlo como se explica a
continuación.
Instalación del kit de soporte del televisor:
Soporte del televisor Soporte 2 tornillos (M8 X L28)
1. Atornille los adaptadores de montaje de pared proporcionados en la parte posterior del televisor.
2. Inserte el tornillo en el centro del soporte del televisor
como se muestra en la ilustración.
Dirección de
apriete
Resalte del
soporte
3. Asegure los soportes del televisor en los adaptadores de
montaje de pared como se muestra en la ilustración.
[UF8000-ZL]BN68-04822A-04L02.indb 29 2013-05-20 �� 10:11:41

Español - 30
4. Asegure el soporte al gabinete con un tornillo para
madera.
✎
Use un tornillo M5 x L35 o mayor.
5. Asegure el soporte con un tornillo en la misma manera como lo aseguró al gabinete. Asegúrese de que
el cable del soporte esté bien tensado. Si el estante es de acero o vidrio, monte el soporte en la pared.
✎
Cuando monte el soporte en una pared, use un anclaje compatible con el material de la pared.
Cuando monte el soporte en una pared, use un anclaje compatible con el material de la pared.
Anclaje
✎
Instale el televisor cerca de la pared para evitar que se caiga hacia atrás.
✎
Cuando instale el soporte del televisor en la pared, asegure el cable nivelado respecto al suelo o
inclinado hacia abajo por motivos de seguridad.
✎
Compruebe de vez en cuando que el cable esté firme.
✎
Cuando desee mover el televisor, primero debe quitar el cable de conexión.
6. Verifique que todas las conexiones estén bien aseguradas. Compruébelas periódicamente para
detectar cualquier signo de fatiga o falla. Si tiene alguna duda sobre la seguridad de sus conexiones,
comuníquese con un instalador profesional.
NFORMACIÓN IMPORTANTE
Si el televisor no se encuentra en una ubicación suficientemente estable, puede resultar peligroso por
el riesgo de caída. La mayoría de las lesiones, en particular en los niños, pueden evitarse tomando
una sencillas precauciones, como:
• Usar gabinetes o soportes recomendados por el fabricante del televisor.
• Usar sólo muebles capaces de soportar el peso del televisor.
• Asegurarse de que el televisor no caliente en exceso el borde del mueble.
• No colocar el televisor sobre muebles altos (por ejemplo, estantes o librerías) sin haber anclado el
mueble y el televisor en un soporte adecuado.
• No poner una tela u otro material similar entre el televisor y el mueble.
• Educar a los niños de los peligros de subirse al mueble para llegar al televisor o a los controles.
[UF8000-ZL]BN68-04822A-04L02.indb 30 2013-05-20 �� 10:11:41

Español - 31
Especificaciones - TV
Resolución de pantalla 1920 x 1080
Consideraciones ambientales
Temperatura de funcionamiento
Humedad de funcionamiento
Temperatura de almacenamiento
Humedad de almacenamiento
50 °F a 104 °F (10 °C a 40 °C)
10% a 80%, sin condensación
-4 °F a 113 °F (-20 °C a 45 °C)
5% a 95%, sin condensación
Soporte giratorio
(Izquierda / Derecha)
0˚
Nombre del modelo UN46F8000 UN55F8000
Tamaño de pantalla 116 cm 138 cm
Sonido
(Salida) 40W(10x2, woofer 10x2)
Dimensiones (An x Pr x Al)
Cuerpo principal
Con el soporte
103.2 x 59.9 x 3.4 cm
103.2 x 63.4 x 25.7 cm
122.4 x 70.7 x 3.4 cm
122.4 x 74.1 x 31.0 cm
Peso
Sin el soporte
Con el soporte
12.8 Kg
14.0 Kg
16.8 Kg
18.3 Kg
✎
El diseño y las especificaciones pueden cambiar sin previo aviso.
✎
El aspecto real de su televisor puede ser distinto de las imágenes de este manual, según el modelo.
✎
Para obtener información sobre la fuente de alimentación y el consumo de energía, consulte la
etiqueta adherida al producto.
Modo suspensión
Para disminuir el consumo de energíadesenchufe el cable de alimentación cuando no vaya a usar el
televisor durante uwn tiempo prolongado.
Advertencia de imagen fija
Evite visualizar imágenes fijas (como archivos de imágenes jpeg) o elementos de imágenes fijas (como
logos de canales de TV, barras bursátiles o de noticias en la parte inferior de la pantalla, etc.) o programas
en formato de imagen panorámica o de 4:3 en la pantalla. La visualización constante de imágenes fijas
puede causar el desgaste de la imagen en la pantalla LED, lo cual afectará la calidad de la imagen. Para
reducir el riesgo de este efecto, siga las recomendaciones indicadas a continuación:
• Evite visualizar el mismo canal de TV por períodos prolongados.
• Siempre trate de visualizar cualquier imagen en la pantalla completa. Utilice el menú de formatos de
imagen del televisor para seleccionar el que coincida mejor.
• Reduzca el brillo y el contraste para evitar la aparición de imágenes fantasma.
• Utilice todas las funciones del televisor diseñadas para reducir la retención de imágenes y el desgaste
de la pantalla. Para obtener más detalles consulte el e-Manual.
Especificaciones
[UF8000-ZL]BN68-04822A-04L02.indb 31 2013-05-20 �� 10:11:41

This page is intentionally
left blank.
[UF8000-ZL]BN68-04822A-04L02.indb 32 2013-05-20 �� 10:11:41
-
 1
1
-
 2
2
-
 3
3
-
 4
4
-
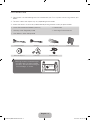 5
5
-
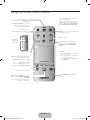 6
6
-
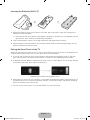 7
7
-
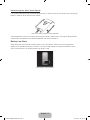 8
8
-
 9
9
-
 10
10
-
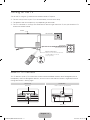 11
11
-
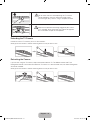 12
12
-
 13
13
-
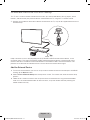 14
14
-
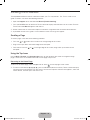 15
15
-
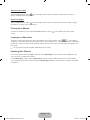 16
16
-
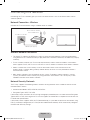 17
17
-
 18
18
-
 19
19
-
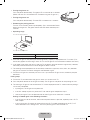 20
20
-
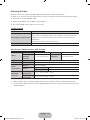 21
21
-
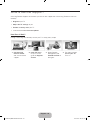 22
22
-
 23
23
-
 24
24
-
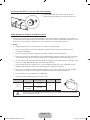 25
25
-
 26
26
-
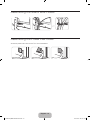 27
27
-
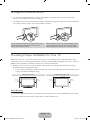 28
28
-
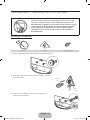 29
29
-
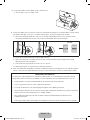 30
30
-
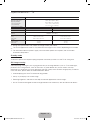 31
31
-
 32
32
-
 33
33
-
 34
34
-
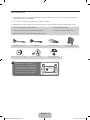 35
35
-
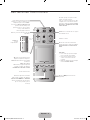 36
36
-
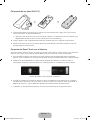 37
37
-
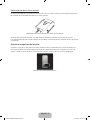 38
38
-
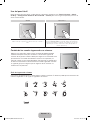 39
39
-
 40
40
-
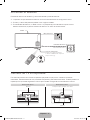 41
41
-
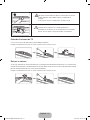 42
42
-
 43
43
-
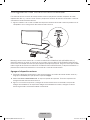 44
44
-
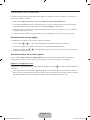 45
45
-
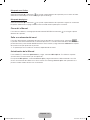 46
46
-
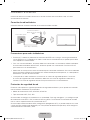 47
47
-
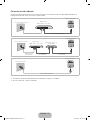 48
48
-
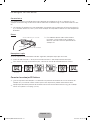 49
49
-
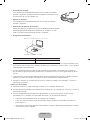 50
50
-
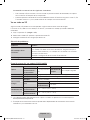 51
51
-
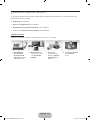 52
52
-
 53
53
-
 54
54
-
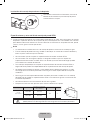 55
55
-
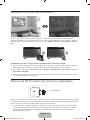 56
56
-
 57
57
-
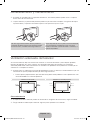 58
58
-
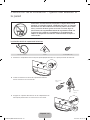 59
59
-
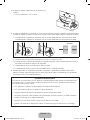 60
60
-
 61
61
-
 62
62


Samsung UN46F8000AK Guía de inicio rápido
- Tipo
- Guía de inicio rápido
- Este manual también es adecuado para
en otros idiomas
Artículos relacionados
-
Samsung PS51F5500AW Guía de inicio rápido
-
Samsung UN65HU8700F Guía de inicio rápido
-
Samsung PL64F8500AF Guía de inicio rápido
-
Samsung PS64F8500AL Guía de inicio rápido
-
-
Samsung UN65JU6500F Guía de inicio rápido
-
-
Samsung UN75JU6500G Guía de inicio rápido
-
Samsung UE65F8000SL Guía de inicio rápido
-
Samsung SEK-1000 Guía de inicio rápido