Electrolux E23CS75DSS0 Guía de instalación
- Tipo
- Guía de instalación

TO BE REMOVED BYTHE CUSTOMER AFTER INSTALLATION IS COMPLETE. (VeaotroIadoparalaversi6ndelespa_ol.)
f
C}
_J
INSTALLATION CHECKOFF LIST
Doors
Handles are secure and tight
Door seals completely to cabinet on aII sides
Doors are level across the top
Leveling
Refrigerator islevel, side to side and tilted 1/4" (6ram) front to back
Toe grille is properly attached to refrigerator
Cabinet is setting solid on aItcorners
Electrical Power
House power turned on
Refrigerator plugged in
Ice Maker
House water suppIy connected to refrigerator
Water & power couplings connected at door
No water leaks present at aIt connections - recheck in 24 hours
Ice Maker isturned ON.
Ice & Water Dispenser operates correctly
Front filter must be flush with fiIter housing (some modets)
Final Checks
Shipping materiaI removed
Fresh Food and Freezer controls set
Crisper Humidity controls set
Registration Card sent in
"reels You Will Need:
Phrllips" heed
Socket
Wrench Set
3/8"
FFxed
Wrench
1
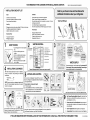
HAND TRUCKING
• Load refrigerator from side of cabinel
onty.
• Do not run retaining straps over
bandies.
• Do not over-tighten retaining straps.
• Never use refrigerator handles to
move the refrigerator.
• Remove tape from doors only after
unit is in place.
INSTALLATION CLEARANCES
Allow the foIIowing clearances for ease of installation
proper air circulation, and plumbing and electrica
connections:
° Sides & Top.......... 3/8_'
* Back ....................... 1"
NOTE: If you are installing your refrigerator beside a wail,
leave 1/2" minimum between hinges and wail to atlow for
the door to swing open.
EnsureicemakertoturnedON.Checktoseethatthe Ice&Water
Dispenser is operating correctly (See Automatic ice & Water
DispenserFeaturesin Use & CareManual.) j
2
I PIECE OF FOAM
OR CARDBOARD
2 WIRE TIES
(A wi_ebask_._s
wll _ave2 wre
ties)
SHIPPING MATERIAL
i_ii¢i01_kJ_ _111F_=_lllll!_i_i_!_ii_!_!2? _
I PIECEOF TAPE
1 PIECEOFTAPEOR
2 BLUESHIPPINGCLIPS
-- 1 PIECEOFTAPE
SHELFSPACERWITH TOE GRILLE
1 PIECEOFTAPE
3 PIECES OF TAPE
1 PIECEOFTAPE
Remove Shipping material. (Features may vary per model.)
LEVELING AND ADJUSTING
AII four corners of refrigerator must restfirmty on a soIid
floor. YourrefrigeratorhasadjustabIe rollersto helpIevel it
and to adjust the doors.
To level cabinet or change door height:
1. Remove toe grilIe.
2. Use a screwdriver,3/_ wrench, or nutdriver to adjust the
rotters.Toraise cabinet or door,turn screw clockwise.To
lowercabinet or door,turn screw counterclockwise.
• f
3
t "!
! i!i ;
J ,
WATER SUPPLY
Connect water supply - check for water Ieaks. Turn icemaker OFF
if water supply is not connected immediately. Connecting to a
reverse osmosis system is not recommended. 2
CONTROLS
When changing control settings, wait 24 hours before making additional adjustments, ,j
4
Sec"Normal Operating Sights & Sounds" in the
your refrigerator is running.
new refrigerator.
IFYOU ARE DISSATISFIED WITH THE INSTALLATION OFYOUR REFRIGERATOR, PLEASE CALLTHE STORE YOU PURCHASED IT FROM. P/N:24_S70200

A SER RETIRADO POR EL CLIENTE CUANDO SE COMPLETE LA INSTALACION. (SeeothersideforEnglishversion.)
,Vf LISTA DEVERIFICACION DE LA INSTALACION
Puertas
Las marfljas est_.naseguradas y apretadas
La puerta cierra herm6ticamente en todos los Iados del gabinete
Las puertas est&n niveladas a trav6s de la parte superior
Nivelacibn
El refrigerador est,. nivelado de Iado a lado e inciinado 1/4"
(6 ram) desde adetante hacia atr&s
La rejilla inferior est& correctamente instalada en et refrigerador
EI gabinete descansa firmemente en todas Ias esquinas
Energia EI6ctrica
La energfa eI6ctrica de Ia casa est& conectada
EI refrigerador est& enchufado
M_quina de Hacer Hielo
EI sumirflstro de agua del hogar est& conectado at refrigerador
Los acoplamientos del agua y de Ia energia est&n conectados en la puerta
No hay escape de agua en ninguna de las conexiones - verifique
nuevamente dentro de 24 horas
La m&quina de hacer hielo est& ACTIVADA
El dispensador de hieto y de agua funciona correctamente
El filtro detantero debe quedar al ras cor_Iacaja del fittro (algur_osmodelos)
Verificaciones Finales
Se retiraron Ios materiales de embarque
Se ajustaron Ios controles det refrigerador y del congetador
Se aiustaron Ios controles de humedad deI cai6n de Ias verduras
Se envi6 IaTarjeta de Registro
Herromientos noc_odos:
Ou_lsr_L=cessQires:
de cubo
Er#,err_e de
Ck_ _ doullles
J
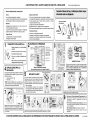
TRANSPORTE CON CARRETILLA 1'_ MATERIALES DE EMBARQUE
L_
* Cargue el refrigerador por et iado del gabinete 1PEDAZODE _ IPEDAZODECINTA
so_arner_te. ESPUMA O CARTON _ I PED/W.ODECINTA O
2 CLIPES,,"iZULES gue ENVIAN
, No pase Iascorreas por encima de Ias manijas. _PEDAZODECINTA
ESPAClADOR DE LA
, No apriete demasiado lascorreas. 2ATADURASDE BANDEJACONREJILLA
ALAMBRE t PED/W.O DE CINTA
, Nunca use ias manijas del refrigerador para (Todas las_anastas
move,o .O.EC..O.TA E
, Retire Ia cinta de Ias puertas despu6s que et aiambre) _ t PED/W.ODECINTA
refdgerador est6instatadoen su lugar.
ESPACIOS MBRES PARA LA Retire los materiales de embarque.
INSTALACION , (La earactedstieas pueden variar segQn el modelo.)
Dejelossiguientesespados libresparafacilitarlacirculaciSnde _ GrilledeprotectionRejillaInferior
aire adecuada durante la instalaei6n y para las conexiones _ NIVELADO Y AJMSTE
el6ctricasde fontaneda:
, Ladesypartesupeder....3/8" Las euatro esquinas del refrigerador deben deseansar
* Partetrasera.....................1" firmemenle sobre suelo firme, Su refrigerador tiene rodillos
ajustablespara fadlitar el nivelade y para ajustar las puerl:as,
NorA: Si inslala el refrigeradorjunto a sea pared, deje un
espaeiomlnimo de 12,7mm (1/2pulg.)enlre lasbisegrasy la Paraajustarel gabineteo cambiar la alturade las puertas: CaisseGabinete
pared para permitirque la puertase puedaabrir. 1. Retire la rejillainferior.
, • 2, Use un destomillador, una Ilavede 3/8" o una Ilave para
" tuercaspara ajustarlos rodillos,Paraelevarel gabineteo la
Asegt_rese de que la m_iquina de hacer hielo est6 ACTIVADA.
Verifique para comprobar de que el dispensador de hielo y
de agua est6 funcionando correctamente (Ver Caracteristicas
del Dispensador Autom_tico de Hielo yAgua en el Manualde Si esnecesario retirarlaspuertas para poderentrarel refrigeradoren tacasa,por favoryea
Use y Cuidado.) lasecci6n Instrucciones para _ delas Puertasen suManualde UsoyCuidado.
!
if!
iaw!l,;_l:_:
!!
SUMINISTRO DE
Conecte el suministro de agua - verifique si hay escapes de agua
APAGUE la m_quina de hater hielo si el suministro de agua
no es conectado inmediatamente. No se recomienda la
conexion a un sistema de osmosis inversa.
CONTROLES
V Vea ta secci6n "Sonidos Normales del
Manual de Use y Cuidado para que se familiarice con los sonidos
que pueda oir cuando su refrigerador sea puesto en
funcionamiento.
Por favor lea todo el Manual de Uso y Cuidado para conocer las
instrucciones importantes de seguridad y para familiarizarse con
su nuevo refdgerador,
_/ Envie laTarjeta de Registre para registrar su refrigerador.
V iFeticitaciones{ Ya puede comenzar a disfrutar de su nuevo
refrigerador_
SI NO ESTA SATISFECHO CON LA INSTALACION DE SU REFRIGERADOR, POR FAVOR PONGASE EN CONTACTO CON LA TIENDA DONDE LO COMPRO. PiN241570200
-
 1
1
-
 2
2


Electrolux E23CS75DSS0 Guía de instalación
- Tipo
- Guía de instalación
en otros idiomas
Otros documentos
-
White-Westinghouse WRS6W1EW5 Guía de instalación
-
Frigidaire GLRT188WDK6 Guía de instalación
-
Frigidaire 25357112603 Guía de instalación
-
White-Westinghouse CRSE266FB3 Guía de instalación
-
Kenmore PLHS269ZDB4 Guía de instalación
-
Crosley FRT21KS6DK0 Guía de instalación
-
Kenmore Elite 25344392402 Guía de instalación
-
Frigidaire FRS3R3JW5 Guía de instalación
-
Kenmore 596.526722 Manual de usuario
-
Admiral CT21G8Q El manual del propietario