
English Français Italiano Español Deutsch Nederlands Русский
DIGITAL MEDIA RECEIVER
AUTORADIO NUMÉRIQUE DE MÉDIA
RICEVITORE MULTIMEDIALE DIGITALE
RECEPTOR DIGITAL DE MEDIOS
DIGITALER MEDIA RECEIVER
DIGITAL MEDIA RECEIVER
ЦИФРОВОЙ МУЛЬТИМЕДИЙНЫЙ ПРИЕМНИК
MVH-X370BT
MVH-170UI
MVH-170UBG
MVH-170UB
Operation Manual
Mode d’emploi
Manuale d’istruzioni
Manual de instrucciones
Bedienungsanleitung
Handleiding
Руководство пользователя

2En
Before You Start....................................................................................... 3
Getting Started........................................................................................ 3
Radio.......................................................................................................... 5
USB/iPod/AUX.......................................................................................... 6
Bluetooth.................................................................................................. 8
App Mode............................................................................................... 10
Settings ................................................................................................... 11
FUNCTION settings .............................................................................. 11
AUDIO settings...................................................................................... 12
SYSTEM settings ................................................................................... 13
ILLUMINATION settings....................................................................... 13
MIXTRAX settings................................................................................. 13
Connections/Installation..................................................................... 15
Additional Information ........................................................................ 18
Table of Contents
About this manual:
• In the following instructions, a USB memory or USB audio player are referred to as
“USB device”.
• In this manual, iPod and iPhone are referred to as “iPod”.
Declaration of Conformity with regard to the R&TTE Directive 1999/5/EC
English:
Hereby, Pioneer, declares that this MVH-X370BT is in
compliance with the essential requirements and other
relevant provisions of Directive 1999/5/EC.
Suomi:
Pioneer vakuuttaa täten että MVH-X370BT tyyppinen
laite on direktiivin 1999/5/EY oleellisten vaatimusten ja
sitä koskevien direktiivin muiden ehtojen mukainen.
Nederlands:
Hierbij verklaart Pioneer dat het toestel MVH-X370BT in
overeenstemming is met de essentiële eisen en de
andere relevante bepalingen van richtlijn 1999/5/EG
Français:
Par la présente Pioneer déclare que l’appareil MVH-
X370BT est conforme aux exigences essentielles et aux
autres dispositions pertinentes de la directive 1999/5/CE
Svenska:
Härmed intygar Pioneer att denna MVH-X370BT står I
överens-stämmelse med de väsentliga egenskapskrav
och övriga relevanta bestämmelser som framgår av
direktiv 1999/5/EG.
Dansk:
Undertegnede Pioneer erklærer herved, at følgende
udstyr MVH-X370BT overholder de væsentlige krav og
øvrige relevante krav i direktiv 1999/5/EF
Deutsch:
Hiermit erklärt Pioneer, dass sich dieses Gerät MVH-
X370BT in Übereinstimmung mit den grundlegenden
Anforde-rungen und den anderen relevanten
Vorschriften der Richtlinie 1999/5/EG befindet". (BMWi)
Ελληνικά:
ΜΕ ΤΗΝ ΠΑΡΟΥΣΑ Pioneer ΔΗΛΩΝΕΙ ΟΤΙ MVH-X370BT
ΣΥΜ-ΜΟΡΦΩΝΕΤΑΙ ΠΡΟΣ ΤΙΣ ΟΥΣΙΩΔΕΙΣ ΑΠΑΙΤΗΣΕΙΣ
ΚΑΙ ΤΙΣ ΛΟΙΠΕΣ ΣΧΕΤΙΚΕΣ ΔΙΑΤΑΞΕΙΣ ΤΗΣ ΟΔΗΓΙΑΣ
1999/5/ΕΚ
Italiano:
Con la presente Pioneer dichiara che questo MVH-
X370BT è conforme ai requisiti essenziali ed alle altre
disposizioni pertinenti stabilite dalla direttiva 1999/5/
CE.
Español:
Por medio de la presente Pioneer declara que el MVH-
X370BT cumple con los requisitos esenciales y
cualesquiera otras disposiciones aplicables o exigibles
de la Directiva 1999/5/CE
Português:
Pioneer declara que este MVH-X370BT está conforme
com os requisitos essenciais e outras disposições da
Directiva 1999/5/CE.
Čeština:
Pioneer tímto prohlašuje, že tento MVH-X370BT je ve
shodě se základními požadavky a dalšími příslušnými
ustanove-ními směrnice 1999/5/ES
Eesti:
Käesolevaga kinnitab Pioneer seadme MVH-X370BT
vastavust direktiivi 1999/5/EÜ põhinõuetele ja
nimetatud direktiivist tulenevatele teistele
asjakohastele sätetele.
Magyar:
Alulírott, Pioneer nyilatkozom, hogy a MVH-X370BT
megfelel a vo-natkozó alapvetõ követelményeknek és az
1999/5/EC irányelv egyéb elõírásainak.
Latviešu valoda:
Ar šo Pioneer deklarē, ka MVH-X370BT atbilst Direktīvas
1999/5/EK būtiskajām prasībām un citiem ar to
saistītajiem noteikumiem.
Lietuvių kalba:
Šiuo Pioneer deklaruoja, kad šis MVH-X370BT atitinka
esminius reikalavimus ir kitas 1999/5/EB Direktyvos
nuostatas.
Malti:
Hawnhekk, Pioneer jiddikjara li dan MVH-X370BT
jikkonforma mal-ħtiġijiet essenzjali u ma provvedimenti
oħrajn relevanti li hemm fid-Dirrettiva 1999/5/EC
Slovenčina:
Pioneer týmto vyhlasuje, že MVH-X370BT spĺňa
základné požiadavky a všetky príslušné ustanovenia
Smernice 1999/5/ES.
Slovenščina:
Pioneer izjavlja, da je ta MVH-X370BT v skladu z
bistvenimi zahtevami in ostalimi relevantnimi določili
direktive 1999/5/ES.
Română:
Prin prezenta, Pioneer declara ca acest MVH-X370BT
este in conformitate cu cerintele esentiale si alte
prevederi ale Directivei 1999/5/EU.
български:
С настоящето, Pioneer декларира, че този MVH-
X370BT отго-варя на основните изисквания и други
съответни постановления на Директива 1999/5/EC.
Polski:
Niniejszym Pioneer oświadcza, że MVH-X370BT jest
zgodny z zasadniczymi wymogami oraz pozostałymi
stosownymi postanowieniami Dyrektywy 1999/5/EC
Norsk:
Pioneer erklærer herved at utstyret MVH-X370BT er i
samsvar med de grunnleggende krav og øvrige
relevante krav i direktiv 1999/5/EF.
Íslenska:
Hér með lýsir Pioneer yfir því að MVH-X370BT er í
samræmi við grunnkröfur og aðrar kröfur, sem gerðar
eru í tilskipun 1999/5/EC
Hrvatski:
Ovime tvrtka Pioneer izjavljuje da je ovaj MVH-X370BT u
skladu osnovnim zahtjevima i ostalim odredbama
Direktive 1999/5/EC.
Manufacturer:
PIONEER CORPORATION
1-1, Shin-ogura, Saiwai-ku, Kawasaki-shi,
Kanagawa 212-0031, JAPAN
EU Representative’s:
Pioneer Europe NV
Haven 1087, Keetberglaan 1,
B-9120 Melsele, Belgium/Belgique
http://www.pioneer.eu

3En
English
Thank you for purchasing this PIONEER product
To ensure proper use, please read through this manual before using this product. It is especially
important that you read and observe WARNINGs and CAUTIONs in this manual. Please keep the
manual in a safe and accessible place for future reference.
Private households in the member states of the EU, in Switzerland and Norway may return their used
electronic products free of charge to designated collection facilities or to a retailer (if you purchase a
similar new one).
For countries not mentioned above, please contact your local authorities for the correct method of
disposal.
By doing so you will ensure that your disposed product undergoes the necessary treatment, recovery
and recycling and thus prevent potential negative effects on the environment and human health.
WARNING
•Do not attempt to install or service this product by yourself. Installation or servicing of this
product by persons without training and experience in electronic equipment and automotive
accessories may be dangerous and could expose you to the risk of electric shock, injury or other
hazards.
•Do not attempt to operate the unit while driving. Make sure to pull off the road and park your vehicle
in a safe location before attempting to use the controls on the device.
CAUTION
•Do not allow this unit to come into contact with moisture and/or liquids. Electrical shock could result.
Also, damage to this unit, smoke, and overheating could result from contact with liquids.
•Always keep the volume low enough to hear outside sounds.
•The Pioneer CarStereo-Pass is for use only in Germany.
If you experience problems
Should this unit fail to work properly, please contact your dealer or nearest authorized PIONEER Service
Station.
MVH-X370BT/170UI/170UBG/170UB
*1 The button indications vary depending on the unit.
*2 This button is referred to as DISP in this manual.
Frequently used operations
The available buttons vary depending on the unit.
Before You Start
If you want to dispose this product, do not mix it with general household waste. There is a separate
collection system for used electronic products in accordance with legislation that requires proper
treatment, recovery and recycling.
Getting Started
Basic operation
Purpose Operation
Turn on the power* Press SRC/OFF to turn on the power.
Press and hold SRC/OFF to turn off the
power.
Adjust the volume Turn the M.C. dial.
Select a source Press SRC/OFF repeatedly.
Change the display information Press DISP repeatedly.
Return to the previous display/list Press /DIMMER.
Return to the normal display from the
menu.
Press BAND/.
Answering/ending a call (Only for MVH-
X370BT)
Press .
SRC (source)/OFF
Detach button
Display windowM.C. (multi-control)
dial
BAND/
/DIMMER Display button*2
*1
*1

4En
* When this unit’s blue/white lead is connected to the vehicle’s auto-antenna relay control terminal,
the vehicle’s antenna extends when this unit’s source is turned on. To retract the antenna, turn the
source off.
Display indication
Detach the front panel to prevent theft. Remove any cables and devices attached to the
front panel and turn off the unit before detaching it.
Important
• Avoid subjecting the front panel to excessive shock.
• Keep the front panel out of direct sunlight and high temperatures.
• Always store the detached front panel in a protective case or bag.
When you turn the ignition switch to ON after installation, [SET UP :YES] appears in the
display.
1 Press the M.C. dial.
The setup menu disappears after 30 seconds of no operation. If you prefer not to set
at this time, turn the M.C. dial to select [NO], then press to confirm.
2 Turn the M.C. dial to select the options, then press to confirm.
To proceed to the next menu option, you need to confirm your selection.
3 [QUIT :YES] appears when all the settings have been made.
To return to the first item of the setup menu, turn the M.C. dial to select [QUIT :NO],
then press to confirm.
4 Press the M.C. dial to confirm the settings.
NOTES
• You can cancel the menu setting by pressing SRC/OFF.
• These settings can be made at any time from the SYSTEM settings (page 13) and INITIAL settings
(page 5).
Indication Description
Appears when a lower tier of the menu or folder exists.
Appears when the automatic answering function is set (page 10).
(Only for Bluetooth-compatible models.)
Appears when the button is pressed.
Appears when the local seek tuning function is set (page 11).
Appears when a traffic program is received.
Appears when traffic announcements are received (page 11).
Appears when the sound retriever function is set (page 12).
Appears when random/shuffle play is set (except when BT AUDIO is
selected as the source).
Appears when repeat play is set (except when BT AUDIO is selected as the
source).
Appears when the iPod control function is set (page 7).
Appears when a Bluetooth connection is made (page 8).
(Only for Bluetooth-compatible models.)
Detaching the front panel
Detach Attach
Setup menu
Menu Item Description
LANGUAGE Select the language to display the text information from a
compressed audio file.
[ENG](English),
[РУС](Russian),
[TUR](Turkish)
CLOCK SET Set the clock.
FM STEP Select the FM tuning step from 100 kHz or 50 kHz.
[100], [50]

5En
English
1 Press the M.C. dial to display the main menu.
2 Turn the M.C. dial to select [SYSTEM], then press to confirm.
3 Turn the M.C. dial to select [DEMO OFF], then press to confirm.
4 Turn the M.C. dial to select [YES], then press to confirm.
1 Press and hold SRC/OFF until the unit turns off.
2 Press and hold SRC/OFF to display the main menu.
3 Turn the M.C. dial to select [INITIAL], then press to confirm.
4 Turn the M.C. dial to select an option, then press to confirm.
NOTE
The options vary depending on the unit.
The tuner frequencies on this unit are allocated for use in Western Europe, Asia, the
Middle East, Africa and Oceania. Use in other areas may result in poor reception. The RDS
(radio data system) function only works in areas that broadcast RDS signals for FM
stations.
1 Press SRC/OFF to select [RADIO].
2 Press BAND/ to select the band from [FM1], [FM2], [FM3], [MW] or [LW].
3 Press a number button (1/ to 6/).
TIP
The / buttons can be also used to select a preset station when [SEEK] is set to [PCH] in the
FUNCTION settings (page 12).
The six strongest stations are stored on the number buttons (1/ to 6/).
1 After selecting the band, press the M.C. dial to display the main menu.
2 Turn the M.C. dial to select [FUNCTION], then press to confirm.
3 Turn the M.C. dial to select [BSM], then press to confirm.
To seek a station manually
1
After selecting the band, press / to select a station.
Press and hold / then release to seek an available station. Scanning stops
when the unit receives a station. To cancel seek tuning, press / .
NOTE
[SEEK] needs to be set to [MAN] in the FUNCTION settings (page 12).
To store stations manually
1
While receiving the station you want to store, press and hold one of the number
buttons (1/ to 6/) until it stops flashing.
Canceling the demonstration display (DEMO OFF)
INITIAL settings
Menu Item Description
FM STEP Select the FM tuning step from 100 kHz or 50 kHz.
[100], [50]
SP-P/O MODE Select when there is a full-range speaker connected to the rear
speaker output leads and there is a subwoofer connected to the
RCA output.
[REAR/SUB.W]
[SUB.W/SUB.W] Select when there is a passive subwoofer connected directly to
the rear speaker output leads and there is a subwoofer
connected to the RCA output.
[REAR/REAR] Select when there are full-range speakers connected to the rear
speaker output leads and RCA output. If there is a full-range
speaker connected to the rear speaker output leads, and the
RCA output is not used, you may select either [REAR/SUB.W] or
[REAR/REAR].
S/W UPDATE Select to update the unit to the latest Bluetooth software. For
details on Bluetooth software and updating, visit our website.
SYSTEM RESET Select [YES] to initialize the unit settings. The unit will be
restarted automatically. (Some of the settings will be retained
even after resetting the unit, such as Bluetooth pairing
information, etc.)
[YES], [CANCEL]
Radio
Receiving preset stations
Best stations memory (BSM)

6En
The unit searches for a station by PTY (program type) information.
1 Press during FM reception.
2 Turn the M.C. dial to select a program type from [NEWS/INFO], [POPULAR],
[CLASSICS] or [OTHERS].
3 Press the M.C. dial.
The unit begins to search for a station. When it is found, its program service name is
displayed.
NOTES
• To cancel the search, press the M.C. dial.
• The program of some stations may differ from that indicated by the transmitted PTY.
• If no station is broadcasting the type of program you searched for, [NOT FOUND] is displayed for
about two seconds and then the tuner returns to the original station.
PTY list
For more details about PTY list, visit the following site:
http://www.pioneer.eu/eur/products/25/121/tech/CarAudio/PTY.html
NOTE
iPod function is not available for MVH-170UBG/170UB.
Disconnect headphones from the device before connecting it to the unit.
USB device/iPod
1
Open the USB port cover.
2 Plug in the USB device/iPod using an appropriate cable.
CAUTION
Use an optional Pioneer USB cable (CD-U50E) to connect the USB storage device as any device
connected directly to the unit will protrude out from the unit, which could be dangerous.
Before removing the device, stop playback.
MTP connection
A device installed with Android OS 4.0 or later can be connected to the unit via MTP, using the cable
supplied with the device. However, depending on the connected device and the numbers of the files in
the device, audio files/songs may not be able to be played back via MTP. Note that MTP connection is
not compatible with WAV and FLAC* file formats, and cannot be used with the MIXTRAX function.
* The FLAC files are only compatible with MVH-170UI/170UBG/170UB.
Using PTY functions
USB/iPod/AUX
Playing back
AUX input jack (3.5 mm stereo jack)
USB port
SRC (source)/OFF
M.C. (multi-control) dial

7En
English
AUX
1
Insert the stereo mini plug into the AUX input jack.
2 Press SRC/OFF to select [AUX] as the source.
NOTE
If [AUX] is set to [OFF] in the SYSTEM settings, [AUX] cannot be selected as a source.
You can make various adjustments in the FUNCTION settings (page 11).
Note that the following operations do not work for an AUX device. To operate an AUX
device, use the device itself.
*1 Compressed audio files only
*2 When there is no 3/S.Rtrv button on the unit, the sound retriever function can be set by the
FUNCTION settings.
Link play mode
You can access songs based on the artist, album, or genre currently playing.
1 While listening to a song, press and hold to enter the link play mode.
2 Turn the M.C. dial to select the mode ([ARTIST], [ALBUM], [GENRE]), then press to
confirm.
The selected song/album will be played after the currently playing song.
NOTE
The selected song/album may be canceled if you use functions other than those from the link play
mode (e.g. fast forward and reverse).
iPod control
You can control the unit via a connected iPod.
The following iPod models are not compatible with this function.
– iPod nano 1st generation, iPod with video
1 Press BAND/ during playback, then select the control mode.
[CONTROL iPod/CTRL iPod]: The unit’s iPod function can be operated from the
connected iPod.
[CONTROL AUDIO/CTRL AUDIO]: The unit’s iPod function can only be operated by
the buttons on the unit. In this mode, the connected iPod cannot be turned on or off.
NOTES
• Pressing iPod can also switch the control mode (only for MVH-170UI).
• Switching the control mode to [CONTROL iPod/CTRL iPod] pauses song playback. Use the connected
iPod to resume playback.
Operations
Purpose Operation
Select a folder/album*1 Press 1/ or 2/.
Select a track/song (chapter) Press or .
Fast forward or reverse Press and hold or .
Search for a file from a list 1 Press to display the list.
2 Turn the M.C. dial to select the desired
file (folder) name or category, then press
to confirm.
3 Turn the M.C. dial to select the desired
file, then press to confirm.
Playback starts.
View a list of the files in the selected folder/
category*1
Press the M.C. dial when a folder/category
is selected.
Play a song in the selected folder/
category*1
Press and hold the M.C. dial when a folder/
category is selected.
Alphabetical search (iPod only) 1 Press to display the list.
2 Turn the M.C. dial to select the desired
category list, then press to enter the
alphabetical search mode.
(Turning the M.C. dial twice also enters
the alphabetical search mode.)
3 Turn the M.C. dial to select a letter, then
press to display the alphabetical list.
To cancel alphabetical search, press /
DIMMER.
Repeat play Press 6/.
Random/shuffle play Press 5/.
Shuffle all play (iPod only) Press and hold 5/.
Pause/resume playback Press 4/PAUSE.
Sound retriever*2 Press 3/S.Rtrv.
[1]: Effective for low compression rates
[2]: Effective for high compression rates
Return to root folder (USB only)*1 Press and hold BAND/.
Change drives in USB device
(Devices that support the USB mass storage
device class protocol only)
Press BAND/.
Useful functions for iPod
Purpose Operation

8En
• The following operations are still accessible from the unit, even if the control mode is set to
[CONTROL iPod/CTRL iPod].
– Pause, fast forward/reverse, song/chapter selection
• The volume can only be adjusted from the unit.
(Only for MVH-X370BT)
The MIXTRAX function creates a non-stop mix of your music library, accompanied by
illumination effects. For details on MIXTRAX settings, see page 13.
NOTES
• This function is not compatible with an Android device connected via MTP.
• When USB is selected as a source and the MIXTRAX function is in use, the sound retriever function is
disabled.
• Depending on the file/song, sound effects may not be available.
• Turn the MIXTRAX function off if the illumination effects it produces interfere with driving.
1 Press 3/MIX to turn MIXTRAX on/off.
(Only for MVH-X370BT)
Important
If three or more Bluetooth devices (e.g. a phone and separate audio player) are connected, they may
not work properly.
1 Turn on the Bluetooth function of the device.
2 Press and hold to display the connection menu.
3 Turn the M.C. dial to select [ADD DEVICE], then press to confirm.
The unit starts to search for available devices, then displays them in the device list.
• To cancel searching, press the M.C. dial.
• If the desired device is not in the list, select [RE-SEARCH].
• If there is no device available, [NOT FOUND] appears in the display.
4 Turn the M.C. dial to select a device from the device list, then press to confirm.
Press and hold the M.C. dial to switch the displayed device information between the
Bluetooth device address and device name.
5 Select [Pioneer BT Unit] shown in the device display.
6 Make sure the same 6-digit number appears on this unit and the device, then
select “Yes” on the device.
NOTES
• [DEVICE FULL] appears if the unit has already been paired with three other devices. In this case, delete
one of the paired devices. See [DEL DEVICE] or [GUEST MODE] in the connection menu (page 8).
• Depending on the device, the PIN code is required in step 6. In this case, input [0000].
TIP
The Bluetooth connection can be also made by detecting the unit from the Bluetooth device. To do so,
[VISIBLE] in the connection menu needs to be set to [ON]. For details on a Bluetooth device operations,
refer to the operating instructions supplied with the Bluetooth device.
Connection menu
About MIXTRAX (USB/iPod only)
Bluetooth
Bluetooth connection
Menu Item Description
DEVICELIST Display the list of paired Bluetooth devices. “*” appears on the
device name when the Bluetooth connection is established.
DEL DEVICE Delete the device information.
[DELETE YES],
[DELETE NO]
ADD DEVICE Register a new device.
A.CONN Select [ON] to connect to a Bluetooth device automatically.
[ON], [OFF]
VISIBLE Select [ON] so that a Bluetooth device can detect the unit when
the unit is connected via Bluetooth to another device.
[ON], [OFF]
PIN CODE Change the PIN code.
1 Press the M.C. dial to display the setting mode.
2 Turn the M.C. dial to select a number.
3 Press the M.C. dial to move the cursor to the next position.
4 After inputting the PIN code, press and hold the M.C. dial.
After inputting the PIN code, pressing the M.C. dial returns you
to the PIN code input display, and you can change the PIN code.
DEV. INFO Switch the device information on the display between the
device name and Bluetooth device address.
GUEST MODE Select [ON] to move to the [DEL DEVICE] screen automatically
when the unit has already been paired with three devices.
[ON], [OFF]

9En
English
First, make a Bluetooth connection with the Bluetooth telephone (page 8). Up to two
Bluetooth telephones can be connected simultaneously.
Important
• Leaving the unit on standby to connect to your phone via Bluetooth while the engine is not running
can drain the vehicle’s battery.
• Be sure to park your vehicle in a safe place and apply the parking brake before operation.
To make a phone call
1
Press to display the phone menu.
When two phones are connected, a phone name appears first then a phone menu
will display. To switch to another phone, press again.
2 Turn the M.C. dial to select [MISSED], [DIALLED], [RECEIVED] or [PHONE BOOK],
then press to confirm.
The phone number list appears.
3 Turn the M.C. dial to select a name or phone number, then press to confirm.
The phone call starts.
To answer an incoming call
1
Press when a call is received.
TIP
When two phones are connected to the unit via Bluetooth and there is an incoming call while one
phone is being used for a call, a message will appear in the display. To answer that incoming call, you
need to end the existing call.
Basic operations
To preset phone numbers
1
Select a phone number from a phone book or call history.
2 Press and hold one of the number buttons (1/ to 6/).
The contact is stored in the selected preset number.
To make a call using a preset number, press one of the number buttons (1/ to 6/),
then press the M.C. dial.
Voice recognition (Only for iPhone)
This function is only available when an iPhone equipped with voice recognition is
connected to the unit via Bluetooth.
1 Press and hold the M.C. dial to activate the voice recognition mode.
2 Press the M.C. dial and then talk into the microphone to input voice commands.
To exit the voice recognition mode, press BAND/.
NOTE
For details on the voice recognition features, refer to the manual supplied with your iPhone.
Phone menu
A.PAIRING Select [ON] to pair the unit and iPhone automatically when an
iPhone is connected to the unit via USB. (This function may not
be available depending on the version of iOS you are using.)
[ON], [OFF]
Bluetooth telephone
Purpose Operation
End a call Press .
Reject an incoming call Press and hold when a call is received.
Switch between the current caller
and a caller on hold
Press the M.C. dial.
Menu Item Description
Cancel a caller on hold Press and hold .
Adjust the volume of the caller’s
voice (When private mode is on,
this function is not available.)
Turn the M.C.dial during the call.
Turn the privacy mode on or off Press BAND/ during the call.
Menu Item Description
MISSED Display the missed call history.
DIALLED Display the dialed call history.
RECEIVED Display the received call history.
PHONE BOOK*1 Display the contacts which have been transferred from your
phone. Set [VISIBLE] in the connection menu to [ON] to browse
the contacts via this unit.
Purpose Operation

10En
*1 The contacts on your phone will normally be transferred automatically when the phone is
connected. If they are not, use your phone to transfer the contacts.
*2 If two phones are connected, this function does not work on incoming calls that are received while
one of the phones is being used for a call.
Important
• Depending on the Bluetooth audio player connected to this unit, the available operations will be
limited to the following two levels:
– A2DP (Advanced Audio Distribution Profile) can only play back songs on your audio player.
– AVRCP (Audio/Video Remote Control Profile) can perform functions such as playback, pause, select
song, etc.
• The sound of the Bluetooth audio player will be muted when the phone is in use.
• When the Bluetooth audio player is in use, you cannot connect to a Bluetooth telephone
automatically.
• Depending on the type of Bluetooth audio player you have connected to this unit, operation and
information displayed may vary based on availability and functionality.
1 Make a Bluetooth connection with the Bluetooth audio player.
2 Press SRC/OFF to select [BT AUDIO] as the source.
3 Press BAND/ to start playback.
Basic operations
You can make various adjustments in the FUNCTION settings (page 11).
* Depending on the connected device, these operations may not be available.
(APP mode is not available for MVH-170UBG/170UB.)
You can enjoy listening to an application on an iPhone/Android device via the unit. In
some cases, you can control an application by using the unit.
For details on compatible devices, visit our website.
Important
Use of third party apps may involve or require the provision of personally identifiable information,
whether through the creation of a user account or otherwise, and for certain applications, the provision
of geolocation data.
ALL THIRD PARTY APPS ARE THE SOLE RESPONSIBILITY OF THE PROVIDERS, INCLUDING WITHOUT
LIMITATION COLLECTION AND SECURITY OF USER DATA AND PRIVACY PRACTICES. BY ACCESSING
THIRD PARTY APPS, YOU AGREE TO REVIEW THE TERMS OF SERVICE AND PRIVACY POLICIES OF THE
PROVIDERS. IF YOU DO NOT AGREE WITH THE TERMS OR POLICIES OF ANY PROVIDER OR DO NOT
CONSENT TO THE USE OF GEOLOCATION DATA WHERE APPLICABLE, DO NOT USE THAT THIRD PARTY
APP.
For iPhone users
This function is compatible with iPhones and iPod touches installed with iOS 5.0 or later.
For Android device users
This function is compatible with devices that have Android OS 2.3 or later installed and also support
Bluetooth SPP (Serial Port Profile) and A2DP (Advance Audio Distribution Profile).
NOTE
PIONEER IS NOT LIABLE FOR ANY THIRD PARTY APPS OR CONTENT, INCLUDING WITHOUT LIMITATION
THEIR ACCURACY OR COMPLETENESS. THE CONTENT AND FUNCTIONALITY OF SUCH APPS ARE THE
SOLE RESPONSIBILITY OF THE APP PROVIDER.
PRESET 1-6 Recall the preset phone numbers. You can also recall the preset
phone numbers by pressing one of the number buttons (1/
to 6/).
PHONE FUNC Select [ON] to answer an incoming call automatically.
A.ANSR:*2
[ON], [OFF]
R.TONE:
[ON], [OFF]
Select [ON] if the ring tone does not come out from the car
speakers. Depending on the connected phone, this function
may not work.
PB INVT Invert the order of names in the phone book (name view).
Bluetooth audio
Purpose Operation
Fast forward or reverse Press and hold or .
Select a track Press or .
Repeat play* Press 6/.
Menu Item Description
Random play* Press 5/.
Pause/resume playback Press 4/PAUSE.
Search for a file from a list 1 Press to display the list.
2 Turn the M.C. dial to select the desired
folder name, then press to confirm.
3 Turn the M.C. dial to select the desired
file, then press to confirm. Playback
starts.
App Mode
Purpose Operation

11En
English
The Bluetooth connection is available for MVH-X370BT.
1 Connect this unit with the mobile device.
• iPhone via USB (page 6)
• Android device via Bluetooth (page 8)
2 Press the M.C. dial to display the main menu.
3 Turn the M.C. dial to select [SYSTEM], then press to confirm.
4 Turn the M.C. dial to select [APP CONN.SET], then press to confirm.
5 Turn the M.C. dial to select one of the below, then press to confirm.
• Select [WIRED] for iPhone.
• Select [BLUETOOTH] for an Android device.
6 Press SRC/OFF to select [APP].
7 Operate the mobile device to start up the application.
Basic operations
You can make various adjustments in the FUNCTION settings (page 11).
You can adjust various settings in the main menu.
1 Press the M.C. dial to display the main menu.
2 Turn the M.C. dial to select one of the categories below, then press to confirm.
• FUNCTION settings (page 11)
• AUDIO settings (page 12)
• SYSTEM settings (page 13)
• ILLUMINATION settings (page 13)
• MIXTRAX settings (page 13)
3 Turn the M.C. dial to select the options, then press to confirm.
NOTES
• The Bluetooth-related menu items in the following tables are not available for MVH-170UI/170UBG/
170UB.
• iPod-related menu items in the following tables are not available for MVH-170UBG/170UB.
• APP mode-related menu items in the following tables are not available for MVH-170UBG/170UB.
The menu items vary according to the source.
Playback of an application via the unit
Purpose Operation
Select a track Press or .
Fast forward or reverse Press and hold or .
Pause/resume playback Press BAND/.
Settings
FUNCTION settings
Menu Item Description
FM SETTING
[TALK], [STANDARD], [MUSIC] Match the sound quality level with the broadcast
signal conditions of the FM band signal.
(Available only when FM band is selected.)
BSM
Store the six strongest stations on the number
buttons (1/ to 6/ ) automatically.
REGIONAL
[ON], [OFF] Limit the reception to the specific regional
programs when AF (alternative frequencies
search) is selected. (Available only when FM
band is selected.)
LOCAL
FM: [OFF], [LV1], [LV2], [LV3], [LV4]
MW/LW: [OFF], [LV1], [LV2]
Restrict the tuning station according to the
signal strength.
TA
[ON], [OFF] Receive current traffic information if available.
(Available only when FM band is selected.)
AF
[ON], [OFF] Allow the unit to retune to a different frequency
providing the same station. (Available only when
FM band is selected.)
NEWS
[ON], [OFF] Interrupt the currently selected source with
news programs. (Available only when FM band is
selected.)

12En
*1 Not available when [SUB.W/SUB.W] is selected in [SP-P/O MODE] in the INITIAL settings (page 5).
*2 Not available when [REAR/REAR] is selected in [SP-P/O MODE] in the INITIAL settings (page 5).
*3 Not available when [OFF] is selected in [SUB.W].
SEEK
[MAN], [PCH] Assign / buttons to seek the stations
one by one (manual tuning) or select a station
from the preset channels.
SEL DEVICE
Connect a Bluetooth device in the list.
S.RTRV
[1] (effective for low compression
rates),
[2] (effective for high
compression rates),
[OFF]
Enhance compressed audio and restore rich
sound.
Not available when;
• USB is selected as a source and the MIXTRAX
function is set to on.
• The FLAC file is played back. (Available for
MVH-170UI/170UBG/170UB)
AUDIO BOOK
[FASTER], [NORMAL], [SLOWER] Change the playback speed. (Not available when
[CONTROL iPod/CTRL iPod] is selected in the
control mode.)
PAUSE
Pause or resume playback.
PLAY
Start playback.
STOP
Stop playback.
AUDIO settings
Menu Item Description
FADER*1
Adjust the front and rear speaker balance.
BALANCE
Adjust the left and right speaker balance.
Menu Item Description
USB
iPod
iPod
EQ SETTING
[SUPER BASS], [POWERFUL],
[NATURAL], [VOCAL], [CUSTOM1],
[CUSTOM2], [FLAT]
Select an equalizer band and
level for further customizing.
Equalizer band: [80HZ], [250HZ],
[800HZ], [2.5KHZ], [8KHZ]
Equalizer level: [+6] to [–6]
Select or customize the equalizer curve.
[CUSTOM1] can be set separately for each source.
However, each of the below combinations are set
to the same setting automatically.
• USB, iPod, and APP (iPhone)
• BT AUDIO, and APP (Android)
[CUSTOM2] is a shared setting used for all
sources.
You can also switch the equalizer by pressing
repeatedly (Only for MVH-170UBG/
170UB).
LOUDNESS
[OFF], [LOW], [MID], [HI] Compensate for clear sound at low volume.
SUB.W*2
[NOR], [REV], [OFF] Select the subwoofer phase.
SUB.W CTRL*2*3
Cut-off frequency: [50HZ],
[63HZ], [80HZ], [100HZ], [125HZ],
[160HZ], [200HZ]
Output level: [–24] to [+6]
Slope level: [–12], [–24]
Only frequencies lower than those in the
selected range are output from the subwoofer.
BASS BOOST
[0] to [+6] Select the bass boost level.
HPF SETTING
Cut-off frequency: [OFF], [50HZ],
[63HZ], [80HZ], [100HZ], [125HZ],
[160HZ], [200HZ]
Slope level: [–12], [–24]
Only frequencies higher than the high-pass filter
(HPF) cutoff are output from the speakers.
SLA
[+4] to [–4] Adjust the volume level for each source except
FM.
Each of the below combinations are set to the
same setting automatically.
• USB, iPod, and APP (iPhone)
• BT AUDIO, and APP (Android)
Menu Item Description

13En
English
You can also access to these menus when the unit is turned off.
*1 [PW SAVE] is canceled if the vehicle battery is disconnected and will need to be turned back on once
the battery is reconnected. When [PW SAVE] is off, depending on connection methods, the unit may
continue to draw power from the battery if your vehicle’s ignition does not have an ACC (accessory)
position.
*2 Not available when [APP] is selected as the source.
(Only for MVH-X370BT)
SYSTEM settings
Menu Item Description
LANGUAGE
[ENG](English), [РУС](Russian),
[TUR](Turkish)
Select the language to display the text
information from a compressed audio file.
CLOCK SET
Set the clock (page 4).
12H/24H
[12H], [24H] Select the time notation.
AUTO PI
[ON], [OFF] Search for a different station with the same
programming, even if using a preset station.
AUX
[ON], [OFF] Set to [ON] when using an auxiliary device
connected to the unit.
BT AUDIO
[ON], [OFF] Set the Bluetooth signal on/off.
MUTE MODE (Only available for MVH-170UI)
[MUTE], [20dB ATT], [10dB ATT] Mute or attenuate sound automatically when a
signal from equipment with a mute function is
received.
PW SAVE*1
[ON], [OFF] Reduce the battery power consumption.
Turning on the source is the only operation
allowed when this function is on.
BT MEM CLEAR
[YES], [CANCEL] Clear the Bluetooth device data (device list, PIN
code, call history, phone book, preset phone
numbers) stored in the unit.
[CLEARED] appears when data is successfully
deleted.
BT VERSION
Displays the system version of the unit and the
Bluetooth module.
APP CONN. SET*2
[WIRED], [BLUETOOTH] Select the appropriate connection method
according to your device.
ILLUMINATION settings
Menu Item Description
DIM SETTING
[SYNC CLOCK], [MANUAL] Change the display brightness.
BRIGHTNESS
[1] to [10] Change the display brightness.
The available setting ranges differ depending on
[DIM SETTING].
MIXTRAX settings
Menu Item Description
SHORT MODE
[1.0 MIN], [1.5 MIN], [2.0 MIN],
[2.5 MIN], [3.0 MIN], [OFF]
Select the length of the playback time.
MIX PATTERN
[SOUND LEVEL] Change the MIXTRAX special effects according
to the audio level.
The mix pattern changes according to the
sound level.
[LOW PASS] The mix pattern changes according to the bass
level.
[RANDOM] The mix pattern changes randomly according
to the sound level mode and low pass mode.
Menu Item Description

14En
DISP FX
[ON], [OFF] Set the MIXTRAX special effects on/off.
CUT IN FX
[ON], [OFF] Turn the MIXTRAX sound effects on/off while
manually changing the tracks.
Menu Item Description

15En
English
Important
• When installing this unit in a vehicle
without an ACC (accessory) position on
the ignition switch, failure to connect the
red cable to the terminal that detects
operation of the ignition key may result
in battery drain.
• Use of this unit in conditions other than
the following could result in fire or
malfunction.
–Vehicles with a 12-volt battery and
negative grounding.
–Speakers with 50 W (output value) and
4 Ω to 8 Ω (impedance value).
• To prevent a short-circuit, overheating or
malfunction, be sure to follow the
directions below.
–Disconnect the negative terminal of the
battery before installation.
–Secure the wiring with cable clamps or
adhesive tape. Wrap adhesive tape
around wiring that comes into contact
with metal parts to protect the wiring.
– Place all cables away from moving parts,
such as the shift lever and seat rails.
–Place all cables away from hot places,
such as near the heater outlet.
–Do not connect the yellow cable to the
battery by passing it through the hole
to the engine compartment.
–Cover any disconnected cable
connectors with insulating tape.
– Do not shorten any cables.
– Never cut the insulation of the power
cable of this unit in order to share the
power with other devices. The current
capacity of the cable is limited.
– Use a fuse of the rating prescribed.
– Never wire the negative speaker cable
directly to ground.
– Never band together negative cables of
multiple speakers.
• When this unit is on, control signals are
sent through the blue/white cable.
Connect this cable to the system remote
control of an external power amp or the
vehicle’s auto-antenna relay control
terminal (max. 300mA 12 V DC). If the
vehicle is equipped with a glass antenna,
connect it to the antenna booster power
supply terminal.
• Never connect the blue/white cable to
the power terminal of an external power
amp. Also, never connect it to the power
terminal of the auto antenna. Doing so
may result in battery drain or a
malfunction.
• The black cable is ground. Ground cables
for this unit and other equipment
(especially, high-current products such as
power amps) must be wired separately. If
they are not, an accidental detachment
may result in a fire or malfunction.
This unit
Connections/Installation
Connections
ACC position No ACC position
MVH-X370BT/170UI/170UBG/170UB
Microphone 4m (13 ft. 1 in.) (Only for
MVH-X370BT)
Rear output or subwoofer output
Front output (Only for MVH-X370BT/
170UI)
Antenna input
Power cord input
Fuse (10 A)
Wired remote input (Only for MVH-
X370BT/170UI)
Hard-wired remote control adapter can
be connected (sold separately).
Microphone input (Only for MVH-
X370BT)
Power cord
Perform these connections when not
connecting a rear speaker lead to a
subwoofer.
To power cord input
Depending on the kind of vehicle, the
function of and may be different.
In this case, be sure to connect to
and to .
Yel low
Back-up (or accessory)
Yel low
Connect to the constant 12 V supply
terminal.
Red
Accessory (or back-up)
Red
Connect to terminal controlled by the
ignition switch (12 V DC).
Connect leads of the same color to each
other.
Black (chassis ground)
Blue/white
The pin position of the ISO connector
will differ depending on the type of
vehicle. Connect and when Pin 5
is an antenna control type. In another
type of vehicle, never connect and
.
Blue/white
Connect to the system control terminal
of the power amp (max. 300 mA 12 V
DC).
Blue/white
Connect to the auto-antenna relay
control terminal (max. 300 mA 12 V DC).
Yellow/black (Only for MVH-170UI)
If you use equipment with a Mute
function, wire this lead to the Audio
Mute lead on that equipment. If not,
keep the Audio Mute lead free of any
connections.
Speaker leads
White: Front left
White/black: Front left
Gray: Front right
Gray/black: Front right
Green: Rear left or subwoofer
Green/black: Rear left or subwoofer
Violet: Rear right or subwoofer
Violet/black: Rear right or subwoofer
ISO connector
In some vehicles, the ISO connector
may be divided into two. In this case, be
sure to connect to both connectors.

16En
NOTES
• Change the initial menu of this unit. Refer
to [SP-P/O MODE] (page 5). The
subwoofer output of this unit is
monaural.
• When using a subwoofer of 70 W (2 Ω), be
sure to connect the subwoofer to the
violet and violet/black leads of this unit.
Do not connect anything to the green
and green/black leads.
Power amp (sold separately)
Perform these connections when using the
optional amplifier.
System remote control
Power amp (sold separately)
Connect with RCA cables (sold
separately)
To front output*
Front speaker*
To rear output or subwoofer output
Rear speaker or subwoofer
* Only for MVH-X370BT/170UI
Important
• Check all connections and systems before
final installation.
• Do not use unauthorized parts as this
may cause malfunctions.
• Consult your dealer if installation requires
drilling of holes or other modifications to
the vehicle.
• Do not install this unit where:
–it may interfere with operation of the
vehicle.
–it may cause injury to a passenger as a
result of a sudden stop.
• The semiconductor laser will be damaged
if it overheats. Install this unit away from
hot places such as near the heater outlet.
• Optimum performance is
obtained when the unit is
installed at an angle of less
than 60°.
• When installing, to ensure proper heat
dispersal when using this unit, make sure
you leave ample space behind the rear
panel and wrap any loose cables so they
are not blocking the vents.
DIN front/rear mount
This unit can be properly installed using
either front-mount or rear-mount
installation.
Use commercially available parts when
installing.
DIN Front-mount
1 Insert the mounting sleeve into the
dashboard.
For installation in shallow spaces, use
the supplied mounting sleeve. If there is
enough space, use the mounting sleeve
that came with the vehicle.
Installation
Leave ample
space
5 cm
5 cm
2 Secure the mounting sleeve by using a
screwdriver to bend the metal tabs
(90°) into place.
Dashboard
Mounting sleeve
Make sure that the unit is installed
securely in place. An unstable
installation may cause skipping or other
malfunctions.
DIN Rear-mount
1 Line up the holes on the mounting
bracket with the holes on the sides of
the unit to attach the bracket.
2 Screw in one screw on each side to
hold the unit in place.
Tapping screw (5 mm × 8 mm)
Mounting bracket
Dashboard or console
Using the included bracket
You can also use the included bracket to
mount the unit. Check to make sure that
the included bracket matches your
particular model of vehicle and then attach
it to the unit as shown below.
Screw
Bracket
Removing the unit
1 Remove the trim ring.
Trim ring
Notched tab
• Releasing the front panel allows easier
access to the trim ring.
• When reattaching the trim ring, point
the side with the notched tab down.

17En
English
2 Insert the supplied extraction keys
into both sides of the unit until they
click into place.
3 Pull the unit out of the dashboard.
(Only for MVH-X370BT)
The microphone should be placed directly
in front of the driver at a suitable distance
to pick up their voice clearly.
CAUTION
It is extremely dangerous to allow the
microphone lead to become wound
around the steering column or shift lever.
Be sure to install the microphone in such a
way that it will not obstruct driving. It is
recommended to use the clamps (sold
separately) to arrange the lead.
To install on the sun visor
1 Fit the microphone lead into the
groove.
2 Install the microphone clip on the sun
visor.
Lowering the sun visor reduces the
voice recognition rate.
To install on the steering
column
1 Slide the microphone base to detach it
from the microphone clip.
Microphone
Microphone clip
Microphone base
Installing the microphone
Microphone
lead
Groove
Microphone clip
2 Install the microphone on the rear side
of the steering column.
Double-sided tape

18En
The display automatically returns to the
normal display.
→ No operations have been made for
about 30 seconds.
– Perform an operation.
The repeat play range changes
unexpectedly.
→ Depending on the repeat play range,
the selected range may change when
another folder or track is being selected
or during fast forwarding/reversing.
– Select the repeat play range again.
A subfolder is not played back.
→ Subfolders cannot be played when
[FLD] (folder repeat) is selected.
– Select another repeat play range.
The sound is intermittent.
→ You are using a device, such as a cellular
phone, that may cause audible
interference.
– Move electrical devices that may be
causing the interference away from
the unit.
The sound from the Bluetooth audio
source is not played back.
→ There is a call in progress on a
Bluetooth-connected cellular phone.
– The sound will be played back when
the call is terminated.
→ A Bluetooth-connected cellular phone
is currently being operated.
– Stop using the cellular phone.
→ The connection between the unit and
the cellular phone is not established
correctly after a call made by a
Bluetooth-connected cellular phone.
– Make a Bluetooth connection
between the unit and the cellular
phone again.
Common
AMP ERROR
→ This unit fails to operate or the speaker
connection is incorrect.
→ The protective circuit is activated.
– Check the speaker connection.
– Turn the ignition switch OFF and back
to ON again. If the message remains,
contact your dealer or an authorized
Pioneer Service Station for assistance.
NO XXXX (NO TITLE, for example)
→ There is no embedded text information.
– Switch the display or play another
track/file.
USB device/iPod
FORMAT READ
→ Sometimes there is a delay between the
start of playback and when you start to
hear any sound.
– Wait until the message disappears and
you hear sound.
NO AUDIO
→ There are no songs.
–Transfer the audio files to the USB
device and connect.
→ The connected USB device has security
enabled.
– Follow the USB device instructions to
disable the security.
Additional Information
Troubleshooting
Error messages
SKIPPED
→ The connected USB device contains
DRM protected files.
– The protected files are skipped.
PROTECT
→ All the files on the connected USB
device are embedded with DRM.
– Replace the USB device.
N/A USB
→ The connected USB device is not
supported by this unit.
– Disconnect your device and replace it
with a compatible USB device.
CHECK USB
→ The USB connector or USB cable has
short-circuited.
– Check that the USB connector or USB
cable is not caught in something or
damaged.
→ The connected USB device consumes
more than maximum allowable current.
– Disconnect the USB device and do not
use it. Turn the ignition switch OFF
and back to ACC or ON. Connect only
compliant USB devices.
→ The iPod operates correctly but does
not charge.
– Make sure the connection cable for
the iPod has not shorted out (e.g., not
caught in metal objects). After
checking, turn the ignition switch OFF
and back to ON, or disconnect the
iPod and reconnect.
ERROR-19
→ Communication failed.
– Perform one of the following
operations, then return to the USB
source.
• Turn the ignition switch OFF and
back to ON.
• Disconnect the USB device.
• Change to a different source.
→ iPod failure.
– Disconnect the cable from the iPod.
Once the iPod’s main menu is
displayed, reconnect the iPod and
reset it.
ERROR-23
→ USB device was not formatted properly.
– Format the USB device with FAT12,
FAT16 or FAT32.
ERROR-16
→ The iPod firmware version is old.
– Update the iPod version.
→ iPod failure.
– Disconnect the cable from the iPod.
Once the iPod’s main menu is
displayed, reconnect the iPod and
reset it.
STOP
→ There are no songs in the current list.
– Select a list that contains songs.
NOT FOUND
→ No related songs.
– Transfer songs to the iPod.
Bluetooth device
ERROR-10
→ The power failed for the Bluetooth
module of the unit.
– Turn the ignition switch OFF and back
to ACC or ON.
Apps
NO BT DEVICE GO TO BT MENU TO
REGISTER
→ No Bluetooth device found.
– Connect the unit and the device via
Bluetooth (page 8).
CONN. FAILED PRESS BAND KEY TO
RETRY
→ Bluetooth connection failed.
–Press BAND/ to make a connection
again.

19En
English
DISCONNECTED PRESS BAND KEY TO
RETRY
→ Bluetooth connection failed.
– Press BAND/ to make a connection
again.
CHECK APP
→ Connection to the application failed.
– Follow the instructions that appear on
the screen.
START UP APP
→ The application has not started running
yet.
– Operate the mobile device to start up
the application.
USB storage device
• Connections via USB hubs are not
supported.
• Firmly secure the USB storage device
before driving. Do not let the USB storage
device fall onto the floor, where it may
become jammed under the brake or
accelerator pedal.
• Depending on the USB storage device,
the following problems may occur.
–Operations may vary.
–The storage device may not be
recognized.
–Files may not be played back properly.
–The device may cause audible
interference when you are listening to
the radio.
iPod
• Do not leave the iPod in places with high
temperatures.
• Firmly secure the iPod when driving. Do
not let the iPod fall onto the floor, where
it may become jammed under the brake
or accelerator pedal.
• The settings of the iPod such as the
equalizer and repeat play are changed
automatically when the iPod is
connected to the unit. Once the iPod is
disconnected, those settings will return
to the original settings.
• Incompatible text saved on the iPod will
not be displayed by the unit.
• Only the first 32 characters can be
displayed as a file name (including the file
extension) or a folder name.
• The unit may not work properly
depending on the application used to
encode WMA files.
• There may be a slight delay at the start of
the playback of audio files embedded
with image data, or audio files stored on a
USB device with numerous folder
hierarchies.
• Russian text to be displayed on this unit
should be encoded in one of the
following character sets:
–Unicode (UTF-8, UTF-16)
– A character set other than Unicode that
is used in a Windows environment and
is set to Russian in the multi-language
setting
CAUTION
• Pioneer cannot guarantee compatibility
with all USB mass storage devices, and
assumes no responsibility for any loss of
data on media players, smartphones, or
other devices while using this product.
• Do not leave discs or a USB storage
device in any place that is subject to high
temperatures.
WMA files
Handling guidelines
Compressed audio
compatibility
File extension .wma
MP3 files
WAV files
• WAV file formats cannot be connected via
MTP.
FLAC files (Only for MVH-170UI/
170UBG/170UB)
• FLAC file formats cannot be connected
via MTP.
• FLAC files may not be playable,
depending on the encoder.
USB device
• There may be a slight delay when starting
playback of audio files on a USB storage
device with numerous folder hierarchies.
This unit supports only the following iPod
models. Supported iPod software versions are
shown below. Older versions may not be
supported.
Made for
–iPod touch (1st through 5th generation)
–iPodclassic
–iPod with video
–iPod nano (1st through 7th generation)
–iPhone5s
–iPhone5c
–iPhone5
–iPhone4S
–iPhone4
–iPhone3GS
–iPhone3G
–iPhone
• Operations may vary depending on the
generation and/or software version of
the iPod.
Bit rate 48 kbps to 320 kbps
(CBR), 48 kbps to 384
kbps (VBR)
Sampling frequency 32 kHz, 44.1 kHz, 48
kHz
Windows Media™
Audio Professional,
Lossless, Voice/DRM
Stream/Stream with
video
Not compatible
File extension .mp3
Bit rate 8 kbps to 320 kbps
(CBR), VBR
Sampling frequency 8 kHz to 48 kHz (32
kHz, 44.1 kHz, 48 kHz
for emphasis)
Compatible ID3 tag
version
1.0, 1.1, 2.2, 2.3, 2.4
(ID3 tag Version 2.x is
given priority over
Version 1.x.)
M3u playlist Not compatible
MP3i (MP3
interactive), mp3 PRO
Not compatible
File extension .wav
Quantization bits 8 and 16 (LPCM), 4
(MSADPCM)
Sampling frequency 16 kHz to 48 kHz
(LPCM), 22.05 kHz and
44.1 kHz (MS ADPCM)
File extension .flac
Sampling frequency 8/11.025/12/16/22.05/
24/32/44.1/48 [kHz]
Quantization bit rate 16 bit
Channel mode 1/2 ch
Playable folder
hierarchy
Up to eight tiers (A
practical hierarchy is
less than two tiers.)
Playable folders Up to 500
Playable files Up to 15 000
Playback of copyright-
protected files
Not compatible
Partitioned USB
device
Only the first partition
can be played.
iPod compatibility

20En
• Users of iPod with the Lightning
Connector should use the Lightning to
USB Cable (supplied with iPod).
• Users of iPod with the Dock Connector
should use the CD-IU51. For details,
consult your dealer.
• Refer to the iPod manuals for information
about the file/format compatibility.
• Audiobook, Podcast: Compatible
CAUTION
Pioneer accepts no responsibility for data
lost on the iPod, even if that data is lost
while this unit is used.
The user cannot assign folder numbers and
specify playback sequences with this unit.
Sequence of audio file depends on the
connected device.
Note that the hidden files in a USB device
cannot be played back.
Example of a hierarchy
Bluetooth
The Bluetooth® word mark and logos are
registered trademarks owned by Bluetooth SIG,
Inc. and any use of such marks by PIONEER
CORPORATION is under license. Other
trademarks and trade names are those of their
respective owners.
iTunes
Apple and iTunes are trademarks of Apple
Inc., registered in the U.S. and other
countries.
WMA
Windows Media is either a registered
trademark or trademark of Microsoft
Corporation in the United States and/or
other countries.
Sequence of audio files
Folder
Compressed audio
file
to : Playback sequence
01 to 05: Folder number
Russian character chart
Copyright and trademark
D: Display C: Character
This product includes technology owned
by Microsoft Corporation and cannot be
used or distributed without a license from
Microsoft Licensing, Inc.
FLAC
Copyright © 2000-2009 Josh Coalson
Copyright © 2011-2013 Xiph.Org
Foundation
Redistribution and use in source and
binary forms, with or without modification,
are permitted provided that the following
conditions are met:
– Redistributions of source code must
retain the above copyright notice, this list
of conditions and the following
disclaimer.
– Redistributions in binary form must
reproduce the above copyright notice,
this list of conditions and the following
disclaimer in the documentation and/or
other materials provided with the
distribution.
– Neither the name of the Xiph.org
Foundation nor the names of its
contributors may be used to endorse or
promote products derived from this
software without specific prior written
permission.
THIS SOFTWARE IS PROVIDED BY THE
COPYRIGHT HOLDERS AND
CONTRIBUTORS “AS IS” AND ANY EXPRESS
OR IMPLIED WARRANTIES, INCLUDING, BUT
NOT LIMITED TO, THE IMPLIED
WARRANTIES OF MERCHANTABILITY AND
FITNESS FOR A PARTICULAR PURPOSE ARE
DISCLAIMED. IN NO EVENT SHALL THE
FOUNDATION OR CONTRIBUTORS BE
LIABLE FOR ANY DIRECT, INDIRECT,
INCIDENTAL, SPECIAL, EXEMPLARY, OR
CONSEQUENTIAL DAMAGES (INCLUDING,
BUT NOT LIMITED TO, PROCUREMENT OF
SUBSTITUTE GOODS OR SERVICES; LOSS OF
USE, DATA, OR PROFITS; OR BUSINESS
INTERRUPTION) HOWEVER CAUSED AND
ON ANY THEORY OF LIABILITY, WHETHER
IN CONTRACT, STRICT LIABILITY, OR TORT
(INCLUDING NEGLIGENCE OR OTHERWISE)
ARISING IN ANY WAY OUT OF THE USE OF
THIS SOFTWARE, EVEN IF ADVISED OF THE
POSSIBILITY OF SUCH DAMAGE.
iPod & iPhone
iPhone, iPod, iPod classic, iPod nano, and
iPod touch are trademarks of Apple Inc.,
registered in the U.S. and other countries.
Lightning is a trademark of Apple Inc.
“Made for iPod” and “Made for iPhone”
mean that an electronic accessory has
been designed to connect specifically to
iPod or iPhone, respectively, and has been
certified by the developer to meet Apple
performance standards. Apple is not
responsible for the operation of this device
or its compliance with safety and
regulatory standards. Please note that the
use of this accessory with iPod or iPhone
may affect wireless performance.
Android™
Android is a trademark of Google Inc.
MIXTRAX
MIXTRAX is a trademark of the PIONEER
CORPORATION.

21En
English
General
Power source: 14.4 V DC (10.8 V to 15.1 V
allowable)
Grounding system: Negative type
Maximum current consumption: 10.0 A
Dimensions (W × H × D):
DIN
Chassis: 178 mm × 50 mm × 97 mm
Nose: 188 mm × 58 mm × 17 mm
D
Chassis: 178 mm × 50 mm × 97 mm
Nose: 170 mm × 46 mm × 17 mm
Weight: 0.5 kg
Audio
Maximum power output:
50 W × 4
70 W × 1/2 Ω (for subwoofer)
Continuous power output:
22 W × 4 (50 Hz to 15 000 Hz, 5 %
THD, 4 Ω load, both channels driven)
Load impedance: 4 Ω (4 Ω to 8 Ω allowable)
Preout maximum output level: 2.0 V
Loudness contour: +10 dB (100 Hz),
+6.5 dB (10 kHz) (volume: –30 dB)
Equalizer (5-Band Graphic Equalizer):
Frequency: 80 Hz/250 Hz/800 Hz/2.5
kHz/8 kHz
Equalization range: ±12 dB (2 dB step)
Subwoofer (mono):
Frequency: 50 Hz/63 Hz/80 Hz/100
Hz/125 Hz/160 Hz/200 Hz
Slope: –12 dB/oct, –24 dB/oct
Gain: +6 dB to –24 dB
Phase: Normal/Reverse
USB
USB standard specification: USB 2.0 full
speed
Maximum current supply: 1 A
USB Class: MSC (Mass Storage Class)
File system: FAT12, FAT16, FAT32
MP3 decoding format: MPEG-1 & 2 Audio
Layer 3
WMA decoding format: Ver. 7, 7.1, 8, 9, 10,
11, 12 (2 ch audio) (Windows Media
Player)
FLAC decoding format: v1.3.0 (Free
Lossless Audio Codec) (Only for MVH-
170UI/170UBG/170UB)
WAV signal format: Linear PCM & MS
ADPCM (Non-compressed)
FM tuner
Frequency range: 87.5 MHz to 108.0 MHz
Usable sensitivity: 11 dBf (1.0 μV/75 Ω,
mono, S/N: 30 dB)
Signal-to-noise ratio: 72 dB (IEC-A network)
MW tuner
Frequency range: 531 kHz to 1 602 kHz
Usable sensitivity: 25 μV (S/N: 20 dB)
Signal-to-noise ratio: 62 dB (IEC-A network)
LW tuner
Frequency range: 153 kHz to 281 kHz
Usable sensitivity: 28 μV (S/N: 20 dB)
Signal-to-noise ratio: 62 dB (IEC-A network)
Bluetooth
(Only for MVH-X370BT)
Version: Bluetooth 3.0 certified
Output power: +4 dBm Maximum (Power
class 2)
Bluetooth profiles:
GAP (Generic Access Profile)
SDAP (Service Discovery Application
Profile)
OPP (Object Push Profile)
HFP (Hands Free Profile) 1.6
PBAP (Phone Book Access Profile)
A2DP (Advanced Audio Distribution
Profile)
AVRCP (Audio/Video Remote Control
Profile) 1.5
SPP (Serial Port Profile) 1.1
Specifications
NOTE
Specifications and the design are subject
to modifications without notice.

2Fr
Avant de commencer ............................................................................. 3
Mise en route ........................................................................................... 3
Radio.......................................................................................................... 5
USB/iPod/AUX.......................................................................................... 6
Bluetooth.................................................................................................. 8
Mode d’application............................................................................... 11
Réglages ................................................................................................. 12
Réglages FUNCTION ............................................................................ 12
Réglages AUDIO.................................................................................... 13
Réglages SYSTEM ................................................................................. 14
Réglages ILLUMINATION..................................................................... 14
Réglages MIXTRAX............................................................................... 15
Raccordements/Installation................................................................ 16
Informations complémentaires.......................................................... 19
Table des matières
À propos de ce mode d’emploi :
• Parmi les instructions suivantes, les clés USB ou les lecteurs audio USB sont
collectivement désignés sous le nom de « périphérique USB ».
• Dans ce mode d’emploi, les iPod et les iPhone sont collectivement désignés sous le
nom d’« iPod ».

3Fr
Français
Nous vous remercions d’avoir acheté cet appareil PIONEER
Pour garantir une utilisation correcte, lisez bien ce mode d’emploi avant d’utiliser cet appareil. Il est
particulièrement important que vous lisiez et respectiez les indications AVERTISSEMENT et
ATTENTION de ce mode d’emploi. Conservez-le dans un endroit sûr et facilement accessible pour
toute consultation ultérieure.
Dans les états membres de l’UE, en Suisse et en Norvège, les foyers domestiques peuvent rapporter
leurs produits électroniques usagés gratuitement à des points de collecte spécifiés ou à un revendeur
(sous réserve d’achat d’un produit similaire).
Dans les pays qui ne sont pas mentionnés ci-dessus, veuillez contacter les autorités locales pour vous
informer de la méthode correcte de mise au rebut.
En agissant ainsi vous assurerez que le produit que vous mettez au rebut est soumis au processus de
traitement, de récupération et de recyclage nécessaire et éviterez ainsi les effets négatifs potentiels sur
l’environnement et la santé publique.
ATTENTION
•N’essayez pas d’installer cet appareil ou d’en faire l’entretien vous-même. L’installation ou
l’entretien de cet appareil par des personnes sans formation et sans expérience en équipement
électronique et en accessoires automobiles peut être dangereux et vous exposer à des risques
d’électrocution ou à d’autres dangers.
•N’essayez pas de démonter ou de modifier cet appareil. Veillez à quitter la route et garer votre véhicule
en lieu sûr avant d’essayer d’utiliser les commandes de l’appareil.
PRÉCAUTION
•Ne laissez pas cet appareil entrer en contact avec de l’humidité et/ou des liquides. Cela pourrait
provoquer une décharge électrique. Tout contact avec des liquides pourrait également provoquer des
dommages, de la fumée et une surchauffe de l’appareil.
•Maintenez le niveau d’écoute à une valeur telle que vous puissiez entendre les sons provenant de
l’extérieur.
•Le Pioneer CarStereo-Pass est utilisable seulement en Allemagne.
Si vous rencontrez des problèmes
En cas d’anomalie, veuillez contacter votre revendeur ou le centre d’entretien agréé par PIONEER le plus
proche.
MVH-X370BT/170UI/170UBG/170UB
*1 Les touches varient selon les appareils.
*2 Cette touche est désignée sous le nom de DISP dans ce mode d’emploi.
Opérations fréquemment utilisées
Les touches disponibles varient selon les appareils.
Avant de commencer
Si vous souhaitez vous débarrasser de cet appareil, ne le mettez pas à la poubelle avec vos ordures
ménagères. Il existe un système de collecte séparé pour les appareils électroniques usagés, qui
doivent être récupérés, traités et recyclés conformément à la législation.
Mise en route
Fonctionnement de base
Objectif Opération
Mettre l’appareil sous tension* Appuyez sur SRC/OFF pour mettre
l’appareil sous tension.
Appuyez longuement sur SRC/OFF pour
mettre l’appareil hors tension.
Régler le volume Tournez la molette M.C..
Sélectionner une source Appuyez plusieurs fois sur SRC/OFF.
Modifier les informations d’affichage Appuyez plusieurs fois sur DISP.
Revenir à l’affichage/la liste précédent(e) Appuyez sur /DIMMER.
Revenir à l’affichage normal depuis le
menu.
Appuyez sur BAND/.
Répondre à/terminer un appel
(uniquement pour le modèle MVH-X370BT)
Appuyez sur .
SRC (source)/OFF
Touche de retrait
Fenêtre d’affichageMolette M.C. (multi-
contrôle)
BAND/
/DIMMER Touche d’affichage*2
*1
*1

4Fr
* Si le fil bleu/blanc de l’appareil est relié à la borne de commande du relais d’antenne automatique du
véhicule, l’antenne se déploie lorsque la source de cet appareil est mise en service. Pour rétracter
l’antenne, mettez la source hors service.
Indication de l’affichage
Retirez la face avant pour empêcher tout vol. Débranchez tous les câbles et les
périphériques branchés à la face avant et mettez l’appareil hors tension avant de le
retirer.
Important
• Évitez de soumettre la face avant à des chocs excessifs.
• Tenez la face avant à l’abri du soleil et des températures élevées.
• Stockez toujours la face avant détachée, dans un étui de protection ou un sac.
Lorsque vous mettez le contact sur ON après avoir installé l’appareil, [SET UP :YES]
apparaît sur l’affichage.
1 Appuyez sur la molette M.C..
Si vous n’utilisez pas l’appareil dans les 30 secondes qui suivent, le menu de
configuration disparaît. Si vous préférez ne pas effectuer la configuration pour
l’instant, tournez la molette M.C. pour sélectionner [NO], puis appuyez pour valider.
2 Tournez la molette M.C. pour sélectionner les options, puis appuyez pour valider.
Pour passer à l’option de menu suivante, vous devez valider votre sélection.
Indication Description
Apparaît lorsqu’il existe un niveau inférieur de menu ou de dossier.
Apparaît lorsque la fonction de réponse automatique est en service
(page 10).
(Uniquement pour les modèles compatibles Bluetooth.)
Apparaît lorsque la touche est appuyée.
Apparaît lorsque la fonction d’accord sur une station locale est en service
(page 12).
Apparaît lorsqu’un programme d’informations routières est capté.
Apparaît lorsqu’un bulletin d’informations routières est capté (page 12).
Apparaît lorsque le sound retriever (correcteur de son compressé) est en
service (page 13).
Apparaît lorsque la lecture aléatoire est en service (sauf si la fonction BT
AUDIO est sélectionnée en tant que source).
Apparaît lorsque la lecture répétée est en service (sauf si la fonction BT
AUDIO est sélectionnée en tant que source).
Apparaît lorsque la fonction de commande d’iPod est en service (page 8).
Apparaît lorsqu’une connexion Bluetooth est établie (page 8).
(Uniquement pour les modèles compatibles Bluetooth.)
Retrait de la face avant
Menu de configuration
Élément de menu Description
LANGUAGE Sélectionnez la langue d’affichage des informations textuelles à
partir d’un fichier audio compressé.
[ENG] (anglais),
[РУС] (russe),
[TUR] (turc)
CLOCK SET Réglez l’horloge.
FM STEP Sélectionnez l’incrément d’accord FM à partir de 100 kHz ou de
50 kHz.
[100], [50]
Retirer Fixer

5Fr
Français
3 [QUIT :YES] apparaît une fois tous les paramètres réglés.
Pour retourner dans le premier élément du menu de configuration, tournez la
molette M.C. afin de sélectionner [QUIT :NO],
puis appuyez pour valider.
4 Appuyez sur la molette M.C. pour valider les paramètres.
REMARQUES
• Vous pouvez annuler le réglage du menu en appuyant sur SRC/OFF.
• Ces paramètres peuvent être ajustés à tout moment à partir des réglages SYSTEM (page 14) et des
réglages INITIAL (page 5).
1 Appuyez sur la molette M.C. pour afficher le menu principal.
2 Tournez la molette M.C. pour sélectionner [SYSTEM], puis appuyez pour valider.
3 Tournez la molette M.C. pour sélectionner [DEMO OFF], puis appuyez pour
valider.
4 Tournez la molette M.C. pour sélectionner [YES], puis appuyez pour valider.
1 Appuyez longuement sur SRC/OFF jusqu’à ce que l’appareil se mette hors
tension.
2 Appuyez longuement sur SRC/OFF pour afficher le menu principal.
3 Tournez la molette M.C. pour sélectionner [INITIAL], puis appuyez pour valider.
4 Tournez la molette M.C. pour sélectionner une option, puis appuyez pour valider.
REMARQUE
Les options varient selon les appareils.
Les fréquences du syntoniseur de cet appareil sont destinées à une utilisation en Europe
de l’Ouest, Asie, Moyen-Orient, Afrique et Océanie. Son utilisation dans d’autres régions
peut se traduire par une réception de mauvaise qualité. La fonction RDS (Radio Data
System) n’est opérationnelle que dans les régions où des signaux RDS sont diffusés pour
les stations FM.
1 Appuyez sur SRC/OFF pour sélectionner [RADIO].
2 Appuyez sur BAND/ pour sélectionner la bande [FM1], [FM2], [FM3], [MW] ou
[LW].
3 Appuyez sur une touche numérique (1/ à 6/).
CONSEIL
Les touches / peuvent également servir à sélectionner une station préréglée lorsque [SEEK]
est réglé sur [PCH] dans les réglages FUNCTION (page 13).
Annulation de l’affichage de démonstration (DEMO
OFF)
Réglages INITIAL
Élément de menu Description
FM STEP Sélectionnez l’incrément d’accord FM à partir de 100 kHz ou de
50 kHz.
[100], [50]
SP-P/O MODE À sélectionner lorsqu’un haut-parleur à gamme étendue est
relié aux fils de sortie du haut-parleur arrière et qu’un haut-
parleur d’extrêmes graves est branché à la sortie RCA.
[REAR/SUB.W]
[SUB.W/SUB.W] À sélectionner lorsqu’un haut-parleur d’extrêmes graves passif
est directement relié aux fils de sortie du haut-parleur arrière et
qu’un haut-parleur d’extrêmes graves est branché à la sortie
RCA.
[REAR/REAR] À sélectionner lorsque des haut-parleurs à gamme étendue sont
reliés aux fils de sortie du haut-parleur arrière et à la sortie RCA.
Si un haut-parleur à gamme étendue est relié aux fils de sortie
du haut-parleur arrière et que la sortie RCA n’est pas utilisée,
vous pouvez sélectionner [REAR/SUB.W] ou [REAR/REAR].
S/W UPDATE À sélectionner pour mettre à jour l’appareil avec le dernier
logiciel Bluetooth. Pour plus de détails sur le logiciel Bluetooth
et la mise à jour, visitez notre site Web.
SYSTEM RESET Sélectionnez [YES] pour réinitialiser les réglages de l’appareil.
L’appareil redémarrera automatiquement. (Certains paramètres
seront conservés même après la rénitialisation de l’appareil, tels
que les informations de couplage Bluetooth, etc.)
[YES], [CANCEL]
Radio
Réception des stations mémorisées
Élément de menu Description

6Fr
Les six stations les plus puissantes sont mémorisées sur les touches numériques (1/ à
6/).
1 Après avoir sélectionné la bande, appuyez sur la molette M.C. pour afficher le
menu principal.
2 Tournez la molette M.C. pour sélectionner [FUNCTION], puis appuyez pour
valider.
3 Tournez la molette M.C. pour sélectionner [BSM], puis appuyez pour valider.
Pour rechercher une station manuellement
1
Après avoir sélectionné la bande, appuyez sur / pour sélectionner une
station.
Appuyez longuement sur / , puis relâchez pour rechercher une station
disponible. Le balayage s’arrête lorsque l’appareil capte une station. Pour annuler
l’accord par recherche, appuyez sur / .
REMARQUE
[SEEK] doit être réglé sur [MAN] dans les réglages FUNCTION (page 13).
Pour mémoriser des stations manuellement
1
Lorsque vous captez la station que vous souhaitez mémoriser, appuyez
longuement sur l’une des touches numériques (1/ à 6/ ) jusqu’à ce qu’elle
cesse de clignoter.
L’appareil recherche une station diffusant des informations PTY (type de programme).
1 Appuyez sur pendant la réception FM.
2 Tournez la molette M.C. pour sélectionner le type de programme [NEWS/INFO],
[POPULAR], [CLASSICS] ou [OTHERS].
3 Appuyez sur la molette M.C..
L’appareil continue à rechercher une station. Lorsqu’il en trouve une, son nom de
service de programme s’affiche.
REMARQUES
• Pour annuler la recherche, appuyez sur la molette M.C..
• Le programme de certaines stations peut différer de celui qu’indique le PTY transmis.
• Si aucune station ne diffuse le type de programme que vous recherchez, [NOT FOUND] s’affiche
pendant environ deux secondes, puis le syntoniseur revient à la station de départ.
Liste des codes PTY
Si vous souhaitez obtenir de plus amples informations sur la liste PTY, veuillez visiter le
site suivant :
http://www.pioneer.eu/eur/products/25/121/tech/CarAudio/PTY.html
REMARQUE
La fonction iPod n’est pas disponible pour le MVH-170UBG/170UB.
Débranchez le casque ou les écouteurs du périphérique avant de raccorder ce dernier à
l’appareil.
Périphérique USB/iPod
1
Ouvrez le cache du port USB.
2 Raccordez le périphérique USB/l’iPod à l’aide d’un câble approprié.
Mémoire des meilleures stations (BSM)
Utilisation des fonctions PTY
USB/iPod/AUX
Lecture
Prise d’entrée AUX (prise stéréo 3,5 mm)
Port USB
SRC (source)/OFF
Molette M.C. (multi-contrôle)

7Fr
Français
ATTENTION
Utilisez un câble optionnel USB Pioneer (CD-U50E) afin de brancher le périphérique de stockage USB,
car un périphérique connecté directement à l’appareil pourrait être dangereux.
Avant de retirer le périphérique, arrêtez la lecture.
Connexion MTP
Il est possible de connecter un périphérique Android (utilisant le système d’exploitation Android 4.0 ou
une version supérieure) via une connexion MTP à l’aide du câble fourni avec le périphérique.
Cependant, en fonction du périphérique connecté et du nombre de fichiers dans le périphérique, les
morceaux/fichiers audio peuvent ne pas être lus via MTP. Notez que la connexion MTP n’est pas
compatible avec les formats de fichiers WAV et FLAC*, et ne peut pas être utilisée avec la fonction
MIXTRAX.
* Les fichiers FLAC sont compatibles uniquement avec les modèles MVH-170UI/170UBG/170UB.
AUX
1
Insérez la mini-fiche stéréo dans la prise d’entrée AUX.
2 Appuyez sur SRC/OFF pour sélectionner la source [AUX].
REMARQUE
Si la source [AUX] est réglée sur [OFF] dans les paramètres SYSTEM, la fonction [AUX] ne peut pas être
sélectionnée.
Vous pouvez procéder à différents ajustements dans les réglages FUNCTION (page 12).
Notez que les opérations suivantes ne fonctionnent pas sur un périphérique AUX. Pour
faire fonctionner un périphérique AUX, utilisez l’appareil lui-même.
*1 Fichiers audio compressés uniquement
*2 Lorsque l’appareil ne dispose pas de touche 3/S.Rtrv, le sound retriever (correcteur de son
compressé) peut être réglé dans les paramètres FUNCTION.
Opérations
Objectif Opération
Sélectionner un dossier/album*1 Appuyez sur 1/ ou 2/.
Sélectionner une piste/un morceau
(chapitre)
Appuyez sur ou .
Avance ou retour rapide Appuyez longuement sur ou .
Rechercher un fichier dans une liste 1 Appuyez sur pour afficher la liste.
2 Tournez la molette M.C. pour
sélectionner la catégorie ou le nom de
fichier (dossier) de votre choix, puis
appuyez pour valider.
3 Tournez la molette M.C. pour
sélectionner le fichier de votre choix, puis
appuyez pour valider.
La lecture démarre.
Afficher une liste de fichiers dans la
catégorie/le dossier sélectionné(e)*1
Appuyez sur la molette M.C. lorsqu’une
catégorie/un dossier est sélectionné(e).
Lire un morceau de la catégorie/du dossier
sélectionné(e)*1
Appuyez longuement sur la molette M.C.
lorsqu’une catégorie/un dossier est
sélectionné(e).
Recherche alphabétique (iPod uniquement) 1 Appuyez sur pour afficher la liste.
2 Tournez la molette M.C. pour
sélectionner la liste de catégories de
votre choix, puis appuyez sur pour
saisir le mode de recherche
alphabétique.
(Pour saisir le mode de recherche
alphabétique, vous pouvez également
tourner deux fois la molette M.C..)
3 Tournez la molette M.C. pour
sélectionner une lettre, puis appuyez
pour afficher la liste alphabétique.
Pour annuler la recherche alphabétique,
appuyez sur /DIMMER.
Lecture répétée Appuyez sur 6/.
Lecture aléatoire Appuyez sur 5/.
Lecture aléatoire de toutes les pistes (iPod
uniquement)
Appuyez longuement sur 5/.
Pause/Reprise de la lecture Appuyez sur 4/PAUSE.
Sound retriever*2 (correcteur de son
compressé)
Appuyez sur 3/S.Rtrv.
[1] : efficace pour les taux de compression
faibles
[2] : efficace pour les taux de compression
élevés
Retour au dossier racine (USB
uniquement)*1
Appuyez longuement sur BAND/.
Changer de lecteurs dans le périphérique
USB
(Uniquement les périphériques qui
prennent en charge le dispositif de
périphérique de mémoire de masse USB)
Appuyez sur BAND/.
Objectif Opération

8Fr
Mode de lecture en lien
Vous pouvez accéder à des morceaux en vous basant sur l’artiste, l’album ou le genre en
cours de lecture.
1 Pendant l’écoute d’un morceau, appuyez longuement sur pour entrer en mode
de lecture en lien.
2 Tournez la molette M.C. pour sélectionner le mode ([ARTIST], [ALBUM], [GENRE]),
puis appuyez pour valider.
Le morceau/l’album sélectionné est lu après le morceau en cours de lecture.
REMARQUE
Le morceau/l’album sélectionné peut être annulé si vous utilisez d’autres fonctions que le mode de
lecture en lien (ex. : avance et retour rapides).
Commande d’un iPod
Vous pouvez commander l’appareil via un iPod raccordé.
Les modèles d’iPod suivants ne sont pas compatibles avec cette fonction.
– iPod nano 1ère génération, iPod avec vidéo
1 Appuyez sur BAND/ en cours de lecture, puis sélectionnez le mode de
commande.
[CONTROL iPod/CTRL iPod] : la fonction iPod de l’appareil peut être activée à partir
de l’iPod raccordé.
[CONTROL AUDIO/CTRL AUDIO] : la fonction iPod de l’appareil ne peut être activée
que par les touches situées sur l’appareil. Dans ce mode, il est impossible de mettre
l’iPod raccordé sous ou hors tension.
REMARQUES
• Appuyer sur iPod peut également commuter le mode de commande (uniquement pour le modèle
MVH-170UI).
• La commutation du mode de commande sur [CONTROL iPod/CTRL iPod] met en pause la lecture d’un
morceau. Utilisez l’iPod raccordé pour reprendre la lecture.
• Les opérations suivantes sont toujours accessibles à partir de l’appareil, même si le mode de
commande est réglé sur [CONTROL iPod/CTRL iPod].
– Pause, avance/retour rapide, sélection d’un morceau/chapitre
• Le volume ne peut être réglé qu’à partir de cet appareil.
(Uniquement pour le modèle MVH-X370BT)
La fonction MIXTRAX crée un mélange ininterrompu de pistes de votre bibliothèque
musicale, agrémenté d’effets d’éclairage. Pour plus de détails sur les réglages de
MIXTRAX, voir page 15.
REMARQUES
• Cette fonction n’est pas compatible avec un périphérique Android connecté via MTP.
• Lorsque la source USB est sélectionnée et la fonction MIXTRAX est en cours d’utilisation, le sound
retriever (correcteur de son compressé) est désactivé.
• Selon le fichier/morceau, il se peut que les effets sonores soient indisponibles.
• Désactivez la fonction MIXTRAX si les effets d’éclairage qu’elle produit vous gênent dans votre
conduite.
1 Appuyez sur 3/MIX pour activer/désactiver MIXTRAX.
(Uniquement pour le modèle MVH-X370BT)
Important
Si au moins trois périphériques Bluetooth (ex. : un téléphone et un lecteur audio séparé) sont
connectés, il se peut qu’ils ne fonctionnent pas correctement.
1 Activez la fonction Bluetooth du périphérique.
2 Appuyez longuement sur pour afficher le menu de connexion.
3 Tournez la molette M.C. pour sélectionner [ADD DEVICE], puis appuyez pour
valider.
L’appareil commence à rechercher les périphériques disponibles, puis les affiche
dans la liste des périphériques.
• Pour annuler la recherche, appuyez sur la molette M.C..
• Si le périphérique de votre choix ne se trouve pas dans la liste, sélectionnez [RE-
SEARCH].
• Si aucun périphérique n’est disponible, [NOT FOUND] s’affiche.
Fonctions utiles pour iPod À propos de MIXTRAX (USB/iPod uniquement)
Bluetooth
Connexion Bluetooth

9Fr
Français
4 Tournez la molette M.C. pour sélectionner un périphérique dans la liste des
périphériques, puis appuyez pour valider.
Appuyez longuement sur la molette M.C. pour commuter les informations de
périphérique affichées entre le nom du périphérique et l’adresse du périphérique
Bluetooth.
5 Sélectionnez [Pioneer BT Unit] qui s’affiche sur le périphérique.
6 Assurez-vous que le même numéro à 6 chiffres apparaît sur cet appareil et le
périphérique, puis sélectionnez « Oui » sur le périphérique.
REMARQUES
• [DEVICE FULL] apparaît si l’appareil a déjà été appairé à trois autres périphériques. Dans ce cas,
supprimez l’un des périphériques appairés. Voir [DEL DEVICE] ou [GUEST MODE] dans le menu de
connexion (page 9).
• En fonction du périphérique, le code PIN est requis à l’étape 6. Dans ce cas, veuillez entrer le code
[0000].
CONSEIL
La connexion Bluetooth peut être établie grâce à la détection de l’appareil depuis le périphérique
Bluetooth. Pour ce faire, la fonction [VISIBLE] dans le menu de connexion doit être réglée sur [ON]. Pour
obtenir davantage d’informations sur le fonctionnement d’un appareil Bluetooth, veuillez vous référer
au mode d’emploi fourni avec le périphérique Bluetooth.
Menu de connexion
Établissez d’abord une connexion Bluetooth avec le téléphone Bluetooth (page 8). Deux
téléphones Bluetooth maximum peuvent être connectés de manière simultanée.
Important
• Si vous laissez l’appareil en veille pour vous connecter à votre téléphone via Bluetooth lorsque le
moteur ne tourne pas, vous risquez d’épuiser la batterie du véhicule.
• Assurez-vous de garer votre véhicule en lieu sûr et de serrer le frein à main avant utilisation.
Pour passer un appel téléphonique
1
Appuyez sur pour afficher le menu de téléphone.
Lorsque deux téléphones sont connectés, un nom de téléphone apparaît en premier
puis le menu de téléphone s’affiche. Pour passer à l’autre téléphone, appuyez de
nouveau sur .
2 Tournez la molette M.C. pour sélectionner [MISSED], [DIALLED], [RECEIVED] ou
[PHONE BOOK], puis appuyez pour valider.
La liste de numéros de téléphone apparaît.
Élément de menu Description
DEVICELIST Affichez la liste des périphériques Bluetooth appairés. « * »
apparaît sur le nom de périphérique lorsque la connexion
Bluetooth est établie.
DEL DEVICE Supprimez les informations de périphérique.
[DELETE YES],
[DELETE NO]
ADD DEVICE Enregistrez un nouveau périphérique.
A.CONN Sélectionnez [ON] pour vous connecter automatiquement à un
périphérique Bluetooth.
[ON], [OFF]
VISIBLE Sélectionnez [ON] pour qu’un périphérique Bluetooth puisse
détecter l’appareil lorsque ce dernier est connecté via Bluetooth
à un autre périphérique.
[ON], [OFF]
PIN CODE Changez de code PIN.
1 Appuyez sur la molette M.C. pour afficher le mode de
réglage.
2 Tournez la molette M.C. pour sélectionner un nombre.
3 Appuyez sur la molette M.C. pour déplacer le curseur sur la
position suivante.
4 Après avoir saisi le code PIN, appuyez longuement sur la
molette M.C..
Après avoir saisi le code PIN, appuyez sur la molette M.C. pour
revenir à l’affichage de saisie du code PIN et changer de code
PIN.
DEV. INFO Commutez les informations de périphérique sur l’affichage
entre le nom du périphérique et l’adresse du périphérique
Bluetooth.
GUEST MODE Sélectionnez [ON] pour passer automatiquement à l’écran [DEL
DEVICE] lorsque l’appareil a déjà été appairé avec trois
périphériques.
[ON], [OFF]
A.PAIRING Sélectionnez [ON] pour appairer automatiquement l’appareil et
un iPhone lorsqu’un iPhone est connecté à l’appareil via USB.
(Cette fonction peut ne pas être disponible suivant la version
d’iOS que vous utilisez.)
[ON], [OFF]
Téléphone Bluetooth
Élément de menu Description

10Fr
3 Tournez la molette M.C. pour sélectionner un nom ou un numéro de téléphone,
puis appuyez pour valider.
L’appel téléphonique commence.
Pour répondre à un appel entrant
1
Appuyez sur lorsque vous recevez un appel.
CONSEIL
Lorsque deux téléphones sont connectés à l’appareil via Bluetooth et qu’il y a un appel entrant pendant
qu’un téléphone est en cours d’utilisation, un message apparaît dans l’affichage. Pour répondre à un
appel entrant, il est nécessaire de terminer l’appel en cours.
Opérations de base
Pour présélectionner des numéros de téléphone
1
Sélectionnez un numéro de téléphone depuis un répertoire ou l’historique des
appels.
2 Appuyez longuement sur l’une des touches numériques (1/ à 6/).
Le contact est mémorisé sous le numéro de présélection choisi.
Pour passer un appel à l’aide d’un numéro de présélection, appuyez sur l’une des
touches numériques (1/ à 6/ ), puis appuyez sur la molette M.C..
Reconnaissance vocale (pour iPhone uniquement)
Cette fonction n’est disponible que si un iPhone équipé de la reconnaissance vocale est
connecté à l’appareil via Bluetooth.
1 Appuyez longuement sur la molette M.C. pour activer le mode de reconnaissance
vocale.
2 Appuyez sur la molette M.C., puis parlez dans le microphone pour entrer les
commandes vocales.
Pour quitter le mode de reconnaissance vocale, appuyez sur BAND/.
REMARQUE
Pour plus de détails sur les fonctions de reconnaissance vocale, consultez le mode d’emploi de votre
iPhone.
Menu de téléphone
*1 Normalement, les contacts de votre téléphone sont transférés automatiquement lorsque le
téléphone est connecté. Dans le cas contraire, utilisez votre téléphone pour transférer les contacts.
*2 Si deux téléphones sont connectés, cette fonction ne fonctionne pas pour les appels entrants que
vous recevez pendant que vous appelez avec l’un des téléphones.
Objectif Opération
Terminer un appel Appuyez sur .
Refuser un appel entrant Appuyez longuement sur lorsque vous recevez
un appel.
Commuter entre l’appel en cours
et un appel en attente
Appuyez sur la molette M.C..
Annuler un appel en attente Appuyez longuement sur .
Régler le volume de la voix de
l’appelant (Lorsque le mode privé
est activé, cette fonction n’est pas
disponible.)
Tourner la molette M.C. pendant l’appel.
Activer ou désactiver le mode
privé
Appuyez sur BAND/ pendant l’appel.
Élément de menu Description
MISSED Affichez l’historique des appels manqués.
DIALLED Affichez l’historique des appels effectués.
RECEIVED Affichez l’historique des appels reçus.
PHONE BOOK*1 Affichez les contacts qui ont été transférés à partir de votre
téléphone. Réglez [VISIBLE] du menu de connexion sur [ON]
pour parcourir les contacts via cet appareil.
PRESET 1-6 Rappelez les numéros de téléphone présélectionnés. Vous
pouvez également rappeler un numéro de téléphone
présélectionné en appuyant sur l’une des touches de
présélection (1/ à 6/).
PHONE FUNC Sélectionnez [ON] pour répondre automatiquement à un appel
entrant.
A.ANSR : *2
[ON], [OFF]
R.TONE :
[ON], [OFF]
Sélectionnez [ON] si la sonnerie n’est pas émise par les haut-
parleurs du véhicule. Suivant le téléphone connecté, cette
fonction peut ne pas fonctionner.
PB INVT Inversez l’ordre des noms dans le répertoire (affichage des
noms).

11Fr
Français
Important
• Selon le lecteur audio Bluetooth connecté à cet appareil, les opérations disponibles sont limitées aux
deux niveaux suivants :
– Profil A2DP (Advanced Audio Distribution Profile) : vous ne pouvez écouter que des morceaux sur
votre lecteur audio.
– AVRCP (Audio/Video Remote Control Profile) : vous pouvez écouter, mettre sur pause, sélectionner
un morceau, etc.
• Le son du lecteur audio Bluetooth est coupé lorsque le téléphone est utilisé.
• Lors de l’utilisation du lecteur audio Bluetooth, vous ne pouvez pas vous connecter
automatiquement à un téléphone Bluetooth.
• Selon le type de lecteur audio Bluetooth connecté à cet appareil, l’affichage des opérations et
informations de certaines fonctions peut ne pas être disponible.
1 Établissez une connexion Bluetooth avec le lecteur audio Bluetooth.
2 Appuyez sur SRC/OFF pour sélectionner la source [BT AUDIO].
3 Appuyez sur BAND/ pour lancer la lecture.
Opérations de base
Vous pouvez procéder à différents ajustements dans les réglages FUNCTION (page 12).
* Selon le périphérique connecté, il se peut que ces opérations soient indisponibles.
(Le mode APP n’est pas disponible pour le modèle MVH-170UBG/170UB.)
Vous pouvez écouter une application sur un périphérique iPhone/Android via cet
appareil. Dans certains cas, vous pouvez commander une application en utilisant cet
appareil.
Pour plus de détails sur les périphériques compatibles, visitez notre site Web.
Important
L’utilisation d’applications tierces peut impliquer ou nécessiter la fourniture d’informations
personnelles, que ce soit en créant un compte d’utilisateur ou une autre méthode ainsi que, pour
certaines applications, la fourniture de données de géolocalisation.
TOUTES LES APPLICATIONS TIERCES RELÈVENT DE L’ENTIÈRE RESPONSABILITÉ DES FOURNISSEURS,
NOTAMMENT MAIS SANS S’Y LIMITER, LA COLLECTE ET LA PROTECTION DES DONNÉES UTILISATEUR ET
LES BONNES PRATIQUES DE CONFIDENTIALITÉ. EN ACCÉDANT À UNE APPLICATION TIERCE, VOUS
ACCEPTEZ DE PRENDRE CONNAISSANCE DES CONDITIONS DE SERVICE ET DES RÈGLES DE
CONFIDENTIALITÉ DES FOURNISSEURS. SI VOUS N’ACCEPTEZ PAS LES CONDITIONS OU RÈGLES D’UN
FOURNISSEUR OU SI VOUS N’ACCEPTEZ PAS L’UTILISATION DES DONNÉES DE GÉOLOCALISATION, LE
CAS ÉCHÉANT, N’UTILISEZ PAS CETTE APPLICATION TIERCE.
Pour les utilisateurs d’iPhone
Cette fonction est compatible avec les iPhone et les iPod touch installés avec iOS 5.0 ou une version
ultérieure.
Pour les utilisateurs de périphérique Android
Cette fonction est compatible avec les périphériques sur lesquels est installé Android OS 2.3 ou une
version ultérieure et qui prennent également en charge les profils Bluetooth SPP (Serial Port Profile) et
A2DP (Advance Audio Distribution Profile).
REMARQUE
PIONEER DÉCLINE TOUTE RESPONSABILITÉ QUANT AUX APPLICATIONS OU AUX CONTENUS TIERS, Y
COMPRIS, SANS S’Y LIMITER, QUANT À LEUR EXACTITUDE OU À LEUR EXHAUSTIVITÉ. LE CONTENU ET
LA FONCTIONNALITÉ DE CES APPLICATIONS RELÈVENT DE LA SEULE RESPONSABILITÉ DU
FOURNISSEUR DE L’APPLICATION.
La connexion Bluetooth est disponible pour le modèle MVH-X370BT.
1 Connectez cet appareil au périphérique mobile.
• iPhone via USB (page 6)
• Périphérique Android via Bluetooth (page 8)
2 Appuyez sur la molette M.C. pour afficher le menu principal.
3 Tournez la molette M.C. pour sélectionner [SYSTEM], puis appuyez pour valider.
Audio Bluetooth
Objectif Opération
Avance ou retour rapide Appuyez longuement sur ou .
Sélectionner une piste Appuyez sur ou .
Lecture répétée* Appuyez sur 6/.
Lecture aléatoire* Appuyez sur 5/.
Pause/Reprise de la lecture Appuyez sur 4/PAUSE.
Rechercher un fichier dans une liste 1 Appuyez sur pour afficher la liste.
2 Tournez la molette M.C. pour
sélectionner le nom du fichier de votre
choix, puis appuyez pour valider.
3 Tournez la molette M.C. pour
sélectionner le fichier de votre choix, puis
appuyez pour valider. La lecture démarre.
Mode d’application
Lecture d’une application via cet appareil

12Fr
4 Tournez la molette M.C. pour sélectionner [APP CONN.SET], puis appuyez pour
valider.
5 Tournez la molette M.C. pour sélectionner l’un des éléments suivants, puis
appuyez pour valider.
• Sélectionnez [WIRED] pour iPhone.
• Sélectionnez [BLUETOOTH] pour un périphérique Android.
6 Appuyez sur SRC/OFF pour sélectionner [APP].
7 Activez le périphérique mobile pour lancer l’application.
Opérations de base
Vous pouvez procéder à différents ajustements dans les réglages FUNCTION (page 12).
Vous pouvez régler divers paramètres dans le menu principal.
1 Appuyez sur la molette M.C. pour afficher le menu principal.
2 Tournez la molette M.C. pour sélectionner l’une des catégories suivantes, puis
appuyez pour valider.
• Réglages FUNCTION (page 12)
• Réglages AUDIO (page 13)
• Réglages SYSTEM (page 14)
• Réglages ILLUMINATION (page 14)
• Réglages MIXTRAX (page 15)
3 Tournez la molette M.C. pour sélectionner les options, puis appuyez pour valider.
REMARQUES
• Les éléments de menu liés au Bluetooth dans les tableaux suivants ne sont pas disponibles pour le
modèle MVH-170UI/170UBG/170UB.
• Les éléments de menu liés au iPod dans les tableaux suivants ne sont pas disponibles pour le modèle
MVH-170UBG/170UB.
• Les éléments de menu liés au mode APP dans les tableaux suivants ne sont pas disponibles pour les
modèles MVH-170UBG/170UB.
Les éléments de menu varient selon la source.
Objectif Opération
Sélectionner une piste Appuyez sur ou .
Avance ou retour rapide Appuyez longuement sur ou .
Pause/Reprise de la lecture Appuyez sur BAND/.
Réglages
Réglages FUNCTION
Élément de menu Description
FM SETTING
[TALK], [STANDARD], [MUSIC] Adaptez le niveau de qualité sonore aux
conditions de signal de radiodiffusion du signal
de la bande FM. (Disponible uniquement lorsque
la bande FM est sélectionnée.)
BSM
Mémorisez automatiquement les six stations les
plus puissantes sur les touches numériques
(1/ à 6/).
REGIONAL
[ON], [OFF] Limitez la réception des programmes régionaux
spécifiques lorsque AF (recherche des autres
fréquences) est sélectionné. (Disponible
uniquement lorsque la bande FM est
sélectionnée.)
LOCAL
FM : [OFF], [LV1], [LV2], [LV3], [LV4]
MW/LW : [OFF], [LV1], [LV2]
Restreignez la station d’accord suivant la
puissance du signal.
TA
[ON], [OFF] Recevez des bulletins d’informations routières le
cas échéant. (Disponible uniquement lorsque la
bande FM est sélectionnée.)
AF
[ON], [OFF] Laissez l’appareil s’accorder sur une autre
fréquence fournissant la même station.
(Disponible uniquement lorsque la bande FM est
sélectionnée.)
NEWS
[ON], [OFF] Interrompez la source actuellement sélectionnée
avec des émissions d’information. (Disponible
uniquement lorsque la bande FM est
sélectionnée.)

13Fr
Français
SEEK
[MAN], [PCH] Attribuez aux touches / la recherche
de stations une par une (accord manuel) ou
sélectionnez une station à partir des canaux
préréglés.
SEL DEVICE
Connectez un périphérique Bluetooth de la liste.
S.RTRV
[1] (efficace pour les taux de
compression faibles),
[2] (efficace pour les taux de
compression élevés),
[OFF]
Améliorez l’audio compressé et restaurez un son
riche.
Indisponible lorsque ;
• La source USB est sélectionnée et la fonction
MIXTRAX est activée.
• Le fichier FLAC est lu. (Disponible pour les
modèles MVH-170UI/170UBG/170UB)
AUDIO BOOK
[FASTER], [NORMAL], [SLOWER] Modifiez la vitesse de lecture. (Indisponible
lorsque [CONTROL iPod/CTRL iPod] est
sélectionné en mode de commande.)
PAU SE
Mettez sur pause ou reprenez la lecture.
PLAY
Lancez la lecture.
STOP
Arrêtez la lecture.
Réglages AUDIO
Élément de menu Description
FADER*1
Réglez l’équilibre sonore entre les haut-parleurs
avant et arrière.
BALANCE
Réglez l’équilibre sonore entre les haut-parleurs
gauche et droite.
Élément de menu Description
USB
iPod
iPod
EQ SETTING
[SUPER BASS], [POWERFUL],
[NATURAL], [VOCAL], [CUSTOM1],
[CUSTOM2], [FLAT]
Sélectionnez la bande et le
niveau de l’égaliseur pour une
personnalisation approfondie.
Bande de l’égaliseur : [80HZ],
[250HZ], [800HZ], [2.5KHZ],
[8KHZ]
Niveau de l’égaliseur : [+6] à [–6]
Sélectionnez ou personnalisez la courbe de
l’égaliseur. [CUSTOM1] peut être défini
séparément pour chaque source. Cependant,
chacune des combinaisons ci-dessous est définie
automatiquement sur le même réglage.
• USB, iPod et APP (iPhone)
• BT AUDIO et APP (Android)
[CUSTOM2] est un réglage commun à toutes les
sources.
Vous pouvez également commuter l’égaliseur en
appuyant plusieurs fois sur
(Uniquement pour le modèle MVH-170UBG/
170UB).
LOUDNESS
[OFF], [LOW], [MID], [HI] Compensez pour obtenir un son net à faible
volume.
SUB.W*2
[NOR], [REV], [OFF] Sélectionnez la phase du haut-parleur
d’extrêmes graves.
SUB.W CTRL*2*3
Fréquence de coupure : [50HZ],
[63HZ], [80HZ], [100HZ], [125HZ],
[160HZ], [200HZ]
Niveau de sortie : [–24] à [+6]
Niveau de la pente : [–12], [–24]
Seules les fréquences inférieures à celles de la
gamme sélectionnée sont émises par le haut-
parleur d’extrêmes graves.
BASS BOOST
[0] à [+6] Sélectionnez le niveau d’accentuation des
graves.
HPF SETTING
Fréquence de coupure : [OFF],
[50HZ], [63HZ], [80HZ], [100HZ],
[125HZ], [160HZ], [200HZ]
Niveau de la pente : [–12], [–24]
Seules les fréquences supérieures à la coupure
du filtre passe-haut (HPF) sont émises en sortie
via les haut-parleurs.
Élément de menu Description

14Fr
*1 Indisponible lorsque [SUB.W/SUB.W] est sélectionné sous [SP-P/O MODE] dans les réglages INITIAL
(page 5).
*2 Indisponible lorsque [REAR/REAR] est sélectionné sous [SP-P/O MODE] dans les réglages INITIAL
(page 5).
*3 Indisponible lorsque [OFF] est sélectionné sous [SUB.W].
Vous pouvez également accéder à ces menus lorsque l’appareil est hors tension.
*1 [PW SAVE] s’annule si la batterie du véhicule est débranchée, et il doit être réactivé une fois la
batterie rebranchée. Lorsque [PW SAVE] est désactivé, selon les méthodes de connexion, l’appareil
peut continuer à consommer l’énergie de la batterie s’il n’y a pas de position ACC (accessoire) sur le
contact de votre véhicule .
*2 Indisponible lorsque [APP] est sélectionné en tant que source.
SLA
[+4] à [–4] Réglez le niveau de volume de chaque source,
sauf celui de la FM.
Chacune des combinaisons ci-dessous est
définie automatiquement sur le même réglage.
• USB, iPod et APP (iPhone)
• BT AUDIO et APP (Android)
Réglages SYSTEM
Élément de menu Description
LANGUAGE
[ENG] (anglais), [РУС] (russe),
[TUR] (turc)
Sélectionnez la langue d’affichage des
informations textuelles à partir d’un fichier audio
compressé.
CLOCK SET
Réglez l’horloge (page 4).
12H/24H
[12H], [24H] Sélectionnez la notation de l’heure.
AUTO PI
[ON], [OFF] Recherchez une autre station avec la même
programmation, même si vous utilisez une
station présélectionnée.
AUX
[ON], [OFF] Sélectionnez [ON] lors de l’utilisation d’un
périphérique auxiliaire connecté à l’appareil.
BT AUDIO
[ON], [OFF] Activez/désactivez le signal Bluetooth.
Élément de menu Description
MUTE MODE (Disponible uniquement pour le modèle MVH-170UI)
[MUTE], [20dB ATT], [10dB ATT] Coupez ou atténuez le son automatiquement
lorsque le signal d’un appareil équipé d’une
fonction de sourdine est reçu.
PW SAVE*1
[ON], [OFF] Réduisez la consommation d’énergie de la
batterie.
L’activation de la source est la seule opération
autorisée lorsque cette fonction est activée.
BT MEM CLEAR
[YES], [CANCEL] Effacez les données du périphérique Bluetooth
(liste des périphériques, code PIN, historique des
appels, annuaire téléphonique, numéros de
téléphone présélectionnés) mémorisés dans
l’appareil.
[CLEARED] apparaît lorsque des données sont
supprimées avec succès.
BT VERSION
Affiche la version du système de l’appareil et du
module Bluetooth.
APP CONN. SET*2
[WIRED], [BLUETOOTH] Sélectionnez la méthode de connexion adaptée
à votre périphérique.
Réglages ILLUMINATION
Élément de menu Description
DIM SETTING
[SYNC CLOCK], [MANUAL] Changez la luminosité de l’affichage.
Élément de menu Description

15Fr
Français
(Uniquement pour le modèle MVH-X370BT)
BRIGHTNESS
[1] à [10] Changez la luminosité de l’affichage.
Les plages de réglage disponibles varient selon
[DIM SETTING].
Réglages MIXTRAX
Élément de menu Description
SHORT MODE
[1.0 MIN], [1.5 MIN], [2.0 MIN],
[2.5 MIN], [3.0 MIN], [OFF]
Sélectionnez la durée de lecture.
MIX PATTERN
[SOUND LEVEL] Changez les effets spéciaux de MIXTRAX
suivant le niveau sonore.
Le modèle de mélange change suivant le
niveau sonore.
[LOW PASS] Le modèle de mélange change suivant le
niveau des graves.
[RANDOM] Le modèle de mélange change de manière
aléatoire suivant le mode de niveau sonore et
le mode passe-bas.
DISP FX
[ON], [OFF] Activez/désactivez les effets spéciaux de
MIXTRAX.
CUT IN FX
[ON], [OFF] Activez/désactivez les effets spéciaux de
MIXTRAX tout en changeant manuellement de
piste.
Élément de menu Description

16Fr
Important
• Lorsque vous installez cet appareil dans
un véhicule sans position ACC
(accessoire) sur le contact, si vous
omettez de brancher le câble rouge à la
borne qui détecte le fonctionnement de
la clé de contact, vous risquez d’entraîner
une fuite de la batterie.
• L’utilisation de cet appareil dans des
conditions autres que ce qui suit peut
provoquer un incendie ou un
dysfonctionnement.
–Véhicules équipés d’une batterie de
12 volts et d’une mise à la terre
négative.
–Haut-parleurs de 50 W (valeur de sortie)
et entre 4 Ω à 8 Ω (valeur d’impédance).
• Pour éviter un court-circuit, une
surchauffe ou un dysfonctionnement,
assurez-vous de suivre les instructions
ci-dessous.
–Débranchez la borne négative de la
batterie avant l’installation.
–Fixez les câbles au moyen de serre-
câbles ou de ruban adhésif. Enroulez du
ruban adhésif autour du câblage qui
entre en contact avec des pièces
métalliques afin de protéger le câblage.
–Placez tous les câbles à l’écart des
pièces mobiles, comme le levier de
vitesse et les rails des sièges.
–Placez tous les câbles à l’écart des
endroits chauds (ex. : la sortie du
chauffage).
–Ne raccordez pas le câble jaune à la
batterie en le faisant passer par le trou
du compartiment moteur.
–Recouvrez de ruban isolant tous les
câbles non raccordés.
–Ne raccourcissez pas les câbles.
–Ne coupez jamais l’isolation du câble
d’alimentation de cet appareil dans le
but de partager l’alimentation avec
d’autres périphériques. La capacité
actuelle du câble est limitée.
–Utilisez un fusible de la valeur indiquée.
–Ne raccordez jamais le câble de haut-
parleur négatif directement à la masse.
–N’attachez jamais ensemble les câbles
négatifs de plusieurs haut-parleurs.
• Lorsque cet appareil est sous tension, les
signaux de commande sont transmis via
le câble bleu/blanc. Branchez ce câble à la
télécommande de système d’un
amplificateur de puissance externe ou à
la borne de commande du relais
d’antenne automatique du véhicule
(max. 300 mA 12 V CC). Si le véhicule est
équipé d’une antenne de vitre, raccordez
cette dernière à la borne d’alimentation
de l’amplificateur d’antenne.
• Ne raccordez jamais le câble bleu/blanc à
la borne d’alimentation d’un
amplificateur de puissance externe. De
même, ne le raccordez jamais à la borne
d’alimentation de l’antenne automatique.
Cela pourrait entraîner la fuite de la
batterie ou un dysfonctionnement de
l’appareil.
Raccordements/Installation
Raccordements
Avec position ACC Sans position ACC
• Le câble noir est la masse. Les câbles de
masse de cet appareil et d’autres
équipements (notamment les produits à
haute intensité tels que les amplificateurs
de puissance) doivent être câblés
séparément. Dans le cas contraire, un
détachement accidentel peut provoquer
un incendie ou un dysfonctionnement.
Cet appareil
Microphone 4m (13pi 1po)
(Uniquement pour le modèle
MVH-X370BT)
Sortie arrière ou sortie du haut-parleur
d’extrêmes graves
Sortie avant (Uniquement pour le
modèle MVH-X370BT/170UI)
Entrée de l’antenne
Entrée du cordon d’alimentation
Fusible (10 A)
Entrée de la télécommande filaire
(Uniquement pour le modèle
MVH-X370BT/170UI)
Il est possible de raccorder un
adaptateur de télécommande câblé
(vendu séparément).
Entrée du microphone (Uniquement
pour le modèle MVH-X370BT)
Cordon d’alimentation
Effectuez ces raccordements si vous ne
raccordez aucun fil de haut-parleur arrière
à un haut-parleur d’extrêmes graves.
Vers l’entrée du cordon d’alimentation
La fonction du et du peut varier
selon le type de véhicule. Dans ce cas,
veillez à brancher le au et le
au .
Jaune
Secours (ou accessoire)
Jaune
À raccorder à la borne d’alimentation
constante de 12 V.
Rouge
Accessoire (ou secours)
Rouge
À raccorder à la borne commandée par
la clé de contact (12 V CC).
Raccordez les fils de même couleur les
uns aux autres.
Noir (masse du châssis)
MVH-X370BT/170UI/170UBG/170UB

17Fr
Français
Bleu/blanc
La position des broches du connecteur
ISO varie selon le type de véhicule.
Raccordez le et le lorsque la
broche 5 est un type de commande
d’antenne. Dans un autre type de
véhicule, ne branchez jamais le et
le .
Bleu/blanc
À raccorder à la borne de commande de
système de l’amplificateur de puissance
(max. 300 mA 12 V CC).
Bleu/blanc
À raccorder à la borne de commande du
relais d’antenne automatique (max.
300 mA 12 V CC).
Jaune/noir (Uniquement pour le
modèle MVH-170UI)
Si vous utilisez un autre appareil doté
d’une fonction de sourdine, raccordez
ce fil au fil de sourdine audio de cet
autre appareil. Sinon, ne raccordez pas
le fil de sourdine audio.
Fils de haut-parleur
Blanc : avant gauche
Blanc/noir : avant gauche
Gris : avant droite
Gris/noir : avant droite
Vert : arrière gauche ou haut-parleur
d’extrêmes graves
Vert/noir : arrière gauche ou haut-
parleur d’extrêmes graves
Violet : arrière droite ou haut-parleur
d’extrêmes graves
Violet/noir : arrière droite ou haut-
parleur d’extrêmes graves
Connecteur ISO
Dans certains véhicules, le connecteur
ISO peut être divisé en deux. Dans ce
cas, veillez à raccorder les deux
connecteurs.
REMARQUES
• Modifiez le menu initial de cet appareil.
Reportez-vous à la section [SP-P/O
MODE] (page 5). La sortie du haut-parleur
d’extrêmes graves de cet appareil est
monophonique.
• Lorsque vous utilisez un haut-parleur
d’extrêmes graves de 70 W (2 Ω), assurez-
vous de raccorder le haut-parleur
d’extrêmes graves aux fils violet et violet/
noir de cet appareil. Ne raccordez rien
aux fils vert et vert/noir.
Amplificateur de puissance
(vendu séparément)
Effectuez ces raccordements si vous
utilisez l’amplificateur optionnel.
Télécommande de système
Amplificateur de puissance (vendu
séparément)
À raccorder aux câbles RCA (vendus
séparément)
Vers la sortie avant*
Haut-parleur avant*
Vers la sortie arrière ou la sortie du haut-
parleur d’extrêmes graves
Haut-parleur arrière ou haut-parleur
d’extrêmes graves
* (Uniquement pour les modèles
MVH-X370BT/170UI)
Important
• Vérifiez tous les raccordements et les
systèmes avant l’installation finale.
• N’utilisez pas de pièces non autorisées,
car cela pourrait provoquer des
dysfonctionnements.
• Consultez votre revendeur si l’installation
nécessite de percer des trous ou
d’apporter d’autres modifications au
véhicule.
• N’installez pas cet appareil aux endroits
où :
–il peut interférer avec le
fonctionnement du véhicule ;
–il peut causer des blessures à un
passager à la suite d’un arrêt brusque.
• S’il surchauffe, le laser à semiconducteur
risque d’être endommagé. Installez cet
appareil à l’écart des endroits chauds
(ex. : la sortie du chauffage).
• Une performance optimale
est obtenue lorsque
l’appareil est installé à un
angle inférieur à 60°.
• Pour l’installation, afin d’assurer une
dispersion de chaleur adéquate lors de
l’utilisation de cet appareil, veillez à
laisser suffisamment d’espace derrière la
face arrière et à enrouler tout câble
gênant de façon à ne pas obstruer les
ouvertures d’aération.
Montage avant/arrière DIN
Cet appareil peut être installé
correctement en optant pour un montage
avant ou un montage arrière.
Pour l’installation, utilisez des pièces
disponibles dans le commerce.
Montage avant DIN
1 Insérez le manchon de montage dans
le tableau de bord.
Pour une installation dans des espaces
peu profonds, utilisez le manchon de
montage fourni. S’il y a suffisamment
d’espace, utilisez le manchon de
montage fourni avec le véhicule.
2 Fixez le manchon de montage à l’aide
d’un tournevis pour plier les
languettes métalliques (90°) et les
mettre en place.
Tableau de bord
Manchon de montage
Assurez-vous que l’appareil soit bien
fixé. Une installation instable peut
entraîner des sauts de piste ou d’autres
dysfonctionnements.
Montage arrière DIN
1 Alignez les trous du support de
montage avec ceux situés sur le côté
de l’appareil afin de fixer le support.
Installation
Laissez
suffisamment
d’espace
5cm
5cm

18Fr
2 Visser avec une vis de chaque côté
pour maintenir l’appareil en place.
Vis taraudeuse (5 mm × 8 mm)
Support de montage
Tableau de bord ou console
Utilisation du support inclus
Vous pouvez également utiliser le support
pour monter l’appareil. Vérifiez pour vous
assurer que le support inclus correspond à
votre modèle de véhicule en particulier,
puis fixez-le à l’appareil tel qu’il est indiqué
ci-dessous.
Vis
Support
Retrait de l’appareil
1 Retirez l’anneau de garniture.
Anneau de garniture
Languette crantée
• Le détachement de la face avant
permet d’accéder plus facilement à
l’anneau de garniture.
• Pour remettre l’anneau de garniture,
orientez le côté de l’appareil avec la
languette crantée vers le bas.
2 Insérez les clés d’extraction fournies
dans les deux côtés de l’appareil
jusqu’à leur enclenchement.
3 Retirez l’appareil du tableau de bord.
(Uniquement pour le modèle MVH-X370BT)
Le microphone doit être placé directement
en face du conducteur à une distance
suffisante pour capter clairement sa voix.
ATTENTION
Il est extrêmement dangereux de laisser le
fil du microphone s’enrouler autour de la
colonne de direction ou du levier de
vitesse. Veillez à installer le microphone de
manière à ce qu’il ne gêne pas la conduite.
Il est recommandé d’utiliser les serre-
câbles (vendus séparément) pour placer le
fil.
Installation du
microphone
Pour installer l’appareil sur le
pare-soleil
1 Faites passer le fil du microphone dans
la rainure.
2 Installez la pince du microphone sur le
pare-soleil.
L’abaissement du pare-soleil réduit le
taux de reconnaissance vocale.
Pour installer l’appareil sur la
colonne de direction
1 Faites glisser la base du microphone
pour la détacher de la pince de
microphone.
Microphone
Pince du microphone
Base du microphone
2 Installez le microphone sur l’arrière de
la colonne de direction.
Fil du
microphone
Rainure
Pince du microphone
Ruban adhésif double face

19Fr
Français
L’affichage redevient automatiquement
ordinaire.
→ Vous n’avez exécuté aucune opération
pendant environ 30 secondes.
– Exécutez une opération.
L’étendue de lecture répétée change de
manière inattendue.
→ En fonction de l’étendue de lecture
répétée, l’étendue sélectionnée peut
changer lors de la sélection d’un autre
dossier ou d’une autre piste ou pendant
l’avance ou le retour rapide.
– Sélectionnez à nouveau l’étendue de
lecture répétée.
Un sous-dossier n’est pas lu.
→ Il est impossible de lire les sous-dossiers
lorsque [FLD] (répétition du dossier) est
sélectionné.
– Sélectionnez une autre étendue de
lecture répétée.
Le son est intermittent.
→ Vous utilisez un périphérique, un
téléphone portable par exemple, qui
peut générer des interférences sonores.
– Éloignez de l’appareil tous les
périphériques électriques susceptibles
de provoquer des interférences.
Le son de la source audio Bluetooth n’est
pas lu.
→ Un appel est en cours sur un téléphone
portable Bluetooth connecté.
– Le son sera lu une fois l’appel terminé.
→ Un téléphone portable connecté à
Bluetooth est en cours d’utilisation.
– Cessez d’utiliser le téléphone portable
pour l’instant.
→ La connexion entre cet appareil et le
téléphone portable n’a pas été établie
correctement après un appel passé avec
un téléphone portable connecté à
Bluetooth.
–Établissez à nouveau la connexion
Bluetooth entre cet appareil et le
téléphone portable.
Commun
AMP ERROR
→ Un dysfonctionnement de l’appareil
s’est produit ou le raccordement des
haut-parleurs est incorrect.
→ Le circuit de protection est activé.
–Vérifiez le raccordement des haut-
parleurs.
–Tournez la clé de contact sur OFF, puis
de nouveau sur ON. Si le message ne
disparaît pas, demandez de l’aide à
votre revendeur ou à un centre
d’entretien agréé par Pioneer.
NO XXXX (ex. : NO TITLE)
→ Aucune information textuelle n’est
intégrée.
–Commutez l’affichage ou la lecture sur
une autre piste ou un autre fichier.
Périphérique USB/iPod
FORMAT READ
→ Le début de la lecture et le début de
l’émission des sons sont parfois décalés.
–Attendez que le message disparaisse
pour entendre les sons.
NO AUDIO
→ Il n’y a aucun morceau.
Informations complémentaires
Dépannage
Messages d’erreur
– Transférez les fichiers audio vers le
périphérique USB et procédez à la
connexion.
→ La sécurité est activée sur le
périphérique USB connecté.
– Suivez les instructions du
périphérique USB pour désactiver la
sécurité.
SKIPPED
→ Le périphérique USB connecté contient
des fichiers protégés par DRM.
– Les fichiers protégés sont sautés.
PROTECT
→ Tous les fichiers sur le périphérique USB
connecté intègrent la protection par
DRM.
– Utilisez un autre périphérique USB.
N/A USB
→ Le périphérique USB connecté n’est pas
pris en charge par cet appareil.
– Déconnectez votre périphérique et
remplacez-le par un périphérique USB
compatible.
CHECK USB
→ Le connecteur USB ou le câble USB est
en court-circuit.
– Vérifiez que le connecteur USB ou le
câble USB n’est pas coincé ou
endommagé.
→ Le périphérique USB connecté
consomme plus que le courant maximal
autorisé.
– Déconnectez le périphérique USB et
ne l’utilisez pas. Mettez le contact sur
OFF, puis de nouveau sur ACC ou ON.
Ne connectez que des périphériques
USB conformes.
→ L’iPod fonctionne correctement mais
n’est pas chargé.
– Assurez-vous que le câble de
connexion de l’iPod n’est pas en court-
circuit (ex. : qu’il n’est pas coincé dans
des objets métalliques). Après avoir
procédé à cette vérification, mettez le
contact sur OFF puis de nouveau sur
ON, ou déconnectez l’iPod et
reconnectez-le.
ERROR-19
→ Panne de communication.
–Effectuez l’une des opérations
suivantes, puis revenez à la source
USB.
• Tournez la clé de contact sur OFF,
puis de nouveau sur ON.
• Déconnectez le périphérique USB.
• Changez de source.
→ Panne de l’iPod.
–Débranchez le câble de l’iPod. Une fois
le menu principal de l’iPod affiché,
reconnectez et réinitialisez l’iPod.
ERROR-23
→ Le périphérique USB n’a pas été formaté
correctement.
–Formatez le périphérique USB avec
FAT12, FAT16 ou FAT32.
ERROR-16
→ La version du microprogramme de
l’iPod est désuète.
–Mettez à jour la version de l’iPod.
→ Panne de l’iPod.
–Débranchez le câble de l’iPod. Une fois
le menu principal de l’iPod affiché,
reconnectez et réinitialisez l’iPod.
STOP
→ La liste en cours ne comporte aucun
morceau.
–Sélectionnez une liste contenant des
morceaux.
NOT FOUND
→ Aucun morceau connexe.
–Transférez des morceaux sur l’iPod.

20Fr
Périphérique Bluetooth
ERROR-10
→ Coupure de courant au niveau du
module Bluetooth de cet appareil.
– Mettez le contact sur OFF, puis de
nouveau sur ACC ou ON.
Applications
NO BT DEVICE GO TO BT MENU TO
REGISTER
→ Aucun périphérique Bluetooth trouvé.
– Connectez cet appareil et le
périphérique via Bluetooth (page 8).
CONN. FAILED PRESS BAND KEY TO
RETRY
→ Échec de la connexion Bluetooth.
– Appuyez sur BAND/ pour établir
une nouvelle connexion.
DISCONNECTED PRESS BAND KEY TO
RETRY
→ Échec de la connexion Bluetooth.
– Appuyez sur BAND/ pour établir
une nouvelle connexion.
CHECK APP
→ Échec de la connexion à l’application.
– Suivez les instructions qui s’affichent à
l’écran.
START UP APP
→ L’application n’a pas encore commencé
à s’exécuter.
– Activez le périphérique mobile pour
lancer l’application.
Périphérique de stockage USB
• Les connexions via un concentrateur USB
ne sont pas prises en charge.
• Attachez fermement le périphérique de
stockage USB avant de conduire. Ne
laissez pas le périphérique de stockage
USB tomber au sol, où il pourrait rester
coincé sous la pédale de frein ou
d’accélérateur.
• Selon le périphérique de stockage USB,
les problèmes suivants peuvent survenir.
–Le fonctionnement peut varier.
–Le périphérique de stockage peut ne
pas être reconnu.
–Les fichiers peuvent ne pas être lus
correctement.
–Le périphérique peut générer des
interférences sonores lorsque vous
écoutez la radio.
iPod
• Ne laissez pas l’iPod dans un endroit
soumis à une température élevée.
• Attachez fermement l’iPod pendant que
vous conduisez. Ne laissez pas l’iPod
tomber au sol, où il pourrait gêner le bon
fonctionnement de la pédale de frein ou
d’accélérateur.
• Les réglages de l’iPod, comme l’égaliseur
et la lecture répétée, changent
automatiquement lorsque l’iPod est
connecté à l’appareil. Une fois l’iPod
déconnecté, les réglages d’origine sont
rétablis.
• Aucun texte incompatible enregistré sur
l’iPod ne sera affiché par cet appareil.
• Seuls les 32 premiers caractères peuvent
s’afficher en tant que nom de fichier
(extension de fichier comprise) ou nom
de dossier.
• L’appareil risque de ne pas fonctionner
correctement selon l’application utilisée
pour encoder les fichiers WMA.
Conseils sur la
manipulation
Compatibilité avec
l’audio compressé
• Il peut se produire un léger retard au
début de la lecture de fichiers audio
intégrés avec des données d’image, ou de
fichiers audio stockés sur un périphérique
USB avec de nombreuses hiérarchies de
dossiers.
• Les textes russes à afficher sur cet
appareil doivent être codés avec l’un des
jeux de caractères suivants :
–Unicode (UTF-8, UTF-16)
–Jeu de caractères autre que l’Unicode
qui est utilisé dans un environnement
Windows et est paramétré sur Russe
dans le réglage multilingue
ATTENTION
• Pioneer ne garantit pas la compatibilité
avec tous les périphériques de stockage
de masse USB et décline toute
responsabilité en cas de perte de
données sur des lecteurs multimédia,
smartphones ou autres périphériques
lors de l’utilisation de ce produit.
• Ne laissez pas de disques ou un
périphérique de stockage USB dans un
lieu où les températures sont élevées.
Fichiers WMA
Fichiers MP3
Fichiers WAV
• Il est impossible de connecter les formats
de fichier WAV via MTP.
Fichiers FLAC (Uniquement
pour les modèles MVH-170UI/
170UBG/170UB)
• Il est impossible de connecter les formats
de fichier FLAC via MTP.
• Les fichiers FLAC peuvent être illisibles,
suivant l’encodeur.
Périphérique USB
• Il peut se produire un léger retard au
début de la lecture de fichiers audio
stockés sur un périphérique de stockage
USB avec de nombreuses hiérarchies de
dossiers.
Extension de fichier .wma
Débit binaire 48 kbps à 320 kbps
(CBR), 48 kbps à
384 kbps (VBR)
Fréquence
d’échantillonnage
32 kHz, 44,1 kHz,
48 kHz
Windows Media™
Audio Professional,
Lossless, Voice/DRM
Stream/Stream avec
vidéo
Incompatible
Extension de fichier .mp3
Débit binaire 8 kbps à 320 kbps
(CBR), VBR
Fréquence
d’échantillonnage
8kHz à 48kHz
(32 kHz, 44,1 kHz,
48 kHz pour
accentuation)
Version étiquette ID3
compatible
1.0, 1.1, 2.2, 2.3, 2.4 (La
version 2.x de
l’étiquette ID3 a
priorité sur la
version 1.x.)
Liste de lecture M3u Incompatible
MP3i (MP3 interactif),
mp3 PRO
Incompatible
Extension de fichier .wav
Bits de quantification 8 et 16 (LPCM), 4 (MS
ADPCM)
Fréquence
d’échantillonnage
16 kHz à 48 kHz
(LPCM), 22,05 kHz et
44,1 kHz (MS ADPCM)
Extension de fichier .flac
Fréquence
d’échantillonnage
8/11,025/12/16/22,05/
24/32/44,1/48 [kHz]
Quantification du
débit binaire
16 bits
Mode canal 1/2 canaux

21Fr
Français
Cet appareil prend en charge uniquement les
modèles d’iPod suivants. Les versions du logiciel
iPod prises en charge sont indiquées ci-dessous.
Les versions antérieures ne sont pas prises en
charge.
Conçu pour
–iPod touch (1ère à la 5ème génération)
–iPodclassic
–iPod avec vidéo
–iPod nano (1ère à la 7ème génération)
–iPhone5s
–iPhone5c
–iPhone5
–iPhone4S
–iPhone4
–iPhone3GS
–iPhone3G
–iPhone
• Les opérations peuvent varier selon la
génération et/ou la version de l’iPod.
• Les utilisateurs d’un iPod avec
connecteur Lightning doivent utiliser le
câble Lightning vers USB (fourni avec
l’iPod).
• Les utilisateurs d’un iPod avec
connecteur pour station d’accueil
doivent utiliser le câble CD-IU51. Pour
plus de détails, consultez votre
revendeur.
• Pour en savoir plus sur la compatibilité
fichier/format, reportez-vous aux
manuels de l’iPod.
• Livre audio, podcast : compatible
ATTENTION
Pioneer n’accepte aucune responsabilité
en cas de perte de données sur l’iPod,
même si la perte de données se produit
pendant l’utilisation de cet appareil.
Sur cet appareil, l’utilisateur ne peut pas
affecter de numéros de dossier ni spécifier
les séquences de lecture. La séquence de
fichier audio dépend du périphérique
raccordé.
Notez qu’il n’est pas possible de lire les
fichiers cachés dans un périphérique USB.
Exemple de hiérarchie
Hiérarchie des
dossiers lisibles
Jusqu’à huit niveaux
(dans la pratique, la
hiérarchie compte
moins de deux
niveaux)
Dossiers lisibles Jusqu’à 500
Fichiers lisibles Jusqu’à 15 000
Lecture des fichiers
protégés par des
droits d’auteur
Incompatible
Périphérique USB
partitionné
Seule la première
partition est lisible.
Compatibilité avec un
iPod
Séquence des fichiers
audio
Dossier
Fichier d’audio
compressé
à : séquence de lecture
01 à 05 : numéro de dossier
Bluetooth
La marque de mot et les logos Bluetooth® sont
des marques déposées appartenant à Bluetooth
SIG, Inc. et toute utilisation de ces marques par
PIONEER CORPORATION est faite sous licence.
Les autres marques de commerce ou noms
commerciaux sont la propriété de leur
propriétaire respectif.
iTunes
Apple et iTunes sont des marques
commerciales d’Apple Inc., enregistrées
aux États-Unis et dans d’autres pays.
WMA
Windows Media est une marque déposée
ou une marque commerciale de Microsoft
Corporation aux États-Unis et/ou dans
d’autres pays.
Ce produit intègre une technologie
détenue par Microsoft Corporation, qui ne
peut être utilisée et distribuée que sous
licence de Microsoft Licensing, Inc.
FLAC
Copyright © 2000-2009 Josh Coalson
Copyright © 2011-2013 Xiph.Org
Foundation
La redistribution et l’utilisation en formes
source et binaire, avec ou sans
modification, sont permises pourvu que les
conditions suivantes soient respectées :
–Toute redistribution de code source doit
être accompagnée de la mention de
droits d’auteur correspondants, de la liste
de conditions et de la clause de non-
responsabilité ci-dessous.
–Les redistributions en forme binaire
doivent reproduire l’avis de droits
d’auteur ci-dessus, cette liste de
conditions et le déni de responsabilité
suivant dans la documentation et/ou tout
autre matériel fourni avec la distribution.
–Ni le nom de la fondation Xiph.org
Foundation, ni celui de ses contributeurs
ne sauraient être utilisés pour soutenir ou
promouvoir des produits dérivés de ce
logiciel sans autorisation écrite préalable.
CE PROGRAMME EST FOURNI PAR LES
DÉTENTEURS DES DROITS D’AUTEUR ET
LES CONTRIBUTEURS « EN L’ÉTAT », SANS
QU’AUCUNE GARANTIE D’AUCUNE SORTE
N’Y SOIT ATTACHÉE, Y COMPRIS LES
GARANTIES COMMERCIALES HABITUELLES.
LA FONDATION DÉTENTRICE DES DROITS
D’AUTEUR, AINSI QUE LES
CONTRIBUTEURS, NE POURRONT ÊTRE
TENUS POUR RESPONSABLES, EN AUCUN
CAS, DE DOMMAGES DIRECTS, INDIRECTS,
ACCIDENTELS, SPÉCIAUX, OU
CONSÉCUTIFS À L’UTILISATION DU
Tableau des caractères
cyrilliques
Droits d’auteur et
marques commerciales
D : Affichage C : Caractère

22Fr
PRODUIT ; ILS NE SAURAIENT ÊTRE MIS EN
CAUSE EN CAS DE PERTE DE DONNÉES, DE
L’INTERRUPTION D’UNE ACTIVITÉ
COMMERCIALE, D’UNE PERTE DE
BÉNÉFICES ; CETTE LISTE N’EST NI
EXHAUSTIVE, NI LIMITATIVE.
iPod & iPhone
iPhone, iPod, iPod classic, iPod nano et
iPod touch sont des marques
commerciales d’Apple Inc., déposées aux
États-Unis et dans d’autres pays.
Lightning est une marque commerciale
d’Apple Inc.
Les accessoires électroniques portant la
mention « Made for iPod » et « Made for
iPhone » ont été conçus pour fonctionner
respectivement avec un iPod ou un iPhone
et sont certifiés
conformes aux exigences d’Apple par le
fabricant. Apple n’est pas responsable du
fonctionnement de cet appareil ou de sa
compatibilité avec les normes
réglementaires et de sécurité. Veuillez
noter que l’emploi de cet accessoire avec
un iPod ou un iPhone peut affecter les
performances sans fil.
Android™
Android est une marque commerciale de
Google Inc.
MIXTRAX
MIXTRAX est une marque commerciale de
PIONEER CORPORATION.
Généralités
Tension d’alimentation : 14,4 V CC (10,8 V à
15,1 V admissible)
Mise à la masse : pôle négatif
Consommation maximale : 10,0 A
Dimensions (L × H × P) :
DIN
Châssis : 178 mm × 50 mm × 97 mm
Panneau avant : 188 mm × 58 mm ×
17 mm
D
Châssis : 178 mm × 50 mm × 97 mm
Panneau avant : 170 mm × 46 mm ×
17 mm
Poids : 0,5 kg
Audio
Puissance de sortie maximale :
50 W × 4
70 W × 1/2 Ω (pour le haut-parleur
d’extrêmes graves)
Puissance de sortie continue :
22 W × 4 (50 Hz à 15 000 Hz, THD 5 %,
impédance de charge 4 Ω, avec les
deux canaux entraînés)
Impédance de charge : 4 Ω (4 Ω à 8 Ω
admissible)
Niveau de sortie maximum de la sortie
préamp. : 2,0 V
Correction physiologique : +10 dB
(100 Hz), +6,5 dB (10 kHz) (volume :
–30 dB)
Égaliseur (égaliseur graphique à
5bandes):
Fréquence : 80 Hz/250 Hz/800 Hz/
2,5 kHz/8 kHz
Plage d’égalisation : ±12 dB (par pas
de 2 dB)
Haut-parleur d’extrêmes graves (mono) :
Fréquence : 50 Hz/63 Hz/80 Hz/
100 Hz/125 Hz/160 Hz/200 Hz
Caractéristiques
techniques
Pente : –12 dB/oct, –24 dB/oct
Gain : +6 dB à –24 dB
Phase : normale/inverse
USB
Spécification standard USB : USB 2.0 vitesse
pleine
Alimentation en courant maximale : 1 A
Classe USB : MSC (Mass Storage Class)
Système de fichiers : FAT12, FAT16, FAT32
Format de décodage MP3 : MPEG-1 et 2
Couche Audio 3
Format de décodage WMA : Ver.7, 7.1, 8, 9,
10, 11, 12 (2 canaux audio) (Windows
Media Player)
FLAC Format de décodage : v1.3.0 (Free
Lossless Audio Codec) (Uniquement
pour les modèles MVH-170UI/
170UBG/170UB)
Format de signal WAV : Linear PCM et MS
ADPCM (non compressé)
Syntoniseur FM
Gamme de fréquences : 87,5 MHz à
108,0 MHz
Sensibilité utile : 11 dBf (1,0 μV/75 Ω,
mono, S/B : 30 dB)
Rapport signal/bruit : 72 dB (réseau IEC-A)
Syntoniseur MW
Gamme de fréquences : 531 kHz à
1 602 kHz
Sensibilité utile : 25 μV (S/B : 20 dB)
Rapport signal/bruit : 62 dB (réseau IEC-A)
Syntoniseur LW
Gamme de fréquences : 153 kHz à 281 kHz
Sensibilité utile : 28 μV (S/B : 20 dB)
Rapport signal/bruit : 62 dB (réseau IEC-A)
Bluetooth
(Uniquement pour le modèle
MVH-X370BT)
Version : Bluetooth 3.0 certifiée
Puissance de sortie : +4 dBm maximum
(Classe de puissance 2)
Profils Bluetooth :
GAP (Generic Access Profile)
SDAP (Service Discovery Application
Profile)
OPP (Object Push Profile)
HFP (Hands Free Profile) 1.6
PBAP (Phone Book Access Profile)
A2DP (Advanced Audio Distribution
Profile)
AVRCP (Audio/Video Remote Control
Profile) 1.5
SPP (Serial Port Profile) 1.1
REMARQUE
Les caractéristiques et la présentation
peuvent être modifiées sans avis préalable.

23Fr
Français

2It
Prima di iniziare....................................................................................... 3
Operazioni preliminari........................................................................... 3
Radio.......................................................................................................... 5
USB/iPod/AUX.......................................................................................... 6
Bluetooth.................................................................................................. 8
Modalità app.......................................................................................... 11
Impostazioni .......................................................................................... 12
Impostazioni FUNCTION..................................................................... 12
Impostazioni AUDIO ............................................................................ 13
Impostazioni SYSTEM.......................................................................... 13
Impostazioni ILLUMINATION.............................................................. 14
Impostazioni MIXTRAX........................................................................ 14
Connessioni/Installazione................................................................... 15
Informazioni aggiuntive...................................................................... 18
Sommario
Informazioni sul manuale:
• Nelle seguenti istruzioni, una memoria USB o un lettore audio USB viene denominato
“dispositivo USB”.
• In questo manuale, iPod e iPhone vengono denominati “iPod”.

3It
Italiano
Grazie per avere acquistato questo prodotto PIONEER
Per garantire un uso corretto, leggere attentamente questo manuale prima di utilizzare il prodotto. È
fondamentale leggere e osservare le indicazioni di AVVERTENZA e AT T E N Z I ON E del manuale. Tenere
il manuale in un luogo sicuro e accessibile per future consultazioni.
Gli utenti privati dei Paesi membri dell’Unione Europea, della Svizzera e della Norvegia possono portare
i propri prodotti elettronici gratuitamente presso i centri di raccolta specificati o presso il rivenditore al
dettaglio (se l’acquisto è stato eseguito presso un rivenditore di questo tipo).
Per i Paesi non specificati in precedenza, contattare le autorità locali per informazioni sul corretto
metodo di smaltimento.
In questo modo si garantirà che il prodotto smaltito subisca i processi di trattamento, recupero e
riciclaggio necessari per prevenire i potenziali effetti negativi per l’ambiente e la salute umana.
AVVERTENZA
•Non cercare di installare o effettuare interventi di manutenzione sul prodotto. L’installazione o
l’esecuzione di interventi di manutenzione sul prodotto da parte di persone sprovviste delle
qualifiche o dell’esperienza richiesta per apparecchi elettronici e accessori automobilistici
potrebbe risultare pericolosa ed esporre a rischi di scosse elettriche e di altre situazioni
pericolose.
•Non cercare di utilizzare i comandi dell’unità durante la guida. Prima di utilizzare i comandi dell’unità,
parcheggiare il veicolo in un luogo sicuro.
ATTENZIONE
•Non lasciare che l’unità entri in contatto con umidità e/o liquidi. Possono verificarsi scosse elettriche.
Inoltre, in seguito al contatto con i liquidi possono verificarsi danni all’unità, fumo e surriscaldamento.
•Mantenere sempre il volume basso abbastanza da poter udire i suoni provenienti dall’esterno.
•Il CarStereo-Pass Pioneer può essere usato solo in Germania.
In caso di problemi
Nel caso che questa unità non funzioni correttamente, contattare il rivenditore o il Centro di assistenza
autorizzato PIONEER più vicino.
MVH-X370BT/170UI/170UBG/170UB
*1 Le indicazioni dei pulsanti variano in base all’unità.
*2 Questo pulsante viene indicato con DISP nel presente manuale.
Operazioni frequenti
I pulsanti disponibili variano in base all’unità.
Prima di iniziare
Se si vuole eliminare questo prodotto, non gettarlo insieme ai rifiuti domestici. Esiste un sistema di
raccolta differenziata in conformità alle leggi che richiedono appositi trattamenti, recupero e riciclo.
Operazioni preliminari
Funzionamento di base
Scopo Operazione
Accendere l’alimentazione* Premere SRC/OFF per accendere
l’alimentazione.
Tenere premuto SRC/OFF per spegnere
l’alimentazione.
Regolare il volume Ruotare la ghiera M.C..
Selezionare una sorgente Premere ripetutamente SRC/OFF.
Cambiare la visualizzazione delle
informazioni
Premere ripetutamente DISP.
Tornare alla precedente visualizzazione/
elenco
Premere /DIMMER.
Tornare alla visualizzazione normale dal
menu.
Premere BAND/.
SRC (sorgente)/OFF
Pulsante di sgancio
Finestra di visualizzazioneGhiera M.C. (multi-
controllo)
BAND/
/DIMMER Pulsante del display*2
*1
*1

4It
* Quando l’interlinea blu/bianca dell’unità è collegata al terminale di controllo relè dell’antenna
automatica, l’antenna del veicolo si estende quando la sorgente dell’unità è attivata. Per ritirare
l’antenna, disattivare la sorgente.
Indicazione del display
Staccare il frontalino per evitarne il furto. Rimuovere tutti i cavi e i dispositivi collegati al
frontalino e spegnere l’unità prima di staccarla.
Importante
• Evitare di sottoporre il frontalino a forti urti.
• Mantenere il frontalino lontano da luce diretta del sole e alte temperature.
• Conservare sempre il frontalino staccato in una custodia protettiva o in borsa.
Quando, dopo l’installazione, l’interruttore di accensione viene impostato su ON, sul
display viene visualizzato [SET UP :YES].
1 Premere la ghiera M.C..
Il menu di configurazione scompare dopo 30 secondi di attività. Se si desidera
effettuare l’impostazione in seguito, ruotare la ghiera M.C. per selezionare [NO],
quindi premere per confermare.
2 Ruotare la ghiera M.C. per selezionare le opzioni, quindi premere per confermare.
Per passare all’opzione di menu successiva, confermare la selezione.
Rispondere a/terminare una chiamata (solo
per MVH-X370BT)
Premere .
Indicazione Descrizione
Viene visualizzata quando esiste un livello inferiore del menu o della
cartella.
Viene visualizzata quando è impostata la funzione di risposta automatica
(pagina 10).
(solo per modelli compatibili con il Bluetooth).
Viene visualizzata quando si preme il pulsante .
Viene visualizzata quando è impostata la funzione di sintonizzazione
automatica locale (pagina 12).
Viene visualizzata quando viene ricevuto un programma sul traffico.
Viene visualizzata quando vengono ricevuti annunci sul traffico
(pagina 12).
Viene visualizzata quando è impostata la funzione sound retriever
(pagina 12).
Viene visualizzata quando è impostata la riproduzione casuale/shuffle
(tranne quando BT AUDIO è selezionato come sorgente).
Viene visualizzata quando è impostata la ripetizione della riproduzione
(tranne quando BT AUDIO è selezionato come sorgente).
Viene visualizzata quando è impostata la funzione di controllo dell’iPod
(pagina 8).
Viene visualizzata in presenza di una connessione Bluetooth (pagina 8).
(solo per modelli compatibili con il Bluetooth).
Scopo Operazione
Rimozione del frontalino
Menu di configurazione
Voce del menu Descrizione
LANGUAGE Selezionare la lingua per visualizzare le informazioni di testo di un
file audio compresso.
[ENG](Inglese),
[РУС](Russo),
[TUR](Turco)
CLOCK SET Impostare l’orologio.
FM STEP Selezionare il passo di frequenza FM tra 100 kHz o 50 kHz.
[100], [50]
Stacca Attacca

5It
Italiano
3 Quando tutte le impostazioni sono state configurate, viene visualizzato [QUIT
:YES].
Per tornare alla prima voce del menu di configurazione, ruotare la ghiera M.C. per
selezionare [QUIT :NO], quindi premere per confermare.
4 Premere la ghiera M.C. per confermare le impostazioni.
NOTE
• È possibile annullare l’impostazione del menu premendo SRC/OFF.
• Tali impostazioni possono essere effettuate in qualsiasi momento dalle impostazioni SYSTEM
(pagina 13) e dalle impostazioni INITIAL (pagina 5).
1 Premere la ghiera M.C. per visualizzare il menu principale.
2 Ruotare la ghiera M.C. per selezionare [SYSTEM], quindi premere per confermare.
3 Ruotare la ghiera M.C. per selezionare [DEMO OFF], quindi premere per
confermare.
4 Ruotare la ghiera M.C. per selezionare [YES], quindi premere per confermare.
1 Tenere premuto SRC/OFF finché l’unità si spegne.
2 Tenere premuto SRC/OFF per visualizzare il menu principale.
3 Ruotare la ghiera M.C. per selezionare [INITIAL], quindi premere per confermare.
4 Ruotare la ghiera M.C. per selezionare un’opzione, quindi premere per
confermare.
NOTA
Le opzioni variano in base all’unità.
Le frequenze del tuner sull’unità sono distribuite per l’utilizzo in Europa occidentale,
Asia, Medio oriente, Africa e Oceania. L’utilizzo in altre aree può provocare una scarsa
ricezione. La funzione RDS (radio data system) funziona solo nelle aree di trasmissione
dei segnali RDS per le stazioni FM.
1 Premere SRC/OFF per selezionare [RADIO].
2
Premere
BAND
/ per selezionare una banda da [FM1], [FM2], [FM3], [MW] o [LW].
3 Premere un pulsante numerico (da 1/ a 6/).
TIP
I pulsanti / possono anche essere utilizzati per selezionare una stazione preimpostata
quando [SEEK] è impostato su [PCH] nelle impostazioni FUNCTION (pagina 12).
Annullamento della visualizzazione di
dimostrazione (DEMO OFF)
Impostazioni INITIAL
Voce del menu Descrizione
FM STEP Selezionare il passo di frequenza FM tra 100 kHz o 50 kHz.
[100], [50]
SP-P/O MODE Selezionare in presenza di un altoparlante full-range collegato
alle interlinee di uscita dell’altoparlante posteriore e di un
subwoofer collegato a un’uscita RCA.
[REAR/SUB.W]
[SUB.W/SUB.W] Selezionare in presenza di un subwoofer passivo collegato
direttamente alle interlinee di uscita dell’altoparlante posteriore
e di un subwoofer collegato all’uscita RCA.
[REAR/REAR] Selezionare in presenza di altoparlanti full-range collegati alle
interlinee di uscita dell’altoparlante posteriore e all’uscita RCA.
In presenza di un altoparlante full-range collegato alle interlinee
di uscita dell’altoparlante posteriore e l’uscita RCA non viene
utilizzata, è possibile selezionare [REAR/SUB.W] o [REAR/REAR].
S/W UPDATE Selezionare per aggiornare l’unità alla versione software
Bluetooth più recente. Per dettagli sul software Bluetooth e
sull’aggiornamento, visitare il nostro sito Web.
SYSTEM RESET Selezionare [YES] per avviare le impostazioni dell’unità. L’unità
viene riavviata automaticamente. (Alcune impostazioni, come le
informazioni di abbinamento Bluetooth e simili, rimangono
memorizzate anche dopo il riavvio dell’unità.)
[YES], [CANCEL]
Radio
Ricezione delle stazioni preimpostate
Voce del menu Descrizione

6It
Le sei stazioni più forti vengono memorizzate sui pulsanti numerici (da 1/ a 6/).
1 Dopo aver selezionato la banda, premere la ghiera M.C. per visualizzare il menu
principale.
2 Ruotare la ghiera M.C. per selezionare [FUNCTION], quindi premere per
confermare.
3 Ruotare la ghiera M.C. per selezionare [BSM], quindi premere per confermare.
Per cercare manualmente una stazione
1
Una volta selezionata la banda, premere / per selezionare una stazione.
Tenere premuto / , quindi rilasciarlo per cercare una stazione disponibile. La
scansione termina quando l’unità riceve una stazione. Per annullare la
sintonizzazione, premere / .
NOTA
[SEEK] deve essere impostato su [MAN] nelle impostazioni FUNCTION (pagina 12).
Per memorizzare manualmente le stazioni
1
Durante la ricezione della stazione che si desidera memorizzare, tenere premuto
uno dei pulsanti numerici (da 1/ a 6/ ) fino a quando non smette di
lampeggiare.
L’unità cerca una stazione per informazione PTY (tipo di programma).
1 Premere durante la ricezione FM.
2 Ruotare la ghiera M.C. per selezionare un tipo di programma da [NEWS/INFO],
[POPULAR], [CLASSICS] o [OTHERS].
3 Premere la ghiera M.C..
L’unità inizia a cercare una stazione. Una volta trovata, viene visualizzato il relativo
nome di servizio del programma.
NOTE
• Per annullare la ricerca, premere la ghiera M.C..
• Il programma di alcune stazioni può differire da quanto indicato dal PTY trasmesso.
• Se non viene trasmessa alcuna stazione per il tipo di programma che si sta cercando, viene
visualizzato [NOT FOUND] per circa due secondi, quindi il tuner torna alla stazione originale.
Elenco PTY
Per maggiori dettagli sull’elenco PTY, visitare il seguente sito:
http://www.pioneer.eu/eur/products/25/121/tech/CarAudio/PTY.html
NOTA
La funzione iPod non è disponibile per MVH-170UBG/170UB.
Scollegare le cuffie dal dispositivo prima di collegarlo all’unità.
Dispositivo USB/iPod
1
Aprire il coperchio della porta USB.
2 Collegare il dispositivo USB/iPod utilizzando un cavo idoneo.
ATTENZIONE
Per collegare il dispositivo di archiviazione USB, utilizzare un cavo USB Pioneer opzionale (CD-U50E),
perché tutti i dispositivi collegati direttamente all’unità sporgono dalla stessa e possono essere
pericolosi.
Prima di rimuovere il dispositivo, interrompere la riproduzione.
Memorizzazione delle stazioni migliori (BSM)
Uso delle funzioni PTY
USB/iPod/AUX
Riproduzione
Jack di ingresso AUX (jack stereo da 3,5 mm)
Porta USB
SRC (sorgente)/OFF
Ghiera M.C. (multi-controllo)

7It
Italiano
Connessione MTP
Un dispositivo installato con Android OS 4.0 o versioni successive, può essere collegato all’unità via
MTP, utilizzando il cavo in dotazione con il dispositivo. Tuttavia, a seconda del dispositivo collegato e
del numero di file sul dispositivo, i file audio/brani potrebbero non essere riproducibili via MTP. Si prega
di notare che la connessione MTP non è compatibile con i formati file WAV e FLAC* e non può essere
utilizzata con la funzione MIXTRAX.
* I file FLAC sono compatibili solo con MVH-170UI/170UBG/170UB.
AUX
1
Inserire la spina mini stereo nel jack di ingresso AUX.
2 Premere SRC/OFF per selezionare [AUX] come sorgente.
NOTA
Se [AUX] è impostato su [OFF] nelle impostazioni SYSTEM, [AUX] non può essere selezionato come
sorgente.
È possibile effettuare diverse regolazioni nelle impostazioni FUNCTION (pagina 12).
Si prega di notare che le seguenti operazioni non funzionano con un dispositivo AUX.
Per far funzionare un dispositivo AUX, utilizzare il dispositivo stesso.
*1 Solo file audio compressi
*2 In assenza del pulsante 3/S.Rtrv sull’unità, la funzione sound retriever può essere impostata
mediante le impostazioni FUNCTION.
Operazioni
Scopo Operazione
Selezionare una cartella/album*1 Premere 1/ o 2/.
Selezionare una traccia/brano (capitolo) Premere o .
Avanzamento o avvolgimento rapido Tenere premuto o .
Cercare un file da un elenco 1 Premere per visualizzare l’elenco.
2 Ruotare la ghiera M.C. per selezionare il
nome file desiderato (cartella) o la
categoria, quindi premere per
confermare.
3 Ruotare la ghiera M.C. per selezionare il
file desiderato, quindi premere per
confermare.
Viene avviata la riproduzione.
Visualizzare un elenco di file nella cartella/
categoria selezionata*1
Premere la ghiera M.C. quando viene
selezionata una cartella/categoria.
Riprodurre un brano nella cartella/categoria
selezionata*1
Tenere premuto la ghiera M.C. quando
viene selezionata una cartella/categoria.
Ricerca alfabetica (solo iPod) 1 Premere per visualizzare l’elenco.
2 Ruotare la ghiera M.C. per selezionare
l’elenco di categoria desiderato, quindi
premere per inserire la modalità di
ricerca alfabetica.
Anche ruotando la ghiera M.C. due volte
è possibile inserire la modalità di ricerca
alfabetica.
3 Ruotare la ghiera M.C. per selezionare
una lettera, quindi premere per
visualizzare l’elenco alfabetico.
Per annullare la ricerca alfabetica, premere
/DIMMER.
Ripetere la riproduzione Premere 6/.
Riproduzione casuale/shuffle Premere 5/.
Riprodurre tutto in modalità shuffle (solo
iPod)
Tenere premuto 5/.
Sospendere/riprendere la riproduzione Premere 4/PAUSE.
Sound retriever*2 Premere 3/S.Rtrv.
[1]: efficace per velocità di compressione
basse
[2]: efficace per velocità di compressione
alte
Tornare alla cartella principale (solo USB)*1 Tenere premuto BAND/.
Cambiare unità nel dispositivo USB
(Solo dispositivi che supportano il
protocollo per dispositivi di archiviazione di
massa USB)
Premere BAND/.
Scopo Operazione

8It
Modalità di riproduzione collegamento
È possibile accedere ai brani in base ad artista, album o genere attualmente in
riproduzione.
1 Mentre si ascolta un brano, tenere premuto per inserire la modalità di
riproduzione collegamento.
2 Ruotare la ghiera M.C. per selezionare la modalità ([ARTIST], [ALBUM], [GENRE]),
quindi premere per confermare.
Il brano/album selezionato verrà riprodotto dopo il brano attualmente in
riproduzione.
NOTA
È possibile annullare il brano/album selezionato se si utilizzano funzioni diverse dalla modalità di
ricerca collegamento (ad esempio avanzamento e riavvolgimento rapidi).
Controllo iPod
È possibile controllare l’unità mediante un iPod connesso.
I seguenti modelli di iPod non sono compatibili con questa funzione.
– iPod nano 1a generazione, iPod con video
1 Premere BAND/ durante la riproduzione, quindi selezionare la modalità di
controllo.
[CONTROL iPod/CTRL iPod]: la funzione iPod dell’unità può essere utilizzata
dall’iPod collegato.
[CONTROL AUDIO/CTRL AUDIO]: la funzione iPod dell’unità può essere utilizzata
solo mediante i pulsanti dell’unità. In questa modalità, l’iPod collegato non può
essere acceso o spento.
NOTE
• La modalità di controllo può essere commutata anche premendo iPod (solo per MVH-170UI).
• Il passaggio dalla modalità di controllo a [CONTROL iPod/CTRL iPod] sospende la riproduzione del
brano. Utilizzare l’iPod collegato per riprendere la riproduzione.
• Le seguenti operazioni continuano a essere accessibili dall’unità anche se la modalità di controllo è
impostata su [CONTROL iPod/CTRL iPod].
– Pausa, avanzamento/riavvolgimento rapido, selezione brano/capitolo
• Il volume può essere regolato solo dall’unità.
(solo per MVH-X370BT)
La funzione MIXTRAX crea un mix ininterrotto della vostra libreria musicale,
accompagnato da effetti luminosi. Per dettagli sulle impostazioni di MIXTRAX,
consultare pagina 14.
NOTE
• Questa funzione non è compatibile con un dispositivo Android collegato via MTP.
• Quando USB è selezionato come sorgente e la funzione MIXTRAX è in uso, la funzione sound retriever
è disattivata.
• In base al file/brano, gli effetti sonori potrebbero non essere disponibili.
• Disattivare la funzione MIXTRAX nel caso in cui gli effetti luminosi interferiscano con la guida.
1 Premere 3/MIX per attivare/disattivare MIXTRAX.
(solo per MVH-X370BT)
Importante
Nel caso in cui siano collegati tre o più dispositivi Bluetooth (ad es. un telefono o un lettore audio
separato), questi potrebbero non funzionare correttamente.
1 Attivare la funzione Bluetooth del dispositivo.
2 Tenere premuto per visualizzare il menu di connessione.
3 Ruotare la ghiera M.C. per selezionare [ADD DEVICE], quindi premere per
confermare.
L’unità inizia a cercare i dispositivi disponibili, quindi li visualizza nell’elenco dei
dispositivi.
• Per annullare la ricerca, premere la ghiera M.C..
• Se il dispositivo desiderato non è presente nell’elenco, selezionare [RE-SEARCH].
• Nel caso in cui non sia disponibile alcun dispositivo, sul display viene visualizzato
[NOT FOUND].
4 Ruotare la ghiera M.C. per selezionare il dispositivo desiderato, quindi premere
per confermare.
Tenere premuta la ghiera M.C. per cambiare le informazioni dispositivo visualizzate
tra indirizzo dispositivo Bluetooth e nome dispositivo.
Funzioni utili per iPod Informazioni su MIXTRAX (solo USB/iPod)
Bluetooth
Connessione Bluetooth

9It
Italiano
5 Selezionare [Pioneer BT Unit] visualizzato sul display del dispositivo.
6 Assicurarsi che il medesimo numero a 6 cifre venga visualizzato sull’unità e sul
dispositivo, quindi selezionare “Sì” sul dispositivo.
NOTE
• [DEVICE FULL] viene visualizzato se l’unità è già abbinata ad altri tre dispositivi. In questo caso,
eliminare uno dei dispositivi abbinati. Vedere [DEL DEVICE] o [GUEST MODE] nel menu di
connessione (pagina 9).
• A seconda del dispositivo, nella fase 6 è necessario il codice PIN. In questo caso, immettere [0000].
TIP
La connessione Bluetooth può anche essere eseguita rilevando l’unità dal dispositivo Bluetooth. Per
eseguire questa operazione, [VISIBLE] nel menu di connessione deve essere impostato su [ON]. Per
dettagli sulle operazioni dei dispositivi Bluetooth, fare riferimento alle istruzioni per l’uso in dotazione
con il dispositivo Bluetooth.
Menu di connessione
Per prima cosa, effettuare una connessione Bluetooth con il telefono Bluetooth
(pagina 8). È possibile connettere fino a due telefoni Bluetooth simultaneamente.
Importante
• Lasciare l’unità in standby per la connessione al telefono via Bluetooth mentre il motore è spento può
causare l’esaurimento della batteria del veicolo.
• Assicurarsi di aver parcheggiato il veicolo in un luogo sicuro e inserire il freno di stazionamento prima
di eseguire l’operazione.
Per effettuare una telefonata
1
Premere per visualizzare il menu del telefono.
Se sono connessi due telefoni, viene visualizzato prima il nome di un telefono, quindi
viene visualizzato il menu del telefono. Per passare all’altro telefono, premere
nuovamente .
2 Ruotare la ghiera M.C. per selezionare [MISSED], [DIALLED], [RECEIVED] o [PHONE
BOOK], quindi premere per confermare.
Viene visualizzato l’elenco dei numeri di telefono.
3 Ruotare la ghiera M.C. per selezionare un nome o un numero di telefono, quindi
premere per confermare.
Viene avviata la telefonata.
Per risponde a una chiamata in entrata
1
Premere quando si riceve una chiamata.
TIP
Se due telefoni sono connessi all’unità via Bluetooth e si riceve una chiamata mentre un telefono è già
in uso per una chiamata, sul display viene visualizzato un messaggio. Per rispondere alla chiamata, è
necessario terminare quella in corso.
Voce del menu Descrizione
DEVICELIST Visualizzare l’elenco dei dispositivi Bluetooth abbinati. Sul nome
del dispositivo viene visualizzato “*” quando viene stabilita la
connessione Bluetooth.
DEL DEVICE Eliminare le informazioni del dispositivo.
[DELETE YES],
[DELETE NO]
ADD DEVICE Registrare un nuovo dispositivo.
A.CONN Selezionare [ON] per connettere automaticamente un
dispositivo Bluetooth.
[ON], [OFF]
VISIBLE Selezionare [ON] in modo che un dispositivo Bluetooth possa
rilevare l’unità quando l’unità è connessa mediante un altro
dispositivo Bluetooth.
[ON], [OFF]
PIN CODE Cambiare il codice PIN.
1 Premere la ghiera M.C. per visualizzare la modalità di
impostazione.
2 Ruotare la ghiera M.C. per selezionare un numero.
3 Premere la ghiera M.C. per spostare il cursore sulla posizione
successiva.
4 Una volta inserito il codice PIN, tenere premuta la ghiera M.C..
Una volta inserito il codice PIN, premendo la ghiera M.C. si torna
alla visualizzazione di immissione del codice PIN e sarà possibile
modificare il codice PIN.
DEV. INFO Cambiare le informazioni dispositivo sul display tra nome
dispositivo e indirizzo dispositivo Bluetooth.
GUEST MODE Selezionare [ON] per passare automaticamente alla schermata
[DEL DEVICE] quando l’unità è già abbinata a tre dispositivi.
[ON], [OFF]
A.PAIRING Selezionare [ON] per abbinare automaticamente l’unità e
iPhone quando un iPhone è connesso all’unità via USB. Questa
funzione potrebbe non essere disponibile a seconda della
versione iOS in uso.
[ON], [OFF]
Telefono Bluetooth
Voce del menu Descrizione

10It
Operazioni di base
Per preimpostare i numeri di telefono
1
Selezionare un numero di telefono da una rubrica o dalla cronologia delle
chiamate.
2 Tenere premuto uno dei pulsanti numerici (da 1/ a 6/).
Il contatto viene memorizzato sul numero preimpostato selezionato.
Per effettuare una chiamata utilizzando un numero preimpostato, premere uno dei
pulsanti numerici (da 1/ a 6/ ), quindi premere la ghiera M.C..
Riconoscimento vocale (solo per iPhone)
Questa funzione è disponibile solo quando un iPhone dotato di riconoscimento vocale
viene collegato all’unità via Bluetooth.
1 Tenere premuta la ghiera M.C. per attivare la modalità di riconoscimento vocale.
2 Premere la ghiera M.C., quindi parlare nel microfono per inserire i comandi vocali.
Per uscire dalla modalità di riconoscimento vocale, premere BAND/.
NOTA
Per dettagli sulle funzioni di riconoscimento vocale, fare riferimento al manuale in dotazione con
l’iPhone.
Menu del telefono
*1 I contatti presenti sul telefono vengono normalmente trasferiti automaticamente quando il
telefono è connesso. In caso contrario, utilizzare il telefono per trasferire i contatti.
*2 Se sono connessi due telefoni, questa funzione non ha effetto sulle chiamate in entrata ricevute
mentre uno dei telefoni è in uso per una chiamata.
Importante
• In base al lettore audio Bluetooth connesso all’unità, le operazioni disponibili saranno limitate ai
seguenti due livelli:
– A2DP (Advanced Audio Distribution Profile) può solo riprodurre i brani presenti sul lettore audio.
– AVRCP (Audio/Video Remote Control Profile) può eseguire funzioni quali riproduzione, pausa,
selezione del brano e così via.
• L’audio del lettore audio Bluetooth viene disattivato quando il telefono è in uso.
• Quando il lettore audio Bluetooth è in uso, non è possibile connettere automaticamente un telefono
Bluetooth.
• In base al tipo di lettore audio Bluetooth connesso all’unità, l’operazione e le informazioni visualizzate
possono variare in base a disponibilità e funzionalità.
Scopo Operazione
Terminare una chiamata Premere .
Rifiutare una chiamata in entrata Tenere premuto quando si riceve una
chiamata.
Passare tra il chiamante corrente e
un chiamante in attesa
Premere la ghiera M.C..
Annullare un chiamante in attesa Tenere premuto .
Regolare il volume della voce del
chiamante. Quando è attiva la
modalità privata, questa funzione
non è disponibile.
Ruotare la ghiera M.C. durante la chiamata.
Attivare o disattivare la modalità di
privacy
Premere BAND/ durante la chiamata.
Voce del menu Descrizione
MISSED Visualizzare la cronologia delle chiamate perse.
DIALLED Visualizzare la cronologia delle chiamate effettuate.
RECEIVED Visualizzare la cronologia delle chiamate ricevute.
PHONE BOOK*1 Visualizzare i contatti trasferiti dal telefono. Impostare [VISIBLE]
nel menu di connessione su [ON] per sfogliare i contatti
attraverso l’unità.
PRESET 1-6 Richiamare i numeri di telefono preimpostati. È inoltre possibile
richiamare i numeri di telefono preimpostati premendo uno dei
tasti numerici (da 1/ a 6/).
PHONE FUNC Selezionare [ON] per risponde automaticamente a una chiamata
in entrata.
A.ANSR:*2
[ON], [OFF]
R.TONE:
[ON], [OFF]
Selezionare [ON] se la suoneria non viene emessa dagli
altoparlanti dell’auto. A seconda del telefono collegato, questa
funzione potrebbe non essere operativa.
PB INVT Invertire l’ordine dei nomi nella rubrica (visualizzazione nomi).
Audio Bluetooth

11It
Italiano
1 Effettuare una connessione Bluetooth con il lettore audio Bluetooth.
2 Premere SRC/OFF per selezionare [BT AUDIO] come sorgente.
3 Premere BAND/ per avviare la riproduzione.
Operazioni di base
È possibile effettuare diverse regolazioni nelle impostazioni FUNCTION (pagina 12).
* In base al dispositivo connesso, queste operazioni potrebbero non essere disponibili.
(La modalità APP non è disponibile per MVH-170UBG/170UB.)
È possibile ascoltare un’applicazione su un dispositivo iPhone/Android attraverso l’unità.
In alcuni casi, è possibile controllare un’applicazione utilizzando l’unità.
Per dettagli sui dispositivi compatibili, visitare il nostro sito Web.
Importante
L’utilizzo di applicazioni di terze parti potrebbe comportare o richiedere di fornire informazioni
personali di identificazione attraverso la creazione di un account utente o in altro modo e, per alcune
applicazioni, attraverso l’invio di dati di geolocalizzazione.
TUTTE LE APPLICAZIONI DI TERZE PARTI SONO DI RESPONSABILITÀ ESCLUSIVA DEI RISPETTIVI
FORNITORI, INCLUSI MA NON LIMITATAMENTE ALLA GESTIONE E SICUREZZA DEI DATI UTENTE E ALLE
PROCEDURE DI TUTELA DELLA PRIVACY. ACCEDENDO AD APPLICAZIONI DI TERZE PARTI, SI ACCETTA DI
ESAMINARE I TERMINI DEL SERVIZIO E I CRITERI SULLA PRIVACY DEI FORNITORI. SE NON SI ACCETTANO
I TERMINI O I CRITERI DI QUALSIASI FORNITORE O NON SI ACCONSENTE, DOVE SIA APPLICABILE,
ALL’USO DEI DATI DI GEOLOCALIZZAZIONE, NON UTILIZZARE TALI APPLICAZIONI DI TERZE PARTI.
Per gli utenti iPhone
Questa funzione è compatibile con iPhone e iPod touch installati con iOS 5.0 o versioni successive.
Per gli utenti di dispositivi Android
Questa funzione è compatibile con i dispositivi con Android OS 2.3 o versioni successive installate e
inoltre supportano Bluetooth SPP (Serial Port Profile) e A2DP (Advance Audio Distribution Profile).
NOTA
PIONEER NON È RESPONSABILE DELLE APP DI TERZE PARTI O DEI RELATIVI CONTENUTI, SENZA ALCUNA
LIMITAZIONE ALL’ACCURATEZZA O ALLA COMPLETEZZA. IL CONTENUTO E LA FUNZIONALITÀ DI TALI
APPLICAZIONI SONO DI SOLA RESPONSABILITÀ DEL FORNITORE DELLA APP.
La connessione Bluetooth è disponibile per MVH-X370BT.
1 Connettere l’unità con un dispositivo mobile.
• iPhone via USB (pagina 6)
• Dispositivo Android via Bluetooth (pagina 8)
2 Premere la ghiera M.C. per visualizzare il menu principale.
3 Ruotare la ghiera M.C. per selezionare [SYSTEM], quindi premere per confermare.
4 Ruotare la ghiera M.C. per selezionare [APP CONN.SET], quindi premere per
confermare.
5 Ruotare la ghiera M.C. per selezionare una delle seguenti voci, quindi premere
per confermare.
• Selezionare [WIRED] per iPhone.
• Selezionare [BLUETOOTH] per un dispositivo Android.
6 Premere SRC/OFF per selezionare [APP].
7 Utilizzare il dispositivo mobile per avviare l’applicazione.
Operazioni di base
È possibile effettuare diverse regolazioni nelle impostazioni FUNCTION (pagina 12).
Scopo Operazione
Avanzamento o avvolgimento rapido Tenere premuto o .
Selezionare una traccia Premere o .
Ripetere la riproduzione* Premere 6/.
Riproduzione casuale* Premere 5/.
Sospendere/riprendere la riproduzione Premere 4/PAUSE.
Cercare un file da un elenco 1 Premere per visualizzare l’elenco.
2 Ruotare la ghiera M.C. per selezionare il
nome della cartella desiderata, quindi
premere per confermare.
3 Ruotare la ghiera M.C. per selezionare il
file desiderato, quindi premere per
confermare. Viene avviata la
riproduzione.
Modalità app
Riproduzione di un’applicazione attraverso l’unità
Scopo Operazione
Selezionare una traccia Premere o .
Avanzamento o avvolgimento rapido Tenere premuto o .
Sospendere/riprendere la riproduzione Premere BAND/.

12It
È possibile regolare diverse impostazioni nel menu principale.
1 Premere la ghiera M.C. per visualizzare il menu principale.
2 Ruotare la ghiera M.C. per selezionare una delle seguenti categorie, quindi
premere per confermare.
• Impostazioni FUNCTION (pagina 12)
• Impostazioni AUDIO (pagina 13)
• Impostazioni SYSTEM (pagina 13)
• Impostazioni ILLUMINATION (pagina 14)
• Impostazioni MIXTRAX (pagina 14)
3 Ruotare la ghiera M.C. per selezionare le opzioni, quindi premere per confermare.
NOTE
• Le voci di menu relative a Bluetooth elencate nelle seguenti tabelle non sono disponibili per MVH-
170UI/170UBG/170UB.
• Le voci di menu relative a iPod elencate nelle seguenti tabelle non sono disponibili per MVH-170UBG/
170UB.
• Le voci di menu relative alla modalità APP elencate nelle seguenti tabelle non sono disponibili per
MVH-170UBG/170UB.
Le voci del menu variano a seconda della sorgente.
Impostazioni
Impostazioni FUNCTION
Voce del menu Descrizione
FM SETTING
[TALK], [STANDARD], [MUSIC] Corrispondenza del livello della qualità audio
con le condizioni del segnale di trasmissione del
segnale di banda FM. Disponibile solo con banda
FM selezionata.
BSM
Memorizzare automaticamente le sei stazioni più
forti sui pulsanti numerici (da 1/ a 6/).
REGIONAL
[ON], [OFF] Limitare la ricezione ai programmi regionali
specifici quando è selezionato AF (ricerca
frequenze alternative). Disponibile solo con
banda FM selezionata.
LOCAL
FM: [OFF], [LV1], [LV2], [LV3], [LV4]
MW/LW: [OFF], [LV1], [LV2]
Limitare la stazione di sintonizzazione in base
alla potenza del segnale.
TA
[ON], [OFF] Ricevere le informazioni sul traffico corrente se
disponibili. Disponibile solo con banda FM
selezionata.
AF
[ON], [OFF] Consentire all’unità di risintonizzarsi su una
frequenza differente fornendo la medesima
stazione. Disponibile solo con banda FM
selezionata.
NEWS
[ON], [OFF] Interrompere la sorgente attualmente
selezionata con programmi di news. Disponibile
solo con banda FM selezionata.
SEEK
[MAN], [PCH] Assegnare i pulsanti / per cercare le
stazioni una a una (sintonizzazione manuale) o
selezionare una stazione dai canali preimpostati.
SEL DEVICE
Connettere un dispositivo Bluetooth nell’elenco.
S.RTRV
[1] (efficace per velocità di
compressione basse),
[2] (efficace per velocità di
compressione alte),
[OFF]
Potenziare l’audio compresso e ripristinare il
suono completo.
Non disponibile quando:
• USB è selezionato come sorgente e la funzione
MIXTRAX è attivata.
• Viene riprodotto un file FLAC. (Disponibile per
MVH-170UI/170UBG/170UB)
AUDIO BOOK
[FASTER], [NORMAL], [SLOWER] Modificare la velocità di riproduzione. Non
disponibile quando [CONTROL iPod/CTRL iPod] è
selezionato nella modalità di controllo.
PAUSE
Sospendere o riprendere la riproduzione.
Voce del menu Descrizione
USB
iPod
iPod

13It
Italiano
*1 Non disponibile quando [SUB.W/SUB.W] è selezionato in [SP-P/O MODE] nelle impostazioni INITIAL
(pagina 5).
*2 Non disponibile quando [REAR/REAR] è selezionato in [SP-P/O MODE] nelle impostazioni INITIAL
(pagina 5).
*3 Non disponibile quando [OFF] è selezionato in [SUB.W].
È anche possibile accedere a questi menu quando l’unità è spenta.
PLAY
Avviare la riproduzione.
STOP
Arrestare la riproduzione.
Impostazioni AUDIO
Voce del menu Descrizione
FADER*1
Regolare il bilanciamento dell’altoparlante
anteriore e posteriore.
BALANCE
Regolare il bilanciamento dell’altoparlante
destro e sinistro.
EQ SETTING
[SUPER BASS], [POWERFUL],
[NATURAL], [VOCAL], [CUSTOM1],
[CUSTOM2], [FLAT]
Selezionare una banda
equalizzatore e il livello per
un’ulteriore personalizzazione.
Banda equalizzatore: [80HZ],
[250HZ], [800HZ], [2.5KHZ],
[8KHZ]
Livello equalizzatore: da [+6] a
[–6]
Selezionare o personalizzare la curva di
equalizzazione. [CUSTOM1] può essere
importato separatamente per ogni sorgente.
Tuttavia, ognuna delle seguenti combinazioni
viene impostata automaticamente sulla stessa
impostazione.
• USB, iPod e APP (iPhone)
• BT AUDIO, e APP (Android)
[CUSTOM2] è un’impostazione condivisa
utilizzata per tutte le sorgenti.
È possibile commutare l’equalizzatore anche
premendo ripetutamente (solo per
MVH-170UBG/170UB).
LOUDNESS
[OFF], [LOW], [MID], [HI] Compensare il suono chiaro a basso volume.
SUB.W*2
[NOR], [REV], [OFF] Selezionare la fase del subwoofer.
Voce del menu Descrizione
SUB.W CTRL*2*3
Frequenza di cutoff: [50HZ],
[63HZ], [80HZ], [100HZ], [125HZ],
[160HZ], [200HZ]
Livello di output: da [–24] a [+6]
Livello di pendenza: [–12], [–24]
Il subwoofer emette solo le frequenze inferiori a
quelle presenti nell’intervallo selezionato.
BASS BOOST
Da [0] a [+6] Selezionare il livello di incremento dei bassi.
HPF SETTING
Frequenza di cutoff: [OFF],
[50HZ], [63HZ], [80HZ], [100HZ],
[125HZ], [160HZ], [200HZ]
Livello di pendenza: [–12], [–24]
Dagli altoparlanti vengono emesse solo le
frequenze superiori al cutoff del filtro passa alto
(HPF).
SLA
Da [+4] a [–4] Regolare il volume del livello per ogni sorgente,
fatta eccezione per FM.
Ognuna delle seguenti combinazioni viene
impostata automaticamente sulla stessa
impostazione.
• USB, iPod e APP (iPhone)
• BT AUDIO e APP (Android)
Impostazioni SYSTEM
Voce del menu Descrizione
LANGUAGE
[ENG](Inglese), [РУС](Russo),
[TUR](Turco)
Selezionare la lingua per visualizzare le
informazioni di testo di un file audio compresso.
CLOCK SET
Impostare l’orologio (pagina 4).
12H/24H
[12H], [24H] Selezionare la notazione temporale.
Voce del menu Descrizione

14It
*1 [PW SAVE] è annullato se la batteria del veicolo è scollegata e dovrà essere riattivato una volta
ricollegata la batteria. Quando [PW SAVE] è disattivato, in base ai metodi di connessione, l’unità può
continuare a ricavare energia dalla batteria se l’interruttore di accensione del veicolo non dispone di
una posizione ACC (accessorio).
*2 Non disponibile quando [APP] è selezionato come sorgente.
(solo per MVH-X370BT)
AUTO PI
[ON], [OFF] Cercare una stazione differente con la medesima
programmazione, anche se si utilizza una
stazione preimpostata.
AUX
[ON], [OFF] Impostare su [ON] quando si utilizza un
dispositivo ausiliario connesso all’unità.
BT AUDIO
[ON], [OFF] Impostare il segnale Bluetooth su on/off.
MUTE MODE (disponibile solo per MVH-170UI)
[MUTE], [20dB ATT], [10dB ATT] Disattivare o attenuare automaticamente l’audio
quando dall’apparecchiatura con funzione Mute
viene ricevuto un segnale.
PW SAVE*1
[ON], [OFF] Ridurre il consumo della batteria.
L’attivazione della sorgente è consentita solo se
questa funzione è attiva.
BT MEM CLEAR
[YES], [CANCEL] Cancellare i dati del dispositivo Bluetooth
(elenco dispositivo, codice PIN, cronologia
chiamate, rubrica, numeri di telefono
preimpostati) memorizzati sull’unità.
Una volta eliminati correttamente i dati,
[CLEARED] viene visualizzato.
BT VERSION
Consente di visualizzare la versione di sistema
dell’unità e del modulo Bluetooth.
APP CONN. SET*2
[WIRED], [BLUETOOTH] Selezionare il metodo di connessione idoneo in
base al dispositivo.
Voce del menu Descrizione
Impostazioni ILLUMINATION
Voce del menu Descrizione
DIM SETTING
[SYNC CLOCK], [MANUAL] Cambiare la luminosità del display.
BRIGHTNESS
Da [1] a [10] Cambiare la luminosità del display.
La gamma delle impostazioni disponibili varia in
base a [DIM SETTING].
Impostazioni MIXTRAX
Voce del menu Descrizione
SHORT MODE
[1.0 MIN], [1.5 MIN], [2.0 MIN],
[2.5 MIN], [3.0 MIN], [OFF]
Selezionare la lunghezza del tempo di
riproduzione.
MIX PATTERN
[SOUND LEVEL] Cambiare gli effetti speciali MIXTRAX in base al
livello audio.
L’effetto misto cambia in base al livello audio.
[LOW PASS] L’effetto misto cambia in base al livello dei
bassi.
[RANDOM] L’effetto misto cambia casualmente in base alla
modalità di livello audio e alla modalità di
passa basso.
DISP FX
[ON], [OFF] Impostare gli effetti speciali MIXTRAX su on/
off.
CUT IN FX
[ON], [OFF] Attivare/disattivare gli effetti audio MIXTRAX
mentre si cambiano manualmente le tracce.

15It
Italiano
Importante
• Durante l’installazione dell’unità su un
veicolo privo di posizione ACC
(accessorio) sull’interruttore di
accensione, il mancato collegamento del
cavo rosso al terminale che rileva il
funzionamento del tasto di accensione
può provocare il consumo della batteria.
• Non utilizzare l’unità con le condizioni
riportate di seguito, in quanto
potrebbero verificarsi incendi o
malfunzionamenti.
–Veicoli con batteria da 12 volt e messa a
terra negativa.
–Altoparlanti da 50 W (valore di output) e
impedenza compresa tra 4 Ω e 8 Ω
(valore di impedenza).
• Per evitare cortocircuiti, surriscaldamento
e malfunzionamenti, assicurarsi di
attenersi alla seguente procedura.
–Scollegare il terminale negativo della
batteria prima dell’installazione.
–Fissare il cablaggio con fascette o nastro
adesivo. Avvolgere nastro adesivo
intorno cablaggio che entra in contatto
con le parti metalliche per proteggere i
cavi.
–Posizionare tutti i cavi lontano dalle
parti in movimento, come ad esempio
la leva del cambio e le guide dei sedili.
–Posizionare tutti i cavi lontano da luoghi
caldi, come ad esempio vicino alle
bocchette del riscaldamento.
– Non collegare il cavo giallo alla batteria
facendolo passare attraverso il foro del
vano motore.
–Coprire tutti i connettori per cavi
scollegati con nastro isolante.
– Non accorciare i cavi.
– Non tagliare mai l’isolamento del cavo
di alimentazione dell’unità al fine di
condividere la potenza con altri
dispositivi. La capacità corrente del cavo
è limitata.
– Utilizzare un fusibile dal valore
prescritto.
– Non collegare il cavo negativo
dell’altoparlante direttamente alla
messa a terra.
– Non unire mai i cavi negativi di diversi
altoparlanti.
• Quando l’unità è accesa, i segnali di
controllo vengono inviati attraverso il
cavo blu/bianco. Collegare il cavo al
telecomando di sistema di un
amplificatore di potenza esterno o al
terminale di controllo relè dell’antenna
automatica del veicolo (max. 300 mA 12 V
CC). Se il veicolo è dotato di un’antenna
da vetro, collegarla al terminale di
alimentazione del booster.
• Non collegare il cavo blu/bianco al
terminale di alimentazione di un
amplificatore di potenza esterno. Inoltre,
non collegarlo al terminale di
alimentazione dell’antenna automatica.
Questa operazione può provocare
l’esaurimento della batteria o un
malfunzionamento.
Connessioni/Installazione
Connessioni
Posizione ACC Senza posizione ACC
• Il cavo nero è la messa a terra. I cavi di
messa a terra per l’unità e per altre
apparecchiature (in particolare prodotti
ad alta corrente, come ad esempio
amplificatori di potenza) devono essere
collegati separatamente. In caso
contrario, un distacco accidentale può
provocare incendi o malfunzionamenti.
L’un it à
Microfono 4 m (13 piedi 1 poll.) (solo per
MVH-X370BT)
Uscita posteriore o uscita subwoofer
Uscita anteriore (solo per MVH-X370BT/
170UI)
Ingresso antenna
Ingresso cavo di alimentazione
Fusibile (10 A)
Ingresso telecomando cablato (solo per
MVH-X370BT/170UI)
È possibile collegare un adattatore per il
telecomando cablato (venduto
separatamente).
Ingresso microfono (solo per MVH-
X370BT)
Cavo di alimentazione
Eseguire questi collegamenti quando non
si effettua la connessione di un
altoparlante posteriore a un subwoofer.
All’ingresso del cavo di alimentazione
In base al veicolo, la funzione di e
può variare. In questo caso, assicurarsi
di collegare a e a .
Giallo
Backup (o accessorio)
Giallo
Effettuare la connessione a un terminale
di alimentazione costante pari a 12 V.
Rosso
Accessorio (o backup)
Rosso
Effettuare la connessione a un terminale
controllato dall’interruttore di
accensione (12 V CC).
Collegare tra loro le interlinee del
medesimo colore.
Nero (messa a terra telaio)
MVH-X370BT/170UI/170UBG/170UB

16It
Blu/bianco
La posizione del pin del connettore ISO
varia in base al tipo di veicolo. Collegare
e quando il Pin 5 è di tipo
controllo antenna. In un altro tipo di
veicolo, non collegare mai e .
Blu/bianco
Effettuare la connessione al terminale di
controllo del sistema dell’amplificatore
di potenza (max. 300 mA 12 V CC).
Blu/bianco
Effettuare la connessione al terminale di
controllo relè dell’antenna automatica
(max. 300 mA 12 V CC).
Giallo/nero (solo per MVH-170UI)
Se si utilizza l’apparecchiatura con
funzione Mute, collegare l’interlinea
all’interlinea Audio Mute
dell’apparecchiatura. In caso contrario,
tenere l’interlinea Audio Mute priva di
collegamenti.
Interlinee altoparlante
Bianco: anteriore sinistra
Bianco/nero: anteriore sinistra
Grigio: anteriore destra
Grigio/nero: anteriore destra
Verde: posteriore sinistra o
subwoofer
Verde/nero: posteriore sinistra o
subwoofer
Viola: posteriore destra o subwoofer
Viola/nero: posteriore destra o
subwoofer
Connettore ISO
In alcuni veicoli, il connettore ISO può
essere diviso in due. In questo caso,
assicurarsi di collegare entrambi i
connettori.
NOTE
• Cambiare il menu iniziale dell’unità. Fare
riferimento a [SP-P/O MODE] (pagina 5).
L’uscita subwoofer dell’unità è
monofonica.
• Quando si utilizza un subwoofer da 70 W
(2 Ω), assicurarsi di collegare il subwoofer
alle interlinee viola e viola/nero dell’unità.
Non collegare nulla alle interlinee verde e
verde/nero.
Amplificatore di potenza
(venduto separatamente)
Eseguire questi collegamenti quando si
utilizza un amplificatore opzionale.
Telecomando di sistema
Amplificatore di potenza (venduto
separatamente)
Effettuare la connessione con cavi RCA
(venduti separatamente)
All’uscita anteriore*
Altoparlante anteriore*
All’uscita posteriore o all’uscita
subwoofer
Altoparlante posteriore o subwoofer
* Solo per MVH-X370BT/170UI
Importante
• Verificare tutti i collegamenti e i sistemi
prima dell’installazione finale.
• Non utilizzare parti non autorizzate, in
quanto possono provocare
malfunzionamenti.
• Se l’installazione richiede la foratura o
altre modifiche del veicolo, consultare il
rivenditore.
• Non installare l’unità se:
–può interferire con il funzionamento dei
veicolo.
–può causare lesioni ai passeggeri in
caso di arresto improvviso.
Installazione
• In caso di surriscaldamento, il laser
semiconduttore può subire danni.
Installare l’unità lontano da luoghi caldi,
come ad esempio vicino alle bocchette
del riscaldamento.
• È possibile ottenere
prestazioni ottimali quando
l’unità viene installata con
un’angolazione inferiore ai
60°.
• Durante l’installazione, per garantire la
corretta dispersione del calore quando si
utilizza l’unità, accertarsi di lasciare
ampio spazio dietro il pannello posteriore
e avvolgere i cavi allentati in modo che
non blocchino le aperture.
Montaggio DIN anteriore/
posteriore
È possibile installare correttamente l’unità
utilizzando sia l’installazione a montaggio
anteriore che a montaggio posteriore.
Per l’installazione, utilizzare i componenti
disponibili in commercio.
Montaggio anteriore DIN
1 Inserire il riduttore di montaggio nel
cruscotto.
Per l’installazione in spazi poco
profondi, utilizzare il riduttore di
montaggio in dotazione. Se lo spazio a
disposizione è sufficiente, utilizzare il
riduttore di montaggio in dotazione
con il veicolo.
2 Fissare il riduttore di montaggio
utilizzando un cacciavite per piegare
le linguette metalliche (90°) in
posizione.
Cruscotto
Riduttore di montaggio
Assicurarsi che l’unità sia installata
saldamente in posizione.
Un’installazione instabile può causare
salti dei brani o altri malfunzionamenti.
Montaggio posteriore DIN
1 Allineare i fori della forcella montante
ai fori sui lati dell’unità per montare la
forcella.
2 Avvitare una vite su ciascun lato per
bloccare l’unità in posizione.
Vite filettata (5 mm × 8 mm)
Forcella montante
Cruscotto o console
Lasciare
ampio spazio
5 cm
5 cm

17It
Italiano
Uso della forcella in dotazione
Per montare l’unità è anche possibile
utilizzare la forcella in dotazione.
Controllare che la forcella in dotazione sia
adatta al modello di veicolo specifico,
quindi montarla sull’unità come illustrato
di seguito.
Vite
Forcella
Rimozione dell’unità
1 Rimuovere l’anello di rivestimento.
Anello di rivestimento
Linguetta a tacche
• Il rilascio del pannello anteriore
consente un più facile accesso
all’anello di rivestimento.
• Quando l’anello di rivestimento viene
nuovamente collegato, puntare il lato
con la linguetta a tacche rivolta verso il
basso.
2 Inserire le chiavi di estrazione in
dotazione in entrambi i lati dell’unità
finché non scattano in posizione.
3 Estrarre l’unità dal cruscotto.
(solo per MVH-X370BT)
Il microfono deve essere posizionato
direttamente davanti al conducente ad
una distanza adeguata per rilevare
chiaramente la voce.
ATTENZIONE
È estremamente pericoloso lasciare che il
cavo del microfono si impigli al piantone
dello sterzo o alla leva del cambio.
Assicurarsi di installare il microfono in
modo tale da non ostacolare la guida. Si
consiglia di utilizzare dei morsetti (venduti
separatamente) per sistemare l’interlinea.
Per l’installazione sul parasole
1 Posizionare l’interlinea del microfono
nella scanalatura.
Installazione del
microfono
Interlinea
microfono
Scanalatura
2 Installare il gancio del microfono sul
parasole.
L’abbassamento del parasole riduce il
tasso di riconoscimento vocale.
Per l’installazione sul piantone
dello sterzo
1 Far scorrere la base del microfono per
sganciare il microfono dal gancio.
Microfono
Gancio microfono
Base microfono
2 Installare il microfono sul lato
posteriore del piantone dello sterzo.
Gancio microfono
Nastro biadesivo

18It
Il display torna automaticamente alla
visualizzazione normale.
→ Non è stata effettuata alcuna
operazione per circa 30 secondi.
–Eseguire un’operazione.
Il range della riproduzione ripetuta
cambia in maniera inattesa.
→ In base al range di riproduzione
ripetuta, il range selezionato può
cambiare quando viene selezionata
un’altra cartella o traccia o durante
l’avanzamento/riavvolgimento rapido.
– Selezionare nuovamente il range di
riproduzione ripetuta.
Una cartella secondaria non viene
riprodotta.
→ Non è possibile riprodurre le cartelle
secondarie quando è selezionato [FLD]
(ripetizione cartella).
– Selezionare un altro range di
riproduzione ripetuta.
Il suono è intermittente.
→ Si sta utilizzando un dispositivo, come
ad esempio un cellulare, che può
provocare interferenze audio.
– Allontanare dall’unità i dispositivi
elettronici che possono causare
interferenze.
Il suono proveniente dalla sorgente audio
Bluetooth non viene riprodotto.
→ Sul cellulare connesso via Bluetooth è in
corso una chiamata.
– L’audio verrà riprodotto al termine
della chiamata.
→ Un cellulare connesso via Bluetooth è
attualmente in uso.
– Smettere di utilizzare il cellulare.
→ La connessione tra l’unità e il cellulare
non è stata stabilita correttamente in
seguito a una chiamata effettuata da un
cellulare connesso via Bluetooth.
–Stabilire nuovamente una
connessione Bluetooth tra l’unità e il
cellulare.
Comuni
AMP ERROR
→ Unità non funzionante o collegamento
altoparlante errato.
→ Il circuito protettivo è attivato.
– Verificare il collegamento degli
altoparlanti.
– Posizionare l’interruttore di
accensione su OFF e nuovamente su
ON. Se il messaggio rimane, contattare
il rivenditore o una Stazione di servizio
Pioneer per ottenere assistenza.
NO XXXX (NO TITLE, a esempio)
→ Non sono presenti informazioni di testo
incorporate.
– Accendere il display o riprodurre un
altro file o traccia.
Dispositivo USB/iPod
FORMAT READ
→ Può verificarsi un ritardo tra l’inizio della
riproduzione e il momento in cui si
inizia a udire il suono.
– Attendere che il messaggio scompaia
e ascoltare l’audio.
NO AUDIO
→ Non sono presenti brani.
Informazioni aggiuntive
Risoluzione dei problemi
Messaggi di errore
– Trasferire i file audio al dispositivo USB
ed effettuare la connessione.
→ Il dispositivo USB connesso ha la
sicurezza abilitata.
– Attenersi alle istruzioni del dispositivo
USB per disattivare la sicurezza.
SKIPPED
→ Il dispositivo USB connesso contiene file
protetti da DRM.
– I file protetti vengono ignorati.
PROTECT
→ Tutti i file sul dispositivo USB connesso
hanno il DRM incorporato.
– Sostituire il dispositivo USB.
N/A USB
→ Il dispositivo USB connesso non è
supportato dall’unità.
– Scollegare il dispositivo e sostituirlo
con un dispositivo USB compatibile.
CHECK USB
→ Il connettore USB o il cavo USB ha
subito un corto circuito.
– Verificare che il connettore USB o il
cavo USB non siano impigliati in
qualcosa o danneggiati.
→ Il dispositivo USB collegato consuma
più della quantità di energia massima
consentita.
– Scollegare il dispositivo USB e non
utilizzarlo. Posizionare l’interruttore di
accensione su OFF e nuovamente su
ACC o ON. Collegare solo dispositivi
USB conformi.
→ L’iPod funziona correttamente ma non è
in carica.
– Assicurarsi che il cavo di collegamento
dell’iPod non sia accorciato (ad
esempio, non sia impigliato in oggetti
metallici). Una volta verificato,
posizionare l’interruttore di
accensione su OFF e nuovamente su
ON, oppure scollegare e ricollegare
l’iPod.
ERROR-19
→ Comunicazione non riuscita.
– Effettuare una delle seguenti
operazioni, quindi tornare alla
sorgente USB.
• Posizionare l’interruttore di
accensione su OFF e nuovamente su
ON.
• Scollegare il dispositivo USB.
• Passare a una sorgente diversa.
→ Errore iPod.
– Scollegare il cavo dall’iPod. Una volta
visualizzato il menu principale
dell’iPod, ricollegare e reimpostare
l’iPod.
ERROR-23
→ Il dispositivo USB non è formattato
correttamente.
– Formattare il dispositivo USB con
FAT12, FAT16 o FAT32.
ERROR-16
→ La versione firmware dell’iPod è
obsoleta.
– Aggiornare la versione iPod.
→ Errore iPod.
– Scollegare il cavo dall’iPod. Una volta
visualizzato il menu principale
dell’iPod, ricollegare e reimpostare
l’iPod.
STOP
→ Nell’elenco corrente non sono presenti
brani.
– Selezionare un elenco che contenga
dei brani.
NOT FOUND
→ Nessun brano correlato.
– Trasferire i brani all’iPod.
Dispositivo Bluetooth
ERROR-10
→ Errore di alimentazione per il modulo
Bluetooth dell’unità.

19It
Italiano
– Posizionare l’interruttore di
accensione su OFF e nuovamente su
ACC o ON.
App
NO BT DEVICE GO TO BT MENU TO
REGISTER
→ Nessun dispositivo Bluetooth rilevato.
– Collegare l’unità e il dispositivo via
Bluetooth (pagina 8).
CONN. FAILED PRESS BAND KEY TO
RETRY
→ Connessione Bluetooth non riuscita.
– Premere BAND/ per effettuare
nuovamente la connessione.
DISCONNECTED PRESS BAND KEY TO
RETRY
→ Connessione Bluetooth non riuscita.
– Premere BAND/ per effettuare
nuovamente la connessione.
CHECK APP
→ Connessione all’applicazione non
riuscita.
– Attenersi alle istruzioni visualizzate
sullo schermo.
START UP APP
→ L’applicazione non è ancora in
esecuzione.
– Utilizzare il dispositivo mobile per
avviare l’applicazione.
Dispositivo di archiviazione
USB
• Le connessioni via hub USB non sono
supportate.
• Fissare saldamente il dispositivo di
archiviazione USB prima di guidare. Non
lasciar cadere il dispositivo di
archiviazione USB sul pavimento, in
quanto potrebbe incastrarsi sotto il
pedale del freno o dell’acceleratore.
• In base al dispositivo di archiviazione
USB, potrebbero verificarsi i seguenti
problemi.
– Le operazioni possono variare.
– Il dispositivo di archiviazione potrebbe
non essere riconosciuto.
– I file potrebbero non essere riprodotti
correttamente.
– Il dispositivo può causare interferenze
audio durante l’ascolto della radio.
iPod
• Non lasciare l’iPod in luoghi con
temperature elevate.
• Fissare saldamente l’iPod durante la
guida. Non lasciar cadere l’iPod sul
pavimento, in quanto potrebbe
incastrarsi sotto il pedale del freno o
dell’acceleratore.
• Le impostazioni dell’iPod, come ad
esempio equalizzatore e ripetizione della
riproduzione, cambiano
automaticamente quando l’iPod è
collegato all’unità. Una volta scollegato
l’iPod, tali impostazioni tornano alle
impostazioni originali.
• Il testo incompatibile salvato sull’iPod
non verrà visualizzato dall’unità.
• Per il nome cartella o per il nome file, è
possibile visualizzare solo i primi 32
caratteri (inclusa l’estensione del file).
• L’unità potrebbe non funzionare
correttamente in base all’applicazione
utilizzata per decodificare i file WMA.
• Potrebbe verificarsi un leggero ritardo
all’avvio della riproduzione dei file audio
incorporati con i dati immagine o dei file
audio memorizzati su un dispositivo USB
con numerose gerarchie di cartelle.
Linee guida di gestione
Compatibilità audio
compresso
• Il testo con caratteri russi da visualizzare
sull’unità deve essere codificato con uno
dei seguenti gruppi di caratteri:
–Unicode (UTF-8, UTF-16)
–Un gruppo di caratteri diverso da
Unicode utilizzato in un ambiente
Windows e impostato su Russo
nell’impostazione multilingue
ATTENZIONE
• Pioneer non può garantire la
compatibilità con tutti i dispositivi di
archiviazione di massa USB e non si
assume alcuna responsabilità per
eventuali perdite di dati su lettori
multimediali, smartphone o altri
dispositivi durante l’utilizzo del prodotto.
• Non lasciare i dischi o un dispositivo di
archiviazione USB in luoghi soggetti a
temperature elevate.
File WMA
File MP3
File WAV
• I formati file WAV non possono essere
collegati via MTP.
File FLAC (solo per MVH-170UI/
170UBG/170UB)
• I formati file FLAC non possono essere
collegati via MTP.
• A seconda del codificatore, i file FLAC
potrebbero non essere riproducibili.
Dispositivo USB
• Potrebbe verificarsi un leggero ritardo
all’avvio della riproduzione dei file audio
su un dispositivo di archiviazione USB
con numerose gerarchie di cartelle.
Estensione file .wma
Velocità di
trasmissione
Da 48 kbps a 320 kbps
(CBR), da 48 kbps a
384 kbps (VBR)
Frequenza di
campionamento
32 kHz, 44,1 kHz,
48 kHz
Windows Media™
Audio Professional,
Compressione dati
senza perdita, Voce/
Streaming DRM/
Streaming con video
Non compatibile
Estensione file .mp3
Velocità di
trasmissione
Da 8 kbps a 320 kbps
(CBR), VBR
Frequenza di
campionamento
Da 8 kHz a 48 kHz
(32 kHz, 44,1 kHz,
48 kHz per enfasi)
Versione tag ID3
compatibile
1.0, 1.1, 2.2, 2.3, 2.4 (la
versione tag ID3 2.x ha
la priorità sulla
versione 1.x.)
Playlist M3u Non compatibile
MP3i (MP3
interattivo), mp3 PRO
Non compatibile
Estensione file .wav
Bit di quantizzazione 8 e 16 (LPCM), 4
(MSADPCM)
Frequenza di
campionamento
Da 16 kHz a 48 kHz
(LPCM), 22,05 kHz e
44,1 kHz (MS ADPCM)
Estensione file .flac
Frequenza di
campionamento
8/11,025/12/16/22,05/
24/32/44,1/48 [kHz]
Bit di quantizzazione 16 bit
Modalità canali 1/2 canali
Gerarchia cartella
riproducibile
Fino a otto livelli (una
gerarchia pratica
presenta meno di due
livelli).
Cartelle riproducibili Fino a 500
File riproducibili Fino a 15 000

20It
L’unità supporta solo i seguenti modelli di iPod.
Di seguito vengono indicate le versioni
supportate del software iPod. Le versioni
precedenti potrebbero non essere supportate.
Realizzato per
– iPod touch (dalla 1a alla 5a generazione)
–iPodclassic
– iPod con video
– iPod nano (dalla 1a alla 7a generazione)
–iPhone5s
–iPhone5c
–iPhone5
–iPhone4S
–iPhone4
–iPhone3GS
–iPhone3G
–iPhone
• Le operazioni possono variare in base alla
generazione e/o alla versione del
software dell’iPod.
• Gli utenti dell’iPod con Lightning
Connector devono utilizzare il cavo da
Lightning a USB (in dotazione con iPod).
• Gli utenti dell’iPod con Dock Connector
devono utilizzare CD-IU51. Per dettagli,
consultare il rivenditore.
• Fare riferimento ai manuali dell’iPod per
ottenere informazioni sulla compatibilità
di file/formato.
• Audiolibri, Podcast: compatibile
ATTENZIONE
Pioneer declina ogni responsabilità per la
perdita di dati sull’iPod, anche se i dati
vengono persi durante l’utilizzo dell’unità.
Con questa unità, l’utente non può
assegnare numeri di cartella e specificare le
sequenze di riproduzione. La sequenza di
file audio dipende dal dispositivo
collegato.
Si prega di notare che i file nascosti di un
dispositivo USB non possono essere
riprodotti.
Esempio di gerarchia
Riproduzione di file
protetti da copyright
Non compatibile
Dispositivo USB
partizionato
È possibile riprodurre
solo la prima
partizione.
Compatibilità iPod
Sequenza di file audio
Cartella
File audio compresso
a : sequenza di riproduzione
Da 01 a 05: numero cartella
Bluetooth
Il marchio nominale e il logo Bluetooth® sono
marchi registrati di proprietà di Bluetooth SIG,
Inc. e sono utilizzati in licenza da PIONEER
CORPORATION. Tutti gli altri marchi registrati e
marchi nominali sono marchi dei rispettivi
proprietari.
iTunes
Apple ed iTunes sono marchi di fabbrica di
Apple Inc., registrati negli Stati Uniti ed in
altri Paesi.
WMA
Windows Media è un marchio di fabbrica o
marchio di fabbrica depositato della
Microsoft Corporation negli Stati Uniti ed
in altri paesi.
Questo prodotto include tecnologie di
proprietà della Microsoft Corporation e
non è utilizzabile senza licenza della
Microsoft Licensing, Inc.
FLAC
Copyright © 2000-2009 Josh Coalson
Copyright © 2011-2013 Xiph.Org
Foundation
La redistribuzione e l’uso di sorgenti e file
binari, con o senza modifiche, sono
permessi alle seguenti condizioni:
– Le redistribuzioni di codice sorgente
devono contenere l’avvertenza di
copyright qui sopra, questa lista di
condizioni e la seguente denuncia di
responsabilità.
– Le redistribuzioni in forma binaria
devono riprodurre l’avvertenza di
copyright qui sopra, questa lista di
condizioni e la seguente denuncia di
responsabilità nella documentazione e/o
altro materiale in dotazione alla
distribuzione.
– Né il nome della Xiph.org Foundation né i
nomi dei suoi contributori possono
venire usati per supportare o
promuovere prodotti derivati da questo
software senza specifico, previo
permesso scritto.
QUESTO SOFTWARE VIENE FORNITO DAI
DETENTORI DEI DIRITTI D’AUTORE “COME
SI TROVA” E SI RIFIUTA QUALSIASI
GARANZIA ESPRESSA O IMPLICITA
COMPRESE, MA SENZA LIMITAZIONI, LE
GARANZIE DI VENDIBILITÀ O CAPACITÀ DI
ESPLETARE UN CERTO COMPITO. IN
NESSUN CASO POTRANNO LA
FONDAZIONE O I CONTRIBUTORI ESSERE
CONSIDERATI RESPONSABILI DI QUALSIASI
DANNO DIRETTO, INDIRETTO,
INCIDENTALE, SPECIALE, ESEMPLARE O
CONSEQUENZIALE (COMPRESI, MA SENZA
LIMITAZIONI, I BENI O SERVIZI PROCURATI
O DI RIMPIAZZO; LE PERDITE DI USO, DATI
O PROFITTI; O LE INTERRUZIONI
DELL’ESERCIZIO) QUALSIASI NE SIA LA
Grafico caratteri russi
Copyright e marchio
D: visualizzazione C: carattere

21It
Italiano
CAUSA E SULLA BASE DI QUALSIASI TEORIA
DI RESPONSABILITÀ, O DA CONTRATTO,
RESPONSABILITÀ IN SENSO STRETTO O
COLPA (COMPRESE LA NEGLIGENZA O
ALTRO) CHE INSORGANO IN QUALSIASI
MODO DALL’USO DI QUESTO SOFTWARE,
ANCHE DOPO CHE L’UTENTE È STATO
AVVISATO DELLA POSSIBILITÀ DI SIMILI
DANNI.
iPod & iPhone
iPhone, iPod, iPod classic, iPod nano, e iPod
touch sono marchi di Apple Inc., registrati
negli Stati Uniti e in altri Paesi.
Lightning è un marchio di fabbrica di
Apple Inc.
“Fatto per l'iPod” e “Fatto per l'iPhone”
significano che un accessorio elettronico è
stato progettato specificamente
rispettivamente per il collegamento con
l'iPod o l'iPhone ed è stato certificato dal
suo sviluppatore corrispondere agli
standard operativi stabiliti da Apple. Apple
non può essere considerata responsabile di
questo dispositivo o della sua osservanza
delle norme di sicurezza e dei vari
regolamenti. Tenere presente che l'uso di
questo accessorio con l'iPod o l'iPhone può
peggiorare le prestazioni wireless.
Android™
Android è un marchio di fabbrica di Google
Inc.
MIXTRAX
MIXTRAX è un marchio registrato di
PIONEER CORPORATION.
Generali
Alimentazione: 14,4 V CC (da 10,8 V a 15,1 V
consentiti)
Sistema di messa a terra: tipo negativo
Consumo di corrente massimo: 10,0 A
Dimensioni (L × A × P):
DIN
Telaio: 178 mm × 50 mm × 97 mm
Testata: 188 mm × 58 mm × 17 mm
D
Telaio: 178 mm × 50 mm × 97 mm
Testata: 170 mm × 46 mm × 17 mm
Peso: 0,5 kg
Audio
Potenza massima:
50 W × 4
70 W × 1/2 Ω (per il subwoofer)
Potenza continua:
22 W × 4 (da 50 Hz a 15 000 Hz, 5 %
THD, 4 Ω di carico, entrambi i canali
pilotati)
Impedenza di carico: 4 Ω (da 4 Ω a 8 Ω
consentiti)
Livello di output massimo tensione preout:
2,0 V
Profilo loudness: +10 dB (100 Hz), +6,5 dB
(10 kHz) (volume: –30 dB)
Equalizzatore (equalizzatore grafico a
5bande):
Frequenza: 80 Hz/250 Hz/800 Hz/
2,5 kHz/8 kHz
Campo di equalizzazione: ±12 dB
(passo 2 dB)
Subwoofer (mono):
Frequenza: 50 Hz/63 Hz/80 Hz/
100 Hz/125 Hz/160 Hz/200 Hz
Pendenza: –12 dB/oct, –24 dB/oct
Guadagno: da +6 dB a –24 dB
Fase: normale/inversa
Specifiche
USB
Specifica standard USB: USB 2.0 full speed
Alimentazione corrente massima: 1 A
Classe USB: MSC (Mass Storage Class)
File system: FAT12, FAT16, FAT32
Formato di decodifica MP3: MPEG-1 e 2
Audio Layer 3
Formato di decodifica WMA: Ver. 7, 7.1, 8, 9,
10, 11, 12 (audio a 2 canali) (Windows
Media Player)
Formato di decodifica FLAC: v1.3.0 (Free
Lossless Audio Codec) (solo per MVH-
170UI/170UBG/170UB)
Formato segnale WAV: Linear PCM & MS
ADPCM (non compresso)
Tuner FM
Intervallo di frequenza: da 87,5 MHz a
108,0 MHz
Sensibilità utilizzabile: 11 dBf (1,0 μV/75 Ω,
mono, S/N: 30 dB)
Rapporto segnale-rumore: 72 dB (rete
IEC-A)
Tuner MW
Intervallo di frequenza: da 531 kHz a
1 602 kHz
Sensibilità utilizzabile: 25 μV (S/N: 20 dB)
Rapporto segnale-rumore: 62 dB (rete
IEC-A)
Tuner LW
Intervallo di frequenza: da 153 kHz a
281 kHz
Sensibilità utilizzabile: 28 μV (S/N: 20 dB)
Rapporto segnale-rumore: 62 dB (rete
IEC-A)
Bluetooth
(solo per MVH-X370BT)
Versione: Bluetooth 3.0 certificata
Potenza continua: +4 dBm massimo (classe
di potenza 2)
Profili Bluetooth:
GAP (Generic Access Profile)
SDAP (Service Discovery Application
Profile)
OPP (Object Push Profile)
HFP (Hands Free Profile) 1.6
PBAP (Phone Book Access Profile)
A2DP (Advanced Audio Distribution
Profile)
AVRCP (Audio/Video Remote Control
Profile) 1.5
SPP (Serial Port Profile) 1.1
NOTA
Caratteristiche tecniche e design sono
soggetti a eventuali modifiche senza
preavviso.

2Es
Antes de empezar ................................................................................... 3
Procedimientos iniciales........................................................................ 3
Radio.......................................................................................................... 5
USB/iPod/AUX.......................................................................................... 6
Bluetooth.................................................................................................. 8
Modo app ............................................................................................... 11
Ajustes..................................................................................................... 12
Ajustes de FUNCTION.......................................................................... 12
Ajustes de AUDIO ................................................................................. 13
Ajustes de SYSTEM............................................................................... 14
Ajustes de ILLUMINATION................................................................... 14
Ajustes de MIXTRAX............................................................................. 14
Conexiones/instalación ....................................................................... 16
Información complementaria............................................................. 19
Índice
Acerca de este manual:
• En las siguientes instrucciones, la designación “dispositivo USB” hace referencia tanto
a dispositivos de memoria USB como a reproductores de audio USB.
• En este manual, la designación “iPod” hace referencia tanto a un iPod como a un
iPhone.

3Es
Español
Muchas gracias por adquirir este producto PIONEER
Lea este manual con atención antes de usar este producto para garantizar un uso correcto. Es muy
importante que lea y respete los mensajes de ADVERTENCIA y PRECAUCIÓN de este manual. Guarde
el manual en un lugar seguro y de fácil acceso para poder consultarlo en el futuro.
Las viviendas privadas en los estados miembros de la UE, en Suiza y Noruega pueden devolver
gratuitamente sus productos electrónicos usados en los centros de recolección previstos o bien en una
tienda minorista (si adquieren un producto similar nuevo).
En el caso de los países que no se han mencionado en el párrafo anterior, póngase en contacto con las
autoridades locales a fin de conocer el método de eliminación correcto.
Al actuar siguiendo estas instrucciones, se asegurará de que el producto eliminado se someta a los
procesos de tratamiento, recuperación y reciclaje necesarios, evitando de este modo efectos
potencialmente negativos en el entorno y la salud humana.
ADVERTENCIA
•No trate de instalar o reparar este producto usted mismo. La instalación o la reparación de este
producto por parte de personas sin cualificación ni experiencia en equipos electrónicos y
accesorios para automóviles puede ser peligrosa y puede exponerle al riesgo de sufrir una
descarga eléctrica u otros peligros.
•No intente utilizar la unidad mientras esté conduciendo. Asegúrese de salir de la carretera y aparcar su
vehículo en un lugar seguro antes de intentar utilizar los controles del dispositivo.
PRECAUCIÓN
•No permita que la unidad entre en contacto con líquidos y/o humedad. De lo contrario, podría
producirse una descarga eléctrica. Asimismo, el contacto de esta unidad con líquidos podría provocar
averías, humo y sobrecalentamientos.
•Mantenga siempre el volumen lo suficientemente bajo como para poder escuchar los sonidos que
provienen del exterior.
•El CarStereo-Pass de Pioneer solo debe usarse en Alemania.
En caso de problemas con el dispositivo
Si esta unidad no funcionase correctamente, póngase en contacto con su concesionario o con el centro
de servicio PIONEER autorizado más cercano.
MVH-X370BT/170UI/170UBG/170UB
*1 Las indicaciones del botón varían en función de la unidad.
*2 En este manual, se hace referencia a este botón con la designación DISP.
Operaciones más frecuentes
Los botones disponibles varían en función de la unidad.
Antes de empezar
Si desea deshacerse de este producto, no lo mezcle con los residuos generales de su hogar. De
conformidad con la legislación vigente, existe un sistema de recogida distinto para los productos
electrónicos que requieren un procedimiento adecuado de tratamiento, recuperación y reciclado.
Procedimientos iniciales
Funcionamiento básico
Función Operación
Encendido* Pulse SRC/OFF para encender la unidad.
Mantenga pulsado SRC/OFF para apagar la
unidad.
Ajustar el volumen Gire el selector M.C..
Seleccionar una fuente Pulse SRC/OFF varias veces.
Cambiar la información mostrada Pulse DISP varias veces.
Volver a la visualización/lista anterior Pulse /DIMMER.
Volver a la visualización normal desde el
menú.
Pulse BAND/.
Responder/finalizar una llamada (Solo para
MVH-X370BT)
Pulse .
SRC (fuente)/OFF
Botón de extracción
VisorSelector M.C. (control
múltiple)
BAND/
/DIMMER Botón de visualización*2
*1
*1

4Es
* Si el cable azul/blanco de esta unidad está conectado al terminal de control de relé de antena de
automóvil, la antena del vehículo se extiende cuando se activa la fuente de esta unidad. Para
replegar la antena, apague la fuente.
Indicaciones en pantalla
Extraiga el frontal para evitar robos. Desconecte todos los cables y dispositivos
conectados al frontal y apague la unidad antes de extraerlo.
Importante
• Evite la exposición del frontal a impactos violentos.
• Guarde el frontal protegido de la luz solar directa y de las temperaturas elevadas.
• Guarde siempre el frontal desmontado en un estuche de protección o una bolsa.
Al situar el contacto en ON después de la instalación, aparece [SET UP :YES] en el visor.
1 Presione el selector M.C..
El menú de configuración desaparece después de 30 segundos sin realizar
operaciones. Si prefiere realizar la configuración en otro momento, gire el selector
M.C. para seleccionar [NO] y presione para confirmar.
2 Gire el selector M.C. para seleccionar las opciones y, a continuación, presione
para confirmar.
Para pasar a la siguiente opción del menú, tiene que confirmar la selección.
3 Aparece [QUIT :YES] cuando se han realizado todos los ajustes.
Para volver al primer elemento del menú de configuración, gire el selector M.C. para
escoger [QUIT :NO], y, a continuación, presione para confirmar.
4 Presione el selector M.C. para confirmar los ajustes.
NOTAS
• Puede cancelar la configuración de los menús pulsando SRC/OFF.
• La configuración puede realizarse en cualquier momento desde los ajustes de SYSTEM (página 14) y
los ajustes de INITIAL (página 5).
Indicación Descripción
Aparece si existe un nivel inferior para un menú o una carpeta.
Aparece si se ha ajustado una función de respuesta automática
(página 10).
(Solo en los modelos compatibles con Bluetooth.)
Aparece si se ha pulsado el botón .
Aparece si se ha ajustado la función de exploración local (página 12).
Aparece si se está recibiendo un programa de tráfico.
Aparece si se están recibiendo anuncios de tráfico (página 12).
Aparece si se ha ajustado la función de recuperación del sonido
(página 13).
Aparece si se ha seleccionado la reproducción aleatoria (excepto si BT
AUDIO está seleccionado como fuente).
Aparece si se ha seleccionado la reproducción repetida (excepto si BT
AUDIO está seleccionado como fuente).
Aparece si se ha ajustado la función de control de iPod (página 8).
Aparece si se establece una conexión Bluetooth (página 8).
(Solo en los modelos compatibles con Bluetooth.)
Extracción del frontal
Extracción Colocación
Menú de configuración
Opción del menú Descripción
LANGUAGE Seleccione el idioma en el que debe aparecer la información de
texto de un archivo de audio comprimido.
[ENG] (inglés),
[РУС] (ruso),
[TUR] (turco)
CLOCK SET Ajuste el reloj.
FM STEP Seleccione los pasos de la sintonización FM entre 100 kHz y 50 kHz.
[100], [50]

5Es
Español
1 Presione el selector M.C. para que aparezca el menú principal.
2 Gire el selector M.C. para seleccionar [SYSTEM] y, a continuación, presione para
confirmar.
3 Gire el selector M.C. para seleccionar [DEMO OFF] y, a continuación, presione para
confirmar.
4 Gire el selector M.C. para seleccionar [YES] y, a continuación, presione para
confirmar.
1 Mantenga pulsado SRC/OFF hasta que se apague la unidad.
2 Mantenga pulsado SRC/OFF para mostrar el menú principal.
3 Gire el selector M.C. para seleccionar [INITIAL] y, a continuación, presione para
confirmar.
4 Gire el selector M.C. para seleccionar una opción y, a continuación, presione para
confirmar.
NOTA
Las opciones varían en función de la unidad.
Las frecuencias del sintonizador de esta unidad están pensadas para su utilización en
Europa Occidental, Asia, Oriente Medio, África y Oceanía. Si se utiliza en otras áreas es
posible que la recepción no sea correcta. La función RDS (sistema de radiodifusión de
datos) solo funciona en áreas en las que se emiten señales RDS correspondientes a
emisoras FM.
1 Pulse SRC/OFF para seleccionar [RADIO].
2 Pulse BAND/ para seleccionar la banda entre las opciones [FM1], [FM2], [FM3],
[MW] o [LW].
3 Pulse un botón numérico (de 1/ a 6/).
SUGERENCIA
Los botones / también pueden utilizarse para seleccionar una emisora memorizada cuando
[SEEK] está ajustado en [PCH] en los ajustes de FUNCTION (página 13).
Cancelación de la pantalla de demostración (DEMO
OFF)
Ajustes de INITIAL
Opción del menú Descripción
FM STEP Seleccione los pasos de la sintonización FM entre 100 kHz y
50 kHz.
[100], [50]
SP-P/O MODE Seleccione esta opción si hay un altavoz de gama completa
conectado a los cables de salida de los altavoces traseros y un
subwoofer conectado a la salida RCA.
[REAR/SUB.W]
[SUB.W/SUB.W] Seleccione esta opción si hay un subwoofer pasivo conectado
directamente a los cables de salida de los altavoces traseros y un
subwoofer conectado a la salida RCA.
[REAR/REAR] Seleccione esta opción si hay altavoces de gama completa
conectados a los cables de salida de los altavoces traseros y a la
salida RCA. Si hay un altavoz de gama completa conectado a los
cables de salida de los altavoces traseros y no se utiliza la salida
RCA, puede seleccionar [REAR/SUB.W] o [REAR/REAR].
S/W UPDATE Seleccione esta opción para actualizar la unidad a la versión más
reciente del software Bluetooth. Para obtener más información
sobre el software Bluetooth y las actualizaciones, visite nuestro
sitio web.
SYSTEM RESET Seleccione [YES] para inicializar los ajustes. La unidad se
reiniciará automáticamente. (Algunos de los ajustes se
mantendrán incluso tras reiniciar la unidad, como por ejemplo
los de Bluetooth, la información sobre emparejamiento, etc.)
[YES], [CANCEL]
Radio
Recepción de emisoras memorizadas
Opción del menú Descripción

6Es
Las seis emisoras con mejor señal se guardan en los botones numéricos (de 1/ a
6/).
1 Después de escoger la banda, presione el selector M.C. para que aparezca el
menú principal.
2 Gire el selector M.C. para seleccionar [FUNCTION] y, a continuación, presione para
confirmar.
3 Gire el selector M.C. para seleccionar [BSM] y, a continuación, presione para
confirmar.
Para buscar una emisora manualmente
1
Después de seleccionar la banda, pulse / para seleccionar una emisora.
Mantenga pulsado / y suéltelo para buscar una emisora disponible. La
exploración se detiene cuando la unidad recibe una emisora. Para cancelar la
búsqueda local, pulse / .
NOTA
[SEEK] debe estar ajustado en [MAN] en los ajustes de FUNCTION (página 13).
Para almacenar las emisoras manualmente
1
Mientras recibe la emisora que desea guardar, mantenga pulsado uno de los
botones numéricos (de 1/ a 6/ ) hasta que deje de parpadear.
La unidad busca una emisora según la información de PTY (tipo de programa).
1 Pulse durante la recepción FM.
2 Gire el selector M.C. para seleccionar un tipo de programa entre las opciones
[NEWS/INFO], [POPULAR], [CLASSICS] y [OTHERS].
3 Presione el selector M.C..
La unidad empieza a buscar una emisora. Cuando la encuentra, muestra el nombre
de su servicio de programas.
NOTAS
• Para cancelar la búsqueda, presione el selector M.C..
• El programa de algunas emisoras puede no coincidir con la indicación del PTY transmitido.
• Si ninguna emisora emite el tipo de programa que ha buscado, aparecerá [NOT FOUND] durante
aproximadamente dos segundos y el sintonizador volverá a la emisora original.
Lista de PTY
Para obtener más información acerca de la lista de PTY, visite el siguiente sitio web:
http://www.pioneer.eu/eur/products/25/121/tech/CarAudio/PTY.html
NOTA
La función iPod no está disponible para MVH-170UBG/170UB.
Desconecte los auriculares del dispositivo antes de conectarlo a la unidad.
Dispositivo USB/iPod
1
Abra la tapa del puerto USB.
2 Conecte el dispositivo USB/iPod utilizando un cable adecuado.
Memoria de las mejores emisoras (BSM)
Uso de las funciones PTY
USB/iPod/AUX
Reproducción
Toma de entrada AUX (toma
estéreo de 3,5 mm)
Puerto USB
SRC (fuente)/OFF
Selector M.C. (control múltiple)

7Es
Español
PRECAUCIÓN
Utilice un cable USB Pioneer opcional (CD-U50E) para conectar el dispositivo de almacenamiento USB,
ya que los dispositivos conectados directamente a la unidad sobresalen de la misma y puede resultar
peligroso.
Antes de extraer el dispositivo, detenga la reproducción.
Conexión MTP
Puede conectar a la unidad un dispositivo con Android OS 4.0 o una versión posterior a través de MTP,
utilizando el cable suministrado con el dispositivo. Sin embargo, en función del dispositivo conectado y
los números de los archivos del dispositivo, es posible que los archivos de sonido/canciones no se
puedan reproducir mediante MTP. Tenga en cuenta que la conexión MTP no es compatible con los
formatos de archivo WAV y FLAC y no puede utilizarse con la función MIXTRAX.
* Los archivos FLAC solo son compatibles con MVH-170UI/170UBG/170UB.
AUX
1
Inserte el miniconector estéreo en la toma de entrada AUX.
2 Pulse SRC/OFF para seleccionar [AUX] como fuente.
NOTA
Si [AUX] está ajustado en [OFF] en los ajustes de SYSTEM, [AUX] no podrá seleccionarse como fuente.
Puede realizar varios ajustes en los ajustes de FUNCTION (página 12).
Tenga en cuenta que las siguientes operaciones no funcionan en un dispositivo AUX.
Para controlar un dispositivo AUX, utilice el dispositivo mismo.
*1 Solo para archivos de audio comprimido
*2 Si la unidad no cuenta con el botón 3/S.Rtrv, la función de recuperación de sonido se puede
establecer desde los ajustes de FUNCTION.
Operaciones
Función Operación
Seleccionar una carpeta/álbum*1 Pulse 1/ o 2/.
Seleccionar una pista/canción (capítulo) Pulse o .
Avanzar o retroceder rápidamente Mantenga pulsado o .
Buscar un archivo en una lista 1 Pulse para mostrar la lista.
2 Gire el selector M.C. para seleccionar el
nombre del archivo (o carpeta) o la
categoría que busca y, a continuación,
presione para confirmar.
3 Gire el selector M.C. para seleccionar el
archivo que desee y, a continuación,
presione para confirmar.
Empieza la reproducción.
Ver una lista de los archivos de la carpeta/
categoría seleccionada*1
Presione el selector M.C. después de
seleccionar una carpeta/categoría.
Reproducir una canción de la carpeta/
categoría seleccionada*1
Mantenga presionado el selector M.C.
después de seleccionar una carpeta/
categoría.
Búsqueda alfabética (solo iPod) 1 Pulse para mostrar la lista.
2 Gire el selector M.C. para seleccionar la
lista de categorías que desee y pulse
para pasar al modo de búsqueda
alfabética.
(Si gira el selector M.C. dos veces
también pasará al modo de búsqueda
alfabética.)
3 Gire el selector M.C. para elegir una letra
y, a continuación, presione para ver la
lista alfabética.
Para cancelar la búsqueda alfabética, pulse
/DIMMER.
Reproducción repetida Pulse 6/.
Reproducción aleatoria Pulse 5/.
Reproducción aleatoria de todo (solo iPod) Mantenga pulsado 5/.
Poner en pausa/reanudar la reproducción Pulse 4/PAUSE.
Recuperación de sonido*2 Pulse 3/S.Rtrv.
[1]: funciona con índices de compresión
bajos
[2]: funciona con índices de compresión
altos
Volver a la carpeta raíz (solo USB)*1 Mantenga pulsado BAND/.
Cambiar unidades en el dispositivo USB
(Solo para dispositivos compatibles con el
protocolo de clase de dispositivos de
almacenamiento masivo USB)
Pulse BAND/.
Función Operación

8Es
Modo de reproducción por asociación
Puede acceder a canciones a partir del artista, el álbum o el género que se está
reproduciendo en cada momento.
1 Mientras escucha una canción, mantenga pulsado para pasar al modo de
reproducción por asociación.
2 Gire el selector M.C. para seleccionar el modo ([ARTIST], [ALBUM], [GENRE]) y, a
continuación, presione para confirmar.
La canción o álbum seleccionado se reproducirá después de la canción que está
sonando.
NOTA
Puede cancelar la reproducción de la canción o el álbum seleccionado si utiliza funciones no
relacionadas con el modo de reproducción por asociación (como el avance o retroceso rápido).
Control de iPod
Puede controlar la unidad a través de un iPod conectado.
Los siguientes modelos de iPod no son compatibles con esta función.
– iPod nano de 1.ª generación, iPod con vídeo
1 Pulse BAND/ durante la reproducción y, a continuación, seleccione el modo de
control.
[CONTROL iPod/CTRL iPod]: la función de iPod de la unidad puede controlarse
desde el iPod conectado.
[CONTROL AUDIO/CTRL AUDIO]: la función de iPod de la unidad solo puede
controlarse desde los botones de la unidad. En este modo, no es posible encender ni
apagar el iPod conectado.
NOTAS
• Si pulsa en iPod también podrá cambiar el modo de control (solo para MVH-170UI).
• Si selecciona [CONTROL iPod/CTRL iPod] como modo de control la reproducción de las canciones se
pone en pausa. Utilice el iPod conectado para reanudar la reproducción.
• Es posible acceder a las siguientes operaciones desde la unidad, aunque el modo de control esté
ajustado en [CONTROL iPod/CTRL iPod].
– Pausa, avance/retroceso rápido, selección de canción/capítulo
• El volumen solo puede ajustarse desde la unidad.
(Solo para MVH-X370BT)
La función MIXTRAX genera una mezcla ininterrumpida a partir de su biblioteca musical,
acompañada de efectos de iluminación. Para obtener más información sobre los ajustes
de MIXTRAX, consulte la página 14.
NOTAS
• Esta función no es compatible con un dispositivo Android conectado a través de MTP.
• Si USB está seleccionado como fuente y se está utilizando la función MIXTRAX, la función de
recuperación de sonido está desactivada.
• En función del archivo o la canción, es posible que los efectos de sonido no estén disponibles.
• Desactive la función MIXTRAX si los efectos de iluminación generados interfieren con la conducción.
1 Presione 3/MIX para activar y desactivar MIXTRAX.
(Solo para MVH-X370BT)
Importante
Si hay tres dispositivos Bluetooth o más conectados (por ejemplo, un teléfono y un reproductor de
audio), es posible que no funcionen correctamente.
1 Active la función Bluetooth del dispositivo.
2 Mantenga pulsado para mostrar el menú de conexión.
3 Gire el selector M.C. para seleccionar [ADD DEVICE] y, a continuación, presione
para confirmar.
La unidad empieza a buscar los dispositivos disponibles y los presenta en la lista de
dispositivos.
• Para cancelar la búsqueda, presione el selector M.C..
• Si el dispositivo que busca no está en la lista, seleccione [RE-SEARCH].
• Si no hay ningún dispositivo disponible, aparece [NOT FOUND] en la pantalla.
4 Gire el selector M.C. para seleccionar un dispositivo en la lista de dispositivos y, a
continuación, presione para confirmar.
Mantenga presionado el selector M.C. para alternar entre la dirección del dispositivo
Bluetooth y el nombre del dispositivo en la información mostrada.
5 Seleccione [Pioneer BT Unit] en la pantalla del dispositivo.
Funciones útiles para iPod Acerca de MIXTRAX (solo USB/iPod)
Bluetooth
Conexión Bluetooth

9Es
Español
6 Asegúrese de que aparece el mismo número de 6 dígitos en esta unidad y en el
dispositivo y, a continuación, seleccione “Sí” en el dispositivo.
NOTAS
• Aparece [DEVICE FULL] si la unidad ya se ha emparejado con tres dispositivos. En este caso, elimine
uno de los dispositivos emparejados. Consulte las opciones [DEL DEVICE] o [GUEST MODE] en el
menú de conexión (página 9).
• En función del dispositivo, se le solicitará un código PIN en el paso 6. En tal caso, escriba [0000].
SUGERENCIA
La conexión Bluetooth también se puede realizar detectando la unidad desde el dispositivo Bluetooth.
Para ello, la opción [VISIBLE] en el menú de conexión debe ajustarse en [ON]. Para obtener más datos
sobre las operaciones en dispositivos Bluetooth, consulte las instrucciones de funcionamiento
suministradas con su dispositivo Bluetooth.
Menú de conexión
En primer lugar, establezca una conexión Bluetooth con el teléfono Bluetooth (página 8).
Se pueden conectar hasta dos teléfonos Bluetooth de forma simultánea.
Importante
• Si deja la unidad en espera para conectar con su teléfono a través de Bluetooth sin el motor
encendido, consumirá batería del vehículo.
• Antes de realizar estas operaciones, asegúrese de aparcar el vehículo en un lugar seguro y aplicar el
freno de estacionamiento.
Para realizar una llamada telefónica
1
Pulse para ver el menú del teléfono.
Cuando se conectan dos teléfonos, primero aparece el nombre del teléfono y, a
continuación, se muestra el menú del teléfono. Para cambiar al otro teléfono, pulse
de nuevo.
2 Gire el selector M.C. para seleccionar [MISSED], [DIALLED], [RECEIVED] o [PHONE
BOOK] y, a continuación, presione para confirmar.
Aparece la lista de números de teléfono.
3 Gire el selector M.C. para seleccionar un nombre o un número de teléfono y, a
continuación, presione para confirmar.
Empieza la llamada telefónica.
Para responder una llamada entrante
1
Pulse al recibir una llamada.
SUGERENCIA
Cuando hay dos teléfonos conectados a la unidad mediante Bluetooth y aparece una llamada entrante
mientras que el otro teléfono está en uso, aparecerá un mensaje en el visor. Para responder a esa
llamada entrante, debe finalizar primero la llamada existente.
Opción del menú Descripción
DEVICELIST Muestra la lista de dispositivos Bluetooth emparejados. Aparece
“*” en el nombre del dispositivo cuando se ha establecido la
conexión Bluetooth.
DEL DEVICE Elimine la información del dispositivo.
[DELETE YES],
[DELETE NO]
ADD DEVICE Registre un nuevo dispositivo.
A.CONN Seleccione [ON] para conectar con un dispositivo Bluetooth
automáticamente.
[ON], [OFF]
VISIBLE Seleccione [ON] para que un dispositivo Bluetooth pueda
detectar la unidad cuando la unidad está conectada a través de
Bluetooth a otro dispositivo.
[ON], [OFF]
PIN CODE Cambie el código PIN.
1 Presione el selector M.C. para que aparezca el modo de
ajuste.
2 Gire el selector M.C. para seleccionar un número.
3 Presione el selector M.C. para mover el cursor a la siguiente
posición.
4 Después de introducir el código PIN, mantenga presionado el
selector M.C..
Después de introducir el código PIN, mantenga presionado el
selector M.C. para volver a la pantalla de introducción del
código PIN y cambiar el código PIN.
DEV. INFO Alterne entre la dirección del dispositivo Bluetooth y el nombre
del dispositivo en la información mostrada.
GUEST MODE Seleccione [ON] para pasar automáticamente a la pantalla [DEL
DEVICE] si la unidad ya se ha emparejado con tres dispositivos.
[ON], [OFF]
A.PAIRING Seleccione [ON] para emparejar la unidad y el iPhone
automáticamente si se conecta un iPhone a la unidad a través
de USB. (Es posible que esta función no esté disponible, en
función de la versión de iOS que utilice.)
[ON], [OFF]
Teléfono Bluetooth
Opción del menú Descripción

10Es
Funcionamiento básico
Para memorizar números de teléfono
1
Seleccione un número de teléfono de la agenda o del historial de llamadas.
2 Mantenga pulsado uno de los botones numéricos (de 1/ a 6/).
El contacto se guarda en el número de memoria seleccionado.
Para realizar una llamada a partir de un número memorizado, pulse uno de los botones
numéricos (de 1/ a 6/ ) y, a continuación, presione el selector M.C..
Reconocimiento de voz (solo para iPhone)
Esta función solo está disponible si hay un iPhone con función de reconocimiento de voz
conectado a la unidad a través de Bluetooth.
1 Mantenga presionado el selector M.C. para activar el modo de reconocimiento de
voz.
2 Mantenga presionado el selector M.C. y pronuncie las órdenes de control por voz
hablando directamente al micrófono.
Para salir del modo de reconocimiento de voz, pulse BAND/.
NOTA
Para obtener información sobre las funciones de reconocimiento de voz, consulte el manual
suministrado con el iPhone.
Menú del teléfono
*1 Los contactos de su teléfono en principio se transfieren automáticamente al conectar el teléfono. Si
no sucede así, utilice el teléfono para transferir los contactos.
*2 Si hay dos teléfonos conectados, esta función no funcionará en las llamadas entrantes que se
reciban mientras que uno de los dos teléfonos esté usándose para llamar.
Importante
• En función del reproductor de audio Bluetooth conectado a esta unidad, las operaciones disponibles
quedarán limitadas a los dos niveles siguientes:
– A2DP (Perfil de distribución de audio avanzado) solo puede reproducir canciones en su reproductor
de audio.
– AVRCP (Perfil de control remoto de audio/vídeo) permite realizar funciones como reproducir, poner
en pausa, seleccionar una canción, etc.
• El sonido del reproductor de audio Bluetooth se silenciará mientras se utiliza el teléfono.
• Cuando se utiliza el reproductor de audio Bluetooth, no es posible la conexión automática con un
teléfono Bluetooth.
• En función del tipo de reproductor de audio Bluetooth conectado a la unidad, el funcionamiento y la
información mostrada pueden variar, según la disponibilidad y las funcionalidades.
Función Operación
Finalizar una llamada Pulse .
Rechazar una llamada entrante Mantenga pulsado al recibir una llamada.
Alternar entre la llamada en curso
y una llamada en espera
Presione el selector M.C..
Cancelar una llamada en espera Mantenga pulsado .
Ajustar el volumen de voz del
interlocutor (si el modo privado
está activado, esta función no
aparece disponible.)
Gire el selector M.C. durante la llamada.
Activar o desactivar el modo de
privacidad
Pulse BAND/ durante la llamada.
Opción del menú Descripción
MISSED Muestra el historial de llamadas perdidas.
DIALLED Muestra el historial de llamadas realizadas.
RECEIVED Muestra el historial de llamadas recibidas.
PHONE BOOK*1 Muestra los contactos transferidos desde su teléfono. Ajuste la
opción [VISIBLE] del menú de conexión en [ON] para ver los
contactos desde esta unidad.
PRESET 1-6 Recupera los números de teléfono memorizados. También
puede recuperar los números de teléfono memorizados
pulsando los botones numéricos (de 1/ a 6/).
PHONE FUNC Seleccione [ON] para responder una llamada entrante
automáticamente.
A.ANSR: *2
[ON], [OFF]
R.TONE:
[ON], [OFF]
Selecciona [ON] si el tono de llamada no proviene de los
altavoces del coche. En función del teléfono conectado, es
posible que esta característica no funcione.
PB INVT Invierte el orden de los nombres de la agenda (vista de nombre).
Audio Bluetooth

11Es
Español
1 Establezca una conexión Bluetooth con el reproductor de audio Bluetooth.
2 Pulse SRC/OFF para seleccionar [BT AUDIO] como fuente.
3 Pulse BAND/ para iniciar la reproducción.
Funcionamiento básico
Puede realizar varios ajustes en los ajustes de FUNCTION (página 12).
* En función del dispositivo conectado, es posible que estas operaciones no estén disponibles.
(El modo APP no está disponible para MVH-170UBG/170UB.)
Puede escuchar el audio de una aplicación de un iPhone/dispositivo Android a través de
la unidad. En algunos casos, puede incluso controlar la aplicación utilizando la unidad.
Para obtener más información sobre los dispositivos compatibles, visite nuestro sitio
web.
Importante
El uso de aplicaciones de terceros puede implicar o necesitar la puesta a disposición de información de
identificación personal, bien mediante la creación de una cuenta de usuario o de algún otro modo, y,
para ciertas aplicaciones, la puesta a disposición de datos de geoubicación.
TODAS LAS APLICACIONES DE TERCEROS SON RESPONSABILIDAD EXCLUSIVA DE LOS PROVEEDORES,
INCLUIDAS SIN LIMITACIÓN LA RECOPILACIÓN Y LA SEGURIDAD DE LOS DATOS DE USUARIO Y LAS
PRÁCTICAS DE PRIVACIDAD. AL ACCEDER A APLICACIONES DE TERCEROS, USTED SE MANIFIESTA DE
ACUERDO EN REVISAR LOS TÉRMINOS DE SERVICIO Y LAS POLÍTICAS DE PRIVACIDAD DE LOS
PROVEEDORES. SI NO ESTÁ DE ACUERDO CON LOS TÉRMINOS O LAS POLÍTICAS DE ALGÚN PROVEEDOR
O NO CONSIENTE EL USO DE DATOS DE GEOUBICACIÓN DONDE SEA APLICABLE, NO UTILICE ESTAS
APLICACIONES DE TERCEROS.
Para usuarios de iPhone
Esta función es compatible con dispositivos iPhone y iPod touch con iOS 5.0 o una versión posterior.
Para usuarios de dispositivos Android
Esta función es compatible con dispositivos con Android OS 2.3 o posterior instalado y que sean
compatibles con los perfiles de Bluetooth SPP (Perfil de puerto de serie) y A2DP (Perfil de distribución
de audio avanzado).
NOTA
PIONEER NO SE HACE RESPONSABLE DE APPS O CONTENIDOS DE OTROS PROVEEDORES, EN RELACIÓN
CON ASPECTOS COMO SU PRECISIÓN, SU EXACTITUD Y OTROS ASPECTOS. EL CONTENIDO Y LAS
FUNCIONALIDADES DE DICHAS APPS SON RESPONSABILIDAD EXCLUSIVA DEL PROVEEDOR DE CADA
APP.
La conexión Bluetooth está disponible en el modelo MVH-X370BT.
1 Conecte el dispositivo móvil a esta unidad.
• iPhone a través de USB (página 6)
• Dispositivos Android a través de Bluetooth (página 8)
2 Presione el selector M.C. para que aparezca el menú principal.
3 Gire el selector M.C. para seleccionar [SYSTEM] y, a continuación, presione para
confirmar.
4 Gire el selector M.C. para seleccionar [APP CONN.SET] y, a continuación, presione
para confirmar.
5 Gire el selector M.C. para seleccionar una de las opciones siguientes y, a
continuación, presione para confirmar.
• Seleccione [WIRED] para un iPhone.
• Seleccione [BLUETOOTH] para un dispositivo Android.
6 Pulse SRC/OFF para seleccionar [APP].
7 Utilice el dispositivo móvil para iniciar la aplicación.
Función Operación
Avanzar o retroceder rápidamente Mantenga pulsado o .
Seleccionar una pista Pulse o .
Reproducción repetida* Pulse 6/.
Reproducción aleatoria* Pulse 5/.
Poner en pausa/reanudar la reproducción Pulse 4/PAUSE.
Buscar un archivo en una lista 1 Pulse para mostrar la lista.
2 Gire el selector M.C. para seleccionar el
nombre de la carpeta que desee y, a
continuación, presione para confirmar.
3 Gire el selector M.C. para seleccionar el
archivo que desee y, a continuación,
presione para confirmar. Empieza la
reproducción.
Modo app
Reproducción de una aplicación a través de la
unidad

12Es
Funcionamiento básico
Puede realizar varios ajustes en los ajustes de FUNCTION (página 12).
Puede ajustar diferentes valores en el menú principal.
1 Presione el selector M.C. para que aparezca el menú principal.
2 Gire el selector M.C. para seleccionar una de las categorías siguientes y, a
continuación, presione para confirmar.
• Ajustes de FUNCTION (página 12)
• Ajustes de AUDIO (página 13)
• Ajustes de SYSTEM (página 14)
• Ajustes de ILLUMINATION (página 14)
• Ajustes de MIXTRAX (página 14)
3 Gire el selector M.C. para seleccionar las opciones y, a continuación, presione
para confirmar.
NOTAS
• Las opciones del menú asociadas a Bluetooth de las tablas siguientes no están disponibles para
MVH-170UI/170UBG/170UB.
• Las opciones del menú asociadas a iPod de las tablas siguientes no están disponibles para
MVH-170UBG/170UB.
• Las opciones del menú asociadas a APP de las tablas siguientes no están disponibles para
MVH-170UBG/170UB.
Los elementos de los menús varían en función de la fuente.
Función Operación
Seleccionar una pista Pulse o .
Avanzar o retroceder rápidamente Mantenga pulsado o .
Poner en pausa/reanudar la reproducción Pulse BAND/.
Ajustes
Ajustes de FUNCTION
Opción del menú Descripción
FM SETTING
[TALK], [STANDARD], [MUSIC] Ajusta el nivel de calidad del sonido a las
condiciones de señal de la emisión de la banda
FM. (Disponible solo si se selecciona la banda
FM.)
BSM
Las seis emisoras con mejor señal se guardan en
los botones numéricos (de 1/ a 6/)
automáticamente.
REGIONAL
[ON], [OFF] Limita la recepción a los programas regionales
específicos cuando se selecciona AF (búsqueda
de frecuencias alternativas). (Disponible solo si
se selecciona la banda FM.)
LOCAL
FM: [OFF], [LV1], [LV2], [LV3], [LV4]
MW/LW: [OFF], [LV1], [LV2]
Limita las emisoras sintonizadas en función de la
intensidad de la señal.
TA
[ON], [OFF] Recibe la información de tráfico actual si está
disponible. (Disponible solo si se selecciona la
banda FM.)
AF
[ON], [OFF] Permite a la unidad volver a sintonizar una
frecuencia diferente que ofrezca la misma
emisora. (Disponible solo si se selecciona la
banda FM.)
NEWS
[ON], [OFF] Interrumpe la fuente activa con programas de
noticias. (Disponible solo si se selecciona la
banda FM.)

13Es
Español
SEEK
[MAN], [PCH] Permite utilizar los botones / para
buscar emisoras una a una (sintonización
manual) o para seleccionar una emisora a partir
de los canales memorizados.
SEL DEVICE
Conecta un dispositivo Bluetooth de la lista.
S.RTRV
[1] (funciona con índices de
compresión bajos),
[2] (funciona con índices de
compresión altos),
[OFF]
Mejora el audio comprimido y recupera un
sonido de calidad.
No está disponible si:
• USB está seleccionado como fuente y la
función MIXTRAX está activada.
• Se reproduce un archivo FLAC. (Disponible para
MVH-170UI/170UBG/170UB)
AUDIO BOOK
[FASTER], [NORMAL], [SLOWER] Cambia la velocidad de reproducción. (No está
disponible si [CONTROL iPod/CTRL iPod] está
seleccionado en el modo de control.)
PAU SE
Pone en pausa o reanuda la reproducción.
PLAY
Inicio de la reproducción.
STOP
Parada de la reproducción.
Ajustes de AUDIO
Opción del menú Descripción
FADER*1
Ajuste el balance de los altavoces delanteros y
traseros.
BALANCE
Ajuste el balance de los altavoces derechos e
izquierdos.
Opción del menú Descripción
USB
iPod
iPod
EQ SETTING
[SUPER BASS], [POWERFUL],
[NATURAL], [VOCAL], [CUSTOM1],
[CUSTOM2], [FLAT]
Seleccione la banda y el nivel del
ecualizador para personalizar
todavía más la configuración.
Banda del ecualizador: [80HZ],
[250HZ], [800HZ], [2.5KHZ],
[8KHZ]
Nivel del ecualizador: de [+6] a
[–6]
Seleccione o personalice la curva del ecualizador.
[CUSTOM1] puede ajustarse por separado para
cada fuente. Sin embargo, cada una de las
siguientes combinaciones presenta
automáticamente el mismo ajuste.
• USB, iPod y APP (iPhone)
• BT AUDIO, y APP (Android)
[CUSTOM2] es un ajuste compartido utilizado
para todas las fuentes.
También puede cambiar el ecualizador
presionando repetidamente (solo para
MVH-170UBG/170UB).
LOUDNESS
[OFF], [LOW], [MID], [HI] Permite aplicar compensación para disfrutar de
un sonido nítido con el volumen más bajo.
SUB.W*2
[NOR], [REV], [OFF] Seleccione la fase del subwoofer.
SUB.W CTRL*2*3
Frecuencia de corte: [50HZ],
[63HZ], [80HZ], [100HZ], [125HZ],
[160HZ], [200HZ]
Nivel de salida: de [–24] a [+6]
Nivel de curva: [–12], [–24]
El subwoofer solo emite las frecuencias por
debajo del intervalo seleccionado.
BASS BOOST
De [0] a [+6] Seleccione el nivel de intensificación de graves.
HPF SETTING
Frecuencia de corte: [OFF],
[50HZ], [63HZ], [80HZ], [100HZ],
[125HZ], [160HZ], [200HZ]
Nivel de curva: [–12], [–24]
Los altavoces solo emiten frecuencias por
encima del punto de corte del filtro de paso alto
(HPF).
SLA
De [+4] a [–4] Ajusta el nivel de volumen de cada fuente
excepto FM.
Cada una de las siguientes combinaciones
presenta automáticamente el mismo ajuste.
• USB, iPod y APP (iPhone)
• BT AUDIO y APP (Android)
Opción del menú Descripción

14Es
*1 No está disponible si [SUB.W/SUB.W] está seleccionado en [SP-P/O MODE], en los ajustes de INITIAL
(página 5).
*2 No está disponible si [REAR/REAR] está seleccionado en [SP-P/O MODE], en los ajustes de INITIAL
(página 5).
*3 No está disponible si [OFF] está seleccionado en [SUB.W].
También puede acceder a estos menús cuando la unidad está apagada.
*1 [PW SAVE] se cancela y se desconecta la batería del vehículo, por lo que tendrá que volver a
encenderse una vez conectada de nuevo la batería. Si [PW SAVE] está desactivado, en función de los
métodos de conexión, es posible que la unidad continúe consumiendo energía de la batería si el
contacto del vehículo no incorpora una posición ACC (accesorio).
*2 No disponible si [APP] está seleccionado como fuente.
(Solo para MVH-X370BT)
Ajustes de SYSTEM
Opción del menú Descripción
LANGUAGE
[ENG] (inglés), [РУС] (ruso), [TUR]
(turco)
Seleccione el idioma en el que debe aparecer la
información de texto de un archivo de audio
comprimido.
CLOCK SET
Ajuste el reloj (página 4).
12H/24H
[12H], [24H] Seleccione el formato de la hora.
AUTO PI
[ON], [OFF] Busca una emisora diferente con la misma
programación, aunque se haya seleccionado una
emisora memorizada.
AUX
[ON], [OFF] Ajuste esta opción en [ON] si utiliza un
dispositivo auxiliar conectado a la unidad.
BT AUDIO
[ON], [OFF] Activa o desactiva la señal Bluetooth.
MUTE MODE (Solo disponible para MVH-170UI)
[MUTE], [20dB ATT], [10dB ATT] Silencia o atenúa el sonido automáticamente
cuando se recibe una señal de un equipo con
una función de silenciamiento.
PW SAVE*1
[ON], [OFF] Reduce el consumo de la batería.
La activación de la fuente es la única operación
permitida cuando esta función está activada.
BT MEM CLEAR
[YES], [CANCEL] Borra los datos del dispositivo Bluetooth (lista de
dispositivos, código PIN, historial de llamadas,
agenda, números de teléfono memorizados)
guardados en la unidad.
Aparece [CLEARED] una vez borrados los datos.
BT VERSION
Muestra la versión del sistema de la unidad y el
módulo Bluetooth.
APP CONN. SET*2
[WIRED], [BLUETOOTH] Seleccione el método de conexión adecuado en
función de su dispositivo.
Ajustes de ILLUMINATION
Opción del menú Descripción
DIM SETTING
[SYNC CLOCK], [MANUAL] Modifica el brillo del visor.
BRIGHTNESS
De [1] a [10] Modifica el brillo del visor.
Los intervalos de ajuste disponibles varían en
función de [DIM SETTING].
Ajustes de MIXTRAX
Opción del menú Descripción
SHORT MODE
[1.0 MIN], [1.5 MIN], [2.0 MIN],
[2.5 MIN], [3.0 MIN], [OFF]
Seleccione la duración del tiempo de
reproducción.
Opción del menú Descripción

15Es
Español
MIX PATTERN
[SOUND LEVEL] Cambie los efectos especiales de MIXTRAX en
función del nivel de audio.
El patrón de mezcla cambia en función del
nivel de sonido.
[LOW PASS] El patrón de mezcla cambia en función del
nivel de graves.
[RANDOM] El patrón de mezcla cambia de forma aleatoria
en función del modo de nivel de sonido y el
modo de paso bajo.
DISP FX
[ON], [OFF] Activa o desactiva los efectos especiales
MIXTRAX.
CUT IN FX
[ON], [OFF] Activa o desactiva los efectos de sonido
MIXTRAX durante el cambio manual de pistas.
Opción del menú Descripción

16Es
Importante
• Si instala esta unidad en un vehículo sin
posición ACC (accesorio) en el contacto, si
no conecta el cable rojo al terminal que
detecta el funcionamiento de la llave de
contacto la batería podría agotarse.
• Si utiliza esta unidad en condiciones
diferentes de las descritas podría
producirse un incendio o una avería.
–Vehículos con una batería de 12 V y una
conexión a tierra negativa.
–Altavoces de 50 W (valor de salida) y de
entre 4Ω y 8Ω (valor de impedancia).
• Para impedir un cortocircuito, un
sobrecalentamiento o una avería, siga las
indicaciones descritas a continuación.
–Desconecte el terminal negativo de la
batería antes de la instalación.
–Fije el cable con abrazaderas de cable o
cinta adhesiva. Envuelva con cinta
adhesiva los cables que estén en
contacto con piezas metálicas, para
protegerlos.
–Aleje los cables de piezas en
movimiento, como la palanca de
cambios o las guías de los asientos.
–Aleje los cables de lugares calientes,
como por ejemplo las salidas de la
calefacción.
–No conecte el cable amarillo a la batería
pasándolo a través del orificio del
compartimento del motor.
–Cubra los conectores de cables
desconectados con cinta aislante.
–No acorte ningún cable.
–Nunca corte el aislamiento del cable de
alimentación de esta unidad para
compartir la potencia con otros
dispositivos. La capacidad de corriente
del cable es limitada.
–Utilice un fusible del nivel especificado.
–Nunca conecte el cable negativo del
altavoz directamente a tierra.
–Nunca agrupe diferentes cables
negativos de varios altavoces.
• Cuando esta unidad está encendida, las
señales de control se envían a través del
cable azul/blanco. Conecte este cable al
terminal de control remoto del sistema
de un amplificador externo o al terminal
de control de relé de antena de
automóvil (máx. 300 mA 12 V CC). Si el
vehículo incorpora una antena en el
cristal, conéctela al terminal de
alimentación de intensificación de la
antena.
• Nunca conecte el cable azul/blanco al
terminal de alimentación de un
amplificador externo ni al terminal de
alimentación de la antena para
automóvil. De lo contrario, la batería
podría agotarse o podría producirse una
avería.
• El cable negro es el cable de tierra. Los
cables de tierra de esta unidad y de otros
equipos (especialmente productos de
alto voltaje como amplificadores) deben
conectarse por separado. De lo contrario,
podrían desprenderse por accidente y
provocar un incendio o una avería.
Conexiones/instalación
Conexiones
Posición ACC Sin posición ACC
Esta unidad
Micrófono 4m (13ps. 1pulg.) (solo para
MVH-X370BT)
Salida trasera o salida de subwoofer
Salida frontal (solo para MVH-X370BT/
170UI)
Entrada de antena
Entrada de cable de alimentación
Fusible (10 A)
Entrada de mando a distancia con cable
(solo para MVH-X370BT/170UI)
Puede conectarse un adaptador de
mando a distancia con cable (vendido
por separado).
Entrada de micrófono (solo para MVH-
X370BT)
Cable de alimentación
Realice estas conexiones siempre y cuando
no haya conectado ningún cable de
altavoz trasero a un subwoofer.
A entrada de cable de alimentación
En función del tipo de vehículo, la
función de y puede ser diferente.
En este caso, asegúrese de conectar
a y a .
Amarillo
Reserva (o adicional)
Amarillo
Conectar al terminal de alimentación
constante de 12 V.
Rojo
Adicional (o reserva)
Rojo
Conectar al terminal controlado por el
interruptor de encendido (12 V CC).
Conecte cada cable con el cable del
mismo color.
Negro (tierra del chasis)
Azul/blanco
La posición de las clavijas del conector
ISO será diferente en función del tipo de
vehículo. Conecte y cuando la
clavija 5 sea de control de antena. En
otro tipo de vehículo, nunca conecte
y .
Azul/blanco
MVH-X370BT/170UI/170UBG/170UB

17Es
Español
Conectar al terminal de control del
sistema del amplificador (máx. 300 mA
12 V CC).
Azul/blanco
Conectar al terminal de control de relé
de antena de automóvil (máx. 300 mA
12 V CC).
Amarillo/negro (solo para MVH-170UI)
Si utiliza equipos con función de
silenciamiento, conecte este cable al
cable de silenciamiento de audio de
dicho equipo. De lo contrario, deje el
cable de silenciamiento de audio libre
de conexiones.
Cables de los altavoces
Blanco: frontal izquierdo
Blanco/negro: frontal izquierdo
Gris: frontal derecho
Gris/negro: frontal derecho
Verde: izquierdo trasero o subwoofer
Verde/negro: izquierdo trasero o
subwoofer
Violeta: derecho trasero o subwoofer
Violeta/negro: derecho trasero o
subwoofer
Conector ISO
En algunos vehículos, es posible que el
conector ISO esté dividido en dos. En
este caso, asegúrese de realizar la
conexión a los dos conectores.
NOTAS
• Cambie el menú inicial de esta unidad.
Consulte [SP-P/O MODE] (página 5). La
salida de subwoofer de esta unidad es
monoaural.
• Si utiliza un subwoofer de 70 W (2 Ω),
asegúrese de conectar el subwoofer a los
cables violeta y violeta/negro de esta
unidad. No conecte nada a los cables
verde y verde/negro.
Amplificador (vendido por
separado)
Realice estas conexiones cuando utilice un
amplificador opcional.
Control remoto del sistema
Amplificador (vendido por separado)
Conectar con cables RCA (vendidos por
separado)
A la salida frontal*
Altavoz frontal*
A salida trasera o salida de subwoofer
Altavoz trasero o subwoofer
* Solo para MVH-X370BT/170UI
Importante
• Compruebe todas las conexiones y
sistemas antes de la instalación definitiva.
• No utilice piezas no homologadas, ya que
podrían producirse averías.
• Consulte con su distribuidor si la
instalación requiere el taladrado de
orificios u otras modificaciones en el
vehículo.
• No instale esta unidad en los siguientes
lugares:
– donde pueda interferir con el control
del vehículo.
– donde pueda lesionar a un pasajero en
caso de parada brusca.
• El láser semiconductor puede resultar
dañado en caso de recalentamiento.
Instale esta unidad lejos de lugares
Instalación
calientes, como por ejemplo las salidas
de la calefacción.
• La unidad funciona en su
nivel óptimo cuando se
instala en ángulos
inferiores a 60°.
• Al realizar la instalación, asegúrese de
que la dispersión del calor es correcta
durante la utilización de la unidad, deje
espacio suficiente detrás del panel
posterior y recoja los cables sueltos para
que no obstruyan las salidas de
ventilación.
Soporte DIN frontal/trasero
Esta unidad puede instalarse utilizando un
soporte frontal o trasero.
Utilice componentes a la venta en
comercios para realizar la instalación.
Soporte DIN frontal
1 Introduzca la carcasa de montaje en el
salpicadero.
Para realizar la instalación en espacios
poco profundos, utilice la carcasa de
montaje suministrada. Si dispone de
espacio suficiente, utilice la carcasa de
montaje incluida con el vehículo.
2 Fije la carcasa de montaje utilizando
un destornillador para doblar las
lengüetas metálicas (90°) y encajarlas
en sus posiciones.
Salpicadero
Carcasa de montaje
Asegúrese de que la unidad está
firmemente instalada en su lugar. Una
instalación inestable puede ocasionar
interrupciones en la reproducción u
otro tipo de averías.
Soporte DIN trasero
1 Alinee los orificios del soporte de
montaje con los de los laterales de la
unidad para colocar el soporte.
2 Enrosque un tornillo en cada lateral
para fijar la unidad en su lugar.
Tornillo de rosca cortante (5 mm ×
8 mm)
Soporte de montaje
Salpicadero o consola
Uso del soporte incluido
También puede usar el soporte incluido
para montar la unidad. Compruebe que el
soporte incluido coincide con el modelo
específico de su coche y, a continuación,
colóquelo en la unidad tal y como se
muestra abajo.
Deje espacio
suficiente
5 cm
5 cm

18Es
Tornillo
Soporte
Extracción de la unidad
1 Extraiga el marco decorativo.
Marco decorativo
Lengüeta con muesca
• El desmontaje del frontal facilita el
acceso al marco decorativo.
• Al volver a colocar el marco
decorativo, hágalo con la parte de la
lengüeta con muesca hacia abajo.
2 Introduzca las llaves de extracción
suministradas en ambos lados de la
unidad hasta que escuche un clic.
3 Tire de la unidad.
(Solo para MVH-X370BT)
El micrófono debe instalarse directamente
delante del conductor, a una distancia
adecuada para poder captar la voz
correctamente.
PRECAUCIÓN
Debe evitarse en todos los casos que el
cable del altavoz se enrede con la columna
de dirección o la palanca de cambios.
Instale siempre el micrófono en lugares en
los que no interfiera con la conducción.
Recomendamos utilizar bridas (vendidas
por separado) para recoger el cable.
Instalación en la visera
1 Introduzca el cable del micrófono en la
ranura.
Instalación del micrófono
Cable del
micrófono
Ranura
2 Instale la pinza del micrófono en la
visera.
Si baja la visera, el nivel de
reconocimiento de voz empeora.
Instalación en la columna de
dirección
1 Deslice la base del micrófono para
separarla de la pinza.
Micrófono
Pinza del micrófono
Base del micrófono
2 Instale el micrófono en la parte
posterior de la columna de dirección.
Pinza del micrófono
Cinta adhesiva de doble cara

19Es
Español
El visor vuelve automáticamente a la
visualización normal.
→ No se han realizado operaciones en
aproximadamente 30 segundos.
– Realice una operación.
El intervalo de la reproducción repetida
cambia de forma imprevista.
→ En función del intervalo de la
reproducción repetida, es posible que el
intervalo seleccionado se modifique
cuando se selecciona otra carpeta o
pista o durante el avance o retroceso
rápido.
– Seleccione de nuevo el intervalo de la
reproducción repetida.
No se reproduce una subcarpeta.
→ Las subcarpetas no pueden
reproducirse si se ha seleccionado la
opción [FLD] (repetición de carpeta).
– Seleccione otro intervalo de la
reproducción repetida.
El sonido es intermitente.
→ Utiliza un dispositivo, como un teléfono
móvil, que puede provocar
interferencias audibles.
– Aleje de la unidad los dispositivos que
puedan provocar las interferencias.
No se reproduce el sonido de la fuente de
audio Bluetooth.
→ Se está realizando una llamada en un
teléfono móvil con una conexión
Bluetooth activa.
–El sonido se recuperará una vez
terminada la llamada.
→ Se está utilizando un teléfono móvil con
una conexión Bluetooth activa.
–Deje de utilizar el teléfono móvil.
→ La conexión entre la unidad y el
teléfono móvil no se establece
correctamente después de realizar una
llamada con un teléfono móvil con una
conexión Bluetooth activa.
–Vuelva a establecer la conexión
Bluetooth entre la unidad y el teléfono
móvil.
Generales
AMP ERROR
→ La unidad no funciona o la conexión del
altavoz es incorrecta.
→ El circuito de protección está activado.
–Compruebe la conexión del altavoz.
–Sitúe la llave de contacto en la
posición OFF y de nuevo en la
posición ON. Si el mensaje continúa
apareciendo, póngase en contacto
con su distribuidor o con un centro de
asistencia Pioneer autorizado para
obtener ayuda.
NO XXXX (NO TITLE, por ejemplo)
→ No hay información de texto asociada.
–Cambie de pantalla o reproduzca otra
pista o archivo.
Dispositivo USB/iPod
FORMAT READ
→ A veces transcurre un tiempo entre el
inicio de la reproducción y el instante
en que empieza a escuchar sonido.
–Espere hasta que el mensaje
desaparezca y empiece a escuchar
sonido.
Información complementaria
Solución de problemas
Mensajes de error
NO AUDIO
→ No hay canciones.
–Transfiera archivos de audio al
dispositivo USB y conéctelo.
→ El dispositivo USB conectado tiene la
protección activada.
– Siga las instrucciones de seguridad del
dispositivo USB para desactivar la
protección.
SKIPPED
→ El dispositivo USB conectado contiene
archivos con protección DRM.
– Se saltarán los archivos protegidos.
PROTECT
→ Todos los archivos del dispositivo USB
conectado tienen incorporada
información DRM.
– Cambie el dispositivo USB.
N/A USB
→ El dispositivo USB conectado no es
compatible con esta unidad.
– Desconecte el dispositivo y cámbielo
por un dispositivo USB compatible.
CHECK USB
→ El conector USB o el cable USB presenta
un cortocircuito.
– Compruebe si el conector USB o el
cable USB está atrapado o dañado.
→ El dispositivo USB conectado consume
una cantidad de corriente superior al
máximo permitido.
– Desconecte el dispositivo USB y no
vuelva a utilizarlo. Sitúe la llave de
contacto en la posición OFF y de
nuevo en la posición ACC u ON.
Conecte solo dispositivos USB
compatibles.
→ El iPod funciona correctamente pero no
se carga.
– Asegúrese de que el cable de
conexión del iPod no haya quedado
cortocircuitado (por ejemplo, por
quedar atrapado en objetos
metálicos). Después de la
comprobación, sitúe la llave de
contacto en OFF y de nuevo en ON o
desconecte el iPod y vuelva a
conectarlo.
ERROR-19
→ Error en la comunicación.
–Realice una de las operaciones
siguientes y, a continuación, vuelva a
la fuente USB.
• Sitúe la llave de contacto en la
posición OFF y seguidamente en la
posición ON.
• Desconecte el dispositivo USB.
• Seleccione una fuente diferente.
→ Error del iPod.
–Desconecte el cable del iPod. Cuando
aparezca el menú principal del iPod,
vuelva a conectar el iPod y reinícielo.
ERROR-23
→ El dispositivo USB no se ha formateado
correctamente.
–Formatee el dispositivo USB con los
formatos FAT12, FAT16 o FAT32.
ERROR-16
→ La versión del firmware del iPod es
antigua.
–Actualice la versión del iPod.
→ Error del iPod.
–Desconecte el cable del iPod. Cuando
aparezca el menú principal del iPod,
vuelva a conectar el iPod y reinícielo.
STOP
→ No hay canciones en la lista actual.
–Seleccione una lista que contenga
canciones.
NOT FOUND
→ No hay canciones asociadas.
–Transfiera canciones al iPod.

20Es
Dispositivo Bluetooth
ERROR-10
→ Se ha producido un fallo en la
alimentación en el módulo Bluetooth
de la unidad.
– Sitúe la llave de contacto en la
posición OFF y de nuevo en la
posición ACC u ON.
Apps
NO BT DEVICE GO TO BT MENU TO
REGISTER
→ No se ha encontrado ningún dispositivo
Bluetooth.
– Conecte la unidad y el dispositivo a
través de Bluetooth (página 8).
CONN. FAILED PRESS BAND KEY TO
RETRY
→ Error en la conexión Bluetooth.
–Pulse BAND/ para establecer de
nuevo una conexión.
DISCONNECTED PRESS BAND KEY TO
RETRY
→ Error en la conexión Bluetooth.
–Pulse BAND/ para establecer de
nuevo una conexión.
CHECK APP
→ Error en la conexión con la aplicación.
– Siga las instrucciones que aparecen en
pantalla.
START UP APP
→ La aplicación todavía no se ha iniciado.
– Utilice el dispositivo móvil para iniciar
la aplicación.
Dispositivo de almacenamiento
USB
• No están permitidas las conexiones a
través de concentradores USB.
• Asegure correctamente el dispositivo de
almacenamiento USB antes de arrancar.
No permita que el dispositivo de
almacenamiento USB se caiga al suelo, ya
que podría interferir con el
funcionamiento del pedal de freno o de
aceleración.
• En función del dispositivo de
almacenamiento USB, pueden producirse
los siguientes problemas.
–Las operaciones pueden variar.
–Es posible que no se reconozca el
dispositivo de almacenamiento.
–Es posible que los archivos no se
reproduzcan correctamente.
–El dispositivo puede provocar
interferencias audibles mientras
escucha la radio.
iPod
• No deje el iPod en lugares expuestos a
temperaturas elevadas.
• Asegure correctamente el iPod mientras
conduce. No permita que el iPod se caiga
al suelo, ya que podría interferir con el
funcionamiento del pedal de freno o de
aceleración.
• Determinados ajustes del iPod, como el
ecualizador y la reproducción repetida,
cambian automáticamente cuando se
conecta el iPod a la unidad. Una vez
desconectado el iPod, estos ajustes
recuperan los parámetros normales.
• El texto no compatible guardado en el
iPod no se visualizará tampoco en la
unidad.
Instrucciones de
manipulación
• Solo se mostrarán los primeros
32 caracteres de un nombre de archivo
(incluyendo la extensión del archivo) o un
nombre de carpeta.
• Es posible que la unidad no funcione
correctamente, en función de la
aplicación utilizada para codificar los
archivos WMA.
• La reproducción de archivos de audio con
datos de imagen asociados o archivos de
audio almacenados en un dispositivo USB
con una jerarquía de carpetas compleja
podría tardar un poco en empezar.
• Para poder visualizar texto en ruso en
esta unidad, debe estar codificado en
alguno de los conjuntos de caracteres
siguientes:
–Unicode (UTF-8, UTF-16)
–Un conjunto de caracteres diferente de
Unicode utilizado en un entorno
Windows y definido como ruso en la
configuración de múltiples idiomas
PRECAUCIÓN
• Pioneer no garantiza la compatibilidad
con todos los dispositivos de
almacenamiento masivo USB y no asume
responsabilidad alguna en caso de
pérdida de datos en reproductores
multimedia, smartphones u otros
dispositivos al utilizar este producto.
• No deje discos ni dispositivos de
almacenamiento USB en lugares
expuestos a temperaturas elevadas.
Archivos WMA
Archivos MP3
Archivos WAV
• Los formatos de archivo WAV no pueden
conectarse a través de MTP.
Archivos FLAC (solo para MVH-
170UI/170UBG/170UB)
• Los formatos de archivo FLAC no pueden
conectarse a través de MTP.
• En función del codificador, es posible que
los archivos FLAC no se puedan
reproducir.
Compatibilidad con
formatos de audio
comprimido
Extensión del archivo .wma
Tasa de bits De 48 kbps a 320 kbps
(CBR), de 48 kbps a
384 kbps (VBR)
Frecuencia de
muestreo
32 kHz, 44,1 kHz,
48 kHz
Windows Media™
Audio Professional,
Lossless, Voice/DRM
Stream/Stream con
vídeo
No compatible
Extensión del archivo .mp3
Tasa de bits De 8 kbps a 320 kbps
(CBR), VBR
Frecuencia de
muestreo
De 8 kHz a 48 kHz
(32 kHz, 44,1 kHz,
48 kHz para énfasis)
Versión de etiqueta
ID3 compatible
1.0, 1.1, 2.2, 2.3, 2.4 (la
versión de etiqueta
ID3 2.x tiene prioridad
sobre la versión 1.x.)
Lista de reproducción
M3u
No compatible
MP3i (MP3
interactivo), mp3 PRO
No compatible
Extensión del archivo .wav
Bits de cuantificación 8 y 16 (LPCM), 4 (MS
ADPCM)
Frecuencia de
muestreo
De 16 kHz a 48 kHz
(LPCM), 22,05 kHz y
44,1 kHz (MS ADPCM)
Extensión del archivo .flac

21Es
Español
Dispositivo USB
• La reproducción de archivos de audio
almacenados en un dispositivo USB con
una jerarquía de carpetas compleja
podría tardar un poco en empezar.
Esta unidad es compatible únicamente con los
siguientes modelos de iPod. Las versiones de
software de iPod compatibles se indican a
continuación. Es posible que la unidad no sea
compatible con versiones anteriores.
Diseñado para
–iPod touch (de la 1.ª a la 5.ª generación)
–iPodclassic
–iPod con vídeo
–iPod nano (de la 1.ª a la 7.ª generación)
–iPhone5s
–iPhone5c
–iPhone5
–iPhone4S
–iPhone4
–iPhone3GS
–iPhone3G
–iPhone
• Las operaciones pueden variar en función
de la generación y/o la versión del
software del iPod.
• Los usuarios de un iPod con conector
Lightning deben utilizar el cable de
Lightning a USB (suministrado con el
iPod).
• Los usuarios de un iPod con conector
Dock deben utilizar el CD-IU51. Para
obtener más información, consulte a su
distribuidor.
• Consulte los manuales del iPod para
obtener información sobre la
compatibilidad de archivos y formatos.
• Audiolibro, podcast: compatible
PRECAUCIÓN
Pioneer declina toda responsabilidad por
la pérdida de datos del iPod, aunque la
pérdida se produzca durante la utilización
de esta unidad.
El usuario no puede asignar números de
carpeta ni especificar secuencias de
reproducción con esta unidad. La
secuencia de los archivos de audio
depende del dispositivo conectado.
Tenga en cuenta que los archivos ocultos
de un dispositivo USB no se pueden
reproducir.
Frecuencia de
muestreo
8/11,025/12/16/22,05/
24/32/44,1/48 [kHz]
Tasa de bits de
cuantificación
16 bits
Modo de canal 1/2 canales
Jerarquía de carpetas
reproducibles
Hasta ocho niveles
(una jerarquía práctica
debe tener menos de
dos niveles)
Carpetas
reproducibles
Hasta 500
Archivos
reproducibles
Hasta 15 000
Reproducción de
archivos protegidos
por derechos de autor
No compatible
Dispositivo USB con
particiones
Solo es posible
reproducir la primera
partición.
Compatibilidad de
modelos de iPod
Secuencia de archivos de
audio
Ejemplo de una jerarquía
Bluetooth
La marca literal y los logotipos Bluetooth® son
marcas registradas propiedad de Bluetooth SIG,
Inc., y cualquier uso de dichas marcas por
PIONEER CORPORATION se hace bajo licencia.
Otras marcas y nombres comerciales son
propiedad de sus respectivos propietarios.
iTunes
Apple e iTunes son marcas comerciales de
Apple Inc., registradas en los EE.UU. y en
otros países.
WMA
Windows Media es una marca registrada o
una marca de fábrica de Microsoft
Corporation en los Estados Unidos y/u
otros países.
Este producto incluye tecnología
propiedad de Microsoft Corporation, y no
se puede usar ni distribuir sin una licencia
de Microsoft Licensing, Inc.
FLAC
Copyright © 2000-2009 Josh Coalson
Copyright © 2011-2013 Xiph.Org
Foundation
Se permite la redistribución y el uso de la
fuente y las formas binarias, con o sin
modificaciones, siempre que se cumplan
las siguientes condiciones:
– Las redistribuciones del código fuente
deben conservar el aviso de derechos de
autor indicado anteriormente, esta lista
de condiciones y el descargo de
responsabilidad que aparecerá más
adelante.
–Las redistribuciones en forma binaria
deben reproducir el aviso de derechos de
autor indicado anteriormente, esta lista
de condiciones y el descargo de
responsabilidad en la documentación y/o
en otros materiales que se proporcionen
con la distribución.
Tabla de caracteres de
ruso
Carpeta
Archivo de audio
comprimido
a : secuencia de reproducción
De 01 a 05: número de carpeta
D: visor C: carácter
Copyright y marcas
registradas

22Es
– No se puede utilizar el nombre de la
Xiph.org Foundation ni los nombres de
sus colaboradores para promocionar o
patrocinar productos derivados de este
software sin permiso por escrito previo.
LOS TITULARES DE LOS DERECHOS DE
AUTOR Y SUS COLABORADORES
PROPORCIONAN ESTE SOFTWARE “TAL
COMO ES” Y SE DECLINA CUALQUIER
GARANTÍA EXPRESA O IMPLÍCITA,
INCLUIDAS, POR EJEMPLO, LAS GARANTÍAS
IMPLÍCITAS DE COMERCIALIZACIÓN O
APTITUD PARA UN PROPÓSITO
PARTICULAR. LA FUNDACIÓN O SUS
COLABORADORES NO SERÁN
RESPONSABLES, EN NINGÚN CASO, DE
DAÑOS DIRECTOS, INDIRECTOS,
INHERENTES, ESPECIALES, EJEMPLARES O
DERIVADOS (INCLUIDOS, ENTRE OTROS, LA
ADQUISICIÓN DE BIENES O SERVICIOS DE
SUSTITUCIÓN; LA PÉRDIDA FUNCIONAL,
DE DATOS O BENEFICIOS O LA
INTERRUPCIÓN DE NEGOCIO),
CUALQUIERA QUE FUERA EL MODO EN
QUE SE PRODUJERON Y EN CUALQUIER
BASE DE RESPONSABILIDAD, YA SEA
CONTRACTUAL, OBJETIVA O
EXTRACONTRACTUAL (INCLUIDA LA
NEGLIGENCIA U OTRAS) QUE PUEDAN
PROCEDER DE CUALQUIER MODO DEL USO
DE ESTE SOFTWARE, INCLUSO SI SE HABÍA
ADVERTIDO DE LA POSIBILIDAD DE DICHO
DAÑO.
iPod & iPhone
iPhone, iPod, iPod classic, iPod nano y
iPod touch son marcas comerciales de
Apple Inc., registradas en los EE. UU. y en
otros países.
Lightning es una marca comercial de Apple
Inc.
“Made for iPod” y “Made for iPhone”
significan que un accesorio electrónico ha
sido diseñado para ser conectado
específicamente a un iPod o a un iPhone,
respectivamente, y ha sido homologado
por quien lo desarrolló para cumplir con las
normas de funcionamiento de Apple.
Apple no es responsable del
funcionamiento de este aparato ni de que
cumpla con las normas de seguridad y
reguladoras. Tenga presente que el empleo
de este accesorio con un iPod o iPhone
puede afectar el funcionamiento
inalámbrico.
Android™
Android es una marca comercial de Google
Inc.
MIXTRAX
MIXTRAX es una marca comercial de
PIONEER CORPORATION.
General
Fuente de alimentación: 14,4 V CC
(de 10,8 V a 15,1 V permisible)
Sistema de conexión a tierra: tipo negativo
Consumo máximo de corriente: 10,0 A
Dimensiones (An × Al × Pr):
DIN
Bastidor: 178 mm × 50 mm × 97 mm
Cara anterior: 188 mm × 58 mm ×
17 mm
D
Bastidor: 178 mm × 50 mm × 97 mm
Cara anterior: 170 mm × 46 mm ×
17 mm
Peso: 0,5 kg
Audio
Salida de potencia máxima:
50 W × 4
70 W × 1/2 Ω (para el subwoofer)
Salida de potencia continua:
22 W × 4 (de 50 Hz a 15 000 Hz, 5%
THD, 4 Ω carga, ambos canales
activados)
Impedancia de carga: 4 Ω (de 4 Ω a 8 Ω
permisible)
Nivel de salida máxima del
preamplificador: 2,0 V
Especificaciones
Contorno de sonoridad: +10 dB (100 Hz),
+6,5 dB (10 kHz) (volumen: –30 dB)
Ecualizador (ecualizador gráfico de
5bandas):
Frecuencia: 80 Hz/250 Hz/800 Hz/
2,5 kHz/8 kHz
Intervalo de ecualización: ±12 dB
(pasos de 2 dB)
Subwoofer (mono):
Frecuencia: 50 Hz/63 Hz/80 Hz/
100 Hz/125 Hz/160 Hz/200 Hz
Curva: –12 dB/oct, –24 dB/oct
Ganancia: +6 dB a –24 dB
Fase: normal/inversa
USB
Especificación estándar USB: USB 2.0 de
alta velocidad
Suministro de corriente máximo: 1 A
Clase USB: MSC (Clase de almacenamiento
masivo)
Sistema de archivos: FAT12, FAT16, FAT32
Formato de decodificación MP3: MPEG-1 &
2 Audio Layer 3
Formato de decodificación WMA: ver. 7,
7.1, 8, 9, 10, 11, 12 (audio 2 canales)
(Windows Media Player)
Formato de decodificación FLAC: v1.3.0
(Free Lossless Audio Codec) (solo para
MVH-170UI/170UBG/170UB)
Formato de señal WAV: PCM lineal y MS
ADPCM (sin comprimir)
Sintonizador FM
Intervalo de frecuencias: de 87,5 MHz a
108,0 MHz
Sensibilidad utilizable: 11 dBf (1,0 μV/75 Ω,
mono, S/R: 30 dB)
Relación señal/ruido: 72 dB (red IEC-A)
Sintonizador MW
Intervalo de frecuencias: de 531 kHz a
1 602 kHz
Sensibilidad utilizable: 25 μV (S/R: 20 dB)
Relación señal/ruido: 62 dB (red IEC-A)
Sintonizador LW
Intervalo de frecuencias: de 153 kHz a
281 kHz
Sensibilidad utilizable: 28 μV (S/R: 20 dB)
Relación señal/ruido: 62 dB (red IEC-A)
Bluetooth
(Solo para MVH-X370BT)
Versión: certificada para Bluetooth 3.0
Potencia de salida: +4 dBm máximo (clase
de potencia 2)
Perfiles Bluetooth:
GAP (Perfil de acceso genérico)
SDAP (Perfil de aplicación de
descubrimiento de servicio)
OPP (Perfil de envío de objeto)
HFP (Perfil manos libres) 1.6
PBAP (Perfil de acceso a la agenda
telefónica)
A2DP (Perfil de distribución de audio
avanzado)
AVRCP (Perfil de control remoto de
audio/vídeo) 1.5
SPP (Perfil de puerto de serie) 1.1
NOTA
Las especificaciones y el diseño están
sujetos a modificaciones sin previo aviso.

23Es
Español

2De
Bevor Sie beginnen................................................................................. 3
Erste Schritte............................................................................................ 4
Radio.......................................................................................................... 6
USB/iPod/AUX.......................................................................................... 7
Bluetooth.................................................................................................. 9
App-Modus............................................................................................. 12
Einstellungen......................................................................................... 13
FUNCTION-Einstellungen ................................................................... 13
AUDIO-Einstellungen........................................................................... 14
SYSTEM-Einstellungen ........................................................................ 15
ILLUMINATION-Einstellungen............................................................ 15
MIXTRAX-Einstellungen...................................................................... 16
Anschlüsse/Einbau................................................................................ 17
Zusätzliche Informationen.................................................................. 20
Inhaltsverzeichnis
Über dieses Handbuch:
• In den folgenden Anweisungen werden ein USB-Stick oder USB-Audioplayer als „USB-
Gerät” bezeichnet.
• iPod und iPhone werden in diesem Handbuch als „iPod” bezeichnet.

3De
Deutsch
Vielen Dank für den Kauf dieses PIONEER-Produkts
Um eine ordnungsgemäße Verwendung sicherzustellen, lesen Sie sich bitte dieses Handbuch durch,
bevor Sie dieses Produkt verwenden. Besonders wichtig ist, dass Sie die Hinweise WAR NU NG und
VORSICHT in diesem Handbuch lesen. Bitte bewahren Sie das Handbuch an einem sicheren und gut
zugänglichen Ort auf, um später darin nachschlagen zu können.
Privathaushalte in den Mitgliedstaaten der EU, in der Schweiz und in Norwegen können ihre
gebrauchten elektronischen Produkte kostenfrei bei speziell dafür eingerichteten Sammelstellen
abgeben oder zu einem Fachhändler zurückbringen (sofern sie ein vergleichbares neues Produkt
kaufen).
In den Ländern, die hier nicht aufgeführt sind, wenden Sie sich hinsichtlich der zu beachtenden
Entsorgungsweise bitte an die zuständige Gemeindeverwaltung.
Auf diese Weise stellen Sie sicher, dass das zu entsorgende Produkt der erforderlichen Verarbeitung,
Rückgewinnung und Wiederverwertung zugeführt wird, und verhindern damit potenziell negative
Auswirkungen auf die Umwelt sowie Gesundheitsschäden.
ACHTUNG
•Versuchen Sie nicht, dieses Produkt selbst zu montieren oder zu warten. Werden Montage-
oder Wartungsarbeiten des Produkts von Personen ohne Ausbildung und Erfahrung
hinsichtlich elektronischer Geräte und Fahrzeugzubehör vorgenommen, kann dies gefährlich
sein und möglicherweise zu elektrischen Schlägen, Verletzungen oder anderen Gefahren
führen.
•Bedienen Sie das Gerät niemals während der Fahrt. Fahren Sie an den Straßenrand und parken Sie Ihr
Fahrzeug zuerst an einem sicheren Ort, bevor Sie die Bedienelemente des Geräts bedienen.
VORSICHT
•Lassen Sie dieses Gerät nicht in Kontakt mit Feuchtigkeit und/oder Flüssigkeiten kommen. Dies
könnte zu einem elektrischen Schlag führen. Außerdem könnte es bei Kontakt mit Flüssigkeiten zu
Beschädigungen des Geräts, Rauchentwicklung und Überhitzung kommen.
•Wählen Sie stets eine Lautstärke, bei der Sie Umgebungsgeräusche noch deutlich wahrnehmen
können.
Im Problemfall
Sollte dieses Gerät nicht ordnungsgemäß funktionieren, dann wenden Sie sich an Ihren Händler oder
an die nächstgelegene PIONEER-Kundendienststelle.
Bevor Sie beginnen
Mischen Sie dieses Produkt, wenn Sie es entsorgen wollen, nicht mit gewöhnlichen
Haushaltsabfällen. Es gibt ein getrenntes Sammelsystem für gebrauchte elektronische Produkte,
über das die richtige Behandlung, Rückgewinnung und Wiederverwertung gemäß der bestehenden
Gesetzgebung gewährleistet wird.
Wichtig
Bitte tragen Sie die folgenden Informationen in das dafür vorgesehene Formular in der
„Schnellstartanleitung“ ein.
— 14-stellige Seriennummer (an der Unterseite des Geräts angegeben)
— Kaufdatum (Datum der Quittung)
— Stempel des Händlers
Diese Informationen dienen als Eigentumsnachweis.
Im Fall eines Diebstahls teilen Sie der Polizei die 14-stellige Seriennummer und das Kaufdatum des
Geräts mit.
Bewahren Sie die „Schnellstartanleitung“ an einem sicheren Ort auf.

4De
MVH-X370BT/170UI/170UBG/170UB
*1 Die Anzeigen der Tasten unterscheiden sich je nach Gerät.
*2 Diese Taste wird in diesem Handbuch als DISP bezeichnet.
Häufig verwendete Bedienvorgänge
Welche Tasten verfügbar sind, unterscheidet sich je nach Gerät.
* Wenn das blau-weiße Kabel dieses Geräts an der Steuerklemme des Automatikantennenrelais des
Fahrzeugs angeschlossen ist, fährt die Fahrzeugantenne aus, wenn die Quelle dieses Geräts
eingeschaltet wird. Um die Antenne einzuziehen, schalten Sie die Quelle aus.
Anzeige im Display
Erste Schritte
Grundlagen der Bedienung
Zweck Bedienung
Gerät einschalten* Drücken Sie SRC/OFF, um das Gerät
einzuschalten.
Halten Sie SRC/OFF gedrückt, um das Gerät
auszuschalten.
Lautstärke einstellen Drehen Sie den M.C.-Regler.
Quelle auswählen Drücken Sie mehrmals SRC/OFF.
Anzeigeinformationen umschalten Drücken Sie mehrmals DISP.
Zur vorhergehenden Anzeige/Liste
zurückkehren
Drücken Sie /DIMMER.
Zurück zur normalen Anzeige aus dem
Menü.
Drücken Sie BAND/.
SRC (Quelle)/OFF
Entriegelungstaste
AnzeigefensterM.C.-(Mehrfunktions-)
Regler
BAND
/DIMMER Anzeigetaste*2
*1
*1
Annehmen/Beenden eines Anrufs (Nur bei
MVH-X370BT)
Drücken Sie .
Anzeige Beschreibung
Erscheint, wenn eine untere Ebene des Menüs oder Ordners existiert.
Erscheint, wenn die automatische Rufannahme eingeschaltet ist (Seite 11).
(Nur bei Bluetooth-kompatiblen Modellen.)
Erscheint, wenn die Taste gedrückt wird.
Erscheint, wenn der Lokalsender-Suchlauf eingeschaltet ist (Seite 13).
Erscheint, wenn ein Verkehrsfunkprogramm empfangen wird.
Erscheint, wenn Verkehrsdurchsagen empfangen werden (Seite 13).
Erscheint, wenn die Sound Retriever-Funktion eingeschaltet ist (Seite 14).
Erscheint, wenn die Zufalls-/Shuffle-Wiedergabe eingestellt ist (außer bei
Auswahl von BT AUDIO als Quelle).
Erscheint, wenn die Wiedergabewiederholung eingestellt ist (außer bei
Auswahl von BT AUDIO als Quelle).
Erscheint, wenn die iPod-Steuerung eingeschaltet ist (Seite 9).
Erscheint, wenn eine Bluetooth-Verbindung hergestellt wird (Seite 9).
(Nur bei Bluetooth-kompatiblen Modellen.)
Zweck Bedienung

5De
Deutsch
Nehmen Sie das Bedienfeld ab, um einen Diebstahl zu verhindern. Ziehen Sie am
Bedienfeld befestigte Kabel und Geräte ab und schalten Sie das Gerät aus, bevor Sie das
Bedienfeld abnehmen.
Wichtig
• Setzen Sie das Bedienfeld keinen starken Erschütterungen aus.
• Halten Sie das Bedienfeld von direktem Sonnenlicht und hohen Temperaturen fern.
• Bewahren Sie das abgenommene Bedienfeld immer in einer Schutzhülle oder Tasche auf.
Wenn Sie nach dem Einbau die Zündung auf ON schalten, erscheint [SET UP :YES] im
Display.
1 Drücken Sie den M.C.-Regler.
Das Einrichtungsmenü verschwindet, wenn 30 Sekunden lang kein Bedienvorgang
ausgeführt wird. Wenn Sie die Einrichtung im Moment nicht durchführen möchten,
drehen Sie den M.C.-Regler, um [NO] auszuwählen, und drücken Sie ihn dann, um
den Vorgang zu bestätigen.
2 Drehen Sie den M.C.-Regler, um die Optionen auszuwählen, und drücken Sie ihn
dann, um den Vorgang zu bestätigen.
Um mit der nächsten Menüoption fortzufahren, müssen Sie Ihre Auswahl
bestätigen.
3 [QUIT :YES] erscheint, wenn alle Einstellungen durchgeführt wurden.
Um zum ersten Eintrag des Einrichtungsmenüs zurückzukehren, drehen Sie den
M.C.-Regler, wählen Sie [QUIT :NO], und drücken Sie dann
zur Bestätigung.
4 Drücken Sie den M.C.-Regler, um die Einstellungen zu bestätigen.
HINWEISE
• Sie können die Menüeinstellung durch Drücken von SRC/OFF abbrechen.
• Diese Einstellungen können jederzeit über die SYSTEM- (Seite 15) und INITIAL-Einstellungen (Seite 6)
vorgenommen werden.
1 Drehen Sie den M.C.-Regler, um das Hauptmenü anzuzeigen.
2 Drehen Sie den M.C.-Regler, um [SYSTEM] auszuwählen, und drücken Sie ihn
dann, um den Vorgang zu bestätigen.
3 Drehen Sie den M.C.-Regler, um [DEMO OFF] auszuwählen, und drücken Sie ihn
dann, um den Vorgang zu bestätigen.
4 Drehen Sie den M.C.-Regler, um [YES] auszuwählen, und drücken Sie ihn dann,
um den Vorgang zu bestätigen.
Abnehmen des Bedienfelds
Einrichtungsmenü
Abnehmen Anbringen
Menüpunkt Beschreibung
LANGUAGE Auswahl der Sprache, in der die Textinformationen komprimierter
Audiodateien angezeigt werden sollen.
[ENG]
(Englisch),
[РУС]
(Russisch),
[TUR]
(Türkisch)
CLOCK SET Einstellung der Uhr.
FM STEP Auswahl der FM-Schrittweite: 100 kHz oder 50 kHz.
[100], [50]
Abbrechen der Demoanzeige (DEMO OFF)

6De
1 Halten Sie SRC/OFF gedrückt, bis sich das Gerät ausschaltet.
2 Halten Sie SRC/OFF gedrückt, um das Hauptmenü anzuzeigen.
3 Drehen Sie den M.C.-Regler, um [INITIAL] auszuwählen, und drücken Sie ihn
dann, um den Vorgang zu bestätigen.
4 Drehen Sie den M.C.-Regler, um eine Option auszuwählen, und drücken Sie ihn
dann, um den Vorgang zu bestätigen.
HINWEIS
Welche Optionen verfügbar sind, unterscheidet sich je nach Gerät.
Die Empfangsfrequenzen dieses Geräts sind für die Nutzung in Westeuropa, Asien, dem
Nahen Osten, Afrika und Ozeanien vorgesehen. Eine Nutzung in anderen Regionen kann
zu schlechtem Empfang führen. Die RDS-Funktion (Radio Data System:
Datenfunksystem) funktioniert nur in Regionen, die RDS-Signale für FM-Sender
übertragen.
1 Drücken Sie SRC/OFF, um [RADIO] auszuwählen.
2 Drücken Sie BAND/ , um das Band auszuwählen: [FM1], [FM2], [FM3], [MW]
oder [LW].
3 Drücken Sie eine Zifferntaste (1/ bis 6/).
TIPP
Die / -Tasten können auch verwendet werden, um einen voreingestellten Sender
auszuwählen, wenn [SEEK] in den FUNCTION-Einstellungen auf [PCH] eingestellt ist (Seite 14).
Die sechs stärksten Sender werden auf den Zifferntasten (1/ bis 6/ ) gespeichert.
1 Wenn Sie das Frequenzband ausgewählt haben, drehen Sie den M.C.-Regler, um
das Hauptmenü anzuzeigen.
2 Drehen Sie den M.C.-Regler, um [FUNCTION] auszuwählen, und drücken Sie ihn
dann, um den Vorgang zu bestätigen.
3 Drehen Sie den M.C.-Regler, um [BSM] auszuwählen, und drücken Sie ihn dann,
um den Vorgang zu bestätigen.
Sender manuell suchen
1
Drücken Sie, nachdem Sie das Band ausgewählt haben, / , um einen
Sender auszuwählen.
Halten Sie / gedrückt und lassen Sie dann die Taste los, um nach einem
verfügbaren Sender zu suchen. Der Suchlauf hält an, wenn das Gerät einen Sender
empfängt. Um den Suchlauf abzubrechen, drücken Sie / .
HINWEIS
[SEEK] muss in den FUNCTION-Einstellungen auf [MAN] eingestellt sein (Seite 14).
INITIAL-Einstellungen
Menüpunkt Beschreibung
FM STEP Auswahl der FM-Schrittweite: 100 kHz oder 50 kHz.
[100], [50]
SP-P/O MODE Wählen Sie diese Option, wenn an den Ausgangsdrähten für die
Hecklautsprecher ein Breitbandlautsprecher und am Cinch-
Ausgang ein Subwoofer angeschlossen ist.
[REAR/SUB.W]
[SUB.W/SUB.W] Wählen Sie diese Option, wenn an den Ausgangsdrähten für die
Hecklautsprecher ein passiver Subwoofer direkt angeschlossen
und am Cinch-Ausgang ein Subwoofer angeschlossen ist.
[REAR/REAR] Wählen Sie diese Option, wenn an den Ausgangsdrähten für die
Hecklautsprecher Breitbandlautsprecher angeschlossen sind.
Wenn an den Ausgangsdrähten für die Hecklautsprecher ein
Breitbandlautsprecher angeschlossen ist und der Cinch-
Ausgang nicht verwendet wird, können Sie entweder [REAR/
SUB.W] oder [REAR/REAR] auswählen.
S/W UPDATE Wählen Sie diese Option, um das Gerät auf die neueste
Bluetooth-Software zu aktualisieren. Einzelheiten zu Bluetooth-
Software und Aktualisierung finden Sie auf unserer Website.
SYSTEM RESET Wählen Sie [YES], um die Geräteeinstellungen zu initialisieren.
Das Gerät wird automatisch neu gestartet. (Einige Einstellungen
bleiben auch nach dem Zurücksetzen des Geräts erhalten,
beispielsweise Bluetooth Informationen zum Pairing, usw.)
[YES], [CANCEL]
Radio
Empfangen von voreingestellten Sendern
Beste Sender-Speicher (BSM)

7De
Deutsch
Sender manuell speichern
1
Halten Sie, während Sie den zu speichernden Sender empfangen, eine der
Zifferntasten (1/ bis 6/ ) gedrückt, bis sie zu blinken aufhört.
Das Gerät sucht anhand von PTY-Informationen (Programmtyp) nach einem Sender.
1 Drücken Sie während des FM-Empfangs .
2 Drehen Sie den M.C.-Regler, um einen Programmtyp auszuwählen: [NEWS/INFO],
[POPULAR], [CLASSICS] oder [OTHERS].
3 Drücken Sie den M.C.-Regler.
Das Gerät beginnt, nach einem Sender zu suchen. Wenn ein Sender gefunden
wurde, wird der Sendername angezeigt.
HINWEISE
• Um die Suche abzubrechen, drücken Sie den M.C.-Regler.
• Das Sendeprogramm einiger Sender kann von der übertragenen PTY-Klassifizierung abweichen.
• Wenn kein Sender den Programmtyp überträgt, nach dem Sie suchen, wird etwa zwei Sekunden lang
[NOT FOUND] angezeigt, und der Tuner kehrt dann zum ursprünglichen Sender zurück.
PTY Liste
Weitere Details über die PTY Liste finden Sie auf folgender Seite:
http://www.pioneer.eu/eur/products/25/121/tech/CarAudio/PTY.html
HINWEIS
Die iPod-Funktion ist für MVH-170UBG/170UB nicht verfügbar.
Ziehen Sie den Kopfhörer des externen Geräts ab, bevor Sie es an dieses Gerät
anschließen.
USB-Gerät/iPod
1
Öffnen Sie die Abdeckung des USB-Anschlusses.
2 Schließen Sie mit einem geeigneten Kabel das USB-Gerät/den iPod an.
VORSICHT
Verwenden Sie ein optionales Pioneer USB Kabel (CD-U50E) zum Anschließen des USB Speichergeräts,
da alle Geräte, die direkt angeschlossen werden, hervorstehen; das kann gefährlich sein.
Beenden Sie, bevor Sie das andere Gerät von diesem Gerät trennen, die Wiedergabe.
MTP-Verbindung
Ein Gerät mit Android-Version 4.0 oder höher kann mit Hilfe des mit dem betreffenden Gerät
gelieferten Kabels über MTP an diesem Gerät angeschlossen werden. Allerdings können, je nach
angeschlossenem Gerät und der Anzahl der Dateien im Gerät, die Audio-Dateien/Titel möglicherweise
nicht über MTP wiedergegeben werden. Beachten Sie, dass die MTP-Verbindung nicht mit WAV- und
FLAC*-Dateiformaten kompatibel ist und nicht mit der MIXTRAX-Funktion verwendet werden kann.
* Die FLAC-Dateien sind nur kompatibel mit MVH-170UI/170UBG/170UB.
PTY Funktionen nutzen
USB/iPod/AUX
Wiedergabe
AUX-Eingangsbuchse (3,5-mm-
Stereobuchse)
USB-Anschluss
SRC (Quelle)/OFF
M.C.-(Mehrfunktions-) Regler

8De
AUX
1
Schließen Sie den Stereo-Mini-Stecker an der AUX-Eingangsbuchse an.
2 Drücken Sie SRC/OFF, um [AUX] als Quelle auszuwählen.
HINWEIS
Wenn [AUX] auf [OFF] in den SYSTEM Einstellungen gestellt ist, kann [AUX] nicht als Quelle ausgewählt
werden.
In den FUNCTION-Einstellungen können Sie verschiedene Anpassungen vornehmen
(Seite 13).
Beachten Sie, dass die folgenden Bedienvorgänge nicht für ein AUX-Gerät anwendbar
sind. Um ein AUX-Gerät zu bedienen, verwenden Sie das Gerät selbst.
*1 Nur komprimierte Audio-Dateien
*2 Wenn es keine 3/S.Rtrv-Taste am Gerät gibt, kann die Sound Retriever-Funktion in den FUNCTION-
Einstellungen konfiguriert werden.
Bedienvorgänge
Zweck Bedienung
Ordner/Album auswählen*1 Drücken Sie 1/ bzw. 2/.
Track/Titel (Kapitel) auswählen Drücken Sie bzw. .
Vor- oder zurückspulen Halten Sie bzw. gedrückt.
In einer Liste nach einer Datei suchen 1 Drücken Sie , um die Liste anzuzeigen.
2 Drehen Sie den M.C.-Regler, um den
Namen oder die Kategorie der/des
gewünschten Datei/Ordners
auszuwählen, und drücken Sie dann den
Regler, um den Vorgang zu bestätigen.
3 Drehen Sie den M.C.-Regler, um die
gewünschte Datei auszuwählen, und
drücken Sie ihn dann, um den Vorgang
zu bestätigen.
Die Wiedergabe startet.
Eine Liste der Dateien im ausgewählten
Ordner/in der ausgewählten Kategorie
ansehen*1
Drücken Sie, wenn ein Ordner/eine
Kategorie ausgewählt ist, den M.C.-Regler.
Einen Musiktitel aus dem/der ausgewählten
Ordner/Kategorie abspielen*1
Halten Sie, wenn ein Ordner/eine Kategorie
ausgewählt ist, den M.C.-Regler gedrückt.
Alphabetische Suche (nur iPod) 1 Drücken Sie , um die Liste anzuzeigen.
2 Drehen Sie den M.C.-Regler, um die
gewünschte Kategorieliste auszuwählen,
und drücken Sie dann , um in den
Modus für die alphabetische Suche zu
wechseln.
(Auch durch zweimaliges Drehen des
M.C.-Reglers wird der Modus für die
alphabetische Suche aufgerufen.)
3 Drehen Sie den M.C.-Regler, um einen
Buchstaben auszuwählen, und drücken
Sie dann den Regler, um die
alphabetische Liste anzuzeigen.
Um die alphabetische Suche abzubrechen,
drücken Sie /DIMMER.
Wiedergabewiederholung Drücken Sie 6/.
Zufalls-/Shuffle-Wiedergabe Drücken Sie 5/.
Zufallswiedergabe aller Titel (nur iPod) Halten Sie 5/ gedrückt.
Wiedergabe pausieren/fortsetzen Drücken Sie 4/PAUS E.
Sound Retriever*2 Drücken Sie 3/S.Rtrv.
[1]: Effektiv bei niedrigen
Kompressionsraten
[2]: Effektiv bei hohen Kompressionsraten
Zurück zum Stammordner (nur USB)*1 Halten Sie BAND/ gedrückt.
Laufwerke im USB Gerät ändern
(Nur Geräte, die das Protokoll der USB
Massenspeicher-Klasse unterstützen)
Drücken Sie BAND/.
Zweck Bedienung

9De
Deutsch
Modus der verknüpften Wiedergabe
Sie können auf Musiktitel zugreifen, die einen Bezug zu dem momentan
wiedergegebenen Interpreten, Album oder Genre haben.
1 Halten Sie, während Sie einen Titel anhören, gedrückt, um in den Modus der
verknüpften Wiedergabe zu wechseln.
2 Drehen Sie den M.C.-Regler, um den Modus ([ARTIST], [ALBUM], [GENRE])
auszuwählen, und drücken Sie dann den Regler, um den Vorgang zu bestätigen.
Der ausgewählte Titel/das ausgewählte Album wird nach dem momentan
wiedergegebenen Titel gespielt.
HINWEIS
Der ausgewählte Titel/das ausgewählte Album kann abgebrochen werden, wenn Sie Funktionen
verwenden, die nicht zum Modus der verknüpften Wiedergabe gehören (z. B. Vor- und Zurückspulen).
Steuerung über iPod
Sie können das Gerät über einen angeschlossenen iPod steuern.
Die folgenden iPod-Modelle sind nicht mit dieser Funktion kompatibel.
– iPod nano der 1. Generation, iPod mit Videofunktion
1 Drücken Sie während der Wiedergabe BAND/ , und wählen Sie dann den
Steuerungsmodus aus.
[CONTROL iPod/CTRL iPod]: Die iPod-Funktion des Geräts kann nur über den
angeschlossenen iPod bedient werden.
[CONTROL AUDIO/CTRL AUDIO]: Die iPod-Funktion des Geräts kann nur mit den
Tasten des Geräts bedient werden. In diesem Modus lässt sich der angeschlossene
iPod nicht ein- oder ausschalten.
HINWEISE
• Durch Drücken von iPod kann auch der Steuerungsmodus umgeschaltet werden (nur für MVH-
170UI).
• Wenn Sie den Steuerungsmodus auf [CONTROL iPod/CTRL iPod] umschalten, pausiert die
Musikwiedergabe. Verwenden Sie den angeschlossenen iPod, um die Wiedergabe fortzusetzen.
• Die folgenden Bedienvorgänge sind weiterhin mit dem Gerät möglich, auch wenn der
Steuerungsmodus auf [CONTROL iPod/CTRL iPod] eingestellt ist.
– Pause, Vor-/zurückspulen, Titel-/Kapitelauswahl
• Die Lautstärke kann nur am Gerät eingestellt werden.
(Nur für MVH-X370BT)
Die MIXTRAX-Funktion erstellt einen von Beleuchtungseffekten begleiteten Nonstop-
Mix Ihrer Musikbibliothek. Einzelheiten zu den MIXTRAX-Einstellungen finden Sie auf
Seite 16.
HINWEISE
• Diese Funktion ist nicht mit einem über MTP angeschlossenen Android-Gerät kompatibel.
• Wenn USB als Quelle gewählt ist und die MIXTRAX-Funktion verwendet wird, ist die Sound Retriever-
Funktion deaktiviert.
• Je nach Datei/Titel sind möglicherweise keine Klangeffekte verfügbar.
• Schalten Sie die MIXTRAX-Funktion aus, wenn die von ihr erzeugten Beleuchtungseffekte beim
Fahren stören.
1 Drücken Sie 3/MIX, um MIXTRAX ein-/auszuschalten.
(Nur für MVH-X370BT)
Wichtig
Wenn drei oder mehr Bluetooth-Geräte (z. B. ein Telefon und ein separater Audioplayer) angeschlossen
sind, kann es sein, dass sie nicht richtig funktionieren.
1 Schalten Sie die Bluetooth-Funktion des externen Geräts ein.
2 Halten Sie gedrückt, um das Verbindungsmenü anzuzeigen.
3 Drehen Sie den M.C.-Regler, um [ADD DEVICE] auszuwählen, und drücken Sie ihn
dann, um den Vorgang zu bestätigen.
Das Gerät beginnt, nach verfügbaren externen Geräten zu suchen, und zeigt sie
dann in der Geräteliste an.
• Um die Suche abzubrechen, drücken Sie den M.C.-Regler.
• Wenn sich das gewünschte externe Gerät nicht auf der Liste befindet, wählen Sie
[RE-SEARCH].
• Wenn kein externes Gerät verfügbar ist, erscheint, [NOT FOUND] im Display.
4 Drehen Sie den M.C.-Regler, um ein Gerät aus der Geräteliste auszuwählen, und
drücken Sie ihn dann, um den Vorgang zu bestätigen.
Halten Sie den M.C.-Regler gedrückt, um den Anzeigeinhalt zwischen der Adresse
und dem Namen des Bluetooth-Geräts umzuschalten.
Nützliche Funktionen für iPods Über MIXTRAX (nur USB/iPod)
Bluetooth
Bluetooth-Verbindung

10De
5 Wählen Sie die im Display des externen Geräts angezeigte Option [Pioneer BT
Unit] aus.
6 Vergewissern Sie sich, dass auf beiden Geräten dieselbe 6-stellige Zahl angezeigt
wird, und wählen Sie dann am externen Gerät die Option „Yes” (Ja).
HINWEISE
• [DEVICE FULL] erscheint, wenn das Gerät bereits mit drei anderen Geräten gekoppelt wurde. Löschen
Sie in diesem Fall eines der gekoppelten Geräte. Siehe hierzu [DEL DEVICE] oder [GUEST MODE] im
Verbindungsmenü (Seite 10).
• Je nach Gerät kann im Schritt 6 die Eingabe eines PIN-Codes erforderlich sein. Geben Sie in diesem
Fall [0000] ein.
TIPP
Die Bluetooth-Verbindung kann auch hergestellt werden, indem das Gerät vom Bluetooth-Gerät
erkannt wird. Dafür muss VISIBLE im Verbindungsmenü auf [ON] gestellt sein. Details zu
Bedienvorgängen eines Bluetooth-Geräts finden Sie in der Betriebsanleitung, die dem Bluetooth-Gerät
beiliegt.
Verbindungsmenü
Stellen Sie als Erstes eine Bluetooth-Verbindung zum Bluetooth-Telefon her (Seite 9). Es
können bis zu zwei Bluetooth Telefone gleichzeitig angeschlossen werden.
Wichtig
• Wenn Sie das Gerät im Standby-Modus lassen, um Ihr Telefon über Bluetooth anzuschließen,
während der Motor ausgeschaltet ist, kann sich die Fahrzeugbatterie entladen.
• Achten Sie darauf, Ihr Fahrzeug an einem sicheren Ort abzustellen und die Feststellbremse
einzulegen, bevor Sie das Gerät/Telefon bedienen.
Tele fo ni er en
1
Drücken Sie , um das Telefonmenü anzuzeigen.
Wenn zwei Telefone angeschlossen sind, erscheint zuerst der Telefonname und dann
das Telefonmenü. Um zu einem anderen Telefon zu wechseln, drücken Sie erneut
.
2 Drehen Sie den M.C.-Regler, um [MISSED], [DIALLED], [RECEIVED] oder [PHONE
BOOK] auszuwählen, und drücken Sie ihn dann, um den Vorgang zu bestätigen.
Die Telefonnummernliste erscheint.
Menüpunkt Beschreibung
DEVICELIST Zeigt die Liste der gekoppelten Bluetooth Geräte an. „*”
erscheint neben dem Gerätenamen, wenn die Bluetooth-
Verbindung hergestellt ist.
DEL DEVICE Die Geräteinformationen löschen.
[DELETE YES],
[DELETE NO]
ADD DEVICE Ein neues Gerät registrieren.
A.CONN Wählen Sie [ON], um automatisch eine Verbindung zu einem
Bluetooth-Gerät herzustellen.
[ON], [OFF]
VISIBLE Wählen Sie [ON], damit ein Bluetooth-Gerät dieses Gerät
erkennen kann, wenn dieses Gerät über Bluetooth mit einem
anderen Gerät verbunden ist.
[ON], [OFF]
PIN CODE PIN-Code ändern.
1 Drehen Sie den M.C.-Regler, um den Einstellungsmodus
anzuzeigen.
2 Drehen Sie den M.C.-Regler, um eine Ziffer auszuwählen.
3 Drücken Sie den M.C.-Regler, um den Cursor zur nächsten
Position zu bewegen.
4 Halten Sie, nachdem Sie den PIN-Code eingegeben haben,
den M.C.-Regler gedrückt.
Wenn Sie, nachdem der PIN-Code eingegeben wurde, den M.C.-
Regler drücken, kehren Sie zum PIN-Code-Eingabedisplay
zurück und können den PIN-Code ändern.
DEV. INFO Die Geräteinformationen im Display zwischen dem
Gerätenamen und der Adresse des Bluetooth-Geräts
umschalten.
GUEST MODE Wählen Sie [ON], um automatisch zum [DEL DEVICE]-Bildschirm
zu wechseln, wenn das Gerät bereits mit drei Geräten gekoppelt
ist.
[ON], [OFF]
A.PAIRING Wählen Sie [ON], um das Gerät automatisch mit dem iPhone zu
paaren, wenn ein iPhone über USB am Gerät angeschlossen ist.
(Diese Funktion ist je nach der von Ihnen verwendeten iOS-
Version möglicherweise nicht verfügbar.)
[ON], [OFF]
Bluetooth-Telefon
Menüpunkt Beschreibung

11De
Deutsch
3 Drehen Sie den M.C.-Regler, um einen Namen oder eine Telefonnummer
auszuwählen, und drücken Sie dann den Regler, um den Vorgang zu bestätigen.
Der Anruf wird getätigt.
Eingehenden Anruf annehmen
1
Drücken Sie , wenn ein Anruf empfangen wird.
TIPP
Wenn zwei Telefone per Bluetooth an das Gerät angeschlossen sind und ein Anruf eingeht, während
das Telefon für einen anderen Anruf verwendet wird, wird eine Meldung im Display eingeblendet. Um
den eingehenden Anruf anzunehmen, müssen Sie den aktuellen Anruf beenden.
Grundlegende Bedienvorgänge
Kurzwahlnummern speichern
1
Wählen Sie eine Telefonnummer aus dem Telefonbuch oder Anrufverlauf aus.
2 Halten Sie eine der Zifferntasten (1/ bis 6/ ) gedrückt.
Der Eintrag wird auf der ausgewählten Zifferntaste gespeichert.
Um eine Kurzwahlnummer für einen Anruf zu verwenden, drücken Sie eine der
Zifferntasten (1/ bis 6/ ), und drücken Sie dann den M.C.-Regler.
Spracherkennung (Nur für iPhone)
Diese Funktion ist nur verfügbar, wenn ein iPhone mit Spracherkennungsfunktion über
Bluetooth am Gerät angeschlossen ist.
1 Halten Sie den M.C.-Regler gedrückt, um den Spracherkennungsmodus zu
aktivieren.
2 Drücken Sie den M.C.-Regler und sprechen Sie dann in das Mikrofon, um
Sprachbefehle einzugeben.
Um den Spracherkennungsmodus zu verlassen, drücken Sie BAND/.
HINWEIS
Einzelheiten zu den Spracherkennungsfunktionen finden Sie im Handbuch Ihres iPhone.
Tele fo nm en ü
*1 Die Einträge in Ihrem Telefon werden normalerweise automatisch übertragen, wenn das Telefon
angeschlossen ist. Ist dies nicht der Fall, verwenden Sie bitte Ihr Telefon, um die Einträge zu
übertragen.
Zweck Bedienung
Gespräch beenden Drücken Sie .
Eingehenden Anruf abweisen Halten Sie gedrückt, wenn ein Anruf
empfangen wird.
Zwischen dem aktuellen Anrufer
und einem wartenden Anrufer
umschalten
Drücken Sie den M.C.-Regler.
Wartenden Anrufer abbrechen Halten Sie gedrückt.
Stellen Sie die Lautstärke der
Anruferstimme ein (wenn der
Privatmodus aktiviert ist, steht
diese Funktion nicht zur
Verfügung).
Drehen Sie den M.C.-Regler während des Anrufs.
Privatsphäremodus ein- oder
ausschalten
Drücken Sie während des Gesprächs BAND/.
Menüpunkt Beschreibung
MISSED Die Liste der entgangenen Anrufe anzeigen.
DIALLED Die Liste der getätigten Anrufe anzeigen.
RECEIVED Die Liste der empfangenen Anrufe anzeigen.
PHONE BOOK*1 Die von Ihrem Telefon übertragenen Einträge anzeigen. Stellen
Sie [VISIBLE] im Verbindungsmenü auf [ON], um mit diesem
Gerät in den Einträgen zu blättern.
PRESET 1-6 Die Kurzwahlnummern abrufen. Sie können die
Kurzwahlnummern auch durch Drücken einer der Zifferntasten
(1/ bis 6/) abrufen.
PHONE FUNC Wählen Sie [ON], um einen eingehenden Anruf automatisch
anzunehmen.
A.ANSR:*2
[ON], [OFF]
R.TONE
[ON], [OFF]
Wählen Sie [ON], wenn der Rufton nicht aus den
Fahrzeuglautsprechern ausgegeben wird. Abhängig vom
angeschlossenem Telefon ist diese Funktion möglicherweise
nicht verfügbar.
PB INVT Die Reihenfolge der Namen im Telefonbuch umkehren
(Namensansicht).

12De
*2 Wenn zwei Telefone angeschlossen sind, steht diese Funktion nicht bei eingehenden Anrufen zur
Verfügung, während eines der Telefone für ein Telefonat verwendet wird.
Wichtig
• Abhängig von dem an diesem Gerät angeschlossenen Bluetooth-Audioplayer sind die verfügbaren
Bedienvorgänge auf die folgenden zwei Ebenen beschränkt:
– A2DP (Advanced Audio Distribution Profile): Kann nur auf Ihrem Audioplayer befindliche Titel
wiedergeben.
– AVRCP (Audio/Video Remote Control Profile): Kann Funktionen wie Wiedergabe, Pause,
Titelauswahl usw. ausführen.
• Der Ton des Bluetooth-Audioplayers wird stummgeschaltet, wenn das Telefon verwendet wird.
• Wenn der Bluetooth-Audioplayer verwendet wird, können Sie keine automatische Verbindung zu
einem Bluetooth-Telefon herstellen.
• Abhängig vom Typ des an diesem Gerät angeschlossenen Bluetooth-Audioplayers können die
Bedienung und die angezeigten Informationen entsprechend der Verfügbarkeit und Funktionalität
variieren.
1 Stellen Sie eine Bluetooth-Verbindung zum Bluetooth-Audioplayer her.
2 Drücken Sie SRC/OFF, um [BT AUDIO] als Quelle auszuwählen.
3 Drücken Sie BAND/ , um die Wiedergabe zu starten.
Grundlegende Bedienvorgänge
In den FUNCTION-Einstellungen können Sie verschiedene Anpassungen vornehmen
(Seite 13).
* Je nach angeschlossenem Gerät sind diese Bedienvorgänge möglicherweise nicht verfügbar.
(Der APP-Modus ist für MVH-170UBG/170UB nicht verfügbar.)
Sie können sich über dieses Gerät den Ton einer Anwendung auf einem iPhone/Android-
Gerät anhören. In einigen Fällen können Sie eine Anwendung mit diesem Gerät steuern.
Einzelheiten zu kompatiblen Geräten finden Sie auf unserer Website.
Wichtig
Die Verwendung von Apps von Dritten kann eventuell die Angabe personenbezogener Daten nach
sich ziehen oder notwendig machen entweder durch das Eröffnen eines Benutzerkontos o. Ä. und für
bestimmte Anwendungen die Angabe von Geolokationsdaten.
ALLE APPS VON DRITTEN UNTERLIEGEN DER ALLEINIGEN VERANTWORTUNG DER ANBIETER
EINSCHLIESSLICH UND OHNE EINSCHRÄNKUNG DEM SAMMELN UND SICHERN DER ANWENDERDATEN
UND DATENSCHUTZMASSNAHMEN. DURCH ZUGRIFF AUF APPS VON DRITTEN ERKLÄREN SIE SICH MIT
DEN NUTZUNGSBEDINGUNGEN UND DATENSCHUTZRICHTLINIEN DER JEWEILIGEN ANBIETER
EINVERSTANDEN. WENN SIE DEN NUTZUNGSBEDINGUNGEN UND RICHTLINIEN EINES ANBIETERS ODER
DER VERWENDUNG VON GEOLOKATIONSDATEN, WO ZUTREFFEND, NICHT ZUSTIMMEN, DANN SEHEN
SIE VON DER VERWENDUNG VON APPS VON DRITTEN AB.
Für iPhone-Benutzer
Diese Funktion ist mit iPhone- und iPod touch-Geräten mit iOS 5.0 oder höher kompatibel.
Für Benutzer von Android-Geräten
Diese Funktion ist mit Geräten mit Android-Version 2.3 oder höher kompatibel, die Bluetooth SPP
(Serial Port Profile) und A2DP (Advanced Audio Distribution Profile) unterstützen.
HINWEIS
PIONEER IST NICHT FÜR DRITTANBIETER-APPS ODER -INHALTE VERANTWORTLICH, EINSCHLIESSLICH
OHNE BESCHRÄNKUNG DEREN RICHTIGKEIT ODER VOLLSTÄNDIGKEIT. DIE ALLEINIGE
VERANTWORTUNG FÜR INHALT UND FUNKTIONALITÄT SOLCHER APPS TRÄGT DER ANBIETER DER APP.
Die Bluetooth-Verbindung ist verfügbar für MVH-X370BT.
1 Verbinden Sie dieses Gerät mit dem mobilen Gerät.
• iPhone über USB (Seite 7)
• Android-Gerät über Bluetooth (Seite 9)
2 Drehen Sie den M.C.-Regler, um das Hauptmenü anzuzeigen.
3 Drehen Sie den M.C.-Regler, um [SYSTEM] auszuwählen, und drücken Sie ihn
dann, um den Vorgang zu bestätigen.
Bluetooth-Audio
Zweck Bedienung
Vor- oder zurückspulen Halten Sie bzw. gedrückt.
Track auswählen Drücken Sie bzw. .
Wiedergabewiederholung* Drücken Sie 6/.
Zufallswiedergabe* Drücken Sie 5/.
Wiedergabe pausieren/fortsetzen Drücken Sie 4/PAUSE.
In einer Liste nach einer Datei suchen 1 Drücken Sie , um die Liste anzuzeigen.
2 Drehen Sie den M.C.-Regler, um den
gewünschten Ordnernamen
auszuwählen, und drücken Sie ihn dann,
um den Vorgang zu bestätigen.
3 Drehen Sie den M.C.-Regler, um die
gewünschte Datei auszuwählen, und
drücken Sie ihn dann, um den Vorgang
zu bestätigen. Die Wiedergabe startet.
App-Modus
Wiedergabe einer Anwendung über das Gerät

13De
Deutsch
4 Drehen Sie den M.C.-Regler, um [APP CONN.SET] auszuwählen, und drücken Sie
ihn dann, um den Vorgang zu bestätigen.
5 Drehen Sie den M.C.-Regler, um eine der nachstehenden Optionen auszuwählen,
und drücken Sie dann den Regler, um den Vorgang zu bestätigen.
• Wählen Sie [WIRED] für ein iPhone.
• Wählen Sie [BLUETOOTH] für ein Android-Gerät.
6 Drücken Sie SRC/OFF, um [APP] auszuwählen.
7 Bedienen Sie das mobile Gerät, um die Anwendung zu starten.
Grundlegende Bedienvorgänge
In den FUNCTION-Einstellungen können Sie verschiedene Anpassungen vornehmen
(Seite 13).
Sie können im Hauptmenü verschiedene Einstellungen vornehmen.
1 Drehen Sie den M.C.-Regler, um das Hauptmenü anzuzeigen.
2 Drehen Sie den M.C.-Regler, um eine der nachstehenden Kategorien
auszuwählen, und drücken Sie ihn dann, um den Vorgang zu bestätigen.
• FUNCTION-Einstellungen (Seite 13)
• AUDIO-Einstellungen (Seite 14)
• SYSTEM-Einstellungen (Seite 15)
• ILLUMINATION-Einstellungen (Seite 15)
• MIXTRAX-Einstellungen (Seite 16)
3 Drehen Sie den M.C.-Regler, um die Optionen auszuwählen, und drücken Sie ihn
dann, um den Vorgang zu bestätigen.
HINWEISE
• Die Bluetooth-zugehörigen Menüelemente in den folgenden Tabellen stehen für MVH-170UI/
170UBG/170UB nicht zur Verfügung.
• Die iPod-zugehörigen Menüelemente in den folgenden Tabellen stehen für MVH-170UBG/170UB
nicht zur Verfügung.
• Dem APP-Modus zugehörige Menüelemente in den folgenden Tabellen sind für MVH-170UBG/170UB
nicht verfügbar.
Die Menüpunkte können sich je nach Quelle unterscheiden.
Zweck Bedienung
Track auswählen Drücken Sie bzw. .
Vor- oder zurückspulen Halten Sie bzw. gedrückt.
Wiedergabe pausieren/fortsetzen Drücken Sie BAND/.
Einstellungen
FUNCTION-Einstellungen
Menüpunkt Beschreibung
FM SETTING
[TALK], [STANDARD], [MUSIC] Die Klangqualität auf die
Sendesignalbedingungen des FM-Band-Signals
abstimmen. (Nur verfügbar, wenn das FM-Band
ausgewählt ist).
BSM
Die sechs stärksten Sender automatisch auf den
Zifferntasten (1/ bis 6/) speichern.
REGIONAL
[ON], [OFF] Den Empfang auf bestimmte
Regionalprogramme beschränken, wenn AF
(alternative Frequenzsuche) ausgewählt ist. (Nur
verfügbar, wenn das FM-Band ausgewählt ist).
LOCAL
FM: [OFF], [LV1], [LV2], [LV3], [LV4]
MW/LW:[OFF], [LV1], [LV2]
Die Suche auf Sender mit ausreichender
Signalstärke beschränken.
TA
[ON], [OFF] Empfang von Verkehrsdurchsagen, falls
verfügbar. (Nur verfügbar, wenn das FM-Band
ausgewählt ist).
AF
[ON], [OFF] Dem Gerät erlauben, auf eine andere Frequenz
umzuschalten, die den gleichen Sender
überträgt. (Nur verfügbar, wenn das FM-Band
ausgewählt ist).
NEWS
[ON], [OFF] Die momentan ausgewählte Quelle mit
Nachrichtendurchsagen unterbrechen. (Nur
verfügbar, wenn das FM-Band ausgewählt ist).

14De
SEEK
[MAN], [PCH] Zuweisung der / -Tasten, um einen
Sender nach dem anderen zu suchen (manuelle
Abstimmung), oder Auswahl eines Senders aus
den voreingestellten Kanälen.
SEL DEVICE
Ein in der Liste enthaltenes Bluetooth-Gerät
anschließen.
S.RTRV
[1] (effektiv bei niedrigen
Kompressionsraten)
[2] (effektiv bei hohen
Kompressionsraten)
[OFF]
Die Qualität komprimierter Audiosignale
verbessern und einen satten Klang
wiederherstellen.
Nicht verfügbar, wenn;
• USB als Quelle ausgewählt und die MIXTRAX
Funktion aktiviert ist.
• Die FLAC Datei wird wiedergegeben.
(Verfügbar für MVH-170UI/170UBG/170UB)
AUDIO BOOK
[FASTER], [NORMAL], [SLOWER] Wiedergabegeschwindigkeit ändern. (Nicht
verfügbar, wenn im Steuerungsmodus
[CONTROL iPod/CTRL iPod] ausgewählt ist.)
PAUSE
Wiedergabe pausieren oder fortsetzen.
PLAY
Wiedergabe starten.
STOP
Wiedergabe beenden.
AUDIO-Einstellungen
Menüpunkt Beschreibung
FADER*1
Balance der Front- und Hecklautsprecher
einstellen.
Menüpunkt Beschreibung
USB
iPod
iPod
BALANCE
Balance der linken und rechten Lautsprecher
einstellen.
EQ SETTING
[SUPER BASS], [POWERFUL],
[NATURAL], [VOCAL], [CUSTOM1],
[CUSTOM2], [FLAT]
Wählen Sie ein Equalizer-Band
und einen Pegel aus, um weitere
Anpassungen vorzunehmen.
Equalizer-Band: [80HZ], [250HZ],
[800HZ], [2.5KHZ], [8KHZ]
Equalizer-Pegel: [+6] bis [–6]
Equalizer-Kurve auswählen oder anpassen.
[CUSTOM1] kann für jede Quelle separat
eingestellt werden. Jede der nachstehenden
Kombinationen wird jedoch automatisch auf
dieselbe Einstellung gesetzt.
• USB, iPod und APP (iPhone)
• BT AUDIO und APP (Android)
[CUSTOM2] ist eine für alle Quellen gemeinsam
verwendete Einstellung.
Sie können auch den Equalizer umschalten,
indem Sie wiederholt drücken (nur bei
MVH-170UBG/170UB).
LOUDNESS
[OFF], [LOW], [MID], [HI] Kompensieren, um bei niedriger Lautstärke
einen klaren Klang zu erhalten.
SUB.W*2
[NOR], [REV], [OFF] Auswahl der Subwoofer-Phase.
SUB.W CTRL*2*3
Grenzfrequenz: [50HZ], [63HZ],
[80HZ], [100HZ], [125HZ], [160HZ],
[200HZ]
Ausgabepegel: [–24] bis [+6]
Steilheit: [–12], [–24]
Der Subwoofer gibt nur Signale unterhalb des
ausgewählten Bereichs aus.
BASS BOOST
[0] bis [+6] Auswahl des Bassverstärkungspegels.
HPF SETTING
Grenzfrequenz: [OFF], [50HZ],
[63HZ], [80HZ], [100HZ], [125HZ],
[160HZ], [200HZ]
Steilheit: [–12], [–24]
Die Lautsprecher geben nur Signale oberhalb
der Grenzfrequenz des Hochpassfilters (HPF) aus.
Menüpunkt Beschreibung

15De
Deutsch
*1 Nicht verfügbar, wenn [SUB.W/SUB.W] bei [SP-P/O MODE] in den INITIAL-Einstellungen ausgewählt
ist (Seite 6).
*2 Nicht verfügbar, wenn [REAR/REAR] bei [SP-P/O MODE] in den INITIAL-Einstellungen ausgewählt ist
(Seite 6).
*3 Nicht verfügbar, wenn [OFF] bei [SUB.W] ausgewählt ist .
Sie können auch bei ausgeschaltetem Gerät auf diese Menüs zugreifen.
*1 [PW SAVE] wird abgebrochen, wenn die Fahrzeugbatterie getrennt wird, und muss nach erneutem
Anschließen der Batterie wieder eingeschaltet werden. Wenn [PW SAVE] ausgeschaltet ist, kann es
abhängig von den Verbindungsmethoden sein, dass das Gerät weiterhin Strom von der Batterie
bezieht, wenn die Zündung Ihres Fahrzeugs keine ACC-Stellung (Stromversorgung über
Starterbatterie) hat.
*2 (Nicht verfügbar, wenn [APP] als Quelle ausgewählt ist.)
SLA
[+4] bis [–4] Den Lautstärkepegel für alle Quellen außer FM
einstellen.
Jede der nachstehenden Kombinationen wird
automatisch auf dieselbe Einstellung gesetzt.
• USB, iPod und APP (iPhone)
• BT AUDIO und APP (Android)
SYSTEM-Einstellungen
Menüpunkt Beschreibung
LANGUAGE
[ENG] (Englisch), [РУС] (Russisch),
[TUR] (Türkisch)
Auswahl der Sprache, in der die
Textinformationen komprimierter Audiodateien
angezeigt werden sollen.
CLOCK SET
Einstellung der Uhr (Seite 5).
12H/24H
[12H], [24H] Auswahl des Zeitdarstellungsformats.
AUTO PI
[ON], [OFF] Auch bei Verwendung eines voreingestellten
Senders nach einem anderen Sender mit
demselben Programm suchen.
AUX
[ON], [OFF] Wählen Sie [ON], wenn Sie ein am Gerät
angeschlossenes Zusatzgerät verwenden.
BT AUDIO
[ON], [OFF] Bluetooth-Signal ein-/ausschalten.
Menüpunkt Beschreibung
MUTE MODE (Nur verfügbar für MVH-170UI)
[MUTE], [20dB ATT], [10dB ATT] Ton automatisch stummschalten oder
abschwächen, wenn ein Signal von einem Gerät
mit Stummschaltungsfunktion empfangen wird.
PW SAVE*1
[ON], [OFF] Batterieverbrauch verringern.
Das Einschalten der Quelle ist der einzige
Vorgang, der erlaubt ist, wenn diese Funktion
eingeschaltet ist.
BT MEM CLEAR
[YES], [CANCEL] Die auf diesem Gerät gespeicherten Bluetooth-
Gerätedaten löschen (Geräteliste, PIN-Code,
Anrufhistorie, Telefonbuch, Kurzwahlnummern).
[CLEARED] erscheint, wenn die Daten erfolgreich
gelöscht wurden.
BT VERSION
Zeigt die Systemversion des Geräts und des
Bluetooth-Moduls an.
APP CONN. SET*2
[WIRED], [BLUETOOTH] Wählen Sie die für Ihr Gerät geeignete
Verbindungsmethode.
ILLUMINATION-Einstellungen
Menüpunkt Beschreibung
DIM SETTING
[SYNC CLOCK], [MANUAL] Displayhelligkeit ändern.
BRIGHTNESS
[1] bis [10] Displayhelligkeit ändern.
Welche Einstellbereiche verfügbar sind, richtet
sich nach [DIM SETTING].
Menüpunkt Beschreibung

16De
(Nur für MVH-X370BT)
MIXTRAX-Einstellungen
Menüpunkt Beschreibung
SHORT MODE
[1.0 MIN], [1.5 MIN], [2.0 MIN],
[2.5 MIN], [3.0 MIN], [OFF]
Auswahl der Wiedergabedauer.
MIX PATTERN
[SOUND LEVEL] Änderung der MIXTRAX-Spezialeffekte je nach
Audiopegel.
Das Mischmuster ändert sich anhand des
Tonpegels.
[LOW PASS] Das Mischmuster ändert sich anhand des
Basspegels.
[RANDOM] Das Mischmuster ändert sich zufällig anhand
von Tonpegel- und Tiefpassmodus.
DISP FX
[ON], [OFF] Ein-/Ausschalten der MIXTRAX-Spezialeffekte.
CUT IN FX
[ON], [OFF] Ein-/Ausschalten der MIXTRAX-Klangeffekte
beim manuellen Umschalten von Tracks.

17De
Deutsch
Wichtig
• Wenn dieses Gerät in ein Fahrzeug
eingebaut wird, das ein Zündschloss
ohne ACC-Stellung (Stromversorgung
über Starterbatterie) hat, und das rote
Kabel nicht mit dem Anschluss
verbunden wird, der die Betätigung des
Zündschlüssels erkennt, kann dies zur
Entladung der Batterie führen.
• Die Verwendung dieses Geräts in
anderen als den folgenden Bedingungen
könnte zu einem Brand oder
Funktionsstörungen führen.
–Fahrzeuge mit 12-Volt-Batterie und
negativer Erdung.
–Lautsprecher mit 50 W (Ausgabewert)
und 4 Ω bis 8 Ω (Impedanzwert).
• Um Kurzschlüsse, Überhitzung oder
Fehlfunktionen zu vermeiden, achten Sie
darauf, die nachstehenden Anweisungen
zu befolgen.
–Unterbrechen Sie vor dem Einbau den
Minuspol der Autobatterie.
–Sichern Sie Kabel mit Kabelklemmen
oder Klebeband. Wickeln Sie Klebeband
um Kabel, die mit Metallteilen in
Kontakt kommen, um die Kabel zu
schützen.
–Verlegen Sie alle Kabel mit einem
Abstand zu beweglichen Teilen wie
Schalthebel und Sitzschiene.
–Verlegen Sie alle Kabel mit einem
Abstand zu warmen Umgebungen, z. B.
der Auslassöffnung der Heizung.
– Verbinden Sie das gelbe Kabel nicht mit
der Batterie, indem Sie es durch das
Loch zum Motorraum führen.
– Verkleiden Sie nicht angeschlossene
Kabelanschlüsse mit Isolierband.
– Kürzen Sie keine Kabel.
– Durchschneiden Sie niemals die
Isolierung des Stromkabels dieses
Geräts, um weitere Geräte mit Strom zu
versorgen. Die Strombelastbarkeit des
Kabels ist begrenzt.
– Verwenden Sie eine Sicherung mit dem
vorgeschriebenen Sicherungswert.
– Schließen Sie das negative
Lautsprecherkabel niemals direkt an
Masse an.
– Binden Sie niemals die negativen Kabel
mehrerer Lautsprecher zusammen.
• Wenn dieses Gerät eingeschaltet ist,
werden Steuersignale durch das
blauweiße Kabel gesendet. Schließen Sie
dieses Kabel an der
Systemfernbedienung eines externen
Leistungsverstärkers oder an der
Steuerklemme des
Automatikantennenrelais des Fahrzeugs
an (max. 300 mA 12 V Gleichspannung).
Wenn das Fahrzeug eine
Scheibenantenne besitzt, schließen Sie
sie am Stromversorgungsanschluss für
den Antennenverstärker an.
• Schließen Sie das blauweiße Kabel
niemals am Stromanschluss eines
externen Leistungsverstärkers an.
Schließen Sie es auch niemals am
Stromanschluss der Autoantenne an.
Dadurch kann es zu Batterieentladung
oder Funktionsstörungen kommen.
Anschlüsse/Einbau
Anschlüsse
ACC-Stellung Keine ACC-Stellung
• Das schwarze Kabel ist das Massekabel.
Massekabel für dieses Gerät und andere
Geräte (insbesondere
Hochstromprodukte wie
Leistungsverstärker) müssen separat
verlegt und angeschlossen werden.
Andernfalls kann ein versehentliches
Abziehen zu einem Brand oder
Funktionsstörungen führen.
Dieses Gerät
Mikrofon 4 m (13 Fuß 1 Zoll) (Nur für
MVH-X370BT)
Hecklautsprecher- oder Subwoofer-
Ausgang
Frontlautsprecherausgang (Nur für
MVH-X370BT/170UI)
Antenneneingang
Stromkabeleingang
Sicherung (10 A)
Eingang für Kabelfernbedienung (Nur
für MVH-X370BT/170UI)
Hier kann ein festverdrahteter
Fernbedienungsadapter angeschlossen
werden (separat erhältlich).
Mikrofoneingang (Nur für MVH-X370BT)
Stromkabel
Stellen Sie diese Verbindungen her, wenn
Sie kein Hecklautsprecherkabel mit einem
Subwoofer verbinden.
Zum Stromkabeleingang
Je nach Fahrzeugart kann die Funktion
von und abweichen. Achten Sie
in diesem Fall darauf, an und
an anzuschließen.
Gelb
Konstantspannung (oder
Zündschlossstrom)
Gelb
An der 12-V-Konstantspannungsbuchse
anschließen.
Rot
Zündschlossstrom (oder
Konstantspannung)
Rot
An der vom Zündschlüssel gesteuerten
Buchse (12 V Gleichspannung)
anschließen.
Verbinden Sie die jeweils gleichfarbigen
Kontakte miteinander.
Schwarz (Gehäuseerdung)
MVH-X370BT/170UI/170UBG/170UB

18De
Blauweiß
Die Polanordnung des ISO-Steckers
variiert je nach Fahrzeugtyp. Verbinden
Sie und , wenn Pol 5 zur
Antennensteuerung vorgesehen ist. Bei
anderen Fahrzeugtypen dürfen und
keinesfalls verbunden werden.
Blauweiß
Anschluss an die
Systemfernbedienungsbuchse des
Leistungsverstärkers (max. 300 mA 12 V
DC).
Blauweiß
Anschluss an die Steuerklemme des
Automatikantennenrelais (max. 300 mA
12 V DC).
Schwarzgelb (Nur für MVH-170UI)
Wenn Sie Geräte mit
Stummschaltungsfunktion verwenden,
verbinden Sie dieses Kabel mit dem
Audio-Stummschaltungskabel des
betreffenden Geräts. Schließen Sie
andernfalls nichts am Audio-
Stummschaltungskabel an.
Lautsprecherkabel
Weiß: Vorn links
Schwarzweiß: Vorn links
Grau: Vorn rechts
Schwarzgrau: Vorn rechts
Grün: hinten links oder Subwoofer
Schwarzgrün: hinten links oder
Subwoofer
Violett: hinten rechts oder
Subwoofer
Schwarzviolett: hinten rechts oder
Subwoofer
ISO-Stecker
Bei einigen Fahrzeugen kann der ISO-
Stecker in zwei Einheiten aufgeteilt sein.
Achten Sie in diesem Fall darauf, die
Verbindung mit beiden Einheiten
herzustellen.
HINWEISE
• Ändern Sie das Grundeinstellungsmenü
dieses Geräts. Siehe [SP-P/O MODE]
(Seite 6). Der Subwoofer-Ausgang dieses
Geräts ist monaural.
• Achten Sie bei Verwendung eines
Subwoofers mit 70 W (2 Ω) darauf, den
Subwoofer am violetten und
schwarzvioletten Kabel dieses Geräts
anzuschließen. Schließen Sie nichts am
grünen und schwarzgrünen Kabel an.
Leistungsverstärker (separat
erhältlich)
Stellen Sie diese Verbindungen her, wenn
Sie den optionalen Verstärker verwenden.
Systemfernbedienung
Leistungsverstärker (separat erhältlich)
Mit Cinch-Kabeln verbinden (separat
erhältlich).
Zum Ausgang für die
Frontlautsprecher*
Frontlautsprecher*
Zum Ausgang für die Hecklautsprecher
oder den Subwoofer
Hecklautsprecher oder Subwoofer
* Nur für MVH-X370BT/170UI
Wichtig
• Prüfen Sie alle Anschlüsse und Systeme
vor dem endgültigen Einbau.
• Verwenden Sie keine nicht autorisierten
Teile, da dies Funktionsstörungen
verursachen kann.
• Wenden Sie sich an Ihren Händler, wenn
der Einbau das Bohren von Löchern oder
andere Modifikationen des Fahrzeugs
erfordert.
• Bauen Sie dieses Gerät nicht dort ein, wo:
–es den Betrieb des Fahrzeugs stören
kann.
–es infolge plötzlichen Anhaltens eine
Verletzung von Insassen verursachen
kann.
• Der Halbleiterlaser wird beschädigt,
wenn er sich überhitzt. Bauen Sie dieses
Gerät mit einem Abstand zu warmen
Umgebungen, z. B. der Auslassöffnung
der Heizung, ein.
• Eine optimale Leistung
wird erzielt, wenn das Gerät
in einem Winkel von
weniger als 60 ° eingebaut
wird.
• Achten Sie, um eine ordnungsgemäße
Wärmeableitung des Geräts
sicherzustellen, beim Einbau darauf,
reichlich Platz hinter der Rückwand des
Geräts zu lassen und lose Kabel so
aufzuwickeln, dass sie nicht die
Lüftungsschlitze blockieren.
DIN-Montage von vorn/hinten
Dieses Gerät kann sowohl von vorn als
auch von hinten ordnungsgemäß
eingebaut werden.
Verwenden Sie beim Einbau
handelsübliche Teile.
DIN-Montage von vorn
1 Schieben Sie den Montagerahmen in
das Armaturenbrett.
Verwenden Sie zum Einbau auf
beengtem Raum den mitgelieferten
Montagerahmen. Wenn genug Platz ist,
verwenden Sie den im Lieferumfang
des Fahrzeugs enthaltenen
Montagerahmen.
2 Sichern Sie den Montagerahmen mit
Hilfe eines Schraubendrehers, indem
Sie die Metallzungen (90 °) an ihren
richtigen Platz biegen.
Armaturenbrett
Montagerahmen
Stellen Sie sicher, dass das Gerät sicher
montiert wird. Eine instabile Installation
kann Überspringen der Titel oder
andere Störungen verursachen.
DIN-Montage von hinten
1 Richten Sie die Bohrungen in der
Montagehalterung mit den Löchern
auf den Seiten des Geräts aus, um die
Halterung zu montieren.
Einbau
Reichlich Platz
lassen
5 cm
5 cm

19De
Deutsch
2 Schrauben Sie auf jeder Seite eine
Schraube in das Gerät, um es zu
fixieren.
Schneidschraube (5 mm × 8 mm)
Befestigungswinkel
Armaturenbrett oder Konsole
Beliegende Halterung verwenden
Sie können auch die beiliegende Halterung
verwenden, um das Gerät zu montieren.
Stellen Sie sicher, dass die beiliegende
Halterung für Ihr konkretes
Fahrzeugmodell passt, und befestigen Sie
diese wie nachfolgend dargestellt am
Gerät.
Schraube
Halterung
Entfernen des Geräts
1 Entfernen Sie den Klemmflansch.
Klemmflansch
Kerbzunge
• Durch Entriegeln des Bedienfelds wird
der Klemmflansch leichter zugänglich.
• Beim Wiederanbringen des
Klemmflanschs muss die gekerbte
Seite nach unten zeigen.
2 Schieben Sie die mitgelieferten
Entnahmeschlüssel in beide Seiten des
Geräts, bis sie mit einem Klicken
einrasten.
3 Ziehen Sie das Gerät aus dem
Armaturenbrett.
(Nur für MVH-X370BT)
Das Mikrofon sollte direkt vor dem Fahrer
in einer geeigneten Entfernung
angebracht werden, um die Stimme klar
aufzufangen.
VORSICHT
Es ist äußerst gefährlich, dem
Mikrofonkabel zu erlauben, sich um die
Lenksäule oder den Schalthebel zu
wickeln. Achten Sie darauf, das Mikrofon so
anzubringen, dass es das Fahren nicht
behindert. Es wird empfohlen, zum Ordnen
Anbringen des Mikrofons
des Kabels die Klammern (separat
erhältlich) zu verwenden.
Anbringen an der
Sonnenblende
1 Passen Sie das Mikrofonkabel in die
Rille ein.
2 Bringen Sie die Mikrofonklemme an
der Sonnenblende an.
Das Herunterklappen der
Sonnenblende verringert die
Spracherkennungsrate.
Anbringen an der Lenksäule
1 Schieben Sie den Mikrofonsockel, um
ihn von der Mikrofonklemme zu lösen.
Mikrofon
Mikrofonklemme
Mikrofonsockel
2 Bringen Sie das Mikrofon an der
Rückseite der Lenksäule an.
Mikrofonkabel
Rille
Mikrofonklemme
Doppelseitiges Klebeband

20De
Das Display kehrt automatisch zur
normalen Anzeige zurück.
→ Es wurden etwa 30 Sekunden lang
keine Bedienvorgänge ausgeführt.
– Führen Sie einen Bedienvorgang aus.
Der Wiederholbereich ändert sich
unerwartet.
→ Je nach Wiederholbereich kann sich der
ausgewählte Bereich bei Auswahl eines
anderen Ordners oder Tracks oder
während des Vor-/Zurückspulens
ändern.
– Wählen Sie den Wiederholbereich
erneut aus.
Ein Unterordner wird nicht
wiedergegeben.
→ Unterordner können nicht
wiedergegeben werden, wenn [FLD]
(Ordnerwiederholung) ausgewählt ist.
– Wählen Sie einen anderen
Wiederholbereich aus.
Der Ton wird unterbrochen.
→ Sie verwenden ein Gerät wie z. B. ein
Mobiltelefon, das hörbare Störungen
verursachen kann.
– Vergrößern Sie den Abstand
elektrischer Geräten, die
möglicherweise die Störung
verursachen, zum Gerät.
Der Ton von der Bluetooth-Audioquelle
wird nicht wiedergegeben.
→ Auf einem über Bluetooth verbundenen
Mobiltelefon wird ein Anruf getätigt.
– Nach Beenden des Anrufs wird der Ton
wiedergegeben.
→ Es wird gerade ein über Bluetooth
verbundenes Mobiltelefon bedient.
– Stellen Sie die Nutzung des
Mobiltelefons ein.
→ Nach einem mit einem über Bluetooth
verbundenen Mobiltelefon getätigten
Anruf wird die Verbindung zwischen
dem Gerät und dem Mobiltelefon nicht
korrekt hergestellt.
– Stellen Sie erneut eine Bluetooth-
Verbindung zwischen dem Gerät und
dem Mobiltelefon her.
Allgemeines
AMP ERROR
→ Betriebsstörung des Geräts oder falsche
Lautsprecherverbindung.
→ Die Schutzschaltung ist aktiviert.
– Überprüfen Sie die
Lautsprecherverbindung.
– Schalten Sie die Zündung OFF und
dann wieder ON. Sollte die Meldung
weiter angezeigt werden, wenden Sie
sich zur Unterstützung an Ihren
Händler oder eine Pioneer-
Kundendienststelle.
NO XXXX (beispielsweise NO TITLE)
→ Es gibt keine eingebetteten
Textinformationen.
–Schalten Sie die Anzeige um oder
spielen Sie einen anderen Track/eine
andere Datei.
USB-Gerät/iPod
FORMAT READ
→ Nach dem Wiedergabestart ist der Ton
manchmal erst nach einer Verzögerung
zu hören.
Zusätzliche Informationen
Fehlerbehebung
Fehlermeldungen
– Warten Sie, bis die Meldung erlischt
und Sie den Ton hören.
NO AUDIO
→ Es sind keine Musiktitel vorhanden.
– Übertragen Sie die Audiodateien an
das USB-Gerät und schließen Sie es an.
→ Auf dem angeschlossenen USB-Gerät ist
die Sicherheitsfunktion aktiviert.
– Folgen Sie den Anweisungen des USB-
Geräts, um die Sicherheitsfunktion zu
deaktivieren.
SKIPPED
→ Das angeschlossene USB-Gerät enthält
DRM-geschützte Dateien (digitale
Rechteverwaltung).
– Die geschützten Dateien werden
übersprungen.
PROTECT
→ Sämtliche Dateien auf dem
angeschlossenen USB-Gerät sind DRM-
geschützt (digitale Rechteverwaltung).
– Wechseln Sie das USB-Gerät aus.
N/A USB
→ Das angeschlossene USB-Gerät wird
von diesem Gerät nicht unterstützt.
– Trennen Sie Ihr Gerät ab und ersetzen
Sie es durch ein kompatibles USB-
Gerät.
CHECK USB
→ Der USB-Anschluss oder das USB-Kabel
wurde kurzgeschlossen.
– Vergewissern Sie sich, dass der USB-
Anschluss oder das USB-Kabel nicht
eingeklemmt oder beschädigt ist.
→ Das angeschlossene USB-Gerät hat
einen höheren als den maximal
zulässigen Stromverbrauch.
– Trennen Sie das USB-Gerät ab und
verwenden Sie es nicht. Schalten Sie
die Zündung AUS und dann wieder
auf ACC oder EIN. Schließen Sie nur
kompatible USB-Geräte an.
→ Der iPod funktioniert ordnungsgemäß,
wird aber nicht geladen.
– Vergewissern Sie sich, dass kein
Kurzschluss des iPod-Kabels vorliegt
(z. B. durch Einklemmen zwischen
Metallgegenständen). Schalten Sie
nach dem Überprüfen die Zündung
AUS und wieder EIN, oder trennen Sie
den iPod ab und schließen Sie ihn
wieder an.
ERROR-19
→ Kommunikation fehlgeschlagen.
– Führen Sie einen der folgenden
Bedienvorgänge aus, und kehren Sie
dann zur USB-Quelle zurück.
• Schalten Sie die Zündung AUS und
wieder EIN.
• Trennen Sie das USB-Gerät ab.
• Schalten Sie auf eine andere Quelle
um.
→ iPod-Störung.
– Trennen Sie das Kabel vom iPod.
Schließen Sie, sobald auf dem iPod das
Hauptmenü angezeigt wird, den iPod
erneut an und setzen Sie ihn zurück.
ERROR-23
→ Das USB-Gerät wurde nicht
ordnungsgemäß formatiert.
– Formatieren Sie das USB-Gerät mit
FAT12, FAT16 oder FAT32.
ERROR-16
→ Die iPod-Firmware ist veraltet.
– Aktualisieren Sie die iPod-Version.
→ iPod-Störung.
– Trennen Sie das Kabel vom iPod.
Schließen Sie, sobald auf dem iPod das
Hauptmenü angezeigt wird, den iPod
erneut an und setzen Sie ihn zurück.
STOP
→ Auf der aktuellen Liste befinden sich
keine Musiktitel.
– Wählen Sie eine Liste aus, die
Musiktitel enthält.

21De
Deutsch
NOT FOUND
→ Keine entsprechenden Musiktitel
gefunden.
– Übertragen Sie Musiktitel an den iPod.
Bluetooth-Gerät
ERROR-10
→ Ausfall der Spannungsversorgung des
Bluetooth-Moduls des Geräts.
– Schalten Sie die Zündung AUS und
dann wieder auf ACC oder EIN.
Apps
NO BT DEVICE GO TO BT MENU TO
REGISTER
→ Es wurde kein Bluetooth-Gerät
gefunden.
– Verbinden Sie dieses Gerät und das
andere Gerät über Bluetooth (Seite 9).
CONN. FAILED PRESS BAND KEY TO
RETRY
→ Die Bluetooth-Verbindung ist
fehlgeschlagen.
– Drücken Sie BAND/ , um erneut
eine Verbindung herzustellen.
DISCONNECTED PRESS BAND KEY TO
RETRY
→ Die Bluetooth-Verbindung ist
fehlgeschlagen.
– Drücken Sie BAND/ , um erneut
eine Verbindung herzustellen.
CHECK APP
→ Die Verbindung mit der Anwendung ist
fehlgeschlagen.
– Folgen Sie den auf dem Bildschirm
gezeigten Anweisungen.
START UP APP
→ Die Anwendung wird noch nicht
ausgeführt.
– Bedienen Sie das mobile Gerät, um die
Anwendung zu starten.
USB-Speichergerät
• Verbindungen über USB-Hubs werden
nicht unterstützt.
• Sorgen Sie vor der Fahrt für eine sichere
Befestigung des USB-Speichergeräts.
Lassen Sie das USB-Speichergerät nicht
auf den Boden fallen, wo es unter dem
Brems- oder Gaspedal eingeklemmt
werden könnte.
• Je nach USB-Speichergerät können die
folgenden Probleme auftreten.
– Die Bedienung kann unterschiedlich
sein.
– Möglicherweise wird das Speichergerät
nicht erkannt.
– Möglicherweise werden Dateien nicht
richtig wiedergegeben.
– Das Gerät kann Störgeräusche
verursachen, wenn Sie Radio hören.
iPod
• Bewahren Sie den iPod nicht an Orten mit
hohen Temperaturen auf.
• Sorgen Sie für eine sichere Befestigung
des iPods während er Fahrt. Lassen Sie
den iPod nicht auf den Boden fallen, wo
er unter dem Brems- oder Gaspedal
eingeklemmt werden könnte.
• Die Einstellungen des iPods, z. B.
Equalizer und Wiedergabewiederholung,
ändern sich beim Anschließen des iPods
an das Gerät automatisch. Wenn der iPod
vom Gerät getrennt wird, kehren diese
Einstellungen wieder in ihren
ursprünglichen Zustand zurück.
• Auf dem iPod gespeicherter
inkompatibler Text wird vom Gerät nicht
angezeigt.
Handhabungsrichtlinien
• Nur die ersten 32 Zeichen können als
Dateiname (einschließlich
Dateierweiterung) oder Ordnername
angezeigt werden.
• Je nach der zur Codierung von WMA-
Dateien verwendeten Anwendung kann
es sein, dass das Gerät nicht richtig
arbeitet.
• Bei Audiodateien mit eingebetteten
Bilddaten oder bei auf einem USB-Gerät
mit komplexer Ordnerstruktur
gespeicherten Audiodateien kann sich
geringfügig der Beginn der Wiedergabe
verzögern.
• Zur Anzeige auf diesem Gerät sollte
russischer Text in einem der folgenden
Zeichensätze codiert sein:
–Unicode (UTF-8, UTF-16)
–Ein anderer Zeichensatz als Unicode,
der in einer Windows-Umgebung
verwendet wird und in den
Sprachoptionen auf Russisch eingestellt
ist
VORSICHT
• Pioneer kann nicht die Kompatibilität mit
allen USB-Massenspeichergeräten
gewährleisten und übernimmt keine
Verantwortung für eventuelle
Datenverluste auf Media-Playern,
Smartphones oder anderen Geräten, die
zusammen mit diesem Produkt
verwendet werden.
• Bewahren Sie Discs oder USB-
Speichergeräte nicht an Orten auf, an
denen hohe Temperaturen herrschen
können.
WMA-Dateien
MP3-Dateien
WAV-Dateien
• WAV-Datenformate können nicht über
MTP verbunden werden.
Kompatibilität
komprimierter
Audioformate
Dateierweiterung .wma
Bitrate 48 Kbit/s bis 320 Kbit/s
(CBR), 48 Kbit/s bis 384
Kbit/s (VBR)
Abtastfrequenz 32 kHz, 44,1 kHz, 48
kHz
Windows Media™
Audio Professional,
Lossless, Voice/DRM
Stream/Stream mit
Video
Nicht kompatibel
Dateierweiterung .mp3
Bitrate 8 Kbit/s bis 320 Kbit/s
(CBR), VBR
Abtastfrequenz 8 kHz bis 48 kHz (32
kHz, 44,1 kHz, 48 kHz
zur Emphase)
Kompatible ID3-Tag-
Version
1.0, 1.1, 2.2, 2.3, 2.4
(ID3-Tag-Version 2.x
erhält Vorrang vor
Version 1.x.)
M3u-Wiedergabeliste Nicht kompatibel
MP3i (MP3 interaktiv),
mp3 PRO
Nicht kompatibel
Dateierweiterung .wav
Quantisierungsbits 8 und 16 (LPCM), 4
(MS ADPCM)
Abtastfrequenz 16 kHz bis 48 kHz
(LPCM), 22,05 kHz und
44,1 kHz (MS ADPCM)

22De
FLAC-Dateien (Nur für MVH-
170UI/170UBG/170UB)
• FLAC-Datenformate können nicht über
MTP verbunden werden.
• FLAC-Dateien können möglicherweise
nicht wiedergegeben werden, abhängig
vom Encoder.
USB-Gerät
• Der Beginn der Wiedergabe von auf
einem USB-Gerät mit komplexer
Ordnerstruktur gespeicherten
Audiodateien kann sich geringfügig
verzögern.
Dieses Gerät unterstützt nur die folgenden iPod-
Modelle. Die unterstützten iPod-
Softwareversionen sind nachstehend
aufgelistet. Ältere Versionen werden ggf. nicht
unterstützt.
Hergestellt für
–iPod touch (1. bis 5. Generation)
–iPodclassic
–iPod mit Videofunktion
–iPod nano (1. bis 7. Generation)
–iPhone5s
–iPhone5c
–iPhone5
–iPhone4S
–iPhone4
–iPhone3GS
–iPhone3G
–iPhone
• Die Bedienung kann sich je nach
Generation und/oder Softwareversion
des iPods unterscheiden.
• Benutzer eines iPods mit Lightning-
Anschluss sollten das Lightning-auf-USB-
Kabel verwenden (im Lieferumfang des
iPods enthalten).
• Benutzer eines iPods mit Dock-Anschluss
sollten das CD-IU51 verwenden.
Einzelheiten erfahren Sie bei Ihrem
Fachhändler.
• Informationen zur Datei-/
Formatkompatibilität finden Sie in den
iPod-Handbüchern.
• Hörbücher, Podcast: Kompatibel
VORSICHT
Pioneer übernimmt keine Haftung für den
Verlust von iPod-Daten, auch dann nicht,
wenn der Verlust der betreffenden Daten
während der Verwendung dieses Geräts
aufgetreten ist.
Der Benutzer kann mit diesem Gerät keine
Ordnernummern zuweisen und auch nicht
die Wiedergabereihenfolge festlegen. Die
Reihenfolge der Audiodateien richtet sich
nach dem angeschlossenen Gerät.
Beachten Sie, dass verstecke Dateien auf
einem USB Gerät nicht wiedergegeben
werden können.
Dateierweiterung .flac
Abtastfrequenz 8/11,025/12/16/22,05/
24/32/44,1/48 [kHz]
Quantisierungsbitrate 16 Bit
Kanalmodus 1/2 Kanal
Abspielbare
Ordnerstruktur
Bis zu acht Ebenen
(Praktikabel sind
weniger als zwei
Ebenen.)
Abspielbare Ordner Bis zu 500
Abspielbare Dateien Bis zu 15 000
Wiedergabe von
urheberrechtlich
geschützten Dateien
Nicht kompatibel
Partitioniertes USB-
Gerät
Es kann nur die erste
Partition
wiedergegeben
werden.
iPod-Kompatibilität
Reihenfolge von
Audiodateien
Beispielstruktur
Bluetooth
Die Bluetooth®-Wortmarke und -Logos sind
eingetragene Marken der Bluetooth SIG, Inc.
Jede Nutzung dieser Marken durch die PIONEER
CORPORATION erfolgt unter entsprechender
Lizenz. Andere Marken und Markennamen sind
das Eigentum ihrer jeweiligen Inhaber.
iTunes
Apple und iTunes sind Marken von Apple
Inc., eingetragen in den USA und anderen
Ländern.
WMA
Windows Media ist eine eingetragene
Marke oder eine Marke der Microsoft
Corporation in den USA und/oder anderen
Ländern.
Dieses Produkt enthält Technologie, die
Eigentum der Microsoft Corporation ist
und nicht ohne Lizenz von Microsoft
Licensing, Inc. vertrieben werden darf.
FLAC
Copyright © 2000-2009 Josh Coalson
Copyright © 2011-2013 Xiph.Org
Foundation
Die Weiterverteilung und Nutzung in
Quell- und Binärform, mit oder ohne
Modifikation, ist unter der Voraussetzung
zulässig, dass die folgenden Bedingungen
eingehalten werden:
– Die Weiterverteilung des Quellcodes
muss den obigen Urheberrechtshinweis,
diese Liste der Bedingungen und die
folgende Verzichtserklärung beinhalten.
– Bei Weiterverteilungen in Binärform
müssen der obige Urheberrechtshinweis,
diese Liste der Bedingungen und die
folgende Verzichtserklärung in der
Dokumentation und/oder anderen
Unterlagen, die bei der Verteilung
bereitgestellt werden, enthalten sein.
Russische Zeichentabelle
Ordner
Komprimierte
Audiodatei
bis : Wiedergabereihenfolge
01 bis 05: Ordnernummer
D: Anzeige C: Zeichen
Urheberrechte und
Marken

23De
Deutsch
–Weder der Name von Xiph.org
Foundation noch die Namen seiner
Mitwirkenden dürfen ohne vorherige
schriftliche Genehmigung verwendet
werden, um Produkte zu bewerben oder
zu befürworten, die von dieser Software
abgeleitet wurden.
DIESE SOFTWARE WIRD VON DEN
INHABERN DES URHEBERRECHTS UND DEN
MITWIRKENDEN „WIE GESEHEN”
BEREITGESTELLT, UND ALLE
AUSDRÜCKLICHEN ODER KONKLUDENTEN
GEWÄHRLEISTUNGEN, EINSCHLIESSLICH,
ABER NICHT DARAUF BESCHRÄNKT, DIE
GARANTIE ZUR EIGNUNG FÜR EINEN
BESTIMMTEN ZWECK, WERDEN
ABGELEHNT. IN KEINEM FALL DARF DIE
STIFTUNG ODER DEREN MITWIRKENDE
FÜR DIREKTE, INDIREKTE, ZUFÄLLIGE,
BESONDERE, EXEMPLARISCHE SCHÄDEN
ODER FOLGESCHÄDEN HAFTBAR
GEMACHT WERDEN (EINSCHLIESSLICH,
ABER NICHT DARAUF BESCHRÄNKT, DIE
BESCHAFFUNG VON ERSATZGÜTERN ODER
DIENSTLEISTUNGEN;
NUTZUNGSSCHÄDEN, DATEN- ODER
GEWINNVERLUSTE; ODER
GESCHÄFTSAUSFÄLLE), DIE DURCH EINE
HAFTUNGSTHEORIE VERURSACHT
WERDEN, WEDER VERTRAGLICH, BEI
ERFOLGSHAFTUNG ODER DELIKTEN
(EINSCHLIESSLICH FAHRLÄSSIGKEIT ODER
SONSTIGES), DIE SICH AUS DER NUTZUNG
DIESER SOFTWARE ERGEBEN, AUCH WENN
DIE MÖGLICHKEIT SOLCHER SCHÄDEN
BESTEHT.
iPod & iPhone
iPhone, iPod, iPod classic, iPod nano und
iPod touch sind in den USA sowie in
anderen Ländern eingetragene Marken
von Apple Inc.
Lightning ist eine Marke der Apple Inc.
Die Kennzeichnungen „Made for iPod” und
„Made for iPhone” bedeuten, dass ein
elektronisches Zubehörteil spezifisch zum
Anschluss an iPod oder iPhone konstruiert
wurde und entsprechend vom Entwickler
als die Leistungsstandards von Apple
erfüllend zertifiziert wurde. Apple
übernimmt keine Verantwortung für die
richtige Funktion dieses Geräts oder seine
Erfüllung von Sicherheitsoder anderen
Vorschriften. Bitte beachten Sie, dass der
Gebrauch dieses Zubehörteils in
Verbindung mit einem iPod oder iPhone
die drahtlose Leistung beeinträchtigen
kann.
Android™
Android ist eine Marke von Google Inc.
MIXTRAX
MIXTRAX ist eine Marke der PIONEER
CORPORATION.
Allgemeines
Stromspannung: 14,4 V Gleichspannung
(Toleranz 10,8 V bis 15,1 V)
Erdungssystem: Negativ
Maximale Leistungsaufnahme: 10,0 A
Abmessungen (B × H × T):
DIN
Gehäusegröße: 178 mm × 50 mm ×
97 mm
Frontfläche: 188 mm × 58 mm ×
17 mm
D
Gehäusegröße: 178 mm × 50 mm ×
97 mm
Frontfläche: 170 mm × 46 mm ×
17 mm
Gewicht: 0,5 kg
Audio
Maximale Ausgangsleistung:
50 W × 4
70 W × 1/2 Ω (für Subwoofer)
Dauer-Ausgangsleistung:
22 W × 4 (50 Hz bis 15 000 Hz, 5 %
THD, bei 4-Ω-Last, beide Kanäle
betrieben)
Lastimpedanz: 4 Ω (4 Ω bis 8 Ω zulässig)
Maximaler Preout-Ausgangspegel: 2,0 V
Loudness-Kontur: +10 dB (100 Hz), +6,5 dB
(10 kHz) (Lautstärke: –30 dB)
Equalizer (Grafischer 5-Band-Equalizer):
Frequenz: 80 Hz/250 Hz/800 Hz/
2,5 kHz/8 kHz
Entzerrungsbereich: ±12 dB
(Inkrement 2 dB)
Subwoofer (Mono):
Frequenz: 50 Hz/63 Hz/80 Hz/100 Hz/
125 Hz/160 Hz/200 Hz
Steilheit: –12 dB/Okt., –24 dB/Okt.
Verstärkung: +6 dB bis –24 dB
Phase: Normal/Gegen
USB
USB-Standard-Spezifikation: USB 2.0 Full
Speed
Maximale Stromversorgung: 1 A
USB-Klasse: MSC (Massenspeicher-Klasse)
Dateisystem: FAT12, FAT16, FAT32
MP3-Decodierformat: MPEG-1 & 2 Audio
Layer 3
WMA Decodierformat: Ver. 7, 7.1, 8, 9, 10,
11, 12 (2-Kanal-Audio) (Windows
Media Player)
FLAC Decodierformat: v1.3.0 (Free Lossless
Audio Codec) (Nur für MVH-170UI/
170UBG/170UB)
WAV-Signalformat: Lineare PCM & MS
ADPCM (nicht komprimiert)
FM-Tuner
Frequenzbereich: 87,5 MHz bis 108,0 MHz
Nutzempfindlichkeit: 11 dBf (1,0 μV/75 Ω,
Mono, S/N: 30 dB)
Signal-Rauschabstand: 72 dB (IEC-A-Netz)
MW-Tuner
Frequenzbereich: 531 kHz bis 1 602 kHz
Nutzempfindlichkeit: 25 μV (Signal-
Rauschabstand: 20 dB)
Signal-Rauschabstand: 62 dB (IEC-A-Netz)
LW-Tuner
Frequenzbereich: 153 kHz bis 281 kHz
Nutzempfindlichkeit: 28 μV (Signal-
Rauschabstand: 20 dB)
Signal-Rauschabstand: 62 dB (IEC-A-Netz)
Bluetooth
(Nur für MVH-X370BT)
Version: Bluetooth-3.0-zertifiziert
Ausgangsleistung: maximal +4 dBm
(Leistungsklasse 2)
Bluetooth-Profile:
GAP (Generic Access Profile)
SDAP (Service Discovery Application
Profile)
OPP (Object Push Profile)
HFP (Hands Free Profile) 1.6
Technische Daten

24De
PBAP (Phone Book Access Profile)
A2DP (Advanced Audio Distribution
Profile)
AVRCP (Audio/Video Remote Control
Profile) 1.5
SPP (Serial Port Profile) 1.1
HINWEIS
Änderungen der technischen Daten und
des Designs vorbehalten.

25De
Deutsch

2Nl
Vóór u begint ........................................................................................... 3
Aan de slag............................................................................................... 3
Radio.......................................................................................................... 5
USB/iPod/AUX.......................................................................................... 6
Bluetooth.................................................................................................. 8
App-modus ............................................................................................ 11
Instellingen ............................................................................................ 12
FUNCTION-instellingen....................................................................... 12
AUDIO-instellingen.............................................................................. 13
SYSTEM-instellingen............................................................................ 13
ILLUMINATION-instellingen ............................................................... 14
MIXTRAX-instellingen.......................................................................... 14
Verbindingen/installatie...................................................................... 15
Aanvullende informatie....................................................................... 18
Inhoud
Over deze handleiding:
• In de volgende instructies worden een USB-geheugen of USB-audiospeler een “USB-
apparaat” genoemd.
• In deze handleiding wordt naar iPod en iPhone verwezen als “iPod”.

3Nl
Nederlands
Hartelijk dank voor uw keuze voor dit PIONEER-product
Lees deze handleiding voordat u het product in gebruik neemt zodat u het goed leert gebruiken. Lees
vooral de gedeelten die met WAARSCHUWING en LET OP gemarkeerd zijn aandachtig. Bewaar deze
handleiding na het lezen op een veilige, voor de hand liggende plaats zodat u ze indien nodig altijd
kunt raadplegen.
In de lidstaten van de EU en in Zwitserland en Noorwegen kunnen particulieren afgedankte
elektronische producten gratis bij de daarvoor bestemde verzamelplaatsen inleveren. Als u een
soortgelijk nieuw product koopt, kunt u het afgedankte product ook bij uw verkooppunt inleveren.
Als u in een ander land woont, neem dan contact op met de plaatselijke overheid voor informatie over
het weggooien van afgedankte producten.
Op die manier zorgt u ervoor dat uw afgedankte product op de juiste wijze wordt verwerkt,
hergebruikt en gerecycled, zonder schadelijke gevolgen voor het milieu en de volksgezondheid.
WAARSCHUWING
•Probeer het product niet zelf te monteren en voer er geen onderhoud aan uit. Montage of
onderhoud van het product door personen zonder technische opleiding en ervaring met
elektronische apparatuur en auto-accessoires kan gevaarlijk zijn, en kan een elektrische schok,
verwonding of andere gevaren veroorzaken.
•Bedien het toestel niet tijdens het rijden. Als u knoppen op het toestel wilt bedienen, moet u het
voertuig eerst van de weg halen en op een veilige plaats parkeren.
LET OP
•Zorg ervoor dat dit toestel niet in contact komt met vocht en/of andere vloeistoffen. Dit kan een
elektrische schok veroorzaken. Ook schade aan het toestel, rook en oververhitting kunnen het gevolg
zijn van contact met vloeistoffen.
•Zet het volume nooit zo hoog dat u geluiden buiten het voertuig niet meer kunt horen.
•De Pioneer CarStereo-Pass wordt alleen in Duitsland gebruikt.
Bij problemen
Neem contact op met uw leverancier of het dichtstbijzijnde erkende Pioneer-servicecentrum als het
toestel niet naar behoren functioneert.
MVH-X370BT/170UI/170UBG/170UB
*1 De knoppen variëren volgens het toestel.
*2 Deze knop wordt in deze handleiding DISP genoemd.
Vaak gebruikte functies
De beschikbare knoppen zijn afhankelijk van het toestel.
Vóór u begint
Deponeer dit product niet bij het gewone huishoudelijk afval wanneer u het wilt verwijderen. Er
bestaat een speciaal wettelijk voorgeschreven verzamelsysteem voor de juiste behandeling, het
opnieuw bruikbaar maken en de recycling van gebruikte elektronische producten.
Aan de slag
Basisbediening
Actie Bediening
Toestel inschakelen* Druk op SRC/OFF om het toestel in te
schakelen.
Hou SRC/OFF ingedrukt om het toestel uit
te schakelen.
Het volume regelen Draai de M.C.-knop.
Een bron selecteren Druk herhaaldelijk op SRC/OFF.
De display-informatie wijzigen Druk herhaaldelijk op DISP.
Terugkeren naar de vorige weergave/lijst Druk op /DIMMER.
Terugkeren naar de normale weergave
vanuit het menu.
Druk op BAND/.
Een oproep beantwoorden/beëindigen
(alleen voor MVH-X370BT)
Druk op .
SRC (bron)/OFF
Ontkoppelknop
DisplayM.C. (multi-control)-
knop
BAND/
/DIMMER Displayknop*2
*1
*1

4Nl
* Wanneer de blauw/witte draad van het toestel verbonden is met het relaiscontact voor de
automatische antenne van de auto, schuift de antenne uit wanneer de bron van het toestel wordt
ingeschakeld. Om de antenne weer in te trekken, schakelt u de bron uit.
Display-indicatie
Verwijder het voorpaneel om diefstal te voorkomen. Verwijder alle kabels en apparaten
die verbonden zijn met het voorpaneel en schakel het toestel uit voor u het voorpaneel
verwijdert.
Belangrijk
• Stel het voorpaneel niet bloot aan te grote schokken.
• Stel het voorpaneel niet bloot aan direct zonlicht en hoge temperaturen.
• Bewaar het verwijderde voorpaneel altijd in een beschermtas of zak.
Wanneer u de contactschakelaar na de installatie naar ON draait, verschijnt [SET UP :YES]
op het display.
1 Druk op de M.C.-knop.
Het instellingenmenu verdwijnt als u het toestel niet binnen 30 seconden bedient.
Als u de instelling later wilt maken, draait u de M.C.-knop om [NO] te selecteren,
druk daarna op de knop om te bevestigen.
2 Draai de M.C.-knop om de opties te selecteren, druk daarna op de knop om te
bevestigen.
Om naar de volgende menuoptie te gaan, dient u uw selectie te bevestigen.
Indicatie Beschrijving
Verschijnt wanneer er een lager niveau van het menu of de map bestaat.
Verschijnt wanneer de automatische antwoordfunctie is ingesteld
(pagina 10).
(Alleen voor Bluetooth-compatibele modellen.)
Verschijnt alleen wanneer de knop wordt ingedrukt.
Verschijnt wanneer de functie afstemmen op lokale zenders is ingesteld
(pagina 12).
Verschijnt wanneer een verkeersprogramma wordt ontvangen.
Verschijnt wanneer verkeersberichten worden ontvangen (pagina 12).
Verschijnt wanneer de functie sound retriever is ingesteld (pagina 12).
Verschijnt wanneer willekeurige weergave/shuffle is ingesteld (behalve
wanneer BT AUDIO als bron is geselecteerd).
Verschijnt wanneer weergave herhalen is ingesteld (behalve wanneer BT
AUDIO als bron is geselecteerd).
Verschijnt wanneer de iPod-bedieningsfunctie is ingesteld (pagina 8).
Verschijnt wanneer een Bluetooth-verbinding is gemaakt (pagina 8).
(Alleen voor Bluetooth-compatibele modellen.)
Het voorpaneel verwijderen
Instellingenmenu
Menu-item Beschrijving
LANGUAGE Selecteer de taal om tekstinformatie van een gecomprimeerd
audiobestand weer te geven.
[ENG](Engels),
[РУС]
(Russisch),
[TUR](Turks)
CLOCK SET Stel de klok in.
Verwijderen Terugzetten

5Nl
Nederlands
3 [QUIT :YES] verschijnt als alle instellingen uitgevoerd zijn.
Om terug te keren naar het eerste item van het instellingenmenu, draait u de M.C.-
knop om [QUIT :NO] te selecteren,
druk daarna op de knop om te bevestigen.
4 Druk op de M.C.-knop om de instellingen te bevestigen.
OPMERKINGEN
• U kunt de menu-instelling annuleren door op SRC/OFF te drukken.
• U kunt deze instellingen gelijk wanneer uitvoeren bij de SYSTEM-instellingen (pagina 13) en INITIAL-
instellingen (pagina 5).
1 Druk op de M.C.-knop om het hoofdmenu weer te geven.
2 Draai aan de M.C.-knop om [SYSTEM] te selecteren, druk daarna op de knop om
te bevestigen.
3 Draai aan de M.C.-knop om [DEMO OFF] te selecteren, druk daarna op de knop
om te bevestigen.
4 Draai aan de M.C.-knop om [YES] te selecteren, druk daarna op de knop om te
bevestigen.
1 Hou SRC/OFF ingedrukt tot het toestel uitschakelt.
2 Hou SRC/OFF ingedrukt om het hoofdmenu weer te geven.
3 Draai aan de M.C.-knop om [INITIAL] te selecteren, druk daarna op de knop om te
bevestigen.
4 Draai de M.C.-knop om een optie te selecteren, druk daarna op de knop om te
bevestigen.
OPMERKING
De opties zijn afhankelijk van het toestel.
De tunerfrequenties van dit toestel zijn bedoeld voor gebruik in West-Europa, Azië, het
Midden-Oosten, Afrika en Oceanië. Bij gebruik in andere regio's kan de ontvangst zwak
zijn. De functie RDS (Radio Data System) werkt alleen in regio's die RDS-signalen voor
FM-zenders uitzenden.
1 Druk op SRC/OFF om [RADIO] te selecteren.
2 Druk op BAND/ om de band te selecteren uit [FM1], [FM2], [FM3], [MW] of [LW].
3 Druk op een cijfertoets (1/ tot 6/).
TIP
De / -knoppen kunnen ook worden gebruikt om een voorkeuzezender te selecteren
wanneer [SEEK] is ingesteld op [PCH] in de FUNCTION-instellingen (pagina 12).
FM STEP Selecteer de FM-afstemstap uit 100 kHz of 50 kHz.
[100], [50]
De demonstratieweergave annuleren (DEMO OFF)
INITIAL-instellingen
Menu-item Beschrijving Menu-item Beschrijving
FM STEP Selecteer de FM-afstemstap uit 100 kHz of 50 kHz.
[100], [50]
SP-P/O MODE Selecteer deze optie als een fullrange-luidspreker aangesloten is
op de draden voor de achterluidspreker en een subwoofer
aangesloten is op de RCA-uitgang.
[REAR/SUB.W]
[SUB.W/SUB.W] Selecteer deze optie als een passieve subwoofer direct
aangesloten is op de draden voor de achterluidspreker en een
subwoofer aangesloten is op de RCA-uitgang.
[REAR/REAR] Selecteer deze optie als fullrange-luidsprekers aangesloten zijn
op de draden voor de achterluidspreker en op de RCA-uitgang.
Als een fullrange-luidspreker aangesloten is op de draden voor
de achterluidspreker en de RCA-uitgang niet wordt gebruikt,
kunt u [REAR/SUB.W] of [REAR/REAR] selecteren.
S/W UPDATE Selecteer deze optie om het toestel bij te werken met de
recentste Bluetooth-software. Voor meer informatie over
Bluetooth-software en het updaten van deze software kunt u
terecht op onze website.
SYSTEM RESET Selecteer [YES] om de instellingen van het toestel te initialiseren.
Het toestel wordt automatisch opnieuw gestart. (Sommige
instellingen blijven behouden nadat een reset van het toestel
werd uitgevoerd, zoals Bluetooth-koppelingsinformatie, enz.)
[YES], [CANCEL]
Radio
Voorgeprogrammeerde zenders ontvangen

6Nl
De zes sterkste zenders worden opgeslagen onder de cijfertoetsen (1/ tot 6/).
1 Na het selecteren van de band drukt u op de M.C.-knop om het hoofdmenu weer
te geven.
2 Draai aan de M.C.-knop om [FUNCTION] te selecteren, druk daarna op de knop
om te bevestigen.
3 Draai aan de M.C.-knop om [BSM] te selecteren, druk daarna op de knop om te
bevestigen.
Een zender handmatig zoeken
1
Als u de band heeft geselecteerd, drukt u op / om een zender te
selecteren.
Hou vervolgens / ingedrukt en laat los om een beschikbare zender te
zoeken. Het scannen stopt wanneer het toestel een zender ontvangt. Druk op /
om de zoekafstemming te annuleren.
OPMERKING
[SEEK] moet ingesteld zijn op [MAN] in de FUNCTION-instellingen (pagina 12).
Zenders handmatig opslaan
1
Terwijl u de zender ontvangt die u wilt opslaan, houdt u een van de cijfertoetsen
(1/ tot 6/ ) ingedrukt tot hij niet meer knippert.
Het toestel zoekt naar een zender op basis van de PTY (programmatype)-informatie.
1 Druk op tijdens FM-ontvangst.
2 Draai de M.C.-knop om een programmatype te selecteren uit [NEWS/INFO],
[POPULAR], [CLASSICS] of [OTHERS].
3 Druk op de M.C.-knop.
Het toestel begint naar een zender te zoeken. Als een zender gevonden is, wordt de
servicenaam van het programma weergegeven.
OPMERKINGEN
• Om het zoeken te annuleren, drukt u op de M.C.-knop.
• Het programma van bepaalde zenders kan afwijken van de doorgestuurde PTY.
• Als geen enkele zender het gewenste programmatype uitzendt, wordt gedurende ongeveer twee
seconden [NOT FOUND] weergegeven en keert de tuner terug naar de oorspronkelijke zender.
PTY-lijst
Meer informatie over de PTY-lijst vindt u op de volgende website:
http://www.pioneer.eu/eur/products/25/121/tech/CarAudio/PTY.html
OPMERKING
De iPod-functie is niet beschikbaar voor MVH-170UBG/170UB.
Koppel de hoofdtelefoon los van het apparaat voor u het aansluit op het toestel.
USB-apparaat/iPod
1
Open het deksel van de USB-poort.
2 Sluit het USB-apparaat/de iPod aan met behulp van een geschikte kabel.
LET OP
Gebruik een optionele Pioneer USB-kabel (CD-U50E) om het USB-opslagapparaat aan te sluiten want
elk apparaat dat rechtstreeks op het toestel wordt aangesloten, steekt uit uit het toestel, wat gevaarlijk
kan zijn.
Voor u het apparaat loskoppelt, dient u de weergave te stoppen.
Best stations memory (BSM)
PTY-functies gebruiken
USB/iPod/AUX
Weergave
AUX-ingang (3,5-mm-stereoplug)
USB-poort
SRC (bron)/OFF
M.C. (multi-control)-knop

7Nl
Nederlands
MTP-verbinding
Een apparaat waarop Android OS 4.0 of recenter geïnstalleerd is, kan via MTP worden verbonden met
het toestel met behulp van de bij het apparaat geleverde kabel. Afhankelijk van het aangesloten
apparaat en het aantal bestanden in het apparaat kunnen audiobestanden/songs mogelijk niet via
MTP worden afgespeeld. Merk op dat de MTP-verbinding niet compatibel is met WAV- en FLAC*-
bestandsindelingen en niet kan worden gebruikt met de MIXTRAX-functie.
* De FLAC-bestanden zijn alleen compatibel met MVH-170UI/170UBG/170UB.
AUX
1
Steek de stereo-miniplug in de AUX-ingangsaansluiting.
2 Druk op SRC/OFF om [AUX] als bron te selecteren.
OPMERKING
Als [AUX] is ingesteld op [OFF] in de SYSTEM-instellingen, kan [AUX] niet als bron worden geselecteerd.
U kunt diverse instellingen uitvoeren in de FUNCTION-instellingen (pagina 12).
Merk op dat de volgende bedieningen niet werken voor een AUX-apparaat. Om een
AUX-apparaat te bedienen, gebruikt u het apparaat zelf.
*1 Alleen gecomprimeerde audiobestanden
*2 Wanneer er geen 3/S.Rtrv-knop op het toestel zit, kan de functie sound retriever worden ingesteld
door de FUNCTION-instellingen.
Link-weergavemodus
U kunt songs oproepen op basis van de momenteel weergegeven artiest, album of
genre.
1 Terwijl u naar een song luistert, houdt u ingedrukt om naar de link-
weergavemodus te gaan.
2 Draai de M.C.-knop om de modus ([ARTIST], [ALBUM], [GENRE]) te selecteren, druk
daarna op de knop om te bevestigen.
Bedieningen
Actie Bediening
Een map/album selecteren*1 Druk op 1/ of 2/.
Een fragment/song (hoofdstuk) selecteren Druk op of .
Snel vooruit of achteruit Hou of ingedrukt.
Een bestand in een lijst zoeken 1 Druk op om de lijst weer te geven.
2 Draai de M.C.-knop om de naam van het
gewenste bestand (de gewenste map) of
categorie te selecteren, druk daarna op
de knop om te bevestigen.
3 Draai de M.C.-knop om het gewenste
bestand te selecteren, druk daarna op de
knop om te bevestigen.
De weergave start.
Een lijst met bestanden in de geselecteerde
map/categorie weergeven*1
Druk op de M.C.-knop wanneer een map/
categorie geselecteerd is.
Een song in de geselecteerde map/
categorie weergeven*1
Hou de M.C.-knop ingedrukt wanneer een
map/categorie geselecteerd is.
Alfabetisch zoeken (alleen iPod) 1 Druk op om de lijst weer te geven.
2 Draai de M.C.-knop om de gewenste
categorielijst te selecteren, druk daarna
op om naar de alfabetische
zoekmodus te gaan.
(De alfabetische zoekmodus wordt ook
opgeroepen door de M.C.-knop twee
keer te draaien.)
3 Draai de M.C.-knop om een letter te
selecteren, druk daarna op de knop om
de alfabetische lijst weer te geven.
Om alfabetisch zoeken te annuleren, drukt
u op /DIMMER.
Weergave herhalen Druk op 6/.
Willekeurige weergave/shuffle Druk op 5/.
Alles in shuffle weergeven (alleen iPod) Hou 5/ ingedrukt.
Weergave pauzeren/hervatten Druk op 4/PAUSE.
Sound retriever*2 Druk op 3/S.Rtrv.
[1]: Geschikt voor lage compressiewaarden
[2]: Geschikt voor hoge compressiewaarden
Terug naar de rootmap (alleen USB)*1 Hou BAND/ ingedrukt.
Stations wijzigen in het USB-apparaat
(Alleen apparaten die het protocol USB
mass storage class ondersteunen)
Druk op BAND/.
Nuttige functies voor iPod
Actie Bediening

8Nl
De geselecteerde song/het geselecteerde album wordt weergegeven na de
momenteel weergegeven song.
OPMERKING
De geselecteerde song/het geselecteerde album kan worden geannuleerd als u andere functies
gebruikt dan functies uit de link-weergavemodus (bijvoorbeeld snel vooruit en achteruit).
iPod-bediening
U kunt het toestel bedienen via een aangesloten iPod.
De volgende iPod-modellen zijn niet compatibel met deze functie.
– iPod nano 1e generatie, iPod met video
1 Druk op BAND/ tijdens de weergave, selecteer vervolgens de
bedieningsmodus.
[CONTROL iPod/CTRL iPod]: De iPod-functie van het toestel kan worden bediend op
de aangesloten iPod.
[CONTROL AUDIO/CTRL AUDIO]: De iPod-functie van het toestel kan alleen worden
bediend met de knoppen op het toestel. In deze modus kan de aangesloten iPod niet
worden in- of uitgeschakeld.
OPMERKINGEN
• Door op iPod te drukken kan ook de bedieningsmodus worden gewijzigd (alleen voor MVH-170UI).
• Door de bedieningsmodus naar [CONTROL iPod/CTRL iPod] te schakelen, wordt de weergave van de
song gepauzeerd. Gebruik de aangesloten iPod om de weergave te hervatten.
• De volgende bedieningen zijn nog steeds mogelijk op het toestel, zelfs als de bedieningsmodus is
ingesteld op [CONTROL iPod/CTRL iPod].
– Pauze, snel vooruit/achteruit, song/hoofdstuk selecteren
• Het volume kan alleen worden geregeld op het toestel.
(Alleen voor MVH-X370BT)
De MIXTRAX-functie creëert een non-stop mix van uw muziekbibliotheek, aangevuld
met verlichtingseffecten. Voor meer details over MIXTRAX-instellingen, zie pagina 14.
OPMERKINGEN
• Deze functie is niet compatibel met een Android-apparaat dat via MTP is verbonden.
• Wanneer USB als bron is geselecteerd en de MIXTRAX-functie wordt gebruikt, is de functie sound
retriever uitgeschakeld.
• Afhankelijk van het bestand/de song zijn geluidseffecten mogelijk niet beschikbaar.
• Schakelt de MIXTRAX-functie uit als de verlichtingseffecten hinderlijk zijn om uw auto te besturen.
1 Druk op 3/MIX om MIXTRAX in/uit te schakelen.
(Alleen voor MVH-X370BT)
Belangrijk
Als er drie of meer Bluetooth-apparaten (bijv. een telefoon en een afzonderlijke audiospeler)
verbonden zijn, werken ze mogelijk niet goed.
1 Schakel de Bluetooth-functie van het apparaat in.
2 Hou ingedrukt om het verbindingsmenu weer te geven.
3 Draai aan de M.C.-knop om [ADD DEVICE] te selecteren, druk daarna op de knop
om te bevestigen.
Het toestel zoekt naar beschikbare apparaten en geeft ze vervolgens weer in de
apparaatlijst.
• Om het zoeken te annuleren, drukt u op de M.C.-knop.
• Als het gewenste apparaat niet in de lijst voorkomt, selecteert u [RE-SEARCH].
• Als er geen apparaat beschikbaar is, verschijnt [NOT FOUND] op het display.
4 Draai de M.C.-knop om een apparaat in de apparaatlijst te selecteren, druk
daarna op de knop om te bevestigen.
Hou de M.C.-knop ingedrukt om de weergegeven apparaatinformatie te schakelen
tussen het Bluetooth-apparaatadres en de apparaatnaam.
5 Selecteer [Pioneer BT Unit] op het display van het apparaat.
6 Controleer of hetzelfde getal van 6 cijfers op het toestel en op het apparaat
verschijnt, selecteer vervolgens “Yes” op het apparaat.
OPMERKINGEN
• [DEVICE FULL] verschijnt als het toestel reeds gekoppeld is met drie andere apparaten. In dit geval
verwijdert u een van de gekoppelde apparaten. Zie [DEL DEVICE] of [GUEST MODE] in het
verbindingsmenu (pagina 9).
• Afhankelijk van het apparaat is de PIN-code vereist in stap 6. In dit geval voert u [0000] in.
TIP
De Bluetooth-verbinding kan ook tot stand worden gebracht door het toestel te detecteren vanaf het
Bluetooth-apparaat. Om dit te doen, moet [VISIBLE] in het verbindingsmenu ingesteld zijn op [ON].
Meer informatie over de bediening van een Bluetooth-apparaat vindt u in de bedieningsinstructies die
bij het Bluetooth-apparaat meegeleverd zijn.
Over MIXTRAX (alleen USB/iPod)
Bluetooth
Bluetooth-verbinding

9Nl
Nederlands
Verbindingsmenu
Breng eerst een Bluetooth-verbinding tot stand met de Bluetooth-telefoon (pagina 8). Er
kunnen maximaal twee Bluetooth-telefoons tegelijkertijd worden verbonden.
Belangrijk
• Als u het toestel in stand-by laat staan om uw telefoon via Bluetooth te verbinden terwijl de motor
niet draait, kan de accu leegraken.
• Parkeer uw auto op een veilige plaats en zet de parkeerrem aan voor u de bediening uitvoert.
Tele fo ne re n
1
Druk op om het telefoonmenu weer te geven.
Wanneer twee telefoons zijn verbonden, wordt eerst de naam van een telefoon
weergegeven en vervolgens een telefoonmenu. Om naar een andere telefoon over te
schakelen, drukt u opnieuw op .
2 Draai aan de M.C.-knop om [MISSED], [DIALLED], [RECEIVED] of [PHONE BOOK] te
selecteren, waarna u op de knop drukt om te bevestigen.
De lijst met telefoonnummers verschijnt.
3 Draai de M.C.-knop om een naam of telefoonnummer te selecteren, druk daarna
op de knop om te bevestigen.
Het telefoongesprek begint.
Een binnenkomende oproep beantwoorden
1
Druk op wanneer er een oproep binnenkomt.
TIP
Wanneer twee telefoons via Bluetooth op het toestel zijn aangesloten en er een binnenkomende
oproep is wanneer een telefoon voor een oproep wordt gebruikt, verschijnt een bericht op het display.
Om de binnenkomende oproep te beantwoorden, dient u de lopende oproep te beëindigen.
Basisbedieningen
Menu-item Beschrijving
DEVICELIST Toon de lijst van gekoppelde Bluetooth-apparaten. “*”
verschijnt bij de apparaatnaam wanneer de Bluetooth-
verbinding tot stand is gebracht.
DEL DEVICE Verwijder de apparaatinformatie.
[DELETE YES],
[DELETE NO]
ADD DEVICE Registreer een nieuw apparaat.
A.CONN Selecteer [ON] om automatisch een Bluetooth-apparaat te
verbinden.
[ON], [OFF]
VISIBLE Selecteer [ON] zodat een Bluetooth-apparaat het toestel kan
detecteren wanneer het toestel via Bluetooth verbonden is met
een ander apparaat.
[ON], [OFF]
PIN CODE De PIN-code wijzigen.
1 Druk op de M.C.-knop om de instelmodus weer te geven.
2 Draai de M.C.-knop om een cijfer te selecteren.
3 Druk op de M.C.-knop om de cursor naar de volgende positie
te brengen.
4 Nadat u de PIN-code heeft ingevoerd, houdt u de M.C.-knop
ingedrukt.
Als u, nadat u de PIN-code heeft ingevoerd, op de M.C.-knop
drukt, keert u terug naar het invoerscherm voor de PIN-code en
kunt u de PIN-code wijzigen.
DEV. INFO Schakel de apparaatinformatie op het display tussen de
apparaatnaam en het Bluetooth-apparaatadres.
GUEST MODE Selecteer [ON] om automatisch naar het [DEL DEVICE]-scherm te
gaan wanneer het toestel reeds met drie apparaten is
gekoppeld.
[ON], [OFF]
A.PAIRING Selecteer [ON] om het toestel en de iPhone automatisch te
koppelen wanneer een iPhone via USB verbonden is met het
toestel. (Deze functie is mogelijk niet beschikbaar, afhankelijk
van de versie van iOS die u gebruikt.)
[ON], [OFF]
Bluetooth-telefoon
Actie Bediening
Een oproep beëindigen Druk op .
Een binnenkomende oproep
weigeren
Hou ingedrukt wanneer er een oproep
binnenkomt.
Tussen de huidige beller en een
beller in wacht schakelen
Druk op de M.C.-knop.
Een beller in wacht annuleren Hou ingedrukt.

10Nl
Telefoonnummers opslaan
1 Selecteer een telefoonnummer uit een telefoonboek of gesprekslijst.
2 Hou een van de cijfertoetsen (1/ tot 6/) ingedrukt.
De contactpersoon wordt opgeslagen onder het geselecteerde voorkeuzenummer.
Om een oproep tot stand te brengen met behulp van een voorkeuzenummer, drukt u op
een van de cijfertoetsen (1/ tot 6/), waarna u op de M.C.-knop drukt.
Spraakherkenning (alleen voor iPhone)
Deze functie is alleen beschikbaar wanneer een iPhone die over spraakherkenning
beschikt, via Bluetooth verbonden is met het toestel.
1 Hou de M.C.-knop ingedrukt om de spraakherkenning te activeren.
2 Druk op de M.C.-knop en spreek in de microfoon om spraakopdrachten te geven.
Druk op BAND/ om de spraakherkenningsfunctie te sluiten.
OPMERKING
Voor meer informatie over de mogelijkheden van spraakherkenning raadpleegt u de bij uw iPhone
geleverde handleiding.
Tele fo on me nu
*1 De contactpersonen in uw telefoon worden normaal gezien automatisch overgezet wanneer de
telefoon wordt aangesloten. Als dit niet het geval is, gebruikt u uw telefoon om de contactpersonen
over te zetten.
*2 Als twee telefoons zijn verbonden, werkt deze functie niet wanneer een oproep binnenkomt terwijl
een van de telefoons voor een oproep wordt gebruikt.
Belangrijk
• Afhankelijk van de aangesloten Bluetooth-audiospeler is de functionaliteit tot een van de volgende
twee niveaus beperkt:
– A2DP (Advanced Audio Distribution Profile); hiermee kunt u muziek op de audiospeler alleen
afspelen.
– AVRCP (Audio/Video Remote Control Profile); hiermee kunt u muziek afspelen, pauzeren, songs
selecteren enz.
• Het geluid van de Bluetooth-audiospeler wordt gedempt wanneer u de telefoon gebruikt.
• Als de Bluetooth-audiospeler in gebruik is, kan niet automatisch verbinding worden gemaakt met
een Bluetooth-telefoon.
• Afhankelijk van het aangesloten type Bluetooth-audiospeler kunnen sommige bedienings- of
informatiefuncties niet beschikbaar zijn.
1 Breng een Bluetooth-verbinding tot stand met de Bluetooth-audiospeler.
2 Druk op SRC/OFF om [BT AUDIO] als bron te selecteren.
3 Druk op BAND/ om de weergave te starten.
Basisbedieningen
U kunt diverse instellingen uitvoeren in de FUNCTION-instellingen (pagina 12).
Pas het stemvolume van de beller
aan (Wanneer de privémodus
ingeschakeld is, is deze functie
niet beschikbaar.)
Draai de M.C.-knop tijdens het gesprek.
De privacymodus in- of
uitschakelen
Druk tijdens het gesprek op BAND/.
Menu-item Beschrijving
MISSED De lijst met gemiste oproepen weergeven.
DIALLED De lijst met gevormde nummers weergeven.
RECEIVED De lijst met ontvangen oproepen weergeven.
PHONE BOOK*1 Toont de contactpersonen die vanaf uw telefoon werden
overgezet. Stel [VISIBLE] in het verbindingsmenu in op [ON] om
via dit toestel door de contactpersonen te bladeren.
Actie Bediening
PRESET 1-6 Voorgeprogrammeerde telefoonnummers opnieuw bellen. U
kunt voorgeprogrammeerde telefoonnummers ook bellen door
op een van de cijfertoetsen (1/ tot 6/ ) te drukken.
PHONE FUNC Selecteer [ON] om een binnenkomende oproep automatisch te
beantwoorden.
A.ANSR:*2
[ON], [OFF]
R.TONE:
[ON], [OFF]
Selecteer [ON] als de beltoon niet via de luidsprekers van de
wagen wordt weergegeven. Afhankelijk van de aangesloten
telefoon werkt deze functie mogelijk niet.
PB INVT Keer de volgorde van de namen in het telefoonboek om
(naamweergave).
Bluetooth-audio
Actie Bediening
Snel vooruit of achteruit Hou of ingedrukt.
Menu-item Beschrijving

11Nl
Nederlands
* Afhankelijk van het verbonden apparaat zijn deze bedieningen mogelijk niet beschikbaar.
(De APP-modus is niet beschikbaar voor MVH-170UBG/170UB.)
U kunt via dit toestel een applicatie op een iPhone-/Android-apparaat gebruiken. In
sommige gevallen kunt u een applicatie bedienen met het toestel.
Meer informatie over compatibele apparaten vindt u op onze website.
Belangrijk
Voor gebruik van applicaties van derden worden mogelijk persoonsgegevens gebruikt of moet u zulke
gegevens verstrekken, bijvoorbeeld door het opzetten van een gebruikersaccount of op andere wijze,
en voor sommige applicaties worden mogelijk geolocatiegegevens gebruikt.
ALLE APPLICATIES VAN DERDEN VALLEN UITSLUITEND ONDER VERANTWOORDELIJKHEID VAN HUN
UITGEVER, INCLUSIEF MAAR NIET BEPERKT TOT HET VERZAMELEN EN BEVEILIGEN VAN
GEBRUIKERSGEGEVENS EN HET PRIVACYBELEID. DOOR EEN APPLICATIE VAN DERDEN TE GEBRUIKEN,
GAAT U ERMEE AKKOORD OM U TE INFORMEREN OVER DE GEBRUIKSVOORWAARDEN EN HET
PRIVACYBELEID VAN DE UITGEVER ERVAN. ALS U NIET AKKOORD GAAT MET DE
GEBRUIKSVOORWAARDEN OF HET BELEID VAN EEN UITGEVER OF GEEN TOESTEMMING GEEFT VOOR
HET GEBRUIK VAN GEOLOCATIEGEGEVENS (INDIEN VAN TOEPASSING), MOET U DE APPLICATIE NIET
GEBRUIKEN.
Voor iPhone-gebruikers
Deze functie is compatibel met iPhones en iPod touches waarop iOS 5.0 of later geïnstalleerd is.
Voor gebruikers van Android-apparaten
Deze functie is compatibel met apparaten waarop Android OS 2.3 of later geïnstalleerd is en die ook
Bluetooth SPP (Serial Port Profile) en A2DP (Advance Audio Distribution Profile) ondersteunen.
OPMERKING
PIONEER IS NIET AANSPRAKELIJK VOOR APPLICATIES VAN DERDEN OF HUN INHOUD, INCLUSIEF MAAR
NIET BEPERKT TOT HUN NAUWKEURIGHEID OF VOLLEDIGHEID. DE INHOUD EN DE FUNCTIONALITEIT
VAN DERGELIJKE APPLICATIES ZIJN UITSLUITEND DE VERANTWOORDELIJKHEID VAN DE LEVERANCIER
VAN DE APPLICATIE.
De Bluetooth-verbinding is beschikbaar voor MVH-X370BT.
1 Verbind dit toestel met het mobiele apparaat.
• iPhone via USB (pagina 6)
• Android-apparaat via Bluetooth (pagina 8)
2 Druk op de M.C.-knop om het hoofdmenu weer te geven.
3 Draai aan de M.C.-knop om [SYSTEM] te selecteren, druk daarna op de knop om
te bevestigen.
4 Draai aan de M.C.-knop om [APP CONN.SET] te selecteren, druk daarna op de
knop om te bevestigen.
5 Draai aan de M.C.-knop om een van de volgende mogelijkheden te selecteren,
druk daarna op de knop om te bevestigen.
• Selecteer [WIRED] voor iPhone.
• Selecteer [BLUETOOTH] voor een Android-apparaat.
6 Druk op SRC/OFF om [APP] te selecteren.
7 Bedien het mobiele apparaat om de applicatie te starten.
Basisbedieningen
U kunt diverse instellingen uitvoeren in de FUNCTION-instellingen (pagina 12).
Selecteer een fragment Druk op of .
Weergave herhalen* Druk op 6/.
Willekeurige weergave* Druk op 5/.
Weergave pauzeren/hervatten Druk op 4/PAUSE.
Een bestand in een lijst zoeken 1 Druk op om de lijst weer te geven.
2 Draai de M.C.-knop om de gewenste
mapnaam te selecteren, druk daarna op
de knop om te bevestigen.
3 Draai de M.C.-knop om het gewenste
bestand te selecteren, druk daarna op de
knop om te bevestigen. De weergave
start.
App-modus
Actie Bediening
Een applicatie weergeven via het toestel
Actie Bediening
Selecteer een fragment Druk op of .
Snel vooruit of achteruit Hou of ingedrukt.
Weergave pauzeren/hervatten Druk op BAND/.

12Nl
U kunt diverse instellingen aanpassen in het hoofdmenu.
1 Druk op de M.C.-knop om het hoofdmenu weer te geven.
2 Draai vervolgens aan de M.C.-knop om een van de volgende categorieën te
selecteren, druk daarna op de knop om te bevestigen.
• FUNCTION-instellingen (pagina 12)
• AUDIO-instellingen (pagina 13)
• SYSTEM-instellingen (pagina 13)
• ILLUMINATION-instellingen (pagina 14)
• MIXTRAX-instellingen (pagina 14)
3 Draai de M.C.-knop om de opties te selecteren, druk daarna op de knop om te
bevestigen.
OPMERKINGEN
• De met Bluetooth verwante menu-items in de volgende tabellen zijn niet beschikbaar voor
MVH-170UI/170UBG/170UB.
• De met iPod verwante menu-items in de volgende tabellen zijn niet beschikbaar voor MVH-170UBG/
170UB.
• APP-modusspecifieke menu-items in de volgende tabellen zijn niet beschikbaar voor MVH-170UBG/
170UB.
De menu-items zijn afhankelijk van de bron.
Instellingen
FUNCTION-instellingen
Menu-item Beschrijving
FM SETTING
[TALK], [STANDARD], [MUSIC] Pas de geluidskwaliteit aan aan het zendsignaal
van de FM-band. (Alleen beschikbaar wanneer
FM-band is geselecteerd.)
BSM
Sla de zes sterkste zenders automatisch op onder
de cijfertoetsen (1/ tot 6/).
REGIONAL
[ON], [OFF] Beperk de ontvangst tot de specifieke regionale
programma's wanneer AF (alternatieve
frequenties zoeken) geselecteerd is. (Alleen
beschikbaar wanneer FM-band is geselecteerd.)
LOCAL
FM: [OFF], [LV1], [LV2], [LV3], [LV4]
MW/LW: [OFF], [LV1], [LV2]
Beperk de zenders automatisch volgens de
signaalsterkte.
TA
[ON], [OFF] Ontvang actuele verkeersinformatie indien
beschikbaar. (Alleen beschikbaar wanneer FM-
band is geselecteerd.)
AF
[ON], [OFF] Laat het toestel opnieuw afstemmen op een
andere frequentie van dezelfde zender. (Alleen
beschikbaar wanneer FM-band is geselecteerd.)
NEWS
[ON], [OFF] Onderbreek de momenteel geselecteerde bron
met nieuwsberichten. (Alleen beschikbaar
wanneer FM-band is geselecteerd.)
SEEK
[MAN], [PCH] Wijs de knoppen / toe om zenders een
voor een te zoeken (handmatige afstemming) of
selecteer een zender uit de
voorgeprogrammeerde kanalen.
SEL DEVICE
Verbind een Bluetooth-apparaat in de lijst.
S.RTRV
[1]: (geschikt voor lage
compressiewaarden),
[2]: (geschikt voor hoge
compressiewaarden),
[OFF]
Verbeter gecomprimeerde audio en zorg voor
een rijk geluid.
Niet beschikbaar wanneer;
• USB als bron is geselecteerd en de MIXTRAX-
functie ingeschakeld is.
• Het FLAC-bestand wordt weergegeven.
(Beschikbaar voor MVH-170UI/170UBG/170UB)
AUDIO BOOK
[FASTER], [NORMAL], [SLOWER] Wijzig de weergavesnelheid. (Niet beschikbaar
wanneer [CONTROL iPod/CTRL iPod]
geselecteerd is in de bedieningsmodus.)
PAUSE
Pauzeer of hervat de weergave.
Menu-item Beschrijving
USB
iPod
iPod

13Nl
Nederlands
*1 Niet beschikbaar wanneer [SUB.W/SUB.W] is geselecteerd in [SP-P/O MODE] in de INITIAL-
instellingen (pagina 5).
*2 Niet beschikbaar wanneer [REAR/REAR] is geselecteerd in [SP-P/O MODE] in de INITIAL-instellingen
(pagina 5).
*3 Niet beschikbaar wanneer [OFF] is geselecteerd in [SUB.W].
U kunt deze menu's ook oproepen wanneer het toestel uitgeschakeld is.
PLAY
Start de weergave.
STOP
Stop de weergave.
AUDIO-instellingen
Menu-item Beschrijving
FADER*1
Pas de balans aan tussen de voor- en
achterluidspreker.
BALANCE
Pas de balans aan tussen de linker en rechter
luidspreker.
EQ SETTING
[SUPER BASS], [POWERFUL],
[NATURAL], [VOCAL], [CUSTOM1],
[CUSTOM2], [FLAT]
Selecteer een equalizerband en -
niveau voor verdere aanpassing.
Equalizerband: [80HZ], [250HZ],
[800HZ], [2.5KHZ], [8KHZ]
Equalizerniveau: [+6] tot [–6]
Selecteer of pas de equalizercurve aan.
[CUSTOM1] kan voor elke bron afzonderlijk
worden ingesteld. Alle hierna vermelde
combinaties worden echter automatisch
ingesteld op dezelfde instelling.
• USB, iPod en APP (iPhone)
• BT AUDIO en APP (Android)
[CUSTOM2] is een gedeelde instelling die voor
alle bronnen wordt gebruikt.
U kunt de equalizer ook schakelen door
herhaaldelijk op te drukken (alleen voor
MVH-170UBG/170UB).
LOUDNESS
[OFF], [LOW], [MID], [HI] Compenseer voor een helder geluid bij laag
volume.
SUB.W*2
[NOR], [REV], [OFF] Selecteer de subwooferfase.
Menu-item Beschrijving
SUB.W CTRL*2*3
Drempelfrequentie: [50HZ],
[63HZ], [80HZ], [100HZ], [125HZ],
[160HZ], [200HZ]
Uitgangsniveau: [–24] tot [+6]
Hellingsniveau: [–12], [–24]
Alleen frequenties die lager zijn dan de
frequenties in het geselecteerde bereik, worden
weergegeven door de subwoofer.
BASS BOOST
[0] tot [+6] Selecteer het bass boost-niveau.
HPF SETTING
Drempelfrequentie: [OFF],
[50HZ], [63HZ], [80HZ], [100HZ],
[125HZ], [160HZ], [200HZ]
Hellingsniveau: [–12], [–24]
Alleen frequenties boven de drempelfrequentie
van het hoog-doorlaatfilter (HPF) worden
weergegeven.
SLA
[+4] tot [–4] Pas het volume aan voor elke bron behalve FM.
Alle hierna vermelde combinaties worden
automatisch ingesteld op dezelfde instelling.
• USB, iPod en APP (iPhone)
• BT AUDIO en APP (Android)
SYSTEM-instellingen
Menu-item Beschrijving
LANGUAGE
[ENG](Engels), [РУС](Russisch),
[TUR](Turks)
Selecteer de taal om tekstinformatie van een
gecomprimeerd audiobestand weer te geven.
CLOCK SET
Stel de klok in (pagina 4).
12H/24H
[12H], [24H] Selecteer de tijdnotatie.
Menu-item Beschrijving

14Nl
*1 [PW SAVE] wordt geannuleerd als de accu losgekoppeld wordt, en moet weer worden ingeschakeld
als de accu weer wordt aangesloten. Wanneer [PW SAVE] uitgeschakeld is, kan het toestel,
afhankelijk van de verbindingsmethode, stroom van de accu blijven trekken als de ontsteking van
uw auto geen positie ACC (accessoire) heeft.
*2 Niet beschikbaar wanneer [APP] als bron is geselecteerd.
(Alleen voor MVH-X370BT)
AUTO PI
[ON], [OFF] Zoek naar een andere zender met dezelfde
programmering, zelfs als u een voorkeuzezender
gebruikt.
AUX
[ON], [OFF] Stel in op [ON] wanneer een hulpapparaat wordt
gebruikt dat verbonden is met het toestel.
BT AUDIO
[ON], [OFF] Zet het Bluetooth-signaal aan/uit.
MUTE MODE (alleen beschikbaar voorMVH-170UI)
[MUTE], [20dB ATT], [10dB ATT] Schakel het geluid automatisch uit of onderdruk
het geluid wanneer een signaal wordt
ontvangen van een apparatuur met
stilschakelfunctie.
PW SAVE*1
[ON], [OFF] Verminder het verbruik van batterijvermogen.
Het inschakelen van de bron is de enige
handeling die met deze functie mogelijk is.
BT MEM CLEAR
[YES], [CANCEL] Wis de Bluetooth-apparaatgegevens
(apparaatlijst, PIN-code, gesprekslijst,
telefoonboek, voorgeprogrammeerde
telefoonnummers) die opgeslagen zijn in het
toestel.
[CLEARED] verschijnt wanneer gegevens met
succes werden verwijderd.
BT VERSION
Toont de systeemversie van het toestel en van de
Bluetooth-module.
APP CONN. SET*2
[WIRED], [BLUETOOTH] Selecteer de geschikte verbindingsmethode
overeenkomstig uw apparaat.
Menu-item Beschrijving
ILLUMINATION-instellingen
Menu-item Beschrijving
DIM SETTING
[SYNC CLOCK], [MANUAL] De display-helderheid wijzigen.
BRIGHTNESS
[1] tot [10] De display-helderheid wijzigen.
De beschikbare instelbereiken zijn verschillend
afhankelijk van [DIM SETTING].
MIXTRAX-instellingen
Menu-item Beschrijving
SHORT MODE
[1.0 MIN], [1.5 MIN], [2.0 MIN],
[2.5 MIN], [3.0 MIN], [OFF]
Selecteer de weergaveduur.
MIX PATTERN
[SOUND LEVEL] Wijzig de speciale MIXTRAX-effecten volgens
het geluidsniveau.
Het mixpatroon wijzigt volgens het
geluidsniveau.
[LOW PASS] Het mixpatroon wijzigt volgens het basniveau.
[RANDOM] Het mixpatroon wijzigt willekeurig volgens de
geluidsniveaumodus en de laag-
doorlaatmodus.
DISP FX
[ON], [OFF] Zet de speciale MIXTRAX-effecten aan/uit.
CUT IN FX
[ON], [OFF] Schakel de speciale MIXTRAX-effecten aan/uit
terwijl de fragmenten handmatig worden
gewijzigd.

15Nl
Nederlands
Belangrijk
• Wanneer dit toestel wordt geïnstalleerd
in een auto zonder ACC (accessoire)-
positie van de contactschakelaar en als
de rode kabel niet wordt verbonden met
de aansluiting die de bediening van de
contactschakelaar detecteert, kan de
accu leeglopen.
• Als dit toestel wordt gebruikt in andere
omstandigheden dan hierna vermeld,
kan er brand of een storing optreden.
–Auto's met een 12-V-accu en negatieve
aarding.
–Luidsprekers van 50 W
(uitgangswaarde) en 4 Ω tot 8 Ω
(impedantiewaarde).
• Om kortsluiting, oververhitting of storing
te voorkomen, dient u de volgende
richtlijnen op te volgen.
–Koppel de negatieve pool van de accu
los voor u met de installatie begint.
–Zet de bedrading vast met
kabelklemmen of kleefband. Wikkel
kleefband rond bedrading die in
contact komt met metalen delen om de
bedrading te beschermen.
–Plaats alle kabels op een veilige afstand
van bewegende delen, zoals de
schakelhendel en de stoelrails.
–Plaats alle kabels op een veilige afstand
van hete plaatsen, dus niet nabij de
uitgang van de verwarming.
– Verbind de gele kabel niet met de accu
door deze door het gat naar het
motorcompartiment te voeren.
– Dek alle losgekoppelde
kabelconnectors af met isolatietape.
–Sluit kabels nooit kort.
– Verwijder de isolatie van de
voedingskabel van dit toestel niet om
de stroomtoevoer met andere
apparaten te delen. De
stroomcapaciteit van de kabel is
beperkt.
– Gebruik een zekering van de
voorgeschreven waarde.
– Verbind de negatieve luidsprekerkabel
nooit rechtstreeks met aarde.
– Voeg nooit negatieve kabels van
meerdere luidsprekers samen.
• Als het toestel ingeschakeld is, worden
stuursignalen via de blauw/witte kabel
verstuurd. Verbind deze kabel met de
systeemafstandsbediening van een
externe eindversterker of met het
relaiscontact voor de automatische
antenne (max. 300 mA 12 V gelijkstroom).
Als de auto uitgerust is met een
ruitantenne, moet verbinding worden
gemaakt met de voedingsaansluiting van
de antennebooster.
• Verbind de blauw/witte kabel nooit met
de voedingsaansluiting van een externe
eindversterker. Verbind deze kabel ook
nooit met de voedingsaansluiting van de
automatische antenne. Hierdoor zou de
accu leeglopen of zou er een storing
optreden.
Verbindingen/installatie
Verbindingen
ACC-positie Geen ACC-positie
• De zwarte kabel is aarde. Aardingskabels
voor dit toestel en andere uitrusting (met
name producten die veel stroom trekken
zoals eindversterkers) moeten
afzonderlijk worden aangesloten. Anders
kan er, wanneer ze toevallig loskomen,
brand of een storing optreden.
Dit toestel
Microfoon 4 m (13 voet 1 duim) (alleen
voor MVH-X370BT)
Achteruitgang of subwooferuitgang
Vooruitgang (alleen voor MVH-X370BT/
170UI)
Antenne-ingang
Stroomkabelingang
Zekering (10 A)
Ingang draadafstandsbediening (alleen
voor MVH-X370BT/170UI)
Een vast bedrade
afstandsbedieningsadapter kan worden
aangesloten (afzonderlijk verkocht).
Microfooningang (alleen voor
MVH-X370BT)
Stroomkabel
Voer deze verbindingen uit wanneer u een
draad voor de achterluidspreker niet
verbindt met een subwoofer.
Naar stroomkabelingang
Afhankelijk van het soort auto kan de
functie van en verschillend zijn.
In dit geval dient u te verbinden met
en met .
Geel
Reserve (of accessoire)
Geel
Verbinden met de constante 12 V
voedingsaansluiting.
Rood
Accessoire (of reserve)
Rood
Verbinden met de aansluiting die door
de contactschakelaar wordt gestuurd
(12 V gelijkstroom).
Verbind draden van dezelfde kleur met
elkaar.
Zwart (chassisaarde)
MVH-X370BT/170UI/170UBG/170UB

16Nl
Blauw/wit
De penpositie van de ISO-connector is
afhankelijk van het autotype. Verbind
en wanneer pen 5 een
antennestuurtype is. In een ander
autotype mag u en nooit
verbinden.
Blauw/wit
Verbinden met de
systeembedieningsaansluiting van de
eindversterker (max. 300 mA 12 V
gelijkstroom).
Blauw/wit
Verbinden met het relaiscontact voor
de automatische antenne (max. 300 mA
12 V gelijkstroom).
Geel/zwart (alleen voor MVH-170UI)
Als u uitrusting gebruikt met een
stilschakelfunctie, verbind u deze draad
met de stilschakeldraad op de
uitrusting. Als er geen stilschakelfunctie
is, mag de stilschakeldraad niet worden
aangesloten.
Luidsprekerdraden
Wit: links voor
Wit/zwart: links voor
Grijs: rechts voor
Grijs/zwart: rechts voor
Groen: links achter of subwoofer
Groen/zwart: links achter of
subwoofer
Violet: rechts achter of subwoofer
Violet/zwart: rechts achter of
subwoofer
ISO-connector
In sommige auto's is de ISO-connector
in twee gesplitst. In dit geval dient u
verbinding te maken met beide
connectoren.
OPMERKINGEN
• Wijzig het beginmenu van dit toestel. Zie
[SP-P/O MODE] (pagina 5). De
subwooferuitgang van dit toestel is
mono.
• Wanneer u een subwoofer van 70 W (2 Ω)
gebruikt, dient u de subwoofer te
verbinden met de violette en violet/
zwarte draden van dit toestel. Sluit niets
aan op de groene en groen/zwarte
draden.
Eindversterker (afzonderlijk
verkocht)
Voer deze verbindingen uit wanneer u de
optionele versterker gebruikt.
Systeemafstandsbediening
Eindversterker (afzonderlijk verkocht)
Verbinden met RCA-kabels (afzonderlijk
verkocht)
Naar vooruitgang*
Voorluidspreker*
Naar achteruitgang of
subwooferuitgang
Achterluidspreker of subwoofer
* Alleen voor MVH-X370BT/170UI
Belangrijk
• Controleer alle verbindingen en
systemen voor de definitieve installatie.
• Gebruik geen ongeoorloofde
onderdelen, want dit kan tot storingen
leiden.
• Raadpleeg uw verdeler als u voor de
installatie gaten moet boren of andere
wijzigingen aan de auto moet
aanbrengen.
• Installeer het toestel niet op de volgende
plaatsen:
–waar het de goede werking van de auto
kan storen.
Installatie
–waar passagiers gekwetst kunnen
geraken bij bruusk afremmen.
• De halfgeleiderlaser raakt beschadigd als
hij te warm wordt. Installeer dit toestel op
een veilige afstand van hete plaatsen,
zoals de uitgang van de verwarming.
• Optimale prestaties zijn
verzekerd wanneer het
toestel in een hoek van
minder dan 60° wordt
geïnstalleerd.
• Tijdens de installatie dient u voor een
goede warmteafvoer bij het gebruik van
het toestel te zorgen. Voorzie daartoe
voldoende vrije ruimte achter het
achterpaneel en wikkel alle losse kabels
op, zodat ze de ventilatieopeningen niet
blokkeren.
DIN-voor- of -achterchassis
Dit toestel kan degelijk worden
geïnstalleerd in een voorchassis of
achterchassis.
Gebruik in de handel verkrijgbare
onderdelen voor de installatie.
DIN-voorchassis
1 Steek de installatiekoker in het
dashboard.
Voor installatie in ondiepe ruimtes
gebruikt u de meegeleverde
installatiekoker. Als er voldoende ruimte
is, gebruikt u de installatiekoker die bij
de auto werd geleverd.
2 Zet de installatiekoker vast door de
metalen lippen 90° te plooien met een
schroevendraaier.
Dashboard
Installatiekoker
Zorg ervoor dat het toestel veilig op zijn
plaats is geïnstalleerd. Een onstabiele
installatie kan het toestel bij het
afspelen doen springen of andere
storingen veroorzaken.
DIN-achterchassis
1 Lijn de gaten in de beugel uit met de
gaten aan de zijkanten van het toestel
om de beugel uit te lijnen.
2 Draai aan elke zijde één schroef in om
het toestel op zijn plaats te houden.
Tappende schroef (5 mm × 8 mm)
Montagebeugel
Dashboard of console
Voorzie
voldoende
ruimte
5 cm
5 cm

17Nl
Nederlands
De meegeleverde beugel gebruiken
U kunt ook de meegeleverde beugel
gebruiken om het toestel te monteren.
Controleer of de meegeleverde beugel
geschikt is voor uw specifieke wagen en
bevestig de beugel dan op het toestel
zoals hierna aangegeven.
Schroef
Beugel
Het toestel verwijderen
1 Verwijder het sierkader.
Sierkader
Gekeepte lip
• Door het voorpaneel los te maken,
kunt u gemakkelijker bij het sierkader
komen.
• Wanneer het sierkader wordt
teruggezet, moet de kant met de
gekeepte lip omlaag wijzen.
2 Steek de meegeleverde uittrekspieën
in beide zijden van het toestel tot ze
op hun plaats klikken.
3 Trek het toestel uit het dashboard.
(Alleen voor MVH-X370BT)
De microfoon moet direct voor de
bestuurder worden geplaatst, op een
geschikte afstand om de stem duidelijk op
te nemen.
LET OP
Het is uiterst gevaarlijk als de
microfoondraad rond de stuurkolom of de
schakelhendel gewikkeld raakt. Installeer
de microfoon dusdanig, dat het rijden op
geen enkele manier wordt gehinderd. Het
is aan te bevelen klemmen (afzonderlijk
verkocht) te gebruiken om de draad vast te
leggen.
Installeren op de zonneklep
1 Plaats de microfoondraad in de groef.
De microfoon installeren
Microfoondraad
Groef
2 Installeer de microfoonklem op de
zonneklep.
Door de zonneklep omlaag te zetten,
vermindert de kwaliteit van de
spraakherkenning.
Installeren op de stuurkolom
1 Verschuif de microfoonvoet om hem
los te maken van de microfoonklem.
Microfoon
Microfoonklem
Microfoonvoet
2 Installeer de microfoon aan de
achterzijde van de stuurkolom.
Microfoonklem
Dubbelzijdige tape

18Nl
Het display keert automatisch terug naar
het gewone display.
→ U hebt gedurende ongeveer 30
seconden geen handeling uitgevoerd.
– Voer een handeling uit.
Het bereik voor weergave herhalen wordt
onverwacht gewijzigd.
→ Afhankelijk van het bereik voor
weergave herhalen kan het
geselecteerde bereik gewijzigd worden
wanneer u een andere map of een
ander fragment selecteert of vooruit of
achteruit spoelt.
– Selecteer het gewenste bereik voor
weergave herhalen opnieuw.
Een onderliggende map wordt niet
afgespeeld.
→ Onderliggende mappen worden niet
afgespeeld wanneer [FLD] (map
herhalen) is geselecteerd.
– Selecteer een ander bereik voor
weergave herhalen.
Het geluid is onderbroken.
→ U gebruikt een apparaat, zoals een
mobiele telefoon, die hoorbare
storingen veroorzaakt.
– Plaats elektrische apparaten die de
storing kunnen veroorzaken, verder
weg van het toestel.
Het geluidssignaal van de Bluetooth-
geluidsbron wordt niet weergegeven.
→ Er wordt op hetzelfde moment
getelefoneerd met een via Bluetooth
aangesloten mobiele telefoon.
– Het geluidssignaal wordt
weergegeven nadat het gesprek
beëindigd is.
→ Er wordt op hetzelfde moment een via
Bluetooth aangesloten mobiele
telefoon gebruikt.
– Gebruik de mobiele telefoon niet op
hetzelfde moment.
→ De verbinding tussen het toestel en de
mobiele telefoon wordt niet correct tot
stand gebracht nadat werd
getelefoneerd met een via Bluetooth
aangesloten mobiele telefoon.
– Breng opnieuw een Bluetooth-
verbinding tot stand tussen het
toestel en de mobiele telefoon.
Algemeen
AMP ERROR
→ Dit toestel werkt niet of er is een
probleem met de
luidsprekeraansluiting.
→ Het beveiligingscircuit is geactiveerd.
– Controleer de luidsprekeraansluiting.
– Draai de contactschakelaar naar OFF
en weer naar ON. Als het bericht nog
wordt weergegeven, neemt u contact
op met uw leverancier of een erkend
Pioneer Servicecentrum.
NO XXXX (bijvoorbeeld NO TITLE)
→ Er is geen ingebedde tekstinformatie.
– Schakel het display om of speel een
ander fragment/bestand af.
Aanvullende informatie
Problemen verhelpen
Foutmeldingen
USB-apparaat/iPod
FORMAT READ
→ Soms is er een vertraging tussen het
begin van de weergave en wanneer u
het geluid begint te horen.
–Wacht tot het bericht verdwijnt en u
het geluid hoort.
NO AUDIO
→ Er zijn geen songs.
– Zet de audiobestanden over naar het
USB-apparaat en maak verbinding.
→ De inhoud van het USB-apparaat is
beveiligd.
– Raadpleeg de instructies bij het USB-
apparaat om de beveiliging uit te
schakelen.
SKIPPED
→ Het aangesloten USB-apparaat bevat
bestanden die met DRM zijn beveiligd.
– Beveiligde bestanden worden
overgeslagen.
PROTECT
→ Alle bestanden op het aangesloten
USB-apparaat zijn beveiligd met DRM.
– Gebruik een ander USB-apparaat.
N/A USB
→ Het aangesloten USB-apparaat wordt
niet ondersteund door dit toestel.
– Koppel het apparaat dat compatibel is
met USB los en vervang het.
CHECK USB
→ Er is kortsluiting opgetreden in de USB-
stekker of de USB-kabel.
– Controleer of de USB-stekker en de
USB-kabel niet ergens ingeklemd of
beschadigd zijn.
→ Het aangesloten USB-apparaat
verbruikt meer stroom dan de maximaal
toelaatbare waarde.
– Ontkoppel het USB-apparaat en
gebruik het niet meer. Zet de
contactschakelaar op UIT en daarna
op ACC of AAN. Sluit alleen
compatibele USB-apparaten aan.
→ De iPod functioneert correct maar
wordt niet opgeladen.
– Controleer of de kabel van de iPod
niet is kortgesloten (bijvoorbeeld
contact maakt met metalen
voorwerpen). Zet daarna de
contactschakelaar UIT en weer AAN, of
ontkoppel de iPod en sluit hem weer
aan.
ERROR-19
→ Communicatiefout.
– Probeer een van de volgende
mogelijkheden en keer dan terug naar
de USB-bron.
• Zet de contactschakelaar UIT en
weer AAN.
• Ontkoppel het USB-apparaat.
• Schakel over naar een andere
signaalbron.
→ iPod-fout.
– Verwijder de kabel uit de iPod. Sluit de
kabel weer aan als het hoofdmenu van
de iPod wordt weergegeven en stel de
iPod opnieuw in.
ERROR-23
→ Het USB-apparaat was niet goed
geformatteerd.
– Formatteer het USB-apparaat met
FAT12, FAT16 of FAT32.
ERROR-16
→ De versie van de iPod-firmware is
verouderd.
– Werk de versie van de iPod bij.
→ iPod-fout.
– Verwijder de kabel uit de iPod. Sluit de
kabel weer aan als het hoofdmenu van
de iPod wordt weergegeven en stel de
iPod opnieuw in.
STOP
→ De huidige lijst bevat geen songs.
– Selecteer een lijst die wel songs bevat.

19Nl
Nederlands
NOT FOUND
→ Geen verwante songs.
– Zet songs over naar de iPod.
Bluetooth-apparaat
ERROR-10
→ Fout in de stroomvoorziening van de
Bluetooth-module van dit toestel.
– Zet de contactschakelaar op UIT en
daarna op ACC of AAN.
Apps
NO BT DEVICE GO TO BT MENU TO
REGISTER
→ Geen Bluetooth-apparaat gevonden.
– Verbind het toestel en het apparaat
via Bluetooth (pagina 8).
CONN. FAILED PRESS BAND KEY TO
RETRY
→ Bluetooth-verbinding mislukt.
–Druk op BAND/ om opnieuw
verbinding te maken.
DISCONNECTED PRESS BAND KEY TO
RETRY
→ Bluetooth-verbinding mislukt.
–Druk op BAND/ om opnieuw
verbinding te maken.
CHECK APP
→ Verbinding met de applicatie mislukt.
– Volg de instructies op het scherm.
START UP APP
→ De applicatie is nog niet gestart.
– Bedien het mobiele apparaat om de
applicatie te starten.
USB-opslagapparaat
• Het maken van verbindingen via een
USB-hub wordt niet ondersteund.
• Maak het USB-opslagapparaat stevig vast
voordat u gaat rijden. Zorg dat het USB-
opslagapparaat niet op de vloer valt
omdat het dan onder het rem- of
gaspedaal terecht kan komen.
• Afhankelijk van het USB-opslagapparaat
kunnen de volgende problemen
voorkomen.
– De bediening kan verschillend zijn.
– Het opslagapparaat wordt niet herkend.
– Bestanden worden niet correct
afgespeeld.
– Het apparaat kan hoorbare interferentie
veroorzaken wanneer u naar de radio
luistert.
iPod
• Stel de iPod niet bloot aan hoge
temperaturen.
• Maak de iPod stevig vast voordat u gaat
rijden. Zorg dat de iPod niet op de vloer
kan vallen omdat hij dan onder het rem-
of gaspedaal terecht kan komen.
• De instellingen van de iPod, zoals de
equalizer en weergave herhalen, worden
automatisch gewijzigd wanneer de iPod
wordt aangesloten op het toestel. Als de
iPod wordt losgekoppeld, keren deze
instellingen terug naar de
oorspronkelijke instellingen.
• Tekst op de iPod die niet compatibel is
met de specificaties van dit toestel, kan
niet worden weergegeven.
Aanwijzingen voor het
gebruik
• Alleen de eerste 32 tekens van de
bestandsnaam (inclusief de extensie) of
mapnaam worden weergegeven.
• Een juiste werking van dit toestel is
afhankelijk van de toepassing waarmee
de WMA-bestanden zijn gecodeerd.
• Er kan een beetje vertraging optreden bij
het beginnen met afspelen van
audiobestanden met beeldgegevens of
audiobestanden op een USB-apparaat
met een uitgebreide mappenstructuur.
• Russische tekst kan alleen op dit toestel
worden weergegeven als die met een van
de volgende tekensets is gecodeerd:
–Unicode (UTF-8, UTF-16)
–Andere tekensets dan Unicode die in
een Windows-omgeving worden
gebruikt en op Russisch zijn ingesteld
bij de taalinstellingen
LET OP
• Pioneer garandeert geen compatibiliteit
met alle USB-opslagapparaten en kan
niet verantwoordelijk worden gesteld
voor eventueel gegevensverlies op
mediaspelers, smartphones of andere
apparaten tijdens het gebruik van dit
product.
• Laat discs en USB-opslagapparaten niet
achter op plaatsen waar de temperatuur
hoog kan oplopen.
WMA-bestanden
MP3-bestanden
WAV-bestanden
• WAV-bestandsindelingen kunnen niet
worden gebruikt via MTP.
Compatibiliteit met
gecomprimeerde audio
Bestandsextensie .wma
Bitsnelheid 48 kbps tot 320 kbps
(CBR), 48 kbps tot
384 kbps (VBR)
Bemonsteringsfrequentie
32 kHz, 44,1 kHz,
48 kHz
Windows Media™
Audio Professional,
Lossless, Voice/DRM
Stream/Stream met
video
Niet compatibel
Bestandsextensie .mp3
Bitsnelheid 8 kbps tot 320 kbps
(CBR), VBR
Bemonsteringsfrequentie
8 kHz tot 48 kHz
(32 kHz, 44,1 kHz,
48 kHz voor de beste
kwaliteit)
Compatibele ID3-tag
versie
1.0, 1.1, 2.2, 2.3, 2.4
(ID3-tag versie 2.x
krijgt prioriteit boven
versie 1.x.)
M3u-afspeellijst Niet compatibel
MP3i (MP3
interactive), mp3 PRO
Niet compatibel
Bestandsextensie .wav
Quantisatiebits 8 en 16 (LPCM), 4 (MS
ADPCM)
Bemonsteringsfrequentie
16 kHz tot 48 kHz
(LPCM), 22,05 kHz en
44,1 kHz (MS ADPCM)

20Nl
FLAC-bestanden (alleen voor
MVH-170UI/170UBG/170UB)
• FLAC-bestandsindelingen kunnen niet
worden gebruikt via MTP.
• FLAC-bestanden kunnen, afhankelijk van
de codeerinrichting, mogelijk niet
worden afgespeeld.
USB-apparaat
• Er kan een beetje vertraging optreden bij
het beginnen met afspelen van
audiobestanden op een USB-
opslagapparaat met een uitgebreide
mappenstructuur.
Alleen de volgende iPod-modellen kunnen met
dit toestel gebruikt worden. Ondersteunde
versies van de iPod-software worden hieronder
genoemd. Oudere versies worden wellicht niet
ondersteund.
Gemaakt voor
–iPod touch (1e tot 5e generatie)
–iPodclassic
– iPod met video
– iPod nano (1e tot 7e generatie)
–iPhone5s
–iPhone5c
–iPhone5
–iPhone4S
–iPhone4
–iPhone3GS
–iPhone3G
–iPhone
• Afhankelijk van de generatie en de versie
van de iPod zijn sommige functies
mogelijk niet beschikbaar.
• Gebruikers van een iPod met Lightning-
aansluiting moeten de Lightning-naar-
USB-kabel gebruiken (bij de iPod
geleverd).
• Gebruikers van een iPod met Dock
Connector moeten CD-IU51 gebruiken.
Raadpleeg uw leverancier voor meer
informatie.
• Raadpleeg de handleiding van de iPod
voor meer informatie over ondersteunde
bestandsindelingen.
• Audiobook, Podcast: Compatibel
LET OP
Pioneer is niet verantwoordelijk voor
verlies van gegevens op de iPod, ook niet
tijdens het gebruik van dit toestel.
De gebruiker kan met dit toestel geen
mapnummers toewijzen of de
afspeelvolgorde wijzigen. De volgorde van
de audiobestanden is afhankelijk van het
aangesloten apparaat.
Bestandsextensie .flac
Bemonsteringsfrequentie
8/11,025/12/16/22,05/
24/32/44,1/48 [kHz]
Quantisatiebitsnelheid 16-bits
Kanaalmodus 1/2 kanalen
Hiërarchie afspeelbare
mappen
Tot acht niveaus (voor
praktisch gebruik kunt
u beter niet meer dan
twee niveaus
gebruiken)
Afspeelbare mappen Maximaal 500
Afspeelbare
bestanden
Maximaal 15 000
Afspelen van
auteursrechtelijk
beschermde
bestanden
Niet compatibel
Gepartitioneerd USB-
apparaat
Alleen de eerste
partitie kan worden
afgespeeld.
Compatibiliteit met
iPod
Volgorde van
audiobestanden
Merk op dat de verborgen bestanden in
een USB-apparaat niet kunnen worden
afgespeeld.
Voorbeeld van een boomstructuur
Bluetooth
Het merk Bluetooth® en de logo’s daarvan zijn
gedeponeerde handelsmerken van Bluetooth
SIG, Inc. PIONEER CORPORATION gebruikt deze
onder licentie. Andere handelsmerken en
handelsnamen zijn eigendom van de
respectieve eigenaren.
iTunes
Apple en iTunes zijn handelsmerken van
Apple Inc., geregistreerd in de V.S. en
andere landen.
WMA
Windows Media is een gedeponeerd
handelsmerk of een handelsmerk van
Microsoft Corporation in de Verenigde
Staten en/of in andere landen.
Dit product bevat technologie die het
eigendom is van Microsoft Corporation en
die niet gebruikt of gedistribueerd mag
worden zonder toestemming van
Microsoft Licensing, Inc.
FLAC
Copyright © 2000-2009 Josh Coalson
Copyright © 2011-2013 Xiph.Org
Foundation
Herverdeling en gebruik in bron- en
binaire vorm, met of zonder wijziging, zijn
toegestaan mits aan de volgende
voorwaarden is voldaan:
– Herverdelingen van de broncode moeten
bovenstaande copyrightmelding, deze
lijst met voorwaarden en de volgende
disclaimer bevatten.
– Herverdelingen in binaire vorm moeten
bovenstaande copyrightmelding, deze
lijst met voorwaarden en de volgende
disclaimer reproduceren in de
documentatie en/of ander materiaal bij
de verdeling.
– Zonder specifieke voorafgaande
schriftelijke bevestiging mogen de naam
Lijst van Russische tekens
Map
Gecomprimeerd
audiobestand
tot : Afspeelvolgorde
01 tot 05: Mapnummer
D: Display C: Teken
Copyright en
handelsmerken

21Nl
Nederlands
van de Xiph.org Foundation of de namen
van zijn bijdragers niet worden gebruikt
om producten goed te keuren of te
promoten die van deze software zijn
afgeleid.
DEZE SOFTWARE WORDT DOOR DE
COPYRIGHTHOUDERS EN BIJDRAGERS
“ZONDER MEER” GELEVERD EN ER WORDT
AFSTAND GEDAAN VAN ELKE EXPLICIETE
OF IMPLICIETE GARANTIE, INCLUSIEF
MAAR NIET BEPERKT TOT DE IMPLICIETE
GARANTIES VAN VERKOOPBAARHEID EN
GESCHIKTHEID VOOR EEN BEPAALD DOEL.
IN GEEN ENKEL GEVAL ZIJN DE STICHTING
OF BIJDRAGERS AANSPRAKELIJK VOOR
ELKE RECHTSTREEKSE ,
ONRECHTSTREEKSE, INCIDENTELE,
SPECIALE, EXEMPLAIRE OF
GEVOLGSCHADE (INCLUSIEF MAAR NIET
BEPERKT TOT DE AANKOOP VAN
VERVANGENDE GOEDEREN OF DIENSTEN;
GEBRUIKS-, GEGEVENS- OF
WINSTDERVING; OF
BEDRIJFSONDERBREKING), HOE DEZE OOK
WERD VEROORZAAKT EN OP OM HET EVEN
WELKE THEORIE VAN AANSPRAKELIJKHEID,
AL DAN NIET VOLGENS CONTRACT,
STRIKTE AANSPRAKELIJKHEID OF
ONGEOORLOOFDE HANDELING
(INCLUSIEF NALATIGHEID OF ANDERS) DIE
OP WELKE MANIER OOK VOORTVLOEIT UIT
HET GEBRUIK VAN DEZE SOFTWARE, ZELFS
INDIEN VOOR DE MOGELIJKHEID VAN
DERGELIJKE SCHADE WERD
GEWAARSCHUWD.
iPod & iPhone
iPhone, iPod, iPod classic, iPod nano en
iPod touch zijn handelsmerken van Apple
Inc., gedeponeerd in de VS en andere
landen.
Lightning is een handelsmerk van Apple
Inc.
“Gemaakt voor iPod” en “Gemaakt voor
iPhone” wil zeggen dat een elektronische
accessoire speciaal ontwikkeld is voor
verbinding met respectievelijk een iPod of
iPhone en door de maker gewaarborgd is
als conform de Apple werkingsnormen.
Apple is niet verantwoordelijk voor de
werking van dit apparaat en voor het
voldoen aan de veiligheidsnormen en
wettelijke normen. Houd er rekening mee
dat het gebruik van dit accessoire met iPod
of iPhone invloed kan hebben op de
draadloze prestatie.
Android™
Android is een handelsmerk van Google
Inc.
MIXTRAX
MIXTRAX is een handelsmerk van de
PIONEER CORPORATION.
Algemeen
Spanningsbron: 14,4 V gelijkstroom (10,8 V
tot 15,1 V toelaatbaar)
Aardingssysteem: negatief
Maximaal stroomverbruik: 10,0 A
Afmetingen (B × H × D):
DIN
Chassis: 178 mm × 50 mm × 97 mm
Voorkant: 188 mm × 58 mm × 17 mm
D
Chassis: 178 mm × 50 mm × 97 mm
Voorkant: 170 mm × 46 mm × 17 mm
Gewicht: 0,5 kg
Audio
Maximaal uitgangsvermogen:
50 W × 4
70 W × 1/2 Ω (voor de subwoofer)
Doorlopend uitgangsvermogen:
22 W × 4 (50 Hz tot 15 000 Hz, 5%
THD, 4-Ω-belasting, beide kanalen)
Belastingsimpedantie: 4 Ω (4 Ω tot 8 Ω
toegestaan)
Preout maximaal uitgangsniveau: 2,0 V
Contouren loudness: +10 dB (100 Hz),
+6,5 dB (10 kHz) (volume: –30 dB)
Equalizer (grafische equalizer met 5
banden):
Frequentie: 80 Hz/250 Hz/800 Hz/
2,5 kHz/8 kHz
Bereik equalizer: ±12 dB (in stappen
van 2 dB)
Subwoofer (mono):
Frequentie: 50 Hz/63 Hz/80 Hz/
100 Hz/125 Hz/160 Hz/200 Hz
Helling: –12 dB/oct, –24 dB/oct
Gain: +6 dB tot –24 dB
Fase: Normaal/tegengesteld
USB
USB-standaardspecificatie: USB 2.0
volledige snelheid
Maximaal stroomverbruik: 1 A
USB-klasse: MSC (Mass Storage Class)
Bestandssysteem: FAT12, FAT16, FAT32
MP3-decoderingsformaat: MPEG-1 & 2
Audio Layer 3
WMA-decoderingsformaat: versie 7, 7.1, 8,
9, 10, 11, 12 (2-kanaalsaudio)
(Windows Media Player)
FLAC-decoderingsformaat: v1.3.0 (Free
Lossless Audio Codec) (alleen voor
MVH-170UI/170UBG/170UB)
WAV-signaalformaat: Lineaire PCM & MS
ADPCM (niet-gecomprimeerd)
FM-tuner
Frequentiebereik: 87,5 MHz tot 108,0 MHz
Bruikbare gevoeligheid: 11 dBf (1,0 μV/
75 Ω, mono, S/R: 30 dB)
Signaal-ruisverhouding: 72 dB (IEC-A-
netwerk)
MW-tuner
Frequentiebereik: 531 kHz tot 1 602 kHz
Bruikbare gevoeligheid: 25 μV (S/R: 20 dB)
Signaal-ruisverhouding: 62 dB (IEC-A-
netwerk)
LW-tuner
Frequentiebereik: 153 kHz tot 281 kHz
Bruikbare gevoeligheid: 28 μV (S/R: 20 dB)
Signaal-ruisverhouding: 62 dB (IEC-A-
netwerk)
Bluetooth
(Alleen voor MVH-X370BT)
Versie: Bluetooth 3.0 gecertificeerd
Uitgangsvermogen: +4 dBm maximaal
(vermogensklasse 2)
Bluetooth-profielen:
GAP (Generic Access Profile)
SDAP (Service Discovery Application
Profile)
OPP (Object Push Profile)
Technische gegevens

22Nl
HFP (Hands Free Profile) 1.6
PBAP (Phone Book Access Profile)
A2DP (Advanced Audio Distribution
Profile)
AVRCP (Audio/Video Remote Control
Profile) 1.5
SPP (Serial Port Profile) 1.1
OPMERKING
Technische gegevens en ontwerp kunnen
zonder voorafgaande kennisgeving
worden gewijzigd.

23Nl
Nederlands

2Ru
Перед началом эксплуатации............................................................ 3
Начало работы....................................................................................... 4
Радио ........................................................................................................ 6
USB/iPod/AUX.......................................................................................... 7
Bluetooth.................................................................................................. 9
Режим приложения ............................................................................ 11
Настройки ............................................................................................. 12
Настройки FUNCTION ........................................................................ 12
Настройки AUDIO................................................................................ 13
Настройки SYSTEM ............................................................................. 14
Настройки ILLUMINATION................................................................. 15
Настройки MIXTRAX........................................................................... 15
Подключения/Установка .................................................................. 16
Дополнительная информация ........................................................ 19
Содержание
О данном руководстве:
• В следующих инструкциях USB-накопитель и аудиопроигрыватель USB
называются “USB-устройство”.
• В данном руководстве устройства iPod и iPhone называются “iPod”.

3Ru
Русский
Благодарим Вас за покупку этого изделия компании PIONEER
Для обеспечения правильности эксплуатации внимательно прочитайте данное руководство
перед началом использования изделия. Особенно важно, чтобы Вы прочли и соблюдали
инструкции, помеченные в данном руководстве заголовками ПРЕДУПРЕЖДЕНИЕ и ВНИМАНИЕ.
Держите данное руководство под рукой для обращения к нему в будущем.
Частные лица в странах Евросоюза, Швейцарии и Норвегии могут бесплатно возвращать
использованные электронные изделия в специализированные пункты приема или в магазин (при
покупке аналогичного нового устройства).
Если Ваша страна не указана в приведенном выше перечне, обращайтесь в органы местного
управления за инструкциями по правильной утилизации продукта.
Тем самым Вы обеспечите утилизацию Вашего изделия с соблюдением обязательных процедур
по обработке, утилизации и вторичной переработке и, таким образом, предотвратите
потенциальное негативное воздействие на окружающую среду и здоровье людей.
Дату изготовления оборудования можно определить по серийному номеру, который содержит
информацию о месяце и годе производства.
ПРЕДУПРЕЖДЕНИЕ
•Не пытайтесь самостоятельно производить установку или ремонт изделия. Установка
или ремонт изделия лицами, не обладающими специальными навыками и опытом
работы с электронным оборудованием и автомобильными аксессуарами, могут создать
опасность поражения электрическим током или иных инцидентов.
•Ни в коем случае не пытайтесь управлять устройством во время движения. Прежде чем
использовать органы управления устройством, необходимо съехать с дороги и припарковать
автомобиль в безопасном месте.
ВНИМАНИЕ
•Не допускайте попадания жидкости на устройство. Это может повлечь поражение
электрическим током. Кроме того, попадание жидкости в устройство может стать причиной его
выхода из строя, перегрева и появления дыма.
•Всегда сохраняйте уровень громкости достаточно низким, чтобы были слышны звуки извне.
•Pioneer CarStereo-Pass предназначен для использования только в Германии.
При возникновении проблем
При неполадках в работе этого изделия свяжитесь с торговым представителем компании-
производителя или с ближайшим сервисным пунктом PIONEER.
Перед началом эксплуатации
Если вы желаете утилизировать данное изделие, не выбрасывайте его вместе с обычным
бытовым мусором. Существует отдельная система сбора использованных электронных
изделий в соответствии с законодательством, которая предполагает соответствующее
обращение, возврат и переработку.
(только для MVH-170UI/
170UBG/170UB)

4Ru
MVH-X370BT/170UI/170UBG/170UB
*1 Индикации этой кнопки могут отличаться в зависимости от устройства.
*2 В этом руководстве данная кнопка именуется как DISP.
Часто используемые операции
Доступные кнопки могут отличаться в зависимости от устройства.
* Когда голубой/белый провод этого устройства подключен к терминалу релейного управления
автоматической антенны, антенна на автомобиле выдвигается при включении источника
сигнала этого устройства. Чтобы втянуть антенну, выключите источник сигнала.
Индикация на дисплее
Начало работы
Основные операции
Назначение Операция
Включение питания* Нажмите SRC/OFF для включения
питания.
Нажмите и удерживайте SRC/OFF для
выключения питания.
Настройка громкости Поверните регулятор M.C..
Выбор источника Несколько раз нажмите SRC/OFF.
Изменение информации на дисплее Несколько раз нажмите DISP.
Возврат к предыдущему экрану/списку Нажмите /DIMMER.
Возврат к обычному дисплею из меню. Нажмите BAND/.
Ответ на вызов/завершение вызова
(Только для MVH-X370BT)
Нажмите .
SRC (источник)/OFF
Кнопка отсоединения
Окно дисплея
Регулятор M.C.
(многозадачное
управление)
BAND/
/DIMMER Кнопка дисплея*2
*1
*1
Индикация Описание
Отображается при наличии нижнего уровня меню или папки.
Отображается, если включена функция автоответчика (стр. 11).
(Только для моделей, совместимых с Bluetooth.)
Отображается, если нажата кнопка .
Отображается при настройке функции поиска локальных
радиостанций (стр. 13).
Отображается при получении программы с трафиком .
Отображается при получении уведомления о трафике (стр. 13).
Отображается, если установлена функция преобразования звука
(стр. 13).
Отображается, если задан режим произвольного воспроизведения
(кроме случаев, когда в качестве источника выбран BT AUDIO).
Отображается, если задан режим повтора воспроизведения (кроме
случаев, когда в качестве источника выбран BT AUDIO).
Отображается, если установлена функция управления iPod (стр. 8).
Отображается, если выполнено подключение Bluetooth (стр. 9).
(Только для моделей, совместимых с Bluetooth.)

5Ru
Русский
Снимите переднюю панель во избежание кражи. Перед снятием панели
отсоедините кабели и устройства, подключенные к передней панели, и отключите
устройство.
Важно
• Оберегайте переднюю панель от сильных ударов.
• Не подвергайте переднюю панель воздействию прямых солнечных лучей и высоких
температур.
• Всегда храните снятую панель в защитном чехле или сумке.
После установки устройства поверните ключ зажигания в положение ON; на
дисплее отобразится установочное меню [SET UP :YES].
1 Нажмите регулятор M.C. .
Если в течение 30 секунд устройство не используется, установочное меню не
будет выводиться. Если вы хотите выполнить настройку позже, поверните M.C.,
чтобы выбрать [NO], и нажмите для подтверждения.
2 Поверните M.C. для выбора параметров, затем нажмите для подтверждения.
Для перехода к следующему пункту меню необходимо подтвердить выбор.
3 [QUIT :YES] отображается после выполнения всех настроек.
Чтобы вернуться к первому пункту установочного меню, поверните регулятор
M.C. для выбора [QUIT :NO],
затем нажмите повторно для подтверждения.
4 Нажмите регулятор M.C., чтобы подтвердить настройки.
ПРИМЕЧАНИЯ
• Вы можете отменить настройку параметра меню, нажав кнопку SRC/OFF.
• Настроить параметры меню можно в настройках SYSTEM (стр. 14) и настройках INITIAL (стр. 5).
1 Нажмите M.C. для отображения главного меню.
2 Поверните M.C. для выбора [SYSTEM], затем нажмите для подтверждения.
3 Поверните M.C. для выбора [DEMO OFF], затем нажмите для подтверждения.
4 Поверните M.C. для выбора [YES], затем нажмите для подтверждения.
1 Нажмите и удерживайте SRC/OFF, пока устройство не отключится.
2 Нажмите и удерживайте SRC/OFF, чтобы отобразить главное меню.
3 Поверните M.C. для выбора [INITIAL], затем нажмите для подтверждения.
4 Поверните M.C. для выбора параметра, затем нажмите для подтверждения.
ПРИМЕЧАНИЕ
Параметры могут отличаться в зависимости от устройства.
Снятие передней панели
Установочное меню
Элемент меню Описание
LANGUAGE Выбор языка для отображения текстовой информации с
сжатого аудиофайла.
[ENG]
(Английский),
[РУС]
(Русский),
[TUR]
(Турецкий)
Снятие Установка
CLOCK SET Настройка часов.
FM STEP Выбор шага настройки в FM-диапазоне (100 кГц или 50 кГц).
[100], [50]
Отмена демонстрационного дисплея (DEMO
OFF)
Настройки INITIAL
Элемент меню Описание
FM STEP Выбор шага настройки в FM-диапазоне (100 кГц или 50 кГц).
[100], [50]
Элемент меню Описание

6Ru
Радиочастоты данного устройства предназначены для использования в Западной
Европе, Азии, Среднем Востоке, Африке и Океании. В других областях прием может
быть неудовлетворительным. Функция RDS (система радиоданных) работает
только в областях, где выполняется вещание сигналов RDS для FM-станций.
1 Нажмите SRC/OFF для выбора [RADIO].
2 Нажмите BAND/ для выбора полосы [FM1], [FM2], [FM3], [MW] или [LW].
3 Нажмите числовую кнопку (от1/ до 6/).
СОВЕТ
Кнопки / можно также использовать для выбора предварительно установленной
станции, если для параметра [SEEK] установлено значение [PCH] в настройках FUNCTION (стр. 13).
За каждой числовой кнопкой сохранена одна из шести радиостанций с наилучшим
качеством приема (с 1/ по 6/).
1 После выбора полосы нажмите регулятор M.C., чтобы отобразить главное
меню.
2 Поверните M.C. для выбора [FUNCTION], затем нажмите для подтверждения.
3 Поверните M.C. для выбора [BSM], затем нажмите для подтверждения.
Поиск станции вручную
1
После выбора полосы нажмите / для выбора станции.
Нажмите и удерживайте / , затем отпустите для поиска доступной
станции. Поиск остановится, когда устройство выполнит прием станции. Для
отмены поиска нажмите / .
ПРИМЕЧАНИЕ
Для параметра [SEEK] необходимо установить значение [MAN] в настройках FUNCTION (стр. 13).
Сохранение станций вручную
1
Во время приема станции, которую требуется сохранить, нажмите и
удерживайте одну из числовых кнопок (с 1/ по 6/ ), пока мигание не
прекратится.
Устройство выполняет поиск станции по информации PTY (тип программы).
1 Нажмите во время FM-приема.
2 Поверните M.C. для выбора типа программы из [NEWS/INFO], [POPULAR],
[CLASSICS] или [OTHERS].
3 Нажмите регулятор M.C..
Устройство начнет поиск станции. После нахождения станции отобразится
название программной службы.
ПРИМЕЧАНИЯ
• Чтобы отменить поиск, нажмите M.C..
• Программы некоторых радиостанций могут отличаться от программ, указанных в
передаваемом коде PTY.
SP-P/O MODE Используется, когда полночастотный динамик подключен к
проводам вывода заднего динамика, а сабвуфер подключен
к выводу RCA.
[REAR/SUB.W]
[SUB.W/SUB.W] Используется, когда пассивный сабвуфер подключен
непосредственно к проводам вывода заднего динамика, а
сабвуфер подключен к выводу RCA.
[REAR/REAR] Используется, когда полночастотный динамик подключен к
проводам вывода заднего динамика выводу RCA Если
полночастотный динамик подключен к проводам вывода
заднего динамика и вывод RCA не используется, выберите
[REAR/SUB.W] или [REAR/REAR].
S/W UPDATE Обновление устройства до последней версии программного
обеспечения Bluetooth. Для просмотра дополнительной
информации о программном обеспечении Bluetooth и
обновлении посетите наш веб-сайт.
SYSTEM RESET Выберите [YES], чтобы инициализировать настройки.
Перезапуск устройства будет выполнен автоматически.
(Некоторые настройки будут сохранены даже после
выполнения сброса, например, Bluetooth информации о
парах и т.п.)
[YES], [CANCEL]
Радио
Прием сохраненных станций
Элемент меню Описание
Память для записи избранных станций (BSM)
Использование функций PTY

7Ru
Русский
• Если ни одна из станций не передает программы нужного типа, то на дисплее в течение
примерно двух секунд будет показано [NOT FOUND], и затем тюнер перейдет в режим приема
станции, с которой был начат поиск.
Список PTY
Дополнительную информацию о списке PTY см. на сайте
http://www.pioneer.eu/eur/products/25/121/tech/CarAudio/PTY.html
ПРИМЕЧАНИЕ
Функция iPod недоступна для MVH-170UBG/170UB.
Отключите от устройства наушники перед подключением к оборудованию.
USB-устройство/iPod
1
Откройте крышку порта USB.
2 Подключите устройство USB/iPod с помощью соответствующего кабеля.
ВНИМАНИЕ
Используйте дополнительный кабель Pioneer USB (CD-U50E) для подключения устройства
хранения USB, так как любое подключенное напрямую устройство будет выступать наружу, что
может быть небезопасно.
Перед извлечением устройства остановите воспроизведение.
Подключение по MTP
Устройство с операционной системой Android 4.0 или более поздней можно подключить по
протоколу MTP с помощью кабеля, прилагаемого к устройству. Тем не менее, в зависимости от
того, какое подключено устройство, а также от количества файлов в устройстве, аудиофайлы/
музыкальные композиции могут не воспроизводиться через MTP. Обратите внимание, что
подключение по протоколу MTP несовместимо с файловыми форматами WAV и FLAC не может
использоваться с функцией MIXTRAX.
* Файлы FLAC совместимы только с устройством MVH-170UI/170UBG/170UB.
AUX
1
Вставьте мини-стереоразъем в входной разъем AUX.
2 Нажмите SRC/OFF для выбора [AUX] в качестве источника.
ПРИМЕЧАНИЕ
Если для настройки [AUX] выбрано значение [OFF] в настройках SYSTEM, то в качестве источника
нельзя выбирать [AUX].
Вы можете настроить различные параметры в настройках FUNCTION (стр. 12).
Обратите внимание, что следующие операции не работают для устройства AUX.
Чтобы воспользоваться устройством AUX, активируйте его.
USB/iPod/AUX
Воспроизведение
Вход AUX (стереоразъем 3,5 мм)
USB-порт
SRC (источник)/OFF
Регулятор M.C. (многозадачное управление)
Операции
Назначение Операция
Выбор папки/альбома*1 Нажмите 1/ или 2/.
Выбор дорожки/композиции (раздела) Нажмите или .
Быстрая перемотка назад и вперед Нажмите и удерживайте или .
Поиск файла из списка 1 Нажмите для отображения списка.
2 Поверните M.C. для выбора
необходимого имени файла (папки)
или категории, затем нажмите
регулятор для подтверждения.
3 Поверните M.C. для выбора
необходимого файла, затем нажмите
для подтверждения.
Начнется воспроизведение.
Просмотр списка файлов в выбранной
папке/категории*1
Нажмите M.C. после выбора папки/
категории.
Воспроизведение композиции в
выбранной папке/категории*1
Нажмите и удерживайте M.C. после
выбора папки/категории.

8Ru
*1 Только для сжатых аудиофайлов
*2 Если на устройстве нет кнопки 3/S.Rtrv, функцию преобразования звука можно активировать
с помощью настроек FUNCTION.
Режим ссылочного воспроизведения
Вы можете осуществить доступ к композициям на основе текущего исполнителя,
альбома или жанра.
1 Во время воспроизведения композиции нажмите и удерживайте для
перехода в режим ссылочного воспроизведения.
2 Поверните регулятор M.C. для выбора режима ([ARTIST], [ALBUM], [GENRE]),
затем нажмите его для подтверждения выбора.
Выбранная композиция/альбом будут воспроизведены после текущей
композиции.
ПРИМЕЧАНИЕ
Выбранную композицию/альбом можно отменить при использовании функций, отличных от
функций режима ссылочного воспроизведения (например, быстрая перемотка вперед и назад).
Управление iPod
Вы можете управлять устройством с помощью подключенного iPod.
Следующие модели iPod несовместимы с данной функцией.
– iPod nano 1-го поколения, iPod с видео
1 Во время воспроизведения нажмите BAND/ , затем выберите режим
управления.
[CONTROL iPod/CTRL iPod]: Функцией iPod устройства можно управлять с
подключенного iPod.
[CONTROL AUDIO/CTRL AUDIO]: Функцией iPod устройства можно управлять с
помощью кнопок на устройстве. В данном режиме подключенное устройство
iPod нельзя включить или выключить.
ПРИМЕЧАНИЯ
• Нажатием кнопки iPod можно также переключиться в режим управления (только для MVH-
170UI).
• При переключении режима управления на [CONTROL iPod/CTRL iPod] выполняется
приостановка воспроизведения композиции. Используйте подключенный iPod для
возобновления воспроизведения.
• Следующие операции будут доступны для выполнения с устройства, даже если установлен
режим управления [CONTROL iPod/CTRL iPod].
– Выбор функций “Пауза”, “Быстрая перемотка вперед/назад”, выбор композиции/раздела
• Громкость можно настроить только на устройстве.
Поиск по алфавиту (только для iPod) 1 Нажмите для отображения списка.
2 Поверните M.C. для выбора
необходимого списка категорий, затем
нажмите для входа в режим поиска
по алфавиту.
(Если повернуть M.C. два раза, также
осуществляется переход в режим
поиска по алфавиту.)
3 Поверните M.C. для выбора буквы,
затем нажмите, чтобы отобразить
алфавитный список.
Для отмены поиска по алфавиту нажмите
/DIMMER.
Повтор воспроизведения Нажмите 6/.
Произвольное воспроизведение Нажмите 5/.
Произвольное воспроизведение всех
элементов (только для iPod)
Нажмите и удерживайте 5/.
Пауза/Возобновление воспроизведения Нажмите 4/PAUS E.
Функция преобразования звука*2 Нажмите 3/S.Rtrv.
[1]: Предназначено для низких скоростей
сжатия
[2]: Предназначено для высоких
скоростей сжатия
Возврат к корневой папке (только для
USB)*1
Нажмите и удерживайте BAND/.
Выбор дисков в устройстве USB
(Только для устройств, поддерживающих
протокол класса запоминающих
устройств USB. )
Нажмите BAND/.
Назначение Операция
Полезные функции для iPod

9Ru
Русский
(Только для MVH-X370BT)
Функция MIXTRAX используется для вставки стереоэффектов между композициями,
позволяя слушать музыку нон-стоп в сочетании с визуальными эффектами.
Дополнительные сведения о настройках MIXTRAX см. стр. 15.
ПРИМЕЧАНИЯ
• Данная функция несовместима с устройством Android, подключенным с помощью MTP.
• Если в качестве источника выбран USB, а функция MIXTRAX активна, то функция
преобразования звука будет отключена.
• В зависимости от файла/композиции звуковые эффекты могут быть недоступны.
• Выключите функцию MIXTRAX, если визуальные эффекты отвлекают вас от вождения.
1 Нажмите кнопку 3/MIX, чтобы включить/отключить MIXTRAX.
(Только для MVH-X370BT)
Важно
Если подключено три или более устройств Bluetooth (например, телефон и отдельный
аудиоплеер), они могут работать неисправно.
1 Включите функцию Bluetooth устройства.
2 Нажмите и удерживайте для отображения меню соединения.
3 Поверните M.C. для выбора [ADD DEVICE], затем нажмите для
подтверждения.
Устройство начнет поиск доступных устройств, после чего отобразит их в
списке устройств.
• Чтобы отменить поиск, нажмите M.C..
• Если необходимого устройства нет в списке, выберите [RE-SEARCH].
• Если нет доступных устройств, на экране отобразится [NOT FOUND].
4 Поверните M.C. для выбора устройства из списка устройств, затем нажмите
для подтверждения.
Нажмите и удерживайте M.C. для переключения информации об устройстве
между адресом устройства Bluetooth и именем устройства.
5 Выберите [Pioneer BT Unit] на экране устройства.
6 Убедитесь, что это же 6-значное число отображается на основном и на
подключенном устройстве, затем нажмите “Да” на подключенном
устройстве.
ПРИМЕЧАНИЯ
• Если уже образована пара с тремя устройствами, отобразится сообщение [DEVICE FULL]. В этом
случае необходимо сначала удалить одно из зарегистрированных устройств из памяти. См. [DEL
DEVICE] или [GUEST MODE] в меню соединения (стр. 9).
• В зависимости от устройства, на шаге 6 потребуется ввод PIN-кода. В этом случае введите [0000].
СОВЕТ
Соединение по Bluetooth можно также установить посредством запуска обнаружения устройства
с устройства Bluetooth. Для этого параметру [VISIBLE] в меню соединения необходимо задать
значение [ON]. Более подробную информацию по операциям на устройстве Bluetooth см. в
руководстве пользователя, поставляемого вместе с устройством Bluetooth.
Меню соединения
Информация о MIXTRAX (только для USB/iPod)
Bluetooth
Подключение по Bluetooth
Элемент меню Описание
DEVICELIST Показ списка зарегистрированных устройств Bluetooth. “*”
отображается в имени устройства, если установлено
подключение по Bluetooth.
DEL DEVICE Удаление информации об устройстве.
[DELETE YES],
[DELETE NO]
ADD DEVICE Регистрация нового устройства.
A.CONN Выберите [ON] для автоматического подключения к
устройству Bluetooth.
[ON], [OFF]
VISIBLE Выберите [ON], чтобы устройство Bluetooth могло
обнаружить оборудование, когда оно подключено по
Bluetooth к другому устройству.
[ON], [OFF]
PIN CODE Изменение PIN-кода.
1 Нажмите M.C. для отображения режима настройки.
2 Поверните M.C. для выбора номера.
3 Нажмите M.C., чтобы переместить курсор в следующее
положение.
4 После ввода PIN-кода, нажмите и удерживайте M.C..
После ввода PIN-кода при нажатии M.C. будет выполнен
возврат на экран ввода PIN-кода, где вы сможете изменить
PIN-код.

10Ru
Сначала установите подключение по Bluetooth с телефоном Bluetooth (стр. 9).
Одновременно можно подключить не более двух телефонов Bluetooth.
Важно
• Если оставить устройство в режиме ожидания подключения телефона по Bluetooth, когда
двигатель не работает, аккумулятор может разрядиться.
• Перед использованием устройства остановите автомобиль в безопасном месте и задействуйте
стояночный тормоз.
Выполнение телефонных вызовов
1
Нажмите , чтобы отобразить меню телефона.
После подключения двух телефонов сначала отобразится имя телефона, затем -
меню телефона. Чтобы переключиться на другой телефон, повторно нажмите
кнопку .
2
Поверните
M.C.
для выбора [MISSED], [DIALLED], [RECEIVED] или [PHONE BOOK],
затем нажмите для подтверждения.
Отобразится список телефонных номеров.
3 Поверните M.C. для выбора имени или номера телефона, затем нажмите для
подтверждения.
Начнется телефонный вызов.
Ответ на входящий вызов
1
При получении вызова нажмите .
СОВЕТ
Если после подключения двух телефонов через Bluetooth на один из телефонов поступает
входящий вызов, на экране отобразится сообщение. Для ответа на этот входящий вызов
необходимо завершить выполняющийся вызов.
Основные операции
Предустановка телефонных номеров
1
Выберите номер телефона из телефонного справочника или из списка
вызовов.
2 Нажмите и удерживайте одну из числовых кнопок (от 1/ до 6/).
Контакт будет назначен выбранной числовой кнопке.
Чтобы выполнить вызов с помощью предустановленного номера, нажмите одну из
числовых кнопок (от 1/ до 6/), затем нажмите M.C..
Распознавание голоса (только для iPhone)
Данная функция доступна только если устройство iPhone, оснащенное функцией
распознавания голоса, подключено к устройству с помощью Bluetooth.
1 Нажмите и удерживайте M.C., чтобы активировать режим распознавания
голоса.
2 Нажмите M.C. и говорите в микрофон для ввода голосовых команд.
Для выхода из режима распознавания голоса нажмите BAND/.
ПРИМЕЧАНИЕ
Для получения дополнительной информации о функциях распознавания голоса см. руководство,
прилагаемое к iPhone.
DEV. INFO Переключение на дисплее имени устройства и адреса
устройства Bluetooth.
GUEST MODE Выберите [ON] для автоматического перехода к экрану [DEL
DEVICE], когда уже образована пара между оборудованием и
тремя другими устройствами.
[ON], [OFF]
A.PAIRING Выберите [ON], чтобы автоматически образовать пару
между оборудованием и iPhone при подключении iPhone к
оборудованию через USB. (Данная функция может быть
недоступна в зависимости от используемой версии ОС.)
[ON], [OFF]
Телефон Bluetooth
Элемент меню Описание
Назначение Операция
Завершение вызова Нажмите .
Отклонение входящего вызова При получении вызова нажмите и удерживайте
.
Переключение между текущим
вызовом и ожидающим вызовом
Нажмите регулятор M.C..
Отмена ожидающего вызова Нажмите и удерживайте .
Настройка громкости голоса
абонента (При активном режиме
приватности эта функция
недоступна.)
Поворачиваете регулятор M.C.во время вызова.
Включение и отключение
режима приватности
Во время вызова нажмите BAND/.

11Ru
Русский
Меню телефона
*1 Передачу контактов вашего телефона можно выполнить автоматически при подключении
телефона. Если передача не выполняется, используйте телефон для передачи контактов.
*2 Если подключено два телефона, то эта функция не работает для входящих вызовов,
принимаемых в то время, пока один из телефонов используется для вызова.
Важно
• В зависимости от модели Bluetooth-аудиопроигрывателя, подключенного к данному
устройству, доступны различные операции, которые подразделяются на два уровня:
– Профиль A2DP (Advanced Audio Distribution Profile): на аудиопроигрывателе возможно только
воспроизведение композиций.
– Профиль AVRCP (Audio/Video Remote Control Profile): устройство позволяет воспроизводить
композиции, включать режим паузы, выбирать композиции и т.п.
• Звук аудиопроигрывателя Bluetooth будет приглушен, если используется телефон.
• Во время использования аудиопроигрывателя Bluetooth невозможно автоматически
подключиться к Bluetooth-телефону.
• В зависимости от типа аудиопроигрывателя Bluetooth, подключенного к этому устройству, для
некоторых функций может отсутствовать возможность отображения информации и элементов
управления.
1 Настройте подключение Bluetooth с аудиопроигрывателем Bluetooth.
2 Нажмите SRC/OFF для выбора [BT AUDIO] в качестве источника.
3 Нажмите BAND/ для начала воспроизведения.
Основные операции
Вы можете настроить различные параметры в настройках FUNCTION (стр. 12).
* Доступность этих операций зависит от того, какое подключено устройство.
(Режим APP недоступен для MVH-170UBG/170UB.)
Вы можете использовать данное приложение на устройстве iPhone/Android с
помощью данного устройства. В некоторых случаях вы можете управлять
приложением с помощью устройства.
Для просмотра сведений о совместимых устройствах посетите наш веб-сайт.
Важно
Использование приложений сторонних разработчиков может включать в себя или требовать
предоставления личных данных (создание профиля пользователя или другие способы), а для
некоторых приложений - предоставления данных о местонахождении.
Элемент меню Описание
MISSED Отображение пропущенных вызовов.
DIALLED Отображение исходящих вызовов.
RECEIVED Отображение входящих вызовов.
PHONE BOOK*1 Отображение контактов, переданных с телефона.
Установите для параметра [VISIBLE] в меню соединения
значение [ON] для просмотра контактов с данного
устройства.
PRESET 1-6 Вызов предварительно заданных номеров. Вы также можете
вызвать предварительно заданные номера, нажав одну из
числовых кнопок (с 1/ по 6/).
PHONE FUNC Выберите [ON] для автоматического ответа на входящие
вызовы.
A.ANSR:*2
[ON], [OFF]
R.TONE:
[ON], [OFF]
Выберите [ON], если сигнал вызова не слышен в динамиках
автомобиля. В зависимости от того, какой подключен
телефон, эта функция может не работать.
PB INVT Обратный порядок имен в телефонном справочнике (в
именном представлении).
Bluetooth-аудио
Назначение Операция
Быстрая перемотка назад и вперед Нажмите и удерживайте или .
Выбор дорожки Нажмите или .
Повтор воспроизведения* Нажмите 6/.
Произвольное воспроизведение* Нажмите 5/.
Пауза/Возобновление воспроизведения Нажмите 4/PAU SE.
Поиск файла из списка 1 Нажмите для отображения списка.
2 Поверните регулятор M.C., чтобы
выбрать требуемое имя папки, затем
нажмите на регулятор для
подтверждения.
3 Поверните регулятор M.C. для выбора
требуемого файла, затем нажмите для
подтверждения. Начнется
воспроизведение.
Режим приложения

12Ru
ВСЕ ПРИЛОЖЕНИЯ СТОРОННИХ РАЗРАБОТЧИКОВ НАХОДЯТСЯ В СФЕРЕ ОТВЕТСТВЕННОСТИ ЭТИХ
РАЗРАБОТЧИКОВ, ЧТО БЕЗ ОГРАНИЧЕНИЙ ВКЛЮЧАЕТ В СЕБЯ СБОР И БЕЗОПАСНОСТЬ
ПОЛЬЗОВАТЕЛЬСКИХ ДАННЫХ И ОБРАЩЕНИЕ С ЧАСТНОЙ ИНФОРМАЦИЕЙ. ПРИ
ИСПОЛЬЗОВАНИИ ПРИЛОЖЕНИЙ СТОРОННИХ РАЗРАБОТЧИКОВ ВЫ СОГЛАШАЕТЕСЬ С
УСЛОВИЯМИ ПРЕДОСТАВЛЕНИЯ СЕРВИСА И ПОЛИТИКОЙ КОНФИДЕНЦИАЛЬНОСТИ
РАЗРАБОТЧИКОВ. ЕСЛИ ВЫ НЕ СОГЛАСНЫ С УСЛОВИЯМИ ИЛИ ПОЛИТИКОЙ РАЗРАБОТЧИКА ИЛИ
НЕ ЖЕЛАЕТЕ ПРЕДОСТАВЛЯТЬ ДАННЫЕ О СВОЕМ МЕСТОНАХОЖДЕНИИ, КОГДА ЭТО ТРЕБУЕТСЯ, НЕ
ИСПОЛЬЗУЙТЕ ТАКОЕ ПРИЛОЖЕНИЕ.
Для пользователей iPhone
Данная функция поддерживается iPhone и iPod touch с iOS 5.0 или более поздней версией.
Для пользователей Android
Данная функция совместима с устройствами, на которых установлена ОС Android 2.3 или боле
поздней версии и которые поддерживают Bluetooth SPP (Serial Port Profile) и A2DP (Advance Audio
Distribution Profile).
ПРИМЕЧАНИЕ
КОМПАНИЯ PIONEER НЕ НЕСЕТ ОТВЕТСТВЕННОСТИ ЗА ПРИЛОЖЕНИЯ ИЛИ СОДЕРЖИМОЕ,
ПРЕДОСТАВЛЕННОЕ СТОРОННИМИ РАЗРАБОТЧИКАМИ, ВКЛЮЧАЯ ИХ ДОСТОВЕРНОСТЬ И
ПОЛНОТУ. ЗА СОДЕРЖИМОЕ И ФУНКЦИОНАЛЬНОСТЬ ТАКИХ ПРИЛОЖЕНИЙ НЕСУТ
ОТВЕТСТВЕННОСТЬ РАЗРАБОТЧИКИ ПРИЛОЖЕНИЙ.
Подключение по Bluetooth доступно для MVH-X370BT.
1 Подключите данное устройство к мобильному устройству.
• iPhone через USB (стр. 7)
• Устройство Android через Bluetooth (стр. 9)
2 Нажмите M.C. для отображения главного меню.
3 Поверните M.C. для выбора [SYSTEM], затем нажмите для подтверждения.
4 Поверните M.C. для выбора [APP CONN.SET], затем нажмите для
подтверждения.
5 Поверните M.C. для выбора одного из следующих параметров, затем
нажмите для подтверждения.
• Выберите [WIRED] для iPhone.
• Выберите [BLUETOOTH] для устройства Android.
6 Нажмите SRC/OFF для выбора [APP].
7 Используйте мобильное устройство для запуска приложения.
Основные операции
Вы можете настроить различные параметры в настройках FUNCTION (стр. 12).
В главном меню можно настроить различные параметры.
1 Нажмите M.C. для отображения главного меню.
2 Поверните M.C. для выбора одной из следующих категорий, затем нажмите
для подтверждения.
• Настройки FUNCTION (стр. 12)
• Настройки AUDIO (стр. 13)
• Настройки SYSTEM (стр. 14)
• Настройки ILLUMINATION (стр. 15)
• Настройки MIXTRAX (стр. 15)
3 Поверните M.C. для выбора параметров, затем нажмите для подтверждения.
ПРИМЕЧАНИЯ
• Пункты меню, имеющие отношение к Bluetooth, в следующих таблицах недоступны для MVH-
170UI/170UBG/170UB.
• Пункты меню, имеющие отношение к iPod, в следующих таблицах недоступны для MVH-170UBG/
170UB.
• Пункты меню, имеющие отношение к APP, в следующих таблицах недоступны для MVH-170UBG/
170UB.
Элементы меню отличаются в зависимости от источника.
Использование приложения на устройстве
Назначение Операция
Выбор дорожки Нажмите или .
Быстрая перемотка назад и вперед Нажмите и удерживайте или .
Пауза/Возобновление воспроизведения Нажмите BAND/.
Настройки
Настройки FUNCTION
Элемент меню Описание
FM SETTING
[TALK], [STANDARD], [MUSIC] Настройка уровня качества сигнала в
соответствии с условиями сигнала вещания
полосы FM. (Доступно только при выборе
полосы FM.)

13Ru
Русский
BSM
Автоматическое сохранение шести
радиостанций с наилучшим качеством приема
под числовыми кнопками (с 1/ по 6/).
REGIONAL
[ON], [OFF] Ограничение приема определенными
региональными программами, если выбрано
AF (поиск альтернативных частот). (Доступно
только при выборе полосы FM.)
LOCAL
FM: [OFF], [LV1], [LV2], [LV3], [LV4]
MW/LW: [OFF], [LV1], [LV2]
Ограничение настройки станции в
соответствии с мощностью сигнала.
TA
[ON], [OFF] Получение текущей информации о трафике,
если доступна. (Доступно только при выборе
полосы FM.)
AF
[ON], [OFF] Перенастройка на другую частоту, на которой
вещается эта же станция. (Доступно только
при выборе полосы FM.)
NEWS
[ON], [OFF] Прерывание выбранного источника
новостными программами. (Доступно только
при выборе полосы FM.)
SEEK
[MAN], [PCH] Назначение кнопок / для
поочередного поиска станций (настройка
вручную) или выбор станций из списка
предустановленных каналов.
SEL DEVICE
Подключение устройства Bluetooth в списке.
Элемент меню Описание
S.RTRV
[1]: (Предназначено для низких
скоростей сжатия),
[2]: (Предназначено для
высоких скоростей сжатия),
[OFF]
Улучшение качества сжатого аудио и
восстановление насыщенности звука.
Недоступно, если в качестве источника
выбран
• USB и активна функция MIXTRAX.
• Воспроизводится файл формата FLAC.
(Доступно для MVH-170UI/170UBG/170UB)
AUDIO BOOK
[FASTER], [NORMAL], [SLOWER] Изменение скорости воспроизведения.
(Недоступно, если выбран параметр
[CONTROL iPod/CTRL iPod] в режиме
управления.)
PAU SE
Пауза или возобновление воспроизведения.
PLAY
Начало воспроизведения.
STOP
Остановка воспроизведения.
Настройки AUDIO
Элемент меню Описание
FADER*1
Настройка баланса переднего и заднего
динамика.
BALANCE
Настройка баланса левого и правого
динамика.
Элемент меню Описание
USB
iPod
iPod

14Ru
*1 Недоступно, если выбран параметр [SUB.W/SUB.W] в [SP-P/O MODE] в настройках INITIAL
(стр. 6).
*2 Недоступно, если выбран параметр [REAR/REAR] в [SP-P/O MODE] в настройках INITIAL (стр. 6).
*3 Недоступно, если выбран параметр [OFF] в [SUB.W].
Вы можете получить доступ к этим меню даже если устройство выключено.
EQ SETTING
[SUPER BASS], [POWERFUL],
[NATURAL], [VOCAL], [CUSTOM1],
[CUSTOM2], [FLAT]
Выбор полосы и уровня
эквалайзера для дальнейшей
настройки.
Полоса эквалайзера: [80HZ],
[250HZ], [800HZ], [2.5KHZ],
[8KHZ]
Уровень эквалайзера: от [+6]
до [–6]
Выберите или настройте кривую эквалайзера.
[CUSTOM1] можно выбрать отдельно для
каждого источника. Однако для любых
комбинаций, указанных ниже, автоматически
устанавливаются одинаковые настройки.
• USB, iPod и APP (iPhone)
• BT AUDIOи APP (Android)
[CUSTOM2] являются общими настройками,
используемыми для всех источников.
Вы можете также включить эквалайзер,
несколько раз нажимая на кнопку
(только для MVH-170UBG/170UB).
LOUDNESS
[OFF], [LOW], [MID], [HI] Компенсация для четкого звучания при
низком уровне громкости.
SUB.W*2
[NOR], [REV], [OFF] Выбор фазы сабвуфера.
SUB.W CTRL*2*3
Частота среза: [50HZ], [63HZ],
[80HZ], [100HZ], [125HZ],
[160HZ], [200HZ]
Уровень выходного сигнала:
от [–24] до [+6]
Крутизна характеристики: от
[–12] до [–24]
На выходе сабвуфера будут воспроизводиться
только те частоты, которые ниже указанного
диапазона частот.
BASS BOOST
от [0] до [+6] Выбор усиления нижних звуковых частот.
HPF SETTING
Частота среза: [OFF], [50HZ],
[63HZ], [80HZ], [100HZ], [125HZ],
[160HZ], [200HZ]
Крутизна характеристики: от
[–12] до [–24]
На динамики будут выводиться только
частоты выше установленных фильтром
высоких частот (HPF).
Элемент меню Описание
SLA
от [+4] до [–4] Настройка уровня громкости для каждого
источника кроме FM.
Для любых комбинаций, указанных ниже,
автоматически устанавливаются одинаковые
настройки.
• USB, iPod и APP (iPhone)
• BT AUDIO и APP (Android)
Настройки SYSTEM
Элемент меню Описание
LANGUAGE
[ENG](Английский), [РУС]
(Русский), [TUR](Турецкий)
Выбор языка для отображения текстовой
информации с сжатого аудиофайла.
CLOCK SET
Настройка часов (стр. 5).
12H/24H
[12H], [24H] Выбор формата времени.
AUTO PI
[ON], [OFF] Поиск другой станции с такой же программой
даже во время вызова предварительной
настройки.
AUX
[ON], [OFF] Выберите [ON] при подключении к данному
устройству вспомогательного устройства.
BT AUDIO
[ON], [OFF] Включение/отключение сигнала Bluetooth.
Элемент меню Описание

15Ru
Русский
*1 Режим [PW SAVE] отключается при отсоединении аккумуляторной батареи автомобиля; при
подсоединении батареи его потребуется включить снова. При выключенном режиме [PW
SAVE] возможно, что, в зависимости от метода подключения, устройство будет потреблять
энергию аккумулятора, если зажигание автомобиля не имеет положения ACC (аксессуар).
*2 Недоступно, если в качестве источника выбрано [APP].
(Только для MVH-X370BT)
MUTE MODE (Доступно только для MVH-170UI)
[MUTE], [20dB ATT], [10dB ATT] Автоматическое отключение или
приглушение звука при получении сигнала с
оборудования с функцией отключения звука.
PW SAVE*1
[ON], [OFF] Режим энергосбережения.
При включении функции будет доступно
только включение источника.
BT MEM CLEAR
[YES], [CANCEL] Удаление данных с устройства Bluetooth
(списка устройства, PIN-кода, журнала
вызовов, телефонного справочника,
предустановленных телефонных номеров).
[CLEARED] отображается при успешном
удалении данных.
BT VERSION
Отображение версии системы устройства и
модуля Bluetooth.
APP CONN. SET*2
[WIRED], [BLUETOOTH] Выбор необходимого способа подключения в
соответствии с устройством.
Настройки ILLUMINATION
Элемент меню Описание
DIM SETTING
[SYNC CLOCK], [MANUAL] Изменение яркости дисплея.
BRIGHTNESS
от [1] до [10] Изменение яркости дисплея.
Доступность наборов настроек зависит от
того, включена ли функция [DIM SETTING].
Элемент меню Описание
Настройки MIXTRAX
Элемент меню Описание
SHORT MODE
[1.0 MIN], [1.5 MIN], [2.0 MIN],
[2.5 MIN], [3.0 MIN], [OFF]
Выбор продолжительности
воспроизведения.
MIX PATTERN
[SOUND LEVEL] Изменение специальных эффектов MIXTRAX
в соответствии с уровнем звука.
Заставка меняется в зависимости от уровня
громкости.
[LOW PASS] Заставка меняется в зависимости от уровня
низких частот.
[RANDOM] Заставка меняется произвольно в
зависимости от уровня громкости и уровня
низких частот.
DISP FX
[ON], [OFF] Включение/отключение эффектов MIXTRAX.
CUT IN FX
[ON], [OFF] Включение/отключение звуковых эффектов
MIXTRAX при изменении дорожек вручную.

16Ru
Важно
• При установке данного устройства в
автомобиле, когда ключ зажигания не
находится в положении ACC
(аксессуар), отсутствие подключения
красного кабеля к терминалу, который
фиксирует положение ключа
зажигания, может привести к разрядке
аккумулятора.
• Использование данного устройства в
условиях, отличных от указанных,
может привести к пожару или
неисправности.
–Автомобили с аккумуляторной
батареей 12 В и отрицательным
заземлением.
–Динамики мощностью более 50 Вт (на
выходе) и сопротивлением 4-8 Ω
(полное сопротивление).
• Во избежание короткого замыкания,
перегрева или неисправности
соблюдайте следующие указания.
–Перед установкой отключите
отрицательную клемму батареи.
–Закрепите провода с помощью
зажимов для кабелей или клейкой
ленты. Оберните клейкую ленту
вокруг проводов, которые касаются
металлических частей, для защиты
проводов.
–Уберите все кабели подальше от
движущихся частей, таких как рычаг
переключения передач и
направляющие сидений.
–Уберите кабели подальше от мест с
повышенной температурой,
например печки.
–Не подключайте желтый кабель к
батареи путем просовывания его
через отверстие в двигательный
отсек.
– Заклейте неподключенные разъемы
кабеля изолентой.
–Не укорачивайте кабели.
–Не нарушайте изоляцию кабеля
питания данного устройства для
питания других устройств. Емкость
кабеля является ограниченной.
–Используйте плавкий
предохранитель соответствующего
номинала.
–Не замыкайте отрицательный кабель
динамиков непосредственно на
землю.
–Не связывайте вместе отрицательные
кабели нескольких динамиков.
• Когда устройство включено, сигналы
управления отправляются по синему/
белому кабелю. Подключите данный
кабель к удаленному управлению
системой внешнего усилителя или
терминалу релейного управления
автоматической антенны автомобиля
(макс. 300 мА, 12 В пост. тока). Если
автомобиль оснащен антенной,
встроенной в лобовое стекло,
подключите ее к терминалу питания
антенного усилителя.
Подключения/Установка
Подключения
В положении
ACC
Вне положения
ACC
• Никогда не подключайте синий/белый
провод к терминалу питания внешнего
усилителя. Также никогда не
подключайте его к терминалу питания
автоматической антенны. В противном
случае это может привести к
протеканию батареи или ее
неисправности.
• Черный кабель заземлен. Кабели
заземления для данного устройства и
другое оборудование (особенно
устройства высокого напряжения,
например усилители) необходимо
подключать отдельно. В противном
случае случайное отключение может
привести к пожару или неисправности.
Данное устройство
Микрофон 4 м (13 фт. 1 дюйм) (только
для MVH-X370BT)
Задний выход или выход сабвуфера
Передний выход (только для MVH-
X370BT/170UI)
Вход для антенны
Вход шнура питания
Предохранитель (10 A)
Проводной пульт ДУ (только для
MVH-X370BT/170UI)
Сюда можно подключить проводной
адаптер ДУ (приобретается
отдельно).
Вход микрофона (только для MVH-
X370BT)
Шнур питания
Выполняйте данные подключения, когда
провод заднего динамика не подключен
к сабвуферу.
Во вход шнура питания
В зависимости от типа автомобиля
функции и могут отличаться. В
этом случае подключите к и
к .
Желтый
Резервный (или опция)
Желтый
Выполняйте подключение к
терминалу с постоянным
напряжением 12 В.
Красный
Опция (или резервный)
Красный
Выполняйте подключение к
терминалу, управляемому ключом
зажигания (12 В пост. тока).
Выполняйте подключение проводов
друг к другу одного цвета.
Черный (“масса”)
MVH-X370BT/170UI/170UBG/170UB

17Ru
Русский
Синий/белый
Положение контакта разъема ISO
будет отличаться в зависимости от
типа автомобиля. Подключите и
, если 5 контакт отвечает за
управление антенной. Если
используется автомобиль другого
типа, никогда не подключайте и
.
Синий/белый
Выполните подключение к терминалу
управления системой усилителя
(макс. 300 мА, 12 В пост. тока).
Синий/белый
Выполните подключение к терминалу
релейного управления
автоматической антенны (макс.
300 мА, 12 В пост. тока).
Желтый/черный (только для MVH-
170UI)
При использовании оборудования с
функцией отключения звука
подключите данный провод к
проводу отключения звука
оборудования. В противном случае
не подключайте провод отключения
звука.
Провода динамика
Белый: Передний левый
Белый/черный: Передний левый
Серый: Передний правый
Серый/черный: Передний правый
Зеленый: Задний левый или
сабвуфер
Зеленый/черный: Задний левый
или сабвуфер
Фиолетовый: Задний правый или
сабвуфер
Фиолетовый/черный: Задний правый
или сабвуфер
Разъем ISO
В некоторых автомобилях разъем ISO
может быть разделен на два. В этом
случае выполняйте подключение к
обоим разъемам.
ПРИМЕЧАНИЯ
• Измените исходное меню данного
устройства. См. [SP-P/O MODE] (стр. 6).
Выход сабвуфера данного устройства
является монофоническим.
• При использовании сабвуфера 70 Вт
(2 Ω) подключайте сабвуфер к
фиолетовому и фиолетовому/черному
проводам устройства. Не подключайте
ничего к зеленому или зеленому/
черному проводам.
Усилитель (приобретается
отдельно)
Выполните данные подключения при
использовании дополнительного
усилителя.
Удаленное управление системой
Усилитель (приобретается отдельно)
Выполните подключение с помощью
RCA (приобретается отдельно)
К переднему выходу*
Передний динамик*
К заднему выходу или выходу
сабвуфера
Задний динамик или сабвуфер
* Только для MVH-X370BT/170UI
Важно
• Перед установкой проверьте все
подключения и системы.
Установка
• Не используйте неоригинальные
запчасти, так как это может привести к
неисправностям.
• Обратитесь к дилеру, если для
установки требуются дополнительные
отверстия или модификации в
автомобиле.
• Не устанавливайте данное устройство
в следующих случаях:
–если оно может нарушить работу
автомобиля.
–если оно может причинить травму
пассажиру в случае резкой
остановки.
• Полупроводниковый лазер будет
поврежден в случае перегрева.
Выполняйте установку данного
устройства вдали от мест с
повышенной температурой, например
печки.
• Оптимальная
производительность
достигается при
установке устройства под
углом менее 60°.
• Чтобы обеспечить необходимое
распределение тепла при
использовании устройства, при
установке оставьте свободное место за
задней панелью и скрутите кабели,
чтобы они не блокировали
вентиляционные отверстия.
Передняя/задняя установка
DIN
Данное устройство можно установить в
передней или задней части.
При установке используйте имеющиеся
в продаже детали.
Передняя установка DIN
1 Установите на приборную панель
установочную шахту.
Если места мало, используйте
прилагаемую установочную шахту.
Если места достаточно, используйте
установочную шахту, прилагаемую к
автомобилю.
2 Закрепите установочную шахту,
отогнув с помощью отвертки
металлические лапки (90°).
Приборная панель
Установочная шахта
Надежно закрепите устройство в
отсеке. Непрочное закрепление
может стать причиной пропуска
станций или других неисправностей.
Задняя установка DIN
1 Совместите отверстия на
крепежном кронштейне с
отверстиями на корпусе устройства
и закрепите кронштейн.
Оставьте
достаточно
места
5 см
5 см

18Ru
2 Вкрутите по одному винту с каждой
стороны, чтобы зафиксировать
устройство на месте.
Саморез (5 мм × 8 мм)
Крепежный кронштейн
Приборная панель или консоль
Как использовать комплектный
кронштейн
Комплектный кронштейн также
используется для монтажа устройства.
Убедитесь, что комплектный кронштейн
рассчитан на крепление в вашем
автомобиле, а затем присоедините его к
устройству, как показано далее.
Винт
Кронштейн
Извлечение устройства
1 Снимите окантовку.
Окантовка
Лапка с зазубринами
• При снятии передней панели
облегчается доступ к окантовке.
• При повторной установке
окантовки поверните панель
стороной с зазубренной лапкой
вниз.
2 Вставьте прилагаемые ключи
извлечения по обеим сторонам
устройства до щелчка.
3 Потяните устройство из приборной
панели.
(Только для MVH-X370BT)
Микрофон необходимо устанавливать
непосредственно напротив водителя на
соответствующем расстоянии для
правильного фиксирования голоса.
ВНИМАНИЕ
Запутывание провода микрофона
вокруг рулевой колонки или рычага
переключения передач может привести
к возникновению чрезвычайно опасной
ситуации. Устанавливайте микрофон
таким образом, чтобы он не мешал
управлять автомобилем. Рекомендуется
Установка микрофона
использовать зажимы (приобретаются
отдельно) для фиксации провода.
Установка на
солнцезащитный козырек
1 Вставьте провод микрофона в
желоб.
2 Установите зажим микрофона на
солнцезащитный козырек.
При опускании солнцезащитного
козырька распознавание голоса
ухудшается.
Установка на рулевую
колонку
1 Передвиньте основу микрофона,
чтобы отсоединить его от зажима
для микрофона.
Микрофон
Зажим микрофона
Основа микрофона
2 Установите микрофон на заднюю
часть рулевой колонки.
Шнур
микрофона
Желоб
Зажим микрофона
Двусторонняя лента

19Ru
Русский
Дисплей автоматически возвращается
в исходный режим.
→ В течение 30 секунд не было
выполнено никаких операций.
– Выполните операцию.
Диапазон повторного
воспроизведения самопроизвольно
изменяется.
→ В зависимости от выбранного
диапазона повторного
воспроизведения он может
изменяться при выборе другой папки
или дорожки, а также при перемотке
вперед/назад.
– Выберите диапазон повторного
воспроизведения еще раз.
Вложенная папка не воспроизводится.
→ Вложенные папки не
воспроизводятся, если выбран
диапазон [FLD] (повторное
воспроизведение папки).
– Выберите другой диапазон
повторного воспроизведения.
Имеются помехи звука.
→ Используется устройство, например,
сотовый телефон, которое может
вызывать шумовые помехи.
– Уберите приборы, вызывающие
помехи, от этого устройства.
Не воспроизводится звук с устройства
Bluetooth, используемого в качестве
источника сигнала.
→ Подключенный через Bluetooth
телефон занят звонком.
–Воспроизведение звука
возобновится после завершения
звонка.
→ Подключенный через Bluetooth
телефон в данный момент
используется.
–Не используйте в это время
телефон.
→ С помощью подключенного через
Bluetooth телефона был произведен и
сразу сброшен звонок. В результате
этого соединение между данным
устройством и мобильным
телефоном было завершено
неправильно.
–Восстановите соединение между
устройством Bluetooth и мобильным
телефоном.
Общие
AMP ERROR
→ Устройство не работает или
неправильно подсоединен динамик.
→ Сработала цепь защиты.
–Проверьте, подключен ли динамик.
–Поверните ключ зажигания в
положение OFF и верните в
положение ON. Если сообщение не
исчезает, свяжитесь с дилерским
центром или авторизованным
сервисным пунктом Pioneer.
NO XXXX (NO TITLE, например)
→ Нет встроенной текстовой
информации.
–Переключите дисплей или
воспроизведите другую дорожку/
файл.
Дополнительная информация
Устранение
неисправностей
Сообщения об ошибках
USB-устройство/iPod
FORMAT READ
→ Иногда происходит задержка между
началом воспроизведения и
появлением звука.
– Звук появится после того как с
дисплея исчезнет сообщение.
NO AUDIO
→ Композиции отсутствуют.
–Перенесите аудиофайлы на
запоминающее устройство USB и
подключите его.
→ На подключенном устройстве USB
включена защита.
– Следуйте инструкциям устройства
USB для снятия защиты.
SKIPPED
→ Подключенное устройство USB
содержит файлы, защищенные
технологией DRM.
– Защищенные файлы пропускаются.
PROTECT
→ Все файлы на подключенном
устройстве USB защищены по
технологии DRM.
– Замените устройство USB.
N/A USB
→ Подключенное устройство USB не
поддерживается данным
устройством.
– Отключите устройство и замените
его совместимым устройством USB.
CHECK USB
→ Короткое замыкание на разъеме USB
или кабеле USB.
– Убедитесь, что разъем USB или
кабель USB не защемлен и не
поврежден.
→ Подключенное запоминающее
устройство USB потребляет больше
максимально допустимой силы тока.
–Отсоедините запоминающее
устройство USB и не используйте
его. Установите ключ зажигания в
положение OFF, затем – в
положение ACC или ON.
Подключайте только совместимые
запоминающие устройства USB.
→ iPod работает, но не подзаряжается.
–Убедитесь в отсутствии короткого
замыкания в кабеле iPod (например,
что кабель не зажат между
металлическими предметами).
После проверки кабеля установите
ключ зажигания в положение OFF, а
затем – в положение ON, либо
отключите и заново подключите
iPod.
ERROR-19
→ Сбой связи.
–Выполните следующие операции,
затем снова выберите USB в
качестве источника.
• Поверните ключ зажигания в
положение OFF и верните в
положение ON.
• Отключите устройство USB.
• Выполните переключение на
другой источник.
→ Сбой iPod.
–Отключите кабель от iPod. При
отображении главного меню iPod
переподключите iPod и выполните
сброс настроек.
ERROR-23
→ Устройство USB отформатировано
неверно.
–Отформатируйте устройство USB в
FAT12, FAT16 или FAT32.
ERROR-16
→ Устаревшая версия прошивки iPod.
–Обновите версию iPod.
→ Сбой iPod.
–Отключите кабель от iPod. При
отображении главного меню iPod

20Ru
переподключите iPod и выполните
сброс настроек.
STOP
→ В текущем списке отсутствуют
композиции.
– Выберите список, содержащий
музыкальные композиции.
NOT FOUND
→ Композиций не найдено.
– Загрузите композиции на iPod.
Bluetooth-устройство
ERROR-10
→ Сбой питания модуля Bluetooth
данного устройства.
–Установите ключ зажигания в
положение OFF, затем – в
положение ACC или ON.
Приложения
NO BT DEVICE GO TO BT MENU TO
REGISTER
→ Устройство Bluetooth не найдено.
– Подключите основное и
подключаемое устройство по
Bluetooth (стр. 9).
CONN. FAILED PRESS BAND KEY TO
RETRY
→ Сбой подключения Bluetooth.
–Нажмите BAND/ , чтобы снова
выполнить соединение.
DISCONNECTED PRESS BAND KEY TO
RETRY
→ Сбой подключения Bluetooth.
–Нажмите BAND/ , чтобы снова
выполнить соединение.
CHECK APP
→ Сбой подключения к приложению.
– Следуйте инструкциям на экране.
START UP APP
→ Приложение еще не запущено.
– Используйте мобильное устройство
для запуска приложения.
Запоминающее устройство
USB
• Подключение через USB-концентратор
не поддерживается.
• Не подключайте другие устройства,
кроме запоминающих устройств USB.
Не допускайте падения устройства USB
на пол, где оно может застрять под
педалью газа или тормоза.
• В зависимости от типа запоминающего
устройства USB могут возникнуть
следующие проблемы.
–Управление функциями может
отличаться.
–Запоминающее устройство может не
распознаваться.
–Файлы могут не воспроизводиться
корректно.
–Устройство может создавать
шумовые помехи во время
прослушивания радио.
iPod
• Не оставляйте iPod в местах с высокой
температурой воздуха.
• При движении автомобиля надежно
закрепите iPod. Не допускайте падения
устройства iPod на пол, где оно может
застрять под педалью газа или
тормоза.
• Настройки iPod, такие как эквалайзер и
повторное воспроизведение,
изменяются автоматически при
подключении iPod к устройству. После
Рекомендации по
обращению с изделием
отключения iPod настройки будут
возвращены к исходным.
• Текст несовместимого формата,
сохраненный на iPod, не будет
отображаться устройством.
• В качестве названия файла или папки
могут отображаться только первые 32
символа (включая расширение).
• Это устройство может работать
некорректно в зависимости от
приложений, использованных для
кодирования WMA.
• При начале воспроизведения
аудиофайлов, содержащих
изображения, и файлов с
запоминающего устройства USB,
содержащего разветвленные иерархии
папок, может происходить небольшая
задержка.
• Русский текст для отображения на
данном устройстве должен быть
зашифрован в одном из следующих
форматов:
–Unicode (UTF-8, UTF-16)
–Другой формат, отличный от Unicode,
который используется в среде
Windows и настроен на русский язык.
ВНИМАНИЕ
• Pioneer не гарантирует совместимость
со всеми устройствами USB и не несет
ответственности за любую потерю
данных на медиапроигрывателях,
смартфонах и других устройствах при
использовании этого изделия.
• Не оставляйте диски или
запоминающее устройство USB в
местах с высокой температурой
воздуха.
Файлы WMA
Файлы MP3
Файлы WAV
• Файлы формата WAV невозможно
подключить через MTP.
Поддержка сжатых
аудиофайлов
Расширение .wma
Скорость передачи
данных
от 48 Кбит/с до
320 Кбит/с (CBR), от
48 Кбит/с до
384 Кбит/с (VBR)
Частота
дискретизации
32 кГц, 44,1 кГц,
48 кГц
Windows Media™
Audio Professional,
Lossless, Voice/DRM
Stream/Stream с
поддержкой видео
Не поддерживается
Расширение .mp3
Скорость передачи
данных
от 8 Кбит/с до
320 Кбит/с (CBR), VBR
Частота
дискретизации
от 8 кГц до 48 кГц
(32 кГц, 44,1 кГц,
48 кГц пиковая)
Совместимая версия
тегов ID3
1.0, 1.1, 2.2, 2.3, 2.4
(Версия тегов ID3 2.x
имеет приоритет
перед версией 1.x.)
Список
воспроизведения
M3u
Не поддерживается
MP3i (интерактивный
MP3), mp3 PRO
Не поддерживается
Расширение .wav
Разрядность
квантования
8 и 16 (LPCM), 4
(MSADPCM)
Частота
дискретизации
от 16 кГц до 48 кГц
(LPCM), 22,05 кГц и
44,1 кГц (MS ADPCM)

21Ru
Русский
Файлы FLAC (только для MVH-
170UI/170UBG/170UB)
• Файлы формата FLAC невозможно
подключить через MTP.
• Возможность воспроизведения файлов
FLAC зависит от того, какое
установлено кодирующее устройство.
USB-устройство
• При начале воспроизведения
аудиофайлов на запоминающем
устройстве USB, содержащем
разветвленные иерархии папок, может
возникать небольшая задержка.
Данное устройство поддерживает только
перечисленные ниже модели iPod.
Совместимые версии ПО для iPod также
указаны ниже. Более старые версии могут не
поддерживаться.
Сделано для
–iPod touch (поколения с 1-го по 5-е)
–iPodclassic
–iPod с видео
–iPod nano (поколения с 1-го по 7-е)
–iPhone5s
–iPhone5c
–iPhone5
–iPhone4S
–iPhone4
–iPhone3GS
–iPhone3G
–iPhone
• Доступные функции могут отличаться в
зависимости от поколения и/или
версии программного обеспечения
iPod.
• Пользователям iPod с разъемом
Lightning потребуется кабель Lightning
- USB (входит в комплект поставки
iPod).
• Пользователям iPod с интерфейсом
Dock Connector потребуется кабель
CD-IU51. Подробную информацию
можно получить по месту покупки.
• О совместимости файлов/форматов см.
в руководствах к iPod.
• Аудиокниги, подкасты:
поддерживаются
ВНИМАНИЕ
Компания Pioneer не несет
ответственности за потерю данных на
iPod, даже если эти данные будут
потеряны во время использования
данного устройства.
Расширение .flac
Частота
дискретизации
8/11,025/12/16/22,05/
24/32/44,1/48 [кГц]
Разрядность
квантования
16 бит
Режим каналов 1/2
Допустимая
иерархия папок
До восьми уровней
(реальная иерархия
папок составляет
менее двух уровней)
Количество
воспроизводимых
папок
Не более 500
Количество
воспроизводимых
файлов
Не более 15 000
Воспроизведение
файлов, защищенных
авторским правом
Не поддерживается
Устройство USB с
несколькими
разделами
Для
воспроизведения
доступен только
первый раздел.
Поддержка iPod
Пользователь не может назначать
номера папок и устанавливать
последовательность воспроизведения с
помощью данного устройства.
Последовательность аудиофайлов
зависит от подключенного устройства.
Обратите внимание, что
воспроизведение скрытых файлов на
устройстве USB невозможно.
Пример иерархии
Bluetooth
Bluetooth® (слово и логотипы) является
зарегистрированным товарным знаком и
принадлежит компании Bluetooth SIG, Inc.;
использование PIONEER CORPORATION этих
товарных знаков разрешено
соответствующей лицензией. Прочие
товарные знаки и торговые наименования
принадлежат соответствующим владельцам.
iTunes
Apple и iTunes являются торговыми
знаками компании Apple Inc.,
зарегистрированными в США и других
странах.
Последовательность
воспроизведения
аудиофайлов
Папка
Сжатый аудиофайл
до : Последовательность
воспроизведения
от 01 до 05: Номер папки
Таблица символов для
русского языка
Авторское право и
товарные знаки
D: Дисплей C: Буква

22Ru
WMA
Windows Media – это
зарегистрированная торговая марка или
торговая марка Microsoft Corporation в
США и/или других странах.
В данном изделии используются
технологии, принадлежащие
корпорации Microsoft, которые не
разрешается использовать или
распространять без лицензии от
Microsoft Licensing, Inc.
FLAC
Авторское право © 2000-2009 Josh
Coalson
Авторское право © 2011-2013 Xiph.Org
Foundation
Распространение и использование в
виде исходного кода или в бинарном
формате, с внесением изменений или
без изменений, разрешается на
следующих условиях:
– В распространяемых файлах с
исходным кодом должно содержаться
указанное выше уведомление об
авторских правах, этот список условий
и следующий документ об отказе от
ответственности.
– В распространяемых бинарных файлах
должна быть возможность
воспроизвести указанное выше
уведомление об авторских правах; в
комплект поставки таких файлов
должен быть включен настоящий
список условий, документ об отказе от
ответственности, включенный в пакет
документации, и/или прочие
материалы, поставляемые в комплекте.
– Ни название фонда Xiph.org
Foundation, ни имена его участников
не могут использоваться для рекламы
или продвижения продуктов,
создаваемых на основе этого
программного обеспечения без
специального предварительного
письменного разрешения.
НАСТОЯЩЕЕ ПРОГРАММНОЕ
ОБЕСПЕЧЕНИЕ ПРЕДОСТАВЛЯЮТСЯ
ВЛАДЕЛЬЦАМИ АВТОРСКИХ ПРАВ И
ДРУГИМИ СТОРОНАМИ НА УСЛОВИЯХ
“КАК ЕСТЬ” БЕЗ КАКИХ-ЛИБО ЯВНЫХ ИЛИ
ПОДРАЗУМЕВАЕМЫХ ГАРАНТИЙ,
ВКЛЮЧАЯ, НО ЭТИМ НЕ
ОГРАНИЧИВАЯСЬ, ПОДРАЗУМЕВАЕМЫЕ
ГАРАНТИИ ТОВАРОПРИГОДНОСТИ И
ПРИГОДНОСТИ ДЛЯ КОНКРЕТНОЙ ЦЕЛИ.
НИ ПРИ КАКИХ ОБСТОЯТЕЛЬСТВАХ НИ
ФОНД, НИ ЕГО УЧАСТНИКИ НЕ
ОТВЕЧАЮТ ЗА КАКИЕ-ЛИБО ПРЯМЫЕ,
КОСВЕННЫЕ, ПОБОЧНЫЕ,
ОПРЕДЕЛЯЕМЫЕ ОСОБЫМИ
ОБСТОЯТЕЛЬСТВАМИ УБЫТКИ,
ШТРАФНЫЕ УБЫТКИ ИЛИ
ПОСЛЕДУЮЩИЕ УБЫТКИ (ВКЛЮЧАЯ, НО
ЭТИМ НЕ ОГРАНИЧИВАЯСЬ, УЩЕРБ,
ВЫЗВАННЫЙ ПОИСКОМ ЗАМЕНЫ
ТОВАРОВ И УСЛУГ, УТРАТОЙ
ВОЗМОЖНОСТИ ЭКСПЛУАТАЦИИ,
ПОТЕРЕЙ ДАННЫХ, ПРИБЫЛИ ИЛИ
ПЕРЕРЫВАМИ В КОММЕРЧЕСКОЙ
ДЕЯТЕЛЬНОСТИ), НЕЗАВИСИМО ОТ
ПРИЧИНЫ ИХ ВОЗНИКНОВЕНИЯ И
ЛЮБОЙ ТЕОРИИ ОТВЕТСТВЕННОСТИ,
КАК ПО ДОГОВОРУ, ТАК И ПО
ГРАЖДАНСКИМ ИСКАМ, ИСКАМ ПО
СТРОГОЙ ОТВЕТСТВЕННОСТИ ИЛИ ЗА
ПРАВОНАРУШЕНИЯ (ВКЛЮЧАЯ
ХАЛАТНОСТЬ ИЛИ ИНЫЕ ПРИЧИНЫ),
ОБУСЛОВЛЕННЫЕ ЛЮБЫМ
ИСПОЛЬЗОВАНИЕМ ДАННОГО
ПРОГРАММНОГО ОБЕСПЕЧЕНИЯ, ДАЖЕ
ЕСЛИ ПОЛЬЗОВАТЕЛЬ ПРЕДУПРЕЖДЕН О
ВОЗМОЖНОМ УЩЕРБЕ.
iPod & iPhone
iPhone, iPod, iPod classic, iPod nano и iPod
touch являются товарными знаками
компании Apple Inc.,
зарегистрированными в США и других
странах.
Lightning является торговым знаком
компании Apple Inc.
“Made for iPod” и “Made for iPhone”
означает, что электронный прибор был
разработан с целью подключения
определенно к iPod или iPhone
соответственно, и имеется
сертифицикация разработчика о
соответствии с техническими
характеристиками Apple. Apple не несет
ответственности за работу данного
устройства или его соответствие со
стандартами по технике безопасности
или регулятивными нормами.
Пожалуйста, обратите внимание, что
использование данного прибора с iPod
или iPhone может отрицательно
сказываться на качестве беспроводной
связи.
Android™
Android является товарным знаком
компании Google Inc.
MIXTRAX
MIXTRAX является торговой маркой
PIONEER CORPORATION.

23Ru
Русский
Серийный номер
На этом рисунке показана информация о месяце и годе изготовления устройства.
P1 - Год изготовления
P2 - Месяц изготовления
Общие
Источник питания: 14,4 В пост. тока
(допустимый диапазон от 10,8 В до
15,1 В)
Система заземления: Заземление
отрицательного полюса
Максимальный потребляемый ток:
10,0 A
Размеры (Ш × В × Г):
DIN
Шасси: 178 мм × 50 мм × 97 мм
Передняя панель: 188 мм × 58 мм ×
17 мм
D
Шасси: 178 мм × 50 мм × 97 мм
Передняя панель: 170 мм × 46 мм ×
17 мм
Масса: 0,5 кг
Аудио
Максимальная выходная мощность:
50 Вт × 4
70 Вт × 1/2 Ω (для сабвуфера)
Номинальная выходная мощность:
22 Вт × 4 (от 50 Гц до 15 000 Гц,
суммарное значение коэффициента
нелинейных искажений 5%,
нагрузка 4 Ω для обоих каналов)
Сопротивление нагрузки: 4 Ω
(допустимо - от 4 Ω до 8 Ω)
Сопротивление нагрузки: 2,0 В
Контур громкости: +10 дБ (100 Гц),
+6,5 дБ (10 кГц) (громкость: –30 дБ)
Эквалайзер (5-полосный графический
эквалайзер):
Частота: 80 Гц/250 Гц/800 Гц/2,5 кГц/
8 кГц
Диапазон амплитудно-частотных
характеристик: ±12 дБ (с шагом
2дБ)
Сабвуфер (моно):
Частота: 50 Гц/63 Гц/80 Гц/100 Гц/
125 Гц/160 Гц/200 Гц
Год 2001 2002 2003 2004 2005 2006 2007 2008 2009 2010
Символ A B C D E F G H I J
Год 2011 2012 2013 2014 2015 2016 2017 2018 2019 2020
СимволKLMNOPQRS T
Месяц123456789101112
Символ A B C D E F G H I J K L
Технические
характеристики
Крутизна характеристики: –12 дБ/
окт, –24 дБ/окт
Усиление: +6 дБ до –24 дБ
Фаза: Нормальная/Обратная
USB
Стандартная спецификация USB: USB 2.0
полноскоростной
Максимальный потребляемый ток: 1 A
Класс USB: MSC (Mass Storage Class)
Файловая система: FAT12, FAT16, FAT32
Формат декодирования файлов MP3:
MPEG-1 и 2 Audio Layer 3
WMA формат декодирования: Вер. 7, 7.1,
8, 9, 10, 11, 12 (2-канальный звук)
(Windows Media Player)
FLAC формат декодирования: v1.3.0 (Free
Lossless Audio Codec) (только для
MVH-170UI/170UBG/170UB)
Формат сигнала WAV: Linear PCM и MS
ADPCM (без компрессии)
Тюнер FM
Диапазон частот: от 87,5 МГц до
108,0 МГц
Полезная чувствительность: 11 дБф
(1,0 мкВ/75 Ω, моно, отношение
сигнал/шум: 30 дБ)
Отношение сигнал/шум: 72 дБ (сеть IEC-
A)
Тюнер MW
Диапазон частот: от 531 кГц до 1 602 кГц
Полезная чувствительность: 25 мкВ
(отношение сигнал/шум: 20 дБ)
Отношение сигнал/шум: 62 дБ (сеть IEC-
A)
Тюнер LW
Диапазон частот: от 153 кГц до 281 кГц
Полезная чувствительность: 28 мкВ
(отношение сигнал/шум: 20 дБ)
Отношение сигнал/шум: 62 дБ (сеть IEC-
A)
Bluetooth
(Только для MVH-X370BT)
Версия: Bluetooth 3.0 certified
Выходная мощность: +4 дБм макс. (Класс
мощности 2)
Профили Bluetooth:
GAP (Generic Access Profile)
SDAP (Service Discovery Application
Profile)
OPP (Object Push Profile)
HFP (Hands Free Profile) 1.6
PBAP (Phone Book Access Profile)
A2DP (Advanced Audio Distribution
Profile)
AVRCP (Audio/Video Remote Control
Profile) 1.5
SPP (Serial Port Profile) 1.1
ПРИМЕЧАНИЕ
• Характеристики и конструкция могут
быть изменены без предварительного
уведомления.
• Данное устройство произведено в
Индонезии.
Примечание:
В соответствии со статьей 5 закона
Российской Федерации «О защите прав
потребителей» и постановлением
правительства Российской Федерации №
720 от 16.06.97 компания Pioneer Europe NV
оговаривает следующий срок службы
изделий, официально поставляемых на
российский рынок.
Автомобильная электроника: 6 лет
Прочие изделия (наушники, микрофоны и
т.п.): 5 лет

24Ru

25Ru
Русский

<QRD3283-B> EW
© 2014 PIONEER CORPORATION. All rights reserved.
© 2014 PIONEER CORPORATION. Tous droits de reproduction et de traduction réservés.
© PIONEER CORPORATION, 2014. Все права защищены.
-
 1
1
-
 2
2
-
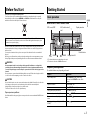 3
3
-
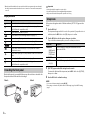 4
4
-
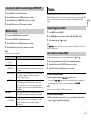 5
5
-
 6
6
-
 7
7
-
 8
8
-
 9
9
-
 10
10
-
 11
11
-
 12
12
-
 13
13
-
 14
14
-
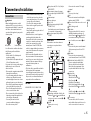 15
15
-
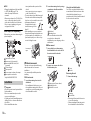 16
16
-
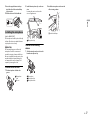 17
17
-
 18
18
-
 19
19
-
 20
20
-
 21
21
-
 22
22
-
 23
23
-
 24
24
-
 25
25
-
 26
26
-
 27
27
-
 28
28
-
 29
29
-
 30
30
-
 31
31
-
 32
32
-
 33
33
-
 34
34
-
 35
35
-
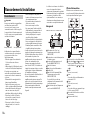 36
36
-
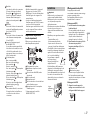 37
37
-
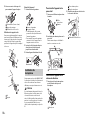 38
38
-
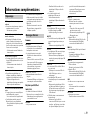 39
39
-
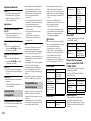 40
40
-
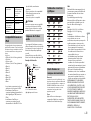 41
41
-
 42
42
-
 43
43
-
 44
44
-
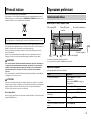 45
45
-
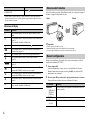 46
46
-
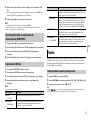 47
47
-
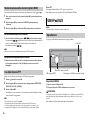 48
48
-
 49
49
-
 50
50
-
 51
51
-
 52
52
-
 53
53
-
 54
54
-
 55
55
-
 56
56
-
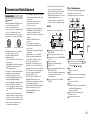 57
57
-
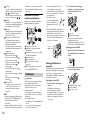 58
58
-
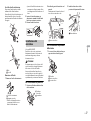 59
59
-
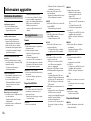 60
60
-
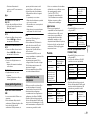 61
61
-
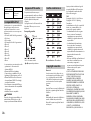 62
62
-
 63
63
-
 64
64
-
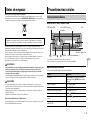 65
65
-
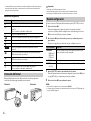 66
66
-
 67
67
-
 68
68
-
 69
69
-
 70
70
-
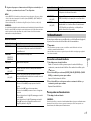 71
71
-
 72
72
-
 73
73
-
 74
74
-
 75
75
-
 76
76
-
 77
77
-
 78
78
-
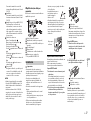 79
79
-
 80
80
-
 81
81
-
 82
82
-
 83
83
-
 84
84
-
 85
85
-
 86
86
-
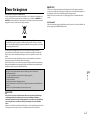 87
87
-
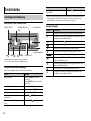 88
88
-
 89
89
-
 90
90
-
 91
91
-
 92
92
-
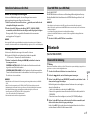 93
93
-
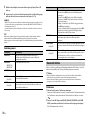 94
94
-
 95
95
-
 96
96
-
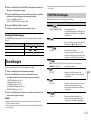 97
97
-
 98
98
-
 99
99
-
 100
100
-
 101
101
-
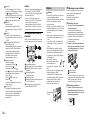 102
102
-
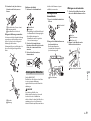 103
103
-
 104
104
-
 105
105
-
 106
106
-
 107
107
-
 108
108
-
 109
109
-
 110
110
-
 111
111
-
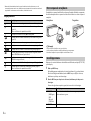 112
112
-
 113
113
-
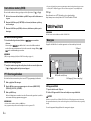 114
114
-
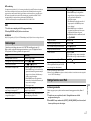 115
115
-
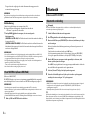 116
116
-
 117
117
-
 118
118
-
 119
119
-
 120
120
-
 121
121
-
 122
122
-
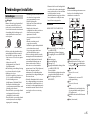 123
123
-
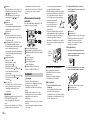 124
124
-
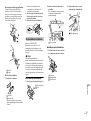 125
125
-
 126
126
-
 127
127
-
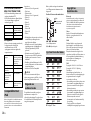 128
128
-
 129
129
-
 130
130
-
 131
131
-
 132
132
-
 133
133
-
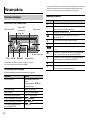 134
134
-
 135
135
-
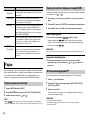 136
136
-
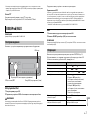 137
137
-
 138
138
-
 139
139
-
 140
140
-
 141
141
-
 142
142
-
 143
143
-
 144
144
-
 145
145
-
 146
146
-
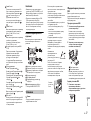 147
147
-
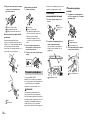 148
148
-
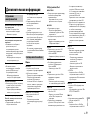 149
149
-
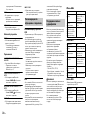 150
150
-
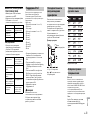 151
151
-
 152
152
-
 153
153
-
 154
154
-
 155
155
-
 156
156


en otros idiomas
- français: Pioneer MVH-170UI Manuel utilisateur
- italiano: Pioneer MVH-170UI Manuale utente
- Deutsch: Pioneer MVH-170UI Benutzerhandbuch
- Nederlands: Pioneer MVH-170UI Handleiding
Artículos relacionados
-
Pioneer MVH-170UBG Manual de usuario
-
Pioneer MVH-180UI Manual de usuario
-
-
-
Pioneer MVH-S300BT El manual del propietario
-
-
Pioneer DEH-X7800DAB El manual del propietario
-
Pioneer MVH-X580DAB Manual de usuario
-
Pioneer MVH-160UI Manual de usuario
-