Kichler Lighting 42896CH Manual de usuario
- Tipo
- Manual de usuario

Date Issued: 06/10/16 IS-42896-US
We’re here to help 866-558-5706
Hrs: M-F 9am to 5pm EST
CAUTION – RISK OF SHOCK –
Disconnect Power at the main circuit breaker panel or main fuse
box before starting and during the installation.
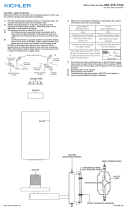
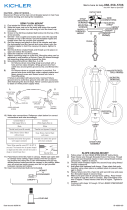
1) Find the appropriate threaded holes on mounting strap. As-
semble mounting screws into threaded holes.
2) Attach mounting strap to outlet box. Mounting strap can be
adjusted to suit position of fixture.
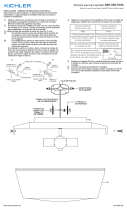
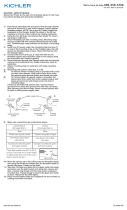
3) Grounding instructions: (See Illus. A or B)
A) On fixtures where mounting strap is provided with a
hole and two raise dimples. Wrap ground wire from
outlet box around green ground screw, and thread into
hole.
B) On fixtures where a cupped washer is provided. Put
ground wire from outlet box under cupped washer and
green ground screw and thread screw into hole in
mounting strap.
If fixture is provided with ground wire. Connect fixture
ground wire to outlet box ground wire with wire connector,
after following the above steps. Never connect ground wire
to black or white power supply wires.
4) Make wire connections. Reference chart below for correct
connections and wire accordingly.
5) Push fixture to wall, carefully passing mounting screws
through holes. Be sure not to pinch wires between wall and
canopy of fixture.
6) Screw threaded lock-up knobs with lock washers onto
mounting screws. Tighten lock-up knobs to secure fixture to
wall.
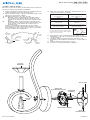
7) Slide the bobeche down over the socket
8) Screw in recommended bulb (not supplied).
GREEN GROUND
SCREW
CUPPED
WASHER
OUTLET BOX
GROUND
FIXTURE
GROUND
DIMPLES
WIRE CONNECTOR
OUTLET BOX
GROUND
GREEN GROUND
SCREW
FIXTURE
GROUND
A
B
Connect Black or
Red Supply Wire to:
Connect
White Supply Wire to:
Black White
*Parallel cord (round & smooth) *Parallel cord (square & ridged)
Clear, Brown, Gold or Black
without tracer
Clear, Brown, Gold or Black
with tracer
Insulated wire (other than green)
with copper conductor
Insulated wire (other than green)
with silver conductor
*Note: When parallel wires (SPT I & SPT II)
are used. The neutral wire is square shaped
or ridged and the other wire will be round in
shape or smooth (see illus.)
Neutral Wire
CRYSTAL
BOBECHE
CRYSTAL
FINIAL
GEMSTRAP
WITH GROUND SCREW
OUTLET BOX
WIRE
CONNECTOR(S)
STRAP
MOUNTING SCREW(S)
MOUNTING
SCREW(S)

Date Issued: 06/10/16 IS-42896-US
Estamos aquí para ayudarle 866-558-5706
Horario: Lunes-Viernes 9am a 5pm EST (hora oficial del este)
PRECAUCIÓN – RIESGO DE DESCARGA ELÉCTRICA –
Desconecte la electricidad en el panel principal del interruptor
automático o caja principal de fusibles antes de comenzar y
durante la instalación.
1) Agujeros en correa de montaje roscados encontrar el apro-
piado. Montar tornillos en agujeros roscados.
2) Coloque la correa de montaje en caja de salida. Correa de
montaje puede ajustarse para adaptarse a la posición de la
luminaria.
3) Instrucciones de conexión a tierra de: (ver Fig. A o B)
A) En partidos donde correa de montaje está provisto de
un agujero y dos crían hoyuelos. Envuelva cable de
tierra del tomacorriente tornillo verde de tierra y el hilo
en el agujero.
B) En instalaciones donde se proporciona una arandela
cónica. Poner cable a tierra de caja bajo la arandela
cónica y tornillo verde de tierra y tornillo de rosca en
orificio de sujeción.
Si el aparato viene con cable a tierra. Conecte el cable de
tierra de la luminaria al alambre de tierra caja de salida con
conector de cable, después de seguir los pasos anteriores.
Nunca conecte el cable de tierra a los conductores de ali-
mentación negro o blanco.
4) Haga las conexiones de alambres (No se provee
conectores). Vea la tabla de referencia de abajo para las
conexiones correctas y los alambres correspondientes.
5) Empuje la luminaria a la pared, cuidadosamente pasar
tornillos a través de orificios. Asegúrese de no pinzar los
cables entre la pared y la cubierta del aparato.
6) Tornillo rosca cierre las perillas con arandelas en los tornil-
los de montaje. Apriete los pomos de bloqueo para fijar la
luminaria a la pared.
7) Diapositiva la bobeche hacia abajo sobre el zócalo
8) Tornillo recomienda bombilla (no suministrado).
ARANDELA
CONCAVA
TIERRA DE LA
CAJA DE SALIDA
TORNILLO DE TIERRA,
VERDE
DEPRESIONES
TIERRA
ARTEFACTO
CONECTOR DE ALAMBRE
TIERRA DE LA
CAJA DE SALIDA
TORNILLO DE TIERRA,
VERDE
TIERRA
ARTEFACTO
A
B
Conectar el alambre de
suministro negro o rojo al
Conectar el alambre de
suministro blanco al
Negro Blanco
*Cordon paralelo (redondo y liso)
*Cordon paralelo (cuadrado y estriado)
Claro, marrón, amarillio o negro
sin hebra identificadora
Claro, marrón, amarillio o negro
con hebra identificadora
Alambre aislado (diferente del verde)
con conductor de cobre
Alambre aislado (diferente del
verde) con conductor de plata
*Nota: Cuando se utiliza alambre paralelo
(SPT I y SPT II). El alambre neutro es de forma
cuadrada o estriada y el otro alambre será de
forma redonda o lisa. (Vea la ilustracíón).
Hilo Neutral
BOBACHE
DE CRISTAL
FINIAL
DE CRISTAL
GEMSTRAP CON
TORNILLO DE TIERRA
CAJA DE SALIDA
CONECTORES
DE ALAMBRE
TORNILLO DE
MONTAJE DE LA
ABRAZADERA
TORNILLO
DE MONTAJE

Date Issued: 06/10/16 IS-42896-CB
INSTRUCTIONS
For Assembling and Installing Fixtures in Canada
Pour L’assemblage et L’installation Au Canada
Nous sommes là pour vous aider 866-558-5706
Heures : du lundi au vendredi, de 9h à 17h (heure de l’Est)
ATTENTION – RISQUE DE DÉCHARGES ÉLECTRIQUES -
Couper le courant au niveau du panneau du disjoncteur du
circuit principal ou de la boîte à fusibles principale avant de
procéder à l’installation.
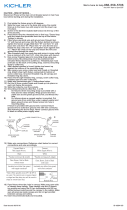
1) Trouver le cas échéant les trous sur une courroie de fixation
filetés. Monter vis de fixation dans les trous taraudés.
2) Fixer la sangle de fixation pour boîte de sortie. Sangle
de fixation peut être ajusté en fonction de la position de
l’appareil.
3) Connecter les ls. Se porter au tableau ci-dessous pour faire
les connexions.
4) Poussez luminaire au mur, soigneusement en passant vis
de fixation dans les trous. Être sûr de ne pas pincer les fils
entre le mur et la verrière de l’appareil.
5) Vis filetée boutons de lock-up avec des rondelles de
blocage sur les vis de montage. Serrer les boutons de ver-
rouillage pour fixer le luminaire au mur.
6) Diapositive le support vers le bas sur le socket.
7) Vis en recommandé ampoule (non fournie).
Connecter le fil noir ou
rouge de la boite
Connecter le fil blanc de la boîte
A Noir A Blanc
*Au cordon parallèle (rond et lisse)
*Au cordon parallele (à angles droits el strié)
Au bransparent, doré, marron, ou
noir sans fil distinctif
Au transparent, doré, marron, ou
noir avec un til distinctif
Fil isolé (sauf fil vert) avec
conducteur en cuivre
Fil isolé (sauf fil vert) avec
conducteur en argent
*Remarque: Avec emploi d’un fil paralléle
(SPT I et SPT II). Le fil neutre est á angles
droits ou strié et l’autre fil doit étre rond ou
lisse (Voir le schéma).
Fil Neutre
CRISTAL
BOBÈCHE
FLEURON
DE CRISTAL
GEMSTRAP
AVEC VIS DE TERRE
BOÎTE À PRISES
CONNECTEURS
DE FIL
VIS DE L’ÉTRIER
DE MONTAGE
VIS DE MONTAGE
-
 1
1
-
 2
2
-
 3
3


Kichler Lighting 42896CH Manual de usuario
- Tipo
- Manual de usuario
en otros idiomas
- français: Kichler Lighting 42896CH Manuel utilisateur
- English: Kichler Lighting 42896CH User manual
Artículos relacionados
-
 Kichler Lighting 45299CH Manual de usuario
-
Kichler Lighting 45495OZ Manual de usuario
-
 Kichler Lighting 45496OZ Manual de usuario
-
 Kichler Lighting 42894CH Manual de usuario
-
 Kichler Lighting 45195AVI Manual de usuario
-
 Kichler Lighting 43590AVI Manual de usuario
-
 Kichler Lighting 42893CH Manual de usuario
-
 Kichler Lighting 45390CH Manual de usuario
-
 Kichler Lighting 43999CH Manual de usuario
-
 Kichler Lighting 43896OZ Manual de usuario


