
HANDBOOK FOR COMPACT
OVERLOCK MACHINE
MANUAL DE INSTRUCCIONES DE LA
MAQUINA COMPACTA OVERLOCK
English
Español
Product Code: 884-B01
Please visit us at http://solutions.brother.com
where you can get product support and answers to
frequently asked questions (FAQs).
Visítenos en
http://solutions.brother.com
donde hallará consejos para la solución de problemas
así como la lista de preguntas y respuestas más
frecuentes.

IMPORTANT SAFETY INSTRUCTIONS
When using the sewing machine, basic safety precautions should always be followed, including the following.
Read all instructions before using this machine.
DANGER
To reduce the risk of electric shock.
The sewing machine should never be left unattended when plugged in.
Always unplug this sewing machine from the electrical outlet immediately
after using and before cleaning.
WARNING
To reduce the risk of burns, fi re, electric shock, or injury to persons.
1. Do not allow to be used as a toy. Close attention is necessary when the sewing machine is used by or near
children.
2. Use this sewing machine only for its intended use as described in this manual. Use only accessories
recommended by the manufacturer as contained in this manual.
3. Never operate this sewing machine if it has a damaged cord or plug, if it is not working properly, if it has been
dropped or damaged, or dropped into water. Return the sewing machine to the nearest authorized dealer or
service center for examination, repair, electrical or mechanical adjustment.
4. Never operate the sewing machine with any air openings blocked. Keep ventilation openings of the sewing
machine and foot controller free from the accumulation of lint, dust, and loose cloth.
5. Never drop or insert any object into any openings.
6. Do not use outdoors.
7. Do not operate where aerosol (spray) products are being used or where oxygen is being administered.
8. To disconnect, turn the main switch to the symbol "O" position which represents off, then remove plug from
outlet.
9. Do not unplug by pulling on cord. To unplug, grasp the plug, not the cord.
10. Keep fi ngers away from all moving parts. Special care is required around the sewing machine needle.
11. Always use the proper needle plate. The wrong plate can cause the needle to break.
12. Do not use bent needles.
13. Do not pull or push fabric while stitching. It may defl ect the needle causing it to break.
14. Switch the sewing machine to the symbol "O" position when making any adjustments in the needle area,
such as threading needle, changing needle, or changing presser foot, etc.
15. Always unplug the sewing machine from the electrical outlet when removing covers, lubricating, or when
making any other user servicing adjustments mentioned in the instruction manual.
16. This sewing machine is not intended for use by young children or infi rm persons without supervision.
17. Young children should be supervised to ensure that they do not play with this sewing machine.
18. Do not disassenble the machine.
19. If the LED light unit (light-emitting diode) is damaged, it must be replaced by authorized dealer.
CAUTION
To use the machine safely
1. (For U.S.A. only)
This appliance has a polarized plug (one blade wider than the other) to reduce the risk of electric shock, this
plug is intended to fi t in a polarized outlet only one way.
If the plug does not fi t fully in the outlet, reverse the plug. If it still does not fi t, contact a qualifi ed electrician to
install the proper outlet.
Do not modify the plug in any way.
2. Make sure you watch the needles carefully while you are sewing. Do not touch the hand wheel, needles,
knives, or other moving parts.
3. Turn off the main power and unplug the cord in the following circumstances:
- When you have stopped using the machine
- When you are replacing or removing the needle or any other part
- If there is a power failure while you are using the machine
- If you are checking or cleaning the machine
- Leaving the machine unattended
4. Do not store anything on the foot controller.
5. Fully plug the machine directly into the wall. Do not use extension cords.
6. If water is dropped on the machine, unplug the machine immediately, and contact your local authorized
dealer.
I

English
SAVE THESE INSTRUCTIONS
This machine is intended for household use.
FOR USERS IN COUNTRIES EXCEPT CENELEC COUNTRIES
This appliance is not intended for use by persons (including children) with reduced physical,
sensory or mental capabilities, or lack of experience and knowledge, unless they have been given
supervision or instruction concerning use of the appliance by a person responsible for their safety.
Children should be supervised to ensure that they do not play with the appliance.
FOR USERS IN CENELEC COUNTRIES
This appliance can be used by children aged from 8 years and above
and persons with reduced physical, sensory or mental capabilities or
lack of experience and knowledge if they have been given supervision or
instruction concerning use of the appliance in a safe way and understand
the hazards involved. Children shall not play with the appliance. Cleaning
and user maintenance shall not be made by children without supervision.
CAUTION
When leaving this sewing machine unattended, the main power and light switch of the machine must be
switched off or the plug must be removed from the socket-outlet.
When servicing the sewing machine, or when removing covers, the machine or the electrical set must be
disconnected from the supply by removing the plug from the socket-outlet.
7. Do not put furniture on the cord.
8. Do not bend the cord, or pull on the cord to unplug.
9. Do not touch the cord with wet hands.
10. Place the machine near to the wall outlet.
11. Do not place the machine on an unstable surface.
12. Do not put on the soft cover.
13. If you notice any abnormal sound or condition, consult your local authorized dealer.
To give your machine a longer life
1. Do not store this machine in direct sunlight or in high humidity conditions. Do not use or store the machine
near a heater, iron, halogen lamp or other hot object.
2. Use only mild soaps or detergents to clean the case. Benzene, thinner, and scouring powders can
damage the case and machine, and should never be used.
3. Do not drop or hit the machine.
4. Always consult this manual before you replace or fi t the presser foot, needle, or any other parts to make
sure you fi t them correctly.
To repair or adjust the machine
If the machine breaks down or needs adjustment, fi rst follow the troubleshooting table to inspect and adjust
the machine yourself. If the problem persists, consult your local authorized dealer.
II

FOR USERS IN THE UK, EIRE,
MALTA AND CYPRUS ONLY
IMPORTANT
- In the event of replacing the plug fuse, use a fuse approved by ASTA to BS 1362, i.e. carrying the mark,
rating as marked on plug.
- Always replace the fuse cover. Never use plugs with the fuse cover omitted.
- If the available electrical outlet is not suitable for the plug supplied with this equipment, you should contact
your authorized dealer to obtain the correct lead.
CONGRATULATIONS ON CHOOSING THIS COMPACT
OVERLOCK MACHINE
Your machine is a high quality, easy-to-use product. To fully enjoy all the features, we suggest that you study
this booklet.
If you need more information regarding the use of your machine, your nearest authorized dealer is always
happy to be of service.
Enjoy yourself!
CAUTION
When threading or replacing needle, the main power and light switch of the machine must be switched off or
the plug must be removed from the socket-outlet.
When the machine is not in use, it is recommended that the electric supply plug is disconnected from the wall
socket to avoid any possible hazards.
Notes on the motor
- The maximum operating speed of this sewing machine is 1,300 stitches per minute, which is quite fast
compared to the normal operating speed of 300 to 800 stitches per minute for the ordinary sewing machine.
- The bearings in the motor are made of a special sintered, oil-impregnated alloy mounted in oilsoaked felt to
withstand long hours of continuous operation.
- Continuous operation of the sewing machine can cause heat to build in the motor area, but not enough to
adversely affect its performance.
It is important to keep fabric and paper away from the air openings on the back and sides of the machine so
air can get to these openings.
- When the motor is running, sparks can be seen through the air openings in the motor bracket on the side
opposite the hand wheel. These sparks are produced by the carbon brushes and the commutator, and are
part of the machines normal operation.
WARNING LABELS
(for complying with UL and CSA requirements)
The following warning labels are on the machine.
Be sure to observe the precautions described in the labels.
1
Caution (U.S.A. and CANADA only)
2
Face plate sticker (U.S.A. and CANADA only)
III
2
1
Label locations

English
Contents
IMPORTANT SAFETY INSTRUCTIONS ...................................................................................
II
II
I
WARNING LABELS ...................................................................................................................
IIIIII
IIIIII
III
Contents ....................................................................................................................................1
Chapter 1: Names of parts and their functions ......................................................................2
Accessories ......................................................................................................................... 3
Powering the machine ........................................................................................................ 4
Turning direction of hand wheel ......................................................................................... 4
Opening/ Closing front cover .............................................................................................. 4
Attaching/ Removing presser foot ...................................................................................... 4
Trim trap ............................................................................................................................... 5
Free-arm sewing (removing bed extension) ...................................................................... 5
Wide table ............................................................................................................................ 5
Retracting knife ................................................................................................................... 6
Stitch length ......................................................................................................................... 6
Stitch width .......................................................................................................................... 6
Differential feed ................................................................................................................... 7
Adjusting the presser foot pressure.................................................................................... 7
Tension adjustment dial...................................................................................................... 8
Chart of thread tension adjustment, Two needle (Four-thread) ........................................ 9
Chart of thread tension adjustment, One needle (Three-thread) ...................................... 10
Chart of thread tension adjustment, One needle (Two-thread) ........................................ 10
Needle ................................................................................................................................. 11
Removing/Installing the needle .......................................................................................... 11
Chapter 2 : Preparation before threading ...............................................................................12
Thread tree .......................................................................................................................... 12
How to use the thread spool cap ........................................................................................ 12
How to use the thread net ................................................................................................... 12
Before threading.................................................................................................................. 12
Chapter 3: Threading ................................................................................................................13
Thread for two-needle four-thread overlock stitch ............................................................. 13
Thread for one-needle three-thread overlock stitch (right needle) ................................... 13
Thread for one-needle three-thread overlock stitch (left needle) ..................................... 13
Thread for one-needle two-thread overlock stitch (right needle) ...................................... 14
Thread for one-needle two-thread overlock stitch (left needle) ........................................ 14
Threading the lower looper ................................................................................................ 14
Threading the upper looper ................................................................................................ 16
Threading the left needle .................................................................................................... 17
Threading the right needle ................................................................................................. 17
Threading the needle (using the needle threader) ........................................................... 18
Chapter 4: Sewing materials, threads and needles comparison chart................................. 19
Chapter 5: Sewing ....................................................................................................................20
Stitch selection .................................................................................................................... 20
Test sewing ......................................................................................................................... 20
Chaining-off ......................................................................................................................... 21
To start sewing .................................................................................................................... 21
To remove work ................................................................................................................... 21
To secure chain ................................................................................................................... 22
If threads break during sewing ........................................................................................... 23
To sew fine materials .......................................................................................................... 23
To use the stitch finger W .................................................................................................... 23
Two-thread sewing.............................................................................................................. 24
Narrow overlock/Rolled hemming stitch ............................................................................ 25
Chart of narrow overlock/ Rolled hemming stitch .............................................................. 26
Chapter 6: Troubleshooting .....................................................................................................27
Chapter 7: Maintenance ............................................................................................................28
Cleaning .............................................................................................................................. 28
Oiling.................................................................................................................................... 28
Chapter 8: Introduction of optional feet ..................................................................................29
Blind stitch foot .................................................................................................................... 29
Taping foot ........................................................................................................................... 31
Pearl sequence foot ............................................................................................................ 32
Piping foot ............................................................................................................................ 33
Gathering foot ...................................................................................................................... 34
Specifications ........................................................................................................................... 35
Specifications ...................................................................................................................... 35
Setting record ...................................................................................... Inside of the back cover
1

2
<A>
<B>
<C><D>
<F><E>
12
CHAPTER 1
NAMES OF PARTS AND THEIR FUNCTIONS
Inside of the front cover
<A> Tweezers (accessory)
L Lower looper threading lever
M Thread take-up for loopers
N Upper looper
O Upper knife
P Lower looper
Q Stitch finger
R Knife lever
1 Front cover compartment
Accessories can be stored in this compartment.
<B> Thread change assembly, <C> Needle set,
<D> Hexagonal driver
2 Bed extension compartment
The removed stitch fingers can be stored in this
compartment. (See CHAPTER 5 "Narrow overlock/Rolled
hemming stitch".
<E> Stitch finger, <F> Stitch finger W
* Air openings (on the back)
1 Thread tree
2 Presser foot pressure adjustment screw
3 Spool pin
4 Spool support
5 Thread take-up cover
6 Needles
7 Bed extension
8 Presser foot
9 Material plate cover
0 Left needle thread tension dial
A Right needle thread tension dial
B Upper looper thread tension dial
C Lower looper thread tension dial
D Front cover
E Presser foot lifting lever
F Main power and light switch
G Stitch length adjustment dial
H Hand wheel
I Differential feed ratio adjustment dial
J Stitch width dial
K Thread guide

3
English
Accessories
Included accessory
1
Soft cover: X77871000
2
Accessory bag: XB2297001
3
Tweezers: XB1618001
4
Thread net (4): X75904000
5
Thread spool cap (4): X77260000
6
Cleaning brush: X75906001
7
Hexagonal driver: XB0393001
8
Needle set (SCHMETZ 130/705H): X75917001
#80: 2 pcs., #90: 2 pcs.
9
Foot controller:
XC7359021 (120V Area)
XB3112001 (230V Area)
XB3134001 (U.K.)
XB3200001 (Argentina)
XB3156001 (Korea)
XB3255001 (China)
XB3190001 (Australia, New Zealand)
XF2826001 (Brazil)
0
Instruction DVD: XB2007001 (NTSC)
XB2014001 (PAL)
A
Thread change assembly: XB1991001
B
Trim trap: XB1958001
C
Stitch fi nger W: XB1902001
Optional accessory
For further information about the following items,
see CHAPTER 8.
D
Blind stitch foot: X76590002
E
Gathering foot:
SA213 (U.S.A., CANADA)
X77459001 (OTHERS)
LG
F
Pearl sequence foot:
SA211 (U.S.A., CANADA)
X76670002 (OTHERS)
LS
G
Piping foot:
SA210 (U.S.A., CANADA)
XB0241101 (OTHERS)
LP
H
Taping (Elastic) foot:
SA212 (U.S.A., CANADA)
X76663001 (OTHERS)
I
Wide table assembly:
XB2023001
* In some regions, the wide table is an included
accessory.
The wide table can also be used as an
accessory box.
Size:
35 cm (W) x 25.5 cm (D)
[Approx. 13-3/4 inches (W) x 10 inches (D) ]
1
2
4
5
7
3
8
0
A
B
C
9
6

4
Powering the machine
Turning on the machine
1. Insert the three-pin plug into the socket on the
bottom right side of the machine. Insert the power
supply plug into a power outlet.
2. Turn the main power and light switch <A> to "I" mark
(to "O" mark to turn off).
<A>
Operation
When the foot controller is pressed lightly, the machine
runs at a low speed. As the foot controller is pressed
further, the machine will increase speed. When the foot
controller is released, the machine stops.
NOTE (For U.S.A. only):
Foot controller: Model KD-1902
This foot controller can be used on the machine with
product code 884-B01. The product code is mentioned
on the machine rating plate.
Turning direction of hand wheel
The hand wheel <A> turns in a counterclockwise
direction (direction of arrow). This is the same direction
as an ordinary home sewing machine.
The needles move to their highest positions by turning
the hand wheel so that the mark <B> on the hand wheel
is aligned to the line on the machine.
<A>
<B>
Opening/ Closing front cover
It is necessary to open the front cover when threading
this machine. Slide it to the right 1 and open 2, or
close it and slide it to the left.
CAUTION
For your safety, make sure that the front cover is
closed when operating the machine.
Always turn off the machine before opening the
front cover.
1
2
Attaching/ Removing presser foot
1. Turn off the main power and light switch or
disconnect the electric supply plug.
2. Raise the presser foot lever. 1
3. Turn the hand wheel 2 so that the mark on the hand
wheel is aligned to the line on the machine. (See
CHAPTER1 "Turning direction of hand wheel".)
4. Push the button on the presser foot holder and the
standard presser foot will be released. 3 4
5. Raise the presser foot farther by pushing the presser
foot lever upward. Then remove the presser foot and
store it in a safe location.
6. Again, raise the presser foot farther by pushing the
presser foot lever upward. Then place the presser
foot just under the presser foot holder <A> so that
the groove in the bottom of the presser foot holder
<B> is aligned and catches the bar on the top of the
foot <C>. Then lower the presser foot lever to
attatch the foot, pushing the button on the presser
foot.
<A>
<C>
<B>
1
1
2
3
4
4
2

5
English
Trim trap
The optional trim trap <A> holds the trimmed
fabric and thread produced when sewing.
<A>
<B>
To install:
Insert the trim trap <A> until it contacts the front cover.
NOTE:
Be sure to position the positioning guide <B> to the one
on the machine.
To remove:
Slowly pull out the trim trap.
NOTE:
The optional trim trap can also be used as the foot
controller holder.
CAUTION
Always remove the foot controller from the trim
trap when carrying the machine.
Free-arm sewing (removing bed extension)
Free-arm sewing enables tubular pieces to be sewn
more easily.
1. Remove the bed extension <A>.
<A>
NOTE:
Be careful not to lose the removed bed extension.
2. Position the fabric, and start sewing. (See CHAPTER
5.)
Wide table
Using the wide table <A> makes the large piece sewing
easy.
To install:
Attach the wide table <A> by pushing it in the direction
of the arrow until the edge line 1 is aligned to the line
2 of the bed extension <B>.
<A>
<B>
2
1
To remove:
To remove the wide table <A>, lift up the machine a little
and then pull out the wide table <A> in the direction of
the arrow.
<A>
NOTE:
Do not move the machine while the wide table <A> is
attached, otherwise damage or injuries may occur.

6
Retracting knife
To sew without cutting the fabric edge, you need to
retract the knife as follows.
CAUTION
Do not touch the knife.
Move the knife lever only while the needle is at its
lowest point.
Be sure to unplug the power supply cord from the
wall outlet before retracting the knife.
1. Pull up the knife lever <A>, then pull it to the right.
<A>
2. Bring down the knife.
3. Retract the knife completely, then take your hand off
from the lever.
Stitch length
The normal stitch length setting is 3 mm. To change the
stitch length, turn the stitch length adjustment dial on the
right side of the body.
1
2
<A>
1 Shorten the stitch length to a minimum of 2 mm (5/64
inch).
2 Lengthen the stitch to a maximum of 4 mm (5/32
inch).
<A> Selection mark
Stitch width
The normal stitch width setting for regular overlock stitch
is 5mm (13/64 inch). To change the stitch width, turn the
stitch width adjustment dial.
1
2
<A>
1 Increase the width to a maximum of 7 mm (9/32
inch).
2 Reduce the stitch width to a minimum of 5 mm
(3/16 inch).
<A> Selection mark

7
English
Differential feed
This serger is equipped with two sets of feed dogs under
the presser foot to move the fabric through the machine.
The differential feed controls the movement of both the
front and the rear feed dogs. When set at 1, the feed
dogs are moving at the same speed (ratio of 1). When
the differential feed ratio is set at less than 1, the front
feed dogs move slower than the rear feed dogs,
stretching the fabric as it is sewn. This is effective on
lightweight fabric that may pucker. When the differential
feed ratio is set at greater than 1, the front feed dogs
move faster than the rear feed dogs, gathering the fabric
as it is sewn. This function assists in removing the
rippling when serging stretch fabrics.
Differential feed adjustment
The normal setting is 1.0 on the differential feed
adjustment dial.
To adjust the diffrerential feed, turn the dial on the right
bottom of the body.
<A>
1
2
1 Less than 1.0 2 Greater than 1.0
<A> Selection mark
Feed
ratio
0.7 - 1.0
1.0
1.0 - 2.0
Main
feed
(rear)
Differential
feed
(front)
Effect
Material is
pulled tight.
Without
differential
feed.
Material is
gathered or
pushed
together.
Application
Prevents thin
materials from
puckering
Normal
sewing
Prevents
stretch
materials from
stretching or
puckering
An example
When stretch material is sewn without using the
differential feed, the edge will be wavy.
To get smooth finish, adjust the feed ratio from 1.0
toward 2.0.
(The feed ratio required depends on the elasticity of the
material.)
The more elastic the material, the further toward 2.0 the
differential feed ratio should be set. Test sew with a
scrap of the fabric to find the correct adjustment.
CAUTION
When sewing thick non-stretchable material such
as denim, do not use the differential feed as it may
damage the fabric.
Adjusting the presser foot pressure
Turn the pressure adjustment screw on the top left of the
machine. You can adjust by reffering the value on the
screw.
The normal setting is "2".
1
2
<A>
1 Less pressure
2 More pressure
<A> Selection mark

8
Tension adjustment dial
There is a thread tension dial for each needle thread,
the lower looper thread and the upper looper thread.
The correct thread tension may vary according to the
type and thickness of the fabric and the type of thread
used. Thread tension adjustments may be necessary for
any change in sewing materials.
1234
1 Yellow marked tension disc is for left needle.
2 Green marked tension disc is for right needle.
3 Pink marked tension disc is for upper looper.
4 Blue marked tension disc is for lower looper.
Tension control
Sewing is possible at position "4" for most
circumstances. (Standard: SPAN 60/3Z)
If the stitch quality is insufficient, select a different
tension setting.
4
5
3
<A> Tension selection mark
1 For heavy tension: 4 to 7
2 For light tension: 4 to 2
3 For medium tension: 5 to 3
If you cannot find the correct tension, refer to the charts
on following pages.
CAUTION
Make sure that the thread is properly seated in the
tension discs.

9
English
A
C
B
A
B
D
A
B
E
F
A
B
E
F
A
B
E
F
A
B
C
D
Chart of thread tension adjustment, Two-needle (Four-thread)
A: Reverse B: Surface C: Left needle thread D: Right needle thread E: Upper looper thread F: Lower looper thread
Right needle
thread is loose.
Left needle
thread is tight.
Right needle
thread is tight.
Upper looper
thread is tight.
Lower looper
thread is loose.
Upper looper
thread is loose.
Lower looper
thread is tight.
Upper looper
thread is loose.
Lower looper
thread is loose.
Left needle
thread is loose.
When you adjust the
thread tension, do it in the
following order:
(1) Left needle thread
(2) Right needle thread
(3) Upper looper thread
(4) Lower looper thread
This is the easiest way to
obtain the correct thread
tension.
Tighten left
needle thread.
(yellow)
Tighten right
needle thread.
(green)
Loosen left
needle thread.
(yellow)
Loosen right
needle thread
(green)
Loosen upper
looper thread
(pink)
Tighten lower
looper thread
(blue)
Tighten upper
looper thread
(pink)
Loosen lower
looper thread
(blue)
Tighten upper
looper thread
(pink)
Tighten lower
looper thread
(blue)

10
A
C
B
A
B
D
E
A
B
D
E
C
A
B
D
E
A
B
D
E
Chart of thread tension adjustment, One-needle (Three-thread)
When you adjust the
thread tension, do it in the
following order:
(1) Needle thread
(2) Upper looper thread
(3) Lower looper thread
This is the easiest way to
obtain the correct thread
tension.
A: Reverse B: Surface C: Needle thread D: Upper looper thread E: Lower looper thread
Needle thread is
tight.
Upper looper
thread is tight.
Lower looper
thread is loose.
Upper looper
thread is loose.
Lower looper
thread is tight.
Needle thread is
loose.
Tighten needle
thread.
(yellow or green)
Loosen needle
thread.
(yellow or green)
Loosen upper
looper thread
(pink)
Tighten lower
looper thread
(blue)
Tighten upper
looper thread
(pink)
Loosen lower
looper thread
(blue)
Tighten upper
looper thread
(pink)
Tighten lower
looper thread
(blue)
Upper looper
thread is loose.
Lower looper
thread is loose.
Chart of thread tension adjustment, One-needle (Two-thread)
A: Reverse B: Surface C: Needle thread D: Lower looper thread
A
C
D
B
A
C
D
B
A
C
D
B
Needle thread is
tight.
Lower looper
thread is loose.
Needle thread is
loose.
Lower looper
thread is tight.
Loosen needle
thread.
(yellow or green)
Tighten lower
looper thread
(blue)
Tighten needle
thread.
(yellow or green)
Loosen lower
looper thread
(blue)

11
English
Needle
This machine uses a standard home sewing
machine needle.
The recommended needle is SCHMETZ 130/705H
(#80 or #90).
Needle description
1 Back (flat side) 2 Front 3 Groove
1
2
3
How to check the needle
4 Flat surface
5 Place the needle on its flat side and check to see if the
space is parallel.
4
5
NOTE:
Countermeasures for material breakage <A>.
It can reduce the occurrence of material breakage by
using SCHIMETZ 130/705H SUK (#90) BALL POINT.
Removing/Installing the needle
<A> Removing/ installing the left needle
<B> Removing/ installing the right needle
2
<A> <B>
1
2
1
1 Tighten 2 Loosen
To remove:
1. Turn the main power and light switch to the
OFF position.
2. Turn the hand wheel so that the mark on the
hand wheel is aligned to the line on the
machine. (See CHAPTER 1 "Turning direction
of hand wheel".)
3. Loosen the corresponding needle set screw
with turning the included hexagonal driver
toward 2 in the figure, and remove the needle.
To install:
1. Turn the main power and light switch to the
OFF position.
2. Turn the hand wheel so that the line on the
hand wheel is aligned to the line on the
machine.
3. Hold the needle with its flat side away from you
and insert it up as far as it will go.
4. Tighten the needle set screw securely with
turning the included hexagonal driver toward
1 in the figure.
NOTE:
Make sure to insert the needles to the highest point in
the needle chamber.
If the needles have been inserted correctly, the right
needle should be set slightly lower than the left one.
CAUTION
Always be sure to turn off the power before
removing/ inserting the needle.
Do not drop the needle and needle set screw in
the machine, otherwise it may be damaged.

12
CHAPTER 2
PREPARATION BEFORE THREADING
Thread tree
Raise the telescoping thread tree to its highest
position. Make sure that the thread holders are in
alignment above the spool pins as illustrated
below.
1 Thread holder on thread tree
2 Spool pin
3 Correct position
3
2
1
How to use the thread spool cap
When using sewing thread spools, the thread
spool cap should be used as illustrated below.
Make sure that the spool notch is on the bottom.
1 Thread spool cap
How to use the thread net
If you are sewing with loosely spun nylon thread,
we recommend that you cover the spool with the
net supplied to prevent the thread from slipping off
the spool.
Adapt the net to the shape of the spool.
Before threading
1. Turn off the main power and light switch for
safety.
2. Raise the presser foot using presser foot lever.
3. Turn the hand wheel so that the mark on the
hand wheel <A> is aligned to the line <B> on
the machine. (See CHAPTER 1 "Turning
direction of hand wheel".)
<B>
<A>

13
English
CHAPTER 3
THREADING
Thread for two-needle four-thread
overlock stitch
Thread for one-needle three-thread
overlock stitch (right needle)
Thread for one-needle three-thread
overlock stitch (left needle)
2
1
3
4
5
6
7
3
4
<A>
left
needle
right
needle
7
2
1
3
4
5
6
7
3
4
<A>
7
2
1
3
4
5
6
7
3
4
<A>
7

14
Threading has to be done in the following order.
1. Lower looper
2. Upper looper
3. Left needle
4. Right needle
Threading the lower looper
Run the thread in the sequence illustrated,
following the blue color and the numbers next to
each threading point.
2
1
3
4
3
4
5
6
7
8
9
0
6
7
8
9
0
1. Open the front cover by sliding to the right and
guiding the top toward you.
2. Pull the thread off the spool and directly up
through the thread holder 1 and the thread
holder 2 on the thread tree from back to front.
3. Pass the thread through the thread guide 3 on
the top of machine.
4. Pass the thread through the tension disc 4
which is in the channel next to the blue tension
adjustment dial.
Thread for one-needle two-thread
overlock stitch (right needle)
Thread for one-needle two-thread
overlock stitch (left needle)
2
1
3
4
5
6
7
3
4
<A>
7
2
1
3
4
5
6
7
3
4
<A>
7

15
English
5. Guide the thread down the channel and pass
the thread through the threading points
5678 next to the blue color marks following
the numerical order in the accompanying
illustration.
NOTE:
Make sure to thread both of the thread take-ups
7
.
Continue on "Lower looper easy threading
operation".
Lower looper easy threading
operation
1. Slide the lower looper threading lever <A> to
the right.
The lower looper <B> moves to the position
illustrated as below.
<A>
<B>
<B>
CAUTION
Slide the threading lever only in the directions
shown by the arrow. Forcefully moving the
threading lever in any other direction may
damage it.
Before sliding the lower looper threading lever,
make sure the needle is at its highest position.
2. Pass the thread as illustrated.
3. Pass the thread through the eye of the lower
looper.
4. Slowly turn the hand wheel, and make sure the
lower looper returns to the original position.
NOTE:
If the lower looper thread breaks during sewing, cut and
remove thread from both of the needles.
Before re-threading the lower looper, make sure that the
lower looper re-threading is done exactly as
diagrammed. The machine will not operate properly if the
threading is not done in the proper sequence.
CAUTION
Thread the needles after the lower looper and
upper looper have been threaded.

16
5. Guide the thread down the channel and pass
the thread through the threading points
5678 next to the pink color marks following
the numerical order in the accompanying
illustration.
NOTE:
Make sure to thread only through the upper thread
take up
7
.
6. Pass the thread through the eye of the upper
looper 9.
NOTE:
If the upper looper thread breaks during sewing:
This may be caused by the lower looper thread getting
caught on the upper looper. If this happens, lower the
upperlooper by turning the hand wheel, remove the
lower looper thread from the upper looper, and re-thread
the upper looper from at least the tension disc.
Threading the upper looper
Run the thread in the sequence illustrated,
following the pink color and the numbers next to
each threading point.
2
1
3
4
3
4
5
6
8
9
7
7
6
8
9
1. Open the front cover by sliding to the right and
guiding the top toward you.
2. Pull the thread off the spool and directly up
through the thread holder 1 and the thread
holder 2 on the thread tree from back to front.
3. Pass the thread through the thread guide 3 on
the top of machine.
4. Pass the thread through the tension disc 4
which is in the channel next to the pink tension
adjustment dial.

17
English
Threading the left needle
1. Slide the change switch <A> to the left until it is
aligned to the "L" mark on the machine.
<A>
2. Run the thread in the sequence illustrated,
following the yellow color and the numbers
next to each threading point.
Two needles
One needle
2
1
3
4
5
6
7
3
4
<B>
7
a) Pull the thread off the spool and directly up
through the thread holder 1 and the thread
holder 2 on the thread tree from back to front.
b) Hold the thread with your left and right hands,
then pass the thread through the thread guide
3, and then pass the thread through the
tension disc 4 which is in the channel next to
the yellow tension adjustment dial.
c) Guide the thread down the channel and across
through the threading points 5 6 7 next to
the yellow color marks following the numerical
order in the accompanying illustration.
NOTE:
Make sure the thread is through the left of the
separater <B>.
CAUTION
· Turn off the machine before threading for safety.
· Turn the hand wheel so that the mark on the hand wheel is aligned to the line on the machine (See
CHAPTER 1 "Turning direction of hand wheel").
Threading the right needle
1. Slide the change switch <A> to the right until it
is aligned to the "R" mark on the machine.
<A>
2. Run the thread in the sequence illustrated
below, following the green color and the
numbers next to each threading point.
2
1
3
4
5
6
7
3
4
<B>
Two needles One needle
7
a) Pull the thread off the spool and directly up
through the thread holder 1 and the thread
holder 2 on the thread tree from back to front.
b) Hold the thread with your left and right hands,
then pass the thread through the thread guide
3, and then pass the thread through the
tension disc 4 which is in the channel next to
the green tension adjustment dial.
c) Guide the thread down the channel and across
through the threading points 5 6 7 next to
the green color marks following the numerical
order in the accompanying illustration.
NOTE:
Make sure the thread is through the right of the
separater <B>.

18
Threading the needle
(using the needle threader)
The needle can be threaded by one-touch
operation using the needle threader.
1. Lower the presser foot lever 1 to lower the
presser foot.
1
2. Pull the end of the thread, which has been
passed through the needle bar thread guide
2, to the left, then pass the thread through the
notch of the thread guide 3, and then firmly
pull the thread from the front and insert it into
the slit of the thread guide disk 4 all the way.
NOTE:
Make sure that the thread passes the notch of the
thread guide
3
.
2
3
4
3. Cut the thread with the thread cutter 5 on the
left side of the machine.
4. Lower the needle threader lever 6 on the left
side of the machine as much as possible.
6
The thread passes through the eye of the
needle.
5. Release the needle threader lever 6.
6. Carefully pull the loop of the thread through the
eye of the needle to pull out the end of the
thread.
7. Raise the presser foot lever 1, then pass the
end of the thread through the presser foot, and
then pull out about 5 cm (2 inches) of thread
toward the rear of the machine.
5cm

19
English
CHAPTER 4
SEWING MATERIALS,THREADS AND NEEDLES COMPARISON CHART
Needle
SCHMETZ
130/705H
#80
SCHMETZ
130/705H
#80
SCHMETZ
130/705H
#80
#90
SCHMETZ
130/705H
#80
#90
SCHMETZ
130/705H
#90
Material
Fine materials:
Georgette
Lawn
Organdy
Tricot
Fine materials:
Georgette
Lawn
Organdy
Tricot
Medium materials:
Broad cloth
Gabardine
Serge
Medium materials:
Broad cloth
Heavy materials:
Tweed
Denim
Knits
Stitch
Overlock
stitch
Narrow over
lock/Rolled
hemming stitch
Overlock
stitch
Narrow over
lock/Rolled
hemming
stitch
Overlock
stitch
Stitch Length
(mm)
2.0 - 3.0
R - 2.0
2.5 - 3.5
R - 2.0
3.0 - 4.0
Thread
Spun #80 - 90
Cotton #100
Filament #80 - 100
Needle thread :
Spun #80 - 90
Filament #80 - 100
Looper thread :
Woolly nylon thread
Spun #80 - 90
Filament #80 - 100
Spun #60 - 80
Cotton #60 - 80
Filament #60 - 80
Needle thread :
Spun #60 - 80
Filament #60 - 80
Looper thread :
Woolly nylon thread
Spun #60 - 80
Filament #60 - 80
Cotton #50 - 60
Spun #60
Filament #50 - 60
NOTE:
Decorative thread will work best in the upper looper for fashion sewing.

20
CHAPTER 5
SEWING
Stitch selection
Select the stitch pattern before you start sewing.
This sewing machine can sew five different
stitches by following the simple steps below:
Four-thread overlock stitch
Use all four threads and two needles for
producing four-thread overlock stitches.
Use: Produces strong seam. Ideal for sewing
knits and wovens.
Three-thread overlock stitch
5 mm (3/16 inch)
Use three threads and the left needle, producing 5
mm (3/16 inch) seams.
Use: For overlock stitching on suits, blouses,
slacks, etc. Ideal for medium to heavy materials.
NOTE:
Remove the right needle when sewing this overlock
stitch.
Three-thread overlock stitch 2.8 mm
(7/64 inch)
Use three threads and the right needle, producing
2.8 mm (7/64 inch) seams.
Use: For overlock stitching on suits, blouses,
slacks, etc. Ideal for fine to medium materials.
NOTE:
Remove the left needle when sewing this overlock
stitch.
Two-thread overlock stitch
5 mm (3/16 inch)
Use two threads and the left needle, producing 5
mm (3/16 inch) seams.
Use: For overlock stitching on suits, blouses,
slacks, etc. Ideal for medium to heavy materials.
NOTE:
Remove the right needle when sewing this overlock
stitch.
Two-thread overlock stitch 2.8 mm
(7/64 inch)
Use two threads and the right needle, producing
2.8 mm (7/64 inch) seams.
Use: For overlock stitching on suits, blouses,
slacks, etc. Ideal for fine to medium materials.
NOTE:
Remove the left needle when sewing this overlock
stitch.
Narrow overlock stitch 2.0mm (5/64
inch) and
Rolled hemming stitch 2.0mm (5/64
inch)
Use as decorative or finishing stitch. See "Narrow
overlock/Rolled hemming stitch" in this chapter
for details.
NOTE:
You can use the optional accessory foot for even more
varieties of stitches. See CHAPTER 8 for details.
Test sewing
Make the test sewing before you start sewing.
1. Set the thread tension as follows:
<For the four-thread overlock stitch and
three-thread overlock stitch>
· Set all the thread tension to "4".
<For the one-needle two-thread overlock
stitch>
· Set the needle thread tension to "2".
· Set the lower looper thread tension to "6".
(See "Chart of two-thread overlock stitch" in
this chapter for details.)
2. Thread the machine and pull all threads out
about 15 cm (6 inches) behind the presser
foot.

21
English
To start sewing
1. Thread the machine and pull all threads out
about 15 cm (6 inches) behind the presser
foot.
2. Lift the presser foot and place the material well
underneath the presser foot before starting to
sew. Slowly sew a few stitches by turning the
hand wheel.
3. The fabric will be fed automatically. You need
only guide it in the required direction.
4. Check the stitch formation (stitch chain) to see
if it is uniform. If the stitch is not uniform, re-
check that the threading has been done
properly and in sequence.
5. Follow the Seam Allowance Guide for
consistent cutting of the fabric seams. The
scale of Seam Allowance Guide shows 9.5,
12.7, 15.9, and 25.4mm (3/8, 1/2, 5/8, and 1
inches) when the stitch width dial is set to "5".
2
1
3
1 Presser foot 2 Upper knife 3 Seam Allowance Guide
To remove work
When the seam is finished, keep the machine
running at a low speed to obtain chaining-off.
Then cut the stitches 5 cm (2 inches) from the
work. If feeding for chaining-off is not enough, pull
the thread gently.
3. Place a piece of scrap material under the
presser foot for test sewing.
NOTE:
Always lift the presser foot before placing the fabric
under it. You cannot start sewing by just running
the fabric under the foot without lifting the presser
foot.
4. Holding all threads with your left hand, turn the
hand wheel slowly a few times toward you,
and check to see that the threads entwine
themselves before using the foot controller to
sew.
Chaining-off
After test-sewing, continue to depress the foot
controller slightly and chain-off 10cm (4 inches).
The threads will entwine themselves into a chain
automatically.
NOTE:
If the thread tension is not correctly balanced, the
chaining-off result will be uneven. If this happens, pull
the threads slightly. Check the threading order and
adjust the thread tension to create an even chain. (See
CHAPTER 1 "Tension adjustment dial".)

22
To secure chain
There are two methods available to secure the
chain.
Method 1
Secure the chain of the beginning and the end of
a stitch with your machine.
At the beginning of a stitch
1. Sew a few stitches, after chaining-off for 5cm
(2 inches).
2. Stop the machine and raise the presser foot.
3. Put the chain under the presser foot, and serge
over it pulling toward you.
4. After sewing a few stitches, cut off the extra
chain with the knife as illustrated.
At the end of a stitch
1. At the end of the seam, sew one stitch out of
the fabric before stopping the machine.
2. Raise the presser foot and the needles, then
reverse the fabric.
3. Lower the needles and the presser foot at the
same position.
4. Serge over the seam, taking care not to cut the
serged seam with a knife.
5. After sewing a few stitches, serge off the fabric
as illustrated.
6. Cut the threads with scissors.
Method 2
With this method, the chain at the beginning and
the end of a stitch can be secured in the same
manner.
1. Tie the thread unpicked from chain.
2. Insert the chain into the end of the seam, using
a hand sewing needle with large eye.
3. Fix the chain with a drop of fabric glue, and cut
the extra stitches after drying.

23
English
If threads break during sewing
Remove the material and re-thread in the correct
order, Lower looper, Upper looper, left needle
and then the right needle (to re-thread, see
CHAPTER 3 "Threading"). Replace the material
under the presser foot and sew 3-5 cm (1-1/8 to 2
inches) over the previous stitches.
CAUTION
Do not leave straight pins in the fabric when
sewing as they will damage the needles and
knives.
To sew fine materials
1. Adjust the presser foot pressure to prevent the
material from puckering and to allow sewing of
curves. (See CHAPTER 1 "Adjusting the
presser foot pressure".)
2. Loosen the thread tension, but remember that
if the tension is too loose, the thread may
break and stitches may be skipped.
To use the stitch finger W
When sewing stretch fabrics, using the included
stitch finger W prevents the fabric from stretching
without adjusting the thread tension.
Stitch finger Stitch finger W
“W” mark

24
Two-thread sewing
How to set the thread change assembly
NOTE:
Be sure to set the thread change assembly to the
machine after completing the needle threading
using the needle threader. (You cannot use the
needle threader with the thread change assembly
set to the machine.)
1. Turn off the machine for safety.
2. Turn the hand wheel so that the mark on the
hand wheel is aligned to the "
TC
" mark on the
machine.
TC
3. Hold the thread change assembly 1 with your
fingertips tightly so that the gap is closed as
shown below.
1
4. While holding the thread change assembly 1,
push the hole of the thread change assembly
onto the upper end of the OL shaft 2 so that
the OL shaft passes through the hole.
1
2
5. Push the thread change assembly 1 fully
downward until the tip 3 of the thread change
assembly is put in the eye of the upper looper
4.
1
4
3
Setting of the looper has finished.
Chart of two-thread overlock stitch
Make sure that the tip is in the
eye of the upper looper.
Stitch length
Stitch width
Stitch finger
Thread tension
Left needle
thread
Lower looper
thread
Right needle
thread
Lower looper
thread
For fine
materials
2 (1 - 3)
6 (5 - 7)
2 (1 - 3)
6 (5 - 7)
For medium
materials
2 (1 - 3)
6 (5 - 7)
2 (1 - 3)
6 (5 - 7)
3
5 - 7
Install

25
English
4. Store the removed stitch finger <A> and/or
stitch finger W <B> inside of the bed
extension.
<B><A>
NOTE:
Make sure to install a stitch finger when sewing
regular overlock stitches.
5. Adjust the stitch width adjustment dial up to the
"R" position.
<A>
<A> Selection mark
6. Adjust the stitch length.
Set the stitch length adjustment dial to "R to 2"
position (for narrow overlock stitch: R to 2, for
rolled hemming stitch: R).
3
<A>
<A> Selection mark
Narrow overlock/ Rolled hemming stitch
The Narrow overlock/Rolled hemming stitch is a
decorative finish for lightweight to midweight
fabrics. It is often used to complete the edge of a
fabric. This stitch is sewn by removing the left
needle and using the 3-thread overlock stitch.
Instructions for both narrow overlock/
Rolled hemming stitches
CAUTION
Turn off the main power and light switch before
removing/ installing a needle.
1. Remove the left needle.
NOTE:
For the recommended thread and needle, see
CHAPTER 4 "Sewing materials, threads, and
needles comparison chart".
2. Thread the machine for a three thread
overlock, using the right needle.
3. Remove the stitch finger <A>.
1 Raise the presser foot lever.
2 Pull all threads toward the back of the
machine.
3 Check to make sure that the thread is no
longer wrapped around the stitch finger.
4 Open the front cover.
5 Turn the hand wheel until the upperlooper
is at its lowest position.
6 Pull the stitch finger to the right and remove
it.
<A>

26
Chart of narrow overlock/ Rolled hemming stitch
Stitch Style
Materials
Needle thread
Upper looper thread
Lower looper thread
Stitch Length
Stitch Width
Stitch Finger
Thread Tension
Needle Thread
Upper looper Thread
Lower looper Thread
Rolled hemming stitch
Underside of material
Top of material
See CHAPTER 4 "Sewing
materials, threads, and needles
comparison chart".
See CHAPTER 4 "Sewing
materials, threads, and needles
comparison chart".
See CHAPTER 4 "Sewing
materials, threads, and needles
comparison chart".
See CHAPTER 4 "Sewing
materials, threads, and needles
comparison chart".
R
R
Removed
For fine materials
4 (3 - 5)
5 (4 - 6)
7 (6 - 8)
Narrow overlock stitch
Underside of material
Top of material
See CHAPTER 4 "Sewing
materials, threads, and
needles comparison chart".
See CHAPTER 4 "Sewing
materials, threads, and
needles comparison chart".
See CHAPTER 4 "Sewing
materials, threads, and
needles comparison chart".
See CHAPTER 4 "Sewing
materials, threads, and
needles comparison chart".
R - 2.0
R
Removed
For fine materials
4 (3 - 5)
5 (4 - 6)
5 (4 - 6)
For medium materials
5 (4 - 6)
5 (4 - 6)
7 (6 - 8)
For medium materials
5 (4 - 6)
6 (5 - 7)
6 (5 - 7)

27
English
CHAPTER 6
TROUBLESHOOTING
This sewing machine is designed for trouble-free operation. However, the following chart indicates trouble
which may occur if basic adjustments are not made properly.
Cause
Presser foot pressure too
loose
1. Needles bent, or needle
tip blunt
2. Needles incorrectly
installed
3. Material pulled forcibly
1. Improper threading
2. Thread tangled
3. Thread tension too tight
4. Needles incorrectly
installed
5. Wrong needle used
6. The tip of the thread
change assembly is not
in the eye of the upper
looper.
1. Needle bent, or needle
tip blunt
2. Needle incorrectly
installed
3. Wrong needle used
4. Improper threading
5. Presser foot pressure too
loose
6. The tip of the thread
change assembly is not
in the eye of the upper
looper.
Thread tensions are not
adjusted properly
1. Thread tension too tight
2. Improper threading or
thread tangled
Remedy
Turn the pressure adjustment screw clockwise to
increase the presser foot pressure. (See page 7.)
Replace with new needle. (See page 11.)
Install needles correctly. (See page 11.)
Do not press or pull material too hard when
sewing.
Thread correctly. (See pages 13-18.)
Check spool pin, thread holders, etc. and
remove tangled thread.
Adjust the thread tension. (See pages 8-10.)
Install needles correctly. (See page 11.)
Use correct needle
Schmetz 130/705H - suggested (See page 11.)
Put the tip of the thread change assembly in
the eye of the upper looper. (See page 24.)
Replace with new needle. (See page 11.)
Install needle correctly. (See page 11.)
Use correct needle.
Schmetz 130/705H - suggested (See page 11.)
Thread correctly. (See pages 13-18.)
Turn the pressure adjustment screw
clockwise to increase the presser foot
pressure. (See page 7.)
Put the tip of the thread change assembly in
the eye of the upper looper. (See page 24.)
Adjust the thread tension. (See pages 8-10.)
Decrease thread tension when sewing
lightweight or fine material.
(See pages 8-10.)
Thread correctly. (See pages 13-18.)
Trouble
1. Does not feed
2. Needles break
3. Threads break
4. Skipped stitches
5. Stitches are not
uniform
6. Fabric is puckered

28
CHAPTER 7
MAINTENANCE
Cleaning
CAUTION
Turn off the machine before cleaning.
Turn the hand wheel and move the needles down.
Periodically clean dust, trimmed fabric and thread
with the included cleaning brush.
Oiling
For smooth and silent operation, the moving parts
(indicated with arrows) of the machine should be
oiled periodically.
CAUTION
Turn off the machine before opening the front
cover and oiling.
NOTE:
Be sure to oil your sewing machine before use.
Always clean the lint off your machine before you apply
oil.
Oil the machine once or twice a month for normal use. If
the machine is used more often, oil it once a week.

29
English
CHAPTER 8
INTRODUCTION OF OPTIONAL FEET
6. Lower the presser foot lever, adjust the fabric
guide toward the folded edge.
7. Adjust the guide position of the presser foot
with the adjusting screw so that the needle is
lightly touching the crease in the fabric. In this
case, the thickness of the fabric is the
criterion.
By turning the screw forward (toward you) the
fabric guide will go to the right. By turning the
screw backward (away from you) the fabric
guide will go to the left.
3 Adjusting screw
4 Fabric guide
To adjust the position of the fabric guide, a
piece of the same fabric should be used to do
a sewing test.
8. While folding the fabric by hand, sew so that
the needle just catches the edge of the
crease.
9. Open the fabric as shown in the illustration.
For best results, use a fine thread in a color
that matches the fabric.
When done correctly, this stitch will be very
hard to see on the right side of the fabric.
Flatlock stitching
The Flatlock stitch is primarily used as a
decorative finish on a project. The finished stitch
can look like a ladder or small parallel lines when
the fabric is pulled flat.
Recommended settings
- Stitch Width: 5 mm
- Stitch Length: 2 - 4 mm
- Needle Thread Tension: 0-3
- Upper Looper Thread Tension: 2-5
- Lower Looper Thread Tension: 6-9
CAUTION
Turn off the machine while replacing the presser
foot.
Blind stitch foot
Features
When using the blind stitch presser foot (multi
purpose foot), you can sew blind stitches and
overlock at the same time. This is ideal when
sewing cuffs, trouser bottoms, pockets, and
hemming skirts etc.
The stitch guide on this foot is also useful when
sewing special stitches like flatlock, pin tuck and
other decorative stitches.
Blind stitching
The blind hem stitch is used for putting a near
invisible hem in garments or home decoration
projects. Use it to hem pants, skirts, or draperies.
Recommended settings
- Stitch Width: 5 mm
- Stitch Length: 3 - 4 mm
- Needle Thread Tension: Slightly Slackened (0-2)
- Upper Looper Thread Tension:
Slightly Tightened (5-7)
- Lower Looper Thread Tension:
Slightly Slackened (2-4)
Procedure
1. Attach the blind stitch foot (see CHAPTER 1
"Attaching/ Removing presser foot").
2. Set up the machine for 3 thread overlock stitch
with one needle in the left position.
The right needle should be removed.
3. Turn the wrong side of the fabric out, fold the
fabric once and then back to the required
width, as illustrated.
1 Reverse
2 Needle path
Sewing will be easier if a crease is ironed into
the folded fabric before sewing.
4. Turn the hand wheel so that the line on the
hand wheel is aligned to the line on the
machine (see CHAPTER 1 "Turning direction
of hand wheel").
5. Lift the presser foot lever and insert the fabric
with the folded edge on the left in such a way
that the needle pierces just the folded edge as
it sews.

30
Procedure
1. Attach the blind stitch foot (see CHAPTER 1
"Attaching/ Removing presser foot").
2. Set up the machine for 3 thread overlock with
one needle in the left position.
The right needle should be removed.
3. Fold the fabric as shown in the illustration.
1 Surface
4. Turn the hand wheel so that the line on the
hand wheel is aligned to the line on the
machine (see CHAPTER 1 "Turning direction
of hand wheel").
5. Lift the presser foot lever and insert the fabric
with the folded edge in such a way that the
needle pierces just on the fold.
6. Lower the presser foot lever, adjust the fabric
guide toward the folded edge.
7. Adjust the guide position of the presser foot
with the adjusting screw so that the needle
moves down to a position 1/8 inch (2.5 to 3.0
mm) inside the folded edge of the fabric, so
that some of the stitching loops over the edge.
2 Adjusting screw
3 Fabric guide
By turning the screw forward the fabric guide
will go to the right. By turning the screw
backward the fabric guide will go to the left.
To adjust the position of the fabric guide, a
piece of the same fabric can be used to do a
sewing test.
8. While holding the fabric pieces together, sew
at a constant speed down the fold.
9. When stiching is finished, pull the fabric open
(flat).
Either stitch finish can be used on the right
side of the fabric. If you sew with the wrong
sides together, the upper looper thread will
decorate the right side when pulled flat. If you
sew with the right sides together, the needle
thread ladder will decorate the right side when
pulled flat.
NOTE:
This method is not suitable for thin fabrics.
Pin tuck stitching
The Pin tuck stitch uses a rolled edge to add
shape and decoration to any sewing project.
Contrasting thread in the upper looper adds an
accent to your project.
For thin fabrics, it's a good idea to choose a fine
thread which will run smoothly.
Procedure
1. Attach the blind stitch foot (see CHAPTER 1
"Attaching/Removing presser foot").
2. Set up the machine for narrow overlock
stitching. (Refer to CHAPTER 5 "Narrow
overlock/Rolled hemming stitch".)
3. Draw equally spaced lines on the fabric with a
fabric pencil as guides for pin tuck placement.
Fold the fabric along one of the lines and
press in place lightly with an iron.
1 Making lines
2 Fold in two
4. Turn the hand wheel so that the line on the
hand wheel is aligned to the line on the
machine (see CHAPTER 1 "Turning direction
of hand wheel").
5. Lift the presser foot lever and insert the fabric
with the folded edge in such a way that the
needle pierces just the folded edge.
6. Lower the presser foot lever, adjust the fabric
guide toward the folded edge.
7. Align the blind stitch presser foot guide with the
line on the right side of the stitch finger.
By turning the screw forward the stitch guide
will go to the right. By turning the screw
backward the stitch guide will go to the left.

31
English
8. Align the fold with the guide and insert the
fabric up to the needle position.
3 Adjusting screw
4 Fabric guide
9. Guide the fold in the fabric to sew half way
between the needle and the upper knife.
10. Continue sewing until all marked lines have
been sewn.
Correct minor contractions by hand.
Taping foot
Features
By using the tape presser foot, you can sew
tapes, as well as elastics and hem at the same
time beautifully.
- Tapes or elastics from 6mm up to 12mm width
can be sewn.
- Attatching tapes is very useful for reinforcement
on stretchable materials sucn as knitted garment
at shoulder. Also attaching elastics is suitable
for sewing cuffs, necklines, etc.
<A> <B>
<A> Usage of the elastic
<B> Usage of the tape
Machine setting (type of stitch):
- 2 needle 4 thread overlock
- 1 needle 3 thread overlock (Either needle can
be used.)
How to set the elastic / tape
1
2
3
4
5
1. Attach the taping foot (see CHAPTER 1
"Attaching/ Removing presser foot").
2. Lift the presser foot lever.
3. Turn the hand wheel so that the line on the
hand wheel is aligned to the line on the
machine (see CHAPTER 1 "Turning direction
of hand wheel").
4. Flip open the tape guide 1, then set the
presser adjusting dial 2 at "0".
5. Put the tape or the elastic 5 through the slot
3.
6. Insert the tape or the elastic 5 through the slot
3 so that the righthand side of tapes / elastics
will be set along the guide 4.
7. Flip shut the tape guide 1 so that it will be set
at the lefthand side of tapes / elastics.
Test sewing
5
1. Lift the presser foot lever.
2. Insert the materials, till the edge of the
materials will touch the blade.
3. Lower the presser foot lever.
4. Set the stitch width control dial at "5".

32
5. Set the stitch length control lever.
- Tapes: between "3" and "4"
- Elastics: "4"
6. Adjust the presser adjusting dial 2
- at "0" when sewing with tapes.
- at desirable number for contraction when
sewing with elastics.
NOTE:
Contraction will be increased with larger number.
7. Make trial sewing and adjust thread tensions.
Example of proper sewing seam:
<B>
<A>
<C>
<D>
<A> Surface
<B> Tape
<C> Surface
<D> Elastic
NOTE:
Thread tensions are similar to normal overedging
when sewing with tapes.
It is recommendable to have a stronger tension for
under looper and over looper for beautiful finish.
It is advisable to make trial sewing on each material
/ thread due to different contraction.
Pearl sequence foot
Features
By using the pearl sequence foot, you can bead
on fabric. It is useful for decorated edge of
curtains, table clothes, dresses, etc. From 3mm to
5mm sequins and pearls can be sewn with this
foot.
LS
Preparation
1. Retract the knife (see CHAPTER 1 "Retracting
knife").
2. Attach the pearl sequence foot (see CHAPTER
1 "Attaching/ Removing presser foot").
3. Set up the machine for 3 thread overlock stitch
with one needle in the left position.
The right needle should be removed.
How to adjust the machine
1. Adjust the stitch length according to the length
as <A> or <B>. For example, 4mm stitch
length means 4mm for <A> or <B>.
<A>
<B>
<A>
<B>
2. Adjust stitch width 3 to 5mm.
3. Adjust thread tension as follows:
Needle thread: slightly decrease
Over looper thread: slightly decrease
Under looper thread: slightly increase
How to set fabric and pearl
1 ~ 1.5mm
1
2
3
1. Fold the fabric according to the line for pearl
fitting.
2. Place the fabric at needle dropping point
keeping the folded edge with guide 1.
3. Use the screw 2 and adjust the clearance
between folded edge needle so that it
becomes 1mm to 1.5mm.
4. Place the pearl through the guide just front of
guide tunnel 3.
Test sewing
1. Sew turning hand wheel by hand until the pearl
comes through the tunnel.
2. Sew at slow speed while guiding the strand of
pearls and fabric by hand.
3. Tie both ends of thread at the beginning and
end.
NOTE:
Thread tension is easy to loosen especially for small
size pearls. Retract movable stitch tongue for better
stitching.

33
English
Piping foot
Features
By using the piping foot, you can attach piping at
the edge of material. Piping is used to decorate
the edge of fabric (pajamas, sports ware), cover
for furniture, cushion, bag, etc.
LP
Preparation
Attach the piping foot (see CHAPTER 1
"Attaching/ Removing presser foot").
Machine setting (type of stitch):
- 2 needle 4 thread overlock
- 1 needle 3 thread overlock (the right needle
should be removed)
How to adjust the machine
1. Set stitch length at 3mm. (standard position)
2. Set stitch width at 5 to 6mm
3. Adjust thread tension for ordinary overlock
stitching (refer to CHAPTER 5 "Stitch
selection").
5 ~ 6mm
3mm
5 ~ 6mm
3mm
How to set fabric and piping tape
<A>
1
2
3cm
1 Surface 2 Reverse
1. Put piping tape between the 2 pcs of fabric and
adjust both edges of the fabric as illustrated.
Keep 3cm piping tape over the edge of fabric
for steady sewing. (The surface of fabric
should be inside.)
2. Place fabric with piping tape under presser
foot and put the piping tape into the groove
<A> of piping foot and start sewing.
Start sewing
1. Carefully guide the fabric and piping tape by
hands during sewing.
2. Turn both sides of the fabric after sewing.
NOTE:
For easy sewing, bast the both fabric and piping tape
before sewing.
Piping sewing is difficult at sharp angles.
In case of wide piping tape, the tape should be attached
after trimming the excess tape.

34
Gathering foot
Features
You can create beautiful gathers using the
gathering foot on various garment and home
decorating applications.
LG
Preparation
Attach the gathering foot (see CHAPTER 1
"Attaching/ Removing presser foot").
Machine setting (type of stitch):
- 2 needle 4 thread overlock
- 1 needle 3 thread overlock (Either needle can
be used.)
How to set fabric
1
2
3
1 Surface 2 Reverse
1. Raise the presser foot lever.
2. Turn the hand wheel so that the mark on the
hand wheel is aligned to the line on the
machine (see CHAPTER 1 "Turning direction
of hand wheel").
3. Position the bottom piece of fabric (the fabric
that will be gathered 1 under the guide 3 just
below the needle).
4. Position the top piece of fabric 2 between the
gathering foot and the guide 3 on top of the
bottom fabric 1.
5. Lower the presser foot lever.
Test sewing
1. Set the stitch length to 3mm.
2. Set the differential feed ratio to 2.
3. Set the stitch width to 5mm.
4. Adjust the other settings to those used during
normal overlock sewing.
5. Sew while keeping the fabric aligned with the
fabric guide 3.
- Adjust the size of the gathers by setting the
sitich length between 2mm and 5mm.
- Adjust the amount of fabric that is gathered
by setting the differential feed ratio between
1.0 and 2.0.
NOTE:
Do not pull or stretch the fabric.

35
English
Specifications
Use
Fine to heavy materials
Sewing speed
Maximum 1,300 stitches per minute
Stitch width
2.3 mm to 7 mm (3/32 to 9/32 inch)
Stitch length (pitch)
2 mm to 4 mm (5/64 to 5/32 inch)
Needle bar stroke
25 mm (63/64 inch)
Presser foot
Free presser type
Presser foot lift
5 mm to 6 mm (3/16 to 15/64 inch)
Needle
SCHMETZ 130/705H
No. of needles and threads
Two/Three/Four threads convertible
Two needles or single needle
Machine net weight
6 kgs.
Machine dimensions
33.5 cm (W) x 29.8 cm (H) x 27.9 cm (D)
(Approx. 13-2/5 (W) x 11-24/25 (H) x 11-4/25 (D)
inches)
Needle set SCHMETZ 130/705H.
#80 (2)
#90 (2)
SPECIFICATIONS

INSTRUCCIONES IMPORTANTES DE SEGURIDAD
Cuando utilice esta máquina, deberá tomar siempre medidas de seguridad básicas, incluidas las que se
enumeran a continuación.
Lea todas las instrucciones antes de utilizar esta máquina.
PELIGRO
Para reducir el riesgo de descarga eléctrica
La máquina de coser nunca deberá dejarse desatendida mientras esté
enchufada. Desconecte siempre el enchufe de la toma de corriente
inmediatamente después de su uso y antes de proceder a su limpieza.
ADVERTENCIA
Para reducir el riesgo de quemaduras, incendio, descarga eléctrica o lesiones
1. No permita que la máquina se utilice como un juguete. Deberá prestar especial atención cuando se utilice
cerca de niños o sea utilizada por ellos.
2. Utilice esta máquina de coser únicamente para los fi nes descritos en este manual. Utilice sólo los accesorios
recomendados por el fabricante en este manual.
3. Nunca ponga la máquina en funcionamiento si el cable o el enchufe están dañados, si no funciona
correctamente, si se ha caído o ha sufrido averías, o si se ha caído dentro del agua. Lleve la máquina al
proveedor o al servicio de reparaciones autorizado más cercano para que sea examinada, reparada o para
que se realicen los ajustes eléctricos o mecánicos necesarios.
4. Nunca utilice esta máquina si las aberturas de ventilación están bloqueadas. Mantenga las aberturas de
ventilación y el pedal de la máquina libres de pelusa, polvo y trocitos de tela.
5. Nunca permita que caigan objetos en ninguna de las aberturas, ni inserte nada en las mismas.
6. No la utilice en el exterior.
7. No la use en lugares donde se utilicen aerosoles (spray), ni en sitios donde se esté administrando oxígeno.
8. Para desconectar, coloque el interruptor principal en la posición “O”, que indica apagado y, a continuación,
desconecte el enchufe de la toma de corriente.
9. No desconecte el enchufe de la corriente tirando del cable. Para desenchufar, sujete el enchufe, no el cable.
10. Mantenga los dedos alejados de las piezas en movimiento. Hay que tener especial cuidado con la zona de la
aguja en la máquina de coser.
11.
Utilice siempre la placa de aguja correcta. Si utiliza una placa que no sea la adecuada, la aguja podría romperse
.
12. No utilice agujas dobladas.
13. No tire del tejido ni lo empuje cuando esté cosiendo. Podría desviar la aguja y romperla.
14. Cuando vaya a realizar ajustes en la zona de la aguja, como enhebrar la aguja, cambiarla, cambiar el
prensatelas, etc. coloque la máquina de coser en la posición con el símbolo “O”.
15. Desenchufe siempre la máquina de la toma de corriente cuando vaya a quitar alguna tapa, lubricar o cuando
vaya a realizar cualquier tipo de ajuste de mantenimiento indicado en este manual de instrucciones.
16. Esta máquina de coser no ha sido diseñada para ser utilizada por niños o personas enfermas sin la
supervisión de un adulto.
17. Los niños pequeños deberán ser vigilados para asegurarse de que no juegan con esta máquina de coser.
18. No desmonte la máquina.
19.
Si la unidad de LED (diodo emisor de luz) está dañada, deberá ser reemplazada por un proveedor autorizado
.
PRECAUCIÓN
Para utilizar la máquina de forma segura
1. (sólo para EE.UU.)
Este aparato tiene un enchufe polarizado (una patilla más ancha que la otra) para reducir el riesgo de descarga
eléctrica; este enchufe está diseñado para encajar en una toma de corriente polarizada de una sola manera.
Si el enchufe no encaja totalmente en la toma de corriente, déle la vuelta . Si aún así no encaja, póngase en
contacto con un electricista cualifi cado para instalar la toma de corriente adecuada.
No modifi que el enchufe de ningún modo.
2. Asegúrese de vigilar las agujas atentamente mientras cose. No toque la ruedecilla, las agujas, las cuchillas
ni otras partes móviles.
3. Desconecte la alimentación y desenchufe el cable en las siguientes circunstancias:
- Cuando termine de utilizar la máquina
- Cuando sustituya o retire la aguja, o cualquier otra pieza
- Si se produce un fallo de alimentación mientras utiliza la máquina
- Si está comprobando o limpiando la máquina
- Si deja la máquina desatendida
I

Español
4. No guarde nada en el pedal.
5. Enchufe la máquina directamente a la red. No utilice alargadores.
6. Si se derrama agua en la máquina, desenchúfela inmediatamente y póngase en contacto con el
proveedor autorizado local.
7. No coloque muebles sobre el cable.
8. No doble el cable, ni tire de él para desenchufar.
9. No toque el cable con las manos mojadas.
10. Coloque la máquina cerca de la toma de corriente.
11. No coloque la máquina sobre un objeto inestable.
12. No coloque la funda.
13. Si nota cualquier sonido o condición anormal, consulte con el proveedor autorizado local.
Para proporcionar una vida útil más larga a la máquina
1. No guarde esta máquina bajo la luz directa del sol ni en condiciones de mucha humedad. No utilice
ni guarde la máquina cerca de un calefactor, plancha, lámpara halógena ni ningún otro objeto que
desprenda calor.
2. Utilice únicamente jabones o detergentes neutros para limpiar la carcasa. El benceno, los disolventes y
los limpiadores en polvo pueden dañar la carcasa y la máquina, por lo que nunca se deben usar.
3. No deje caer ni golpee la máquina.
4. Consulte siempre este manual antes de cambiar o ajustar el prensatelas, la aguja o cualquier otro
elemento para asegurarse de que se ajustan correctamente.
Para reparar o ajustar la máquina
Si la máquina se estropea o precisa un ajuste, siga en primer lugar la tabla de localización de problemas
para inspeccionar y ajustar la máquina por sí mismo. Si el problema persiste, consulte con el proveedor
autorizado local.
CONSERVE ESTAS INSTRUCCIONES
Esta máquina ha sido diseñada para uso
doméstico.
PARA USUARIOS DE PAÍSES NO CENELEC
Este aparato no ha sido diseñado para ser utilizado por personas (niños incluidos) con alguna
discapacidad física, sensorial o mental, ni por personas sin experiencia o conocimientos técnicos,
a menos que hayan recibido supervisión o instrucciones relativas al uso del aparato por parte de
una persona responsable de su seguridad. Los niños deberán ser vigilados para asegurarse de
que no juegan con el aparato.
PARA USUARIOS EN PAÍSES CENELEC
Este aparato puede ser utilizado por niños de a partir de 8 años de edad y
por personas con capacidades físicas, sensoriales o mentales reducidas
o que carezcan de la experiencia y los conocimientos siempre y cuando
hayan recibido supervisión o instrucciones relativas al uso del aparato de
modo seguro y comprendan los riesgos existentes. No permita que los
niños jueguen con el aparato. La limpieza y el mantenimiento del usuario
no deben ser realizados por niños sin supervisión.
PRECAUCIÓN
Si deja esta máquina de coser desatendida, el interruptor de alimentación principal y de luz de la máquina
debe estar apagado o se debe desconectar el enchufe de la toma de corriente.
Al realizar el mantenimiento de la máquina de coser, o bien al retirar tapas, se debe desconectar la máquina o
el conjunto eléctrico del suministro retirando el enchufe de la toma de corriente.
II

SÓLO PARA LOS USUARIOS DEL REINO
UNIDO, IRLANDA, MALTA Y CHIPRE
IMPORTANTE
- Si cambia el fusible del enchufe, utilice un fusible homologado por ASTA para BS 1362, es decir, que lleve
la marca
correspondiente a la marca en el enchufe.
- No olvide volver a colocar siempre la tapa del fusible. No utilice nunca enchufes sin la tapa del fusible.
- Si la toma de corriente no es la adecuada para el enchufe suministrado con esta máquina, póngase en
contacto con un distribuidor autorizado para obtener el cable correcto.
ENHORABUENA POR HABER ELEGIDO ESTA COMPACTA
MAQUINA OVERLOCK
Su máquina es de una efi cacia y calidad excelentes; así pues, a fi n de disfrutar completamente de todas las
características incorporadas, le sugerimos que lea cuidadosamente el manual.
Si necesitara mayor información sobre el uso de esta máquina, el proveedor autorizado más cercano estará
encantado de ofrecerle sus servicios.
¡Diviértase!
PRECAUCIÓN
Al enhebrar o cambiar la aguja, el interruptor de alimentación principal y de luz de la máquina debe estar
apagado o se debe desconectar el enchufe de la toma de corriente.
Cuando no se utilice la maquina, se recomienda que el enchufe esté desconectado de la toma de corriente
de la pared, a fi n de evitar cualquier peligro.
Notas sobre el motor
- La velocidad máxima de funcionamiento de esta máquina de coser es de 1.300 puntadas por minuto, lo
que resulta bastante rápido comparado con la velocidad normal de 300 a 800 puntadas por minuto de las
máquinas de coser normales.
- Los cojinetes del motor están hechos de una aleación especial impregnada en aceite sintético y montada
en un fi eltro impregnado en aceite, para poder funcionar continuamente durante muchas horas.
- Un funcionamiento continuo de la máquina puede producir un calentamiento en la zona del motor, pero no
lo sufi ciente como para alterar su rendimiento y funcionamiento.
Sin embargo, es importante mantener las aberturas de ventilación de la parte trasera y de los lados de la
máquina sin tapar con tejido o papel durante el uso, para que el aire pueda circular por las aberturas.
- Durante el funcionamiento del motor, se pueden ver chispas a través de las aberturas de ventilación de la
abrazadera del motor, en el lado contrario a la ruedecilla. Estas chispas son producidas por las escobillas
de carbón que entran en contacto con el conmutador y forman parte del funcionamiento normal de la
máquina.
III

Español
Contenido
INSTRUCCIONES IMPORTANTES DE SEGURIDAD ...........................................................
II
II
I
Contenido............................................................................................................................... 1
Capítulo 1: Nombres de las partes y sus funciones .......................................................... 2
Accesorios ........................................................................................................................ 3
Encendido de la máquina ................................................................................................. 4
Cambio de la dirección de la ruedecilla ............................................................................ 4
Apertura/cierre de la tapa delantera ................................................................................. 4
Instalación/desmontaje del prensatelas ............................................................................ 4
Orificio de corte ................................................................................................................. 5
Costura de mangas (extracción del suplemento para la mesa) ....................................... 5
Mesa ancha ......................................................................................................................5
Repliegue de la cuchilla .................................................................................................... 6
Largo de las puntadas ...................................................................................................... 6
Ancho de las puntadas ..................................................................................................... 6
Alimentador con diferencial .............................................................................................. 7
Ajuste de la presión del prensatelas ................................................................................. 7
Disco de ajuste de la tensión ............................................................................................ 8
Tabla de ajuste de tensión de los hilos, dos agujas (cuatro hilos) ................................... 9
Tabla de ajuste de tensión de los hilos, una aguja (tres hilos) ......................................... 10
Tabla de ajuste de tensión de los hilos, una aguja (dos hilos) ......................................... 10
Aguja ................................................................................................................................. 11
Desmontaje/instalación de la aguja .................................................................................. 11
Capítulo 2: Preparación antes del enhebrado .................................................................... 12
Árbol del hilo ..................................................................................................................... 12
Como utilizar el tope del carrete ....................................................................................... 12
Cómo utilizar la malla para hilo ......................................................................................... 12
Antes de enhebrar ............................................................................................................ 12
Capítulo 3: Enhebrado .......................................................................................................... 13
Enhebrado para puntadas Overlock de dos agujas y cuatro hilos ................................... 13
Enhebrado para puntadas Overlock de una aguja y tres hilos (aguja derecha) ............... 13
Enhebrado para puntadas Overlock de una aguja y tres hilos (aguja izquierda) ............. 13
Enhebrado para puntadas Overlock de una aguja y dos hilos (aguja derecha) ............... 14
Enhebrado para puntadas Overlock de una aguja y dos hilos (aguja izquierda) ............. 14
Enhebrado del áncora inferior .......................................................................................... 14
Enhebrado del áncora superior ........................................................................................ 16
Enhebrado de la aguja izquierda ...................................................................................... 17
Enhebrado de la aguja derecha ........................................................................................ 17
Enhebrado de la aguja (utilizando el enhebrador de aguja) ............................................. 18
Capítulo 4: Tabla de relación entre los distintos tejidos, hilos y agujas de costura ....... 19
Capítulo 5: Costura ............................................................................................................... 20
Selección de las distintas puntadas .................................................................................. 20
Costura de prueba ............................................................................................................ 20
Cadeneta .......................................................................................................................... 21
Para empezar a coser ...................................................................................................... 21
Para retirar el trabajo ........................................................................................................ 21
Para asegurar la cadeneta ............................................................................................... 22
Si los hilos se rompen al coser ......................................................................................... 23
Para coser tejidos finos .................................................................................................... 23
Para utilizar la uñeta de puntadas W ................................................................................ 23
Puntada de dos hilos ........................................................................................................ 24
Puntada overlock estrecha/de dobladillo enrollado .......................................................... 25
Tabla de puntada overlock estrecha/de dobladillo enrollado ............................................ 26
Capítulo 6: Guía de localización de problemas .................................................................. 27
Capítulo 7: Mantenimiento.................................................................................................... 28
Limpieza ........................................................................................................................... 28
Engrasado ........................................................................................................................ 28
Capítulo 8: Introducción de prensatelas opcional ............................................................. 29
Prensatelas para puntadas invisibles ............................................................................... 29
Prensatelas para cintas .................................................................................................... 31
Prensatelas para tira de perlas ......................................................................................... 32
Prensatelas para ribeteados ............................................................................................. 33
Prensatelas fruncidor ........................................................................................................ 34
Especificaciones ................................................................................................................... 35
Especificaciones ............................................................................................................... 35
Notas de ajustes ..............................................................................Dentro de la tapa trasera
1

2
CAPÍTULO 1
NOMBRES DE LAS PARTES Y SUS FUNCIONES
Interior de la tapa delantera
<A> Pinzas (accesorio)
L Palanca de enhebrado del áncora inferior
M Toma de hilo para áncoras
N Áncora superior
O Cuchilla superior
P Áncora inferior
Q Uñeta de puntadas
R Palanca de cuchilla
1 Compartimento de la tapa delantera
Los accesorios pueden guardarse en este compartimiento.
<B> Conjunto de cambio de hilo, <C> Juego de agujas,
<D> Destornillador hexagonal
2 Compartimiento del suplemento para la mesa
Las uñetas de puntadas pueden guardarse en este
compartimiento. (Véase el CAPÍTULO 5 "Puntada overlock
estrecha/de dobladillo enrollada".
<E> Uñeta de puntadas, <F> Uñeta de puntadas W
* Aberturas de ventilación de la parte trasera y de los lados.
(en la parte trasera)
1 Árbol del hilo
2
Tornillo de ajuste de la presión del prensatelas
3 Portabobinas
4 Soporte de la bobina
5 Tapa de toma de hilo
6 Agujas
7 Suplemento para la mesa
8 Prensatelas
9 Tapa de tejido
0
Disco de tensión del hilo de la aguja izquierda
A
Disco de tensión del hilo de la aguja derecha
B Disco de tensión del hilo del áncora superior
C Disco de tensión del hilo del áncora inferior
D Tapa delantera
E Palanca de levantamiento del prensatelas
F Interruptor de alimentación principal y de luz
G Disco de ajuste del largo de las puntadas
H
Ruedecilla
I
Disco de ajuste de velocidad de
alimentación con diferencial
J
Disco de ancho de las puntadas
K Guía de enhebrado
<A>
<B>
<C><D>
<F><E>
12

Español
3
Accesorios
Accesorios incluidos
1
Funda: X77871000
2
Bolsa de accesorios: XB2297001
3
Pinzas: XB1618001
4
Malla para hilo (4): X75904000
5
Tope del carrete (4): X77260000
6
Cepillo limpiador: X75906001
7
Llave hexagonal: XB0393001
8
Juego de agujas (SCHMETZ 130/705H):
X75917001
n° 80: 2 unidades, n° 90: 2 unidades
9
Pedal:
XC7359021 (zona con 120 V)
XB3112001 (zona con 230 V)
XB3134001 (Reino Unido)
XB3200001 (Argentina)
XB3156001 (Corea)
XB3255001 (China)
XB3190001 (Australia, Nueva Zelanda)
XF2826001 (Brasil)
0
DVD de instrucciones: XB2007001 (NTSC)
XB2014001 (PAL)
A
Conjunto de cambio de hilo: XB1991001
B
Orifi cio de corte: XB1958001
C
Uñeta de puntadas W: XB1902001
Accesorios opcionales
Para obtener más información sobre los siguientes
elementos, véase el CAPÍTULO 8.
D
Prensatelas para puntadas invisibles:
X76590002
E
Prensatelas fruncidor:
SA213 (EE.UU., CANADÁ)
X77459001 (OTROS)
LG
F
Prensatelas para tiras de perlas:
SA211 (EE.UU., CANADÁ)
X76670002 (OTROS)
LS
G
Prensatelas para ribeteados:
SA210 (EE.UU., CANADÁ)
XB0241101 (OTROS)
LP
H
Prensatelas para cintas (elásticas):
SA212 (EE.UU., CANADÁ)
X76663001 (OTROS)
I
Conjunto de mesa ancha:
XB2023001
* En algunas regiones, la mesa ancha se
incluye como accesorio.
La mesa ancha también puede utilizarse como
caja de accesorios.
Tamaño:
35 cm (An) x 25.5 cm (Pr)
1
2
4
5
7
3
8
0
A
B
C
9
6

4
Encendido de la máquina
Activación de la máquina
1.
Introduzca el enchufe de tres puntas en la
conexión que se encuentra en el lado inferior
derecho de la máquina. Inserte el enchufe de
alimentación en una toma de corriente.
2.
Coloque el interruptor de alimentación principal
y de luz <A> en la marca “I” (utilice la marca
“O” para apagar).
<A>
Funcionamiento
Al oprimir ligeramente el pedal, la máquina
funcionará
a baja velocidad. A medida que se apriete más, la
máquina incrementará su velocidad. La máquina
se parará tan pronto como se suelte el pedal.
NOTA (sólo para EE.UU.):
Pedal: Modelo KD-1902
Este pedal se puede utilizar en la máquina con código
de producto 884-B01. El código de producto se
menciona en la placa de características de la máquina.
Cambio de la dirección de la ruedecilla
La ruedecilla <A> funciona en el sentido contrario
al de las manecillas del reloj (dirección de la
flecha). Es la misma dirección que en la mayoría
de las máquinas de coser domésticas.
Las agujas se mueven hasta sus posiciones más
altas girando la ruedecilla hasta que la marca <B>
de la misma queda alineada con la línea de la
máquina.
<A>
<B>
Apertura/cierre de la tapa delantera
Es necesario abrir la tapa delantera para enhebrar la
máquina. Deslícela hacia la derecha 1 y ábrala
2
,
o bien ciérrela y deslícela hacia la izquierda.
PRECAUCIÓN
Por su propia seguridad, asegúrese siempre de
que la tapa delantera esté bien cerrada antes de
hacer funcionar la máquina.
Apague siempre la máquina antes de abrir la tapa
delantera.
1
2
Instalación/desmontaje del prensatelas
1. Apague el interruptor de alimentación principal y de
luz o desconecte el enchufe de la toma de corriente.
2. Levante la palanca del prensatelas. 1
3.
Gire la ruedecilla 2 hasta que la marca de la misma
queda alineada con la línea de la máquina (véase el
CAPÍTULO 1 “Cambio de la dirección de la ruedecilla”).
4. Oprima el botón del soporte del prensatelas para
liberar el prensatelas estándar. 3 4
5.
Levante más el prensatelas empujando la palanca del
prensatelas hacia arriba. A continuación, extraiga el
prensatelas y guárdelo en una ubicación segura.
6. De nuevo, levante más el prensatelas empujando la
palanca del prensatelas hacia arriba. A continuación,
coloque el prensatelas justo debajo del soporte del
prensatelas <A> de modo que el canal situado en la
parte inferior del soporte del prensatelas <B> quede
alineado y atrape la barra de la parte superior del
prensatelas <C>. Después, baje la palanca del
prensatelas para acoplarlo, oprimiendo el botón del
prensatelas.
<A>
<C>
<B>
1
1
2
3
4
4
2

5
Español
Orificio de corte
El orificio de corte opcional <A> sostiene el hilo y el
tejido cortado generados al coser.
<A>
<B>
Para instalar:
Inserte el orificio de corte <A> hasta que toque la tapa
delantera.
NOTA:
Asegúrese de situar la guía de colocación <B> en la
guía de la máquina.
Para desmontar:
Saque lentamente el orificio de corte.
NOTA:
El orificio de corte opcional también se puede utilizar
como el soporte del pedal.
PRECAUCIÓN
Extraiga siempre el pedal del orificio de corte al
transportar la máquina.
Costura de mangas (extracción del
suplemento para la mesa)
La costura sin brazo permite coser trozos tubulares de
tejido de forma más sencilla.
1. Extraiga el suplemento para la mesa <A>.
<A>
NOTA:
Asegúrese de no perder el suplemento para la mesa
extraído.
2. Coloque el tejido y comience a coser (véase el
CAPÍTULO 5).
Mesa ancha
La utilización de la mesa ancha <A> facilita el cosido de
piezas grandes.
Para instalar:
Fije la mesa ancha <A> empujándolo en la dirección de
la flecha hasta que la línea del borde
1
quede alineada
con la línea
2
del suplemento para la mesa <B>.
<A>
<B>
2
1
Para quitar:
Para quitar la mesa ancha <A>, levante ligeramente la
máquina y después tire de la mesa ancha <A> en la
dirección de la flecha.
<A>
NOTA:
No mueva la máquina mientas la mesa ancha <A> esté
fijada, ya que de lo contrario podrían ocurrir daños o
lesiones.

6
Repliegue de la cuchilla
Para coser sin cortar el borde del tejido, necesita
replegar la cuchilla de la siguiente forma.
PRECAUCIÓN
No toque la cuchilla.
Mueva la palanca de cuchilla sólo cuando la aguja
esté en el punto más bajo.
Asegúrese de desconectar el cable de alimentación
de la toma de corriente antes de replegar la cuchilla.
1. Levante la palanca de cuchilla <A> y tire de ella
hacia la derecha.
<A>
2. Baje la cuchilla.
3. Repliegue la cuchilla completamente y retire la mano
de la palanca.
Largo de las puntadas
Un ajuste normal para el largo de las puntadas se sitúa
en 3 mm. Para cambiar el largo de las puntadas, gire el
disco de ajuste del largo de las puntadas en el lado
derecho de la máquina.
1
2
<A>
1 Acorte la longitud de puntada a un mínimo de 2 mm.
2 Alargue la puntada a un máximo de 4 mm.
<A> Marca de selección
Ancho de las puntadas
El ajuste normal del ancho de puntada para una
puntada overlock corriente es de 5 mm. Para cambiar el
ancho de puntada, gire el disco de ajuste del ancho de
las puntadas.
1
2
<A>
1 Aumente el ancho a un máximo de 7 mm.
2 Acorte el ancho de puntada a un mínimo de 5 mm.
<A> Marca de selección

7
Español
Alimentador con diferencial
Esta máquina de coser está provista de dos series de
alimentadores debajo del prensatelas para guiar el
tejido por la máquina. El alimentador con diferencial
controla los movimientos de los alimentadores
delanteros y traseros. Al ajustarlo en 1, los
alimentadores se desplazarán a una velocidad idéntica
(velocidad de 1). Al ajustar la velocidad del alimentador
con diferencial en menos de 1, los alimentadores
delanteros se mueven más despacio que los traseros,
estirando el tejido a medida que se cose. Esta
operación resulta muy efectiva al coser materiales finos
que pueden arrugarse. Cuando la velocidad del
alimentador con diferencial esté ajustada en un valor
superior a 1, los alimentadores delanteros se mueven
más rápido que los alimentadores traseros, juntando el
tejido al coserlo. Esta función permite quitar las arrugas
al coser tejidos que se estiran.
Ajuste del alimentador con diferencial
El ajuste normal es de 1,0 en el disco de ajuste del
alimentador con diferencial.
Para ajustar el alimentador con diferencial, gire el disco
en el lado inferior derecho de la máquina.
<A>
1
2
1 Menos de 1,0 2 Más de 1,0 <A> Marca de selección
Ejemplo
Al coser tejidos extensibles sin utilizar una alimentación
con diferencial, su borde quedará ondulado.
Para obtener un acabado liso, ajuste la velocidad del
alimentador de 1,0 hacia 2,0
(la velocidad del alimentador requerida dependerá de la
elasticidad del material).
Cuanto más elástico sea el tejido, más hacia 2,0 se
debe colocar el ajuste de la velocidad de alimentación
con diferencial. Haga una prueba con un fragmento de
tejido para encontrar el ajuste correcto.
PRECAUCIÓN
Si debe coser tejidos gruesos que no son
elásticos, tales como el tejano, no trabaje con el
alimentador con diferencial para no deteriorar el
material.
Ajuste de la presión del prensatelas
Gire el tornillo de ajuste de la presión situado en la parte
superior izquierda de la máquina. Puede realizar el
ajuste haciendo referencia al valor del tornillo.
El ajuste normal es “2”.
1
2
<A>
1 Menos presión
2 Más presión
<A> Marca de selección
Velocidad
de
alimen-
tación
0,7 - 1,0
1,0
1,0 - 2,0
Alimen-
tador
principal
(trasero)
Alimen-
tador con
diferencial
(delantero)
Efecto
El tejido
se estira.
Sin
alimentación
con
diferencial.
El tejido se
contrae o
se junta.
Uso
Impide que
los tejidos
finos se
frunzan.
Costura
normal.
Impide que
los tejidos
extensibles
se estiren o
frunzan.

8
Disco de ajuste de la tensión
Existe un disco de tensión para el hilo de cada aguja,
el hilo del áncora superior y el del áncora inferior. La
tensión de hilo correcta puede variar dependiendo del
tipo y grosor del tejido así como del tipo de hilo utilizado.
Ajustes de tensión del hilo pueden revelarse necesarios
al cambiar de materiales de costura.
1234
1 El disco de tensión con marca amarilla es para la
aguja izquierda.
2 El disco de tensión con marca verde es para la aguja
derecha.
3 El disco de tensión con marca rosada es para el
áncora superior.
4 El disco de tensión con marca azul es para el áncora
inferior.
Control de la tensión
Se puede coser en la posición “4”, en la mayoría de los
casos (estándar: SPAN 60/3Z).
Si la calidad de las puntadas resulta insuficiente,
seleccione un ajuste de tensión distinto.
4
5
3
1
2
3
<A> Marca de selección de tensión
1 Para tensión fuerte: 4 a 7
2 Para tensión ligera: 4 a 2
3 Para tensión media: 5 a 3
Si no puede encontrar la tensión correcta, consulte las
tablas de las siguientes páginas.
PRECAUCIÓN
Asegúrese de que el hilo esté bien colocado en
los discos de tensión.

Español
9
A
C
B
A
B
D
A
B
E
F
A
B
E
F
A
B
E
F
A
B
C
D
Tabla de ajuste de tensión de los hilos, dos agujas (cuatro hilos)
A: Revés B: Derecho C: Hilo de la aguja izquierda D: Hilo de la aguja derecha E: Hilo del áncora superior
F: Hilo del áncora inferior
El hilo de la aguja
derecha está
suelto.
El hilo de la aguja
izquierda está
tenso.
El hilo de la aguja
derecha está
tenso.
El hilo del áncora
superior está
tenso.
El hilo del áncora
inferior está
suelto.
El hilo del áncora
superior está
suelto.
El hilo del áncora
inferior está
tenso.
El hilo del áncora
superior está
suelto.
El hilo del áncora
inferior está
suelto.
El hilo de la aguja
izquierda está
suelto.
Al ajustar la tensión de los
hilos, debe hacerlo en el
orden siguiente:
(1) Hilo de la aguja
izquierda
(2)
Hilo de la aguja
derecha
(3) Hilo del áncora superior
(4) Hilo del áncora inferior
Es la mejor forma de lograr
una tensión de hilo
correcta.
Tense el hilo de
la aguja izquierda
(amarillo).
Tense el hilo de
la aguja derecha
(verde).
Afloje el hilo de la
aguja izquierda
(amarillo).
Afloje el hilo de la
aguja derecha
(verde).
Afloje el hilo del
áncora superior
(rosado).
Tense el hilo del
áncora inferior
(azul).
Tense el hilo del
áncora superior
(rosado).
Afloje el hilo del
áncora inferior
(azul).
Tense el hilo del
áncora superior
(rosado).
Tense el hilo del
áncora inferior
(azul).

10
A
C
B
A
B
D
E
A
B
D
E
C
A
B
D
E
A
B
D
E
Tabla de ajuste de tensión de los hilos, una aguja (tres hilos)
Al ajustar la tensión de los
hilos, debe hacerlo en el
orden siguiente:
(1) Hilo de las agujas
(2) Hilo del áncora superior
(3) Hilo del áncora inferior
Es la mejor forma de lograr
una tensión de hilo
correcta.
A: Revés B: Derecho C: Hilo de las agujas D: Hilo del áncora superior E: Hilo del áncora inferior
El hilo de la aguja
está tenso.
El hilo del áncora
superior está
tenso.
El hilo del áncora
inferior está
suelto.
El hilo del áncora
superior está
suelto.
El hilo del áncora
inferior está
tenso.
El hilo de la aguja
está suelto.
Tense el hilo
de la aguja
(amarillo o
verde).
Afloje el hilo
de la aguja
(amarillo o
verde).
Afloje el hilo del
áncora superior
(rosado).
Tense el hilo
del áncora
inferior (azul).
Tense el hilo
del áncora
superior (rosado).
Afloje el hilo del
áncora inferior
(azul).
Tense el hilo
del áncora
superior (rosado).
Tense el hilo del
áncora inferior
(azul).
El hilo del áncora
superior está
suelto.
El hilo del áncora
inferior está suelto.
Tabla de ajuste de tensión de los hilos, una aguja (dos hilos)
A: Revés B: Derecho C: Hilo de las agujas D: Hilo del áncora inferior
A
C
D
B
A
C
D
B
A
C
D
B
El hilo de la aguja
está tenso.
El hilo del áncora
inferior está
suelto.
El hilo de la aguja
está suelto.
El hilo del áncora
inferior está
tenso.
Afloje el hilo
de la aguja
(amarillo o
verde).
Tense el hilo
del áncora
inferior (azul).
Tense el hilo
de la aguja
(amarillo o
verde).
Afloje el hilo del
áncora inferior (azul).

11
Español
Aguja
Está máquina funciona con una aguja normal para
máquinas de coser domésticas.
Se recomienda el uso de una aguja SCHMETZ
130/705H (n° 80 o n° 90).
Descripción de la aguja
1
Parte trasera (lado plano) 2 Parte delantera 3 Canal
1
2
3
Cómo comprobar la aguja
4 Superficie plana
5 Coloque la aguja en su lado plano y compruebe que el
espacio sea paralelo.
4
5
NOTA:
Medidas para evitar la rotura del material <A>.
Puede reducir la aparición de roturas del material
usando una aguja de punta redondeada SCHMETZ 130/
705H SUK (n° 90).
Desmontaje/instalación de la aguja
<A> Desmontaje/instalación de la aguja izquierda
<B> Desmontaje/instalación de la aguja derecha
2
<A> <B>
1
2
1
1 Tender 2 Aflojar
Para desmontar:
1. Apague el interruptor de alimentación principal
y de luz (posición OFF).
2. Gire la ruedecilla hasta que la marca de la
misma queda alineada con la línea de la
máquina (véase el CAPÍTULO 1 “Cambio de
la dirección de la ruedecilla”).
3. Afloje el tornillo de instalación de la aguja
correspondiente girando la llave hexagonal
incluida hacia 2 en la figura y retire la aguja.
Para instalar:
1. Apague el interruptor de alimentación principal
y de luz (posición OFF).
2. Gire la ruedecilla hasta que la línea de la
misma queda alineada con la línea de la
máquina.
3. Sujete la aguja con la parte plana alejada de
usted e insértela hacia arriba hasta el tope.
4. Apriete firmemente el tornillo de instalación de
la aguja girando la llave hexagonal incluida
hacia 1 en la figura.
NOTA:
Asegúrese de insertar las agujas hasta el punto más alto
de la cámara de agujas.
Si las agujas se han introducido correctamente, la aguja
derecha debería quedar un poco más abajo que la
izquierda.
PRECAUCIÓN
Asegúrese siempre de desconectar la alimentación
antes de desmontar/instalar la aguja.
No deje caer la aguja ni el tornillo de instalación de
la aguja en la máquina, ya que podría dañarse.

12
CAPÍTULO 2
PREPARACIÓN ANTES DEL ENHEBRADO
Árbol del hilo
Levante el árbol telescópico del hilo hasta su
posición más alta. Compruebe que los portahilos
quedan alineados sobre los portabobinas como
se ilustra a continuación.
1 Portahilos en el árbol del hilo
2 Portabobinas
3 Posición correcta
3
2
1
Como utilizar el tope del carrete
Cuando utilice carretes de hilo de costura, el tope
del carrete debe emplearse tal como se ilustra
abajo. Asegúrese de que la muesca del carrete
quede hacia abajo.
1
1 Tope del carrete
Cómo utilizar la malla para hilo
Si está cosiendo con un hilo de hilvanar, le
recomendamos cubrir el carrete con la malla
provista para que el hilo no se deslice del carrete.
Adapte la malla a la forma del carrete.
Antes de enhebrar
1. Apague el interruptor de alimentación principal
y de luz por seguridad.
2. Levante el prensatelas con la palanca.
3. Gire la ruedecilla hasta que la marca de la
misma <A> queda alineada con la línea <B>
de la máquina (véase el CAPÍTULO 1
“Cambio de la dirección de la ruedecilla”).
<B>
<A>

Español
13
CAPÍTULO 3
ENHEBRADO
Enhebrado para puntadas Overlock
de dos agujas y cuatro hilos
Enhebrado para puntadas Overlock de
una aguja y tres hilos (aguja derecha)
Enhebrado para puntadas Overlock de
una aguja y tres hilos (aguja izquierda)
2
1
3
4
5
6
7
3
4
<A>
left
needle
right
needle
7
2
1
3
4
5
6
7
3
4
<A>
7
2
1
3
4
5
6
7
3
4
<A>
7
aguja
izquierda
aguja
derecha

14
El enhebrado debe realizarse en el siguiente orden.
1. Áncora inferior
2. Áncora superior
3. Aguja izquierda
4. Aguja derecha
Enhebrado del áncora inferior
Enhebre el hilo según lo ilustrado en la secuencia,
observando el color azul y los números inscritos al
lado de cada punto de enhebrado.
2
1
3
4
3
4
5
6
7
8
9
0
6
7
8
9
0
1. Abra la tapa delantera deslizándola hacia la
derecha y guiando la parte superior hacia
usted.
2. Saque el hilo del carrete y póngalo
directamente a través del portahilos 1 y el
portahilos 2 del árbol de enhebrado desde
detrás a delante.
3. Pase el hilo por la guía de hilo 3 de la parte
superior de la máquina.
4. Pase el hilo por el disco de tensión 4, que
está en el canal situado al lado del disco de
ajuste de la tensión azul.
Enhebrado para puntadas Overlock de
una aguja y dos hilos (aguja derecha)
Enhebrado para puntadas Overlock de
una aguja y dos hilos (aguja izquierda)
2
1
3
4
5
6
7
3
4
<A>
7
2
1
3
4
5
6
7
3
4
<A>
7

Español
15
3. Pase el hilo por el ojo del áncora inferior.
4. Gire lentamente la ruedecilla a mano, y
asegúrese de que el áncora inferior vuelva a
su posición original.
NOTA:
Si el hilo del áncora inferior se rompe al coser, corte y
deseche el hilo de ambas agujas.
Antes de volver a enhebrar el áncora inferior, asegúrese
de que este proceso se realiza exactamente según lo
mostrado en el diagrama. La máquina no funcionará
correctamente si no está enhebrada en el orden
apropiado.
PRECAUCIÓN
Enhebre las agujas después de haber enhebrado
los áncoras superior e inferior.
5. Guíe el hilo por el canal y pase el hilo por los
puntos de enhebrado 5678 situados al
lado de las marcas de color azul siguiendo el
orden numérico de la ilustración.
NOTA:
Asegúrese de enhebrar ambas tomas de hilo
7
.
Continúe con “Proceso simple de enhebrado del
áncora inferior”.
Proceso simple de enhebrado del
áncora inferior
1. Deslice la palanca de enhebrado del áncora
inferior <A> hacia la derecha.
El áncora inferior <B> se mueve a la posición
ilustrada a continuación.
<A>
<B>
<B>
PRECAUCIÓN
Deslice la palanca de enhebrado sólo en las
direcciones mostradas por la flecha. Si mueve
a la fuerza la palanca de enhebrado en
cualquier otra dirección, podría dañarla.
Antes de deslizar la palanca de enhebrado del
áncora inferior, asegúrese de que la aguja
está en su posición más alta.
2. Pase el hilo como se muestra.

16
5. Guíe el hilo por el canal y pase el hilo por los
puntos de enhebrado 5678 al lado de las
marcas de color rosa siguiendo el orden
numérico de la ilustración.
NOTA:
Asegúrese de enhebrar únicamente la toma de hilo
superior
7
.
6. Pase el hilo por el ojo del áncora superior 9.
NOTA:
Si el hilo del áncora superior se rompe al coser:
el hilo del áncora inferior se engancha a veces con el
hilo del áncora superior. En este caso, baje el áncora
superior girando la ruedecilla, saque el hilo del áncora
inferior fuera del áncora superior y vuelva a enhebrar el
áncora superior desde el disco de tensión como
mínimo.
Enhebrado del áncora superior
Enhebre el hilo según lo ilustrado en la secuencia,
observando el color rosa y los números inscritos
al lado de cada punto de enhebrado.
2
1
3
4
3
4
5
6
8
9
7
7
6
8
9
1. Abra la tapa delantera deslizándola hacia la
derecha y guiando la parte superior hacia
usted.
2. Saque el hilo del carrete y póngalo
directamente a través del portahilos 1 y el
portahilos 2 del árbol de enhebrado desde
detrás a delante.
3. Pase el hilo por la guía de hilo 3 de la parte
superior de la máquina.
4. Pase el hilo por le disco de tensión 4, que
está en el canal al lado del disco de ajuste de
la tensión rosado.

Español
17
Enhebrado de la aguja izquierda
1. Deslice el interruptor de cambio <A> hacia la
izquierda hasta que quede alineado con la
marca "L" de la máquina.
<A>
2.
Enhebre la aguja tal como se ilustra en la secuencia,
respetando el color amarillo y los números inscritos
al lado de cada punto de enhebrado.
a) Saque el hilo del carrete y póngalo
directamente a través del portahilos 1 y el
portahilos 2 del árbol de enhebrado desde
detrás a delante.
b) Sujete el hilo con sus manos izquierda y
derecha, y después pase el hilo a través de la
guía de hilo 3, y después pase el hilo por el
disco de tensión 4 que es el canal situado al
lado del disco de ajuste de la tensión amarillo.
c) Guíe el hilo por el canal y pase el hilo a través
de los puntos de enhebrado 5 6 7 situados
al lado de las marcas de color amarillo
siguiendo el orden numérico de la ilustración.
NOTA:
Asegúrese de que el hilo se sitúa a la izquierda del
separador <B>.
Enhebrado de la aguja derecha
1. Deslice el interruptor de cambio <A> hacia la
derecha hasta que quede alineado con la
marca "R" de la máquina.
<A>
2. Enhebre el hilo según ilustrado en la secuencia de
abajo, siguiendo el color verde y los números
inscritos al lado de cada punto de enhebrado.
a) Saque el hilo del carrete y póngalo
directamente a través del portahilos 1 y el
portahilos 2 del árbol de enhebrado desde
detrás a delante
b) Sujete el hilo con sus manos izquierda y
derecha, y después pase el hilo a través de la
guía de hilo 3, y después pase el hilo por el
disco de tensión 4 que es el canal situado al
lado del disco de ajuste de la tensión verde.
c) Guíe el hilo por el canal y a través de los
puntos de enhebrado 5 6 7 al lado de las
marcas de color verde siguiendo el orden
numérico de la ilustración.
NOTA:
Asegúrese de que el hilo se sitúa a la derecha del
separador <B>.
Two needles
One needle
2
1
3
4
5
6
7
3
4
<B>
7
Dos agujas
Una aguja
2
1
3
4
5
6
7
3
4
<B>
Two needles One needle
7
Dos agujas
Una aguja
PRECAUCIÓN
· Antes del enhebrado apague la máquina por seguridad.
· Gire la ruedecilla de forma que la marca de la misma quede alineada con la línea de la máquina (Véase el
CAPÍTULO 1 "Cambio de la dirección de la ruedecilla").

18
Enhebrado de la aguja (utilizando
el enhebrador de aguja)
La aguja puede enhebrarse de la aguja mediante
operación de un toque utilizando el enhebrador de
aguja.
1. Baje la palanca del prensatelas 1 para bajar el
prensatelas.
1
2. Tire del extremo del hilo, pasado a través de la
guía de hilo de la barra de la aguja 2, a la
izquierda, después pase el hilo a través de la
muesca de la guía de hilo 3, y después tire
firmemente del hilo desde la parte frontal e
insértelo completamente en la ranura del disco
de guía de hilo 4.
NOTA:
Asegúrese de que el hilo pase la muesca de la guía
de hilo
3
.
2
3
4
3. Corte el hilo con el cortador de hilo 5 del lado
izquierdo de la máquina.
4. Baje lo más posible la palanca del enhebrador
de aguja 6 del lado izquierdo de la máquina.
6
El hilo pasa a través del ojo de la aguja.
5. Suelte la palanca del enhebrador de aguja 6.
6. Tire cuidadosamente del bucle del hilo a través
del ojo de la aguja para sacar el extremo del
hilo.
7. Levante la palanca del prensatelas 1, después
pase el extremo del hilo a través del
prensatelas, y después saque unos 5 cm de
hilo hacia la parte trasera de la máquina.
5cm

Español
19
CAPÍTULO 4
TABLA DE RELACIÓN ENTRE LOS DISTINTOS
TEJIDOS, HILOS Y AGUJAS DE COSTURA
Aguja
SCHMETZ
130/705H
n° 80
SCHMETZ
130/705H
n° 80
SCHMETZ
130/705H
n° 80
n° 90
SCHMETZ
130/705H
n° 80
n° 90
SCHMETZ
130/705H
n° 90
Tejido
Tejidos finos:
Georgette
Lino
Organdí
Tricot
Tejidos finos:
Georgette
Lino
Organdí
Tricot
Tejidos medios:
Paño fino
Gabardina
Sarga
Tejidos medios:
Paño fino
Tejidos gruesos:
Tweed
Tejano
Punto
Puntada
Puntada overlock
Puntada overlock
estrecha/de
dobladillo
enrollado
Puntada overlock
Puntada overlock
estrecha/de
dobladillo
enrollado
Puntada overlock
Largo de las
puntadas (mm)
2,0 - 3,0
R - 2,0
2,5 - 3,5
R - 2,0
3,0 - 4,0
Hilo
Hilo de hilvanar n° 80 - 90
Algodón n° 100
Filamento n° 80 - 100
Hilo de las agujas:
Hilo de hilvanar n° 80 - 90
Filamento n° 80 - 100
Hilo de los áncoras:
Hilo de nilón tipo lana
Hilo de hilvanar n° 80 - 90
Filamento n° 80 - 100
Hilo de hilvanar n° 60 - 80
Algodón n° 60 - 80
Filamento n° 60 - 80
Hilo de las agujas:
Hilo de hilvanar n° 60 - 80
Filamento n° 60 - 80
Hilo de los áncoras:
Hilo de nilón tipo lana
Hilo de hilvanar n° 60 - 80
Filamento n° 60 - 80
Algodón n° 50 - 60
Hilo de hilvanar n° 60
Filamento n° 50 - 60
NOTA:
El hilo decorativo funcionará mejor en el áncora superior para la costura de diseño.

20
CAPÍTULO 5
COSTURA
Selección de las distintas puntadas
Seleccione el patrón de puntada antes de
empezar a coser. Esta máquina de coser puede
realizar cinco puntadas distintas siguiendo los
sencillos pasos que se indican a continuación.
Puntada overlock de cuatro hilos
Utilice los cuatro hilos y las dos agujas para
realizar puntadas overlock de cuatro hilos.
Uso: Produce una costura fuerte. Ideal para coser
prendas de punto y tejidos.
Puntada overlock de tres hilos
5 mm
Utilice tres hilos y la aguja izquierda para producir
costuras de 5 mm.
Uso: Para puntadas overlock en trajes, blusas,
pantalones, etc. Ideal para tejidos medios y
gruesos.
NOTA:
Retire la aguja derecha para coser con esta puntada
overlock.
Puntada overlock de tres hilos
2,8 mm
Utilice tres hilos y la aguja derecha para producir
costuras de 2,8 mm.
Uso: Para puntadas overlock en trajes, blusas,
pantalones, etc. Ideal para tejidos finos y medios.
NOTA:
Retire la aguja izquierda para coser con esta puntada
overlock.
Puntada Overlock de dos hilos5 mm
Utilice dos hilos y la aguja izquierda, para producir
costuras de 5 mm.
Uso: Para puntadas overlock en trajes, blusas,
pantalones, etc. Ideal para tejidos medios y
gruesos.
NOTA:
Retire la aguja derecha para coser con esta puntada
overlock.
Puntada Overlock de dos hilos 2,8
mm
Utilice dos hilos y la aguja derecha, para producir
costuras de 2,8 mm.
Uso: Para puntadas overlock en trajes, blusas,
pantalones, etc. Ideal para tejidos finos y medios.
NOTA:
Retire la aguja izquierda para coser con esta puntada
overlock.
Puntada overlock estrecha 2,0 mm y
Puntada de dobladillo enrollada 2,0 mm
Se utilizan con fines decorativos o en las
puntadas de acabado. Véase “Puntada overlock
estrecha/de dobladillo enrollada” en este capítulo
para obtener detalles.
NOTA:
Puede utilizar el prensatelas opcional para producir
otros tipos de puntadas. Véase el CAPÍTULO 8 para
obtener detalles.
Costura de prueba
Haga una costura de prueba antes de empezar a
coser.
1. Ajuste de la tensión del hilo de la forma
siguiente:
<Para puntadas Overlock de cuatro hilos y
puntadas Overlock de tres hilos>
· Ajuste toda la tensión del hilo a "4".
<Para puntadas Overlock de una aguja y dos
hilos>
· Ajuste de la tensión del hilo de la aguja a
"2".
· Ajuste de la tensión del hilo del áncora
inferior a "6". (Véase "Tabla de puntada
Overlock de dos hilos" de este capítulo para
los detalles.)
2. Enhebre la máquina y saque todos los hilos
unos 15 cm detrás del prensatelas.

Español
21
Para empezar a coser
1. Enhebre la máquina y saque todos los hilos
unos 15 cm detrás del prensatelas.
2. Levante el prensatelas y coloque bien el tejido
debajo del prensatelas antes de empezar a
coser. Cosa lentamente algunas puntadas
girando la ruedecilla.
3. El tejido avanzará de forma automática. Sólo
necesita guiarlo en la dirección deseada.
4. Compruebe la formación de las puntadas (en
la cadeneta) para ver si son uniformes. Si las
puntadas no son uniformes, vuelva a
comprobar que el hilo esté bien enhebrado y
según la secuencia adecuada.
5. Siga la Guía de Tolerancia de Costura para
cortar adecuadamente las costuras de los
tejidos. La escala de la Guía de Tolerancia de
Costura muestra 9,5, 12,7, 15,9 y 25,4 mm
cuando el disco de ancho de las puntadas se
establece en “5”.
2
1
3
1 Prensatelas 2 Cuchilla superior 3 Guía de Tolerancia de Costura
Para retirar el trabajo
Una vez terminada la costura, siga cosiendo a baja
velocidad para formar una cadeneta. A continuación,
corte las puntadas a unos 5 cm del trabajo. Si la
alimentación no resulta suficiente como para crear
una cadeneta, tire suavemente del hilo.
3. Coloque un trozo de tejido debajo del
prensatelas para realizar la costura de prueba.
NOTA:
Levante siempre el prensatelas antes de colocar el
tejido debajo. No puede comenzar a coser
simplemente colocando el tejido debajo del
prensatelas sin elevarlo.
4. Mientras sujeta todos los hilos con la mano
izquierda, gire la ruedecilla despacio varias
veces hacia usted y compruebe que los hilos
se entrelazan antes de utilizar el pedal para
coser.
Cadeneta
Después de la costura de prueba, siga apretando
el pedal ligeramente y haga una cadeneta de
unos 10 cm. Los hilos se entrelazarán
automáticamente en forma de cadena.
NOTA:
Si la tensión de los hilos no queda bien ajustada, la
cadeneta resultará desigual. En este caso, tire para
sacar un poco los hilos. Compruebe el orden de
enhebrado y ajuste la tensión de los hilos para crear una
cadeneta uniforme (véase el CAPÍTULO 1 “Disco de
ajuste de la tensión”).

22
Para asegurar la cadeneta
Existen dos métodos para asegurar la cadeneta.
Método 1
Asegure la cadeneta del principio y del fin de una
puntada con la máquina.
Al principio de una puntada
1. Cosa algunas puntadas tras realizar una
cadeneta de unos 5 cm.
2. Detenga la máquina y levante el prensatelas.
3. Coloque la cadeneta bajo el prensatelas y
cosa sobre ésta tirando hacia usted.
4. Tras coser algunas puntadas, corte la
cadeneta sobrante con la cuchilla como se
ilustra.
Al final de una puntada
1. Al final de la costura, cosa una puntada fuera
del tejido antes de detener la máquina.
2. Levante el prensatelas y las agujas, y dé la
vuelta al tejido.
3. Baje las agujas y el prensatelas en la misma
posición.
4. Cosa sobre la costura evitando cortar la
costura cosida con una cuchilla.
5. Tras coser algunas puntadas, remate el tejido
como se ilustra.
6. Corte los hilos con unas tijeras.
Método 2
Con este método, se puede asegurar la cadeneta
del principio y del fin de una puntada de la misma
manera.
1. Cosa el hilo suelto de la cadeneta.
2. Inserte la cadeneta en el final de la costura con
una aguja de costura manual con un ojo
grande.
3. Remate la cadeneta con una gota de
pegamento para tela y corte los hilos
sobrantes una vez seca.

Español
23
Si los hilos se rompen al coser
Quite el tejido y vuelva a enhebrar en el orden
correcto: Áncora inferior, áncora superior, aguja
izquierda y aguja derecha (para volver a enhebrar,
véase el CAPÍTULO 3 “Enhebrado”). Sustituya el
tejido colocado bajo el prensatelas y cosa 3-5 cm
sobre las puntadas anteriores.
PRECAUCIÓN
Nunca deje alfileres en el tejido al coser ya que
podrían romper las agujas y cuchillas.
Para coser tejidos finos
1. Ajuste la presión del prensatelas para que el
tejido no se frunza y para permitir la costura
de curvas (véase el CAPÍTULO 1 “Ajuste de la
presión del prensatelas”).
2. Afloje la tensión del hilo pero no olvide que si
la tensión queda demasiada floja, el hilo se
puede romper y algunas puntadas podrían
saltarse.
Para utilizar la uñeta de puntadas W
Cuando cosa tejidos que se estiran, la utilización
de la uñeta de puntadas W evita que el tejido se
estire sin ajustar la tensión del hilo.
Uñeta de puntadas Uñeta de puntadas W
Marca "W"

24
Puntada de dos hilos
Cómo ajustar el conjunto de cambio de
hilo
NOTA:
Asegúrese de colocar el conjunto de cambio de hilo
en la máquina después de completar el enhebrado
de la aguja utilizando el enhebrador de aguja. (No
podrá utilizar el enhebrador de aguja con el conjunto
de cambio de aguja colocado en la máquina.)
1. Apague la máquina por seguridad.
2. Gire la ruedecilla de forma que la marca de la
misma quede alineada con la marca "
TC
" de
la máquina.
TC
3. Sujete ligeramente el conjunto de cambio de
hilo 1 con la punta de sus dedos de forma
que la separación quede cerrada como se
muestra a continuación.
1
4. Sujetando el conjunto de cambio de aguja 1,
empuje el orificio del conjunto de cambio de
aguja en el extremo superior del eje OL 2 de
forma que este eje OL pase a través del
orificio.
1
2
5. Empuje completamente hacia abajo el conjunto
de cambio de aguja 1 hasta que la punta 3
del conjunto de cambio de aguja se coloque
en el ojo del áncora superior 4.
1
4
3
El ajuste del áncora ha finalizado.
Tabla de puntada Overlock de dos
hilos
Asegúrese de que la punta esté
en el ojo del áncora superior.
Largo de puntada
Ancho de puntada
Uñeta de puntadas
Tensión del hilo
Hilo de la aguja
izquierda
Hilo del áncora
inferior
Hilo de la aguja
derecha
Hilo del áncora
inferior
Para tejidos
finos
2 (1 - 3)
6 (5 - 7)
2 (1 - 3)
6 (5 - 7)
Para tejidos
medios
2 (1 - 3)
6 (5 - 7)
2 (1 - 3)
6 (5 - 7)
3
5 - 7
Instalar

Español
25
Puntada overlock estrecha/de
dobladillo enrollado
La puntada overlock estrecha/de dobladillo
enrollado constituye un acabado decorativo para
tejidos finos y medios. Se usa a menudo para
terminar los bordes de los tejidos. Esta puntada
se obtiene retirando la aguja izquierda y usando la
puntada overlock de tres hilos.
Instrucciones para las puntadas overlock
estrechas/de dobladillo enrollado
PRECAUCIÓN
Desconecte el interruptor de alimentaci
ó
n principal y de
luz antes de desmontar/instalar una aguja.
1. Retire la aguja izquierda.
NOTA:
Para obtener información sobre la aguja y el hilo
recomendados, véase el CAPÍTULO 4 “Tabla de
relación entre los distintos tejidos, hilos y agujas de
costura”.
2. Enhebre la máquina para puntadas overlock de
tres hilos, usando la aguja derecha.
3. Retire la uñeta de puntadas <A>.
1 Levante la palanca del prensatelas.
2 Tire de todos los hilos hacia la parte trasera
de la máquina.
3 Compruebe que el hilo no queda enrollado
alrededor de la uñeta de puntadas.
4 Abra la tapa delantera.
5 Gire la ruedecilla hasta que el áncora
superior llegue a su posición más baja.
6 Tire de la uñeta de puntadas hacia la
derecha para retirarla.
<A>
4. Guarde la uñeta de puntadas retirada <A> y/o
la uñeta de puntadas W <B> dentro del
suplemento para la mesa.
<B><A>
NOTA:
Asegúrese siempre de instalar una uñeta de
puntadas antes de coser con puntadas Overlock
normales.
5. Ajuste el ancho de las puntadas con el disco
de ajuste hasta la posición "R".
<A>
<A> Marca de selección
6. Ajuste el largo de las puntadas.
Coloque el disco de ajuste del largo de las
puntadas en la posición “R a 2” (para puntada
overlock estrecha: R a 2, para puntada de
dobladillo enrollado: R).
3
<A>
<A> Marca de selección

26
Tabla de puntada overlock estrecha/de dobladillo enrollado
Estilo de puntada
Tejidos
Hilo de las agujas
Hilo del áncora superior
Hilo del áncora inferior
Largo de las puntadas
Ancho de las puntadas
Uñeta de puntadas
Tensión de los hilos
Hilo de las agujas
Hilo del áncora superior
Hilo del áncora inferior
Puntada de dobladillo enrollado
Parte inferior del tejido
Parte superior del tejido
Véase el CAPÍTULO 4 “Tabla
de relación entre los distintos
tejidos, hilos y agujas de
costura”.
Véase el CAPÍTULO 4 “Tabla de
relación entre los distintos tejidos,
hilos y agujas de costura”.
Véase el CAPÍTULO 4 “Tabla de
relación entre los distintos tejidos,
hilos y agujas de costura”.
Véase el CAPÍTULO 4 “Tabla de
relación entre los distintos tejidos,
hilos y agujas de costura”.
R
R
Retirada
Para tejidos finos
4 (3 - 5)
5 (4 - 6)
7 (6 - 8)
Puntada overlock estrecha
Parte inferior del tejido
Parte superior del tejido
Véase el CAPÍTULO 4 “Tabla de
relación entre los distintos tejidos,
hilos y agujas de costura”.
Véase el CAPÍTULO 4 “Tabla de
relación entre los distintos tejidos,
hilos y agujas de costura”.
Véase el CAPÍTULO 4 “Tabla de
relación entre los distintos tejidos,
hilos y agujas de costura”.
Véase el CAPÍTULO 4 “Tabla de
relación entre los distintos tejidos,
hilos y agujas de costura”.
R - 2,0
R
Retirada
Para tejidos finos
4 (3 - 5)
5 (4 - 6)
5 (4 - 6)
Para tejidos medios
5 (4 - 6)
5 (4 - 6)
7 (6 - 8)
Para tejidos medios
5 (4 - 6)
6 (5 - 7)
6 (5 - 7)

Español
CAPÍTULO 6
GUÍA DE LOCALIZACIÓN DE PROBLEMAS
Esta máquina de coser ha sido concebida para un funcionamiento sin problemas. Sin embargo, la siguiente
tabla le indica los problemas que podrían presentarse si los ajustes básicos no fueron realizados
correctamente.
Causa
La presión del prensatelas es
insuficiente.
1. Las agujas están dobladas o
la punta está rota.
2. Las agujas están mal
colocadas.
3. Se hizo fuerza en el tejido.
1. Los hilos están mal
enhebrados.
2. Los hilos están enredados.
3. La tensión de los hilos es
demasiado fuerte.
4. Las agujas están mal
colocadas.
5. La aguja es inadecuada.
6. La punta del conjunto de
cambio de hilo no está en el
ojo del áncora superior.
1. La aguja está doblada o la
punta está rota.
2. La aguja está mal colocada.
3. La aguja es inadecuada.
4. Los hilos están mal
enhebrados.
5. La presión del prensatelas
es insuficiente.
6. La punta del conjunto de
cambio de hilo no está en el
ojo del áncora superior.
La tensión de los hilos no está
bien ajustada.
1. La tensión de los hilos es
demasiado fuerte.
2. Los hilos están mal
enhebrados o están
enredados.
Remedio
Gire el tornillo de ajuste de la presión en el sentido
de las manecillas de un reloj para aumentar la
presión del prensatelas. (Véase página 7)
Cambie la aguja por una nueva. (Véase página
11)
Coloque las agujas correctamente. (Véase página
11)
No apriete ni tire del tejido demasiado fuerte al coser.
Enhebre los hilos correctamente.
(Véanse páginas 13-18)
Compruebe el portabobinas, los portahilos, etc. y
retire los hilos enredados.
Ajuste la tensión de los hilos. (Véanse páginas 8-
10)
Coloque las agujas correctamente. (Véase página
11)
Utilice la aguja correcta.
Schmetz 130/705H (recomendada). (Véase
página 11)
Ponga la punta del conjunto de cambio de hilo en
el ojo del áncora superior. (Véase página 24.)
Cambie la aguja por una nueva. (Véase página
11)
Coloque la aguja correctamente. (Véase página
11)
Utilice la aguja correcta.
Schmetz 130/705H (recomendada). (Véase
página 11)
Enhebre los hilos correctamente.
(Véanse páginas 13-18)
Gire el tornillo de ajuste de la presión en el sentido
de las manecillas de un reloj para aumentar la
presión del prensatelas. (Véase página 7)
Ponga la punta del conjunto de cambio de hilo en
el ojo del áncora superior. (Véase página 24.)
Ajuste la tensión de los hilos. (Véanse
páginas 8-10)
Disminuya la tensión de los hilos al coser
tejidos finos o ligeros.
(Véanse páginas 8-10)
Enhebre los hilos correctamente.
(Véanse páginas 13-18)
Problema
1. No se alimenta el
tejido
2. Las agujas se
rompen
3. Los hilos se rompen
4. Se saltan puntadas
5. Las puntadas no
quedan uniformes
6. El tejido se frunce
27

28
CAPÍTULO 7
MANTENIMIENTO
Limpieza
PRECAUCIÓN
Apague la máquina antes de limpiarla.
Gire la ruedecilla para mover las agujas hacia
abajo.
Limpie periódicamente el polvo, los restos de
tejido y los hilos con el cepillo limpiador que se
incluye.
Engrasado
Para conseguir un funcionamiento suave y
silencioso de la máquina, sus partes móviles
(indicadas con flechas) se deberán engrasar
periódicamente.
PRECAUCIÓN
Apague la máquina antes de abrir la tapa
delantera y engrasar.
NOTA:
Asegúrese siempre de engrasar la máquina antes de
utilizarla.
Siempre limpie la pelusa antes de proceder al
engrasado.
Engrase la maquina una o dos veces al mes para un uso
normal. Si se utiliza la maquina más a menudo,
engrásela cada semana.

29
Español
CAPÍTULO 8
INTRODUCCIÓN DE PRENSATELAS OPCIONAL
6. Baje la palanca del prensatelas y ajuste la guía
del tejido hacia el borde doblado.
7. Ajuste la posición de la guía del prensatelas
con el tornillo de ajuste de modo que la
máquina toque ligeramente el pliegue en la
tela. En este caso, el criterio es el grosor de la
tela.
Al girar el tornillo hacia delante (hacia usted),
la guía del tejido irá a la derecha. Al girar el
tornillo hacia atrás (opuesto a usted), la guía
del tejido irá a la izquierda.
3 Tornillo de ajuste
4 Guía del tejido
Para ajustar la posición de la guía del tejido,
se debe utilizar un pedazo del mismo tejido
para hacer una prueba de costura.
8. Si el tejido se dobla con la mano, cosa de
modo que la aguja sólo alcance el borde del
pliegue.
9. Abra el tejido como se muestra en la
ilustración.
Para obtener mejores resultados, utilice un hilo
fino en un color que coordine con el tejido.
Si se hace correctamente, esta puntada
apenas se verá en el derecho del tejido.
Puntadas overlock planas
Las puntadas overlock planas se usan
principalmente para lograr un acabado decorativo
en un trabajo. Una vez terminadas, las puntadas
pueden parecerse a una escalera o a pequeñas
líneas paralelas cuando se estira el tejido plano.
Ajustes recomendados
- Ancho de las puntadas: 5 mm
- Largo de las puntadas: 2 - 4 mm
- Tensión del hilo de la aguja: 0-3
- Tensión del hilo del áncora superior: 2-5
- Tensión del hilo del áncora inferior: 6-9
PRECAUCIÓN
Apague la máquina al sustituir el prensatelas.
Prensatelas para puntadas invisibles
Características
Al utilizar el prensatelas para puntadas invisibles
(prensatelas multipropósito), puede coser
puntadas invisibles y overlock al mismo tiempo.
Es ideal para coser puños, bajos de pantalones,
bolsillos, dobladillos de faldas, etc.
La guía de puntadas de este prensatelas también
es útil para coser puntadas overlock planas,
pliegues y otras puntadas decorativas.
Puntadas invisibles
La puntada de dobladillo invisible se utiliza para
realizar un dobladillo casi invisible en prendas o
en trabajos para decoración de hogar. Utilícela en
dobladillos de pantalones, faldas o cortinas.
Ajustes recomendados
- Ancho de las puntadas: 5 mm
- Largo de las puntadas: 3 - 4 mm
- Tensión del hilo de la aguja: un poco flojo (0-2)
- Tensión del hilo del áncora superior:
un poco apretado (5-7)
- Tensión del hilo del áncora inferior:
un poco flojo (2-4)
Procedimiento
1. Conecte el prensatelas para puntadas
invisibles (véase el CAPÍTULO 1 “Instalación/
desmontaje del prensatelas”).
2. Ajuste la máquina para puntada overlock de 3
hilos con una aguja en la posición izquierda.
La aguja de la derecha se debe quitar.
3. Gire el revés de la tela hacia fuera, doble la
tela una vez y de nuevo hacia atrás el ancho
necesario, como se ilustra a continuación.
1
2
1 Revés
2 Paso de la aguja
La costura será más sencilla si se plancha un
pliegue en la tela doblada antes de coser.
4. Gire la ruedecilla hasta que la línea de la
misma quede alineada con la línea de la
máquina (véase el CAPÍTULO 1 “Cambio de
la dirección de la ruedecilla”).
5. Levante la palanca del prensatelas e inserte el
tejido con el borde doblado a la izquierda para
que la aguja perfore justo el borde doblado al
coser.

30
Procedimiento
1. Conecte el prensatelas para puntadas
invisibles (véase el CAPÍTULO 1 “Instalación/
desmontaje del prensatelas”).
2. Ajuste la máquina para puntada overlock de 3
hilos con una aguja en la posición izquierda.
La aguja de la derecha se debe quitar.
3. Doble el tejido como se muestra en la
ilustración.
1
1 Superficie
4. Gire la ruedecilla hasta que la línea de la
misma quede alineada con la línea de la
máquina (véase el CAPÍTULO 1 “Cambio de la
dirección de la ruedecilla”).
5. Levante la palanca del prensatelas e inserte el
tejido con el borde doblado para que la aguja
perfore justo el borde doblado al coser.
6. Baje la palanca del prensatelas y ajuste la guía
de tejido hacia el borde doblado.
7. Por medio del tornillo de ajuste, adapte la
posición de la guía del prensatelas para que
la aguja baje a una posición de 2,5 a 3,0 mm
hacia dentro del borde doblado del tejido, de
tal forma que algunas de las puntadas pasen
por encima del borde.
2 Tornillo de ajuste
3 Guía del tejido
Al girar el tornillo hacia delante, la guía del
tejido se desplazará a la derecha. Al girar el
tornillo hacia atrás, la guía del tejido se
desplazará a la izquierda.
Para ajustar la posición de la guía del tejido,
se puede utilizar un pedazo del mismo tejido
para hacer una prueba de costura.
8. Manteniendo los pedazos de tejido juntos, siga
cosiendo todo el pliegue a velocidad
constante.
9. Al terminar la costura, abra el tejido (plano).
Cualquier lado de las puntadas puede utilizarse
en el derecho del tejido. Si va a coser con los
reveses juntos, el hilo del áncora superior va a
decorar el derecho al aplanar el tejido. Si cose
con los derechos juntos, la escalera del hilo de
la aguja decorará el derecho al aplanar el tejido.
NOTA:
Este método no conviene para tejidos finos.
Puntadas de pliegues pequeños
Las puntadas de pliegues pequeños usan un
borde enrollado para agregar cierta forma y
decoración a cualquier trabajo de costura. Un hilo
de color que contraste en el áncora superior
realza el trabajo.
Para tejidos finos, le sugerimos elegir un hilo fino
que corre fácilmente.
Procedimiento
1. Conecte el prensatelas para puntadas
invisibles (véase el CAPÍTULO 1 “Instalación/
desmontaje del prensatelas”).
2. Ajuste la máquina para puntada overlock
estrecha. (Véase el CAPÍTULO 5 “Puntada
overlock estrecha/de dobladillo enrollada”.)
3. Con un lápiz especial de costura, dibuje líneas
en el tejido a igual distancia las unas de las
otras para que sirvan de guías en la ubicación
de los pliegues. Doble el tejido a lo largo de
una línea y plánchelo un poco.
1
2
1 Trazado de líneas
2 Doblar en dos
4. Gire la ruedecilla hasta que la línea de la
misma quede alineada con la línea de la
máquina (véase el CAPÍTULO 1 “Cambio de la
dirección de la ruedecilla”).
5. Levante la palanca del prensatelas e inserte el
tejido con el borde doblado para que la aguja
perfore justo en borde doblado al coser.
6. Baje la palanca del prensatelas y ajuste la guía
del tejido hacia el borde doblado.
7. Alinee la guía del prensatelas para puntadas
invisibles con la línea a la derecha de la uñeta
de puntadas. Al girar el tornillo hacia delante,
la guía de puntadas se desplazará a la
derecha. Al girar el tornillo hacia atrás, la guía
de puntadas se desplazará a la izquierda.

31
Español
8. Alinee el pliegue con la guía e inserte el tejido
hasta la posición de la aguja.
3 Tornillo de ajuste
4 Guía del tejido
9. Guíe el pliegue del tejido para coser a medio
camino entre la aguja y la cuchilla superior.
10. Siga cosiendo hasta que se hayan cosido
todas las líneas marcadas.
Corrija las pequeñas arrugas con la mano.
Prensatelas para cintas
Características
Mediante el prensatelas para cintas, puede coser
cintas y elásticos, y hacer dobladillos al mismo
tiempo con un bonito aspecto.
-
Se pueden coser cintas o elásticos de 6 a 12 mm
de ancho.
- Es muy útil coser cintas para reforzar materiales
elásticos, como hombros en prendas de punto.
Además la fijación de elásticos es conveniente
para coser puños de camisas, escotes, etc.
<A> <B>
<A> Uso del elástico
<B> Uso de la cinta
Ajuste de la máquina (tipo de puntada):
- overlock de 2 agujas y 4 hilos
- overlock de 1 aguja y 3 hilos (se puede utilizar
cualquier aguja)
Como ajustar la cinta o el elástico
1
2
3
4
5
1. Conecte el prensatelas para cintas (véase el
CAPÍTULO 1 “Instalación/desmontaje del
prensatelas”).
2. Levante la palanca del prensatelas.
3. Gire la ruedecilla hasta que la línea de la
misma quede alineada con la línea de la
máquina (véase el CAPÍTULO 1 “Cambio de
la dirección de la ruedecilla”).
4. Abra la guía de la cinta 1 y gire el disco de
ajuste del prensatelas 2 hasta “0”.
5. Coloque la cinta o el elástico 5 a lo largo del la
ranura 3.
6. Introduzca la cinta o el elástico 5 por la ranura
3 para que la parte derecha de las cintas o
elásticos se ajuste a lo largo de la guía 4.
7. Cierre la guía de la cinta 1 para que se ajuste
a la izquierda de las cintas o elásticos.
Costura de prueba
5
1. Levante la palanca del prensatelas.
2. Inserte el tejido hasta que el borde toque la
cuchilla.
3. Baje la palanca del prensatelas.
4. Gire el disco de control del ancho de las
puntadas hasta “5”.

32
5. Ajuste la palanca de control del largo de las
puntadas.
- Cintas: entre “3” y “4”
- Elásticos: “4”
6. Gire el disco de ajuste del prensatelas 2
- hasta “0” al coser con cintas.
- hasta el número que desee para rizar al
coser con elásticos.
NOTA:
El rizo aumentará cuanto mayor sea el número.
7. Realice una costura de prueba y ajuste la
tensión de los hilos.
Ejemplo para una costura adecuada:
<B>
<A>
<C>
<D>
<A> Superficie
<B> Cinta
<C> Superficie
<D> Elástico
NOTA:
La tensión de los hilos es similar a la de un
ribeteado normal al coser con cintas.
Se recomienda utilizar una tensión mayor para el
áncora inferior y el áncora superior para obtener
un bonito acabado.
Se recomienda realizar una costura de prueba con
cada tejido e hilo debido a la diferencia de rizado.
Prensatelas para tira de perlas
Características
Al utilizar el prensatelas para tira de perlas, puede
adornar con cuentas el tejido. Es útil para decorar
bordes de cortinas, manteles, vestidos, etc. Con
este prensatelas se pueden coser lentejuelas y
perlas de 3 mm a 5 mm.
LS
Preparación
1. Repliegue la cuchilla (véase el CAPÍTULO 1
“Repliegue de la cuchilla”).
2. Conecte el prensatelas para tira de perlas
(véase el CAPÍTULO 1 “Instalación/
desmontaje del prensatelas”).
3. Ajuste la máquina para puntada overlock de 3
hilos con una aguja en la posición izquierda.
La aguja de la derecha se debe quitar.
Cómo ajustar la máquina
1. Ajuste el largo de las puntadas de acuerdo con
la longitud como <A> o <B>. Por ejemplo, un
largo de las puntadas de 4 mm indica 4 mm
para <A> o <B>.
<A>
<B>
<A>
<B>
2. Ajuste el ancho de las puntadas de 3 a 5 mm.
3. Ajuste la tensión del hilo como sigue:
Hilo de la aguja: reducir un poco
Hilo del áncora superior: reducir un poco
Hilo del áncora inferior: aumentar un poco
Cómo ajustar el tejido y las perlas
1 ~ 1.5mm
1
2
3
1. Doblar el tejido según la línea para ajustar las
perlas.
2. Coloque el tejido justo bajo la aguja sujetando
el borde doblado con la guía 1.
3. Utilice el tornillo 2 para ajustar el espacio
entre la aguja del borde doblado, para que
esté entre 1 y 1,5 mm.
4. Coloque las perlas en la guía delante del
hueco de la guía 3.
Costura de prueba
1. Cosa girando la ruedecilla con la mano hasta
que la perla pase por el hueco.
2. Cosa a velocidad lenta mientras guíe la hebra
de perlas y el tejido con la mano.
3. Ate ambos extremos del hilo al comienzo y al
final.
NOTA:
La tensión del hilo es fácil que se afloje especialmente
para perlas de tamaño pequeño. Repliegue la lengüeta
de puntada móvil para coser mejor.

33
Español
Prensatelas para ribeteados
Características
Al utilizar el prensatelas para ribeteados, puede
fijar ribeteados el borde del tejido. El ribeteado se
utiliza para decorar el borde de tejidos (pijamas o
ropa deportiva), tapetes para muebles, cojines,
bolsas, etc.
LP
Preparación
Conecte el prensatelas para ribeteados (véase el
CAPÍTULO 1 “Instalación/desmontaje del
prensatelas”).
Ajuste de la máquina (tipo de
puntada):
- overlock de 2 agujas y 4 hilos
- overlock de 1 aguja y 3 hilos (se debe quitar la
aguja de la derecha)
Cómo ajustar la máquina
1. Ajuste el largo de las puntadas a 3 mm.
(posición estándar)
2. Ajuste el ancho de las puntadas de 5 a 6 mm
3. Ajuste la tensión de los hilos para puntadas
overlock normales (véase el CAPÍTULO 5
“Selección de las distintas puntadas”).
5 ~ 6mm
3mm
5 ~ 6mm
3mm
Cómo ajustar el tejido y la cinta de
ribetear
<A>
1
2
3cm
1 Superficie 2 Revés
1. Coloque la cinta de ribetear entre 2 trozos de
tejido y ajuste los dos bordes como se ilustra.
Mantenga 3 cm de cinta de ribetear sobre el
borde del tejido para coser de forma continua.
(La superficie del tejido debe quedar en el
interior.)
2. Coloque el tejido con cinta de ribetear bajo el
prensatelas, coloque la cinta de ribetear en el
canal <A> del prensatelas y empiece a coser.
Empiece a coser
1. Guíe el tejido y la cinta de ribetear con la mano
uniformemente durante la costura.
2. Gire ambos lados del tejido después de coser.
NOTA:
Para una costura fácil, hilvane el tejido y la cinta de
ribetear antes de coser.
El ribeteado es difícil en ángulos agudos.
En caso de cinta de ribetear ancha, la cinta deberá
fijarse después de recortar la parte sobrante.

34
Prensatelas fruncidor
Características
Puede crear bonitos frunces con el prensatelas
fruncidor en distintos tipos de prendas y
aplicaciones para decoración de hogar.
LG
Preparación
Conecte el prensatelas fruncidor (véase el
CAPÍTULO 1 “Instalación/desmontaje del
prensatelas”).
Ajuste de la máquina (tipo de puntada):
- overlock de 2 agujas y 4 hilos
- overlock de 1 aguja y 3 hilos (se puede utilizar
cualquier aguja)
Cómo ajustar el tejido
1
2
3
1 Superficie 2 Revés
1. Levante la palanca del prensatelas.
2. Gire la ruedecilla hasta que la marca de la
misma quede alineada con la línea de la
máquina (véase el CAPÍTULO 1 “Cambio de la
dirección de la ruedecilla”).
3. Coloque el trozo inferior del tejido (el tejido que
se va a fruncir 1 bajo la guía 3 justo bajo la
aguja).
4. Coloque el trozo superior del tejido 2 entre el
prensatelas fruncidor y la guía 3 sobre el
trozo inferior 1.
5. Baje la palanca del prensatelas.
Costura de prueba
1. Ajuste el largo de las puntadas a 3 mm.
2. Ajuste la velocidad del alimentador con
diferencial a 2.
3. Ajuste el ancho de las puntadas a 5 mm.
4. Ajuste los demás parámetros a los que utiliza
durante la costura overlock normal.
5. Cosa manteniendo el tejido alineado con la
guía del tejido 3.
- Cambie el tamaño de los frunces ajustando
el largo de las puntadas entre 2 y 5 mm.
- Cambie la cantidad de tejido que se va a
fruncir ajustando la velocidad del alimentador
con diferencial entre 1,0 y 2,0.
NOTA:
No tire del tejido ni lo extienda.

35
Español
Especificaciones
Uso
Tejidos finos a gruesos
Velocidad de costura
1.300 puntadas por minuto como máximo
Ancho de las puntadas
2,3 mm a 7 mm
Largo de las puntadas (altura)
2 mm a 4 mm
Movimiento de la barra de las agujas
25 mm
Prensatelas
Tipo de prensatelas libre
Elevación del prensatelas
5 mm a 6 mm
Aguja
SCHMETZ 130/705H
N° de agujas e hilos
Convertible en dos/tres/cuatro hilos
Dos agujas o una sola
Peso neto de la máquina
6 kg
Dimensiones de la máquina
33,5 cm (An) x 29,8 cm (Al) x 27,9 cm (Pr.)
Juego de agujas SCHMETZ 130/705H
nº 80 (2)
nº 90 (2)
ESPECIFICACIONES

36

37
SETTING RECORD / NOTAS DE AJUSTES
THREAD TENSION
TENSION DE HILO
FABRIC
TEJIDO
THREAD
HILO
NEEDLE
AGUJA
NOTE
NOTA
STITCH
TYPE
Tipo de
puntada
left
needle
aguja
izquier-
da
right
needle
aguja
derecha
upper-
looper
áncora
superior
lower-
looper
áncora
inferior

XB2006401
Printed in Taiwan
-
 1
1
-
 2
2
-
 3
3
-
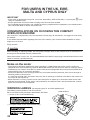 4
4
-
 5
5
-
 6
6
-
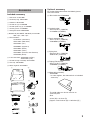 7
7
-
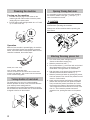 8
8
-
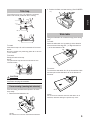 9
9
-
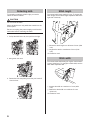 10
10
-
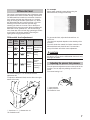 11
11
-
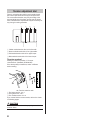 12
12
-
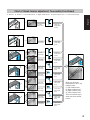 13
13
-
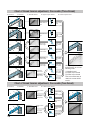 14
14
-
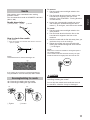 15
15
-
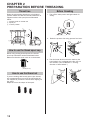 16
16
-
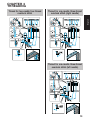 17
17
-
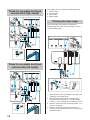 18
18
-
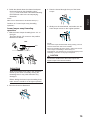 19
19
-
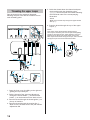 20
20
-
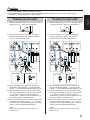 21
21
-
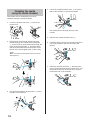 22
22
-
 23
23
-
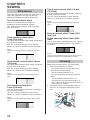 24
24
-
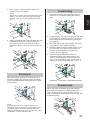 25
25
-
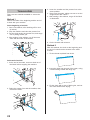 26
26
-
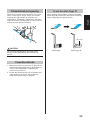 27
27
-
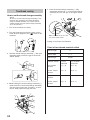 28
28
-
 29
29
-
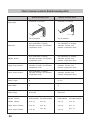 30
30
-
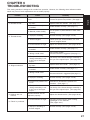 31
31
-
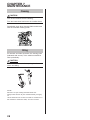 32
32
-
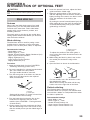 33
33
-
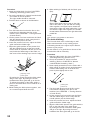 34
34
-
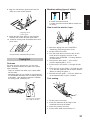 35
35
-
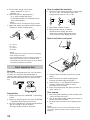 36
36
-
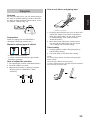 37
37
-
 38
38
-
 39
39
-
 40
40
-
 41
41
-
 42
42
-
 43
43
-
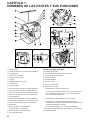 44
44
-
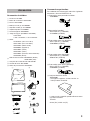 45
45
-
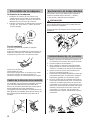 46
46
-
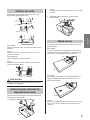 47
47
-
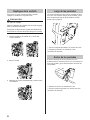 48
48
-
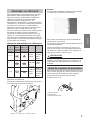 49
49
-
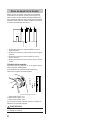 50
50
-
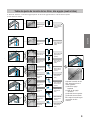 51
51
-
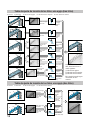 52
52
-
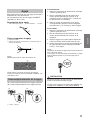 53
53
-
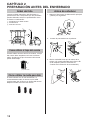 54
54
-
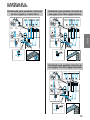 55
55
-
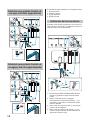 56
56
-
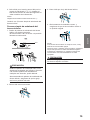 57
57
-
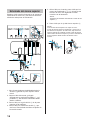 58
58
-
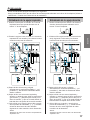 59
59
-
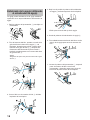 60
60
-
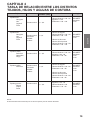 61
61
-
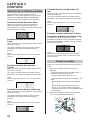 62
62
-
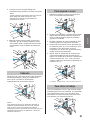 63
63
-
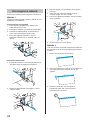 64
64
-
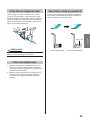 65
65
-
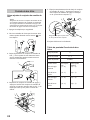 66
66
-
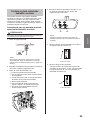 67
67
-
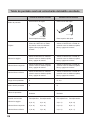 68
68
-
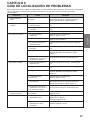 69
69
-
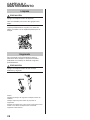 70
70
-
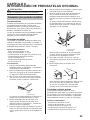 71
71
-
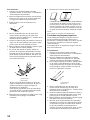 72
72
-
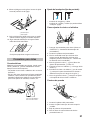 73
73
-
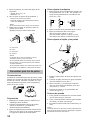 74
74
-
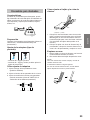 75
75
-
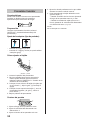 76
76
-
 77
77
-
 78
78
-
 79
79
-
 80
80


Brother 3234DT Guía del usuario
- Categoría
- Máquinas de coser
- Tipo
- Guía del usuario
en otros idiomas
- English: Brother 3234DT User guide
Artículos relacionados
-
Brother 5234PRW Guía del usuario
-
Brother PS3734T Manual de usuario
-
Brother COMPACT OVERLOCK MACHINE Manual de usuario
-
-
Brother Sewing Machine 2340CV Manual de usuario
-
-
-
-
-