Silverwood CPBS1151-WHTCOM Manual de usuario
- Tipo
- Manual de usuario

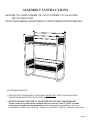
ASSEMBLY INSTRUCTIONS
Page 1
CHEYENNE PRODUCTS
THIS INSTRUCTION BOOKLET CONTAINS IMPORTANT SAFETY INFORMATION.
PLEASE READ AND KEEP FOR FUTURE REFERENCE.
**
**
DO NOT RETURN THIS ITEM TO THE STORE OR CONTACT THE RETAILER.
Please contact our dedicated customer service team at 1-800-737-5267 or email
[email protected] to request parts or assistance with your
merchandise. Office hours: Monday - Friday from 8:00 AM - 6:00 PM - (Eastern Time Zone)
Item# BS1151-ORB-COM/BS1151-WHT-COM/BS1151-GLD-COM/
BS1151-NKL-COM
UPC# 05027699536-4/05027699537-1/05027699538-8/05027699539-5

Page 2
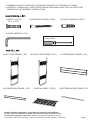
1) BOLTS (10 PCS)
1/4” x 1 3/16”L
A) LEFT SIDE FRAME (1 PC)
D) LOWER BACK FRAME (1 PC) E) METAL SHELF (2 PCS) F) BOTTOM SUPPORT BAR (1 PC)
B) RIGHT SIDE FRAME (1 PC) C) UPPER BACK FRAME (1 PC)
**ASSEMBLE ON SOFT SURFACES TO PREVENT DAMAGE TO THE PRODUCT FINISH.
**CAREFULLY REMOVE ALL PARTS FROM THE BOX AND MAKE SURE THAT NO PARTS ARE
MISSING ON THE ASSEMBLY INSTRUCTIONS.
DO NOT RETURN THIS ITEM TO THE STORE OR CONTACT THE RETAILER.
Please contact our dedicated customer service team at 1-800-737-5267 or email
[email protected] to request parts or assistance with your
merchandise. Office hours: Monday - Friday from 8:00 AM - 6:00 PM - (Eastern Time Zone)
2) MOUNTING SCREW (2 PCS) 3) PLASTIC ANCHOR (2 PCS)
4) ALLEN WRENCH (1 PC)
NOTE: Phillips head screwdriver required
but not provided.

Page 3
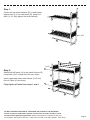
Step 1:
DO NOT RETURN THIS ITEM TO THE STORE OR CONTACT THE RETAILER.
Please contact our dedicated customer service team at 1-800-737-5267 or email
[email protected] to request parts or assistance with your
merchandise. Office hours: Monday - Friday from 8:00 AM - 6:00 PM - (Eastern Time Zone)
Fasten the two metal shelves (E) x2 and bottom
support bar (F) x1 to side frame (B), using five
bolts (1) x5. Only tighten the bolts halfway.
Step 2:
E
E
F
F
B
1 (x5)
1 (x5)
B
C
D
A
Insert upper and lower back frames (C+D) into
the left frame (A) as shown.
Fully tighten all bolts from steps 1 and 2.
Attach the left frame (A) to the metal shelves (E)
using bolts (1)x5. Leave the bolts very loose.

Page 4
2
2
3 3
B
A
Step 3:
A. If mounting into drywall:
1. Drill two 1/4” pilot holes into dry wall.
2. Firmly press plastic anchors (3) into pilot holes.
3. Insert mounting screws (2) into holes in left and right side frames (A) & (B) and screw firmly into
plastic anchors using phillips head screwdriver (not provided).
B. If mounting to studs in wall:
1. Insert mounting screws (2) into holes in left and right side frames (A) & (B) and screw directly into
studs in wall using phillips head screwdriver (not provided).
Caution: Plastic Anchors (3) and Mounting Screws (2) must be used when mounting product to drywall.
Drill /1 " pilot hole4
Stud
DO NOT RETURN THIS ITEM TO THE STORE OR CONTACT THE RETAILER.
Please contact our dedicated customer service team at 1-800-737-5267 or email
[email protected] to request parts or assistance with your
merchandise. Office hours: Monday - Friday from 8:00 AM - 6:00 PM - (Eastern Time Zone)
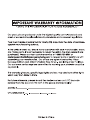
**WEIGHT RESTRICTION FOR EACH SHELF: 20 LBS.
**MAXIMUM LOAD FOR THE PRODUCT: 40 LBS.
**CLEANING: WIPE WITH A SOFT CLOTH, NEVER USE HARSH CHEMICALS OR ABRASIVE
CLEANERS FOR POLISHING.
**WE AT CHEYENNE ARE COMMITED TO HELPING SAVE THE ENVIRONMENT FOR FUTURE
GENERATIONS. WE ENCOURAGE YOU TO REUSE OR RECYCLE ALL OF THE MATERIALS
USED IN THE PACKAGING OF THIS PRODUCTS.


1
Item# BS1151-ORB-COM/BS1151-WHT-COM/BS1151-GLD-COM/
BS1151-NKL-COM
UPC# 05027699536-4/05027699537-1/05027699538-8/05027699539-5
CHEYENNE PRODUCTS
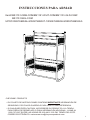
INSTRUCCIONES PARA ARMAR
EL FOLLETO DE INSTRUCCIONES CONTIENE IMPORTANTE INFORMACIÓN DE
SEGURIDAD. POR FAVOR GUÁRDELO PARA UNA FUTURA REFERENCIA.
SI CUALQUIER PIEZA FALTARA, NO REGRESE EL PRODUCTO A LA TIENDA.
PARA PIEZAS DE REEMPLAZO O PARA INFORMACIÓN ADICIONAL., LLAME AL
1 800-737-5267 ENTRE LAS HORAS DE 8:00 AM Y 6:00 PM, TIEMPO DEL ESTE.
CORREO ELECTRÓNICO: [email protected]
**
**

2
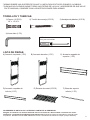
1) Pernos (10 PCS)
1/4” x 1 3/16”L
A) Armazón izquierda (1 PC)
D) Armazón respaldo de
inferior (1 PC)
E) Estante de metal (2 PCS) F) Barra de soporte
inferior (1 PC)
B) Armazón derecha (1 PC) C) Armazón respaldo de
superior (1 PC)
2) Tornillo de montaje (2 PCS) 3) Anclajes de plástico (2 PCS)
4) Llave allen (1 PC)
TORNILLOS Y TUERCAS:
**ARMAR SOBRE UNA SUPERFICIE SUAVE Y LIMPIA PARA EVITAR EL DAÑAR EL ACABADO.
**CON MUCHO CUIDADO SAQUE TODAS LAS PIEZAS DE LA CAJA Y ASEGÚRESE DE QUE NO LE
FALTE NINGUNA, COMPARE CON LAS INSTRUCCIONES PARA ARMAR.
NO REGRESE EL ARTICULO A LA TIENDA O CONTACTE AL VENDEDOR.
Póngase en contacto con nuestro dedicado servicio al cliente al 1-800-737-5267 o envíenos un correo
electrónico a [email protected] requiriendo piezas de reemplazo o ayuda al armar
su producto. Nuestras oficinas están abiertas de Lunes a Viernes de las 8:00am a 6:00pm (Tiempo del Este).
LISTA DE PIEZAS:
NOTA: Se necesita un destornillador de
cruz, pero no incluido.

3
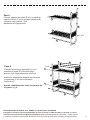
Paso 1
Paso 2
E
E
F
F
B
1 (x5)
1 (x5)
B
C
D
A
NO REGRESE EL ARTICULO A LA TIENDA O CONTACTE AL VENDEDOR.
Póngase en contacto con nuestro dedicado servicio al cliente al 1-800-737-5267 o envíenos un correo
electrónico a [email protected] requiriendo piezas de reemplazo o ayuda al armar
su producto. Nuestras oficinas están abiertas de Lunes a Viernes de las 8:00am a 6:00pm (Tiempo del Este).
Fije dos estantes de metal (E)x2 y la barra de
soporte inferior (F) a los armazón derecha (B)
utilizando cinco pernos (1)x5.
Apriételos solo ligeramente.
Conecte los
armazón izquierda (A) a los
estantes de metal (E) utilizando cinco
pernos (1)x5. Deje los pernos muy floja.
Inserte los
armazónes respaldo de inferiores
y superiores
(C+D) en los armazón
izquierda (A).
Apriete completamente todos los pernos de
los pasos 1 y 2.

4
2
2
3 3
B
A
NO REGRESE EL ARTICULO A LA TIENDA O CONTACTE AL VENDEDOR.
Póngase en contacto con nuestro dedicado servicio al cliente al 1-800-737-5267 o envíenos un correo
electrónico a [email protected] requiriendo piezas de reemplazo o ayuda al armar
su producto. Nuestras oficinas están abiertas de Lunes a Viernes de las 8:00am a 6:00pm (Tiempo del Este).
Taladro orificio de 1/4”
3
2
Postes
Tubo de
posterior
Tubo de
posterior
Paneles
de yeso
2
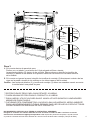
Paso 3
A. Si lo monta dentro de pared de yeso:
Perfore con un taladro y una broca de 1/4 de pulgada orificios e inserte
las anclas de plástico (3) dentro de los orificios. Ahora coloque y atornille los tornillos de
montaje (2) dentro de las anclas en la pared a través de los orificios en los tubos traseros
de la unidad.
B.
Caution: Las anclas de plástico (3) y tornillos de montaje (2) deben ser usandos cuando se monta
la unidad sobre una pared de yeso.
Si lo monta a vigas en la pared, atornille los tornillos de montaje (2) directament e dentro de las
vigas en la pared a través de los orificios en los tubos traseros de la unidad.
** RESTRICCIÓN DE PESO PARA CADA ESTANTE: 20 LIBRAS.
** CARGA MÁXIMA DE PESO PARA EL PRODUCTO: 40 LIBRAS.
** PARA LIMPIAR: UTILICE UN PAÑO SUAVE. NUNCA UTILICE QUÍMICOS O LIMPIADORES
ABRASIVOS PARA PULIRLO.
** CHEYENNE ESTÁ COMPROMETIDO A AYUDAR A SALVAGUARDAR EL MEDIO AMBIENTE
PARA LAS GENERACIONES FUTURAS. PEDIMOS QUE USE DE NUEVO O RECICLE TODOS
LOS MATERIALES DE EMPAQUE DE ESTE PRODUCTO.

Impreso en China
-
 1
1
-
 2
2
-
 3
3
-
 4
4
-
 5
5
-
 6
6
-
 7
7
-
 8
8
-
 9
9
-
 10
10


