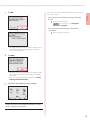
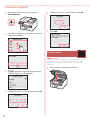
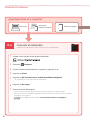
Canon GX7000 Series Inkjet Printer Guía del usuario
- Categoría
- Impresión
- Tipo
- Guía del usuario
Este manual también es adecuado para

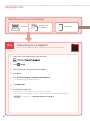
Guía de inicio
Lea primero Información de seguridad
e información importante (apéndice).
Getting Started
Read Safety and Important Information
(addendum) first.

Instalación de la impresora ...............................................................................................página 1
Conexión con un ordenador, teléfono inteligente o tableta ....................... página 6
Cómo sujetar la impresora
Las ilustraciones y las capturas de pantalla que se utilizan en esta publicación son de la serie GX7000. La información especíca
de un modelo se indica mediante iconos.
Installing the Printer ...................................................................................................................page 1
Connecting to a Computer, Smartphone or Tablet ............................................... page 6
Holding the Printer
The illustrations and screenshots used in this book are from the GX7000 series. Model-specic information is indicated by icons.

1
ENGLISH
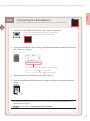
Setting Up the Printer
1. Box Contents
•
Ink Bottles
•
Power Cord
•
Phone Cable
•
Safety and Important Information
•
Getting Started (this manual)
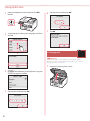
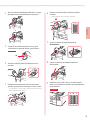
2. Removing Packing Materials
1
Remove and dispose of any packing materials
and orange tape.
•
Using the printer with orange tape or packing
material still attached, may cause the printer to
malfunction.
2
Open the scanning unit / cover, remove and
dispose of the orange tape and protective
material inside.
a b
3
Close the scanning unit / cover.
•
Open the scanning unit / cover fully and then close it.
b
a
Caution
Watch your ngers.
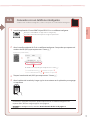
3. Turning on the Printer
1
Connect the power cord.
Back
For Setup, visit the URL
https://ij.start.canon
or scan the code with your mobile device
•
Follow the instructions below if you do not have an internet connection.

2
Setting Up the Printer
2
Open the operation panel and press the ON
button.
3
Scroll and tap to select your language, and then
tap Yes .
4
If the following screen appears, tap your
country or region to select.
5
Set the date, and then tap OK.
6
Set the time, and then tap OK.
7
Tap OK.
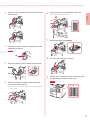
4. Pouring Ink
Important
This product requires careful handling of ink. Ink may splatter
when the ink tanks are lled with ink. If ink gets on your clothes or
belongings, it may not come o.
1
Open the scanning unit / cover.

3
ENGLISH
2
Open the ink tank cover and tank cap on the left
of the printer.
3
Hold the ink bottle upright and gently twist the
bottle cap to remove.
Check!
BK
4
Align the nozzle of the ink bottle with the inlet.
5
Slowly stand the ink bottle upside down and
push down to pour the ink.
•
If the ink does not pour, gently remove the ink bottle
and try again.
a
b
6
Gently remove the ink bottle from the inlet.
•
Be careful not to spill the ink.
b
a
7
Replace the tank cap securely.
8
Close the ink tank cover securely.
9
Repeat steps 2 through 8 to pour all ink into the
corresponding ink tanks on the right.
Check!
C M Y

4
Setting Up the Printer
10
Close the scanning unit / cover.
•
Open the scanning unit / cover fully and then close it.
b
a
Caution
Watch your ngers.
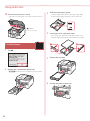
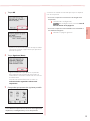
5. Loading Paper
1
Tap OK.
2
Remove the cassette from the printer.
•
Pull out Cassette 1 (upper) from the printer.
3
Slide apart the paper guides.
•
Slide the right paper guide to the right edge. Align
the front paper guide with the Letter or A4 mark.
4
Load Letter or A4 sized plain paper.
•
Place the paper against the front paper guide, and
align the right paper guide to the width of the paper.
a b
5
Replace the cassette.
6
Pull out the paper output tray.

5
ENGLISH
7
Tap OK.
•
The alignment process prints out one double sided
sheet. Wait without touching the paper until the
screen in step 8 appears.
8
Tap Next.
•
Follow the on-screen instructions to continue setup.
This includes making selections related to sending
information.
Refer to "Sending Information To Canon" in Safety
and Important Information.
9
Check that the following screen appears.
If you will use the printer without connecting any other
devices, setup is now complete.
Select the connection method that best matches how you
will use the printer.
•
To use the printer without connecting to any other
devices
Setup is now complete.
To set up a fax, see "Using Fax
Function" on page 8.
•
To use the printer connecting to a computer or
smartphone
Proceed to the next page.

6-a
6
Setting Up the Printer
Computer Smartphone
Computer and
smartphone
Connecting to a Computer
If you are using multiple computers, perform these steps on each computer.
1
Access the Canon website from your computer.
2
Select Set Up.
3
Enter your printer's model name and click Go.
4
Click Start.
5
Click (B) Connecting to a Computer/Smartphone.
•
The following steps are for Windows users.
6
Click Download.
7
Run the downloaded file.
•
Follow the on-screen instructions. This may take some time.
•
To connect to a smartphone as well, see "6-b. Connecting to a Smartphone" on page 7.
•
To set up a fax, see "Using Fax Function" on page 8.
What device are you connecting?
6-a. Connecting to a Computer

6-b
7
ENGLISH
1
Install the "Canon PRINT Inkjet/SELPHY" app on your smartphone.
•
Search for "Canon PRINT" in App Store, or Google Play.
•
Access the Canon website to download the app.
2
Open your smartphone's Wi-Fi settings. Check that the network name (SSID) that starts
with "Canon_ij_" appears.
(Example of iOS screen)
The network name (SSID) that starts with "Canon_ij_"
•
If "Canon_ij_" appears Proceed to step
3
.
•
If "Canon_ij_" does not appear Proceed to step
4
.
3
Tap the network name (SSID) that starts with "Canon_ij_".
4
Open the installed app, and follow the on-screen instructions in the app to add your
printer.
Connecting to a Smartphone
If you are using multiple smartphones, perform these steps on each smartphone.
6-b. Connecting to a Smartphone
• Once you have added your printer, you can print from your smartphone. To print photos, see
"Loading Paper" on page 8.
•
To set up a fax, see "Using Fax Function" on page 8.

8
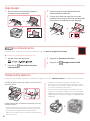
1
Open the rear tray cover and extend the paper
support.
2
Slide the right-hand side paper guide to the far
right.
3
Load several sheets of paper with the print side
facing up and slide the side paper guide against
the edge of the paper stack.
a
b
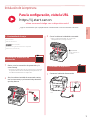
Transporting Your Printer
When relocating the printer, check the following. Refer to the Online Manual for details.
Check that the position of the ink valve lever is closed.
Pack the printer in a plastic bag in case ink leaks.
•
Pack the printer in a sturdy box so that it is placed with its
bottom facing down, using sucient protective material
to ensure safe transport.
•
Do not tilt the printer. Ink may leak.
•
Please handle with care and ensure the box remains at
and NOT turned upside down or on its side, as the printer
may be damaged and ink in the printer may leak.
•
When a shipping agent is handling transport of the
printer, have its box marked "THIS SIDE UP" to keep the
printer with its bottom facing down. Mark also with
"FRAGILE" or "HANDLE WITH CARE".
Loading Paper
Using Fax Function
The fax function of your printer requires setup. Refer to FAX Setup Guide.
■ Access the FAX Setup Guide
1
Access the Canon website.
2
Click See Recommended Functions.
3
Click Functions/Services.
4
Click Setting Up the FAX.

1
ESPAÑOL
Instalación de la impresora
1. Contenido de la caja
•
Frascos de tinta
•
Cable de alimentación
•
Cable de teléfono
•
Información de seguridad e información importante
•
Guía de inicio (este manual)
2. Retirar los materiales de
protección
1
Retire y tire los materiales de protección y la
cinta naranja.
•
El uso de la impresora con la cinta naranja o material
de protección todavía adherido podría provocar un
mal funcionamiento de la impresora.
2
Abra la cubierta/unidad de escaneado, retire y
tire la cinta naranja y el material de protección
que hay dentro.
a b
3
Cierre la cubierta/unidad de escaneado.
•
Abra la cubierta/unidad de escaneado
completamente y luego ciérrela.
b
a
Precaución
Tenga cuidado con
los dedos.
3. Encender la impresora
1
Conecte el cable de alimentación.
Atrás
Para la configuración, visite la URL
https://ij.start.canon
o bien escanee el código con su dispositivo móvil
•
Siga las instrucciones que se proporcionan a continuación si no tiene conexión a Internet.

2
Instalación de la impresora
2
Abra el panel de control y pulse el botón
ACTIVADO (ON).
3
Desplácese y toque para seleccionar su idioma y
luego toque Sí (Yes).
4
Si aparece la siguiente pantalla, toque
su país o región para seleccionarlo.
5
Establezca la fecha y, a continuación, toque OK.
6
Establezca la hora y, a continuación, toque OK.
7
Toque OK.
4. Verter la tinta
Importante
Este producto requiere un tratamiento cuidadoso de la tinta, ya que
puede salpicar cuando se rellenan de tinta los depósitos de tinta.
Es posible que las manchas de tinta no salgan de la ropa u otras
pertenencias.
1
Abra la cubierta/unidad de escaneado.

3
ESPAÑOL
2
Abra la cubierta del depósito de tinta y la tapa
del depósito a la izquierda de la impresora.
3
Sujete el frasco de tinta hacia arriba y gire
suavemente la tapa del frasco para retirarla.
¡Comprobar!
BK
4
Alinee la boquilla del frasco de tinta con la
entrada.
5
Coloque lentamente el frasco de tinta boca
abajo y empuje hacia abajo para verter la tinta.
•
Si la tinta no se vierte, retire suavemente el frasco de
tinta e inténtelo de nuevo.
a
b
6
Retire suavemente el frasco de tinta de la
entrada.
•
Tenga cuidado de no derramar la tinta.
b
a
7
Vuelva a colocar la tapa del depósito
firmemente.
8
Cierre la cubierta del depósito de tinta
firmemente.
9
Repita los pasos del 2 al 8 para verter toda la
tinta en los depósitos de tinta correspondientes
de la derecha.
¡Comprobar!
C M Y

4
Instalación de la impresora
10
Cierre la cubierta/unidad de escaneado.
•
Abra la cubierta/unidad de escaneado
completamente y luego ciérrela.
b
a
Precaución
Tenga cuidado con
los dedos.
5. Carga de papel
1
Toque OK.
2
Retire el cassette de la impresora.
•
Retire el Cassette 1 (superior) de la
impresora.
3
Separe las guías del papel deslizándolas.
•
Deslice la guía del papel derecha hacia el borde
derecho. Alinee la guía del papel frontal con la marca
Carta o A4.
4
Cargue papel Carta o papel normal de tamaño
A4.
•
Coloque el papel delante de la guía del papel frontal
y alinee la guía del papel derecha con el ancho del
papel.
a b
5
Reemplace el cassette.
6
Extraiga la bandeja de salida del papel.

5
ESPAÑOL
7
Toque OK.
•
El proceso de alineación imprime una hoja de doble
cara. Espere sin tocar el papel hasta que aparezca la
pantalla del paso 8.
8
Toque Siguiente (Next).
•
Siga las instrucciones que aparecen en pantalla
para continuar con la instalación. Esto incluye la
realización de selecciones relacionadas con el envío
de información.
Consulte "Enviando información a Canon" en
Información de seguridad e información
importante.
9
Compruebe que aparezca la siguiente pantalla.
Si va a utilizar la impresora sin conectar con ningún otro
dispositivo, la configuración ya se ha completado.
Seleccione el método de conexión que mejor se adapte al
uso de la impresora.
•
Para usar la impresora sin conectar con ningún otro
dispositivo
Ha nalizado la conguración.
Para congurar un fax, consulte "Usar la
función de fax" en la página 8.
•
Para usar la impresora conectándola a un ordenador o
un teléfono inteligente
Continúe a la página siguiente.

6-a
6
Instalación de la impresora
Ordenador Teléfono inteligente
Ordenador y
teléfono inteligente
Conectar al ordenador
Si utiliza varios ordenadores, realice estos pasos en cada ordenador.
1
Acceda al sitio web de Canon desde el ordenador.
2
Seleccione Configurar.
3
Escriba el nombre del modelo de su impresora y haga clic en Ir.
4
Haga clic en Iniciar.
5
Haga clic en (B) Conexión con un ordenador/teléfono inteligente.
•
Los siguientes pasos son para usuarios de Windows.
6
Haga clic en Descargar.
7
Ejecute el archivo descargado.
•
Siga las instrucciones que aparezcan en pantalla. Esto puede llevar algún tiempo.
•
Para conectar con un teléfono inteligente también, consulte "6-b. Conexión con un teléfono
inteligente" en la página 7.
•
Para congurar un fax, consulte "Usar la función de fax" en la página 8.
¿Qué dispositivo va a conectar?
6-a. Conectar al ordenador

6-b
7
ESPAÑOL
1
Instale la aplicación "Canon PRINT Inkjet/SELPHY" en su teléfono inteligente.
•
Busque "Canon PRINT" en App Store o Google Play.
•
Acceda al sitio web Canon para descargar la aplicación.
2
Abra la configuración de Wi-Fi de su teléfono inteligente. Compruebe que aparezca el
nombre de red (SSID) que empieza con "Canon_ij_".
(Ejemplo de la pantalla de iOS)
El nombre de red (SSID) que empieza con "Canon_ij_"
•
Si se muestra "Canon_ij_" continúe en el paso
3
.
•
Si no se muestra "Canon_ij_" continúe en el paso
4
.
3
Toque el nombre de red (SSID) que empieza con "Canon_ij_".
4
Abra la aplicación instalada y luego siga las instrucciones en la aplicación para agregar
su impresora.
Conexión con un teléfono inteligente
Si utiliza varios teléfonos inteligentes, realice estos pasos en cada teléfono inteligente.
6-b. Conexión con un teléfono inteligente
• Cuando haya agregado la impresora, podrá imprimir desde su teléfono inteligente. Para
imprimir fotos, consulte "Carga de papel" en la página 8.
•
Para configurar un fax, consulte "Usar la función de fax" en la página 8.

8
1
Abra la cubierta de la bandeja posterior y
extienda el soporte del papel.
2
Deslice la guía del papel del lado derecho
totalmente hacia la derecha.
3
Cargue varias hojas de papel con la cara de
impresión hacia arriba y deslice la guía del papel
lateral contra el borde de las hojas de papel.
a
b
Transporte de la impresora
Cuando vaya a transportar la impresora, compruebe lo siguiente. Consulte el Manual en línea para obtener más información.
Compruebe que la palanca de válvula de tinta esté en la
posición cerrada.
Embale la impresora en una bolsa de plástico por si hay
derrames de tinta.
•
Embale la impresora en una caja resistente y de modo
que no quede boca abajo. Utilice suciente material de
protección para garantizar un transporte seguro.
•
No incline la impresora. De lo contrario, es posible que la
tinta se derrame.
•
Manipule con cuidado y asegúrese de que la caja
permanece en una supercie plana y que NO se coloca
boca abajo o de lado, ya que la impresora podría dañarse
y la tinta de la impresora, derramarse.
•
Cuando se ocupe del transporte de la impresora una
empresa de mensajería, marque la caja con "ESTE LADO
ARRIBA" para mantener la impresora con la parte inferior
abajo. Márquela también con "FRÁGIL" o "MANEJAR CON
CUIDADO".
Carga de papel
Usar la función de fax
La función de fax de su impresora necesita congurarse. Consulte Guía de configuración del FAX.
■ Acceda a la Guía de conguración del FAX
1
Acceda al sitio web de Canon.
2
Haga clic en Consulte las funciones
recomendadas.
3
Haga clic en Funciones/Servicios.
4
Haga clic en Configuración del FAX.

How-To Video Library
Videoteca sobre procedimientos
Marcas comerciales
•
Windows es una marca comercial o marca comercial registrada de Microsoft Corporation, registrada en EE.UU. y/o en otros países.
•
App Store es una marca comercial de Apple Inc., registradas en EE.UU. y en otros países.
•
Google Play es una marca comercial registrada de Google LLC.
Trademarks
•
Windows is a trademark or registered trademark of Microsoft Corporation in the U.S. and/or other countries.
•
App Store is a trademark of Apple Inc., registered in the U.S. and other countries.
•
Google Play is a registered trademark of Google LLC..
RMC (Regulatory Model Code): K10527
RMC (Regulatory Model Code): K10528

Desde su navegador
Acceso al Manual en línea
Access Online Manual
From your browser
PRINTED IN XXXXXXXX
QT6-3586-V01 © CANON INC. 2020XXXXXXXX
-
 1
1
-
 2
2
-
 3
3
-
 4
4
-
 5
5
-
 6
6
-
 7
7
-
 8
8
-
 9
9
-
 10
10
-
 11
11
-
 12
12
-
 13
13
-
 14
14
-
 15
15
-
 16
16
-
 17
17
-
 18
18
-
 19
19
-
 20
20


Canon GX7000 Series Inkjet Printer Guía del usuario
- Categoría
- Impresión
- Tipo
- Guía del usuario
- Este manual también es adecuado para
en otros idiomas
Artículos relacionados
-
Canon G1230 Printer Instrucciones de operación
-
-
Canon PIXMA G620 Guía de inicio rápido
-
-
Canon G4270 Instrucciones de operación
-
Canon PIXMA G7020 Guía de inicio rápido
-
Canon Pixma GM4010 El manual del propietario
-
Canon PIXMA G7040 Manual de usuario
-
Canon PIXMA G3200 El manual del propietario
-