Behringer S32 Guía de inicio rápido
- Categoría
- Equipo de música suplementario
- Tipo
- Guía de inicio rápido
Este manual también es adecuado para
La página se está cargando...

2 Quick Start Guide 3DIGITAL SNAKE S32
Important Safety
Instructions
LEGAL DISCLAIMER
Instrucciones de
seguridad
NEGACIÓN LEGAL
GARANTÍA LIMITADA
LIMITED WARRANTY
Terminals marked with this symbol carry
electrical current of su cient magnitude
to constitute risk of electric shock.
Use only high-quality professional speaker cables with
¼" TS or twist-locking plugs pre-installed. Allother
installation or modi cation should be performed only
by quali edpersonnel.
This symbol, wherever it appears,
alertsyou to the presence of uninsulated
dangerous voltage inside the
enclosure-voltage that may be su cient to constitute a
risk ofshock.
This symbol, wherever it appears,
alertsyou to important operating and
maintenance instructions in the
accompanying literature. Please read the manual.
Caution
To reduce the risk of electric shock, donot
remove the top cover (or the rear section).
No user serviceable parts inside. Refer servicing to
quali ed personnel.
Caution
To reduce the risk of re or electric shock,
do not expose this appliance to rain and
moisture. The apparatus shall not be exposed to dripping
or splashing liquids and no objects lled with liquids,
suchas vases, shall be placed on the apparatus.
Caution
These service instructions are for use
by quali ed service personnel only.
Toreduce the risk of electric shock do not perform any
servicing other than that contained in the operation
instructions. Repairs have to be performed by quali ed
servicepersonnel.
1. Read these instructions.
2. Keep these instructions.
3. Heed all warnings.
4. Follow all instructions.
5. Do not use this apparatus near water.
6. Clean only with dry cloth.
7. Do not block any ventilation openings. Install in
accordance with the manufacturer’s instructions.
8. Do not install near any heat sources such as
radiators, heat registers, stoves, or other apparatus
(including ampli ers) that produce heat.
9. Do not defeat the safety purpose of the polarized
or grounding-type plug. A polarized plug has two blades
with one wider than the other. A grounding-type plug
has two blades and a third grounding prong. The wide
blade or the third prong are provided for your safety. Ifthe
provided plug does not t into your outlet, consult an
electrician for replacement of the obsolete outlet.
10. Protect the power cord from being walked on or
pinched particularly at plugs, convenience receptacles,
and the point where they exit from the apparatus.
11. Use only attachments/accessories speci ed by
themanufacturer.
12. Use only with the
cart, stand, tripod, bracket,
or table speci ed by the
manufacturer, orsold with
the apparatus. When a cart
is used, use caution when
moving the cart/apparatus
combination to avoid
injury from tip-over.
13. Unplug this apparatus during lightning storms or
when unused for long periods of time.
14. Refer all servicing to quali ed service personnel.
Servicing is required when the apparatus has been
damaged in any way, such as power supply cord or plug
is damaged, liquid has been spilled or objects have fallen
into the apparatus, the apparatus has been exposed
to rain or moisture, does not operate normally, or has
beendropped.
15. The apparatus shall be connected to a MAINS socket
outlet with a protective earthing connection.
16. Where the MAINS plug or an appliance coupler is
used as the disconnect device, the disconnect device shall
remain readily operable.
17. Correct disposal of this
product: This symbol indicates that
this product must not be disposed
of with household waste,
according to the WEEE Directive
(2012/19/EU) and your national
law. This product should be taken
to a collection center licensed for the recycling of waste
electrical and electronic equipment (EEE). The
mishandling of this type of waste could have a possible
negative impact on the environment and human health
due to potentially hazardous substances that are generally
associated with EEE. At the same time, your cooperation
in the correct disposal of this product will contribute to
the e cient use of natural resources. For more
information about where you can take your waste
equipment for recycling, please contact your local city
o ce, or your household waste collection service.
18. Do not install in a con ned space, such as a book
case or similar unit.
19. Do not place naked ame sources, such as lighted
candles, on the apparatus.
20. Please keep the environmental aspects of battery
disposal in mind. Batteries must be disposed-of at a
battery collection point.
21. Use this apparatus in tropical and/or
moderate climates.
MUSIC Group accepts no liability for any loss which
may be su ered by any person who relies either
wholly or in part upon any description, photograph,
or statement contained herein. Technical speci cations,
appearances and other information are subject to
change without notice. All trademarks are the property
of their respective owners. MIDAS, KLARK TEKNIK,
LAB GRUPPEN, LAKE, TANNOY, TURBOSOUND,
TC ELECTRONIC, TC HELICON, BEHRINGER, BUGERA
and DDA are trademarks or registered trademarks
of MUSIC Group IP Ltd. © MUSIC Group IP Ltd.
2016 All rights reserved.
For the applicable warranty terms and conditions
and additional information regarding MUSIC Group’s
Limited Warranty, please see complete details online at
music-group.com/warranty.
Las terminales marcadas con este símbolo
transportan corriente eléctrica de
magnitud su ciente como para constituir
un riesgo de descarga eléctrica. Utilice solo cables de
altavoz profesionales y de alta calidad con conectores
TS de 6,3 mm o de bayoneta pre jados. Cualquier otra
instalación o modi cación debe ser realizada únicamente
por un técnico cuali cado.
Este símbolo, siempre que aparece,
leadvierte de la presencia de voltaje
peligroso sin aislar dentro de la caja;
estevoltaje puede ser su ciente para constituir un riesgo
dedescarga.
Este símbolo, siempre que aparece,
leadvierte sobre instrucciones operativas
y de mantenimiento que aparecen en la
documentación adjunta. Por favor, lea el manual.
Atención
Para reducir el riesgo de descarga
eléctrica, no quite la tapa (o la parte
posterior). No hay piezas en el interior del equipo que
puedan ser reparadas por el usuario. Si es necesario,
póngase en contacto con personal cuali cado.
Atención
Para reducir el riesgo de incendio o
descarga eléctrica, no exponga este
aparato a la lluvia, humedad o alguna otra fuente que
pueda salpicar o derramar algún líquido sobre el aparato.
Nocoloque ningún tipo de recipiente para líquidos sobre
el aparato.
Atención
Las instrucciones de servicio deben
llevarlas a cabo exclusivamente personal
cuali cado. Para evitar el riesgo de una descarga eléctrica,
no realice reparaciones que no se encuentren descritas
en el manual de operaciones. Lasreparaciones deben ser
realizadas exclusivamente por personalcuali cado.
1. Lea las instrucciones.
2. Conserve estas instrucciones.
3. Preste atención a todas las advertencias.
4. Siga todas las instrucciones.
5. No use este aparato cerca del agua.
6. Limpie este aparato con un paño seco.
7. No bloquee las aberturas de ventilación. Instale el
equipo de acuerdo con las instrucciones del fabricante.
8. No instale este equipo cerca de fuentes de calor
tales como radiadores, acumuladores de calor, estufas u
otros aparatos (incluyendo ampli cadores) que puedan
producir calor.
9. No elimine o deshabilite nunca la conexión a tierra
del aparato o del cable de alimentación de corriente.
Unenchufe polarizado tiene dos polos, uno de los cuales
tiene un contacto más ancho que el otro. Una clavija con
puesta a tierra dispone de tres contactos: dos polos y la
puesta a tierra. El contacto ancho y el tercer contacto,
respectivamente, son los que garantizan una mayor
seguridad. Si el enchufe suministrado con el equipo no
concuerda con la toma de corriente, consulte con un
electricista para cambiar la toma de corriente obsoleta.
10. Coloque el cable de suministro de energía de manera
que no pueda ser pisado y que esté protegido de objetos
a lados. Asegúrese de que el cable de suministro de
energía esté protegido, especialmente en la zona de la
clavija y en el punto donde sale del aparato.
11. Use únicamente los dispositivos o accesorios
especi cados por el fabricante.
12. Use únicamente la
carretilla, plataforma,
trípode, soporte o mesa
especi cados por el
fabricante o suministrados
junto con el equipo.
Altransportar el equipo,
tenga cuidado para evitar
daños y caídas al tropezar con algún obstáculo.
13. Desenchufe el equipo durante tormentas o si no va a
utilizarlo durante un periodo largo.
14. Confíe las reparaciones únicamente a servicios
técnicos cuali cados. La unidad requiere mantenimiento
siempre que haya sufrido algún daño, si el cable de
suministro de energía o el enchufe presentaran daños,
sehubiera derramado un líquido o hubieran caído objetos
dentro del equipo, si el aparato hubiera estado expuesto
a la humedad o la lluvia, si ha dejado de funcionar de
manera normal o si ha sufrido algún golpe o caída.
15. Al conectar la unidad a la toma de corriente eléctrica
asegúrese de que la conexión disponga de una unión
atierra.
16. Si el enchufe o conector de red sirve como único
medio de desconexión, éste debe ser accesiblefácilmente.
17. Cómo debe deshacerse de
este aparato: Este símbolo indica
que este aparato no debe ser
tratado como basura orgánica,
según lo indicado en la Directiva
WEEE (2012/19/EU) y a las
normativas aplicables en su país.
En lugar de ello deberá llevarlo al punto limpio más
cercano para el reciclaje de sus elementos eléctricos/
electrónicos (EEE). Al hacer esto estará ayudando a
prevenir las posibles consecuencias negativas para el
medio ambiente y la salud que podrían ser provocadas por
una gestión inadecuada de este tipo de aparatos. Además,
el reciclaje de materiales ayudará a conservar los recursos
naturales. Para más información acerca del reciclaje de
este aparato, póngase en contacto con el Ayuntamiento
de su ciudad o con el punto limpio local.
18. No instale esta unidad en un espacio muy reducido,
tal como encastrada en una librería o similar.
19. No coloque objetos con llama, como una vela
encendida, sobre este aparato.
20. Tenga presentes todas las advertencias relativas
al reciclaje y correcta eliminación de las pilas. Las pilas
deben ser siempre eliminadas en un punto limpio y nunca
con el resto de la basura orgánica.
21. Use este aparato en rangos de temperatura
moderados y/o tropicales.
MUSIC Group no admite ningún tipo de responsabilidad
por cualquier daño o pérdida que pudiera sufrir
cualquier persona por con ar total o parcialmente en la
descripciones, fotografías o a rmaciones contenidas en
este documento. Las especi caciones técnicas, imágenes
y otras informaciones contenidas en este documento
están sujetas a modi caciones sin previo aviso. Todas las
marcas comerciales que aparecen aquí son propiedad
de sus respectivos dueños. MIDAS, KLARK TEKNIK,
LAB GRUPPEN, LAKE, TANNOY, TURBOSOUND,
TC ELECTRONIC, TC HELICON, BEHRINGER, BUGERA
y DDA son marcas comerciales o marcas registradas
de MUSIC Group IP Ltd. © MUSIC Group IP Ltd.
2016 Reservados todos los derechos.
Si quiere conocer los detalles y condiciones aplicables
de la garantía así como información adicional sobre la
Garantía limitada de MUSIC Group, consulte online toda la
información en la web music-group.com/warranty.
La página se está cargando...
La página se está cargando...

8 9 Quick Start GuideDIGITAL SNAKE S32
(EN) Step 1: Hook-Up
(ES) Paso 1: Conexión
(FR) Etape 1 : Connexions
(DE)
Schritt 1: Verkabelung
(PT) Passo 1: Conexões
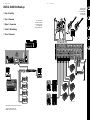
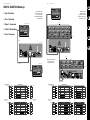
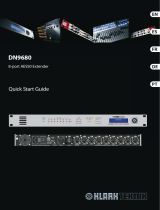
DIGITAL SNAKE S32 Hook-up
F1320D active monitor
B215D active speaker B1800D PRO
DI Box
GTX30
XM8500
Keyboard
P16-D
P16-M
FCA1616 interface
FCB1010 MIDI pedal
VIEW
VIEW
VIEWVIEWVIEWVIEWVIEWVIEW
VIEW
VIEW
VIEW
–
6
X32
S32 rear panel connections
S32 Conexiones del panel trasero
S32 — Connexions de face arrière
S32 - rückseitige Anschlüsse
Conexões do painel traseiro do S32
S32 common connections
S32 Conexiones habituales
S32 — Connexions communes
S32 - übliche Anschlüsse
Conexões comuns do S32
Cabling for all AES50 connections between X32 and S32 stageboxes:
• Shielded CAT-5e, Ethercon terminated ends
• Maximum cable length 100 meters (330 feet)

10 11 Quick Start GuideDIGITAL SNAKE S32
OUT 17-24
IN 33-48
VIEW
VIEW
VIEWVIEWVIEWVIEWVIEWVIEW
VIEW
VIEW
VIEW
–
6
X32
IN 1-32
OUT 1-16
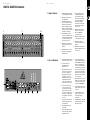
Linking an S32 and S16
Enlace de un S32 y un S16
Connexion d'un S32 et d'un S16
Kopplung einer S32 und einer S16
Conectando um S32 e um S16
S32 between two X32 consoles
S32 entre dos mesas de mezclas X32
S32 entre deux consoles X32
S32 zwischen zwei X32 Mischpulten
S32 entre duas mesas X32
DIGITAL SNAKE S32 Hook-up
Note: The signals on both units
arefully de ned on the X32’s
‘Routing/AES50 Output’ page.
S32 on stage
AES50-A
AES50-A
X32 at Side-stage
X32 at Front-of-House
VIEW
VIEW
VIEWVIEWVIEWVIEWVIEWVIEW
VIEW
VIEW
VIEW
–
6
X32
VIEW
VIEW
VIEWVIEWVIEWVIEWVIEWVIEW
VIEW
VIEW
VIEW
–
6
X32
Shielded CAT-5e
(EN) Step 1: Hook-Up
(ES) Paso 1: Conexión
(FR) Etape 1 : Connexions
(DE)
Schritt 1: Verkabelung
(PT) Passo 1: Conexões
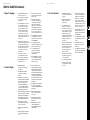
S32 with S16 and console: S32 Digital Stage Box
from stage
A AS32B A S16 -2- (Out 17-24) B
1-8 1-8 Local In 1-8 1-8 1-8 Local In 1-8 1-8
9-16
9-16 Local In 9-16 9-16 9-16 Local In 9-16 9-16
17-24
17-24 Local In 17-24 17-24 17-24 17-24
25-32
25-32 Local In 25-32 25-32 25-32 25-32
33-40
33-40 33-40 33-40 33-40
41-48
41-48 41-48 41-48 41-48
TX RX TX RX
Mixing Console FOH
(clock master)
RX
S32 TX RX S32 TX
to stage
A AS32B A S16 -2- (Out 17-24) B
1-8 1-8 XLR OUT 1-8 1-8 1-8 1-8
9-16
9-16 XLR OUT 9-16 9-16 9-16 9-16
17-24
17-24 ADAT OUT 17-24 17-24 17-24 XLR OUT 1-8 17-24
25-32
25-32 ADAT OUT 25-32 25-32 25-32 ADAT OUT 25-32 25-32
33-40
33-40 P16 OUT 1-8 33-40 33-40 P16 OUT 1-8 33-40
41-48
41-48 P16 OUT 9-16 41-48 41-48 P16 OUT 9-16 41-48
S32 with two consoles: S32 Digital Stage Box
from stage
A AS32B A
to FOH
1-8
1-8 Local In 1-8 1-8 1-8
9-16
9-16 Local In 9-16 9-16 9-16
17-24
17-24 Local In 17-24 17-24 17-24
25-32
25-32 Local In 25-32 25-32 25-32
33-40
33-40 33-40 33-40
41-48
41-48 41-48 41-48
RX TX RX TX
Mixing Console FOH
(clock master)
Mixing Console Stage
(sync slave)
TX RX
S32 TX RX
to stage
A AS32B A
1-8 1-8 XLR OUT 1-8 Local In 1-8 1-8 1-8
9-16
9-16 XLR OUT 9-16 Local In 9-16 9-16 9-16
17-24
17-24 ADAT OUT 17-24 Local In 17-24 17-24 17-24
25-32
25-32 ADAT OUT 25-32 Local In 25-32 25-32 25-32
33-40
33-40 P16 OUT 1-8 33-40 33-40
41-48
41-48 P16 OUT 9-16 41-48 41-48

12 13 Quick Start GuideDIGITAL SNAKE S32
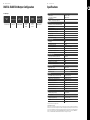
DIGITAL SNAKE S32 Controls
(2)(1) (3) (4)
(5)
(9)
(7)
(10) (12)
(8) (11)
(6)
(1) PHANTOM LEDs light when the 48 V supply
voltage is engaged for a particular channel.
(2) MIDAS-designed mic/line inputs accept
balanced XLR male plugs.
(3) MUTE ALL button mutes all outputs for
safely connecting and disconnecting cables
while the PA system is still on. Keep the
button depressed while patching cables on
XLRinputs 1-32. The button’s red light will
turn o shortly after releasing it, indicating
that the inputs are now active again.
(4) AES50 SYNC LEDs indicate proper clock
synchronisation on either AES50 port with a
green light. A red light indicates the AES50
connection is not synchronised, and o
indicates AES50 is not connected.
(5) XLR outputs 1-16 accept female balanced
XLR plugs and provide the signals 1-16 of
AES50 port A.
(6) POWER switch turns the unit on and o .
(7) USB input accepts a USB type-B plug for
rmware updates via PC.
(8) AES50 ports A and B allow connection
to a SuperMAC digital multi-channel
network via shielded Cat-5e Ethernet
cable with terminated ends compatible
to Neutrik etherCON. NOTE: The clock
master, typicallythe digital mixer,
mustbe connected to the AES50 port A,
whileadditional stage boxes would be
connected to port B.
(9) ULTRANET port provides the 16 AES50
channels 33-48 on a single shielded
CAT5 cable to a BEHRINGER P16
personalmonitoring system.
(10) ADAT OUT jacks send AES50 channels 17-32
to external equipment via optical cable.
(11) AES/EBU outputs send the AES50
channels 13/14 and 15/16 to devices with
digitalinputs.
(12) MIDI IN/OUT jacks accept standard 5-pin
MIDI cables for MIDI communication to and
from an X32 console.
(1) Pilotos PHANTOM; se iluminan cuando haya
activado el botón 48 V de un canal concreto.
(2) Las entradas de micro/línea con
diseño MIDAS aceptan clavijas
XLRmachobalanceadas.
(3) El botón MUTE ALL anula todas las salidas
para una conexión y desconexión segura
de los cables con el sistema PA activo.
Mantenga pulsado este botón mientras
realiza el cableado en las tomas de
entrada XLR 1-32. El piloto rojo del botón
se iluminará un momento después de
desactivar el botón para indicarle que las
entradas vuelven a estar de nuevo activas.
(4) Los pilotos AES50 SYNC le indican una
correcta sincronización de la señal de
reloj en cualquiera de los puertos AES50
por medio de un piloto verde. Un piloto
rojo indica que la conexión AES50 no está
sincronizada y si no está iluminado ningún
piloto allí le indica que el puerto AES50 no
está conectado.
(5) Las salidas XLR 1-16 aceptan clavijas XLR
hembra balanceadas y emiten las señales
1-16 del puerto AES50 A.
(6) El botón POWER le permite encender y
apagar la unidad.
(7) La toma de entrada USB acepta una clavija
USB de tipo B para realizar actualizaciones
del rmware a través de un PC.
(8) Los puertos AES50 A y B permiten la
conexión de esta unidad a una red digital
multicanal SuperMAC a través de un cable
Ethernet Cat-5e con blindaje y extremos
con terminación, compatible con Neutrik
etherCON. NOTA: Debe conectar la unidad
máster o controladora de la señal de reloj,
por lo general la mesa de mezclas digital,
al puerto AES50 A, mientras que el resto de
unidades adicionales de escenarios deberán
ser conectadas al puerto B.
(9) El puerto ULTRANET le ofrece los 16 canales
AES50 33-48 a través de un único cable CAT5
con blindaje para su envío a un sistema de
monitorización personal BEHRINGER P16.
(10) Las tomas ADAT OUT dan salida a los canales
AES50 17-32 a unidades externas a través de
un cable óptico.
(11) Las salidas AES/EBU emiten los canales
AES50 13/14 y 15/16 para la conexión
a dispositivos que dispongan de
entradasdigitales.
(12) Las toma MIDI IN/OUT admiten cables MIDI
de 5 puntas standard para la comunicación
MIDI a y desde una mesa X32.
(EN) Step 2: Controls
(ES) Paso 2: Controles
La página se está cargando...
La página se está cargando...

18 Quick Start Guide 19DIGITAL SNAKE S32
FEDERAL COMMUNICATIONS
COMMISSION COMPLIANCE
INFORMATION
Responsible Party Name: MUSIC Group Services NV Inc.
Address: 5270 Procyon Street
Las Vegas, NV 89118
USA
Phone Number: +1 702 800 8290
DIGITAL SNAKE S32
complies with the FCC rules as mentioned in the followingparagraph:
This equipment has been tested and found to comply with the limits for a ClassA
digital device, pursuant to part 15 of the FCC Rules. These limits are designed
to provide reasonable protection against harmful interference in a residential
installation. This equipment generates, uses and can radiate radio frequency
energy and, if not installed and used in accordance with the instructions, may cause
harmful interference to radio communications. However, there is no guarantee that
interference will not occur in a particular installation. If this equipment does cause
harmful interference to radio or television reception, which can be determined
by turning the equipment o and on, the user is encouraged to try to correct the
interference by one or more of the followingmeasures:
• • Reorient or relocate the receiving antenna
• • Increase the separation between the equipment and receiver
• • Connect the equipment into an outlet on a circuit di erent from that to which the
receiver is connected
• • Consult the dealer or an experienced radio/TV technician forhelp
This device complies with Part 15 of the FCC rules. Operation is subject to the
following two conditions:
(1) this device may not cause harmful interference, and
(2) this device must accept any interference received, including interference that may
cause undesired operation.
Important information:
Changes or modi cations to the equipment not expressly approved by MUSIC Group
can void the user’s authority to use the equipment.
DIGITAL SNAKE S32
Other important information
1. Register online. Please register your new
MUSIC Group equipment right after you purchase it by
visiting behringer.com. Registering your purchase using
our simple online form helps us to process your repair
claims more quickly and e ciently. Also, read the terms
and conditions of our warranty, if applicable.
2. Malfunction. Should your MUSIC Group
Authorized Reseller not be located in your vicinity,
you may contact the MUSIC Group Authorized Ful ller
for your country listed under “Support” at behringer.com.
Should your country not be listed, please check if your
problem can be dealt with by our “Online Support” which
may also be found under “Support” at behringer.com.
Alternatively, please submit an online warranty claim at
behringer.com BEFORE returning the product.
3. Power Connections. Before plugging the
unit into a power socket, please make sure you are using
the correct mains voltage for your particular model.
Faulty fuses must be replaced with fuses of the same type
and rating without exception.
1. Registro online. Le recomendamos que
registre su nuevo aparato MUSIC Group justo después de
su compra accediendo a la página web behringer.com.
El registro de su compra a través de nuestro sencillo
sistema online nos ayudará a resolver cualquier
incidencia que se presente a la mayor brevedad posible.
Además, aproveche para leer los términos y condiciones de
nuestra garantía, si es aplicable en su caso.
2. Averías. En el caso de que no exista un distribuidor
MUSIC Group en las inmediaciones, puede ponerse en
contacto con el distribuidor MUSIC Group de su país,
que encontrará dentro del apartado “Support” de nuestra
página web behringer.com. En caso de que su país no
aparezca en ese listado, acceda a la sección “Online Support”
(que también encontrará dentro del apartado “Support”
de nuestra página web) y compruebe si su problema aparece
descrito y solucionado allí. De forma alternativa, envíenos a
través de la página web una solicitud online de soporte en
periodo de garantía ANTES de devolvernos el aparato.
3. Conexiones de corriente. Antes de enchufar
este aparato a una salida de corriente, asegúrese de que dicha
salida sea del voltaje adecuado para su modelo concreto.
En caso de que deba sustituir un fusible quemado, deberá
hacerlo por otro de idénticas especi caciones, sin excepción.
1. Enregistrez-vous en ligne. Prenez le
temps d’enregistrer votre produit MUSIC Group aussi vite
que possible sur le site Internet behringer.com. Le fait
d’enregistrer le produit en ligne nous permet de gérer
les réparations plus rapidement et plus e cacement.
Prenez également le temps de lire les termes et conditions
de notre garantie.
2. Dysfonctionnement. Si vous n’avez pas de
revendeur MUSIC Group près de chez vous, contactez le
distributeur MUSIC Group de votre pays : consultez la liste
des distributeurs de votre pays dans la page “Support” de
notre site Internet behringer.com. Si votre pays n’est pas
dans la liste, essayez de résoudre votre problème avec
notre “aide en ligne” que vous trouverez également dans
la section “Support” du site behringer.com. Vous pouvez
également nous faire parvenir directement votre demande
de réparation sous garantie par Internet sur le site
behringer.com AVANT de nous renvoyer le produit.
3. Raccordement au secteur. Avant de relier
cet équipement au secteur, assurez-vous que la tension
secteur de votre région soit compatible avec l’appareil.
Veillez à remplacer les fusibles uniquement par des
modèles exactement de même taille et de même valeur
électrique — sans aucune exception.
1. Online registrieren. Bitte registrieren Sie Ihr
neues MUSIC Group-Gerät direkt nach dem Kauf auf der
Website behringer.com. Wenn Sie Ihren Kauf mit unserem
einfachen online Formular registrieren, können wir Ihre
Reparaturansprüche schneller und e zienter bearbeiten.
Lesen Sie bitte auch unsere Garantiebedingungen,
falls zutre end.
2. Funktionsfehler. Sollte sich kein MUSIC Group
Händler in Ihrer Nähe be nden, können Sie den
MUSIC Group Vertrieb Ihres Landes kontaktieren,
der auf behringer. com unter „Support“ aufgeführt
ist. Sollte Ihr Land nicht aufgelistet sein, prüfen Sie
bitte, ob Ihr Problem von unserem „Online Support“
gelöst werden kann, den Sie ebenfalls auf behringer.com
unter „Support“ nden. Alternativ reichen Sie bitte Ihren
Garantieanspruch online auf behringer.com ein, BEVOR Sie
das Produkt zurücksenden.
3. Stromanschluss. Bevor Sie das Gerät an
eine Netzsteckdose anschließen, prüfen Sie bitte, ob Sie
die korrekte Netzspannung für Ihr spezielles Modell
verwenden. Fehlerhafte Sicherungen müssen ausnahmslos
durch Sicherungen des gleichen Typs und Nennwerts
ersetzt werden.
1. Registre-se online. Por favor, registre seu
novo equipamento MUSIC Group logo após a compra
visitando o site behringer.com Registrar sua compra
usando nosso simples formulário online nos ajuda a
processar seus pedidos de reparos com maior rapidez e
e ciência. Além disso, leia nossos termos e condições de
garantia, caso seja necessário.
2. Funcionamento Defeituoso. Caso seu
fornecedor MUSIC Group não esteja localizado nas
proximidades, você pode contatar um distribuidor
MUSIC Group para o seu país listado abaixo de “Suporte”
em behringer.com. Se seu país não estiver na lista,
favor checar se seu problema pode ser resolvido com o
nosso “Suporte Online” que também pode ser achado
abaixo de “Suporte”em behringer.com. Alternativamente,
favor enviar uma solicitação de garantia online em
behringer.com ANTES da devolução do produto.
3. Ligações. Antes de ligar a unidade à tomada,
assegure-se de que está a utilizar a voltagem correcta para
o modelo em questão. Os fusíveis com defeito terão de
ser substituídos, sem qualquer excepção, por fusíveis do
mesmo tipo e corrente nominal.
Important information
Aspectos importantes
Informations importantes
Weitere wichtige
Informationen
Outras Informações
Importantes
La página se está cargando...
Transcripción de documentos
2 DIGITAL SNAKE S32 Important Safety Instructions Terminals marked with this symbol carry electrical current of sufficient magnitude to constitute risk of electric shock. Use only high-quality professional speaker cables with ¼" TS or twist-locking plugs pre-installed. All other installation or modification should be performed only by qualified personnel. This symbol, wherever it appears, alerts you to the presence of uninsulated dangerous voltage inside the enclosure - voltage that may be sufficient to constitute a risk of shock. This symbol, wherever it appears, alerts you to important operating and maintenance instructions in the accompanying literature. Please read the manual. Caution To reduce the risk of electric shock, do not remove the top cover (or the rear section). No user serviceable parts inside. Refer servicing to qualified personnel. Caution To reduce the risk of fire or electric shock, do not expose this appliance to rain and moisture. The apparatus shall not be exposed to dripping or splashing liquids and no objects filled with liquids, such as vases, shall be placed on the apparatus. Caution These service instructions are for use by qualified service personnel only. To reduce the risk of electric shock do not perform any servicing other than that contained in the operation instructions. Repairs have to be performed by qualified service personnel. 1. Read these instructions. 2. Keep these instructions. 3. Heed all warnings. 4. Follow all instructions. 5. Do not use this apparatus near water. 6. Clean only with dry cloth. 7. Do not block any ventilation openings. Install in accordance with the manufacturer’s instructions. 8. Do not install near any heat sources such as radiators, heat registers, stoves, or other apparatus (including amplifiers) that produce heat. Quick Start Guide 9. Do not defeat the safety purpose of the polarized or grounding-type plug. A polarized plug has two blades with one wider than the other. A grounding-type plug has two blades and a third grounding prong. The wide blade or the third prong are provided for your safety. If the provided plug does not fit into your outlet, consult an electrician for replacement of the obsolete outlet. 10. Protect the power cord from being walked on or pinched particularly at plugs, convenience receptacles, and the point where they exit from the apparatus. 11. Use only attachments/accessories specified by the manufacturer. 12. Use only with the cart, stand, tripod, bracket, or table specified by the manufacturer, or sold with the apparatus. When a cart is used, use caution when moving the cart/apparatus combination to avoid injury from tip-over. 13. Unplug this apparatus during lightning storms or when unused for long periods of time. 14. Refer all servicing to qualified service personnel. Servicing is required when the apparatus has been damaged in any way, such as power supply cord or plug is damaged, liquid has been spilled or objects have fallen into the apparatus, the apparatus has been exposed to rain or moisture, does not operate normally, or has been dropped. 15. The apparatus shall be connected to a MAINS socket outlet with a protective earthing connection. 16. Where the MAINS plug or an appliance coupler is used as the disconnect device, the disconnect device shall remain readily operable. 17. Correct disposal of this product: This symbol indicates that this product must not be disposed of with household waste, according to the WEEE Directive (2012/19/EU) and your national law. This product should be taken to a collection center licensed for the recycling of waste electrical and electronic equipment (EEE). The mishandling of this type of waste could have a possible negative impact on the environment and human health due to potentially hazardous substances that are generally associated with EEE. At the same time, your cooperation in the correct disposal of this product will contribute to the efficient use of natural resources. For more information about where you can take your waste equipment for recycling, please contact your local city office, or your household waste collection service. 18. Do not install in a confined space, such as a book case or similar unit. 19. Do not place naked flame sources, such as lighted candles, on the apparatus. 20. Please keep the environmental aspects of battery disposal in mind. Batteries must be disposed-of at a battery collection point. 21. Use this apparatus in tropical and/or moderate climates. Instrucciones de seguridad LEGAL DISCLAIMER MUSIC Group accepts no liability for any loss which may be suffered by any person who relies either wholly or in part upon any description, photograph, or statement contained herein. Technical specifications, appearances and other information are subject to change without notice. All trademarks are the property of their respective owners. MIDAS, KLARK TEKNIK, LAB GRUPPEN, LAKE, TANNOY, TURBOSOUND, TC ELECTRONIC, TC HELICON, BEHRINGER, BUGERA and DDA are trademarks or registered trademarks of MUSIC Group IP Ltd. © MUSIC Group IP Ltd. 2016 All rights reserved. LIMITED WARRANTY For the applicable warranty terms and conditions and additional information regarding MUSIC Group’s Limited Warranty, please see complete details online at music-group.com/warranty. Las terminales marcadas con este símbolo transportan corriente eléctrica de magnitud suficiente como para constituir un riesgo de descarga eléctrica. Utilice solo cables de altavoz profesionales y de alta calidad con conectores TS de 6,3 mm o de bayoneta prefijados. Cualquier otra instalación o modificación debe ser realizada únicamente por un técnico cualificado. Este símbolo, siempre que aparece, le advierte de la presencia de voltaje peligroso sin aislar dentro de la caja; este voltaje puede ser suficiente para constituir un riesgo de descarga. Este símbolo, siempre que aparece, le advierte sobre instrucciones operativas y de mantenimiento que aparecen en la documentación adjunta. Por favor, lea el manual. Atención Para reducir el riesgo de descarga eléctrica, no quite la tapa (o la parte posterior). No hay piezas en el interior del equipo que puedan ser reparadas por el usuario. Si es necesario, póngase en contacto con personal cualificado. Atención Para reducir el riesgo de incendio o descarga eléctrica, no exponga este aparato a la lluvia, humedad o alguna otra fuente que pueda salpicar o derramar algún líquido sobre el aparato. No coloque ningún tipo de recipiente para líquidos sobre el aparato. Atención Las instrucciones de servicio deben llevarlas a cabo exclusivamente personal cualificado. Para evitar el riesgo de una descarga eléctrica, no realice reparaciones que no se encuentren descritas en el manual de operaciones. Las reparaciones deben ser realizadas exclusivamente por personal cualificado. 1. Lea las instrucciones. 2. Conserve estas instrucciones. 3. Preste atención a todas las advertencias. 4. Siga todas las instrucciones. 5. No use este aparato cerca del agua. 6. Limpie este aparato con un paño seco. 7. No bloquee las aberturas de ventilación. Instale el equipo de acuerdo con las instrucciones del fabricante. 8. No instale este equipo cerca de fuentes de calor tales como radiadores, acumuladores de calor, estufas u otros aparatos (incluyendo amplificadores) que puedan producir calor. 9. No elimine o deshabilite nunca la conexión a tierra del aparato o del cable de alimentación de corriente. Un enchufe polarizado tiene dos polos, uno de los cuales tiene un contacto más ancho que el otro. Una clavija con puesta a tierra dispone de tres contactos: dos polos y la puesta a tierra. El contacto ancho y el tercer contacto, respectivamente, son los que garantizan una mayor seguridad. Si el enchufe suministrado con el equipo no concuerda con la toma de corriente, consulte con un electricista para cambiar la toma de corriente obsoleta. 10. Coloque el cable de suministro de energía de manera que no pueda ser pisado y que esté protegido de objetos afilados. Asegúrese de que el cable de suministro de energía esté protegido, especialmente en la zona de la clavija y en el punto donde sale del aparato. 11. Use únicamente los dispositivos o accesorios especificados por el fabricante. 12. Use únicamente la carretilla, plataforma, trípode, soporte o mesa especificados por el fabricante o suministrados junto con el equipo. Al transportar el equipo, tenga cuidado para evitar daños y caídas al tropezar con algún obstáculo. 13. Desenchufe el equipo durante tormentas o si no va a utilizarlo durante un periodo largo. 14. Confíe las reparaciones únicamente a servicios técnicos cualificados. La unidad requiere mantenimiento siempre que haya sufrido algún daño, si el cable de suministro de energía o el enchufe presentaran daños, se hubiera derramado un líquido o hubieran caído objetos dentro del equipo, si el aparato hubiera estado expuesto a la humedad o la lluvia, si ha dejado de funcionar de manera normal o si ha sufrido algún golpe o caída. 15. Al conectar la unidad a la toma de corriente eléctrica asegúrese de que la conexión disponga de una unión a tierra. 16. Si el enchufe o conector de red sirve como único medio de desconexión, éste debe ser accesible fácilmente. 17. Cómo debe deshacerse de este aparato: Este símbolo indica que este aparato no debe ser tratado como basura orgánica, según lo indicado en la Directiva WEEE (2012/19/EU) y a las normativas aplicables en su país. En lugar de ello deberá llevarlo al punto limpio más cercano para el reciclaje de sus elementos eléctricos / electrónicos (EEE). Al hacer esto estará ayudando a prevenir las posibles consecuencias negativas para el medio ambiente y la salud que podrían ser provocadas por una gestión inadecuada de este tipo de aparatos. Además, el reciclaje de materiales ayudará a conservar los recursos naturales. Para más información acerca del reciclaje de este aparato, póngase en contacto con el Ayuntamiento de su ciudad o con el punto limpio local. 3 18. No instale esta unidad en un espacio muy reducido, tal como encastrada en una librería o similar. 19. No coloque objetos con llama, como una vela encendida, sobre este aparato. 20. Tenga presentes todas las advertencias relativas al reciclaje y correcta eliminación de las pilas. Las pilas deben ser siempre eliminadas en un punto limpio y nunca con el resto de la basura orgánica. 21. Use este aparato en rangos de temperatura moderados y/o tropicales. NEGACIÓN LEGAL MUSIC Group no admite ningún tipo de responsabilidad por cualquier daño o pérdida que pudiera sufrir cualquier persona por confiar total o parcialmente en la descripciones, fotografías o afirmaciones contenidas en este documento. Las especificaciones técnicas, imágenes y otras informaciones contenidas en este documento están sujetas a modificaciones sin previo aviso. Todas las marcas comerciales que aparecen aquí son propiedad de sus respectivos dueños. MIDAS, KLARK TEKNIK, LAB GRUPPEN, LAKE, TANNOY, TURBOSOUND, TC ELECTRONIC, TC HELICON, BEHRINGER, BUGERA y DDA son marcas comerciales o marcas registradas de MUSIC Group IP Ltd. © MUSIC Group IP Ltd. 2016 Reservados todos los derechos. GARANTÍA LIMITADA Si quiere conocer los detalles y condiciones aplicables de la garantía así como información adicional sobre la Garantía limitada de MUSIC Group, consulte online toda la información en la web music-group.com/warranty. 8 DIGITAL SNAKE S32 9 Quick Start Guide DIGITAL SNAKE S32 Hook-up S32 common connections S32 Conexiones habituales S32 — Connexions communes S32 - übliche Anschlüsse Conexões comuns do S32 (EN) Step 1: Hook-Up (ES) Paso 1: Conexión S32 rear panel connections S32 Conexiones del panel trasero S32 — Connexions de face arrière S32 - rückseitige Anschlüsse Conexões do painel traseiro do S32 (FR) Etape 1 : Connexions (DE) Schritt 1: Verkabelung GTX30 (PT) Passo 1: Conexões DI Box XM8500 FCB1010 MIDI pedal P16-D FCA1616 interface Keyboard VIEW VIEW VIEW VIEW VIEW VIEW VIEW VIEW VIEW VIEW –6 VIEW X32 F1320D active monitor P16-M Cabling for all AES50 connections between X32 and S32 stageboxes: • Shielded CAT-5e, Ethercon terminated ends • Maximum cable length 100 meters (330 feet) B215D active speaker B1800D PRO 10 DIGITAL SNAKE S32 11 Quick Start Guide DIGITAL SNAKE S32 Hook-up VIEW VIEW S32 between two X32 consoles S32 entre dos mesas de mezclas X32 S32 entre deux consoles X32 S32 zwischen zwei X32 Mischpulten S32 entre duas mesas X32 (EN) Step 1: Hook-Up (ES) Paso 1: Conexión VIEW VIEW VIEW VIEW VIEW VIEW Linking an S32 and S16 Enlace de un S32 y un S16 Connexion d'un S32 et d'un S16 Kopplung einer S32 und einer S16 Conectando um S32 e um S16 VIEW VIEW –6 VIEW X32 (FR) Etape 1 : Connexions IN 1-32 X32 at Front-of-House VIEW VIEW (DE) Schritt 1: Verkabelung VIEW VIEW VIEW VIEW VIEW VIEW VIEW VIEW –6 VIEW (PT) Passo 1: Conexões OUT 1-16 X32 AES50-A S32 on stage IN 33-48 X32 at Side-stage Shielded CAT-5e Note: The signals on both units are fully defined on the X32’s ‘Routing/AES50 Output’ page. VIEW OUT 17-24 VIEW VIEW VIEW VIEW VIEW VIEW VIEW VIEW VIEW –6 AES50-A VIEW X32 S32 with two consoles: A from stage 1-8 9-16 17-24 25-32 33-40 41-48 RX Mixing Console FOH (clock master) TX A to stage 1-8 9-16 17-24 25-32 33-40 41-48 A 1-8 9-16 17-24 25-32 33-40 41-48 TX RX A 1-8 9-16 17-24 25-32 33-40 41-48 S32 Digital Stage Box S32 Local In 1-8 Local In 9-16 Local In 17-24 Local In 25-32 S32 S32 XLR OUT 1-8 XLR OUT 9-16 ADAT OUT 17-24 ADAT OUT 25-32 P16 OUT 1-8 P16 OUT 9-16 Local In 1-8 Local In 9-16 Local In 17-24 Local In 25-32 B 1-8 9-16 17-24 25-32 33-40 41-48 RX A 1-8 9-16 17-24 25-32 33-40 41-48 TX TX B 1-8 9-16 17-24 25-32 33-40 41-48 RX A 1-8 9-16 17-24 25-32 33-40 41-48 to FOH Mixing Console Stage (sync slave) S32 with S16 and console: A from stage 1-8 9-16 17-24 25-32 33-40 41-48 Mixing Console FOH (clock master) to stage A 1-8 9-16 17-24 25-32 33-40 41-48 A 1-8 9-16 17-24 25-32 33-40 41-48 TX RX A 1-8 9-16 17-24 25-32 33-40 41-48 S32 Digital Stage Box S32 Local In 1-8 Local In 9-16 Local In 17-24 Local In 25-32 S32 S32 XLR OUT 1-8 XLR OUT 9-16 ADAT OUT 17-24 ADAT OUT 25-32 P16 OUT 1-8 P16 OUT 9-16 B 1-8 9-16 17-24 25-32 33-40 41-48 RX A 1-8 9-16 17-24 25-32 33-40 41-48 TX S16 -2- (Out 17-24) Local In 1-8 Local In 9-16 B 1-8 9-16 17-24 25-32 33-40 41-48 RX TX B 1-8 9-16 17-24 25-32 33-40 41-48 RX A 1-8 9-16 17-24 25-32 33-40 41-48 S32 S16 -2- (Out 17-24) TX B 1-8 9-16 17-24 25-32 33-40 41-48 XLR OUT 1-8 ADAT OUT 25-32 P16 OUT 1-8 P16 OUT 9-16 12 DIGITAL SNAKE S32 13 Quick Start Guide DIGITAL SNAKE S32 Controls (EN) Step 2: Controls (1) PHANTOM LEDs light when the 48 V supply voltage is engaged for a particular channel. (2) MIDAS-designed mic/line inputs accept balanced XLR male plugs. MUTE ALL button mutes all outputs for safely connecting and disconnecting cables while the PA system is still on. Keep the button depressed while patching cables on XLR inputs 1-32. The button’s red light will turn off shortly after releasing it, indicating that the inputs are now active again. (3) (1) (2) (3) (4) (4) (5) (5) (ES) Paso 2: Controles (6) (8) (9) (10) (11) XLR outputs 1-16 accept female balanced XLR plugs and provide the signals 1-16 of AES50 port A. (6) POWER switch turns the unit on and off. (7) USB input accepts a USB type-B plug for firmware updates via PC. (1) Pilotos PHANTOM; se iluminan cuando haya activado el botón 48 V de un canal concreto. (2) Las entradas de micro/línea con diseño MIDAS aceptan clavijas XLR macho balanceadas. (3) El botón MUTE ALL anula todas las salidas para una conexión y desconexión segura de los cables con el sistema PA activo. Mantenga pulsado este botón mientras realiza el cableado en las tomas de entrada XLR 1-32. El piloto rojo del botón se iluminará un momento después de desactivar el botón para indicarle que las entradas vuelven a estar de nuevo activas. (4) (7) AES50 SYNC LEDs indicate proper clock synchronisation on either AES50 port with a green light. A red light indicates the AES50 connection is not synchronised, and off indicates AES50 is not connected. (12) Los pilotos AES50 SYNC le indican una correcta sincronización de la señal de reloj en cualquiera de los puertos AES50 por medio de un piloto verde. Un piloto rojo indica que la conexión AES50 no está sincronizada y si no está iluminado ningún piloto allí le indica que el puerto AES50 no está conectado. (5) Las salidas XLR 1-16 aceptan clavijas XLR hembra balanceadas y emiten las señales 1-16 del puerto AES50 A. (6) El botón POWER le permite encender y apagar la unidad. (7) La toma de entrada USB acepta una clavija USB de tipo B para realizar actualizaciones del firmware a través de un PC. (8) AES50 ports A and B allow connection to a SuperMAC digital multi-channel network via shielded Cat-5e Ethernet cable with terminated ends compatible to Neutrik etherCON. NOTE: The clock master, typically the digital mixer, must be connected to the AES50 port A, while additional stage boxes would be connected to port B. (9) ULTRANET port provides the 16 AES50 channels 33-48 on a single shielded CAT5 cable to a BEHRINGER P16 personal monitoring system. (10) ADAT OUT jacks send AES50 channels 17-32 to external equipment via optical cable. (11) AES/EBU outputs send the AES50 channels 13/14 and 15/16 to devices with digital inputs. (12) MIDI IN/OUT jacks accept standard 5-pin MIDI cables for MIDI communication to and from an X32 console. (8) Los puertos AES50 A y B permiten la conexión de esta unidad a una red digital multicanal SuperMAC a través de un cable Ethernet Cat-5e con blindaje y extremos con terminación, compatible con Neutrik etherCON. NOTA: Debe conectar la unidad máster o controladora de la señal de reloj, por lo general la mesa de mezclas digital, al puerto AES50 A, mientras que el resto de unidades adicionales de escenarios deberán ser conectadas al puerto B. (9) El puerto ULTRANET le ofrece los 16 canales AES50 33-48 a través de un único cable CAT5 con blindaje para su envío a un sistema de monitorización personal BEHRINGER P16. (10) Las tomas ADAT OUT dan salida a los canales AES50 17-32 a unidades externas a través de un cable óptico. (11) Las salidas AES/EBU emiten los canales AES50 13/14 y 15/16 para la conexión a dispositivos que dispongan de entradas digitales. (12) Las toma MIDI IN/OUT admiten cables MIDI de 5 puntas standard para la comunicación MIDI a y desde una mesa X32. 18 DIGITAL SNAKE S32 Quick Start Guide Other important information Important information 1. Register online. Please register your new MUSIC Group equipment right after you purchase it by visiting behringer.com. Registering your purchase using our simple online form helps us to process your repair claims more quickly and efficiently. Also, read the terms and conditions of our warranty, if applicable. 2. Malfunction. Should your MUSIC Group Authorized Reseller not be located in your vicinity, you may contact the MUSIC Group Authorized Fulfiller for your country listed under “Support” at behringer.com. Should your country not be listed, please check if your problem can be dealt with by our “Online Support” which may also be found under “Support” at behringer.com. Alternatively, please submit an online warranty claim at behringer.com BEFORE returning the product. 3. Power Connections. Before plugging the unit into a power socket, please make sure you are using the correct mains voltage for your particular model. Faulty fuses must be replaced with fuses of the same type and rating without exception. Informations importantes Outras Informações Importantes 1. Enregistrez-vous en ligne. Prenez le temps d’enregistrer votre produit MUSIC Group aussi vite que possible sur le site Internet behringer.com. Le fait d’enregistrer le produit en ligne nous permet de gérer les réparations plus rapidement et plus efficacement. Prenez également le temps de lire les termes et conditions de notre garantie. 1. Registre-se online. Por favor, registre seu novo equipamento MUSIC Group logo após a compra visitando o site behringer.com Registrar sua compra usando nosso simples formulário online nos ajuda a processar seus pedidos de reparos com maior rapidez e eficiência. Além disso, leia nossos termos e condições de garantia, caso seja necessário. 2. Dysfonctionnement. Si vous n’avez pas de revendeur MUSIC Group près de chez vous, contactez le distributeur MUSIC Group de votre pays : consultez la liste des distributeurs de votre pays dans la page “Support” de notre site Internet behringer.com. Si votre pays n’est pas dans la liste, essayez de résoudre votre problème avec notre “aide en ligne” que vous trouverez également dans la section “Support” du site behringer.com. Vous pouvez également nous faire parvenir directement votre demande de réparation sous garantie par Internet sur le site behringer.com AVANT de nous renvoyer le produit. 2. Funcionamento Defeituoso. Caso seu fornecedor MUSIC Group não esteja localizado nas proximidades, você pode contatar um distribuidor MUSIC Group para o seu país listado abaixo de “Suporte” em behringer.com. Se seu país não estiver na lista, favor checar se seu problema pode ser resolvido com o nosso “Suporte Online” que também pode ser achado abaixo de “Suporte”em behringer.com. Alternativamente, favor enviar uma solicitação de garantia online em behringer.com ANTES da devolução do produto. 3. Raccordement au secteur. Avant de relier cet équipement au secteur, assurez-vous que la tension secteur de votre région soit compatible avec l’appareil. Veillez à remplacer les fusibles uniquement par des modèles exactement de même taille et de même valeur électrique — sans aucune exception. 3. Ligações. Antes de ligar a unidade à tomada, assegure-se de que está a utilizar a voltagem correcta para o modelo em questão. Os fusíveis com defeito terão de ser substituídos, sem qualquer excepção, por fusíveis do mesmo tipo e corrente nominal. FEDERAL COMMUNICATIONS COMMISSION COMPLIANCE INFORMATION DIGITAL SNAKE S32 Responsible Party Name: MUSIC Group Services NV Inc. Address: 5270 Procyon Street Las Vegas, NV 89118 USA Phone Number: +1 702 800 8290 DIGITAL SNAKE S32 complies with the FCC rules as mentioned in the following paragraph: This equipment has been tested and found to comply with the limits for a Class A digital device, pursuant to part 15 of the FCC Rules. These limits are designed to provide reasonable protection against harmful interference in a residential installation. This equipment generates, uses and can radiate radio frequency energy and, if not installed and used in accordance with the instructions, may cause harmful interference to radio communications. However, there is no guarantee that interference will not occur in a particular installation. If this equipment does cause harmful interference to radio or television reception, which can be determined by turning the equipment off and on, the user is encouraged to try to correct the interference by one or more of the following measures: • Reorient or relocate the receiving antenna • Increase the separation between the equipment and receiver Aspectos importantes 1. Registro online. Le recomendamos que registre su nuevo aparato MUSIC Group justo después de su compra accediendo a la página web behringer.com. El registro de su compra a través de nuestro sencillo sistema online nos ayudará a resolver cualquier incidencia que se presente a la mayor brevedad posible. Además, aproveche para leer los términos y condiciones de nuestra garantía, si es aplicable en su caso. 2. Averías. En el caso de que no exista un distribuidor MUSIC Group en las inmediaciones, puede ponerse en contacto con el distribuidor MUSIC Group de su país, que encontrará dentro del apartado “Support” de nuestra página web behringer.com. En caso de que su país no aparezca en ese listado, acceda a la sección “Online Support” (que también encontrará dentro del apartado “Support” de nuestra página web) y compruebe si su problema aparece descrito y solucionado allí. De forma alternativa, envíenos a través de la página web una solicitud online de soporte en periodo de garantía ANTES de devolvernos el aparato. 3. Conexiones de corriente. Antes de enchufar este aparato a una salida de corriente, asegúrese de que dicha salida sea del voltaje adecuado para su modelo concreto. En caso de que deba sustituir un fusible quemado, deberá hacerlo por otro de idénticas especificaciones, sin excepción. Weitere wichtige Informationen 1. Online registrieren. Bitte registrieren Sie Ihr neues MUSIC Group-Gerät direkt nach dem Kauf auf der Website behringer.com. Wenn Sie Ihren Kauf mit unserem einfachen online Formular registrieren, können wir Ihre Reparaturansprüche schneller und effizienter bearbeiten. Lesen Sie bitte auch unsere Garantiebedingungen, falls zutreffend. 2. Funktionsfehler. Sollte sich kein MUSIC Group Händler in Ihrer Nähe befinden, können Sie den MUSIC Group Vertrieb Ihres Landes kontaktieren, der auf behringer. com unter „Support“ aufgeführt ist. Sollte Ihr Land nicht aufgelistet sein, prüfen Sie bitte, ob Ihr Problem von unserem „Online Support“ gelöst werden kann, den Sie ebenfalls auf behringer.com unter „Support“ finden. Alternativ reichen Sie bitte Ihren Garantieanspruch online auf behringer.com ein, BEVOR Sie das Produkt zurücksenden. 3. Stromanschluss. Bevor Sie das Gerät an eine Netzsteckdose anschließen, prüfen Sie bitte, ob Sie die korrekte Netzspannung für Ihr spezielles Modell verwenden. Fehlerhafte Sicherungen müssen ausnahmslos durch Sicherungen des gleichen Typs und Nennwerts ersetzt werden. • Connect the equipment into an outlet on a circuit different from that to which the receiver is connected • Consult the dealer or an experienced radio/TV technician for help This device complies with Part 15 of the FCC rules. Operation is subject to the following two conditions: (1) this device may not cause harmful interference, and (2) this device must accept any interference received, including interference that may cause undesired operation. Important information: Changes or modifications to the equipment not expressly approved by MUSIC Group can void the user’s authority to use the equipment. 19-
 1
1
-
 2
2
-
 3
3
-
 4
4
-
 5
5
-
 6
6
-
 7
7
-
 8
8
-
 9
9
-
 10
10
-
 11
11


Behringer S32 Guía de inicio rápido
- Categoría
- Equipo de música suplementario
- Tipo
- Guía de inicio rápido
- Este manual también es adecuado para
en otros idiomas
- français: Behringer S32 Guide de démarrage rapide
- English: Behringer S32 Quick start guide
- Deutsch: Behringer S32 Schnellstartanleitung
- português: Behringer S32 Guia rápido
Artículos relacionados
-
Behringer X-ADAT Guía de inicio rápido
-
-
-
Behringer SD8 Guía de inicio rápido
-
-
-
-
-
-
Otros documentos
-
Klark Teknik KT-AES50 Guía de inicio rápido
-
 KLARK 8-port AES50 Extender Guía de inicio rápido
-
Midas NEUTRON Guía de inicio rápido
-
-
Klark Teknik EQP-KT Guía de inicio rápido
-
Midas DM16 Guía de inicio rápido
-
-
Klark Teknik DN32-ADAT Guía de inicio rápido
-
Midas DL32 Guía de inicio rápido
-
Klark Teknik VNET2-AES INTERFACE Guía de inicio rápido
