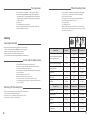
Tefal FR702D51 Manual de usuario
- Categoría
- Freidoras
- Tipo
- Manual de usuario

Instructions for Use
en
es

3
2
5
7
1
1.a 1.b 1.c 1.d
2
2.a
2.b
RESET
3
6
14
15
4
8
12
12.a
12.b
3.a
3.b
9
11
10
13
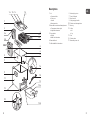
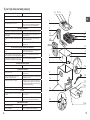
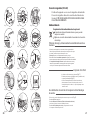
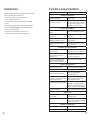
Description
1. Lid
a. Permanent filter
b. Filter cover
c. Handle
d.Viewing window
2. Removable control unit and heating element
a. Temperature indicator light
b. Adjustable thermostat
3. Frying basket
a. Handle
b. MAX food level marker
4. Removable bowl
5. MIN and MAX oil level markers
6. Basket high position
7. Fixed oil filter grid
8. Reset function
9. Safety carrying handles
10. Filtration and drainage button
11. Housing
12. Oil box
a. Lid
b. Cap
13. Feet
14. Filtration valve
15. Removable power cord
en

5
4
IMPORTANT SAFEGUARDS
When using fryer, basic safety precautions should always be followed,
including the following:
1. Read all instructions before using.
2. Do not touch hot surfaces. Use handles or knobs.
3. To protect against electric shock, do not immerse cord, plugs or
fryer in water or other liquid.
4. Close supervision is necessary when the fryer is used by or near
children.
5. Unplug from outlet when not in use and before cleaning. Allow to
cool before putting on or taking off parts, and before cleaning the
fryer.
6. Do not operate the fryer with a damaged cord or plug or after the
fryer malfunctions, or has been damaged in any manner. Return
the fryer to the nearest authorized service facility for examination,
repair or adjustment.
7. The use of accessory attachments not recommended by the fryer
manufacturer may cause injuries.
8. Do not use outdoors.
9. Do not let cord hang over edge of table or counter, or touch hot
surfaces.
10. Do not place on or near a hot gas or electric burner, or in a heated
oven.
11. Extreme caution must be used when moving fryer containing hot
oil.
12. Always attach plug to the fryer first (depending on model), then
plug cord in the wall outlet.
To disconnect, turn any control to “off”, then remove plug from
wall outlet.
13. Do not use the fryer for other than intended use.
14. Be sure handles are properly assembled to basket and locked in
place. See detailed assembly instructions. Ensure the two metallic
parts of the basket handle are correctly positioned before locking
the handle on the basket.
15.
SAVE THESE INSTRUCTIONS.
FOR HOUSEHOLD USE ONLY.
16. Before use, check that your local voltage corresponds with the
specifications shown on the appliance nameplate located under the fryer.
17. Only connect the appliance to electrical sockets which have a minimum
load of 15A. If the sockets and the plug on the appliance should prove
incompatible, get a professionally qualified technician to replace the
socket with a more suitable one.
18. This electrical equipment operates at high temperatures which may cause
burns. Do not touch the filter, window, metal walls (depending on model),
or other apparent metal parts.
19. To ensure safe operation, oversized foods must not be inserted into the
fryer.
20. Ensure that the lid and bowl are completely dry after washing and before
use.
21. Never immerse the fryer basket into the hot oil - or drain it - without the
fryer lid in place.
22. The oil level must always be between the Min. and Max. markings.
23. Do not overload the basket. For safety reasons never exceed the maximum
quantity.
24. Never operate your fryer without any oil.
25. The cooking times are given as guidelines only.
26. The oil must be filtered regularly and changed after 8 to 12 uses.
27. Do not mix different types of oil.
28. If you use solid vegetable shortening, cut it into pieces and melt it over low
heat in a separate pot beforehand, then slowly pour it into the deep fryer
pot. Never put solid shortening directly into the deep fryer pot or basket, as
this will lead to deterioration of the fryer.
29. If the fryer has a removable pot, never remove it while the deep fryer is on.
30. This model is equipped with a permanent metallic filter, which does not
need to be changed.
31. This appliance is not designed to be used by people (including children)
with a physical, sensory or mental impairment, or people without
knowledge or experience, unless they are supervised or given prior
instructions concerning the use of the appliance by someone responsible
for their safety.
Children must be supervised to ensure that they do not play with the
appliance.
32. Warning: Possible eruption. Waters reaction to hot oil is extremely volatile.
Please ensure, no matter what the recipe states, food must be dried
thoroughly before immersing in Hot oil.

7
6
33. If you have any problems, contact the authorized after-sales
service center or the internet address www.t-falusa.com or
www.t-fal.ca.
34. The appliance can be used up to an altitude of 4000 m.
35. If the supply cord is damaged, it must be replaced by the
manufacturer, its service agent or similarly qualified persons in
order to avoid a hazard.
36. WARNING: Keep the appliance out of reach from young children,
particularly during use and cool down.
37. The appliance must not be immersed.
38. CAUTION: Hot surfaces. The temperature of accessible
surfaces may be high when the appliance is operating.
Do not touch the hot surfaces of the appliance.
39. This appliance is intended to be used in household only. It is
not intended to be used in the following applications, and the
guarantee will not apply for:
- staff kitchen areas in shops, offices and other working
environments;
- farm houses;
- by clients in hotels, motels and other residential type
environments;
- bed and breakfast type environments
Polarization instructions (USA)
If this appliance has a polarized plug (one blade is wider than the
other), it is to reduce the risk of electric shock.
This plug is intended to fit into a polarized outlet only one way.
If the plug does not fit fully into the outlet, reverse the plug. If it
still does not fit, contact a qualified electrician. Do not attempt to
modify the plug in any way.
Short Cord instructions
Do not use with an extension cord. A short power supply cord is
provided to reduce the risks resulting from being tangled in, or
tripping over, a long cord.
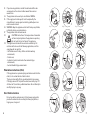
fig. 6
fig. 9
fig. 11
F
fig. 12
fig. 14 fig. 15
fig. 1
fig. 5
fig. 7 fig. 8
fig. 10
fig. 13
fig. 2 fig. 3
fig. 4
CLICK

9
8
Magnetic connector (USA)
The cord is equipped with a detachable magnetic connector. The
magnetic connector should be attached directly to the fryer. THIS
SHOULD BE DONE PRIOR TO PLUGGING THE CORD INTO THE
WALL OUTLET.
Environment
Environment protection first!
Your appliance contains valuable materials which can be
recovered or recycled.
Leave it at a local civic waste collection point.
Filtration, drainage and automatic storage of oil/shortening
• Your fryer is fitted with an exclusive and patented system for
filtration and automatic drainage, suitable for most types of oils
and shortenings used for cooking.
• The drainage of oil is completely automatic and safe.
• The automatic patented filtration system ensures your oil/
shortening stays clean and lasts longer for healthier frying.
• The Oil box container enables you to store your oil and keep it
until you want to use it next and to avoid any transfer of flavors.
Ultra easy cleaning
•
Your fryer is easy to handle and to dismantle – fig. 1.
• All the parts (except the control unit) are dishwasher safe – fig. 2.
•
Thanks to the patented automatic filtration and oil storage
system, your fryer can go into the dishwasher after each use,
making it clean as new after each use.
Using the Oil box container control button
•
The Oil box control button has 3 positions – fig. 8.
Fry Position : to fry.
Automatic Oil Filtration Position : to drain and filter the oil into
the oil box.
Oil box Position : to allow for removal of the oil box container.
Preparation
Before using for the first time
• The fryer can be completely dismantled – fig. 1.
Remove the lid. Remove the frying basket, the control unit and the
bowl. Remove the oil box by positioning the Oil box control button
on the Oil box position.
• Clean the lid, the bowl, the housing, the frying basket – fig. 2 and
the Oil box with soap and water or put them in the dishwasher.
Clean the control unit and the heating element with a damp cloth.
Dry thoroughly.
•
After cleaning, press on the filtration valve under the bowl to
release any water in the bowl (see description - 14).
• Place the bowl and the heating element in position.
• Place the Oil box control button on the Oil box position and insert
the empty Oil box into the fryer.
• Completely unfold the basket handle; a “click” indicates that it is
correctly positioned – fig. 4.
Filling the bowl
• Fill the bowl with oil – fig. 5.
• Never exceed the maximum level indicated in the bowl – fig. 5.
Oil
Vegetable fat
Min. 1.6L 3.21lbs
Max. 1.8L 3.62 lbs
• For best results use oil recommended for deep frying: vegetable
oil, corn oil, canola oil, etc. If using sunflower oil ensure the oil is
changed every 5 uses. Oils which should NOT be used under any
circumstances and may cause overflowing/smoking/risk of fire are:
ground nut oil, soya oil, olive oil, lard or drippings.
•
If you use solid vegetable oil, cut it into small pieces and melt it
in a separate pan – fig. 6. Pour the melted oil into the fryer bowl.
Never melt solid fat on the heating element or in the frying basket.
Never put solid fat directly into the bowl or basket to avoid any risk of
fire or damage the appliance.
Loading the basket
• Remove excess water, ice or frost from food.
•
Fill the basket before placing it in the deep fryer (see the cooking tables
page 11) – f ig. 7.
Do not overfill the basket. Reduce the quantities for
frozen foods.
•
Cooking tips : Cut food into similar-sized pieces so that they cook
evenly. Avoid using pieces that are too thick. For crispier frozen
fries, wash them in cold water and dry them carefully. Not all frozen
foods are ready to use, check the manufacturer’s instructions.
Do not immerse the
control unit with the
heating element in water
– fig. 3.
Check that the filtration
and drainage button has
gone back to its original
position.
Make sure that the
control unit is correctly
positioned otherwise the
fryer cannot function.
Do not mix different
types of oil or fat as this
may cause the oil to
overflow.
The oil/fat level must
always be between the
min. and max. markers,
stamped inside the bowl.
Check this each time prior
to cooking and add some
of the same type of oil if
necessary.

11
10
Frying process
•
Place the Oil box control button on the Fry position – fig. 8.
•
After the bowl has been filled with oil, plug in the fryer without the
frying basket – fig. 9. Turn the adjustable thermostat to the desired
temperature (see cooking tables). The temperature indicator light will
switch on – fig. 10
.
•
Put the lid on
• The fryer will now start to heat the oil.
• Note : the temperature indicator light will switch off when the
desired temperature is reached.
Cooking
Lowering the basket
• After the temperature indicator light has gone out, remove the
lid, place and lower the basket slowly into the oil . Plunging the
basket too rapidly in the oil may cause it to overflow.
• Watch cooking for 1 minute before putting the lid on.
•
To avoid any risk of burns, never put your hands above the filtration zone.
At the end of cooking time
• Move the thermostat down to the lowest setting.
• Raise the lid using the lid handle and refrain from letting any
condensation drip into the hot oil bowl.
•
Place the basket on the edge of the bowl with basket hanging clips.
• Let the food drain.
• Remove the basket. Serve the food.
• Replace the lid when the fryer is not in use.
• To use a second time, correct the oil level if necessary.
•
For filtration action, turn the button to the automatic oil filtration
position – fig. 11.
Switching off the deep fryer
• When you have finished frying, move the thermostat down to the
lowest setting, then unplug the deep fryer.
• Allow the oil to cool completely in the fryer (approx. 2 hours).
• Move the fryer using the carrying handles.
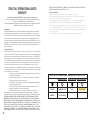
Table of cooking times
•
The cooking times are a guide only, they may vary depending
on the size of the food, the amount of the food, individual
preferences and the voltage.
•
Cooking tips: For the best results, use the traditional French
method of frying homemade French fries :
- first frying at 320°F
-
second frying at 374°F.
•
When cooking battered food and doughnuts, remove the wire
basket to prevent food from sticking to it and use tongs to slowly
lower the food into the hot oil.
Fresh food Quantity Temperature Cooking time
French fries (maximum quantity
for cooking in two times) 1.7 lbs
338°F 18-19 min
338°F 6-8 min
French fries (maximum quantity)
1.1 lbs 338°F 11-13 min
Chicken drumstick 4 356°F 16-18 min
Apple fritters 6 338°F 6-8 min
Mushrooms 0.88 lb 302°F 10-12 min
Fish fillets 0.88 lb 320°F 6-7 min
Frozen food Quantity Temperature Cooking time
French fries 0.87 lbs 338°F 9-11 min
Chicken nuggets 1.52 lbs 374°F 11-13 min
Fish fillets 0.77 lb 374°F 6-7 min
Fish sticks 10 374°F 6-7 min
Frozen shrimp 15 374°F 4-5 min
338°F
1.7 lbs 18-19 min.
338°F
6-8 min.
°F °F

13
12
Cleaning and Maintenance
•
For your safety, the appliance automatically drains all kinds of
oils (or solid shortenings) when it is cool enough (approximately 2
hours after the last cooking).
• When finished cooking, turn the Oil box control button on the
Automatic oil filtration position – fig .11-12 .
• Once the filtration is finished, you can store the container :
- In the appliance: Turn the Oil box control button on Fry position.
The appliance must be carried and transported flat.
- Out of the appliance : Turn the Oil box control button to the Oil
box position and then remove the container – fig.13.
• Transport it with care.
• To re-use the oil, remove the container with care.
Unscrew the oil box cap and empty the oil in the fryer bowl.
• For the solid shortening, remove the lid from the container. Turn
the container over and press it to loosen the shortening. Cut it into
pieces and melt it in a separate pan. Then, pour it into the bowl.
• Insert the empty container in the fryer, with its lid and cap.
Place the Oil box control button on the Fry position.
• 100% dishwasher safe (except the control unit)
• The lid, bowl, housing, frying basket and the Oil box are
dishwasher safe.
Important
In order to avoid water being added to the oil :
• Please respect carefully the safety and usage recommendations
contained in the Instructions For Use.
• Use your fryer away from water splashes.
• Dry the food thoroughly before cooking.
• Do not touch hot surfaces when cooking – fig.14.
• Make sure that the filter is clean, so as to always allow the free
circulation of the steam.
• When you open the lid, be careful not to let the condensation
drops fall into the oil.
• Ensure that the oil box is clean and dry before draining and
filtering the oil.
• Never store the oil box full of oil in the refrigerator or freezer.
• Always store the oil box in the horizontal position, with lid closed,
in a dry place.
• After each cleaning of the bowl, press on the filtration valve of the
oil filtration system located under the bowl.
• Dry all the cleaned parts thoroughly before reassembling and
storing the fryer.
•
Never store your deep fryer outside. Choose a dry and well-
ventilated place.
Make sure that the oil
container is empty before
draining the fryer.
Carry the container with
both hands.
Store it in a cool dry place
away from the light.
Never put the Oil box in
the microwave oven.
Do not pour used oil in
the sink.
Before filling the fryer
bowl, always check to
ensure the filtration
and drainage button of
the fryer is in the right
position.
Reset function
• Your appliance is equipped with an overheating security feature
located in the back of the control unit.
• If you use your fryer without oil, the safety cut-off is activated and
the appliance will shut off automatically.
• In this case, unplug the appliance and let it cool (about 15
minutes).
• After the bowl has been filled with oil, plug the appliance in. Then
press the safety cut-off RESET button with a toothpick or similar
non-metallic object – fig.15.
• If the problem with the safety cut-off persists, please call our
consumer service center (see details on page 16).

15
14
If your fryer does not work properly
Problems and possible causes Solutions
The fryer is not heating
The appliance is not plugged in. Plug in the appliance.
The safety cut-off is activated.
The indicator light does not come Press the “reset” button, which is located at the
back of the fryer. If the problem persits, please
contact our Consumer Service Department.
The frying oil overflows
The MAX marker for filling the bowl has been exceeded.
Check the oil level (MAX), and remove the excess.
The MAX marker for filling the frying basket has
been exceeded. Check the MAX level of the frying basket, and
remove the excess.
Food is wet or contains too much water (frozen
food). Remove any ice and dry the food thoroughly.
Lower the basket slowly.
Different types of oil/shortening have been
mixed. Empty and clean the bowl. Refill the bowl with
one type of oil.
The food does not become golden, and remains soft
The food is too thick and contains too much
water. Experiment by lengthening the cooking time or
cut food into thinner pieces.
Too much food being cooked at the same time
and the cooking oil is not at the right temperature.
Fry food in small quantities (especially when
frozen).
The temperature of the frying oil may not be
high enough: the temperature is set incorrectly. Set to the recommended temperature.
The French fries stick together
The French fries stick together. Wash potatoes well and dry them thoroughly.
The bowl does not drain
The oil is still too hot. Wait for the temperature to go down (approxi-
mately 2 hours).
The Oil box control button is not on the
Automatic Oil Filtration position. Turn the Oil box control button on the Automatic
Oil Filtration position.
The filter grid is blocked or clogged. Empty the oil into a container and clean the fil-
ter grid with soap and water and a non-metallic
brush. Press on the filtration valve under the fryer
to let out water and crumbs.
The shortening is solidified. Allow the fryer to heat (4 to 5 minutes).
Oil leaks
The max (1.8L) fill mark for the bowl has been
exceeded. Do not exceed the oil level (1.8L). Clean the fryer
before any use.
There is some oil left in the container or it is full.
Turn the Oil box control button on the Oil box
position, pull out the container and drain it.
Emits unpleasant smells
The oil has deteriorated. Use new oil.
The oil is unsuitable. Use a good quality blended vegetable oil.
5
7
1
1.a 1.b 1.c 1.d
2
2.a
2.b
RESTABLECER
3
6
14
15
4
8
12
12.a
12.b
3.a
3.b
9
11
10
13
bandeja de aceite
filtración
automática
de aceite
filtración
automática
de aceite
bandeja de aceite
es

17
16
Descripción
1. Tapa
a. Filtro permanente
b. Cubierta de filtro
c. Mango
d. Ventana de visualización
2. Unidad de control extraíble y elemento de
calentamiento
a. Luz indicadora de temperatura
b. Termostato ajustable
3. Canasta para freír
a. Mango
b. Marcador de nivel máximo de
alimentos
4. bowl removible
5. Marcadores de nivel de aceite mínimo y
máximo
6. Posición alta de la canasta
7. Rejilla fija del filtro de aceite
8. Función de reinicio
9. Mangos de seguridad para el transporte
10. Botón de filtración y drenaje
11. Carcasa
12. Bandeja de aceite
a. Tapa
b. Cubierta
13. Base
14. Válvula de filtración
15. Cable de alimentación removible
INDICACIONES DE SEGURIDAD
IMPORTANTES
Cuando utilice la freidora, siempre se deben seguir las precauciones
básicas de seguridad, incluidas las siguientes:
1. Lea todas las instrucciones antes de usarla.
2. No toque las superficies calientes. Utilice los mangos o las perillas.
3. Para evitar descargas eléctricas, no sumerja el cable, los enchufes
ni la freidora en agua u otros líquidos.
4. La freidora no puede ser utilizada por niños o dejar sin supervisión,
cuando se utilice cerca de un niño es necesario supervisarlo de
cerca.
5. Desenchúfela de la toma de corriente cuando no esté en uso
y antes de la limpieza. Deje que se enfríe totalmente antes de
colocar o quitar las piezas y antes de limpiar la freidora.
6. No utilice la freidora con un cable o enchufe dañado, o después de
que la freidora funcione mal o se haya dañado de alguna manera.
Envíe la freidora al centro de servicio autorizado más cercano para
que la examinen, reparen o ajusten.
7. El uso de accesorios no recomendados por el fabricante puede
causar daños o lesiones.
8. No la utilice al aire libre.
9. No deje que el cable cuelgue del borde de la mesa o la barra, ni
toque superficies calientes.
10. No la coloque sobre o cerca de un calefactor eléctrico o de gas
caliente, o en un horno caliente.
11. Se debe tener mucho cuidado al mover una freidora que contenga
aceite caliente.
12. Siempre conecte primero el enchufe a la freidora (dependiendo
del modelo) y, luego, enchufe el cable en la toma de corriente.
Para desconectarla, gire todas las perillas a la posición de
“apagado” y, luego, desconecte el enchufe de la toma de corriente.
13. La freidora solo debe utilizarse para su uso previsto.
14. Compruebe de que los mangos estén correctamente ensamblados
en la canasta y asegurados en su lugar. Consulte las instrucciones
detalladas para el armado. Asegúrese de que las dos piezas
metálicas del mango de la canasta estén ubicadas correctamente
antes de bloquear esta última.

19
18
15.
CONSERVE ESTAS
INSTRUCCIONES.
SOLO PARA USO DOMÉSTICO.
16.
Antes de usarla, compruebe que el voltaje local coincida con las
especificaciones indicadas en la placa de identificación del aparato
ubicada debajo de la freidora.
17. Conecte el aparato solo a enchufes eléctricos que tengan una carga
mínima de 15A. Si las tomas de corriente y el enchufe del aparato no
son compatibles, solicite a un técnico calificado que reemplace la toma
de corriente por una más adecuada.
18. Este equipo eléctrico funciona a altas temperaturas, lo que puede
causar quemaduras. No toque el filtro, la ventana, las paredes metálicas
(dependiendo del modelo) u otras piezas aparentemente metálicas.
19. Para garantizar un funcionamiento seguro, no se deben introducir
alimentos de gran tamaño en la freidora.
20. Asegúrese de que la tapa y el recipiente estén completamente secos
después del lavado y antes de su uso.
21. Nunca sumerja la canasta de la freidora en el aceite caliente (ni la
drene) sin la tapa de la freidora en su lugar.
22. El nivel de aceite debe estar siempre entre las marcas de mínimo y máximo.
23. No sobrecargue la canasta. Por motivos de seguridad, nunca exceda la
cantidad máxima.
24. Nunca utilice su freidora sin aceite.
25. Los tiempos de cocción se proporcionan únicamente a modo de guía.
26. El aceite debe filtrarse regularmente y cambiarse después de 8 a 12 usos.
27. No mezcle diferentes tipos de aceite.
28. Si utiliza manteca vegetal sólida, córtela en trozos y derrítala a fuego
lento en una olla aparte, una vez derretida viértala lentamente de la olla
a la freidora de inmersión. Nunca ponga manteca sólida directamente
en bowl o la canasta de la freidora de inmersión, ya que esto provocará el
deterioro de la freidora.
29. Si la freidora tiene un bowl extraíble, nunca lo quite mientras la freidora
de inmersión esté encendida.
30. Este modelo está equipado con un filtro metálico permanente que no
necesita cambiarse.
31. Este aparato no está diseñado para ser utilizado por personas (incluidos
los niños) con una discapacidad física, sensorial o mental, o personas sin
conocimiento ni experiencia, a menos que alguien responsable de su
seguridad los supervise o les dé instrucciones previas sobre el uso del aparato.
Se debe supervisar a los niños para asegurarse de que no jueguen con el
aparato.
32. Advertencia: Posible erupción. La reacción del agua al aceite caliente
es extremadamente volátil. Asegúrese de secar bien los alimentos
antes de sumergirlos en aceite caliente, independientemente de lo
que indique la receta.
33. Si tiene algún problema, comuníquese con el centro de servicio posventa
autorizado o ingrese a www.t-fal.com.mx
34. El aparato se puede utilizar hasta a una altitud de 4000 m.
35. Si el cable de alimentación está dañado, el fabricante, su agente de
servicio o personas con calificaciones similares deberán reemplazarlo
para evitar peligros.
36. ADVERTENCIA: Mantenga el aparato fuera del alcance de niños
pequeños, en especial durante el uso y el enfriamiento.
37. El aparato no debe sumergirse.
38.
PRECAUCIÓN: Superficies calientes. Es posible que la
temperatura de las superficies accesibles sea elevada
cuando el aparato esté en funcionamiento.
No toque las superficies calientes del aparato.
39. Este aparato está diseñado para utilizarse únicamente en el hogar. No
está diseñado para utilizarse en las siguientes situaciones, y la garantía
no se aplicará para:
- áreas de cocina del personal en tiendas, oficinas y otros entornos de
trabajo;
- casas de campo;
- clientes en hoteles, moteles y otros entornos de tipo residencial;
- entornos de alojamiento con desayuno.
Instrucciones de polarización (EE. UU.)
Si este aparato cuenta con un enchufe polarizado (una cuchilla es más
ancha que la otra), es para disminuir el riesgo de descarga eléctrica.
Este enchufe está diseñado para ajustarse a una toma de
corriente polarizada de una sola manera. Si el enchufe no se
ajusta completamente a la toma de corriente, invierta el enchufe.
Si aún no puede conectarlo, comuníquese con un electricista
calificado. No intente modificar el enchufe de ninguna manera.
Instrucciones del Cable Corto
No utilice el aparato con un cable de extensión. Se proporciona un
cable de suministro de corriente corto para reducir los riesgos de
enredarse o tropezarse con un cable largo.

21
20
fig. 6
fig. 9
fig. 11
F
fig. 12
fig. 14 fig. 15
fig. 1
fig. 5
fig. 7 fig. 8
fig. 10
fig. 13
fig. 2 fig. 3
fig. 4
RESTABLECERRESTABLECER
clicclic
bandeja de aceite
filtración
automática
de aceite
filtración
automática
de aceite
bandeja de aceite
Conector magnético (EE. UU.)
El cable está equipado con un conector magnético desmontable.
El conector magnético debe estar conectado directamente a la
freidora. ESTO SE DEBE HACER ANTES DE ENCHUFAR EL CABLE
EN LA TOMA DE CORRIENTE.
Medioambiente
¡La protección del medioambiente es lo primero!
El aparato contiene materiales valiosos que se pueden
recuperar o reciclar.
Déjelo en un centro de recolección de residuos local o centro
de reciclaje
Filtración, drenaje y almacenamiento automático de aceite o
manteca
• La freidora está equipada con un sistema exclusivo y patentado de
filtración y drenaje automático, adecuado para la mayoría de los tipos
de aceites y mantecas que se utilizan para cocinar.
• El drenaje de aceite es completamente automático y seguro.
• El sistema de filtración automático patentado asegura que su aceite o
manteca permanezcan limpios y duren más para una fritura más saludable.
• El recipiente de la Bandeja de aceite le permite almacenar su aceite y
mantenerlo para reutilizarlo hasta que quiera usarlo para la siguiente
ocasión y a fin de evitar cualquier transferencia de sabores.
Limpieza ultra fácil
•
La freidora es fácil de manejar y desarmar (fig. 1).
• Todas las piezas (excepto la unidad de control y unidad de calor)
son aptas para lavavajillas (fig. 2).
•
Gracias al sistema patentado de filtración automática y
almacenamiento de
aceite, la freidora puede entrar en el
lavavajillas después de cada uso,
lo que la deja limpia como si
estuviese nueva.
Uso del botón de control del recipiente de la Bandeja
de aceite
•
El botón de control de la Bandeja de aceite tiene tres posiciones (fig. 8).
Posición Fry (Freír): para freír.
Posición Automatic Oil Filtration (Filtración Automática de Aceite):
para drenar y filtrar el aceite
en la bandeja de aceite.
Posición Oil box (Bandeja de aceite): para permitir la extracción
del recipiente de la bandeja de aceite.

23
22
Preparación
Antes del primer uso
• La freidora se puede desmontar completamente (fig. 1).
Retire la tapa. Retire la canasta para freír, la unidad de control y el
recipiente. Retire la bandeja de aceite colocando el botón de control
de la Bandeja de aceite en la posición Oil box (Bandeja de aceite).
• Limpie la tapa, el recipiente, la carcasa, la canasta para freír (fig. 2)
y la Bandeja de aceite con agua y jabón o póngalos en el lavavajillas.
Limpie la unidad de control y el elemento de calentamiento con un
paño húmedo. Séquelos bien.
•
Después de la limpieza, presione la válvula de filtración debajo del
recipiente para
liberar el agua en el recipiente (consulte la
descripción: 14).
• Coloque el recipiente y el elemento de calentamiento en su lugar.
• Coloque el botón de control de la bandeja de aceite en la posición
Oil box (Bandeja de aceite) e inserte la Bandeja de aceite vacía en
la freidora.
• Despliegue por completo el mango de la canasta; un “clic” indica
que está en la posición correcta (fig. 4).
Llenar el recipiente
• Llene el recipiente con aceite (fig. 5).
• Nunca exceda el nivel máximo indicado en el recipiente (fig. 5).
Aceite
Grasa vegetal
Mín. 1.6L 3.21lbs- 1.4Kg
Máx. 1.8L 3.62lbs- 1.6Kg
• Para obtener mejores resultados, utilice aceite recomendado para
freír: aceite vegetal, aceite de maíz, aceite de canola, etc. Si utiliza
aceite de girasol, asegúrese de cambiar el aceite cada cinco usos.
Los aceites que NO se deben utilizar bajo ninguna
circunstancia
y que pueden provocar derrames/humo/riesgo de incendio son:
aceite de cacahuate, aceite de soja, aceite de oliva, grasa de cerdo
o grasas derretidas.
•
Si utiliza aceite vegetal sólido, córtelo en trozos pequeños y
derrítalo previamente antes de colocarlo en la freidora
en una sartén aparte (fig. 6). Vierta el aceite derretido en el
recipiente de la freidora. Nunca derrita grasa sólida en el elemento
de calentamiento ni en la canasta para freír. Nunca coloque grasa
sólida directamente en el recipiente o la canasta para evitar riesgos
de incendio o daños en el aparato.
Cargar la canasta
• Retire el exceso de agua, hielo o escarcha de los alimentos.
•
Llene la canasta antes de colocarla en la freidora de inmersión (consulte las
tablas de cocción página 11) (fig. 7).
No llene demasiado la canasta.
Reduzca las cantidades para
los alimentos congelados.
•
Consejos de cocina: Corte los alimentos en trozos de tamaño similar
para que se cocinen de manera uniforme. Evite utilizar trozos demasiado
gruesos. Para papas fritas congeladas más crujientes, lávelas con agua fría
y séquelas cuidadosamente. No todos los alimentos congelados están
listos para el uso, así que consulte las instrucciones del fabricante.
No sumerja la unidad de
control con el
elemento
de calentamiento en
agua
– fig. 3.
Compruebe que el botón
de filtración y drenaje
volvió a su posición
original.
Asegúrese de que la
unidad de control esté
ubicada correctamente;
de lo contrario, la freidora
no puede funcionar.
No mezcle diferentes
tipos de aceite o grasa,
ya que esto puede causar
que el aceite se desborde.
El nivel de aceite o grasa
siempre debe estar entre
los marcadores mín. y
máx. estampados dentro
del recipiente.
Compruebe esto cada
vez antes de cocinar y
agregue un poco del
mismo tipo de aceite
si es necesario.
Proceso de fritura
•
Coloque el botón de control de la Bandeja de aceite en la posición
Fry (Freír) (fig. 8).
•
Después de llenar el recipiente con aceite, enchufe la freidora sin
la
canasta para freír (fig. 9). Gire el termostato ajustable a la
temperatura
deseada (consulte las tablas de cocción). La luz indicadora
de temperatura se encenderá (fig. 10)
.
•
Coloque la tapa
• La freidora comenzará a calentar el aceite.
• Nota: La luz indicadora de temperatura se apagará cuando se
alcance la temperatura deseada.
Cocción
Bajar la canasta
• Después de que la luz indicadora de temperatura se haya apagado,
retire la tapa, coloque y baje la canasta lentamente en el aceite.
Sumergir la canasta demasiado rápido en el aceite puede causar derrame.
• Vigile la cocción durante 1 minuto antes de poner la tapa.
•
Para evitar cualquier riesgo de quemaduras, nunca coloque las manos
sobre la zona de filtración.
Al final del tiempo de cocción
• Mueva el termostato hacia abajo hasta el ajuste más bajo.
• Levante la tapa con el mango y evite que la condensación gotee
en el recipiente de aceite caliente.
•
Coloque la canasta en el borde del recipiente con los sujetadores
colgantes de la canasta.
• Deje que los alimentos se drenen.
• Retire la canasta. Sirva los alimentos.
• Vuelva a colocar la tapa cuando la freidora no esté en uso.
• Para usar una segunda vez, corrija el nivel de aceite si es
necesario.
•
Para la acción de filtración, coloque el botón en la posición de
filtración automática de
aceite (fig. 11).
Apagar la freidora de inmersión
• Cuando haya terminado de freír, baje el termostato al ajuste más
bajo y, a continuación, desenchufe la freidora de inmersión.
• Deje que el aceite se enfríe completamente en la freidora (aprox. 2 horas).
• Mueva la freidora utilizando los mangos de transporte.

25
24
170°C
1.99 lbs 18-19 min.
170°C
6-8 min.
°F °F
Tabla de tiempos de cocción
•
Los tiempos de cocción son solo una guía, pueden variar según
el tamaño de los alimentos, la cantidad de alimentos, las
preferencias individuales y el voltaje.
•
Consejos de cocina: A fin de obtener los mejores resultados, utilice
el método francés tradicional para freír papas fritas caseras:
- primera fritura a 320ºF
-
segunda fritura a 374ºF.
•
Cuando cocine alimentos rebozados y donas, retire la canasta de
alambre para evitar que los alimentos se peguen y utilice pinzas
para sumergir
lentamente los alimentos al aceite caliente.
Alimentos frescos Cantidad Temperatura Tiempo de
cocción
Papas fritas (cantidad máxima
para cocinar dos veces) 1.7lbs-800g
338ºF-170°C 18-19 min
338ºF-170°C 6-8 min
Papas fritas (cantidad máxima)
1.1lbs-500g 338ºF-170°C 11-13 min
Muslo de pollo 4 356ºF- 180°C 16-18 min
Buñuelos de manzana 6 338ºF-170°C 6-8 min
Champiñones 0.88lb-400g 302ºF-150°C 10-12 min
Filetes de pescado 0.88lb-400g 320ºF-160°C 6-7 min
Alimentos congelados Cantidad Temperatura Tiempo de
cocción
Papas fritas 0.87lbs-400g 338ºF-170°C 9-11 min
Nuggets de pollo 1.52lbs-700g 374ºF-190°C 11-13 min
Filetes de pescado 0.77lb-350g 374ºF-190°C 6-7 min
Palitos de pescado 10 374ºF-190°C 6-7 min
Camarón congelado 15 374ºF-190°C 4-5 min
Limpieza y Mantenimiento
•
Por su seguridad, el aparato drena automáticamente todo tipo de
aceites (o mantecas sólidas) cuando está lo suficientemente frío
(aproximadamente 2 horas después de la última cocción).
• Cuando termine de cocinar, coloque el botón de control de la
Bandeja de aceite en la posición Automatic oil filtration (Filtración
automática de aceite) (fig. 11-12).
• Una vez terminada la filtración, puede almacenar el recipiente:
- En el aparato: Coloque el botón de control de la Bandeja de aceite
en la posición Fry (Freír). El aparato se debe llevar y transportar de
manera horizontal.
- Fuera del aparato: Coloque el botón de control de la Bandeja de
aceite en la posición Oil box (Bandeja de aceite) y, a continuación,
retire el recipiente (fig. 13).
• Transporte con cuidado.
• Para reutilizar el aceite, retire el recipiente con cuidado.
Destape la cubierta de la bandeja de aceite y vacíe el aceite en el
recipiente de la freidora.
• Para la manteca sólida, retire la tapa del recipiente. Voltee
el recipiente y presiónelo para aflojar la manteca. Córtela en
trozos y derrítela en una sartén aparte. Luego, viértala en el recipiente.
• Introduzca el recipiente vacío en la freidora, con su tapa y cubierta.
Coloque el botón de control de la Bandeja de aceite en la posición Fry (Freír).
• 100 % apta para lavavajillas (excepto la unidad de control y unidad de calor)
• La tapa, el recipiente, la carcasa, la canasta para freír y la Bandeja de aceite son
aptos para el lavavajillas.
Importante
Para evitar que se agregue agua al aceite, haga lo siguiente:
• Respete cuidadosamente las recomendaciones de seguridad y uso
que se encuentran en las Instrucciones de Uso.
• Utilice la freidora lejos de salpicaduras de agua.
• Seque bien los alimentos antes de cocinarlos.
• No toque las superficies calientes cuando cocine (fig. 14).
• Asegúrese de que el filtro esté limpio para permitir siempre la libre
circulación del vapor.
• Cuando abra la tapa, tenga cuidado de que las gotas de
condensación no caigan en el aceite.
• Asegúrese de que la bandeja de aceite esté limpia y seca antes de drenar y
filtrar el aceite.
• Nunca almacene la bandeja de aceite llena de aceite en el refrigerador o congelador.
• Guarde siempre la bandeja de aceite en posición horizontal, con la tapa cerrada y
en un lugar seco.
• Después de cada limpieza del recipiente, presione la válvula de filtración del
sistema de filtración de aceite ubicado debajo del recipiente.
• Seque bien todas las piezas limpias antes de volver a armar y
almacenar la freidora.
•
Nunca guarde la freidora de inmersión en el exterior. Elija un lugar
bien ventilado y seco.
Asegúrese de que la
bandeja de aceite esté
vacía antes de drenar la
freidora.
Transporte la bandeja
con ambas manos.
Guárdela en un lugar
fresco y seco, lejos de
la luz.
Nunca coloque la
Bandeja de aceite en
el microondas.
No vierta aceite usado
el fregadero.
Antes de llenar el
recipiente de la freidora,
verifique siempre que
el botón de filtración y
drenaje de la freidora
esté en la posición
correcta.

27
26
Función de reinicio
• El aparato está equipado con una función de seguridad contra sobrecalentamiento
ubicada en la parte posterior de la unidad de control.
• Si utiliza su freidora sin aceite, el corte de seguridad se activa y
el aparato se apagará automáticamente.
• En este caso, desenchufe el aparato y deje que se enfríe (aproximadamente
15 minutos).
• Después de llenar el recipiente con aceite, enchufe el aparato. A continuación,
presione el botón RESET (RESTABLECER) de corte de seguridad con un palillo o
un objeto no metálico similar (fig. 15).
• Si el problema con el corte de seguridad persiste, llame a nuestro
centro de servicio al consumidor (consulte los detalles en la página 16).
Si la freidora no funciona correctamente
Problemas y posibles causas Soluciones
La freidora no está calentando
El aparato no está enchufado. Enchufe el aparato.
El corte de seguridad está activado.
La luz indicadora no se enciende Presione el botón “reset” (restablecer) que se
encuentra en la parte posterior de la freidora. Si
el problema persiste, comuníquese con nuestro
Departamento de Servicio al Cliente.
El aceite de fritura se desborda
Se ha excedido el marcador MAX para llenar el
recipiente. Revise el nivel de aceite (MAX) y quite el exceso.
Se ha excedido el marcador MAX para llenar la
canasta de freír. Verifique el nivel MAX de la canasta para freír y
retire el exceso.
Los alimentos están húmedos o contienen
demasiada agua (alimentos congelados). Retire el hielo y seque bien los alimentos. Baje la
canasta lentamente.
Se mezclaron diferentes tipos de aceite o
manteca. Vacíe y limpie el recipiente. Llene el recipiente
con un tipo de aceite.
Los alimentos no se doran y siguen suaves.
Los alimentos son demasiado espesos y
contienen mucha agua. Experimente alargando el tiempo de cocción o
cortando los alimentos en trozos más delgados.
Se cocinan demasiados alimentos al mismo
tiempo y el aceite de cocina no está a la
temperatura correcta.
Fría los alimentos en pequeñas cantidades
(sobre todo si están congelados).
Es posible que la temperatura del aceite
para freír no sea lo suficientemente alta: la
temperatura se ajustó incorrectamente.
Ajuste a la temperatura recomendada.
Las papas fritas se pegan entre sí
Las papas fritas se pegan entre sí. Lave bien las papas y séquelas completamente.
El recipiente no se drena
El aceite todavía está demasiado caliente. Espere a que la temperatura baje
(aproximadamente 2 horas).
El botón de control de la Bandeja de aceite
no está en la posición Automatic Oil Filtration
(Filtración Automática de Aceite).
Coloque el botón de control de la Bandeja de
aceite en la posición Automatic Oil Filtration
(Filtración Automática de Aceite).
La rejilla del filtro está bloqueada u obstruida.
Vacíe el aceite en un recipiente y limpie la
rejilla del filtro con agua y jabón, y un cepillo no
metálico. Presione la válvula de filtración debajo
de la freidora para dejar salir el agua y las migajas.
La manteca está solidificada.
Deje que la freidora se caliente (de 4 a 5 minutos).
Fugas de aceite
Se ha superado la marca de llenado máximo
(1.8L) del recipiente. No exceda el nivel de aceite (1.8L). Limpie la
freidora antes de usarla.
Queda algo de aceite en el recipiente o está lleno.
Coloque el botón de control de la Bandeja de
aceite en la posición Oil box (Bandeja de aceite),
extraiga el recipiente y drénelo.
Se emanan olores desagradables
El aceite se ha deteriorado. Utilice aceite nuevo.
El aceite no es adecuado.
Utilice un aceite vegetal mezclado de buena calidad.

28
TEFAL/T-FAL* INTERNATIONAL LIMITED
WARRANTY
This product is repairable by TEFAL/T-FAL*, during and after the guarantee period.
Accessories, consumables and end-user replaceable parts can be purchased, if locally available, as
described on the TEFAL/T-FAL internet site www.t-falusa.com
*TEFAL household appliances appear under the T-FAL brand in some territories like America and Japan.
TEFAL/T-FAL are registered trademarks of Groupe SEB.
The Warranty
TEFAL/T-FAL warrants its products against any manufacturing defect in materials or workmanship
during the warranty period within those countries as stated in the attached country list, starting
from the initial date of purchase. The international manufacturer’s warranty covers all costs related
to restoring the proven defective product so that it conforms to its original specifications, through
the repair or replacement of any defective part and the necessary labor. At TEFAL/T-FAL’s choice, an
equivalent or superior replacement product may be provided instead of repairing a defective product.
TEFAL/T-FAL’s sole obligation and your exclusive resolution under this warranty are limited to such
repair or replacement.
Conditions & Exclusions
TEFAL/T-FAL shall not be obliged to repair or replace any product which is not accompanied by a
valid proof of purchase. The product can be taken directly in person or must be adequately pack-
aged and returned, by recorded delivery (or equivalent method of postage), to a TEFAL/T-FAL
authorized service centre. Full address details for each country’s authorized service centres are
listed on TEFAL/T-FAL website (www.t-falusa.com) or by calling the appropriate consumer service
centre set out in the attached country list. This warranty applies only for products purchased
and used for domestic purposes and will not cover any damage which occurs as a result of
misuse, negligence, failure to follow TEFAL/T-FAL instructions, or a modification or unauthorized
repair of the product.It also does not cover normal wear and tear, maintenance or replacement
of consumable parts, or the following:
- damages or poor results specifically due to wrong voltage or frequency as stamped on
the product ID or specification
- using the wrong type of water or consumable - mechanical damages, overloading -
damage as a result of lightning or power surges
- ingress of water, dust or insects into the product (excluding appliances with features
specifically designed for insects)
- scaling (any de-scaling must be carried out according to the instructions for use) -
damage to any glass or porcelain ware in the product
- accidents including fire, flood, etc - professional, workplace or commercial use
This warranty also does not apply to any product that has been tampered with, or to damages
incurred through improper use and care, faulty packaging by the owner or mishandling by any carrier.
THERE ARE NO WARRANTIES WHICH EXTEND BEYOND THOSE STATED HEREIN. ANY IMPLIED
WARRANTIES THAT MAY BE APPLICABLE TO T-FAL ELECTRICAL PRODUCTS AND T-FAL PRODUCTS
WITH BATTERIES, INCLUDING IMPLIED WARRANTIES OF MERCHANTABILITY OR FITNESS FOR A
PARTICULAR PURPOSE, ARE LIMITED IN DURATION TO THE DURATION OF THIS WARRANTY. SOME
STATES DO NOT ALLOW LIMITATIONS ON HOW LONG AN IMPLIED WARRANTY LASTS, SO THE
ABOVE LIMITATION MAY NOT APPLY TO YOU. UNDER NO CIRCUMSTANCES SHALL T-FAL BE LIABLE
FOR ANY SPECIAL, INCIDENTAL, OR CONSEQUENTIAL DAMAGES BASED UPON BREACH OF THIS
LIMITED WARRANTY, BREACH OF CONTRACT OR STRICT LIABILITY. SOME STATES DO NOT ALLOW
THE EXCLUSION OR LIMITATION OF INCIDENTAL OR CONSEQUENTIAL DAMAGES, SO THE ABOVE
LIMITATION OR EXCLUSION MAY NOT APPLY TO YOU.
Additional information :
Where a product purchased in a listed country and then used in another listed country:
(a) The international TEFAL/T-FAL warranty duration is the period for the country of usage, even if the product
was purchased in a listed country with a longer guarantee duration.
(b) The international TEFAL/TFAL warranty does not apply in case of non-conformity of the purchased product
with local standards, such as voltage, frequency, power plugs or other local technical specifications.
(c) The repair process for product purchased outside the country of use may require a longer time if the product
is not locally sold by TEFAL/T-FAL in the country of usage. If the product is not repairable in the new country of
usage, the international TEFAL/T-FAL warranty is limited to a replacement by a similar or alternative product at
similar cost, where possible.
Please keep this document for your reference should you wish to make a claim under the warranty.
TEFAL/T-FAL INTERNATIONAL GUARANTEE: COUNTRY LIST
www.tefal.com
www.t-fal.com www.t-falusa.com
16
consumer may also have other legal rights which vary from State to State or Country to Country. The
consumer may assert any such rights at his sole discretion.
*** Where a product purchased in one listed country and then used in another listed country, the international
TEFAL/T-FAL guarantee duration is the one in the country of usage, even if the product was purchased in a
listed country with different guarantee duration. The repair process may require a longer time if the product is
not locally sold by TEFAL/T-FAL. If the product is not repairable in the new country, the international TEFAL/T-
FAL guarantee is limited to a replacement by a similar or alternative product at similar cost, where possible.
* TEFAL household appliances appear under the T-FAL brand in some territories like America and Japan. TEFAL/
T-FAL are registered trademarks of Groupe SEB.
Please keep this document for your reference should you wish to make a claim under the guarantee.
TEFAL/T-FAL INTERNATIONAL GUARANTEE: COUNTRY LIST
www.tefal.com www.t-fal.com
! !
CANADA 1-800-418-3325 U.S.A. 800-395-8325
MEXICO (01800) 112 8325
Ref : NC00127879 Réalisation : Espace Graphique
CANADA 1-800-418-3325 U.S.A. 973-352-7488
MEXICO (55) 52839354


Ref : NC00127879-02
-
 1
1
-
 2
2
-
 3
3
-
 4
4
-
 5
5
-
 6
6
-
 7
7
-
 8
8
-
 9
9
-
 10
10
-
 11
11
-
 12
12
-
 13
13
-
 14
14
-
 15
15
-
 16
16
-
 17
17


Tefal FR702D51 Manual de usuario
- Categoría
- Freidoras
- Tipo
- Manual de usuario
en otros idiomas
- English: Tefal FR702D51 User manual