Samsung DW80N3030UB/AA-00 El manual del propietario
- Categoría
- Lavaplatos
- Tipo
- El manual del propietario
Este manual también es adecuado para

Dishwasher
user manual
imagine the possibilities
Thank you for purchasing this Samsung product.
DW80 0 0 Series
DD81 02613A-0
N3 3
-
3

English - 2
contents
SETTING UP YOUR DISHWASHER
6
6 Unpacking your dishwasher
6 Checking parts
7 Control panel
9 Cycle selector
10 Meeting installation requirements
USING YOUR DISHWASHER
11
11 Basic guidelines
13 Adjusting the height of the upper rack
13 Removing the upper rack
1 Loading the lower rack
1 Loading the upper rack
CLEANING AND MAINTAINING YOUR
DISHWASHER
Cleaning the exterior
Cleaning the interior
Cleaning the filters
2 Cleaning the nozzles
21 Storing your dishwasher
CYCLES
22
22 Cycle chart
TROUBLESHOOTING
23
23 Check these points if your dishwasher…
26 Information codes
APPENDIX
27
27 Helping the environment
27 Specifi cations
1 Using the cutlery rack
17 Using detergent
19
19
19
0
4
4
15 Using the rack3rd
19
6

English - 3
safety information
IMPORTANT SAFETY INSTRUCTIONS
What the icons and signs in this user manual mean:
WARNING
Hazards or unsafe practices that may result in severe personal injury or death
.
CAUTION
Hazards or unsafe practices that may result in personal injury or property
damage.
CAUTION
To reduce the risk of fir e, explosion, electric shock, or personal injury when using
your dishwasher, follow these basic safety precautions:
Do NOT attempt.
Do NOT disassemble.
Do NOT touch.
Follow directions explicit y.
Unplug the power plug from the wall socket.
Make sure the machine is grounded to prevent electric shock.
Call the service center for help.
SAVE THESE INSTRUCTIONS
01 safety information
Congratulations on your new Samsung dishwasher. This manual contains
important information on the installation, use, and care of your appliance.
Please take time to read this manual to take full advantage of your
many benefits and features.
WHAT YOU NEED TO KNOW ABOUT THE SAFETY INSTRUCTIONS
Warnings and Important Safety Instructions in this manual do not cover a ll
possible conditions and situations that may occur. It is your responsibility
to use common sense, caution, and care when installing, maintaining, and
operating your washer
.
dish
dishwasher's
.
WARNING
l
Cancer and Reproductive Harm-www.P65Warnings.ca.gov.

English - 4
Do not wash plastic items unless they are marked “dishwasher safe” or the equivalent.
For plastic items not so marked, check the manufacturer’s recommendations.
Do not touch the HEATING ELEMENT during or immediately after use.
WARNING : When using your dishwasher, follow basic precautions, including the following:
1. Read all instructions before using the dishwasher.
2. Use the dishwasher only for its intended function.
3. Use only detergents or wetting agents recommended for use in a dishwasher and keep
them out of the reach of children.
4. When loading items to be washed:
- locate sharp items so that they are not likely to damage the door seal, and
- load sharp knives with the handles up to reduce the risk of cut-type injuries.
5. Do not wash plastic items unless they are marked “dishwasher safe” or the equivalent.
For plastic items not so marked, check the manufacturer’s recommendations.
6. Do not touch the HEATING ELEMENT during or immediately after use.
7. Do not operate your dishwasher unless all ENCLOSURE panels are properly in place.
8. Do not tamper with the controls.
9. Do not abuse, sit on, or stand on the door or on a dish rack of the dishwasher.
10. To reduce the risk of injury, do not allow children to play in or on the dishwasher.
11. Under certain conditions, hydrogen gas may be produced in a hot-water system that
has not been used for two weeks or more. HYDROGEN GAS IS EXPLOSIVE. If the hot-
water system has not been used for such a period, before using the dishwasher, turn
on all hot-water faucets and let the water flo w from each for several minutes. This will
release any accumulated hydrogen gas. As the gas is f lammable, do not smoke or use
an open flame d uring this time.
12. Remove the door to the washing compartment when removing an old dishwasher from
service or discarding it.
After unpacking the dishwasher, keep the packaging out of the reach of children.
The dishwasher is extremely heavy. Do not attempt to move or carry the dishwasher by
yourself. Two or more people are needed to move a dishwasher and avoid potential injuries.
Do not install the dishwasher near electrical components. Keep the dishwasher away from
open f lames.
Install and level your dishwasher on an uncarpeted
WARNING
safety information
SAVE THESE INSTRUCTIONS
01 safety information
Do not touch the VENT ELEMENT during or immediately after use.
floor that can support its weight.
•
•
•
•
WARNING
WARNING - When using the dishwasher, follow basic precautions, including the
following:
As with any equipment using electricity, water, and moving parts, potential hazards exist.
Use the dishwasher only for its intended function.
Use only detergents or wetting agents recommended for use in a dishwasher, and keep
them out of the reach of children.
When loading items to be washed:
- Locate sharp items so that they are not likely to damage the door seal, and
- Load sharp knives with the handles up to reduce the risk of cut-type injuries.
Read all instructions before using the dishwasher.

English - 5
To safely operate this appliance, familiarize yourself with its operations and exercise care
when using it.
Do not put gasoline, solvents, or other flammable materials inside the dishwasher. Do not
wash dishes exposed to these materials.
Keep your dishwasher detergent out of the reach of children. Detergent has an adverse
effect on human organs. It contains elements for polishing and is corrosive. Avoid letting the
detergent come into contact with your skin and eyes.
Do not push or place pressure on the door when it is open, as this may damage the
dishwasher or cause harm.
Do not allow children to play in or on the dishwasher. They may harm themselves or
damage the dishwasher.
Disconnect the power cable (or set the circuit breaker to off) before servicing your
dishwasher.
Do not repair, replace, or service any part of your dishwasher yourself. Disassembly, repairs
and modific ations must be performed by authorized service technicians only. Work done by
an unauthorized person may void your warranty.
Before disposing of your dishwasher, remove the door of the washing compartment or the
door latch so that children or small animals cannot get trapped inside.
If the dishwasher is left unused for an extended period of time, turn off the water supply.
This dishwasher is intended for residential use only.
BEFORE USING YOUR DISHWASHER
WARNING
Tip-Over Hazard
- Do not use the dishwasher until it is correctly installed.
Electric Shock Hazard
Failure to follow these instructions can result in death, f ire, or electric shock:
- Electrically ground the dishwasher
- Connect the ground wire to the green ground connector in the junction box.
Do not use an extension cord.
SAVE THESE INSTRUCTIONS
01 safety information
WARNING
Do not push down on the dishwasher door when it is open.
o not place excessive weight on the dishwasher door when it is open. D
-
-
•
•
•
•
•
•
•
•
•
•
Your dishwasher must be properly grounded. Never connect it to an ungrounded outlet.
See page 10 for more information on grounding your dishwasher.
Connect the ground wire to the green ground connector in the terminal box.
After the dishwasher is installed, check that the drain hose is properly connected and
that there is no leakage from the hose connectors. If the drain hose is loose, it may cause
property damage.
The water supply line is susceptible to breakage. As time goes by, it becomes less f lexible.
Check the line periodically. If it is swollen, torn, cut, or there is a water leak, replace it
immediately.
•
•
•
•

English - 6
setting up your dishwasher
Be sure to have your installer follow these instructions closely so that your new
dishwasher works properly and that you’re not at risk of injury when washing
dishes.
UNPACKING YOUR DISHWASHER
Once your new dishwasher has been delivered to you, carefully unpack it and check for any damage.
If the dishwasher has been damaged, make note of it on the waybill and keep a copy. Do not install the
dishwasher, and contact Samsung Customer Service at the number listed below.
If there is no damage to the product, you can proceed with the installation. If you are going to install it
yourself, make sure to read through the installation guide and follow the directions inside.
After unpacking your dishwasher, keep the packaging out of the reach of children to ensure their safety.
CHECKING PARTS
When your dishwasher has been unpacked, make sure you’ve received all the parts shown below.
If your dishwasher was damaged during shipping, or if you do not have all the parts, contact Samsung
Customer Service at 1-800-SAMSUNG (726-7864)
Lower rack
Cutlery rack
Accessory parts - User/Installation manual, Installation Kit.
WARNING
02 setting up your dishwasher
The floater is very important for the operation of your dishwasher.
Please do not tamper with, damage, or remove the floater.
.
3rd Rack
(For applicable models)
Upper rack
Middle nozzle

English - 7
CONTROL PANEL
When you press the Power button, the entire display turns on and off, and
then the light of the most recently f inished cycle lights up.
When the selected cycle is complete, the dishwasher powers off
automatically.
Select the appropriate wash cycle depending on the soil level of your
dishes. After you select a cycle, the Cycle On light for that cycle lights up.
The temperature rises to 15 °F (70 °C) in the f inal rinse cycle for high
temperature sanitization.
If you select the Sanitize option, the “Sanitize” lamp blinks when the water
temperature reaches the sanitary temperature (over 156 °F (69 °C)), and
then remains illuminated until the Sanitize option ends. When you press the
Power button, the “Sanitize” lamp turns off.
The Normal Cycle with the Sanitize option selected is NSF certified.
The Sanitize feature operates in accordance with NSF/ANSI Standard
184 for Residential Dishwashers. Certified residential dishwashers are
not intended for licensed food establishments.
02 setting up your dishwasher
1
2
3
4
5
1
Power
2
Cycle Selector
4
Sanitize
3
Hi-Temp Wash
Raises the main wash temperature to improve cleaning for loads containing
tough, baked-on food.
Hi-Temp Wash is not available for the cycle. Express 60
5
Heated Dry
When the “Heated Dry” function is selected, the heater will work during the
drying process.
Control Lock allows you to lock the buttons on the control panel so children
cannot accidently start the dishwasher by pressing the buttons on the
panel.
To lock and unlock the buttons on the control panel, hold the Heated Dry
button down for three (3) seconds when power is On.
6
Delay Start
Delay a cycle for 3, 6 or 9 hour . The hour displayed
indicates the time at which the dishwasher will start.
If a proble occurs during an operation,
(Control Lock)
/
m
specific LEDS blink, indicating
the cause of the problem. The blinking is accompanied by a warning
tone. For more information, refer to "Information Codes" on page 26.
8
6
7
s

English - 8
Start
To start a cycle, press the Start button before closing the door.
To cancel the cycle, press and hold the Start button for 3 seconds or press
the Power button to power off .
You can select options (Hi-Temp Wash, anitize, eated Dry) before starting a
cycle. If you change the cycle after selecting an option, the original cycle is reset.
To prevent the touchpad from losing response sensitivity, follow these instructions:
- Touch the center of each keypad using one finger . Do not push.
- Clean the touch control’s surface regularly with a soft, damp cloth.
- Be careful not to touch more than one touch key pad at a time, except as directed.
When you pause a cycle by opening the door, press the Start button before closing
the door to continue the cycle.
Push door f irmly closed within 3 seconds of pressing Start button.
If the door is not closed within 3 seconds, the cycle will not start.
setting up your dishwasher
O O X
02 setting up your dishwasher
the dishwasher
the
the
7
S H

English - 9
CYCLE SELECTOR
1
Auto
This cycle detects the level of soil and automatically initiates the optimal cycle
after a few minutes of operation.
2
Normal Use this cycle for normally soiled dinner dishes.
3
Heavy Use this cycle for heavily soiled dishes and dishes with heavy soil.
4
Express 60
Use this cycle for lightly soiled dishes. There's no drying time in Express 60, so
02 setting up your dishwasher
1 2 3 4
60
Heated Dry option if you want to improve drying performance.you can choose the

English - 10
MEETING INSTALLATION REQUIREMENTS
Electrical supply and grounding
To prevent the risk of fire, electric shock, or personal injury, all wiring and grounding must be
done in accordance with the National Electrical Code ANSI/FNPA, No. 70 Latest Revision and
local codes and ordinances. It is the personal responsibility of the appliance owner to provide
adequate electrical service for this appliance.
Never use an extension cord.
When preparing for installation, ensure that you provide:
An individual branch circuit with a 120 V, 60 Hz, 15 AMP fuse or circuit breaker that serves
only your dishwasher.
Your dishwasher must be grounded. If your dishwasher malfunctions or breaks down, grounding
will reduce the risk of electric shock by providing a path of least resistance for the electric
current.
Never connect the ground wire to plastic plumbing lines, gas lines, or hot water pipes.
GROUNDING INSTRUCTIONS
For a permanently connected appliance:
This appliance must be connected to a grounded metal, permanent wiring system, or an
equipment-grounding conductor must be run with the circuit conductors and then connected to
the equipment-grounding terminal or lead on the appliance.
Water supply
The hot water supply line pressure must be between 20-120 psi (140-830 kPa).
Adjust the water heater to deliver water between 120 F (49 ) - 149 (65 ).° °C °F °C
Most plumbing supply stores sell water supply lines of various lengths up to 10 feet
(305 cm) long.
You can reduce the risk of leaks and water damage by:
Making water faucets easily accessible.
Turning off faucets when the dishwasher is not in use.
Periodically checking for leaks at water supply line fittings.
Before using your dishwasher for the first time, check all connections at the water supply valve
and faucets for leaks.
Flooring
For safety, your dishwasher must be installed on a solidly constructed f loor.
Never install your dishwasher on a platform or poorly supported structure.
Your dishwasher must be properly installed in accordance with the Installation Guide before you use it. If
you did not receive an Installation Guide with your dishwasher, you can obtain one by visiting our website at
www.samsung.com.
CAUTION
WARNING
WARNING
setting up your dishwasher
02 setting up your dishwasher

English - 11
using your dishwasher
BASIC GUIDELINES
1. Open the door and load your dishes (see page 14).
- Place dishes into the upper and lower racks, unless you have selected Lower Rack.
- Remove any food remains from the dishes before placing them in the rack(s).
- After placing the dishes into the racks, rotate the nozzles by hand to check whether any
of the dishes will interfere with them.
- Make sure the dishes will not prevent the detergent dispenser from opening.
2. Add detergent to the dispenser (see page ).
- Make sure to use only automatic dishwasher detergent and rinse aid.
- Refer to “Using detergent” on page for instructions explaining how to add detergent and
rinse aid.
3. Press the Power button.
- When you press the Power button, the entire display turns on and off, and then the indicator of the
most recently f inished cycle lights up.
4.
Select an appropriate cleaning cycle depending on the soil level of the dishes. (See pages 9 and 2 .)
- Press the appropriate cycle button.
- When you press a cycle button, the cycle indicator
lights up.
5. Press the Start button, and then close the door within 3 seconds.
- The dishwasher will start draining after a few seconds, and then start the selected cycle.
- Make sure to close the door f irmly. If the door is not closed properly, the selected cycle will not start
automatically.
6. When the wash cycle is completed.
- The light illuminates and the dishwasher sounds a chime.
- The dishwasher powers off automatically.
- If you want to load more dishes or pause the dishwasher while it is already running, make sure to
open the door slowly and carefully as there is a possibility of injury from the hot steam inside the
dishwasher.
- If the door is opened while the dishwasher is running, a safety mechanism is activated and stops
the cycle.
- To resume operation, press the Start button, and then close the door within 3 seconds.
- Adding dishes several minutes after the dishwasher starts operating may affect its performance.
- If you open the door while the dishwasher is running at high temperature, it will drain the hot water
automatically to protect you from scalding.
You should use rinse aids for better drying performance. You can further improve drying performance
by also selecting the Sanitize and Heated D .
CAUTION
03 using your dishwasher
ry option
If "Low Rinse" (
improve drying performance.
Open the dishwasher's door, nd then wait a few minutes before removing the dishes.
will be cooler and the drying will be improved.
to
) is illuminated, the temperature and time of final rinse can be increased
-
If "Low Rinse" ( ) is illuminated,
-
you should refill the rinse aid dispenser to improve washing
and drying performance.
17
17
2
the
a
he dishes
T

this option selected.
- If a cycle is running, the buttons will not respond (except the o wer button).
- If the dishwasher is off, only the Power button responds.
English - 12
Touch controls
Touch controls allow you to operate the dishwasher easily. hey:
Have a simple and stylish design.
Are easy to clean.
If you have children or you want to clean the Control Interface, we recommend activating
the Control Lock feature to lock the control buttons. See page 7.
- Children will not be able to accidently start the dishwasher by touching the controls with
using your dishwasher
Delay start
When you select the Delay Start option, your dishwasher will:
Start draining to remove remaining water at once (pre-drain).
Your dishwasher will operate the selected cycle when the delay time expires.
When using the dishwasher, try to arrange the dishes properly as described on page 14 to 16.
You should remove food remains such as bones, fruit seeds, etc. and any other waste such
as toothpicks, paper, etc. from the dishes as these may cause damage to the dishes, create
noise, or cause the dishwasher to malfunction.
Select the appropriate cycle depending on the level of soil and the type of dishes.
Use only the proper amount of detergent and rinsing agent.
Do not wash the following items in your dishwasher
Acrylic or Aluminum items: Dishes with printed gold rim decoration may become
discolored.
Dishes treated with adhesive: Treated plastics, wood, ivory, copper, and tin may come
loose.
Plastics with a temperature tolerance less than 194 (90 ):°F °C Thin plastics wash and dry
poorly, and may be damaged due to elevated wash temperatures.
Tin: Tin items should be washed by hand and dried immediately as may rust.
Wooden utensils: Wooden items may crack.
WARNING
WARNING
03 using your dishwasher
Do not touch the VENT ELEMENT during or immediately after using the dishwasher.
T
they
Are convenient to operate, requiring only a soft touch.
s
P

English - 13
ADJUSTING THE HEIGHT OF THE UPPER RACK
You can adjust the height of the upper rack in your Samsung dishwasher so that the lower rack can
accommodate larger sized dishes. With the upper rack set at the highest position, the lower rack can
accommodate plates up to 12 in. (30 cm) in diameter and the upper rack can accommodated plates up to
8 in. (20 cm) in diameter.
1.
2.
We recommend adjusting the height of the
upper rack before loading dishes into the
rack. If you adjust the rack after loading
the dishes, you may damage the dishes.
REMOVING THE UPPER RACK
Pull the upper rack towards the front and then remove it by lifting it up slightly and pulling it towards the
front. See the illustrations below.
While the upper rack is removable, it must be installed for the dishwasher to operate properly.
If you attempt to operate the dishwasher without the rack, noise will occur and the dishwasher will
perform poorly.
Step 1. Step 2. Step 3.
CAUTION
CAUTION
03 using your dishwasher
Lower position
Upper position
To lower the upper rack by 2 in. (5 cm),
remove the upper rack as shown in
Removing the Upper Rac w. Then
reinsert the ck so that the upper four
wheels on each side ar
guide rail. See th ower position
illustration to the right
To lower the upper rack by 2 in. (5 cm),
remove the upper rack as shown in
Removing the Upper Rack w. Then,
reinsert the rack so that the upper four
wheels on each side of the rack are above
guide rail. See th wer position
illustration to the right
To raise the upper rack, remove the
upper rack as shown i
Upper Rack hen re insert the
rack so that the lower three wheels
on each sid
guide rail. Se
illustration to the right.
To raise the upper rack, remove the
upper rack as shown i
Upper Rack hen insert the
rack so that the lower three wheels
on each side of the rack are above and
guide rail. Se
illustration to the right.
.
belo
Loe
n
w. T
belo
e the th e Upper position
the
a
and below the
,
RemovinRemoving
below the
re

English - 14
LOADING THE LOWER RACK
The lower rack has been especially designed for dinner dishes, soup bowls, plates, pots, lids, casserole
dishes, and plates.
Load large items such as pans and pots into the dishwasher so their open sides face downwards. We
recommend loading cups, stemware, and small plates into the upper rack.
See the recommended loading patterns below.
10 place setting
using your dishwasher
12 place setting
LOADING THE UPPER RACK
The upper rack has been designed for small plates, mugs, glasses, and plastic items marked “dishwasher
safe”. Load your plates into the dishwasher in two half rows, so that the front of each plate faces the back
of the plate in front of it, and the open sides of the plates at the center of the dishwasher face each other.
See the illustrations below.
Make sure the loaded dishes do not interfere with the rotation of the nozzle which is located at the bottom
of the upper rack. (Check this by rotating the nozzle by hand.)
When loading dishes, pull the upper rack out suff iciently so you can load it without striking the counter
above.
10 place setting
12 place setting
03 using your dishwasher
Saucer

English - 15
03 using your dishwasher
USING THE 3RD RACK
- The cutler rack is best for flatware and cooking
or serving utensils.
Use the cutlery rack to organize flatware or
utensils.
- For best results, place heavily soiled items in
the standard cutlery basket.
* NOTE: The cutlery rack can be removed if you
need more space on the upper rack to clean
larger items.

English - 16
USING THE CUTLERY RACK
You can place each knife, spoon, or fork separately into the spoon stands in the
basket’s covers to prevent chipping and discoloration.
You can use the cutlery rack with the cover open. Refer to the illustration below.
10 place setting
12 place setting
The spoon stands as seen from above with the suggested placement of cutlery items. Match the numbers
in the diagram to the numbers in the list of cutlery items below.
DO NOT let any item extend through the bottom.
1 32
1
Spoons
2
Knives
3
Salad forks
4
Forks
5
Serving spoons
6
Serving forks
using your dishwasher
2
2
2
2
2
2
2
2
2
2
2
2
2
2
2
2
2
44
4
44
4
4
4
44
4
44
4
4
33
33
33
33
3
33
11
11
11
1
11
11
11
1
11
11
11
1
11
11
11
11
11
11
11
11
11
11
11
11
1
11
11
11
1
11
11
11
1
11
11
11
1
11
11
11
11
11
11
11
11
11
11
11
11
11
11
11
1
11
11
11
1
11
11
11
1
11
11
11
1
11
11
11
1
11
11
11
1
11
11
11
1
11
11
11
1
11
11
11
1
11
11
11
1
11
11
11
11
11
11
11
11
11
11
11
11
11
11
11
11
11
11
11
11
11
11
11
11
1
11
11
1
11
11
11
1
11
11
11
1
11
11
11
1
11
11
11
1
11
11
11
1
11
11
11
1
11
11
11
1
11
11
11
1
11
11
11
1
11
11
11
1
11
11
11
1
11
11
11
1
11
11
11
1
11
11
11
1
11
11
11
1
1
5
5
6
6444 5
4
4
33
33
33
33
3
33
03 using your dishwasher

using your dishwasher
English - 17
USING DETERGENT
All dishwasher cycles require detergent in the detergent compartment.
Add the correct amount of detergent for the selected cycle to ensure the best performance.
Use dishwasher detergent only. Regular detergent produces too much foam, which may decrease the
dishwasher’s performance or cause it to malfunction.
Do not swallow dishwasher detergent. Avoid breathing in the fumes. Dishwasher detergent contains
irritants and caustic chemicals that can induce respiratory conditions. If you have swallowed
dishwasher detergent or inhaled the fumes, seek medical attention immediately.
Keep dishwasher detergent out of the reach of children.
Filling the detergent dispenser
1. Open the detergent dispenser c ap by pushing the detergent
dispenser release catch.
The f lap is always open at the end of a dishwashing cycle.
2. Add the recommended amount of detergent to the main
wash detergent compartment.
3. Close the f lap by sliding it and then
down.
4. For better cleaning result, especially if you have very dirt
items, pour a small amount (about 15 g) of
detergent
The additional detergent will activate during the pre-wash
phase.
CAUTION
WARNING
WARNING
onto the door.
03 using your dishwasher
down to the clos position
pressing it
ed ,
y

English - 18
03 using your dishwasher
The cover opens automatically to dispense the detergent during the wash.
CYCLE
AMOUNT OF DETERGENT
Main wash dispenser Onto the door for pre-wash
Auto, Normal 20 g 10 g
Heavy, Express 60 30 g 15 g
The numbers inside the dispenser refer to grams.
Filling the rinse aid reservoir
Your dishwasher has been designed to use liquid rinse aid only.
Using a powdered rinse aid will clog the reservoir opening and cause the dishwasher to
Rinse aid improves the drying performance of the dishwasher.
Do not add regular detergent to the rinse aid reservoir.
1. the rinse aid reservoir cap.
2. Fill the rinse aid reservoir with rinse aid.
Use the viewing port when fil ling the rinse aid reservoir.
Do not f ill the reservoir above the full level indicator.
Excess rinse aid can over flo w during the wash cycle.
3.
4. Close the rinse aid reservoir cap.
CAUTION
CAUTION
malfunction.
View the amount of rinse aid in the reservoir through
the clear viewing port. Stop adding when the
reservoir reaches the full level.
Open

English - 19
cleaning and maintaining your
dishwasher
Keeping your dishwasher clean improves its performance, reduces unnecessary
repairs, and lengthens its life.
CLEANING THE EXTERIOR
It’s best to clean spills on the outside of your dishwasher as they occur. Use a soft, damp cloth on the
control panel to gently wipe away spills and dust. Do not use benzene, wax, thinner, chlorine bleach, or
alcohol. These materials may discolor the inner walls and cause stains. Do not clean the dishwasher by
sprinkling water over it and avoid letting water come into contact with any of the electrical parts.
If your dishwasher has a stainless steel door panel, you can clean it with a stainless steel cleaner for
Home Appliances or a similar product using a clean, soft cloth.
CLEANING THE INTERIOR
Clean the interior of your dishwasher periodically to remove any dirt or food particles. Wipe the inside of
the dishwasher and the inner part of the door with a wet dishcloth. We recommend f illing the detergent
dispenser with dish detergent, and then running the dishwasher empty periodically using either the Normal
or Express 60 cycle with the sanitize option. This will keep your dishwasher clean.
If white spots and odor are still present in your dishwasher, run the Normal cycle with the dishwasher empty
and without detergent until it f lushes. Then, interrupt the cycle and put an 8 ounce cup of white vinegar into
the lower basket. Close the dishwasher and let the cycle f inish.
Do not remove the tub front seal (the long rubber seal enclosing the opening of the dishwasher).
CLEANING THE FILTERS
1. Turn off the dishwasher.
2. Rotate the f ilter insert counterclockwise to unfasten and then detach
the f ilter insert.
3. Remove the f ine f ilter (f lat, rectangular).
CAUTION
Do not touch the HEATING ELEMENT during or immediately after using the dishwasher.
04 cleaning and maintaining

English - 20
4. Remove any dirt or other remains from the fil ter, and then rinse
under running water.
5. Reassemble the f ilter in the reverse order of disassembly, re-insert
the f ilter insert, and then rotate clockwise as shown until close .
If the fil ter insert is not closed properly, its performance will
be decreased.
CLEANING THE NOZZLES
If your dishwasher does not seem to be cleaning adequately or the nozzles seem clogged, you can clean
each of the nozzles. When removing the nozzles, take care as they may break.
Lower nozzle
1. Check whether the nozzle holes are
clogged by food particles.
2. If cleaning is needed, remove the nozzle by
pulling it upwards.
3. Clean the nozzle, and then push it back
into place.
4. Check whether the nozzle is engaged
correctly by rotating it by hand.
CAUTION
04 cleaning and maintaining
it
d it

English - 21
Middle nozzle
1. Pull the upper rack towards the front and
remove it.
2. Check whether the nozzle holes are
clogged by food particles.
3. If cleaning is needed, remove the nozzle.
4. To remove the nozzle, unfasten and
remove the nut, and then remove the
nozzle.
5. Clean the nozzle, re-insert it, and fasten
the nut.
6. When fastening the nut, turn it fir mly by
hand.
7. Check whether the nozzle is engaged
correctly by rotating it by hand.
Upper nozzle
1. Check whether the nozzle holes are
clogged by food particles.
2. If cleaning is needed, remove the nozzle.
3. To remove the nozzle, pull out the upper
rack f irst, unfasten the nozzle cap by
turning it counterclockwise, and then
remove the upper nozzle.
4. Clean the nozzle, re-insert it, and then
fasten the nozzle cap to the nozzle by
turning the cap clockwise.
5. Check whether the nozzle is engaged
correctly by rotating it by hand.
STORING YOUR DISHWASHER
If you need to store your dishwasher for an extended period of time, fir st drain and disconnect it. If you
leave water in the hoses and internal components, you can damage the dishwasher.
After draining and disconnecting the dishwasher, be sure to turn off the water supply valve and circuit
breaker.
cleaning and maintaining your
dishwasher
1
2
Cap nozzle
04 cleaning and maintaining

English - 22
cycles
CYCLE CHART
05 cycles
When you select the Auto or Normal cycle, you can eliminate optional steps depending on the soil level
of the dishes.
The water consumption and wash time varies depending on the steps or options you add, and on the
pressure and temperature of the supplied water.
When you select any options, the cycle time can be changed.
Cycle
Pre-
wash1
Pre-
wash2
Main wash Rinse1
Rinse
2
Last Rinse
[Sanitize]
Dry
Water
[gal(l)]
CycleTime
(min)
Auto
1 -1
Normal
3-6
(11.8-22.7)
1
-14
108-126 °F
(42-52 )°C
Heavy
(2
1 1 ( )°F °C
°C
Express
4
1 ( )°F °C
( : Basic, : Optional step)
(15.3)
60
118-126 °F
(48-52 )°C
136°F-
3-6
(11.8-22.7)
1
R
inse
3
3 55
144
°F/
15 F8°
(58-62 °C/70 )
°C
43
R
inse
4
136°F-
144
°F/
15 F8°
(58-62 °C/70 )
°C
70
°C/ 65
7.3 7.4)
6
26
52
136°F/
15 F8°
°C70
°C/ 58
149°F/
15 F8°
09
19
4
2
When the Rinse Aid is empty, wash time and Last Rinse temperature can increase a little.

English - 23
troubleshooting
CHECK THESE POINTS IF YOUR DISHWASHER…
PROBLEM POSSIBLE CAUSE SOLUTION
Will not start.
The door is not closed completely. Check if the door is latched and closed
completely.
No cycle is selected. Select a proper cycle.
The power cable is not connected. Connect the power cable properly.
The Control Panel is locked. Unlock the child lock
A circuit breaker is open. Reset the circuit breaker.
An operation or
cycle is taking too long.
Cold water is being supplied.
to a hot water supply.
(Additional time is required to heat cold
water.)
There are food
particles remaining
on dishes.
(Not cleaning
properly.)
You selected an inappropriate
cycle.
Select a cycle according to the number and
soil level of the dishes, as directed in this
manual.
The water temperature is low. Connect the water supply line to a hot
water supply.
For best performance, the temperature of
the supplied water should be 120 (49 ).°F °C
Low water pressure. The water pressure should be between 20
and 120 psi (140 - 830 kPa).
The water is too hard. Use high-quality, fresh detergent with rinse
aid.
Dishwasher detergent was not
used.
Use automatic dishwasher detergent.
We recommend a powder or gel type
dishwasher detergent.
Detergent remains in the
dispenser.
Make sure large items such as cookie
sheets, cutting boards, or contaners, etc.
are not blocking the detergent dispenser
and preventing it from opening properly.
Rearrange the dishes so they do not
interfere with detergent dispenser
operation.
There is no rinse aid. Check the dispenser and add rinse aid.
Use liquid type rinse aid.
A nozzle is clogged. Clean the nozzle ee page .
The dishes are improperly loaded.
Too many dishes have been
loaded.
Rearrange the dishes so they do not
interfere with nozzle rotation and detergent
dispenser operation.
Load only an appropriate number of dishes.
Load your dishes as recommended. (See
page 14.)
. S
06 troubleshooting
17
Make sure the water supply line is connected

English - 24
PROBLEM POSSIBLE CAUSE SOLUTION
Leaves glasses with
a dull film.
The water supplied is soft and too
much detergent was used.
Underload the dishwasher and use a rinse
aid to minimize this.
Aluminum dishes were included in
the wash load.
Remove the marks on the dishes using a
low sensitivity cleaner.
Leaves a yellow
or brown film on
the inside of the
dishwasher.
This is caused by coffee and tea
soils.
Remove the soils using a spot cleaner.
Does not dry dishes
well.
There is no rinse aid in the
dispenser.
Check the dispenser and add rinse aid.
Use a liquid type rinse aid.
The temperature of the water
is low when the dishwasher is
running.
Use rinse aid with the Sanitize option.
Too many dishes have been
loaded.
Proper loading of items can affect drying.
Load your dishes as recommended. (See
page 14.)
Glasses and cups with concave
bottoms hold water. This water
may spill onto other items when
After the cycle fin ishes, empty the lower
rack fir st and then the upper rack. This will
prevent water from dripping from the upper
rack onto the dishes in the lower rack.
Has a bad odor.
Water was left over from an
incomplete cycle.
The Drain Hose is obstructed. Contact a qualifie d service technician to
remove any obstruction from the drain
hose.
The dishwasher is not used daily
or soiled dishes are left in unit too
long.
With the dishwasher empty and no
detergent in the dispenser, place a glass with
ounces of vinegar upright into the lower
rack, and then run a Normal
cycle.
Is too noisy.
Sound is generated when the
dispenser cover is open and the
drain pump is operating in an early
stage.
This is normal operation.
The dishwasher is not level. Ensure the dishwasher is level.
Foreign material (a screw, a plastic
piece) is in the pump chamber.
Contact a qualif ied service technician to
remove foreign material from the pump
chamber.
There is a ‘chopping’ sound
because a nozzle is bumping
against the dishes.
Rearrange the dishes.
troubleshooting
you are unloading.
Make sure that the water supply line is connected
to a hot water supply.
8
With the dishwasher empty, add detergent
to the dispenser, and then run the Normal
cyele to clean the dishwasher.

English - 25
PROBLEM POSSIBLE CAUSE SOLUTION
food particles.
Clean the nozzle hole . See page .
The nozzle is blocked by a dish or
pot and cannot rotate.
After placing the dishes into the racks,
rotate the nozzles by hand to check
whether any of the dishes interfere with
them.
Water won’t
pump out of the
dishwasher.
The drain is clogged. Contact a qualif ied service technician to
remove any obstruction from the drain hose
and check the drain pump operation.
Has a bent upper
rack after loading
dishes.
The dishes are not loaded
properly.
Load your dishes as recommended.
(See page 14.)
06 troubleshooting
A nozzle does not
rotate smoothly.
17Nozzle holes are clogged with s

English - 26
INFORMATION CODES
The Control Panel displays information codes to help you understand what is occurring with your
dishwasher.
For any codes not listed above, call 1-800-SAMSUNG (726-7864)
troubleshooting
If there is water in the base pan because of an overfill or small leak,
the water should be removed before restarting the dishwasher.
WARNING
High-water level
Not reaching required
temperature
If your dishwasher has a problem, the CODE SYMBOL lights blink as shown below.
60
60
60
60
60
60
No water
60
60
Possible
e water tap isn't opened.
e pressure switch is broken.
he wash pump sn't work .
the Main PBA .
e high water switch econds.
e eater is broken.
he emperature detected by the mistor is wrong.
he
leakage
switch
is
broken.
Th
Th
T ing
There is a problem with
Th was activated 5 stimes for 5
The high water switch was on continuously for 120 seconds.
Th
T t
There is a problem with the Main PBA.
The heater was on continuously for 60 minutes, but the water
did not heat up to the required temperature.
h
There is a problem with the Main PBA.
T
The leakage switch was activated for 2 seconds.
There is a problem with the Main PBA.
The thermistor suffered an open-circuit failure.
There is a problem with the Main PBA.
The thermistor suffered a short circuit failure.
There is a problem with the Main PBA.
A touch key was operated abnormally or operated abnormally.
Example: A key was pressed for more than 30 seconds.
There is a problem with the Sub PBA.
A touch key was operated abnormally or operated abnormally.
Example: A key was pressed for more than 30 seconds
There is a problem with the Main PBA.
There is a problem with the Sub PBA.
Thermistor open-circuit
failure
Thermistor short-circuit
failure
Abnormal operation of
touch key-press
Abnormal signal
If an overflow occurs, turn off the main water supply before calling
i
ther
fo r service.
Water leakage

English - 27
appendix
HELPING THE ENVIRONMENT
Your dishwasher is manufactured from recyclable materials. If you decide to dispose of it, please
observe local waste disposal regulations. Cut off the power cable so that the appliance cannot be
connected to a power source.
Remove the door so that animals and small children cannot get trapped inside the appliance.
Do not exceed the detergent quantities recommended in the detergent manufacturers’ instructions.
SPECIFICATIONS
Model
Type Built-in Dishwasher Wash capacity 1 place settings
Power
120 V, 60 Hz only
Used water pressure
20 - 120 psi
(140 - 830 kPa)
Rated power uasge
Wash Motor
50 W
Heater 840 W
Dimensions
(Width × Depth × Height)
Weight
Unpacked
07 appendix
[604 x 629
23 ¾ x 24
⁄ in.
33 ¾
x
5
70.5 lb (32 kg)
4
3
x 858mm]
DW80N3030U*

English - 28
warranty (U.S.A)
SAMSUNG DISHWASHER
LIMITED WARRANTY TO ORIGINAL PURCHASER WITH PROOF OF PURCHASE
This SAMSUNG brand product, as supplied and distributed by SAMSUNG ELECTRONICS AMERICA, INC.
(SAMSUNG) and delivered new, in the original carton to the original consumer purchaser, is warranted by
SAMSUNG against manufacturing defects in materials or workmanship for the limited warranty period,
starting from the date of original purchase, of:
One (1) year parts and labor
This limited warranty is valid only on products purchased and used in the United States that have been
installed, operated, and maintained according to the instructions attached to or furnished with the product.
To receive warranty service, the purchaser must contact SAMSUNG at the address or phone number
provided below for problem determination and service procedures. Warranty service can only be performed
by a SAMSUNG authorized service center. The original dated bill of sale must be presented upon request as
proof of purchase to SAMSUNG or SAMSUNG’s authorized service center to receive warranty service.
SAMSUNG will provide in-home service within the contiguous United States during the warranty period
at no charge, subject to availability of SAMSUNG authorized servicers within the customer’s geographic
area. If in-home service is not available, SAMSUNG may elect, at its option, to provide transportation of the
product to and from an authorized service center. If the product is located in an area where service by a
SAMSUNG authorized servicer is not available, you may be responsible for a trip charge or required to bring
the product to a SAMSUNG authorized service center for service.
To receive in-home service, product must be unobstructed and accessible to the service agent.
During the applicable warranty period, a product will be repaired, replaced, or the purchase price refunded,
at the sole option of SAMSUNG. SAMSUNG may use new or reconditioned parts in repairing a product, or
replace the product with a new or reconditioned product. Replacement parts and products are warranted
for the remaining portion of the original product’s warranty or ninety (90) days, whichever is longer. All
replaced parts and products are the property of SAMSUNG and you must return them to SAMSUNG.
This limited warranty covers manufacturing defects in materials or workmanship encountered in normal
household, noncommercial use of this product and shall not cover the following: damage that occurs in
shipment, delivery, installation, and uses for which this product was not intended; damage caused by
unauthorized modifi cation or alteration of the product; product where the original factory serial numbers
have been removed, defaced, changed in any way, or cannot be readily determined; cosmetic damage
including scratches, dents, chips, and other damage to the product’s fi nishes; damage caused by abuse,
misuse, pest infestations, accident, fi re, fl oods, or other acts of nature or God; damage caused by use of
equipment, utilities, services, parts, supplies, accessories, applications, installations, repairs, external wiring
or connectors not supplied or authorized by SAMSUNG; damage caused by incorrect electrical line current,
voltage, fl uctuations and surges; damage caused by failure to operate and maintain the product according
to instructions; in-home instruction on how to use your product; and service to correct installation not in
accordance with electrical or plumbing codes or correction of household electrical or plumbing (i.e., house
wiring, fuses, or water inlet hoses).
DW9900M_DD68-00184B-03_EN.indd 37DW9900M_DD68-00184B-03_EN.indd 37 2018-07-17 5:17:182018-07-17 5:17:18

English - 29
The cost of repair or replacement under these excluded circumstances shall be the customer’s
responsibility.
Visits by an authorized servicer to explain product functions, maintenance or installation are not covered
by this limited warranty. Please contact SAMSUNG at the number below for assistance with any of these
issues.
EXCLUSION OF IMPLIED WARRANTIES
IMPLIED WARRANTIES, INCLUDING THE IMPLIED WARRANTIES OF MERCHANTABILITY OR FITNESS
FOR A PARTICULAR PURPOSE, ARE LIMITED TO ONE YEAR OR THE SHORTEST PERIOD ALLOWED BY
LAW. Some states do not allow limitations on how long an implied warranty lasts, so the above limitations
or exclusions may not apply to you. This warranty gives you specifi c rights, and you may also have other
rights, which vary from state to state.
LIMITATION OF REMEDIES
YOUR SOLE AND EXCLUSIVE REMEDY IS PRODUCT REPAIR, PRODUCT REPLACEMENT, OR REFUND
OF THE PURCHASE PRICE AT SAMSUNG’S OPTION, AS PROVIDED IN THIS LIMITED WARRANTY.
SAMSUNG SHALL NOT BE LIABLE FOR SPECIAL, INCIDENTAL OR CONSEQUENTIAL DAMAGES,
INCLUDING BUT NOT LIMITED TO TIME WAY FROM WORK, HOTELS AND/OR RESTAURANT MEALS,
REMODELING EXPENSES, LOSS OF REVENUE OR PROFITS, FAILURE TO REALIZE SAVINGS OR
OTHER BENEFITS REGARDLESS OF THE LEGAL THEORY ON WHICH THE CLAIM IS BASED, AND EVEN
IF SAMSUNG HAS BEEN ADVISED OF THE POSSIBILITY OF SUCH DAMAGES. Some states do not allow
exclusion or limitation of incidental or consequential damages, so the above limitations or exclusions may
not apply to you. This warranty gives you specifi c rights, and you may also have other rights, which vary
from state to state.
SAMSUNG does not warrant uninterrupted or error-free operation of the product. No warranty or guarantee
given by any other person, fi rm, or corporation with respect to this product shall be binding on SAMSUNG.
To obtain warranty service, please contact SAMSUNG at:
In USA
Samsung Electronics America, Inc.
85 Challenger Road
Ridgefi eld Park, NJ 07660
1-800-SAMSUNG (726-7864)
www.samsung.com/us/support
warranty (U.S.A)
DW9900M_DD68-00184B-03_EN.indd 38DW9900M_DD68-00184B-03_EN.indd 38 2018-07-17 5:17:182018-07-17 5:17:18

English - 30
warranty (CANADA)
SAMSUNG DISHWASHER
LIMITED WARRANTY TO ORIGINAL PURCHASER
This SAMSUNG brand product, as supplied and distributed by SAMSUNG ELECTRONICS CANADA, INC.
(SAMSUNG) and delivered new, in the original carton to the original consumer purchaser, is warranted by
SAMSUNG against manufacturing defects in materials and workmanship for a limited warranty period of:
One (1) Year All Parts and Labor.
This limited warranty begins on the original date of purchase, and is valid only on products purchased
and used in the Canada. To receive warranty service, the purchaser must contact SAMSUNG for problem
determination and service procedures. Warranty service can only be performed by a SAMSUNG authorized
service center. The original dated bill of sale must be presented upon request as proof of purchase to
SAMSUNG or SAMSUNG’s authorized service center. SAMSUNG will provide in-home service during the
warranty period at no charge, subject to availability within the contiguous Canada.
In home service is not available in all areas.
To receive in-home service, product must be unobstructed and accessible to the service agent. If service
is not available, SAMSUNG may elect to provide transportation of the product to and from an authorized
service center.
SAMSUNG will repair, replace, or refund this product at our option and at no charge as stipulated herein,
with new or reconditioned parts or products if found to be defective during the limited warranty period
specifi ed above. All replaced parts and products become the property of SAMSUNG and must be returned
to SAMSUNG. Replacement parts and products assume the remaining original warranty, or ninety (90)
days, whichever is longer.
This limited warranty covers manufacturing defects in materials and workmanship encountered in normal,
noncommercial use of this product and shall not apply to the following: damage that occurs in shipment;
delivery and installation; applications and uses for which this product was not intended; altered product or
serial numbers; cosmetic damage or exterior fi nish; accidents, abuse, neglect, fi re, water, lightning, or other
acts of nature or God; use of products, equipment, systems, utilities, services, parts, supplies, accessories,
applications, installations, repairs, external wiring or connectors not supplied or authorized by SAMSUNG
that damage this product or result in service problems; incorrect electrical line voltage, fl uctuations and
surges; customer adjustments and failure to follow operating instructions, maintenance and environmental
instructions that are covered and prescribed in the instruction book; product removal and reinstallation;
problems caused by pest infestations. This limited warranty does not cover problems resulting from
incorrect electric current, voltage or supply, light bulbs, house fuses, house wiring, cost of a service call for
instructions, or fi xing installation errors. SAMSUNG does not warrant uninterrupted or error-free operation of
the product.
DW9900M_DD68-00184B-03_EN.indd 39DW9900M_DD68-00184B-03_EN.indd 39 2018-07-17 5:17:182018-07-17 5:17:18

English -
EXCEPT AS SET FORTH HEREIN, THERE ARE NO WARRANTIES ON THIS PRODUCT EITHER EXPRESS
OR IMPLIED, AND SAMSUNG DISCLAIMS ALL WARRANTIES INCLUDING, BUT NOT LIMITED TO, ANY
IMPLIED WARRANTIES OF MERCHANTABILITY, INFRINGEMENT OR FITNESS FOR A PARTICULAR
PURPOSE. NO WARRANTY OR GUARANTEE GIVEN BY ANY PERSON, FIRM, OR CORPORATION WITH
RESPECT TO THIS PRODUCT SHALL BE BINDING ON SAMSUNG. SAMSUNG SHALL NOT BE LIABLE
FOR LOSS OF REVENUE OR PROFITS, FAILURE TO REALIZE SAVINGS OR OTHER BENEFITS, OR ANY
OTHER SPECIAL, INCIDENTAL OR CONSEQUENTIAL DAMAGES CAUSED BY THE USE, MISUSE, OR
INABILITY TO USE THIS PRODUCT, REGARDLESS OF THE LEGAL THEORY ON WHICH THE CLAIM IS
BASED, AND EVEN IF SAMSUNG HAS BEEN ADVISED OF THE POSSIBILITY OF SUCH DAMAGES.
NOR SHALL RECOVERY OF ANY KIND AGAINST SAMSUNG BE GREATER IN AMOUNT THAN THE
PURCHASE PRICE OF THE PRODUCT SOLD BY SAMSUNG AND CAUSING THE ALLEGED DAMAGE.
WITHOUT LIMITING THE FOREGOING, PURCHASER ASSUMES ALL RISK AND LIABILITY FOR LOSS,
DAMAGE, OR INJURY TO PURCHASER AND PURCHASER’S PROPERTY AND TO OTHERS AND THEIR
PROPERTY ARISING OUT OF THE USE, MISUSE, OR INABILITY TO USE THIS PRODUCT. THIS LIMITED
WARRANTY SHALL NOT EXTEND TO ANYONE OTHER THAN THE ORIGINAL PURCHASER OF THIS
PRODUCT, IS NONTRANSFERABLE AND STATES YOUR EXCLUSIVE REMEDY.
Some states or provinces do not allow limitations on how long an implied warranty lasts, or the exclusion
or limitation of incidental or consequential damages, so the above limitations or exclusions may not apply
to you. This warranty gives you specifi c rights, and you may also have other rights, which vary from state to
state or province to province.
To obtain warranty service, please contact SAMSUNG at:
In CANADA
Samsung Electronics Canada Inc.
2050 Derry Road West
Mississauga, Ontario L5N 0B9 Canada
1-800-SAMSUNG (726-7864)
www.samsung.com/ca/support (English)
www.samsung.com/ca_fr/support (French)
warranty (CANADA)
DW9900M_DD68-00184B-03_EN.indd 40DW9900M_DD68-00184B-03_EN.indd 40 2018-07-17 5:17:182018-07-17 5:17:18
31

memo

memo

U.S.A 1-800-SAMSUNG (726-7864) www.samsung.com/us/support
CANADA 1-800-SAMSUNG (726-7864)
www.samsung.com/ca/support (English)
www.samsung.com/ca_fr/support (French)
bit.ly/samsungdishwashers
Questions or Comments?
COUNTRY
CALL
OR VISIT US ONLINE AT
DD81-02613A-0
ME ICO
01-800-SAMSUNG (726-7864)
www.samsung.com/m /support
3

Lavavajillas
manual de usuario
DW80 0 0 Series
Imagine las posibilidades
Gracias por adquirir este producto Samsung.
N3 3
DD81 02613A-0
-
3

Español - 2
contenido
CONFIGURACIÓN DE LA LAVAVAJILLAS
6
6 Desembalaje de su lavavajillas
6 Comprobación de piezas
7 Panel de control
9 Selector de ciclos
10 Cumplimiento de los requisitos de instalación
11 Directrices básicas
13 Ajuste de la altura de la rejilla superior
13 Extracción de la rejilla superior
14 Carga de la rejilla inferior
14 Carga de la rejilla superior
16 Uso de la rejilla para cubiertos
17 Uso de detergente
0 Limpieza de las boquillas
21 Almacenamiento de su lavavajillas
22 Tabla de ciclos
23 Compruebe estos puntos si su lavavajillas...
26 Códigos de información
27 Ayudar al medio ambiente
27 Datos técnicos
USO DEL LAVAVAJILLAS
LIMPIEZA Y MANTENIMIENTO DE SU
LAVAVAJILLAS
11
CICLOS
22
SOLUCIÓN DE PROBLEMAS
23
APÉNDICE
27
19
19 Limpieza del exterior
19 Limpieza del interior
19 Limpieza de los filtros
2
15 Uso de la estante 3

información de seguridad
Felicidades por su nuevo lavaplatos Samsung. Este manual contiene información
sobre la instalación, uso y cuidado de su electrodoméstico. Por favor, tómese tiempo
para leer este manual para aprovechar al máximo los muchos beneficios y
características de su lavavajillas.
INSTRUCCIONES DE SEGURIDAD IMPORTANTES
Lo que significan los iconos y signos de este manual de usuario:
ADVERTENCIA
Peligros o prácticas inseguras que pueden resultar en lesiones personales graves
o la muerte.
PRECAUCIÓN
PRECAUCIÓN
Peligros o prácticas inseguras que pueden resultar en lesiones personales
o propiedades daños.
Para reducir el riesgo de incendio, explosión, descarga eléctrica o lesiones
personales al usar su lavavajillas, siga estas precauciones básicas de seguridad:
NO lo intentes.
NO desarmes.
NO toques.
Siga las instrucciones explícitamente..
Desconecte el enchufe de la toma de corriente.
Asegúrese de que la máquina esté conectada a tierra para evitar descargas eléctricas.
Llame al centro de servicio para obtener ayuda.
GUARDE ESTAS INSTRUCCIONES
01 información de seguridad
Español - 3
INSTRUCCIONES DE SEGURIDAD IMPORTANTES
Las advertencias y las instrucciones de seguridad importantes de este manual no
cubren todas las posibles condiciones y situaciones que puedan ocurrir. Es su
responsabilidad usar el sentido común, precaución y cuidado al instalar, mantener y
operar su lavavajillas.
ADVERTENCIA
Cáncer y afecciones reproductivas - www.P65Warnings.ca.gov.

Español - 4
ADVERTENCIA
información de seguridad
GUARDE ESTAS INSTRUCCIONES
01 información de seguridad
No lave artículos de plástico a menos que estén marcados como "seguros para el
lavavajillas" o equivalente.
Para artículos de plástico no marcados, consulte las recomendaciones del fabricante.
No toque el ELEMENTO DE CALEFACCIÓN durante o inmediatamente después del uso.
No toque el ELEMENTO DE AIREACIÓN durante o inmediatamente después del uso.
ADVERTENCIA: Cuando use su lavavajillas, siga las precauciones básicas, incluyendo las
siguientes:
1. Lea todas las instrucciones antes de usar el lavavajillas.
2. Utilice el lavavajillas solamente para la función que se desea.
3. Utilice sólo detergentes o agentes humectantes recomendados para su uso en un
lavavajillas y mantenga fuera del alcance de los niños.
4. Al cargar los artículos a lavar:
- Coloque los objetos puntiagudos para que no dañen el sello de la puerta y
- Cargue las cuchillas afiladas con las manijas para reducir el riesgo de lesiones por
corte.
5. No lave artículos de plástico a menos que estén marcados como "seguros para el
lavavajillas" o equivalente.
Para artículos de plástico no marcados, consulte las recomendaciones del fabricante.
6. No toque el ELEMENTO DE CALEFACCIÓN durante o inmediatamente después del
uso.
7. No haga funcionar el lavavajillas a menos que todos los paneles estén correctamente
colocados.
8. No manipule los controles.
9. No abuse, se siente o se pare en la puerta o en un estante del plato del lavavajillas.
10. Para reducir el riesgo de lesiones, no permita que los niños jueguen dentro o en el
lavavajillas.
11. Bajo ciertas condiciones, se puede producir gas hidrógeno en un sistema de agua
caliente que no se ha utilizado durante dos semanas o más. EL GAS DE HIDRÓGENO
ES EXPLOSIVO. Si el sistema de agua caliente no se ha utilizado durante ese período,
antes de usar el lavavajillas, abra todos los grifos de agua caliente y deje que fluya el
agua de cada uno durante varios minutos. Esto liberará cualquier gas de hidrógeno
acumulado. Dado que el gas es inflamable, no fume ni use una llama abierta durante
este tiempo.
12. Retire la puerta del compartimiento de lavado cuando retire un lavavajillas viejo de
servicio.
Después de desembalar el lavavajillas, mantenga el embalaje fuera del alcance de los
niños.
El lavavajillas es extremadamente pesado. No intente mover ni llevar el lavavajillas por
usted mismo. Se necesitan dos o más personas para mover un lavavajillas y evitar
lesiones potenciales.
No instale el lavavajillas cerca de componentes eléctricos. Mantenga al lavavajillas
alejado de llamas abiertas.
Instale y nivele su lavavajillas en un piso sin alfombras que pueda soportar su peso.
Para operar con seguridad este aparato, familiarícese con sus operaciones y tenga
cuidado cuando se utiliza.
No ponga gasolina, disolventes u otros materiales inflamables dentro del lavavajillas. No
lave los platos expuestos a estos materiales.
Mantenga su detergente para lavavajillas fuera del alcance de los niños. El detergente
tiene efectos adversos sobre los órganos humanos. Contiene elementos para pulir y es
corrosivo. Evite dejar que el detergente entre en contacto con la piel y los ojos.
No empuje ni coloque presión sobre la puerta cuando esté abierta, ya que esto puede
dañar el lavavajillas o causar daños.
No permita que los niños jueguen dentro o en el lavavajillas. Pueden dañarse a sí mismos
o dañar el lavavajillas.
Desconecte el cable de alimentación (o desconecte el interruptor de circuito) antes de poner
en marcha su lavavajillas.
No repare ni reemplace ninguna parte de su lavavajillas usted mismo. El desmontaje, las
reparaciones y las modificaciones deben ser realizadas únicamente por técnicos
autorizados. El trabajo realizado por una persona no autorizada puede anular la garantía.
Antes de deshacerse de su lavavajillas, retire la puerta del compartimento de lavado o el
pestillo de la puerta para que los niños o los animales pequeños no queden atrapados
dentro.
Si el lavavajillas se deja sin usar durante un período de tiempo prolongado, apague el
suministro de agua.
Este lavavajillas está diseñado para uso residencial solamente.
•
•
•
•
PRECAUCIÓN
ADVERTENCIA - Cuando utilice el lavavajillas, siga las precauciones básicas,
siguientes:
Lea todas las instrucciones antes de usar el lavavajillas.
Como con cualquier equipo que usa electricidad, agua y partes móviles, existen peligros
potenciales.
Utilice el lavavajillas solamente para la función que se desea.
Utilice sólo detergentes o agentes humectantes recomendados para su uso en un
lavavajillas y mantenga fuera del alcance de los niños.
Al cargar los artículos a lavar:
- Coloque los objetos puntiagudos para que no dañen el sello de la puerta y
- Cargue las cuchillas afiladas con las manijas para reducir el riesgo de lesiones por
corte.

ANTES DE USAR SU LAVAVAJILLAS
Español - 5
.
ADVERTENCIAW
ADVERTENCIA
GUARDE ESTAS INSTRUCCIONES
01 información de seguridad
No lave artículos de plástico a menos que estén marcados como "seguros para el
lavavajillas" o equivalente.
Para artículos de plástico no marcados, consulte las recomendaciones del fabricante.
No toque el ELEMENTO DE CALEFACCIÓN durante o inmediatamente después del uso.
No toque el ELEMENTO DE AIREACIÓN durante o inmediatamente después del uso.
ADVERTENCIA: Cuando use su lavavajillas, siga las precauciones básicas, incluyendo las
siguientes:
1. Lea todas las instrucciones antes de usar el lavavajillas.
2. Utilice el lavavajillas solamente para la función que se desea.
3. Utilice sólo detergentes o agentes humectantes recomendados para su uso en un
lavavajillas y mantenga fuera del alcance de los niños.
4. Al cargar los artículos a lavar:
- Coloque los objetos puntiagudos para que no dañen el sello de la puerta y
- Cargue las cuchillas afiladas con las manijas para reducir el riesgo de lesiones por
corte.
5. No lave artículos de plástico a menos que estén marcados como "seguros para el
lavavajillas" o equivalente.
Para artículos de plástico no marcados, consulte las recomendaciones del fabricante.
6. No toque el ELEMENTO DE CALEFACCIÓN durante o inmediatamente después del
uso.
7. No haga funcionar el lavavajillas a menos que todos los paneles estén correctamente
colocados.
8. No manipule los controles.
9. No abuse, se siente o se pare en la puerta o en un estante del plato del lavavajillas.
10. Para reducir el riesgo de lesiones, no permita que los niños jueguen dentro o en el
lavavajillas.
11. Bajo ciertas condiciones, se puede producir gas hidrógeno en un sistema de agua
caliente que no se ha utilizado durante dos semanas o más. EL GAS DE HIDRÓGENO
ES EXPLOSIVO. Si el sistema de agua caliente no se ha utilizado durante ese período,
antes de usar el lavavajillas, abra todos los grifos de agua caliente y deje que fluya el
agua de cada uno durante varios minutos. Esto liberará cualquier gas de hidrógeno
acumulado. Dado que el gas es inflamable, no fume ni use una llama abierta durante
este tiempo.
12. Retire la puerta del compartimiento de lavado cuando retire un lavavajillas viejo de
servicio.
Después de desembalar el lavavajillas, mantenga el embalaje fuera del alcance de los
niños.
El lavavajillas es extremadamente pesado. No intente mover ni llevar el lavavajillas por
usted mismo. Se necesitan dos o más personas para mover un lavavajillas y evitar
lesiones potenciales.
No instale el lavavajillas cerca de componentes eléctricos. Mantenga al lavavajillas
alejado de llamas abiertas.
Instale y nivele su lavavajillas en un piso sin alfombras que pueda soportar su peso.
Su lavavajillas debe estar debidamente conectado a tierra. Nunca lo conecte a una
toma de tierra sin conexión a tierra. Consulte la página 10 para obtener más
información sobre la conexión a tierra de su lavavajillas.
Conecte el cable de tierra al conector de tierra verde en la caja de conexiones.
Después de instalar el lavavajillas, compruebe que la manguera de desagüe está bien
conectada y que no hay fugas de los conectores de la manguera. Si la manguera de
desagüe está floja, puede dañar a la propiedad.
La línea de suministro de agua es susceptible de rotura. A medida que pasa el tiempo,
se vuelve menos flexible. Compruebe la línea periódicamente. Si está hinchado, roto,
cortado o hay una fuga de agua, cámbielo inmediatamente.
Para operar con seguridad este aparato, familiarícese con sus operaciones y tenga
cuidado cuando se utiliza.
No ponga gasolina, disolventes u otros materiales inflamables dentro del lavavajillas. No
lave los platos expuestos a estos materiales.
Mantenga su detergente para lavavajillas fuera del alcance de los niños. El detergente
tiene efectos adversos sobre los órganos humanos. Contiene elementos para pulir y es
corrosivo. Evite dejar que el detergente entre en contacto con la piel y los ojos.
No empuje ni coloque presión sobre la puerta cuando esté abierta, ya que esto puede
dañar el lavavajillas o causar daños.
No permita que los niños jueguen dentro o en el lavavajillas. Pueden dañarse a sí mismos
o dañar el lavavajillas.
Desconecte el cable de alimentación (o desconecte el interruptor de circuito) antes de poner
en marcha su lavavajillas.
No repare ni reemplace ninguna parte de su lavavajillas usted mismo. El desmontaje, las
reparaciones y las modificaciones deben ser realizadas únicamente por técnicos
autorizados. El trabajo realizado por una persona no autorizada puede anular la garantía.
Antes de deshacerse de su lavavajillas, retire la puerta del compartimento de lavado o el
pestillo de la puerta para que los niños o los animales pequeños no queden atrapados
dentro.
Si el lavavajillas se deja sin usar durante un período de tiempo prolongado, apague el
suministro de agua.
Este lavavajillas está diseñado para uso residencial solamente.
Peligro de sobrecarga
- No utilice el lavavajillas hasta que esté correctamente instalado.
- No empuje hacia abajo la puerta del lavavajillas cuando esté abierta.
- No coloque un peso excesivo en la puerta del lavavajillas cuando esté abierta.
Peligro de choque eléctrico
El incumplimiento de estas instrucciones puede provocar la muerte, incendio o descarga
eléctrica:
- Conecte a tierra el lavavajillas
- Conecte el cable de tierra al conector de tierra verde en la caja de conexiones.
- No utilice un cable de extensión.
•
•
•
•
•
•
•
•
•
Su lavavajillas debe estar debidamente conectado a tierra. Nunca lo conecte a una
toma de tierra sin conexión a tierra. Consulte la página para obtener más
información sobre la conexión a tierra de su lavavajillas.
Conecte el cable de tierra al conector de tierra verde en la caja de conexiones.
Después de instalar el lavavajillas, compruebe que la manguera de desagüe está bien
conectada y que no hay fugas de los conectores de la manguera. Si la manguera de
desagüe está floja, puede dañar a la propiedad.
La línea de suministro de agua es susceptible de rotura. A medida que pasa el tiempo,
se vuelve menos flexible. Compruebe la línea periódicamente. Si está hinchado, roto,
cortado o hay una fuga de agua, cámbielo inmediatamente.
•
•
•
•
10

Español - 6
configuración de su lavavajillas
Rejilla inferior
Cubertería
02 configuración de su lavavajillas
Asegúrese de que su instalador siga estas instrucciones para que su nuevo
lavavajillas funcione correctamente y para que no está en riesgo de lesiones al lavar
los platos.
DESEMBALAJE DE SU LAVAVAJILLAS
Una vez que se le haya entregado su nuevo lavavajillas, desembale cuidadosamente y compruebe si hay
algún daño.Si el lavavajillas se ha dañado, anótelo en la hoja de ruta y guarde una copia. No instale el
lavavajillas y comuníquese con el servicio de atención al cliente de Samsung, en el número que se indica a
continuación.
Si no hay daños en el producto, puede continuar con la instalación. Si va a instalarlo usted mismo,
asegúrese de leer la guía de instalación y siga las instrucciones que hay en su interior.
Después de desembalar su lavavajillas, mantenga el embalaje fuera del alcance de los niños para
garantizar su seguridad.
COMPROBACIÓN DE PIEZAS
Cuando se haya desembalado el lavavajillas, asegúrese de que ha recibido todas las piezas que se muestran
a continuación.
Si su lavavajillas se dañó durante el envío o si no tiene todas las piezas, póngase en contacto con el ervicio
de atención al cliente de Samsung en el 1-800-SAMSUNG (726-7864)
Accesorios - Manual de usuario/instalación, Kit de instalación.
El flotador es muy importante para el funcionamiento de su lavavajillas.
Por favor, no manipule, no dañe o quite el flotador.
ADVERTENCIA
Tubería de
drenaje
Boquilla inferior
Combinación de filtro
(para modelos aplicables)
Flotador
Dispensador
Puerta
Entrada de agua
Boquilla central
Rejilla superior
Estante 3
(Para modelos aplicables)

Español - 7
PANEL DE CONTROL
1
Potencia
2
Selector de ciclos
4
Higienizado
3
Lavado alta
temperatura
5
alentamiento en
6
Retrasar inicio
02 configuración de su lavavajillas
Cuando presione el botón de encendido, la pantalla entera se enciende y
entonces se enciende la luz del último ciclo terminado.
Cuando el ciclo seleccionado se ha completado, el lavavajillas se apaga
automáticamente.
Seleccione el ciclo de lavado apropiado dependiendo del nivel de suciedad de
sus platos. Después de seleccionar un ciclo, se enciende la luz de ciclo
activado para ese ciclo. Si se produce un problema durante una operación, los
LED específicos parpadean indicando la causa del problema. El parpadeo se
acompaña de un tono de advertencia. Para más información, consulte “Códigos
de información” en la página
Aumenta la temperatura de lavado principal para mejorar la limpieza de las
cargas que contienen alimentes horneados resistentes.
El lavado a alta temperatura no está disponible para el ciclo Expresar 60.
La temperatura sube a 15 °F ( °C) en el ciclo de enjuague final para una
higienización de temperatura alta.
Si selecciona la opción higienización, la lámpara "Higienizado" parpadeará
cuando la temperatura del agua alcance la temperatura de higienizado (más de
156 °F (69°C)), y entonces permanece iluminado hasta que la opción de
higienizado termine. Cuando pulse la tecla de encendido, la lámpara
"Higienizado" se apaga.
El ciclo normal con la opción de higienizado seleccionada está certificado
por NSF.
La función de higienizado funciona de acuerdo con la Norma NSF/ANSI
184 para lavavajillas residenciales. Los lavavajillas residenciales
certificados no están diseñados para ser utilizados por establecimientos de
alimentos con licencia.
Cuando se selecciona la función "Calentamiento en seco”, el calentador
funcionará durante el proceso de secado.
El bloqueo le permite bloquear los botones del panel de control para que los
niños no puedan activar accidentalmente el lavavajillas presionando los
botones en el panel.
Para bloquear y desbloquear los botones del panel de control, mantenga
presionado el botón de Calentamiento en seco durante tres (3) segundos
cuando la alimentación esté encendida.
(3 seg.)
(Bloqueo de control)
C
8 70
La hora mostrada indica el momento en que se iniciará el lavado.
26.
sec /o
Demora un ciclo por 3,6? o 9 horas.
1
2
3
4
5
6
7

Español - 8
Iniciar
O O X
Lavado alta
temperatura
Retrasar
inicio
Limpiar
Inicio
Cancelar y
drenar
(3seg)
Calentamiento
en seco
configuración de su lavavajillas
02 configuración de su lavavajillas
Para iniciar un ciclo, pulse el botón Inicio antes de cerrar la puerta.
Para cancelar el ciclo, mantenga presionado el botón de inicio durante 3
segundos o presione el botón de encendido para apagar.
Puede seleccionar opciones (
ciclo después de seleccionar una opción, el ciclo
Para evitar que los botones pierdan sensibilidad de respuesta, siga estas instrucciones:
- Toque el centro de cada teclado usando un dedo. No presione.
- Limpie regularmente la superficie del control táctil con un paño suave y húmedo.
- Tenga cuidado de no tocar más de un botón a la vez, excepto como se indica.
Cuando se interrumpe un ciclo al abrir la puerta, pulse el botón Inicio antes de cerrar la puerta para
continuar el ciclo.
Empuje la puerta firmemente cerrada en los siguientes 3 segundos tras presionar el botón Inicio.
Si la puerta no se cierra en 3 segundos, el ciclo no se iniciará.
Higienizado
7
)
antes de iniciar un ciclo. Si cambia el
Lavado alta temperatura, Higienizado, Calentamiento en seco
original se restablece.

Español - 9
SELECTOR DE CICLO
1
Auto
2
Normal
3
Pesado
4
Expresar 60
02 configuración de su lavavajillas
Este ciclo detecta el nivel de suciedad e inicia automáticamente el ciclo óptimo después de
algunos minutos de funcionamiento.
Utilice este ciclo para platos sucios.
Use este ciclo para platos muy sucios y platos con suciedad pesada.
Utilice este ciclo para platos ligeramente sucios.
No hay tiempo de secado en "Expresar 60", por lo
e puede elegir la opción
"Calentamiento en seco" si desea mejorar el rendimiento de secado.
qu
1 2 3 4
60

Español - 10
CUMPLIMIENTO DE LOS REQUISITOS DE INSTALACIÓNINST
Suministro eléctrico y puesta a tierra
configuración de su lavavajillas
02 configuración de su lavavajillas
Para evitar el riesgo de incendio, descarga eléctrica o lesiones personales, todo el cableado debe
estar hecho de acuerdo con el Código Eléctrico Nacional ANSI / FNPA, No. 70 Última Revisión y
los códigos y ordenanzas locales. Es responsabilidad personal del propietario del aparato
proporcionar el servicio eléctrico adecuado para este aparato.
Nunca utilice un cable de extensión.
Al preparar la instalación, asegúrese de proporcionar:
Un circuito de derivación individual con un fusible o disyuntor de 120 V, 60Hz, 15 AMP que dé
servicio sólo a su lavavajillas.
Su lavavajillas debe estar conectado a tierra. Si el lavavajillas falla, la conexión a tierra reducirá el
riesgo de una descarga eléctrica proporcionando una ruta de menor resistencia para la corriente.
Nunca conecte el cable de tierra a tuberías plásticas, líneas de gas o tuberías de agua caliente.
INSTRUCCIONES DE CONEXIÓN A TIERRA
Para un aparato conectado permanentemente:
Este aparato debe estar conectado a un sistema de cableado permanente o un conductor de
puesta a tierra del equipo debe conectarse a los conductores del terminal de puesta a tierra del
equipo o el cable del aparato.
Suministro de agua
La presión de la línea de suministro de agua caliente debe estar entre 20-120 psi (140-830 kPa).
Ajuste el calentador de agua para proveer agua entre 120 °F (49 °C) y 149 °F (65 °C).
La mayoría de las tiendas de suministros de plomería venden líneas de suministro de agua
de varias longitudes de hasta 10 pies (305 cm) de largo.
Puede reducir el riesgo de fugas y daños causados por el agua:
Hacer los grifos de agua fácilmente accesibles.
Apagar los grifos cuando el lavavajillas no esté en uso.
Comprobar periódicamente si hay fugas en los accesorios de la línea de suministro de
agua.
Antes de utilizar el lavavajillas por primera vez, verifique todas las conexiones en la válvula de
suministro de agua y grifos para comprobar si hay fugas.
Piso
Por seguridad, su lavavajillas debe estar instalado en un piso sólido.
Nunca instale su lavavajillas en una plataforma o estructura mal apoyada.
Su lavavajillas debe estar correctamente instalado de acuerdo con la Guía de instalación antes de usarlo. Si no
recibió una Guía de instalación con su lavavajillas, puede obtener una visitando nuestro sitio web en www.sam-
sung.com.
ADVERTENCIA
PRECAUCIÓN
ADVERTENCIA

Español - 11
Uso de su lavavajillas
DIRECTRICES BÁSICAS
PRECAUCIÓN
03 Uso de su lavavajillas
1. Abra la puerta y coloque los platos (consulte la página 14).
- Coloque los platos en las rejillas superior e inferior, a menos que haya seleccionado la rejilla inferior.
- Retire los restos de alimentos de los platos antes de colocarlos en las rejillas.
- Después de colocar los platos en las rejillas, gire las boquillas a mano para comprobar si alguno de los
platos interfiere con ellas.
- Asegúrese de que los platos no impidan que el dispensador de detergente se abra.
2. Agregue detergente al dispensador (consulte la página 17).
- Asegúrese de usar sólo detergente y abrillantador para lavavajillas automático.
- Consulte "Uso del detergente" en la página para obtener instrucciones que explican cómo añadir el
detergente y el abrillantador.
3. Pulse el botón Inicio.
- Cuando presione el botón de encendido, la pantalla entera se enciende y apaga y, a continuación, el ciclo
de ciclo más reciente se enciende.
4. Seleccione un ciclo de limpieza apropiado dependiendo del nivel de suciedad de los platos. (Véanse las
páginas y .)
- Presione el botón de ciclo apropiado.
- Cuando se pulsa un botón de ciclo, el indicador de ciclo se ilumina.
5. Pulse el botón Inicio y luego cierre la puerta en 3 segundos.
- El lavavajillas comenzará a drenar después de unos segundos y luego comenzará el ciclo seleccionado.
- Cerciórese de cerrar firmemente la puerta. Si la puerta no se cierra correctamente, el ciclo seleccionado no
se iniciará automáticamente.
6. Cuando finalice el ciclo de lavado.
- La luz se ilumina y el lavavajillas suena una alarma.
- El lavavajillas se apaga automáticamente.
- Si desea cargar más platos o pausar el lavavajillas mientras está funcionando, asegúrese de abrir la
puerta lentamente y con cuidado ya que existe la posibilidad de lesión por el vapor caliente dentro del
lavavajillas.
- Si la puerta se abre mientras el lavavajillas está funcionando, se activa un mecanismo de seguridad y se
detiene el ciclo.
- Para reanudar el funcionamiento, pulse el botón Inicio y luego cierre la puerta en 3 segundos.
- La adición de platos varios minutos después de que el lavavajillas comience a funcionar podría afectar
su rendimiento.
- Si abre la puerta mientras el lavavajillas está funcionando a alta temperatura, drenará el agua caliente
automáticamente para protegerlo de quemaduras.
Debe utilizar abrillantador para un mejor rendimiento de secado. Puede mejorar aún más el rendimiento
de secado seleccionando también la opción Higienizar
17
9 22
y Calentamiento en seco...
.
(
)
-
(
)
-
Si el "Low Rinse"
está iluminado, debe volver a llenar el dispensador de abrillantador para mejorar el rendimiento
avado y secado. de l
Si el "Low Rinse"
está iluminado, se puede aumentar la temperatura y el tiempo de enjuague final para mejorar el
rendimiento de secado.
Abra la puerta del lavavajillas, déjela y espere unos minutos antes de retirar los platos.
De esta forma, estarán más fríos y se mejorará el secado.

Español - 12
Controles táctiles
ADVERTENCIA
ADVERTENCIA
Uso de su lavavajillas
03 Uso de su lavavajillas
Los controles táctiles le permiten manejar el lavavajillas.
Conveniente de operar, requiriendo solamente un toque suave.
Tienen un diseño simple y con estilo.
Son fáciles de limpiar.
Si tiene hijos o desea limpiar la Interfaz de Control, le recomendamos que active la función de
bloqueo para bloquear los botones de control. Vea la página 7.
- Los niños no podrán activar el lavavajillas accidentalmente tocando los controles con esta
opción seleccionada.
- Si se está ejecutando un ciclo, los botones no responden. (Excepto el botón de encendido)
- Si el lavavajillas está apagado, sólo responde el botón de encendido.
No toque el ELEMENTO DE AIREACIÓN durante o inmediatamente después del uso.
Retrasar inicio
Cuando seleccione la opción de Retrasar inicio, su lavavajillas:
Comienza a drenar para eliminar el agua restante de una vez (pre-drenaje).
Su lavavajillas operará el ciclo seleccionado cuando expire el tiempo de retardo.
Cuando use el lavavajillas, trate de arreglar los platos apropiadamente como se describe en las
páginas a .
Deberá retirar los restos de alimentos tales como huesos, semillas de frutas, etc. y cualquier otro
como palillos, papel, etc. de los platos ya que pueden dañar los platos, crear ruido, o hacer que
el lavavajillas funcione mal.
Seleccione el ciclo apropiado dependiendo del nivel de suciedad y el tipo de platos.
Use sólo la cantidad adecuada de detergente y agente de enjuague.
No lave los siguientes artículos
Artículos de acrílico o aluminio: Los platos con decoración de borde de oro impreso pueden
eliminar el color.
Platos tratados con adhesivo: Los plásticos tratados, la madera, el marfil, el cobre y el estaño
pueden soltarse.
Plásticos con una tolerancia de temperatura inferior a 194 °F (90 °C): Los plásticos finos se lavan
y secan mal, y pueden ser dañados debido a temperaturas de lavado elevadas.
Estaño: El estaño se debe lavar a mano y secarse inmediatamente, ya que puede oxidarse.
Utensilios de madera: Los artículos de madera pueden agrietarse.
14 16

Español - 13
AJUSTE DE LA ALTURA DE LA REJILLA SUPERIOR
EXTRACCIÓN DE LA REJILLA SUPERIOR
Paso 1. Paso 2. Paso 2.
PRECAUCIÓN
PRECAUCIÓN
Puede ajustar la altura de la rejilla superior de su lavavajillas Samsung para que la rejilla inferior pueda
acomodar platos de mayor tamaño. Con la rejilla superior colocada en la posición más alta, la rejilla inferior
acomoda placas de hasta 12 pulgadas (30 cm) de diámetro y el estante superior puede acomodar placas
hasta 8 pulg. (20 cm) de diámetro.
1. Para bajar el bastidor superior de 5 cm (2 pulgadas),
retire el bastidor superior como se muestra en Extracción
del bastidor superior a continuación. Después, vuelva a
colocar la rejilla de manera que las cuatro ruedas
superiores de cada lado estén a cada lado del riel de
guía. Vea la ilustración de la posición inferior a la
derecha.
2. Para levantar el estante superior, quite el estante superior
como se muestra en Extracción del bastidor superior a
continuación. Después, vuelva a colocar la rejilla de
modo que las tres ruedas inferiores de cada lado estén a
cada lado del riel de guía. Vea la ilustración de la
posición superior a la derecha.
Recomendamos ajustar la altura de la superior antes
de cargar los platos en la rejilla. Si ajusta la rejilla
después de cargar los platos, puede dañar los platos.
Posición Inferior
Posición Superior
Tire de la rejilla superior hacia el frente y luego retírela levantándola ligeramente y tirando hacia el frente. Vea
las ilustraciones abajo.
Como la rejilla superior es extraíble, debe ser instalada para que el lavavajillas funcione correctamente.
Si intenta utilizar el lavavajillas sin la rejilla, se producirá ruido y el lavavajillas no funcionará
correctamente
03 Uso de su lavavajillas

Español - 14
CARGA DE LA REJILLA INFERIOR
10 cubiertos 12 cubiertos
Platillo
CARGA DE LA REJILLA SUPERIOR
10 cubiertos
12 cubiertos
Uso de su lavavajillas
03 Uso de su lavavajillas
La rejilla inferior ha sido especialmente diseñada para platos de cena, cuencos de sopa, platos, ollas, tapas,
cazuelas y platos.
Cargue objetos grandes como cacerolas y cazuelas en el lavavajillas para que sus lados abiertos estén hacia
abajo. Recomendamos cargar vasos, tazas y pequeños platos en el estante superior.
Consulte los patrones de carga recomendados a continuación.
La rejilla superior ha sido diseñada para platos pequeños, tazas, vasos y artículos de plástico marcados como
"seguros para el lavavajillas". Cargue los platos en el lavavajillas en dos medias filas, de manera que la parte
frontal de cada plato quede mirando hacia atrás de la placa delante de ella, y los lados abiertos de las placas
en el centro del lavavajillas están enfrentados entre sí.Vea las ilustraciones abajo.
Asegúrese de que los platos cargados no interfieran con la rotación de la boquilla que se encuentra en la parte
inferior de la rejilla superior. (Compruebe esto girando la boquilla manualmente.)Al cargar los platos, tire de la
bandeja superior hacia abajo de forma que pueda cargarla sin golpear el contador de encima.

Español - 15
03 Uso de su lavavajillas
Uso de la eatante 3
- Esta bandeja es adecuada para cubiertos
de mesa y de cocina o de servir.Utilice la
bandeja para cubiertos para organizar la
ubertería.
- Para obtener los mejores resultados,
coloque los elementos muy sucios en la
cesta para cubiertos estándar.
* NOTA : Puede retirar la bandeja para
cubiertos si necesita disponer de más
espacio en la cesta superior para
utensilios más voluminosos.

Español - 16
USO DE LA REJILLA PARA CUBIERTOS
10 cubiertos
12 cubiertos
NO deje que ningún artículo se extienda por la parte inferior.
1 32
1
2
3
4
5
6
2
2
2
2
2
2
2
2
2
2
2
2
2
2
2
2
2
44
4
44
4
4
4
44
4
44
4
4
33
33
33
33
3
33
11
11
11
1
11
11
11
1
11
11
11
1
11
11
11
11
11
11
11
11
11
11
11
11
1
11
11
11
1
11
11
11
1
11
11
11
1
11
11
11
11
11
11
11
11
11
11
11
11
11
11
11
1
11
11
11
1
11
11
11
1
11
11
11
1
11
11
11
1
11
11
11
1
11
11
11
1
11
11
11
1
11
11
11
1
11
11
11
1
11
11
11
11
11
11
11
11
11
11
11
11
11
11
11
11
11
11
11
11
11
11
11
11
1
11
11
1
11
11
11
1
11
11
11
1
11
11
11
1
11
11
11
1
11
11
11
1
11
11
11
1
11
11
11
1
11
11
11
1
11
11
11
1
11
11
11
1
11
11
11
1
11
11
11
1
11
11
11
1
11
11
11
1
11
11
11
1
1
5
5
6
6444 5
4
4
33
33
33
33
3
33
03 Uso de su lavavajillas
Uso de su lavavajillas
Puede colocar cada cuchillo, cuchara o tenedor por separado en los soportes de la
de la cesta para evitar el desbastado y la decoloración.
Puede utilizar el portacubiertos con la tapa abierta. Consulte la ilustración de la
derecha.
La cuchara está como se ve desde arriba con la colocación sugerida de los cubiertos.
Haga coincidir los números en el diagrama a los números en la lista de artículos de
cubiertos a continuación.
Cucharas
Cuchillos
Tenedores de ensalada
Tenedores
Cucharas para servir
Tenedores para servir
cuchara en las cubiertas

Español - 17
USO DE DETERGENTE
Llenado del dispensador de detergente
03 Uso de su lavavajillas
ADVERTENCIA
ADVERTENCIA
PRECAUCIÓN
Uso de su lavavajillas
Todos los ciclos de lavavajillas requieren detergente en el compartimento de detergente.
Agregue la cantidad correcta de detergente para el ciclo seleccionado para asegurar el mejor rendimiento.
Utilice solamente detergente para lavavajillas. El detergente regular produce demasiada espuma, lo
que puede hacer disminuir el rendimiento del lavavajillas o hacer que funcione mal.
No trague el detergente del lavavajillas. Evite respirar los vapores. El detergente para lavavajillas
contiene productos químicos cáusticos e irritantes que pueden inducir afecciones respiratorias. Si usted
ha tragado detergente para lavavajillas o ha inhalado los vapores, busque atención médica
inmediatamente.
Mantenga el detergente del lavavajillas fuera del alcance de los niños.
1. Abra la tapa del dispensador de detergente empujando el dispensador de
detergente.
La solapa está siempre abierta al final de un ciclo de lavado.
2. Añada la cantidad recomendada de detergente al compartimiento del
detergente principal.
3. Cierre la solapa deslizándola hacia la y luego presionándola abajo.
4. Para un mejor resultado de limpieza, especialmente si hay mucha
suciedad, vierta una pequeña cantidad (unos 15 g) de detergente en la
puerta.
El detergente adicional se activará durante la fase de prelavado.
abajo

Español - 18
03 using your dishwasher
La cubierta se abre automáticamente para dispensar el detergente durante el lavado.
CICLO
CANTIDAD DE DETERGENTE
Dispensador de lavado principal En la puerta para prelavado
Auto, Normal 20 g 10 g
Pesado, Express 60 30 g 15 g
Los números dentro del dispensador se refieren a gramos.
Llenado del depósito de abrillantador
PRECAUCIÓN
PRECAUCIÓN
Su lavavajillas ha sido diseñado para usar sólo abrillantador líquido.
El uso de un abrillantador en polvo obstruirá la abertura del depósito y hará que el lavavajillas
tenga un mal funcionamiento.
El abrillantador mejora el rendimiento de secado del lavavajillas.
No agregue detergente normal al depósito de abrillantador.
1. Abrir la tapa del depósito de abrillantador .
2. Llene el depósito del abrillantador con el abrillantador.
2. Llene el depósito del abrillantador con el abrillantador.
Utilice el puerto de visualización al llenar el depósito de
abrillantador.
No llene el depósito por encima del indicador de nivel
completo.
El exceso de abrillantador puede sobrefluir durante el ciclo de
lavado.
3. Vea la cantidad de enjuague en el depósito a través del puerto de
visualización transparente. Deje de añadir cuando el depósito
alcance el nivel completo.
4. Cierre la tapa del depósito del abrillantador .

Español - 19
Limpieza y mantenimiento
de su lavavajillas
LIMPIEZA DE LOS FILTROS
.
04 Limpieza y mantenimiento de su lavavajillas
PRECAUCIÓN
Mantener su lavavajillas limpio mejora su rendimiento, reduce las reparaciones
innecesarias y alarga su vida útil.
LIMPIEZA DEL EXTERIOR
Es mejor limpiar derrames en el exterior de su lavavajillas cuando ocurren. Utilice un paño suave y húmedo en
el panel de control para limpiar con cuidado los derrames y el polvo. No utilice benceno, cera, diluyente, cloro
o alcohol. Estos materiales pueden decolorar las paredes internas y causar manchas. No limpie el lavavajillas
rociando agua sobre él y evite que el agua entre en contacto con cualquiera de las partes eléctricas.
Si su lavavajillas tiene un panel de puerta de acero inoxidable, se puede limpiar con un limpiador de
acero inoxidable para electrodomésticos o un producto similar utilizando un paño limpio y suave.
LIMPIEZA DEL INTERIOR
Limpie el interior de su lavavajillas periódicamente para eliminar cualquier suciedad o partículas de alimentos.
Limpie el interior del lavavajillas y la parte interior de la puerta con un paño húmedo. Recomendamos rellenar
el dispensador de detergente con detergente para platos y luego ejecutar el lavavajillas vacío periódicamente
usando el ciclo Normal o el Express 60 con la opción desinfectar. Esto mantendrá su lavavajillas limpio.
Si hay manchas blancas y olor aún presentes en su lavavajillas, ejecute el ciclo Normal con el lavavajillas
vacío y sin detergente hasta que se vacíe. Entonces, interrumpa el ciclo y ponga una taza de 8 onzas de
vinagre blanco en la cesta inferior. Cierre el lavavajillas y deje que termine el ciclo.
No quite el sello frontal del recipiente (el sello de goma largo que rodea la abertura del lavavajillas).
No toque el ELEMENTO DE CALEFACCIÓN durante o inmediatamente después del uso.
1. Apague el lavavajillas.
2. Gire el inserto del filtro hacia la izquierda para soltarlo y luego
separe el inserto del filtro.
3. Retire el filtro fino (plano, rectangular).

Español - 20
CAUTION
4. Retire la suciedad u otros restos del filtro y luego enjuáguelos con agua corriente.
5. Vuelva a montar el filtro en el orden inverso al desensamblaje, vuelva a insertar
el inserto del filtro y gírelo en el sentido de las agujas del reloj como se muestra
hasta que esté cerrado.
Si el inserto del filtro no se cierra correctamente, su rendimiento disminuirá.
LIMPIEZA DE LAS BOQUILLAS
Si su lavavajillas no parece estar limpiando adecuadamente o las boquillas parecen atascadas, puede limpiar
cada una de las boquillas. Cuando retire las boquillas, tenga cuidado porque pueden romperse.
Boquilla inferior
1. Compruebe si los orificios de la boquilla están obstruidos por las partículas
de alimentos.
2. Si la limpieza es necesaria, retire la boquilla tirando hacia arriba.
3. Limpie la boquilla y luego empuje hacia atrás en su lugar.
4. Compruebe si la boquilla está unida correctamente girándola con la mano.
04 Limpieza y mantenimiento de su lavavajillas

Español - 21
ALMACENAMIENTO DE SU LAVAVAJILLAS
1
2
Tapa de la boquilla
Si necesita almacenar su lavavajillas durante un período de tiempo prolongado, primero drene y desconéctelo.
Si deja agua en las mangueras y los componentes internos, puede dañar el lavavajillas.
Después de drenar y desconectar el lavavajillas, asegúrese de apagar la válvula de suministro de agua y el
interruptor del circuito.
Limpieza y mantenimiento
de su lavavajillas
Boquilla central
1. Tire de la rejilla superior hacia el frente y
retírela.
2. Compruebe si los orificios de la boquilla
están obstruidos por las partículas de
alimentos.
3. Si la limpieza es necesaria, quite la boquilla.
4. Para quitar la boquilla, suelte y retire la
tuerca y, a continuación, la boquilla.
5. Limpie la boquilla, vuelva a insertarla y
apriete la tuerca.
6. Al sujetar la tuerca, gírela firmemente con la
mano.
7. Compruebe si la boquilla está unida
correctamente girándola con la mano.
Boquilla superior
1. Compruebe si los orificios de la boquilla
están obstruidos por las partículas de
alimentos.
2. Si la limpieza es necesaria, quite la
boquilla.
3. Para extraer la boquilla, tire de la parte
superior de la rejilla primero, desatornille
la tapa girándola en sentido antihorario, y
luego retire la boquilla superior.
4. Limpie la boquilla, vuelva a insertarla y fije
la tapa de la boquilla a la boquilla girando
la tapa en sentido horario.
5. Compruebe si la boquilla está unida
correctamente girándola con la mano.
04 Limpieza y mantenimiento de su lavavajillas

Español - 22
Ciclos
TABLA DE CICLOS
Ciclo
Pre-
lavado 1
Lavado
principal
Enjuague1 Enjuague2 Enjuague3
Último enjuague
[Higienizado]
Tiempo de
ciclo con(mín)
Agua
[gal(l)]
Pre-
lavado 2
Seco
Auto
1 -1
Normal
3-6
(11.8-22.7)
119-144
108-126 °F
(42-52 )°C
27.4)
1 ( )°F °C
65 °C/
°C
Express
4
1 ( )°F °C
136 °F
( : BÁSICO, : Paso opcional)
(15. )
60
118-126 °F
(48-52 )°C
3-6
(11.8-22.7)
1
Cuando selecciona el ciclo Auto o Normal, puede eliminar pasos opcionales
dependiendo del nivel de suciedad de la vajilla.
El consumo de agua y el tiempo de lavado varían dependiendo de los pasos u
opciones que añada, y de la presión y temperatura del agua suministrada.
Al seleccionar cualquier opción, se puede cambiar el tiempo de ciclo.
44°F/
31 55
Heavy
136-1
4
70
7.3 (
6
26 52
/
3
09 3
2
05 Ciclos
°C
Enjuague4
158°F
°C/58-62 70
44°F/136-1
°C
158°F
°C/58-62 70
15 F8°
°C/
°C70
149 °F/
15 F8°
58
Cuando falta producto de enjuague, el tiempo de lavado y la temperatura
del ultimo enjuague se pueden incrementar un poco.

Español - 23
solución de problemas
COMPRUEBE ESTOS PUNTOS SI SU LAVAVAJILLAS...
PROBLEMA
No arranca.
Tarda demasiado
con una operación o
un ciclo normal.
Hay partículas
restantes de comida
en los platos.
(No limpia
correctamente.)
CAUSA POSIBLE
La puerta no está completamente
cerrada.
No se ha seleccionado ningún ciclo.
El cable de alimentación no está
conectado.
El panel de control está bloqueado.
Un interruptor automático está abierto.
Se suministra agua fría.
Ha seleccionado un ciclo inapropiado.
La temperatura del agua es baja.
Baja presión de agua.
El agua es demasiado dura.
El detergente del lavavajillas no se usó.
El detergente permanece en el
dispensador.
No hay abrillantador.
Una boquilla está obstruida.
Los platos están mal cargados.
Se han cargado demasiados platos.
SOLUCIÓN
Compruebe si la puerta está cerrada y cerrada
completamente.
Seleccione un ciclo adecuado.
Conecte el cable de alimentación correctamente.
Desbloquee el bloqueo para niños
Reinicie el disyuntor.
Compruebe si la línea de suministro de agua está
conectada a un suministro de agua caliente.
(Se requiere tiempo adicional para calentar el agua
fría.)
Seleccione un ciclo según el número y nivel de
suciedad de los platos, como se indica en este
manual.
Conecte la línea de suministro de agua a un
suministro de agua caliente.
Para obtener el mejor rendimiento, la temperatura
del el agua suministrada debe ser de 120 °F (49 °C).
La presión del agua debe estar entre 20 y 120 psi
(140 - 830 kPa).
Utilice detergente fresco de alta calidad con ayuda
para el aclarado.
Utilice detergente para lavavajillas.
Recomendamos un tipo de detergente para
lavavajillas de polvo o gel.
Asegúrese de que los elementos grandes como
láminas para hornear galletas, tablas de cortar o
contenedores, etc.
no están bloqueando el dispensador de detergente y
permita que se abra correctamente.
Reorganice los platos para que no interfieran con el
funcionamiento del dispensador de detergente.
Revise el dispensador y agregue el abrillantador.
Utilice un líquido de enjuague de tipo abrillantador.
Limpie la boquilla, vea la página .
Reorganice los platos para que no interfieren con la
rotación de la boquilla y el dispensador de
detergente.
Cargue sólo un número apropiado de platos.
Cargue sus platos como se recomienda. (Ver página
.)
17
14
06 solución de problemas

Español - 24
solución de problemas
PROBLEMA
Deje las gafas con
un film opaco.
Deja una película
amarilla o marrón en
el interior del
lavavajillas.
No seca los platos
bien.
Tiene un mal olor.
Es demasiado
ruidoso.
CAUSA POSIBLE
El agua suministrada es suave y
demasiada se utilizó mucho detergente.
Se incluyeron platos de aluminio en la
carga de lavado.
No hay abrillantador en el dispensador.
La temperatura del agua es baja cuando
el lavavajillas está funcionando.
Se han cargado demasiados platos.
Vasos y copas con la parte inferior
cóncava con agua. Este agua puede
derramarse sobre otros objetos cuando
descargue.
Quedó agua de un ciclo incompleto.
La manguera de drenaje está obstruida.
El lavavajillas no se utiliza diariamente o
los platos sucios se dejan en la unidad
mucho tiempo.
Se genera ruido cuando la tapa del
dispensador está abierta y la bomba de
drenaje está funcionando en una etapa
temprana.
El lavavajillas no está nivelado.
Material extraño (un tornillo, una pieza de
plástico) está en la cámara de la bomba.
Hay un sonido de "corte" porque una
boquilla está chocando contra los platos.
SOLUCIÓN
Cargue menos el lavavajillas y use un abrillantador
para minimizar esto.
Retire las marcas de los platos usando un limpiador
de baja sensibilidad.
Retire los suelos con un limpiador de manchas.
Revise el dispensador y agregue el abrillantador.
Utilice una ayuda de enjuague de tipo líquido.
Conecte la línea de suministro de agua a un
suministro de agua caliente.
Utilice el abrillantador con la opción Higienizado.
La carga adecuada de los artículos puede afectar el
secado.
Cargue sus platos como se recomienda. (Verpágina
)
Una vez finalizado el ciclo, vacíe el primero y luego
el estante superior. Esto Evite que el agua gotee de
la parte superior Coloque los platos en la rejilla
inferior.
Inserte el detergente sin cargar la vajilla,y ejecute el
ciclo Normal para limpiar el lavavajillas.
Póngase en contacto con un técnico para quitar
cualquier obstrucción del manguera de drenaje.
Con el lavavajillas vacío y sin detergente, coloque un
vaso con 8 onzas de vinagre en posición vertical en
la parte inferior de la rejilla y, a continuación, ejecute
un ciclo normal.
Esto es una operación normal.
Asegúrese de que el lavavajillas esté nivelado.
Póngase en contacto con un técnico para retirar el
material extraño de la cámara de la bomba.
Reorganice los platos.
No hay abrillantador en el dispensador.
La temperatura del agua es baja cuando el
lavavajillas está funcionando.
Se han cargado demasiados platos.
Vasos y copas con la parte inferior cóncava con
agua. Este agua puede derramarse sobre otros
objetos cuando descargue.
14.

Español - 25
PROBLEMA
Una boquilla no gira
suavemente.
El agua no bombea
fuera del
lavavajillas.
Tiene una rejilla
superior doblada
después de la carga
platos.
CAUSA POSIBLE
El orificio de la boquilla está obstruido
con partículas de alimentos.
La boquilla está bloqueada por un plato u
olla y no puede girar.
El drenaje está obstruido.
Los platos no están cargados
correctamente.
SOLUCIÓN
Limpie el orificio de la boquilla. Vea la página 17.
Después de colocar los platos en las rejillas, gire las
boquillas con la mano para comprobar si alguno de
los platos interfiere con ellos.
Póngase en contacto con un técnico para quitar
cualquier obstrucción de la manguera de drenaje y
compruebe el funcionamiento de la bomba de
drenaje.
Cargue sus platos como se recomienda.(Véase la
página .)14
06 solución de problemas

Español - 26
CÓDIGOS DE INFORMACIÓN
ADVERTENCIA
El panel de control muestra códigos de información para ayudarle a entender lo que está ocurriendo con su
lavavajillas.
Si su lavavajillas tiene un problema, las luces del SÍMBOLO DE CÓDIGO parpadean como se muestra a
continuación.
solución de problemas
60
Express
60
Express
60
Express
60
Express
60
Express
60
Express
60
Express
60
Expres
Sin agua
Nivel de agua alto
No se llega a la temperatura
requerida
Fallo del circuito abierto del
termistor
Falla en el cortocircuito del
termistor
Funcionamiento anormal al
presionar la tecla táctil
Señal anormal
El grifo de agua no está abierto.
El interruptor de presión está roto.
La bomba de lavado no funciona.
Hay un problema con la PBA principal.
El interruptor de agua alta se activó 5 veces durante 5 segundos.
El interruptor de agua alta estaba encendido continuamente durante 120 segundos.
Hay un problema con la PBA principal.
El calentador estaba encendido continuamente durante 60 minutos, pero el agua no
calentó hasta la temperatura requerida.
El calentador está roto.
La temperatura detectada por el termistor es incorrecta.
Hay un problema con la PBA principal.
El interruptor de fugas está roto.
El interruptor de fuga se activó durante 2 segundos.
Hay un problema con la PBA principal.
El termistor sufrió un fallo de circuito abierto.
Hay un problema con la PBA principal.
El termistor sufrió un fallo de cortocircuito.
Hay un problema con la PBA principal.
Una tecla táctil fue operada de forma anormal.
Ejemplo: Se pulsó una tecla durante más de 30 segundos.
Hay un problema con el PBA secundario.
Una tecla táctil fue operada de forma anormal.
Ejemplo: Se pulsó una tecla durante más de 30 segundos.
Hay un problema con la PBA principal.
Hay un problema con el PBA secundario.
Posibles causas
Para cualquier código no mencionado anteriormente, llame al 1-800-SAMSUNG (726-7864)
Si se produce un desbordamiento, apague el suministro de agua principal antes de llamar al servicio
técnico.
Si hay agua en la bandeja de base debido a un exceso de llenado o una pequeña fuga, el agua debe
ser retirada antes de reiniciar el lavavajillas.
Heavy
Heavy
s
Fugas de agua
Heavy
Heavy
Heavy
Heavy
Heavy
Heavy

Español - 27
apéndice
AYUDAR AL MEDIO AMBIENTE
ESPECIFICACIONES
50 W
840 W
07 apéndice
[604 x 629 858mm]
Su lavavajillas está fabricado con materiales reciclables. Si decide eliminarlo, por favor respete las normas
locales de eliminación de residuos. Corte el cable de alimentación para que el aparato no pueda ser
conectado a una fuente de energía.
Retire la puerta para que los animales y los niños pequeños no puedan quedar atrapados dentro del
aparato.
No exceda las cantidades de detergente recomendadas en las instrucciones de los fabricantes de
detergentes.
Modelo
Tipo
Potencia
Uso de potencia nominal
Dimensiones
(Ancho × Profundidad ×
Altura)
Peso
Lavavajillas incorporado
120 V, 60 Hz solamente
Motor de lavado
Calentador
Capacidad de lavado
Presión de agua usada
15 posiciones
Desempaquetado
x
23 ¾ x 24 ⁄ in.
33 ¾
x
4
3
.5 lb ( 2kg)37 0
DW80N3030U*

Español - 28
garantía (EE.UU.)
LAVAVAJILLAS SAMSUNG
GARANTÍA LIMITADA PARA EL COMPRADOR ORIGINAL CON PRUEBA DE COMPRA
El presente producto de la marca SAMSUNG, tal como lo provee y distribuye SAMSUNG ELECTRONICS AMERICA,
INC. (SAMSUNG) y lo entrega como nuevo, en su empaque de cartón original al comprador consumidor original, está
garantizado por SAMSUNG contra defectos de fabricación de los materiales o mano de obra durante el período de la
garantía limitada, a partir de la fecha original de compra, de:
Un (1) ano para todas las piezas y la mano de obra.
Esta garantía limitada es válida únicamente para productos comprados y usados en los Estados Unidos de América, y
que fueron instalados, utilizados y mantenidos de acuerdo con las instrucciones provistas con el producto. Para recibir
el servicio técnico de la garantía, el comprador debe comunicarse con la dirección o el teléfono de SAMSUNG que
fi guran más abajo con el fi n de que se determine el problema y los procedimientos del servicio. El servicio técnico de
la garantía solo puede ser prestado por un centro de servicio técnico autorizado de SAMSUNG. Se debe presentar
la factura de compra original como prueba de compra a SAMSUNG o al centro de servicio técnico autorizado de
SAMSUNG para recibir el servicio técnico de la garantía.
SAMSUNG brindará servicio técnico a domicilio sin cargo dentro de los Estados Unidos contiguos durante el período
de garantía, sujeto a la disponibilidad de los proveedores de servicio autorizados de SAMSUNG del área geográfi ca del
cliente. Si el servicio a domicilio no está disponible, SAMSUNG podrá optar, a su elección, por brindar el servicio de
transporte del producto de ida y vuelta a un centro de servicio autorizado. Si el producto está ubicado en una zona en
la que no se encuentra disponible ningún centro de servicio autorizado por SAMSUNG, usted podrá ser responsable
del cargo por transporte o se le podrá requerir que entregue el producto a un centro de servicio autorizado por
SAMSUNG para recibir asistencia técnica.
Para recibir el servicio técnico a domicilio, el producto no debe presentar obstrucciones y debe ser accesible para el
agente del servicio técnico.
Durante el periodo de garantía aplicable, el producto se reparará o se reemplazará, o se devolverá el importe de
compra, a la entera discreción de SAMSUNG. SAMSUNG podrá usar piezas nuevas o reacondicionadas para la
reparación del producto, así como reemplazar el producto por un producto nuevo o reacondicionado. La vigencia de
la garantía de las piezas y los productos reemplazados será por el período restante de la garantía original del producto
o por un período de noventa (90) días, el que sea el más largo. Todas las piezas y los productos reemplazados son
propiedad de SAMSUNG y deben ser devueltos a SAMSUNG.
La presente garantía limitada cubre defectos de fabricación de los materiales o la mano de obra encontrados durante
el uso normal y doméstico de este producto y no cubrirá lo siguiente: daño que ocurra durante el envío, entrega e
instalación y usos para los cuales el presente producto no fue destinado; daño causado por modifi cación o alteración
no autorizada del producto; producto cuyos números de serie originales de fábrica fueron eliminados, desfi gurados,
alterados en algún modo o que no se puedan determinar fácilmente; daño cosmético incluyendo rayones, hendiduras,
abolladuras y otros daños al acabado del producto; daño causado por abuso o mal uso, plagas, accidente, incendio,
inundación u otros casos fortuitos o de fuerza mayor; daño causado por el uso de equipo, utilidades, servicios, piezas,
suministros, accesorios, aplicaciones, instalaciones, reparaciones, cableado externo o conectores no provistos ni
autorizados por SAMSUNG; daño causado por línea eléctrica o voltaje incorrecto, fl uctuaciones y sobretensión; daño
causado por no operar y mantener el producto de acuerdo con las instrucciones; instrucción a domicilio acerca de
cómo usar el producto; y servicio técnico para corregir una instalación que no cumpla con los códigos eléctricos o de
plomería o corrección de cableado eléctrico o tuberías (es decir, cableado doméstico, fusibles o mangueras de entrada
de agua).
DW9900M_DD68-00184A-04_MES.indd Sec10:37DW9900M_DD68-00184A-04_MES.indd Sec10:37 2018-07-20 2:34:572018-07-20 2:34:57

Español - 29
El costo de reparación o reemplazo bajo estas circunstancias excluidas será responsabilidad del cliente.
Las visitas de un técnico de servicio autorizado para explicar las funciones, el mantenimiento o la instalación del
producto no están cubiertas por esta garantía limitada. Comuníquese con SAMSUNG al número que fi gura a
continuación si necesita asistencia en los casos mencionados.
EXCLUSIÓN DE GARANTÍAS IMPLÍCITAS
LAS GARANTÍAS IMPLÍCITAS, INCLUYENDO GARANTÍAS DE COMERCIABILIDAD O APTITUD PARA UN PROPÓSITO
EN PARTICULAR, ESTÁN LIMITADAS A UN AÑO O AL PERIODO MÁS CORTO PERMITIDO POR LA LEY. Algunos
estados no permiten limitaciones en cuanto al periodo de vigencia de una garantía implícita, de tal forma que las
limitaciones o exclusiones mencionadas tal vez no se apliquen a usted en particular. Esta garantía le otorga derechos
específi cos, e incluso puede otorgarle otros derechos que varían de un estado a otro.
LIMITACIÓN DE RECURSOS
EL ÚNICO Y EXCLUSIVO RECURSO ES LA REPARACIÓN DEL PRODUCTO, EL REEMPLAZO DEL PRODUCTO O
LA DEVOLUCIÓN DEL IMPORTE DE COMPRA, A DISCRECIÓN DE SAMSUNG, CONFORME A ESTA GARANTÍA
LIMITADA. SAMSUNG NO SERÁ RESPONSABLE POR DAÑOS ESPECIALES, IMPREVISTOS O DERIVADOS,
INCLUYENDO ENTRE OTROS, TIEMPO FUERA DEL TRABAJO, HOTELES Y/O COMIDAS EN RESTAURANTES,
GASTOS DE REMODELACIÓN, PÉRDIDAS DE INGRESOS O GANANCIAS, INCAPACIDAD DE GENERAR AHORROS
U OTROS BENEFICIOS INDEPENDIENTEMENTE DE LA TEORÍA LEGAL EN LA QUE SE BASE EL RECLAMO, E
INCLUSO SI SAMSUNG HA SIDO ADVERTIDA DE LA POSIBILIDAD DE DICHOS DAÑOS. Algunos estados no
permiten la exclusión o la limitación de daños imprevistos o derivados, por lo que las limitaciones o exclusiones
mencionadas tal vez no se apliquen a usted en particular. Esta garantía le otorga derechos específi cos, e incluso puede
otorgarle otros derechos que varían de un estado a otro.
SAMSUNG no garantiza el funcionamiento ininterrumpido o sin errores del producto. Ningún aval o garantía otorgados
por otra persona, compañía o corporación con respecto al presente producto revestirá carácter vinculante para
SAMSUNG.
Para recibir un servicio técnico de garantía, comuníquese con SAMSUNG a:
En EE.UU.
Samsung Electronics America, Inc.
85 Challenger Road
Ridgefi eld Park, NJ 07660
1-800-SAMSUNG (726-7864)
www.samsung.com/us/support
garantía (EE.UU.)
DW9900M_DD68-00184A-04_MES.indd Sec10:38DW9900M_DD68-00184A-04_MES.indd Sec10:38 2018-07-20 2:34:572018-07-20 2:34:57

Español - 30
garantía (CANADÁ)
LAVAVAJILLAS SAMSUNG
GARANTÍA LIMITADA PARA EL COMPRADOR ORIGINAL
El presente producto de la marca SAMSUNG, tal como lo provee y distribuye SAMSUNG ELECTRONICS CANADA,
INC. (SAMSUNG) y lo entrega como nuevo, en su empaque de cartón original al comprador o consumidor original, está
garantizado por SAMSUNG contra defectos de fabricación de los materiales y la mano de obra durante el período de la
garantía limitada de:
Un (1) ano para todas las piezas y la mano de obra.
La presente garantía limitada comienza en la fecha original de compra y es válida únicamente para productos
comprados y usados en los Canadá. Para recibir el servicio técnico de la garantía, el comprador debe comunicarse
con SAMSUNG con el fi n de que se determine el problema y los procedimientos del servicio. El servicio técnico de
la garantía solo puede ser prestado por un centro de servicio técnico autorizado de SAMSUNG. Se debe presentar
la factura de compra original como prueba de compra a SAMSUNG o al servicio técnico autorizado de SAMSUNG.
SAMSUNG prestará servicio técnico a domicilio durante el período de la garantía sin costo, sujeto a la disponibilidad
dentro de Canadá contigua.
El servicio técnico a domicilio no está disponible en todas las áreas.
Para recibir el servicio técnico a domicilio, el producto no debe presentar obstrucciones y debe ser accesible para
el agente del servicio técnico. Si el servicio técnico no está disponible, SAMSUNG puede optar por transportar el
producto hasta y desde el centro de servicio técnico autorizado.
SAMSUNG reparará, reemplazará el producto u ofrecerá un reembolso a nuestra discreción y sin cargo adicional, tal
como se establece en la presente garantía, con piezas o productos nuevos o reacondicionados si se comprueba que
es defectuoso durante el período de la garantía limitada especifi cado anteriormente. Todas las piezas y los productos
reemplazados pasan a ser propiedad de SAMSUNG y deben ser devueltos a SAMSUNG. Las piezas y los productos
reemplazados asumen la garantía original que resta, o noventa (90) días, el período que sea más prolongado.
La presente garantía limitada cubre defectos de fabricación de los materiales y la mano de obra encontrados durante
el uso normal y doméstico de este producto y no será válida para lo siguiente: daños que ocurran durante el envío;
entrega e instalación; aplicaciones y usos para los cuales el presente producto no fue destinado; producto o números
de serie alterados; daño cosmético o acabado exterior; accidentes, abuso, descuido, incendio, inundación, caída de
rayos, u otros casos fortuitos o de fuerza mayor; uso de productos, equipo, sistemas, utilidades, servicios, piezas,
suministros, accesorios, aplicaciones, instalaciones, reparaciones, cableado externo o conectores no provistos ni
autorizados por SAMSUNG que dañen este producto o que acarreen problemas en el servicio; voltaje de la línea
eléctrica incorrecto, fl uctuaciones y sobretensión; ajustes del cliente e incumplimiento de lo establecido en el manual
de instrucciones, instrucciones de mantenimiento y ambientales que están cubiertas y recomendadas en el manual
de instrucciones; traslado y reinstalación del producto; problemas causados por plagas. La presente garantía limitada
no cubre problemas derivados de la corriente, el voltaje o el suministro eléctrico incorrectos, las bombillas de luz, los
fusibles de la casa, el cableado de la casa, el costo de llamada al servicio técnico para recibir instrucciones, o corregir
errores en la instalación. SAMSUNG no garantiza el funcionamiento ininterrumpido o sin errores del producto.
DW9900M_DD68-00184A-04_MES.indd Sec10:39DW9900M_DD68-00184A-04_MES.indd Sec10:39 2018-07-20 2:34:572018-07-20 2:34:57

Español -
SALVO LO ESTABLECIDO EN LA PRESENTE GARANTÍA, NO EXISTEN GARANTÍAS SOBRE EL PRESENTE
PRODUCTO, YA SEAN EXPRESAS O TÁCITAS, Y SAMSUNG DESCONOCE TODAS LAS GARANTÍAS QUE
INCLUYEN, AUNQUE NO EN CARÁCTER TAXATIVO, CUALQUIER GARANTÍA TÁCITA DE QUE EL PRODUCTO
SE ENCUENTRA EN CONDICIONES APTAS PARA LA VENTA, DE DEFRAUDACIÓN DE DERECHOS O DE QUE
EL PRODUCTO SE ADECUA A LOS FINES ESPECÍFICOS PARA LOS CUALES SE ADQUIERE. NINGÚN AVAL O
GARANTÍA OTORGADOS POR PERSONA, COMPAÑÍA O CORPORACIÓN ALGUNA CON RESPECTO AL PRESENTE
PRODUCTO REVESTIRÁ CARÁCTER VINCULANTE PARA SAMSUNG. SAMSUNG NO SERÁ RESPONSABLE POR
PÉRDIDA DE INGRESOS O LUCRO CESANTE, IMPOSIBILIDAD DE GENERAR AHORROS U OBTENER OTROS
BENEFICIOS, O CUALQUIER DAÑO DERIVADO DE CIRCUNSTANCIAS ESPECIALES, DAÑO IMPREVISTO O
DERIVADO CAUSADO POR EL USO, USO INCORRECTO, O INCAPACIDAD PARA USAR EL PRESENTE PRODUCTO,
INDEPENDIENTEMENTE DE LA TEORÍA LEGAL EN QUE SE FUNDE EL RECLAMO Y AUN CUANDO SE LE HAYA
NOTIFICADO A SAMSUNG DE LA POSIBILIDAD DE TALES DAÑOS.
NINGÚN RESARCIMIENTO DE NINGUNA ÍNDOLE CONTRA SAMSUNG SUPERARÁ EL MONTO DEL PRECIO DE
COMPRA DEL PRODUCTO VENDIDO POR SAMSUNG Y CAUSANTE DEL PRESUNTO DAÑO.
SIN LIMITAR LO PRECEDENTE, EL COMPRADOR ASUME TODO EL RIESGO Y LA RESPONSABILIDAD POR
PÉRDIDA, DAÑO O LESIÓN AL COMPRADOR Y A LOS BIENES DEL COMPRADOR Y A TERCEROS Y A SUS BIENES
DERIVADOS DEL USO, USO INCORRECTO O INCAPACIDAD PARA USAR EL PRESENTE PRODUCTO. LA PRESENTE
GARANTÍA LIMITADA NO SE EXTENDERÁ A NINGUNA PERSONA DISTINTA DEL COMPRADOR ORIGINAL DEL
PRESENTE PRODUCTO, ES INTRANSFERIBLE Y ESTABLECE SU EXCLUSIVA REPARACIÓN.
Algunos estados o provincias no permiten limitaciones en cuanto al plazo de una garantía implícita, o la exclusión o
limitación de daños imprevistos o derivados, por lo tanto las limitaciones o exclusiones antedichas pueden no aplicarse
en su caso. Esta garantía le otorga derechos específi cos, y además puede tener otros derechos que varían según el
estado o la provincia.
Para recibir un servicio técnico de garantía, comuníquese con SAMSUNG a:
En CANADÁ
Samsung Electronics Canada Inc.
2050 Derry Road West
Mississauga, Ontario L5N 0B9 Canada
1-800-SAMSUNG (726-7864)
www.samsung.com/ca/support (English)
www.samsung.com/ca_fr/support (French)
garantía (CANADÁ)
DW9900M_DD68-00184A-04_MES.indd Sec10:40DW9900M_DD68-00184A-04_MES.indd Sec10:40 2018-07-20 2:34:572018-07-20 2:34:57
31

memorándum

memorándum

¿Tiene alguna pregunta o algún comentario
PAÍS LLAME AL O VIS
Í
TENOS EN ÍNEA EN
U.S.A 1-800-SAMSUNG (726-7864) www.samsung.com/us/support
CANADA 1-800-SAMSUNG (726-7864)
www.samsung.com/ca/support (Español)
www.samsung.com/ca_fr/support (French)
bit.ly/samsungdishwashers
Escanee el código QR* o visite
www.samsung.com/spsn para
ver nuestros útiles vídeos y
muestras en vivo.
* Requiere que el lector se instale en su
smartphone.
L
DD81-02613A-0
www.samsung.com/mx/support
MEXICO 01-800-SAMSUNG (726-7864)
3
-
 1
1
-
 2
2
-
 3
3
-
 4
4
-
 5
5
-
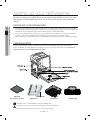 6
6
-
 7
7
-
 8
8
-
 9
9
-
 10
10
-
 11
11
-
 12
12
-
 13
13
-
 14
14
-
 15
15
-
 16
16
-
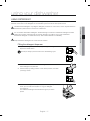 17
17
-
 18
18
-
 19
19
-
 20
20
-
 21
21
-
 22
22
-
 23
23
-
 24
24
-
 25
25
-
 26
26
-
 27
27
-
 28
28
-
 29
29
-
 30
30
-
 31
31
-
 32
32
-
 33
33
-
 34
34
-
 35
35
-
 36
36
-
 37
37
-
 38
38
-
 39
39
-
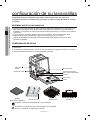 40
40
-
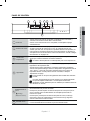 41
41
-
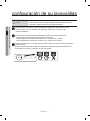 42
42
-
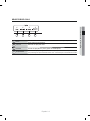 43
43
-
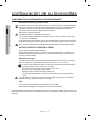 44
44
-
 45
45
-
 46
46
-
 47
47
-
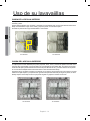 48
48
-
 49
49
-
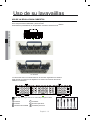 50
50
-
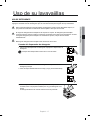 51
51
-
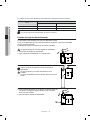 52
52
-
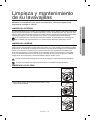 53
53
-
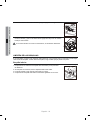 54
54
-
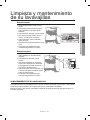 55
55
-
 56
56
-
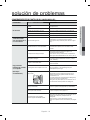 57
57
-
 58
58
-
 59
59
-
 60
60
-
 61
61
-
 62
62
-
 63
63
-
 64
64
-
 65
65
-
 66
66
-
 67
67
-
 68
68


Samsung DW80N3030UB/AA-00 El manual del propietario
- Categoría
- Lavaplatos
- Tipo
- El manual del propietario
- Este manual también es adecuado para