Magic Chef Mcstcw21S3 Manual de usuario
- Categoría
- Lavadoras
- Tipo
- Manual de usuario
Este manual también es adecuado para

1
PLEASE READ THIS MANUAL CAREFULLY BEFORE USING YOUR WASHER
AND KEEP IT FOR FUTURE REFERENCE.
Model MCSTCW16W3 / MCSTCW16S3 / MCSTCW21W3 / MCSTCW21S3
1.6 & 2.1 Cu. Ft. Portable Washer
User’s Manual

2
PRODUCT REGISTRATION
Thank you for purchasing this Magic Chef® product. The first step to protect your new product is to complete the product
registration on our website: www.mcappliance.com/register. The benefits of registering your product include the following:
1. Registering your product will allow us to contact you regarding a safety notification or product update.
2. Registering your product will allow for more efficient warranty service processing when warranty service is required.
3. Registering your product could act as your proof of purchase in the event of insurance loss.
Once again, thank you for purchasing this Magic Chef product.

3
CONTENTS
PRODUCT REGISTRATION . . . . . . . . . . . . . . . . . . . . . . . . . . . . . . . . . . . . . . . . . . . . . . . . . . . . . 2
IMPORTANT SAFETY INSTRUCTIONS . . . . . . . . . . . . . . . . . . . . . . . . . . . . . . . . . . . . . . . . . . . 4
SPECIFICATIONS. . . . . . . . . . . . . . . . . . . . . . . . . . . . . . . . . . . . . . . . . . . . . . . . . . . . . . . . . . . . . . 6
PARTS AND FEATURES . . . . . . . . . . . . . . . . . . . . . . . . . . . . . . . . . . . . . . . . . . . . . . . . . . . . . . . . 7
INSTALLATION INSTRUCTIONS . . . . . . . . . . . . . . . . . . . . . . . . . . . . . . . . . . . . . . . . . . . . . . . . 8
BEFORE USE . . . . . . . . . . . . . . . . . . . . . . . . . . . . . . . . . . . . . . . . . . . . . . . . . . . . . . . . . . . . . . . . 10
OPERATING INSTRUCTIONS . . . . . . . . . . . . . . . . . . . . . . . . . . . . . . . . . . . . . . . . . . . . . . . . . . . 11
WASHING PROGRAM GUIDE . . . . . . . . . . . . . . . . . . . . . . . . . . . . . . . . . . . . . . . . . . . . . . . . . .15
CARE AND MAINTENANCE . . . . . . . . . . . . . . . . . . . . . . . . . . . . . . . . . . . . . . . . . . . . . . . . . . . .17
TROUBLESHOOTING. . . . . . . . . . . . . . . . . . . . . . . . . . . . . . . . . . . . . . . . . . . . . . . . . . . . . . . . . .18
LIMITED WARRANTY . . . . . . . . . . . . . . . . . . . . . . . . . . . . . . . . . . . . . . . . . . . . . . . . . . . . . . . . 20

4
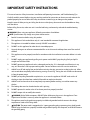
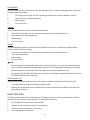
IMPORTANT SAFETY INSTRUCTIONS
This manual contains Safety Instructions, Installation and Operating Instructions, and Troubleshooting Tips.
Carefully read this manual before using your washing machine for instructions on how to use and maintain the
product properly. Be sure to follow the safety instructions to avoid injury or damage to the product.
Keep this manual. When passing on/selling the device to a third party, the manual must be handed over along
with the device.
Before calling for service, make sure unit is installed and being used correctly, and read the troubleshooting
section.
WARNING: When using your appliance, follow the precautions listed below:
NOTE: Specifications may change at any time without notice.
1. Read all instructions before using this product.
2. This appliance is for household use only. It is not intended for commercial applications.
3. The appliance is intended for indoor use only. DO NOT use outdoors.
4. DO NOT use this appliance for other than its intended purpose.
5. Use only detergents or softeners recommended for use in this manual and keep them out of the reach of
children.
6. This appliance must be properly installed in accordance with the installation instructions before it is to be
used.
7. DO NOT unplug your appliance by pulling on its power cord. ALWAYS grasp the plug firmly and pull it
straight out from the outlet.
8. DO NOT operate any appliance that has a damaged cord or plug, if it is damaged or malfunctions in any
way, or if the outlet is not in proper working order. Contact customer service or a service technician.
9. ALWAYS turn off and unplug from outlet before servicing, changing accessories or cleaning the unit. Allow
unit to cool down completely before cleaning, moving or servicing. Turning the unit off does not disconnect
it from the power source.
10. DO NOT put anything flammable or explosive in, on, or near the appliance. DO NOT wash articles of
clothing or items that have been soaked in flammable or explosive chemicals.
11. ALWAYS wait for the washer tub to completely stop moving before reaching in to add or remove any
clothes.
12. The loading door must be closed when the tub is spinning.
13. DO NOT operate this washer unless all enclosure panels are properly installed.
14. DO NOT tamper with or modify the controls.
15. WARNING: Risk of child entrapment. DO NOT allow children to play on or in the appliance. Close
supervision of children is necessary when the appliance is used around them.
16. The appliance must be plugged into a properly installed and grounded outlet that meets the voltage
requirements listed on the ratings label.
17. CAUTION: The power cord is equipped with a 3-prong grounding plug to protect against shock hazards.
ALWAYS plug the cord into a properly installed and grounded 3-prong wall receptacle, and DO NOT remove
the grounding prong.

5
18. Under certain conditions, hydrogen gas may be produced in a household hot water system that has not
been used for two weeks or more. Hydrogen gas is highly explosive. If the hot water system has not been
used for more than two weeks, turn on all hot water faucets and let the water flow for several minutes
prior to using your compact washer.
19. DO NOT modify or repair the unit by yourself. Contact customer service or a qualified service technician if
service is required.
20. To reduce the risk of electric shock or fire, DO NOT use an extension cord or outlet adapters to connect the
unit to an electrical power source. The appliance must be properly grounded using a three-prong electric
receptacle wall outlet.
21. DO NOT install the washing machine in a moist or wet area, or where it can get wet. DO NOT spray with
water when cleaning.
22. DO NOT put children on top of, or allow children to climb in or on, the washer.
23. Regularly clean the power plug to remove dust and dirt, in order to prevent electrical failure.
24. It is recommended to unplug the unit when it is not in use.
25. ALWAYS be sure to properly and securely connect the power cord to the outlet, and the water hoses to
prevent leakage or electrical shock.
26. DO NOT operate the unit or handle the plug with wet hands.
27. The water temperature to the washing machine should not exceed 131° F (55° C).
28. DO NOT wash raincoats, heavy jackets, or similar, heavy items.
READ AND FOLLOW THIS
SAFETY INFORMATION CAREFULLY
SAVE THESE INSTRUCTIONS

6
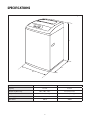
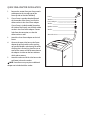
SPECIFICATIONS
Model MCSTCW16W3 / MCSTCW16S3 MCSTCW21W3 / MCSTCW21S3
Capacity 1.6 cu ft. 2.1 cu ft.
Dimensions (W x D x H) 20.3” x 20.7” x 37.1” 21.7” x 22.3” x 37.6”
Weight 71.5 lbs. (157.6 kg) 78.1 lbs. (172.2 kg)
Power Supply 120V / 60Hz 120V / 60Hz
Input Power 340 W 450 W
Figure 1
D
H
W

7
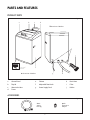
PARTS AND FEATURES
PRODUCT PARTS
ACCESSORIES
Figure 2
Figure 3
a. Control Panel
b. Top Lid
c. Water Inlet Hose
d. Frame
e. Cabinet
f. Adjustable Foot Knob
g. Power Supply Cord
h. Drain Hose
i. Filter
j. Rollers
b c d
i
j
a
e
g h
f
▲ Front View of Washer
▼ Rear View of Washer
Water
Supply
Hose (2)
Quick
Connection
Adaptor

8
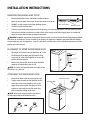
REMOVING PACKAGING AND SET UP
• Remove packing box, foam, and bottom cardboard piece.
• Open the washer door and remove all the accessories in the drum.
• DO NOT use the washer on the foam packaging base.
• Carefully lay the machine down.
• Slide the noise proof plate into place over the opening in the bottom and attach with the mounting screw.
• The washer should be installed on a stable surface close enough to the water supply, drain, and electrical
outlet to ensure that the hoses and power cord reach.
WARNING: Improper connection of the power cord can result in a risk of electric shock. Check with a qualified
electrician or serviceman if you are in doubt as to whether the appliance is properly grounded. DO NOT modify
the provided plug with the appliance – even if it will not fit into the outlet. Have a qualified technician install the
proper wall outlet for you.
INSTALLATION INSTRUCTIONS
Noise Proof Plate
Mounting Screw
Figure 4
PLACEMENT OF UPPER WATER DRAIN HOSE
• The height of the drain hose (a) should be ~34” to 40”.
• The diameter of the drain pipe (b) should not be
less than 1.20”, with a flow capacity of at least 10.5
gallons (40 L) per minute.
• Before using the washer, the drain hose should be
properly secured to drain pipe or sink.
NOTE: The water will overflow when the height of the
drain hose is less than 34".
Figure 5
Figure 7
Figure 6
a
b
ATTACHING THE WATER INLET HOSE
• Connect the water inlet hose screw to the tap.
• Tightly screw the other end of the hose to the
water inlet valve using the plastic seal inside.
• Apply force evenly on the clamping nut while
tightening and avoid twisting the water inlet
valve to prevent leakage at the joint.
NOTE: When only using one water inlet hose, it
must be connected to the cold water inlet.
Water Inlet Hose
Clamping Nut

9
QUICK SINK ADAPTOR INSTALLATION
1. Remove the aerator from your faucet nozzle
and determine the size and type of the
faucet (Inside or Outside Threaded).
2. If your faucet is outside threaded (threads
on the outside of the faucet), use the thin
rubber washer in the silver faucet adapter.
If your faucet is inside threaded (threads on
the inside of the faucet), use the thick rubber
washer in the silver faucet adapter. If water
leaks from the connection, use the thin
rubber washer as well.
3. Attach the silver faucet adapter to the sink
faucet.
4. Connect the water inlet hose to the faucet
adaptor by pulling back the collar, pushing
up onto the adaptor, and releasing the collar,
verifying that is securely in place. Be sure to
connect the correct end of the water hose to
the adaptor. A sticker on the hose indicates
which end to connect.
5. Attach the other end of the inlet hose to the
cold water inlet on the washer.
NOTE: Some faucets may require an additional
adaptor not included with the washer.
Figure 8
Faucet
Washers
Faucet Adaptor
Washer
Quick Connector
Washer
Water Inlet Hose

10
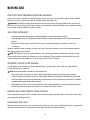
BEFORE USE
CHECK LIST AND PREPARATION BEFORE WASHING
Read all instructions carefully to avoid any damage or issues with the washing machine and to clothes. ALWAYS
follow instructions on fabric care labels on clothing articles for proper care.
WARNING: DO NOT leave items to be washed in the washing machine for long periods of time. Items left in
the machine may get moldy and get spots. Clothes may also become discolored if they are not washed according
to the stated washing temperature and instructions.
SELECTING DETERGENT
• Low foaming powdered detergent is recommended for use with the washing machine.
• Some detergents may not completely dissolve if there is too much detergent or if the water temperature is
too low.
• Bleach can damage clothes. Use bleach with caution and follow detergent and clothing article care
instructions.
Washing method is based on weight of clothes, soil level, local water hardness as well as the recommendations
from the detergent manufacturers.
NOTE: DO NOT place or store laundry products, such as detergent, bleach, or liquid fabric softener, on top
of your washer/dryer combo unit. Wipe up any spills immediately. These products can damage the finish and
controls. Keep all laundry products in a safe, dry space out of reach of children.
SEPARATE CLOTHES TO BE WASHED
Classify clothes to be washed into cottons, blended fibers, synthetic fibers, silks, wools, etc. Light and dark
clothes should also be separated.
NOTE: New, colored fabrics should be washed separately.
• Accessories: Loose accessories on some clothes may become damaged and/or damage the washing
machine. Clothes that contain buttons or embroideries should be turned inside-out before being washed.
• Fasteners: Zippers must be closed and buttons or hooks must be firmly affixed. Any loose bands or ribbons
should be tied together before being washed.
• Water-proof materials: It is not recommended to wash water-proof fabrics as they may become damaged
and/or cause damage to the washing machine and other items being washed.
REMOVE ALL LOOSE OBJECTS FROM CLOTHES
Check all pockets/compartments of clothes to be washed and remove any loose items such as coins. Loose items
may damage the washing machine.
BALANCING THE LOAD
Washing large, heavy garments, such as towels, jeans, jackets etc., may cause an unbalanced load. It is suggested to
add one or two more items to balance the load to allow smooth and complete draining.

11
OPERATION INSTRUCTIONS
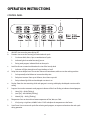
CONTROL PANEL
Figure 9
a. ON/OFF: Use to turn the power ON or OFF
b. Function: Use to set the function(s) of the desired wash cycle.
1. Can choose Wash, Rinse, Spin, or combinations of cycles.
2. Indicator lights show what function(s) are set.
3. During wash program, indicator blinks to show cycle.
c. Load Size: Use to set water level based on the size of the laundry load.
1. Indicator will light selected size of Large, Medium, or Small.
d. Delay: Use to set delayed start. The set time chosen will count down, and then start the washing machine.
1. Push repeatedly or hold down to increase the delay time.
2. Delay time increases 1 hour up to 24 hours, then 6 hours up to 48.
3. Delay indicator light flashes when delayed start time is set.
e. Display: Shows the time remaining while wash program is running, and displays the delayed start time while
setting.
f. Program: Use to select automatic wash program. Indicator will be lit or flashing to indicate selected program.
1. Heavy (Lit) – Quick (Flashing)
2. Jeans (Lit) – Anti-Wrinkle (Flashing)
3. Normal (Lit) – Air Dry (Flashing)
g. Temperature: Press to select desired water temperature of Hot, Warm, or Cold.
1. If only using a single hose, ALWAYS select “Cold” and adjust the temperature at the faucet.
h. Start/Pause: Press to start wash cycle after selecting wash program, or to pause and continue the wash cycle
during operation.
b c d fe g h
a

12
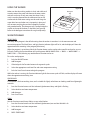
Figure 10
USING THE WASHER
Make sure that the washing machine is level and stable, and
securely connect the water inlet hose to the water source
and turn on the tap. If only one water inlet hose is being
used, it must be connected to the cold water inlet on the
washer and the Cold water setting must be used. Hang the
water drain hose and make sure it is properly in place and
will not move and plug the cord into a properly installed
and grounded outlet. The detergent tray is located inside the
washer, at the top of the drum, in the back (see Figure 10).
Refer to the detergent instructions for usage and quantity.
Detergent
Tray
WASH PROGRAMS
HEAVY WASH
The Heavy Wash program is the default setting when the washer is turned on. It is the most common and
convenient program. The Wash, Rinse, and Spin function indicator lights will be lit, and the display will show the
approximate time remaining in the program (42 minutes).
When the program is set to Heavy Wash, the Function button can be used to select specific wash cycles, or run a
full wash. Pushing the Function button will cycle between: WASH/RINSE/SPIN → WASH → WASH/RINSE →
RINSE/SPIN → SPIN, allowing any combination of functions to be set.
To run the wash program:
1. Push the ON/OFF button.
2. Add Detergent.
3. If desired, push the Function button to change wash cycles.
4. Select the appropriate wash Load Size and water temperature setting.
5. Push the Start/Pause button to begin the program.
While the washer is running, the Function indicator light for the current cycle will flash, and the display will count
down the approximate remaining time.
QUICK WASH
This function is for short washing times, and is suitable for lightly soiled items or clothing made from lightweight
materials.
1. Press the Function button until the indicator light between Heavy and Quick is flashing.
2. Select load size and water temperature.
3. Add detergent.
4. Press Start/Pause.
JEANS
Use this function to wash heavy fabrics or very soiled clothes.
1. Press the Function button until the indicator light between Jeans and Anti-Wrinkle is lit.
2. Select load size and water temperature.
3. Add Detergent.
4. PRESS START/PAUSE.

13
ANTI-WRINKLE
Use this function for short washing times. Using the high water level, this function thoroughly rinses and washes
garments to prevent wrinkling.
1. Press the Function button until the indicator light between Jeans and Anti-Wrinkle is flashing.
2. Select load size and water temperature.
3. Add Detergent.
4. Press Start/Pause.
NORMAL
Use this function to wash clothes or linens made from cotton.
1. Press the Function button until the indicator light between Jeans and Anti-Wrinkle is lit.
2. Select load size and water temperature.
3. Add Detergent.
4. Press Start/Pause.
AIR DRY
For non-waterproof garments, or those that fade or deform easily, use this function to dry without heating,
achieving results similar to line drying.
1. Press the Function button until the indicator light between Jeans and Anti-Wrinkle is lit.
2. Select water temperature.
3. Add Detergent.
4. Press Start/Pause.
NOTE:
• The wash program can be paused by pushing the Start/Pause button. Press it again to restart the program.
• Close the lid after loading the washing machine, otherwise it will stop working and display an error code.
• The washing machine will not work if the water does not reach the selected water level.
• After pressing the ON/OFF button, the washing machine will automatically power down after 10 minutes if
the START/PAUSE button is not pressed.
END OF WASH CYCLE
When the washing machine stops, the buzzer will sound for 6 seconds, and then the washer will turn off.
• Turn off the water tap when you are done using the washer.
• Although the washer powers down automatically, the power cord needs to be pulled out for safety and
precautionary measures.
DELAY FUNCTION
The washing machine can be set for a delayed start. The delay can be set in 1 hour increments from 1-24 hours,
and then in 6 hour increments up to 48 hours. To set the delay start feature:
1. Press the ON/OFF button to turn the washer ON.
2. Properly hang the drain hose and turn on the water tap.
3. Load the laundry and detergent in the washer.
4. Select the appropriate water level.

14
5. Select the desired program and functions.
6. Press the delay button to set the number of hours to delay the start of the wash cycle.
7. Close the lid and press the Start/Pause button.
Once the delay function is activated, the Delay indicator light will flash, and all other lights will turn off. To check
the status of the delay preset, push and hold the Delay button. Release the Delay button to return to the Delay
start mode.
To cancel the Delay setting, press the ON/OFF button.
POWER LOSS MEMORY FUNCTION
In the event of the loss of power, the washer will automatically resume operation from previous settings when
power is restored.

15
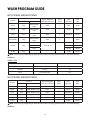
MCSTCW16W3 AND MCSTCW16S3
Program
Load Size
Approx. Wash Time
(including Soak time)
Rinse
Cycles
Final
Spin Time
Total
Time
Default Scope
Heavy Large
Small, Medium,
Large
12 min 2 5 min 42 min
Quick Large
Small, Medium,
Large
3 min 1 30 sec 10 min
Jeans Large
Small, Medium,
Large
17 min 2 1 min 30 sec 42 min
Anti-Wrinkle Large
Small, Medium,
Large
12 min 2 - 34 min
Normal Large
Small
15 min 30 sec 1
6 min 36 min
Medium 10 min 44 min
Large 18 min 50 min
Air Dry Large - - - 57 min 60 min
NOTE: Times may vary depending on water pressure from inlet pipe, garment materials, and water draining
conditions.
WATER USAGE
Load Size Load Size in lbs. Approx. Water used in Gallons
Large 6.79 lbs. 10.57
Medium 4.89 lbs. 7.93
Small Less than 4.89 lbs. 4.23
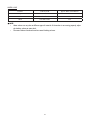
MCSTCW21W3 AND MCSTCW21S3
Program
Load Size
Approx. Wash Time
(including Soak time)
Rinse
Cycles
Final
Spin Time
Total
Time
Default Scope
Heavy Large Small, Medium, Large 12 min 2 5 min 42 min
Quick Large Small, Medium, Large 3 min 1 30 sec 10 min
Jeans Large Small, Medium, Large 17 min 2 1 min 30 sec 42 min
Anti-Wrinkle Large Small, Medium, Large 12 min 2 - 34 min
Normal Large Small, Medium, Large 17 min 1 12 min 44 min
Air Dry Large - - - 57 min 60 min
NOTE: Times may vary depending on water pressure from inlet pipe, garment materials, and water draining
conditions.
WASH PROGRAM GUIDE

16
WATER USAGE
Load Size Load Size in lbs. Approx. Water used in Gallons
Large 8.4 lbs. 11.36
Medium 5.64 lbs. 7.93
Small Less than 5.64 lbs. 4.76
NOTE:
• Water volume can vary due to different types of materials. If the washer is not running properly, adjust
the clothing volume or water level.
• The water volumes listed are based on normal clothing volumes.

17
CARE AND MAINTENANCE
Use a soft cloth to wipe off any water and dirt residue from the surface of the washing machine after every use.
Detergents, propellants, and other chemicals should not be used to clean the washing machine in order to avoid
any possible damage to the finish and plastic accessories.
Clean any filters to maintain optimal performance (after every use).

18
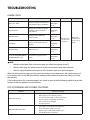
TROUBLESHOOTING
ALARM CODES
Problem Cause of Problem Code Alarm Sound Stopping Alarm
Water Hose Alarm
Failure to reach preset water level
after filling for approx. 16 minutes.
E1
Other lights
are off.
Buzzer for 10
seconds every
16 minutes.
Open lid to
fix fault, then
close to stop
alarm.
Open Lid Alarm
Opening the lid while the washer
is running or after starting the
delay function.
E2
Other lights
are off.
Imbalance Alarm
Washing machine imbalance
checked 3 times.
E3
Other lights
are off.
Drain Alarm
Failure to finish draining after 4
minutes.
E4
Other lights
are off.
Overflow Alarm Water inlet hose.
E5
Other lights
are off.
Door Lock Alarm (MCSTCW21S3
and MCSTCW21W3 only)
Door Failed to properly lock or
unlock
E6
Other lights
are off.
NOTE:
• Overflow alarm: Water drain valve remains open until manual intervention (shutoff).
• Once the alarm stops, the washer returns to its previous status prior to the alarm indication.
• Code E6: Unplug the power cord to open the lid. If the door is open, press the Power button.
When the washing machine needs servicing, contact our customer service department, and a representative will
try to diagnose the issue. DO NOT dismantle the washing machine without prior permission. Doing so will void
your warranty.
If the washing machine fails to operate properly, or it sounds an alarm, check the following guidelines for possible
solutions to common problems or alarm indicators.
LIST OF PROBLEMS AND POSSIBLE SOLUTIONS
Problems Check the Following
Water Fails to Flow In
• The power is off or the fuse has burned out.
• Water supply is off or has low pressure.
• Inlet hose and water tap is connected and open.
• Inlet valve filter is blocked by dirt buildup.
• Coil of inlet valve is damaged.
• Program is paused.
Washing Machine Fails to Run
• The power is off or the fuse has burned out.
• The power supply voltage is too low.
• Water needs to reach required water level.
• The DELAY function is activated.

19
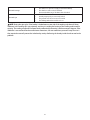
Abnormal Drainage
• The drain hose is placed too high (See Installation Guide).
• The drain hose end is sealed or blocked.
• The internal rubber ring of the drain valve is blocked.
Abnormal Spin
• The door lid is not closed.
• Laundry is improperly or excessively loaded.
• The ground is not flat or feet are not leveled.
• The washing machine’s motor belt is loose.
NOTE: During the spin cycle, if the laundry is loaded more to one side of the washing tub, there will be an
imbalance in the washing tub’s spin trajectory, resulting in it striking the housing of the washing machine while
spinning. The washing machine will compensate by automatically correcting it with more water. However, if the
imbalance is not resolved after three continuous corrections, the auto-correction system will stop. The user is
then required to manually correct the imbalance by evenly distributing the laundry inside the tub to resolve the
problem.

20
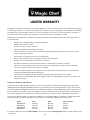
LIMITED WARRANTY
MC Appliance Corporation warrants each new Portable Washer to be free from defects in material and workmanship, and agrees
to remedy any such defect or to furnish a new part(s), at the company’s option, for any part(s) of the unit that has failed during
the warranty period. Parts and labor expenses are covered on this unit for a period of one year from the date of purchase. A
copy of the dated sales receipt/invoice is required to receive warranty service, replacement or refund.
This warranty covers appliances in use within the contiguous United States, Alaska, Hawaii and Puerto Rico. This warranty does not
cover the following:
• Damages due to shipping damage or improper installation.
• Damages due to misuse or abuse.
• Content losses due to failure of the unit.
• Repairs performed by unauthorized service agents.
• Service calls that do not involve defects in material and workmanship such as instructions on proper use of the
product or improper installation.
• Replacement or resetting of house fuses or circuit breakers.
• Failure of this product if used for other purposes than its intended purpose.
• Disposal costs for any failed unit not returned to our factory.
• Any delivery/installation costs incurred as the result of a unit that fails to perform as specified.
• Expenses for travel and transportation for product service if your appliance is located in a remote area where
service by an authorized service technician is not available.
• The removal and reinstallation of your appliance if it is installed in an inaccessible location or is not installed in
accordance with published installation instructions.
• Refunds for non repairable products are limited to the price paid for the unit per the sales receipt.
• This warranty is non transferable. This warranty applies only to the original purchaser and does not extend to any
subsequent owner(s).
Limitations of Remedies and Exclusions:
Product repair in accordance with the terms herein, is your sole and exclusive remedy under this limited warranty. Any and all
implied warranties including merchantability and fitness for a particular purpose are hereby limited to one year or the shortest
period allowed by law. MC Appliance Corporation is not liable for incidental or consequential damages and no representative or
person is authorized to assume for us any other liability in connection with the sale of this product. Under no circumstances is
the consumer permitted to return this unit to the factory without the prior written consent of MC Appliance Corporation.
Some states prohibit the exclusion or limitation of incidental or consequential damages, or limitations on implied warranties.
This warranty gives you specific legal rights, and you may also have other rights which vary from state to state.
Model Parts Labor Type of Service
MCSTCW16W3 One Year One Year Carry In
MCSTCW16S3 One Year One Year Carry In
MCSTCW21W3 One Year One Year Carry In
MCSTCW21S3 One Year One Year Carry In
For Service or Assistance please call 888-775-0202 or visit us on the web at www.mcappliance.com to request warranty service
or order parts.

21
CNA International, Inc. d/b/a MC Appliance Corporation. All rights reserved.
Magic Chef® logo is a registered trademark of CNA International, Inc.
www.mcappliance.com Printed in China

22
POR FAVOR LEA ATENTAMENTE ESTE MANUAL ANTES DE USAR SU
LAVADORA PARA FUTURAS REFERENCIAS.
Modelo MCSTCW16W3 / MCSTCW16S3 / MCSTCW21W3 / MCSTCW21S3
Lavadora portátil de
1.6 y 2.1 pies cúbicos
Manual del usuario

23
REGISTRO DEL PRODUCTO
Gracias por comprar un producto Magic Chef®. El primer paso para proteger su nuevo producto es completar el registro del
producto en nuestro sitio web: www.mcappliance.com/register. Entre los beneficios de registrar su producto se incluyen los
siguientes:
1. Registrar su producto nos permitirá contactarlo en relación con cualquier aviso de seguridad o actualización del
producto.
2. Registrar su producto permitirá un proceso de servicio de garantía más eficiente, cuando se requiera el servicio de
garantía.
3. Registrar su producto podría servir como su prueba de compra en el caso de que usted sufra una pérdida que esté
cubierta por el seguro.
Una vez más, gracias por comprar un producto Magic Chef.

24
ÍNDICE
REGISTRO DEL PRODUCTO . . . . . . . . . . . . . . . . . . . . . . . . . . . . . . . . . . . . . . . . . . . . . . . . . . . .23
INSTRUCCIONES DE SEGURIDAD IMPORTANTES . . . . . . . . . . . . . . . . . . . . . . . . . . . . . . . . 25
ESPECIFICACIONES . . . . . . . . . . . . . . . . . . . . . . . . . . . . . . . . . . . . . . . . . . . . . . . . . . . . . . . . . . 27
PIEZAS Y FUNCIONES . . . . . . . . . . . . . . . . . . . . . . . . . . . . . . . . . . . . . . . . . . . . . . . . . . . . . . . . 28
INSTRUCCIONES DE INSTALACIÓN . . . . . . . . . . . . . . . . . . . . . . . . . . . . . . . . . . . . . . . . . . . . 29
ANTES DE SU USO. . . . . . . . . . . . . . . . . . . . . . . . . . . . . . . . . . . . . . . . . . . . . . . . . . . . . . . . . . . 31
INSTRUCCIONES DE FUNCIONAMIENTO. . . . . . . . . . . . . . . . . . . . . . . . . . . . . . . . . . . . . . . 32
GUÍA DE PROGRAMAS DE LAVADO . . . . . . . . . . . . . . . . . . . . . . . . . . . . . . . . . . . . . . . . . . . . 36
CUIDADO Y MANTENIMIENTO . . . . . . . . . . . . . . . . . . . . . . . . . . . . . . . . . . . . . . . . . . . . . . . 38
SOLUCIÓN DE PROBLEMAS. . . . . . . . . . . . . . . . . . . . . . . . . . . . . . . . . . . . . . . . . . . . . . . . . . . 39
GARANTÍA LIMITADA . . . . . . . . . . . . . . . . . . . . . . . . . . . . . . . . . . . . . . . . . . . . . . . . . . . . . . . . .41

25
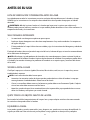
INSTRUCCIONES DE SEGURIDAD IMPORTANTES
Este manual contiene instrucciones de seguridad, instrucciones de instalación y funcionamiento, y consejos de
solución de problemas. Por favor, lea atentamente este manual antes de utilizar su lavadora para conocer las
instrucciones sobre cómo utilizar y mantener el producto adecuadamente. Asegúrese de seguir las instrucciones
de seguridad para evitar lesiones o daños al producto.
Guarde este manual. Al transferir/vender el dispositivo a un tercero, el manual debe entregarse junto con el
dispositivo.
Antes de contactar al servicio técnico, cerciórese de que la unidad esté instalada y se esté usando de manera
correcta, y lea la sección de solución de problemas.
ADVERTENCIA: siga las precauciones que se indican a continuación al utilizar su aparato:
NOTA: las especificaciones pueden cambiar en cualquier momento y sin aviso previo.
1. Lea todas las instrucciones antes de utilizar este prodicto.
2. Este aparato es solo para uso doméstico. No está diseñado para aplicaciones comerciales.
3. Este aparato está diseñado solamente para uso doméstico. NO lo utilice al aire libre.
4. NO use este electrodoméstico de una manera que no sea la prevista.
5. Use solo los detergentes o suavizantes recomendados en este manual y manténgalos fuera del alcance de
los niños.
6. Este aparato debe instalarse correctamente según las instrucciones de instalación antes de usarse.
7. NO desenchufe su aparato halando el cable de alimentación. Siempre sujete la clavija firmemente y sáquela
derecha desde el tomacorriente.
8. No utilice ningún aparato que tenga un cable o enchufe dañado, si está dañado o funciona mal de algún
modo o si la toma de corriente no funciona correctamente. Póngase en contacto con Atención al Cliente o
con un técnico de servicio.
9. SIEMPRE apague y desenchufe la unidad del tomacorriente antes de repararla, cambiarle accesorios o
limpiarla. Permita que la unidad se enfríe antes de limpiarla, moverla o repararla. Apagar la unidad no la
desconecta de la fuente de poder.
10. NO coloque nada inflamable o explosivo dentro, sobre o cerca del aparato. NO lave prendas de ropa o
artículos que hayan sido empapados en químicos inflamables o explosivos.
11. SIEMPRE espere que la tina de la lavadora deje de moverse completamente antes de acercarse a colocar o
sacar ropa.
12. La puerta de carga debe estar cerrada cuando la tina esté girando.
13. NO utilice esta lavadora a menos que todos los paneles de cierre estén instalados correctamente.
14. NO manipule ni modifique los controles.
15. ADVERTENCIA: Existe el riesgo de que un niño quede atrapado. NO permita que los niños jueguen encima
o dentro del aparato. Es necesario vigilar de cerca a los niños cuando se utilice el aparato cerca de ellos.
16. Este electrodoméstico debe enchufarse en un tomacorriente adecuadamente instalado y conectado a
tierra, que cumpla con los requisitos de voltaje indicados en la etiqueta de especificaciones eléctricas.
17. PRECAUCIÓN: el cable eléctrico está equipado con un enchufe de 3 puntas conectado a tierra para
protegerlo de peligros de descarga eléctrica. SIEMPRE conecte el cable a un receptor de pared a tierra de
tres espigas instalado correctamente y NO elimine la espiga a tierra.

26
18. Bajo ciertas circunstancias, se podría producir gas de hidrógeno en un sistema de agua caliente para el hogar
que no se haya usado por dos semanas o más. El gas de hidrógeno es altamente explosivo. Si el sistema de
agua caliente no se ha usado por más de dos semanas, abra todos los grifos de agua caliente y deje que
salga el agua por varios minutos antes de usar su lavadora compacta.
19. NO altere ni repare la unidad usted mismo. De ser necesario, comuníquese con servicio al cliente o con un
técnico de servicio calificado.
20. Para reducir el riesgo de descarga eléctrica o incendio, no use una extensión o adaptador de corriente
para conectar la unidad a una fuente de energía eléctrica. El aparato debe estar conectado a tierra
correctamente usando un tomacorriente de pared de tres espigas.
21. NO instale la lavadora en un área húmeda o mojada, o donde pueda mojarse. NO use atomizadores de agua
al limpiarla.
22. NO siente niños sobre ella o permita que se suban sobre la lavadora.
23. Limpie regularmente el enchufe para eliminar polvo y tierra, y así evitar fallas eléctricas.
24. Se recomienda desconectar la unidad cuando no esté en uso.
25. SIEMPRE asegúrese de conectar de forma correcta y segura el cable de corriente al tomacorriente y las
mangueras de agua para evitar fugas o descargas eléctricas.
26. NO opere la unidad ni manipule la clavija con las manos húmedas.
27. La temperatura del agua de la lavadora no debería exceder los 131 °F (55 °C).
28. No lave impermeables, abrigos gruesos o artículos pesados similares.
LEA ESTA INFORMACIÓN DE
SEGURIDAD Y SÍGALA CUIDADOSAMENTE
GUARDE ESTAS INSTRUCCIONES

27
ESPECIFICACIONES
Modelo MCSTCW16W3 / MCSTCW16S3 MCSTCW21W3 / MCSTCW21S3
Capacidad 1.6 cu ft. 2.1 cu ft.
Dimensiones (AxLxP) 20.3” x 20.7” x 37.1” 21.7” x 22.3” x 37.6”
Peso 71.5 lbs. (157.6 kg) 78.1 lbs. (172.2 kg)
Fuente de alimentación 120V / 60Hz 120V / 60Hz
Potencia de entrada 340 W 450 W
Figura 1
D
H
W

28
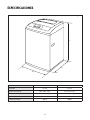
PIEZAS Y FUNCIONES
PARTES DEL PRODUCTO
ACCESORIOS
Figura 2
Figura 3
a. Panel de control
b. Tapa superior
c. Manguera de entrada de agua
d. Estructura
e. Gabinete
f. Perilla de pie ajustable
g. Cable de corriente
h. Manguera de desagüe
i. Filtro
j. Rodillos
b c d
i
j
a
e
g h
f
▲ Vista frontal de la lavadora
▼ Vista trasera de la lavadora
Manguera
de agua (2)
Adaptador para
conexión rápida

29
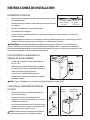
INSTRUCCIONES DE INSTALACIÓN
Lámina a prueba
de sonido
Tornillo
de montaje
Figura 4
COLOCACIÓN DE LA MANGUERA DE
DRENAJE DE AGUA SUPERIOR
• La altura de la manguera de drenaje (a) debería ser
de ~34” a 40”.
• El diámetro de la tubería de drenaje (b) no debería
ser menor de 1.20”, con una capacidad de flujo de al
menos 10.5 galones (40 L) por minuto.
• Antes de usar la lavadora, debe asegurarse
correctamente la manguera de drenaje a la tubería
de drenaje o lavabo.
Figura 5
Figura 7Figura 6
a
b
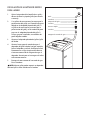
CONECTAR LA MANGUERA DE ENTRADA
DE AGUA
• Conecte el perno de la manguera de entrada de
agua a la llave de paso.
• Enrosque firmemente el otro extremo de la
manguera a la válvula de entrada de agua usando el
sello plástico de adentro.
• Use la fuerza uniformemente en la tuerca de agarre
mientras la ajusta y evite girar la válvula de entrada
de agua para evitar fugas en la junta.
NOTA: Cuando use solo una manguera de entrada de
agua, debe estar conectada a la entrada de agua fría.
Manguera de
entrada de agua
Tuerca
de agarre
DESEMPACAR E INSTALAR
• Retire la caja del empaque, el aislamiento de poliuretano y la pieza
del fondo de cartón.
• Abra la puerta de la lavadora y saque todos los accesorios que están
en el tambor.
• NO use la lavadora sobre la base de poliuretano.
• Con cuidado, baje la máquina.
• Deslice la lámina a prueba de sonido en su lugar sobre la apertura en la parte inferior y ajústelo con el
tornillo de montaje.
• La lavadora debería instalarse en una superficie estable lo suficientemente cerca a la toma de agua, drenaje
y tomacorrientes para asegurar que las mangueras y el cable conector alcancen.
ADVERTENCIA: La conexión inapropiada del cable de corriente puede resultar en un riesgo de descarga
eléctrica. Verifique con un electricista o técnico calificado si tiene dudas sobre si el aparato está conectado a
tierra correctamente. No modifique el enchufe original del aparato, incluso si no encaja en el tomacorriente. Deje
que un técnico calificado le instale el tomacorriente correcto.
NOTA: El agua se desbordará si la altura de la manguera de drenaje es menor de 34”.

30
INSTALACIÓN DE ADAPTADOR RÁPIDO
PARA LAVABO
1. Quite el oxigenador de la boquilla de su grifo y
observe el tamaño y tipo de grifo (rosca interna
o externa).
2. Si su grifo es de rosca externa (se enrosca por la
parte exterior del grifo), use la arandela de goma
delgada en el adaptador plateado del grifo. Si
su grifo es de rosca interna (se enrosca por la
parte interior del grifo), use la arandela de goma
gruesa en el adaptador plateado del grifo. Si
se fuga agua por la conexión, use arandelas de
goma delgadas también.
3. Conecte el adaptador plateado del grifo al grifo
del lavabo.
4. Conecte la manguera de entrada de agua al
adaptador del grifo halando la solapa, empújela
hacia el adaptador y suéltela. Verifique que esté
firmemente en su lugar. Asegúrese de conectar
el extremo correcto de la manguera de agua al
adaptador. Una etiqueta en la manguera le indica
cuál extremo conectar.
5. Enrosque el otro extremo de la entrada de agua
fría a la lavadora.
NOTA: Algunos grifos pueden requerir un adaptador
adicional que no viene incluido con la lavadora.
Figura 8
Grifo
Lavadoras
Adaptador del grifo
Lavadora
Conector rápido
Lavadora
Manguera de entrada de agua

31
ANTES DE SU USO
LISTA DE VERIFICACIÓN Y PREPARACIÓN ANTES DE LAVAR
Lea cuidadosamente todas las instrucciones para evitar cualquier daño o problemas con la lavadora y la ropa.
SIEMPRE siga las instrucciones en las etiquetas sobre cuidado de la tela en prendas de ropa para un cuidado
adecuado.
ADVERTENCIA: NO deje las piezas lavadas en la lavadora por largos ratos. Las piezas que se dejan en la
lavadora pueden ponerse mohosas y mancharse. La ropa también pueden decolorarse si no se lavan conforme a la
temperatura de lavado y las instrucciones.
SELECCIONAR EL DETERGENTE
• Se recomienda usar detergente en polvo con poca espuma.
• Puede que algunos detergentes no se disuelvan completamente si hay mucha cantidad o si la temperatura
del agua es muy baja.
• El cloro puede dañar la ropa. Utilice cloro con cuidado y sigas las instrucciones del detergente y cuidado de
la vestimenta.
El método de lavado se basa en el peso de la ropa, nivel del sucio, la dureza del agua, así como las recomendaciones
de los fabricantes de detergente.
NOTA: NO coloque ni guarde productos de lavandería, tales como detergentes, cloro o suavizante líquido, en
la parte superior de la lavadora/secadora. Limpie cualquier derrame de inmediato. Estos productos pueden dañar
el acabado y los controles. Mantenga los productos de lavandería en un espacio seguro y seco fuera del alcance
de los niños.
SEPARE LA ROPA A LAVAR
Clasifique la ropa que va a lavar en algodón, fibra mixta, fibra sintética, seda, lana, etc. La ropa clara y oscura
también debería separarse.
NOTA: La tela nueva de color debe lavarse aparte.
• Accesorios: Los accesorios sueltos de algunas prendas pueden dañarse o dañar la lavadora. La ropa que
contenga botones o bordados debería voltearse antes de lavarla.
• Cierres: Las cremalleras deben cerrarse y los botones o ganchos deben estar firmemente fijados. Cualquier
cinta o lazo suelto debe amarrarse antes de lavarse.
• Materiales a prueba de agua: No se recomienda lavar telas impermeables ya que pueden dañarse o causar
daños a la lavadora y otras piezas que se estén lavando.
QUITE TODOS LOS OBJETOS SUELTOS DE LA ROPA
Revise todos los bolsillos/compartimientos de la ropa a lavar y saque cualquier artículo suelto como monedas.
Los artículos sueltos pueden dañar la lavadora.
EQUILIBRE LA CARGA
Lavar prendas grandes y pesadas, como toallas, jeans, chaquetas, etc., puede causar una carga desequilibrada. Se
sugiere que añada uno o dos artículos más para equilibrar la carga y permitir un drenaje suave y completo.

32
INSTRUCCIONES DE FUNCIONAMIENTO
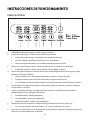
PANEL DE CONTROL
Figura 9
a. ENCENDIDO/APAGADO: Úselo para encender o apagar la lavadora.
b. Función: Úselo para elegir la/s función/es del ciclo de lavado deseado.
1. Puede elegir Lavado, Enjuague, Centrifugado o una combinación de ciclos.
2. Las luces indicadoras muestran qué función/es está/n seleccionada/s.
3. Durante el programa de lavado, la luz indicadora parpadea para mostrar el ciclo.
c. Tamaño de la carga: Úselo para elegir el nivel del agua con base en el tamaño de la carga de ropa.
1. El indicador iluminará el tamaño seleccionado entre Grande, Medio, o Pequeño.
d. Retraso: Úselo para seleccionar el comienzo con retraso. El tiempo elegido hará una cuenta regresiva y luego
comenzará a funcionar la lavadora.
1. Oprima repetidas veces o manténgalo presionado para aumentar el tiempo de retraso.
2. El tiempo de retraso aumenta de 1 hora hasta 24 horas, luego de 6 horas hasta 48.
3. La luz indicadora del retraso parpadea cuando se configura el tiempo de comienzo de acción retardada.
e. Pantalla: Muestra el tiempo restante mientras el programa de lavado está corriendo y muestra el tiempo de
retraso mientras se configura.
f. Programa: Úselo para seleccionar un programa de lavado automático. El indicador estará encendido o
parpadeando para indicar el programa seleccionado.
1. Pesado (Encendido) - Rápido (Parpadeante)
2. Jeans (Encendido) - Antiarrugas (Parpadeante)
3. Normal (Encendido) - Secado con aire (Parpadeante)
g. Temperatura: Pulse para seleccionar la temperatura del agua deseada entre Caliente, Tibia o Fría.
1. Si usa una sola manguera, seleccione siempre “Fría” y ajuste la temperatura en el grifo.
h. Inicio/Pausa: Pulse para iniciar el ciclo de lavado después de seleccionar el programa de lavado, o para pausar y
continuar el ciclo de lavado durante su operación.
b c d fe g h
a

33
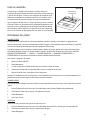
Figura 10
USAR LA LAVADORA
Asegúrese que la lavadora esté nivelada y estable, conecte la
manguera de entrada de agua de forma segura hacia la fuente de agua
y abra la llave de paso. Si solo usa una manguera de entrada de agua,
debe estar conectada a la entrada de agua fría en la lavadora y usar
la configuración de Agua fría. Cuelgue la manguera de drenaje de
agua y asegúrese de que esté en su lugar correcto y que no se moverá.
Conecte el cable a un tomacorriente instalado adecuadamente y con
conexión a tierra. La bandeja para el detergente está ubicada dentro
de la lavadora, sobre el tambor, en la parte de atrás (vea la figura 10).
Vea las instrucciones del detergente para leer sobre su uso y cantidad.
Bandeja para
el detergente
PROGRAMAS DE LAVADO
LAVADO PESADO
El programa de Lavado Pesado es el ajuste por defecto cuando la lavadora se enciende. Es el programa más
común y conveniente. Las luces indicadoras de Lavado, Enjuague y Centrifugado estarán encendidas, y la pantalla
mostrará el tiempo aproximado que le queda al programa (42 minutos).
Cuando el programa está ajustado en Lavado Pesado, el botón de Función puede usarse para seleccionar ciclos
de lavado específicos o hacer una lavada completa. Oprimir el botón de Función hará el ciclo entre: LAVADO/
ENJUAGUE/CENTRIFUGADO → LAVADO → LAVADO/ENJUAGUE → ENJUAGUE/CENTRIFUGADO →
CENTRIFUGADO, lo que permite seleccionar cualquier combinación de funciones.
Para activar el programa de lavado:
1. Oprima el botón ON/OFF.
2. Añada detergente.
3. Si lo desea, presione el botón de Función para cambiar el ciclo de lavado.
4. Seleccione el Tamaño de la carga adecuado y ajuste la temperatura del agua.
5. Oprima el botón Start/Pause para iniciar el programa.
Mientras la lavadora esté en funcionamiento, la luz indicadora de la Función para el ciclo actual parpadeará y la
pantalla mostrará la cuenta regresiva del tiempo restante estimado.
LAVADO RÁPIDO
Esta función es para tiempos cortos de lavado y sirve para prendas que no estén muy sucias o ropa de materiales
ligeros.
1. Pulse el botón de Función hasta que la luz indicadora entre Pesado y Rápido esté parpadeando.
2. Seleccione el Tamaño de la carga y la temperatura del agua.
3. Añada detergente.
4. Pulse Start/Pause.
MEZCLILLA
Use esta función para lavar telas gruesas o ropa muy sucia.
1. Pulse el botón de Función hasta que la luz indicadora entre Mezclilla y Antiarrugas esté parpadeando.
2. Seleccione el tamaño de la carga y la temperatura del agua.
3. Añada detergente.

34
4. Pulse Start/Pause.
ANTIARRUGAS
Use esta función para tiempos cortos de lavado. Usando el nivel de agua alto, esta función enjuaga
completamente y lava prendas para evitar las arrugas.
1. Pulse el botón de Función hasta que la luz indicadora entre Mezclilla y Antiarrugas esté parpadeando.
2. Seleccione el tamaño de la carga y la temperatura del agua.
3. Añada detergente.
4. Pulse Start/Pause.
NORMAL
Use esta función para lavar ropa o ropa blanca de algodón.
1. Pulse el botón de Función hasta que la luz indicadora entre Mezclilla y Antiarrugas esté parpadeando.
2. Seleccione el tamaño de la carga y la temperatura del agua.
3. Añada detergente.
4. Pulse Start/Pause.
SECAR AL AIRE
Para prendas que no sean impermeables, o aquellas que se destiñen o deforman fácilmente, use esta función para
secar sin calor y logrará resultados similares a colgar en tendedero.
1. Pulse el botón de Función hasta que la luz indicadora entre Mezclilla y Antiarrugas esté parpadeando.
2. Seleccione la temperatura del agua.
3. Añada detergente.
4. Pulse Start/Pause.
NOTA:
• Puede pausar el programa de lavado presionando el botón Start/Pause. Púlselo de nuevo para reiniciar el
programa.
• Cierre la tapa después de cargar la lavadora, si no, dejará de trabajar y mostrará un código de error.
• La lavadora no trabajará si el agua no alcanza el nivel de agua seleccionado.
• Luego de presionar el botón ON/OFF, la lavadora se apagará luego de 10 minutos si no se presiona el botón
START/PAUSE.
FIN DEL CICLO DE LAVADO
Cuando la lavadora se detenga, sonará el timbre por 6 segundos y luego la lavadora se apagará.
• Cierre la llave de paso cuando haya terminado de usar la lavadora.
• Aunque la lavadora se apaga automáticamente, es necesario desconectarla como medida de seguridad y
precaución.
FUNCIÓN DE RETRASO
La lavadora puede programarse para comenzar con retraso. El retraso puede programarse en incrementos de 1
hora a 24 horas y luego en incrementos de 6 horas hasta 48. Para configurar el comienzo con retraso:
1. Pulse el botón ON/OFF para ENCENDER la lavadora.
2. Cuelgue de forma adecuada la manguera de drenaje y abra la llave de paso.

35
3. Cargue la ropa y el detergente en la lavadora.
4. Seleccione el nivel de agua adecuado.
5. Seleccione el programa y funciones deseados.
6. Pulse el botón de retraso para elegir el número de horas en que se retrasará el comienzo del ciclo de lavado.
7. Cierre la tapa y pulse el botón Start/Pause.
Cuando se activa la función de retraso, la luz indicadora de Retraso parpadeará y todas las otras luces se
apagarán. Para revisar el estado del retraso programado, pulse y mantenga presionado el botón de retraso. Suelte
el botón de retraso para volver al modo de inicio del Retraso.
Para cancelar la configuración de Retraso, pulse el botón ON/OFF.
FUNCIÓN DE MEMORIA EN PÉRDIDA DE CORRIENTE
En la eventualidad de una pérdida de corriente, la lavadora automáticamente reiniciará operaciones de la
configuración anterior cuando se restaure la corriente.

36
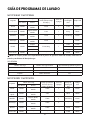
MCSTCW16W3 Y MCSTCW16S3
Programa
Tamaño de la carga Tiempo aproximado de
lavado (incluye tiempo
de remojo)
Ciclos de
enjuague
Tiempo de
centrifugado
final
Tiempo total
Por defecto Alcance
Pesado Grande
Pequeño, Medio,
Grande
12 min 2 5 min 42 min
Lavado rápido Grande
Pequeño, Medio,
Grande
3 min 1 30 seg 10 min
Mezclilla Grande
Pequeño, Medio,
Grande
17 min 2 1 min 30 seg 42 min
Antiarrugas Grande
Pequeño, Medio,
Grande
12 min 2 - 34 min
Normal Grande
Pequeño
15 min 30 seg 1
6 min 36 min
Medio 10 min 44 min
Grande 18 min 50 min
Secar al aire Grande - - - 57 min 60 min
NOTA: Los tiempos pueden variar dependiendo de la presión de agua de la tubería de entrada, material de las
prendas y condiciones del drenaje de agua.
USO DE AGUA
Tamaño de la carga Tamaño de la carga en libras. Agua utilizada aproximada en galones
Grande 6.79 lbs. 10.57
Medio 4.89 lbs. 7.93
Pequeño Menos de 4.89 lbs. 4.23
MCSTCW21W3 Y MCSTCW21S3
Programa
Tamaño de la carga Tiempo aproximado
de lavado (incluye
tiempo de remojo)
Ciclos de
enjuague
Tiempo de
centrifugado
final
Tiempo
total
Por defecto Alcance
Pesado Grande
Pequeño, Medio,
Grande
12 min 2 5 min 42 min
Lavado
rápido
Grande
Pequeño, Medio,
Grande
3 min 1 30 sec 10 min
Mezclilla Grande
Pequeño, Medio,
Grande
17 min 2 1 min 30 seg 42 min
Antiarrugas Grande
Pequeño, Medio,
Grande
12 min 2 - 34 min
Normal Grande
Pequeño, Medio,
Grande
17 min 1 12 min 44 min
Secar al aire Grande - - - 57 min 60 min
GUÍA DE PROGRAMAS DE LAVADO

37
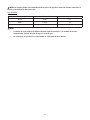
NOTA: Los tiempos pueden variar dependiendo de la presión de agua de la tubería de entrada, material de las
prendas y condiciones del drenaje de agua.
USO DE AGUA
Tamaño de la carga Tamaño de la carga en libras. Agua utilizada aproximada en galones
Grande 8.4 lbs. 11.36
Medio 5.64 lbs. 7.93
Pequeño Menos de 5.64 lbs. 4.76
NOTA:
• El volumen de agua puede variar debido a distintos tipos de materiales. Si la lavadora no funciona
correctamente, ajuste el volumen de ropa o el nivel de agua.
• Los volúmenes de agua de la lista están basados en volúmenes de ropa normales.

38
CUIDADO Y MANTENIMIENTO
Después de cada uso, use un paño de tela suave para limpiar cualquier agua y residuo de polvo de la superficie
de la lavadora. No debería usarse detergentes, propulsores y otros químicos para limpiar la lavadora y así evitar
cualquier daño posible al acabado y accesorios de plástico.
Limpie todos los filtros para mantener un desempeño óptimo (después de cada uso).

39
SOLUCIÓN DE PROBLEMAS
CÓDIGOS DE ALARMA
Problema Causa del problema Código
Sonido de la
alarma
Alarma de
terminar
Alarma de mangueras de agua
Incapacidad de alcanzar el nivel de
agua predeterminado después de
llenar durante aproximadamente
16 minutos.
E1
Otras luces
están apagadas.
Timbre por 10
segundos cada
16 minutos.
Abra la tapa
para arreglar
la falla, luego
ciérrela para
detener la
alarma.
Alarma de tapa abierta
Abrir la tapa mientras la lavadora
está trabajando o después de
comenzar la función de retraso.
E2
Otras luces
están apagadas.
Alarma de desequilibrio
El desequilibrio de la lavadora fue
verificado 3 veces.
E3
Otras luces
están apagadas.
Alarma de drenaje
Incapacidad de drenar después de
4 minutos.
E4
Otras luces
están apagadas.
Alarma de rebosamiento Manguera de entrada de agua.
E5
Otras luces
están apagadas.
Alarma de puerta cerrada (Solo
MCSTCW21S3 y MCSTCW21W3)
La puerta no abrió o cerró
adecuadamente
E6
Otras luces
están apagadas.
NOTA:
• Alarma de rebosamiento: La válvula de drenaje de agua se mantiene abierta hasta recibir intervención
manual (interruptor).
• Cuando la alarma se detenga, la lavadora vuelve a su estado anterior a la indicación de la alarma.
• Código E6: Desenchufe el cable de electricidad para abrir la tapa. Si la tapa está abierta, pulse el botón
Power.
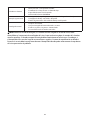
Cuando la lavadora necesite servicio técnico, comuníquese con nuestro departamento de atención al cliente y
un representante intentará diagnosticar el problema. NO desarme la lavadora sin autorización previa. Hacerlo
anularía su garantía.
Si la lavadora no funciona adecuadamente, o suena una alarma, revise las siguientes directrices para soluciones
posibles a problemas comunes o indicadores de alarma.
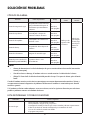
LISTA DE PROBLEMAS Y POSIBLES SOLUCIONES
Problemas Revise lo siguiente
No entra el agua
• No hay corriente o se ha quemado el fusible.
• No hay suministro de agua o tiene poca presión.
• La manguera de entrada y la llave de paso están conectadas y abiertas respectivamente.
• El filtro de la válvula de entrada está bloqueado por acumulación de tierra.
• La rosca de la válvula de entrada está dañada.
• El programa está pausado.

40
La lavadora no funciona
• No hay corriente o se ha quemado el fusible.
• El suministro de voltaje eléctrico es demasiado bajo.
• El agua debe alcanzar el nivel requerido.
• Está activada la función de RETRASO.
Drenaje de agua anormal
• La manguera de drenaje de agua está muy alta (Consulte la guía de instalación).
• La manguera de drenaje está sellada o bloqueada.
• El anillo de goma interno de la válvula de drenaje está bloqueado.
Centrifugado anormal
• La tapa no está cerrada.
• La ropa está cargada de forma inadecuada o en exceso.
• El suelo no es plano o las patas no están niveladas.
• La correa del motor de la lavadora está suelta.
NOTA: Durante el ciclo de centrifugado, si la lavadora está más cargada en un lado de la tina, habrá
desequilibrio en la trayectoria de centrifugado de la tina, lo que resultaría en golpes al armazón de la lavadora
mientras centrifuga. La lavadora compensará corrigiéndolo automáticamente con más agua. Sin embargo, si
el desequilibrio no se resuelve luego de tres correcciones seguidas, el sistema de autocorrección se detendrá.
Entonces el usuario deberá corregir manualmente el desequilibrio distribuyendo uniformemente la ropa dentro
de la tina para resolver el problema.

41
GARANTÍA LIMITADA
MC Appliance Corporation garantiza que cada Lavadora portátil nueva carece de defectos en los materiales y en la mano de
obra, y conviene en remediar cualquier defecto o proporcionar la(s) pieza(s) nueva(s), por cualquier/cualesquiera pieza(s) de la
unidad que haya(n) fallado durante el período de garantía, a discreción de la compañía. Las piezas y los gastos de mano de obra
de esta unidad están cubiertos por un período de un año a partir de la fecha de compra. Es necesario presentar una copia del
recibo o de la factura de venta fechado, para recibir el servicio de garantía, reemplazo o reembolso.
Esta garantía cubre los aparatos en uso dentro de los Estados Unidos contiguos, Alaska, Hawái y Puerto Rico. Esta garantía no
cubre lo siguiente:
• Los daños causados durante el envío o por instalación incorrecta.
• Los daños causados por uso incorrecto o abuso.
• La pérdida de contenido a causa de fallas de la unidad.
• Las reparaciones llevadas a cabo por agentes de servicio no autorizados.
• Las llamadas al servicio técnico que no impliquen defectos en el material y mano de obra, tales como instrucciones
sobre el uso correcto del producto o la instalación incorrecta.
• El reemplazo o reajuste de los fusibles de la casa o los interruptores de circuito.
• La falla de este producto si se usa para fines distintos de aquellos para los que fue diseñado.
• Los costos de desecho de cualquier unidad defectuosa no devuelta a nuestra fábrica.
• Cualquiera de los costos de entrega/instalación incurridos como resultado de una unidad que no funcione según las
especificaciones.
• Los gastos de viaje y transporte para obtener servicio para el producto si su aparato está ubicado en una zona
remota donde el servicio por parte de un técnico de servicio autorizado no está disponible.
• El retiro y la nueva instalación de su aparato si está instalado en una ubicación inaccesible o no fue instalado
conforme a las instrucciones de instalación publicadas.
• Los rembolsos por los productos que no son reparables se limitan al precio pagado por la unidad conforme a la
factura de venta.
• Esta garantía es intransferible. Esta garantía aplica solo al comprador original y no se extiende a cualquier
propietario(s) subsecuente(s).
LIMITACIONES A LAS SOLUCIONES Y EXCLUSIONES:
La reparación del producto de acuerdo con los términos aquí indicados, es su única y exclusiva solución bajo esta garantía
limitada. Cualquiera y todas las garantías implícitas, incluyendo la comercialización y la idoneidad para un propósito particular
se limitan por medio de la presente a un año o al período más corto permitido por la ley. MC Appliance Corporation no es
responsable por daños incidentales o emergentes y ningún representante o persona está autorizada para asumir por nuestra
parte, ninguna otra responsabilidad en relación con la venta de este producto. Bajo ninguna circunstancia se le permite al
consumidor devolver esta unidad a la fábrica sin la autorización previa por escrito suministrada por MC Appliance Corporation.
Algunos estados prohíben la exclusión o limitación de los daños incidentales o emergentes, o limitaciones en las garantías
implícitas. Esta garantía le otorga derechos legales específicos y podría tener otros derechos que varían según el estado.
Modelo Piezas Mano de obra Tipo de servicio
MCSTCW16W3/ MCSTCW16S3 Un año Un año Reparación en taller
MCSTCW21W3/ MCSTCW21S3 Un año Un año Reparación en taller
Para servicio o asistencia por favor llame al 888-775-0202 o visítenos en el sitio web en www.mcappliance.com para solicitar
servicio de garantía u ordenar piezas.

42
CNA International, Inc., opera bajo el nombre comercial de MC Appliance Corporation.
Todos los derechos reservados. El logo de Magic Chef® es una marca registrada de
CNA International, Inc.
www.mcappliance.com Impreso en China
-
 1
1
-
 2
2
-
 3
3
-
 4
4
-
 5
5
-
 6
6
-
 7
7
-
 8
8
-
 9
9
-
 10
10
-
 11
11
-
 12
12
-
 13
13
-
 14
14
-
 15
15
-
 16
16
-
 17
17
-
 18
18
-
 19
19
-
 20
20
-
 21
21
-
 22
22
-
 23
23
-
 24
24
-
 25
25
-
 26
26
-
 27
27
-
 28
28
-
 29
29
-
 30
30
-
 31
31
-
 32
32
-
 33
33
-
 34
34
-
 35
35
-
 36
36
-
 37
37
-
 38
38
-
 39
39
-
 40
40
-
 41
41
-
 42
42


Magic Chef Mcstcw21S3 Manual de usuario
- Categoría
- Lavadoras
- Tipo
- Manual de usuario
- Este manual también es adecuado para
en otros idiomas
- English: Magic Chef Mcstcw21S3 User manual
Artículos relacionados
-
Magic Chef MCSTCW16W2 Guía del usuario
-
Magic Chef MCSFLW27W El manual del propietario
-
-
Magic Chef MCSTCW16W4 Manual de usuario
-
-
-
-
-