Behringer X1622USB Guía de inicio rápido
- Categoría
- Controladores de DJ
- Tipo
- Guía de inicio rápido
La página se está cargando...

2 XENYX X2442USB/X2222USB/X1622USB Quick Start Guide 3
Important Safety
Instructions
LEGAL DISCLAIMER
Instrucciones de
seguridad
NEGACIÓN LEGAL
GARANTÍA LIMITADA
LIMITED WARRANTY
Terminals marked with this symbol carry
electrical current of sucient magnitude
to constitute risk of electric shock.
Use only high-quality professional speaker cables with
¼" TS or twist-locking plugs pre-installed. Allother
installation or modication should be performed only
by qualiedpersonnel.
This symbol, wherever it appears,
alertsyou to the presence of uninsulated
dangerous voltage inside the
enclosure-voltage that may be sucient to constitute a
risk ofshock.
This symbol, wherever it appears,
alertsyou to important operating and
maintenance instructions in the
accompanying literature. Please read the manual.
Caution
To reduce the risk of electric shock, donot
remove the top cover (or the rear section).
No user serviceable parts inside. Refer servicing to
qualied personnel.
Caution
To reduce the risk of re or electric shock,
do not expose this appliance to rain and
moisture. The apparatus shall not be exposed to dripping
or splashing liquids and no objects lled with liquids,
suchas vases, shall be placed on the apparatus.
Caution
These service instructions are for use
by qualied service personnel only.
Toreduce the risk of electric shock do not perform any
servicing other than that contained in the operation
instructions. Repairs have to be performed by qualied
servicepersonnel.
1. Read these instructions.
2. Keep these instructions.
3. Heed all warnings.
4. Follow all instructions.
5. Do not use this apparatus near water.
6. Clean only with dry cloth.
7. Do not block any ventilation openings. Install in
accordance with the manufacturer’s instructions.
8. Do not install near any heat sources such as
radiators, heat registers, stoves, or other apparatus
(including ampliers) that produce heat.
9. Do not defeat the safety purpose of the polarized
or grounding-type plug. A polarized plug has two blades
with one wider than the other. A grounding-type plug
has two blades and a third grounding prong. The wide
blade or the third prong are provided for your safety. Ifthe
provided plug does not t into your outlet, consult an
electrician for replacement of the obsolete outlet.
10. Protect the power cord from being walked on or
pinched particularly at plugs, convenience receptacles,
and the point where they exit from the apparatus.
11. Use only attachments/accessories specied by
themanufacturer.
12. Use only with the
cart, stand, tripod, bracket,
or table specied by the
manufacturer, orsold with
the apparatus. When a cart
is used, use caution when
moving the cart/apparatus
combination to avoid
injury from tip-over.
13. Unplug this apparatus during lightning storms or
when unused for long periods of time.
14. Refer all servicing to qualied service personnel.
Servicing is required when the apparatus has been
damaged in any way, such as power supply cord or plug
is damaged, liquid has been spilled or objects have fallen
into the apparatus, the apparatus has been exposed
to rain or moisture, does not operate normally, or has
beendropped.
15. The apparatus shall be connected to a MAINS socket
outlet with a protective earthing connection.
16. Where the MAINS plug or an appliance coupler is
used as the disconnect device, the disconnect device shall
remain readily operable.
17. Correct disposal of this
product: This symbol indicates that
this product must not be disposed
of with household waste,
according to the WEEE Directive
(2012/19/EU) and your national
law. This product should be taken
to a collection center licensed for the recycling of waste
electrical and electronic equipment (EEE). The
mishandling of this type of waste could have a possible
negative impact on the environment and human health
due to potentially hazardous substances that are generally
associated with EEE. At the same time, your cooperation
in the correct disposal of this product will contribute to
the ecient use of natural resources. For more
information about where you can take your waste
equipment for recycling, please contact your local city
oce, or your household waste collection service.
18. Do not install in a conned space, such as a book
case or similar unit.
19. Do not place naked ame sources, such as lighted
candles, on the apparatus.
20. Please keep the environmental aspects of battery
disposal in mind. Batteries must be disposed-of at a
battery collection point.
21. Use this apparatus in tropical and/or
moderate climates.
MUSIC Tribe accepts no liability for any loss which
may be suered by any person who relies either
wholly or in part upon any description, photograph,
or statement contained herein. Technical specications,
appearances and other information are subject to
change without notice. All trademarks are the property
of their respective owners. MIDAS, KLARK TEKNIK,
LAB GRUPPEN, LAKE, TANNOY, TURBOSOUND,
TC ELECTRONIC, TC HELICON, BEHRINGER, BUGERA and
COOLAUDIO are trademarks or registered trademarks
of MUSIC Tribe Global Brands Ltd. © MUSIC Tribe Global
Brands Ltd. 2018 All rights reserved.
For the applicable warranty terms and conditions
and additional information regarding MUSIC Tribe’s
Limited Warranty, please see complete details online at
musictri.be/warranty.
Las terminales marcadas con este símbolo
transportan corriente eléctrica de
magnitud suciente como para constituir
un riesgo de descarga eléctrica. Utilice solo cables de
altavoz profesionales y de alta calidad con conectores
TS de 6,3 mm o de bayoneta prejados. Cualquier otra
instalación o modicación debe ser realizada únicamente
por un técnico cualicado.
Este símbolo, siempre que aparece,
leadvierte de la presencia de voltaje
peligroso sin aislar dentro de la caja;
estevoltaje puede ser suciente para constituir un riesgo
dedescarga.
Este símbolo, siempre que aparece,
leadvierte sobre instrucciones operativas
y de mantenimiento que aparecen en la
documentación adjunta. Por favor, lea el manual.
Atención
Para reducir el riesgo de descarga
eléctrica, no quite la tapa (o la parte
posterior). No hay piezas en el interior del equipo que
puedan ser reparadas por el usuario. Si es necesario,
póngase en contacto con personal cualicado.
Atención
Para reducir el riesgo de incendio o
descarga eléctrica, no exponga este
aparato a la lluvia, humedad o alguna otra fuente que
pueda salpicar o derramar algún líquido sobre el aparato.
Nocoloque ningún tipo de recipiente para líquidos sobre
el aparato.
Atención
Las instrucciones de servicio deben
llevarlas a cabo exclusivamente personal
cualicado. Para evitar el riesgo de una descarga eléctrica,
no realice reparaciones que no se encuentren descritas
en el manual de operaciones. Lasreparaciones deben ser
realizadas exclusivamente por personalcualicado.
1. Lea las instrucciones.
2. Conserve estas instrucciones.
3. Preste atención a todas las advertencias.
4. Siga todas las instrucciones.
5. No use este aparato cerca del agua.
6. Limpie este aparato con un paño seco.
7. No bloquee las aberturas de ventilación. Instale el
equipo de acuerdo con las instrucciones del fabricante.
8. No instale este equipo cerca de fuentes de calor
tales como radiadores, acumuladores de calor, estufas u
otros aparatos (incluyendo amplicadores) que puedan
producir calor.
9. No elimine o deshabilite nunca la conexión a tierra
del aparato o del cable de alimentación de corriente.
Unenchufe polarizado tiene dos polos, uno de los cuales
tiene un contacto más ancho que el otro. Una clavija con
puesta a tierra dispone de tres contactos: dos polos y la
puesta a tierra. El contacto ancho y el tercer contacto,
respectivamente, son los que garantizan una mayor
seguridad. Si el enchufe suministrado con el equipo no
concuerda con la toma de corriente, consulte con un
electricista para cambiar la toma de corriente obsoleta.
10. Coloque el cable de suministro de energía de manera
que no pueda ser pisado y que esté protegido de objetos
alados. Asegúrese de que el cable de suministro de
energía esté protegido, especialmente en la zona de la
clavija y en el punto donde sale del aparato.
11. Use únicamente los dispositivos o accesorios
especicados por el fabricante.
12. Use únicamente la
carretilla, plataforma,
trípode, soporte o mesa
especicados por el
fabricante o suministrados
junto con el equipo.
Altransportar el equipo,
tenga cuidado para evitar
daños y caídas al tropezar con algún obstáculo.
13. Desenchufe el equipo durante tormentas o si no va a
utilizarlo durante un periodo largo.
14. Confíe las reparaciones únicamente a servicios
técnicos cualicados. La unidad requiere mantenimiento
siempre que haya sufrido algún daño, si el cable de
suministro de energía o el enchufe presentaran daños,
sehubiera derramado un líquido o hubieran caído objetos
dentro del equipo, si el aparato hubiera estado expuesto
a la humedad o la lluvia, si ha dejado de funcionar de
manera normal o si ha sufrido algún golpe o caída.
15. Al conectar la unidad a la toma de corriente eléctrica
asegúrese de que la conexión disponga de una unión
atierra.
16. Si el enchufe o conector de red sirve como único
medio de desconexión, éste debe ser accesiblefácilmente.
17. Cómo debe deshacerse de
este aparato: Este símbolo indica
que este aparato no debe ser
tratado como basura orgánica,
según lo indicado en la Directiva
WEEE (2012/19/EU) y a las
normativas aplicables en su país.
En lugar de ello deberá llevarlo al punto limpio más
cercano para el reciclaje de sus elementos eléctricos/
electrónicos (EEE). Al hacer esto estará ayudando a
prevenir las posibles consecuencias negativas para el
medio ambiente y la salud que podrían ser provocadas por
una gestión inadecuada de este tipo de aparatos. Además,
el reciclaje de materiales ayudará a conservar los recursos
naturales. Para más información acerca del reciclaje de
este aparato, póngase en contacto con el Ayuntamiento
de su ciudad o con el punto limpio local.
18. No instale esta unidad en un espacio muy reducido,
tal como encastrada en una librería o similar.
19. No coloque objetos con llama, como una vela
encendida, sobre este aparato.
20. Tenga presentes todas las advertencias relativas
al reciclaje y correcta eliminación de las pilas. Las pilas
deben ser siempre eliminadas en un punto limpio y nunca
con el resto de la basura orgánica.
21. Use este aparato en rangos de temperatura
moderados y/o tropicales.
MUSIC Tribe no admite ningún tipo de responsabilidad
por cualquier daño o pérdida que pudiera sufrir
cualquier persona por conar total o parcialmente
en la descripciones, fotografías o armaciones
contenidas en este documento. Las especicaciones
técnicas, imágenes y otras informaciones contenidas
en este documento están sujetas a modicaciones
sin previo aviso. Todas las marcas comerciales que
aparecen aquí son propiedad de sus respectivos
dueños. MIDAS, KLARK TEKNIK, LAB GRUPPEN,
LAKE, TANNOY, TURBOSOUND, TC ELECTRONIC,
TC HELICON, BEHRINGER, BUGERA y COOLAUDIO
son marcas comerciales o marcas registradas de
MUSIC Tribe Global Brands Ltd. © MUSIC Tribe Global
Brands Ltd. 2018 Reservados todos los derechos.
Si quiere conocer los detalles y condiciones aplicables
de la garantía así como información adicional sobre la
Garantía limitada de MUSIC Tribe, consulte online toda la
información en la web musictri.be/warranty.
La página se está cargando...
La página se está cargando...

8 XENYX X2442USB/X2222USB/X1622USB Quick Start Guide 9
(EN)
Step 1: Hook-Up
(ES)
Paso 1: Conexión
(FR)
Etape 1 : Connexions
(DE)
Schritt 1: Verkabelung
(PT)
Passo 1: Conexões
XENYX X2442USB/X2222USB/X1622USB Hook-up
Project studio
Estudio de grabación
Project studio
Projektstudio
Estúdio de projecto
Band or small church with stage monitors
Banda o iglesia pequeña con monitores de escenario
Groupe ou petite église avec retours sur scène
Band oder kleine Kirche mit Bühnenmonitoren
Banda ou pequena igreja com monitores de palco

10 XENYX X2442USB/X2222USB/X1622USB Quick Start Guide 11
(EN)
Step 1: Hook-Up
(ES)
Paso 1: Conexión
(FR)
Etape 1 : Connexions
(DE)
Schritt 1: Verkabelung
(PT)
Passo 1: Conexões
XENYX X2442USB/X2222USB/X1622USB Hook-up
Business/ multimedia presentation
Presentación de negocio/multimedia
Présentation commerciale/multimédia
Business/Multimedia-Präsentation
Apresentação empresarial/multimédia
Band or small church with external effects
Banda o iglesia pequeña con efectos externos
Groupe ou petite église avec effets externes
Band oder kleine Kirche mit externen Effekten
Banda ou pequena igreja com efeitos externos

12 XENYX X2442USB/X2222USB/X1622USB Quick Start Guide 13
(EN)
Step 2: Controls
(ES)
Paso 2: Controles
(FR)
Etape 2 : Réglages
(DE)
Schritt 2:
Bedienelemente
(PT)
Passo 2: Controles
XENYX X2442USB/X2222USB/X1622USB Controls
PAN/BAL knob positions the
channel in the stereo eld.
PAN/BAL, este control sitúa
el canal en el campo estéreo.
Le potentiomètre PAN/BAL
détermine la position du
canal dans le champ stéréo.
PAN/BAL-Regler positioniert
den Kanal im Stereofeld.
O botão PAN/BAL posiciona o
canal no campo estéreo.
GAIN knob adjusts the
sensitivity of the MIC and/or
LINE inputs.
GAIN, este control ajusta la
sensibilidad de las entradas MIC
y/o LINE.
Le potentiomètre GAIN règle
la sensibilité des entrées MIC
et/ou LINE.
GAIN -Regler stellt die
Emp ndlichkeit des MIC-
und/oder LINE-Eingangs ein.
O botão GAIN ajusta a
sensibilidade das entradas
MIC e/ou LINE.
EQ knobs adjust the high,
mid and low frequencies of
the channel. Adjust the FREQ
knob to select the speci c
frequency adjusted by the
MID knob.
EQ, estos controles ajustan
las frecuencias alta, media
y baja del canal. Ajuste el
control FREQ para seleccionar
la frecuencia especí ca
regulada con el control MID.
Les potentiomètres EQ
règlent les fréquences aiguës,
médiums et graves du canal.
Réglez le potentiomètre
FREQ pour sélectionner
la fréquence modi ée par le
potentiomètre MID.
EQ-Regler stellen die
hohen, mittleren und
tiefen Frequenzen des
Kanals ein. Verwenden
Sie den FREQ-Regler,
um die spezi sche über
den MID-Regler geregelte
Frequenz auszuwählen.
Os botões EQ ajustam as
frequências altas, médias
e baixas do canal. Ajuste o
botão FREQ para seleccionar
a frequência especí ca
ajustada pelo botão MID.
AUX knobs adjust how
much of the channel’s signal
routes to the AUX SEND jacks.
Press the PRE button when
routing the signal to a
stage monitor. Use the FX
knob to send the channel’s
signal to the internal
multi-FX processor.
AUX, este control ajusta qué
parte de la señal del canal se
dirige a los jacks AUX SEND.
Pulse el botón PRE al dirigir
la señal a un monitor de
escenario. Utilice el control
FX para enviar la señal del
canal al procesador de
multiefectos interno.
Les potentiomètres AUX
règlent le volume du signal
du canal envoyé aux jacks
AUX SEND. Appuyez sur la
touche PRE lorsque le signal
est envoyé à un haut-parleur
de retour. Envoyez le signal
du canal vers le processeur
multi-e et interne à l'aide du
potentiomètre FX.
AUX-Regler stellen ein, wie
viel des Kanalsignals auf die
AUX SEND-Buchsen geleitet
wird. Drücken Sie die PRE-
Taste, wenn Sie das Signal
auf einen Bühnenmonitor
leiten möchten. Verwenden
Sie den FX-Regler, um das
Kanalsignal auf den internen
Multi-E ektprozessor
zu leiten.
Os botões AUX ajustam a
quantidade de sinal do canal
encaminhada para as chas
AUX SEND. Prima o botão PRE
ao encaminhar o sinal para
um monitor de palco. Utilize
o botão FX para enviar o sinal
do canal para o processador
multi-efeitos interno.
MUTE button mutes
the channel.
MUTE, este botón silencia
el canal.
La touche MUTE permet de
désactiver le volume sonore
du canal.
MUTE stellt den
Kanal stumm.
O botão MUTE silencia
o canal.
CLIP LED lights when the
channel signal overloads.
CLIP, estos LED se iluminan
cuando la señal del canal
se sobrecarga.
La LED CLIP s'allume
lorsqu'une surcharge apparaît
dans le signal du canal.
CLIP-LED leuchtet auf,
wenn das Kanalsignal zu hoch
ausgesteuert wird.
O LED CLIP acende-se
quando o sinal do canal
está sobrecarregado.

14 XENYX X2442USB/X2222USB/X1622USB Quick Start Guide 15
(X2442USB only)
(EN)
Step 2: Controls
(ES)
Paso 2: Controles
(FR)
Etape 2 : Réglages
(DE)
Schritt 2:
Bedienelemente
(PT)
Passo 2: Controles
XENYX X2442USB/X2222USB/X1622USB Controls
COMP knob adjusts the
amount of compression e ect
on the channel.
COMP, este control ajusta
la cantidad de efecto de
compresión en el canal.
Le potentiomètre COMP règle
l'e et de compression sur
le canal.
COMP-Regler stellt die Stärke
des Kompressionse ekts im
Kanal ein.
O botão COMP ajusta a
quantidade do efeito de
compressão no canal.
CHANNEL FADER adjusts the
channel volume.
CHANNEL FADER ajusta el
volumen del canal.
Le FADER DE CANAL permet
de régler le volume du canal.
CHANNEL FADER
zur Einstellung der
Kanallautstärke.
O CHANNEL FADER ajusta o
volume do canal.
PHANTOM ON switch sends
48V to the XLR inputs for use
with condenser microphones.
PHANTOM ON, este
interruptor envía 48 V a las
entradas XLR para usarlas con
micrófonos de condensador.
Le commutateur PHANTOM
ON envoie 48 V aux
entrées XLR, dans le cas de
l'utilisation de microphones
électrostatiques.
PHANTOM ON-Schalter
liefert 48 V an die XLR-
Eingänge zur Verwendung
von Kondensatormikrofonen.
O botão PHANTOM ON
envia 48 V para as entradas
XLR para utilização com
microfones condensadores.
AC IN accepts the included
power cable for connection to
a mains outlet.
ENTRADA DE CA acepta el
cable de alimentación que se
incluye para la conexión a una
toma de corriente.
AC IN permet de connecter
le câble d'alimentation inclus
à l'alimentation secteur.
AC IN dient zum Anschluss
des mitgelieferten Netzkabels
an einer Steckdose.
O AC IN aceita o cabo
de alimentação incluído
para ligação a uma
tomada eléctrica.
POWER ON switch turns the
mixer on and o .
POWER ON, este interruptor
enciende y apaga la mesa
de mezclas.
POWER ON permet d'allumer
ou d'éteindre la console.
POWER ON-Schalter schaltet
das Mischpult ein und aus.
O botão POWER ON liga e
desliga o misturador.

16 XENYX X2442USB/X2222USB/X1622USB Quick Start Guide 17
(EN)
Step 2: Controls
(ES)
Paso 2: Controles
(FR)
Etape 2 : Réglages
(DE)
Schritt 2:
Bedienelemente
(PT)
Passo 2: Controles
XENYX X2442USB/X2222USB/X1622USB Controls
X2442USB
SOURCE buttons route
the 2-track/USB, SUB, and
MAIN MIX to the PHONES and
CONTROL ROOM jacks.
SOURCE, estos botones
dirigen las señales
2-TRACK/USB, SUB y MAIN
MIX a los jacks PHONES y
CONTROL ROOM.
Les touches SOURCE
acheminent les signaux
2-track/USB, SUB et MAIN MIX
vers les jacks PHONES et
CONTROL ROOM.
SOURCE -Tasten leiten das
2-TR/USB-, das SUB- und
das MAIN MIX-Signal auf
die PHONES- und CONTROL
ROOM-Buchsen.
Os botões SOURCE
encaminham as 2-TR/USB,
USB e MAIN MIX para as chas
PHONES e CONTROL ROOM.
AUX SENDS adjust the
amount of signal sent to a
monitor speaker or external
e ects processor via the
AUX SEND jacks.
AUX SENDS ajusta la cantidad
de señal que se envía hasta
un altavoz de monitoreo
o procesador de efectos
externo a través de los jacks
AUX SEND.
Les potentiomètres
AUX SENDS règlent le
volume du signal envoyé à un
haut-parleur de retour ou à
un processeur d'e ets externe
via les jacks AUX SEND.
AUX SENDS stellt ein, mit
welcher Stärke ein Signal über
die AUX SEND-Anschlüsse auf
einen Monitorlautsprecher
oder einen externen
E ektprozessor geleitet wird.
AUX SENDS ajusta a
quantidade de sinal enviada
para um altifalante de
monitor ou processador de
efeitos externo através das
chas AUX SEND.
MULTI-FX PROCESSOR adds
a selected sound e ect to any
channels whose FX knob is
turned up. See the Multi-FX
Processor section for details.
MULTI-FX PROCESSOR
añade un efecto de sonido
seleccionado a cualquier
canal en el que esté activado
el control FX. Consulte
la información detallada
en la sección Procesador
de multiefectos.
Le PROCESSEUR
MULTI-EFFET ajoute l'e et
sonore sélectionné aux canaux
dont le potentiomètre FX est
activé. Reportez-vous à la
section Processeur multi-e et
pour en savoir plus.
MULTI-FX PROCESSOR
fügt allen Kanälen, deren
FX-Regler aufgedreht
ist, einen ausgewählten
E ekt hinzu. Details siehe
Multi-E ektprozessor.
AUX RETURNS adjust the
amount of signal returning
from an external e ects
processor that is included
in the main mix. Use the
TO AUX SEND knob(s)
to include the e ects signal
in your monitor mix as well.
AUX RETURNS, ajusta la
cantidad de señal que retorna
desde un procesador de
efectos externo incluido en
la mezcla principal. Utilice los
controles TO AUX SEND para
incluir la señal de efectos en la
mezcla del monitor también.
Les potentiomètres
AUX RETURNS règlent le
volume du signal revenant d'un
processeur d'e ets externe
inclus dans le mix principal.
Utilisez les potentiomètres
TO AUX SEND a n d'inclure
également le signal d'e et
dans le mix de retour.
AUX RETURNS stellt ein,
mit welcher Stärke ein
Signal von einem externen
E ektprozessor in den
Main Mix integriert wird.
Verwenden Sie den/die
TO AUX SEND-Regler, um das
E ektsignal ebenfalls in den
Monitor-Mix zu integrieren.
VU METER displays the
MAIN OUTPUT signal
level. Press the MODE
button to switch between
SOLO (normal) and PFL
(pre-fader listen) for level
setting purposes.
VU METER muestra el nivel
de la señal MAIN OUTPUT.
Pulse el botón MODE para
alternar entre SOLO (normal)
y PFL (escucha pre-fader)
al realizar los ajustes de nivel.
Le VU-METRE a che le
niveau du signal de la
SORTIE MAIN. Appuyez sur
la touche MODE pour passer
de Solo (normal) à PFL
(Pre-Fader Listen) lors du
réglage des niveaux.
VU METER zeigt
die Signalstärke des
MAIN OUTPUT an. Drücken Sie
die MODE-Taste, um zwischen
SOLO (normal) und PFL (Pre-
Fader Listen) zur Einstellung
der Signalstärke zu wechseln.
2-TR/USB TO MAIN button
routes the 2-TRACK and USB
signal to the MAIN MIX.
2-TR/USB TO MAIN, este
botón dirige la señal 2-TRACK
y USB a MAIN MIX.
Le bouton 2-TR/USB TO
MAIN permet d'acheminer
les signaux 2-TRACK et USB
vers MAIN MIX.
2-TR/USB TO MAIN-Taste
leitet das 2-TRACK- und USB-
Signal auf den MAIN MIX.
O MULTI-FX PROCESSOR
(Processador Multi-
Efeitos) adiciona
um efeito de som
seleccionado aos
canais em que o botão
de efeitos tenha sido
activado. Consulte a
secção Processador
Multi-Efeitos para obter
mais informações.
AUX RETURNS ajusta a
quantidade de retorno de
sinal de um processador
de efeitos externo
incluído no main mix.
Utilize o(s) botão(ões)
TO AUX SEND para incluir
também o sinal de efeitos
na mistura de monitor.
MAIN MIX
fader(s) adjust the
overall output of the mixer.
MAIN MIX, estos faders
ajustan la salida general de la
mesa de mezclas.
Les faders MAIN MIX règlent
la sortie globale de la console.
MAIN MIX-Fader stellt/stellen
den Summenausgangspegel
des Mischpults ein.
O(s) fader(s) MAIN MIX
ajusta(m) a saída geral
do misturador.
O VU METER (MEDIDOR
DE VU) apresenta o nível
do sinal MAIN OUTPUT.
Prima o botão MODE
para alternar entre SOLO
(normal) e PFL (audição
pré-fader) para ns de
de nição de nível.
O botão 2-TR/USB TO
MAIN encaminha o sinal
2-TRACK e USB para o
MAIN MIX.
MODE button determines
whether the channel’s
SOLO button operates as
‘Solo in Place’ (button out)
or ‘Pre-Fader Listen’ (button
in). PFL is preferred for gain
setting purposes.
MODE, este botón determina
si el botón SOLO funciona
como ‘Solo in Place’ (botón
sin pulsar) o ‘Pre-Fader Listen’
(botón pulsado). Es preferible
la escucha pre-fader para
ajustar la ganancia.
La touche MODE permet
de choisir si la touche SOLO
des canaux doit fonctionner
comme SOLO (“ Solo in
Place”, touche relâchée)
ou comme PFL (“ Pre-Fader
Listen ”, touche enfoncée).
Sélectionnez PFL pour
régler le gain.
MODE-Taste bestimmt,
ob die SOLO-Taste des
Kanals als ”Solo in Place”
(Taste nicht eingedrückt)
oder als ”Pre-Fader Listen”
(PFL, Taste eingedrückt)
arbeitet. Zum Einstellen
der Signalstärke wird
PFL bevorzugt.
O botão MODE determina
se o botão SOLO dos
canais funciona como
“Solo activado” (botão
desligado) ou “Audição de
pré-fader” (botão ligado).
A audição de pré-fader (PFL)
é recomendada para ns de
de nição de ganho.
SUB faders adjust the output
of the SUB OUTPUT jacks.
Use the LEFT/RIGHT buttons
to assign the SUB signal to the
left and/or right MAIN MIX.
SUB, estos faders ajustan
la salida de los jacks
SUB OUTPUT. Utilice los
botones LEFT/RIGHT
para asignar la señal SUB
a MAIN MIX izquierda
o derecha.
Les faders SUB règlent la
sortie des jacks SORTIE SUB.
A ectez le signal SUB
au MAIN MIX droit et/ou
gauche à l'aide des touches
LEFT/RIGHT.
SUB-Fader stellen die
Signalstärke der SUB-
OUTPUT-Buchsen ein.
Verwenden Sie die LEFT-/
RIGHT-Tasten, um das
SUB-Signal auf den linken
und/oder rechten MAIN MIX
zu leiten.
Os faders SUB ajustam a saída
das chas SUB OUTPUT. Utilize
os botões LEFT/RIGHT para
atribuir o sinal SUB a MAIN
MIX esquerdo e/ou direito.
PHONES/CTRL ROOM knob
adjusts the headphone or
studio monitor volume.
PHONES/CTRL ROOM, este
control ajusta el volumen de
los auriculares o del monitor
de estudio.
Le potentiomètre
PHONES/CTRL ROOM règle
le volume du casque ou du
haut-parleur studio.
PHONES/CTRL ROOM
-Regler stellt die Lautstärke
der Kopfhörer bzw.
Monitorlautsprecher im
Studio ein.
O botão PHONES/CTRL
ROOM ajusta o volume dos
auscultadores ou do estúdio
do monitor.

18 XENYX X2442USB/X2222USB/X1622USB Quick Start Guide 19
(EN)
Step 3: Getting
started
(ES)
Paso 3: Puesta en
marcha
(FR)
Etape 3 : Mise en
oeuvre
(DE)
Schritt 3: Erste
Schritte
(PT)
Passo 3: Primeiros
Passos
XENYX X2442USB/X2222USB/X1622USB Getting started
(EN) Make sure the power to all devices is
turned o !
(ES) ¡Asegúrese de que la alimentación de
todos los dispositivos esté apagada!
(FR) Véri ez que tous les appareils sont hors tension.
(DE) Achten Sie darauf, dass alle Geräte
ausgeschaltet sind!
(PT) Certi que-se de que a alimentação de todos os
dispositivos está desligada!
(EN) Connect all the appropriate power,
audio and USB cables to the mixer.
(ES) Conecte todos los cables de
alimentación, audio y USB adecuados a la mesa
de mezclas.
(FR) Branchez les câbles d’alimentation, audio et USB
appropriés à la console.
(DE) Schließen Sie alle benötigten
Stromversorgungs-, Audio- und USB-Kabel am
Mischpult an.
(PT) Ligue ao misturador todos os cabos de
alimentação, áudio e USB adequados.
(EN) Set all controls as shown above (EQ and
PAN/BAL centered, all others down/o ).
(ES) Establezca todos los controles tal y
como se indica más arriba (EQ y PAN/BAL centrados,
el resto abajo/apagados).
(FR) Réglez toutes les commandes comme sur la
gure (EQ et PAN/BAL au centre, toutes les autres
éteintes/en butée gauche).
(DE) Stellen Sie alle Bedienelemente wie oben
gezeigt ein (EQ und PAN/BAL in die Mitte,
alle anderen nach unten/aus).
(PT) De na todos os comandos conforme indicado
acima (EQ e PAN/BAL centrados, todos os outros para
baixo/desligados).
(EN) Turn the mixer on.
(ES) Encienda la mesa de mezclas.
(FR) Mettez la console en marche.
(DE) Schalten Sie das Mischpult ein.
(PT) Ligue o misturador.
(EN) Set the GAIN for each channel.
See the Gain Setting section for details.
(ES) Establezca GAIN para cada canal.
Consulte los detalles en la sección Ajuste de
la ganancia.
(FR) Réglez le GAIN de chaque canal. Reportez-vous à
la section Réglage du gain pour en savoir plus.
(DE) Stellen Sie GAIN für jeden Kanal
ein. Details nden Sie im Kapitel
„Einstellen des Kanalpegels“.
(PT) De na o GAIN (GANHO) para cada canal.
Consulte a secção De nição de Ganho para obter
mais informações.
(EN) With the MAIN MIX fader(s) and
PHONES/CTRL ROOM knob all the way
down, turn your PA system or powered
monitors on.
(ES) Con los faders MAIN MIX y el control PHONES/
CTRL ROOM situados hacia abajo por completo,
encienda su ampli cador de potencia o monitores
con alimentación.
(FR) Laissez les faders MAIN MIX et le potentiomètre
PHONES/CTRL ROOM au minimum et allumez
votre ampli cateur de puissance ou vos
haut-parleurs actifs.
(DE) Schalten Sie Ihr Beschallungssystem oder ihre
aktiven Monitorlautsprecher ein, wenn sich der/die
MAIN MIX-Fader und der PHONES/CTRL ROOM-Regler
in unterster Stellung be nden.
(PT) Com o(s) fader(s) MAIN MIX e o botão PHONES/
CTRL ROOM totalmente para baixo, ligue o sistema
PA ou monitores alimentados.
(EN) Slowly raise the
MAIN MIX fader(s)
or PHONES/CTRL ROOM
knob to 0 or to desired level.
(ES) Eleve lentamente los faders
MAIN MIX o el control PHONES/
CTRL ROOM hasta 0, o hasta el
nivel deseado.
(FR) Montez lentement les faders
MAIN MIX ou le potentiomètre
PHONES/CTRL ROOM pour les
placer sur 0 ou sur le niveau
désiré (illustration).
(DE) Bewegen Sie den/die MAIN MIX-Fader oder den
PHONES/CTRL ROOM-Regler in die Stellung “0” oder
auf den gewünschten Pegel.
(PT) Eleve lentamente o comando do(s) fader(s)
MAIN MIX ou PHONES/CTRL ROOM para 0 ou para
o nível desejado.
(EN) Press the MAIN button on each
channel to assign the channel to the
MAIN MIX.
(ES) Eleve lentamente los faders MAIN MIX o el
control PHONES/CTRL ROOM hasta 0, o hasta el
nivel deseado.
(FR) Appuyez sur la touche MAIN des canaux pour les
a ecter au MAIN MIX.
(DE) Drücken Sie die MAIN-Taste für jeden Kanal,
der dem MAIN MIX zugewiesen werden soll.
(PT) Prima o botão MAIN em cada canal para atribuir
o canal para MAIN MIX.
(EN) Adjust the relative level of various
microphones and instruments by raising
each CHANNEL FADER.
(ES) Ajuste el nivel relativo de los diversos micrófonos
e instrumentos elevando cada CHANNEL FADER.
(FR) Réglez le niveau relatif des microphones et des
instruments en montant chaque FADER DE CANAL.
(DE) Stellen Sie die relativen Pegel verschiedener
Mikrofone und Instrumente ein, indem Sie die Fader
der jeweiligen Kanäle nach oben schieben.
(PT) Ajuste o nível relativo de diversos microfones e
instrumentos, elevando cada CHANNEL FADER.
(EN) Adjust the left-right position of a
channel in the stereo eld if necessary
by turning the channel’s PAN or
BAL knob.
(ES) Ajuste la posición izquierda-derecha de un
canal en el campo estéreo si es necesario girando
el control PAN o BAL del canal.
(FR) Le cas échéant, réglez la position
droite-gauche des canaux dans le champ
stéréo en tournant le potentiomètre PAN ou
BAL correspondant.
(DE) Stellen Sie bei Bedarf die Position eines
Kanals im Stereofeld ein, indem Sie den
PAN- oder BAL-Regler des jeweiligen Kanals
nach rechts oder links drehen.
(PT) Ajuste a posição esquerda-direita de um
canal no campo estéreo, se necessário, rodando o
botão PAN ou BAL do canal.
(EN) Adjust the COMP knob to add
compression to an input if necessary.
(ES) Ajuste el control COMP para
añadir compresión a una entrada si es necesario.
(FR) Le cas échéant, réglez le potentiomètre COMP
pour ajouter une compression à une entrée.
(DE) Fügen Sie bei Bedarf mit dem COMP-Regler
einem Eingang Kompression hinzu.
(PT) Ajuste o botão COMP para adicionar
compressão a uma entrada se necessário.

20 XENYX X2442USB/X2222USB/X1622USB Quick Start Guide 21
(EN)
Step 3: Getting
started
(ES)
Paso 3: Puesta en
marcha
(FR)
Etape 3 : Mise en
oeuvre
(DE)
Schritt 3: Erste
Schritte
(PT)
Passo 3: Primeiros
Passos
XENYX X2442USB/X2222USB/X1622USB Getting started XENYX X2442USB/X2222USB/X1622USB Gain Setting
(EN) Setting the channel gain for the
X1622USB/X2222USB/X2442USB:
(ES) Ajuste de la ganancia del canal para el
X1622USB/X2222USB/X2442USB:
(FR) Réglage du gain du canal sur le
X1622USB/X2222USB/X2442USB:
(DE) Einstellen des Kanalpegels mit dem
X1622USB/X2222USB/X2442USB:
(PT) De nir o ganho de canal para o
X1622USB/X2222USB/X2442USB:
(EN) Press the Channel 1 SOLO button.
Press the MODE button next to the VU METER
to allow the METER to operate in PFL
(pre-fader listen) mode.
(ES) Pulse el botón SOLO del Canal 1. Pulse el botón
MODE junto al VU METER para permitir que el METER
funcione en modo PFL (escucha pre-fader).
(FR) Appuyez sur la touche SOLO du canal 1.
Appuyez sur la touche MODE en regard du VU-METRE
pour que ce dernier fonctionne en mode PFL
(Pre-Fader Listen).
(DE) Drücken Sie die SOLO-Taste für Kanal 1.
Drücken Sie die MODE-Taste neben dem
VU-Meter, damit das VU-Meter im PFL-Modus
(Pre-Fader Listen) arbeitet.
(PT) Prima o botão SOLO do canal 1. Prima o botão
MODE junto a VU METER para permitir que METER
funcione no modo PFL (audição pré-fader).
(EN) Sing, speak or play at a normal level
through the microphone or instrument
connected to Channel 1.
(ES) Cante, hable o toque a un nivel normal a través
del micrófono o instrumento conectado al Canal 1.
(FR) Chantez, parlez ou jouez à un niveau normal
dans le microphone ou avec l’instrument connecté
au canal 1.
(DE) Singen, sprechen oder spielen Sie mit
normaler Lautstärke in das an Kanal 1
angeschlossene Mikrofon bzw. mit dem an Kanal 1
angeschlossenen Instrument.
(PT) Cante, fale ou toque a um nível normal através
do microfone ou instrumento ligado ao canal 1.
(EN) While singing or playing, turn
Channel 1’s GAIN control. The VU METER
will display the signal level. Set the GAIN
control so that the loudest peaks reach 0 on the
VU METER. Press the Channel 1 SOLO button again.
(ES) Mientras esté cantando o tocando, gire el control
GAIN del Canal 1. El VU METER mostrará el nivel de
señal. Establezca el control GAIN de forma que los
picos más altos lleguen a 0 en el VU METER. Pulse de
nuevo el botón SOLO del Canal 1.
(FR) Pendant que vous chantez ou jouez, tournez la
commande GAIN du canal 1. Le VU-METRE a che
le niveau du signal. Réglez la commande GAIN de
sorte que les pics les plus forts atteignent 0 sur le
VU-METRE. Appuyez de nouveau sur la touche SOLO
du canal 1.
(DE) Drehen Sie beim Singen oder Spielen den
GAIN-Regler für Kanal 1. Das VU-Meter zeigt den
Signalpegel an. Stellen Sie den GAIN-Regler so ein,
dass die lautesten Stellen auf dem VU-Meter den
Wert 0 erreichen. Drücken Sie erneut die SOLO-Taste
für Kanal 1.
(PT) Enquanto canta ou toca, rode o controlo GAIN do
canal 1. O VU METER irá apresentar o nível do sinal.
De na o controlo GAIN de forma a que os picos mais
altos atinjam 0 no VU METER. Prima novamente o
botão SOLO do canal 1.
(EN) Repeat steps 1-3 for any other
channels that will be used.
(ES) Repita los pasos 1-3 para el resto
de canales que se vayan a utilizar.
(FR) Répétez les étapes 1 à 3 pour les autres
canaux utilisés.
(DE) Wiederholen Sie Schritte 1-3 für alle weiteren
verwendeten Kanäle.
(PT) Repita os passos 1-3 para quaisquer outros
canais que utilize.
(EN) For live applications, adjust the
overall output from the mixer to the
power amp or powered speakers by
raising the MAIN MIX fader(s). If the red CLIP LEDs on
the VU METER light, lower the MAIN MIX fader(s).
(ES) Para las aplicaciones en directo, ajuste la
salida general desde la mesa de mezclas hasta
el ampli cador de potencia o los altavoces
alimentados elevando los faders MAIN MIX. Baje los
faders MAIN MIX si los LED CLIP en el VU METER
se encienden.
(FR) Pour les applications live, réglez la sortie globale
de la console vers l’ampli cateur de puissance ou
les haut-parleurs actifs en montant les faders MAIN
MIX. Si les LED rouge CLIP du VU-METRE s’allument,
baissez les faders MAIN MIX.
(DE) Stellen Sie bei Live-Anwendungen den
Summenpegel vom Mischpult zum Verstärker oder
zur Aktivbox ein, indem Sie den/die MAIN MIX-Fader
nach oben schieben. Wenn die roten CLIP-LEDs am
VU-Meter au euchten, schieben Sie den/die MAIN
MIX-Fader nach unten.
(PT) Para aplicações em directo, ajuste a saída geral
do misturador para o ampli cador de potência ou
colunas com alimentação elevando o(s) fader(s)
MAIN MIX. Se os LEDs CLIP vermelhos no VU METER
acenderem, baixe o fader(s) MAIN MIX.
(EN) Use the channel AUX knobs and
master AUX SEND knobs to send the
channel signals to an e ects processor or
stage monitor connected to the AUX SEND jacks.
If used for e ects, route the signal back from the
processor to the AUX RETURN jacks.
(ES) Utilice los controles AUX del canal y ajuste los
controles AUX SEND para enviar las señales del
canal hasta un procesador de efectos o monitor
de escenario conectado a los jacks AUX SEND. Si se
utiliza para los efectos, dirija la señal del procesador
a los jacks AUX RETURN.
(FR) Utilisez les potentiomètres AUX et les
potentiomètres généraux AUX SEND pour envoyer
le signal du canal au processeur d’e ets ou au
haut-parleur de retour branché aux jacks AUX SEND.
Lorsqu’il est utilisé pour des e ets, renvoyez ce
signal du processeur aux jacks AUX RETURN.
(DE) Verwenden Sie die AUX-Regler der jeweiligen
Kanäle und den AUX SEND-Regler am Master, um das
Signal des Kanals auf einen E ektprozessor oder
Bühnenmonitor zu leiten, der an den AUX SEND-
Buchsen angeschlossen ist. Wenn Sie die Buchse für
E ekte verwenden, leiten Sie das Signal über die
AUX RETURN-Buchsen vom Prozessor zurück.
(PT) Utilize os botões AUX de canal e os botões AUX
SEND principais para enviar o sinal do canal para um
processador de efeitos ou monitor de palco ligado às
chas AUX SEND. Se utilizado para efeitos,
encaminhe o sinal de volta do processador para as
chas AUX RETURN.
F1320D

22 XENYX X2442USB/X2222USB/X1622USB Quick Start Guide 23
Multi-FX Processor
(EN) Your mixer has a built-in e ects processor.
Follow these steps to add an e ect to one or
more channels.
(ES) Su mesa de mezclas tiene un procesador
de efectos integrado. Siga estos pasos para
añadir un efecto a uno o más canales.
(FR) La console est équipée d’un processeur
d’e ets intégr é. Les étapes suivantes vous
permettront d’ajouter un e et à un ou
plusieurs canaux.
(DE) Ihr Mischpult verfügt über einen
eingebauten E ektprozessor. Folgen Sie
diesen Schritten, um einem oder mehreren
Kanälen einen E ekt hinzuzufügen.
(PT) O misturador dispõe de um processador
de efeitos integrado. Siga estes passos para
adicionar um efeito a um ou mais canais.
(EN) Turn the FX knob up half way on each
channel to which you would like to add
an e ect.
(ES) Gire el control FX media vuelta en cada canal al
que desee añadir un efecto.
(FR) Tournez jusqu’à mi-parcours le potentiomètre
FX des canaux sur lesquels vous souhaitez ajouter
un e et.
(DE) Drehen Sie für jeden Kanal, dem Sie einen E ekt
hinzufügen möchten, den FX-Regler halb auf.
(PT) Rode o botão FX para cima até meio em cada
canal a que pretende adicionar um efeito.
(EN) Turn the FX SEND and FX RETURN
knobs to 0. You may adjust them later.
(ES) Gire los controles FX SEND y
FX RETURN hasta la posición 0. Puede ajustarlos
más tarde.
(FR) Réglez les potentiomètres FX SEND et FX RETURN
sur 0. Vous pourrez les régler ultérieurement.
(DE) Stellen Sie den FX SEND- und den FX RETURN-
Regler auf 0. Diese können Sie später anpassen.
(PT) Rode os botões FX SEND e FX RETURN para 0.
Poderá ajustá-los posteriormente.
(EN) Scroll through the e ects by turning
the PROGRAM knob. The preset number
will ash in the display. Press the
PROGRAM knob to select the e ect.
(ES) Gire el control PROGRAM para desplazarse por
los efectos. El número prede nido parpadeará en la
pantalla. Pulse el control PROGRAM para seleccionar
el efecto.
(FR) Faites dé ler les e ets en faisant tourner le
bouton PROGRAM. Le numéro du preset clignote sur
l’a chage. Appuyez sur le bouton PROGRAM pour
sélectionner l’e et.
(DE) Wählen Sie mit dem Program-Regler einen
E ekt aus., indem Sie den PROGRAM-Regler drehen.
Die aktuelle Nummer wird im Display angezeigt.
Drücken Sie auf den PROGRAM-Regler, um den
E ekt auszuwählen.
(PT) Percorra os efeitos rodando o botão PROGRAM.
O número prede nido pisca no ecrã. Prima o botão
PROGRAM para seleccionar o efeito.
(EN) Adjust the e ect’s rst parameter:
• After you have selected a preset
(step 3), press the PROGRAM knob to
enter Edit Mode. The right LED inside the display
will start blinking.
• Turn the PROGRAM knob to adjust the parameter.
After 5 seconds of inactivity, the mixer exits Edit
Mode and the LED goes out.
(ES) Ajuste el primer parámetro del efecto:
• Después de seleccionar un preajuste (paso 3),
pulse el control PROGRAM para entrar en modo de
edición. El LED derecho situado en el interior de la
pantalla comenzará a parpadear.
• Gire el control PROGRAM para ajustar el parámetro.
Después de 5 segundos de inactividad, la mesa de
mezclas sale del modo de edición y el LED se apaga.
(FR) Réglez le premier paramètre de l’e et :
• Après avoir sélectionné un preset (étape 3),
appuyez sur le bouton PROGRAM pour entrer dans
le mode Edit. La LED droite de l'a chage clignote.
• Tournez le bouton PROGRAM pour régler le
paramètre. Après 5 secondes d’inactivité,
la console quitte le mode Edit et la LED s’éteint.
(DE) Einstellen des ersten E ektparameters:
• Nachdem Sie ein Preset gewählt haben (Schritt 3),
drücken Sie auf den PROGRAM-Regler, um in den
Bearbeitungsmodus zu gelangen. Die rechte LED
im Display beginnt zu blinken.
• Drehen Sie den PROGRAM-Regler, um die
Parameter einzustellen. Nach 5 Sekunden
ohne Aktivität verlässt das Mischpult den
Bearbeitungsmodus, und die LED erlischt.
(PT) Ajuste o primeiro parâmetro do efeito:
• Após seleccionar uma prede nição (passo 3),
prima o botão PROGRAM para aceder ao modo de
edição. O LED direito no interior do visor começa
a piscar.
• Rode o botão PROGRAM para ajustar o parâmetro.
Após 5 segundos de inactividade, o misturador sai
do modo de edição e o LED apaga-se.
(EN) Adjust the e ect’s second parameter:
• If the e ect’s second parameter is an
on/o or toggled value, press the TAP
button to select between settings. 2 LEDs inside
the display will start blinking.
• If the e ect’s second parameter is speed-based,
press the TAP button in rhythm with the desired
tempo. The TAP LED will ash to the current tempo.
If ‘Lo’ is displayed, the tapped tempo is too slow.
If ‘Hi’ is displayed, the tapped tempo is too fast.
• After 5 seconds of inactivity, the mixer exits Edit
Mode and the LEDs go out.
(ES) Ajuste el segundo parámetro del efecto:
• Si el segundo parámetro del efecto es un valor
que alterna entre encendido y apagado, pulse el
botón TAP para seleccionar entre los ajustes. 2 LED
situados en el interior de la pantalla comenzarán
a parpadear.
• Si el segundo parámetro del efecto depende de
la velocidad, pulse el botón TAP en ritmo con el
tempo deseado. El LED TAP parpadeará al tempo
actual. Si se muestra ‘Lo’, el tempo de toque es
demasiado lento. Si se muestra ‘‘Hi’, el tempo de
toque es demasiado rápido.
• Después de 5 segundos de inactividad, la mesa de
mezclas sale del modo de edición y el LED se apaga.
(FR) Réglez le deuxième paramètre de l’e et :
• Si le deuxième paramètre de l'e et correspond
à une valeur de marche/arrêt ou de bouton,
appuyez sur la touche TAP pour sélectionner un
paramètre. 2 LED de l'a chage clignotent.
• Si le deuxième paramètre de l'e et dépend d'une
vitesse, appuyez sur la touche TAP en rythme avec
le tempo souhaité. La LED TAP clignote au rythme
actuel. Si « Lo » s'a che, le tempo est trop lent.
Si « Hi » s'a che, le tempo est trop rapide.
• Après 5 secondes d'inactivité, la console quitte le
mode Edit et les LED s'éteignent.
(DE) Einstellen des zweiten E ektparameters:
• Wenn der zweite Parameter des E ekts ein
Ein/Aus- oder umschaltbarer Wert ist, drücken Sie
die TAP-Taste, um zwischen den Einstellungen zu
wechseln. 2 LEDs im Display beginnen zu blinken.
• Wenn der zweite Parameter des E ekts
tempobasiert ist, drücken Sie die TAP-Taste
synchron mit dem gewünschten Tempo.
Die TAP-LED blinkt im aktuellen Tempo.
Wenn „Lo“ angezeigt wird, ist das eingestellte
Tempo zu niedrig. Wenn „Hi“ angezeigt wird,
ist das eingestellte Tempo zu hoch.
• Nach 5 Sekunden ohne weitere Aktion verlässt
das Mischpult den Bearbeitungsmodus, und die
LEDs erlöschen.
(PT) Ajuste o segundo parâmetro do efeito:
• Se o segundo parâmetro do efeito for um valor
ligado/desligado ou alternado, prima o botão TAP
para seleccionar entre as de nições. 2 LEDs no
interior do visor começarão a piscar.
• Se o segundo parâmetro do efeito for baseado na
velocidade, prima o botão TAP no ritmo desejado.
O LED TAP irá piscar ao ritmo actual. Se for
apresentado ‘Lo’, o ritmo tocado é demasiado
lento. Se for apresentado ‘Hi’, o ritmo tocado é
demasiado rápido.
• Após 5 segundos de inactividade, o misturador sai
do modo de edição e os LEDs apagam-se.
(EN) Readjust each channel’s FX knob to
make sure the right amount of e ect
is added.
(ES) Reajuste el control FX de cada canal
para garantizar que se añada la cantidad de
efecto correcta.
(FR) Réglez le potentiomètre FX de chaque canal pour
véri er que l’ajout de l’e et est correct.
(DE) Stellen Sie den FX-Regler für jeden Kanal
nach, damit der E ekt mit der richtigen Stärke
hinzugefügt wird.
(PT) Reajuste o botão FX de cada canal para se
certi car de que é adicionada a quantidade de
efeito adequada.
La página se está cargando...

26 XENYX X2442USB/X2222USB/X1622USB Quick Start Guide 27
FEDERAL COMMUNICATIONS
COMMISSION COMPLIANCE
INFORMATION
Responsible Party Name: MUSIC Tribe Commercial NV Inc.
Address: 5270 Procyon Street
Las Vegas, NV 89118
USA
Phone Number: +1 702 800 8290
XENYX X2442USB/X2222USB/X1622USB
complies with the FCC rules as mentioned in the followingparagraph:
This equipment has been tested and found to comply with the limits for a ClassB
digital device, pursuant to part 15 of the FCC Rules. These limits are designed
to provide reasonable protection against harmful interference in a residential
installation. This equipment generates, uses and can radiate radio frequency
energy and, if not installed and used in accordance with the instructions, may cause
harmful interference to radio communications. However, there is no guarantee that
interference will not occur in a particular installation. If this equipment does cause
harmful interference to radio or television reception, which can be determined
by turning the equipment o and on, the user is encouraged to try to correct the
interference by one or more of the followingmeasures:
• • Reorient or relocate the receiving antenna
• • Increase the separation between the equipment and receiver
• • Connect the equipment into an outlet on a circuit di erent from that to which the
receiver is connected
• • Consult the dealer or an experienced radio/TV technician forhelp
This device complies with Part 15 of the FCC rules. Operation is subject to the
following two conditions:
(1) this device may not cause harmful interference, and
(2) this device must accept any interference received, including interference that may
cause undesired operation.
Important information:
Changes or modi cations to the equipment not expressly approved by MUSIC Tribe
can void the user’s authority to use the equipment.
XENYX
X2442USB/X2222USB/X1622USB
Other important information
1. Register online. Please register your new
MUSIC Tribe equipment right after you purchase it by
visiting behringer.com. Registering your purchase using
our simple online form helps us to process your repair
claims more quickly and e ciently. Also, read the terms
and conditions of our warranty, if applicable.
2. Malfunction. Should your MUSIC Tribe
Authorized Reseller not be located in your vicinity,
you may contact the MUSIC Tribe Authorized Ful ller for
your country listed under “Support” at behringer.com.
Should your country not be listed, please check if your
problem can be dealt with by our “Online Support” which
may also be found under “Support” at behringer.com.
Alternatively, please submit an online warranty claim at
behringer.com BEFORE returning the product.
3. Power Connections. Before plugging the
unit into a power socket, please make sure you are using
the correct mains voltage for your particular model.
Faulty fuses must be replaced with fuses of the same type
and rating without exception.
1. Registro online. Le recomendamos que
registre su nuevo aparato MUSIC Tribe justo después de
su compra accediendo a la página web behringer.com.
El registro de su compra a través de nuestro sencillo
sistema online nos ayudará a resolver cualquier
incidencia que se presente a la mayor brevedad posible.
Además, aproveche para leer los términos y condiciones de
nuestra garantía, si es aplicable en su caso.
2. Averías. En el caso de que no exista un distribuidor
MUSIC Tribe en las inmediaciones, puede ponerse en
contacto con el distribuidor MUSIC Tribe de su país,
que encontrará dentro del apartado “Support” de nuestra
página web behringer.com. En caso de que su país no
aparezca en ese listado, acceda a la sección “Online Support”
(que también encontrará dentro del apartado “Support”
de nuestra página web) y compruebe si su problema aparece
descrito y solucionado allí. De forma alternativa, envíenos a
través de la página web una solicitud online de soporte en
periodo de garantía ANTES de devolvernos el aparato.
3. Conexiones de corriente. Antes de enchufar
este aparato a una salida de corriente, asegúrese de que dicha
salida sea del voltaje adecuado para su modelo concreto.
En caso de que deba sustituir un fusible quemado, deberá
hacerlo por otro de idénticas especi caciones, sin excepción.
1. Enregistrez-vous en ligne. Prenez le
temps d’enregistrer votre produit MUSIC Tribe aussi vite
que possible sur le site Internet behringer.com. Le fait
d’enregistrer le produit en ligne nous permet de gérer
les réparations plus rapidement et plus e cacement.
Prenez également le temps de lire les termes et conditions
de notre garantie.
2. Dysfonctionnement. Si vous n’avez pas de
revendeur MUSIC Tribe près de chez vous, contactez le
distributeur MUSIC Tribe de votre pays : consultez la liste
des distributeurs de votre pays dans la page “Support” de
notre site Internet behringer.com. Si votre pays n’est pas
dans la liste, essayez de résoudre votre problème avec
notre “aide en ligne” que vous trouverez également dans
la section “Support” du site behringer.com. Vous pouvez
également nous faire parvenir directement votre demande
de réparation sous garantie par Internet sur le site
behringer.com AVANT de nous renvoyer le produit.
3. Raccordement au secteur. Avant de relier
cet équipement au secteur, assurez-vous que la tension
secteur de votre région soit compatible avec l’appareil.
Veillez à remplacer les fusibles uniquement par des
modèles exactement de même taille et de même valeur
électrique — sans aucune exception.
1. Online registrieren. Bitte registrieren Sie Ihr
neues MUSIC Tribe-Gerät direkt nach dem Kauf auf der
Website behringer.com. Wenn Sie Ihren Kauf mit unserem
einfachen online Formular registrieren, können wir Ihre
Reparaturansprüche schneller und e zienter bearbeiten.
Lesen Sie bitte auch unsere Garantiebedingungen,
falls zutre end.
2. Funktionsfehler. Sollte sich kein MUSIC Tribe
Händler in Ihrer Nähe be nden, können Sie den
MUSIC Tribe Vertrieb Ihres Landes kontaktieren, der auf
behringer. com unter „Support“ aufgeführt ist. Sollte Ihr
Land nicht aufgelistet sein, prüfen Sie bitte, ob Ihr
Problem von unserem „Online Support“ gelöst werden
kann, den Sie ebenfalls auf behringer.com unter
„Support“ nden. Alternativ reichen Sie bitte Ihren
Garantieanspruch online auf behringer.com ein, BEVOR Sie
das Produkt zurücksenden.
3. Stromanschluss. Bevor Sie das Gerät an
eine Netzsteckdose anschließen, prüfen Sie bitte, ob Sie
die korrekte Netzspannung für Ihr spezielles Modell
verwenden. Fehlerhafte Sicherungen müssen ausnahmslos
durch Sicherungen des gleichen Typs und Nennwerts
ersetzt werden.
1. Registre-se online. Por favor, registre seu
novo equipamento MUSIC Tribe logo após a compra
visitando o site behringer.com Registrar sua compra
usando nosso simples formulário online nos ajuda a
processar seus pedidos de reparos com maior rapidez e
e ciência. Além disso, leia nossos termos e condições de
garantia, caso seja necessário.
2. Funcionamento Defeituoso.
Caso seu fornecedor MUSIC Tribe não esteja localizado
nas proximidades, você pode contatar um distribuidor
MUSIC Tribe para o seu país listado abaixo de “Suporte”
em behringer.com. Se seu país não estiver na lista,
favor checar se seu problema pode ser resolvido com o
nosso “Suporte Online” que também pode ser achado
abaixo de “Suporte”em behringer.com. Alternativamente,
favor enviar uma solicitação de garantia online em
behringer.com ANTES da devolução do produto.
3. Ligações. Antes de ligar a unidade à tomada,
assegure-se de que está a utilizar a voltagem correcta para
o modelo em questão. Os fusíveis com defeito terão de
ser substituídos, sem qualquer excepção, por fusíveis do
mesmo tipo e corrente nominal.
Important information
Aspectos importantes
Informations importantes
Weitere wichtige
Informationen
Outras Informações
Importantes
La página se está cargando...
Transcripción de documentos
2 XENYX X2442USB/X2222USB/X1622USB Important Safety Instructions Terminals marked with this symbol carry electrical current of sufficient magnitude to constitute risk of electric shock. Use only high-quality professional speaker cables with ¼" TS or twist-locking plugs pre-installed. All other installation or modification should be performed only by qualified personnel. This symbol, wherever it appears, alerts you to the presence of uninsulated dangerous voltage inside the enclosure - voltage that may be sufficient to constitute a risk of shock. This symbol, wherever it appears, alerts you to important operating and maintenance instructions in the accompanying literature. Please read the manual. Caution To reduce the risk of electric shock, do not remove the top cover (or the rear section). No user serviceable parts inside. Refer servicing to qualified personnel. Caution To reduce the risk of fire or electric shock, do not expose this appliance to rain and moisture. The apparatus shall not be exposed to dripping or splashing liquids and no objects filled with liquids, such as vases, shall be placed on the apparatus. Caution These service instructions are for use by qualified service personnel only. To reduce the risk of electric shock do not perform any servicing other than that contained in the operation instructions. Repairs have to be performed by qualified service personnel. 1. Read these instructions. 2. Keep these instructions. 3. Heed all warnings. 4. Follow all instructions. 5. Do not use this apparatus near water. 6. Clean only with dry cloth. 7. Do not block any ventilation openings. Install in accordance with the manufacturer’s instructions. 8. Do not install near any heat sources such as radiators, heat registers, stoves, or other apparatus (including amplifiers) that produce heat. Quick Start Guide 9. Do not defeat the safety purpose of the polarized or grounding-type plug. A polarized plug has two blades with one wider than the other. A grounding-type plug has two blades and a third grounding prong. The wide blade or the third prong are provided for your safety. If the provided plug does not fit into your outlet, consult an electrician for replacement of the obsolete outlet. 10. Protect the power cord from being walked on or pinched particularly at plugs, convenience receptacles, and the point where they exit from the apparatus. 11. Use only attachments/accessories specified by the manufacturer. 12. Use only with the cart, stand, tripod, bracket, or table specified by the manufacturer, or sold with the apparatus. When a cart is used, use caution when moving the cart/apparatus combination to avoid injury from tip-over. 13. Unplug this apparatus during lightning storms or when unused for long periods of time. 14. Refer all servicing to qualified service personnel. Servicing is required when the apparatus has been damaged in any way, such as power supply cord or plug is damaged, liquid has been spilled or objects have fallen into the apparatus, the apparatus has been exposed to rain or moisture, does not operate normally, or has been dropped. 15. The apparatus shall be connected to a MAINS socket outlet with a protective earthing connection. 16. Where the MAINS plug or an appliance coupler is used as the disconnect device, the disconnect device shall remain readily operable. 17. Correct disposal of this product: This symbol indicates that this product must not be disposed of with household waste, according to the WEEE Directive (2012/19/EU) and your national law. This product should be taken to a collection center licensed for the recycling of waste electrical and electronic equipment (EEE). The mishandling of this type of waste could have a possible negative impact on the environment and human health due to potentially hazardous substances that are generally associated with EEE. At the same time, your cooperation in the correct disposal of this product will contribute to the efficient use of natural resources. For more information about where you can take your waste equipment for recycling, please contact your local city office, or your household waste collection service. 18. Do not install in a confined space, such as a book case or similar unit. 19. Do not place naked flame sources, such as lighted candles, on the apparatus. 20. Please keep the environmental aspects of battery disposal in mind. Batteries must be disposed-of at a battery collection point. 21. Use this apparatus in tropical and/or moderate climates. Instrucciones de seguridad LEGAL DISCLAIMER MUSIC Tribe accepts no liability for any loss which may be suffered by any person who relies either wholly or in part upon any description, photograph, or statement contained herein. Technical specifications, appearances and other information are subject to change without notice. All trademarks are the property of their respective owners. MIDAS, KLARK TEKNIK, LAB GRUPPEN, LAKE, TANNOY, TURBOSOUND, TC ELECTRONIC, TC HELICON, BEHRINGER, BUGERA and COOLAUDIO are trademarks or registered trademarks of MUSIC Tribe Global Brands Ltd. © MUSIC Tribe Global Brands Ltd. 2018 All rights reserved. LIMITED WARRANTY For the applicable warranty terms and conditions and additional information regarding MUSIC Tribe’s Limited Warranty, please see complete details online at musictri.be/warranty. Las terminales marcadas con este símbolo transportan corriente eléctrica de magnitud suficiente como para constituir un riesgo de descarga eléctrica. Utilice solo cables de altavoz profesionales y de alta calidad con conectores TS de 6,3 mm o de bayoneta prefijados. Cualquier otra instalación o modificación debe ser realizada únicamente por un técnico cualificado. Este símbolo, siempre que aparece, le advierte de la presencia de voltaje peligroso sin aislar dentro de la caja; este voltaje puede ser suficiente para constituir un riesgo de descarga. Este símbolo, siempre que aparece, le advierte sobre instrucciones operativas y de mantenimiento que aparecen en la documentación adjunta. Por favor, lea el manual. Atención Para reducir el riesgo de descarga eléctrica, no quite la tapa (o la parte posterior). No hay piezas en el interior del equipo que puedan ser reparadas por el usuario. Si es necesario, póngase en contacto con personal cualificado. Atención Para reducir el riesgo de incendio o descarga eléctrica, no exponga este aparato a la lluvia, humedad o alguna otra fuente que pueda salpicar o derramar algún líquido sobre el aparato. No coloque ningún tipo de recipiente para líquidos sobre el aparato. Atención Las instrucciones de servicio deben llevarlas a cabo exclusivamente personal cualificado. Para evitar el riesgo de una descarga eléctrica, no realice reparaciones que no se encuentren descritas en el manual de operaciones. Las reparaciones deben ser realizadas exclusivamente por personal cualificado. 1. Lea las instrucciones. 2. Conserve estas instrucciones. 3. Preste atención a todas las advertencias. 4. Siga todas las instrucciones. 5. No use este aparato cerca del agua. 6. Limpie este aparato con un paño seco. 7. No bloquee las aberturas de ventilación. Instale el equipo de acuerdo con las instrucciones del fabricante. 8. No instale este equipo cerca de fuentes de calor tales como radiadores, acumuladores de calor, estufas u otros aparatos (incluyendo amplificadores) que puedan producir calor. 9. No elimine o deshabilite nunca la conexión a tierra del aparato o del cable de alimentación de corriente. Un enchufe polarizado tiene dos polos, uno de los cuales tiene un contacto más ancho que el otro. Una clavija con puesta a tierra dispone de tres contactos: dos polos y la puesta a tierra. El contacto ancho y el tercer contacto, respectivamente, son los que garantizan una mayor seguridad. Si el enchufe suministrado con el equipo no concuerda con la toma de corriente, consulte con un electricista para cambiar la toma de corriente obsoleta. 10. Coloque el cable de suministro de energía de manera que no pueda ser pisado y que esté protegido de objetos afilados. Asegúrese de que el cable de suministro de energía esté protegido, especialmente en la zona de la clavija y en el punto donde sale del aparato. 11. Use únicamente los dispositivos o accesorios especificados por el fabricante. 12. Use únicamente la carretilla, plataforma, trípode, soporte o mesa especificados por el fabricante o suministrados junto con el equipo. Al transportar el equipo, tenga cuidado para evitar daños y caídas al tropezar con algún obstáculo. 13. Desenchufe el equipo durante tormentas o si no va a utilizarlo durante un periodo largo. 14. Confíe las reparaciones únicamente a servicios técnicos cualificados. La unidad requiere mantenimiento siempre que haya sufrido algún daño, si el cable de suministro de energía o el enchufe presentaran daños, se hubiera derramado un líquido o hubieran caído objetos dentro del equipo, si el aparato hubiera estado expuesto a la humedad o la lluvia, si ha dejado de funcionar de manera normal o si ha sufrido algún golpe o caída. 15. Al conectar la unidad a la toma de corriente eléctrica asegúrese de que la conexión disponga de una unión a tierra. 16. Si el enchufe o conector de red sirve como único medio de desconexión, éste debe ser accesible fácilmente. 17. Cómo debe deshacerse de este aparato: Este símbolo indica que este aparato no debe ser tratado como basura orgánica, según lo indicado en la Directiva WEEE (2012/19/EU) y a las normativas aplicables en su país. En lugar de ello deberá llevarlo al punto limpio más cercano para el reciclaje de sus elementos eléctricos / electrónicos (EEE). Al hacer esto estará ayudando a prevenir las posibles consecuencias negativas para el medio ambiente y la salud que podrían ser provocadas por una gestión inadecuada de este tipo de aparatos. Además, el reciclaje de materiales ayudará a conservar los recursos naturales. Para más información acerca del reciclaje de este aparato, póngase en contacto con el Ayuntamiento de su ciudad o con el punto limpio local. 3 18. No instale esta unidad en un espacio muy reducido, tal como encastrada en una librería o similar. 19. No coloque objetos con llama, como una vela encendida, sobre este aparato. 20. Tenga presentes todas las advertencias relativas al reciclaje y correcta eliminación de las pilas. Las pilas deben ser siempre eliminadas en un punto limpio y nunca con el resto de la basura orgánica. 21. Use este aparato en rangos de temperatura moderados y/o tropicales. NEGACIÓN LEGAL MUSIC Tribe no admite ningún tipo de responsabilidad por cualquier daño o pérdida que pudiera sufrir cualquier persona por confiar total o parcialmente en la descripciones, fotografías o afirmaciones contenidas en este documento. Las especificaciones técnicas, imágenes y otras informaciones contenidas en este documento están sujetas a modificaciones sin previo aviso. Todas las marcas comerciales que aparecen aquí son propiedad de sus respectivos dueños. MIDAS, KLARK TEKNIK, LAB GRUPPEN, LAKE, TANNOY, TURBOSOUND, TC ELECTRONIC, TC HELICON, BEHRINGER, BUGERA y COOLAUDIO son marcas comerciales o marcas registradas de MUSIC Tribe Global Brands Ltd. © MUSIC Tribe Global Brands Ltd. 2018 Reservados todos los derechos. GARANTÍA LIMITADA Si quiere conocer los detalles y condiciones aplicables de la garantía así como información adicional sobre la Garantía limitada de MUSIC Tribe, consulte online toda la información en la web musictri.be/warranty. 8 XENYX X2442USB/X2222USB/X1622USB Quick Start Guide XENYX X2442USB/X2222USB/X1622USB Hook-up (EN) Step 1: Hook-Up (ES) Paso 1: Conexión (FR) Etape 1 : Connexions (DE) Schritt 1: Verkabelung (PT) Passo 1: Conexões Project studio Band or small church with stage monitors Estudio de grabación Banda o iglesia pequeña con monitores de escenario Project studio Groupe ou petite église avec retours sur scène Projektstudio Band oder kleine Kirche mit Bühnenmonitoren Estúdio de projecto Banda ou pequena igreja com monitores de palco 9 10 XENYX X2442USB/X2222USB/X1622USB Quick Start Guide XENYX X2442USB/X2222USB/X1622USB Hook-up (EN) Step 1: Hook-Up (ES) Paso 1: Conexión (FR) Etape 1 : Connexions (DE) Schritt 1: Verkabelung (PT) Passo 1: Conexões Business/ multimedia presentation Band or small church with external effects Presentación de negocio/multimedia Banda o iglesia pequeña con efectos externos Présentation commerciale/multimédia Groupe ou petite église avec effets externes Business/Multimedia-Präsentation Band oder kleine Kirche mit externen Effekten Apresentação empresarial/multimédia Banda ou pequena igreja com efeitos externos 11 12 XENYX X2442USB/X2222USB/X1622USB Quick Start Guide XENYX X2442USB/X2222USB/X1622USB Controls (EN) Step 2: Controls (ES) Paso 2: Controles GAIN knob adjusts the sensitivity of the MIC and/or LINE inputs. (FR) Etape 2 : Réglages GAIN, este control ajusta la sensibilidad de las entradas MIC y/o LINE. (DE) Schritt 2: Bedienelemente (PT) Passo 2: Controles Le potentiomètre GAIN règle la sensibilité des entrées MIC et/ou LINE. GAIN -Regler stellt die Empfindlichkeit des MICund/oder LINE-Eingangs ein. O botão GAIN ajusta a sensibilidade das entradas MIC e/ou LINE. AUX knobs adjust how much of the channel’s signal routes to the AUX SEND jacks. Press the PRE button when routing the signal to a stage monitor. Use the FX knob to send the channel’s signal to the internal multi-FX processor. AUX, este control ajusta qué parte de la señal del canal se dirige a los jacks AUX SEND. Pulse el botón PRE al dirigir la señal a un monitor de escenario. Utilice el control FX para enviar la señal del canal al procesador de multiefectos interno. Les potentiomètres AUX règlent le volume du signal du canal envoyé aux jacks AUX SEND. Appuyez sur la touche PRE lorsque le signal est envoyé à un haut-parleur de retour. Envoyez le signal du canal vers le processeur multi-effet interne à l'aide du potentiomètre FX. AUX-Regler stellen ein, wie viel des Kanalsignals auf die AUX SEND-Buchsen geleitet wird. Drücken Sie die PRETaste, wenn Sie das Signal auf einen Bühnenmonitor leiten möchten. Verwenden Sie den FX-Regler, um das Kanalsignal auf den internen Multi-Effektprozessor zu leiten. Os botões AUX ajustam a quantidade de sinal do canal encaminhada para as fichas AUX SEND. Prima o botão PRE ao encaminhar o sinal para um monitor de palco. Utilize o botão FX para enviar o sinal do canal para o processador multi-efeitos interno. PAN/BAL knob positions the channel in the stereo field. PAN/BAL, este control sitúa el canal en el campo estéreo. EQ knobs adjust the high, mid and low frequencies of the channel. Adjust the FREQ knob to select the specific frequency adjusted by the MID knob. Le potentiomètre PAN/BAL détermine la position du canal dans le champ stéréo. PAN/BAL-Regler positioniert den Kanal im Stereofeld. EQ, estos controles ajustan las frecuencias alta, media y baja del canal. Ajuste el control FREQ para seleccionar la frecuencia específica regulada con el control MID. O botão PAN/BAL posiciona o canal no campo estéreo. Les potentiomètres EQ règlent les fréquences aiguës, médiums et graves du canal. Réglez le potentiomètre FREQ pour sélectionner la fréquence modifiée par le potentiomètre MID. EQ-Regler stellen die hohen, mittleren und tiefen Frequenzen des Kanals ein. Verwenden Sie den FREQ-Regler, um die spezifische über den MID-Regler geregelte Frequenz auszuwählen. Os botões EQ ajustam as frequências altas, médias e baixas do canal. Ajuste o botão FREQ para seleccionar a frequência específica ajustada pelo botão MID. CLIP LED lights when the channel signal overloads. CLIP, estos LED se iluminan cuando la señal del canal se sobrecarga. La LED CLIP s'allume lorsqu'une surcharge apparaît dans le signal du canal. CLIP-LED leuchtet auf, wenn das Kanalsignal zu hoch ausgesteuert wird. O LED CLIP acende-se quando o sinal do canal está sobrecarregado. MUTE button mutes the channel. MUTE, este botón silencia el canal. La touche MUTE permet de désactiver le volume sonore du canal. MUTE stellt den Kanal stumm. O botão MUTE silencia o canal. 13 14 XENYX X2442USB/X2222USB/X1622USB Quick Start Guide XENYX X2442USB/X2222USB/X1622USB Controls (EN) Step 2: Controls COMP knob adjusts the amount of compression effect on the channel. (ES) Paso 2: Controles COMP, este control ajusta la cantidad de efecto de compresión en el canal. (FR) Etape 2 : Réglages Le potentiomètre COMP règle l'effet de compression sur le canal. (DE) Schritt 2: Bedienelemente COMP-Regler stellt die Stärke des Kompressionseffekts im Kanal ein. (PT) Passo 2: Controles O botão COMP ajusta a quantidade do efeito de compressão no canal. CHANNEL FADER adjusts the channel volume. CHANNEL FADER ajusta el volumen del canal. Le FADER DE CANAL permet de régler le volume du canal. (X2442USB only) CHANNEL FADER zur Einstellung der Kanallautstärke. O CHANNEL FADER ajusta o volume do canal. PHANTOM ON switch sends 48V to the XLR inputs for use with condenser microphones. PHANTOM ON, este interruptor envía 48 V a las entradas XLR para usarlas con micrófonos de condensador. PHANTOM ON-Schalter liefert 48 V an die XLREingänge zur Verwendung von Kondensatormikrofonen. Le commutateur PHANTOM ON envoie 48 V aux entrées XLR, dans le cas de l'utilisation de microphones électrostatiques. O botão PHANTOM ON envia 48 V para as entradas XLR para utilização com microfones condensadores. AC IN accepts the included power cable for connection to a mains outlet. AC IN dient zum Anschluss des mitgelieferten Netzkabels an einer Steckdose. ENTRADA DE CA acepta el cable de alimentación que se incluye para la conexión a una toma de corriente. O AC IN aceita o cabo de alimentação incluído para ligação a uma tomada eléctrica. AC IN permet de connecter le câble d'alimentation inclus à l'alimentation secteur. POWER ON switch turns the mixer on and off. POWER ON, este interruptor enciende y apaga la mesa de mezclas. POWER ON permet d'allumer ou d'éteindre la console. POWER ON-Schalter schaltet das Mischpult ein und aus. O botão POWER ON liga e desliga o misturador. 15 16 XENYX X2442USB/X2222USB/X1622USB Quick Start Guide XENYX X2442USB/X2222USB/X1622USB Controls X2442USB (EN) Step 2: Controls AUX SENDS adjust the amount of signal sent to a monitor speaker or external effects processor via the AUX SEND jacks. (ES) Paso 2: Controles (FR) Etape 2 : Réglages SOURCE buttons route the 2-track/USB, SUB, and MAIN MIX to the PHONES and CONTROL ROOM jacks. (DE) Schritt 2: Bedienelemente SOURCE, estos botones dirigen las señales 2-TRACK/USB, SUB y MAIN MIX a los jacks PHONES y CONTROL ROOM. (PT) Passo 2: Controles Les touches SOURCE acheminent les signaux 2-track/USB, SUB et MAIN MIX vers les jacks PHONES et CONTROL ROOM. SOURCE -Tasten leiten das 2-TR/USB-, das SUB- und das MAIN MIX-Signal auf die PHONES- und CONTROL ROOM-Buchsen. Os botões SOURCE encaminham as 2-TR/USB, USB e MAIN MIX para as fichas PHONES e CONTROL ROOM. AUX SENDS ajusta la cantidad de señal que se envía hasta un altavoz de monitoreo o procesador de efectos externo a través de los jacks AUX SEND. AUX SENDS stellt ein, mit welcher Stärke ein Signal über die AUX SEND-Anschlüsse auf einen Monitorlautsprecher oder einen externen Effektprozessor geleitet wird. Les potentiomètres AUX SENDS règlent le volume du signal envoyé à un haut-parleur de retour ou à un processeur d'effets externe via les jacks AUX SEND. AUX SENDS ajusta a quantidade de sinal enviada para um altifalante de monitor ou processador de efeitos externo através das fichas AUX SEND. MULTI-FX PROCESSOR adds a selected sound effect to any channels whose FX knob is turned up. See the Multi-FX Processor section for details. MULTI-FX PROCESSOR añade un efecto de sonido seleccionado a cualquier canal en el que esté activado el control FX. Consulte la información detallada en la sección Procesador de multiefectos. AUX RETURNS adjust the amount of signal returning from an external effects processor that is included in the main mix. Use the TO AUX SEND knob(s) to include the effects signal in your monitor mix as well. AUX RETURNS, ajusta la cantidad de señal que retorna desde un procesador de efectos externo incluido en la mezcla principal. Utilice los controles TO AUX SEND para incluir la señal de efectos en la mezcla del monitor también. PHONES/CTRL ROOM knob adjusts the headphone or studio monitor volume. PHONES/CTRL ROOM, este control ajusta el volumen de los auriculares o del monitor de estudio. Le potentiomètre PHONES/CTRL ROOM règle le volume du casque ou du haut-parleur studio. MODE button determines whether the channel’s SOLO button operates as ‘Solo in Place’ (button out) or ‘Pre-Fader Listen’ (button in). PFL is preferred for gain setting purposes. MODE, este botón determina si el botón SOLO funciona como ‘Solo in Place’ (botón sin pulsar) o ‘Pre-Fader Listen’ (botón pulsado). Es preferible la escucha pre-fader para ajustar la ganancia. La touche MODE permet de choisir si la touche SOLO des canaux doit fonctionner comme SOLO (“ Solo in Place”, touche relâchée) ou comme PFL (“ Pre-Fader Listen ”, touche enfoncée). Sélectionnez PFL pour régler le gain. MODE-Taste bestimmt, ob die SOLO-Taste des Kanals als ”Solo in Place” (Taste nicht eingedrückt) oder als ”Pre-Fader Listen” (PFL, Taste eingedrückt) arbeitet. Zum Einstellen der Signalstärke wird PFL bevorzugt. O botão MODE determina se o botão SOLO dos canais funciona como “Solo activado” (botão desligado) ou “Audição de pré-fader” (botão ligado). A audição de pré-fader (PFL) é recomendada para fins de definição de ganho. SUB faders adjust the output of the SUB OUTPUT jacks. Use the LEFT/RIGHT buttons to assign the SUB signal to the left and/or right MAIN MIX. SUB, estos faders ajustan la salida de los jacks SUB OUTPUT. Utilice los botones LEFT/RIGHT para asignar la señal SUB a MAIN MIX izquierda o derecha. Les faders SUB règlent la sortie des jacks SORTIE SUB. Affectez le signal SUB au MAIN MIX droit et/ou gauche à l'aide des touches LEFT/RIGHT. PHONES/CTRL ROOM -Regler stellt die Lautstärke der Kopfhörer bzw. Monitorlautsprecher im Studio ein. O botão PHONES/CTRL ROOM ajusta o volume dos auscultadores ou do estúdio do monitor. 2-TR/USB TO MAIN button routes the 2-TRACK and USB signal to the MAIN MIX. 2-TR/USB TO MAIN, este botón dirige la señal 2-TRACK y USB a MAIN MIX. Le PROCESSEUR MULTI-EFFET ajoute l'effet sonore sélectionné aux canaux dont le potentiomètre FX est activé. Reportez-vous à la section Processeur multi-effet pour en savoir plus. MULTI-FX PROCESSOR fügt allen Kanälen, deren FX-Regler aufgedreht ist, einen ausgewählten Effekt hinzu. Details siehe Multi-Effektprozessor. Les potentiomètres AUX RETURNS règlent le volume du signal revenant d'un processeur d'effets externe inclus dans le mix principal. Utilisez les potentiomètres TO AUX SEND afin d'inclure également le signal d'effet dans le mix de retour. Le bouton 2-TR/USB TO MAIN permet d'acheminer les signaux 2-TRACK et USB vers MAIN MIX. SUB-Fader stellen die Signalstärke der SUBOUTPUT-Buchsen ein. Verwenden Sie die LEFT-/ RIGHT-Tasten, um das SUB-Signal auf den linken und/oder rechten MAIN MIX zu leiten. VU METER muestra el nivel de la señal MAIN OUTPUT. Pulse el botón MODE para alternar entre SOLO (normal) y PFL (escucha pre-fader) al realizar los ajustes de nivel. VU METER zeigt die Signalstärke des MAIN OUTPUT an. Drücken Sie die MODE-Taste, um zwischen SOLO (normal) und PFL (PreFader Listen) zur Einstellung der Signalstärke zu wechseln. Os faders SUB ajustam a saída das fichas SUB OUTPUT. Utilize os botões LEFT/RIGHT para atribuir o sinal SUB a MAIN MIX esquerdo e/ou direito. MAIN MIX fader(s) adjust the overall output of the mixer. MAIN MIX-Fader stellt/stellen den Summenausgangspegel des Mischpults ein. O(s) fader(s) MAIN MIX ajusta(m) a saída geral do misturador. O botão 2-TR/USB TO MAIN encaminha o sinal 2-TRACK e USB para o MAIN MIX. 2-TR/USB TO MAIN-Taste leitet das 2-TRACK- und USBSignal auf den MAIN MIX. Le VU-METRE affiche le niveau du signal de la SORTIE MAIN. Appuyez sur la touche MODE pour passer de Solo (normal) à PFL (Pre-Fader Listen) lors du réglage des niveaux. Les faders MAIN MIX règlent la sortie globale de la console. AUX RETURNS ajusta a quantidade de retorno de sinal de um processador de efeitos externo incluído no main mix. Utilize o(s) botão(ões) TO AUX SEND para incluir também o sinal de efeitos na mistura de monitor. AUX RETURNS stellt ein, mit welcher Stärke ein Signal von einem externen Effektprozessor in den Main Mix integriert wird. Verwenden Sie den/die TO AUX SEND-Regler, um das Effektsignal ebenfalls in den Monitor-Mix zu integrieren. VU METER displays the MAIN OUTPUT signal level. Press the MODE button to switch between SOLO (normal) and PFL (pre-fader listen) for level setting purposes. MAIN MIX, estos faders ajustan la salida general de la mesa de mezclas. O MULTI-FX PROCESSOR (Processador MultiEfeitos) adiciona um efeito de som seleccionado aos canais em que o botão de efeitos tenha sido activado. Consulte a secção Processador Multi-Efeitos para obter mais informações. O VU METER (MEDIDOR DE VU) apresenta o nível do sinal MAIN OUTPUT. Prima o botão MODE para alternar entre SOLO (normal) e PFL (audição pré-fader) para fins de definição de nível. 17 18 XENYX X2442USB/X2222USB/X1622USB Quick Start Guide XENYX X2442USB/X2222USB/X1622USB Getting started (EN) Step 3: Getting started (EN) Set the GAIN for each channel. (EN) Press the MAIN button on each (EN) Adjust the left-right position of a See the Gain Setting section for details. channel to assign the channel to the MAIN MIX. channel in the stereo field if necessary by turning the channel’s PAN or (ES) Establezca GAIN para cada canal. Consulte los detalles en la sección Ajuste de la ganancia. (ES) Paso 3: Puesta en marcha (FR) Réglez le GAIN de chaque canal. Reportez-vous à la section Réglage du gain pour en savoir plus. (DE) Stellen Sie GAIN für jeden Kanal (FR) Etape 3 : Mise en oeuvre ein. Details finden Sie im Kapitel „Einstellen des Kanalpegels“. (PT) Defina o GAIN (GANHO) para cada canal. Consulte a secção Definição de Ganho para obter mais informações. (DE) Schritt 3: Erste Schritte (ES) Eleve lentamente los faders MAIN MIX o el control PHONES/CTRL ROOM hasta 0, o hasta el nivel deseado. (FR) Appuyez sur la touche MAIN des canaux pour les affecter au MAIN MIX. (DE) Drücken Sie die MAIN-Taste für jeden Kanal, der dem MAIN MIX zugewiesen werden soll. (PT) Prima o botão MAIN em cada canal para atribuir o canal para MAIN MIX. (EN) With the MAIN MIX fader(s) and PHONES/CTRL ROOM knob all the way down, turn your PA system or powered monitors on. (PT) Passo 3: Primeiros Passos BAL knob. (ES) Ajuste la posición izquierda-derecha de un canal en el campo estéreo si es necesario girando el control PAN o BAL del canal. (FR) Le cas échéant, réglez la position droite-gauche des canaux dans le champ stéréo en tournant le potentiomètre PAN ou BAL correspondant. (DE) Stellen Sie bei Bedarf die Position eines Kanals im Stereofeld ein, indem Sie den PAN- oder BAL-Regler des jeweiligen Kanals nach rechts oder links drehen. (PT) Ajuste a posição esquerda-direita de um canal no campo estéreo, se necessário, rodando o botão PAN ou BAL do canal. (ES) Con los faders MAIN MIX y el control PHONES/ CTRL ROOM situados hacia abajo por completo, encienda su amplificador de potencia o monitores con alimentación. (FR) Laissez les faders MAIN MIX et le potentiomètre PHONES/CTRL ROOM au minimum et allumez votre amplificateur de puissance ou vos haut-parleurs actifs. (EN) Make sure the power to all devices is (EN) Set all controls as shown above (EQ and (DE) Schalten Sie Ihr Beschallungssystem oder ihre turned off! PAN/BAL centered, all others down/off ). (ES) ¡Asegúrese de que la alimentación de (ES) Establezca todos los controles tal y aktiven Monitorlautsprecher ein, wenn sich der/die MAIN MIX-Fader und der PHONES/CTRL ROOM-Regler in unterster Stellung befinden. todos los dispositivos esté apagada! (FR) Vérifiez que tous les appareils sont hors tension. (DE) Achten Sie darauf, dass alle Geräte ausgeschaltet sind! (PT) Certifique-se de que a alimentação de todos os dispositivos está desligada! (EN) Connect all the appropriate power, audio and USB cables to the mixer. (ES) Conecte todos los cables de alimentación, audio y USB adecuados a la mesa de mezclas. (FR) Branchez les câbles d’alimentation, audio et USB appropriés à la console. (DE) Schließen Sie alle benötigten Stromversorgungs-, Audio- und USB-Kabel am Mischpult an. (PT) Ligue ao misturador todos os cabos de alimentação, áudio e USB adequados. como se indica más arriba (EQ y PAN/BAL centrados, el resto abajo/apagados). (FR) Réglez toutes les commandes comme sur la figure (EQ et PAN/BAL au centre, toutes les autres éteintes/en butée gauche). (DE) Stellen Sie alle Bedienelemente wie oben gezeigt ein (EQ und PAN/BAL in die Mitte, alle anderen nach unten/aus). (PT) Defina todos os comandos conforme indicado acima (EQ e PAN/BAL centrados, todos os outros para baixo/desligados). (EN) Turn the mixer on. (ES) Encienda la mesa de mezclas. (FR) Mettez la console en marche. (DE) Schalten Sie das Mischpult ein. (PT) Ligue o misturador. (PT) Com o(s) fader(s) MAIN MIX e o botão PHONES/ CTRL ROOM totalmente para baixo, ligue o sistema PA ou monitores alimentados. (EN) Slowly raise the MAIN MIX fader(s) or PHONES/CTRL ROOM knob to 0 or to desired level. (ES) Eleve lentamente los faders MAIN MIX o el control PHONES/ CTRL ROOM hasta 0, o hasta el nivel deseado. (FR) Montez lentement les faders MAIN MIX ou le potentiomètre PHONES/CTRL ROOM pour les placer sur 0 ou sur le niveau désiré (illustration). (DE) Bewegen Sie den/die MAIN MIX-Fader oder den PHONES/CTRL ROOM-Regler in die Stellung “0” oder auf den gewünschten Pegel. (PT) Eleve lentamente o comando do(s) fader(s) MAIN MIX ou PHONES/CTRL ROOM para 0 ou para o nível desejado. (EN) Adjust the relative level of various microphones and instruments by raising each CHANNEL FADER. (ES) Ajuste el nivel relativo de los diversos micrófonos e instrumentos elevando cada CHANNEL FADER. (FR) Réglez le niveau relatif des microphones et des instruments en montant chaque FADER DE CANAL. (DE) Stellen Sie die relativen Pegel verschiedener Mikrofone und Instrumente ein, indem Sie die Fader der jeweiligen Kanäle nach oben schieben. (PT) Ajuste o nível relativo de diversos microfones e instrumentos, elevando cada CHANNEL FADER. (EN) Adjust the COMP knob to add compression to an input if necessary. (ES) Ajuste el control COMP para añadir compresión a una entrada si es necesario. (FR) Le cas échéant, réglez le potentiomètre COMP pour ajouter une compression à une entrée. (DE) Fügen Sie bei Bedarf mit dem COMP-Regler einem Eingang Kompression hinzu. (PT) Ajuste o botão COMP para adicionar compressão a uma entrada se necessário. 19 20 XENYX X2442USB/X2222USB/X1622USB Quick Start Guide 21 XENYX X2442USB/X2222USB/X1622USB Getting started XENYX X2442USB/X2222USB/X1622USB Gain Setting (EN) Step 3: Getting started (EN) Setting the channel gain for the (PT) Cante, fale ou toque a um nível normal através X1622USB/X2222USB/X2442USB: do microfone ou instrumento ligado ao canal 1. (ES) Paso 3: Puesta en marcha (FR) Etape 3 : Mise en oeuvre (EN) For live applications, adjust the overall output from the mixer to the power amp or powered speakers by raising the MAIN MIX fader(s). If the red CLIP LEDs on the VU METER light, lower the MAIN MIX fader(s). (ES) Para las aplicaciones en directo, ajuste la salida general desde la mesa de mezclas hasta el amplificador de potencia o los altavoces alimentados elevando los faders MAIN MIX. Baje los faders MAIN MIX si los LED CLIP en el VU METER se encienden. (FR) Pour les applications live, réglez la sortie globale (DE) Schritt 3: Erste Schritte (PT) Passo 3: Primeiros Passos de la console vers l’amplificateur de puissance ou les haut-parleurs actifs en montant les faders MAIN MIX. Si les LED rouge CLIP du VU-METRE s’allument, baissez les faders MAIN MIX. (DE) Stellen Sie bei Live-Anwendungen den Summenpegel vom Mischpult zum Verstärker oder zur Aktivbox ein, indem Sie den/die MAIN MIX-Fader nach oben schieben. Wenn die roten CLIP-LEDs am VU-Meter aufleuchten, schieben Sie den/die MAIN MIX-Fader nach unten. (PT) Para aplicações em directo, ajuste a saída geral do misturador para o amplificador de potência ou colunas com alimentação elevando o(s) fader(s) MAIN MIX. Se os LEDs CLIP vermelhos no VU METER acenderem, baixe o fader(s) MAIN MIX. (EN) Use the channel AUX knobs and master AUX SEND knobs to send the channel signals to an effects processor or stage monitor connected to the AUX SEND jacks. If used for effects, route the signal back from the processor to the AUX RETURN jacks. (ES) Utilice los controles AUX del canal y ajuste los controles AUX SEND para enviar las señales del canal hasta un procesador de efectos o monitor de escenario conectado a los jacks AUX SEND. Si se utiliza para los efectos, dirija la señal del procesador a los jacks AUX RETURN. (FR) Utilisez les potentiomètres AUX et les potentiomètres généraux AUX SEND pour envoyer le signal du canal au processeur d’effets ou au haut-parleur de retour branché aux jacks AUX SEND. Lorsqu’il est utilisé pour des effets, renvoyez ce signal du processeur aux jacks AUX RETURN. (DE) Verwenden Sie die AUX-Regler der jeweiligen Kanäle und den AUX SEND-Regler am Master, um das Signal des Kanals auf einen Effektprozessor oder Bühnenmonitor zu leiten, der an den AUX SENDBuchsen angeschlossen ist. Wenn Sie die Buchse für Effekte verwenden, leiten Sie das Signal über die AUX RETURN-Buchsen vom Prozessor zurück. (PT) Utilize os botões AUX de canal e os botões AUX SEND principais para enviar o sinal do canal para um processador de efeitos ou monitor de palco ligado às fichas AUX SEND. Se utilizado para efeitos, encaminhe o sinal de volta do processador para as fichas AUX RETURN. (ES) Ajuste de la ganancia del canal para el X1622USB/X2222USB/X2442USB: (ES) Repita los pasos 1-3 para el resto de canales que se vayan a utilizar. (FR) Réglage du gain du canal sur le X1622USB/X2222USB/X2442USB: (FR) Répétez les étapes 1 à 3 pour les autres (DE) Einstellen des Kanalpegels mit dem X1622USB/X2222USB/X2442USB: (DE) Wiederholen Sie Schritte 1-3 für alle weiteren (PT) Definir o ganho de canal para o X1622USB/X2222USB/X2442USB: (PT) Repita os passos 1-3 para quaisquer outros canaux utilisés. verwendeten Kanäle. canais que utilize. (EN) Press the Channel 1 SOLO button. Press the MODE button next to the VU METER to allow the METER to operate in PFL (pre-fader listen) mode. (ES) Pulse el botón SOLO del Canal 1. Pulse el botón MODE junto al VU METER para permitir que el METER funcione en modo PFL (escucha pre-fader). (FR) Appuyez sur la touche SOLO du canal 1. Appuyez sur la touche MODE en regard du VU-METRE pour que ce dernier fonctionne en mode PFL (Pre-Fader Listen). (DE) Drücken Sie die SOLO-Taste für Kanal 1. Drücken Sie die MODE-Taste neben dem VU-Meter, damit das VU-Meter im PFL-Modus (Pre-Fader Listen) arbeitet. (PT) Prima o botão SOLO do canal 1. Prima o botão MODE junto a VU METER para permitir que METER funcione no modo PFL (audição pré-fader). (EN) While singing or playing, turn Channel 1’s GAIN control. The VU METER will display the signal level. Set the GAIN control so that the loudest peaks reach 0 on the VU METER. Press the Channel 1 SOLO button again. (ES) Mientras esté cantando o tocando, gire el control GAIN del Canal 1. El VU METER mostrará el nivel de señal. Establezca el control GAIN de forma que los picos más altos lleguen a 0 en el VU METER. Pulse de nuevo el botón SOLO del Canal 1. (FR) Pendant que vous chantez ou jouez, tournez la commande GAIN du canal 1. Le VU-METRE affiche le niveau du signal. Réglez la commande GAIN de sorte que les pics les plus forts atteignent 0 sur le VU-METRE. Appuyez de nouveau sur la touche SOLO du canal 1. (ES) Cante, hable o toque a un nivel normal a través del micrófono o instrumento conectado al Canal 1. (DE) Drehen Sie beim Singen oder Spielen den GAIN-Regler für Kanal 1. Das VU-Meter zeigt den Signalpegel an. Stellen Sie den GAIN-Regler so ein, dass die lautesten Stellen auf dem VU-Meter den Wert 0 erreichen. Drücken Sie erneut die SOLO-Taste für Kanal 1. (FR) Chantez, parlez ou jouez à un niveau normal (PT) Enquanto canta ou toca, rode o controlo GAIN do (EN) Sing, speak or play at a normal level through the microphone or instrument connected to Channel 1. dans le microphone ou avec l’instrument connecté au canal 1. (DE) Singen, sprechen oder spielen Sie mit normaler Lautstärke in das an Kanal 1 angeschlossene Mikrofon bzw. mit dem an Kanal 1 angeschlossenen Instrument. F1320D (EN) Repeat steps 1-3 for any other channels that will be used. canal 1. O VU METER irá apresentar o nível do sinal. Defina o controlo GAIN de forma a que os picos mais altos atinjam 0 no VU METER. Prima novamente o botão SOLO do canal 1. 22 XENYX X2442USB/X2222USB/X1622USB Quick Start Guide Multi-FX Processor (EN) Your mixer has a built-in effects processor. Follow these steps to add an effect to one or more channels. (EN) Adjust the effect’s second parameter: • If the effect’s second parameter is an on/off or toggled value, press the TAP button to select between settings. 2 LEDs inside the display will start blinking. (ES) Su mesa de mezclas tiene un procesador de efectos integrado. Siga estos pasos para añadir un efecto a uno o más canales. • If the effect’s second parameter is speed-based, press the TAP button in rhythm with the desired tempo. The TAP LED will flash to the current tempo. If ‘Lo’ is displayed, the tapped tempo is too slow. If ‘Hi’ is displayed, the tapped tempo is too fast. (FR) La console est équipée d’un processeur d’effets intégr é. Les étapes suivantes vous permettront d’ajouter un effet à un ou plusieurs canaux. (DE) Ihr Mischpult verfügt über einen eingebauten Effektprozessor. Folgen Sie diesen Schritten, um einem oder mehreren Kanälen einen Effekt hinzuzufügen. • After 5 seconds of inactivity, the mixer exits Edit Mode and the LEDs go out. (ES) Ajuste el segundo parámetro del efecto: • Si el segundo parámetro del efecto es un valor que alterna entre encendido y apagado, pulse el botón TAP para seleccionar entre los ajustes. 2 LED situados en el interior de la pantalla comenzarán a parpadear. (PT) O misturador dispõe de um processador de efeitos integrado. Siga estes passos para adicionar um efeito a um ou mais canais. (EN) Turn the FX knob up half way on each channel to which you would like to add an effect. (ES) Gire el control FX media vuelta en cada canal al que desee añadir un efecto. (FR) Tournez jusqu’à mi-parcours le potentiomètre FX des canaux sur lesquels vous souhaitez ajouter un effet. (DE) Drehen Sie für jeden Kanal, dem Sie einen Effekt hinzufügen möchten, den FX-Regler halb auf. (PT) Rode o botão FX para cima até meio em cada canal a que pretende adicionar um efeito. (EN) Turn the FX SEND and FX RETURN knobs to 0. You may adjust them later. (ES) Gire los controles FX SEND y FX RETURN hasta la posición 0. Puede ajustarlos más tarde. (FR) Réglez les potentiomètres FX SEND et FX RETURN sur 0. Vous pourrez les régler ultérieurement. (DE) Stellen Sie den FX SEND- und den FX RETURN- Regler auf 0. Diese können Sie später anpassen. (PT) Rode os botões FX SEND e FX RETURN para 0. Poderá ajustá-los posteriormente. (EN) Scroll through the effects by turning the PROGRAM knob. The preset number will flash in the display. Press the PROGRAM knob to select the effect. (ES) Gire el control PROGRAM para desplazarse por los efectos. El número predefinido parpadeará en la pantalla. Pulse el control PROGRAM para seleccionar el efecto. (FR) Faites défiler les effets en faisant tourner le bouton PROGRAM. Le numéro du preset clignote sur l’affichage. Appuyez sur le bouton PROGRAM pour sélectionner l’effet. (DE) Wählen Sie mit dem Program-Regler einen Effekt aus., indem Sie den PROGRAM-Regler drehen. Die aktuelle Nummer wird im Display angezeigt. Drücken Sie auf den PROGRAM-Regler, um den Effekt auszuwählen. (PT) Percorra os efeitos rodando o botão PROGRAM. O número predefinido pisca no ecrã. Prima o botão PROGRAM para seleccionar o efeito. (EN) Adjust the effect’s first parameter: • After you have selected a preset (step 3), press the PROGRAM knob to enter Edit Mode. The right LED inside the display will start blinking. • Turn the PROGRAM knob to adjust the parameter. After 5 seconds of inactivity, the mixer exits Edit Mode and the LED goes out. (ES) Ajuste el primer parámetro del efecto: • Después de seleccionar un preajuste (paso 3), pulse el control PROGRAM para entrar en modo de edición. El LED derecho situado en el interior de la pantalla comenzará a parpadear. • Gire el control PROGRAM para ajustar el parámetro. Después de 5 segundos de inactividad, la mesa de mezclas sale del modo de edición y el LED se apaga. (FR) Réglez le premier paramètre de l’effet : • Après avoir sélectionné un preset (étape 3), appuyez sur le bouton PROGRAM pour entrer dans le mode Edit. La LED droite de l'affichage clignote. • Tournez le bouton PROGRAM pour régler le paramètre. Après 5 secondes d’inactivité, la console quitte le mode Edit et la LED s’éteint. • Si el segundo parámetro del efecto depende de la velocidad, pulse el botón TAP en ritmo con el tempo deseado. El LED TAP parpadeará al tempo actual. Si se muestra ‘Lo’, el tempo de toque es demasiado lento. Si se muestra ‘‘Hi’, el tempo de toque es demasiado rápido. • Después de 5 segundos de inactividad, la mesa de mezclas sale del modo de edición y el LED se apaga. (DE) Einstellen des ersten Effektparameters: (FR) Réglez le deuxième paramètre de l’effet : • Nachdem Sie ein Preset gewählt haben (Schritt 3), drücken Sie auf den PROGRAM-Regler, um in den Bearbeitungsmodus zu gelangen. Die rechte LED im Display beginnt zu blinken. • Si le deuxième paramètre de l'effet correspond à une valeur de marche/arrêt ou de bouton, appuyez sur la touche TAP pour sélectionner un paramètre. 2 LED de l'affichage clignotent. • Drehen Sie den PROGRAM-Regler, um die Parameter einzustellen. Nach 5 Sekunden ohne Aktivität verlässt das Mischpult den Bearbeitungsmodus, und die LED erlischt. • Si le deuxième paramètre de l'effet dépend d'une vitesse, appuyez sur la touche TAP en rythme avec le tempo souhaité. La LED TAP clignote au rythme actuel. Si « Lo » s'affiche, le tempo est trop lent. Si « Hi » s'affiche, le tempo est trop rapide. (PT) Ajuste o primeiro parâmetro do efeito: • Após seleccionar uma predefinição (passo 3), prima o botão PROGRAM para aceder ao modo de edição. O LED direito no interior do visor começa a piscar. • Rode o botão PROGRAM para ajustar o parâmetro. Após 5 segundos de inactividade, o misturador sai do modo de edição e o LED apaga-se. • Après 5 secondes d'inactivité, la console quitte le mode Edit et les LED s'éteignent. (DE) Einstellen des zweiten Effektparameters: • Wenn der zweite Parameter des Effekts ein Ein/Aus- oder umschaltbarer Wert ist, drücken Sie die TAP-Taste, um zwischen den Einstellungen zu wechseln. 2 LEDs im Display beginnen zu blinken. • Wenn der zweite Parameter des Effekts tempobasiert ist, drücken Sie die TAP-Taste synchron mit dem gewünschten Tempo. Die TAP-LED blinkt im aktuellen Tempo. Wenn „Lo“ angezeigt wird, ist das eingestellte Tempo zu niedrig. Wenn „Hi“ angezeigt wird, ist das eingestellte Tempo zu hoch. • Nach 5 Sekunden ohne weitere Aktion verlässt das Mischpult den Bearbeitungsmodus, und die LEDs erlöschen. (PT) Ajuste o segundo parâmetro do efeito: • Se o segundo parâmetro do efeito for um valor ligado/desligado ou alternado, prima o botão TAP para seleccionar entre as definições. 2 LEDs no interior do visor começarão a piscar. • Se o segundo parâmetro do efeito for baseado na velocidade, prima o botão TAP no ritmo desejado. O LED TAP irá piscar ao ritmo actual. Se for apresentado ‘Lo’, o ritmo tocado é demasiado lento. Se for apresentado ‘Hi’, o ritmo tocado é demasiado rápido. • Após 5 segundos de inactividade, o misturador sai do modo de edição e os LEDs apagam-se. (EN) Readjust each channel’s FX knob to make sure the right amount of effect is added. (ES) Reajuste el control FX de cada canal para garantizar que se añada la cantidad de efecto correcta. (FR) Réglez le potentiomètre FX de chaque canal pour vérifier que l’ajout de l’effet est correct. (DE) Stellen Sie den FX-Regler für jeden Kanal nach, damit der Effekt mit der richtigen Stärke hinzugefügt wird. (PT) Reajuste o botão FX de cada canal para se certificar de que é adicionada a quantidade de efeito adequada. 23 26 XENYX X2442USB/X2222USB/X1622USB Quick Start Guide Other important information Important information 1. Register online. Please register your new MUSIC Tribe equipment right after you purchase it by visiting behringer.com. Registering your purchase using our simple online form helps us to process your repair claims more quickly and efficiently. Also, read the terms and conditions of our warranty, if applicable. 2. Malfunction. Should your MUSIC Tribe Authorized Reseller not be located in your vicinity, you may contact the MUSIC Tribe Authorized Fulfiller for your country listed under “Support” at behringer.com. Should your country not be listed, please check if your problem can be dealt with by our “Online Support” which may also be found under “Support” at behringer.com. Alternatively, please submit an online warranty claim at behringer.com BEFORE returning the product. 3. Power Connections. Before plugging the unit into a power socket, please make sure you are using the correct mains voltage for your particular model. Faulty fuses must be replaced with fuses of the same type and rating without exception. Informations importantes Outras Informações Importantes 1. Enregistrez-vous en ligne. Prenez le temps d’enregistrer votre produit MUSIC Tribe aussi vite que possible sur le site Internet behringer.com. Le fait d’enregistrer le produit en ligne nous permet de gérer les réparations plus rapidement et plus efficacement. Prenez également le temps de lire les termes et conditions de notre garantie. 1. Registre-se online. Por favor, registre seu novo equipamento MUSIC Tribe logo após a compra visitando o site behringer.com Registrar sua compra usando nosso simples formulário online nos ajuda a processar seus pedidos de reparos com maior rapidez e eficiência. Além disso, leia nossos termos e condições de garantia, caso seja necessário. 2. Dysfonctionnement. Si vous n’avez pas de revendeur MUSIC Tribe près de chez vous, contactez le distributeur MUSIC Tribe de votre pays : consultez la liste des distributeurs de votre pays dans la page “Support” de notre site Internet behringer.com. Si votre pays n’est pas dans la liste, essayez de résoudre votre problème avec notre “aide en ligne” que vous trouverez également dans la section “Support” du site behringer.com. Vous pouvez également nous faire parvenir directement votre demande de réparation sous garantie par Internet sur le site behringer.com AVANT de nous renvoyer le produit. 2. Funcionamento Defeituoso. Caso seu fornecedor MUSIC Tribe não esteja localizado nas proximidades, você pode contatar um distribuidor MUSIC Tribe para o seu país listado abaixo de “Suporte” em behringer.com. Se seu país não estiver na lista, favor checar se seu problema pode ser resolvido com o nosso “Suporte Online” que também pode ser achado abaixo de “Suporte”em behringer.com. Alternativamente, favor enviar uma solicitação de garantia online em behringer.com ANTES da devolução do produto. 3. Raccordement au secteur. Avant de relier cet équipement au secteur, assurez-vous que la tension secteur de votre région soit compatible avec l’appareil. Veillez à remplacer les fusibles uniquement par des modèles exactement de même taille et de même valeur électrique — sans aucune exception. 3. Ligações. Antes de ligar a unidade à tomada, assegure-se de que está a utilizar a voltagem correcta para o modelo em questão. Os fusíveis com defeito terão de ser substituídos, sem qualquer excepção, por fusíveis do mesmo tipo e corrente nominal. FEDERAL COMMUNICATIONS COMMISSION COMPLIANCE INFORMATION XENYX X2442USB/X2222USB/X1622USB Responsible Party Name: MUSIC Tribe Commercial NV Inc. Address: 5270 Procyon Street Las Vegas, NV 89118 USA Phone Number: +1 702 800 8290 XENYX X2442USB/X2222USB/X1622USB complies with the FCC rules as mentioned in the following paragraph: This equipment has been tested and found to comply with the limits for a Class B digital device, pursuant to part 15 of the FCC Rules. These limits are designed to provide reasonable protection against harmful interference in a residential installation. This equipment generates, uses and can radiate radio frequency energy and, if not installed and used in accordance with the instructions, may cause harmful interference to radio communications. However, there is no guarantee that interference will not occur in a particular installation. If this equipment does cause harmful interference to radio or television reception, which can be determined by turning the equipment off and on, the user is encouraged to try to correct the interference by one or more of the following measures: • Reorient or relocate the receiving antenna • Increase the separation between the equipment and receiver Aspectos importantes 1. Registro online. Le recomendamos que registre su nuevo aparato MUSIC Tribe justo después de su compra accediendo a la página web behringer.com. El registro de su compra a través de nuestro sencillo sistema online nos ayudará a resolver cualquier incidencia que se presente a la mayor brevedad posible. Además, aproveche para leer los términos y condiciones de nuestra garantía, si es aplicable en su caso. 2. Averías. En el caso de que no exista un distribuidor MUSIC Tribe en las inmediaciones, puede ponerse en contacto con el distribuidor MUSIC Tribe de su país, que encontrará dentro del apartado “Support” de nuestra página web behringer.com. En caso de que su país no aparezca en ese listado, acceda a la sección “Online Support” (que también encontrará dentro del apartado “Support” de nuestra página web) y compruebe si su problema aparece descrito y solucionado allí. De forma alternativa, envíenos a través de la página web una solicitud online de soporte en periodo de garantía ANTES de devolvernos el aparato. 3. Conexiones de corriente. Antes de enchufar este aparato a una salida de corriente, asegúrese de que dicha salida sea del voltaje adecuado para su modelo concreto. En caso de que deba sustituir un fusible quemado, deberá hacerlo por otro de idénticas especificaciones, sin excepción. Weitere wichtige Informationen 1. Online registrieren. Bitte registrieren Sie Ihr neues MUSIC Tribe-Gerät direkt nach dem Kauf auf der Website behringer.com. Wenn Sie Ihren Kauf mit unserem einfachen online Formular registrieren, können wir Ihre Reparaturansprüche schneller und effizienter bearbeiten. Lesen Sie bitte auch unsere Garantiebedingungen, falls zutreffend. 2. Funktionsfehler. Sollte sich kein MUSIC Tribe Händler in Ihrer Nähe befinden, können Sie den MUSIC Tribe Vertrieb Ihres Landes kontaktieren, der auf behringer. com unter „Support“ aufgeführt ist. Sollte Ihr Land nicht aufgelistet sein, prüfen Sie bitte, ob Ihr Problem von unserem „Online Support“ gelöst werden kann, den Sie ebenfalls auf behringer.com unter „Support“ finden. Alternativ reichen Sie bitte Ihren Garantieanspruch online auf behringer.com ein, BEVOR Sie das Produkt zurücksenden. 3. Stromanschluss. Bevor Sie das Gerät an eine Netzsteckdose anschließen, prüfen Sie bitte, ob Sie die korrekte Netzspannung für Ihr spezielles Modell verwenden. Fehlerhafte Sicherungen müssen ausnahmslos durch Sicherungen des gleichen Typs und Nennwerts ersetzt werden. • Connect the equipment into an outlet on a circuit different from that to which the receiver is connected • Consult the dealer or an experienced radio/TV technician for help This device complies with Part 15 of the FCC rules. Operation is subject to the following two conditions: (1) this device may not cause harmful interference, and (2) this device must accept any interference received, including interference that may cause undesired operation. Important information: Changes or modifications to the equipment not expressly approved by MUSIC Tribe can void the user’s authority to use the equipment. 27-
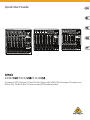 1
1
-
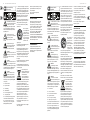 2
2
-
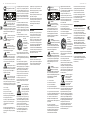 3
3
-
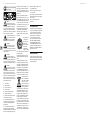 4
4
-
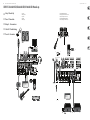 5
5
-
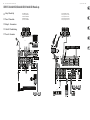 6
6
-
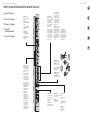 7
7
-
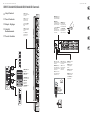 8
8
-
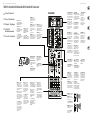 9
9
-
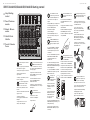 10
10
-
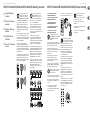 11
11
-
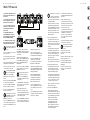 12
12
-
 13
13
-
 14
14
-
 15
15


Behringer X1622USB Guía de inicio rápido
- Categoría
- Controladores de DJ
- Tipo
- Guía de inicio rápido
en otros idiomas
- français: Behringer X1622USB Guide de démarrage rapide
- English: Behringer X1622USB Quick start guide
- Deutsch: Behringer X1622USB Schnellstartanleitung
- português: Behringer X1622USB Guia rápido
Artículos relacionados
-
Behringer Xenyx 802 Guía de inicio rápido
-
Behringer X2442USB Guía de inicio rápido
-
-
Behringer 1002B Guía de inicio rápido
-
-
Behringer QX1002USB Guía de inicio rápido
-
Behringer 1002FX Guía de inicio rápido
-
-
-