
FRANÇAIS
ENGLISH ESPAÑOL
OWNER'S MANUAL
FRENCH DOOR
REFRIGERATOR
Read this owner's manual thoroughly before operating the appliance
and keep it handy for reference at all times.
LFXS28596*/LFXS26973*/LFXS26596*
www.lg.com
Copyright © 2018 LG Electronics Inc. All Rights Reserved.
MFL68680495
Rev.00_050218

2
TABLE OF CONTENTS
3 PRODUCT FEATURES
4 SAFETY INSTRUCTIONS
4 IMPORTANT SAFETY INSTRUCTIONS
9 PRODUCT SPECIFICATIONS
10 PRODUCT OVERVIEW
10 Exterior
11 Interior
13 INSTALLATION
13 Installation Overview
14 Unpacking the Refrigerator
14 Choosing the Proper Location
16 Removing/Assembling Handles
17 Removing/Assembling the Doors and Drawers
23 Connecting the Water Line
26 Leveling and Door Alignment
27 Turning on the Power
28 OPERATION
28 Before Use
29 Control Panel
31 Ice and Water Dispenser
32 Ice Compartment
34 Automatic Icemaker
36 Storing Food
39 Humidity Controlled Crispers (On Some Models)
40 Glide‘N’Serve
40 Durabase
®
40 Detaching/Assembling the Storage Bins
41 InstaView Door-in-Door (On Some Models)
42 InstaView Function
43 Adjusting the Refrigerator Shelves
44 SMART FUNCTIONS
44 LG SmartThinQ Application
47 Smart Grid Function
48 Smart Diagnosis™ Function
49 MAINTENANCE
49 Cleaning
50 Replacing the Fresh Air Filter
50 Replacing the Water Filter
55 TROUBLESHOOTING
55 FAQs: Frequently Asked Questions
56 Before Calling for Service
64 LIMITED WARRANTY
64 FOR USA
67 FOR CANADA

3PRODUCT FEATURES
ENGLISH
PRODUCT FEATURES
Depending on the model, some of the following functions may not be available.
HUMIDITY CONTROLLED CRISPERS
The Humidity Controlled Crispers are designed to help keep fruits and vegetables fresh and crisp. Control the
amount of humidity in the crispers by adjusting the settings between Fruit (Low) and Vegetables (High).
GLIDE‘N’SERVE
The Glide‘N’Serve provides storage space with a variable temperature control that keeps the compartment
colder than the refrigerator. It is a convenient place to store sandwiches or meat to be cooked.
AUTO-CLOSING HINGE
The refrigerator doors and freezer drawers close automatically with a slight push. (The door only closes
automatically when it is open at an angle less than 30°.)
ICE PLUS
Ice production is increased when the freezer section is maintained at the coldest temperature for a 24-hour
period.

4 SAFETY INSTRUCTIONS
SAFETY INSTRUCTIONS
READ ALL INSTRUCTIONS BEFORE USE
Your safety and the safety of others are very important.
We have provided many important safety messages in this manual and on your appliance. Always read and
follow all safety messages.
This is the safety alert symbol.
This symbol alerts you to potential hazards that can kill or injure you and others.
All safety messages will follow the safety alert symbol and either the word WARNING or CAUTION.
These words mean:
WARNING
You may be killed or seriously injured if you do not follow instructions.
CAUTION
You may be injured or cause damage to the product if you do not follow instructions.
All safety messages tell you what the potential hazard is, tell you how to reduce the chance of injury, and tell
you what may happen if the instructions are not followed.
IMPORTANT SAFETY INSTRUCTIONS
WARNING
To reduce the risk of explosion, re, death, electric shock, scalding or injury
to persons when using this product, follow basic precautions, including the
following:
California Proposition 65
• This product contains chemicals known to the State of California to cause cancer and birth defects or other
reproductive harm. Wash hands after handling. (USA only)
INSTALLATION
• To reduce the risk of injury to persons, adhere to all industry recommended safety procedures including the
use of long-sleeved gloves and safety glasses.
• Never attempt to operate this appliance if it is damaged, malfunctioning, partially disassembled, or has
missing or broken parts, including a damaged cord or plug.
• Only connect this product to a dedicated grounded electrical outlet rated for use with this product (115 V, 60
Hz, AC only). It is the user’s responsibility to replace a standard 2-prong wall outlet with a standard 3-prong
wall outlet.
• Do not use an outlet that can be turned off with a switch. Do not use an extension cord.
• The appliance must be positioned for easy access to a power source.
• When moving the refrigerator, be careful not to roll over or damage the power cord.
• Contact an authorized service center when installing or relocating the refrigerator.
• Do not, under any circumstances, cut or remove the third (ground) prong from the power cord.

5SAFETY INSTRUCTIONS
ENGLISH
• Keep packing materials out of the reach of children. Packaging material can be dangerous for children.
There is a risk of suffocation.
• Do not install the refrigerator in a damp or dusty place where insulation on electrical parts may deteriorate.
• Do not place the refrigerator in direct sunlight or expose it to the heat from heating appliances such as
stoves or heaters.
• Do not bend or pinch the power cord excessively or place heavy objects on it.
OPERATION
• This product is not to be used for special purposes such as the storage of medicine or test materials or for
use on ships, etc.
• DO NOT allow children to climb, stand, or hang on the refrigerator doors or on the shelves in the
refrigerator. They could damage the refrigerator and seriously injure themselves.
• Do not allow children to climb into the refrigerator. They could be trapped and suffocated.
• Children should be supervised to ensure that they do not play with the refrigerator.
• Keep ngers out of pinch point areas; clearances between the doors and cabinets are necessarily small. Be
careful closing doors when children are nearby.
• Do not touch frozen food or the metal parts in the freezer compartment with wet or damp hands. Doing so
may cause frostbite.
• Do not refreeze frozen food that has thawed completely. Doing so may result in a serious health hazard.
• Do not use an adapter plug or plug the power plug into a multi-outlet extension cord.
• Do not use a cord that shows cracks or abrasion damage along its length or at either the plug or connector
end. Immediately have all power cords that have become frayed or otherwise damaged repaired or replaced
by qualied service personnel.
• Do not operate the refrigerator or touch the power cord with wet hands.
• Do not modify or extend the power cord.
• Do not use an uncertied power outlet. Do not plug appliance into a damaged wall outlet.
• Do not put hands, feet or other objects into the air vents or bottom of the refrigerator. Doing so could result
in personal injury or electric shock.
• In the event of a gas leak (propane/LPG), ensure the area is adequately ventilated and contact an
authorized service center before resuming use. Do not touch the refrigerator or power cord of the
refrigerator.
• Disconnect the power cord immediately and contact an authorized service center if there is a strange noise,
odor, or smoke coming from the appliance.
• Do not use any fuse (such as copper, steel wire, etc.) other than a standard fuse.
• Do not place or use an electrical appliance inside the refrigerator, unless it is of a type recommended by the
manufacturer.
• Do not put animals inside the appliance.
• Do not place heavy or fragile objects, liquid lled containers, combustible substances, or ammable objects
(such as candles and lamps) on the appliance.
• Avoid contact with any moving parts of the ejector mechanism or with the heater that releases the ice
cubes. DO NOT place ngers in the automatic icemaker when the refrigerator is plugged in.
• When dispensing ice from the dispenser, do not use a fragile container.
• This appliance is not intended for use by persons (including children) with reduced physical, sensory or
mental capabilities, or lack of experience and knowledge, unless they have been given supervision or
instruction concerning the use of the appliance by a person responsible for their safety.
• If connected to a circuit protected by fuses, use time delay fuse.

6 SAFETY INSTRUCTIONS
MAINTENANCE
• Do not use a hair dryer to dry the inside of the refrigerator.
• Do not light a candle to remove odors in the refrigerator.
• In the event of a refrigerant leak, move ammable objects away from the refrigerator. Ensure the area is
adequately ventilated and contact an authorized service center.
• Keep ammable materials and vapors, such as gasoline, away from the refrigerator.
• This appliance is intended to be used in household and similar applications such as staff kitchen areas
in shops, ofces and other working environments; farm houses and by clients in hotels, motels and other
residential type environments; bed and breakfast type environments; catering and similar non-retail
applications.
• This appliance can be used by children aged from 8 years and above and persons with reduced physical,
sensory or mental capabilities or lack of experience and knowledge if they have been given supervision or
instruction concerning use of the appliance in a safe way and understand the hazards involved. Children
shall not play with the appliance. Cleaning and user maintenance shall not be made by children without
supervision.
• Unplug the power plug before cleaning or repairing the refrigerator.
• The refrigerator and freezer compartment lights are interior LED lighting, and service should be performed
by a qualied technician.
• Unplug the power plug immediately in the event of a blackout or thunderstorm.
• Turn the power off if water or dust penetrates into the refrigerator. Call a service agent.
• Do not store glass containers or soda in the freezer compartment. Contents may expand when frozen,
break the container and cause injury.
• Do not store, disassemble or repair the appliance yourself or allow unqualied personnel to do so.
• If the electrical supply cord is damaged, it must only be replaced by the manufacturer or its service agent or
a similar qualied person in order to avoid a hazard.
• Do not store explosive substances such as aerosol cans with a ammable propellant in this appliance.
• Do not use or place ammable substances (chemicals, medicine, cosmetics, etc) near the refrigerator or
store them inside the refrigerator. Do not place the refrigerator in the vicinity of ammable gas.
DISPOSAL
• Junked or abandoned refrigerators are dangerous, even if they are sitting for only a few days. When
disposing of the refrigerator, remove the packing materials from the door or take off the doors but leave the
shelves in place so that children may not easily climb inside.
• If disposing of a refrigerator, make sure the refrigerant is removed for proper disposal by a qualied servicer.
If you release the refrigerant, you may be ned or imprisoned in accordance with the relevant environmental
law.

7SAFETY INSTRUCTIONS
ENGLISH
GROUNDING INSTRUCTIONS
• Improper connection of the equipment-grounding conductor can result in a risk of electric shock. Check with
a qualied electrician or service personnel if you are in doubt whether the appliance is properly grounded.
Do not modify the plug provided with the appliance; if it will not t the outlet, have a proper outlet installed by
a qualied electrician.
• Have a qualied electrician check the wall outlet and wiring for proper grounding.
• Never unplug the appliance by pulling on the power cord. Always grip the plug rmly and pull straight out
from the outlet. Failure to do so may damage the power cord, resulting in a risk of re and electric shock.
CAUTION
To reduce the risk of minor or moderate injury to persons, malfunction, or damage
to the product or property when using this product, follow basic precautions,
including the following:
INSTALLATION
• Do not install the refrigerator where there may be a danger of the unit falling.
• The refrigerator must be properly installed in accordance with the Installation Instructions.
OPERATION
• Do not use aerosols near the refrigerator.
• This appliance is intended to be used only in domestic and similar applications.
• Do not strike or apply excessive force to any glass surface. Do not touch glass surfaces if they are cracked
or broken.
• Do not overll or pack items too tightly into door bins. Doing so may cause damage to the bin or personal
injury if items are removed with excessive force.
• Do not overll the appliance with food. Doing so may cause personal injury or property damage.
• Do not hang on to or place heavy objects on the refrigerator’s dispenser.
• Do not strike or apply excessive force to any glass surface. It may break.
MAINTENANCE
• Do not use strong detergents like wax or thinners for cleaning. Clean with a soft cloth.
• Remove foreign objects (such as dust and water) off the prongs of the power plug and contact areas. Do
not use a wet or damp cloth when cleaning the plug.
• Do not spray water directly on the inside or outside of the refrigerator.
• Do not clean glass shelves or covers with warm water when they are cold. They may break if exposed to
sudden temperature changes.
SAVE THESE INSTRUCTIONS

8 SAFETY INSTRUCTIONS
WARNING
• Keep ventilation openings, in the appliance enclosure or in the built-in structure, clear of obstruction.
• Do not use mechanical devices or other means to accelerate the defrosting process, other than those
recommended by the manufacturer.
• Do not damage the refrigerant circuit.
• Do not use electrical appliances inside the food storage compartments of the appliance, unless they are of
the type recommended by the manufacturer.
• The refrigerant and insulation blowing gas used in the appliance require special disposal procedures. When
disposing, please consult with service agent or a similarly qualied person.
This appliance contains a small amount of isobutane refrigerant (R600a), a natural gas with high
environmental compatibility, but which is also combustible. When transporting and installing the
appliance, care should be taken to ensure that no parts of the refrigerating circuit are damaged.
Refrigerant squirting out of the pipes could ignite or cause an eye injury. If a leak is detected,
avoid any naked ames or potential sources of ignition and air the room in which the appliance is
standing for several minutes.
In order to avoid the creation of a ammable gas air mixture if a leak in the refrigerating circuit
occurs, the size of the room in which the appliance may be sited depends on the amount of
refrigerant used. The room must be 10.8 square feet (1 square meter) in size for every 8g of
R600a refrigerant inside the appliance. The amount of refrigerant in your particular appliance is
shown on the identication plate inside the appliance. Never start up an appliance showing any
signs of damage. If in doubt, consult your dealer.

9PRODUCT SPECIFICATIONS
ENGLISH
PRODUCT SPECIFICATIONS
The appearance and specications listed in this manual may vary due to constant product improvements.
Electrical requirements: 115 V, 60 Hz
Min. / Max. water pressure: 20 - 120 psi (138 - 827 kPa)
Model LFXS28596*
Description Standard-depth, French door refrigerator, bottom freezer
Net weight 322 lb (146 kg)
Model LFXS26973*
Description Standard-depth, French door refrigerator, bottom freezer
Net weight 291 lb (132 kg)
Model LFXS26596*
Description Standard-depth, French door refrigerator, bottom freezer
Net weight 309 lb (140 kg)

10 PRODUCT OVERVIEW
PRODUCT OVERVIEW
The images in this guide may be different from the actual components and accessories, which are subject to
change by the manufacturer without prior notice for product improvement purposes.
Exterior
3
4
5
1
6
7
9
8
2
3
4
1
7
9
8
2
Control Panel
Sets the refrigerator and freezer temperatures,
the water lter condition and the dispenser mode.
Filtered Water and Ice Dispenser
Dispenses puried water and ice.
EZ Handle
Easily opens the freezer door.
Handle
Opens and closes the refrigerator door.
1
2
3
4
Door button (On Some Models)
Opens the Door-in-Door Compartment.
InstaView Door-in-Door (On Some Models)
The InstaView Door-in-Door compartment allows
for easy access to commonly used food items.
LED Light
LED lights up when the freezer door is opened.
Refrigerator
Fresh food compartment
Freezer
Frozen food compartment
5
6
7
8
9

11PRODUCT OVERVIEW
ENGLISH
Interior
Standard Door: LFXS26973*
10
2
3
4
5
6
11
7
14
12
13
8
1
10
11
14
12
13
9
2
3
4
5
6
7
1
InstaView Door-in-Door: LFXS26596*/LFXS28596*

12 PRODUCT OVERVIEW
LED interior lamps
Light up the inside of the refrigerator.
Water lter
Puries water.
NOTE
• The lter should be replaced every 6
months. See the Replacing the Water
Filter section in this manual for details.
In-door Icemaker (Refrigerator)
This is where ice is automatically produced and
stored.
Crisper
Helps vegetables and fruit to stay crisp.
Humidity Controlled Crisper (On Some
Models)
Helps vegetables and fruit to stay crisp and
controls humidity.
Fixed Door Bin
Store chilled food or drinks.
Auto-Closing Hinge (On Some Models)
The refrigerator doors and freezer drawers close
automatically when pushed slightly. (The door
only closes automatically when it is open at an
angle of less than 30°.)
Ice Bin
If a large amount of ice is needed, transfer the
ice in the in-door ice bin to an ice storage bin in
the freezer.
Dairy Bin (On Some Models)
Store dairy products.
1
2
3
4
5
6
7
8
Door-in-Door Case
A convenient storage area for frequently-used
items that require easy access.
Adjustable Refrigerator Shelf
The refrigerator shelves are adjustable to meet
individual storage needs.
Glide‘N’Serve
Store food items at a different temperature than
the regular refrigerator area.
Automatic Icemaker (Freezer)
Additional icemaker in freezer.
Pullout Drawer
Provides extra storage within the freezer
compartment.
Durabase
®
and Durabase
®
Divider
Provide storage for large food items.
9
10
11
12
13
14

13INSTALLATION
ENGLISH
INSTALLATION
Installation Overview
Please read the following installation instructions rst after purchasing this product or transporting it to another
location.
Unpacking the
Refrigerator
Choosing the Proper
Location
Disassembling/
Assembling
Connecting the Water
Line
Leveling and Door
Alignment
CAUTION
• Connect to potable water supply only.
• Fill with potable water only.

14 INSTALLATION
Unpacking the Refrigerator
WARNING
• Use two or more people to move and install the
refrigerator. Failure to do so can result in back
injury or other injury.
• The refrigerator is heavy. Protect the oor when
moving the refrigerator for cleaning or service.
Always pull the refrigerator straight out when
moving it. Do not wiggle or walk the refrigerator
when trying to move it, as oor damage could
occur.
• Keep ammable materials and vapors, such as
gasoline, away from the refrigerator. Failure to
do so can result in re, explosion, or death.
NOTE
• Remove tape and any temporary labels from
your refrigerator before using. Do not remove any
warning labels, the model and serial number label,
or the Tech Sheet that is located under the front of
the refrigerator.
• To remove any remaining tape or glue, rub the area
briskly with your thumb. Tape or glue residue can
also be easily removed by rubbing a small amount
of liquid dish soap over the adhesive with your
ngers. Rinse with warm water and dry.
• Do not use sharp instruments, rubbing alcohol,
ammable uids, or abrasive cleaners to remove
tape or glue. These products can damage the
surface of your refrigerator.
• Reinstall or adjust shelves as needed. Refrigerator
shelves are installed in the shipping position.
Reinstall shelves according to your individual
storage needs.
Choosing the Proper
Location
Water
Water supply must be easily connected for the
automatic icemaker.
NOTE
• The water pressure must be 20 - 120 psi or 138 -
827 kPa or 1.4 - 8.4 kgf/cm
2
. If the refrigerator is
installed in an area with low water pressure (below
20 psi or 138 kPa or 1.4 kgf/cm
2
), you can install a
booster pump to compensate for the low pressure.
Electricity
Use an individual, grounded outlet:115 Volts, 60 Hz,
AC, 15 Amps minimum.
WARNING
• Do not overload house wiring and cause a re
hazard by plugging in multiple appliances in the
same outlet with the refrigerator.
• To reduce the risk of electric shock, do not install
the refrigerator in a wet or damp area.
Flooring
To avoid noise and vibration, the unit must be
installed and leveled on a solidly constructed oor. If
required, adjust the leveling legs to compensate for
the unevenness of the oor.
NOTE
• Installing on carpeting, soft tile surfaces, a platform
or weakly supported structure is not recommended.
Ambient Temperature
Install this appliance in an area where the
temperature is between 55 °F (13 °C) and 110 °F
(43 °C).
If the temperature around the appliance is too low or
high, cooling ability may be adversely affected.

15INSTALLATION
ENGLISH
Dimensions and Clearances
• Check the dimensions of the appliance and the installation path to ensure there is sufcient room to move the
refrigerator through doors or narrow openings.
• If an opening is too narrow to t the refrigerator through, the doors must be removed.
• The installation location chosen for the refrigerator should allow space behind the unit for connections and
airow and space in front to open the doors and drawers.
• Too small of a distance from adjacent items may result in lowered freezing capability and increased electricity
consumption charges. Allow at least 24 inches (610 mm) in front of the refrigerator to open the doors, and at
least 2 inches (50.8 mm) between the back of the refrigerator and the wall.
B
A
C
D
F
G
E
H
I
- List LFXS28596*
A Depth without handle
33 3/4"
(857 mm)
B Width
35 3/4"
(908 mm)
C Height to Top of Case
68 3/8"
(1737 mm)
D Height to Top of Hinge
69 3/4"
(1772 mm)
E Back Clearance
2"
(50 mm)
F Depth without Door
29 7/8"
(759 mm)
G
Depth (Total with Door Open
Front Clearance
Depth With handle
90°)
48 1/2"
(1232 mm)
I
24"
(610 mm)
H
36 1/4”
(921 mm)
LFXS26973*
LFXS26596*
32 3/8"
(822 mm)
35 3/4"
(908 mm)
68 3/8"
(1737 mm)
69 3/4"
(1772 mm)
2"
(50 mm)
28 1/2"
(724 mm)
47 1/8"
(1197 mm)
22
5/8"
(575 mm)
34 7/8”
(886 mm)

16 INSTALLATION
Removing/Assembling
Handles
• When moving the refrigerator through a narrow
opening, removing the doors is preferred.
• The appearance of the handles may vary from what
is shown.
WARNING
When assembling or disassembling the
refrigerator handles:
• Grasp the handle rmly to avoid dropping it.
• Do not swing the handle into nearby people or
animals.
• Make sure that the bracket hole of the handle
ts properly into the stopper bolt of the door.
Assemble the set screws to x the handle into
place.
• Make sure that there is not a gap between the
door and handle after assembling the handle.
Tools Needed
3/32 in. Allen wrench
1/8 in. Allen wrench
1/4 in. Allen wrench
Removing the Refrigerator Handles
1
Loosen the set screws (1) with a 3/32 in. Allen
wrench and remove the handle.
2
Loosen the mounting fasteners (2) that connect
to the refrigerator door and handle using a 1/4
in. Allen wrench, and remove the mounting
fasteners.
Assembling the Refrigerator Handles
1
Assemble the mounting fasteners (1) at both ends
of the handle with a 1/4 in. Allen wrench.
2
Place the handle on the door by tting the handle
footprints over the mounting fasteners and
tightening the set screws (2) with a 3/32 in. Allen
wrench.

17INSTALLATION
ENGLISH
Removing the Freezer Drawer Handle
1
Loosen the set screws (1) located on the lower
side of the handle with a 1/8 in. Allen wrench and
remove the handle.
2
Loosen the mounting fasteners (2) with a 1/4
in. Allen wrench, and remove the mounting
fasteners.
Assembling the Freezer Drawer
Handle
1
Assemble the mounting fasteners (1) at both ends
of the handle with a 1/4 in. Allen wrench.
2
Place the handle on the door by tting the handle
footprints over the mounting fasteners and
tightening the set screws (2) with a 1/8 in. Allen
wrench.
Removing/Assembling the
Doors and Drawers
If the entrance door is too narrow for the refrigerator
to pass through, remove the refrigerator doors and
move the refrigerator sideways through the doorway.
WARNING
• Use two or more people to remove and install
the refrigerator and freezer doors.
• Disconnect the electrical supply to the
refrigerator before installing.
• Do not put hands, feet or other objects into the
air vents or bottom of the refrigerator.
• Be careful when handling the hinge and stopper.
• Remove food and bins before detaching the
doors.
• Do not hold the handle when removing or
replacing the doors as the handle may come off.
Tools Needed
3/32 in. Allen wrench
1/8 in. Allen wrench
1/4 in. Allen wrench
Removing the Left Refrigerator Door
1
The water supply is connected to the upper
right part of the rear surface of the refrigerator.
Remove the ring in the joint area. Hold the water
supply connection and gently push the collet to
detach the water supply line as shown.
Collet
NOTE
• Detachment of the water supply line is applicable
only when detaching the left refrigerator door.

18 INSTALLATION
2
Remove the screw (1) from the hinge cover at the
top of the refrigerator. Lift the hook (not visible),
located at the bottom of the front side of the cover
(2) with a at-head screwdriver.
3
Remove the cover and pull out the tube (1).
Disconnect all wire harnesses (2). Unscrew the
ground wire (3).
3
4
Rotate the hinge lever counterclockwise (1). Lift
the top hinge (2) free of the hinge lever latch.
(1
)
(2)
Hinge Lever Latch
CAUTION
• When lifting the hinge free of the latch, be careful
that the door does not fall forward.
5
Lift the door from the middle hinge pin and
remove the door.
CAUTION
• Place the door, inside facing up, on a
nonscratching surface.
NOTE
Disassembling/Assembling the Water Lines
Collet
Tube
Insert line
Clip
(Correct)
Removing the Right Refrigerator
Door
1
Remove the top hinge cover screw (1). Lift
the hook (not visible), located at the bottom of
the front side of the cover (2), with a at-head
screwdriver.

19INSTALLATION
ENGLISH
2
Detach the wire harness (1). Unscrew the ground
wire (3) on the InstaView model only.
3
3
Rotate the hinge lever (1) clockwise. Lift the top
hinge (2) free of the hinge lever latch.
Hinge Lever Latch
CAUTION
• When lifting the hinge free of the latch, be careful
that the door does not fall forward.
4
Lift the door from the middle hinge pin and
remove the door.
CAUTION
• Place the door, inside facing up, on a non-
scratching surface.
Assembling the Right Refrigerator
Door
Install the right-side door rst.
1
Make sure that the plastic sleeve is inserted in
the bottom of the door. Lower the door onto the
middle hinge pin as shown in the gure.
2
Fit the hinge (1) over the hinge lever latch and slot
it into place. Rotate the lever (2) counterclockwise
to secure the hinge.
Hinge Lever Latch
3
Connect the wire harness (1). On the InstaView
model, screw in the ground wire.
4
Place the cover (1) in its place. Insert and tighten
the cover screw (2).

20 INSTALLATION
Assembling the Left Refrigerator
Door
Install the left refrigerator door after the right door is
installed.
1
Make sure that the plastic sleeve is inserted in
the bottom of the door. Install the refrigerator door
onto the middle hinge.
2
Fit the hinge (1) over the hinge lever latch and
slot it into place. Rotate the lever clockwise (2)
and fasten the hinge.
Hinge Lever Latch
3
Connect all the wire harnesses.
4
Push the water supply tube into the hole on the
top case and pull it through the backplate.
5
Hold the water supply connection and gently push
in the collet to connect the water supply line as
shown. Insert the tube at least 5/8 inch (15 mm)
into the connector. Insert the clip on the joint to
fasten the tube in place.
Collet
6
Place the cover (1) in place. Insert and tighten the
cover screw (2).
NOTE
Disassembling/Assembling the Water Lines
Collet
Tube
Insert line
Clip
(Correct)
• Gently press the collet and insert the tube until only
one line shows on the tube.
(Correct) (Incorrect)

21INSTALLATION
ENGLISH
Removing the Freezer Drawers
For models with two freezer drawers, remove both
drawers in the same way.
The Pullout Drawer located above the freezer drawer
is not shown for clarity.
WARNING
To reduce the risk of electric shock, injury to
persons, and death, follow basic precautions,
including the following:
• Use two or more people to remove and install
the refrigerator doors and freezer drawer.
• Be careful of sharp hinges on both sides of the
drawer.
• When you lay the drawer down, be careful not to
damage the oor.
• Do not sit or stand on the freezer drawer.
• To prevent accidents, keep children and pets
away from the drawer. Do not leave the drawer
open. If the Durabase
®
storage bin is removed
from the freezer drawer, there is sufcient space
for a small child or pet to crawl inside.
1
Pull the drawer open to full extension.
2
Gently lift and pull out the ice bin.
3
Lift the front of the drawer up, then pull it straight
out.
4
Remove the Durabase basket from the rails.
Remove the screws from the rails at both ends.
5
Grip both sides of the drawer and pull it up to
remove it from the rails.
CAUTION
• Do not hold the handle when removing or
replacing the drawer. The handle may come off,
causing personal injury.

22 INSTALLATION
6
Hold both rails and push them in simultaneously.
Assembling the Freezer Drawer
1
Pull out both rails simultaneously, until they are
fully extended.
2
Grasp the drawer on each side and hook the
drawer supports into the rail tabs located on both
sides.
CAUTION
• Do not hold the handle when removing or
replacing the drawer. The handle may come off,
causing personal injury.
3
Lower the door into its nal position and tighten
the screws located on both sides.
4
Push the drawer back until it clicks into place.
5
Replace the ice bin in the drawer. Insert the
Durabase basket in the rail assembly.

23INSTALLATION
ENGLISH
Connecting the Water Line
Before Beginning
This water line installation is not covered by the
refrigerator warranty. Follow these instructions
carefully to minimize the risk of expensive water
damage.
If necessary, call a qualied plumber to correct water
hammer before installing the water supply line to
the refrigerator. Water banging in the pipes, or water
hammer in residential plumbing can cause damage
to refrigerator parts and lead to water leakage or
ooding.
• Turn the icemaker OFF if the refrigerator will be
used before the water line is connected.
• Do not install the icemaker tubing in areas where
the ambient temperatures fall below freezing.
WARNING
• Connect to potable water supply only.
CAUTION
• To prevent burns and product damage, only
connect the refrigerator water line to a cold water
supply.
• Wear eye protection during installation to prevent
injury.
Water Pressure
You will need a cold water supply.
Water Pressure
models with
water lter
20–120 psi
(138 - 827 kPa)
where reverse
osmosis
water ltration
system is
connected to
a cold water
supply
40–60 psi minimum to reverse
osmosis system (2.8 – 4.2 kgf/cm
2
,or
less than 2–3 seconds to ll a cup of
7 oz capacity)
If the water pressure from the reverse osmosis
system is less than 20 psi or 138 kPa or 1.4 kgf/ cm
2
(takes more than 4 seconds to ll a cup of 7 oz or
198 cc capacity):
• Check to see if the sediment lter in the reverse
osmosis system is blocked. Replace the lter if
necessary.
• Allow the storage tank on the reverse osmosis
system to rell after heavy usage.
• If the water pressure remains low, call a licensed,
qualied plumber.
• All installations must be in accordance with local
plumbing code requirements.
Supplies Needed
• Copper or PEX Tubing, ¼ in. outer diameter, to
connect the refrigerator to the water supply. Be sure
both ends of the tubing are cut square. To determine
how much tubing you need, measure the distance
from the water valve on the back of the refrigerator
to the water supply pipe. Then, add 8 feet (2.4 m).
Be sure there is sufcient extra tubing (about 8 feet
[2.4 m] coiled into 3 turns of about 10 in. [25 cm]
diameter) to allow the refrigerator to move out from
the wall after installation.
• Power drill.
• ½ in. or adjustable wrench.
• Flat-blade and Phillips-head screwdrivers.
• Two ¼ in. outer diameter compression nuts and
2 ferrules (sleeves) to connect the copper tubing to
the shutoff valve and the refrigerator water valve.
• If your existing copper water line has a ared tting
at the end, purchase an adapter (available at
plumbing supply stores) to connect the water line
to the refrigerator OR cut off the ared tting with a
tube cutter and then use a compression tting.

24 INSTALLATION
• Shutoff valve to connect to the cold water line.
The shutoff valve should have a water inlet with a
minimum inside diameter of 5/32 in. at the point of
connection to the COLD WATER LINE. Saddle-type
shutoff valves are included in many water supply
kits. Before purchasing, make sure a saddle-type
valve complies with your local plumbing codes.
NOTE
• A self-piercing saddle type water valve should not
be used.
Water Line Installation Instructions
WARNING
Electric Shock Hazard:
• When using any electrical device (such as a
power drill) during installation, be sure the device
is battery-powered, double-insulated or grounded
in a manner that will prevent the hazard of
electric shock.
Install the shutoff valve on the nearest frequently
used drinking water line.
1
Shut off the main water supply.
Turn on the nearest faucet to relieve the pressure
on the line.
2
Choose the valve location.
Choose a location for the valve that is easily
accessible. It is best to connect into the side of
a vertical water pipe. When it is necessary to
connect into a horizontal water pipe, make the
connection to the top or side, rather than at the
bottom, to avoid drawing off any sediment from
the water pipe.
3
Drill the hole for the valve.
• Drill a ¼ in. hole in the water pipe using a sharp
bit. Remove any burrs resulting from drilling the
hole in the pipe. Be careful not to allow water
to drain into the drill. Failure to drill a ¼ in. hole
may result in reduced ice production or smaller
cubes.
NOTE
• The hookup line cannot be white, plastic tubing.
Licensed plumbers must use only copper tubing
(NDA tubing #49595 or #49599) or Cross Link
Polyethylene (PEX) tubing.
4
Fasten the shutoff valve.
Fasten the shutoff valve to the cold water pipe
with the pipe clamp.
Pipe Clamp
Saddle-Type
Shutoff Valve
Vertical Cold
Water Pipe
NOTE
• Commonwealth of Massachusetts Plumbing Codes
248CMR shall be adhered to. Saddle valves are
illegal and use is not permitted in Massachusetts.
Consult with your licensed plumber.
5
Tighten the pipe clamp.
Tighten the clamp screws until the sealing washer
begins to swell.
Pipe Clamp
Clamp Screw
Washer
Inlet End
NOTE
• Do not over tighten clamp or you may crush the
tubing.

25INSTALLATION
ENGLISH
6
Route the tubing.
Route the tubing between the cold water line and
the refrigerator.
Route the tubing through a hole drilled in the wall
or oor (behind the refrigerator or adjacent base
cabinet) as close to the wall as possible.
NOTE
• Be sure there is sufcient extra tubing (about 8 ft.
coiled into three turns of about 10 in. diameter) to
allow the refrigerator to move out from the wall after
installation.
7
Connect the tubing to the valve.
Place the compression nut and ferrule (sleeve)
for copper tubing onto the end of the tubing and
connect it to the shutoff valve.
Make sure the tubing is fully inserted into the
valve. Tighten the compression nut securely.
Saddle-Type
Shutoff Valve
Packing Nut
Outlet Valve
Compression Nut
Ferrule (sleeve)
8
Flush out the tubing.
Turn the main water supply on and ush out the
tubing until the water is clear. Shut the water off at
the water valve after about one quart of water has
been ushed through the tubing.
9
Connect the tubing to the refrigerator.
NOTE
• Before making the connection to the refrigerator, be
sure that the refrigerator power cord is not plugged
into the wall outlet.
• Remove the plastic exible cap from the water
valve.
• Place the compression nut and ferrule (sleeve) onto
the end of the tubing as shown.
• Insert the end of the copper tubing into the
connection as far as possible. While holding the
tubing, tighten the tting.
Tubing Clamp
¼ in. Compression Nut
Ferrule (sleeve)
¼ in. Tubing
Refrigerator Connection
10
Turn the water on at the shutoff valve.
Tighten any connections that leak.
CAUTION
• Check for leaks at all water line connections.

26 INSTALLATION
Leveling and Door Alignment
Leveling
The refrigerator has two front leveling legs. Adjust the
legs to alter the tilt from front-to-back or side-to side.
If the refrigerator seems unsteady, or the doors do
not close easily, adjust the refrigerator’s tilt using the
instructions below:
1
Turn the leveling leg to the left to raise that side
of the refrigerator or to the right to lower it. It may
take several turns of the leveling leg to adjust the
tilt of the refrigerator.
NOTE
• A are nut wrench works best, but an open-end
wrench will sufce. Do not over-tighten.
2
Open both doors and check to make sure that
they close easily. If the doors do not close easily,
tilt the refrigerator slightly more to the rear by
turning both leveling legs to the left. It may take
several more turns, and be sure to turn both
leveling legs the same amount.
Door Alignment
Standard Door
Both the left and right refrigerator doors have an
adjustable nut, located on the bottom hinge, to raise
and lower them to align properly.
If the space between the doors is uneven, follow the
instructions below to align the doors evenly:
Use the wrench (included with the owner's manual)
to turn the nut in the door hinge to adjust the height.
Turn the nut to the right to raise the door or to the left
to lower it.
Door-in-Door
The left refrigerator door has an adjustable nut,
located on the bottom hinge, to raise and lower the
door for proper alignment.
If the space between the doors is uneven, follow the
instructions below to align the left door:
Use the wrench (included with the owner's manual)
to turn the nut in the door hinge to adjust the height.
Turn the nut to the right to raise the door or to the left
to lower it.

27INSTALLATION
ENGLISH
The right refrigerator door does not have an
adjustable nut.
If the space between the doors is uneven, follow the
instructions below to align the right door:
1
With one hand, lift up both the inner and outer
door sections of the right door to raise them at the
middle hinge. (It may be easier to lift it with the
doors open.)
2
With the other hand, use pliers to insert the snap
ring on the middle hinge of the inner door section
as shown. Do not insert the ring on the hinge of
the outer door section.
3
Insert additional snap rings until the right door is
aligned. (Two snap rings are provided with the
unit.)
Turning on the Power
After installing, plug the refrigerator’s power cord into
a 3-prong grounded outlet and push the refrigerator
into the nal position.
CAUTION
• Connect to a rated power outlet.
• Have a qualied electrician check the wall outlet
and wiring for proper grounding.
• Do not damage or cut off the ground terminal of
the power plug.
Position the Refrigerator
Arrange the coil of tubing so that it does not vibrate
against the back of the refrigerator or against the
wall. Push the refrigerator back to the wall.
Start the Icemaker
If the water line is connected, set the icemaker power
switch to the ON position.
The icemaker will not begin to operate until it reaches
its operating temperature of 15 °F (–9 °C) or below. It
will then begin operation automatically if the icemaker
power switch is in the ON (I) position.

28 OPERATION
OPERATION
Before Use
Clean the refrigerator.
Clean the refrigerator thoroughly and wipe off all dust that accumulated during shipping.
CAUTION
• Do not scratch the refrigerator with a sharp object or use a detergent that contains
alcohol, a ammable liquid or an abrasive when removing any tape or adhesive from
the refrigerator. Remove adhesive residue by wiping it off with your thumb or dish
detergent.
• Do not peel off the model or serial number label or the technical information on the rear
surface of the refrigerator.
Open refrigerator and freezer doors to ventilate the interior.
The inside of the refrigerator may smell like plastic at rst. Remove any adhesive tape
from inside the refrigerator and open the refrigerator doors and the freezer drawers for
ventilation.
Connect the power supply.
Check if the power supply is connected before use.
Read the “Turning On The Power” section.
Wait for the refrigerator to cool.
Allow the refrigerator to run for at least two to three hours before putting food in it. Check the
ow of cold air in the freezer compartment to ensure proper cooling.
CAUTION
• Putting food in the refrigerator before it has cooled could cause the food to spoil, or a
bad odor to remain inside the refrigerator.
The refrigerator makes a loud noise after initial operation.
This is normal. The volume will decrease as the temperature decreases.

29OPERATION
ENGLISH
Control Panel
Depending on the model, some of the following functions may not be available.
Control Panel Features
1
2
3
4
5
6
7
8
9
NOTE
• When the refrigerator is in the Power Saving Mode, the display remains off until a door is opened or a button is
pressed. Once on, the display remains on for 20 seconds.
Ice Plus
This function increases both ice making and freezing capabilities.
• Press the Ice Plus button to illuminate the icon and activate the function for 24 hours. The function
automatically shuts off after 24 hours.
• Stop the function manually by pressing the button once more.
Smart Grid
Press the Smart Grid button to turn the Smart Grid function On/Off. When the function is on, the icon
illuminates. The Smart Grid function automatically turns on when the refrigerator is connected to the Wi-Fi
network.
When the refrigerator is responding to a Demand Response (DR) message from the electric company, the
Grid text illuminates.
Freezer
Indicates the set temperature of the freezer compartment in Celsius (°C) or Fahrenheit (°F).
The default freezer temperature is 0°F (-18 °C). Press the Freezer button repeatedly to select a new set
temperature from -6 °F to 8 °F (-21 °C to -13 °C).
1
2
3

30 OPERATION
Refrigerator Temperature
Indicates the set temperature of the refrigerator
compartment in Celsius (°C) or Fahrenheit (°F).
The default refrigerator temperature is 37 °F (3
°C). Press the Refrigerator button repeatedly to
select a new set temperature from 33 °F to 46 °F
(1 °C to 8 °C).
NOTE
• To change the temperature mode from °F
to °C (or vice versa) press and hold the
Refrigerator and Freezer Temperature
seconds. The temperature indicator on the
display window switches between Celsius and
Fahrenheit.
• The displayed temperature is the target
temperature, and not the actual temperature
of the refrigerator. The actual refrigerator
temperature depends on the food inside the
refrigerator.
Fresh Air Filter
The Fresh Air Filter helps remove odors from
the refrigerator. The Fresh Air Filter has two
settings, Auto and Power. In Auto mode, the
Fresh Air Filter cycles on and off in increments
of ten minutes on and 110 minutes off. If set to
the Power mode, the Fresh Air Filter stays on
continuously for four hours, cycling on and off in
off. After four hours, the Fresh Air Filter switches
back to Auto mode.
• Press the Fresh Air Filter button repeatedly to
toggle between Power mode and Auto mode.
NOTE
•
Replace Filter
and hold the Fresh Air Filter button for three
seconds to turn the icon light off. Replace the
* Lock
The Lock function disables every other button on
the display.
• When power is initially connected to the
refrigerator, the Lock function is off.
• To lock the control panel buttons, press and
hold the Lock button until the closed Lock
icon appears in the display and the function is
activated.
• To disable the Lock function, press and hold the
Lock button for approximately three seconds.
Water Filter
Replace Filter
press and hold the Water Filter button for three
seconds to turn the icon light off. Replace the
* Wi-Fi
The Wi-Fi button, when used with the LG
Smart Refrigerator smart phone app, allows the
refrigerator to connect to a home Wi-Fi network.
Refer to Smart Function for information on the
initial setup of the application.
The Wi-Fi icon shows the status of the
refrigerator's network connection. The icon
illuminates when the refrigerator is connected to
the Wi-Fi network.
Press and hold the Wi-Fi button for 3 seconds to
connect to the network. The icon blinks while the
connection is being made, then turns on once the
connection is successfully made.
Dispenser Mode
Press the buttons to select cubed ice, water, or
crushed ice. The LED illuminates over the mode
selected.
3
and
8
SABBATH (On Some Models)
Sabbath mode is used on the Jewish Sabbath
and holidays.
•
To turn Sabbath mode on, touch the display to
activate it, then press and hold the Freezer
and Wi-Fi buttons for 3 seconds until Sb
appears in the display.
•
Sabbath mode automatically turns off after 96
hours.
•
To turn Sabbath mode off manually, press and
hold the Freezer and Wi-Fi buttons for 3
seconds.
•
Once turned on, Sabbath mode is maintained
even after a power outage.
•
Selecting Sabbath mode automatically turns
off the Alarm functions. The dispenser is also
disabled.

31OPERATION
ENGLISH
CAUTION
Display Mode (For Store Use Only)
• The Display Mode disables all cooling in the
refrigerator and freezer sections to conserve
energy while on display in a retail store. When
activated, OFF is displayed on the control panel
and the display remains on for 20 seconds.
To deactivate / activate:
• With either refrigerator door opened, press and
hold the Refrigerator and Ice Plus buttons at the
same time for ve seconds. The control panel
beeps and the temperature settings display to
conrm that Display Mode is deactivated. Use
the same procedure to activate Display Mode.
Ice and Water Dispenser
CAUTION
• Keep children away from the dispenser. Children
may play with or damage the controls.
• Throw away the rst few batches of ice (about
140 - 160 cubes) after installation. This is also
necessary if the refrigerator has not been used
for a long time.
• If ice or water dispenses unexpectedly, turn off
the water supply and contact an LG Electronics
Customer Information Center.
• Never use a glass that is exceptionally narrow
or deep. Ice may jam in the ice passage and
refrigerator performance may be affected.
Dispenser Structure
Dispenser
Paddle
Tray
Using the Dispenser
Incorrect Correct
Water
Ice

32 OPERATION
NOTE
• To dispense cold water or ice, push on the
dispenser paddle with a glass.
• The rst ice and water dispensed may include
particles or odor from the water supply line or the
water tank. Throw away the rst few batches of ice
(about 140 - 160 cubes). This is also necessary if
the refrigerator has not been used for a long time.
• The dispenser will not operate when either of the
refrigerator doors is open.
• If discolored ice is dispensed, check the water lter
and water supply. If the problem continues, contact
an LG Electronics Customer Information Center.
Do not use the water or ice until the problem is
corrected.
• Dispense ice into a glass before lling it with water
or other beverages. Splashing may occur if ice is
dispensed into a glass that already contains liquid.
• Some dripping may occur after dispensing. Hold the
cup beneath the dispenser for a few seconds after
dispensing to catch all of the drops.
• Keep containers at an appropriate distance from
the dispensers. Tall, narrow glasses should be
held far enough from the ice outlet to prevent ice
from jamming in the ice chute. A container with a
very small opening should be held as close to the
dispenser as possible to avoid spilling.
• Keep the glass at a proper distance from the ice
outlet. A glass held too close to the outlet may
prevent ice from dispensing.
Locking the Dispenser
Press the Lock button on the control panel for 3
seconds to lock or unlock the dispenser and all of the
control panel functions.
Ice Compartment
CAUTION
• Keep hands and tools out of the ice compartment
door and dispenser chute. Failure to do so may
result in damage or personal injury.
Keep the ice compartment door closed tightly. If the
ice compartment door is not closed tightly, the cold
air in the ice bin will freeze food in the refrigerator
compartment. This could also cause the icemaker to
stop producing ice.
In-Door Ice Bin
The icemaker stops producing ice when the in-
door ice bin is full. To make room for additional ice,
empty the ice bin into the extra ice bin in the freezer
compartment. During use, the ice may stack unevenly
in the bin, causing the icemaker to misread the
number of ice cubes and stop producing ice. Shaking
the ice bin to level the ice within it can reduce this
problem.
CAUTION
• When handling the ice bin, keep hands away
from the icemaker tray area to avoid personal
injury.
• Storing cans or other items in the ice bin will
damage the icemaker.
• Never use thin crystal glasses or containers to
collect ice. Such containers may chip or break
resulting in glass fragments in the ice.
If the icemaker is turned OFF for an extended period
of time, the ice compartment will gradually warm up
to the temperature of the refrigerator compartment.
To prevent ice cubes from melting and leaking from
the dispenser, ALWAYS empty the ice bin when the
icemaker is turned OFF for more than a few hours.
The ice passage may become blocked with frost
if only crushed ice is used. Remove the frost that
accumulates by removing the ice bin and clearing the
passage with a rubber spatula. Dispensing cubed ice
can also help prevent frost buildup.

33OPERATION
ENGLISH
Detaching the In-Door Ice Bin
1
Gently pull the handle to open the ice
compartment.
2
To remove the in-door ice bin, grip the front
handle, slightly lift the lower part, and slowly pull
out the bin as shown.
Assembling the In-Door Ice Bin
1
Carefully insert the in-door ice bin, slanting the
top slightly to t it under the icemaker.
2
Gently push the handle to close the ice
compartment.
CAUTION
• When handling the ice bin, keep hands away
from the icemaker tray area to avoid personal
injury.
• Avoid touching the auto shutoff (feeler arm)
when replacing the ice bin. See the label on the
ice compartment door for details.

34 OPERATION
Automatic Icemaker
In-Door Icemaker
Power Switch
Ice-detecting Sensor
Icemaker
NOTE
• Ice is made in the automatic in-door icemaker and
sent to the dispenser. The icemaker produces
70 - 182 cubes in a 24-hour period, depending
on freezer compartment temperature, room
temperature, number of door openings and other
operating conditions.
• It takes about 12 to 24 hours for a newly installed
refrigerator to begin making ice.
• Ice-making stops when the in-door ice bin is full.
When full, the in-door ice bin holds approximately 6
to 8 (12-16 oz.) glasses of ice.
• Foreign substances or frost on the ice-detecting
sensor can interrupt ice production. Make sure
the sensor area is clean at all times for proper
operation.
• To increase ice production, use the Ice Plus
function. The function increases both ice making
and freezing capabilities.
WARNING
Personal Injury Hazard
• DO NOT place ngers or hands on the automatic
ice making mechanism while the refrigerator is
plugged in.
CAUTION
Never store beverage cans or other items in
the ice bin for the purpose of rapid cooling.
Doing so may damage the icemaker or the
containers may burst.
• To avoid personal injury, keep hands out of the
ice door and passage.
Freezer Icemaker
Power SwitchAuto shutoff (feeler arm)
NOTE
• The automatic freezer icemaker produces 12 cubes
at a time, 50-110 pieces within a 24 hour period
if conditions are favorable. This amount may vary
according to the environment (ambient temperature
around the appliance, frequency of the door being
opened, amount of food stored in the appliance,
etc.).
• If the ice bin is completely lled with ice, ice
production will stop.
• Sound of ice dropping into the ice bin is normal.
• The icemaker produces ice once approximately 48
hours have passed after the appliance is initially
installed.
• Discard the rst ice cubes produced after initial
install.
• Ice cubes which are stored in the ice bin for a
long time may clump together and be difcult
to separate. If this happens, empty the ice bin
completely and clean it before reinstalling it.

35OPERATION
ENGLISH
Turning the Automatic Icemakers On
or Off
To turn off one of the automatic icemakers, set the
icemaker switch to OFF (O). To turn on the automatic
icemaker, set the switch to ON (I).
Normal Sounds You May Hear
• Keeping the power turned on to the icemakers
before the water line is connected can damage the
icemakers.
• The icemaker water valve will buzz as the icemaker
lls with water. If the power switch is in the ON
(I) position, it will buzz even if it has not yet been
hooked up to water. To stop the buzzing, move the
power switch to OFF (O).
• You will hear the sound of cubes dropping into the
bin and water running in the pipes as the icemaker
rells.
NOTE
• Do not keep the power turned on to the icemakers
if the water line is not connected. Doing so can
damage the icemakers.
Preparing for Vacation
Set both icemaker power switches to OFF (O) and
shut off the water supply to the appliance.
If the ambient temperature will drop below freezing,
have a qualied technician drain the water supply
system to prevent serious property damage due
to ooding caused by ruptured water lines or
connections.
NOTE
• The ice bin should be emptied any time the
icemaker on/off switch is turned to the OFF (O)
position.

36 OPERATION
Storing Food
Where to Store Food
Depending on the model, some of the following functions may not be available.
Each compartment inside the refrigerator is designed to store different types of food.
Store food in the optimal space to enjoy the freshest taste.
Standard Door
1
2
3
5
4
6
8
9
Door-in-Door
7
1
2
8
9
3
5
4

37OPERATION
ENGLISH
In-door Icemaker (Refrigerator)
This is where ice is automatically produced and stored.
Vegetable Storage (Crisper)
Preserves vegetables and fruit.
Automatic Icemaker (Freezer)
This is where ice is automatically produced and stored.
Removable Ice storage bin
If a large amount of ice is needed, transfer the ice in the in-door ice bin to an ice storage bin in the freezer.
Durabase
®
Largest storage space in the freezer.
Dairy Product Bin
Stores milk products such as butter and cheese.
Door-in-Door Case
Convenient storage for frequently used items such as beverages, butter, margarine,cream cheese,peanut
butter, and condiments.
Adjustable Refrigerator Shelf
Adjustable shelves to meet individual storage needs.
Glide‘N’Serve (On Some Models)
Provides storage space with a variable temperature control that keeps the compartment at a different
temperature than the refrigerator. It is a convenient place to store sandwiches or meat to be cooked.
1
2
3
4
5
6
7
8
9

38 OPERATION
CAUTION
• Do not overll or pack items too tightly into door
bins. Doing so may cause damage to the bin
or personal injury if items are removed with
excessive force.
• Do not store glass containers in the freezer.
Contents may expand when frozen, break the
container and cause injury.
• The temperature inside the EasyReach™ is
slightly lower than in the shelf or door bin area.
NOTE
- If you are leaving home for a short period, like a
short vacation, the refrigerator should be left on.
Refrigerated foods that are able to be frozen will
stay preserved longer if stored in the freezer.
- If you are leaving the refrigerator turned off for
an extended period, remove all food and unplug
the power cord. Clean the interior, and leave the
doors open to prevent fungi from growing in the
refrigerator.
- Do not store food with high moisture content
towards the top of the refrigerator. The moisture
could come in direct contact with the cold air and
freeze.
- Wash food before storing it in the refrigerator.
Vegetables should be washed, and food
packaging should be wiped down to prevent
adjacent foods from being contaminated.
- If the refrigerator is kept in a hot and humid
place, frequent opening of the door or storing a
lot of vegetables in the refrigerator may cause
condensation to form. Wipe off the condensation
with a clean cloth or a paper towel.
- If the refrigerator door or freezer drawer is opened
or closed too often, warm air may penetrate the
refrigerator and raise its temperature. This can
increase the running costs of the unit.
Food Storage Tips
Wrap or store food in the refrigerator in airtight and
moisture-proof material unless otherwise noted. This
prevents food odor and taste transfer throughout the
refrigerator. For dated products, check date code to
ensure freshness.
Food How to
Butter or
Margarine
Keep opened butter in covered
dish or closed compartment.
When storing an extra supply,
wrap in freezer packaging and
freeze.
Cheese
Store in original wrapping until
used. Once opened, rewrap
tightly in plastic wrap or
aluminum foil.
Milk
Wipe milk cartons. For coldest
milk, place containers on an
interior shelf.
Eggs
Store in original carton on
interior shelf, not on door shelf.
Fruit
Do not wash or hull fruit until
it is ready to be used. Sort
and keep fruit in original
container in a crisper, or store
in completely closed paper bag
on refrigerator shelf.
Leafy
Vegetables
Remove store wrapping, trim or
tear off bruised and discolored
areas, wash in cold water, and
drain. Place in plastic bag or
plastic container and store in
crisper.
Vegetables with
skins(carrots,peppers)
Place in plastic bags or plastic
container and store in crisper.
Fish
Freeze fresh sh and shellsh
if they are not being eaten
the same day purchased.
Eating fresh sh and shellsh
the same day purchased is
recommended.
Leftovers
Cover leftovers with plastic
wrap or aluminum foil, or store
in plastic containers with tight
lids.

39OPERATION
ENGLISH
Storing Frozen Food
Check a freezer guide or a reliable cookbook for
further information about preparing food for freezing
or food storage times.
Freezing
Your freezer will not quick-freeze a large quantity of
food. Do not put more unfrozen food into the freezer
than will freeze within 24 hours (no more than 2 to
3 pounds of food per cubic foot of freezer space).
Leave enough space in the freezer for air to circulate
around packages. Be careful to leave enough room
at the front so the door can close tightly.
Storage times will vary according to the quality and
type of food, the type of packaging or wrap used
(how airtight and moisture-proof) and the storage
temperature. Ice crystals inside a sealed package are
normal. This simply means that moisture in the food
and air inside the package have condensed, creating
ice crystals.
NOTE
• Allow hot foods to cool at room temperature for 30
minutes, and then package and freeze. Cooling hot
foods before freezing saves energy.
Packaging
Successful freezing depends on correct packaging.
When you close and seal the package, it must not
allow air or moisture in or out. If it does, you could
have food odor and taste transfer throughout the
refrigerator and could also dry out frozen food.
Packaging recommendations
• Rigid plastic containers with tight-tting lids
• Straight-sided canning/freezing jars
• Heavy-duty aluminum foil
• Plastic-coated paper
• Non-permeable plastic wraps
• Specied freezer-grade self-sealing plastic bags
Follow package or container instructions for proper
freezing methods.
Do not use
• Bread wrappers
• Non-polyethylene plastic containers
• Containers without tight lids
• Wax paper or wax-coated freezer wrap
• Thin, semi-permeable wrap
Humidity Controlled Crispers
(On Some Models)
The crispers provide fresher tasting fruit and
vegetables by letting you easily control humidity
inside the drawer.
You can control the amount of humidity in the
moisture-sealed crispers by adjusting the control to
any setting between Vegetables and Fruit.
• Vegetables keeps moist air in the crisper for best
storage of fresh, leafy vegetables.
• Fruit lets moist air out of the crisper for best storage
of fruit.

40 OPERATION
Glide‘N’Serve (On Some
Models)
The Glide’N’Serve provides storage space with
a variable temperature control that can keep the
compartment at a slightly different temperature than
the refrigerator section. This drawer can be used for
large party trays, deli items and beverages. (This
drawer should not be used to store vegetables that
require high humidity.)
Press the Select button to choose between Produce
(Cold), Deli (Colder) and Meat (Coldest).
Durabase
®
The Durabase
®
divider allows you to organize the
Durabase
®
area into sections. It can be adjusted from
side to side to accommodate items of different sizes.
WARNING
• If the Durabase
®
divider is removed, there is
enough open space for children or pets to crawl
inside. To prevent accidental child and pet
entrapment or suffocation risk, DO NOT allow
children or pets to touch or go near the drawer.
Detaching/Assembling the
Storage Bins
Some bins may vary in appearance and will only t in
one location.
Glide'N'Serve and Crispers
1
To remove the humidity controlled crispers and
the Glide'N'Serve, pull out the crisper (1) or
Glide'N'Serve (2) to full extension, lift the front up,
and pull straight out.
2
To install, slightly tilt up the front, insert the crisper
or drawer into the frame and push it back into
place.

41OPERATION
ENGLISH
Crisper Cover
To remove, lift the front of the cover up until it
detaches from the back wall of the cabinet, then pull
it out.
Door Bins
The door bins are removable for easy cleaning and
adjustment.
1
To remove the bin, simply lift the bin up and pull
straight out.
2
To replace the bin, slide it in above the desired
support and push down until it snaps into place.
CAUTION
• Regularly detach and wash the storage bins and
shelves; they can become easily contaminated
by food.
• Do not apply excessive force while detaching or
assembling the storage bins.
• Do not use the dishwasher to clean the storage
bins and shelves.
InstaView Door-in-Door (On
Some Models)
The InstaView Door-in-Door compartment allows for
easy access to commonly used food items.
Knock twice on the glass to turn the LED light inside
the InstaView on or off. The LED light turns off
automatically after 10 seconds.
• The LED light turns off automatically after 10
seconds.
• The LED light does not turn on if the right
refrigerator door is open.
• The InstaView function will not activate for two
seconds after closing the door.
•
Door-in-Door Compartment
To access the InstaView Door-in-Door compartment,
lightly press the button on the right refrigerator door
handle.

42 OPERATION
InstaView Function
The InstaView function on the Door-in-Door lets you
see if you’re running low on frequently used items
like beverages and snacks, without opening the
refrigerator door.
1
Knock twice on the glass to turn the LED light
inside the Door-in-Door on or off.
2
The LED light turns off automatically after ten
seconds.
• The InstaView Door-in-Door function is disabled
when the right refrigerator door is open, for two
seconds after closing the door, and when the ice
dispenser is in use.
• Knock near the center of the glass. Knocking
near the edges of the glass may not activate the
InstaView Door-in-Door function properly.
• Knock hard enough that the knocking sound is
audible.
• The InstaView Door-in-Door function may activate if
a loud noise occurs near the refrigerator.
Door-in-Door Case
To open the Door-in-Door case, pull evenly on the
marked area. The Door-in-Door case is removable for
easy cleaning and adjustment.
1
To remove the Door-In-Door case, lift up and pull
out.
2
To replace the Door-in-Door case, line up the tabs
on the Door-In-Door case with the slots on the
door and push down until it snaps into place.
CAUTION
• Do not overcrowd door bins or close doors with
excessive force. The inner Door-in-Door may not
close properly or may be pushed open by falling
items, resulting in product or property damage or
personal injury.

43OPERATION
ENGLISH
Adjusting the Refrigerator
Shelves
The shelves in the refrigerator are adjustable to meet
individual storage needs. Your model may have full or
split shelves.
Adjusting the shelves to t items of different heights
will make nding the exact item you want easier.
Detaching the Shelf
(Half Shelf Type)
1
Tilt up the front of the shelf and then lift the shelf
straight up.
2
Pull the shelf out.
Assembling the Shelf
(Half Shelf Type)
1
Tilt the front of the shelf up and guide the shelf
hooks into the slots at a desired height.
2
Lower the front of the shelf so that the hooks drop
into the slots.
CAUTION
• Make sure that shelves are level from one side
to the other. Failure to do so may result in the
shelf falling or spilled food.
• Do not clean glass shelves with warm water
while they are cold. Shelves may break if
exposed to sudden temperature changes or
impact.
• Glass shelves are heavy. Use special care when
removing them.
Using the Folding Shelf
Store taller items, such as a gallon container
or bottles, by pushing the front half of the shelf
underneath the back half of the shelf. Pull the front of
the shelf forward to return to a full shelf.
CAUTION
• Glass shelves are heavy. Use special care when
removing them.
• Do not clean glass shelves with warm water
while they are cold. Shelves may break if
exposed to sudden temperature changes or
impact.

44 SMART FUNCTIONS
SMART FUNCTIONS
LG SmartThinQ Application
The LG SmartThinQ application allows you to
communicate with the appliance using a smartphone.
Before Using LG SmartThinQ
• For appliances with the or logo
1
Use a smartphone to check the strength of
the wireless router (Wi-Fi network) near the
appliance.
• If the distance between the appliance and the
wireless router is too far, the signal strength
becomes weak. It may take a long time to
register or installation may fail.
2
Turn off the Mobile data or Cellular Data on your
smartphone.
3
Connect your smartphone to the wireless router.
NOTE
• To verify the Wi-Fi connection, check that Wi-Fi
icon on the control panel is lit.
• The appliance supports 2.4 GHz Wi-Fi networks
only. To check your network frequency, contact your
Internet service provider or refer to your wireless
router manual.
• LG SmartThinQ is not responsible for any network
connection problems or any faults, malfunctions, or
errors caused by network connection.
• The surrounding wireless environment can make
the wireless network service run slowly.
• If the appliance is having trouble connecting to the
Wi-Fi network, it may be too far from the router.
Purchase a Wi-Fi repeater (range extender) to
improve the Wi-Fi signal strength.
• The network connection may not work properly
depending on the Internet service provider.
• The Wi-Fi connection may not connect or may
be interrupted because of the home network
environment.
• If the appliance cannot be registered due to
problems with the wireless signal transmission,
unplug the appliance for about a minute, then plug
in the appliance and try again.
• If the rewall on your wireless router is enabled,
disable the rewall or add an exception to it.
• The wireless network name (SSID) should be a
combination of English letters and numbers. (Do not
use special characters.)
• Smartphone user interface (UI) may vary depending
on the mobile operating system (OS) and the
manufacturer.
• If the security protocol of the router is set to WEP,
network setup may fail. Change the security
protocol (WPA2 is recommended), and register the
product again.
Installing the LG SmartThinQ
Application
Search for the LG SmartThinQ application from the
Google Play Store or Apple App Store on a smart
phone. Follow instructions to download and install the
application.
NOTE
• If you choose the simple login to access the LG
SmartThinQ application, you must go through
the appliance registration process each time you
change your smartphone or reinstall the application.

45SMART FUNCTIONS
ENGLISH
LG SmartThinQ Application Features
• For appliances with the or logo
Firmware Update
Keep the appliance performance updated.
Manage Food
This feature helps track items in the refrigerator and
freezer, sends alerts when items are near their use
by dates, generates grocery lists, and links to related
recipes.
Energy Monitoring
This feature keeps track of the refrigerator’s power
consumption and the number of door openings.
Remote Control
Control the refrigerator temperature, Fresh Air Filter
and Ice Plus from the smart phone app.
Push Messages
If the door remains open for more than ten minutes,
you will receive a push message. When Ice Plus is
nished, you will receive a push message.
Smart Diagnosis™
This function provides useful information for
diagnosing and solving issues with the appliance
based on the pattern of use.
Settings
Allows you to set various options on the refrigerator
and in the application.
NOTE
• If you change your wireless router, your Internet
service provider or your password after registering
the appliance, delete it from the LG SmartThinQ
Settings → Edit Product and register again.
• This information is current at the time of publication.
The application is subject to change for product
improvement purposes without notice to users.
Connecting to Wi-Fi
The Wi-Fi button, when used with the LG
SmartThinQ application, allows the refrigerator
to connect to a home Wi-Fi network. The Wi-Fi
icon shows the status of the refrigerator’s network
connection. The icon illuminates when the refrigerator
is connected to the Wi-Fi network.
Initial Appliance Registration
Run the LG SmartThinQ application and follow
the instructions in the application to register the
appliance.
Re-registering the Appliance or Registering
Another User
Press and hold the Wi-Fi button for 3 seconds to
temporarily turn it off. Run the LG SmartThinQ
application and follow the instructions in the
application to register the appliance.
NOTE
• To disable the Wi-Fi function, press and hold the
Wi-Fi button for 3 seconds. Wi-Fi icon will be turned
off.
Wireless LAN Module Specications
Model LCW-004
Frequency Range 2412 - 2462 MHz
Output Power
(Max)
IEEE 802.11 b : 22.44 dBm
IEEE 802.11 g : 24.68 dBm
IEEE 802.11 n : 24.11 dBm

46 SMART FUNCTIONS
FCC Notice (For transmitter module
contained in this product)
This equipment has been tested and found to comply
with the limits for a Class B digital device, pursuant
to Part 15 of the FCC Rules. These limits are
designed to provide reasonable protection against
harmful interference in a residential installation. This
equipment generates, uses, and can radiate radio
frequency energy and, if not installed and used in
accordance with the instructions, may cause harmful
interference to radio communications. However, there
is no guarantee that interference will not occur in a
particular installation. If this equipment does cause
harmful interference to radio or television reception,
which can be determined by turning the equipment
off and on, the user is encouraged to try to correct
the interference by one or more of the following
measures:
• Reorient or relocate the receiving antenna.
• Increase the separation between the equipment and
the receiver.
• Connect the equipment to an outlet on a circuit
different from that to which the receiver is
connected.
• Consult the dealer or an experienced radio/TV
technician for help.
This device complies with Part 15 of the FCC Rules.
Operation is subject to the following two conditions:
1) This device may not cause harmful interference
and
2) This device must accept any interference received,
including interference that may cause undesired
operation of the device.
Any changes or modications in construction of this
device which are not expressly approved by the party
responsible for compliance could void the user’s
authority to operate the equipment.
FCC RF Radiation Exposure
Statement
This equipment complies with FCC radiation
exposure limits set forth for an uncontrolled
environment. This transmitter must not be co-located
or operating in conjunction with any other antenna or
transmitter.
This equipment should be installed and operated with
a minimum distance of 20 cm (7.8 inches) between
the antenna and your body. Users must follow the
specic operating instructions for satisfying RF
exposure compliance.
Industry Canada Statement (For
transmitter module contained in this
product)
This device complies with Industry Canada’s
applicable licence-exempt RSSs. Operation is subject
to the following two conditions:
1) This device may not cause interference; and
2) This device must accept any interference,
including interference that may cause undesired
operation of the device.
IC Radiation Exposure Statement
This equipment complies with IC radiation exposure
limits set forth for an uncontrolled environment.
This equipment should be installed and operated with
a minimum distance of 20 cm (7.8 inches) between
the antenna and your body.
NOTE
• THE MANUFACTURER IS NOT RESPONSIBLE
FOR ANY RADIO OR TV INTERFERENCE
CAUSED BY UNAUTHORIZED MODIFICATIONS
TO THIS EQUIPMENT. SUCH MODIFICATIONS
COULD VOID THE USER’S AUTHORITY TO
OPERATE THE EQUIPMENT.
Open Source Software Notice
Information
To obtain the source code under GPL, LGPL, MPL,
and other open source licenses, that is contained in
this product, please visit http://opensource.lge.com.
In addition to the source code, all referred license
terms, warranty disclaimers and copyright notices are
available for download.
LG Electronics will also provide open source code
to you on CD-ROM for a charge covering the cost
of performing such distribution (such as the cost of
media, shipping, and handling) upon email request
to [email protected]. This offer is valid for a
period of three years after our last shipment of this
product. This offer is valid to anyone in receipt of this
information.

47SMART FUNCTIONS
ENGLISH
Smart Grid Function
When the refrigerator operates in Smart Grid mode,
the Smart Refrigerator function can control energy
usage or delay the operation of some functions to
save energy during peak usage periods.
• You can override the Smart Grid function any time
(using the Smart Grid button or application).
• To use the Smart Grid function, you need to register
your appliance with your electric utility company.
Smart Grid Application Features
Smart Saving_Demand Response
You can lower energy usage based on Demand
Response (DR) signals from the utility company. If
the refrigerator is operating in Smart Saving mode
according to the DR signal, you can see a pop up.
Seasonal Energy Savings
Lower energy usage based on time period.
Using the Smart Grid Function
This feature responds to notication events from your
utility company to run high energy consuming tasks
during off-peak periods when demand is lower. These
notication events are known as Demand Response
signals.
If the refrigerator receives a Demand Response
signal from the utility company, the refrigerator will
turn on the Grid LED on the refrigerator display and
control its power consumption according to the signal.
The refrigerator will respond to the signals received
from the utility company as long as product
performance is maintained.
If the refrigerator receives a Demand Response
signal, the refrigerator will operate in Delay Appliance
Load (DAL) or Temporary Appliance Load Reduction
(TALR) mode.
Delay Appliance Load (DAL)
The refrigerator responds to a DAL signal by
providing a moderate load reduction for the duration
of the delay period.
This mode controls functions that consume a lot of
energy such as adjusting the cooling system, running
the defrost cycle, and making ice.
• When the refrigerator operates in DAL mode, the
Grid LED is illuminated on the refrigerator display.
• DAL mode is automatically deactivated after the
period stipulated by the DAL signal (max. 4 hours)
or when you override the Smart Grid function.
Temporary Appliance Load Reduction
(TALR)
The refrigerator responds to a TALR signal by
aggressively reducing the load for a short time
period, typically 10 minutes. This mode reduces
energy consumption by stopping the compressor and
controlling the functions that consume a lot of energy
such as the defrost cycle and fan.
• When the refrigerator operates in TALR mode, the
Grid LED is illuminated on the refrigerator display.
• TALR mode is automatically deactivated after the
received duration (max. 10 minutes), or when you
override the Smart Grid function. The mode is
immediately deactivated and the refrigerator returns
to its normal state when the door is opened or
closed, or the dispenser is used.
Override Smart Grid Mode
To ignore the Demand Response signal from the
utility company and override the Smart Grid function,
push the Smart Grid button while the refrigerator is
in Smart Grid mode.
When you override the Smart Grid function, the
refrigerator ignores the Demand Response signal
and is no longer controlled by the utility company until
the next Demand Response signal is sent. You can
also override the Smart Grid function using the smart
phone app.
LG Open API
You can manage Smart Grid features for the LG
Smart Refrigerator.
Please check the detailed specications on the notice
page on us.smartthinq.com.
API list
Demand Response
• Send demand response signal
Power Saving
• Set saving mode
• Get schedule of DR/Delay Defrost
Energy Monitoring
• Get door open event information
• Get energy consumption information
Delay Defrost Capability
• Insert a delay defrost schedule event
• Update a delay defrost schedule event
• Delete a delay defrost schedule event
• Get the delay defrost schedule

48 SMART FUNCTIONS
Smart Diagnosis™ Function
Should you experience any problems with the
appliance, it has the capability of transmitting data
via your telephone to the LG Customer Information
Center. NFC or Wi-Fi equipped models can also
transmit data to a smartphone using the LG Smart
ThinQ application.
Smart Diagnosis™ through the
Customer Information Center
• For appliances with the or logo
This method allows you to speak directly to our
trained specialists. The specialist records the data
transmitted from the appliance and uses it to analyze
the issue, providing a fast and effective diagnosis.
1
Call the LG Electronics Customer Information
Center at:
(LG U.S.A.) 1-800-243-0000
(LG Canada) 1-888-542-2623
2
Hold the Lock button for three seconds.
• If the display has been locked for over ve
minutes, you must deactivate the lock and then
reactivate it.
3
Open the right refrigerator door.
4
Hold the mouthpiece of your phone in front of the
speaker that is located on the right hinge of the
refrigerator door, when instructed to do so by the
call center.
5
Press and hold the Freezer button for three
seconds while continuing to hold your phone to
the speaker.
6
After you hear three beeps, release the Freezer
button.
7
Keep the phone in place until the tone
transmission has nished. The display will
count down the time. Once the countdown is
over and the tones have stopped, resume your
conversation with the specialist, who will then
be able to assist you in using the information
transmitted for analysis.
NOTE
• For best results, do not move the phone while the
tones are being transmitted.
• If the call center agent is not able to get an accurate
recording of the data, you may be asked to try
again.
• The Smart Diagnosis™ function depends on the
local call quality.
• Bad call quality may result in poor data transmission
from your phone to the call center, which could
cause Smart Diagnosis™ to malfunction.
Wi-Fi Network
• For appliances with the or logo
Use the Smart Diagnosis feature in the LG
SmartThinQ application for help diagnosing issues
with the appliance without the assistance of the LG
Customer Information Center.
Follow the instructions in the LG SmartThinQ
application to perform a Smart Diagnosis using your
smartphone.

49MAINTENANCE
ENGLISH
MAINTENANCE
Cleaning
WARNING
• Use non-ammable cleaner. Failure to do so can
result in re, explosion, or death.
CAUTION
• Do not use an abrasive cloth or sponge
when cleaning the interior and exterior of the
refrigerator.
• Do not place your hand on the bottom surface
of the refrigerator when opening and closing the
doors.
• When lifting the hinge free of the latch, be careful
that the door does not fall forward.
General Cleaning Tips
• Both the refrigerator and freezer sections defrost
automatically; however, clean both sections once a
month to prevent odors.
• Wipe up spills immediately.
• Unplug the refrigerator or disconnect power before
cleaning.
• Remove all removable parts, such as shelves.
• Use a clean sponge or soft cloth and a mild
detergent in warm water. Do not use abrasive or
harsh cleaners.
• Hand wash, rinse and dry all surfaces thoroughly.
• When cleaning the inside or outside of the
appliance, do not wipe it with a rough brush,
toothpaste, or ammable materials. Do not use
cleaning agents containing ammable substances.
- This may cause discoloration or damage to the
appliance.
- Flammable substances: alcohol (ethanol,
methanol, isopropyl alcohol, isobutyl alcohol,
etc.), thinner, bleach, benzene, ammable liquid,
abrasive, etc.
Exterior
Waxing external painted metal surfaces helps provide
rust protection. Do not wax plastic parts. Wax painted
metal surfaces at least twice a year using appliance
wax (or auto paste wax). Apply wax with a clean, soft
cloth.
For products with black stainless steel exterior, spray
glass cleaner on a clean, microber cloth and rub in
direction of grain. Do not spray glass cleaner directly
at the display panel. Do not use harsh or abrasive
cleaners.
For products with a standard stainless steel exterior,
use a damp microber cloth and rub in the direction
of the grain. Dry with a paper towel to avoid streaks.
For stubborn stains and ngerprints, use a few drops
of liquid dish soap in water, and rinse with hot water
before drying. Do not use abrasive or harsh cleaners.
Inside Walls
• Allow freezer to warm up so the cloth will not stick.
To help remove odors, wash the inside of the
refrigerator with a mixture of baking soda and warm
water. Mix 2 tablespoons of baking soda to 1 quart of
water (26 g soda to 1 liter water.) Be sure the baking
soda is completely dissolved so it does not scratch
the surfaces of the refrigerator.
Door Liners and Gaskets
Use a clean sponge or soft cloth and a mild
detergent in warm water. Do not use cleaning waxes,
concentrated detergents, bleaches, or cleaners
containing petroleum on plastic refrigerator parts.
Plastic Parts (covers and panels)
Use a clean sponge or soft cloth and a mild detergent
in warm water. Do not use glass cleaners, abrasive
cleansers, or ammable uids. These can scratch or
damage the material.
Condenser Coils
Use a vacuum cleaner with a brush or crevice
attachment to clean the condenser cover and vents.
Do not remove the panel covering the condenser coil
area.

50 MAINTENANCE
Replacing the Fresh Air Filter
Replace the Fresh Air Filter:
• Approximately every six months.
• When the Replace Filter
icon turns on.
Fresh Air Filter
1
Turn the lter cover to the left to detach it from the
refrigerator wall. Remove the lter from the cover.
• The lter is located on the inside of the lter
cover.
2
Place the new lter inside of the cover with the
side that says Front facing outward.
3
Turn the lter cover to the right to attach it to the
refrigerator wall.
4
Press and hold the Fresh Air Filter button for
three seconds to reset the lter sensor.
Replacing the Water Filter
Replace the Water Filter :
• Approximately every six months.
• When the Replace Filter
icon turns on.
• When the water dispenser output decreases.
Before Replacing the Water Filter:
If the top shelf, located below the water lter, is in the
highest position, it will need to be removed prior to
replacing the water lter.
To remove any shelf : Tilt up the front of the shelf (1)
and lift (2). Pull the shelf out.
1
Remove the old water lter.
Lower or remove the top left shelf to allow the
water lter to rotate all the way down.
Pinch the sides to open the water lter cover.
NOTE
• Replacing the water lter causes a small amount of
water (around 1 oz. or 25 cc) to drain.
• Wrap a cloth around the front end of the water lter
cover to collect any leaking water. Hold the water
lter upright, once it is removed, to prevent any
remaining water from spilling out of the water lter.

51MAINTENANCE
ENGLISH
2
Pull the water lter downward and turn it
counterclockwise before pulling it out. Make sure
to rotate the lter down completely before pulling
it out of the manifold hole.
3
Replace with a new water lter.
Take the new water lter out of its packing and
remove the protective cover from the o-rings.
With the water lter tabs in the horizontal position,
push the new water lter into the manifold hole
and turn it clockwise until it stops.
4
Close the water lter cover. The cover will click
when closed correctly.
5
After the water lter is replaced, dispense 2.5
gallons of water (ush for approximately 5
minutes) to remove trapped air and contaminants
from the system.
NOTE
• Do not dispense the entire 2.5 gallon amount
continuously. Press and release the dispenser pad
for cycles of 30 seconds ON and 60 seconds OFF.
6
After changing the lter, press and hold the
Water Filter button for three seconds to reset the
indicator light.
NOTE
To purchase a replacement water lter:
• Visit your local dealer or distributor
• Search using "water lter" on lg.com
• Use replacement cartridge: ADQ747935**
For further assistance, call:
1-800-243-0000 (USA)
1-888-542-2623 (Canada)

52 MAINTENANCE
Performance Data Sheet
Model: LT1000P Use Replacement Cartridge: ADQ747935**
The concentration of the indicated substances in water entering the system was reduced to a concentration less
than or equal to the permissible limit for water leaving the system as specied in NSF/ANSI Standard 42 and
Standard 53.
System tested and certied by NSF International against NSF/ANSI Standard 42, Standard 53
and Standard 401 for the reduction of substances listed below.
Substance
Reduction
Average
Inuent
Challenge
NSF specied
Challenge
Concentration
Avg %
Reduction
Average
Product Water
Concentration
Max
Permissible
Product Water
Concentration
NSF
Reduction
Requirements
Chlorine Taste
and Odor
2.0 μg/L 2.0 μg/L± 10% >97.5% 0.050 μg/L N/A ≥ 50.00%
Nominal
Particulate
Class I, , ≥ 0.5
to < 1.0 μm
12,000,000
pts/mL
At least
10,000
particles/mL
99.80% 24,000 pts/ml N/A ≥ 85.00%
Asbestos 180 MFL
10
7
to 10
8
MFL; bers
greater than
10 μg/Lin
length
>99.00% < 1 MFL N/A ≥ 99.00%
Atrazine 8.5 μg/L
9.0 μg/L ±
10%
>94.10% 0.500 μg/L 3.0 μg/L NA
Benzene 15.0 μg/L
15.0 μg/L ±
10%
>96.60% 0.510 μg/L 5.0 μg/L NA
Carbofuran 74.0 μg/L
80.0 μg/L ±
10%
98.30% 1.258 μg/L 40 μg/L NA
Lindane 1.9 μg/L
2.0 μg/L ±
10%
>99.00% 0.019 μg/L 0.2 μg/L NA
P-Dichlorobenzene
230.0 μg/L
225.0 μg/L ±
10%
>99.80% 0.460 μg/L 75.0 μg/L NA
2,4-D 210.0 μg/L
210.0 μg/L ±
10%
>99.90% 0.210 μg/L 70.0 μg/L NA
Lead pH @6.5 140.0 μg/L
150.0 μg/L ±
10%
99.60% 0.560 μg/L 10.0 μg/L NA
Lead pH @8.5 150.0 μg/L
150.0 μg/L ±
10%
>99.70% <0.500 μg/L 10.0 μg/L NA
Mercury @ pH
6.5
5.9 μg/L
6.0 μg/L ±
10%
91.00% 0.531 μg/L 2.0 μg/L NA
(Continued on next page)

53MAINTENANCE
ENGLISH
Substance
Reduction
Average
Inuent
Challenge
NSF specied
Challenge
Concentration
Avg %
Reduction
Average
Product Water
Concentration
Max
Permissible
Product Water
Concentration
NSF
Reduction
Requirements
Mercury @ pH
8.5
5.6 μg/L
6.0 μg/L ±
10%
92.5% 0.420 μg/L 2.0 μg/L NA
Cyst*
100,000
cysts/L
Minimum
50,000 cysts/L
>99.99% 10 cysts/L N/A ≥ 99.95%
Atenolol 240 ng/L
200 ± 40%
ng/L
> 95.50% 10.80 ng/L 30 ng/L NA
Carbamazepine
1600 ng/L
1400 ± 40%
ng/L
98.40% 25.60 ng/L 200 ng/L NA
DEET 1600 ng/L
1400 ± 40%
ng/L
97.10% 46.40 ng/L 200 ng/L NA
Trimethoprim 170 ng/L
140 ± 40%
ng/L
>96.80% 5.44 ng/L 20 ng/L NA
Linuron 160 ng/L
140 ± 40%
ng/L
>96.60% 5.44 ng/L 20 ng/L NA
Phenytoin 200 ng/L
200 ± 40%
ng/L
>94.80% 10.40 ng/L 30 ng/L NA
Ibuprofen 400 ng/L
400 ± 40%
ng/L
>94.50% 22.00 ng/L 60 ng/L NA
Naproxen 140 ng/L
140 ± 40%
ng/L
>96.10% 5.46 ng/L 20 ng/L NA
Estrone 120 ng/L
140 ± 40%
ng/L
>96.10% 4.68 ng/L 20 ng/L NA
Bisphenol A 2000 ng/L
2000 ± 40%
ng/L
>98.90% 22.00 ng/L 300 ng/L NA
Nonyl Phenol 1600 ng/L
1400 ± 40%
ng/L
>97.10% 46.40 ng/L 200 ng/L NA
• Based on the use of Cryptosporidium parvum oocysts.

54 MAINTENANCE
Application Guidelines/Water Supply
Parameters
Service Flow 0.5 gpm (1.9 lpm)
Water Supply
Community or Private Well - Potable
Water
Water
Pressure
20 – 120 psi (138 – 827 kPa)
Water
Temperature
33 °F – 100 °F (0.6 °C – 37.8 °C)
Capacity 200 gallons (757 liters)
It is essential that the manufacturer’s recommended
installation, maintenance and lter replacement
requirements be carried out for the product to perform
as advertised.
NOTE
• While the testing was performed under standard
laboratory conditions, actual performance may vary.
Replacement Cartridge: LT1000P ADQ747935**
For replacement lters, visit your local dealer or
distributor or search under "water lters" on the
lg.com website.
For further assistance, contact the LG Electronics
Customer Information Center.
USA: 1-800-243-0000
Canada: 1-888-542-2623
LG is a trademark of LG corp.
NSF is a trademark of NSF International.
Manufactured for LG Electronics by:
LG Electronics, INC
170, Sungsanpaechoungro, Seongsan-gu,
Gyeongsangnam-do, THE REPUBLIC OF KOREA
WARNING
To reduce the risk associated with choking:
• Do not allow children under 3 years of age to
have access to small parts during the installation
of this product.
To reduce the risk associated with the
ingestion of contaminants:
• Do not use with water that is microbiologically
unsafe or of unknown quality without adequate
disinfection before or after the system. Systems
certied for cyst reduction may be used on
disinfected water that may contain lterable
cysts. EPA Establishment # 070595-MEX-001
CAUTION
To reduce the risk associated with property
damage due to water leakage:
• Read and follow Use Instructions before
installation and use of this system.
• Installation and use MUST comply with all state
and local plumbing codes.
• Do not install if water pressure exceeds 120 psi
(827 kPa). If your water pressure exceeds 80
psi, you must install a pressure limiting valve.
Contact a plumber if uncertain how to check your
water pressure.
• Do not install where water hammer conditions
may occur. If water hammer conditions exist you
must install a water hammer arrester. Contact a
plumbing professional if you are uncertain how to
check for this condition.
• Do not install on hot water supply lines. The
maximum operating water temperature of this
lter system is 100 °F (37.8 °C).
• Protect lter from freezing. Drain lter when
temperatures drop below 40 °F (4.4 °C).
• The disposable lter cartridge MUST be replaced
every 6 months, at the rated capacity or if a
noticeable reduction in ow rate occurs.
• Protect from freezing, remove lter cartridge
when temperatures are expected to drop below
33° F.
• Do not install systems in areas where ambient
temperatures may go above 110° F (43.3° C).
• Where a backow prevention device is installed
on a water system, a device for controlling
pressure due to thermal expansion must be
installed.
• Ensure all tubing and ttings are secure and free
of leaks.

55TROUBLESHOOTING
ENGLISH
TROUBLESHOOTING
FAQs: Frequently Asked Questions
Q: What are the best temperature settings for my refrigerator and freezer?
A: The default setting for the refrigerator is 37° Fahrenheit (3° Celsius). The default setting for the
freezer is 0° Fahrenheit (-18° Celsius). Adjust these settings as necessary to keep food at desired
temperatures. Milk should be cold when stored on the inner shelf of the refrigerator. Ice cream should
be rm and ice cubes should not melt in the freezer. To switch the display from Fahrenheit to Celsius,
press and hold the Freezer and Refrigerator buttons until you hear a beep and the settings in the
display change. On some models, you can also select the Refrigerator Manager application on the
display and use the Unit button.
Q: How do I set the refrigerator and freezer temperatures?
A: Continually press the Refrigerator or Freezer button on the control panel until the desired
temperature appears. The numbers will cycle from highest to lowest and then return to the highest
again with continuous pressing. On some models, you can also set the temperatures in the
Refrigerator Manager application on the display.
Q: Why do I hear a buzzing noise from my refrigerator periodically?
A: This may happen if you do not have a water source attached to your refrigerator and the icemaker is
turned on. If you do not have a water source attached to the back of the refrigerator you should turn
the icemaker off.
Q: Why does the icemaker tray look crooked?
A: This is a normal part of the icemaker cycle. The icemaker tray may appear level or with a slight tilt.
The change in position is to assist in the freezing process.
Q:
My refrigerator is powered on and the controls are working, but it’s not cooling and the display
shows “OFF” (see below). What is wrong?
A: The refrigerator is in Demo Mode. This mode disables cooling to save energy while the appliance
is on display in a store. To restore normal operation, press and hold the Refrigerator and Ice Plus
buttons for 5 seconds or until you hear a beep and the temperature settings appear on the display.
Use the same procedure to return the refrigerator to Demo Mode, if desired.

56 TROUBLESHOOTING
Before Calling for Service
Review this section before calling for service; doing so will save you both time and money.
Cooling
Problem Possible Cause Solutions
Refrigerator and
Freezer section are
not cooling.
The refrigerator control is set
to OFF (some models).
• Turn the control ON. Refer to the Setting the Controls
section for proper temperature settings.
Refrigerator is set to Demo
Mode.
• Demo Mode allows the lights and control display to
work normally while disabling cooling, to save energy
while the refrigerator is on the showroom oor. See the
FAQs section of this manual for instructions on how to
disable Demo Mode.
Refrigerator is in the defrost
cycle.
• During the defrost cycle, the temperature of each
compartment may rise slightly. Wait 30 minutes and
conrm the proper temperature has been restored once
the defrost cycle has completed.
Refrigerator was recently
installed.
• It may take up to 24 hours for each compartment to
reach the desired temperature.
Refrigerator was recently
relocated.
• If the refrigerator was stored for a long period of time
or moved on its side, it is necessary for the refrigerator
to stand upright for 24 hours before connecting it to
power.
Cooling system
runs too much.
Refrigerator is replacing an
older model.
• Modern refrigerators require more operating time but
use less energy due to more efcient technology.
Refrigerator was recently
plugged in or power restored.
• The refrigerator will take up to 24 hours to cool
completely.
The door is opened often or a
large amount of food / hot food
was added.
• Adding food and opening the door warms the
refrigerator, requiring the compressor to run longer in
order to cool the refrigerator back down. In order to
conserve energy, try to get everything you need out of
the refrigerator at once, keep food organized so it is
easy to nd, and close the door as soon as the food is
removed. (Refer to the Food Storage Guide.)
Doors are not closed
completely.
• Firmly push the doors shut. If they will not shut all the
way, the "Doors will not close correctly or pop open"
section.
Refrigerator is installed in a
hot location.
• The compressor will run longer under warm conditions.
At normal room temperatures (70 °F) expect your
compressor to run about 40 % to 80 % of the time.
Under warmer conditions, expect it to run even more
often. The refrigerator should not be operated above
110 °F.
Condenser / back cover is
clogged.
• Use a vacuum cleaner with an attachment to clean the
condenser cover and vents. Do not remove the panel
covering the condenser coil area.

57TROUBLESHOOTING
ENGLISH
Cooling
Problem Possible Cause Solutions
Interior moisture
buildup.
Doors are opened often or for
long periods of time.
• When the doors are opened often or for long periods
of time, warm, humid air enters the compartment.
This raises the temperature and moisture level within
the compartment. To lessen the effect, reduce the
frequency and duration of door openings.
Doors are not closed correctly.
• See the "Doors will not close correctly or pop open"
section.
Weather is humid.
• Humid weather allows additional moisture to enter the
compartments when the doors are opened leading to
condensation or frost. Maintaining a reasonable level of
humidity in the home will help to control the amount of
moisture that can enter the compartments.
Defrost cycle recently
completed.
• During the defrost cycle, the temperature of each
compartment may rise slightly and condensation may
form on the back wall. Wait 30 minutes and conrm that
the proper temperature has been restored once the
defrost cycle has completed.
Food is not packaged
correctly.
• Food stored uncovered or unwrapped, and damp
containers can lead to moisture accumulation within
each compartment. Wipe all containers dry and store
food in sealed packaging to prevent condensation and
frost.
Food is freezing
in the refrigerator
compartment.
Food with high water content
was placed near an air vent.
• Rearrange items with high water content away from air
vents.
Refrigerator temperature
control is set incorrectly.
• If the temperature is too cold, adjust the control one
increment at a time and wait for the temperature to
stabilize. Refer to the Control Panel section for more
information.
Refrigerator is installed in a
cold location.
• When the refrigerator is operated in temperature
below 41°F (5°C), food can freeze in the refrigerator
compartment. The refrigerator should not be operated
in temperature below 55°F (13°C).
Refrigerator or
Freezer section is
too warm.
Refrigerator was recently
installed.
• It may take up to 24 hours for each compartment to
reach the desired temperature.
The air vents are blocked. Cold
air circulates from the freezer
to the fresh food section and
back again through air vents
in the wall dividing the two
sections.
• Locate air vents by using your hand to sense airow
and move all packages that block vents and restrict
airow. Rearrange items to allow air to ow throughout
the compartment.

58 TROUBLESHOOTING
Cooling/Ice & Water
Problem Possible Cause Solutions
Refrigerator or
Freezer section is
too warm.
Doors are opened often or for
long periods of time.
• When the doors are opened often or for long periods
of time, warm, humid air enters the compartment.
This raises the temperature and moisture level within
the compartment. To lessen the effect, reduce the
frequency and duration of door openings.
Unit is installed in a hot
location.
• The refrigerator should not be operated in temperatures
above 110 °F.
A large amount of food or
hot food was added to either
compartment.
• Adding food warms the compartment requiring the
cooling system to run. Allowing hot food to cool to room
temperature before putting it in the refrigerator will
reduce this effect.
Doors not closed correctly.
• See the Doors will not close correctly or pop open
section in Parts & Features Troubleshooting.
Temperature control is not set
correctly.
• If the temperature is too warm, adjust the control one
increment at a time and wait for the temperature to
stabilize.
Defrost cycle has recently
completed.
• During the defrost cycle, the temperature of each
compartment may rise slightly and condensation may
form on the back wall. Wait 30 minutes and conrm the
proper temperature has been restored once the defrost
cycle has completed.
Refrigerator or
Freezer section is
too cold.
Incorrect temperature control
settings.
• If the temperature is too cold, adjust the control one
increment at a time and wait for the temperature
to stabilize. Refer to the Control Panel for more
information.
Frost or ice crystals
form on frozen food
(inside of sealed
package).
Condensation from food with a
high water content has frozen
inside of the food package.
• This is normal for food items with a high water content.
Food has been left in the
freezer for a long period of
time.
• Do not store food items with high water content in the
freezer for a long period of time.
Frost or ice crystals
form on frozen
food (outside of
package).
Door is opened frequently or
for long periods of time.
• When the doors are opened often or for long periods
of time, warm, humid air enters the compartment. This
raises the temperature and moisture level within the
compartment. Increased moisture will lead to frost
and condensation. To lessen the effect, reduce the
frequency and duration of door openings.
Door is not closing properly.
• Refer to the Doors will not close correctly or pop open
section in the Troubleshooting section.

59TROUBLESHOOTING
ENGLISH
Ice & Water
Problem Possible Cause Solutions
Icemaker is
not making
enough ice.
Demand exceeds ice storage
capacity.
• The icemaker will produce approximately 70-184 cubes
in a 24 hour period.
House water supply is not
connected, valve is not turned on
fully, or valve is clogged.
• Connect the refrigerator to a cold water supply with
adequate pressure and turn the water shutoff valve fully
open. If the problem persists, it may be necessary to
contact a plumber.
Water lter has been exhausted.
• Replacing the water lter is recommended:
• Approximately every six months.
• When the water lter indicator turns on.
• When the water dispenser output decreases.
• When the ice cubes are smaller than normal.
Low house water supply pressure.
• The water pressure must be between 20 and 120 psi
on models without a water lter and between 40 and
120 psi on models with a water lter. If the problem
persists, it may be necessary to contact a plumber.
Reverse Osmosis ltration system
is used.
• Reverse osmosis ltration systems can reduce the
water pressure below the minimum amount and result
in icemaker issues. (Refer to the Connecting the Water
Line section.)
Tubing connecting refrigerator to
house supply valve is kinked.
• The tubing can kink when the refrigerator is moved
during installation or cleaning resulting in reduced water
ow. Straighten or repair the water supply line and
arrange it to prevent future kinks.
Doors are opened often or for long
periods of time.
• If the doors of the unit are opened often, ambient
air will warm the refrigerator which will prevent the
unit from maintaining the set temperature. Lowering
the refrigerator temperature can help, as well as not
opening the doors as frequently.
Doors are not closed completely.
• If the doors are not properly closed, ice production will
be affected. See the "Doors will not close correctly or
pop open" section in Parts & Features Troubleshooting
for more information.
The temperature setting for the
freezer is too warm.
• The recommended temperature for the freezer
compartment for normal ice production is 0°F. If the
freezer temperature is warmer, ice production will be
affected.
Icemaker is
not making
ice
Refrigerator was recently installed
or icemaker recently connected.
• It may take up to 24 hours for each compartment to
reach the desired temperature and for the icemaker to
begin making ice.
Icemaker not turned on.
• Locate the icemaker ON/OFF and conrm that it is
turned on.

60 TROUBLESHOOTING
Ice & Water
Problem Possible Cause Solutions
Icemaker is not
making ice
The ice detecting sensor is
obstructed.
• Foreign substances or frost on the ice-detecting sensor
can interrupt ice production. Make sure that the sensor
area is clean at all times for proper operation.
The refrigerator is not
connected to a water supply or
the supply shutoff valve is not
turned on.
• Connect the refrigerator to the water supply and turn
the water shutoff valve fully open.
Icemaker shutoff (arm or
sensor) obstructed.
• If your icemaker is equipped with an ice shutoff arm,
make sure that the arm moves freely. If your icemaker
is equipped with the electronic ice shutoff sensor, make
sure that there is a clear path between the two sensors.
Reverse osmosis water
ltration system is connected
to your cold water supply.
• Reverse osmosis ltration systems can reduce the
water pressure below the minimum amount and result
in icemaker issues. (Refer to the Connecting the Water
Line section.)
Ice has bad taste or
odor.
Water supply contains
minerals such as sulfur.
• A water lter may need to be installed to eliminate taste
and odor problems. NOTE: In some cases, a lter may
not help. It may not be possible to remove all minerals/
odor/taste in all water supplies.
Icemaker was recently
installed.
• Ice that has been stored for too long will shrink,
become cloudy, and may develop a stale taste. Throw
away old ice and make a new supply.
The food has not been
stored properly in either
compartment.
• Rewrap the food. Odors may migrate to the ice if food
is not wrapped properly.
The interior of the refrigerator
needs to be cleaned.
• See the Maintenance section for more information.
The ice storage bin needs to
be cleaned.
• Empty and wash the bin (discard old cubes). Make sure
that the bin is completely dry before reinstalling it.
Icemaker is making
too much ice.
Icemaker shutoff (arm/ sensor)
is obstructed.
• Empty the ice bin. If your icemaker is equipped with an
ice shutoff arm, make sure that the arm moves freely.
If your icemaker is equipped with the electronic ice
shutoff sensor, make sure that there is a clear path
between the two sensors. Reinstall the ice bin and wait
24 hours to conrm proper operation.

61TROUBLESHOOTING
ENGLISH
Parts & Features
Problem Possible Cause Solutions
Doors will not close
correctly or pop
open.
Food packages are blocking
the door open.
• Rearrange food containers to clear the door and door
shelves.
Ice bin, crisper cover, pans,
shelves, door bins, or baskets
are out of position.
• Push bins all the way in and put crisper cover, pans,
shelves and baskets into their correct positions. See
the Operation section for more information.
The doors were removed
during product installation and
not properly replaced.
• Remove and replace the doors according to the
Removing and Replacing Refrigerator Handles and
Doors section.
Refrigerator is not leveled
properly.
• See Door Alignment in the Refrigeration Installation
section to level refrigerator.
Doors are difcult
to open.
The gaskets are dirty or sticky.
• Clean the gaskets and the surfaces that they touch.
Rub a thin coat of appliance polish or kitchen wax on
the gaskets after cleaning.
Door was recently closed.
• When you open the door, warmer air enters the
refrigerator. As the warm air cools, it can create a
vacuum. If the door is hard to open, wait one minute to
allow the air pressure to equalize, then see if it opens
more easily.
Refrigerator
wobbles or seems
unstable
Leveling legs are not adjusted
properly.
• Refer to the Leveling and Door Alignment section.
Floor is not level.
• It may be necessary to add shims under the leveling
legs or rollers to complete installation.
Lights do not work. LED interior lighting failure.
• The refrigerator compartment lamp is LED interior
lighting, and service should be performed by a qualied
technician.
Refrigerator has an
unusual odor.
The Air Filter may need to
be set to the MAX setting or
replaced.
• Set the Air Filter to the MAX setting. If the odor does
not go away within 24 hours, the lter may need to be
replaced. See the Replacing the Air Filter section for
replacement instructions.
The interior of
the refrigerator is
covered with dust
or soot.
The refrigerator is located
near a re source, such as a
replace, chimney, or candle.
• Make sure that the refrigerator is not located near a re
source, such as a replace, chimney or candle.

62 TROUBLESHOOTING
Noises
Problem Possible Cause Solutions
Clicking
The defrost control will click when the
automatic defrost cycle begins and ends.
The thermostat control (or refrigerator
control on some models) will also click
when cycling on and off.
• Normal Operation
Rattling
Rattling noises may come from the ow
of refrigerant, the water line on the back
of the unit, or items stored on top of or
around the refrigerator.
• Normal Operation
Refrigerator is not resting solidly on the
oor.
• Floor is weak or uneven or leveling legs
need to be adjusted. See the Leveling and
Door Alignment section.
Refrigerator with linear compressor was
jarred while running.
• Normal Operation
Whooshing
Evaporator fan motor is circulating air
through the refrigerator and freezer
compartments.
• Normal Operation
Air is being forced over the condenser by
the condenser fan.
• Normal Operation
Gurgling
Refrigerant owing through the cooling
system.
• Normal Operation
Popping
Contraction and expansion of the inside
walls due to changes in temperature.
• Normal Operation
Sizzling
Water dripping on the defrost heater
during a defrost cycle.
• Normal Operation
Vibrating
If the side or back of the refrigerator is
touching a cabinet or wall, some of the
normal vibrations may make an audible
sound.
• To eliminate the noise, make sure that the
sides and back cannot vibrate against any
wall or cabinet.
Dripping
Water running into the drain pan during
the defrost cycle.
• Normal Operation
Pulsating or high-
pitched sound
Your refrigerator is designed to run
more efciently to keep your food items
at the desired temperature. The high
efciency compressor may cause your
new refrigerator to run longer than
your old one, but it is still more energy
efcient than previous models. While the
refrigerator is running, it is normal to hear
a pulsating or high-pitched sound.
• Normal Operation

63TROUBLESHOOTING
ENGLISH
Wi-Fi Network
Problem Possible Cause Solutions
Your home appliance and
smartphone is not connecting to
the Wi-Fi network.
The password for the Wi-Fi that
you are trying to connect to is
incorrect.
• Find the Wi-Fi network connected
to your smartphone and remove it,
then register your appliance on LG
SmartThinQ application.
Mobile data for your smartphone
is turned on.
• Turn off the Mobile data on your
smartphone before registering the
appliance.
The wireless network name (SSID)
is set incorrectly.
• The wireless network name (SSID)
should be a combination of English
letters and numbers. (Do not use
special characters.)
The router frequency is not 2.4
GHz.
• Only a 2.4 GHz router frequency
is supported. Set the wireless
router to 2.4 GHz and connect the
appliance to the wireless router. To
check the router frequency, check
with your Internet service provider
or the router manufacturer.
The router is too far from the
appliance.
• If the appliance is too far from the
router, the signal may be weak
and the connection may not be
congured correctly. Move the
router closer to the appliance
or purchase and install a Wi-Fi
repeater.

64 LIMITED WARRANTY
LIMITED WARRANTY
FOR USA
ARBITRATION NOTICE: THIS LIMITED WARRANTY CONTAINS AN ARBITRATION PROVISION THAT
REQUIRES YOU AND LG TO RESOLVE DISPUTES BY BINDING ARBITRATION INSTEAD OF IN COURT,
UNLESS YOU CHOOSE TO OPT OUT. IN ARBITRATION, CLASS ACTIONS AND JURY TRIALS ARE NOT
PERMITTED. PLEASE SEE THE SECTION TITLED “PROCEDURE FOR RESOLVING DISPUTES” BELOW.
Should your LG Refrigerator ("Product") fail due to a defect in materials or workmanship under normal and
proper use, during the warranty period set forth below, LG Electronics (“LG”) will, at its option, repair or replace
the Product. This limited warranty is valid only to the original retail purchaser of the Product and applies only
when purchased and used within the United States including U.S. Territories.
WARRANTY PERIOD
Refrigerator/Freezer
Sealed System
(Condenser, Dryer,
Connecting Tube
and Evaporator)
Compressor
One (1) year from the
date of original retail
purchase
Five (5) years from the
date of original retail
purchase
Five (5) years from the
date of original retail
purchase
Linear / Inverter Compressor Only : Parts
Only for years 6-10 from the date of
original retail purchase (Consumer will be
charged for labor)
Parts and Labor
(internal/ functional
parts only)
Parts and Labor Parts and Labor
• Replacement products and parts are warranted for the remaining portion of the original warranty period or
ninety (90) days, whichever is greater.
• Replacement products and parts may be new, reconditioned, refurbished, or otherwise factory remanufactured.
• Proof of original retail purchase specifying the Product model and date of purchase is required to obtain
warranty service under this limited warranty.
EXCEPT TO THE EXTENT PROHIBTED BY APPLICABLE LAW, ANY IMPLIED WARRANTY OF
MERCHANTABILITY OR FITNESS FOR A PARTICULAR PURPOSE ON THE PRODUCT IS LIMITED IN
DURATION TO THE DURATION OF THE ABOVE LIMITED WARRANTY. UNDER NO CIRCUMSTANCES
SHALL LG OR ITS U.S. DISTRIBUTORS/DEALERS BE LIABLE FOR ANY INDIRECT, INCIDENTAL,
CONSEQUENTIAL, SPECIAL, OR PUNITIVE DAMAGES, INCLUDING, WITHOUT LIMITATION, LOST
GOODWILL, LOST REVENUES OR PROFITS, WORK STOPPAGE, IMPAIRMENT OF OTHER GOODS,
COST OF REMOVAL AND REINSTALLATION OF THE PRODUCT, LOSS OF USE, OR ANY OTHER
DAMAGES WHETHER BASED IN CONTRACT, TORT, OR OTHERWISE. LG’S TOTAL LIABILITY, IF ANY,
SHALL NOT EXCEED THE PURCHASE PRICE PAID BY YOU FOR THE PRODUCT.
Some states do not allow the exclusion or limitation of incidental or consequential damages or limitations on how
long an implied warranty lasts, so the above exclusions or limitations may not apply to you. This limited warranty
gives you specic legal rights and you may also have other rights that vary from state to state.
THIS LIMITED WARRANTY DOES NOT COVER:
• Service trips to deliver, pick up, or install, educate how to operate, correct wiring, or correct unauthorized
repairs.
• Damage or failure of the Product to perform during power failures and interrupted or inadequate electrical
service.
• Damage or failure caused by leaky or broken water pipes, frozen water pipes, restricted drain lines, inadequate
or interrupted water supply or inadequate supply of air.
• Damage resulting from operating the product in a corrosive atmosphere or contrary to the product owner’s
manual.
• Damage or failure to the Product caused by accidents, pests and vermin, lightning, wind, re, oods, acts of
God, or any other causes beyond the control of LG.
• Damage or failure caused by unauthorized modication or alteration, or if used for other than the intended
purpose.

65LIMITED WARRANTY
ENGLISH
• Damage or failure resulting from misuse, abuse, improper installation, repair, or maintenance. Improper repair
includes use of parts not authorized by LG. Improper installation or maintenance includes installation or
maintenance contrary to the Product owner’s manual.
• Damage or failure caused by incorrect electrical current, voltage, or plumbing codes.
• Damage or failure caused by transportation and handling, including scratches, dents, chips, and/or other
damage to the nish of the Product, unless such damage is reported within one (1) week of delivery.
• Damage or missing items to any display, open box, or discounted Product.
• Refurbished Product or any Product sold “As Is”, “Where Is”, “With all Faults”, or similar disclaimer.
• Products with original serial numbers that have been removed, altered, or cannot be readily determined.
• Increases in utility costs and additional utility expenses.
• Any noises associated with normal operation.
• Use of accessories (e.g., water lters, etc.), components, or consumable cleaning products that are not
authorized by LG.
• Replacement of light bulbs, lters, or any consumable parts.
• When Product is used for other than normal and proper household use (e.g. commercial or industrial use,
ofces, and recreational facilities or vehicles) or contrary to the instructions outlined in the Product’s owner’s
manual.
• Costs associated with removal and reinstallation of your Product for repairs.
• Shelves, door bins, drawers, handle and accessories, except for internal/functional parts covered under this
limited warranty.
The cost of repair or replacement under these excluded circumstances shall be borne by the consumer.
TO OBTAIN WARRANTY SERVICE AND ADDITIONAL INFORMATION
Call 1-800-243-0000 and select the appropriate option from the menu.
Or visit our website at http://www.lg.com
Or by mail: LG Electronics Customer Service P.O. Box 240007 Huntsville, AL 35813 ATTN: CIC
PROCEDURE FOR RESOLVING DISPUTES:
ALL DISPUTES BETWEEN YOU AND LG ARISING OUT OF OR RELATING IN ANY WAY TO THIS LIMITED
WARRANTY OR THE PRODUCT SHALL BE RESOLVED EXCLUSIVELY THROUGH BINDING ARBITRATION,
AND NOT IN A COURT OF GENERAL JURISDICTION. BINDING ARBITRATION MEANS THAT YOU AND LG
ARE EACH WAIVING THE RIGHT TO A JURY TRIAL AND TO BRING OR PARTICIPATE IN A CLASS ACTION.
Denitions. For the purposes of this section, references to “LG” mean LG Electronics U.S.A., Inc., its parents,
subsidiaries and afliates, and each of their ofcers, directors, employees, agents, beneciaries, predecessors
in interest, successors, assigns and suppliers; references to “dispute” or “claim” shall include any dispute,
claim or controversy of any kind whatsoever (whether based in contract, tort, statute, regulation, ordinance,
fraud, misrepresentation or any other legal or equitable theory) arising out of or relating in any way to the sale,
condition or performance of the product or this Limited Warranty.
Notice of Dispute. In the event you intend to commence an arbitration proceeding, you must rst notify LG in
writing at least 30 days in advance of initiating the arbitration by sending a letter to LG at LG Electronics, USA,
Inc. Attn: Legal Department- Arbitration 1000 Sylvan Ave, Englewood Cliffs 07632. You and LG agree to engage
in good faith discussions in an attempt to amicably resolve your claim. The notice must provide your name,
address, and telephone number; identify the product that is the subject of the claim; and describe the nature of
the claim and the relief being sought. If you and LG are unable to resolve the dispute within 30 days, either party
may proceed to le a claim for arbitration.

66 LIMITED WARRANTY
Agreement to Binding Arbitration and Class Action Waiver. Upon failure to resolve the dispute during the
30 day period after sending written notice to LG, you and LG agree to resolve any claims between us only by
binding arbitration on an individual basis, unless you opt out as provided below. Any dispute between you and
LG shall not be combined or consolidated with a dispute involving any other person’s or entity’s product or
claim. More specically, without limitation of the foregoing, any dispute between you and LG shall not under any
circumstances proceed as part of a class or representative action. Instead of arbitration, either party may bring
an individual action in small claims court, but that small claims court action may not be brought on a class or
representative basis.
Arbitration Rules and Procedures. To begin arbitration of a claim, either you or LG must make a written
demand for arbitration. The arbitration will be administered by the American Arbitration Association (“AAA”)
and will be conducted before a single arbitrator under the AAA’s Consumer Arbitration Rules that are in effect
at the time the arbitration is initiated (referred to as the “AAA Rules”) and under the procedures set forth in this
section. The AAA Rules are available online at www.adr.org/consumer. Send a copy of your written demand for
arbitration, as well as a copy of this provision, to the AAA in the manner described in the AAA Rules. You must
also send a copy of your written demand to LG at LG Electronics, USA, Inc. Attn: Legal Department- Arbitration
1000 Sylvan Avenue Englewood Cliffs, NJ 07632. If there is a conict between the AAA Rules and the rules
set forth in this section, the rules set forth in this section will govern. This arbitration provision is governed
by the Federal Arbitration Act. Judgment may be entered on the arbitrator’s award in any court of competent
jurisdiction. All issues are for the arbitrator to decide, except that issues relating to the scope and enforceability
of the arbitration provision and to the arbitrability of the dispute are for the court to decide. The arbitrator is
bound by the terms of this provision.
Governing Law. The law of the state of your residence shall govern this Limited Warranty and any disputes
between us except to the extent that such law is preempted by or inconsistent with applicable federal law.
Fees/Costs. You do not need to pay any fee to begin an arbitration. Upon receipt of your written demand for
arbitration, LG will promptly pay all arbitration ling fees to the AAA unless you seek more than $25,000 in
damages, in which case the payment of these fees will be governed by the AAA Rules. Except as otherwise
provided for herein, LG will pay all AAA ling, administration and arbitrator fees for any arbitration initiated in
accordance with the AAA Rules and this arbitration provision. If you prevail in the arbitration, LG will pay your
attorneys’ fees and expenses as long as they are reasonable, by considering factors including, but not limited to,
the purchase amount and claim amount. Notwithstanding the foregoing, if applicable law allows for an award of
reasonable attorneys’ fees and expenses, an arbitrator can award them to the same extent that a court would. If
the arbitrator nds either the substance of your claim or the relief sought in the demand is frivolous or brought for
an improper purpose (as measured by the standards set forth in Federal Rule of Civil Procedure 11(b)), then the
payment of all arbitration fees will be governed by the AAA Rules. In such a situation, you agree to reimburse LG
for all monies previously disbursed by it that are otherwise your obligation to pay under the AAA Rules. Except
as otherwise provided for, LG waives any rights it may have to seek attorneys’ fees and expenses from you if LG
prevails in the arbitration.
Hearings and Location. If your claim is for $25,000 or less, you may choose to have the arbitration conducted
solely on the basis of (1) documents submitted to the arbitrator, (2) through a telephonic hearing, or (3) by
an in-person hearing as established by the AAA Rules. If your claim exceeds $25,000, the right to a hearing
will be determined by the AAA Rules. Any in-person arbitration hearings will be held at a location within the
federal judicial district in which you reside unless we both agree to another location or we agree to a telephonic
arbitration.
Opt Out. You may opt out of this dispute resolution procedure. If you opt out, neither you nor LG can require the
other to participate in an arbitration proceeding. To opt out, you must send notice to LG no later than 30 calendar
days from the date of the rst consumer purchaser’s purchase of the product by either: (i) sending an e-mail to
[email protected], with the subject line: “Arbitration Opt Out” or (ii) calling 1-800-980-2973. You must include in
the opt out e-mail or provide by telephone: (a) your name and address; (b) the date on which the product was
purchased; (c) the product model name or model number; and (d) the serial number (the serial number can be
found (i) on the product; or (ii) online by accessing https://www.lg.com/us/support/repair-service/schedule-repair-
continued and clicking on “Find My Model & Serial Number”).
You may only opt out of the dispute resolution procedure in the manner described above (that is, by e-mail or
telephone); no other form of notice will be effective to opt out of this dispute resolution procedure. Opting out of
this dispute resolution procedure will not affect the coverage of the Limited Warranty in any way, and you will
continue to enjoy the full benets of the Limited Warranty. If you keep this product and do not opt out, then you
accept all terms and conditions of the arbitration provision described above.

67LIMITED WARRANTY
ENGLISH
FOR CANADA
ARBITRATION NOTICE: THIS LIMITED WARRANTY CONTAINS AN ARBITRATION PROVISION THAT
REQUIRES YOU AND LG TO RESOLVE DISPUTES BY BINDING ARBITRATION INSTEAD OF IN COURT,
UNLESS THE LAWS OF YOUR PROVINCE OR TERRITORY DO NOT PERMIT THAT, OR, IN OTHER
JURISDICTIONS, IF YOU CHOOSE TO OPT OUT. IN ARBITRATION, CLASS ACTIONS AND JURY TRIALS
ARE NOT PERMITTED. PLEASE SEE THE SECTION TITLED “PROCEDURE FOR RESOLVING DISPUTES”
BELOW.
Should your LG Refrigerator ("Product") fail due to a defect in materials or workmanship under normal and
proper use, during the warranty period set forth below, LG Electronics Canada, Inc. (“LGECI”) will, at its option,
repair or replace the Product upon receipt of proof of the original retail purchase. This limited warranty is valid
only to the original retail purchaser of the Product and applies only to a Product distributed, purchased and used
within Canada, as determined at the sole discretion of LGECI.
WARRANTY PERIOD (Note: If the original date of purchase cannot be veried, the warranty will begin sixty
(60) days from the date of manufacture)
Refrigerator
Sealed System (Condenser, Dryer, Connecting Tube
and Evaporator)
Linear / Inverter
Compressor
One (1) year from the
date of original retail
purchase
One (1) year from the
date of original retail
purchase
Seven (7) years from
the date of original retail
purchase
Ten (10) years from the
date of original retail
purchase
Parts and Labor (internal/
functional parts only)
Parts and Labor
Parts only (Consumer will
be charged for labor)
Part only (Consumer will
be charged for labor)
• Replacement products and parts are warranted for the remaining portion of the original warranty period or
ninety (90) days, whichever is greater.
• Replacement products and parts may be new, reconditioned, refurbished, or otherwise factory remanufactured,
all at the sole discretion of LGECI.
• Proof of original retail purchase specifying the Product model and date of purchase is required to obtain
warranty service under this Limited Warranty.
LGECI’S SOLE LIABILITY IS LIMITED TO THE LIMITED WARRANTY SET OUT ABOVE. EXCEPT
AS EXPRESSLY PROVIDED ABOVE, LGECI MAKES NO, AND HEREBY DISCLAIMS, ALL OTHER
WARRANTIES AND CONDITIONS RESPECTING THE PRODUCT, WHETHER EXPRESS OR IMPLIED,
INCLUDING BUT NOT LIMITED TO, ANY IMPLIED WARRANTY OR CONDITION OF MERCHANTABILITY
OR FITNESS FOR A PARTICULAR PURPOSE, AND NO REPRESENTATIONS SHALL BE BINDING ON
LGECI. LGECI DOES NOT AUTHORIZE ANY PERSON TO CREATE OR ASSUME FOR IT ANY OTHER
WARRANTY OBLIGATION OR LIABILITY IN CONNECTION WITH THE PRODUCT. TO THE EXTENT THAT
ANY WARRANTY OR CONDITION IS IMPLIED BY LAW, IT IS LIMITED TO THE WARRANTY PERIOD SET
OUT ABOVE. UNDER NO CIRCUMSTANCES SHALL LGECI, THE MANUFACTURER OR DISTRIBUTOR
OF THE PRODUCT, BE LIABLE FOR ANY INCIDENTAL, CONSEQUENTIAL, SPECIAL, DIRECT, INDIRECT,
PUNITIVE OR EXEMPLARY DAMAGES, INCLUDING, WITHOUT LIMITATION, LOSS OF GOODWILL, LOST
PROFITS, LOSS OF ANTICIPATED PROFITS, LOST REVENUE, LOSS OF USE, OR ANY OTHER DAMAGE,
WHETHER ARISING DIRECTLY OR INDIRECTLY FROM ANY CONTRACTUAL BREACH, FUNDAMENTAL
BREACH, TORT OR OTHERWISE, OR FROM ANY ACTS OR OMISSIONS. LGECI’S TOTAL LIABILITY, IF
ANY, SHALL NOT EXCEED THE PURCHASE PRICE PAID BY YOU FOR THE PRODUCT.
This Limited Warranty gives you specic legal rights. You may also have other rights that vary from province to
province depending on applicable provincial laws. Any term of this Limited Warranty that negates or varies any
implied condition or warranty under provincial law is severable where it conicts with such provincial law without
affecting the remainder of this warranty’s terms.

68 LIMITED WARRANTY
THIS LIMITED WARRANTY DOES NOT COVER:
• Service trips to i) deliver, pick up, or install or; educate on how to operate the Product; ii) correct wiring or
plumbing; or iii) correct unauthorized repairs or installations of the Product;
• Damage or failure of the Product to perform during power failures and interrupted or inadequate electrical
service;
• Damage or failure caused by leaky or broken water pipes, frozen water pipes, restricted drain lines, inadequate
or interrupted water supply or inadequate supply of air;
• Damage or failure resulting from operating the Product in a corrosive atmosphere or contrary to the instructions
outlined in the Product’s owner’s manual;
• Damage or failure to the Product caused by accidents, pests and vermin, lightning, wind, re, oods, acts of
God, or any other causes beyond the control of LGECI or the manufacturer;
• Damage or failure resulting from misuse, abuse, improper installation, repair, or maintenance of the
Product. Improper repair includes use of parts not authorized or specied by LGECI. Improper installation or
maintenance includes installation or maintenance contrary to the Product’s owner’s manual;.
• Damage or failure caused by unauthorized modication or alteration of the Product, or if used for other than the
intended household purpose/use of the Product, or damage or failure resulting from any water leakage due to
improper installation of the Product;
• Damage or failure caused by incorrect electrical current, voltage or plumbing codes;
• Damage or failure caused by use that is other than normal household use, including, without limitation,
commercial or industrial use, including use in commercial ofces or recreational facilities, or as otherwise
outlined in the Product’s owner’s manual;
• Damage or failure caused by the use of any accessories, components or cleaning products, including, without
limitation, water lters, that are not approved/authorized by LGECI;
• Replacement of the water lter cartridge due to water pressure that is outside the specied operating range or
due to excessive sediment in the water supply;
• Damage or failure caused by transportation and handling, including scratches, dents, chips and/or other
damage to the nish of the Product, unless such damage results from defects in materials or workmanship
and is reported to LGECI within one (1) week of delivery of the Products;
• Damage or missing items to any display, open box, refurbished or discounted Product;
• Refurbished Product or any Product sold “As Is”, “Where Is”, “With all Faults”, or any similar disclaimer;
• Products with original serial numbers that have been removed, altered or cannot be readily determined at the
discretion of LGECI;
• Increases in utility costs and additional utility expenses in any way associated with the Product;
• Any noises associated with normal operation of the Product;
• Replacement of light bulbs, lters, fuses or any other consumable parts;
• Replacement of any part that was not originally included with the Product;
• Costs associated with removal and/or reinstallation of the Product for repairs; and
• Shelves, door bins, drawers, handle and accessories to the Product, except for internal/functional parts
covered under this Limited Warranty.
• Coverage for "in Home" repairs, for products in-warranty, will be provided if the Product is within a 150 km
radius from the nearest authorized service center (ASC), as determined by LG Canada. If your Product is
located outside a 150 km radius from a ASC, as determined by LG Canada, it will be your responsibility to bring
the Product, at your sole expense, to the ASC for in-warranty repair.
All costs and expenses associated with the above excluded circumstances, listed under the heading,
This Limited Warranty Does Not Cover, shall be borne by the consumer.
TO OBTAIN WARRANTY SERVICE AND ADDITIONAL INFORMATION, PLEASE CALL OR VISIT OUR
WEBSITE:
Call 1-888-542-2623 (7 A.M. to 12 A.M., 365 days a year) and select the appropriate option from the menu, or
visit our website at http://www.lg.com

69LIMITED WARRANTY
ENGLISH
PROCEDURE FOR RESOLVING DISPUTES:
EXCEPT WHERE PROHIBITED AT LAW, ALL DISPUTES BETWEEN YOU AND LG ARISING OUT OF
OR RELATING IN ANY WAY TO THIS LIMITED WARRANTY OR THE PRODUCT SHALL BE RESOLVED
EXCLUSIVELY THROUGH BINDING ARBITRATION, AND NOT IN A COURT OF GENERAL JURISDICTION.
EXCEPT WHERE PROHIBITED AT LAW, YOU AND LG BOTH IRREVOCABLY AGREE TO WAIVE THE RIGHT
TO A JURY TRIAL AND TO BRING OR PARTICIPATE IN A CLASS ACTION.
Denitions. For the purposes of this section, references to “LG” mean LG Electronics Canada, Inc., its parents,
subsidiaries and afliates, and each of their ofcers, directors, employees, agents, beneciaries, predecessors
in interest, successors, assigns and suppliers; references to “dispute” or “claim” shall include any dispute,
claim or controversy of any kind whatsoever (whether based in contract, tort, statute, regulation, ordinance,
fraud, misrepresentation or any other legal or equitable theory) arising out of or relating in any way to the sale,
condition or performance of the product or this Limited Warranty.
Notice of Dispute. In the event you intend to commence an arbitration proceeding, you must rst notify LG in
writing at least 30 days in advance of initiating the arbitration by sending a letter to LGECI Legal Team at 20
Norelco Drive, North York, Ontario, Canada M9L 2X6 (the “Notice of Dispute”). You and LG agree to engage
in good faith discussions in an attempt to amicably resolve your claim. The notice must provide your name,
address, and telephone number; identify the product that is the subject of the claim; and describe the nature
of the claim and the relief being sought. If you and LG are unable to resolve the dispute within 30 days of LG’s
receipt of the Notice of Dispute, the dispute shall be resolved by binding arbitration in accordance with the
procedure set out herein. You and LG both agree that, during the arbitration proceeding, the terms (including any
amount) of any settlement offer made by either you or LG will not be disclosed to the arbitrator until the arbitrator
determines the dispute.
Agreement to Binding Arbitration and Class Action Waiver. Upon failure to resolve the dispute during the
30 day period after LG’s receipt of the Notice of Dispute, you and LG agree to resolve any claims between you
and LG only by binding arbitration on an individual basis, unless you opt out as provided below, or you reside
in a jurisdiction that prevents full application of this clause in the circumstances of the claims at issue (in which
case if you are a consumer, this clause will only apply if you expressly agree to the arbitration). To the extent
permitted by applicable law, any dispute between you and LG shall not be combined or consolidated with a
dispute involving any other person’s or entity’s product or claim. More specically, without limitation of the
foregoing, except to the extent such a prohibition is not permitted at law, any dispute between you and LG shall
not under any circumstances proceed as part of a class or representative action. Instead of arbitration, either
party may bring an individual action in small claims court, but that small claims court action may not be brought
on a class or representative basis except to the extent this prohibition is not permitted at law in your province or
territory of jurisdiction as it relates to the claims at issue between you and LG.
Arbitration Rules and Procedures. To begin arbitration of a claim, either you or LG must make a written
demand for arbitration. The arbitration will be private and condential, and conducted on a simplied and
expedited basis before a single arbitrator chosen by the parties under the provincial or territorial commercial
arbitration law and rules of the province or territory of your residence. You must also send a copy of your
written demand to LG at LG Electronics, Canada, Inc., Attn: Legal Department- Arbitration, 20 Norelco Drive,
North York, Ontario M9L 2X6. This arbitration provision is governed by your applicable provincial or territorial
commercial arbitration legislation. Judgment may be entered on the arbitrator’s award in any court of competent
jurisdiction. All issues are for the arbitrator to decide, except that, issues relating to the scope and enforceability
of the arbitration provision and to the arbitrability of the dispute are for the court to decide. The arbitrator is
bound by the terms of this provision.
Governing Law. The law of the province or territory of your purchase shall govern this Limited Warranty and
any disputes between you and LG except to the extent that such law is preempted by or inconsistent with
applicable federal or provincial/territorial law. Should arbitration not be permitted for any claim, action, dispute or
controversy between you and LG, you and LG attorn to the exclusive jurisdiction of the courts of the province or
territory of your purchase for the resolution of the claim, action, dispute or controversy between you and LG.
Fees/Costs. You do not need to pay any fee to begin an arbitration. Upon receipt of your written demand for
arbitration, LG will promptly pay all arbitration ling fees unless you seek more than $25,000 in damages, in
which case the payment of these fees will be governed by the applicable arbitration rules. Except as otherwise
provided for herein, LG will pay all ling, administration and arbitrator fees for any arbitration initiated in
accordance with the applicable arbitration rules and this arbitration provision. If you prevail in the arbitration, LG
will pay your attorneys’ fees and expenses as long as they are reasonable, by considering factors including, but
not limited to, the purchase amount and claim amount. Notwithstanding the foregoing, if applicable law allows
for an award of reasonable attorneys’ fees and expenses, an arbitrator can award them to the same extent
that a court would. If the arbitrator nds either the substance of your claim or the relief sought in the demand
is frivolous or brought for an improper purpose (as measured by the applicable laws), then the payment of all
arbitration fees will be governed by the applicable arbitration rules. In such a situation, you agree to reimburse
LG for all monies previously disbursed by it that are otherwise your obligation to pay under the applicable
arbitration rules. Except as otherwise provided for, LG waives any rights it may have to seek attorneys’ fees and
expenses from you if LG prevails in the arbitration.

70 LIMITED WARRANTY
Hearings and Location. If your claim is for $25,000 or less, you may choose to have the arbitration conducted
solely (1) on the basis of documents submitted to the arbitrator, (2) through a telephonic hearing, or (3) by an
in-person hearing as established by the applicable arbitration rules. If your claim exceeds $25,000, the right to
a hearing will be determined by the applicable arbitration rules. Any in-person arbitration hearings will be held at
the nearest, most mutually-convenient arbitration location available within the province or territory in which you
reside unless you and LG both agree to another location or agree to a telephonic arbitration.
Severability and Waiver. If any portion of this Limited Warranty (including these arbitration procedures) is
unenforceable, the remaining provisions will continue in full force and effect to the maximum extent permitted by
applicable law. Should LG fail to enforce strict performance of any provision of this Limited Warranty (including
these arbitration procedures), it does not mean that LG intends to waive or has waived any provision or part of
this Limited Warranty.
Opt Out. You may opt out of this dispute resolution procedure. If you opt out, neither you nor LG can require the
other to participate in an arbitration proceeding. To opt out, you must send notice to LG no later than 30 calendar
days from the date of the rst consumer purchaser’s purchase of the product by either (i) sending an e-mail to
[email protected], with the subject line: “Arbitration Opt Out;” or (ii) calling 1-800-980-2973. You must include in
the opt out e-mail or provide by telephone: (a) your name and address; (b) the date on which the product was
purchased; (c) the product model name or model number; and (d) the serial number (the serial number can be
found (i) on the product; or (ii) online by accessing https://www.lg.com/ca_en/support/repair-service/schedule-
repair and clicking on “Find My Model & Serial Number”).
In the event that you “Opt Out”, the law of the province or territory of your residence shall govern this Limited
Warranty and any disputes between you and LG except to the extent that such law is preempted by or
inconsistent with applicable federal or provincial/territorial law. Should arbitration not be permitted for any claim,
action, dispute or controversy between you and LG, you and LG agree to attorn to the exclusive jurisdiction
of the courts of the province or territory of your residence for the resolution of the claim, action, dispute or
controversy between you and LG.
You may only opt out of the dispute resolution procedure in the manner described above (that is, by e-mail or
telephone); no other form of notice will be effective to opt out of this dispute resolution procedure. Opting out of
this dispute resolution procedure will not affect the coverage of the Limited Warranty in any way, and you will
continue to enjoy the full benets of the Limited Warranty. If you keep this product and do not opt out, then you
accept all terms and conditions of the arbitration provision described above.
Conict of Terms. In the event of a conict or inconsistency between the terms of this Limited Warranty and the
End User License Agreement (“EULA”) in regards to dispute resolution, the terms of this Limited Warranty shall
control and govern the rights and obligations of the parties and shall take precedence over the EULA.

71
MEMO

FRANÇAIS
MANUEL DU PROPRIÉTAIRE
RÉFRIGÉRATEUR À
PORTE À DEUX BATTANTS
Veuillez lire attentivement le présent manuel de l’utilisateur avant de faire
fonctionner l’appareil et conservez-le à portée de la main pour le consulter
en tout temps.
LFXS28596*/LFXS26973*/LFXS26596*
www.lg.com
Copyright © 2018 LG Electronics inc. Tous droits réservés.

2
TABLE DES MATIÈRES
3 CARACTÉRISTIQUES DU
PRODUIT
4 CONSIGNES DE SÉCURITÉ
4 CONSIGNES DE SÉCURITÉ IMPORTANTES
9 CARACTÉRISTIQUES DU
PRODUIT
10 APERÇU DU PRODUIT
10 Extérieur
11 Intérieur
13 INSTALLATION
13 Aperçudelʼinstallation
14 Déballageduréfrigérateur
14 Choixdel’emplacementadéquat
16 Retraitetassemblagedespoignées
17 Retraitetassemblagedesportesetdestiroirs
23 Raccordementdelaconduited’eau
26 Nivellementetalignementdelaporte
27 Miseenmarche
28 FONCTIONNEMENT
28 Avantl’utilisation
29 Panneaudecontrôle
31 Machineàglaçonsautomatiqueetdistributeur
d’eau
32 Compartimentàglaçons
34 Machineàglaçonsautomatique
36 Stockagedesaliments
39 Bacsàlégumesetfruitsàhumiditécontrôlée(sur
certainsmodèles)
40 Tiroir Glide N’ Serve
40 Durabase
®
40 Retraitetmontagedesbacsderangement
41 PortedanslaporteavectechnologieInstaView
(surcertainsmodèles)
42 FonctionInstaView
43 Réglagedesétagèresduréfrigérateur
44 FONCTIONS INTELLIGENTES
44 ApplicationLGSmartThinQ
47 FonctionSmartGrid
48 FonctionSmartDiagnosis
MC
49 ENTRETIEN
49 Nettoyage
50 Remplacementdufiltreàairfrais
50 Remplacementdufiltreàeau
55 DÉPANNAGE
55 Foireauxquestions
56 Avantdʼappelerleréparateur
64 GARANTIE LIMITÉE
64 POUR ÉTATS-UNIS
66 POUR CANADA

3CARACTÉRISTIQUESDUPRODUIT
FRANÇAIS
CARACTÉRISTIQUES DU PRODUIT
Selonlemodèle,certainesdesfonctionssuivantespourraientnepasêtreoffertes.
BACS À LÉGUMES À HUMIDITÉ CONTRÔLÉE
Lesbacsàlégumesàhumiditécontrôléesontconçuspouraideràconserverlafraîcheurdesfruitsetdeslégumes.
Contrôlezletauxd’humiditédanslesbacsàlégumesenajustantlesréglagesentreFruits(faible)etLégumes(élevé).
TIROIR GLIDE N’ SERVE
LetiroirGlideN’Serveoffredel’espacederangementaccompagnéd’unecommandedetempératurevariablequi
permetdemaintenircettesectionplusfroidequeleresteduréfrigérateur.Cecompartimentestpratiquepourconserver
dessandwichsoudelaviandecrue.
CHARNIÈRE À FERMETURE AUTOMATIQUE
Lesportesduréfrigérateuretletiroirducongélateursefermentautomatiquementàl’aided’unelégèrepoussée.(Les
portessefermentautomatiquementseulementlorsqu’ellessontouvertesàunangledemoinsde30°.)
GLACE PLUS
Laproductiondeglaceestaugmentéelorsquelecongélateurestmaintenuàlatempératurelaplusfroidependantune
période de 24 heures.

4 CONSIGNES DE SÉCURITÉ
CONSIGNES DE SÉCURITÉ
LISEZ TOUTES LES CONSIGNES AVANT LʼUTILISATION
Il est très important dʼassurer votre sécurité et celle des autres.
Nousfournissonsdenombreuxconseilsdesécuritéimportantsdanscemanueletsurvotreappareil.Liseztoujours
l’ensembledesmessagesdesécuritéetrespectez-les.
Ceci
estlesymboledʼalertedesécurité.
Ce
symboleestdestinéàvousalerterdesdangerspotentielspouvantentraînerlamortoudesblessures.
Tous
lesmessagesdesécuritéserontprécédésdusymboledʼalertedesécuritéetdutermeAVERTISSEMENT
ou MISE EN GARDE.
Voici
lemessagequecesmotsvéhiculent:
AVERTISSEMENTS
Vouspouvezêtretuéougrièvementblessésivousnesuivezpaslesconsignes.
MISES EN GARDE
Vouspouvezêtrelégèrementblesséoupouvezendommagerleproduitsivousnesuivezpaslesconsignes.
Tous
lesmessagesrelatifsàlasécuritévousindiquentlanaturedudangerpotentiel,lafaçonderéduirelerisquede
blessureetcequipeutseproduiresivousnesuivezpaslesinstructions.
CONSIGNES DE SÉCURITÉ IMPORTANTES
AVERTISSEMENTS
Pour réduire les risques dʼexplosion, dʼincendie, de mort, de décharge électrique,
de brûlure ou de blessures lors de lʼutilisation de lʼappareil, prenez les précautions
élémentaires, y compris les suivantes :
Proposition 65 de la Californie
• Ceproduitcontientdesproduitschimiquesreconnusparl’EtatdelaCaliforniepourprovoquerdescancers
etdesmalformationscongenitalesoud’autresproblemesdereproduction.Lavez-vous les mains après la
manutention.(SeulementEtats-Unis)
INSTALLATION
• Pourréduirelerisquedeblessures,veuillezsuivretouteslesprocéduresdesécuritérecommandéespar
l’industrie,cequiinclutleportdelunettesdesécuritéetdelongsgants.
• N’essayezjamaisd’utilisercetappareils’ilestendommagé,défectueuxoupartiellementdésassemblé,s’il
manquedespiècesousidespièces,incluantlecâbleetlache,sontendommagées.
• Branchezseulementcetappareilsurunepriseélectriquemiseàlaterredontlavaleurnominaleconvient
àcelui-ci(115V,60Hz,c.a.uniquement).L’utilisateurestresponsableduremplacementdelaprisede
courantmuralestandardàdeuxbrochesparuneprisedecourantmuralestandardàtroisbroches.
• N’utilisezpasuneprisedecourantquipeutêtremisehorsfonctionàl’aided’uninterrupteur.N’utilisezpas
derallonge.
• L’appareildoitêtreplacédefaçonàcequelasourced’alimentationsoitfacilementaccessible.
• Lorsquevousdéplacezl’appareil,soyezprudentetévitezd’écraserlecordond’alimentationoude
l’endommager.
• Communiquezavecuncentredeservicesautorisélorsquevousinstallezl’appareilouquevouslereplacez
àunnouvelendroit.
• Necoupeznin’enlevezjamaislabrochedemiseàlaterreducâbled’alimentation.

5CONSIGNES DE SÉCURITÉ
FRANÇAIS
• Gardezlematérieldʼemballagehorsdeportéedesenfants.Lematérieldʼemballageposeundangerpour
lesenfants.Ilyaunrisquedesuffocation.
• N’installezpasl’appareildansunendroithumideoupoussiéreux,oùlesmatériauxisolantsquisetrouvent
surlescomposantsélectriquespourraientsedétériorer.
• N’exposezpasl’appareildirectementàlalumièredusoleilouàlachaleurproduitepardesappareils
commeunfourouunappareildechauffage.
• Nepliezpasounepincezpaslecordond’alimentationdefaçonexcessive;neplacezpasd’objetslourds
sur celui-ci.
FONCTIONNEMENT
• L’appareiln’estpasconçupourêtreutiliséàdesnsspéciales,commel’entreposagedemédicamentsou
dematérield’essai,nipourêtreutilisésurdesbateaux,etc.
• NEpermettezPASauxenfantsdegrimperoudesetenirsurlesportesdel’appareiloulestablettesà
l’intérieurdecelui-ci,nides’accrocheràcesmêmesportesettablettes.Ilspourraientendommagerle
réfrigérateuretseblessersérieusement.
• Nepermettezpasauxenfantsdegrimperàl’intérieurdel’appareil.Ilspourraientdemeurercoincéset
suffoquer.
• Lasurveillancedesenfantsestrequiseandes’assurerqu’ilsnejouentpasavecl’appareil.
• Gardezvosdoigtsàdistancedeszonesdecoincement;lesdégagementsentrelesportesetlesarmoires
sontinévitablementréduits.Soyezprudentlorsquevousfermezlesportesdel’appareiletquedesenfants
setrouventàproximitédecelui-ci.
• Netouchezpaslesalimentssurgelésoulescomposantsmétalliquesducongélateursivosmainssont
mouilléesouhumides.Celapourraitentraînerdesgelures.
• Nerecongelezpasdesalimentssurgelésquiontétécomplètementdécongelés.Celapourraitêtre
dangereuxpourlasanté.
• N’utilisezpasdeched’adaptationetnebranchezpaslached’alimentationélectriquesurunerallonge
électriqueàprisesmultiples.
• N’utilisezpasdecordonquiprésentedesssuresoudestracesd’abrasionsursalongueurouencoreà
l’extrémitédelacheouàcelleduconnecteur.Demandezàunemployéd’uncentredeservicesautorisé
deremplacerouderéparerimmédiatementtoutcordond’alimentationdénudé,eflochéouautrement
endommagé.
• Nefaitespasfonctionnerleréfrigérateuretnetouchezpaslecordond’alimentationsivosmainssont
mouillées.
• Nemodiezetneprolongezpaslecordond’alimentation.
• N’utilisezpasuneprisedecourantnonhomologuée.Nebranchezpasl’appareilsuruneprisedecourant
muralesicelle-ciestendommagée.
• Neplacezpasvospiedsouvosmains,ouencoredesobjetsdansleséventsd’aérationouaubasdu
réfrigérateur.Celapourraitcauserdesblessuresouprovoquerunedéchargeélectrique.
• Encasdefuitedegaz(propane,GPL),assurez-vousqueleslieuxsontbienventilésetcontactezuncentre
deservicesautoriséavantderemettrel’appareilenfonction.Netouchezpasl’appareilousoncordon
d’alimentation.
• Siunbruitétrange,uneodeurparticulièreoudelafuméeprovientdel’appareil,débranchezlecordon
d’alimentationsur-le-champetcontactezuncentredeservicesautorisé.
• N’utilisezpasdefusible(commeducuivre,unld’acier),àl’exceptiond’unfusiblestandard.
• Neplacezpasetn’utilisezpasd’appareilélectriqueàl’intérieurduréfrigérateur,saufs’ils’agitd’untype
d’appareilrecommandéparlefabricant.
• Neplacezpasd’animauxàl’intérieurdel’appareil.
• Neplacezpasd’objetslourdsoufragiles,decontenantsemplisdeliquide,deproduitscombustiblesou
d’objetsinammables(commedesbougiesetdeslampes)surl’appareil.
• Éviteztoutcontactaveclespiècesmobilesdumécanismed’éjectionouavecl’élémentchauffantquilibère
lescubesdeglace.NEplacezPASvosdoigtsdanslamachineàglaçonsautomatiquelorsquel’appareilest
branché.
• Lorsqueledistributeurproduitdesglaçons,n’utilisezpasdecontenantfragilepourlesrecueillir.
• Cetappareilnʼestpasdestinéàêtreutilisépardespersonnes(incluantdesenfants)dontlescapacités
physiques,mentalesousensoriellessontréduites,ouquinʼontpaslʼexpérienceoulesconnaissancespour
lefaire,àmoinsdʼavoirreçudesinstructionsetdʼavoirétésuperviséesparunepersonneresponsablede
leur sécurité.
• Encasdebranchementsuruncircuitprotégépardesfusibles,utilisezunfusibletemporisé.

6 CONSIGNES DE SÉCURITÉ
ENTRETIEN
• N’utilisezpasdeséchoiràcheveuxpoursécherl’intérieurdel’appareil.
• N’allumezpasdebougiepourdissiperlesodeursàl’intérieurdel’appareil.
• Siunefuitedefrigorigènesurvient,éloignezlesobjetsinammablesdel’appareil.Assurez-vousqueles
lieuxsontbienventilésetcontactezuncentredeservicesautorisé.
• Éloignezduréfrigérateurtouteslesmatièresetvapeursinammablescommel’essence.
• Cetappareilestconçupourêtreutiliséàdesnsdomestiquesetàd'autresnsdecetype,parexemple
danslecoincuisinedupersonneldesmagasins,desbureauxetd’autresenvironnementsdetravail;dans
lesfermesetparlesclientsdeshôtels,desmotelsetd’autresenvironnementsdetyperésidentiel;dansdes
environnementscommelesgîtes;pourdesapplicationsdansledomainedelarestaurationetdelavente
en gros.
• Cetappareilpeutêtreutilisépardesenfantsâgésdehuitansetplus,despersonnesavecdescapacités
physiques,sensoriellesoumentalesréduitesoudespersonnesquiontunmanquedeconnaissances
etd’expériences’ilsontétésupervisésous’ilsontreçudesinstructionspourutiliserl’appareildefaçon
sécuritaireets’ilscomprennentlesrisquesassociés.Lesenfantsnedevraientpasjoueravecl’appareil.
Lenettoyageetl’entretiendel’appareilnedevraientpasêtreeffectuéspardesenfantslaisséssans
surveillance.
• Débranchezl’appareildelached’alimentationavantdelenettoyeroudeleréparer.
• L’éclairageàl’intérieurduréfrigérateuretducongélateurestunéclairageàDEL,etsonentretiendoitêtre
réaliséparuntechnicienqualié.
• Débranchezl’appareildelached’alimentationimmédiatementsiunepannedecourantouunorage
survient.
• Éteignezl’alimentationdel’appareilsidel’eauoudelapoussièrepénètreàl’intérieurdecelui-ci.Appelez
unagentducentredeservices.
• Neplacezpasdecontenantsenverrenideboissonsgazeusesdanslecongélateur.Lecontenuliquide
peutprendredel’expansionlorsqu’ilestcongelé,endommagerlecontenantetcauserdesblessures.
• N’entreposezpas,nedémontezpasetneréparezpasl’appareilvous-même,etnelaissezpasunemployé
nonqualiélefaire.
• Silecordond’alimentationélectriqueestendommagé,ildoitêtreremplacéparlefabricantuniquementou
parsonagentdeserviceouencoreunepersonnequaliéepossédantcetypedecompétencespouréviter
unrisque.
• Nerangezpasdesubstancesexplosivestellesquedesaérosolsavecungazpropulseurinammabledans
cetappareil.
• Nepasutilisernimettredessubstancesinammables(produitschimiques,médicaments,cosmétiques,
etc.)prèsduréfrigérateuretnepaslesstockeràl’intérieurduréfrigérateur.Nepasplacerleréfrigérateurà
proximitédegazinammables.
MISE AU REBUT
• Lesappareilsabandonnéssontdangereux,mêmesicettesituationnedurequequelquesjours.Lorsque
vousvoulezmettrel’appareilaurebut,retirezlesmatériauxd’emballagedesportesouretirezlesportes
enlaissantlestablettesenplaceanquelesenfantsnepuissentpasgrimperfacilementàl’intérieurde
l’appareil.
• Sivoussouhaitezmettrel’appareilaurebut,assurez-vousquelefrigorigèneaétéretiréetqu’ilseraéliminé
defaçonadéquateparunemployéd’uncentredeservicesautorisé.Sivousêtesresponsabled’unefuite
defrigorigène,vouspourriezdevoirpayeruneamendeouvouspourriezêtreemprisonnéenvertudeslois
environnementalesapplicables.

7CONSIGNES DE SÉCURITÉ
FRANÇAIS
CONSIGNES DE MISE À LA TERRE
• Laconnexionincorrecteduconducteurpourrelierlesappareilsàlaterrepeutcréerunrisquededécharge
électrique.Vériezavecunélectriciencompétentouunpersonneldeservicesivousn’êtespascertainque
l’appareilestcorrectementmisàlaterre.Nemodiezpaslachefournieavecl’appareil;siellenerentre
pasdanslaprise,faitesinstallerunepriseappropriéeparunélectriciencompétent.
• Assurez-vousqu’unélectricienqualiéexaminelaprisedecourantmuraleetlecâblage,etqu’ilconrme
quelamiseàlaterreestadéquate.
• Nedébranchezjamaisl’appareilentirantsurlecordond’alimentation.Teneztoujourslachefermement
pourlaretirerdelaprise.Lenon-respectdecetteconsignepeutendommagerlecordond’alimentation,ce
quipeutcauserunincendieouentraînerunedéchargeélectrique.
MISES EN GARDE
Pour réduire les risques de blessures mineures, de pannes ou de dommages causés
à lʼappareil ou à la propriété lors de lʼutilisation de lʼappareil, prenez les précautions
élémentaires, y compris les suivantes :
INSTALLATION
• N’installezpasl’appareilàunendroitàpartirduquelilrisquedetomber.
• L’appareildoitêtreinstallécorrectement,conformémentauxinstructionsd’installation.
FONCTIONNEMENT
• N’utilisezpasd’aérosolsàproximitédel’appareil.
• L’appareilestconçupourêtreutiliséseulementàdesnsdomestiquesetàd’autresnsdecetype.
• N’appliquezpasuneforceexcessiveetnefrappezpassurtoutesurfacedeverre.Netouchezpasles
surfacesdeverresiellessontssuréesouendommagées.
• Neplacezpastropd’articlesoudesarticlestroprapprochéslesunsdesautresdanslesbalconnets.Cela
pourraitendommagerlesbalconnetsoucauserdesblessuresauxutilisateurssilesarticlessontretirésdes
balconnetsavecforce.
• Neplacezpasunequantitéexcessived’alimentsdansl’appareil.Celapourraitcauserdesblessuresaux
utilisateursoudesdommagesmatériels.
• N’accrochezpasetneplacezpasd’objetslourdssurledistributeurdel’appareil.
• Nedonnezpasdecoupsurunesurfaceenverreetn’yexercezpasdepressionexcessive.Ellepourraitsebriser.
ENTRETIEN
• N’utilisezpasdepuissantsdétergentscommedelacireoudesdiluantspournettoyerl’appareil.Nettoyez-le
àl’aided’unlingedoux.
• Retirezlescorpsétrangers(commelapoussièreetl’eau)deszonesdecontactetdesbrochesdelache
d’alimentation.N’utilisezpasdelingemouilléouhumidepournettoyerlache.
• Nevaporisezpasd’eaudirectementsurlessurfacesintérieuresouextérieuresdel’appareil.
• Nenettoyezpaslestablettesoulescouverclesenverreavecdel’eauchaudelorsqu’ilssontfroids.Une
expositionàunchangementbrusquedetempératurepeutlesendommager.
GARDEZ CES CONSIGNES

8 CONSIGNES DE SÉCURITÉ
AVERTISSEMENTS
• Maintenezlibresdetouteobstructionlesouverturesdeventilationquisetrouventdansl’enceintede
l’appareiloudanslastructureintégrée.
• N’utilisezpasdedispositifsmécaniquesoud’autresmoyenspouraccélérerleprocessusdedégivrage
autresqueceuxrecommandésparlefabricant.
• N’endommagezpaslecircuitfrigorique.
• N’utilisezpasd’appareilsélectriquesàl’intérieurdescompartimentspournourrituredel’appareil,saufs’ils
sontdutyperecommandéparlefabricant.
• Enraisonduréfrigérantetdugazdesoufaged’isolationutilisésdanscetappareil,desprocédures
spécialesdemiseaurebutsontnécessaires.Avantd’endisposer,veuillezconsulterl’agentdeserviceou
uneautrepersonnequaliée.
Cetappareilcontientunepetitequantitéderéfrigérantisobutane(R600a);ils’agitd’ungaznaturelà
hautecompatibilitéenvironnementale,maisquiestégalementcombustible.Lorsdutransportetde
l’installationdel’appareil,veillezàcequ’aucunepartieducircuitfrigoriquenesoitendommagée.En
casdefuiteduréfrigérant,celui-cipourraits’enammerouprovoqueruneblessureauxyeux.Siune
fuiteestdétectée,éloignezlesammesnuesoulessourcespotentiellesd’inammationetaérezla
piècedanslaquellel’appareilsetrouvependantplusieursminutes.
An
d’éviterlaformationd’unmélanged’airetdegazinammableencasdefuitedanslecircuit
frigorique,latailledelapiècedanslaquellel’appareilestutiliséestdéterminéeselonlaquantitéde
réfrigérantutilisée.Lapiècedoitavoirunetaillede10,8pi2(1m2)pourchaque8gderéfrigérantR600a
dansl’appareil.Laquantitéderéfrigérantquisetrouvedansvotreappareilestindiquéesurlaplaque
d’identicationsituéeàl’intérieurdecelui-ci.Nemettezjamaisenmarcheunappareilquiprésentedes
signesdedommages.Encasdedoute,consultezvotrerevendeur.

9CARACTÉRISTIQUESDUPRODUIT
FRANÇAIS
CARACTÉRISTIQUES DU PRODUIT
Lʼaspectetlescaractéristiquesénumérésdansleprésentmanuelpeuventvarierenraisondesconstantesaméliorations
apportéesauproduit.
Alimentation :115V,60Hz
Pression de l’eau min./max. :
20à120psi(138à827kPa)
Modèle LFXS28596*
Description
Réfrigérateur
àprofondeurstandarddotéd'uneporteàdeuxbattants,avec
congélateurinférieur
Poids net 322lb(146kg)
Modèle LFXS26973*
Description
Réfrigérateur
àprofondeurstandarddotéd'uneporteàdeuxbattants,avec
congélateurinférieur
Poids net 291lb(132kg)
inférieur
Poids net 309 lb (140 kg)
Modèle LFXS26596*
Description
Réfrigérateur à profondeur standard doté d'une porte à deux battants, avec
congélateur

10 APERÇU DU PRODUIT
APERÇU DU PRODUIT
Lesillustrationscontenuesdanscemanuelpeuventêtredifférentesdescomposantsetaccessoiresréels,etceux-ci
peuventêtremodiéssanspréavisparlefabricantdanslebutd’améliorerleproduit.
Extérieur
3
4
5
1
6
7
9
8
2
3
4
1
7
9
8
2
Panneau de contrôle
Permet
deréglerlatempératureàl’intérieurdu
réfrigérateuretducongélateur,l’étatdultreàeauet
le mode du distributeur.
Distributeur d’eau ltrée et de glaçons
Distribue
del’eaupuriéeetdesglaçons.
Poignée facilitant l’ouverture
Facilite
l’ouverturedutiroirducongélateur.
Poignée
Permet
d’ouvriretdefermerlesportesdu
réfrigérateur.
1
2
3
4
Bouton de la porte (sur certains modèles)
Permet
d’ouvrirlecompartimentPortedanslaporte.
Porte dans la porte avec technologie InstaView
(sur certains modèles)
La
Portedanslaportedotéedelatechnologie
InstaViewpermetunaccèsfacileauxaliments
courammentutilisés.
Éclairage à DEL
La
DELs’allumelorsqueletiroirducongélateurest
ouvert.
Réfrigérateur
Conserve
lesalimentsfrais.
Congélateur
Conserve
lesalimentssurgelés.
5
6
7
8
9

11APERÇU DU PRODUIT
FRANÇAIS
Intérieur
Porte normale : LFXS26973*
10
2
3
4
5
6
11
7
14
12
13
8
1
10
11
14
12
13
9
2
3
4
5
6
7
1
Porte dans la porte avec technologie InstaView : LFXS26596*/LFXS28596*

12 APERÇU DU PRODUIT
Éclairage intérieur à DEL
Éclaire
l’intérieurduréfrigérateur.
Filtre à eau
Purie
l’eau.
REMARQUE
• Leltredoitêtreremplacétouslessixmois.
Pourplusdedétails,veuillezvousréférerà
lasection«Remplacementdultreàeau»
quisetrouvedanscemanuel.
Machine à glaçons dans la porte (réfrigérateur)
C’est
àcetendroitquelaglaceestproduiteet
stockéeautomatiquement.
Bac à légumes
Aide
àconserverlafraîcheurdesfruitsetdes
légumes.
Bac à légumes à humidité contrôlée (sur certains
modèles)
Aide
àconserverlafraîcheurdesfruitsetdes
légumesetcontrôleletauxd’humidité.
Balconnet xe
Permet
deconserverlesboissonsetlesaliments
froids.
Charnière à fermeture automatique (sur certains
modèles)
Les
portesduréfrigérateuretletiroirducongélateur
sefermentautomatiquementàl’aided’unelégère
poussée.(Lesportessefermentautomatiquement
seulementlorsqu’ellessontouvertesàunanglede
moinsde30°.)
Bac à glaçons
Si
unegrandequantitédeglaceestnécessaire,
transférezcelledubacàglaçonsdanslaportedans
unbacdestockagedeglacedanslecongélateur.
Bac pour produits laitiers (sur certains modèles)
Utilisé
pourrangerlesproduitslaitiers.
1
2
3
4
5
6
7
8
Compartiment Porte dans la porte
Zone
derangementpratiquequifacilitel’accèsaux
articlesfréquemmentutilisés.
Tablette ajustable
Les
tablettesduréfrigérateursontajustablespour
répondreàtouttypedebesoinsenmatièrede
rangement.
Tiroir Glide N’
Serve
Permet
deconserverlesalimentsàunetempérature
quin’estpaslamêmequecelledesautressections
duréfrigérateur.
Machine à glaçons automatique (congélateur)
Machine
àglaçonssupplémentairedansle
congélateur.
Tiroir gigogne
Offre
del’espacederangementsupplémentaireà
l’intérieurducongélateur.
Durabase
®
et séparateur Durabase
®
Offredel’espacederangementpourlesalimentset
lesarticlesdegrandesdimensions.
9
10
11
12
13
14

13INSTALLATION
FRANÇAIS
INSTALLATION
Aperçu de lʼinstallation
Veuillezd’abordlirecesinstructionsd’installationaprèsl’achatdeceproduitousondéplacementdansunautrelieu.
Déballagedu
réfrigérateur
Choixdel’emplacement
adéquat
Retraitetassemblage
Raccordementdela
conduited’eau
Nivellement et
alignementdelaporte
MISES EN GARDE
• Branchezl’appareilàunesourced’eaupotable
seulement.
• Utilisezuniquementdel’eaupotable.

14 INSTALLATION
Déballage du réfrigérateur
AVERTISSEMENTS
• Aumoinsdeuxpersonnessontnécessairespour
déplaceretinstallerleréfrigérateur.Lenon-respect
decetteconsignepourraitentraînerdesblessures,
notammentaudos.
• Leréfrigérateurestlourd.Protégezleplancherlors
dudéplacementduréfrigérateurpourlenettoyage
oul’entretien.Déplaceztoujoursvotreréfrigérateur
enpositionverticale.Neremuezpasleréfrigérateur
etneledéplacezpasenl’appuyantsursescoins,
carcelapourraitendommagerleplancher.
• Éloignezduréfrigérateurtouteslesmatières
etvapeursinammablescommel’essence.Le
non-respectdecetteconsignepeutprovoquerun
incendie,uneexplosionoulamort.
REMARQUE
• Retirezlerubanadhésifetlesétiquettestemporaires
devotreréfrigérateuravantl’utilisation.N’enlevezpas
lesétiquettesd’avertissement,l’étiquettedunumérode
modèleetdesérieoulachetechniquequisetrouve
sousl’avantduréfrigérateur.
• Frottezénergiquementaveclepoucepourretirerle
rubanoulacollerestésàlasurface.Onpeutaussi
facilementretirerlerubanoulacolleenlesfrottant
aveclesdoigtsaprèsyavoirversédusavonliquideà
vaisselle.Rincezensuiteàl’eautièdeetessuyez.
• N’utilisezpasd’instrumentstranchants,d’alcoolà
friction,deliquidesinammablesoudenettoyants
abrasifspourenleverdurubanadhésifoudelacolle.
Cesproduitspeuventendommagerlasurfacedevotre
réfrigérateur.
• Réinstallezouajustezlesétagèresàvotreguise.Les
étagèresdesréfrigérateurssontinstalléesdefaçonà
faciliterletransport.Réinstallezlesétagèresselonvos
besoinsderangement.
Choix de l’emplacement
adéquat
Eau
L’alimentationeneaudoitêtrefacileàbrancherpourla
machineàglaçonsautomatique.
REMARQUE
• Lapressiond’eaudoitêtrecompriseentre20et
120psi,entre138et827kPaouentre1,4et8,4kgf/
cm
2
.Sileréfrigérateurestinstalléàunendroitoùla
pressiond’eauestfaible(inférieureà20psi,138kPa
ou1,4kgf/cm
2
),vouspouvezinstallerunepompe
d’appointpourcompensercettepressionfaible.
Électricité
Leréfrigérateurdoitêtrebranchésursapropreprisede
courantmiseàlaterre,dontlavaleurnominaleestd’au
moins115volts,de60Hzc.a.etde15ampères.
AVERTISSEMENTS
• Enbranchantd’autresélectroménagerssurla
priseélectriqueduréfrigérateur,vousrisquezde
surchargerlescircuitsélectriquesetdeprovoquer
un incendie.
• Pourréduirelerisquedechocélectrique,nepas
installerleréfrigérateurdansunendroitmouilléou
humide.
Plancher
Pouréviterlebruitetlesvibrations,l’appareildoitêtre
installéetmisàniveausurunplancherstable.Aubesoin,
ajustezlespiedsdenivellementpourcompenserles
inégalitésdusol.
REMARQUE
• L’installationsurdestapis,dessurfacesmolles,une
plate-formeouunestructurefaiblementsoutenuen’est
pasconseillée.
Température ambiante
Installezcetappareildansunendroitoùlatempérature
estcompriseentre13°C(55°F)et43°C(110°F).
Si
latempératureautourdel’appareilesttropbasseou
tropélevée,lacapacitéderefroidissementpeutêtre
affectée.

15INSTALLATION
FRANÇAIS
Dimensions et dégagements
• Vériezlesdimensionsdel’appareiletcellesdesouverturesetdesportesparlesquellesilpasseralorsdeson
installationandevousassurerqu’ilyasufsammentd’espacepourledéplacer.
• Siuneouvertureesttropétroitepourlaisserpasserleréfrigérateur,lesportesdoiventêtreretirées.
• L’endroitchoisipourinstallerleréfrigérateurdoitoffrirassezd’espacederrièrecelui-cipourassureruneventilationet
desbranchementsadéquats,etsufsammentd’espaceàl’avantpourouvrirlesportesettiroirs.
• Sil’appareilestinstallétropprèsdesélémentsadjacents,celapeutréduirelacapacitédecongélationetaugmenterla
consommationd’électricité.Laissezaumoins610mm(24pouces)àl’avantduréfrigérateurpourouvrirlesportesetau
moins50,8mm(2pouces)entrel’arrièreduréfrigérateuretlemur.
B
A
C
D
F
G
E
H
I
- Liste LFXS28596*
A Profondeur sans la poignée
32 3/8 po
(822 mm)
33 3/4 po
(857 mm)
B Largeur
35 3/4 po
(908 mm)
35 3/4 po
(908 mm)
C
Hauteur jusqu’au-dessus de la
caisse
68 3/8 po
(1737 mm)
68 3/8 po
(1737 mm)
D
Hauteur jusqu’au-dessus de la
charnière
69 3/4 po
(1772 mm)
69 3/4 po
(1772 mm)
E Espace libre à l’arrière
2 po
(50 mm)
2
po
(50 mm)
F Profondeur sans la porte
28 1/2 po
(724 mm)
29 7/8 po
(759 mm)
G
Profondeur (au total, avec la
porte ouverte à 90°)
47 1/8 po
(1197 mm)
48 1/2 po
(1232 mm)
I Espace libre à l’avant
22 5/8 po
(575 mm)
24 po
(610 mm)
H Profondeur avec la poignée
36 1/4 po
(921 mm)
34 7/8 po
(886 mm)
LFXS26973*
LFXS26596*

16 INSTALLATION
Retrait et assemblage des
poignées
• Sivousdevezfairepasserleréfrigérateurparune
ouvertureétroite,ilestrecommandéderetirerles
portes.
• L’apparenceréelledespoignéespeutvarier.
AVERTISSEMENTS
Lors de l’assemblage ou du retrait des poignées :
• Tenezlapoignéefermementpouréviterqu’ellene
tombe.
• Nelancezpaslapoignéeversdespersonnesou
desanimauxàproximité.
• Assurez-vousqueletroudelaplaquedelapoignée
estcorrectementalignésurl’axedebutéedela
porte.Serrezlesvispourinstallerlapoignée.
• Unefoislapoignéexée,assurez-vousqu’iln’ya
pasd’écartentrelaporteetlapoignée.
Outils nécessaires
Clé Allen de 3/32
po
Clé Allen de 1/8
po
Clé Allen de 1/4
po
Retrait des poignées du réfrigérateur
1
Desserrezlesvis(1)àl’aided’unecléAllende
3/32po,puisretirezlapoignée.
2
Desserrezlesxationsdemontage(2)quisevissent
àlaporteetàlapoignéeduréfrigérateuràl’aide
d’unecléAllende1/4po,puisretirezlesxationsde
montage.
Assemblage des poignées du
réfrigérateur
1
Assemblezlesxationsdemontage(1)auxdeux
extrémitésdelapoignéeàl’aided’unecléAllende
1/4 po.
2
Placezlapoignéesurlaporteenl’installantsurles
xationsetenserrantlesvis(2)avecunecléAllende
3/32 po.

17INSTALLATION
FRANÇAIS
Retrait de la poignée du tiroir du
congélateur
1
Desserrezlesvis(1)situéesaubasdelapoignée
àl’aided’unecléAllende1/8po,puisretirezla
poignée.
2
Desserrezlesxationsdemontage(2)àl’aided’une
cléAllende1/4po,puisretirez-les.
Assemblage de la poignée du tiroir du
congélateur
1
Assemblezlesxationsdemontage(1)auxdeux
extrémitésdelapoignéeàl’aided’unecléAllende
1/4 po.
2
Placezlapoignéesurlaporteenl’installantsurles
xationsetenserrantlesvis(2)avecunecléAllen
de 1/8 po.
Retrait et assemblage des
portes et des tiroirs
Si votre porte d’entrée est trop étroite pour permettre
le
passageduréfrigérateur,retirezlesportesdu
réfrigérateuretdéplacezleréfrigérateurlatéralementà
traverslaporte.
AVERTISSEMENTS
• Aumoinsdeuxpersonnessontnécessairespour
installerouretirerlesportesduréfrigérateuretdu
congélateur.
• Débranchezl’alimentationélectriqueduréfrigérateur
avantl’installation.
• Neplacezpasvosmains,vospiedsoudes
objetsdansleséventsd’aérationouaubasdu
réfrigérateur.
• Soyezprudentenmanipulantlacharnièreetle
butoirand’évitertouteblessure.
• Sortezlesalimentsetlesbalconnetsavantde
démonter les portes.
• Sivousretirezoureplacezlesportes,nelestenez
pasparlapoignée,carcelle-cipourraitsedétacher.
Outils nécessaires
Clé Allen de 3/32
po
Clé Allen de 1/8
po
Clé Allen de 1/4
po
Retrait de la porte gauche du
réfrigérateur
1
Laprised’eauestreliéeàlapartiesupérieure
droitedelasurfacearrièreduréfrigérateur.Enlevez
l’anneaudelazonederaccordement.Tenezla
prised’eauetappuyezdoucementsurlecolletpour
débrancherlaconduited’alimentationcommeillustré.
Collet
REMARQUE
• Ledétachementdelaligned’alimentationeneauest
applicableuniquementlorsdudétachementdelaporte
gaucheduréfrigérateur.

18 INSTALLATION
2
Retirezlavis(1)ducouvercledelacharnièreen
hautduréfrigérateur.Soulevezlecrochet(non
visible),situésurlapartieinférieureducôtéavantdu
couvercle(2),àl’aided’untournevisàtêteplate.
3
Enlevezlecouvercleetretirezletuyau(1).
Débrancheztouslesfaisceauxélectriques(2).
Dévissezleldemasse(3).
3
4
Faitespivoterlelevierdelacharnièredanslesens
antihoraire(1).Soulevezlacharnièresupérieure(2)
horsduloquetdulevierdelacharnière.
(1
)
(2)
Loquetdulevierde
lacharnière
MISES EN GARDE
• Aumomentdesouleverlacharnièrepourla
dégager,veillezàcequelaportenetombepasvers
l’avant.
5
Soulevezlaportedel’axedelacharnièrecentraleet
retirez-la.
MISES EN GARDE
• Placezlaporte,avecl’intérieurorientéverslehaut,
surunesurfacelisse.
REMARQUE
Démontage et raccordement de la conduite d’eau
Collet
Tuyau
Ligne
d’insertion
Attache
(Correct)
Retrait de la porte droite du
réfrigérateur
1
Enlevezlavisducouvercledelacharnière
supérieure(1).Soulevezlecrochet(nonvisible),situé
surlapartieinférieureducôtéavantducouvercle(2),
àl’aided’untournevisàtêteplate.

19INSTALLATION
FRANÇAIS
2
Détachezlefaisceauélectrique(1).Surlemodèle
InstaView,dévissezleldemiseàlaterre(3).
3
3
Faitespivoterlelevierdelacharnière(1)dansle
senshoraire.Soulevezlacharnièresupérieure(2)
horsduloquetdulevierdelacharnière.
Loquetdulevierde
lacharnière
MISES EN GARDE
• Aumomentdesouleverlacharnièrepourla
dégager,veillezàcequelaportenetombepasvers
l’avant.
4
Soulevezlaportedel’axedelacharnièrecentraleet
retirez-la.
MISES EN GARDE
• Placezlaporte,avecl’intérieurorientéverslehaut,
surunesurfacelisse.
Installation de la porte droite du
réfrigérateur
Installezd’abordlaportedroite.
1
Assurez-vousquelemanchonenplastiqueestinséré
danslapartieinférieuredelaporte.Abaissezlaporte
danslagoupilledelacharnièrecentrale,commesur
l’illustration.
2
Fixezlacharnière(1)surleverrouàlevierdela
charnièreetinsérez-la.Faitespivoterlelevier(2)
danslesensantihorairepourxerlacharnière.
Loquetdulevierde
lacharnière
3
Branchezlefaisceauélectrique(1).Surlemodèle
InstaView,visserleldemiseàlaterre.
4
Replacezlecouvercle(1).Insérezetserrezlavisdu
couvercle(2).

20 INSTALLATION
Installation de la porte gauche du
réfrigérateur
Installezlaportegaucheduréfrigérateuraprèsavoir
installélaportedroite.
1
Assurez-vousquelemanchonenplastiqueestinséré
danslapartieinférieuredelaporte.Installezlaporte
duréfrigérateurdanslacharnièrecentrale.
2
Placezlacharnière(1)surleverrouàlevierdela
charnièreetinsérez-la.Faitespivoterlelevierdansle
senshoraire(2)etxezlacharnière.
Loquetdulevierde
lacharnière
3
Brancheztouslesfaisceauxélectriques.
4
Insérezletuyaud’alimentationeneaudansletroudu
casiersupérieuretfaites-lepasseràtraverslaplaque
arrière.
5
Tenezlaprised’eauetappuyezdoucementsurle
colletpourraccorderlaconduited’alimentation,tel
qu’illustré.Insérezletuyauàuneprofondeurd’au
moins15mm(5/8depouce)dansleconnecteur.
Installezl’attachesurleraccordpourmaintenirle
tuyauenplace.
Collet
6
Replacezlecouvercle(1).Insérezetserrezlavisdu
couvercle(2).
REMARQUE
Démontage et raccordement de la conduite d’eau
Collet
T u y a u
Ligne
d’insertion
A t t a c h e
( C o r r e c t )
• Appuyezdoucementsurlecolletetinsérezletuyau
jusqu’àcequ’uneseuleligneapparaissesurcelui-ci.
( C o r r e c t ) ( I n c o r r e c t )

21INSTALLATION
FRANÇAIS
Retrait des tiroirs du congélateur
Pourlesmodèlesdontlecongélateuradeuxtiroirs,
enlevezlesdeuxtiroirsdelamêmefaçon.
Parsoucideclarté,letiroiramoviblesituéau-dessusdu
tiroirducongélateurnegurepassurlesillustrations.
AVERTISSEMENTS
An de réduire les risques de décharges
électrique, de blessures ou de décès, des
précautions de base doivent être prises, y compris
les suivantes :
• Aumoinsdeuxpersonnessontnécessairespour
installerouretirerlesportesduréfrigérateuretle
tiroirducongélateur.
• Faitesattentionauxcharnièrespointuessurlesdeux
côtésdutiroir.
• Lorsquevousposezletiroirparterre,veillezàne
pasendommagerleplancher.
• Nemontezpassurletiroiretnevousyasseyez
pas.
• And’empêcherlesaccidents,maintenezles
enfantsetlesanimauxdomestiquesloindutiroir.Ne
laissezpasletiroirouvert.Silebacderangement
Durabase
®
estretirédutiroirducongélateur,ilya
sufsammentd’espaceàl’intérieurpourqu’unpetit
enfantouunanimaldomestiquepuisseypénétrer.
1
Tirezletiroirjusqu’àsonextensioncomplète.
2
Soulevezettirezdélicatementlebacàglaçonspour
le retirer.
3
Soulevezl’avantdutiroir,puistirez-le.
4
Enlevezlesvisdesrailsauxdeuxextrémités.
5
Saisissezlesdeuxcôtésdutiroirettirez-lepourle
retirerdesrails.
MISES EN GARDE
• Netenezpaslapoignéelorsquevousenlevezou
replacezletiroir.Celle-cipourraitsedétacheret
provoquerdegravesblessures.

22 INSTALLATION
6
Saisissezunraildanschaquemainetpoussez-les
simultanément.
Montage du tiroir du congélateur
1
Tirezlesdeuxrailssimultanémentjusqu’àextension
complète.
2
Saisissezletiroirdechaquecôtéetaccrochezles
supportsdutiroirsurlesongletsdesrailssituéssur
lesdeuxcôtés.
MISES EN GARDE
• Netenezpaslapoignéelorsquevousenlevezou
replacezletiroir.Celle-cipourraitsedétacheret
provoquerdegravesblessures.
3
Abaissezlaportedanssapositionnaleetresserrez
lesvisplacéesdesdeuxcôtés.
4
Poussezletiroirjusqu’àcequevousentendiezun
clic.
5
Replacezlebacàglaçonsdansletiroir.Insérezle
panierDurabasedanslerailmonté.

23INSTALLATION
FRANÇAIS
Raccordement de la conduite
d’eau
Avant de commencer
L’installationdelaconduited’eaun’estpascouvertepar
lagarantieduréfrigérateur.Suivezattentivementces
instructionsandeminimiserlesrisquesdedégâtsd’eau
coûteux.
Au
besoin,faitesappelàunplombierqualiépour
éliminerlescoupsdebélieravantderaccorderla
conduited’alimentationd’eauauréfrigérateur.L’eau
cognantdanslestuyauxoulescoupsdebélierdansla
plomberierésidentiellepeuventcauserdesdommages
auxpiècesdevotreréfrigérateuretprovoquerdesfuites
oudesinondations.
• Éteignezlamachineàglaçonssivouscomptezutiliser
leréfrigérateuravantd’avoirraccordélaconduite
d’alimentationeneau.
• N’installezpaslestuyauxdelamachineàglaçonsdans
deszonesoùlatempératuredescendau-dessousde
zéro.
AVERTISSEMENTS
• Branchezl’appareilàunesourced’eaupotable
seulement.
MISES EN GARDE
• Pouréviterlesbrûluresettoutdommageà
l’appareil,raccordezuniquementlaconduited’eau
duréfrigérateuràunesourced’eaufroide.
• Portezdeslunettesdeprotectionpendant
l’installationpouréviterlesblessures.
Pression de l’eau
Unealimentationeneaufroideestnécessaire.
Pression de l’eau
Modèles
équipésd’un
ltreàeau
de
20à120psi
(de
138à827kPa)
Si
unsystème
deltration
d’eaupar
osmose inverse
est
connectéà
l’alimentation
eneaufroide
De
40à60psiauminimumpour
unsystèmeparosmoseinverse(de
2,8à4,2kgf/cm
2
,oumoinsde2à3
secondes pour remplir un récipient
d’environ
200ml)
Silapressiondel’eaudusystèmed’osmoseinverseest
inférieureà20psiou138kPaou1,4kgf/cm²(c’est-à-
dire
quecelaprendplusde4secondespourremplirune
tassed’unecapacitéde7oncesoude198cm³):
• Vériezsileltreàsédimentsdanslesystème
d’osmoseinverseestbloqué.Remplacezleltresi
nécessaire.
• Laissezleréservoirsurlesystèmeparosmoseinverse
seremplirdenouveauaprèsuneutilisationintensive.
• Silapressiondel’eaudemeurefaible,appelezun
plombieragrééetqualié.
• Touteslesinstallationsdoiventêtreconformesaux
exigences du code de plomberie en vigueur.
Matériel nécessaire
• Tuyaux en cuivre ou en XLPEde¼depodediamètre
extérieur,pourrelierleréfrigérateuràlaprised’eau.
Assurez-vousquelesdeuxextrémitésdestuyaux
soientcoupéesaucarré.Pourdéterminerlenombre
detuyauxdontvousavezbesoin,mesurezladistance
delavanned’eauàl’arrièreduréfrigérateurautuyau
d’alimentationeneau.Ensuite,ajoutez2,4m(8
pieds).Assurez-vousquevousdisposezd’untuyau
sufsammentlong(environ2,4m[8pieds]enroulés
en3toursd’environ25cm[10po]dediamètre)pour
permettreauréfrigérateurd’êtreretirédumuraprès
l’installation.
• Perceuse électrique.
• Clé à molette ou clé de ½ po.
• Tournevis à tête plate et pour vis cruciformes.
• Deux boulons de compression de diamètre
extérieur de ¼ de po et 2 bagues (manchons) pour
raccorderletubeencuivreàlavanned’arrêtetàla
vanned’eauduréfrigérateur.
• Sivotrecanalisationencuivreexistantecomporteun
raccordévaséàl’extrémité,vousaurezbesoind’un
adaptateur(offertdanslesmagasinsdefournitures
deplomberie)pourraccorderlaconduited’eauau
réfrigérateurOUvouspouvezcouperleraccordévasé
avecundécoupeurdetube,puisutiliserunraccordde
compression.

24 INSTALLATION
• Vanned’arrêtàraccorderàlaconduited’eaufroide.La
vanned’arrêtdoitavoiruneprised’eaud’undiamètre
intérieurminimalde5/32poaupointdeconnexion
àlaCONDUITED’EAUFROIDE.Lesvannesd’arrêt
àétriersontcomprisesdansbeaucoupd’ensembles
d’approvisionnementeneau.Avantdel’acheter,
assurez-vousqu’unevanneàétrierestconformeaux
codes de plomberie en vigueur.
REMARQUE
• Unevanned’eauàétrierauto-perceusenedevraitpas
êtreutilisée.
Instructions d’installation de la conduite
d’eau
AVERTISSEMENTS
Risque de décharge électrique :
• Sivousutilisezunappareilélectrique(commeune
perceuseélectrique)lorsdel’installation,assurez-
vous
queledispositifestalimentéparpile,qu’il
comporteunedoubleisolationouqu’ilestmisàla
terred’unemanièrequipermettrad’évitertoutrisque
dedéchargeélectrique.
Installezlavanned’arrêtsurlaconduited’eaupotable
fréquemmentutiliséelaplusprès.
1
Fermez la source principale d’alimentation en
eau.
Ouvrez
lerobinetleplusprèspourenleverla
pressionsurlaligne.
2
Choisissez l’emplacement de la vanne.
Choisissez
unemplacementfacilementaccessible.
Ilestpréférabledelareliersurlecôtéd’untuyau
d’eauvertical.Lorsqu’ilestnécessairedelarelierà
untuyaud’eauhorizontal,réalisezleraccordement
surlehautousurlecôté,plutôtquesurlebas,pour
éviterderecevoirdessédimentsdutuyaud’eau.
3
Percez le trou pour la vanne.
• Percezuntroude¼podansletuyaud’eauàl’aide
d’unemèchepointue.Enleveztouteslesbavures
résultantduperçagedutroudansletuyau.Veillez
ànepaslaisserl’eaudrainerparletrou.Lefait
denepasperceruntroude¼popeutdiminuerla
productiondeglaceoulatailledesglaçons.
REMARQUE
• Lalignederaccordementnepeutpasêtrecomposée
detuyauxenplastiqueblancs.Lesplombiersagréésne
doiventutiliserquedestuyauxencuivreNDAn°49595
ou49599oudestuyauxenpolyéthylèneréticulé
(XLPE).
4
Resserrez la vanne d’arrêt.
Resserrez
lavanned’arrêtdutuyaud’eaufroideà
l’aideducollierdeserrage.
Collierdeserrage
Vanned’arrêtde
type étrier
Tuyauvertical
d’eaufroide
REMARQUE
• LescodesdeplomberiedelaCommonwealthof
Massachusetts248CMRdoiventêtrerespectés.Les
vannesàétriersontillégalesetleurutilisationn’est
pasautoriséedansleMassachusetts.Consultezun
plombieragréé.
5
Resserrez le collier de serrage.
Serrez
lesvisdeserragejusqu’àcequelarondelle
defermeturecommenceàener.
Collierdeserrage
Visdeserrage
Rondelle
Extrémitédelaprised’eau
REMARQUE
• Neserrezpasexcessivementlavis,carvouspourriez
écraserletuyau.

25INSTALLATION
FRANÇAIS
6
Dirigez le tuyau.
Faites
passerletuyauentrelaconduited’eaufroide
etleréfrigérateur.
Faites
passerletuyauparuntroupercédansle
murouleplancher(derrièreleréfrigérateurou
unearmoiredecuisineadjacente),aussiprèsque
possible du mur.
REMARQUE
• Assurez-vousquevousdisposezd’untuyau
sufsammentlong(environ2,4m[8pieds]enroulés
en3toursd’environ25cm[10po]dediamètre)pour
permettred’éloignerleréfrigérateurdumuraprès
l’installation.
7
Raccordez le tuyau à la vanne.
Placez
unécroudecompressionetunebague
(manchon)pourletuyaudecuivreàl’extrémitédu
tuyauetraccordez-leàlavanned’arrêt.
Assurez-vous
queletuyauestentièrement
insérédanslavanne.Serrezfermementl’écrouà
compression.
Vanned’arrêtde
type étrier
Écroud’emballage
Vannedesortie
Écrouàcompression
Bague(manchon)
8
Vidangez le tuyau.
Ouvrez
laprised’eauprincipaleetrincezletuyau
jusqu’àcequel’eausoitclaire.Fermezl’alimentation
eneauàlahauteurdelavanneunefoisqu’environ
unlitred’eauacirculédansletuyau.
9
Raccordez le tuyau au réfrigérateur.
REMARQUE
• Avantd’effectuerleraccordauréfrigérateur,assurez-
vous
quelecordond’alimentationélectriquen’estpas
branchédanslaprisemurale.
• Enlevezlecapuchonexibleenplastiquedelavanne
d’eau.
• Placezl’écrouàcompressionetlabague(manchon)à
l’extrémitédutuyaucommeilestindiqué.
• Insérezl’extrémitédutuyaudecuivredanslaconnexion
aussiloinquepossible.Toutentenantletuyau,serrez
leraccord.
Collierdeserrage
Écrouàcompressionde1/4po
Bague(manchon)
Tuyaude1/4po
Branchementauréfrigérateur
10
Ouvrez l’eau à la vanne d’arrêt.
Serrez
touslesraccordsquifuient.
MISES EN GARDE
• Vérieztouslesraccordsdelaconduited’eaupour
voirs’ilyadesfuites.

26 INSTALLATION
Nivellement et alignement de la
porte
Nivellement
Votreréfrigérateuradeuxpiedsdenivellementàl’avant.
Ajustezlespiedspourmodierl’inclinaisondel’avant
versl’arrièreoudegaucheàdroite.Sivotreréfrigérateur
sembleinstableouquelesportessontdifcilesàfermer,
ajustezl’inclinaisonduréfrigérateurensuivantles
instructionsci-dessous:
1
Tournezlepieddenivellementverslagauchepour
soulevercecôtéduréfrigérateurouversladroite
pourl’abaisser.Ilestpossiblequevousayezà
tournerplusieursfoislepieddenivellementpour
ajusterl’inclinaisonduréfrigérateur.
REMARQUE
• Uneclépolygonaleàtêtesfenduesconvientlemieuxà
cettetâche,maisunecléàfourchepeutêtresufsante.
Neserrezpasexcessivement.
2
Ouvrezlesdeuxportespourvérierqu’ellesferment
facilement.Silesportesneserefermentpas
facilement,inclinezleréfrigérateurunpeuplusvers
l’arrièreentournantlesdeuxpiedsdenivellement
verslagauche.Celapeutprendreplusieurstours
supplémentaires,etvousdevrieztournerautantles
deux pieds de nivellement.
Alignement de la porte
Porte normale
Lesportesgaucheetdroiteduréfrigérateursontdotées
d’unécrouajustable,situésurlacharnièreinférieure,
pourlessouleveretlesabaisserandelesaligner.
Si
l’espaceentrevosportesn’estpasuniforme,suivez
lesinstructionsci-dessouspourlesaligner.
Utilisez
laclé(compriseavecleGuided’utilisationet
d’entretien)pourtournerl’écroudanslacharnièredela
porteand’enajusterlahauteur.Tournezdanslesens
horairepourmonterlaporteoudanslesensinversepour
l’abaisser.
Porte dans la porte
Laportegaucheduréfrigérateurestdotéed’unécrou
ajustable,situésurlacharnièreinférieure,pourla
souleveretl’abaisserandel’aligner.
Si
l’espaceentrevosportesn’estpasuniforme,suivez
lesinstructionsci-dessouspourlesaligner:
Utilisez
laclé(compriseavecleGuided’utilisationet
d’entretien)pourtournerl’écroudanslacharnièredela
porteand’enajusterlahauteur.Tournezdanslesens
horairepourmonterlaporteoudanslesensinversepour
l’abaisser.

27INSTALLATION
FRANÇAIS
Laportedroiteduréfrigérateurn’apasd’écrouajustable.
Sil’espaceentrevosportesestinégal,suivezles
instructionsci-dessouspouralignerlaportedroite.
1
D’unemain,soulevezlespartiesintérieureet
extérieuredelaportededroiteauniveaudela
charnièrecentrale.(Ouvrezlaportepourque
l’opérationsoitplusfacile.)
2
Del’autremain,insérezlejoncd’arrêtàl’aided’une
pincesurlacharnièrecentraledelapartieintérieure
delaporte,commeillustré.N’insérezpaslejoncsur
lacharnièredelapartieextérieuredelaporte.
3
Insérezdesjoncsd’arrêtsupplémentairesjusqu’àce
quelaportededroitesoitalignée.(Deuxjoncsd’arrêt
sontfournis.)
Mise en marche
Aprèsl’installation,branchezlecordond’alimentationdu
réfrigérateurdansunepriseà3brochesmiseàlaterreet
poussezleréfrigérateurdanssapositionnale.
MISES EN GARDE
• Branchez-leàuneprisedepuissancenominale.
• Assurez-vousqu’unélectricienqualiéexamine
laprisedecourantmuraleetlecâblage,etqu’il
conrmequelamiseàlaterreestadéquate.
• Necoupezpasetn’endommagezpaslabornede
terredelaprisedecourant.
Choix de l’emplacement du réfrigérateur
Disposezletuyauenroulédesortequ’ilnevibrepas
contrelapartiearrièreduréfrigérateuroucontrelemur.
Poussezleréfrigérateurcontrelemur.
Démarrer la machine à glaçons
Silaconduited’eauestraccordée,réglezl’interrupteurde
lamachineàglaçonsàlapositionMARCHE.
Lamachineàglaçonscommenceàfonctionner
uniquementlorsqu’elleaatteintsatempératurede
fonctionnementde-9°C(15°F)ouunetempérature
inférieure.Ellefonctionneraensuiteautomatiquementsi
l’interrupteurestàlapositionON(marche)(I).

28 FONCTIONNEMENT
FONCTIONNEMENT
Avant l’utilisation
Nettoyez le réfrigérateur.
Nettoyez
leréfrigérateuràfondetenleveztoutelapoussièrequis’estaccumuléependantle
transport.
MISES EN GARDE
• Negrattezpasleréfrigérateuravecunobjetpointuetn’utilisezpasdedétergentquicontient
del’alcool,duliquideinammableouunesubstanceabrasivepourretirerlerubanadhésifou
lacolleduréfrigérateur.Enlevezlesrésidusdecolleenlesessuyantavecvotrepouceoudu
détergentàvaisselle.
• Neretirezpasl’étiquettedunumérodemodèleoudesérieoulesinformationstechniquessur
lasurfacearrièreduréfrigérateur.
Ouvrez les portes du réfrigérateur et du congélateur pour aérer l’intérieur.
L’intérieur
duréfrigérateurpeutdégageruneodeurdeplastiqueaudébut.Enleveztoutruban
adhésifdel’intérieurduréfrigérateuretouvrezlesportesduréfrigérateuretlestiroirsdu
congélateuràdesnsdeventilation.
Branchez l’alimentation.
Vériez
quel’alimentationestbranchéeavantl’utilisation.
Lire
lasection“Lamisesoustension”.
Attendez que le réfrigérateur refroidisse.
Laissez
votreréfrigérateurenmarchededeuxàtroisheuresaumoinsavantd’ymettredes
aliments.Vériezleuxd’airfroiddanslecompartimentducongélateurpourassurerun
refroidissementcorrect.
MISES EN GARDE
• Attendezquelesalimentsaientrefroidiavantdelesplacerdansleréfrigérateur,sinonils
pourraientsegâteroulaisserunemauvaiseodeurtenaceàl’intérieurduréfrigérateur.
Le réfrigérateur émet un bruit fort après la mise en marche initiale.
C’est
normal.Levolumediminueàmesurequelatempératurebaisse.

29FONCTIONNEMENT
FRANÇAIS
Panneau de contrôle
Selonlemodèle,certainesdesfonctionssuivantespourraientnepasêtreoffertes.
Caractéristiques du panneau de commande
1
2
3
4
5
6
7
8
9
REMARQUE
• LorsqueleréfrigérateurestplacéenModed’économied’énergie,l’écranresteéteintjusqu’àcequ’uneportesoit
ouverteouqu’unetouchesoitenfoncée.Unefoisallumé,l’écranresteallumépendant20secondes.
Ice Plus (Glace Plus)
Cettefonctionaugmenteaussibienlescapacitésdeproductiondeglacequedecongélation.
• AppuyezsurlatoucheIce Pluspourallumerl’icôneetactiverlafonctionpendant24heures.Lafonctions’éteindra
automatiquementaprès24heures.
• Vouspouvezarrêtercettefonctionmanuellementenappuyantsurlatoucheuneautrefois.
Smart Grid (réseaux intelligents)
AppuyezsurlatoucheSmart GridpourmettreenmarcheouéteindrelafonctionSmartGrid.Lorsquelafonction
estenmarche,l’icônes’allume.LafonctionSmartGridsemetautomatiquementenmarchelorsqueleréfrigérateur
estconnectéàunréseauWi-Fi.
Lorsqueleréfrigérateurrépondàunmessagedegestiondelademande(GD)delacompagnied’électricité,lemot
Grid(réseau)s’allume.
C o n g é l a t e u r
IndiquelatempératureducompartimentducongélateurenCelsius(°C)ouenFahrenheit(°F).
Latempératurepardéfautducongélateurestde-18°C(0°F).AppuyezsurlatoucheFreezeràplusieursreprises
poursélectionnerunenouvelletempératureentre-21°Cet-13°C(entre-6°Fet8°F).
1
2
3

30 FONCTIONNEMENT
Refrigerator (réfrigérateur)
Indique la température du compartiment du
réfrigérateur en Celsius (°C) ou en Fahrenheit (°F).
La température par défaut du réfrigérateur est de
3
°C (37 °F). Appuyez sur la touche Refrigerator à
plusieurs reprises pour sélectionner une nouvelle
température entre 1 °C et 8 °C (entre 33 °F et 46
°F).
REMARQUE
• Pour
le mode de température de °F
à °C (ou vice-versa), maintenez les touches
Refrigerator et Freezer Temperature enfoncées
simultanément pendant environ cinq secondes.
L’indicateur de température sur la fenêtre
passe de Celsius à Fahrenheit.
• La température
est la température cible,
et non la température réelle du réfrigérateur. La
température réelle du réfrigérateur dépend des
aliments stockés dans le réfrigérateur.
Fresh Air Filter (Filtre à air frais)
Le
à air frais sert à éliminer les odeurs du
réfrigérateur. Le
à air frais dispose de deux
paramètres, Auto et Power (PWR). En mode Auto,
le
à air frais s’allumera et s’éteindra par tranches
de 10 minutes en marche et de 110 minutes éteint.
S’il est réglé sur le mode Power (PWR), le
à
air
frais restera allumé pendant quatre heures, avec
des
cycles d’allumage de dix minutes allumé et de cinq
minutes éteint. Après quatre heures, le
à air
frais passera en mode Auto.
• Appuyez à plusieurs reprises sur la touche Fresh
Air Filter pour sélectionner les modes Power ou
Auto.
REMARQUE
• Remplacez le
à air frais si l’icône Replace
Filter est allumée. Après avoir remplacé le
à air frais, maintenez enfoncée la touche Fresh
Air Filter pendant trois secondes pour éteindre
la
lumière de l’icône. Il est recommandé de changer
le
à air frais environ tous les 6 mois.
* Lock (Verrouillage)
La fonction de verrouillage désactive toutes les
autres touches de l’écran.
• Lorsque le courant est initialement branché
au réfrigérateur, la fonction de verrouillage est
désactivée.
• Pour verrouiller les touches du panneau de
commande, maintenez enfoncée la touche Lock
jusqu’à ce que l’icône de verrouillage
apparaisse, signe que la fonction est activée.
• Pour désactiver la fonction de verrouillage,
maintenez enfoncée la touche Lock pendant
environ trois secondes.
W
Remplacez le à eau si l’icône Replace Filter
est allumée. Après avoir remplacé le
à eau,
maintenez enfoncée la touche Water Filter pendant
trois secondes pour éteindre la lumière de l’icône.
Vous devez changer le
à eau environ tous les
six mois.
* Wi-Fi
Lorsqu’elle est utilisée avec l’application pour
téléphone intelligent LG Smart Refrigerator, la touche
Wi-Fi permet au réfrigérateur de se connecter
au réseau Wi-Fi de votre domicile. Reportez-
vous à la section des fonctions intelligentes pour
les informations sur la
initiale de
l’application.
L’icône Wi-Fi vous permet de
l’état de
connexion au réseau du réfrigérateur. Lorsque le
réfrigérateur est connecté au réseau Wi-Fi, l’icône
Connecter est allumée.
Appuyez sur la touche Wi-Fi et maintenez-la
enfoncée pendant trois secondes pour établir la
connexion au réseau. L’icône clignote lorsque
la connexion est en cours, et s’allume lorsque la
connexion a été établie avec succès.
Mode du distributeur
Appuyez sur les touches pour choisir entre les
glaçons, l’eau ou la glace pilée. La DEL du mode
sélectionné s’allume.
3
et
8
mode SABBAT (sur certains modèles)
Le mode Sabbat est utilisé lors du Sabbat juif
et des jours fériés.
•
Pour activer le mode Sabbat, appuyez sur l’écran,
puis appuyez simultanément sur les boutons
Freezer (congélateur) et Wi-Fi (Wi-Fi) et
maintenez-les enfoncés pendant 3 secondes,
jusqu’à ce que « Sb »
à l’écran.
•
Le mode Sabbat s’éteint automatiquement après 96
heures.
•
Pour désactiver le mode Sabbat manuellement,
appuyez simultanément sur les boutons Freezer
(congélateur) et Wi-Fi (Wi-Fi) et maintenez-
les enfoncés pendant 3 secondes.
•
Une fois activé, le mode Sabbat est maintenu même
après une panne de courant.
•
La sélection du mode Sabbat désactive
automatiquement les fonctionnalités Alarme.
Le distributeur est également désactivé.

31FONCTIONNEMENT
FRANÇAIS
MISES EN GARDE
Mode Présentation (pour une utilisation en
magasin uniquement)
• LemodePrésentationdésactivetoutrefroidissement
danslescompartimentsduréfrigérateuretdu
congélateurandeconserverl’énergielorsdela
présentationenmagasin.Lorsquecemodeest
activé,l’indicationOFFapparaîtdansl’afcheuret
celui-cis’éteintaprès20secondeslorsquevous
fermezlaporte.
Pour désactiver ou activer le mode Présentation
:
• Enlaissantunedesportesduréfrigérateurouverte,
maintenezenfoncéessimultanémentlestouches
RefrigeratoretIcePluspendantcinqsecondes.Le
panneaudecommandeémetunsignalsonoreetles
réglagesdetempératures’afchentpourconrmer
quelemodePrésentationestdésactivé.Utilisezla
mêmeprocédurepouractiverlemodePrésentation.
Machine à glaçons automatique
et distributeur d’eau
MISES EN GARDE
• Gardezlesenfantsloindudistributeur.Ilspourraient
joueraveclescommandesoulesendommager.
• Jetezlespremierslotsdeglace(de140à160
glaçons)produitsaprèsl’installation.Celaest
égalementnécessairesileréfrigérateurn’apasété
utilisépendantunelonguepériode.
• Sidelaglaceoudel’eausontdistribuéesdefaçon
inattendue,coupezl’alimentationeneauetappelez
lecentred’assistancedeLG.
• N’utilisezjamaisunverretropétroitouprofond.De
laglacepeutrestercoincéedanslepassageetle
fonctionnementduréfrigérateurpeutenêtreaffecté.
Structure du distributeur
Distributeur
Pale
Plateau
Utilisation du distributeur
Incorrecte Correcte
Eau
Glace

32 FONCTIONNEMENT
REMARQUE
• Pourdistribuerdel’eaufroideoudelaglace,appuyez
surlapaledudistributeuravecunverre.
• Lapremièrefois,laglaceetl’eauproduitespeuvent
contenirdesparticulesoudesodeursprovenantdela
conduited’approvisionnementeneauouduréservoir
d’eau.Jetezlespremierslotsdeglace(de140à160
glaçons).Ilestégalementnécessairedelefairesile
réfrigérateurn’apasétéutilisépendantunelongue
période.
• Ledistributeurnefonctionnepaslorsquel’unedes
portesduréfrigérateurestouverte.
• Sidelaglacedécoloréeestdistribuée,vériezleltre
àeauetl’alimentationeneau.Sileproblèmepersiste,
appelezlecentred’assistancedeLG.N’utilisezpasla
glaceoul’eaujusqu’àcequeleproblèmesoitrésolu.
• Distribuezlaglacedansunverreavantdeleremplir
avecdel’eauoud’autresboissons.Deséclaboussures
peuventseproduiresilaglaceestdistribuéedansun
verrequicontientdéjàduliquide.
• Quelquesgouttespeuventtomberaprèsladistribution.
Tenezvotretassesousledistributeurpendantquelques
secondesaprèsladistributionpourrecueillirtoutesles
gouttes.
• Gardezlesrécipientsàunedistanceacceptabledu
distributeur.Tenezlesverresétroitsetprofondsassez
loindelasortiedeglacepourempêcheruneobstruction
danslagoulotte.Sivousdistribuezdel’eauoudela
glacedansunrécipientavecunepetiteouverture,
placez-leaussiprèsdudistributeurquepossiblepour
éviter les débordements.
• Gardezleverreàunedistanceappropriéedu
distributeurdeglace.Unverretropprochedu
distributeurpeutempêcherladistributiondeglace.
Verrouillage du distributeur
AppuyezsurlatoucheLock(verrouillage)surlepanneau
decommandependant3secondespourverrouillerou
déverrouillerledistributeurettouteslesfonctionnalitésdu
panneaudecommande.
Compartiment à glaçons
MISES EN GARDE
• Tenezvosmainsetvosoutilsàl’écartdelaporte
etdelagoulottededistributionducompartiment
àglaçons.Lenon-respectdecesconsignespeut
entraînerdesdommagesoudesblessures.
Gardezlaporteducompartimentàglaçonsfermée
hermétiquement;sinon,l’airfroidducompartimentà
glaçonsprovoqueralacongélationdesalimentsplacés
dansleréfrigérateur.Celapeutaussiinterromprele
fonctionnementdelamachineàglaçons.
Bac à glaçons dans la porte
Laproductiondeglaçonscesselorsquelebacqui
setrouvedanslaporteestplein.Pouraugmenterla
productiondeglaçons,videzlebacàglaçonsdanscelui
quisetrouvedanslecongélateur.Durantlaproduction
deglaçons,cesdernierspourraients’empilerdefaçon
inégale.Lamachinepourraitdoncévaluerincorrectement
laquantitédeglaçonsetcesserdefonctionner.Pourbien
répartirlesglaçonsetremédieràceproblème,secouez
lebacàglaçons.
MISES EN GARDE
• Lorsquevousmanipulezlebacàglaçons,gardez
vosmainsloindelazoneduplateaudelamachine
àglaçonspouréviterdevousblesser.
• Lestockagedecannettesoud’autresarticlesdans
lebacàglaçonspourraitendommagerlamachineà
glaçons.
• N’utilisezjamaisdelaverrerieoudelavaisselleen
cristalpourrecueillirlaglace.Cesrécipientspeuvent
secasserouéclaterenprojetantdesfragmentsde
verreparmilesglaçons.
SilamachineàglaçonsestmiseenpositionARRÊT
pendantunepériodeprolongée,lecompartimentà
glaçonsseréchaufferajusqu’àcequ’ilatteignela
températureduréfrigérateur.Pouréviterquelesglaçons
fondentetquedel’eaus’écouledudistributeur,videz
TOUJOURSlebacàglaçonslorsquelamachineest
éteintependantplusdequelquesheures.
Si
vousn’utilisezquedelaglaceconcassée,ilest
possiblequedugivrebloquelepassagedesglaçons.
Enlevezlegivreaccumuléenretirantlebacàglaçons
etendégageantlepassageavecunespatuleen
caoutchouc.Ladistributiondeglaçonspeutaussiaiderà
prévenirl’accumulationdegivre.

33FONCTIONNEMENT
FRANÇAIS
Retrait du bac à glaçons dans la porte
1
Tirezdoucementlapoignéepourouvrirle
compartimentàglaçons.
2
Pourenleverlebacàglaçonsàl’intérieurdelaporte,
saisissezlapoignéeavant,soulevezlégèrementla
partieinférieureetretirezlentementlebaccommeil
est illustré.
Assemblage du bac à glaçons dans la porte
1
Insérezdoucementlebacàglaçonsàl’intérieurdela
porteeninclinantlégèrementlehautandeleglisser
souslamachineàglaçons.
2
Poussezdoucementlapoignéepourfermerle
compartimentàglaçons.
MISES EN GARDE
• Lorsquevousmanipulezlebacàglaçons,gardez
vosmainsloindelazoneduplateaudelamachine
àglaçonspouréviterdevousblesser.
• Lorsquevousreplacezlebacàglaçons,évitezde
toucherledispositifd’arrêtautomatique(levier).
Pourobtenirdesprécisions,consultezl’étiquettesur
laporteducompartimentàglaçons.

34 FONCTIONNEMENT
Machine à glaçons automatique
Machine à glaçons dans la porte
Interrupteur
Capteurdeglaçons
Machineàglaçons
REMARQUE
• Lesglaçonssontfabriquésdanslamachineàglaçons
automatiquequisetrouvedanslaporteetenvoyés
versledistributeur.Lamachineàglaçonsproduitentre
70et182glaçonsparpériodede24heures,selonla
températureducongélateur,latempératureambiante,
lenombredefoisoùlaporteestouverteetd’autres
conditionsdefonctionnement.
• Ilfaudraenviron12à24heurespourqu’unréfrigérateur
nouvellementinstallécommenceàproduiredes
glaçons.
• Laproductiondeglaçonss’arrêtequandlebacà
glaçonsàl’intérieurdelaporteestplein.Àcemoment,
lebaccontientenviron6à8verres(12à16oz)de
glace.
• Laprésencedesubstancesétrangèresoudegivresur
lecapteurdeglaçonspeutinterromprelaproduction
deglaçons.Assurez-vousquelazoneducapteurreste
toujoursproprepourgarantirunbonfonctionnement.
• Pouraugmenterlaproductiondeglaçons,utilisezla
fonctionIcePlus,laquellepermetd’augmenterles
capacitésdecongélationetdefabricationdeglace.
AVERTISSEMENTS
Risque de blessure
• NEplacezPASlesdoigtsoulesmainssurle
mécanismedelamachineàglaçonsautomatique
pendantqueleréfrigérateurestbranché.
MISES EN GARDE
Ne stockez jamais de cannettes ou d’autres
articles dans le bac à glaçons dans le but de les
refroidir rapidement. Cela pourrait endommager
la machine à glaçons et les contenants pourraient
éclater.
• Pouréviterlesblessures,gardezlesmainshorsde
laporteetdupassagedesglaçons.
Machine à glaçons du congélateur
InterrupteurDispositifd’arrêtautomatique(levier)
REMARQUE
• Lamachineàglaçonsautomatiqueducongélateur
produit12cubesàlafois,50à110glaçonsparpériode
de24heuressilesconditionssontfavorables.Cette
quantitépeutvarierselonl’environnement(température
ambiante,lenombredefoisoùlaporteestouverte,la
quantitédenourrituredansl’appareil,etc.).
• Silebacàglaçonsestrempliaumaximumdesa
capacité,laproductiondeglaçonscessera.
• Lesondesglaçonstombantdanslebacestnormal.
• Lamachineàglaçonscommenceàproduiredes
glaçonsenviron48heuresaprèsl’installationinitialedu
réfrigérateur.
• Jetez
lespremiersglaçonsproduitsaprèsl’installation
initiale.
• Lesglaçonsstockésdanslebacàglaçonspendant
unepériodeprolongéepeuvents’agglutineretvous
pourriezéprouverdeladifcultéàlesséparer.Dansce
cas,videzcomplètementlebacàglaçonsetnettoyez-le
avantdeleremettreenplace.

35FONCTIONNEMENT
FRANÇAIS
Mise en marche ou arrêt de la machine
à glaçons automatique
Pouréteindrel’unedesmachinesàglaçons
automatiques,réglezl’interrupteurdelamachineà
glaçonssurARRÊT (O).Pourallumerlamachineà
glaçonsautomatique,réglezl’interrupteursurMARCHE
(I).
Les sons normaux que vous entendrez
• Sivouslaissezfonctionnerlamachineàglaçonsavant
sonraccordementàl’arrivéed’eau,vousrisquezde
l’endommager.
• Lavanned’eaudelamachineàglaçonsémettraun
bourdonnementpendantleremplissagedelamachine.
Si l’interrupteur est réglé sur MARCHE (I),lamachine
àglaçonsbourdonneramêmesiellen’estpasencore
raccordéeàuneconduited’eau.Pourarrêterle
bourdonnement,réglezl’interrupteursurARRÊT (O).
• Vousentendrezlesondesglaçonsquitombentdans
lebacetl’eauquicirculedanslestuyauxtandisquela
machineàglaçonsseremplitànouveau.
REMARQUE
• Nelaissezpaslesmachinesàglaçonsfonctionnersi
ellesnesontpasraccordéesàl’arrivéed’eau.Cela
pourraitlesendommager.
Préparation en vue des vacances
Réglezlesinterrupteursdelamachineàglaçonssur
ARRÊT (O)etfermezl’alimentationeneaudel’appareil.
Si
latempératureambianterisquededescendresous
lepointdecongélation,demandezàuntechnicien
qualiédedrainerlesystèmed’alimentationeneaupour
empêcherlesdégâtsimportantsquecauseraitlarupture
desconduitesd’eauoudesraccordements.
REMARQUE
• Lebacàglaçonsdoitêtrevidéchaquefoisque
l’interrupteurMarche/Arrêtdelamachineàglaçonsest
réglé sur ARRÊT (O).

36 FONCTIONNEMENT
Stockage des aliments
Lieu de conservation des aliments
Selonlemodèle,certainesdesfonctionssuivantespourraientnepasêtreoffertes.
Chaque
compartimentàl’intérieurduréfrigérateurestconçupourstockerdifférentstypesd’aliments.
Rangez
vosalimentsdansl’espaceoptimalpourproterd’ungoûtplusfrais.
Standard Door
1
2
3
5
4
6
8
9
Door-in-Door
7
1
2
8
9
3
5
4

37FONCTIONNEMENT
FRANÇAIS
Machine à glaçons dans la porte (réfrigérateur)
C’est
àcetendroitquelaglaceestproduiteetstockéeautomatiquement.
Stockage de légumes (Bac à fruits et légumes)
Conserve
lesfruitsetlégumes.
Machine à glaçons automatique (congélateur)
C’est
àcetendroitquelaglaceestproduiteetstockéeautomatiquement.
Bac à glaçons amovible
Si
unegrandequantitédeglaceestnécessaire,transférezcelledubacàglaçonsdanslaportedansunbacde
stockagedeglacedanslecongélateur.
Durabase
®
Leplusgrandespacedestockagedanslecongélateur.
Bac pour produits laitiers
Permet
derangerlesproduitslaitierscommelebeurreetlefromage.
Compartiment Porte dans la porte
Rangement
pratiquepourlesarticlesfréquemmentutiliséscommelesboissons,lebeurre,lamargarine,lacrème,
lefromage,lebeurred’arachideetlescondiments.
Tablette ajustable
Tablettes
réglablespoursatisfairevosbesoinsdestockageparticuliers.
Tiroir Glide‘N’Serve (sur certains modèles)
Fournit
unespacedestockageavecuncontrôledetempératurevariablequimaintientlecompartimentàune
températuredifférentedecelleduréfrigérateur.Cecompartimentestpratiquepourconserverdessandwichsoude
laviandecrue.
1
2
3
4
5
6
7
8
9

38 FONCTIONNEMENT
MISES EN GARDE
• Neplacezpastropd’articlesoudesarticlestrop
rapprochéslesunsdesautresdanslesbalconnets.
Celapourraitendommagerlesbalconnetsoucauser
desblessuresauxutilisateurssilesarticlessont
retirésdesbalconnetsavecforce.
• Nerangezpasdecontenantsenverredansle
congélateur.Lecontenuliquidepeutprendrede
l’expansionlorsqu’ilestcongelé,endommagerle
contenantetcauserdesblessures.
• Latempératureàl’intérieurduEasyReachMCest
légèrementinférieurequesurl’étagèreoudansla
zonedubacdanslaporte.
REMARQUE
-
Sivousquittezvotredomicilependantunecourte
périodedetemps,pourdesvacances,parexemple,
leréfrigérateurdevraitresterallumé.Lesaliments
réfrigéréspouvantêtrecongelésseconserverontplus
longtempss’ilssontstockésdanslecongélateur.
-
Sivouslaissezleréfrigérateuréteintpendantune
périodeprolongée,videz-ledetouslesaliments
etdébranchez-le.Nettoyezl’intérieuretlaissezla
porteouvertepourempêcherlesmoisissuresdese
développerdansleréfrigérateur.
-
Nestockezpasd’alimentsàteneurélevéeenhumidité
danslapartiesupérieureduréfrigérateur.L’humidité
pourraitentrerdirectementencontactavecl’airfroid
et geler.
-
Lavezlesalimentsavantdelesstockerdansle
réfrigérateur.Lesfruitsetleslégumesdoiventêtre
lavésetl’emballagedesalimentsdoitêtreessuyé
pourempêcherdecontaminerlesalimentsà
proximité.
-
Sileréfrigérateurestinstallédansunendroitchaud
ethumide,l’ouverturefréquentedelaporteoulefait
destockerbeaucoupdelégumesdansleréfrigérateur
peutprovoquerdelacondensation.Essuyezla
condensationavecunchiffonpropreouuneserviette
enpapier.
-
Silaporteduréfrigérateurouletiroirducongélateur
sontouvertsouferméstropsouvent,l’airchaud
peutpénétrerdansleréfrigérateuretéleversa
température.Celapeutaussiaccroîtrelecoûtde
fonctionnementdel’appareil.
Conseils pour le stockage des aliments
Pourconserverlesalimentsauréfrigérateur,enveloppez-
les
depelliculeétancheàl’airetrésistanteàl’humidité
ouconservez-lesdansdescontenantshermétiques,
saufindicationcontraire.Celaempêcheladiffusionde
l’odeuretdugoûtdesalimentsdansleréfrigérateur.Pour
assurerlafraîcheurdesproduitspérissables,vériezla
datedepéremption.
Aliment Comment le stocker
Beurre ou
margarine
Conservez le beurre dont l’emballage
est ouvert dans un plat couvert ou
un compartiment fermé. Lorsque
vous en stockez une quantité
supplémentaire, enveloppez-le dans
un emballage pour congélateur et
congelez le tout.
Fromage
Stockez-le dans l’emballage
d’origine jusqu’au moment de le
consommer. Une fois l’emballage
ouvert, réemballez le fromage
hermétiquement dans de la pellicule
plastique ou du papier d’aluminium.
Lait
Essuyez les cartons de lait. Pour
que le lait soit plus froid, placez-
le sur une tablette à l’intérieur du
réfrigérateur.
Œufs
Stockez-les dans la boîte d’origine
sur une tablette à l’intérieur du
réfrigérateur, et non dans la porte.
Fruits
Ne lavez et ne pelez pas les fruits
jusqu’à ce qu’ils soient prêts à
être consommés. Triez les fruits et
conservez-les dans leur contenant
d’origine que vous placerez dans un
bac à fruits et légumes, ou rangez-les
dans un sac en papier bien fermé sur
une tablette du réfrigérateur.
Légumes à
feuilles
Retirez les légumes de l’emballage
du commerce, puis coupez ou
déchirez les parties endommagées
et décolorées. Lavez les légumes à
l’eau froide et égouttez-les. Rangez-
les dans un sac ou un contenant en
plastique et placez-les dans le bac à
fruits et légumes.
Légumes
à pelure
(carottes,
poivrons)
Rangez-les dans un sac ou un
contenant en plastique et placez-les
dans le bac à fruits et légumes.
Poisson
Congelez le poisson et les crustacés
frais s’ils ne sont pas consommés
le jour même de l’achat. Il est
recommandé de consommer le
poisson et les crustacés frais le jour
même de l’achat.
Restes
Couvrez les restes de pellicule plastique ou de
papier d’aluminium, ou rangez-les dans des
contenants en plastique hermétiques.

39FONCTIONNEMENT
FRANÇAIS
Stockage d’aliments congelés
Consultezunmanuelsurlescongélateursouunlivre
derecettesablepourplusderenseignementssurla
préparationd’alimentspourlacongélationousurles
duréesdeconservationdesaliments.
Congélation
Votrecongélateurnepourracongelerrapidementune
grandequantitéd’aliments.Danslecongélateur,ne
placezpasunequantitéd’alimentssupérieureàcelle
quipeutêtrecongeléedansundélaide24heures
(c’est-à-direpasplusde2à3livresd’alimentsparpied
cubed’espacedecongélateur).Laissezsufsamment
d’espacedanslecongélateurpourpermettreune
circulationd’airautourdesemballages.Deplus,laissez
sufsammentd’espaceàl’avantdefaçonàpouvoir
fermerlaportehermétiquement.
Lesduréesdeconservationvarierontenfonctionde
laqualitéetdutyped’aliments,dutyped’emballage
oudepelliculeutilisés(degréd’étanchéitéàl’airet
derésistanceàl’humidité)etdelatempératurede
stockage.Laprésencedecristauxdeglacedansun
emballagescelléestnormale.Celasigniesimplement
quel’humiditédanslesalimentsetl’airàl’intérieurde
l’emballageontproduitdelacondensation,créantdes
cristauxdeglace.
REMARQUE
• Laissezrefroidirlesalimentschaudsàlatempérature
ambiantependant30minutes,puisemballez-leset
congelez-les.Lefaitderefroidirlesalimentschauds
avantdelescongeleréconomisedel’énergie.
E m b a l l a g e
Unecongélationréussiedépendd’unemballageadéquat.
Lorsquevousfermezetscellezl’emballage,celui-cine
doitpaspermettrel’entréeoulasortied’airoud’humidité.
Autrement,l’odeuretlegoûtdesalimentspourraientêtre
diffusésdansleréfrigérateuretlesalimentscongelés
pourraientsécher.
Emballages recommandés
• Contenantsdeplastiquerigidesaveccouvercles
hermétiques
• Bocauxàbordsdroitspourconserve/congélation
• Papierd’aluminiumrobuste
• Papierplastié
• Pelliculesplastiéesimperméables
• Sacsenplastiqueautoadhésifsdequalitépour
congélateur
Suivezlesinstructionssurl’emballageoulerécipient
pourlesméthodesdecongélationadéquates.
N’utilisez pas ce qui suit :
• Papierd’emballagepourpain
• Récipientsenplastiquesanspolyéthylène
• Récipientssanscouvercleshermétiques
• Papierparafnéoupapierd’emballagerecouvertde
cirepourcongélation
• Papierd’emballagemince,semi-perméable
Bacs à légumes et fruits à
humidité contrôlée (sur certains
modèles)
Cesbacspréserventlegoûtfraidesfruitetlégumesen
vouspermettantderégleraisémentl’humiditéàl’intérieur
du tiroir.
Vouspouvezréglerletauxd’humiditédesbacsàfruitet
légumesétanchesàl’humiditéenplaçantlecurseurentre
Vegetables (Légumes) et Fruit (Fruit).
• LégumesMaintientdel’airhumidedanslebacpourla
conservationoptimaledeslégumesàfeuillesfrais.
• LeréglageFruit (Fruit)laisseéchapperdel’airhumide
dubacpourlaconservationoptimaledesfruit.

40 FONCTIONNEMENT
Tiroir Glide N’ Serve (sur
certains modèles)
LetiroirGlideN'Serveoffreunespacedestockage
avecuncontrôledetempératurevariablequipeut
garderlecompartimentàunetempératurelégèrement
différentedecelledanslasectionduréfrigérateur.Ce
tiroirpeutêtreutilisépourrangerdegrandsplateauxpour
réception,desproduitsdecharcuterieetdesboissons.
(Cetiroirnedoitpasserviràrangerleslégumesqui
nécessitentuntauxélevéd’humidité.)
AppuyezsurlatoucheSelect pour choisir entre Produce
(froid),Deli(plusfroid)etMeat(leplusfroid).
Durabase
®
LediviseurDurabase
®
permetdeséparerl'espace
Durabase
®
ensections.Ilpeutêtreajustéd’uncôtéà
l’autrepourcontenirdesélémentsdedifférentestailles.
AVERTISSEMENTS
• SilediviseurDurabase
®
est retiré du tiroir du
congélateur,ilyasufsammentd’espaceà
l’intérieurpourqu’unpetitenfantouunanimal
domestiquepuisseypénétrer.Pourempêcherqu'un
enfantouunanimaldomestiqueyresteenferméet
suffoque,NElaissezPASlesenfantsetlesanimaux
domestiquestoucherletiroirous'enapprocher.
Retrait et montage des bacs de
rangement
Certainsbacspeuventavoiruneapparencedifférenteet
entrerdansunseulcompartiment.
Glide'N'Serve et bacs à légumes et
fruits
1
Pourretirerlesbacsàfruitsetlégumesàhumidité
contrôléeetletiroirGlide’N’Serve,tirezlebacàfruits
etlégumes(1)ouletiroirGlide’N’Serve(2)jusqu’à
leurpleineextension,soulevezl’avantetretirez-les.
2
Pourl’installer,inclinezlégèrementledevantdubac
àlégumesoudutiroir,insérez-ledanslecadreet
remettez-leenplaceenlepoussant.

41FONCTIONNEMENT
FRANÇAIS
Couvercle du bac à fruits et légumes
Pourleretirer,tirezl’avantducouverclejusqu’àcequ’il
sedétachedelaparoiarrièredel’enceinte,puissortez-
le.
Bacs de la porte
Lesbacsdelaportesontamoviblespourfaciliterleur
nettoyageetleurréglage.
1
Pourretirerlebac,soulevez-leetretirez-le.
2
Pourreplacerlebac,faites-leglisserau-dessusde
sonsupportetappuyezjusqu’àcequ’ilsemetteen
place.
MISES EN GARDE
• Détachezetlavezrégulièrementlesbacsde
rangementetlesétagères,quipeuventêtre
facilementcontaminésparlanourriture.
• N'usezpasdeforceexcessivelorsduretraitoudu
montagedesbacsderangement.
• N'utilisezpaslelave-vaissellepournettoyerlesbacs
derangementetlesétagères.
Porte dans la porte avec
technologie InstaView (sur
certains modèles)
LaPortedanslaportedotéedelatechnologieInstaView
permetunaccèsfacileauxalimentscourammentutilisés.
Tapez
deuxfoissurlavitrepourallumerouéteindreles
DELsàl’intérieurducompartimentInstaView.
• LeslumièresDELs’éteignentautomatiquementaprès
10 secondes.
• LesDELsnes’éteignentpassilaporteduréfrigérateur
est ouverte.
• LafonctionInstaViewnes’activerapaspendantdeux
secondesaprèsfermeturedelaporte.
•
Compartiment Porte dans la porte
PouraccéderaucompartimentInstaViewDoorInDoor,
appuyezlégèrementsurleboutonsituéàladroitedela
poignéeduréfrigérateurpourouvrirlaporte.

42 FONCTIONNEMENT
Fonction InstaView
LafonctionInstaViewdelaPortedanslaporte
vouspermetdevoirs’ilvousmanquedesaliments
fréquemmentutiliséscommedesboissonsetdes
collations,etce,sansavoiràouvrirlaportedu
réfrigérateur.
1
Frappezdeuxfoissurlavitrepouractiverou
désactiverlalumièreàDELquisetrouveàl’intérieur
delaPortedanslaporte.
2
LalumièreàDELs’éteintautomatiquementaprèsdix
secondes.
• Lafonctionportedanslaporteestdésactivéequandla
porteducôtédroitduréfrigérateurestouverte,pendant
deuxsecondesaprèsavoirrefermécetteporte,et
quandledistributeurdeglaceestutilisé.
• Frappezprèsducentredelavitre.Lefaitdefrapper
prèsdesbordsdelavitrepourraitnepasactiver
correctementlafonctionInstaViewdelaPortedansla
porte.
• Frappezavecassezdeforcepourquelebruitdefrappe
soitaudible.
• LafonctionInstaViewdelaPortedanslaportepeut
s’activersiunbruitfortseproduitprèsduréfrigérateur.
Compartiment Porte dans la porte
Pourouvrirlecompartimentdelaportedanslaporte,
tirezégalementsurlazonemarquée.Lecompartiment
delaportedanslaporteestamoviblepourfaciliterson
nettoyageetsonréglage.
1
PourretirerlebacPortedanslaporte,soulevez-le
verslehautetsortez-le.
2
PourreplacerlecompartimentdetypePortedans
laporte,alignezleslanguettesducompartimentsur
lesfentesdelaporteetenfoncezjusqu’àcequetout
s’enclencheenplace.
MISES EN GARDE
• Nesurchargezpaslescompartimentsdansles
portes.Nefermezpaslesportesavecforce.
Laporteintérieurepourraitnepassefermer
correctementous’ouvrirbrusquementenraisonde
lachutedecertainsarticles,cequipourraitcauser
desdommagesmatérielsoudesblessures.

43FONCTIONNEMENT
FRANÇAIS
Réglage des étagères du
réfrigérateur
Lesétagèresdevotreréfrigérateursontajustablespour
répondreàvosbesoinsdestockageparticuliers.Votre
modèlepeutcomporterdepleinesétagèresoudesdemi-
étagères.
En
réglantlahauteurdesétagèrespouryplacerdes
alimentsdedifférentestailles,vousretrouverezplus
facilementcequevouscherchez.
Retrait de la tablette
(de type demi-tablette)
1
Inclinezlapartieavantdelatabletteverslehautet
soulevez-la.
2
Retirez-la.
Montage de l’étagère
(de type demi-tablette)
1
Faitesbasculerl’avantdel’étagèreverslehautet
guidezlescrochetsdel’étagèredanslesfentesàla
hauteurdésirée.
2
Ensuite,abaissezl’avantdel’étagèreanqueles
crochetstombentdanslesfentes.
MISES EN GARDE
• Assurez-vousquelesétagèressontd’aplombd’un
côtéàl’autre.Nepaslefairepeutprovoquerla
chutedel’étagèreoudesaliments.
• Nenettoyezpaslestablettesenverreavecdel’eau
chaudelorsqu’ellessontfroides.Ellespourraientse
brisersiellessontexposéesàdeschangements
brusquesdetempératureouàdesimpacts.
• Lesétagèresenverresontlourdes.Soyez
particulièrementprudentlorsquevouslesretirez.
Utilisation de l’étagère pliable
Rangezdesobjetsplusgrands,commeungrand
récipientoudesbouteilles,enpoussantsimplement
lamoitiéavantdel’étagèresouslapartiearrièrede
l’étagère.Tirezl’avantdel’étagèreversvouspour
retrouveruneétagèrepleine.
MISES EN GARDE
• Lesétagèresenverresontlourdes.Soyez
particulièrementprudentlorsquevouslesretirez.
• Nenettoyezpaslestablettesenverreavecdel’eau
chaudelorsqu’ellessontfroides.Ellespourraientse
brisersiellessontexposéesàdeschangements
brusquesdetempératureouàdesimpacts.

44 FONCTIONS INTELLIGENTES
FONCTIONS
INTELLIGENTES
Application LG SmartThinQ
L’applicationLGSmartThinQvouspermetde
communiqueravecl’appareilàl’aided’untéléphone
intelligent.
Avant d’utiliser l’application LG
SmartThinQ
• Pourlesélectroménagersaveclelogo ou .
1
Utilisezuntéléphoneintelligentpourvérierla
forcedusignaldurouteursansl(réseauWi-Fi)à
proximitédel’appareil.
• S’ilyaunetropgrandedistanceentrel’appareil
etlerouteursansl,l’intensitédusignals’affaiblit.
L’enregistrement peut prendre du temps ou
l’installation
peutéchouer.
2
DésactivezlesDonnées mobiles ou les Données
cellulaires sur votre téléphone intelligent.
3
Connectezvotretéléphoneintelligentaurouteursans
l.
REMARQUE
• Pourconnaîtrel’étatduréseauWi-Fi,vériezque
l’icôneWi-Fi
estalluméesurlepanneaude
conguration.
• L’appareilprendseulementenchargelesréseauxWi-Fi
de2,4GHz.Pourvérierlafréquencedevotreréseau,
contactezvotrefournisseurdeservicesInternetou
reportez-vousaumanueldevotrerouteursansl.
• LGSmartThinQn’estpasresponsabledes
problèmesdeconnexionauréseauoudesdéfauts,
dysfonctionnementsouerreurscausésparlaconnexion
auréseau.
• L’environnementsanslpeutcauserunralentissement
dufonctionnementduréseausansl.
• Sil’appareiladesdifcultésàseconnecterauréseau
Wi-Fi,ilestpeut-êtretroploindurouteur.Procurez-vous
unrépéteurWi-Fi(rallongedeportée)pouraméliorerla
forcedusignalWi-Fi.
• La
connexionréseaupeutnepasfonctionner
correctementselonlefournisseurdeservicesInternet.
• LaconnexionWi-Fipeutnepassefaireouêtre
interrompueàcausedel’environnementduréseau
domestique.
• Sil’appareilnepeutpasêtreenregistréenraisonde
problèmesaveclatransmissiondusignalsansl,
débranchez-leetattendezenvironuneminuteavantde
lerebrancheretderéessayer.
• Silepare-feudevotrerouteursanslestactivé,
désactivez-leouajoutez-yuneexception.
• Lenomduréseausansl(SSID)doitêtreune
combinaisondelettresetdechiffresanglais.(N’utilisez
pasdecaractèresspéciaux.)
• L’interfaceutilisateur(IU)dutéléphoneintelligentpeut
varierenfonctiondusystèmed’exploitation(SE)mobile
etdufabricant.
• Sileprotocoledesécuritédurouteurestcongurésur
WEP,lacongurationduréseaupeutéchouer.Veuillez
changerleprotocoledesécurité(nousrecommandons
WPA2)etenregistrezleproduitànouveau.
Installation de l’application LG
SmartThinQ
Àpartird’untéléphoneintelligent,cherchezl’application
LGSmartThinQdanslaboutiqueGooglePlayoul’App
Stored’Apple.Suivezlesdirectivespourtéléchargeret
installerl’application.
REMARQUE
• Sivouschoisissezlaconnexionsimplepouraccéderà
l’applicationSmartThinQdeLG,vousdevrezpasserpar
leprocessusd’enregistrementdel’appareilchaquefois
quevouschangezdetéléphoneintelligentouquevous
réinstallezl’application.

45FONCTIONS INTELLIGENTES
FRANÇAIS
Caractéristiques de l’application LG
SmartThinQ
• Pourlesélectroménagersaveclelogo ou .
Mise à jour du micrologiciel
Mettezàjourlerendementdel’appareil.
Gestion des aliments
Cettefonctionnalitévousaideàsavoirquelsalimentsse
trouventdansvotreréfrigérateuretvotrecongélateur,
vousenvoieunealertelorsqu’ilsapprochentdeladate
limitedeconsommation,génèredeslistesd’épicerieet
envoie des liens vers des recettes.
Surveillance de la consommation d’énergie
Cettefonctionnalitépermetdesuivrelaconsommation
énergétiqueduréfrigérateurainsiquelenombredefois
oùlaporteestouverte.
Contrôle à distance
Contrôlezlatempératureduréfrigérateur,leltreàair
fraisetlafonctionnalitéIcePlusàl’aidedel’application
pour téléphone intelligent.
Messages automatiques
Silaporteresteouvertependantplusdedixminutes,
vousrecevrezunmessageautomatisé.Lorsquela
fonctionIcePlusestterminée,vousrecevrezaussiun
messageautomatisé.
Smart Diagnosis
MC
Cettefonctionfournitdesrenseignementsutilespour
diagnostiqueretrésoudrelesproblèmesaveclʼappareil
ensebasantsurleproldʼutilisation.
Paramètres
Cettefonctionnalitévouspermetderéglerdiverses
optionsduréfrigérateuretdel’application.
REMARQUE
• Sivouschangezderouteursansl,defournisseur
deservicesInternetoudemotdepasseaprès
l’enregistrementdel’appareil,veuillezsupprimer
leproduitdel’applicationSmartThinQdeLGdans
Paramètres→Modier le produit et enregistrer le
produit
denouveau.
• Cetteinformationestàjouraumomentdela
publication.L’applicationestsujetteàdesmodications
àdesnsd’améliorationduproduit,etce,sansque
l’utilisateurensoitpréalablementavisé.
Connexion à un réseau wi-
Lorsqu’elleestutiliséeavecl’applicationSmartThinQ
deLG,latouchewi-permetauréfrigérateurdese
connecterauréseauwi-devotredomicile.L’icônewi-
indique
l’étatdelaconnexionauréseauduréfrigérateur.
Lorsqueleréfrigérateurestconnectéauréseauwi-,
l’icônes’allume.
Enregistrement initial de l’appareil
Exécutezl’applicationSmartThinQdeLGetsuivezles
directivesdel’applicationpourenregistrerl’appareil.
Réenregistrement de l’appareil ou
enregistrement d’un autre utilisateur
Appuyezsurlatouchewi-etmaintenez-laenfoncée
pendanttroissecondespourl’éteindretemporairement.
Exécutezl’applicationSmartThinQdeLGetsuivezles
directivesdel’applicationpourenregistrerl’appareil.
REMARQUE
• Pourdésactiverlafonctionwi-,maintenezenfoncéela
touche wi-pendanttroissecondes.L’icônewi-sera
désactivée.
Caractéristiques du module LAN sans
l
Modèle LCW-004
Gamme de
fréquences
2412
-2462MHz
Puissance de sortie
(Max.)
IEEE
802.11b:22.44dBm
IEEE802.11g:24.68dBm
IEEE802.11n:24.11dBm

46 FONCTIONS INTELLIGENTES
Avis de la FCC (Pour module émetteur
contenu dans ce produit)
Cetéquipementaététestéetjugéconformeauxlimites
d’unappareilnumériquedeclasseB,conformément
àlapartie15desrèglesdelaFCC.Ceslimitessont
établiespourfourniruneprotectionraisonnablecontreles
interférencesnuisiblesdansuneinstallationrésidentielle.
Cetéquipementproduit,utiliseetpeutémettrede
l’énergieradioélectriqueet,s’iln’estpasinstalléet
utiliséconformémentauxprésentesinstructions,peut
causerdesinterférencesnuisiblesauxcommunications
radio.Quoiqu’ilensoit,onnepeutpasgarantirque
desinterférencesneseproduirontpasdanscertaines
installations.Sicetappareilcausedesinterférences
nuisiblesàlaréceptiondessignauxderadiooude
télévision,cequipeutêtredéterminéenallumanteten
éteignantl’appareil,onencouragel’utilisateuràessayer
decorrigercesinterférencesparl’undesmoyens
suivants:
• Réorientezoudéplacezl’antennederéception.
• Augmentezladistanceséparantl’équipementdu
récepteur.
• Branchezl’appareilsuruncircuitélectriquedifférentde
celuioùlerécepteurestbranché.
• Contactezvotrerevendeurouuntechnicienradio/
télévision expérimenté.
Cet
appareilestconformeàlapartie15durèglement
delaFCCLefonctionnementestsoumisauxdeux
conditionssuivantes:
1)
L’appareilnedoitpasproduiredebrouillage;et
2)
l’appareildoitacceptertoutbrouillageradioélectrique
subi,mêmesilebrouillageestsusceptibled’en
compromettrelefonctionnement.
Tout
changementoutoutemodicationapportésà
cetappareiletquinesontpasapprouvésdemanière
expliciteparlefabricantsontsusceptiblesd’annuler
l’autoritédel’utilisateurquantàutiliserl’appareil.
Énoncé FCC sur l’exposition aux
radiations RF
Cetéquipementestconformeauxlimitesderadiation
delaFCCdéniespourunenvironnementnoncontrôlé.
Cetappareiletsaousesantennesnedoiventpasêtre
colocalisésouopérésenconjonctionavectoutautre
antenneoutransmetteur.
Cet
appareildoitêtreinstalléetutilisédefaçonà
maintenirunedistanceminimalede20cm(7,8po)entre
l’antenneetl’utilisateur.Lesutilisateursdoiventrespecter
lesdirectivesd’utilisationandesatisfaireauxcritèresen
matièred’expositionauxrayonnementsRF.
Avis d’Industrie Canada (pour le module
de transmission compris dans ce
produit)
CetappareilestconformeauxnormesCNRd’Industrie
Canadaapplicablesauxappareilsradioexemptsde
licence.Sonfonctionnementestsoumisauxdeux
conditionssuivantes:
1)
Cetappareilnedoitpasprovoquerd'interférences;
2)
Cetappareildoitacceptertouteslesinterférences,y
compriscellespouvantentraînersondysfonctionnement.
Avis d’Industrie Canada sur l’exposition
aux rayonnements
Cetappareilestconformeauxlimitesd’expositionaux
rayonnementsd’IndustrieCanadapourunenvironnement
noncontrôlé.
Cet
appareildoitêtreinstallédefaçonàgarderune
distanceminimalede20cm(7,8po)entrelasourcede
rayonnementetvotrecorps.
REMARQUE
• LE FABRICANT N’EST PAS RESPONSABLE
DES
INTERFÉRENCESRADIOÉLECTRIQUES
CAUSÉES PAR DES MODIFICATIONS NON
AUTORISÉES
APPORTÉESÀCETAPPAREIL.DE
TELLES MODIFICATIONS POURRAIENT ANNULER
L’AUTORISATION
ACCORDÉEÀL’UTILISATEURDE
FAIRE FONCTIONNER L’APPAREIL.
Informations sur les logiciels libres
Pourobtenirlecodesourceconformémentaux
dispositionsdelalicencepubliquegénérale,delalicence
publiquegénéralelimitée,delalicencepubliqueMozilla
etdetouteautrelicencerégissantleslogicielsàcode
sourcelibrecontenusdanscetappareil,visitezlesite
http://opensource.lge.com.
Enplusducodesource,
touteslesdispositionsdelicence,lesexonérationsde
garantieetlesavisdedroitsd’auteurspeuventaussiêtre
téléchargés.
LG
Electronicsmettraégalementàvotredispositionle
codesourcelibresurCD-ROMpourunprixcouvrantle
coûtdeladistribution(coûtdusupport,del’expédition
etdelamanutention)sursimpledemandeparcourrielà
l’adresse[email protected].Cetteoffreestvalable
pendantunepériodedetroisansàcompterdeladate
deladernièredistributiondeceproduit.Cetteoffreest
validepourquiconquepossèdecetteinformation.

47FONCTIONS INTELLIGENTES
FRANÇAIS
Fonction Smart Grid
LorsqueleréfrigérateurestenmodeSmartGrid,la
fonctionRéfrigérateurintelligentpeutcontrôlerl’utilisation
del’énergieouretarderlamiseenmarchedecertaines
fonctionsand’économiserl’énergiedurantlespériodes
de pointe.
• VouspouvezannulerlafonctionSmartGridentout
temps(aumoyendelatoucheoudel’applicationSmart
Grid).
• PourutiliserlafonctionSmartGrid,vousdevez
enregistrervotreappareilauprèsdevotrefournisseur
d’électricité.
Fonctionnalités de l’application Smart
Grid
Économie intelligente_Gestion de la demande
Vouspouvezréduirel’utilisationénergétiqueenfonction
dessignauxdegestiondelademande(GD)provenant
delasociétédeservicespublics.Sileréfrigérateurest
enmoded’économieintelligenteselonlessignauxde
gestiondelademande,vousverrezapparaîtreune
fenêtre.
Économie d’énergie en saison
Réduisezlaconsommationselonlapériodedel’année.
Utilisation de la fonction Smart Grid
Cettefonctionnalitérépondauxnoticationsenvoyées
parvotrefournisseurd’électricitépourexécuterles
tâchesconsommantbeaucoupd’électricitépendantles
heurescreuses,lorsquelademandeestmoinsélevée.
Cesnoticationssontappelées«signauxdegestionde
la
demande».
Si
leréfrigérateurreçoitunsignaldegestiondela
demandedelapartdufournisseurd’électricité,ilallume
levoyantGridsurl’écranetcontrôlesaconsommation
d’énergieenfonctiondusignal.
Le
réfrigérateurrépondraauxsignauxreçusaussi
longtempsqu’ilpourramaintenirsonefcacité.
Si
leréfrigérateurreçoitunsignaldegestiondela
demande,ilfonctionneraenmodeDAL(chargedifférée)
ouTALR(réductiontemporairedelacharge).
Charge différée (DAL)
LeréfrigérateurrépondraàunsignalDALenréduisant
defaçonmodéréelachargepourladuréedelapériode
indiquée.
Ce
modecontrôlelesfonctionsénergivorestellesque
l’ajustementdusystèmederefroidissement,ledégivrage
etlafabricationdelaglace.
• LorsqueleréfrigérateurestenmodeDAL,levoyant
Gridestallumésurl’écranduréfrigérateur.
• LemodeDALestautomatiquementdésactivéàlan
delapériodeindiquéeparlesignalDAL(max.de4
heures)oulorsquevousannulezlafonctionSmartGrid.
Réduction temporaire de la charge de l’appareil
(TALR)
LeréfrigérateurrépondraàunsignalTALRenréduisant
defaçonimportantelachargepourunecourte
période,habituellement10minutes.Cemoderéduitla
consommationélectriqueenarrêtantlecompresseur
etencontrôlantlesfonctionsénergivorescommele
dégivrageetleventilateur.
• LorsqueleréfrigérateurestenmodeTALR,levoyant
Gridestallumésurl’écranduréfrigérateur.
• LemodeTALRestautomatiquementdésactivéàla
ndelapériodeindiquée(max.de10minutes)ou
lorsquevousannulezlafonctionSmartGrid.Cemode
estautomatiquementdésactivéetleréfrigérateurest
ramenéàsonétatnormalsivousouvrezoufermezune
porte ou si le distributeur est utilisé.
Annulation du mode Smart Grid
Sivousvoulezqueleréfrigérateurignorelesignalde
gestiondelademandedevotrefournisseurd’électricité,
vouspouvezannulerlafonctionSmartGridenappuyant
surlatoucheSmart Gridpendantqueleréfrigérateur
fonctionneenmodeSmartGrid.
Lorsque
vousannulezlafonctionSmartGrid,le
réfrigérateurignorelesignaldegestiondelademande
etn’estpluscommandéparvotrefournisseurd’électricité
jusqu’auprochainenvoidesignal.Vouspouvezaussi
annulerlafonctionSmartGridàl’aidedel’application
pour téléphone intelligent.
API ouverte de LG
VouspouvezgérerlesfonctionsSmartGriddu
réfrigérateurintelligentdeLG.
Veuillez
consulterlapagedenoticationde
us.smartthinq.compourplusdedétails.
Liste des API
Réponseàlademande
• Envoyerunsignalderéponseàlademande
Mode
écoénergétique
• Réglerlemodeécoénergétique
• Obtenirl’horaire(programme)duDR/reportde
dégivrage
Surveillance
delaconsommationd’énergie
• Informationsurl’événementd’ouverturedeporte
• Obtenirlesinformationssurlaconsommationd’énergie
Reporter
lafonctiondedégivrage
• Insérerunévénementprogrammédereportdu
dégivrage
• Mettreàjourunévénementprogrammédereportdu
dégivrage
• Annulerunévénementprogrammédereportdu
dégivrage
• Obtenirleprogrammedureportdedégivrage

48 FONCTIONS INTELLIGENTES
Fonction Smart Diagnosis
MC
Sivouséprouvezdesproblèmesavecvotre
électroménager,celui-cialacapacitédetransmettredes
donnéesaucentred’informationàlaclientèledeLGpar
l’intermédiairedevotretéléphone.Lesmodèleséquipés
delatechnologieNFCouduWi-Fipeuventégalement
transmettredesdonnéesàuntéléphoneintelligentà
l’aidedel’applicationLGSmartThinQ.
Smart Diagnosis
MC
– diagnostic par le
Centre dʼinformation à la clientèle
• Pourlesélectroménagersaveclelogo ou
Cetteméthodevouspermetdeparlerdirectementàl’un
denosspécialistesformés.Lespécialisteenregistre
lesdonnéestransmisesparl’appareiletlesutilisepour
analyserleproblème,fournissantainsiundiagnostic
rapideetefcace.
1
AppelezleCentredʼinformationàlaclientèledeLG
Electronicsau:
(LG
États-Unis)1800243-0000
(LG
Canada)1888542-2623
2
Maintenezlatouchedeverrouillageenfoncée
pendanttroissecondes.
• Sil’afchageaétéverrouillépendantplusdecinq
minutes,vousdevezdésactiverleverrou,puisle
réactiver.
3
Ouvrezlaportedroiteduréfrigérateur.
4
Approchezlemicrophonedevotretéléphonedevant
lehaut-parleursituésurlacharnièredroitedelaporte
devotreréfrigérateurlorsquelespécialisteducentre
d’assistancevousledemandera.
5
MaintenezenfoncéelatoucheFreezerpendanttrois
secondestoutentenantvotretéléphonedevantle
haut-parleur.
6
Aprèsavoirentendutroissignauxsonores,relâchez
latoucheFreezer.
7
Maintenezletéléphonedanscettepositionjusqu’à
cequelatransmissiondelatonalitésoitterminée.Un
décomptedutempss’afcheraàl’écran.Lorsquele
décompteestterminéetquevousn’entendezplus
lestonalités,reprenezvotreconversationavecle
spécialiste,
quiseraalorsenmesuredevousaider
grâceàl’informationtransmiseauxnsd’analyse.
REMARQUE
• Pourobtenirlesmeilleursrésultats,évitezdebougerle
téléphonependantlatransmissionsonore.
• Silʼagentducentredeservicenʼapaspuobtenirun
enregistrementexactdesdonnées,ilsepeutquʼilvous
demandedʼessayerdenouveau.
• LafonctionSmartDiagnosis
MC
dépenddelaqualitéde
lʼappellocal.
• Unemauvaisetélécommunicationpeutentraînerune
piètretransmissiondedonnéesentrevotretéléphone
etlecentred’appels,desortequeleSmartDiagnosis
MC
risque
denepasfonctionnercorrectement.
Réseau Wi-Fi
• Pourlesélectroménagersaveclelogo ou
UtilisezlafonctionSmartDiagnosisdel’application
LGSmartThinQpourvousaideràdiagnostiquerles
problèmesavecl’appareilsansl’assistanceducentre
d’informationàlaclientèledeLG.
Suivez
lesinstructionsdel’applicationLGSmartThinQ
poureffectuerundiagnosticintelligentàl’aidedevotre
téléphone intelligent.

49ENTRETIEN
FRANÇAIS
ENTRETIEN
Nettoyage
AVERTISSEMENTS
• Utilisezunproduitdenettoyageininammable.
Nepaslefairepourraitentraînerunincendie,une
explosion ou des blessures mortelles.
MISES EN GARDE
• N’utilisezpasdechiffonsoud’épongesrugueuses
pournettoyerl’intérieuretl’extérieurduréfrigérateur.
• Neplacezpasvotremainsurlasurfaceinférieure
duréfrigérateurquandvousouvrezoufermezles
portes.
• Aumomentdesouleverlacharnièrepourla
dégager,veillezàcequelaportenetombepasvers
l’avant.
Conseils généraux de nettoyage
• Lessectionsduréfrigérateuretducongélateurse
dégivrentautomatiquement,maisnettoyezlesdeux
sectionsunefoisparmoispouréviterlesodeurs.
• Essuyezimmédiatementlesalimentsrenversés.
• Débrancheztoujoursleréfrigérateuroucoupezle
courantavantdelenettoyer.
• Enleveztouteslespiècesamovibles,tellesqueles
étagères,lesbacsàlégumesetfruits,etc.
• Utilisezuneépongepropreouunchiffonetun
détergentdouxavecdel’eauchaude.N’utilisezpasde
produitsdenettoyageabrasifsouforts.
• Lavezàlamain,rincezetséchezsoigneusementtoutes
lessurfaces.
• Lorsdunettoyagedel’intérieuroudel’extérieur
del’appareil,nelenettoyezpasavecunebrosse
rugueuse,dudentifriceoudesmatériauxinammables.
N’utilisezpasdeproduitsdenettoyagecontenantdes
substancesinammables.
-
Celapeutcauserunedécolorationdel’appareilou
entraînerdesdommages.
-
Listedessubstancesinammables:alcool(éthanol,
méthanol,alcoolisopropylique,alcoolisobutylique,
etc.),diluant,eaudejavel,benzène,liquide
inammable,abrasif,etc.
Extérieur
Appliquerdelaciresurlessurfacesmétalliquespeintes
aideàfourniruneprotectionantirouille.Necirezpas
lespiècesenplastique.Cirezlessurfacesmétalliques
peintesaumoinsdeuxfoisparanavecdelacirepour
électroménagers(oucireautocollante).Appliquezlacire
avecunchiffonpropreetdoux.
Pour
lesappareilsavecunextérieurnoirenacier
inoxydable,vaporisezdunettoyantàvitressurunlinge
enmicrobrepropreetfrottezdanslesensdugrain.
Nevaporisezpasdenettoyantàvitresdirectementsur
l’écran.N’utilisezpasdeproduitsdenettoyageabrasifs
ouforts.
Pour
lesappareilsavecunextérieurenacierinoxydable
normal,frottezdanslesensdugrainàl’aided’unlinge
enmicrobrepropreetmouillé.Essuyezavecdupapier
essuie-toutpouréviterlesmarques.Pouréliminerles
tachestenacesetlesmarqueslaisséesparlesdoigts,
versezquelquesgouttesdesavonàvaisselleliquide
dansdel’eauetlavezlasurfaceaveccemélange,rincez
àl’eauchaude,puisséchez.N’utilisezpasdeproduitsde
nettoyageabrasifsouforts.
Parois intérieures
• Laissezlecongélateurseréchaufferpouréviterquele
chiffoncolle.
Pour
éliminerlesodeurs,vouspouvezlaverl’intérieur
duréfrigérateuravecunmélangedebicarbonatede
soudeetd’eauchaude.Mélangezdeuxcuillèresà
soupedebicarbonatedesoudeàunlitred’eau(26gde
bicarbonatedesoudepourunlitred’eau).Assurez-vous
quelebicarbonatedesoudeestcomplètementdissous
andenepasrayerlessurfacesduréfrigérateur.
Revêtements et joints de porte
Utilisezuneépongepropreouunchiffonetundétergent
douxavecdel’eauchaude.N'utilisezpasdecirede
nettoyage,dedétergentconcentré,d’eaudeJaveloude
nettoyantcontenantdupétrolesurlespiècesenplastique
duréfrigérateur.
Pièces en plastique (couvercles et
panneaux)
Utilisezuneépongepropreouunchiffonetundétergent
douxavecdel’eauchaude.N’utilisezpasdeproduits
nettoyantspourvitres,denettoyantsabrasifsoude
liquidesinammables.Cesproduitspeuventrayerou
endommagerlasurface.
Serpentins du condensateur
Utilisezunaspirateurmunid’unemboutplatcourtpour
nettoyerlecouvercleducondensateuretsesévents.
Neretirezpaslepanneauquirecouvrelazonedu
condensateur.

50 ENTRETIEN
Remplacement du ltre à air
frais
Ilestrecommandédechangerleltreàairfrais:
• Environ tous les six mois.
• Lorsquel’indicateurReplace Filter
s’allume.
FreshAirFilter(Filtreàairfrais)
1
Tournezlecouvercledultreverslagauchepourle
détacherdelaparoiduréfrigérateur.Retirezleltre
du couvercle.
• Leltresetrouveàl’intérieurducouvercledultre.
2
Placezlenouveaultreàl’intérieurducouvercleen
vousassurantquelecôtéquiindiqueFront(avant)
est orienté vers l’extérieur.
3
Tournezlecouvercledultreversladroitepourle
xeràlaparoiduréfrigérateur.
4
MaintenezlatoucheFresh Air Filterenfoncée
pendanttroissecondespourréinitialiserlecapteur
dultre.
Remplacement du ltre à eau
Ilestrecommandéderemplacerleltreàeau:
• Environ tous les six mois.
• Lorsquel’indicateurReplace Filter
s’allume.
• Lorsquelasortied’eaududistributeurdiminue.
Avant de remplacer le ltre à eau :
Silaclayettesupérieure,situéesousleltreàeau,est
danslapositionlaplushaute,vousdevrezlaretireravant
deremplacerleltreàeau.
Pour
retireruneclayette:inclinezlapartieavantdela
clayetteverslehaut(1)etsoulevez-la(2).Retirez-la.
1
Retirezleltreàeauàremplacer.
Abaissez
ouretirezl’étagèresupérieuregauchepour
permettreaultreàeaudepivoterjusqu’enbas.
Appuyez
surlescôtéspourouvrirlecouvercledu
ltreàeau.
REMARQUE
• Leremplacementdultreàeauprovoqueledrainage
d’unepetitequantitéd’eau(environ25mlou1oz).
• Enveloppezl'extrémitéavantducouvercledultreà
eauavecunlingepourrecueillirl'eauquis'écoulera.
Unefoisleltreàeauretiré,tenez-leenposition
verticalepouréviterquedel'eaurestantes'enéchappe.

51ENTRETIEN
FRANÇAIS
2
Tirezleltreàeauverslebasettournez-ledansle
sensantihoraireavantdeleretirer.Assurez-vousde
fairepivotercomplètementleltreverslebasavant
deleretirerdel’oriceducollecteur.
3
Remplacez avec un nouveau ltre à eau
Sortezlenouveaultreàeaudesonemballageet
retirezlecouvercledeprotectiondesjointstoriques.
Enplaçantleslanguettesdultreàeauenposition
horizontale,enfoncezlenouveaultreàeaudans
l’oriceducollecteurettournez-ledanslesens
horairejusqu’àcequ’ils’arrête.
4
Fermezlecouvercledultreàeau.Vous
entendrezuncliclorsquelecouvercleserafermé
adéquatement.
5
Unefoisqueleltreàeauaétéremplacé,faites
coulerenvironneuflitresd’eau(cequiprendra
environcinqminutes)pouréliminerl’airetles
contaminantsdusystème.
REMARQUE
• Nefaitespascoulerlesneuflitresd'eaudefaçon
continue.Appuyezetrelâchezlatouchedudistributeur
pourdescyclesde30secondesenpositiondemarche
etde60secondesenpositiond’arrêt.
6
Unefoisleltreremplacé,maintenezlatouche
Water Filterenfoncéependanttroissecondespour
réinitialiserlecapteurdultre.
REMARQUE
Pour acheter un ltre à eau de rechange :
• Rendez-vouschezundétaillantouundistributeur
• Faitesunerechercheentapantlesmots«ltreàeau»
sur le site lg.com
• Utilisezlacartouchederemplacement:ADQ747935**
Pour plus de renseignements, appelez au
1 800 243-0000 (É.-U.)
1 888 542-2623 (Canada)

52 ENTRETIEN
Fiche technique des performances
Modèle
: LT1000P Utilisez la cartouche de remplacement : ADQ747935**
La
concentrationdessubstancesindiquéesprésentesdansl’eauentrantdanslecircuitaétéréduiteàuneconcentration
inférieureouégaleàlalimiteautoriséepourl’eauquittantlecircuit,selonlesspécicationsNSF/ANSIdesnormes42et
53.
LesystèmeaétésoumisàdesessaisetestcertiéenvertudeNSFInternational,conformément
auxnormes42,53et401delaNSF/ANSIpourcequiestdelaréductiondelaconcentrationdes
substancesmentionnéesci-dessous.
Réduction
des
substances
Concentration
moyenne
Concentration
visée par NSF
% de la
diminution
moyenne
Concentration
moyenne
d’eau dans le
produit
Concentration
d’eau
maximale
permise dans
le produit
Exigences
NSF de
diminution
Goût et odeur
de chlore
2.0
μg/L 2.0μg/L±10% >97,5% 0.050μg/L s. o. ≥50,00%
Particules
nominalesde
classeI,≥0,5à
<1,0μm
12
000 000
pts/ml
Au moins 10
000
particules/
ml
99,80% 24 000 pts/ml s. o. ≥85,00%
Amiante 180
MFL
10
7
à10
8
MFL;
longueur
desbres
supérieuresà
10μm
>
99,00% < 1 MFL s. o. ≥99,00%
Atrazine 8.5
μg/L 9.0μg/L±10% >94,10% 0.500μg/L 3.0μg/L s.o.
Benzène 15.0
μg/L
15,0
μg/l
±10%
>
96,60% 0.510μg/L 5.0μg/L s.o.
Carbofuran 74.0
μg/L
80.0
μg/L±
10%
98,30% 1.258
μg/L 40μg/L s.o.
Lindane 1.9
μg/L 2.0μg/L±10% >99,00% 0.019μg/L 0.2μg/L s.o.
P-Dichlorobenzène
230.0μg/L
225.0
μg/L±
10%
>
99,80% 0.460μg/L 75.0μg/L s.o.
2,4-D 210.0
μg/L
210.0
μg/L±
10%
>
99,90% 0.210μg/L 70.0μg/L s.o.
Plomb
pH@
6,5
140.0
μg/L
150.0
μg/L±
10%
99,60% 0.560
μg/L 10.0μg/L s.o.
Plomb
pH@
8,5
150.0
μg/L
150.0
μg/L±
10%
>
99,70% <0.500μg/L 10.0μg/L s.o.
Mercure
@pH
6,5
5.9
μg/L 6.0μg/L±10% 91,00% 0.531μg/L 2.0μg/L s.o.
(Pagesuivante)

53ENTRETIEN
FRANÇAIS
Réduction
des
substances
Concentration
moyenne
Concentration
visée par NSF
% de la
diminution
moyenne
Concentration
moyenne
d’eau dans le
produit
Concentration
d’eau
maximale
permise dans
le produit
Exigences
NSF de
diminution
Mercure@pH
8,5
5.6
μg/L 6.0μg/L±10% 92.5% 0.420μg/L 2.0μg/L s.o.
Sporocyste*
100
000
sporocystes/l
Au minimum
50 000
sporocystes/L
>
99,99%
10
sporocystes/l
s. o. ≥99,95%
Aténolol 240 ng/l 200
±40%ng/l >95,50% 10,80ng/l 30 ng/l s.o.
Carbamazépine
1600 ng/l
1400
±
40%ng/l
98,40% 25,60
ng/l 200 ng/l s.o.
DEET 1600 ng/l
1400
±
40%ng/l
97,10% 46,40
ng/l 200 ng/l s.o.
Triméthoprime
170 ng/l 140
±40%ng/l >96,80% 5,44ng/l 20 ng/l s.o.
Linuron 160 ng/l 140±40%ng/l >96,60% 5,44ng/l 20 ng/l s.o.
Phénytoïne 200 ng/l 200±40%ng/l >94,80% 10,40ng/l 30 ng/l s.o.
Ibuprofène 400 ng/l 400±40%ng/l >94,50% 22,00ng/l 60 ng/l s.o.
Naproxen 140 ng/l 140
±40%ng/l >96,10% 5,46ng/l 20 ng/l s.o.
Estrone 120 ng/l 140±40%ng/l >96,10% 4,68ng/l 20 ng/l s.o.
Bisphénol A 2 000 ng/l
2
000±
40%ng/l
>
98,90% 22,00ng/l 300 ng/l s.o.
Nonylphénol 1600 ng/l
1400
±
40%ng/l
>
97,10% 46,40ng/l 200 ng/l s.o.
• Basésurl’utilisationdesocystesCryptosporidiumparvum.

54 ENTRETIEN
Directives d’utilisation et spécications de
l’alimentation en eau
Débit
d’utilisation
1,9
l/min(0,5gal/min)
Alimentation
en
eau
Réseau
municipaloupuitsprivé-Eau
potable
Pression de
l’eau
20
à120psi(138à827kPa)
Température
de
l’eau
33
°F–100°F(0,6°C–37,8°C)
Capacité 757
litres(200gallons)
Ilestessentieldesuivrelesrecommandationsdu
fabricantrelativesàl’installation,àl’entretienetau
remplacementdultreanquel’appareilfonctionne
conformémentauxperformancesannoncées.
REMARQUE
• Lestestsontétéeffectuésenlaboratoireetle
rendementpeutvarierensituationd’utilisationréelle.
Cartouche
deremplacement:LT1000P
ADQ747935**
Pour
obtenirdel'informationsurlesltresàeau
derechange,rendez-vouschezundétaillantouun
distributeurourecherchezlesmots«ltreàeau»surle
site lg.com.
Pour
obtenirdel’aidesupplémentaire,communiquez
aveclecentred’informationàlaclientèledeLG
Electronics.
É.-U.
:1800243-0000
Canada:
1-888-542-2623
LG
estunemarquedecommercedeLGCorp.
NSF
estunemarquecommercialedeNSFInternational.
Fabriqué
pourLGElectronicspar:
LG
Electronics,INC
170,
Sungsanpaechoungro,Seongsan-gu,
Gyeongsangnam-do,
THEREPUBLICOFKOREA
AVERTISSEMENTS
An de réduire les risques d’étouffement :
• N’autorisezpaslesenfantsdemoinsde3ansà
avoiraccèsauxpetitespiècespendantl’installation
de ce produit.
An de réduire le risque associé à l’ingestion de
produits contaminants
:
• N’utilisezpasd’eauinsalubreoudequalitéinconnue
sansdésinfectionadéquateenamontouenavaldu
système.Lessystèmescertiéspouruneréduction
delaprésencedekystespeuventêtreutilisésavec
del’eauquipeutcontenirdeskystesltrables.
ÉtablissementEPA#070595-MEX-001
MISES EN GARDE
An de réduire le risque associé à des dommages
matériels causés par une fuite d’eau :
• Lisezetsuivezlesinstructionsd’utilisationavant
l’installationetl’utilisationdecesystème.
• L’installationetl’utilisationDOIVENTêtreconformes
àl’ensembledescodesdeplomberierégionauxet
locauxenvigueur.
• N’installezpasleproduitsilapressiond’eau
dépasse120psi(827kPa).Silapressiond’eau
dépasse80psi,vousdevezinstallerunevalvede
limitationdepression.Faitesappelàunplombier
sivousnesavezpascommentvérierlapression
d’eau.
• N’installezpasceproduitdansdesconditions
propicesauxcoupsdebélier.Sidetellesconditions
sontprésentes,vousdevezinstallerundispositif
antibélier.Faitesappelàunplombierprofessionnel
sivousavezdesdoutessurlamanièredecontrôler
ces conditions.
• N’installezpasceproduitsurdesconduites
d’alimentationeneauchaude.Latempérature
maximaledel’eaupendantlefonctionnementdece
systèmeestde37,8°C(100°F).
• Protégezleltrecontrelegel.Vidangezleltre
lorsquelatempératuredescendsous4,4°C(40°F).
• LacartouchedultrejetableDOITêtreremplacée
touslessixmois,selonlacapacitéévaluée,ouplus
tôtsiledébitralentitdefaçonmanifeste.
• Protégezledispositifcontrelegel.Retirezla
cartouchedultrelorsquelestempératuresrisquent
dedescendreau-dessousde0°C(33°F).
• N’installezpascessystèmesdansdesrégions
oùlestempératuresambiantespeuventdépasser
43,3°C(110°F).
• Siundispositifdepréventiondurefoulementest
installé
surlesystème,undispositifpermettant
decontrôlerlapressionrésultantdeladilatation
thermique
doitêtreinstallé.
• Vériezquetouslestuyauxetlesraccordssont
serrésetneprésententaucunetracedefuite.

55DÉPANNAGE
FRANÇAIS
DÉPANNAGE
Foire aux questions
Q : Quelles sont les températures optimales pour mon réfrigérateur et mon congélateur?
R: Leréglagepardéfautduréfrigérateurestde37°F(3°C).Leréglagepardéfautducongélateurestde0°F
(-18°C).Ajustezcesréglagesaubesoinpourconserverlesalimentsàlatempératuredésirée.Lelaitdoit
êtrefroidquandilestrangésurl’étagèreintérieureduréfrigérateur.Lacrèmeglacéedoitêtreferme,etles
glaçonsnedoiventpasfondredanslecongélateur.Pourpasserd’unafchageendegrésFahrenheitàun
afchageendegrésCelsius,maintenezlestouchesCongélateur et Réfrigérateurenfoncéesjusqu’àce
quevousentendiezunsignalsonoreetquelesréglagesafchéschangent.Surcertainsmodèles,vous
pouvezégalementsélectionnerl’applicationGestionnairederéfrigérateursurl’écranetutiliserlebouton
Appareil.
Q : Comment puis-je régler la température du réfrigérateur et du congélateur?
R: MaintenezleboutonRéfrigérateur ou Congélateurenfoncésurlepanneaudecommandejusqu’àceque
latempératuredésirées’afche.Leschiffress’afcherontenordredécroissantetrecommencerontleurcycle
sivousmaintenezlatoucheenfoncée.Surcertainsmodèles,vouspouvezaussiréglerlestempératuresà
partirdel’applicationGestionnairederéfrigérateursurl’écran.
Q : Quel est ce bourdonnement que le réfrigérateur émet de temps à autre?
R: Cesonpeutêtreémissileréfrigérateurn’estpasalimentéeneaualorsquelamachineàglaçonsest
allumée.Sil’alimentationeneaun’estpasraccordéeàl’arrièredevotreréfrigérateur,vousdevriezéteindre
lamachineàglaçons.
Q : Pourquoi le plateau de la machine à glaçons semble-t-il croche?
R: Ils’agitd’unétatnormalducycledelamachineàglaçons.Leplateaudelamachineàglaçonspeutsembler
àniveauoulégèrementincliné.Lechangementdepositionaideauprocessusdecongélation.
Q :
Mon réfrigérateur est sous tension et les commandes fonctionnent, mais il ne refroidit pas et
l’afcheur indique « OFF » (voir ci-dessous). Quel est le problème?
R
: LeréfrigérateurestenmodePrésentation.Cemodedésactivetoutrefroidissementand’économiserde
l’énergielorsqueleréfrigérateurestenmagasin.Pourretourneraumodenormal,maintenezlestouches
TempératureetIce Plusenfoncéespendantcinqsecondesoujusqu’àcequ’unbipsoitémisetqueles
réglagesdetempératures’afchent.UtilisezlamêmeprocédurepouractiverlemodePrésentation,au
besoin.

56 DÉPANNAGE
Avant dʼappeler le réparateur
Consultezcettesectiondumanuelavantdedemanderunserviced’entretien;cefaisant,vouséconomisereztempset
argent.
Refroidissement
Problème Cause possible Solutions
Les compartiments
du réfrigérateur et
du congélateur ne
refroidissent pas.
La commande du réfrigérateur
est réglée sur ARRÊT (sur
certains modèles).
• RéglezlacommandesurMARCHE.Veuillezconsulterla
sectionPanneaudecontrôlepourunbonajustementdes
températures.
Le réfrigérateur est réglé sur le
mode Présentation.
• LemodePrésentationpermetunfonctionnementnormalde
l’éclairageet
de
l’afchagedupanneaudecontrôle,maisdésactive
lerefroidissementpouréconomiserl’énergiedurant
l’expositionenmagasin.VoirlaFAQpourlesinstructions
dedésactivationdumodePrésentation.
Le réfrigérateur est dans un
cycle de dégivrage.
• Durantlecyclededégivrage,latempératuredechaque
compartimentpeutaugmenterlégèrement.Attendez30
minutes,puisvériezquelatempératureestrevenueàla
normaleunefoislecyclededégivrageterminé.
Le réfrigérateur vient d’être
installé.
• Chaquecompartimentpeutmettrejusqu’à24hpour
atteindrelatempératurevisée.
Le réfrigérateur a récemment été
déplacé.
• Sileréfrigérateuraétéentreposéoucouchépendant
unelonguepériode,celui-cidoitêtreplacéàlaverticale
pendant24havantd’êtremissoustension.
Le système de
refroidissement est
trop puissant.
Le réfrigérateur remplace un
ancien modèle.
• Lesréfrigérateursmodernesnécessitentuntempsde
fonctionnementpluslong,maisconsommentmoins
d’énergiegrâceàunetechnologieplusefcace.
Le réfrigérateur vient d’être
branché ou remis sous tension.
• Leréfrigérateurpeutmettrejusqu’à24hpourrefroidir
complètement.
La porte a souvent été ouverte,
ou beaucoup d’aliments ou des
aliments chauds y ont été placés.
• L’ajoutd’alimentsoul’ouverturedelaporteréchauffe
leréfrigérateur,cequidemandeaucompresseurde
fonctionnerpluslongtempspourrefroidirlescompartiments.
Andeconserverl’énergie,essayezdesortirtoutcedont
vousavezbesoinduréfrigérateurenuneseulefois,rangez
vosalimentsdemanièreorganiséeandelestrouver
facilementetfermezlaportedèsquelesalimentssont
sortis.(ConsultezleGuidedeconservationdesaliments.)
Les portes ne sont pas
complètement fermées.
• Poussezlesportesfermement.Siellesneseferment
pascomplètement,consultezlasectionLesportesne
sefermentpascomplètementous’ouvrenttoutesseules
danslapartiePiècesetcaractéristiquesdelasection
Dépannage.
Le réfrigérateur est installé dans
un environnement chaud.
• Lecompresseurfonctionnerapluslongtempsdansun
environnementchaud.Lorsquelatempératureambianteest
normale(21°C),votrecompresseurfonctionneentre40%
et80%dutemps.Silapièceestpluschaude,attendez-
vous
àcequ’ilfonctionneencoreplus.Leréfrigérateur
nedoitpasêtremisenfonctionlorsquelatempérature
ambianteestsupérieureà43°C.
Le condensateur ou le panneau
arrière est obstrué.
• Utilisezunaspirateurmunid’unemboutplatcourtpour
nettoyer le couvercle du condenseur et ses évents. Ne
retirez
paslepanneauquirecouvrelazoneducondenseur.

57DÉPANNAGE
FRANÇAIS
Refroidissement
Problème Cause possible Solutions
Accumulation
d’humidité à
l’intérieur.
Les portes sont souvent
ouvertes ou restent ouvertes
longtemps.
• Lorsquelesportessontsouventouvertesourestent
ouverteslongtemps,del’airchaudethumideentreà
l’intérieurducompartiment.Latempératureetleniveau
d’humiditéaugmententainsiàl’intérieurducompartiment.
Pourdiminuerceteffet,réduisezlafréquenceetladurée
d’ouverture des portes.
Les portes ne sont pas fermées
correctement.
• Siellesnesefermentpascomplètement,consultezla
sectionLesportesnesefermentpascomplètement
ous’ouvrenttoutesseulesdanslapartiePièceset
caractéristiquesdelasectionDépannage.
Conditions ambiantes humides.
• Desconditionsambianteshumidesfontentrerplus
d’humiditédanslescompartimentslorsquelesportessont
ouvertes,cequigénèredelacondensationoudugivre.
Maintenirunniveaud’humiditéraisonnabledanslamaison
aideraàcontrôlerlaquantitéd’humiditéquipeutentrer
danslescompartiments.
Cycle de dégivrage récemment
effectué.
• Pendantlecyclededégivrage,latempératuredechaque
compartimentpeutaugmenterlégèrementetdela
condensationpeutseformersurlaparoiarrière.Unefoisle
cyclededégivrageterminé,attendez30minutesetvériez
quelatempératureabienétérétablie.
Les aliments ne sont pas
emballés correctement.
• Lesalimentsquisontrangésàdécouvertousans
emballageetlescontenantshumidespeuvententraîner
uneaccumulationd’humiditédanschaquecompartiment.
Essuyeztouslescontenantsetrangezlesalimentsdans
desemballagesscelléspouréviterlacondensationetle
givre.
Les aliments
gèlent dans le
compartiment du
réfrigérateur.
Des aliments à teneur élevée en
eau ont été placés à proximité
d’une bouche d’aération.
• Placezlesalimentsàhauteteneureneauloindesbouches
d’aération.
La température du réfrigérateur
est mal réglée.
• Silatempératureesttropfroide,ajustez-launeunitéà
lafoisetattendezquelatempératuresestabilise.Pour
plusd’information,reportez-vousàlasectionRéglagedes
commandes.
Le réfrigérateur est installé dans
un endroit froid.
• Lorsqueleréfrigérateurfonctionnedansdesconditions
inférieuresà41°F(5°C),lesalimentspeuventgelerdans
lecompartimentduréfrigérateur.Leréfrigérateurnedoit
pasêtreutiliséàunetempératureinférieureà55°F(13
°C).
Les compartiments
du réfrigérateur et
du congélateur sont
trop chauds.
Le réfrigérateur vient d’être
installé.
• Chaquecompartimentpeutmettrejusqu’à24hpour
atteindrelatempératurevisée.
Les bouches d’aération sont
obstruées. L’air froid circule du
congélateur vers les aliments
frais et ainsi de suite par les
bou
ches d’aération dans la paroi
entre les deux sections.
• Trouvezl’emplacementdesbouchesd’aérationen
détectantlemouvementdel’airàl’aidedevotremain,puis
déplaceztouslesélémentsquilesobstruentetempêchent
unebonnecirculationd’air.Réorganisezleséléments
andepermettrelalibrecirculationdel’airàl’intérieurdu
compartiment.

58 DÉPANNAGE
Refroidissement/Eau et glace
Problème Cause possible Solutions
Les compartiments
du réfrigérateur et
du congélateur sont
trop chauds.
Les portes sont souvent
ouvertes ou restent ouvertes
longtemps.
• Lorsquelesportessontsouventouvertesourestent
ouverteslongtemps,del’airchaudethumideentreà
l’intérieurducompartiment.Latempératureetleniveau
d’humiditéaugmententainsiàl’intérieurducompartiment.
Pourdiminuerceteffet,réduisezlafréquenceetladurée
d’ouverture des portes.
Le réfrigérateur est installé dans
un endroit chaud.
• Leréfrigérateurnedoitpasêtremisenfonctionlorsquela
températureambianteestsupérieureà43°C.
Beaucoup d’aliments ou des
aliments chauds ont été placés
dans l’un des compartiments.
• L’ajoutd’alimentsaugmentelatempératuredu
compartiment,cequientraîneledéclenchementdu
systèmederefroidissement.Pourlimiterceteffet,laissez
refroidirlesalimentschaudsàtempératureambianteavant
delesplacerdansleréfrigérateur.
Les portes ne sont pas
correctement fermées.
• Siellesnesefermentpascomplètement,consultezla
sectionLesportesnesefermentpascomplètement
ou
s’ouvrenttoutesseulesdanslapartiePièceset
caractéristiquesdelasectionDépannage.
La température n’est pas réglée
correctement.
• Silatempératureesttropélevée,ajustezlesréglagesune
positionàlafoisetattendezquelatempératuresestabilise.
Le cycle de dégivrage vient de se
terminer.
• Durantlecyclededégivrage,latempératuredechaque
compartimentpeutaugmenterlégèrementetdessignes
decondensationpeuventapparaîtresurlaparoiarrière.
Attendez30minutes,puisvériezquelatempérature
estrevenueàlanormaleunefoislecyclededégivrage
terminé.
Les compartiments
du réfrigérateur et
du congélateur sont
trop froids.
La température n’est pas réglée
correctement.
• Silatempératureesttropbasse,ajustezlesréglages
unepositionàlafoisetattendezquelatempératurese
stabilise.ConsultezlePanneaudecommandepourplusde
renseignementsàcesujet.
Du givre ou des
cristaux de glace
se forment sur les
aliments surgelés
(à l’intérieur
de l’emballage
hermétique).
La condensation issue
d’aliments à haute teneur en eau
a gelé
à l’intérieur de l’emballage.
• Cephénomèneestnormalpourdesalimentsàhaute
teneureneau.
Les aliments ont été laissés
dans le congélateur pendant une
longue période.
• Nestockezpasdesalimentsàhauteteneureneaudansle
congélateurpendantunelonguepériode.
Du givre ou des
cristaux de glace
se forment sur les
aliments congelés
(à l’extérieur de
l’emballage).
La porte est ouverte trop
fréquemment ou trop longtemps.
• Lorsquelesportessontouvertestropfréquemmentou
troplongtemps,del’airchaudethumideentredansle
compartiment.Ceciaccroîtlatempératureetl’humiditéà
l’intérieurducompartiment.Lorsqu’ilyaplusd’humidité,
celaentraînelaformationdegivreetdecondensation.Pour
atténuerl’effet,ouvrezlaportemoinssouventoumoins
longtemps.
La porte ne se ferme pas
correctement.
• Consultezlasectiondudépannageintitulée«Lesportesne
sefermentpascorrectementous’ouvrenttoutesseules».

59DÉPANNAGE
FRANÇAIS
Eau et glace
Problème Cause possible Solutions
La machine
à glaçons ne
produit pas
assez de glace.
La demande dépasse la capacité de
production de glace.
• Lamachineàglaçonspeutproduireapproximativementde
70à182glaçonsparpériodede24heures.
L’entrée d’eau du domicile n’est
pas branchée, la valve n’est pas
complètement ouverte ou elle est
bouchée.
• Raccordezleréfrigérateuràunealimentationeneaufroide
avecunepressionadéquateetouvrezcomplètement
lavalved’eau.Sileproblèmepersiste,ilserapeut-être
nécessairedefaireappelàunplombier.
Le ltre à eau est saturé.
• Ilestrecommandéderemplacerleltreàeau:
• Environ tous les six mois.
• Lorsquelevoyantdultreàeaus’allume.
• Lorsquelasortied’eaududistributeurdiminue.
• Lorsquelescubesdeglacesontpluspetitsqu’àl’habitude.
La pression d’entrée d’eau du domicile
est trop faible.
• Lapressiondel’eaudoitêtrecompriseentre20et120psi
pourlesmodèlessansltreetentre40et120psipourles
modèlesavecltre.Sileproblèmepersiste,ilserapeut-
être
nécessairedefaireappelàunplombier.
Un système de ltrage par osmose
inverse est utilisé.
• Lessystèmesdeltrationparosmoseinversepeuvent
réduirelapressiondel’eauau-dessousdelavaleur
minimaleetoccasionnerundysfonctionnementde
lamachineàglaçons.(Veuillezconsulterlasection
Raccordementdelaconduited’eau.)
Le tuyau reliant le réfrigérateur au
robinet d’approvisionnement est plié.
• Letuyaupeutseplierlorsqueleréfrigérateurestdéplacé
lorsdel’installationoudunettoyage,provoquantune
réductiondudébitd’eau.Redressezouréparezlaconduite
d’alimentationeneauetdisposez-lademanièreàéviter
qu’ellesepliedenouveau.
Les portes sont souvent ouvertes ou
restent ouvertes longtemps.
• Lorsquelesportesdel’appareilsontsouventouvertes,
l’airambiantvaréchaufferleréfrigérateuretempêcher
lemaintiendelatempératureprogramméedel’appareil.
Abaisserlatempératureprogramméepeutrésoudrece
problème,toutcommelefaitdenepasouvrirlesportes
aussifréquemment.
Les portes ne sont pas complètement
fermées.
• Silesportesnesontpascorrectementfermées,la
productiondeglaceseraaffectée.Consultezlasection
Lesportesnesefermentpascomplètementous’ouvrent
toutesseulesdanslapartiePiècesetcaractéristiquesdela
sectionDépannagepourensavoirplusàcesujet.
Le réglage de la température du
congélateur est trop élevé.
• Pourassureruneproductionnormaledeglace,la
températurerecommandéeducompartimentdu
congélateurestde0°F.Silatempératureducongélateur
estplusélevée,laproductiondeglaceseraaffectée.
La machine
à glaçons ne
produit pas de
glace.
Le réfrigérateur a été installé
récemment ou la machine à glaçons
vient d’être branchée.
• Jusqu’à24heurespeuventêtrenécessairespourque
chaquecompartimentatteignelatempératuredésiréeet
quelamachineàglaçonssemetteàfonctionner.
La machine à glaçons n’est pas en
marche.
• VériezquelatoucheMarche/Arrêtdelamachineà
glaçonsestrégléesurMarche.

60 DÉPANNAGE
Eau et glace
Problème Cause possible Solutions
La machine à
glaçons ne produit
pas de glace.
Le capteur de glaçons est
obstrué.
• Laprésencedesubstancesétrangèresoudegivresur
lecapteurdeglaçonspeutinterromprelaproduction
deglaçons.Assurez-vousquelazoneducapteurreste
toujoursproprepourgarantirunbonfonctionnement.
Le réfrigérateur n’est pas
raccordé à une alimentation en
eau ou la valve n’est pas ouverte.
• Raccordezleréfrigérateuràl’alimentationeneauetouvrez
complètementlavalve.
Le dispositif d’arrêt automatique
(levier) de la machine à glaçons
est obstrué.
• Sivotremachineàglaçonsestdotéed’unlevierd’arrêt
automatique,assurez-vousquecedernierpeutêtre
déplacélibrement.Sivotremachineàglaçonsestdotée
d’uncapteurdecontrôledelaproductiondeglace,assurez-
vous
quel’espaceentrelesdeuxcapteursestdégagé.
Un système de ltration d’eau
par osmose inverse est raccordé
à l’alimentation en eau froide.
• Lessystèmesdeltrationparosmoseinversepeuvent
réduirelapressiondel’eauau-dessousdelavaleur
minimaleetoccasionnerundysfonctionnementde
la
machineàglaçons.(Veuillezconsulterlasection
Raccordementdelaconduited’eau.)
La glace goûte ou
sent mauvais.
L’entrée d’eau contient des
minéraux comme du soufre.
• L’installationd’unltreàeaupeutêtrenécessairepour
éliminerlesproblèmesdegoûtetd’odeur.REMARQUE:
Danscertainscas,unltreàeaupeutserévélerinsufsant.
Iln’estpastoujourspossibled’éliminerlesminéraux,les
goûtsoulesodeursprésentsdanstouteslessources
d’alimentationeneau.
La machine à glaçons vient
d’être installée.
• Lesglaçonsquisontstockésdepuislongtempsrapetissent,
deviennenttroublesoupeuventavoirmauvaisgoût.Jetez
lavieilleglaceetfabriquez-enunenouvelleréserve.
Les aliments n’ont pas été
rangés correctement dans un
des compartiments.
• Remballezlesaliments.L’odeurdesalimentspeutsexer
àlaglacesiceux-cinesontpasemballéscorrectement.
L’intérieur du réfrigérateur doit
être nettoyé.
• VeuillezconsulterlasectionEntretienpourensavoirplusà
cesujet.
Le bac à glace doit être nettoyé.
• Videzetlavezlebac(jetezlesvieuxglaçons).Assurez-
vous
quelebacestcomplètementsecavantdele
réinstaller.
La machine à
glaçons produit trop
de glace.
Le dispositif d’arrêt automatique
(levier et capteur) de la machine
à glaçons est obstrué.
• Videzlebacàglaçons.Sivotremachineàglaçonsest
dotée
d’unlevierd’arrêtautomatique,assurez-vousque
cedernierpeutêtredéplacélibrement.Sivotremachine
àglaçonsestdotéed’uncapteurdecontrôledela
productiondeglace,assurez-vousquel’espaceentreles
deux
capteursestdégagé.Réinstallezlebacàglaçonset
vériezlebonfonctionnementdelamachineauboutde
24 heures.

61DÉPANNAGE
FRANÇAIS
Pièces et caractéristiques
Problème Cause possible Solutions
Les portes ne
se ferment pas
complètement ou
s’ouvrent toutes
seules.
Des aliments empêchent la
fermeture de la porte.
• Rangezlesalimentsd’uneautrefaçonpourdégagerla
porteetsesétagères.
Le bac à glaçons, le couvercle
du bac à légumes et fruits, les
bacs, les étagères, les bacs de la
porte ou les paniers ne sont pas
positionnés correctement.
• Poussezlesbacsjusqu’aufondetplacezlecouvercledu
bacàlégumesetfruits,lesbacs,lesétagèresetlespaniers
dansleurpositionnormale.Veuillezconsulterlasection
Fonctionnementpourensavoirplusàcesujet.
Les portes ont été enlevées
durant l’installation de l’appareil
et n’ont pas été correctement
remises en place.
• Enlevezetrepositionnezlesportesdelamanièredécrite
danslasectionRetraitetassemblagedesportesetdes
tiroirs
Le réfrigérateur n’est pas
d’aplomb.
• VeuillezconsulterlasectionNivellementetalignement
delaportedanslapartieInstallationpourpositionnerle
réfrigérateurdefaçonadéquate.
Les portes sont
difciles à ouvrir.
Les joints sont sales ou collants.
• Nettoyezlesjointsetleurssurfacesdecontact.Frottezun
chiffonavecdulustreoudelacirepourmeublessurles
jointsaprèslesavoirnettoyés.
La porte vient d’être refermée.
• Lorsquevousouvrezlaporte,del’airtièdeentredansle
réfrigérateur.Àmesurequel’airtièdeserefroidit,ilpeut
créeruneffetd’aspiration.Silaporteestdifcileàouvrir,
veuillezpatienteruneminutepourpermettreàlapression
del’airdes’équilibrer,puisvériezquelaportes’ouvreplus
facilement.
Le réfrigérateur
vacille ou paraît
instable.
Les pieds de nivellement ne sont
pas correctement ajustés.
• VeuillezconsulterlasectionNivellementetalignementde
laporte.
Le sol n’est pas égal.
• Ilpeutêtrenécessairedeplacerdescalessouslespieds
denivellementpourterminerl’installation.
L’éclairage ne
fonctionne pas.
Les lumières à DEL à l’intérieur
ne fonctionnent pas.
• Lalampeducompartimentduréfrigérateurestunediode
d’éclairageinterne,etsonentretiendoitêtreréaliséparun
professionnel.
L’odeur du
réfrigérateur est
inhabituelle.
Le ltre à air doit peut-être être
réglé sur la valeur MAX ou être
remplacé.
• RéglezleltreàairàlavaleurMAX.Sil’odeurpersiste
pendantplusde24h,leltredoitprobablementêtre
changé.VeuillezconsulterlasectionRemplacementdu
ltreàairfraispourlesdirectivesderemplacement.
L’intérieur du
réfrigérateur est
couvert de poussière
ou de suie.
Le réfrigérateur est placé près
d’une amme ou d’un feu,
comme une cheminée, un poêle
à bois ou une bougie.
• Assurez-vousqueleréfrigérateurn’estpassituéprèsd’une
ammeoud’unfeu,commeunecheminée,unpoêleàbois
ou une bougie.

62 DÉPANNAGE
Bruits
Problème Cause possible Solutions
Clic
La commande du dégivrage cliquette lorsque
le cycle de dégivrage automatique se met
en marche ou s’arrête. La commande du
thermostat (ou la commande du réfrigérateur
sur certains modèles) cliquette aussi en
début et en n de cycle.
• Fonctionnementnormal
Cliquetis
Des cliquetis peuvent être dus à la
circulation du uide frigorigène, à la
conduite d’alimentation en eau à l’arrière de
l’appareil, ou aux éléments rangés au-dessus
ou autour du réfrigérateur.
• Fonctionnement
normal
Le réfrigérateur n’est pas en position stable
sur le sol.
• Lesolancheouestinégal,oulespieds
denivellementdoiventêtreajustéssousle
réfrigérateur.Veuillezconsulterlasection
Nivellementetalignementdelaporte.
Le réfrigérateur doté d’un compresseur
linéaire a été déplacé brusquement.
• Fonctionnementnormal
Sifement
Le moteur du ventilateur de l’évaporateur fait
circuler de l’air à travers les compartiments
du réfrigérateur et du congélateur.
• Fonctionnementnormal
Le ventilateur du condenseur soufe de l’air
sur le condensateur.
• Fonctionnementnormal
Gargouillement
Le uide frigorigène circule dans le système
de refroidissement.
• Fonctionnementnormal
Pop
Contraction et expansion des parois
internes causées par les changements de
température.
• Fonctionnementnormal
Grésillement
Eau s’égouttant sur le radiateur de dégivrage
lors du cycle de dégivrage.
• Fonctionnementnormal
Vibration
Si le côté ou l’arrière du réfrigérateur
touche un meuble ou un mur, certaines des
vibrations normales de l’appareil peuvent
émettre un son audible.
• Poursupprimercebruit,assurez-vousqueles
côtésetl’arrièreduréfrigérateurnepeuvent
pasvibrercontreunmeubleouunmur.
Égouttement
Eau s’écoulant à travers l’égouttoir au cours
du cycle de dégivrage.
• Fonctionnementnormal
Pulsations ou son
aigu
Votre réfrigérateur est conçu pour
fonctionner de manière efcace pour
conserver vos aliments à la bonne
température. Le compresseur à haute
performance peut amener votre
nou
veau réfrigérateur à fonctionner plus
régulièrement, mais il est toujours plus
économe en énergie que les anciens
modèles. Il est normal d’entendre des
pulsations ou un son aigu au cours du
fonctionnement de votre réfrigérateur.
• Fonctionnementnormal

63DÉPANNAGE
FRANÇAIS
Réseau Wi-Fi
Problème Cause possible Solutions
Votre appareil électroménager et
votre téléphone intelligent ne sont
pas connectés au réseau Wi-Fi.
Le mot de passe donnant accès au
réseau Wi-Fi auquel vous essayez de
vous connecter est incorrect.
• TrouvezleréseauWi-Ficonnecté
àvotretéléphoneintelligentet
supprimez-le,puisenregistrezvotre
appareilsurl’applicationSmartThinQ
de LG.
Les données mobiles de votre
téléphone intelligent sont activées.
• Désactivezlesdonnées mobiles
de
votretéléphoneintelligentavant
d'enregistrerl’appareil.
Le nom du réseau sans l (SSID) est
erroné.
• Lenomduréseausansl(SSID)doit
êtreunecombinaisondelettreset
dechiffresanglais.(N’utilisezpasde
caractèresspéciaux.)
La fréquence du routeur n’est pas de
2,4 GHz.
• Seuleunefréquencederouteurde
2,4GHzestpriseencharge.Réglez
lerouteursanslà2,4GHzet
connectez-yl’appareil.Pourconnaître
lafréquencedurouteur,informez-
vous
auprèsdevotrefournisseurde
servicesInternetoudufabricantdu
routeur.
Le routeur est trop loin de l’appareil.
• Sil’appareilesttropéloignédu
routeur,lesignalpeutêtrefaibleetla
connexionpeutnepasêtrecongurée
correctement.Placezlerouteurplus
prèsdel’appareilouachetezet
installezunrépéteurWi-Fi.

64 GARANTIE LIMITÉE
GARANTIE LIMITÉE
POUR ÉTATS-UNIS
SivotreréfrigérateurLG(«produit»)nefonctionnepasàcaused’undéfautdematériauxoudefabricationmalgréun
usagedomestiquenormalaucoursdelapériodedegarantieénoncéeci-dessous,LGrépareraouremplaceraleproduit,
àsadiscrétion.Cettegarantielimitéeestvalideuniquementpourl’acheteuroriginalduproduitetnes’appliqueque
lorsqu’ilestachetéetutiliséauxÉtats-Unis,ycomprissurlesterritoiresaméricains.Unepreuvedel’achatoriginalest
exigéepourobtenirleservicedegarantieenvertudecettegarantielimitée.
PÉRIODE DE GARANTIE
Réfrigérateur /
Congélateur
Système scellé
(condensateur,
sécheuse, tuyau
de raccordement et
évaporateur)
Compresseur
Un
(1)anaprèsladate
dʼachatoriginalde
lʼappareil.
Cinq
(5)ansaprèsla
datedʼachatoriginalde
lʼappareil
Cinq
(5)ansaprèsla
datedʼachatoriginalde
lʼappareil
Compresseur
linéaire/àinversionseulement
:Piècesseulement-dela6
e
àla10
e
année
àcompterdeladated’achatoriginalde
l’appareil.(Lesfraisdemain-d’œuvreseront
facturésauconsommateur.)
Pièces
etmain-d’œuvre
(piècesinternes
etfonctionnelles
uniquement)
Pièces
etmain-d’œuvre Piècesetmain-d’œuvre
• Lesproduitsetpiècesderemplacementsontgarantispourlaportionrestantedelapériodedegarantieoriginaleou
quatre-vingt-dix(90)jours,selonlapériodelapluslongue.
• Lesproduitsetpiècesderemplacementpeuventêtreneufsouremisàneuf.
• Unepreuvedel’achatoriginaldétaillantlemodèleduproduitetladated’achatestexigéepourobtenirleservicede
garantieenvertudecettegarantielimitée.
SAUF DANS LES LIMITES PRÉVUES PAR LA LÉGISLA
TION EN VIGUEUR, TOUTE GARANTIE IMPLICITE DE
QUALITÉ MARCHANDE OU D’ADAPTATION À UN USAGE PARTICULIER SUR LE PRODUIT EST LIMITÉE
À LA DURÉE DE LA PRÉSENTE GARANTIE LIMITÉE. EN AUCUN CAS, LG OU SES DISTRIBUTEURS OU
REVENDEURS AUX ÉTATS-UNIS NE SERONT RESPONSABLES DE TOUT DOMMAGE INDIRECT, ACCESSOIRE,
CONSÉCUTIF, SPÉCIAL OU PUNITIF, Y COMPRIS, MAIS SANS S’Y LIMITER, LES PERTES DE FONDS
COMMERCiAUX, LES PERTES DE REVENUS OU DE BÉNÉFICES, UN ARRÊT DE TRAVAIL, LA DÉTÉRIORATION
D’AUTRES MARCHANDISES, LES COÛTS ASSOCIÉS AU DÉPLACEMENT ET À LA RÉINSTALLATION DU
PRODUIT, LA PERTE D’UTILISATION, OU TOUT AUTRE DOMMAGE, QU’IL SOIT CONTRACTUEL, DÉLICTUEL OU
AUTRE. LA RESPONSABILITÉ TOTALE DE LG, LE CAS ÉCHÉANT, NE POURRA EN AUCUN CAS EXCÉDER LA
SOMME QUE VOUS AVEZ PAYÉE POUR ACQUÉRIR LE PRODUIT.
Certains
Étatsnepermettentpasl'exclusionoulalimitationdesdommagesindirectsouconsécutifs,ouleslimitationsde
laduréedelagarantieimplicite,auquelcasl'exclusionoulalimitationsusmentionnéepeutnepass'appliqueràvous.
Cettegarantievousconfèredesdroitsjuridiquesparticuliers,etvousavezpeut-êtreaussid'autresdroitsquipeuvent
varierselonl'Étatoùvoushabitez.
LA PRÉSENTE GARANTIE LIMITÉE NE COUVRE PAS CE QUI SUIT
:
• Unappeldeservicepourlivrer,ramasser,installerouréparerleproduit;renseignerleclientsurlefonctionnementdu
produit,rectierlecâblageoucorrigerdesréparationsnonautorisées.
• Lebrisouledysfonctionnementduproduitdurantunepanne,uneinterruptiondel'alimentationélectriqueouune
mauvaisealimentationenélectricité.
• Lebrisouledysfonctionnementcauséspardestuyauxdʼeauquifuientquisontinadaptésougelés,despetitstuyaux
devidange,unearrivéedʼeauinadaptéeoucoupée,ouunearrivéedʼairinadaptée.
• Lesdommagesdommagesattribuablesàl'utilisationduproduitdansunmilieuauxconditionscorrosivesoudefaçon
contraire
auxindicationsdumanueld’utilisation.
• Lebrisouledysfonctionnementduproduitcauséspardesaccidents,desinsectesnuisibles,delavermine,lafoudre,
levent,unincendie,uneinondationouunecatastrophenaturelle,outouteautresituationhorsducontrôledeLG.
• Lebrisouledysfonctionnementattribuablesàtoutemodicationnonautoriséeouparuneutilisationautrequecelle
prévue,ouparunefuited’eaurésultantd'uneinstallationinadéquate.

65GARANTIE LIMITÉE
FRANÇAIS
• Lebrisouledysfonctionnementattribuablesàuneutilisationmauvaiseouabusive,ouàuneinstallation,àune
réparationouàunentretieninadéquats.Uneréparationincorrectecomprendl’utilisationdepiècesnonautoriséespar
LG.Uneinstallationouunentretienincorrectcomprendl’installationoul’entretiendefaçoncontraireauxindicationsdu
manueld’utilisation.
• Lebrisouledysfonctionnementcausésparunealimentationélectriqueouuneplomberieinadéquate,uneutilisation
commercialeouindustrielle,oul’utilisationd’accessoires,decomposantsoudeproduitsdenettoyagenonapprouvés
parLG.
• Lebrisouledysfonctionnementcausésparletransportetlamanutention,ycomprislesrayures,bosses,entaillesou
autresdommagesauproduitni,saufsidetelsdommagessontrapportésdansundélaid’une(1)semaineaprèsla
livraison.
• Lesdommagesetlespiècesmanquantespourtoutproduitutiliséauxnsdedémonstration,toutproduitdéjàdéballé
avantl’achatoutoutproduitvenduàrabais.
• Toutproduitremisàneufoutoutautreproduitvendu«telquel»,«telquedisponible»,«avectouslesdéfauts»,ou
toutavisdenon-responsabilitésemblable.
• Desproduitsdontlenumérodesérieoriginalaétéretiré,modiéounepeutêtrefacilementdéterminé.
• Lesaugmentationsdesfraisdefonctionnementetdesautresdépensesdefonctionnement.
• Toutbruitassociéàunfonctionnementnormal.
• L’utilisationd’accessoires(p.ex.,ltresàeau,etc.),decomposantsoudeproduitsdenettoyagenonapprouvéspar
LG.
• Leremplacementdesampoules,desltresoudesconsommables.
• Lesréparationslorsquevotreappareilestutilisédansdesconditionsautresquenormalesetdomestiques(utilisation
commerciale,dansdesbureauxoudesinstallationsrécréativesoudesvéhicules)oucontrairesauxconsignesétablies
danslemanueldupropriétairedelʼappareil.
• Lescoûtsassociésauretraitetàlaréinstallationduproduitdevotrerésidenceauxnsderéparation.
• Lesétagères,lesbacsdelaporte,lestiroirs,lespoignéesetlesaccessoires,àl’exceptiondespiècesinternes/
fonctionnelles
couverteparlaprésentegarantielimitée.
Le coût des réparations ou du remplacement dans les circonstances d’exclusion ci-dessus est assumé par le
consommateur.
OBTENIR
DESSERVICESSOUSGARANTIEETDESRENSEIGNEMENTSADDITIONNELS
Composez
le1800243-0000etsélectionnezl’optionappropriéedanslemenu.
Ou
visiteznotresiteWebauhttp://www.lg.com
Ou
parcourrier:ServiceàlaclientèledeLGElectronics/LGElectronicsCustomerServiceP.O.Box240007Huntsville,
AL35813c/o:CIC

66 GARANTIE LIMITÉE
POUR CANADA
AVIS D’ARBITRAGE : LA PRÉSENTE GARANTIE LIMITÉE CONTIENT UNE DISPOSITION SUR L’ARBITRAGE
QUI EXIGE QUE LE RÈGLEMENT DES DIFFÉRENDS ENTRE VOUS ET LG S’EFFECTUE PAR ARBITRAGE
EXÉCUTOIRE PLUTÔT QUE DEVANT UN TRIBUNAL, À MOINS QUE LES LOIS DE VOTRE PROVINCE OU
TERRITOIRE L’INTERDISENT OU QUE, DANS UN AUTRE TERRITOIRE DE COMPÉTENCE, VOUS VOUS
PRÉVALIEZ D’UNE OPTION DE RETRAIT. LES RECOURS COLLECTIFS ET LES PROCÈS DEVANT JURY NE
SONT PAS AUTORISÉS PAR LE PROCESSUS D’ARBITRAGE. VEUILLEZ VOUS RÉFÉRER CI-DESSOUS À
L’ARTICLE
« PROCÉDURE DE RÈGLEMENT DE DIFFÉREND ».
Si
votreréfrigérateurLG(«Produit»)atombéenpanneenraisond'undéfautdematériauxoudefabricationsousune
utilisationnormaleetappropriée,pendantlapériodedegarantieindiquéeci-dessous,LGElectronicsCanadaInc.
(«LGECI»),àsongré,répareraouremplacerale«Produit»aprèsréceptiondelapreuved'achatoriginaleaudétail.
Cettegarantielimitéeestvalableuniquementqu’àl'acheteuroriginaldu«Produit»dudétaillantets'appliqueuniquement
àunproduitdistribué,achetéetutiliséauCanada,telquedéterminéàlaseulediscrétionde«LGECI».
PÉRIODE DE GARANTIE (Remarque : Dans le cas où la date d’achat initial ne peut pas être vériée, la garantie
commence soixante (60) jours après la date de fabrication.)
Réfrigérateur
Système scellé (condensateur, sécheuse, tuyau de
raccordement et évaporateur)
Compresseur linéaire / à
inversion
Un (1) an après la date
dʼachat original de
lʼappareil.
Un (1) an après la date
dʼachat original de
lʼappareil.
Sept (7) ans après la
date d’achat original de
l’appareil.
Dix (10) ans après la
date dʼachat original de
lʼappareil.
Pièces
etmain-d’œuvre
(piècesinterneset
fonctionnellesuniquement)
Pièces
etmain-d’œuvre
Pièces
uniquement(lamain-
d’œuvre
serafacturéeau
client)
Pièces
uniquement(lamain-
d’œuvre
serafacturéeau
client)
• Lesproduitsetpiècesderemplacementsontgarantispourlaportionrestantedelapériodedegarantieoriginaleou
quatre-vingt-dix(90)jours,selonlapériodelapluslongue.
• Lesproduitsetpiècesderechangepeuventêtreneufs,reconditionnés,remisàneufouautrementfabriquésenusine,
tousàlaseulediscrétionde«LGECI».
• Lapreuvedel’achatdedétailoriginalspéciantlemodèleduproduitetladated’achatestrequisepourobtenirun
servicesousgarantieenvertudelaprésentegarantielimitée.
LA RESPONSABILITÉ DE LGECI EST LIMITÉE À LA GARANTIE LIMITÉE EXPRIMÉE CI-DESSUS. SAUF
TEL
QU’EXPRESSÉMENT FOURNI CI-DESSUS, LGECI DÉCLINE TOUTE AUTRE GARANTIE ET CONDITION
CONCERNANT LE PRODUIT, EXPLICITE OU IMPLICITE, Y COMPRIS, MAIS SANS S'Y LIMITER, TOUTE
GARANTIE IMPLICITE OU CONDITION DE QUALITÉ MARCHANDE OU D'ADAPTATION À UN USAGE
PARTICULIER, ET AUCUNE REPRÉSENTATION NE SERA LIÉE À LGECI. LGECI N'AUTORISE AUCUNE
PERSONNE À CRÉER OU ENSOSSER À SA PLACE QUELCONQUE AUTRE OBLIGATION DE GARANTIE OU
RESPONSABILITÉ RELATIVE AU PRODUIT. DANS LA MESURE OÙ TOUTE GARANTIE OU CONDITION EST
IMPLICITE PAR LA LOI, ELLE EST LIMITÉE À LA PERIODE DE GARANTIE DÉCLARÉE CI-DESSUS. EN AUCUN
CAS, LGECI, LE FABRICANT OU LE DISTRIBUTEUR DU PRODUIT, NE SERA TENU RESPONSABLE DE TOUT
DOMMAGE ACCESSOIRE, CONSÉCUTIF, SPÉCIAL, DIRECT, INDIRECT, PUNITIF OU EXEMPLAIRE, Y COMPRIS,
SANS LIMITATION, LA PERTE DE COTE D’ESTIME, PERTE DE PROFITS, PERTE DE PROFITS ANTICIPÉS,
PERTE DE REVENUS, PERTE D'UTILISATION OU DE TOUT AUTRE DOMMAGE, QU'IL SOIT PROVENU
DIRECTEMENT OU INDIRECTEMENT DE TOUTE INFRACTION CONTRACTUELLE, VIOLATION FONDAMENTALE,
DÉLICTUELLE OU AUTRE, OU DE TOUT ACTE OU OMISSION. LA RESPONSABILITÉ TOTALE DE LGECI, S’IL EN
EST, N’OUTREPASSERA PAS LE PRIX D'ACHAT PAYÉ PAR VOUS POUR LE PRODUIT.
Cette
garantielimitéevousdonnedesdroitslégauxspéciques.Vouspouvezégalementavoird'autresdroitsquivarient
d'uneprovinceàl'autreselonlesloisprovincialesapplicables.TouttermedecetteGarantielimitéequinieoumodie
touteconditionougarantieimpliciteenvertudelaloiprovincialeestdivisiblelorsqu'elleestenconitaveccetteloi
provincialesansaffecterlerestedestermesdecettegarantie.

67GARANTIE LIMITÉE
FRANÇAIS
LA PRÉSENTE GARANTIE LIMITÉE NE COUVRE PAS CE QUI SUIT :
• Toutdéplacementdutechnicienpour:i)livrer,reprendre,installerou;éduquercommentutiliserleProduit;ii)corriger
lecâblageouplomberie;ouiii)rectiertouteréparationouinstallationnon-autoriséeduProduit;
• DommageoupanneduProduitàperformerlorsdepannedecourantetserviceélectriqueinadéquatouinterrompu;
• Dommageoupanneenraisondetuyauxd’eaubrisésoudontl’eaufuit,conduited’eaugelée,conduitederécupération
obstruée,approvisionnementd’eauinadéquatouinterrompuouravitaillementd’airinadéquat;
• Dommageoupannerésultantdel’utilisationduProduitdansunenvironnementcorrosifoucontraireauxinstructions
détailléesdanslemanueld’utilisationduProduit;
• DommageoupanneduProduitenraisond’accidents,ravageursetparasites,foudre,vent,feu,inondations,actesde
DieuoutouteautreraisonhorsducontrôledeLGECIoudufabricant;
• Dommageoupannerésultantd’utilisationinappropriéeouabusiveoud’installation,réparationouentretienimparfait
duProduit.Réparationimparfaiteinclutl’utilisationdepiècesnonautoriséesouspéciéesparLGECI.Installationou
entretienimparfaitincluttouteinstallationouentretiencontraireauxinstructionsdétailléesaumanueld’utilisationdu
Produit’;
• DommageoupanneenraisondemodicationoualtérationnonautoriséeduProduit,ousiutilisépournsautres
quecelled’appareilménagerdomestique,oudommageoupannerésultantdetoutefuited'eaudueàunemauvaise
installationduproduit;
• Dommageoupanneenraisondecourantélectrique,tensionoucodesdeplomberieincorrects;
• Dommageoupanneenraisond’utilisationautrequecelled’appareilménagerdomestiquenormale,incluant,sans
limite,l’utilisationcommercialeouindustrielle,incluantl’utilisationaubureaucommercialoucentrerécréatif,ou
détailléeautrementaumanueld’utilisationduProduit;
• Dommageoupanneenraisond’utilisationdetoutaccessoire,composantouproduitnettoyant,incluant,sanslimite,
ltresàeaunonautorisésparLGECI;
• Remplacementdelacartouchedultreàeauenraisondelapressiond’eausituéeendehorsdelaplagede
fonctionnementspéciéeousédimentsexcessifsdansl’approvisionnementd’eau;
• Dommageoupanneprovoquéparletransportetmanipulation,incluantrayures,bosses,écaillageet/ouautre
endommagementàlanitionduProduit,à moins queteldommageaitrésultédefabricationoumatériauxdéfectueux
etrapporteràLGECIdansla(1)semainesuivantlivraisonduProduit;
• DommageorarticlesabsentsdetoutProduitdémonstrateur,boîteouverte,réusinéouescompté;
• ProduitréusinéoutoutProduitvendu“Telquel”,“Oùest”,“Avectousdéfauts”,outoutemiseengardesimilaire;
• Produitdontlenumérodesérieoriginalaitétéretiré,altéréounepeutêtrefacilementdéterminéàladiscrétionde
LGECI;
• Augmentationdelafactured’électricitéetdépensesadditionnellesd’utilitédequelquemanièreassociéeauProduit;
• ToutbruitassociéaufonctionnementnormalduProduit;
• Remplacementdesampoules,ltres,fusiblesoutoutautreélémentconsommable;
• Remplacementdetoutepiècen’étantpasoriginalementinclueavecleProduit;
• Coûtsassociésairetraitet/ouréinstallationduProduitpournsderéparation;et
• Lesclayettes,bacs,tiroirs,poignéesetaccessoiresduProduit,sauflespiècesinternes/fonctionnellescouvertespar
cettegarantielimitée.
• Couverturepourréparationsàdomicile,pourproduitsousgarantie,serafourniesileProduitsetrouvedansunrayon
de150kmducentredeserviceautorisé(ASC)leplusprès,telquedéterminéparLGCanada.SivotreProduitest
situéàl’extérieurdurayonde150kmd’uncentredeserviceautorisé,telquedéterminéparLGCanada,ilenirade
votreresponsabilitéd’apportervotreProduit,àvosfrais,aucentredeservice(ASC)pourréparationsousgarantie.
Tous coûts et dépenses associés aux circonstances exclues ci-dessus, énumérés sous la rubrique “Cette
garantie limitée ne couvre pas” sont à la charge du consommateu
r.
AFIN
D’OBTENIRSOUTIENDEGARANTIEET
INFORMATIONSSUPPLÉMENTAIRESVEUILLEZNOUS
APPELER
OUVISITERNOTRESITEWEB:
Sans
frais:1-888-542-2623(7hàminuit–l’annéelongue)etsélectionnezl’optionappropriéeaumenu,ouvisitezlesite
webà:http://www.lg.com

68 GARANTIE LIMITÉE
PROCÉDURE DE RÈGLEMENT DE DIFFÉREND :
SAUF
LAOÙLALOIL’INTERDIT,TOUTDIFFÉRENDENTREVOUSETLGASSOCIÉDEQUELQUEFAÇONQUECE
SOITÀLAPRÉSENTEGARANTIELIMITÉESERÈGLEEXCLUSIVEMENTPARARBITRAGEEXÉCUTOIREPLUTÔT
QUEDEVANTUNTRIBUNALDEDROITCOMMUN.SAUFLAOÙLALOIL’INTERDIT,VOUSETLGRENONCEZ
IRRÉVOCABLEMENTÀTOUTDROITÀUNPROCÈSDEVANTJURY,AINSIQU’ÀEXERCERUNRECOURS
COLLECTIFOUÀYPARTICIPER.
Dénitions.
Auxnsduprésentarticle,«LG»désigneLGElectronicsCanadaInc.,sessociétésmères,seslialeset
sessociétésafliéesettousleursdirigeants,administrateurs,employés,agents,bénéciaires,détenteursprécédents
desmêmesdroits,successeurs,cessionnairesetfournisseurs;«différend»et«réclamation»englobenttout
différend,réclamationoulitigedequelquesortequecesoit(fondéssuruneresponsabilitécontractuelle,délictuelle,
légale,réglementaireoudécoulantd’uneordonnance,parfraude,faussereprésentationousousquelquerégimede
responsabilitéquecesoit)découlantdequelquefaçonquecesoitdelavente,desconditionsoudel’exécutiondu
produitoudelaprésenteGarantielimitée.
Avis de différend.
Sivousprévoyezengageruneprocédured’arbitrage,vousdevezd’abordenvoyeràLGunpréavis
écritd’aumoins30joursàl’adressesuivante:ÉquipejuridiqueLGECI,NorelcoDrive,NorthYork,Ontario,Canada
M9L2X6(l’«avisdedifférend»).VousetLGconvenezdediscuterentoutebonnefoipourtenterderéglerledifférend
àl’amiable.L’avisdoitmentionnervotrenom,votreadresse,votrenumérodetéléphone,leproduitfaisantl’objetdela
réclamation,lanaturedelaréclamationetlaréparationdemandée.SivousetLGneparvenezpasàréglerledifférend
dansles30jourssuivantlaréceptiondel’avisdedifférendparLG,ledifférenddoitêtreréglépararbitrageexécutoire
conformémentàlaprocédureétablieauxprésentes.VousetLGconvenezque,toutaulongduprocessusd’arbitrage,
lesmodalités(ycomprislesmontants)detouteoffrederèglementformuléeparvousouparLGneserontpas
divulguéesàl’arbitreetresterontcondentiellesàmoinsd’accordcontraireentrelesdeuxpartiesouquel’arbitrerèglele
différend.
Entente d’arbitrage exécutoire et renonciation à un recours collectif.
Silaréclamationn’apuêtrerégléedansles
30jourssuivantlaréceptiondel’avisdedifférendparLG,vousetLGconvenezdeneréglerlesréclamationsvous
opposantquepararbitrageexécutoireaucasparcas,àmoinsquevousvousprévaliezdel'optionderetraitévoquée
plushautouquevousrésidiezdansunterritoiredecompétencesquiinterditlapleineapplicationdecetteclausedans
lecasderéclamationsdecetype(Danslequelcas,sivousêtesunconsommateur,cetteclausenes'appliqueraquesi
vousacceptezexpressémentl'arbitrage).Danslamesureoùlaloienvigueurlepermet,aucundifférendentrevouset
LGnepeutêtrecombinéouregroupéavecundifférendfaisantintervenirleproduitoularéclamationd'unepersonneou
entitétierce.Plusprécisémentetsanslimiterlaportéedecequiprécède,saufdanslamesureoùunetelleinterdiction
n'estpasautoriséeendroit,enaucuncasundifférendentrevousetLGnepeutêtretraitédanslecadred'unrecours
collectif.Aulieudel'arbitrage,lespartiespeuventintenteruneactionindividuelledevantunecourdespetitescréances,
maiscetteactionnepeutpasêtreintentéedanslecadred'unrecourscollectif,saufdanslamesureoùunetelle
interdictionn'estpasautoriséeendroitdansvotreprovinceouterritoiredecompétencespouruneréclamationencause
quinousoppose.
Règles et procédures d’arbitrage.
Poursoumettreuneréclamationàunarbitrage,l’unedesdeuxparties,soitvousou
LG,doitdéposerunedemandeécriteàceteffet.L’arbitrageestprivéetcondentielets’effectueselonuneprocédure
simpliéeetaccéléréedevantunarbitreuniquechoisiparlespartiesconformémentauxloisetrèglementsenvigueur
portant
surl’arbitragecommercialdevotreprovinceouterritoirederésidence.Vousdevezégalementenvoyerunecopie
devotredemandeécriteàLGElectronicsCanadaInc.,LegalDepartment-Arbitration,20NorelcoDrive,NorthYork,
Ontario
M9L
2X6.Laprésentedispositionsurl’arbitrageestrégieparlesloisetrèglementssurl’arbitragecommercial
applicablesdevotreprovinceouterritoire.Lasentencearbitralepeutdonnerlieuàunjugementden’importequel
tribunal
compétent.
Toutes
lesdécisionsrelèventdel’arbitre,àl’exceptiondesquestionsassociéesàlaportéeetà
l’applicabilitédeladispositionsurl’arbitrageetàl’arbitrabilitédudifférend,quisontduressortdutribunal.L’arbitreest
tenu
derespecterlesmodalitésdelaprésentedisposition.
Droit applicable.
Lesloisdevotreprovinceouterritoirede’achatrégissentlaprésenteGarantielimitéeettoutdifférend
entrenous,saufdanslamesureoùdetellesloissontsupplantéespardesloisfédérales,provincialesouterritoriales
applicablesousontincompatiblesaveccesdernières.Sil'arbitragen'estpasautorisépourrégleruneréclamation,une
poursuite,undifférendouunlitigenousopposant,nousnousenremettronsàlacompétenceexclusivedestribunauxde
votreprovinceouterritoirede’achatcompétencepourlerèglementdelaréclamation,delapoursuite,dudifférendoudu
litigenousopposant.
Frais et coûts.
Aucunsfraisnesontexigiblespourentameruneprocédured’arbitrage.Àlaréceptiondevotredemande
d’arbitrageécrite,LGréglerarapidementlatotalitédesfraisdedépôtdelademanded’arbitrage,saufsivousréclamez
desdommages-intérêtssupérieursà25000$.Danscecas,lepaiementdecesfraisserarégiparlesrèglesd’arbitrage
applicables.Saufdispositioncontraireauxprésentes,LGpaieratouslesfraisdedépôtdedemandeetd’administration
ainsiqueleshonorairesdel’arbitreconformémentauxrèglesd’arbitrageapplicablesetàlaprésentedispositionsur
l’arbitrage.Sivousremportezl’arbitrage,LGrègleravosfraisethonorairesjuridiquesaprèsavoirdéterminés’ilssont
raisonnablesensefondantsurdesfacteurscomme,entreautres,lemontantdel’achatetlemontantdelaréclamation.
Sil’arbitrejugequelemotifdelaréclamationoulesréparationsdemandéessontfutilesousefondentsurdesmotifs
déplacés(auregarddesloisapplicables),lepaiementdetouslesfraisd’arbitrageserarégiparlesrèglesd’arbitrage
applicables.Dansuntelcas,vousacceptezderembourseràLGlatotalitédesmontantsversésqu’ilvousrevient
autrementdepayerenvertudesrèglesd’arbitrageapplicables.Saufdispositioncontraireetsielleremportel’arbitrage,
LGrenonceàtoussesdroitsdevousréclamerdesfraisethorairesjuridiques.

69GARANTIE LIMITÉE
FRANÇAIS
Audience et lieu de l’arbitrage.Sivotreréclamationestégaleouinférieureà25000$,vouspouvezopterpourun
arbitrageconduitselonl’unedesmodalitéssuivantesuniquement:1)surexamendesdocumentsremisàl’arbitre,2)par
audiencetéléphoniqueou3)paraudienceenpersonneselonlesdispositionsdesrèglesd’arbitrageapplicables.Sivotre
réclamationdépasse25000$,ledroitàuneaudienceseradéniparlesrèglesd’arbitrageapplicables.Lesaudiences
arbitralesenpersonnesetiendrontàl’endroitleplusprocheetlepluspratiquepourlesdeuxpartiessituédansvotre
provinceouvotreterritoirederésidence,saufsinousconvenonsmutuellementd’unautrelieuoud’unarbitragepar
téléphone.
Dissociabilité et renonciation.
SiunepartiedelaprésenteGarantielimitée(ycomprislesprésentesprocédures
d’arbitrage)n’estpasapplicable,lesdispositionsrestantesdemeurentenvigueurdanslamesurepermiseparlaloi
applicable.Lefaitdenepasexigerlastricteexécutiond’unedispositiondelaprésenteGarantielimitée(ycomprisles
présentesprocéduresd’arbitrage)nesigniepasquenousayonsrenoncéniquenousayonsl’intentionderenoncerà
toutedispositionoupartiedelaprésenteGarantielimitée.
Option de retrait.
Vouspouvezvousretirerdelaprésenteprocédurederèglementdedifférend.Danscecas,nivous
niLGnepouvezimposeràl’autrepartiedeparticiperàuneprocédured’arbitrage.Pourvousprévaloirdel’optionde
retrait,vousdevezenvoyerunpréavisàLGdanslestrente(30)jourscivilsàcompterdeladatedel’achatduproduit
parlepremieracheteuri)dansuncourrieladresséà[email protected]etdontlaligned’objetportelamention«Retrait
del’arbitrage»ouii)encomposantle1-800-980-2973.Quecesoitparcourrieloupartéléphone,vousdevrezdonnera)
votrenometvotreadresse;b)ladated’achatduproduit;c)lenomoulenumérodemodèleduproduitetd)lenuméro
desérie[qu’ilestpossibledetrouveri)surleproduitouii)enliqneauhttps://www.lg.com/ca_fr/soutien/reparation-
garantie/demande-reparation,
Trouvermesnumérosdemodèleetdesérie].
Si
vousvousprévalezdel’optionderetrait,lesloisdevotreprovinceouterritoirederésidencerégissentlaprésente
Garantielimitéeettoutdifférendentrenous,saufdanslamesureoùdetellesloissontsupplantéespardeslois
fédérales,provincialesouterritorialesapplicablesousontincompatiblesaveccesdernières.Sil’arbitragen’estpas
autorisépourrégleruneréclamation,unepoursuite,undifférendouunlitigenousopposant,nousnousenremettrons
àlacompétenceexclusivedestribunauxdevotreprovinceouterritoiredecompétencepourlerèglementdela
réclamation,delapoursuite,dudifférendoudulitigenousopposant
Vous
nepouvezvousprévaloirdel’optionderetraitquedelamanièredécriteplushaut(c’est-à-direparcourrielou
partéléphone).Aucunautretyped’avisneseraprisencomptepourleretraitdelaprésenteprocédurederèglement
dedifférend.Lefaitdeseretirerdelaprésenteprocédurederèglementdedifférendnecomprometd’aucunefaçon
laprotectionaccordéeenvertudelaGarantielimitée,etvouscontinuerezàjouirdetouslesavantagesprévusparla
Garantielimitée.Sivousconservezceproduitsansvousprévaloirdel’optionderetrait,vousacceptezlesconditions
généralesdeladispositionsurl’arbitrageénoncéeci-dessus.
Conit de modalités.
Encasdeconitoud’incompatibilitéentrelesmodalitésdelaprésentegarantielimitéeetle
contratdelicenced’utilisation(CLU)encequiconcernelerèglementdesdifférends,lesmodalitésdelaprésente
garantielimitéecontrôlentetrégissentlesdroitsetobligationsdespartiesetontpréséancesurleCLU.

70
MEMO

ESPAÑOL
MANUAL DEL PROPIETARIO
REFRIGERADOR CON
PUERTA FRANCESA
Lea detenidamente el manual del propietario antes de poner el
electrodoméstico en funcionamiento y consérvelo a mano en todo momento
para su referencia.
LFXS28596*/LFXS26973*/LFXS26596*
www.lg.com
Copyright © 2018 LG Electronics Inc. Todos los Derechos Reservados.

2
TABLA DE CONTENIDOS
3 CARACTERÍSTICAS DEL
PRODUCTO
4 INSTRUCCIONES DE SEGURIDAD
4 INSTRUCCIONES IMPORTANTES DE
SEGURIDAD
9 ESPECIFICACIONES DEL
PRODUCTO
10 DESCRIPCIÓN GENERAL DEL
PRODUCTO
10 Exterior
11 Interior
13 INSTALACIÓN
13 Descripción general de la instalación
14 Desempacando el refrigerador
14 Elección de la ubicación adecuada
16 Removiendo/Ensamblando Agarraderas
17 Removiendo/Ensamblando las Puertas y
Estantes.
23 Conectando la línea de agua
26 Nivelando y Alineando la Puerta
27 Encendido
28 FUNCIONAMIENTO
28 Antes de Usar
29 Panel de control
31 Dispensador de Hielo y Agua
32 Compartimento de Hielo
34 Dispensador de Hielo Automático
36 Almacenando Alimentos
39 Cajón para verduras de humedad controlada (En
Algunos Modelos)
40 Glide‘N’Serve
40 Durabase
®
40 Desprendiendo/Ensamblando los Recipientes de
Almacenamiento.
41 InstaView Puerta en Puerta (En algunos
modelos)
42 Función InstaView
43 Ajustando los Estantes del Refrigerador
44 FUNCIONES INTELIGENTES
44 Aplicación LG SmartThinQ
47 Función Smart Grid (Red Inteligente)
48 Función Smart Diagnosis ™ (Diagnóstico
Inteligente)
49 MANTENIMIENTO
49 Limpieza
50 Reemplazo del Filtro de Aire Fresco
50 Reemplazo del Filtro de Agua
55 SOLUCIÓN DE PROBLEMAS
55 Preguntas frecuentes
56 Antes de llamar al servicio técnico
64 GARANTÍA LIMITADA
64 PARA EE. UU.
67 PARA CANADÁ

3CARACTERÍSTICAS DEL PRODUCTO
ESPAÑOL
CARACTERÍSTICAS DEL PRODUCTO
Según el modelo, es posible que algunas de las siguientes funciones no estén disponibles.
CAJONES CON HUMEDAD CONTROLADA
Los cajones con humedad controlada están diseñados para mantener las frutas y los vegetales frescos y crujientes.
Controle la cantidad de humedad de los cajones para verduras mediante los ajustes de Frutas (humedad baja) o
Vegetales (humedad alta).
GLIDE ‘N’ SERVE
El compartimiento Glide‘N’Serve proporciona un espacio de almacenamiento con un control de temperatura variable
que mantiene el compartimiento más frío que el refrigerador. Es un lugar conveniente para almacenar emparedados o
carne a cocinar.
BISAGRA DE CIERRE AUTOMÁTICO
Las puertas del refrigerador y los cajones del congelador se cierran automáticamente mediante una leve presión. (La
puerta únicamente se cierra automáticamente cuando se encuentra abierta a un ángulo menor a 30°).
FUNCIÓN ICE PLUS
La producción de hielo se incrementa cuando la sección del congelador se mantiene en la temperatura más baja
durante un período de 24 horas.

4 INSTRUCCIONES DE SEGURIDAD
INSTRUCCIONES DE SEGURIDAD
LEA TODAS LAS INSTRUCCIONES ANTES DE UTILIZAR
Su seguridad y la de los demás son muy importantes.
Tanto en este manual como en el equipo, hemos proporcionado muchos mensajes de seguridad importantes.
Siempre debe leer y respetar todos los mensajes de seguridad.
Este es el símbolo de alerta de seguridad.
Este símbolo le advierte sobre posibles riesgos que pueden ocasionar lesiones o la muerte a usted o a otros.
El símbolo de alerta de seguridad siempre estará acompañado de las palabras "ADVERTENCIA" o
"PRECAUCIÓN" y seguido de un mensaje de seguridad importante.
Estos términos signican lo siguiente:
ADVERTENCIA
Podría sufrir lesiones graves o la muerte si no sigue las instrucciones.
PRECAUCIÓN
Puede resultar lesionado o causar daño al producto si no sigue las instrucciones.
Todos los mensajes de seguridad le dicen cuáles son los peligros potenciales, cómo evitarlos, y qué podría suceder
si no sigue las instrucciones.
INSTRUCCIONES IMPORTANTES DE SEGURIDAD
ADVERTENCIA
Para disminuir el riesgo de explosiones, incendios, descargas eléctricas, quemaduras,
lesiones o muerte para las personas que usen este artefacto, siga las precauciones
básicas, incluidas las siguientes:
Propuesta 65 de California
• Este producto contiene químicos conocidos por el estado de California por causar cáncer,
malformaciones de nacimiento u otros daños reproductivos. Lávese bien las manos después de su
manipulación. (Solo USA)
INSTALACIÓN
• Para reducir el riesgo de lesiones personales, respete todos los procedimientos de seguridad
recomendados por la industria, incluso el uso de guantes de manga larga y gafas de seguridad.
• Nunca intente operar este artefacto si se encuentra dañado, si no funciona correctamente, si no está
ensamblado por completo o si tiene piezas faltantes o rotas, incluido un cable o enchufe dañado.
• Conecte este producto únicamente a un tomacorriente dedicado, conectado a tierra, apto para usar
con este producto (115 voltios, 60 Hz, solo CA). El usuario tiene la responsabilidad de reemplazar un
tomacorriente de pared estándar de 2 tomas por un tomacorriente de pared estándar de 3 tomas.
• No use un tomacorriente que pueda apagarse con un interruptor. No use un cable de extensión.
• Posicione el electrodoméstico de un modo que le permita acceder fácilmente a la alimentación eléctrica.
• Al mover el electrodoméstico, tenga cuidado de no torcer ni dañar el cable de alimentación.
• Póngase en contacto con un centro de servicio autorizado antes de instalar o cambiar de lugar el
electrodoméstico.
• Por ninguna razón debe cortar o quitar la tercera clavija (tierra) del cable de alimentación.

5INSTRUCCIONES DE SEGURIDAD
ESPAÑOL
• Mantenga los materiales de empaque fuera del alcance de los niños. Los materiales de empaque pueden
ser peligrosos para los niños. Corren riesgo de asxia.
• No instale el electrodoméstico en un lugar húmedo o polvoriento, donde el aislamiento de las piezas
eléctricas podría deteriorarse.
• No coloque el electrodoméstico bajo la luz solar directa ni lo exponga a electrodomésticos que emitan calor,
como cocinas o calefactores.
• No doble ni pellizque en exceso el cable de alimentación, ni coloque objetos pesados sobre este.
FUNCIONAMIENTO
• No use este electrodoméstico para nes especiales, como para conservar medicamentos o materiales de
ensayo, usar en barcos, etc.
• NO permita que los niños entren y se paren o se cuelguen de las puertas o los estantes del
electrodoméstico. Podrían dañar el refrigerador o sufrir lesiones graves.
• No permita que los niños entren al electrodoméstico. Podrían quedar atrapados y sofocarse.
• Debe supervisar a los niños para asegurarse de que no jueguen con el electrodoméstico.
• Mantenga los dedos lejos de los puntos de riesgo de pinzamiento; las distancias de separación entre las
puertas y los gabinetes son necesariamente pequeñas. Tenga cuidado al cerrar las puertas cuando haya
niños cerca.
• No toque los alimentos congelados ni las partes metálicas del compartimento del congelador si tiene las
manos mojadas o húmedas. Hacerlo podría causar congelación.
• No vuelva a congelar alimentos congelados que se hayan descongelado por completo. Esto podría ser
peligroso para su salud.
• No use adaptadores ni enchufe el cable de alimentación en un alargador de múltiples tomacorrientes.
• No use un cable que tenga grietas o daño de abrasión en su longitud o en algún extremo del enchufe o
conector. Haga que personal de servicio calicado repare inmediatamente todo cable de energía que esté
gastado o dañado de alguna manera.
• No use el refrigerador ni toque el cable de alimentación con las manos mojadas.
• No modique ni extienda el cable de alimentación.
• No use un tomacorriente que no esté certicado. No enchufe el electrodoméstico en un tomacorriente de
pared dañado.
• No coloque las manos, los pies u otros objetos en la ventilación de aire ni en la parte inferior del
refrigerador. Si lo hace, podría sufrir lesiones personales o descargas eléctricas.
• Si se produce una fuga de gas (propano/GPL), asegúrese de que el área esté adecuadamente ventilada y
póngase en contacto con un centro de servicio autorizado antes de volver a usar el refrigerador. No toque
ni desarme el electrodoméstico ni el cable de alimentación del electrodoméstico.
• Ante la presencia de ruidos u olores extraños, o si sale humo del electrodoméstico, desconecte el cable de
alimentación de inmediato y póngase en contacto con un centro de servicio autorizado.
• No use fusibles (como cobre, alambre de acero, etc.) que no sean los fusibles estándar.
• No coloque ni use un aparato eléctrico dentro del electrodoméstico, a menos que sea de un tipo
recomendado por el fabricante.
• No introduzca animales con vida dentro del electrodoméstico.
• No coloque objetos pesados o frágiles, contenedores llenos de líquido, sustancias combustibles u objetos
inamables (como velas y lámparas) sobre el electrodoméstico.
• Evite el contacto con las partes móviles del mecanismo eyector o con el elemento de calor que dispensa
los cubos de hielo. NO introduzca los dedos en el mecanismo de fabricación automática de hielo con el
refrigerador enchufado.
• Al retirar hielo del dispensador, no use un contenedor frágil.
• Este artefacto no ha sido diseñado para ser utilizado por personas con capacidades físicas, sensoriales o
mentales disminuidas (incluidos niños) o que no cuenten con la experiencia o los conocimientos necesarios
para operarlo, salvo que una persona responsable de su seguridad les brinde la supervisión o la instrucción
pertinente en cuanto al uso del artefacto.
• Si se conecta a un circuito protegido con fusibles, utilice un fusible de retardo.

6 INSTRUCCIONES DE SEGURIDAD
MANTENIMIENTO
• No use secadoras eléctricas para secar el interior del producto.
• No prenda velas para remover el olor interno del producto.
• En el caso de fuga del refrigerante, aleje los objetos inamables del refrigerador. Asegúrese de que el área
esté bien ventilada y póngase en contacto con un centro de servicio autorizado.
• Mantenga materiales inamables y vapores, como gasolina, alejados del refrigerador.
• Este electrodoméstico está diseñado para uso doméstico y aplicaciones similares como areas de cocina en
tiendas, ocinas y lugares de trabajo; granjas; por clientes en hoteles, moteles y otros tipos de ambientes
residenciales; dormitorios; aplicaciones de abastecimiento y de servicios similares de no distribución.
• Los niños mayores de 8 años y las personas con capacidades físicas, sensoriales o mentales reducidas,
o sin experiencia o conocimientos pueden usar este electrodoméstico, si cuentan con la supervisión o la
instrucción necesarias sobre el uso seguro del electrodoméstico y comprenden los riesgos involucrados.
Los niños no deben jugar con el electrodoméstico. Los niños que no estén supervisados no deben realizar
la limpieza ni el mantenimiento del producto.
• Desenchufe el cable de alimentación antes de limpiar o reparar el electrodoméstico.
• Las luces del refrigerador y el compartimento del congelador son luces LED para interiores, y un técnico
calicado debe realizar el mantenimiento.
• En caso de apagón o tormenta eléctrica, desenchufe el cable de alimentación de inmediato.
• Apague la alimentación si ingresa agua o polvo en el electrodoméstico. Llame a un agente de servicio.
• No almacene contenedores de vidrio ni refrescos en el compartimento del congelador. Al congelarse, los
contenidos pueden expandirse, romper el contenedor y provocar lesiones.
• No almacene, desarme ni repare el electrodoméstico usted mismo ni permita que el personal no calicado
lo haga.
• Si se daña el cable de electricidad, solo el fabricante está autorizado para reemplazarlo, o bien su agente
de servicio técnico o una persona de calicación similar para prevenir riesgos.
• No almacene sustancias explosivas como latas de aerosol con propulsores inamables en este
electrodoméstico.
• No utilice ni ubique sustancias inamables (químicos, medicamentos, cosméticos, etc.) cerca del
refrigerador; tampoco los almacene dentro del refrigerador. No sitúe el refrigerador cerca de una fuente de
gas inamable.
ELIMINACIÓN
• Los electrodomésticos desechados o abandonados son peligrosos, incluso si se dejan de usar solo por
unos pocos días. Al momento de desechar el refrigerador, retire los materiales de embalaje de la puerta o
quite las puertas, pero deje los estantes en su lugar, a n de que los niños no puedan ingresar fácilmente a
este.
• Si desechara un refrigerador, asegúrese de retirar el refrigerante para que un miembro calicado del
personal de servicio lo deseche correctamente. Si usted libera el refrigerante, podría ser multado o
encarcelado de conformidad con la ley ambiental vigente.

7INSTRUCCIONES DE SEGURIDAD
ESPAÑOL
INSTRUCCIONES DE CONEXIÓN A TIERRA
• La conexión inadecuada del conductor de conexión a tierra puede resultar en riesgo de choque eléctrico.
Pregunte a un electricista calicado o al personal de servicio si no está seguro si el artefacto está
adecuadamente conectado a tierra. No modique el enchufe que viene con el artefacto. Si no cabe en el
contacto, pida que un electricista calicado instale un contacto apropiado.
• Haga que un técnico certicado verique que el tomacorriente de pared y los cables estén adecuadamente
conectados a tierra.
• Nunca tire del cable de alimentación para desenchufar el electrodoméstico. Agarre siempre el enchufe
rmemente y tire del mismo para retirarlo del tomacorriente. Si no hace esto, podría dañar el cable de
alimentación y generar un riesgo de incendio y descarga eléctrica.
PRECAUCIÓN
Para reducir el riesgo de lesiones leves o moderadas a personas, el mal funcionamiento
o daño al producto o propiedad cuando use este producto, siga las precauciones
básicas, incluido lo siguiente:
INSTALACIÓN
• No coloque el electrodoméstico en un lugar donde podría caerse.
• El refrigerador debe instalarse correctamente, teniendo en cuenta las instrucciones de instalación.
FUNCIONAMIENTO
• No use aerosoles cerca del electrodoméstico.
• Este refrigerador está destinado únicamente a usos domésticos y similares.
• No golpee ni aplique demasiada fuerza en las supercies de vidrio. No toque las supercies de vidrio si
están agrietadas o rotas.
• No llene ni envase en exceso los alimentos en los compartimentos de la puerta. Esto podría dañar el
compartimento o provocar lesiones personales al retirar los alimentos aplicando una fuerza excesiva.
• No llene demasiado el electrodoméstico con alimento. Si lo hace, puede causar lesión personal o daño a la
propiedad.
• No cuelgue ni coloque objetos pesados en el dispensador del electrodoméstico.
• No golpee ni aplique fuerza excesiva en las supercies de vidrio. Es posible que esto la rompa.
MANTENIMIENTO
• No use detergentes fuertes como cera o diluyentes para la limpieza. Limpie con un trapo suave.
• Retire los objetos extraños (como polvo y agua) de las clavijas del enchufe y las áreas de contacto. No use
un trapo mojado o húmedo para limpiar el enchufe.
• No rocíe agua directamente en el interior o exterior del electrodoméstico.
• Cuando estén fríos, no limpie los estantes de vidrio ni las tapas con agua caliente. Si se exponen a
cambios de temperatura repentinos, podrían romperse.
GUARDE ESTAS INSTRUCCIONES

8 INSTRUCCIONES DE SEGURIDAD
ADVERTENCIA
• Mantenga las aperturas de ventilación, en la cubierta del electrodoméstico o en la estructura incorporada,
despejadas de obstrucciones.
• No utilice dispositivos mecánicos u otros medios para acelerar el proceso de descongelado, con excepción
de aquellos recomendados por el fabricante.
• No dañe el circuito refrigerante.
• No utilice aparatos eléctricos dentro de los compartimientos de almacenaje de alimentos del
electrodoméstico, a menos que sean de un tipo recomendado por el fabricante.
• El gas refrigerante y de aislamiento usado en el electrodoméstico requiere procedimientos de desechado
especiales. Al desechar, por favor consulte con un agente de servicio o persona similarmente calicada.
Este electrodoméstico contiene una pequeña cantidad de refrigerante isobutano (R600a), gas
natural con alta compatibilidad ambiental, pero también combustible. Al transportar e instalar el
electrodoméstico, debe prestar atención para asegurar que ninguna parte del circuito refrigerante se
dañe. Fuga del refrigerante fuera de las pipas podría generar un incendio o causar una lesión ocular.
Si se detecta una fuga, evite cualquier llama descubierta o causas potenciales de incendio, y ventile el
ambiente en el que se encuentra el electrodoméstico por varios minutos.
A manera de evitar la creación de una mezcla de gas y aire inamable en caso ocurra una fuga
en el circuito refrigerante, el tamaño del ambiente en el que el electrodoméstico se ubica deberá
corresponder a la cantidad de refrigerante usada. El espacio debe ser de 10.8 pies cuadrados (1 metro
cuadrado) por cada 8g de refrigerante R600a dentro del electrodoméstico. La cantidad de refrigerante
en su electrodoméstico particular se muestra en la placa de identicación ubicada dentro del mismo.
Nunca inicie un electrodoméstico mientras este muestre algún signo defectuoso. En caso de dudas,
consulte con su distribuidor.

9ESPECIFICACIONES DEL PRODUCTO
ESPAÑOL
ESPECIFICACIONES DEL PRODUCTO
La apariencia y las especicaciones detalladas en este manual podrían variar debido a mejoras constantes en el
producto.
Requerimientos Eléctricos: 115 V, 60 Hz
Presión de Agua Min/Max: 20 - 120 psi (138 - 827 kPa)
Modelo LFXS28596*
Descripción Profundidad-estándar, Refrigerador de puerta francesa, congelador bajo
Peso neto 322 lb (146 kg)
Modelo LFXS26973*
Descripción Profundidad-estándar, Refrigerador de puerta francesa, congelador bajo
Peso neto 291 lb (132 kg)
Modelo LFXS26596*
Descripción Profundidad-estándar, Refrigerador de puerta francesa, congelador bajo
Peso neto 309 lb (140 kg)

10 DESCRIPCIÓN GENERAL DEL PRODUCTO
DESCRIPCIÓN GENERAL DEL PRODUCTO
Las ilustraciones en esta guía pueden diferir de los componentes y accesorios reales, los cuales están sujetos a
cambios sin previo aviso por parte del fabricante a n de introducir mejoras en el producto.
Exterior
3
4
5
1
6
7
9
8
2
3
4
1
7
9
8
2
Panel de control
Fija la temperatura del refrigerador y el congelador,
el estado del agua ltrada y el modo del
dispensador.
Dispensador de agua ltrada y hielo
Dispensa agua puricada y hielo.
EZ manija
Abre la puerta del congelador fácilmente.
Manija
Abre y cierra la puerta del refrigerador.
1
2
3
4
Botón de la puerta (en algunos modelos)
Abre el compartimiento Door-In-Door (puerta en
puerta).
InstaView Puerta en Puerta (En algunos modelos)
El compartimento InstaView Puerta en Puerta facilita
el acceso a artículos de consumo frecuentes.
Luz LED
La luz LED se enciende cuando se abre la puerta del
congelador.
Refrigerador
Mantiene los alimentos frescos.
Congelador
Mantiene los alimentos congelados.
5
6
7
8
9

11DESCRIPCIÓN GENERAL DEL PRODUCTO
ESPAÑOL
Interior
Puerta Estándar: LFXS26973*
10
2
3
4
5
6
11
7
14
12
13
8
1
10
11
14
12
13
9
2
3
4
5
6
7
1
Puerta-en-Puerta InstaView: LFXS26596*/LFXS28596*

12 DESCRIPCIÓN GENERAL DEL PRODUCTO
Lámparas LED interiores
Iluminan el interior del refrigerador.
Filtro de agua
Purica el agua.
NOTA
• El ltro debe cambiarse cada 6 meses.
Consulte la sección Reemplazo del ltro
de agua de este manual para obtener más
información.
Máquina de Hielo Interior (Refrigerador)
Aquí es donde el hielo se produce y almacena
automáticamente.
Cajón para verduras
Ayuda a mantener los vegetales y las frutas
crujientes.
Cajón para verduras con humedad controlada
(en algunos modelos)
Ayuda a mantener los vegetales y las frutas
crujientes, y controla la humedad.
Bandeja de puerta ja
Preserva las comidas o los tragos congelados.
Bisagra de cierre automático (en algunos
modelos)
Las puertas del refrigerador y los cajones del
congelador se cierran automáticamente mediante
una leve presión. (La puerta únicamente se cierra
automáticamente cuando se encuentra abierta a un
ángulo menor a 30°).
Recipiente de Hielo
Si necesita una gran cantidad de hielo, traslade el
hielo en el cesto de hielo de la puerta a un cesto de
almacenamiento de hielo en el congelador
.
Recipiente de Lácteos (En algunos modelos)
Almacena productos lácteos.
1
2
3
4
5
6
7
8
Caja Door-In-Door (puerta a puerta)
Un área conveniente de almacenamiento para los
alimentos usados con frecuencia que requieren un
fácil acceso.
Estante ajustable de refrigerador
Los estantes del refrigerador son ajustables
para satisfacer sus necesidades personales de
almacenamiento.
Glide‘N’Serve
Le permite almacenar productos alimenticios a una
temperatura diferente a la del resto del refrigerador.
Máquina de Hielo Automática (Congelador)
Máquina de hielo adicional en el congelador.
Cajón extraíble
Provee almacenaje adicional dentro del
compartimiento del congelador.
Durabase
®
y divisor Durabase
®
Proporciona almacenamiento para los productos
alimenticios de gran tamaño.
9
10
11
12
13
14

13INSTALACIÓN
ESPAÑOL
INSTALACIÓN
Descripción general de la instalación
Lea las siguientes instrucciones de instalación inmediatamente después de adquirir este producto o transportarlo a otra
ubicación.
Desempacando el
refrigerador
Elección de la ubicación
adecuada
Desensamblando /
Ensamblando
Conectando la línea
de agua
Nivelando y Alineando
la Puerta
PRECAUCIÓN
• Conecte únicamente a un suministro de agua
potable.
• Llene únicamente con agua potable.

14 INSTALACIÓN
Desempacando el refrigerador
ADVERTENCIA
• Utilice a dos o más personas para mover e instalar
el refrigerador. Si no lo hace, puede resultar en
lesiones en la espalda o de otro tipo.
• El refrigerador es pesado. Proteja el piso al mover
el refrigerador para limpieza o servicio. Siempre
empuje el refrigerador hacia afuera al moverlo. No
menee o sacuda el refrigerador al intentar moverlo
pues puede dañar el piso.
• Mantenga materiales inamables y vapores, como
gasolina, alejados del refrigerador. Si no lo hace
puede provocar un incendio, explosión o muerte.
NOTA
• Remueva la tapa y cualquier etiqueta temporal de
su refrigerador previo a su uso. No remueva ninguna
etiqueta de precaución, modelo y número de serie, o la
Hoja Técnica que se encuentra bajo la parte frontal del
refrigerador.
• Para remover cualquier resto de adhesivo o goma, frote
vigorosamente el área con su pulgar. El residuo de
adhesivo o goma también puede removerse facilmente
al frotar sobre él una pequeña cantidad de jabón líquido
para platos con sus dedos. Enjuague con agua tibia y
seque.
• No utilice instrumentos puntiagudos, alcohol para
frotar, uidos inamables o limpiadores abrasivos
para remover cinta adhesiva o goma. Estos productos
pueden dañar la supercie de su refrigerador.
• Reinstale o ajuste lo estantes como sea necesario.
Los estantes del refrigerador están instalados en
su posición de embarque. Reinstale los estantes
de acuerdo a sus necesidades de almacenamiento
individuales.
Elección de la ubicación
adecuada
Agua
El suministro de agua debe estar fácilmente conectado
para el dispensador de hielo automático.
NOTA
• La presión del agua debe ser de 20 - 120 psi ó 138
- 827 kPa o 1.4 - 8.4 kgf/cm
2
. Si el refrigerador es
instalado en un área con baja presión de agua (debajo
de 20 psi o 138 kPa o 1.4 kgf/cm) puede instalar una
bomba de refuerzo para compensar la baja presión.
Electricidad
Utilice un enchufe con conexión a tierra individual: 115
Volts, 60 Hz, AC Amps mínimo.
ADVERTENCIA
• No sobrecarge el cableado del hogar causando
peligro de incendio al conectar múltiples
electrodomésticos en el mismo enchufe del
refrigerador.
• Para reducir el riesgo de descarga eléctrica, no
instale el refrigerador en un área húmeda ni mojada.
Suelo
Para evitar ruido y vibración, la unidad debe ser instalada
y nivelada en un piso sólidamente construido. De ser
necesario, ajuste el nivel de las patas para compensar la
irregularidad del piso.
NOTA
• No es recomendable la instalación sobre alfombrado,
baldosas suaves o estructuras débilmente apoyadas.
Temperatura ambiente
Instale este electrodoméstico en un área donde la
temperatura esté entre 55 °F (13 °C) y 110 °F (43 °C).
Si la temperatura alrededor del electrodoméstico es
muy baja o alta, la capacidad de enfriamiento puede ser
afectada negativamente.

15INSTALACIÓN
ESPAÑOL
Dimensiones y Espacios
• Revise las dimensiones del electrodoméstico y el proceso de instalación para asegurar que haya suciente espacio
para mover el refrigerador a través de puertas o aperturas angostas.
• Si una apertura es muy angosta para que pase el refrigerador, las puertas de éste deberán ser removidas.
• La ubicación de instalación elegida para el refrigerador debería considerar espacio en la parte trasera de la unidad
para conexiones, circulación de aire y espacio en el frente para abrir las puertas y estantes.
• Una distancia muy pequeña entre los elementos adyacentes puede resultar en capacidad de enfriamiento reducida
y en cargos altos de consumo eléctrico. Deje al menos 24 pulgadas (610 mm) frente al refrigerador para abrir las
puertas, y al menos 2 pulgadas (50.8 mm) entre la parte trasera del refrigerador y la pared.
B
A
C
D
F
G
E
H
I
- Lista
LFXS26973*
LFXS26596*
LFXS28596*
A Profundidad sin agarrador
32 3/8"
(822 mm)
33 3/4"
(857 mm)
B Ancho
35 3/4"
(908 mm)
35 3/4"
(908 mm)
C Altura a la Punta de la Caja
68 3/8"
(1737 mm)
68 3/8"
(1737 mm)
D Altura a la Punta de la Bisagra
69 3/4"
(1772 mm)
69 3/4"
(1772 mm)
E Espacio T
rasero
2"
(50 mm)
2"
(50 mm)
F Profundidad sin Puerta
28 1/2"
(724 mm)
29 7/8"
(759 mm)
G
Profundidad (T
otal con Puerta
Abierta 90°)
47 1/8"
(1197 mm)
48 1/2"
(1232 mm)
I Espacio Frontal
22
5/8"
(575 mm)
24"
(610 mm)
H Profundidad con manija
36 1/4”
(921 mm)
34 7/8”
(886 mm)

16 INSTALACIÓN
Removiendo/Ensamblando
Agarraderas
• Es preferible remover las puertas del refrigerador al
moverlo a través de una apertura estrecha.
• La apariencia de los agarradores puede variar de como
se muestra.
ADVERTENCIA
Al armar o desarmar los agarradores del
refrigerador:
• Sujete el agarrador rmemente para evitar dejarlo
caer.
• No balancee el agarrador cerca de personas o
animales cercanos.
• Asegúrese de que el agujero en el soporte del
agarrador calce adecuadamente en el tornillo de la
tapa de la puerta. Ensamble los tornillos de presión
para jar el agarrador en su lugar.
• Asegúrese de que no existe una brecha entre la
puerta y el agarrador luego de haber ensamblado el
agarrador.
Herramientas necesarias
Llave Allen de 3/32 pulgadas
Llave Allen de 1/8 pulgadas
Llave Allen de 1/4 pulgadas
Removiendo los Agarradores del
Refrigerador
1
Aoje los tornillos de presión (1) con una llave Allen
de 3/32 pulgadas y remueva el agarrador.
2
Aoje la tornillería de montaje (2) que conecta la
puerta del refrigerador y el agarrador usando una
llave Allen de 1/4 pulgadas, y remueva la tornillería.
Ensamblando los Agarradores del
Refrigerador
1
Ensamble la tornillería de montaje (1) en ambos
extremos del agarrador con una llave Allen de 1/4
pulgadas.
2
Coloque el agarrador en la puerta calzando la parte
inferior del mismo con la tornillería de montaje y
asegurando los tornillos de presión (2) con una llave
Allen de 3/32 pulgadas.

17INSTALACIÓN
ESPAÑOL
Removiendo el Agarrador del Estante
del Congelador.
1
Aoje los tornillos de presión (1) ubicados en la parte
inferior del agarrador con una llave Allen de 1/8
pulgadas y remuévalo.
2
Aoje la tornillería de montaje (2) con una llave Allen
de 1/8 pulgadas y remuévala.
Ensamblando el Agarrador del Estante
del Congelador.
1
Ensamble la tornillería de montaje (1) en ambos
extremos del agarrador con una llave Allen de 1/4
pulgadas.
2
Coloque el agarrador en la puerta calzando la parte
inferior del mismo con la tornillería de montaje y
asegurando los tornillos de presión (2) con una llave
Allen de 1/8 pulgadas.
Removiendo/Ensamblando las
Puertas y Estantes.
Si la puerta de entrada es muy angosta para que el
refrigerador pase, remueva las puertas del mismo y
mueva el refrigerador, de costado, a través de la puerta.
ADVERTENCIA
• Utilice a dos o más personas para remover e instalar
las puertas del refrigerador y del congelador.
• Desconecte la fuente de electricidad del refrigerador
previo a instalarlo.
• No coloque las manos, los pies u otros objetos
en la ventilación de aire ni en la parte inferior del
refrigerador.
• Tenga cuidado al manejar la bisagra y el tapón.
• Remueva los alimentos y recipientes previo a
desprender las puertas.
• No sujete la manija al remover o reemplazar las
puertas ya que ésta podría destrabarse.
Herramientas necesarias
Llave Allen de 3/32 pulgadas
Llave Allen de 1/8 pulgadas
Llave Allen de 1/4 pulgadas
Removiendo la Puerta Izquierda del
Refrigerador
1
El suministro de agua está conectado a la parte
superior derecha de la supercie posterior del
refrigerador. Remueva el anillo del área conjunta.
Sujete la conexión del suministro de agua y empuje
gentilmente la pinza para destrabar la línea de
suministro de agua, como se muestra.
Pinza
NOTA
• El desmontaje del conducto de suministro de agua
sólo debe realizarse cuando se desmonta la puerta del
refrigerador izquierda.

18 INSTALACIÓN
2
Remueva el tornillo (1) de la cubierta de la bisagra
en la parte superior del refrigerador. Levante el
gancho (no visible), ubicado en la parte inferior del
lado delantero de la cubierta (2) con un destornillador
plano.
3
Remueva la cubierta y extraiga el tubo (1).
Desconecte todos los arneses de cables (2).
Desatornille el cable de tierra (3).
3
4
Rote la manija de la bisagra hacia la izquierda (1).
Levante la bisagra superior (2) libre del picaporte de
la manija de la bisagra.
(1
)
(2)
Picaporte de
la Manija de la
Bisagra.
PRECAUCIÓN
• Al liberar la bisagra del picaporte, tenga cuidado de
que la puerta no se caiga hacia adelante.
5
Levante la puerta del centro del perno de la bisagra y
remuévala.
PRECAUCIÓN
• Coloque la puerta, de adentro hacia afuera, en una
supercie que no la raye.
NOTA
Desensamblando / Ensamblando las Líneas de Agua
Pinza
Tubo
Inserte línea
Clip
(Correcto)
Removiendo la Puerta Derecha del
Refrigerador
1
Remueva el tornillo de la cubierta superior de la
bisagra (1). Levante el gancho (no visible), ubicado
en la parte inferior del lado delantero de la cubierta
(2) con un destornillador plano.

19INSTALACIÓN
ESPAÑOL
2
Destrabe el arnés de cable (1). En el modelo
InstaView, desatornille el cable a tierra (3)
3
3
Rote la manija de la bisagra hacia la izquierda (1).
Levante la bisagra superior (2) libre del picaporte de
la manija de la bisagra.
Picaporte de
la Manija de la
Bisagra.
PRECAUCIÓN
• Al liberar la bisagra del picaporte, tenga cuidado de
que la puerta no se caiga hacia adelante.
4
Levante la puerta del centro del perno de la bisagra y
remuévala.
PRECAUCIÓN
• Coloque la puerta, con el interior viendo hacia
arriba, sobre una supercie que no la raye.
Ensamblando la Puerta Derecha del
Refrigerador
Instale la puerta del lado derecho primero.
1
Asegúrese de que la funda de plástico esté insertada
al fondo de la puerta. Baje la puerta al centro del
perno de la bisagra como se muestra en la gura.
2
Ajuste la bisagra (1) sobre el picaporte de la manija
de la bisagra y encájela en su lugar. Rote la manija
(2) hacia la izquierda para asegurar la bisagra.
Picaporte de
la Manija de la
Bisagra.
3
Conecte el arnés del cable (1). En el modelo
InstaView, atornille el cable de tierra.
4
Coloque la cubierta (1) en su lugar. Inserte y asegure
el tornillo de la cubierta (2).

20 INSTALACIÓN
Ensamblando la Puerta Izquierda del
Refrigerador
Instale la puerta izquierda del refrigerador luego de haber
instalado la puerta derecha.
1
Asegúrese de que la funda de plástico esté insertada
al fondo de la puerta. Instale la puerta del refrigerador
en la bisagra del medio.
2
Ajuste la bisagra (1) sobre el picaporte de la manija
de la bisagra y encájela en su lugar. Rote la manija
en la dirección del reloj (2) y asegure la bisagra.
Picaporte de
la Manija de la
Bisagra.
3
Conecte todos los arneses de cables.
4
Introduzca el tubo de suministro de agua en el
agujero ubicado en la caja superior y tire de él a
través del plato trasero.
5
Sujete la conexión de suministro de agua y empuje
gentilmente la pinza para conectar la línea de
suministro de agua como se muestra. Introduzca
un tubo de al menos 5/8 pulgadas (15 mm) en el
conector. Introduzca el clip en el área de unión para
asegurar el tubo en su lugar.
Pinza
6
Coloque la cubierta (1) en su lugar. Inserte y asegure
el tornillo de la cubierta (2).
NOTA
Desensamblando / Ensamblando las Líneas de Agua
Pinza
Tubo
Inserte línea
Clip
(Correcto)
• Presione suavemente la pinza e inserte el tubo hasta
que únicamente una línea se muestre en él.
(Correcto) (Incorrecto)

21INSTALACIÓN
ESPAÑOL
Removiendo los Cajones del
Congelador
Para módelos con dos cajones de congelador, remueva
ambos de la misma manera.
El Estante Extraíble sobre el congelador no se muestra
por claridad.
ADVERTENCIA
Para reducir el riesgo de descarga eléctrica,
heridas en personas, y muerte, siga precauciones
básicas, incluyendo las siguientes:
• Utilice a dos o más personas para remover e
instalar las puertas del refrigerador y el estante del
congelador.
• Sea cuidadoso de bisagras cortantes en ambos
lados del estante.
• Al bajar el estante tenga cuidado de no dañar el
piso.
• No se siente o pare en el estante del congelador.
• Para prevenir accidentes, mantenga a los niños y
mascotas alejadas del estante. No deje el estante
abierto. Si el recipiente de almacenamiento
Durabase
®
es removido del estante del congelador, hay espacio
suciente para que un niño o mascota se introduzca
en él.
1
Despliegue el estante para extenderlo
completamente.
2
Levante y retire gentilmente el recipiente de hielo.
3
Levante la parte frontal del cajón hacia arriba y
retírela.
4
Remueva los tornillos de los rieles en ambos
extremos.
5
Agarre ambos lados del estante y levántelo para
removerlo de los rieles.
PRECAUCIÓN
• No sujete el agarrador mientras remueve o
reemplaza el estante. El agarrador puede caerse y
causar una herida personal.

22 INSTALACIÓN
6
Sujete ambos rieles y empújelos dentro
simultáneamente.
Ensamblando el Cajón del Congelador
1
Retire ambos rieles simultaneámente hasta que estos
se hayan extendido completamente.
2
Agarre el estante a cada lado y enganche los
soportes del mismo a las pestañas ubicadas a ambos
lados de los rieles.
PRECAUCIÓN
• No sujete el agarrador mientras remueve o
reemplaza el estante. El agarrador puede caerse y
causar una herida personal.
3
Baje la puerta a su posición nal y asegure los
tornillos localizados en ambos lados.
4
Empuje el cajón hacia atrás hasta que haga click en
su lugar.
5
Vuelva a colocar el recipiente de hielo en el estante.
Introduzca la canasta Durabase en el montaje del
riel.

23INSTALACIÓN
ESPAÑOL
Conectando la línea de agua
Antes de Iniciar
La instalación de esta línea de agua no está cubierta
por la garantía del refrigerador. Siga las instrucciones
cuidadosamente para minimizar el riesgo de costosos
gastos de agua.
De ser necesario, llame a un plomero calicado para
corregir el golpe de ariete previo a instalar la línea de
suministro de agua al refrigerador. Agua golpeando o
forjando tuberías residenciales puede causar daños
a partes del refrigerador y provocar fugas de agua o
inundaciones.
• Apague el dispensador de hielo (OFF) si el refrigerador
será usado previo a conectar la línea de agua.
• No instale la tubería del dispensador de hielo en
áreas donde la temperatura ambiente cae al punto de
congelación.
ADVERTENCIA
• Conecte únicamente a un suministro de agua
potable.
PRECAUCIÓN
• Para prevenir quemaduras y daños al producto,
únicamente conecte la línea de agua del refrigerador
a un suministro de agua fría.
• Utilice protección visual durante la instalación para
prevenir heridas.
Presión de Agua
Necesitará un suministro de agua fría.
Presión de Agua
modelos con
ltro de agua
20–120 psi
(138 - 827 kPa)
donde un
sistema de
ltración
de agua de
osmosis
inversa está
conectado a un
suministro de
agua fría
Mínimo 40-60 psi para revertir el
sistema de osmosis (2.8 – 4.2 kgf/cm
2
,
o menos de 2-3 segundos para llenar
una taza con capacidad de 7 oz).
Si la presión del agua del sistema de osmosis inversa es
menor a 20 psi o 138 kPa o 1.4 kgf/cm² (toma más de 4
segundos llenar una taza de 7 oz o capacidad de 198 cc)
• Revise para ver si el ltro de sedimentos en el sistema
de osmosis inversa está bloqueado. Reemplace el ltro
de ser necesario.
• Permita que el tanque de almacenamiento en el
sistema de osmosis inversa se vuelva a llenar luego de
uso intensivo.
• Si la presión del agua continúa baja, llame a un plomero
calicado y con licencia.
• Todas las instalaciones deben ser de acuerdo a los
requerimientos del código de plomería local.
Suministros Requeridos
• Cobre o Tubería PEX, ¼ pulgadas. diámetro externo,
para conectar el refrigerador al suministro de agua.
Asegúrese de que ambos extremos de la tubería
sean cortados de forma recta. Para determinar cuánta
tubería necesita, mida la distancia desde la válvula
de agua en la parte trasera del refrigerador hasta la
cañería de suministro de agua. Luego, agregue 8 pies
(2.4m). Asegúrese de que haya suciente tubería extra
(alrededor de 8 pies [2.4m] enrollados en 3 vueltas de
alrededor de 10 pulgadas. [25 cm] de diámetro) para
permitir movimiento al refrigerador desde la pared luego
de la instalación.
• Taladro eléctrico.
• Llave de ½ pulg. o una llave inglesa.
• Destornillador de hoja plana y Phillips.
• Dos tuercas de presión de ¼ pulgadas de diámetro
externo y 2 casquillos (fundas) para conectar el tubo
de cobre a la válvula de cierre y a la válvula de agua
del refrigerador.
• Si su línea de agua de cobre existente tiene una
adaptación acampanada al nal, compre un adaptador
(disponible en tiendas de plomería) para conectar la
línea de agua al refrigerador O corte la adaptación
acampanada con un cortador de tubos y luego use un
accesorio de compresión.

24 INSTALACIÓN
• Válvula de cierre para conectar a la línea de agua fría.
La válvula de cierre debe tener una toma de agua con
un diámetro interior mínimo de 5/32 pulgadas al punto
de conexión a la LÍNEA DE AGUA FRÍA. Las válvulas
de cierre tipo silla están incluidas en varios kits de
suministro de agua. Previo a su compra, asegúrese
de que la válvula de tipo silla acate sus códigos de
plomería locales.
NOTA
• Una válvula autopunzante de agua tipo silla no debería
ser utilizada.
Instrucciones de Instalación Línea de
Agua
ADVERTENCIA
Peligro de Descarga Eléctrica:
• Cuando use cualquier dispositivo eléctrico (Como un
taladro eléctrico) durante la instalación, asegúrese
de que su dispositivo está alimentado por batería,
tenga doble aislado o esté en tierra de manera que
prevenga el peligro de descarga eléctrica.
Instale la válvula de cierre en la línea frecuente de agua
potable más cercana.
1
Apague el suministro de agua principal.
Abra el grifo más cercano para aliviar la presión en
la línea.
2
Elija la ubicación de la válvula
Elija una ubicación para la válvula que sea fácilmente
accesible. Es mejor conectar a un lado de la tubería
vertical de agua. Cuando sea necesario conectar a
una tubería horizontal de agua, haga la conexión a
la parte superior o de costado, en vez de a la parte
inferior, para evitar el trasiego de cualquier sedimento
desde la tubería de agua.
3
Perfore el agujero para la Válvula
• Perfore un agujero de ¼ pulgadas en la tubería
de agua utilizando una broca punzante. Remueva
cualquier rebaba resultante de la perforación del
agujero en la tubería.
Tenga cuidado de no permitir
que agua escurra dentro del taladro. No perforar
un agujero de ¼ pulgadas puede resultar en una
producción reducida de hielo o en cubos más
pequeños.
NOTA
• La línea de montaje no puede ser tubería plástica
blanca. Plomeros certicados deben usar únicamente
tubería de cobre (tubería NDA #49595 o #49599) o
tubería de Polietileno de Vínculo Cruzado (PEX).
4
Sujete la válvula de cierre.
Sujete la válvula de cierre a la tubería de agua fría
con la abrazadera.
Abrazadera
Válvula de Cierre
Tipo Silla
Tubería
Vertical de
Agua Fría
NOTA
• Deberán cumplirse los códigos de plomería de la
mancomunidad de Massachusetts 248CMR. Las
válvulas de asiento son ilegales y su uso no está
permitido en Massachusetts. Consulte con su plomero
certicado.
5
Apriete la abrazadera.
Apriete los tornillos de la abrazadera hasta que la
arandela de sellado comience a hincharse.
Abrazadera
Arandela de Sellado
Arandela
Extremo de la Entrada de la
Arandela
NOTA
• No apriete en exceso la arandela o puede aplastar la
tubería.

25INSTALACIÓN
ESPAÑOL
6
Encamine la tubería
Encamine la tubería entre la línea de agua fría y el
refrigerador.
Encamine la tubería a través del agujero en la pared
o piso (detrás del refrigerador o gabinete base
adyacente) lo más cerca de la pared posible.
NOTA
• Asegúrese de que haya suciente tubería extra
(alrededor de 8 pies enrollados en 3 vueltas de
alrededor de 10 pulgadas de diámetro) para permitir
movimiento al refrigerador desde la pared luego de la
instalación.
7
Conecte la tubería a la válvula.
Coloque la tuerca de compresión y el casquillo
(lengüeta) para tubería de cobre al nal del tubo y
conéctelo a la válvula de cierre.
Asegúrese de que la tubería esté completamente
introducida dentro de la válvula. Apriete la tuerca de
compresión de forma segura.
Válvula de Cierre
Tipo Silla
Tuerca Espaciadora
Válvula de Salida
Tuerca de Compresión
Casquillo (lengüeta)
8
Enjuague el tubo.
Encienda el suministro de agua y Enjuague el tubo
hasta que el agua esté clara. Cierre el agua en la
válvula de agua cuando se haya eliminado alrededor
de 1/4 de agua a través del tubo.
9
Conecte el tubo al refrigerador.
NOTA
• Previo a llevar a cabo la conexión del refrigerador,
asegúrese de que el cable de energía de este no esté
conectado al enchufe de la pared.
• Remueva el tapón plástico exible de la válvula de
agua.
• Coloque la tuerca de presión y el casquillo (lengüeta) al
nal del tubo esté como se muestra.
• Introduzca el nal del tubo de cobre lo más lejos posible
en la conexión. Mientras sujeta el tubo, apriete la
adaptación.
Tubo Abrazadera
Tuerca de Compresión de 1/4
pulgadas.
Casquillo (lengüeta)
Tubo de 1/4 Pulgadas.
Conexión del Refrigerador
10
Abra el agua en la válvula de cierre.
Apriete cualquier conexión que muestre fugas.
PRECAUCIÓN
• Verique que no hayan fugas en las conexiones de
líneas de agua.

26 INSTALACIÓN
Nivelando y Alineando la Puerta
Nivelando
El refrigerador tiene dos puertas niveladoras frontales.
Ajuste las patas para alterar la inclinación de adelante
hacia atrás o de un lado al otro. Si el refrigerador se
ve inestable o las puertas no cierran fácilmente, ajuste
la inclinación del mismo siguiendo las instrucciones a
continuación:
1
Gire la pata de nivelación hacia la izquierda para
levantar ese lado del refrigerador o hacia la derecha
para bajarlo. Puede ser necesario nivelar las
patas varias veces para ajustar la inclinación del
refrigerador.
NOTA
• Una llave de tuerca acampanada funciona mejor, pero
una llave abierta será suciente. No apriete demasiado.
2
Abra ambas puertas y verique que cierren
fácilmente. Si las puertas no cierran fácilmente,
mueva un poco el refrigerador hacia atrás girando
ambas patas hacia la izquierda. Puede ser necesario
hacerlo varias veces, asegúrese de girar ambas
patas niveladoras en la misma proporción.
Alineamiento de la Puerta
Puerta Estándar
Tanto la puerta izquierda como la derecha del
refrigerador tienen una tuerca ajustable en la bisagra
inferior para levantarlas o bajarlas a manera de alinearlas
apropiadamente.
Si el espacio entre las puertas es desigual, siga las
instrucciones a continuación para alinear las puertas de
manera pareja.
Use la llave (Incluida con el manual del usuario) para
girar la tuerca en la bisagra de la puerta y así ajustar su
altura. Gire la tuerca hacia la derecha para levantar la
puerta o hacia la izquierda para bajarla.
Door-In-Door (Puerta en Puerta)
La puerta izquierda del refrigerador tiene una tuerca
ajustable en la bisagra inferior para levantarla o bajarla a
manera de alinearlas apropiadamente.
Si el espacio entre las puertas es desigual, siga las
instrucciones a continuación para alinear la puerta
izquierda:
Use la llave (Incluida con el manual del usuario) para
girar la tuerca en la bisagra de la puerta y así ajustar su
altura. Gire la tuerca hacia la derecha para levantar la
puerta o hacia la izquierda para bajarla.

27INSTALACIÓN
ESPAÑOL
La puerta derecha del refrigerador no tiene una tuerca
ajustable.
Si el espacio entre las puertas es desigual, siga las
instrucciones a continuación para alinear la puerta
derecha:
1
Con una mano, levante la sección interior y exterior
de la puerta derecha para elevarla en la bisagra
del medio. (puede ser más fácil levantarla con las
puertas abiertas)
2
Con la otra mano utilice un alicate para insertar el
anillo rápido en la bisagra del medio de la sección
interior de la puerta como se muestra. No introduzca
el anillo en la bisagra de la sección exterior de la
puerta.
3
Inserte anillos rápidos adicionales hasta que la
puerta esté alineada. (Dos anillos rápidos han sido
proveídos con la unidad.)
Encendido
Luego de la instalación, conecte el cable de corriente
a un enchufe con conexión a tierra de tres espigas y
empuje el refrigerador a su posición nal.
PRECAUCIÓN
• Conecte a un enchufe de potencia nominal.
• Haga que un técnico certicado verique que
el tomacorriente de pared y los cables estén
adecuadamente conectados a tierra.
• No dañe o corte la terminal de tierra del enchufe de
poder.
Posicione el Refrigerador
Arregle la bobina de tubería para que esta no vibre
contra la parte trasera del refrigerador o contra la pared.
Empuje el refrigerador hacia la pared.
Inicie el Dispensador de Hielo
Si la línea de agua está conectada, ajuste el interruptor
de encendido del dispensador de hielo a la posición ON.
El dispensador de hielo no empezará a operar hasta
que éste alcance su temperatura de operación de
15 °F (–9 °C) o menos. Éste empezará entonces a
operar automáticamente si el interruptor de poder del
dispensador de hielo está en la posición ON (I).

28 FUNCIONAMIENTO
FUNCIONAMIENTO
Antes de Usar
Limpie el refrigerador.
Limpie el refrigerador intensivamente y sacuda todo el polvo acumulado durante el envío.
PRECAUCIÓN
• No raye el refrigerador con objetos puntiagudos ni use detergente que contenga alcohol,
líquidos inamables o abrasivos al remover cualquier cinta o adhesivo del mismo. Remueva
los residuos de adhesivos borrándolos con su pulgar o detergente para platos.
• No despegue la etiqueta de número de serie, modelo o información técnica del panel trasero
del refrigerador.
Abra las puertas del refrigerador y del congelador para ventilar el interior.
El interior del refrigerador puede oler a plástico al inicio. Remueva toda cinta adhesiva del interior
del refrigerador y abra las puertas del refrigerador y los estantes del congelador para ventilación.
Conecte la fuente de energía.
Verique que la fuente de energía esté conectada previo a usar.
Lea la sección “Encendido”.
Espere a que el refrigerador enfríe.
Permita que el refrigerador funcione por al menos dos o tres horas previo a colocar alimentos
en él. Verique el ujo de aire frío en el compartimento del congelador para asegurar el enfriado
adecuado.
PRECAUCIÓN
• Si coloca alimentos en el refrigerador previo a que este haya enfriado puede causar que los
alimentos se echen a perder o que un mal olor permanezca en su interior.
El refrigerador hace un sonido fuerte luego de la operación inicial.
Esto es normal. El volumen disminuirá conforme la temperatura baje.

29FUNCIONAMIENTO
ESPAÑOL
Panel de control
Según el modelo, es posible que algunas de las siguientes funciones no estén disponibles.
Funciones del panel de control
1
2
3
4
5
6
7
8
9
NOTA
• Cuando el refrigerador está en Modo de Ahorro de Energía (Power Saving Mode), la pantalla permanecerá apagada
hasta que se abra una puerta o se presione un botón. Una vez hecho, la pantalla se mantendrá encendida por 20
segundos.
Ice Plus (Más Hielo)
Esta función incrementa tanto la producción de hielo como la capacidad de congelamiento.
• Presione el botón Ice Plus para iluminar el ícono y activar la función por 24 horas. La función se desactiva
automáticamente después de 24 horas.
• Detenga la función manualmente presionando el botón una vez más.
Smart Grid (Red inteligente)
Presione el botón Smart Grid para Encender/Apagar la función de Red Inteligente. Cuando la función está
activada, el ícono se ilumina. La función de Red Inteligente (Smart Grid) se activa automáticamente cuando el
refrigerador está conectado a la red Wi-Fi.
Cuando el refrigerador está respondiendo a un mensaje de Demanda de Respuesta (DR) de la compañía eléctrica,
el texto de la Red se ilumina.
Congelador
Indica la temperatura establecida del compartimento del refrigerador en grados Celsius (°C) o Fahrenheit (°F)
La temperatura predeterminada del congelador es de 0°F (-18 °C). Presione repetidamente el botón Freezer para
seleccionar una nueva temperatura desde -6 °F hasta 8 °F (-21 °C hasta -13 °C).
1
2
3

30 FUNCIONAMIENTO
Refrigerator Temperature (Temperatura del
Refrigerador)
Indica la temperatura establecida del compartimento
del refrigerador en grados Celsius (°C) o Fahrenheit
(°F)
La temperatura predeterminada del refrigerador
es de 37 °F (3°C). Presione repetidamente el
botón Refrigerator para seleccionar una nueva
temperatura desde 33 °F hasta 46 °F (1 °C hasta 8
°C).
NOTA
• Para cambiar el modo de temperatura de °F
a °C (o viceversa) mantenga presionado el
botón Refrigerator y Freezer Temperature
simultáneamente por aproximadamente cinco
segundos. El indicador de temperatura en la
ventana de visualización cambia entre Celsius y
Fahrenheit.
• Cuando el icono Replace Filter se encienda, es
el botón Fresh Air Filter por tres segundos para
apagar la luz del icono. Es recomendable cambiar
meses.
Fresh Air Filter (Filtro de Aire Fresco)
El Filtro de Aire Fresco ayuda a remover olores
del refrigerador. El Filtro de Aire Fresco tiene dos
modo Auto, el Filtro de Aire Fresco opera ciclos de
encendido y apagado de diez minutos encendido
y 110 minutos apagado. En el modo Potencia
(Power), el Filtro de Aire Fresco se mantiene
encendido continuamente por cuatro horas con
ciclos de encendido y apagado en incrementos de
diez minutos encendido y cinco minutos apagado.
Después de cuatro horas, el Filtro de Aire Fresco
regresa a modo Auto.
• Presione el botón Fresh Air Filter repetidamente
para alternar entre el modo Potencia y Auto.
NOTA
•
Replace Filter se encienda. Luego de reemplazar
Fresh Air Filter por tres segundos para apagar
aproximadamente cada seis meses.
* Lock (Bloqueo)
La función de Bloqueo (Lock) deshabilita todos los
demás botones en la pantalla.
• Cuando la energía es inicialmente conectada al
refrigerador, la función de Bloqueo (Lock) está
desactivada.
• Para bloquear los botones del panel de control,
mantenga presionado el botón Lock hasta que se
muestre el ícono cerrado de Lock
y la función
sea activada.
Water Filter (Filtro de agua)
Replace Filter se encienda. Luego de reemplazar
de Water Filter por tres segundos para apagar
aproximadamente cada seis meses.
* Wi-Fi
El botón Wi-Fi, al ser usado con la aplicación
para teléfonos inteligentes LG Smart Refrigerator,
permite al refrigerador conectarse a la red Wi-Fi
doméstica. Consulte las Funciones inteligentes para
aplicación.
El ícono Wi-Fi muestra el estado de la conexión de
red del refrigerador. El ícono se ilumina cuando el
refrigerador está conectado a la red Wi-Fi.
Presione y mantenga presionado el botón Wi-Fi
por 3 segundos para conectar a la red.
El ícono parpadea mientras la conexión está en
proceso, luego se enciende cuando se ha logrado
exitosamente.
Modo de Dispensador
Presione los botones para seleccionar cubos de
hielo, agua, o hielo triturado. La LED se ilumina
sobre el modo seleccionado.
y SABBATH (En algunos modelos)
El modo Sabbath es utilizado en el Sabbat y las
festividades Judías.
•
Para encender el modo Sabbath, presione la
pantalla para activarla, luego mantenga
presionados los botones Freezer (Congelador) y
Wi-Fi
3 segundos hasta que aparezca Sb en
la pantalla.
•
El modo Sabbath se desactiva automáticamente
después de 96 horas.
•
Para apagar el modo Sabbath manualmente,
mantenga presionados los botones Freezer
(Congelador) y
Wi-Fi
3 segundos.
•
Una vez encendido, el modo Sabbath se
mantendrá activo incluso si ocurre un apagón.
•
Elegir el modo Sabbath automáticamente
desactiva las funciones de Alarma.
El dispensador también se desactiva.
• Para deshabilitar la función de Bloqueo (Lock)
mantenga presionado el botón Lock por
aproximadamente tres segundos.

31FUNCIONAMIENTO
ESPAÑOL
PRECAUCIÓN
Modo de Visualización (Únicamente Para Uso de
Tiendas)
• El Modo de Visualización deshabilita toda
refrigeración en las secciones del refrigerador y
congelador para conservar energía mientras se
exhibe en una tienda minorista. Cuando se activa,
se muestra apagado (OFF) en el panel de control y
la pantalla permanece encendida por 20 segundos.
Para desactivar / activar:
• Con cualquier puerta del refrigerador abierta,
mantenga presionados los botones Refrigerator y
Ice Plus al mismo tiempo por cinco segundos. El
panel de control emite un pitido y la conguración
de la temperatura muestra la conrmación de que el
Modo de Exhibición está desactivado. Use el mismo
procedimiento para activar el Modo de Exhibición.
Dispensador de Hielo y Agua
PRECAUCIÓN
• Mantenga a los niños alejados del dispensador.
Pueden jugar o dañar los controles.
• Deseche las primeras series de hielo (alrededor de
140-160 cubos) luego de la instalación. Eso también
es necesario si el refrigerador no ha sido usado por
un largo tiempo.
• Si inesperadamente se dispensa hielo o agua,
apague el suministro de agua y contacte al Centro
de Información al Cliente LG Electronic.
• Nunca use un vaso que sea excepcionalmente
puntiagudo o loso. El hielo puede atascarse en el
paso de hielo y el desempeño del refrigerador puede
verse afectado.
Estructura del Dispensador
Palanca
Dispensador
Bandeja
Usando el Dispensador
(Incorrecto) (Correcto)
Agua
Hielo

32 FUNCIONAMIENTO
NOTA
• Para dispensar agua fría o hielo, presione la palanca
del dispensador con un vaso.
• El agua y hielo dispensado en el primer uso puede
incluir partículas u olor provenientes de la línea de
suministro o el tanque de agua. Deseche las primeras
series de hielo (alrededor de 140-160 cubos). También
es necesario si el refrigerador no ha sido usado por un
largo tiempo.
• El dispensador no funcionará cuando alguna de las
puertas esté abierta.
• Si hielo decolorado está siendo dispensado, verique
el ltro y el suministro de agua. Si el problema
continúa, contacte al Centro de Información al Cliente
LG Electronics. No utilice agua o hielo hasta que el
problema sea corregido.
• Dispense hielo dentro de un vaso previo a llenarlo con
agua u otra bebida. Pueden ocurrir salpicaduras si el
hielo es dispensado dentro de un vaso que ya contiene
líquido.
• Algo de goteado puede ocurrir luego de dispensar.
Sostenga la taza debajo del dispensador por algunos
segundos luego de dispensar para que esta recoja
todas las gotas.
• Mantenga los contenedores a una distancia apropiada
de los dispensadores. Los vasos altos y estrechos
deben ser sostenidos a una distancia prudente de la
salida de hielo para prevenir que el hielo se atasque en
la bandeja de drenaje. Un contenedor con una apertura
muy pequeña debe ser sostenido lo más cerca posible
del dispensador para evitar derrames.
• Mantenga el vaso a una distancia apropiada de la
salida de hielo. Un vaso sostenido muy cerca de la
salida puede evitar que el hielo sea dispensado.
Bloqueando el Dispensador
Presione el botón Lock en el panel de control por 3
segundos para bloquear o desbloquear el dispensador y
todas las funciones del panel de control.
Compartimento de Hielo
PRECAUCIÓN
• Mantenga las manos y herramientas fuera de la
puerta del compartimento de hielo y del canal del
dispensador. Si no lo hace, puede resultar en daños
o lesiones personales.
Mantenga la puerta del compartimento de hielo bien
cerrada. Si la puerta del compartimento de hielo
no está bien cerrada, el aire frío en el recipiente de
hielo congelará los alimentos en el compartimento
del refrigerador. Esto también puede causar que el
dispensador de hielo deje de producir hielo.
Recipiente de Hielo Interior
La máquina de hielo detiene la producción cuando
el recipiente interior está lleno. Para hacer espacio
para hielo adicional, vacíe el recipiente de hielo
en el recipiente adicional que se encuentra en el
compartimiento del congelador. Durante su uso,
el hielo podría apilarse de forma dispareja en el
recipiente, causando que la máquina de hielo identique
erroneamente el número de cubos de hielo y detenga la
producción. Sacudir el recipiente de hielo para nivelar los
cubos dentro de él puede reducir este problema.
PRECAUCIÓN
• Cuando manipule el recipiente de hielo, mantenga
sus manos alejadas del área de la bandeja del
dispensador para evitar lesiones.
• Los tarros de almacenamiento u otros artículos en el
recipiente de hielo dañarán el dispensador.
• Nunca use vasos delgados o contenedores de
cristal para recoger hielo. Dichos contenedores
pueden romperse o astillarse, dejando fragmentos
de vidrio en el hielo.
Si el dispensador de hielo está apagado (OFF) por
un período largo de tiempo, el compartimento de
hielo se calentará gradualmente a la temperatura del
compartimento del refrigerador. Para prevenir que
los cubos de hielo se derritan y escurran fuera del
dispensador, SIEMPRE vacíe el recipiente de hielo
cuando este esté apagado (OFF) por más de algunas
horas.
El paso de hielo puede bloquearse con escarcha si
solo se usa hielo picado. Remueva la escarcha que se
acumula retirando el recipiente de hielo y despejando
el paso con una espátula de goma. Dispensar cubos de
hielo también puede ayudar a prevenir la formación de
escarcha.

33FUNCIONAMIENTO
ESPAÑOL
Desprendiendo el Contenedor de Hielo Interior.
1
Tire gentilmente de la manija para abrir el
compartimiento de hielo.
2
Para remover el contenedor de hielo interior, agarre
la manija frontal, levante sutilmente la parte inferior y
retire lentamente el recipiente como se muestra.
Ensamblando el contenedor de hielo interior.
1
Inserte cuidadosamente el contenedor de hielo
interior, inclinando un poco la parte superior para que
calce debajo del dispensador.
2
Tire gentilmente de la manija para abrir el
compartimiento de hielo.
PRECAUCIÓN
• Cuando manipule el recipiente de hielo, mantenga
sus manos alejadas del área de la bandeja del
dispensador para evitar lesiones.
• Evite tocar la desconexión automática (brazo
sensitivo) mientras reemplaza el contenedor
de hielo. Vea la etiqueta en la puerta del
compartimiento de hielo para detalles.

34 FUNCIONAMIENTO
Dispensador de Hielo
Automático
Máquina de Hielo Interior
Switch de Encendido
Sensor detector de hielo
Máquina de hielo
NOTA
• El hielo es producido en la máquina de hielo automática
interior y enviado al dispensador. La máquina de hielo
produce de 70 a 182 cubos en un periodo de 24 horas,
dependiendo de la temperatura del compartimiento del
congel
ador, temperatura ambiente, la cantidad de veces
que se abre la puerta y otras condiciones de operación.
• Toma alrededor de 12 a 24 horas para que un
refrigerador recién instalado empiece a producir hielo.
• La producción de hielo se detiene cuando el contenedor
de hielo interior está lleno. Estando lleno, el contenedor
de hielo interior contiene aproximadamente de 6 a 8
(12-16 oz) vasos de hielo.
• La presencia de sustancias desconocidas o escarcha
en el sensor detector de hielo puede interrumpir la
producción del mismo. Asegúrese de que el área del
sensor esté limpia todo el tiempo para que opere
apropiadamente.
• Para incrementar la producción de hielo, use la función
Ice Plus. Esta función incrementa tanto la producción
de hielo como la capacidad de congelamiento.
ADVERTENCIA
Peligro de Lesión Personal
• NO coloque los dedos o manos en el mecanismo de
fabricación automática de hielo con el refrigerador
enchufado.
PRECAUCIÓN
Nunca almacene latas de bebidas u otros artículos
en el contenedor de hielo con el propósito de
rápido enfriamiento. Hacerlo puede dañar el
dispensador de hielo o causar la explosión de los
contenedores.
• Para evitar lesiones personales, mantenga las
manos fuera de la puerta y el paso de hielo.
Máquina de Hielo del Congelador
Switch de EncendidoDesconexión automática (brazo sensitivo)
NOTA
• La máquina de hielo automática del congelador produce
12 cubos a la vez, 50-110 cubos en un periodo de 24
horas si las condiciones son favorables. Esta cantidad
podría variar de acuerdo al ambiente (temperatura
ambiente alrededor del electrodoméstico, frecuencia
con la que se abre la puerta, cantidad de alimentos
almacenados
en el electrodoméstico, etc.).
• Si el recipiente de hielo está completamente lleno, la
producción de hielo se detendrá.
• Es normal escuchar el sonido del hielo cayendo en el
recipiente.
• La máquina de hielo produce hielo cuando han
transcurrido aproximadamente 48 horas después de la
instalación inicial del electrodoméstico.
• Deseche los primeros cubos de hielo producidos
después de la instalación inicial.
• Los cubos de hielo que se almacenen en el recipiente
por un largo periodo de tiempo podrían amonotonarse
y esto le podría dar dicultades al separarlos. Si esto
sucede, vacíe completamente el recipiente de hielo y
limpielo antes de re-instalarlo.

35FUNCIONAMIENTO
ESPAÑOL
Encendiendo o Apagando las Máquinas
de Hielo Automáticas
Para apagar una de las máquinas de hielo automáticas,
coloque el interruptor de la máquina en la posición OFF
(O). Para encender la máquina de hielo, coloque el
interruptor en la posición ON (I).
Sonidos Normales Que Puede Escuchar
• Mantener las máquinas de hielo encendidas antes de
haber conectado la linea de agua podría dañarlas.
• La válvula de agua de la máquina de hielo hará un
zumbido conforme se llene de agua. Si el interruptor
está en la posición de ENCENDIDO (I), el zumbido se
ejecutará incluso si aún no ha sido conectada al agua.
Para detener el zumbido, mueva el interruptor a la
posición de AP
AGADO (O).
• Escuchará el sonido de cubos de hielo cayendo en el
contenedor y agua corriendo por la tubería mientras el
dispensador de hielo se llena nuevamente.
NOTA
• No mantenga las máquinas de hielo encendidas si la
linea de agua no está conectada. Hacerlo poría dañar
las máquinas de hielo.
Preparando para Vacaciones
Congure ambos interruptores de las máquinas de hielo
a la posición OFF (O) y cierre el suministro de agua del
electrodoméstico.
Si la temperatura ambiente cae al punto de congelación,
contacte a un técnico calicado para drenar el sistema
de suministro de agua y así prevenir serios daños a la
propiedad debido a inundaciones causadas por la ruptura
de líneas de agua o conexiones.
NOTA
• El recipiente de hielo debe ser vaciado cada vez que
el interruptor de la máquina de hielo se mueva a la
posición APAGADO (O).

36 FUNCIONAMIENTO
Almacenando Alimentos
Dónde Almacenar Alimentos
Según el modelo, es posible que algunas de las siguientes funciones no estén disponibles.
Cada compartimento dentro del refrigerador está diseñado para almacenar distintos tipos de alimentos.
Almacene alimentos en el espacio óptimo para disfrutar del sabor más fresco.
Standard Door
1
2
3
5
4
6
8
9
Door-in-Door
7
1
2
8
9
3
5
4

37FUNCIONAMIENTO
ESPAÑOL
Máquina de Hielo Interior (Refrigerador)
Aquí es donde el hielo se produce y almacena automáticamente.
Almacenar Vegetales (Cajón para verduras)
Preserva vegetales y frutas.
Máquina de Hielo Automática (Congelador)
Aquí es donde el hielo se produce y almacena automáticamente.
Recipiente de hielo removible
Si necesita una gran cantidad de hielo, traslade el hielo en el cesto de hielo de la puerta a un cesto de
almacenamiento de hielo en el congelador.
Durabase
®
Espacio más amplio de almacenamiento en el congelador.
Recipiente de Productos Lácteos
Almacena productos lácteos como manteca y queso.
Caja Door-In-Door (puerta a puerta)
Almacenamiento conveniente para productos de uso frecuente como bebidas, manteca, margarina, queso crema,
mantequilla de maní y condimentos.
Estante ajustable de refrigerador
Estantes ajustables de acuerdo a sus necesidades de almacenamiento individuales.
Glide‘N’Serve (En Algunos Modelos)
Proporciona un espacio de almacenamiento con un control de temperatura variable que mantiene el compartimiento
a una temperatura diferente a la del refrigerador. Es un lugar conveniente para almacenar emparedados o carne a
cocinar.
1
2
3
4
5
6
7
8
9

38 FUNCIONAMIENTO
PRECAUCIÓN
• No llene ni envase en exceso los alimentos en los
compartimentos de la puerta. Esto podría dañar el
compartimento o provocar lesiones personales al
retirar los alimentos aplicando una fuerza excesiva.
• No almacene contenedores de vidrio en el
congelador. Al congelarse, los contenidos pueden
expandi
rse, romper el contenedor y provocar
lesiones.
• La temperatura del interior del compartimento
EasyReach™ es ligeramente inferior a la
temperatura del estante o a la del área del
contenedor de la puerta.
NOTA
-
Si se ausentará de casa por un corto período
de tiempo, como unas pequeñas vacaciones, el
refrigerador debe dejarse encendido. La comida
refrigerada que pueda ser congelada se preservará
por más tiempo si es almacenada en el congelador.
-
Si dejará el refrigerador apagado por un período largo
de tiempo, saque toda la comida y desconecte el
cable de corriente. Limpie el interior y deje la puerta
abierta para prevenir la formación de hongos en el
refrigerador.
-
No almacene alimentos con contenido muy húmedo
cerca del área superior del refrigerador. La humedad
podría entrar en contacto directo con el aire frío y
congelarse.
-
Lave los alimentos previo a almacenarlos en el
refrigerador. Frutas y vegetales deben ser lavados,
y empaques de alimentos deben ser limpiados para
evitar que alimentos cercanos sean contaminados.
-
Si el refrigerador se mantiene en un lugar caliente y
húmedo, abrir frecuentemente la puerta o almacenar
muchos vegetales en el refrigerador podría causar la
formación de condensación. Limpie la condensación
con un paño limpio o una toalla de papel.
-
Si la puerta del refrigerador o el estante del
congelador se abre y cierra muy a menudo, aire
caliente puede penetrarlo y elevar así su temperatura.
Esto puede incrementar los gastos de funcionamiento
de la unidad.
Consejos de Almacenamiento de
Alimentos
Envuelva o almacene alimentos en el refrigerador en
materiales herméticos y a prueba de humedad a menos
que se indique lo contrario. Esto previene que el olor
y sabor de los alimentos se transera a través del
refrigerador . Para productos con fecha de caducidad,
revise las fechas para asegurar su frescura.
Comida Cómo
Manteca o
Margarina
Mantenga manteca abierta en un
plato cerrado o compartimento
cerrado. Cuando almacene
suministros adicionales, envuélvalos
en empaquetado de congelado y
congele.
Queso
Almacene en empaquetado original
hasta que se use. Una vez abierto,
reempaque ajustadamente en
envoltorio plástico o papel aluminio.
Leche
Limpie las cajas de leche. Para leche
más fría coloque los contenedores
en un estante interior.
Huevos
Almacene en cartón original en el
estante interior, no en el estante de
la puerta.
Fruta
No lave o pele fruta hasta que esté
lista para ser usada. Organice y
mantenga la fruta en el cajón de
verduras en sus contenedores
originales, o almacénelas en bolsas
de papel completamente cerradas en
el estante del refrigerador.
Vegetales
Frondosos
Remueva el empaquetado de la
tienda, recorte o arranque áreas
descoloridas y dañadas, lave en agua
fría y escurra. Coloque en bolsas o
contenedores plásticos y almacene
en el cajón de verduras.
Vegetales
con cáscara
(zanahorias,
pimientos)
Coloque en bolsas o contenedores
plásticos y almacene en el cajón de
verduras.
Pescado
Congele pescado fresco y mariscos
si éstos no son consumidos
el mismo día de la compra. Es
recomendable comer pescado
fresco y mariscos el mismo día de la
compra.
Restos de
comida
Cubra los restos de comida con
envoltorio plástico o papel aluminio,
o almacénelos en contenedores
plásticos con tapas ajustadas.

39FUNCIONAMIENTO
ESPAÑOL
Almacenando Alimentos Congelados
Revise una guía de congelado o un libro de cocina
conable para mayor información acerca del
preparado de alimentos para congelado o tiempos de
almacenamiento.
Congelando
Su congelador no congelará rápidamente una gran
cantidad de alimentos. No coloque más alimentos
descongelados en el congelador que los que se enfriarán
durante las próximas 24 horas (no más de 2 a 3 libras de
comida por pie cúbico del espacio del congelador). Deje
suciente espacio en el congelador para que circule aire
alrededor de los empaquetados. Tenga cuidado de dejar
suciente espacio en la parte frontal para que la puerta
pueda cerrar correctamente.
El tiempo de almacenamiento variará dependiendo de
la calidad y el tipo de alimentos, el tipo de empaquetado
o envoltura utilizada (cuán hermética o a prueba de
humedad) y la temperatura de almacenaje. Los cristales
de hielo dentro de paquetes sellados son normales. Esto
simplemente signica que la humedad en la comida y
el aire dentro del empaquetado se han condensado,
creando hielos de cristal.
NOTA
• Permita que los alimentos calientes se enfríen a
temperatura ambiente por 30 minutos, y luego
empaque y congele. Enfriar alimentos calientes previo a
congelarlos ahorra energía.
Empaquetado
El congelamiento exitoso dependerá del empaquetado
correcto. Cuando cierre y selle el empaquetado, éste
no debe permitir que entre o salga aire o humedad. Si
lo hace, puede que el olor y sabor de sus alimentos se
transeran a través del refrigerador y esto puede también
causar que los alimentos congelados se sequen.
Recomendaciones de empaquetado
• Contenedores plásticos rígidos con tapas ajustadas.
• Enlatado de lados rectos / tarros de congelamiento
• Papel aluminio pesado
• Papel plasticado
• Empaques plásticos impermeables
• Bolsas plásticas autosellables para congelador.
Siga las instrucciones del empaque o contenedor para
métodos de congelamiento apropiados.
No use
• Envoltorios de pan
• Contenedores plásticos que no sean de polietileno
• Contenedores sin tapas ajustadas
• Papel de cera o envoltorios de congelado recubiertos
de cera.
• Envoltorio delgado y semipermeable.
Cajón para verduras de
humedad controlada (En
Algunos Modelos)
Los cajones proveen fruta y vegetales con un sabor
más fresco al permitirle controlar la húmedad dentro del
estante fácilmente.
Puede controlar la cantidad de humedad en los cajones
sellados ajustando el control a cualquier conguración
entre Vegetables (Vegetals) y Fruit (Fruta).
• Vegetables (Vegetals) mantiene aire húmedo en el
cajón para el mejor almacenaje de vegetales frescos y
frondosos.
• Fruit (Fruta) deja salir el aire húmedo del cajón para el
mejor almacenaje de fruta.

40 FUNCIONAMIENTO
Glide‘N’Serve (En algunos
modelos)
El compartimiento Glide‘N’Serve proporciona un espacio
de almacenamiento con un control de temperatura
variable que puede mantener el compartimiento a una
temperatura un poco diferente a la de la sección del
refrigerador. Este estante puede ser usado para bandejas
de esta, ambrería y bebidas. (Este estante no debe
ser usado para almacenar vegetales que requieren alta
humedad)
Presione el botón Select para elegir entre Produce
(Frío), Deli (Más Frío) and Meat (El más frío).
Durabase
®
El divisor Durabase
®
le permite organizar el área
Durabase
®
en secciones. Puede ser ajustado de lado a
lado para acomodar artículos de diferentes tamaños.
ADVERTENCIA
• Si el divisor Durabase
®
es removido, hay espacio
suciente para que niños o mascotas se introduzcan
en él. Para prevenir que un niño o mascota se
atasque o sofoque, NO permita que niños o
mascotas toquen o se acerquen al estante.
Desprendiendo/Ensamblando
los Recipientes de
Almacenamiento.
Algunos recipientes pueden variar en apariencia y solo
calzarán en una ubicación.
Glide'N'Serve y Cajones para verduras
1
Para remover el recipiente de humedad controlada
para verduras y el Glide'N'Serve, extraiga el
recipiente (1) o el Glide'N'Serve (2) a su máxima
extensión, levante la parte frontal, y retírelo
completamente.
2
Para instalar, incline el frente levemente hacia arriba,
inserte el cajón para verduras o estante en el marco y
empújelo hacia atrás en su lugar.

41FUNCIONAMIENTO
ESPAÑOL
Cubierta del recipiente para verduras
Para removerla, levante la parte frontal de la cubierta
hasta que ésta se separe de la pared trasera del
gabinete, luego retírela.
Contenedores de la Puerta
Los contenedores de la puerta son removibles para
limpieza y ajuste fácil.
1
Para remover el recipiente, simplemente levántelo y
extraiga directamente hacia afuera.
2
Para reubicar el recipiente, deslícelo hacia adentro
sobre el soporte deseado y empújelo hasta que calce
en su lugar.
PRECAUCIÓN
• Desprenda regularmente y lave los recipientes
y estantes de almacenamiento; estos pueden
contaminarse fácilmente por los alimentos.
• No aplique fuerza en exceso mientras desprende o
ensambla los recipientes de almacenamiento.
• No use lava platos para limpiar los recipientes y
estantes de almacenamiento.
InstaView Puerta en Puerta (En
algunos modelos)
El compartimento InstaView Puerta en Puerta facilita el
acceso a artículos de consumo frecuentes.
Golpee dos veces en el vidrio para encender o apagar la
luz led que se encuentra dentro del InstaView.
• La luz led se apaga automáticamente luego de 10
segundos.
• La luz led no enciende si la puerta derecha del
refrigerador está abierta.
• La función InstaView no se activa hasta dos segundos
después de cerrada la puerta.
Compartimiento Door-In-Door
Para acceder al compartimento InstaView Door in Door,
presione ligeramente el botón ubicado en la manija de la
puerta derecha del refrigerador.

42 FUNCIONAMIENTO
Función InstaView
La función InstaView en la Puerta en Puerta le permite
ver si se están agotando sus artículos de consumo más
frecuentes como bebidas y refrigerios, sin abrir la puerta
del refrigerador.
1
Presione la pantalla dos veces para encender o
apagar la luz LED del interior de la Puerta en Puerta.
2
La luz LED se apaga automáticamente después de
diez segundos.
• La función Knock-On está deshabilitada cuando la
puerta de la derecha del refrigerador está abierta,
durante dos segundos después de cerrar la puerta y
cuando el dispensador de hielo está en uso.
• Presione cerca del centro de la pantalla. Presionar
cerca de los lados de la pantalla puede que no active la
función InstaView Puerta en Puerta apropiadamente.
• Presione lo suficientemente fuerte para que el sonido
sea audible.
• La función InstaView Puerta en Puerta podría activarse
si ocurre un ruido fuerte cerca del
refrigerador.
Caja Door-In-Door (puerta a puerta)
Para abrir el compartimiento Puerta-en-Puerta, tire
uniformemente en el área marcada. El compartimiento
Puerta-en-Puerta es removible para facilitar su limpieza
y ajuste.
1
Para remover la caja Door-In-Door, levante y
extraiga.
2
Para reubicar la caja Door-In-Door, alinee las
pestañas en la caja Door-In-Door con las ranuras en
la puerta y empuje hacia abajo hasta que calce en su
lugar.
PRECAUCIÓN
• No sature los recipientes de la puerta ni cierre
las puertas con mucha fuerza. Puede que el
compartimiento Puerta-en-Puerta interior no cierre
apropiadamente o que se abra debido a la caída
de articulos, provocando daños al producto, a la
propiedad, o heridas personales.

43FUNCIONAMIENTO
ESPAÑOL
Ajustando los Estantes del
Refrigerador
Los estantes del refrigerador son ajustables para
satisfacer necesidades de almacenamiento individuales.
Su modelo puede tener estantes completos o divididos.
Ajustar los estantes para que quepan artículos de
diferentes tamaños hará más fácil la búsqueda de
artículos especícos.
Desprendiendo el Estante
(Tipo de Media Gaveta)
1
Incline hacia arriba la parte frontal del estante y luego
levántelo.
2
Retire el estante.
Ensamblando el Estante
(Tipo de Media Gaveta)
1
Incline el frente del estante hacia arriba y guíe los
ganchos hacia dentro de las ranuras a la altura
deseada.
2
Baje el frente del estante para que los ganchos
caigan dentro de las ranuras.
PRECAUCIÓN
• Asegúrese de que los estantes estén nivelados de
un lado al otro. No hacerlo puede ocasionar que el
estante caiga o los alimentos se derramen.
• No limpie los estantes de vidrio con agua caliente
mientras estén fríos. Los estantes podrían romperse
si se exponen a cambios de temperatura o impactos
repentinos.
• Los estantes de vidrio son pesados. Tenga especial
cuidado al removerlos.
Usando el Estante Plegable
Almacene artículos más altos, como un contenedor de
galón o botellas, empujando la mitad frontal del estante
debajo de la mitad trasera del mismo. Jale la mitad del
estante hacia adelante para regresarlo a un estante
completo.
PRECAUCIÓN
• Los estantes de vidrio son pesados. Tenga especial
cuidado al removerlos.
• No limpie los estantes de vidrio con agua caliente
mientras estén fríos. Los estantes podrían romperse
si se exponen a cambios de temperatura o impactos
repentinos.

44 FUNCIONES INTELIGENTES
FUNCIONES
INTELIGENTES
Aplicación LG SmartThinQ
La aplicación LG SmartThinQ le permite comunicarse
con el electrodoméstico usando un teléfono inteligente.
Previo a utilizar LG SmartThinQ
• Para electrodomésticos con el logo o .
1
Utilice un teléfono inteligente para vericar la
potencia del enrutador (Red Wi-Fi) cerca del
electrodoméstico.
• Si la distancia entre el electrodoméstico y el
enrutador inalámbrico es muy grande, la señal será
débil. Puede que le tome más tiempo registrarse o
que falle la instalación.
2
Desactive los Datos Móviles o Datos Celulares en
su teléfono inteligente.
3
Conecte su teléfono inteligente al enrutador
inalámbrico.
NOTA
• Para vericar la conexión Wi-Fi, revise que el ícono Wi-
Fi
en el panel de control esté encendido.
• El electrodoméstico funciona únicamente con redes Wi-
Fi de 2.4 GHz. Contacte a su proveedor de servicios de
internet o verique el manual del enrutador inalámbrico
para revisar la frecuencia de su red.
• LG SmartThinQ no es
responsable por ningún problema
de conexión en red, falla, mal funcionamiento o error
causado por la conexión de red.
• El entorno inalámbrico circundante puede hacer que el
servicio de red inalámbrica funcione lentamente.
• Si el aparato tiene problemas para conectarse a la red
Wi-Fi, es posible que se encuentre demasiado lejos
del router. Adquiera un repetidor Wi-Fi (extensor de
alcance) para mejorar la intensidad de la señal Wi-Fi.
• Es posible que la conexión de red no funcione bien por
cuestiones relacionadas con su proveedor de servicios
de Internet.
• Es posible que la conexión Wi-Fi no se conecte o se
interrumpa debido al entorno de la red doméstica.
• Si el electrodoméstico no puede registrarse debido a
problemas con la transmisión de la señal inalámbrica,
desconéctelo por aproximadamente un minuto, luego
vuelva a conectarlo e inténtelo de nuevo.
• Si el cortafuegos de su enrutador inalámbrico está
activado, desactivelo o añada una excepción a éste.
• El nombre de la red inalámbrica (SSID) debe ser una
combinación de letras y números. (No utilice símbolos
especiales)
• La interfaz de usuario (IU) del teléfono inteligente
puede variar dependiendo del sistema operativo (OS)
del móvil y del fabricante.
• Puede que la conguración de red falle si el protocolo
de seguridad del router está en WEP. Cambie el
protocolo de seguridad por otro (es recomendado el
WP
A2) y registre el producto de nuevo.
Instalando la aplicación LG SmartThinQ
Busque la aplicación LG SmartThinQ en la tienda Google
Play o App Store desde su teléfono inteligente. Siga las
instrucciones para descargar e instalar la aplicación.
NOTA
• Si elige el inicio de sesión simple para acceder a la
aplicación LG SmartThinQ, deberá realizar el proceso
de registro del electrodoméstico cada vez que cambie
de teléfono o reinstale la aplicación.

45FUNCIONES INTELIGENTES
ESPAÑOL
Funciones de la aplicación LG
SmartThinQ
• Para electrodomésticos con el logo o .
Actualización de Firmware
Mantiene el rendimiento del electrodoméstico
actualizado.
Administrador de Alimentos
Esta característica ayuda a buscar artículos en el
refrigerador y congelador, envía alertas cuando artículos
están cerca de sus fechas de caducidad, genera listas de
compras y vincula a recetas relacionadas.
Monitoreo de energía
Esta función lleva un registro del consumo de energía del
refrigerador y la cantidad de veces que se abrió la puerta.
Control Remoto
Controle la temperatura del refrigerador, el Filtro Fresh
Air y la función Ice Plus desde la aplicación para
telefonos inteligentes.
Mensajes Push
Si la puerta permanece abierta durante más de diez
minutos, recibirá un mensaje automático. También
recibirá un mensaje automático cuando la función Ice
Plus nalice.
Smart Diagnosis™
Esta función brinda información útil para diagnosticar y
resolver problemas con el producto conforme a su patrón
de uso.
Conguración
Le permite ajustar varias opciones en el refrigerador y en
la aplicación.
NOTA
• Si cambia su enrutador inalámbrico, proveedor de
servicios de internet, o su contraseña, por favor borre
el producto de LG SmartThinQ Ajustes →
Editar
Producto y regístrelo de nuevo.
• Esta información está actualizada en el momento de
su publicación. La aplicación está sujeta a cambios,
con nes de mejorar el producto, sin previo aviso a los
usuarios.
Conexión a Wi-Fi
El botón Wi-Fi, al ser usado con la aplicación LG
SmartThinQ, permite al refrigerador conectarse a la red
Wi-Fi doméstica. El ícono Wi-Fi muestra el estado de
la conexión de red del refrigerador. El ícono se ilumina
cuando el refrigerador está conectado a la red Wi-Fi.
Registro Inicial del Electrodoméstico
Ejecute la aplicación LG SmartThinQ y siga las
instrucciones en ella para registrar el electrodoméstico.
Volver a Registrar el Electrodoméstico o
Registrar Otro Usuario
Mantenga presionado el botón Wi-Fi por 3 segundos
para un apagado temporal. Ejecute la aplicación LG
SmartThinQ y siga las instrucciones en ella para registrar
el electrodoméstico.
NOTA
• Para desactivar la función Wi-Fi, mantenga presionado
el botón Wi-Fi por 3 segundos. El ícono Wi-Fi se
apagará.
Especicaciones módulo LAN
inalámbrico
Modelo LCW-004
Rango de
frecuencia
2412 - 2462 MHz
Rango de
frecuencia (max.)
IEEE 802.11 b : 22.44 dBm
IEEE 802.11 g : 24.68 dBm
IEEE 802.11 n : 24.11 dBm

46 FUNCIONES INTELIGENTES
Aviso de la FCC (para el módulo
transmisor contenido en este producto)
Este equipo fue probado y se determinó que cumple
con los límites para los dispositivos digitales de Clase
B, en conformidad con la parte 15 de las normas de la
FCC. Estos límites están diseñados para ofrecer una
protección razonable contra interferencias dañinas en
una instalación residencial. Este equipo genera, usa y
puede emitir energía de radiofrecuencia y, si no se instala
y utiliza de acuerdo con las instrucciones, podría causar
interferencias dañinas a las comunicaciones por radio.
Sin embargo, no se garantiza que dicha interferencia
no pueda ocurrir en instalaciones particulares. Si este
equipo causa interferencia dañina a la recepción de
radio o televisión, que se puede determinar encendiendo
y apagando el equipo, se aconseja al usuario intentar
corregir la interferencia realizando alguna de las
siguientes acciones:
• Reorientar o reubicar la antena receptora.
• Aumentar la separación entre el equipo y el receptor.
• Conectar el equipo a una toma de corriente en un
circuito diferente del utilizado por el receptor.
• Consultar al vendedor o a un técnico de radio/TV con
experiencia para solicitar ayuda.
Este dispositivo cumple con la parte 15 de las normas
de la FCC. La operación está sujeta a las dos siguientes
condiciones:
1) Este dispositivo no debe causar interferencia dañina, y
2) Este dispositivo debe aceptar cualquier interferencia
recibida, incluso aquellas que pudieran causar un
funcionamiento no deseado del dispositivo.
Cualquier cambio o modicación en la construcción
de este dispositivo, que no cuente con la aprobación
expresa de la parte responsable del cumplimiento, puede
anular la autorización del usuario para operarlo.
Declaración sobre exposición a la
radiación de RF de la FCC
Este equipo cumple con los límites de exposición a
la radiación de la FCC establecidos para entornos no
controlados. Este transmisor no se debe ubicar ni operar
junto con ninguna otra antena ni transmisor.
El equipo se debe instalar y operar con una distancia
mínima de 20 cm (7.8 pulg.) entre la antena y su cuerpo.
Los usuarios deben seguir las instrucciones de operación
especícas de manera tal de cumplir con las normas de
exposición a la RF.
Declaración de Industry Canada (Para
el módulo transmisor contenido en este
producto)
Este dispositivo cumple con las RSS exentas de licencia
de las industria de Canadá. Su funcionamiento queda
sujeto a las siguientes condiciones:
1) Puede que este dispositivo no cause interferencia; y
2) Este dispositivo debe aceptar cualquier interferencia
recibida, incluyendo interferencia que puede causar el
funcionamiento no deseado del dispositivo.
Declaración sobre Exposición a
Radiación de la IC
Este equipo cumple con los límites de exposición a
la radiación de la IC establecidos para entornos no
controlados.
Este equipo debe ser instalado y operado con una
distancia mínima de 20 cm (7.8 pulg.) entre la antena y
su cuerpo.
NOTA
• EL FABRICANTE NO SE HACE RESPONSABLE
DE CUALQUIER INTERFERENCIA DE TV O
RADIO CAUSADA POR MODIFICACIONES
NO AUTORIZADAS A ESTE EQUIPO. TALES
MODIFICACIONES PODRÍAN ANULAR LA
AUTORIDAD DEL USUARIO PARA PONER EL
EQUIPO EN FUNCIONAMIENTO.
Información de anuncio de programas
de código abierto
Para obtener el código fuente bajo GPL, LGPL, MPL
y otras licencias de código abierto que contiene este
producto, visite http://opensource.lge.com. Además del
código fuente, se pueden descargar los términos de la
licencia, las anulaciones de la garantía y los avisos de
derechos de autor.
LG Electronics también le proporcionará el código abierto
en un CD-ROM por un costo que cubra los gastos de
dicha distribución (como el costo del medio, del envío
y de la manipulación) una vez realizado el pedido por
correo electrónico a la dirección [email protected].
Esta oferta es válida solo durante un período de tres
años después de que se envíe el último cargamento de
este producto. Esta oferta es válida para todo aquel que
reciba esta información.

47FUNCIONES INTELIGENTES
ESPAÑOL
Función Smart Grid (Red
Inteligente)
Cuando el refrigerador opera en modo Red Inteligente,
la función Refrigerador Inteligente (Smart Refrigerator)
puede controlar el uso de energía o retrasar la operación
de algunas funciones para ahorrar energía durante
períodos de uso pico.
• Puede anular la función Red Inteligente en cualquier
momento (usando el botón o aplicación Smart Grid).
• Para usar la función Red Inteligente, necesita registrar
su electrodoméstico con su compañía eléctrica.
Características de la Aplicación Red
Inteligente
Ahorro Inteligente_Respuesta bajo Demanda
Puede bajar el uso de energía de acuerdo a las señales
de Respuesta a la demanda (DR) de la compañía de
energía. Si el refrigerador está funcionando en modo
ahorro inteligente de acuerdo a la señal DR, verá un
mensaje emergente.
Ahorro de Energía por Temporada
Menor uso de energía basado en un período de tiempo.
Usando la Función Red Inteligente
Esta característica responde a eventos de noticación de
su compañía eléctrica para llevar a cabo tareas de alto
consumo energético durante períodos no pico cuando
la demanda es baja. Estos eventos de noticación son
conocidos como señales de Respuesta Bajo Demanda.
Si el refrigerador recibe una señal de Respuesta Bajo
Demanda de la compañía eléctrica, activará el LED de
Red (Grid LED) en la pantalla y controlará su consumo
energético de acuerdo a la señal.
El refrigerador responderá a las señales recibidas
desde la compañía eléctrica siempre y cuando se le dé
mantenimiento al desempeño del producto.
Si el refrigerador recibe una señal de Respuesta Bajo
Demanda, operará en modo Retardo de Carga del
Electrodoméstico (DAL) o Reducción Temporal de Carga
del Electrodoméstico (TALR).
Retardo de Carga del Electrodoméstico (DAL)
El refrigerador responde a la señal DAL proporcionando
una reducción moderada de carga durante la duración
del período de retraso.
Este modo controla funciones que consumen mucha
energía como el ajustado del sistema de enfriado, ciclo
de descongelado y producción de hielo.
• Cuando el refrigerador opera en modo DAL, el LED
de Red (Grid LED) se ilumina en la pantalla del
refrigerador.
• El modo DAL es desactivado automáticamente luego
del período estipulado por la señal DAL (máx. 4 horas)
o cuando anula la función Red Inteligente.
Reducción Temporal de Carga del
Electrodoméstico (TALR)
El refrigerador responde a la señal TALR reduciendo
agresivamente la carga por un período corto de tiempo,
típicamente 10 minutos. Este modo reduce el consumo
de energía deteniendo el compresor y controlando las
funciones con mayor consumo de energía como el ciclo
de descongelado y el ventilador.
• Cuando el refrigerador opera en modo TALR, el
LED de Red (Grid LED) se ilumina en la pantalla del
refrigerador
.
• El modo TALR es desactivado automáticamente
luego de la duración recibida (máx. 10 minutos), o
cuando anula la función Red Inteligente. El modo es
desactivado inmediatamente y el refrigerador regresará
a su estado normal cuando la puerta sea abierta o
cerrada, o el dispensador sea usado.
Anule el Modo Red Inteligente
Para ignorar la señal de Respuesta bajo Demanda de la
compañía eléctrica y anular la función Red Inteligente,
presione el botón Smart Grid mientras el refrigerador
está en modo Red Inteligente.
Cuando anula la función Red Inteligente, el refrigerador
ignora la señal de Respuesta bajo Demanda y este ya
no es controlado por la compañía eléctrica hasta que la
siguiente es enviada. También puede anular la función
Red Inteligente usando la aplicación para teléfonos
inteligentes.
LG Abrir API
Puede administrar las características de Red Inteligente
para el Refrigerador Inteligente LG.
Sírvase revisar las especicaciones detalladas en la
página de aviso en us.smartthing.com.
Lista API
Respuesta bajo Demanda
• Enviar señal de respuesta bajo demanda
Ahorro de Energía
• Congurar modo de ahorro
• Obtener programación de DR/Retraso de
Descongelado
Monitoreo de energía
• Obtenga información de la apertura de la puerta.
• Obtenga información del consumo de energía
Capacidad de Retraso de Descongelado
• Introducir un evento de programación de retraso de
descongelado.
• Actualizar un evento de programación de retraso de
descongelado
• Borrar un evento de programación de descongelado
atrasado
• Obtener programación de descongelado atrasado.

48 FUNCIONES INTELIGENTES
Función Smart Diagnosis ™
(Diagnóstico Inteligente)
En caso de experimentar algún problema con el aparato,
el mismo tiene la capacidad de transmitir datos a través
de su teléfono al Centro de información del cliente de
LG. Los modelos equipados con NFC o Wi-Fi pueden
también transmitir datos a un teléfono inteligente usando
la aplicación LG Smart ThinQ.
Smart Diagnosis™ a través del Centro
de información al cliente
• Para electrodomésticos con el logo o
Este método le permite hablar directamente con uno de
nuestros especialistas calicados. El especialista registra
los datos transmitidos desde el aparato y los usa para
analizar el problema, así le brinda un diagnostico efectivo
y rápido.
1
Comuníquese con el Centro de información al cliente
de LG Electronics llamando al:
(LG EE.
UU.) 1-800-243-0000
(LG Canadá) 1-888-542-2623
2
Mantenga presionado el botón de bloqueo durante
tres segundos.
• Si la pantalla ha sido bloqueada por más de cinco
minutos, debe desactivar el bloqueo y luego
reactivarlo.
3
Abra la puerta derecha del refrigerador.
4
Mantenga el micrófono de su teléfono frente al
altavoz que se encuentra ubicado en la bisagra
derecha de la puerta del refrigerador, cuando así se
lo indique el centro de llamadas.
5
Mantenga presionado el botón Freezer por tres
segundos mientras continúa sujetando su teléfono
frente al altavoz.
6
Tras escuchar tres pitidos, suelte el botón Freezer.
7
Mantenga el teléfono en su sitio hasta que haya
terminado la transmisión de tonos. La pantalla
mostrará el recuento de tiempo. Una vez que haya
nalizado el recuento de tiempo y los tonos se
hayan detenido, reanude su conversación con el
especialista, quien podrá entonces asistirle en utilizar
la información transmitida para el análisis.
NOTA
• Para obtener resultados óptimos, no mueva el teléfono
mientras se transmitan los tonos.
• Si el agente del centro de atención no puede obtener
una grabación precisa de los datos, es posible que le
pida que lo intente nuevamente.
• La calidad de la función Smart Diagnosis™ depende de
la calidad de la llamada local.
• Una llamada de mala calidad podría provocar
problemas en la transmisión de datos enviados al
centro de llamadas desde su teléfono, perjudicando así
el funcionamiento de Smart Diagnosis™ .
Red Wi-Fi
• Para electrodomésticos con el logo o
Use la función Smart Diagnosis en la aplicación LG
SmartThinQ para ayudar a diagnosticar problemas sin la
ayuda del Centro de información al cliente de LG.
Siga las instrucciones en la aplicación LG SmartThinQ
para realizar un diagnóstico inteligente usando su
teléfono inteligente.

49MANTENIMIENTO
ESPAÑOL
MANTENIMIENTO
Limpieza
ADVERTENCIA
• Utilice un limpiador no inamable. Si no lo hace,
puede resultar en incendio, explosión o muerte.
PRECAUCIÓN
• No use un trapo abrasivo o esponja mientras limpia
el interior y exterior del refrigerador.
• No coloque su mano en la supercie inferior del
refrigerador cuando abra y cierre las puertas.
• Al liberar la bisagra del picaporte, tenga cuidado de
que la puerta no se caiga hacia adelante.
Consejos Generales de Limpieza
• Tanto las secciones del refrigerador como del
congelador se descongelan automáticamente; sin
embargo, limpie ambas secciones una vez al mes para
prevenir olores.
• Limpie derrames inmediatamente.
• Desconecte el refrigerador o la corriente eléctrica previo
a la limpieza.
• Remueva todas las partes removibles, como los
estantes.
• Use una esponja limpia o un paño suave y un
detergente ligero en agua tibia. No utilice abrasivos o
limpiadores ásperos.
• Lave a mano, enjuague y seque todas las supercies
intensivamente.
• Al limpiar el interior o exterior del electrodoméstico, no
utilice un cepillo de dientes, pasta dental, o materiales
inamables. No utilice agentes de limpieza que
contengan sustancias inamables.
-
Esto podría causar decoloración o daños al
electrodoméstico.
-
Sustancias inamables: alcohol (etanol, metanol,
alcohol isopropílico, alcohol isobutílico, etc.),
disolventes, cloro, benceno, líquidos inamables,
abrasivos, etc.
Exterior
Sustancias inamables: alcohol (etanol, metanol, alcohol
isopropílico, alcohol isobutílico, etc.), disolventes, cloro,
benceno, líquidos inamables, abrasivos, etc.
Para productos con un exterior de acero inoxidable
negro, rocíe limpiador de vidrio en un paño limpio de
microbra y frote en dirección de la bra. No rocíe
limpiador de vidrio directamente al panel de pantalla. No
utilice limpiadores ásperos o abrasivos.
Para productos con un exterior de acero inoxidable
estándar, use un paño húmedo de microbra y frote
en dirección de la bra. Seque con una toalla de papel
para evitar rayones. Para manchas rebeldes y huellas
digitales, use algunas gotas de jabón líquido para platos
en agua y enjuague con agua caliente antes de secar. No
utilice abrasivos o limpiadores ásperos.
Paredes Interiores
• Permita que el congelador se caliente para que el paño
no se pegue.
Como ayuda para remover olores, lave el interior del
refrigerador con una mezcla de bicarbonato de sodio y
agua tibia. Mezcle 2 cucharadas de bicarbonato de sodio
con 1 cuarto de galón de agua (26 g de bicarbonato en 1
litro de agua). Asegúrese de que el bicarbonato de sodio
está completamente disuelto para que este no raye las
supercies del refrigerador .
Revestimientos de Puertas y Juntas
Use una esponja limpia o un paño suave y un
detergente ligero en agua tibia. No utilice ceras de
limpieza, detergentes concentrados, lejías o limpiadores
que contengan petróleo en las partes plásticas del
refrigerador.
Partes Plásticas (Cubiertas y Paneles)
Use una esponja limpia o un paño suave y un detergente
ligero en agua tibia. No utilice limpiadores de vidrio,
limpiadores abrasivos o líquidos inamables. Estos
pueden rayar o dañar el material.
Bobinas del Condensador
Use una aspiradora con un cepillo o hendedura
adjunta para limpiar la cubierta y los respiraderos del
condensador. No remueva el panel que cubre el área de
las bobinas del condensador.

50 MANTENIMIENTO
Reemplazo del Filtro de Aire
Fresco
Reemplace el ltro de aire:
• Aproximadamente cada seis meses.
• Cuando el icono Replace Filter
se encienda.
Fresh Air Filter (Filtro de Aire Fresco)
1
Gire la cubierta del ltro a la izquierda para
desprenderla de la pared del refrigerador. Remueva
el ltro de la cubierta.
• El ltro está ubicado en la parte interior de la
cubierta del ltro.
2
Coloque el nuevo ltro dentro de la cubierta con el
lado que dice Frente mirando hacia afuera.
3
Gire la cubierta del ltro hacia la derecha para
sujetarla a la pared del refrigerador.
4
Mantenga presionado el boton Fresh Air Filter por
tres segundos para reiniciar el sensor del ltro.
Reemplazo del Filtro de Agua
Reemplace el ltro de agua:
• Aproximadamente cada seis meses.
• Cuando el ícono Replace Filter
se encienda.
• Cuando disminuya la potencia del dispensador de agua.
Antes de Reemplazar el Filtro de Agua:
Si el estante superior, localizado debajo del ltro de agua,
está en la posición más alta, este deberá ser removido
previo a reemplazar el ltro de agua.
Para retirar cualquier estante : Levante el frente del
estante (1)y tire hacia arriba (2). Retire el estante.
1
Retire el ltro de agua viejo
Baje o remueva el estante superior izquierdo para
permitir al ltro de agua girar totalmente hacia abajo.
Pulse el botón de presión para abrir la cubierta del
ltro de agua.
NOTA
• Reemplazar el ltro de agua causa que una pequeña
cantidad de agua (alrededor de 1 oz o 25 cc) se drene.
• Envuelva un paño alrededor de la parte delantera de la
cubierta del ltro de agua para recoger cualquier goteo.
En cuanto sea removido, sostenga el ltro de agua en
posición vertical, para prevenir que cualquier remanente
de agua salga del ltro.

51MANTENIMIENTO
ESPAÑOL
2
Tire hacia abajo del ltro de agua y gírelo hacia
la izquierda antes de retirarlo. Asegúrese de rotar
completamente el ltro hacia abajo antes de retirarlo
de la abertura.
3
Reemplace con un nuevo ltro de agua.
Desempaque su nuevo ltro de agua y remueva la
cubierta protectora de los anillos. Con las pestañas
del ltro de agua en posición horizontal, introduzca
el nuevo ltro en la abertura y gírelo hacia la derecha
hasta que se detenga.
4
Cierre la cubierta del ltro de agua. La cubierta hará
clic al cerrarla correctamente.
5
Luego de reemplazar el ltro de agua, dispense
2.5 galones de agua (deje correr el agua por
aproximadamente 5 minutos) para remover el aire
atrapado y los contaminantes del sistema.
NOTA
• No dispense los 2.5 galones completos de manera
continua. Presione y suelte el botón del dispensador
en ciclos de 30 segundos ENCENDIDO y 60 segundos
APAGADO.
6
Luego de cambiar el ltro, mantenga presionado el
botón Water Filter por tres segundos para reiniciar el
sensor del ltro.
NOTA
Para comprar un ltro de agua de repuesto:
• Visite a su proveedor o distribuidor local
• Busque usando "ltro de agua" en lg.com
• Utilice cartucho de reemplazo: ADQ747935**
Para mayor asistencia, llame al:
1-800-243-0000 (USA)
1-888-542-2623 (Canadá)

52 MANTENIMIENTO
Hoja de Datos de Rendimiento
Modelo: LT1000P Utilice cartucho de reemplazo: ADQ747935**
La concentración de las sustancias indicadas en el agua que entra al sistema se redujo a una concentración menor o
igual al límite permisible para el agua de salida según lo especicado en NSF/ANSI Estándar 42 and Estándar 53.
Sistema probado y certicado por NSF Internacional en contra de NSF/ANSI Estándar 42, Estándar
43 y Estándar 401 para la reducción de las siguientes sustancias.
Reducción de
Sustancia
Dicultad
de Auencia
Promedio
Concentración
Objetivo
especicada
por NSF
% Reducción
Promedio
Concentración
Media de
Producto en
Agua
Concentración
Máxima
Permisible de
Producto en
Agua
Requisitos de
Reducción
NSF
Olor y Sabor a
Cloro
2.0 μg/L 2.0 μg/L± 10% >97.5% 0.050 μg/L N/A ≥ 50.00%
Partícula
Nominal Clase
I, , ≥ 0.5 a <
1.0 μm
12,000,000 pts/
mL
Al menos
10,000
partículas/mL
99.80% 24,000 pts/ml N/A ≥ 85.00%
Asbesto 180 MFL
De 10
7
a 10
8
MFL; bras de
una longitud
mayor a 10
μg/L in
>99.00% < 1 MFL N/A ≥ 99.00%
Atracina 8.5 μg/L 9.0 μg/L ± 10% >94.10% 0.500 μg/L 3.0 μg/L NA
Benceno 15.0 μg/L
15.0 μg/L ±
10%
>96.60% 0.510 μg/L 5.0 μg/L NA
Carbofurano 74.0 μg/L
80.0 μg/L ±
10%
98.30% 1.258 μg/L 40 μg/L NA
Lindano 1.9 μg/L 2.0 μg/L ± 10% >99.00% 0.019 μg/L 0.2 μg/L NA
P-Diclorobenceno
230.0 μg/L
225.0 μg/L ±
10%
>99.80% 0.460 μg/L 75.0 μg/L NA
2,4-D 210.0 μg/L
210.0 μg/L ±
10%
>99.90% 0.210 μg/L 70.0 μg/L NA
Plomo pH
@6.5
140.0 μg/L
150.0 μg/L ±
10%
99.60% 0.560 μg/L 10.0 μg/L NA
Plomo pH
@8.5
150.0 μg/L
150.0 μg/L ±
10%
>99.70% <0.500 μg/L 10.0 μg/L NA
Mercurio @ pH
6.5
5.9 μg/L 6.0 μg/L ± 10% 91.00% 0.531 μg/L 2.0 μg/L NA
(Continúa en la siguiente página)

53MANTENIMIENTO
ESPAÑOL
Reducción de
Sustancia
Dicultad
de Auencia
Promedio
Concentración
Objetivo
especicada
por NSF
% Reducción
Promedio
Concentración
Media de
Producto en
Agua
Concentración
Máxima
Permisible de
Producto en
Agua
Requisitos de
Reducción
NSF
Mercurio @ pH
8.5
5.6 μg/L 6.0 μg/L ± 10% 92.5% 0.420 μg/L 2.0 μg/L NA
Bacterias*
100,000
quistes/L
Mínimo
de 50,000
bacterias/L
>99.99% 10 quistes/L N/A ≥ 99.95%
Atenolol 240 ng/L 200 ± 40% ng/L > 95.50% 10.80 ng/L 30 ng/L NA
Carbamazepina
1600 ng/L
1400 ± 40%
ng/L
98.40% 25.60 ng/L 200 ng/L NA
DEET 1600 ng/L
1400 ± 40%
ng/L
97.10% 46.40 ng/L 200 ng/L NA
Trimetoprima 170 ng/L 140 ± 40% ng/L >96.80% 5.44 ng/L 20 ng/L NA
Linuron 160 ng/L 140 ± 40% ng/L >96.60% 5.44 ng/L 20 ng/L NA
Fenitoína 200 ng/L 200 ± 40% ng/L >94.80% 10.40 ng/L 30 ng/L NA
Ibuprofeno 400 ng/L 400 ± 40% ng/L >94.50% 22.00 ng/L 60 ng/L NA
Naproxeno 140 ng/L 140 ± 40% ng/L >96.10% 5.46 ng/L 20 ng/L NA
Estrona 120 ng/L 140 ± 40% ng/L >96.10% 4.68 ng/L 20 ng/L NA
Bisfenol A 2000 ng/L
2000 ± 40%
ng/L
>98.90% 22.00 ng/L 300 ng/L NA
Nonilfenol 1600 ng/L
1400 ± 40%
ng/L
>97.10% 46.40 ng/L 200 ng/L NA
• Basado en el uso de ooquistes de Crypstosporidium parvum.

54 MANTENIMIENTO
Lineamientos de Aplicación / Parámetros de
Suministro de Agua
Flujo de
Servicio
0.5 gpm (1.9 lpm)
Suministro de
Agua
Pozo Comunitario o Privado - Agua
Potable
Presión de
Agua
20 – 120 psi (138 – 827 kPa)
Temperatura
del agua
33 °F – 100 °F (0.6 °C – 37.8 °C)
Capacidad 200 galones (757 litros)
Es indispensable que se realicen la instalación
recomendada por el fabricante, el mantenimiento y
los requerimientos de remplazo del ltro para que el
producto se desempeñe adecuadamente.
NOTA
• Aunque se llevaron a cabo las pruebas en condiciones
estándar de laboratorio, el desempeño real podría
variar.
Cartucho de Reemplazo: L
T1000P ADQ747935**
Para ltros de reemplazo, visite a su proveedor o
distribuidor local o busque "ltros de agua" en el sitio web
lg.com.
Para mayor asistencia, contácte al Centro de Información
al Cliente de LG Electronics.
USA: 1-800-243-0000
Canadá: 1-888-542-2623
LG es una marca registrada de la corporación LG.
NSF es una marca comercial de NSF International.
Manufacturado por LG Electronics por:
LG Electronics, INC
170, Sungsanpaechoungro, Seongsan-gu,
Gyeongsangnam-do, LA REPÚBLICA DE COREA.
ADVERTENCIA
Para reducir el riesgo asociado con asxia:
• No permita que los niños menores de 3 años tengan
acceso a las piezas pequeñas durante la instalación
de este producto.
Para reducir el riesgo asociado con la ingesta de
contaminantes:
• No utilice con agua que no sea segura en términos
microbiológicos o de calidad desconocida, sin
la adecuada desinfección previa o posterior
del sistema. Los sistemas certicados para la
reducción de quistes pueden ser utilizados en agua
desinfectada que pueda contener quistes ltrables.
EPA Establishment # 070595-MEX-001
PRECAUCIÓN
Para reducir el riesgo asociado con daños a la
propiedad debido a fugas de agua:
• Lea y siga las Instrucciones de Uso previo a la
instalación y uso de este sistema.
• La instalación y uso DEBEN cumplir con toda la
normativa de plomería estatal y local.
• No lleve a cabo la instalación si la presión del agua
excede los 120 psi (827 kPa). Si la presión del
agua excede los 80 psi, deberá instalar una válvula
limitante de presión. Contácte a un plomero si no
está seguro sobre cómo revisar la presión del agua.
• No lleve a cabo la instalación donde pueden
producirse condiciones de golpes de ariete de agua.
Si existen condiciones de golpes de ariete de agua,
deberá
instalar un supresor de golpes de ariete.
Contacte a un plomero profesional si no sabe cómo
revisar esta condición.
• No lleve a cabo la instalación en líneas de agua
caliente. La temperatura máxima de operación de
este sistema de ltro es 100 °F (37.8 °C).
• Evite la congelación del ltro. Drene el ltro cuando
la temperatura caiga debajo de 40 °F (4.4 °C).
• El cartucho de ltro desechable DEBE sustituirse
cada 6 meses, con la capacidad nominal o si se
observa una signicativa reducción del caudal.
• Para proteger de la congelación, remueva el
cartucho del ltro cuando se prevea que las
temperaturas puedan ser inferiores a 33° F.
• No instale sistemas en áreas donde la temperatura
ambiente pueda superar los 110° F (43.3° C).
• Donde se instale un dispositivo de prevención de
reujo en un sistema de agua, deberá instalarse
un dispositivo para controlar la presión debido a la
expansión térmica.
• Asegúrese de que todas las tuberías y conexiones
estén correctamente instaladas y sin fugas.

55SOLUCIÓN DE PROBLEMAS
ESPAÑOL
SOLUCIÓN DE PROBLEMAS
Preguntas frecuentes
P: ¿Cuál es la mejor conguración de temperatura para mi refrigerador y congelador?
R: La conguración predeterminada del refrigerador es 37° Fahrenheit (3° Celsios). La conguración
predeterminada del congelador es 0° Fahrenheit (-18° Celsios). Ajuste esta conguración según sus
necesidades
a manera de mantener los alimentos a la temperatura deseada. La leche deberá mantenerse
fría al almacenarse en el estante interior del refrigerador. El helado deberá estar rme y los cubos de
hielo no deberán derretirse en el congelador. Para cambiar la pantalla de Fahrenheit a Celsios, mantenga
presionados
los botones Freezer y Refrigerator hasta que escuche un sonido y vea el cambio de ajustes en
la pantalla. También puede seleccionar la aplicación Refrigerator Manager (Administrador del Refrigerador)
en la pantalla y utilizar el botón Unit (Unidad).
P: ¿Cómo establezco la temperatura del refrigerador y del congelador?
R: Presione continuamente el boton Refrigerator o Freezer en el panel de control hasta que la temperatura
deseada aparezca. Los números cambiarán de mayor a menor y luego regresarán al mayor al presionar
continuamente. En algunos modelos usted también puede establecer las temperaturas en la aplicación
Refrigerator Manager (Administrador del Refrigerador) en la pantalla.
P: ¿Por qué escucho un zumbido periódicamente desde mi refrigerador?
R: Esto puede suceder si no tiene una fuente de agua conectada a su refrigerador y el dispensador de hielo
está encendido. Si no tiene una fuente de agua conectada a la parte trasera del refrigerador, debe apagar el
dispensador de hielo.
P: ¿Por qué el recipiente del dispensador de hielo se ve encorvado?
R: Esta es una parte normal del ciclo del dispensador de hielo. La bandeja del dispensador de hielo puede
parecer nivelada o con una leve inclinación. El cambio de posición es para asistir el proceso de congelación.
P:
Mi refrigerador está encendido y los controles están funcionando, pero no está enfriando y la pantalla
muestra "OFF" (Apagado) (Vea abajo). ¿Qué está mal?
R: El refrigerador está en Modo Demo. Este modo inhabilita el enfriado para ahorrar energía mientras el
electrodoméstico está siendo exhibido en una tienda. Para restaurar la operación normal, mantenga
presionados los botones Temperatura y Ice Plus por 5 segundos o hasta que escuche un pitido e
la conguración de temperatura aparezca en la pantalla. Si así lo desea, use el mismo procedimiento para
regresar el refrigerador a Modo Demo.

56 SOLUCIÓN DE PROBLEMAS
Antes de llamar al servicio técnico
Revise esta sección antes de llamar para servicio; hacerlo le ahorrará tiempo y dinero.
Enfriamiento
Problema Causa posible Soluciones
Las secciones
del Refrigerador y
Congelador no están
enfriando.
El control del refrigerador está
congurado en APAGADO
(algunos modelos).
• Congure el control en ENCENDIDO. Consulte la
Conguración en la sección Controles para los ajustes
apropiados de temperatura.
El Refrigerador está congurado
en Modo Demo.
• Modo Demo permite que la iluminación y la pantalla de
control funcionen normalmente mientras que deshabilita el
enfriamiento para ahorrar energía mientras el refrigerador
está en exhibición. Vea las Preguntas Frecuentes y la
Conguración en la sección Controles de este manual para
instrucciones sobre cómo deshabilitar el Modo Demo.
El refrigerador está en el ciclo de
descongelado.
• Durante el ciclo de descongelado, la temperatura de cada
compartimento puede incrementarse levemente. Espere 30
minutos y conrme que la temperatura apropiada haya sido
restaurada una vez que el ciclo de descongelado haya sido
completado.
El refrigerador fue instalado
recientemente.
• Puede tomar hasta 24 horas para que cada compartimento
alcance la temperatura deseada.
El refrigerador fue reubicado
recientemente.
• Si el refrigerador estaba almacenado por un período largo
de tiempo o reclinado, es necesario que éste se mantenga
en posición vertical por 24 horas previo a conectarlo a la
corriente eléctrica.
El sistema de
enfriamiento se
ejecuta mucho.
El refrigerador está
reemplazando un modelo
anterior.
• Los refrigeradores modernos requieren más tiempo de
operación pero usan menos energía debido a tecnología
más eciente.
El refrigerador fue conectado
recientemente o su fuente de
energía fue restablecida.
• Puede tomar hasta 24 horas para que el refrigerador enfríe
completamente.
La puerta es abierta
frecuentemente o una gran
cantidad de alimentos /
alimentos calientes fueron
añadidos.
• Al añadir alimentos y abrir las puertas el refrigerados se
calienta, requiriendo que el compresor se ejecute más
tiempo a manera de enfriarlo de nuevo. A manera de
conservar energía, intente retirar todo lo que necesita del
refrigerador al mismo tiempo, mantenga los alimentos
organizados para que sea fácil encontrarlos, y cierre la
puerta en cuanto los alimentos sean retirados. (Consulte la
Guía de Almacenamiento
de Alimentos.)
Las puertas no están
completamente cerradas.
• Cierre las puertas rmemente. Si éstas no cierran
completamente, vea la sección Puertas no cierran o abren
completamente en Solución de Problemas.
El refrigerador está instalado en
una ubicación caliente.
• El compresor se ejecutará por más tiempo en condiciones
templadas. En temperaturas normales de habitación (70 °F)
espere que su compresor se ejecute de un 40% a un 80%
del tiempo. Bajo condiciones más calientes, espere que
éste se ejecute más seguido. El refrigerador no debe ser
operado sobre 110 °F.
Condensador / cubierta trasera
está obstruida.
• Use una aspiradora con un accesorio adjunto para limpiar
la cubierta y los respiraderos del condensador. No remueva
el panel que cubre el área de las bobinas del condensador.

57SOLUCIÓN DE PROBLEMAS
ESPAÑOL
Enfriamiento
Problema Causa posible Soluciones
Acumulación de
humedad interior.
Las puertas están abiertas
constantemente o por períodos
largos de tiempo.
• Cuando las puertas están abiertas constantemente o por
períodos largos de tiempo, el aire caliente y húmedo entra
al compartimento. Esto eleva la temperatura y el nivel de
humedad dentro del compartimento. Para disminuir el
efecto, reduzca la frecuencia y duración de apertura de la
puerta.
Las puertas no están cerradas
correctamente.
• Vea la sección Puertas no cierran o abren completamente
en Solución de Problemas de Partes & Características.
El clima es húmedo.
• El clima húmedo permite que humedad adicional ingrese
a los compartimentos cuando las puertas se abren,
provocando condensación o escarcha. Mantener un nivel
de humedad razonable en el hogar ayudará a controlar
la cantidad de humedad que pueda ingresar a los
compartimentos.
Ciclo de descongelado
recientemente completado.
• Durante el ciclo de descongelado, la temperatura de cada
compartimento puede incrementar levemente y puede
que se forme condensación en la pared trasera. Espere
30 minutos y conrme que la temperatura adecuada se
ha restaurado una vez el ciclo de descongelado ha sido
completado.
Los alimentos no están
empacados correctamente.
• Los alimentos almacenados, descubiertos o desenvueltos,
y contenedores húmedos pueden llegar a generar
acumulación de humedad dentro de cada compartimento.
Seque todos los contenedores y almacene los alimentos
en empaques sellados para prevenir condensación y
escarcha.
Los alimentos se
están congelando en
el compartimento del
refrigerador.
Alimentos con contenido alto en
agua fueron ubicados cerca de
una ranura de ventilación.
• Reorganice los artículos con contenido alto en agua
alejados de las ranuras de ventilación.
La temperatura del
refrigerador está congurada
incorrectamente.
• Si la temperatura es muy baja, ajuste el control mediante
un incremento a la vez y espere a que la temperatura se
estabilice. Consulte la sección Ajustando los Controles para
más información.
El refrigerador está instalado en
una ubicación fría.
• Cuando el refrigerador es operado en una temperatura
inferior a 41°F (5°C), los alimentos pueden congelarse en el
compartimento del refrigerador. El refrigerador no debe ser
operado en temperaturas inferiores a 55°F (13°C).
Las secciones
del Refrigerador y
Congelador están
muy calientes.
El refrigerador fue instalado
recientemente.
• Puede tomar hasta 24 horas para que cada compartimento
alcance la temperatura deseada.
Los respiraderos están
bloqueados. Aire frío circula
desde el congelador hasta la
sección de alimentos frescos
y luego de regreso a través de
los respiraderos en la pared que
divide las dos secciones.
• Reorganice los artículos con contenido alto en agua
alejados de las ranuras de ventilación.

58 SOLUCIÓN DE PROBLEMAS
Enfriado/Agua & Hielo
Problema Causa posible Soluciones
Las secciones
del Refrigerador y
Congelador están
muy calientes.
Las puertas están abiertas
constantemente o por períodos
largos de tiempo.
• Cuando las puertas están abiertas constantemente o por
períodos largos de tiempo, el aire caliente y húmedo entra
al compartimento. Esto eleva la temperatura y el nivel de
humedad dentro del compartimento. Para disminuir el
efecto, reduzca la frecuencia y duración de apertura de la
puerta.
Reorganice los artículos con
contenido alto en agua alejados
de las ranuras de ventilación.
• Reorganice los artículos con contenido alto en agua
alejados de las ranuras de ventilación.
Reorganice los artículos con
contenido alto en agua alejados
de las ranuras de ventilación.
• Reorganice los artículos con contenido alto en agua
alejados de las ranuras de ventilación.
Reorganice los artículos con
contenido alto en agua alejados
de las ranuras de ventilación.
• Vea la sección Puertas no cierran o abren completamente
en Solución de Problemas de Partes & Características.
Reorganice los artículos con
contenido alto en agua alejados
de las ranuras de ventilación.
• Si la temperatura es muy alta, ajuste el control un
incremento a la vez y espere a que la temperatura se
estabilice.
Reorganice los artículos con
contenido alto en agua alejados
de las ranuras de ventilación.
• Durante el ciclo de descongelado, la temperatura de cada
compartimento puede incrementar levemente y formar
condensación en la pared trasera. Espere 30 minutos
y conrme que la temperatura apropiada haya sido
restaurada una vez el ciclo de descongelado haya sido
completado.
La sección del
Refrigerador o
Congelador está muy
fría.
Ajustes de control de
temperatura incorrectos.
• Si la temperatura es muy fría, ajuste el control un
incremento a la vez y espere a que la temperatura se
estabilice. Consulte el Panel de Control para mayor
información.
Se forma escarcha
o cristales de
hielo en alimentos
congelados (dentro
de paquete sellado).
Condensación de alimentos con
un alto contenido de agua se ha
congelado dentro del paquete.
• Esto es normal para alimentos con un alto contenido de
agua.
Alimentos se han dejado en el
congelador por un largo período
de tiempo.
• No almacene alimentos con un alto contenido de agua en
el congelador por un largo período de tiempo.
Formación de
escarcha o cristales
de hielo en alimentos
congelados (fuera
del empaque).
La puerta es abierta
frecuentemente o por períodos
prolongados de tiempo.
• Cuando las puertas son abiertas constantemente o por
períodos largos de tiempo, aire caliente y húmedo entra
al compartimento. Esto eleva la temperatura y el nivel de
humedad dentro del compartimento. Para disminuir el
efecto, reduzca la frecuencia y duración de apertura de la
puerta.
La puerta no cierra
correctamente.
• Vea la sección de Las puertas no cierran o abren
correctamente en la sección de Resolución de problemas.

59SOLUCIÓN DE PROBLEMAS
ESPAÑOL
Hielo & Agua
Problema Causa posible Soluciones
El dispensador
de hielo
no está
produciendo
suciente
hielo.
La demanda excede la capacidad de
almacenamiento de hielo.
• El dispensador de hielo producirá aproximadamente 70-184
cubos en un período de 24 horas.
El suministro de agua principal no
está conectado, la válvula no está
completamente encendida o la válvula
está obstruida.
• Conecte el refrigerador a un suministro de agua fría con
presión adecuada y abra la válvula de cierre de agua
completamente. Si el problema continúa, puede que sea
necesario contactar a un plomero.
El ltro de agua ha sido agotado.
• Se recomienda reemplazar el ltro de agua:
• Cada seis meses aproximadamente.
• Cuando se encienda el indicador de ltro de agua.
• Cuando disminuya la potencia del dispensador de agua.
• Cuando los cubos de hielo sean más pequeños de lo
normal.
Baja presión de suministro de agua
principal.
• La presión del agua debe estar entre los 20 y los 120 psi
en modelos sin ltro de agua y entre los 40 y 120 psi en
modelos con ltro de agua. Si el problema continúa, puede
que sea necesario contactar a un plomero.
Se está usando el
Sistema de Filtración
de Osmosis Inversa.
• Los sistemas de ltración de osmosis inversa pueden
reducir la presión de agua por debajo de la cantidad
mínima y provocar problemas en el dispensador de hielo.
(Consulte la sección Conectando la Línea de Agua.)
La tubería que conecta el refrigerador
a la válvula de suministro del hogar
está retorcida.
• La tubería se puede retorcer cuando el refrigerador es
movido durante la instalación o limpieza, provocando
un ujo reducido de agua. Enderece o repare la línea
del suministro de agua y arréglela para prevenir futuras
torceduras.
Las puertas están abiertas
constantemente o por períodos largos
de tiempo.
• Si las puertas de la unidad se abren a menudo, el aire
ambiental calentará el refrigerador, lo que impedirá que la
unidad pueda mantener la temperatura establecida. Puede
ayudar el bajar la temperatura del refrigerador, así como no
abrir las puertas con tanta frecuencia.
Las puertas no están completamente
cerradas.
• Si las puertas no están cerradas correctamente, la
producción de hielo se verá afectada. Para obtener
mayor información, vea la sección Las puertas no se
cierran completamente o quedan abiertas en la sección
Componentes y Características de la Guía de resolución de
problemas.
El ajuste de temperatura del
congelador es demasiado cálido.
• La temperatura recomendada para el compartimento del
congelador para una producción normal de hielo es de 0 °F.
Si la temperatura del congelador es superior, la producción
se verá afectada.
El d
ispensador
de hielo
no está
produciendo
hielo.
El refrigerador fue instalado
recientemente o el dispensador de
hielo fue conectado recientemente.
• Puede tomar hasta 24 horas para que cada compartimento
alcance la temperatura deseada y para que el dispensador
de hielo empiece a producir hielo.
El dispensador de hielo no está
conectado.
• Localice el botón Encendido/Apagado y conrme que está
en la posición de Encendido (On).

60 SOLUCIÓN DE PROBLEMAS
Hielo & Agua
Problema Causa posible Soluciones
El dispensador
de hielo no está
produciendo hielo.
El sensor de detección de hielo
está obstruido.
• Las sustancias desconocidas o escarcha en el sensor
detector de hielo pueden interrumpir la producción del
mismo. Asegúrese de que el área del sensor está limpia
todo el tiempo para que opere apropiadamente.
El refrigerador no está conectado
a un suministro de agua o la
válvula de cierre del suministro
no está abierta.
• Conecte el refrigerador al suministro de agua y abra
completamente la válvula de cierre de agua.
Corte del dispensador de hielo
(brazo o sensor) obstruido.
• Si su dispensador de hielo está equipado con un brazo
de corte de hielo, asegúrese de que el brazo se mueve
libremente. Si su dispensador de hielo está equipado con
un sensor de corte de hielo, asegúrese de que haya un
espacio limpio entre los dos sensores.
El sistema de ltración de
agua de osmosis inversa está
conectado a su suministro de
agua fría.
• Los sistemas de ltración de osmosis inversa pueden
reducir la presión de agua por debajo de la cantidad
mínima y provocar problemas en el dispensador de hielo.
(Consulte la sección Conectando la Línea de Agua.)
El hielo tiene mal
sabor u olor.
El suministro de agua contiene
minerales como azufre.
• Puede ser necesario instalar un ltro de agua para eliminar
problemas de sabor y olor. NOTA: En algunos casos, un
ltro puede no ayudar. Puede no ser posible remover todo
mineral/olor/sabor del suministro de agua.
El d
ispensador de hielo fue
instalado recientemente.
• El hielo que ha sido almacenado por mucho tiempo se
encogerá, tornará turbio y podrá desarrollar un sabor a
viejo. Tire el hielo viejo y haga un nuevo suministro.
Los alimentos no han sido
almacenados apropiadamente en
los compartimentos.
• Empaque nuevamente los alimentos. Los olores pueden
migrar hacia el hielo si los alimentos no son empacados
apropiadamente.
El interior del refrigerador debe
ser limpiado.
• Vea la sección de Mantenimiento para mayor información.
El recipiente de almacenamiento
de hielo necesita ser limpiado.
• Vacíe y lave el recipiente (deseche cubos viejos).
Asegúrese de que el recipiente está completamente seco
previo a reinstalarlo.
El dispensador
de hielo está
produciendo
demasiado hielo.
Corte del dispensador de hielo
(brazo/sensor) está obstruido.
• Vacíe el recipiente de hielo. Si su dispensador de hielo está
equipado con un brazo de corte de hielo, asegúrese de que
el brazo se mueve libremente. Si su dispensador de hielo
está equipado con el sensor de corte de hielo electrónico,
asegúrese de que haya un espacio limpio entre los dos
sensores. Reinstale el recipiente de hielo y espere 24 horas
para conrmar que opera apropiadamente.

61SOLUCIÓN DE PROBLEMAS
ESPAÑOL
Partes y Características
Problema Causa posible Soluciones
Las puertas
no se cierran
correctamente o se
quedan abiertas.
Paquetes de alimentos están
bloqueando la puerta e impiden
que se cierre.
• Reorganice los contenedores de alimentos para liberar la
puerta y los estantes de la puerta.
El recipiente de hielo, la tapa del
cajón para verduras, las bateas,
los estantes, las bandejas de las
puertas o las cestas no están en
su sitio.
• Empuje correctamente hacia adentro las bandejas, la tapa
del cajón para verduras, las bateas, los estantes y las
cestas en su posición adecuada. Vea la sección Uso del
Refrigerador para mayor información.
Las puertas se desmontaron
durante la instalación del
producto y no se volvieron a
colocar correctamente.
• Desmonte y vuelva a colocar las puertas siguiendo las
instrucciones de la sección Desmontaje y Sustitución de los
Agarradores y Puertas del Refrigerador.
El refrigerador no está
correctamente nivelado.
• Vea la sección Alineación de las Puertas en la sección
Instalación del Refrigerador para nivelar el refrigerador.
Es difícil abrir las
puertas.
Las juntas están sucias o
pegajosas.
• Limpie las juntas y las supercies que tocan. Aplique una
na capa de cera para electrodomésticos o cera de cocina
en las juntas después de limpiarlas.
La puerta se acaba de cerrar.
• Cuando abre la puerta, aire más caliente entra al
refrigerador. Al enfriarse, puede crear un vacío. Si le cuesta
abrir la puerta, espere un minuto para permitir que la
presión del aire se ecualice y, a continuación, compruebe si
se abre con más facilidad.
El refrigerador se
tambalea o parece
inestable.
Las patas niveladoras no están
correctamente ajustadas.
• Consulte la sección Nivelación y Alineación de Puertas.
El piso no está nivelado.
• Puede ser necesario agregar calibradores debajo de
las patas o rodillos de nivelación o para completar la
instalación.
Las luces no
funcionan.
Falla de iluminación interior LED.
• La lámpara del compartimento del refrigerador es una
iluminación interior LED, por lo que el mantenimiento
deberá ser realizado por un técnico calicado.
El refrigerador tiene
un olor inusual.
El Filtro de Aire puede necesitar
ser ajustado a MAX o ser
reemplazado.
• Ajuste el Filtro de Aire a MAX. Si no desaparece el olor
dentro de las siguientes 24 horas, el ltro puede necesitar
ser reemplazado. Consulte la sección Sustitución del Filtro
de Aire para obtener instrucciones acerca del reemplazo.
El interior del
refrigerador está
cubierto con polvo u
hollín
.
El refrigerador está ubicado
cerca de una fuente de fuego,
como una chimenea o candela.
• Asegúrese de que el refrigerador no se encuentre ubicado
cerca de una fuente de fuego, como una chimenea o
candela.

62 SOLUCIÓN DE PROBLEMAS
Ruidos
Problema Causa posible Soluciones
Haciendo clic
El control de descongelado hará un “clic”
cuando el ciclo de descongelado comience
y termine. El control del termostato (o
control del refrigerador en algunos modelos)
también hará un clic al iniciar o nalizar un
ciclo.
• Funcionamiento normal
Traqueteo
Los ruidos de traqueteo pueden proceder
del ujo del refrigerante, de la tubería de
agua en la parte posterior de la unidad o de
artículos almacenados encima o alrededor
del refrigerador.
• Funcionamiento normal
El refrigerador no está sólidamente apoyado
en el suelo.
• El suelo es poco sólido o irregular, o es
necesario ajustar las patas de nivelación.
Consulte la sección Nivelación y Alineación de
las Puertas.
El refrigerador con compresor lineal se
sacudió mientras estaba funcionando.
• Funcionamiento normal
Crujido
El motor del ventilador del evaporador
está circulando el aire a través de los
compartimentos del refrigerador y del
congelador.
• Funcionamiento normal
El ventilador del condensador está forzando
el paso de aire a través del condensador.
• Funcionamiento normal
Vibración
El refrigerante está uyendo a través del
sistema de enfriamiento.
• Funcionamiento normal
Vibración
Contracción y expansión de las paredes
internas debido a cambios en la temperatura.
• Funcionamiento normal
Chisporroteo
El agua cayendo en el calentador de
descongelación durante un ciclo de
descongelado.
• Funcionamiento normal
Vibración
Si el lateral o la parte posterior del
refrigerador están en contacto con un
mueble o una pared, algunas de las
vibraciones normales pueden producir un
sonido audible.
• Para eliminar el ruido, asegúrese de que los
laterales y la parte posterior no puedan vibrar
contra las paredes o los muebles.
Goteo
Agua cayendo en la batea de drenaje durante
el ciclo de descongelado.
• Funcionamiento normal
Sonido de pulsación
o agudo.
Su refrigerador está diseñado para funcionar
de forma más eciente para conservar los
alimentos a la temperatura deseada. El
compresor de alta eciencia puede hacer
que su nuevo refrigerador funcione durante
más tiempo que su antiguo refrigerador, y
aun así será más eciente energéticamente
que los modelos anteriores. Mientras el
refrigerador está en funcionamiento, es
normal escuchar un sonido de pulsación o
agudo.
• Funcionamiento normal

63SOLUCIÓN DE PROBLEMAS
ESPAÑOL
Red Wi-Fi
Problema Causa posible Soluciones
Su electrodoméstico y teléfono
inteligente no se está conectando a
la red Wi-Fi.
La contraseña para la red Wi-Fi a la
que se está intentando conectar es
incorrecta.
• Busque la red Wi-Fi conectada a
su teléfono inteligente y remuévala,
luego registre su electrodoméstico en
la aplicación LG SmartThinQ.
Los Datos Móviles para su teléfono
inteligente están activados.
• Desactive los Datos Móviles en su
teléfono inteligente previo a registrar
el electrodoméstico.
El nombre de la red inalámbrica
(SSID) se ha congurado
incorrectamente.
• El nombre de la red inalámbrica
(SSID) debe ser una combinación de
letras y números. (No utilice símbolos
especiales)
La frecuencia del enrutador no es de
2.4 GHz.
• Sólo se admite una frecuencia de
enrutador de 2.4 GHz. Congure
el enrutador inalámbrico a 2.4 GHz
y conecte el electrodoméstico a
éste. Para vericar la frecuencia del
enrutador, consulte con su proveedor
de servicios de internet o con el
fabricante del enrutador.
El enrutador está muy lejos del
electrodoméstico.
• Si el electrodoméstico se encuentra
muy lejos del enrutador, puede que
la señal sea débil y que la conexión
no sea congurada correctamente.
Coloque el enrutador más cerca del
electrodoméstico o compre e instale
un repetidor Wi-Fi.

64 GARANTÍA LIMITADA
GARANTÍA LIMITADA
PARA EE. UU.
AVISO DE ARBITRAJE: ESTA GARANTÍA LIMITADA CONTIENE UNA CLÁUSULA DE ARBITRAJE QUE LE
DEMANDA A USTED Y A LG RESOLVER CONFLICTOS A TRAVÉS DE UN ARBITRAJE VINCULANTE EN LUGAR
DE HACERLO EN LA CORTE, A MENOS QUE USTED DECIDA NO PARTICIPAR. EN EL ARBITRAJE NO ESTÁN
PERMITIDAS LAS ACCIONES COLECTIVAS NI LOS JUICIOS CON JURADO. POR FAVOR, VEA A CONTINUACIÓN
LA SECCIÓN TITULADA “PROCEDIMIENTO PARA RESOLVER CONFLICTOS”.
En caso de que su refrigerador LG (“Producto”) presente alguna falla por defectos de materiales o de fabricación bajo
uso apropiado y normal durante el período de garantía establecido más abajo, el mismo será reparado o reemplazado
por LG Electronics ("LG"), a su opción. Esta garantía limitada es válida únicamente para el comprador nal original del
producto, y únicamente cuando el producto ha sido comprado y utilizado dentro de los Estados Unidos, incluidos los
territorios norteamericanos.
PERÍODO DE GARANTÍA
Refrigerador/
Congelador
Sistema Sellado
(Condensador,
Filtro desecante,
Tubo Conector y
Evaporador)
Compresor
Un (1) año a partir de
la fecha original de
compra
Cinco (5) años a partir
de la fecha original de
compra
Cinco (5) años a partir
de la fecha original de
compra
Sólo Compresor Lineal / Inversor : Partes
sólo para los años 6-10 desde la fecha
original de compra. (La mano de obra se le
cargará al consumidor)
Piezas y mano de obra
(solo piezas internas/
funcionales)
Piezas y mano de obra Piezas y mano de obra
• Los productos y las piezas de repuesto están garantizados durante el tiempo restante del período original de garantía
o noventa (90) días, lo que resulte mayor.
• Los productos y las piezas de repuesto pueden ser nuevos, reparados, reacondicionados, o reconstruidos por la
fábrica.
• Es necesario presentar prueba de la compra minorista especicando el modelo del producto y la fecha de compra para
obtener el servicio de garantía bajo esta garantía limitada.
Salvo lo prohibido por la ley, toda garantía de comercialización o idoneidad implícita, para un propósito
particular en el producto, está limitada a la duración de la garantía arriba expresada. Bajo ninguna circunstancia
deberá LG o sus distribuidores/representantes ser responsable por cualquier daño indirecto, incidental,
consecuente, especial, o punitivo, lo cual incluye pero no se limita a, pérdida de fondos del comercio, ganancias
perdidas, interrupción del trabajo, deterioro de otros bienes, costo de remover y reinstalar el producto, pérdida
de uso, o cualquier otro daño ya sea basado en contrato, perjuicio, u otros. La responsabilidad total de LG, en
caso exista, no excederá el precio que usted pagó por adquirir el producto.
Algunos
estados no permiten la exclusión o limitación de daños incidentales o emergentes, o limitaciones a la duración
de la garantía implícita, por lo que la exclusión o limitación anteriormente mencionada podrían no corresponder en su
caso. Esta garantía limitada le otorga derechos legales especícos y es posible que usted cuente con otros derechos
que varían según el estado.
ESTA GARANTÍA LIMITADA NO CUBRE LO SIGUIENTE:
• Viajes del servicio técnico para entregar, buscar o instalar el producto, instruir al cliente sobre la operación del mismo,
corregir el cableado o las reparaciones/instalaciones no autorizadas.
• Daño o fallo del producto al operar durante fallas e interrupciones del suministro eléctrico, o resultado de un servicio
eléctrico inadecuado.
• Daños o fallas causadas por tuberías de agua rotas o con fugas, tuberías de agua congeladas, líneas de desagüe
restringidas, suministro de agua inadecuado o interrumpido, o suministro de aire inadecuado.
• Daños resultantes de operar el producto en una atmósfera corrosiva o contraria a las instrucciones detalladas en el
manual del propietario del producto.
• Daños o fallos del producto causados por accidentes, pestes y alimañas, rayos, viento, incendio, inundaciones, hechos
de fuerza mayor, o cualquier otra causa fuera del control de LG.
• Daños o fallos causados por modicaciones o alteraciones no autorizadas, o si se usa para otro n que no sea el
previsto.

65GARANTÍA LIMITADA
ESPAÑOL
• Daños o fallos resultantes de mal uso, abuso, instalación, reparación o mantenimiento incorrectos. Una reparación
incorrecta incluye el uso de piezas no autorizadas, aprobadas o especicadas por LG. La instalación o el
mantenimiento inadecuado incluye aquellos contrarios a lo especicado en el manual del usuario del producto.
• Daños o fallos causados por corriente o voltaje eléctrico incorrecto, o por códigos de fontanería.
• Daños o fallos causados por el transporte y el manejo, incluye rayas, muescas, astillados y/u otros daños al acabado
del producto, a menos que tales daños se informen dentro del plazo de una (1) semana de la entrega.
• Daños o artículos faltantes a productos comprados con descuento, con la caja abierta o que hayan estado en
exhibición.
• Productos reacondicionados o cualquier producto vendido con los avisos "En el estado actual", "En el sitio actual",
"Con todos sus defectos" o similares.
• Productos cuyos números de serie originales hayan sido retirados, alterados o no se puedan determinar fácilmente.
• Aumentos en los costos de los servicios públicos y otros gastos adicionales de dichos servicios.
• Cualquier ruido asociado con la operación normal.
• Uso de accesorios (Ej, ltros de agua, etc.), componentes, o productos de limpieza consumibles que no estén
autorizados por LG.
• Reemplazo de focos, ltros o cualquier parte consumible.
• Cuando el producto se use de otra forma que no sea uso doméstico usual y normal (p. ej., uso comercial o industrial,
en ocinas e instalaciones recreativas o vehículos) o uso contrario a las instrucciones detalladas en el manual del
propietario del producto.
• Costos asociados con el retiro y la reinstalación de su producto para realizar reparaciones.
• Estantes, bandejas de puerta, cajones, manijas y accesorios, a excepción de las partes internas/funcionales cubiertas
bajo esta garantía limitada.
El costo de la reparación o el reemplazo en estas circunstancias excluidas estará a cargo del consumidor.
PARA OBTENER SER
VICIO EN GARANTÍA E INFORMACIÓN ADICIONAL
Llame al 1-800-243-0000 y seleccione la opción apropiada desde el menú.
O visite nuestro sitio web en http://www.lg.com
O por correo: LG Electronics Customer Service P.O. Box 240007 Huntsville, AL 35813 ATTN: CIC
PROCEDIMIENTO PARA RESOLVER CONFLICTOS:
TODOS LOS CONFLICTOS ENTRE USTED Y LG QUE SURJAN FUERA DE O RELACIONADOS DE ALGUNA
MANERA CON ESTA GARANTÍA LIMITADA O CON EL PRODUCTO, SE RESOLVERÁN EXCLUSIVAMENTE A
TRAVÉS DE UN ARBITRAJE VINCULANTE Y NO EN UNA CORTE DE JURISDICCIÓN GENERAL. ARBITRAJE
VINCULANTE SIGNIFICA QUE USTED Y LG RENUNCIAN AL DERECHO DE UN JUICIO CON JURADO Y A
REALIZAR O PARTICIPAR EN UNA DEMANDA COLECTIVA.
Deniciones. Para el propósito de esta sección, las referencias a “LG” signican: LG Electronics U.S.A., Inc., sus
empresas matrices, subsidiarias y liales y cada uno de sus directivos, directores, empleados, agentes, beneciarios,
predecesores en interés, sucesores, cesionarios y proveedores; las referencias a “conicto” o “reclamación” incluirán
cualquier conicto, reclamo o controversia de cualquier tipo, sin importar (ya sea basado en contrato, agravio, estatuto,
regulación, ordenanza, fraude, falsa representación o cualquier teoría legal o equitativa) que surja de o esté relacionada
con cualquier forma de venta, condición o desempeño del producto o de esta Garantía Limitada.
Aviso de disputa. En caso de que usted desee iniciar un procedimiento de arbitraje, primero debe noticar a LG por
escrito al menos 30 días antes de iniciar el arbitraje enviando una carta a LG a LG Electronics, USA, Inc. Atención: Legal
Department- Arbitration 1000 Sylvan Ave, Englewood Cliffs 07632. Usted y LG aceptan participar en discusiones de
buena fe en un intento de resolver su reclamo de manera amistosa. En la carta debe proporcionar su nombre, dirección
y número de teléfono; identicar el producto que es objeto de la reclamación; y describir la naturaleza del reclamo y
el remedio que busca. Si usted y LG no pueden resolver la disputa dentro de 30 días, cualquiera de las partes puede
proceder a presentar una demanda de arbitraje.

66 GARANTÍA LIMITADA
Acuerdo de arbitraje vinculante y renuncia de demanda colectiva. En caso de no resolver la disputa durante
el período de 30 días después de enviar una noticación por escrito a LG, Usted y LG se comprometen a resolver
cualquier reclamo entre nosotros, solamente a través de arbitraje vinculante sobre una base individual, a menos que
usted se excluya, conforme a lo dispuesto a continuación. Cualquier conicto entre usted y LG no estarán combinados
o consolidados con una controversia relacionada con cualquier otro producto o reclamo de otra persona o entidad. Más
especícamente y sin prejuicio de lo anterior, no procederá bajo ninguna circunstancia cualquier disputa entre usted y
LG como parte de una acción colectiva o representativa. En lugar del arbitraje, cualquiera de las partes podrá iniciar una
acción individual en la corte de reclamos menores, pero tales acciones en la corte de reclamos menores no podrán ser
realizadas en una acción colectiva o representativa.
Normas y procedimientos de arbitraje. Para comenzar con el arbitraje de un reclamo, usted o LG deben realizar
una demanda escrita para arbitraje. El arbitraje será administrado por la Asociación Americana de Arbitraje (AAA)
y se llevará a cabo ante un árbitro único bajo las Normas de Arbitraje del Consumidor de la AAA, que tienen efecto
al momento de inicio del arbitraje (en adelante “Normas de la AAA”) y bajo los procedimientos establecidos en esta
sección. Las Normas de la AAA están disponibles en línea en www.adr.org/consumer. Envíe una copia de su solicitud
de arbitraje por escrito, así como una copia de esta disposición, a la AAA de la forma descrita en las Normas de la
AAA. También debe enviar una copia de su solicitud por escrito a LG en LG Electronics, USA, Inc. Atención: Legal
Department- Arbitration 1000 Sylvan Ave, Englewood Cliffs 07632. Si hay un conicto entre las Normas de la AAA y
las reglas establecidas en esta sección, prevalecerán dichas reglas de esta sección. Esta disposición de arbitraje se
rige por la Ley Federal de Arbitraje. El juicio se puede introducir en el laudo arbitral en cualquier tribunal de jurisdicción
competente. Todos son temas para que el árbitro tome sus decisiones, excepto aquellos asuntos relativos al alcance y
aplicabilidad de la cláusula de arbitraje y de la capacidad de arbitraje de la controversia para que el tribunal decida. El
árbitro se regirá por los términos de esta disposición.
Legislación vigente. La legislación del estado de su residencia regirá esta Garantía Limitada, así como todas las
disputas entre nosotros, salvo que sea invalidada o inconsistente con leyes federales aplicables.
Tarifas / Costos. Usted no debe pagar ninguna tarifa para comenzar un arbitraje. Al recibir su solicitud de arbitraje
por escrito, LG pagará todos los gastos administrativos rápidamente a la AAA, a menos que usted solicite más de
$25,000.00 por daños, en cuyo caso el pago de estos gastos se regirá por las Normas de la AAA. Salvo disposición
contraria prevista en el presente documento, LG pagará a la AAA todos los gastos documentales, administrativos y de
arbitraje para cualquier arbitraje iniciado, de conformidad con las Normas de la AAA y esta disposición de arbitraje. Si
usted prevalece en el arbitraje, LG pagará los honorarios y gastos de sus abogados, siempre y cuando sean razonables,
considerando factores que incluyen, entre otros, el monto de la compra y el monto del reclamo. No obstante lo anterior,
si la ley aplicable permite una adjudicación de honorarios y gastos razonables de abogados, un árbitro puede otorgarlos
en la misma medida que lo haría un tribunal. Si el árbitro considera que la sustancia de su reclamo o la reparación
solicitada en la demanda es frívola o se utiliza para un propósito inadecuado (calicado según las normas establecidas
en la Norma Federal de Procedimiento Civil 11 (b)), el pago de todos los honorarios de arbitraje se regirá por las Normas
de la AAA. En tal situación usted se compromete a reembolsar a LG todos los fondos erogados previamente por ella,
cuyo pago es, por otra parte, su obligación, según las Normas de la AAA. Salvo disposición contraria, LG renuncia a
cualquier derecho que pudiera tener para solicitarle los honorarios y gastos de sus abogados, si LG prevalece en el
arbitraje.
Audiencias y ubicación. Si su reclamo es por $25,000 o menos, usted puede optar que el arbitraje sea realizado
únicamente sobre la base de: (1) documentos presentados al árbitro, (2) a través de una audiencia telefónica o (3) por
una audiencia en persona, según lo establecido por las Normas de la AAA. Si su reclamo excede $25,000, el derecho a
una audiencia estará determinado por las Normas de la AAA. Cualquier audiencia de arbitraje en persona se realizará
en un lugar dentro del distrito judicial federal en el cual resida, a menos que ambos acuerden otra ubicación o estemos
de acuerdo con el arbitraje telefónico.
Exclusión. Usted puede quedarse fuera de este procedimiento de resolución de la disputa. Si se excluye, ni usted ni LG
pueden solicitar al otro que participe en un procedimiento de arbitraje. Para excluirse usted debe enviar una noticación
a LG, en un lapso de hasta 30 días continuos, contados a partir de la fecha de la primera compra del consumidor del
producto, ya sea por: (i) el envío de un correo electrónico a [email protected] con el siguiente Asunto: “Exclusión del
arbitraje” o (ii) llamada al 1-800-980-2973. Debe incluir en el correo electrónico de exclusión o suministrar por teléfono:
(a) su nombre y dirección; (b) la fecha en la cual el producto fue comprado; (c) el nombre o el número del modelo del
producto; y (d) el número del serial (el número del serial puede ser hallado (i) en el producto, o (ii) en la dirección
de https://www.lg.com/us/support/repair-service/schedule-repair-continued al hacer clic en “Find My Model & Serial
Number”).
Sólo puede excluirse del procedimiento de resolución de conictos en la forma descrita anteriormente (es decir, por
correo electrónico o por teléfono); ninguna otra forma de noticación será efectiva para hacerlo. Excluirse de este
procedimiento de resolución de controversias no afectará de ninguna manera la cobertura de la Garantía Limitada, por
lo que usted continuará disfrutando de todos sus benecios. Si conserva este producto y no se excluye, usted acepta
todos los términos y condiciones de la cláusula de arbitraje descrita anteriormente.

67GARANTÍA LIMITADA
ESPAÑOL
PARA CANADÁ
Si su Refrigerador LG ("Producto") falla debido a defectos en los materiales o en la mano de obra bajo condiciones
normales y apropiadas de uso, durante el período de garantía expresado a continuación, LG Electronics Canadá,
Inc. ("LGECI") llevará a cabo, a su criterio, la reparación o el reemplazo del producto una vez se haya presentado el
recibo original de compra. Esta garantía limitada es válida únicamente para el comprador original del producto y aplica
únicamente a productos distribuidos, comprados y utilizados en Canadá, según lo determinado a discreción de LGECI.
PERÍODO DE GARANTÍA (Nota: Si la fecha original de compra no pudiera ser vericada, la vigencia de la garantía
comenzará sesenta (60) días a partir de la fecha de manufactura)
Refrigerador
Sistema Sellado (Condensador, Filtro desecante, Tubo
Conector y Evaporador)
Compresor Lineal /
Inversor
Un (1) año a partir de la
fecha original de compra
Un (1) año a partir de la
fecha original de compra
Siete (7) años a partir de la
fecha original de compra
Diez (10) años a partir de la
fecha original de compra
Piezas y mano de obra (solo
piezas internas/ funcionales)
Piezas y mano de obra
Solo piezas (Se le cobrará
mano de obra al consumidor)
Solo piezas (Se le cobrará
mano de obra al consumidor)
• Los productos y las piezas de repuesto están garantizados durante el tiempo restante del período original de garantía
o noventa (90) días, lo que resulte mayor.
• Los productos y las piezas de repuesto pueden ser nuevos, reacondicionados, renovados, o refabricados, todo esto a
discreción de LGECI.
• A manera de obtener el servicio de garantía bajo esta Garantía Limitada, se requiere prueba de la compra original del
producto especicando el modelo del mismo y la fecha de compra.
LA RESPONSABILIDAD EXCLUSIVA
DE LGECI SE LIMITA A LA GARANTÍA LIMITADA ARRIBA EXPRESADA.
SALVO LO EXPRESAMENTE PROVISTO MÁS ARRIBA, LGECI NO OTORGA Y POR LA PRESENTE NIEGA
TODA OTRA GARANTíA O CONDICIÓN RESPECTO AL PRODUCTO, EXPRESA O IMPLÍCITA, INCLUYENDO A
TÍTULO ENUNCIATIVO MÁS NO LIMITATIVO CUALQUIER GARANTÍA O CONDICIÓN DE COMERCIABILIDAD, O
APTITUD PARA UN FIN PARTICULAR; Y NINGUNA DECLARACIÓN SERÁ VINCULANTE PARA LGECI. LGECI NO
AUTORIZA A NINGUNA PERSONA A CREAR O ASUMIR EN SU NOMBRE CUALQUIER OTRA OBLIGACIÓN DE
GARANTÍA EN RELACIÓN CON EL PRODUCTO. EN LA MEDIDA EN QUE TODA GARANTÍA O CONDICIÓN ES
IMPLÍCITA DE ACUERDO A LA LEY, ÉSTA SE LIMITA AL PERÍODO DE GARANTÍA EXPRESADO PREVIAMENTE.
BAJO NINGUNA CIRCUNSTANCIA SERÁ LGECI, EL FABRICANTE, O DISTRIBUIDOR, RESPONSABLE POR
DAÑOS INCIDENTALES, CONSECUENTES, ESPECIALES, DIRECTOS O INDIRECTOS, DAÑOS PUNITIVOS O
EJEMPLARES, INCLUYENDO, SIN LIMITARSE A, PÉRDIDA DE USO O CUALQUIER OTRO DAÑO, YA SEA QUE
SURJA DIRECTA O INDIRECTAMENTE DE CUALQUIER INCUMPLIMIENTO CONTRACTUAL, FUNDAMENTAL,
PERJUICIO, O POR CUALQUIER ACCIÓN U OMISIÓN. TODA RESPONSABILIDAD DE LGECI, EN CASO EXISTIR,
NO DEBERÁ EXCEDER EL PRECIO QUE USTED HAYA PAGADO POR EL PRODUCTO.
Esta Garantía Limitada le otorga derechos legales especícos. Usted podría contar con otros derechos, que pueden
variar de provincia a provincia, dependiendo de las leyes provinciales aplicables. Todo término incluido en esta Garantía
Limitada que niegue o modique cualquier condición o garantía implícita sujeto a la ley provincial es divisible y separable
cuando entre en conicto con la ley provincial sin afectar el resto de los términos de esta garantía.

68 GARANTÍA LIMITADA
ESTA GARANTÍA LIMITADA NO CUBRE LO SIGUIENTE:
• Viajes del servicio técnico para i) entregar, buscar, instalar o; educar al cliente sobre la operación del Producto; ii)
corrección de cableado o fontanería; ó iii) corrección de reparaciones/instalaciones no autorizadas en el Producto;
• Dañas o fallos en el funcionamiento del Producto debido a fallas e interrupciones del suministro eléctrico o a un
servicio eléctrico inadecuado;
• Daños o fallos causados por tuberías de agua rotas o con fugas, tuberías de agua congeladas, líneas de desagüe
restringidas, suministro de agua inadecuado o interrumpido, o suministro de aire inadecuado;
• Daños o fallos resultantes de operar el producto en una atmósfera corrosiva o contraria a las instrucciones detalladas
en el manual del propietario del Producto;
• Daños o fallas del Producto causados por accidentes, pestes y alimañas, rayos, viento, incendio, inundaciones,
hechos de fuerza mayor, o por cualquier otra causa fuera del control de LGECI o del fabricante;
• Daño o fallo causado por el mal uso, abuso, instalación, reparación o mantenimiento inapropiados del Producto. La
reparación inapropiada incluye la utilización de piezas no autorizadas o especicadas por LGECI. El mantenimiento
o la instalación inapropiada incluye todo aquel llevado a cabo de forma contraria a lo expresado en el manual del
propietario del Producto;
• Daño o fallo causado por la modicación o alteración no autorizada del Producto, o si se ha utilizado para otro
propósito/uso que no fuera el doméstico previsto, o daños o fallos provocados por cualquier pérdida de agua
ocasionada por una instalación inapropiada del Producto;
• Daño o fallo causado por corriente eléctrica o voltaje incorrectos, o códigos de cañería;
• Daño o fallo causado por un uso distinto al normal hogareño, incluyendo, sin limitación, el uso comercial o industrial,
incluyendo aquel en ocinas comerciales o instalaciones de recreación, o contrario a las instrucciones incluidas en el
manual del propietario del Producto.
• Daño o fallo causado por el uso de cualquier accesorio, componente o producto de limpieza no aprobado/autorizado
por LGECI, incluyendo, sin limitarse a, ltros de agua;
• Reemplazo del cartucho del ltro de agua debido a, presión del agua fuera del rango de operación especícado o, a
cantidades excesivas de sedimento en el suministro de agua;
• Daño o fallo causado por el transporte y el manejo, incluye rayas, muescas, astillado y otros daños al acabado del
Producto, a menos que tales daños resulten de defectos de materiales o de fabricación, y se informe a LGECI dentro
del plazo de una (1) semana de la entrega del Producto.
• Daño o elementos faltantes de cualquier producto de exposición, caja abierta, restaurado o de descuento;
• Producto restaurado o vendido como "En el estado actual", "En el sitio actual", "Con todos sus defectos", o con
cualquier aviso similar;
• Productos con números de serie originales que hayan sido removidos, alterados o que no pueden ser fácilmente
determinados a discreción de LGECI;
• Aumentos en los costos de los servicios públicos y otros gastos adicionales relacionados de cualquier manera con el
Producto;
• Cualquier ruido asociado con la operación normal del Producto;
• Reemplazo de bombillas, ltros, fusibles o cualquier otra parte consumible;
• Reemplazo de cualquier parte que no haya sido incluida originalmente con el Producto;
• Gastos relacionados con la retirada y/o reinstalación del Producto para reparación; y
• Estantes, bandejas de puerta, cajones, manijas y accesorios del Producto, a excepción de las partes internas/
funcionales cubiertas bajo esta Garantía Limitada.
• Se proveerá cobertura para reparaciones "en casa" a aquellos productos con garantía que se encuentren dentro de
un radio de 150 km desde el centro de servicio autorizado (ASC) más cercano, según ha sido determinado por LG
Canada. Si su Producto se encuentra ubicado fuera del radio de 150 km a partir del ASC, según ha sido determinado
por LG Canada, será su responsabilidad llevar el Producto, y cubrir los gastos que esto implique, al ASC para una
reparación bajo garantía en dicho centro.
T
odos los costos y gastos asociados con las circunstancias de exclusión mencionadas anteriormente, listadas
bajo el título, Esta Garantía Limitada No Cubre, serán abonados por el consumidor.
PARA OBTENER SERVICIO DE GARANTÍA E INFORMACIÓN ADICIONAL, POR FAVOR LLAME O VISITE NUESTRO
SITIO WEB:
Comuníquese al 1-888-542-2623 (7 A.M. a 12 A.M., 365 días al año) y seleccione la opción apropiada del menú, o visite
nuestro sitio web en http://www.lg.com

69
MEMO

LG Customer Information Center
Register your product Online!
www.lg.com
For inquiries or comments,
visit www.lg.com or call:
1-800-243-0000
U.S.A.
1-888-542-2623
CANADA
-
 1
1
-
 2
2
-
 3
3
-
 4
4
-
 5
5
-
 6
6
-
 7
7
-
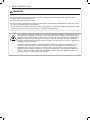 8
8
-
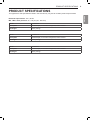 9
9
-
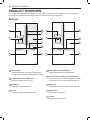 10
10
-
 11
11
-
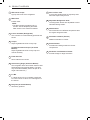 12
12
-
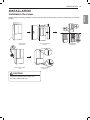 13
13
-
 14
14
-
 15
15
-
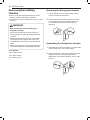 16
16
-
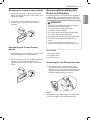 17
17
-
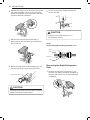 18
18
-
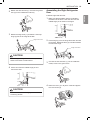 19
19
-
 20
20
-
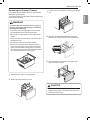 21
21
-
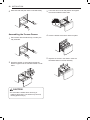 22
22
-
 23
23
-
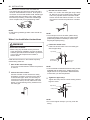 24
24
-
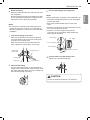 25
25
-
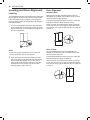 26
26
-
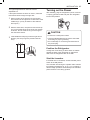 27
27
-
 28
28
-
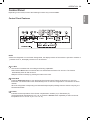 29
29
-
 30
30
-
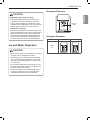 31
31
-
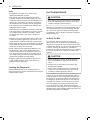 32
32
-
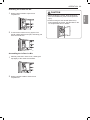 33
33
-
 34
34
-
 35
35
-
 36
36
-
 37
37
-
 38
38
-
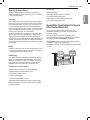 39
39
-
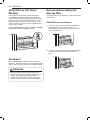 40
40
-
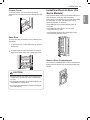 41
41
-
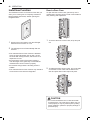 42
42
-
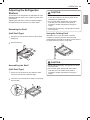 43
43
-
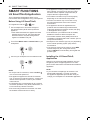 44
44
-
 45
45
-
 46
46
-
 47
47
-
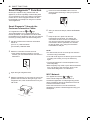 48
48
-
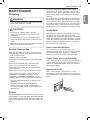 49
49
-
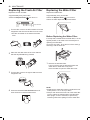 50
50
-
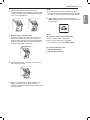 51
51
-
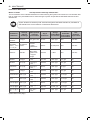 52
52
-
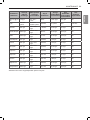 53
53
-
 54
54
-
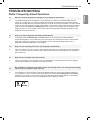 55
55
-
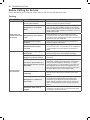 56
56
-
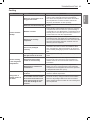 57
57
-
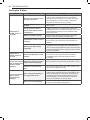 58
58
-
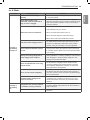 59
59
-
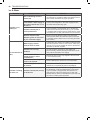 60
60
-
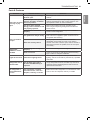 61
61
-
 62
62
-
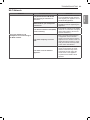 63
63
-
 64
64
-
 65
65
-
 66
66
-
 67
67
-
 68
68
-
 69
69
-
 70
70
-
 71
71
-
 72
72
-
 73
73
-
 74
74
-
 75
75
-
 76
76
-
 77
77
-
 78
78
-
 79
79
-
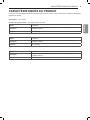 80
80
-
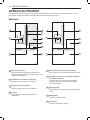 81
81
-
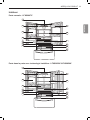 82
82
-
 83
83
-
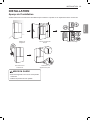 84
84
-
 85
85
-
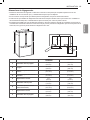 86
86
-
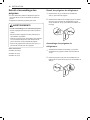 87
87
-
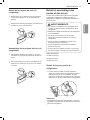 88
88
-
 89
89
-
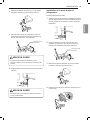 90
90
-
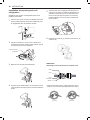 91
91
-
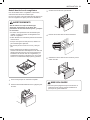 92
92
-
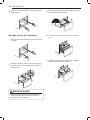 93
93
-
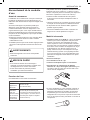 94
94
-
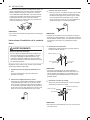 95
95
-
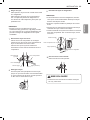 96
96
-
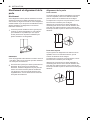 97
97
-
 98
98
-
 99
99
-
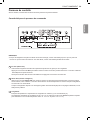 100
100
-
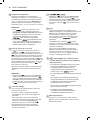 101
101
-
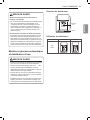 102
102
-
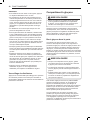 103
103
-
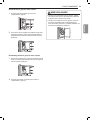 104
104
-
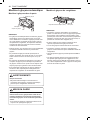 105
105
-
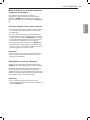 106
106
-
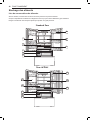 107
107
-
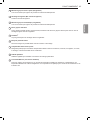 108
108
-
 109
109
-
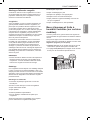 110
110
-
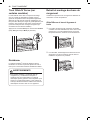 111
111
-
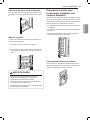 112
112
-
 113
113
-
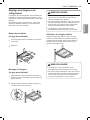 114
114
-
 115
115
-
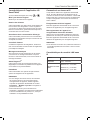 116
116
-
 117
117
-
 118
118
-
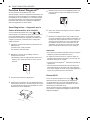 119
119
-
 120
120
-
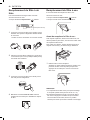 121
121
-
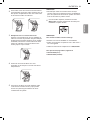 122
122
-
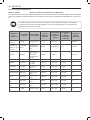 123
123
-
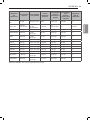 124
124
-
 125
125
-
 126
126
-
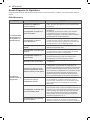 127
127
-
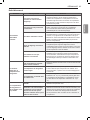 128
128
-
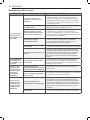 129
129
-
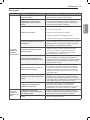 130
130
-
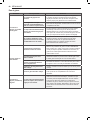 131
131
-
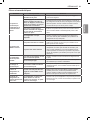 132
132
-
 133
133
-
 134
134
-
 135
135
-
 136
136
-
 137
137
-
 138
138
-
 139
139
-
 140
140
-
 141
141
-
 142
142
-
 143
143
-
 144
144
-
 145
145
-
 146
146
-
 147
147
-
 148
148
-
 149
149
-
 150
150
-
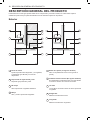 151
151
-
 152
152
-
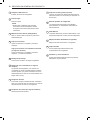 153
153
-
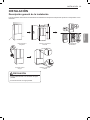 154
154
-
 155
155
-
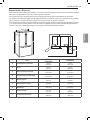 156
156
-
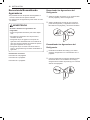 157
157
-
 158
158
-
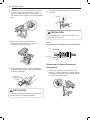 159
159
-
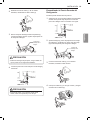 160
160
-
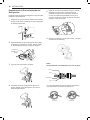 161
161
-
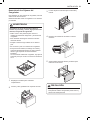 162
162
-
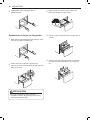 163
163
-
 164
164
-
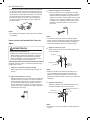 165
165
-
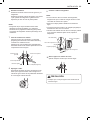 166
166
-
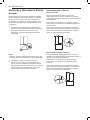 167
167
-
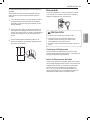 168
168
-
 169
169
-
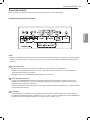 170
170
-
 171
171
-
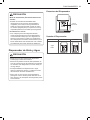 172
172
-
 173
173
-
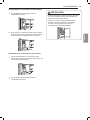 174
174
-
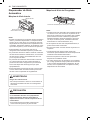 175
175
-
 176
176
-
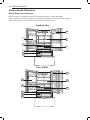 177
177
-
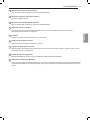 178
178
-
 179
179
-
 180
180
-
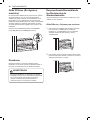 181
181
-
 182
182
-
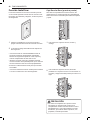 183
183
-
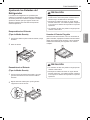 184
184
-
 185
185
-
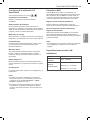 186
186
-
 187
187
-
 188
188
-
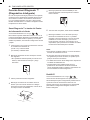 189
189
-
 190
190
-
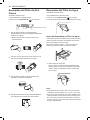 191
191
-
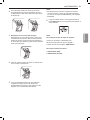 192
192
-
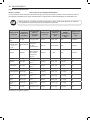 193
193
-
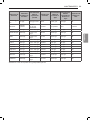 194
194
-
 195
195
-
 196
196
-
 197
197
-
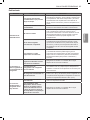 198
198
-
 199
199
-
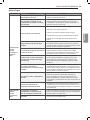 200
200
-
 201
201
-
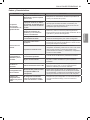 202
202
-
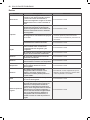 203
203
-
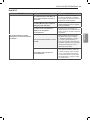 204
204
-
 205
205
-
 206
206
-
 207
207
-
 208
208
-
 209
209
-
 210
210
-
 211
211


en otros idiomas
- français: LG LFCC23596S Mode d'emploi
- English: LG LFCC23596S User guide
Artículos relacionados
-
LG Electronics LRSES2706V Manual de usuario
-
LG LRSES2706V El manual del propietario
-
LG Electronics LRSES2706V El manual del propietario
-
-
LG Electronics 1102891 El manual del propietario
-
-
LG LFXS28596S El manual del propietario
-
LG LFXS26973D El manual del propietario
-
LG LFXS28596S El manual del propietario
-
LG LFXC22596S El manual del propietario