LG 29FU6RS El manual del propietario
- Categoría
- Televisores LCD
- Tipo
- El manual del propietario

담당
관리자
Model Description
MODEL
BRAND
Printing Specification
1. Trim Size (Format) : 150mm x 210 mm
2. Printing Colors
• Cover : 1 COLOR (BLACK)
• Inside : 1 COLOR (BLACK)
3. Stock (Paper)
• Cover : Uncoated paper , 백상지 60 g/㎡
• Inside : Uncoated paper , 백상지 60 g/㎡
4. Printing Method : OFF-SET
5. Bindery : Saddle stitch
6. Language : Spanish/English
7. Number of pages : 32
Part No.
1.
2.
User’s Guide Specification
User’s Guide Specification
Changes
4.
REV.
NO.
MM/DD/YY SIGNATURE CHANGE NO.
CHANGE CONTENTS
1
2
3
4
5
7
6
SUFFIX
29FU6TS-L5
LG
MFL42505203
(1) Origin Notification
* LGESY : China * LGEVN : Vietnam * LGEEG : Egypt * LGEAZ : Brazil
* LGENP : China * LGETH : Thailand * LGEMA : Poland
* LGEIN : Indonesia * LGEIL : India * LGERA : Russia
* LGEDI : Indonesia * LGEAK : Kazakhstan * LGERS : Mexico
8
9
Special Instructions3.
Product Name
29FU6TS
10
YANG HM
08.02.29
KANG KWANG
SUK
08.02.29
CW62D

Pagination sheet
Pagination sheet
P/NO.MFL42505203
Total pages : 32 pages
2 3
Rear cover
…. ….
LG(SP)
P/No
18
Problemas
con la TV
15
Trouble
shooting
check list
30
Rear cover
LG
(EN)
19
Front cover
Front cover
…. 31

Televisor a color
MANUAL DEL USUARIO
Por favor, lea detenidamente este manual antes de poner en
funcionamiento su televisor.
Conserve el manual para futuras consultas.
Anote el número de modelo y serie del aparato. Anote la
información de la etiqueta ubicada en el panel posterior, su
distribuidor se la pedirá en caso de cualquier solicitud de
servicio.
Internet Home Page : http://www.lge.com
P/N : MFL42505203 (CW62D)

ADVERTENCIA : PARA REDUCIR EL RIESGO DE CHOQUE ELECTRICO, NO EXPONGA ESTE
PRODUCTO A LA LLUVIA O LA HUMEDAD.
PRECAUCION : PARA REDUCIR EL RIESGO DE CHOQUE ELECTRICO, NO RETIRE LA
CUBIERTA POSTERIOR. NO REEMPLACE PARTES DENTRO DEL TV.
REFIERASE AL PERSONAL DE SERVICIO CAPACITADO.
PRECAUCIONES DE SEGURIDAD
Escriba los Números de Modelo y Serie
Los números de modelo y serie se encuentran en
la parte de atrás de la unidad. El número de serie
es único en esta unidad. Debe registrar la
información solicitada y retener esta guía como un
registro permanente de su compra. Favor guardar
su recibo como prueba de su compra.
Fecha de Compra
Distribuidor
Dirección
Teléfono
No. de Modelo
No. de Serie
Limpieza
Desconecte el cordón de alimentación del
tomacorriente antes de limpiar el televisor. No
utilice limpiadores líquidos o aerosoles. Utilice un
paño apenas húmedo para limpiarlo.
No utilice accesorios que no hayan sido
recomendados por el fabricante del televisor ya
que pueden resultar peligrosos.
Fuente de Alimentación
Esta unidad está diseñada para operar sólo con la
alimentación o corriente indicada. Si usted no está
seguro del voltaje que hay en su hogar, consulte a
su distribuidor o a la compañía de electricidad.
DESCONECTAR EL DISPOSITIVO DE LA RED
ELÉCTRICA
-El enchufe eléctrico sirve para desconectar el
producto. El enchufe debe estar siempre accesible.
Instalación
No utilice esta unidad cerca del agua, tina de
baño, lavamanos, fregador, tina de lavar, en un
sótano húmedo o cerca de una piscina, etc.
No coloque la unidad sobre una mesa rodante
aunque esté fija. La unidad puede caerse,
causando serios daños a niños o adultos y a la
misma unidad.
Coloque la unidad en un mueble recomendado
por el fabricante o vendido con el receptor de
televisión. Siga las instrucciones del fabricante
para aquellos televisores que se colocan en la
pared o en los anaqueles y utilice el soporte
aprobado por el fabricante.
Las ranuras en la parte superior, atrás y abajo del
televisor son para ventilación y aseguran un buen
funcionamiento del aparato, evitando que se
sobrecaliente.
Estas ranuras no deben ser bloqueadas o
cubiertas. Las ranuras nunca deben ser
bloqueadas colocando la unidad en una cama,
sofa, alfombra o superficie similar. Esta unidad no
debe colocarse en un mueble cerrado como una
biblioteca a menos que el mismo tenga la
ventilación apropiada.
Se recomienda que no se opere esta unidad
cerca de bocinas o muebles metálicos grandes
para evitar que el magnetismo de estos influya
sobre la pureza (uniformidad) de los colores en la
pantalla.
Sitios con humedad:
Este aparato no debe ser expuesto a goteras,
escurrimientos o salpicaduras y no deben
colocarse sobre de el objetos con liquido tales
como vasos o floreros.
Uso
No permita que nada esté encima del cordón de
alimentación. No coloque el televisor donde el
cordón de alimentación pueda ser pisado.
No sobrecargue los tomacorrientes y cordones de
alimentación, ya que pueden causar un incendio o
una descarga eléctrica. Nunca meta objetos de
ninguna clase en el televisor a través de las
ranuras ya que pueden tocar puntos de voltajes
peligrosos los cuales pueden causar un incendio,
un corto circuito o una descarga eléctrica.
Nunca derrame líquidos de ninguna clase encima
del televisor.
Servicio
No intente darle servicio usted mismo al televisor
ya que al abrir la cubierta de éste usted se
expondría a voltaje peligroso o a cualquier otro
peligro. Refiérase siempre que sea necesario al
técnico de servicio calificado.
2
DESCRIPCION DE LOS CONTROLES....3
Pantalla de Menús
....................................4
FUNCIONAMIENTO BASICO DEL
TELEVISOR...............................................5
FUNCIONES VARIAS................................6
CONTROL DE LA IMAGEN......................7
CONTROL DE SONIDO............................7
CONFIGURACIÓN ENTRADA USB
...............8
FUNCION DE SUBTITULAJE
......................12
FUNCIONES PIP (Algunos modelos)....13
CONEXION DE EQUIPOS EXTERNOS
(Algunos modelos).................................14
PROBLEMAS CON LA TV
..........................16
TABLA DE CONTENIDO

3
DESCRIPCION DE LOS CONTROLES
1. BOTON POWER (ENCENDIDO) (ON/OFF)
Refierase al "Encendido / Apagado del TV".
2. BOTON SLEEP
Para fijar el tiempo de apagado, si desea dormir.
3. BOTON A. PROG (Auto program)
Para memorizar los canales por medio de la
autoprogramación.
4. BOTON MTS (Algunos modelos)
Para escuchar sonido MTS.
5. BOTONES NUMERADOS
Para seleccionar directamente el canal deseado.
BOTONES SELECCIÓN USB
Para activar la función USB.
6. BOTON MUTE
Para pausar el sonido.
Presione nuevamente para restablecer el sonido.
7. BOTONES CH (
D
/
E
)
• Para seleccionar el canal deseado.
• Para seleccionar el item del menú deseado
cuando el menú está exhibido en la pantalla.
BOTONES VOLUMEN (
F
/
G
)
• Para incrementar o disminuir el nivel del volumen.
• Para entrar o ajustar el menú seleccionado
cuando el menú está exhibido en la pantalla.
BOTON ENTER (
A
)
• Para salir del Menú exhibido.
• Para memorizar el Menú ajustado.
• Para volver al modo de TV.(Solamente por
control remoto)
8. BOTON MENU
Para exhibir en la pantalla los menús.
9. BOTON TV/VIDEO
Para seleccionar el modo TV, VIDEO o
COMPONENT.
10.BOTON MEMORY/ERASE (Algunos modelos)
Para memorizar o borrar el canal deseado.
11.BOTON CAPTION (Algunos modelos)
Para seleccionar el modo de Subtítulos.
Refiera a la "Función de Subtitulaje".
12.BOTON FCR (Revisión de Canal Favorito)
Para seleccionar sus canales favoritos.
Refierase a "Memoria de canales favoritos".
13.BOTON USB
Para seleccionar el modo USB.
14. : No funciona
15.INDICADOR MODO DE ESPERA
Se ilumina en color rojo cuando el televisor
esta en modo de espera. refierase al
"Encendido / apagado del TV".
16.SENSOR DEL CONTROL REMOTO
Colocación de las baterías a la unidad
de control remoto
Este control remoto funciona con baterías.
Requiere de baterías AAA para su operación. Para
asegurar un funcionamiento correcto, reemplace
las baterías por lo menos una vez al año.
Precaución: Las baterías instaladas
incorrectamente pueden dañar el control remoto. No
mezcle baterías nuevas y usadas o de diferentes
tipos (por ejemplo, estándar y alcalinas).
1. Deslice la cubierta del control remoto en
dirección de la flecha.
2. Inserte dos baterías nuevas como lo indican las
marcas de polaridad (+ y
-
) que se encuentran
dentro del compartimiento.
3. Coloque nuevamente la cubierta del control remoto.
SLEEP
MUTE
TV/VIDEO
POWER
123
4
5
6
7
8
9
0
ENTER
FCR
MTS
A.PROG
MEMORY/ERASE
CAPTION
MENU
VOL
VOL
CH
CH
USB
U
S
B
SELECT
VOL.+
VOL.-
ZOOM
/ESC
2
6
5
8
7
9
11
12
13
1
4
3
10
14

4
Pantalla de Menús
CH.
Canal
El dialogo entre tu y tu equipo toma lugar en la
pantalla con un menu de operacion. los pasos que
se requieren para la activacion de los botones.
Seleccion del Menú
1. Presiona el boton de MENU
D
/
E
siguiendo
el boton de la pantalla.
2.Presiona el boton de
G
y despues
D
/
E
hasta
seleccionar el menú.
3.Presione el boton de
G
en la pantalla del sub-
menú o el de jalar hacia abajo.
4.Cambia la presentacion y selecciona menú
con
F
/
G
o
D
/
E
.Usted puede mover hasta el
nivel mas alto presionando ENTER (
A
) o
F
para ir al nivel mas bajo presione el boton
G
.
CH.
CH.
CH.
CH.
Idioma
(
Language
)
{
Entrada {
Bloqueado {
Subt
í
t+ {
Desmagnet. {
Game {
Especial
Selecc.
++
+Entrada{+Volver}
Programa +auto {
Programa +manual {
Favorito+ {
Auto+demo+ ++++{
Reloj {
Timer +off {
Timer +on {
Auto+_off+ {
Temporizadora
APC ++
{
XD {
Contraste {
Brillo
+ {
Color ++++++++{
Nitidez + {
Tinte
+ {
Imagen
DASP ++{
Turbo +Sound {
AVL {
Balance {
Sonido
Canal {
Memoria {
Sint._fina {
Nombre+canal {
Programa
+
manual
CH.
Programa +auto {
Programa +manual {
Favorito+ {
Auto+demo+ ++++{
Canal
CATV++95
_____
_____
_____
_____
_____
_____
Favorito+ {
Selecc.
++
+Entrada{+Volver}
Selecc.
++
+Entrada{+Volver}
Selecc.
++
+Entrada{+Volver}
Selecc.
++
+Entrada{+Volver}
Selecc.
++
+Entrada{+Volver}
Selecc.
++
+Entrada{+Volver}

Antes de poner a funcionar su televisor,
asegúrese que las siguientes instrucciones se han
cumplido.
• Su TV ha sido conectado a un sistema de
antena o cable.
• Su TV ha sido conectado a un tomacorriente.
• En este manual tal vez los menús desplegados
puedan ser diferentes a los de su TV debido a
que esto es solo un ejemplo para ayudar en la
operación de su TV.
Encendido /Apagado del TV
Presione el botón POWER (ON/OFF) en el TV;
esto regresa al modo de espera. El TV cambia al
modo de espera (Stand by) y el indicador del
modo se enciende en rojo.
Para encender el TV desde el modo de espera,
presione el boton TV/VIDEO, CH
D
/
E
en el
equipo, o los botones POWER, TV/VIDEO,
CH
D
/
E
, ENUMERADO del control remoto.
El número del canal se exhibirá en la pantalla. La
exhibición en la pantalla desaparecerá luego de
algunos segundos.
Presione el botón POWER en el control remoto;
esto hace regresar al modo de espera
Para apagar el TV presione el botón POWER en
el Televisor.
Seleccionando el idioma en
pantalla.
1. Presione el botón MENU y luego
D
/
E
hasta
que el menú aparezca como se muestra a la
derecha.
2. Presione el botón
G
y luego
D
/
E
para
seleccionar
Idioma.
3. Presione el botón
G
y luego
D
/
E
para
seleccionar el idioma deseado.
De aquí en adelante la exhibición en pantalla
aparecerá en el idioma seleccionado.
4. Presione el botón MENU para salir.
Memorización de Canales
Esta es la función para memorizar todos los
canales activos en su área antes de utilizar el TV.
Hay dos maneras de memorizar los canales.
Usted puede utilizar cualquiera.
Una es la PROGRAMA AUTO y la otra es la
PROGRAMA MANUAL.En la PROGRAMA
AUTO, el televisor memorizará los canales en
orden ascendente. Si hay canales adicionales que
quiera añadir o borrar, puede agregarlos o
borrarlos manualmente.
Memorizando los canales por
medio de la PROGRAMACION
AUTOMATICA
La PROGRAMACION AUTO busca y memoriza
todos los canales activos en su área y usted
puede entonces seleccionar los canales por
medio de los botones
D
/
E
.
Utilizando el botón A. PROG
Usted puede convenientemente realizar una
PROGRAMACION AUTOMATICA utilizando el
botón A.PROG en el control remoto.
1. Presione el botón A.PROG.
2. Presione el botón
G
o A. PROG.
La PROGRAMACION AUTOMATICA empieza
inmediatamente.
Si quiere detener la programación automática,
presione el botón ENTER (
■).
Notas :
•Si la señal programada es de baja calidad,
memorice nuevamente en la
Programa auto.
•La PROGRAMACION AUTOMATICA salva todos
los canales admisibles sin importar la recepción
de la señal (RF, cable).
•Si los canales generales de TV y los de cable TV
son duplicados presione los botones de números
(0~9) para cambiar a
Memorización de los Canales por medio
de la PROGRAMACION MANUAL
Utilización del botón MEMORY/ERASE
Usted puede realizar convenientemente la
PROGRAMACION MANUAL utilizando el botón
de MEMORY/ERASE en el control remoto.
1. Presione el botón
D
/
E
o botones
NUMERADOS para seleccionar el canal
deseado.
2. Presione MEMORY/ERASE para seleccionar
Memoria o Borrar.
La exhibición en la pantalla aparecerá como se
muestra a la derecha.
Selección de Canales
Presione el botón
D
/
E
para seleccionar
convenientemente el canal de arriba o de abajo
en vez del canal que se está viendo o presione
los botones NUMERADOS directamente para
seleccionar el canal deseado.
Ajuste del Volumen
Presione el botón
G
para aumentar el nivel del
volumen o presione el botón
F
para disminuir el
nivel del volumen.
Para pausar el sonido, presione el botón MUTE.
Resulta conveniente cuando el teléfono suena.
Para restablecer el sonido, presione el botón
MUTE o VOL
F
/
G
.
FUNCIONAMIENTO BASICO DEL TELEVISOR
5
Canales generable
de TV
Canales de
cable TV

FUNCIONES VARIAS
Fijación de la Hora
Antes de fijar el encendido y apagado del
temporizador, primero tiene que fijar la hora actual.
Fijación del temporizador de
apagado
Programa su televisor para cambiar al modo
standby luego de transcurrido el tiempo
programado.
Nota: Si se ajusta la hora de encendido igual a la de
apagado, solamente funcionará el apagado.
Fijación del temporizador de
encendido
Notas:
• Programa su televisor para encenderse a la hora
prefijada. Luego de dos horas de permanecer
encendido sin la activación de ningún botón el TV
pasará al modo de Stand by o se apagará
automáticamente.
• Esta función trabaja solamente en modo de espera.
Fijación del temporizador para
dormir
Con estas funciones usted no tendrá que
preocuparse por activar el modo de espera
(standby) en su televisor antes de quedarse
dormido.La función Sleep Timer automáticamente
apagará el televisor, después de que haya
transcurrido el intervalo de tiempo prefijado.
Presione el botón de SLEEP para seleccionar la
hora de dormir.
Cada vez que presione este botón, usted podrá
ver la secuencia de tiempos como se muestra
abajo y seleccionar el tiempo deseado.
El temporizador empieza a contar disminuyendo
desde la cantidad de minutos seleccionada.
Notas:
•En pocos segundos, el tiempo de dormir
seleccionado desaparecerá y funcionará
automáticamente.
•Para ver el tiempo de dormir que queda,
presione una vez el botón de SLEEP y podrá
verlo en la pantalla.
•Para borrar la hora de dormir, presione el botón
SLEEP continuamente hasta que
Sleep --- se
exhiba.
Apagado automático
Luego de 10 minutos de no recibir señal el televisor
cambiará a modo standby automáticamente.
Usando el desmagnetizador de
pantalla(Algunos modelos)
Debido a que este TV puede ser afectado por el
campo magnético de la tierra, la pureza de
color de la imagen pude verse afectada por
campos magnéticos cercanos a la instalación
del TV. Algunas rayas pueden aparecer en su
pantalla o el color puede que no sea igual en la
esquina. Usted puede disfrutar del programa
con una alta calidad de color operando el
Desmagnet.
Notas :
• No opere frecuentemente esta función, la vida
del CPT puede acortarse.
• Si usted no puede ajustar las condiciones de
pantalla a través de Desmagnet., intente
nuevamente después de 4 minutos.
Bloqueo de teclado
El televisor puede ser programado para que solo
pueda ser operado por el control remoto. Esta
caraterística puede ser utilizada para evitar que
personal no autorizado lo utilice.
Notas :
•Con la función de bloqueo activado, aparecerá
Bloqueado en la pantalla si cualquier botón del
panel frontal del TV es presionado aunque este
viendo el TV.
•Esta función se desactiva al desconectar el TV.
JUEGO (algunos modelos)
Usted puede disfrutar de un video juego en su TV.
Ajuste de Sintonía Fina
Esta función es para ajustar la imagen a la
condición estable cuando la imagen es pobre, por
ejemplo, las rayas horizontales, imagen
distorsionada o sin color durante la transmisión.
Notas :
•Para liberar el ajuste de sintonía fina
memorizado, programe nuevamente el canal
mediante la PROGRAMACION AUTOMATICA o
PROGRAMACION MANUAL.
•Cuando se memoriza el ajuste de sintonía fina, el
color del número y Stereo/SAP del canal cambia a
amarillo.
Memorización de los canales
favoritos
La memorización de los canales favoritos es
una característica conveniente que le permite
explorar rápidamente más de 5 canales de su
elección sin que tenga que esperar que el TV
explore los que están en medio.
Demostración Automática
Auto demo permite que usted pueda revisar todos
los menus disponibles en su TV .
---→ 10 → 20 →30 →60 →90 →120 →180 →240
6

CONTROL DE LA IMAGEN
Control automático de la Imagen
(Algunos modelos)
Puede seleccionar la imagen programada de
fábrica como prefiera.
Utilización del botón APC
1. Presione el botón APC en el control remoto.
2. Presione el botón APC para seleccionar
Nítida,Optima, Suave o Usuario.
3. Presione el botón ENTER (
■
) para salir.
Ajuste de la Imagen
Esta es la función para ajustar manualmente la
imagen a los niveles deseados (
Contraste,
Brillo, Color, Nitidez, Tinte
) de la pantalla
como usted quiera. Si la imagen que seleccionó
no es satisfactoria, usted puede seleccionar el
preajuste de fábrica.
En el sistema de transmisión PAL M/N el ajuste
para
Tinte no aparecerá.
XD (Algunos modelos)
XD es la exclusiva tecnología de mejora de
imágenes de LG Electronics, que logra mostrar
una fuente HD real a través de un avanzado
algoritmo de procesamiento de señal digital.
Nota: Cuando seleccione las opciones APC
(Nitida, Optima y Suave), XD cambiará
automáticamente a Encendido.
7
CONTROL DE SONIDO
Disfrute de la transmisión
ESTEREO / SAP
Su TV puede recibir programas MTS Estéreo y
SAP que acompañen la programación, como
sistemas que transmitirán una señal de audio
adicional de igual calidad que la original. La
función MTS no opera en el modo de Video.
Utilizando el botón MTS
1. Presione el botón MTS para seleccionar el modo
MTS deseado.
Cada vez que presione este botón,
MONO,
ESTÉREO o SAP apareceran.
2. Presione el botón ENTER (
■) para salir.
Notas:
•Estéreo o SAP pueden ser reproducidas
solamente cuando la estación de TV transmita
esta señal aunque usted haya seleccionado
ESTÉREO o SAP.
•El sonido mono es reproducido automáticamente
en caso de transmisión mono aún cuando
ESTÉREO o SAP haya sido seleccionado.
•Seleccione
MONO si desea escuchar el sonido
mono durante una transmision Estéreo / SAP.
Control Automático de Sonido
Usted puede disfrutar de un magnífico sonido sin la
necesidad de ajustes. Este TV automáticamente
ajusta el sonido apropiado al tipo de programa que
esta viendo.
AVL (Nivelador Automático de
Volumen)
El AVL automaticámente mantiene un nivel de
volumen aunque usted cambie de canal.
X-WAVE (Algunos modelos)
Notas:
1. En caso de una mala recepción, o débil,
seleccione otra frecuencia.
2. A fin de lograr los mejores resultados, no debería
existir una separación superior a los 5m(16.4 pies)
entre la TV y el receptor de FM.
3. En ciertas áreas, la capacidad del transmisor
de FM puede verse reducida, por ejemplo en
caso de cercanía a una torre de radiodifusión.
4. La sensibilidad de recepción puede depender
del tipo de receptor (radio FM).
Turbo Sonido (Algunos modelos)
Cuando se activa esta función, el sonido resultará
más acentuado y amplificado que el normal.

8
Configuración entrada USB
• Conexión USB
Conectar el puerto USB de la memoria USB al
puerto USB en el lado del televisor. Tras conectar
las clavijas de entrada USB, pulse el botón USB.
• Retirar el dispositivo USB del televisor.
1. Volver al menú principal y pulsar STOP(
A
/ESC)dos
veces.
2. Retirar el dispositivo USB del televisor.
- Cuando conecte un USB o pulse el
botón USB, se visualizarán las
siguientes pantallas.
•Ud. también puede ajustar USB en el menú Especial.
Notas :
• No extraiga el dispositivo USB mientras se
está utilizando.
Se pueden reproducir archivos de música
(MP3), archivos de imágenes (JPG) y archivos
AVI.
• Esta unidad no puede utilizar un HUB USB.
• Dispositivo USB recomendado y sistema del
archivo.
- La conexión del dispositivo USB debe cumplir las
especificaciones USB 2.0.
-Compatible con: FAT16, FAT32 (Recomendado
FAT32 para USB superior a 2GB)
- Utilizar sólo el dispositivo USB recomendado.
• Los dispositivos que precisan la instalación de
un programa adicional pueden presentar
problemas de identificación o en la lectura de
datos.
• En el caso de un USB HDD, asegúrese de
conectar un cable de alimentación auxiliar al
USB HDD para un funcionamiento correcto. Se
admiten las particiones primarias de una
unidad. En caso de una partición de una
ampliación, ésta no será compatible.
• Las cámaras digitales y los teléfonos móviles
no son compatibles.
• Los archivos AVI, JPG o MP3 dañados o no
compatibles pueden generar errores. No
intente cambiar la extensión de los archivos no
compatibles a la de aquellos que son
compatibles.
• El códec de este dispositivo es un códec de
hardware por lo que el formato del archivo
compatible y el códec no se pueden actualizar
mediante un firmware.
• El modo USB se puede activar o desactivar en la
tecla USB del mando a distancia.
• Si quiere volver al modo USB tras estar en el
modo RF los medios, música o películas en
reproducción se detendrán en pausa. Para iniciar
y continuar con la reproducción, pulse la tecla
G
II.
• Función TIMEOUT: si no se realiza ninguna IR
entrada con el mando a distancia en un intervalo
de 4 horas tras acceder al modo USB, todas las
funciones en reproducción se detendrán
fijándose en el menú principal USB.
• Los clientes también tendrán que tener en
cuenta que es necesario tener un permiso para
poder descargarse archivos MP3 o películas de
Internet. Nuestra empresa no está autorizada
para conceder ese permiso. El permiso deberá
solicitarse siempre al propietario de los derechos
de autor.
USBUSB
CH.
Move++Next+{
+
Exit}
Language {
Input {
Key+lock {
Caption+ {
Degauss {
USB {
Special
USB {
ON
USB
OK

9
Selección de idioma OSD
- El menú puede ser mostrado en pantalla en un
idioma seleccionado. Para seleccionar el idioma:
1. Presione el botón USB y luego presione el botón
D
/
E
/
F
/
G
para seleccionar el menú Setup.
2. Pulse el botón ENTER para acceder al menú Setup.
3. Presione el botón
D
/
E
para seleccionar
AJUSTE SYSTEMA.
4. Presione el botón
G
y luego presione el botón
D
/
E
para seleccionar LENGUAJE OSD.
5. Presione el botón
G
y luego presione el botón
D
/
E
para seleccionar el lenguaje deseado.
6. Pulse el botón USB para salir o pulse el botón
A
/ESC para volver al menú USB.
Seleccione la versión del software
- Muestra la versión del software.
1. Presione el botón USB y luego presione el botón
D
/
E
/
F
/
G
para seleccionar el menú Setup.
2. Pulse el botón ENTER para acceder al menú Setup.
3. Presione el botón
D
/
E
para seleccionar
AJUSTE SYSTEMA.
4. Presione el botón
G
y luego presione el botón
D
/
E
para seleccionar S/W VERSION.
5. Presione el botón
G
.
6. Pulse el botón USB para salir o pulse el botón
A
/ESC para volver al menú USB.
Seleccione la opción predeterminada
- Utilice la opción predeterminada para iniciar los
ajustes definidos.
1. Presione el botón USB y luego presione el botón
D
/
E
/
F
/
G
para seleccionar el menú Setup.
2. Pulse el botón ENTER para acceder al menú Setup.
3. Presione el botón
D
/
E
para seleccionar
AJUSTE SYSTEMA.
4. Presione el botón
G
y luego presione el botón
D
/
E
para seleccionar DE FÁBRICA.
5. Presione el botón
G
.
6. Pulse el botón USB para salir o pulse el botón
A
/ESC para volver al menú USB.
LENGUAJE+OSD
S/W +VERSION
DE+F
Á
BRICA
ENGLISH
ESPA
Ñ
OL
PORTUGUES
AJUSTE
+SYSTEMA
Selección de Efecto
Efecto de la imagen visualizada en la
presentación.
1. Presione el botón USB y luego presione el botón
D
/
E
/
F
/
G
para seleccionar el menú Setup.
2. Pulse el botón ENTER para acceder al menú Setup.
3. Presione el botón
D
/
E
para seleccionar
AJUSTE FOTO.
4. Presione el botón
G
y luego presione el botón
D
/
E
para seleccionar EFFECTO.
5. Pulse el botón
G
y después el botón
D
/
E
para
seleccionar el efecto deseado.
6. Pulse el botón USB para salir o pulse el botón A /ESC
para volver al menú USB.
Selección de Frecuencia
Intervalo de la imagen visualizada en la
presentación.
1. Presione el botón USB y luego presione el botón
D
/
E
/
F
/
G
para seleccionar el menú Setup.
2. Pulse el botón ENTER para acceder al menú Setup.
3. Presione el botón
D
/
E
para seleccionar
AJUSTE FOTO.
4. Presione el botón
G
y luego presione el botón
D
/
E
para seleccionar FRECUENCIA.
5. Pulse el botón
G
y después el botón
D
/
E
para
seleccionar la frecuencia.
6. Pulse el botón USB para salir o pulse el botón A /ESC
para volver al menú USB.
Selección de Música
Puede activar o desactivar la música de fondo al
reproducir el modo fotográfico.
1. Presione el botón USB y luego presione el botón
D
/
E
/
F
/
G
para seleccionar el menú Setup.
2. Pulse el botón ENTER para acceder al menú Setup.
3. Presione el botón
D
/
E
para seleccionar
AJUSTE FOTO.
4. Presione el botón
G
y luego presione el botón
D
/
E
para seleccionar
MÚSICA
.
5. Presione el botón
G
y luego presione el botón
D
/
E
para seleccionar ON o OFF.
6. Pulse el botón USB para salir o pulse el botón A /ESC
para volver al menú USB.
Selección del Modo de reproducción
Puede seleccionar el modo de reproducción
deseado en la presentación.
1. Presione el botón USB y luego presione el botón
D
/
E
/
F
/
G
para seleccionar el menú Setup.
2. Pulse el botón ENTER para acceder al menú Setup.
3. Presione el botón
D
/
E
para seleccionar
AJUSTE FOTO.
4. Presione el botón
G
y luego presione el botón
D
/
E
para seleccionar JUEGO MODO.
5. Presione el botón
G
y luego presione el botón
D
/
E
para seleccionar NORMAL o RANDOM.
6. Pulse el botón USB para salir o pulse el botón A /ESC
para volver al menú USB.
EFFECTO
FRECUENCIA
M
Ú
SICA
JUEGO+MODO
RANDOM
WIPE +BOTTOM
WIPE +LEFT
WIPE +RIGHT
LEFT+TOP
AJUSTE
+FOTO
Configuración entrada USB

10
Selección de Película, Música o
Fotografía
- Cuando conecte un USB o pulse el botón USB,
se visualizarán las siguientes pantallas.
1. Presione el botón
F
/
G
para seleccionar Movie,
Music o Photo.
2. Pulse el botón ENTER para acceder Movie,
Music o Photo.
3. Pulse el botón USB para salir.
Reproducción del archivo de la
película
1. Presione el botón USB y luego presione el botón
D
/
E
/
F
/
G
para seleccionar el menú Movie.
2. Presione el botón ENTER.
3. Pulse el botón
D
/
E
/
F
/
G
para seleccionar la
carpeta y el archivo de la película deseada.
4. Presione el botón
G
II o ENTER. La película ha
comenzado.
5.
Pulse el botón USB para salir o pulse el
botón
A /ESC para volver al menú USB.
Uso del control remoto
Notas:
• La compatibilidad de este reproductor con los archivos
de película AVI está limitada de la siguiente manera:
-La resolución disponible de los archivos AVI es inferior
a 720x480 (576) píxeles.
-Si el códec de vídeo no es compatible, se mostrará la
pantalla de visualización “UNSUPPORTED
FORMAT” (FORMATO NO COMPATIBLE) en el
menú Lista de archivos.
-Si el códec de audio no es compatible, se podrá
visualizar el vídeo sin sonido y aparecerá la
pantalla de visualización “UNSUPPORTED
FORMAT” (FORMATO NO COMPATIBLE).
-Si el sonido no dispone de flujo de datos, “NO
SOUND” (SIN SONIDO) aparecerá en la pantalla.
-Si el número de fotogramas en pantalla es superior
a 30 por segundo, puede que el dispositivo no
funcione con normalidad.
• Formatos de subtítulos reproducibles: srt, sri, smi,
txt, ssa, ass, sub, psb
• Extensiones de archivo de la película de
supportable: “.DAT”, “.AVI”, “.MP4”, “.MPG”
• Codec del vídeo de supportable: MPEG1(VCD
1.0, 1.1, 2.0, SVCD), MPEG4 ASP o codecs
compatibles
/ESC
ENTER
[K_OTHERS]
K_OTHERS
J_SUB T
I_CONT
H_VIDE_1
OTH_01_1.AV1
OTH_02_1.AV1
Configuración entrada USB (Película)
1
2
VOL.+
VOL.-
Para subir o bajar el nivel de volumen de la película.
Pulse el botón para saltar a la película anterior.
Pulse el botón para saltar a la película siguiente.
Carpetas movidas en menú.
Sera visualizada una pantalla fija. (Al reproducir la película)
Reproducir la película secuencialmente
(en la lista de películas)
Pulsar el botón como recordatorio.
Pulsar el botón para un avance rápido.
Mostrar la información de la película. (al reproducir la película)
Reproducir la película seleccionada con el cursor.
(en la lista de películas)
ACTIVACIÓN/DESACTIVACIÓN de subtítulos
4
6
4
6
7
9
7
9
Configuración entrada USB (mp3)
Funcionamiento de la reproducción
de MP3
- Los archivos de música/MP3 pueden contener
restricciones de derechos de copia.
1. Presione el botón USB y luego presione el botón
D
/
E
/
F
/
G
para seleccionar el menú Music.
2. Presione el botón ENTER.
3. Pulse el botón
D
/
E
/
F
/
G
para seleccionar la
carpeta y el archivo de música deseado.
4. Presione el botón
G
II o ENTER. La música ha comenzado.
5.
Pulse el botón USB para salir o pulse el
botón
A /ESC para volver al menú USB.
Uso del control remoto
5
/ESC
8
ENTER
0
SELECT
ENTER
/ESC/ESC
ENTER
[G_AUDIO]
G_AUDIO
D_FILE
AUD_1A.MP3
AUD_1B.MP3
AUD_1C.MP3
AUD_3A.MP3
AUD_3B.MP3
1
2
VOL.+
VOL.-
Para subir o bajar el nivel de volumen de la música.
Pulse el botón para avanzar 5 segundos.
Pulse el botón para retroceder 4 segundos.
Carpetas movidas en menú.(en lista de música)
Detener la reproducción de música.(al reproducir la música)
Pulsar el botón como recordatorio.
Pulsar el botón para un avance rápido.
Para detener en pausa la reproducción
(durante la reproducción de música).
Reproducir música secuencialmente
(en la lista de música)
Reproducir la música seleccionada con el cursor.
4
6
4
5
/ESC
6
7
9
8
ENTER
7
9

11
Configuración entrada USB (mp3)
Notas :
• La compatibilidad de los archivos MP3 con este
reproductor queda limitada de la siguiente
manera:
- Frecuencia de muestreo: entre 8 -48 KHz
- Velocidad de bits: 32 -384 Kbps, admite todas
las velocidades de bits variables
- El TV no puede leer un archivo MP3 con una
extensión de archivo diferente a “.mp3’
- El nombre del archivo debe tener 8 letras como
máximo y la extensión .mp3.
- El número total de archivos en el dispositivo de
memoria USB debería ser inferior a 1200.
• Este reproductor de MP3 para TV requiere que los
archivos mp3 cumplan ciertas normas técnicas
(ISO/IEC 111723, ISO/IEC 13818-3.2) para
poder alcanzar la calidad óptima de reproducción.
• Existen diferentes tipos de codificadores de MP3
y requieren ciertas condiciones previamente
existentes para garantizar la compatibilidad de
la reproducción.
• La tecla de navegación podrá desplazarse hacia arriba
o hacia abajo durante la reproducción de un archivo
MP3 aunque no podrá acceder a otra carpeta.
• A fin de reproducir un archivo en otra carpeta,
detenga el archivo en reproducción y
seguidamente podrá reproducir otro título de
otra carpeta.
• El tiempo de duracion real puede variar al
tiempo mostrado.
Configuración entrada USB (JPEG)
Opciones de visualización de los
archivos JPEG
- Cuando seleccione PHOTO en el menú de entrada,
verá una pantalla con varias fotos en miniatura.
1. Presione el botón USB y luego presione el botón
D
/
E
/
F
/
G
para seleccionar el menú Photo.
2. Presione el botón ENTER.
3. Pulse el botón
D
/
E
/
F
/
G
para seleccionar el
archivo de la foto.
4. Pulse el botón ENTER para visualizar una imagen,
y pulse 8 para visualizar la presentación completa.
5.
Pulse el botón USB para salir o pulse el
botón
A /ESC para volver al menú USB.
Presentación en diapositivas
1. Pulse el botón
D
/
E
/
F
/
G
para seleccionar el
archivo JPEG y después pulse el botón .
Se ha iniciado la presentación.
2. En la configuración USB, puede elegir el modo
de presentación, el de frecuencia o reproducción.
3. Pulse el botón
G
II para pausar la imagen actual.
4.
Pulse el botón USB para salir o pulse el
botón
A /ESC para volver al menú USB.
Imagen fija
Pulse los botones
D
/
E
/
F
/
G
para seleccionar los
archivos JPEG y pulse el botón ENTER.Se inicia la
visualización de la imagen fija seleccionada.
K_REA_1. JPG +81K+720x576
1.+K_REA_1 [81K]
2.+A_NLTM_1 [154K]
3.+B_RED [43K]
4.+K_REA_1 [81K]
5.+A_NLTM_1 [154K]
6.+B_RED [43K]
8
Configuración entrada USB (JPEG)
Uso del control remoto
Notas :
• La compatibilidad de los archivos JPEG con
este reproductor queda limitada de la
siguiente manera :
- Dependiendo del tamaño y número de
archivos JPEG, el TV podría tardar bastante
tiempo en leer el contenido de la memoria. Si
no ve un mensaje en pantalla transcurridos
varios minutos, algunos de los ficheros tal
vez sean demasiado grandes. Reduzca la
resolución de los ficheros JPEG a menos de
2M píxeles, como la resolución 2760 x 2048.
- El número total de archivos y carpetas en el
dispositivo de memoria USB debería ser inferior a
1200.
- Este decodificador jpeg de TV no puede leer
archivos que no tengan la extensión ".jpg",
aunque los archivos aparezcan como
archivos de imagen JPEG en Windows
Explorer.
1
2
VOL.+
VOL.-
Para subir o bajar el nivel de volumen de la música.
(Al seleccionar la activación de la música de fondo
al reproducir el modo fotográfico).
Para seleccionar la página anterior o siguiente.
(en el modo miniatura).
Para acceder a la fotografía anterior o siguiente
(en la reproducción de una foto).
Mueva al menú principal desde el modo Thumbnail.
Estos botones (FFyRW) no están disponibles
en el modo de foto.
Para aumentar o reducir la imagen 2, 3 ó 4 veces.
(en la reproducción de una foto)
1. Modo zoom
Para desplazarse hacia la izquierda/derecha,arriba/abajo
2. Imagen Congelada
VOL+: Se gira 90¡ª(a la dirección de reloj)
VOL- : Se gira -90¡ª(a la izquierda)
CH+ : al revés y viceversa
CH- : Imagen del espejo y viceversa
4
6
5
/ESC
7
9
3
ZOOM
VOL
VOL
CH
CH

El subtitulaje es un proceso que convierte la
porción de audio de un programa de televisión en
palabras escritas, las cuales aparecen en la
pantalla del televisor en una forma similar a los
subtítulos. El subtitulaje permite al televidente leer
el diálogo y narración de los programas de
televisión.
Uso de Subtitulaje
Las leyendas son los subtítulos del diálogo y
narración de los programas de televisión. Para
programas pregrabados, el diálogo del programa
puede prepararse anticipadamente con subtítulos.
Es posible subtitular un programa en vivo usando
un proceso llamado "subtitulaje de tiempo real", el
cual crea subtitulajes instantáneamente.
El subtitulaje de tiempo real es normalmente
efectuado por reporteros profesionales que usan
un sistema de taquigrafía a máquina y una
computadora para traducir al inglés.
El subtitulaje es un sistema efectivo para
personas con incapacidad auditiva, y también
puede ayudar en la enseñanza de idiomas.
• La imagen a abajo muestra un subtitulaje típico.
Consejos para el Subtitulaje
• No todas las transmisiones de TV incluyen
señales de subtitulaje.
• Algunas veces las estaciones de Televisión
transmiten dos señales de subtitulaje diferentes
en el mismo canal. Seleccionando
MODO 1 o
MODO 2, puede seleccionar cuál señal
visualizar.
MODO 1 es la señal usual con los
subtitulajes, mientras que
MODO 2 puede
mostrar la información de demostración o
programación.
• El televisor puede no recibir señales de
subtitulaje en las situaciones siguientes:
Se enfrentan condiciones de recepción deficientes:
A
IGNICION:
La imagen puede vibrar, desviarse, llenarse de
manchas negras o rayas horizontales.
Usualmente causadas por interferencia de
sistemas de ignición de automóviles, lámparas
de neón, taladros eléctricos y otros aparatos
eléctricos.
A
FANTASMAS:
Los fantasmas son causados cuando la señal del
Televisor se separa y sigue dos trayectorias. Una
es la trayectoria directa y la otra es reflejada desde
edificios altos, montañas u otros objetos. Puede
mejorar la recepción cambiando la dirección o
posición de la antena.
A
NIEVE:
Si su receptor se localiza en una zona marginal
en donde la señal es débil, su imagen puede
ser estropeada por la aparición de puntos
pequeños. Será necesario instalar una antena
especial para mejorar la imagen.
Se reproduce una cinta de grabación vieja, en
mal estado o copia pirata.
Las señales fuertes, aleatorias desde un carro
o avión interfieren con la señal de TV.
La señal de la antena es débil.
El programa no se subtituló cuando fue
producido, transmitido o grabado.
Uso de Función de Texto
Los servicios de Texto proporcionan una extensa
variedad de información sobre toda clase de
temas (por ejemplo, listas de programas
subtitulados, pronóstico de tiempo, tópicos del
mercado de valores, noticias para personas con
incapacidad auditiva
...
) a través de la pantalla de
Televisión.
Pero no todas las estaciones ofrecen servicios de
texto, aunque pudieran ofrecer subtítulaje.
Nota:En el caso de recibir una señal débil, un
cuadro negro sin imagen puede aparecer y
desaparecer en la pantalla, aún cuando la
modalidad de texto se seleccione. Esta situación
es normal en estos casos.
Operación del Subtitulaje
Utilizando el botón CAPTION
1. Presione el botón CAPTION.
2. Presione el botón CAPTION para seleccionar
OFF, Modo 1, Modo 2,Texto 1 o Texto 2.
3. Presione el botón ENTER (
A
) para salir.
Utilizando el botón de MENU
1. Presione el botón MENU y luego presione el botón
D
/
E
para seleccionar el menú especial.
2. Presione el botón
G
y luego
D
/
E
para seleccionar
Subtít.
3. Presione el botón
G
y luego
D
/
E
para seleccionar
Off, Modo 1,Modo 2,Texto 1 o Texto 2.
4. Presione el botón MENU para salir.
Nota:El televisor está programado para recordar
cuál fue la última modalidad que se fijó, aún
cuando lo haya apagado.
FUNCION DE SUBTITULAJE
FOLLOW ME
12
1
2
3
4
5

FUNCIONES PIP (Algunos modelos)
Observación del PIP (Imagen
sobre Imagen)
Esta función llama una pequeña imagen (PIP :
Imagen) con la imagen principal. Al mismo tiempo
podrá observar dos programas diferentes.
1. Presione el botón PIP/DW para seleccionar el
modo PIP o Imagen Gemela. cada vez que
presione el botón PIP/DW, puede cambiar el
tamaño de sub imagen de acuerdo a las
opciones se muestran abajo.
2. Presione el botón CH
+
/
-
para seleccionar el
canal deseado para la sub-imagen.
Nota:
• Presione el botón
D
/
E
para seleccionar el canal
en la imagen principal y presione el botón CH
+
/
-
para seleccionar el canal de la sub imagen.
• El 4:3 y Zoom no funciona en el modo PIP [L].
Selección de la Señal de Entrada
(en el modo PIP e Imagen Gemela)
Utilizando el botón PIP MENU
1. Presione el botón PIP MENU.
2. Presione el botón
D
/
E
para seleccionar
Entrada.
3. Presione el botón
G
y luego
D
/
E
para seleccionar
TV, Video 1, Video 2 o Video 3.
4. Presione el botón VOLUME (
F
)para salir.
Utilizando el botón de MENU
1. Presione el botón MENU y luego presione el
botón
D
/
E
para seleccionar el menú especial.
2. Presione el botón
G
y luego
D
/
E
para
seleccionar
Especial.
3. Presione el botón
G
y luego
D
/
E
para
seleccionar
PIP Entrada .
4. Presione el botón
G
y luego
D
/
E
para seleccionar
TV, AV 1, AV 2 oAV 3.
5. Presione el botón VOLUME (
F
) para salir.
Búsqueda de Canal
Esta función busca las imagenes de todos los
canales programados (a través de la pantalla PIP)
mientras la pantalla principal permanece en el
canal actual.
Presione el botón CH. SEARCH.
Las imagenes de todos los canales programados
son buscadas a través de la pantalla PIP, como
se muestra a la derecha.
Para liberar la búsqueda de canal, presione
nuevamente el botón CH. SEARCH.
Nota: Presionando el botón SWAP puede ver
el canal buscado en la pantalla del PIP
Atravez de la pantalla principal.
Moviendo la Sub Imagen (en
modo PIP)
Presione el botón POSITION para seleccionar la
posición de la sub imagen.
Cambio de Pantallas
Presione el botón SWAP.
Cada vez que presione el botón la imagen
principal y la sub imagen cambian de lugar.
Imagen Fija
Presione el botón de STILL.
En modo PIP, la imagen congelada será
desplegada en la sub imagen
Para cancelar la imagen fija, presione el botón
STILL
nuevamente.
13
PIP [S]
PIP [M]
PIP [L] : DW
PIP off
24
< Modo de la DW >
todavía imagen
< Modo de la PIP >
todavía imagen

CONEXION DE EQUIPOS EXTERNOS (Algunos modelos)
14
Antena Externa
Para mejor recepción, recomendamos que utilice
una antena externa. El mal tiempo y los cables de
antena pueden reducir la calidad de la señal.
Antes de conectar el aparato de televisión, revise
la antena y cables. En cualquier centro de servicio
le pueden explicar sobre los diversos tipos de
antenas exteriores disponibles.
Cable Plano de 300 ohm
1. Conecte el cable plano de 300 ohm a los
tornillos en el adaptador de 300 a 75 ohm.
2. Inserte el adaptador de 300 a 75 ohm en el
conector de la antena de 75 ohm.
Cable Coaxial de 75 ohm
1. Conecte el cable coaxial de 75 ohm directamente
al conector de la antena de 75 ohm.
Telecable (CATV)
Si se suscribe al sistema de telecable (CATV),
cambie la conexión de la antena tal como se
describe a continuación.
1. Quite el adaptador de 300 a 75 ohm o el cable
de antena de 75 ohm del aparato.
2. Conecte el cable de telecable CATV (cable
coaxial de 75 ohm) al conector de la antena de
75 ohm.
CONEXION DE EQUIPOS EXTERNOS
Usted puede conectar equipos adicionales, como
una VHS, Cámara de Video,etc. a su TV.
Aquí se muestra algunas formas de cómo puede
conectarse.
Estos son ejemplos de la disposición de los
conectores.
1. IN 1 JACKS : Conecte las salidas del equipo
(VCR, DVD, Videocámara) a estas entradas.
Presione el botón TV/VIDEO para seleccionar
AV 1.
2. IN 2 JACKS : Conecte las salidas del equipo
(VCR, DVD, Videocámara) a estas entradas.
Presione el botón TV/VIDEO para seleccionar
AV 2.
3. IN 3 JACKS : Conecte las salidas del equipo
(VCR, DVD, Videocámara) a estas entradas.
Presione el botón TV/VIDEO para seleccionar
AV 3.
4. OUT JACKS (Salida de conectores): Conecte
las entradas de un equipo externo (VCR,
Amplificador de Audio ) a estas salidas para
grabar o monitorear el programa deseado.
Nota:El televisor está programado para
recordar cuál fue la última modalidad que se fijó,
aún cuando haya apagado el Televisor.
Conectando las entradas
AUDIO/VIDEO
1. Conecte las salidas de AUDIO/VIDEO del VCR
a la entrada (A/V) IN 1 o IN 2.
Si usted conecta el JACK de audio solamente,
no podrá escuchar el sonido del televisor.
2. Presione el botón TV/VIDEO para seleccionar
AV-1 o AV-2.
Nota:En algunos modelos si usted conecta la
salida de audio/video del VCR a la entrada
IN 3(A/V) en la parte frontal o lateral del TV,
seleccione
AV-3.
3. Presione el botón PLAY del VCR.
En video será visible en la pantalla.
Nota: En caso de una video grabadora MONO,
conecte la salida del VCR a la entrada AUDIO
L/MONO IN del TV. Así que el sonido podrá ser
escuchado por ambas bocinas. Si usted lo
conecta a la entrada AUDIO R IN del TV, el
sonido se escuchará en la bocina derecha.
VCR Grabando(Algunos modelos)
Nota: En algunos modelos mono, cuando en los
conectores de entrada en el panel delantero y el
panel trasero se conectan equipos externos al
mismo tiempo, los conectores de entrada en el
panel delantero tienen prioridad sobre aquellos
del panel trasero del televisor.
1. Conecte las entradas de audio/video del VCR a
las salidas (A/V) de su TV.
2. Seleccione el canal en su televisor.
3. Fije el VCR para grabar.
Grabando un programa de otro
equipo
(Algunos modelos)
1. Conecte las salida del VCR reproductor en la
entrada IN 1, IN 2 o IN 3 de su TV.
2. Conecte las entradas del VCR de grabado a
las salidas (A/V) del TV.
3. Presione TV/VIDEO para seleccionar
AV 1 o AV 2.
4. Presione el botón PLAY en el VCR reproductor
y fije el VCR para grabar.

•
Conecte las entradas compuestas de Video Y, Pb, Pr
(480i)
y las entradas de audio R y L
.
•
Nota: El televisor está programado para
recordar cuál fue la última modalidad
que se fijó, aún cuando lo haya
apagado.
1.Cómo conectar
Nota:
2.
Cómo Usar
•Encienda la unidad y presione la tecla TV/VIDEO
en el control remoto o la tecla TV/VIDEO en el
panel frontal del TV para seleccionar el
COMPONENT.
•Intente esto después de encender el DVD.
< Panel trasero del DVD >
AUDIO
PB PRY (R) (L)
Y
IN2
PB PR
DVD IN (480i)
VIDEO
(L/MONO) AUDIO(R)
COMPONENT
< Panel de Conexión del TV >
TV INPUT
Y P
B
P
R
DVD OUTPUT
Cb
B -Y
Pb
P
B
Cr
R -Y
Pr
P
R
Y
Y
Y
Y
15

PROBLEMAS CON LA TV
SINTOMA
No enciende
No hay imagen o no hay sonido
Sonido bien, imagen pobre
Recepción pobre
Líneas en la imagen
Fantasmas (Imagenes múltiples)
No funciona el Control Remoto.
No puede sintonizar el canal deseado
VERIFIQUE ESTOS PASOS Y TRATE
DE HACER EL AJUSTE
Asegúrese que el cable de alimentación
está enchufado
Asegúrese que el televisor está encendido
Verifique las baterías del Control Remoto.
Intente otra estación
(Problemas de transmisión) Verifique la
conexión de la antena
Puede ser interferencia a nivel local
Ajuste la antena
Ajuste el control de imagen
Memorice los canales por PROG. AUTO

Color Television
OWNER'S MANUAL
Please read this manual carefully before operating your set.
Retain it for future reference.
Record model number and serial number of the set.
See the label attached on the back cover and quote this
information to your dealer when you require service.

WARNING : TO REDUCE THE RISK OF FIRE OR ELECTRIC SHOCK, DO NOT EXPOSE THIS
PRODUCT TO RAIN OR MOISTURE.
CAUTION : TO REDUCE THE RISK OF ELECTRIC SHOCK, DO NOT REMOVE COVER(OR
BACK). NO USER-SERVICEABLE PARTS IN SIDE. REFER SERVICING TO
QUALIFIED SERVICE PERSONNEL.
Safety Precautions
Writing Model And Serial Numbers
The serial number and model number are found
on the back of this unit. The serial number is
unique to this unit. You should record requested
information here and retain this guide as a
permanent record of your purchase. Please retain
your purchase receipt as your proof of purchase.
Date of Purchase
Dealer Purchased from
Dealer Address
Dealer Phone No.
Model No.
Serial No.
Cleaning
Unplug this television receiver from the wall outlet
before cleaning. Do not use liquid cleaners or
aerosol cleaners. Use a damp cloth for cleaning.
Do not use attachments not recommended by the
television receiver manufacturer as they may
cause hazards.
Power Supply
This television receiver should be operated only
from the type of power source indicated on the
marking label. If you are not sure of the type of
power supplied to your home, consult your
television dealer or local power company.
DISCONNECTING DEVICE FROM MAINS
- Mains plug is the disconnecting device. The plug
must remain readily operable.
Installation
Do not use this television receiver near water, for
example, near a bathtub, washbowl, kitchen sink,
or laundry tub, in a wet basement, or near a swim-
ming pool, etc.
Do not place this television receiver on an
unstable cart, stand, or table. The television
receiver may fall, causing serious injury to a child
or an adult, and serious damage to the appliance.
Use only with a cart or stand recommended by the
manufacturer, or sold with the television receiver.
Wall or shelf mounting should follow the manu-
facturer's instructions and should use a mounting
kit approved by the manufacturer.
Slots and openings in the cabinet and the back or
bottom are provided for ventilation, and to insure
reliable operation of the television receiver, and to
protect it from overheating. These openings must
not be blocked or covered. The openings should
never be blocked by placing the television receiver
on a bed, sofa, rug, or other similar surface. This
television receiver should not be placed in a built-
in installation such as a bookcase unless proper
ventilation is provided.
It is recommended not to operate this unit near
speakers or big metallic furnitures in order to keep
their magnetism from disturbing colors purity
(uniformity) on the screen.
Wet Location Marking:
Apparatus shall not be exposed to dripping or
splashing and no objects filled with liquids, such
as vases, shall be placed on the apparatus.
Use
Do not allow anything to rest on the power cord.
Do not locate this television receiver where the
cord will be abused by persons walking on it.
Do not overload wall outlets and extension cords
as this can result in fire or electric shock.
Never push objects of any kind into this television
receiver through cabinet slots as they may touch
dangerous voltage points or short out parts that
could result in a fire or electric shock.
Never spill liquid of any kind on the television
receiver.
Service
Do not attempt to service this television yourself
as opening or removing covers may expose you
to dangerous voltage or other hazards. Refer all
servicing to qualified personnel.
2
CONTENTS
Description of controls............................3
On screen menus.....................................4
Basic TV operation ..................................5
Various function ......................................6
Picture control .........................................7
Sound control ..........................................7
USB Mode.................................................8
Closed caption function........................12
PIP function (some models)..................13
Connection of external equipment
(some models)........................................14
Troubleshooting check list....................16

Description of controls
3
1. POWER BUTTON (or ON/OFF )
Refer to "Turning on/off the TV".
2. SLEEP BUTTON
To set the desired sleep time.
3. A. PRGO (Auto program) BUTTON
To memorize channels by AUTO PROGRAM.
4. MTS BUTTON (some models)
To listen to the MTS sound.
5. NUMBER BUTTONS
To select the desired channel directly.
USB SELECT BUTTONS
To operate USB function.
6. MUTE BUTTON
To mute the sound. Again to restore the muted
sound.
7. CH UP/DOWN (
D
/
E
) BUTTONS
• To select the desired channel.
• To select the desired menu item when menu
is displayed on the screen.
VOLUME UP/DOWN (
F
/
G
) BUTTONS
• To increase or decrease volume level.
• To enter or adjust the selected menu when
menu is displayed on the screen.
ENTER (
A
) BUTTON
• To exit from the displayed menu.
• To memorize the adjusted menu.
• To recall the current TV mode (by remote
control only).
8. MENU BUTTON
To display on-screen or exit from USB mode.
* Other local key is not available in USB mode.
9. TV/VIDEO BUTTON
To select TV, VIDEO or COMPONENT mode.
10.MEMORY/ERASE BUTTON (some models)
To memorize or erase the desired channel.
11.CAPTION BUTTON (some models)
To select the CAPTION mode.
Refer to "Closed caption function".
12.FCR (Favorite Channel Review) BUTTON
To select the favorite channel.
Refer to "Favorite channel memory".
13.USB BUTTON
Enter into or exit from USB mode.
14. : No function.
15.STAND BY INDICATOR
Illuminates red when the TV is in standby
mode. Refer to "Turning on/off the TV".
16.REMOTE CONTROL SENSOR
Fitting Batteries in the Remote Control Unit
The remote control is powered by batteries. This
requires AAA type batteries for operation. To
ensure consistent operation, change the batteries
about once a year.
Caution : Batteries installed incorrectly may leak
and damage the remote control. Do not mix old
and new batteries or different types of batteries
(for example, standard and alkaline).
1. Remove the battery compartment cover by
sliding it in the arrowhead direction.
2. Insert new batteries as indicated by the polarity
markings (+ and -) inside the compartment.
3. Replace the battery compartment cover.
SLEEP
MUTE
TV/VIDEO
POWER
123
4
5
6
7
8
9
0
ENTER
FCR
MTS
A.PROG
MEMORY/ERASE
CAPTION
MENU
VOL
VOL
CH
CH
USB
U
S
B
SELECT
VOL.+
VOL.-
ZOOM
/ESC
2
6
5
8
7
9
11
12
13
1
4
3
10
14

On screen menus
4
CH.
Move++Next+{
+
Exit}
Language {
Input {
Key+lock {
Caption+ {
Degauss {
Game {
Special
CH.
Move++Next+{+Exit}
Auto+program {
Manual program {
Favorite+channel++ {
Auto+demo+ ++++ {
Channel
The dialogue between you and your set takes place
on screen with an operator menu .The buttons
required for the operating steps are also displayed.
Menu selection
1.Press the MENU button and then
D
/
E
button to
display each menu.
2.Press the
G
button and then
D
/
E
button to
select a menu item.
3.Press the
G
button to display the sub menu or
the pull-down menu.
4.Change the setting of an item in the sub or pull-
down menu with
F
/
G
or
D
/
E
.You can move to
the higher level menu with ENTER (
A
) or
F
button and to move to the lower level menu
press the
G
button.
CH.
Move++Next+{+Back}
DASP +
+{
Turbo +Sound {
AVL {
Balance {
Sound
CH.
Move++Next+{+Back}
Clock {
Off_timer {
On+_timer {
Auto+_off+ {
Timer
Move++Next+{+Back}
Channel {
Memory {
Fine {
Ch.+name {
Manual
+
program
CH.
Move++Next+{+Back}
Auto+program {
Manual program {
Favorite+channel+
{
Auto+demo+ + {
Channel
CATV++95
_____
_____
_____
_____
_____
_____
_____
Favorite+channel+{
CH.
Move++Next+{+Back}
APC +
+{
XD {
Contrast {
Brightness + {
Color ++++++++{
Sharpness + {
Tint
++++++
+ {
Picture

5
Basic TV operation
Before operating your TV, make sure the following
instructions have been completed.
• Your TV has been connected to an antenna or a
cable system.
• Your TV has been plugged in a power outlet.
• In this manual, the OSD (On Screen Display)
may be different from your TV’s because it is just
an example to help you with the TV operation.
Turning on/off the TV
Press the POWER (or ON/OFF) button on
the set. At this time, the set switches to
standby mode and the standby indicator
lights up in red.
To switch the TV on from standby mode,
press the TV/VIDEO, CH
D
/
E
button on
the set or POWER, TV/VIDEO, CH
D
/
E
or
number button on the remote control.
A channel number will be displayed on the
screen. The on-screen display will disappear
after a few seconds.
Press the POWER button on the remote
control. It reverts to standby mode.
To switch the TV off, press the POWER
button on the set.
Selecting the on screen language
1. Press the MENU button and then
D
/
E
button
until the menu is displayed as shown right.
2. Press the
G
and then
D
/
E
button to select
Language.
3. Press the
G
and then use
D
/
E
button to
select the desired language.
From this point on, the on-screen display will be
presented in the language of your choice.
4. Press the MENU button to exit.
Memorizing Channels
This is the function to memorize all the active
channels in your area before you can use the TV.
There are two ways of memorizing channels. You
can use either.
One is called AUTO PROGRAM and the other is
called MANUAL PROGRAM.
In AUTO PROGRAM the TV will memorize the
channels in ascending order. If there are
additional channels you want to add or delete, you
can manually add or delete those channels.
Memorizing the Channels by AUTO
PROGRAM
AUTO PROGRAM searches and memorizes all
the active channels in your area then you can
select the desired channel with the
D
/
E
buttons.
Using the A.PROG button
You can conveniently perform AUTO PROGRAM
using the A.PROG button on the remote control.
1. Press the A.PROG button.
2. Press the
G
or A.PROG button.The AUTO
PROGRAM starts now.
If you want to stop auto programming, press the
ENTER (
A
) button.
Only the channels searched up to that time are
memorized.
Notes :
• If the programmed signal has poor quality,
memorize again in the
Auto program.
• AUTO PROGRAM stores all receivable channels
regardless of receiving signal (RF, Cable).
• If channels of general wireless TV and cable TV
are duplicated, press the number buttons (0 ~ 9)
to change as .
Using the MENU button
1. Press the MENU button and then use
D
/
E
button to select the channel menu.
2. Press the
G
and then
D
/
E
button to select
Auto program.
3. Press the
G
button to enter the Auto program
mode.
4. The AUTO PROGRAM starts now.
Memorizing the Channels by
MANUAL PROGRAM
Using the MEMORY/ERASE button
You can conveniently perform MANUAL
PROGRAM using the MEMORY / ERASE button
on the remote control.
1. Press the
D
/
E
or NUMBER buttons to select
the channel number you want to memorize or
erase.
2. Press the MEMORY/ERASE button to select
Memory or Erase.
The on screen display appears as shown right.
Selecting the Channel
Press the
D
/
E
button to conveniently select the
upper or lower channel then the channel being
viewed, or NUMBER buttons to directly select the
desired channel.
Adjusting the Volume
Press the
G
button to increase the volume level or
F
button to decrease the volume level.
To mute the sound, Press the MUTE button.
It's convenient when you get the telephone calls.
To restore the muted sound, press the MUTE
button again or VOL
F
/
G
button.
Channels of general
wireless TV
Channels of
Cable TV

Various function
Setting the Clock
Before setting the on/off timer, first you should set
the current time.
Setting the OFF TIMER
This is the function to automatically switch the TV
to standby mode at a preset time.
Note:If the same time is set for the on time and off
time, only the off time operates.
Setting the ON TIMER
This is the function to automatically turn the TV on
at a preset time and channel.
Notes:
•If you don’t press any button within 2 hours after
turning on the TV set by ON TIMER function, the
set will be automatically switched back to standby
mode.
•TV must be in standby mode for the On timer to
work.
Setting the Sleep Time
You don't have to remember to switch the TV to
standby mode before you go to sleep. The sleep
timer automatically turns the TV off after the
preset time elapses.
Press the SLEEP button to select the desired
sleep time.
Each time you press this button, the sleep time is
displayed one by one as shown below. The timer
begins to count down from the number of minutes
selected.
Notes:
•After a few seconds, the desired sleep time will
disappear and be operated automatically.
•To view the remaining sleep time, press the
SLEEP button once and the remaining sleep time
will be displayed.
•To cancel the sleep time, select the
Sleep ---
mode by using the SLEEP button.
Auto Off
If there is no input signal, the TV is switched to
standby mode automatically in 10 minutes.
Operating the degauss (some
models)
In this TV set the magnetic field of the earth may
influence on the color purity of picture by neighbor
magnetic substance or installation direction of the
TV set. The stripes may appear on the screen or
the color may not be equal in the corner. You can
enjoy the program in high color quality by
operating the Degauss.
Notes:
•Do not operate this function often because the
lifetime of CPT may be shorten.
•If you cannot adjust the screen condition by
degaussing, try it again after about 4 minutes.
Key Lock
The TV can be set so that the remote control is
needed to control it.This feature can be used to
prevent unauthorized viewing.
Notes :
•With the key lock on, the display
Key lock
appears on the screen if any button on the front
panel is pressed while viewing the TV.
•This programmed to remember which option it
was last set to even if you switch the TV from
standby mode.
Game (some models)
You can enjoy the TV game with this set.
Adjusting the Fine
This function is to adjust the picture to stable
condition when it is poor, for example, a horizontal
stripe, twisted picture or no color in broad-casting.
Notes :
•To release the memorized fine tuning, program
again the fine-tuned channel by AUTO PROGRAM
or MANUAL PROGRAM.
•If the finely tuned channel is memorized, the color
of the channel number changes to yellow.
Favorite channel memory
Favorite channel memory is a convenient feature
that lets you quickly scan up to five channels of
your choice without having to wait for the TV to
scan through all the in-between channels.
Auto Demonstration
Auto demo allows you to review all the menus
available on the TV set.
6
---→10 →20→30 →60 →90 →120→180→240

Picture control
Auto Picture Control
You can select picture modes programmed at
factory as you prefer.
Using the APC button
1. Press the APC button.
2. Press the APC button to select Clear,
Optimum, Soft
or User.
3. Press the ENTER(
A
) button to exit.
Adjusting the Picture
This is the function to manually adjust the desired
picture levels (Contrast, Brightness, Color,
Sharpness, Tint
) of the screen as you like. If the
picture you set is not satisfactory, you can select a
factory preset picture. In the broadcasting system
PAL-M/N, the picture item Tint is not displayed.
XD (some models)
XD is LG Electronic’s unique picture improving
technology to display a real HD source through an
advanced digital signal processing algorithm.
Note : When selecting APC options (Clear,
Optimum and Soft), XD is automatically
change to On.
7
Sound control
Enjoying the Stereo/SAP Broadcast
This TV set can receive MTS stereo programs and
any SAP (Secondary Audio Program) that
accompanies the stereo program, as the system to
be transmitted one additional sound signal as well
as the original one. MTS function doesn't operate
in the video mode.
Using the MTS Button
1. Press the MTS button to select your desired
MTS mode.
Each time you press this button, the
MONO,
STEREO or SAP mode appears in turn.
2. Press the ENTER (
A
) button to exit.
Notes:
• Stereo or SAP can only be received if the TV
station transmits those signals, even though you
have selected
STEREO or SAP.
• Mono sound is automatically received if the
broadcast is only in Mono; even though
STEREO
or SAP has been selected.
• Select
MONO if you want to listen to mono
sound in remote fringe areas during stereo/SAP
broadcasting.
Auto Sound Control
You can enjoy the best sound without any special
adjustment because this TV set automatically
adjusts the sound appropriate to viewing program
character by self-intelligence.
AVL (Auto Volume Leveler)
AVL automatically keeps on an equal volume level
even if you change channels.
X-WAVE (some models)
Note:
1. If the reception is poor or weak, select a
different frequency.
2. For best results, there should be no more that
19ft between the TV and FM Receiver.
3. In certian areas, the FM transmitter ability may
be weak, such as near a broadcast tower.
4. The reception sensitivity may depend on the
kinds of receiver (FM radio).
Turbo Sound (some models)
With this function sound will be more
emphasized and amplified than normal sound.
You can enjoy the Turbo sound so much better
than normal sound.

8
USB MODE
• Connecting USB device
1. Connect USB device to USB slot which is on
the slide of the TV set.
2. Press USB key on the remote or select USB in
main menu special mode.
• Removing the USB device from TV
1. Return to main menu and press STOP(
A
/ESC)
twice.
2. Remove the USB device from TV.
- When you plug a USB or press
the USB button, the below
screens will be displayed.
• Enter into USB mode
1. Press “USB” key on remote control.
2. Select “USB” on the main menu special mode.
• Exit from USB mode
1. Press “USB or MENU” key on remote control in
USB mode.
2. Press local key “MENU” in USB mode.
Notes :
• Don’t extract the USB device while operating.
Music files (MP3), image files (JPG) and AVI
files can be played.
• USB HUB connection is not available.
• Recommended USB device and file system.
- Connecting USB device should comply with
USB 2.0 specifications.
- Compatible with : FAT16, FAT32 (Recommend
FAT32 for USB over 2GB).
- Only use USB memory stick recommended.
• Devices which require additional program
installation may cause identification or data
reading problem.
• In case of a USB HDD, make sure to connect an
auxiliary power to the USB HDD for proper
operation. 1 primary partitions of a drive is
supported. If there is an extension partition, it will
not be supported.
• Digital cameras and mobile phones are not
supported.
• Unsupported or damaged AVI, JPG or MP3 files
can cause errors. Do not try to change the file
extension of unsupported file types to the file
extension of supported file types.
• This device codec is hardware codec so the
supportable file format and codec can not be
updated by firmware upgrade.
• Entry into USB mode can be activated or de-
activated by USB key on the remote controller.
• If you make entry back into USB mode after
switching to RF while playing USB media, music
and movie will be paused. For play, press
G
II
key to continue to play.
• TIMEOUT function : If there is no IR Input from
remote controller for about 4 hours after entry to
USB mode, all operations being played stop and
will be switched and fixed to USB main menu.
• Customers should note that permission is
required in order to download MP3 or movie files
from internet. Our company has no right to grant
such permission.Permission should always be
sought from the copyright owner.
CH.
Move++Next+{
+
Exit}
Language {
Input {
Key+lock {
Caption+ {
Degauss {
USB {
Special
USB {
ON
USB
OK
USB
USB

9
Select the OSD Language
- The menus can be shown on the screen in the
selected language. First select your language.
1. Press the USB button and then use
D
/
E
/
F
/
G
button to select the Setup.
2. Press the ENTER button to enter the Setup menu.
3. Press the
D
/
E
button to select the SYSTEM SETUP.
4. Press the
G
and then use
D
/
E
button to select
OSD LANGUAGE..
5. Press the
G
and then use
D
/
E
button to
select the desired language.
6. Press the USB button to exit or press the
A
/ESC button to return to the USB menu. Press
the Menu button to return to the TV menu.
Select the S/W Version
- Show the S/W Version.
1. Press the USB button and then use
D
/
E
/
F
/
G
button to select the Setup.
2. Press the ENTER button to enter the Setup menu.
3. Press the
D
/
E
button to select the SYSTEM SETUP.
4. Press the
G
and then use
D
/
E
button to select
S/W VERSION.
5. Press the
G
.
6. Press the USB button to exit or press the
A
/ESC button to return to the USB menu. Press
the Menu button to return to the TV menu.
Select the Default
- Use the Default option to initialize the adjusted settings.
1. Press the USB button and then use
D
/
E
/
F
/
G
button to select the Setup.
2. Press the ENTER button to enter the Setup menu.
3. Press the
D
/
E
button to select the SYSTEM SETUP.
4. Press the
G
and then use
D
/
E
button to
select
DEFAULT.
5. Press the
G
.
6. Press the USB button to exit or press the
A
/ESC button to return to the USB menu. Press
the Menu button to return to the TV menu.
OSD+LANGUAGE
S/W +VERSION
DEFAULT
ENGLISH
ESPA
Ñ
OL
PORTUGUES
SYSTEM
+SETUP
SYSTEM SETUP
/ESC
ENTER
OK
OK
PHOTO SETUP
Select the Effect
The picture display effect for the slide show.
The playing mode of some files format is from
top to button.
1. Press the USB button and then use
D
/
E
/
F
/
G
button to select the Setup.
2..Press the ENTER button to enter the Setup menu.
3. Press the
D
/
E
button to select the PHOTO SETUP.
4. Press the
G
and then use
D
/
E
button to
select
EFFECT.
5. Press the
G
and then use
D
/
E
button to
select the desired Effect.
6. Press the USB button to exit or press the
A
/ESC button to return to the USB menu.
Select the Frequency
The picture display interval for the slide show.
1. Press the USB button and then use
D
/
E
/
F
/
G
button to select the Setup.
2. Press the ENTER button to enter the Setup menu.
3. Press the
D
/
E
button to select the PHOTO SETUP.
4. Press the
G
and then use
D
/
E
button to select
FREQUENCY.
5. Press the
G
and then use
D
/
E
button to
select the Frequency.
6. Press the USB button to exit or press the
A
/ESC button to return to the USB menu.
Select the Music
You can turn on or off the background music
when playing the photograph mode.
The background music is from USB memory.
1. Press the USB button and then use
D
/
E
/
F
/
G
button to select the Setup.
2. Press the ENTER button to enter the Setup menu.
3. Press the
D
/
E
button to select the PHOTO SETUP.
4. Press the
G
and then use
D
/
E
button to
select
MUSIC.
5. Press the
G
and then use
D
/
E
button to
select
ON or OFF.
6. Press the USB button to exit or press the
A
/ESC button to return to the USB menu.
Select the Play Mode
You can select your desired playback mode in
the slide shows.
1. Press the USB button and then use
D
/
E
/
F
/
G
button to select the Setup.
2. Press the ENTER button to enter the Setup menu.
3. Press the
D
/
E
button to select the PHOTO SETUP.
4. Press the
G
and then use
D
/
E
button to select
PLAY MODE.
5. Press the
G
and then use
D
/
E
button to
select
NORMAL or RANDOM.
6. Press the USB button to exit or press the
A
/ESC button to return to the USB menu.
EFFECT
FREQUENCY
MUSIC
PLAY+MODE
RANDOM
WIPE +BOTTOM
WIPE +LEFT
WIPE +RIGHT
LEFT+TOP
PHOTO
+SETUP
/ESC
ENTER
OK
OK

10
Select the MOVIE, MUSIC or
PHOTO Media
- When you plug a USB or press the USB button,
the below screens will be displayed.
1. Press
F
/
G
button to select Movie, Music or Photo.
2. Press the ENTER button to enter the Movie,
Music or Photo media.
3. Press the USB button to exit.
Movie File Playing Operation
1. Press the USB button and then use
D
/
E
/
F
/
G
button to select the Movie.
2. Press the ENTER button.
3. Press the
D
/
E
/
F
/
G
button to select folder and
desired movie file.
4. Press the
G
II
(
alternative play
)
or ENTER
(
single play
)
button. Then the movie starts.
5. Press the USB button to exit or press the
A
/ESC
button to stop or return to the USB main menu.
Using the remote control
Notes:
• Movie (AVI)file compatibility with this player is limited
as follows :
-Available resolution of AVI file is under 720x480
(576)pixel.
-If video codec is not supportable, "UNSUPPORTED
FORMAT"OSD will be displayed in the file list menu.
-If sound codec is not supportable, Video may display
but "UNSUPPORTED FORMAT" OSD will be
displayed with no sound.
-If sound has no data stream,"NO SOUND"OSD will
be displayed on the screen.
-If the number of the screen frame is over 30 per 1
second, this device may not operate normally.
• Supportable Subtitle format: srt, sri, smi, txt, ssa, ass,
sub, psb
• Supportable movie file extension: “.DAT”, “.AVI”,
“.MP4”, “.MPG”
• Supportable video codecs: MPEG1(VCD 1.0, 1.1,
2.0, SVCD), MPEG4 ASP or Compatible codecs
/ESC
ENTER
[K_OTHERS]
K_OTHERS
J_SUB T
I_CONT
H_VIDE_1
OTH_01_1.AVI
OTH_02_1.AVI
MOVIE Media
1
2
VOL.+
VOL.-
To increase or decrease volume level for the Movie.
Press the button to jump previous Movie.
Press the button to jump next Movie.
Stop movie playing or move to the movie file list menu.
Still screen is displayed. (When playing movie)
Play movie in sequence (at movie list)
Press the button to rewind.
Press the button to fast forward.
Show the Information of movie. (when playing movie)
Play movie selected by cursor. (at movie list)
ON/OFF or Select subtitle
4
6
4
5
/ESC
6
8
7
9
7
9
ENTER
0
SELECT
MUSIC Media
MP3 File Playing Operation
- Purchased MP3/music files may contain copyright restrictions.
1. Press the USB button and then use
D
/
E
/
F
/
G
button to select the Music.
2. Press the ENTER button.
3. Press the
D
/
E
/
F
/
G
button to select folder and
desired music file.
4. Press the
G
II
(
alternative play
)
or ENTER
(
single
play
)
button. Then the music starts.
5. Press the USB button to exit or press the
A
/ESC
button to stop or return to the USB menu.
Using the remote control
ENTER
/ESC/ESC
ENTER
[G_AUDIO]
G_AUDIO
D_FILE
AUD_1A.MP3
AUD_1B.MP3
AUD_1C.MP3
AUD_3A.MP3
AUD_3B.MP3
1
2
VOL.+
VOL.-
To increase or decrease volume level for the Music.
Press the button to jump previous Movie.
Press the button to jump next Movie.
Moved the Folders in menu. (at music list)
Stop playing music. (when playing music)
Press the button to jump backforward.
Press the button to jump forward.
To pause playback.(when playing music)
Play music in sequence (at music list)
Play music selected by cursor.
4
6
4
5
/ESC
6
7
9
8
ENTER
7
9

11
Using the remote control
Notes :
•MP3 compatibility with this player is limited as follows:
- Sampling frequency :within 8 -48 KHz
- Bit rate :32 -384 Kbps, Support all variable bit rates
- TV can not read an MP3 file that has a file
extension other than “.mp3’
- File name should have a maximum of 8 letters
and must incorporate an .mp3 extension.
- Total number of files on the USB memory device
should be less than 1200.
• This TV mp3 player requires mp3 files to meet
certain technical standards (ISO/IEC
111723,ISO/IEC 13818-3.2)in order to achieve
optimal playback quality.
• There are many different types of MP3 encoders
and these require certain pre-existing conditions
above to ensure compatible playback.
• The navigation key can be shifted only up and
down during MP3 file play and cannot switch to
other folder.
• In order to play a file in other folder, stop the file
being played, and move cursor to another folder.
• In case of VBR (Variable Bit Rate) MP3, estimated
playing time may not correct as actual playing.
MUSIC Media
JPEG File Viewing Options
- When you select Photo in entry menu, you will now
see a screen filled with thumbnail photo media.
1. Press the USB button and then use
D
/
E
/
F
/
G
button to select the Photo.
2. Press the ENTER button.
3. Press the
D
/
E
/
F
/
G
button to select photo file.
4. Press the ENTER button for 1 picture display
and press 8 for slide show.
5. Press the USB button to exit or press the
A
/ESC button to stop slide show or return to
thumbnail file list, USB main menu.
Slide Show
1. Press the
D
/
E
/
F
/
G
button to select JPEG file
and then press the button. Slide show starts.
2. You can choose the slide show effect, frequency
and play mode in the USB Setup.
3. Press the
G
II button to pause the current image.
4. Press the USB button to exit or press the
A
/ESC
button to stop slide show return to the USB
menu.
Still picture
Press the
D
/
E
/
F
/
G
button to select JPEG file
then press the ENTER button. Selected still picture
display starts.
/ESC
ENTER
OK
OK
K_REA_1. JPG +81K+720x576
1.+K_REA_1 [81K]
2.+A_NLTM_1 [154K]
3.+B_RED [43K]
4.+K_REA_1 [81K]
5.+A_NLTM_1 [154K]
6.+B_RED [43K]
8
PHOTO Media
PHOTO Media
1
2
VOL.+
VOL.-
To increase or decrease volume level for the Music.
(When selecting the turn-on of background music
when playing the photograph mode.)
To select the previous or next page. (at thumbnail mode)
To jump to the previous or next photo (at one photo display)
Move to main menu from thumbnail mode.
These keys (FF&RW) are not available in photo mode.
To enlarge or reduce the image 2, 3 or 4 times.
at one photo display)
1. Zoom mode
To scroll left, right, up and down
2. Still picture display mode
VOL+: Rotate 90
¡ª(Clockwise)
VOL- : Rotate -90¡ª (Counter - clockwise)
CH+ : Upside down & vice versa
CH- : Mirror image & vice versa
4
6
5
/ESC
7
9
3
ZOOM
VOL
VOL
CH
CH
Using the remote control
Notes :
• JPEG compatibility with this player is limited as
follows :
- Depending upon the size and the number of JPEG
files,it could take a long time for TV to read the USB
memory's contents. If you don't see an on screen
display after several minutes,some of the files
maybe too large-reduce the resolution of the JPEG
files to less than 2M pixels as 2760x2048 resolution.
- The total number of files and folders on the USB
memory device should be less than 1200.
- File name without ".jpg" extension will not be able to
read by this TV jpeg decoder. Even though the files
are shown as JPEG image files in Windows
Explorer.
- Cause of Photo character, Progressive JPEG is
always scanned “WIPETOP” regardless of Photo
Effect.

Closed caption function
12
Closed captioning is a process which converts the
audio portion of a television program into written
words, which then appear on the television screen
in a form similar to subtitles. Closed captions allow
viewers to read the dialogue and narration of
television programs.
Using Closed Captions
Captions are the subtitles of the dialogue and
narration of television programs. For prerecorded
programs, program dialogue can be arranged into
captions in advance. It's possible to caption a live
program by using a process called “real-time
captioning”, which creates captions instantly.
Real-time captioning is normally done by
professional reporters using a machine shorthand
system and computer for translation into English.
Captioning is an effective system for the hearing-
impaired, and it can also aid in teaching language
skills.
• The picture at left shows a typical caption.
Caption Tips
• Not all TV broadcasts include closed caption
signals.
• Sometimes TV stations broadcast two different
caption signals on the same channel. By
selecting MODE 1 or MODE 2, you can choose
which signal you view. MODE 1 is usually the
signal with the captions, while MODE 2 might
show demonstration or programming
information.
• Your TV might not receive caption signals
normally in the following situations.
Poor reception conditions are encountered:
A
IGNITION:
Picture may flutter, drift, suffer from black spots
or horizontal streaking. Usually caused by
interference from automobile ignition systems,
neon lamps, electrical drills and other electrical
appliances.
A
GHOSTS:
Ghosts are caused when the TV signal splits
and follows two paths. One is the direct path
and the other is reflected off tall buildings, hills
or other objects. Changing the direction or
position of the antenna may improve reception.
A
SNOW:
If your receiver is located at the weak, fringe
area of a TV signal, your picture may be marred
by small dots. It may be necessary to install a
special antenna to improve the picture.
An old, bad or illegally recorded tape is played.
Strong, random signals from a car or airplane
interfere with the TV signal.
The signal from the antenna is weak.
The program wasn't captioned when it was
produced, transmitted or taped.
Using the Text Function
Text services give a wide variety of information on
all kind of subjects (ex. captioned program lists,
weather forecasts, stock exchange topics, news
for hearing-impaired---) through the full TV screen.
But not all stations offer text services, even though
they might offer captioning.
Note:In the event you receive a poor signal, an
empty black box may appear and
disappear, even when the text mode is
selected. This is normal function in such an
event.
Operating the Caption and Text
Using the CAPTION button
1. Press the CAPTION button.
2. Press the CAPTION button to select
OFF,
Mode 1,Mode 2, Text 1 or Text 2.
3. Press the ENTER (
A
) button to exit.
Using the MENU button
1. Press the MENU button and then use
D
/
E
button to select the Special menu.
2. Press the
G
and then
D
/
E
button to select
Caption.
3. Press the
G
button and then use
D
/
E
button
to select
Off, Mode 1, Mode 2, Text 1 or Text
2.
4. Press the MENU button to exit.
Note:This TV is programmed to remember which
mode it was last set to, even if you turn the TV off.
FOLLOW ME
1
2
3
4
5

PIP function (Some models)
13
Watching the PIP (Picture in
Picture)
This is the function to call up a little picture (PIP :
picture in picture) within the main picture. Thus at
the same time you can watch two different
programs.
1. Press the PIP/DW button to select PIP mode or
double window mode. Repeatedly press the
PIP/DW button to select the desired sub picture
size.
2. Press the CH
+
/
-
button of the PIP buttons to
select the desired channel in the sub picture.
Notes:
•Press the
D
/
E
button to select the upper or
lower channel in main picture and press the CH
+
/
-
button of the PIP buttons to select the upper
or lower channel in sub picture.
• 4:3 and Zoom don’t operate in PIP [L] mode.
Selecting the input signal (in PIP
and Double window mode)
Using the PIP MENU Button
1. Press the PIP MENU button.
2. Press the
D
/
E
button to select Input.
3. Press the
G
and then use
D
/
E
button to
select
TV, AV 1, AV 2, AV 3.
4. Press the VOLUME (
F
) button to exit.
Using the MENU Button
1. Press the MENU button and then use
D
/
E
button to select the Special menu.
2. Press the
G
and then use
D
/
E
button to select
the
PIP input.
3. Press the
G
and then use
D
/
E
button to select
the
TV, AV 1, AV 2, AV 3.
4. Press the
F
button to exit.
Channel Search
This is the function to search one by one the
pictures of all the programmed channels through
the PIP screen while the main screen remains as
a current channel.
Press the CH. SEARCH button.
The pictures of all the programmed channels are
searched through one PIP screen.
To release the channel search, press the CH.
SEARCH.
Note: By pressing the SWAP button, you can see
the channel being searched on the PIP
screen through the main screen.
Moving the Sub Picture
(in PIP mode)
Press the POSITION button to select the desired
position of sub picture.
Swapping Screens
Press the SWAP button.
Each time you press this button, the main picture
and sub picture exchange places.
Still Picture
Press the STILL button.
The still picture is displayed.
In PIP mode, the still picture is displayed in the
sub picture.
To cancel the still picture, press the STILL button
again.
Press the MAIN STILL button. In PIP mode, the
still picture is displayed in the main picture.
To cancel the still picture, press the
MAIN STILL button again.
PIP [S]
PIP [M]
PIP [L] : DW
PIP off
24
< PIP mode >
< Double window mode >
Still picture
Still picture

Connection of external equipment (some models)
14
Connecting an Outdoor Antenna
For the best reception, we recommend you use an
outdoor antenna.
Severely weathered antennas and antenna cables
can reduce the signal quality. Before connecting it,
necessarily inspect them. Any service center can
explain the various outdoor antennas available to
you.
300 Ohm Flat Wire
1. Connect the 300 ohm flat wire to screws on the
300 ohm to 75 ohm adapter.
2. Push the end of 300 ohm to 75 ohm adapter
into 75 ohm antenna jack.
75 Ohm Coaxial Cable
1. Connect the 75 ohm coaxial cable directly to the
75 ohm antenna jack.
Connecting a CATV Cable
If you subscribe to a CATV system, change the
antenna connection as described below.
1. Remove the 300 to 75 ohm adapter or the cable
from the set if attached.
2. Connect the CATV cable (75 ohm coaxial
cable) to the 75 ohm antenna jack.
connection of additional equipment
You can connect additional equipment, such as
VCRs, camcorders etc. to your set.Here shown
may be somewhat different from your set.
These are an example drawing of typical jack
layout.
1. IN 1 JACKS : Connect external equipment
outputs (VCR, LASER DISC, CAMCORDER) to
these inputs. Press the TV/VIDEO button to
select
AV1.
2. IN 2 JACKS : Connect external equipment
outputs (VCR, LASER DISC, CAMCORDER) to
these inputs. Press the TV/VIDEO button to
select
AV2.
3. IN 3 JACKS : Connect external equipment
outputs (VCR, LASER DISC, CAMCORDER) to
these inputs. Press the TV/VIDEO button to
select
AV3.
4. OUT JACKS: Connect external equipment
inputs (VCR, Audio amplifier) to these outputs
for recording or monitering the selected
program.
Note:This TV is programmed to remember which
mode it was last set to, even if you turn the TV off.
Connecting AUDIO/VIDEO IN Jacks
1. Connect the audio/video output jacks of the VCR to
IN 1 or IN 2(A/V) jacks on the side or back of TV.
If you connect the audio jack only, you can't hear the
sound from the TV.
2. Press the TV/VIDEO button to select
AV1 or AV2.
Note: In some stereo models, if you connect the
audio/video output jacks of the VCR to the AV
AV IN 3(A/V) jacks on the front or side of TV,
select
AV3.
3. Press the PLAY button on the VCR.
The video playback is on the TV screen.
Note: In case of MONO VCR, connect the output
jack of VCR to the AUDIO L/MONO IN jack
of TV so that the sound can be heard from
both speakers. If you connect it to the
AUDIO R IN jack of TV the sound is heard
only from right speaker.
VCR Recording(some models)
Note: In some mono models, when the input jacks
on the front panel and back panel are connected to
external equipments at the same time, the input jacks
on the front panel have priority over the
input jacks on the back panel of the
TV.
1.
Connect the audio/video input jacks of the recording
VCR to the OUT (A/V) jacks on the back
.
2. Select the program number on the TV.
3. Set the recording VCR to record.
Recording a program from con-
nected other equipment
(some models)
1. Connect the output jacks of the playback VCR
to the IN 1 or IN 2 (A/V) jacks on the side or
back of TV (or IN 3 jacks on the side of TV ).
2. Connect the input jacks of the recording VCR to
the OUT (A/V) jacks on the back of TV.
3. Press the TV/VIDEO button to select
AV-1 or
AV-2.
If you connect it to the IN 3 (A/V) jacks on the
side of TV, you should select
AV-3.
4. Press the PLAY button on the playback VCR
and set the recording VCR to record.

15
• Connect component video inputs to Y, P
B
,
P
R
(480i) and audio IN2 to audio(L/R) ports.
•
Note: This TV is programmed to remember
which mode it was last set to, even if you turn the
TV off.
1.How to connect
Note:
2.How to use
•Turn the set on and press the TV/VIDEO button
on the remote control or TV/VIDEO button on the
front panel to select
COMPONENT.
•Try this after turning on the DVD set.
< Back panel of DVD >
AUDIO
PB PRY (R) (L)
Y
IN2
PB PR
DVD IN (480i)
VIDEO
(L/MONO) AUDIO(R)
COMPONENT
< TV connection panel >
TV INPUT
Y P
B
P
R
DVD OUTPUT
Cb
B -Y
Pb
P
B
Cr
R -Y
Pr
P
R
Y
Y
Y
Y

Troubleshooting check list
SYMPTOMS
No power
No picture or sound
Poor picture but good sound
Poor reception
Lines in picture
Ghosts (multiple images)
Remote control does not work.
Cannot tune desired channel.
CHECK THESE THINGS
Is power cord plugged in?
Is television turned on?
Check batteries in remote control.
Try another channel (station trouble).
Check antenna connectings.
Check for local interference.
Adjust the antenna.
Adjust the picture control.
Program channel using AUTO
PROGRAM.
-
 1
1
-
 2
2
-
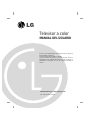 3
3
-
 4
4
-
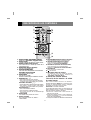 5
5
-
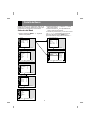 6
6
-
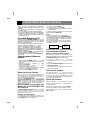 7
7
-
 8
8
-
 9
9
-
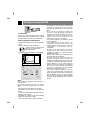 10
10
-
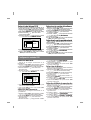 11
11
-
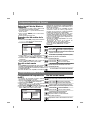 12
12
-
 13
13
-
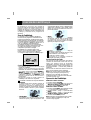 14
14
-
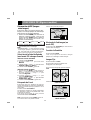 15
15
-
 16
16
-
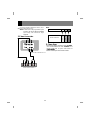 17
17
-
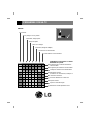 18
18
-
 19
19
-
 20
20
-
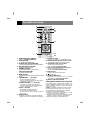 21
21
-
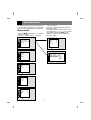 22
22
-
 23
23
-
 24
24
-
 25
25
-
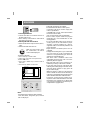 26
26
-
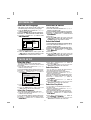 27
27
-
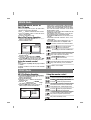 28
28
-
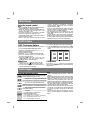 29
29
-
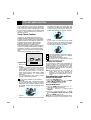 30
30
-
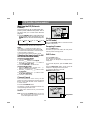 31
31
-
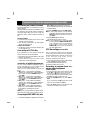 32
32
-
 33
33
-
 34
34


LG 29FU6RS El manual del propietario
- Categoría
- Televisores LCD
- Tipo
- El manual del propietario
en otros idiomas
- English: LG 29FU6RS Owner's manual
Artículos relacionados
-
LG 29FU6RS El manual del propietario
-
-
-
-
LG 29FU6RS Manual de usuario
-
-
-
LG 29FS7RL Manual de usuario
-
-