GE PT9551BLTS El manual del propietario
- Categoría
- Medir, probar
- Tipo
- El manual del propietario

Write the model and serial
numbers here:
Model # _________________
Serial # _________________
You can find them on a label on
the side trim or on the front of the
(lower) oven behind the oven door.
ESPAÑOL
Para consultar una version en
español de este manual de
instrucciones, visite nuestro sitio de
internet GEAppliances.com.
OWNER’S MANUAL
WALL OVEN
Direct Air Convection Built-In Electric
49-80812-1 12-17 GEA
GE is a trademark of the General Electric Company. Manufactured under trademark license.
30" Single Wall Oven
PT9051
30" Double Wall Oven
PT9551
SAFETY INFORMATION .........3
USING THE OVEN
Oven Controls .........................6
Double Oven ..........................7
Settings ..............................7
Sabbath ..............................9
Oven Racks ..........................10
Aluminum Foil and Oven Liners ......... 11
Cookware ............................ 11
Cooking Modes .......................12
Probe ...............................14
Cooking Guide .......................15
CARE AND CLEANING
Cleaning The Oven - Exterior ...........16
Cleaning The Oven - Interior ...........17
Oven Racks ..........................18
Probe ...............................18
Oven Light ...........................19
Oven Door ...........................19
TROUBLESHOOTING TIPS ..... 20
WARRANTY ......................22
ACCESSORIES ...................23
CONSUMER SUPPORT ......... 24

THANK YOU FOR MAKING GE APPLIANCES A PART OF YOUR HOME.
Whether you grew up with GE Appliances, or this is your first, we’re happy to have you in the family.
We take pride in the craftsmanship, innovation and design that goes into every GE Appliances
product, and we think you will too. Among other things, registration of your appliance ensures that we
can deliver important product information and warranty details when you need them.
Register your GE appliance now online. Helpful websites and phone numbers are available in the
Consumer Support section of this Owner’s Manual. You may also mail in the pre-printed registration
card included in the packing material.

49-80812-1 3
READ AND SAVE THESE INSTRUCTIONS
IMPORTANT SAFETY INFORMATION
READ ALL INSTRUCTIONS BEFORE USING THE APPLIANCE
SAFETY INFORMATION
WARNING
GENERAL SAFETY INSTRUCTIONS
Ŷ 8VHWKLVDSSOLDQFHRQO\IRULWVLQWHQGHGSXUSRVHDV
described in this Owner’s Manual.
Ŷ%HVXUH\RXUDSSOLDQFHLVSURSHUO\LQVWDOOHGDQG
grounded by a qualified installer in accordance with
the provided installation instructions.
Ŷ'RQRWDWWHPSWWRUHSDLURUUHSODFHDQ\SDUWRI\RXU
oven unless it is specifically recommended in this
manual. All other servicing should be performed by a
qualified technician.
Ŷ%HIRUHSHUIRUPLQJDQ\VHUYLFHGLVFRQQHFWWKH
power supply at the household distribution panel by
removing the fuse or switching off the circuit breaker.
Ŷ'RQRWOHDYHFKLOGUHQDORQH²FKLOGUHQVKRXOGQRW
be left alone or unattended in an area where an
appliance is in use. They should never be allowed to
climb, sit or stand on any part of the appliance.
Ŷ
CAUTION
'RQRWVWRUHLWHPVRILQWHUHVW
to children in cabinets above an oven - children
climbing on the oven to reach items could be
seriously injured.
Ŷ8VHRQO\GU\SRWKROGHUV²PRLVWRUGDPSSRWKROGHUV
RQKRWVXUIDFHVPD\UHVXOWLQEXUQVIURPVWHDP'R
QRWOHWSRWKROGHUVWRXFKKRWKHDWLQJHOHPHQWV'R
not use a towel or other bulky cloth in place of pot
holders.
Ŷ 1HYHUXVH\RXUDSSOLDQFHIRUZDUPLQJRUKHDWLQJ
the room.
Ŷ 'RQRWWRXFKWKHKHDWLQJHOHPHQWVRUWKHLQWHULRU
surface of the oven. These surfaces may be hot
enough to burn even though they are dark in color.
'XULQJDQGDIWHUXVHGRQRWWRXFKRUOHWFORWKLQJ
or other flammable materials contact any interior
area of the oven; allow sufficient time for cooling
first. Other surfaces of the appliance may become
hot enough to cause burns. Potentially hot surfaces
include the oven vent opening, surfaces near the
opening and crevices around the oven door.
Ŷ 'RQRWKHDWXQRSHQHGIRRGFRQWDLQHUV3UHVVXUH
could build up and the container could burst,
causing an injury.
Ŷ 'RQRWXVHDQ\W\SHRIIRLORUOLQHUWRFRYHUWKH
oven bottom or anywhere in the oven, except as
described in this manual. Oven liners can trap heat
or melt, resulting in damage to the product and risk
of shock, smoke or fire.
Ŷ $YRLGVFUDWFKLQJRULPSDFWLQJJODVVGRRUVRUFRQWURO
SDQHOV'RLQJVRPD\OHDGWRJODVVEUHDNDJH'R
not cook on a product with broken glass. Shock, fire
or cuts may occur.
Ŷ &RRNPHDWDQGSRXOWU\WKRURXJKO\²PHDWWRDWOHDVW
an internal temperature of 160°F and poultry to at
least an internal temperature of 180°F. Cooking
to these temperatures usually protects against
foodborne illness.
WARNING
Read all safety instructions before using the product. Failure to follow these instructions may result
in fire, electrical shock, serious injury or death.
WARNING
KEEP FLAMMABLE MATERIALS AWAY FROM THE OVEN
Failure to do so may result in fire or personal injury.
Ŷ 'RQRWVWRUHRUXVHIODPPDEOHPDWHULDOVLQRUQHDU
an oven, including paper, plastic, pot holders,
linens, wall coverings, curtains, drapes and gasoline
or other flammable vapors and liquids.
Ŷ 1HYHUZHDUORRVHILWWLQJRUKDQJLQJJDUPHQWVZKLOH
using the appliance. These garments may ignite if
they contact hot surfaces, causing severe burns.
Ŷ 'RQRWOHWFRRNLQJJUHDVHRURWKHUIODPPDEOH
materials accumulate in or near the oven. Grease in
the oven or near the oven may ignite.

4 49-80812-1
READ AND SAVE THESE INSTRUCTIONS
IMPORTANT SAFETY INFORMATION
READ ALL INSTRUCTIONS BEFORE USING THE APPLIANCE
WARNING
IN THE EVENT OF A FIRE, TAKE THE FOLLOWING
STEPS TO PREVENT INJURY AND FIRE SPREADING
Ŷ 'RQRWXVHZDWHURQJUHDVHILUHV1HYHUSLFNXSD
flaming pan.
Ŷ ,IWKHUHLVDILUHLQWKHRYHQGXULQJEDNLQJVPRWKHU
the fire by closing the oven door and turning the
oven off or by using a multi-purpose dry chemical or
foam-type fire extinguisher.
Ŷ ,IWKHUHLVDILUHLQWKHRYHQGXULQJVHOIFOHDQWXUQ
WKHRYHQRIIDQGZDLWIRUWKHILUHWRJRRXW'RQRW
IRUFHWKHGRRURSHQ,QWURGXFWLRQRIIUHVKDLUDWVHOI
clean temperatures may lead to a burst of flame
from the oven.
WARNING
OVEN SAFETY INSTRUCTIONS
Ŷ 6WDQGDZD\IURPWKHRYHQZKHQRSHQLQJWKHRYHQ
door. Hot air or steam which escapes can cause
burns to hands, face and/or eyes.
Ŷ .HHSWKHRYHQYHQWXQREVWUXFWHG
Ŷ .HHSWKHRYHQIUHHIURPJUHDVHEXLOGXS*UHDVHLQ
the oven may ignite.
Ŷ 3ODFHRYHQUDFNVLQGHVLUHGORFDWLRQZKLOHRYHQLV
FRRO,IUDFNPXVWEHPRYHGZKLOHRYHQLVKRWGRQRW
let pot holder contact hot heating element in oven.
Ŷ :KHQXVLQJFRRNLQJRUURDVWLQJEDJVLQWKHRYHQ
follow the manufacturer’s directions.
Ŷ 3XOOLQJRXWWKHVWDQGDUGUDFNVWRWKHLUVWRSORFNV
or the extension rack to its fully open position is
DFRQYHQLHQFHLQOLIWLQJKHDY\IRRGV,WLVDOVRD
precaution against burns from touching hot surfaces
of the door or oven walls.
Ŷ 'RQRWOHDYHLWHPVVXFKDVSDSHUFRRNLQJXWHQVLOV
RUIRRGLQWKHRYHQZKHQQRWLQXVH,WHPVVWRUHGLQ
an oven can ignite.
Ŷ 1HYHUSODFHFRRNLQJXWHQVLOVSL]]DRUEDNLQJVWRQHV
or any type of foil or liner on the oven floor. These
items can trap heat or melt, resulting in damage to
the product and risk of shock, smoke or fire.
WARNING
SELF-CLEANING OVEN SAFETY INSTRUCTIONS
The self-cleaning feature operates the oven at temperatures high enough to burn away food soils in the oven.
Follow these instructions for safe operation.
Ŷ 'RQRWWRXFKRYHQVXUIDFHVGXULQJVHOIFOHDQ
RSHUDWLRQ.HHSFKLOGUHQDZD\IURPWKHRYHQGXULQJ
self-cleaning. Failure to follow these instructions
may cause burns.
Ŷ %HIRUHVHOIFOHDQLQJWKHRYHQUHPRYHVKLQ\VLOYHU
colored oven racks (on some models), the probe,
any aluminum foil, and any broiler pan, grid, and
other cookware. Only porcelain coated oven racks
may be left in the oven.
SAFETY INFORMATION

49-80812-1 5
SAFETY INFORMATION
The remote enable equipment installed on this oven
has been tested and found to comply with the limits for
D&ODVV%GLJLWDOGHYLFHSXUVXDQWWRSDUWRIWKH)&&
Rules. These limits are designed to:
(a) provide reasonable protection against harmful
interference in a residential installation. This equipment
generates, uses and can radiate radio frequency energy
and, if not installed and used in accordance with the
instructions, may cause harmful interference to radio
communications. However, there is no guarantee that
LQWHUIHUHQFHZLOOQRWRFFXULQDSDUWLFXODULQVWDOODWLRQ,I
this equipment does cause harmful interference to radio
or television reception, which can be determined by
turning the equipment off and on, the user is encouraged
to try to correct the interference by one or more of the
following measures:
Ŷ5HRULHQWRUUHORFDWHWKHUHFHLYLQJDQWHQQD
Ŷ,QFUHDVHWKHVHSDUDWLRQEHWZHHQWKHHTXLSPHQWDQG
receiver.
Ŷ&RQQHFWWKHHTXLSPHQWLQWRDQRXWOHWRQDFLUFXLW
different from that to which the receiver is connected.
Ŷ&RQVXOWWKHGHDOHURUDQH[SHULHQFHGUDGLR79
technician for help.
(b) accept any interference received, including
interference that may cause undesired operation of the
device.
Note that any changes or modifications to the wireless
communication device installed on this oven that are not
expressly approved by the manufacturer could void the
user's authority to operate the equipment.
READ AND SAVE THESE INSTRUCTIONS
WARNING
SELF-CLEANING OVEN SAFETY INSTRUCTIONS (Cont.)
Ŷ %HIRUHRSHUDWLQJWKHVHOIFOHDQF\FOHZLSHJUHDVH
and food soils from the oven. Excessive amount
of grease may ignite, leading to smoke damage to
your home.
Ŷ ,IWKHVHOIFOHDQLQJPRGHPDOIXQFWLRQVWXUQWKH
oven off and disconnect the power supply. Have it
serviced by a qualified technician.
Ŷ 'RQRWFOHDQWKHGRRUJDVNHW7KHGRRUJDVNHWLV
essential for a good seal. Care should be taken not
to rub, damage or move the gasket.
Ŷ 'RQRWXVHRYHQFOHDQHUV1RFRPPHUFLDORYHQ
cleaner or oven liner protective coating of any kind
should be used in or around any part of the oven.
IMPORTANT SAFETY INFORMATION
READ ALL INSTRUCTIONS BEFORE USING THE APPLIANCE
Carefully grasp a corner of the protective shipping film
with your fingers and slowly peel it from the appliance
VXUIDFH'RQRWXVHDQ\VKDUSLWHPVWRUHPRYHWKHILOP
Remove all of the film before using the appliance for the
first time.
To assure no damage is done to the finish of the
product, the safest way to remove the adhesive from
packaging tape on new appliances is an application of
a household liquid dishwashing detergent. Apply with a
soft cloth and allow to soak.
NOTE: 7KHDGKHVLYHPXVWEHUHPRYHGIURPDOOSDUWV,W
cannot be removed if it is baked on.
How to Remove Protective Shipping Film and Packaging Tape
STATE OF CALIFORNIA PROPOSITION 65 WARNINGS
WARNING
This product contains one or more chemicals known to the State of California to cause cancer,
and birth defects or other reproductive harm.
Self-clean electric ovens: Self clean ovens can cause low level exposure to some of the Proposition 65
substances, including carbon monoxide, during the cleaning cycle. Exposure to these substances can be
PLQLPL]HGE\RSHQLQJDZLQGRZRUXVLQJDYHQWLODWLRQIDQRUKRRG

6 49-80812-1
Oven Controls
USING THE OVEN: Oven Controls
Upper Oven and Lower Oven
When using a double oven you can set separate modes
in each oven. The selected oven will appear above the
cooking modes. NOTE:,IXVLQJDVLQJOHRYHQWKHUHZLOO
not be an oven selection.
Bake
This option allows the user to access traditional the
traditional bake mode.
Broil
%URLO FDQEHVHOHFWHGWRDFFHVV%URLO/RZDQG%URLO+LJK
See the Cooking Modes section for more information.
Convect
7KLVRSWLRQDOORZV\RXWRXWLOL]HWKHFRQYHFWLRQV\VWHP
to cook in a variety of modes. See the Cooking Modes
section for more information.
More
Select this option to access the Proof, Probe, Warm, Self
Clean, and Steam Clean options.
Precision Cooking
3UHFLVLRQ&RRNLQJLVDVXLWHRIFXVWRPL]HGFRRNLQJ
cycles that have been designed for specific foods. The
display will guide you through setting the oven and food
appropriately for the cycle selected. Precision cooking
cycles vary based on food type; see the Cooking Modes
section for more detailed information.
Recipes
This option allows you to access pre-loaded recipes for
FHUWDLQIRRGV1HZUHFLSHVFDQEHORDGHGDQGIROORZHG
WKURXJKWKH*($SSOLDQFHV.LWFKHQ$SSRQFH\RXU
phone is connected. See the Wi-Fi Connect section for
instructions on connecting your phone.
Oven Light
To turn on or off the oven cavity lights, press the %RWK
cavity lights will be illuminated if using a double oven.
Settings
Press the to access the Settings. See the Settings
section for more information.
Favorite
This option allows the user to save their favorite cycles
for easy access in the future. After selecting a cooking
mode and setting the temperature and any timers, press
the to save it as a favorite for future use. After saving
a cycle, press the on the main menu to quickly access
the saved mode.
Kitchen Timer
This feature works as a countdown timer. Press the
, select the amount of time for the timer to operate, and
press Start. The oven will continue to operate once the
timer countdown is complete. To turn off the timer, select
the and press Clear.
Cook Time
This function counts down cooking time and turns off the
oven when the cooking time is complete. Press the
during a cycle, select the amount of cooking time, and
press Start.
Delay Time
7KLVIHDWXUHGHOD\VWKH VWDUWWLPHIRUDQRYHQF\FOH8VH
this feature to set a time when you want the oven to
start. Select a cycle, then press the . Select the time of
day for the oven to turn on and press Start. A cook time
can also be programmed if desired.
Wi-Fi & Remote Enable
Press
GET CONNECTED
to connect your oven to Wi-Fi.
This option allows you to download content to your
oven and control it remotely. The oven must be
connected to Wi-Fi before Remote Enable can be
activated. For instructions on how to connect your oven,
see the Wi-Fi Connect/Remote Enable section under
Settings in this manual.
Single Wall Oven Main Menu
Bake Broil Convect
Precision
Cooking
More Recipes
12:30 PM
GET CONNECTED
'RXEOH:DOO2YHQ0DLQ0HQXV
Bake Broil Convect
Precision
Cooking
More Recipes
UPPER OVEN
12:30 PM
Precision
Cooking
Bake Broil Convect More Recipes
LOWER OVEN
12:30 PM
12:30 PM
UPPER OVEN
LOWER OVEN
GET CONNECTED

49-80812-1 7
USING THE OVEN:'RXEOH2YHQ6HWWLQJV
Double Oven
When using both cavities to cook, the control will allow you to switch back and forth between the upper and lower
oven to review the cycle selection for each. When viewing the cooking mode screen you can access the alternate
cavity by pressing on the banner at the top or bottom of the screen.
* Compatible Apple or Android devices and home Wi-Fi network required.
Settings
There are numerous settings that are accessed by pressing in the top right corner of the main screen.
Wi-Fi & Remote Enable
This appliance is configurable to allow remote operation
DWDQ\WLPH'RQRWVWRUHDQ\IODPPDEOHPDWHULDOVRU
temperature sensitive items inside or on top of this
DSSOLDQFH%\XVLQJWKH:L)L&RQQHFWIHDWXUH\RXZLOO
be able to control essential oven operations such as
temperature settings, timers and cooking modes using
your smartphone or tablet.*
Select the then Wi-Fi & Remote Enable - follow the
LQVWUXFWLRQVRQ\RXURYHQGLVSOD\DQGSKRQHDSS,WLV
necessary to turn on Wi-Fi before using Remote Enable
on your oven.
Connecting your Wi-Fi Connect Enabled oven
1. Have your smart phone or tablet ready with the ability
to access the internet and download apps.
2. You will need to know the password of your home
Wi-Fi router. Have this password ready while you are
setting up your GE Appliances oven.
3. On your smart phone or tablet, visit
www.GEAppliances.com/connect to learn more
about connected appliance features and to download
the app to connect to your oven.
4. Follow the onscreen instructions in the app to connect
your GE Appliances oven. When connected, your
oven should show that it is connected to your home
Wi-Fi network.
5. ,IWKHUHDUHLVVXHVFRQQHFWLQJZLUHOHVVO\WR\RXURYHQ
please call 800.220.6899 and ask for assistance
regarding oven wireless connectivity.
To connect additional smart devices, repeat steps 3 and 4.
Remote Starting your Oven
To be able to start the oven remotely once connected
to Wi-Fi, press Remote Enable on the main menu or
access Wi-Fi & Remote Enable in the settings menu
and turn Remote Enable on. The oven can now be
started remotely using a connected device. The icon
must be active to start the oven remotely. To disconnect
your phone from Remote Enable, access the Wi-Fi &
Remote Enable settings and turn Remote Enable off.
NOTE: )RRGVWKDWVSRLOHDVLO\²VXFKDVPLONHJJVILVK
VWXIILQJVSRXOWU\DQGSRUN²VKRXOGQRWEHDOORZHGWR
sit for more than 1 hour before or after cooking. Room
WHPSHUDWXUHSURPRWHVWKHJURZWKRIKDUPIXOEDFWHULD%H
sure that the oven light is off because heat from the bulb
will speed harmful bacteria growth.
SETTINGS
LOCK CONTROL
SABBATH
SOUND
SET CLOCK
Wi-Fi & REMOTE ENABLE
12:30 PM
COOKING
SYSTEM
SETTINGS
SABBATH
SOUND
DISPLAY
12:30 PM
Slide up and down to access all the settings
TO LOWER OVEN
BAKE 400°F
12:30 PM
350
°F
PREHEATED
BAKE
CANCEL
BAKE 350°F
TO UPPER OVEN
12:30 PM
BAKE
400
PREHEATED
°F
CANCEL
8SSHU2YHQ%DNH&\FOH /RZHU2YHQ%DNH&\FOH

8 49-80812-1
USING THE OVEN: Settings
Settings (Cont.)
There are numerous settings that are accessed by pressing in the top right corner of the main screen.
Set Clock
This feature allows you to set the clock and specifies
how the time of day will be displayed. Options are for a
standard 12-hour clock with AM and PM selections or
24-hour military time display.
Lock Control
6HOHFWWKLVRSWLRQLQRUGHUWRORFNWKH/&'IURPDQ\
undesired screen selections. To unlock the screen, press
and press Unlock on the next screen.
Sabbath
Sabbath mode disables the oven lights (the oven light
will not turn on when the door is opened), all sounds
(the control will not beep when the screen is pressed),
&RQYHFWLRQPRGHV%URLOPRGHV:DUP3URRIDQGDOO
time functions. Sabbath mode can only be used with
WUDGLWLRQDO%DNH7KLVIHDWXUHFRQIRUPVWRWKH6WDU.
Jewish Sabbath requirements. Please reference the
Sabbath Mode section for more information.
Sound
This setting screen allows you to change the volume, the
end of cycle tone, and turn on or off the touch sound.
Display
This screen shows the options for brightness, clock off,
energy saver, and screen time out. Clock off will remove
the clock from the display when the screen is inactive,
but it will be shown after pressing the screen. The screen
can be set to never time out or it can be set to shut off
after 1, 5, or 10 minutes.
Cooking
Ŷ The oven is set to Fahrenheit, however, in this setting
the cooking unit can be changed to Celsius.
Ŷ Auto Recipe Conversion can be turned on in order
to automatically reduce the programmed cooking
WHPSHUDWXUHIRU&RQYHFWLRQ%DNHRU&RQYHFWLRQ%DNH
0XOWL1RWHWKDWWKLVZLOORQO\UHGXFHWKHFRRNLQJ
temperature, not the baking time. When the 12 Hour
Shut Off option is turned on, it will automatically shut
off the oven after 12 hours of continuous use.
Ŷ Adjust Temperature allows the oven temperature to
be adjusted up to 35°F hotter or down to 35°F cooler.
8VHWKLVIHDWXUHLI\RXEHOLHYH\RXURYHQWHPSHUDWXUH
is too hot or cold and wish to change it. For double
ovens, the upper and lower oven temperatures are
adjusted separately.
System
This screen allows you to clear your saved user data and
shows the current software version.
SETTINGS
LOCK CONTROL
SABBATH
SOUND
SET CLOCK
Wi-Fi & REMOTE ENABLE
12:30 PM
COOKING
SYSTEM
SETTINGS
SABBATH
SOUND
DISPLAY
12:30 PM
Slide up and down to access all the settings

49-80812-1 9
USING THE OVEN: Settings / Sabbath
Sabbath
Sabbath mode disables the oven lights (the oven light will not turn on when the door is opened), all sounds (the control
ZLOOQRWEHHSZKHQWKHVFUHHQLVSUHVVHG&RQYHFWLRQPRGHV%URLOPRGHV:DUP3URRIDQGDOOWLPHIXQFWLRQV
6DEEDWKPRGHFDQRQO\EHXVHGZLWKWUDGLWLRQDO%DNH7KLVIHDWXUHFRQIRUPVWRWKH6WDU.-HZLVK6DEEDWKUHTXLUHPHQWV
NOTE:,IDSRZHURXWDJHRFFXUVGXULQJZKHQWKHRYHQLVLQ6DEEDWK0RGHWKHXQLWZLOOUHWXUQWR6DEEDWK0RGH
when power is restored.
Entering Sabbath Mode
Press the on the main screen to access the Settings
menu and scroll down to Sabbath.
Start a Sabbath Bake
8VHWKHNH\SDGRQWKHVFUHHQWRHQWHUWKHWHPSHUDWXUH
WKDW\RXZRXOGOLNHWRXVHIRU6DEEDWK%DNH2QFHWKH
temperature is set, press the to set the cook time for
WKHF\FOHLQKRXUVDQGPLQXWHV,IXVLQJDGRXEOHRYHQ
you can then set the temperature and time desired for the
other cavity by selecting it to the left of the temperature
GLVSOD\,IDWLPHULVQRWVHWWKHRYHQZLOOVWDUWDEDNH
cycle during Sabbath mode and continue until Sabbath
mode is turned off. You can also set whether the oven
light will be on or off by pressing the on this screen.
Once you have programmed the temperature and time,
press Start. The next screen will display the settings that
\RXSURJUDPPHGIRU\RXU6DEEDWK%DNH
Adjusting the Temperature During a
Sabbath Bake
,IWKHWHPSHUDWXUHQHHGVWREHDGMXVWHGDIWHU
SURJUDPPLQJWKHRYHQIRUD6DEEDWK%DNHSUHVVRQH
of the temperature icons displayed on the Sabbath cycle
screen and press Enter. This will allow you to adjust the
WHPSHUDWXUHIRUWKHF\FOH1RWHWKDWWKHGLVSOD\ZLOOQRW
show that the oven temperature has been changed.
Exit the Sabbath Mode
To exit Sabbath mode, either press the X in the upper
right corner if in the programming screen, or press Exit
Sabbath if in the cycle screen. There is also an option to
turn off the cycle when on the cycle screen by pressing
Turn Off, but your oven will still remain in Sabbath mode
until you exit the mode. NOTE:,IDSRZHURXWDJHRFFXUV
while the oven is in Sabbath Mode, the unit will return
to Sabbath Mode when power is restored, however
the oven will return to the off state even if it was in the
middle of a bake cycle when the power outage occurred.
SABBATH
ENTER TURN OFFOven On
EXIT SABBATH
12:30 PM
Select temperature, then press ENTER to edit.
200°F 250°F 300°F 350°F 400°F
SABBATH
EXIT SABBATH
Select temperature, then press ENTER to edit.
5:30ENTER TURN OFFUpper Oven On
250°F200°F 300°F 350°F 400°F
5:30ENTER TURN OFFLower Oven On
250°F200°F 300°F 350°F 400°F
12:30 PM
Programming Screens
6LQJOHDQG'RXEOH2YHQ
Sabbath Cycle Screens
12:30 PM
SABBATH
BAKE TEMP
UPPER OVEN
LOWER OVEN
123
456
789
0
i
---
°F
START
12:30 PM
SABBATH
BAKE TEMP
123
456
789
0
i
---
°F
START

10 49-80812-1
Oven Racks
Your oven has six rack positions. Recommended rack
positions for various types of foods are provided in the
Cooking Guide. Adjusting rack position is one way to
impact cooking results. For example, if you would prefer
darker tops on cakes, muffins, or cookies, try moving
IRRGRQHUDFNSRVLWLRQKLJKHU,I\RXILQGIRRGVDUHWRR
brown on top try moving them down next time.
When baking with multiple pans and on multiple racks,
ensure there is at least 1½" between pans to allow
sufficient space for air to flow.
Oven Racks
Your oven may have extension racks and/or traditional
flat racks.
To avoid possible burns, place the racks in the desired
position before you turn the oven on.
Extension Racks
Extension racks have an install feature that locks into the
rack supports (guides) on both sides. Once the install
feature is locked into place, always pull the rack out,
by its upper front rail, to its full extension stop position,
when placing or removing cookware.
,IH[WHQVLRQUDFNVDUHGLIILFXOWWRH[WHQGOXEULFDWHWKH
racks with the graphite lubricant provided with your
oven. Remove the rack from the oven, remove debris in
the slide tracks with a paper towel, shake the graphite
lubricant and place 4 small drops on the two bottom
tracks of the left and right sides. Open and close the
rack several times to distribute the lubricant.
To order additional graphite lubricant, read the
Assistance and Accessories section at the beginning of
this manual.
To Remove An Extension Rack:
1. Make sure the rack is pushed all the way into the
oven.
2. Grasp the rack by both its upper front rail and its
lower handles on two sides and lift straight up to
unlock the rack from the rack supports.
3. Firmly holding onto both the upper front rail and lower
handles on both sides, pull the rack forward. Grasp the
rack on both sides if necessary. Then remove it from
the oven.
To Replace An Extension Rack:
1. Place the rear portion of the rack onto the rack
supports (guides) as shown in the picture.
2. Hold the upper front rail and lower handles and push
the rack all the way in until the install feature locks
into the front rack support.
,IH[WHQVLRQUDFNVDUHGLIILFXOWWRUHSODFHRUUHPRYHZLSH
WKHRYHQUDFNVXSSRUWVZLWKFRRNLQJRLO'RQRWZLSHRLO
on the rack slides.
The oven
has 6 rack
positions
8SSHU)URQW5DLO
Handle
Handle
Handle
Handle
8SSHU)URQW5DLO
/LIWWRXQORFN
from the rack
support
,QVWDOO)HDWXUH
Front Rack
/RFN
Hold the upper front rail and
lower handles and push the rack
all the way in until the install
feature locks on the front support
8SSHU)URQW5DLO
USING THE OVEN: Oven Racks

49-80812-1 11
USING THE OVEN:2YHQ5DFNV$OXPLQXP)RLODQG2YHQ/LQHUV&RRNZDUH
Traditional Flat Racks
The racks have stops so that when placed correctly on
the supports they will stop before coming completely out
and will not tilt. When placing and removing cookware,
pull the rack out until it stops.
To Remove a Rack
Pull it toward you, tilt the front end up and pull it out.
To Replace a Rack
Tilt the front of the rack up, hook the rear locating posts
under the rack supports, push the rack back (past the
stoppers) and lower it into position. Push the rack all the
way in.
,IIODWUDFNVDUHGLIILFXOWWRVOLGHDQGRUUHPRYHSODFH
some cooking oil on a soft cloth or paper towel and rub
onto the sides of the rack and each rack support.
Oven Racks (cont.)
Flat Rack
CAUTION
Use caution when removing a rack from lowest position as door may be hot.
Stopper
Rack
Support
/RFDWLQJ
Post
CAUTION
Do not use any type of foil or oven liner to cover the oven bottom. These items can trap heat
or melt, resulting in damage to the product and risk of shock, smoke or fire. Damage from improper use of
these items is not covered by the product warranty.
)RLOPD\EHXVHGWRFDWFKVSLOOVE\SODFLQJDVKHHWRQDORZHUUDFNVHYHUDOLQFKHVEHORZWKHIRRG'RQRWXVHPRUH
IRLOWKDQQHFHVVDU\DQGQHYHUHQWLUHO\FRYHUDQRYHQUDFNZLWKDOXPLQXPIRLO.HHSIRLODWOHDVW´IURPRYHQZDOOV
to prevent poor heat circulation.
Aluminum Foil and Oven Liners
Cookware
Cookware Guidelines
7KHPDWHULDOILQLVKDQGVL]HRIFRRNZDUHDIIHFWEDNLQJ
performance.
'DUNFRDWHGDQGGXOOSDQVDEVRUEKHDWPRUHUHDGLO\
than light, shiny pans. Pans that absorb heat more
readily can result in a browner, crisper, and thicker crust.
,IXVLQJGDUNDQGFRDWHGFRRNZDUHFKHFNIRRGHDUOLHU
WKDQPLQLPXPFRRNWLPH,IXQGHVLUDEOHUHVXOWVDUH
obtained with this type of cookware consider reducing
oven temperature by 25º F next time.
Shiny pans can produce more evenly cooked baked
goods such as cakes and cookies.
Glass and ceramic pans heat slowly but retain heat well.
These types of pans work well for dishes such as pies
and custards.
Air insulated pans heat slowly and can reduce bottom
browning.
.HHSFRRNZDUHFOHDQWRSURPRWHHYHQKHDWLQJ

12 49-80812-1
Cooking Modes
Your new oven has a variety of cooking modes to help you get the best results. These modes are described below.
Refer to the Cooking Guide section for recommendations for specific foods. Remember, your new oven may perform
differently than the oven it is replacing.
Temperature Setting
When selecting a temperature, the traditional preset
temperatures are shown and can be selected by
VFUROOLQJKRUL]RQWDOO\DQGVHOHFWLQJWKHGHVLUHG
WHPSHUDWXUH,I\RXZLVKWRFRRNDWDQDOWHUQDWH
temperature, press the temperature in the middle of the
screen and a number pad will appear so the desired
temperature can be input.
Bake
The traditional bake mode is intended for single rack
cooking. This mode uses heat primarily from the lower
element but also from the upper element to cook food.
To use this mode press the Bake option on the main
menu and scroll to the desired temperature and press
Start. Preheating is generally recommended when using
this mode.
Broiling Modes
Always broil with the door closed. The broil element in
this oven is very powerful. Monitor food closely while
EURLOLQJ8VHFDXWLRQZKHQEURLOLQJRQXSSHUUDFN
positions as placing food closer to the broil element
increases smoking, spattering, and the possibility
of fats igniting. Broiling on rack position 6 is not
recommended.
%URLOLQJFDQEHXVHGIRUIRRGVWKDWZRXOGW\SLFDOO\EH
grilled. Adjust the rack position in order to vary the
intensity of the heat to the food. Place foods closer to the
broil element when a seared surface and rare interior are
desired. For best performance, center the food below the
broil heating element.
Broil
Select Broil on the main menu, then select High or Low
depending on the amount of searing and the internal
temperature that is preferred. The High setting is best for
thinner cuts of meat and/or foods you prefer less done on
WKHLQWHULRU7KH/RZVHWWLQJLVSUHIHUUHGIRUWKLFNHUFXWVRI
meat and foods you like to be cooked all the way through.
,WLVQRWQHFHVVDU\WRSUHKHDWWKHRYHQIRUWKHVHPRGHV
Convection Modes
7KHVHPRGHVXWLOL]HKHDWIURPWKHWUDGLWLRQDOXSSHUDQG
lower elements combined with the convection element
and consistent airflow to enhance evenness. Your oven
is equipped with Auto Recipe Conversion so that it
automatically adjusts the amount of heat to maintain the
proper temperature when using the modes with specified
temperatures. Preheating is recommended for these
PRGHVH[FHSWIRU&RQYHFWLRQ%URLO&ULVS
Convection Bake
This mode is intended for single rack baking when
additional airflow is desired to enhance evenness. Select
Convect, then Bake, scroll to the desired temperature,
and press Start. Preheating is generally recommended
when using this mode.
Convection Bake Multi Rack
This mode has been designed to allow for more even
FRRNLQJZKHQPXOWLSOHUDFNVDUHXWLOL]HG%DNLQJWLPH
may be slightly longer than what would be expected for
a single rack. To use this mode, select Convect, then
Bake Multi-Rack, scroll to the desired temperature, and
press Start. Preheating is generally recommended when
using this mode.
Convection Roast
This mode is intended for roasting whole cuts of meat
RQDVLQJOHUDFN7KHXWLOL]DWLRQRIDOOWKUHHHOHPHQWVDQG
direct airflow down from the top of the oven improves
browning and reduces cooking time. Check food earlier
than the recipe suggests or use the probe when using
this mode. To use this mode, select Convect, then press
Roast, scroll to the desired temperature, and press Start.
USING THE OVEN: Cooking Modes

49-80812-1 13
USING THE OVEN: Cooking Modes
Cooking Modes (Cont.)
Convection Broil
&RQYHFWLRQ%URLOKDVWKUHHRSWLRQV/RZ+LJKDQG
&ULVS/RZDQG+LJKDUHVLPLODUWRWKHWUDGLWLRQDOEURLO
modes with the addition of direct airflow to aid in searing
DQGEURZQLQJ)RUEHVWUHVXOWVZLWKWKH/RZDQG+LJK
settings, it is recommended to preheat the oven for
PLQXWHV&RQYHFWLRQ%URLO&ULVSLVLQWHQGHGDVD
finishing mode at the end of a cooking cycle to add
surface browning to a dish such as a casserole or a
roast. To use these modes, select Convect, then Broil,
then your desired mode.
Proof
Proof mode is designed for rising (fermenting and
proofing) bread doughs. Press the More option on the
main menu, then Proof, then Start. Cover dough well to
SUHYHQWGU\LQJRXW%UHDGZLOOULVHPRUHUDSLGO\WKDQDW
room temperature. NOTE:'RQRWXVHWKH3URRIPRGH
for warming food or keeping food hot. The proofing oven
temperature is not hot enough to hold foods at safe
temperatures.
Warm
Warm mode is designed to keep hot foods at a higher
temperature for up to 3 hours. To use this mode, select
More from the main menu, then Warm, then press Start.
3UHKHDWLQJLVQRWUHTXLUHG'RQRWXVHZDUPWRKHDWFROG
food other than crisping crackers, chips, or dry cereal.
,WLVDOVRUHFRPPHQGHGWKDWIRRGQRWEHNHSWZDUPIRU
more than 2 hours.
Precision Cooking
These modes provide guidance or pre-set cooking
algorithms to assist the user in cooking various types of
food. The selection you make in the Precision Cooking
menu will guide you to input the information required to
help cook your food. At the end of estimated cooking
time, check the food to see if it is done to your liking.
1RWHWKDWGLIIHUHQFHVLQIRRGVKDSHSUHSDUDWLRQDQG
preferences for doneness can impact the time required
to cook the food.
Some cycles require the food temperature probe
supplied with your oven. The target temperature for the
probe is automatically set based on selections made
for each food. Always check foods using a secondary
food thermometer as probe placement can impact the
measured temperature. See Probe section for more
details on using and positioning the probe properly.
On some pages
i
will show up. Press
i
to access
additional information that pertains to the cooking cycles
within that category.
Additional cycles will be available through software
updates. Connect your oven to have access to these
updates. See the Wi-Fi Connect section for details on
how to connect your oven.

14 49-80812-1
Probe
WARNING
Consuming undercooked food can result in foodborne illness. Use probe according to
the following instructions to ensure all portions of the food reach minimum safe cooking temperatures.
Recommendations for minimum safe food temperatures can be found at
www.foodsafety.gov or www.IsItDoneYet.gov.
Internal food temperature is frequently used as an indicator of doneness, especially for roasts and poultry.
The Probe mode monitors the internal food temperature and turns the oven off when the internal food
temperature reaches the programmed temperature.
Always check the temperature at multiple locations in the food with a food thermometer after cooking to
ensure that all portions of the food have reached the minimum safe internal temperature for that food.
Proper Probe Placement
After preparing the meat and placing it on the cooking
pan follow these instructions for proper probe placement.
Ŷ ,QVHUWWKHSUREHLQWRWKHIRRGVRWKDWWKHWLSRIWKH
probe will rest in the center of the thickest part of
the food. For best performance the probe should
EHIXOO\LQVHUWHGLQWRWKHIRRG,IWKHSUREHLVQRW
located properly, it may not accurately measure the
temperature of the coolest portion of the food. Some
foods, particularly small items, are not well suited for
FRRNLQJZLWKWKHSUREHGXHWRWKHLUVKDSHRUVL]H
Ŷ 7KHSUREHVKRXOGQRWWRXFKERQHIDWRUJULVWOH
Ŷ )RUZKROHSRXOWU\LQVHUWWKHSUREHLQWRWKHWKLFNHVW
part of the breast.
Ŷ )RUERQHOHVVURDVWVLQVHUWWKHSUREHLQWRWKHFHQWHU
of the roast.
Ŷ )RUERQHLQKDPRUODPELQVHUWWKHSUREHLQWRWKH
center of the lowest large muscle or joint.
Ŷ )RUFDVVHUROHVRUGLVKHVVXFKDVPHDWORDILQVHUWWKH
probe into the center of the dish.
Ŷ )RUILVKLQVHUWWKHSUREHIURPMXVWDERYHWKHJLOOLQWR
the meatiest area, parallel to the backbone.
Probe Usage
To use the probe without preheating:
,QVHUWWKHSUREHLQWRWKHIRRGVHH3URSHU3UREH
Placement).
2. Place the food in the oven and connect the probe into
the probe outlet in the oven.
3. Program the desired probe and cooking mode
settings by selecting More, then Probe, then
FKRRVLQJWKHGHVLUHGFRRNLQJPRGH1H[WFKRRVHWKH
desired cooking temperature and select Next. Finally,
select the desired internal food temperature and
press Start.
To use the probe with preheating:
1. Press the desired cook mode (Traditional Bake,
Convection Bake, or Convection Roast) and select
the desired cooking temperature.
,QVHUWWKHSUREHLQWRWKHIRRGVHH3URSHU3UREH
Placement).
3. Once the oven is preheated, place the food in the
oven and connect the probe to the probe outlet,
PDNLQJVXUHLWLVIXOO\LQVHUWHG8VHFDXWLRQWKHRYHQ
walls and probe outlet are hot.
4. Program the probe temperature by selecting More,
then Probe, then entering the desired internal food
temperature. The maximum internal food temperature
that you can set is 200° F.
Probe Care Guidelines
Ŷ 8VHRISUREHVRWKHUWKDQWKHRQHSURYLGHGZLWKWKLV
product may result in damage to the probe input jack.
Ŷ 8VHWKHKDQGOHVRIWKHSUREHDQGSOXJZKHQLQVHUWLQJ
and removing them from the meat and outlet
Ŷ 7RDYRLGGDPDJLQJ\RXUSUREHGRQRWXVHWRQJVWR
pull on the cable when removing it.
Ŷ 7RDYRLGEUHDNLQJWKHSUREHPDNHVXUHIRRGLV
completely defrosted before inserting the probe.
Ŷ 7RSUHYHQWSRVVLEOHEXUQVGRQRWXQSOXJWKHSUREH
from the outlet until the oven has cooled.
Ŷ 1HYHUOHDYHWKHSUREHLQVLGHWKHRYHQGXULQJDVHOIRU
steam clean cycle.
Ŷ 'RQRWVWRUHWKHSUREHLQWKHRYHQ
USING THE OVEN: Probe

49-80812-1 15
Cooking Guide
USING THE OVEN: Cooking Guide
FOOD TYPE
RECOMMENDED
MODE(S)
RECOMMENDED
RACK POSITION(S) ADDITIONAL SUGGESTIONS
Baked Goods
/D\HUFDNHVVKHHWFDNHV
bundt cakes, muffins, quick
breads on a Single Rack
&RQYHFWLRQ%DNH
7UDGLWLRQDO%DNH
3 8VHVKLQ\FRRNZDUH
/D\HUFDNHVRQ0XOWLSOH5DFNV 7UDGLWLRQDO%DNH 2 and 4
Extension rack in higher position if used. Ensure adequate airflow
(see illustration below).
Chiffon cakes (angel food)
&RQYHFWLRQ%DNH
7UDGLWLRQDO%DNH
1 8VHVKLQ\FRRNZDUH
Cookies, biscuits, scones on a
Single Rack
&RQYHFWLRQ%DNH 3 8VHVKLQ\FRRNZDUH
Cookies, biscuits, scones on
Multiple Racks
&RQYHFWLRQ%DNH
Multi Rack
2 and 4
2, 3 and 5
Extension rack position 4 for 2 racks, and position 3 for 3 racks.
Ensure adequate airflow.
Beef & Pork
Hamburgers 7UDGLWLRQDO%URLO+L 5
8VHH[WHQVLRQUDFNIRUSDWWLHVVSDFHGHTXDOO\RQEURLOSDQJULG
to get a well seared exterior and a rare interior cook the first side
approximately 3 minutes and cook the second side approximately 4
minutes. Move food down for more doneness/less searing. For best
performance, center food below the broil heating element.
Steaks & Chops
&RQYHFWLRQ%URLO+L
7UDGLWLRQDO%URLO+L
5
8VHDEURLOSDQ3UHKHDWPLQXWHVLIXVLQJ&RQYHFWLRQ%URLO0RGH
Move food down for more doneness/less searing. Watch food
closely when broiling. For best performance, center food below the
broil heating element.
Roasts Convection Roast 2 or 3
8VHDORZVLGHGSDQVXFKDVDEURLOSDQ3UHKHDWLQJLVQRW
QHFHVVDU\8VHSUREHIHDWXUH
Poultry
Whole chicken Convection Roast 2 or 3 8VHDORZVLGHGSDQVXFKDVDEURLOSDQ8VHSUREHIHDWXUH
%RQHLQFKLFNHQEUHDVWVOHJV
thighs
%URLO+L 1
,IEUHDGHGRUFRDWHGLQVDXFHDYRLG%URLO+LPRGHV%URLOVNLQVLGH
down first. Watch food closely when broiling. For best performance
when broiling, center food below the broil heating element.
%URLO/R
&RQYHFWLRQ%DNH
7UDGLWLRQDO%DNH
3
%RQHOHVVFKLFNHQEUHDVWV
&RQYHFWLRQ%URLO/R
&RQYHFWLRQ%DNH
7UDGLWLRQDO%DNH
3
3UHKHDWPLQXWHVLIXVLQJ&RQYHFWLRQ%URLO0RYHIRRGGRZQIRU
more doneness/less searing and up for greater searing/browning
when broiling. For best performance when broiling, center food
below the broil heating element.
Whole turkey Convection Roast 1 or 2 8VHDORZVLGHGSDQVXFKDVDEURLOSDQ8VHWKHSUREHIHDWXUH
7XUNH\%UHDVW Convection Roast 2 or 3 8VHDORZVLGHGSDQVXFKDVDEURLOSDQ8VHWKHSUREHIHDWXUH
Fish
&RQYHFWLRQ%URLO/R
%URLO/R
5 (1/2 thick or less)
4 (>1/2 inch)
3UHKHDWPLQXWHVZKHQ&RQYHFWLRQ%URLOLQJ:DWFKIRRGFORVHO\
when broiling. For best performance, center food below the broil
heating element.
Casseroles
&RQYHFWLRQ%DNH
7UDGLWLRQDO%DNH
3
8VH&RQYHFWLRQ%URLO&ULVSPRGHGXULQJODVWPLQXWHVRIEDNLQJ
to melt/brown cheese or crisp surface.
Frozen Convenience Foods
3L]]DIUHQFKIULHVWDWRUWRWV
FKLFNHQQXJJHWVDSSHWL]HUVRQ
a Single Rack
&RQYHFWLRQ%DNH
7UDGLWLRQDO%DNH
3
8VH&RQYHFWLRQ%URLO&ULVSPRGHGXULQJODVWPLQXWHVRIFRRNLQJ
to crisp the exterior.
3L]]DIUHQFKIULHVWDWRUWRWV
FKLFNHQQXJJHWVDSSHWL]HUVRQ
Multiple Racks
&RQYHFWLRQ%DNH
Multi Rack
2 and 4
,IXVLQJ&ULVSPRGHSODFHERWKSDQVRQWRSUDFNLIVSDFHDOORZV
otherwise Crisp one at a time on top rack position.
*When baking four cake layers at a time, use racks 2
and 4. Place the pans as shown so that one pan is not
directly above another.
Cook food thoroughly to help protect against food
borne illness. Minimum safe food temperature
recommendations for food safety can be found at
www.IsItDoneYet.gov. Make sure to use a food
thermometer to take food temperatures.
7KHWDEOHEHORZSURYLGHVVRPHJXLGHOLQHVIRUW\SLFDOFRRNLQJPRGHV,I\RXZRXOGOLNHWRXVH3UHFLVLRQ&RRNLQJ
modes they can be substituted for the modes shown below for applicable foods.

16 49-80812-1
Control Panel
,W¶VDJRRGLGHDWRZLSHWKHFRQWUROSDQHODIWHUHDFKXVH
Clean with mild soap and water or vinegar and water,
rinse with clean water and polish dry with a soft cloth.
'RQRWXVHDEUDVLYHFOHDQVHUVVWURQJOLTXLGFOHDQVHUV
plastic scouring pads or oven cleaners on the control
SDQHO²WKH\ZLOOGDPDJHWKHILQLVK
Oven Exterior
'RQRWXVHRYHQFOHDQHUVDEUDVLYHFOHDQVHUVVWURQJ
liquid cleansers, steel wool, plastic scouring pads, or
cleaning powders on the interior or exterior of the oven.
Clean with a mild soap and water or vinegar and water
solution. Rinse with clean water and dry with a soft cloth.
When cleaning surfaces, make sure that they are at
room temperature and not in direct sunlight.
,IVWDLQRQWKHGRRUYHQWWULPLVSHUVLVWHQWXVHDPLOG
abrasive cleaner and a sponge-scrubber for best results.
Spillage of marinades, fruit juices, tomato sauces and
basting liquids containing acids may cause discoloration
DQGVKRXOGEHZLSHGXSLPPHGLDWHO\/HWKRWVXUIDFHV
cool, then clean and rinse.
Cleaning The Oven - Exterior
CARE AND CLEANING: Cleaning The Oven - Exterior
WARNING
,I\RXUUDQJHLVUHPRYHGIRUFOHDQLQJVHUYLFLQJRUDQ\UHDVRQEHVXUHWKH
anti-tip device is reengaged properly when the range is replaced. Failure to
take this precaution could result in tipping of the range and can result in death
or serious burns to children or adults.
%HVXUHDOOFRQWUROVDUHRIIDQGDOOVXUIDFHVDUHFRROEHIRUHFOHDQLQJDQ\SDUWRIWKHUDQJH
Painted Surfaces and Black Stainless Steel
Painted surfaces include the sides of the range and the
door, top of control panel and the drawer front. Clean
these with soap and water or a vinegar and water solution.
'RQRWXVHFRPPHUFLDORYHQFOHDQHUVFOHDQLQJ
powders, steel wool or harsh abrasives on any painted
VXUIDFHLQFOXGLQJ%ODFN6WDLQOHVV6WHHO
Stainless Steel - Excluding Black Stainless Steel (on some models)
'RQRWXVHDVWHHOZRROSDGLWZLOOVFUDWFKWKHVXUIDFH
To clean the stainless steel surface, use warm sudsy
water or a stainless steel cleaner or polish. Always wipe
the surface in the direction of the grain. Follow the cleaner
instructions for cleaning the stainless steel surface.
To inquire about purchasing cleaning products including
stainless steel appliance cleaner or polish, see the
Accessories and Consumer Support sections at the end
of this manual.

49-80812-1 17
Cleaning The Oven - Interior
CARE AND CLEANING: &OHDQLQJ7KH2YHQ,QWHULRU
The interior of your new oven can be cleaned manually or by using Steam Clean or Self Clean modes.
Spillage of marinades, fruit juices, tomato sauces and basting liquids containing acids may cause discoloration and
VKRXOGEHZLSHGXSLPPHGLDWHO\/HWKRWVXUIDFHVFRROWKHQFOHDQDQGULQVH
Manual Cleaning
'RQRWXVHRYHQFOHDQHUVVWURQJOLTXLGFOHDQVHUV
steel wool, or scouring pads on the interior of the oven.
Clean with a mild soap and water, or vinegar and water
solution. Rinse with clean water and dry with a soft cloth.
When cleaning surfaces, make sure that they are at
room temperature.
Steam Clean Mode
Steam clean is intended to clean small spills using water
and a lower cleaning temperature than Self-Clean.
To use the Steam Clean feature, wipe grease and soils
from the oven. Pour one cup of water into the bottom of
the oven. Close the door. Press the More option, then
select Steam Clean, and press Start to the right of the
screen. The oven door will lock. You cannot open the door
during the 30 minute steam clean as this will decrease the
steam clean performance. At the end of the steam clean
cycle the door will unlock. Wipe out any excess water
and any remaining soil. NOTE: Water in the bottom of the
oven may be hot right after finishing the cycle.
Self Clean Mode
5HDG6HOI&OHDQLQJ2YHQ6DIHW\,QVWUXFWLRQVDWWKH
beginning of this manual before using Self Clean Mode.
Self clean uses very high temperatures to clean the oven
interior. The oven door will lock when using this feature.
%HIRUHRSHUDWLQJWKHVHOIFOHDQF\FOHZLSHXSJUHDVH
and soils from the oven. Remove all items from the
oven other than enameled (dark color) racks. Shiny or
silver racks and any cookware or other items should all
be removed from the oven before initiating a self clean
F\FOH&ORVHWKHGRRU,IXVLQJDGRXEOHRYHQVHOHFW
which oven you would like to clean. Select the More
option, then Self Clean. Choose a 3, 4, or 5 hour cycle,
and select the illuminated Start pad to the right of the
screen. The oven will show that the door has locked and
display the amount of time remaining in the cycle. Press
the illuminated Cancel pad to the right of the screen if
you wish to stop the cycle. At the end of a cycle, the
oven door will not unlock until the oven has cooled below
the locking temperature.
For heavily soiled ovens, the maximum 5 hour clean time
LVUHFRPPHQGHG,I\RXZLVKWRXVHWKHGHIDXOWWLPH
press Start immediately after pressing Self Clean. The
oven will turn off automatically when the self-clean cycle
is complete. The door will stay locked until the oven has
cooled down. After the oven has cooled down wipe any
ash out of the oven.
We recommend venting your kitchen with an open
window or using a ventilation fan or hood during the first
self-clean cycle.
Soil on the front frame of the oven and outside the
gasket on the door will need to be cleaned by hand.
Clean these areas with hot water, soap-filled steel wool
pads or cleaners such as Soft Scrub
®
. Rinse well with
clean water and dry.
'RQRWFOHDQWKHJDVNHW7KHILEHUJODVVPDWHULDORI
WKHRYHQGRRUJDVNHWFDQQRWZLWKVWDQGDEUDVLRQ,WLV
HVVHQWLDOIRUWKHJDVNHWWRUHPDLQLQWDFW,I\RXQRWLFHLW
becoming worn or frayed, replace it.
Make sure the oven light bulb cover is in place and the
oven light is off. When using the Self Clean Mode in a
GRXEOHRYHQRQO\WKHXSSHURUORZHURYHQFDQXWLOL]H
the cycle at one time. Additionally, no other mode may
be started in the alternate oven cavity while self clean is
in progress.
IMPORTANT: The health of some birds is extremely
sensitive to the fumes given off during the self-cleaning
cycle of any range. Move birds to another well-ventilated
room.

18 49-80812-1
Oven Racks
Probe
The racks that were provided with your oven (dark
enameled racks, not shiny) may remain in the oven
during the self-cleaning cycle without being damaged.
To manually clean racks, use warm, soapy water. Make
sure not to wash the rack slides on an extension rack.
,IUDFNVEHFRPHPRUHGLIILFXOWWRUHPRYHIURPWKHRYHQ
put some vegetable oil on a soft cloth or paper towel and
UXERQWRWKHRYHQUDFNVXSSRUWV'RQRWZLSHWKHRLORQ
an extension rack slide.
Periodically, after several self-clean cycles, the extension
rack slides may need to be lubricated using the graphite
lubricant shipped with your wall oven. To order additional
graphite lubricant read the Assistance and Accessories
sections at the beginning of this manual.
1. Remove extension rack from the oven. See the
Extension Oven Racks section.
2. Fully extend the rack on a table or countertop.
1HZVSDSHUPD\EHSODFHGXQGHUQHDWKWKHUDFNIRU
easy clean up.
,IWKHUHLVGHEULVLQWKHVOLGHWUDFNVZLSHLWDZD\
using a paper towel. NOTE: Any graphite lubricant
wiped away must be replaced.
4. Shake the graphite lubricant before opening it.
Starting with left slide mechanism of the rack, place
four (4) small drops of lubricant on the two (2) bottom
tracks of the slide close to the bearing carriers.
5. Repeat for the right slide mechanism of the rack.
6. Open and close the rack several times to distribute
the lubricant.
7. Replace the cap on the lubricant and shake it again.
Turn the rack over and repeat steps 3, 4, 5 and 6.
8. Close the rack, turn rack right-side-up and place in
the oven. See the Extension Oven Racks section.
9. Repeat above steps for each rack.
NOTE:'RQRWVSUD\ZLWKFRRNLQJVSUD\RURWKHUOXEULFDQW
sprays.
The temperature probe may be cleaned with soap and
water or a soap-filled scouring pad. Cool the temperature
probe before cleaning. Scour stubborn spots with a soap-
filled scouring pad, rinse and dry.
To order additional temperature probes read the
Assistance and Accessories sections at the beginning of
this manual.
Ŷ 'RQRWLPPHUVHWKHWHPSHUDWXUHSUREHLQZDWHU
Ŷ 'RQRWVWRUHWKHWHPSHUDWXUHSUREHLQWKHRYHQ
Ŷ 'RQRWOHDYHWKHWHPSHUDWXUHSUREHLQVLGHWKHRYHQ
during a self or steam clean cycle.
CARE AND CLEANING: Oven Racks / Probe

49-80812-1 19
WARNING
SHOCK OR BURN HAZARD:%HIRUHUHSODFLQJRYHQOLJKWEXOEGLVFRQQHFWWKHHOHFWULFDOSRZHUWRWKH
oven at the main fuse or circuit breaker panel. Failure to do so may result in electric shock or burn.
CAUTION
BURN HAZARD: The glass cover and bulb should be removed when cool. Touching hot glass with
bare hands or a damp cloth can cause burns.
Oven Door Removal
NOTE:'RRUUHPRYDOLVQRWDUHTXLUHPHQWIRULQVWDOODWLRQ
of the product but is an added convenience.
To remove the door:
1. Open the oven door as far as it will go.
2. Remove hinge bracket from front frame and set
aside. The hinge bracket must be replaced for proper
door functionality when door is reinstalled.
3. Push both hinge locks down toward the door frame to
the unlocked position. This may require a flat-blade
screwdriver. DO NOT LIFT THE DOOR BY THE
HANDLE!
4. Place hands on both sides of the door and close the
oven door to the removal position (approximately
´±´>FP±FP@IURPWKHFORVHGSRVLWLRQ
/LIWWKHGRRUXSDQGRXWXQWLOWKHKLQJHDUPVFOHDUWKH
slots. NOTE:7KHRYHQGRRULVYHU\KHDY\%HVXUH
you have a firm grip before lifting the oven door off
WKHKLQJHV8VHFDXWLRQRQFHWKHGRRULVUHPRYHG
'RQRWOD\WKHGRRURQLWVKDQGOH7KLVFRXOGFDXVH
dents or scratches.
Replacing the Oven Door
NOTE: The oven door is heavy. You may need help
lifting the door high enough to slide it into the hinge slots.
'RQRWOLIWWKHGRRUE\WKHKDQGOH
/LIWWKHRYHQGRRUE\JUDVSLQJHDFKVLGH
2. With the door at the same angle as the removal
SRVLWLRQDSSUR[LPDWHO\´±´>FP±FP@IURP
the closed position), seat the notch of the hinge arm
into the bottom edge of the hinge slot. The notch of
the hinge arm must be fully seated into the bottom of
the slot.
)XOO\RSHQWKHGRRU,IWKHGRRUZLOOQRWIXOO\RSHQWKH
indentation is not seated correctly in the bottom edge
of the slot.
4. Push the hinge locks up against the front frame of the
oven cavity, to the locked position.
5. Replace hinge bracket. The hinge bracket must be
replaced for proper door functionality.
6. Close the oven door.
'LVFRQQHFWSRZHUDWWKHPDLQIXVHRUFLUFXLWEUHDNHU
panel.
2. Remove oven racks.
3. Slide a flat blade screwdriver between the housing
and the glass light cover.
4. Support the glass light cover with two fingers to
prevent the cover from falling to the bottom of the
RYHQ%HFDUHIXOQRWWRFKLSWKHRYHQFRDWLQJ
5. Gently twist the screwdriver blade to loosen the glass
light cover.
6. Remove the glass light cover.
7. Remove the bulb by firmly grasping and sliding the
bulb straight out until the two prongs have cleared the
ceramic holder.
'RQRWWRXFKWKHJODVVRIWKHQHZUHSODFHPHQWEXOE
ZLWK\RXUILQJHUV,WZLOOFDXVHWKHEXOEWRIDLOZKHQLW
lights. Grasp the replacement bulb with a clean towel
or facial tissue with the prongs facing down. Align the
two prongs in the ceramic holder, pressing gently until
the bulb is securely in the ceramic socket.
9. Slide the protective lens into the holder and push until
the clips snap into the housing.
10. Reconnect power.
Oven Light
Oven Door
CARE AND CLEANING: 2YHQ/LJKW2YHQ'RRU
Hinge in
/RFNHG
Position
1RWFKRI+LQJH
Securely Fitted
,QWR%RWWRPRI
Hinge Slot
%RWWRP
Edge of
Slot
Hinge
Arm
+LQJH1RWFK
+LQJH%UDFNHW
Hinge
Slot
Hinge
Arm
+LQJH8QORFNHG
Position
Hinge Clears Slot
+LQJH%UDFNHW

20 49-80812-1
Save time and money! Review the charts on the following pages first and you may not need to call for service.
Problem Possible Cause What To Do
My new oven doesn't
cook like my old one.
Is something wrong
with the temperature
settings?
Your new oven has a different cooking system
from your old oven and therefore may cook
differently than your old oven.
For the first few uses, follow your recipe times
DQGWHPSHUDWXUHVFDUHIXOO\,I\RXVWLOOWKLQN\RXU
new oven is too hot or too cold, you can adjust the
temperature yourself to meet your specific cooking
preference. See the Special Features Section to
adjust the oven temperature. NOTE: This adjustment
DIIHFWV7UDGLWLRQDO%DNH&RQYHFWLRQ%DNHDQG
&RQYHFWLRQ%DNH0XOWLWHPSHUDWXUHVLWZLOOQRWDIIHFW
&RQYHFWLRQ5RDVW7UDGLWLRQDO%URLO&RQYHFWLRQ%URLO
or Clean.
Food does not bake
properly
Oven controls improperly set. See the Cooking Modes section.
Rack position is incorrect or rack is not level. See the Cooking Modes section and Cooking Guide.
,QFRUUHFWFRRNZDUHRUFRRNZDUHRILPSURSHUVL]H
being used.
See the Cookware section.
Oven temperature needs adjustment. See the Cooking option under the Settings section.
,QJUHGLHQWVXEVWLWXWLRQ Substituting ingredients can change the recipe
outcome.
Food does not broil
properly
Oven controls improperly set. Make sure you select the appropriate broil mode.
NOTE: Convection crisp is not for broiling foods.
,PSURSHUUDFNSRVLWLRQEHLQJXVHG See the Cooking Guide for rack location
suggestions.
Food being cooked in a hot pan. Make sure cookware is cool
Cookware not suited for broiling. 8VHDSDQVSHFLILFDOO\GHVLJQHGIRUEURLOLQJ
Aluminum foil used on the broiling pan and
grid has not been fitted properly and slit as
recommended.
,IXVLQJDOXPLQXPIRLOFRQIRUPWRSDQVOLWV
,QVRPHDUHDVWKHSRZHUYROWDJHPD\EHORZ Preheat the broil element for 10 minutes.
Oven temperature too
hot or too cold
Oven temperature needs adjustment. See the Cooking option under the Settings section.
Oven does not work or
appears not to work
A fuse in your home may be blown or the circuit
breaker tripped.
Replace the fuse or reset the circuit breaker.
Oven controls improperly set. 6HHWKH8VLQJWKH2YHQVHFWLRQ
Oven is in Sabbath Mode 9HULI\WKDWWKHRYHQLVQRWLQ6DEEDWK0RGH6HH
the Sabbath option under the Settings section.
“Crackling” or
“popping” sound
This is the sound of the metal heating and cooling
during both the cooking and cleaning functions.
This is normal.
Why is my range making
a "clicking" noise when
using my oven?
Your range has been designed to maintain a
tighter control over your oven's temperature. You
may hear your oven's heating elements "click"
on and off more frequently than in older ovens
to achieve better results during baking, broiling,
convection, and self-clean cycles.
This is normal.
Clock and timer do not
work
A fuse in your home may be blown or the circuit
breaker tripped.
Replace the fuse or reset the circuit breaker.
Oven light does not
work
/LJKWEXOELVORRVHRUGHIHFWLYH Tighten or replace bulb.
Oven will not self-clean The temperature is too high to set a self-clean
operation.
Allow the oven to cool and reset the controls.
Oven controls improperly set. See the Cleaning the Oven section.
Troubleshooting tips ... %HIRUH\RXFDOOIRUVHUYLFH
TROUBLESHOOTING TIPS

49-80812-1 21
Problem Possible Cause What To Do
Excessive smoking
during clean cycle
Excessive soil or grease. Press Cancel on the pad to the right of the screen
to stop the cycle. Open the windows to rid the room
of smoke. Wait until the door unlocks. Wipe up the
excess soil and reset the clean cycle.
Excessive smoking
during broiling
Food too close to burner element. /RZHUWKHUDFNSRVLWLRQRIWKHIRRG
Oven door will not open
after a clean cycle
Oven too hot. Allow the oven to cool below locking temperature.
Oven not clean after a
clean cycle
Oven controls improperly set. See the Cleaning the Oven section.
Oven was heavily soiled. Clean up heavy spillovers before starting the clean
cycle. Heavily soiled ovens may need to self-clean
again or for a longer period of time.
“F— and a number or
letter” are displayed on
LCD screen
You have a function error code. Press DismissRQWKH/&'VFUHHQ$OORZWKH
oven to cool for one hour. Put the oven back into
operation.
,IWKHIXQFWLRQFRGHUHSHDWV 'LVFRQQHFWDOOSRZHUWRWKHRYHQIRUDWOHDVW
VHFRQGVDQGWKHQUHFRQQHFWSRZHU,IWKHIXQFWLRQ
error code repeats, call for service.
LCD is not functioning
properly
A fuse in your home may be blown or the circuit
breaker tripped.
Replace the fuse or reset the circuit breaker.
Oven controls improperly set. See the Cooking Modes or Settings section to
ensure proper use. Ensure unit is updated to the
most recent software update.
/&'VFUHHQLVORFNHG 8QORFNWKHVFUHHQE\SUHVVLQJWKHUnlockLFRQ,I
this does not correct the issue, cycle power at the
circuit breaker and ensure unit is updated to the
most recent software update.
/&'LVIDXOW\ Cycle power at the circuit breaker and ensure unit is
XSGDWHGWRWKHPRVWUHFHQWVRIWZDUHXSGDWH,ILVVXH
persists, call service to assess the issue.
Power outage, clock
resets
Power outage or surge 5HVHWWKHFORFN,IWKHRYHQZDVLQXVH\RXPXVW
reset it by pressing Cancel, setting the clock and
resetting any cooking function.
“Burning” or “oily” odor
emitting from the vent
This is normal in a new oven and will disappear in
time.
To speed the process, set a self-clean cycle for a
minimum of 3 hours. See the Cleaning the Oven
section.
Strong odor An odor from the insulation around the inside of
the oven is normal for the first few times the oven
is used.
This is temporary and will go away after several
uses or a self-clean cycle.
Fan noise A cooling fan may automatically turn on. This is normal. The cooling fan will turn on to cool
LQWHUQDOSDUWV,WPD\UXQIRUXSWRKRXUVDIWHU
the oven is turned off.
My oven door glass
appears to be "tinted" or
have a "rainbow" color.
Is this defective?
1R7KHLQQHURYHQJODVVLVFRDWHGZLWKDKHDW
barrier to reflect the heat back into the oven to
prevent heat loss and keep the outer door cool
while baking.
7KLVLVQRUPDO8QGHUFHUWDLQOLJKWRUDQJOHV\RX
may see this tint or rainbow color.
Sometimes the oven
takes longer to preheat
to the same temperature
Cookware or food in oven The cookware or food in the oven will cause the
oven to take longer to preheat. Remove items to
reduce preheat time.
1XPEHURIUDFNVLQRYHQ Adding more racks to the oven will cause the oven
to take longer to preheat. Remove some racks.
'LIIHUHQWFRRNLQJPRGHV The different cooking modes use different preheat
methods to heat the oven for the specific cooking
mode. Some modes will take longer than others (i.e.
convection bake multi).
Oven will not work
remotely
Router issues, no wireless signal, etc. For assistance with oven wireless network
connectivity, please call 1-800-220-6899.
Oven is not connected.
TROUBLESHOOTING TIPS
Troubleshooting tips ... %HIRUH\RXFDOOIRUVHUYLFH

22 49-80812-1
Staple your receipt here. Proof of the original purchase
date is needed to obtain service under the warranty.
GEAppliances.com
$OOZDUUDQW\VHUYLFHLVSURYLGHGE\RXU)DFWRU\6HUYLFH&HQWHUVRUDQDXWKRUL]HG&XVWRPHU&DUH
®
technician. To schedule
service online, visit us at www.geappliances.com/service_and_support/, or call GE Appliances at 800.GE.CARES
(800.432.2737). Please have your serial number and your model number available when calling for service.
Servicing your appliance may require the use of the onboard data port for diagnostics. This gives a GE Appliances factory
service technician the ability to quickly diagnose any issues with your appliance and helps GE Appliances improve its
SURGXFWVE\SURYLGLQJ*($SSOLDQFHVZLWKLQIRUPDWLRQRQ\RXUDSSOLDQFH,I\RXGRQRWZDQW\RXUDSSOLDQFHGDWDWREH
sent to GE Appliances, please advise your technician not to submit the data to GE Appliances at the time of service.
What GE Appliances will not cover:
Ŷ Service trips to your home to teach you how to use
the product.
Ŷ ,PSURSHULQVWDOODWLRQGHOLYHU\RUPDLQWHQDQFH
Ŷ Failure of the product if it is abused, misused,
modified, or used for other than the intended purpose
or used commercially.
Ŷ Replacement of house fuses or resetting of circuit
breakers.
Ŷ 'DPDJHWRWKHSURGXFWFDXVHGE\DFFLGHQWILUH
floods, or acts of God.
Ŷ ,QFLGHQWDORUFRQVHTXHQWLDOGDPDJHFDXVHGE\
possible defects with this appliance.
Ŷ 'DPDJHFDXVHGDIWHUGHOLYHU\
Ŷ Product not accessible to provide required service.
Ŷ 6HUYLFHWRUHSDLURUUHSODFHOLJKWEXOEVH[FHSWIRU/('
lamps.
WARRANTY
GE Appliances Electric Range Warranty
EXCLUSION OF IMPLIED WARRANTIES
<RXUVROHDQGH[FOXVLYHUHPHG\LVSURGXFWUHSDLUDVSURYLGHGLQWKLV/LPLWHG:DUUDQW\$Q\LPSOLHGZDUUDQWLHV
including the implied warranties of merchantability or fitness for a particular purpose, are limited to one year or
the shortest period allowed by law.
This warranty is extended to the original purchaser and any succeeding owner for products purchased for home use
ZLWKLQWKH86$,IWKHSURGXFWLVORFDWHGLQDQDUHDZKHUHVHUYLFHE\D*($SSOLDQFHV$XWKRUL]HG6HUYLFHULVQRWDYDLODEOH
\RXPD\EHUHVSRQVLEOHIRUDWULSFKDUJHRU\RXPD\EHUHTXLUHGWREULQJWKHSURGXFWWRDQ$XWKRUL]HG*($SSOLDQFHV
6HUYLFHORFDWLRQIRUVHUYLFH,Q$ODVNDWKHZDUUDQW\H[FOXGHVWKHFRVWRIVKLSSLQJRUVHUYLFHFDOOVWR\RXUKRPH
Some states do not allow the exclusion or limitation of incidental or consequential damages. This warranty gives you
specific legal rights, and you may also have other rights which vary from state to state. To know what your legal rights
are, consult your local or state consumer affairs office or your state’s Attorney General.
Warrantor: GE Appliances, a Haier company
Extended Warranties: Purchase a GE Appliances extended warranty and learn about special discounts that are
available while your warranty is still in effect. You can purchase it online anytime at
www.geappliances.com/service_and_support/shop-for-extended-service-plans.htm
or call 800.626.2224 during normal business hours. GE Appliances Service will still be there after your warranty expires.
For the period of GE Appliances will replace
One year
From the date
of the original
purchase
Any partRIWKHUDQJHZKLFKIDLOVGXHWRDGHIHFWLQPDWHULDOVRUZRUNPDQVKLS'XULQJWKLV
limited one-year warranty, GE Appliances will provide, free of charge, all labor and in-home
service to replace the defective part.

49-80812-1 23
Looking For Something More?
GE Appliances offers a variety of accessories to
improve your cooking and maintenance experiences!
Refer to the Consumer Support page for phone numbers
and website information.
The following products and more are available:
Accessories
6PDOO%URLOHU3DQô´[ó´[ò´
/DUJH%URLOHU3DQô´[ó´[ò´
;/%URLOHU3DQ´[ó´[ó´
Parts
Oven racks
Oven burners
/LJKWEXOEV
Probe
Cleaning Supplies
CitruShine™ Stainless Steel Wipes
&(5$0$%5<7(
®
Stainless Steel Appliance Cleaner
*UDSKLWH/XEULFDQW
7KHODUJHEURLOHUSDQGRHVQRWILWLQ´´UDQJHV
7KH;/EURLOHUSDQGRHVQRWILWLQ´ZDOORYHQV´GURSLQVRU´´UDQJHV
Accessories
ACCESSORIES

24 49-80812-1
3ULQWHGLQWKH8QLWHG6WDWHV
Consumer Support
CONSUMER SUPPORT
GE Appliances Website
Have a question or need assistance with your appliance? Try the GE Appliances Website 24 hours a day, any day
of the year! You can also shop for more great GE Appliances products and take advantage of all our on-line support
VHUYLFHVGHVLJQHGIRU\RXUFRQYHQLHQFH,QWKH86GEAppliances.com
Register Your Appliance
Register your new appliance on-line at your convenience! Timely product registration will allow for enhanced
communication and prompt service under the terms of your warranty, should the need arise. You may also mail in
WKHSUHSULQWHGUHJLVWUDWLRQFDUGLQFOXGHGLQWKHSDFNLQJPDWHULDO,QWKH86GEAppliances.com/register
Schedule Service
Expert GE Appliances repair service is only one step away from your door. Get on-line and schedule your service at
\RXUFRQYHQLHQFHDQ\GD\RIWKH\HDU,QWKH86GEAppliances.com/service
or call 800.432.2737 during normal business hours.
Extended Warranties
Purchase a GE Appliances extended warranty and learn about special discounts that are available while your
warranty is still in effect. You can purchase it on-line anytime. GE Appliances Services will still be there after your
ZDUUDQW\H[SLUHV,QWKH86GEAppliances.com/extended-warranty
or call 800.626.2224 during normal business hours.
Remote Connectivity
For assistance with wireless network connectivity (for models with remote enable),
visit our website at GEAppliances.com/connected-home-smart-appliances/RUFDOOLQWKH86
Parts and Accessories
,QGLYLGXDOVTXDOLILHGWRVHUYLFHWKHLURZQDSSOLDQFHVFDQKDYHSDUWVRUDFFHVVRULHVVHQWGLUHFWO\WRWKHLUKRPHV
9,6$0DVWHU&DUGDQG'LVFRYHUFDUGVDUHDFFHSWHG2UGHURQOLQHWRGD\KRXUVHYHU\GD\
,QWKH86GEApplianceparts.com or by phone at 877.959.8688 during normal business hours.
Instructions contained in this manual cover procedures to be performed by any user. Other servicing
generally should be referred to qualified service personnel. Caution must be exercised, since improper
servicing may cause unsafe operation.
Contact Us
,I\RXDUHQRWVDWLVILHGZLWKWKHVHUYLFH\RXUHFHLYHIURP*($SSOLDQFHVFRQWDFWXVRQRXU:HEVLWHZLWKDOOWKH
details including your phone number, or write to:
,QWKH86*HQHUDO0DQDJHU&XVWRPHU5HODWLRQV_*($SSOLDQFHV$SSOLDQFH3DUN_/RXLVYLOOH.<
GEAppliances.com/contact

MANUAL DEL
PROPIETARIO
Escriba los números de modelo y de
serie aquí:
Nº de Modelo ____________
Nº de Serie ______________
Los podrá encontrar en una etiqueta en
el borde lateral o en el frente del horno
(inferior) detrás de la puerta del horno.
HORNO DE PARED
Eléctrico con Convección Directa de Aire Incorporada
49-80812-1 12-17 GEA
GE es una marca registrada de General Electric Company. Fabricado bajo licencia de marca.
Horno de Pared Simple de 30”
PT9051
Horno de Pared Doble de 30”
PT9551
INFORMACIÓN DE SEGURIDAD ... 3
USO DEL HORNO
Controles del Horno ........................ 6
Horno Doble .............................. 7
Settings (Configuraciones) .................. 7
Modo Sabático ............................ 9
Estantes del Horno .........................10
Papel de Aluminio y Cobertores del Horno ....11
Utensilios .................................11
Modos de Cocción .........................12
Probe (Sonda) .............................14
Guía de Cocción ...........................15
CUIDADO Y LIMPIEZA
Cuidado y limpieza - Exterior ................16
Cuidado y limpieza - Interior ................17
Estantes del Horno .........................18
Probe (Sonda) .............................18
Luz del Horno .............................19
Puerta del Horno ..........................19
CONSEJOS PARA LA
SOLUCIÓN DE PROBLEMAS ...20
GARANTÍA .......................... 22
ACCESORIOS ...................... 23
SOPORTE PARA
EL CONSUMIDOR ................. 24

2 49-80812-1
GRACIAS POR HACER QUE GE APPLIANCES SEA PARTE DE SU HOGAR.
Ya sea que haya crecido usando GE Appliances, o que ésta es su primera vez, nos complace
tenerlo en la familia.
Sentimos orgullo por el nivel de arte, innovación y diseño de cada uno de los electrodomésticos de
GE Appliances, y creemos que usted también. Entre otras cosas, el registro de su electrodoméstico
asegura que podamos entregarle información importante del producto y detalles de la garantía
cuando los necesite.
Registre su electrodoméstico GE ahora a través de Internet. Sitios Web y números telefónicos útiles
están disponibles en la sección de Soporte para el Consumidor de este Manual del Propietario.
También puede enviar una carta en la tarjeta de inscripción preimpresa que se incluye con
el material embalado.

49-80812-1 3
LEA Y GUARDE ESTAS INSTRUCCIONES
INFORMACIÓN IMPORTANTE DE SEGURIDAD
LEA TODAS LAS INSTRUCCIONES ANTES DE USAR
INFORMACIÓN DE SEGURIDAD
ADVERTENCIA
INSTRUCCIONES GENERALES DE SEGURIDAD
Ŷ 88VHHVWHHOHFWURGRPpVWLFRVyORSDUDVXSURSyVLWR
original, como se describe en el Manual del Propietario.
Ŷ6ROLFLWHTXHXQLQVWDODGRUFDOLILFDGRLQVWDOHVX
electrodoméstico y que esté adecuadamente conectado
a tierra, de acuerdo con las instrucciones de instalación
provistas.
Ŷ1RLQWHQWHUHSDUDURUHHPSOD]DUQLQJXQDSDUWHGHOKRUQR
a menos que se recomiende específicamente en este
manual. Cualquier otra reparación deberá ser realizada
por un técnico calificado.
Ŷ$QWHVGHUHDOL]DUFXDOTXLHUVHUYLFLRWpFQLFRGHVFRQHFWHHO
suministro de corriente desde el panel de distribución del
hogar, retirando el fusible o desconectando el disyuntor.
Ŷ1RGHMHDORVQLxRVVRORV±QRVHGHEHUiGHMDUDORVQLxRV
solos o fuera de su radio de atención en el área donde
HOHOHFWURGRPpVWLFRVHHQFXHQWUHHQXVR1XQFDVHOHV
deberá permitir trepar, sentarse o pararse sobre ninguna
parte del electrodoméstico.
Ŷ
PRECAUCIÓN
1RFRORTXHDUWtFXORVGHLQWHUpV
para los niños sobre los gabinetes que están sobre un
KRUQR±VLORVQLxRVVHWUHSDQVREUHHOKRUQRSDUDOOHJDUD
estos artículos podrían sufrir lesiones graves.
Ŷ8VHVyORPDQJRVGHROODVVHFDV±ORVPDQJRVK~PHGRV
sobre superficies calientes pueden producir quemaduras
GHELGRDOYDSRU1RGHMHTXHORVPDQJRVGHODVROODV
WRTXHQORVHOHPHQWRVTXHHVWiQFDOLHQWHV1RXVHXQD
toalla u otra tela voluminosa para reemplazar el mango de
las cacerolas.
Ŷ1XQFDXVHHOHOHFWURGRPpVWLFRSDUDFDOHQWDUR
calefaccionar la habitación.
Ŷ1RWRTXHHOHOHPHQWRFDOHQWDGRUQLODVXSHUILFLHLQWHULRUGHO
horno. Es posible que estas superficies estén demasiado
calientes como para quemar, aunque su color sea oscuro.
Durante y después del uso, no toque ni permita que telas
u otros materiales inflamables toquen cualquier área
interior del horno; espere a que haya pasado un tiempo
suficiente para que se enfríen. Otras superficies del
electrodoméstico se podrán calentar lo suficiente como
para ocasionar lesiones. Las superficies potencialmente
calientes incluyen la abertura de la ventilación del horno,
superficies cercanas a la abertura y grietas alrededor de la
puerta del horno.
Ŷ1RFDOLHQWHHQYDVHVGHFRPLGDTXHQRKD\DQVLGR
abiertos. Se podría acumular presión y el envase podría
explotar, ocasionando una lesión.
Ŷ1RXVHQLQJ~QWLSRGHDOXPLQLRRFREHUWRUSDUDFXEULUHO
fondo del horno o cualquier parte del horno, excepto como
se describe en este manual. Los cobertores de horno pueden
atrapar el calor o derretirse, ocasionando daños sobre el
producto y el riesgo de descargas, humo o incendios.
Ŷ(YLWHODVUDOODGXUDVRLPSDFWRVVREUHODVSXHUWDVGHYLGULRR
los paneles de control. Hacer esto podrá producir la rotura
GHYLGULRV1RFRFLQHXQSURGXFWRFRQXQYLGULRURWR(V
posible que se produzcan descargas, incendios o cortes.
Ŷ&RFLQHFDUQHV\FDUQHVGHDYHHQIRUPDFRPSOHWD±OD
carne por lo menos a una temperatura interna de 160º F
y la carne de ave por lo menos a una temperatura interna
GH)1RUPDOPHQWHODFRFFLyQDHVWDVWHPSHUDWXUDV
es una protección contra las enfermedades transmitidas
por la comida.
ADVERTENCIA
/HDWRGDVODVLQVWUXFFLRQHVGHVHJXULGDGDQWHVGHXWLOL]DUHVWHSURGXFWR1RVHJXLUHVWDVLQVWUXFFLRQHV
puede generar un incendio, una descarga eléctrica, lesiones corporales o la muerte.
ADVERTENCIA
MANTENGA LOS MATERIALES INFLAMABLES ALEJADOS DE LA COCINA
Si esto no se cumple, se podrán sufrir lesiones personales graves o incendios.
Ŷ 1RJXDUGHQLXVHPDWHULDOHVLQIODPDEOHVHQRFHUFDGH
un horno, incluyendo papel, plástico, mangos de ollas,
trapos, cobertores de pared, cortinas, paños y gasolina u
otros vapores y líquidos inflamables.
Ŷ 1XQFDXVHSUHQGDVKROJDGDVRTXHFXHOJXHQPLHQWUDV
usa el electrodoméstico. Estas prendas se podrán
incendiar si entran en contacto con superficies calientes,
ocasionando quemaduras graves.
Ŷ 1RSHUPLWDTXHODJUDVDGHODFRFFLyQXRWURVPDWHULDOHV
inflamables se acumulen en o cerca del horno. La grasa
que está en o cerca del horno se podrá incendiar.

4 49-80812-1
LEA Y GUARDE ESTAS INSTRUCCIONES
INFORMACIÓN IMPORTANTE DE SEGURIDAD
LEA TODAS LAS INSTRUCCIONES ANTES DE USAR
ADVERTENCIA
EN CASO DE INCENDIO, SIGA LOS SIGUIENTES PASOS PARA
EVITAR LESIONES O LA PROPAGACIÓN DEL FUEGO
Ŷ 1RXVHDJXDVREUHHOIXHJRGHODJUDVD1XQFDWRPHXQD
olla que se esté incendiando.
Ŷ 6LKD\XQLQFHQGLRHQHOKRUQRGXUDQWHHOKRUQHDGR
ahogue el fuego cerrando la puerta del horno y apagando
el mismo o usando un químico seco multipropósito o un
extintor de incendio con espuma.
Ŷ (QFDVRGHTXHKD\DIXHJRHQHOKRUQRGXUDQWHHOFLFOR
de limpieza automática, apague el horno y espere a que
HOIXHJRVHH[WLQJD1RIXHUFHODSXHUWDSDUDDEULUOD
La entrada de aire fresco sobre las temperaturas de la
limpieza automática podrá conducir a la producción de
llamas en el horno.
ADVERTENCIA
INSTRUCCIONES DE SEGURIDAD DEL HORNO
Ŷ 0DQWpQJDVHDOHMDGRGHOKRUQRDODEULUODSXHUWDGHO
mismo. El aire caliente o el vapor que sale puede causar
quemaduras en las manos, rostro y/u ojos.
Ŷ 0DQWHQJDGHVREVWUXLGDODYHQWLODFLyQGHOKRUQR
Ŷ 0DQWHQJDHOKRUQROLEUHGHDFXPXODFLyQGHJUDVD/D
grasa del horno se puede incendiar.
Ŷ &RORTXHORVHVWDQWHVGHOKRUQRHQODXELFDFLyQGHVHDGD
mientras éste se encuentra frío. Si es necesario mover
el estante mientras el horno está caliente, evite que
el mango de la olla tenga contacto con el elemento
calentador en el horno.
Ŷ $OXVDUODVEROVDVSDUDFRFLQDURGRUDUHQHOKRUQRVLJD
las instrucciones del fabricante.
Ŷ (VFRQYHQLHQWHHPSXMDUKDFLDDIXHUDORVHVWDQWHV
estándares hasta el tope o empujar el estante extensible
hasta la posición completamente abierta para levantar
comidas pesadas. Esto también es una precaución contra
quemaduras por tocar superficies calientes de la puerta o
las paredes del horno.
Ŷ 1RGHMHSURGXFWRVWDOHVFRPRSDSHOXWHQVLOLRVGHFRFLQD
ni comida en el horno cuando éste no se encuentre en
uso. Los artículos guardados en el horno se pueden
incendiar.
Ŷ 1XQFDFRORTXHORVXWHQVLOLRVGHFRFLQDSLHGUDVSDUD
pizza u horneado o cualquier otro tipo de aluminio o
cobertor en la base del horno. Estos ítems pueden
atrapar el calor o derretirse, ocasionando daños sobre el
producto y el riesgo de descargas, humo o incendios.
ADVERTENCIA
INSTRUCCIONES DE SEGURIDAD DEL HORNO
CON LIMPIEZA AUTOMÁTICA
La función de limpieza automática usa el horno en temperaturas lo suficientemente altas como para consumir la suciedad de
comida que haya dentro del horno. Para un funcionamiento seguro, siga estas instrucciones.
Ŷ 1RWRTXHODVVXSHUILFLHVGHOKRUQRGXUDQWHHOFLFORGH
limpieza automática. Mantenga a los niños alejados del
horno durante la limpieza automática. Si no se siguen
estas instrucciones, se podrán producir quemaduras.
Ŷ $QWHVGHXVDUHOFLFORGHOLPSLH]DDXWRPiWLFDGHOKRUQR
retire los estantes de color gris brillante (en algunos
modelos), la sonda, cualquier papel de aluminio, y
cualquier bandeja para asar, rejilla, u otros utensilios.
Sólo se pueden dejar dentro del horno los estantes para
horno cubiertos de porcelana.
INFORMACIÓN DE SEGURIDAD

49-80812-1 5
INFORMACIÓN DE SEGURIDAD
El equipo de acceso remoto instalado en este horno fue
probado y cumple con los límites establecidos para un
GLVSRVLWLYRGLJLWDOGHFODVH%VHJ~QODSDUWHGHOD1RUPDWLYD
de la FCC. Estos límites fueron diseñados para:
(a) brindar una protección razonable contra interferencias
nocivas en una instalación residencial. Este equipo genera,
usa y puede emitir energía de radiofrecuencia y, si no se
instala y utiliza de acuerdo con las instrucciones, puede
ocasionar interferencias perjudiciales en las comunicaciones
de radio. Sin embargo, no se garantiza que no se presenten
interferencias en una instalación en particular. Si el equipo
provoca interferencias perjudiciales para la recepción de radio
o televisión, lo cual puede comprobar encendiendo y apagando
el equipo, se aconseja al usuario que intente corregir la
interferencia con una de las siguientes medidas:
Ŷ5HRULHQWHRUHXELTXHODDQWHQDUHFHSWRUD
Ŷ$XPHQWHODVHSDUDFLyQHQWUHHOHTXLSR\HOUHFHSWRU
Ŷ&RQHFWHHOHTXLSRDXQWRPDFRUULHQWHGHXQFLUFXLWRGLIHUHQWH
del tomacorriente al que se encuentra conectado el
receptor.
Ŷ3DUDVROLFLWDUD\XGDFRQVXOWHFRQHOSURYHHGRUPLQRULVWDRD
un técnico experimentado de radio/ TV.
(b) tolerar cualquier interferencia recibida, incluyendo las
interferencias que puedan provocar un funcionamiento no
deseado del dispositivo.
Observe que todos los cambios o modificaciones sobre el
dispositivo de comunicación inalámbrico instalado en este
horno que no estén expresamente aprobados por el fabricante
podrían anular la autoridad del usuario para operar el
equipamiento.
LEA Y GUARDE ESTAS INSTRUCCIONES
ADVERTENCIA
INSTRUCCIONES DE SEGURIDAD DEL HORNO
CON LIMPIEZA AUTOMÁTICA (Cont.)
Ŷ $QWHVGHXWLOL]DUHOFLFORGHOLPSLH]DDXWRPiWLFDOLPSLH
ODJUDVD\UHVWRVGHFRPLGDTXHKD\DHQHOKRUQR8QD
cantidad excesiva de grasa se puede incendiar, lo cual
puede producir daños con humo en su hogar.
Ŷ 6LHOPRGRGHOLPSLH]DDXWRPiWLFDIXQFLRQDGHIRUPD
incorrecta, apague el horno y desconecte el suministro de
corriente. Solicite el servicio de un técnico calificado.
Ŷ 1ROLPSLHODMXQWDGHODSXHUWD/DMXQWDGHODSXHUWDHV
esencial para un buen sellado. Se debe tener cuidado de
no frotar, dañar ni mover la junta.
Ŷ 1RXVHOLPSLDGRUHVSDUDKRUQR1RVHGHEHUiXVDU
limpiadores comerciales para horno ni revestimientos de
protección para hornos de ningún tipo en o alrededor de
cualquier parte del horno.
INFORMACIÓN IMPORTANTE DE SEGURIDAD
LEA TODAS LAS INSTRUCCIONES ANTES DE USAR
Cómo Retirar la Película Protectora de Envío y la Cinta de Embalaje
Con cuidado tome un extremo de la película protectora de envío
con los dedos y lentamente retire la misma de la superficie del
electrodoméstico.
1RXWLOLFHQLQJ~QSURGXFWRILORVRSDUDUHWLUDUODSHOtFXOD5HWLUHWRGD
la película antes de usar el electrodoméstico por primera vez.
Para asegurar que no haya daños sobre el acabado del
producto, la forma más segura de retirar el adhesivo de la cinta
de embalaje en electrodomésticos nuevos es aplicando un
detergente líquido hogareño para lavar platos. Aplique con una
tela suave y deje que se seque.
NOTA: El adhesivo deberá ser eliminado de todas las partes.
1RVHSXHGHUHWLUDUVLVHKRUQHDFRQpVWHGHQWUR
ADVERTENCIA DE LA PROPOSICIÓN 65 DEL ESTADO DE CALIFORNIA
ADVERTENCIA
Este producto contiene uno o más químicos que el Estado de California entiende que producen
cáncer, y defectos en el nacimiento u otros daños reproductivos.
Los hornos con limpieza automática pueden ocasionar exposiciones de bajo nivel a algunas de las sustancias de la
Proposición 65, incluyendo monóxido de carbono, durante el ciclo de limpieza. La exposición a sustancias puede ser
minimizada abriendo una ventana o usando un extractor o campana.

6 49-80812-1
USO DEL HORNO: Controles del Horno
Controles del Horno
Upper Oven and Lower Oven
(Horno Superior y Horno Inferior)
Al usar un horno doble, usted puede configurar modos
separados en cada horno. El horno seleccionado aparecerá
en los modos de cocción. NOTA: Si usará un horno simple, no
habrá selección de hornos.
Bake (Hornear)
Esta opción le permite al usuario acceder al modo de horneado
tradicional.
Broil (Asar)
La función Broil (Asar) puede ser seleccionada para acceder
a Broil Low (Asado Bajo) y Broil High (Asado Alto). Para más
información, consulte la sección de Modos de Cocción.
Convect (Convección)
Esta opción le permite utilizar el sistema de convección para
cocinar en una variedad de modos. Para más información,
consulte la sección de Modos de Cocción.
More (Más)
Seleccione esta opción para acceder a las opciones de
Proof (Leudar), Probe (Sonda), Warm (Calentar), Self Clean
(Limpieza Automática), y Steam Clean (Limpieza con Vapor).
Precision Cooking (Cocción de Precisión)
Precision Cooking (Cocción de Precisión) consta de una serie
de ciclos de cocción que fueron diseñados para comidas
específicas. La pantalla lo guiará a través de la configuración
del horno y de la comida de forma apropiada para el ciclo
seleccionado. Los ciclos de cocción de precisión varían de
acuerdo al tipo de comida; para acceder a información más
detallada, consulte la sección de Modos de Cocción.
Recipes (Recetas)
Esta opción le permite acceder a recetas configuradas
previamente para ciertas comidas. Las recetas nuevas
pueden ser ingresadas y seguidas a través de la Aplicación GE
Appliances Kitchen, una vez que su teléfono esté conectado.
Para acceder a instrucciones sobre cómo conectar su teléfono,
consulte la sección Wi-Fi Connect (Conexión Wi-Fi).
Oven Light (Luz del Horno)
Para encender o apagar las luces de la cavidad del horno
presione
. Ambas cavidades del horno serán iluminadas si
usará un horno doble.
Settings (Configuraciones)
Presione para acceder a la función Settings
(Configuraciones). Para más información, consulte la sección
de Configuraciones.
Favorite (Favoritos)
Esta opción le permite al usuario guardar sus ciclos favoritos
para un fácil acceso en el futuro. Luego de seleccionar
un modo de cocción y de configurar una temperatura y un
temporizador, presione
para guardar dicha configuración
como favorita para uso futuro. Luego de guardar un ciclo,
presione
en el menú principal para acceder rápidamente al
modo guardado.
Kitchen Timer (Temporizador de la Cocina)
Esta función trabaja como un temporizador con cuenta
regresiva. Presione
, seleccione la cantidad de tiempo
que desea que el temporizador funcione, y presione Start
(Iniciar). El horno continuará funcionando cuando la cuenta
regresiva del temporizador se haya completado. Para apagar
el temporizador, seleccione y presione Clear (Borrar).
Cook Time (Tiempo de Cocción)
Esta función realiza una cuenta regresiva del tiempo de
cocción y apaga el horno cuando el tiempo de cocción está
completo. Presione
durante un ciclo, seleccione la cantidad
de tiempo de cocción, y presione Start (Iniciar).
Delay Time (Tiempo de Retraso)
Esta función retrasa el tiempo de inicio de un ciclo del horno.
8VHHVWDIXQFLyQSDUDFRQILJXUDUHOWLHPSRHQTXHGHVHDTXH
el horno se inicie. Seleccione un ciclo, y luego presione
. Seleccione la hora del día en que desea que el horno se
encienda y presione Start (Iniciar). Si lo desea, también puede
ser programado un tiempo de cocción.
Wi-Fi & Remote Enable
(Wi-Fi y Acceso Remoto)
Presione
GET CONNECTED
(Conéctese) para conectar el
horno al Wi-Fi. Esta opción le permite descargar contenido
a su horno y controlar el mismo de forma remota. El horno
deberá ser conectado al Wi-Fi antes de que Remote Enable
(Acceso Remoto) sea activado. Para acceder a instrucciones
sobre cómo conectar su horno, consulte la sección de
Conexión a Wi-Fi/ Acceso Remoto, bajo Configuraciones en
este manual.
Menú Principal del Horno de Pared Simple
Bake Broil Convect
Precision
Cooking
More Recipes
12:30 PM
GET CONNECTED
Menús principales del Horno de Pared Doble
Bake Broil Convect
Precision
Cooking
More Recipes
UPPER OVEN
12:30 PM
Precision
Cooking
Bake Broil Convect More Recipes
LOWER OVEN
12:30 PM
12:30 PM
UPPER OVEN
LOWER OVEN
GET CONNECTED

49-80812-1 7
USO DEL HORNO: Horno Doble / Settings (Configuraciones)
Horno Doble
Al usar ambas cavidades para cocinar, el control le permitirá oscilar entre el horno superior e inferior, a fin de revisar la sección
del ciclo de cada uno. Al revisar la pantalla del modo de cocción, usted puede acceder a la cavidad alterna presionando el titular
de la pantalla.
* Se requiere el uso de dispositivos y de una red Wi-Fi hogareña que sean compatibles con Apple o Android.
Settings (Configuraciones)
Existen numerosas configuraciones que son accedidas presionando la esquina superior derecha de la pantalla principal.
Wi-Fi & Remote Enable (Wi-Fi y Acceso Remoto)
Este electrodoméstico puede ser configurado para un
IXQFLRQDPLHQWRUHPRWRHQFXDOTXLHUPRPHQWR1RJXDUGH
materiales inflamables o ítems sensibles a cambios de
temperatura dentro ni sobre este electrodoméstico. Al usar
la función Wi-Fi Connect (Conexión Wi-Fi), usted podrá
controlar funciones esenciales de su horno tales como las
configuraciones de temperatura, temporizadores y modos de
cocción, utilizando su teléfono inteligente o tableta*.
Seleccione las y luego Wi-Fi & Remote Enable±VLJDODV
instrucciones de la pantalla de su horno y de la aplicación de
su teléfono. Es necesario activar la función Wi-Fi antes de usar
Remote Enable (Acceso Remoto) en su horno.
Conecte su horno con Conexión Habilitada de Wi-Fi
1. Tenga preparado su teléfono inteligente o tableta con
la posibilidad de acceso a Internet y a la descarga de
aplicaciones.
8VWHGGHEHUiFRQRFHUODFRQWUDVHxDGHOHQUXWDGRU:L)LGH
su hogar. Tenga esta contraseña a mano al configurar el
horno de GE Appliances.
3. En su teléfono inteligente o tableta, visite www.
GEAppliances.com/connect para conocer más sobre las
funciones del electrodoméstico conectado y para descargar
la aplicación para conectarse a su horno.
4. Siga las instrucciones en pantalla de la aplicación para
FRQHFWDUVXKRUQRGH*($SSOLDQFHV8QDYH]FRQHFWDGR
su horno debe mostrar que se encuentra conectado a la
red de Wi-Fi de su hogar.
5. Si se producen inconvenientes para conectarse de
forma inalámbrica a su horno, por favor comuníquese
al 800.220.6899 y solicite asistencia en relación a la
conectividad inalámbrica de su horno.
Para conectar dispositivos inteligentes adicionales, repita los
pasos 3 y 4.
Inicio Del Horno en Forma Remota
Para poder iniciar el horno de forma remota una vez conectado
a Wi-Fi, presione Remote Enable (Acceso Remoto) en el
menú principal o acceda a Wi-Fi & Remote Enable (Wi-Fi y
Acceso Remoto) desde el menú de configuraciones y active
Remote Enable (Acceso Remoto). El horno puede ser iniciado
ahora de forma remota con un dispositivo conectado. El ícono
deberá estar activo para iniciar el horno de forma remota. Para
desconectar su teléfono de Remote Enable (Acceso Remoto),
acceda a las configuraciones de Wi-Fi & Remote Enable (Wi-Fi y
Acceso Remoto) y desactive Remote Enable (Acceso Remoto).
Luego de usar el horno, recuerde verificar que el ícono esté
iluminado, si desea iniciar el horno de forma remota en el futuro.
NOTA: Las comidas que se echan a perder rápidamente,
tales como leche, huevos, pescado, rellenos, ave y cerdo, no
se deberán dejar reposar por más de 1 hora antes y después
de la cocción. La temperatura ambiente estimula el desarrollo
de bacterias nocivas. Asegúrese de que la luz del horno esté
apagada, ya que el calor de la lámpara acelerará el crecimiento
de bacterias nocivas.
SETTINGS
LOCK CONTROL
SABBATH
SOUND
SET CLOCK
Wi-Fi & REMOTE ENABLE
12:30 PM
COOKING
SYSTEM
SETTINGS
SABBATH
SOUND
DISPLAY
12:30 PM
Realice el deslizamiento hacia arriba y hacia abajo para acceder a todas las configuraciones
TO LOWER OVEN
BAKE 400°F
12:30 PM
350
°F
PREHEATED
BAKE
CANCEL
BAKE 350°F
TO UPPER OVEN
12:30 PM
BAKE
400
PREHEATED
°F
CANCEL
Ciclo de Horneado del Horno Superior Ciclo de Horneado del Horno Inferior

8 49-80812-1
USO DEL HORNO: Settings (Configuraciones)
Settings (Configuraciones) (Cont.)
Existen numerosas configuraciones que son accedidas presionando en la esquina superior derecha de la pantalla principal.
Set Clock (Configuración del Reloj)
Esta función le permite configurar el reloj y especifica cómo
la hora del día será exhibida. Las opciones para mostrar la
hora son el horario de un reloj estándar de 12 horas con
selecciones AM y PM o de estilo militar de 24 horas.
Lock Control (Control de Bloqueo)
Seleccione esta opción a fin de bloquear el LCD desde
cualquier selección de pantalla no deseada. Para desbloquear
la pantalla, presione
y presione Unlock (Desbloquear) en
la siguiente pantalla.
Sabbath (Modo Sabático)
El modo sabático desactiva las luces del horno (la luz del
horno no se encenderá cuando la puerta sea abierta), todos
los sonidos (el control no emitirá un pitido cuando se presione
la pantalla), los modos de Convection (Convección), los modos
de Broil (Asar), Warm (Calentar), Proof (Leudar), y todas las
funciones de tiempo. El modo sabático sólo puede ser usado
con la función tradicional de Bake (Hornear). Esta función
se activa conforme con los requisitos Sabáticos Judíos de la
Estrella K. Para más información, por favor consulte la sección
Sabbath Mode (Modo Sabático).
Sound (Sonido)
Esta pantalla de configuración le permite cambiar el volumen,
el tono de fin de ciclo, y encender o apagar el sonido táctil.
Display (Pantalla)
Esta pantalla muestra las opciones de brillo, reloj apagado,
ahorro de energía, y tiempo de inactividad de la pantalla.
La función de reloj apagado eliminará el reloj de la pantalla
cuando la misma se encuentre inactiva, pero será mostrado
luego de presionar sobre la pantalla. La pantalla puede ser
configurada para que nunca quede inactiva o puede ser
configurada para que se apague luego de 1, 5 o 10 minutos.
Cooking (Cocción)
Ŷ El horno está configurado en grados Fahrenheit; sin
embargo, en esta configuración la unidad de cocción puede
ser cambiada a Celsius.
Ŷ La función Auto Recipe Conversion (Conversión de
Receta Automática) puede ser activada a fin de reducir
automáticamente la temperatura de cocción programada para
Convection Bake (Hornear por Convección) o Convection
Bake Multi (Hornear por Convección Múltiple). Observe que
esto no reducirá la temperatura de cocción, ni el tiempo de
horneado. Cuando la opción de 12 Hour Shut Off (Apagado
Luego de 12 Horas) sea activada, la misma se apagará de
forma automática luego de 12 horas de uso continuo.
Ŷ La función Adjust Temperature (Temperatura Ajustada)
permite que la temperatura del horno sea ajustada hasta
)PiVFDOLHQWHR)PiVIUtD8VHHVWDIXQFLyQVL
considera que la temperatura de su horno está demasiado
caliente o fría y desea modificarla. Para los modelos con
horno doble, las temperaturas de los hornos superior e
inferior se ajustan de forma separada.
System (Sistema)
Esta pantalla le permite borrar sus datos de usuario guardados
y mostrar la versión actual de su software.
SETTINGS
LOCK CONTROL
SABBATH
SOUND
SET CLOCK
Wi-Fi & REMOTE ENABLE
12:30 PM
COOKING
SYSTEM
SETTINGS
SABBATH
SOUND
DISPLAY
12:30 PM
Realice el deslizamiento hacia arriba y hacia abajo para acceder a todas las configuraciones

49-80812-1 9
USO DEL HORNO: Modo Sabático
Modo Sabático
El modo sabático desactiva las luces del horno (la luz del horno no se encenderá cuando la puerta sea abierta), todos los sonidos
(el control no emitirá un pitido cuando se presione la pantalla), los modos los modos de Convection (Convección), los modos de Broil
(Asar), Warm (Calentar), Proof (Leudar), y todas las funciones de tiempo. El modo sabático sólo puede ser usado con la función
tradicional de Bake (Hornear). Esta función se activa conforme con los requisitos Sabáticos Judíos de la Estrella K.
NOTA: Si se produce un corte de corriente durante el momento en que el horno se encuentra en Sabbath Mode (Modo Sabático),
la unidad regresará a dicho modo cuando la energía sea restablecida.
Ingreso al Modo Sabático
Presione en la pantalla principal para acceder al menú
Settings (Configuraciones) y haga el desplazamiento hacia
abajo hasta Sabbath (Sabático).
Inicie un Horneado Sabático
8VHODWHFODGHODSDQWDOODSDUDLQJUHVDUODWHPSHUDWXUDTXH
GHVHDXVDUSDUD6DEEDWK%DNH+RUQHDGR6DEiWLFR8QD
vez configurada la temperatura, presione
para configurar
el tiempo de cocción del ciclo en horas y minutos. Si usará
un horno doble, entonces puede seleccionar la temperatura
y el tiempo deseados para la otra cavidad seleccionando
los mismos sobre la izquierda de la pantalla de temperatura.
Si no se configura un temporizador, el horno comenzará
un ciclo de horneado durante el modo Sabbath (Sabático)
\FRQWLQXDUiKDVWDTXHGLFKRPRGRVHDDSDJDGR8VWHG
puede también seleccionar si la luz del horno se encenderá
o apagará presionando
VREUHODSDQWDOOD8QDYH]TXH
haya programado la temperatura y el tiempo, presione Start
(Iniciar). La siguiente pantalla exhibirá las configuraciones que
programó para Sabbath Bake (Horneado Sabático).
Ajuste de Temperatura Durante un
Horneado Sabático
Si es necesario ajustar la temperatura luego de programar
el horno para Sabbath Bake (Horneado Sabático), presione
uno de los íconos de temperatura exhibidos en la pantalla del
ciclo Sabbath (Sabático) y presione Enter (Ingresar). Esto le
permitirá ajustar la temperatura para el ciclo. Observe que la
pantalla no mostrará que la temperatura del horno cambió.
Salida del Modo Sabático
Para salir del modo Sabbath (Sabático), presione la X en
la esquina superior derecha si se encuentra en la pantalla
de programación, o presione Exit Sabbath (Salir del Modo
Sabático) si se encuentra en la pantalla del ciclo. Existe
también la opción de apagar el ciclo cuando se encuentre en
la pantalla del ciclo presionando Turn Off (Apagar), pero el
horno aún permanecerá en el modo Sabbath (Sabático) hasta
que salga del modo. NOTA: Si se produce un corte de energía
mientras el horno se encuentra en Sabbath Mode (Modo
Sabático), la unidad regresará a dicho modo cuando la energía
sea restablecida; sin embargo, el horno regresará al estado de
apagado incluso aunque se encuentre en el medio del ciclo de
horneado cuando el corte de energía se haya producido.
SABBATH
ENTER TURN OFFOven On
EXIT SABBATH
12:30 PM
Select temperature, then press ENTER to edit.
200°F 250°F 300°F 350°F 400°F
SABBATH
EXIT SABBATH
Select temperature, then press ENTER to edit.
5:30ENTER TURN OFFUpper Oven On
250°F200°F 300°F 350°F 400°F
5:30ENTER TURN OFFLower Oven On
250°F200°F 300°F 350°F 400°F
12:30 PM
Programación de pantallas
Pantallas del Ciclo Sabático
en Hornos Simples y Dobles
12:30 PM
SABBATH
BAKE TEMP
UPPER OVEN
LOWER OVEN
123
456
789
0
i
---
°F
START
12:30 PM
SABBATH
BAKE TEMP
123
456
789
0
i
---
°F
START

10 49-80812-1
USO DEL HORNO: Estantes del Horno
El horno cuenta con seis posiciones de estantes. En la Guía
de Cocción, se brindan recomendaciones de posiciones de
los estantes para diferentes tipos de comidas. Se ajusta
un estante en una dirección para afectar los resultados de
cocción. Por ejemplo, si se prefieren partes superiores más
oscuras en tartas, panecillos o galletas, pruebe moviendo
la comida a un estante que se encuentre una posición más
arriba. Si encuentra que las comidas están demasiado doradas
en la parte superior, pruebe moviendo las mismas más abajo
la próxima vez.
Al hornear con múltiples ollas y en múltiples estantes,
asegúrese de que haya por lo menos 11/2” entre las ollas, a fin
de dejar suficiente espacio para que fluya el aire.
Estantes del Horno
Es posible que su horno cuente con estantes extensibles y/o
estantes planos tradicionales.
Para evitar posibles quemaduras, coloque los estantes en la
posición deseada antes de encender el horno.
Estantes Extensibles
Los estantes extensibles cuentan con la función Install
(Instalar), que se bloquea en los soportes de los estantes
JXtDVDDPERVODGRV8QDYH]TXHODIXQFLyQ,QVWDOO
(Instalación) queda correctamente bloqueada, siempre empuje
hacia afuera el estante desde el riel frontal superior hasta la
posición de detención en su máxima extensión, al colocar o
retirar utensilios.
Si resulta difícil extender estos estantes, lubrique los mismos
con lubricante de grafito, provisto con el horno. Retire el
estante del horno, retire cualquier obstrucción en el recorrido
deslizable con una toalla de papel, agite el lubricante de grafito
y coloque 4 gotitas en los dos recorridos inferiores de los lados
izquierdo y derecho. Abra y cierre el estante varias veces para
distribuir el lubricante.
Para ordenar más lubricante de grafito, lea la sección de
Asistencia y Accesorios en el comienzo de este manual.
Para Retirar un Estante Extensible:
1. Asegúrese de que el estante sea empujado totalmente
dentro del horno.
2. Tome el estante tanto desde su riel frontal superior como
de sus manijas inferiores y levante directamente para
desbloquear el estante de los soportes del estante.
3. De manera firme, mientras sostiene tanto el riel frontal
superior como las manijas inferiores, empuje el estante hacia
adelante. En caso de ser necesario, tome el estante sobre
ambos lados. Luego retire el mismo del horno.
Para Reemplazar un Estante Extensible:
1. Coloque la posición trasera del estante sobre los soportes
del estante (guías), como se muestra en la imagen.
2. Sostenga el riel frontal superior y las manijas inferiores y
empuje el estante hasta que la función de instalación se
bloquee en el soporte del estante frontal.
Si resulta difícil reemplazar o retirar los estantes extensibles,
limpie los soportes de los estantes del horno con aceite
GHFRFLQD1RTXLWHHODFHLWHGHFRFLQDGHOHVSDFLRGH
deslizamiento.
Estantes del Horno
El horno
tiene 6
posiciones
de estantes
Manija
Manija
Riel Frontal Superior
Función de Instalación
Bloqueo del
Estante Frontal
Sostenga el riel frontal superior
y las manijas inferiores y empuje
el estante hasta que la función
de instalación se bloquee en el
soporte frontal.
Manija
Manija
Riel Frontal Superior
Riel Frontal Superior
Levante para
desbloquear
desde el
soporte del
estante

49-80812-1 11
USO DEL HORNO:(VWDQWHVGHO+RUQR3DSHOGH$OXPLQLR\&REHUWRUHVGHO+RUQR8WHQVLOLRV
Estantes Planos Tradicionales
Los estantes poseen bloqueadores, de modo que al colocarlos
correctamente sobre los soportes se detendrán antes de
salirse completamente y no se inclinarán. Al colocar y retirar
utensilios de cocina, empuje la parrilla hasta que se detenga.
Para Retirar un Estante
Empuje el mismo hacia usted, incline el frente hacia arriba y
empuje hacia afuera.
Para Reemplazar un Estante
Incline el frente del estante hacia arriba, cuelgue la parte
trasera ubicando los enlaces debajo de los soportes de
los estantes, empuje el estante hacia atrás (hasta trabarlo
en los bloqueadores) y haga que descienda hasta su
posición. Empuje el estante hasta que quede introducido
completamente.
Si resulta difícil deslizar y/o retirar estantes planos, coloque un
poco de aceite de cocina en una tela suave o en una toalla de
papel y frote los costados del estante y cada soporte del mismo.
PRECAUCIÓN
Tenga cuidado al retirar un estante de la posición más baja, ya que la puerta podrá estar caliente.
Estantes del Horno (cont.)
Estante plano
Bloqueador
Soporte del
estante
Enlace de
ubicación
PRECAUCIÓN
No use ningún tipo de aluminio o cobertor de horno para cubrir el fondo del horno. Estos ítems
pueden atrapar el calor o derretirse, ocasionando daños sobre el producto y el riesgo de descargas, humo o incendios.
Los daños por uso inadecuado de estos ítems no están cubiertos por la garantía del producto.
Se podrá usar aluminio para evitar derrames, colocando una hoja sobre un estante inferior varias pulgadas debajo de la comida.
1RXVHPiVDOXPLQLRTXHHOQHFHVDULR\QXQFDFXEUDWRWDOPHQWHHOHVWDQWHGHXQKRUQRFRQSDSHOGHDOXPLQLR0DQWHQJDHO
aluminio a por lo menos 1 1/2” de las paredes del horno, para evitar una circulación deficiente del calor.
Papel de Aluminio y Cobertores del Horno
Utensilios
Pautas de Uso de Utensilios
El material, el acabado y el tamaño de los utensilios afectan el
horneado.
Las ollas oscuras, revestidas y opacas absorben el calor más
rápidamente que las ollas claras y brillantes. Al usar ollas
que absorben el calor más rápidamente, las comidas podrán
resultar más doradas, crocantes y con una capa más gruesa.
Si utiliza utensilios oscuros y revestidos, controle la comida
antes del tiempo mínimo de cocción. Si se obtienen resultados
no deseados con este tipo de utensilios, considere la
posibilidad de reducir la temperatura del horno en 25º F la
próxima vez.
Las ollas brillantes pueden producir resultados de horneado
más parejos en tortas y galletas.
Las ollas de vidrio y cerámica calientan con lentitud, pero
retienen bien el calor.
Estos tipos de ollas funcionan bien con platos tales como
tartas y postres con natilla.
Las ollas con aislante de aire calientan lentamente y pueden
producir fondos dorados.
Mantenga los utensilios limpios para una cocción más pareja.

12 49-80812-1
USO DEL HORNO: Modos de Cocción
Modos de Cocción
Su nuevo horno posee una variedad de modos de cocción para que pueda obtener los mejores resultados. Estos modos
se describen a continuación. Para acceder a recomendaciones para comidas específicas, consulte la sección de la Guía de
Cocción. Recuerde que es posible que su nuevo horno funcione de manera diferente que aquel que está reemplazando.
Configuración de Temperatura
Al seleccionar una temperatura, las temperaturas tradicionales
configuradas previamente son exhibidas y pueden ser
seleccionadas al deslizarse horizontalmente y seleccionando
la temperatura deseada. Si desea cocinar en una temperatura
alterna, presione la temperatura en el medio de la pantalla y
una tecla numérica aparecerá de modo que la temperatura
deseada pueda ser ingresada.
Horneado
El modo de horneado tradicional está pensado para la cocción
en un solo estante. Este modo usa el calor principalmente
desde el elemento inferior, pero también desde el elemento
superior para cocinar la comida. Para usar este modo,
presione la opción Bake (Hornear) en el menú principal
y realice el deslizamiento hasta la temperatura deseada y
presione Start (Iniciar). El precalentamiento generalmente se
recomienda al usar este modo.
Modo para Asar
Siempre ase con la puerta cerrada. El elemento para asar en
el horno es muy potente. Monitoree la comida de cerca al asar.
Tenga cuidado al asar en posiciones de estantes superiores,
ya que colocar la comida más cerca del elemento para asar
incrementa el humo, salpicaduras y la posibilidad de que se
incendien las grasas. No se recomienda asar en el estante
de la posición 6.
La función para asar puede ser usada en comidas que
típicamente serían a la parrilla. Ajuste la posición del estante
para variar la intensidad del calor que llega a la comida.
Coloque la comida más cerca del elemento para asar, cuando
se desee una superficie más soasada y un interior poco
cocido. Para un mejor rendimiento, centre la comida debajo del
elemento que emite calor para asar.
Asar
Seleccione Broil (Asar) en el menú principal, luego seleccione
High (Alto) o Low (Bajo) dependiendo de su preferencia
en relación a la cantidad de soasado y de la temperatura
interna. La configuración High (Alta) es mejor para cortes
más delgados de carne y/o comidas que prefiera que queden
menos cocidas en su interior. La configuración Low (Baja) es
preferida para cortes más gruesos de carne y comidas que
GHVHHTXHVHDQFRFLQDGDVFRPSOHWDPHQWH1RHVQHFHVDULR
calentar el horno previamente en estos modos.
Modos de Convección
Estos modos utilizan calor de los elementos tradicionales
superior e inferior, combinados con el elemento de convección
y un flujo de aire consistente para mejorar la uniformidad. Su
horno está equipado con la función Auto Recipe Conversion
(Conversión de Receta Automática), de modo que ajusta de
forma automática la cantidad de calor a fin de mantener la
temperatura adecuada usando los modos con las temperaturas
especificadas. Se recomienda el precalentamiento al usar
estos modos, excepto en Convection Broil Crisp (Asar por
Convección Crocante).
Horneado por Convección
Este modo está pensado para el horneado en un solo estante
cuando se desee un flujo de aire adicional para mejorar la
uniformidad. Seleccione Convect (Convección), luego Bake
(Hornear), realice el deslizamiento hasta la temperatura
deseada, y luego presione Start (Iniciar). El precalentamiento
generalmente se recomienda al usar este modo.
Horneado por Convección en Estantes
Múltiples
Este modo fue diseñado para permitir una cocción más pareja
al utilizar estantes múltiples. Es posible que el tiempo de
horneado sea un poco más prolongado en comparación con
lo que se espera con un solo estante. Para usar este modo,
seleccione Convect (Convección), luego Bake Multi-Rack
(Hornear en Estantes Múltiples), realice el deslizamiento
hasta la temperatura deseada, y presione Start (Iniciar).
Generalmente se recomienda realizar el calentamiento previo
al usar este modo.
Dorado por Convección
Este modo está pensado para dorar cortes enteros de carne
en un solo estante. La utilización de los tres elementos y
el flujo de aire directo desde la parte superior del horno
mejoran el nivel de dorado y reducen el tiempo de cocción.
Controle la comida ante de lo sugerido por la receta o
use una sonda al usar este modo. Para usar este modo,
seleccione Convect (Convección), luego presione Roast
(Dorar), realice el deslizamiento hasta la temperatura
deseada, y presione Start (Iniciar).

49-80812-1 13
USO DEL HORNO: Modos de Cocción
Modos de Cocción (Cont.)
Asar por Convección
Convection Broil (Asar por Convección) posee tres opciones:
Low (Bajo), High (Alto), y Crisp (Crocante). Low (Bajo) y
High (Alto) son similares a los modos de asado tradicional
con la adición del flujo de aire directo para ayudar en el
soasado y dorado. Para obtener mejores resultados con las
configuraciones Low (Bajo) y High (Alto), se recomienda
calentar previamente el horno durante 5 minutos. El modo
Convection Broil Crisp (Asar por Convección Crocante) está
pensado como un modo de acabado al final del ciclo de
cocción, a fin de agregar dorado superficial a un plato tal
como una cazuela o una barbacoa. Para usar estos modos,
seleccione Convect (Convección), luego Broil (Asar), y
luego el modo deseado.
Leudar
El modo Proof (Leudar) está diseñado para elevar (fermentar
y leudar) masas de pan. Presione la opción More (Más) en el
menú principal, luego Proof (Leudar), y luego Start (Iniciar).
Cubra bien la masa para evitar que se seque. El pan se
elevará más rápidamente que a temperatura ambiente.
NOTA:1RXVHHOPRGR3URRI/HXGDUSDUDFDOHQWDUFRPLGD
o mantener la comida caliente. La temperatura del horno al
leudar no está lo suficientemente caliente como para mantener
las comidas a temperaturas seguras.
Calentar
El modo Warm (Calentar) está diseñado para mantener
comidas calientes hasta durante 3 horas. Para usar este modo,
seleccione More (Más) en el menú principal, luego Warm
(Calentar), y luego presione Start (Iniciar)1RVHUHTXLHUH
SUHFDOHQWDUODVPLVPDV1RXVHODIXQFLyQ:DUP&DOHQWDU
para calentar comida fría, excepto galletas crujientes, papas
fritas o cereales secos. También se recomienda que la comida
no se mantenga caliente por más de dos horas.
Cocción de Precisión
Estos modos brindan orientación o algoritmos de cocción
configurados previamente para ayudar al usuario en la cocción
de diferentes tipos de comidas. La selección que usted realizó
en el menú Precision Cooking (Cocción de Precisión) lo guiará
para ingresar la información requerida como ayuda para
cocinar su comida. Al final del tiempo de cocción estimado,
controle que la comida este hecha de acuerdo a su gusto.
Observe que las diferencias en la forma de la comida, la
preparación y las preferencias de terminación pueden afectar
en el tiempo requerido para cocinar la comida.
Algunos ciclos requieren que la sonda de temperatura de
la comida sea suministrada con el horno. El objetivo de
temperatura para la sonda es configurado de forma automática
en base a las selecciones realizadas para cada comida.
Siempre controle las comidas usando un termómetro de
comidas secundario, ya que el posicionamiento de la sonda
puede impactar en la temperatura medida. Para más detalles
sobre el uso y posicionamiento correctos de la sonda, consulte
la sección de la Sonda.
En algunas páginas, aparecerá
i
. Presione
i
para acceder
a información adicional perteneciente a los ciclos de cocción
dentro de dicha categoría.
Ciclos adicionales estarán disponibles a través de
actualizaciones del software. Conecte su horno para tener
acceso a estas actualizaciones. Para acceder a instrucciones
sobre cómo conectar su horno, consulte la sección Wi-Fi
Connect (Conexión Wi-Fi).

14 49-80812-1
USO DEL HORNO: Probe (Sonda)
Probe (Sonda)
ADVERTENCIA
El consumo de comida semicruda puede hacer que se contraigan enfermedades producidas
por la comida. Use la sonda de acuerdo con las siguientes instrucciones, a fin de asegurar que todas las partes de la
comida alcancen temperaturas de cocción mínimamente seguras. Puede encontrar recomendaciones de temperaturas
de cocción mínimamente seguras en www.foodsafety.gov o en www.IsItDoneYet.gov.
La temperatura interna de la comida con frecuencia se usa como indicador de que está lista, especialmente al dorar o
preparar carne de ave. El modo Probe (Sonda) monitorea la temperatura interna de la comida y apaga el horno cuando
esta última alcanza la temperatura programada.
Controle siempre la temperatura en múltiples partes de la comida, utilizando un termómetro de comidas luego de
realizar la cocción, a fin de asegurar que todas las partes de la misma hayan alcanzado una temperatura interna
mínimamente segura en dicha comida.
Ubicación Correcta de la Sonda
Luego de preparar la comida y de colocarla en la olla, siga
estas instrucciones para una ubicación correcta de la sonda.
Ŷ ,QVHUWHODVRQGDHQODFRPLGDGHPRGRTXHODSXQWDGH
la sonda se apoye en el centro de la parte más gruesa de
la comida. Para un mejor rendimiento, la sonda debería
ser completamente insertada en la comida. Si la sonda
no es ubicada correctamente, es posible que no mida con
precisión la temperatura de la parte más fría de la comida.
Algunas comidas, particularmente las más pequeñas, no
son adecuadas para la cocción con el uso de una sonda,
debido a sus formas o tamaños.
Ŷ 1RGHEHUtDWRFDUHOKXHVRODJUDVDQLHOFDUWtODJR
Ŷ 3DUDFRFLQDUXQDYHHQWHUDLQVHUWHODVRQGDHQODSDUWH
más gruesa de la pechuga.
Ŷ 3DUDGRUDUVLQKXHVRVLQVHUWHODVRQGDHQHOFHQWURGHO
dorado.
Ŷ 3DUDFRFLQDUMDPyQRFRUGHURFRQKXHVRVLQVHUWHODVRQGD
en el centro de la articulación o del músculo más bajo y
largo.
Ŷ 3DUDSUHSDUDUFD]XHODVRSODWRVWDOHVFRPRSDVWHOGH
carne, inserte la sonda en el centro del plato.
Ŷ 3DUDFRFLQDUSHVFDGRLQVHUWHODVRQGDMXVWRDUULEDGHOD
agalla en la zona más carnosa paralela a columna.
Uso de la Sonda
Para usar la sonda sin precalentamiento:
,QVHUWHODVRQGDHQODFRPLGDFRQVXOWHVREUHOD8ELFDFLyQ
Correcta de la Sonda).
2. Coloque la comida en el horno y conecte la sonda en su
correspondiente tomacorriente en el horno.
3. Programe la sonda deseada y las configuraciones del
modo de cocción seleccionando More (Más), luego Probe
(Sonda), y eligiendo luego el modo de cocción deseado.
More (Más), luego Probe (Sonda), luego eligiendo la
temperatura de cocción deseada y seleccione Next
(Siguiente). Finalmente seleccione la temperatura interna
deseada para la comida y presione Start (Iniciar).
Para usar la sonda con precalentamiento:
1. Presione la tecla del modo de cocción deseado (Horneado
Tradicional, Horneado por Convección, o Dorado por
Convección) e ingrese la temperatura de cocción deseada.
2. Inserte la sonda en la comidaFRQVXOWHVREUHOD8ELFDFLyQ
Correcta de la Sonda).
8QDYH]TXHHOKRUQRIXHSUHFDOHQWDGRFRORTXHODFRPLGD
en el mismo y conecte la sonda en su correspondiente
tomacorriente, asegurándose de que esté completamente
insertada. Tenga cuidado, ya que las paredes del horno y el
tomacorriente de la sonda están calientes.
4. Programe la temperatura de la sonda seleccionando
More (Más), luego Probe (Sonda), e ingresando luego
la temperatura interna deseada para la comida. La
temperatura interna máxima de la comida que se puede
configurar es 200° F.
Pautas para el Cuidado de la Sonda
Ŷ (OXVRGHXQDVRQGDTXHQRVHDDTXHOODSURYLVWDFRQHVWH
producto podrá ocasionar daños sobre la ficha de entrada
de la sonda.
Ŷ 8VHODVPDQLMDVGHODVRQGDDOHQFKXIDU\GHVHQFKXIDUOD
misma, luego de insertar o de retirar la sonda de la carne o
del tomacorriente.
Ŷ 3DUDHYLWDUGDxRVVREUHODVRQGDQRXVHDJDUUDGHUDVSDUD
empujar el cable al retirarlo.
Ŷ 3DUDHYLWDUURPSHUODVRQGDDVHJ~UHVHGHTXHOD
comida haya sido completamente descongelada antes de
insertarla.
Ŷ 3DUDHYLWDUSRVLEOHVTXHPDGXUDVQRGHVHQFKXIHODVRQGD
del tomacorriente del horno hasta que este último se haya
enfriado.
Ŷ 1XQFDGHMHODVRQGDGHQWURGHOKRUQRGXUDQWHXQFLFORGH
limpieza automática o de limpieza con vapor.
Ŷ 1RJXDUGHODVRQGDGHQWURGHOKRUQR

49-80812-1 15
USO DEL HORNO: Guía de Cocción
TIPO DE COMIDA
MODO(S)
RECOMENDADO(S)
POSICIÓN(ES)
DE ESTANTES
RECOMENDADA SUGERENCIAS ADICIONALES
Productos Horneados
Tortas con capas, tortas
rectangulares, roscas, panecillos,
pan rápido en un Solo Estante
Horneado por Convección
Horneado Tradicional
3 8VHXWHQVLOLRVEULOODQWHV
Tortas con capas* en Múltiples
Estantes
Horneado Tradicional 2 y 4
Estante extensible en la posición más alta, si se usa. Asegúrese de que
haya un flujo de aire adecuado (Vea la ilustración).
Tortas de grasa (pastel de ángel)
Horneado por Convección
Horneado Tradicional
1 8VHXWHQVLOLRVEULOODQWHV
Galletas, galletitas, bizcochitos
en un Solo Estante
Horneado por Convección 3 8VHXWHQVLOLRVEULOODQWHV
Galletas, galletitas, bizcochitos
en Múltiples Estantes
Horneado por Convección
Múltiples Estantes
2 y 4
2, 3 y 5
8VHODSRVLFLyQSDUDHVWDQWHVH[WHQVLEOHV\ODSRVLFLyQSDUD
estantes. Asegúrese de que haya un flujo de aire adecuado.
Bife y Cerdo
Hamburguesas Asado Tradicional Alto 5
8VHHOHVWDQWHH[WHQVLEOHSDUDKDPEXUJXHVDVHVSDFLDGDVGHIRUPD
pareja en una olla con parrilla para asar a fin de obtener una parte
externa bien soasada y una parte interna poco cocida, cocine el
primer lado aproximadamente 3 minutos y cocine el segundo lado
aproximadamente 4 minutos. Mueva la comida hacia abajo para que
quede más preparada y menos soasada. Para un mejor rendimiento,
centre la comida debajo del elemento que emite calor para asar.
Bifes y Chuletas
Asado por Convección Alto
Asado Tradicional Alto
5
8VHXQDROODSDUDDVDUSUHFDOLHQWHPLQXWRVVLXVDUiHO0RGRSDUD
Asar por Convección. Mueva la comida hacia abajo para que quede
más preparada y menos soasada. Preste atención a la comida al asarla.
Para un mejor rendimiento, centre la comida debajo del elemento
calentador para asar.
Dorados Dorado por Convección 2 o 3
8VHXQDROODFKDWDWDOFRPRXQDROODSDUDDVDU1RVHUHTXLHUH
SUHFDOHQWDUOD8VHODIXQFLyQVRQGD
Ave
Pollo entero Dorado por Convección 2 o 3 8VHXQDROODFKDWDWDOFRPRXQDROODSDUDDVDU8VHODIXQFLyQVRQGD
Pechugas, patas, muslos con
huesos
Asar Alto 1
Si se empanó o cubrió con salsa, evite los modos Broil Hi (Asar Alto). Ase
del lado de la piel hacia abajo primero. Preste atención a la comida al
asarla. Para un mejor rendimiento, centre la comida debajo del elemento
calentador para asar.
Asado Bajo
Horneado por Convección
Horneado Tradicional
3
Pechugas de pollo deshuesadas
Asado por Convección Bajo
Horneado por Convección
Horneado Tradicional
3
Precaliente durante 5 minutos si usará la Función de Asado por
Convección. Mueva la comida más abajo para que quede más
preparada y menos soasada y más arriba para soasar/ dorar al asar.
Para un mejor rendimiento, centre la comida debajo del elemento
calentador para asar.
Pavo entero Dorado por Convección 1 o 2 8VDXQDROODFKDWDWDOFRPRXQDROODSDUDDVDU8VHODIXQFLyQVRQGD
Pechuga de Pavo Dorado por Convección 2 o 3 8VHXQDROODFKDWDWDOFRPRXQDROODSDUDDVDU8VHODIXQFLyQVRQGD
Pescado
Asado por Convección Bajo
Asado Bajo
5 (mitad del grosor o menos)
4 (>1/2 pulgada)
Precaliente 5 minutos al Asar por Convección. Preste atención a la
comida al asarla. Para un mejor rendimiento, centre la comida debajo
del elemento calentador para asar.
Cazuelas
Horneado por Convección
Horneado Tradicional
3
8VHHOPRGR&RQYHFWLRQ%URLO&ULVS$VDGRSRU&RQYHFFLyQ&URFDQWH
durante los últimos 2 a 5 minutos del horneado para derretir/ dorar
quesos o superficies crocantes.
Comidas Congeladas a Conveniencia
Pizza, papas fritas, tator tots,
patitas de pollo fritas, aperitivos
en un Solo Estante
Horneado por Convección
Horneado Tradicional
3
8VHHOPRGR&RQYHFWLRQ%URLO&ULVS$VDGRSRU&RQYHFFLyQ&URFDQWH
durante los últimos 2 a 5 minutos de cocción para dejar crocante la parte
exterior.
Pizza, papas fritas, tator tots,
patitas de pollo fritas, aperitivos
en Múltiples Estantes
Horneado por Convección
Múltiples Estantes
2 y 4
Si usará el modo Crisp (Crocante), coloque ambas ollas en el estante
superior si el espacio lo permite; de otra forma prepare una por vez en
el estante superior.
*Al hornear cuatro tortas con capas a la vez, use los estantes
2 y 4. Coloque las ollas como se muestra, de modo que no
quede una olla encima de la otra.
Cocine la comida completamente para evitar que se
produzcan enfermedades a partir de la comida. Puede
encontrar recomendaciones sobre temperatura mínima para
cocinar de forma segura en www.IsItDoneYet.gov. Asegúrese
de usar un termómetro de comidas para medir la temperatura
de las mismas.
Guía de Cocción
La siguiente tabla brinda algunas pautas para los modos de cocción típicos. Si desea usar los modos de Precision Cooking
(Cocción de Precisión), los mismos pueden ser sustituidos por los modos mostrados a continuación para comidas pertinentes.

16 49-80812-1
Panel de Control
8QDEXHQDLGHDHVOLPSLDUHOSDQHOGHFRQWUROOXHJRGHFDGD
uso. Limpie con un jabón suave y agua o vinagre y agua,
enjuague con agua limpia y pula en seco con una tela suave.
1RXVHOLPSLDGRUHVDEUDVLYRVOLPSLDGRUHVOtTXLGRVIXHUWHV
almohadillas para fregar de plástico ni limpiadores de horno en
el panel de control; dañarán el acabado.
Exterior del Horno
1RXVHOLPSLDGRUHVGHKRUQROLPSLDGRUHVDEUDVLYRV
limpiadores líquidos fuertes, estropajos de acero, almohadillas
para fregar de plástico, ni polvos limpiadores en el interior
o el exterior del horno. Limpie el mismo con agua y jabón o
una solución de vinagre y agua. Enjuague con agua limpia y
seque con una tela seca. Al limpiar supeficies, asegúrese de
que estén a temperatura ambiente y fuera del contacto con
la luz solar. Si las manchas en el borde de la ventana de la
puerta son persistentes, use un limpiador abrasivo suave o
una esponja con estropajo para obtener un mejor resultado. El
derrame de adobo, jugos de fruta, salsas de tomate y líquidos
para humedecer que contengan ácidos pueden ocasionar
descoloración y se deberán limpiar de inmediato. Deje que las
superficies calientes se enfríen, y luego limpie y enjuague.
Cuidado y limpieza - Exterior
ADVERTENCIA
Si se quita la cocina para efectuar una limpieza, reparaciones o cualquier
otra razón, verifique que el dispositivo anti-volcaduras se coloque de manera
adecuada cuando vuelva a instalarse la cocina. Si no toma esta precaución, la
cocina puede volcarse y provocar lesiones.
Asegúrese de que todos los controles estén apagados y que las superficies estén frías antes de limpiar cualquier parte de la cocina.
CUIDADO Y LIMPIEZA: Limpieza de la Cocina - Exterior
Superficies pintadas y Acero Inoxidable Negro
Las superficies pintadas incluyen los lados de la cocina y la
puerta, la parte superior del panel de control y el frente del
cajón. Límpielas con jabón y agua o con una solución de
agua y vinagre.
1RXWLOLFHOLPSLDGRUHVGHKRUQRFRPHUFLDOHVSROYRVOLPSLDGRUHV
esponjillas de acero o abrasivos potentes sobre cualquier
superficie pintada, LQFOX\HQGRHO$FHUR,QR[LGDEOH1HJUR
Superficies de Acero Inoxidable - Excluyendo el Acero Inoxidable Negro
(en algunos modelos)
1RXVHYLUXWDVGHDFHURpVWDVGDxDUiQODVXSHUILFLH
Para limpiar la superficie de acero inoxidable, use agua tibia
con jabón o un limpiador o pulidor para acero inoxidable.
Siempre limpie la superficie en la dirección del veteado. Siga
las instrucciones del limpiador para limpiar la superficie de
acero inoxidable.
Para realizar consultas sobre la adquisición de productos,
incluyendo limpiadores o pulidores para electrodomésticos
de acero inoxidable, consulte las secciones de Accesorios y
Soporte al Consumidor al final de este manual.

49-80812-1 17
CUIDADO Y LIMPIEZA: Limpieza de la Cocina - Interior
Cuidado y limpieza - Interior
El interior de su nuevo horno puede ser limpiado de forma manual o utilizando los modos Steam Clean (Limpieza con Vapor) o
Self Clean (Limpieza Automática).
El derrame de adobo, jugos de fruta, salsas de tomate y líquidos para humedecer que contengan ácidos pueden ocasionar
descoloración y se deberán limpiar de inmediato. Espere a que las superficies calientes se enfríen, y luego limpie y enjuague.
Limpieza Manual
1RXVHOLPSLDGRUHVGHKRUQROLPSLDGRUHVOtTXLGRVIXHUWHV
estropajos de acero, ni almohadillas para fregar en el interior
del horno. Limpie con agua y jabón suave o con una solución
de vinagre y agua. Enjuague con agua limpia y seque con
una tela seca. Al limpiar las superficies, asegúrese de que se
encuentren a temperatura ambiente.
Modo de Limpieza con Vapor
La finalidad de la función Steam Clean (Limpieza con Vapor)
es usar agua para limpiar la suciedad leve de su horno en una
temperatura inferior a la de Self Clean (Limpieza Automática).
Para usar la función Steam Clean (Limpieza con Vapor), limpie
las grasas y suciedades del horno. Vierta una taza de agua
en la parte inferior del horno. Cierre la puerta. Presione la
opción More (Más), luego seleccione Steam Clean (Limpieza
con Vapor), y luego presione Start (Iniciar) sobre la parte
GHUHFKDGHODSDQWDOOD/DSXHUWDGHOKRUQRVHEORTXHDUi1R
podrá abrir la puerta durante los 30 minutos de la limpieza
con vapor, ya que esto reducirá su rendimiento. Al finalizar el
ciclo de limpieza con vapor, la puerta se desbloqueará. Limpie
cualquier exceso de agua y cualquier suciedad que haya
quedado. NOTA: El agua en la parte inferior del horno podrá
estar caliente justo después de finalizado el ciclo.
Modo de Limpieza Automática
Lea las Instrucciones de Seguridad del Horno con Limpieza
Automática, en el comienzo de este manual, antes de usar
el modo Self Clean (Limpieza Automática). Este modo usa
temperaturas muy altas para limpiar el interior del horno.
Cuando use esta función, la puerta del horno se trabará. Antes
de utilizar el ciclo de limpieza automática, limpie la grasa
y restos de comida que haya en el horno. Retire todos los
artículos del horno, excepto los estantes esmaltados (color
oscuro). Los estantes brillantes o de plata y cualquier utensilio
u otros artículos deberán ser retirados del horno antes de iniciar
un ciclo de limpieza automática. Cierre la puerta. Si usará un
horno doble, seleccione qué horno desea limpiar. Seleccione
la opción More (Más), y luego Self Clean (Limpieza
Automática). Elija un ciclo de 3, 4 o 5 horas y seleccione la
tecla Start (Iniciar) iluminada sobre la parte derecha de la
pantalla. El horno mostrará que la puerta fue bloqueada y
exhibirá la cantidad de tiempo restante en el ciclo. Presione la
tecla iluminada Cancel (Cancelar) sobre la parte derecha de la
pantalla, si desea detener el ciclo. Al finalizar el ciclo, la puerta
del horno no se desbloqueará hasta que el horno se haya
enfriado por debajo de la temperatura de bloqueado.
Para hornos con niveles de suciedad excesiva, se recomienda
usar el tiempo de limpieza máximo de 5 horas. Si desea
usar el tiempo por omisión, presione la tecla Start (Iniciar)
inmediatamente luego de presionar la tecla Self Clean
(Limpieza Automática). El horno se apagará de forma
automática cuando el ciclo de limpieza automática sea
completado. La puerta permanecerá bloqueada hasta que el
KRUQRVHKD\DHQIULDGR8QDYH]TXHHOKRUQRVHKD\DHQIULDGR
limpie cualquier ceniza que haya quedado en el horno.
Durante el primer ciclo de limpieza, le recomendamos ventilar
su cocina con una ventana abierta o usar un ventilador o
campana de ventilación.
La suciedad en la estructura frontal del horno y la parte externa
de la junta de la puerta se deberán limpiar de forma manual.
Limpie estas áreas con agua caliente, estropajos de acero con
jabón o limpiadores tales como Soft Scrub
®
. Enjuague bien con
agua caliente y seque.
1ROLPSLHODMXQWD(OPDWHULDOGHILEUDGHYLGULRGHODMXQWDGH
la puerta del horno no resiste la abrasión. Es esencial que la
junta permanezca intacta. Si observa que comienza a gastarse
o deshilacharse, reemplace la misma.
Asegúrese de que el cobertor de la lámpara de luz del horno
se encuentre en su lugar y que la luz del mismo esté apagada.
Al usar el modo Self Clean (Limpieza Automática) en un horno
doble, sólo el horno superior o inferior podrán utilizar el ciclo
uno por vez. De forma adicional, ningún otro modo podrá ser
iniciado en la cavidad del horno alterna mientras el ciclo de
limpieza automática se encuentre en progreso.
IMPORTANTE: Las emanaciones producidas por el ciclo de
autolimpieza de cualquier horno afectan la salud de algunas
aves de manera notoria. Procure llevar sus aves a otra
habitación bien ventilada.

18 49-80812-1
CUIDADO Y LIMPIEZA: Estantes del Horno / Probe (Sonda)
Los estantes que fueron provistos con el horno (estantes
oscuros esmaltados, no brillantes) pueden permanecer en el
horno durante el ciclo de limpieza automática, ya que este
ciclo no los dañará.
Para limpiar los estantes de forma manual, use agua caliente
y jabón. Asegúrese de no lavar el espacio de deslizamiento de
un estante extensible.
Si resulta difícil retirar los estantes del horno, coloque un poco
de aceite vegetal en una tela seca o toalla de papel y frote
VREUHORVVRSRUWHVGHORVHVWDQWHVGHOKRUQR1ROLPSLHHO
aceite en el espacio de deslizamiento del estante extensible.
De forma periódica, luego de varios ciclos de limpieza
automática, los espacios de deslizamiento del estante
extensible deberán ser lubricados utilizando lubricante de
grafito, enviado junto con su horno de pared. Para ordenar
más lubricante de grafito, lea la sección de Asistencia y
Accesorios en el comienzo de este manual.
1. Retire el estante extensible del horno. Consulte la sección
de Estantes Extensibles del Horno.
2. Extienda totalmente el estante sobre una mesa o mesada.
Se podrá colocar papel de periódico debajo del estante
para una limpieza fácil.
3. Si hay restos en las pistas de deslizamiento, limpie
los mismos con una toalla de papel. NOTA: Cuando
el lubricante de grafito se haya acabado, deberá ser
reemplazado.
4. Agite el lubricante de grafito antes de abrir el mismo.
Comenzando con el mecanismo de deslizamiento del lado
izquierdo del estante, coloque cuatro (4) gotas pequeñas
de lubricante en los dos (2) espacios inferiores de
deslizamiento, cerca de los rulemanes de apoyo.
5. Repita esto sobre el mecanismo del lado derecho del
estante.
6. Abra y cierre el estante varias veces para distribuir el
lubricante.
7. Reemplace la tapa del lubricante y agite el mismo
nuevamente. Dé vuelta el estante y repita los pasos 3, 4, 5
y 6.
8. Cierre el estante, gire el estante con el lado derecho hacia
arriba y coloque el mismo en el horno. Consulte la sección
de Estantes Extensibles del Horno..
9. Repita los pasos anteriores con cada estante.
NOTA:1RURFtHFRQHVSUiLGHFRFLQDRFXDOTXLHURWUR
lubricante en esprái
La sonda de temperatura se puede limpiar con agua y jabón
o con una almohadilla de estropajo llena de jabón. Enfríe
la sonda de temperatura antes de su limpieza. Fregue las
manchas difíciles con una almohadilla de estropajo llena de
jabón, enjuague y seque.
Para ordenar más sondas de temperatura, lea la sección de
Asistencia y Accesorios en el comienzo de este manual.
Ŷ 1RVXPHUMDODVRQGDGHWHPSHUDWXUDHQDJXD
Ŷ 1RJXDUGHODVRQGDGHWHPSHUDWXUDGHQWURGHOKRUQR
Ŷ 1XQFDGHMHODVRQGDGHWHPSHUDWXUDGHQWURGHOKRUQRGXUDQWH
un ciclo de limpieza automática o de limpieza con vapor.
Estantes del Horno
Probe (Sonda)

49-80812-1 19
CUIDADO Y LIMPIEZA: Luz del Horno / Puerta del Horno
ADVERTENCIA
PELIGRO DE DESCARGA O QUEMADURAS: Antes de reemplazar la lámpara de luz del horno,
desconecte la conexión eléctrica del horno del fusible principal o del panel del disyuntor. Si esto no se
cumple, se podrá producir una descarga eléctrica o un incendio.
PRECAUCIÓN
RIESGO DE INCENDIO: La tapa de vidrio y la lámpara de luz se deberán retirar cuando estén frías.
Tocar el vidrio caliente sin protección en las manos o con un trapo húmedo puede ocasionar quemaduras.
1. Desconecte la corriente desde el fusible principal o el panel
del disyuntor.
2. Retire los estantes del horno.
3. Deslice un destornillador de punta plana entre la caja y la
tapa de luz de vidrio.
4. Apoye la tapa de luz de vidrio con dos dedos para evitar
que se caiga al fondo del horno. Tenga cuidado de no
astillar la cubierta del horno.
5. De forma suave, gire la punta del destornillador para aflojar
la tapa de luz de vidrio.
6. Retire la tapa de luz de vidrio.
7. Retire la lámpara sosteniendo firmemente y deslizando
la misma hacia afuera, hasta que las dos clavijas hayan
dejado el soporte de cerámica.
1RWRTXHHOYLGULRGHODQXHYDOiPSDUDFRQORVGHGRV(VWR
hará que la lámpara falle al dar luz. Tome la lámpara de
reemplzado con una toalla limpia o un pañuelo de papel
con las clavijas hacia abajo. Aliñe las dos clavijas en el
soporte de cerámica, presionando suavemente hasta que la
lámpara quede asegurada en la ficha de cerámica.
9. Deslice las lentes protectoras del soporte y presione hasta
que las pinzas queden enganchadas en la caja.
10. Vuelva a conectar la corriente.
Reemplazo de la Lámpara del Horno
Luz del Horno
Retiro de la Puerta del Horno
NOTA: La remoción de la puerta no es un requerimiento de
la instalación del producto, pero es una comodidad adicional.
Para quitar la puerta:
1. Abra la puerta del horno en su totalidad.
2. Retire el soporte de la bisagra de la estructura frontal
y déjelo a un lado. El soporte de la bisagra debe ser
colocado nuevamente para un funcionamiento apropiado
de la puerta cuando está última sea reinstalada.
3. Presione ambas trabas de la bisagra hacia abajo en
dirección del marco de la puerta hasta destrabarlas.
Para esto puede hacer falta un destornillador de lados
planos. ¡NO LEVANTE LA PUERTA DE LA MANIJA!
4. Coloque las manos sobre ambos lados y cierre
la puerta del horno hasta la posición de remoción
DSUR[LPDGDPHQWH´±´>FP±FP@GHOD
posición de cierre).
5. Levante la puerta hasta que los brazos de la bisagra
hayan salido de las ranuras. NOTA: La puerta del
horno es muy pesada. Asegúrese de tener un agarre
firme antes de levantar la puerta del horno de sus
bisagras. Tenga cuidado una vez que haya quitado
ODSXHUWD1RGHSRVLWHODSXHUWDVREUHODPDQLMD(VWR
puede provocar abolladuras o rayones.
Reemplazo de la Puerta del Horno
NOTA: La puerta del horno es pesada. Puede necesitar ayuda
para levantar la puerta lo suficiente como para deslizarla dentro
GHODVUDQXUDVGHODELVDJUD1ROHYDQWHODSXHUWDGHODPDQLMD
1. Levante la puerta del horno tomándola de ambos lados.
2. Con la puerta en el mismo ángulo de la posición de
UHPRFLyQDSUR[LPDGDPHQWH´±´>FP±FP@GHVGH
la posición de cerrado), introduzca la muesca del brazo
de la bisagra dentro del extremo inferior de la ranura de la
bisagra. La ranura del brazo de la bisagra debe estar bien
colocada en la parte inferior de la ranura.
3. Abra la puerta por completo. Si la puerta no se abre por
completo, la muesca no está bien colocada en el extremo
inferior de la ranura.
4. Presione las trabas de la bisagra hacia arriba contra el
armazón frontal de la cavidad del horno, hasta alcanzar la
posición de trabado.
5. Reemplace el soporte de la bisagra. El soporte de
la bisagra debe ser colocado nuevamente para un
funcionamiento apropiado de la puerta.
6. Cierre la puerta del horno.
Puerta del Horno
Bisagra en
la posición
de trabado
Ranura de la
bisagra bien
colocada en la
parte inferior de
la ranura de la
bisagra
Lado
inferior de
la ranura
Brazo
de la bisagra
Ranura de la bisagra
Soporte de la Bisagra
Ranura
de la
bisagra
Brazo
de la
bisagra
Posición destrabada
de la bisagra
La bisagra sale de la ranura
Soporte de la Bisagra

20 49-80812-1
¡Ahorre tiempo y dinero! Primero revise los cuadros que aparecen en las siguientes páginas y es posible que no necesite
solicitar reparaciones.
Problema Causa Posible Qué Hacer
Mi horno nuevo no cocina
como el anterior. ¿Hay
algún problema con
las configuraciones de
temperatura?
Su horno nuevo cuenta con un sistema de cocción
diferente con relación al anterior y, por lo tanto, es
posible que cocine de forma diferente.
En los primeros usos, use los tiempos y temperaturas de
su receta con cuidado. Si aún piensa que su horno nuevo
cocina con demasiado calor o demasiado frío, podrá ajustar el
termostato usted mismo para aplicar su preferencia de cocción
específica. Para ajustar la temperatura del horno, consulte la
sección de Funciones Especiales. NOTA: Este ajuste afecta
las temperaturas de los modos Traditional Bake (Horneado
Tradicional), Convection Bake (Hornear por Convección) y
Convection Bake Multi (Horneado por Convección Múltiple);
éste no afectará los modos Convection Roast (Dorar por
Convección), Traditional Broil (Asado Tradicional), Convection
Broil (Asar por Convección) o Clean (Limpiar).
La comida no se hornea de
forma apropiada
Controles del horno configurados de forma incorrecta. Consulte la sección Modos de Cocción.
La posición del estante es incorrecta o el estante no
está nivelado.
SeConsulte la sección Modos de Cocción y la Guía de
Cocción.
8VRGHXQDFDFHURODLQFRUUHFWDRGHXQDFDFHURODGH
tamaño incorrecto.
&RQVXOWHODVHFFLyQ8WHQVLOLRV
La temperatura del horno debe ser ajustada. Consulte la opción Cooking (Cocción) en la sección Settings
(Configuraciones).
Sustitución de ingredientes Sustituir ingredientes puede modificar el resultado de la receta.
La comida no asa de forma
apropiada
Controles del horno configurados de forma incorrecta. Asegúrese de seleccionar el modo correcto para asar. NOTA:
El modo para cocción crocante por convección no es para asar
comidas.
Se usó una posición incorrecta del estante. Para acceder a sugerencias de ubicación de estantes, consulte
la Guía de Cocción.
Se cocinó comida en una olla caliente. Asegúrese de que el utensilio esté frío
8WHQVLOLRGHFRFLQDLQDGHFXDGRSDUDDVDU 8VHXQDROODHVSHFtILFDPHQWHGLVHxDGDSDUDDVDU
El papel de aluminio usado para la olla y la rejilla para
asar no se ajustó ni cortó de forma apropiada, según
lo recomendado.
Si usará papel de aluminio, deberá usarse conforme con las
aberturas de la olla.
En algunas áreas, es posible que el nivel de corriente
(voltaje) sea bajo.
Precaliente el elemento para asar durante 10 minutos.
La temperatura del horno
es demasiado caliente o
demasiado fría
La temperatura del horno debe ser ajustada. Consulte la opción Cooking (Cocción) en la sección Settings
(Configuraciones).
El horno no funciona o
parece no funcionar
Es posible que un fusible de su hogar se haya
quemado o que el disyuntor se haya desconectado.
Reemplace el fusible o reinicie el disyuntor.
Controles del horno configurados de forma incorrecta. &RQVXOWHODVHFFLyQ8VRGHO+RUQR
El horno se encuentra en Sabbath Mode (Modo
Sabático)
Verifique que el horno no esté en Sabbath Mode (Modo
Sabático). Consulte la opción Sabbath (Sabático) en la sección
Settings (Configuraciones).
Sonido de “chisporroteo” o
“traqueo”
Éste es el sonido de metal calentándose o
enfriándose durante las funciones de cocción y
limpieza..
Esto es normal.
¿Por qué la estufa hace un
sonido de “clic” cuando
uso el horno?
Su estufa fue diseñada para mantener un control más
ajustado sobre la temperatura del horno. Es posible
que escuche que los elementos de calentamiento del
horno hagan sonidos de “clic” con mayor frecuencia
que con hornos más antiguos para lograr mejores
resultados durante los ciclos de horneado, asado,
convección y limpieza automática.
Esto es normal.
El reloj y el temporizador no
funcionan
Es posible que un fusible de su hogar se haya
quemado o que el disyuntor se haya desconectado.
Reemplace el fusible o reinicie el disyuntor.
La luz del horno no
funciona
La lámpara está floja o presenta defectos. Ajuste o reemplace la lámpara.
El modo de limpieza
automática del horno no
funciona
La temperatura del horno es demasiado caliente
como para configurar la limpieza automática.
Espere a que el horno se enfríe y reinicie los controles.
Los controles del horno están configurados de forma
incorrecta.
Consulte la sección de Limpieza del Horno.
Consejos para la Solución de Problemas... Antes de solicitar el servicio técnico
CONSEJOS PARA LA SOLUCIÓN DE PROBLEMAS

49-80812-1 21
Problema Causa Posible Qué Hacer
Exceso de humo durante un
ciclo de limpieza
Suciedad o grasa excesiva. Presione Cancel (Cancelar) sobre la tecla que se encuentra
sobre la parte derecha de la pantalla para detener el ciclo.
Limpie el exceso de suciedad y reinicie el ciclo de limpieza.
Humo excesivo al asar La comida está demasiado cerca del quemador. Baje la posición del estante con comida.
La puerta del horno no se
abrirá luego de un ciclo de
limpieza
El horno está demasiado caliente. Espere a que el horno se enfríe por debajo de la temperatura
de bloqueo.
El horno no limpia luego de
un ciclo de limpieza
Los controles del horno están configurados de forma
incorrecta.
Consulte la sección de Limpieza del Horno.
El horno estaba demasiado sucio. Limpie derrames excesivos antes de iniciar el ciclo de limpieza.
Es posible que, en hornos con mucha suciedad, sea necesario
usar la limpieza automática nuevamente o usarla durante un
período de tiempo más prolongado.
“F – y un número o letra”
son exhibidos en la pantalla
de LCD
Tiene un código de error de función. Presione Dismiss (Descartar) en la pantalla de LCD. Vuelva a
poner el horno en funcionamiento.
Si el código de función se repite. Desconecte totalmente la corriente de la cocina durante por lo
menos 30 minutos y vuelva a conectar la misma. Si el código
de error de función se repite, llame al servicio técnico.
El LCD no está funcionando
correctamente
Es posible que un fusible de su hogar se haya
quemado o que el disyuntor se haya desconectado.
Reemplace el fusible o reinicie el disyuntor.
Los controles del horno están configurados de forma
incorrecta.
Consulte la sección de Modos de Cocción o Configuraciones
para asegurar un uso correcto. Asegúrese de que la unidad se
encuentre actualizada con el software más reciente.
La pantalla de LCD está bloqueada. Desbloquee la pantalla presionando el ícono Unlock
(Desbloquear). Si esto no corrige el problema, haga circular
corriente por el disyuntor y asegúrese de que la unidad se
encuentre actualizada con el software más reciente.
El LCD es defectuoso. Haga circular corriente por el disyuntor y asegúrese de que la
unidad se encuentre actualizada con el software más reciente.
Si el problema persiste, comuníquese con el servicio técnico
para evaluar el mismo.
Corte de corriente, el reloj
se reinicia
Corte o exceso de corriente Reinicie el reloj. Si el horno se encontraba en uso, deberá
reiniciar el mismo presionando la tecla Cancel (Cancelar),
configurando el reloj y reiniciando cualquier función de cocción.
Olor a “quemado”
o “aceite” desde la
ventilación
Esto es normal en un horno nuevo y desaparecerá
con el tiempo.
Para acelerar el proceso, configure un ciclo de limpieza
automática por un mínimo de 3 horas. Consulte la sección de
Limpieza del Horno.
Olor fuerte 8QRORUHQODDLVODFLyQDOUHGHGRUGHOLQWHULRUGHOKRUQR
es normal desde las primeras veces en que el horno
es usado.
Esto es temporario y desaparecerá luego de varios usos o de
un ciclo de limpieza automática.
Ruido del ventilador Es posible que un ventilador de enfriamiento se active
automáticamente.
Esto es normal. El ventilador de enfriamiento se encenderá
para enfriar las partes internas. Es posible que funcione hasta
durante una hora y media, una vez que el horno se haya
apagado.
La puerta de vidrio del
horno parece estar “teñida”
o tener un color “arcoíris”.
¿Es esto un defecto?
1R(OYLGULRGHOKRUQRLQWHUQRHVWiFXELHUWRFRQXQD
barrera de calor que refleja este último nuevamente
hacia el horno, a fin de evitar la pérdida de calor y de
mantener fría la puerta externa mientras se hornea.
Esto es normal. Bajo ciertas luces y ángulos, es posible que
visualice esta tinta o arcoíris.
A veces el horno tarda más
en precalentarse a la misma
temperatura
8WHQVLOLRRFRPLGDHQHOKRUQR El utensilio o la comida en el horno hará que éste tarde más en
precalentarse. Retire estos artículos para reducir el tiempo de
precalentamiento.
1~PHURGHHVWDQWHVHQHOKRUQR Agregar más estantes al horno hará que éste tarde más en
precalentarse. Retire algunos estantes.
Diferentes modos de cocción Los diferentes modos de cocción utilizan diferentes métodos
de precalentamiento para calentar el horno en un modo de
cocción específico. Algunos modos tardarán más que otros
(tales como: horneado por convección múltiple).
El horno no funciona en
forma remota
Problemas en el enrutador, no hay señal inalámbrica,
etc.
Para solicitar asistencia con la conectividad de red inalámbric
a,
comuníquese al 1-800-220-6899.
El horno no está conectado.
CONSEJOS PARA LA SOLUCIÓN DE PROBLEMAS
Consejos para la Solución de Problemas... Antes de solicitar el servicio técnico

22 49-80812-1
Garantía de la Cocina Eléctrica de GE Appliances
GARANTÍA
Abroche su recibo aquí. Para acceder al servicio técnico de acuerdo con
la garantía deberá contar con la prueba de la fecha original de compra.
GEAppliances.com
Todo el servicio de garantía es provisto por nuestros Centros de Servicio de Fabricación, o un técnico autorizado de Customer Care®.
Para programar una visita del servicio técnico a través de Internet, visítenos en www.geappliances.com/service_and_support/, o
llame al 800.GE.CARES (800.432.2737). Cuando llame para solicitar el servicio, tenga los números de serie y modelo disponibles.
Para realizar el servicio técnico de su electrodoméstico, se podrá requerir el uso de datos del puerto de abordaje para su diagnóstico.
Esto da al técnico del servicio de fábrica de GE Appliances la habilidad de diagnosticar de forma rápida cualquier problema con
su electrodoméstico, y de ayudar a GE Appliances a mejorar sus productos al brindarle a GE Appliances la información sobre su
electrodoméstico. Si no desea que los datos de su electrodoméstico sean enviados a GE Appliances, solicitamos que le indique a su
técnico no entregar los datos a GE Appliances en el momento del servicio.
Qué no cubrirá GE Appliances:
Ŷ Viajes del técnico del servicio a su hogar para enseñarle
sobre cómo usar el producto.
Ŷ ,QVWDODFLyQHQWUHJDRPDQWHQLPLHQWRLQDGHFXDGRV
Ŷ )DOODVGHOSURGXFWRHQFDVRGHDEXVRPDOXVRPRGLILFDFLyQ
o uso para propósitos diferentes al original o uso comercial.
Ŷ 5HHPSOD]RGHIXVLEOHVGHODFDVDRUHLQLFLRGHGLV\XQWRUHV
Ŷ 'DxRVRFDVLRQDGRVVREUHHOSURGXFWRSRUDFFLGHQWH
incendio, inundaciones o catástrofes naturales.
Ŷ 'DxRVLQFLGHQWDOHVRFRQVHFXHQWHVFDXVDGRVSRUSRVLEOHV
defectos sobre este producto.
Ŷ 'DxRFDXVDGRGHVSXpVGHODHQWUHJD
Ŷ 3URGXFWRQRDFFHVLEOHSDUDEULQGDUHOVHUYLFLRUHTXHULGR
Ŷ 6ROLFLWHHOVHUYLFLRWpFQLFRSDUDUHSDUDURUHHPSOD]DUODV
lámparas, excepto las lámparas LED.
EXCLUSIÓN DE GARANTÍAS IMPLÍCITAS
Su única y exclusiva alternativa es la reparación del producto, como se indica en la Garantía Limitada. Las
garantías implícitas, incluyendo garantías implícitas de comerciabilidad o conveniencia sobre un propósito
particular, se limitan a un año o al período más corto permitido por la ley.
Esta garantía se extiende al comprador original y a cualquier dueño subsiguiente de productos comprados para
XVRKRJDUHxRGHQWURGH((886LHOSURGXFWRHVWiHQXQiUHDGRQGHQRVHHQFXHQWUDGLVSRQLEOHXQ3URYHHGRU
Autorizado del Servicio Técnico de GE Appliances, usted será responsable por el costo de un viaje o se podrá
requerir que traiga el producto a una ubicación del Servicio Técnico de GE Appliances autorizado para recibir el
servicio. En Alaska, la garantía excluye el costo de envío o llamadas del servicio a su hogar. Algunos estados
no permiten la exclusión o limitación de daños fortuitos o consecuentes. Esta garantía le da derechos legales
específicos y es posible que tenga otros derechos legales que varían entre un estado y otro. Para conocer cuáles son
sus derechos legales, consulte a la oficina de asuntos del consumidor local o estatal o al Fiscal de su estado.
Garante: GE Appliances, a Haier company
Garantías Extendidas: Adquiera una garantía extendida de GE Appliances y conozca los descuentos especiales que
están disponibles mientras su garantía aún está vigente. Puede acceder a la misma a través de Internet en cualquier
momento en
www.geappliances.com/service_and_support/shop-for-extended-service-plans.htm
o llamando al 800.626.2224 durante el horario comercial. Los Servicios para los GE Appliances aún estarán
disponibles cuando su garantía caduque.
Por el Período de GE Appliances reemplazará
Un Año
Desde la fecha de la
compra original
Cualquier parte de la cocina que falle debido a un defecto en los materiales o la fabricación. Durante
esta garantía limitada de un año, GE Appliances también proveerá, sin costo, todo el trabajo y el
servicio en el hogar para reemplazar la parte que presente defectos.

49-80812-1 23
Looking For Something More?
GE Appliances offers a variety of accessories to
improve your cooking and maintenance experiences!
Refer to the Consumer Support page for phone numbers
and website information.
The following products and more are available:
Accesorios
Olla para Asar Pequeña (8 ¾ ” x 1 ¼” x 13 ½ “)
Olla para Asar Grande* (12 ¾ ” x 1 ¼” x 16 ½ “)
Olla para Asar Extra Grande* (17 ¾ ” x 1 ¼” x 19 ½ “)
Piezas
Estantes del horno
Elementos del horno
Lámparas de luz
Sonda
Suministros de Limpieza
Limpiadores de Acero Inoxidable CitriShine
Limpiador de Electrodomésticos de Acero Inoxidable CeramaBryte
Lubricante de Grafito
*La olla para asar grande no entra en cocinas de 20”/24”.
**La olla XL no entra en hornos de pared de 24”, empotrables de 27” o cocinas de 20”/24”.
Accesorios

24 49-80812-1
Soporte para el Consumidor
SOPORTE PARA EL CONSUMIDOR
Sitio Web de GE Appliances
¿Desea realizar una consulta o necesita ayuda con su electrodoméstico? ¡Intente a través del Sitio Web de GE Appliances las
KRUDVGHOGtDFXDOTXLHUGtDGHODxR8VWHGWDPELpQSXHGHFRPSUDUPiVHOHFWURGRPpVWLFRVPDUDYLOORVRVGH*($SSOLDQFHV\
aprovechar todos nuestros servicios de soporte a través de Internet, diseñados para su conveniencia.
(Q((88GEAppliances.com
Registre su Electrodoméstico
£5HJLVWUHVXHOHFWURGRPpVWLFRQXHYRDWUDYpVGH,QWHUQHWVHJ~QVXFRQYHQLHQFLD8QUHJLVWURSXQWXDOGHVXSURGXFWRSHUPLWLUi
una mejor comunicación y un servicio más puntual de acuerdo con los términos de su garantía, en caso de surgir la necesidad.
También puede enviar una carta en la tarjeta de inscripción preimpresa que se incluye con el material embalado.
(Q((88GEAppliances.com/register
Servicio Programado
El servicio de reparación de expertos de GE Appliances está a sólo un paso de su puerta. Conéctese a través de Internet y programe
VXVHUYLFLRDVXFRQYHQLHQFLDFXDOTXLHUGtDGHODxR(Q((88GEAppliances.com/service
o comuníquese al 800.432.2737 durante el horario de atención comercial.
Garantías Extendidas
Adquiera una garantía extendida de GE Appliances y conozca los descuentos especiales que están disponibles mientras su
garantía aún está vigente. La puede adquirir en cualquier momento a través de Internet. Los servicios de GE Appliances aún
estarán allí cuando su garantía caduque.
(Q((88GEAppliances.com/extended-warranty
o comuníquese al 800.626.2224 durante el horario de atención comercial.
Conectividad Remota
Para solicitar asistencia para la conectividad de red inalámbrica (para modelos con acceso remoto),
visite nuestro sitio web en GEAppliances.com/connected-home-smart-appliances/RFRPXQtTXHVHDOHQ((88
Piezas y Accesorios
Aquellos individuos calificados para realizar el servicio técnico de sus propios electrodomésticos podrán solicitar el envío de
piezas o accesorios directamente a sus hogares (se aceptan las tarjetas VISA, MasterCard y Discover). Ordene hoy a través de
,QWHUQHWGXUDQWHODVKRUDVWRGRVORVGtDV(Q((88GEApplianceparts.com o de forma telefónica al 877.959.8688 durante
el horario de atención comercial.
Las instrucciones que figuran en este manual cubren los procedimientos que serán realizados por cualquier usuario.
Otros servicios técnicos generalmente deben ser derivados a personal calificado del servicio. Se deberá tener cuidado,
ya que una reparación indebida podrá hacer que el funcionamiento no sea seguro.
Contáctenos
Si no se encuentra satisfecho con el servicio que recibió de GE Appliances, comuníquese con nosotros a través de nuestro sitio
Web con todos los detalles, incluyendo su número telefónico, o escriba a:
(Q((88*HQHUDO0DQDJHU&XVWRPHU5HODWLRQV_*($SSOLDQFHV$SSOLDQFH3DUN_/RXLVYLOOH.<
GEAppliances.com/contact
-
 1
1
-
 2
2
-
 3
3
-
 4
4
-
 5
5
-
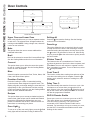 6
6
-
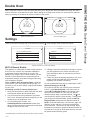 7
7
-
 8
8
-
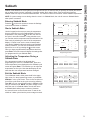 9
9
-
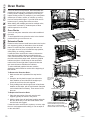 10
10
-
 11
11
-
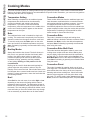 12
12
-
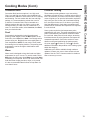 13
13
-
 14
14
-
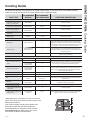 15
15
-
 16
16
-
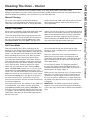 17
17
-
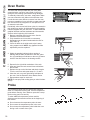 18
18
-
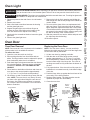 19
19
-
 20
20
-
 21
21
-
 22
22
-
 23
23
-
 24
24
-
 25
25
-
 26
26
-
 27
27
-
 28
28
-
 29
29
-
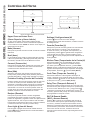 30
30
-
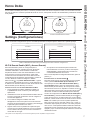 31
31
-
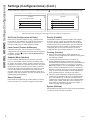 32
32
-
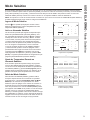 33
33
-
 34
34
-
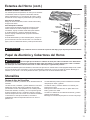 35
35
-
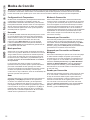 36
36
-
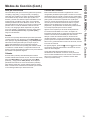 37
37
-
 38
38
-
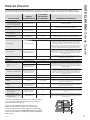 39
39
-
 40
40
-
 41
41
-
 42
42
-
 43
43
-
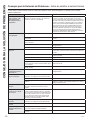 44
44
-
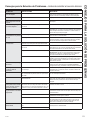 45
45
-
 46
46
-
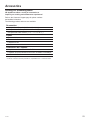 47
47
-
 48
48


GE PT9551BLTS El manual del propietario
- Categoría
- Medir, probar
- Tipo
- El manual del propietario
en otros idiomas
- English: GE PT9551BLTS Owner's manual
Artículos relacionados
-
GE Cafe Series PK7500FMDS El manual del propietario
-
GE ZKD90DSSNSS El manual del propietario
-
GE Appliances PTD7000BNTS El manual del propietario
-
GE CTS70DM2NS5 Manual de usuario
-
GE PKS7000FNDS El manual del propietario
-
GE PTD700LSNSS El manual del propietario
-
-
GE ZTDX1FPSNSS El manual del propietario
-
-
GE ZTSX1DSSNSS El manual del propietario
