Forno FDWBI8067-24S El manual del propietario
- Categoría
- Lavaplatos
- Tipo
- El manual del propietario
Este manual también es adecuado para

Dishwasher
Instruction Manual
FDWBI8004-24S

CONTENTS
Please carefully read this manual before using the dishwasher, it will help you
use and maintain the dishwasher properly.
02
03
04
05
06
07
2
IMPORTANT SAFETY INSTRUCTIONS
FEATURES OF YOUR NEW DISHWASHER
Specifications
F
ilter System
S
mart Wash System
3
3
4
4
6
6
7
8
9
9
10
10
1
1
12
OPERATING INSTRUCTIONS
Control panel
Cycle Chart
PREPARING AND LOADING DISHES
Loading the Lower Basket
Loa
ding the Upper Basket
Loa
ding the Silverware Basket
A
dding a Dish
F
illing the detergent dispenser
F
illing the rinse aid reservoir
13
13
13
14
USER MAINTENANCE
Cleaning the Exterior
C
leaning the Interior
C
leaning the Nozzles
15
TROUBLESHOOTING
1
01
1
Customer Care

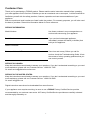
Customer Care
Thank you for purchasing a FORNO product. Please read the entire instruction manual before operating
your new appliance for the first time. Whether you are an occasional user or an expert , it will be beneficial to
familiarize yourself with the safety practices, features, operation and care recommendations of your
appliance.
Both the model and serial number are listed inside the product. For warranty purposes, you will also need
the date of purchase. Record this information below for future reference.
SERVICE INFORMATION
Model Number:
Use these numbers in any correspondence or
service calls concerning your appliance.
Serial Number: If you received a damaged appliance,
immediately contact the dealer (or builder) that
sold you the appliance
Date of Purchase:
Purchase Address & Phone: Save time and money. Before you call for
service, check the Troubleshooting Guide. It lists
the causes of minor operating problems that you
can correct yourself.
SERVICE IN CANADA:
Keep the instruction manual handy to answer your questions. If you don’t understand something or you need
more assistance, please call our Customer Service: 1-800-561-7265
Or email: service@distinctive-online.com
SERVICE IN THE UNITED STATES:
Keep the instruction manual handy to answer your questions. If you don’t understand something or you need
more assistance, please call our Customer Service: 1-866-231-8893
Or email: in[email protected]
Digital instruction manual can be downloaded from www.forno.ca
If your appliance ever requires servicing, be sure to use a FORNO Factory Certified Service provider
recommended by our customer care center. All Factory Certified Service providers are carefully selected
and thoroughly trained by us.
1

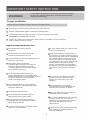
IMPORTANT SAFETY INSTRUCTION
WARNING
Proper installation
Please install your dishwasher properly, following the installation guide.
Water supply inlet temperature should be between 120℉ and 149℉.
Dispose of the discarded appliance and packing material properly.
The dishwasher must be properly grounded, or it can be an electric shock hazard.
PERMANENTLY CONNECTED is allowed.
If there is any damage to the Dishwasher, please contact to your Dealer, and do not attempt to
repair or replace any part by yourself.
For your safety, please follow the information in this manual to minimize
the risk of fire, explosion, electric shock, and to help prevent property
damage or personal injury.
Basic precaution before use
Read all instructions before using the
dishwasher.
The manual does not cover every possible
condition and situation that may occur.
Use the dishwasher only for its intended purpose as
described in this manual.
When loading items to be washed:
-
Load sharp items and knives so that they are
not likely to damage the door seal and tub.
-
Load sharp items and knives with the handles
up to reduce the risk of injury.
Do not wash plastic items unless they are
marked dishwasher safe
. If not indicated, check
w
ith the manufacturer for recommendations, as items
that are not dishwasher safe may melt and
create a potential fire hazard.
If the dishwasher drains in to a food disposer,
make sure disposer is completely empty before
running the dishwasher.
Do not tamper with the controls.
Do not operate your dishwasher unless all
enclosure panels are properly in place.
Do not touch the heating element during or
immediately after use, especially if the sanitize
option has been selected.
To reduce the risk of injury, do not allow children
to play in or on a dishwasher.
Do not let children abuse, sit, or stand on door
or racks of the dishwasher.
Under certain conditions, hydrogen gas may
be produced in a hot water system that has not
been used for two weeks or more. HYDROG
EN
GAS IS EXPLOSIVE. If the hot water system
has not been used for such a period, before
using dishwasher, turn on all hot water faucets
and let water flow from each for several
minutes. This will release any accumulated
hydrogen gas. Hydrogen gas is flammab
le. Do
not smoke or use an open flame during this
time.
Do not store or use combustible materials,
gasoline or other flammable vapors and
liquids in the vicinity of this or any other
appliance.
Use only detergents or rinse agents
recommended for use in a d
ishwasher and
keep them out of the reach of children.
Keep young children and infants away from
dishwasher when it is operating.
Do not use the dishwasher if it has a damaged
power line or plug, and do not plug the
dishwasher into a damaged outlet. Failure
to
follow
these instructions may result in
electrical shock.
Remove the door of the washing compartment
when removing an old dishwasher from
service or discarding It.
222221154324543543
2

FEATURES OF YOUR NEW DISHWASHER
Specification
Capacity
Dimension
Power Supply
Rated power usage
Water Feed Pressure
10 place settings
23.5 x 22.6 x 32.4 inches (W x D x H)
120 Volts, 60Hz
Wash motor 100W Heater 700W
5.8 ~ 145 psi (0.04 ~ 1MPa)
1
6
2
3
5
4
7
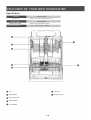
1 Lock
2 Upper Basket
3 Upper Spray Arm
4 Cutlery Basket
5 Lower Basket
6
7
Cup Shelf
Heating Element
3333
3

FEATURES OF YOUR NEW DISHWASHER
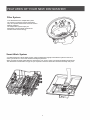
Filter System
Your dishwasher has a multiple-filter system.
The system is composed
of three mesh filters.
They
can separate soiled water and clean water in
different chambers.
The multiple filter
system helps your
dishwasher to
achieve better performance
with less water and less energy.
Smart Wash System
Your dishwasher has a Smart Wash System. When a partial load of lightly soiled dishes is placed in the unit, a
wash cycle similar to
a short wash will automatically be performed.
When a full load of heavily soiled dishes is placed in the unit, a heavy wash cycle will automatically be performed.
The dishwasher can determine the type of cycle required to clean the dishes and will clean efficiently every time.
比例 1.000
4

FEATURES OF YOUR NEW DISHWASHER
How your dishwasher cleans
Your dishwasher cleans by spraying
a mixture of hot water and detergent
through the spray arms
against
soiled surfaces.
The dishwasher fills with water,
covering the filter area. Water
is then
pumped through the multiple filter
s
and spray arms. Separated soil
particles go down the drain as the
water is pumped out and replaced
with clean water.
The number of water fills will vary
with the cycle being used.
Getting Started
1. Load the dishwasher (See Dish Preparation and
Loading sections).
2. Add detergent (See Filling the detergent dispenser).
3. Add rinse aid (See Filling the rinse aid dispenser).
4. Select desired CYCLE (See Cycle Chart).
5. Select desired OPTIONS (See Control Panel).
The indicator light above the pad will glow when
selected.
6. Run the hot water faucet closest to the dishwasher
until the water is hot, then turn it off.
7. To start, press Start/Cancel (See Control Panel),
then close the door.
Note:
Your dishwasher has the controls mounted
in the front of the door. The door should be
closed before operating the machine.
Wash Cycle Selections
Cycle times are approximate and will vary with the
options selected. Hot water is necessary to activate
the detergent and
melt fatty food residues. An automatic
sensor will check the incoming water temperature. If
it is not at the appropriate temperature the timer will
delay the cycle to allow automatic water heating during
the main wash. When the HI
-TEMP wash is selected
an
even higher temperature will be set to handle
heavier soil loads.
5

OPERATING INSTRUCTIONS
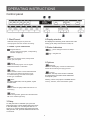
Control panel
4
5
2
3
6
1
1.Start/Cancel
Select the wash program or pause the
wash program when the machine is working.
4.Display window
This displays the remaining hours and minutes of the
running cycle, delay hours and error codes, etc.
2.Wash Cycle Selections
Program Buttons
T
ouch to select the Program, corresponding
indicator will light up;
Heavy
This cycle is for hard
-to-clean, heavily soiled
dishes, pots, and pans.
Normal
This is
the default program. It is for regular
soiled dinner dishes or silverware.
Light
This is
suitable to clean normal soiled tableware
and it is the most efficient program in terms
of combined energy and water consumption
for this type of tableware.
Glass
For lightly
-soiled loads, such as glasses, crystal
and fine china.
Quick
A shorter wash for lightly
-soiled loads that do not
need drying.
Rinse
Use for rinsing dishes
, glasses and silverware that
will not be washed right away.
5.Status Indicators
Rinse detergent need to be refilled
Program end
6.Options
Heating Dry
When the
"Heating Dry" function is selected, the
heater will work during the drying process.
Hi Temp
When the "Hi Temp wash" function is selected,
the temperature of the water will be maintained
at 60
℃
(140
℉
) max.
Warning: The Hi Temp option is available with the
"Heavy" ,"Normal", "ECO" and "Glass" cycles.
3.Delay
To delay the start of a selected cycle, press the
Delay Start
button until the desired delay time shows
in the LED display. You can delay the start for 1 to
24 hours. To cancel the delay start option before the
delay period is over, press the Start/Cancel
button for
3-5 seconds.
6

OPERATING THE DISHWASHER
Status Window
H:01- H:24
If the Delay Start option is s
elected,
the number of delay start hours
shows in the status window.
2:25-0 :00
After the machine starts
operating,
the remaining time of the selected
cycle will be shown in the window.
Error indication
In certain situations which are critical to
the machine
’s functioning and safe oper-
ation, the control
s will shut down and
the machine will
indicate an error code.
(See Error Codes on page 18).
If Error codes are displayed, contact the
dealer or service
provider. They will be able to
provide assistance in troubleshooting
the problem and
/or locating an authorized
service technician if needed.
NOTE
The remaining time could suddenly
increase or drop
by several minutes.
This means the Smart Sensor has
checked the soil level and det
ermined
if additional water fills are needed or if
water fills can be reduced.
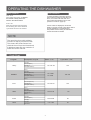
Cycle Chart
Program
Description of Cycle
Pre-wash
Main Wash(60℃)
Water
(
L/G
)
Cycle time
(
min
)
Heavy
Rinse(65℃)
Rinse(with Sani69℃)
Drying
Pre-wash
Main Wash(50-55℃)
19. 7L/5. 2G
155
NORMAL
Rinse(58-60℃)
Rinse(with Sani69℃)
Drying
Pre-wash
Main Wash(45-50℃)
9.5~18.5L/
2.5~4.9G
105~135
ECO
Rinse(50-55℃)
Rinse(with Sani69℃)
Drying
Pre-wash
Main Wash(48-50℃)
Rinse(50-55℃)
Drying
Pre-wash
15. 5L/4.1G
105
Glass
15.5L/4.1G
110
Quick
Rinse
Main Wash(50℃)
Rinse(55)
Pre-wash
Main Wash
12.5L/3.3G
6.7L/1.8G
60
20
7

PREPARING AND LOADING DISHES
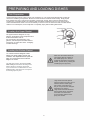
Dish Preparation
Scrape away large pieces of food, bones, pits, toothpicks, etc. The continuously filtered wash system will
remove the remaining food p
articles. Burned-on foods should be loosened before loading. Empty liquids
from glasses and cups. Foods such as mustard, mayonnaise, vinegar, lemon juice and tomato based
products may cause discoloration of stainless steel and plastics if allowed to sit fo
r a long period of time.
Unless the dishwasher
needs to be run immediately, it is best to rinse off these food soils. If the dishwasher
drains into a food disposer, be sure disposer is completely empty before starting dishwasher.
Loading the Upper Basket
The upper basket is designed for cups,
glasses, small plates, bowls and plastic items
marked dishwasher safe etc.
For best results, place the bowls, cups,
glasses,
and saucepans with soiled surface
facing down or toward the center. Tilt slightly
for better drainage.
Loading the Bottom Basket
The b ottom basket is designed to load
plates, soup bowls, plates, saucers and
cookware. The adjustable
basket space will
allow you to load items with a maximum
height of 11 inches.
The fold-down tines in the bottom basket
make it easy to
load those extra large and
hard
-to-fit items. The tines may be left
up for normal use or folded down for more
flexible loading. Fold down for more space
to load large pots or pans.
Make sure the loaded dishes do
not interfere with the ro
tation of
the middle spray arm, which is
located at the bottom of the upper
basket. (Check this by rotating the
middle spray arm by hand.)
Large items should be placed
along the edge so
that they do not
interfere with the middle spray
arm rotation, and mak
e sure
they
do not prevent the detergent
dispenser from opening.
Large items should be turned so
that the inside faces downward,
and make sure these items
do not interfere with the lower
spray arm rotation.
8

PREPARING AND LOADING DISHES
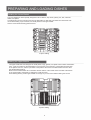
Loading the Lower Basket
The lower basket has been specially designed for dinner dishes, soup bowls, plates, pots, lids, casserole
dishes, and plates.
Load large items such as
pots and pans into the dishwasher so that their open sides face downwards. We
recommend loading
cups, stemware, and small plates into the upper basket.
See the recommended loading patterns below.
10 place setting
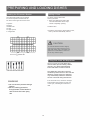
Loading the Upper Basket
The upper basket has been designed for small plates, mugs, glasses, and plastic items marked “dishwasher
safe”. Lo
ad your plates into the dishwasher in two half rows, so that the front of each plate faces the back
of the plate in front of it, and the open sides of the plates at the center of the dishwasher face each other.
See the illustrations below.
Make sure the lo
aded dishes do not interfere with the rotation of the nozzle which is located at the bottom
of the upper basket. (Check this by rotating the nozzle by hand.)
When loading dishes, pull the upper basket out enough so you can load it without striking the counter
10-place setting
9

PREPARING AND LOADING DISHES
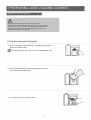
Loading the Silverware Basket
The silverware basket can be divided
into three separate modules that can
be used in both upper and lower racks
1.Spoons
2.Knives
3.Salad forks
4.Forks
5.Large spoons
6. Large forks
Adding A Dish
To add or remove items after
wash cycle starts:
1. Open door slightly and wait a few
seconds until wash action stops
before completely opening.
2.Add the item.
3.Close the door firmly to latch within 4 secs,
then cycle will automatically resume.
1
6
5
1
2
3
3
1
2
3
3
1
2
3
1
2
3
1
2
3
3
1
1
3
3
1
1
CAUTION
TO AVOID BURN INJURY: Slightly
open door and wait until spray arms
and wash action stop. Hot water may
splash out of dishwasher. Failure to
do so may result in injury.
4
5
1
1
4
2
4
4
2
4
2
1
1
4
2
4
4
2
4
4
1
1
1
1
1
1
In
Filling the rinse aid dispenser
Rinse aid greatly improves drying and
reduces water spots and filming. Without
rinse aid
, your dishes and dishwasher
interior will collect excessive moisture.
The Heated Dry option will not perform
as
efficiently without rinse aid. The rinse aid
dispenser, located next to the
detergent
cup, automatically releases a measured
amount of rinse aid during the last rinse.
1
2
3
4
5
6
WARNING
1.Do not let items protrude though
bottom.
2.Be sure nothing protrudes
though bottom of the basket or
rack to block the lower spray
arm
If the rinse aid is low, the Rinse Aid light
is illuminated at the beginning and end
of the cycle
, indicating that it is time to
refill.
10

PREPARING AND LOADING DISHES
Filling the rinse aid dispenser
Your dishwasher is designed to use a liquid rinse aid.
The use of rinse
aid greatly improves drying performance after the
final rinse. Do not use a solid or bar
-type rinse aid. Under normal
conditions, the
rinse aid will last approximately one month. It is
best to keep it full, but do not overfill.
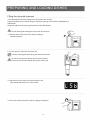
Filling the detergent dispenser
1. Open the detergent dispenser cap by pushing the detergent
dispenser release catch.
The flap is always open at the end of a dishwashing cycle.
2. Add the recommended amount of detergent to the main
wash detergent compartment.
3. Close the flap and then press it down.
11

PREPARING AND LOADING DISHES
Filling the rinse aid reservoir
Your dishwasher has been designed to use liquid rinse aid only.
Using a powdered rinse aid will clog the reservoir opening and cause the dishwasher to
malfunction.
Rinse aid improves the drying performance of the dishwasher.
Do not add regular detergent to the rinse aid reservoir.
CAUTION
1. Remove the rinse aid reservoir cap by rotating it
counterclockwise.
2. Fill the rinse aid reservoir with rinse aid.
Use the viewing port when filling the rinse aid reservoir.
Do not fill the reservoir above the full level indicator.
Excess rinse aid can overflow during the wash cycle.
CAUTION
3. Add the rinse aid if the LED screen shows “LSb”.
This means that there is no rinse aid left.
4. Close the rinse aid reservoir cap by rotating it clockwise.
12

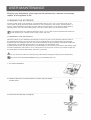
USER MAINTENANCE
Keeping your dishwasher clean improves its performance, reduces unnecessary
repairs, and lengthens its life.
CLEANING THE EXTERIOR
It’s best to clean spills on the outside of your dishwasher as they occur. Use a soft, damp cloth on the
control panel to gently wipe away spills and dust. Do not
use benzene, wax, thinner, chlorine bleach, or
alcohol. These materials may discolor the inner walls and cause stains. Do not clean the dishwasher by
sprinkling water over it and avoid letting water come into contact with any of the electrical parts.
If your dishwasher has a stainless steel door panel, you can clean it with a stainless steel cleaner for
home appliances or a similar product using a clean, soft cloth.
CLEANING THE INTERIOR
Clean the interior of your dishwasher periodically to remove any dirt or food particles. Wipe the inside of
the dishwasher and the inner part of the door with a wet dishcloth. We recommend filling the detergent
dispenser with dish detergent, and then running the dishwasher empty periodically using either the Normal
or Expres
s 60 cycle with the sanitize option. This will keep your dishwasher clean.
If white spots and odo
ur are still present in your dishwasher, run the Normal cycle with the dishwasher empty
and without detergent until it flushes. Then, interrupt the cycle and p
ut an 8 ounce cup of white vinegar into
the lower basket. Close the dishwasher and let the cycle finish.
CAUTION
Do not remove the tub’s front seal (the long rubber seal enclosing the opening of the dishwasher).
Do not touch the HEATING ELEMENT during or immediately after use.
CLEANING THE FILTERS
1. Turn off the dishwasher.
Open
2. Rotate the filter insert counterclockwise to unfasten and then detach
the filter insert.
3. Remove the fine filter (flat, rectangular).
13

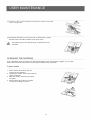
USER MAINTENANCE
4. Remove any dirt or other residues from the filters, and then rinse them
under running water.
5. Reassemble the filters in the reverse order of dissasembly, replace
the filter insert and rotate clockwise to the close arrow.
If the filter insert is not closed properly, its performance will
CAUTION
decrease.
CLEANING THE NOZZLES
If your dishwasher does not seem to be cleaning adequately or the nozzles seem clogged, you can clean
each of the nozzles. Be careful when removing the nozzles as they may break.
Lower nozzle
1. Check whether the nozzle holes are
clogged by food particles.
2. If cleaning is needed, remove the nozzle by
pulling it upwards.
3. Clean the nozzle, and then push it back
into place.
4. Check whether the nozzle is engaged
correctly by rotating it by hand.
14

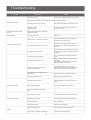
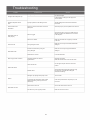
Troubleshooting
Problem
Possible cause
Dishwasher won't start
Solution
Shut the door completely and make sure it is latched
Power supply or power line is not connected Check and connect the power supply
Dishwasher won't start
Delay Start option has been selected
Child Lock activated
(selected models)
Dishwasher beeps at the end of
the cycle
Rinse Aid light on
This indicates that the wash cycle finished,
dishwasher will beep
LED screen shows “Lsb”
The dishwasher is connected to cold water
Add rinse aid
Check the dishwasher, make sure it is properly
connected to the hot water supply
When heavy soil is detected, the auto, normal,
p
ots and pans cycle will automatically increases the
cycle time
When the sanitize option is selected, the cycle time
will be increase
d to meet the sanitized temperature
requirement
Use your dishwasher when the water pressure is
normal
Make sure the dishwasher is connected to the hot
water supply
Try
to not use your dishwasher when hot water is
being used elsewhere in the house
Load the dishes again as per the manual
Add detergent depending on the water hardness
and the cycle you chose. Use fresh detergent
Refer to Delay Start section in this manual to reset
Deactivate the child lock, refer to the child lock
section in this manual
Dishwasher operates too long
The cycle time will vary due to the soil level
The sanitize option is selected
Water pressure is temporarily low
The inlet water temperature is low
Dishes are not clean enough
Dishes are loaded too close together,
improper use of detergent
The selected cycle is not suitable for food
soil condition
Spray arm is blocked by items
Choose another cycle for longer washing time
Make sure the spay arm rotates freely
Fill rinse aid dispenser or increase the amount of
rinse aid.
Load the dishes again as per the manual.
Detergent dispenser is empty
Dishes not dry enough
Improper loading of dishes
The cycle you chose does not include
drying
Water hardness is too high
Spots and film on dishes
Improper loading of dishes
Old rinse aid is used
Rinse dispenser empty
Using too much detergent
Etching
The inlet water temperature exceeds 158℉
Choose the proper cycle with drying
For extremely hard water, install a water softener
Load the dishes again as the manual indicates
Use fresh rinse aid
Add rinse aid to the dispenser
Use less detergent if you have soft water
Lower the inlet water temperature
15

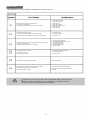
Troubleshooting
Problem
Detergent left in dispenser cup
Spray arm is blocked
Possible cause
Detergent may be too old
Solution
Use fresh detergent
Load the dishes, making sure the spray arms
are not blocked
Add the detergent and rinse aid as indicated in
the manual
Select the proper cycle as explained in the manual
Detergent dispenser will not
shut
Water remains in the
dishwasher
Improper operation of the detergent cover
Previous cycle has not finished or has been
interrupted
Drain is clogged
Dishwasher does not
drain properly
Drain hose is kinked
Check the air gap if you have one. Make sure the
disposer is empty if the dishwasher is connected
to the disposer
Make sure the drain hose is properly connected
to the sink
Make sure to use only the automatic dishwasher
detergent
Suds in the tub
Wrong detergent is used
Excessive suds caused by using the
wrong detergent
Dishwasher leaks
Dishwasher is not level
Make sure to use only the proper dishwasher
detergent
Level the dishwasher
Black or gray marks on dishes
Aluminum utensils have rubbed
against dishes
Rearrange the dishes
Make sure the inlet water is no less than 120F
Coffee and tea soil
Stained tub interior
Reddish stains
Use an approved spot cleaner to remove the
residue
Some tomato-based foods will cause this, using
the rinse only cycle right after loading will
decrease the staining
This is normal
Detergent cup opening\ Drain pump sound
Noises
A hard object has entered the wash module.
When the object is ground up, the sound
should stop
Water valve is turned off
Dishwasher won't fill
Door latch may not be properly seated
If the noise persists after a complete cycle, call
for service.
Check if the water valve is turned on
Make sure the door is closed
16

Error Codes
When malfunctions occur, the appliance will display error codes to warn you:
E1
during the water inlet step, if the flow meter
can't detect the water after 4
minutes, the dishwasher will post an E1 error message.
1. check the water supply
2. check the inlet valve
3. check the inlet
4. ch
eck the flowmeter
5. check the pressure switch
6. check the drain
7. check the PCB
1. check the heater
2. check the thermistor
3. check the PCB
E3
(only appears in factory mode)
when the temperature cant reached the defined value
after 90 minutes, the dishwasher will post an E3 error message.
E4
E6
E7
E9
If water floods into the bottom and triggers the detector switch, will
post an
E1 error message
the dishwasher will post an E4 error message
1. check the use of detergent
2. check whether the appliance is l
evel
3. check the micro
-switch
4. check the drain pump
5. check the
water fill level
6. Locate the leak
1. check the inlet water temperature
2. check the thermistor
3. check the PCB
(only appears in factory mode)
E6
- thermal sensor cut.
E7 - thermal sensor short.
If pushing one button for more than 30s, the
dishwasher will post an E9 error message.
Button sticks,warning resolved when
releasing the buttom
Ed
If the Dashboard detects that the communication data is
abnormal for more than 30s, the dishwasher
will post an Ed error message.
communication data abnormal, warning
resolved
when communication data returns
to normal.
WARNING
If overflow occurs, turn off the main water supply before calling a service provider.
If there is water in the
bottom pan due to overfilling or a small leak, the water
should be removed before restarting the dishwasher.
1 7

Lavavajillas
Manual de Instrucciones
FDWBI8004-24S

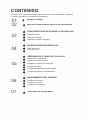
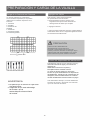
CONTENIDO
Por favor, lea cuidadosamente este manual antes de usar el lavavajillas, le ayudará
a utilizar y mantener el lavavajillas correctamente.
02
03
04
05
06
07
2
INSTRUCCIONES IMPORTANTES DE SEGURIDAD
CARACTERÍSTICAS DE SU NUEVO LAVAVAJILLAS
Especificaciones
S
istema de Filtrado
S
istema de Lavado Inteligente
3
3
4
4
6
6
7
8
9
9
10
10
1
1
12
INSTRUCCIONES DE OPERACIÓN
Panel de Control
Tabla de Ciclos
PREPARACIÓN Y CARGA DE LA VAJILLA
Carga de la Cesta Inferior
C
arga de la Cesta Superior
C
arga de la Cesta de los Cubiertos
A
gregar una vajilla
L
lenado del dispensador de detergente
L
lenado del depósito de abrillantador
13
13
13
14
MANTENIMIENTO DEL USUARIO
Limpieza del Exterior
L
impieza del Interior
L
impieza de la Boquillas
15
SOLUCIÓN DE PROBLEMAS
01
1
Servicio al cliente

Si usted es un usuario ocasional o
un expert,
Tanto el modelo como el número de serie se enumeran dentro del producto.
El manual de instrucciones se puede descargar desde www.forno.ca
1

INSTRUCCIONES IMPORTANTES DE SEGURIDAD
ADVERTENCIA
Instalación adecuada
Para instalar su lavavajillas apropiadamente, por favor siga la guía de instalación.
La temperatura de entrada de suministro de agua debe ser entre 120℉ y 149℉.
Elimine correctamente el aparato a desechar y el material de embalaje.
El lavavajillas debe estar correctamente conectado a tierra, o puede resultar en un riesgo de descarga
eléctrica.
CONECTARLO PERMANENTEMENTE está permitido.
Si hay algún daño en el lavavajillas, póngase en contacto con su distribuidor, no intente repararlo o reemplazar
ninguna pieza usted mismo.
Para su seguridad, por favor siga las indicaciones en este manual para minimizar
el riesgo de incendio, explosión, descarga eléctrica
y para ayudar a
prevenir daños a la propiedad o lesiones personales.
Precaución básica antes del uso
Lea todas las instrucciones antes de usar el
lavavajillas.
Este manual no abarca todas las posibles
condiciones y situaciones que pueden ocurrir.
Utilice el lavavajillas sólo para la función prevista como
se describe en este manual.
Al cargar los artículos a ser lavados:
-
Cargue objetos afilados y cuchillos de manera que
no puedan dañar el sello de la puerta y
la cuba de lavado.
-
Cargue objetos afilados y cuchillos con las asas
hacia arriba para reducir el riesgo de lesiones.
No lave los artículos de plástico a menos que estén
indicados
como aptos para lavavajillas, si no está indicado,
v
erifique con el fabricante acerca de recomendaciones, ya
que
los artículos
que no están aptos para lavavajillas pueden
derretirse y
crear un riesgo potencial de incendio.
Si el lavavajillas drena en un triturador de alimentos,
asegúrese de que
el mismo
esté completamente vacío antes
de
encender el lavavajillas.
No juegue con los controles.
No opere su lavavajillas a menos que todos
los paneles del gabinete estén en el lugar correcto.
No toque el elemento calefactor durante o
inmediatamente después de su uso, especialmente si
se ha seleccionado la opción de desinfección.
Para reducir el riesgo de lesiones, no permita que los niños
jueguen en o sobre el lavavajillas.
No permita que los niños rompan, se sienten o se paren en
la puerta
o estantes del lavavajillas.
Bajo ciertas condiciones, se puede
p
roducir gas hidrógeno en un sistema de agua caliente que
no se ha
utilizado durante dos
o más semanas. EL GAS
H
IDRÓGENO ES EXPLOSIVO. Si el sistema de agua
caliente
no ha sido usado por un largo período, antes
de usar el lavavajillas, encienda tod
os los grifos de agua
caliente
y deje fluir el agua por varios
minutos. Esto
liberará cualquier gas hidrógeno acumulado.
El gas hidrógeno es inflamable. No
fume o utilice una llama abierta durante este
tiempo.
No almacene o use materiales combustibles,
gasolina u otros vapores y
líquidos
inflamab
les en la cercanía de este u otro
aparato.
Use solo detergentes o agentes de enjuague
recomendados
para el uso en lavavajillas y
manténgalos fuera del alcance de los niños.
Mantenga a los niños menores y bebes lejos del
lavavajillas cuando esté funcionando.
No use el lavavajillas si tiene la corriente de
energía o el enchufe dañado, no enchufe el
lavavajillas a un tomacorriente dañado. El no
respectar
estas instrucciones puede resultar en
una descarga eléctrica.
Retire la puerta del compartimiento de lavado
cuando retire o reemplace un lavavajillas viejo..
2
2

CARACTERÍSTICAS DE SU NUEVO LAVAVAJILLAS
Especificaciones
Capacidad
Dimensión
Fuente de alimentación
Uso de energía nominal
Presión del suministro de agua
10 ajustes de lugar
23 . 5 x 22.6 x 32.4 pulgadas (A x A x P)
120 voltios, 60 Hz
Motor de Lavado 100W Calentador 700W
5.8 ~ 145 psi (0.04 ~ 1MPa)
1
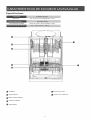
6
2
3
5
4
7
1 Cerradura
2 Cesta superior
3 Brazo rociador superior
4 Cesta de cubiertos
5 Cesta inferior
6
7
Estante para tazas
Elemento de calefacción
3

CARACTERÍSTICAS DE SU NUEVO LAVAVAJILLAS
Sistema de Filtrado
Su lavavajillas tiene un Sistema de Filtros múltiple.
En el sistema hay tres filtros de malla.
Puede separar el agua sucia y el agua limpia en
diferentes compartimientos.
El sistema de fil
tros múltiple ayuda a su
lavavajillas a obtener un mejor rendimiento
con menos agua y menos energía.
Sistema de Lavado Inteligente
Su lavavajillas tiene un Sistema de Lavado Inteligente. Cuando se coloca una carga parcial de platos ligeramente sucios en la
unidad,
se realizará automáticamente un ciclo de lavado similar a un lavado corto.
Cuando se coloca una carga completa de platos muy sucios en la unidad, se realizará automáticamente un ciclo de lavado
pesado.
Puede determinar el tipo de ciclo necesario para limpiar la vajilla y limpiará así de la manera más eficiente cada vez.
比例 1.000
4

CARACTERÍSTICAS DE SU NUEVO LAVAVAJILLAS
Cómo limpia su lavavajillas
Su lavavajillas limpia rociando
una mezcla de agua caliente y detergente
a través de los brazos de
rociado contra
las superficies sucias.
El lavavajillas se llena de agua
cubriendo
el área del filtro. El agua es después
bombeada a través del filtro múltiple
y los brazos de rociado. Las partículas de
suciedad bajan por el drenaje
.
A
medida que el agua es bombeada hacia
afuera, se reemplaza con agua limpia.
El numero de llenados de agua puede variar
con el ciclo que se utiliza.
Inicio
1 Cargue el lavavajillas (Vea las secciones de preparación y
carga de la vajilla)
2 Añada el detergente (Ver Llenado del dispensador de detergente)
3 Añada el abrillantador (Ver Llenado del dispensador de
abrillantador).
4 Seleccione el CICLO deseado (Ver Tabla de Ciclos)
5
Elija la OPCIÓN deseada (Ver Panel de Control)
La luz indicadora por encima
del botón se iluminará cuando se
selecciona.
6
Abra el grifo de agua caliente más cercano al lavavajillas
hasta que el agua esté caliente, después ciérrelo.
7
Para comenzar, presione Comenzar/Cancelar (Ver Panel de
Control). A continuación, cierre la puerta.
Nota:
Su lavavajillas tiene los controles montados
en el frente de la puerta. La puerta debe estar
cerrada primero si desea operar la máquina.
Selección de Ciclos de Lavado
Los tiempos de cada ciclo son aproximados y varían con las
opciones seleccionadas. El agua caliente
es necesaria para activar
el detergente y derretir l
a suciedad de los alimentos grasos. Un
sensor automático
comprobará la temperatura del agua entrante. Si
no
está a la temperatura adecuada, el temporizador
retrasará el ciclo para permitir el calentamien
to automático del agua
durante el lavado principal. Cuando se selecciona el lavado HI
-TEMP
se garantiza una temperatura aún mayor para manejar
cargas de suciedad más pesadas.
5

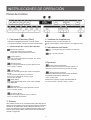
INSTRUCCIONES DE OPERACIÓN
Panel de Control
4
5
2
3
6
1
1. Comenzar/Cancelar (Start)
Selecciona el programa de lavado o pone en pausa
el programa de lavado cuando la máquina está trabajando.
4. Ventana de visualización
Muestra las horas y minutos restantes del
ciclo en funcionamiento
, retraso del inicio, los códigos de error,
etc.
2. Selecciones de Ciclos de Lavado
Botones de programas
T
oque para seleccionar el programa,
el indicador correspondiente se iluminará.
Pesado (Heavy)
Este ciclo es para platos difíciles de limpiar, muy sucios,
ollas, sartenes y platos.
Normal (Normal)
Este es un programa estándar. Es para
vajilla de cena
sucia normal o cubiertos.
Ligero (Light)
Es
el ciclo adecuado para limpiar vajillas normalmente
sucias
y es el programa más eficiente en términos
de consumo combinado de energía y agua
para ese tipo de vajilla.
Vidrio (Glass)
Para cargas ligeramente sucias, como vasos, cristal
es
y porcelana fina.
Rápido (Quick)
Un lavado más corto para cargas ligeramente sucias
que no necesitan secado.
Enjuague (Rinse)
Utilícelo para enjuagar
platos, vasos y cubiertos
que no se lavarán de inmediato.
5. Indicadores de Estado
Detergente/enjuague necesita ser rellenado
Fin del programa
6 Opciones
Secado caliente (Heated Dry)
Cuando se selecciona la función "
Secado caliente", el
calentador funcionará durante el proceso de secado.
Alta temperatura (Hi Temp)
Cuando se selecciona la función
«Lavado HI-TEMP»,
la temperatura del agua se mantendrá
a 60℃ (140℉) máx.
Advertencia: La opción Hi Temp está disponible con
los ciclos "Pesado", "Normal", "ECO" y "Vidrio".
3. Retraso
Para retrasar el inicio de un ciclo seleccionado, pulse el botón de
Retraso de Inicio
(Delay) hasta que aparezca el tiempo de retraso
deseado en la pantalla LED. Puede retrasar el inicio de 1 a
24
horas. Para cancelar la opci
ón de Retraso de Inicio antes de que
termine
el período de retraso, pulse el botón de Inicio/Cancelar
durante 3-5 segundos.
6

FUNCIONAMIENTO DEL LAVAVAJILLAS
Ventana de Estado
H:01- H:24
Si se elige la opción Retras
o de Inicio,
el número de horas de retr
aso del inicio
se mostrará en la ventana de estado.
2:25-0 :00
Después de que la máquina comience a
funcionar,
el tiempo restante del ciclo
seleccionado se mostrará en la ventana.
Indicación de Error
En determinadas situaciones que son críticas
para el fun
cionamiento de la máquina y una
utilización
segura, el control se apagará
e indicará un código de error
(Ver Códigos de error en la página 18).
Si se muestran códigos de error, póngase
en contacto con el distribuidor o servicio
al cliente.
Ellos podrán pro
porcionar asistencia
para
resolver el problema y /o localizar
el técnico de servicio autorizado, si es necesario.
NOTA
El tiempo restante podría repentinamente
aumentar o bajar
de varios minutos.
Esto significa que el sensor inteligente ha
comprobado el ni
vel de suciedad y ha
determinado
si se necesitan rellenos de agua
adicionales o si
se pueden eliminar los rellenos de
agua previstos.
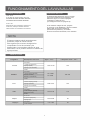
Tabla de Ciclos
Programa
Descripción del Ciclo
Pre Lavado
Lavado Principal (60℃)
Agua
(
L/G
)
Tiempo del Ciclo
(
min
)
Pesado
Enjuague (65℃
)
Enjuague (con Sani 69℃)
Secado
Pre Lavado
Lavado Principal
(50-55
℃
)
19 7L/5. 2G
155
NORMAL
Enjuague
(58-60
℃
)
Enjuague (con Sani69℃)
Secado
Pre Lavado
Lavado Principal
(45-50
℃
)
9.5~18.5L/
2.5~4.9G
105~135
ECO
Enjuague
(50-55
℃
)
Enjuague (con Sani69℃)
Secado
Pre Lavado
Lavado Principal (48-50℃)
Enjuague
(50-55
℃
)
Secado
Pre Lavado
15 5L/4.1G
105
Vidrio
15.5L/4.1G
1 01
Rápido
Enjuague
Lavado Principal (50℃)
Enjuague (55)
Pre Lavado
Lavado Principal
12.5L/3.3G
6.7L/1.8G
60
20
7

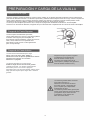
PREPARACIÓN Y CARGA DE LA VAJILLA
Preparación de la vajilla
Raspe los pedazos grandes de alimentos, huesos, restos, palillos, etc. El sistema de lavado de filtrado continuo eliminará las
partículas de alimentos restantes. Los alimento
s quemados y adheridos deben aflojarse antes de la carga. Vacíe los líquidos de
vasos y tazas. Alimentos como mostaza, mayonesa, vinagre, jugo de limón y productos a base de
tomate pueden causar
decoloración
del acero inoxidable y plásticos si permanecen durante un largo período de tiempo.
A menos que el lavavajillas
opere de una vez, lo mejor es enjuagar estas suciedades de alimentos. Si el lavavajillas
se drena en un triturador de alimentos, asegúrese de que el triturador esté completamente vacío antes de iniciar el lavavajillas.
Carga de la Cesta Superior
La cesta superior está diseñada para tazas,
vasos, platos pequeños, cuencos y artículos de plástico
marcados como
seguros para lavavajillas, etc.
Para obtener mejores resultados, coloque los cuencos,
taz
as, vasos, sartenes con la superficie sucia
hacia abajo o hacia el centro. Incline ligeramente
para un mejor drenaje.
Carga de la Cesta Inferior
La cesta inferior está diseñada para cargar
platos, cuencos de sopa, platos, platillos y
utensilios de cocina.
El espacio ajustable de la cesta le
permitirá cargar artículos con una altura
máxima de 11 pulgadas.
Los dientes plegables en la cesta inferior
facilitan la carga de esos artículos extra grandes
y difíciles de montar. Los dientes pueden dejarse
hacia arrib
a para un uso normal o plegarse
hacia abajo para una carga más flexible. Pliegue hacia
abajo para más espacio
para cargar ollas o sartenes
grandes.
Asegúrese de que los platos cargados
no interfieran con la rotación del
brazo de
rociado central, que se
enc
uentra en la parte inferior de la
cesta superior. (Verifique esto girando el
brazo de rociado central a mano.)
Los artículos grandes deben colocarse
a l
os bordes para que no
interfieran con la rotación del brazo
de rociado central, y
asegurarse de
que no i
mpidan que el dispensador
de detergente se abra.
Los artículos grandes deben girarse para
que las caras interiores miren hacia abajo,
y
asegurarse de que estos artículos
no interfieran con la rotación del
brazo de rociado inferior.
8

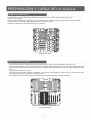
PREPARACIÓN Y CARGA DE LA VAJILLA
Carga de la Cesta Inferior
La cesta inferior ha sido especialmente diseñada para platos de cena, cuencos de sopa, platos, ollas, tapas,
cacerolas
y otros platos.
Cargue artículos grandes como sartenes y ollas en el lavavajillas
de manera tal que sus lados abiertos miren hacia abajo.
Recomendamos
cargar tazas, vajilla y platos pequeños en la cesta superior.
Consulte los patrones de carga recomendados a continuación.
10 ajustes de lugar
Carga de la Cesta Superior
La cesta superior ha sido diseñada para platos pequeños, tazas, vasos y artículos de plástico marcados como
"seguros para lavavajillas". Cargue sus platos en el lavavajillas en dos medias filas, de modo que la parte delantera de cada
plato mire hacia la parte trasera
del plato de adelante, y los lados abiertos de los platos en el centro del lavavajillas se miren
entre sí.
Vea las ilustraciones a continuación.
Asegúrese de que los platos cargados no interfieran con la rotación de la boquilla que se encuentra en la parte inferior
de la
cest
a superior. (Verifique esto girando la boquilla a mano.)
Al cargar platos, tire de la cesta superior lo suficiente para que pueda cargarla sin golpear la mesada.
10 ajustes de lugar
9

PREPARACIÓN Y CARGA DE LA VAJILLA
Carga de la Cesta de los Cubiertos
La cesta de cubiertos se puede dividir
en tres módulos separados que se pueden
utilizar
tanto en estantes superiores como
inferiores.
1. Cucharas
2. Cuchillos
3. Tenedores de
ensalada
4. Tenedores
5. Cucharas grandes
6 Tenedores grandes
Agregar una Vajilla
Para agregar o quitar artículos después
de que se inicie el ciclo de lavado:
1 Abra ligeramente la puerta y espere unos
segundos hasta que la acción de lavado se
detenga antes de abrirse por completo.
2. Agregue el artículo.
3. Cierre la puerta firmemente para que quede trabada, a
continuación dentro
de los 4 segundos siguientes el ciclo
se reanudará automáticamente.
1
6
5
1
2
3
3
1
2
3
3
1
2
3
1
2
3
1
2
3
3
1
1
3
3
1
1
PRECAUCIÓN
PARA EVITAR LESIONES POR
QUEMADURAS: Abra ligeramente
la puerta y esper
e hasta que los brazos de
rociado y la acción de lavado se detengan. Agua
caliente puede
salir del lavavajillas. El no
seguir
estas indicaciones puede resultar en lesiones.
4
5
1
1
4
2
4
4
2
4
2
1
1
4
2
4
4
2
4
4
1
1
1
1
1
1
En
Llenado del dispensador del abrillantador
El abrillantador mejora en gran medida el secado y
reduce las manchas de agua y
la formación de
películas
. Sin
abrillantador el interior de sus platos y
lavavajillas tendrán humedad excesiva.
La opción de Secado Caliente no funcionará
tan bie
n sin ayuda del abrillantador. El dispensador
del abrillantador,
situado junto al compartimento de
detergente,
libera automáticamente una cantidad
medida de abrillantador durante el último enjuague.
1
2
3
4
5
6
ADVERTENCIA
1. No permita que un artículo se vaya hacia
a la parte inferior.
2. Asegúrese de que nada sobresalga
de la cesta o que el
estante bloquee el brazo inferior
del rociado.
Si el abrillantador está bajo, la luz del abrillantador
se ilumina al principio y al final
del ciclo indicando
que es el momento de rellenar.
10

PREPARACIÓN Y CARGA DE LA VAJILLA
Llenado del dispensador del abrillantador
Su lavavajillas está diseñado para utilizar un abrillantador líquido.
El uso de enjuague mejora en gran medida el rendimiento de
secado después de
l
enjuague final. No utilice un enjuague sólido o de tipo barra. En condiciones
normales,
el abrillantador durará aproximadamente un mes. Lo mejor es
mantenerlo lleno, pero no llenar en exceso.
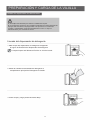
Llenado del dispensador de detergente
1 Abra la tapa del dispensador de detergente empujando
el seguro de liberación del dispensador de detergente.
La tapa siempre está abierta al final de un ciclo de lavado.
2 Añada la cantidad recomendada de detergente al
compartimento principal del detergente de lavado.
3 Cierre la tapa y luego presiónela hacia abajo.
11

PREPARACIÓN Y CARGA DE LA VAJILLA
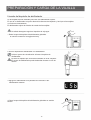
Llenado del depósito de abrillantador
Su lavavajillas ha sido diseñado para usar solo abrillantador líquido.
El uso de un abrillantador en polvo obstruirá la abertura del d
epósito y hará que el lavavajillas
no funcione correctamente.
El abrillantador mejora la eficacia de secado del lavavajillas.
No añada detergente regular al depósito de enjuague.
PRECAUCIÓN
1 Retire la tapa del depósito del abrillantador girándola
en sentido contrario a las agujas del reloj.
2 Llene el depósito de abrillantador con abrillantador.
Utilice el puerto de visualización al llenar el depósito de
abrillantador.
No llene el depósito por encima del indicador de nivel completo.
El exceso de abrilla
ntador puede desbordar durante el ciclo de
lavado.
PRECAUCIÓN
3 Agregue el abrillantador si la pantalla LED muestra "LSb".
Abrillantador restante.
4 Cierre la tapa del depósito del abrillantador girándola en sentido
horario.
12

MANTENIMIENTO DEL USUARIO
Mantener su lavavajillas limpio mejora su rendimiento, reduce las reparaciones
innecesarias y alarga su vida útil.
LIMPIEZA DEL EXTERIOR
Se recomienda limpiar los derrames en el exterior de su lavavajillas a medida que se producen. Utilice un paño suave
y húmedo en el
panel de control para limpiar suavemente los derrames y el polvo. No utilice benceno, cera, diluyente,
cloro blanqueador o
alcohol. Estos materiales pueden decolorar las paredes internas y causar manchas. No limpie el
lavavajillas rociando agua sobre él y evite dejar que el agua entre en contacto con cualquiera de las partes eléctricas.
Si su lavavajillas tiene un panel de puerta de acero inoxidable, puede limpiarlo con un limpiador de acero inoxidable
para electrodomésticos o un producto similar utilizando un paño limpio y suave.
LIMPIEZA DEL INTERIOR
Limpie el interior de su lavavajillas periódicamente para eliminar cualquier suciedad o partículas de alimentos. Limpie el
interior del
lavavajillas y la parte interior de la puerta con un paño húmedo. Recomendamos llenar el dispensador de
detergente
con detergente para platos y, a continuación, limpiar el lavavajillas periódicamente utilizando el ciclo Normal o
Express 60 con la opción de desinfección. Esto mantendrá su lavavajillas limpio.
Si t
odavía hay manchas blancas y olores en el lavavajillas, ejecute el ciclo normal con el lavavajillas vacío y sin detergente
hasta que se enjuague. Luego, interrumpa el ciclo y ponga una taza de 8 onzas de vi
nagre blanco en la cesta inferior.
Cierre el lavavajillas y deje que el ciclo termine.
PRECAUCIÓN
No retire el sello delantero de la cuba de lavado (el sello de goma largo que rodea la abertura del lavavajillas).
No toque el ELEMENTO CALEFACTOR durante o inmediatamente después de su
uso.
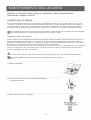
LIMPIEZA DE LOS FILTROS
1 Apague el lavavajillas.
Abrir
2 Gire el conjunto de filtros en sentido antihorario para aflojar y,
a continuación, retírelo.
3 Retire el filtro fino (plano, rectangular).
13

MANTENIMIENTO DEL USUARIO
4 Retire cualquier suciedad u otros restos de los filtros y luego
enjuáguelos con agua corriente.
5 Vuelva a montar los filtros en el orden inverso del desmontaje,
Reposicione el conjunto de filtros y gire en sentido de la flecha para cerrar.
Si la placa de filtros no está cerrada correctamente, su rendimiento
disminuirá.
PRECAUCIÓN
LIMPIEZA DE LAS BOQUILLAS
Si su lavavajillas no parece estar limpiando adecuadamente o las boquillas parecen obstruidas, puede limpiar
cada una de las boquillas. Al retirarlas, tenga cuidado, ya que pueden romperse.
Boquilla inferior
1 Compruebe si los orificios de las boquillas están
obstruidos
por partículas de alimentos.
2 Si se necesita
una limpieza, retire la boquilla tirando de
ella hacia arriba.
3 Limpie la boquilla y, a continuación,
presiónela de
nuevo en su lugar.
4 Compruebe si las boquillas están ajustadas
correctamente girándolas con las manos.
14

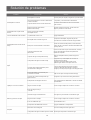
Solución de problemas
Problema
Causa posible
El lavavajillas no comienza
Solución
Cierre la puerta por completo, asegúrese de que esté trabada
La fuente de alimentación o la línea de alimentación Compruebe y conecte la fuente de alimentación
no están conectadas
El lavavajillas no comienza
La opción Retraso de Inicio ha sido seleccionada
El bloqueo para niños está activado
(Modelos seleccionados)
El lavavajillas emite un pitido al final
del ciclo
La luz del abrillantador está encendida
Indica el ciclo de lavado terminado,
el lavavajillas sonará
La pantalla LED muestra “Lsb”
El lavavajillas está conectado al agua fría
Agregar abrillantador
Compruebe el lavavajillas, asegúrese de que esté
correctamente conectado al suministro de agua caliente
Cuando se detecta suciedad pesada, el ciclo automático,
normal,
de ollas y de sartenes aumentará automáticamente
el tiempo del ciclo
Cuando se selecciona la opción de desinfección, el tiempo
de ciclo aumentará para
alcanzar la temperatura de
desinfección requerida
Utilice el lavavajillas cuando la presión del agua sea
normal
Asegúrese de que el lavavajillas esté conectado al
suministro de agua calient
e
Trate de no usar el lavavajillas cuando se esté
utilizando agua caliente en otra parte de la casa
Vuelva a cargar los platos como indica el manual
Agregue el detergente dependiendo de la dureza
del agua y del ciclo que haya elegido. Use detergente fresco
Consulte la sección Retraso de Inicio en este manual
para su reinicio
Desactive el bloqueo para niños, consulte la sección
Bloqueo para niños en este manual.
El lavavajillas funciona durante mucho
tiempo
El tiempo de ciclo variará debido a la suciedad
La opción de desinfección está
seleccionada
La presión del agua es temporalmente baja
La temperatura del agua de entrada es baja
La vajilla no está lo suficientemente
limpia
Los platos están cargados demasiado juntos
Uso inadecuado de detergente
El ciclo seleccionado no es adecuado para
la condición de suciedad
Los brazos de rociado están bloqueados por
algunos artículos
Elija otro ciclo para un tiempo de lavado más largo
Asegúrese de que el brazo de rociado gira libremente
Llene el dispensador de abrillantador o aumente la cantidad
de abrillantador.
Vuelva a cargar la vajilla como se indica en el manual
El dispensador de detergente está vacío
Vajilla que no se seca lo suficiente
Carga incorrecta de la vajilla
El ciclo que eligió no incluyó
el secado
La dureza del agua es demasiado alta
Manchas y película en la vajilla
Carga incorrecta de la vajilla
Se usó un abrillantador viejo
El dispensador de abrillantador está vacío
Está usando mucho detergente
Decapado
La temperatura del agua de entrada supera
los 158
℉
Elija el ciclo adecuado con el secado
Para aguas muy duras instale un suavizador de agua
Vuelva a cargar la vajilla como se indica en el manual
Use abrillantador fresco
Agregue abrillantador en el dispensador
Use menos detergente si tiene agua suave
Disminuya la temperatura de entrada de agua
15

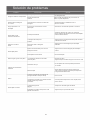
Solución de problemas
Problema
Detergente residual en el dispensador
El brazo de rociado está
obstruido
Causa posible
El detergente puede ser muy viejo
Solución
Use detergente fresco
Cargue la vajilla, asegurándose de que los brazos de
rociado no queden bloqueados
Añadir el detergente y abrillantador como se
indica en el manual
Seleccione el ciclo adecuado explicado en el manual
El dispensador de detergente
no se cierra
El agua permanece en el
lavavajillas
Funcionamiento incorrecto de la cubierta del
detergente
El ciclo previo no ha terminado o ha sido
interrumpido
El drenaje está obstruido
El lavavajillas no esta
drenando correctamente
La manguera de drenaje está
anudada
Verifique la cámara de aire, si tiene una. Asegúrese
de que el
triturador de alimentos está vacío si el lavavajillas
está conectado al triturador
Asegúrese de que la manguera de drenaje está conectada
correctamente al lavabo
Asegúrese de usar solo detergente para lavavajillas
automático
Espuma en la cuba de
lavado
Está siendo usado un detergente
incorrecto
Espuma excesiva causada por el uso de un
detergente incorrecto
El lavavajillas pierde
El lavavajillas no está nivelado
Asegúrese de usar solo el detergente para lavavajillas
correcto
Nivele el lavavajillas
Marcas negras o grises en los platos
Los utensilios de aluminio se han frotado
contra los platos
Reordene los platos
Asegúrese de que la entrada de agua no sea menor a 120H
Suciedad de café y té
Interior de la cuba de lavado
manchado
Manchas rojizas
Use un limpiador de manchas aprobado para eliminar
la suciedad
Algunos alimentos a base de tomate causarán esto,
Usar el ciclo de enjuague únicamente justo después de
la carga disminuirá las manchas
Esto es normal
Sonido de la apertura del compartimento de
detergente/bomba
de drenaje e drenaje
Ruidos
Un objeto duro ha entrado en el módulo de lavado.
Cuando el objeto
baje, el sonido
se detendrá
La válvula del agua está
apagada
El lavavajillas no se llena
El pestillo de la cerradura de la puerta no está
ajustado correctamente
Si el ruido persiste después de un ciclo completo, llame
para un servicio.
Verifique si la válvula del agua está abierta
Asegúrese de que la puerta está cerrada
16

Códigos de Errores
Cuando ocurren algunas fallas de funcionamiento, el aparato mostrará códigos de error para advertirle:
E1
durante el paso de entrada de agua, si el medidor de flujo
no puede detectar el agua definida después de 4 minutos,
el lavavajillas avisará un mensaje E1.
1. verifique el suministro de agua
2. verifique la válvula de entrada
3. verifique la entrada
4. verifique el medidor de flujo
5. verifique el interruptor de presión
6. verifique el drenaje
7. verifique el PCB
1. verifique el calentador
2. verifique el termostato
3. verifique el PCB
E3
(Solo aparece en el modo de fábrica)
cuando la temperatura no puede alcanzar el valor definido
después de 90 minutos, el lavavajillas avisará un mensaje E3.
E4
E6
E7
E9
si el agua se inunda en el fondo y provoca el
movimiento defectuoso del interruptor, el la
vavajillas avisará
un mensaje E4
1. Verifique el uso del detergente
2. Verifique que el aparato
está nivelado
3. verifique el micro interruptor
4. verifique la bomba de drenaje
5. Verifique la cantidad de agua de llenado
6. Busque donde está la pérdida
1. verifique la temperatura de entrada de agua
2. verifique el termostato
3. verifique el PCB
(Solo aparece en el modo de fábrica)
E6
- el sensor térmico está cortado
E7 - el sensor térmico está corto
Si un botón es presionado por mas de 30 seg, el
el lavavajillas avisará un mensaje E9.
El botón ha quedado trabado, la advertencia se
resuelve cuando se libera el botón.
Ed
Si el panel detecta que los datos de comunicación son
anormales durante más de 30 seg, el lavavajillas
avisará un mensaje de datos de comunicación Ed
Anomalía de comunicación, la advertencia se resuelve
cuando los datos de comunicación vuelven
a la normalidad.
ADVERTENCIA
Si se produce un desborde, apague el suministro de agua principal antes de llamar a un servicio.
Si hay agua en la bandeja
de base debido a un sobrellenado o una pequeña pérdida, el agua debe
retirarse antes de reiniciar el lavavajillas.
17
Codigo de Error
Mensaje de Error
Posible motivo
Síntoma
-
 1
1
-
 2
2
-
 3
3
-
 4
4
-
 5
5
-
 6
6
-
 7
7
-
 8
8
-
 9
9
-
 10
10
-
 11
11
-
 12
12
-
 13
13
-
 14
14
-
 15
15
-
 16
16
-
 17
17
-
 18
18
-
 19
19
-
 20
20
-
 21
21
-
 22
22
-
 23
23
-
 24
24
-
 25
25
-
 26
26
-
 27
27
-
 28
28
-
 29
29
-
 30
30
-
 31
31
-
 32
32
-
 33
33
-
 34
34
-
 35
35
-
 36
36
-
 37
37
-
 38
38


Forno FDWBI8067-24S El manual del propietario
- Categoría
- Lavaplatos
- Tipo
- El manual del propietario
- Este manual también es adecuado para
En otros idiomas
- English: Forno FDWBI8067-24S Owner's manual
Otros documentos
-
LG Electronics LDT9965BD Manual de usuario
-
LG LSDF9962ST El manual del propietario
-
LG LDF8072ST El manual del propietario
-
LG 8806084006028 El manual del propietario
-
LG LDS5540ST El manual del propietario
-
LG LSDF9962ST/00 El manual del propietario
-
LG LDF7774BD/00 El manual del propietario
-
Kenmore 12339 El manual del propietario
-
LG 8806084350503 El manual del propietario
-
Glacier Bay 29607 Guía de instalación