
- O4outdoor unit


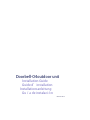
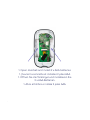
Doorbell features
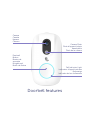
Doorbell Rear features
Doorbell
Button
Bouton de
sonnette
Klingelknopf
Botón de timbre
Call Indicator Light
Indicateur d’appel lumineux
Rufanzeige
Indicador de luz de llamada
Camera Flash
Flash d’appareil photo
Kamerablitz
Flash de la cámara
Camera
Caméra
Kamera
Cámara
Eule Photo Doorbell Userguide.indd 2 27/11/2017 08:56:32


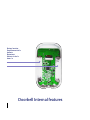
Doorbell Internal features
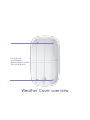
Weather Cover overview
Fixing Screw
Vis de xation
Befestigungsschraube
Tornillo de jación
Eule Photo Doorbell Userguide.indd 5 27/11/2017 08:56:32

Inner ringer overview
LED Status Light
Voyant d’état à DEL
LED-Statusleuchte
Luz de estado LED
Function Key
Clé de fonction
Funktionstaste
Tecla de función
Speaker
Haut-parleur
Lautsprecher
Altavoz
Eule Photo Doorbell Userguide.indd 6 27/11/2017 08:56:33

Batteries
Installation Guide
Guide d’installation
Installationsanleitung
Guía de instalación
Inner ringer overview
Eule Photo Doorbell Userguide.indd 7 27/11/2017 08:56:33

1. Open doorbell and install 2 x AAA batteries.
1. Ouvrier la sonnette et installez 2 piles AAA.
1. Önen Sie die Türklingel und installieren Sie
2 x AAA-Batterien.
1. Abra el timbre e instale 2 pilas AAA.
Eule Photo Doorbell Userguide.indd 8 27/11/2017 08:56:33

Eule Photo App
Installation Guide
Guide d’installation de l’application
App Installationshandbuch
Guía de instalación de la aplicación
Eule Photo Doorbell Userguide.indd 9 27/11/2017 08:56:33

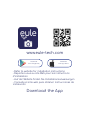
Download the App
Download
from Google Play
Download
from App Store
www.eule-tech.com
- Refer to website for installation instructions
- Reportez-vous au site Web pour les instructions
d’installation
- Auf der Website nden Sie Installationsanweisungen
- Consulte el sitio web para obtener instrucciones de
instalación
Eule Photo Doorbell Userguide.indd 10 27/11/2017 08:56:33

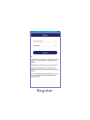
Register
Eule Photo Doorbell Userguide.indd 11 27/11/2017 08:56:33

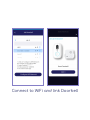
Connect to WiFi and link Doorbell
After installation the latest image
will appear on the app home page
Eule Photo Doorbell Userguide.indd 12 27/11/2017 08:56:34

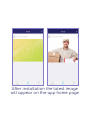
After installation the latest image
will appear on the app home page
Eule Photo Doorbell Userguide.indd 13 27/11/2017 08:56:34

Installation Guide
Guide d’installation
Installationsanleitung
Guía de instalación
Eule Photo Doorbell Userguide.indd 14 27/11/2017 08:56:34

Suggested xing locations
The eule doorbell can be xed in place either
by the 3M tape or by screwing to your door-
frame or other suitable location.
La sonnette d’eule peut être xée en place par
le ruban 3M ou en vissant à votre porte ou à
un autre endroit approprié.
Die Eule-Türklingel kann entweder mit dem
3M-Band oder durch Verschrauben an Ihrem
Türrahmen oder an einer anderen geeigneten
Stelle befestigt werden.
El timbre eule se puede jar en su lugar medi-
ante la cinta de 3M o atornillándolo al marco
de la puerta u otra ubicación adecuada.
Eule Photo Doorbell Userguide.indd 15 27/11/2017 08:56:34

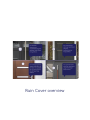
Rain Cover overview
Eule Photo Doorbell Userguide.indd 16 27/11/2017 08:56:35

Rain Cover overview
Door Mounting Options
1. Screw Mounting
2. Screw Mounting with
weather cover
3. Tape Mounting
4. Tape Mounting with
weather cover
Eule Photo Doorbell Userguide.indd 17 27/11/2017 08:56:35

Screw Mounting
Installation Guide
Guide d’installation
Installationsanleitung
Guía de instalación
Eule Photo Doorbell Userguide.indd 18 27/11/2017 08:56:35

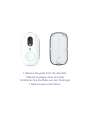
1. Remove the plate from the doorbell.
1. Retirez la plaque de la sonnette.
1. Entfernen Sie die Platte von der Türklingel.
1. Retire la placa del timbre.
Eule Photo Doorbell Userguide.indd 19 27/11/2017 08:56:35

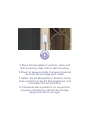
2. Place the backplate in position, mark and
drill mounting holes, then screw into place.
2. Placer la plaque arrière, marquez et percez
les trous de montage, puis vissez.
2. Setzen Sie die Rückplatte in Position, mark-
ieren und bohren Sie die Montagelöcher und
schrauben Sie sie dann fest.
2. Coloque la placa posterior en su posición,
marque y taladre los oricios de montaje,
luego atornille en su lugar.
D
R
I
L
L
&
S
C
R
E
W
D
R
I
L
L
&
S
C
R
E
W
Eule Photo Doorbell Userguide.indd 20 27/11/2017 08:56:35

3. Mount the doorbell onto the plate and
screw in retaining screw.
3. Monter la sonnette sur la plaque et vissez la
vis de retenue.
3. Montieren Sie die Türklingel auf die Platte
und schrauben Sie die Halteschraube ein.
3. Monte el timbre en la placa y atornille el
tornillo de retención.
S
C
R
E
W
I
N
S
C
R
E
W
I
N
S
C
R
E
W
I
N
S
C
R
E
W
I
N
Eule Photo Doorbell Userguide.indd 21 27/11/2017 08:56:35

Weather Cover Mounting
with Screws
Installation Guide
Guide d’installation
Installationsanleitung
Guía de instalación
Eule Photo Doorbell Userguide.indd 22 27/11/2017 08:56:35

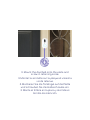
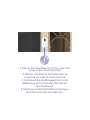
1. Place the rain cover in position, mark and
drill mounting screws into place.
1. Placer la protection contre la pluie, marquez
et percez les vis de montage.
1. Bringen Sie die Regenabdeckung in Position,
markieren Sie sie und bohren Sie die Befesti-
gungsschrauben.
1. Coloque la cubierta para lluvia en su
posición, marque y taladre los tornillos de
montaje en su lugar.
Eule Photo Doorbell Userguide.indd 23 27/11/2017 08:56:35

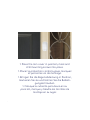
2. Mount the doorbell unit in the cover and
screw in the retaining screw.
2. Monter l’unité de la sonnette dans le
couvercle et vissez la vis de retenue.
2. Montieren Sie die Klingeleinheit in die
Abdeckung und schrauben Sie die Hal-
teschraube ein.
2. Monte la unidad del timbre en la tapa y
atornille el tornillo de retención..
S
C
R
E
W
I
N
S
C
R
E
W
I
N
S
C
R
E
W
I
N
S
C
R
E
W
I
N
Eule Photo Doorbell Userguide.indd 24 27/11/2017 08:56:35

3M Tape Mounting
(without Weather Cover)
Installation Guide
Guide d’installation
Installationsanleitung
Guía de instalación
Eule Photo Doorbell Userguide.indd 25 27/11/2017 08:56:35

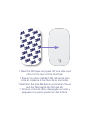
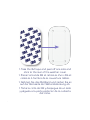
1. Take the 3M tape and peel o one side and
stick to the rear of the doorbell.
1. Prener le ruban adhésif 3M, retirez-le d’un
côté et collez-le à l’arrière de la sonnette.
1. Nehmen Sie das 3M-Band und ziehen Sie es
auf der Rückseite der Klingel ab.
1. Tome la cinta de 3M y despegue un lado y
péguese a la parte posterior del timbre.
Eule Photo Doorbell Userguide.indd 26 27/11/2017 08:56:35

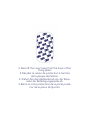
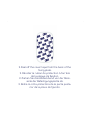
2. Peel o the cover tape from the back of the
xing plate.
2. Décoller le ruban de protection à l’arrière
de la plaque de xation.
2. Ziehen Sie das Abdeckband von der Rück-
seite der Befestigungsplatte ab.
2. Retire la cinta protectora de la parte poste-
rior de la placa de jación.
Eule Photo Doorbell Userguide.indd 27 27/11/2017 08:56:36

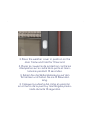
3. Place the doorbell in position on the door
frame and hold for 10 second.
3. Placer la sonnette en position sur le cadre
de la porte et maintenez-la pendant 10
secondes
3. Setzen Sie die Türklingel in Position auf dem
Türrahmen und halten Sie sie 10
Sekunden lang.
3. Coloque la timbre posterior en posición en
el marco de la puerta y manténgala
presionada durante 10 segundos.
Eule Photo Doorbell Userguide.indd 28 27/11/2017 08:56:36

3M Tape Mounting
(with Weather Cover)
Installation Guide
Guide d’installation
Installationsanleitung
Guía de instalación
Eule Photo Doorbell Userguide.indd 29 27/11/2017 08:56:36

1. Take the 3M tape and peel o one side and
stick to the rear of the weather cover.
1. Prener la bande 3M et retirez-la d’un côté et
collez-la à l’arrière de la couverture météo.
1. Nehmen Sie das 3M-Band und ziehen Sie es
auf der Rückseite der Wetterabdeckung ab.
1. Tome la cinta de 3M y despegue de un lado
y péguela a la parte posterior de la cubierta
del clima.
Eule Photo Doorbell Userguide.indd 30 27/11/2017 08:56:36

2. Peel o the cover tape from the back of the
xing plate.
2. Décoller le ruban de protection à l’arrière
de la plaque de xation.
2. Ziehen Sie das Abdeckband von der Rück-
seite der Befestigungsplatte ab.
2. Retire la cinta protectora de la parte poste-
rior de la placa de jación.
Eule Photo Doorbell Userguide.indd 31 27/11/2017 08:56:36

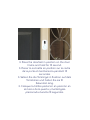
3. Place the weather cover in position on the
door frame and hold for 10 second.
3. Placer le couvercle de protection contre les
intempéries sur le cadre de la porte et main-
tenez-le pendant 10 secondes.
3. Setzen Sie die Wetterabdeckung auf den
Türrahmen und halten Sie sie 10 Sekunden
lang.
3. Coloque la cubierta del clima en posición
en el marco de la puerta y manténgala presio-
nada durante 10 segundos.
Eule Photo Doorbell Userguide.indd 32 27/11/2017 08:56:36

4. Mount the doorbell unit in the cover and
screw in the retaining screw.
4. Monter la sonnette sur la plaque et vissez
la vis de retenue.
4. Montieren Sie die Türklingel auf die Platte
und schrauben Sie die Halteschraube ein.
4. Monte la unidad del timbre en la tapa y
atornille el tornillo de retención..
S
C
R
E
W
I
N
S
C
R
E
W
I
N
S
C
R
E
W
I
N
S
C
R
E
W
I
N
Eule Photo Doorbell Userguide.indd 33 27/11/2017 08:56:36

FCC Statement
This equipment has been tested and found to comply wiht the limits for Class
B digital device, pursant to part 15 of the FCC rules. These limits are designed
to provide reasonable protection against harmful interference in a residential
installation. This equipment generates, uses and can radiate radio frequency
energy and, if not installed and used in accordance with the instructions,
may cause harmful interence to radio communications. However, there is no
guarantee that interference will not occur in a particular installation.
If this equipment does cause harmful interference to radio or television
reception, which can be determined by turning the equipment o or on, the
user is encouraged to try to correct the interference by one or more of the
following measures;
- Reorient or relocate the receiving antenna
- Increase the separation between the equipment and the receiver
Connect the queopment into an outlet on a circuit different from that
which the receiver is connected.
- Consult an experienced radio/TV technician for help.
FCC ID: 2AOJ2-D2-A
FCC Radiation Exposure Statement
This equipment complies with FCC RF radiation exposure limits set forth for an
uncontrolled enviroment. This transmitter should be installed and operated
a minoimum distance of 20 centimeters between the radiator and your
body and must not be co-located or operated in conjunction with any other
antenna or transmitter. This equipment complies with Part 15 of the FCC Rules.
Operation is subject to the following two conditions;
(1) This device may not cause harmful interference, and
(2) This device must accept any interference received, including interference
that may cause undesired operation.
Caution!
Any changes or modications to this unit not expressly approved by the party
responsible for compliance could void the user’s authority to operate the
equipment.
Eule Photo Doorbell Userguide.indd 34 27/11/2017 08:56:36

Safety Warnings
This device is not intended for use by persons (including children) with
reduced physical, sensory or mental capacities, or lack of experience or
knowledge, unless they have been given supervision or instruction concerning
use of the applliance responsible for their safety.
Children should be supervised to ensure that they do not play with the appli-
ance. The wall adapter is designed for internal use only.
Before inserting the batteries. check tht the contacts in the device and on the
batteries are clean, and clean them if necessary. Note the polarity (+/-) when
inserting the batteries.
Do not throw the batteries into a re, short-circuit or dismantle them. Keep
children away from batteries. Seek medical attention immediately if a battery
is swallowed.
Consignes de sécurité
Cet appareil n’est pas destiné à être utilisé par des personnes (notamment
des enfants) dont les capacités physiques, sensorielles ou mentales sont
réduites, ou qui n’ont pad d’expérience et de connaissances, à moins qu’elle
ne soient suveillées ou instrites concernant l’utilisation de l’appareil par une
personne responsible de la sécurité.
Les enfants doivent être surveillés pour s’assurer qu’ils ne jouent pas avec
l’appareil. L’adaptateur mural est conçu pour un usage interne uniquement.
Avant d’insérer les piles. Vériez que les contacts de l’appareil et des piles
sont propres et nettoyez-les si nécessaire. Respectez la polarité (+/-) lors de
l’insertion des piles.
Ne jetez pas les piles dans un incendie, créer de court-circuitez ou les déman-
teler. Gardez les enfants loin des piles. Consulter un médecin immédiatement
si une pile est avalée.
Eule Photo Doorbell Userguide.indd 35 27/11/2017 08:56:36

EU Declaration of Conformity
We, Eule, declare that this device is in compliance with the essential requirements and other
provisions of Directive 1999/5/EC.
English
We, Eule, declare that this device is in compliance with the essential requirements and other
provisions of Directive 1999/5/EC.
Deutsch (German)
Wir, Eule, erklären, dass dieses Gerät die grundlegenden Anforderungen und andere Bestimmun-
gen der Richtlinie 1999/5 / EG erfüllt.
Français (French)
Nous, Eule, déclarons que cet appareil est conforme aux exigences essentielles et aux autres
dispositions de la directive 1999/5 / CE.
Español (Spanish)
Nosotros, Eule, declaramos que este dispositivo cumple con los requisitos esenciales y otras
disposiciones de la Directiva 1999/5 / CE.
Nederlands (Dutch)
Wij, Eule, verklaren dat dit apparaat voldoet aan de essentiële vereisten en andere bepalingen
van Richtlijn 1999/5 / EG.
Italiano (Italian)
Noi, Eule, dichiariamo che questo dispositivo è conforme ai requisiti essenziali e alle altre dispo-
sizioni della direttiva 1999/5 / CE.
Dansk (Danish)
Vi, Eule, erklærer, at denne enhed overholder de væsentlige krav og andre bestemmelser i direktiv
1999/5 / EF.
Svenska (Swedish)
Vi, Eule, förklarar att denna enhet överensstämmer med de väsentliga kraven och andra bestäm-
melser i direktiv 1999/5 / EG.
Norge (Norwegian)
Vi, Eule, erklærer at denne enheten er i samsvar med de vesentlige kravene og andre bestemmel-
ser i direktiv 1999/5 / EF.
Polskie (Polish)
My, Reguła, oświadczamy, że to urządzenie jest zgodne z zasadczy mi wymaganiami i innymi
postanowieniami dyrektywy 1999/5 / WE.
Eule Photo Doorbell Userguide.indd 36 27/11/2017 08:56:36

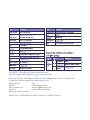
EU USERS - Eule oers a 2 year limited warranty
All other regions Eule oers a 1 year limited warranty
Email our Service and Support team at support@eule-tech.com . For FAQ’s and
installation advise please see www.eule-tech.com
Manufacturer: Eule
Website: www.eule-tech.com
After-sale service: support@eule-tech.com
Warranty: 2 year limited warranty
Importer and distributor:
Strax GmbH. 52-54 Belgische Allee, Troisdorf, D-53842, Germany
Eule Photo Doorbell Userguide.indd 37 27/11/2017 08:56:36

Congratulations your doorbell is
installed.
Félicitations, votre sonnette est
installée.
Herzlichen Glückwunsch, dass Ihre
Türklingel installiert ist.
Felicitaciones, tu timbre está insta-
lado
.
Eule Photo Doorbell Userguide.indd 38 27/11/2017 08:56:37
-
 1
1
-
 2
2
-
 3
3
-
 4
4
-
 5
5
-
 6
6
-
 7
7
-
 8
8
-
 9
9
-
 10
10
-
 11
11
-
 12
12
-
 13
13
-
 14
14
-
 15
15
-
 16
16
-
 17
17
-
 18
18
-
 19
19
-
 20
20
-
 21
21
-
 22
22
-
 23
23
-
 24
24
-
 25
25
-
 26
26
-
 27
27
-
 28
28
-
 29
29
-
 30
30
-
 31
31
-
 32
32
-
 33
33
-
 34
34
-
 35
35
-
 36
36
-
 37
37
-
 38
38


en otros idiomas
- français: Eule Doorbell-O4 Guide d'installation
- English: Eule Doorbell-O4 Installation guide
Otros documentos
-
Zhiyun Smooth X Essential Combo White (SM108) Manual de usuario
-
Eufy E8213 Guía del usuario
-
-
 Learning Resources LPK5460-GUD Manual de usuario
-
Byron DIC-23312 Instructions Manual
-
Silvercrest 284941 Assembly, Operating And Safety Instructions
-
Robin ProLine Manual de usuario
-
Byron DIC-24112 El manual del propietario
-
Netatmo Netatmo Smart Video Doorbell Guía de instalación
-
Marmitek DoorGuard 450 Manual de usuario
