ATEN CE350 Guía de inicio rápido
- Categoría
- Conmutadores KVM
- Tipo
- Guía de inicio rápido
Este manual también es adecuado para

Quick Start Guide
© Copyright 2012 ATEN
®
International Co., Ltd.
ATEN and the ATEN logo are trademarks of ATEN International Co.,
Ltd. All rights reserved. All other trademarks are the property of their
respective owners.
This product is RoHS compliant.
Part No. PAPE-1223-631G Printing Date: 12/2012
PS/2 KVM Extender
CE350 / CE370 PS/2 KVM Extender Quick Start Guide
Guide de mise en route rapide du système KVM PS/2 Extender CE350 / CE370
CE350 / CE370 KVM-Verlängerung für PS/2 Kurzanleitung
Guía rápida del sistema de extensión KVM para PS/2 CE350 / CE370
Requirements
Console
•AVGA,SVGA,SXGA,UXGA,WUXGA,ormultisyncmonitorcapableofthehighestresolution
thatyouwillbeusingonanycomputerintheinstallation
Note: IfyouconnectaDDCtypemonitortotheLocalUnit,themonitorthatconnectstothe
RemoteUnitmustbeabletosupportthehighestvideoresolutionthattheDDCmonitor
can provide
•APS/2keyboard
•APS/2mouse
•Stereomicrophoneandstereospeakers(optional)
Computers
Thefollowingequipmentmustbeinstalledoneachcomputerthatistobeconnectedtothesystem:
•AVGA,SVGA,SXGA,UXGA,WUXGA,ormultisynccard.
•APS/2keyboardport
•APS/2mouseport
•Speakerandmicrophoneports(optional)
Cables
•Foroptimalsignalintegrity,andtosimplifythelayout,westronglyrecommendthatyouusethe
highqualitycustomKVMCablethatisprovidedwiththispackage.
•Cat5ecableistheminimumrequiredtoconnecttheLocalandRemoteCE350/CE370Units.
Cableofalowerstandardwillresultindegradingofthevideosignal.Forbestperformance,we
stronglyrecommendCat5ecable.
MaximumCableDistances
Connection Distance
ComputertoLocalUnit(CE350L/CE370L) 10 m
LocalUnit(CE350L)toRemoteUnit(CE350R) 150 m
LocalUnit(CE370L)toRemoteUnit(CE370RQ) 300 m
RemoteUnit(CE350R/CE370RQ)tomonitor 20 m
Conguration minimale
Console
•MoniteurVGA, SVGA,SXGA,UXGA,WUXGAou Multisyncprenantenchargelaplushaute
résolution utilisée sur n’importe lequel des ordinateurs de l’installation
Remarque: si vous connectez un moniteur de type DDC à la console locale, le moniteur
connecté à la console distante doit pouvoir prendre en charge la résolution vidéo
la plus élevée du moniteur DDC
•UnclavierPS/2
•UnesourisPS/2
•Microphonestéréoethaut-parleursstéréo(enoption)
Ordinateurs
Les composants suivants doivent être installés sur chaque ordinateur à connecter au système :
•UnecarteVGA,SVGA,SXGA,UXGA,WUXGAouMultisync
•UnclavierPS/2
•UnesourisPS/2
•Portspourhaut-parleursetmicrophone(facultatifs)
Câbles
•Pourassureruneréceptionoptimaledusignaletsimplierl'installation,ilestfortement
recommandéd'utiliserlecâbleKVMspéciquedehautequalitéfourniaveccesystème
d'extension.
•LaconnexionentrelaconsolelocaleetlaconsoledistantedusystèmeCE350/CE370requiert
auminimumuncâbledecatégorie5e.Uncâbledecatégorieinférieurerisquededégraderle
signalvidéo.Pourdesrésultatsoptimaux,nousvousrecommandonsfortementd'utiliserun
câbledecatégorie5e.
Longueurdecâblemaximale
Connexion Distance
Ordinateuràunitélocale(CE350L/CE370L) 10 m
Unitélocale(CE350L)àunitédistante(CE350R) 150 m
Unitélocale(CE370L)àunitédistante(CE370RQ) 300 m
Unitédistante(CE350R/CE370RQ)àmoniteur 20 m
Voraussetzungen
Konsolen
•EinVGA-,SVGA-,SXGA-,UXGA-,WUXGA-oderMultisync-Monitor,derinderLageist,diehöchste
Auösungdarzustellen,dieSieaufeinemderzuinstallierendenComputerverwendenmöchten.
Hinweis: WennSieeinenDDC-MonitorandaslokaleGerätanschließen,müssenalleanderen
MonitoreebenfallsdiehöchsteAuösungunterstützen,diederDDC-Monitor
unterstützt.
•EinePS/2-Tastaur
•EinePS/2-Maus
•Stereo-MikrofonundStereo-Lautsprecher(optional)
Computer
AufdenComputern,diemitdemSystemverbundenwerdensollen,mussmindestensFolgendes
installiert sein:
•EineVGA-,SVGA-,SXGA-,UXGA-,WUXGA-oderMultisync-Grakkarte
•EinePS/2-Tastaur
•EinePS/2-Maus
•Lautsprecher-undMikrofonanschlussbuchsen(optional)
Kabel
•Daherundzur Vereinfachung desAufbaus empfehlenwir,dassSie dasmitgelieferte,
hochwertige,individuelleKVM-KabelsetdesHerstellersverwenden.
•ZurVerbindungderlokalenundentferntenCE350-/CE370-GerätewirdmindestenseinKat-5e-
Kabelsbenötigt. KabelgeringererStandardsführenzuschlechtererBildqualität. Umoptimale
Ergebnissezuerzielen,empfehlenwirdieVerwendungvonKat-5e-Kabel.
MaximaleKabellängen
Verbindung Entfernung
ComputermitlokalemGerät(CE350L/CE370L) 10 m
LokalesGerät(CE350L)mitentferntemGerät(CE350R) 150 m
LokalesGerät(CE370L)mitentferntemGerät(CE370RQ) 300 m
EntferntesGerät(CE350R/CE370RQ)mitMonitor 20 m
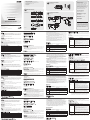
Hardwareübersicht
A
CE350L/CE370L(lokaleGeräte)Vorderseite
Requisitos
Consolas
•UnmonitorVGA, SVGA,SXGA,UXGA,WUXGA oMultiSynccapazderepresentar la
resolución más elevada que vaya a usar con cualquiera de los ordenadores a instalar.
Nota: Si conecta un monitor que admite la señal DDC a la consola local, el monitor de la
unidadremotadebeadmitirlaresoluciónmáximaposibleparaelmonitorDDC.
•UntecladoPS/2
•UnratónPS/2
•Micrófonoestéreoyaltavocesestéreo(opcional)
Ordenadores
En cada ordenador que vaya a conectar al sistema se tienen que instalar los siguientes
componentes:
•UnatarjetagrácaVGA,SVGA,SXGA,UXGA,WUXGAomultisync.
•UntecladoPS/2
•UnratónPS/2
•Puertosparaaltavocesymicrófono(opcionales)
Cables
•Paragarantizarunarecepciónoptima dela señalysimplificarelsistema,recomendamos
vivamentequeuseelcableKVMpersonalizadodealtacalidadincluidoconeldispositivo.
•Serequierecomo mínimouncabledeCat.5epara conectarlaunidadlocalylaremota
CE350/CE370.Uncabledecalidadinferiortiendeadeteriorarlaseñalgráca.Paramejores
resultados,lerecomendamosvivamentequeempleeuncabledeCat.5e.
Longitudesmáximasdecables
Conexión Distancia
Ordenadoraunidadlocal(CE350L/CE370L) 10 m
Unidadlocal(CE350L)aunidadremota(CE350R) 150 m
Unidadlocal(CE370L)aunidadremota(CE370RQ) 300 m
Unidadremota(CE350R/CE370RQ)almonitor 20 m
Presentación del hardware
A
CE350L/CE370L(unidadeslocales)-Vistafrontal
Hardware Review
A
CE350L/CE370L(LocalUnits)FrontView
1. KVM Port Section
2. RS-232 Serial Port
3.OperatingModePushbutton
4. LEDs
CE350R(RemoteUnit)FrontView
1. RS-232 Serial Port
2.PictureCompensationPushbuttons
3. LEDs
CE370RQ(RemoteUnit)FrontView
1. RS-232 Serial Port
2.DeskewandPictureCompensationPushbuttons
3. LEDs
Rear View / Side View
1. Power Jack
2. Audio Ports
3. Remote I/O
4. Console Ports
5. Grounding Terminal
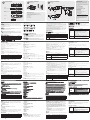
Hardware Installation
B
Rack Mounting
Forconvenience andexibility, theCE350/CE370can bemountedonsystemracks.Torack
mount a unit do the following:
1.UsingthescrewsprovidedintheRackMountKit,screwthemountingbracketintothetopor
bottomoftheunit.
2.Screwthebracketintoanyconvenientlocationontherack.
Note: Thesescrewsarenotprovided.WerecommendthatyouuseM3x5PhillipsTypeI
cross, recessed type screws.
SettingUp
C
Setting up the CE350 / CE370 PS/2 KVM Extender system is simply a matter of plugging in the
cables.MakesurethatalltheequipmenttobeconnectedupispoweredOff.
Description de l’appareil
A
CE350L/CE370L(Unitéslocales)–Vueavant
1. Section des ports KVM
2. Port série RS-232
3.Boutondesélectiondumodedefonctionnement
4. Voyants
CE350R(unitédistante)–Vueavant
1. Port série RS-232
2.Boutonsdecompensationdel'image
3. Voyants
CE370RQ(unitédistante)–Vueavant
1. Port série RS-232
2.Boutonsdecorrectiondudésalignementetdecompensationdel'image
3. Voyants
Vue arrière / Vue latérale
1. Prise d’alimentation
2. Ports audio
3. E/S distantes
4. Ports de console
5. Prise de terre
Installation du matériel
B
Montagesurbâti
Pourun plusgrand confort,lesconsolesCE350/CE370peuvent êtremontées surbâti.Pour
monteruneconsolesurbâti,procédezcommesuit:
1. Vissez le supportde montagesur bâtisur la partiesupérieure ou inférieuredel'appareil
commeindiquésurleschémaci-dessousàl'aidedesvisfournies.
2.Vissezlesupportaubâtiàn’importequelendroitvoussemblantadapté.
Remarque: lesvisnesontpasfournies.Ilestconseilléd'utiliserdesviscruciformesàtêteà
empreinte M3 x 5 Philips de type I.
Installation
C
L'installationdusystèmeKVMPS/2ExtenderCE350/CE370consistesimplementàconnecter
lescâbles.Assurez-vousquetouslesappareilsàconnectersontbienéteints.
1.KVM-Portabschnitt
2. Serieller RS-232-Port
3.Betriebsmodus-Auswahltaste
4. LED-Anzeigen
CE350R(entferntesGerät)Vorderseite
1. Serieller RS-232-Port
2.Bildkompensations-Drucktaster
3. LED-Anzeigen
CE370RQ(entferntesGerät)Vorderseite
1. Serieller RS-232-Port
2.Bildkompensations-Drucktasten
3. LED-Anzeigen
Rückseitige Ansicht / Seitliche Ansicht
1.Stromeingangsbuchse
2. Audioports
3. E/A zur Gegenstelle
4. Konsolports
5. Erdungsanschluss
Hardware installieren
B
Rack-Montage
Ummehr FlexibilitätundKomfortzubieten,kannder CE350bzw.CE370im Rackeingebaut
werden.UmeinGerätimRackeinzubauen,gehenSiefolgendermaßenvor:
1.VerwendenSiediemitgeliefertenSchrauben,umden MontagerahmenaufdieOber-bzw.
UnterseitedesGeräteszuschrauben(siehediefolgendeAbbildung):
2.VerschraubenSiedieHalterungmiteinemfreienundgeeignetgelegenenEinschubamRack.
Hinweis: DieSchraubensindnichtimLieferumfangenthalten.WirempfehlendieVerwendung
vonKreuzschlitzschraubendesTypsM3x5mitversenktemKopf.
Einrichtung
C
Die Installation der PS/2-KVM-Verlängerung CE350 / CE370 ist mit ein paar wenigen
Kabelanschlüssenerledigt.SchaltenSiealleanzuschließendenGeräteaus.
1. Verbinden Sie die Kabel der lokalen Konsolgeräte (Maus,Tastatur, Monitor, Mikrofon,
Lautsprecher)mitdenentsprechendenBuchsenimKonsolabschnittaufderRückseitedeslokalen
Gerätes(CE350L/CE370L).JederPortistdurcheinentsprechendesSymbolgekennzeichnet.
2.Verbinden SiediegeeignetenSteckerdesmitgeliefertenPS/2-KVM-Kabels mitden Buchsenim
CPU-AbschnittaufderVorderseitedeslokalenGerätes(CE350L/CE370L).
1. Sección de puertos KVM
2. Puerto serie RS-232
3.Botóndemodooperativo
4. Indicadores LED
CE350R(unidadremota)–Vistafrontal
1. Puerto serie RS-232
2.Botóndecompensacióndeimagen
3. Indicadores LED
CE370RQ(unidadremota)–Vistafrontal
1. Puerto serie RS-232
2.Botonesdecompensacióndeimagen
3. Indicadores LED
Vista posterior / Vista lateral
1. Entrada de alimentación
2. Puertos de audio
3. Puertos E/S para equipo remoto
4. Puertos de consola
5. Toma de tierra
Instalar el hardware
B
Montajeenrack
Paraunmayorconfortymásexibilidad,elCE350/CE370puedemontarseenunrack.Para
montar un equipo en el rack, haga lo siguiente:
1.Atornillecomoseindicaenelsiguientediagramaelmarcodemontajeenlapartesuperioro
inferiordelaunidadconlostornillosincluidosconelkitparamontajeenrack:
2. Atornille los rieles en una posición deseada del rack.
Nota: los tornillos necesarios no vienen incluidos con la unidad. Le recomendamos que utilice
tornillos empotrados de estrella / cruz M3 x 5 de tipo I.
Instalación
C
La instalación del sistema de extensión KVM CE350 / CE370 es tan sencilla como conectar
unoscables.Apaguetodoslosdispositivosquevayaaconectar.
1. Conecte los cables delosdispositivos deconsolalocales (ratón,teclado, monitor,micrófonoy
altavoces)alospuertoscorrespondientesdelaseccióndeconsolasituadaenelpanelposterior
de la unidad local CE350L/CE370L. Cada puerto viene marcado con un icono correspondiente.
2. Inserte los conectores del cable PS/2 KVM incluido con el dispositivo en los puertos
correspondientesdelasecciónCPUsituadaenelpanelfrontaldelaunidadlocalCE350L/CE370L.
1.Plugthecablesfromthelocalconsoledevices(mouse,keyboard,monitor,microphone,speakers)
intotheirportsontheConsolesectionontherearoftheLocalUnit(CE350L/CE370L).Eachportis
marked with an appropriate icon to indicate itself.
2.PlugtheappropriateconnectorsonthePS/2KVMcablesuppliedwiththisunitintotheirportson
theCPUsectiononthefrontoftheLocalUnit(CE350L/CE370L).
3.PlugtheconnectorsontheotherendofthePS/2KVMcableintotheappropriateportsonthelocal
computer. Each connector is marked with an appropriate icon to indicate which it is.
Note:
IfyouarecombiningtheCE350/CE370withaKVMswitch,theotherendofthePS/2KVM
cableplugsintotheappropriateportsontheKVMswitch.
4.Forcontrolofserialdevices,connecttheRS-232serialportonthelocalunittoaserialportonthe
local computer.
5.PlugeitherendoftheCat5ecableintotheCE350L/CE370L'sRemoteI/Oport.Plugtheotherend
oftheCat5ecableintotheI/OportoftheRemoteUnit(CE350R/CE370RQ).
6.Plugoneofthepoweradapters(suppliedwiththispackage)intoanACsource;plugtheadapter's
powercableintotheCE350L/CE370L'sPowerJack.
7. Plug the cables from the remote console devices (mouse, keyboard, monitor, speakers,
microphone),intotheirportsontheConsolesideoftheCE350R/CE370RQ.
8.Plugthesecondpoweradapter(suppliedwiththispackage)intoanACsource;plugtheadapter's
powercableintotheCE350R/CE370RQ’sPowerJack.
Note: Hot-pluggingtheCat5ecablewillautomaticallytriggerthedeskewfunction.
Operation
Operating Modes
The CE350 / CE370 PS/2 KVM Extender has three operating modes: Local, Auto, and Remote,
asdescribedinthetablebelow:
Mode Description
Local
OnlythelocalconsolehasKVMaccess.Theremoteconsole’skeyboardandmouse
inputisdisabled.
Auto
BoththelocalandremoteconsolescanhaveKVMaccess,butnotatthesame
time. The console without access has to wait until the console with access stops
inputtingdatabeforeitcangainaccess.
Remote
The remote console has KVM access. Remote mode can only occur when the
pushbuttonontheLocalUnit(CE350L/CE370L)issettoAutoandthelocalconsole
is idle.
Note: The default operating mode is Auto.
1.Branchezlescâbles despériphériquesdeconsole locaux(souris,clavier, moniteur,microphone
ethaut-parleurs) surlesports correspondantsdelasectionConsolesituéeàl'arrière del'unité
locale(CE350L/CE370L).Chaqueportestidentiéparuneicônereprésentative.
2.Insérez les connecteurs appropriés du câbleKVMPS/2fourni avec l'appareildansles ports
correspondantsdelasectionUCsituéeàl'avantdel'unitélocale(CE350L/CE370L).
3.Insérezlesconnecteursdel'autreextrémitéducâbleKVMPS/2danslesportscorrespondantsde
l'ordinateurlocal.Chaqueconnecteurcomporteuneicônepermettantdeledistinguerfacilement.
Remarque:sivouscombinezlesystèmeCE350/CE370avecuncommutateurKVM,insérez
lesconnecteursdel'autreextrémitéducâbleKVMPS/2danslesports
correspondants du commutateur KVM.
4.Pourcontrôlerdespériphériquessérie,reliezleportsérieRS-232del'unitélocaleàunportsérie
del'ordinateurlocal.
5.Branchezuneextrémitéducâbledecatégorie5esurleportd’E/Sdistantes(RemoteI/O)del'unité
locale CE350L/CE370L. Branchezl'autreextrémitéducâble surleport I/Odel'unitédistante
(CE350R/CE370RQ).
6. Branchez l'un des adaptateurssecteur fournissur une prisede courant CAet surla prise
d'alimentationdel'unitélocaleCE350L/CE370L.
7.Branchezlescâblesdespériphériquesdeconsoledistants(souris,clavier,moniteur,haut-parleurset
microphone)surlesportscorrespondantsdelasectiondeconsoledel'unitéCE350R/CE370RQ.
8. Branchez le deuxième adaptateur secteur fourni sur une prise de courant et sur la prise
d'alimentationdurécepteurCE350R/CE370RQ.
Remarque: Laconnexionàchaudducâbledecatégorie5edéclencheautomatiquementla
fonction de correction du désalignement.
Utilisation
Modes de fonctionnement
Le système KVM PS/2 Extender CE350 / CE370 propose trois modes de fonctionnement : Local
(connexionlocale),Auto(connexionautomatique)etRemote(connexiondistante),décritsdans
letableauci-dessous:
Mode Description
Local
SeulelaconsolelocalealecontrôleKVM.L’entréeduclavieretdelasourisdela
console distante est désactivée.
Auto
Lesdeuxconsoles(localeetdistante)peuventprendrelecontrôleKVM,maispas
enmêmetemps.Avantd'obtenirunaccès,laconsolen'ayantpaslecontrôledoit
patienterjusqu'àcequecelleayantlecontrôlecessed'entrerdesdonnées.
Distant
SeulelaconsoledistantepeutprendrelecontrôleKVM.Cemoden’estdisponible
quesileboutondelaconsolelocale(CE350L/CE370L)estenpositionAutoet
qu’elle est inactive.
Remarque: le mode de fonctionnement par défaut est Auto.
3.IVerbindenSiedieSteckeramanderenEndedesPS/2-KVM-KabelsmitdenbetreffendenPorts
deslokalenComputers.JederSteckeristdurcheinentsprechendesSymbolgekennzeichnet.
Hinweis:WennSiedenCE350/CE370miteinemKVM-Switchkombinierenmöchten,schließen
SiedasandereEndedesPS/2-KVM-KabelsandieentsprechendenPortsdesKVM-Switchesan.
4.ZurSteuerungseriellerGeräteverbindenSiedenseriellenRS-232-AnschlussdeslokalenGerätes
mit einem seriellen Port am lokalen Computer.
5.VerbindenSieje einEndedesKat-5e-KabelsmitdemAnschlussRemote I/OdesCE350L/
CE370L.VerbindenSiedasandereEndedesKat-5e-KabelsmitdemAnschlussI/OdesGerätes
derGegenstelle(CE350R/CE370RQ).
6.VerbindenSiedaseineEndedesmitgeliefertenNetzteilsmiteinerSteckdoseunddasNetzkabel
mitderStromeingangsbuchsedesCE350L/CE370L.
7.VerbindenSiedieKabelderKonsolgerätederGegenstelle(Maus,Tastatur,Monitor,Lautsprecher,
Mikrofon)mitdenentsprechendenBuchsenimKonsolabschnittdesCE350R/CE370RQ.
8.Verbinden Siedaszweite mitgelieferteNetzteil miteinerSteckdoseundseinNetzkabel mitder
StromeingangsbuchsedesCE350R/CE370RQ.
Hinweis: WennSiedasKat-5e-KabelsineingeschaltetemZustandanschließen,wird
automatischeineBildkompensationausgeführt.
Bedienung
Betriebsmodi
DieCE350/CE370PS/2-KVM-VerlängerungunterstütztdreiBetriebsarten:Lokal,Automatisch
undGegenstelle,siehefolgendeTabelle:
Betriebsart Beschreibung
Local
NurdielokaleKonsolehatKVM-Zugriff.DieTastaturunddieMausderKonsoleder
Gegenstelle sind deaktiviert.
Automatisch
Sowohldie lokalealsauch dieKonsoleder Gegenstellekönnendie KVM-
Steuerungübernehmen (allerdingsnichtgleichzeitig).Bevorsie Zugrifferhält,
mussdie KonsoleohneZugriffwarten,bisdieKonsolemitaktuellemZugriffdie
Dateneingabestoppt.
Gegenstelle
NurdieentfernteKonsolehatKVM-Zugriff.DieKVM-SteuerungvonderKonsoleder
Gegenstelleistnurmöglich,wennderentsprechendeDrucktasteramCE350Lbzw.
CE370LaufAutogestelltwurdeunddielokaleKonsolenichtbenutztwird.
Hinweis:StandardmäßigistdieBetriebsartaufAutovoreingestellt.
CE350R-Bildkompensation
ManuelleAbstimmung
3.IInsertelosconectoresdelotroextremodelcablePS/2KVMenlospuertoscorrespondientesdel
ordenador local. Cada conector viene marcado con un icono correspondiente.
Nota:sicombinaelCE350/CE370conunconmutadorKVM,insertelosconectoresdelotro
extremodelcablePS/2KVMenlospuertoscorrespondientesdelconmutadorKVM.
4. Para controlar dispositivos serie, conecte el puerto serie RS-232 de la unidad local a un puerto
serie del ordenador local.
5.ConecteunextremodelcabledeCat.5ealpuertoRemoteI/OdelaunidadlocalCE350L/CE370L.
Conecteelotroextremodelcabledecat.5ealpuertoI/OdelaunidadremotaCE350R/CE370RQ.
6. Conecte uno delosadaptadoresdealimentaciónincluidos aunatoma eléctrica yelcable de
alimentación del adaptador a la entrada de alimentación de la unidad local CE350L/CE370L.
7.Conecteloscablesdelosdispositivos deconsolaremotos (ratón,teclado,monitor,altavoces y
micrófono)alospuertosdeconsolacorrespondientesdelaunidadremotaCE350R/CE370RQ.
8.Conecte elsegundo adaptadorde alimentación incluidoaunatoma eléctricay el cable del
adaptador a la entrada de alimentación de la unidad remota CE350R/CE370RQ.
Nota: SiconectaelcabledeCat.5econelequipoencendido,seefectuaráuna
compensación de imagen de forma automática.
Funcionamiento
Modos operativos
El sistema de extensión PS/2 KVM CE350 / CE370 ofrece tres modos operativos: Local,
AutomáticoyRemoto,quesedescribenenlasiguientetabla:
Modo Descripción
Local
Sólo la consola local tiene el control KVM. La entrada del teclado y del ratón de la
consola remota está desactivada.
Auto
TantolaconsolalocalcomolaremotapuedentenerelcontrolKVM(peronunca
lasdosalavez).Antesdeconseguirelacceso,laconsolaquenotieneelcontrol
KVMdebeesperarhastaquelaconsolaquelotienedejedeintroducirdatos.
Remota
SólolaconsolaremotatieneaccesoKVM.ElcontrolKVMremotosóloesposible
cuandoelpulsadordelaunidadlocal(CE350L/CE370L)estéenlaposiciónAutoy
no se utilice la consola local.
Nota: El modo operativo predeterminado es Automático.
CE350R Control de compensación
Ajustemanual
CE350 / CE370
CE350R Compensation Control
Manual Tuning
Ifit becomesnecessarytofine-tunethe videosignal, presstheplus(+)button toincrease
the video signal compensation;press the minus (–) button to decrease the video signal
compensation.
Auto-detect
Pressboth buttons(+/–)for2seconds totriggertheauto-detectionfunctionandclear the
stored the settings.
CE370RQ Deskew
Button / Switch Description
Color / +
1.PressandreleasetoenterRedcolormode.Use(+)and(–)toadjust.
2.PressandholdfortwosecondstoinvoketheOSD(whennocoloris
selected).
3. Press and hold for two seconds to change the color mode or
compensation(whenselected)ThesequenceisR_G_B_Video
Compensation_exit_R…
4.Pressandreleasetoincreasevalue(delaytime/compensation)when
any color / compensation is selected.
5.PressandholdbothColorandSelectbuttonssimultaneouslytotrigger
theauto-detectfunction(adjustsR/G/B/Compensationautomatically)
and clear the stored settings.
Select / -
1.PressandreleasetoenterRedcolormode.Use(+)and(–)toadjust.
2.Pressandreleasetodecreasevalue(delaytime/
compensation)
when any color / compensation is selected.
Note:1.Thereisaten-secondtimeoutforoperations1and2oftheColor/+button.
2.Thevalueforoperationsusing+and–donotcyclefrommaximumtominimumand
viceversa.Usetheotherbuttontoincrease/decreaseasrequired.
Contrôledelacompensationsurl’unitéCE350R
Réglage manuel
Siun réglagefin dusignalvidéos’avèrenécessaire,appuyezsur latouche plus(+)pour
augmenterla compensationdu signalvidéoousurlatouchemoins (–)pour diminuerla
compensation du signal vidéo.
Détection automatique
Appuyezsurlesdeuxtouches(+/–)enmêmetempspendant2secondespourdéclencherla
fonction de détection automatique et effacer les réglages en mémoire.
Fonctiondecorrectiondudésalignementdel’unitéCE370RQ
Bouton /
Commutateur
Description
Color / +
(Couleur / +)
1.Appuyezsurceboutonpuisrelâchez-lepourentrerenmodede
couleurrouge.Utilisez(+)et(-)pourajuster.
2.Appuyezsurceboutonetmaintenez-leenfoncépendantdeux
secondespourfaireapparaîtrel'afchageàl'écran(lorsqu'aucune
couleurn'estsélectionnée).
3.Appuyezsurceboutonetmaintenez-leenfoncépourchangerlemode
couleuroulacompensation(lorsquecettedernièreestsélectionnée).La
séquenceestlasuivante:R_V_B_Compensationvidéo_quitter_R…
4.Appuyezsurceboutonetrelâchez-lepouraugmenterlavaleur
(retard/compensation)lorsqu’aucunecouleur/compensationn’est
sélectionnée.
5.AppuyezsimultanémentsurlesboutonsCouleuretSélectionet
maintenez-les enfoncés pour déclencher la fonction de détection
automatique(ajustelescouleursR/V/Betlacompensation
automatiquement)etsupprimerlesparamètresenmémoire.
Select / -
(Sélection / -)
1.Appuyezsurceboutonpuisrelâchez-lepourentrerenmodede
couleurrouge.Utilisez(+)et(-)pourajuster.
2.Appuyezsurceboutonetrelâchez-lepourdiminuerlavaleur
(retard/compensation)lorsqu’aucunecouleur/compensationn’est
sélectionnée.
Remarque:1.Ilexisteundélaid’attentededixsecondespourlesopérations1et2dubouton
Couleur/+.
2.Lavaleurdesopérationsréaliséesaveclesboutons+et–nesuitpasuncycle
dumaximumauminimumetvice-versa.Utilisezl’autreboutonpouraugmenter/
diminuer en fonction des nécessités.
Fallseserforderlichwird,dasBildsignalnachzujustieren,drückenSiediePlustaste(+),umdie
Bildkompensationzuerhöhenbzw.dieMinustaste(-),umsiezuverringern.
Automatische Erkennung
HaltenSie beideTasten (+/–)2Sekundenlanggedrückt,umeineautomatischeAbstimmung
durchzuführenunddiezuvorabgespeichertenWertezulöschen.
CE370RQBildsignalkompensation
Taste / Schalter Beschreibung
Color / +
1.Drückenundloslassen,umdieEinstellfunktionderFarbeRot
aufzurufen.DrückenSiedieTasten(+)bzw.(-),umdengewünschten
Werteinzustellen.
2. Halten Sie die Taste zwei Sekunden lang gedrückt, um das OSD-
Bildschirmmenüeinzublenden(sofernkeineFarbeinstellfunktion
ausgewähltwurde).
3.HaltenSiedieTastebeiausgewählterFarbeinstellfunktionzwei
Sekundenlanggedrückt,umzueineranderenFarbeumzuschalten.
DieReihenfolgelautetdabeiR_G_B_Kompensation_Beenden_R…
4.DrückenSiedieseTastebeiausgewählterFarbeinstellfunktion,und
lassenSiesielos,umdenWert(Laufzeit/Kompensation)zuerhöhen.
5. Drücken und halten Sie die Tasten Color und Select gleichzeitig, um eine
automatischeAbstimmungdurchzuführenunddiegespeichertenWertezu
löschen.DabeiwirddieRGB-Kompensationautomatischdurchgeführt.
Select / -
1.Drückenundloslassen,umdieEinstellfunktionderFarbeRot
aufzurufen.DrückenSiedieTasten(+)bzw.(-),umdengewünschten
Werteinzustellen.
2.DrückenSiedieseTastebeiausgewählterFarbeinstellfunktion,
undlassenSiesielos,umdenWert(Laufzeit/Kompensation)zu
verringern.
Hinweis:1.DieBedienungderTasteColor/+fürdieSchritte1und2mussinnerhalbvon10
Sekunden erfolgen.
2.Nach Erreichendesmaximalenbzw.minimalen WertesüberdieTasten+bzw.
–wird nichtautomatischeinSprungzum niedrigstenbzw.höchstenWert
zumFortfahren derEinstellungdurchgeführt.Siemüssendiejeweils andere
Einstelltastedrücken,umdenWertwiederumzuerhöhenbzw.zuverringern.
Situvieraqueefectuarunajustenodelaseñalgráca,pulseelbotónmás(+)paraaumentar
lacompensacióndelaseñalgrácaopulseelbotónmenos(-)parareducirla.
Detección automática
Mantengapulsados ambosbotones(+/–) durante2segundosparaactivar ladetección
automáticayborrarlosajustesguardados.
CE370RQ Compensación de señal
Botón / Interruptor Descripción
Color / +
1.Pulseysuelteestebotónparaaccederalafuncióndeajusteparael
colorrojo.Pulselosbotones(+)y(-)paraajustarelvalordeseado.
2.Mantengapulsadoelbotóndurantedossegundosparaabrirelmenú
enpantalla(cuandonotengaseleccionadaningunafuncióndeajuste
decolor).
3.Mantengapulsadoestebotóndurantedossegundosparacambiarel
coloracompensar(cuandolotengaseleccionado).LasecuenciaesR
_G_B_Compensacióndeimagen_Salir_R…
4.Pulseysuelteelbotónparaincrementarelvalor((tiempode
propagación/compensación)cuandotengaseleccionadouncolorpara
compensar.
5.MantengapulsadoslosbotonesColorySelectsimultáneamentepara
ejecutarlacompensaciónautomática(ajustalacompensaciónparalos
coloresR,VyAautomáticamente)yborralosvaloresalmacenados.
Select / -
1.Pulseysuelteestebotónparaaccederalafuncióndeajusteparael
colorrojo.Pulselosbotones(+)y(-)paraajustarelvalordeseado.
2.Pulseysuelteelbotónparareducirelvalor(tiempodepropagación/
compensación)cuandotengaseleccionadouncolorparacompensar.
Nota:1. Eltiempodeesperaparapulsarel botónColor/+enlospasos 1y2esdediez
segundos.
2.Losajustesno soncíclicos,esdecir,al alcanzarelvalormáximocon elbotón
+o elmínimoconelbotón –,elajustenosigue enelvalormínimoo máximo
respectivamente.Pulse elotro botónparaincrementaroreducir elvalor como
requiera.
B
C
CE350L / CE370L
(LocalUnits)FrontView
Side View
Rear View
1
2 3
1
2
3 4
1
2 3
Phillips hex head
M3 x 8
8
CE350R /370RQ
6
CE350L / CE370L
7
5
Cat 5e cable
5
1
2
PS/2 KVM
cable
Local PC
3
4
5
1
3
2
4
Allinformation,documentation,rmware,
software utilities, and specifications
containedinthispackagearesubjectto
change withoutprior notificationby the
manufacturer.Pleasevisitour website
http://www.aten.com/download/?cid=dds
for the most up-to-date versions.
Important Notice
Considering environmental protection,
ATEN does not provide a fully printed
user manual for this product. If the
information contained in the Quick Start
Guideisnotenoughforyoutocongure
and operate your product, please
visitourwebsitewww.aten.com,and
download the full user manual.
Online Registration
http://eservice.aten.com
Technical Phone Support
International:
886-2-86926959
North America:
1-888-999-ATEN Ext: 4988
United Kingdom:
44-8-4481-58923
1CE350LorCE370LPS/2KVMExtender(LocalUnit)
1CE350RorCE370RQPS/2KVMExtender(RemoteUnit)
1CustomPS/2KVMCableSet(1.8m)
2 Power Adapters
1 Mounting Kit
1UserInstructions
Package Contents:
www.aten.com
www.aten.com
www.aten.com
www.aten.com
Hardware Review
A
Hardware Installation
Hardware Installation
Rack Mounting
SettingUp
1
1
7
1
1
1
2
2
2
2
2
3
3
3
3
3
4
4
5
5
5
6
8
4
La página se está cargando...
Transcripción de documentos
Package Contents: B 1 CE350L or CE370L PS/2 KVM Extender (Local Unit) 1 CE350R or CE370RQ PS/2 KVM Extender (Remote Unit) 1 Custom PS/2 KVM Cable Set (1.8 m) 2 Power Adapters 1 Mounting Kit 1 User Instructions A Important Notice Hardware Installation Phillips hex head M3 x 8 Rack Mounting Considering environmental protection, ATEN does not provide a fully printed user manual for this product. If the information contained in the Quick Start Guide is not enough for you to configure and operate your product, please visit our website www.aten.com, and download the full user manual. Hardware Review 11 2 2 3 3 Online Registration 4 4 http://eservice.aten.com C CE350L / CE370L (Local Units) Front View 11 2 2 33 Hardware Installation Technical Phone Support Setting Up International: 886-2-86926959 Rear View CE350L / CE370L 5 5 North America: 1-888-999-ATEN Ext: 4988 PS/2 KVM Extender 1 1 CE350 / CE370 2 2 3 3 6 6 1 1 22 Quick Start Guide PS/2 KVM cable 1 1 22 Local PC 33 33 CE350R /370RQ © Copyright 2012 ATEN® International Co., Ltd. ATEN and the ATEN logo are trademarks of ATEN International Co., Ltd. All rights reserved. All other trademarks are the property of their respective owners. United Kingdom: 44-8-4481-58923 44 Cat 5e cable All information, documentation, firmware, software utilities, and specifications contained in this package are subject to change without prior notification by the manufacturer. Please visit our website http://www.aten.com/download/?cid=dds for the most up-to-date versions. 55 4 4 5 5 7 7 88 This product is RoHS compliant. Part No. PAPE-1223-631G Side View Printing Date: 12/2012 CE350 / CE370 PS/2 KVM Extender Quick Start Guide www.aten.com Requirements Hardware Review Console CE350L / CE370L (Local Units) Front View • A VGA, SVGA, SXGA, UXGA, WUXGA, or multisync monitor capable of the highest resolution that you will be using on any computer in the installation Note: If you connect a DDC type monitor to the Local Unit, the monitor that connects to the Remote Unit must be able to support the highest video resolution that the DDC monitor can provide • A PS/2 keyboard • A PS/2 mouse • Stereo microphone and stereo speakers (optional) 1. KVM Port Section 2. RS-232 Serial Port 3. Operating Mode Pushbutton 4. LEDs Computers The following equipment must be installed on each computer that is to be connected to the system: • A VGA, SVGA, SXGA, UXGA, WUXGA, or multisync card. • A PS/2 keyboard port • A PS/2 mouse port • Speaker and microphone ports (optional) A CE350R (Remote Unit) Front View 1. RS-232 Serial Port 2. Picture Compensation Pushbuttons 3. LEDs CE370RQ (Remote Unit) Front View 1. RS-232 Serial Port 2. Deskew and Picture Compensation Pushbuttons 3. LEDs Rear View / Side View Cables • For optimal signal integrity, and to simplify the layout, we strongly recommend that you use the high quality custom KVM Cable that is provided with this package. • Cat 5e cable is the minimum required to connect the Local and Remote CE350 / CE370 Units. Cable of a lower standard will result in degrading of the video signal. For best performance, we strongly recommend Cat 5e cable. 1. Power Jack 2. Audio Ports 3. Remote I/O 4. Console Ports 5. Grounding Terminal Connection Distance Computer to Local Unit (CE350L / CE370L) 10 m Local Unit (CE350L) to Remote Unit (CE350R) 150 m Local Unit (CE370L) to Remote Unit (CE370RQ) 300 m Remote Unit (CE350R / CE370RQ) to monitor 20 m Manual Tuning If it becomes necessary to fine-tune the video signal, press the plus (+) button to increase the video signal compensation; press the minus (–) button to decrease the video signal compensation. Auto-detect Press both buttons (+ / –) for 2 seconds to trigger the auto-detection function and clear the stored the settings. CE370RQ Deskew Button / Switch Description Color / + 1. Press and release to enter Red color mode. Use (+) and (–) to adjust. 2. Press and hold for two seconds to invoke the OSD (when no color is selected). 3. Press and hold for two seconds to change the color mode or compensation (when selected) The sequence is R _ G _ B _ Video Compensation _ exit _ R … 4. Press and release to increase value (delay time / compensation) when any color / compensation is selected. 5. Press and hold both Color and Select buttons simultaneously to trigger the auto-detect function (adjusts R/G/B/Compensation automatically) and clear the stored settings. Select / - 1. Press and release to enter Red color mode. Use (+) and (–) to adjust. 2. Press and release to decrease value (delay time / compensation) when any color / compensation is selected. Operating Modes The CE350 / CE370 PS/2 KVM Extender has three operating modes: Local, Auto, and Remote, as described in the table below: Mode B Rack Mounting For convenience and flexibility, the CE350 / CE370 can be mounted on system racks. To rack mount a unit do the following: 1. Using the screws provided in the Rack Mount Kit, screw the mounting bracket into the top or bottom of the unit. 2. Screw the bracket into any convenient location on the rack. Note: These screws are not provided. We recommend that you use M3 x 5 Phillips Type I cross, recessed type screws. Setting Up CE350R Compensation Control Operation Hardware Installation Maximum Cable Distances 1. Plug the cables from the local console devices (mouse, keyboard, monitor, microphone, speakers) into their ports on the Console section on the rear of the Local Unit (CE350L/CE370L). Each port is marked with an appropriate icon to indicate itself. 2. Plug the appropriate connectors on the PS/2 KVM cable supplied with this unit into their ports on the CPU section on the front of the Local Unit (CE350L/CE370L). 3. Plug the connectors on the other end of the PS/2 KVM cable into the appropriate ports on the local computer. Each connector is marked with an appropriate icon to indicate which it is. Note: If you are combining the CE350 / CE370 with a KVM switch, the other end of the PS/2 KVM cable plugs into the appropriate ports on the KVM switch. 4. For control of serial devices, connect the RS-232 serial port on the local unit to a serial port on the local computer. 5. Plug either end of the Cat 5e cable into the CE350L/CE370L's Remote I/O port. Plug the other end of the Cat 5e cable into the I/O port of the Remote Unit (CE350R/CE370RQ). 6. Plug one of the power adapters (supplied with this package) into an AC source; plug the adapter's power cable into the CE350L/CE370L's Power Jack. 7. Plug the cables from the remote console devices (mouse, keyboard, monitor, speakers, microphone), into their ports on the Console side of the CE350R/CE370RQ. 8. Plug the second power adapter (supplied with this package) into an AC source; plug the adapter's power cable into the CE350R/CE370RQ’s Power Jack. Note: Hot-plugging the Cat 5e cable will automatically trigger the deskew function. Local Auto Remote Description Only the local console has KVM access. The remote console’s keyboard and mouse input is disabled. Both the local and remote consoles can have KVM access, but not at the same time. The console without access has to wait until the console with access stops inputting data before it can gain access. The remote console has KVM access. Remote mode can only occur when the pushbutton on the Local Unit (CE350L / CE370L) is set to Auto and the local console is idle. Note: 1. There is a ten-second timeout for operations 1 and 2 of the Color / + button. 2. The value for operations using + and – do not cycle from maximum to minimum and vice versa. Use the other button to increase/decrease as required. Note: The default operating mode is Auto. C Setting up the CE350 / CE370 PS/2 KVM Extender system is simply a matter of plugging in the cables. Make sure that all the equipment to be connected up is powered Off. Guide de mise en route rapide du système KVM PS/2 Extender CE350 / CE370 www.aten.com Configuration minimale Description de l’appareil Console CE350L / CE370L (Unités locales) – Vue avant • Moniteur VGA, SVGA, SXGA, UXGA, WUXGA ou Multisync prenant en charge la plus haute résolution utilisée sur n’importe lequel des ordinateurs de l’installation Remarque: si vous connectez un moniteur de type DDC à la console locale, le moniteur connecté à la console distante doit pouvoir prendre en charge la résolution vidéo la plus élevée du moniteur DDC • Un clavier PS/2 • Une souris PS/2 • Microphone stéréo et haut-parleurs stéréo (en option) 1. Section des ports KVM 2. Port série RS-232 3. Bouton de sélection du mode de fonctionnement 4. Voyants Ordinateurs Les composants suivants doivent être installés sur chaque ordinateur à connecter au système : • Une carte VGA, SVGA, SXGA, UXGA, WUXGA ou Multisync • Un clavier PS/2 • Une souris PS/2 • Ports pour haut-parleurs et microphone (facultatifs) A CE350R (unité distante) – Vue avant 1. Port série RS-232 2. Boutons de compensation de l'image 3. Voyants CE370RQ (unité distante) – Vue avant 1. Port série RS-232 2. Boutons de correction du désalignement et de compensation de l'image 3. Voyants Vue arrière / Vue latérale Câbles • Pour assurer une réception optimale du signal et simplifier l'installation, il est fortement recommandé d'utiliser le câble KVM spécifique de haute qualité fourni avec ce système d'extension. • La connexion entre la console locale et la console distante du système CE350 / CE370 requiert au minimum un câble de catégorie 5e. Un câble de catégorie inférieure risque de dégrader le signal vidéo. Pour des résultats optimaux, nous vous recommandons fortement d'utiliser un câble de catégorie 5e. Longueur de câble maximale 1. Prise d’alimentation 2. Ports audio 3. E/S distantes 4. Ports de console 5. Prise de terre Utilisation Installation du matériel Connexion Distance 10 m Unité locale (CE350L) à unité distante (CE350R) 150 m Unité locale (CE370L) à unité distante (CE370RQ) 300 m Unité distante (CE350R / CE370RQ) à moniteur 20 m Réglage manuel Si un réglage fin du signal vidéo s’avère nécessaire, appuyez sur la touche plus (+) pour augmenter la compensation du signal vidéo ou sur la touche moins (–) pour diminuer la compensation du signal vidéo. Détection automatique Appuyez sur les deux touches (+ / –) en même temps pendant 2 secondes pour déclencher la fonction de détection automatique et effacer les réglages en mémoire. Fonction de correction du désalignement de l’unité CE370RQ Bouton / Commutateur Color / + Le système KVM PS/2 Extender CE350 / CE370 propose trois modes de fonctionnement : Local (connexion locale), Auto (connexion automatique) et Remote (connexion distante), décrits dans le tableau ci-dessous : B Pour un plus grand confort, les consoles CE350 / CE370 peuvent être montées sur bâti. Pour monter une console sur bâti, procédez comme suit : 1. Vissez le support de montage sur bâti sur la partie supérieure ou inférieure de l'appareil comme indiqué sur le schéma ci-dessous à l'aide des vis fournies. 2. Vissez le support au bâti à n’importe quel endroit vous semblant adapté. Remarque: les vis ne sont pas fournies. Il est conseillé d'utiliser des vis cruciformes à tête à empreinte M3 x 5 Philips de type I. Installation Contrôle de la compensation sur l’unité CE350R (Couleur / +) Modes de fonctionnement Montage sur bâti Ordinateur à unité locale (CE350L / CE370L) 1. Branchez les câbles des périphériques de console locaux (souris, clavier, moniteur, microphone et haut-parleurs) sur les ports correspondants de la section Console située à l'arrière de l'unité locale (CE350L/CE370L). Chaque port est identifié par une icône représentative. 2. Insérez les connecteurs appropriés du câble KVM PS/2 fourni avec l'appareil dans les ports correspondants de la section UC située à l'avant de l'unité locale (CE350L/CE370L). 3. Insérez les connecteurs de l'autre extrémité du câble KVM PS/2 dans les ports correspondants de l'ordinateur local. Chaque connecteur comporte une icône permettant de le distinguer facilement. Remarque: si vous combinez le système CE350 / CE370 avec un commutateur KVM, insérez les connecteurs de l'autre extrémité du câble KVM PS/2 dans les ports correspondants du commutateur KVM. 4. Pour contrôler des périphériques série, reliez le port série RS-232 de l'unité locale à un port série de l'ordinateur local. 5. Branchez une extrémité du câble de catégorie 5e sur le port d’E/S distantes (Remote I/O) de l'unité locale CE350L/CE370L. Branchez l'autre extrémité du câble sur le port I/O de l'unité distante (CE350R/CE370RQ). 6. Branchez l'un des adaptateurs secteur fournis sur une prise de courant CA et sur la prise d'alimentation de l'unité locale CE350L/CE370L. 7. Branchez les câbles des périphériques de console distants (souris, clavier, moniteur, haut-parleurs et microphone) sur les ports correspondants de la section de console de l'unité CE350R/CE370RQ. 8. Branchez le deuxième adaptateur secteur fourni sur une prise de courant et sur la prise d'alimentation du récepteur CE350R/CE370RQ. Remarque: La connexion à chaud du câble de catégorie 5e déclenche automatiquement la fonction de correction du désalignement. C L'installation du système KVM PS/2 Extender CE350 / CE370 consiste simplement à connecter les câbles. Assurez-vous que tous les appareils à connecter sont bien éteints. Mode Local Auto Distant Description Seule la console locale a le contrôle KVM. L’entrée du clavier et de la souris de la console distante est désactivée. Les deux consoles (locale et distante) peuvent prendre le contrôle KVM, mais pas en même temps. Avant d'obtenir un accès, la console n'ayant pas le contrôle doit patienter jusqu'à ce que celle ayant le contrôle cesse d'entrer des données. Seule la console distante peut prendre le contrôle KVM. Ce mode n’est disponible que si le bouton de la console locale (CE350L / CE370L) est en position Auto et qu’elle est inactive. Remarque: le mode de fonctionnement par défaut est Auto. Select / - (Sélection / -) Description 1. Appuyez sur ce bouton puis relâchez-le pour entrer en mode de couleur rouge. Utilisez (+) et (-) pour ajuster. 2. Appuyez sur ce bouton et maintenez-le enfoncé pendant deux secondes pour faire apparaître l'affichage à l'écran (lorsqu'aucune couleur n'est sélectionnée). 3. Appuyez sur ce bouton et maintenez-le enfoncé pour changer le mode couleur ou la compensation (lorsque cette dernière est sélectionnée). La séquence est la suivante: R _ V _ B _ Compensation vidéo _ quitter _ R … 4. Appuyez sur ce bouton et relâchez-le pour augmenter la valeur (retard / compensation) lorsqu’aucune couleur / compensation n’est sélectionnée. 5. Appuyez simultanément sur les boutons Couleur et Sélection et maintenez-les enfoncés pour déclencher la fonction de détection automatique (ajuste les couleurs R / V / B et la compensation automatiquement) et supprimer les paramètres en mémoire. 1. Appuyez sur ce bouton puis relâchez-le pour entrer en mode de couleur rouge. Utilisez (+) et (-) pour ajuster. 2. Appuyez sur ce bouton et relâchez-le pour diminuer la valeur (retard / compensation) lorsqu’aucune couleur / compensation n’est sélectionnée. Remarque: 1. Il existe un délai d’attente de dix secondes pour les opérations 1 et 2 du bouton Couleur / +. 2. La valeur des opérations réalisées avec les boutons + et – ne suit pas un cycle du maximum au minimum et vice-versa. Utilisez l’autre bouton pour augmenter / diminuer en fonction des nécessités. CE350 / CE370 KVM-Verlängerung für PS/2 Kurzanleitung www.aten.com Voraussetzungen Konsolen • Ein VGA-, SVGA-, SXGA-, UXGA-, WUXGA- oder Multisync-Monitor, der in der Lage ist, die höchste Auflösung darzustellen, die Sie auf einem der zu installierenden Computer verwenden möchten. Hinweis: Wenn Sie einen DDC-Monitor an das lokale Gerät anschließen, müssen alle anderen Monitore ebenfalls die höchste Auflösung unterstützen, die der DDC-Monitor unterstützt. • Eine PS/2-Tastaur • Eine PS/2-Maus • Stereo-Mikrofon und Stereo-Lautsprecher (optional) Computer Auf den Computern, die mit dem System verbunden werden sollen, muss mindestens Folgendes installiert sein: • Eine VGA-, SVGA-, SXGA-, UXGA-, WUXGA- oder Multisync-Grafikkarte • Eine PS/2-Tastaur • Eine PS/2-Maus • Lautsprecher- und Mikrofonanschlussbuchsen (optional) Kabel • Daher und zur Vereinfachung des Aufbaus empfehlen wir, dass Sie das mitgelieferte, hochwertige, individuelle KVM-Kabelset des Herstellers verwenden. • Zur Verbindung der lokalen und entfernten CE350-/CE370-Geräte wird mindestens ein Kat-5eKabels benötigt. Kabel geringerer Standards führen zu schlechterer Bildqualität. Um optimale Ergebnisse zu erzielen, empfehlen wir die Verwendung von Kat-5e-Kabel. Maximale Kabellängen Verbindung Entfernung 1. KVM-Portabschnitt 2. Serieller RS-232-Port 3. Betriebsmodus-Auswahltaste 4. LED-Anzeigen CE350R (entferntes Gerät) Vorderseite 1. Serieller RS-232-Port 2. Bildkompensations-Drucktaster 3. LED-Anzeigen CE370RQ (entferntes Gerät) Vorderseite 1. Serieller RS-232-Port 2. Bildkompensations-Drucktasten 3. LED-Anzeigen 1. Stromeingangsbuchse 2. Audioports 3. E/A zur Gegenstelle 4. Konsolports 5. Erdungsanschluss Bedienung CE370RQ Bildsignalkompensation Taste / Schalter Color / + Die CE350 / CE370 PS/2-KVM-Verlängerung unterstützt drei Betriebsarten: Lokal, Automatisch und Gegenstelle, siehe folgende Tabelle: Hardware installieren B Rack-Montage Um mehr Flexibilität und Komfort zu bieten, kann der CE350 bzw. CE370 im Rack eingebaut werden. Um ein Gerät im Rack einzubauen, gehen Sie folgendermaßen vor: 1. Verwenden Sie die mitgelieferten Schrauben, um den Montagerahmen auf die Ober- bzw. Unterseite des Gerätes zu schrauben (siehe die folgende Abbildung): 2. Verschrauben Sie die Halterung mit einem freien und geeignet gelegenen Einschub am Rack. Hinweis: Die Schrauben sind nicht im Lieferumfang enthalten. Wir empfehlen die Verwendung von Kreuzschlitzschrauben des Typs M3 x 5 mit versenktem Kopf. 10 m 150 m Lokales Gerät (CE370L) mit entferntem Gerät (CE370RQ) 300 m Einrichtung Entferntes Gerät (CE350R / CE370RQ) mit Monitor 20 m Die Installation der PS/2-KVM-Verlängerung CE350 / CE370 ist mit ein paar wenigen Kabelanschlüssen erledigt. Schalten Sie alle anzuschließenden Geräte aus. 1. Verbinden Sie die Kabel der lokalen Konsolgeräte (Maus, Tastatur, Monitor, Mikrofon, Lautsprecher) mit den entsprechenden Buchsen im Konsolabschnitt auf der Rückseite des lokalen Gerätes (CE350L/CE370L). Jeder Port ist durch ein entsprechendes Symbol gekennzeichnet. 2. Verbinden Sie die geeigneten Stecker des mitgelieferten PS/2-KVM-Kabels mit den Buchsen im CPU-Abschnitt auf der Vorderseite des lokalen Gerätes (CE350L/CE370L). A Automatische Erkennung Halten Sie beide Tasten (+ / –) 2 Sekunden lang gedrückt, um eine automatische Abstimmung durchzuführen und die zuvor abgespeicherten Werte zu löschen. Betriebsmodi Computer mit lokalem Gerät (CE350L / CE370L) CE350L / CE370L (lokale Geräte) Vorderseite Falls es erforderlich wird, das Bildsignal nachzujustieren, drücken Sie die Plustaste (+), um die Bildkompensation zu erhöhen bzw. die Minustaste (-), um sie zu verringern. Rückseitige Ansicht / Seitliche Ansicht Lokales Gerät (CE350L) mit entferntem Gerät (CE350R) Hardwareübersicht 3. IVerbinden Sie die Stecker am anderen Ende des PS/2-KVM-Kabels mit den betreffenden Ports des lokalen Computers. Jeder Stecker ist durch ein entsprechendes Symbol gekennzeichnet. Hinweis: Wenn Sie den CE350 / CE370 mit einem KVM-Switch kombinieren möchten, schließen Sie das andere Ende des PS/2-KVM-Kabels an die entsprechenden Ports des KVM-Switches an. 4. Zur Steuerung serieller Geräte verbinden Sie den seriellen RS-232-Anschluss des lokalen Gerätes mit einem seriellen Port am lokalen Computer. 5. Verbinden Sie je ein Ende des Kat-5e-Kabels mit dem Anschluss Remote I/O des CE350L/ CE370L. Verbinden Sie das andere Ende des Kat-5e-Kabels mit dem Anschluss I/O des Gerätes der Gegenstelle (CE350R/CE370RQ). 6. Verbinden Sie das eine Ende des mitgelieferten Netzteils mit einer Steckdose und das Netzkabel mit der Stromeingangsbuchse des CE350L/CE370L. 7. Verbinden Sie die Kabel der Konsolgeräte der Gegenstelle (Maus, Tastatur, Monitor, Lautsprecher, Mikrofon) mit den entsprechenden Buchsen im Konsolabschnitt des CE350R/CE370RQ. 8. Verbinden Sie das zweite mitgelieferte Netzteil mit einer Steckdose und sein Netzkabel mit der Stromeingangsbuchse des CE350R/CE370RQ. Hinweis: Wenn Sie das Kat-5e-Kabels in eingeschaltetem Zustand anschließen, wird automatisch eine Bildkompensation ausgeführt. Betriebsart Beschreibung Nur die lokale Konsole hat KVM-Zugriff. Die Tastatur und die Maus der Konsole der Local Gegenstelle sind deaktiviert. Sowohl die lokale als auch die Konsole der Gegenstelle können die KVMSteuerung übernehmen (allerdings nicht gleichzeitig). Bevor sie Zugriff erhält, Automatisch muss die Konsole ohne Zugriff warten, bis die Konsole mit aktuellem Zugriff die Dateneingabe stoppt. Nur die entfernte Konsole hat KVM-Zugriff. Die KVM-Steuerung von der Konsole der Gegenstelle Gegenstelle ist nur möglich, wenn der entsprechende Drucktaster am CE350L bzw. CE370L auf Auto gestellt wurde und die lokale Konsole nicht benutzt wird. Hinweis: Standardmäßig ist die Betriebsart auf Auto voreingestellt. C Select / - Beschreibung 1. Drücken und loslassen, um die Einstellfunktion der Farbe Rot aufzurufen. Drücken Sie die Tasten (+) bzw. (-), um den gewünschten Wert einzustellen. 2. Halten Sie die Taste zwei Sekunden lang gedrückt, um das OSDBildschirmmenü einzublenden (sofern keine Farbeinstellfunktion ausgewählt wurde). 3. Halten Sie die Taste bei ausgewählter Farbeinstellfunktion zwei Sekunden lang gedrückt, um zu einer anderen Farbe umzuschalten. Die Reihenfolge lautet dabei R _ G _ B _ Kompensation _ Beenden_ R … 4. Drücken Sie diese Taste bei ausgewählter Farbeinstellfunktion, und lassen Sie sie los, um den Wert (Laufzeit/Kompensation) zu erhöhen. 5. Drücken und halten Sie die Tasten Color und Select gleichzeitig, um eine automatische Abstimmung durchzuführen und die gespeicherten Werte zu löschen. Dabei wird die RGB-Kompensation automatisch durchgeführt. 1. Drücken und loslassen, um die Einstellfunktion der Farbe Rot aufzurufen. Drücken Sie die Tasten (+) bzw. (-), um den gewünschten Wert einzustellen. 2. Drücken Sie diese Taste bei ausgewählter Farbeinstellfunktion, und lassen Sie sie los, um den Wert (Laufzeit/Kompensation) zu verringern. Hinweis: 1. Die Bedienung der Taste Color / + für die Schritte 1 und 2 muss innerhalb von 10 Sekunden erfolgen. 2. Nach Erreichen des maximalen bzw. minimalen Wertes über die Tasten + bzw. – wird nicht automatisch ein Sprung zum niedrigsten bzw. höchsten Wert zum Fortfahren der Einstellung durchgeführt. Sie müssen die jeweils andere Einstelltaste drücken, um den Wert wiederum zu erhöhen bzw. zu verringern. CE350R-Bildkompensation Manuelle Abstimmung Guía rápida del sistema de extensión KVM para PS/2 CE350 / CE370 Requisitos Consolas • Un monitor VGA, SVGA, SXGA, UXGA, WUXGA o MultiSync capaz de representar la resolución más elevada que vaya a usar con cualquiera de los ordenadores a instalar. Nota: Si conecta un monitor que admite la señal DDC a la consola local, el monitor de la unidad remota debe admitir la resolución máxima posible para el monitor DDC. • Un teclado PS/2 • Un ratón PS/2 • Micrófono estéreo y altavoces estéreo (opcional) Ordenadores En cada ordenador que vaya a conectar al sistema se tienen que instalar los siguientes componentes: • Una tarjeta gráfica VGA, SVGA, SXGA, UXGA, WUXGA o multisync. • Un teclado PS/2 • Un ratón PS/2 • Puertos para altavoces y micrófono (opcionales) Cables • Para garantizar una recepción optima de la señal y simplificar el sistema, recomendamos vivamente que use el cable KVM personalizado de alta calidad incluido con el dispositivo. • Se requiere como mínimo un cable de Cat. 5e para conectar la unidad local y la remota CE350 / CE370. Un cable de calidad inferior tiende a deteriorar la señal gráfica. Para mejores resultados, le recomendamos vivamente que emplee un cable de Cat. 5e. Longitudes máximas de cables Conexión Distancia Ordenador a unidad local (CE350L / CE370L) 10 m Unidad local (CE350L) a unidad remota (CE350R) 150 m Unidad local (CE370L) a unidad remota (CE370RQ) 300 m Unidad remota (CE350R / CE370RQ) al monitor 20 m Presentación del hardware A CE350L / CE370L (unidades locales) - Vista frontal www.aten.com 1. Sección de puertos KVM 2. Puerto serie RS-232 3. Botón de modo operativo 4. Indicadores LED CE350R (unidad remota) – Vista frontal 1. Puerto serie RS-232 2. Botón de compensación de imagen 3. Indicadores LED CE370RQ (unidad remota) – Vista frontal 1. Puerto serie RS-232 2. Botones de compensación de imagen 3. Indicadores LED Vista posterior / Vista lateral 1. Entrada de alimentación 2. Puertos de audio 3. Puertos E/S para equipo remoto 4. Puertos de consola 5. Toma de tierra Instalar el hardware Si tuviera que efectuar un ajuste fino de la señal gráfica, pulse el botón más (+) para aumentar la compensación de la señal gráfica o pulse el botón menos (-) para reducirla. Detección automática Mantenga pulsados ambos botones (+ / –) durante 2 segundos para activar la detección automática y borrar los ajustes guardados. CE370RQ Compensación de señal Botón / Interruptor Color / + Funcionamiento Modos operativos B Montaje en rack Para un mayor confort y más flexibilidad, el CE350 / CE370 puede montarse en un rack. Para montar un equipo en el rack, haga lo siguiente: 1. Atornille como se indica en el siguiente diagrama el marco de montaje en la parte superior o inferior de la unidad con los tornillos incluidos con el kit para montaje en rack: 2. Atornille los rieles en una posición deseada del rack. Nota: los tornillos necesarios no vienen incluidos con la unidad. Le recomendamos que utilice tornillos empotrados de estrella / cruz M3 x 5 de tipo I. Instalación 3. IInserte los conectores del otro extremo del cable PS/2 KVM en los puertos correspondientes del ordenador local. Cada conector viene marcado con un icono correspondiente. Nota: si combina el CE350 / CE370 con un conmutador KVM, inserte los conectores del otro extremo del cable PS/2 KVM en los puertos correspondientes del conmutador KVM. 4. Para controlar dispositivos serie, conecte el puerto serie RS-232 de la unidad local a un puerto serie del ordenador local. 5. Conecte un extremo del cable de Cat. 5e al puerto Remote I/O de la unidad local CE350L/CE370L. Conecte el otro extremo del cable de cat. 5e al puerto I/O de la unidad remota CE350R/CE370RQ. 6. Conecte uno de los adaptadores de alimentación incluidos a una toma eléctrica y el cable de alimentación del adaptador a la entrada de alimentación de la unidad local CE350L/CE370L. 7. Conecte los cables de los dispositivos de consola remotos (ratón, teclado, monitor, altavoces y micrófono) a los puertos de consola correspondientes de la unidad remota CE350R/CE370RQ. 8. Conecte el segundo adaptador de alimentación incluido a una toma eléctrica y el cable del adaptador a la entrada de alimentación de la unidad remota CE350R/CE370RQ. Nota: Si conecta el cable de Cat. 5e con el equipo encendido, se efectuará una compensación de imagen de forma automática. C La instalación del sistema de extensión KVM CE350 / CE370 es tan sencilla como conectar unos cables. Apague todos los dispositivos que vaya a conectar. 1. Conecte los cables de los dispositivos de consola locales (ratón, teclado, monitor, micrófono y altavoces) a los puertos correspondientes de la sección de consola situada en el panel posterior de la unidad local CE350L/CE370L. Cada puerto viene marcado con un icono correspondiente. 2. Inserte los conectores del cable PS/2 KVM incluido con el dispositivo en los puertos correspondientes de la sección CPU situada en el panel frontal de la unidad local CE350L/CE370L. El sistema de extensión PS/2 KVM CE350 / CE370 ofrece tres modos operativos: Local, Automático y Remoto, que se describen en la siguiente tabla: Modo Local Auto Remota Descripción Sólo la consola local tiene el control KVM. La entrada del teclado y del ratón de la consola remota está desactivada. Tanto la consola local como la remota pueden tener el control KVM (pero nunca las dos a la vez). Antes de conseguir el acceso, la consola que no tiene el control KVM debe esperar hasta que la consola que lo tiene deje de introducir datos. Sólo la consola remota tiene acceso KVM. El control KVM remoto sólo es posible cuando el pulsador de la unidad local (CE350L / CE370L) esté en la posición Auto y no se utilice la consola local. Nota: El modo operativo predeterminado es Automático. CE350R Control de compensación Ajuste manual Select / - Descripción 1. Pulse y suelte este botón para acceder a la función de ajuste para el color rojo. Pulse los botones (+) y (-) para ajustar el valor deseado. 2. Mantenga pulsado el botón durante dos segundos para abrir el menú en pantalla (cuando no tenga seleccionada ninguna función de ajuste de color). 3. Mantenga pulsado este botón durante dos segundos para cambiar el color a compensar (cuando lo tenga seleccionado). La secuencia es R _ G _ B _ Compensación de imagen_ Salir _ R … 4. Pulse y suelte el botón para incrementar el valor ((tiempo de propagación/compensación) cuando tenga seleccionado un color para compensar. 5. Mantenga pulsados los botones Color y Select simultáneamente para ejecutar la compensación automática (ajusta la compensación para los colores R, V y A automáticamente) y borra los valores almacenados. 1. Pulse y suelte este botón para acceder a la función de ajuste para el color rojo. Pulse los botones (+) y (-) para ajustar el valor deseado. 2. Pulse y suelte el botón para reducir el valor (tiempo de propagación/ compensación) cuando tenga seleccionado un color para compensar. Nota: 1. El tiempo de espera para pulsar el botón Color / + en los pasos 1 y 2 es de diez segundos. 2. Los ajustes no son cíclicos, es decir, al alcanzar el valor máximo con el botón + o el mínimo con el botón –, el ajuste no sigue en el valor mínimo o máximo respectivamente. Pulse el otro botón para incrementar o reducir el valor como requiera.-
 1
1
-
 2
2


ATEN CE350 Guía de inicio rápido
- Categoría
- Conmutadores KVM
- Tipo
- Guía de inicio rápido
- Este manual también es adecuado para
en otros idiomas
- français: ATEN CE350 Guide de démarrage rapide
- italiano: ATEN CE350 Guida Rapida
- English: ATEN CE350 Quick start guide
- Deutsch: ATEN CE350 Schnellstartanleitung
- 日本語: ATEN CE350 クイックスタートガイド
Artículos relacionados
-
ATEN CE700A Guía de inicio rápido
-
ATEN CE800b Guía de inicio rápido
-
ATEN CE770 Guía de inicio rápido
-
-
ATEN CE750 Guía de inicio rápido
-
ATEN USB DVI Cat 5 KVM Extender (1024 x 768@60m) Guía de inicio rápido
-
ATEN CE100 Manual de usuario
-
ATEN CE690-AT-U Guía de inicio rápido
-
ATEN CE790 Guía de inicio rápido
-
ATEN CE775 Guía de inicio rápido