ATEN UEH4002 Guía de inicio rápido
- Categoría
- Extensores de consola
- Tipo
- Guía de inicio rápido

© Copyright 2014 ATEN
®
International Co., Ltd.
ATEN and the ATEN logo are trademarks of ATEN International Co., Ltd. All rights reserved. All
other trademarks are the property of their respective owners.
This product is RoHS compliant.
Part No. PAPE-1223-940G Printing Date: 12/2014
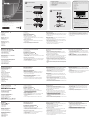
Hardware Review
A
UEH4002L Front View
1. Power LED
2. Link LED
3. Host LED.
4. Activity LED
UEH4002L Rear View
5. Power Port
6. USB Type B connector
7. Link Port (RJ45)
UEH4002R Front View
1. Device Port (USB Type A)
2. Device LED
3. Power LED
4. Link LED
5. Host LED
6. Activity LED
Description de l’appareil
A
Vue avant de l’unité locale UEH4002L
1. Voyant d’alimentation (Power)
2. Voyant de liaison (Link)
3. Voyant d’hôte (Host)
4. Voyant d’activité (Activity)
Vue arrière de l’unité locale UEH4002L
5. Prise d’alimentation
6. Port USB de type B
7. Port de liaison (RJ45)
Vue avant de l’unité distante UEH4002R
1. Port de périphérique (USB de type A)
2. Voyant de périphérique
3. Voyant d’alimentation (Power)
4. Voyant de liaison (Link)
5. Voyant d’hôte (Host)
6. Voyant d’activité (Activity)
Hardwareübersicht
A
Vorderseite des UEH4002L
1. LED-Betriebsanzeige
2. Verbindungsanzeige
3. Host-LED
4. Aktivitäts-LED
Rückseite des UEH4002L
5. Stromeingangsbuchse
6. USB-Anschluss, Typ B
7. Verbindungs-Port (RJ45)
Vorderseite des UEH4002R
1. USB-Anschluss Typ A für Geräte
2. Geräte-LED
3. LED-Betriebsanzeige
4. Verbindungsanzeige
5. Host-LED
6. Aktivitäts-LED
Presentación del hardware
A
Vista anterior del UEH4002L
1. Indicador LED de alimentación
2. Indicador de enlace (Link)
4. Indicador de actividad
Vista posterior del UEH4002L
5. Entrada de alimentación
6. Conector USB de tipo B
7. Puerto de enlace (RJ45)
Vista anterior del UEH4002R
1. Puerto para dispositivos (USB tipo A)
2. Indicador de dispositivos
3. Indicador LED de alimentación
4. Indicador de enlace (Link)
6. Indicador de actividad
Hardware
A
UEH4002L Vista frontale
1. LED d’alimentazione
2. LED di collegamento
3. LED dell’host.
4. LED d‘attività
UEH4002L Vista posteriore
5. Porta dell’alimentazione
6. Connettore USB tipo B
7. Porta di collegamento (RJ45)
UEH4002R Vista frontale
1. Porta dispositivo (USB di tipo A).
2. LED dispositivo
3. LED d’alimentazione
4. LED di collegamento
5. LED dell’host
6. LED d‘attività
UEH4002R Rear View
7. Power Port
8. Link Port (RJ45)
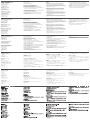
Hardware Installation
B
Installing the Local unit
1. Place the Local unit near the computer.
2. Install the supplied USB cable between the Local and USB port
on the host computer.
Installing the Remote unit
1. Place the Remote unit near the USB device(s) in the desired
remote location.
2. Plug the power adapter into a suitable AC outlet.
3. Connect the power adapter to the Remote unit.
Vue arrière de l’unité distante UEH4002R
7. Prise d’alimentation
8. Port de liaison (RJ45)
Installation du matériel
B
Installation de l’unité locale
1. Placez l’unité locale à proximité de l’ordinateur.
2. Installez le câble USB fourni entre l’unité locale et le port USB de
l’ordinateur hôte.
Installation de l’unité distante
1. Placez l’unité distante à proximité du ou des périphériques USB
de l’emplacement distant.
2. Branchez l’adaptateur secteur dans une prise murale adéquate.
3. Connectez l’adaptateur à l’unité distante.
Rückseite des UEH4002R
7. Stromeingangsbuchse
8. Verbindungs-Port (RJ45)
Hardware installieren
B
Lokales Gerät installieren
1. Stellen Sie das lokale Gerät in der Nähe des Computers auf.
2. Verbinden Sie das mitgelieferte USB-Kabel mit dem lokalen
Gerät und Ihrem Host-Computer.
Gerät der Gegenstelle installieren
1. Stellen Sie das Gerät der Gegenstelle in die Nähe der
anzuschließenden USB-Geräte.
2. Verbinden Sie das Netzteil mit einer geeigneten Steckdose.
3. Verbinden Sie das Netzteil mit dem Gerät der Gegenstelle.
Vista posterior del UEH4002R
7. Entrada de alimentación
8. Puerto de enlace (RJ45)
Instalar el hardware
B
Instalar la unidad local
1. Coloque la unidad local cerca de la computadora.
2. Instale el cable USB suministrado entre la unidad local y el
Instalar la unidad remota
1. Coloque la unidad remota cerca del / de los dispositivo(s) USB
en la ubicación distante.
2. Enchufe el cable de alimentación en una toma eléctrica
adecuada.
3. Conecte el adaptador de alimentación a la unidad remota.
UEH4002R Vista posteriore
7. Porta dell’alimentazione
8. Porta di collegamento (RJ45)
Installazione dell’hardware
B
Installazione dell’unità locale
1. Posizionare l’unità locale vicino al computer.
2. Collegare le porte USB dell'unità locale e del computer host
tramite l'apposito cavo fornito in dotazione.
Installazione dell’unità remota
1. Posizionare l’unità remota vicino ai dispositivi USB nel luogo
remoto desiderato.
2. Collegare l’alimentatore a una presa CA adatta.
3. Collegare l’alimentatore all’unità remota.
Connecting the Local unit to the Remote unit
With Surface Cabling
1. Plug one end of the Cat 5 cabling (not included) into the Link port
(RJ45) on the Local unit.
2. Plug the other end of the Cat 5 cabling into the Link port (RJ45)
on the Remote unit.
With Premise Cabling
1. Plug one end of a Cat 5 patch cord (not included) into the Link
port (RJ45) on the Local unit.
2. Plug the other end of the patch cord into the Cat 5 information
outlet near the host computer.
3. Plug one end of the 2nd Cat 5 patch cord (not included) into the
Link port (RJ45) on the Remote unit.
4. Plug the other end of the 2nd patch cord into the Cat 5
information outlet near the USB device.
Connexion de l’unité locale à l’unité distante
Câblage direct
1. Branchez une extrémité du câble de catégorie 5 (non fourni)
dans le port de liaison (RJ45) de l'unité locale.
2. Branchez l’autre extrémité du câble de catégorie 5 dans le port
de liaison (RJ45) de l'unité distante.
Utilisation du pré-câblage du bâtiment
1. Branchez une extrémité d’un cordon de brassage de catégorie 5
(non fourni) dans le port de liaison (RJ45) de l'unité locale.
2. Branchez l’autre extrémité du cordon de brassage dans la prise
de données de catégorie 5 située à côté de l'ordinateur hôte.
3. Branchez une extrémité du second cordon de brassage de
catégorie 5 (non fourni) dans le port de liaison (RJ45) de l'unité
distante.
4. Branchez l’autre extrémité du second cordon de brassage dans
la prise de données de catégorie 5 située à côté du périphérique
USB.
Lokales Gerät mit dem Gerät der Gegenstelle verbinden
Traditionelle Verkabelung
1. Verbinden Sie das eine Ende des Kat. 5-Kabels (nicht im
Lieferumfang enthalten) mit dem Anschluss-Link (RJ45) des
lokalen Gerätes.
2. Verbinden Sie das andere Ende des Kat. 5-Kabels mit dem
Anschluss-Link (RJ45) des Gerätes der Gegenstelle.
Mit Patchkabeln
1. Verbinden Sie das eine Ende eines Kat. 5-Patchkabels (nicht
im Lieferumfang enthalten) mit dem Anschluss-Link (RJ45) des
lokalen Gerätes.
2. Verbinden Sie das andere Ende des Patchkabels mit der Kat.
5-Dose in der Nähe des Host-Computers.
3. Verbinden Sie das eine Ende eines zweiten Kat. 5-Patchkabels
(nicht im Lieferumfang enthalten) mit dem Anschluss-Link (RJ45)
des Gerätes der Gegenstelle.
4. Verbinden Sie das andere Ende des zweiten Patchkabels mit der
Kat. 5-Dose in der Nähe des USB-Gerätes.
Conectar la unidad local a la unidad remota
Cableado tradicional
1. Enchufe un extremo del cable de categoría 5 (no incluido) al
puerto de enlace Link (RJ45) de la unidad local.
2. Enchufe el otro extremo del cable de categoría 5 al puerto de
enlace Link (RJ45) de la unidad remota.
Con cables patch cord
1. Enchufe un extremo del cable patch cord de categoría 5 (no
incluido) al puerto de enlace Link (RJ45) de la unidad local.
2. Enchufe el otro extremo del cable patch cord en la toma de Cat.
3. Enchufe un extremo de un segundo cable patch cord de
categoría 5 (no incluido) al puerto de enlace Link (RJ45) de la
unidad remota.
4. Enchufe el otro extremo del segunda cable patch cord en la toma
de Cat. 5 ubicada cerca del dispositivo USB.
Collegare l’unità locale all’unità remota.
Con cablaggio diretto
1. Inserire un’estremità del cavo Cat.5 (non incluso) nella porta di
collegamento (RJ45) dell’unità locale.
2. Inserire l’altra estremità del cavo Cat.5 nella porta di
collegamento (RJ45) dell’unità remota.
Con cablaggio strutturato
1. Inserire un’estremità del cavo Cat.5 patch (non incluso) nella
porta di collegamento (RJ45) dell’unità locale.
2. Inserire l’altra estremità del cavo patch nella presa Cat 5 accanto
al computer host.
3. Inserire un’estremità del secondo cavo Cat.5 patch (non incluso)
nella porta di collegamento (RJ45) dell’unità remota.
4. Inserire l’altra estremità del secondo cavo patch nella presa Cat
5 accanto al dispositivo USB.
Connecting a USB Device
1. Install any software required to operate the USB device(s). Refer
to the documentation for the USB device(s), as required.
2. Connect the USB device to the device port on the Remote unit.
3. Check that the device is detected and installed properly in the
operating system.
Raccordement d’un périphérique USB
1. Installez tous les logiciels nécessaires à l'utilisation du ou des
périphériques USB. Si nécessaire, consultez la documentation
du ou des périphériques USB.
2. Connectez le périphérique USB au port de périphérique situé sur
l’unité distante.
système d'exploitation.
USB-Gerät anschließen
1. Installieren Sie ggf. die Software, die zum Betrieb Ihrer USB-
Geräte erforderlich ist. Siehe die Dokumentation zu Ihren USB-
Geräten.
2. Verbinden Sie das USB-Gerät mit dem Geräteport an der Einheit
der Gegenstelle.
3. Stellen Sie sicher, dass das Gerät vom Betriebssystem
ordnungsgemäß erkannt und installiert wird.
Conectar un dispositivo USB
1. Si fuera necesario, instale el software requerido para el o los
dispositivo(s) USB. Consulte la documentación del o de los
dispositivo(s) USB.
2. Conecte el dispositivo USB al puerto para dispositivos de la
unidad remota.
3. Compruebe que el dispositivo haya sido detectado e instalado
debidamente por su sistema operativo.
Collegamento di un dispositivo USB
1. Installare eventuale software necessario per far funzionare
i dispositivi USB. Consultare, secondo necessità, la
documentazione dei dispositivi USB.
2. Collegare il dispositivo USB alla porta dispositivo sull’unità
remota.
correttamente nel sistema operativo.
B
Package Contents
1 UEH4002L Cat 5 USB 2.0 Extender (Local unit)
1 UEH4002R Cat 5 USB 2.0 Extender (Remote unit)
1 AC Power Adapter
1 USB 2.0 Cable (6 ft)
1 User Instructions
UEH4002L Front View
UEH4002R Front View
UEH4002L Rear View
UEH4002R Rear View
Hardware Installation
Cat 5 USB 2.0 Extender
Quick Start Guide
UEH4002
UEH4002 Cat 5 USB 2.0 Extender Quick Start Guide
www.aten.com
Système d'extension USB 2.0 Catégorie 5 UEH4002 – Guide de mise en route rapide
www.aten.com
UEH4002 USB 2.0-Verlängerung über Kat. 5 Kurzanleitung
www.aten.com
UEH4002 Alargador USB 2.0 de Cat. 5 Guía rápida
www.aten.com
Estensore Cat 5 USB 2.0 UEH4002 - Guida rapida
www.aten.com
All 2.0 & 1.1 Devices
USB 2.0 over 100 m
(UPT, Cat 5, Cat 6)
2
7 8
3 5
1 4 6
1
5 6 7
3
2 4
Important Notice
Considering environmental protection, ATEN does not provide a fully
printed user manual for this product. If the information contained in the
Quick Start Guide is not enough for you to confi gure and operate your
product, please visit our website www.aten.com, and download
the full user manual.
Online Registration
http://eservice.aten.com
Technical Phone Support
International:
886-2-86926959
North America:
1-888-999-ATEN Ext: 4988
United Kingdom:
44-8-4481-58923
All information, documentation, firmware, software utilities, and
specifi cations contained in this package are subject to change without
prior notification by the manufacturer. Please visit our website http://
www.aten.com/download/?cid=dds for the most up-to-date versions.
EMC Information
FEDERAL COMMUNICATIONS COMMISSION INTERFERENCE STATEMENT:
This equipment has been tested and found to comply with the limits for a Class B
digital service, pursuant to Part 15 of the FCC rules. These limits are designed to provide
reasonable protection against harmful interference in a residential installation. Any
changes or modifi cations made to this equipment may void the user s authority to
operate this equipment. This equipment generates, uses, and can radiate radio frequency
energy. If not installed and used in accordance with the instructions, may cause harmful
interference to radio communications. However, there is no guarantee that interference
will not occur in a particular installation. If this equipment does cause harmful
interference to radio or television reception, which can be determined by turning the
equipment off and on, the user is encouraged to try to correct the interference by one or
more of the following measures:
- Reorient or relocate the receiving antenna;
- Increase the separation between the equipment and receiver;
- Connect the equipment into an outlet on a circuit different from that to
which the receiver is connected;
- Consult the dealer/an experienced radio/television technician for help.
FCC Caution: Any changes or modifi cations not expressly approved by the party
responsible for compliance could void the user's authority to operate this equipment.
The following contains information that relates to China:
A
Hardware Review
La página se está cargando...
Transcripción de documentos
A Package Contents Hardware Review 2 4 Important Notice 1 UEH4002L Cat 5 USB 2.0 Extender (Local unit) 1 UEH4002R Cat 5 USB 2.0 Extender (Remote unit) 1 AC Power Adapter 1 USB 2.0 Cable (6 ft) 1 User Instructions UEH4002L Front View Considering environmental protection, ATEN does not provide a fully printed user manual for this product. If the information contained in the Quick Start Guide is not enough for you to configure and operate your product, please visit our website www.aten.com, and download the full user manual. Online Registration http://eservice.aten.com Technical Phone Support International: 886-2-86926959 North America: 1-888-999-ATEN Ext: 4988 1 3 UEH4002L Rear View 5 UEH4002 6 1 Cat 5 USB 2.0 Extender Quick Start Guide B Hardware Installation 4 6 UEH4002R Front View 2 3 5 ATEN and the ATEN logo are trademarks of ATEN International Co., Ltd. All rights reserved. All other trademarks are the property of their respective owners. UEH4002R Rear View This product is RoHS compliant. Part No. PAPE-1223-940G The following contains information that relates to China: 7 USB 2.0 over 100 m (UPT, Cat 5, Cat 6) © Copyright 2014 ATEN® International Co., Ltd. United Kingdom: 44-8-4481-58923 Printing Date: 12/2014 7 8 All 2.0 & 1.1 Devices EMC Information FEDERAL COMMUNICATIONS COMMISSION INTERFERENCE STATEMENT: This equipment has been tested and found to comply with the limits for a Class B digital service, pursuant to Part 15 of the FCC rules. These limits are designed to provide reasonable protection against harmful interference in a residential installation. Any changes or modifications made to this equipment may void the user s authority to operate this equipment. This equipment generates, uses, and can radiate radio frequency energy. If not installed and used in accordance with the instructions, may cause harmful interference to radio communications. However, there is no guarantee that interference will not occur in a particular installation. If this equipment does cause harmful interference to radio or television reception, which can be determined by turning the equipment off and on, the user is encouraged to try to correct the interference by one or more of the following measures: - Reorient or relocate the receiving antenna; - Increase the separation between the equipment and receiver; - Connect the equipment into an outlet on a circuit different from that to which the receiver is connected; - Consult the dealer/an experienced radio/television technician for help. FCC Caution: Any changes or modifications not expressly approved by the party responsible for compliance could void the user's authority to operate this equipment. All information, documentation, firmware, software utilities, and specifications contained in this package are subject to change without prior notification by the manufacturer. Please visit our website http:// www.aten.com/download/?cid=dds for the most up-to-date versions. UEH4002 Cat 5 USB 2.0 Extender Quick Start Guide Hardware Review www.aten.com UEH4002R Rear View A Connecting the Local unit to the Remote unit With Surface Cabling 1. Plug one end of the Cat 5 cabling (not included) into the Link port (RJ45) on the Local unit. 2. Plug the other end of the Cat 5 cabling into the Link port (RJ45) on the Remote unit. 7. Power Port 8. Link Port (RJ45) UEH4002L Front View 1. Power LED 2. Link LED 3. Host LED. 4. Activity LED Hardware Installation B Installing the Local unit 1. Place the Local unit near the computer. 2. Install the supplied USB cable between the Local and USB port on the host computer. UEH4002L Rear View 5. Power Port 6. USB Type B connector 7. Link Port (RJ45) Installing the Remote unit 1. Place the Remote unit near the USB device(s) in the desired remote location. 2. Plug the power adapter into a suitable AC outlet. 3. Connect the power adapter to the Remote unit. UEH4002R Front View 1. Device Port (USB Type A) 2. Device LED 3. Power LED 4. Link LED 5. Host LED 6. Activity LED Connecting a USB Device 1. Install any software required to operate the USB device(s). Refer to the documentation for the USB device(s), as required. 2. Connect the USB device to the device port on the Remote unit. 3. Check that the device is detected and installed properly in the operating system. With Premise Cabling 1. Plug one end of a Cat 5 patch cord (not included) into the Link port (RJ45) on the Local unit. 2. Plug the other end of the patch cord into the Cat 5 information outlet near the host computer. 3. Plug one end of the 2nd Cat 5 patch cord (not included) into the Link port (RJ45) on the Remote unit. 4. Plug the other end of the 2nd patch cord into the Cat 5 information outlet near the USB device. Système d'extension USB 2.0 Catégorie 5 UEH4002 – Guide de mise en route rapide Description de l’appareil www.aten.com Vue arrière de l’unité distante UEH4002R A 7. Prise d’alimentation 8. Port de liaison (RJ45) Vue avant de l’unité locale UEH4002L 1. Voyant d’alimentation (Power) 2. Voyant de liaison (Link) 3. Voyant d’hôte (Host) 4. Voyant d’activité (Activity) Installation du matériel B Installation de l’unité locale 1. Placez l’unité locale à proximité de l’ordinateur. 2. Installez le câble USB fourni entre l’unité locale et le port USB de l’ordinateur hôte. Vue arrière de l’unité locale UEH4002L 5. Prise d’alimentation 6. Port USB de type B 7. Port de liaison (RJ45) Installation de l’unité distante Vue avant de l’unité distante UEH4002R 1. Port de périphérique (USB de type A) 2. Voyant de périphérique 3. Voyant d’alimentation (Power) 4. Voyant de liaison (Link) 5. Voyant d’hôte (Host) 6. Voyant d’activité (Activity) 1. Placez l’unité distante à proximité du ou des périphériques USB de l’emplacement distant. 2. Branchez l’adaptateur secteur dans une prise murale adéquate. 3. Connectez l’adaptateur à l’unité distante. Connexion de l’unité locale à l’unité distante Câblage direct 1. Branchez une extrémité du câble de catégorie 5 (non fourni) dans le port de liaison (RJ45) de l'unité locale. 2. Branchez l’autre extrémité du câble de catégorie 5 dans le port de liaison (RJ45) de l'unité distante. Utilisation du pré-câblage du bâtiment 1. Branchez une extrémité d’un cordon de brassage de catégorie 5 (non fourni) dans le port de liaison (RJ45) de l'unité locale. 2. Branchez l’autre extrémité du cordon de brassage dans la prise de données de catégorie 5 située à côté de l'ordinateur hôte. 3. Branchez une extrémité du second cordon de brassage de catégorie 5 (non fourni) dans le port de liaison (RJ45) de l'unité distante. 4. Branchez l’autre extrémité du second cordon de brassage dans la prise de données de catégorie 5 située à côté du périphérique USB. Raccordement d’un périphérique USB 1. Installez tous les logiciels nécessaires à l'utilisation du ou des périphériques USB. Si nécessaire, consultez la documentation du ou des périphériques USB. 2. Connectez le périphérique USB au port de périphérique situé sur l’unité distante. système d'exploitation. UEH4002 USB 2.0-Verlängerung über Kat. 5 Kurzanleitung Hardwareübersicht www.aten.com Rückseite des UEH4002R A Lokales Gerät mit dem Gerät der Gegenstelle verbinden 7. Stromeingangsbuchse 8. Verbindungs-Port (RJ45) Vorderseite des UEH4002L 1. LED-Betriebsanzeige 2. Verbindungsanzeige 3. Host-LED 4. Aktivitäts-LED Hardware installieren B Lokales Gerät installieren 1. Stellen Sie das lokale Gerät in der Nähe des Computers auf. 2. Verbinden Sie das mitgelieferte USB-Kabel mit dem lokalen Gerät und Ihrem Host-Computer. Rückseite des UEH4002L 5. Stromeingangsbuchse 6. USB-Anschluss, Typ B 7. Verbindungs-Port (RJ45) Gerät der Gegenstelle installieren 1. Stellen Sie das Gerät der Gegenstelle in die Nähe der anzuschließenden USB-Geräte. 2. Verbinden Sie das Netzteil mit einer geeigneten Steckdose. 3. Verbinden Sie das Netzteil mit dem Gerät der Gegenstelle. Vorderseite des UEH4002R 1. USB-Anschluss Typ A für Geräte 2. Geräte-LED 3. LED-Betriebsanzeige 4. Verbindungsanzeige 5. Host-LED 6. Aktivitäts-LED Traditionelle Verkabelung 1. Verbinden Sie das eine Ende des Kat. 5-Kabels (nicht im Lieferumfang enthalten) mit dem Anschluss-Link (RJ45) des lokalen Gerätes. 2. Verbinden Sie das andere Ende des Kat. 5-Kabels mit dem Anschluss-Link (RJ45) des Gerätes der Gegenstelle. Mit Patchkabeln 1. Verbinden Sie das eine Ende eines Kat. 5-Patchkabels (nicht im Lieferumfang enthalten) mit dem Anschluss-Link (RJ45) des lokalen Gerätes. 2. Verbinden Sie das andere Ende des Patchkabels mit der Kat. 5-Dose in der Nähe des Host-Computers. 3. Verbinden Sie das eine Ende eines zweiten Kat. 5-Patchkabels (nicht im Lieferumfang enthalten) mit dem Anschluss-Link (RJ45) des Gerätes der Gegenstelle. 4. Verbinden Sie das andere Ende des zweiten Patchkabels mit der Kat. 5-Dose in der Nähe des USB-Gerätes. USB-Gerät anschließen 1. Installieren Sie ggf. die Software, die zum Betrieb Ihrer USBGeräte erforderlich ist. Siehe die Dokumentation zu Ihren USBGeräten. 2. Verbinden Sie das USB-Gerät mit dem Geräteport an der Einheit der Gegenstelle. 3. Stellen Sie sicher, dass das Gerät vom Betriebssystem ordnungsgemäß erkannt und installiert wird. UEH4002 Alargador USB 2.0 de Cat. 5 Guía rápida Presentación del hardware Vista anterior del UEH4002L 1. Indicador LED de alimentación 2. Indicador de enlace (Link) 4. Indicador de actividad Vista posterior del UEH4002L 5. Entrada de alimentación 6. Conector USB de tipo B 7. Puerto de enlace (RJ45) Vista anterior del UEH4002R 1. Puerto para dispositivos (USB tipo A) 2. Indicador de dispositivos 3. Indicador LED de alimentación 4. Indicador de enlace (Link) A www.aten.com Vista posterior del UEH4002R Conectar la unidad local a la unidad remota Cableado tradicional 1. Enchufe un extremo del cable de categoría 5 (no incluido) al puerto de enlace Link (RJ45) de la unidad local. 2. Enchufe el otro extremo del cable de categoría 5 al puerto de enlace Link (RJ45) de la unidad remota. 7. Entrada de alimentación 8. Puerto de enlace (RJ45) Instalar el hardware B Instalar la unidad local 1. Coloque la unidad local cerca de la computadora. 2. Instale el cable USB suministrado entre la unidad local y el Instalar la unidad remota 1. Coloque la unidad remota cerca del / de los dispositivo(s) USB en la ubicación distante. 2. Enchufe el cable de alimentación en una toma eléctrica adecuada. 3. Conecte el adaptador de alimentación a la unidad remota. Con cables patch cord 1. Enchufe un extremo del cable patch cord de categoría 5 (no incluido) al puerto de enlace Link (RJ45) de la unidad local. 2. Enchufe el otro extremo del cable patch cord en la toma de Cat. Conectar un dispositivo USB 1. Si fuera necesario, instale el software requerido para el o los dispositivo(s) USB. Consulte la documentación del o de los dispositivo(s) USB. 2. Conecte el dispositivo USB al puerto para dispositivos de la unidad remota. 3. Compruebe que el dispositivo haya sido detectado e instalado debidamente por su sistema operativo. 3. Enchufe un extremo de un segundo cable patch cord de categoría 5 (no incluido) al puerto de enlace Link (RJ45) de la unidad remota. 4. Enchufe el otro extremo del segunda cable patch cord en la toma de Cat. 5 ubicada cerca del dispositivo USB. 6. Indicador de actividad Estensore Cat 5 USB 2.0 UEH4002 - Guida rapida Hardware A UEH4002L Vista frontale 1. LED d’alimentazione 2. LED di collegamento 3. LED dell’host. 4. LED d‘attività UEH4002L Vista posteriore 5. Porta dell’alimentazione 6. Connettore USB tipo B 7. Porta di collegamento (RJ45) UEH4002R Vista frontale 1. Porta dispositivo (USB di tipo A). 2. LED dispositivo 3. LED d’alimentazione 4. LED di collegamento 5. LED dell’host 6. LED d‘attività www.aten.com UEH4002R Vista posteriore Collegare l’unità locale all’unità remota. 7. Porta dell’alimentazione 8. Porta di collegamento (RJ45) Installazione dell’hardware B Installazione dell’unità locale 1. Posizionare l’unità locale vicino al computer. 2. Collegare le porte USB dell'unità locale e del computer host tramite l'apposito cavo fornito in dotazione. Installazione dell’unità remota 1. Posizionare l’unità remota vicino ai dispositivi USB nel luogo remoto desiderato. 2. Collegare l’alimentatore a una presa CA adatta. 3. Collegare l’alimentatore all’unità remota. Con cablaggio diretto 1. Inserire un’estremità del cavo Cat.5 (non incluso) nella porta di collegamento (RJ45) dell’unità locale. 2. Inserire l’altra estremità del cavo Cat.5 nella porta di collegamento (RJ45) dell’unità remota. Con cablaggio strutturato 1. Inserire un’estremità del cavo Cat.5 patch (non incluso) nella porta di collegamento (RJ45) dell’unità locale. 2. Inserire l’altra estremità del cavo patch nella presa Cat 5 accanto al computer host. 3. Inserire un’estremità del secondo cavo Cat.5 patch (non incluso) nella porta di collegamento (RJ45) dell’unità remota. 4. Inserire l’altra estremità del secondo cavo patch nella presa Cat 5 accanto al dispositivo USB. Collegamento di un dispositivo USB 1. Installare eventuale software necessario per far funzionare i dispositivi USB. Consultare, secondo necessità, la documentazione dei dispositivi USB. 2. Collegare il dispositivo USB alla porta dispositivo sull’unità remota. correttamente nel sistema operativo.-
 1
1
-
 2
2


ATEN UEH4002 Guía de inicio rápido
- Categoría
- Extensores de consola
- Tipo
- Guía de inicio rápido
en otros idiomas
- français: ATEN UEH4002 Guide de démarrage rapide
- italiano: ATEN UEH4002 Guida Rapida
- English: ATEN UEH4002 Quick start guide
- Deutsch: ATEN UEH4002 Schnellstartanleitung
- русский: ATEN UEH4002 Инструкция по началу работы
- português: ATEN UEH4002 Guia rápido
- 日本語: ATEN UEH4002 クイックスタートガイド
Artículos relacionados
-
ATEN UCE260 Guía de inicio rápido
-
ATEN CE610 Guía de inicio rápido
-
ATEN UEH4002A Guía de inicio rápido
-
ATEN CE604 Guía de inicio rápido
-
ATEN VE150AR Guía de inicio rápido
-
ATEN CE775 Guía de inicio rápido
-
ATEN VE813 Guía de inicio rápido
-
-
-
ATEN CE700A Guía de inicio rápido