
24VAC SENSOR COM 1 2 3 4 5 6
Level
Fasten screw through one of the
pre-formed mounting holes.
24VAC SENSOR COM 1 2 3 4 5 6
Do not connect to power
source until after wiring
valves to timer.
TIMER
QUICK START
GUIDE
PN 57874-50 rB
p 801 295 9820
f 801 951 5815
www.fluid-studio.net
1065 South 500 West
Bountiful, Utah 84010
proof no: 4
date: 09.13.11
des: SM
client: Orbit
sku: 57874
upc: NA
file name: 57874-50 rB.indd
software: InDesign CS5
colors
additional instructions:
· Font sizes cannot be smaller than 7 pt.
· Translation Approval code: LB682594
fold color
non printing
PMS
????
PMS
????
color
non printing
PMS
????
Registration
K
Printers are responsible for
meeting print production
requirements. Any changes
must be approved by the
client and Fluid Studio.
printed piece must meet
designated specifications
on this form.
dimensions:
flat: w: 28" h: 14"
finished: w 28" d: " h 14"
© 2007 Fluid Studio. This
work is the property of Fluid
Studio, and cannot be used,
reproduced or distributed
in any way without their
express permission.
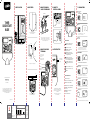
1. SELECT LOCATION
.
.
.
.
.
.
.
.
.
.
.
.
.
.
.
.
.
.
.
.
.
.
.
.
.
.
.
.
.
.
.
.
.
.
.
.
.
.
.
.
.
.
.
.
.
.
.
.
.
.
.
.
.
.
.
.
.
.
.
.
.
.
.
.
.
.
.
.
.
.
.
.
.
.
.
.
.
.
.
Indoor
Clean, dry, and out of direct sunlight.
A
F
G
H
B
C
D
E
ENTER - To confirm a new setting
MANUAL - To water manually
CLEAR - To clear a setting
PROGRAM - to switch between
programs - A and B
ARROW [ ] - To skip to the next
setting / watering station or move to
other programs/settings
ARROW [ ] - To go back to the
previous setting / watering station or
move to other programs/settings
RAIN DELAY - To pause operation
for 24-72 hours due to rain or other
factors
[
+
] To increase a numeric setting
[
-
] To decrease a numeric setting
MANUAL
Button Function:
AUTO - Watering mode
SET CLOCK - Set calendar and clock time
SET DATE - Year, Month, and Day
START TIME - Set time to begin watering
RUN TIME - Set watering duration for
each station
HOW OFTEN - Set frequency of
watering days
OFF - Turn all stations off
Dial Position Function:
A
B
C
F
D
E
G
H
Reset
Shroud
cover
attachment
5. CONNECT TO
ELECTRICAL POWER
24VAC SENSOR COM 1 2 3 4 5 6
4. CONNECT VALVE WIRE
TO TERMINAL
Station 1
Strip wire
Push in wire and
tighten screw
Only connect one valve to
each terminal (station).
7. PROGRAM TIMER
Turn dial to SET DATE and enter current date
(+/-) (enter or arrows will advance).
Set Current Time
(e.g. pacific,
mountain standard)
A
Turn dial to SET CLOCK enter current time (+/-).
Set Date
B
SET
DATE
C
Watering
Start Time
Turn dial to START TIME and to enter the time to begin
watering (+/-). Important: Only set one start time per
station unless you want to water multiple times per day.
D
Set Watering Duration
for Each Station
Turn dial to RUN TIME enter the watering duration (+/- ) for
each station (enter or arrow to move between stations).
E
Set Watering
Days or Interval
Turn dial to HOW OFTEN to select watering days
(arrows to move between selections and enter to select).
Set Auto Mode
F
Turn dial to AUTO— Congratulations, you have programmed your timer!
(See page 9 of manual for detailed instructions on programming.)
Keyhole
Pre-formed
mounting holes
No. 8 Screw
Wall
1/8"
2. MOUNT TIMER
Use included mounting template to
mark screw locations.
Hang timer on screw using keyhole.
To
Timer
Wire Nut
Solenoid
Common Wire
Valve
Connect one of the two wires from each valve to the
common wire leading to the timer (usually white).
Connect the other wire from each valve to one of the
colored wires leading to the timer.
3. CONNECT SPRINKLER
VALVES TO TIMER WIRES
6. ACTIVATE BATTERY
Remove plastic
strip to activate
battery.
One Lithium CR2032 battery (included) is
required to retain the program in memory
during power loss. Annual replacement is
recommended.
Remove the plastic strip to activate the
pre-installed battery.
Battery
REQUIRED TOOLS:
Phillips Screwdriver
Wire Strippers
Manual Watering
G
Press MANUAL—Program will start in 5 seconds.
Attach power
connector to 24VAC
plug on the timer
wiring terminal.
Note: The quick start guide is intended to help you
get up and running with your new timer. It includes
basic installation and programming help. For more
detailed and advanced instruction, please refer to
the included timer manual.
I
I

24VAC SENSOR COM 1 2 3 4 5 6
No conecte al suministro
de electricidad hasta haber
cableado las válvulas al
temporizador.
GUÍA DE INICIO
RÁPIDO DEL
TEMPORIZADOR
1. SELECCIONE UNA
UBICACIÓN
.
.
.
.
.
.
.
.
.
.
.
.
.
.
.
.
.
.
.
.
.
.
.
.
.
.
.
.
.
.
.
.
.
.
.
.
.
.
.
.
.
.
.
.
.
.
.
.
.
.
.
.
.
.
.
.
.
.
.
.
.
.
.
.
.
.
.
.
.
.
.
.
.
.
.
.
.
.
.
Interiores
Mantenga en un lugar limpio, seco y alejado de la luz solar directa.
A
F
G
B
C
D
E
ENTER (INTRO): Para configurar al modo
manual. Para regar manualmente.
CLEAR (BORRAR): Para borrar una configuración.
PROGRAM (PROGRAMA): Para cambiar
entre programas A y B.
FLECHA [ ]: Para pasar a la siguiente
configuración/estación de riego o moverse a
otros programas/configuraciones.
FLECHA [ ]: Para volver a la configuración
anterior/estación de riego o moverse a otros
programas/configuraciones.
RAIN DELAY (RETARDO POR LLUVIA): Para
detener el funcionamiento de 24 a 72 horas por
lluvia u otros factores
[
+
] Para aumentar una configuración numérica.
[
-
] Para disminuir una configuración numérica.
MANUAL
Funciones de los botones:
AUTO: Modo de riego
SET CLOCK (CONFIGURACIÓN DE RELOJ):
Configura el calendario y la hora del reloj.
SET DATE (AJUSTE DE FECHA): Configura el año,
mes y día.
START TIME (HORA DE INICIO): Configura la hora
de inicio para comenzar a regar.
RUN TIME (TIEMPO DE FUNCIONAMIENTO):
Configura la duración del riego para cada estación.
HOW OFTEN (FRECUENCIA): Configura la
frecuencia de los días de riego.
OFF (APAGADO): Apaga todas las estaciones.
Funciones de las posiciones del selector:
A
B
C
F
D
E
G
H
Reinicio
Accesorio
de
cubierta
5. CONECTE A LA
ALIMENTACIÓN ELÉCTRICA
24VAC SENSOR COM 1 2 3 4 5 6
4. CONECTE EL CONDUCTOR
DE LA VÁLVULA AL
TERMINAL
Estación 1
Pele el cable
Empuje el alambre y
apriete el tornillo
Sólo conecte una
válvula a cada terminal
(estación).
7. PROGRAME EL TEMPORIZADOR
Gire el selector para SET DATE (Ajuste de fecha) e ingrese la
fecha actual (+/-) (Enter (Intro) o las flechas avanzarán).
Configure la hora
actual (por ejemplo,
del pacífico, estándar
de la montaña)
A
Gire el selector para SET CLOCK (Configuración de reloj) e
ingrese la hora actual (+/-).
Configure la fecha
B
SET
DATE
C
Configure la hora de
inicio para comenzar
a regar
Gire el selector para START TIME (Hora de inicio) para in-
gresar la hora de inicio de riego (+/-). Importante: Configure
sólo una hora de inicio para cada estación a menos que desee
regar varias veces al día.
D
Seleccione la duración
del riego para cada
estación
Gire el selector para RUN TIME (Tiempo de funcionamiento)
e ingrese la duración de riego (+/-) para cada estación (Enter
(Intro) o las flechas se moverán).
E
Configure los
días o intervalos
de riego
Gire el selector para HOW OFTEN (Frecuencia) para seleccionar
los días de riego (flechas para mover e Intro para seleccionar).
Configure el modo
automático
F
Gire el selector para AUTO: ¡su temporizador ya está programado!
(Consulte la página 9 del manual para obtener instrucciones
detalladas sobre la programación).
Orificio con forma
de bocallave
Orificios de montaje
preformados
Tornillo No. 8
Pared
1/8"
2. MONTE EL TEMPORIZADOR
24VAC SENSOR COM 1 2 3 4 5 6
Nivel
Atornille a través de uno de los orificios
de montaje preformados.
Use la plantilla de montaje incluida para marcar las
ubicaciones de los tornillos.
Cuelgue el temporizador en el orificio con forma de
bocallave con un tornillo.
3. CONECTE LAS VÁLVULAS
DEL REGADOR A LOS
CONDUCTORES DEL
TEMPORIZADOR
6. ACTIVE LA BATERÍA
Retire la cinta
plástica para activar
la batería.
Se requiere una batería de litio CR2032 (incluida)
para mantener el programa en la memoria
durante cortes de electricidad. Se recomienda su
reemplazo cada año.
Retire la cinta plástica para activar la batería
preinstalada.
Batería
HERRAMIENTAS NECESARIAS:
Destornillador Phillips
Pinzas pelacables
Riego manual
G
Presione MANUAL—El programa comenzará en 5 segundos.
Conecte el conector
de alimentación a la
toma de 24 VCA del
terminal de cableado
del temporizador.
Nota: La guía de inicio rápido sirve para
ayudarlo a poner en funcionamiento su nuevo
temporizador. Incluye la instalación básica y ayuda
de programación. Si desea obtener información
más detallada y avanzada, consulte el manual del
temporizador que se incluye.
Al
temporizador
Empalme
plástico
Solenoide
Conductor común
Válvula
Conecte uno de los dos conductores de cada válvula al
conductor común que va al temporizador (generalmente
blanco). Conecte el otro conductor de cada válvula a uno
de los conductores de colores que van al temporizador.
H
I
I
Transcripción de documentos
2. Mount Timer 1. Select Location 3. Connect sprinkler valves to timer wires 5. Connect to Electrical Power Battery 7. Program Timer A Common Wire Indoor To Timer Wire Nut 24VAC SENSOR COM 1 2 3 4 5 6 timer quick start guide Attach power connector to 24VAC plug on the timer wiring terminal. . . . . . . . . . . . . . . . . . . . . . . . . . . . . . . . . . . . . . . . . . . . . . . . D A Turn dial to set clock enter current time (+/-). C B H Valve . . . E F . . . . . . . . . . . . . . . . . . . . . . . . Reset Keyhole A Enter - To confirm a new setting Manual - To water manually B clear - To clear a setting C program - to switch between programs - A and B D ARROW [] - To skip to the next setting / watering station or move to other programs/settings E ARROW [ ] - To go back to the previous setting / watering station or move to other programs/settings F rain delay - To pause operation for 24-72 hours due to rain or other factors G [ + ] To increase a numeric setting H [ -] To decrease a numeric setting I Manual 1/8" No. 8 Screw Wall Pre-formed mounting holes 4. Connect valve wire to terminal Hang timer on screw using keyhole. 6. Activate Battery Do not connect to power source until after wiring valves to timer. Only connect one valve to each terminal (station). Turn dial to set date and enter current date (+/-) (enter or arrows will advance). Watering Start Time Button Function: . . Shroud cover attachment C Connect one of the two wires from each valve to the common wire leading to the timer (usually white). Connect the other wire from each valve to one of the colored wires leading to the timer. . Clean, dry, and out of direct sunlight. . Set Date SET DATE Use included mounting template to mark screw locations. . G I B Solenoid Set Current Time (e.g. pacific, mountain standard) Remove plastic strip to activate battery. Station 1 Strip wire Push in wire and tighten screw Turn dial to start time and to enter the time to begin watering (+/-). Important: Only set one start time per station unless you want to water multiple times per day. D Set Watering Duration for Each Station Turn dial to run time enter the watering duration (+/- ) for each station (enter or arrow to move between stations). E Set Watering Days or Interval Level Turn dial to how often to select watering days (arrows to move between selections and enter to select). Dial Position Function: Auto - Watering mode Required Tools: F Set Auto Mode Set Clock - Set calendar and clock time Phillips Screwdriver Wire Strippers 24VAC SENSOR COM 1 2 3 4 5 Set Date - Year, Month, and Day 6 Start Time - Set time to begin watering Note: The quick start guide is intended to help you get up and running with your new timer. It includes basic installation and programming help. For more detailed and advanced instruction, please refer to the included timer manual. 24VAC SENSOR COM 1 2 3 4 5 6 Fasten screw through one of the pre-formed mounting holes. One Lithium CR2032 battery (included) is required to retain the program in memory during power loss. Annual replacement is recommended. Remove the plastic strip to activate the pre-installed battery. Turn dial to auto— Congratulations, you have programmed your timer! Run Time - Set watering duration for each station How Often - Set frequency of watering days G Manual Watering Off - Turn all stations off Press Manual—Program will start in 5 seconds. PN 57874-50 rB proof no: (See page 9 of manual for detailed instructions on programming.) 4 finished: w 28" d: " h 14" des: SM colors sku: 57874 www.fluid-studio.net 1065 South 500 West Bountiful, Utah 84010 Registration fold color non printing color non printing K PMS ???? PMS ???? upc: NA file name: 57874-50 rB.indd software: InDesign CS5 Printers are responsible for meeting print production requirements. Any changes must be approved by the client and Fluid Studio. printed piece must meet designated specifications on this form. flat: w: 28" h: 14" date: 09.13.11 client: Orbit p 801 295 9820 f 801 951 5815 dimensions: additional instructions: · Font sizes cannot be smaller than 7 pt. · Translation Approval code: LB682594 PMS ???? © 2007 Fluid Studio. This work is the property of Fluid Studio, and cannot be used, reproduced or distributed in any way without their express permission. 1. SELECCIONE UNA UBICACIÓN 2. MONTE EL TEMPORIZADOR 3. CONECTE LAS VÁLVULAS DEL REGADOR A LOS CONDUCTORES DEL TEMPORIZADOR Interiores Batería SENSOR COM 1 2 3 4 5 G I Solenoide E B Conecte el conector de alimentación a la toma de 24 VCA del terminal de cableado del temporizador. D A Gire el selector para Set Clock (Configuración de reloj) e ingrese la hora actual (+/-). F C B H . . . . . . . . . . . . . . . . . . . . . . . . . . . . . . . . . . . . . . . . . . . . . . . . . . . . Configure la fecha SET DATE Válvula Use la plantilla de montaje incluida para marcar las ubicaciones de los tornillos. Reinicio Accesorio de cubierta Gire el selector para Set Date (Ajuste de fecha) e ingrese la fecha actual (+/-) (Enter (Intro) o las flechas avanzarán). C . Configure la hora actual (por ejemplo, del pacífico, estándar de la montaña) 6 Conductor común Al temporizador 7. PROGRAME EL TEMPORIZADOR A 24VAC Empalme plástico GUÍA DE INICIO RÁPIDO DEL TEMPORIZADOR 5. CONECTE A LA ALIMENTACIÓN ELÉCTRICA . . . . . . . . . . . . . . . . . .Mantenga . . en . . . Conecte uno de los dos conductores de cada válvula al conductor común que va al temporizador (generalmente blanco). Conecte el otro conductor de cada válvula a uno de los conductores de colores que van al temporizador. Orificio con forma de bocallave . . . un lugar limpio, seco y alejado de la luz solar directa. Funciones de los botones: 1/8" Tornillo No. 8 Pared Orificios de montaje preformados Cuelgue el temporizador en el orificio con forma de bocallave con un tornillo. 4. CONECTE EL CONDUCTOR DE LA VÁLVULA Al TERMINAL No conecte al suministro de electricidad hasta haber cableado las válvulas al temporizador. 6. ACTIVE LA BATERÍA Retire la cinta plástica para activar la batería. Sólo conecte una válvula a cada terminal (estación). Configure la hora de inicio para comenzar a regar Estación 1 Pele el cable Empuje el alambre y apriete el tornillo A ENTER (INTRO): Para configurar al modo manual. Para regar manualmente. B CLEAR (BORRAR): Para borrar una configuración. C PROGRAM (PROGRAMA): Para cambiar entre programas A y B. D FLECHA []: Para pasar a la siguiente configuración/estación de riego o moverse a otros programas/configuraciones. E FLECHA []: Para volver a la configuración anterior/estación de riego o moverse a otros programas/configuraciones. F RAIN DELAY (RETARDO POR LLUVIA): Para detener el funcionamiento de 24 a 72 horas por lluvia u otros factores G [ + ] Para aumentar una configuración numérica. H [ -] Para disminuir una configuración numérica. I MANUAL Gire el selector para Start Time (Hora de inicio) para ingresar la hora de inicio de riego (+/-). Importante: Configure sólo una hora de inicio para cada estación a menos que desee regar varias veces al día. D Seleccione la duración del riego para cada estación Gire el selector para Run Time (Tiempo de funcionamiento) e ingrese la duración de riego (+/-) para cada estación (Enter (Intro) o las flechas se moverán). E Configure los días o intervalos de riego Nivel Gire el selector para How Often (Frecuencia) para seleccionar los días de riego (flechas para mover e Intro para seleccionar). Funciones de las posiciones del selector: Auto: Modo de riego SET CLOCK (CONFIGURACIÓN DE RELOJ): Configura el calendario y la hora del reloj. HERRAMIENTAS NECESARIAS: Destornillador Phillips Pinzas pelacables 24VAC 24VAC Nota: La guía de inicio rápido sirve para ayudarlo a poner en funcionamiento su nuevo temporizador. Incluye la instalación básica y ayuda de programación. Si desea obtener información más detallada y avanzada, consulte el manual del temporizador que se incluye. F SENSOR COM 1 2 3 4 5 6 Atornille a través de uno de los orificios de montaje preformados. SENSOR COM 1 2 3 4 5 Configure el modo automático SET DATE (AJUSTE DE FECHA): Configura el año, mes y día. 6 Se requiere una batería de litio CR2032 (incluida) para mantener el programa en la memoria durante cortes de electricidad. Se recomienda su reemplazo cada año. Retire la cinta plástica para activar la batería preinstalada. Gire el selector para Auto: ¡su temporizador ya está programado! START TIME (HORA DE INICIO): Configura la hora de inicio para comenzar a regar. RUN TIME (TIEMPO DE FUNCIONAMIENTO): Configura la duración del riego para cada estación. G Riego manual HOW OFTEN (FRECUENCIA): Configura la frecuencia de los días de riego. OFF (APAGADO): Apaga todas las estaciones. Presione Manual—El programa comenzará en 5 segundos. (Consulte la página 9 del manual para obtener instrucciones detalladas sobre la programación).-
 1
1
-
 2
2


Orbit 57876 Manual de usuario
- Tipo
- Manual de usuario
- Este manual también es adecuado para