Panasonic ES2207 Operating Instructions Manual
- Categoría
- Afeitadoras de mujer
- Tipo
- Operating Instructions Manual
Este manual también es adecuado para

Operating Instructions
Instrucciones de operación
WET/DRY Rechargeable Shaver
Afeitadora Recargable HÚMEDO/SECO
Model No.
Modelo No.
ES2207
Before operating this unit, please read these instructions completely.
Antes de operar este aparato, lea este instructivo en su totalidad.
Contents
English 2
Español 9
1 2007/10/25 15:34:12

2
3
IMPORTANT SAFETY INSTRUCTIONS
When using an electrical appli-
ance, basic precautions should
always be followed, including the
following:
Read all instructions before using
this appliance.
DANGER
To reduce the risk of electric shock:
1. Do not reach for the appliance
if it has fallen into water.
Unplug immediately.
2. Do not place or store the
charging stand where it can fall
into a tub or sink. Do not place
or drop it into water or other
liquid.
3. Before charging the shaver,
wipe off any moisture from the
shaver and charging stand.
Always handle with dry hands.
4. Always charge the shaver in a
cool, dry place.
5. Except when charging, always
unplug the charging stand from
the electrical outlet.
6. Unplug this appliance before
cleaning.
7. Changer unit is not for immer
-
sion or for use in shower.
8. Do not use an extension cord
with this appliance.
WARNING
To reduce the risk of burns, fire,
electric shock, or injury to persons:
1. Do not use this shaver with
damaged shaving blades and/
or foil.
2.
Close supervision is necessary
when this shaver is used by, on
or near children or invalids.
3. Use this appliance only for its
intended use as described in
this manual. Do not use attach
-
ments not recommended by the
manufacturer.
4. Never operate the charging
stand if it has a damaged cord
or plug, if it is not working
properly, if it has been dropped
or damaged or dropped into
water. Return the appliance to a
service center for examination
and repair.
5. Never drop or insert any object
into any opening.
6.
Do not use outdoors or operate
where aerosol (spray) products
are being used or where oxygen
is being administered.
7.
Always attach plug to appliance
first, then to outlet. To discon
-
nect, turn all controls to “off”
then remove plug from outlet.
8. Plug charger directly into
receptacle - do not use an
extension cord.
9. Unplug charger before plugging
or unplugging appliance.
SAVE THESE INSTRUCTIONS
Caution
Do not charge the shaver where the temperature is below 0 °C (32 °F) or
above 40 °C (104 °F), where it will be exposed to direct sunlight or a heat
source, or where there is a lot of moisture.
When charging or using the shaver in low temperature, the operating time
may be reduced. The recommended charging temperature is 15-35 °C
(59-95 °F) and the recommended using temperature is 5-35 °C(41-95 °F).
Use only the included shaver charging stand RE7-43 to charge the
ES2207 shaver.
Dry the shaver completely before setting it in the charging stand.
Keep the charging stand away from water and handle it only with dry
hands. Do not use an extension cord to connect the charging stand to an
outlet.
The shaver may not immediately begin to charge after being placed into
the charging stand after use.
Allow the shaver to sit in the charging stand for a few minutes and check
again to make sure that it is being charged.
Store the charging stand in a dry area where it will be protected from
damage.
The outer foil is very thin. If handled improperly, it can be easily damaged.
To avoid personal injury, do not use the shaver if it has a damaged foil or
inner blade.
Wash the shaver in tap water. Do not use salt water or boiled water.
Also, do not use cleaning products that are designed for toilets, bathrooms
or kitchen appliances. Do not submerge the shaver for a long time.
Do not wipe any part of the shaver with thinner, benzine or alcohol.
Clean it by using a cloth dampened with soapy water.
Do not take the housing apart as this can affect the watertight
construction.
This charging stand is intended to be correctly oriented in a vertical or
floor mount position.
Before use
Important
Before use
This Ladies’ WET/DRY shaver can be used for wet shaving with shaving
lather or for dry shaving. You can use this watertight shaver in the shower
and clean it in water. The following is the symbol of Wet shaver. The symbol
means that hand-held part may be used in a bath or shower.
•
•
•
•
•
•
•
•
•
•
•
•
•
2-3 2007/10/25 15:34:12

4
5
Our research has shown that you can enjoy closer and smoother shaves
with the three floating heads and sharp blades. And our pop-up trimmer will
be able to cut longer hairs with ease. Treat yourself to wet lather shaves for
at least three weeks and notice the difference.
Cleaning is so simple. Just rinse out the shaving head under the tap or
shower. No mess, no fuss!
Charge the shaver for at least 12 hours before using it for the first time or
when it has not been in use for more than six months.
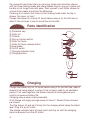
Parts identification
A Protective cap
B Outer foil
C Trimmer
D Pop-up trimmer switch
E Outer foil frame
F Outer foil frame release button
G Inner blade
H On/Off switch
I Charging indicator lamp
J Charging stand
Before use
Charging
Charge the shaver fully for 12 hours before using it for the first time, when it
seems to be losing speed, or when it has not been used for an extended
period. If not used regularly, the shaver should be recharged every six
months to preserve battery life.
Charging once a week is recommended.
A full charge will supply enough power for about 7 shaves (three minutes
per shave).
Turn the shaver off and set it firmly into the charging stand. Keep the stand
level. Plug into an AC outlet.
The charge indicator lamp will glow and it will stay on until the charging
stand is removed from the AC outlet.
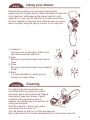
Using
Using your shaver
Remove the protective cap and apply shaving lather
generously. For the best results, move the shaver in back and
forth directions, while keeping the shaver head at a right
angle (90°) to your skin so that the two trimmers and outer
foil work together at the same time. Slide the pop-up trimmer
switch up when using the pop-up trimmer to cut long hairs.
1 Underarm
Hold your arm up enough to stretch your
skin and shave back and forth.
2 Legs
Be sure to move the shaver from ankle to
knee.
3 Arms
Be sure to move the shaver from outside to
inside.
4 Bikini
It is recommended to use the pop-up
trimmer for proper shave.
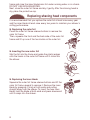
Cleaning
Cleaning
For cleanliness and convenience, we
recommend that you clean your shaver
with water and a liquid hand soap. Regular
cleaning will keep your shaver in good
condition while preventing odors or
bacteria from developing, and maintain the
cutting performance.
With the outer foil in place, apply some
hand soap onto the outer foil.
Turn the shaver on and turn off after few seconds.
Next, press the outer foil frame release buttons to remove the outer foil
4-5 2007/10/25 15:34:13

4
5
Our research has shown that you can enjoy closer and smoother shaves
with the three floating heads and sharp blades. And our pop-up trimmer will
be able to cut longer hairs with ease. Treat yourself to wet lather shaves for
at least three weeks and notice the difference.
Cleaning is so simple. Just rinse out the shaving head under the tap or
shower. No mess, no fuss!
Charge the shaver for at least 12 hours before using it for the first time or
when it has not been in use for more than six months.
Parts identification
A Protective cap
B Outer foil
C Trimmer
D Pop-up trimmer switch
E Outer foil frame
F Outer foil frame release button
G Inner blade
H On/Off switch
I Charging indicator lamp
J Charging stand
Before use
Charging
Charge the shaver fully for 12 hours before using it for the first time, when it
seems to be losing speed, or when it has not been used for an extended
period. If not used regularly, the shaver should be recharged every six
months to preserve battery life.
Charging once a week is recommended.
A full charge will supply enough power for about 7 shaves (three minutes
per shave).
Turn the shaver off and set it firmly into the charging stand. Keep the stand
level. Plug into an AC outlet.
The charge indicator lamp will glow and it will stay on until the charging
stand is removed from the AC outlet.
Using
Using your shaver
Remove the protective cap and apply shaving lather
generously. For the best results, move the shaver in back and
forth directions, while keeping the shaver head at a right
angle (90°) to your skin so that the two trimmers and outer
foil work together at the same time. Slide the pop-up trimmer
switch up when using the pop-up trimmer to cut long hairs.
1 Underarm
Hold your arm up enough to stretch your
skin and shave back and forth.
2 Legs
Be sure to move the shaver from ankle to
knee.
3 Arms
Be sure to move the shaver from outside to
inside.
4 Bikini
It is recommended to use the pop-up
trimmer for proper shave.
Cleaning
Cleaning
For cleanliness and convenience, we
recommend that you clean your shaver
with water and a liquid hand soap. Regular
cleaning will keep your shaver in good
condition while preventing odors or
bacteria from developing, and maintain the
cutting performance.
With the outer foil in place, apply some
hand soap onto the outer foil.
Turn the shaver on and turn off after few seconds.
Next, press the outer foil frame release buttons to remove the outer foil
4-5 2007/10/25 15:34:13

6
7
frame and rinse the inner blade/outer foil under running water or in a basin.
DO NOT USE BOILING WATER.
Next, close the outer foil frame and dry it gently. After the shaving head is
dry, place the protective cap.
Replacing shaving head components
It is recommended that you replace the outer foil at least once every year
and the inner blade at least once every two years to maintain your shaver’s
cutting performance.
Replacing the outer foil
Press the outer foil frame release buttons to remove the
outer foil frame.
Then, squeeze the front and the back side of the outer foil
frame and lift up one of the two knobs on the outer foil.
Inserting the new outer foil
Slip the foil into the frame and guide the plastic edges
onto the hooks in the outer foil frame until it clicks into
the shaver.
Replacing the inner blade
Squeeze the outer foil frame release buttons and lift the
outer foil frame upward to remove it. Remove the inner
blade by grasping it firmly at both ends and pulling
straight away from the shaver. To insert the new inner
blade, hold the blade at both ends and press downward
until it snaps into the shaver.
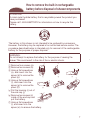
How to remove the built-in rechargeable
battery before disposal of shavercomponents
ATTENTION:
A nickel metal hydride battery that is recyclable powers the product you
have purchased.
Please call 1-800-8-BATTERY for information on how to recycle this
battery.
R B R C
N i - M H
T M
The battery in this shaver is not intended to be replaced by consumers.
However, the battery may be replaced at an authorized service center. The
procedure described below is intended only for removal of the rechargeable
battery for the purpose of proper disposal.
WARNING:
Do not attempt to replace the battery for the purpose of reusing the
shaver. This could result in the risk of fire or electric shock.
(f)
(h)
(g)
(e) (c)
(d)
(j)
(i)
(k)
(l)
(m)
(a)
(b)
1 Remove four screws (a).
2 Remove two screws (b).
3 Using a flat screwdriver
(c), and insert into the
space (d) to remove the
panel (e).
4 Using a flat screwdriver
(f), and insert into the
space (g) to remove the
panel (h).
5 Pull the housing (i) out of
the end cap (j).
6 Remove two screws (k)
inside of the end cap and
pull the battery.
7 Using a flat screwdriver
(l), and insert into the
space (m) to remove the battery.
6-7 2007/10/25 15:34:13

6
7
frame and rinse the inner blade/outer foil under running water or in a basin.
DO NOT USE BOILING WATER.
Next, close the outer foil frame and dry it gently. After the shaving head is
dry, place the protective cap.
Replacing shaving head components
It is recommended that you replace the outer foil at least once every year
and the inner blade at least once every two years to maintain your shaver’s
cutting performance.
Replacing the outer foil
Press the outer foil frame release buttons to remove the
outer foil frame.
Then, squeeze the front and the back side of the outer foil
frame and lift up one of the two knobs on the outer foil.
Inserting the new outer foil
Slip the foil into the frame and guide the plastic edges
onto the hooks in the outer foil frame until it clicks into
the shaver.
Replacing the inner blade
Squeeze the outer foil frame release buttons and lift the
outer foil frame upward to remove it. Remove the inner
blade by grasping it firmly at both ends and pulling
straight away from the shaver. To insert the new inner
blade, hold the blade at both ends and press downward
until it snaps into the shaver.
How to remove the built-in rechargeable
battery before disposal of shavercomponents
ATTENTION:
A nickel metal hydride battery that is recyclable powers the product you
have purchased.
Please call 1-800-8-BATTERY for information on how to recycle this
battery.
R B R C
N i - M H
T M
The battery in this shaver is not intended to be replaced by consumers.
However, the battery may be replaced at an authorized service center. The
procedure described below is intended only for removal of the rechargeable
battery for the purpose of proper disposal.
WARNING:
Do not attempt to replace the battery for the purpose of reusing the
shaver. This could result in the risk of fire or electric shock.
(f)
(h)
(g)
(e) (c)
(d)
(j)
(i)
(k)
(l)
(m)
(a)
(b)
1 Remove four screws (a).
2 Remove two screws (b).
3 Using a flat screwdriver
(c), and insert into the
space (d) to remove the
panel (e).
4 Using a flat screwdriver
(f), and insert into the
space (g) to remove the
panel (h).
5 Pull the housing (i) out of
the end cap (j).
6 Remove two screws (k)
inside of the end cap and
pull the battery.
7 Using a flat screwdriver
(l), and insert into the
space (m) to remove the battery.
6-7 2007/10/25 15:34:13

8
ATTENTION:
These laws of various states and municipalities restrict disposal of
rechargeable batteries (and products from which such batteries have not
been removed) in ordinary household waste. Please comply with your
local laws. If you are not certain as to proper disposal, please contact your
local sanitation department.
Specifications
Power source: 120 V, 60 Hz
Motor voltage: 1.2 V DC
Charging time: 12 hours
This product is intended for household use only.
READ ALL INSTRUCTIONS BEFORE USE.
FOR YOUR CONVENIENCE, WE HAVE ESTABLISHED A TOLL-FREE (IN
USA ONLY) NATIONAL ACCESSORY PURCHASE HOT LINE AT
1-800-338-0552.
8 2007/10/25 15:34:13

9
IMPORTANTE PARA SU SEGURIDAD
Al usar un aparato eléctrico,
siempre se debe tomar ciertas
precauciones básicas, incluyendo
las siguientes:
Lea todas las instrucciones antes
de usar este aparato.
PELIGRO
Para evitar descargas eléctricas:
1.
No coja el aparato que haya caído al
agua. Desenchufe inmediatamente.
2. No coloque ni guarde el soporte
de carga donde pueda caer en
una bañera o hundirse. No lo
coloque ni lo arroje al agua ni en
ningún otro líquido.
3. Antes de cargar la afeitadora,
seque bien la afeitadora y el
soporte. Manipúlelos siempre con
las manos secas.
4. Cargue siempre la afeitadora en
un lugar fresco y seco.
5.
Excepto durante la operación de
carga, desconecte siempre el soporte
de carga del tomacorriente eléctrico.
6. Desenchufe este aparato antes
de limpiarlo.
7.
El soporte de carga no es para ser
sumergido ni para ser usado en la ducha.
8. No use un cable de extensión
con este aparato.
ADVERTENCIA
Para evitar quemaduras, incendios, descargas
eléctricas y lesiones personales:
1. No use esta afeitadora con hojas
dañadas.
2.
El uso de esta afeitadora en niños o
inválidos, o cerca de ellos, requiere
de una acuciosa supervisión.
3.
Use este aparato solamente
para el fin que ha sido diseñado,
como se describe en este
manual. No use accesorios no
recomendados por el fabricante.
4.
No use el aparato si el cable o la
clavija están dañados, si el
aparato no funciona correcta
-
mente, o si éste se ha caído, está
dañado o ha caído al agua. Lleve
el aparato a un centro de servicio
para que sea revisado y reparado.
5. Nunca introduzca ningún tipo de
objetos por las aberturas del
aparato.
6. No use la afeitadora al aire libre
ni en lugares donde se estén
usando productos tipo aerosol
(pulverizadores) o donde se esté
administrando oxígeno.
7.
Siempre acople el enchufe primero al
aparato, luego a la toma de corriente.
Para desconectar, ponga todos los
controles en “off” y luego saque el
enchufe de la toma de corriente.
8. Enchufe el cargador directa-
mente al receptáculo – no use un
cable de extensión.
9. Desenchufe el cargador antes de
enchufar o desenchufar el
aparato.
GUARDE ESTAS INSTRUCCIONES
9 2007/10/25 15:34:13

10
11
Cuidado
No cargue la afeitadora en donde la temperatura sea de menos de 0 °C
(32 °F) o de más de 40 °C (104 °F), donde vaya a estar expuesta a la luz
directa del sol o a una fuente de calor, o en donde haya mucha humedad.
Al cargar o utilizar la afeitadora a bajas temperaturas, podría reducirse el
tiempo de funcionamiento. La temperatura de carga recomendada es de
15-35 °C (59-95 °F) y la de uso es de 5-35 °C(41-95 °F).
Use sólo el soporte de carga RE7-43 de la afeitadora incluido para cargar
la afeitadora ES2207.
El cordón de alimentación del soporte de carga no puede ser
reemplazado; si se daña el cordón, el cargador entero deberá ser
descartado.
Seque completamente la afeitadora antes de colocarla en el soporte de
carga.
Mantenga el soporte de carga lejos del agua y manéjelo sólo con las
manos secas. No use un cordón de extensión para conectar el soporte a
una toma de corriente.
Puede que la afeitadora no comience a cargar inmediatamente después
de ser colocada en el soporte de carga después del uso.
Deje que la afeitadora permanezca sentada en el soporte de carga unos
minutos y compruebe otra vez que esté siendo cargada.
Coja el enchufe cuando desconecte el soporte de carga de una toma de
corriente; el jalar el cordón puede dañarlo.
Almacene el soporte de carga y su juego de cordón en un área seca en
donde estará protegido contra daños.
La lámina exterior es muy fina. Si no es manejada correctamente, puede
dañarse fácilmente. Para evitar una herida personal, no use la afeitadora
si tiene una lámina o una cuchilla interior dañadas.
Lave la afeitadora con agua del grifo. No utilice agua salada o agua
caliente. Por otra parte, no utilice productos de limpieza para lavabos,
baños o utensilios de cocina. No deje la afeitadora sumergida durante
períodos prolongados.
No limpie ninguna parte de la afeitadora con diluyente, benzina o alcohol.
Límpiela usando un paño mojado con agua de jabón.
No desmonte el conjunto ya que esto puede afectar la construcción
impermeable.
Esta unidad de soporte de carga está pensado para ser orientada
correctamente en una posición vertical o en el suelo.
Antes del uso
Importante
Antes del uso
Esta afeitadora para Damas MOJADO/SECO puede ser usada para
afeitadas húmedas con espuma de afeitar o para afeitadas en seco. Se
•
•
•
•
•
•
•
•
•
•
•
•
•
•
puede usar esta afeitadora impermeable en la ducha y limpiarla en el agua.
El siguiente es el símbolo de afeitadora Mojada. El símbolo significa que la
parte que se sostiene con la mano puede ser usada en el baño o en la
ducha.
Nuestra investigación ha mostrado que se puede disfrutar de afeitadas más
al rás y suaves con las tres cabezas flotantes y las cuchillas afiladas. Y
nuestro recortador desplegable podrá cortar pelos más largos con facilidad.
Dése a sí misma afeitadas húmedas con espuma durante por lo menos tres
semanas y vea la diferencia.
La limpieza es tan simple.
Simplemente enjuague la cabeza de afeitado bajo el grifo de agua o la
ducha. ¡Limpio y sin complicaciones! Cargue la afeitadora durante por lo
menos 12 horas antes de usarlas por primera vez o cuando no ha sido
usada por más de seis meses.
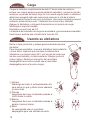
Identificación de partes
A Tapa protectora
B Lámina exterior
C Recortador
D Interruptor de recortador desplegable
E Marco de lámina exterior
F Botón de soltar el marco de lámina exterior
G Cuchilla interior
H Interruptor encender/apagar
I Lámpara indicadora de carga
J Soporte de carga
10-11 2007/10/25 15:34:13

10
11
Cuidado
No cargue la afeitadora en donde la temperatura sea de menos de 0 °C
(32 °F) o de más de 40 °C (104 °F), donde vaya a estar expuesta a la luz
directa del sol o a una fuente de calor, o en donde haya mucha humedad.
Al cargar o utilizar la afeitadora a bajas temperaturas, podría reducirse el
tiempo de funcionamiento. La temperatura de carga recomendada es de
15-35 °C (59-95 °F) y la de uso es de 5-35 °C(41-95 °F).
Use sólo el soporte de carga RE7-43 de la afeitadora incluido para cargar
la afeitadora ES2207.
El cordón de alimentación del soporte de carga no puede ser
reemplazado; si se daña el cordón, el cargador entero deberá ser
descartado.
Seque completamente la afeitadora antes de colocarla en el soporte de
carga.
Mantenga el soporte de carga lejos del agua y manéjelo sólo con las
manos secas. No use un cordón de extensión para conectar el soporte a
una toma de corriente.
Puede que la afeitadora no comience a cargar inmediatamente después
de ser colocada en el soporte de carga después del uso.
Deje que la afeitadora permanezca sentada en el soporte de carga unos
minutos y compruebe otra vez que esté siendo cargada.
Coja el enchufe cuando desconecte el soporte de carga de una toma de
corriente; el jalar el cordón puede dañarlo.
Almacene el soporte de carga y su juego de cordón en un área seca en
donde estará protegido contra daños.
La lámina exterior es muy fina. Si no es manejada correctamente, puede
dañarse fácilmente. Para evitar una herida personal, no use la afeitadora
si tiene una lámina o una cuchilla interior dañadas.
Lave la afeitadora con agua del grifo. No utilice agua salada o agua
caliente. Por otra parte, no utilice productos de limpieza para lavabos,
baños o utensilios de cocina. No deje la afeitadora sumergida durante
períodos prolongados.
No limpie ninguna parte de la afeitadora con diluyente, benzina o alcohol.
Límpiela usando un paño mojado con agua de jabón.
No desmonte el conjunto ya que esto puede afectar la construcción
impermeable.
Esta unidad de soporte de carga está pensado para ser orientada
correctamente en una posición vertical o en el suelo.
Antes del uso
Importante
Antes del uso
Esta afeitadora para Damas MOJADO/SECO puede ser usada para
afeitadas húmedas con espuma de afeitar o para afeitadas en seco. Se
•
•
•
•
•
•
•
•
•
•
•
•
•
•
puede usar esta afeitadora impermeable en la ducha y limpiarla en el agua.
El siguiente es el símbolo de afeitadora Mojada. El símbolo significa que la
parte que se sostiene con la mano puede ser usada en el baño o en la
ducha.
Nuestra investigación ha mostrado que se puede disfrutar de afeitadas más
al rás y suaves con las tres cabezas flotantes y las cuchillas afiladas. Y
nuestro recortador desplegable podrá cortar pelos más largos con facilidad.
Dése a sí misma afeitadas húmedas con espuma durante por lo menos tres
semanas y vea la diferencia.
La limpieza es tan simple.
Simplemente enjuague la cabeza de afeitado bajo el grifo de agua o la
ducha. ¡Limpio y sin complicaciones! Cargue la afeitadora durante por lo
menos 12 horas antes de usarlas por primera vez o cuando no ha sido
usada por más de seis meses.
Identificación de partes
A Tapa protectora
B Lámina exterior
C Recortador
D Interruptor de recortador desplegable
E Marco de lámina exterior
F Botón de soltar el marco de lámina exterior
G Cuchilla interior
H Interruptor encender/apagar
I Lámpara indicadora de carga
J Soporte de carga
10-11 2007/10/25 15:34:13

12
13
Antes del uso
Carga
Cargue la afeitadora completamente durante 12 horas antes de usarla por
primera vez, cuando parezca que está perdiendo velocidad, o cuando no ha sido
usada por un periodo de tiempo largo. Si no es usada regularmente, la afeitadora
deberá ser recargada cada seis meses para preservar la vida de la batería.
Se recomienda cargarla una vez a la semana. Una carga completa proveerá
suficiente potencia para unas 7 afeitadas (tres minutos por afeitada).
Apague la afeitadora y colóquela firmemente en el soporte de carga.
Mantenga el soporte nivelado.
Enchúfelo en una toma de CA.
La lámpara del indicador de carga se encenderá y permanecerá encendida
hasta que el enchufe sea retirado de la toma de CA.
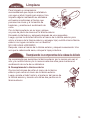
Utilización
Usando su afeitadora
Retire la tapa protectora y aplique generosamente espuma
de afeitar.
Para mejores resultados, mueva la afeitadora hacia adelante
y hacia atrás, mientras que mantiene la cabeza de la
afeitadora a un ángulo recto (90°) con su piel de modo que
los dos recortadores y la lámina exterior trabajen juntos al
mismo tiempo. Deslice el interruptor del recortador
desplegable hacia arriba cuando use el recortador
desplegable para cortar pelos largos.
1 Sobaco
Mantenga su brazo lo suficientemente alto
para estirar su piel y afeitar hacia adelante
y hacia atrás.
2 Piernas
Asegúrese de mover la afeitadora desde el
tobillo hasta la rodilla.
3 Brazos
Asegúrese de mover la afeitadora desde el
exterior hacia el interior.
4 Bikini
Se recomienda usar el recortador
desplegable para una afeitada correcta.
Limpieza
Limpieza
Para limpieza y conveniencia,
recomendamos que limpie su afeitadora
con agua y jabón líquido para manos. Una
limpieza regular mantendrá su afeitadora
en buenas condiciones al tiempo que
previene los olores y la formación de
bacterias, y mantiene el rendimiento de
corte.
Con la lámina exterior en su lugar, aplique
un poco de jabón de manos en la lámina exterior.
Encienda la afeitadora y apáguela después de unos segundos.
Luego, oprima los botones de soltar el marco de la lámina exterior para
retirar el marco de la lámina exterior y enjuagar la(s) cuchilla interior/lámina
exterior con agua corriente o en un lavatorio.
NO USE AGUA HIRVIENDO
Después, cierre el marco de la lámina exterior y séquelo suavemente. Una
vez que la cabeza esté seca, coloque la tapa protectora.
Reemplazando los componentes de la cabeza de afeitado
Se recomienda que reemplace la lámina exterior por lo menos una vez al
año y la cuchilla interior por lo menos cada dos años para mantener el
rendimiento de corte de su afeitadora.
Reemplazando la lámina exterior
Oprima los botones de soltar el marco de la lámina
exterior para retirar el marco de la lámina exterior.
Luego, apriete el lado frontal y el posterior del marco de
la lámina exterior y levante uno de las dos perillas en la
lámina exterior.
12-13 2007/10/25 15:34:14

12
13
Antes del uso
Carga
Cargue la afeitadora completamente durante 12 horas antes de usarla por
primera vez, cuando parezca que está perdiendo velocidad, o cuando no ha sido
usada por un periodo de tiempo largo. Si no es usada regularmente, la afeitadora
deberá ser recargada cada seis meses para preservar la vida de la batería.
Se recomienda cargarla una vez a la semana. Una carga completa proveerá
suficiente potencia para unas 7 afeitadas (tres minutos por afeitada).
Apague la afeitadora y colóquela firmemente en el soporte de carga.
Mantenga el soporte nivelado.
Enchúfelo en una toma de CA.
La lámpara del indicador de carga se encenderá y permanecerá encendida
hasta que el enchufe sea retirado de la toma de CA.
Utilización
Usando su afeitadora
Retire la tapa protectora y aplique generosamente espuma
de afeitar.
Para mejores resultados, mueva la afeitadora hacia adelante
y hacia atrás, mientras que mantiene la cabeza de la
afeitadora a un ángulo recto (90°) con su piel de modo que
los dos recortadores y la lámina exterior trabajen juntos al
mismo tiempo. Deslice el interruptor del recortador
desplegable hacia arriba cuando use el recortador
desplegable para cortar pelos largos.
1 Sobaco
Mantenga su brazo lo suficientemente alto
para estirar su piel y afeitar hacia adelante
y hacia atrás.
2 Piernas
Asegúrese de mover la afeitadora desde el
tobillo hasta la rodilla.
3 Brazos
Asegúrese de mover la afeitadora desde el
exterior hacia el interior.
4 Bikini
Se recomienda usar el recortador
desplegable para una afeitada correcta.
Limpieza
Limpieza
Para limpieza y conveniencia,
recomendamos que limpie su afeitadora
con agua y jabón líquido para manos. Una
limpieza regular mantendrá su afeitadora
en buenas condiciones al tiempo que
previene los olores y la formación de
bacterias, y mantiene el rendimiento de
corte.
Con la lámina exterior en su lugar, aplique
un poco de jabón de manos en la lámina exterior.
Encienda la afeitadora y apáguela después de unos segundos.
Luego, oprima los botones de soltar el marco de la lámina exterior para
retirar el marco de la lámina exterior y enjuagar la(s) cuchilla interior/lámina
exterior con agua corriente o en un lavatorio.
NO USE AGUA HIRVIENDO
Después, cierre el marco de la lámina exterior y séquelo suavemente. Una
vez que la cabeza esté seca, coloque la tapa protectora.
Reemplazando los componentes de la cabeza de afeitado
Se recomienda que reemplace la lámina exterior por lo menos una vez al
año y la cuchilla interior por lo menos cada dos años para mantener el
rendimiento de corte de su afeitadora.
Reemplazando la lámina exterior
Oprima los botones de soltar el marco de la lámina
exterior para retirar el marco de la lámina exterior.
Luego, apriete el lado frontal y el posterior del marco de
la lámina exterior y levante uno de las dos perillas en la
lámina exterior.
12-13 2007/10/25 15:34:14

14
15
Insertando la lámina exterior nueva
Deslice la lámina en el marco y guíe los filos plásticos
hacia los ganchos en el marco de la lámina exterior
hasta que entre con un clic en la afeitadora.
Reemplazando la cuchilla interior
Apriete los botones de soltar el marco de lámina
exterior y levante el marco de la lámina exterior hacia
arriba para retirarlo. Retire la cuchilla interior cogiéndola
firmemente por ambos extremos y jalándola hacia
afuera de la afeitadora. Para insertar una nueva cuchilla,
sostenga la cuchilla por ambos extremos y oprima hacia
abajo hasta que se inserte en la afeitadora.
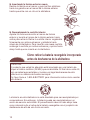
Cómo retirar la batería recargable incorporada
antes de deshacerse de la afeitadora
ATENCION:
El producto que usted ha adquirido está impulsado por una batería de
níquel e hidruro metálico (Ni-MH) que es reciclable. Al final de su vida útil,
bajo variadas leyes estatales y locales, es ilegal deshacerse de esta
batería en su sistema de basura municipal.
Por favor llame a 1-800-8-BATTERY para información sobre cómo reciclar
esta batería.
R B R C
N i - M H
T M
La batería en esta afeitadora no está diseñada para ser reemplazada por
consumidores. Sin embargo, la batería puede ser reemplazada en un
centro de servicio autorizado. El procedimiento descrito más abajo tiene
como intención sólo el retire de la batería recargable con el propósito de
deshacerse de ella de una forma correcta.
ADVERTENCIA:
No intente reemplazar la batería con el propósito de reusar la afeitadora.
Esto podría resultar en el riesgo de incendio o choque eléctrico.
(f)
(h)
(g)
(e) (c)
(d)
(j)
(i)
(k)
(l)
(m)
(a)
(b)
1 Retire cuatro tornillos (a).
2 Retire dos tornillos (b).
3 Usando un destornillador
plano (c), insértelo dentro
del espacio (d) para retirar
el panel (e).
4 Usando un destornillador
plano (f), insértelo dentro
del espacio (g) para retirar
el panel (h).
5 Jale el conjunto (i) hacia
afuera de la tapa del
extremo (j).
6 Retire dos tornillos (k)
dentro de la tapa del
extremo y jale la batería.
7 Usando un destornillador
plano (l), insértelo dentro del espacio (m) para retirar la batería.
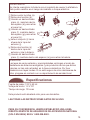
ATENCION:
Las leyes de varios estados y municipalidades restringen el modo de
deshacerse de baterías recargables (y de productos de los que dichas
baterías no han sido retiradas) en la basura doméstica. Por favor
obedezca sus leyes locales. Si no está seguro de cómo deshacerse de
ellas, póngase en contacto con su departamento de sanidad local.
Especificaciones
Fuente de poder: 120 V, 60 Hz
Voltaje del motor: 1.2 V CC
Tiempo de carga: 12 horas
Este producto está diseñado sólo para uso doméstico.
LEA TODAS LAS INSTRUCCIONES ANTES DE SU USO.
PARA SU CONVENIENCIA, HEMOS ESTABLECIDO UNA LINEA
DIRECTA GRATUITA DE ADQUISICION DE ACCESORIOS NATIONAL
(SOLO EN EEUU) EN EL 1-800-338-0552.
14-15 2007/10/25 15:34:14

14
15
Insertando la lámina exterior nueva
Deslice la lámina en el marco y guíe los filos plásticos
hacia los ganchos en el marco de la lámina exterior
hasta que entre con un clic en la afeitadora.
Reemplazando la cuchilla interior
Apriete los botones de soltar el marco de lámina
exterior y levante el marco de la lámina exterior hacia
arriba para retirarlo. Retire la cuchilla interior cogiéndola
firmemente por ambos extremos y jalándola hacia
afuera de la afeitadora. Para insertar una nueva cuchilla,
sostenga la cuchilla por ambos extremos y oprima hacia
abajo hasta que se inserte en la afeitadora.
Cómo retirar la batería recargable incorporada
antes de deshacerse de la afeitadora
ATENCION:
El producto que usted ha adquirido está impulsado por una batería de
níquel e hidruro metálico (Ni-MH) que es reciclable. Al final de su vida útil,
bajo variadas leyes estatales y locales, es ilegal deshacerse de esta
batería en su sistema de basura municipal.
Por favor llame a 1-800-8-BATTERY para información sobre cómo reciclar
esta batería.
R B R C
N i - M H
T M
La batería en esta afeitadora no está diseñada para ser reemplazada por
consumidores. Sin embargo, la batería puede ser reemplazada en un
centro de servicio autorizado. El procedimiento descrito más abajo tiene
como intención sólo el retire de la batería recargable con el propósito de
deshacerse de ella de una forma correcta.
ADVERTENCIA:
No intente reemplazar la batería con el propósito de reusar la afeitadora.
Esto podría resultar en el riesgo de incendio o choque eléctrico.
(f)
(h)
(g)
(e) (c)
(d)
(j)
(i)
(k)
(l)
(m)
(a)
(b)
1 Retire cuatro tornillos (a).
2 Retire dos tornillos (b).
3 Usando un destornillador
plano (c), insértelo dentro
del espacio (d) para retirar
el panel (e).
4 Usando un destornillador
plano (f), insértelo dentro
del espacio (g) para retirar
el panel (h).
5 Jale el conjunto (i) hacia
afuera de la tapa del
extremo (j).
6 Retire dos tornillos (k)
dentro de la tapa del
extremo y jale la batería.
7 Usando un destornillador
plano (l), insértelo dentro del espacio (m) para retirar la batería.
ATENCION:
Las leyes de varios estados y municipalidades restringen el modo de
deshacerse de baterías recargables (y de productos de los que dichas
baterías no han sido retiradas) en la basura doméstica. Por favor
obedezca sus leyes locales. Si no está seguro de cómo deshacerse de
ellas, póngase en contacto con su departamento de sanidad local.
Especificaciones
Fuente de poder: 120 V, 60 Hz
Voltaje del motor: 1.2 V CC
Tiempo de carga: 12 horas
Este producto está diseñado sólo para uso doméstico.
LEA TODAS LAS INSTRUCCIONES ANTES DE SU USO.
PARA SU CONVENIENCIA, HEMOS ESTABLECIDO UNA LINEA
DIRECTA GRATUITA DE ADQUISICION DE ACCESORIOS NATIONAL
(SOLO EN EEUU) EN EL 1-800-338-0552.
14-15 2007/10/25 15:34:14

Service · Assistance · Accessories
800‑338‑0552(In USA)
www.panasonic.com/personalcare
IN USA CONTACT:
Panasonic Consumer
Electronics Company
One Panasonic Way 1H-1
Secaucus, NJ 07
No.1 EN ES (U.S.A.)
Printed in China
Impreso en Chine
16 2007/10/25 15:34:14
-
 1
1
-
 2
2
-
 3
3
-
 4
4
-
 5
5
-
 6
6
-
 7
7
-
 8
8
-
 9
9
-
 10
10
-
 11
11
-
 12
12
-
 13
13
-
 14
14
-
 15
15
-
 16
16


Panasonic ES2207 Operating Instructions Manual
- Categoría
- Afeitadoras de mujer
- Tipo
- Operating Instructions Manual
- Este manual también es adecuado para
En otros idiomas
- English: Panasonic ES2207
Documentos relacionados
-
Panasonic ES2206 Manual de usuario
-
-
Panasonic ES2216 Manual de usuario
-
-
Panasonic ES-SA40-K Instrucciones de operación
-
-
-
-
Panasonic ES8101 Manual de usuario
-
Panasonic ES8103S Manual de usuario