Graco imonitor 2797VIB3 Manual de usuario
- Categoría
- Muebles de bebe
- Tipo
- Manual de usuario

Q
u
Q
Q
ick Start
Pro
d
uct Instruction Manua
l
MODEL# 2797VIB3
L
C
D
SC
REEN:
Q
UI
C
K REFEREN
C
E
G
UID
E
Parent Unit
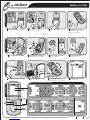
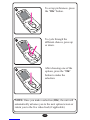
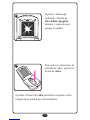
1 Depress for 1 sec. to turn camera on. 2 Place camera facing baby. 3 Open monitor and press
power button for 1 sec. to turn on.
R
LCD
SCREEN
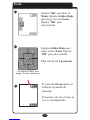
To cycle through the different choices, press up or down.
To cycle through the different choices, press up or down. No Signal
Activating Units
4 Parent unit will begin search
and activate video.
R
O
p
e
n
Power Button
R
VOLUME
©2008 Graco ISPM023AA 03/08
9:22pm 9:22pm 9:22pm 9:22pm
9:22pm9:22pm 9:22pm 9:22pm 9:22pm
12 Hour(am/pm)
24 Hour 07:32 pm Alarm On
Alarm Off
06: 15 am
English
Français
Español
Vibe on
Vibe off
10
1 Remove battery door.
R
R
2 Plug battery in. 3 Replace battery door.
4 Parent unit & nursery unit
are ready for use.
2 Install 3 AAA (LR03) batteries
(optional) Batteries not included.
1 Remove battery door (optional).
R
3 Connect AC adapter and place
nursery unit on base.
R
R
Parent UnitNursery Unit
R
4 To charge battery, connect
the AC adapter to the monitor
and charge for 3 hours.

Q
u
Q
Q
ick Start
Manue
l
d
e
d
irectives
d
e pro
d
uctio
n
MODÈLE# 2797VIBCA3
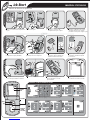
1 Appuyer sur le bouton pendant
1 seconde pour allumer la caméra.
2 Placer la caméra face au bébé. 3 Ouvrir l’écran et appuyer sur le
bouton pendant 1 seconde
pour l’allumer.
Mise en marche de l’appareil
4 L’appareil pour adulte commencera
à rechercher et à activer la vidéo.
O
u
v
r
i
r
Appuyer sur le bouton
R
1 Retirer le couvercle du compartiment
à pile.
R
R
2 Raccorder la pile. 3 Remettre le couvercle du
compartiment à pile en place.
4 L’appareil pour adulte et l’appareil
de chambre d’enfant sont prêts
à fonctionner.
2 Insérer 3 piles AAA (LR03)
(facultatif). Piles non comprises.
1 Retirer le couvercle du
compartiment à piles (facultatif).
R
3 Brancher l’adaptateur de courant
alternatif et placer l’appareil de
chambre d’enfant sur la base.
R
R
Appareil pour adulte
Appareil de chambre d’enfant
R
4 Brancher l’adaptateur de courant
alternatif dans une prise murale
pendant 3 heures pour charger la pile.
É
CRAN DEL : GUIDE DE R
É
F
É
RENCE RAPID
E
Appareil pour adulte
R
ÉCRAN
DEL
Pour afficher les différents choix, appuyer vers le haut ou vers le bas.
Pour afficher les différents choix, appuyer vers le haut ou vers le bas. No Signal
VOLUME
9:22pm 9:22pm 9:22pm 9:22pm
9:22pm9:22pm 9:22pm 9:22pm 9:22pm
12 Hour(am/pm)
24 Hour 07:32 pm Alarm On
Alarm Off
06: 15 am
English
Français
Español
Vibe on
Vibe off
10
BAS
MARCHE
/ARRÊT
DU VIDÉO
HAUT
R

Q
u
Q
Q
ick Start
Manua
l
d
e instrucciones para
l
a pro
d
ucción
MODELO# 2797VIB3
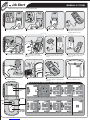
1 Oprímala durante 1 segundo para
encender la cámara.
2 Ponga la cámara mirando al bebé. 3 Abra el monitor y oprima el botón de
encendido durante 1 segundo para
activarlo.
Activación de la unidad
4 La unidad para padres comenzará a
buscar y activará el video.
A
b
r
i
r
Botón de activación
R
ARRIBA
4 La unidad para padres y la unidad
para el dormitorio están listas
para el uso.
2 Instale 3 pilas tamaño AAA
(LR03) (opcional). No se incluyen
las pilas.
1 Saque la tapa de las pilas (opcional).
R
3 Conecte el adaptador de CA y ponga
la unidad para el dormitorio sobre
la base.
R
R
Unidad para el dormitorio
1 Saque la tapa de las pilas.
R
R
2 Ponga la pila. 3 Vuelva a poner la tapa de las pilas.
Unidad para padres
R
4 Para cargar la pila, conecte el
adaptador de CA al monitor y
cárguelo durante 3 horas.
PANTALLA DE CRISTAL L
Í
QUIDO
(
LCD
)
: GU
Í
A R
Á
PIDA DE REFERENCI
A
Unidad para padres
R
PANTALLA
LCD
Para pasar por las diferentes opciones, oprima arriba o abajo.
Para pasar por las diferentes opciones, oprima arriba o abajo. No Señal
9:22pm 9:22pm 9:22pm 9:22pm
9:22pm9:22pm 9:22pm 9:22pm 9:22pm
12 Hour(am/pm)
24 Hour 07:32 pm Alarm On
Alarm Off
06: 15 am
English
Français
Español
Vibe on
Vibe off
10
ABAJO
ENCENDIDO
/APAGADO
DEL VIDEO
VOLUMEN
R


2
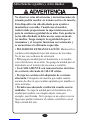
Failure to follow these warnings and the assembly
instructions could result in serious injury or death.
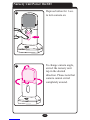
This device is designed to aid in the monitoring of
your child. When using the monitor, you must still
provide the supervision necessary for the continued
safety of your child. This product is not designed or
intended for use as a medical monitor. Always be sure
that both the transmitter and receiver are working
properly and are within range of each other.
• STRANGULATION HAZARD. Keep the adapter
cords out of the reach of children. Do not use with
extension cords.
• DO NOT place the Nursery Unit or its cord within
your child’s reach. Do not put the Nursery Unit inside a
crib or playard.
• Use ONLY with 110-120 volt AC electrical outlets.
• Protect the AC adapter cords. Place them so they are
not walked on or pinched by furniture or other items.
• Allow for proper ventilation when units are in use.
Do not cover the Nursery Unit or Parent Units with any
object such as a blanket. Do not place it in a drawer or in
any location which would mufe the sound or interfere
with the normal ow of air.
• DO NOT immerse any part of the Nursery Unit, Parent
Units, or docking station in water. Clean only with a dry
cloth.
Warnings to Parents and Other Users

3
• DO NOT place unit near water and moisture. Do not
use the Nursery Unit outdoors. Do not use the Nursery
Unit near possible wet areas, such as a bathtub, shower,
wash basin, sink, laundry tub, swimming pool, wet
basement, etc.
• Keep Nursery Unit away from heat sources, such as
replaces, radiators, stoves, and TVs or other appliances.
Heat can damage the case or electrical parts.
• Do not use the Nursery Unit if:
• The adapter cords or plugs have been damaged.
• The unit has been exposed to liquids.
• Unit has been dropped or is damaged.
• DO NOT OPEN THE NURSERY UNIT, PARENT
UNIT, NURSERY UNIT BASE OR ADAPTERS. No
user-serviceable parts inside. Risk of electrical shock,
re or death.
• The antenna used for this transmitter must be installed
to provide a separation distance of at least 20 cm (7.9”)
from all persons and must not be co-located or operating
in conjunction with any other antenna or transmitter.
FCC Statement:
WARNING Modications not authorized by the
manufacturer may void users authority to operate this
device.
NOTE: This equipment has been tested and found to
comply with the limits for a Class B digital device,
pursuant to Part 15 of the FCC Rules.

4
These limits are designed to provide reasonable
protection against harmful interference in a residential
installation. This equipment generates, uses and can
radiate radio frequency energy and, if not installed and
used in accordance with the instructions, may cause
harmful interference to radio communications.
However, there is no guarantee that interference will not
occur in a particular installation. If this equipment does
cause harmful interference to radio or television
reception, which can be determined by turning the
equipment off and on, the user is encouraged to try to
correct the interference by one or more of the following
measures:
• Reorient or relocate the receiving antenna.
• Increase the separation between the equipment and
receiver.
• Connect the equipment into an outlet on a circuit
different from that to which the receiver is connected.
• Consult the dealer or an experienced radio/TV
technician for help.
This device complies with part 15 of the FCC Rules.
Operation is subject to the following two conditions:
(1) This device may not cause harmful interference, and
(2) This device must accept any interference received,
including interference that may cause undesired
operation.

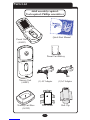
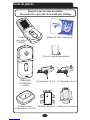
Nursery Unit
(A6403)
R
R
Parent Unit
(A6402)
Parent Unit Battery
Nursery Unit Base
(A5195)
(1) AC Adapter
OWNER’S MANUAL Keep instructions for future use.
Digital Color Video Baby Monitor
Q u ic k St art
P r oduct I nst ruc tion Manual
Quick Start Manual
Wall Mount
(1) AC Adapter
Belt Clip
5
Parts List
Adult assembly required.
Tool required: Phillips screwdriver


10
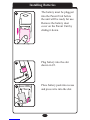
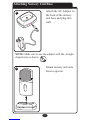
Installing Batteries
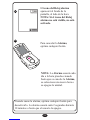
Use AC adapters for normal
power usage – batteries
intended as backup for
power outage.
(Optional)
Use a Phillips head
screwdriver to remove the
battery door.
NOTE: Screw should be
loosened but stay attached
to battery door.
(Optional)
Insert 3 AAA (LR03)
batteries.
Make sure they are inserted
correctly.
● Batteries can be useful in the case of a power outage.
● Batteries should be replaced periodically.
● Batteries should only be used in case of emergency
or for short periods of time.
● To save battery power, only audio functions are active
while using batteries (NO VIDEO).
6
7


R
R
9:22pm
13
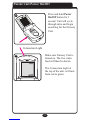
Parent Unit Power On/Off
Press and hold Power
On/Off button for 1
second. Unit will cycle
through intro and begin
searching for the Nursery
Unit.
Make sure Nursery Unit is
turned on. The live video
feed will then be shown.
The Connection Light at
the top of the unit, will turn
from red to green.
Connection Light
12
13


R
R
R
15
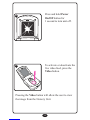
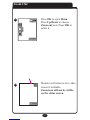
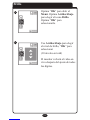
To cycle through the
different choices, press up
or down.
After choosing one of the
options, press the “OK”
button to make the
selection.
NOTE: Once you make a selection (OK), the unit will
automatically advance you to the next option/screen or
return you to the live video feed (if applicable).
To set up preferences, press
the “OK” button.
16
17
18

9:22pm
Use UP/DOWN to
choose, OK to select
9
:
22pm
9:22pm
Use UP/DOWN to
choose, OK to select
9
:
22pm
9:22pm
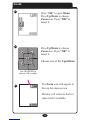
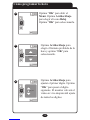
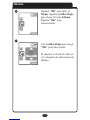
The Zoom icon will appear at
the top the status screen.
Monitor will return to the live
video feed if available.
16
Zoom
Press “OK” to open Menu.
Press Up/Down to choose
Zoom icon. Press “OK” to
select it.
Press Up/Down to choose
Zoom area. Press “OK” to
select it.
Choose one of the 5 positions
19
20
21


9:22pm
9
:
22p
m
9:22pm
9
:
22p
m
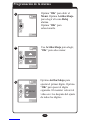
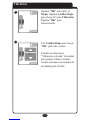
12 Hour(am/pm)
24 Hour
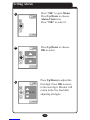
Press Up/Down to choose your
preferred time display format
and press OK to select.
Press Up/Down to adjust the
rst digit. Press OK to move
to the next digit. Monitor will
return to the live feed after
adjusting all digits.
18
Press “OK” to open Menu.
Press Up/Down to choose
Clock icon. Press “OK” to select
it.
Setting Time
26
9:22pm
9
:
22p
m
07:32 pm
25
24

9:22pm
9
:
22p
m
9:22pm
9
:
22p
m
Alarm On
Alarm Off
9:22pm
9
:
22pm
m
07:22 PM
19
Setting Alarm
Press “OK” to open Menu.
Press Up/Down to choose
Alarm Clock icon.
Press “OK” to select it.
Press Up/Down to choose,
OK to select.
Press Up/Down to adjust the
rst digit. Press OK to move
to the next digit. Monitor will
return to the live feed after
adjusting all digits.
27
28
29

9:22pm
Alarm Clock icon will appear
on the bottom of the screen,
next to the time.
NOTE: If Alarm Clock icon
is not visible, it has not been
activated.
When Alarm sounds, press any button to deactivate it.
Alarm will sound off every 2 seconds for 10 minutes, or
until user stops it.
20
NOTE: Alarm will chime
every day at the pre-selected
time until Alarm is
deactivated, new time is
selected. or if unit if powered
off.
30
31
R
To silence Alarm, press any
button.


25
Battery Information
Parent Unit Battery Level
The Battery Icon shows how much power is left in
the batteries:
The Battery icon will cycle while batteries are
charging.
• When the batteries are low, the Battery Icon will
blink and the monitor will beep once every minute.
• When the batteries are extremely low, the screen
will display the warning ,“Batteries are very low.
Turning off…” The unit will then turn off.
• The Battery Level Light will illuminate green when
the batteries are OK, red when the batteries are low.
The Battery Level Light can be seen easily when the
Parent Unit is closed.
• Batteries should be disposed of
properly by recycling.
Parent Unit Battery Charging
• Plug the AC Adapter into the Parent Unit to start
charging the batteries.
LOW FULL
39

26
• The Charging Status Light will illuminate red while
the batteries are being charged, green when the
batteries are fully charged. The Charging Status Light
can be seen easily when the Parent Unit is closed.
Nursery Unit Backup Batteries
• Three AAA (LR03) batteries can be optionally
installed in the Nursery Unit in case AC power is lost.
• When the Nursery Unit is on battery power, only
the audio will be transmitted. This helps to extend the
battery life.
• The Power Light is green when the batteries are
good, red when the batteries are low.
• The Parent Unit will show “Nursery Unit AC Power
Disconnected” when the Nursery Unit is on battery
power.
• Remove the batteries from the unit if it is no longer
being used or will be stored for an extended period of
time.

27
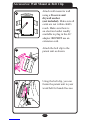
Accessories/ Wall Mount & Belt Clip
Attach wall mount to wall
using a #6 screw and
drywall anchor
(not included). Make sure all
cords are not within child’s
reach. Make sure there is
an electrical outlet readily
available to plug in the AC
adapter. DO NOT use an
extension cord.
40
41
42
Attach the belt clip to the
parent unit as shown.
Using the belt clip, you can
fasten the parent unit to your
waist/belt for hands free use.

28
Trouble Shooting
Most problems have a simple solution.
First, check that:
• Power is turned ON for both units
• Both units are plugged in (or batteries are fresh in
Nursery Unit and fully charged in Parent Unit)
• Electrical outlet works
• Volume is turned up on Parent Unit
• Parent Unit is in range of the Nursery Unit
Parent Unit Only Works With AC Adapter
• Check that the battery is properly installed and
plugged into connector.
No Sound or No Video
• Batteries dead or weak — replace or use AC Adapter.
• AC Adapter not properly connected — check the
connections.
• Nursery Unit covered or blocked — remove the
obstruction.
• Press the Video Button to view the video.

29
Weak Sound, Static or Poor Video.
• Nursery Unit too far from baby — move closer.
• Parent Unit too far from Nursery Unit — move them
closer.
• Large objects blocking the signal —
try repositioning Nursery Unit.
• Volume setting too low — turn it up.
• Interference from other electrical equipment—
eliminate cause of static (TVs, mixers, computers,
fans, fluorescent lights, light dimmers, etc.)
• Significant amount of obstructions between Parent
Unit and Nursery Unit such as walls, ceilings and
buildings. Try moving the Nursery Unit to another
part of the room.
Shrill Sound (Feedback)
• Nursery Unit and Parent Unit too close together—
move them farther apart.
• Volume set too high — lower the volume.

30
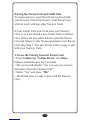
Pairing the Parent Unit and Child Unit
To ensure privacy, your Parent Unit is paired with
your Nursery Unit at the factory. Your Parent Unit
will not work with any other Nursery Units.
If your Parent Unit won’t lock onto your Nursery
Unit, or you purchased a new Parent Unit or Nursery
Unit, follow the procedure below to pair the Parent
Unit and Nursery Unit. If you purchased a new Parent
Unit, skip Step 1. The new Parent Unit is ready to pair
with your Nursery Units.
1. Erase the Pairing from the Parent Unit
• Press Volume Up, Volume Down, and Video
buttons simultaneously for 3 seconds.
• The screen will display “Are you sure you want to
disconnect from the Nursery Unit?”
• Select “Yes” and press “OK”.
• The Parent Unit is ready to pair with the Nursery
Unit.

31
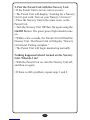
2. Pair the Parent Unit with the Nursery Unit
• If the Parent Unit is not on, turn it on now.
• The Parent Unit will display “Looking for a Nursery
Unit to pair with. Turn on your Nursery Unit now.”
• Place the Nursery Unit in the same room, as the
Parent Unit.
• Turn the Nursery Unit Off then On again using the
On/Off Button. The green power light should come
on.
• Within a few seconds, the Parent Unit will find the
Nursery Unit. The Parent Unit will display “Nursery
Unit found. Pairing complete.”
• The Parent Unit will begin monitoring normally.
Nothing happened when I turned on the Nursery
Unit. What do I do?
• With the Parent Unit on, turn the Nursery Unit off,
and then on again.
• If there is still a problem, repeat steps 1 and 2.

32
Replacement Parts
Warranty Information (USA)
To purchase parts or accessories or for warranty
information in the United States, please contact us at
the following:
Graco Children’s Products
150 Oaklands Blvd.
Exton, PA 19341
www.gracobaby.com
or
1-800-345-4109
Product Registration (USA)
To register your Graco product from
within the U.S.A. visit us online at
www.gracobaby.com/productregistration.
We currently do not accept product registrations from
those living outside the United States of America.


2
No observar estas advertencias y las instrucciones de
armado podría resultar en lesiones serias o la muerte.
Este dispositivo ha sido diseñado para ayudar a
monitorizar a su niño. Cuando usa el monitor,
todavía debe proporcionar la supervisión necesaria
para la continua seguridad de su niño. Este producto
no ha sido diseñado ni debe usarse como un moni-
tor médico. Tenga siempre la seguridad de que el
transmisor y el receptor funcionan correctamente y
se encuentran a la distancia requerida.
• PELIGRO DE ESTRANGULACIÓN. Mantener los
cordones del adaptador lejos del alcance de los niños.
No lo use con cordones de extensión.
• NO ponga la unidad para el dormitorio o su cordón
cerca del alcance de su niño. No ponga la unidad para el
dormitorio en el interior de una cuna o corralito.
• Úselo SOLAMENTE con tomacorrientes eléctricos
de corriente alternada de 110-120 voltios.
• Proteja los cordones del adaptador de corriente
alternada. Colóquelos de manera que nadie camine
encima de ellos ni que resulten apretados por muebles u
otros artículos.
• Permita una adecuada ventilación cuando usa las
unidades. No tape la unidad para el dormitorio ni la
unidad para padres con ningún objeto como por
ejemplo, una frazada. No lo ponga en un cajón ni en un
lugar que pudiera silenciar el sonido o interferir con el
ujo normal del aire.
Advertencias a padres y otros dueños

3
• NO sumerja ninguna parte de la unidad para el
dormitorio, unidades para padres o estación de conexión
en agua. Límpiela solamente con un trapo seco.
• NO ponga la unidad cerca del agua o humedad. No
use la unidad para el dormitorio a la intemperie. No use
la unidad para el dormitorio cerca de posibles lugares
húmedos, tales como bañera, ducha, lavadero, fregadero,
lavarropa, piscina, sótano húmedo, etc.
• Mantenga la unidad para el dormitorio lejos de
fuentes de calor, tales como estufas a leña, radiadores,
cocinas y televisores u otros aparatos. El calor puede
dañar la caja o piezas eléctricas.
• No use la unidad para el dormitorio si:
• Los cordones del adaptador o enchufes han resultado
dañados.
• La unidad ha entrado en contacto con líquidos.
• La unidad se ha caído o ha resultado dañada.
• NO ABRA LA UNIDAD PARA EL DORMITORIO,
UNIDAD PARA PADRES, UNIDAD DE BASE DEL
DORMITORIO O ADAPTADORES. No hay partes
que el usuario pueda arreglar en el interior. Riesgo de
choque eléctrico, incendio o muerte.
• La antena que se usa en este transmisor debe estar
instalada para proporcionar una distancia de por lo
menos 20 cm (7,9 pulgadas) de todas las personas y no
debe estar ubicada ni funcionando junto con ninguna
otra antena o transmisor.
Declaración de la Comisión Federal de
Comunicaciones:
ADVERTENCIA Las modicaciones no
autorizadas por el fabricante podrían cancelar la
autoridad del usuario para usar este dispositivo.

4
NOTA: Este equipo ha sido probado y se ha determinado
que cumple con los límites de un dispositivo digital
Clase B, según la parte 15 de las normas de la FCC.
Estos límites han sido creados para proporcionar una
protección razonable contra la peligrosa interferencia
en una instalación residencial. Este equipo genera, usa
y puede emitir energía de radiofrecuencia y si no se
lo instala y usa de acuerdo a las instrucciones, podría
causar interferencias peligrosas con las comunicaciones
de radio.
Sin embargo, no se garantiza que la interferencia no
ocurrirá en una instalación particular. Si este equipo
causa interferencia peligrosa con la recepción de radio
o televisión, lo cual se puede determinar apagando y
encendiendo el equipo, se sugiere al usuario que trate de
corregir la interferencia a través de una de las siguientes
medidas:
• Reorientar o cambiar de lugar la antena de recepción.
• Aumentar la distancia entre el equipo y el receptor.
• Conectar el equipo a un tomacorriente en un circuito
diferente del que está conectado el receptor. • Consultar
al minorista o a un técnico experimentado de radio y
televisión para obtener ayuda.
Este dispositivo cumple con la Parte 15 de las Normas
de la FCC. Su funcionamiento está sujeto a las dos
condiciones siguientes:
1) Este dispositivo no debería causar interferencia
peligrosa, y
2) Este dispositivo debe aceptar cualquier interferencia
recibida, incluyendo interferencia que pudiera causar un
funcionamiento peligroso.

Unidad para
el dormitorio
(A6403)
R
R
Unidad
para padres
(A6402)
Pila de la unidad para padres
Unidad de base
del dormitorio (A5195)
OWNER’S MANUAL Keep instructions for future use.
Digital Color Video Baby Monitor
Q u ic k St art
P r oduct I nst ruc tion Manual
Manual de activación rápida
(1) Adaptador de CA(1) Adaptador de CA
Montante de pared Traba para el cinturón
5
Lista de piezas
Requiere que lo arme un adulto.
Herramienta requerida: Destornillador Phillips

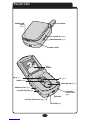
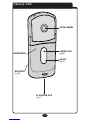
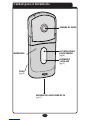
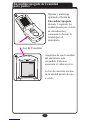
ENCENDIDO
/APAGADO
DEL VIDEO (pg14)
LUZ DEL NIVEL
DE LA PILA
(pg26)
PANTALLA LCD
ALTAVOZ
LUZ DE LA SITUACIÓN
DE CARGA (pg25)
ENCENDIDO
/APAGADO (pg13)
ENCHUFE DEL
ADAPTADOR DE CA (pg8)
ARRIBA(pg15) BIEN (pg15)
ABAJO (pg15)
PILA (pg7)
6
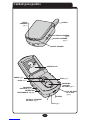
Unidad para padres
LUZ DE
CONEXIÓN
(pg13)
LUCES SONORAS
ANTENA
BAJAR EL VOLUMEN
(pg24)
SUBIR EL VOLUME
N
(pg24)

7
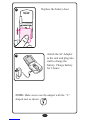
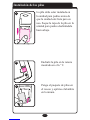
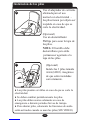
Instalación de las pilas
La pila debe estar instalada en
la unidad para padres antes de
que la unidad esté lista para su
uso. Saque la tapa de la pila en la
unidad para padres deslizándola
hacia abajo.
Ponga el paquete de pilas en
el receso y oprima el alambre
en la ranura.
Enchufe la pila en la ranura
mostrada en el n.° 2.
1
2
3


10
Instalación de las pilas
Use el adaptador de corriente
alternada para el uso
normal con electricidad –
las pilas tienen por objeto ser
respaldo en caso de que se
corte la electricidad.
(Opcional)
Use un destornillador
Phillips para sacar la tapa de
las pilas.
NOTA: El tornillo debe
destornillarse pero debe
permanecer agarrado a la
tapa de las pilas.
(Opcional)
Instale las 3 pilas tamaño
AAA (LR03). Asegúrese
de que estén instaladas
correctamente.
● Las pilas pueden ser útiles en caso de que se corte la
electricidad.
● Se deben cambiar periódicamente las pilas.
● Las pilas deben usarse solamente en caso de
emergencia o durante períodos breves de tiempo.
● Para ahorrar pilas, solamente las funciones de audio
están activadas cuando se usan las pilas (SIN VIDEO).
6
7

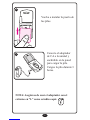
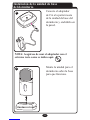
NOTA: Asegúrese de usar el adaptador con el
extremo recto como se indica aquí.
11
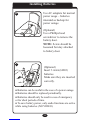
Instalación de la unidad de base
del dormitorio
Conecte el adaptador
de CA a la parte trasera
de la unidad de base del
dormitorio y enchúfela en
la pared.
Monte la unidad para el
dormitorio sobre la base
para que funcione.
8
9


R
R
9:22pm
13
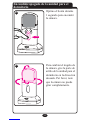
Asegúrese de que la unidad
del dormitorio esté
encendida. Entonces
aparecerá el video en vivo.
La luz de conexión encima
de la unidad pasará de roja
a verde.
Luz de Conexión
Encendido/apagado de la unidad
para padres
Oprima y mantenga
oprimido el botón de
Encendido/Apagado
durante 1 segundo. La
unidad pasará por el ciclo
de introducción y
comenzará a buscar la
unidad para el
dormitorio.
12
13


R
R
R
15
Para programar las
preferencias, oprima el
botón “OK”.
Para pasar por las diferentes
opciones, oprima arriba o
abajo.
Después de elegir una de
las opciones, oprima el
botón “OK” para activar la
selección.
NOTE: Una vez que haya hecho su selección (OK), la
unidad avanzará automáticamente a la próxima opción/
pantalla o volverá al video en vivo (si corresponde).
16
17
18

9:22pm
Use UP/DOWN to
choose, OK to select
9
:
22pm
9:22pm
Use ARRIBA/ABAJO para
ele
g
ir, OK
p
ara seleccionar
9
:
22pm
9:22pm
El icono del Zoom aparecerá
arriba de la pantalla de
situación.
El monitor volverá al video en
vivo si está disponible.
16
Zoom
Oprima “OK” para abrir el
Menú. Oprima Arriba/Abajo
para elegir el icono Zoom.
Oprima “OK” para
seleccionarla.
Oprima Arriba/Abajo para
elegir el área Zoom. Oprima
“OK” para seleccionarla.
Elija una de las 5 posiciones
19
20
21


9:22pm
9
:
22p
m
Oprima Arriba/Abajo para
elegir el formato preferido de la
hora y oprima “OK” para
seleccionarlo.
Oprima Arriba/Abajo para
ajustar el primer dígito. Oprima
“OK” para pasar al dígito
siguiente. El monitor volverá al
video en vivo después del ajuste
de todos los dígitos.
9:22pm
9
:
22p
m
12 Hour(am/pm)
24 Hour
18
Oprima “OK” para abrir el
Menú. Oprima Arriba/Abajo
para elegir el icono Reloj.
Oprima “OK” para seleccionarla.
26
9:22pm
9
:
22p
m
07:32 pm
Cómo programar la hora
25
24

9:22pm
9
:
22p
m
9:22pm
9
:
22p
m
Alarma activada
Alarma deactivada
9:22pm
9
:
22pm
m
07:22 PM
19
Programación de la alarma
Oprima “OK” para abrir el
Menú. Oprima Arriba/Abajo
para elegir el icono Reloj
alarma.
Oprima “OK” para
seleccionarla.
Use Arriba/Abajo para elegir,
“OK” para seleccionar.
Oprima Arriba/Abajo para
ajustar el primer dígito. Oprima
“OK” para pasar al dígito
siguiente. El monitor volverá al
video en vivo después del ajuste
de todos los dígitos.
27
28
29

9:22pm
El icono del Reloj alarma
aparecerá al fondo de la
pantalla, al lado de la hora.
NOTA: Si el icono del Reloj
alarma no está visible, no está
activado.
Cuando suene la alarma, oprima cualquier botón para
desactivarla. La alarma sonará cada 2 segundos durante
10 minutos o hasta que el usuario la apague.
20
NOTA: La Alarma sonará cada
día a la hora preseleccionada
hasta que se cancele la Alarma,
se seleccione una nueva hora o
se apague la unidad.
30
31
R
Para cancelar la Alarma,
oprima cualquier botón.

21
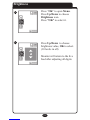
Use Arriba/Abajo para elegir
el nivel de brillo, “OK” para
seleccionar
(10 niveles en total)
El monitor volverá al video en
vivo después del ajuste de todos
los dígitos.
Oprima “OK” para abrir el
Menú. Oprima Arriba/Abajo
para elegir el icono Brillo.
Oprima “OK” para
seleccionarla.
32
33
9:22pm
9
:
22pm
9:22pm
9
:
22pm
10
Brillo


23
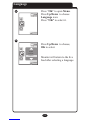
Vibration
Use Arriba/Abajo para elegir,
“OK” para seleccionar.
Cuando se selecciona
“Vibración activada” la unidad
para padres vibrará cuando
resulte activada con sonidos de
la unidad para el bebé.
Oprima “OK” para abrir el
Menú. Oprima Arriba/Abajo
para elegir el icono Vibración.
Oprima “OK” para
seleccionarla.
9:22pm
9
:
22pm
9:22pm
9
:
22pm
Vibe on
Vibe off
36
37


25
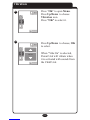
Nivel de la pila de la unidad para padres
El icono de las pilas muestra cuánta potencia queda
en las pilas:
El icono de la pila cambiará mientras se cargan las
pilas.
• Cuando las pilas están descargadas, el icono de las
pilas destellará y el monitor emitirá un sonido cada
minuto.
• Cuando las pilas están extremadamente descarga-
das, la pantalla mostrará la advertencia, “Las pilas
están muy descargadas. Apagando...” La unidad
entonces se apagará.
• La luz del nivel de las pilas será verde cuando las
pilas están cargadas, rojas cuando están descargadas.
La luz del nivel de las pilas se puede ver fácilmente
cuando la unidad para padres está cerrada.
• Las pilas deben desecharse correctamente
a través del reciclado.
LOW FULL
39
Información de la pila

26
Cómo cargar la pila de la unidad para padres
• Enchufe el adaptador de CA en la unidad para
padres para comenzar a cargar las pilas.
• La luz de carga se prenderá roja mientras se cargan
las pilas, verdes cuando las pilas estén totalmente
cargadas. La luz de carga se puede ver fácilmente
cuando la unidad para padres está cerrada.
Pilas de respaldo de la unidad para el dormitorio
• Se pueden instalar opcionalmente tres pilas AAA
(LR03) en la unidad para el dormitorio en caso de
que se corte la corriente.
• Cuando la unidad para el dormitorio funciona con
las pilas, solamente se transmitirá el audio. Esto
ayuda a extender la vida útil de las pilas.
• La luz de la electricidad es verde cuando las pilas
están cargadas y roja cuando las pilas están
descargadas.
• La unidad para padres indicará “Electricidad
desconectada a la unidad para el dormitorio” cuando
la unidad para el dormitorio funcione con las pilas.
• Saque las pilas de la unidad si ya no la usa más o si
la guardará durante un período largo de tiempo.

27
40
41
42
Conecte la traba para el
cinturón a la unidad para
padres como se indica.
Usando la traba para el
cinturón, puede sujetar la
unidad para padres a la
cintura/cinturón para usarlo
sin las manos.
Instale el montante para la
pared usando un tornillo
n.° 6 y sujetador para yeso
(no se incluyen). Asegúrese
de que todos los cordones
estén lejos del alcance del
niño. Asegúrese que haya
un tomacorriente disponible
para enchufar el adaptador
de CA. NO use un cordón de
extensión.
Accesorios/Montante de pared y traba
para el cinturón

28
La mayoría de los problemas tienen una simple
solución. Primero, verifique que:
• La electricidad esté ENCENDIDA en ambas
unidades.
• Ambas unidades estén enchufadas (o que las pilas
están nuevas en la unidad para el dormitorio y
totalmente cargadas en la unidad para padres)
• El tomacorriente está energizado
• El volumen está alto en la unidad para padres
• La unidad para padres está dentro de la distancia
requerida de la unidad para el dormitorio
La unidad para padres solamente funciona con el
adaptador de CA
• Verifique que la pila esté enchufada.
No se reciben sonidos ni video
• Las pilas están descargadas o con poca
carga – cámbielas o use el adaptador de corriente
alternada.
• El adaptador de corriente alternada no está
conectado correctamente – verifique las conexiones.
• La unidad para el dormitorio está cubierta o
bloqueada – saque la obstrucción.
• Si la unidad para padres funciona con las pilas,
oprima el botón de video para ver el video.
Solución de desperfectos

29
Sonido débil, estática o video pobre.
• La unidad para el dormitorio está demasiado lejos
del bebé – muévala más cerca.
• La unidad para padres está demasiado lejos de la
unidad para el dormitorio – muévala más cerca.
• Objetos grandes bloquean la señal – trate de poner la
unidad para el dormitorio en otro lugar.
• Volumen demasiado bajo – súbalo.
• Interferencia de otros equipos eléctricos – elimine la
causa de la estática (televisores, mezcladores,
computadoras, ventiladores, luces fluorescentes,
potenciómetro de luces, etc.)
• Una cantidad significante de obstrucciones entre
la unidad para padres y la unidad para el dormitorio,
como paredes, techos y edificios. Pruebe mover la
unidad para el dormitorio a otra parte de la sala.
Sonido agudo (retroalimentación)
• La unidad para el dormitorio y la unidad para padres
están demasiado cerca – sepárelas más.
• Volumen fijado demasiado alto – baje el volumen.

30
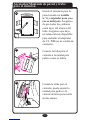
Programación de la unidad para padres y unidad
para niños
Para asegurar la privacidad, la unidad para padres se
programa con su unidad del dormitorio en la fábrica.
Su unidad para padres no funcionará con ninguna otra
unidad del dormitorio.
Si su unidad para padres no se conecta con su unidad
del dormitorio o si compró una nueva unidad para
padres o dormitorio, siga el procedimiento a
continuación para programar la unidad para padres
y la unidad para el dormitorio. Si compró una nueva
unidad para padres, evite el paso 1. La nueva unidad
para padres está lista para programarse con sus
unidades del dormitorio.
1. Borrar la programación de la unidad para
padres
• Oprima los botones para subir y bajar el volumen
y los botones de vídeo simultáneamente durante 3
segundos.
• La pantalla mostrará “¿Está seguro que desea
desconectar la unidad del dormitorio?”
• Seleccione “Sí” y oprima “OK”.
• La unidad para padres está lista para ser programada
con la unidad del dormitorio.

31
2. Programación de la unidad para padres con la
unidad del dormitorio
• Si la unidad para padres no está encendida,
enciéndala ahora.
• La unidad para padres mostrará “Buscando una
unidad del dormitorio con la que programarse.
Encienda la unidad del dormitorio ahora.”
• Ponga la unidad del dormitorio en la misma sala que
la unidad para padres.
• Apague la unidad del dormitorio y vuelva a pren-
derla usando el botón de encendido/apagado.
Se deberá encender la luz verde de encendido.
• En unos pocos segundos, la unidad para padres
encontrará la unidad del dormitorio. La unidad para
padres mostrará “Se encontró la unidad del
dormitorio. Programación completa.”
• La unidad para padres comenzará monitorizar
normalmente.
No pasó nada cuando encendí la unidad para el
dormitorio. ¿Qué debo hacer?
• Con la unidad para padres encendida, apague la
unidad para el dormitorio y luego enciéndala de
nuevo.
• Si todavía tiene problemas, repita los pasos 1 y 2.

Información sobre la garantía y las
piezas de repuesto (EE.UU.)
Para comprar piezas o accesorios o para obtener
información sobre la garantía en los Estados Unidos,
por favor comuníquese con nosotros en:
Graco Children’s Products
150 Oaklands Blvd.
Exton, PA 19341
www.gracobaby.com
o
1-800-345-4109
Registro del producto (EE.UU.)
Para registrar su producto Graco desde dentro de los
EE.UU., visítenos en línea en
www.gracobaby.com/productregistration.
Actualmente no aceptamos registros de los
productos de quienes viven fuera de los
Estados Unidos de América
32
-
 1
1
-
 2
2
-
 3
3
-
 4
4
-
 5
5
-
 6
6
-
 7
7
-
 8
8
-
 9
9
-
 10
10
-
 11
11
-
 12
12
-
 13
13
-
 14
14
-
 15
15
-
 16
16
-
 17
17
-
 18
18
-
 19
19
-
 20
20
-
 21
21
-
 22
22
-
 23
23
-
 24
24
-
 25
25
-
 26
26
-
 27
27
-
 28
28
-
 29
29
-
 30
30
-
 31
31
-
 32
32
-
 33
33
-
 34
34
-
 35
35
-
 36
36
-
 37
37
-
 38
38
-
 39
39
-
 40
40
-
 41
41
-
 42
42
-
 43
43
-
 44
44
-
 45
45
-
 46
46
-
 47
47
-
 48
48
-
 49
49
-
 50
50
-
 51
51
-
 52
52
-
 53
53
-
 54
54
-
 55
55
-
 56
56
-
 57
57
-
 58
58
-
 59
59
-
 60
60
-
 61
61
-
 62
62
-
 63
63
-
 64
64
-
 65
65
-
 66
66
-
 67
67


Graco imonitor 2797VIB3 Manual de usuario
- Categoría
- Muebles de bebe
- Tipo
- Manual de usuario
En otros idiomas
- English: Graco imonitor 2797VIB3 User manual
Documentos relacionados
-
Graco 2797 Manual de usuario
-
-
-
-
-
-
-
-
-