
Sensitivity (SPL)
Frequency response
Impedance
Power handling
Drivers
Speaker himensions (H x W x D)
Weight
Power output
Mains voltage
Drivers
Speaker dimensions (H x W x D)
Weight
Installation guide
Installationsanleitung
Guide d’installation
Guía de instalación
Guida all’installazione
Installatiehandleiding
Installationsguide
Руководство по установке
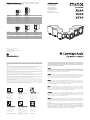
Thank you for purchasing this Cambridge Audio Minx subwoofer. Installed and used properly the
subwoofer will deliver astonishing sound quality, whether playing music or movies, whatever the
listening environment. Please read this guide carefully, as it contains essential information in
getting the very best from your subwoofer
.
D
Deutsch
Vielen Dank, dass Sie diesen Subwoofer Minx von Cambridge Audio gekauft haben. Bei richtiger Installation
und Verwendung liefert der Subwoofer eine überragende Klangqualität, bei Musik und bei Filmen, und dies
unabhängig vom Umfeld des Hörers. Bitte lesen Sie diesen Leitfaden gründlich durch, denn er enthält wichtige
Informationen für den optimalen Hörgenuss mit Ihrem Subwoofer.
Français
Nous vous remercions d'avoir choisi ce caisson de grave Cambridge Audio Minx. Installé et utilisé dans les
règles de l'art, ce caisson de grave délivrera une qualité sonore stupéfiante avec de la musique ou des films,
quel que soit l'environnement d'écoute. Nous vous recommandons de lire attentivement ce guide. Il contient
des informations essentielles qui vous permettront de tirer le meilleur de votre caisson de grave.
Español
Gracias por adquirir este subwoofer Cambridge Audio Minx. Instalados y utilizados correctamente, los
subwoofer proporcionan una sorprendente calidad acústica, bien sea en la reproducción de música o películas,
con independencia del entorno de audición. Por favor lea esta guía detenidamente puesto que contiene
información fundamental para sacar el mayor partido de su subwoofer.
Italiano
Grazie per aver acquistato questo subwoofer Cambridge Audio Minx. Una volta installato ed utilizzato in
maniera corretta, questo subwoofer sarà in grado di offrire una qualità acustica stupefacente, che riproduca
musica o colonne sonore, in qualsiasi ambiente d'ascolto. Leggete con attenzione il presente manuale, poiché
contiene informazioni indispensabili per trarre il meglio dal Vostro nuovo subwoofer.
Nederlands
Dank u voor de aanschaf van deze Cambridge Audio Minx subwoofer. Als de subwoofer correct wordt
geïnstalleerd en gebruikt zal deze een verbazingwekkende geluidskwaliteit geven, of u nu muziek of films
afspeelt en ongeacht de luisteromgeving. Lees deze handleiding aandachtig door, aangezien deze essentiële
informatie bevat over hoe u het beste uit uw subwoofer haalt.
Svenska
Tillykke med købet af din Cambridge Audio Minx Subwoofer. Korrekt opsat og anvendt vil subwooferen levere
en fænomenal lydkvalitet uanset om det er til musik eller film, og uanset lytteområde. Læs venligst denne
guide grundigt igennem, da den indeholder vigtige informationer om, hvordan du får mest ud af din subwoofer.
Русский
Мы благодарны Вам за покупку этого сабвуфера Minx компании Cambridge Audio. При правильной
установке и использовании сабвуфер обеспечит поразительное качество звучания при
воспроизведении музыки или фильмов в любой окружающей обстановке для прослушивания.
Внимательно прочитайте это руководство, поскольку в нем содержится важнейшая информация,
необходимая для получения самых лучших результатов от вашего сабвуфера.
A
Avoid extreme temperatures
Extreme Temperaturen vermeiden
Évitez les températures extrêmes
Evite temperaturas extremas
Evitare temperature estreme
Vermijd extreme temperature
Undvik extrema temperaturförhållanden
Не допускайте воздействия экстремальных
температур
Secure all cables
Alle Kabel gut sichern
Attachez fermement tous les câbles
Asegure todos los cables
Fissare tutti i cavi
Beveilig alle kabels
Säkra alla kablar
Закрепите все кабели
Avoid solvent-based cleaners
Keine Lösemittel zum Reinigen verwenden
N'utilisez pas de produit de nettoyage à
base de solvant
Evite utilizar limpiadores basados en
disolventes
Evitare detergenti basati su solventi
Vermijd reinigingsmiddelen op basis van
oplosmiddelen
Undvik lösningsbaserade rengöringsmedel
Не пользуйтесь очистителями на основе
растворителей
R
Read all instructions
Bitte lesen Sie alle Punkte genau durch
Lisez toutes les instructions
Lea todas las instrucciones
Leggere tutte le istruzioni
Lees alle aanwijzingen
Läs alle instruktioner
Прочтите все инструкции
Avoid damp
Kontakt mit Feuchtigkeit vermeiden
N'installez pas le système dans un
environnement humide
Evite la humedad
Evitare l'umidità
Vermijd vocht
Undvik fukt
Не допускайте воздействия влаги
Avoid direct sunlight
Nie direktem Sonnenlicht aussetzen
Évitez une exposition directe aux rayons
du soleil
Evite la luz directa del sol
Evitare la luce solare diretta
Vermijd direct zonlicht
Undvik direkt solljus
Не допускайте воздействия прямого солнечного
света
Technical specifications /
Technische daten / Caractéristiques techniques /
Especificaciones técnicas / Specifiche tecniche / Technische specificaties / Tekniska
specifikationer / Технические характеристики
Part No. AP27393/3
www.cambridge-audio.com
Min 10
85dB (2.83 Vrms input)
130Hz - 20kHz
8 Ohms compatible
15-50W Recommended
1 x 2.25" BMR
78 x 78 x 85mm (3.1 x 3.1 x 3.3")
0.43Kg (0.95lbs)
X200
200W
100V/110-120V/220-240V
1 x 6.5" Subwoofer
2 x 6.5" Passive Radiator
219 x 210 x 222mm (8.6 x 8.3 x 8.7")
5.0Kg (11.0lbs)
X300
300W
100V/110-120V/220-240V
1 x 8" Subwoofer
1 x 8" Passive Radiator
311 x 266 x 278mm (12.4 x 10.5 x 11.0")
7.5Kg (16.5lbs)
X500
500W
100V/110-120V/220-240V
1 x 10" Subwoofer
1 x 10" Passive Radiator
365 x 320 x 350mm (14.3 x 12.6 x 13.8")
11.7Kg (25.8lbs)
Min 20
87dB (2.83 Vrms input)
130Hz - 20kHz
8 Ohms compatible
15-75W Recommended
2 x 2.25" BMR
154 x 78 x 85mm (6.0 x 3.1 x 3.3")
0.75Kg (1.65lbs)
Minx is a trademark of Cambridge Audio. All rights reserved.
© Copyright Audio Partnership Plc 2010
Cambridge Audio is a brand of Audio Partnership Plc.
Registered Office: Gallery Court, Hankey Place, London SE1 4BB, UK.
Registered in England No. 2953313
This guide is designed to make installing and using this product as easy as possible. Information in this
document has been carefully checked for accuracy at the time of printing; however, Cambridge Audio's policy
is one of continuous improvement, therefore design and specifications are subject to change without prior
notice.
Befolgen Sie für die Installation und Verwendung des Produkts die Schritte in dieser Bedienungsanleitung. Die Informationen in dieser Anleitung
wurden zur Zeit der Drucklegung hinsichtlich ihrer Genauigkeit sorgfältig überprüft. Cambridge Audio ist jedoch bestrebt, seine Produkte ständig
zu verbessern, und daher können sich das Design und die technischen Daten ohne vorherige Ankündigung ändern.
Ce manuel vise à faciliter l’installation et l’utilisation de ce produit. Les informations qu’il contient ont été vérifiées soigneusement avant leur
impression. Toutefois, comme Cambridge Audio a pour principe d’améliorer constamment ses produits, les caractéristiques techniques et générales
peuvent être modifiées sans préavis.
Esta guía está diseñada para que instalar y utilizar este producto sea lo más fácil posible. La precisión de la información que contiene este
documento fue verificada cuidadosamente en el momento de su impresión. No obstante, la política de Cambridge Audio se basa en mejorar
continuamente, por lo que el diseño y las especificaciones están sujetas a modificaciones sin previo aviso.
Questa Guida è stata ideate per rendere l’installazione e l’impiego di questo prodotto più facili possibile. Le informazioni contenute in questo
documento sono state accuratamente verificate per la loro esattezza al momento della stampa; in ogni caso la poltica di Cambridge Audio è fatta
di miglioramenti continui, per cui il progetto e le specifiche sono soggetti a modifiche senza necessità di preavviso.
Deze handleiding is bedoeld om de installatie en het gebruik van het product zo eenvoudig mogelijk te maken. De in dit document verstrekte
informatie is voor het drukken zorgvuldig gecontroleerd op nauwkeurigheid; het beleid van Cambridge Audio is echter gericht op voortdurende
verbetering. Ontwerp en specificaties kunnen derhalve zonder voorafgaande kennisgeving worden gewijzigd.
Denna handbok är utformad för att underlätta installation och användning av denna produkt. Informationen i detta dokument har kontrollerats
noggrant vid tryckningstillfället. Cambridge Audio har dock en policy av kontinuerliga förbättringar, vilket innebär att design och specifikationer kan
ändras utan föregående meddelande.
Настоящее руководство поможет пользователю упростить установку оборудования и эксплуатировать его с максимальной эффективностью.
Содержащаяся в настоящем документе информация была тщательно проверена на момент публикации. Однако компания Cambridge Audio
проводит политику постоянного усовершенствования выпускаемой ею продукции, и поэтому оставляет за собой право вносить изменения
в конструкцию изделий и их технические характеристики без предварительного уведомления.

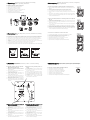
2. Positioning /
Aufstellen / Emplacement / Colocación / Posizionamento / Plaatsing /
Placering /
Расположение
2.1 Your subwoofer can be placed almost anywhere in the room as bass sound is largely non-directional.
2.1 Ihr Subwoofer kann an einer beliebigen Stelle im Raum platziert werden, da die Bassfrequenzen eher nicht geortet werden können.
2.1 Votre subwoofer peut être placé quasiment n’importe où dans la pièce, du fait que les graves sont en grande partie non-directionnelles.
2.1 Es posible colocar el subwoofer prácticamente en cualquier lugar de la habitación, pues los graves apenas son direccionales.
2.1 Il subwoofer può essere posizionato in praticamente qualsiasi punto della stanza in quanto il suono dei bassi è prevalentemente non
direzionale.
2.1 Uw subwoofer kan eigenlijk overal in de ruimte worden geplaatst omdat basgeluid voornamelijk richtingloos is.
2.1 Din subwoofer kan placeras nästan var som helst i rummet eftersom basljud i stort sett inte är riktat.
2.1.
Сабвуфер можно установить практически в любом месте в помещении, так как воспроизводимый им звук в основном ненаправленный.
3. Connections /
Anschlüsse / Raccordements / Conexiones / Collegamenti /
Aansluitingen / Anslutningar /
Подключение
5.1 7.12.1
3.1 Connect to left and right Line inputs if using with a 2-channel hi-fi system.
3.1 Wenn Sie ein 2-Wege-HiFi-System verwenden, schließen Sie das Gerät an den linken und rechten Line-
Eingang an.
3.1 Raccordez aux entrées de ligne droite et gauche si vous utilisez un système hi-fi 2 canaux.
3.1 Conecte las entradas de línea izquierda y derecha si usa un sistema hi-fi de dos canales.
3.1 In caso di utilizzo di un sistema hi-fi a 2 canali collegare gli ingressi di linea destro e sinistro.
3.1 Aansluiten op linker en rechter lijninvoeren wanneer gebruik wordt gemaakt van een 2-kanaals hi-fi
systeem.
3.1 Anslut till vänster och höger Line-ingångar om du använder subwoofern med ett hi-fi-system med 2 kanaler.
3.1.
Подключите источник сигнала к линейным входам правого и левого канала сабвуфера, если
используется 2-канальная Hi-Fi-система.
3.2 Connect to the left (LFE/Sub) Line In socket if using an AV receiver or Amp with
Sub out.
3.2 Schließen Sie das Gerät an den linken (LFE/Sub-) Line-Eingang an, wenn Sie einen AV-Receiver oder einen
Verstärker mit einem Sub-Ausgang verwenden.
3.2 Raccordez au connecteur d’entrée de ligne gauche (LFE/Sub) si vous utilisez un récepteur AV ou un
amplificateur avec sortie Sub.
3.2 Conecte la toma de entrada de línea izquierda (LFE/Sub) si utiliza un receptor de A/V o un amplificador
con salida de subwoofer.
3.2 Collegare la presa sinistra Line In (LFE/Sub) in caso di utilizzo di un ricevitore AV o di un Amp con uscita Sub.
3.2 Aansluiten op de linker (LFE/Sub) lijningang wanneer een AV-ontvanger of versterker met Sub-uit wordt gebruikt.
3.2 Anslut tillvänster (LFE/Sub) Line In-ingång om du använder en AV-mottagare eller förstärkare med Sub-utgång.
3.2.
Подключите источник сигнала к линейному входу левого канала («LFE/Sub») сабвуфера, если
используется аудио-видеоресивер или усилитель с выходом на сабвуфер.
3.3 To connect a second subwoofer use the Line out sockets.
3.3 Verwenden Sie die Line-Ausgänge, um das Gerät mit einem zweiten Subwoofer zu verbinden.
3.3 Pour raccorder un deuxième subwoofer, utilisez les connecteurs de sortie de ligne.
3.3 Utilice las clavijas de salida de línea para conectar un segundo subwoofer.
3.3 Per collegare un secondo subwoofer utilizzare le prese Line out.
3.3 Maak gebruik van de lijnuitgangen om een tweede subwoofer aan te sluiten.
3.3 Anslut en andra subwoofer med hjälp av Line out-utgångarna.
3.3.
Для подключения второго сабвуфера используйте разъемы линейного выхода.
4
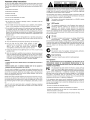
4. Controls /
Bedienelemente / Commandes / Controles / Comandi / Bediening /
Kontroller /
Органы управления
4.4 Auto feature will switch your subwoofer on and
off automatically by signal detection.
4.4 Wird ein Signal erkannt, schaltet die automatische
Aktivierungsfunktion den Subwoofer automatisch ein oder aus.
4.4 La fonctionnalité Auto allume et éteint automatiquement votre
subwoofer par la détection du signal.
4.4 La función Auto encenderá y apagará automáticamente el
subwoofer mediante detección de la señal.
4.4 La funzione Auto accende e spegne automaticamente il
subwoofer al rilevamento del segnale.
4.4 De “Auto”-functie schakelt uw subwoofer automatisch aan en uit
via signaalwaarneming.
4.4 Autofunktionen slår på och stänger av din subwoofer
automatiskt med hjälp av signalavkänning.
4.4
Функция обнаружения звукового сигнала автоматически
включает и отключает звук сабвуфера.
4.1 Set Volume to balance subwoofer output with
Min 10 or Min 20 speakers by ear.
4.1 Stellen Sie die Lautstärke ein, um die Subwoofer-
Ausgangslautstärke mit Min 10 oder Min 20-Lautsprechern dem
Gehör nach anzupassen.
4.1 Réglez le Volume pour équilibre la sortie du subwoofer avec les
enceintes Min 10 ou Min 20 à l’oreille.
4.1 Configure el volumen para ajustar la salida del subwoofer con
los altavoces Min 10 o Min 20 a oído.
4.1 Impostare il volume per equilibrare l’uscita subwoofer con
altoparlanti Min 10 o Min 20 a orecchio.
4.1 Stel het volume op het gehoor zodanig in dat deze in balans is met
het vermogen van de subwoofer met min. 10 of min. 20 speakers.
4.1 Ställ in volymen för att balansera subwooferns utmatning med
Min 10 eller Min 20 högtalare efter hörsel.
4.1.
Отрегулируйте громкость на слух, чтобы сбалансировать
уровень громкости сабвуфера с акустическими системами Min
10 или Min 20.
4.3 Adjust Frequency to integrate subwoofer with
Min 10 or Min 20 speakers.
4.3 Passen Sie die Frequenz an, um den Subwoofer mit Min 10-
oder Min 20-Lautsprechern verwenden zu können.
4.3 Ajustez la Fréquence pour intégrer le subwoofer aux enceintes
Min 10 ou Min 20.
4.3 Ajuste la frecuencia para integrar el subwoofer con altavoces
Min 10 o Min 20.
4.3 Regolare la frequenza in modo da integrare il subwoofer con
altoparlanti Min 10 o Min 20.
4.3 Pas de frequentie aan om de subwoofer te integreren met min.
10 of min. 20 speakers.
4.3 Justera frekvens för att integrera subwoofern med Min 10 eller
Min 20 högtalare.
4.3.
Отрегулируйте частоту для интеграции сабвуфера с
акустическими системами Min 10 или Min 20.
4.2 Adjust Phase if using non Minx speakers (0 =
normal).
4.2 Passen Sie die Phase an, wenn Sie keine Minx-Lautsprecher
verwenden (0 = normal).
4.2 Ajustez la Phase si vous utilisez des enceintes autres que celles
de la gamme Minx (0 = normal).
4.2 Ajuste la fase si utiliza altavoces distintos de Minx (0 = normal).
4.2 In caso di utilizzo di altoparlanti non Minx regolare la fase (0 = normale).
4.2 Stel de fase bij indien niet-Minx speakers worden gebruikt (0 = normaal).
4.2 Justera Fas om du använder högtalare av en annan typ än Minx
(0 = normal).
4.2.
Отрегулируйте фазу (0 = обычная) при использовании
акустических систем, отличных от Minx.
Volume
Min Max
0
o
180
o
50Hz 200Hz
90º
Phase
Standby
Feature
Power AC
Power
Wireless Port
R
(LFE/
SUB)
R
L
(LFE/
SUB)
L
Out In
OutIn
Off On
220-240V
110-120V
Designed and engineered in London, England
CA629 Digital Subwoofer
www.cambridge-audio.com
Audio Detect
(Normal Use)
Rated Consumption
(@ 1/8
th
Output Power)
130W
Max Consumption
800W
Force On
(No Standby)
CAUTION
Risk of electric
shock.
Do not open.
AVIS
Risque de choc
electrique.
Ne pas ouvrir.
ACHTUNG
Vorm öffnen
des gerätes.
Netzstecker ziehen.
Made under licence in China
This device complies with part 15 of the FCC Rules. Operation is subject to the following two conditions: (1) This device may not cause
harmful interference, and (2) this device must accept any interference, including interference that may cause undesired operation.
Crossover
Frequency
Audio
120Hz
160Hz80Hz
Mains Voltage
Selector Switch
110-120V/220-240V
AC ~ 50/60Hz
500W Output
Caution
Serial Number Label Removed
Wireless Port
5. Wireless option /
Drahtlosfunktion / Options sans fil / Opción inalámbrica /
Opzione wireless / Draadloze optie / Trådlöst alternativ /
Дополнительный модуль
беспроводной связи
5.1 Connection for future Cambridge Audio Wireless Module.
5.1 Anschlussbuchse für Drahtlosmodul von Cambridge Audio.
5.1 Raccordement pour futur module sans fil Cambridge Audio.
5.1 Conexión para el futuro módulo inalámbrico de Cambridge Audio.
5.1 Collegamento per un futuro modulo wireless Cambridge Audio.
5.1 Aansluiting voor draadloze Cambridge Audio module.
5.1 Anslutning för framtida Cambridge Audio Wireless Module.
5.1
Разъем для подключения будущего модуля беспроводной связи Cambridge Audio.
1. Unpacking /
Auspacken / Ouverture de l’emballage / Desembalaje /
Disimballaggio / Uitpakken / Uppackning /
Распаковка
1.1 Follow the diagrams to unpack your subwoofer:
1.1 Beachten Sie die Bilder beim Auspacken des Subwoofers:
1.1 Suivez les schémas pour déballer votre subwoofer :
1.1 Siga los diagramas para desembalar el subwoofer:
1.1 Per il disimballaggio del subwoofer attenersi agli schemi in dotazione:
1.1 Volg de tekeningen voor het uitpakken van uw subwoofer:
1.1 Följ ritningarna för att packa upp din subwoofer:
1.1.
Следуйте приведенной ниже схеме для распаковки сабвуфера.
I
n
s
t
a
ll
a
t
i
o
n
G
u
i
d
e
I
n
s
t
a
l
l
a
t
i
o
n
s
a
n
l
e
i
t
u
n
g
G
u
i
de
d'
i
n
s
t
a
l
l
a
t
i
o
n
G
u
í
a
d
o
ne
I
n
s
t
a
l
l
a
t
i
e
h
a
n
d
l
e
i
d
i
n
g
I
n
s
t
a
l
l
a
t
i
o
n
s
g
u
i
d
e
Р
у
к
овод
ств
о
п
о
у
ст
а
но
в
к
е
Y
ou
r
m
u
s
ic
+
o
u
r
p
a
s
s
io
n
kg
Auto
Detect
On
Volume
Min Max
0
o
180
o
200Hz50Hz
100
65 150
80 120
Frequency
Phase
90º
Crossover
This device complies with part 15 of the FCC Rules. Operation is subject to the
following two conditions: (1) This device may not cause harmful interference, and
(2) this device must accept any interference, including interference that may cause
undesired operation.
CAUTION
Risk of electric
shock.
Do not open.
AVIS
Risque de choc
electrique.
Ne pas ouvrir.
ACHTUNG
Vorm öffnen
des gerätes.
Netzstecker ziehen.
CA629 Digital Subwoofer
Rated Power Consumption: 600W
www.cambridgeaudio.com
Designed and engineered in London, England
Power AC
Power
Wireless
Port
R
L (LFE / SUB)
R
L
Out In
Off On
220-240V
100-120V
Mains Voltage
Selector Switch
100-120V/220-240V
AC ~ 50/60Hz
R
L (LFE / SUB)
R
L
Out In
Auto
Detect
On
Volume
Min Max
0
o
180
o
200Hz50Hz
100
65 150
80 120
Frequency
Phase
90º
Crossover
Caution:
Serial Number Label Removed
Made under licence in China
Apparatet må kun tilkoples jordet stikkontakt. Laite on
liitettävä suojamaadoituskoskoskettimilla varustenttuun
pistorasiaan. Apparaten skall anslutas till jordat uttagt.
This device complies with part 15 of the FCC Rules. Operation is subject to the
following two conditions: (1) This device may not cause harmful interference, and
(2) this device must accept any interference, including interference that may cause
undesired operation.
CAUTION
Risk of electric
shock.
Do not open.
AVIS
Risque de choc
electrique.
Ne pas ouvrir.
ACHTUNG
Vorm öffnen
des gerätes.
Netzstecker ziehen.
CA629 Digital Subwoofer
Rated Power Consumption: 600W
www.cambridgeaudio.com
Designed and engineered in London, England
Power AC
Power
Wireless
Port
R
L (LFE / SUB)
R
L
Out In
Off On
220-240V
100-120V
Mains Voltage
Selector Switch
100-120V/220-240V
AC ~ 50/60Hz
R
L (LFE / SUB)
R
L
Out In
R
L (LFE / SUB)
R
L
Out In

Im
porta
nt
Safety
Instructions
Wichtige Sicherheitsma1Snahmen
Consignes de securite importantes
Instrucciones importantes de seguridad
Importanti istruzioni di sicurezza
Belangrijke veiligheidsregels
Viktiga sakerhetsanvisningar
Ba>KHble
lIIHCTpyKllllllll
no
TeXHlIIKe
6e30nacHocTlII
£~*~:t~~
8
Cambridge
Audio'·

Important
safety
instructions
For
your
own
safety please read the following important safety instructions
carefully before attempting to connect this unit to the mains power supply.
They
will also enable
you
to getthe best performance and prolong the life
of
the unit:
1.
Read
these instructions.
2.
Keep these instructions.
3.
Heed
all warnings.
4. Follow all instructions.
5.
Do
not use this apparatus near water.
6. Clean only with a dry cloth.
7.
Do
not block any ventilation openings. Install
in
accordance with the
manufacturer's instructions.
8.
Do
not install near any heat sources such as radiators, heat registers,
stoves, or other apparatus (including amplifiers) that produce heat.
9.
Do
not defeat the safety purpose
of
the polarized or grounding-type plug.
A polarized plug has two blades with one wider than the other. A
groundingtype plug has two blades and a third grounding prong. The wide
blade or the third prong are provided for your safety. If the provided plug
does not
fit
into your outlet, consult
an
electrician for replacement of the
obsolete outlet.
10. Protect the power cord from being walked
on
or pinched, particularly
at
plugs, convenience receptacles, and the point where they exit from the
apparatus.
11.
Only
use attachments/accessories specified
by
the manufacturer.
12.
Use
only with the cart, stand, tripod, bracket, or table
CI
specified
by
the manufacturer, or sold with the apparatus. •
When a
cart
is used, use caution when moving the
cart/apparatus combination to avoid injury from tip-over.
13. Unplug this apparatus during lightning storms or when unused for long
periods
of
time.
14. Refer all servicing to qualified service personnel. Servicing is required
when the apparatus has been damaged in any
way,
such as the power-
supply cord or plug being damaged, liquid has been spilled or objects
have fallen into the apparatus, the apparatus has been exposed to rain
or moisture, does not operate normally, or has been dropped.
WARNING
-
To
reduce the risk
of
fire
or
electric shock, do not expose
this
unit
to
rain
or
moisture.
- Batteries (battery pack
or
batteries installed) shall not be exposed
to
excessive heatsuch as sunshine, fire or the like.
The
unit must be installed
in
a manner that makes disconnection of the
mains plug from the mains socket outlet (or appliance connector from the
rear of the unit) possible. Where the mains plug is used as the disconnect
device, the disconnect device shall remain readily operable.
Only
use the
mains cord supplied with this unit.
Please ensurethere isample ventilation (at least 10cm clearance all round).
Do
not put any objects
on
top of this unit.
Do
not situate it
on
a rug or other
soft surface and do not obstruct any air inlets or outlet grilles.
Do
not cover
the ventilation grilles with items such as newspapers, table-cloths, curtains
etc.
This unit must not be used near water or exposed to dripping or splashing
water or other liquids.
No
objects filled with liquid, such as vases, shall be
placed
on
the unit.
2
The
lightning flash with the arrowhead symbol within
an
equilateral triangle
is intended to alert the user to the presence of un-insulated 'dangerous
voltage' within the product's enclosure
that
may be of sufficient magnitude
to constitute a risk of electric shock to persons.
The
exclamation point within
an
equilateral triangle is intended to alert the
user to the presence of important operating and maintenance instructions
in the service literature relevant to this appliance.
The symbol
on
this product indicates that
it
is
of
CLASS
II
(double
insulated) construction.
WEEEsymbol
The
crossed-out wheeled bin is the European Union symbol for
indicating
separate collection
for
electrical and electronic
- equipment. This product contains electrical and electronic
equipment which should
be
reused, recycled or recovered and
should not
be
disposed of with unsorted regUlar waste. Please return the
unit or contactthe authorised dealer from whom
you
purchased this product
for more information.
(
L:
CE
mark
~ This product complies with European
Low
Voltage (2006/95/EC),
Electromagnetic Compatibility
(2004/108/EC)
and
EnVironmentally-friendly design of Energy-related Products
(2009/125/EC)
Directives when used and installed according to this instruction manual.
For
continued compliance only Cambridge Audio accessories should be used
with this product and servicing must
be
referred to qualified service
personnel.
~...
e-Tick
mark
" This product meets the Australian Communications Authority's
Radio communications and
EMC
requirements.
~
Ross Test
Stamp
,.;:
This product meets Russian electronic safety approvals.
FCC
regUlations
NOTE:
THE
MANUFACTURER
IS
NOT
RESPONSIBLE
FOR
ANY
RADIO
OR
TV
INTERFERENCE
CAUSED
BY
UNAUTHORIZED
MODIFICATIONS
TO
THIS
EQUIPMENT.
SUCH
MODIFICATIONS
COULD
VOID
THE
USER
AUTHORITY
TO
OPERATE
THE
EQUIPMENT.
~
This equipment has been tested and found to comply with the
~
limits for a Class B digital device, pursuant to Part
15
of the
FCC
Rules. These limits are designed to provide reasonable protection
against harmful interference
in
a residential installation. This equipment
generates, uses and can radiate radio frequency energy and,
if
not installed
and used
in
accordance with the instructions, may cause harmful
interference to radio communications. However, there is no guarantee
that
interference will not occur
in
a particular installation.
If this equipment does cause harmful interference to radio or television
reception, which can be determined
by
turning the equipment
off
and on,
the user is encouraged to try to correct the interference
by
one or more of
the following measures:
- Re-orient or relocate the receiving antenna.
- Increase the separation between the equipment and receiver.
- Connect the equipment into
an
outlet
on
a circuit different from that to
which the receiver is connected.
- Consult the dealer or an experienced radio/TV technician for help.

Some countries and
US
states do not allow the exclusion or limitation of
incidental or consequential damages or implied warranties
so
the above
exclusions may notapply to you. This Warranty gives
you
specific legal rights,
and
you
may have other statutory rights, which vary from state to state or
country to country.
FUSE
BLUE
N
Plug
Fitting
Instructions
(UK
Only)
The
cord supplied with this appliance
is
factory fitted with a
UK
mains plug
fitted with a 5 amp fuse inside. If it
is
necessary to change the fuse, it
is
important
that
a 5 amp one
is
used. If the plug needs to be changed
because it is not suitable for your socket, or becomes damaged, it should
be
cut
off
and
an
appropriate plug fitted following the wiring instructions below.
The
plug must then
be
disposed
of
safely, as insertion into a mains socket
is
likely to cause an electrical hazard. Should it be necessary to
fit
a 3-pin
BS
mains plug to the power cord the wires should
be
fitted as shown
in
this
diagram.
The
colours
of
the wires
in
the
mains lead
of
this appliance may not
correspond with the coloured markings identifying the terminals
in
your plug.
Connect them as follows:
The wire which
is
coloured
BLUE
must
be
connected to the terminal which is marked with
the letter 'N' or coloured
BLACK.
The wire which is coloured
BROWN
must be
connected to the terminal which is marked with
the letter
'Lor
coloured
RED.
Limited warranty
Cambridge Audio warrants this product to
be
free from defects
in
materials
and workmanship (subject to the terms set forth below). Cambridge Audio
will repair or replace (at Cambridge Audio's option) this product or any
defective parts
in
this product. Warranty periods may vary from country to
country. If
in
doubt consult your dealer and ensure
that
you
retain proof
of
purchase.
To
obtain warranty service, please contact the Cambridge Audio authorised
dealerfrom which
you
purchased this product. If your dealer is not equipped
to perform the repair
of
your Cambridge Audio product, it can
be
returned
by
your dealer to Cambridge Audio or an authorised Cambridge Audio service
agent.
You
will need to ship this product
in
either its original packaging or
packaging affording an equal degree
of
protection.
Proof
of
purchase
in
the form of a bill
of
sale or receipted invoice. which is
evidence
that
this product is within the warranty period, must
be
presented
to obtain warranty service.
This Warranty
is
invalid
if
(a) the factory-applied serial number has been
altered or removed from this product or (b) this product was not purchased
from a Cambridge Audio authorised dealer.
You
may call Cambridge Audio or
your local country Cambridge Audio distributor to confirm that
you
have an
unaltered serial number
and/or
you
purchased from a Cambridge Audio
authorised dealer.
This Warranty does not cover cosmetic damage or damage due to acts
of
God, accident, misuse. abuse, negligence, commercial use, or modification
of, or to any part of, the product. This Warranty does not cover damage due
to improper operation, maintenance or installation, or attempted repair
by
anyone other than Cambridge Audio or a Cambridge Audio dealer, or
authorised service agent which is authorised to do Cambridge Audio
warranty work.
Any
unauthorised repairs will void this Warranty. This
Warranty does not cover products sold
AS
IS
or
WITH
ALL
FAULTS.
REPAIRS
OR
REPLACEMENTS
AS
PROVIDED
UNDER
THIS
WARRANTY
ARE
THE
EXCLUSIVE
REMEDY
OF
THE
CONSUMER.
CAMBRIDGE
AUDIO
SHALL
NOT
BE
LIABLE
FOR
ANY
INCIDENTAL
OR
CONSEQUENTIAL
DAMAGES
FOR
BREACH
OF
ANY
EXPRESS
OR
IMPLIED
WARRANTY
IN
THIS
PRODUCT.
EXCEPT
TO
THE
EXTENT
PROHIBITED
BY
LAW,
THIS
WARRANTY
IS
EXCLUSIVE
AND
IN
LIEU
OF
ALL
OTHER
EXPRESS
AND
IMPLIED
WARRANTIES
WHATSOEVER
INCLUDING,
BUT
NOT
LIMITED
TO,
THE
WARRANTY
OF
MERCHANTABILITY
AND
FITNESS
FOR
A
PRACTICAL
PURPOSE.
The wire which is coloured
GREEN/YELLOW
must be connected to the terminal which is
marked with the letter 'E' or coloured
GREEN.
If a standard
13
amp
(BS
1363)
plug
is
used, a 5 amp fuse must
be
fitted,
or
if
any other type
of
plug
is
used a 5 amp fuse must
be
fitted, either
in
the
plug or adaptor, or on the distribution board.
Loudspeakers
Before making any connections to loudspeakers, make sure all power is
turned
off
and only use suitable interconnects.
Power
sources
The
unit should
be
operated only from the type
of
power source indicated
on
the marking label. If
you
are not sure
of
the type
of
power supply to your
home, consult your product dealer or local power company.
This unit can
be
left
in
Standby mode when not
in
use and will draw
<lW
in
this state.
To
turn the unit off, switch
off
at
the
rear panel. If
you
do not
intend to use this unit for a long period
of
time, unplug it from the mains
socket.
Battery
disposal
Please dispose
of
any discharged batteries according
to
local
environmental/electronic waste disposal guidelines.
Ventilation
IMPORTANT
-
The
unit will become hot when
in
use.
Do
not stack multiple
units
on
top
of
each other.
Do
not place
in
an enclosed area such as a
bookcase or
in
a cabinet without sufficient ventilation. Ensure
that
small
objects do not fall through any ventilation grille. If this happens, switch
off
immediately, disconnect from the mains supply and contact your dealer for
advice.
Positioning
Choose the installation location carefully. Avoid placing it
in
direct sunlight or
close to a source
of
heat. No naked flame sources, such as lighted candles,
should
be
placed
on
the unit. Also avoid locations subject to vibration and
excessive dust, cold or moisture.
The
unit can
be
used
in
a moderate
climate.
This unit must be installed on a sturdy, level surface.
Do
not place
in
a
sealed area such as a bookcase or in a cabinet.
Any
space open
at
the back
(such as a dedicated equipment rack) is fine however.
Do
not place the unit
on
an unstable surface or shelf.
The
unit may fall, causing serious injury to
a child or adult as well as serious damage to the product.
Do
not place other
equipment
on
top
of
the unit.
Due to stray magnetic fields turntables or
CRT
TVs
should not be located
nearby due to possible interference. Electronic audio components have a
running
in
period
of
around a week (if used several hours per day). This will
allow the new components to settle down, the sonic properties will improve
over this time.
Cleaning
To
clean the unit, wipe its case with a dry, lint-free cloth.
Do
not use any
cleaning fluids containing alcohol, ammonia or abrasives.
Do
not spray an
aerosol
at
or near the unit.
Servicing
These units are not user serviceable, never attempt to repair, disassemble
or reconstruct the unit
if
there seems to
be
a problem. A serious electric
shock could result
if
this precautionary measure is ignored.
In
the event of a
problem or failure, please contact your dealer.
Overloading
Do
not overload wall outlets or extension cord as this can result
in
a risk
of
fire or electric shock. Overloaded
AC
outlets, extension cords. frayed power
cords, damaged or cracked wire insulation, and broken plugs are dangerous.
They
may result
in
a shock or fire hazard.
Be
sure to insert each power cord securely.
To
prevent hum and noise, do
not bundle the interconnect leads with the power cord or speaker leads.
3

www.cambridge-audio.com
AP26782/3
-
 1
1
-
 2
2
-
 3
3
-
 4
4
-
 5
5
-
 6
6


Cambridge Audio minx X200 Guía de instalación
- Categoría
- Subwoofers
- Tipo
- Guía de instalación
En otros idiomas
Documentos relacionados
-
Cambridge Audio Minx X201 White Manual de usuario
-
-
-
-
-
-
Cambridge Audio SX-120 El manual del propietario
-
-
-