Klarstein 10045431 El manual del propietario
- Categoría
- Iluminación de conveniencia
- Tipo
- El manual del propietario

MARVEL MIRROR
Infrarot-Heizung
Infrared Heater
Radiador infrarrojo
Radiateur Infrarouge
Radiatore a infrarossi
Hinweis: Dieses Produkt ist nur für gut isolierte Räume
oder für den gelegentlichen Gebrauch geeignet.
Note: This product is only suitable for well insulated
spaces or occasional use.
Nota: Este producto está indicado únicamente en
lugares abrigados o para una utilización punctual.
Remarque : Ce produit ne peut être utilisé que dans
des locaux bien isolés ou de manière occasionnelle.
Advertencia: Questo prodotto è adatto solo per spazi
ben isolati o uso occasionale.
www.klarstein.com
10045431 10045432


3
DE
Sehr geehrter Kunde,
wir gratulieren Ihnen zum Erwerb Ihres Gerätes. Lesen Sie
die folgenden Hinweise sorgfältig durch und befolgen Sie
diese, um möglichen Schäden vorzubeugen. Für Schäden,
die durch Missachtung der Hinweise und unsachgemäßen
Gebrauch entstehen, übernehmen wir keine Haftung.
Scannen Sie den folgenden QR-Code, um Zugriff auf die
aktuellste Bedienungsanleitung und weitere Informationen
rund um das Produkt zu erhalten.
INHALTSVERZEICHNIS
Technische Daten 3
Sicherheitshinweise 4
Installation 5
Bedienfeld und Fernbedienung 6
Display-Anzeigen 7
Bedienung 7
Fehlerbehebung 10
Reinigung und Pege 10
Produktdatenblatt 10045431 11
Produktdatenblatt 10045432 12
Spezielle Entsorgungshinweise für Verbraucher in Deutschland 13
Hinweise zur Entsorgung 15
Hersteller & Importeur (UK) 15
TECHNISCHE DATEN
Artikelnummer 10045431 10045432
Stromversorgung 220-240 V ~ 50 Hz
Leistung 600 W 720 W
Abmessungen 55 x 100 cm 60 x 120 cm
English 17
Español 29
Français 41
Italiano 53

4
DE
SICHERHEITSHINWEISE
• Prüfen Sie vor der Benutzung die angegebene Spannung auf der Geräteplakette
und schließen Sie das Gerät nur an Steckdosen an, die der Spannung des Geräts
entsprechen.
• Falls das Netzkabel beschädigt ist, lassen Sie es von einer ausgebildeten
Fachkraft ersetzen.
• Stellen Sie die Heizung nicht direkt unter der Steckdose auf.
• Halten Sie einen Meter Abstand zu brennbaren Materialien wie Möbeln,
Vorhängen oder Ähnlichem.
• Benutzen Sie das Gerät außerhalb der Reichweite von Kindern. Kinder dürfen
das Gerät nur unter Aufsicht bedienen.
• Das Gerät ist nicht für den kommerziellen Gebrauch, sondern nur für
Gebrauch im Haushalt und in ähnlichen Umgebungen vorgesehen.
• Benutzen Sie das Gerät nicht, wenn es Fehlfunktionen aufweist oder in
irgendeiner Form beschädigt wurde.
• Reparaturen dürfen nur von ausgebildeten Fachkräften durchgeführt werden.
• Falsch oder eigenständig ausgeführte Reparaturen stellen ein
Verletzungsrisiko dar.
• Verlegen Sie das Netzkabel nicht unter Teppichen oder Läufern.
• Achten Sie darauf, dass das Netzkabel nicht über scharfe Kanten oder heiße
Oberächen verläuft.
• Decken Sie die Heizung nicht ab, um ein Überhitzen zu vermeiden.
• Benutzen Sie das Gerät nicht mit einem externen Timer, einer ferngesteuerten
Steckdose oder einem anderen Gerät, das die Heizung automatisch ein- und
ausschaltet.
• Tauchen Sie das Gerät nicht in Wasser oder andere Flüssigkeiten.
• Benutzen Sie das Gerät nicht in der Nähe von Badewannen, Duschen oder
Swimmingpools.
• Benutzen Sie das Gerät nicht im Freien.
• Benutzen Sie das Gerät nicht mit nassen Händen.
• Benutzen Sie das Gerät nicht auf oder in der Nähe heißer Oberächen.
• Benutzen Sie das Gerät nicht mit beschädigtem Netzkabel.
• Ziehen Sie vor der Reinigung den Stecker aus der Steckdose und lassen Sie
das Gerät vollständig abkühlen.
• Benutzen Sie zur Reinigung keine Scheuermittel.
• Verwenden Sie nur Zubehör, das vom Hersteller ausdrücklich dafür zugelassen ist.
• Kinder ab 8 Jahren, psychisch, sensorisch und körperlich eingeschränkte
Menschen dürfen das Gerät nur benutzen, wenn sie vorher von einer für
sie verantwortlichen Aufsichtsperson ausführlich mit den Funktionen und
den Sicherheitsvorkehrungen vertraut gemacht wurden und die damit
verbundenen Risiken verstehen.
• Achten Sie darauf, dass Kinder nicht mit dem Gerät spielen.
VORSICHT
Verbrennungsgefahr! Einige Geräteteile können sehr heiß werden.
Achten Sie darauf, dass Sie oder Ihre Kinder sich nicht daran verbrennen.

5
DE
INSTALLATION
Installation an der Wand
Markieren Sie die Positionen der vier
zu bohrenden Löcher an der Wand,
und bohren Sie die Löcher mit dem
Bohrer. Achten Sie darauf, dass der
Abstand zwischen den einzelnen
Löchern mit den runden Löchern der
Wandhalterungen übereinstimmt.
Setzen Sie die Kunststoffdübel in die
Löcher ein.
Setzen Sie die 4 Metallschrauben
für die Wandmontage in die
Kunststoffdübel ein.
Heben Sie das Heizgerät an und
richten Sie die vier Löcher an den
Halterungen auf der Rückseite des
Heizgeräts an den 4 Schrauben an der
Wand aus.
Schieben Sie die Schraube von Position
A auf Position B, indem Sie das
Heizgerät leicht bewegen.

6
DE
Freistehende Installation
1. Stellen Sie die Füße auf den Boden.
2. Stecken Sie die Ständer in die Aussparung an der Unterseite der Halterungen.
Ziehen Sie die Ständer dann mit den 6 kleinen schwarzen Schrauben fest.
BEDIENFELD UND FERNBEDIENUNG
Fernbedienung
Hauptschalter
Halterung
Beleuchteter Ein/Aus-Schalter
Heizplatte

7
DE
DISPLAY-ANZEIGEN
BEDIENUNG
Um das Heizgerät in Betrieb zu nehmen, gehen Sie wie folgt vor:
• Überprüfen Sie das Heizgerät, um sicherzustellen, dass es nicht beschädigt ist.
• Schließen Sie das Heizgerät an und schalten Sie den beleuchteten Ein/Aus-
Schalter an der Seite des Heizgeräts ein.
Es gibt zwei Möglichkeiten, das Heizgerät zu benutzen:
(1) Gerät manuell ein- und ausschalten
• Wenn das Gerät eingeschaltet wird, ertönt der Summer einmal und das Gerät
bendet sich im Standby-Modus.
• Drücken Sie die Power-Taste auf der Fernbedienung. Das Power-Symbol
leuchtet im Display auf.
• Wenn die eingestellte Temperatur höher als die Raumtemperatur von 2 °C ist,
heizt das Gerät automatisch. Das Symbol leuchtet im Display auf und die
Heizanzeige leuchtet ebenfalls am Heizgerät.
Temperatur
Wochentag Stunde Minute
Power
Wochentimer
Heizsymbol

8
DE
(2) Wochentimer einstellen
Um den Wochentimer-Modus zu starten, drücken Sie die Ein/Aus-Taste. Wenn das
Power-Symbol vom Display verschwindet, drücken Sie die Timer-Taste . Die
Symbole für Timer und Kalender blinken.
So programmieren Sie den Wochen-Timer:
1. Drücken Sie die Pfeiltasten oder , um den Wochentag einzustellen.
Drücken Sie dann die Zahnrad-Taste zur Bestätigung.
2. Im Display blinkt [P1]. Drücken Sie die Zahnrad-Taste erneut zur
Bestätigung.
3. Stellen Sie die Einschaltzeit ein. Die Stunde blinkt im Display. Drücken Sie die
Pfeiltasten oder , um die Stunde einzustellen. Drücken Sie dann die
Zahnrad-Taste zur Bestätigung. Die Minuten blinken im Display. Drücken
Sie die Pfeiltasten oder , um die Minuten einzustellen. Drücken Sie dann
die Zahnrad-Taste zur Bestätigung.
4. Stellen Sie die Ausschaltzeit auf die gleiche Weise wie die Einschaltzeit ein.
5. Stellen Sie die tägliche Einschalt- und Ausschaltzeit für P2, P3 und P4 nach der
gleichen Methode wie für P1 ein.
Hinweis: Die Heizperioden P1, P2, P3 und P4 können so eingestellt werden,
dass sie sich die Heizung an jeden Tag zu unterschiedlichen Zeiten ein- oder
ausschaltet.
6. Nachdem Sie den Wochentimer eingestellt haben, warten Sie, bis das Display
nach ca. 10 Sekunden in den Standby-Modus zurückkehrt. Drücken Sie einmal
auf die Zahnrad-Taste und dann auf die Power-Taste . Vergewissern
Sie sich, dass die beiden Symbole auf dem Display gleichzeitig aueuchten,
dann funktioniert das Gerät im Wochentimer-Modus. Wenn Sie wieder in den
normalen Modus wechseln möchten, drücken Sie direkt noch einmal auf die
Power-Taste . Das Gerät wechselt daraufhin in den Standby-Modus und Sie
können es wieder manuell bedienen.

9
DE
Aktuelle Uhrzeit einstellen
Der Wochentimer funktioniert nur, wenn Sie die aktuelle Uhrzeit eingestellt haben.
Gehen Sie zum Einstellen der aktuellen Uhrzeit wie folgt vor:
1. Drücken Sie die Ein/Aus-Taste. Wenn das Power-Symbol auf dem Display
leuchtet, drücken Sie einmal die Timer-Taste .
2. Die Stunde blinkt im Display. Drücken Sie die Pfeiltasten oder , um die
Stunde einzustellen. Drücken Sie dann die Zahnrad-Taste zur Bestätigung.
Die Minuten blinken im Display. Drücken Sie die Pfeiltasten oder , um die
Minuten einzustellen. Drücken Sie dann die Zahnrad-Taste zur Bestätigung.
3. Dann blinkt der Wochentag. Drücken Sie die Pfeiltasten oder , um
den Wochentag einzustellen. Drücken Sie dann die Zahnrad-Taste zur
Bestätigung.
Temperatur einstellen
Drücken Sie die Pfeiltasten oder , um die Temperatur einzustellen. Die
Temperatur kann von 5-50 °C eingestellt werden. Die beiden Ziffern blinken
einige Sekunden lang, ohne dass eine Bedienung erfolgt, und kehren dann zur
Anzeige der Raumtemperatur zurück. Wenn die Raumtemperatur niedriger als
die eingestellte Temperatur von 2 °C ist, wird die Heizung automatisch gestartet.
Wenn die Raumtemperatur die eingestellte Temperatur erreicht hat oder
übersteigt, wird die Heizung automatisch ausgeschaltet.
Erkennung offener Fenster
Dieses Heizgerät erkennt offene Fenster. Wenn das Heizgerät eingeschaltet ist
(egal ob im manuellen Modus oder im Wochentimer-Modus), wird die Heizung
automatisch gestoppt, wenn die ermittelte Temperatur innerhalb von 5 Minuten
um 5 °C (oder mehr) fällt.

10
DE
FEHLERBEHEBUNG
Wenn Ihr Heizgerät nicht funktioniert, befolgen Sie diese Anweisungen:
• Vergewissern Sie sich, dass Ihr Stromkreisunterbrecher oder Ihre Sicherung
richtig funktioniert.
• Vergewissern Sie sich, dass das Heizgerät eingesteckt ist und dass die
Steckdose ordnungsgemäß funktioniert.
• Wenn der Ein/Aus-Schalter in der Ein-Position nicht leuchtet, ist das Gerät
womöglich kaputt. Wenden Sie sich in diesem Fall an den Kundendienst.
Hinweis: Wenn ein Problem mit ihrem Heizgerät auftritt, versuchen sie nicht,
das Heizgerät selbst zu öffnen oder zu reparieren. Dies kann zum Erlöschen der
Garantie führen und kann Schäden oder Verletzungen verursachen. Wenn das
Problem weiterhin besteht, wenden sie sich bitte an den Händler.
REINIGUNG UND PFLEGE
Hinweis: Schalten Sie das Gerät aus und ziehen Sie den Stecker aus der
Steckdose. Warten Sie, bis das Gerät vollständig abgekühlt ist, bevor Sie es
reinigen.
• Benutzen Sie zur Reinigung der Lüftungsschlitze und Gitter einen
Staubsauger.
• Entfernen Sie Staub auf den Außenächen mit einem feuchten (nicht nassen)
Tuch.
• Verwenden Sie keine scharfen Reinigungsmittel oder Scheuermittel.
• Besprühen Sie das Gerät nicht mit Flüssigkeiten und tauchen Sie es nicht in
Wasser oder andere Flüssigkeiten.
• Öffnen Sie niemals das Gehäuse der Heizung.

11
DE
PRODUKTDATENBLATT 10045431
Modellkennung(en) 10045431
Angabe Symbol Wert Einheit Angabe Einheit
Wärmeleistung Nur bei elektrischen Speicher-Einzelraumheizgeräten:
Art der Regelung der Wärmezufuhr
Nennwärmeleistung Pnom 0.60 kW Manuelle Regelung der Wärmezufuhr mit
integriertem Thermostat
k.A.
Mindestwärmeleistung
(Richtwert)
Pmin 0.60 kW Manuelle Regelung der Wärmezufuhr
mit Rückmeldung der Raum- und/oder
Außentemperatur
k.A.
Maximale kontinuierliche
Wärmeleistung
Pmax,c 0.60 kW Elektronische Regelung der Wärmezufuhr
mit Rückmeldung der Raum- und/oder
Außentemperatur
k.A.
Hilfsstromverbrauch Wärmeabgabe mit Gebläseunterstützung k.A.
Bei Nennwärmeleistung elmax k.A. kW Art der Wärmeleistung/Raumtemperaturkontrolle
Bei Mindestwärmeleistung elmin k.A. kW Einstuge Wärmeleistung, keine
Raumtemperaturkontrolle
nein
Im Bereitschaftszustand elSB 0.26 W Zwei oder mehr manuell einstellbare Stufen,
keine Raumtemperaturkontrolle
nein
Raumtemperaturkontrolle mit mechanischem
Thermostat
nein
Mit elektronischer Raumtemperaturkontrolle nein
Mit elektronischer Raumtemperaturkontrolle
und Tageszeitregelung
nein
Mit elektronischer Raumtemperaturkontrolle
und Wochentagsregelung
ja
Sonstige Regelungsoptionen
Raumtemperaturkontrolle mit
Präsenzerkennung
nein
Raumtemperaturkontrolle mit Erkennung
offener Fenster
ja
Mit Fernbedienungsoption nein
Mit adaptiver Regelung des Heizbeginns nein
Mit Betriebszeitbegrenzung ja
Mit Schwarzkugelsensor nein
Kontaktangaben Chal-Tec GmbH, Wallstraße 16, 10179, Berlin, Deutschland

12
DE
PRODUKTDATENBLATT 10045432
Modellkennung(en) 10045432
Angabe Symbol Wert Einheit Angabe Einheit
Wärmeleistung Nur bei elektrischen Speicher-Einzelraumheizgeräten:
Art der Regelung der Wärmezufuhr
Nennwärmeleistung Pnom 0.72 kW Manuelle Regelung der Wärmezufuhr mit
integriertem Thermostat
k.A.
Mindestwärmeleistung
(Richtwert)
Pmin 0.72 kW Manuelle Regelung der Wärmezufuhr
mit Rückmeldung der Raum- und/oder
Außentemperatur
k.A.
Maximale kontinuierliche
Wärmeleistung
Pmax,c 0.72 kW Elektronische Regelung der Wärmezufuhr
mit Rückmeldung der Raum- und/oder
Außentemperatur
k.A.
Hilfsstromverbrauch Wärmeabgabe mit Gebläseunterstützung k.A.
Bei Nennwärmeleistung elmax k.A. kW Art der Wärmeleistung/Raumtemperaturkontrolle
Bei Mindestwärmeleistung elmin k.A. kW Einstuge Wärmeleistung, keine
Raumtemperaturkontrolle
nein
Im Bereitschaftszustand elSB 0.26 W Zwei oder mehr manuell einstellbare Stufen,
keine Raumtemperaturkontrolle
nein
Raumtemperaturkontrolle mit mechanischem
Thermostat
nein
Mit elektronischer Raumtemperaturkontrolle nein
Mit elektronischer Raumtemperaturkontrolle
und Tageszeitregelung
nein
Mit elektronischer Raumtemperaturkontrolle
und Wochentagsregelung
ja
Sonstige Regelungsoptionen
Raumtemperaturkontrolle mit
Präsenzerkennung
nein
Raumtemperaturkontrolle mit Erkennung
offener Fenster
ja
Mit Fernbedienungsoption nein
Mit adaptiver Regelung des Heizbeginns nein
Mit Betriebszeitbegrenzung ja
Mit Schwarzkugelsensor nein
Kontaktangaben Chal-Tec GmbH, Wallstraße 16, 10179, Berlin, Deutschland

13
DE
SPEZIELLE ENTSORGUNGSHINWEISE FÜR
VERBRAUCHER IN DEUTSCHLAND
Entsorgen Sie Ihre Altgeräte fachgerecht. Dadurch wird gewährleistet, dass die
Altgeräte umweltgerecht verwertet und negative Auswirkungen auf die Umwelt
und menschliche Gesundheit vermieden werden. Bei der Entsorgung sind
folgende Regeln zu beachten:
• Jeder Verbraucher ist gesetzlich verpichtet, Elektro- und Elek-
tronikaltgeräte (Altgeräte) sowie Batterien und Akkus getrennt
vom Hausmüll zu entsorgen. Sie erkennen die entsprechenden
Altgeräte durch folgendes Symbol der durchgestrichenen
Mülltonne (WEEE-Symbol).
• Sie haben Altbatterien und Altakkumulatoren, die nicht vom Altgerät
umschlossen sind, sowie Lampen, die zerstörungsfrei aus dem Altgerät
entnommen werden können, vor der Abgabe an einer Entsorgungsstelle vom
Altgerät zerstörungsfrei zu trennen.
• Bestimmte Lampen und Leuchtmittel fallen ebenso unter das Elektro- und
Elektronikgesetz und sind dementsprechend wie Altgeräte zu behandeln.
Ausgenommen sind Glühbirnen und Halogenlampen. Entsorgen Sie
Glühbirnen und Halogenlampen bitte über den Hausmüll, sofern sie nicht das
WEEE-Symbol tragen.
• Jeder Verbraucher ist für das Löschen von personenbezogenen Daten auf dem
Elektro- bzw. Elektronikgerät selbst verantwortlich.
Rücknahmepicht der Vertreiber
Vertreiber mit einer Verkaufsäche für Elektro- und Elektronikgeräte von
mindestens 400 Quadratmetern sowie Vertreiber von Lebensmitteln mit einer
Gesamtverkaufsäche von mindestens 800 Quadratmetern, die mehrmals im
Kalenderjahr oder dauerhaft Elektro- und Elektronikgeräte anbieten und auf dem
Markt bereitstellen, sind verpichtet,
1. bei der Abgabe eines neuen Elektro- oder Elektronikgerätes an einen Endnutzer
ein Altgerät des Endnutzers der gleichen Geräteart, das im Wesentlichen die
gleichen Funktionen wie das neue Gerät erfüllt, am Ort der Abgabe oder in
unmittelbarer Nähe hierzu unentgeltlich zurückzunehmen und
2. auf Verlangen des Endnutzers Altgeräte, die in keiner äußeren Abmessung
größer als 25 Zentimeter sind, im Einzelhandelsgeschäft oder in unmittelbarer
Nähe hierzu unentgeltlich zurückzunehmen; die Rücknahme darf nicht an den
Kauf eines Elektro- oder Elektronikgerätes geknüpft werden und ist auf drei
Altgeräte pro Geräteart beschränkt.

14
DE
• Bei einem Vertrieb unter Verwendung von Fernkommunikationsmitteln
ist die unentgeltliche Abholung am Ort der Abgabe auf Elektro- und
Elektronikgeräte der Kategorien 1, 2 und 4 gemäß § 2 Abs. 1 ElektroG, nämlich
„Wärmeüberträger“, „Bildschirmgeräte“ (Oberäche von mehr als 100 cm²)
oder „Großgeräte“ (letztere mit mindestens einer äußeren Abmessung
über 50 Zentimeter) beschränkt. Für andere Elektro- und Elektronikgeräte
(Kategorien 3, 5 und 6) ist eine Rückgabemöglichkeit in zumutbarer
Entfernung zum jeweiligen Endnutzer zu gewährleisten.
• Altgeräte dürfen kostenlos auf dem lokalen Wertstoffhof oder in folgenden
Sammelstellen in Ihrer Nähe abgegeben werden: www.take-e-back.de
• Für Elektro- und Elektronikgeräte der Kategorien 1, 2 und 4 bieten wir auch
die Möglichkeit einer unentgeltlichen Abholung am Ort der Abgabe an. Beim
Kauf eines Neugeräts haben Sie die Möglichkeit, eine Altgerätabholung über
die Webseite auszuwählen.
• Batterien können überall dort kostenfrei zurückgegeben werden, wo sie
verkauft werden (z. B. Super-, Bau-, Drogeriemarkt). Auch Wertstoff- und
Recyclinghöfe nehmen Batterien zurück. Sie können Batterien auch per Post
an uns zurücksenden. Altbatterien in haushaltsüblichen Mengen können Sie
direkt bei uns von Montag bis Freitag zwischen 08:00 und 16:00 Uhr unter der
folgenden Adresse unentgeltlich zurückgeben:
Chal-Tec Fulllment GmbH
Norddeutschlandstr. 3
47475 Kamp-Lintfort
• Wichtig zu beachten ist, dass Lithiumbatterien aus Sicherheitsgründen vor der
Rückgabe gegen Kurzschluss gesichert werden müssen (z. B. durch Abkleben
der Pole).
• Finden sich unter der durchgestrichenen Mülltonne auf der Batterie zusätzlich
die Zeichen Cd, Hg oder Pb ist das ein Hinweis darauf, dass die Batterie
gefährliche Schadstoffe enthält. (»Cd« steht für Cadmium, »Pb« für Blei und
»Hg« für Quecksilber.)
Hinweis zur Abfallvermeidung
Indem Sie die Lebensdauer Ihrer Altgeräte verlängern, tragen Sie dazu bei,
Ressourcen ezient zu nutzen und zusätzlichen Müll zu vermeiden. Die
Lebensdauer Ihrer Altgeräte können Sie verlängern, indem Sie defekte Altgeräte
reparieren lassen. Wenn sich Ihr Altgerät in gutem Zustand bendet, könnten Sie
es spenden, verschenken oder verkaufen.

15
DE
HINWEISE ZUR ENTSORGUNG
Wenn es in Ihrem Land eine gesetzliche Regelung
zur Entsorgung von elektrischen und elektronischen
Geräten gibt, weist dieses Symbol auf dem Produkt oder
auf der Verpackung darauf hin, dass dieses Produkt
nicht im Hausmüll entsorgt werden darf. Stattdessen
muss es zu einer Sammelstelle für das Recycling von
elektrischen und elektronischen Geräten gebracht
werden. Durch regelkonforme Entsorgung schützen
Sie die Umwelt und die Gesundheit Ihrer Mitmenschen
vor negativen Konsequenzen. Informationen zum
Recycling und zur Entsorgung dieses Produkts,
erhalten Sie von Ihrer örtlichen Verwaltung oder Ihrem
Hausmüllentsorgungsdienst.
HERSTELLER & IMPORTEUR (UK)
Hersteller:
Chal-Tec GmbH, Wallstraße 16, 10179 Berlin, Deutschland.
Importeur für Großbritannien:
Berlin Brands Group UK Limited
PO Box 42
272 Kensington High Street
London, W8 6ND
United Kingdom


17
EN
Dear customer,
Congratulations on your purchase. Please read the
following instructions carefully and follow them to prevent
potential damage. We accept no liability for damage caused
by disregarding the instructions and improper use. Please
scan the QR code to access the latest operating instructions
and further information about the product.
CONTENTS
Safety Instructions 18
Installation 19
Control panel and remote control 20
Display indications 21
Operation 21
Troubleshooting 24
Cleaning and Care 24
Product data sheet 10045431 25
Product data sheet 10045432 26
Disposal Considerations 27
Manufacturer & importer (UK) 27
TECHNICAL DATA
Article number 10045431 10045432
Power supply 220-240 V ~ 50 Hz
Power 600 W 720 W
Dimensions: 55 x 100 cm 60 x 120 cm

18
EN
SAFETY INSTRUCTIONS
• Before use, check the voltage specied on the device label and only connect the
device to outlets that match the voltage of the device.
• If the power cord is damaged, have it replaced by a trained professional.
• Do not place the heater directly under a power socket.
• Ensure the appliance is kept one metre away from combustible materials such
as furniture, curtains or similar.
• Use the device out of the reach of children. Children may only operate the
device under supervision.
• The appliance is intended for use in the home and similar environments only.
It is not intended for commercial use.
• Do not use the device if it malfunctions or has been damaged in any way.
• Repairs may only be carried out by trained specialists.
• Incorrectly or independently performed repairs pose a risk of injury.
• Do not run the power cord under carpets or rugs.
• Make sure that the power cord does not come into contact with sharp edges
or hot surfaces.
• To prevent it from overheating, do not cover the heater.
• Do not use the appliance with an external timer, a remote-controlled socket or
any other device that automatically switches the heating on and off.
• Do not immerse the device in water or other liquids.
• Do not use the device near bathtubs, showers or swimming pools.
• Do not use the device outdoors.
• Do not use the device with wet hands.
• Do not use the appliance on or near hot surfaces.
• Do not use the device with a damaged power cord.
• Before cleaning, unplug the device from the wall outlet and allow it to cool
completely.
• Do not use abrasive cleaners for cleaning.
• Only use accessories that are expressly approved for this purpose by the
manufacturer.
• Children over 8 years as well as mentally, sensory and physically impaired
persons may only use the device if they have been informed in detail about
the functions and safety precautions by a supervisor responsible for them
beforehand and understand the associated risks.
• Make sure that children do not play with the appliance.
CAUTION
Risk of burns! Some parts of the device can become very hot. Be careful
not to burn yourself or your children with it.

19
EN
INSTALLATION
Installation on the wall
Mark the positions of the four holes
to be drilled on the wall and use a drill
to drill the holes. Make sure that the
distance between each hole matches
the round hole on the wall bracket.
Insert the plastic dowels into the
holes.
Insert the 4 metal screws for wall
mounting into the plastic dowels.
Lift the heater and align the 4 holes on
the brackets on the back of the heater
with the 4 screws on the wall.
Slide the screw from position A to
position B by slightly moving the
heater.

20
EN
Free-standing installation
1. Place the feet on the oor.
2. Insert the stands into the recess at the bottom of the brackets. Then use the 6
small black screws to tighten the stands.
CONTROL PANEL AND REMOTE CONTROL
Remote control
Main switch
Holder
Illuminated on/off switch
Heating panel

21
EN
DISPLAY INDICATIONS
OPERATION
To start up the heater, proceed as follows:
• Check the heater to make sure it is not damaged.
• Plug in the heater and turn on the illuminated on/off switch on the side of the
heater.
There are two ways to use the heater:
(1) Switch the device on and off manually
• When the device is turned on, the buzzer will sound once and the device will
be in standby mode.
• Press the power button on the remote control. The power symbol will
light up on the display.
• If the set temperature is higher than the room temperature of 2 °C, the device
will heat up automatically. The symbol lights up in the display and the
heating indicator also lights up on the heater.
Temperature
Day of the week Hour Minute
Power
Weekly timer
Heating symbol

22
EN
(2) Set weekly timer
To start the weekly timer mode, press the on/off button. When the power symbol
disappears from the display, press the timer button . The timer and calendar
symbols ash.
To program the weekly timer:
1. Press the arrow buttons or to set the day of the week. Then press the
gear button to conrm.
2. [P1] ashes in the display. Press the gear button again to conrm.
3. Set the switch-on time. The hour ashes in the display. Press the arrow
buttons or to set the hour. Then press the gear button to conrm.
The minutes ash on the display. Press the arrow buttons or to set the
minutes. Then press the gear button to conrm.
4. Set the switch-off time in the same way as the switch-on time.
5. Set the daily on and off time for P2, P3 and P4 using the same method as for
P1.
Note: The heating periods P1, P2, P3 and P4 can be set to turn the heating on or
off at different times each day.
6. After setting the weekly timer, wait for the display to return to standby mode
after about 10 seconds. Press the gear button once and then press the
power button . Make sure that the two symbols on the display light up at
the same time, then the device will work in weekly timer mode. If you want to
switch back to normal mode, directly press the power button again. The
device then switches to standby mode and you can operate it manually again.

23
EN
Setting the current time
The weekly timer only works if you have set the current time. To set the current
time, do the following:
1. Press the "On/Off" button. When the power symbol is lit on the display,
press the timer button once.
2. The hour ashes in the display. Press the arrow buttons or to set the
hour. Then press the gear button to conrm. The minutes ash on the
display. Press the arrow buttons or to set the minutes. Then press the
gear button to conrm.
3. Then the day of the week ashes. Press the arrow buttons or to set the
day of the week. Then press the gear button to conrm.
Setting the temperature
Press the arrow buttons or to set the temperature. The temperature
can be set between 5-50 °C. The two digits will ash for a few seconds without
any operation, then return to displaying the room temperature. If the room
temperature is lower than the set temperature of 2 °C, the heating will start
automatically. When the room temperature reaches or exceeds the set
temperature, the heater will turn off automatically.
Open window detection
This heater detects open windows. When the heater is on (whether in manual
mode or weekly timer mode), the heater will stop automatically if the detected
temperature drops 5 °C (or more) within 5 minutes.

24
EN
TROUBLESHOOTING
If your heater is not working, follow these instructions:
• Make sure your circuit breaker or fuse is working properly.
• Make sure the heater is plugged in and that the mains outlet is working
properly.
• If the power button does not light up in the "on" position, the device may be
defective. In this case, please contact customer service.
Note: If there is a problem with your heater, do not attempt to open or repair
the heater yourself. This can void the warranty and may cause damage or injury.
If the problem persists, please contact the retailer.
CLEANING AND CARE
Note: Switch off the appliance and remove the plug from the socket. Wait until
the appliance has cooled down completely before cleaning it.
• Use a vacuum cleaner to clean the ventilation slots and grilles.
• Remove dust from the exterior surfaces with a damp (not wet) cloth.
• Do not use harsh cleaning agents or abrasive cleaners.
• Do not spray or immerse the device in water or any other liquid.
• Never open the heater housing.

25
EN
PRODUCT DATA SHEET 10045431
Model identier(s) 10045431
Specication Symbol Value Unit Specication Unit
Heat output Only for electric storage room heaters: Type of heat
supply control
Nominal heat output Pnom 0.60 kW Manual control of the heat supply with
integrated thermostat
N/A
Minimum heat output
(guide value)
Pmin 0.60 kW Manual control of the heat supply with
feedback of the room and/or outside
temperature
N/A
Maximum continuous heat
output
Pmax,c 0.60 kW Electronic control of the heat supply with
feedback of the room and/or outside
temperature
N/A
Auxiliary power consumption Heat output with fan support N/A
Nominal heat output elmax N/A kW Type of heat output/room temperature control
With minimum heat output elmin N/A kW Single stage heat output, no room
temperature control
no
Standby mode elSB 0.26 W Two or more manually adjustable levels, no
room temperature control
no
Room temperature control with mechanical
thermostat
no
With electronic room temperature control no
With electronic room temperature control and
time of day control
no
With electronic room temperature control and
day of week control
yes
Other regulatory options
Room temperature control with presence
detection
no
Room temperature control with open window
detection
yes
With remote control option no
With adaptive control of the heating start no
Operating time limit yes
With black ball sensor no
Contact details Chal-Tec GmbH, Wallstraße 16, 10179 Berlin, Germany.

26
EN
PRODUCT DATA SHEET 10045432
Model identier(s) 10045432
Specication Symbol Value Unit Specication Unit
Heat output Only for electric storage room heaters: Type of heat
supply control
Nominal heat output Pnom 0.72 kW Manual control of the heat supply with
integrated thermostat
N/A
Minimum heat output
(guide value)
Pmin 0.72 kW Manual control of the heat supply with
feedback of the room and/or outside
temperature
N/A
Maximum continuous heat
output
Pmax,c 0.72 kW Electronic control of the heat supply with
feedback of the room and/or outside
temperature
N/A
Auxiliary power consumption Heat output with fan support N/A
Nominal heat output elmax N/A kW Type of heat output/room temperature control
With minimum heat output elmin N/A kW Single stage heat output, no room
temperature control
no
Standby mode elSB 0.26 W Two or more manually adjustable levels, no
room temperature control
no
Room temperature control with mechanical
thermostat
no
With electronic room temperature control no
With electronic room temperature control and
time of day control
no
With electronic room temperature control and
day of week control
yes
Other regulatory options
Room temperature control with presence
detection
no
Room temperature control with open window
detection
yes
With remote control option no
With adaptive control of the heating start no
Operating time limit yes
With black ball sensor no
Contact details Chal-Tec GmbH, Wallstraße 16, 10179 Berlin, Germany.

27
EN
DISPOSAL CONSIDERATIONS
If there is a legal regulation in your country regarding
the disposal of electrical and electronic equipment, this
symbol on the product or on the packaging indicates that
this product must not be disposed of with household
waste. Instead, it must be taken to a collection point
for the recycling of electrical and electronic equipment.
By disposing of this product in accordance with the
regulations, you protect the environment and the health
of those around you from negative consequences. For
information on recycling and disposal of this product,
contact your local government or household waste
disposal service.
MANUFACTURER & IMPORTER (UK)
Manufacturer:
Chal-Tec GmbH, Wallstrasse 16, 10179 Berlin, Germany.
Importer for Great Britain:
Berlin Brands Group UK Limited
PO Box 42
272 Kensington High Street
London, W8 6ND
United Kingdom


29
ES
Estimado cliente:
Le felicitamos por la adquisición de este producto. Lea
atentamente el siguiente manual y siga cuidadosamente las
instrucciones de uso con el n de evitar posibles daños. La
empresa no se responsabiliza de los daños ocasionados por
un uso indebido del producto o por haber desatendido las
indicaciones de seguridad. Escanee el siguiente código QR
para obtener acceso al manual de usuario más reciente e
información adicional sobre el producto.
ÍNDICE
Indicaciones de seguridad 30
Instalación 31
Panel de control y mando a distancia 32
Indicadores de pantalla 33
Funcionamiento 33
Reparación de anomalías 36
Limpieza y cuidado 36
Ficha del producto 10045431 37
Ficha del producto 10045432 38
Indicaciones sobre la retirada del aparato 39
Fabricante e importador (Reino Unido) 39
DATOS TÉCNICOS
Número del artículo 10045431 10045432
Suministro eléctrico 220-240 V ~ 50 Hz
Potencia 600 W 720 W
Dimensiones 55 x 100 cm 60 x 120 cm

30
ES
INDICACIONES DE SEGURIDAD
• Antes de su utilización, compruebe la tensión en la placa técnica del aparato y
conéctelo solamente a tomas de corriente con la misma tensión.
• Si el cable de alimentación está dañado, contacte con un servicio técnico
cualicado para su sustitución.
• No coloque el calefactor justo bajo la toma de corriente.
• Mantenga un metro de distancia con materiales inamables como muebles,
cortinas o similares.
• Utilice el aparato exclusivamente fuera del alcance de los niños. Los niños solo
podrán utilizar el aparato bajo supervisión.
• Este aparato no está indicado para uso comercial, sino para uso doméstico o
entornos similares.
• No utilice el aparato si presenta fallos en el funcionamiento o si ha sufrido
cualquier tipo de daños.
• Las reparaciones deberán ser realizadas solamente por personal formado.
• Las reparaciones realizadas de forma incorrecta o por cuenta propia suponen
un riesgo de lesiones.
• No pase el cable de alimentación por debajo de alfombras o felpudos.
• Asegúrese de que el cable de alimentación no pase por bordes alados o
supercies calientes.
• No tape el calefactor para evitar un sobrecalentamiento.
• No utilice el aparato con un temporizador externo, una toma de corriente con
control remoto u otro aparato que encienda y apague automáticamente la
calefacción.
• Nunca sumerja el aparato en agua ni en ningún otro líquido.
• No utilice el aparato cerca de bañeras, duchas o piscinas.
• No utilice el aparato al aire libre.
• No utilice el aparato con las manos mojadas.
• No utilice el aparato encima o cerca de supercies calientes.
• No utilice el aparato con un cable de alimentación dañado.
• Desenchufe el aparato y deje que se enfríe totalmente antes de limpiarlo.
• No utilice productos abrasivos para la limpieza.
• Utilice solamente accesorios que hayan sido expresamente autorizados por el
fabricante.
• Los niños mayores de 8 años y las personas con discapacidad física, sensorial
o psíquica pueden utilizar el aparato si han sido previamente instruidos por
una persona responsable sobre el funcionamiento del mismo y conocen las
funciones, las indicaciones de seguridad y los riesgos asociados.
• No permita que niños jueguen con el aparato.
ATENCIÓN
¡Peligro de quemaduras! Algunos componentes del aparato pueden
alcanzar temperaturas muy elevadas. Asegúrese de que ni usted ni los
niños se quemen.

31
ES
INSTALACIÓN
Instalación en la pared
Marque en la pared las posiciones de
los cuatro oricios que debe taladrar
y perfore los oricios con el taladro.
Asegúrese de que la distancia entre
cada oricio coincide con los oricios
redondos de los soportes situados en
la parte posterior del calefactor.
Introduzca los tacos de plástico en los
oricios.
Introduzca los 4 tornillos metálicos
para el montaje en la pared en los
tacos de plástico.
Levante el calefactor y alinee los
cuatro oricios redondos de los
soportes de la parte posterior del
aparato con los cuatro tornillos de la
pared.
Pase los tornillos de la posición A a la
posición B moviendo ligeramente el
aparato.

32
ES
Instalación independiente
1. Coloque las patas en el suelo.
2. Inserte los soportes en el hueco de la parte inferior de las escuadras. A
continuación, apriete los soportes con los 6 tornillos negros pequeños.
PANEL DE CONTROL Y MANDO A DISTANCIA
Mando a distancia
Interruptor principal
Soporte
Interruptor iluminado de
encendido/apagado
Placa calentadora

33
ES
INDICADORES DE PANTALLA
FUNCIONAMIENTO
Para poner en marcha el calefactor, proceda de la siguiente manera:
• Compruebe el calefactor para asegurarse de que no esté dañado.
• Conecte el enchufe a la toma de corriente y encienda el interruptor principal
luminoso situado en la parte lateral calefactor.
Hay dos formas de utilizar el calefactor:
(1) Encender y apagar el dispositivo manualmente
• Cuando se enciende el aparato, suena un pitido una vez y el calefactor entra
en modo de espera.
• Pulse el botón de encendido del mando a distancia. El símbolo de
encendido se ilumina en la pantalla.
• Si la temperatura programada es 2 ºC superior a la temperatura ambiente, el
aparato se calienta automáticamente. El símbolo se ilumina en la pantalla y
se enciende el indicador de temperatura en el calefactor.
Temperatura
Día de la semana Hora Minuto
Encendido
Temporizador semanal
Símbolo de calefacción

34
ES
(2) Ajuste el temporizador semanal
Para iniciar el modo de temporizador semanal, pulse el botón de encendido/
apagado. Cuando el símbolo de encendido desaparezca de la pantalla, pulse
la tecla del temporizador . Los símbolos del temporizador y del calendario
parpadean.
Para programar el temporizador semanal:
1. Pulse las teclas de echa o para ajustar el día de la semana. A
continuación, pulse la tecla de rueda dentada para conrmar.
2. En la pantalla parpadea ahora [P1]. A continuación, pulse la tecla de rueda
dentada para conrmar.
3. Congure la hora de encendido. La hora parpadea en la pantalla. Pulse las
teclas de echa o para ajustar la hora. A continuación, pulse la tecla
de rueda dentada para conrmar. Los minutos parpadean en la pantalla.
Pulse las teclas de echa o para ajustar los minutos. A continuación,
pulse la tecla de rueda dentada para conrmar.
4. Ajuste la hora de apagado del mismo modo que la de encendido.
5. Ajuste la hora diaria de encendido y apagado de P2, P3 y P4 siguiendo el
mismo método que para P1.
Nota: Los periodos de calefacción P1, P2, P3 y P4 pueden ajustarse para
encender o apagar la calefacción a diferentes horas cada día.
6. Una vez que haya ajustado el temporizador semanal, espere a que la pantalla
vuelva al modo de espera después de unos 10 segundos. Pulse una vez
la tecla de rueda dentada y, a continuación, el botón de encendido
. Asegúrese de que los dos símbolos de la pantalla se encienden al mismo
tiempo, entonces el aparato funciona en el modo de temporizador semanal.
Si desea volver al modo normal, pulse de nuevo directamente el botón de
encendido . El aparato pasará al modo de espera y podrá volver a utilizarlo
manualmente.

35
ES
Conguración de la hora actual
El temporizador semanal sólo funciona si ha ajustado la hora actual. Proceda del
siguiente modo para ajustar la hora actual:
1. Pulse el botón ON/OFF. Cuando se encienda el símbolo de encendido en la
pantalla, pulse una vez la tecla del temporizador .
2. La hora parpadea en la pantalla. Pulse las teclas de echa o para ajustar
la hora. A continuación, pulse la tecla de rueda dentada para conrmar. Los
minutos parpadean en la pantalla. Pulse las teclas de echa o para ajustar
los minutos. A continuación, pulse la tecla de rueda dentada para conrmar.
3. Luego parpadea el día de la semana. Pulse las teclas de echa o para
ajustar el día de la semana. A continuación, pulse la tecla de rueda dentada
para conrmar.
Ajuste de la temperatura
Presione las teclas de echa o para ajustar la temperatura deseada. La
temperatura puede ajustarse entre 5 y 50 °C. Los dos dígitos parpadean durante
unos segundos sin realizar ninguna operación y luego vuelven a mostrar
la temperatura ambiente. Si la temperatura ambiente es 2 ºC inferior a la
temperatura congurada, la calefacción se pone en marcha automáticamente.
Si la temperatura ambiente alcanza o supera la temperatura congurada, la
calefacción se detiene automáticamente.
Detección de ventanas abiertas
Este calefactor detecta las ventanas abiertas. Si el aparato está encendido
(independientemente de si se encuentra en modo normal o en modo de
temporizador semanal), se apagará automáticamente cuando la temperatura
registrada descienda en 5 °C (o más) en el transcurso de 5 minutos.

36
ES
REPARACIÓN DE ANOMALÍAS
Si su calefactor no funciona, siga estas instrucciones:
• Asegúrese de que su disyuntor o fusible funciona correctamente.
• Asegúrese de que el calefactor está enchufado y de que la toma de corriente
funciona correctamente.
• Si el interruptor de encendido/apagado no está encendido en la posición de
encendido, es posible que la unidad esté averiada. En este caso, contacte con
el servicio de atención al cliente.
Nota: Si sigue teniendo problemas con su calefcator, no intente abrir el aparato
ni repararlo usted mismo. Esto puede ocasionar la pérdida de la garantía y
generar daños o lesiones. Si el problema persiste, póngase en contacto con el
distribuidor.
LIMPIEZA Y CUIDADO
Nota: apague el aparato y desconecte el enchufe de la toma de corriente.
Espere a que el aparato se haya enfriado por completo antes de limpiarlo.
• Para la limpieza de las ranuras de ventilación y rejillas, utilice una aspiradora.
• Retire el polvo de las supercies exteriores con un paño húmedo (no mojado).
• No utilice productos de limpieza agresivos ni abrasivos.
• Nunca sumerja el aparato en agua ni en ningún otro líquido ni lo pulverice con
líquidos.
• Nunca abra la carcasa de la calefacción.

37
ES
FICHA DEL PRODUCTO 10045431
Denominación(es) del
modelo
10045431
Datos Símbolo Valor Unidad Datos Unidad
Potencia caloríca Solo en calefactores eléctricos para habitaciones
individuales: tipo de regulación del suministro de calor
Potencia caloríca nominal Pnom 0,60 kW Regulación manual del suministro caloríco
con termostato integrado
n /A
Potencia caloríca mínima
(valor de referencia)
Pmín. 0,60 kW Regulación manual del suministro caloríco
con reacción de la temperatura ambiente y/o
exterior
n/A
Potencia caloríca
continuada máxima
Pmáx 0,60 kW Control electrónico del suministro de calor con
información sobre la temperatura ambiente
y/o exterior
n /A
Consumo de energía auxiliar Emisión de calor con soporte de ventilador n /A
Con potencia caloríca
nominal
elmáx. n /A kW Tipo de potencia caloríca/controles de temperatura
ambiente
Con potencia caloríca
mínima
elmín. n /A kW Potencia caloríca de nivel único, sin control
de temperatura ambiente
no
En modo de espera elSB 0.26 W Dos o más niveles ajustables manualmente,
sin control de temperatura ambiente
no
Controles de temperatura ambiente con
termostato mecánico
no
Con control de temperatura ambiente
electrónico
no
Con control de temperatura ambiente
electrónico y regulación de las horas del día
no
Con control de temperatura ambiente
electrónico y regulación de los días de la
semana
sí
Otras opciones de regulación
Controles de temperatura ambiente con
detección de presencia
no
Controles de temperatura ambiente con
detección de ventana abierta
sí
Con opción de mando a distancia no
Con regulación adaptativa del inicio de la
calefacción
no
Con limitación del tiempo de funcionamiento sí
Con sensor de bola negra no
Datos de contacto Chal-Tec GmbH, Wallstraße 16, 10179 Berlín, Alemania.

38
ES
FICHA DEL PRODUCTO 10045432
Denominación(es) del
modelo
10045432
Datos Símbolo Valor Unidad Datos Unidad
Potencia caloríca Solo en calefactores eléctricos para habitaciones
individuales: tipo de regulación del suministro de calor
Potencia caloríca nominal Pnom 0.72 kW Regulación manual del suministro caloríco
con termostato integrado
n /A
Potencia caloríca mínima
(valor de referencia)
Pmín. 0.72 kW Regulación manual del suministro caloríco
con reacción de la temperatura ambiente y/o
exterior
n/A
Potencia caloríca
continuada máxima
Pmáx 0.72 kW Control electrónico del suministro de calor con
información sobre la temperatura ambiente
y/o exterior
n /A
Consumo de energía auxiliar Emisión de calor con soporte de ventilador n /A
Con potencia caloríca
nominal
elmáx. n /A kW Tipo de potencia caloríca/controles de temperatura
ambiente
Con potencia caloríca
mínima
elmín. n /A kW Potencia caloríca de nivel único, sin control
de temperatura ambiente
no
En modo de espera elSB 0.26 W Dos o más niveles ajustables manualmente,
sin control de temperatura ambiente
no
Controles de temperatura ambiente con
termostato mecánico
no
Con control de temperatura ambiente
electrónico
no
Con control de temperatura ambiente
electrónico y regulación de las horas del día
no
Con control de temperatura ambiente
electrónico y regulación de los días de la
semana
sí
Otras opciones de regulación
Controles de temperatura ambiente con
detección de presencia
no
Controles de temperatura ambiente con
detección de ventana abierta
sí
Con opción de mando a distancia no
Con regulación adaptativa del inicio de la
calefacción
no
Con limitación del tiempo de funcionamiento sí
Con sensor de bola negra no
Datos de contacto Chal-Tec GmbH, Wallstraße 16, 10179 Berlín, Alemania.

39
ES
INDICACIONES SOBRE LA RETIRADA DEL APARATO
Si en su país existe una disposición legal relativa a la
eliminación de aparatos eléctricos y electrónicos, este
símbolo estampado en el producto o en el embalaje
advierte de que no debe eliminarse como residuo
doméstico. En lugar de ello, debe depositarse en un
punto de recogida de reciclaje de aparatos eléctricos y
electrónicos. Una retirada de aparatos conforme a las
leyes contribuye a proteger el medio ambiente y a las
personas a su alrededor frente a posibles consecuencias
perjudiciales para la salud. Para obtener información más
detallada sobre el reciclaje de este producto, póngase
en contacto con su ayuntamiento o con el servicio de
eliminación de residuos domésticos.
FABRICANTE E IMPORTADOR (REINO UNIDO)
Fabricante:
Chal-Tec GmbH, Wallstraße 16, 10179 Berlín, Alemania.
Importador para Gran Bretaña:
Berlin Brands Group UK Limited
PO Box 42
272 Kensington High Street
London, W8 6ND
Reino Unido


41
FR
Cher client, chère cliente,
Toutes nos félicitations pour l’acquisition de ce nouvel
appareil. Lisez attentivement les consignes suivantes et
suivez-les pour éviter d'éventuels dommages. Nous ne
saurions être tenus pour responsables des dommages dus
au non-respect des consignes et à la mauvaise utilisation
de l’appareil. Scannez le QR-Code pour obtenir la dernière
version du mode d'emploi ainsi que d'autres informations
concernant le produit.
SOMMAIRE
Consignes de sécurité 42
Installation 43
Panneau de commande et télécommande 44
Voyants à l‘écran 45
Utilisation 45
Résolution des problèmes 48
Nettoyage et entretien 48
Fiche de données produit 10045431 49
Fiche de données produit 10045432 50
Informations sur le recyclage 51
Fabricant et importateur (GB) 51
FICHE TECHNIQUE
Numéro d'article 10045431 10045432
Alimentation 220-240 V ~ 50 Hz
Puissance 600 W 720 W
Dimensions 55 x 100 cm 60 x 120 cm

42
FR
CONSIGNES DE SÉCURITÉ
• Avant utilisation, vériez la tension sur l'étiquette de l'appareil et connectez
l'appareil uniquement à des prises qui correspondent à sa tension.
• Si le cordon d'alimentation est endommagé, faites-le remplacer par un
spécialiste qualié.
• Ne placez pas le radiateur directement sous la prise.
• Gardez une distance d'un mètre avec des matériaux inammables tels que
des meubles, des rideaux ou tout autre objet similaire.
• Utilisez l'appareil hors de portée des enfants. Les enfants ne sont autorisés à
utiliser l'appareil que sous surveillance.
• L'appareil n'est pas destiné à un usage commercial, mais uniquement à un
usage domestique et à des environnements similaires.
• N'utilisez pas l'appareil s'il fonctionne mal ou s'il est endommagé de quelque
manière que ce soit.
• Les réparations ne peuvent être effectuées que par des spécialistes qualiés.
• Les réparations effectuées de manière incorrecte ou de manière
indépendante représentent un risque de blessure.
• Ne faites pas passer le cordon d'alimentation sous une moquette ou un tapis.
• Assurez-vous que le cordon d'alimentation ne passe pas sur des bords
tranchants ou des surfaces chaudes.
• Ne couvrez pas le radiateur pour éviter la surchauffe.
• N'utilisez pas l'appareil avec une minuterie externe, une prise télécommandée
ou tout autre dispositif permettant d'allumer et d'éteindre automatiquement le
radiateur.
• Ne plongez pas non plus l'appareil dans l'eau ou dans d'autres liquides.
• N'utilisez pas l'appareil à proximité d'une baignoire, d'une douche ou d'une
piscine.
• N'utilisez pas l'appareil à l'extérieur.
• N'utilisez pas l'appareil avec les mains mouillées.
• N'utilisez pas l'appareil sur ou à proximité de surfaces chaudes.
• N'utilisez pas l'appareil si le câble est endommagé.
• Avant le nettoyage, débranchez la che de la prise et laissez l'appareil refroidir
complètement.
• N'utilisez pas de produits abrasifs pour le nettoyage.
• N'utilisez que des accessoires expressément approuvés par le fabricant.
• Les enfants à partir de 8 ans et les personnes souffrant de handicaps
mentaux, sensoriels et physiques ne peuvent utiliser l'appareil que s'ils ont
été parfaitement familiarisés avec les fonctions et les précautions de sécurité
par une personne responsable et s'ils comprennent les risques associés.
• Veillez à ce que les enfants ne jouent pas avec l'appareil.
ATTENTION
Risque de brûlure ! Certaines parties de l'appareil peuvent être très
chaudes. Faites attention à ne pas vous brûler vous-même ni vos enfants.

43
FR
INSTALLATION
Installation murale
Marquez les positions des quatre
perçages sur le mur et utilisez la
perceuse pour percer les trous.
Assurez-vous que la distance entre les
trous correspond aux trous ronds sur
les supports.
Insérez les chevilles en plastique dans
les trous.
Insérez les 4 vis métalliques de
montage mural dans les chevilles en
plastique.
Soulevez le radiateur, alignez les
quatre trous ronds sur les supports à
l'arrière du radiateur avec les 4 vis sur
le mur.
Faites glisser la vis de la position A à la
position B en déplaçant légèrement le
radiateur.

44
FR
Installation sur pied
1. Mettez les pieds sur le sol.
2. Insérez les pieds dans les fentes au bas des supports. Serrez ensuite les pieds
avec les 6 petites vis noires.
PANNEAU DE COMMANDE ET TÉLÉCOMMANDE
Télécommande
Interrupteur principal
Support
Interrupteur marche/arrêt
lumineux
Plaque chauffante

45
FR
VOYANTS À L'ÉCRAN
UTILISATION
Pour démarrer le radiateur, procédez comme suit :
• Vériez que le radiateur n'est pas endommagé.
• Branchez ensuite le radiateur et allumez l'interrupteur principal lumineux
marche/arrêt sur le côté du radiateur.
Vous pouvez utiliser le radiateur de deux façons :
(1) Pour allumer et éteindre l'appareil manuellement
• Lorsque l'appareil est allumé, le buzzer retentit une fois et il passe en mode
veille.
• Appuyez sur la touche d'alimentation de la télécommande. Le symbole
s'allume à l'écran.
• Lorsque la température réglée est supérieure à la température ambiante de 2
°C, le radiateur démarre automatiquement. Le symbole s'allume à l'écran
et le voyant de chauffage de l'appareil s'allume également.
Température
Jour de semaine Heure Minute
Alimentation
Programmateur hebdomadaire
Icône de chauffage

46
FR
(2) Réglage de la minuterie hebdomadaire
Pour démarrer le mode minuterie hebdomadaire, appuyez sur la touche marche/
arrêt. Lorsque l'icône d'alimentation disparaît de l'écran, appuyez sur la touche
de la minuterie . Les icônes de la minuterie et du calendrier clignotent.
Programmation de la minuterie hebdomadaire :
1. Appuyez sur les touches échées ou pour régler le jour de la semaine.
Appuyez ensuite sur la touche engrenage pour conrmer.
2. [P1] clignote sur l'écran. Appuyez ensuite sur la touche engrenage pour
conrmer.
3. Réglez l'heure de démarrage. Les heures clignotent à l'écran. Appuyez sur
les touches échées ou pour régler les heures. Appuyez ensuite sur la
touche engrenage pour conrmer. Les chiffres des minutes clignotent à
l'écran. Appuyez sur les touches échées ou pour régler les minutes.
Appuyez ensuite sur la touche engrenage pour conrmer.
4. Réglez l'heure d'arrêt de la même manière que l'heure de mise en marche.
5. Réglez l'heure de marche et d'arrêt quotidienne pour P2, P3 et P4 en utilisant
la même méthode que pour P1.
Remarque : Les périodes de chauffage P1, P2, P3 et P4 peuvent être réglées
pour allumer ou éteindre le chauffage à des heures différentes chaque jour.
6. Après avoir réglé la minuterie hebdomadaire, attendez que l'achage
revienne en mode veille après environ 10 secondes. Appuyez une fois sur
la touche d'engrenage , puis appuyez sur le bouton d'alimentation
. Vériez que les deux symboles s'allument en même temps à l'écran,
signiant que l'appareil fonctionne en mode minuterie hebdomadaire.
Pour revenir au mode normal, appuyez à nouveau directement sur la
touche d'alimentation. L'appareil passe alors en mode veille et vous pouvez à
nouveau l'utiliser manuellement.

47
FR
Réglage de l'heure actuelle
La minuterie hebdomadaire ne fonctionne que si vous avez réglé l'heure actuelle.
Pour régler l'heure actuelle, procédez comme suit :
1. Appuyez sur la touche marche/arrêt. Lorsque l'icône d'alimentation
apparaît à l'écran, appuyez sur la touche de la minuterie .
2. Les heures clignotent à l'écran. Appuyez sur les touches échées ou pour
régler les heures. Appuyez ensuite sur la touche engrenage pour conrmer.
Les chiffres des minutes clignotent à l'écran. Appuyez sur les touches échées
ou pour régler les minutes. Appuyez ensuite sur la touche engrenage
pour conrmer.
3. Le jour de la semaine clignote ensuite. Appuyez sur les touches échées ou
pour régler le jour de la semaine. Appuyez ensuite sur la touche engrenage
pour conrmer.
Réglage de la température
Appuyez sur les touches échées ou pour régler la température. La
température est réglable entre 5 °C et 50 °C. Les deux chiffres clignotent pendant
quelques secondes puis reviennent à l'achage de la température ambiante
si vous ne faites aucune saisie. Le radiateur démarre automatiquement si la
température ambiante est inférieure de 2 °C à la température réglée. Lorsque la
température ambiante atteint ou dépasse la température réglée, le chauffage se
désactive automatiquement.
Détection de fenêtre ouverte
Ce radiateur détecte les fenêtres ouvertes. Lorsque le radiateur est allumé (en
mode normal ou en mode minuterie hebdomadaire), il s'éteint automatiquement
si la température détectée baisse de 5 °C (ou plus) dans les 5 minutes.

48
FR
RÉSOLUTION DES PROBLÈMES
Si votre radiateur ne fonctionne pas, veuillez suivre ces instructions :
• Vériez que votre disjoncteur ou votre fusible fonctionne correctement.
• Vériez que le radiateur est branché et que la prise fonctionne correctement.
• Si le bouton d'alimentation ne s'allume pas en position marche, l'appareil
peut être défectueux. Dans ce cas, contactez le service client.
Remarque : Si un problème apparaît avec votre radiateur, n'essayez pas
d'ouvrir ou de réparer l'appareil vous-même. Cela peut annuler la garantie,
causer des dommages ou des blessures. Si le problème persiste, contactez votre
revendeur.
NETTOYAGE ET ENTRETIEN
Remarque : Éteignez l'appareil et débranchez la che de la prise. Attendez que
l'appareil refroidisse complètement avant de le nettoyer.
• Utilisez un aspirateur pour nettoyer les fentes d'aération et la grille.
• Enlevez la poussière sur les surfaces extérieures avec un chiffon humide (non
mouillé).
• N'utilisez pas de nettoyants chimiques ou de produits abrasifs agressifs.
• Ne vaporisez ou n'immergez pas l'appareil dans l'eau ou tout autre liquide.
• N'ouvrez jamais le boîtier du radiateur.

49
FR
FICHE DE DONNÉES PRODUIT 10045431
Référence(s) du modèle 10045431
Donnée Symbole Valeur Unité Donnée Unité
Puissance thermique Uniquement pour les radiateurs électriques à
accumulation : type de contrôle de l'apport de chaleur
Puissance thermique
nominale
Pnom 0,60 kW Contrôle manuel de l'apport de chaleur avec
un thermostat intégré
n.c.
Puissance thermique
minimale (valeur indicative)
Pmin 0,60 kW Contrôle manuel de l'apport de chaleur avec
retour de la température ambiante et/ou
extérieure
n.c.
Puissance thermique
continue maximale
Pmax,c 0,60 kW Régulation électronique de l'apport de chaleur
avec retour de la température ambiante et/
ou extérieure
n.c.
Consommation d'énergie auxiliaire Dissipation thermique avec assistance par
ventilateur
n.c.
À puissance thermique
nominale
elmax n.c. kW Type de puissance thermique / régulation de la
température ambiante
À puissance thermique
minimale
elmin n.c. kW Puissance calorique à une vitesse, pas de
contrôle de la température ambiante
non
En veille elSB 0,26 W Deux vitesses ou plus réglables
manuellement, pas de contrôle de la
température ambiante
non
Contrôle de la température ambiante par
thermostat mécanique
non
Contrôle électronique de la température
ambiante
non
Contrôle électronique de la température
ambiante et réglage de l'heure de la journée
non
Contrôle électronique de la température
ambiante et réglage des jours de la semaine
oui
Autres options de réglage
Régulation de la température ambiante avec
détection de présence
non
Régulation de la température ambiante avec
détection de fenêtre ouverte
oui
Avec option télécommande non
Avec contrôle adaptatif du démarrage du
chauffage
non
Avec limite de durée de fonctionnement oui
Avec capteur à boule noire non
Coordonnées de contact Chal-Tec GmbH, Wallstraße 16, 10179, Berlin, Allemagne

50
FR
FICHE DE DONNÉES PRODUIT 10045432
Référence(s) du modèle 10045432
Donnée Symbole Valeur Unité Donnée Unité
Puissance thermique Uniquement pour les radiateurs électriques à
accumulation : type de contrôle de l'apport de chaleur
Puissance thermique
nominale
Pnom 0,72 kW Contrôle manuel de l'apport de chaleur avec
un thermostat intégré
n.c.
Puissance thermique
minimale (valeur indicative)
Pmin 0,72 kW Contrôle manuel de l'apport de chaleur avec
retour de la température ambiante et/ou
extérieure
n.c.
Puissance thermique
continue maximale
Pmax,c 0,72 kW Régulation électronique de l'apport de chaleur
avec retour de la température ambiante et/
ou extérieure
n.c.
Consommation d'énergie auxiliaire Dissipation thermique avec assistance par
ventilateur
n.c.
À puissance thermique
nominale
elmax n.c. kW Type de puissance thermique / régulation de la
température ambiante
À puissance thermique
minimale
elmin n.c. kW Puissance calorique à une vitesse, pas de
contrôle de la température ambiante
non
En veille elSB 0,26 W Deux vitesses ou plus réglables
manuellement, pas de contrôle de la
température ambiante
non
Contrôle de la température ambiante par
thermostat mécanique
non
Contrôle électronique de la température
ambiante
non
Contrôle électronique de la température
ambiante et réglage de l'heure de la journée
non
Contrôle électronique de la température
ambiante et réglage des jours de la semaine
oui
Autres options de réglage
Régulation de la température ambiante avec
détection de présence
non
Régulation de la température ambiante avec
détection de fenêtre ouverte
oui
Avec option télécommande non
Avec contrôle adaptatif du démarrage du
chauffage
non
Avec limite de durée de fonctionnement oui
Avec capteur à boule noire non
Coordonnées de contact Chal-Tec GmbH, Wallstraße 16, 10179, Berlin, Allemagne

51
FR
INFORMATIONS SUR LE RECYCLAGE
Si l'élimination des appareils électriques et électroniques
est réglementée dans votre pays, ce symbole sur le
produit ou sur l'emballage PIÈCEique qu'il ne doit pas
être mis au rebut avec les ordures ménagères. Vous
devez l'acheminer vers un point de collecte pour le
recyclage des appareils électriques et électOIniques.
En respectant des règles de recyclage, vous pOItégez
l'enviOInnement et la santé de vos semblables des
conséquences négatives. Pour plus d'informations sur
le recyclage et la mise au rebut de ce pOIduit, contactez
votre autorité locale ou votre service d'élimination des
déchets ménagers.
FABRICANT ET IMPORTATEUR (GB)
Fabricant :
Chal-Tec GmbH, Wallstraße 16, 10179 Berlin, Allemagne.
Importateur pour la Grande-Bretagne :
Berlin Brands Group UK Ltd
PO Box 42
272 Kensington High Street
London, W8 6ND
United Kingdom


53
IT
Gentile cliente,
La ringraziamo per l'acquisto del dispositivo. La preghiamo
di leggere attentamente le seguenti indicazioni e di
seguirle per evitare eventuali danni. Non ci assumiamo
alcuna responsabilità per danni scaturiti da una mancata
osservanza delle avvertenze di sicurezza e da un uso
improprio del dispositivo. Scansionare il seguente codice
QR per accedere al manuale d'uso più recente e ricevere
informazioni sul prodotto.
INDICE
Avvertenze di sicurezza 54
Installazione 55
Pannello di controllo e telecomando 56
Indicazioni del display 57
Utilizzo 57
Risoluzione dei problemi 60
Pulizia e manutenzione 60
Scheda informativa del prodotto 61
Scheda informativa del prodotto 10045432 62
Avviso di smaltimento 63
Produttore e importatore (UK) 63
DATI TECNICI
Numero articolo 10045431 10045432
Alimentazione 220-240 V ~ 50 Hz
Potenza 600 W 720 W
Dimensioni 55 x 100 cm 60 x 120 cm

54
IT
AVVERTENZE DI SICUREZZA
• Prima dell'utilizzo, vericare la tensione indicata sulla targhetta del dispositivo e
collegarlo solo a prese con la stessa tensione.
• Se il cavo d'alimentazione è danneggiato, farlo sostituire da un tecnico
qualicato.
• Non posizionare la stufa direttamente sotto a una presa elettrica.
• Tenere almeno un metro di distanza da materiali inammabili come mobili,
tende o similari.
• Utilizzare il dispositivo fuori dalla portata dei bambini. I bambini possono
usare il dispositivo solo con la dovuta supervisione.
• Il dispositivo non è adatto a uso commerciale, ma solo domestico e in contesti
simili.
• Non utilizzare il dispositivo se presenta malfunzionamenti o se è stato
danneggiato in qualche modo.
• Le riparazioni devono essere eseguite solo da personale qualicato.
• Riparazioni errate o realizzate autonomamente possono rappresentare un
rischio di lesione.
• Non far passare il cavo di alimentazione sotto a tappeti o passatoie.
• Assicurarsi che il cavo d'alimentazione non sia collocato su bordi taglienti o
superci bollenti.
• Per evitare il surriscaldamento, non coprire la stufa.
• Non utilizzare il dispositivo con un timer esterno, una presa di corrente con
comando a distanza o un altro dispositivo che accende e spegne la stufa
automaticamente.
• Non immergere il dispositivo in acqua o altri liquidi.
• Non utilizzare il dispositivo vicino a vasche, docce o piscine.
• Non utilizzare il dispositivo all’aperto.
• Non toccare il dispositivo con le mani bagnate.
• Non utilizzare il dispositivo sopra o vicino a superci bollenti.
• Non utilizzare il dispositivo con il cavo di alimentazione danneggiato.
• Prima della pulizia, staccare la spina e lasciar raffreddare completamente il
dispositivo.
• Non utilizzare prodotti abrasivi per la pulizia.
• Utilizzare solo accessori espressamente autorizzati dal produttore.
• Bambini a partire da 8 anni e persone con limitate capacità siche, psichiche
e sensoriali possono utilizzare il dispositivo solo se sono stati istruiti da una
persona responsabile della loro supervisione sulle modalità d'uso e sulle
procedure di sicurezza e comprendono i rischi associati.
• Assicurarsi che i bambini non giochino con il dispositivo.
ATTENZIONE
Pericolo di ustioni! Alcuni componenti possono diventare estremamente
caldi. Assicurarsi che nessuno si ustioni. Prestare particolare attenzione ai
bambini.

55
IT
INSTALLAZIONE
Installazione a parete
Segnare la posizione dei quattro
fori sulla parete e realizzarli con un
trapano. Assicurarsi che la distanza tra
i singoli fori corrisponda a quella dei
fori rotondi dei supporti a parete.
Inserire i tasselli di plastica nei fori.
Inserire le 4 viti in metallo per il
montaggio a parete nei tasselli di
plastica.
Sollevare la stufa e posizionare i
quattro fori rotondi sui supporti sul
lato posteriore del dispositivo in
corrispondenza delle 4 viti sulla parete.
Far scorrere la vite dalla posizione
A alla posizione B muovendo
leggermente la stufa.

56
IT
Installazione indipendente
1. Posizionare i piedini sul pavimento.
2. Inserire il basamento nell'incavo sotto ai supporti. Avvitare bene le 6 piccole
viti nere al basamento.
PANNELLO DI CONTROLLO E TELECOMANDO
Telecomando
Interruttore principale
Supporto
Interruttore luminoso on/off
Pannello riscaldante

57
IT
INDICAZIONI DEL DISPLAY
UTILIZZO
Seguire i seguenti passaggi per azionare la stufa:
• Controllare la stufa per accertarsi che non sia danneggiata.
• Inserire la spina e attivare l'interruttore luminoso on/off posto sul lato della
stufa.
La stufa può essere utilizzata in due modi:
(1) Accendere e spegnere manualmente il dispositivo
• Quando il dispositivo è acceso, viene emesso un segnale acustico una volta e
la stufa si trova in modalità standby.
• Premere il tasto Power sul telecomando. Sul display si illumina l'icona
Power .
• Se la temperatura impostata supera di 2 °C la temperatura ambiente, il
dispositivo inizia automaticamente a scaldarsi. L'icona si illumina sul
display e l'indicazione di riscaldamento si accende sul dispositivo.
Temperatura
Giorno settimanale Ora Minuti
Potenza
Timer settimanale
Icona della funzione di
riscaldamento

58
IT
(2) Impostare il timer settimanale
Per avviare la modalità timer settimanale, premere il tasto on/off. Quando l'icona
Power scompare dal display, premere il tasto Timer . Le icone per Timer e
Calendario lampeggiano.
Il timer settimanale si programma nella modalità seguente:
1. Premere i tasti freccia oppure per impostare il giorno della settimana.
Premere il tasto Ruota dentata per confermare.
2. Sullo schermo lampeggia [P01]. Premere nuovamente il tasto Ruota dentata
per confermare.
3. Impostare l'ora di accensione. Sul display lampeggia l'ora. Premere i tasti
freccia o per impostare l'ora. Premere il tasto Ruota dentata per
confermare. Sul display lampeggiano i minuti. Premere i tasti freccia o
per impostare i minuti. Premere il tasto Ruota dentata per confermare.
4. Impostare l'ora di spegnimento seguendo lo stesso procedimento.
5. Impostare gli orari di accensione e spegnimento giornalieri per P2, P3 e P4
seguendo lo stesso procedimento utilizzato per P1.
Nota: i periodi di riscaldamento P1, P2, P3 e P4 possono essere impostati in
modo da avere orari di accensione e spegnimento diversi per ogni giorno.
6. Dopo aver impostato il timer settimanale, attendere che il display torni in
modalità standby dopo circa 10 secondi. Premere una volta il tasto Ruota
dentata e poi il tasto Power . Assicurarsi che entrambe le icone si
illuminino contemporaneamente sul display. Il dispositivo funziona ora in
modalità timer settimanale. Se si desidera tornare nella modalità normale,
premere un'altra volta il tasto Power . Il dispositivo passa così in modalità
standby ed è possibile azionarlo manualmente.

59
IT
Impostare l'ora corrente
Il timer settimanale funziona solo se è stata impostata l'ora corrente. Per
impostare l'ora corrente seguire i seguenti passaggi:
1. Premere il tasto on/off. Quando l'icona Power lampeggia sul display,
premere una volta il tasto Timer .
2. Sul display lampeggia l'ora. Premere i tasti freccia o per impostare l'ora.
Premere il tasto Ruota dentata per confermare. Sul display lampeggiano i
minuti. Premere i tasti freccia o per impostare i minuti. Premere il tasto
Ruota dentata per confermare.
3. Ora lampeggia il giorno della settimana. Premere i tasti freccia oppure
per impostare il giorno della settimana. Premere il tasto Ruota dentata per
confermare.
Impostare la temperatura
Premere i tasti freccia oppure per impostare la temperatura. La temperatura
può essere impostata tra 5 e 50 °C. Entrambe le cifre lampeggiano per alcuni
secondi senza che venga premuto alcun tasto e tornano poi a indicare la
temperatura ambiente. Se la temperatura ambiente è inferiore di 2 °C rispetto a
quella impostata, il riscaldamento si attiva automaticamente. Se la temperatura
ambiente è maggiore o uguale alla temperatura impostata, il riscaldamento si
spegne automaticamente.
Rilevamento di nestre aperte
La stufa rileva se ci sono nestre aperte. Se la stufa è accesa (in modalità normale
o timer settimanale) e la temperatura registrata scende di 5 °C (o più) nel giro di 5
minuti, il riscaldamento viene spento automaticamente.

60
IT
RISOLUZIONE DEI PROBLEMI
Se la stufa non funziona, seguire queste indicazioni:
• Assicurarsi che l'interruttore automatico o il fusibile funzionino correttamente.
• Assicurarsi che la stufa sia collegata e che la presa elettrica funzioni
correttamente.
• Se l'interruttore on/off non lampeggia quando è in posizione on, signica che
il dispositivo è rotto. In tal caso, rivolgersi al servizio di assistenza ai clienti.
Nota: se si hanno problemi con la stufa, non cercare di aprire o riparare il
dispositivo autonomamente. Questo può causare la perdita di validità della
garanzia, danneggiamenti o lesioni. Se il problema persiste, contattare il
rivenditore.
PULIZIA E MANUTENZIONE
Nota: spegnere il dispositivo e staccare la spina dalla presa. Attendere che il
dispositivo si sia completamente raffreddato prima di pulirlo.
• Usare un aspirapolvere per pulire fessure di ventilazione e griglia.
• Rimuovere la polvere dalle superci esterne con un panno umido (non
bagnato).
• Non utilizzare detergenti aggressivi o prodotti abrasivi.
• Non spruzzare liquidi sul dispositivo e non immergerlo in acqua o altri liquidi.
• Non aprire mai l'alloggiamento della stufa.

61
IT
SCHEDA INFORMATIVA DEL PRODOTTO
Contrassegno/i del
modello
10045431
Indicazione Simbolo Valore Unità Indicazione Unità
Potenza termica Solo per dispositivi elettrici di accumulo di calore per
locali singoli: tipo di regolazione dell'ausso di calore
Potenza termica nominale Pnom 0,60 kW Controllo manuale dell'apporto termico con
termostato integrato
n.d.
Potenza termica minima
(valore indicativo)
Pmin 0,60 kW Controllo manuale dell'apporto termico con
riscontro della temperatura ambiente e/o
esterna
n.d.
Potenza termica massima
continua
Pmax,c 0,60 kW Controllo elettronico dell'apporto termico
con riscontro della temperatura ambiente e/o
esterna
n.d.
Consumo di elettricità ausiliaria Emissione termica con supporto della ventola n.d.
Per la potenza termica
nominale
elmax n.d. kW Tipo di potenza termica/controllo della temperatura
ambiente
Per la potenza termica
minima
elmin n.d. kW Potenza termica di un solo livello, senza
controllo della temperatura ambiente
no
In modalità standby elSB 0.26 W Due o più livelli impostabili manualmente,
senza controllo della temperatura ambiente
no
Controllo della temperatura ambiente con
termostato meccanico
no
Con controllo elettronico della temperatura
ambiente
no
Con controllo elettronico della temperatura
ambiente e timer giornaliero
no
Con controllo elettronico della temperatura
ambiente e timer settimanale
sì
Altre opzioni di controllo
Controllo della temperatura ambiente con
rilevamento di presenza
no
Controllo della temperatura ambiente con
rilevamento di nestre aperte
sì
Con opzione telecomando no
Con controllo di avvio adattabile del
riscaldamento
no
Con limitazione della durata di funzionamento sì
Con sensore a sfera nera no
Contatti Chal-Tec GmbH, Wallstraße 16, 10179, Berlino, Germania

62
IT
SCHEDA INFORMATIVA DEL PRODOTTO 10045432
Contrassegno/i del
modello
10045432
Indicazione Simbolo Valore Unità Indicazione Unità
Potenza termica Solo per dispositivi elettrici di accumulo di calore per
locali singoli: tipo di regolazione dell'ausso di calore
Potenza termica nominale Pnom 0,72 kW Controllo manuale dell'apporto termico con
termostato integrato
n.d.
Potenza termica minima
(valore indicativo)
Pmin 0,72 kW Controllo manuale dell'apporto termico con
riscontro della temperatura ambiente e/o
esterna
n.d.
Potenza termica massima
continua
Pmax,c 0,72 kW Controllo elettronico dell'apporto termico
con riscontro della temperatura ambiente e/o
esterna
n.d.
Consumo di elettricità ausiliaria Emissione termica con supporto della ventola n.d.
Per la potenza termica
nominale
elmax n.d. kW Tipo di potenza termica/controllo della temperatura
ambiente
Per la potenza termica
minima
elmin n.d. kW Potenza termica di un solo livello, senza
controllo della temperatura ambiente
no
In modalità standby elSB 0.26 W Due o più livelli impostabili manualmente,
senza controllo della temperatura ambiente
no
Controllo della temperatura ambiente con
termostato meccanico
no
Con controllo elettronico della temperatura
ambiente
no
Con controllo elettronico della temperatura
ambiente e timer giornaliero
no
Con controllo elettronico della temperatura
ambiente e timer settimanale
sì
Altre opzioni di controllo
Controllo della temperatura ambiente con
rilevamento di presenza
no
Controllo della temperatura ambiente con
rilevamento di nestre aperte
sì
Con opzione telecomando no
Con controllo di avvio adattabile del
riscaldamento
no
Con limitazione della durata di funzionamento sì
Con sensore a sfera nera no
Contatti Chal-Tec GmbH, Wallstraße 16, 10179, Berlino, Germania

63
IT
AVVISO DI SMALTIMENTO
Se nel vostro Paese sono vigenti regolamenti legislativi
relativi allo smaltimento di dispositivi elettrici ed
elettronici, questo simbolo sul prodotto o sull'imballaggio
indica che non è consentito smaltire questo prodotto
insieme ai riuti domestici. Il dispositivo deve invece
essere portato in un centro di raccolta per il riciclaggio
di dispositivi elettrici ed elettronici. Lo smaltimento
conforme tutela l'ambiente e salvaguarda la salute
del prossimo da conseguenze negative. Informazioni
riguardanti il riciclaggio e lo smaltimento di questo
prodotto sono disponibili presso l'amminutiistrazione
locale o il servizio di smaltimento dei riuti.
PRODUTTORE E IMPORTATORE (UK)
Produttore:
Chal-Tec GmbH, Wallstraße 16, 10179 Berlino, Germania.
Importatore per la Gran Bretagna:
Berlin Brands Group UK Limited
PO Box 42
272 Kensington High Street
London, W8 6ND
United Kingdom

-
 1
1
-
 2
2
-
 3
3
-
 4
4
-
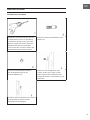 5
5
-
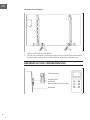 6
6
-
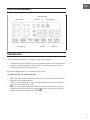 7
7
-
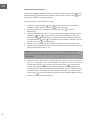 8
8
-
 9
9
-
 10
10
-
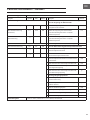 11
11
-
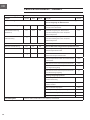 12
12
-
 13
13
-
 14
14
-
 15
15
-
 16
16
-
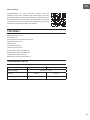 17
17
-
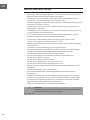 18
18
-
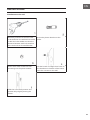 19
19
-
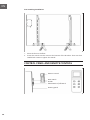 20
20
-
 21
21
-
 22
22
-
 23
23
-
 24
24
-
 25
25
-
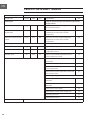 26
26
-
 27
27
-
 28
28
-
 29
29
-
 30
30
-
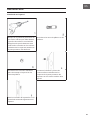 31
31
-
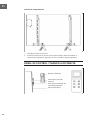 32
32
-
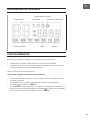 33
33
-
 34
34
-
 35
35
-
 36
36
-
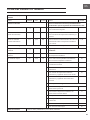 37
37
-
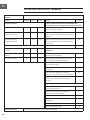 38
38
-
 39
39
-
 40
40
-
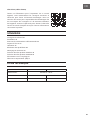 41
41
-
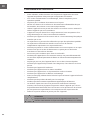 42
42
-
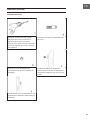 43
43
-
 44
44
-
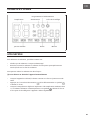 45
45
-
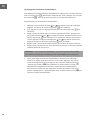 46
46
-
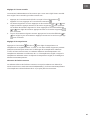 47
47
-
 48
48
-
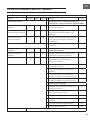 49
49
-
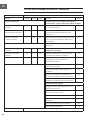 50
50
-
 51
51
-
 52
52
-
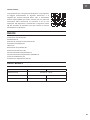 53
53
-
 54
54
-
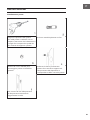 55
55
-
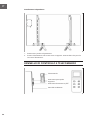 56
56
-
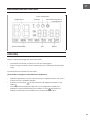 57
57
-
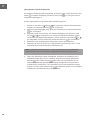 58
58
-
 59
59
-
 60
60
-
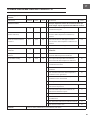 61
61
-
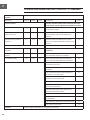 62
62
-
 63
63
-
 64
64


Klarstein 10045431 El manual del propietario
- Categoría
- Iluminación de conveniencia
- Tipo
- El manual del propietario
en otros idiomas
- français: Klarstein 10045431 Le manuel du propriétaire
- italiano: Klarstein 10045431 Manuale del proprietario
- English: Klarstein 10045431 Owner's manual
- Deutsch: Klarstein 10045431 Bedienungsanleitung