
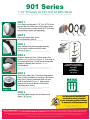
901 Series
1-1/2” Schedule 40 PVC Half Kit Bath Waste
Series 901 medida 40 de PVC. Medio Juego de Desagűe del Baño. Instrucciones de Instalación
STEP 1
Cut to length and assemble 1-1/2” Sch. 40 PVC drain
pipe and tee to the drain and overow elbows (Items
7-8) using the proper solvent cement (PVC drain pipe,
tee and solvent cement sold separately).
Usando el pegamento apropiado, ensamble las uniones y el tubo del desagűe (#7-8).
STEP 2
Place foam gasket (Item 9) onto
the overow elbow (Item 8).
Coloca el empaque de espuma (#9) en el codo del rebosadero (#8).
STEP 3
Insert overow elbow and foam gasket assembly
into the bathtub overow hole from the back
of the tub (Figure 1)
.
Inserte el codo y el empaque de espuma en el hoyo del rebodadero de la tina por atrás de la tina.
STEP 4
Screw on retainer nut (Item 10) from inside of the
bathtub. Hand tighten only
(Figure 2)
. Then snap on
the overow plate (Item 11) with the slot facing down
towards the bathtub drain. Remove “Orange”
Test Membrane.
Atornilla la tuerca de retención (#10) por dentro de la tina. Apretar solo con la mano (Figura 3) y luego
instalar el chapeton a presión del rebosadero (#11) con la abertu a hacia abajo. Retire Naranja
Prueba de membrana.
STEP 5
Secure drain elbow (Item 7) and drain ange gasket
(Item 6) under the bathtub by screwing in the strainer
body (Item 5) through the bathtub drain hole from
inside of the bathtub (Figure 3). Apply sealant
between the tub and underside of the strainer
body ange area (Item 5).
Asegura el codo del desagűe (#7) y el empaque (#6) debajo de la tina por medio del atornillado
de la coladera (#5) por el hoyo del desagűe por dentro de la tina (Figura 2 ).
STEP 6
Install the bathtub stopper into the strainer body
(Items 1-4)
(Figure 4).
Instala el tapon en la coladera (#1-4) (Figura 5).
Figure 1
Figure 3
Figure 4
Figure 2
CARE OF PRODUCT FINISH:
Do not use abrasive or caustic cleaning agents, as they may discolor or permanently damage the nish of the product. Cleaning should be done using warm soapy water, applied with
a clean soft cloth and dried with a clean soft cloth.
DO NOT USE OIL-BASED PUTTY PRODUCTS:
Watco does not recommend and does not warranty this product when oil/petroleum based plumber’s putty
is used when installing this product.
CUIDADO DEL PRODUCTO: No usar productos de limpieza dañinos que puedan decolorar o dañar permanentemente el terminado del producto. La limpieza deverá ser usando
agua tibia con jabón, aplicandolo con un trapo limpio y suave y secando con un trapo seco. No usar productos de masilla con base de aceite. Watco no recomienda y no garantiza este producto,
cuando se utiliza masilla para plomeria con base de aceite o petroleo para instalar este producto
.
All Watco bath wastes and
accessories carry a limited
5-year warranty against defects
in material and workmanship.
Todos los Accesorios y desagűes de baño Watco
contiene una garantía limtida de 5 años contra de
defectos de material y mano de obra.
1
2
3
4
5
6
7
12
8
9
10
11
1
2
3
4
5
6
7
12
8
9
10
11
1
2
3
4
5
6
7
12
8
9
10
11
Available in multiple
stopper congurations:
Push Pull
®
PresFlo
®
Foot Actuated
Lift & Turn
-
 1
1

Watco 901-FA-PVC-BN Guía del usuario
- Tipo
- Guía del usuario
- Este manual también es adecuado para
en otros idiomas
- English: Watco 901-FA-PVC-BN User guide
Artículos relacionados

Otros documentos
-
Jacuzzi MOF6636WCR2CPWC Guía de instalación
-
DANCO 10534 Instrucciones de operación
-
Jacuzzi P6F6731BCXXXXW Guía de instalación
-
-
Jacuzzi NOV7242WLR2XXW Guía de instalación
-
Signature Hardware 447039 Guía de instalación
-
Signature Hardware 447027 Guía de instalación
-
American Standard 2764014M202.011 Guía de instalación