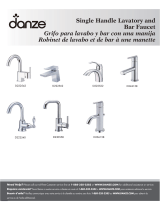
Gerber D216158 Manual de usuario
- Categoría
- Grifos
- Tipo
- Manual de usuario
Este manual también es adecuado para
La página se está cargando...

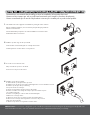
2.
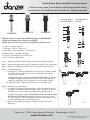
Install the spout trim ring onto the spout shank.
Instale el anillo ornamental del gnifo en el vástago del vertedor.
Installer l’garniture circulaire de bec sur la tige du bec.
3. Loosen the set screw from the valve.
Afloje el tornillo de sujeción en la válvula.
Desserrer la vis de pression du robinet.
Maintenance Your new faucet is designed for years of trouble-free performance. Keep it looking new by cleaning it periodically with a soft
cloth. Avoid abrasive cleaners, steel wool and harsh chemicals as these will dull the finish and void your warranty.
Danze always recommends that plumbing products be installed by a licensed professional.
Danze aconseja siempre que sea un profesional autorizado quien instale los productos de plomería.
Danze recommande que les articles de plomberie soient toujours installés par un professionnel qualifié.
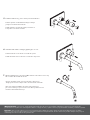
4.
Install the spout to the spout shank:
A. Slide back the spout body from the spout end.
B. Slide the spout onto the spout mounting shank. Tighten the set screw with the hex wrench.
C. Slide the spout body to the spout trim ring.
Coloque el vertedor en el vástago:
A. Deslice el cuerpodel pico desde el extremo del vertedor.
B. Deslice el vertedor en el vástago de montaje. Ajuste el tornillo de sujeción
con una llave hexagonal.
C. Deslice el cuerpodel pico sobre el anillo ornamental del gnifo.
Installer le bec sur la tige du bec:
A. Glisser la corps du bec vers l’arrière à partir de l’extrémité du bec.
B. Glisser le bec sur la tige de montage de bec. Serrer la vis de pression à
l’aide d’une clé hexagonale.
C. Glisser la corps du bec vers l’garniture circulaire de bec.
Shut off the main water supply before installation by turning the valves clockwise.
Antes de realizar la instalación, cierre el suministro principal de agua girando las
válvulas en sentido horario.
Fermez l'alimentation principale en eau avant l'installation en tournant les valves
d'alimentation dans le sens horaire.
1.
La página se está cargando...

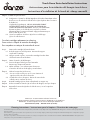
If you've followed the instructions carefully and your faucet still does not work properly, take these corrective steps.
Si usted ha seguido las instrucciones cuidadosamente y su grifo todavía no funciona correctamente, sigue estos pasos
correctivos.
Si vous avez suivi attentivement les instructions et que votre robinet ne fonctionne toujours pas correctement, apporter
les correctifs suivants.
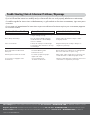
Trouble-Shooting/Guía de Solucionar Problemas/Dépannage
Problem/Problema/Problème
Cause/Causa
Action/Solución/Correctif
Leaks underneath handle.
Goteo debajo de la manija.
Fuites sous la manette.
/Cause
Damaged ceramic disc. Dirty or damaged
o-ring on cartridge or body.
Disco de cerámica dañado. Empaque
circular del cartucho o del ensamblaje
esta sucio o dañado.
Le disque de céramique est endommagé.
Le joint torique de la cartouche ou du corps
est endommagé.
Replace ceramic disc. Clean or replace the o-ring.
Cambie el disco de cerámica. Limpie o cambie
el empaque circular
Remplacer le disque de céramique. Nettoyer ou
remplacer le joint torique
Remove the faucet. Turn the faucet over and tighten the
three screws in the base or replace o-ring.
Quite el grifo. Voltee el grifo al reves y apriete los tres
tornillos de la base ó cambie el empaque circular.
Enlever le robinet. Retourner le robinet et serrer les trois
vis de la base ou remplacer le joint torique.
Cover plate leaks around the bottom
of the spout.
Cubierta gotea en la base de el cuello.
Il y a une fuite sur l’applique autour
du bas du bec.
Screws that affix the gasket
to the faucet are loose.
Los tornillos que fijan la empaque
al grifo estan sueltos.
Les vis qui fixent la joint
au robinet sont desserrées.
Need Help? Please call our toll-free Customer service line at 1-888-328-2383 or WWW.DANZE.COM for additional assistance or service.
Requiere asistencia? Favor llamar a nuestro servicio a clientes sin costo al 1-888-328-2383 o WWW.DANZE.COM para asistencia adicional o servicio.
Besoin d’aide? Veuillez communiquer avec notre service à la clientèle au numéro sans frais 1-888-328-2383 ou WWW.DANZE.COM pour obtenir du
service ou de l’aide additionnels.

Danze, Inc. / 2500 Internationale Parkway / Woodridge, IL 60517
www.Danze.com
© 2010 DANZE, INC. All rights reserved.
Pub No. IM-TD Drain/12-15
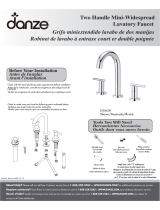
Touch Down Drain Installation Instructions
Instrucciones para la instalación del desagüe touch down
Instructions d’installation de la bonde de vidange manuelle
Check to make sure you have the following parts indicated below:
Configuration 1
(metal & 50/50)
Configuration 2
(plastic)
Verifique que tenga todas las partes indicadas:
Vérifier pour vous assurer que vous possédez les pièces au bas:
1. Stopper / Parador /Tampon
2.
Cartridge / Cartucho / Cartouche
3. Drain collar
/ Boca de desagüe / Collet de renvoi
4.
Rubber washer / Arandela / Rondelle
5.
Lock nut / Contratuerca / Écrou de blocage
6. Seal / Sello / Rondelle étanche
1.
2.1.
2.2.
4.
5.
4.
5.
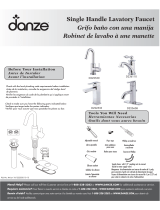
Step 1.
Remove the rubber washer (4) and lock nut (5) from the drain assembly.
Etapa 1.
Quite la arandela de goma (4) y la contratuerca (5) del conjunto dedesagüe.
Étape 1. Enlever la rondelle de caoutchouc (4) et l’écrou de blocage (5) du renvoi.
Step 2.
Install the drain body
2.1.
Configuration 1 (metal or 50/50): Place a ring of silicone sealant beneath
lip of drain collar (3) and place in opening of sink. Press down firmly to
secure the drain collar (3).
Configuration 2 (plastic): DO NOT APPLY SILICONE SEALANT TO THE LIP
OF DRAIN COLLAR. Keep the tapered seal at the drain collar and place in
opening of sink directly. Press down firmly to secure the drain collar (3).
2.2. Tighten the rubber washer (4) and lock nut (5) onto the drain collar.
Etapa 2. Instale el cuerpo del desagüe
2.1.Configuración 1 (metal o 50/50): Aplique un anillo de sellante de silicona
por debajo del borde de la boca de desagüe (3) y colóquelo en la abertura
del lavabo. Presione con fuerza para afianzar la bocade desagüe (3).
Configuración 2 (plástico): NO APLIQUE SELLANTE DE SILICONA AL BORDE
DE LA BOCA DE DESAGÜE. Mantenga la junta tórica en su sitio sobre la
boca de desagüe y coloque directamente en la abertura del lavabo. Presione
con fuerza para afianzar la boca dedesagüe (3).
2.2. Apriete la arandela de goma (4) y la contratuerca (5) en la boca del
desagüe (3).
1.
2.
3.
4.
5.
6.
1.
2.
3.
5.
4.
6.
DA505918
DA505219P
DA505207
La página se está cargando...
Transcripción de documentos
Danze always recommends that plumbing products be installed by a licensed professional. Danze aconseja siempre que sea un profesional autorizado quien instale los productos de plomería. Danze recommande que les articles de plomberie soient toujours installés par un professionnel qualifié. 1. Shut off the main water supply before installation by turning the valves clockwise. Antes de realizar la instalación, cierre el suministro principal de agua girando las válvulas en sentido horario. Fermez l'alimentation principale en eau avant l'installation en tournant les valves d'alimentation dans le sens horaire. 2. Install the spout trim ring onto the spout shank. Instale el anillo ornamental del gnifo en el vástago del vertedor. Installer l’garniture circulaire de bec sur la tige du bec. 3. Loosen the set screw from the valve. Afloje el tornillo de sujeción en la válvula. Desserrer la vis de pression du robinet. 4. Install the spout to the spout shank: A. Slide back the spout body from the spout end. B. Slide the spout onto the spout mounting shank. Tighten the set screw with the hex wrench. C. Slide the spout body to the spout trim ring. Coloque el vertedor en el vástago: A. Deslice el cuerpodel pico desde el extremo del vertedor. B. Deslice el vertedor en el vástago de montaje. Ajuste el tornillo de sujeción con una llave hexagonal. C. Deslice el cuerpodel pico sobre el anillo ornamental del gnifo. Installer le bec sur la tige du bec: A. Glisser la corps du bec vers l’arrière à partir de l’extrémité du bec. B. Glisser le bec sur la tige de montage de bec. Serrer la vis de pression à l’aide d’une clé hexagonale. C. Glisser la corps du bec vers l’garniture circulaire de bec. Maintenance Your new faucet is designed for years of trouble-free performance. Keep it looking new by cleaning it periodically with a soft cloth. Avoid abrasive cleaners, steel wool and harsh chemicals as these will dull the finish and void your warranty. Trouble-Shooting/Guía de Solucionar Problemas/Dépannage If you've followed the instructions carefully and your faucet still does not work properly, take these corrective steps. Si usted ha seguido las instrucciones cuidadosamente y su grifo todavía no funciona correctamente, sigue estos pasos correctivos. Si vous avez suivi attentivement les instructions et que votre robinet ne fonctionne toujours pas correctement, apporter les correctifs suivants. Problem/Problema/Problème Cause/Causa /Cause Action/Solución/Correctif Leaks underneath handle. Damaged ceramic disc. Dirty or damaged o-ring on cartridge or body. Replace ceramic disc. Clean or replace the o-ring. Goteo debajo de la manija. Disco de cerámica dañado. Empaque circular del cartucho o del ensamblaje esta sucio o dañado. Cambie el disco de cerámica. Limpie o cambie el empaque circular Fuites sous la manette. Le disque de céramique est endommagé. Le joint torique de la cartouche ou du corps est endommagé. Remplacer le disque de céramique. Nettoyer ou remplacer le joint torique Cover plate leaks around the bottom of the spout. Screws that affix the gasket to the faucet are loose. Remove the faucet. Turn the faucet over and tighten the three screws in the base or replace o-ring. Cubierta gotea en la base de el cuello. Los tornillos que fijan la empaque al grifo estan sueltos. Quite el grifo. Voltee el grifo al reves y apriete los tres tornillos de la base ó cambie el empaque circular. Il y a une fuite sur l’applique autour du bas du bec. Les vis qui fixent la joint au robinet sont desserrées. Enlever le robinet. Retourner le robinet et serrer les trois vis de la base ou remplacer le joint torique. Need Help? Please call our toll-free Customer service line at 1-888-328-2383 or WWW.DANZE.COM for additional assistance or service. Requiere asistencia? Favor llamar a nuestro servicio a clientes sin costo al 1-888-328-2383 o WWW.DANZE.COM para asistencia adicional o servicio. Besoin d’aide? Veuillez communiquer avec notre service à la clientèle au numéro sans frais 1-888-328-2383 ou WWW.DANZE.COM pour obtenir du service ou de l’aide additionnels. Touch Down Drain Installation Instructions Instrucciones para la instalación del desagüe touch down Instructions d’installation de la bonde de vidange manuelle Configuration 1 (metal & 50/50) Configuration 2 (plastic) 1. 2. 1. 2. DA505918 DA505219P DA505207 3. 3. 4. Check to make sure you have the following parts indicated below: Verifique que tenga todas las partes indicadas: Vérifier pour vous assurer que vous possédez les pièces au bas: 5. 6. 4. 5. 1. Stopper / Parador /Tampon 2. Cartridge / Cartucho / Cartouche 3. Drain collar / Boca de desagüe / Collet de renvoi 4. Rubber washer / Arandela / Rondelle 5. Lock nut / Contratuerca / Écrou de blocage 6. Seal / Sello / Rondelle étanche Step 1. 4. 5. 4. 5. Remove the rubber washer (4) and lock nut (5) from the drain assembly. Etapa 1. Quite la arandela de goma (4) y la contratuerca (5) del conjunto dedesagüe. 1. Étape 1. Enlever la rondelle de caoutchouc (4) et l’écrou de blocage (5) du renvoi. Step 2. Install the drain body 2.1. Configuration 1 (metal or 50/50): Place a ring of silicone sealant beneath lip of drain collar (3) and place in opening of sink. Press down firmly to secure the drain collar (3). 6. Configuration 2 (plastic): DO NOT APPLY SILICONE SEALANT TO THE LIP OF DRAIN COLLAR. Keep the tapered seal at the drain collar and place in opening of sink directly. Press down firmly to secure the drain collar (3). 2.2. Tighten the rubber washer (4) and lock nut (5) onto the drain collar. 2.1. Etapa 2. Instale el cuerpo del desagüe 2.1. Configuración 1 (metal o 50/50): Aplique un anillo de sellante de silicona por debajo del borde de la boca de desagüe (3) y colóquelo en la abertura del lavabo. Presione con fuerza para afianzar la bocade desagüe (3). Configuración 2 (plástico): NO APLIQUE SELLANTE DE SILICONA AL BORDE DE LA BOCA DE DESAGÜE. Mantenga la junta tórica en su sitio sobre la boca de desagüe y coloque directamente en la abertura del lavabo. Presione con fuerza para afianzar la boca dedesagüe (3). 2.2. Apriete la arandela de goma (4) y la contratuerca (5) en la boca del desagüe (3). 2.2. Danze, Inc. / 2500 Internationale Parkway / Woodridge, IL 60517 www.Danze.com © 2010 DANZE, INC. All rights reserved. Pub No. IM-TD Drain/12-15-
 1
1
-
 2
2
-
 3
3
-
 4
4
-
 5
5
-
 6
6


Gerber D216158 Manual de usuario
- Categoría
- Grifos
- Tipo
- Manual de usuario
- Este manual también es adecuado para
en otros idiomas
- français: Gerber D216158 Manuel utilisateur
- English: Gerber D216158 User manual
Artículos relacionados
-
 Gerber Plumbing D304658 Manual de usuario
-
 Gerber Plumbing D222530 Manual de usuario
-
 Gerber Plumbing D222562 Manual de usuario
-
Gerber D304087 Manual de usuario
-
 Gerber Plumbing D304155 Manual de usuario
-
-
-
-
 Gerber Plumbing Reef Two Handle Mini-Widespread Lavatory Faucet Manual de usuario


