
STV-062
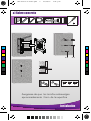
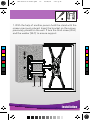
Soporte ultra delgado para pantalla
LED / LCD 24 - 47”
V1.0
0816AManual de Usuario
C
M
Y
CM
MY
CY
CMY
K
STV-062-V1.0-instr.pdf 1 23/08/16 5:06 p.m.

Precauciones
• Este aparato NO está destinado para ser
utilizado por personas con capacidades diferen-
tes, a menos que cuenten con la preparación y
supervisión adecuadas.
• Este producto NO es un juguete; manténgalo
fuera del alcance de los niños.
Antes de utilizar su nuevo producto,
lea el siguiente instructivo
C
M
Y
CM
MY
CY
CMY
K
STV-062-V1.0-instr.pdf 2 23/08/16 5:06 p.m.

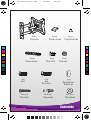
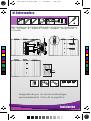
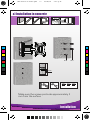
Contenido
Soporte Protectores Sujetacables
Extensores Tornillos Tuercas
Tornillos Taquetes
Rondana
Tornillos
Rondanas
Plásticas
A(x1)
B(x2) C(x1)
D(x4)
E(x4) F(x4)
W-B (x3) W-A (x3)
M-A
(
(
x4)
M-B
(x4)
x4)
W- (x1)C
C
M
Y
CM
MY
CY
CMY
K
STV-062-V1.0-instr.pdf 3 23/08/16 5:06 p.m.

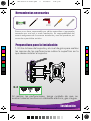
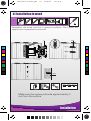
Instalación
Herramientas necesarias
Preparativos para la instalación
Steren no se hace responsable por daños materiales ni personales
causados por mal uso o mala instalación. Es responsabilidad del
usuario asegurarse de la correcta instalación y uso del producto, así
como de su periódica revisión.
1. Utilice la base del soporte y el nivel de gota para realizar
las marcas de las perforaciones sobre la superficie en la
que desea instalar el soporte.
Al realizar las perforaciones, tenga cuidado de que no
existan tuberías ocultas con cableado eléctrico, gas o agua.
Nivel de gota
C
M
Y
CM
MY
CY
CMY
K
STV-062-V1.0-instr.pdf 4 23/08/16 5:06 p.m.

Instalación
a) Sobre concreto
Asegúrese de que los tornillos sobresalgan
aproximadamente 3 mm de la superficie
60mm
(2.4”)
Ø10mm
(ø 3 /8”)
2
1
X X
√
W-AW-B
3mm
C
M
Y
CM
MY
CY
CMY
K
STV-062-V1.0-instr.pdf 5 23/08/16 5:06 p.m.

Instalación
b) Sobre madera
Recuerde que la madera debe estar en óptimas condiciones.
No coloque el soporte sobre madera comprimida o
húmeda.
Asegúrese de que los tornillos sobresalgan
aproximadamente 3 mm de la superficie
Ø4.5mm
55mm
(2.2”)
(ø 3/16”)
1
3
2
X X
√
3mm
W-A
X
A
C
M
Y
CM
MY
CY
CMY
K
STV-062-V1.0-instr.pdf 6 23/08/16 5:06 p.m.

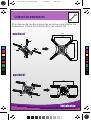
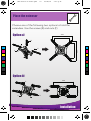
Instalación
Elija alguna de las dos siguientes opciones para sujetar los
extensores. Utilice los tornillos (E) y las tuercas (F)
opción a)
opción b)
400
200
D
E
F
F
E
D
400
300
300
400
Colocar los extensores
C
M
Y
CM
MY
CY
CMY
K
STV-062-V1.0-instr.pdf 7 23/08/16 5:06 p.m.

Instalación
Instalación de la pantalla
Utilice 4 tornillos (M-A / M-B) y las 4 rondanas
(M-C) para fijar el soporte a la parte posterior
de la pantalla.
Los tornillos suministrados son de medidas estándar. Le recomenda-
mos consultar el manual de instrucciones de su pantalla para obtener
información acerca de los tornillos necesarios para montarla en un
soporte.
TV
TV
TV
TV
TV
TV
opción a)
opción b)
M-A
M-B
M-B
M-C
C
M
Y
CM
MY
CY
CMY
K
STV-062-V1.0-instr.pdf 8 23/08/16 5:06 p.m.

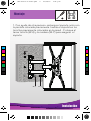
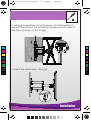
Instalación
1. Con ayuda de otra persona sostenga el soporte junto con
la pantalla colocada previamente. Inserte el soporte en los
tornillos previamente colocados en la pared . C oloque el
tercer tornillo (W-A) y la rondana (W-C) para asegurar el
soporte.
Montaje
W-C
W-A
C
M
Y
CM
MY
CY
CMY
K
STV-062-V1.0-instr.pdf 9 23/08/16 5:06 p.m.

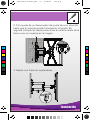
Instalación
2. Con ayuda de un desarmador de punta de cruz atornille
hasta que el soporte quede firmemente colocado. En
seguida coloque las tapas protectoras en ambos lados de la
base como se muestra en la imagen.
3. Inserte con fuerza el sujetacables.
C
B
C
M
Y
CM
MY
CY
CMY
K
STV-062-V1.0-instr.pdf 10 23/08/16 5:06 p.m.

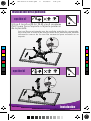
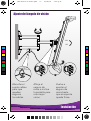
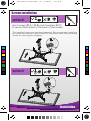
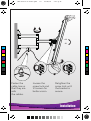
Instalación
Abroche el
sujeta cables
para que
queden
seguros
los cables.
Afloje el
seguro de
rosca e incline
la pantalla para
una mejor
vision.
Vuelva a
apretar el
seguro de
rosca hasta
que el soporte
quede firme.
2 3
1 8 0 °
+20°
-20°
1
Ajuste del ángulo de visión
C
M
Y
CM
MY
CY
CMY
K
STV-062-V1.0-instr.pdf 11 23/08/16 5:06 p.m.

PÓLIZA DE GARANTÍA
Esta póliza garantiza el producto por el término de un año en todos sus componentes y mano de obra contra cualquier defecto de fabricación y funcionamiento, a
partir de la fecha de entrega.
CONDICIONES
1.- Para hacer efectiva la garantía, presente esta póliza y el producto, en donde fue adquirido o en Electrónica Steren S.A. de C.V.
2.- Electrónica Steren S.A de C.V. se compromete a reparar el producto en caso de estar defectuoso sin ningún cargo al consumidor. Los gastos de transportación
serán cubiertos por el proveedor.
3.- El tiempo de reparación en ningún caso será mayor a 30 días,contados a partir de la recepción del producto en cualquiera de los sitios donde pueda hacerse
efectiva la garantía.
4.- El lugar donde puede adquirir partes, componentes, consumibles y accesorios, así como hacer válida esta garantía es en cualquiera de las direcciones
mencionadas posteriormente.
ESTA PÓLIZA NO SE HARÁ EFECTIVA EN LOS SIGUIENTES CASOS:
1.- Cuando el producto ha sido utilizado en condiciones distintas a las normales.
2.- Cuando el producto no ha sido operado de acuerdo con el instructivo de uso.
3.- Cuando el producto ha sido alterado o reparado por personal no autorizado por Electrónica Steren S.A. de C.V.
El consumidor podrá solicitar que se haga efectiva la garantía ante la propia casa comercial donde adquirió el producto. Si la presente garantía se extraviara, el
consumidor puede recurrir a su proveedor para que le expida otra póliza, previa presentación de la nota de compra o factura respectiva.
DATOS DEL DISTRIBUIDOR
Nombre del Distribuidor _________________________________________
Domicilio _____________________________________________________
Fecha de entrega ______________________________________________
ELECTRÓNICA STEREN S.A. DE C.V.
Biólogo Maximino Martínez No. 3408, San Salvador Xochimanca, Del. Azcapotzalco, Ciudad de México, 02870, RFC: EST850628-K51
STEREN PRODUCTO EMPACADO S.A. DE C.V.
Autopista México- Qro. Km 26.5 S/N Nave 3-A Col. Lomas de Boulevares ,Tlalnepantla de Baz, Estado de México, México CP. 54020
RFC: SPE941215H43
Producto: Soporte ultra delgado para pantalla LED / LCD 24 - 47”
Modelo: STV-062
Marca: Steren
Centro de Atención a Clientes
01 800 500 9000
En caso de que su producto
presente alguna falla, acuda al
centro de distribución más
cercano a su domicilio y en caso
de tener alguna duda o pregunta
por favor llame a nuestro Centro
de Atención a Clientes, en donde
con gusto le atenderemos en todo
lo relacionado con su producto
Steren.
C
M
Y
CM
MY
CY
CMY
K
STV-062-V1.0-instr.pdf 12 23/08/16 5:06 p.m.

STV-062
24 to 47” ultra slim LED / LCD TV stand
V1.0
0816AInstruction Manual
C
M
Y
CM
MY
CY
CMY
K
STV-062-V1.0-instr.pdf 13 23/08/16 5:06 p.m.

Cautions
• This device cannot be used by people with
different habilities, unless they have preparation
and supervision.
• This product is NOT a toy; keep it away from
children
• Before using your product, please read the
following instructions
C
M
Y
CM
MY
CY
CMY
K
STV-062-V1.0-instr.pdf 14 23/08/16 5:07 p.m.

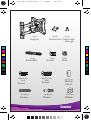
Content
Support Protections Cable lead
- through
Extenders Screws Nuts
Screws Dowel
Washer
Screws
Screws
Washer
Plastic
A(x1)
B(x2) C(x1)
D(x4)
E(x4) F(x4)
W-B (x3) W-A (x3)
M6x14
M-A
(x4) M8x20
M-B
(x4)
M-C (x4)
W- (x1)C
C
M
Y
CM
MY
CY
CMY
K
STV-062-V1.0-instr.pdf 15 23/08/16 5:07 p.m.

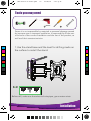
Installation
Tools you may need
Steren it is not responsible by materials or personal damage caused
by improper use or improper installation. Is responsibility of the user
to be sure of the correct installation and the use of the product, as
well as of their constant revision.
1. Use the stand base and the level for drilling marks on
the surface to install the stand.
Before drill, make sure that electrical wire pipes, gas or water exists.
Level drop
C
M
Y
CM
MY
CY
CMY
K
STV-062-V1.0-instr.pdf 16 23/08/16 5:07 p.m.

Installation
a) Installation in concrete
60mm
(2.4")
ø 10mm
(ø 3/8")
2
1
X X
√
W-AW-B
3mm
Make sure the screws protrude approximately 3
mm from the surface
C
M
Y
CM
MY
CY
CMY
K
STV-062-V1.0-instr.pdf 17 23/08/16 5:07 p.m.

Installation
b) Installation in wood
Remember: the wood must be in optimal conditions. Don’t place the
support over compressed or wet wood.
Ø4.5mm
55mm
(2.2”)
(ø 3/16”)
1
3
2
X X
√
3mm
W-A
X
A
Make sure the screws protrude approximately 3
mm from the surface
C
M
Y
CM
MY
CY
CMY
K
STV-062-V1.0-instr.pdf 18 23/08/16 5:07 p.m.

Installation
400
200
D
E
F
F
E
D
400
300
300
400
Place the extensor
Choose one of the following two options to hold the
extenders. Use the screws (E) and nuts (F)
Option a)
Option b)
C
M
Y
CM
MY
CY
CMY
K
STV-062-V1.0-instr.pdf 19 23/08/16 5:07 p.m.

Installation
Screen installation
The supplied screws are standard measures. We recommend consulting
the instruction manual of your screen for information about the necessary
screws for mounting on a support.
TV
TV
TV
TV
TV
TV
option a)
option b)
M-A
M-B
M-B
M-C
Use 4 screws (M-A / M-B) and 4 washers (M-C)
to secure the bracket to the back of the screen.
C
M
Y
CM
MY
CY
CMY
K
STV-062-V1.0-instr.pdf 20 23/08/16 5:07 p.m.

Installation
1. With the help of another person hold the stand with the
screen previously placed. Insert the bracket on the screws
previously placed on the wall. P lace the third screw (W-A)
and the washer (W-C) to ensure support.
W-C
W-A
C
M
Y
CM
MY
CY
CMY
K
STV-062-V1.0-instr.pdf 21 23/08/16 5:07 p.m.

Installation
C
B
2. Using a screwdriver, cross tip screw until the bracket is
seated. Then attach the protective covers on both sides of
the base as shown in the image.
3. Insert the cable lead - through
C
M
Y
CM
MY
CY
CMY
K
STV-062-V1.0-instr.pdf 22 23/08/16 5:07 p.m.

Installation
Fasten the
cable ties so
that they are
safe
the cables.
Loosen the
screw lock and
tilt screen for
better vision.
Retighten the
screw lock until
the bracket is
secure.
2 3
1 8 0 °
+20°
-20°
1
C
M
Y
CM
MY
CY
CMY
K
STV-062-V1.0-instr.pdf 23 23/08/16 5:07 p.m.

In case your product fails or have
questions, please contact your
nearest dealer. If you are in
Mexico, please call to our Call
Center.
This Steren product is warranted under normal usage against defects in workmanship and materials to the original purchaser for one year
from the date of purchase.
CONDITIONS
1. This warranty card with all the required information, invoice or purchase ticket, product box or package, and product, must be presented
when warranty service is required.
2. If the product is in the warranty time, the company will repair it free of charge.
3. The repairing time will not exceed 30 natural days, from the day the claim was received.
4. Steren sell parts, components, consumables and accessories to customer, as well as warranty service, at any of the addresses mentioned
later.
THIS WARRANTY IS VOID IN THE NEXT CASES:
If the product has been damaged by an accident, acts of God, mishandling, leaky batteries, failure to follow enclosed instructions, improper
repair by unauthorized
personnel, improper safe keeping, among others.
a) The consumer can also claim the warranty service in the purchase establishment.
b) If you lose the warranty card, we can reissue it, if you show the invoice or purchase ticket.
RETAILER INFORMATION
Name of the retailer ____________________________________
Address _____________________________________________
Product ______________________________________________
Brand _______________________________________________
Serial number _________________________________________
Date of delivery _______________________________________
Product: 24 to 47” ultra slim LED / LCD TVstand
Number part: STV-062
Brand: Steren
C
M
Y
CM
MY
CY
CMY
K
STV-062-V1.0-instr.pdf 24 23/08/16 5:07 p.m.
-
 1
1
-
 2
2
-
 3
3
-
 4
4
-
 5
5
-
 6
6
-
 7
7
-
 8
8
-
 9
9
-
 10
10
-
 11
11
-
 12
12
-
 13
13
-
 14
14
-
 15
15
-
 16
16
-
 17
17
-
 18
18
-
 19
19
-
 20
20
-
 21
21
-
 22
22
-
 23
23
-
 24
24


en otros idiomas
- English: Steren STV-062 Owner's manual
Artículos relacionados
-
Steren STV-021 El manual del propietario
-
-
-
-
-
-
-
-
-