Marley EM-JT010 Manual de usuario
- Categoría
- Placa giratoria
- Tipo
- Manual de usuario

Stir It Up Lux / Bluetooth® Turntable Quick Start Guide Quick Start Guide Quick Start Guide Quick Start Guide Quick Start Guide
A. RCA Line Out
B. Pre-Amp Switch Button
C. USB-C Out
D. O// Knob
E. Headphone Jack
LEGEND
F. Bluetooth® Button
G. - VOL + Knob
H. Anti-skating Knob
A.
D. E. F.
B.
G. H.
FUNCTION LAYOUT
OUT PUT PRE-AMP
OFF ON OUT 5.0 1.0A
DC IN 15.0V 0.8A
4
Gr. 32.5 21.5 1.25
1. Spindle
2. Turntable
3. Balance Weight
4. Anti-Skating Knob
5. Tone Arm Lift Level
6. Tone Arm Rest Holder
7. Tone Arm
English
Français 14
Español
Deutsche
Italiano
Nederlands
8. Stylus
9. Needle Cover
10. Multi-Function Button
11. Power Adaptor With
Interchangeable Plugs
12. Adaptor
13. Stylus Pressure Gauge
LEGEND
INDEX
3.
12.
4.
6.
2.
1.
5.
11.
8.
9.
10.
PRODUCT MAP
HOW TO VIDEOS
VIDEO TUTORIAL
INSTRUCTIEVIDEO’S
TUTORIELS
VIDEOANLEITUNGEN
VÍDEOS GUÍA
使用方法视频
하는 법 영상
使用方法動画
ATTENTION: PLEASE READ QUICK START GUIDE BEFORE USE
ATTENTION: PRIÈRE DE LIRE LE GUIDE DE
DÉMARRAGE RAPIDE AVANT UTILISATION
ATENCIÓN: LEA LA GUÍA DE INICIO RÁPIDO ANTES DE USARLO
BEACHTUNG: VOR DEM GEBRAUCH BITTE DIE SCHNELLSTARTANLEITUNG LESEN
ATTENZIONE: LEGGERE LA GUIDA DI AVVIAMENTO RAPIDO PRIMA DEL USO
OPGELET: VOOR HET GEBRUIK DE SNELSTARTGIDS LEZEN
注 意: ご 使 用 前 に クイッ ク ス タ ー トガ イド を 必 ず お 読 み くだ さ い 。
提示:使用前請閱讀快捷使用說明
주의 : 사용 전에 빠른 시작 가이드를 읽어 주십시오.
STIR IT UP LUX
QUICK START GUIDE
7.
C.
ENGLISH
13.

Quick Start Guide Quick Start Guide Quick Start Guide Quick Start Guide Quick Start Guide Quick Start Guide
BLUETOOTH® PAIRING
• Power on the external Bluetooth® device rst before turning on the BT
function on the Turntable.
• Press the BT button on the turntable (MFB) to enable the unit to search the
Bluetooth® device till BT indicator light becomes solid. This will indicated
your devices are paired.
NOTE: If the Turntable does not pair with your Bluetooth® device within 30
seconds, press the Bluetooth® search button again on the turntable and it
should pair.
• Blue LED light flash
• Blue LED light stable
DISCONNECT BLUETOOTH® PAIRING
Long press and hold the BT button till the BT indicator light turns o. Turntable will
then disconnect from external device.
• Blue LED light will turn to Red.This indicates Bluetooth is off, but
turntbale still has power.
VOLUME CONTROL
Increase Volume: Rotate the Volume Knob clockwise.
Decrease Volume: Rotate Volume Knob counter clockwise.
HEADPHONE OPERATION VIA HEADPHONE
JACK
Connect set of headphone (not included) in the headphone jack.
Note: Never put on the headphone till you have plugged in the headphone plug
NON BLUETOOTH® CONNECTION SETUP
LED will also be solid RED when headphones are plugged in.
CAUTION: Switch o the power to all equipment before making connections.
Read the instructions of each component you intend to use with this unit. Be
sure to insert each plug securely. To prevent hum and noise, avoid bundling the
signal interconnection cables together with the AC power cord.
3. Make sure the stylus needle cover is removed.
4. Turn the RPM dial to the correct speed for the record. E.g. 45 / 33
5. If wanting to play vi Bluetooth – Please see the “Bluetooth Pairing” section
and then come back here once connected to an output device. If wanting to
play vi Line out or Headphone out – please check their sections on how to
connect the output device. And then come back here.
6. Lift the tonearm vi the lift lever and move the tonearm head to the edge
of the record.
7. Now lower the tonearm, by lowering the tone arm lift lever.
NOTE: The turntable platter will auto-start spinning once the tonearm is above
the platter.
8. Once the record is nished, the turntable platter will auto stop. Lift the
tonearm and place it on the tonearm rest.To listen to the B side of your
record, flip the record and repeat the above from step 6.
NOTE: Once nished listening to record, make sure the stylus needle cover
is re-attached to protect the stylus.
Do not try to adjust the balance weight or anti-skate while playing record,
this could break the stylus needle and scratch the record.
Do not try to turn the turntable platter manually. Moving or jarring the turn-
table without securing the tonearm, could result in damage to the tonearm.
Re-secured the tone arm before transportation to protect the needle.
Remove the balance weight before transportation to prevent
damage or breakage to the unit.
Quick Start Guide
8
BALANCING THE TONEARM
Option 1 (Without Stylus Pressure Gauge):
• Push the Balance Weight on the tone arm until you feel click.
• Remove the stylus needle cover, before attempting to balance the tonearm.
• Unclip the tonearm and from its rest , and make sure it is floating freely.
• Rotate the Balance Weight back and fourth until the tone arm is parallel with
the platter.
• Now place the tonearm back into it’s rest and clip it in so it is secure. Now
hold the balance weight so it cannot move, and with your other hand rotate
the front dial until it is at 0. Your tonearm is now zeroed.
• Now you need to add the correct tracking force for the stylus. You do this by
now rotating the whole balance weight counter clock-wise until the correct
weight is added. The correct tracking force for this stylus = 1.5g – 2.5g (2.0g
standard)
NOTE: Once finished, if not using the turntable to play record,
put the stylus needle cover back on to protect the stylus when not
in use.
0
Option 2 (Using Stylus Pressure Gauge):
• Push the Balance Weight on the tone arm until you feel click.
• Remove the stylus needle cover, before attempting to balance the tonearm.
• Unclip the tonearm and from its rest , and make sure it is floating freely.
• Place the stylus pressure gauge onto the platter.
• Place the stylus onto the 2-gram mark (recommended Tracking force for our
stylus).
• Roatate the balance weight back and fourth until the pressure gauge is level.
Ensure that the needle stays on the 2g mark.
2
ANTI-SKATING
Anti-skate applies small outward force to the tonearm. This is to counteract
the tendency of the arm to move inward (skate) toward the centre of the record,
especially as the record approaches the centre of the record.
The Anti-Skate should match the tracking force added. So for our turntable,
set to 2.
PLAYING A RECORD
1. Make sure the Stir It Up Lux is connected to the power adapter and wall
outlet, and the outlet is switched on.
2. Put vinyl on the turntable.
2
SETUP
ATTACHING THE DRIVE BELT
Note: The drive belt comes pre-installed. However, if when you open the
turntable, there is no visible belt around the sub-platter and motor. Please
re-fit the belt.
• To t the belt, put the belt on the motor (this is the gold spindle), then
keeping the belt tight stretch it around the sub-platter. Once in place make
sure the belt if flat and not twisted.
• Now place the glass platter on the black sub-platter, by aligning the centre
holes.
• Now place the slip mat on the glass platter, again aligning the centre holes.
The platter should be attached to the base.
LINE OUT OPERATION
1.Switch the PRE-AMP OFF/ON SWITCH to ON position.
2. Plug one end of the RCA cable (included) into the LINE OUT socket at the
back of the unit. Be sure to match the color with the socket.
3. Plug the other end of the cable into the LINE IN socket of your home amplier
device.
4. Switch on the unit and the amplier device you connected.
5. Adjust the volume on the amplier device.
AMPLIFIER
OUT PUT PRE-AMP
OFF ON OUT 5.0 1.0A
DC IN 15.0V 0.8A
USBC OUT PORT
You can use the USB-C out port to charge any of your devices from here. We
can recommend charging House of Marley Speaker from this to save on plug
adaptors.
VOLUME +
VOLUME -

Quick Start Guide Quick Start Guide Quick Start Guide Quick Start Guide Quick Start Guide
Quick Start GuideQuick Start Guide
FRANÇAIS
A. Sortie Ligne RCA
B. Interrupteur De Préamplicateur
C. Sortie USB-C
D. Bouton Arrêt//
E. Prise De Casque
LÉGENDE
F. Bouton Bluetooth®
G. Bouton - VOL +
H. Bouton Anti-skating
A.
D. E. F.
B.
G. H.
OUT PUT PRE-AMP
OFF ON OUT 5.0 1.0A
DC IN 15.0V 0.8A
4
Gr. 32.5 21.5 1.25
1. Axe
2. Platine
3. Contrepoids
4. Bouton Anti-skating
5. Niveau De Relevage Du Bras De
Lecture
6. Support Du Bras De Lecture
7. Bras De Lecture
8. Pointe De Lecture
9. Couvercle De L’aiguille
10. Bouton multifonction
11. Adaptateur
D'alimentation Avec 4 Fiches
Interchangeables
12. Adaptateur
. B alance mécanique pour pointe
de lecture
LÉGENDE
3.
12.
4.
6.
2.
1.
5.
11.
8.
9.
10.
LE PLAN DU PRODUIT
7.
C.
ÉQUILIBRAGE DU BRAS DE LECTURE
Option 1 (sans balance mécanique pour pointe de lecture):
• Poussez le contrepoids sur le bras de lecture jusqu’ entendre un clic.
• Retirez le couvercle de l pointe de lecture, avant d’essayer d’équilibrer le
bras de lecture.
• Déclipsez le bras de lecture et assurez-vous qu'il flotte librement au-dessus
de s position de repos.
• Faites pivoter le contrepoids d’avant en arrière jusqu’ ce que le bras de
lecture soit parallèle au plateau.
• Ensuite, replacez le bras de lecture sur s position de repos et clipsez-le pour
le xer. Ensuite, maintenez le contrepoids, de sorte qu’il ne bouge pas et,
avec votre autre main, faites tourner le bouton avant jusqu’ ce qu’il indique
0. Votre bras de lecture est désormais mis zéro.
• Maintenant, vous devez régler l force d'appui de l pointe de lecture. Pour
cela, vous devez tourner l’ensemble du contrepoids dans le sens des aiguilles
d’une montre, jusqu’ avoir ajouté le poids requis. L force d'appui pour cette
pointe de lecture est comprise entre 1,5 g et 2,5 g (2,0 g de valeur standard)
REMARQUE : Une fois l'opération terminée, si vous n’utilisez pas l
platine pour écouter un disque, replacez le couvercle sur l pointe
de lecture pour l protéger lorsqu’elle n’est pas utilisée.
02
INSTALLATION DE LA COURROIE
D’ENTRAÎNEMENT
REMARQUE: La courroie d’entraînement est préinstallée sur l’appareil.
Cependant, si vous ne voyez pas la courroie autour du sous-plateau et
du moteur lorsque vous ouvrez le tourne-disque, veuillez la réinstalle.
• Pour installer l courroie, placez-l sur le moteur (l’axe doré), puis tendez-l
pour l faire passer autour dusous-plateau. Une fois qu’elle est en place,
vériez que l courroie est bien plat et qu’elle n’est pas tordue.
• Maintenant, placez le plateau en verre sur le sous-plateau noir, en alignant
les trous centraux.
• Placez ensuite le tapis antidérapant REGRIND™ en liège sur le plateau en
verre, toujours en alignant les trous centraux.
PRÉSENTATION DES FONCTIONS PRÉPARATION
13.

Quick Start Guide Quick Start Guide Quick Start Guide Quick Start Guide Quick Start Guide Quick Start Guide
APPAIRAGE BLUETOOTH® (BT)
• Activez l fonction Bluetooth® de l'enceinte externe avant d'activer l
fonction BT de l platine.
• Appuyez sur le bouton BT sur l platine (MFB), an que le dispositif puisse
rechercher l'appareil Bluetooth® jusqu’ ce que le témoin BT reste xe. Ce
témoin xe indique que les deux appareils sont appariés.
REMARQUE: Si le tourne-disque ne s'appaire pas avec votre appareil
Bluetooth® dans les 30 secondes, appuyez de nouveau sur le bouton de
recherche Bluetooth® du tourne-disque. L'appairage devrait maintenant
avoir lieu.
• Voyant LED bleu clignotant
• Voyant LED bleu stable
DÉSAPPAIRAGE BLUETOOTH® (BT)
Appuyez sur le bouton BT jusqu’ ce que le voyant BT s'éteigne. L platine se
déconnecte de l’appareil externe.
• Le témoin LED bleu devient rouge. Cel indique que l fonction Bluetooth est
désactivée, mais l platine est toujours alimentée.
Quick Start Guide
21
FONCTIONNEMENT DE LA SORTIE LIGNE
RCA
1. Mettez l’INTERRUPTEUR MARCHE/ARRÊT DE PRÉAMPLIFICATION sur l position Marche.
2. Branchez une extrémité du câble RCA (inclus) dans l prise LINE OUT (Sortie) l’arrière de
l'appareil. Veillez bien faire correspondre l couleur l prise.
3. Branchez l'autre extrémité du câble dans l prise LINE IN (Entrée) de votre amplicateur.
4. Mettez l’appareil et l’amplicateur connecté en marche.
5. Réglez le volume sur l’amplicateur.
AMPLIFIER
OUT PUT PRE-AMP
OFF ON OUT 5.0 1.0A
DC IN 15.0V 0.8A
PORT DE SORTIE USBC
Vous pouvez utiliser le port de sortie USB-C pour charger tous vos appareils
ici. Nous vous recommandons de charger une enceinte House of Marley
depuis ce port pour éviter l’utilisation d’adaptateurs.
ESPAÑOL
3. Assurez-vous d’avoir retiré le couvercle de l pointe de lecture.
4. Tournez le cadran « RPM » sur l vitesse adaptée au disque. Par exemple, 45
/ 33
5. Si vous souhaitez utiliser l platine vi Bluetooth, veuillez vous reporter l
section « Appairage Bluetooth » et revenir ce paragraphe une fois l platine
connectée un dispositif de sortie. Si vous souhaitez que le disque soit lu vi
une sortie câblée ou un casque, veuillez vous reporter aux sections
expliquant comment connecter le dispositif de sortie. Revenez ensuite cette
section.
6. Levez le bras de lecture l'aide du levier de levage et déplacez l tête du
bras de lecture vers le bord du disque.
7. Abaissez maintenant le bras de lecture, en abaissant le levier de levage du
bras de lecture.
REMARQUE : Le plateau de l platine commence tourner automatiquement
dès lors que le bras de lecture se trouve au-dessus du plateau.
8. Une fois l lecture du disque terminée, le plateau de l platine s’arrête
automatiquement. Levez le bras de lecture et placez-le sur s position de
repos. Pour écouter l face B de votre disque, retournez-le et répétez l
procédure ci-dessus depuis l’étape 6.
REMARQUE : Une fois l lecture du disque terminée, remettez le couvercle de
l pointe de lecture an de l protéger.
Ne tentez pas de régler le contrepoids lorsqu’un disque est joué, car cel pourrait
briser l'aiguille et rayer le disque.
Fixez le bras de lecture avant le transport pour protéger l'aiguille.
Retirez le contrepoids avant le transport pour éviter d’endommager et de
briser l'appareil.
N'arrêtez jamais et ne faites jamais tourner le plateau manuellement. Un
déplacement ou un un heurt de l platine lorsque le bras de lecture n’est
pas xé pourrait endommager ce dernier.
Option 2 (en utilisant l balance mécanique pour pointe de lecture):
• Poussez le contrepoids sur le bras de lecture jusqu’ entendre un clic.
• Retirez le couvercle de l pointe de lecture, avant d’essayer d’équilibrer le
bras de lecture.
• Déclipsez le bras de lecture et assurez-vous qu'il flotte librement au-dessus
de s position de repos.
• Placez l balance mécanique pour pointe de lecture sur le plateau.
• Placez l pointe de lecture sur l marque des 2 grammes (force d’appui
recommandée pour notre pointe de lecture).
• Faites pivoter le contrepoids d’avant en arrière jusqu’ ce que l balance
mécanique soit au même niveau. Assurez-vous que l pointe de lecture reste
bien sur l marque des 2 grammes.
2
ANTI-PATINAGE
L’anti-patinage applique au bras de lecture une faible force centrifuge. Ainsi, l
tendance du bras se déplacer vers l'intérieur (patiner) vers le centre du disque
est compensée, notamment lorsque le bras se rapproche du milieu du disque.
L'anti-patinage doit correspondre l force d'appui appliquée. Ainsi, pour notre
platine, réglez-le sur 2.
LECTURE D’UN DISQUE
1. Assurez-vous que le modèle Stir It Up Lux est branché l'adaptateur secteur
et l prise murale et que celle-ci est alimentée.
2. Placez un disque vinyle sur le plateau.
VOLUME +
VOLUME -
CONTRÔLE DU VOLUME
Augmentation du volume: Tournez le bouton du volume dans le sens des
aiguilles d'une montre.
Réduction du volume: Tournez le bouton du volume dans le sens contraire
des aiguilles d’une montre.
FONCTIONNEMENT DU CAQUE VIA LA PRISE
CASQUE
Le témoin LED s'allume également en ROUGE xe lorsque le casque est branché.
Remarque: Ne mettez jamais le casque sur l tête tant que le casque n’est
pas branché dans l prise casque.
CONNEXION SANS BLUETOOTH®
MISE EN GARDE: Coupez toute l’alimentation vers l’équipement avant de procéder aux
connexions. Lisez les instructions de chaque composant que vous prévoyez d'utiliser avec
cette platine. Veillez bien brancher chaque che. Pour éviter les parasites et le bruit, évitez
de regrouper les câbles d’interconnexion de signal avec le cordon d'alimentation secteur.
Quick Start Guide
A. Salid De Líne RCA
B. Botón Interruptor Del
Pre-Amplicador
C. Salid USB-C
D. Perill De
Apagado//
LEYENDA
E. Conector Par
Auriculares
F. Botón Bluetooth®
G. -Perill - VOL +
H. Perill Anti-Patinaje
A.
D. E. F.
B.
G. H.
OUT PUT PRE-AMP
OFF ON OUT 5.0 1.0A
DC IN 15.0V 0.8A
C.
UBICACIÓN Y FUNCIONES
DE LAS PARTES.

Quick Start Guide Quick Start Guide Quick Start Guide Quick Start Guide Quick Start Guide Quick Start Guide
4
Gr. 32.5 21.5 1.25
1. Eje
2. Tocadiscos
3. Contrapeso
4. Perill Anti-Patinaje
5. Nivel De Elevación Del Brazo
De Lectur
6. Soporte De Respaldo Del Brazo
De Lectur
7. Brazo De Lectur
8. Aguj
9. Cubiert De L Aguj
10. Botón multifunción
11. Adaptador De
Corriente Con 4 Enchufes
Intercambiables
12. Adaptador De 45 Rpm
13. Calibrador de presión de aguj
LEYENDA
12.
11.
AJUSTAR EL BRAZO FONOCAPTOR
Opción 1 (sin calibrador de presión de aguja):
• Presione el contrapeso sobre el brazo hast sentir un «clic».
• Quite l tap de l aguj antes de intentar ajustar el brazo fonocaptor.
• Suelte el brazo fonocaptor del soporte y asegúrese de que se mantiene
suspendido en el aire sin problema.
• Gire el contrapeso de un lado otro hast que el brazo quede paralelo al
plato.
• A continuación, vuelv colocar el brazo fonocaptor en el soporte e inserte
l aguj en su sitio par que quede seguro. Luego, sujete el contrapeso par
que no se muev y, con l otr mano, gire el dial delantero hast que esté en
0. El brazo fonocaptor est ahor en el valor 0.
• Ahor establezc l fuerz de seguimiento correct par l aguja. Par ello,
gire el contrapeso en sentido contrario las agujas del reloj hast que se
encuentre en el peso correcto. L fuerz de seguimiento correct par est
aguj es de entre 1,5 g y 2,5 g (2,0 g es l fuerz estándar)
NOTA: Un vez que hay terminado, si no v usar el tocadiscos,
vuelv colocar l tap protector de l aguja.
02
CÓMO SUJETAR LA CORREA DE
TRANSMISIÓN
NOTA: La correa de transmisión viene preinstalada. Sin embargo, si al abrir
el tocadiscos no se ve la correa alrededor del subplato y el motor, coloque la
correa.
• Par montar l correa, sitúel sobre el motor (el eje dorado) y, sujetando l
correa, estírel alrededor del subplato. Un vez colocada, asegúrese de que
l corre est plan y no est torcida.
• Ahora, coloque el plato de cristal sobre el subplato negro, alineando los
oricios centrales.
• A continuación, coloque l alfombrill antideslizante de corcho REGRIND™
sobre el plato cristal alineando de nuevo los oricios centrales.
Opción 2 (con calibrador de presión de aguja):
• Presione el contrapeso sobre el brazo hast sentir un «clic».
• Quite l tap de l aguj antes de intentar ajustar el brazo fonocaptor.
• Suelte el brazo fonocaptor del soporte y asegúrese de que se mantiene
suspendido en el aire sin problema.
• Coloque el calibrador de presión de aguj sobre el plato.
• Coloque l aguj sobre l marc de 2 gramos (fuerz de seguimiento
recomendad par nuestr aguja).
• Gire el contrapeso de un lado otro hast que el calibrador de presión esté
nivelado. Asegúrese de que l aguj se manteng en l marc de 2 g.
2
ANTI-PATINAJE
El anti-skate aplic un pequeñ fuerz haci fuer al brazo fonocaptor. Sirve
par contrarrestar l tendenci del brazo deslizarse haci el centro del disco,
especialmente cuando l grabación lleg l mitad.
El anti-skate debe coincidir con l fuerz de seguimiento establecida. Par
nuestro tocadiscos, póngalo en el valor 2.
CÓMO TOCAR UN DISCO
1. Asegúrese de que el Stir It Up Lux esté conectado al adaptador de corriente
y un tom de corriente de pared, y que l tom esté encendida.
2. Coloque un vinilo en el tocadiscos.
CONFIGURACIÓN
Quick Start GuideQuick Start Guide 3533
3. Asegúrese de que h quitado l tap protector de l aguja.
4. Ajuste el dial l velocidad correct par el disco. Por ejemplo, entre los
valores 45 y 33
5. Si dese reproducirlo través de Bluetooth, consulte l sección «Conexión
por Bluetooth» y luego vuelv aquí un vez que esté conectado cualquier
dispositivo de salida. Si dese reproducirlo través de un salid por cable o
auriculares, consulte las secciones sobre cómo conectar el dispositivo de
salida. Luego, vuelv este paso.
6. Levante el brazo fonocaptor mediante el elevador y muev el cabezal del
brazo fonocaptor hast el borde del disco.
7. Ahor baje el brazo fonocaptor mediante el elevador del brazo fonocaptor.
NOTA: El plato del tocadiscos comenzar girar automáticamente un vez
que el brazo fonocaptor esté encim del plato.
8. Un vez que naliz el disco, el plato se detendr automáticamente. Levante
el brazo fonocaptor y colóquelo en el soporte. Par escuchar l car B de su
disco, dele l vuelt al disco y repit todo lo anterior desde el paso 6.
NOTA: Un vez que termine de escuchar un disco, asegúrese de volver
colocar l tap protector de l aguja.
Sosteng el brazo de lectur cad vez que realice cualquier ajuste o acción,
de modo que se protej el brazo de lectura.
No trate de ajustar el contrapeso mientras toc un disco, y que esto
podrí romper l aguj y rayar el disco.
Vuelv asegurar el brazo de lectur antes de transportar l unidad par
proteger l aguja.
Retire el contrapeso antes de transportar l unidad par prevenir que ést
se dañe o rompa.
No deteng ni gire manualmente l base giratoria. Mover o sacudir el
tocadiscos sin asegurar l pinz del brazo de lectur podrí resultar en
daños al brazo de lectura.
3.
4.
6.
2.
1.
5.
8.
9.
10.
7.
MAPA DE PRODUCTO
13.

Quick Start Guide Quick Start Guide Quick Start Guide Quick Start Guide Quick Start Guide
DEUTSCHE
CONTROL DE VOLUMEN
Aumento de volumen: Gire l perill de volumen según el sentido de las
manecillas del reloj.
Disminución del volumen: Gire l perill de volumen en sentido contrario las
manecillas del reloj.
VOLUME +
VOLUME -
OPERACIÓN DE LOS AURICULARES
A TRAVÉS DEL CONECTOR PARA
AURICULARES
El LED también estar ROJO jo cuando los auriculares estén conectados.
Nota: Nunc se coloque los auriculares hast que hay conectado el
enchufe de los auriculares
CONFIGURACIÓN DE LA CONEXIÓN SIN
BLUETOOTH®
PRECAUCIÓN: Interrump l alimentación de todo el equipo antes de realizar
cualquier conexión. Le las instrucciones de cad componente que pretend
usar con est unidad. Asegúrese de insertar cad enchufe en form segura. Par
prevenir algún zumbido o ruido, evite juntar los cables de interconexión de señal
con el cable de alimentación de CA.
4
Gr. 32.5 21.5 1.25
1. Stift
2. Plattenspieler
3. Balancegewicht
4. Anti-Skating-Knopf
5. Tonarm-Heber
6. Tonarm-Aufnahme
7. Tonarm
8. Tonabnehmer
9. Nadelschutz
10. Multi-Function Button
11. Netzadapter mit 4
austauschbaren Steckern
12. Adaptor
13. Tonarmwaage
LEGENDE
3.
12.
4.
6.
2.
1.
5.
11.
8.
9.
10.
PRODUKTKARTE
7.
ACOPLAMIENTO BLUETOOTH®
• Enciend primero el dispositivo Bluetooth® externo antes de encender l
función de BT del tocadiscos.
• Presione el botón BT en el tocadiscos (MFB) par permitir que l unidad
busque el dispositivo Bluetooth® hast que l luz indicador de BT se
vuelv ja. Esto indicar que sus dispositivos están conectados.
NOTA: Si el tocadiscos no se acopl con su dispositivo Bluetooth® dentro de 30
segundos, presione el botón de búsqued Bluetooth® nuevamente en el tocadiscos y
deber acoplarse.
• Luz LED azul parpadeante
• Luz LED azul estable
CÓMO DESCONECTAR EL ACOPLAMIENTO
BLUETOOTH®
Presione y manteng presionado el botón BT hast que se apague l luz indicador
BT. El tocadiscos se desconectar del dispositivo externo.
• L luz LED azul cambiar rojo. Esto indic que Bluetooth est apagado,
pero que el tocadiscos aún est conectado.
OPERACIÓN DE SALIDA DE LÍNEA
1. Coloque el INTERRUPTOR DE APAGADO/ENCENDIDO DEL PRE-AMPLIFICADOR
en l posición de ENCENDIDO (ON).
2. Conecte un extremo del cable RCA (incluido) en el enchufe de SALIDA DE
LÍNEA (LINE OUT) que est en l parte de atrás de l unidad. Asegúrese de que
correspond el color con el enchufe.
3. Conecte el otro extremo del cable en el enchufe de ENTRADA DE LÍNEA (LINE IN) de su
dispositivo amplicador casero.
4. Enciend l unidad y el dispositivo amplicador que conectó.
5. Ajuste el volumen en el dispositivo amplicador.
AMPLIFIER
OUT PUT PRE-A MP
OFF ON OUT 5.0 1.0A
DC IN 15.0V 0.8A
PUERTO DE SALIDA USBC
Puede usar el puerto de salid USB-C par cargar cualquier de nuestros
dispositivos desde aquí. Recomendamos cargar un altavoz House of Marley
desde aquí par dejar libres los adaptadores de corriente.
13.

Quick Start Guide Quick Start Guide Quick Start Guide Quick Start Guide Quick Start Guide Quick Start Guide
A. RCA-Ausgangsleitung
B. Vorverstärker-Schalttaste
C. USB-C-Ausgang
D. Aus/33/45 Knopf
E. Kopfhörerbuchse
LEGENDE
F. Bluetooth®-Taste
G. - VOL + Knopf
H. Anti-Skating-Knopf
A.
D. E. F.
B.
G. H.
FUNKTIONSLAYOUT
OUT PUT PRE-AMP
OFF ON OUT 5.0 1.0A
DC IN 15.0V 0.8A
C.
EINSTELLUNG DES TONARMS
Option 1 (ohne Tonarmwaage):
• Ausgleichsgewicht am Tonarm vorschieben, bis ein Klick zu spüren ist.
• Entfernen Sie die Nadelabdeckung, ehe Sie den Tonarm ausbalancieren.
• Lösen Sie den Tonarm von seiner Arretierung, sodass er sich frei bewegen
lässt.
• Ausgleichsgewicht hin und her drehen, bis der Tonarm parallel zum
Plattenteller ist.
• Arretieren Sie jetzt den Tonarm wieder in seiner Ruheposition. Halten Sie das
Gegengewicht, sodass es sich nicht bewegen kann, und drehen Sie mit der
anderen Hand die vordere Drehscheibe auf 0. Jetzt ist Ihr Tonarm auf Null
gesetzt.
• Jetzt braucht die Nadel noch die richtige Auflagekraft. Dazu drehen Sie das
gesamte Gegengewicht gegen den Uhrzeigersinn, bis das richtige Gewicht
aufliegt. Die richtige Auflagekraft für die Nadel ist 1,5-2,5 g (2,0 g sind
Standard)
HINWEIS: Wenn Sie keine Platte abspielen möchten, bringen Sie
nach dem Einstellen die Nadelabdeckung wieder an, um die Nadel
während des Nichtgebrauchs zu schützen.
0
2
ANBRINGEN DES ANTIRIEBSRIEMENS
Hinweis: Der Antriebsriemen ist bei Lieferung bereits installiert. Beim Öffnen des
Plattenspielers ist der Riemen um Unterteller und Motor aber nicht sichtbar. Riemen
bitte wieder anbringen.
• Riemen zur Montage auf den Motor (das ist die goldene Spindel) legen
und um den Unterteller spannen. Nachprüfen, ob er flach anliegt und
nicht verdreht ist.
• Glasteller auf den schwarzen Unterteller legen (Mittellöcher ausrichten).
• REGRIND™ Korkleitmatte auf den Glasteller legen (Mittellöcher ausrichten).
Option 2 (mit Tonarmwaage):
• Ausgleichsgewicht am Tonarm vorschieben, bis ein Klick zu spüren ist.
• Entfernen Sie die Nadelabdeckung, ehe Sie den Tonarm ausbalancieren.
• Lösen Sie den Tonarm von seiner Arretierung, sodass er sich frei bewegen
lässt.
• Tonarmwaage auf dem Plattenteller platzieren.
• Tonabnehmernadel auf der 2-Gramm-Marke platzieren (empfohlenes
Auflagegewicht für die Tonabnehmernadel).
• Ausgleichsgewicht hin und her drehen, bis die Tonarmwaage waagerecht ist.
Die Nadel muss bei der 2-g-Marke bleiben.
2
ANTI-SKATE
Anti-Skate besteht in einer leichten nach außen wirkenden Kraft auf den Tonarm.
Diese wirkt entgegen des Tonarmzugs nach innen, in Richtung Plattenmitte
(Skating), und zwar umso stärker, je näher zur Mitte er kommt.
Das Anti-Skate sollte auf die angewendete Auflagekraft abgestimmt sein. Stellen
Sie sie für Ihren Plattenspieler deshalb auf 2.
SPIELEN EINER SCHALLPLATTE
1. Verbinden Sie den Stir It Up Lux mit dem Netzadapter und einer
funktionierenden Netzsteckdose.
2. Legen Sie eine Vinylplatte auf den Plattenteller.
BLUETOOTH®-KOPPLUNG
• Vor dem Einschalten der BT-Funktion am Schallplattenspieler das externe
Bluetooth®-Gerät anschalten.
• Drücken Sie die BT-Taste am Plattenspieler (MFB), um nach einem
Bluetooth®-Gerät zu suchen, bis das BT-Signallämpchen durchgehend
leuchtet. Dies bedeutet, die Kopplung war erfolgreich.
HINWEIS: Falls sich der Plattenteller nicht innerhalb von 30 Sekunden mit Ihrem
Bluetooth®-Gerät koppeln lässt, die Bluetooth®-Suchtaste auf dem Plattenteller
nochmals drücken. Jetzt sollten die Geräte gekoppelt werden.
• Blaue LED-Leuchte blinkt
• Blaue LED-Leuchte leuchtet beständig
BLUETOOTH®-GERÄTE ENTKOPPELN
Die BT-Taste eine Zeit lang drücken, bis die BT-Anzeigeleuchte erlischt. Der
Schallplattenspieler wird vom externen Gerät abgetrennt.
• Die blaue LED-Leuchte wird ausgeschaltet.
LAUTSTÄRKEREGLER
Lautstärke erhöhen: Den Lautstärkeknopf nach rechts drehen.
Lautstärke verringern: Den Lautstärkeknopf nach links drehen.
VOLUME +
VOLUME -
3. Entfernen Sie die Nadelabdeckung.
4. Drehen Sie die RPM-Auswahl auf die richtige Geschwindigkeit für die Platte
– 45 oder 33
5. Bluetooth: Siehe Abschnitt „Bluetooth-Kopplung“. Nach Verbindung eines
Ausgangsgeräts wieder an diese Stelle zurückkommen. Kabel- oder
Kopfhörerausgang: Siehe Abschnitte zur Verbindung von externen Geräten.
Danach wieder an diese Stelle zurückkommen.
6. Heben Sie den Tonarm mit Hilfe des Hebels an und bewegen Sie den Arm an
den Rand der Platte.
7. Senken Sie jetzt den Arm mit Hilfe des Hebels.
HINWEIS: Der Plattenteller beginnt sich automatisch zu drehen, sobald der
Tonarm über der Platte steht.
8. Wenn die Platte abgespielt ist, schaltet sich der Plattenteller automatisch
wieder ab. Heben Sie den Tonarm und bringen Sie ihn in seine Ruheposition.
Zum Hören der B-Seite drehen Sie die Platte um und wiederholen ab Schritt 6.
HINWEIS: Wenn Sie keine Platte mehr hören möchten, bringen Sie auf jeden Fall
die Nadelabdeckung wieder an, um die Nadel zu schützen.
Bei Einstellungen den Tonarm festhalten, um diesen zu schützen.
Das Balancegewicht darf nicht verstellt werden, während eine Schallplatte
abgespielt wird. Dabei könnte die Nadel abbrechen und die Schallplatte
beschädigt werden.
Vor dem Transportieren den Tonarm feststellen, um die Nadel zu schützen.
Vor dem Transportieren das Balancegewicht abnehmen, um Schäden am
Gerät zu vermeiden.
Den Plattenteller weder anhalten noch umdrehen. Bewegen oder Rütteln
des Schallplattenspielers ohne Feststellen des Tonarms kann den Tonarm
beschädigen.
KOPFHÖRERBETRIEB ÜBER
KOPFHÖRERBUCHSE
Das LED-Licht erscheint außerdem durchgehend rot, wenn Kopfhörer angeschlossen
sind.
Hinweis: Niemals einen bereits an die Kopfhörerbuchse angeschlossenen
Kopfhörer aufsetzen
Nota: Nunc se coloque los auriculares hast que hay conectado el
enchufe de los auriculares
EINRICHTUNG OHNE
BLUETOOTH®VERBINDUNG
VORSICHT: Vor dem Anschließen alle Geräte ausschalten. Die Anleitungen für
alle Komponenten, die Sie mit diesem Gerät benutzen möchten, durchlesen. Alle
Stecker fest einstecken. Signalverbindungskabel dürfen sich nicht in der Nähe des
AC-Stromkabels benden, um Brummen und Rauschen zu vermeiden.
INSTALLATION

Quick Start Guide Quick Start Guide Quick Start Guide Quick Start Guide Quick Start Guide Quick Start Guide
ITALIANO
Quick Start Guide
4
Gr. 32.5 21.5 1.25
1. Mandrino
2. Giradischi
3. Peso
4. Rotellin antiskate
5. Alzabraccio
6. Supporto braccio
7. Braccio
8. Stylus
9. Protezione ago
10. Pulsante multifunzione
(MFB)
11. Adattatore alimentazione con 4
spine intercambiabili
12. Adattatore
13. Misuratore di forza della puntina
LEGENDA
3.
12.
4.
6.
2.
1.
5.
11.
8.
9.
10.
7.
A. Line In Uscit RCA
B. Interruttore Preamplicatore
C. Uscit USB-C
D. Rotellin Disattivato/33/45
E. Jack Cue
LEGENDA
F. Pulsante Bluetooth®
G. - VOL + Rotellin
H. Rotellin Antiskate
A.
D. E. F.
B.
G. H.
OUT PUT PRE-AMP
OFF ON OUT 5.0 1.0A
DC IN 15.0V 0.8A
C.
MONTAGGIO DELLA CINGHIA DI
TRASMISSIONE
NOTA: La cinghia di trasmissione è preinstallata. Tuttavia, se al momento di
aprire il giradischi non c'è nessuna cinghia visibile intorno al sottopiatto e al
motorino, occorre rimontare la cinghia.
• Per sistemare l cinghia, applicatel sul motore (il perno dorato) e,
tenendol ben tesa, fatel girare attorno al sottopiatto. Un volt
posizionata, assicuratevi che l cinghi si piatt e non attorcigliata.
• Or posizionate il piatto di vetro sul sottopiatto nero, allineando gli
appositi fori centrali.
• Posizionate or il tappetino di sughero REGRIND™ sul piatto di vetro,
allineando nuovamente i fori centrali.
IL PIANO DEL PRODOTTO PRESENTAZIONE DELLE
FUNZIONI PREPARAZIONE
AUSGANGSLEITUNGS-BETRIEB
1. Den AUS-/EIN-SCHALTER FÜR DEN VORVERSTÄRKER (PRE-AMP OFF/ON
SWITCH) auf EIN (ON) stellen.
2. Das eine Ende des RCA-Kabels (im Lieferumfang inbegrien) in die
AUSGANGSLEITUNG (LINE OUT) Buchse an der Rückseite des Geräts stecken. Die
Farbe an der Buchse muss mit der Farbe am Kabel übereinstimmen.
3. Das andere Kabelende in die EINGANGSLEITUNG (LINE IN) Buchse Ihres
Heimverstärkers stecken.
4. Das Gerät und den von Ihnen angeschlossenen Verstärker einschalten.
5. Die Lautstärke am Verstärker einstellen.
AMPLIFIER
OUT PUT PRE-AMP
OFF ON OUT 5.0 1.0A
DC IN 15.0V 0.8A
USBCAUSGANG:
Der USB-C-Ausgang kann zum Laden von Geräten verwendet werden. Es
wird empfohlen, Lautsprecher von House of Marley damit zu laden, um
Zwischenstecker zu sparen.
13.

Quick Start Guide Quick Start Guide Quick Start Guide Quick Start Guide Quick Start Guide Quick Start Guide
Quick Start Guide
56
Opzione 2 (con misuratore di forz dell puntina):
• Spingere il contrappeso sul braccio no sentire un clic.
• Rimuovere il coperchio dell testin prim di tentare di bilanciare il braccio.
• Sganciare il braccio dal suo supporto e assicurarsi che fluttui liberamente.
• Posizionare il misuratore di forz dell puntin sul piatto.
• Posizionare l puntin sull tacc dei 2 grammi (forz di tracciamento
consigliat per le nostre puntine).
• Ruotare il contrappeso avanti e indietro nché il misuratore di forz non è
orizzontale. Assicurarsi che l puntin rimang sull tacc dei 2 grammi.
2
ANTI-SKATE
L'anti-skate applic un piccol forz verso l'esterno del braccio. Questo serve
contrastare l tendenz del braccio spostarsi all'interno (skate) verso il centro
del disco, soprattutto quando esso si avvicin al centro del disco.
L'anti-skate deve corrispondere all pressione di lettur aggiunta. Per il nostro
giradischi, impostare 2.
RIPRODUZIONE DI UN DISCO
1. Assicurarsi che Stir It Up Lux si collegato all'adattatore di corrente e un
pres muro e che l pres si accesa.
2. Mettere un vinile sul giradischi.
ASSOCIAZIONE BLUETOOTH®
• Attivare l funzione Bluetooth® dell'altoparlante esterno prim di attivare l
funzione BT del giradischi.
• Premere il pulsante BT sul giradischi (MFB) per consentire all'unit di
cercare il dispositivo Bluetooth® nché l spi BT non divent ssa. Ciò
indic che i dispositivi sono accoppiati.
NOTA: Se il Giradischi non si associ al dispositivo Bluetooth® entro 30 secondi,
premere di nuovo il pulsante di ricerc Bluetooth® sul giradischi, e si dovrebbe
associare.
• Blue LED light flash
• Blue LED light stable
DISSOCIAZIONE BLUETOOTH®
Mantenere premuto il pulsante BT (MFB) no quando l spi BT non si spegne. A
questo punto il giradischi si scolleg dal dispositivo esterno.
• L luce blu del LED divent rossa. Ciò indic che il Bluetooth è disattivato,
m il giradischi è ancor alimentato.
REGOLAZIONE DEL VOLUME
Per alzare il volume: Ruotare in senso orario l rotellin del volume.
Per abbassare il volume: Ruotare in senso antiorario l rotellin del volume.
VOLUME +
VOLUME -
3. Assicurarsi che il coperchio dell testin dello stilo si rimosso.
4. Ruotare il selettore RPM sull velocit corrett per il disco. Ad esempio 45 /
33
5. Se si desider riprodurre tramite Bluetooth, consultare l sezione "Bluetooth
Pairing" e procedere un volt collegato un dispositivo di uscita. Se si
desider riprodurre tramite l'uscit di line o l'uscit cue, consultare le
rispettive sezioni su come collegare il dispositivo di uscita. E poi procedere.
6. Sollevare il braccio tramite il meccanismo di Cueing e spostare l testin sul
bordo del disco.
7. Or abbassare il braccio, abbassando il meccanismo di Cueing del braccio.
NOTA: Il piatto del giradischi inizier girare automaticamente quando il
braccio si trover sopr il piatto.
8. Un volt terminato il disco, il piatto del giradischi si arrester
automaticamente. Sollevare il braccio e posizionarlo sul supporto del braccio.
Per ascoltare il lato B del disco, capovolgere il disco e ripetere le operazioni
descritte al punto 6.
NOTA: Un volt terminato l'ascolto di un disco, accertarsi che il coperchio
dell testin dello stilo si riattaccato per proteggere lo stilo.
Tenere il braccio ogni volt che si eettuano regolazioni o interventi per
proteggerlo.
Non tentare di regolare il peso mentre si riproduce un disco per evitare di
rompere l’ago e graare il disco.
Fissare il braccio prim del trasporto per proteggere l’ago.
Rimuovere il peso prim del trasporto per prevenire danni o l rottur
dell’unità.
Non bloccare o girare manualmente il piatto. Se si spost o scuote il
giradischi senz aver ssato il morsetto del braccio si rischi di danneggiare
il braccio
USO DELLE CUFFIE CON IL JACK
APPOSITO
Il LED divent ROSSO sso anche quando le cue sono collegate.
Nota: Mettersi le cue solamente dopo aver inserito l spin delle cue.
IMPOSTAZIONE DI UN COLLEGAMENTO NON
BLUETOOTH®
ATTENZIONE: Spegnere tutti i dispositivi prim di eseguire i collegamenti. Leggere
le istruzioni di ciascun componente che s’intende usare con quest unità. Inserire
fondo ogni spina. Per prevenire ronzio e rumore, evitare di raggruppare i cavi di
interconnessione del segnale insieme al cavo di alimentazione.
USO DELLA LINEA IN USCITA
1. Collocare in posizione OFF L’INTERRUTTORE ON/OFF PREAMPLIFICATORE.
2. Inserire un’estremit del cavo RCA (in dotazione) nell pres LINE OUT sul retro
dell’unità. Assicurarsi di abbinare il colore quello dell presa.
3. Inserire l’altr estremit del cavo nell pres LINE IN del dispositivo di
amplicazione di casa.
4. Accendere l’unit e il dispositivo di amplicazione collegato.
5. Regolare il volume sul dispositivo di amplicazione.
AMPLIFIER
OUT PUT PRE-AMP
OFF ON OUT 5.0 1.0A
DC IN 15.0V 0.8A
PORTA DI USCITA USBC
È possibile utilizzare l port di uscit USB-C per caricare qualsiasi
dispositivo. Si consigli di caricare un altoparlante House of Marley
utilizzando quest port per non dover acquistare un adattatore per l spin
BILANCIAMENTO DEL BRACCIO
Opzione 1 (senz misuratore di forz dell puntina):
• Spingere il contrappeso sul braccio no sentire un clic.
• Rimuovere il coperchio dell testin prim di tentare di bilanciare il braccio.
• Sganciare il braccio dal suo supporto e assicurarsi che fluttui liberamente.
• Ruotare il contrappeso avanti e indietro no quando il braccio non è
parallelo al piatto.
• Riposizionare il braccio nel suo alloggiamento e agganciarlo in modo che si
ben saldo. Or tenere il contrappeso in modo che non poss muoversi e con
l'altr mano ruotare il quadrante anteriore no portarlo 0. Il braccio è
or azzerato.
• Or è necessario aggiungere l pressione di lettur corrett per lo stilo. A
questo scopo, ruotare l'intero peso del contrappeso in senso antiorario nché
non viene aggiunto il peso corretto. L pressione di lettur corrett per
questo stilo = 1,5g - 2,5g (2,0 g standard)
NOTA: Un volt terminato, se non si utilizz il giradischi per
riprodurre un disco, rimettere il coperchio dell testin dello stilo
per proteggere lo stilo quando non viene utilizzato.
0
2

Quick Start Guide Quick Start Guide Quick Start Guide Quick Start Guide Quick Start Guide Quick Start Guide
NEDERLANDS
Quick Start Guide
4
Gr. 32.5 21.5 1.25
1. As
2. Platenspeler
3. Contragewicht
4. Anti-skate knop
5. Toonarm omhoog/ omlaag
6. Ondersteuning toonarm lift
7. Toonarm
8. Stylus
9. Naald element houder
10. Multi-Functie knop
11. Voeding adapter met 4
verschillende wereld
stekker adapters
12. 45 TPM Adapter
13. Stylusdrukmeter
LEGENDA
3.
12.
4.
6.
2.
1.
5.
11.
8.
9.
10.
7.
A. RCA uit naar speaker
versterker
B. Voorversterker UIT/AAN
C. USB-C Uit
D. UIT/AAN/33/45TPM
LEGENDA
E. Hoofdtelefoon
F. Bluetooth® knop (MFB)
G. VOLUME +/-
H. Anti-skating knop
A.
D. E. F.
B.
G. H.
OUT PUT PRE-AMP
OFF ON OUT 5.0 1.0A
DC IN 15.0V 0.8A
C.
DE TOONARM BALANCEREN
Optie 1 (zonder stylusdrukmeter):
• Druk op het contragewicht op de toonarm tot u een klik voelt.
• Verwijder eerst de stylusnaaldafdekking voordat u de toonarm probeert te
balanceren.
• Haal de toonarm uit de klem en van de steun, en zorg ervoor dat deze vrij
zweeft.
• Draai het contragewicht heen en weer totdat de toonarm evenwijdig is aan
het plateau.
• Plaats de toonarm nu terug in de steun en klik hem goed vast. Houd het
balansgewicht nu vast zodat het niet kan bewegen en draai de voorste
draaiknop met uw andere hand naar 0. Uw toonarm is nu op nul gezet.
• Nu kunt u de juiste spoorkracht voor de stylus toevoegen. Dit doet u door
het contragewicht met de klok mee te draaien totdat het juiste gewicht
is toegevoegd. Het juiste gewicht voor deze stylus = 1,5 g – 2,5 g (2,0 g
standaard)
OPMERKING: Als u klaar bent en de draaitafel niet gebruikt om een
plaat af te spelen, plaatst u de stylusnaaldafdekking terug om de
stylus te beschermen wanneer deze niet in gebruik is.
02
AANDRIJFRIEM PLAATSEN
OPMERKING: De aandrijfsnaar wordt vooraf geïnstalleerd. Is er rond het subplateau
en de motor van de platenspeler bij openen echter geen aandrijfsnaar zichtbaar,
plaats dan de aandrijfsnaar opnieuw.
• Bevestig de aandrijfsnaar aan de motor (dat is de goudkleurige spoel) en
houd de snaar vervolgens strak en trek rond het subplateau. Controleer n
bevestiging of de snaar plat is en niet gedraaid.
• Plaats het metalen plateau nu op het zwarte subplateau door te zorgen dat de
gaten in het midden op één lijn liggen.
• Plaats nu de siliconen REGRIND™-slipmat op het metalen plateau en zorg
opnieuw dat de gaten in het midden op één lijn liggen.
PRODUCTKAART FUNCTIEINDELING INSTELLEN
Voor vragen over uw House Of Marley draaitafel, scan de
onderstaande QR Code 13.

Quick Start Guide Quick Start Guide Quick Start Guide Quick Start Guide Quick Start Guide Quick Start Guide
Quick Start Guide
71
Optie 2 (met stylusdrukmeter):
• Druk op het contragewicht op de toonarm tot u een klik voelt.
• Verwijder eerst de stylusnaaldafdekking voordat u de toonarm probeert te
balanceren.
• Haal de toonarm uit de klem en van de steun, en zorg ervoor dat deze vrij
zweeft.
• Plaats de stylusdrukmeter op het plateau.
• Plaatst de stylus bij de markering ‘2 gram’ (aanbevolen naalddruk voor onze
stylus).
• Draai het contragewicht heen en weer totdat de drukmeter waterpas is. Zorg
dat de naald blijft staan bij ‘2 gram’.
2
ANTI-SKATE
Anti-skate, oftewel dwarsdruk, oefent een kleine naar buiten gerichte kracht op
de toonarm uit. Dit is om de binnenwaartse neiging van de arm (skate) richting
het midden van de plaat tegen te gaan, met name wanneer de plaat het midden
van de plaat nadert.
De Anti-Skate moet gelijk zijn aan de toegevoegde spoorkracht. Stel deze voor
onze draaitafel dus in op 2.
EEN PLAAT AFSPELEN
1. Zorg ervoor dat de Stir It Up Lux is aangesloten op de voedingsadapter en
een stopcontact, en dat het stopcontact is ingeschakeld.
2. Leg een plaat op de draaitafel.
BLUETOOTH® VERBINDING
• LET OP DAT ER ZICH GEEN ANDERE APPARATEN IN PAIRING MODE BEVINDEN
(de Stir It Up Lux koppelt met de 1e in de buurt)
• Zet EERST het apparaat aan waarop je de muziek wilt weergeven EN ZET
DEZE IN PAIRING MODE.
• Druk op de BT-knop op de draaitafel (MFB) om het apparaat naar het
Bluetooth®-apparaat te laten zoeken totdat het BT-lampje ononderbroken
brandt. Dit geeft aan dat uw apparaten zijn gekoppeld.
NB: Als de draaitafel niet binnen 30sec verbinding heeft met je Bluetooth®
apparaat, druk dan nogmaals op de MFB knop, en wacht tot de verbinding tot
stand is gekomen.
• Blauwe LED knippert, draaitafel in pairmode
• Blauwe LED brandt constant, er is een bluetooth koppeling met een apparaat
• Indien LED rood brandt is de koppeling mislukt of verbroken
ONTKOPPELEN BLUETOOTH® VERBINDING
Houdt de BT knop ingedrukt totdat de LED ROOD, je Stir It Up wordt ontkoppelt van je speaker.
• Indien de blauwe LED, rood wordt, geeft dit aan dat Bluetooth is
uitgeschakeld maar de draaitafel nog steeds aan staat.
VOLUME +
VOLUME -
3. Verwijder de stylusnaaldafdekking.
4. Draai de toerenknop naar de juiste snelheid voor de plaat. Bijv. 45 / 33
5. Als u vi Bluetooth wilt afspelen – Raadpleeg dan het onderdeel ’Bluetooth-
koppeling‘ en kom vervolgens hier terug nadat een uitvoerapparaat is
gekoppeld. Als u vi de lijnuitgang of de hoofdtelefoonuitgang wilt spelen
– bekijk dan de secties over het aansluiten van het uitvoerapparaat. En kom
daarn hier terug.
6. Til de toonarm op vi de lifthendel en verplaats de toonarmkop naar de rand
van de plaat.
7. Laat nu de toonarm zakken door de lifthendel van de toonarm te laten
zakken.
OPMERKING: Zodr de toonarm zich boven het draaiplateau bevindt, begint
deze automatisch te draaien.
8. Zodr de plaat klaar is, stopt het draaiplateau automatisch. Til de toonarm op
en plaats deze op de toonarmsteun. Om naar de B-kant van uw plaat te
luisteren, draait u de plaat om en herhaalt u de bovenstaande instructies
vanaf stap 6.
OPMERKING: Als u klaar bent met het beluisteren van een plaat, plaats dan de
stylusnaaldafdekking terug om de stylus te beschermen.
Verwijder het plastic bescherm kapje van de naald voordat je de naalddruk gaat
afstellen.
Verander de naalddruk of antiskating NIET tijdens het afspelen van een plaat,
dit kan de plaat beschadigen.
Tijdens transport: vergrendel de toonarm om de naald te beschermen tegen
beschadiging. Verwijder het contragewicht, verwijder het plateau, plaats het
beschermkapje over de naald.
Niet het draaiplateau handmatig tegenhouden of draaien.
VOLUME REGELING
Het volume van de hoofdtelefoon en de Bluetooth verbinding kan ingesteld worden
met de draaiknop.
Volume verhogen: draai de volumeknop rechtsom. Volume verlagen: draai de
volumeknop linksom.
HOOFDTELEFOON AANSLUITING
Het led-lampje brandt ook ononderbroken ROOD wanneer de hoofdtelefoon
is aangesloten.
Noot: EERST de hoofdtelefoon aansluiten en DAN PAS OPZETTEN ivm
onverwacht volume.
LIJN UITGANG AANSLUITING
Indien je geen gebruik maakt van Bluetooth, kan je de Stir It Up Lux vi de
lijnuitgang, bedraad, aansluiten.
LET OP: Schakel alle stroom uit van de aan te sluiten apparaten. Raadpleeg de
gebruiksaanwijzing van de apparaten voor verdere uitleg.
Druk alle stekkers goed aan in de verbindingen zonder deze te forceren.tc te
vermijden; laat geen lijnuit bedrading langs/om stroomsdraden heen lopen.
LINE OUT AANSLUITEN
Met bijgeleverde kabel RCA > 3,5 mm kan de draaitafel op de meeste draagbare
speakers worden aangesloten. Een huiskamer versterker kan een optionele RCA >
RCA kabel nodig hebben.
1.Zet de PRE-AMP OFF/ON Schakelaar naar de ON positie. 2.Sluit de RCA kabel
rood/wit aan op de LINE OUTPUT
van de draaitafel.
3.Sluit de 3.5 mm kabel aan op de line in van de draagbare speaker of op de
huiskamer versterker.
4.Zet de draaitafel aan en het aangesloten apparaat. 5.Stel het volume in op de
speaker/versterker.
AMPLIFIER
OUT PUT PRE-AMP
OFF ON OUT 5.0 1.0A
DC IN 15.0V 0.8A
USBCUITGANG
U kunt de USB-C-uitgang gebruiken om uw apparaten op te laden. We
raden aan om een House of Marley Speaker op te laden om de hoeveelheid
verlengsnoeren te beperken.

Quick Start Guide Quick Start Guide Quick Start Guide Quick Start Guide Quick Start Guide Quick Start Guide
STIR IT UP LUX
READ ALL INSTRUCTIONS BEFORE USE AND SAVE THESE INSTRUCTIONS FOR FUTURE
REFERENCE.
This equipment has been tested and found to comply with the limits for a Class B digital device,
pursuant to part 15 of the FCC Rules. These limits are designed to provide reasonable protection
against harmful interference in a residential installation. This equipment generates uses and can
radiate radio frequency energy and, if not installed and used in accordance with the instructions,
may cause harmful interference to radio communications. However, there is no guarantee that
interference will not occur in a particular installation. If this equipment does cause harmful
interference to radio or television reception, which can be determined by turning the equipment
o and on, the user is encouraged to try to correct the interference by one or more of the
following measures:
—Reorient or relocate the receiving antenna.
—Increase the separation between the equipment and receiver.
—Connect the equipment into an outlet on a circuit dierent from that to which the receiver is
connected.
—Consult the dealer or an experienced radio/TV technician for help.
This device complies with FCC radiation exposure limits set forth for an uncontrolled environment.
This device complies with Part 15 of the FCC Rules. Operation is subject to the following two
conditions: (1) this device may not cause harmful interference, and (2) this device must accept any
interference received, including interference that may cause undesired operation.
FCC RF EXPOSURE STATEMENT:
This transmitter must not be co-located or operating in conjunction with any other antenna or
transmitter.
CAUTION!
Any changes or modications not expressly approved by the party responsible for compliance
could void the user’s authority to operate the equipment. To Maintain compliance with the FCC's
RF exposure guidelines, place the product at least 20cm from nearby persons.
ISEDC STATEMENT
This device complies with Innovation, Science, and Economic Development Canada license-exempt
RSS standard(s). Operation is subject to the following two conditions: (1) this device may not cause
interference, and (2) this device must accept any interference, including interference that may
cause undesired operation of the device.
Le présent appareil est conforme aux CNR d’ Innovation, Sciences et Développement économique
Canada applicables aux appareils radio exempts de licence. L’exploitation est autorisée aux deux
conditions suivantes : (1) l’appareil nedoit pas produire de brouillage, et (2) l’utilisateur de l’appareil
doit accepter tout brouillage radioélectrique subi, même si le brouillage est susceptible d’en
compromettre le fonctionnement.
The device complies with RF exposure guidelines, users can obtain Canadian information on RF
exposure and compliance.
Les utilisateurs peuvent sur l’exposition aux radiofréquences et la conformité and compliance
d’acquérirles informations correspondantes. Utilisateurs peut obtenir l’information canadienne sur
l’exposition et la conformité de rf.
The device should be installed and operated with a minimum distance of 20cm between the
radiator and your body.
L'appareil doit être installé et utilisé avec une distance minimale de 20 cm entre le radiate et
votre corps.
This Class B digital apparatus complies with Canadian ICES-003.
Cet appareil numérique de classe b est conforme à la norme nmb - 003 du canada.
ISEDC RF EXPOSURE STATEMENT:
The device is compliance with RF exposure guidelines, users can obtain Canadian information on
RF exposure and compliance.
LE PRÉSENT APPAREIL EST CONFORME
Après examen de ce matériel aux conformité ou aux limites d’intensité de champ RF, les
utilisateurs peuvent sur l’exposition aux radiofréquences et l conformité and compliance
d’acquérir. les informations correspondantes.
WEEE EXPLANATION
This marking indicates that this product should not be disposed with other household wastes
throughout the EU. To prevent possible harm to the environment or human health from
uncontrolled waste disposal, recycle it responsibly to promote the sustainable reuse of material
resources.
Hereby, FKA Brands Ltd, declares that this radio equipment is in compliance with the essential
requirements and other relevant provisions of Directive 2014/53/EU. A copy of the Declaration of
Conformity can be obtained from www.thehouseofmarley.co.uk/declaration-of-conformity
FR STIR IT UP LUX
LIRE TOUTES LES INSTRUCTIONS AVANT UTILISATION. LES CONSERVER POUR POUVOIR LES
CONSULTER ULTÉRIEUREMENT.
EXPLICATION WEEE
Le symbole indique que le produit ne doit pas être éliminé avec les autres déchets ménagers
dans toute l’Union Européenne. L’élimination incontrôlée des déchets pouvant porter
préjudice l’environnement ou l santé humaine, veuillez le recycler de façon responsable. Vous
favoriserez ainsi l réutilisation durable des ressources matérielles.
FKA Brands Ltd déclare par l présente que cet équipement radio est conforme aux exigences
essentielles et autres dispositions pertinentes de l Directive 2014/53/EU. Pour obtenir un exemplaire
de l Déclaration de conformité, s’adresser www.thehouseofmarley.co.uk/declaration-of-
conformity
NL STIR IT UP LUX
ALLE INSTRUCTIES LEZEN ALVORENS HET PRODUCT IN GEBRUIK TE NEMEN. DEZE INSTRUCTIES
ZORGVULDIG BEWAREN.
UITLEG OVER AEEA
Deze markering geeft aan dat dit product binnen de EU niet met ander huisvuil mag worden
weggeworpen. Om eventuele schade aan het milieu of de menselijke gezondheid door het
ongecontroleerd wegwerpen van afval te voorkomen, dient dit apparaat op verantwoorde wijze
gerecycled te worden om duurzaam hergebruik van materiaalbronnen te bevorderen.
Hierbij verklaart FKA Brands Ltd. dat deze radioapparatuur voldoet aan de essentiële vereisten en
andere relevante voorschriften van Directive 2014/53/EU. Een kopie van de conformiteitsverklaring
kan worden verkregen vi
www.thehouseofmarley.co.uk/declaration-of-conformity
IT STIR IT UP LUX
LEGGERE INTEGRALMENTE LE PRESENTI ISTRUZIONI PRIMA DELL’USO. CONSERVARE LE
PRESENTI ISTRUZIONI PER CONSULTAZIONI SUCCESSIVE.
SPIEGAZIONE DIRETTIVA RAEE
Questo simbolo indic che il prodotto non deve essere smaltito assieme agli altri riuti
domestici in tutti i Paesi dell’Unione Europea. Al ne di evitare un eventuale danno
ambientale e all salute uman derivante dallo smaltimento dei riuti non controllato,
riciclare il prodotto in manier responsabile per promuovere il riutilizzo sostenibile delle risorse
materiali.
Con l presente, FKA Brands Ltd dichiar che l’apparecchiatur radio in oggetto è conforme
ai requisiti essenziali e ad altre disposizioni pertinenti dell Direttiv 2014/53/EU. È
possibile richiedere un copi dell Dichiarazione di conformit scrivendo all’indirizzo www.
thehouseofmarley.co.uk/declaration-of-conformity
SP STIR IT UP LUX
LEA TODAS LAS INSTRUCCIONES ANTES DE USAR. GUARDE ESTAS INSTRUCCIONES PARA REFERENCIA
FUTURA.
Quick Start Guide
78
EXPLICACIÓN RAEE
Este símbolo indic que este artículo no se debe tirar l basur con otros residuos
domésticos en ningún lugar de l UE. A n de prevenir los efectos perjudiciales que l
eliminación sin control de los residuos puede tener sobre el medio ambiente o l salud de las
personas, le rogamos que los recicle de form responsable par fomentar l reutilización
sostenible de los recursos materiales.
Por l presente, FKA Brands Ltd declar que este dispositivo de radio est en conformidad con
los requisitos esenciales y otras disposiciones relevantes de l directiv 2014/53/EU. Si dese un
copi de l declaración de conformidad, solicítel www.thehouseofmarley.co.uk/declaration-
of-conformity
FIN STIR IT UP LUX
LUE KAIKKI OHJEET ENNEN KÄYTTÖÄ. SÄILYTÄ NÄMÄ OHJEET TULEVAA TARVETTA VARTEN.
TÄRKEÄT VAROTOIMENPITEET:
WEEESELITYS
Täm merkki tarkoittaa, ett tät tuotett ei sa hävittä muiden talousjätteiden mukan
missään EUmaassa. Kontrolloimattomast jätteiden hävittämisest mahdollisesti aiheutuvien
ympäristöhaittojen tai terveysvaarojen estämiseksi hävit täm tuote vastuullisesti
edistääksesi materiaalivarojen uudelleenkäyttöä.
FKA Brands Ltd. vakuuttaa, ett täm radiolaite on direktiivin 2014/53/EU vaatimusten j muiden
siihen liittyvien säädösten mukainen. Kopion vaatimustenmukaisuusvakuutuksest voi tilat
lähettämäll sähköposti osoitteeseen www.thehouseofmarley.co.uk/declaration-of-conformity
DE STIR IT UP LUX
LESEN SIE SICH VOR DER BENUTZUNG ALLE HINWEISE GUT DURCH. BEWAHREN SIE DIESE
HINWEISE GUT AUF.
WEEEERKLÄRUNG
Diese Kennzeichnung weist darauf hin, dass dieses Produkt innerhalb der EU nicht mit
anderem Hausmüll entsorgt werden soll. Damit durch unkontrollierte Abfallentsorgung
verursachte mögliche Umwelt- oder Gesundheitsschäden verhindert werden können, entsorgen
Sie dieses Produkt bitte ordnungsgemäß und fördern Sie damit eine nachhaltige
Wiederverwendung der Rohstoe.
Hiermit erklärt die FKA Brands Ltd., dass dieses Funkgerät in Übereinstimmung mit den
wesentlichen Anforderungen und anderen entsprechenden Bestimmungen der Richtlinie 2014/53/
EU geliefert wird. Eine Kopie der Konformitätserklärung ist über www.thehouseofmarley.co.uk/
declaration-of-conformity
TR STIR IT UP LUX
KULLANMADAN ÖNCE TÜM TALİMATLARI OKUYUN. BU TALİMATLARI DAHA SONRA BAŞVURMAK
ÜZERE SAK.
WEEE AÇIKLAMASI
Bu işaret bu ürünün AB genelinde diğer ev atıklarıyl birlikte atılmaması gerektiğini belirtir.
Kontrolsüz atığın çevre vey insan sağlığın olası zararları engellemek için sorumlu bir şekilde
geri dönüştürülmesini ve malzeme kaynaklarının sürdürebilir şekilde yeniden kullanılmasını sağlayın.
İş bu vesileyle, FKA Brands Ltd, bu telsiz ekipmanının 2014/53/EU Yönergesinin temel
gereksinimleri ve diğer ilgili hükümleriyle uyumlu olduğunu beyan eder. Uygunluk Beyanı’nın bir
kopyası
www.thehouseofmarley.co.uk/declaration-of-conformity
SV STIR IT UP LUX
LÄS DESSA INSTRUKTIONER OCH BEHÅLL DEM FÖR ENKEL REFERENS.
LÄS ALLA INSTRUKTIONERNA FÖRE ANVÄNDNING. SPARA DESSA INSTRUKTIONER FÖR
FRAMTIDA REFERENS.
WEEEFÖRKLARING
Denn markering indikerar att denn produkt inte får avyttras med annat hushållsavfall inom
EU. För att förhindr möjlig skad p miljö eller person från okontrollerat avfallsavyttrande,
återvinn p ansvarsfullt vis för att främj det fortsatt återanvändandet av materialresurser.
Härmed deklarerar FKA Brands Ltd att denn radioutrustning är förenlig med nödvändig krav och
andr relevant bestämmelser i direktivet 2014/53/EU. En kopi av förenlighetsdeklarationen kan
erhållas från www.thehouseofmarley.co.uk/declaration-of-conformity
RU STIR IT UP LUX
ПРОЧИТАЙТЕ ВСЕ ИНСТРУКЦИИ ПЕРЕД ИСПОЛЬЗОВАНИЕМ. СОХРАНИТЕ
ЭТИ ИНСТРУКЦИИ ДЛЯ ДАЛЬНЕЙШЕГО ИСПОЛЬЗОВАНИЯ.
ЗАМЕНА БАТАРЕЙКИ
Динамик Stir It Up Wireless содержит аккумулятор, срок службы которого
соответствует сроку службы продукта. Если возникнет необходимость в
замене аккумулятора, что маловероятно, обратитесь в службу поддержки.
Ее персонал предоставляет гарантийное обслуживание и осуществляет
замену аккумуляторов (на замену аккумуляторов действие гарантии не
распространяется).
ИНСТРУКЦИИ К БАТАРЕЯМ
Данный символ означает, что батареи не следует утилизировать
совместно с бытовым мусором, поскольку они содержат вещества,
способные нанести вред окружающей среде и здоровью. Утилизируйте
батареи в специально предназначенных для этого приемных пунктах.
ПОЯСНЕНИЕ WEEE
Данная маркировка означает, что в странах Европы не допускается
утилизировать прибор вместе с другими бытовыми отходами. Чтобы не
нанести ущерба окружающей среде и здоровью населения в результате
неверной утилизации отходов, прибор следует сдать на переработку, чтобы
обеспечить экологичное повторное использование материальных ресурсов.
Компания FKA Brands Ltd настоящим подтверждает соответствие данного
радиооборудования основным требованиям и другим применимым
положениям Директивы 2014/53/EU. Копия Декларации соответствия можно
получить по электронному адресу:
www.thehouseofmarley.co.uk/declaration-of-conformity
DK STIR IT UP LUX
LÆS HELE VEJLEDNINGEN IGENNEM FØR BRUG. GEM DENNE VEJLEDNING TIL SENERE BRUG.
WEEE FORKLARING
Denne afmærkning angiver, at dette produkt ikke m bortskaes med andet
husholdningsaald inden for EU. For at forhindre mulig skade for miljøet eller menneskers
sundhed p grund af ukontrolleret aaldsbortskaelse, skal det genanvendes p ansvarlig vis for
at fremme den bæredygtige genanvendelse af materielle ressourcer.
FKA Brands Ltd erklærer hermed, at dette radioudstyr efterlever de essentielle krav og andre
relevante bestemmelser i Direktiv 2014/53/EU. En kopi af Overensstemmelseserklæringen kan
fås hos
www.thehouseofmarley.co.uk/declaration-of-conformity
NO STIR IT UP LUX
LES ALLE INSTRUSJONENE FØR BRUK. TA VARE PÅ DISSE INSTRUKSJONENE FOR FREMTIDIG
REFERANSE.
WEEE FORKLARING
Denne merkingen indikerer at innen EU skal dette produktet ikke kastes sammen med annet
husholdningssøppel. For forebygge mulig skade p miljøet eller menneskelig helse
forårsaket av ukontrollert avfallstømming, skal produktet gjenvinnes ansvarlig for støtte
holdbar gjenbruk av materialressurser.
FKA Brands Ltd, erklærer herved at dette radioutstyret samsvarer med nødvendige krav og andre
relevante forholdsregler i direktiv 2014/53/EU. En kopi av konformitetserklæringen er tilgjengelig
fr
www.thehouseofmarley.co.uk/declaration-of-conformity
EL STIR IT UP LUX
ΔΙΑΒΑΣΤΕ ΟΛΕΣ ΤΙΣ ΟΔΗΓΙΕΣ ΠΡΙΝ ΤΗ ΧΡΗΣΗ. ΦΥΛΑΞΤΕ ΑΥΤΕΣ ΤΙΣ ΟΔΗΓΙΕΣ
ΓΙΑ ΜΕΛΛΟΝΤΙΚΗ ΑΝΑΦΟΡΑ.
ΑΝΤΙΚΑΤΑΣΤΑΣΗ ΜΠΑΤΑΡΙΑΣ
Το ηχείο Stir It Up Wireless περιλαμβάνει μια επαναφορτιζόμενη μπαταρία
ειδικά σχεδιασμένη ώστε να διαρκεί για όλη την ωφέλιμη ζωή του προϊόντος.
Στην απίθανη περίπτωση που θα χρειαστείτε μπαταρία αντικατάστασης,
επικοινωνήστε με την Εξυπηρέτηση Πελατών, η οποία θα σας δώσει
λεπτομέρειες για αντικατάσταση της μπαταρίας εντός και εκτός εγγύησης.
ΟΔΗΓΙΑ ΓΙΑ ΤΙΣ ΜΠΑΤΑΡΙΕΣ
Το σύμβολο αυτό υποδεικνύει ότι οι μπαταρίες δεν πρέπει να απορρίπτονται
μαζί με οικιακά απορρίμματα, καθώς περιέχουν ουσίες που μπορεί να είναι
επιβλαβείς για το περιβάλλον και την υγεία. Απορρίπτετε τις μπαταρίες στα
καθορισμένα σημεία συλλογής.
ΕΠΕΞΗΓΗΣΗ ΑΗΗΕ
Αυτή η σήμανση επισημαίνει ότι αυτό το προϊόν δεν πρέπει να απορρίπτεται με
άλλα οικιακά απόβλητα σε όλη την ΕΕ. Για να μην προκληθεί ζημιά στο
περιβάλλον ή στην υγεία λόγω μη ελεγχόμενης απόρριψης αποβλήτων,
ανακυκλώστε το υπεύθυνα, προάγοντας τη βιώσιμη επαναχρησιμοποίηση των
υλικών πόρων.
Με το παρόν, η FKA Brands Ltd δηλώνει ότι αυτός ο ασύρματος εξοπλισμός
συμμορφώνεται με τις ουσιώδεις απαιτήσεις και τις άλλες σχετικές προβλέψεις
της Οδηγίας 2014/53/EΕ. Μπορείτε να αποκτήσετε ένα αντίγραφο της Δήλωσης
Συμμόρφωσης αν επικοινωνήσετε με τη διεύθυνση
www.thehouseofmarley.co.uk/declaration-of-conformity
CZ STIR IT UP LUX
PŘED POUŽITÍM ZAŘÍZENÍ SI PŘEČTĚTE VŠECHNY POKYNY. POKYNY USCHOVEJTE PRO
BUDOUCÍ NAHLÉDNUTÍ.
VYSVĚTLENÍ OEEZ
Tato značk udává, že výrobek nesmí být n území EU vyhazován s běžným domácím
odpadem. Pro prevenci možného znečištění životního prostředí újmě n zdraví osob
nekontrolovaným odpadem recyklujte výrobek odpovědným způsobem.
Společnost FKA Brands Ltd tímto prohlašuje, že toto rádiové vybavení je ve shodě se základními
požadavky dalšími relevantními ustanoveními směrnice 2014/53/EU. Kopii prohlášení o shodě
získáte n adrese www.thehouseofmarley.co.uk/declaration-of-conformity
HU STIR IT UP LUX
HASZNÁLAT ELŐTT OLVASSA EL AZ UTASÍTÁSOKAT, ÉS A KÉSŐBBI HASZNÁLATHOZ TEGYE EL
EZEKET.
WEEEMAGYARÁZAT
Ez jelölés azt jelzi, hogy ezt terméket az Európai Unióban nem szabad háztartási
hulladék közé dobni. Az ellenőrizetlen hulladékkezelésből származó környezeti vagy
egészségügyi kár elkerülése végett, és tárgyi készletek fenntartható kezelése jegyében
felelősségteljesen hasznosíts újra.
A FKA Brands Ltd. kijelenti, hogy ez rádióberendezés eleget tesz 2014/53/EU irányelv
szükséges követelményeinek és egyéb vonatkozó rendelkezéseinek. A Megfelelőségi nyilatkozat
másolatát
www.thehouseofmarley.co.uk/declaration-of-conformity
PT STIR IT UP LUX
LEIA TODAS AS INSTRUÇÕES ANTES DE UTILIZAR. CONSERVE ESTAS INSTRUÇÕES PARA
REFERÊNCIA FUTURA.
EXPLICAÇÃO DA REEE
Est marcação indic que o produto não deve ser eliminado juntamente com outros resíduos
domésticos em tod UE. Par impedir possíveis danos ambientais ou saúde human
resultantes de um eliminação não controlad dos resíduos, este produto dever ser reciclado de
form responsável de modo promover reutilização sustentável dos recursos materiais.
Dest forma, o FKA Brands Ltd, declar que este equipamento de rádio est em conformidade
com os requisitos essenciais outras provisões relevantes d Diretiv 2014/53/EU. É possível obter
um cópi d Declaração de Conformidade através do www.thehouseofmarley.co.uk/declaration-
of-conformity
SK STIR IT UP LUX
PRED POUŽITÍM ZARIADENIA SI PREČÍTAJTE VŠETKY POKYNY. POKYNY USCHOVAJTE NA
NAHLIADNUTIE V BUDÚCNOSTI.
WEEE POPIS
Tento symbol znamená, že výrobok by s v rámci celej EU nem vyhadzovať do domáceho
odpadu. Aby nedošlo k možnému znečisteniu životného prostredie alebo poškodeniu zdravi
v dôsledku nekontrolovaného odpadu, je potrebné pristupovať k recyklovaniu zodpovedne
propagovať tak opätovné použitie zdrojových materiálov.
Spoločnosť FKA Brands Ltd. týmto vyhlasuje, že toto rádiové zariadenie je v súlade so základnými
požiadavkami ďalšími relevantnými ustanoveniami Smernice 2014/53/EÚ. Kópiu vyhláseni o
zhode získate n adrese www.thehouseofmarley.co.uk/declaration-of-conformity
PL STIR IT UP LUX
PRZED UŻYCIEM NALEŻY PRZECZYTAĆ CAŁĄ INSTRUKCJĘ. INSTRUKCJĘ NALEŻY ZACHOWAĆ
NA PRZYSZŁOŚĆ.
OBJAŚNIENIE WEEE
Ten znak wskazuje, że n obszarze UE przyrządu nie wolno pozbywać się wyrzucając do
śmieci domowych. Aby chronić środowisko i zdrowie, którym zagraż nieodpowiedni
utylizacj odpadów, przyrząd należy recyklingować, aby umożliwić odzysk materiałów, z których
został wykonany.
Niniejszym rm FKA Brands Ltd oświadcza, że to urządzenie radiowe jest zgodne z
podstawowymi wymaganiami oraz innymi właściwymi postanowieniami Dyrektywy 2014/53/EU.
Kopię Deklaracji zgodności możn uzyskać pod www.thehouseofmarley.co.uk/declaration-of-
conformity
BG STIR IT UP LUX
ПРОЧЕТЕТЕ ВСИЧКИ ИНСТРУКЦИИ ПРЕДИ УПОТРЕБА И ГИ ЗАПАЗЕТЕ ЗА
БЪДЕЩА СПРАВКА.
ПРЕДУПРЕЖДЕНИЕ: БАТЕРИИТЕ (КУТИЯТА С БАТЕРИИ ИЛИ ПОСТАВЕНИТЕ
БАТЕРИИ) НЕ ТРЯБВА ДА СЕ ИЗЛАГАТ НА ПРЕКАЛЕНО ЗАТОПЛЯНЕ
КАТО СЛЪНЧЕВА ТОПЛИНА, ОГЪН ИЛИ ДРУГИ ПОДОБНИ. ВНИМАНИЕ:
ОПАСНОСТ ОТ ЕКСПЛОЗИЯ АКО БАТЕРИЯТА НЕ Е ПОСТАВЕНА ПРАВИЛНО.
ЗАМЕНЕТЕ ЕДИНСТВЕНО СЪС СЪЩИЯ ИЛИ С ПОДОБЕН ВИД.
ЗАМЯНА НА БАТЕРИЯТА:
Вашият Stir It Up Wireless включва зареждащи се батерии, предназначени да
издържат през целия живот на продукта. В малко вероятния случай, когато
се наложи замяна на батерията, моля свържете се с отдела за клиентско
обслужване, който ще Ви осигури информация за гаранцията и услугата за
замяна на батерията извън гаранция.
ДИРЕКТИВА ЗА БАТЕРИЯТА
Този символ показва, че батериите не трябва да се изхвърлят с битовите
отпадъци, защото съдържат вещества, които може да са опасни за
околната среда и за здравето. Моля, изхвърляйте батериите на
предназначените за тази
цел места.
OEEO ОБЯСНЕНИЕ
Това маркиране показва, че този продукт не трябва да се изхвърля с
други битови отпадъци в границите на ЕС. За предотвратяване на
евентуална щета за околната среда или за човешкото здраве поради
безконтролно изхвърляне на боклука, рециклирайте го отговорно, за да
съдействате за екологичната многократна употреба на материалните
ресурси.
С настоящето, FKA Brands Ltd, декларира, че това радиосъоръжение ев
съответствие на основните изисквания и на други необходими условия на
Директива 2014/53/EU. Копие от Декларацията за съответствие може да бъде
получено от
www.thehouseofmarley.co.uk/declaration-of-conformity
RO STIR IT UP LUX
CITII TOATE INSTRUCIUNILE ÎNAINTE DE UTILIZARE ŞI PĂSTRAILE PENTRU A LE CONSULTA
ÎN VIITOR.
ÎNLOCUIREA BATERIILOR
Difuzorul Stir It Up LUX include un acumulator conceput s reziste pe toat durat de via
produsului. În cazul improbabil în care ai obligat s înlocuii acumulatorul, contactai Serviciul
Clieni care v v inform cu privire l garani produsului dumneavoastr şi l înlocuire
acumulatorului dup expirare garaniei.
EXPLICAIA DEEE
Acest simbol indic faptul c acest produs nu trebuie eliminat împreun cu alte deşeuri
menajere pe teritoriul UE. Pentru preveni posibile prejudicii asupr mediului sau sănătăii
umane din cauz eliminării necontrolate deşeurilor, reciclai-l cu responsabilitate pentru
favoriz reutilizare durabil resurselor materiale.
FKA Brands Ltd declar c acest dispozitiv radio este în conformitate cu cerinele eseniale şi
alte prevederi relevante ale Directivei 2014/53/EU. Un exemplar al Declaraiei de conformitate
poate obinut de l
www.thehouseofmarley.co.uk/declaration-of-conformity
AR STIR IT UP LUX
ةيبرعلا
FKA Brands Ltd
CN STIR IT UP LUX
使用之前請閱讀所有指南並妥善保存以備未來參考
歐共體廢棄電子電器設備指南(WEEE)解釋
此標識表示在歐共體內本產品不得與家庭勒色一起丟棄。無控制的勒色丟棄有害環境
或健康,必須避免。請盡力回收廢舊設備,使其持續得以再生利用。
FKA分銷有限公司在此聲明,此無線設備符合2014/53/EU指南的基本要求和其它
相關條款。請訪問www.thehouseofmarley.co.uk/declaration-of-conformity以
獲取合規聲明的副本。
NCC WARNING MESSAGE
Compliance Info
Conformité / Conformidad / Beachtung / Conformit / Nalevingsinformatie / 合規信息 / 규정 준수
정보 / コンプ ライアンス 情 報

Stir It Up Lux / Bluetooth® Turntable Quick Start Guide Quick Start Guide Quick Start Guide Quick Start Guide Quick Start Guide Quick Start Guide
escuchar un volumen excesivamente alto durante un periodo prolongado. Par ver los detalles
completos y las excepciones, consulte
http://www.thehouseofmarley.com/instructionbooks.
An d’éviter tout dommage auditif possible, ne pas écouter un volume sonore élevé pendant
une période prolongée. Pour les informations complètes et les exceptions, rendez-vous sur http://
www.thehouseofmarley.com/instructionbooks.
Um mögliche Hörschäden zu vermeiden, stellen Sie die Lautstärke nicht über einen längeren
Zeitraum sehr hoch ein. Weitere Informationen und Ausnahmen erhalten Sie hier http://www.
thehouseofmarley.com/instructionbooks.
Per evitare possibili danni all’udito, non ascoltare audio livelli elevati di volume per lunghi
periodi. Per tutti i dettagli e le eccezioni, visitare il sito
http://www.thehouseofmarley.com/instructionbooks.
To prevent possible hearing damage, do
not listen at high volume levels for long
periods.
Full instruction and warranty details can
be found at http://www.thehouseofmarley.
com/instructionbooks
Con el n de evitar lesiones auditivas, se aconsej no
인증받은자의 상호: (주)디엠에이씨인터내셔널
제품명/모델명:특정소출력무선기기(무선데이타통신시스템용무선기기)/EM-
JT010
제조자 및 제조국가: FKA Distributing Co., LLC / China
인증번호: R-C-DMV-EM-JT010, EM-JT010
제품명 (Product name): Stir It Up LUX Turntable
모델명 (Model): EM-JT010
무선 방식 (Operation Frequency): Bluetooth (2402 – 2480 MHz)
채널 (Radio Channel): 79channels for BDR/EDR
무선 채널 (Bluetooth Mode): BT 5.3
출력 (Output Power): 3mW
안테나 이득 (Antenna Gain): 0dB
변조 형식 (Modulation Type): GFSK、π/4-DQPSK
전원 (Power Supply): 15 V
Marley and the Marley logo are registered trademarks of Fifty-Six Hope Road Music Limited and
the use of such marks by House of Marley is under license. The Bluetooth® word mark and logos
are registered trademarks owned by Bluetooth® SIG, Inc. and any use of such marks by The
House of Marley is under license.
Operating frequency band: 2402 – 2480MHz
CE Maximum radio-frequency power transmitted: 2.64dBm
DISTRIBUTED BY:
The House of Marley, LLC
3000 North Pontiac Trail, Commerce Township,
MI 48390 USA
Imported into the UK by
FKA Brands Ltd, Tonbridge, TN110GP, UK.
Imported into the EU by
FKA Brands Ltd, 29 Earlsfort Terrace, Dublin 2. IE
Distributed in Australi by
Homedics Australi Pty Ltd
14 Kingsley Close
Rowville, Victori 3178
Distributed in New Zealand by
CDB Medi Ltd
4 Lovell Court
Albany, Auckland, New Zealand 0800 232 633
IB-EMJT010SB-1222-01
EM-JT010
© 2023 House of Marley, LLC.
All Rights Reserved.
低功率電波輻射性電機管理辦法
第十二條 經型式認證合格之低功率射頻電機,非經許可,公司、商號或使用者均不得
擅自變更頻 率、加大功率或變更原設計之特性及功能。
第十四條 低功率射頻電機之使用不得影響飛航安全及干擾合法通信;經發現有干擾現
象時,應改 善至無干擾時方得繼續使用。
前項合法通信,指依電信法規定作業之無線電通信。
ID STIR IT UP LUX
BACA SEMUA PETUNJUK SEBELUM PENGGUNAAN DAN SIMPAN PETUNJUK INI UNTUK RUJUKAN
DI MASA MENDATANG.
PENJELASAN WEEE
Tand ini menunjukkan bahw produk ini tidak boleh dibuang bersam sampah rumah tangg
lain di seluruh UE. Untuk mencegah kemungkinan bahay pad lingkungan atau kesehatan
manusi dari pembuangan limbah yang tidak terkendali, daur ulang produk ini secar bertanggung
jawab untuk mempromosikan penggunaan kembali sumber day bahan secar berkelanjutan.
FKA Brands Ltd dengan ini menyatakan bahw peralatan radio ini mematuhi persyaratan penting
dan ketentuan relevan lainny dari Arahan 2014/53/EU. Salinan Pernyataan Kepatuhan bis
diperoleh dari
www.thehouseofmarley.co.uk/declaration-of-conformity
RECYCLING
This product bears the selective sorting symbol for Waste
electrical and electronic equipment (WEEE). This means
that this product must be handled pursuant to European
directive 2012/19/EU in order to be recycled or dismantled
to minimize its impact on the environment.
User has the choice to give his product to a competent
recycling organization or to the retailer when he buys a
new electrical or electronic equipment
This symbol indicates class II equipment
This symbol indicates AC voltage
This symbol indicates for indoor use only
This symbol indicates DC voltage
The po wer adaptor plug is used as the disconnect device, The connected AC
power outlet must be located near the equipment and be easily accessible.
The marking information is located at the bottom of the apparatus.
WARNING: Only the accessories (such as external power supply) provided by
the manufacturer can be used with the product.
Adapter Informatio n
Manufacturer : Shenzhen Aquilstar Technology Co, Ltd.
Model: ASS A107 W- 150080
Input: 100-240 V- 50/60Hz 0.45A
Output: 15.0V , 0.8A, 12W
TheHouseofMarley.com
BOB MARLEY™
MARLEY™
BOBMARLEY.COM
©Fifty-Six Hope Road Music Ltd., 2011-2023.
Right of Publicity and Person Rights.
Fifty-Six Hope Road Music Ltd. EM-JT010
Marley, the Marley logo, Bob Marley and the Bob Mar-
ley logo are registered trademarks of Fifty-Six Hope
Road Music Limited and any use of such marks by The
House of Marley is under license. The Bluetooth®
word mark and logos are registered trademarks
owned by Bluetooth® SIG, Inc. and any use of such
marks by The House of Marley is under license.
STIR IT UP LUX
QUICK START GUIDE
201-220575
-
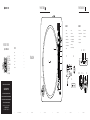 1
1
-
 2
2
-
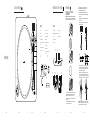 3
3
-
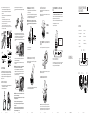 4
4
-
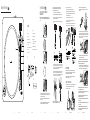 5
5
-
 6
6
-
 7
7
-
 8
8
-
 9
9
-
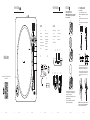 10
10
-
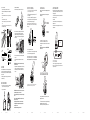 11
11
-
 12
12
-
 13
13


Marley EM-JT010 Manual de usuario
- Categoría
- Placa giratoria
- Tipo
- Manual de usuario
en otros idiomas
- français: Marley EM-JT010 Manuel utilisateur
- italiano: Marley EM-JT010 Manuale utente
- English: Marley EM-JT010 User manual
- Deutsch: Marley EM-JT010 Benutzerhandbuch
- Nederlands: Marley EM-JT010 Handleiding
- română: Marley EM-JT010 Manual de utilizare
Otros documentos
-
Audio Technica AT-LP3 Manual de usuario
-
Crosley KT6101-WA Manual de usuario
-
-
Audio Technica AT-LP1240-USB XP EDITION Manual de usuario
-
Crosley T170A-WH Manual de usuario
-
Reloop TURN3 Manual de usuario
-
Crosley t150 Manual de usuario
-
Gemini TT-01mkii Manual de usuario