
www.dell.com | support.dell.com
Dell™ OptiPlex™ 320
Quick Reference Guide
Models DCSM, DCNE

Notes, Notices, and Cautions
NOTE: A NOTE indicates important information that helps you make better use of your computer.
NOTICE: A NOTICE indicates either potential damage to hardware or loss of data and tells you how to avoid the
problem.
CAUTION: A CAUTION indicates a potential for property damage, personal injury, or death.
If you purchased a Dell™ n Series computer, any references in this document to Microsoft
®
Windows
®
operating systems are not applicable.
____________________
Information in this document is subject to change without notice.
© 2006 Dell Inc. All rights reserved.
Reproduction in any manner whatsoever without the written permission of Dell Inc. is strictly forbidden.
Trademarks used in this text: Dell, OptiPlex, and the DELL logo are trademarks of Dell Inc.; Microsoft and Windows are registered trademarks
of Microsoft Corporation; Intel and Pentium are registered trademarks of Intel Corporation.
Other trademarks and trade names may be used in this document to refer to either the entities claiming the marks and names or their products.
Dell Inc. disclaims any proprietary interest in trademarks and trade names other than its own.
Models DCSM, DCNE
September 2006 P/N FK640 Rev. A01

Contents 3
Contents
Finding Information . . . . . . . . . . . . . . . . . . . . . . . . . . . . . . . . 5
Setting Up Your Computer
. . . . . . . . . . . . . . . . . . . . . . . . . . . . . 8
System Views
. . . . . . . . . . . . . . . . . . . . . . . . . . . . . . . . . . 11
Mini Tower Computer — Front View
. . . . . . . . . . . . . . . . . . . . 11
Mini Tower Computer — Back View
. . . . . . . . . . . . . . . . . . . . 13
Mini Tower Computer — Back-Panel Connectors
. . . . . . . . . . . . . 14
Desktop Computer — Front View
. . . . . . . . . . . . . . . . . . . . . . 16
Desktop Computer — Back View
. . . . . . . . . . . . . . . . . . . . . . 17
Desktop Computer — Back-Panel Connectors
. . . . . . . . . . . . . . 18
Removing the Computer Cover
. . . . . . . . . . . . . . . . . . . . . . . . . . 20
Before You Begin
. . . . . . . . . . . . . . . . . . . . . . . . . . . . . . 20
Mini Tower Computer
. . . . . . . . . . . . . . . . . . . . . . . . . . . . 21
Desktop Computer
. . . . . . . . . . . . . . . . . . . . . . . . . . . . . 23
Inside Your Computer
. . . . . . . . . . . . . . . . . . . . . . . . . . . . . . 24
Mini Tower Computer
. . . . . . . . . . . . . . . . . . . . . . . . . . . . 24
Desktop Computer
. . . . . . . . . . . . . . . . . . . . . . . . . . . . . 27
Solving Problems
. . . . . . . . . . . . . . . . . . . . . . . . . . . . . . . . 30
Dell Diagnostics
. . . . . . . . . . . . . . . . . . . . . . . . . . . . . . . 30
System Lights
. . . . . . . . . . . . . . . . . . . . . . . . . . . . . . . . 33
Diagnostic Lights
. . . . . . . . . . . . . . . . . . . . . . . . . . . . . . . . . 34
Beep Codes
. . . . . . . . . . . . . . . . . . . . . . . . . . . . . . . . . 37
Resolving Software and Hardware Incompatibilities
. . . . . . . . . . . 38
Using Microsoft Windows XP System Restore
. . . . . . . . . . . . . . . 38
Reinstalling Microsoft Windows XP
. . . . . . . . . . . . . . . . . . . . 39
Using the Drivers and Utilities CD
. . . . . . . . . . . . . . . . . . . . . . . . 42
Index . . . . . . . . . . . . . . . . . . . . . . . . . . . . . . . . . . . . . . . . . 43

4 Contents

Quick Reference Guide 5
Finding Information
NOTE: Some features or media may be optional and may not ship with your computer. Some features or media may
not be available in certain countries.
NOTE: Additional information may ship with your computer.
What Are You Looking For? Find It Here
• A diagnostic program for my computer
• Drivers for my computer
• My computer documentation
• My device documentation
• Desktop System Software (DSS)
Drivers and Utilities CD (also known as ResourceCD)
NOTE: The Drivers and Utilities CD may be optional and may
not ship with your computer.
Documentation and drivers are already installed on your
computer. You can use the CD to reinstall drivers (see
"Reinstalling Drivers and Utilities" in your online User’s
Guide), to run the Dell Diagnostics (see "Dell Diagnostics"
on page 30), or to access your documentation.
Readme files may be
included on your CD to
provide the most current
updates about technical
changes to your computer
or advanced technical-
reference material for
technicians or experienced
users.
NOTE: Drivers and documentation updates can be found at
support.dell.com.
• Warranty information
• Terms and Conditions (U.S. only)
• Safety instructions
• Regulatory information
• Ergonomics information
• End User License Agreement
Dell™ Product Information Guide

6 Quick Reference Guide
• How to remove and replace parts
• Specifications
• How to configure system settings
• How to troubleshoot and solve problems
Dell™ OptiPlex™ User’s Guide
Microsoft Windows XP Help and Support Center
1
Click
Start
→
Help and Support
→
Dell User and System
Guides
→
System Guides
.
2
Click the
User’s Guide
for your computer.
The User’s Guide is also available on the optional Drivers
and Utilities CD.
• Service Tag and Express Service Code
• Microsoft Windows License Label
Service Tag and Microsoft
®
Windows
®
License
These labels are located on your computer.
• Use the Service Tag to
identify your computer
when you use
support.dell.com
or
contact support.
• Enter the Express
Service Code to direct
your call when
contacting support.
• How to reinstall my operating system
Operating System CD
NOTE: The Operating System CD may be optional and may
not ship with your computer.
The operating system is already installed on your computer.
To reinstall your operating system, use the Operating
System CD. See "Reinstalling Microsoft Windows XP" on
page 39.
After you reinstall your
operating system, you can
use the optional Drivers
and Utilities CD
(ResourceCD) to reinstall
drivers for the devices that
came with your computer.
Your operating system
product key label is located
on your computer.
NOTE: The color of your CD varies based on the operating
system you ordered.
What Are You Looking For? Find It Here

Quick Reference Guide 7
• Solutions — Troubleshooting hints and tips, articles from
technicians, frequently asked questions, and online
courses
• Community — Online discussion with other Dell
customers
• Upgrades — Upgrade information for components, such
as memory, the hard drive, and the operating system
• Customer Care — Contact information, service call and
order status, warranty, and repair information
• Service and support — Service call status and support
history, service contract, online discussions with technical
support
• Reference — Computer documentation, details on my
computer configuration, product specifications, and white
papers
• Downloads — Certified drivers, patches, and software
updates
• Desktop System Software (DSS) — If you reinstall the
operating system for your computer, you should also
reinstall the DSS utility. DSS provides critical updates for
your operating system and support for Dell™ 3.5-inch
USB floppy drives, Intel
®
processors, optical drives, and
USB devices. DSS is necessary for correct operation of
your Dell computer. The software automatically detects
your computer and operating system and installs the
updates appropriate for your configuration.
Dell Support Website — support.dell.com
NOTE: Select your region or business segment to view the
appropriate support site.
To download Desktop System Software:
1
Go to
support.dell.com
, select your region or business
segment, and enter your Service Tag.
2
Select
Drivers & Downloads
and click
Go
.
3
Click your operating system and search for the keyword
Desktop System Software
.
NOTE: The support.dell.com user interface may vary
dependent upon your selections.
• How to use Windows XP
• How to work with programs and files
• How to personalize my desktop
Windows Help and Support Center
1
Click
Start
→
Help and Support
.
2
Type a word or phrase that describes your problem and
click the arrow icon.
3
Click the topic that describes your problem.
4
Follow the instructions on the screen.
What Are You Looking For? Find It Here

8 Quick Reference Guide
Setting Up Your Computer
CAUTION: Before performing any of the procedures in this section, follow the safety instructions in Product
Information Guide.
NOTICE: If your computer has an expansion card installed (such as a modem card), connect the appropriate cable
to the card, not to the connector on the back panel.
NOTICE: To help allow the computer to maintain proper operating temperature, ensure that you do not place the
computer too close to a wall or other storage compartment that might prevent air circulation around the chassis.
NOTE: Before you install any devices or software that did not ship with your computer, read the documentation
that came with the device or software, or contact the vendor to verify that the device or software is compatible
with your computer and operating system.
You must complete all the steps to properly set up your computer. See the appropriate figures that follow
the instructions.
NOTICE: Do not attempt to operate a PS/2 mouse and a USB mouse simultaneously.
1
Connect the keyboard and mouse.
NOTICE: Do not connect a modem cable to the network adapter connector. Voltage from telephone
communications can cause damage to the network adapter.
Set Up Your Keyboard and Mouse
2
Connect the modem or network cable.
Insert the network cable, not the telephone line, into the network connector. If you have an optional
modem, connect the telephone line to the modem.

Quick Reference Guide 9
3
Connect the monitor using
either
the white DVI cable
or
the blue VGA cable (
do not
connect both
cables).
Align and gently insert the monitor cable to avoid bending connector pins. Tighten the thumbscrews
on the cable connectors.
NOTE: Some monitors have the video connector underneath the back of the screen. See the documentation
that came with your monitor for its connector locations.
Set Up Your Monitor
4
Connect the speakers.
5
Connect power cables to the computer, monitor, and devices and connect the other ends of the power
cables to electrical outlets.

10 Quick Reference Guide
Power Connections
NOTICE: To avoid damaging a computer with a manual voltage-selection switch, set the switch for the voltage that
most closely matches the AC power available in your location.
NOTICE: In Japan, the voltage selection switch must be set to the 115-V position even though the AC power
available in Japan is 100 V.
6
Verify that the voltage selection switch is set correctly for your location.
Your computer has a manual voltage-selection switch. Computers with a voltage selection switch on
the back panel must be manually set to operate at the correct operating voltage.

Quick Reference Guide 11
System Views
Mini Tower Computer — Front View
1 location of Service Tag Use the Service Tag to identify your computer when you access the Dell Support
website or call technical support.
2 CD/DVD drive Insert a CD or DVD (if supported) into this drive.
3 floppy drive Insert a floppy disk into this drive.
4 hard-drive activity light This light flickers when the hard drive is in use.
4
9
7
8
3
2
6
5
1
10

12 Quick Reference Guide
5 USB 2.0 connectors (2) Use the USB connectors on the front of the computer for devices that you connect
occasionally, such as joysticks or cameras, or for bootable USB devices.
It is recommended that you use the USB connectors on the back of the computer
for devices that typically remain connected, such as printers and keyboards.
6 diagnostic lights Use the lights to help you troubleshoot a computer problem based on the
diagnostic code (for more information, see "Diagnostic Lights" on page 34).
7 power button Press this button to turn on the computer.
NOTICE: To avoid losing data, do not turn off the computer by pressing the
power button. Instead, perform an operating system shutdown.
NOTICE: If your operating system has ACPI enabled, when you press the power
button the computer will perform an operating system shutdown.
8 power light The power light illuminates and blinks or remains solid to indicate different
operating states:
• No light — The computer is turned off.
• Steady green — The computer is in a normal operating state.
• Blinking green — The computer is in a power-saving mode.
• Blinking or solid amber — The computer is receiving electrical power, but an
internal power problem might exist. See "Power Problems" in your online
User’s
Guide
.
To exit from a power-saving mode, press the power button or use the keyboard or
the mouse if it is configured as a wake device in the Windows Device Manager. For
more information about sleep modes and exiting from a power-saving mode, see
your online User’s Guide.
For a description of light codes that can help you troubleshoot problems with your
computer, see "System Lights" on page 33.
9 headphone connector Use the headphone connector to attach headphones.
10 link integrity light
• Green — A good connection exists between a 10-Mbps network and the computer.
• Orange — A good connection exists between a 100-Mbps network and the
computer.
• Off — The computer is not detecting a physical connection to the network.

Quick Reference Guide 13
Mini Tower Computer — Back View
1
cover release latch
This latch allows you to open the computer cover.
2
padlock ring
Insert a padlock to lock the computer cover.
3 power connector Insert the power cable into this connector.
4
3
5
6
2
1

14 Quick Reference Guide
Mini Tower Computer — Back-Panel Connectors
4 voltage selection switch Your computer is equipped with a manual voltage-selection switch. To avoid
damaging a computer with a manual voltage-selection switch, set the switch for the
voltage that most closely matches the AC power available in your location.
NOTICE: In Japan the voltage-selection switch must be set to the 115-V
position.
Also, ensure that your monitor and attached devices are electrically rated to operate
with the AC power available in your location.
5 back-panel connectors Plug serial, USB, and other devices into the appropriate connector.
See "Mini Tower Computer — Back-Panel Connectors" on page 14.
6 card slots Access connectors for any installed PCI and PCI Express cards.
1
parallel connector
Connect a parallel device, such as a printer, to the parallel connector. If you have a
USB printer, plug it into a USB connector.
NOTE: The integrated parallel connector is automatically disabled if the computer
detects an installed card containing a parallel connector configured to the same
address. For more information, see your online User’s Guide.
2
link integrity light • Green — A good connection exists between a 10-Mbps network and the
computer.
• Orange — A good connection exists between a 100-Mbps network and the
computer.
• Off — The computer is not detecting a physical connection to the network.
13
10 9 8
5
6
7
24

Quick Reference Guide 15
3
network adapter
connector
To attach your computer to a network or broadband device, connect one end of a
network cable to a network jack or your network or broadband device. Connect the
other end of the network cable to the network adapter connector on the back
panel of your computer. A click indicates that the network cable has been securely
attached.
NOTE: Do not plug a telephone cable into the network connector.
On computers with a network adapter card, use the connector on the card.
It is recommended that you use Category 5 wiring and connectors for your
network. If you must use Category 3 wiring, force the network speed to 10 Mbps
to ensure reliable operation.
4
network activity light
This light flashes yellow when the computer is transmitting or receiving network
data. A high volume of network traffic may make this light appear to be in a steady
"on" state.
5
line-in connector
Use the blue line-in connector to attach a record/playback device such as a
cassette player, CD player, or VCR.
On computers with a sound card, use the connector on the card.
6
line-out connector
Use the green line-out connector to attach headphones and most speakers with
integrated amplifiers.
On computers with a sound card, use the connector on the card.
7
microphone connector
Use the pink microphone connector to attach a personal computer microphone
for voice or musical input into a sound or telephony program.
On computers with a sound card, the microphone connector is on the card.
8
USB 2.0 connectors (4)
Use the back USB connectors for devices that typically remain connected, such as
printers and keyboards.
9
video connector
Plug the cable from your VGA-compatible monitor into the blue connector.
NOTE: If you purchased an optional graphics card, this connector will be covered by
a cap. Connect your monitor to the connector on the graphics card. Do not remove
the cap.
10
serial connector
Connect a serial device, such as a handheld device, to the serial port. The default
designation is COM1 for serial connector 1.
For more information, see your online User’s Guide.

16 Quick Reference Guide
Desktop Computer — Front View
1 USB 2.0 connectors (2) Use the USB connectors on the front of the computer for devices that you
connect occasionally, such as joysticks or cameras, or for bootable USB devices
(see your online User’s Guide for more information about booting to a USB
device).
It is recommended that you use the USB connectors on the back panel for devices
that typically remain connected, such as printers and keyboards.
2 hard-drive activity light This light flickers when the hard drive is being accessed.
3 power button Press this button to turn on the computer.
NOTICE: To avoid losing data, do not turn off the computer by pressing the
power button for 6 seconds or longer. Instead, perform an operating system
shutdown.
NOTICE: If your operating system has ACPI enabled, when you press the
power button the computer will perform an operating system shutdown.
4 Dell badge This badge can be rotated to match the orientation of your computer. To rotate
the badge, place your fingers around the outside of the badge, press firmly, and
turn the badge. You can also rotate the badge using the slot provided near the
bottom of the badge.
89
3
5
1
4610
2
11
7

Quick Reference Guide 17
Desktop Computer — Back View
5 power light The power light illuminates and blinks or remains solid to indicate different
operating states:
• No light — The computer is turned off.
• Steady green — The computer is in a normal operating state.
• Blinking green — The computer is in a power-saving mode.
• Blinking or solid amber — See "Power Problems" in your online
User’s Guide
.
To exit from a power-saving mode, press the power button or use the keyboard or
the mouse if it is configured as a wake device in the Windows Device Manager.
For a description of light codes that can help you troubleshoot problems with your
computer see "System Lights" on page 33.
6 diagnostic lights Use the lights to help you troubleshoot a computer problem based on the
diagnostic code. For more information, see "Diagnostic Lights" on page 34.
7 link integrity light
• Green — A good connection exists between a 10-Mbps network and the
computer.
• Orange — A good connection exists between a 100-Mbps network and the
computer.
• Off — The computer is not detecting a physical connection to the network.
8 headphone connector Use the headphone connector to attach headphones.
9 floppy drive Insert a floppy disk into this drive.
10 CD/DVD drive Insert a CD or DVD (if supported) into this drive.
11 location of Service Tag Use the Service Tag to identify your computer when you access the Dell Support
website or call technical support.
1 card slots Access connectors for any installed PCI and PCI Express Cards.
2 back-panel connectors Plug serial, USB, and other devices into the appropriate connector.
See "Desktop Computer — Back-Panel Connectors" on page 18.
3 power connector Insert the power cable into this connector.
5
1
2 3 4 6

18 Quick Reference Guide
Desktop Computer — Back-Panel Connectors
4 voltage selection switch Your computer is equipped with a manual voltage-selection switch. To avoid
damaging a computer with a manual voltage-selection switch, set the switch for
the voltage that most closely matches the AC power available in your location.
NOTICE: In Japan, the voltage-selection switch must be set to the 115-V
position.
Also, ensure that your monitor and attached devices are electrically rated to
operate with the AC power available in your location.
5 padlock ring Insert a padlock to lock the computer cover.
6 cover release latch Use this latch to open the computer cover.
1
parallel connector
Connect a parallel device, such as a printer, to the parallel connector. If you have a
USB printer, plug it into a USB connector.
NOTE: The integrated parallel connector is automatically disabled if the computer
detects an installed card containing a parallel connector configured to the same
address. For more information, see your online User’s Guide.
2
link integrity light • Green — A good connection exists between a 10-Mbps network and the
computer.
• Orange — A good connection exists between a 100-Mbps network and the
computer.
• Off — The computer is not detecting a physical connection to the network.
13
10 9 8
5
6
7
24

Quick Reference Guide 19
3
network adapter
connector
To attach your computer to a network or broadband device, connect one end of a
network cable to either a network jack or your network or broadband device.
Connect the other end of the network cable to the network adapter connector on
the back panel of your computer. A click indicates that the network cable has been
securely attached.
NOTE: Do not plug a telephone cable into the network connector.
On computers with a network adapter card, use the connector on the card.
It is recommended that you use Category 5 wiring and connectors for your
network. If you must use Category 3 wiring, force the network speed to 10 Mbps
to ensure reliable operation.
4
network activity light
This light flashes yellow when the computer is transmitting or receiving network
data. A high volume of network traffic may make this light appear to be in a steady
"on" state.
5
line-in connector
Use the blue line-in connector to attach a record/playback device such as a
cassette player, CD player, or VCR.
On computers with a sound card, use the connector on the card.
6
line-out connector
Use the green line-out connector to attach headphones and most speakers with
integrated amplifiers.
On computers with a sound card, use the connector on the card.
7
microphone connector
Use the pink microphone connector to attach a personal computer microphone
for voice or musical input into a sound or telephony program.
On computers with a sound card, the microphone connector is on the card.
8
USB 2.0 connectors (4)
Use the back USB connectors for devices that typically remain connected, such as
printers and keyboards.
9
video connector
Plug the cable from your VGA-compatible monitor into the blue connector.
NOTE: If you purchased an optional graphics card, this connector will be covered by
a cap. Connect your monitor to the connector on the graphics card. Do not remove
the cap.
10
serial connector
Connect a serial device, such as a handheld device, to the serial port. The default
designation is COM1 for serial connector 1.
For more information, see your online User’s Guide.

20 Quick Reference Guide
Removing the Computer Cover
CAUTION: Before you begin any of the procedures in this section, follow the safety instructions in the Product
Information Guide.
CAUTION: To guard against electrical shock, always unplug your computer from the electrical outlet before
removing the cover.
Before You Begin
NOTICE: To avoid losing data, save and close any open files and exit any open programs before you turn off your
computer.
1
Shut down the operating system:
a
Save and close any open files, exit any open programs, click the
Start
button, and then click
Tu rn
Off Computer
.
b
In the
Turn off computer
window, click
Tur n off
.
The computer turns off after the operating system shutdown process finishes.
2
Ensure that the computer and any attached devices are turned off. If your computer and attached
devices did not automatically turn off when you shut down your operating system, turn them off now.
Before Working Inside Your Computer
Use the following safety guidelines to help protect your computer from potential damage and to help
ensure your own personal safety.
CAUTION: Before you begin any of the procedures in this section, follow the safety instructions in the Product
Information Guide.
CAUTION: Handle components and cards with care. Do not touch the components or contacts on a card. Hold a
card by its edges or by its metal mounting bracket. Hold a component such as a processor by its edges, not by
its pins.
NOTICE: Only a certified service technician should perform repairs on your computer. Damage due to servicing
that is not authorized by Dell is not covered by your warranty.
NOTICE: When you disconnect a cable, pull on its connector or on its strain-relief loop, not on the cable itself.
Some cables have a connector with locking tabs; if you are disconnecting this type of cable, press in on the locking
tabs before you disconnect the cable. As you pull connectors apart, keep them evenly aligned to avoid bending any
connector pins. Also, before you connect a cable, ensure that both connectors are correctly oriented and aligned.
To avoid damaging the computer, perform the following steps before you begin working inside the
computer.
1
Turn off your computer.
NOTICE: To disconnect a network cable, first unplug the cable from your computer and then unplug it from the
network wall jack.
2
Disconnect any telephone or telecommunication lines from the computer.

Quick Reference Guide 21
3
Disconnect your computer and all attached devices from their electrical outlets, and then press the
power button to ground the system board.
4
If applicable, remove the computer stand (for instructions, see the documentation that came with the
stand).
CAUTION: To guard against electrical shock, always unplug your computer from the electrical outlet before
removing the cover.
5
Remove the computer cover:
• Remove the mini tower computer cover (see "Mini Tower Computer" on page 21).
• Remove the desktop computer cover (see "Desktop Computer" on page 27).
NOTICE: Before touching anything inside your computer, ground yourself by touching an unpainted metal surface,
such as the metal at the back of the computer. While you work, periodically touch an unpainted metal surface to
dissipate any static electricity that could harm internal components.
Mini Tower Computer
CAUTION: Before you begin any of the procedures in this section, follow the safety instructions in the Product
Information Guide.
CAUTION: To guard against electrical shock, always unplug your computer from the electrical outlet before
removing the computer cover.
1
Follow the procedures in "Before You Begin" on page 20.
2
If you have installed a padlock through the padlock ring on the back panel, remove the padlock.
3
Lay the computer on its side.
4
Slide the cover release latch back as you lift the cover.
5
Grip the sides of the computer cover and pivot the cover up using the hinge tabs as leverage points.
6
Remove the cover from the hinge tabs and set it aside on a soft nonabrasive surface.

22 Quick Reference Guide
1 security cable slot
2 cover release latch
3 padlock ring
2
1
3

Quick Reference Guide 23
Desktop Computer
CAUTION: Before you begin any of the procedures in this section, follow the safety instructions in the Product
Information Guide.
CAUTION: To guard against electrical shock, always unplug your computer from the electrical outlet before
removing the computer cover.
1
Follow the procedures in "Before You Begin" on page 20.
2
If you have installed a padlock through the padlock ring on the back panel, remove the padlock.
3
Slide the cover release latch back as you lift the cover.
4
Pivot the cover up using the hinge tabs as leverage points.
5
Remove the cover from the hinge tabs and set it aside on a soft nonabrasive surface.
1
security cable slot
2
cover release latch
3
padlock ring
2
1
3

24 Quick Reference Guide
Inside Your Computer
Mini Tower Computer
1 CD/DVD drive 4 system board
2 floppy drive 5 heat sink assembly
3 power supply 6 hard drive
1
3
4
6
2
5

Quick Reference Guide 25
System Board Components
12
4
6
15
3
16
17
14
10
5
8
7
12
13
911

26 Quick Reference Guide
Jumper Settings
1 fan connector (FAN) 10 internal buzzer (SPKR1)
2 processor connector (CPU) 11 password jumper (PSWD)
3 processor power connector (12VPOWER) 12 real time clock reset jumper (RTCRST)
4 front-panel connector (FNT_PANEL) 13 battery socket (BATT)
5 memory module connectors (DIMM_1,
DIMM_2)
14 PCI Express x16 card connector
6 SATA drive connectors (SATA0, SATA1) 15 PCI card connectors (2)
7 power connector (POWER) 16 floppy drive connector (FLOPPY)
8 CD/DVD drive connector (IDE) 17 serial/ PS/2 connector (PS2/SER2)
9 SATA drive connectors (SATA2, SATA3)
Mini Tower Computer

Quick Reference Guide 27
Desktop Computer
Jumper Setting Description
PSWD Password features are enabled
(default setting).
Password features are disabled.
RTCRST
The real-time clock has been
enabled (default setting).
The real-time clock is being reset
(jumpered temporarily).
jumpered unjumpered
1 drive bay (CD/DVD, floppy,
and hard drive)
4 card slots
2 power supply 5 heat sink assembly
3 system board 6 front I/O panel
1
2
3
4
5
6
1
1

28 Quick Reference Guide
System Board Components
12
4
6
15
3
16
17
14
10
5
8
7
12
13
11 9

Quick Reference Guide 29
Jumper Settings
1 fan connector (FAN) 10 internal buzzer (SPKR1)
2 processor connector (CPU) 11 password jumper (PSWD)
3 processor power connector (12VPOWER) 12 RTC reset jumper (RTCRST)
4 front-panel connector (FNT_PANEL) 13 battery socket (BATT)
5 memory module connectors (DIMM_1, DIMM_2) 14 PCI Express x16 card connector
6 serial ATA drive connectors (SATA0, SATA1) 15 PCI card connector (2)
7 power connector (POWER) 16 floppy drive connector (FLOPPY)
8 CD/DVD drive connector (IDE) 17 serial/ PS/2 connector (PS2/SER2)
9 serial ATA drive connectors (SATA2, SATA3)
Desktop Computer

30 Quick Reference Guide
Solving Problems
Dell provides a number of tools to help you if your computer does not perform as expected. For the latest
troubleshooting information available for your computer, see the Dell Support website at
support.dell.com.
If computer problems occur that require help from Dell, write a detailed description of the error, beep
codes, or diagnostics light patterns, record your Express Service Code and Service Tag below, and then
contact Dell from the same location as your computer. For information on contacting Dell, see your
online User’s Guide.
For an example of the Express Service Code and Service Tag, see "Finding Information" on page 5.
Express Service Code: ___________________________
Service Tag: ___________________________
Dell Diagnostics
CAUTION: Before you begin any of the procedures in this section, follow the safety instructions in the Product
Information Guide.
When to Use the Dell Diagnostics
If you experience a problem with your computer, perform the checks in "Solving Problems" in your online
User’s Guide and run the Dell Diagnostics before you contact Dell for technical assistance. For
information on contacting Dell, see your online User’s Guide.
NOTICE: The Dell Diagnostics works only on Dell™ computers.
Jumper Setting Description
PSWD Password features are enabled
(default setting).
Password features are disabled.
RTCRST
The real-time clock has been
enabled (default setting).
The real-time clock is being reset
(jumpered temporarily).
jumpered unjumpered
1
1

Quick Reference Guide 31
Enter system setup (see "System Setup" in your online User’s Guide for instructions), review your
computer’s configuration information, and ensure that the device you want to test displays in system
setup and is active.
Start the Dell Diagnostics from either your hard drive or from the optional Drivers and Utilities CD (also
known as the ResourceCD).
Starting the Dell Diagnostics From Your Hard Drive
1
Turn on (or restart) your computer.
2
When the DELL logo appears, press <F12> immediately.
NOTE: If you see a message stating that no diagnostics utility partition has been found, run the Dell
Diagnostics from the optional Drivers and Utilities CD (see "Starting the Dell Diagnostics From the Drivers and
Utilities CD" on page 31).
If you wait too long and the operating system logo appears, continue to wait until you see the
Microsoft
®
Windows
®
desktop. Then shut down your computer and try again.
3
When the boot device list appears, highlight
Boot to Utility Partition
and press <Enter>.
4
When the Dell Diagnostics
Main Menu
appears, select the test you want to run.
Starting the Dell Diagnostics From the Drivers and Utilities CD
1
Insert the
Drivers and Utilities
CD.
2
Shut down and restart the computer.
When the DELL logo appears, press <F12> immediately.
If you wait too long and the operating system logo appears, continue to wait until you see the
Microsoft Windows desktop. Then shut down your computer and try again.
NOTE: The next steps change the boot sequence for one time only. On the next start-up, the computer boots
according to the devices specified in system setup.
3
When the boot device list appears, highlight the listing for the CD/DVD drive and press <Enter>.
4
Select the listing for the CD/DVD drive option from the CD boot menu.
5
Select the option to boot from the CD/DVD drive from the menu that appears.
6
Ty p e
1
to start the
Drivers and Utilities
CD menu.
7
Ty p e
2
to start the Dell Diagnostics.
8
Select
Run the 32 Bit Dell Diagnostics
from the numbered list. If multiple versions are listed, select
the version appropriate for your computer.
9
When the Dell Diagnostics
Main Menu
appears, select the test you want to run.

32 Quick Reference Guide
Dell Diagnostics Main Menu
1
After the Dell Diagnostics loads and the
Main
Menu
screen appears, click the button for the option
you want.
2
If a problem is encountered during a test, a message appears with an error code and a description of the
problem. Write down the error code and problem description and follow the instructions on the
screen.
If you cannot resolve the error condition, contact Dell. For information on contacting Dell, see your
online
User’s Guide
.
NOTE: The Service Tag for your computer is located at the top of each test screen. If you contact Dell,
technical support will ask for your Service Tag.
3
If you run a test from the
Custom Test
or
Symptom Tree
option, click the applicable tab described in
the following table for more information.
4
When the tests are completed, if you are running the Dell Diagnostics from the
Drivers and Utilities
CD (optional)
,
remove the CD.
5
Close the test screen to return to the
Main
Menu
screen. To exit the Dell Diagnostics and restart the
computer, close the
Main
Menu
screen.
Option Function
Express Test Performs a quick test of devices. This test typically takes 10 to 20 minutes and requires
no interaction on your part. Run Express Test first to increase the possibility of tracing
the problem quickly.
Extended Test Performs a thorough check of devices. This test typically takes an hour or more and
requires you to answer questions periodically.
Custom Test Tests a specific device. You can customize the tests you want to run.
Symptom Tree Lists the most common symptoms encountered and allows you to select a test based on
the symptom of the problem you are having.
Tab Function
Results Displays the results of the test and any error conditions encountered.
Errors Displays error conditions encountered, error codes, and the problem description.
Help Describes the test and may indicate requirements for running the test.
Configuration Displays your hardware configuration for the selected device.
The Dell Diagnostics obtains configuration information for all devices from system
setup, memory, and various internal tests, and it displays the information in the device
list in the left pane of the screen. The device list may not display the names of all the
components installed on your computer or all devices attached to your computer.
Parameters You can customize the test by changing the test settings.

Quick Reference Guide 33
System Lights
Your power light may indicate a computer problem.
Power Light Problem Description Suggested Resolution
Solid green Power is on, and the computer is
operating normally.
No corrective action is required.
Blinking green The computer is in a power-saving
mode.
Press the power button, move the mouse, or
press a key on the keyboard to wake the
computer.
Blinks green several
times and then turns off
A configuration error exists. Check Diagnostic Lights to see if the specific
problem is identified (see "Diagnostic Lights"
on page 34).
Solid yellow The Dell Diagnostics is running a
test, or a device on the system board
may be faulty or incorrectly installed.
If the Dell Diagnostics is running, allow the
testing to complete.
Check Diagnostic Lights to see if the specific
problem is identified (see "Diagnostic Lights"
on page 34).
If the computer does not boot, contact Dell
for technical assistance.
For information on
contacting Dell, see your online
User’s Guide
.
Blinking yellow A power supply or system board
failure has occurred.
Check Diagnostic Lights to see if the specific
problem is identified (see "Diagnostic Lights"
on page 34).
See "Power Problems" in your online User’s
Guide.
Solid green and a beep
code during POST
A problem was detected while the
BIOS was executing.
For instructions on diagnosing the beep code
see "Beep Codes" on page 37. Also, check
Diagnostic Lights to see if the specific
problem is identified.
Solid green power light,
no beep code and no
video during POST
The monitor or the graphics card may
be faulty or incorrectly installed.
Check Diagnostic Lights to see if the specific
problem is identified.
Solid green power light
and no beep code, but
the computer locks up
during POST
An integrated system board device
may be faulty.
Check Diagnostic Lights to see if the specific
problem is identified. If the problem is not
identified, contact Dell for technical
assistance.
For information on contacting Dell,
see your online
User’s Guide
.

34 Quick Reference Guide
Diagnostic Lights
CAUTION: Before you begin any of the procedures in this section, follow the safety instructions in the Product
Information Guide.
To help you troubleshoot a problem, your computer has four lights labeled "1," "2," "3," and "4" on the
front or back panel. The lights can be "off" or green. When the computer starts normally, the patterns or
codes on the lights change as the boot process completes. If the POST portion of system boot completes
successfully, all four lights display solid green for a short time, and then turn off.
If the computer malfunctions during the POST process, the pattern displayed on the LEDs may help
identify where in the process the computer halted. If the computer malfunctions after a successful
POST, the diagnostic lights do not indicate the cause of the problem.
NOTE: The orientation of the diagnostic lights may vary depending on the system type. The diagnostic lights can be
either vertically or horizontally oriented.
Light Pattern Problem Description Suggested Resolution
The computer is in a normal "off"
condition, or a possible pre-BIOS failure
has occurred.
The diagnostic lights are not lit after the
computer successfully boots to the
operating system.
Plug the computer into a working electrical
outlet and press the power button.
A possible BIOS failure has occurred; the
computer is in recovery mode.
Run the BIOS Recovery utility, wait for
recovery completion, and then restart the
computer.
A possible processor failure has occurred. Reinstall the processor and restart the
computer.
For information on reinstalling the
processor, see your online
User’s Guide
.

Quick Reference Guide 35
Memory modules are detected, but a
memory failure has occurred.
• If you have one memory module installed,
reinstall it and restart the computer. For
information on reinstalling memory
modules, see your online
User’s Guide
.
• If you have two or more memory modules
installed, remove the modules, reinstall one
module, and then restart the computer. If
the computer starts normally, reinstall an
additional module. Continue until you have
identified a faulty module or reinstalled all
modules without error.
• If available, install properly working
memory of the same type into your
computer.
• If the problem persists,
contact Dell
. For
information on contacting Dell, see your
online
User’s Guide
.
A possible graphics card failure has
occurred.
• If the computer has a graphics card, remove
the card, reinstall it, and then restart the
computer.
• If the problem still exists, install a graphics
card that you know works and restart the
computer.
• If the problem persists or the computer has
integrated graphics,
contact Dell
. For
information on contacting Dell, see your
online
User’s Guide
.
A possible floppy or hard drive failure has
occurred.
Reseat all power and data cables and restart
the computer.
A possible USB failure has occurred. Reinstall all USB devices, check cable
connections, and then restart the computer.
Light Pattern Problem Description Suggested Resolution

36 Quick Reference Guide
No memory modules are detected.
• If you have one memory module installed,
reinstall it and restart the computer. For
information on reinstalling memory
modules, see your online
User’s Guide
.
• If you have two or more memory modules
installed, remove the modules, reinstall one
module, and then restart the computer. If
the computer starts normally, reinstall an
additional module. Continue until you have
identified a faulty module or reinstalled all
modules without error.
• If available, install properly working
memory of the same type into your
computer.
• If the problem persists,
contact Dell
. For
information on contacting Dell, see your
online
User’s Guide
.
Memory modules are detected, but a
memory configuration or compatibility
error exists.
• Ensure that no
special memory
module/memory connector placement
requirements
exist.
• Verify that the
memory modules
that you
are installing are compatible with your
computer.
• If the problem persists,
contact Dell
. For
information on contacting Dell, see your
online
User’s Guide
.
A failure has occurred.
This pattern also displays when you enter
system setup and may not indicate a
problem.
• Ensure that the cables are properly
connected to the system board from the
hard drive, CD drive, and DVD drive.
• Check the computer message that appears
on your monitor screen.
• If the problem persists,
contact Dell
. For
information on contacting Dell, see your
online
User’s Guide
.
After POST is complete, all four
diagnostic lights turn green briefly before
turning off to indicate a normal operating
condition.
None.
Light Pattern Problem Description Suggested Resolution

Quick Reference Guide 37
Beep Codes
Your computer might emit a series of beeps during start-up if the monitor cannot display errors or
problems. This series of beeps, called a beep code, identifies a problem. One possible beep code
(code 1-3-1) consists of one beep, a burst of three beeps, and then one beep. This beep code tells you
that the computer encountered a memory problem.
If your computer beeps during start-up:
1
Write down the beep code.
2
See "Dell Diagnostics" on page 30 to identify a more serious cause.
3
Contact Dell for technical assistance. For information on contacting Dell, see your online
User’s
Guide
.
Code Cause Code Cause
1-1-2 Microprocessor register failure 3-1-4 Slave interrupt mask register failure
1-1-3 NVRAM read/write failure 3-2-2 Interrupt vector loading failure
1-1-4 ROM BIOS checksum failure 3-2-4 Keyboard Controller test failure
1-2-1 Programmable interval timer failure 3-3-1 NVRAM power loss
1-2-2 DMA initialization failure 3-3-2 Invalid NVRAM configuration
1-2-3 DMA page register read/write
failure
3-3-4 Video Memory test failure
1-3 Video Memory test failure 3-4-1 Screen initialization failure
1-3-1 through 2-4-4 Memory not being properly
identified or used
3-4-2 Screen retrace failure
3-1-1 Slave DMA register failure 3-4-3 Search for video ROM failure
3-1-2 Master DMA register failure 4-2-1 No timer tick
3-1-3 Master interrupt mask register
failure
4-2-2 Shutdown failure
4-2-3 Gate A20 failure 4-4-1 Serial or parallel port test failure
4-2-4 Unexpected interrupt in protected
mode
4-4-2 Failure to decompress code to
shadowed memory
4-3-1 Memory failure above address
0FFFFh
4-4-3 Math-coprocessor test failure
4-3-3 Timer-chip counter 2 failure 4-4-4 Cache test failure
4-3-4 Time-of-day clock stopped

38 Quick Reference Guide
Resolving Software and Hardware Incompatibilities
If a device is either not detected during the operating system setup or is detected but incorrectly
configured, you can use the Hardware Troubleshooter to resolve the incompatibility.
1
Click the
Start
button and click
Help and Support
.
2
Ty p e
hardware troubleshooter
in the
Search
field and click the arrow to start the search.
3
Click
Hardware Troubleshooter
in the
Search Results
list.
4
In the
Hardware Troubleshooter
list, click
I need to resolve a hardware conflict on my computer
, and
click
Next
.
Using Microsoft Windows XP System Restore
The Microsoft Windows XP operating system provides System Restore to allow you to return your
computer to an earlier operating state (without affecting data files) if changes to the hardware, software,
or other system settings have left the computer in an undesirable operating state. See the Windows Help
and Support Center for information on using System Restore. To access the Windows Help and Support
Center, see "Windows Help and Support Center" on page 7.
NOTICE: Make regular backups of your data files. System Restore does not monitor your data files or recover them.
Creating a Restore Point
1
Click the
Start
button and click
Help and Support
.
2
Click
System Restore
.
3
Follow the instructions on the screen.
Restoring the Computer to an Earlier Operating State
NOTICE: Before you restore the computer to an earlier operating state, save and close any open files and exit any
open programs. Do not alter, open, or delete any files or programs until the system restoration is complete.
1
Click the
Start
button, point to
All Programs
→
Accessories
→
System Tools
, and then click
System
Restore
.
2
Ensure that
Restore my computer to an earlier time
is selected, and click
Next
.
3
Click a calendar date to which you want to restore your computer.
The
Select a Restore Point
screen provides a calendar that allows you to see and select restore points.
All calendar dates with available restore points appear in boldface type.
4
Select a restore point and click
Next
.
If a calendar date has only one restore point, then that restore point is automatically selected. If two or
more restore points are available, click the restore point that you prefer.

Quick Reference Guide 39
5
Click
Next
.
The
Restoration Complete
screen appears after System Restore finishes collecting data and then the
computer restarts.
6
After the computer restarts, click
OK
.
To change the restore point, you can either repeat the steps using a different restore point, or you can
undo the restoration.
Undoing the Last System Restore
NOTICE: Before you undo the last system restore, save and close all open files and exit any open programs. Do not
alter, open, or delete any files or programs until the system restoration is complete.
1
Click the
Start
button, point to
All Programs
→
Accessories
→
System Tools
, and then click
System
Restore
.
2
Click
Undo my last restoration
and click
Next
.
3
Click
Next
.
The
System Restore
screen appears and the computer restarts.
4
After the computer restarts, click
OK
.
Enabling System Restore
If you reinstall Windows XP with less than 200 MB of free hard-disk space available, System Restore is
automatically disabled. To verify that System Restore is enabled:
1
Click the
Start
button and click
Control
Panel
.
2
Click
Performance and Maintenance
.
3
Click
System
.
4
Click the
System Restore
tab.
5
Ensure that
Turn off System Restore
is unchecked.
Reinstalling Microsoft Windows XP
Before You Begin
NOTE: The procedures in this document were written for the Windows default view in Windows XP Home Edition,
so the steps will differ if you set your Dell computer to the Windows Classic view or are using Windows XP
Professional.
If you are considering reinstalling the Windows XP operating system to correct a problem with a newly
installed driver, first try using Windows XP Device Driver Rollback.
1
Click the
Start
button and click
Control Pane
l.
2
Under
Pick a Category
, click
Performance and Maintenance
.
3
Click
System
.

40 Quick Reference Guide
4
In the
System Properties
window, click the
Hardware
tab.
5
Click
Device Manager
.
6
Right-click the device for which the new driver was installed and click
Properties
.
7
Click the
Drivers
tab.
8
Click
Roll Back Driver
.
If Device Driver Rollback does not resolve the problem, then use System Restore to return your operating
system to the operating state it was in before you installed the new device driver (see "Using Microsoft
Windows XP System Restore" on page 38).
NOTE: The Drivers and Utilities CD contains drivers that were installed during assembly of the computer. Use the
Drivers and Utilities CD to load any required drivers, including the drivers required if your computer has a RAID
controller.
Reinstalling Windows XP
NOTICE: You must use Windows XP Service Pack 1 or later when you reinstall Windows XP.
NOTICE: Before performing the installation, back up all data files on your primary hard drive. For conventional hard
drive configurations, the primary hard drive is the first drive detected by the computer.
To reinstall Windows XP, you need the following items:
•Dell
Operating System
CD
•Dell
Drivers and Utilities
CD
To reinstall Windows XP, perform all the steps in the following sections in the order in which they are
listed.
The reinstallation process can take 1 to 2 hours to complete. After you reinstall the operating system, you
must also reinstall the device drivers, virus protection program, and other software.
NOTICE: The Operating System CD provides options for reinstalling Windows XP. The options can overwrite files
and possibly affect programs installed on your hard drive. Therefore, do not reinstall Windows XP unless a Dell
technical support representative instructs you to do so.
NOTICE: To prevent conflicts with Windows XP, disable any virus protection software installed on your computer
before you reinstall Windows XP. See the documentation that came with the software for instructions.
Booting From the Operating System CD
1
Save and close any open files and exit any open programs.
2
Insert the
Operating System
CD. Click
Exit
if the
Install Windows XP
message appears.
3
Restart the computer.
4
Press <F12> immediately after the DELL logo appears.
If the operating system logo appears, wait until you see the Windows desktop, and then shut down the
computer and try again.

Quick Reference Guide 41
5
Press the arrow keys to select
CD-ROM
, and press <Enter>.
6
When the
Press any key to boot from CD
message appears, press any key.
Windows XP Setup
1
When the
Windows XP Setup
screen appears, press <Enter> to select
To set up Windows now
.
2
Read the information on the
Microsoft Windows Licensing Agreement
screen, and press <F8> to
accept the license agreement.
3
If your computer already has Windows XP installed and you want to recover your current Windows XP
data, type
r
to select the repair option, and remove the CD.
4
If you want to install a new copy of Windows XP, press <Esc> to select that option.
5
Press <Enter> to select the highlighted partition (recommended), and follow the instructions on the
screen.
The
Windows XP Setup
screen appears, and the operating system begins to copy files and install the
devices. The computer automatically restarts multiple times.
NOTE: The time required to complete the setup depends on the size of the hard drive and the speed of your
computer.
NOTICE: Do not press any key when the following message appears: Press any key to boot from
the CD
.
6
When the
Regional and Language Options
screen appears, select the settings for your location and
click
Next
.
7
Enter your name and organization (optional) in the
Personalize Your Software
screen, and click
Next
.
8
At the
Computer Name and Administrator Password
window, enter a name for your computer (or
accept the one provided) and a password, and click
Next
.
9
If the
Modem Dialing Information
screen appears, enter the requested information and click
Next
.
10
Enter the date, time, and time zone in the
Date and Time Settings
window, and click
Next
.
11
If the
Networking Settings
screen appears, click
Typical
and click
Next
.
12
If you are reinstalling Windows XP Professional and you are prompted to provide further information
regarding your network configuration, enter your selections. If you are unsure of your settings, accept
the default selections.
Windows XP installs the operating system components and configures the computer. The computer
automatically restarts.
NOTICE: Do not press any key when the following message appears: Press any key to boot from
the CD
.
13
When the
Welcome to Microsoft
screen appears, click
Next
.
14
When the
How will this computer connect to the Internet?
message appears,
click
Skip
.

42 Quick Reference Guide
15
When the
Ready to register with Microsoft?
screen appears, select
No, not at this time
and click
Next
.
16
When the
Who will use this computer?
screen appears, you can enter up to five users.
17
Click
Next
.
18
Click
Finish
to complete the setup, and remove the CD.
19
Reinstall the appropriate drivers with the
Drivers and Utilities
CD.
20
Reinstall your virus protection software.
21
Reinstall your programs.
NOTE: To reinstall and activate your Microsoft Office or Microsoft Works Suite programs, you need the Product
Key number located on the back of the Microsoft Office or Microsoft Works Suite CD sleeve.
Using the Drivers and Utilities CD
To use the Drivers and Utilities CD (also known as the ResourceCD) while you are running the Windows
operating system:
NOTE: To access device drivers and user documentation, you must use the Drivers and Utilities CD while you are
running Windows.
1
Turn on the computer and allow it to boot to the Windows desktop.
2
Insert the
Drivers and Utilities
CD into the CD drive.
If you are using the
Drivers and Utilities
CD for the first time on this computer, the
ResourceCD
Installation
window opens to inform you that the
Drivers and Utilities
CD is about to begin installation.
3
Click
OK
to continue.
To complete the installation, respond to the prompts offered by the installation program.
4
Click
Next
at the
Welcome Dell System Owner
screen.
5
Select the appropriate
System Model
,
Operating System
,
Device Type
,
and
Topic
.
Drivers for Your Computer
To display a list of device drivers for your computer:
1
Click
My Drivers
in the
Topic
drop-down menu.
The
Drivers and Utilities
CD (optional) scans your computer’s hardware and operating system, and
then a list of device drivers for your system configuration is displayed on the screen.
2
Click the appropriate driver and follow the instructions to download the driver to your computer.
To view all available drivers for your computer, click Drivers from the Topic drop-down menu.

Index 43
Index
B
beep codes, 37
C
CDs
operating system, 6
conflicts
software and hardware
incompatibilities, 38
cover
removing, 20
D
Dell Diagnostics, 30
Dell support site, 7
diagnostics
beep codes, 37
Dell Diagnostics, 30
documentation
End User License
Agreement, 5
ergonomics, 5
online, 7
Product Information Guide, 5
regulatory, 5
safety, 5
User’s Guide, 6
warranty, 5
drivers
list of, 42
Drivers and Utilities CD, 5
E
End User License
Agreement, 5
ergonomics information, 5
error messages
beep codes, 37
diagnostic lights, 34
system lights, 33
H
hardware
beep codes, 37
conflicts, 38
Dell Diagnostics, 30
Hardware Troubleshooter, 38
Help and Support Center, 7
help file
Windows Help and Support
Center, 7
I
installing parts
before you begin, 20
IRQ conflicts, 38
L
labels
Microsoft Windows, 6
Service Tag, 6
lights
diagnostic, 34
power, 17
system, 33
M
motherboard. See system
board
O
operating system
reinstalling, 6
reinstalling Windows XP, 39
Operating System CD, 6
P
power
light, 17
power light
diagnosing problems with, 33
problems. See troubleshooting
Product Information Guide, 5

44 Index
44 Index
R
regulatory information, 5
reinstalling
Windows XP, 39
S
safety instructions, 5
Service Tag, 6
software
conflicts, 38
support website, 7
system board, 25, 28
System Restore, 38
T
troubleshooting
beep codes, 37
conflicts, 38
Dell Diagnostics, 30
diagnostic lights, 34
Hardware Troubleshooter, 38
Help and Support Center, 7
restore computer to previous
operating state, 38
system lights, 33
U
User’s Guide, 6
W
warranty information, 5
Windows XP
Hardware Troubleshooter, 38
Help and Support Center, 7
reinstalling, 6, 39
setup, 41
System Restore, 38

www.dell.com | support.dell.com
Dell™ OptiPlex™ 320
Guide de référence rapide
Modèles DCSM, DCNE

Remarques, avis et précautions
REMARQUE : Une REMARQUE fournit des informations importantes qui vous aident à mieux utiliser votre ordinateur.
AVIS : Un AVIS vous avertit d’un risque de dommage matériel ou de perte de données et vous indique comment éviter le
problème.
PRÉCAUTION : Une PRÉCAUTION indique un risque potentiel d'endommagement du matériel, de blessure corporelle
ou de mort.
Si vous avez acheté un ordinateur Dell™ Série n, les références du présent document concernant les systèmes
d'application Microsoft
®
Windows
®
ne sont pas applicables.
____________________
Les informations de ce document sont sujettes à modification sans préavis.
© 2006 Dell Inc. Tous droits réservés.
La reproduction de ce document, de quelque manière que ce soit, sans l'autorisation écrite de Dell Inc. est strictement interdite.
Marques utilisées dans ce document : Dell, OptiPlex et le logo DELL sont des marques de Dell Inc. ; Microsoft et Windows sont des marques
déposées de Microsoft Corporation ; Intel et Pentium sont des marques déposées d'Intel Corporation.
D'autres marques et noms commerciaux peuvent être utilisés dans ce document pour faire référence aux entités se réclamant de ces marques
et de ces noms ou à leurs produits. Dell Inc. rejette tout intérêt propriétaire dans les marques et les noms commerciaux autres que les siens.
Modèles DCSM, DCNE
Septembre 2006 Réf. FK640 Rév. A01

Table des matières 47
Table des matières
Recherche d'informations . . . . . . . . . . . . . . . . . . . . . . . . . . . . 49
Configuration de votre ordinateur
. . . . . . . . . . . . . . . . . . . . . . . . 52
Vues du système
. . . . . . . . . . . . . . . . . . . . . . . . . . . . . . . . . 55
Ordinateur mini-tour — Vue frontale
. . . . . . . . . . . . . . . . . . . . 55
Ordinateur mini-tour — Vue arrière
. . . . . . . . . . . . . . . . . . . . 57
Ordinateur mini-tour — Connecteurs du panneau arrière
. . . . . . . . . 58
Ordinateur de bureau — Vue frontale
. . . . . . . . . . . . . . . . . . . 60
Ordinateur de bureau — Vue arrière
. . . . . . . . . . . . . . . . . . . . 61
Ordinateur de bureau — Connecteurs du panneau arrière
. . . . . . . . 62
Retrait du capot de l'ordinateur
. . . . . . . . . . . . . . . . . . . . . . . . . 64
Avant de commencer
. . . . . . . . . . . . . . . . . . . . . . . . . . . . 64
Ordinateur mini-tour
. . . . . . . . . . . . . . . . . . . . . . . . . . . . 65
Ordinateur de bureau
. . . . . . . . . . . . . . . . . . . . . . . . . . . . 67
L’intérieur de votre ordinateur
. . . . . . . . . . . . . . . . . . . . . . . . . . 68
Ordinateur mini-tour
. . . . . . . . . . . . . . . . . . . . . . . . . . . . 68
Ordinateur de bureau
. . . . . . . . . . . . . . . . . . . . . . . . . . . . 71
Résolution des problèmes
. . . . . . . . . . . . . . . . . . . . . . . . . . . . 74
Dell Diagnostics
. . . . . . . . . . . . . . . . . . . . . . . . . . . . . . . 74
Voyants du système
. . . . . . . . . . . . . . . . . . . . . . . . . . . . . 77
Voyants de diagnostic
. . . . . . . . . . . . . . . . . . . . . . . . . . . . . . 78
Codes sonores
. . . . . . . . . . . . . . . . . . . . . . . . . . . . . . . 81
Résolution des incompatibilités logicielles et matérielles
. . . . . . . . . 82
Utilisation de la fonction Restauration du système
Microsoft® Windows® XP
. . . . . . . . . . . . . . . . . . . . . . . . . 82
Réinstallation de Microsoft® Windows® XP
. . . . . . . . . . . . . . . 83
Utilisation du CD Drivers and Utilities
. . . . . . . . . . . . . . . . . . . . . . 86
Index . . . . . . . . . . . . . . . . . . . . . . . . . . . . . . . . . . . . . . . . . 87

48 Table des matières

Guide de référence rapide 49
Recherche d'informations
REMARQUE : Certaines fonctionnalités ou supports peuvent être optionnels et ne pas accompagner votre
ordinateur. Certaines fonctionnalités ou supports peuvent ne pas être disponibles dans certains pays.
REMARQUE : Il est possible que des informations supplémentaires soient fournies avec votre ordinateur.
Que recherchez-vous ? Cherchez ici
• Programme de diagnostic pour mon ordinateur
• Pilotes pour mon ordinateur
• Documentation de mon ordinateur
• Documentation concernant mon périphérique
• Logiciel DSS (Desktop System Software)
CD Drivers and Utilities (également appelé CD ResourceCD)
REMARQUE : Le CD Drivers and Utilities peut être optionnel et ne
pas être expédié avec votre ordinateur.
La documentation et les pilotes sont déjà installés sur l'ordinateur.
Vous pouvez utiliser le CD pour réinstaller les pilotes (reportez-
vous à la section « Réinstallation des pilotes et utilitaires » de votre
Guide d'utilisation en ligne), pour exécuter Dell Diagnosticsics
(reportez-vous à la section « Dell Diagnostics » à la page 74) ou
pour accéder à votre documentation.
Des fichiers « Lisez-moi » peuvent
être inclus sur votre CD afin de
fournir les informations les plus
récentes concernant des
modifications techniques
apportées à votre système ou des
informations de référence
destinées aux techniciens ou aux
utilisateurs expérimentés.
REMARQUE : Les dernières mises à jour des pilotes et de la
documentation se trouvent à l'adresse support.dell.com.
• Informations sur les garanties
• Termes et Conditions (États-Unis uniquement)
• Consignes de sécurité
• Informations sur les réglementations
• Informations relatives à l'ergonomie
• Contrat de licence pour utilisateur final
Guide d'information sur le produit Dell™

50 Guide de référence rapide
• Comment retirer et remplacer des pièces
• Caractéristiques
• Comment configurer les paramètres du système
• Comment déterminer et résoudre des problèmes
Guide d'utilisation du Dell™ OptiPlex™
Centre d'aide et de support Microsoft Windows XP
1
Cliquez sur
Démarrer
→
Aide et Support
→
Guides d'utilisation
du système
→
Guides du système
.
2
Cliquez sur le
Guide d'utilisation
de votre ordinateur.
Le Guide d'utilisation est également disponible sur le CD Drivers
and Utilities en option.
• Numéro de service et code de service express
• Étiquette de licence Microsoft Windows
Numéro de service et licence Microsoft
®
Windows
®
Ces étiquettes sont apposées à votre ordinateur.
• Utilisez le numéro de service
pour identifier votre ordinateur
lorsque vous accédez au site
Web
support.dell.com
ou
lorsque vous contactez le service
de support.
• Entrez le code de service
express pour orienter votre
appel lorsque vous contactez le
service de support.
• Comment réinstaller mon système d'exploitation
CD Operating System
REMARQUE : Le CD Operating System peut être en option et n'est
pas obligatoirement expédié avec tous les ordinateurs.
Le système d'exploitation est déjà installé sur votre ordinateur.
Pour réinstaller le système d'exploitation, utilisez le CD Operating
System. Reportez-vous à la section « Réinstallation de Microsoft®
Windows® XP » à la page 83.
Après avoir réinstallé le système
d'exploitation, utilisez le CD
Drivers and Utilities en option
(ResourceCD) pour réinstaller les
pilotes des périphériques fournis
avec votre ordinateur.
L'étiquette de la Product Key (Clé
de produit) du système
d'exploitation est apposée à
l'ordinateur.
REMARQUE : La couleur du CD varie selon le système d'exploitation
que vous avez commandé.
Que recherchez-vous ? Cherchez ici

Guide de référence rapide 51
• Solutions — Conseils et astuces de dépannage,
articles de techniciens, questions fréquemment
posées et cours en ligne
• Forum clients — Discussion en ligne avec d'autres
clients Dell
• Mises à niveau — Informations sur les mises à
niveau des composants, comme la mémoire, l'unité
de disque dur et le système d'exploitation
• Service clientèle — Coordonnées, appels de service
et état des commandes, garantie et informations
sur les réparations
• Service et support — État des appels de service et
historique du support, contrat de service,
discussions en ligne avec le support technique
• Référence — Documentation de l'ordinateur,
détails sur la configuration de l'ordinateur,
caractéristiques de produit et livres blancs
• Téléchargements — Pilotes, correctifs et mises à
jour logicielles agréés
• Logiciel DSS (Desktop System Software) — Si
vous réinstallez le système d'exploitation de
l'ordinateur, vous devez également réinstaller
l'utilitaire DSS. l'utilitaire fournit des mises à jour
essentielles pour le système d'exploitation et la
prise en charge des lecteurs de disquette USB
Dell™ de 3,5 pouces, des processeurs Intel
®
, des
lecteurs optiques et des périphériques USB.
l'utilitaire est requis pour le bon fonctionnement
de votre ordinateur Dell. Ce logiciel détecte
automatiquement votre ordinateur et son système
d'exploitation, et installe les mises à jour
appropriées à votre configuration.
Site Web du service de support de Dell — support.dell.com
REMARQUE : Sélectionnez votre région ou votre secteur d'activité
pour afficher le site de support approprié.
Pour télécharger DSS (Desktop System Software) :
1
Rendez-vous sur
support.dell.com
, sélectionnez votre région ou
votre secteur d'activité et entrez votre numéro de service.
2
Sélectionnez
Drivers & Downloads
(Pilotes et téléchargements)
et cliquez sur
Go/OK
.
3
Cliquez sur votre système d'exploitation et recherchez le mot-clé
Desktop System Software
.
REMARQUE : L'interface utilisateur support.dell.com peut varier en
fonction de vos sélections.
• Comment utiliser Windows XP
• Comment utiliser des programmes et des fichiers
• Comment personnaliser mon bureau
Centre d'aide et de support de Windows
1
Cliquez sur
Démarrer
→
Aide et support
.
2
Entrez un mot ou une expression qui décrit votre problème, puis
cliquez sur l'icône en forme de flèche.
3
Cliquez sur la rubrique qui décrit votre problème.
4
Suivez les instructions qui s'affichent.
Que recherchez-vous ? Cherchez ici

52 Guide de référence rapide
Configuration de votre ordinateur
PRÉCAUTION : Avant de commencer toute procédure de cette section, lisez les consignes de sécurité du Guide
d'information sur le produit.
AVIS : Si votre ordinateur est doté d'une carte d'extension (une carte modem par exemple), branchez le câble
approprié sur la carte et non pas sur le connecteur du panneau arrière.
AVIS : Pour garantir une bonne température de fonctionnement de l'ordinateur, veillez à ne pas placer l'ordinateur
trop près d'un mur ou d'un compartiment de rangement pouvant empêcher une bonne circulation de l'air autour du
châssis.
REMARQUE : Avant d'installer tout périphérique ou logiciel qui n'a pas été livré avec votre ordinateur, lisez
attentivement la documentation fournie avec le logiciel ou le périphérique ou contactez votre fournisseur, afin de
vous assurer que le logiciel ou l'appareil est compatible avec votre ordinateur et votre système d'exploitation.
Votre ordinateur sera correctement configuré uniquement lorsque toutes ces étapes seront réalisées.
Reportez-vous aux illustrations appropriées qui suivent les instructions.
AVIS : N'utilisez pas simultanément une souris PS/2 et une souris USB.
1
Branchez le clavier et la souris.
AVIS : Ne branchez pas de câble modem dans le connecteur d'adaptateur réseau. En effet, la tension des
communications téléphoniques risquerait de l'endommager.
Installation du clavier et de la souris
2
Branchez le modem ou le câble réseau.
Insérez le câble réseau, et non la ligne téléphonique, dans le connecteur réseau. Si vous disposez d'un
modem optionnel, connectez la ligne téléphonique à ce dernier.

Guide de référence rapide 53
3
Connectez le moniteur à l'aide
du
câble DVI blanc
ou du
câble VGA bleu (ne connectez
pas
les deux
câbles).
Alignez, puis insérez avec précaution le câble du moniteur de manière à ne pas tordre les broches du
connecteur. Resserrez les vis moletées des connecteurs de câble.
REMARQUE : Sur certains moniteurs, le connecteur vidéo est placé sous l'arrière de l'écran. Consultez la
documentation fournie avec votre moniteur pour connaître les emplacements des connecteurs.
Installation du moniteur
4
Branchez les haut-parleurs.
5
Branchez les câbles d'alimentation à l'ordinateur, au moniteur et aux périphériques, puis insérez les
autres extrémités des câbles dans des prises électriques.

54 Guide de référence rapide
Connexions d'alimentation
AVIS : Si vous utilisez un sélecteur de tension manuel, réglez le commutateur sur la tension la plus proche de
l'alimentation en CA de votre région afin d'éviter d'endommager l'ordinateur.
AVIS : Au Japon, le sélecteur de tension doit être placé en position 115 V même si la tension disponible au Japon
est de 100 V.
6
Vérifiez que le sélecteur de tension indique la tension appropriée à votre zone géographique.
Votre ordinateur est équipé d'un sélecteur de tension manuel. Les ordinateurs dotés d'un sélecteur de
tension sur leur panneau arrière doivent être réglés manuellement, en fonction de la tension
disponible.

Guide de référence rapide 55
Vues du système
Ordinateur mini-tour — Vue frontale
4
9
7
8
3
2
6
5
1
10
1 emplacement du numéro
de service
Utilisez le numéro de service pour identifier votre ordinateur lorsque vous accédez
au site Web de support de Dell ou que vous contactez le support technique.
2 lecteur de CD/DVD Permet d'insérer un CD ou un DVD (si cela est pris en charge).
3 lecteur de disquette Permet d'insérer une disquette.
4 voyant d'activité de
l'unité de disque dur
Ce voyant clignote lorsque le disque dur fonctionne.

56 Guide de référence rapide
5 connecteurs USB 2.0 (2) Utilisez les connecteurs USB frontaux pour les périphériques connectés
occasionnellement, comme les manettes de jeu ou les appareils photo, ou les
périphériques USB amorçables.
Il est recommandé d'utiliser les connecteurs USB situés à l'arrière de l'ordinateur
pour les périphériques connectés en permanence, comme l'imprimante et le clavier.
6 voyants de diagnostic Les voyants vous aident à résoudre les problèmes informatiques d'après le code de
diagnostic (pour de plus amples informations, reportez-vous à la section «Voyants
de diagnostic » à la page 78).
7 bouton d'alimentation Appuyez sur ce bouton pour allumer l'ordinateur.
AVIS : Pour ne pas perdre de données, n'éteignez pas l'ordinateur en appuyant
sur le bouton d'alimentation. Procédez plutôt à un arrêt du système d'exploitation.
AVIS : Si la fonctionnalité ACPI est activée sur votre système d'exploitation,
lorsque vous appuyez sur le bouton d'alimentation, l'ordinateur procède à un
arrêt du système d'exploitation.
8 voyant d'alimentation Le voyant d'alimentation s'allume et clignote ou reste fixe, selon l'état de
fonctionnement :
• Éteint — L'ordinateur est éteint.
• Vert fixe — L'ordinateur fonctionne normalement.
• Vert clignotant — L'ordinateur est en mode d'économie d'énergie.
• Orange fixe ou clignotant — L'ordinateur est alimenté mais il peut y avoir un
problème d'alimentation interne. Reportez-vous à la section « Problèmes
d'alimentation » du
Guide d'utilisation
en ligne.
Pour quitter le mode d'économie d'énergie, appuyez sur le bouton d'alimentation ou
utilisez le clavier ou la souris si ce périphérique est configuré comme un
périphérique de réveil dans le Gestionnaire de périphériques Windows. Pour plus
d'informations sur les modes de mise en veille et sur la façon de quitter un mode
d'économie d'énergie, reportez-vous à la section Guide d'utilisation en ligne.
Pour obtenir une description des codes lumineux pouvant vous aider à résoudre les
problèmes rencontrés sur votre ordinateur, reportez-vous à la section « Voyants du
système » à la page 77.
9 connecteur de casque Utilisez le connecteur de casque pour brancher le casque.
10 voyant d'intégrité de la
liaison
• Vert — Une bonne connexion est établie entre le réseau 10 Mb/s et l'ordinateur.
• Orange — Une bonne connexion est établie entre le réseau 100 Mb/s et l'ordinateur.
• Éteint — L'ordinateur ne détecte pas de connexion physique au réseau.

Guide de référence rapide 57
Ordinateur mini-tour — Vue arrière
4
3
5
6
2
1
1
loquet de fermeture du capot
Ce loquet permet d'ouvrir le capot de l'ordinateur.
2
anneau pour cadenas
Insérez un cadenas pour verrouiller le capot de l'ordinateur.
3 connecteur d'alimentation Permet de brancher le câble d'alimentation.

58 Guide de référence rapide
Ordinateur mini-tour — Connecteurs du panneau arrière
4 commutateur de sélection de
tension
Votre ordinateur est équipé d'un sélecteur de tension manuel. Si vous utilisez un
sélecteur de tension manuel, réglez le commutateur sur la tension la plus proche de
l'alimentation en CA de votre région afin d'éviter d'endommager l'ordinateur.
AVIS : Au Japon le sélecteur de tension doit être configuré sur 115 V.
Assurez-vous également que votre moniteur et tous ses périphériques sont
électriquement réglés pour fonctionner avec la puissance en CA disponible dans
votre zone géographique.
5 connecteurs du panneau
arrière
Permettent de connecter les périphériques série, USB et les autres périphériques à
leurs connecteurs respectifs.
Reportez-vous à la section « Ordinateur mini-tour — Connecteurs du panneau
arrière » à la page 58.
6 logements de carte Permettent d'accéder aux connecteurs de toutes les cartes PCI et PCI Express
installées.
1
connecteur parallèle
Permet de connecter un périphérique parallèle, tel qu'une imprimante. Si vous
avez une imprimante USB, raccordez-la à un connecteur USB.
REMARQUE : Le connecteur parallèle intégré est automatiquement désactivé si
l'ordinateur détecte une carte installée contenant un connecteur parallèle configuré
sur la même adresse. Pour plus d'informations, reportez-vous à la section Guide
d'utilisation en ligne.
2
voyant d'intégrité de la
liaison
• Vert — Une bonne connexion est établie entre le réseau 10 Mb/s et l'ordinateur.
• Orange — Une bonne connexion est établie entre le réseau 100 Mb/s et
l'ordinateur.
• Éteint — L'ordinateur ne détecte pas de connexion physique au réseau.
13
10
98
5
6
7
24

Guide de référence rapide 59
3
connecteur de carte
réseau
Pour connecter l'ordinateur à un périphérique réseau ou large bande, branchez
l'une des extrémités d'un câble réseau à une prise réseau, un périphérique réseau
ou un périphérique large bande. Connectez l'autre extrémité du câble au
connecteur de carte réseau situé sur le panneau arrière de votre ordinateur. Un
déclic indique que le câble de réseau a été correctement installé.
REMARQUE : Ne branchez pas un câble téléphonique au connecteur réseau.
Sur les ordinateurs équipés d'une carte d'adaptateur réseau, utilisez le connecteur
situé sur cette carte.
Il est recommandé d'utiliser un câblage et des connecteurs de catégorie 5 pour le
réseau. Si vous devez utiliser un câblage de catégorie 3, forcez la vitesse réseau à
10 Mb/s pour garantir un fonctionnement fiable.
4
voyant d'activité réseau
Ce voyant est jaune clignotant lorsque l'ordinateur transmet ou reçoit des données
réseau. Un trafic réseau important peut donner l'impression que ce voyant est fixe.
5
connecteur ligne d'entrée
Utilisez le connecteur ligne d'entrée bleu pour raccorder un appareil
d'enregistrement/de lecture, tel qu'un lecteur de cassette, un lecteur de CD ou un
magnétoscope.
Sur les ordinateurs équipés d'une carte son, utilisez le connecteur qui se trouve sur
cette carte.
6
connecteur ligne de sortie
Utilisez le connecteur ligne de sortie vert pour raccorder le casque et la plupart des
haut-parleurs dotés d'amplificateurs intégrés.
Sur les ordinateurs équipés d'une carte son, utilisez le connecteur qui se trouve sur
cette carte.
7
connecteur microphone
Utilisez le connecteur microphone rose pour raccorder un microphone
d'ordinateur personnel destiné à une entrée vocale ou musicale dans un
programme sonore ou de téléphonie.
Sur les ordinateurs équipés d'une carte son, le connecteur microphone est situé
sur la carte.
8
connecteurs USB 2.0 (4)
Utilisez les connecteurs USB situés à l'arrière pour les périphériques connectés en
permanence, comme l'imprimante et le clavier.
9
connecteur vidéo
Branchez le câble du moniteur compatible VGA dans le connecteur bleu.
REMARQUE : Si vous avez acheté une carte graphique optionnelle, ce connecteur
sera recouvert d'un cache. Connectez votre moniteur au connecteur sur la carte
graphique. Ne retirez pas le cache.
10
connecteur série
Connectez un périphérique série, tel qu'un PDA, au port série. La désignation par
défaut est COM1 pour le connecteur série 1.
Pour plus d'informations, reportez-vous au Guide d'utilisation.

60 Guide de référence rapide
Ordinateur de bureau — Vue frontale
1 connecteurs USB 2.0 (2) Utilisez les connecteurs USB situés à l'avant de l'ordinateur pour connecter les
périphériques dont vous ne vous servez qu'occasionnellement, tels qu'une manette
de jeu ou une caméra, ou des périphériques USB amorçables (reportez-vous au
Guide d'utilisation pour de plus amples informations sur l'amorçage à partir d'un
périphérique USB).
Il est recommandé d'utiliser les connecteurs USB situés à l'arrière de l'ordinateur
pour les périphériques connectés en permanence, comme l'imprimante et le
clavier.
2 voyant d'activité de
l'unité de disque dur
Ce voyant clignote rapidement lors de l'accès au disque dur.
3 bouton d'alimentation Appuyez sur ce bouton pour allumer l'ordinateur.
AVIS : Afin d'éviter de perdre des données, n'éteignez pas l'ordinateur en
appuyant sur le bouton d'alimentation pendant 6 secondes ou plus. Procédez
plutôt à un arrêt du système d'exploitation.
AVIS : Si la fonctionnalité ACPI est activée sur votre système d'exploitation,
lorsque vous appuyez sur le bouton d'alimentation, l'ordinateur procède à un
arrêt du système d'exploitation.
4 badge Dell Vous pouvez faire pivoter ce badge pour l'aligner sur l'orientation de votre
ordinateur. Pour le faire pivoter, placez vos doigts sur le pourtour du badge,
appuyez fermement dessus, puis tournez-le. Vous pouvez également le faire
pivoter à l'aide de l'encoche située vers le bas du badge.
8
9
3
5
1
46
10
2
11
7

Guide de référence rapide 61
Ordinateur de bureau — Vue arrière
5 voyant d'alimentation Le voyant d'alimentation s'allume et clignote ou reste fixe, selon l'état de
fonctionnement :
• Éteint — L'ordinateur est éteint.
• Vert fixe — L'ordinateur fonctionne normalement.
• Vert clignotant — L'ordinateur est en mode d'économie d'énergie.
• Orange clignotant ou fixe — Reportez-vous à la section « Problèmes
d'alimentation » du
Guide d'utilisation
en ligne.
Pour quitter le mode d'économie d'énergie, appuyez sur le bouton d'alimentation
ou utilisez le clavier ou la souris si ce périphérique est configuré comme un
périphérique de réveil dans le Gestionnaire de périphériques Windows.
Pour obtenir une description des codes lumineux pouvant vous aider à résoudre les
problèmes rencontrés avec votre ordinateur, reportez-vous à la section « Voyants
du système » à la page 77.
6 voyants de diagnostic Ces voyants vous aident à résoudre les problèmes informatiques d'après le code de
diagnostic. Pour plus d'informations, reportez-vous à la section «Voyants de
diagnostic » à la page 78.
7 voyant d'intégrité de la
liaison
• Vert — Une bonne connexion est établie entre le réseau 10 Mb/s et l'ordinateur.
• Orange — Une bonne connexion est établie entre le réseau 100 Mb/s et
l'ordinateur.
• Éteint — L'ordinateur ne détecte pas de connexion physique au réseau.
8 connecteur de casque Utilisez le connecteur de casque pour brancher le casque.
9 lecteur de disquette Permet d'insérer une disquette.
10 lecteur de CD/DVD Permet d'insérer un CD ou un DVD (si cela est pris en charge).
11 emplacement du
numéro de service
Utilisez le numéro de service pour identifier votre ordinateur lorsque vous accédez
au site Web de support de Dell ou que vous contactez le support technique.
1 logements de carte Permettent d'accéder aux connecteurs de toutes les cartes PCI et PCI Express
installées.
2 connecteurs du panneau
arrière
Permettent de connecter les périphériques série, USB et les autres périphériques à
leurs connecteurs respectifs.
Reportez-vous à la section « Ordinateur de bureau — Connecteurs du panneau
arrière » à la page 62.
5
1
2
3
4
6

62 Guide de référence rapide
Ordinateur de bureau — Connecteurs du panneau arrière
3 connecteur
d'alimentation
Permet de brancher le câble d'alimentation.
4 commutateur de
sélection de tension
Votre ordinateur est équipé d'un sélecteur de tension manuel. Si vous utilisez un
sélecteur de tension manuel, réglez le commutateur sur la tension la plus proche
de l'alimentation en CA de votre région afin d'éviter d'endommager l'ordinateur.
AVIS : Au Japon, le sélecteur de tension doit être configuré sur 115 V.
Assurez-vous également que votre moniteur et tous ses périphériques sont
électriquement réglés pour fonctionner avec la puissance en CA disponible dans
votre zone géographique.
5 anneau pour cadenas Insérez un cadenas pour verrouiller le capot de l'ordinateur.
6 loquet de fermeture du
capot
Ce loquet permet d'ouvrir le capot de l'ordinateur.
1
connecteur parallèle
Permet de connecter un périphérique parallèle, tel qu'une imprimante. Si vous
avez une imprimante USB, raccordez-la à un connecteur USB.
REMARQUE : Le connecteur parallèle intégré est automatiquement désactivé si
l'ordinateur détecte une carte installée contenant un connecteur parallèle configuré
sur la même adresse. Pour plus d'informations, reportez-vous au Guide d'utilisation.
2
voyant d'intégrité de la
liaison
• Vert — Une bonne connexion est établie entre le réseau 10 Mb/s et l'ordinateur.
• Orange — Une bonne connexion est établie entre le réseau 100 Mb/s et
l'ordinateur.
• Éteint — L'ordinateur ne détecte pas de connexion physique au réseau.
13
10 9 8
5
6
7
24

Guide de référence rapide 63
3
connecteur de carte
réseau
Pour connecter l'ordinateur à un périphérique réseau ou large bande, branchez
l'une des extrémités d'un câble réseau à une prise réseau, un périphérique réseau
ou un périphérique large bande. Connectez l'autre extrémité du câble au
connecteur de carte réseau situé sur le panneau arrière de votre ordinateur. Un
déclic indique que le câble de réseau a été correctement installé.
REMARQUE : Ne branchez pas un câble téléphonique au connecteur réseau.
Sur les ordinateurs équipés d'une carte d'adaptateur réseau, utilisez le connecteur
situé sur cette carte.
Il est recommandé d'utiliser un câblage et des connecteurs de catégorie 5 pour le
réseau. Si vous devez utiliser un câblage de catégorie 3, forcez la vitesse réseau à
10 Mb/s pour garantir un fonctionnement fiable.
4
voyant d'activité réseau
Ce voyant est jaune clignotant lorsque l'ordinateur transmet ou reçoit des
données réseau. Un trafic réseau important peut donner l'impression que ce
voyant est fixe.
5
connecteur ligne d'entrée
Utilisez le connecteur ligne d'entrée bleu pour raccorder un appareil
d'enregistrement/de lecture, tel qu'un lecteur de cassette, un lecteur de CD ou un
magnétoscope.
Sur les ordinateurs équipés d'une carte son, utilisez le connecteur qui se trouve sur
cette carte.
6
connecteur ligne de
sortie
Utilisez le connecteur ligne de sortie vert pour raccorder le casque et la plupart
des haut-parleurs dotés d'amplificateurs intégrés.
Sur les ordinateurs équipés d'une carte son, utilisez le connecteur qui se trouve sur
cette carte.
7
connecteur microphone
Utilisez le connecteur microphone rose pour raccorder un microphone
d'ordinateur personnel destiné à une entrée vocale ou musicale dans un
programme sonore ou de téléphonie.
Sur les ordinateurs équipés d'une carte son, le connecteur microphone est situé
sur la carte.
8
connecteurs USB 2.0 (4)
Utilisez les connecteurs USB situés à l'arrière pour les périphériques connectés en
permanence, comme l'imprimante et le clavier.
9
connecteur vidéo
Branchez le câble du moniteur compatible VGA dans le connecteur bleu.
REMARQUE : Si vous avez acheté une carte graphique optionnelle, ce connecteur
sera recouvert d'un cache. Connectez votre moniteur au connecteur sur la carte
graphique. Ne retirez pas le cache.
10
connecteur série
Connectez un périphérique série, tel qu'un PDA, au port série. La désignation par
défaut est COM1 pour le connecteur série 1.
Pour plus d'informations, reportez-vous au Guide d'utilisation.

64 Guide de référence rapide
Retrait du capot de l'ordinateur
PRÉCAUTION : Avant de commencer toute procédure de cette section, consultez et respectez les consignes de
sécurité du Guide d'information sur le produit.
PRÉCAUTION : Pour prévenir tout risque de choc électrique, débranchez toujours votre ordinateur de la prise
électrique avant de retirer le capot.
Avant de commencer
AVIS : Pour éviter de perdre des données, enregistrez tous les fichiers ouverts, fermez-les et quittez toutes les
applications avant de procéder à l'arrêt du système.
1
Arrêtez le système d'exploitation :
a
Enregistrez et fermez tous les fichiers ouverts, quittez tous les programmes, cliquez sur le bouton
Démarrer
, puis cliquez sur
Arrêter l'ordinateur
.
b
Dans la fenêtre
Arrêter l'ordinateur
, cliquez sur
Arrêter/Éteindre
.
L'ordinateur s'éteint une fois le processus d'arrêt terminé.
2
Vérifiez que l'ordinateur et les périphériques reliés sont éteints. Si votre ordinateur et les périphériques
qui y sont connectés ne se sont pas éteints automatiquement lorsque vous avez éteint votre ordinateur,
éteignez-les maintenant.
Avant d'intervenir à l'intérieur de votre ordinateur
Respectez les consignes de sécurité suivantes pour vous aider à protéger votre ordinateur contre les
dommages éventuels et pour garantir votre sécurité personnelle.
PRÉCAUTION : Avant de commencer toute procédure de cette section, consultez et respectez les consignes de
sécurité du Guide d'information sur le produit.
PRÉCAUTION : Manipulez les composants et les cartes avec précaution. Ne touchez pas les composants ou les
contacts d'une carte. Tenez une carte par les bords ou par la languette de montage métallique. Tenez les
composants, tels qu'un processeur, par les bords et non par les broches.
AVIS : Seul un technicien d'entretien qualifié doit effectuer les réparations sur votre ordinateur. Les dommages
causés par une personne non agréée par Dell ne sont pas couverts par votre garantie.
AVIS : Lorsque vous débranchez un câble, tirez sur le connecteur ou sur la boucle prévue, mais jamais sur le câble
lui-même. Certains câbles sont munis d'un connecteur aux languettes de verrouillage ; si vous déconnectez ce
type de câble, appuyez sur les languettes de verrouillage vers l'intérieur avant de déconnecter le câble. Quand
vous séparez les connecteurs en tirant dessus, veillez à les maintenir alignés pour ne pas plier de broches de
connecteur. De même, lorsque vous connectez un câble, assurez-vous que les deux connecteurs sont bien
orientés et alignés.
Avant de commencer à travailler sur l'ordinateur, suivez les étapes suivantes pour éviter de
l'endommager.
1
Éteignez l'ordinateur.
AVIS : Pour déconnecter un câble réseau, débranchez d'abord le câble de votre ordinateur, puis de la prise réseau
murale.

Guide de référence rapide 65
2
Débranchez tous les fils de téléphone ou de télécommunication de l'ordinateur.
3
Déconnectez l'ordinateur et tous ses périphériques de leurs prises secteur, puis appuyez sur le bouton
d'alimentation pour mettre la carte système à la terre.
4
Retirez, le cas échéant, le socle inclinable de l'ordinateur (pour les instructions, reportez-vous à la
documentation fournie avec le socle inclinable).
PRÉCAUTION : Pour prévenir tout risque de choc électrique, débranchez toujours votre ordinateur de la prise
électrique avant de retirer le capot.
5
Retirez le capot de l'ordinateur :
• Retirez le capot de l'ordinateur mini-tour (reportez-vous à la section « Ordinateur mini-tour » à la
page 65).
• Retirez le capot de l'ordinateur de bureau (reportez-vous à la section « Ordinateur de bureau » à la
page 71).
AVIS : Avant de toucher quoi que ce soit à l'intérieur de l'ordinateur, mettez-vous à la terre en touchant une
surface métallique non peinte, par exemple la partie métallique à l'arrière de l'ordinateur. Pendant votre
intervention, touchez périodiquement une surface métallique non peinte de l'ordinateur pour dissiper toute
électricité statique qui pourrait endommager les composants internes.
Ordinateur mini-tour
PRÉCAUTION : Avant de commencer toute procédure de cette section, consultez et respectez les consignes de
sécurité du Guide d'information sur le produit.
PRÉCAUTION : Pour éviter tout choc électrique, débranchez toujours la prise secteur de votre ordinateur avant
de retirer le capot de l'ordinateur.
1
Suivez les procédures de la section « Avant de commencer » à la page 64.
2
Si vous avez installé un cadenas dans l'anneau prévu à cet effet sur le panneau arrière, retirez-le.
3
Faites reposer l'ordinateur sur le côté.
4
Faites glisser le loquet de fermeture du capot vers l'arrière tout en soulevant le capot.
5
Prenez le capot de l'ordinateur par les côtés et faites-le pivoter vers le haut en utilisant les languettes de
charnière comme leviers.
6
Retirez le capot des languettes de charnière et mettez-le de côté sur une surface douce non abrasive.

66 Guide de référence rapide
1 emplacement pour câble de sécurité
2 loquet de fermeture du capot
3 anneau pour cadenas
2
1
3

Guide de référence rapide 67
Ordinateur de bureau
PRÉCAUTION : Avant de commencer toute procédure de cette section, consultez et respectez les consignes de
sécurité du Guide d'information sur le produit.
PRÉCAUTION : Pour éviter tout choc électrique, débranchez toujours la prise secteur de votre ordinateur avant
de retirer le capot de l'ordinateur.
1
Suivez les procédures de la section « Avant de commencer » à la page 64.
2
Si vous avez installé un cadenas dans l'anneau prévu à cet effet sur le panneau arrière, retirez-le.
3
Faites glisser le loquet de fermeture du capot vers l'arrière tout en soulevant le capot.
4
Faites pivoter le capot de l'ordinateur vers le haut en utilisant les languettes de charnière comme
leviers.
5
Retirez le capot des languettes de charnière et mettez-le de côté sur une surface douce non abrasive.
1
emplacement pour câble de sécurité
2
loquet de fermeture du capot
3
anneau pour cadenas
2
1
3

68 Guide de référence rapide
L’intérieur de votre ordinateur
Ordinateur mini-tour
1 lecteur de CD/DVD 4 carte système
2 lecteur de disquette 5 assemblage du dissipateur de chaleur
3 bloc d'alimentation 6 unité de disque dur
1
3
4
6
2
5

Guide de référence rapide 69
Composants de la carte système
12
4
6
15
3
16
17
14
10
5
8
7
12
13
911

70 Guide de référence rapide
Paramètres des cavaliers
1 connecteur de ventilateur (FAN) 10 avertisseur interne (SPKR1)
2 connecteur du processeur (UC) 11 cavalier du mot de passe (PSWD)
3 connecteur d'alimentation du processeur
(12VPOWER)
12 real time clock reset jumper (RTCRST - Cavalier
de réinitialisation de l'horloge temps réel)
4 connecteur du panneau avant (FNT_PANEL) 13 support de pile (BATT)
5 connecteurs de module de mémoire (DIMM_1,
DIMM_2)
14 connecteur de carte PCI Express x16
6 connecteurs de disque SATA (SATA0, SATA1) 15 connecteurs de carte PCI (2)
7 connecteur d'alimentation (POWER) 16 connecteur pour lecteur de disquette (FLOPPY)
8 connecteur du lecteur de CD/DVD (IDE) 17 connecteur série/PS/2 (PS2/SER2)
9 connecteurs de disque SATA (SATA2, SATA3)
Ordinateur mini-tour

Guide de référence rapide 71
Ordinateur de bureau
Cavalier Paramètre Description
PSWD Les fonctions de mot de passe sont
activées (configuration par défaut).
Les fonctions de mot de passe sont
désactivées.
RTCRST
L'horloge en temps réel a été
activée (configuration par défaut).
L'horloge en temps réel est en cours
de réinitialisation (cavalier fermé
temporairement).
fermé ouvert
1 baie de lecteurs (CD/DVD,
disquette et disque dur)
4 logements de carte
2 bloc d'alimentation 5 assemblage du dissipateur de chaleur
3 carte système 6 panneau d'E/S avant
1
2
3
4
5
6
1
1

72 Guide de référence rapide
Composants de la carte système
12
4
6
15
3
16
17
14
10
5
8
7
12
13
11
9

Guide de référence rapide 73
Paramètres des cavaliers
1 connecteur de ventilateur (FAN) 10 avertisseur interne (SPKR1)
2 connecteur du processeur (UC) 11 cavalier du mot de passe (PSWD)
3 connecteur d'alimentation du processeur
(12VPOWER)
12 cavalier de réinitialisation RTC (RTCRST)
4 connecteur du panneau avant (FNT_PANEL) 13 support de pile (BATT)
5 connecteurs de module de mémoire (DIMM_1,
DIMM_2)
14 connecteur de carte PCI Express x16
6 connecteurs de lecteur ATA série (SATA0, SATA1) 15 connecteur de carte PCI (2)
7 connecteur d'alimentation (POWER) 16 connecteur pour lecteur de disquette
(FLOPPY)
8 connecteur du lecteur de CD/DVD (IDE) 17 connecteur série/PS/2 (PS2/SER2)
9 connecteurs de lecteur ATA série (SATA2, SATA3)
Ordinateur de bureau

74 Guide de référence rapide
Résolution des problèmes
Dell fournit un certain nombre d'outils qui vous aideront si votre ordinateur ne fonctionne pas de la
manière escomptée. Pour obtenir les dernières informations sur le dépannage disponibles pour votre
ordinateur, consultez le site Web de support de Dell à l'adresse support.dell.com.
Si des problèmes nécessitant l'aide de Dell surviennent, rédigez une description détaillée de l'erreur, des
codes sonores ou des voyants de diagnostic ; notez votre code de service express et votre numéro de
service ci-dessous, puis contactez Dell depuis l'endroit où se trouve votre ordinateur. Pour savoir
comment contacter Dell, reportez-vous au Guide d'utilisation en ligne.
Pour obtenir un exemple de code de service express et de numéro de service, reportez-vous à la section
« Recherche d'informations » à la page 49.
Code de service express : ___________________________
Numéro de service : ___________________________
Dell Diagnostics
PRÉCAUTION : Avant de commencer toute procédure de cette section, consultez et respectez les consignes de
sécurité du Guide d'information sur le produit.
Quand utiliser Dell Diagnostics
Si vous rencontrez des difficultés avec votre ordinateur, procédez aux vérifications décrites dans la
section « Résolution des problèmes » du Guide d'utilisation en ligne et exécutez Dell Diagnostics avant
de contacter Dell pour obtenir une assistance technique. Pour savoir comment contacter Dell, reportez-
vous au Guide d'utilisation en ligne.
AVIS : Dell Diagnostics ne fonctionne que sur les ordinateurs Dell™.
Cavalier Paramètre Description
PSWD Les fonctions de mot de passe sont
activées (configuration par défaut).
Les fonctions de mot de passe sont
désactivées.
RTCRST
L'horloge en temps réel a été
activée (configuration par défaut).
L'horloge en temps réel est en cours
de réinitialisation (cavalier fermé
temporairement).
fermé ouvert
1
1

Guide de référence rapide 75
Ouvrez le programme de configuration du système (reportez-vous à la section « Programme de
configuration du système » du Guide d'utilisation en ligne), étudiez les informations de configuration de
votre ordinateur et vérifiez que le périphérique à tester apparaît dans le programme de configuration du
système et qu'il est actif.
Démarrez Dell Diagnostics à partir du disque dur ou du CD Drivers and Utilities (Pilotes et utilitaires,
également appelé CD ResourceCD).
Démarrage de Dell Diagnostics à partir de votre disque dur
1
Mettez votre ordinateur sous tension (ou redémarrez-le).
2
Lorsque le logo DELL s'affiche, appuyez immédiatement sur <F12>.
REMARQUE : Si un message vous indique qu'aucune partition d'utilitaire de Dell Diagnostics n'a été
trouvée, exécutez Dell Diagnostics à partir de votre CD Drivers and Utilities en option (reportez-vous à la
section « Lancement de Dell Diagnostics à partir du CD Drivers and Utilities » à la page 75).
Si vous attendez trop longtemps et que le logo du système d'exploitation apparaît, patientez jusqu'à ce
que le bureau de Microsoft
®
Windows
®
s'affiche. Ensuite, arrêtez votre ordinateur et faites une
nouvelle tentative.
3
Lorsque la liste des périphériques d'amorçage s'affiche, sélectionnez
Amorcer sur la partition de
l'utilitaire
et appuyez sur <Entrée>.
4
Lorsque le
menu principal
de Dell Diagnostics s'affiche, sélectionnez le test à effectuer.
Lancement de Dell Diagnostics à partir du CD Drivers and Utilities
1
Insérez le CD
Drivers and Utilities
.
2
Arrêtez l'ordinateur et redémarrez-le.
Lorsque le logo DELL s'affiche, appuyez immédiatement sur <F12>.
Si vous n'avez pas appuyé sur la touche assez vite, le logo du système d'exploitation apparaît. Attendez
jusqu'à ce que le bureau Microsoft® Windows® s'affiche. Ensuite, arrêtez votre ordinateur et faites
une nouvelle tentative.
REMARQUE : Les étapes suivantes modifient la séquence d'amorçage pour une seule exécution. Au démarrage
suivant, l'ordinateur démarre en fonction des périphériques définis dans le programme de configuration du
système.
3
Lorsque la liste des périphériques d'amorçage s'affiche, sélectionnez le lecteur de CD/DVD et appuyez
sur <Entrée>.
4
Sélectionnez l'option Lecteur de CD/DVD dans le menu d'amorçage du CD.
5
Sélectionnez l'option Amorcer à partir du lecteur de CD/DVD dans le menu qui s'affiche.
6
Entrez
1
pour lancer le menu du CD
Drivers and Utilities
.
7
Entrez
2
pour démarrer Dell Diagnostics.
8
Sélectionnez
Run Dell 32-bit Diagnostics
(Exécuter Dell Diagnostics 32 bits) dans la liste numérotée.
Si plusieurs versions sont répertoriées, sélectionnez la version appropriée pour votre ordinateur.
9
Lorsque le
menu principal
de Dell Diagnostics s'affiche, sélectionnez le test à effectuer.

76 Guide de référence rapide
Menu principal de Dell Diagnostics
1
Une fois Dell Diagnostics chargé et lorsque l'écran
Menu
principal
s'affiche, cliquez sur le bouton de
l'option que vous souhaitez.
2
Si un problème survient pendant un test, un message indiquant le code d'erreur et une description du
problème s'affiche. Notez le code d'erreur et la description du problème et suivez les instructions à
l'écran.
Si vous ne pouvez pas résoudre le problème, contactez Dell. Pour savoir comment contacter Dell,
reportez-vous au
Guide d'utilisation
en ligne.
REMARQUE : Le numéro de service de votre ordinateur est situé en haut de chaque écran de test. Lorsque
vous contacterez le support technique de Dell, ce numéro de service vous sera demandé.
3
Si vous exécutez un test à partir de l'option
Custom Test
(test personnalisé) ou
Symptom Tree
(arborescence des symptômes), cliquez sur l'onglet approprié décrit dans le tableau suivant pour
obtenir plus d'informations.
Option Fonction
Express Test (Test
rapide)
Exécute un test rapide des périphériques. Ce test dure généralement entre 10 et 20
minutes et n'exige pas d'action de votre part. Lancez le test rapide en premier pour
trouver le problème plus rapidement.
Extended Test (Test
approfondi)
Exécute un test approfondi des périphériques. En règle générale, ce test prend une
heure ou plus et nécessite que vous répondiez régulièrement à des questions.
Custom Test (Test
personnalisé)
Teste un périphérique spécifique. Vous pouvez personnaliser les tests à exécuter.
Symptom Tree
(Arborescence des
symptômes)
Répertorie les symptômes couramment rencontrés et permet de sélectionner un test en
fonction du symptôme du problème.
Onglet Fonction
Résultats Affiche les résultats du test et les conditions d'erreur rencontrées.
Erreurs Affiche les conditions d'erreur rencontrées, les codes d'erreur et la description du
problème.
Aide Décrit le test et peut indiquer les conditions requises pour exécuter le test.
Configuration Affiche la configuration matérielle du périphérique sélectionné.
Dell Diagnostics obtient les informations de configuration de tous les périphériques à
partir du programme de configuration du système, de la mémoire et de divers tests
internes, et les affiche dans la liste des périphériques située dans le volet gauche de
l'écran. La liste des périphériques risque de ne pas afficher les noms de tous les
composants installés sur votre ordinateur ou de tous les périphériques reliés à celui-ci.
Paramètres Vous pouvez personnaliser le test en modifiant ses paramètres.

Guide de référence rapide 77
4
Une fois les tests terminés, si vous exécutez Dell Diagnostics à partir du
Drivers and Utilities
(en
option)
,
retirez le CD.
5
Fermez l'écran de test pour revenir à l'écran
Menu
principal
. Pour quitter Dell Diagnostics et
redémarrer l'ordinateur, fermez l'écran
Menu
principal
.
Voyants du système
Le voyant d'alimentation peut indiquer un problème avec l'ordinateur.
Voyant d'alimentation Description du problème Solution proposée
Vert fixe L'ordinateur est allumé et fonctionne
normalement.
Aucune action nécessaire.
Vert clignotant L'ordinateur est en mode d'économie
d'énergie.
Pour réactiver l'ordinateur, appuyez sur le bouton
d'alimentation, déplacez la souris ou appuyez sur
une touche du clavier.
Clignote vert plusieurs
fois, puis s'éteint
Il s'agit d'une erreur de configuration. Contrôlez les voyants de diagnostic pour savoir si
le problème est identifié (reportez-vous à la
section « Voyants de diagnostic » à la page 78).
Jaune fixe Dell Diagnostics exécute un test ou
un dispositif de la carte système est
peut-être défectueux ou mal installé.
Si Dell Diagnostics est en cours d'exécution,
laissez-le s'achever.
Contrôlez les voyants de diagnostic pour savoir si
le problème est identifié (reportez-vous à la
section « Voyants de diagnostic » à la page 78).
Si l'ordinateur ne démarre pas, contactez Dell
pour obtenir une assistance technique.
Pour
savoir comment contacter Dell, reportez-vous au
Guide d'utilisation
en ligne.
Jaune clignotant Une panne d'électricité ou une
défaillance de la carte système s'est
produite.
Contrôlez les voyants de diagnostic pour savoir si
le problème est identifié (reportez-vous à la
section « Voyants de diagnostic » à la page 78).
Reportez-vous à la section « Problèmes
d'alimentation » du Guide d'utilisation en ligne.
Vert fixe et code sonore
durant le POST
Un problème a été détecté pendant
l'exécution du BIOS.
Pour des instructions sur le diagnostic du code
sonore, reportez-vous à la section « Codes
sonores » à la page 81. Vérifiez également les
voyants de diagnostic pour déterminer si le
problème spécifique a été identifié.
Voyant d'alimentation
vert fixe, aucun code
sonore et aucune vidéo
durant le POST
Le moniteur ou la carte graphique est
peut-être défectueux ou mal installé.
Vérifiez les voyants de diagnostic pour voir si le
problème en question est identifié.
Voyant d'alimentation
vert fixe et aucun code
sonore, mais l'ordinateur
se verrouille durant le
POST
Un dispositif de la carte système est
peut-être défectueux.
Vérifiez les voyants de diagnostic pour voir si le
problème en question est identifié. Si le
problème n'est pas identifié, contactez Dell pour
obtenir une assistance technique.
Pour savoir
comment contacter Dell, reportez-vous au
Guide
d'utilisation
en ligne.

78 Guide de référence rapide
Voyants de diagnostic
PRÉCAUTION : Avant de commencer toute procédure de cette section, consultez et respectez les consignes de
sécurité du Guide d'information sur le produit.
Afin de vous aider à résoudre les problèmes, l'ordinateur est équipé de quatre voyants situés sur le
panneau avant ou arrière : « 1 », « 2 », « 3 » et « 4 ». Ces voyants peuvent être verts ou éteints. Lorsque
l'ordinateur démarre normalement, le comportement ou les codes des voyants changent au fur et à
mesure de l'avancement du processus de démarrage. Si la partie POST (autotest à la mise sous tension)
du démarrage du système s'effectue correctement, les quatre voyants sont vert fixe pendant quelques
instants, puis s'éteignent.
Si l'ordinateur ne fonctionne pas correctement lors du processus POST, le comportement des voyants
peut vous aider à identifier l'origine du problème. Si l'ordinateur ne fonctionne pas correctement une fois
le processus POST exécuté correctement, les voyants n'indiquent pas l'origine du problème.
REMARQUE : L'orientation des voyants de diagnostic peut varier selon le type de système. Les voyants de
diagnostic peuvent être orientés verticalement ou horizontalement.
Comportement des
voyants
Description du problème Solution proposée
L'ordinateur est en condition d'arrêt
normale ou une panne est survenue avant
le BIOS.
Les voyants de diagnostic ne sont pas
allumés alors que le système d'exploitation
de l'ordinateur s'est lancé correctement.
Raccordez l'ordinateur à une prise secteur qui
fonctionne et appuyez sur le bouton
d'alimentation.
Échec éventuel du BIOS ; l'ordinateur est
en mode Restauration.
Exécutez l'utilitaire de sauvegarde du BIOS,
attendez que la restauration soit terminée et
redémarrez l'ordinateur.
Une défaillance du processeur semble
s'être produite.
Réinstallez le processeur et redémarrez
l'ordinateur.
Pour des informations sur la
réinstallation du processeur, reportez-vous au
Guide d'utilisation
en ligne.

Guide de référence rapide 79
Les modules de mémoire sont détectés,
mais une panne de mémoire est survenue.
• Si un module de mémoire est installé,
réinstallez-le et redémarrez l'ordinateur.
Pour des informations sur la réinstallation
des modules de mémoire, reportez-vous au
Guide d'utilisation
en ligne.
• Si au moins deux modules de mémoire sont
installés, supprimez-les, réinstallez un
module, puis redémarrez l'ordinateur. Si
l'ordinateur redémarre normalement,
réinstallez un autre module. Répétez cette
procédure jusqu'à identification du module
défectueux ou réinstallation de tous les
modules sans erreur.
• Installez correctement la mémoire de travail
du même type sur votre ordinateur, si celle-
ci est disponible.
• Si le problème persiste,
contactez Dell
.
Pour savoir comment contacter Dell,
reportez-vous au
Guide d'utilisation
en
ligne.
Une défaillance de la carte graphique
semble s'être produite.
• Si l'ordinateur possède une carte graphique,
retirez-la, réinstallez-la, puis redémarrez
l'ordinateur.
• Si le problème persiste, installez une carte
graphique qui fonctionne et redémarrez
l'ordinateur.
• Si le problème persiste ou que votre
ordinateur dispose de fonctions vidéo
intégrées,
contactez Dell
. Pour savoir
comment contacter Dell, reportez-vous au
Guide d'utilisation
en ligne.
Panne possible de lecteur de disquette ou
de disque dur.
Réinstallez tous les câbles de données et
d'alimentation, puis redémarrez l'ordinateur.
Panne USB possible. Réinstallez tous les périphériques USB,
vérifiez la connexion des câbles, puis
redémarrez l'ordinateur.
Comportement des
voyants
Description du problème Solution proposée

80 Guide de référence rapide
Aucun module de mémoire n'a été
détecté.
• Si un module de mémoire est installé,
réinstallez-le et redémarrez l'ordinateur.
Pour des informations sur la réinstallation
des modules de mémoire, reportez-vous au
Guide d'utilisation
en ligne.
• Si au moins deux modules de mémoire sont
installés, supprimez-les, réinstallez un
module, puis redémarrez l'ordinateur. Si
l'ordinateur redémarre normalement,
réinstallez un autre module. Répétez cette
procédure jusqu'à identification du module
défectueux ou réinstallation de tous les
modules sans erreur.
• Installez correctement la mémoire de travail
du même type sur votre ordinateur, si celle-
ci est disponible.
• Si le problème persiste,
contactez Dell
.
Pour savoir comment contacter Dell,
reportez-vous au
Guide d'utilisation
en
ligne.
Les modules de mémoire sont détectés,
mais une erreur de configuration de
mémoire ou de compatibilité est
survenue.
• Vérifiez qu'aucune
contrainte particulière
ne doit être respectée pour l'installation des
modules dans les connecteurs de mémoire.
• Vérifiez que les
modules de mémoire
que
vous installez sont compatibles avec votre
ordinateur.
• Si le problème persiste,
contactez Dell
.
Pour savoir comment contacter Dell,
reportez-vous au
Guide d'utilisation
en
ligne.
Une erreur est survenue.
Cette séquence s'affiche également
lorsque vous ouvrez le programme de
configuration du système et n'est pas
forcément significative d'un problème.
• Vérifiez que les câbles sont correctement
connectés entre le disque dur, le lecteur de
CD-ROM, le lecteur de DVD-ROM et la
carte système.
• Lisez le message qui s'affiche sur l'écran du
moniteur.
• Si le problème persiste,
contactez Dell
.
Pour savoir comment contacter Dell,
reportez-vous au
Guide d'utilisation
en
ligne.
Une fois le POST terminé, les quatre
voyants de diagnostic deviennent
brièvement verts avant de s'éteindre pour
indiquer une condition de
fonctionnement normale.
Aucune.
Comportement des
voyants
Description du problème Solution proposée

Guide de référence rapide 81
Codes sonores
Votre ordinateur peut émettre une série de signaux sonores lors du démarrage si le moniteur ne peut pas
afficher les erreurs ou les problèmes éventuels. Cette série de signaux, appelés « codes sonores », permet
d'identifier les problèmes de fonctionnement de l'ordinateur. Un des codes sonores possibles
(code 1-3-1) est composé d'un signal, d'une série de trois signaux, puis d'un autre signal. Ce code sonore
vous indique que l'ordinateur a rencontré un problème de mémoire.
Si votre ordinateur émet un signal lors du démarrage :
1
Notez le code sonore.
2
Pour identifier une cause plus sérieuse, reportez-vous à la section « Dell Diagnostics » à la page 74.
3
Contactez Dell pour obtenir une assistance technique. Pour savoir comment contacter Dell, reportez-
vous au
Guide d'utilisation
en ligne.
Code Cause Code Cause
1-1-2 Panne de registre du
microprocesseur
3-1-4 Échec de registre de masque
d'interruption esclave
1-1-3 Erreur de lecture/écriture en
NVRAM
3-2-2 Échec de chargement du vecteur
d'interruption
1-1-4 Échec du total des vérifications
BIOS ROM
3-2-4 Échec du test de contrôleur de
clavier
1-2-1 Erreur du temporisateur
d'intervalles programmable
3-3-1 Perte d'alimentation de NVRAM
1-2-2 Échec d'initialisation du DMA
(accès direct à la mémoire)
3-3-2 Configuration incorrecte de la
NVRAM
1-2-3 Échec de lecture/écriture du
registre des pages de DMA
3-3-4 Échec du test de la mémoire vidéo
1-3 Échec du test de la mémoire vidéo 3-4-1 Échec d'initialisation de l'écran
1-3-1 à 2-4-4 La mémoire n'est pas correctement
identifiée ou utilisée
3-4-2 Échec de retraçage de l'écran
3-1-1 Échec de registre DMA esclave 3-4-3 Échec de recherche de ROM vidéo
3-1-2 Échec de registre DMA maître 4-2-1 Aucune impulsion d'horloge
3-1-3 Échec de registre de masque
d'interruption maître
4-2-2 Échec de l'arrêt
4-2-3 Échec de la porte A20 4-4-1 Échec du test de port parallèle ou
série
4-2-4 Interruption inattendue en mode
protégé
4-4-2 Échec de décompression de code
dans la mémoire en double
4-3-1 Échec de mémoire au-dessus de
l'adresse 0FFFFh
4-4-3 Échec du test de coprocesseur
mathématique
4-3-3 Panne du compteur 2 de puce de
l'horloge
4-4-4 Échec du test de mémoire cache
4-3-4 Arrêt de l'horloge machine

82 Guide de référence rapide
Résolution des incompatibilités logicielles et matérielles
Si un périphérique n'est pas détecté pendant la configuration du système d'exploitation ou est détecté
mais n'est pas configuré correctement, utilisez le Dépanneur des conflits matériels pour résoudre cette
incompatibilité.
1
Cliquez sur le bouton
Démarrer
, puis sur
Aide et support
.
2
Entrez
Dépanneur des conflits matériels
dans le champ
Rechercher
, puis cliquez sur la
flèche pour lancer la recherche.
3
Cliquez sur
Dépanneur des conflits matériels
dans la liste
Résultats de la recherche
.
4
Dans la liste
Dépanneur des conflits matériels
, cliquez sur
Je dois résoudre un conflit matériel sur
mon ordinateur
, puis sur
Suivant
.
Utilisation de la fonction Restauration du système Microsoft® Windows® XP
Le système d'exploitation Microsoft Windows XP fournit une fonctionnalité de restauration du système
qui vous permet de rétablir l'ordinateur à un état de fonctionnement préalable (sans affecter les fichiers
de données) si des modifications apportées aux logiciels, au matériel ou à d'autres paramètres du système
ont mis l'ordinateur dans un état de fonctionnement non souhaité. Consultez le Centre d'aide et de
support Windows pour plus d'informations sur l'utilisation de la fonction Restauration du système. Pour
accéder au Centre d'aide et de support de Windows, reportez-vous à la section « Centre d'aide et de
support de Windows » à la page 51.
AVIS : Sauvegardez régulièrement vos fichiers de données. La fonction Restauration du système ne contrôle pas
vos fichiers de données et ne permet pas de les récupérer.
Création d'un point de restauration
1
Cliquez sur le bouton
Démarrer
, puis sur
Aide et support
.
2
Cliquez sur
Restauration du système
.
3
Suivez les instructions qui s'affichent.
Restauration de l'ordinateur à un état antérieur
AVIS : Avant de restaurer l'ordinateur à un état antérieur, enregistrez et fermez tous les fichiers ouverts et quittez
tous les programmes en cours d'exécution. Ne modifiez, n'ouvrez ou ne supprimez en aucun cas des fichiers ou
des programmes tant que la restauration du système n'est pas terminée.
1
Cliquez sur le bouton
Démarrer
, pointez sur
Tous les programmes
→
Accessoires
→
Outils système
,
puis cliquez sur
Restauration du système
.
2
Vérifiez que l'option
Restore my computer to an earlier time
(restaurer mon ordinateur à une heure
antérieure) est sélectionnée et cliquez sur
Suivant
.
3
Cliquez sur la date à laquelle vous souhaitez restaurer l'ordinateur.
L'écran
Sélectionner un point de restauration
affiche un calendrier vous permettant de sélectionner
des points de restauration. Toutes les dates du calendrier comportant des points de restauration
apparaissent en gras.
4
Sélectionnez un point de restauration, puis cliquez sur
Suivant
.
Si une date du calendrier contient un seul point de restauration, ce dernier est sélectionné
automatiquement. Si plusieurs points de restauration sont disponibles, cliquez sur celui que vous
souhaitez utiliser.

Guide de référence rapide 83
5
Cliquez sur
Suivant
.
L'écran
Restauration terminée
s'affiche une fois que la collecte des données par la fonction
Restauration du système est terminée. L'ordinateur redémarre.
6
Une fois l'ordinateur redémarré, cliquez sur
OK
.
Pour changer de point de restauration, répétez les étapes précédentes en utilisant un autre point de
restauration ou annulez la restauration.
Annulation de la dernière restauration du système
AVIS : Avant d'annuler la dernière restauration du système, enregistrez et fermez tous les fichiers ouverts et
quittez tous les programmes en cours d'exécution. Ne modifiez, n'ouvrez ou ne supprimez en aucun cas des
fichiers ou des programmes tant que la restauration du système n'est pas terminée.
1
Cliquez sur le bouton
Démarrer
, pointez sur
Tous les programmes
→
Accessoires
→
Outils système
,
puis cliquez sur
Restauration système
.
2
Cliquez sur
Undo my last restoration
(Annuler ma dernière restauration) puis sur
Suivant
.
3
Cliquez sur
Suivant
.
L'écran
Restauration du système
apparaît et l'ordinateur redémarre.
4
Une fois l'ordinateur redémarré, cliquez sur
OK
.
Activation de la fonction Restauration du système
Si vous réinstallez Windows XP avec moins de 200 Mo d'espace disponible sur le disque dur, la fonction
Restauration du système est automatiquement désactivée. Pour voir si la fonction Restauration du
système est activée :
1
Cliquez sur le bouton
Démarrer
, puis sur
Panneau de
configuration
.
2
Cliquez sur
Performances et maintenance
.
3
Cliquez sur
Système
.
4
Cliquez sur l'onglet
Restauration du système
.
5
Assurez-vous que l'option
Désactiver la Restauration du système
est bien désactivée.
Réinstallation de Microsoft® Windows® XP
Avant de commencer
REMARQUE : Les procédures décrites dans ce document concernent la vue Windows par défaut dans Windows
XP Home Edition ; les étapes diffèrent lorsque l'ordinateur Dell™ est défini sur la vue classique de Windows ou
qu'il fonctionne sous Windows XP Professional.
Si vous souhaitez réinstaller le système d'exploitation Windows XP pour corriger un problème avec un
nouveau pilote, utilisez tout d'abord la fonction Restauration des pilotes de périphériques.
1
Cliquez sur le bouton
Démarrer
puis sur
Panneau de configuratio
n.
2
Sous
Choisissez une catégorie
, cliquez sur
Performances et maintenance
.
3
Cliquez sur
Système
.

84 Guide de référence rapide
4
Dans la fenêtre
Propriétés système
, cliquez sur l'onglet
Matériel
.
5
Cliquez sur
Gestionnaire de périphériques
.
6
Cliquez avec le bouton droit sur le périphérique pour lequel le nouveau pilote a été installé et cliquez
sur
Propriétés
.
7
Cliquez sur l'onglet
Pilotes
.
8
Cliquez sur
Restauration des pilotes
.
Si la fonction Restauration des pilotes de périphériques ne résout pas le problème, utilisez la fonction
Restauration du système pour remettre votre système d'exploitation dans un état de fonctionnement
antérieur à l'installation du nouveau pilote de périphérique (reportez-vous à la section « Utilisation de la
fonction Restauration du système Microsoft® Windows® XP » à la page 82).
REMARQUE : Le CD Drivers and Utilities contient les pilotes installés à l'assemblage de l'ordinateur. Utilisez le CD
Drivers and Utilities pour charger les pilotes requis, notamment les pilotes requis dans le cas où votre ordinateur
est doté d'un contrôleur RAID.
Réinstallation de Windows XP
AVIS : Vous devez utiliser Windows XP avec le Service Pack 1 ou suivant pour la réinstallation.
AVIS : Avant d'effectuer l'installation, sauvegardez tous les fichiers de données de votre disque dur principal.
Dans le cas des configurations de disque dur conventionnelles, le disque dur principal correspond au premier
disque dur détecté par l'ordinateur.
Pour réinstaller Windows XP, vous devez disposer des éléments suivants :
•CD
Operating System
de Dell
•CD
Drivers and Utilities
de Dell
Pour réinstaller Windows XP, suivez toutes les étapes des sections ci-après, dans l'ordre indiqué.
Le processus de réinstallation peut prendre de 1 à 2 heures. Après avoir réinstallé le système
d'exploitation, vous devez également réinstaller les pilotes de périphériques, le programme antivirus et
d'autres logiciels.
AVIS : Le CD Operating System offre des options de réinstallation pour Windows XP. Ces options peuvent
remplacer des fichiers installés et avoir des répercussions sur les programmes installés sur votre disque dur. Par
conséquent, ne réinstallez pas Windows XP à moins qu'un membre de l'équipe du support technique de Dell ne
vous le demande.
AVIS : Pour éviter des conflits avec Windows XP, vous devez désactiver tout logiciel de protection antivirus
installé sur l'ordinateur avant de réinstaller le système d'exploitation. Pour plus d'informations, consultez la
documentation qui accompagne le logiciel.
Démarrage à partir du CD Operating System
1
Enregistrez et fermez tous les fichiers et les programmes ouverts.
2
Insérez le CD
Operating System
. Cliquez sur
Quitter
si le message
Install Windows XP
(Installer Windows XP) apparaît.
3
Redémarrez l'ordinateur.

Guide de référence rapide 85
4
Appuyez sur <F12> dès l'apparition du logo DELL.
Si le logo du système d'exploitation apparaît, patientez jusqu'à l'affichage du bureau Windows,
éteignez de nouveau l'ordinateur et faites une nouvelle tentative.
5
Utilisez les touches de direction pour sélectionner l'option
CD-ROM
, puis appuyez sur <Entrée>.
6
Appuyez sur une touche lorsque le message
Press any key to boot from CD
(Appuyez sur
une touche pour démarrer depuis le CD-ROM) apparaît à l'écran.
Installation de Windows XP
1
Lorsque l'écran
Windows XP Setup
(Installation de Windows XP) apparaît, appuyez sur <Entrée>
pour sélectionner
To set up Windows now
(Pour installer Windows maintenant).
2
Lisez les informations de la fenêtre
Contrat de licence Microsoft Windows
, puis appuyez sur la touche
<F8> pour accepter les termes du contrat.
3
Si Windows XP est déjà installé sur votre ordinateur et que vous souhaitez récupérer vos données
Windows XP actuelles, entrez
r
pour sélectionner l'option de réparation, puis retirez le CD.
4
Si vous souhaitez installer une nouvelle copie de Windows XP, appuyez sur <Échap> pour
sélectionner cette option.
5
Appuyez sur <Entrée> pour sélectionner la partition en surbrillance (recommandé), puis suivez les
instructions à l'écran.
L'écran
Installation de Windows XP
s'affiche et le système d'exploitation commence à copier les
fichiers et à installer les périphériques. L'ordinateur redémarre automatiquement à plusieurs reprises.
REMARQUE : Le temps requis pour terminer l'installation dépend de la taille de votre disque dur et de la rapidité
de votre ordinateur.
AVIS : N'appuyez sur aucune touche lorsque le message suivant s'affiche : Press any key to boot
from the CD
(Appuyez sur une touche pour démarrer à partir du CD).
6
Lorsque l'écran
Options régionales et linguistiques
s'affiche, sélectionnez les paramètres de votre
région, puis cliquez sur
Suivant
.
7
Entrez votre nom et le nom de votre organisation (facultatif) dans l'écran
Personalize Your Software
(Personnaliser votre logiciel), puis cliquez sur
Suivant
.
8
Entrez un nom pour votre ordinateur (ou acceptez le nom proposé) ainsi qu'un mot de passe lorsque la
fenêtre
Nom de l'ordinateur et mot de passe Administrateur
s'affiche, puis cliquez sur
Suivant
.
9
Si l'écran
Informations de numérotation pour le modem
s'affiche, entrez les informations demandées
et cliquez sur
Suivant
.
10
Entrez la date, l'heure et le fuseau horaire dans la fenêtre
Date and Time Settings
(Paramètres de date
et d'heure), puis cliquez sur
Suivant
.
11
Si l'écran
Paramètres de mise en réseau
s'affiche, cliquez sur
Ty p e
, puis sur
Suivant
.
12
Si vous réinstallez Windows XP Professional et que vous êtes invité à fournir des informations
complémentaires concernant votre configuration réseau, indiquez vos choix. Si vous n'êtes pas sûr de
vos paramètres, acceptez les paramètres par défaut.
Windows XP installe les composants du système d'exploitation et configure l'ordinateur. L'ordinateur
redémarre automatiquement.
AVIS : N'appuyez sur aucune touche lorsque le message suivant s'affiche : Press any key to boot
from the CD
(Appuyez sur une touche pour démarrer à partir du CD).

86 Guide de référence rapide
13
Lorsque l'écran
Bienvenue dans Microsoft
s'affiche, cliquez sur
Suivant
.
14
Lorsque le message
Comment cet ordinateur sera-t-il connecté à Internet ?
apparaît, cliquez sur
Ignorer
.
15
Lorsque l'écran
Prêt à vous enregistrer auprès de Microsoft ?
apparaît, sélectionnez
Non, pas cette
fois-ci
et cliquez sur
Suivant
.
16
Lorsque le message
Qui va utiliser cet ordinateur ?
(Qui va utiliser cet ordinateur ?) apparaît, vous
pouvez entrer jusqu'à cinq utilisateurs.
17
Cliquez sur
Suivant
.
18
Cliquez sur
Terminer
pour terminer le programme d'installation et retirez le CD.
19
Réinstallez les pilotes appropriés à l'aide du CD
Drivers and Utilities
.
20
Réinstallez votre logiciel antivirus.
21
Réinstallez vos programmes.
REMARQUE : Pour réinstaller et activer vos programmes Microsoft Office ou Microsoft Works Suite, il vous faut le
numéro de Product Key (clé de produit) situé à l'arrière de la pochette du CD Microsoft Office ou Microsoft Works
Suite.
Utilisation du CD Drivers and Utilities
Pour utiliser le CD Drivers and Utilities (également appelé ResourceCD) lorsque vous utilisez le système
d'exploitation Windows :
REMARQUE : Pour accéder aux pilotes de périphériques et à la documentation d'utilisation, vous devez utiliser le
CD Drivers and Utilities lorsque vous utilisez Windows.
1
Allumez l'ordinateur et attendez que le bureau Windows s'affiche.
2
Insérez le CD
Drivers and Utilities
dans le lecteur de CD.
S'il s'agit de votre première utilisation du CD
Drivers and Utilities
, la fenêtre
Installation du CD
ResourceCD
s'ouvre et vous indique que le CD
Drivers and Utilities
va commencer l'installation.
3
Cliquez sur
OK
pour continuer.
Pour terminer l'installation, suivez les invites du programme d'installation.
4
Dans l'écran
Welcome Dell System Owner
(Vous êtes propriétaire d'un système Dell, bienvenue),
cliquez sur
Suivant
.
5
Effectuez les sélections appropriées pour
Modèle de système
,
Système d'exploitation
,
Type de
périphérique
et
Rubrique
.
Pilotes pour votre ordinateur
Pour afficher la liste des pilotes de périphériques appropriés à votre ordinateur :
1
Dans le menu déroulant
Topic
(Rubrique), cliquez sur
My Drivers
(Mes pilotes).
Le CD
Drivers and Utilities
(en option) analyse le système d'exploitation et les éléments matériels de
votre ordinateur et affiche ensuite une liste de pilotes de périphériques pour la configuration de votre
système.
2
Cliquez sur le pilote approprié et suivez les instructions pour le télécharger sur votre ordinateur.
Pour afficher tous les pilotes disponibles pour votre ordinateur, cliquez sur Pilotes dans le menu
déroulant Rubrique.

Index 87
Index
A
alimentation
voyant, 61
C
capot
retrait, 64
carte mère. Voir carte système
carte système, 69, 72
CD
système d'exploitation, 50
CD Drivers and Utilities, 49
CD Operating System, 50
Centre d'aide et de
support, 51
codes sonores, 81
conflits
incompatibilités logicielles et
matérielles, 82
conflits IRQ, 82
consignes de sécurité, 49
contrat de licence pour
utilisateur final, 49
D
Dell Diagnostics, 74
dépannage
Centre d'aide et de support, 51
codes sonores, 81
conflits, 82
Dell Diagnostics, 74
Dépanneur des conflits
matériels, 82
restaurer l'ordinateur à un état
antérieur, 82
voyants de diagnostic, 78
voyants du système, 77
Dépanneur des conflits
matériels, 82
diagnostics
codes sonores, 81
Dell Diagnostics, 74
documentation
contrat de licence pour
utilisateur final, 49
en ligne, 51
ergonomie, 49
garantie, 49
Guide d'information sur le
produit, 49
Guide d'utilisation, 50
réglementation, 49
sécurité, 49
E
étiquettes
Microsoft Windows, 50
numéro de service, 50
F
fichier d'aide
Centre d'aide et de support de
Windows, 51
G
Guide d'information sur le
produit, 49
Guide d'utilisation, 50
I
informations relatives à
l'ergonomie, 49
informations relatives à la
garantie, 49
informations sur les
réglementations, 49
installation de pièces
avant de commencer, 64
L
logiciel
conflits, 82

88 Index
88 Index
M
matériel
codes sonores, 81
conflits, 82
Dell Diagnostics, 74
messages d'erreur
codes sonores, 81
voyants de diagnostic, 78
voyants du système, 77
N
numéro de service, 50
P
pilotes
liste des, 86
problèmes. Voir dépannage
R
réinstallation
Windows XP, 83
Restauration du système, 82
S
site du service de support de
Dell, 51
site Web du service de
support, 51
système d'exploitation
réinstallation, 50
réinstallation de Windows
XP, 83
V
voyant d'alimentation
diagnostics, 77
voyants
alimentation, 61
diagnostic, 78
système, 77
W
Windows XP
Centre d'aide et de support, 51
Dépanneur des conflits
matériels, 82
installation, 85
réinstallation, 50, 83
Restauration du système, 82

www.dell.com | support.dell.com
Dell™ OptiPlex™ 320
Schnellreferenzhandbuch
Modelle DCSM, DCNE

Anmerkungen, Hinweise und Vorsichtshinweise
ANMERKUNG: Eine ANMERKUNG macht auf wichtige Informationen aufmerksam, mit denen Sie den Computer besser
einsetzen können.
HINWEIS: Ein HINWEIS warnt vor möglichen Beschädigungen der Hardware oder Datenverlust und zeigt, wie diese
vermieden werden können.
VORSICHT: Durch VORSICHT werden Sie auf Gefahrenquellen hingewiesen, die materielle Schäden, Verletzungen
oder sogar den Tod von Personen zur Folge haben können.
Wenn Sie einen Dell™-Computer der Serie N besitzen, treffen alle Referenzen in diesem Dokument auf die
Microsoft
®
Windows
®
-Betriebssysteme nicht zu.
____________________
Die in diesem Dokument enthaltenen Informationen können sich ohne vorherige Ankündigung ändern.
© 2006 Dell Inc. Alle Rechte vorbehalten.
Nachdrucke jeglicher Art ohne die vorherige schriftliche Genehmigung von Dell Inc. sind strengstens untersagt.
In diesem Text verwendete Marken: Dell, OptiPlex und das DELL-Logo sind Marken von Dell Inc.; Microsoft und Windows sind eingetragene
Marken der Microsoft Corporation; Intel und Pentium sind eingetragene Marken der Intel Corporation.
Alle anderen in dieser Dokumentation genannten Marken und Handelsbezeichnungen sind Eigentum der entsprechenden Hersteller und Firmen.
Dell Inc. verzichtet auf alle Besitzrechte an Marken und Handelsbezeichnungen, die nicht Eigentum von Dell sind.
Modelle DCSM, DCNE
September 2006 Teilenr. FK640 Rev. A01

Inhalt 91
Inhalt
Informationsquellen . . . . . . . . . . . . . . . . . . . . . . . . . . . . . . . 93
Einrichten des Computers
. . . . . . . . . . . . . . . . . . . . . . . . . . . . 96
Systemansichten
. . . . . . . . . . . . . . . . . . . . . . . . . . . . . . . . . 99
Mini-Tower-Computer – Vorderansicht
. . . . . . . . . . . . . . . . . . . 99
Mini-Tower-Computer – Rückansicht
. . . . . . . . . . . . . . . . . . 101
Mini-Tower-Computer – Anschlüsse an der Rückseite
. . . . . . . . . 102
Desktop-Computer – Vorderansicht
. . . . . . . . . . . . . . . . . . . 104
Desktop-Computer – Rückansicht
. . . . . . . . . . . . . . . . . . . . 105
Desktop-Computer – Anschlüsse an der Rückseite
. . . . . . . . . . . 106
Abnehmen der Computerabdeckung
. . . . . . . . . . . . . . . . . . . . . 108
Vorbereitung
. . . . . . . . . . . . . . . . . . . . . . . . . . . . . . . 108
Mini-Tower-Computer
. . . . . . . . . . . . . . . . . . . . . . . . . . 109
Desktop-Computer
. . . . . . . . . . . . . . . . . . . . . . . . . . . . 111
Im Innern des Computers
. . . . . . . . . . . . . . . . . . . . . . . . . . . 112
Mini-Tower-Computer
. . . . . . . . . . . . . . . . . . . . . . . . . . 112
Desktop-Computer
. . . . . . . . . . . . . . . . . . . . . . . . . . . . 115
Problemlösung
. . . . . . . . . . . . . . . . . . . . . . . . . . . . . . . . . 118
Dell Diagnostics
. . . . . . . . . . . . . . . . . . . . . . . . . . . . . . 119
Systemanzeigen
. . . . . . . . . . . . . . . . . . . . . . . . . . . . . . 121
Diagnoseanzeigen
. . . . . . . . . . . . . . . . . . . . . . . . . . . . . . . 123
Signaltoncodes
. . . . . . . . . . . . . . . . . . . . . . . . . . . . . . 126
Beheben von Software- und Hardware-Inkompatibilitäten
. . . . . . . 127
Verwenden der Microsoft Windows XP-
Systemwiederherstellung
. . . . . . . . . . . . . . . . . . . . . . . . . 127
Neuinstallation von Microsoft Windows XP
. . . . . . . . . . . . . . . 128
Verwenden der Drivers and Utilities CD
. . . . . . . . . . . . . . . . . . . 132
Stichwortverzeichnis . . . . . . . . . . . . . . . . . . . . . . . . . . . . 133

92 Inhalt

Schnellreferenzhandbuch 93
Informationsquellen
ANMERKUNG: Einige Funktionen oder Datenträger sind möglicherweise optional und werden nicht mit Ihrem
Computer geliefert. Einige Leistungsmerkmale sind möglicherweise in bestimmten Ländern nicht verfügbar.
ANMERKUNG: Zusätzliche Informationen werden eventuell mit dem Computer geliefert.
Welche Informationen benötigen Sie? Hier finden Sie das Gesuchte:
• Ein Diagnoseprogramm für den Computer
• Treiber für den Computer
• Dokumentation zu Ihrem Computer
• Dokumentation zu dem Gerät
• Desktop-System-Software (DSS)
Drivers and Utilities CD (auch als ResourceCD bezeichnet)
ANMERKUNG: Die Drivers and Utilities CD ist optional und ist
möglicherweise nicht im Lieferumfang Ihres Computers enthalten.
Dokumentation und Treiber, sind bereits auf dem Computer in-
stalliert. Verwenden Sie diese CD, um Treiber neu zu installieren
(siehe „Neu Installieren von Treibern und Dienstprogrammen“ im
Online-Benutzerhandbuch), um Dell Diagnostics auszuführen
(siehe „Dell Diagnostics“ auf Seite 119) oder um auf die
Dokumen-tation zuzugreifen.
Möglicherweise finden Sie auf
der CD Readme-Dateien. Diese
Dateien enthalten Angaben zu
den neuesten technischen Än-
derungen bzw. Detailinforma-
tionen zu technischen Fragen
für erfahrene Benutzer oder
Techn iker.
ANMERKUNG: Treiber und
Dokumentationsaktualisierungen
finden Sie unter support.dell.com.
• Garantieinformationen
• Verkaufs- und Lieferbedingungen (nur für die
USA)
• Sicherheitshinweise
• Zulassungsinformationen
• Informationen zur Ergonomie
• Enduser-Lizenzvereinbarung
Dell™ Produktinformationshandbuch

94 Schnellreferenzhandbuch
• Anleitungen zum Entfernen und Austau-
schen von Teilen
• Technische Daten
• Anleitungen zum Konfigurieren der System-
einstellungen
• Fehlerbehebung und Beheben von Störungen
Dell™ OptiPlex™ Benutzerhandbuch
Microsoft Windows XP Hilfe- und Supportcenter
1
Klicken Sie auf
Start
→
Hilfe und Support
→
Dell Dell Benutzer-
und Systemhandbücher
→
Systemhandbücher
.
2
Klicken Sie auf das
Benutzerhandbuch
für Ihren Computer.
Das Benutzerhandbuch ist auch auf der optionalen Drivers and
Utilities CD enthalten.
• Service-Tag-Nummer und Express-
Servicecode
• Microsoft Windows-Lizenzetikett
Service-Tag-Nummer und Microsoft
®
Windows
®
Lizenz
Diese Aufkleber sind am Computer angebracht.
• Geben Sie die Service-Tag-
Nummer auf der Website
support.dell.com
oder beim
Anruf beim Support an, um
den Computer zu
identifizieren.
• Geben Sie beim Anruf beim
Technischen Support den
Express-Servicecode an, um
zum geeigneten Ansprechpart-
ner weitergeleitet zu werden.
• Anleitungen zur Neuinstallation des
Betriebssystems
Betriebssystem-CD
ANMERKUNG: Die Betriebssystem-CD ist optional und ist mögli-
cherweise nicht im Lieferumfang Ihres Computers enthalten.
Das Betriebssystem ist bereits auf dem Computer installiert. Um
das Betriebssystem neu zu installieren, verwenden Sie die Betriebs-
system-CD. Siehe „Neuinstallation von Microsoft Windows XP“
auf Seite 128
Nach der Neuinstallation Ihres
Betriebssystems können Sie die
optionale Drivers and Utilities
CD (ResourceCD) dazu verwen-
den, die im Lieferumfang Ihres
Computers enthaltenen Treiber
neu zu installieren.
Das Etikett mit dem Product Key
des Betriebssystems finden Sie
am Computer.
ANMERKUNG: Die Farbe der CD
hängt davon ab, welches
Betriebssystem Sie bestellt haben.
Welche Informationen benötigen Sie? Hier finden Sie das Gesuchte:

Schnellreferenzhandbuch 95
• Lösungen – Hinweise zum Beheben von
Störungen, Veröffentlichungen von Techni-
kern, häufig gestellte Fragen (FAQs) und
Online-Schulungen
• Community – Online-Diskussionen mit
anderen Dell-Kunden
• Aufrüstungen – Informationen zu Aufrüs-
tungen von Komponenten, wie z. B. Speicher,
Festplatten und Betriebssysteme
• Kundenbetreuung – Kontaktinformationen,
Serviceanfrage und Bestellstatus, Garantie
und Reparaturinformationen
• Service und Support – Status von Service-
Anfragen und Support-Historie, Service-
Kontakt, Online-Diskussionen mit dem
technischen Support
• Referenz – Computer-Dokumentation,
Einzelheiten über die Computerkonfigu-
ration, Produktangaben und Whitepapers
• Downloads – Zugelassene Treiber, Patches
und Software-Aktualisierungen
• Desktop-System-Software (DSS) – Wenn Sie
das Betriebssystem auf Ihrem Computer neu
installieren, sollten Sie auch das DSS-
Dienstprogramm neu installieren. DSS- sorgt
dafür, dass wichtige Aktualisierungen für Ihr
Betriebssystem durchgeführt werden und
bietet Support für Dell™ 3,5-Zoll-USB-Dis-
kettenlaufwerke, Intel
®
-Prozessoren, optische
Laufwerke und USB-Geräte. DSS- ist für den
ordnungsgemäßen Betrieb Ihres Dell-Com-
puters erforderlich. Die Software erkennt
automatisch Ihren Computertyp und das
Betriebssystem und installiert die für Ihre
Konfiguration geeigneten Aktualisierungen.
Dell Support-Website – support.dell.com
ANMERKUNG: Wählen Sie Ihre Region oder Ihren Geschäftsbe-
reich aus, um die entsprechende Support-Site angezeigt zu
bekommen.
So laden Sie die Desktop-System-Software herunter:
1
Wählen Sie auf der Website
support.dell.com
Ihre Region oder
Ihren Geschäftsbereich, und geben Sie Ihre Service-Tag-Nummer
ein.
2
Wählen Sie
Treiber und Downloads
, und klicken Sie auf
Start
.
3
Klicken Sie auf den Namen Ihres Betriebssystems, und suchen Sie
nach dem Stichwort
Desktop-System-Software
.
ANMERKUNG: Die support.dell.com-Benutzeroberfläche ist je nach
Ihrer Auswahl verschieden.
• Anleitungen zum Arbeiten unter Windows
XP
• So arbeiten Sie mit Programmen und
Dateien
• So können Sie Ihren Desktop individuell
gestalten
Windows Hilfe- und Supportcenter
1
Klicken Sie auf
Start
→
Hilfe und Support
.
2
Geben Sie ein Wort oder einen Ausdruck ein, das bzw. der Ihr
Problem beschreibt, und klicken Sie anschließend auf das
Pfeilsymbol.
3
Klicken Sie auf das Thema, das Ihr Problem beschreibt.
4
Folgen Sie den Anweisungen auf dem Bildschirm.
Welche Informationen benötigen Sie? Hier finden Sie das Gesuchte:

96 Schnellreferenzhandbuch
Einrichten des Computers
VORSICHT: Bevor Sie Arbeiten an den in diesem Abschnitt beschriebenen Komponenten ausführen, lesen Sie
zuerst die Sicherheitshinweise im Produktinformationshandbuch.
HINWEIS: Wenn im Computer eine Erweiterungskarte installiert ist (wie z. B. eine Modemkarte), schließen Sie das
entsprechende Kabel an die Netzwerkkarte an, und nicht an den Anschluss auf der Computerrückseite.
HINWEIS: Sie können den Computer dabei unterstützen, das System bei optimaler Betriebstemperatur zu betrei-
ben und eine ständige Luftzirkulation um das Gehäuse sicherzustellen, indem Sie den Computer nicht direkt an eine
Wand stellen oder in einem geschlossen Regalsystem platzieren.
ANMERKUNG: Bevor Sie Geräte oder Software installieren, die nicht mit Ihrem Computer ausgeliefert wurden,
sollten Sie die mit der Software oder dem Gerät gelieferte Dokumentation lesen oder sich an den Händler wenden,
um sicherzustellen, dass die Software bzw. das Gerät mit Ihrem Computer und Betriebssystem kompatibel sind.
Um den Computer ordnungsgemäß einzurichten, müssen Sie alle Schritte ausführen. Sehen Sie sich
auch die Abbildungen an, die den Anweisungen folgen.
HINWEIS: Eine PS/2-Maus und eine USB-Maus dürfen nicht gleichzeitig verwendet werden.
1
Schließen Sie die Tastatur und die Maus an
HINWEIS: Schließen Sie kein Modemkabel an den Netzwerkadapteranschluss an. Die Spannung einer Telefon-
leitung kann zu Beschädigungen am Netzwerkadapter führen.
Aufstellen von Tastatur und Maus
2
Schließen Sie das Modem oder Netzwerkabel an.
Stecken Sie das Netzwerkkabel, nicht aber das Telefonkabel in den Netzwerkanschluss. Wenn Sie über
ein optionales Modem verfügen, schließen Sie das Telefonkabel am Modem an.

Schnellreferenzhandbuch 97
3
Schließen Sie den Monitor,
entweder
mithilfe des weißen DVI-Kabels
oder
des blauen VGA-Kabels an
(schließen Sie
nicht
beide Kabel an denselben Computer an).
Richten Sie das Monitorkabel aus und schieben Sie es vorsichtig ein, damit die Anschlussstifte nicht
verbogen werden. Ziehen Sie die Flügelschrauben an den Kabelanschlüssen fest.
ANMERKUNG: Bei einigen Bildschirmen befindet sich der Monitoranschluss unterhalb der Bildschirmrück-
seite. Die Standorte der Anschlüsse können Sie aus der Dokumentation entnehmen, die Sie zusammen mit
Ihrem Bildschirm erhalten haben.
Anschließen des Bildschirms
4
Schließen Sie die Lautsprecher an.
5
Schließen Sie Computer, Bildschirm und Geräte an das Stromversorgungskabel an und stecken Sie das
jeweils andere Ende in eine Stromsteckdose.

98 Schnellreferenzhandbuch
Stromanschlüsse
HINWEIS: Um die Beschädigung eines Computers mit einem manuellen Spannungswahlschalter zu verhindern,
stellen Sie den Schalter auf die Spannung ein, die der Wechselspannung an Ihrem Standort am ehesten entspricht.
HINWEIS: Obwohl die Versorgungsspannung in Japan nur 100 V beträgt, müssen in Japan am Spannungswahl-
schalter 115 V eingestellt sein.
6
Stellen Sie sicher, dass der Spannungswahlschalter der Einstellung für Ihren Standort entspricht.
Ihr Computer ist mit einen manuellen Spannungswahlschalter ausgestattet. Bei Computern mit
Spannungswahlschalter auf der Rückseite muss die richtige Betriebsspannung manuell eingestellt
werden.

Schnellreferenzhandbuch 99
Systemansichten
Mini-Tower-Computer – Vorderansicht
1 Position der Service-
Tag-Nummer
Die Service-Tag-Nummer wird zur Identifizierung des Computers beim Zugriff auf
die Support-Website von Dell oder bei Anrufen beim technischen Support
verwendet.
2 CD-/DVD-Laufwerk Legen Sie eine CD oder eine DVD (falls unterstützt) in dieses Laufwerk ein.
3 Diskettenlaufwerk Legen Sie eine Diskette in dieses Laufwerk ein.
4 Aktivitätsanzeige
Festplattenlaufwerk
Diese Anzeige flackert, wenn das Festplattenlaufwerk benutzt wird.
4
9
7
8
3
2
6
5
1
10

100 Schnellreferenzhandbuch
5 USB 2.0-Anschlüsse (2) Verwenden Sie die vorderen USB-Anschlüsse für Geräte, die Sie gelegentlich an-
schließen, wie Joysticks oder Kameras, oder startfähige USB-Geräte.
Es wird empfohlen, die USB-Anschlüsse auf der Rückseite des Computers für
Geräte zu verwenden, die normalerweise angeschlossen bleiben, wie z. B. Drucker
und Tastaturen.
6 Diagnoseanzeigen Beheben Sie Computerprobleme mithilfe der auf dem Daignosecode basierenden
Anzeigeleuchten (weitere Informationen erhalten Sie unter „Diagnoseanzeigen“
auf Seite 123).
7 Betriebsschalter Drücken Sie auf diese Schaltfläche, um den Computer einzuschalten.
HINWEIS: Um Datenverlust zu vermeiden, drücken Sie zum Ausschalten des
Computers nicht den Betriebsschalter. Fahren Sie stattdessen das Betriebssys-
tem herunter.
HINWEIS: Wenn ACPI (Erweiterte Konfigurations- und Energieverwaltungs-
schnittstelle) beim Betriebssystem aktiviert ist, fährt der Computer das Betriebs-
system herunter, wenn Sie den Betriebsschalter drücken.
8 Stromversorgungslicht Die Stromversorgungsanzeige leuchtet und blinkt oder leuchtet stetig, um ver-
schiedene Betriebsmodi anzuzeigen.
• Leuchtet nicht – der Computer ist ausgeschaltet.
• Stetig grün – der Computer befindet sich in einem normalen Betriebsmodus.
• Blinkt grün – der Computer befindet sich in einem Energiesparmodus.
• Blinkend oder stetig gelb – Der Computer wird zwar mit Strom versorgt, aber es
besteht möglicherweise ein Problem mit der internen Stromversorgung.
Informationen finden Sie unter „Probleme mit der Stromversorgung“ in Ihrem
Online-
Benutzerhandbuch
.
Zum Beenden des Energiesparmodus drücken Sie den Netzschalter, oder verwen-
den Sie die Tastatur oder die Maus, sofern diese im Geräte-Manager unter
Windows als Aufweckgerät konfiguriert wurde. Weitere Informationen zu den
Ruhezuständen und zum Beenden eines Energiesparmodus finden Sie in Ihrem
Online-Benutzerhandbuch.
Unter „Systemanzeigen“ auf Seite 121 finden Sie eine Beschreibung der Codes für
die Anzeigeleuchten, die Ihnen die Fehlersuche bei dem Computer erleichtern.
9 Kopfhöreranschluss Schließen Sie mithilfe des Kopfhöreranschlusses Kopfhörer an.
10 Verbindungsintegri-
tätsanzeige
• Grün – Es besteht eine gute Verbindung zwischen einem 10-Mbit/s-Netzwerk und
dem Computer.
• Orange – Es besteht eine gute Verbindung zwischen einem 100-Mbit/s-Netzwerk
und dem Computer.
• Off (Deaktiviert) – Der Computer ermittelt keine physische Verbindung zum
Netzwerk.

Schnellreferenzhandbuch 101
Mini-Tower-Computer – Rückansicht
1
Abdeckungsfreigabe-
vorrichtung
Mithilfe dieses Riegels können Sie die Computerabdeckung öffnen.
2
Halbringförmiger Bügel
für ein Vorhängeschloss
Bringen Sie ein Vorhängeschloss an, um die Computerabdeckung zu verriegeln.
3 Stromanschluss Fügen Sie das Netzkabel in diesen Anschluss ein.
4
3
5
6
2
1

102 Schnellreferenzhandbuch
Mini-Tower-Computer – Anschlüsse an der Rückseite
4 Spannungswahlschalter Der Computer ist mit einem manuellen Spannungswahlschalter ausgestattet. Um
die Beschädigung eines Computers mit einem manuellen Spannungswahlschalter
zu verhindern, stellen Sie den Schalter auf die Spannung ein, die der Wechsel-
spannung an Ihrem Standort am ehesten entspricht.
HINWEIS: In Japan sollte der Spannungswahlschalter mit dem Wert 115-V
eingestellt werden.
Stellen Sie sicher, dass der Monitor und die angeschlossenen Geräte mit der ver-
fügbaren Netzspannung betrieben werden können.
5 Anschlüsse an der
Rückseite
Verbinden Sie serielle Geräte, USB-Geräte und sonstige Geräte mit dem entspre-
chenden Anschluss.
Siehe „Mini-Tower-Computer – Anschlüsse an der Rückseite“ auf Seite 102.
6 Kartensteckplätze Anschlüsse für installierte PCI- oder PCI-Express-Karten.
1
Paralleler Anschluss
Schließen Sie ein paralleles Gerät, wie z. B. einen Drucker, an den parallelen
Anschluss an. Ein USB-Drucker wird an einen USB-Anschluss angeschlossen.
ANMERKUNG: Der integrierte parallele Anschluss wird automatisch deaktiviert,
wenn der Computer eine installierte Karte mit einem parallelen Anschluss ermittelt,
der für die gleiche Adresse konfiguriert wurde. Weitere Informationen hierzu finden
Sie in Ihrem Online-Benutzerhandbuch
2
Verbindungsintegritäts-
anzeige
• Grün – Es besteht eine gute Verbindung zwischen einem 10-Mbit/s-Netzwerk und
dem Computer.
• Orange – Es besteht eine gute Verbindung zwischen einem 100-Mbit/s-Netzwerk
und dem Computer.
• Off (Deaktiviert) – Der Computer ermittelt keine physische Verbindung zum
Netzwerk.
13
10 9 8
5
6
7
24

Schnellreferenzhandbuch 103
3
Netzwerkadapter-
anschluss
Um den Computer an ein Netzwerk oder Breitbandgerät anzuschließen, stecken
Sie ein Ende eines Netzwerkkabels in eine Netzwerkbuchse oder in das Netzwerk-
oder Breitbandgerät. Schließen Sie das andere Ende des Netzwerkkabels an den
Netzwerkadapteranschluss an der Rückseite des Computers an. Ein Klicken zeigt
an, dass das Netzwerkkabel sicher angeschlossen ist.
ANMERKUNG: Schließen Sie kein Telefonkabel an den Netzwerkanschluss an.
Bei Computern mit einer Netzwerkadapter-Karte verwenden Sie den Anschluss
auf der Karte.
Es wird empfohlen, dass Sie Verkabelungen und Anschlüsse der Kategorie 5 für Ihr
Netzwerk verwenden. Wenn Kabel der Kategorie 3 verwendet werden müssen,
erzwingen Sie eine Netzwerkgeschwindigkeit von 10 Mbit/s, um zuverlässigen
Betrieb zu gewährleisten.
4
Netzwerk-
Aktivitätsleuchte
Die Anzeige blinkt gelb, wenn der Computer Netzwerkdaten sendet oder em-
pfängt. Hohe Netzwerkbelastung hat möglicherweise zur Folge, dass diese Anzeige
stetig leuchtet.
5
Leitungseingangs-
anschluss
Verwenden Sie den blauen Leitungseingangsanschluss, um ein Aufnahme-/
Wiedergabegerät, wie z. B. ein Kassettengerät, einen CD-Player oder einen
Videorekorder anzuschließen.
Bei Computern mit einer Soundkarte muss der Anschluss auf der Karte verwendet
werden.
6
Leitungsausgangs-
anschluss
Verwenden Sie den grünen Leitungsausgangsanschluss, um Kopfhörer und die
meisten der Lautsprechertypen mit integrierten Verstärkern anzuschließen.
Bei Computern mit einer Soundkarte muss der Anschluss auf der Karte verwendet
werden.
7
Mikrofonanschluss
Verwenden Sie den rosafarbenen Mikrofonanschluss, um ein Personalcomputer-
mikrofon für Stimm- oder Musikeingabe an ein Sound- oder Telefonieprogramm
anzuschließen.
Bei Computern mit einer Sound-Karte befindet sich der Mikrofonanschluss auf
der Karte.
8
USB 2.0-Anschlüsse (4)
Verwenden Sie die hinteren USB-Anschlüsse für Geräte, die normalerweise ange-
schlossen bleiben, wie z. B. Drucker und Tastaturen.
9
Monitoranschluss
Stecken Sie das Kabel IhresVGA-kompatiblen Monitors in den blauen Anschluss.
ANMERKUNG: Wenn bei der Lieferung bereits eine Grafikkarte installiert ist, ist
dieser Anschluss mit einer Abdeckung versehen. Schließen Sie Ihren Bildschirm an
den Anschluss auf der Grafikkarte an. Entfernen Sie nicht die Abdeckkappen.
10
Serieller Anschluss
Schließen Sie ein serielles Gerät, wie z. B. ein Handheld, an den seriellen Port an.
Die Standardbezeichnung ist COM 1 für den seriellen Anschluss 1.
Weitere Informationen finden Sie in Ihrem Online-Benutzerhandbuch.

104 Schnellreferenzhandbuch
Desktop-Computer – Vorderansicht
1 USB 2.0-Anschlüsse (2) Schließen Sie Geräte, die Sie nur gelegentlich nutzen, beispielsweise einen
Joystick, eine Kamera oder startfähige USB-Geräte an den USB-Anschlüssen
vorne am Computer an. (Weitere Informationen zum Starten von einem USB-
Gerät aus finden Sie in Ihrem Online-Benutzerhandbuch).
Es wird empfohlen, die USB-Anschlüsse auf der Rückseite des Computers für
Geräte zu verwenden, die normalerweise angeschlossen bleiben, wie z. B. Drucker
und Tastaturen.
2 Aktivitätsanzeige
Festplattenlaufwerk
Diese Anzeige flackert, wenn auf das Festplattenlaufwerk zugegriffen wird.
3 Betriebsschalter Drücken Sie auf diese Schaltfläche, um den Computer einzuschalten.
HINWEIS: Um Datenverlust zu vermeiden, schalten Sie den Computer nicht
aus, indem Sie den Betriebsschalter sechs Sekunden oder länger drücken.
Fahren Sie stattdessen das Betriebssystem herunter.
HINWEIS: Wenn ACPI (Erweiterte Konfigurations- und Energieverwaltungs-
schnittstelle) beim Betriebssystem aktiviert ist, fährt der Computer das Be-
triebssystem herunter, wenn Sie den Betriebsschalter drücken.
4 Dell-Emblem Dieses Emblem lässt sich drehen, um der Orientierung Ihres Computers zu ent-
sprechen. Legen Sie zum Drehen Ihre Finger außen um das Emblem, drücken Sie
fest und drehen Sie das Emblem. Sie können das Emblem auch drehen, indem Sie
den Schlitz nahe der Emblemunterseite verwenden.
89
3
5
1
4610
2
11
7

Schnellreferenzhandbuch 105
Desktop-Computer – Rückansicht
5 Stromversorgungs-
anzeige
Die Stromversorgungsanzeige leuchtet und blinkt oder leuchtet stetig, um ver-
schiedene Betriebsmodi anzuzeigen.
• Leuchtet nicht – der Computer ist ausgeschaltet.
• Stetig grün – der Computer befindet sich in einem normalen Betriebsmodus.
• Blinkt grün – der Computer befindet sich in einem Energiesparmodus.
• Blinkt oder stetig gelb – Weitere Informationen finden Sie unter „Probleme mit
der Stromversorgung“ in Ihrem Online-
Benutzerhandbuch
.
Zum Beenden des Energiesparmodus drücken Sie den Netzschalter, oder verwen-
den Sie die Tastatur oder die Maus, sofern diese im Geräte-Manager unter
Windows als Aufweckgerät konfiguriert wurde.
Unter „Systemanzeigen“ auf Seite 121 finden Sie eine Beschreibung der Codes,
die Ihnen die Fehlersuche im Computer erleichtern.
6 Diagnoseanzeigen Verwenden Sie die Anzeigen für eine leichtere Behebung von Störungen bei
Computerproblemen auf der Grundlage des Diagnosecodes. Weitere Informa-
tionen finden Sie unter „Diagnoseanzeigen“ auf Seite 123.
7 Verbindungsintegritäts-
anzeige
• Grün – Es besteht eine gute Verbindung zwischen einem 10-Mbit/s-Netzwerk
und dem Computer.
• Orange – Es besteht eine gute Verbindung zwischen einem 100-Mbit/s-Netzwerk
und dem Computer.
• Off (Deaktiviert) – Der Computer ermittelt keine physische Verbindung zum
Netzwerk.
8 Kopfhöreranschluss Schließen Sie mithilfe des Kopfhöreranschlusses Kopfhörer an.
9 Diskettenlaufwerk Legen Sie eine Diskette in dieses Laufwerk ein.
10 CD-/DVD-Laufwerk Legen Sie eine CD oder eine DVD (falls unterstützt) in dieses Laufwerk ein.
11 Position der Service-Tag-
Nummer
Die Service-Tag-Nummer wird zur Identifizierung des Computers beim Zugriff
auf die Support-Website von Dell oder bei Anrufen beim technischen Support
verwendet.
1 Kartensteckplätze Anschlüsse für installierte PCI- oder PCI-Express-Karten.
2 Anschlüsse an der
Rückseite
Verbinden Sie serielle Geräte, USB-Geräte und sonstige Geräte mit dem ent-
sprechenden Anschluss.
Siehe „Desktop-Computer – Anschlüsse an der Rückseite“ auf Seite 106.
5
1
2 3 4 6

106 Schnellreferenzhandbuch
Desktop-Computer – Anschlüsse an der Rückseite
3 Stromanschluss Fügen Sie das Netzkabel in diesen Anschluss ein.
4 Spannungswahlschalter Der Computer ist mit einem manuellen Spannungswahlschalter ausgestattet. Um
die Beschädigung eines Computers mit einem manuellen Spannungswahlschalter
zu verhindern, stellen Sie den Schalter auf die Spannung ein, die der Wechsel-
spannung an Ihrem Standort am ehesten entspricht.
HINWEIS: In Japan sollte der Spannungswahlschalter mit dem Wert 115-V
eingestellt werden.
Stellen Sie sicher, dass der Monitor und die angeschlossenen Geräte mit der
verfügbaren Netzspannung betrieben werden können.
5 Halbringförmiger Bügel
für ein Vorhängeschloss
Bringen Sie ein Vorhängeschloss an, um die Computerabdeckung zu verriegeln.
6 Abdeckungsfreigabe-
vorrichtung
Mithilfe dieses Riegels können Sie die Computerabdeckung öffnen.
1
Paralleler Anschluss
Schließen Sie ein paralleles Gerät, wie z. B. einen Drucker, an den parallelen
Anschluss an. Ein USB-Drucker wird an einen USB-Anschluss angeschlossen.
ANMERKUNG: Der integrierte parallele Anschluss wird automatisch deaktiviert,
wenn der Computer eine installierte Karte mit einem parallelen Anschluss ermittelt,
der für die gleiche Adresse konfiguriert wurde. Weitere Informationen finden Sie in
Ihrem Online-Benutzerhandbuch.
2
Verbindungsintegritäts-
anzeige
• Grün – Es besteht eine gute Verbindung zwischen einem 10-Mbit/s-Netzwerk
und dem Computer.
• Orange – Es besteht eine gute Verbindung zwischen einem 100-Mbit/s-Netzwerk
und dem Computer.
• Off (Deaktiviert) – Der Computer ermittelt keine physische Verbindung zum
Netzwerk.
13
10 9 8
5
6
7
24

Schnellreferenzhandbuch 107
3
Netzwerkadapter-
anschluss
Um den Computer an ein Netzwerk oder Breitbandgerät anzuschließen, stecken
Sie ein Ende eines Netzwerkkabels in eine Netzwerkbuchse oder in das Netzwerk-
oder Breitbandgerät. Schließen Sie das andere Ende des Netzwerkkabels an den
Netzwerkadapteranschluss an der Rückseite des Computers an. Ein Klicken zeigt
an, dass das Netzwerkkabel sicher angeschlossen ist.
ANMERKUNG: Schließen Sie kein Telefonkabel an den Netzwerkanschluss an.
Bei Computern mit einer Netzwerkadapter-Karte verwenden Sie den Anschluss
auf der Karte.
Es wird empfohlen, dass Sie Verkabelungen und Anschlüsse der Kategorie 5 für Ihr
Netzwerk verwenden. Wenn Kabel der Kategorie 3 verwendet werden müssen,
erzwingen Sie eine Netzwerkgeschwindigkeit von 10 Mbit/s, um zuverlässigen
Betrieb zu gewährleisten.
4
Netzwerk-
Aktivitätsleuchte
Die Anzeige blinkt gelb, wenn der Computer Netzwerkdaten sendet oder em-
pfängt. Hohe Netzwerkbelastung hat möglicherweise zur Folge, dass diese
Anzeige stetig leuchtet.
5
Leitungseingangs-
anschluss
Verwenden Sie den blauen Leitungseingangsanschluss, um ein Aufnahme-/
Wiedergabegerät, wie z. B. ein Kassettengerät, einen CD-Player oder einen
Videorekorder anzuschließen.
Bei Computern mit einer Soundkarte muss der Anschluss auf der Karte verwendet
werden.
6
Leitungsausgangs-
anschluss
Verwenden Sie den grünen Leitungsausgangsanschluss, um Kopfhörer und die
meisten der Lautsprechertypen mit integrierten Verstärkern anzuschließen.
Bei Computern mit einer Soundkarte muss der Anschluss auf der Karte verwendet
werden.
7
Mikrofonanschluss
Verwenden Sie den rosafarbenen Mikrofonanschluss, um ein Personalcomputer-
mikrofon für Stimm- oder Musikeingabe an ein Sound- oder Telefonieprogramm
anzuschließen.
Bei Computern mit einer Sound-Karte befindet sich der Mikrofonanschluss auf
der Karte.
8
USB 2.0-Anschlüsse (4)
Verwenden Sie die hinteren USB-Anschlüsse für Geräte, die normalerweise ange-
schlossen bleiben, wie z. B. Drucker und Tastaturen.
9
Monitoranschluss
Stecken Sie das Kabel Ihres VGA-kompatiblen Monitors in den blauen Anschluss.
ANMERKUNG: Wenn bei der Lieferung bereits eine Grafikkarte installiert ist, ist
dieser Anschluss mit einer Abdeckung versehen. Schließen Sie Ihren Bildschirm an
den Anschluss auf der Grafikkarte an. Entfernen Sie nicht die Abdeckkappen.
10
Serieller Anschluss
Schließen Sie ein serielles Gerät, wie z. B. ein Handheld, an den seriellen Port an.
Die Standardbezeichnung ist COM 1 für den seriellen Anschluss 1.
Weitere Informationen finden Sie in Ihrem Online-Benutzerhandbuch.

108 Schnellreferenzhandbuch
Abnehmen der Computerabdeckung
VORSICHT: Bevor Sie mit den Arbeiten in diesem Abschnitt beginnen, befolgen Sie erst die Sicherheitshinweise
im Produktinformationshandbuch.
VORSICHT: Um Stromschläge zu vermeiden, trennen Sie vor dem Entfernen der Abdeckung den Computer immer
von der Steckdose.
Vorbereitung
HINWEIS: Um Datenverluste zu vermeiden, speichern und schließen Sie alle geöffneten Dateien und beenden Sie
alle aktiven Programme, bevor Sie den Computer herunterfahren.
1
Starten Sie das Betriebssystem.
a
Speichern und schließen Sie alle geöffneten Dateien und beenden Sie alle aktiven Programme.
Klicken Sie auf die Schaltfläche
Start
und anschließend auf
Computer ausschalten
.
b
Klicken Sie im Fenster
Computer ausschalten
auf die Schaltfläche
Ausschalten
.
Der Computer schaltet sich aus, wenn das Herunterfahren des Betriebssystems abgeschlossen ist.
2
Stellen Sie sicher, dass der Computer und alle angeschlossenen Geräte ausgeschaltet sind. Wenn Ihr
Computer und die angeschlossenen Komponenten beim Herunterfahren des Computers nicht auto-
matisch ausgeschaltet wurden, schalten Sie sie jetzt aus.
Vor der Arbeit im Innern des Computers
Die folgenden Sicherheitshinweise schützen den Computer vor möglichen Schäden und dienen der
persönlichen Sicherheit des Benutzers.
VORSICHT: Bevor Sie mit den Arbeiten in diesem Abschnitt beginnen, befolgen Sie erst die Sicherheitshinweise
im Produktinformationshandbuch.
VORSICHT: Gehen Sie mit Komponenten und Karten vorsichtig um. Komponenten und Kontakte auf einer Karte
dürfen nicht angefasst werden. Berühren Sie eine Karte ausschließlich an den Rändern oder am Montageblech.
Fassen Sie Komponenten wie Prozessoren grundsätzlich an den Kanten und niemals an den Stiften an.
HINWEIS: Reparaturen an Ihrem Computer sollten nur von einem zertifizierten Service-Techniker ausgeführt
werden. Schäden durch nicht von Dell genehmigte Wartungsversuche werden nicht durch die Garantie abgedeckt.
HINWEIS: Ziehen Sie beim Trennen des Geräts nur am Stecker oder an der Zugentlastung und nicht am Kabel
selbst. Einige Kabel haben Stecker mit Verriegelungsklammern. Drücken Sie beim Abziehen solcher Kabel vor dem
Abnehmen die Verriegelungsklammern. Halten Sie beim Trennen von Steckverbindungen die Anschlüsse gerade,
um keine Stifte zu verbiegen. Achten Sie vor dem Anschließen eines Kabels darauf, dass die Stecker korrekt
ausgerichtet und nicht verkantet aufgesetzt werden.
Um Schäden am Computer zu vermeiden, führen Sie folgende Schritte aus, bevor die Arbeiten im
Innern des Computers begonnen werden.
1
Schalten Sie den Computer aus.
HINWEIS: Wenn Sie ein Netzwerkkabel lösen, ziehen Sie es erst vom Computer und dann von der Netzwerkwand-
steckerbuchse ab.
2
Trennen Sie alle Telefon- und Datenübertragungskabel vom Computer.

Schnellreferenzhandbuch 109
3
Trennen Sie den Computer und alle angeschlossenen Geräte von der Steckdose, und drücken Sie
anschließend den Betriebsschalter, um die Systemplatine zu erden.
4
Entfernen Sie, falls vorhanden, den Computer-Standrahmen (weitere Anweisungen finden Sie in der
mit dem Standrahmen mitgelieferten Dokumentation).
VORSICHT: Um Stromschläge zu vermeiden, trennen Sie vor dem Entfernen der Abdeckung den Computer immer
von der Steckdose.
5
Entfernen Sie die Computerabdeckung:
• Entfernen Sie die Mini-Tower-Computerabdeckung (siehe „Mini-Tower-Computer“ auf
Seite 109).
• Entfernen Sie die Desktop-Computerabdeckung (siehe „Desktop-Computer“ auf Seite 115).
HINWEIS: Vor dem Berühren einer Komponente im Innern des Computers müssen Sie erst eine nicht lackierte
Metallfläche, wie z. B. das Metall auf der Rückseite des Computers berühren, um sich zu erden. Wiederholen Sie
diese Erdung während der Arbeit regelmäßig, um statische Elektrizität abzuleiten, die interne Bauteile beschädigen
könnte.
Mini-Tower-Computer
VORSICHT: Bevor Sie mit den Arbeiten in diesem Abschnitt beginnen, befolgen Sie erst die Sicherheitshinweise
im Produktinformationshandbuch.
VORSICHT: Um elektrische Schläge zu vermeiden, trennen Sie vor dem Entfernen der Computerabdeckung den
Computer immer von der Steckdose.
1
Folgen Sie den Anweisungen unter „Vorbereitung“ auf Seite 108.
2
Wenn an der Rückseite ein Vorhängeschloss durch den Ring geschoben wurde, entfernen Sie das
Vorhängeschloss.
3
Legen Sie den Computer auf die Seite.
4
Drücken Sie die Freigabevorrichtung für die Abdeckung nach hinten und nehmen Sie dabei die
Abdeckung ab.
5
Fassen Sie die Computerabdeckung an den Seiten an und drehen Sie sie nach oben, indem Sie die
Scharnierhalterungen als Hebelpunkte verwenden.
6
Entfernen Sie die Abdeckung aus den Scharnierhalterungen und legen Sie sie auf einer weichen,
glatten Oberfläche ab.

110 Schnellreferenzhandbuch
1 Sicherheitskabeleinschub
2 Abdeckungsfreigabevorrichtung
3 Halbringförmiger Bügel für ein
Vorhängeschloss
2
1
3

Schnellreferenzhandbuch 111
Desktop-Computer
VORSICHT: Bevor Sie mit den Arbeiten in diesem Abschnitt beginnen, befolgen Sie erst die Sicherheitshinweise
im Produktinformationshandbuch.
VORSICHT: Um elektrische Schläge zu vermeiden, trennen Sie vor dem Entfernen der Computerabdeckung den
Computer immer von der Steckdose.
1
Folgen Sie den Anweisungen unter „Vorbereitung“ auf Seite 108.
2
Wenn an der Rückseite ein Vorhängeschloss durch den Ring geschoben wurde, entfernen Sie das
Vorhängeschloss.
3
Drücken Sie die Freigabevorrichtung für die Abdeckung nach hinten und nehmen Sie dabei die
Abdeckung ab.
4
Rotieren Sie die Abdeckung mithilfe der Scharnierhalterung als Hebelvorrichtung nach oben.
5
Entfernen Sie die Abdeckung aus den Scharnierhalterungen und legen Sie sie auf einer weichen,
glatten Oberfläche ab.
1
Sicherheitskabeleinschub
2
Abdeckungsfreigabevorrichtung
3
Halbringförmiger Bügel für ein Vorhängeschloss
2
1
3

112 Schnellreferenzhandbuch
Im Innern des Computers
Mini-Tower-Computer
1 CD-/DVD-Laufwerk 4 Systemplatine
2 Diskettenlaufwerk 5 Kühlkörperbaugruppe
3 Netzteil 6 Festplatte
1
3
4
6
2
5

Schnellreferenzhandbuch 113
Komponenten der Systemplatine
12
4
6
15
3
16
17
14
10
5
8
7
12
13
911

114 Schnellreferenzhandbuch
Jumper-Einstellungen
1 Lüfteranschluss (FAN) 10 interner Summer (SPKR1)
2 Mikroprozessoranschluss (CPU) 11 Kennwort-Jumper (PSWD)
3 Netzanschluss des Prozessors (12V POWER) 12 Jumper zum Zurücksetzen der Echtzeituhr
(RTCRST)
4 Frontblendenanschluss (FNT_PANEL) 13 Batteriesockel (BATTERY)
5 Speichermodulanschlüsse (DIMM_1, DIMM_2) 14 Anschluss für PCI-Express x16-Karte
6 Anschlüsse für serielles SATA-Laufwerk (SATA0,
SATA1)
15 PCI-Kartensteckplätze (2)
7 Netzanschluss (POWER) 16 Diskettenlaufwerkanschluss (FLOPPY)
8 Anschluss für CD-/DVD-Laufwerk (IDE) 17 serieller/ PS/2-Anschluss (PS2/SER2)
9 Anschlüssel für SATA-Laufwerk (SATA2,
SATA3)
Mini-Tower-Computer

Schnellreferenzhandbuch 115
Desktop-Computer
Jumper Einstellung Beschreibung
PSWD Die Kennwortfunktionen sind
aktiviert (Standardeinstellung).
Kennwortfunktionen sind
deaktiviert.
RTCRST
Die Echtzeituhr wurde aktiviert
(Standardeinstellung).
Die Echtzeituhr wurde zurück-
gesetzt (zeitweise überbrückt).
überbrückt nicht überbrückt
1 Laufwerkschacht (CD/DVD, Diskette und Festplatte) 4 Kartensteckplätze
2 Netzteil 5 Kühlkörperbaugruppe
3 Systemplatine 6 Vordere E/A-Leiste
1
2
3
4
5
6
1
1

116 Schnellreferenzhandbuch
Komponenten der Systemplatine
12
4
6
15
3
16
17
14
10
5
8
7
12
13
11 9

Schnellreferenzhandbuch 117
Jumper-Einstellungen
1 Lüfteranschluss (FAN) 10 interner Summer (SPKR1)
2 Mikroprozessoranschluss (CPU) 11 Kennwort-Jumper (PSWD)
3 Netzanschluss des Prozessors (12V POWER) 12 Jumper für Echtzeituhr-Reset (RTCRST)
4 Frontblendenanschluss (FNT_PANEL) 13 Batteriesockel (BATTERY)
5 Speichermodulanschlüsse (DIMM_1, DIMM_2) 14 Anschluss für PCI-Express x16-Karte
6 Anschlüsse für serielles ATA-Festplattenlaufwerk
(SATA0, SATA1)
15 PCI-Kartensteckplatz (2)
7 Netzanschluss (POWER) 16 Diskettenlaufwerkanschluss (FLOPPY)
8 Anschluss für CD-/DVD-Laufwerk (IDE) 17 serieller/ PS/2-Anschluss (PS2/SER2)
9 Anschlüsse für serielles ATA-Festplattenlaufwerk
(SATA2, SATA3)
Desktop-Computer

118 Schnellreferenzhandbuch
Problemlösung
Dell stellt eine Reihe von Hilfewerkzeugen zur Verfügung, die Ihnen bei Problemen mit dem Computer
weiterhelfen. Neueste Informationen zur Fehlerbehebung an Ihrem Computer finden Sie auf der
Support-Website von Dell unter support.dell.com.
Wenn Probleme mit dem Computer auftreten, für deren Lösung Sie die Hilfe von Dell benötigen,
erstellen Sie eine detaillierte Beschreibung des Fehlers, des Signaltoncodes oder der Diagnoseanzeige.
Tragen Sie unten den Express-Servicecode und die Service-Tag-Nummer ein, und rufen Sie Dell von der
Nähe Ihres Computers aus an. Informationen zur Kontaktaufnahme mit Dell finden Sie im Online-
Benutzerhandbuch.
Unter „Informationsquellen“ auf Seite 93 finden Sie ein Beispiel für den Express-Servicecode und die
Service-Tag-Nummer.
Express-Servicecode: ___________________________
Service-Tag-Nummer: ___________________________
Jumper Einstellung Beschreibung
PSWD Die Kennwortfunktionen sind
aktiviert (Standardeinstellung).
Kennwortfunktionen sind
deaktiviert.
RTCRST
Die Echtzeituhr wurde aktiviert
(Standardeinstellung).
Die Echtzeituhr wurde zurück-
gesetzt (zeitweise überbrückt).
überbrückt nicht überbrückt
1
1

Schnellreferenzhandbuch 119
Dell Diagnostics
VORSICHT: Bevor Sie mit den Arbeiten in diesem Abschnitt beginnen, befolgen Sie erst die Sicherheitshinweise
im Produktinformationshandbuch.
Wann wird das Programm Dell Diagnostics eingesetzt?
Wenn eine Störung am Computer auftritt, führen Sie zuerst die Tests unter „Beheben von Störungen“ in
Ihrem Online-Benutzerhandbuch durch und führen Sie das Programm „Dell Diagnostics“ aus, bevor Sie
Dell kontaktieren, um technische Hilfe zu erhalten. Informationen zur Kontaktaufnahme mit Dell fin-
den Sie im Online-Benutzerhandbuch.
HINWEIS: Dell Diagnostics läuft nur auf Dell™-Computern.
Starten Sie das System-Setup-Programm (weitere Anweisungen finden Sie unter „System-Setup-Pro-
gramm“ in Ihrem Online-Benutzerhandbuch), überprüfen Sie die Konfigurationsdaten Ihres Computers
und stellen Sie sicher, dass das zu testende Gerät im System-Setup-Programm angezeigt wird und aktiv
ist.
Starten Sie die „Dell Diagnostics“ entweder von Ihrem Festplattenlaufwerk oder von der optionalen
Drivers and Utilities CD (diese wird auch als ResourceCD bezeichnet).
Starten von Dell Diagnostics vom Festplattenlaufwerk
1
Schalten Sie den Computer ein bzw. führen Sie einen Neustart durch.
2
Wenn das DELL-Logo angezeigt wird, drücken Sie sofort <F12>.
ANMERKUNG: Wenn eine Meldung angezeigt wird, dass keine Partition für ein Diagnose-Dienstprogramm
gefunden wurde, starten Sie Dell Diagnostics über die optionale Drivers and Utilities CD (siehe „Starten von
Dell Diagnostics von der Drivers and Utilities CD“ auf Seite 119).
Falls Sie zu lange gewartet haben, und das Betriebssystem-Logo angezeigt wird, warten Sie noch, bis
der Microsoft
®
Windows
®
-Desktop angezeigt wird. Fahren Sie danach den Computer herunter und
versuchen Sie es erneut.
3
Wenn die Liste mit den Startgeräten angezeigt wird, markieren Sie
Starten in die Programmpartition
und drücken Sie auf die <Eingabetaste>.
4
Wenn das
Hauptmenü
des Programms „Dell Diagnostics“ erscheint, wählen Sie den gewünschten Test
aus.
Starten von Dell Diagnostics von der Drivers and Utilities CD
1
Legen Sie die
Drivers and Utilities
CD.
2
Computer herunterfahren und erneut starten.
Wenn das DELL-Logo angezeigt wird, drücken Sie sofort <F12>.
Wenn Sie zu lange warten und das Betriebssystem-Logo eingeblendet wird, warten Sie noch, bis der
Windows-Desktop angezeigt wird. Fahren Sie danach den Computer herunter und versuchen Sie es
erneut.

120 Schnellreferenzhandbuch
ANMERKUNG: Durch die nächsten Schritte wird die Startreihenfolge einmalig geändert. Bei dem nächsten
Systemstart startet der Computer entsprechend den im System-Setup-Programm angegebenen Geräten.
3
Wenn die Liste der startfähigen Geräte angezeigt wird, markieren Sie die Auflistung für das CD/DVD-
Laufwerk und drücken Sie auf die <Eingabetaste>.
4
Wählen Sie im CD-Startmenü die Auflistung für die Option „CD/DVD Drive“ (CD/DVD-Laufwerk)
aus.
5
Wählen Sie im angezeigten Menü die Option zum Starten vom CD/DVD-Laufwerk aus.
6
Geben Sie
1
ein, um das Menü der
Drivers and Utilities
CD aufzurufen.
7
Geben Sie
2
ein, um „Dell Diagnostics“ zu starten.
8
Wählen Sie
Run Dell 32-bit Diagnostics
(Dell 32-Bit-Diagnose ausführen) aus der nummerierten
Liste aus. Wählen Sie die für Ihren Computer zutreffende Version aus, wenn mehrere Versionen auf-
gelistet werden.
9
Wenn das
Hauptmenü
des Programms „Dell Diagnostics“ erscheint, wählen Sie den gewünschten Test
aus.
Hauptmenü des Programms Dell Diagnostics
1
Klicken Sie nach dem Laden der Dell Diagnostics und nachdem das
Hauptmenü
angezeigt wird auf
die Schaltfläche für die von Ihnen gewünschte Option.
2
Wenn beim Test eine Störung gefunden wird, wird eine Meldung mit dem Fehlercode und eine Be-
schreibung der Störung angezeigt. Notieren Sie den Fehlercode und die Problembeschreibung und
folgen Sie den Anweisungen auf dem Bildschirm.
Kann das Problem nicht gelöst werden, wenden Sie sich an Dell. Informationen zur Kontaktaufnahme
mit Dell finden Sie im Online-
Benutzerhandbuch
.
ANMERKUNG: Die Service-Tag-Nummer des Computers finden Sie im oberen Bereich der einzelnen
Testanzeigen. Wenn Sie bei Dell anrufen, fragt Sie der Technische Support nach der Service-Tag-Nummer.
Option Funktion
Express Test
(Schnelltest)
Es wird ein Schnelltest der Geräte durchgeführt. Dieser Test dauert normalerweise
etwa 10 bis 20 Minuten. Es ist keine Benutzeraktion erforderlich. Führen Sie den
Schnelltest zuerst aus, um die Möglichkeit zum schnellen Auffinden des Problems zu
erhöhen.
Erweiterter Test Es wird ein ausführlicher Test der Geräte durchgeführt. Dieser Test dauert normaler-
weise mindestens eine Stunde und erfordert die Beantwortung einiger Fragen.
Custom Test
(Benutzerdefinierter
Test)
Es wird ein bestimmtes Gerät geprüft. Die auszuführenden Tests können vom Benutzer
angepasst werden.
Symptom Tree
(Problemübersicht)
Listet die am häufigsten vorkommenden Symptome auf und lässt zu, dass Sie einen
Test wählen, der auf dem Symptom der vorliegenden Störung basiert.

Schnellreferenzhandbuch 121
3
Klicken Sie beim Ausführen eines Tests im
benutzerdefinierten Test
oder mit der Option
Symptom
Tree
(Problemübersicht) auf das in der folgenden Tabelle beschriebene zutreffende Register, um
weitere Informationen zu erhalten.
4
Nachdem die Tests abgeschlossen sind, wenn Sie „Dell Diagnostics“ von der optionalen
Drivers and
Utilities
CD ausführen
,
die CD aus dem Laufwerk entfernen.
5
Schließen Sie den Testbildschirm und kehren Sie zum
Hauptmenü
zurück. Schließen Sie zum Been-
den von Dell Diagnostics und zum Neustart des Computers das
Hauptmenü
.
Systemanzeigen
Die Stromversorgungsanzeige könnte auf ein Problem mit dem Computer hinweisen.
Registerkarte Funktion
Ergebnisse Es werden die Testergebnisse und möglicherweise gefundene Probleme angezeigt.
Fehler Es werden die gefundenen Fehler, die Fehlercodes und eine Beschreibung des Problems
angezeigt.
Hilfe Beschreibt den Test und verweist auf mögliche Voraussetzungen für die Durchführung
des Tests.
Konfiguration Die Hardware-Konfiguration der ausgewählten Geräte wird angezeigt.
Das Programm Dell Diagnostics sammelt über das System-Setup-Programm, den
Speicher und verschiedene interne Tests Konfigurationsinformationen für alle Geräte.
Diese Informationen werden in der Geräteliste auf der linken Seite des Fensters an-
gezeigt. In der Geräteliste werden möglicherweise nicht die Namen aller Geräte an-
gezeigt, die im Computer installiert oder daran angeschlossen sind.
Parameter Sie können den Test durch Änderungen an den Einstellungen an Ihre Bedürfnisse
anpassen.
Stromversorgungslicht Problembeschreibung Lösungsvorschlag
Stetig grün leuchtend Der Computer wird mit Strom ver-
sorgt und arbeitet ordnungsgemäß.
Keine Korrekturmaßnahme erforderlich
Grün blinkend Der Computer befindet sich im
Energiesparmodus.
Drücken Sie den Betriebsschalter, bewegen Sie
die Maus, oder drücken Sie eine beliebige Taste
auf der Tastatur, um den Computer wieder zu
aktivieren.
Mehrmals grün blinkend,
anschließend aus
Es liegt ein Konfigurationsfehler vor. Prüfen Sie die Diagnoseanzeigen, um festzu-
stellen, ob sich das genaue Problem ausfindig
machen lässt (siehe „Diagnoseanzeigen“ auf
Seite 123).

122 Schnellreferenzhandbuch
Stetig gelb leuchtend Dell Diagnostics führt einen Test
durch, oder eine Komponente auf
der Systemplatine ist möglicher-
weise fehlerhaft oder wurde nicht
richtig installiert.
Warten Sie bei Ausführung von Dell
Diagnostics, bis die Tests vollständig abgeschlos-
sen sind.
Prüfen Sie die Diagnoseanzeigen, um festzu-
stellen, ob sich das genaue Problem ausfindig
machen lässt (siehe „Diagnoseanzeigen“ auf
Seite 123).
Startet der Computer nicht, wenden Sie sich an
Dell, um technische Unterstützung anzufordern.
Informationen zur Kontaktaufnahme mit Dell
finden Sie im Online-
Benutzerhandbuch
.
Gelb blinkend Es ist ein Ausfall bei der
Stromversorgung oder der
Systemplatine aufgetreten.
Prüfen Sie die Diagnoseanzeigen, um festzu-
stellen, ob sich das genaue Problem ausfindig
machen lässt (siehe „Diagnoseanzeigen“ auf
Seite 123).
Informationen finden Sie unter „Probleme mit
der Stromversorgung“ in Ihrem Online-Benut-
zerhandbuch.
Stetig grün leuchtend,
Signaltoncode während
des POST
Beim Ausführen des BIOS wurde ein
Fehler erkannt.
Unter „Signaltoncodes“ auf Seite 126 finden Sie
Anleitungen zur Diagnose des Signaltoncodes.
Überprüfen Sie auch die Diagnoseanzeigen um
festzustellen, ob es sich um ein bekanntes
Problem handelt.
Stromanzeige stetig grün
leuchtend, kein Signalton-
code oder keine Anzeige
während des POST
Der Bildschirm oder die Grafikkarte
ist möglicherweise fehlerhaft oder
nicht ordnungsgemäß installiert.
Überprüfen Sie die Diagnoseanzeigen, um fest-
zustellen, ob das bestimmte Problem erkannt
wurde.
Stromversorgungslicht
stetig grün leuchtend, kein
Signaltoncode während
des POST, Computer
stürzt bei POST ab
Eine auf der Systemplatine inte-
grierte Komponente ist möglicher-
weise fehlerhaft.
Überprüfen Sie die Diagnoseanzeigen, um fest-
zustellen, ob das bestimmte Problem erkannt
wurde. Wenn Sie das Problem nicht finden kön-
nen, wenden Sie sich an Dell, um technische
Unterstützung anzufordern.
Informationen zur
Kontaktaufnahme mit Dell finden Sie im Online-
Benutzerhandbuch
.
Stromversorgungslicht Problembeschreibung Lösungsvorschlag

Schnellreferenzhandbuch 123
Diagnoseanzeigen
VORSICHT: Bevor Sie mit den Arbeiten in diesem Abschnitt beginnen, befolgen Sie erst die Sicherheitshinweise
im Produktinformationshandbuch.
Um Ihnen die Behebung einer Störung zu erleichtern, verfügt Ihr Computer an der Vorder- oder Rück-
seite über vier Anzeigen, die mit „1“, „2“, „3“, und „4“ gekennzeichnet sind. Die Anzeigen können aus-
geschaltet sein oder grün leuchten. Wenn der Computer normal hochfährt, ändern sich die Muster oder
Codes der Anzeigen, sobald der Startvorgang abgeschlossen ist. Wenn der Einschalt-Selbsttest des Sys-
temstarts erfolgreich war, leuchten alle vier Anzeigen kurz grün auf und werden dann abgeschaltet.
Wenn beim Abarbeiten der POST-Routine ein Fehler auftritt, geben die von den LEDs angezeigten
Muster einen Hinweis auf den Vorgang, bei dem der Fehler aufgetreten ist. Wenn der Computer nach
dem Einschalt-Selbsttest eine Fehlfunktion aufweist, zeigen die Diagnoseanzeigen nicht die Ursache der
Fehlfunktion an.
ANMERKUNG: Die Ausrichtung der Diagnoseanzeigen variiert möglicherweise in Abhängigkeit vom Systemtyp.
Die Diagnoseanzeigen sind entweder vertikal oder horizontal ausgerichtet.
Leuchtmuster Problembeschreibung Lösungsvorschlag
Der Computer ist entweder abgeschal-
tet oder ein Pre-BIOS-Fehler ist aufge-
treten.
Die Diagnoseanzeigen leuchten nicht,
wenn der Computer das Betriebssystem
ordnungsgemäß gestartet hat.
Schließen Sie den Computer an eine funktionie-
rende Steckdose an, und drücken Sie den Betriebs-
schalter.
Es ist möglicherweise ein BIOS-Fehler
aufgetreten; der Computer befindet
sich im Wiederherstellungsmodus.
Führen Sie das BIOS-Wiederherstellungspro-
gramm aus, warten Sie, bis die Wiederherstellung
abgeschlossen ist, und starten Sie den Computer
neu.
Möglicherweise ist ein Fehler im Prozes-
sor aufgetreten.
Installieren Sie den Prozessor erneut und starten
Sie den Computer neu.
Informationen, wie Sie den
Prozessor neu installieren, finden Sie in Ihrem
Online-
Benutzerhandbuch
.

124 Schnellreferenzhandbuch
Die Speichermodule wurden erkannt, es
ist jedoch ein Speicherfehler
aufgetreten.
• Wenn ein Speichermodul installiert ist, installie-
ren Sie dieses neu und starten dann den Com-
puter neu. Weitere Informationen zur erneuten
Installation der Speichermodule finden Sie in
Ihrem Online-
Benutzerhandbuch
.
• Wenn zwei oder mehr Speichermodule installiert
sind, entfernen Sie die Module, installieren ein
Modul neu und starten dann den Computer neu.
Installieren Sie ein weiteres Modul neu, wenn der
Computer beim Neustart normal hochfährt.
Fahren Sie damit fort, bis Sie ein fehlerhaftes
Modul identifiziert oder alle Module fehlerfrei
neu installiert haben.
• Installieren Sie gegebenenfalls ordnungsgemäß
funktionierende Speichermodule des gleichen
Typs in Ihrem Computer.
• Wenn das Problem fortbesteht,
wenden Sie sich
an Dell
. Informationen zur Kontaktaufnahme
mit Dell finden Sie im Online-
Benutzerhandbuch
.
Möglicherweise ist ein Fehler bei der
Grafikkarte aufgetreten.
• Wenn der Computer mit einer Grafikkarte aus-
gestattet ist, entfernen Sie die Karte, installieren
Sie sie neu und starten Sie den Computer neu.
• Wenn das Problem fortbesteht, installieren Sie
eine Grafikkarte, die nachweislich funktioniert,
und starten Sie den Computer neu.
• Besteht das Problem weiterhin oder besitzt der
Computer eine integrierte Grafikkarte,
wenden
Sie sich an Dell
. Informationen zur Kontaktauf-
nahme mit Dell finden Sie im Online-
Benutzer-
handbuch
.
Ein möglicher Disketten- oder Festplat-
tenlaufwerkfehler ist aufgetreten.
Schließen Sie alle Strom- und Datenkabel erneut
an und starten Sie den Computer neu.
Ein möglicher USB-Fehler ist auf-
getreten.
Installieren Sie alle USB-Komponenten neu, über-
prüfen Sie die Kabelverbindungen und starten Sie
anschließend den Computer neu.
Leuchtmuster Problembeschreibung Lösungsvorschlag

Schnellreferenzhandbuch 125
Es wurden keine Speichermodule
erkannt.
• Wenn ein Speichermodul installiert ist, installie-
ren Sie dieses neu und starten dann den Com-
puter neu. Weitere Informationen zur erneuten
Installation der Speichermodule finden Sie in
Ihrem Online-
Benutzerhandbuch
.
• Wenn zwei oder mehr Speichermodule installiert
sind, entfernen Sie die Module, installieren ein
Modul neu und starten dann den Computer neu.
Installieren Sie ein weiteres Modul neu, wenn der
Computer beim Neustart normal hochfährt. Fah-
ren Sie damit fort, bis Sie ein fehlerhaftes Modul
identifiziert oder alle Module fehlerfrei neu in-
stalliert haben.
• Installieren Sie gegebenenfalls ordnungsgemäß
funktionierende Speichermodule des gleichen
Typs in Ihrem Computer.
• Wenn das Problem fortbesteht,
wenden Sie sich
an Dell
. Informationen zur Kontaktaufnahme
mit Dell finden Sie im Online-
Benutzerhandbuch
.
Die Speichermodule wurden erkannt, es
besteht jedoch ein Speicherkonfigura-
tions- oder Kompatibilitätsfehler.
• Vergewissern Sie sich, dass
keine besonderen
Anforderungen
für die Anordnung der Speicher-
module/Speicheranschlüsse bestehen.
• Prüfen Sie, ob die von Ihnen installierten
Spei-
chermodule
mit dem Computer kompatibel sind.
• Besteht das Problem weiterhin,
wenden Sie sich
an Dell
. Informationen zur Kontaktaufnahme
mit Dell finden Sie im Online-
Benutzerhandbuch
.
Ein Fehler ist aufgetreten.
Dieses Muster wird auch angezeigt,
wenn Sie das System-Setup-Programm
aufrufen; es deutet daher nicht notwen-
digerweise auf ein Problem hin.
• Vergewissern Sie sich, dass die Kabel vom Fest-
plattenlaufwerk, CD-Laufwerk und DVD-Lauf-
werk richtig an der Systemplatine angeschlossen
sind.
• Überprüfen Sie die auf dem Bildschirm ange-
zeigte Computermeldung.
• Wenn das Problem fortbesteht,
wenden Sie sich
an Dell
. Informationen zur Kontaktaufnahme
mit Dell finden Sie im Online-
Benutzerhandbuch
.
Nach Abschluss des Einschalt-Selbstests
leuchten alle vier Diagnoseanzeigen
kurz grün auf, bevor sie ausgeschaltet
werden und damit einen normalen Be-
triebszustand anzeigen.
Keine.
Leuchtmuster Problembeschreibung Lösungsvorschlag

126 Schnellreferenzhandbuch
Signaltoncodes
Während des Startvorgangs gibt der Computer möglicherweise eine Reihe von Signaltönen ab, wenn auf
dem Bildschirm keine Fehlermeldungen oder Probleme angezeigt werden können. Anhand dieser Reihe
von Signaltönen, die auch als Signaltoncode bezeichnet werden, lässt sich ein Problem identifizieren. Ein
Signaltoncode (Code 1-3-1) besteht beispielsweise aus einem einzelnen Signalton, einer Folge von drei
Signaltönen und wieder einem einzelnen Signalton. Dieser Signaltoncode weist auf ein Speicherproblem
beim Computer hin.
Wenn Ihr Computer während des Startvorgangs Signaltöne ausgibt:
1
Notieren Sie den Signaltoncode.
2
Lesen Sie „Dell Diagnostics“ auf Seite 119, um eine gravierendere Ursache zu ermitteln.
3
Wenden Sie sich an Dell, falls Sie technische Unterstützung brauchen. Informationen zur
Kontaktaufnahme mit Dell finden Sie im Online-
Benutzerhandbuch
.
Code Ursache Code Ursache
1-1-2 Registerfehler im Mikroprozessor 3-1-4 Fehler beim Slave-Interruptmas-kenregister
1-1-3 NVRAM Lese-/Schreibfehler 3-2-2 Ladefehler des Interrupt-Vektors
1-1-4 ROM-BIOS-Prüfsummenfehler 3-2-4 Fehler beim Testen des Tastatur-Controllers
1-2-1 Programmierbarer
Intervallzeitgeberfehler
3-3-1 Unterbrechung der NVRAM-
Stromversorgung
1-2-2 DMA-Initialisierungsfehler 3-3-2 Unzulässige NVRAM-Konfiguration
1-2-3 DMA-Seitenregister-Schreib-/Lese-Fehler 3-3-4 Fehler beim Testen des Video-speichers
1-3 Fehler beim Testen des Videospeichers 3-4-1 Bildschirminitialisierung versagt
1-3-1 bis 2-4-4 Speicher wird nicht ordnungs-gemäß
erkannt oder verwendet
3-4-2 Bildschirmneuzeichnung versagt
3-1-1 Fehler beim Slave-DMA-Register 3-4-3 Fehler bei der Suche nach dem Video-ROM
3-1-2 Fehler beim Master-DMA-Register 4-2-1 Kein Zeitgeber-Tick
3-1-3 Fehler beim Master-Interruptmas-
kenregister
4-2-2 Shutdown failure (Fehler beim
Herunterfahren)
4-2-3 Gate A20 failure (Gate A20 versagt) 4-4-1 Fehler beim Testen der seriellen oder
parallelen Ports
4-2-4 Unexpected interrupt in protected mode
(Unerwarteter Interrupt im geschützten
Modus)
4-4-2 Fehler beim Dekomprimieren von Code im
Shadow-RAM
4-3-1 Speicherfehler oberhalb von Adresse
0FFFFh
4-4-3 Fehler beim Testen des mathema-tischen
Coprozessors
4-3-3 Zeitgeber-Chipzähler 2 ausgefallen 4-4-4 Fehler beim Cache-Speichertest
4-3-4 Time-of-day clock stopped (Tagesuhr
angehalten)

Schnellreferenzhandbuch 127
Beheben von Software- und Hardware-Inkompatibilitäten
Wenn ein Gerät während des Betriebssystem-Setups nicht erkannt wird oder zwar erkannt, aber nicht
korrekt konfiguriert wird, können Sie die Inkompatibilität mit dem „Ratgeber bei Hardware-Konflikten“
beheben.
1
Klicken Sie auf die Schaltfläche
Start
und auf
Hilfe und Support
.
2
Geben Sie im Feld
Suchen
den Begriff
Ratgeber bei Hardware-Konflikten
ein, und
klicken Sie anschließend auf den Pfeil, um mit der Suche zu beginnen.
3
In der Liste
Suchergebnisse
klicken Sie auf
Ratgeber bei Hardware-Konflikten
.
4
Klicken Sie in der Liste
Ratgeber bei Hardware-Konflikten
auf
Ein Hardware-Konflikt auf dem
Computer muss gelöst werden
und dann auf
Weiter
.
Verwenden der Microsoft Windows XP-Systemwiederherstellung
Das Betriebssystem Microsoft Windows XP bietet die Möglichkeit der Systemwiederherstellung, damit
Sie Ihren Computer nach Änderungen an der Hardware und Software oder sonstiger Systemeinstellun-
gen wieder in einen früheren Betriebszustand zurückversetzen können (ohne dabei die Arbeitsdateien zu
beeinträchtigen), wenn die vorgenommenen Änderungen den Computer in einem unerwünschten Be-
triebszustand gelassen haben. Informationen über die Verwendung der Systemwiederherstellung finden
Sie im Hilfe- und Supportcenter von Windows. Hinweise zum Zugriff auf das Hilfe- und Supportcenter
von Windows finden Sie auf „Windows Hilfe- und Supportcenter“ auf Seite 95.
HINWEIS: Erstellen Sie von allen Arbeitsdateien regelmäßig Sicherungskopien. Ihre Arbeitsdateien können durch
die Systemwiederherstellung nicht überwacht oder wiederhergestellt werden.
Erstellen einer Wiederherstellungsreferenz
1
Klicken Sie auf die Schaltfläche
Start
und anschließend auf
Hilfe und Support
.
2
Klicken Sie auf
Systemwiederherstellung
.
3
Folgen Sie den Anweisungen auf dem Bildschirm.
Zurückversetzen des Computers in einen früheren Betriebszustand
HINWEIS: Speichern und schließen Sie alle geöffneten Dateien und beenden Sie alle geöffneten Programme,
bevor Sie den Computer in einen früheren Betriebszustand zurückversetzen. Ändern, öffnen oder löschen Sie keine
Dateien oder Programme, bis die Systemwiederherstellung vollständig abgeschlossen ist.
1
Klicken Sie auf die Schaltfläche
Start
, zeigen Sie auf
Alle Programme
→
Zubehör
→
Systempro-
gramme
, und klicken Sie dann auf
Systemwiederherstellung
.
2
Stellen Sie sicher, dass die Option
Restore my computer to an earlier time
(Computer zu einem
früheren Zeitpunkt wiederherstellen) ausgewählt ist, und klicken Sie auf
Next
(Weiter).
3
Klicken Sie auf das Kalenderdatum des Betriebssystemzustands, zu dem der Computer wiederher-
gestellt werden soll.
Im Fenster
Eine Wiederherstellungsreferenz wählen
können Sie den Kalender verwenden, um Wie-
derherstellungsreferenzen anzuzeigen und auszuwählen. Alle Kalenderdaten, für den Wiederherstel-
lungsreferenzen vorhanden sind, werden fett formatiert dargestellt.

128 Schnellreferenzhandbuch
4
Wählen Sie eine Wiederherstellungsreferenz aus und klicken Sie auf
Weiter
.
Wenn für dieses Kalenderdatum nur eine einzige Wiederherstellungsreferenz vorhanden ist, wird diese
automatisch ausgewählt. Falls zwei oder mehrere Wiederherstellungsreferenzen vorhanden sind,
klicken Sie auf die gewünschte Wiederherstellungsreferenz.
5
Klicken Sie auf
Weiter
.
Der Bildschirm
Wiederherstellung abgeschlossen
wird angezeigt, nachdem die Systemwiederher-
stellung das Sammeln von Daten abgeschlossen hat. Anschließend startet der Computer neu.
6
Klicken Sie nach dem Neustart auf
OK
.
Um die Wiederherstellungsreferenz zu ändern, können Sie entweder die Schritte mit einer anderen
Wiederherstellungsreferenz wiederholen oder die Wiederherstellung rückgängig machen.
Zurücksetzen der letzten Systemwiederherstellung
HINWEIS: Speichern und schließen Sie alle geöffneten Dateien, und beenden Sie alle geöffneten Programme,
bevor Sie die letzte Systemwiederherstellung rückgängig machen. Ändern, öffnen oder löschen Sie keine Dateien
oder Programme, bis die Systemwiederherstellung vollständig abgeschlossen ist.
1
Klicken Sie auf die Schaltfläche
Start
, zeigen Sie auf
Alle Programme
→
Zubehör
→
Systempro-
gramme
, und klicken Sie auf
Systemwiederherstellung
.
2
Klicken Sie auf
Letzte Wiederherstellung rückgängig machen
und auf
Weiter
.
3
Klicken Sie auf
Weiter
.
Das Fenster
Systemwiederherstellung
wird angezeigt. Anschließend startet der Computer neu.
4
Klicken Sie nach dem Neustart auf
OK
.
Aktivieren der Systemwiederherstellung
Falls nach einer erneuten Installation von Windows XP weniger als 200†MB freier Speicherplatz auf der
Festplatte verbleiben, wird die Systemwiederherstellungsfunktion automatisch deaktiviert. So stellen Sie
fest, dass die Systemwiederherstellung aktiv ist:
1
Klicken Sie auf die Schaltfläche
Start
und anschließend auf
Systemsteuerung
.
2
Klicken Sie auf
Leistung und Wartung
.
3
Klicken Sie auf
System
.
4
Klicken Sie auf die Registerkarte
Systemwiederherstellung
.
5
Stellen Sie sicher, dass die Option
Systemwiederherstellung deaktivieren
nicht markiert ist.
Neuinstallation von Microsoft Windows XP
Vorbereitung
ANMERKUNG: Die Anweisungen in diesem Dokument wurden für die Windows Standardansicht in Windows XP
Home Edition geschrieben. Die Schritte werden daher anders sein, wenn Sie Ihren Dell-Computer zur klassischen
Ansicht wechseln oder Windows XP Professional verwenden.

Schnellreferenzhandbuch 129
Wenn Sie das Betriebssystem Windows XP neu installieren möchten, um ein Problem mit einem neu
installierten Treiber zu beheben, probieren Sie zunächst die Rücksetzfunktion von Windows XP.
1
Klicken Sie auf die Schaltfläche
Start
und auf
Systemsteuerun
g.
2
Klicken Sie bei
Eine Kategorie wählen
auf
Leistung und Wartung
.
3
Klicken Sie auf
System
.
4
Klicken Sie im Bildschirm
Systemeigenschaften
auf die Registerkarte
Hardware
.
5
Klicken Sie auf
Geräte-Manager
.
6
Klicken Sie mit der rechten Maustaste auf die Geräte, für die ein neuer Treiber installiert wurde, und
anschließend auf
Eigenschaften
.
7
Klicken Sie auf die Registerkarte
Treiber
.
8
Klicken Sie auf
Installierter Treiber
.
Verwenden Sie die Systemwiederherstellung, wenn die Rücksetzfunktion für Gerätetreiber das Problem
nicht löst (siehe „Verwenden der Microsoft Windows XP-Systemwiederherstellung“ auf Seite 127), um
das Betriebssystem wieder in den Zustand vor der Installation des neuen Treibers zurückzuversetzen.
ANMERKUNG: Die Drivers and Utilities CD enthält die Treiber, die während der Montage des Computers installiert
wurden. Verwenden Sie die Drivers and Utilities CD zum Laden von allen erforderlichen Treibern, einschließlich der
erforderlichen Treiber, wenn Sie über einen Computer mit RAID-Controller verfügen.
Neu Installieren von Windows XP
HINWEIS: Wenn Sie Windows XP neu installieren, müssen Sie das Windows XP Service Pack 1 oder höher
verwenden.
HINWEIS: Vor der Installation erstellen Sie erst eine Sicherungskopie der Daten auf dem ersten Festplattenlauf-
werk. In herkömmlichen Festplattenkonfigurationen handelt es sich bei dem primären Festplattenlaufwerk um das
zuerst vom Computer erkannte Laufwerk.
Zum neu Installieren von Windows XP benötigen Sie Folgendes:
•Dell-
Betriebssystem
-CD
•Dell
Drivers and Utilities
CD
Führen Sie zum neu Installieren von Windows XP die Anweisungen in den folgenden Abschnitten in der
angegebenen Reihenfolge aus.
Der Neuinstallationsvorgang kann 1 bis 2 Stunden in Anspruch nehmen. Nach der Neuinstallation des
Betriebssystems müssen Sie auch die Gerätetreiber, das Virenschutzprogramm und andere Software neu
installieren.
HINWEIS: Die Betriebssystem-CD-ROM bietet Optionen zur Neuinstallation von Windows XP. Mit diesen Optionen
können Dateien überschrieben und Programme beeinträchtigt werden, die auf der Festplatte installiert sind.
Installieren Sie deshalb Windows XP nur dann neu, wenn Sie von einem Mitarbeiter des technischen Supports von
Dell dazu angewiesen wurden.
HINWEIS: Um Konflikte zu vermeiden, muss vor der Neuinstallation von Windows XP auf dem System vorhandene
Virenschutz-Software deaktiviert werden. Anleitungen dazu finden Sie in der Dokumentation der jeweiligen
Software.

130 Schnellreferenzhandbuch
Starten von der Betriebssystem-CD
1
Speichern und schließen Sie alle geöffneten Dateien und beenden Sie alle geöffneten Programme.
2
Legen Sie die
Betriebssystem
-CD ein. Klicken Sie auf
Beenden
, wenn die Meldung
Windows XP
installieren
angezeigt wird.
3
Starten Sie den Computer neu.
4
Drücken Sie <F12> sofort nachdem das Logo von DELL erscheint.
Falls bereits das Logo des Betriebssystems angezeigt wird, warten Sie, bis der Windows-Desktop er-
scheint, fahren Sie den Computer herunter, und versuchen Sie es noch einmal.
5
Wählen Sie mit den Pfeiltasten
CD-ROM
aus und drücken Sie dann die <Eingabetaste>.
6
Drücken Sie eine beliebige Taste, wenn die Meldung
Press any key to boot from CD
(Drücken Sie eine beliebige Taste, um von CD zu starten) angezeigt wird.
Windows XP Setup
1
Wenn der Bildschirm
Windows XP Setup
angezeigt wird, drücken Sie die <Eingabetaste>, um
Windows jetzt einrichten
auszuwählen.
2
Lesen Sie die Informationen auf der Anzeige
Microsoft Windows-Lizenzvereinbarung
und drücken
Sie <F8>, um die Lizenzvereinbarung anzunehmen.
3
Wenn auf Ihrem Computer bereits Windows XP installiert ist und Ihre aktuellen Windows XP-Daten
wiederhergestellt werden sollen, geben Sie
r
ein, um die Reparaturoption auszuwählen, und entneh-
men Sie dann die CD dem Laufwerk.
4
Wenn Sie eine neue Kopie von Windows XP installieren möchten, drücken Sie <Esc>, um diese
Option zu wählen.
5
Drücken Sie die <Eingabetaste>, um die markierte Partition auszuwählen (empfohlen) und befolgen
Sie die Anweisungen auf dem Bildschirm.
Der Bildschirm
Windows XP Setup
wird angezeigt und das Betriebssystem beginnt damit, Dateien zu
kopieren und die Geräte zu installieren. Im Verlauf dieses Vorgangs wird der Computer automatisch
mehrmals neu gestartet.
ANMERKUNG: Die zur Installation benötigte Zeit hängt von der Größe der Festplatte und der Geschwindigkeit des
Computers ab.
HINWEIS: Drücken Sie keine Taste, während die folgende Meldung angezeigt wird: Drücken Sie eine
beliebige Taste zum Starten von der CD
.
6
Wenn der Dialog
Regions- und Sprachoptionen
angezeigt wird, wählen Sie die Einstellungen für
Ihren Standort aus und klicken Sie anschließend auf
Weiter
.
7
Geben Sie im Fenster
Benutzerinformationen
Ihren Namen und Ihre Firma (optional) an und klicken
Sie anschließend auf
Weiter
.
8
Weisen Sie im Fenster
Computer Name and Administrator Password
(Computername und Adminis-
trator-Kennwort) einen Computernamen zu (oder akzeptieren Sie den bereits vorgegebenen), geben
Sie ein Kennwort ein und klicken Sie auf
Weiter
.

Schnellreferenzhandbuch 131
9
Wenn der Bildschirm
Modemwählinformationen
angezeigt wird, geben Sie die erforderlichen Infor-
mationen ein und klicken Sie auf
Weiter
.
10
Geben Sie Im Fenster
Datum- und Uhrzeiteinstellungen
Datum, Uhrzeit und Zeitzone ein und
klicken Sie anschließend auf
Weiter
.
11
Wenn der Bildschirm
Netzwerkeinstellungen
angezeigt wird, klicken Sie auf
Typisch
und dann auf
Weiter
.
12
Wenn Sie Windows XP Professional neu installieren und zur Eingabe weiterer Informationen zur
Netzwerkkonfiguration aufgefordert werden, geben Sie die entsprechenden Daten ein. Wenn Sie Ihre
Einstellungen nicht genau kennen, bestätigen Sie die vorgegebenen Werte.
Windows XP installiert die Komponenten des Betriebssystems und konfiguriert den Computer. Der
Computer wird automatisch neu gestartet.
HINWEIS: Drücken Sie keine Taste, während die folgende Meldung angezeigt wird: Drücken Sie eine
beliebige Taste zum Starten von der CD
.
13
Wenn der
Begrüßungs-Bildschirm von Microsoft
angezeigt wird, klicken Sie auf
Weiter
.
14
Wenn die Meldung
Wie wird auf diesem Computer die Verbindung mit dem
Internet hergestellt?
angezeigt wird, klicken Sie auf
Überspringen
.
15
Wenn der Bildschirm
Ready to register with Microsoft?
(Sich jetzt bei Microsoft eintragen?) angezeigt
wird, wählen Sie
Nein, jetzt nicht
und klicken auf
Weiter
.
16
Wenn der Bildschirm
Who will use this computer?
(Wer wird diesen Computer verwenden?) ange-
zeigt wird, können Sie bis zu fünf Benutzer eingeben.
17
Klicken Sie auf
Weiter
.
18
Klicken Sie auf
Fertig stellen
, um das Setup abzuschließen, und entnehmen Sie die CD aus dem
Laufwerk.
19
Installieren Sie die entsprechenden Treiber erneut mit der
Drivers and Utilities
CD.
20
Installieren Sie gegebenenfalls Ihre Virenschutz-Software erneut.
21
Installieren Sie Ihre Programme erneut.
ANMERKUNG: Zur Neuinstallation und Aktivierung von Programmen der Microsoft Office oder Microsoft Works
Suite müssen Sie die Product Key-Nummer, die sich auf der Rückseite der Microsoft Office oder Microsoft Works
Suite CD-Hülle befindet, eingeben.

132 Schnellreferenzhandbuch
Verwenden der Drivers and Utilities CD
So verwenden Sie die Drivers and Utilities CD (auch als ResourceCD bezeichnet), während Sie das
Windows-Betriebssystem ausführen:
ANMERKUNG: Verwenden Sie für den Zugriff auf Gerätetreiber und Benutzer-Dokumentation die Drivers and
Utilities CD, während Windows ausgeführt wird.
1
Schalten Sie den Computer ein und warten Sie, bis Windows gestartet wurde.
2
Legen Sie die
Drivers and Utilities
CD in das Laufwerk ein.
Wenn Sie die
Drivers and Utilities
CD zum ersten Mal auf diesem Computer verwenden, wird das
Fenster
ResourceCD Installation
(Installation der ResourceCD) geöffnet, das Sie über den Beginn der
Installation der
Drivers and Utilities
CD informiert.
3
Klicken Sie auf
OK
, um fortzufahren.
Folgen Sie den Bildschirmanweisungen des Installationsprogramms, um die Installation
abzuschließen.
4
Klicken Sie im Bildschirm
Herzlichen Glückwunsch zum Kauf Ihres Dell Systems!
auf
Weiter
.
5
Treffen Sie eine geeignete Auswahl für
Systemmodell
,
Betriebssystem
,
Gerätetyp
und
Thema
.
Treiber für Ihren Computer
So erhalten Sie eine Liste der Gerätetreiber für Ihren Computer:
1
Klicken Sie auf
Meine Treiber
im Drop-Down-Menü
Thema
.
Die optionale
Drivers and Utilities
CD prüft die Hardware-Konfiguration des Computers und das
Betriebssystem und zeigt dann auf dem Bildschirm eine Liste der Gerätetreiber für Ihre Systemkonfi-
guration an.
2
Wählen Sie den geeigneten Treiber aus und folgen Sie den Anweisungen zum Herunterladen.
Um eine Liste aller verfügbaren Treiber für Ihren Computer anzuzeigen, klicken Sie im Drop-Down-
Menü Thema auf Treiber.

Stichwortverzeichnis 133
Stichwortverzeichnis
A
Abdeckung
abnehmen, 108
Anzeigen
Diagnose, 123
Stromversorgung, 105
System, 121
B
Beheben von Störungen
Computer auf früheren
Systemzustand
wiederherstellen, 127
Dell Diagnostics, 119
Diagnoseanzeigen, 123
Hilfe- und Supportcenter, 95
Konflikte, 127
Ratgeber bei, 127
Signaltoncodes, 126
Systemanzeigen, 121
Benutzerhandbuch, 94
Betriebssystem
neu installieren, 94
Neuinstallation von Windows
XP, 128
Betriebssystem-CD, 94
C
CDs
Betriebssystem, 94
D
Dell
Dell Diagnostics, 119
Support-Website, 95
Diagnose
Dell, 119
Signaltoncodes, 126
Dokumentation
Benutzerhandbuch, 94
Endbenutzerlizenzvereinbarun
g, 93
Ergonomie, 93
Garantie, 93
Online, 95
Produktinformationshandbuch
,93
Sicherheit, 93
Zulassung, 93
Drivers and Utilities CD, 93
E
Endbenutzerlizenzvereinbaru
ng, 93
Etikett
Microsoft Windows, 94
Service-Tag-Nummer, 94
F
Fehlermeldungen
Diagnoseanzeigen, 123
Signaltoncodes, 126
Systemanzeigen, 121
G
Garantieinformationen, 93
H
Hardware
Dell Diagnostics, 119
Signaltoncodes, 126
Hauptplatine. Siehe
Systemplatine
Hilfe- und Supportcenter, 95
Hilfedatei
Windows Hilfe- und
Supportcenter, 95
I
Informationen zur
Ergonomie, 93
Installieren von Teilen
Vorbereitung, 108

134 Stichwortverzeichnis
134 Stichwortverzeichnis
K
Konflikte
Beheben von Software- und
Hardware-
Inkompatibilitäten, 127
L
Laufwerke
Liste von, 132
N
Neuinstallation
Windows XP, 128
P
Probleme
Dell Diagnostics, 119
Probleme. Siehe Beheben von
Störungen
Produktinformationshandbuc
h, 93
R
Ratgeber bei Hardware-
Konflikten, 127
S
Service-Tag-Nummer, 94
Sicherheitshinweise, 93
Signaltoncodes, 126
Stromversorgung
Anzeige, 105
Stromversorgungslicht
Probleme diagnostizieren, 121
Support-Website, 95
Systemplatine, 113, 116
Systemwiederherstellung, 127
U
Unterbrechunganforderungs
(IRQ)-Konflikte, 127
W
Windows XP
Hilfe- und Supportcenter, 95
neu installieren, 94
Neuinstallation, 128
Ratgeber bei Hardware-
Konflikten, 127
setup, 130
Systemwiederherstellung, 127
Z
Zulassungsinformationen, 93

www.dell.com | support.dell.com
Dell™ OptiPlex™ 320
Guida di consultazione rapida
Modelli DCSM, DCNE

N.B., Avvisi e Attenzione
N.B. Un N.B. indica informazioni importanti che contribuiscono a migliorare l'utilizzo del computer.
AVVISO: Un AVVISO indica un danno potenziale all'hardware o perdita di dati e spiega come evitare il problema.
ATTENZIONE: Un messaggio di ATTENZIONE indica un rischio di danni materiali, lesioni personali o morte.
Se si è acquistato un computer Dell™ Serie n, qualsiasi riferimento in questo documento ai sistemi operativi
Microsoft
®
Windows
®
non è applicabile.
____________________
Le informazioni contenute in questo documento sono soggette a modifica senza preavviso.
© 2006 DellInc. Tutti i diritti riservati.
È severamente vietata la riproduzione, con qualsiasi strumento, senza l'autorizzazione scritta di Dell Inc..
Marchi commerciali utilizzati in questo testo: Dell, OptiPlex e il logo DELL sono marchi commerciali di Dell Inc.; Microsoft e Windows sono
marchi depositati di Microsoft Corporation; Intel e Pentium sono marchi depositati di Intel Corporation.
Altri marchi di fabbrica e nomi commerciali possono essere utilizzati in questo documento sia in riferimento alle aziende che rivendicano i
marchi e i nomi che ai prodotti stessi. Dell Inc. nega qualsiasi partecipazione di proprietà relativa a marchi e nomi commerciali diversi da quelli
di sua proprietà.
Modelli DCSM, DCNE
Settembre 2006 N/P FK640 Rev. A01

Sommario 137
Sommario
Ricerca di informazioni . . . . . . . . . . . . . . . . . . . . . . . . . . . . 139
Configurazione del computer
. . . . . . . . . . . . . . . . . . . . . . . . . 142
Viste del sistema
. . . . . . . . . . . . . . . . . . . . . . . . . . . . . . . . 145
Computer minitorre — Vista anteriore
. . . . . . . . . . . . . . . . . . 145
Computer minitorre — Vista posteriore
. . . . . . . . . . . . . . . . . 147
Computer minitorre — Connettori del pannello posteriore
. . . . . . . 148
Computer desktop — Vista anteriore
. . . . . . . . . . . . . . . . . . . 150
Computer desktop — Vista posteriore
. . . . . . . . . . . . . . . . . . 151
Computer desktop — Connettori del pannello posteriore
. . . . . . . . 152
Rimozione del coperchio del computer
. . . . . . . . . . . . . . . . . . . . 154
Operazioni preliminari
. . . . . . . . . . . . . . . . . . . . . . . . . . 154
Computer minitorre
. . . . . . . . . . . . . . . . . . . . . . . . . . . . 155
Computer desktop
. . . . . . . . . . . . . . . . . . . . . . . . . . . . . 157
Esplorazione dell'interno del computer
. . . . . . . . . . . . . . . . . . . . 158
Computer minitorre
. . . . . . . . . . . . . . . . . . . . . . . . . . . . 158
Computer desktop
. . . . . . . . . . . . . . . . . . . . . . . . . . . . . 161
Soluzione dei problemi
. . . . . . . . . . . . . . . . . . . . . . . . . . . . 164
Dell Diagnostics
. . . . . . . . . . . . . . . . . . . . . . . . . . . . . . 164
Indicatori di sistema
. . . . . . . . . . . . . . . . . . . . . . . . . . . 167
Indicatori della diagnostica
. . . . . . . . . . . . . . . . . . . . . . . . . . 168
Codici bip
. . . . . . . . . . . . . . . . . . . . . . . . . . . . . . . . . 171
Risoluzione di incompatibilità del software e dell'hardware
. . . . . . . 172
Uso del Ripristino configurazione di sistema di Microsoft
Windows XP
. . . . . . . . . . . . . . . . . . . . . . . . . . . . . . . 172
Reinstallazione di Microsoft Windows XP
. . . . . . . . . . . . . . . . 173
Uso del CD Drivers and Utilities
. . . . . . . . . . . . . . . . . . . . . . . . 176
Indice analitico . . . . . . . . . . . . . . . . . . . . . . . . . . . . . . . . 177

138 Sommario

Guida di consultazione rapida 139
Ricerca di informazioni
N.B. Alcune funzioni o applicazioni multimediali possono essere opzionali e non spediti con il computer. Alcune
funzioni o applicazioni multimediali potrebbero non essere disponibili in alcuni Paesi.
N.B. Informazioni supplementari potrebbero essere fornite assieme al computer.
Cosa si ricerca? Si trova qui
• Un programma diagnostico per il computer
• Driver per il computer
• Documentazione del computer
• Documentazione delle periferiche
• Desktop System Software (DSS)
CD Drivers and Utilities (noto anche ResourceCD)
N.B. Il CD Drivers and Utilities può essere opzionale e
potrebbe non essere spedito col computer.
La documentazione dell'utente e i driver sono preinstallati
sul computer. È possibile utilizzare il CD per reinstallare i
driver (consultare "Reinstallazione di driver e utilità" nella
Guida dell'utente in linea), per eseguire il programma Dell
Diagnostics (consultare "Dell Diagnostics" a pagina 164) o
per accedere alla documentazione.
I file Leggimi possono
essere compresi nel CD per
fornire gli aggiornamenti
più attuali relativi a
modifiche tecniche
operate sul computer o
materiale di riferimento
tecnico avanzato per
assistenti tecnici o utenti
esperti.
N.B. Aggiornamenti dei driver e della documentazione sono
disponibili all'indirizzo support.dell.com.
• Informazioni sulla garanzia
• Termini e condizioni (solo per gli Stati Uniti)
• Istruzioni di sicurezza
• Avvisi normativi
• Informazioni sull'ergonomia
• Contratto di licenza Microsoft con l'utente finale
Guida alle informazioni sul prodotto Dell™

140 Guida di consultazione rapida
• Come rimuovere e sostituire componenti
• Specifiche
• Come configurare le impostazioni del sistema
• Come individuare e risolvere i problemi
Guida dell'utente di Dell™ OptiPlex™
Guida in linea e supporto tecnico di Microsoft Windows XP
1
Fare clic su
Start
→
Guida in linea e supporto tecnico
→
Guide dell'utente e di sistema
→
Guide dell'utente
.
2
Fare clic sulla
Guida dell'utente
del computer.
La Guida dell'utente è anche disponibile nel CD opzionale
Drivers and Utilities.
• Numero di servizio e codice di servizio espresso
• Etichetta di licenza di Microsoft Windows
Numero di servizio e Licenza di Microsoft
®
Windows
®
Queste etichette sono situate sul computer.
• Usare il Numero di
servizio per identificare
il computer quando si
utilizza
support.dell.com
o ci si
rivolge al supporto.
• Immettere il codice di
servizio espresso per
smistare la telefonata
quando ci si rivolge al
supporto.
• Come reinstallare il sistema operativo
CD Sistema operativo
N.B. Il CD Sistema operativo può essere opzionale e potrebbe
non essere spedito col computer.
Il sistema operativo è già installato nel computer. Utilizzare
il CD Sistema operativo per reinstallare il sistema operativo.
Consultare "Reinstallazione di Microsoft Windows XP" a
pagina 173.
Dopo la reinstallazione del
sistema operativo, è
possibile utilizzare il CD
Drivers and Utilities
opzionale (ResourceCD)
per reinstallare i driver per
le periferiche fornite
assieme al computer.
L'etichetta della product
key del sistema operativo è
situata sul computer.
N.B. Il colore del CD varia in base al sistema operativo
ordinato.
Cosa si ricerca? Si trova qui

Guida di consultazione rapida 141
• Soluzioni — suggerimenti per la risoluzione dei problemi,
articoli di tecnici, domande frequenti e corsi in linea
• Comunità — discussione in linea con altri clienti Dell
• Aggiornamenti — informazioni di aggiornamento per
componenti, quali ad esempio la memoria, il disco rigido e
il sistema operativo
• Servizio clienti — recapiti, informazioni sullo stato
dell'ordine e della richiesta di servizio, sulla garanzia e
sulle riparazioni
• Servizio e supporto — stato della richiesta di servizio,
contratto di assistenza, discussioni in linea con il supporto
tecnico
• Riferimenti — documentazione per il computer, dettagli
sulla configurazione del computer, specifiche dei prodotti
e white paper
• Download — aggiornamenti di driver, patch e software
certificati
• Desktop System Software (DSS) — Se si reinstalla il
sistema operativo per il computer, va anche reinstallata
l'utilità DSS. l'utilità fornisce aggiornamenti importanti
per il sistema operativo e supporto per unità disco floppy
USB Dell™ da 3,5 pollici, processori Intel
®
, unità ottiche
e periferiche USB. l'utilità è necessaria per il corretto
funzionamento del computer Dell. Il software rileva
automaticamente il computer e il sistema operativo e
installa gli aggiornamenti adeguati alla propria
configurazione.
Sito Web del supporto tecnico della Dell — support.dell.com
N.B. Selezionare il Paese o il settore commerciale per
visualizzare il sito del supporto corretto.
Per scaricare Desktop System Software:
1
Visitare
support.dell.com
, selezionare il Paese o il settore
commerciale, e immettere il Numero di servizio.
2
Selezionare
Drivers & Downloads
e fare clic su
Go
(Vai).
3
Fare clic sul sistema operativo e ricercare la parola chiave
Desktop System Software
.
N.B. L'interfaccia utente di support.dell.com potrebbe variare
in base alle selezioni.
• Come usare Windows XP
• Come gestire programmi e file
• Come personalizzare il desktop
Guida in linea e supporto tecnico di Windows
1
Fare clic su
Start
→
Guida in linea e supporto tecnico
.
2
Digitare una parola o una frase che descriva il problema e
fare clic sull'icona della freccia.
3
Fare clic sull'argomento che descrive il problema.
4
Seguire le istruzioni visualizzate.
Cosa si ricerca? Si trova qui

142 Guida di consultazione rapida
Configurazione del computer
ATTENZIONE: Prima di eseguire le procedure descritte in questa sezione, seguire le istruzioni di sicurezza
ubicate nella Guida alle informazioni sul prodotto.
AVVISO: Se nel computer è stata installata una scheda di espansione (quale ad esempio una scheda modem),
collegare il cavo di rete appropriato alla scheda, non al connettore sul pannello posteriore.
AVVISO: Per consentire al computer di mantenere una temperatura di esercizio ottimale, assicurarsi di collocare il
computer lontano da pareti o scaffali che potrebbero impedire la circolazione dell'aria attorno al telaio.
N.B. Prima di installare qualsiasi periferica o software non forniti con il computer, leggere la documentazione
fornita con tale periferica o software, o contattare il venditore per verificare che la periferica o il software sia
compatibile con il computer e il sistema operativo.
Per installare correttamente il computer, seguire tutti i punti della procedura descritta. Vedere le figure
appropriate che seguono le istruzioni.
AVVISO: Non usare contemporaneamente un mouse PS/2 e un mouse USB.
1
Collegare la tastiera e il mouse.
AVVISO: Non collegare il cavo di un modem al connettore della scheda di rete. La tensione della linea telefonica
potrebbe danneggiare la scheda di rete.
Configurazione della tastiera e del mouse
2
Collegare il modem o il cavo di rete.
Inserire il cavo di rete, non la linea telefonica, nel connettore di rete. Se l'utente ha in dotazione un
modem opzionale, collegare la linea telefonica al modem.

Guida di consultazione rapida 143
3
Collegare il monitor utilizzando il cavo DVI bianco
o
il cavo VGA blu (
non
collegare entrambi i cavi).
Inserire delicatamente il connettore del cavo del monitor allineandolo correttamente con il connettore
sul computer per evitare di piegare i piedini. Stringere le viti a testa zigrinata dei connettori del cavo.
N.B. Alcuni monitor hanno il connettore video sotto il retro dello schermo. Consultare la documentazione
fornita assieme al monitor per le ubicazioni dei connettori.
Configurazione del monitor
4
Collegare gli altoparlanti.
5
Collegare i cavi di alimentazione al computer, al monitor e alle periferiche e inserire l'altra estremità
dei cavi di alimentazione nelle prese elettriche.

144 Guida di consultazione rapida
Collegamenti all'alimentazione
AVVISO: Per evitare di danneggiare il computer con un selettore di tensione manuale, impostare il selettore sulla
tensione che meglio corrisponde all'alimentazione c.a. disponibile presso la sede.
AVVISO: In Giappone, il selettore di tensione deve essere impostato sulla posizione 115 V anche se il valore
dell'alimentazione c.a. disponibile è 100 V.
6
Verificare che il selettore di tensione sia impostato correttamente per la propria ubicazione.
Il computer ha un selettore di tensione manuale. I computer con un selettore di tensione sul pannello
posteriore devono essere impostati manualmente per operare alla corretta tensione di esercizio.

Guida di consultazione rapida 145
Viste del sistema
Computer minitorre — Vista anteriore
1 posizione del Numero
di servizio
Utilizzare il Numero di servizio per identificare il computer quando si accede al sito
Web del supporto tecnico della Dell o chiamare il supporto tecnico.
2 unità CD/DVD Inserire un CD o DVD (se supportati) in questa unità.
3 unità disco floppy Inserire un disco floppy in questa unità.
4 spia di attività del disco
rigido
Questa spia lampeggia quando il disco rigido è in uso.
4
9
7
8
3
2
6
5
1
10

146 Guida di consultazione rapida
5 connettori USB 2.0 (2) Utilizzare i connettori USB sulla parte anteriore del computer per periferiche che
vengono collegate raramente, quali ad esempio i joystick o le fotocamere digitali, o
per periferiche USB avviabili.
Si consiglia di utilizzare i connettori USB sul retro del computer per periferiche che
di solito restano collegate, quali ad esempio le stampanti e le tastiere.
6 indicatori della
diagnostica
Utilizzare gli indicatori per contribuire a risolvere un problema relativo al computer
basato sul codice di diagnostica (per maggiori informazioni, consultare "Indicatori
della diagnostica" a pagina 168).
7 pulsante di
alimentazione
Premere questo pulsante per accendere il computer.
AVVISO: Per evitare la perdita di dati, non spegnere il computer premendo il
pulsante di alimentazione, effettuare invece l'arresto del sistema operativo.
AVVISO: Se l'interfaccia ACPI è attivata nel sistema operativo, quando si preme
il pulsante di alimentazione il computer esegue l'arresto del sistema operativo.
8 indicatore di
alimentazione
L'indicatore di alimentazione si accende e lampeggia oppure rimane fisso ad
indicare diversi stati operativi:
• Nessuna luce — Il computer è spento.
• Verde fisso — Il computer è in un normale stato operativo.
• Verde lampeggiante — Il computer si trova in modalità di risparmio energia.
• Se l'indicatore di alimentazione è ambra lampeggiante — Il computer è
alimentato, ma può essere presente un problema di alimentazione interno.
Consultare "Problemi relativi all'alimentazione" nella
Guida dell'utente
in linea.
Per uscire da una modalità di risparmio energia, premere il pulsante di
alimentazione oppure premere un tasto sulla tastiera o spostare il mouse qualora
siano configurati come periferiche di attivazione in Gestione periferiche di
Windows. Per maggiori informazioni sulle modalità di sospensione e su come
uscire da una modalità di risparmio energia, consultare la Guida dell'utente in linea.
Per una descrizione dei codici luminosi che possono contribuire a risolvere
problemi relativi al computer, consultare "Indicatori di sistema" a pagina 167.
9 connettore della cuffia Usare il connettore delle cuffie per collegare le cuffie.
10 indicatore di integrità
del collegamento
• Verde — È presente una connessione funzionante tra una rete a 10 Mbps e il
computer.
• Arancione — È presente una connessione funzionante tra una rete a 100 Mbps e il
computer.
• Spento — Il computer non rileva alcuna connessione fisica alla rete.

Guida di consultazione rapida 147
Computer minitorre — Vista posteriore
1
chiusura a scatto del
coperchio
Questo dispositivo di chiusura consente di aprire il coperchio del computer.
2
anello del lucchetto
Inserire un lucchetto per impedire l'apertura del coperchio del computer.
3 connettore di
alimentazione
Inserire un cavo di alimentazione in questo connettore.
4
3
5
6
2
1

148 Guida di consultazione rapida
Computer minitorre — Connettori del pannello posteriore
4 selettore di tensione Il computer è dotato di un selettore di tensione manuale. Per evitare di danneggiare
il computer con un selettore di tensione manuale, impostare il selettore sulla
tensione che meglio corrisponde all'alimentazione c.a. disponibile presso la sede.
AVVISO: In Giappone, è necessario impostare il selettore di tensione sulla
posizione 115 V.
Accertarsi inoltre che le caratteristiche elettriche del monitor e delle periferiche
collegate siano adeguate per il tipo di alimentazione c.a. disponibile presso la sede.
5 connettori del pannello
posteriore
Usare il connettore appropriato per collegare periferiche seriali, USB e di altro tipo.
Consultare "Computer minitorre — Connettori del pannello posteriore" a
pagina 148.
6 slot per schede Questi slot consentono di accedere ai connettori delle schede PCI e PCI Express
installate.
1
connettore parallelo
Collegare una periferica parallela, quale ad esempio una stampante, al connettore
parallelo. Se si usa una stampante USB, collegarla al connettore USB.
N.B. Il connettore parallelo integrato è disattivato automaticamente se il computer
rileva una scheda installata contenente un connettore parallelo configurato allo
stesso indirizzo. Per maggiori informazioni, consultare la Guida dell'utente in linea
2
indicatore di integrità del
collegamento
• Verde — È presente una connessione funzionante tra una rete a 10 Mbps e il
computer.
• Arancione — È presente una connessione funzionante tra una rete a 100 Mbps e
il computer.
• Spento — Il computer non rileva alcuna connessione fisica alla rete.
13
10 9 8
5
6
7
24

Guida di consultazione rapida 149
3
connettore della scheda
di rete
Per collegare il computer a una periferica di rete o a banda larga, collegare
un'estremità del cavo di rete a uno spinotto di rete o alla periferica di rete o a
banda larga. Collegare l'altra estremità del cavo di rete al connettore della scheda
di rete sul pannello posteriore del computer. Uno scatto indicherà che il cavo di
rete è stato saldamente inserito nel connettore.
N.B. Non collegare un cavo telefonico al connettore di rete.
Su computer con una scheda di rete, utilizzare il connettore sulla scheda.
È consigliabile utilizzare un cablaggio e connettori di categoria 5 per la rete. Se è
necessario usare un cablaggio di categoria 3, forzare la velocità di rete a 10 Mbps
per garantire un funzionamento affidabile.
4
spia di attività della rete
La spia lampeggia in giallo quando il computer trasmette o riceve dati di rete. In
presenza di un intenso traffico di rete, è possibile che questo indicatore appaia
costantemente acceso.
5
connettore della linea di
ingresso
Utilizzare il connettore blu della linea di ingresso per collegare una periferica di
registrazione/riproduzione, quale ad esempio un lettore di cassette, un lettore CD
o un videoregistratore.
Sui computer dotati di una scheda audio, usare il connettore sulla scheda.
6
connettore della linea di
uscita
Utilizzare il connettore verde della linea di uscita per collegare le cuffie e la
maggior parte di altoparlanti con amplificatori integrati.
Sui computer dotati di una scheda audio, usare il connettore sulla scheda.
7
connettore del microfono
Utilizzare il connettore rosa del microfono per collegare un microfono (da
computer) per ingresso vocale o musicale in un programma di audio o di telefonia
Su computer con una scheda audio, il connettore del microfono si trova sulla
scheda.
8
connettori USB 2.0 (4)
Utilizzare i connettori USB posteriori per periferiche che di solito restano
collegate, quali ad esempio le stampanti e le tastiere.
9
connettore video
Inserire il cavo dal monitor compatibile VGA nel connettore blu.
N.B. Se è stata acquistata una scheda grafica opzionale, questo connettore è
protetto da un cappuccio. Collegare il monitor al connettore sulla scheda grafica.
Non rimuovere il cappuccio.
10
connettore seriale
Collegare una periferica seriale, quale ad esempio un palmare, alla porta seriale. La
designazione predefinita è COM1 per il connettore seriale 1.
Per maggiori informazioni, consultare la Guida dell'utente in linea.

150 Guida di consultazione rapida
Computer desktop — Vista anteriore
1 connettori USB 2.0 (2) Usare i connettori USB sulla parte anteriore del computer per collegare periferiche
che si usano raramente, quali i joystick o le fotocamere, o per periferiche USB
avviabili (per maggiori informazioni sull'avvio da una periferica USB, consultare la
Guida dell'utente in linea).
Si consiglia di utilizzare i connettori USB sul pannello posteriore per periferiche
che di solito restano collegate, quali ad esempio le stampanti e le tastiere.
2 spia di attività del disco
rigido
Questa spia lampeggia durante l'accesso al disco rigido.
3 pulsante di
alimentazione
Premere questo pulsante per accendere il computer.
AVVISO: Per evitare la perdita di dati, non spegnere il computer premendo il
pulsante di alimentazione per più di 6 secondi, effettuare invece l'arresto del
sistema operativo.
AVVISO: Se l'interfaccia ACPI è attivata nel sistema operativo, quando si
preme il pulsante di alimentazione il computer esegue l'arresto del sistema
operativo.
4 marchio Dell Questo marchio può essere ruotato in modo da corrispondere all'orientamento del
computer. Per ruotare il marchio, collocare le dita attorno alla parte esterna del
marchio, premere saldamente e ruotare il marchio. È anche possibile ruotare il
marchio utilizzando lo slot fornito in prossimità della parte inferiore del marchio.
89
3
5
1
4610
2
11
7

Guida di consultazione rapida 151
Computer desktop — Vista posteriore
5 indicatore di
alimentazione
L'indicatore di alimentazione si accende e lampeggia oppure rimane fisso ad
indicare diversi stati operativi:
• Nessuna luce — Il computer è spento.
• Verde fisso — Il computer è in un normale stato operativo.
• Verde lampeggiante — Il computer si trova in modalità di risparmio energia.
• Giallo lampeggiante o fisso — Consultare "Problemi relativi all'alimentazione"
nella
Guida dell'utente
in linea.
Per uscire da una modalità di risparmio energia, premere il pulsante di
alimentazione oppure premere un tasto sulla tastiera o spostare il mouse qualora
siano configurati come periferiche di attivazione in Gestione periferiche di
Windows.
Consultare "Indicatori di sistema" a pagina 167 per una descrizione dei codici
luminosi che possono contribuire alla risoluzione dei problemi relativi al
computer.
6 indicatori della
diagnostica
Utilizzare gli indicatori per contribuire a risolvere i problemi di un computer in
base al codice di diagnostica. Per ulteriori informazioni, consultare "Indicatori
della diagnostica" a pagina 168.
7 indicatore di integrità
del collegamento
• Verde — È presente una connessione funzionante tra una rete a 10 Mbps e il
computer.
• Arancione — È presente una connessione funzionante tra una rete a 100 Mbps e
il computer.
• Spento — Il computer non rileva alcuna connessione fisica alla rete.
8 connettore della cuffia Usare il connettore delle cuffie per collegare le cuffie.
9 unità disco floppy Inserire un disco floppy in questa unità.
10 unità CD/DVD Inserire un CD o DVD (se supportati) in questa unità.
11 posizione del Numero di
servizio
Utilizzare il Numero di servizio per identificare il computer quando si accede al
sito Web del supporto tecnico della Dell o chiamare il supporto tecnico.
1 slot per schede Questi slot consentono di accedere ai connettori delle schede PCI e PCI Express
installate.
5
1
2 3 4 6

152 Guida di consultazione rapida
Computer desktop — Connettori del pannello posteriore
2 connettori del pannello
posteriore
Usare il connettore appropriato per collegare periferiche seriali, USB e di altro tipo.
Consultare "Computer desktop — Connettori del pannello posteriore" a
pagina 152.
3 connettore di
alimentazione
Inserire un cavo di alimentazione in questo connettore.
4 selettore di tensione Il computer è dotato di un selettore di tensione manuale. Per evitare di
danneggiare il computer con un selettore di tensione manuale, impostare il
selettore sulla tensione che meglio corrisponde all'alimentazione c.a. disponibile
presso la sede.
AVVISO: In Giappone, è necessario impostare il selettore di tensione sulla
posizione 115 V.
Accertarsi inoltre che le caratteristiche elettriche del monitor e delle periferiche
collegate siano adeguate per il tipo di alimentazione c.a. disponibile presso la sede.
5 anello del lucchetto Inserire un lucchetto per impedire l'apertura del coperchio del computer.
6 chiusura a scatto del
coperchio
Utilizzare questo dispositivo di chiusura per aprire il coperchio del computer.
1
connettore parallelo
Collegare una periferica parallela, quale ad esempio una stampante, al connettore
parallelo. Se si usa una stampante USB, collegarla al connettore USB.
N.B. Il connettore parallelo integrato è disattivato automaticamente se il computer
rileva una scheda installata contenente un connettore parallelo configurato allo
stesso indirizzo. Per maggiori informazioni, consultare la Guida dell'utente in linea.
2
indicatore di integrità del
collegamento
• Verde — È presente una connessione funzionante tra una rete a 10 Mbps e il
computer.
• Arancione — È presente una connessione funzionante tra una rete a 100 Mbps e
il computer.
• Spento — Il computer non rileva alcuna connessione fisica alla rete.
13
10 9 8
5
6
7
24

Guida di consultazione rapida 153
3
connettore della scheda
di rete
Per collegare il computer a una periferica di rete o a banda larga, collegare
un'estremità del cavo di rete a uno spinotto di rete o alla periferica di rete o a
banda larga. Collegare l'altra estremità del cavo di rete al connettore della scheda
di rete sul pannello posteriore del computer. Uno scatto indicherà che il cavo di
rete è stato saldamente inserito nel connettore.
N.B. Non collegare un cavo telefonico al connettore di rete.
Su computer con una scheda di rete, utilizzare il connettore sulla scheda.
È consigliabile utilizzare un cablaggio e connettori di categoria 5 per la rete. Se è
necessario usare un cablaggio di categoria 3, forzare la velocità di rete a 10 Mbps
per garantire un funzionamento affidabile.
4
spia di attività della rete
La spia lampeggia in giallo quando il computer trasmette o riceve dati di rete. In
presenza di un intenso traffico di rete, è possibile che questo indicatore appaia
costantemente acceso.
5
connettore della linea di
ingresso
Utilizzare il connettore blu della linea di ingresso per collegare una periferica di
registrazione/riproduzione, quale ad esempio un lettore di cassette, un lettore CD
o un videoregistratore.
Sui computer dotati di una scheda audio, usare il connettore sulla scheda.
6
connettore della linea di
uscita
Utilizzare il connettore verde della linea di uscita per collegare le cuffie e la
maggior parte di altoparlanti con amplificatori integrati.
Sui computer dotati di una scheda audio, usare il connettore sulla scheda.
7
connettore del microfono
Utilizzare il connettore rosa del microfono per collegare un microfono (da
computer) per ingresso vocale o musicale in un programma di audio o di telefonia.
Su computer con una scheda audio, il connettore del microfono si trova sulla
scheda.
8
connettori USB 2.0 (4)
Utilizzare i connettori USB posteriori per periferiche che di solito restano
collegate, quali ad esempio le stampanti e le tastiere.
9
connettore video
Inserire il cavo del monitor compatibile VGA nel connettore blu.
N.B. Se è stata acquistata una scheda grafica opzionale, questo connettore è
protetto da un cappuccio. Collegare il monitor al connettore sulla scheda grafica.
Non rimuovere il cappuccio.
10
connettore seriale
Collegare una periferica seriale, quale ad esempio un palmare, alla porta seriale.
La designazione predefinita è COM1 per il connettore seriale 1.
Per maggiori informazioni, consultare la Guida dell'utente in linea.

154 Guida di consultazione rapida
Rimozione del coperchio del computer
ATTENZIONE: Prima di eseguire le procedure descritte in questa sezione, seguire le istruzioni di sicurezza
riportate nella Guida alle informazioni sul prodotto.
ATTENZIONE: Per evitare il rischio di scariche elettriche, scollegare sempre il computer dalla presa elettrica
prima di rimuovere il coperchio.
Operazioni preliminari
AVVISO: Per non rischiare di perdere i dati, salvare e chiudere eventuali file aperti e uscire da tutti i programmi in
esecuzione prima di spegnere il computer.
1
Arrestare il sistema operativo:
a
Salvare e chiudere eventuali file aperti e arrestare i programmi in esecuzione, quindi fare clic sul
pulsante
Start
e fare clic su
Spegni computer
.
b
Nella finestra
Spegni computer
, fare clic su
Spegni
.
Il computer si spegne dopo che il processo di arresto del sistema operativo termina.
2
Assicurarsi che il computer e le periferiche collegate siano spenti. Se il computer e le periferiche
collegate non si sono spenti automaticamente durante l'arresto del sistema, spegnerli ora.
Interventi preliminari sui componenti interni del computer
Per proteggere il computer da eventuali danni e per la sicurezza personale, attenersi alle istruzioni sulla
sicurezza riportate di seguito.
ATTENZIONE: Prima di eseguire le procedure descritte in questa sezione, seguire le istruzioni di sicurezza
riportate nella Guida alle informazioni sul prodotto.
ATTENZIONE: Maneggiare con cura componenti e schede. Non toccare i componenti o i contatti sulle schede.
Manipolare una scheda dai bordi o dalla staffa metallica di montaggio. Maneggiare un componente, ad esempio
un processore, dai bordi, non dai piedini.
AVVISO: Solo un tecnico di assistenza qualificato dovrebbe eseguire le riparazioni del computer. Danni dovuti a
riparazioni non autorizzate da Dell non sono coperte dalla garanzia.
AVVISO: Per scollegare un cavo, afferrare il connettore o il serracavi, non il cavo stesso. Alcuni cavi dispongono
di un connettore con linguette di blocco; se si scollega questo tipo di cavo, premere sulle linguette di blocco prima
di scollegare il cavo. Nel separare i connettori, mantenerli allineati per evitare di piegare un eventuale piedino.
Inoltre, prima di collegare un cavo accertarsi che entrambi i connettori siano allineati e orientati in modo corretto.
Per evitare di danneggiare il computer, eseguire la seguente procedura prima di cominciare ad intervenire
sui componenti interni del computer.
1
Spegnere il computer.
AVVISO: Per scollegare un cavo di rete, prima scollegare il cavo dal computer, poi dallo spinotto di rete a muro.
2
Scollegare dal computer eventuali linee telefoniche o di telecomunicazione.

Guida di consultazione rapida 155
3
Scollegare il computer e tutte le periferiche collegate dalle rispettive prese elettriche, quindi premere il
pulsante di alimentazione per mettere a terra la scheda di sistema.
4
Se presente, rimuovere il piedistallo del computer (per istruzioni, consultare la documentazione
fornita col piedistallo).
ATTENZIONE: Per evitare il rischio di scariche elettriche, scollegare sempre il computer dalla presa elettrica
prima di rimuovere il coperchio.
5
Rimuovere il coperchio del computer:
• Rimuovere il coperchio del computer minitorre (consultare "Computer minitorre" a pagina 155).
• Rimuovere il coperchio del computer desktop (consultare "Computer desktop" a pagina 161).
AVVISO: Prima di toccare qualsiasi componente interno del computer, scaricare a terra l'elettricità statica del
corpo toccando una superficie metallica non verniciata, quale ad esempio il metallo sul retro del computer.
Durante l'intervento toccare periodicamente una superficie metallica non verniciata per scaricare l'elettricità
statica eventualmente accumulata che potrebbe danneggiare i componenti interni.
Computer minitorre
ATTENZIONE: Prima di eseguire le procedure descritte in questa sezione, seguire le istruzioni di sicurezza
riportate nella Guida alle informazioni sul prodotto.
ATTENZIONE: Per evitare il rischio di scariche elettriche, scollegare sempre il computer dalla presa elettrica
prima di rimuovere il coperchio del computer.
1
Seguire le procedure descritte in "Operazioni preliminari" a pagina 154.
2
Se si è installato un lucchetto attraverso l'anello del lucchetto sul pannello posteriore, rimuovere il
lucchetto.
3
Appoggiare il computer sul proprio lato.
4
Far scorrere la chiusura a scatto del coperchio all'indietro quando si solleva il coperchio.
5
Afferrare i lati del coperchio del computer e ruotare il coperchio verso l'alto utilizzando le linguette dei
cardini come punti di leva.
6
Rimuovere il coperchio dalle linguette dei cardini e metterlo da parte su una superficie morbida non
abrasiva.

156 Guida di consultazione rapida
1 slot per cavo di sicurezza
2 chiusura a scatto del coperchio
3 anello del lucchetto
2
1
3

Guida di consultazione rapida 157
Computer desktop
ATTENZIONE: Prima di eseguire le procedure descritte in questa sezione, seguire le istruzioni di sicurezza
riportate nella Guida alle informazioni sul prodotto.
ATTENZIONE: Per evitare il rischio di scariche elettriche, scollegare sempre il computer dalla presa elettrica
prima di rimuovere il coperchio del computer.
1
Seguire le procedure descritte in "Operazioni preliminari" a pagina 154.
2
Se si è installato un lucchetto attraverso l'anello del lucchetto sul pannello posteriore, rimuovere il
lucchetto.
3
Far scorrere la chiusura a scatto del coperchio all'indietro quando si solleva il coperchio.
4
Ruotare il coperchio verso l'alto utilizzando le linguette dei cardini come leve.
5
Rimuovere il coperchio dalle linguette dei cardini e metterlo da parte su una superficie morbida non
abrasiva.
1
slot per cavo di sicurezza
2
chiusura a scatto del coperchio
3
anello del lucchetto
2
1
3

158 Guida di consultazione rapida
Esplorazione dell'interno del computer
Computer minitorre
1 unità CD/DVD 4 scheda di sistema
2 unità disco floppy 5 gruppo del dissipatore di calore
3 alimentatore 6 disco rigido
1
3
4
6
2
5

Guida di consultazione rapida 159
Componenti della scheda di sistema
12
4
6
15
3
16
17
14
10
5
8
7
12
13
911

160 Guida di consultazione rapida
Impostazioni dei ponticelli
1 connettore della ventola (FAN) 10 cicalino interno (SPKR1)
2 connettore del processore (CPU) 11 ponticello di ripristino password (PSWD)
3 connettore di alimentazione del processore
(12VPOWER)
12 ponticello di reimpostazione dell'orologio in
tempo reale (RTCRST)
4 connettore sul pannello anteriore
(FNT_PANEL)
13 zoccolo della batteria (BATT)
5 connettori dei moduli di memoria (DIMM_1,
DIMM_2)
14 scheda PCI Express x16
6 connettori dell'unità SATA (SATA0, SATA1) 15 connettori della scheda PCI (2)
7 connettore di alimentazione (POWER) 16 connettore dell'unità floppy (FLOPPY)
8 connettore dell'unità CD/DVD (IDE) 17 connettore PS/2/seriale (PS2/SER2)
9 connettori dell'unità SATA (SATA2, SATA3)
Computer minitorre

Guida di consultazione rapida 161
Computer desktop
Ponticelli Impostazione Descrizione
PSWD Le funzionalità della password sono
attivate (impostazione predefinita).
Le funzionalità delle password sono
disattivate.
RTCRST
L'orologio in tempo reale è stato
attivato (impostazione predefinita).
L'orologio in tempo reale è in corso di
ripristino (collegato temporaneamente
mediante ponticello).
collegato mediante ponticello collegato senza ponticello
1 alloggiamento delle unità
(CD/DVD, floppy e disco rigido)
4 slot per schede
2 alimentatore 5 gruppo del dissipatore di calore
3 scheda di sistema 6 pannello anteriore d'I/O
1
2
3
4
5
6
1
1

162 Guida di consultazione rapida
Componenti della scheda di sistema
12
4
6
15
3
16
17
14
10
5
8
7
12
13
11 9

Guida di consultazione rapida 163
Impostazioni dei ponticelli
1 connettore della ventola (FAN) 10 cicalino interno (SPKR1)
2 connettore del processore (CPU) 11 ponticello di ripristino password (PSWD)
3 connettore di alimentazione del processore
(12VPOWER)
12 ponticello di ripristino RTC (RTCRST)
4 connettore sul pannello anteriore (FNT_PANEL) 13 zoccolo della batteria (BATT)
5 connettori dei moduli di memoria (DIMM_1,
DIMM_2)
14 scheda PCI Express x16
6 connettori dell'unità ATA seriale (SATA0, SATA2) 15 connettore della scheda PCI (2)
7 connettore di alimentazione (POWER) 16 connettore dell'unità floppy (FLOPPY)
8 connettore dell'unità CD/DVD (IDE) 17 connettore PS/2/seriale (PS2/SER2)
9 connettori dell'unità ATA seriale (SATA2, SATA3)
Computer desktop

164 Guida di consultazione rapida
Soluzione dei problemi
Dell fornisce una serie di strumenti per assistere l'utente se il computer non funziona nel modo previsto.
Per ottenere le informazioni più aggiornate per la risoluzione dei problemi, visitare il sito Web del
supporto tecnico della Dell all'indirizzo support.dell.com.
Se i problemi relativi al computer riscontrati richiedono l'intervento di Dell, scrivere una descrizione
dettagliata dell'errore, i codici bip o la combinazione degli indicatori di diagnostica, annotare di seguito il
codice di servizio espresso e il Numero di servizio, quindi contattare la Dell dalla postazione di lavoro del
computer. Per informazioni su come contattare la Dell, consultare la Guida dell'utente in linea.
Consultare "Ricerca di informazioni" a pagina 139 per un esempio di Codice di servizio espresso e
Numero di servizio.
Codice di servizio espresso: ___________________________
Numero di servizio: ___________________________
Dell Diagnostics
ATTENZIONE: Prima di eseguire le procedure descritte in questa sezione, seguire le istruzioni di sicurezza
riportate nella Guida alle informazioni sul prodotto.
Quando utilizzare il programma Dell Diagnostics
Se si sperimenta un problema relativo al computer, eseguire i controlli in "Soluzione dei problemi" nella
Guida dell'utente in linea ed eseguire il programma Dell Diagnostics prima di contattare la Dell per
supporto tecnico. Per informazioni su come contattare la Dell, consultare la Guida dell'utente in linea.
AVVISO: Il programma Dell Diagnostics funziona solo su computer Dell™.
Ponticelli Impostazione Descrizione
PSWD Le funzionalità della password
sono attivate (impostazione
predefinita).
Le funzionalità delle password
sono disattivate.
RTCRST
L'orologio in tempo reale è stato
attivato (impostazione
predefinita).
L'orologio in tempo reale è in
corso di ripristino (collegato
temporaneamente mediante
ponticello).
collegato mediante ponticello collegato senza ponticello
1
1

Guida di consultazione rapida 165
Accedere all'Installazione del sistema (per le istruzioni, consultare "Installazione del sistema" nella Guida
dell'utente in linea), leggere le informazioni sulla configurazione del computer e assicurarsi che la
periferica che si desidera esaminare sia visualizzata nell'Installazione del sistema e sia attiva.
Avviare Dell Diagnostics dal disco rigido o dal CD opzionale Drivers and Utilities (noto anche come
ResourceCD).
Avvio del programma Dell Diagnostics dal disco rigido
1
Accendere il computer (o riavviare il sistema).
2
Quando viene visualizzato il logo della DELL™, premere immediatamente <F12>.
N.B. Se viene visualizzato un messaggio che indica che nessuna partizione dell'utilità di diagnostica è stata
trovata, eseguire il programma Dell Diagnostics dal CD opzionale Drivers and Utilities (consultare "Avvio del
programma Dell Diagnostics dal CD Drivers and Utilities" a pagina 165).
Se si attende troppo a lungo e viene visualizzato il logo del sistema operativo, attendere la visualizzazione del
desktop di Microsoft
®
Windows
®
. Arrestare quindi il sistema e riprovare.
3
Quando appare l'elenco delle periferiche di avvio, evidenziare
Boot to Utility partition
(Avvia alla
partizione dell'utilità) e premere <Invio>.
4
Quando viene visualizzato il
Main Menu
(Menu principale)
di Dell Diagnostics, scegliere il tipo di
prova da eseguire.
Avvio del programma Dell Diagnostics dal CD Drivers and Utilities
1
Inserire il CD
Drivers and Utilities
.
2
Arrestare e riavviare il sistema.
Quando viene visualizzato il logo della DELL™, premere immediatamente <F12>.
Se si attende troppo a lungo e viene visualizzato il logo del sistema operativo, attendere che compaia il
desktop di Microsoft Windows. Arrestare quindi il sistema e riprovare.
N.B. I passi successivi cambiano la sequenza d'avvio una sola volta. All'avvio successivo, il sistema si avvia in
base alle periferiche specificate nell'Installazione del sistema.
3
Quando appare l'elenco delle periferiche di avvio, evidenziare l'unità CD/DVD e premere <Invio>.
4
Selezionare l'opzione dell'unità CD/DVD dal menu di avvio del CD.
5
Selezionare l'opzione di avvio dall'unità CD/DVD dal menu che viene visualizzato.
6
Digitare
1
per avviare il menu del CD
Drivers and Utilities
.
7
Digitare
2
per avviare il programma Dell Diagnostics.
8
Selezionare
Run the 32 Bit Dell Diagnostics
(Esegui il programma Dell Diagnostics a 32 bit)
dall'elenco numerato. Se sono elencate più versioni, selezionare la versione appropriata per il computer
utilizzato.
9
Quando viene visualizzato il
Main Menu
(Menu principale) di Dell Diagnostics, scegliere il tipo di
prova da eseguire.

166 Guida di consultazione rapida
Main Menu (Menu principale) di Dell Diagnostics
1
Dopo il caricamento del programma Dell Diagnostics e la comparsa della schermata
Main
Menu
(Menu principale), fare clic sul pulsante relativo all'opzione desiderata.
2
Se si riscontra un problema durante una prova, viene visualizzato un messaggio che visualizza il codice
di errore e la descrizione del problema. Annotare il codice di errore e la descrizione del problema e
seguire le istruzioni visualizzate.
Se non è possibile risolvere la condizione di errore, contattare la Dell. Per informazioni su come
contattare la Dell, consultare la
Guida dell'utente
in linea.
N.B. Il Numero di servizio per il computer si trova nella parte superiore di ciascuna schermata della prova. Se
si contatta la Dell, il personale del supporto tecnico richiederà all'utente il Numero di servizio.
3
Se si esegue una verifica dalle opzioni
Custom Test
(Prova personalizzata) o
Symptom Tree
(Albero dei
sintomi), fare clic sulla scheda pertinente descritta nella tabella seguente per maggiori informazioni.
Opzione Funzione
Express Test Esegue una prova veloce delle periferiche. L'esecuzione di questa prova richiede in
genere da 10 a 20 minuti e non richiede interazione da parte dell'utente. Eseguire
Express Test (Prova veloce) prima per aumentare la possibilità di scoprire il problema
rapidamente.
Extended Test Esegue una verifica approfondita delle periferiche. L'esecuzione di questa prova
richiede in genere almeno un'ora e l'utente dovrà rispondere periodicamente a delle
domande.
Custom Test Esegue la prova di una periferica specifica. È possibile personalizzare le prove che si
desidera eseguire.
Symptom Tree Elenca i sintomi più comuni riscontrati e consente di selezionare una prova in base al
sintomo del problema che si sperimenta.
Scheda Funzione
Results Visualizza i risultati della prova e le eventuali condizioni di errore riscontrate.
Errors Visualizza le condizioni di errore riscontrate, i codici di errore e la descrizione del
problema.
Help Descrive la prova e può contenere informazioni sui requisiti per l'esecuzione della
prova.
Configuration Visualizza la configurazione hardware della periferica selezionata.
Le informazioni di configurazione di tutte le periferiche visualizzate nel programma
Dell Diagnostics sono derivate dall'Installazione del sistema, dalla memoria e da varie
prove interne e vengono visualizzate nell'elenco delle periferiche disponibile nel
riquadro sinistro dello schermo. Nell'elenco delle periferiche potrebbero non essere
elencati i nomi di tutti i componenti installati nel computer o di tutte le periferiche
collegate al computer.
Parameters È possibile personalizzare la prova modificandone le impostazioni.

Guida di consultazione rapida 167
4
Quando le prove sono completate, se si sta eseguendo il programma Dell Diagnostics dal CD
Drivers
and Utilities
(opzionale)
,
rimuovere il CD.
5
Chiudere la schermata di verifica per ritornare alla schermata
Main
Menu
(Menu principale). Per
uscire dal programma Dell Diagnostics e riavviare il computer, chiudere la schermata
Main
Menu
(Menu principale).
Indicatori di sistema
L'indicatore di alimentazione potrebbe indicare un problema al computer.
Indicatore di
alimentazione
Descrizione del problema Soluzione consigliata
Verde fisso Il computer è acceso e funziona
regolarmente.
Non è richiesta alcuna azione correttiva.
Verde lampeggiante Il computer è ora in modalità di
risparmio energia.
Premere il pulsante di alimentazione, spostare
il mouse o premere un tasto sulla tastiera per
riattivare il sistema.
Verde lampeggiante per
alcuni istanti, quindi
spento
È presente un errore di
configurazione.
Verificare se gli indicatori della diagnostica
identificano il problema specifico (consultare
"Indicatori della diagnostica" a pagina 168).
Giallo fisso Una prova del programma Dell
Diagnostics è in esecuzione o una
periferica sulla scheda di sistema
potrebbe essere guasta o non
installata correttamente.
Se il programma Dell Diagnostics è in
esecuzione, attendere il termine della prova.
Verificare se gli indicatori della diagnostica
identificano il problema specifico (consultare
"Indicatori della diagnostica" a pagina 168).
Se il computer non si avvia, contattare la Dell
per supporto tecnico.
Per informazioni su come
contattare la Dell, consultare la
Guida
dell'utente
in linea.
Giallo lampeggiante Si è verificato un guasto
all'alimentatore o alla scheda di
sistema.
Verificare se gli indicatori della diagnostica
identificano il problema specifico (consultare
"Indicatori della diagnostica" a pagina 168).
Consultare "Problemi relativi
all'alimentazione" nella Guida dell'utente in
linea.
Verde fisso e codice bip
durante il POST
È stato rilevato un problema durante
l'esecuzione del BIOS.
Per istruzioni relative alla diagnosi dei codici
bip consultare "Codici bip" a pagina 171.
Verificare inoltre se gli indicatori della
diagnostica identificano il problema specifico.
Indicatore di
alimentazione verde
fisso, nessun codice bip e
schermo nero durante il
POST
La scheda grafica o il monitor
potrebbe essere guasto o non
installato correttamente.
Verificare gli indicatori della diagnostica
prima di controllare se è stato identificato un
problema specifico.

168 Guida di consultazione rapida
Indicatori della diagnostica
ATTENZIONE: Prima di eseguire le procedure descritte in questa sezione, seguire le istruzioni di sicurezza
riportate nella Guida alle informazioni sul prodotto.
Per fornire assistenza all'utente in merito alla risoluzione dei problemi, sul pannello posteriore del
computer sono situati quattro indicatori luminosi contrassegnati dai numeri "1", "2", "3" e "4" sul
pannello anteriore o posteriore. Questi indicatori possono essere "spenti" o verdi. Quando il computer si
avvia normalmente, le combinazioni o i codici luminosi cambiano durante la procedura di avvio. Se il
POST viene superato durante l'avvio del sistema, i quattro indicatori diventano verdi fissi per un breve
periodo, quindi si spengono.
Se durante il POST, invece, si verificano problemi di funzionamento del computer, è possibile fare
riferimento alla combinazione visualizzata sui LED per identificare il punto della procedura in cui il
computer si è bloccato. Se sussiste un malfunzionamento del computer dopo che il POST è stato
superato, gli indicatori della diagnostica non indicano la causa del problema.
N.B. L'orientamento degli indicatori della diagnostica può variare a seconda del tipo di sistema. Gli indicatori della
diagnostica possono essere orientati verticalmente oppure orizzontalmente.
Indicatore di
alimentazione verde fisso
e nessun codice bip, ma il
computer si blocca
durante il POST
È possibile che una periferica
integrata della scheda di sistema sia
danneggiata.
Verificare gli indicatori della diagnostica
prima di controllare se è stato identificato un
problema specifico. Se non è possibile
identificare il problema, contattare la Dell per
supporto tecnico.
Per informazioni su come
contattare la Dell, consultare la
Guida
dell'utente
in linea.
Combinazione di
indicatori
Descrizione del problema Soluzione consigliata
Il computer si trova in una condizione di
spegnimento normale o in una possibile
anomalia pre-BIOS.
Gli indicatori della diagnostica non sono
accesi dopo il corretto avvio del sistema
operativo.
Collegare il computer ad una presa elettrica
funzionante e premere il pulsante di
alimentazione.
Possibile guasto del BIOS e attivazione
della modalità di recupero.
Eseguire l'utilità di ripristino del BIOS,
attendere il completamento del ripristino,
quindi riavviare il sistema.
Si è verificato un possibile guasto al
processore.
Reinstallare il processore e riavviare il
sistema.
Per informazioni sulla reinstallazione
del processore, consultare la
Guida dell'utente
in linea.
Indicatore di
alimentazione
Descrizione del problema Soluzione consigliata

Guida di consultazione rapida 169
I moduli di memoria sono rilevati, ma si è
verificato un guasto della memoria.
• Se è presente un solo modulo di memoria,
reinstallarlo e riavviare il sistema. Per
informazioni sulla reinstallazione dei
moduli di memoria, consultare la
Guida
dell'utente
in linea.
• Se sono presenti due o più moduli di
memoria, rimuoverli, reinstallare un solo
modulo, quindi riavviare il sistema. Se il
sistema si avvia normalmente, reinstallare
un modulo aggiuntivo. Continuare fino a
individuare un modulo difettoso o a
reinstallare tutti i moduli senza errori.
• Se disponibile, installare nel computer
memoria correttamente funzionante dello
stesso tipo.
• Se il problema persiste,
contattare la Dell
.
Per informazioni su come contattare la Dell,
consultare la
Guida dell'utente
in linea.
Possibile guasto della scheda grafica.
• Se il computer dispone di una scheda
grafica, rimuoverla, reinstallarla, quindi
riavviare il sistema.
• Se il problema persiste, installare una
scheda grafica funzionante e riavviare il
sistema.
• Se il problema persiste o il computer
dispone di grafica integrata,
contattare la
Dell
.Per informazioni su come contattare la
Dell, consultare la
Guida dell'utente
in
linea.
Si è verificata una possibile anomalia
nell'unità disco floppy o disco rigido.
Riposizionare tutti i cavi di alimentazione e
dati, e riavviare il sistema.
Si è verificata una possibile anomalia alla
USB.
Reinstallare tutte le periferiche USB,
controllare le connessioni cavo, quindi
riavviare il sistema.
Combinazione di
indicatori
Descrizione del problema Soluzione consigliata

170 Guida di consultazione rapida
Non viene rilevato alcun modulo di
memoria.
• Se è presente un solo modulo di memoria,
reinstallarlo e riavviare il sistema. Per
informazioni sulla reinstallazione dei
moduli di memoria, consultare la
Guida
dell'utente
in linea.
• Se sono presenti due o più moduli di
memoria, rimuoverli, reinstallare un solo
modulo, quindi riavviare il sistema. Se il
sistema si avvia normalmente, reinstallare
un modulo aggiuntivo. Continuare fino a
individuare un modulo difettoso o a
reinstallare tutti i moduli senza errori.
• Se disponibile, installare nel computer
memoria correttamente funzionante dello
stesso tipo.
• Se il problema persiste,
contattare la Dell
.
Per informazioni su come contattare la Dell,
consultare la
Guida dell'utente
in linea.
I moduli di memoria sono rilevati, ma
esiste un errore di compatibilità o di
configurazione della memoria.
• Accertarsi che non esistano
requisiti
speciali di posizionamento dei connettori
o dei moduli di memoria
.
• Verificare che i
moduli di memoria
installati siano compatibili con il computer.
• Se il problema persiste,
contattare la Dell
.
Per informazioni su come contattare la Dell,
consultare la
Guida dell'utente
in linea.
Si è verificata un'anomalia.
Questa combinazione viene visualizzata
anche quando si accede all'Installazione
del sistema e non indica necessariamente
un problema.
• Accertarsi che i cavi del disco rigido,
dell'unità CD e dell'unità DVD siano
correttamente collegati alla scheda di
sistema.
• Fare riferimento al messaggio visualizzato
sullo schermo.
• Se il problema persiste,
contattare la Dell
.
Per informazioni su come contattare la Dell,
consultare la
Guida dell'utente
in linea.
Dopo il completamento del POST, tutti i
quattro indicatori della diagnostica
assumono brevemente il colore verde
prima di spegnersi per indicare una
condizione operativa normale.
Nessuno.
Combinazione di
indicatori
Descrizione del problema Soluzione consigliata

Guida di consultazione rapida 171
Codici bip
Se il computer non è in grado di visualizzare errori o problemi sul monitor, è possibile che all'avvio
emetta una serie di bip. Questa serie di bip, detta codice bip, identifica il problema. Ad esempio, il
codice bip 1-3-1 è costituito da un bip, seguito da una sequenza di tre bip e infine da un altro bip e
segnala che è stato riscontrato un problema di memoria.
Se il computer emette un bip in fase di avvio, seguire la procedura descritta.
1
Annotare il codice bip.
2
Consultare "Dell Diagnostics" a pagina 164 per identificare una causa più seria.
3
Contattare la Dell per supporto tecnico. Per informazioni su come contattare la Dell, consultare la
Guida dell'utente
in linea.
Codice Causa Codice Causa
1-1-2 Errore del registro del microprocessore 3-1-4 Errore del registro maschera d'interrupt slave
1-1-3 Errore di lettura/scrittura della
NVRAM
3-2-2 Errore di caricamento del vettore di interrupt
1-1-4 Errore di checksum della ROM del
BIOS
3-2-4 Errore della prova Keyboard Controller
(Controller della tastiera)
1-2-1 Errore al timer di intervallo
programmabile
3-3-1 Interruzione dell'alimentazione della
NVRAM
1-2-2 Errore di inizializzazione dell'accesso
diretto alla memoria (DMA)
3-3-2 Configurazione NVRAM non valida
1-2-3 Errore di lettura/scrittura dal o nel
registro delle pagine DMA
3-3-4 Errore della prova Video Memory (Memoria
video)
1-3 Errore della prova Video Memory
(Memoria video)
3-4-1 Errore di inizializzazione dello schermo
Da 1-3-1 a 2-4-4 Memoria non correttamente
identificata o usata
3-4-2 Errore di ritraccia dello schermo
3-1-1 Errore del registro DMA slave 3-4-3 Ricerca di errore della memoria ROM video
3-1-2 Errore del registro DMA master 4-2-1 Nessun timer tick
3-1-3 Errore del registro della maschera
d'interrupt master
4-2-2 Errore dell'arresto
4-2-3 Errore del Gate A20 4-4-1 Errore di verifica della porta seriale o parallela
4-2-4 Interrupt imprevisto in modalità
protetta
4-4-2 Errore di decompressione del codice nella
memoria nascosta
4-3-1 Errore di memoria a un indirizzo
superiore a 0FFFFh
4-4-3 Errore di verifica del coprocessore
matematico
4-3-3 Errore del contatore 2 del chip del
timer
4-4-4 Errore di verifica della cache
4-3-4 Orologio dell'ora del giorno interrotto

172 Guida di consultazione rapida
Risoluzione di incompatibilità del software e dell'hardware
Se durante l'installazione del sistema operativo una periferica non viene rilevata oppure viene rilevata e
configurata in modo errato, è possibile usare l'utilità Risoluzione dei problemi relativi all'hardware per
risolvere il problema di compatibilità.
1
Fare clic sul pulsante
Start
, quindi fare clic su
Guida in linea e supporto tecnico
.
2
Digitare
risoluzione dei problemi relativi all'hardware
nel campo
Cerca
, quindi
fare clic sulla freccia per iniziare la ricerca.
3
Fare clic su
Risoluzione dei problemi relativi all'hardware
nell'elenco
Risultati ricerca
.
4
Nell'elenco
Risoluzione dei problemi relativi all'hardware
fare clic su
Risoluzione di un conflitto
hardware nel computer
, quindi fare clic su
Avanti
.
Uso del Ripristino configurazione di sistema di Microsoft Windows XP
Il sistema operativo Microsoft Windows XP fornisce l'utilità Ripristino configurazione di sistema che
consente di ripristinare il sistema allo stato operativo precedente, senza modificare i file di dati, a seguito
di modifiche all'hardware, al software o ad altre impostazioni di sistema che hanno reso il computer
instabile. Consultare la Guida in linea e supporto tecnico di Windows per informazioni sull'utilizzo di
Ripristino configurazione di sistema. Per accedere alla Guida in linea e supporto tecnico di Windows,
consultare "Guida in linea e supporto tecnico di Windows" a pagina 141.
AVVISO: Eseguire i backup regolari dei file di dati. Ripristino configurazione di sistema non controlla i file di dati e
non può ripristinarli.
Creazione di un punto di ripristino
1
Fare clic sul pulsante
Start
, quindi scegliere
Guida in linea e supporto tecnico
.
2
Fare clic su
Ripristino configurazione di sistema
.
3
Seguire le istruzioni visualizzate.
Ripristino del computer a uno stato operativo precedente
AVVISO: Salvare e chiudere qualsiasi file aperto e uscire da qualsiasi programma aperto prima di ripristinare il
computer ad uno stato operativo precedente. Non modificare, aprire o eliminare alcun file o programma prima che
il sistema venga completamente ripristinato.
1
Fare clic sul pulsante
Start
, scegliere
Tutti i programmi
→
Accessori
→
Utilità di sistema
, quindi fare
clic su
Ripristino configurazione di sistema
.
2
Verificare che l'opzione
Ripristina l'installazione del sistema esistente in un dato momento
sia
selezionata, quindi fare clic su
Avanti
.
3
Selezionare dal calendario la data a cui si desidera ripristinare la configurazione del computer.
Nella schermata
Selezionare un punto di ripristino
è disponibile un calendario in cui sono riportati i
punti di ripristino e da cui è possibile selezionare quello desiderato. Se per una data è disponibile un
punto di ripristino, tale data viene visualizzata in grassetto.
4
Selezionare un punto di ripristino, quindi fare clic su
Avanti
.
Se per una data è disponibile un solo punto di ripristino, questo verrà automaticamente selezionato.
Se, invece, sono disponibili due o più punti di ripristino, è necessario fare clic su quello desiderato.

Guida di consultazione rapida 173
5
Fare clic su
Avanti
.
Viene visualizzata la schermata
Ripristino completo
dopo il termine della raccolta di dati con
Ripristino configurazione di sistema, quindi il computer si riavvia.
6
Al riavvio del computer, fare clic su
OK
.
Per modificare il punto di ripristino, ripetere la procedura usando un punto di ripristino diverso oppure
annullare il ripristino.
Annullamento dell'ultimo Ripristino configurazione di sistema
AVVISO: Salvare e chiudere tutti i file aperti e uscire da tutti i programmi in esecuzione prima di annullare l'ultimo
ripristino del sistema. Non modificare, aprire o eliminare alcun file o programma prima che il sistema venga
completamente ripristinato.
1
Fare clic sul pulsante
Start
, scegliere
Tutti i programmi
→
Accessori
→
Utilità di sistema
, quindi fare
clic su
Ripristino configurazione di sistema
.
2
Selezionare
Annulla ultima operazione di ripristino
, quindi fare clic su
Avanti
3
Fare clic su
Avanti
.
Viene visualizzata la finestra
Ripristino configurazione di sistema
, quindi il sistema si riavvia.
4
Al riavvio del computer, fare clic su
OK
.
Attivazione del Ripristino configurazione di sistema
Se si reinstalla Windows XP su un disco rigido con meno di 200 MB di spazio libero, Ripristino
configurazione di sistema viene automaticamente disattivato. Per verificare se Ripristino configurazione
di sistema è attivato:
1
Fare clic sul pulsante
Start
e fare clic su
Pannello
di controllo
.
2
Fare clic su
Prestazioni e manutenzione
.
3
Fare clic su
Sistema
.
4
Selezionare la scheda
Ripristino configurazione di sistema
.
5
Accertarsi che
Disattiva Ripristino configurazione di sistema
non sia selezionato.
Reinstallazione di Microsoft Windows XP
Operazioni preliminari
N.B. Le procedure in questo documento sono state scritte per la visualizzazione predefinita di Windows XP Home
Edition, quindi la procedura sarà diversa se si imposta il computer Dell™ sulla visualizzazione classica di Windows
o se si sta utilizzando Windows XP Professional.
Prima di reinstallare il sistema operativo Windows XP per correggere un problema relativo a un driver
appena installato, provare a usare l'utilità Ripristino driver di periferica di Windows XP.
1
Fare clic sul pulsante
Start
e su
Pannello di controllo
.
2
In
Scegliere una categoria
, fare clic su
Prestazioni e manutenzione
.
3
Fare clic su
Sistema
.
4
Nella finestra
Proprietà del sistema
, selezionare la scheda
Hardware
.

174 Guida di consultazione rapida
5
Fare clic su
Gestione periferiche
.
6
Fare clic con il pulsante destro del mouse sulla periferica per la quale il nuovo driver è stato installato e
fare clic su
Proprietà
.
7
Selezionare la scheda
Driver
.
8
Fare clic su
Ripristina driver
.
Se Ripristino driver di periferica non risolve il problema, utilizzare Ripristino configurazione di sistema
per riportare il sistema operativo allo stato operativo in cui si trovava prima dell'installazione del nuovo
driver della periferica (consultare "Uso del Ripristino configurazione di sistema di Microsoft Windows
XP" a pagina 172).
N.B. Il CD Drivers and Utilities contiene driver che sono stati installati durante l'assemblaggio del computer.
Utilizzare il CD Drivers and Utilities per caricare eventuali driver richiesti, includendo i driver richiesti se il computer
ha un controller RAID.
Reinstallazione di Windows XP
AVVISO: Quando si reinstalla Windows XP, utilizzare Windows XP Service Pack 1 o successivo.
AVVISO: Prima di procedere con l'installazione, eseguire il backup di tutti i file di dati presenti sul disco rigido
primario. Nelle configurazioni standard, il disco rigido principale è la prima unità rilevata dal computer.
Per reinstallare Windows XP sono necessari i seguenti supporti.
•CD
Sistema operativo
di Dell
•CD
Drivers and Utilities
Per reinstallare Windows XP, eseguire tutti i punti descritti nelle sezioni seguenti nell'ordine in cui sono
riportati.
Il processo di reinstallazione può durare da 1 a 2 ore. Dopo avere reinstallato il sistema operativo, è
inoltre necessario reinstallare i driver di periferica, il programma antivirus e altro software.
AVVISO: Il CD Sistema operativo fornisce diverse opzioni per reinstallare Windows XP. Tali opzioni potrebbero
sovrascrivere i file installati ed eventualmente compromettere il funzionamento dei programmi installati sul disco
rigido. Pertanto non reinstallare Windows XP a meno che ciò non sia stato raccomandato da un rappresentante del
supporto tecnico di Dell.
AVVISO: Al fine di prevenire conflitti con Windows XP, disattivare l'eventuale software antivirus installato nel
sistema prima di reinstallare il sistema operativo. Per istruzioni, consultare la documentazione fornita con il
software.
Avvio dal CD Sistema operativo
1
Salvare e chiudere i file aperti e uscire da tutte le applicazioni in esecuzione.
2
Inserire il CD
Sistema operativo
. Fare clic su
Esci
se il messaggio
Installa Windows XP
viene
visualizzato.
3
Riavviare il sistema.
4
Premere <F12> immediatamente dopo che appare il logo DELL.
Se viene visualizzato il logo del sistema operativo, attendere la visualizzazione del desktop di Windows,
quindi arrestare il sistema e riprovare.

Guida di consultazione rapida 175
5
Premere i tasti di direzione per selezionare
CD-ROM
, quindi premere <Invio>.
6
Quando viene visualizzato il messaggio
Premere un tasto per avviare da CD-ROM
,
premere un tasto.
Installazione di Windows XP
1
Quando viene visualizzata la schermata
Installazione di Windows XP
, premere <Invio> per
selezionare
Installa Windows ora
.
2
Leggere le informazioni nella schermata
Contratto di licenza di Microsoft Windows
e premere <F8>
per accettare il contratto di licenza Microsoft.
3
Se sul computer è già installato Windows XP e si desidera ripristinare i dati presenti nella
configurazione corrente di Windows XP, digitare
r
per selezionare l'opzione di ripristino, quindi
rimuovere il CD dall'unità.
4
Se si desidera installare una copia di Windows XP, premere <Esc> per selezionare tale opzione.
5
Premere <Invio> per selezionare la partizione evidenziata (opzione consigliata), quindi seguire le
istruzioni visualizzate.
Viene visualizzata la schermata
Installazione di Windows XP
e viene avviato il processo di copia dei
file e di installazione delle periferiche del sistema operativo. Il sistema si riavvierà automaticamente
più volte.
N.B. Il tempo necessario per completare l'installazione dipende dalle dimensioni del disco rigido e dalla velocità
del computer.
AVVISO: Non premere nessun tasto quando viene visualizzato il messaggio: Premere un tasto per
avviare da CD-ROM
.
6
Quando viene visualizzata la schermata
Opzioni internazionali e della lingua
, selezionare le
impostazioni per la propria ubicazione e fare clic su
Avanti
.
7
Immettere il nome e la società (opzionale) nella schermata
Personalizzazione del software
, quindi fare
clic su
Avanti
.
8
Immettere il nome del computer (o accettare quello predefinito) e una password nella finestra
Nome
computer e password di amministratore
, quindi fare clic su
Avanti
.
9
Se viene visualizzata la schermata
Informazioni su chiamata modem
, immettere le informazioni
richieste e fare clic su
Avanti
.
10
Immettere la data, l'ora e il fuso orario nella finestra
Impostazioni data e ora
, quindi fare clic su
Avanti
.
11
Se viene visualizzata la schermata
Impostazioni di rete
, fare clic su
Tipica
e su
Avanti
.
12
Se si sta reinstallando Windows XP Professional e viene chiesto di fornire ulteriori informazioni sulla
configurazione di rete, effettuare le selezioni appropriate. Se non si è certi di quali informazioni
immettere, è consigliabile accettare le opzioni predefinite.
Windows XP installerà i componenti del sistema operativo e configurerà il computer. Il sistema si
riavvierà automaticamente.
AVVISO: Non premere nessun tasto quando viene visualizzato il messaggio: Premere un tasto per
avviare da CD-ROM
.
13
Quando appare la schermata
Microsoft Windows
, fare clic su
Avanti
.

176 Guida di consultazione rapida
14
Quando viene visualizzato il messaggio
Tipo di connessione a Internet
, fare clic su
Ignora
.
15
Quando viene visualizzata la schermata
Registrazione prodotto Microsoft
, selezionare
No, non adesso
e fare clic su
Avanti
.
16
Quando viene visualizzata la schermata
Utenti del computer
, è possibile immettere fino a cinque
utenti.
17
Fare clic su
Avanti
.
18
Fare clic su
Fine
per completare l'installazione, quindi rimuovere il CD dall'unità.
19
Reinstallare i driver appropriati col CD
Drivers and Utilities
.
20
Reinstallare il software antivirus.
21
Reinstallare i programmi.
N.B. Per reinstallare ed attivare i programmi della suite Microsoft Office o Microsoft Works, è necessario il numero
della Product Key ubicato sul retro della custodia del CD della suite Microsoft Office o Microsoft Works.
Uso del CD Drivers and Utilities
Per usare il CD Drivers and Utilities (noto anche come ResourceCD) durante l'esecuzione del sistema
operativo Windows:
N.B. Per accedere ai driver di periferica e alla documentazione per l'utente, è necessario usare il CD Drivers and
Utilities mentre sul computer è in esecuzione un sistema operativo Windows.
1
Accendere il computer e attendere che venga visualizzato il desktop di Windows.
2
Inserire il CD
Drivers and Utilities
nell'unità CD.
La prima volta che si usa il CD
Drivers and Utilities
sul computer, si apre la finestra
ResourceCD
Installation
(Installazione di ResourceCD) per informare che il CD
Drivers and Utilities
sta per iniziare
l'installazione.
3
Fare clic su
OK
per continuare.
Per completare l'installazione, rispondere alle domande visualizzate dal programma di installazione.
4
Fare clic su
Next
(Avanti) nella schermata
Welcome Dell System Owner
(Introduzione al sistema
Dell).
5
Selezionare le voci appropriate per
System Model
(Modello del sistema),
Operating System
(Sistema
operativo),
Device Type
(Tipo di periferica) e
Topic
(Argomento).
Driver per il computer
Per visualizzare un elenco di driver di periferica per il computer:
1
Fare clic su
My Drivers
(Driver di periferica) nel menu a discesa
Topic
(Argomento).
Il CD
Drivers and Utilities
(opzionale) esegue un'analisi dell'hardware del sistema operativo del
computer e, al termine, viene visualizzato l'elenco dei driver di periferica per l'attuale configurazione
del sistema.
2
Fare clic sul driver desiderato e seguire le istruzioni per scaricare il file sul computer.
Per visualizzare un elenco di tutti i driver disponibili per il computer, fare clic su Drivers nel menu a
discesa Topic (Argomento).

Indice analitico 177
Indice analitico
A
alimentazione
indicatore, 151
C
CD
Sistema operativo, 140
CD Drivers and Utilities, 139
CD Sistema operativo, 140
codici bip, 171
conflitti
incompatibilità del software e
dell'hardware, 172
conflitti IRQ, 172
Contratto di licenza con
l'utente finale, 139
coperchio
rimozione, 154
D
Dell Diagnostics, 164
diagnostica
codici bip, 171
Dell Diagnostics, 164
documentazione
Contratto di licenza con
l'utente finale, 139
ergonomia, 139
garanzia, 139
Guida alle informazioni sul
prodotto, 139
Guida dell'utente, 140
in linea, 141
normativa, 139
sicurezza, 139
driver
elenco di, 176
E
etichette
Microsoft Windows, 140
Numero di servizio, 140
F
file della guida
Guida in linea e supporto
tecnico di Windows, 141
G
Guida alle informazioni sul
prodotto, 139
Guida dell'utente, 140
Guida in linea e supporto
tecnico, 141
H
hardware
codici bip, 171
Dell Diagnostics, 164
I
indicatore di alimentazione
diagnostica dei problemi
con, 167
indicatori
alimentazione, 151
diagnostica, 168
sistema, 167
informazioni
sull'ergonomia, 139
informazioni sulla
garanzia, 139
informazioni sulle
normative, 139
installare componenti
operazioni preliminari, 154
istruzioni di sicurezza, 139
M
messaggi di errore
codici bip, 171
indicatori della
diagnostica, 168
indicatori di sistema, 167

178 Indice analitico
178 Indice analitico
N
Numero di servizio, 140
P
problemi. Vedere risoluzione
dei problemi
R
reinstallazione
Windows XP, 173
Ripristino configurazione di
sistema, 172
risoluzione dei problemi
codici bip, 171
conflitti, 172
Dell Diagnostics, 164
Guida in linea e supporto
tecnico, 141
indicatori della
diagnostica, 168
indicatori di sistema, 167
ripristinare il computer ad uno
stato operativo
precedente, 172
Risoluzione dei, 172
Risoluzione dei problemi
relativi all'hardware, 172
S
scheda di sistema, 159, 162
scheda madre. Vedere scheda
di sistema
sistema operativo
reinstallazione, 140
reinstallazione di Windows
XP, 173
sito del supporto tecnico della
Dell, 141
sito Web del supporto
tecnico, 141
W
Windows XP
Guida in linea e supporto
tecnico, 141
installazione, 175
reinstallazione, 140, 173
Ripristino configurazione di
sistema, 172
Risoluzione dei problemi
relativi all'hardware, 172

www.dell.com | support.dell.com
Dell™ OptiPlex™ 320
Guía de referencia rápida
Modelos DCSM, DCNE

Notas, avisos y precauciones
NOTA: Una NOTA indica información importante que le ayudar a hacer un mejor uso del ordenador.
AVISO: Un AVISO indica la posibilidad de daños al hardware o pérdida de datos y le explica cómo evitar el problema.
PRECAUCIÓN: Una PRECAUCIÓN indica un posible daño material, lesión corporal o muerte.
Si ha adquirido un ordenador Dell™ Serie n, todas las referencias que aparecen en este documento relativas a los
sistemas operativos de Microsoft
®
Windows
®
no son aplicables.
____________________
La información contenida en este documento puede modificarse sin previo aviso.
© 2006 Dell Inc. Todos los derechos reservados.
La reproducción de este documento de cualquier manera sin la autorización por escrito de Dell Inc. queda estrictamente prohibida.
Marcas comerciales utilizadas en este texto: Dell, OptiPlex y el logotipo de DELL son marcas comerciales de Dell Inc.; Microsoft y Windows
son marcas comerciales registradas de Microsoft Corporation; Intel y Pentium son marcas comerciales registradas de Intel Corporation.
Otras marcas y otros nombres comerciales pueden utilizarse en este documento para hacer referencia a las entidades que los poseen o a sus
productos. Dell Inc. renuncia a cualquier interés sobre la propiedad de marcas y nombres comerciales que no sean los suyos.
Modelos DCSM, DCNE
Septiembre 2006 N/P FK640 Rev. A01

Contenido 181
Contenido
Localización de información . . . . . . . . . . . . . . . . . . . . . . . . . 183
Configuración del ordenador
. . . . . . . . . . . . . . . . . . . . . . . . . 186
Vistas del sistema
. . . . . . . . . . . . . . . . . . . . . . . . . . . . . . . 189
Ordenador de minitorre — Vista anterior
. . . . . . . . . . . . . . . . 189
Ordenador de minitorre — Vista posterior
. . . . . . . . . . . . . . . . 191
Ordenador de minitorre — Conectores del panel posterior
. . . . . . . 192
Ordenador de sobremesa — Vista anterior
. . . . . . . . . . . . . . . 194
Ordenador de sobremesa — Vista posterior
. . . . . . . . . . . . . . . 195
Ordenador de sobremesa — Conectores del panel posterior
. . . . . . 196
Cómo quitar la cubierta del ordenador
. . . . . . . . . . . . . . . . . . . . 198
Antes de empezar
. . . . . . . . . . . . . . . . . . . . . . . . . . . . . 198
Ordenador de minitorre
. . . . . . . . . . . . . . . . . . . . . . . . . . 199
Ordenador de sobremesa
. . . . . . . . . . . . . . . . . . . . . . . . . 201
Interior de su ordenador
. . . . . . . . . . . . . . . . . . . . . . . . . . . . 202
Ordenador de minitorre
. . . . . . . . . . . . . . . . . . . . . . . . . . 202
Ordenador de sobremesa
. . . . . . . . . . . . . . . . . . . . . . . . . 205
Solución de problemas
. . . . . . . . . . . . . . . . . . . . . . . . . . . . 208
Dell Diagnostics
. . . . . . . . . . . . . . . . . . . . . . . . . . . . . . 208
Indicadores luminosos del sistema
. . . . . . . . . . . . . . . . . . . . 211
Diagnóstico
. . . . . . . . . . . . . . . . . . . . . . . . . . . . . . . . . . 212
Códigos de sonido
. . . . . . . . . . . . . . . . . . . . . . . . . . . . 215
Cómo resolver incompatibilidades de software y hardware
. . . . . . . 216
Utilización de la función Restaurar sistema de
Microsoft Windows XP
. . . . . . . . . . . . . . . . . . . . . . . . . . 216
Cómo volver a instalar Microsoft Windows XP
. . . . . . . . . . . . . 217
Uso del CD Drivers and Utilities
. . . . . . . . . . . . . . . . . . . . . . . . 220
Índice . . . . . . . . . . . . . . . . . . . . . . . . . . . . . . . . . . . . . . . 221

182 Contenido

Guía de referencia rápida 183
Localización de información
NOTA: Algunas funciones o medios son opcionales y pueden no incluirse en su ordenador. Es posible que algunas
funciones o medios no estén disponibles en determinados países.
NOTA: Su ordenador puede incluir información adicional.
¿Qué busca? Aquí lo encontrará
• Un programa de diagnóstico para mi ordenador
• Controladores para mi ordenador
• La documentación de mi ordenador
• La documentación de mi dispositivo
• Desktop System Software (DSS)
El CD Drivers and Utilities (Controladores y utilidades)
(también conocido como ResourceCD)
NOTA: el CD denominado Drivers and Utilities (Controladores y
utilidades) es opcional y es posible que no se entregue con el
ordenador.
La documentación y los controladores ya están instalados en
su ordenador. Puede utilizar el CD para volver a instalar los
controladores (consulte el apartado “Reinstalación de
controladores y utilidades” en la Guía del usuario en línea).
Para ejecutar los Dell Diagnostics (consulte el apartado “Dell
Diagnostics” en la página 208) o para tener acceso a la
documentación.
Los archivos “readme”
(léame) pueden estar
incluidos en su CD para
ofrecerle las actualizaciones
más recientes sobre los
cambios técnicos del
ordenador o material de
consulta destinado a los
técnicos o usuarios
avanzados.
NOTA: Los controladores y las actualizaciones de la
documentación se pueden encontrar en support.dell.com.
• Información sobre la garantía
• Términos y condiciones (sólo en EE.UU.)
• Instrucciones de seguridad
• Información reglamentaria
• Información ergonómica
• Contrato de licencia de usuario final
Guía de información del producto de Dell™

184 Guía de referencia rápida
• Cómo extraer y cambiar piezas
• Especificaciones
• Cómo configurar los parámetros del sistema
• Cómo detectar y solucionar problemas
Guía del usuario Dell™ OptiPlex™
Centro de Ayuda y Soporte de Microsoft Windows XP
1
Haga clic en
Inicio
→
Ayuda y soporte técnico
→
Guías del
usuario y del sistema Dell
→
Guías del sistema
.
2
Haga clic en la
Guía del usuario
de su ordenador.
La Guía del usuario también está disponible en el CD Drivers
and Utilities (Controladores y utilidades).
• Etiqueta de servicio y Express Service Code
(Código de servicio rápido)
• Etiqueta de licencia de Microsoft Windows
Etiqueta de servicio y licencia de Microsoft
®
Windows
®
Estas etiquetas se incluyen en el ordenador.
• Utilice la etiqueta de
servicio para identificar el
ordenador cuando utilice
support.dell.com
o se
ponga en contacto con el
servicio de asistencia.
• Escriba el código de
servicio urgente para
dirigir su llamada cuando
se ponga en contacto con
el servicio de asistencia.
• Cómo volver a instalar mi sistema operativo
CD Operating System (Sistema operativo)
NOTA: el CD Operating System (Sistema operativo) es
opcional, por lo que es posible que no se envíe con su
ordenador.
El sistema operativo ya está instalado en el ordenador. Para
volver a instalar el sistema operativo, utilice el CD del
sistema operativo. Consulte el apartado “Cómo volver a
instalar Microsoft Windows XP” en la página 217.
Después de volver a instalar
el sistema operativo, puede
usar el CD opcional Drivers
and Utilities (Controladores
y utilidades) (ResourceCD)
para volver a instalar los
controladores de los
dispositivos incluidos con el
ordenador.
La clave del producto del
sistema operativo se
encuentra en el ordenador.
NOTA: El color de su CD varía según el sistema operativo que
haya solicitado.
¿Qué busca? Aquí lo encontrará

Guía de referencia rápida 185
• Soluciones: consejos y orientación para la solución
de problemas, artículos de técnicos, preguntas más
frecuentes y cursos en línea.
• Comunidad: debates en línea con otros clientes de
Dell.
• Actualizaciones: información de actualización para
componentes como, por ejemplo, la memoria, la
unidad de disco duro y el sistema operativo.
• Atención al cliente: información de contacto,
llamada de servicio y estado de los pedidos, garantía
e información de reparación.
• Servicio y asistencia: historial de asistencia y estado
de las llamadas de servicio, contrato de servicio,
debates en línea con el personal de asistencia
técnica.
• Referencia: documentación del ordenador, detalles
en la configuración de mi ordenador,
especificaciones del producto y documentación
técnica.
• Descargas: controladores certificados, revisiones y
actualizaciones de software.
• Software del sistema de escritorio (DSS): Si vuelve
a instalar el sistema operativo del ordenador,
también debe volver a instalar lautilidad DSS. DSS
proporciona actualizaciones importantes del
sistema operativo y asistencia para unidades de
disquete USB de 3,5 pulgadas de Dell™,
procesadores Intel
®
, unidades ópticas y dispositivos
USB. DSS es necesaria para el correcto
funcionamiento de su ordenador Dell. El software
detecta automáticamente su ordenador y sistema
operativo e instala las actualizaciones apropiadas a
su configuración.
Sitio web Dell Support: support.dell.com
NOTA: seleccione su región o segmento de negocios para ver
el sitio de asistencia técnica apropiado.
Para descargar Desktop System Software:
1
Vaya a
support.dell.com
, seleccione su zona o segmento
empresarial e introduzca la etiqueta de servicio.
2
Seleccione
Drivers & Downloads
(Controladores y
descargas) y haga clic en
Go
(Ir).
3
Haga clic en el sistema operativo y busque la palabra clave
Desktop System Software
.
NOTA: La interfaz para el usuario support.dell.com puede
variar dependiendo de las selecciones que efectúe.
• Cómo utilizar Windows XP
• Cómo trabajar con programas y archivos
• Cómo personalizar mi escritorio
Centro de ayuda y soporte técnico de Windows
1
Haga clic en
Inicio
→
Ayuda y soporte técnico
.
2
Escriba una palabra o frase que describa el problema y, a
continuación, haga clic en el icono de flecha.
3
Haga clic en el tema que describa el problema.
4
Siga las instrucciones que aparecen en pantalla.
¿Qué busca? Aquí lo encontrará

186 Guía de referencia rápida
Configuración del ordenador
PRECAUCIÓN: Antes de realizar cualquiera de los procedimientos de esta sección, siga las instrucciones de
seguridad que se encuentran en la Guía de información del producto.
AVISO: Si el ordenador tiene instalada una tarjeta de expansión (como una tarjeta de módem), conecte el cable
adecuado a la tarjeta, no al conector situado en el panel posterior.
AVISO: Para ayudar a permitir que el ordenador mantenga una temperatura de funcionamiento adecuada,
asegúrese de no colocar el ordenador demasiado cerca de la pared o de otro compartimento de almacenamiento
que pueda prevenir la circulación del aire por el chasis.
NOTA: Antes de instalar algún dispositivo o software no suministrados con el ordenador, consulte la
documentación que los acompaña o póngase en contacto con su proveedor para asegurarse de que software o el
dispositivo es compatible con el ordenador y el sistema operativo.
Debe completar todos los pasos para configurar el ordenador adecuadamente. Consulte las ilustraciones
adecuadas que siguen a las instrucciones.
AVISO: No intente operar un ratón PS/2 y un ratón USB simultáneamente.
1
Conecte el teclado y el ratón.
AVISO: No conecte un cable de módem al conector del adaptador de red. El voltaje de las comunicaciones
telefónicas puede dañar el adaptador de red.
Configurar el teclado y el ratón
2
Conecte el módem o el cable de red.
Inserte el cable de red, no la línea telefónica, en el conector de red. Si tiene un módem opcional,
conecte la línea telefónica al módem.

Guía de referencia rápida 187
3
Conecte el monitor utilizando el cable DVI blanco
o
el cable VGA azul (
no
conecte ambos cables).
Alinee e inserte suavemente el cable del monitor para evitar que se doblen las patas del conector.
Apriete los tornillos mariposa de los conectores del cable.
NOTA: En algunos monitores el conector de vídeo se encuentra debajo de la parte posterior de la pantalla.
Consulte la documentación que se incluía con el monitor para ver las ubicaciones del conector.
Configurar el monitor
4
Conecte los altavoces.
5
Conecte los cables de alimentación al ordenador, monitor y dispositivos e inserte los otros extremos de
los cables de alimentación a las tomas de alimentación eléctrica.

188 Guía de referencia rápida
Conexiones de alimentación
AVISO: Con el fin de evitar dañar un ordenador que tenga un interruptor de selección de voltaje manual, coloque
dicho interruptor en la posición que más se parezca a la de la potencia de corriente alterna disponible en su área.
AVISO: En Japón, el conmutador de selección de voltaje debe estar establecido en la posición 115 V incluso si el
suministro de corriente alterna disponible en Japón es de 100 V.
6
Verifique que el conmutador de selección de voltaje es la adecuada para su país.
El ordenador tiene un interruptor de selección de voltaje manual. Los ordenadores con un interruptor
de selección de voltaje en el panel posterior se deben ajustar manualmente para que funcionen con el
voltaje de operación correcto.

Guía de referencia rápida 189
Vistas del sistema
Ordenador de minitorre — Vista anterior
1 Ubicación de la etiqueta
de servicio
Utilice la etiqueta de servicio para identificar el ordenador al acceder al sitio web
Dell Support o al llamar al servicio de soporte técnico.
2 Unidad de CD/DVD Inserte un CD o DVD (si lo admite) en esta unidad.
3 Unidad de disco flexible Inserte un disquete en esta unidad.
4 Indicador de actividad de
la unidad de disco duro
Este indicador parpadea cuando se utiliza la unidad de disco duro.
4
9
7
8
3
2
6
5
1
10

190 Guía de referencia rápida
5 Conectores USB 2.0 (2) Use los conectores USB situados en la parte anterior del ordenador para los
dispositivos que se conectan ocasionalmente, como, por ejemplo, palancas de
mando o cámaras, o para dispositivos USB de inicio.
Se recomienda la utilización de los conectores USB en la parte posterior del
ordenador para los dispositivos que suelen estar siempre conectados, como las
impresoras y los teclados.
6 Indicadores de diagnóstico Utilice los indicadores para ayudarle a solucionar un problema del ordenador en
función del código de diagnóstico (para obtener más información, consulte el
apartado “Diagnóstico” en la página 212).
7 Botón de alimentación Pulse el botón de encendido para encender el ordenador.
AVISO: Para evitar la pérdida de datos, no apague el ordenador pulsando el
botón de alimentación. En su lugar, apague el ordenador mediante el sistema
operativo.
AVISO: Si su sistema operativo tiene ACPI activado, al pulsar el botón de
alimentación el ordenador se apagará mediante el sistema operativo.
8 Indicador de alimentación El indicador de alimentación se ilumina y parpadea o permanece encendido para
indicar estados diferentes:
• Sin luz: el ordenador está apagado.
• Verde sólido: el ordenador se encuentra en un estado de funcionamiento
normal.
• Verde intermitente: el ordenador se encuentra en un estado de ahorro de
energía.
• Ámbar intermitente o sólido: el ordenador recibe alimentación, pero podría
existir un problema de alimentación interno. Consulte el apartado relativo a los
problemas de alimentación en la
Guía del usuario
en línea.
Para salir de un modo de ahorro de energía, pulse el botón de encendido o utilice
el teclado o el ratón si está configurado como un dispositivo de activación en el
Administrador de dispositivos de Windows. Para obtener más información sobre
los modos de suspensión y sobre cómo salir de un estado de ahorro de energía,
consulte la Guía del usuario en línea.
Para ver una descripción de los códigos luminosos que pueden ayudarle a
solucionar problemas del ordenador, consulte el apartado “Indicadores
luminosos del sistema” en la página 211.
9 Conector para auriculares Enchufe los auriculares o los altavoces al conector.
10 Indicador de integridad de
vínculo
• Verde: existe una conexión correcta entre una red a 10 Mbps y el ordenador.
• Naranja: existe una conexión correcta entre una red a 100 Mbps y el ordenador.
• Apagado: el ordenador no detecta una conexión física con la red.

Guía de referencia rápida 191
Ordenador de minitorre — Vista posterior
1
Pestillo de liberación de la cubierta
Este seguro le permite abrir la cubierta de su ordenador.
2
Anillo del candado
Inserte un candado para bloquear la cubierta del ordenador.
3 Conector de alimentación Inserte el cable de alimentación en este conector.
4
3
5
6
2
1

192 Guía de referencia rápida
Ordenador de minitorre — Conectores del panel posterior
4 Interruptor de selección de voltaje Su ordenador está equipado con un interruptor de selección de voltaje
manual. Con el fin de evitar dañar un ordenador que tenga un
interruptor de selección de voltaje manual, coloque dicho interruptor
en la posición que más se parezca a la de la potencia de corriente
alterna disponible en su área.
AVISO: En Japón el interruptor de selección de voltaje debe estar
establecido en la posición 115-V.
Asimismo, asegúrese de que la clasificación eléctrica del monitor y los
dispositivos conectados es la correcta según la potencia de corriente
alterna disponible en su localidad.
5 Conectores del panel posterior Enchufe los dispositivos serie, USB y de otro tipo en el conector
apropiado.
Consulte el apartado “Ordenador de minitorre — Conectores del panel
posterior” en la página 192.
6 Ranuras para tarjetas Acceda a los conectores de las tarjetas PCI y PCI Express instaladas.
1
Conector paralelo
Conecte un dispositivo paralelo, como una impresora, al conector paralelo. Si
tiene una impresora USB, enchúfela a un conector USB.
NOTA: El conector paralelo integrado se desactiva automáticamente si el ordenador
detecta una tarjeta instalada que contiene un conector paralelo configurado en la
misma dirección. Para obtener más información, consulte la Guía del usuario en
línea.
2
Indicador de integridad
de vínculo
• Verde: existe una conexión correcta entre una red a 10 Mbps y el ordenador.
• Naranja: existe una conexión correcta entre una red a 100 Mbps y el ordenador.
• Apagado: el ordenador no detecta una conexión física con la red.
13
10 9 8
5
6
7
24

Guía de referencia rápida 193
3
Conector del adaptador
de red
Para conectar el ordenador a una red o a un dispositivo de banda ancha, conecte
un extremo de un cable de red a un enchufe de red o a su dispositivo de banda
ancha. Conecte el otro extremo del cable de red al conector del adaptador de red,
situado en el panel posterior del ordenador. Cuando el cable de red se haya
conectado correctamente, oirá un clic.
NOTA: No enchufe un cable de teléfono al conector de red.
En los ordenadores con una tarjeta adaptadora de red, utilice el conector de la
tarjeta.
Se recomienda que utilice cableado y conectores de categoría 5 para su red. Si
debe utilizar la categoría 3 para cables, fuerce la velocidad de la red a 10 Mbps para
garantizar un funcionamiento fiable.
4
Indicador de actividad de
red
Este indicador amarillo parpadea cuando el ordenador transmite o recibe datos de
la red. Un gran volumen de tráfico en la red puede hacer que este indicador
luminoso parezca estar continuamente encendido.
5
Conector de entrada de
línea
Utilice el conector azul de entrada de línea para conectar un dispositivo de
grabación/reproducción como un reproductor de casete, de CD o VCR.
En ordenadores con tarjeta de sonido, use el conector de la tarjeta.
6
Conector de salida de
línea
Utilice el conector verde de salida de línea para conectar auriculares y la mayoría
de altavoces con amplificadores integrados.
En ordenadores con tarjeta de sonido, use el conector de la tarjeta.
7
Conector de micrófono
Utilice el conector rosa de micrófono para conectar un micrófono de PC para la
entrada de música o de voz a un programa de sonido o de telefonía.
En los ordenadores con tarjeta de sonido, el conector de micrófono está en la
tarjeta.
8
Conectores USB 2.0 (4)
Utilice los conectores USB posteriores para los dispositivos que suelen permanecer
siempre conectados como, por ejemplo, impresoras y teclados.
9
Conector de vídeo
Conecte el cable delmonitor compatible con VGA en el conector azul.
NOTA: Si ha adquirido una tarjeta gráfica opcional, este conector tendrá una tapa.
Conecte el monitor al conector de la tarjeta de gráficos. No quite la tapa.
10
Conector serie
Conecte un dispositivo serie, como un dispositivo portátil, al puerto serie. El
nombre predeterminado para el conector serie 1 es COM1.
Para obtener más información, consulte la Guía del usuario en línea.

194 Guía de referencia rápida
Ordenador de sobremesa — Vista anterior
1 Conectores USB 2.0 (2) Utilice los conectores USB de la parte frontal del ordenador para los dispositivos
que conecte ocasionalmente, como palancas de mando o cámaras, o para
dispositivos USB de arranque (consulte la Guía del usuario en línea para obtener
más información sobre cómo arrancar desde un dispositivo USB).
Se recomienda la utilización de los conectores USB en el panel posterior para los
dispositivos que suelen estar siempre conectados, como las impresoras y los
teclados.
2 Indicador de actividad
de la unidad de disco
duro
Este indicador parpadea cuando se accede a la unidad de disco duro.
3 Botón de alimentación Pulse el botón de encendido para encender el ordenador.
AVISO: Para evitar la pérdida de datos, no apague el ordenador pulsando el
botón de encendido durante 6 segundos o más. En su lugar, apague el
ordenador mediante el sistema operativo.
AVISO: Si su sistema operativo tiene ACPI activado, al pulsar el botón de
alimentación el ordenador se apagará mediante el sistema operativo.
4 Placa de identificación
de Dell
Esta placa puede girarse de modo que esté orientada igual que su ordenador. Para
girar la placa, coloque los dedos alrededor de la placa, presione con fuerza y gírela.
También puede girarla utilizando la ranura que hay cerca de la parte inferior de la
placa.
89
3
5
1
4610
2
11
7

Guía de referencia rápida 195
Ordenador de sobremesa — Vista posterior
5 Indicador de
alimentación
El indicador de alimentación se ilumina y parpadea o permanece encendido para
indicar estados diferentes:
• Sin luz: el ordenador está apagado.
• Verde sólido: el ordenador se encuentra en un estado de funcionamiento normal.
• Verde intermitente: el ordenador se encuentra en un estado de ahorro de energía.
• Ámbar continuo o parpadeante: consulte “Problemas de alimentación” en la
Guía
del usuario.
Para salir de un modo de ahorro de energía, pulse el botón de encendido o utilice
el teclado o el ratón si está configurado como un dispositivo de activación en el
Administrador de dispositivos de Windows.
Para ver una descripción de los códigos luminosos que pueden ayudarle a
solucionar problemas del ordenador, consulte el apartado “Indicadores luminosos
del sistema” en la página 211.
6 Indicadores de
diagnóstico
Utilice los indicadores para solucionar problemas del ordenador basados en el
código de diagnóstico. Para obtener más información, consulte el apartado
“Diagnóstico” en la página 212.
7 Indicador de integridad
de vínculo
• Verde: existe una conexión correcta entre una red a 10 Mbps y el ordenador.
• Naranja: existe una conexión correcta entre una red a 100 Mbps y el ordenador.
• Apagado: el ordenador no detecta una conexión física con la red.
8 Conector para
auriculares
Enchufe los auriculares o los altavoces al conector.
9 Unidad de disco flexible Inserte un disquete en esta unidad.
10 Unidad de CD/DVD Inserte un CD o DVD (si lo admite) en esta unidad.
11 Ubicación de la etiqueta
de servicio
Utilice la etiqueta de servicio para identificar el ordenador al acceder al sitio web
Dell Support o al llamar al servicio de soporte técnico.
1 Ranuras para tarjetas Acceda a los conectores de las tarjetas PCI y PCI Express instaladas.
2 Conectores del panel
posterior
Enchufe los dispositivos serie, USB y de otro tipo en el conector apropiado.
Consulte el apartado “Ordenador de sobremesa — Conectores del panel
posterior” en la página 196.
3 Conector de alimentación Inserte el cable de alimentación en este conector.
5
1
2 3 4 6

196 Guía de referencia rápida
Ordenador de sobremesa — Conectores del panel posterior
4 Interruptor de selección de
voltaje
Su ordenador está equipado con un interruptor de selección de voltaje
manual. Con el fin de evitar dañar un ordenador que tenga un interruptor de
selección de voltaje manual, coloque dicho interruptor en la posición que
más se parezca a la de la potencia de corriente alterna disponible en su área.
AVISO: En Japón, el interruptor de selección de voltaje debe estar
establecido en la posición 115-V.
Asimismo, asegúrese de que la clasificación eléctrica del monitor y los
dispositivos conectados es la correcta según la potencia de corriente alterna
disponible en su localidad.
5 Anillo del candado Inserte un candado para bloquear la cubierta del ordenador.
6 Pestillo de liberación de la
cubierta
Utilice este seguro para abrir la cubierta del ordenador.
1
Conector paralelo
Conecte un dispositivo paralelo, como una impresora, al conector paralelo. Si
tiene una impresora USB, enchúfela a un conector USB.
NOTA: El conector paralelo integrado se desactiva automáticamente si el ordenador
detecta una tarjeta instalada que contiene un conector paralelo configurado en la
misma dirección. Para obtener más información, consulte la Guía del usuario en
línea.
2
Indicador de integridad
de vínculo
• Verde: existe una conexión correcta entre una red a 10 Mbps y el ordenador.
• Naranja: existe una conexión correcta entre una red a 100 Mbps y el ordenador.
• Apagado: el ordenador no detecta una conexión física con la red.
13
10 9 8
5
6
7
24

Guía de referencia rápida 197
3
Conector del adaptador
de red
Para conectar el ordenador a una red o a un dispositivo de banda ancha, conecte
un extremo de un cable de red a un enchufe de red o a su dispositivo de banda
ancha. Conecte el otro extremo del cable de red al conector del adaptador de red,
situado en el panel posterior del ordenador. Cuando el cable de red se haya
conectado correctamente, oirá un clic.
NOTA: No enchufe un cable de teléfono al conector de red.
En los ordenadores con una tarjeta adaptadora de red, utilice el conector de la
tarjeta.
Se recomienda que utilice cableado y conectores de categoría 5 para su red. Si
debe utilizar la categoría 3 para cables, fuerce la velocidad de la red a 10 Mbps
para garantizar un funcionamiento fiable.
4
Indicador de actividad de
red
Este indicador amarillo parpadea cuando el ordenador transmite o recibe datos de
la red. Un gran volumen de tráfico en la red puede hacer que este indicador
luminoso parezca estar continuamente encendido.
5
Conector de entrada de
línea
Utilice el conector azul de entrada de línea para conectar un dispositivo de
grabación/reproducción como un reproductor de casete, de CD o VCR.
En ordenadores con tarjeta de sonido, use el conector de la tarjeta.
6
Conector de salida de
línea
Utilice el conector verde de salida de línea para conectar auriculares y la mayoría
de altavoces con amplificadores integrados.
En ordenadores con tarjeta de sonido, use el conector de la tarjeta.
7
Conector de micrófono
Utilice el conector rosa de micrófono para conectar un micrófono de PC para la
entrada de música o de voz a un programa de sonido o de telefonía.
En los ordenadores con tarjeta de sonido, el conector de micrófono está en la
tarjeta.
8
Conectores USB 2.0 (4)
Utilice los conectores USB posteriores para los dispositivos que suelen permanecer
siempre conectados como, por ejemplo, impresoras y teclados.
9
Conector de vídeo
Conecte el cable delmonitor compatible con VGA en el conector azul.
NOTA: Si ha adquirido una tarjeta gráfica opcional, este conector tendrá una tapa.
Conecte el monitor al conector de la tarjeta de gráficos. No quite la tapa.
10
Conector serie
Conecte un dispositivo serie, como un dispositivo portátil, al puerto serie. El
nombre predeterminado para el conector serie 1 es COM1.
Para obtener más información, consulte la Guía del usuario en línea.

198 Guía de referencia rápida
Cómo quitar la cubierta del ordenador
PRECAUCIÓN: Antes de comenzar cualquiera de los procedimientos de esta sección, siga las instrucciones de
seguridad que se encuentran en la Guía de información del producto.
PRECAUCIÓN: Para protegerse de las descargas eléctricas, desconecte el ordenador de la toma de corriente
eléctrica antes de retirar la cubierta.
Antes de empezar
AVISO: Para evitar la pérdida de datos, guarde y cierre todos los archivos abiertos y salga de todos los programas
abiertos antes de apagar el ordenador.
1
Apague el sistema operativo:
a
Guarde y cierre los archivos abiertos, salga de todos los programas, haga clic en el botón
Inicio
y
luego en
Apagar ordenador
.
b
En la ventana
Apagar ordenador
, haga clic en
Apagar
.
El ordenador se apaga una vez finalizado el proceso de cierre del sistema operativo.
2
Asegúrese de que el ordenador y los dispositivos conectados estén apagados. Si el ordenador y los
dispositivos conectados no se apagaron automáticamente cuando apagó el sistema operativo,
apáguelos ahora.
Antes de trabajar en el interior de su ordenador
Aplique las siguientes pautas de seguridad para proteger el ordenador contra posibles daños y garantizar
su propia seguridad personal.
PRECAUCIÓN: Antes de comenzar cualquiera de los procedimientos de esta sección, siga las instrucciones de
seguridad que se encuentran en la Guía de información del producto.
PRECAUCIÓN: Manipule los componentes y las tarjetas con precaución. No toque los componentes o contactos
ubicados en una tarjeta. Sostenga las tarjetas por sus bordes o por su soporte metálico de montaje. Sujete un
componente, como un procesador, por sus bordes y no por sus patas.
AVISO: Sólo un técnico certificado debe realizar reparaciones en el ordenador. La garantía no cubre los daños por
reparaciones no autorizadas por Dell.
AVISO: Cuando desconecte un cable, tire de su conector o de su lazo liberador de tensión, y no del cable mismo.
Algunos cables cuentan con un conector que tiene lengüetas de sujeción; si está desconectando un cable de este
tipo, presione las lengüetas de sujeción antes de desconectar el cable. Cuando separe conectores, manténgalos
alineados para evitar doblar las patas de conexión. Además, antes de conectar un cable, asegúrese de que los dos
conectores estén orientados y alineados correctamente.
Para evitar daños en el ordenador, realice los pasos siguientes antes de comenzar a trabajar dentro del
ordenador.
1
Apague el ordenador.
AVISO: Para desconectar un cable de red, desconecte primero el cable del ordenador y, a continuación, del
enchufe de red de la pared.
2
Desconecte del ordenador las líneas de teléfono o de telecomunicaciones.

Guía de referencia rápida 199
3
Desconecte el ordenador y todos los dispositivos conectados de las tomas de alimentación eléctrica
correspondientes y, a continuación, pulse el botón de encendido para conectar a tierra la placa base.
4
Si fuera aplicable, retire la base del ordenador (para obtener más instrucciones, consulte la
documentación que se incluye con la base).
PRECAUCIÓN: Para protegerse de las descargas eléctricas, desconecte el ordenador de la toma de corriente
eléctrica antes de retirar la cubierta.
5
Retire la cubierta del sistema.
• Retire la cubierta del ordenador minitorre (consulte el apartado “Ordenador de minitorre” en la
página 199).
• Retire la cubierta del ordenador de sobremesa (consulte el apartado “Ordenador de sobremesa” en
la página 205).
AVISO: Antes de tocar algo en el interior del ordenador, conéctese a tierra tocando una superficie metálica sin
pintura como, por ejemplo, la parte posterior del ordenador . Mientras trabaja, toque periódicamente una
superficie metálica sin pintar para disipar la electricidad estática y evitar que los componentes internos resulten
dañados.
Ordenador de minitorre
PRECAUCIÓN: Antes de comenzar cualquiera de los procedimientos de esta sección, siga las instrucciones de
seguridad que se encuentran en la Guía de información del producto.
PRECAUCIÓN: Para protegerse de las descargas eléctricas, desconecte el ordenador de la toma de
alimentación eléctrica antes de retirar la cubierta.
1
Siga los procedimientos que se indican en el apartado “Antes de empezar” en la página 198.
2
Si ha instalado un candado a través del anillo del candado en el panel posterior, retire el candado.
3
Apoye el ordenador en uno de sus lados.
4
Deslice el seguro de liberación de la cubierta hacia atrás al mismo tiempo que levanta la cubierta.
5
Sujete los laterales de la cubierta del ordenador y gire la cubierta hacia arriba hasta que salga,
utilizando las lengüetas de la bisagra para hacer palanca.
6
Retire la cubierta de las lengüetas de la bisagra y colóquela sobre una superficie suave y no abrasiva.

200 Guía de referencia rápida
1 Ranura para cable de seguridad
2 Pestillo de liberación de la cubierta
3 Anillo del candado
2
1
3

Guía de referencia rápida 201
Ordenador de sobremesa
PRECAUCIÓN: Antes de comenzar cualquiera de los procedimientos de esta sección, siga las instrucciones de
seguridad que se encuentran en la Guía de información del producto.
PRECAUCIÓN: Para protegerse de las descargas eléctricas, desconecte el ordenador de la toma de
alimentación eléctrica antes de retirar la cubierta.
1
Siga los procedimientos que se indican en el apartado “Antes de empezar” en la página 198.
2
Si ha instalado un candado a través del anillo del candado en el panel posterior, retire el candado.
3
Deslice el seguro de liberación de la cubierta hacia atrás al mismo tiempo que levanta la cubierta.
4
Levante la cubierta utilizando las lengüetas de la bisagra a modo de palanca.
5
Retire la cubierta de las lengüetas de la bisagra y colóquela sobre una superficie suave y no abrasiva.
1
Ranura para cable de seguridad
2
Pestillo de liberación de la cubierta
3
Anillo del candado
2
1
3

202 Guía de referencia rápida
Interior de su ordenador
Ordenador de minitorre
1 Unidad de CD/DVD 4 Tarjeta del sistema
2 Unidad de disco flexible 5 Ensamblaje de disipador de calor
3 Fuente de alimentación 6 Unidad de disco duro
1
3
4
6
2
5

Guía de referencia rápida 203
Componentes de la placa base
12
4
6
15
3
16
17
14
10
5
8
7
12
13
911

204 Guía de referencia rápida
Configuración de puentes
1 Conector del ventilador (FAN) 10 Timbre interno (SPKR1)
2 Conector del procesador (CPU) 11 Puente de contraseña (PSWD)
3 Conector de alimentación del procesador
(12VPOWER)
12 Puente de restablecimiento del reloj en tiempo real
(RTCRST)
4 Conector del panel anterior (FNT_PANEL) 13 Zócalo de la batería (BATT)
5 Conectores del módulo de memoria
(DIMM_1, DIMM_2)
14 Conector de tarjeta PCI Express x16
6 Conectores de unidad SATA (SATA0, SATA1) 15 Conectores de tarjeta PCI (2)
7 Conector de alimentación (POWER) 16 Conector de la unidad de disco flexible (FLOPPY)
8 Conector de unidad de CD/DVD (IDE) 17 Conector serie/ PS/2 (PS2/SER2)
9 Conectores de unidad SATA (SATA2, SATA3)
Ordenador de minitorre

Guía de referencia rápida 205
Ordenador de sobremesa
Puente Posición Descripción
PSWD Las funciones de contraseña están
activadas (valor predeterminado).
Las funciones de contraseña están
desactivadas.
RTCRST
El reloj de tiempo real se ha
activado (valor predeterminado).
El reloj de tiempo real se está
restableciendo (puenteado
temporalmente).
puenteado no puenteado
1 Compartimento de las unidades (CD/DVD,
disquete y unidad de disco duro)
4 Ranuras para tarjetas
2 Fuente de alimentación 5 Ensamblaje de disipador de calor
3 Tarjeta del sistema 6 Panel de E/S frontal
1
2
3
4
5
6
1
1

206 Guía de referencia rápida
Componentes de la placa base
12
4
6
15
3
16
17
14
10
5
8
7
12
13
11 9

Guía de referencia rápida 207
Configuración de puentes
1 Conector del ventilador (FAN) 10 Timbre interno (SPKR1)
2 Conector del procesador (CPU) 11 Puente de contraseña (PSWD)
3 Conector de alimentación del procesador (12VPOWER) 12 Puente de reinicio de RTC (RTCRST)
4 Conector del panel anterior (FNT_PANEL) 13 Zócalo de la batería (BATT)
5 Conectores del módulo de memoria (DIMM_1, DIMM_2) 14 Conector de tarjeta PCI Express x16
6 Conectores de unidad serie ATA (SATA0, SATA1) 15 Conector de tarjeta PCI (2)
7 Conector de alimentación (POWER) 16 Conector de la unidad de disco flexible
(FLOPPY)
8 Conector de unidad de CD/DVD (IDE) 17 Conector serie/ PS/2 (PS2/SER2)
9 Conectores de unidad serie ATA (SATA2, SATA3)
Ordenador de sobremesa

208 Guía de referencia rápida
Solución de problemas
Dell proporciona una serie de herramientas para ayudarle en el caso de que el ordenador no funcione
como es de esperar. Para obtener la información más actualizada sobre la solución de problemas de su
ordenador, consulte el sitio web Dell Support en support.dell.com.
Si se produce algún problema en el ordenador para el que necesite la ayuda de Dell, escriba una
descripción detallada del error, los códigos de sonido o los patrones de los indicadores de diagnóstico,
introduzca el código de servicio rápido y la etiqueta de servicio que aparece a continuación y póngase en
contacto con Dell desde la misma ubicación que el ordenador. Para obtener información acerca de cómo
ponerse en contacto con Dell, consulte la Guía del usuario en línea.
Para obtener un ejemplo del código de servicio rápido y la etiqueta de servicio, consulte el apartado
“Localización de información” en la página 183.
Código de servicio urgente:___________________________
Etiqueta de servicio: ___________________________
Dell Diagnostics
PRECAUCIÓN: Antes de comenzar cualquiera de los procedimientos de esta sección, siga las instrucciones de
seguridad que se encuentran en la Guía de información del producto.
Cuándo utilizar los Dell Diagnostics (Diagnósticos Dell)
Si tiene algún problema con el ordenador, realice las comprobaciones que se indican en el apartado
“Solución de problemas” de la Guía del usuario en línea y ejecute los Dell Diagnostics antes de ponerse
en contacto con Dell para obtener asistencia técnica. Para obtener información acerca de cómo ponerse
en contacto con Dell, consulte la Guía del usuario en línea.
AVISO: Los Dell Diagnostics (Diagnósticos Dell) sólo funcionan en los ordenadores Dell™.
Puente Posición Descripción
PSWD Las funciones de contraseña están
activadas (valor predeterminado).
Las funciones de contraseña están
desactivadas.
RTCRST
El reloj de tiempo real se ha
activado (valor predeterminado).
El reloj de tiempo real se está
restableciendo (puenteado
temporalmente).
puenteado no puenteado
1
1

Guía de referencia rápida 209
Introduzca la configuración del sistema (consulte “Configuración del sistema” en la Guía del usuario en
línea para obtener instrucciones), revise la información sobre la configuración del ordenador y asegúrese
de que el dispositivo que quiere probar se muestra en la configuración del sistema y está activo.
Inicie Dell Diagnostics desde la unidad de disco duro o desde el CD opcional Drivers and Utilities
(Controladores y utilidades) (también conocido como ResourceCD).
Cómo iniciar Dell Diagnostics desde la unidad de disco duro
1
Encienda (o reinicie) el ordenador.
2
Cuando aparezca el logotipo de DELL, pulse <F12>inmediatamente.
NOTA: Si recibe un mensaje que indica que no se ha encontrado ninguna partición para la utilidad de
diagnóstico, ejecute los Dell Diagnostics desde el CD opcional Drivers and Utilities (Controladores y
utilidades) (consulte el apartado “Cómo iniciar los Dell Diagnostics desde el CD Drivers and Utilities
(Controladores y utilidades) opcional” en la página 209).
Si espera demasiado y aparece el logotipo del sistema operativo, siga esperando hasta que aparezca el
escritorio de Microsoft
®
Windows
®
. Después apague el ordenador y vuelva a intentarlo.
3
Cuando aparezca la lista de dispositivos de inicio, resalte
Boot to Utility Partition
(Iniciar desde la
partición de utilidades) y pulse <Intro>.
4
Cuando aparezca el
Main Menu
(Menú principal) de Dell Diagnostics, seleccione la prueba que desea
ejecutar.
Cómo iniciar los Dell Diagnostics desde el CD Drivers and Utilities (Controladores y utilidades) opcional
1
Inserte el CD
Drivers and Utilities
(Controladores y utilidades).
2
Apague y reinicie el ordenador.
Cuando aparezca el logotipo de DELL, pulse <F12>inmediatamente.
Si no lo hace inmediatamente, aparecerá el logotipo del sistema operativo; espere hasta que aparezca el
escritorio de Microsoft Windows. Después apague el ordenador y vuelva a intentarlo.
NOTA: Los siguientes pasos cambian la secuencia de inicio una sola vez. La próxima vez que inicie el ordenador,
éste lo hará según los dispositivos especificados en la configuración del sistema.
3
Cuando aparezca la lista de dispositivos de inicio, resalte CD/DVD drive (Unidad de CD/DVD y pulse
<Intro>.
4
Seleccione la opción CD/DVD Drive (Unidad de CD/DVD) en el menú de inicio del CD.
5
Seleccione la opción CD/DVD Drive (Unidad de CD/DVD) en el menú de inicio del CD.
6
Escriba
1
para iniciar el menú del CD
Drivers and Utilities
(Controladores y utilidades).
7
Escriba
2
para iniciar los Dell Diagnostics.
8
Seleccione
Run the 32 Bit Dell Diagnostics
(Ejecutar los Dell Diagnostics de 32 bits) de la lista
numerada. Si se muestran varias versiones, seleccione la apropiada para su ordenador.
9
Cuando aparezca el
Main Menu
(Menú principal) de Dell Diagnostics, seleccione la prueba que desea
ejecutar.

210 Guía de referencia rápida
Menú principal de Dell Diagnostics (Diagnósticos Dell)
1
Una vez se hayan cargado los Dell Diagnostics y aparezca la pantalla
Main
Menu
(Menú principal),
haga clic en el botón de la opción que desea.
2
Si se produce un problema durante una prueba, aparecerá un mensaje con un código de error y una
descripción del problema. Anote el código de error y la descripción del problema, y siga las
instrucciones de la pantalla.
Si no puede resolver la condición del error, póngase en contacto con Dell. Para obtener información
acerca de cómo ponerse en contacto con Dell, consulte la
Guía del usuario
en línea.
NOTA: La etiqueta de servicio para su ordenador está situada en la parte superior de cada pantalla de
prueba. Si se pone en contacto con Dell, el servicio de asistencia técnica le pedirá su etiqueta de servicio.
3
Si ejecuta una prueba desde la opción
Custom Test
(Prueba personalizada) o
Symptom Tree
(Árbol de
síntomas), haga clic en la ficha correspondiente que se describe en la tabla siguiente para obtener más
información.
4
Cuando las pruebas hayan finalizado, si está ejecutando Dell Diagnostics desde el CD
Drivers and
Utilities
(Controladores y Utilidades) (opcional)
,
extraiga el CD.
Opción Función
Express Test (Prueba
rápida)
Realiza una prueba rápida de los dispositivos. Esta prueba suele tardar de 10 a 20 minutos y
no requiere ninguna acción por parte del usuario. Ejecute primero Express Test (Prueba
rápida) para incrementar la posibilidad de rastrear el problema rápidamente.
Extended Test (Prueba
extendida)
Realiza una prueba completa de los dispositivos. Esta prueba suele durar una hora o más, y
requiere que el usuario responda a preguntas periódicamente.
Custom Test (Prueba
personalizada)
Prueba un dispositivo específico. Puede personalizar las pruebas que desee ejecutar.
Symptom Tree (Árbol
de síntomas)
Hace una lista de los síntomas más habituales que se pueden encontrar y le permite
seleccionar una prueba basándose en el síntoma del problema que usted tiene.
Ficha Función
Results (Resultado) Muestra el resultado de la prueba y las condiciones de error encontradas.
Errors (Errores) Muestra las condiciones de error encontradas, los códigos de error y la descripción del
problema.
Help (Ayuda) Describe la prueba y puede indicar los requisitos para ejecutarla.
Configuration
(Configuración)
Muestra la configuración de hardware del dispositivo seleccionado.
Dell Diagnostics obtiene la información de configuración de todos los dispositivos a
partir de la configuración del sistema, la memoria y varias pruebas internas, y la muestra
en la lista de dispositivos del panel izquierdo de la pantalla. La lista de dispositivos puede
que no muestre los nombres de todos los componentes instalados en el ordenador o de
todos los dispositivos conectados al ordenador.
Parameters (Parámetros) Le permite personalizar la prueba cambiando su configuración.

Guía de referencia rápida 211
5
Cierre la pantalla de prueba para volver a la pantalla
Main
Menu
(Menú principal). Para salir de Dell
Diagnostics y reiniciar el ordenador, cierre la pantalla
Main Menu
(Menú principal).
Indicadores luminosos del sistema
El indicador de alimentación puede indicar un problema en el ordenador.
Indicador de alimentación Descripción del problema Solución sugerida
Verde constante El ordenador está encendido y
funciona de la manera habitual.
No se necesita acción correctiva.
Verde intermitente El ordenador se encuentra en un
modo de ahorro de energía.
Pulse el botón de encendido, mueva el ratón, o
pulse una tecla del teclado para activar el
ordenador.
Parpadea en verde varias veces y
luego se apaga
Existe un error de configuración. Compruebe los indicadores luminosos de
diagnóstico para intentar identificar el problema
específico (consulte el apartado “Diagnóstico”
en la página 212).
Amarillo constante Los Dell Diagnostics están
ejecutando una prueba, o un
dispositivo de la placa base
puede estar averiado o instalado
incorrectamente.
Si están ejecutándose los Dell Diagnostics, deje
que terminen las pruebas.
Compruebe los indicadores luminosos de
diagnóstico para intentar identificar el problema
específico (consulte el apartado “Diagnóstico”
en la página 212).
Si el ordenador no se inicia, diríjase a Dell para
obtener asistencia técnica.
Para obtener
información acerca de cómo ponerse en contacto
con Dell, consulte la
Guía del usuario
en línea.
Amarillo intermitente Se ha producido un fallo del
suministro de energía o de la
placa base.
Compruebe los indicadores luminosos de
diagnóstico para intentar identificar el problema
específico (consulte el apartado “Diagnóstico”
en la página 212).
Consulte el apartado relativo a los problemas de
alimentación en la Guía del usuario en línea.
Verde continuo y un código de
sonido durante la prueba POST
Se detectó un problema
mientras se ejecutaba el BIOS.
Para obtener instrucciones sobre cómo
diagnosticar el código de sonido consulte el
apartado “Códigos de sonido” en la página 215.
Consulte también los indicadores de
diagnóstico para intentar identificar el problema
específico.
Indicador de alimentación
iluminado en color verde y
ningún código de sonido ni
vídeo durante la prueba POST
El monitor o la tarjeta de
gráficos puede estar fallando o
puede estar instalado
incorrectamente.
Compruebe los indicadores de diagnóstico para
ver si se identifica el problema específico.

212 Guía de referencia rápida
Diagnóstico
PRECAUCIÓN: Antes de comenzar cualquiera de los procedimientos de esta sección, siga las instrucciones de
seguridad que se encuentran en la Guía de información del producto.
Para ayudarle a solucionar un problema con el ordenador, el ordenador cuenta con cuatro indicadores
denominados “1”, “2”, “3” y “4”situados en el panel anterior o posterior. Estos indicadores pueden ser
verdes o pueden estar apagados. Cuando el ordenador se inicia de manera normal, los patrones o códigos
de los indicadores cambian a medida que avanza el proceso de arranque. Si la etapa POST (Autoprueba
de encendido) de inicio del sistema se realiza con todo éxito, los cuatro indicadores luminosos muestran
verde continuo por un corto periodo de tiempo y después se apagan.
En el caso de que se produzcan errores durante el proceso de la POST, el patrón mostrado en los
indicadores LED puede ayudarle a identificar la fase del proceso en la que se ha detenido el ordenador. Si
el ordenador no funciona correctamente después de haberse realizado una Autoprueba de encendido
(POST) con éxito, los indicadores luminosos de diagnóstico no indican la causa del problema.
NOTA: La orientación de los indicadores de diagnóstico puede variar en función del tipo de sistema. Los
indicadores de diagnóstico pueden estar orientados de manera vertical u horizontal.
Indicador de alimentación
iluminado de verde y ningún
código de sonido, pero el
ordenador se bloquea durante
la prueba POST
Puede haber un dispositivo de la
placa base integrada que esté
fallando.
Compruebe los indicadores de diagnóstico para
ver si se identifica el problema específico. Si
todavía no se ha identificado el problema,
diríjase a Dell para obtener asistencia técnica.
Para obtener información acerca de cómo ponerse
en contacto con Dell, consulte la
Guía del usuario
en línea.
Patrón de luz Descripción del problema Solución sugerida
El ordenador está apagado o se ha
producido un error de pre-BIOS.
Los indicadores de diagnóstico no
permanecen encendidos después de que el
ordenador se inicie correctamente en el
sistema operativo.
Enchufe el ordenador a una toma de
alimentación eléctrica en funcionamiento y
pulse el botón de alimentación.
Se ha producido un posible fallo del BIOS;
el ordenador se encuentra en modo de
recuperación.
Ejecute la Utilidad de recuperación de BIOS,
espere a que acabe la recuperación y reinicie
el ordenador.
Se ha producido un posible fallo en el
procesador.
Vuelva a instalar el procesador y reinicie el
ordenador.
Para obtener información sobre
cómo volver a instalar el procesador, consulte la
Guía del usuario
en línea.
Indicador de alimentación Descripción del problema Solución sugerida

Guía de referencia rápida 213
Se han detectado los módulos de
memoria, pero se ha producido un error de
memoria.
• Si tiene instalado un módulo de memoria,
vuelva a instalarlo y, a continuación, reinicie
el ordenador. Para obtener información
sobre cómo volver a instalar los módulos de
memoria, consulte la
Guía del usuario
en
línea.
• Si tiene instalados dos o más módulos de
memoria, extráigalos, vuelva a instalar uno y
reinicie el ordenador. Si el ordenador se
inicia normalmente, vuelva a instalar otro
módulo. Prosiga de este modo hasta que
identifique el módulo anómalo o hasta que
haya vuelto a instalar todos los módulos sin
errores.
• Si es posible, instale una memoria del
mismo tipo que funcione correctamente en
el ordenador.
• Si el problema persiste,
póngase en
contacto con Dell
. Para obtener
información acerca de cómo ponerse en
contacto con Dell, consulte la
Guía del
usuario
en línea.
Se ha producido un posible fallo de la
tarjeta de gráficos.
• Si el ordenador incluye una tarjeta gráfica,
extráigala, vuelta a instalarla y, a
continuación, reinicie el ordenador.
• Si persiste el problema, instale una tarjeta
de gráficos que sepa que funcione y reinicie
el ordenador.
• Si no se soluciona el problema o el
ordenador tiene gráficos integrados,
póngase en contacto con Dell. Para obtener
información acerca de cómo ponerse en
contacto con Dell, consulte la
Guía del
usuario
en línea.
Se ha producido un error de unidad de
disco flexible o de disco duro.
Vuelva a asentar todos los cables de
alimentación y de datos y reinicie el
ordenador.
Se ha producido un fallo de USB. Vuelva a instalar todos los dispositivos USB,
compruebe las conexiones por cable y reinicie
el ordenador.
Patrón de luz Descripción del problema Solución sugerida

214 Guía de referencia rápida
No se detectan módulos de memoria.
• Si tiene instalado un módulo de memoria,
vuelva a instalarlo y, a continuación, reinicie
el ordenador. Para obtener información
sobre cómo volver a instalar los módulos de
memoria, consulte la
Guía del usuario
en
línea.
• Si tiene instalados dos o más módulos de
memoria, extráigalos, vuelva a instalar uno y
reinicie el ordenador. Si el ordenador se
inicia normalmente, vuelva a instalar otro
módulo. Prosiga de este modo hasta que
identifique el módulo anómalo o hasta que
haya vuelto a instalar todos los módulos sin
errores.
• Si es posible, instale una memoria del
mismo tipo que funcione correctamente en
el ordenador.
• Si el problema persiste,
póngase en
contacto con Dell
. Para obtener
información acerca de cómo ponerse en
contacto con Dell, consulte la
Guía del
usuario
en línea.
Se han detectado los módulos de
memoria, pero existe un error de
configuración del sistema o de
compatibilidad.
• Asegúrese de que no existen
requisitos
especiales para la colocación del conector
o del módulo de memoria
.
• Verifique que los
módulos de memoria
que
va a instalar son compatibles con el
ordenador.
• Si el problema persiste,
póngase en
contacto con Dell
. Para obtener
información acerca de cómo ponerse en
contacto con Dell, consulte la
Guía del
usuario
en línea.
Se ha producido un fallo.
Este patrón también se muestra cuando
entra en la configuración del sistema y
puede que no indique un problema.
• Compruebe que los cables de las unidades
de disco duro, de CD y de DVD están
conectados a la placa base.
• Compruebe el mensaje del ordenador que
aparece en la pantalla del monitor.
• Si el problema persiste,
póngase en
contacto con Dell
. Para obtener
información acerca de cómo ponerse en
contacto con Dell, consulte la
Guía del
usuario
en línea.
Cuando se ha completado la POST, los
cuatro indicadores verdes se encienden
unos segundos antes de apagarse para
indicar un funcionamiento normal.
Ninguna.
Patrón de luz Descripción del problema Solución sugerida

Guía de referencia rápida 215
Códigos de sonido
Si el monitor no puede mostrar errores o problemas, es posible que el ordenador emita una serie de
sonidos durante el inicio. Esta serie de sonidos, denominada códigos de sonido, identifica un problema.
Un código de sonido posible (código 1-3-1) consta de un sonido, una secuencia de tres sonidos y a
continuación, otro sonido. Este código de sonido indica que el ordenador ha detectado un problema de
memoria.
Si el ordenador emite sonidos durante el inicio:
1
Anote el código de sonido.
2
Consulte el apartado “Dell Diagnostics” en la página 208 para identificar una causa más grave.
3
Diríjase a Dell para obtener asistencia técnica. Para obtener información acerca de cómo ponerse en
contacto con Dell, consulte la
Guía del usuario
en línea.
Código Causa Código Causa
1-1-2 Fallo en un registro del microprocesador 3-1-4 Fallo en el registro esclavo de enmascaramiento
de interrupciones
1-1-3 Fallo de lectura/escritura NVRAM 3-2-2 Fallo en la carga del vector de interrupciones
1-1-4 Fallo en la suma de comprobación del
BIOS en ROM
3-2-4 Fallo de la prueba de la controladora del
teclado
1-2-1 Error del temporizador de intervalos
programable
3-3-1 Pérdida de alimentación para la NVRAM
1-2-2 Fallo en la inicialización de DMA 3-3-2 Configuración de la NVRAM no válida
1-2-3 Fallo de lectura /escritura en el registro de
páginas del sistema de DMA
3-3-4 Fallo en la prueba de la memoria de vídeo
1-3 Fallo en la prueba de la memoria de vídeo 3-4-1 Fallo de inicio de la pantalla
1-3-1 a 2-4-4 La memoria no se está utilizando o
identificando adecuadamente
3-4-2 Fallo en el retrazo de la pantalla
3-1-1 Fallo en el registro DMA esclavo 3-4-3 Fallo de búsqueda de ROM de vídeo
3-1-2 Fallo en el registro del DMA maestro 4-2-1 No hay impulsos del temporizador
3-1-3 Fallo en el registro maestro de
enmascaramiento de interrupciones.
4-2-2 Fallo de suspensión del trabajo
4-2-3 Error Gate A20 4-4-1 Fallo en la prueba de un puerto serie o paralelo
4-2-4 Interrupción inesperada en modo
protegido
4-4-2 Falló la descompresión de los datos hacia la
memoria duplicada
4-3-1 Fallo de memoria por encima de la
dirección 0FFFFh
4-4-3 Fallo en la prueba del coprocesador
matemático
4-3-3 Fallo en el contador del chip del
temporizador 2
4-4-4 Fallo de la prueba de la memoria caché
4-3-4 El reloj de hora se ha parado

216 Guía de referencia rápida
Cómo resolver incompatibilidades de software y hardware
Si un dispositivo no se detecta durante la configuración del sistema operativo o se detecta pero no está
configurado correctamente, puede utilizar el Agente de solución de errores de hardware para solucionar
la incompatibilidad.
1
Haga clic en el botón
Inicio
y en
Ayuda y soporte técnico
.
2
Escriba
solucionador de problemas de hardware
en el campo
Buscar
y haga clic en la
flecha para iniciar la búsqueda.
3
Haga clic en
Solucionador de problemas de hardware
en la lista
Resultados de la búsqueda
.
4
En la lista
Solucionador de problemas de hardware
, haga clic en
Necesito resolver un conflicto de
hardware de mi ordenador
y haga clic en
Siguiente
.
Utilización de la función Restaurar sistema de Microsoft Windows XP
El sistema operativo Microsoft Windows XP dispone de la función Restaurar sistema que permite
regresar a un estado operativo anterior del ordenador (sin que esto afecte a los archivos de datos) si los
cambios efectuados en el hardware, software o en otros parámetros del sistema han dejado al ordenador
en un estado operativo no deseado. Consulte el Centro de ayuda y soporte técnico de Windows para
obtener información sobre el uso de la función Restaurar sistema. Para acceder al centro de ayuda y
soporte técnico de Windows, consulte el apartado “Centro de ayuda y soporte técnico de Windows” en la
página 185.
AVISO: Realice copias de seguridad periódicas de los archivos de datos. La función Restaurar sistema no
supervisa ni recupera los archivos de datos.
Creación de un punto de restauración
1
Haga clic en el botón
Inicio
y seleccione
Ayuda y soporte técnico
.
2
Haga clic en
Restaurar sistema
.
3
Siga las instrucciones que aparecen en pantalla.
Restauración del ordenador a un estado operativo anterior
AVISO: Antes de restaurar el ordenador a un estado operativo anterior, guarde y cierre los archivos abiertos y
salga de los programas activos. No modifique, abra ni suprima ningún archivo ni programa hasta que la
restauración del sistema haya finalizado.
1
Haga clic en el botón
Inicio
, seleccione
Todos los programas
→
Accesorios
→
Herramientas del sistema
y, a continuación, haga clic en
Restaurar sistema
.
2
Asegúrese de seleccionar
Devolver el ordenador a un estado anterior
y, a continuación, haga clic en
Siguiente
.
3
En el calendario, haga clic en la fecha a la que desea restaurar el ordenador.
La pantalla
Selección de un punto de restauración
proporciona un calendario que permite ver y
seleccionar puntos de restauración. Todas las fechas con puntos de restauración disponibles aparecen
en negrita.
4
Seleccione un punto de restauración y, a continuación, haga clic en
Siguiente
.
Si una fecha sólo tiene un punto de restauración, éste se selecciona automáticamente. Si hay dos o más
puntos de restauración disponibles, haga clic en el punto de restauración que prefiera.

Guía de referencia rápida 217
5
Haga clic en
Siguiente
.
La pantalla de
Restauración finalizada
aparece cuando la función Restaurar sistema ha terminado de
recopilar los datos y, a continuación, se reinicia el ordenador.
6
Cuando el ordenador se reinicie, haga clic en
Aceptar
.
Para cambiar el punto de restauración, puede repetir los pasos con otro punto de restauración o bien
puede deshacer la restauración.
Cómo deshacer la última operación de Restaurar sistema
AVISO: Antes de deshacer la última restauración del sistema, guarde y cierre todos los archivos abiertos y cierre
todos los programas. No modifique, abra ni suprima ningún archivo ni programa hasta que la restauración del
sistema haya finalizado.
1
Haga clic en el botón
Inicio
, seleccione
Todos los programas
→
Accesorios
→
Herramientas del sistema
y, a continuación, haga clic en
Restaurar sistema
.
2
Seleccione
Deshacer la última restauración
y haga clic en
Siguiente
.
3
Haga clic en
Siguiente
.
Aparece la pantalla
Restaurar sistema
y, a continuación, el ordenador se reinicia.
4
Cuando el ordenador se reinicie, haga clic en
Aceptar
.
Activación de la función Restaurar sistema
Si reinstala Windows XP con menos de 200 MB de espacio libre disponible en el disco duro, se
desactivará automáticamente la función Restaurar sistema. Para verificar si la función Restaurar sistema
está activada:
1
Haga clic en el botón
Inicio
y en
Panel de control
.
2
Haga clic en
Rendimiento y mantenimiento
.
3
Haga clic en
Sistema
.
4
Haga clic en la ficha
Restaurar sistema
.
5
Asegúrese de que está desmarcada la opción
Desactivar Restaurar sistema
.
Cómo volver a instalar Microsoft Windows XP
Antes de comenzar
NOTA: Los procedimientos de este documento fueron escritos para la vista predefinida de Windows en Windows
XP Home Edition, por lo que los pasos serán diferentes si configura su ordenador Dell con la vista clásica de
Windows o está utilizando Windows XP Professional.
Si está considerando reinstalar el sistema operativo Windows XP para corregir un problema con un
controlador instalado recientemente, intente usar primero la función Device Driver Rollback (Deshacer
controlador de dispositivos) de Windows XP.
1
Haga clic en el botón
Inicio
y en
Panel de control
.
2
En
Elija una categoría
, haga clic en
Rendimiento y mantenimiento
.
3
Haga clic en
Sistema
.
4
En la ventana
Propiedades del sistema
, haga clic en la ficha
Hardware
.

218 Guía de referencia rápida
5
Haga clic en
Administrador de dispositivos
.
6
Haga clic con el botón derecho del ratón en el dispositivo para el que se ha instalado el nuevo
controlador y haga clic en
Propiedades
.
7
Haga clic en la ficha
Controladores
.
8
Haga clic en
Desinstalar controlador
.
Si la función de desinstalación del controlador de dispositivo no resuelve el problema, utilice la función
Restaurar sistema para que el sistema operativo vuelva al estado operativo en que se encontraba antes de
que se instalara el nuevo controlador de dispositivo (consulte el apartado “Utilización de la función
Restaurar sistema de Microsoft Windows XP” en la página 216).
NOTA: El CD Drivers and Utilities (Controladores y utilidades) contiene los controladores que se instalaron durante
el ensamblaje del ordenador. Utilice el CD Drivers and Utilities para cargar cualquier controlador necesario,
incluidos los controladores necesarios si el ordenador tiene una controladora RAID.
Reinstalación de Windows XP
AVISO: Debe utilizar Windows XP Service Pack 1 o posterior cuando vuelva a instalar Windows XP.
AVISO: Antes de realizar la instalación, haga una copia de seguridad de todos los archivos de datos en la unidad
de disco duro principal. En las configuraciones convencionales de disco duro, la unidad de disco duro principal es
la primera unidad que detecta el ordenador.
Para volver a instalar Windows XP, necesita los siguientes elementos:
• El CD
Operating System
(Sistema operativo) de Dell
•El CD
Drivers and Utilities
(Controladores y utilidades) de Dell
Para reinstalar Windows XP, realice todos los pasos descritos en las secciones siguientes en el orden en
que se enumeran.
El proceso de reinstalación puede durar entre una y dos horas. Una vez finalizada la reinstalación del
sistema operativo, deberá reinstalar los controladores de dispositivo, el antivirus y los demás programas
de software.
AVISO: En el CD Operating System se ofrecen varias opciones para reinstalar Windows XP. Estas opciones pueden
llegar a sobrescribir archivos y pueden afectar a las aplicaciones instaladas en la unidad de disco duro. Por lo
tanto, se recomienda no reinstalar Windows XP a menos que se lo indique un representante de asistencia técnica
de Dell.
AVISO: Para evitar conflictos con Windows XP, desactive el software antivirus que tenga instalado en el
ordenador antes de reinstalar Windows. Para obtener instrucciones, consulte la documentación proporcionada
con el software.
Arranque desde el CD Operating System (Sistema operativo)
1
Guarde y cierre los archivos que tenga abiertos y salga de todos los programas.
2
Inserte el CD
Operating System
(Sistema operativo). Haga clic en
Salir
si aparece el mensaje
Instalar Windows XP
.
3
Reinicie el ordenador.
4
Pulse <F12> inmediatamente después de que aparezca el logotipo de DELL.
Si se muestra el logotipo del sistema operativo, espere hasta que aparezca el escritorio de Windows y, a
continuación, apague el ordenador e inténtelo de nuevo.

Guía de referencia rápida 219
5
Pulse las teclas de flecha para seleccionar el
CD-ROM
y pulse <Intro>.
6
Cuando aparezca el mensaje
Pulse cualquier tecla para arrancar desde el CD
,
pulse cualquier tecla.
Configuración de Windows XP
1
Cuando aparezca la pantalla
Programa de instalación de Windows XP
, presione <Intro> para
seleccionar
Instalar Windows ahora
.
2
Lea la información en la pantalla del
Acuerdo de Licencia de Microsoft Windows
y pulse <F8> para
aceptar el contrato de licencia.
3
Si el ordenador ya tiene instalado Windows XP y desea recuperar los datos actuales de Windows XP,
escriba
r
para seleccionar la opción de reparación y, a continuación, extraiga el CD.
4
Si desea instalar una nueva copia de Windows XP, pulse <Esc> para seleccionar dicha opción.
5
Pulse <Intro> para seleccionar la partición resaltada (recomendada) y, a continuación, siga las
instrucciones de la pantalla.
Aparecerá la pantalla
Programa de instalación de Windows XP
y el sistema operativo empezará a
copiar archivos y a instalar los dispositivos. El ordenador se reinicia automáticamente varias veces.
NOTA: El tiempo necesario para que se complete la instalación depende del tamaño de la unidad de disco duro y
de la velocidad del ordenador.
AVISO: No pulse ninguna tecla cuando aparezca el mensaje siguiente: Presione cualquier tecla
para arrancar desde el CD
.
6
Cuando aparezca la pantalla
Configuración regional y de idioma
, seleccione la configuración regional
de su zona y pulse
Siguiente
.
7
Escriba su nombre y el de su organización (opcional) en la pantalla
Personalice su software
y, a
continuación, haga clic en
Siguiente
.
8
En la ventana
Nombre del ordenador y contraseña del administrador
, escriba un nombre para el
ordenador (o bien acepte la propuesta) y una contraseña y haga clic en
Siguiente
.
9
Si aparece la pantalla de
Información de marcado de módem
, introduzca la información solicitada y
haga clic en
Siguiente
.
10
Escriba la fecha, la hora y la zona horaria en la ventana
Valores de fecha y hora
y, a continuación, haga
clic en
Siguiente
.
11
Si aparece la pantalla
Configuración de red
, haga clic en
Típica
y, después, en
Siguiente
.
12
Si va a reinstalar Windows XP Professional y el sistema le pide que proporcione más información
acerca de la configuración de red, especifique sus selecciones. Si no está seguro de su configuración,
acepte las opciones predeterminadas.
Windows XP instala los componentes del sistema operativo y configura el ordenador. El ordenador se
reiniciará automáticamente.
AVISO: No pulse ninguna tecla cuando aparezca el mensaje siguiente: Presione cualquier tecla
para arrancar desde el CD
.
13
Cuando aparezca la pantalla
Bienvenido a Microsoft
, haga clic en
Siguiente
.
14
Cuando aparezca el mensaje
¿Cómo se conectará este ordenador a Internet?
, haga
clic en
Omitir
.

220 Guía de referencia rápida
15
Cuando aparezca la pantalla
¿Preparado para registrarse con Microsoft?
, seleccione
No en este
momento
y haga clic en
Siguiente
.
16
Cuando aparezca la pantalla
¿Quién usará este ordenador?
, podrá especificar un máximo de cinco
usuarios.
17
Haga clic en
Siguiente
.
18
Haga clic en
Finalizar
para completar la instalación y extraiga el CD.
19
Vuelva a instalar los controladores apropiados con el CD
Drivers and Utilities
(Controladores y
utilidades).
20
Vuelva a instalar el software antivirus.
21
Reinstale los programas.
NOTA: Para volver a instalar y activar los programas de Microsoft Office o Microsoft Works Suite, necesita el
número de Product Key ubicado en la parte posterior de la portada del CD de Microsoft Office o Microsoft Works
Suite.
Uso del CD Drivers and Utilities
Para utilizar el CD denominado Drivers and Utilities (Controladores y utilidades) (también conocido
como ResourceCD) mientras está ejecutando el sistema operativo Windows:
NOTA: Para acceder a los controladores del dispositivo y a la documentación del usuario, debe utilizar el CD
Drivers and Utilities (Controladores y utilidades) mientras ejecuta Windows.
1
Encienda el ordenador y permita que se inicie en el escritorio de Windows.
2
Inserte el CD
Drivers and Utilities
(Controladores y utilidades) en la unidad de CD-ROM.
Si está utilizando el CD
Drivers and Utilities
(Controladores y utilidades) por primera vez en este
ordenador, se abrirá la ventana
ResourceCD Installation
(Instalación de ResourceCD) para informarle
que el CD
Drivers and Utilities
(Controladores y utilidades) está a punto de empezar su instalación.
3
Haga clic en
OK
(Aceptar) para continuar.
Para completar la instalación, responda a las peticiones ofrecidas por el programa de instalación.
4
Haga clic en
Next
(Siguiente)
en la pantalla
Welcome Dell System Owner
(Bienvenida al propietario
del sistema Dell).
5
Seleccione el
System Model
(Modelo del sistema),
Operating System
(Sistema operativo),
DeviceType
(Tipo de dispositivo)
y
Topic
(Tema) adecuados.
Controladores para el ordenador
Para mostrar una lista de los controladores de dispositvo del ordenador
1
Haga clic en
My Drivers
(Mis controladores) en el menú descendente
Topic
(Tema).
El CD denominado
Drivers and Utilities
(Controladores y utilidades) (opcional) examina el sistema
operativo y el hardware del ordenador y después aparece en la pantalla una lista de los controladores de
dispositivos de la configuración del sistema.
2
Pulse sobre el controlador adecuado y siga las instrucciones para descargarlo al ordenador.
Para ver todos los controladores disponibles para el ordenador, haga clic en Drivers (Controladores) en el
menú descendente Topic (Tema).

Índice 221
Índice
A
alimentación
indicador, 195
archivo de ayuda
Centro de ayuda y soporte
técnico de Windows, 185
C
CD
sistema operativo, 184
CD Drivers and Utilities
(Controladores y
utilidades), 183
CD Operating System
(Sistema operativo), 184
Centro de ayuda y soporte
técnico, 185
códigos de sonido, 215
conflictos
incompatibilidades de software
y hardware, 216
Contrato de licencia del
usuario final, 183
controladores
lista de, 220
cubierta
retirar, 198
D
Dell Diagnostics, 208
diagnósticos
códigos de sonido, 215
Dell Diagnostics, 208
documentación
Contrato de licencia del
usuario final, 183
en línea, 185
ergonomía, 183
garantía, 183
Guía de información del
producto, 183
Guía del usuario, 184
reglamentaria, 183
seguridad, 183
E
etiqueta de servicio, 184
etiquetas
etiqueta de servicio, 184
Microsoft Windows, 184
G
Guía de información del
producto, 183
Guía del usuario, 184
H
hardware
códigos de sonido, 215
Dell Diagnostics, 208
I
indicador de alimentación
diagnosticar problemas
con, 211
indicadores
alimentación, 195
indicadores luminosos
diagnóstico, 212
sistema, 211
información
reglamentaria, 183
información sobre
ergonomía, 183
información sobre la
garantía, 183
instalar piezas
antes de empezar, 198
instrucciones de
seguridad, 183

222 Índice
222 Índice
M
mensajes de error
códigos de sonido, 215
indicadores luminosos de
diagnóstico, 212
indicadores luminosos del
sistema, 211
P
placa base, 203, 206
placa base. Consulte placa
base
problemas. Consulte solución
de problemas
R
Restaurar sistema, 216
S
sistema operativo
volver a instalar, 184
volver a instalar Windows
XP, 217
sitio web de asistencia
técnica, 185
sitio web de asistencia técnica
de Dell, 185
solución de problemas
Centro de ayuda y soporte
técnico, 185
códigos de sonido, 215
conflictos de hardware y
software, 216
Dell Diagnostics, 208
indicadores luminosos de
diagnóstico, 212
indicadores luminosos del
sistema, 211
restaurar al estado de
funcionamiento
anterior, 216
Solucionador de problemas de
hard, 216
Solucionador de problemas de
hardware, 216
V
volver a instalar
Windows XP, 217
W
Windows XP
Centro de ayuda y soporte
técnico, 185
configuración, 219
Restaurar sistema, 216
Solucionador de problemas de
hardware, 216
solucionador de problemas de
hardware, 216
volver a instalar, 184, 217

www.dell.com | support.dell.com
Dell™ OptiPlex™ 320
Hızlı Başvuru Kılavuzu
Modeller DCSM, DCNE

Notlar, Bildirimler ve Uyarılar
NOT:
NOT, bilgisayarınızdan daha iyi şekilde yararlanmanızı sağlayan önemli bilgiler verir.
DİKKAT:
BİLDİRİM, ya donanımda olası hasarı ya da veri kaybını belirtir ve size, bu sorunu nasıl önleyeceğinizi anlatır.
UYARI:
UYARI, olası maddi hasar, kişisel yaralanma veya ölüm tehlikesi anlamına gelir.
Dell™ n Serisi bir bilgisayar satın aldıysanız, bu belgede Microsoft
®
Windows
®
işletim sistemlerine yapılan her
türlü gönderme geçersizdir.
____________________
Bu belgedeki bilgiler, önceden bildirilmeksizin değiştirilebilir.
© 2006 Dell Inc. Tüm hakları saklıdır.
Dell Inc. tarafından verilmiş yazılı izin olmadan herhangi bir şekilde çoğaltılması kesinlikle yasaktır.
Bu metinde kullanılan ticari markalar: Dell, OptiPlex ve DELL logosu Dell Inc.'in ticari markaları; Microsoft ve Windows, Microsoft
Corporation'ın tescilli ticari markaları ve Intel ve Pentium, Intel Corporation'ın tescilli ticari markalarıdır.
Bu belgede, marka ve adların sahiplerine ya da ürünlerine atıfta bulunmak için başka ticari marka ve ticari adlar kullanılabilir. Dell Inc. kendine
ait olanların dışındaki ticari markalar ve ticari isimlerle ilgili hiçbir mülkiyet hakkı olmadığını beyan eder.
Modeller DCSM, DCNE
Eylül 2006 P/N FK640 Rev. A01

İçerik
225
İçerik
Bilgi Bulma
. . . . . . . . . . . . . . . . . . . . . . . . . . . . . . . . . .
227
Bilgisayarınızı Ayarlama
. . . . . . . . . . . . . . . . . . . . . . . . . . .
230
Sistem Görünümleri
. . . . . . . . . . . . . . . . . . . . . . . . . . . . .
233
Mini Tower Bilgisayar — Önden Görünüş
. . . . . . . . . . . . . . . .
233
Mini Tower Bilgisayar — Arkadan Görünüş
. . . . . . . . . . . . . . .
235
Mini Tower Bilgisayar — Arka Panel Konektörleri
. . . . . . . . . . . .
236
Masaüstü Bilgisayar — Önden Görünüş
. . . . . . . . . . . . . . . . .
238
Masaüstü Bilgisayar — Arkadan Görünüş
. . . . . . . . . . . . . . . .
239
Masaüstü Bilgisayar — Arka Panel Konektörleri
. . . . . . . . . . . . .
240
Bilgisayar Kapağını Çıkarma
. . . . . . . . . . . . . . . . . . . . . . . .
242
Başlamadan Önce
. . . . . . . . . . . . . . . . . . . . . . . . . . . .
242
Mini Tower Bilgisayar
. . . . . . . . . . . . . . . . . . . . . . . . . . .
243
Masaüstü Bilgisayar
. . . . . . . . . . . . . . . . . . . . . . . . . . .
245
Bilgisayarınızın İçi
. . . . . . . . . . . . . . . . . . . . . . . . . . . . . .
246
Mini Tower Bilgisayar
. . . . . . . . . . . . . . . . . . . . . . . . . . .
246
Masaüstü Bilgisayar
. . . . . . . . . . . . . . . . . . . . . . . . . . .
249
Sorun Çözme
. . . . . . . . . . . . . . . . . . . . . . . . . . . . . . . . .
252
Dell Diagnostics
. . . . . . . . . . . . . . . . . . . . . . . . . . . . . .
252
Sistem Işıkları
. . . . . . . . . . . . . . . . . . . . . . . . . . . . . . .
255
Tanılama Işıkları
. . . . . . . . . . . . . . . . . . . . . . . . . . . . . . . .
256
Bip Kodları
. . . . . . . . . . . . . . . . . . . . . . . . . . . . . . . .
258
Yazılım ve Donanım Uyuşmazlıklarını Çözümleme
. . . . . . . . . . .
259
Microsoft Windows XP Sistem Geri Yükleme Özelliğini
Kullanma
. . . . . . . . . . . . . . . . . . . . . . . . . . . . . . . . .
259
Microsoft Windows XP'yi Yeniden Yükleme
. . . . . . . . . . . . . . .
261
Drivers and Utilities CD'sini Kullanma
. . . . . . . . . . . . . . . . . . .
263
Dizin
. . . . . . . . . . . . . . . . . . . . . . . . . . . . . . . . . . . . . . . .
265

226
İçerik

Hızlı Başvuru Kılavuzu
227
Bilgi Bulma
NOT:
Bazı özellik ve ortamlar isteğe bağlı olabilir ve bilgisayarınızla birlikte gelmeyebilir. Bazı özellik ve ortamlar
belirli ülkelerde kullanılmıyor olabilir.
NOT:
Bilgisayarınızla birlikte ek bilgi gelebilir.
Ne Arıyorsunuz? Aradığınızı Burada Bulun
• Bilgisayarım için bir tanılama programı
• Bilgisayarım için sürücüler
• Bilgisayarımın belgeleri
• Aygıtımın belgeleri
• Masaüstü Sistem Yazılımı (DSS)
Drivers and Utilities CD'si (ResourceCD de denir)
NOT:
Drivers and Utilities CD'si isteğe bağlı olabilir ve
bilgisayarınızla birlikte gelmeyebilir.
Belgeler ve sürücüler bilgisayarınıza zaten yüklenmiştir.
Sürücüleri yeniden yüklemek için CD'yi kullanabilirsiniz
(çevrimiçi Kullanım Kılavuzu 'nda "Sürücüleri ve Yardımcı
Programları Yeniden Yükleme" konusuna bakın) Dell Diagnost
programını çalıştırmak içinics (bkz "Dell Diagnostics"
sayfa 252) veya belgenize erişmek için.
Bilgisayarınızla ilgili teknik
değişiklikler ya da
teknisyenlere veya deneyimli
kullanıcılara yönelik ileri
düzeyde teknik başvuru
malzemeleri hakkında en yeni
güncelleştirmeleri sağlamak
üzere CD'nizde Benioku
dosyaları bulunabilir.
NOT:
Sürücü ve belge güncelleştirmeleri
support.dell.com
web sitesinde bulunabilir.
• Garanti bilgileri
• Hükümler ve Koşullar (sadece ABD)
• Güvenlik yönergeleri
• Düzenleyici bilgiler
• Ergonomi bilgileri
• Son Kullanıcı Lisans Sözleşmesi
Dell™ Ürün Bilgisi Kilavuzu

228
Hızlı Başvuru Kılavuzu
• Parçaları nasıl çıkartabilirim ve değiştirebilirim?
• Özellikler
• Sistem ayarlarını nasıl yapılandırabilirim?
• Sorunları nasıl giderebilirim ve çözebilirim?
Dell™ OptiPlex™ Kullanım Kılavuzu
Microsoft Windows XP Yardım ve Destek Merkezi
1
Başlat
→
Yardım ve Destek
→
Dell User and System
Guides
→
System Guides
seçeneklerini tıklatın.
2
Bilgisayarınızla ilgili
User's Guide
seçeneğini tıklatın.
User's Guide ayrıca isteğe bağlı Drivers and Utilities CD'sinde
de bulunur.
• Service Tag (Servis Etiketi) ve Express Service Code
(Hızlı Servis Kodu)
• Microsoft Windows Lisans Etiketi
Service Tag ve Microsoft
®
Windows
®
Lisansı
Bu etiketleri, bilgisayarınızın üzerinde bulabilirsiniz.
•
support.dell.com
adresini
kullanırken veya desteğe
başvuracağınız zaman
bilgisayarınızı tanıtmak
için Service Tag'i kullanın.
•Desteğe başvurduğunuzda
aramanızın yönlendirilmesi
için Express Service Code'u
girin.
•Işletim sistemimi nasıl yeniden yüklerim?
Operating System CD'si
NOT:
Operating System CD'si isteğe bağlı olabilir ve
bilgisayarınızla birlikte gelmeyebilir.
Işletim sistemi bilgisayarınıza zaten yüklenmiştir. İşletim
sisteminizi yeniden yüklemek için, Operating System CD'sini
kullanın. Bkz "Microsoft Windows XP'yi Yeniden Yükleme"
sayfa 261.
İşletim sisteminizi yeniden
yükledikten sonra,
bilgisayarınızla birlikte gelen
aygıtların sürücülerini yeniden
yüklemek için isteğe bağlı
Drivers and Utilities CD
(ResourceCD'sini)
kullanabilirsiniz.
Işletim sisteminizin ürün
anahtarı etiketi, bilgisayarınızda
bulunur.
NOT:
CD'nizin rengi, sipariş ettiğiniz işletim sistemine göre
değişir.
Ne Arıyorsunuz? Aradığınızı Burada Bulun

Hızlı Başvuru Kılavuzu
229
• Çözümler — Sorun giderme ipuçları, teknisyenlerden
makaleler, sık sorulan sorular ve çevrimiçi eğitimler
• Topluluk — Diğer Dell müşterileriyle çevrimiçi tartışma
• Yükseltmeler — Bellek, sabit sürücü ve işletim sistemi
gibi bileşenler için yükseltme bilgileri
•Müşteri Hizmetleri — Iletişim bilgileri, servis çağrısı ve
sipariş durumu, garanti ve onarım bilgileri
• Servis ve destek — Servis çağrısı durumu ve destek
geçmişi, servis sözleşmesi, teknik destekle çevrimiçi
tartışmalar
•Başvuru — Bilgisayar belgeleri, bilgisayar yapılandırma
bilgileri, ürün özellikleri ve teknik belgeler
• Yüklemeler — Onaylı sürücüler, düzeltme ekleri ve
yazılım güncelleştirmeleri
• Desktop System Software (DSS - Masaüstü Sistem
Yazılımı) — Bilgisayarınızın işletim sistemini yeniden
yüklerseniz, DSS yardımcı programını da yeniden
yüklemeniz gerekir. DSS İşletim sisteminiz için çok
önemli güncelleştirmeler sağlar ve Dell™ 3.5-inç USB
disket sürücüleri, Intel
®
işlemciler, optik sürücüler ve
USB aygıtları için destek sunar. DSS Dell bilgisayarınızın
doğru çalışması için gereklidir. Yazılım, bilgisayarınızı ve
işletim sisteminizi otomatik olarak algılar ve
yapılandırmanıza uygun güncelleştirmeleri yükler.
Dell Support Web sitesi — support.dell.com
NOT:
Uygun destek sitesini görüntülemek için, bulunduğunuz
bölgeyi veya iş kolunu seçin.
Desktop System Software'i karşıdan yüklemek için:
1
support.dell.com
adresine gidin, bölgenizi veya iş kolunuzu
seçin ve Service Tag'i girin.
2
Drivers & Downloads
(Sürücüler ve Yüklemeler) öğesini
seçip
Go
'yu tıklatın.
3
İşletim sisteminizi tıklatın ve
Desktop System Software
anahtar sözcüğünü aratın.
NOT:
support.dell.com
kullanıcı arabirimi seçimlerinize bağlı
olarak farklılık gösterebilir.
• Windows XP'yi nasıl kullanırım?
• Program ve dosyalarla nasıl çalışırım?
• Masaüstümü nasıl kişiselleştirebilirim?
Windows Yardım ve Destek Merkezi
1
Başlat
→
Yardım ve D e stek
'i tıklatın.
2
Sorununuzu belirten bir sözcük veya tümcecik girin ve ok
simgesini tıklatın.
3
Sorununuzu açıklayan konuyu tıklatın.
4
Ekrandaki yönergeleri izleyin.
Ne Arıyorsunuz? Aradığınızı Burada Bulun

230
Hızlı Başvuru Kılavuzu
Bilgisayarınızı Ayarlama
UYARI:
Bu bölümdeki yordamları uygulamadan önce, Ürün Bilgisi Kilavuzu'ndaki güvenlik yönergelerine
bakın.
DİKKAT:
Bilgisayarınızda genişletme kartı (örneğin bir modem kartı) takılıysa, ilgili kabloyu arka paneldeki
konektöre değil, karta takın.
DİKKAT:
Bilgisayarın uygun çalışma sıcaklığını korumasına yardımcı olmak için, bilgisayarı bir duvara veya kasa
etrafında hava dolaşımını engelleyebilecek diğer yerlere fazla yakın yerleştirmediğinizden emin olun.
NOT:
Bilgisayarınızla birlikte gelmeyen herhangi bir aygıtı veya yazılımı yüklemeden önce, söz konusu aygıt veya
yazılımla birlikte gelen belgeleri okuyun veya satıcıdan aygıtın ya da yazılımın bilgisayarınız ve işletim sisteminizle
uyumlu olup olmadığını öğrenin.
Bilgisayarınızı gerektiği gibi kurabilmek için tüm adımları tamamlamanız gerekir. Yönergelerin ardından
gelen ilgili şekillere bakın.
DİKKAT:
PS/2 ve USB farelerini aynı anda çalıştırmayı denemeyin.
1
Klavyeyi ve fareyi bağlayın.
DİKKAT:
Ağ bağdaştırıcısı konektörüne modem kablosu takmayın. Telefon iletişimi sırasında voltaj ağ
bağdaştırıcısına zarar verebilir.
Klavye ve Fareyi Takma
2
Modem veya ağ kablosunu bağlayın.
Ağ kablosunu telefon hattına değil ağ konektörüne takın. İsteğe bağlı modeminiz varsa, telefon hattını
modeme bağlayın.

Hızlı Başvuru Kılavuzu
231
3
Monitörü
ya
beyaz DVI kablosunu
veya
mavi VGA kablosunu (her iki kabloyu birden
bağlamayın
)
kullanarak bağlayın.
Konektör pinlerinin eğilmemesine dikkat ederek, monitör kablosunu hizalayın ve hafifçe takın. Kablo
konektörlerindeki kelebek başlı vidaları sıkın.
NOT:
Bazı monitörlerde, ekranın arkasının alt tarafında video konektörü vardır. Konektör yerleri için,
monitörünüzle gelen belgelere bakın.
Monitörü Takma
4
Hoparlörleri bağlayın.
5
Güç kablolarını bilgisayara, monitöre ve aygıtlara takın ve güç kablolarını diğer uçlarını elektrik prizlerine
takın.

232
Hızlı Başvuru Kılavuzu
Güç Bağlantıları
DİKKAT:
Voltaj seçim anahtarını el ile ayarlamadan bilgisayarınızın zarar görmemesi için, anahtarı bulunduğunuz
bölgedeki voltaja en yakın değere ayarlayın.
DİKKAT:
Japonya'da AC gücü 100 V olmasına karşın, voltaj seçim anahtarı 115 V olarak ayarlanmalıdır.
6
Voltaj seçim anahtarının bölgenize uygun şekilde ayarlandığını doğrulayın.
Bilgisayarınızda manüel voltaj seçim anahtarı vardır. Arka panelde voltaj seçim anahtarı bulunan
bilgisayarların, doğru çalışma voltajında çalışmaları için el ile ayarlanmaları gerekir.

Hızlı Başvuru Kılavuzu
233
Sistem Görünümleri
Mini Tower Bilgisayar — Önden Görünüş
1 Service Tag yeri Dell Support web sitesine eriştiğinizde veya teknik desteği aradığınızda
bilgisayarınızı tanıtmak için Service Tag'i kullanın.
2 CD/DVD sürücüsü Bu sürücüye CD veya DVD (destekleniyorsa) takın.
3 disket sürücüsü Bu sürücüye disket takın.
4 sabit disk etkinlik ışığıBu ışık, sabit disk kullanımdayken titrer.
4
9
7
8
3
2
6
5
1
10

234
Hızlı Başvuru Kılavuzu
5 USB 2.0 konektörleri (2) Oyun çubuğu veya kamera gibi seyrek kullandığınız aygıtlar veya önyüklenebilir
USB aygıtları için bilgisayarın ön tarafındaki USB konektörlerini kullanın.
Yazıcı ve klavye gibi genellikle bağlı kalan aygıtlar için bilgisayarın arkasındaki USB
konektörlerini kullanmanız önerilir.
6 tanılama ışıkları Tanılama koduna göre bilgisayarınızdaki sorunları gidermenize yardımcı olması için
ışıkları kullanın (daha fazla bilgi için, bkz. "Tanılama Işıkları" sayfa 256).
7
güç düğmesi Bilgisayarı açmak için bu düğmeye basın.
DİKKAT:
Veri kaybı olmaması için, bilgisayarınızı güç düğmesine basarak
kapatmayın. Bunun yerine, işletim sisteminden kapatın.
DİKKAT:
Işletim sisteminizde ACPI etkinse, güç düğmesine bastığınızda
bilgisayar işletim sisteminden kapanır.
8
güç ışığı Farklı çalışma durumlarını belirtmek için güç ışığı yanar ve yanıp söner veya sabit
kalır:
•Işık yok — Bilgisayar kapalıdır.
• Sabit yeşil — Bilgisayar normal çalışma durumundadır.
• Yanıp sönen yeşil — Bilgisayar güç tasarrufu modundadır.
• Yanıp sönen veya sabit sarı — Bilgisayar elektrik enerjisi alıyor, ancak dahili bir güç
hatası olabilir. Çevrimiçi
Kullanım Kılavuzu
'nuzdaki "Güç Sorunları" konusuna
bakın.
Güç tasarrufu modundan çıkmak için güç düğmesine basın veya Windows Aygıt
Yöneticisi'nde uyandırma aygıtı olarak yapılandırılmışsa klavyeyi veya fareyi
kullanın. Uyku modları ve güç tasarrufu modundan çıkma hakkında daha fazla bilgi
için, çevrimiçi Kullanım Kılavuzu'na bakın.
Bilgisayarınızla ilgili sorunları gidermenizde yardımcı olacak ışık kodlarının
açıklaması için, bkz. "Sistem Işıkları" sayfa 255.
9
kulaklık konektörü Kulaklık konektörünü kulaklık bağlamak için kullanın.
10
bağlantı bütünlüğü ışığı
•Yeşil — 10 Mb/sn ağ ve bilgisayar arasında iyi bir bağlantı var.
• Turuncu — 100 Mb/sn ağ ve bilgisayar arasında iyi bir bağlantı var.
• Kapalı — Bilgisayar ağa fiziksel bir bağlantı algılayamadı.

Hızlı Başvuru Kılavuzu
235
Mini Tower Bilgisayar — Arkadan Görünüş
1
kapak serbest bırakma
mandalı
Bu mandal, bilgisayar kapağını açmanızı sağlar.
2
asma kilit halkası
Bilgisayar kapağını kilitlemek için bir asma kilit takın.
3
güç konektörü Güç kablosunu bu konektöre takın.
4
3
5
6
2
1

236
Hızlı Başvuru Kılavuzu
Mini Tower Bilgisayar — Arka Panel Konektörleri
4
voltaj seçim anahtarı Bilgisayarınız manuel voltaj seçim anahtarı ile donatılmıştır. Voltaj seçim anahtarını el
ile ayarlamadan bilgisayarınızın zarar görmemesi için, anahtarı bulunduğunuz
bölgedeki voltaja en yakın değere ayarlayın.
DİKKAT:
Japonya'da, voltaj seçim anahtarı 115-V pozisyonuna ayarlanmalıdır.
Ayrıca monitörünüzün ve bağlı aygıtlarınızın nominal elektrik değerlerinin bölgenizde
kullanılan AC gücüyle çalışmaya uygun olduğundan emin olun.
5
arka panel konektörleri Seri, USB veya diğer aygıtları uygun konektöre takın.
Bkz. "Mini Tower Bilgisayar — Arka Panel Konektörleri" sayfa 236.
6
kart yuvaları Takılı PCI ve PCI Express kartlarına erişim.
1
paralel bağlantı konektörü
Yazıcı gibi paralel aygıtları paralel bağlantı konektörüne bağlayın. USB yazıcınız
varsa, bunu USB konektörüne takın.
NOT:
Bilgisayar, aynı adrese yapılandırılmış paralel konektör içeren bir kart takılı
olduğunu algıladığında, tümleşik paralel konektör otomatik olarak devre dışı bırakılır.
Bilgi için, çevrimiçi Kullanım Kılavuzu'na bakın.
2
bağlantı bütünlüğü ışığı•Yeşil — 10 Mb/sn ağ ve bilgisayar arasında iyi bir bağlantı var.
• Turuncu — 100 Mb/sn ağ ve bilgisayar arasında iyi bir bağlantı var.
• Kapalı — Bilgisayar ağa fiziksel bir bağlantı algılayamadı.
13
10 9 8
5
6
7
24

Hızlı Başvuru Kılavuzu
237
3
ağ bağdaştırıcısı
konektörü
Bilgisayarınızı bir ağa veya geniş bant aygıtına bağlamak için, ağ kablosunun bir
ucunu bir ağ prizine veya ağınıza ya da geniş bant aygıtına bağlayın. Ağ kablosunun
diğer ucunu bilgisayarınızın arka panelindeki ağ bağdaştırıcısı konektörüne takın. Ağ
kablosu tam olarak yerine oturduğunda bir tık sesi duyarsınız.
NOT:
Ağ konektörüne telefon kablosu takmayın.
Ağ bağdaştırıcısı kartı bulunan bilgisayarlarda, karttaki konektörü kullanın.
Ağınız için Kategori 5 kablo ve konektör kullanmanız önerilir. Kategori 3 kablo
kullanmanız gerekiyorsa, güvenilir çalışmasını sağlamak için ağ hızını 10 Mb/sn'ye
zorlayın.
4
ağ etkinlik ışığı
Bu ışık ağ verileri iletir veya alırken sarı renkte yanıp söner. Yüksek hacimli ağ
trafiği, bu ışığın sürekli "açık" durumda görünmesine yol açabilir.
5
giriş konektörü
Kaset çalar, CD çalar veya VCR gibi kayıt/kayıttan yürütme aygıtlarını bağlamak
için mavi renkli giriş konektörünü kullanın.
Ses kartı bulunan bilgisayarlarda, karttaki konektörü kullanın.
6
çıkış konektörü
Kulaklıkları ve yerleşik yükselticili hoparlör setlerinin çoğunu bağlamak için yeşil
renkli çıkış konektörünü kullanın.
Ses kartı bulunan bilgisayarlarda, karttaki konektörü kullanın.
7
mikrofon konektörü
Bir ses veya telefon programına ses veya müzik girişi için kişisel bilgisayar
mikrofonu takmak için pembe mikrofon konektörünü kullanın.
Ses kartı bulunan bilgisayarlarda, mikrofon konektörü kartın üzerindedir.
8
USB 2.0 konektörleri (4)
Yazıcı ve klavye gibi genellikle bağlı kalan aygıtlar için arka USB konektörlerini
kullanın.
video konektörü
VGA uyumlu monitörünüzün kablosunu mavi konektöre takın.
NOT:
Isteğe bağlı bir grafik kartı satın aldıysanız, bu konektör bir kapakçıkla
kapatılmış olacaktır. Monitörünüzü grafik kartındaki konektöre takın. Kapakçığı
çıkartmayın.
10
seri bağlantı konektörü
El bilgisayarı gibi seri aygıtları seri bağlantı noktasına bağlayın. Seri konektör 1 için
varsayılan bağlantı noktası COM1'dir.
Daha fazla bilgi için çevrimiçi Kullanım Kılavuzu'na bakın.

238
Hızlı Başvuru Kılavuzu
Masaüstü Bilgisayar — Önden Görünüş
1
USB 2.0 konektörleri (2) Oyun çubuğu ve kamera gibi seyrek bağlanan aygıtlar veya önyüklenebilir USB
aygıtları için bilgisayarın önündeki USB konektörlerini kullanın (bir USB aygıtını
önyükleme hakkında daha fazla bilgi için çevrimiçi Kullanım Kılavuzu'na bakın).
Yazıcılar ve klavyeler gibi normalde bağlı kalan aygıtlar için arka paneldeki USB
konektörlerini kullanmanız önerilir.
2
sabit disk etkinlik ışığı Bir sabit sürücüye erişildiğinde bu ışık yanıp söner.
3
güç düğmesi Bilgisayarı açmak için bu düğmeye basın.
DİKKAT:
Veri kaybını önlemek için, bilgisayarı güç düğmesine 6 saniye veya
daha uzun süre basarak kapatmayın. Bunun yerine, işletim sisteminden
kapatın.
DİKKAT:
Işletim sisteminizde ACPI etkinse, güç düğmesine bastığınızda
bilgisayar işletim sisteminden kapanır.
4
Dell rozeti Bu rozet bilgisayarınızın yönüyle eşleşecek şekilde döndürülebilir. Rozeti
döndürmek için, rozetin kenarlarından tutun, sıkıca bastırın ve rozeti döndürün.
Rozetin alt kısmındaki yuvayı kullanarak da rozeti döndürebilirsiniz.
89
3
5
1
4610
2
11
7

Hızlı Başvuru Kılavuzu
239
Masaüstü Bilgisayar — Arkadan Görünüş
5
güç ışığı Farklı çalışma durumlarını belirtmek için güç ışığı yanar ve yanıp söner veya sabit
kalır:
•Işık yok — Bilgisayar kapalıdır.
•Sabit yeşil — Bilgisayar normal çalışma durumundadır.
• Yanıp sönen yeşil — Bilgisayar güç tasarrufu modundadır.
• Yanıp sönen veya sabit koyu sarı — Çevrimiçi
Kullanım Kılavuzu
'nuzdaki "Güç
Sorunları" konusuna bakın.
Güç tasarrufu modundan çıkmak için güç düğmesine basın veya Windows Aygıt
Yöneticisi'nde uyandırma aygıtı olarak yapılandırılmışsa klavyeyi veya fareyi
kullanın.
Bilgisayarınızla ilgili sorunları gidermenizde yardımcı olacak ışık kodlarının
açıklamaları için bkz. "Sistem Işıkları" sayfa 255.
6
tanılama ışıkları Bilgisayar sorunlarını tanılama koduna göre gidermenize yardımcı olması için bu
ışıkları kullanın. Daha fazla bilgi için bkz. "Tanılama Işıkları" sayfa 256.
7
bağlantı bütünlüğü ışığı
•Yeşil — 10 Mb/sn ağ ve bilgisayar arasında iyi bir bağlantı var.
• Turuncu — 100 Mb/sn ağ ve bilgisayar arasında iyi bir bağlantı var.
• Kapalı — Bilgisayar ağa fiziksel bir bağlantı algılayamadı.
8
kulaklık konektörü Kulaklık konektörünü kulaklık bağlamak için kullanın.
9
disket sürücüsü Bu sürücüye disket takın.
10
CD/DVD sürücüsü Bu sürücüye CD veya DVD (destekleniyorsa) takın.
11
Service Tag yeri Dell Support web sitesine eriştiğinizde veya teknik desteği aradığınızda
bilgisayarınızı tanıtmak için Service Tag'i kullanın.
1
kart yuvaları Takılı PCI ve PCI Express Kartlarına erişim konektörü.
2
arka panel konektörleri Seri, USB veya diğer aygıtları uygun konektöre takın.
Bkz."Masaüstü Bilgisayar — Arka Panel Konektörleri" sayfa 240.
3
güç konektörü Güç kablosunu bu konektöre takın.
5
1
2 3 4 6

240
Hızlı Başvuru Kılavuzu
Masaüstü Bilgisayar — Arka Panel Konektörleri
4
voltaj seçim anahtarı Bilgisayarınız manuel voltaj seçim anahtarı ile donatılmıştır. Voltaj seçim anahtarını
el ile ayarlamadan bilgisayarınızın zarar görmemesi için, anahtarı bulunduğunuz
bölgedeki voltaja en yakın değere ayarlayın.
DİKKAT:
Japonya'da, voltaj seçim anahtarı 115-V pozisyonuna ayarlanmış
olmalıdır.
Ayrıca monitörünüzün ve bağlı aygıtlarınızın nominal elektrik değerlerinin
bölgenizde kullanılan AC gücüyle çalışmaya uygun olduğundan emin olun.
5
asma kilit halkası Bilgisayar kapağ ını kilitlemek için bir asma kilit takın.
6
kapak serbest bırakma
mandalı
Bilgisayar kapağını açmak için bu mandalı kullanın.
1
paralel bağlantı konektörü
Yazıcı gibi paralel aygıtları paralel bağlantı konektörüne bağlayın. USB yazıcınız
varsa, bunu USB konektörüne takın.
NOT:
Bilgisayar, aynı adrese yapılandırılmış paralel konektör içeren bir kart takılı
olduğunu algıladığında, tümleşik paralel konektör otomatik olarak devre dışı bırakılır.
Daha fazla bilgi için çevrimiçi Kullanım Kılavuzu'na bakın.
2
bağlantı bütünlüğü ışığı•Yeşil — 10 Mb/sn ağ ve bilgisayar arasında iyi bir bağlantı var.
• Turuncu — 100 Mb/sn ağ ve bilgisayar arasında iyi bir bağlantı var.
• Kapalı — Bilgisayar ağa fiziksel bir bağlantı algılayamadı.
13
10 9 8
5
6
7
24

Hızlı Başvuru Kılavuzu
241
3
ağ bağdaştırıcısı
konektörü
Bilgisayarınızı ağa veya geniş bant aygıtına bağlamak için, ağ kablosunun bir ucunu
ağ prizine veya ağ ya da geniş bant aygıtınıza bağlayın. Ağ kablosunun diğer ucunu
bilgisayarınızın arka panelindeki ağ bağdaştırıcısı konektörüne takın. Ağ kablosu
tam olarak yerine oturduğunda bir tık sesi duyarsınız.
NOT:
Ağ konektörüne telefon kablosu takmayın.
Ağ bağdaştırıcısı kartı bulunan bilgisayarlarda, karttaki konektörü kullanın.
Ağınız için Kategori 5 kablo ve konektör kullanmanız önerilir. Kategori 3 kablo
kullanmanız gerekiyorsa, güvenilir çalışmasını sağlamak için ağ hızını 10 Mb/sn'ye
zorlayın.
4
ağ etkinlik ışığı
Bu ışık ağ verileri iletir veya alırken sarı renkte yanıp söner. Yüksek hacimli ağ
trafiği, bu ışığın sürekli "açık" durumda görünmesine yol açabilir.
5
giriş konektörü
Kaset çalar, CD çalar veya VCR gibi kayıt/kayıttan yürütme aygıtlarını bağlamak
için mavi renkli giriş konektörünü kullanın.
Ses kartı bulunan bilgisayarlarda, karttaki konektörü kullanın.
6
çıkış konektörü
Kulaklıkları ve yerleşik yükselticili hoparlör setlerinin çoğunu bağlamak için yeşil
renkli çıkış konektörünü kullanın.
Ses kartı bulunan bilgisayarlarda, karttaki konektörü kullanın.
7
mikrofon konektörü
Bir ses veya telefon programına ses veya müzik girişi için kişisel bilgisayar
mikrofonu takmak için pembe mikrofon konektörünü kullanın.
Ses kartı bulunan bilgisayarlarda, mikrofon konektörü kartın üzerindedir.
8
USB 2.0 konektörleri (4)
Yazıcı ve klavye gibi genellikle bağlı kalan aygıtlar için arka USB konektörlerini
kullanın.
9
video konektörü
VGA uyumlu monitörünüzün monitörünüzün kablosunu mavi konektöre takın.
NOT:
Isteğe bağlı bir grafik kartı satın aldıysanız, bu konektör bir kapakçıkla
kapatılmış olacaktır. Monitörünüzü grafik kartındaki konektöre takın. Kapakçığı
çıkartmayın.
10
seri bağlantı konektörü
El bilgisayarı gibi seri aygıtları seri bağlantı noktasına bağlayın. Seri konektör 1 için
varsayılan bağlantı noktası COM1'dir.
Daha fazla bilgi için çevrimiçi Kullanım Kılavuzu'na bakın.

242
Hızlı Başvuru Kılavuzu
Bilgisayar Kapağını Çıkarma
UYARI:
Bu bölümdeki yordamlara başlamadan önce, Ürün Bilgisi Kilavuzu'ndaki güvenlik yönergelerini
izleyin.
UYARI:
Elektrik çarpmalarına karşı korunmak için, kapağı çıkarmadan önce bilgisayarınızın fişini elektrik
prizinden çekin.
Başlamadan Önce
DİKKAT:
Veri kaybını önlemek için, bilgisayarınızı kapatmadan önce açık dosyaları kaydedip kapatın ve açık
programlardan çıkın.
1
Işletim sistemini kapatın:
a
Açık dosyaları kaydedip kapatın, açık programlardan çıkın,
Başlat
düğmesini ve ardından
Bilgisayarı Kapat
'ı tıklatın.
b
Bilgisayarı kapat
penceresinde
Kapat
'ı tıklatın.
Işletim sistemini kapatma işlemi sona erdiğinde bilgisayar kapanır.
2
Bilgisayarın ve takılı aygıtların kapandığından emin olun. Işletim sistemini kapattığınızda bilgisayarınız
ve takılı aygıtlar otomatik olarak kapanmadıysa, bunları şimdi kapatın.
Bilgisayarınızın Içinde Çalışmaya Başlamadan Önce
Bilgisayarınızı olası zararlardan korumak ve kendi kişisel güvenliğinizi sağlamak için aşağıdaki güvenlik
ilkelerini kullanın.
UYARI:
Bu bölümdeki yordamlara başlamadan önce, Ürün Bilgisi Kilavuzu'ndaki güvenlik yönergelerini
izleyin.
UYARI:
Bileşenleri ve kartları itina ile kullanın. Bileşenlere veya kartların üzerindeki temas noktalarına
dokunmayın. Kartları uç kısmından veya metal montaj kenarından tutun. Bileşenleri, örneğin bir işlemciyi
pinlerinden değil kenarlarından tutun.
DİKKAT:
Yalnızca yetkili bir servis teknisyeni bilgisayarınızda onarım yapmalıdır. Dell tarafından
yetkilendirilmemiş servislerden kaynaklanan zararlar garantinizin kapsamında değildir.
DİKKAT:
Bir kabloyu çıkarırken kablonun kendisini değil, fişi veya koruyucu halkayı tutarak çekin. Bazı kablolarda
kilitleme dilleri vardır; bu tür kabloları çıkarırken, kabloyu çekmeden önce kilitleme dillerini içeriye bastırın.
Bağlayıcıları çıkartırken, bağlayıcı pinlerinin eğilmesini önlemek için bağlayıcıları düz tutun. Ayrıca bir kabloyu
bağlamadan önce, her iki bağlayıcının yönlerinin doğru olduğundan ve doğru hizalandıklarından emin olun.
Bilgisayara vermekten kaçınmak için, bilgisayarın içinde çalışmaya başlamadan önce aşağıdaki adımları
uygulayın.
1
Bilgisayarınızı kapatın.
DİKKAT:
Ağ kablosunu çıkarmak için, kabloyu önce bilgisayarınızdan, sonra da ağ duvar prizinden çekin.
2
Telefon veya iletişim hatlarını bilgisayardan çıkarın.

Hızlı Başvuru Kılavuzu
243
3
Bilgisayarınızı ve takılı tüm aygıtları elektrik prizlerinden çıkarın ve ardından sistem kartını topraklamak
için güç düğmesine basın.
4
Uygunsa, bilgisayarın standını çıkarın (yönergeler için, standla birlikte gelen belgelere bakın).
UYARI:
Elektrik çarpmalarına karşı korunmak için, kapağı çıkarmadan önce bilgisayarınızın fişini elektrik
prizinden çekin.
5
Bilgisayarın kapağını çıkarın:
• Mini tower bilgisayarın kapağını çıkarın (bkz. "Mini Tower Bilgisayar" sayfa 243).
• Masaüstü bilgisayarın kapağını çıkarın (bkz. "Masaüstü Bilgisayar" sayfa 249).
DİKKAT:
Bilgisayarınızın içindeki herhangi bir şeye dokunmadan önce, bilgisayarınızın arkasındaki metal kısım
gibi boyanmamış bir metal yüzeye dokunarak kendinizi topraklayın. Çalışırken, iç bileşenlere zarar verebilecek
statik elektriği boşaltmak için, boyanmamış metal yüzeye belirli aralıklarla dokunun.
Mini Tower Bilgisayar
UYARI:
Bu bölümdeki yordamlara başlamadan önce, Ürün Bilgisi Kilavuzu'ndaki güvenlik yönergelerini
izleyin.
UYARI:
Elektrik çarpmalarına karşı korunmak için, kapağı çıkarmadan önce bilgisayarınızın fişini elektrik
prizinden çekin.
1
"Başlamadan Önce" sayfa 242 konusundaki yönergeleri izleyin.
2
Arka paneldeki asma kilit halkasına bir asma kilit taktıysanız asma kilidi çıkarın.
3
Bilgisayarınızı yan yatırın.
4
Kapağı kaldırırken, kapak serbest bırakma mandalını geriye kaydırın.
5
Bilgisayar kapağının yan taraflarından tutun ve menteşe tırnaklarını baskı noktası olarak kullanarak
kapağı yukarı doğru döndürün.
6
Kapağı menteşe tırnaklarından çıkarın ve yumuşak ve pürüzsüz bir yere koyun.

244
Hızlı Başvuru Kılavuzu
1
güvenlik kablosu yuvası
2
kapak serbest bırakma mandalı
3
asma kilit halkası
2
1
3

Hızlı Başvuru Kılavuzu
245
Masaüstü Bilgisayar
UYARI:
Bu bölümdeki yordamlara başlamadan önce, Ürün Bilgisi Kilavuzu'ndaki güvenlik yönergelerini
izleyin.
UYARI:
Elektrik çarpmalarına karşı korunmak için, kapağı çıkarmadan önce bilgisayarınızın fişini elektrik
prizinden çekin.
1
"Başlamadan Önce" sayfa 242 konusundaki yönergeleri izleyin.
2
Arka paneldeki asma kilit halkasına bir asma kilit taktıysanız asma kilidi çıkarın.
3
Kapağı kaldırırken, kapak serbest bırakma mandalını geriye kaydırın.
4
Menteşe tırnaklarını destek olarak kullanarak kapağı yukarı doğru çevirin.
5
Kapağı menteşe tırnaklarından çıkarın ve yumuşak ve pürüzsüz bir yere koyun.
1
güvenlik kablosu yuvası
2
kapak serbest bırakma mandalı
3
asma kilit halkası
2
1
3

246
Hızlı Başvuru Kılavuzu
Bilgisayarınızın İçi
Mini Tower Bilgisayar
1
CD/DVD sürücüsü
4
sistem kartı
2
disket sürücüsü
5
ısı emicisi birimi
3
güç kaynağı
6
sabit sürücü
1
3
4
6
2
5

Hızlı Başvuru Kılavuzu
247
Sistem Kartı Bileşenleri
12
4
6
15
3
16
17
14
10
5
8
7
12
13
911

248
Hızlı Başvuru Kılavuzu
Atlatıcı Ayarları
1
fan konektörü (FAN)
10
iç hoparlör (SPKR1)
2
işlemci konektörü (CPU)
11
parola atlatıcı (PSWD)
3
işlemci güç konektörü (12VPOWER)
12
gerçek zaman saati atlatıcıyı sıfırlar (RTCRST)
4
ön panel konektörü (FNTPANEL)
13
pil yuvası (BATT)
5
bellek modülü konektörleri (DIMM1, DIMM2)
14
PCI Express x16 kart konektörü
6
SATA sürücü konektörleri (SATA0, SATA1)
15
PCI kart konektörleri (2)
7
güç konektörü (POWER)
16
disket sürücü konektörü (FLOPPY)
8
CD/DVD sürücüsü konektörü (IDE)
17
seri/ PS/2 konektörü (PS2/SER2)
9
SATA sürücü konektörleri (SATA2, SATA3)
Mini Tower Bilgisayar

Hızlı Başvuru Kılavuzu
249
Masaüstü Bilgisayar
Atlatıcı Ayar Açıklama
PSWD Parola özellikleri etkindir
(varsayılan ayar).
Parola özellikleri devre dışıdır.
RTCRST
Gerçek zamanlı saat etkindir
(varsayılan ayar).
Gerçek zamanlı saat sıfırlanır
(geçici atlatmalı).
atlatmalı atlatmasız
1
sürücü yuvası (CD/DVD,
disket ve sabit sürücü)
4
kart yuvaları
2
güç kaynağı
5
ısı emicisi birimi
3
sistem kartı
6
ön G/Ç paneli
1
2
3
4
5
6
1
1

250
Hızlı Başvuru Kılavuzu
Sistem Kartı Bileşenleri
12
4
6
15
3
16
17
14
10
5
8
7
12
13
11 9

Hızlı Başvuru Kılavuzu
251
Jumper Ayarları
1
fan konektörü (FAN)
10
iç hoparlör (SPKR1)
2
işlemci konektörü (CPU)
11
parola atlatıcı (PSWD)
3
işlemci güç konektörü (12VPOWER)
12
RTC sıfırlama atlatıcısı (RTCRST)
4
ön panel konektörü (FNTPANEL)
13
pil yuvası (BATT)
5
bellek modülü konektörleri (DIMM1, DIMM2)
14
PCI Express x16 kart konektörü
6
seri ATA sürücü konektörleri (SATA0, SATA1)
15
PCI kartı konektörü (2)
7
güç konektörü (POWER)
16
disket sürücü konektörü (FLOPPY)
8
CD/DVD sürücüsü konektörü (IDE)
17
seri/ PS/2 konektörü (PS2/SER2)
9
seri ATA sürücüsü konektörleri (SATA2, SATA3)
Masaüstü Bilgisayar

252
Hızlı Başvuru Kılavuzu
Sorun Çözme
Dell, bilgisayarınızın beklendiği şekilde çalışmaması halinde yardımcı olacak çeşitli araçlar sağlamaktadır.
Bilgisayarınız için kullanılabilecek en son sorun giderme bilgileri için, support.dell.com adresindeki Dell
Destek web sitesine bakın.
Bilgisayarınızda Dell'den yardım almanızı gerektiren sorunlar olursa, hatanın ayrıntılı bir açıklamasını, sesli
uyarı kodlarını veya tanılama ışığı desenlerini yazın, altına Express Service Code ve Service Tag
numaralarını kaydedin, sonra da bilgisayarınızın bulunduğu yerdeki Dell birimine başvurun. Dell'e
başvurma hakkında bilgi için, çevrimiçi Kullanım Kılavuzu'nuza bakın.
Express Service Code ve Service Tag örneği için bkz. "Bilgi Bulma" sayfa 227.
Express Service Code: ___________________________
Service Tag: ___________________________
Dell Diagnostics
UYARI:
Bu bölümdeki yordamlara başlamadan önce, Ürün Bilgisi Kilavuzu'ndaki güvenlik yönergelerini
izleyin.
Dell Teşhislerini Kullanma Zamanı
Bilgisayarınızda bir sorunla karşılaşırsanız, teknik yardım için Dell'i aramadan önce çevrimiçi User's
Guide'daki "Solving Problems" konusunda geçen denetimleri gerçekleştirin ve sonra Dell Diagnostics
programını çalıştırın. Dell'e başvurma hakkında bilgi için, çevrimiçi Kullanım Kılavuzu'nuza bakın.
DİKKAT:
Dell Diagnostics programı yalnızca Dell™ bilgisayarlarda çalışır.
Sistem kurulumuna girin (yönergeler için, çevrimiçi Kullanım Kılavuzu'ndaki "Sistem Kurulumu" konusuna
bakın), bilgisayarınızın yapılandırma bilgilerini gözden geçirin ve sınamak istediğiniz aygıtın sistem
kurulumunda görüntülendiğini ve etkin olduğunu doğrulayın.
Atlatıcı Ayar Açıklama
PSWD Parola özellikleri etkindir
(varsayılan ayar).
Parola özellikleri devre dışıdır.
RTCRST
Gerçek zamanlı saat etkindir
(varsayılan ayar).
Gerçek zamanlı saat sıfırlanır
(geçici atlatmalı).
atlatmalı atlatmasız
1
1

Hızlı Başvuru Kılavuzu
253
Dell Diagnostics programını sabit sürücünüzden veya isteğe bağlı Drivers and Utilities CD'sinden
(ResourceCD de denir).
Dell Diagnostics Programını Sabit Sürücünüzden Başlatma
1
Bilgisayarınızı açın (veya yeniden başlatın).
2
DELL logosu göründüğünde, hemen <F12> tuşuna basın.
NOT:
Tanılayıcı program disk bölümü bulunamadığını bildiren bir iletiyle karşılaşırsanız, isteğe bağlı Drivers
and Utilities CD'sinden Dell Diagnostics'i çalıştırın (bkz. "Dell Diagnostics Programını Drivers and Utilities
CD'sinden Başlatma" sayfa 253).
Fazla uzun süre beklediyseniz ve işletim sistemi logosu görünürse, Microsoft
®
Windows
®
masaüstünü
görene kadar bekleyin. Ardından bilgisayarınızı kapatın ve yeniden deneyin.
3
Önyükleme aygıt listesi göründüğünde,
Boot to Utility Partition
(Yardımcı Program Bölümüne Önyükle)
seçeneğini vurgulayın ve <Enter> tuşuna basın.
4
Dell Diagnostics programının
Ana Menüsü
göründüğünde, yürütmek istediğiniz sınamayı seçin.
Dell Diagnostics Programını Drivers and Utilities CD'sinden Başlatma
1
Drivers and Utilities
CD'sinden.
2
Bilgisayarı kapatıp tekrar başlatın.
DELL logosu göründüğünde, hemen <F12> tuşuna basın.
Uzunca bir süre beklediyseniz ve işletim sistemi logosu görünürse, Microsoft Windows masaüstünü
görene kadar bekleyin. Ardından bilgisayarınızı kapatın ve yeniden deneyin.
NOT:
Sonraki adımlar, önyükleme sırasını yalnızca bir kez değiştirir. Sonraki başlatmada, bilgisayar sistem
kurulumunda belirtilen aygıtlara göre önyükleme yapar.
3
Önyükleme aygıt listesi göründüğünde, CD/DVD sürücüsü listesini vurgulayın ve <Enter> tuşuna basın.
4
CD önyükleme menüsünden CD/DVD sürücüsü seçeneğinin listesini seçin.
5
Görünen menüden CD/DVD sürücüden önyükleme seçeneğini belirleyin.
6
Drivers and Utilities
CD'si menüsünü başlatmak için
1
yazın.
7
Dell Diagnostics programını başlatmak için
2
yazın.
8
Numaralı listeden
Run the 32 Bit Dell Diagnostics
'ı (32 Bit Dell Diagnostics Programını Çalıştır) seçin.
Birden çok sürüm listelenmişse, bilgisayarınıza uygun sürümü seçin.
9
Dell Diagnostics programının
Ana Menüsü
göründüğünde, yürütmek istediğiniz sınamayı seçin.
Dell Tanıları Ana Menüsü
1
Dell Diagnostics programı yüklendikten ve
Ana
Menü
ekranı göründükten sonra, istediğiniz seçeneğin
düğmesini tıklatın.

254
Hızlı Başvuru Kılavuzu
2
Sınama sırasında bir sorunla karşılaşılırsa, sorunun hata kodunu ve açıklamasını içeren bir ileti görünür.
Hata kodunu ve sorun açıklamasını not edin ve ekrandaki yönergeleri izleyin.
Hata durumunu çözemiyorsanız, Dell'e başvurun. Dell'e başvurma hakkında bilgi için, çevrimiçi
Kullanım
Kılavuzu
'nuza bakın.
NOT:
Bilgisayarınızın Service Tag numarası, her sınama ekranının en üstünde bulunur. Dell'e
başvurduğunuzda, teknik destek bölümü Service Tag numaranızı sorar.
3
Custom Test
(Özel Sınama) veya
Symptom Tree
(Belirti Ağacı) seçeneğinden bir sınama yürütürseniz,
daha fazla bilgi için aşağıdaki tabloda açıklanan ilgili sekmeyi tıklatın.
4
Sınamalar bittiğinde, Dell Diagnostics programını
Drivers and Utilities
CD'sinden (isteğe bağlı)
çalıştırdıysanız, CD'yi çıkarın.
5
Sınama ekranını kapatarak,
Ana Menü
ekranına dönün. Dell Diagnostics programından çıkmak ve
bilgisayarı yeniden başlatmak için,
Ana
Menü
ekranını kapatın.
Seçenek Işlev
Express Test (Hızlı
Sınama)
Aygıtları hızla sınar. Bu sınama 10 - 20 dakika kadar sürer ve katılımınızı gerektirmez.
Sorunu daha hızlı saptama olasılığını artırmak için önce Ekspres Test'i çalıştırın.
Extended Test
(Genişletilmiş Sınama)
Aygıtları tam olarak sınar. Bu sınama bir saat ya da daha uzun sürer ve belirli soruları
yanıtlamanızı gerektirir.
Custom Test (Özel
Sınama)
Belirli bir aygıtı sınar. Çalıştırmak istediğiniz sınamaları özelleştirebilirsiniz.
Symptom Tree (Belirti
Ağacı)
Karşılaşılan en yaygın belirtileri listeler ve yaşadığınız sorunun belirtisine göre bir sınama
seçmenize olanak sağlar.
Sekme Işlev
Results (Sonuçlar) Sınama sonuçlarını ve karşılaşılan hata durumlarını görüntüler.
Errors (Hatalar) Karşılaşılan hata durumlarını, hata kodlarını ve sorun açıklamasını görüntüler.
Help (Yardım) Sınamayı açıklar ve sınama çalıştırma gereksinimlerini belirtebilir.
Configuration
(Yapılandırma)
Seçilen aygıt için donanım yapılandırmanızı görüntüler.
Dell Diagnostics programı, tüm aygıtların yapılandırma bilgilerini sistem kurulumundan,
bellekten ve çeşitli iç sınamalardan alır ve bilgileri ekranın sol bölmesindeki aygıt
listesinde görüntüler. Aygıt listesi, bilgisayarınıza takılı tüm bileşenlerin veya
bilgisayarınıza bağlanmış tüm aygıtların adlarını görüntülemeyebilir.
Parameters
(Parametreler)
Sınama ayarlarını değiştirerek sınamayı özelleştirebilirsiniz.

Hızlı Başvuru Kılavuzu
255
Sistem Işıkları
Güç ışığınız, bir bilgisayar sorununu belirtebilir.
Güç Işığı Problem Tanımı Önerilen Çözüm
Sabit yeşil Güç açık ve bilgisayar normal
çalışıyor.
Düzeltici eylem gerekmez.
Yanıp sönen yeşil Bilgisayar güç tasarrufu modundadır. Bilgisayarı çalıştırmak için güç düğmesine
basın, fareyi hareket ettirin veya klavyedeki bir
tuşa basın.
Yeşil ışık birkaç kez yanıp
sönüyor ve ardından
kapanıyor
Bir yapılandırma hatası var. Belirli bir sorunu tanımlayıp tanımlamadığını
görmek için Tanılama Işıklarını denetleyin
(bkz. "Tanılama Işıkları" sayfa 256).
Sabit sarı Dell Diagnostics programı bir sınama
yürütüyor veya sistem kartındaki bir
aygıt hatalı veya yanlış takılmış.
Dell Diagnostics programı çalışıyorsa,
sınamanın bitmesini bekleyin.
Belirli bir sorunu tanımlayıp tanımlamadığını
görmek için Tanılama Işıklarını denetleyin
(bkz. "Tanılama Işıkları" sayfa 256).
Bilgisayar önyükleme yapmıyorsa, teknik
yardım için Dell'e başvurun.
Dell'e başvurma
hakkında bilgi için, çevrimiçi
Kullanım
Kılavuzu
'nuza bakın.
Yanıp sönen sarı Güç kaynağı veya sistem kartı arızası
ortaya çıktı.
Belirli bir sorunu tanımlayıp tanımlamadığını
görmek için Tanılama Işıklarını denetleyin
(bkz. "Tanılama Işıkları" sayfa 256).
Çevrimiçi Kullanım Kılavuzu'nuzdaki "Güç
Sorunları" konusuna bakın.
POST sırasında sabit yeşil
ve bir sesli uyarı kodu
BIOS çalışması sırasında bir sorun
belirlendi.
Sesli uyarı koduyla tanılama yönergeleri için
bkz. "Bip Kodları" sayfa 258. Ayrıca, belirli bir
sorunu tanımlayıp tanımlamadığını görmek için
Tanılama Işıklarını denetleyin.
Sabit yeşil güç ışığı, sesli
uyarı kodu yok ve POST
sırasında görüntü yok
Monitör veya grafik kartı hatalı ya da
yanlış takılmış olabilir.
Belirli bir sorunu tanımlayıp tanımlamadığını
görmek için Tanılama Işıklarını denetleyin.
Yeşil güç ışığı kesintisiz
yanıyor ve bip kodu yok,
ancak bilgisayar POST
sırasında kilitleniyor
Tümleşik sistem kartı aygıtlarından biri
hatalı olabilir.
Belirli bir sorunu tanımlayıp tanımlamadığını
görmek için Tanılama Işıklarını denetleyin.
Sorun tanımlanmıyorsa, teknik yardım için
Dell'e başvurun.
Dell'e başvurma hakkında bilgi
için, çevrimiçi
Kullanım Kılavuzu
'nuza bakın.

256
Hızlı Başvuru Kılavuzu
Tanılama Işıkları
UYARI:
Bu bölümdeki yordamlara başlamadan önce, Ürün Bilgisi Kilavuzu'ndaki güvenlik yönergelerini
izleyin.
Sorun gidermenize yardımcı olması için, bilgisayarınızın ön veya arka panelinde "1," "2," "3" ve "4"
şeklinde etiketlenmiş dört ışık vardır. Bu ışıklar "kapalı" veya yeşil olabilir. Bilgisayar normal şekilde
başladığında, ışıkların biçimi veya kodları, önyükleme işlemi tamamlandıkça değişir. Sistem
önyüklemesinin POST kısmı başarıyla tamamlandığında, dört ışığın tümü kısa bir süre sabit yeşil görünür ve
ardından kapanır.
POST işlemi sırasında bilgisayarda hata olursa, LED'lerde görüntülenen desen, işlem sırasında bilgisayarın
takıldığı yeri saptamaya yardım edebilir. Bilgisayar, başarılı bir POST sonrasında hata verirse, tanılama
ışıkları sorunun nedenini belirtmez.
NOT:
Tanılama ışıklarının yönü, sistem türüne göre değişebilir. Tanılama ışıkları yatay veya dikey yönde olabilir.
Işık Deseni Problem Tanımı Önerilen Çözüm
Bilgisayar normal "kapalı" durumda veya
BIOS öncesi bir arıza olmuş olabilir.
Bilgisayar işletim sistemini başarıyla
önyükledikten sonra tanılama ışıkları
yanmıyor.
Bilgisayarı çalışan bir elektrik prizine takın ve güç
düğmesine basın.
Olası bir BIOS hatası oluştu; bilgisayar
kurtarma modunda.
BIOS Kurtarma yardımcı programını çalıştırın,
kurtarmanın tamamlanmasını bekleyin ve
ardından bilgisayarı yeniden başlatın.
Bir işlemci arızası oluşmuş olabilir. Işlemciyi tekrar takın ve bilgisayarı yeniden
başlatın.
İşlemciyi yeniden takma hakkında bilgi
için çevrimiçi
Kullanım Kılavuzu
'nuza bakın.
Bellek modülleri saptandı, ancak bir bellek
hatası oluştu.
• Yalnızca bir bellek modülü takılıysa, bunu
çıkarıp takın ve bilgisayarı yeniden başlatın.
Bellek modüllerini yeniden takma hakkında bilgi
için, çevrimiçi
Kullanım Kılavuzu
'nuza bakın.
• Iki ya da daha fazla bellek modülü takılıysa,
modülleri çıkarın, tek bir modülü takın ve
bilgisayarı yeniden başlatın. Bilgisayar normal
şekilde başlarsa, diğer bir modülü takın. Arızalı
bir modül bulana kadar veya tüm modülleri
hatasız şekilde takana kadar devam edin.
• Mümkünse, bilgisayarınıza aynı türde, düzgün
çalışan bir bellek takın.
• Sorun devam ederse,
Dell'e başvurun
. Dell'e
başvurma hakkında bilgi için, çevrimiçi
Kullanım Kılavuzu
'nuza bakın.

Hızlı Başvuru Kılavuzu
257
Bir grafik kartı hatası oluşmuş olabilir.
• Bilgisayarda bir grafik kartı varsa, kartı çıkarıp
takın ve ardından bilgisayarı yeniden başlatın.
• Sorun devam ederse, çalıştığını bildiğiniz bir
grafik kartı takın ve bilgisayarı yeniden başlatın.
• Sorun devam ederse veya bilgisayarda tümleşik
grafik kartı varsa,
Dell'e başvurun
. Dell'e
başvurma hakkında bilgi için, çevrimiçi
Kullanım Kılavuzu
'nuza bakın.
Bir disket veya sabit sürücü arızası oluşmuş
olabilir.
Tüm güç ve veri kablolarını yeniden yerleştirin ve
bilgisayarı yeniden başlatın.
Bir USB hatası oluşmuş olabilir. Tüm USB aygıtlarını yeniden takın, kablo
bağlantılarını kontrol edin ve ardından bilgisayarı
yeniden başlatın.
Bellek modülü algılanamadı.
• Yalnızca bir bellek modülü takılıysa, bunu
çıkarıp takın ve bilgisayarı yeniden başlatın.
Bellek modüllerini yeniden takma hakkında bilgi
için, çevrimiçi
Kullanım Kılavuzu
'nuza bakın.
• Iki ya da daha fazla bellek modülü takılıysa,
modülleri çıkarın, tek bir modülü takın ve
bilgisayarı yeniden başlatın. Bilgisayar normal
şekilde başlarsa, diğer bir modülü takın. Arızalı
bir modül bulana kadar veya tüm modülleri
hatasız şekilde takana kadar devam edin.
• Mümkünse, bilgisayarınıza aynı türde, düzgün
çalışan bir bellek takın.
• Sorun devam ederse,
Dell'e başvurun
. Dell'e
başvurma hakkında bilgi için, çevrimiçi
Kullanım Kılavuzu
'nuza bakın.
Bellek modülleri saptandı, ancak bir bellek
yapılandırma veya uyum hatası var.
•
Özel bellek modülü/bellek konektörü
yerleştirme gereksinimi
bulunmadığından emin
olun.
•Taktığınız
bellek modüllerinin
bilgisayarınızla
uyumlu olduğunu doğrulayın.
• Sorun devam ederse,
Dell'e başvurun
. Dell'e
başvurma hakkında bilgi için, çevrimiçi
Kullanım Kılavuzu
'nuza bakın.
Işık Deseni Problem Tanımı Önerilen Çözüm

258
Hızlı Başvuru Kılavuzu
Bip Kodları
Monitör hataları veya sorunları görüntüleyemezse, bilgisayarınız başlangıçta bir dizi sesli uyarı verebilir.
Sesli uyarı kodu adı verilen sesli uyarı dizileri bir sorunu belirtir. Olası sesli uyarı kodlarından biri
(kod 1-3-1), tek bir sesli uyarı, arka arkaya üç sesli uyarı ve ardından tek bir sesli uyarı şeklinde bir diziden
oluşur. Bu sesli uyarı kodu, bilgisayarın bir bellek sorunuyla karşılaştığını anlatır.
Bilgisayarınız başlatma sırasında uyarı sesi çıkartırsa:
1
Sesli uyarı kodunu not edin.
2
Daha ciddi bir sebebi bulmak için, bkz. "Dell Diagnostics" sayfa 252.
3
Teknik destek için Dell'le temasa geçin. Dell'e başvurma hakkında bilgi için, çevrimiçi
Kullanım
Kılavuzu
'nuza bakın.
Bir hata oluştu.
Bu desen, sistem ayarlarına girdiğinizde de
ortaya çıkabilir ve bir sorun olduğu
anlamına gelmeyebilir.
• Sabit diskten, CD sürücüsünden ve DVD
sürücüsünden gelen tüm kabloların sistem
kartına düzgün bağlandığından emin olun.
• Monitörünüzün ekranında görünen bilgisayar
iletisini kontrol edin.
• Sorun devam ederse,
Dell'e başvurun
. Dell'e
başvurma hakkında bilgi için, çevrimiçi
Kullanım Kılavuzu
'nuza bakın.
POST tamamlandıktan sonra, dört tanılama
ışığı normal çalışma koşulunda olduğunu
belirtmek üzere kısa bir süre kapanır, sonra
da yeşil yanmaya başlar.
Yok.
Kod Sebep Kod Sebep
1-1-2 Mikroişlemci kayıt hatası 3-1-4 Bağımlı kesinti maskesi kayıt hatası
1-1-3 NVRAM okuma/yazma hatası 3-2-2 Kesinti vektör yükleme hatası
1-1-4 ROM BIOS sağlama hatası 3-2-4 Klavye Denetleyicisi sınama hatası
1-1-2 Programlanabilir aralık süreölçeri hatası 3-3-1 NVRAM güç kaybı
1-2-2 DMA başlatma hatası 3-3-2 Geçersiz NVRAM yapılandırması
1-3-2 DMA sayfa kaydı okuma/yazma hatası 3-3-4 Görüntü Belleği sınama hatası
1-3 Görüntü Belleği sınama hatası 3-1-4 Ekran başlatma hatası
1-3-1 den 2-4-4 e
kadar
Bellek düzgün tanımlanmıyor veya
kullanılmıyor
3-4-2 Ekran kaynağını bulma hatası
3-1-1 Bağımlı DMA kayıt hatası 3-4-3 Video ROM arama hatası
3-1-2 Ana DMA kayıt hatası 4-2-1 Süreölçer sesi yok
Işık Deseni Problem Tanımı Önerilen Çözüm

Hızlı Başvuru Kılavuzu
259
Yazılım ve Donanım Uyuşmazlıklarını Çözümleme
Işletim sistemi kurulumu sırasında bir aygıt algılanamazsa veya algılandığı halde, yanlış yapılandırılırsa,
uyumsuzluğu çözmek için Donanım Sorun Gidericisi'ni kullanabilirsiniz.
1
Başlat
düğmesini ve
Yardım ve Destek
'i tıklatın.
2
Ara
alanına
hardware troubleshooter
(donanım sorun gidericisi) yazın ve ardından aramayı
başlatmak için oku tıklatın.
3
Arama Sonuçları
listesinde
Donanım Sorun Gidericisi
'ni tıklatın.
4
Donanım Sorun Gidericisi
listesinde,
Bilgisayarımda bir donanım çakışmasını çözmem gerekiyor
'u
ve ardından
Devam
'ı tıklatın.
Microsoft Windows XP Sistem Geri Yükleme Özelliğini Kullanma
Microsoft Windows XP işletim sistemi, donanımda, yazılımda veya sistem ayarlarında yapılan değişiklikler
bilgisayarı istenmeyen bir sistem durumuna getirmişse, bilgisayarınızı önceki bir sistem durumuna geri
yüklemenizi (veri dosyalarını etkilemeden) sağlayan Sistem Geri Yükleme özelliği sağlar. Sistem Geri
Yükleme'yi kullanma hakkında daha fazla bilgi için, Windows Yardım ve Destek Merkezi'ne bakın.
Windows Yardım ve Destek Merkezi'ne erişmek için, bkz. "Windows Yardım ve Destek Merkezi" sayfa 229.
DİKKAT:
Veri dosyalarınız düzenli olarak yedekleyin. Sistem Geri Yükleme, veri dosyalarınızı izlemez veya
kurtarmaz.
Geri Yükleme Noktası Oluşturma
1
Başlat
düğmesini ve
Yardım ve Destek
seçeneğini tıklatın.
2
Sistem Geri Yükleme
'yi tıklatın.
3
Ekrandaki yönergeleri izleyin.
Bilgisayarı Daha Önceki Bir Sistem Durumuna Geri Yükleme
DİKKAT:
Bilgisayarı daha önceki bir sistem durumuna geri yüklemeden önce, açık dosyaları kaydedip kapatın ve
açık programlardan çıkın. Sistem geri yükleme bitene kadar hiçbir dosyayı veya programı değiştirmeyin, açmayın
veya silmeyin.
3-1-3 Ana kesinti maskesi kayıt hatası 4-2-2 Kapatma hatası
4-2-3 Kapı A20 hatası 4-4-1 Seri veya paralel bağlantı noktası testi hatası
4-2-4 Korumalı kipte beklenmedik kesinti 4-4-2 Gölgeli belleğe kod açma hatası.
4-3-1 Adres 0FFFFh üzerinde bellek hatası 4-4-3 Matematik yardımcı işlemcisi test hatası
4-3-3 Saat çipi sayacı 2 başarısız 4-4-4 Önbellek testi hatası
4-3-4 Gün saati durdu
Kod Sebep Kod Sebep

260
Hızlı Başvuru Kılavuzu
1
Başlat
düğmesini tıklatın,
Tüm Programlar
→
Donatılar
→
Sistem Araçları
'nın üzerine gelin ve
ardından
Sistem Geri Yükleme
'yi tıklatın.
2
Bilgisayarımı daha önceki bir tarihe geri yükle
'nin seçildiğinden emin olun ve
Devam
'ı tıklatın.
3
Bilgisayarınızı geri yüklemek istediğiniz bir takvim tarihini tıklatın.
Geri Yükleme Noktası Seç
ekranı, geri yükleme noktalarını görmenizi ve seçmenizi sağlayan bir takvim
içerir. Kullanılabilir geri yükleme noktalarına sahip tüm takvim günleri kalın yazı biçimiyle görüntülenir.
4
Bir geri yükleme noktası seçin ve
Devam
'ı tıklatın.
Bir takvim tarihinde yalnızca bir geri yükleme noktası varsa, o geri yükleme noktası otomatik olarak
seçilir. Iki veya daha fazla geri yükleme noktası varsa, tercih ettiğiniz geri yükleme noktasını tıklatın.
5
Devam
'ı tıklatın.
Sistem Geri Yükleme, veri toplamayı bitirdiğinde
Geri Yükleme Tamamlandı
ekranı görüntülenir ve
bilgisayar yeniden başlar.
6
Bilgisayar yeniden başladıktan sonra,
Tamam
'ı tıklatın.
Geri yükleme noktasını değiştirmek için, farklı bir geri yükleme noktası kullanarak yukarıdaki adımları
tekrarlayabilirsiniz veya geri yüklemeyi geri alabilirsiniz.
Son Sistem Geri Yüklemeyi Geri Alma
DİKKAT:
Son sistem geri yüklemesini geri almadan önce, açık dosyaları kaydedip kapatın ve açık programlardan
çıkın. Sistem geri yükleme bitene kadar hiçbir dosyayı veya programı değiştirmeyin, açmayın veya silmeyin.
1
Başlat
düğmesini tıklatın,
Tüm Programlar
→
Donatılar
→
Sistem Araçları
'nın üzerine gelin ve
ardından
Sistem Geri Yükleme
'yi tıklatın.
2
Son geri yüklememi geri al
'ı ve
Devam
'ı tıklatın.
3
Devam
'ı tıklatın.
Sistem Geri Yükleme
ekranı görüntülenir ve bilgisayar yeniden başlar.
4
Bilgisayar yeniden başladıktan sonra,
Tamam
'ı tıklatın.
Sistem Geri Yükleme'yi Etkinleştirme
Windows XP'yi 200 MB'den daha az kullanılabilir boş sabit disk alanıyla yeniden yüklerseniz, Sistem Geri
Yükleme otomatik olarak devre dışı kalır. Sistem Geri Yükleme'nin etkin olduğunu doğrulamak için:
1
Başlat
düğmesini ve
Denetim
Masası
'nı tıklatın.
2
Performans ve Bakım
'ı tıklatın.
3
Sistem
'i tıklatın.
4
Sistem Geri Yükleme
sekmesini tıklatın.
5
Sistem Geri Yükleme'yi Kapat
kutusunda işaret bulunmadığından emin olun.

Hızlı Başvuru Kılavuzu
261
Microsoft Windows XP'yi Yeniden Yükleme
Başlamadan Önce
NOT:
Bu belgedeki yordamlar Windows XP Home Edition'daki varsayılan Windows görünümü için yazılmıştır; Dell
bilgisayarınızı Windows Klasik görünümüne ayarlarsanız veya Windows XP Professional kullanıyorsanız adımlar
değişebilir.
Yeni yüklenen bir sürücüdeki sorunu düzeltmek için Windows XP işletim sistemini yeniden yüklemeyi
düşünüyorsanız, önce Windows XP Aygıt Sürücüsünü Geri Alma'yı kullanmayı deneyin.
1
Başlat
düğmesini ve
Denetim Masas
ı'nı tıklatın.
2
Kategori Seç
altında
Performans ve Bakım
.
3
Sistem
'i tıklatın.
4
Sistem Özellikleri
penceresinde,
Donanım
sekmesini tıklatın.
5
Aygıt Yöneticisi
'ni tıklatın.
6
Yeni sürücünün yüklendiği aygıtı tıklatın ve
Özellikler
'i tıklatın.
7
Sürücüler
sekmesini tıklatın.
8
Sürücüyü Geri Al
'ı tıklatın.
Sürücüye Geri Dön komutu sorunu çözmezse, işletim sisteminizi yeni aygıt sürücüsünü yüklemeden önceki
durumuna geri döndürmek için Sistem Geri Yükleme özelliğini kullanın (bkz. "Microsoft Windows XP
Sistem Geri Yükleme Özelliğini Kullanma" sayfa 259).
NOT:
Drivers and Utilities CD'sinden bilgisayarın montajı sırasında yüklenen sürücüleri içerir. Drivers and Utilities
CD'sinden bilgisayarınızın RAID denetleyicisi varsa gereken sürücüler dahil, gerekli sürücüleri yüklemek
içinkullanın.
Windows XP'yi Yeniden Yükleme
DİKKAT:
Windows XP'yi yeniden yüklemek için, Windows XP Service Pack 1 veya daha üstünü kullanmanız
gerekir.
DİKKAT:
Kurulumu yapmadan önce, birincil sabit sürücünüzdeki tüm veri dosyalarını yedekleyin. Geleneksel
sabit sürücü yapılandırmaları için, birincil sabit sürücü, bilgisayarın ilk algıladığı sürücüdür.
Windows XP'yi yeniden yüklemek için aşağıdakiler gereklidir:
•Dell
Operating System
CD'si
•Dell
Drivers and Utilities
CD'sinden
Windows XP'yi yeniden yüklemek için, aşağıdaki bölümlerde anlatılan adımları, listelendikleri sırayla
uygulayın.
Yeniden yükleme işleminin tamamlanması 1 ila 2 saat sürebilir. Işletim sistemini yeniden yükledikten sonra,
aygıt sürücülerini, virüsten koruma programını ve diğer yazılımları da yeniden yüklemeniz gerekir.

262
Hızlı Başvuru Kılavuzu
DİKKAT:
Operating System CD'si, Windows XP'yi yeniden yükleme seçenekleri sunar. Bu seçenekler, dosyaların
üzerine yazabilir ve sabit sürücünüzde yüklü programları etkileyebilir. Bu yüzden, bir Dell teknik destek temsilcisi
bunu yapmanızı söylemedikçe Windows XP'yi yeniden yüklemeyin.
DİKKAT:
Windows XP ile çakışmaları önlemek için, Windows XP'yi yeniden yüklemeden önce, bilgisayarınıza
yüklü virüsten koruma yazılımlarını devre dışı bırakın. Yönergeler için, yazılımınızla birlikte verilmiş belgelere bakın.
Operating System CD'sinden Önyükleme
1
Açık dosyaları kaydedip kapatın ve açık programlardan çıkın.
2
Operating System
CD'sini takın.
Install Windows XP
(Windows XP'yi Yükle) iletisi görünürse
Çıkış
'ı tıklatın.
3
Bilgisayarı yeniden başlatın.
4
DELL logosu görüntülenir görüntülenmez <F12> tuşuna basın.
Işletim sistemi logosu görünürse, Windows masaüstünü görene kadar bekleyin ve ardından bilgisayarınızı
kapatıp yeniden deneyin.
5
CD-ROM
'u seçmek için ok tuşlarına ve <Enter>'a basın.
6 Press any key to boot from CD
(CD'den başlatmak için bir tuşa basın) iletisi görüntülenirse,
herhangi bir tuşa basın.
Windows XP Kurulumu
1
Windows XP Kurulumu
ekranı görüntülendiğinde,
Windows'u şimdi kur
'u seçmek için <Enter>'a basın.
2
Microsoft Windows Lisans Sözleşmesi
ekranındaki bilgileri okuyun ve lisans sözleşmesini kabul etmek
için <F8>'e basın.
3
Bilgisayarınızda Windows XP zaten kuruluysa ve geçerli Windows XP verilerinizi kurtarmak istiyorsanız,
onarma seçeneğini seçmek için
r
yazın ve CD'yi çıkarın.
4
Yeni bir Windows XP kopyası yüklemek istiyorsanız, bu seçenek için <Esc> tuşuna basın.
5
Vurgulanan bölümü seçmek için <Enter> tuşuna basın (önerilen) ve ekrandaki yönergeleri uygulayın.
Windows XP Kurulumu
ekranı görüntülenir ve işletim sistemi dosyaları kopyalamaya ve aygıtları
yüklemeye başlar. Bilgisayar birkaç kez otomatik olarak yeniden başlar.
NOT:
Kurulumu tamamlamak için gereken zaman, sabit sürücünün büyüklüğüne ve bilgisayarınızın hızına bağlıdır.
DİKKAT:
Aşağıdaki ileti görüntülendiğinde hiçbir tuşa basmayın:
Press any key to boot from
the CD
.
(CD'den başlatmak için bir tuşa basın).
6
Bölge ve Dil Seçenekleri
ekranı görüntülendiğinde, bölgenizin ayarlarını seçin ve
İleri
'yi tıklatın.
7
Yazılımınızı Kişiselleştirin
ekranı görüntülendiğinde adınızı ve kuruluşunuzun adını (isteğe bağlı) girin
ve
İleri
'yi tıklatın.
8
Bilgisayar Adı ve Yönetici Parolası
penceresinde, bilgisayarınız için bir ad girin (veya sağlanan adı
kabul edin), parolayı girin ve
İleri
'yi tıklatın.
9
Modem Çevirme Bilgisi
ekranı görüntülenirse, istenen bilgileri girin ve
İleri
'yi tıklatın.

Hızlı Başvuru Kılavuzu
263
10
Tarih ve Saat Ayarları
penceresinde tarihi, saati ve saat dilimini girin ve
İleri
'yi tıklatın.
11
Ağ Ayarları
ekranı görüntülenirse,
Normal
'i ve
İleri
'yi tıklatın.
12
Windows XP Professional'ı yeniden yüklüyorsanız ve ağ ayarlarınız hakkında ek bilgiler sağlamanız
istenirse, seçimlerinizi girin. Ayarlarınızdan emin değilseniz, varsayılan seçimleri kabul edin.
Windows XP, işletim sistemi bileşenlerini yükler ve bilgisayarı yapılandırır. Bilgisayar otomatik olarak
yeniden başlar.
DİKKAT:
Aşağıdaki ileti görüntülendiğinde hiçbir tuşa basmayın:
Press any key to boot from the
CD
.
(CD'den başlatmak için bir tuşa basın).
13
Microsoft'a Hoş Geldiniz
ekranı görüntülendiğinde
İleri
'yi tıklatın.
14 How will this computer connect to the Internet?
(Bu bilgisayar Internet'e nasıl
bağlansın?) iletisi görüntülendiğinde
Atla
'yı tıklatın.
15
Microsoft'a kayıt yaptırmak istiyor musunuz?
ekranı görüntülendiğinde
Hayır, şu anda değil
'i seçin
ve
İleri
'yi tıklatın.
16
Bu bilgisayarı kimler kullanacak?
ekranı görüntülendiğinde en çok beş kullanıcı girebilirsiniz.
17
Devam
'ı tıklatın.
18
Kurulumu tamamlamak için
Son
'u tıklatın ve CD'yi çıkarın.
19
İlgili sürücüleri
Drivers and Utilities
CD'sinden.
20
Virüsten koruma yazılımınızı yeniden yükleyin.
21
Programlarınızı yeniden yükleyin.
NOT:
Microsoft Office veya Microsoft Works Suite programlarını yeniden yüklemek veya etkinleştirmek için,
Microsoft Office veya Microsoft Works Suite CD'sinin arkasında bulunan Ürün Anahtarı numarası gereklidir.
Drivers and Utilities CD'sini Kullanma
Drivers and Utilities CD'sini (ResourceCD olarak da bilinir) Windows işletim sistemini çalıştırırken
kullanmak için:
NOT:
Aygıt sürücülerine ve kullanıcı belgelerine erişmek için, Drivers and Utilities
CD'sini
Windows çalıştırırken
kullanmanız gerekir.
1
Bilgisayarı açın ve Windows masaüstünün yüklenmesini bekleyin.
2
Drivers and Utilities
CD'sini CD sürücüye takın.
Drivers and Utilities
CD'sini bu bilgisayarda ilk kez kullanıyorsanız,
ResourceCD Installation
(Kaynak CD
Kurulumu) penceresi açılır ve
Drivers and Utilities
CD'sinin yüklemeye başlayacağını bildirir.
3
Devam etmek
için
Tamam'ı tıklatın.
Yüklemeyi tamamlamak için yükleme programının istediklerini yanıtlayın.
4
Welcome Dell System Owner
(Hoş Geldiniz Dell Sistemi Sahibi) ekranında
İleri
'yi tıklatın.
5
Uygun
Sistem Modeli
,
İşletim Sistemi
,
Aygıt Türü
, ve
Konu
'yu seçin.

264
Hızlı Başvuru Kılavuzu
Bilgisayarınızın Sürücüleri
Bilgisayarınız için bir aygıt sürücüleri listesi görüntülemek için:
1
Topic
(Konu) açılan menüsünde
My Drivers
'ı (Sürücülerim) tıklatın.
Drivers and Utilities
CD'si (isteğe bağlı) bilgisayarınızın donanımını ve işletim sistemini tarar ve sistem
yapılandırmanız için aygıt sürücülerinin bir listesi görüntülenir.
2
Uygun sürücüyü tıklatın ve sürücüyü bilgisayarınıza yükleme yönergelerini uygulayın.
Bilgisayarınız için kullanılabilen tüm sürücüleri görmek için, Topic açılan menüsünde Drivers'ı tıklatın.

Dizin
265
Dizin
A
ana kart. Bkz. sistem kartı
B
belge
ergonomi, 227
garanti, 227
güvenlik, 227
mevzuat, 227
Son Kullanıcı Lisans
Anlaşması, 227
Ürün Bilgileri Kılavuzu, 227
C
CDs
operating system, 228
Ç
çakışmalar
yazılım ve donanım
uyuşmazlıkları, 259
D
Dell Diagnostics, 252
Dell support site, 229
documentation
online, 229
User's Guide, 228
donanım
çakışmalar, 259
Dell Diagnostics, 252
sesli uyarı kodları, 258
Donanım Sorun Giderici, 259
Drivers and Utilities CD, 227
E
ergonomi bilgileri, 227
G
garanti bilgileri, 227
güç
ışık, 239
güç ışığı
sorunları tanılama, 255
güvenlik talimatları, 227
H
hata iletileri
sesli uyarı kodları, 258
sistem ışıkları, 255
tanılama ışıkları, 256
Help and Support Center, 229
help file
Windows Help and Support
Center, 229
I
işletim sistemi
Windows XP'yi yeniden
yükleme, 261
IRQ çakışmaları, 259
K
kapak
çıkarma, 242
L
labels
Microsoft Windows, 228
Service Tag, 228
M
mevzuat bilgileri, 227
O
operating system
reinstalling, 228
Operating System CD, 228

266
Dizin
266
Dizin
P
parçaları takma
başlamadan önce, 242
S
Service Tag, 228
sesli uyarı kodları, 258
Sistem Geri Yükleme, 259
sistem kartı, 247, 250
Son Kullanıcı Lisans
Anlaşması, 227
sorun giderme
bilgisayarı önceki çalışma
durumuna geri
yükleme, 259
çakışmalar, 259
Dell Diagnostics, 252
Donanım Sorun Giderici, 259
sesli uyarı kodları, 258
sistem ışıkları, 255
tanılama ışıkları, 256
sorunlar. Bkz. sorun giderme
support website, 229
sürücüler
liste, 264
T
tanılama
Dell Diagnostics, 252
sesli uyarı kodları, 258
troubleshooting
Help and Support Center, 229
U
User's Guide, 228
Ü
Ürün Bilgileri Kılavuzu, 227
W
Windows XP
Donanım Sorun Giderici, 259
Donanım Sorun Gidericisi, 259
Help and Support Center, 229
kurulum, 262
reinstalling, 228
Sistem Geri Yükleme, 259
yeniden yükleme, 261
Y
yazılım
çakışmalar, 259
yeniden yükleme
Windows XP, 261
ışıklar
güç, 239
sistem, 255
tanılama, 256
-
 1
1
-
 2
2
-
 3
3
-
 4
4
-
 5
5
-
 6
6
-
 7
7
-
 8
8
-
 9
9
-
 10
10
-
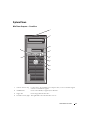 11
11
-
 12
12
-
 13
13
-
 14
14
-
 15
15
-
 16
16
-
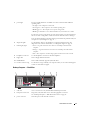 17
17
-
 18
18
-
 19
19
-
 20
20
-
 21
21
-
 22
22
-
 23
23
-
 24
24
-
 25
25
-
 26
26
-
 27
27
-
 28
28
-
 29
29
-
 30
30
-
 31
31
-
 32
32
-
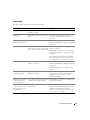 33
33
-
 34
34
-
 35
35
-
 36
36
-
 37
37
-
 38
38
-
 39
39
-
 40
40
-
 41
41
-
 42
42
-
 43
43
-
 44
44
-
 45
45
-
 46
46
-
 47
47
-
 48
48
-
 49
49
-
 50
50
-
 51
51
-
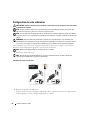 52
52
-
 53
53
-
 54
54
-
 55
55
-
 56
56
-
 57
57
-
 58
58
-
 59
59
-
 60
60
-
 61
61
-
 62
62
-
 63
63
-
 64
64
-
 65
65
-
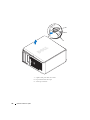 66
66
-
 67
67
-
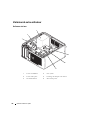 68
68
-
 69
69
-
 70
70
-
 71
71
-
 72
72
-
 73
73
-
 74
74
-
 75
75
-
 76
76
-
 77
77
-
 78
78
-
 79
79
-
 80
80
-
 81
81
-
 82
82
-
 83
83
-
 84
84
-
 85
85
-
 86
86
-
 87
87
-
 88
88
-
 89
89
-
 90
90
-
 91
91
-
 92
92
-
 93
93
-
 94
94
-
 95
95
-
 96
96
-
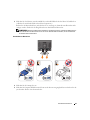 97
97
-
 98
98
-
 99
99
-
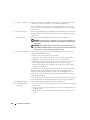 100
100
-
 101
101
-
 102
102
-
 103
103
-
 104
104
-
 105
105
-
 106
106
-
 107
107
-
 108
108
-
 109
109
-
 110
110
-
 111
111
-
 112
112
-
 113
113
-
 114
114
-
 115
115
-
 116
116
-
 117
117
-
 118
118
-
 119
119
-
 120
120
-
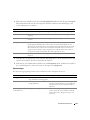 121
121
-
 122
122
-
 123
123
-
 124
124
-
 125
125
-
 126
126
-
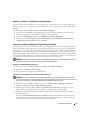 127
127
-
 128
128
-
 129
129
-
 130
130
-
 131
131
-
 132
132
-
 133
133
-
 134
134
-
 135
135
-
 136
136
-
 137
137
-
 138
138
-
 139
139
-
 140
140
-
 141
141
-
 142
142
-
 143
143
-
 144
144
-
 145
145
-
 146
146
-
 147
147
-
 148
148
-
 149
149
-
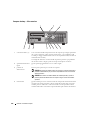 150
150
-
 151
151
-
 152
152
-
 153
153
-
 154
154
-
 155
155
-
 156
156
-
 157
157
-
 158
158
-
 159
159
-
 160
160
-
 161
161
-
 162
162
-
 163
163
-
 164
164
-
 165
165
-
 166
166
-
 167
167
-
 168
168
-
 169
169
-
 170
170
-
 171
171
-
 172
172
-
 173
173
-
 174
174
-
 175
175
-
 176
176
-
 177
177
-
 178
178
-
 179
179
-
 180
180
-
 181
181
-
 182
182
-
 183
183
-
 184
184
-
 185
185
-
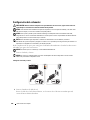 186
186
-
 187
187
-
 188
188
-
 189
189
-
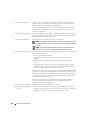 190
190
-
 191
191
-
 192
192
-
 193
193
-
 194
194
-
 195
195
-
 196
196
-
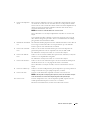 197
197
-
 198
198
-
 199
199
-
 200
200
-
 201
201
-
 202
202
-
 203
203
-
 204
204
-
 205
205
-
 206
206
-
 207
207
-
 208
208
-
 209
209
-
 210
210
-
 211
211
-
 212
212
-
 213
213
-
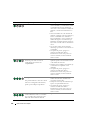 214
214
-
 215
215
-
 216
216
-
 217
217
-
 218
218
-
 219
219
-
 220
220
-
 221
221
-
 222
222
-
 223
223
-
 224
224
-
 225
225
-
 226
226
-
 227
227
-
 228
228
-
 229
229
-
 230
230
-
 231
231
-
 232
232
-
 233
233
-
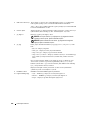 234
234
-
 235
235
-
 236
236
-
 237
237
-
 238
238
-
 239
239
-
 240
240
-
 241
241
-
 242
242
-
 243
243
-
 244
244
-
 245
245
-
 246
246
-
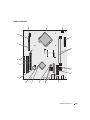 247
247
-
 248
248
-
 249
249
-
 250
250
-
 251
251
-
 252
252
-
 253
253
-
 254
254
-
 255
255
-
 256
256
-
 257
257
-
 258
258
-
 259
259
-
 260
260
-
 261
261
-
 262
262
-
 263
263
-
 264
264
-
 265
265
-
 266
266


en otros idiomas
- français: Dell OptiPlex 320 Guide de démarrage rapide
- italiano: Dell OptiPlex 320 Guida Rapida
- Deutsch: Dell OptiPlex 320 Schnellstartanleitung
- Türkçe: Dell OptiPlex 320 Hızlı başlangıç Kılavuzu