Archos 55 Helium 4 Seasons El manual del propietario
- Categoría
- Smartphones
- Tipo
- El manual del propietario

1
Help & assistance
Congratulations for the purchase of an ARCHOS device! This quick start guide helps you
to start using your device properly. If you have more questions concerning the use of your
device, visit us at:
twitter.com/archos
www.facebook.com/archos
Blog
https://blog.archos.com/
http://faq.archos.com/
www.archos.com, click Support > After-sales support
www.archos.com, click Support > Downloads > Declaration of conformity
As we are often updating and improving our products, your device’s software may have a slightly
different appearance or modified functionality than presented in this quick start guide.

2
Warranty
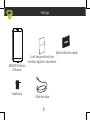
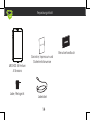
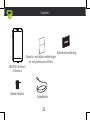
Unboxing
ARCHOS 55 Helium 4
Seasons
Quick start guide
Warranty, legal and safety notice
Charging cable
Charger adapter

3
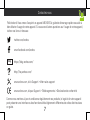
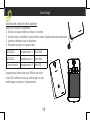
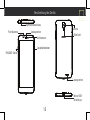
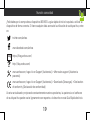
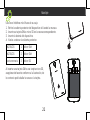
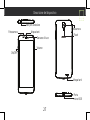
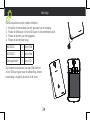
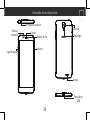
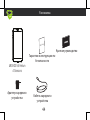
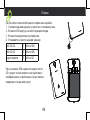
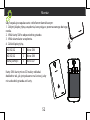
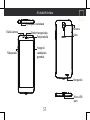
Describing your device
Front camera
Phone speaker
Headphone jack
Back camera
Flash light
ON/OFF
Volume
Loudspeaker
Micro-USB
port
Light sensor

4
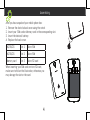
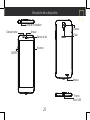
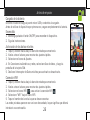
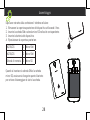
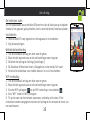
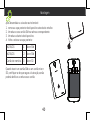
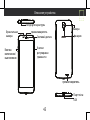
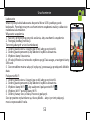
Picture to show how to remove the bottom casing
Picture to show the cards position
Picture to show how to remove the bottom casing
Picture to show the cards position
After you have unpacked your mobile phone box:
1. Remove the device’s back cover using the notch.
2. Insert your SIM card or Memory card in the corresponding slot.
3. Insert the device’s battery.
4. Replace the back cover.
4G/3G/2G slot 1 Micro-SIM
4G/3G/2G slot 2 Micro-SIM
Memory card slot 3 Micro-SD card
When inserting your SIM card or micro-SD card,
make sure to follow the illustration, otherwise you
may damage the slot or the card.
Assembling

5
Charging your battery completely
Plug the charging cable in the Micro-USB port and the adapter in a power outlet.
Leave the device until the battery is fully charged.
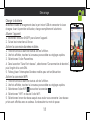
Turning ON
1. Press and hold the ON/OFF button to turn on the device.
2. Follow the instructions to set up your device.
Activating mobile date connection
1. Touch and pull down the status bar to display it.
2. Touch again the bar to reveal the quick settings.
3. Select the Settings icon.
4. In Wireless & networks, select Data usage, then the SIM card tab.
5. Slide the Mobile data switch to turn on/off.
Activating WiFi connection
1. Touch and pull down the status bar to display it.
2. Touch again the bar to reveal the quick settings.
3. Select the WiFi icon
to activate the WiFi connection .
4. Select “WiFi” below the WiFi icon.
5. Touch the name of network you want to connect to.
Private networks are shown with a lock icon and will require you to enter your
password.
Starting up

6
- My device is frozen: press the ON/OFF button for more than 10 seconds or remove and replace the
battery, then turn on the device.
- My device encounters dysfunctions: go to Settings > About phone > Check for update system to
check for updates. If your device is up-to-date, try to reset the device from Settings > Factory data
reset > Backup & restore. We recommend to save your files before resetting.
- My WiFi reception is too low: make sure you are not far from the WiFi hotspot. Update the firmware
of the device: http://www.archos.com/support. Reset and redefine your connection parameters.
Contact your WiFi connection provider.
- My device bootlogo is playing in a loop: you need to completely reset your device. Go to faq.archos.
com and select your device. In Backup & Recovery, select How to reinitialize my ARCHOS.
FOR MORE ANSWERS ABOUT YOUR TECHNICAL DIFFICULTIES, DO NOT HESITATE TO VISIT: FAQ.ARCHOS.
COM
Troubleshooting

7
Félicitations! Vous venez d’acquérir un appareil ARCHOS! Ce guide de démarrage rapide vous aide à
bien débuter l’usage de votre appareil. Si vous avez d’autres questions sur l’usage de votre appareil,
visitez nos liens ci-dessous :
twitter.com/archos
www.facebook.com/archos
Blog
https://blog.archos.com/
http://faq.archos.com/
www.archos.com, click Support > After-sales support
www.archos.com, cliquez Support > Téléchargements > Déclaration de conformité
Comme nous mettons à jour et améliorons régulièrement nos produits, le logiciel de votre appareil
peut présenter une interface ou des fonctionnalités légèrement différentes de celles décrites dans
ce guide.
Contactez-nous

8
Warranty
Déballage
ARCHOS 55 Helium
4 Seasons
Guide d’utilisation rapide
Livret des garanties et des
mentions légales et sécuritaires
Câble de charge
Adaptateur

9
Description de l’appareil
Caméra avant
Combiné
Prise jack
Caméra arrière
Flash
Haut-parleur
Port
micro-USB
Capteur de luminosité
ON/OFF
Volume

10
Picture to show how to remove the bottom casing
Picture to show the cards position
Picture to show how to remove the bottom casing
Picture to show the cards position
Insertion de cartes et de la batterie
Après avoir déballé le téléphone :
1. Enlevez la coque arrière en utilisant l’encoche.
2. Insérez votre carte SIM ou carte mémoire dans l’emplacement correspondant.
3. Insérez la batterie dans le téléphone.
4. Remettez en place la coque arrière.
4G/3G/2G emplacement 1 Micro-SIM
4G/3G/2G emplacement 2 Micro-SIM
Carte mémoire emplacement 3 Micro-SD
Lorsque vous insérez une carte SIM ou une carte
micro-SD, conformez-vous au schéma pour ne pas
endommager la carte ou l’emplacement.
Assemblage

11
Charger la batterie
Branchez le câble de chargement dans le port micro-USB et connectez-le à son
chargeur. Avant la première utilisation, chargez complètement la batterie.
Allumer l’appareil
1. Maintenez le bouton ON/OFF pour allumer l’appareil.
2. Suivez les instructions à l’écran.
Activer la connexion données mobiles
1. Tirez vers le bas la barre de statuts afin de l’afficher.
2. Une fois affichée, touchez-la à nouveau pour accéder aux réglages rapides.
3. Sélectionnez l’icône Paramètres.
4. Dans la section “Sans fil et réseaux”, sélectionnez “Consommation de données”,
puis l’onglet de la carte SIM.
5. Faites glisser l’interrupteur Données mobiles pour activer/désactiver.
Activer la connexion WiFi
1. Tirez vers le bas la barre de statuts afin de l’afficher.
2. Une fois affichée, touchez-la à nouveau pour accéder aux réglages rapides.
3. Sélectionnez l’icône WiFi
pour activer la connexion .
4. Sélectionnez “WiFi” en bas de l’icône WiFi.
5. Sélectionnez le nom du réseau auquel vous voulez vous connecter. Les réseaux
privés sont affichés avec un cadenas. Ils nécessitent un mot de passe.
Démarrage

12
- Mon téléphone ne répond pas: appuyez 10 secondes sur le bouton ON/OFF ou enlevez la batterie et
remettez-la en place, puis rallumez l’appareil.
- Mon téléphone rencontre des problèmes : allez dans paramètres > A propos du téléphone > mise
à jour pour voir si aucune mise à jour n’est disponible. Si votre appareil est à jour, procédez donc à
une réinitialisation complète à partir de paramètres > sauvegarde et réinitialisation. N’oubliez pas de
sauvegarder vos fichiers avant la réinitialisation complète.
- Votre connexion WiFi est très faible : assurez-vous de ne pas être trop loin de la borne WiFi. Veuillez
mettre à jour votre produit si nécessaire. Paramétrez à nouveau votre connexion. Contactez votre
fournisseur d’accès.
- Le logo de démarrage tourne en boucle : vous devez réinitialiser complètement votre appareil. Allez
sur faq.archos.com et sélectionnez votre appareil. Dans Sauvegarde & réinitialisation, sélectionnez
Comment réinitialiser mon ARCHOS.
POUR PLUS DE RENSEIGNEMENTS SUR VOS PROBLÈMES TECHNIQUES, N’HÉSITEZ PAS À CONSULTER
LA PAGE : FAQ.ARCHOS.COM
Dépannage

13
Vielen Dank, dass Sie sich für ein ARCHOS-Gerät entschieden haben! Diese Schnellstartanleitung wird
Sie bei der ordnungsgemäßen Bedienung Ihres Geräts unterstützen. Falls Sie bezüglich der Bedienung
Ihres Geräts weitere Fragen haben, besuchen Sie uns unter:
twitter.com/archos
www.facebook.com/archos
Blog
https://blog.archos.com/
http://faq.archos.com/
www.archos.com, klicken Sie auf Support > After-Sales-Support
www.archos.com, klicken Sie auf Support > Downloads > Konformitätserklärung
Da unsere Produkte kontinuierlich aktualisiert und weiterentwickelt werden, kann die Software Ihres
Geräts in Erscheinung und Funktionalität geringfügige Abweichungen zu den Darstellungen in dieser
Schnellstartanleitung aufweisen.
Willkommen

14
Warranty
Verpackungsinhalt
ARCHOS 55 Helium
4 Seasons
Benutzerhandbuch
Garantie, Impressum und
Sicherheitshinweise
Ladekabel
Lade-/Netzgerät

15
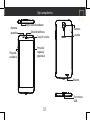
Beschreibung des Geräts
Frontkamera Lautsprecher
Kopfhöreranschluss
Kamera
Bliztlicht
EIN/AUS-Taste
Lautstärketasten
Lautsprecher
Micro-USB-
Anschluss
Lichtsensor

Picture to show how to remove the bottom casing
Picture to show the cards position
16
Nach dem Auspacken des Mobiltelefons:
1. Heben Sie die Rückabdeckung des Geräts mithilfe der Einkerbung an.
2. Stecken Sie eine SIM-Karte oder micro-SD-Karte in den entsprechenden
Steckplatz ein.
3. Legen Sie den Akku des Geräts ein.
4. Bringen Sie die Rückabdeckung wieder an.
4G/3G/2G 1 Micro-SIM
4G/3G/2G 2 Micro-SIM
Speicherkarte 3 Micro-SD
Beachten Sie beim Einführen der SIM-Karte
oder micro-SD-Karte unbedingt die Illustration,
der Steckplatz oder die Karte könnten sonst
beschädigt werden.
Montage
Picture to show how to remove the bottom casing
Picture to show the cards position

17
Starten
Aufladen des Akkus
Stecken Sie das Ladekabel in den Micro-USB-Anschluss und verbinden Sie es
mit dem Ladegerät. Vor der erstmaligen Benutzung des Geräts sollte der Akku
vollständig aufgeladen werden.
Einschalten
1. Drücken und halten Sie die EIN/AUS-Taste, um das Gerät einzuschalten.
2. Folgen Sie den Anweisungen.
Activating mobile date connection
1. Die Statusleiste berühren und nach unten ziehen, um diese anzuzeigen.
2. Die Leiste erneut berühren, um die Schnelleinstellungen anzuzeigen.
3. Wählen Sie das Symbol “Einstellungen”.
4. Unter “WLAN & Netzwerke” wählen Sie “Datennutzung” und dann die
Registerkarte “SIM-Karte”.
5. Schieben Sie den Schalter “Mobilfunkdaten” auf Ein/Aus.
Activating WiFi connection
1. Die Statusleiste berühren und nach unten ziehen, um diese anzuzeigen.
2. Die Leiste erneut berühren, um die Schnelleinstellungen anzuzeigen.
3. Wählen Sie das WLAN-Symbol
zur Aktivierung der WLAN-Verbindung .
4. Wählen Sie “WLAN” unter dem WLAN-Symbol.
5. Tippen Sie auf den Namen des Netzwerks, mit dem eine Verbindung hergestellt werden soll.
Private Netzwerke werden mit einem Schlosssymbol angezeigt und hier muss das Passwort eingegeben werden

18
- Mein Gerät ist abgestürzt: Halten Sie die EIN/AUS-Taste mindestens 10 Sekunden lang gedrückt
oder entnehmen Sie den Akku und setzen Sie wieder ein und starten Sie das Gerät.
- Mein Telefon hat Probleme: Gehen Sie zu Einstellungen> Telefoninfo > Update, um zu sehen, ob
Updates verfügbar sind. Wenn Ihr Gerät auf dem neuesten Stand ist, führen Sie so einen Hard-Reset
über Einstellungen> Sichern und zurücksetzen. Denken Sie daran, Ihre Dateien vor dem vollständigen
Reset sichern.
- Bei zu schwachem WLAN-Empfang: Vergewissern Sie sich, dass Sie nicht zu weit vom WLAN-
Hotspot entfernt sind. Aktualisierung der Gerätefirmware: http://www.archos.com/support.
Setzen Sie die Verbindungsparameter zurück und definieren Sie sie neu. Wenden Sie sich an Ihren
Internetanbieter.
- Das Boot-Logo in einer Schleife: Sie müssen Ihr Gerät komplett zurückgesetzt. Gehen Sie faq.
archos.com und wählen Sie Ihr Gerät. In Backup & Reset, wählen Sie Wie mein ARCHOS zurücksetzen.
WEITERE ANTWORTEN BEI TECHNISCHEN PROBLEMEN FINDEN SIE UNTER: FAQ.ARCHOS.COM
Fehlerbehebung

19
¡Felicidades por la compra de su dispositivo ARCHOS! La guía rápida de inicio le ayudará a utilizar su
dispositivo de forma correcta. Si tiene cualquier duda acerca de la utilización de su dispositivo, entre
en:
twitter.com/archos
www.facebook.com/archos
Blog
https://blog.archos.com/
http://faq.archos.com/
www.archos.com, haga clic en Support (Asistencia) > After-sales support (Asistencia
posventa)
www.archos.com, haga clic en Support (Asistencia) > Downloads (Descargas) > Declaration
of conformity (Declaración de conformidad)
Al estar actualizando y mejorando constantemente nuestros productos, la apariencia o el software
de su dispositivo pueden variar ligeramente con respecto a lo descrito en esta Guía Rápida de Inicio.
Nuestra comunidad

20
Warranty
Contenido de la caja
ARCHOS 55 Helium
4 Seasons
Guía de usuario
Avisos de garantía, legales y de
seguridad
Cable de carga
Adaptador/cargador

21
Descripción de su dispositivo
Cámara frontal Altavoz
Conector de headset
Camera
Flash
ON/OFF
Volumen
Altavoz
Puerto
micro USB
Sensor de luz

22
Picture to show how to remove the bottom casing
Picture to show the cards position
Picture to show how to remove the bottom casing
Picture to show the cards position
Una vez el teléfono móvil fuera de su caja:
1. Retire la cubierta posterior del dispositivo utilizando la muesca.
2. Inserte su tarjeta SIM o micro SD en la ranura correspondiente.
3. Inserte la batería del dispositivo.
4. Vuelva a colocar la cubierta posterior.
4G/3G/2G 1 Micro-SIM
4G/3G/2G 2 Micro-SIM
carta memoria 3 Micro-SD
Al insertar una tarjeta SIM o una tarjeta micro SD,
asegúrese de hacerlo conforme a la ilustración, de
lo contrario podría dañar la ranura o la tarjeta.
Montaje

23
Cargado de la batería
Enchufe el cable de carga al puerto micro USB y conéctelo al cargador.
Antes de utilizar el dispositivo por primera vez, cargue completamente la batería.
Encendido
1. Mantenga pulsado el botón ON/OFF para encender el dispositivo.
2. Siga las instrucciones.
Activación de los datos móviles
1. Toque y arrastre hacia abajo la barra de estado para mostrarla.
2. Vuelva a tocar la barra para mostrar los ajustes rápidos.
3. Seleccione el icono de Ajustes.
4. En Conexiones inalámbricas y redes, seleccione Uso de datos, y luego la
pestaña de la tarjeta SIM.
5. Deslice el interruptor de Datos móviles para activarlo o desactivarlo.
Conexión WiFi
1. Toque y arrastre hacia abajo la barra de estado para mostrarla.
2. Vuelva a tocar la barra para mostrar los ajustes rápidos.
3. Seleccione el icono WiFi
para activar la conexión WiFi .
4. Seleccione “WiFi” bajo el icono WiFi.
5. Toque el nombre de la red a la que se desee conectar.
Las redes privadas aparecen con un icono de candado, lo que significa que deberá
introducir una contraseña.
Antes de empezar

24
- Mi teléfono está bloqueado: pulse el botón ON / OFF durante 10 segundos o quitar la batería y
ponerla en su sitio
- El dispositivo se encuentra con disfunciones: Vaya a Ajustes> Acerca del teléfono> Consultar la
actualización del sistema para comprobar si hay actualizaciones. Si el dispositivo es de hasta al día,
trate de reiniciar el dispositivo de Configuración> Restablecer datos de fábrica> Copia de seguridad y
restauración. Recomendamos guardar sus archivos antes de restaurar.
- Si la recepción WiFi es demasiado débil: acérquese más al punto de acceso WiFi. Actualice el
firmware del dispositivo: http://www.archos.com/support. Restablezca y vuelva a configurar sus
parámetros de conexión. Póngase en contacto con su proveedor de servicios WiFi.
- Mi bootlogo dispositivo está jugando en un bucle: tendrá que restablecer completamente su
dispositivo. Ir a faq.archos.com y seleccione su dispositivo. En Backup & Recovery, seleccione Cómo
reinicializar mis ARCHOS.
PARA RESOLVER CUALQUIER INCIDENCIA TÉCNICA, NO DUDE EN VISITAR: FAQ.ARCHOS.COM
Resolución de problemas

25
Congratulazioni per aver acquistato un dispositivo ARCHOS. La presente guida rapida supporta
l’utente nel corretto utilizzo del dispositivo. Per ulteriori dettagli sull’uso del dispositivo, visitare:
twitter.com/archos
www.facebook.com/archos
Blog
https://blog.archos.com/
http://faq.archos.com/
www.archos.com, fai clic su Assistenza > Supporto post vendita
www.archos.com, fai clic Assistenza > Download > Dichiarazione di conformità
Poiché aggiorniamo e miglioriamo con frequenza i nostri prodotti, il software del dispositivo
potrebbe avere un aspetto leggermente differente o funzionalità modificate rispetto a quelle
mostrate nella presente Guida rapida.
Unisciti a noi

26
Warranty
Contenuto della confezione
ARCHOS 55 Helium
4 Seasons
Guida dell’utente
Garanzia, note legali e sulla
sicurezza
Cavo di caricamento
Caricabatterie

27
Descrizione del dispositivo
Fotocamera
Altoparlanti
Jack per auricolare
Fotocamera
Flash
ON/OFF
Volume
Altoparlanti
Porta
micro-USB
Sensore di luce

28
Picture to show how to remove the bottom casing
Picture to show the cards position
Picture to show how to remove the bottom casing
Picture to show the cards position
Dopo aver estratto dalla confezione il telefono cellulare:
1. Rimuovere la copertura posteriore del dispositivo utilizzando il foro.
2. Inserire la scheda SIM o scheda micro-SD nello slot corrispondente.
3. Inserire la batteria del dispositivo.
4. Riposizionare la copertura posteriore.
4G/3G/2G 1 Micro-SIM
4G/3G/2G 2 Micro-SIM
Scheda di memoria 3 Micro-SD
Quando si inserisce la scheda SIM o la scheda
micro-SD, assicurarsi di seguire quanto illustrato
per evitare di danneggiare lo slot o la scheda.
Assemblaggio

29
Caricamento della batteria
Inserire il cavo di ricarica nella porta micro-USB e collegarlo al caricabatterie.
Prima di utilizzare il dispositivo per la prima volta, caricare completamente la
batteria.
Accensione
1. Tenere premuto il pulsante ON/OFF per accendere il dispositivo.
2. Seguire le istruzioni.
Connessione dati
1. Toccare e tirare verso il basso la barra di stato per visualizzarla.
2. Toccare di nuovo la barra per visualizzare le impostazioni rapide.
3. Selezionare l’icona “Settings” [Impostazioni].
4. In Wireless e reti, selezionare Uso dati, quindi la scheda della SIM card.
5. Scorrere il dito per attivare/disattivare l’opzione Connessione dati.
Connessione Wi-Fi
1. Toccare e tirare verso il basso la barra di stato per visualizzarla.
2. Toccare di nuovo la barra per visualizzare le impostazioni rapide.
3. Selezionare l’icona del Wi-Fi
per attivare la connessione Wi-Fi .
4. Selezionare “Wi-Fi” sotto l’icona del Wi-Fi.
5. Toccare il nome della rete a cui l’utente desidera connettersi.
Le reti private vengono mostrate con un’icona di blocco e richiedono l’inserimento
della password.
Operazioni preliminari

30
- Il telefono è bloccato: premere sul pulsante ON/OFF per più di 10 secondi o rimuovere la batteria e
rimetterla al suo posto.
- Il dispositivo incontra disfunzioni: andare a Impostazioni> Info sul telefono> Verifica per il
sistema di aggiornamento per controllare gli aggiornamenti. Se il dispositivo è up-to-date, cercare di
ripristinare il dispositivo da Impostazioni> Ripristino dati di fabbrica> Backup e ripristino. Si consiglia
di salvare i file prima di resettare.
- Se la connessione Wi-Fi è troppo lenta: assicurarsi di trovarsi in prossimità dell’hotspot Wi-Fi.
Aggiornare il firmware del dispositivo: http://www.archos.com/support. Ripristinare e ridefinire i
parametri della connessione. Contattare il provider della connessione Wi-Fi.
- Il mio bootlogo dispositivo sta giocando in un ciclo: è necessario ripristinare completamente il
dispositivo. Vai a faq.archos.com e selezionare il dispositivo. In Backup & Recovery, selezionare Come
reinizializzare miei ARCHOS.
PER ULTERIORI SOLUZIONI RELATIVE A PROBLEMI TECNICI, VISITARE: FAQ.ARCHOS.COM
Risoluzione dei problemi

31
Gefeliciteerd met de aanschaf van uw ARCHOS-apparaat! Met behulp van de verkorte handleiding kunt
u meteen aan de slag. Als u nog vragen heeft over het gebruik van het apparaat, ga dan naar:
twitter.com/archos
www.facebook.com/archos
Blog
https://blog.archos.com/
http://faq.archos.com/
www.archos.com, klik op Support > After-sales support
www.archos.com, click Support > Downloads > Declaration of conformity
[Conformiteitsverklaring]
Aangezien wij onze producten regelmatig updaten en verbeteren, kunnen de afbeeldingen en/of de
functies van uw apparaatsoftware afwijken van de software in deze Verkorte handleiding.
Kom erbij!

32
Warranty
Uitpakken
ARCHOS 55 Helium
4 Seasons
Gebruikershandleiding
Garantie, wettelijke mededelingen
en veiligheidsvoorschriftem
Oplaadkabel
Oplader/adapter

33
Beschrijving van het apparaat
Camera aan de
voorkant
Luidspreker
Aansluiting voor headset
Camera
Flash
AAN/UIT
Volume
Luidspreker
Micro-USB-
poort
Licht sensor

34
Picture to show how to remove the bottom casing
Picture to show the cards position
Picture to show how to remove the bottom casing
Picture to show the cards position
Na het uitpakken van de mobiele telefoon:
1. Verwijder de achterklep van het apparaat via de inkeping.
2. Plaats de SIM-kaart of micro-SD-kaart in de betreffende sleuf.
3. Plaats de batterij van het apparaat.
4. Plaats de achterklep terug.
4G/3G/2G 1 Micro-SIM
4G/3G/2G 2 Micro-SIM
Geheugenkaart 3 Micro-SD
Kijk tijdens het plaatsen van een SIM-kaart of
micro-SD-kaart goed naar de afbeelding. Anders
beschadigt u mogelijk de sleuf of de kaart.
Montage

35
De batterijen laden
Sluit de oplaadkabel aan op de Micro-SB-poort en sluit de kabel aan op de oplader.
Voordat u het apparaat gaat gebruiken, moet u eerst de batterij helemaal opladen.
Inschakelen
1. Houd de AAN/UIT-knop ingedrukt om het apparaat in te schakelen.
2. Volg de aanwijzingen.
Mobiele dataverbinding
1. Trek de statusbalk omlaag om deze weer te geven.
2. Raak de balk nogmaals aan om de snelinstellingen weer te geven.
3. Selecteer het pictogram Settings [Instellingen].
4. Bij Draadloos & Netwerken kiest u Datagebruik en dan de tab Sim-kaart.
5. Verschuif de schakelaar voor mobiele data om in en uit te schakelen.
WiFi-verbinding
1. Trek de statusbalk omlaag om deze weer te geven.
2. Raak de balk nogmaals aan om de snelinstellingen weer te geven.
3. Kies het WiFi-pictogram
om de WiFi-verbinding in te schakelen .
4. Kies “WiFi” onder het WiFi-pictogram.
5. Tik op de naam van het netwerk waarmee u verbinding wilt maken. Privé-
netwerken worden weergegeven met een slot-pictogram en vereisen de invoer van
een wachtwoord.
Aan de slag

36
- Mijn telefoon doet niets meer: Houd de AAN/UIT-knop langer dan 10 seconden ingedrukt of verwijder
de accu en zet hem terug op zijn plaats.
- Mijn toestel ontmoetingen disfuncties: ga naar Instellingen> Over de telefoon> Controleren op
update systeem om te controleren op updates. Als uw apparaat up-to-date, proberen om het apparaat
te resetten via Instellingen> Terugzetten op fabrieksinstellingen> Backup and Restore. Wij adviseren
om uw bestanden op te slaan voordat resetten.
- Als de WiFi-ontvangst zwak is, controleer dan of u niet te ver weg bent van de WiFi-hotspot. Update
de firmware van het apparaat: http://www.archos.com/support. Reset de verbindingsparameters en
stel ze opnieuw in. Neem contact op met de provider van uw WiFi-verbindin.
- Mijn toestel Bootlogo speelt in een lus: je nodig hebt om uw apparaat volledig opnieuw in te stellen.
Ga naar faq.archos.com en selecteer uw apparaat. In Backup & Recovery, selecteert u Hoe mijn
ARCHOS opnieuw te initialiseren.
VOOR MEER ANTWOORDEN OP TECHNISCHE VRAGEN GAAT U NAAR: FAQ.ARCHOS.COM
Probleemoplossing

37
Obrigado por ter adquirido um dispositivo ARCHOS! Este guia de introdução irá ajudá-lo a
utilizar o seu dispositivo corretamente. Caso tenha mais questões sobre como utilizar o
seu dispositivo, visite-nos em:
twitter.com/archos
www.facebook.com/archos
Blog
https://blog.archos.com/
http://faq.archos.com/
www.archos.com, clique em Suporte > Suporte pós-venda
www.archos.com, clique em Suporte > Transferências > Declaração de conformidade
Como estamos constantemente a atualizar e a melhorar os nossos produtos, o software do seu
dispositivo poderá ter um aspeto ou funcionalidades ligeiramente diferentes das apresentadas neste
guia de introdução.
Junte-se a nós

38
Warranty
Desempacotamento
Cabo de carregamento
Transformador do
carregador
ARCHOS 55 Helium
4 Seasons
Guia do usuário
Garantia, avisos legais e de
segurança

39
Descrição do seu dispositivo
Câmara
dianteira
Coluna
Entrada do auricular
Câmara
Flashlight
Ligar/desligar
Volume
Coluna
Porta Micro-
USB
Sensor de luz

40
Picture to show how to remove the bottom casing
Picture to show the cards position
Picture to show how to remove the bottom casing
Picture to show the cards position
Após desembalar a caixa do seu telemóvel:
1. remova a capa posterior do dispositivo através do entalhe.
2. Introduza o seu cartão SIM na ranhura correspondente.
3. Introduza a bateria do dispositivo.
4. Volte a colocar a capa posterior.
4G/3G/2G 1 Micro-SIM
4G/3G/2G 2 Micro-SIM
Cartão de memória 3 Micro-SD
Quando inserir um cartão SIM ou um cartão micro-
SD, certifique-se de que segue a ilustração, senão
poderá danificar a ranhura ou o cartão.
Montagem

41
Carregar a bateria
Ligue o cabo de carregamento à entrada Micro USB e ao seu carregador.
Antes de utilizar o seu dispositivo pela primeira vez, carregue totalmente a bateria.
Ligar
1. Prima e mantenha premido o botão LIGAR/DESLIGAR para ligar o dispositivo.
2. Siga as instruções.
Ligação de dados móveis
1. Toque e puxe para baixo a barra de estado para exibi-la.
2. Toque de novo na barra para revelar as definições rápidas.
3. Selecione o ícone “Settings” (Definições).
4. Em Sem fios e redes, selecione Utilização de dados seguido do separador do
Cartão SIM.
5. Deslize o botão de dados móveis para ligar/desligar.
Ligação Wi-Fi
1. Toque e puxe para baixo a barra de estado para exibi-la.
2. Toque de novo na barra para revelar as definições rápidas.
3. Selecione o ícone de Wi-Fi
para ativar a ligação Wi-Fi .
4. Selecione “Wi-Fi” abaixo do respetivo ícone.
5. Toque no nome da rede à qual pretende ligar-se.
As redes privadas são exibidas com um símbolo de cadeado e precisará de introduzir
a sua palavra-passe.
Início

42
- O meu telefone bloqueou: prima o botão LIGAR/DESLIGAR por mais de 10 segundos ou remova a
bateria e colocá-lo de novo no lugar.
- Meu dispositivo encontra disfunções: vá para Configurações> Sobre o telefone> Verificar sistema
de atualização para verificar se há atualizações. Se o dispositivo é up-to-date, tente reiniciar o
dispositivo de Configurações> Restaurar dados de fábrica> Backup e restauração. Recomendamos
guardar os ficheiros antes de redefinir.
- Se as suas capacidades para Wi-fi forem reduzidas: certifique-se de que não está longe de um
hotspot Wi-fi. Atualize o firmware do dispositivo: http://www.archos.com/support. Reponha e redefina
os parâmetros de ligação. Contacte o seu prestador de serviços Wi-fi.
- Meu bootlogo dispositivo está jogando em um loop: você precisa redefinir completamente o seu
dispositivo. Ir para faq.archos.com e selecione seu dispositivo. Em Backup & Recovery, selecione
Como reinicializar meus ARCHOS.
PARA MAIS RESPOSTAS SOBRE DIFICULDADES TÉCNICAS, NÃO HESITE EM VISITAR: FAQ.ARCHOS.COM
Resolução de problemas

43
ARCHOS!
.
,
-:
twitter.com/archos
www.facebook.com/archos
Blog
https://blog.archos.com/
http://faq.archos.com/
www.archos.com >
www.archos.com > >
,
.
!

44
Warranty
ARCHOS 55 Helium
4 Seasons

45
Кнопка
включения /
выключения
micro-
USB
громкоговоритель

46
Picture to show how to remove the bottom casing
Picture to show the cards position
Picture to show how to remove the bottom casing
Picture to show the cards position
:
1. .
2. SIM- .
3. .
4. .
4G/3G/2G 1 Micro-SIM
4G/3G/2G 2 Micro-SIM
3 Micro-SD
SIM- micro-
SD
,
.

47
Micro-USB,
.
.
1. ./., .
2. .
1. , .
2. , .
3. .
4. .
SIM-.
5.
.
WiFi
1. , .
2. , .
3. WiFi
, WiFi .
4. WiFi WiFi.
5. , .
;
.

48
- : /
10 , .
- : >
> ,
. ,
> > &
. , .
- Wi-Fi , ,
Wi-Fi.
: http://www.archos.com/support.
. Wi-Fi-.
- bootlogo :
. faq.archos.com .
ARCHOS.
,
, :
FAQ.ARCHOS.COM

49
Gratulujemy zakupu urządzenia ARCHOS! Skrócona instrukcja obsługi pomoże Ci we
właściwym rozpoczęciu korzystania z urządzenia. Jeśli masz więcej pytań dotyczących
użytkowania swojego urządzenia, odwiedź nas na:
twitter.com/archos
www.facebook.com/archos
Blog
https://blog.archos.com/
http://faq.archos.com/
www.archos.com, kliknij Support > After-sales support
www.archos.com, kliknij Support > Downloads > Declaration of conformity
Często aktualizujemy iwprowadzamy udoskonalenia wnaszych produktach, dlatego też
oprogramowanie może nieznacznie różnić się wyglądem lub dostępnością funkcji od tego, co
zaprezentowano wskróconej instrukcji obsługi.
Dołącz do nas

50
Warranty
W pudełku
ARCHOS 55 Helium
4 Seasons
Skrócona instrukcja obsługi
Gwarancja, oświadczenia
prawne i informacje dotyczące
bezpieczeństwa
Kabel do ładowania
Ładowarka

51
Opis urządzenia
Wejście słuchawkowe
Głośnik telefonu
Kamera
przednia
Przycisk
zasilania
Przyciski
regulacji
głośności
Kamera
Latarka
Port micro
USB
Głośnik
Czujnik światła

52
Picture to show how to remove the bottom casing
Picture to show the cards position
Picture to show how to remove the bottom casing
Picture to show the cards position
Gdy rozpakujesz opakowanie ztelefonem komórkowym:
1. Zdejmij klapkę tylną urządzenia, korzystając zprzeznaczonego do tego
rowka.
2. Włóż kartę SIM wodpowiednie gniazdo.
3. Włóż akumulator urządzenia.
4. Załóż klapkę tylną.
4G/3G/2G 1 Micro-SIM
4G/3G/2G 2 Micro-SIM
Karta pamięci 3 Micro-SD
Kartę SIM i kartę micro-SD należy wkładać
dokładnie tak, jak jest pokazane na ilustracji, aby
nie uszkodzić gniazda ani karty.
Montaż

53
Ładowanie
Włóż wtyczkę kabla ładowania do portu Micro-USB ipodłącz go do
ładowarki. Przed pierwszym uruchomieniem urządzenia należy całkowicie
naładować akumulator.
Włączanie urządzenia
1. Naciśnij iprzytrzymaj przycisk zasilania, aby uruchomić urządzenie.
2. Postępuj według instrukcji.
Transmisja danych wsieci komórkowej
1. Dotknij pasek stanu iściągnij go wdół, aby go wyświetlić.
2. Dotknij pasek ponownie, aby odsłonić szybkie ustawienia.
3. Wybierz ikonę Ustawienia.
4. Wsekcji Wireless & networks wybierz opcję Data usage, anastępnie kartę
SIM card.
5. Dane mobilne można włączyć/wyłączyć, przesuwając przełącznik Mobile
data.
Połączenie Wi-Fi
1. Dotknij pasek stanu iściągnij go wdół, aby go wyświetlić.
2. Dotknij pasek ponownie, aby odsłonić szybkie ustawienia.
3. Wybierz ikonę Wi-Fi
, aby uaktywnić połączenie Wi-Fi .
4. Wybierz „Wi-Fi” poniżej ikony Wi-Fi.
5. Dotknij nazwę sieci, zktórą chcesz się połączyć.
Sieci prywatne wyświetlane są zikoną kłódki – aby się znimi połączyć,
musisz wprowadzić hasło.
Uruchomienie

54
- Moje urządzenie jest zamrożone: nacisnąć przycisk ON / OFF przez ponad 10 sekund lub
wyjąć i wymienić baterię, a następnie włącz urządzenie.
- Moje urządzenie napotyka dysfunkcje: przejdź do menu Ustawienia> Informacje o
telefonie> Sprawdź uaktualnienia systemu, aby sprawdzić dostępność aktualizacji. Jeśli
urządzenie jest up-to-date, spróbuj zresetować urządzenie z menu Ustawienia> Ustawienia
fabryczne> Kopia zapasowa i przywracanie. Zaleca się, aby zapisać swoje pliki przed
skasowaniem.
- Jeśli sygnał Wi-Fi jest zbyt słaby, upewnij się, że nie jesteś daleko od hotspotu Wi-Fi.
Zaktualizuj oprogramowanie wbudowane: http://www.archos.com/support. Zresetuj izmień
parametry łączności. Skontaktuj się zdostawcą usług sieci Wi-Fi.
- Moje urządzenie bootlogo jest odtwarzany w pętli: trzeba całkowicie zresetować
urządzenie. Idź do faq.archos.com i wybierz swoje urządzenie. W Backup & Recovery wybierz
Jak ponownie zainicjować moje ARCHOS.
ABY UZYSKAĆ WIĘCEJ ODPOWIEDZI NA TEMAT PROBLEMÓW TECHNICZNYCH, ODWIEDŹ
STRONĘ: FAQ.ARCHOS.COM
Rozwiązywanie problemów

55
Gratulálunk új ARCHOS készüléke megvásárlásához! Ez a rövid felhasználói útmutató
segítséget nyújt a készülék helyes használatának megkezdéséhez. Ha további kérdése van a
készülékkel kapcsolatban, az alábbi elérhetőségeken kaphat választ:
twitter.com/archos
www.facebook.com/archos
Blog
https://blog.archos.com/
http://faq.archos.com/
www.archos.com, kattintson a Támogatás > Szerviz támogatás menüpontra
www.archos.com, kattintson a Támogatás > Letöltések > Megfelelőségi nyilatkozat
menüpontra
Termékeink rendszeres frissítése és fejlesztése miatt előfordulhat, hogy az Ön készülékének
szoftvere némiképp eltérően jelenik meg, vagy funkciói kismértékben eltérőek az ebben a
Rövid felhasználói útmutatóban olvasottakhoz képest.
Üdvözöljük körünkben!

56
Warranty
Kicsomagolás
ARCHOS 55 Helium
4 Seasons
Rövid felhasználói útmutató
Jótállási, jogi és biztonsági
információkat tartalmazó
füzet
Töltőkábel
Töltőadapter

57
A készülék leírása
Fejhallgató-csatlakozó
Telefon hangszórója
Elülső kamera
Főkapcsoló
Hangerő-
szabályozó
gombok
Kamera
Vaku
Hangszóró
Micro USB
port
Fényérzékelő

58
Picture to show how to remove the bottom casing
Picture to show the cards position
Picture to show how to remove the bottom casing
Picture to show the cards position
A mobiltelefon dobozának kicsomagolását követően:
1. A horonyba benyúlva távolítsa el a készülék hátlapját.
2. Helyezze be a SIM kártyát a megfelelő nyílásba.
3. Helyezze be a készülék akkumulátorát.
4. Helyezze vissza a hátlapot.
4G/3G/2G 1 Micro-SIM
4G/3G/2G 2 Micro-SIM
Memóriakártya 3 Micro SD
A SIM kártyát és a micro SD-kártyát feltétlenül
az ábrán látható módon helyezze be, ellenkező
esetben megsérülhet a nyílás vagy a kártya.
Összeszerelés

59
Töltés
Csatlakoztassa a töltőkábelt Micro USB-csatlakozóhoz és a töltőhöz.
A készülék első használata előtt töltse fel teljesen az akkumulátort.
Bekapcsolás
1. A készülék bekapcsolásához tartsa lenyomva a főkapcsolót.
2. Kövesse az utasításokat.
Mobil adatkapcsolat
1. A megjelenítéshez érintse meg és húzza lefelé az állapotjelző sávot.
2. A gyorsbeállítások felfedéséhez ismét érintse meg a sávot.
3. Válassza ki a Beállítások ikont.
4. A Vezeték nélküli és hálózatok részben válassza ki a Adathasználat, majd
a SIM kártya lapot.
5. A ki- vagy bekapcsoláshoz csúsztassa el a Mobil adatok kapcsolót.
Wi-Fi kapcsolat
1. A megjelenítéshez érintse meg és húzza lefelé az állapotjelző sávot.
2. A gyorsbeállítások felfedéséhez ismét érintse meg a sávot.
3. Válassza ki a Wi-Fi ikont
a Wi-Fi kapcsolat aktiválásához.
4. Válassza ki a „WiFi” elemet a Wi-Fi ikon alatt.
5. Érintse meg annak a hálózatnak a nevét, amelyikhez csatlakozni szeretne.
A magánhálózatok mellett lakat szimbólum látható, és jelszó megadását
kérik.
Indítás

60
- Saját készülék lefagyott: nyomja meg az ON / OFF gombot több mint 10 másodpercig, vagy
cserélje ki az akkumulátort, majd kapcsolja be a készüléket.
- Saját eszköz találkozik zavarok: menjen a Beállítások> A telefonról> Frissítések rendszer
ellenőrzi a frissítéseket. Ha az eszköz up-to-date, próbálja visszaállítani a készüléket a
Beállítások> Gyári adatok visszaállítása> Biztonsági mentés és visszaállítás. Javasoljuk, hogy
mentse a fájlokat a visszaállítás előtt.
- Ha a Wi-Fi jelerősség túl gyenge: győződjön meg arról, hogy nincs túl messze a Wi-Fi
hotspottól. Frissítse a készülék rmware-ét: http://www.archos.com/support. Állítsa vissza és
állítsa be újra a csatlakozási paramétereket. Forduljon a Wi-Fi szolgáltatóhoz.
- Saját eszköz bootlogo játszik a hurok: meg kell, hogy teljesen a készülék újraindítására.
Tovább a faq.archos.com és válassza ki az eszközt. Ezen biztonsági mentés és helyreállítás,
válassza Hogyan újrainicializál az Archos.
MŰSZAKI PROBLÉMÁIRA AZ ALÁBBI CÍMEN IS TALÁLHAT VÁLASZT: FAQ.ARCHOS.COM
Hibaelhárítás

61
Open Source Software Offer
The software bundled with this product includes software files subject to certain open source
license requirements. Such open source software files are subject solely to the terms of the relevant
open source software license. Such open source software is provided on an “AS IS” basis to the
maximum extent permitted by applicable law.
For the open source files contained herein, please access “Open source license” section located
at: Settings\About phone\Legal information on the device for the relevant copyright and licensing
terms. You may obtain a copy of Apache License, Version 2.0 at http://www.apache.org/licenses/
LICENSE-2.0. You may also obtain a copy of GNU General Public License, Version 2 at the Free
Software Foundation, INC, 51 Franklin Street, Fifth Floor, Boston, MA 02110-1301, USA.
Until the date that is three years after our last shipment of this product, you may obtain a copy
of the source code corresponding to the binaries for any GPL-Licensed file by contacting ARCHOS
customer service at http://www.archos.com and ARCHOS will send you a link to such source code or
will provide instructions to get the source on a physical medium.
This offer is valid to anyone in receipt of this information.

62
National restrictions
This device is intended for home and office use in all EU countries (and other countries following the
EU directive 1999/5/EC) without any limitation except for the countries mentioned below:
Country Restriction Reason/remark
Bulgaria None General authorization required for outdoor use and public
service
France Outdoor use limited to
10 mW e.i.r.p. within the
band 2454-2483.5 MHz
Military Radiolocation use. Refarming of the 2.4 GHz band
has been ongoing in recent years to allow current relaxed
regulation. Full implementation planned 2012
Italy None If used outside of own premises, general authorization is
required.
Luxembourg None General authorization required for network and service
supply (not for spectrum)
Norway Implemented This subsection does not apply for the geographical aera
within a radius of 20 km from the centre of Ny-Alesund
Russian
Federation
None Only for indoor applications
Note: Frequencies 2454-2483.5MHZ are restricted to indoor use in France.

63
SAR
After the laboratory measurements, the SAR values for this mobile are:
0.207 W/KG HEAD; 1.489 W/KG BODY
Archos company (Contact address : ARCHOS SA 12 Rue Ampère 91430 Igny France) declares that
this device is in compliance with the essential requirements and other relevant provisions of
Directive 1999/5/EC: http://www.archos.com/support/download/conformity/CE_DOC_AC55HE.pdf
Par la présente, ARCHOS (adresse de contact : ARCHOS SA 12 Rue Ampère 91430 Igny France)
déclare que l’appareil est conforme aux exigences essentielles et aux autres dispositions
pertinentes de la directive 1999/5/CE. La déclaration de conformité peut être consultée sur le site :
http://www.archos.com/support/download/conformity/CE_DOC_AC55HE.pdf
-
 1
1
-
 2
2
-
 3
3
-
 4
4
-
 5
5
-
 6
6
-
 7
7
-
 8
8
-
 9
9
-
 10
10
-
 11
11
-
 12
12
-
 13
13
-
 14
14
-
 15
15
-
 16
16
-
 17
17
-
 18
18
-
 19
19
-
 20
20
-
 21
21
-
 22
22
-
 23
23
-
 24
24
-
 25
25
-
 26
26
-
 27
27
-
 28
28
-
 29
29
-
 30
30
-
 31
31
-
 32
32
-
 33
33
-
 34
34
-
 35
35
-
 36
36
-
 37
37
-
 38
38
-
 39
39
-
 40
40
-
 41
41
-
 42
42
-
 43
43
-
 44
44
-
 45
45
-
 46
46
-
 47
47
-
 48
48
-
 49
49
-
 50
50
-
 51
51
-
 52
52
-
 53
53
-
 54
54
-
 55
55
-
 56
56
-
 57
57
-
 58
58
-
 59
59
-
 60
60
-
 61
61
-
 62
62
-
 63
63


Archos 55 Helium 4 Seasons El manual del propietario
- Categoría
- Smartphones
- Tipo
- El manual del propietario
en otros idiomas
Artículos relacionados
-
 Archos Helium 55 Helium Ultra Manual de usuario
-
 Archos Platinium CE 50P Manual de usuario
-
Archos Platinium 55b Platinum Manual de usuario
-
Mode d'Emploi 55b Cobalt Manual de usuario
-
-
Archos Neon 50f Neon Manual de usuario
-
 Mode d'Emploi 55 Helium Manual de usuario
-
Archos Helium 50f Helium El manual del propietario
-
Archos Cobalt 50b Cobalt El manual del propietario


