
EN Counter refrigerators/
Freezers
Instruction manual
2DE Edelstahl-Kühl-/
Tiefkühltische
Bedienungsanleitung
26
NL RVS werkbanken met
koeling/vriezer
Handleiding
10 IT Banchi frigoriferi/congelatori
a banco in acciaio inossidabile
Manuale di istruzioni
34
FR
Tables réfrigérées inox
Mode d'emploi
18 ES Frigoríficos / Congeladores
de mostrador de acero
inoxidable
Manual de instrucciones
42
Model • Modèle • Modell • Modello • Modelo • Malli:
G377/G378/G379/G596/G597/G598/GD873/GD874/DL914/
DL915/GL182/GL183/GL184/G599/G600/DL916/DL917
Stainless Steel Counter
Refrigerators/Freezers
Instruction manual
G377-G379_G596-G600_GD873-GD874_DL914-DL917_GL182-GL184_ML_A5_v7_20230504.indb 1G377-G379_G596-G600_GD873-GD874_DL914-DL917_GL182-GL184_ML_A5_v7_20230504.indb 1 2023/5/4 15:072023/5/4 15:07

2
EN
Safety Instructions
• Position on a flat, stable surface.
• A service agent/qualified technician should carry out
installation and any repairs if required. Do not remove any
components or service panels on this product.
• Consult Local and National Standards to comply with the
following:
- Health and Safety at Work Legislation
- BS EN Codes of Practice
- Fire Precautions
- IEE Wiring Regulations
- Building Regulations
• DO NOT use jet/pressure washers to clean the appliance.
• DO NOT use the appliance outside.
• DO NOT use this appliance to store medical supplies.
• DO NOT stand or support yourself on the base, drawers or
doors.
• DO NOT allow oil or fat to come into contact with the plastic
components or door seal. Clean immediately if contact occurs.
• Bottles that contain a high percentage of alcohol must be
sealed and placed vertically in the refrigerator.
• Always carry, store and handle the appliance in a vertical
position and move by holding the base of the appliance.
• Always switch off and disconnect the power supply to the unit
before cleaning.
• Keep all packaging away from children. Dispose of the packaging
in accordance with the regulations of local authorities.
• If the power cord is damaged, it must be replaced by a POLAR
agent or a recommended qualified technician in order to avoid
a hazard.
• POLAR recommend that this product is connected to a circuit
protected by an appropriate RCD (Residual Current Device).
G377-G379_G596-G600_GD873-GD874_DL914-DL917_GL182-GL184_ML_A5_v7_20230504.indb 2G377-G379_G596-G600_GD873-GD874_DL914-DL917_GL182-GL184_ML_A5_v7_20230504.indb 2 2023/5/4 15:072023/5/4 15:07

3
EN
• This appliance is not intended for use by persons (including
children) with reduced physical, sensory or mental capabilities,
or lack of experience or knowledge, unless they have been
given supervision or instruction concerning the use of the
appliance by a person responsible for their safety.
• POLAR recommends that this appliance should be periodically
tested (at least annually) by a Competent Person. Testing
should include, but not be limited to: Visual Inspection,
Polarity Test, Earth Continuity, Insulation Continuity and
Functional Testing.
Caution: Risk of Fire
• Do not store explosive substances such as aerosol cans with a
flammable propellant in this appliance.
Warning: Keep all ventilation openings clear of
obstruction. Unit should not be boxed in without
adequate ventilation.
• Warning: Do not use mechanical devices or other means
to accelerate the defrosting process, other than those
recommended by the manufacturer.
• Warning: Do not damage the refrigerant circuit.
• Warning: Do not use electrical appliances inside the food
storage compartments of the appliance.
Product Description
G377 - POLAR 228 litre 2 Door Counter Refrigerator
G378 - POLAR 339 litre 3 Door Counter Refrigerator
G379 - POLAR 449 litre 4 Door Counter Refrigerator
G596 - POLAR 282 litre 2 Door Counter Refrigerator
G597 - POLAR 417 litre 3 Door Counter Refrigerator
G598 - POLAR 553 litre 4 Door Counter Refrigerator
GD873 - POLAR 282 litre 1 Door 2 Drawer Counter
Refrigerator
GD874 - POLAR 417 litre 2 Door 2 Drawer Counter
Refrigerator
DL914 - POLAR 282 litre 2 Door Counter Refrigerator
with upstand
DL915 - POLAR 417 litre 3 Door Counter Refrigerator
with upstand
GL182 - POLAR 3 door bakery counter fridge
with Granite worktop
GL183 - POLAR 2 door bakery counter
refrigerator
GL184 - POLAR 3 door bakery counter
refrigerator
G599 - POLAR 282 litre 2 Door Counter
Freezer
G600 - POLAR 417 litre 3 Door Counter
Freezer
DL916 - POLAR 282 litre 2 Door Counter
Freezer with upstand
DL917 - POLAR 417 litre 3 Door Counter
Freezer with upstand
G377-G379_G596-G600_GD873-GD874_DL914-DL917_GL182-GL184_ML_A5_v7_20230504.indb 3G377-G379_G596-G600_GD873-GD874_DL914-DL917_GL182-GL184_ML_A5_v7_20230504.indb 3 2023/5/4 15:072023/5/4 15:07

4
EN
Introduction
Please take a few moments to carefully read
through this manual. Correct maintenance and
operation of this machine will provide the best
possible performance from your POLAR product.
Pack Contents
The following is included:
• POLAR Refrigerator or Freezer
• Shelf guide (2 per door) except GL182 (14 per
door)
• Shelf (1 per door) except GL182, GL183 and
GL184 (No shelves included)
• Instruction manual
• Spacer (x2)
POLAR prides itself on quality and service, ensuring
that at the time of unpacking the contents are
supplied fully functional and free of damage.
Should you find any damage as a result of transit,
please contact your POLAR dealer immediately.
Installation
Note: Not for use in vans or trailers, food
trucks or similar vehicles.
Note: If the unit has not been stored or
moved in an upright position, let it stand
upright for approximately 12 hours before
operation. If in doubt allow to stand.
1. Remove the appliance from the packaging.
Make sure that all protective plastic film and
coatings are thoroughly removed from all
surfaces.
2. To optimize performance and longevity, ensure
a minimum clearance of 2.5cm is maintained
between the unit and walls and other objects,
with a minimum 20cm clearance on the top.
NEVER LOCATE NEXT TO A HEAT SOURCE.
To avoid being pushed tight against
the wall accidentally and ensure good
ventilation, 2 spaces are supplied for
mounting on the rear.
3. Set the brakes on the castors to keep the
appliance in position OR
Level the appliance by adjusting the screw
feet.
Note: Before using the appliance for the
first time, clean the shelves and interior
with soapy water then dry well.
Fitting the Shelves
1. Place one set of shelf guides on either side of
the cabinet at the desired height.
2. Slide the shelf into place.
3. Repeat for the remaining shelves.
Attach Refrigerated Counter Top
G611 (for GL182 Only) (This is
optional)
1. Remove the appliance from the packaging.
2. Tip the appliance back and loosely attach the
three brackets to the underside of the counter
top, using suitable screws. Do not fully tighten
at this stage.
Note: Ensure the two ‘L’ shape
brackets are fitted to the
outside edges.
3. Lower the Counter Top unit onto the marble
sides. Ensure the side brackets are postponed
on the inside of the marble rim.
4. Push the side brackets flush with the marble
and tighten the bracket screws.
Fit Glass Panels G611 (for GL182
Only)
1. Screw the collars to the rim of the appliance.
Note: Ensure the hole in the
collar for the grub screw faces
inwards.
G377-G379_G596-G600_GD873-GD874_DL914-DL917_GL182-GL184_ML_A5_v7_20230504.indb 4G377-G379_G596-G600_GD873-GD874_DL914-DL917_GL182-GL184_ML_A5_v7_20230504.indb 4 2023/5/4 15:072023/5/4 15:07

5
EN
2. Slot the two side panels into the collars, with
the holes in the glass at the top.
Note: Ensure the screw hole
furthest from the edge of the
panel goes to the back of the
appliance.
3. Screw a grub screw into each collar to secure
the panels.
Note: Ensure the soft end of the
grub screw is the end making
contact with the glass.
Do not over-tighten the grub
screw as it will result in the
glass breaking.
4. Slot the rear panel into the collars, with the
holes in the glass at the top.
5. Screw a grub screw into each collar to secure
the panel.
6. Slot the plastic plugs into each of the holes.
7. Screw the brackets to the inside of each panel
using the bolt assemblies.
Note: Ensure the short end
of the bolt assembly is on the
outside of the panels.
8. Place the top panel onto the brackets, ensuring
all holes line up.
9. Insert the plugs and attach the top panel to
the brackets with the bolt assembly.
Bracket
Glass Panel
Bolt Assembly
Plug
Bolt Assembly
Operation
Storing Food
To get the best results from your POLAR appliance,
follow these instructions:
• Only store foodstuffs in the appliance when it
has reached the correct operating temperature.
• Do not place uncovered hot food or liquids (like
acidic fluids) inside the appliance (as it can
damage the evaporator).
• Wrap or cover food where possible.
• Do not obstruct the fans inside the appliance.
• Avoid opening the doors for prolonged periods
of time.
Turn On
1. Ensure the power switch is set to [O] and turn
on at the socket.
2. Switch on the Power [I]. The current
temperature within the appliance is displayed.
Control Panel
Set the Operating Temperature
1. Hold the SET button for 3 seconds. The value
of the current set point will be displayed.
2. Press the or buttons to display the
required temperature.
3. Press the SET button to store the temperature.
Manual Defrost
• The appliance will automatically run a defrost
cycle every six hours.
• To manually defrost the appliance: Press
and hold the defrost button "aux" for 2
seconds to begin a manual defrost. The defrost
light illuminates.
• The defrost cycle will end automatically.
G377-G379_G596-G600_GD873-GD874_DL914-DL917_GL182-GL184_ML_A5_v7_20230504.indb 5G377-G379_G596-G600_GD873-GD874_DL914-DL917_GL182-GL184_ML_A5_v7_20230504.indb 5 2023/5/4 15:072023/5/4 15:07

6
EN
Cleaning, Care & Maintenance
Defrost appliance at least every 3 months, more often if required.
Switch off and disconnect from the power supply before cleaning.
• Clean the interior of the appliance as often as possible.
• Do not use abrasive cleaning agents. These can leave harmful residues.
• Clean the door seal with warm soapy water.
• Always wipe dry after cleaning.
• Do not allow water used in cleaning to run through the drain hole into the evaporation pan.
• Take care when cleaning the rear of the appliance. Sharp edges can cut.
Refrigerating tips:
• Condensation and ice will form with frequent and prolonged opening of the doors.
• Operating outside of the recommend temperature range and placing next to a heat source will also
increase the amount of ice and internal/external condensation. If external condensation occurs wipe
the surface down with a cloth.
• Excessive ice will result in longer running times that will increase energy consumption and increase
the deterioration of components.
• If the gasket or seal is damaged or deformed, energy consumption will increase. To restore efficiency,
replace gasket.
Stainless Steel Care
To maintain the stainless steel exterior of your Polar item, please consider the following information:
Never:
• Use abrasive Scourers or scrubbing pads, etc.
• Use Chlorinated or acidic detergents
• Allow anything e.g. food, dirt, cleaning chemicals to remain on the surface for longer than necessary,
clean them off right away.
• Allow the surface to remain wet.
Do:
• Clean often.
• Use soft Cloths or plastic Scourers.
• Rub with the grain of the metal, rather than across it.
• Use detergents and polish designed for cleaning Stainless Steel.
• Ensure that the cleaning products are washed off fully and that the steel is left dry.
Condenser Cleaning
• The condenser is part of the refrigeration
system. The condenser requires monthly
cleaning.
• Always disconnect power supply before carrying
out Routine Maintenance.
• Failure to clean the condenser will reduce the
performance and life of your Polar unit and may
invalidate your warranty.
• The condenser is located behind the service
door on the right-hand side of the refrigeration
cabinet.
• These models have a removable filter which can
be cleaned with a vacuum cleaner.
G377-G379_G596-G600_GD873-GD874_DL914-DL917_GL182-GL184_ML_A5_v7_20230504.indb 6G377-G379_G596-G600_GD873-GD874_DL914-DL917_GL182-GL184_ML_A5_v7_20230504.indb 6 2023/5/4 15:072023/5/4 15:07

7
EN
Troubleshooting
A qualified technician must carry out repairs if required.
Fault Probable Cause Solution
The appliance is not
working
The unit is not switched on Check the unit is plugged in correctly and
switched on
Plug or lead is damaged Replace plug or lead
Fuse in the plug has blown Replace the fuse
Mains power supply fault Check mains power supply
The appliance turns on,
but the temperature is
too high/low
Too much ice on the evaporator Defrost the appliance
Condenser blocked with dust Clean the Condenser
Doors are not shut properly Check doors are shut and seals are not
damaged
Appliance is located near a
heat source or air flow to the
condenser is being interrupted
Move the refrigerator to a more suitable
location
Ambient temperature is too high Increase ventilation or move appliance to a
cooler position
Unsuitable foodstuffs are being
stored in the appliance Remove any excessive hot foodstuffs or
blockages to the fan
Appliance is overloaded Reduce the amount of food stored in the
appliance
The appliance is
leaking water The appliance is not properly
levelled Adjust the screw feet to level the appliance
(if applicable)
The discharge outlet is blocked Clear the discharge outlet
Movement of water to the drain is
obstructed Clear the floor of the appliance (if
applicable)
The water container is damaged Consult a qualified Technician
The drip tray is overflowing Empty the drip tray (if applicable)
The appliance is
unusually loud The safety band has not been
removed Remove the safety band
Loose nut/screw Check and tighten all nuts and screws
The appliance has not been
installed in a level or stable
position
Check installation position and change if
necessary
G377-G379_G596-G600_GD873-GD874_DL914-DL917_GL182-GL184_ML_A5_v7_20230504.indb 7G377-G379_G596-G600_GD873-GD874_DL914-DL917_GL182-GL184_ML_A5_v7_20230504.indb 7 2023/5/4 15:072023/5/4 15:07

8
EN
Technical Specifications
Note: Due to our continuing program of research and development, the specifications herein may be
subject to change without notice.
Model Voltage Power Current Temperature
Range
Net
usable
Capacity
(Litre)
Refrigerant Dimensions
H x W x D mm Weight
(kg)
G377 230V
50Hz 230W 1.6A -2°C to 8°C 155 R600a 80g 850 x 1360 x
600 88
G378 230V
50Hz 230W 1.6A -2°C to 8°C 231 R600a 80g 850 x 1795 x
600 125
G379 230V
50Hz 230W 1.6A -2°C to 8°C 312 R600a 80g 860 x 2230 x
600 143
G596 230V
50Hz 350W 1.95A -2°C to 10°C 190 R600a 95g 850 x 1360 x
700 98
G597 230V
50Hz 350W 1.95A -2°C to 10°C 291 R600a 95g 850 x 1790 x
700 134
G598 230V
50Hz 350W 1.95A -2°C to 10°C 393 R600a 95g 850 x 2230 x
700 153
GD873 230V
50Hz 350W 1.95A -2°C to 10°C 142 R600a 95g 850 x 1360 x
700 98
GD874 230V
50Hz 350W 1.95A -2°C to 10°C 242 R600a 95g 850 x 1790 x
700 134
DL914 230V
50Hz 350W 1.95A -2°C to 10°C 190 R600a 95g 960 x 1360 x
700 98
DL915 230V
50Hz 350W 1.95A -2°C to 10°C 291 R600a 95g 960 x 1790 x
700 134
GL182 230V
50Hz 350W 1.95A 2°C to 10°C 406 R600a 95g 1000 x 2020 x
800 320
GL183 230V
50Hz 350W 1.95A 2°C to 10°C 290 R600a 95g 860 x 1510 x
800 140
GL184 230V
50Hz 350W 1.95A 2°C to 10°C 444 R600a 95g 860 x 2020 x
800 152
G599 230V
50Hz 750W 3.5A -10°C to
-20°C 187 R290 90g 850 x 1360 x
700 103
G600 230V
50Hz 750W 3.5A -10°C to
-20°C 280 R290 90g 850 x 1795 x
700 136.5
DL916 230V
50Hz 750W 3.5A -10°C to
-20°C 187 R290 90g 960 x 1360 x
700 103
DL917 230V
50Hz 750W 3.5A -10°C to
-20°C 280 R290 90g 960 x 1795 x
700 136.5
Note: For optimal product performance and efficiency, please ensure to mind the net usable capacity (load
limit) when filling.
G377-G379_G596-G600_GD873-GD874_DL914-DL917_GL182-GL184_ML_A5_v7_20230504.indb 8G377-G379_G596-G600_GD873-GD874_DL914-DL917_GL182-GL184_ML_A5_v7_20230504.indb 8 2023/5/4 15:072023/5/4 15:07

9
EN
Electrical Wiring
POLAR appliances are supplied with a 3 pin BS1363 plug and lead.
The plug is to be connected to a suitable mains socket.
POLAR appliances are wired as follows:
• Live wire (coloured brown) to terminal marked L
• Neutral wire (coloured blue) to terminal marked N
• Earth wire (coloured green/yellow) to terminal marked E
This appliance must be earthed.
If in doubt consult a qualified electrician.
Electrical isolation points must be kept clear of any obstructions. In the event of any emergency
disconnection being required they must be readily accessible.
Disposal
EU regulations require refrigeration product to be disposed of by specialist companies who remove or
recycle all gasses, metal and plastic components.
Consult your local waste collection authority regarding disposal of your appliance. Local authorities are
not obliged to dispose of commercial refrigeration equipment but may be able to offer advice on how to
dispose of the equipment locally.
Alternatively call the POLAR helpline for details of national disposal companies within the EU.
Compliance
The WEEE logo on this product or its documentation indicates that the product must
not be disposed of as household waste. To help prevent possible harm to human
health and/or the environment, the product must be disposed of in an approved and
environmentally safe recycling process. For further information on how to dispose of
this product correctly, contact the product supplier, or the local authority responsible for
waste disposal in your area.
POLAR parts have undergone strict product testing in order to comply with
regulatory standards and specifications set by international, independent,
and federal authorities.
POLAR products have been approved to carry the following symbol:
All rights reserved. No part of these instructions may be produced or transmitted in any form or by any means, electronic,
mechanical, photocopying, recording or otherwise, without the prior written permission of POLAR.
Every effort is made to ensure all details are correct at the time of going to press, however, POLAR reserve the right to
change specifications without notice.
G377-G379_G596-G600_GD873-GD874_DL914-DL917_GL182-GL184_ML_A5_v7_20230504.indb 9G377-G379_G596-G600_GD873-GD874_DL914-DL917_GL182-GL184_ML_A5_v7_20230504.indb 9 2023/5/4 15:072023/5/4 15:07

10
NL
Veiligheidstips
• Plaatsen op een vlakke en stabiele ondergrond.
• De installatie en eventuele reparaties dienen door een
servicemonteur/vakman uitgevoerd te worden. Verwijder geen
onderdelen of servicepanelen van dit product.
• Raadpleeg en volg de plaatselijke en nationale regelgeving op
m.b.t. tot het volgende:
- Wetgeving inzake gezondheid en veiligheid op het werk
- Nen-praktijkrichtlijnen
- Brandpreventie
- IEE-bedradingsvoorschriften
- Bouwvoorschriften
• Dit product NIET reinigen met spuit-/drukreinigers.
• Dit product NIET gebruiken voor de berging van medische
producten.
• NIET op het blad, de lades en de deuren staan of als
ondersteuning gebruiken.
• Laat olie of vet NIET in contact komen met plastic componenten
of deurafdichtingen. Onmiddellijk reinigen indien dit wel gebeurt.
• Uitsluitend geschikt voor gebruik binnenshuis.
• Flessen met een hoog alcoholpercentage moet goed worden
afgesloten en verticaal in de koelkast worden bewaard.
• Dit product altijd in een verticale positie vervoeren, opslaan en
gebruiken. Het product verplaatsen door aan de onderkant op
te tillen.
• Alvorens dit product te reinigen dient men altijd de
stroomvoorziening uit te schakelen.
• Laat verpakkingsmateriaal niet binnen handbereik van kinderen.
Verpakkingsmateriaal in overeenstemming met de regelgeving
van de plaatselijke overheden als afval laten verwerken.
• Indien de stroomkabel beschadigd raakt, dient men deze door
een POLAR technicus of een aanbevolen vaktechnicus te laten
vervangen om gevaarlijke situaties te verhinderen.
G377-G379_G596-G600_GD873-GD874_DL914-DL917_GL182-GL184_ML_A5_v7_20230504.indb 10G377-G379_G596-G600_GD873-GD874_DL914-DL917_GL182-GL184_ML_A5_v7_20230504.indb 10 2023/5/4 15:072023/5/4 15:07

11
NL
• Dit apparaat is niet bedoeld voor gebruik door personen met
lichamelijke, zintuiglijke of mentale beperkingen (inclusief
kinderen) of met gebrek aan ervaring of kennis, tenzij zij hierin
worden begeleid of zijn opegeleid in het gebruik van het apparaat
door een persoon, die verantwoordelijk is voor hun veiligheid.
• POLAR
beveelt aan dat dit apparaat periodiek (minstens
jaarlijks) door een bevoegde persoon wordt getest. Tests
moeten omvatten, maar zijn niet beperkt tot: visuele inspectie,
polariteit, aardings continuïteit (klasse I-apparatuur), isolatie
continuïteit en functionele test.
Voorzichtig: Risico bij open Vuur
• Bewaar geen explosieve stoffen zoals spuitbussen met een
ontvlambaar drijfgas in dit apparaat.
Waarschuwing:
Hou alle ventilatieopeningen vrij
van obstakels. De eenheid mag niet ingesloten
worden zonder geschikte ventilatie.
• Waarschuwing: mechanische apparaten of andere
middelen niet gebruiken om het ontdooien te versnellen, met
uitzondering van de door de fabrikant aanbevolen middelen.
• Waarschuwing: het koelcircuit niet beschadigen.
• Waarschuwing: Gebruik geen elektrische apparaten in de
bewaarruimten van het apparaat.
Productbeschrijving
G377 - POLAR 228 liter 2 deurs werkbank met koeling
G378 - POLAR 339 liter 3 deurs werkbank met koeling
G379 - POLAR 449 liter 4 deurs werkbank met koeling
G596 - POLAR 282 liter 2 deurs werkbank met koeling
G597 - POLAR 417 liter 3 deurs werkbank met koeling
G598 - POLAR 553 liter 4 deurs werkbank met koeling
GD873 - POLAR 282 liter 1 deurs werkbank met
koeling en 2 lades
GD874 - POLAR 417 liter 2 deurs werkbank met
koeling en 2 lades
DL914 - POLAR 282 liter 2 deurs werkbank met koeling
(met achteropstand)
DL915 - POLAR 417 liter 3 deurs werkbank
met koeling (met achteropstand)
GL182 - POLAR 3-deurs bakkerij-koelkast met
granieten werkblad
GL183 - POLAR 2-deurs patisserie counter
GL184 - POLAR 3-deurs patisserie counter
G599 - POLAR 282 liter 2-deurs werkbank met
vriezer
G600 - POLAR 417 liter 3 Deur Teller Vriezer
DL916 - POLAR 282 liter 2-deurs werkbank
met vriezer en achteropstand
DL917 - POLAR 417 liter 3-deur werkbank met
vriezer en achteropstand
G377-G379_G596-G600_GD873-GD874_DL914-DL917_GL182-GL184_ML_A5_v7_20230504.indb 11G377-G379_G596-G600_GD873-GD874_DL914-DL917_GL182-GL184_ML_A5_v7_20230504.indb 11 2023/5/4 15:072023/5/4 15:07

12
NL
Inleiding
Neem de tijd om deze handleiding aandachtig door
te lezen. Met het correcte gebruik en onderhoud
levert dit product van POLAR de beste resultaten op.
Verpakkingsinhoud
De verpakking bevat het volgende:
• POLAR koeling of vriezer
• Ladegeleider (2 per deur), behalve GL182 (14
per deur)
• Lades (1 per deur), behalve GL182, GL183 en
GL184 (geen platen meegeleverd)
• Handleiding
• Afstandshouder (x2)
POLAR is trots op de haar productkwaliteit en
dienstverlening en controleer de inhoud van de
verpakkingen, tijdens de verpakkingsfase, op
functioneren en schade.
Mocht uw product door transport zijn beschadigd,
neem dan onmiddellijk contact op met uw POLAR
dealer.
Installatie
Opmerking: Niet voor gebruik in
bestelwagens of aanhangwagens,
foodtrucks of soortgelijke voertuigen.
Opmerking: indien het apparaat niet in
een rechtopstaande positie is opgeslagen
of vervoerd, dient men het product 12 uur
vóór gebruik in de rechtopstaande positie
te plaatsen. Bij twijfel dient men het
product in een rechtopstaande positie te
plaatsen.
1. Haal het product uit de verpakking. Zorg ervoor
dat u de beschermingsfolie en -lagen van alle
oppervlakken heeft verwijderd.
2. Om de prestaties en levensduur te
optimaliseren, dient u ervoor te zorgen dat
er minimaal 2,5 cm afstand wordt gehouden
tussen de unit en muren en andere objecten,
met een minimale vrije ruimte van 20 cm aan
de bovenkant. PLAATS NOOIT NAAST EEN
WARMTEBRON.
Opmerking: Om te voorkomen, dat het
apparaat per ongeluk vast tegen de
muur wordt gedrukt en om voor een
goede ventilatie te zorgen, zijn er 2
afstandshouders meegeleverd voor de
bevestiging aan de achterzijde.
3. Zet de wielen op de rem om het product op
zijn plaats vast te zetten.
Opmerking: Voor het eerste gebruik van dit
product dient u de lades en de binnenzijde
met zeepwater te reinigen, en daarna goed
droogmaken met een droogdoek.
Het plaatsen van de lades
1. Plaats één set van de ladegeleiders aan beide
zijden van de kast en op de gewenste hoogte.
2. Schuif de lade op zijn plaats.
3. Herhaal deze handeling voor de overige lades.
Het bevestigen van de
opzetkoelvitrine (G611, uitsluitend
op GL182) (Dit is optioneel)
1. Haal het product uit de verpakking.
2. Kantel het product naar achteren en bevestig
de drie beugels met de juiste schroeven aan
de onderzijde van de opzetkoelvitrine. Draai ze
nog niet helemaal vast.
Opmerking: zorg dat de twee
‘L’-vormige beugels aan de
buitenranden worden bevestigd.
3. Laat de opzetkoelvitrine op de marmeren
zijkanten zakken. Zorg dat de beugels aan de
binnenkant van de marmeren rand komen.
4. Zorg dat de zijbeugels correct uitgelijnd zijn op
het marmer en draai de beugelschroeven aan.
Het plaatsen van de glaspanelen
G611 (uitsluitend GL182)
1. Schroef de tussendelen vast aan de rand van
het product.
Opmerking: zorg dat het gat in het
tussendeel voor de fixeerschroeven naar
binnen is gericht.
G377-G379_G596-G600_GD873-GD874_DL914-DL917_GL182-GL184_ML_A5_v7_20230504.indb 12G377-G379_G596-G600_GD873-GD874_DL914-DL917_GL182-GL184_ML_A5_v7_20230504.indb 12 2023/5/4 15:072023/5/4 15:07

13
NL
2. Schuif de twee zijpanelen in de tussendelen
met de gaten in het glas naar boven gericht.
Schroef een fixeerschroef in
elk van de tussendelen om de
panelen te bevestigen.
3. Schroef een fixeerschroef in elk van de
tussendelen om de panelen te bevestigen.
Opmerking: zorg dat het zachte
uiteinde van de fixeerschroef
het deel is dat in contact komt
met het glas.
Draai de imbusboutjes niet te
strak aan, anders zal het glas
kunnen breken.
4. Schuif de het achterpaneel in de tussendelen
met de gaten in het glas naar boven gericht.
5. Schroef een fixeerschroef in elk van de
tussendelen om het paneel te bevestigen.
6. Schuif in elk van de gaten één plastic plug.
7. Schroef de beugels met behulp van de
boutunits aan de binnenzijde van elk paneel.
Opmerking: zorg dat het kortste
uiteinde van het boutunit aan
de buitenkant van de panelen
zit.
8. Plaats het bovenste paneel in de beugels en
zorg dat alle gaten op elkaar zijn uitgelijnd.
9. Plaats de pluggen en bevestig het bovenste
paneel aan de beugels met behulp van de
boutunits.
Beugel
Glaspaneel
Boutunit
Plug
Boutunit
Bediening
Opslag van levensmiddelen
Volg de volgende aanwijzingen voor de beste
resultaten met uw POLAR product:
• Bewaar uitsluitend levensmiddelen in het
product wanneer het product de juiste
gebruikstemperatuur heeft gereikt.
• Plaats geen onbedekt heet voedsel of
vloeistoffen (zoals zure vloeistoffen) in het
toestel (aangezien dit de verdamper kan
beschadigen).
• Voedsel bedekken en inwikkelen wanneer
mogelijk.
• Niet de interne ventilatoren in het product
blokkeren.
• Laat de deuren niet al te lang openstaan.
Inschakelen
1. Controleer of stroomschakelaar in de positie [O]
staat en de steker in het stopcontact zit.
2. Schakel de stroom [I] in. De actuele
interne temperatuur van het product wordt
weergegeven.
Bedieningspaneel
Werktemperatuur instellen
1. Houd de SET toets gedurende 3 seconden
ingedrukt. De waarde van het huidige
instelpunt wordt weergegeven.
2. Druk op de of knoppen om de
vereiste temperatuur weer te geven.
3. Druk op de SET knop om de
temperatuurwaarde op te slaan.
Handmatig ontdooien
De knop “aux” indrukken en gedurende
2 seconden ingedrukt houden om ontdooiing te
starten. Het ontdooiingslampje gaat aan.
De ontdooicyclus eindigt automatisch.
G377-G379_G596-G600_GD873-GD874_DL914-DL917_GL182-GL184_ML_A5_v7_20230504.indb 13G377-G379_G596-G600_GD873-GD874_DL914-DL917_GL182-GL184_ML_A5_v7_20230504.indb 13 2023/5/4 15:072023/5/4 15:07

14
NL
Reiniging, zorg & onderhoud
Ontdooi en reinig uw apparaat ten minste om de 3 maanden, en vaker indien nodig.
Alvorens het apparaat te reinigen dient men de stroomvoorziening uit te schakelen.
• Reinig zo vaak mogelijk de binnenkant van het product.
• Gebruik géén schurende reinigingsmiddelen. Dergelijke middelen kunnen schadelijke resten
achterlaten.
• Reinig de deurdichting met warm zeepwater.
• Na reiniging altijd droogmaken.
• Het voor reiniging gebruikte water mag niet door het afvoergat naar de verdampingspan stromen.
• Ga voorzichtig te werk bij het reinigen van de achterzijde van het product. Scherpe randen kunnen
snijwonden veroorzaken.
Koeltips:
• Bij veelvuldig en langdurig openen van de deuren zal zich condens en ijs vormen.
• Gebruik buiten het aanbevolen temperatuurbereik en plaatsing naast een warmtebron zal ook de
hoeveelheid ijs en interne/externe condensatie doen toenemen. In geval van externe condensatie
kunt u het oppervlak afvegen met een doek.
• Te veel ijs leidt tot langere bedrijfstijden, waardoor het energieverbruik toeneemt en de onderdelen
slechter worden.
• Als de pakking of afdichting beschadigd of vervormd is, zal het energieverbruik toenemen. Vervang
de pakking om de efficiëntie te herstellen.
Verzorging van roestvrij staal
De volgende informatie betreft het onderhoud van de roestvrijstalen buitenkant van het Polar product.
Nooit:
• schurende blokjes of sponsjes etc. gebruiken;
• reinigingsmiddelen met chloor of zuur gebruiken;
• toelaten dat voedsel, vuil, chemische reinigingsmiddelen enz. langer dan nodig op het oppervlak
achterblijven - verwijder ze onmiddellijk;
• toelaten dat het oppervlak nat blijft.
Wel:
• vaak schoonmaken;
• zachte doeken en plastic sponsjes gebruiken;
• met de draad van het metaal mee wrijven, in plaats van tegen de draad in;
• reinigings- en poetsmiddelen gebruiken die speciaal voor roestvrij staal zijn bedoeld;
• ervoor zorgen dat de reinigingsproducten volledig worden afgespoeld en dat het staal droog achter
blijft.
Reiniging van condensor
• De condensor maakt deel uit van het
koelsysteem. De condensor moet maandelijks
worden schoongemaakt.
• Haal altijd eerst de stekker uit het stopcontact
voordat routine-onderhoud wordt uitgevoerd.
• Als de condensor niet wordt schoongemaakt,
heeft dit een nadelige invloed op de prestaties
en de levensduur van het Polar-product en kan
de garantie ongeldig maken.
• De condensor zit achter de onderhoudsdeur op
de rechterzijde van de koelkast.
• Deze modellen hebben een uitneembaar
filter dat met een stofzuiger kan worden
schoongemaakt.
G377-G379_G596-G600_GD873-GD874_DL914-DL917_GL182-GL184_ML_A5_v7_20230504.indb 14G377-G379_G596-G600_GD873-GD874_DL914-DL917_GL182-GL184_ML_A5_v7_20230504.indb 14 2023/5/4 15:072023/5/4 15:07

15
NL
Oplossen van problemen
Indien nodig moet een gekwalificeerde technicus reparaties uitvoeren.
Probleem Mogelijke oorzaak Handeling
Het apparaat werkt
niet
Het apparaat staat uit Controleer of de stroomkabel van het
apparaat is aangesloten en of het apparaat
is ingeschakeld
Stekker en kabel zijn beschadigd Vervang stekker of kabel
Storing netvoeding Controleer netvoeding
Het product staat
aan maar de
temperatuur is te
hoog/laag
Teveel ijs in de verdamper Ontdooi het apparaat
Condensor wordt geblokkeerd door
stof Reinig de condensor
Deuren niet goed gesloten Controleer of de deuren goed dicht zijn en
of afdichtingen niet beschadigd zijn
Het product bevindt zich in de
nabijheid van een warmtebron of
de luchtstroom naar de condensor
wordt onderbroken
Verplaats de koelkast naar een geschiktere
locatie
Omgevingstemperatuur is te hoog Verbeter de ventilatie of verplaats het
product naar een koelere locatie
Ongeschikte levensmiddelen worden
in het product bewaard Verwijder alle overbodige warme
levensmiddelen of deblokkeer de ventilator
Het product wordt overbelast Verminder de hoeveelheid opgeslagen
voedsel in het product
Het product lekt
water Het product staat niet recht Pas de verstelbare poten aan om het
product te nivelleren (indien nodig)
De afvoeropening wordt geblokkeerd Maak de afvoeropening vrij van obstakels
De waterstroom naar de afvoer
wordt geblokkeerd Maak de vloer vrij van obstakels (indien
nodig)
De waterbak is beschadigd Raadpleeg een gekwalificeerde technicus
De lekbak stroomt over Leeg de lekbak (indien nodig)
Het product maakt
ongebruikelijk veel
lawaai
U heeft de veiligheidsband niet
verwijderd Verwijder de veiligheidsband
Moer/schroef los Alle moeren en schroeven controleren en
aandraaien
Het product is niet op een vlakke of
stabiele ondergrond geplaatst Controleer de positie en verander deze
indien nodig
G377-G379_G596-G600_GD873-GD874_DL914-DL917_GL182-GL184_ML_A5_v7_20230504.indb 15G377-G379_G596-G600_GD873-GD874_DL914-DL917_GL182-GL184_ML_A5_v7_20230504.indb 15 2023/5/4 15:072023/5/4 15:07

16
NL
Technische specificaties
Opmerking: Als gevolg van ons voortdurende programma van onderzoek en ontwikkeling, kunnen de
specificaties hierin zonder voorafgaande kennisgeving worden gewijzigd.
Model Voltage Vermogen Stroom Temperatuur-
bereik
Net
bruikbare
capaciteit
(L)
Koel-
middel Afmetingen
h x b x d mm Gewicht
(Kg)
G377 230V
50Hz 230W 1,6A -2°C tot 8°C 155 R600a
80g 850 x 1360 x
600 88
G378 230V
50Hz 230W 1,6A -2°C tot 8°C 231 R600a
80g 850 x 1795 x
600 125
G379 230V
50Hz 230W 1,6A -2°C tot 8°C 312 R600a
80g 860 x 2230 x
600 143
G596 230V
50Hz 350W 1,95A -2°C tot 10°C 190 R600a
95g 850 x 1360 x
700 98
G597 230V
50Hz 350W 1,95A -2°C tot 10°C 291 R600a
95g 850 x 1790 x
700 134
G598 230V
50Hz 350W 1,95A -2°C tot 10°C 393 R600a
95g 850 x 2230 x
700 153
GD873 230V
50Hz 350W 1,95A -2°C tot 10°C 142 R600a
95g 850 x 1360 x
700 98
GD874 230V
50Hz 350W 1,95A -2°C tot 10°C 242 R600a
95g 850 x 1790 x
700 134
DL914 230V
50Hz 350W 1,95A -2°C tot 10°C 190 R600a
95g 960 x 1360 x
700 98
DL915 230V
50Hz 350W 1,95A -2°C tot 10°C 291 R600a
95g 960 x 1790 x
700 134
GL182 230V
50Hz 350W 1,95A 2°C tot 10°C 406 R600a
95g 1000 x 2020
x 800 320
GL183 230V
50Hz 350W 1,95A 2°C tot 10°C 290 R600a
95g 860 x 1510 x
800 140
GL184 230V
50Hz 350W 1,95A 2°C tot 10°C 444 R600a
95g 860 x 2020 x
800 152
G599 230V
50Hz 750W 3,5A -10°C tot -20°C 187 R290 90g 850 x 1360 x
700 103
G600 230V
50Hz 750W 3,5A -10°C tot -20°C 280 R290 90g 850 x 1795 x
700 136,5
DL916 230V
50Hz 750W 3,5A -10°C tot -20°C 187 R290 90g 960 x 1360 x
700 103
DL917 230V
50Hz 750W 3,5A -10°C tot -20°C 280 R290 90g 960 x 1795 x
700 136,5
Opmerking: Voor optimale prestaties en efficiëntie van het product dient u bij het vullen rekening te
houden met de netto bruikbare capaciteit (laadlimiet).
G377-G379_G596-G600_GD873-GD874_DL914-DL917_GL182-GL184_ML_A5_v7_20230504.indb 16G377-G379_G596-G600_GD873-GD874_DL914-DL917_GL182-GL184_ML_A5_v7_20230504.indb 16 2023/5/4 15:072023/5/4 15:07

17
NL
Elektrische bedrading
Men dient de stekker op een geschikt stopcontact aan te sluiten.
De bedrading van dit apparaat is als volgt:
• Stroomkabel (bruin) naar de aansluitklem gemarkeerd met L
• Neutraalkabel (blauw) naar de aansluitklem gemarkeerd met N
• Aardekabel (groen/geel) naar de aansluitklem gemarkeerd met E
Dit apparaat moet worden geaard.
Raadpleeg bij twijfel een vakkundige elektricien.
De elektrische isolatiepunten mogen niet worden geblokkeerd. In geval van een nooduitschakeling
moeten de isolatiepunten direct toegankelijk zijn.
Afvalverwerking
De EU-richtlijnen vereisen dat koelproducten door gespecialiseerde bedrijven wordt verwerkt die gassen,
metalen en plastic componenten verwijderen of recyclen.
Raadpleeg uw plaatselijke afvalverwerkingsbedrijf voor informatie over de verwerking van uw apparaat.
Plaatselijke overheden zijn niet verplicht om commerciële koelapparatuur als afval te verwerken maar
kunnen u wellicht informeren waar u het apparaat kunt afgeven.
U kunt ook de POLAR-helpdesk bellen voor informatie over landelijke afvalverwerkingsbedrijven in de EU.
Productconformiteit
Het WEEE-logo op dit product of bijbehorende documentatie geeft aan dat het product
niet onder huisvuil valt en als zodanig ook niet mag worden verwerkt. Ter preventie
van mogelijke gevaren voor de gezondheid van personen en/of voor het milieu,
dient men dit product in overeenstemming met het voorgeschreven en milieuveilige
recyclingproces als afval te verwerken. Raadpleeg uw productleverancier of uw plaatselijk
afvalverwerkingsbedrijf voor meer informatie over de juiste afvalverwerking van dit
product.
De onderdelen van POLAR producten hebben strenge producttesten ondergaan om te
voldoen aan wettelijke regels en specificaties die door internationale, onafhankelijke en
landelijke overheden worden voorgeschreven.
POLAR producten zijn goedgekeurd en voorzien van het volgende symbool:
Alle rechten voorbehouden. Het is verboden om deze handleiding, hetzij volledig of gedeeltelijk, elektronisch of mechanisch
te reproduceren, kopiëren, op opslagmedia op te slaan of op enigerlei wijze over te dragen, zonder voorafgaande
goedkeuring van POLAR.
Wij hebben er alles aan gedaan om er zeker van te zijn dat op publicatiedatum van de handleiding alle details correct zijn.
Polar behoudt zich echter het recht om zonder voorafgaande kennisgeving de specificaties te wijzigen.
G377-G379_G596-G600_GD873-GD874_DL914-DL917_GL182-GL184_ML_A5_v7_20230504.indb 17G377-G379_G596-G600_GD873-GD874_DL914-DL917_GL182-GL184_ML_A5_v7_20230504.indb 17 2023/5/4 15:072023/5/4 15:07

18
FR
Conseils de sécurité
• Placez l’appareil sur une surface plane, stable.
• L’installation et les éventuelles réparations doivent être
confiées à un dépanneur / technicien qualifié. Ne retirez aucun
composant ou cache de ce produit.
• Consultez les normes locales et nationales pour vous
conformer aux :
- lois sur l’hygiène et la sécurité au travail ;
- codes de bonnes pratiques BS EN ;
- précautions contre le risque d’incendie ;
- réglementations sur les branchements électriques IEE ;
- règlements sur la construction.
• NE PAS nettoyer cet appareil avec un nettoyeur à jet / à pression.
• NE PAS se servir de cet appareil pour stocker des médicaments.
• NE PAS se tenir debout sur le châssis, les tiroirs ou les portes
ou s’y accouder.
• NE PAS éclabousser les composants en plastique ou les joints
de porte d’huile ou de matières grasses. En cas d’éclaboussure,
nettoyez immédiatement la surface touchée.
• Cet appareil est réservé exclusivement à une utilisation à
l’intérieur.
• Les bouteilles qui contiennent un haut pourcentage d’alcool
doivent être bouchonnées et rangées à la verticale dans le
réfrigérateur.
• Veillez à toujours transporter, stocker et manipuler l’appareil à
la verticale et à le déplacer en tenant la base du châssis.
• N’oubliez jamais d’éteindre et de débrancher l’appareil avant
de procéder à son nettoyage.
• Gardez les emballages hors de portée des enfants.
Débarrassez-vous des emballages conformément aux
règlements des autorités locales.
• POLAR recommande de faire tester régulièrement cet appareil
(une fois par an au minimum) par une personne compétente.
Le test devrait inclure, entre autres : inspection visuelle, test
de polarité, la continuité de masse (équipement de classe I),
test d’isolation et test de fonctionnement.
G377-G379_G596-G600_GD873-GD874_DL914-DL917_GL182-GL184_ML_A5_v7_20230504.indb 18G377-G379_G596-G600_GD873-GD874_DL914-DL917_GL182-GL184_ML_A5_v7_20230504.indb 18 2023/5/4 15:072023/5/4 15:07

19
FR
• Un cordon d’alimentation endommagé doit être remplacé par
un agent POLAR ou un technicien qualifié recommandé, pour
éviter tout danger.
• Cet appareil n’a pas été conçu pour être utilisé par des
personnes (enfants inclus) à capacités physiques, sensorielles
ou mentales réduites ou ne disposant pas d’une expérience ou
de connaissances suffisantes, à moins que lesdites personnes
n’aient été formées ou instruites quant à son utilisation, par
une personne responsable de leur sécurité.
Attention : Risque d’ incendie
• Ne stockez pas de substances explosives telles que les
aérosols avec un propulseur inflammable dans cet appareil.
Attention : Évitez de bloquer toutes les ouvertires
d’aération. L’unité ne doit pas être mise dans un
box dans aération adéquate.
• Attention : Ne pas utiliser de dispositifs mécaniques ou
autres moyens pour accélérer le processus de dégivrage, autre
que le fabricant recommandé Ceux par.
• Attention : Ne pas endommager le circuit frigorifique.
• Attention : Ne pas utiliser d’appareils électriques à l’intérieur
des compartiments de stockage des aliments de l’appareil.
Description du produit
G377 - Table réfrigérée positive, deux portes 228 litres
G378 - Table réfrigérée positive, trois portes 339 litres
G379 - Table réfrigérée positive, quatre portes 449 litres
G596 - Table réfrigérée positive GN, deux portes 282
litres
G597 - Table réfrigérée positive GN, trois portes 417
litres
G598 - Table réfrigérée positive GN, quatre portes 553
litres
GD873 - Table réfrigérée positive, une porte, deux
tiroirs 282 litres
GD874 - Table réfrigérée positive, deux porte, deux
tiroirs 417 litres
DL914 - Table réfrigérée positive GN, deux portes avec
dosseret 282 litres
DL915 - Table réfrigérée positive GN, trois
portes avec dosseret 417 litres
GL182 - POLAR Réfrigérateur 3 portes pour
boulangerie avec plan de travail en granit
GL183 - Tour pâtissier, deux portes
GL184 - Tour pâtissier, trois portes
G599 - Table réfrigérée négative GN, deux
portes 282 litres
G600 - Table réfrigérée positive GN, trois
portes 417 litres
DL916 - Table réfrigérée négative GN, deux
portes avec dosseret 282 litres
DL917 - Table réfrigérée négative GN, trois
portes avec dosseret 417 litres
G377-G379_G596-G600_GD873-GD874_DL914-DL917_GL182-GL184_ML_A5_v7_20230504.indb 19G377-G379_G596-G600_GD873-GD874_DL914-DL917_GL182-GL184_ML_A5_v7_20230504.indb 19 2023/5/4 15:072023/5/4 15:07

20
FR
Introduction
Nous vous invitons à consacrer quelques instants à
la lecture attentive de ce mode d’emploi. L’entretien
et l’utilisation appropriés de cet appareil vous
permettront de tirer le meilleur de votre produit
POLAR.
Contenu de l’emballage
Les éléments suivants vous sont fournis de série :
• Meuble réfrigéré positif ou négatif
• Supports de clayettes (2 par porte) sauf GL182
(14 par porte)
• Clayettes (1 par porte) sauf GL182, GL183 et
GL184 (non fournies)
• Mode d’emploi
• Entretoise (x2)
POLAR attache une grande importance à la qualité
et au service et veille à fournir des produits en
parfait état opérationnel, parfaitement intacts
au moment de l’emballage. Nous vous prions de
contacter votre revendeur POLAR immédiatement
si vous constatez un dommage quelconque survenu
pendant le transport du produit.
Installation
Remarque : Ne pas utiliser dans des
camionnettes ou des semi-remorques,
dans des camions-restaurants ou véhicules
similaires.
Remarque : dans les cas où l’appareil a
été stocké ou déplacé autrement qu’à la
verticale, placez-le en position debout
pendant environ 12 heures avant de vous
en servir. En cas de doute, laissez l’appareil
se reposer.
1. Sortez l’appareil de l’emballage. Veillez à bien
retirer toute la pellicule et les revêtements de
protection de toutes les surfaces.
2. Pour optimiser les performances et la longévité,
assurez-vous qu’un dégagement minimum
de 2,5 cm est maintenu entre l’unité et les
murs et autres objets, avec un dégagement
minimum de 20 cm sur le dessus. NE JAMAIS
PLACER À PROXIMITÉ D’UNE SOURCE DE
CHALEUR.
Remarque : Pour éviter que le congélateur ne
soit accidentellement poussé contre le mur et
pour garantir une bonne ventilation, deux (2)
entretoises à monter à l’arrière sont fournis.
3. Bloquez les freins des roulettes de l’appareil,
pour l’empêcher de bouger.
Remarque : Avant d’utiliser l’appareil pour
la première fois, nettoyez les tablettes et
l’intérieur à l’eau savonneuse puis séchez
bien.
Installation des clayettes
1. Placez une paire de supports de clayettes de
part et d’autre de l’armoire, à la hauteur voulue.
2. Introduisez la clayette.
3. Répétez cette opération pour les autres clayettes.
Pose du plan de travail de comptoir
réfrigéré G611 (GL182 uniquement)
(Ceci est optionnel)
1. Sortez l’appareil de l’emballage.
2. Faites pivoter l’appareil vers l’arrière et
raccordez les trois pattes de fixation sous le
plan de travail, sans les serrer, à l’aide des vis
qui conviennent. Ne les serrez pas à fond pour
l’instant.
Remarque : Veillez à installer
les deux pattes de fixation en ‘L’
sur les bords extérieurs.
3. Posez le plan de travail sur les côtés en
marbre. Veillez à ce que les pattes de fixation
latérales soient reportées sur l’intérieur du bord
en marbre.
4. Poussez les pattes de fixation de niveau avec le
marbre et vissez les vis de patte de fixation.
Installation des parois de verre
G611 (GL182 uniquement)
1. Vissez les colliers sur le bord de l’appareil.
Remarque : Veillez à ce que le trou du
collier prévu pour la vis sans tête soit
tourné vers l’intérieur.
G377-G379_G596-G600_GD873-GD874_DL914-DL917_GL182-GL184_ML_A5_v7_20230504.indb 20G377-G379_G596-G600_GD873-GD874_DL914-DL917_GL182-GL184_ML_A5_v7_20230504.indb 20 2023/5/4 15:072023/5/4 15:07

21
FR
2. Faites coulisser les deux parois latérales dans
les colliers, en plaçant les trous pratiqués dans
le verre au-dessus.
Remarque : Veillez à prévoir le
trou de vis le plus éloigné du
bord de la vitre pour l’arrière de
l’appareil.
3. Vissez une vis sans tête dans chaque collier,
pour caler les parois.
Remarque : Veillez à ce que le
côté souple de la vis sans tête
soit le côté posé sur le verre.
Ne pas trop serrer les vis sans
tête car cela entraînera la
cassure du verre.
4. Faites coulisser la paroi arrière dans les colliers,
en plaçant les trous pratiqués dans la vitre sur
le dessus.
5. Vissez une vis sans tête dans chaque collier,
pour caler la paroi.
6. Insérez les obturateurs en plastique dans les
trous.
7. Vissez les pattes de fixation sur l’intérieur
de chaque vitre, à l’aide des ensembles de
boulonnage.
Remarque : Veillez à ce que la
partie courte de l’ensemble de
boulonnage se situe à l’extérieur
des parois.
8. Posez la paroi supérieure sur les pattes de fixation,
en veillant à ce que tous les trous s’alignent.
9. Insérez les obturateurs et fixez la paroi
supérieure aux pattes de fixation, à l’aide des
ensembles de boulonnage.
Patte de fixation
Paroi en verre
Ensemble de boulonnage
Obturateur
Ensemble de
boulonnage
Fonctionnement
Stockage des aliments
Suivez ces consignes pour profiter au mieux de
votre appareil POLAR :
• Ne stockez des aliments dans l’appareil que
lorsqu’il a atteint la bonne température de
fonctionnement.
• Ne placez pas d’aliments ou de liquides
chauds non couverts (comme des liquides
acides) à l’intérieur de l’appareil (car cela peut
endommager l’évaporateur).
• Autant que faire se peut, enveloppez ou
couvrez les aliments.
• Veillez à ne pas obstruer les ventilateurs à
l’intérieur de l’appareil.
• Évitez de laisser trop longtemps les portes
ouvertes.
Mise en service
1. Vérifiez que l’interrupteur marche / arrêt est
réglé sur [O] et allumez la prise.
2. Mettez l’appareil sous tension, position [I]. La
température à l’intérieur de l’appareil s’affiche.
Panneau de configuration
Réglez la température de
fonctionnement
1. Maintenez le bouton SET pendant 3 secondes.
La valeur du point de consigne actuel s’affiche.
2. Appuyez sur les boutons ou pour
afficher la température requise.
3. Appuyez sur le bouton SET pour mémoriser la
température.
Dégivrage manuel
AAppuyez sur le bouton «aux» et maintenez-
le enfoncé pendant 2 secondes pour démarrer le
dégivrage automatique. Le voyant de dégivrage
s’allume.
Le cycle de dégivrage se termine automatiquement.
G377-G379_G596-G600_GD873-GD874_DL914-DL917_GL182-GL184_ML_A5_v7_20230504.indb 21G377-G379_G596-G600_GD873-GD874_DL914-DL917_GL182-GL184_ML_A5_v7_20230504.indb 21 2023/5/4 15:072023/5/4 15:07

22
FR
Nettoyage, entretien et maintenance
Dégivrer les appareils au moins tous les trois mois, plus souvent si nécessaire.
N’oubliez jamais d’éteindre et de débrancher l’appareil avant de procéder à son nettoyage.
• Nettoyez l’intérieur de l’appareil aussi souvent que possible.
• N’utilisez aucun produit de nettoyage abrasif. Ces produits peuvent laisser des résidus nocifs.
• Nettoyez le joint de la porte avec de l’eau savonneuse chaude.
• Veillez à le sécher en l’essuyant après nettoyage.
• Ne laissez pas l’eau de nettoyage s’écouler à travers l’orifice de vidange du bac d’évaporation.
• Soyez prudent quand vous nettoyez l’arrière de l’appareil. Les bords effilés peuvent couper.
Conseils pour la réfrigération :
• L’ouverture fréquente et prolongée des portes entraîne la formation de condensation et de glace.
• Le fait de faire fonctionner l’appareil en dehors de la plage de température recommandée et de le
placer à côté d’une source de chaleur augmente également la quantité de glace et de condensation
interne/externe. En cas de condensation externe, essuyez la surface avec un chiffon.
• Une quantité excessive de glace entraînera des temps de fonctionnement plus longs qui augmenteront
la consommation d’énergie et la détérioration des composants.
• Si le joint ou la garniture est endommagé ou déformé, la consommation d’énergie augmentera. Pour
rétablir l’efficacité, remplacez le joint d’étanchéité.
Entretien de l’inox
Veuillez lire les informations suivantes sur l’entretien de l’extérieur en inox de votre appareil Polar :
Ne jamais :
• Utiliser de tampons abrasifs, etc.
• Utiliser de détergents chlorés ou acides
• Laisser de saletés, de résidus alimentaires ou de produits chimiques de nettoyage sur la surface
pendant de longues périodes. Les nettoyer immédiatement.
• Laisser la surface mouillée
À faire :
• Nettoyer souvent
• Utiliser des chiffons doux et des tampons en plastique
• Frotter dans le sens du grain du métal et non l’inverse
• Utiliser des détergents et produits d’entretien spécialement conçus pour l’inox
• Veiller à bien rincer les produits de nettoyage et à essuyer l’inox
Nettoyage du condensateur
• Le condensateur fait partie du système de
réfrigération et doit être nettoyé tous les mois.
• Toujours débrancher la source d’alimentation
afin de procéder à l’entretien courant.
• Un condensateur sale réduit les performances
et la durée de vie de l’appareil Polar et peut
annuler la garantie.
• Le condensateur se trouve derrière la porte
de service du côté droit de l’armoire de
réfrigération.
• Ces modèles sont équipés d’un filtre amovible
qui peut être nettoyé à l’aide d’un aspirateur.
G377-G379_G596-G600_GD873-GD874_DL914-DL917_GL182-GL184_ML_A5_v7_20230504.indb 22G377-G379_G596-G600_GD873-GD874_DL914-DL917_GL182-GL184_ML_A5_v7_20230504.indb 22 2023/5/4 15:072023/5/4 15:07

23
FR
Dépannage
Un technicien qualifié doit effectuer les réparations si nécessaire.
Dysfonctionnement Cause probable Intervention
L'appareil ne
fonctionne pas L'appareil n'est pas allumé Vérifier que l'appareil est bien branché et
allumé
La fiche ou le câble est
endommagé Remplacez la fiche ou le câble
Défaut d’alimentation secteur Vérifier l’alimentation secteur
L'appareil s'allume,
mais la température
est trop haute / basse
Excès de glace sur l'évaporateur Dégivrer l’appareil
Le condensateur est saturé de
poussières Nettoyer le condenseur
Les portes sont mal fermées Vérifier que les portes sont fermées et l'état
des joints
L'appareil est situé près d'une
source de chaleur ou l'air ne
circule pas librement vers le
condensateur
Déplacer le réfrigérateur pour le placer à
un endroit mieux adapté
Température ambiante trop haute Augmenter la ventilation ou placer l'appareil
à un endroit plus frais
Des aliments inadéquats sont
stockés dans l'appareil Retirer les aliments trop chauds ou les
éventuelles obstructions au ventilateur
L'appareil est surchargé Réduire la quantité d'aliments stockés dans
l'appareil
Fuite d'eau L'appareil n'est pas de niveau Régler les pieds à vis pour le mettre de
niveau (le cas échéant)
Évacuation bouchée Déboucher l'évacuation
Circuit de vidange bouché Nettoyer le plancher de l'appareil (le cas
échéant)
Bac à eau endommagé Consulter un technicien qualifié
La cuvette de dégivrage déborde Vider la cuvette de dégivrage (le cas
échéant)
L'appareil fait beaucoup
de bruit La sangle de sécurité n'a pas été
retirée Retirer la sangle de sécurité
Écrou / vis desserrés Vérifier et resserrer les écrous et vis
La surface sur laquelle l'appareil
a été posé n'est pas de niveau ou
l'appareil n'est pas stable
Vérifier la position d'installation et la
changer si nécessaire
G377-G379_G596-G600_GD873-GD874_DL914-DL917_GL182-GL184_ML_A5_v7_20230504.indb 23G377-G379_G596-G600_GD873-GD874_DL914-DL917_GL182-GL184_ML_A5_v7_20230504.indb 23 2023/5/4 15:072023/5/4 15:07

24
FR
Spécifications techniques
Remarque : en raison de notre programme continu de recherche et de développement, les spécifications
du présent document peuvent être modifiées sans préavis.
Modèle Tension Puissance Courant Plage de
température Capacité
(litres) Réfrigérant Dimensions
h x l x p mm Poids
(kg)
G377 230V
50Hz 230W 1,6A de -2°C à 8°C 155 R600a 80g 850 x 1360
x 600 88
G378 230V
50Hz 230W 1,6A de -2°C à 8°C 231 R600a 80g 850 x 1795
x 600 125
G379 230V
50Hz 230W 1,6A de -2°C à 8°C 312 R600a 80g 860 x 2230
x 600 143
G596 230V
50Hz 350W 1,95A de -2°C à 10°C 190 R600a 95g 850 x 1360
x 700 98
G597 230V
50Hz 350W 1,95A de -2°C à 10°C 291 R600a 95g 850 x 1790
x 700 134
G598 230V
50Hz 350W 1,95A de -2°C à 10°C 393 R600a 95g 850 x 2230
x 700 153
GD873 230V
50Hz 350W 1,95A de -2°C à 10°C 142 R600a 95g 850 x 1360
x 700 98
GD874 230V
50Hz 350W 1,95A de -2°C à 10°C 242 R600a 95g 850 x 1790
x 700 134
DL914 230V
50Hz 350W 1,95A de -2°C à 10°C 190 R600a 95g 960 x 1360
x 700 98
DL915 230V
50Hz 350W 1,95A de -2°C à 10°C 291 R600a 95g 960 x 1790
x 700 134
GL182 230V
50Hz 350W 1,95A de 2°C a 10°C 406 R600a 95g 1000 x 2020
x 800 320
GL183 230V
50Hz 350W 1,95A de 2°C a 10°C 290 R600a 95g 860 x 1510
x 800 140
GL184 230V
50Hz 350W 1,95A de 2°C a 10°C 444 R600a 95g 860 x 2020
x 800 152
G599 230V
50Hz 750W 3,5A de -10°C a -20°C 187 R290 90g 850 x 1360
x 700 103
G600 230V
50Hz 750W 3,5A de -10°C a -20°C 280 R290 90g 850 x 1795
x 700 136,5
DL916 230V
50Hz 750W 3,5A de -10°C a -20°C 187 R290 90g 960 x 1360
x 700 103
DL917 230V
50Hz 750W 3,5A de -10°C a -20°C 280 R290 90g 960 x 1795
x 700 136,5
Remarque : pour une performance et une efficacité optimales du produit, veillez à tenir compte de la
capacité nette utilisable (limite de charge) lors du remplissage.
G377-G379_G596-G600_GD873-GD874_DL914-DL917_GL182-GL184_ML_A5_v7_20230504.indb 24G377-G379_G596-G600_GD873-GD874_DL914-DL917_GL182-GL184_ML_A5_v7_20230504.indb 24 2023/5/4 15:072023/5/4 15:07

25
FR
Raccordement électrique
La prise doit être reliée à la prise secteur qui convient.
Cet appareil est câblé comme suit :
• Fil conducteur (brun) à la borne marquée L
• Fil neutre (bleu) à la borne marquée N
• Fil de terre (vert / jaune) à la borne marquée E
Cet appareil doit être mis à la terre.
En cas de doute, consultez un électricien qualifié.
Les points d’isolation électrique doivent être libres de toute obstruction. En cas de débranchement requis
en urgence, ils doivent être facilement accessibles.
Mise au rebut
Les règlements de l’UE exigent que les produits munis de réfrigérants soient mis au rebut par des
entreprises spécialisées, équipées pour extraire et recycler les composants à gaz, métalliques et en
plastique.
Adressez-vous à votre autorité chargée de la collecte des déchets pour ce qui concerne la mise au
rebut de votre appareil. Même si rien n’oblige les autorités locales à se charger de la mise au rebut du
matériel de réfrigération commerciale, elles pourraient être en mesure de vous conseiller sur les moyens
disponibles localement pour s’en débarrasser.
Vous pouvez aussi appeler le standard d’assistance Polar, qui saura vous renseigner sur les entreprises de
prise en charge nationales au sein de l’UE.
Conformité
Le logo WEEE qui figure sur ce produit ou sa documentation indique qu'il ne doit pas
être mis au rebut avec les ordures ménagères. Pour éviter qu'il ne présente un risque
pour la santé humaine et / ou écologique, confiez la mise au rebut de ce produit à un
site de recyclage agréé respectueux de l'environnement. Pour de plus amples détails sur
la mise au rebut appropriée de ce produit, contactez le fournisseur du produit ou l'autorité
responsable de l'enlèvement des ordures dans votre région.
Les pièces Polar ont été soumises à des tests rigoureux pour pouvoir être déclarées
conformes aux normes et spécifications réglementaires définies par les autorités
internationales, indépendantes et fédérales.
Les produits Polar ont été déclarés aptes à porter le symbole suivant :
Tous droits réservés. La production ou transmission, partielles ou intégrales, sous quelque forme que ce soit ou par n’importe
quel moyen, tant électronique que mécanique, sous forme de photocopie, d’enregistrement ou autre de ce mode d’emploi
sont interdites sans l’autorisation préalablement accordée par POLAR.
Nous nous efforçons, par tous les moyens dont nous disposons, de faire en sorte que les détails contenus dans le présent
mode d’emploi soient corrects en date d’impression. Toutefois, POLAR se réserve le droit de changer les spécifications de
ses produits sans préavis.
G377-G379_G596-G600_GD873-GD874_DL914-DL917_GL182-GL184_ML_A5_v7_20230504.indb 25G377-G379_G596-G600_GD873-GD874_DL914-DL917_GL182-GL184_ML_A5_v7_20230504.indb 25 2023/5/4 15:072023/5/4 15:07

26
DE
Sicherheitshinweise
• Auf eine flache, stabile Fläche stellen.
• Alle erforderlichen Montage- und Reparaturarbeiten sollten
von Wartungspersonal oder einem qualifizierten Techniker
durchgeführt werden. Keine Bauteile oder Bedienflächen von
diesem Produkt entfernen.
• Für folgende Normen und Vorschriften sind die lokalen und
nationalen Normen heranzuziehen:
- Arbeitsschutzvorschriften
- BS-EN-Verhaltenspraktiken
- Brandschutzvorschriften
- IEE-Anschlussvorschriften
- Bauvorschriften
• Das Gerät NICHT mit einem Strahl-/Hochdruckreiniger reinigen.
• Das Gerät NICHT zum Aufbewahren von medizinischen
Produkten verwenden.
• Sich NICHT auf den Schrank, die Schubladen oder die Türen
draufstellen oder aufstützen.
• KEIN Öl oder Fett mit den Kunststoffteilen oder der Türdichtung
in Kontakt kommen lassen. Bei Kontakt sofort reinigen.
• Nur zum Gebrauch in Gebäuden.
• Flaschen mit hochkonzentriertem Alkohol müssen dicht
verschlossen und aufrecht stehend im Kühlschrank aufbewahrt
werden.
• Das Gerät stets aufrecht tragen, lagern und transportieren.
Zum Transport den Schrank an der Unterseite anfassen.
• Vor Reinigungsarbeiten stets zunächst das Gerät abschalten
und den Netzstecker aus der Steckdose ziehen.
• Verpackungsmaterial außerhalb der Reichweite von Kindern
aufbewahren und gemäß den lokalen Vorschriften entsorgen.
• POLAR empfiehlt, dass dieses Gerät regelmäßig (wenigstens
jährlich) von einem Fachmann überprüft wird. Die Überprüfung
sollte beinhalten, ohne darauf beschränkt zu sein: Visuelle
Überprüfung, Polaritätstest, Erdungskontinuität (Klasse-1-
Geräte), Isolationskontinuität und Funktionalitätsprüfung.
G377-G379_G596-G600_GD873-GD874_DL914-DL917_GL182-GL184_ML_A5_v7_20230504.indb 26G377-G379_G596-G600_GD873-GD874_DL914-DL917_GL182-GL184_ML_A5_v7_20230504.indb 26 2023/5/4 15:072023/5/4 15:07

27
DE
• Aus Sicherheitsgründen muss ein beschädigtes Stromkabel von
einem POLAR-Mitarbeiter oder einem qualifizierten Elektriker
erneuert werden.
• Dieses Gerät sollte nur dann von Personen (einschließlich
Kindern) mit reduzierten körperlichen, sensorischen oder
geistigen Fähigkeiten, mangelnder Erfahrung oder Kenntnissen
verwendet werden, wenn sie von einer für ihre Sicherheit
verantwortlichen Person im Gebrauch des Geräts geschult
wurden bzw. ständig beaufsichtigt werden.
Vorsicht: Gefahr von Feuer
• Explosive Stoffe wie Sprühdosen mit brennbaren Treibmittel in
diesem Gerät nicht speichern.
Warnung: Halten Sie alle Lüftungsöffnungen frei.
Das Gerät sollte nicht ohne geeignet Ventilation
eingebaut werden.
• Warnung: Verwenden Sie keine mechanischen Vorrichtungen
oder andere Mittel, um den Abtauvorgang zu beschleunigen,
andere als die vom Hersteller empfohlen, die mit dem.
• Warnung: Halten Sie den Kältemittelkreislauf nicht beschädigen.
• Warnung: Verwenden Sie keine elektrischen Geräte innerhalb
des Lebensmittellagerraumes betreiben.
Produktbeschreibung
G377 - POLAR Kühltisch 228 Liter 2-türig
G378 - POLAR Kühltisch 3-türig 339 L
G379 - POLAR Kühltisch 4-türig 449 L
G596 - POLAR Kühltisch 282 Liter 2-türig
G597 - POLAR Thekenkühlschrank 417 Liter 3-türig
G598 - POLAR Kühltisch 4-türig 553 Liter
GD873 - POLAR Kühltisch 1-türig mit 2 Schubladen 282 L
GD874 - POLAR Kühltisch 2-türig mit 2 Schubladen 417 L
DL914 - POLAR Kühltisch mit Aufkantung 2-türig 282 L
DL915 - POLAR Kühltisch mit Aufkantung 3-türig 417 L
GL182 - POLAR 3-türiger Bäckerei-Thekenkühlschrank mit Granitarbeitsplatte
GL183 - POLAR Kühltheke Patisserieabmessung zweitürig
GL184 - POLAR Kühltheke Patisserieabmessung dreitürig
G599 - POLAR Tiefkühltisch 2-türig 282L
G600 -POLAR Tiefkühltisch 3-türig 417L
DL916 - POLAR 2-türiger Edelstahlgefrierschrank mit Spritzschutz 282Ltr
DL917 - POLAR 3-türiger Edelstahlgefrierschrank mit Spritzschutz 417Ltr
G377-G379_G596-G600_GD873-GD874_DL914-DL917_GL182-GL184_ML_A5_v7_20230504.indb 27G377-G379_G596-G600_GD873-GD874_DL914-DL917_GL182-GL184_ML_A5_v7_20230504.indb 27 2023/5/4 15:072023/5/4 15:07

28
DE
Einführung
Bitte nehmen Sie sich einige Minuten Zeit und
lesen Sie dieses Handbuch sorgfältig durch. Nur bei
korrekter Wartung und vorschriftsgemäßem Betrieb
kann Ihr POLAR-Produkt optimale Leistung erzielen.
Lieferumfang
Folgende Teile befinden sich in der Verpackung:
• POLAR-Kühl- oder Tiefkühlgerät
• Schienen (2 pro Tür) mit Ausnahme GL182 (14
pro Tür)
• Ablagen (1 pro Tür) mit Ausnahme GL182,
GL183 und GL184 (keine Regale im
Lieferumfang enthalten)
• Bedienungsanleitung
• Abstandshalter (x2)
POLAR ist stolz auf die hochwertige Qualität seiner
Produkte und seinen erstklassigen Service. Wir
stellen sicher, dass alle gelieferten Produkte zum
Zeitpunkt der Verpackung voll funktionsfähig sind
und sich in einwandfreiem Zustand befinden.
Sollten Sie Transportschäden feststellen, wenden
Sie sich bitte unverzüglich an Ihren POLAR-Händler.
Montage
Hinweis: Nicht zur Verwendung in
Lieferwagen oder Anhängern, Transportern
oder ähnlichen Fahrzeugen.
Hinweis: Wenn das Gerät nicht aufrecht
transportiert oder gelagert wurde, muss
es vor Inbetriebnahme rund 12 Stunden
aufrecht aufgestellt werden. Im Zweifelsfall
lassen Sie es aufrecht stehen.
1. Das Gerät aus der Verpackung nehmen. Darauf
achten, dass die gesamte Plastikfolie und
alle Beschichtungen von sämtlichen Flächen
entfernt wurden.
2. Um die Leistung und Langlebigkeit zu
optimieren, stellen Sie sicher, dass zwischen dem
Gerät und den Wänden und anderen Objekten
ein Mindestabstand von 2,5 cm eingehalten
wird, wobei oben ein Mindestabstand von 20 cm
eingehalten wird. NIEMALS IN DER NÄHE
EINER WÄRMEQUELLE
.
Hinweis: Um ein versehentliches
Zusammendrücken gegen die Wand zu
vermeiden und eine gute Belüftung zu
gewährleisten, sind auf der Rückseite 2
Räume für die Montage vorgesehen.
3. Die Bremsen an den Laufrollen feststellen,
damit sich der Schrank nicht bewegen kann.
Hinweis: Reinigen Sie die Einlegeböden
und das Innere des Geräts vor der ersten
Inbetriebnahme mit Seifenwasser und
trocknen Sie es gut ab.
Befestigen der Ablagen
1. E
inen Satz Ablageschienen auf beiden
Schrankseiten in der gewünschten Höhe platzieren.
2. Die Ablage einschieben.
3. Wiederholen Sie das Verfahren für die übrigen
Ablagen.
Aufsatzkühlvitrine befestigen G611
(nur GL182) (Dies ist optional)
1. Das Gerät aus der Verpackung nehmen.
2. Das Gerät etwas nach hinten kippen und die
drei Klammern mit geeigneten Schrauben
locker an der Unterseite der Arbeitsfläche
befestigen. Die Schrauben jetzt noch nicht fest
anziehen.
Hinweis: Darauf achten, dass die
beiden „L“-förmigen Klammern
an den Außenkanten befestigt
werden.
3. Die Aufsatzkühlvitrine auf die Marmorseiten
absenken. Dabei sicherstellen, dass die
Seitenklammern innen an der Marmorkante zu
liegen kommen.
4. Die seitlichen Klammern an der Marmorkante
ausrichten und die Klammerschrauben
anziehen.
Gläser einsetzen G611 (nur GL182)
1. Die Halterungen an den Rand des Geräts
anschrauben.
Hinweis: Darauf achten, dass
die Bohrung in der Halterung für
die Gewindestifte nach innen
weist.
G377-G379_G596-G600_GD873-GD874_DL914-DL917_GL182-GL184_ML_A5_v7_20230504.indb 28G377-G379_G596-G600_GD873-GD874_DL914-DL917_GL182-GL184_ML_A5_v7_20230504.indb 28 2023/5/4 15:072023/5/4 15:07

29
DE
2. Die beiden seitlichen Glasplatten in die
Halterungen schieben. Darauf achten, dass
sich die Bohrungen im Glas oben befinden.
Hinweis: Darauf achten, dass
die am weitesten von der
Kante der Glasplatte entfernte
Gewindebohrung zur Rückseite
des Geräts weist.
3. Zur Befestigung der Glasplatten einen
Gewindestift in jede Halterung drehen.
Hinweis: Darauf achten, dass das
weiche Ende des Gewindestifts
mit dem Glas in Kontakt kommt.
Ziehen Sie die Gewindestifte
nicht zu fest an, da dadurch das
Glas bricht.
4. Die rückwärtige Fläche in die Halterungen
schieben. Darauf achten, dass sich die
Bohrungen im Glas oben befinden.
5. Zur Befestigung der Glasplatte einen
Gewindestift in jede Halterung drehen.
6. Die Kunststoffstopfen in die Bohrungen stecken.
7. Die Klammern mithilfe der Schrauben innen an
den einzelnen Glasplatten sichern.
Hinweis: Das kurze Ende der
Schrauben muss sich an der
Außenseite der Glasplatten
befinden.
8. Die obere Glasfläche auf die Klammern setzen.
Dabei müssen alle Bohrungen auf einer Linie
liegen.
9. Die Stopfen einstecken und die obere Platte mit
den Schrauben an den Klammern befestigen.
Klammer
Glasplatte
Schraube
Kunststoffstopfen
Schraube
Betrieb
Lagerung von Nahrungsmitteln
Sie erzielen die besten Ergebnisse mit Ihrem
POLAR-Gerät, wenn Sie folgende Anweisungen
beachten:
• Nahrungsmittel dürfen erst nach Erreichen der
korrekten.
• Stellen Sie keine heißen Lebensmittel oder
Flüssigkeiten (z. B. säurehaltige Flüssigkeiten)
unbedeckt in das Gerät (dies kann den
Verdampfer beschädigen).
• Keine unbedeckten heißen Nahrungsmittel oder
Flüssigkeiten in das Gerät legen oder stellen.
• Nahrungsmittel nach Möglichkeit einwickeln
oder bedecken.
• Nicht die Lüfter im Gerät versperren.
• Türen nicht über längere Zeit geöffnet lassen.
Einschalten
1. Darauf achten, dass der Ein-/Ausschalter auf
[O] steht und der Netzstecker eingesteckt ist.
2. Das Gerät einschalten [I]. Die momentane
Temperatur im Gerät wird angezeigt.
Bedienfeld
Betriebstemperatur einstellen
1. Halten Sie die SET-Taste für 3 Sekunden
gedrückt. Der Wert des aktuellen Sollwertes
wird angezeigt.
2. Drücken Sie die Taste oder , um die
benötigte Temperatur aufzurufen.
3. Zum Speichern der Temperatur drücken Sie die
Taste SET.
Manuelles Abtauen
Um den Abtauvorgang zu starten, die Taste „aux“
2 Sekunden lang gedrückt halten. Die Abtaulampe
leuchtet auf.
Der Abtauzyklus wird automatisch beendet.
G377-G379_G596-G600_GD873-GD874_DL914-DL917_GL182-GL184_ML_A5_v7_20230504.indb 29G377-G379_G596-G600_GD873-GD874_DL914-DL917_GL182-GL184_ML_A5_v7_20230504.indb 29 2023/5/4 15:072023/5/4 15:07

30
DE
Reinigung, Pflege und Wartung
Tauen Sie das Gerät mindestens alle 3 Monate ab, bei Bedarf häufiger.
Vor Reinigungsarbeiten stets zunächst das Gerät abschalten und den Netzstecker aus der
Steckdose ziehen.
• Den Schrank möglichst häufig innen reinigen.
• Keine Scheuermittel verwenden, da diese schädliche Rückstände hinterlassen können.
• Die Türdichtung mit warmem Seifenwasser reinigen.
• Nach dem Reinigen stets mit einem Tuch trocknen.
• Zur Reinigung verwendetes Wasser darf nicht durch die Ablauföffnung in die Auffangschale gelangen.
• Vorsicht beim Reinigen der Geräterückseite. Scharfe Kanten können zu Verletzungen führen.
Tipps zum Kühlen:
• Bei häufigem und längerem Öffnen der Türen bilden sich Kondenswasser und Eis.
• Wenn Sie das Gerät außerhalb des empfohlenen Temperaturbereichs betreiben und es in der
Nähe einer Wärmequelle aufstellen, erhöht sich ebenfalls die Menge an Eis und interner/externer
Kondensation. Bei äußerer Kondensation wischen Sie die Oberfläche mit einem Tuch ab.
• Übermäßige Vereisung führt zu längeren Laufzeiten, die den Energieverbrauch erhöhen und den
Verschleiß der Komponenten beschleunigen.
• Wenn die Dichtung beschädigt oder verformt ist, erhöht sich der Energieverbrauch. Um die Effizienz
wiederherzustellen, die Dichtung ersetzen.
Pflegeanleitung für Edelstahl
Um das Edelstahlgehäuse ihres POLAR Geräts zu erhalten, beachten Sie bitte Folgendes:
Niemals:
• Scheuernde Topfkratzer, Scheuerschwämme usw. verwenden
• Chlor- oder säurehaltige Reinigungsmittel verwenden
• Artikel wie Nahrungsmittel, Schmutz, Reinigungschemikalien usw. länger als nötig auf der Oberfläche
lassen; diese Stoffe sofort entfernen.
• Die Oberfläche nass bleiben lassen.
Unbedingt:
• Oft reinigen.
• Weiche Tücher oder Kunststoffkratzer verwenden.
• Mit der Metallmaserung reiben, nicht dagegen.
• Reinigungsmittel und eine Politur speziell zur Reinigung von Edelstahl verwenden.
• Darauf achten, dass die Reinigungsprodukte vollständig abgewaschen werden und der Stahl
anschließend trocken ist.
Reinigung des Kondensators
• Der Kondensator ist Teil der Kühlanlage. Er muss
jeden Monat gereinigt werden.
• Vor der Ausführung von Routinewartungsaufgaben
stets das Gerät abschalten bzw. den Netzstecker
aus der Steckdose ziehen.
• Wird der Kondensator nicht gereinigt, nehmen
die Leistungsfähigkeit und Lebensdauer Ihres
Polar-Geräts ab und Ihr Garantieanspruch kann
erlöschen.
• Der Kondensator befindet sich hinter der
Betriebstür rechts am Kühlschrank.
• Diese Modelle sind mit einem herausnehmbaren
Filter ausgestattet, der mit einem Staubsauger
gereinigt werden kann.
G377-G379_G596-G600_GD873-GD874_DL914-DL917_GL182-GL184_ML_A5_v7_20230504.indb 30G377-G379_G596-G600_GD873-GD874_DL914-DL917_GL182-GL184_ML_A5_v7_20230504.indb 30 2023/5/4 15:072023/5/4 15:07

31
DE
Störungssuche
Falls erforderlich, muss ein qualifizierter Techniker Reparaturen durchführen.
Störung Vermutliche Ursache Lösung
Das Gerät
funktioniert nicht Das Gerät ist nicht eingeschaltet Prüfen, ob der Netzstecker in die
Steckdose gesteckt wurde und das Gerät
eingeschaltet ist
Stecker und Kabel sind beschädigt Stecker oder Leitung ersetzen
Fehler Netzstromversorgung Netzstromversorgung prüfen
Das Gerät lässt sich
einschalten, aber
die Temperatur ist
zu hoch/niedrig
Zu viel Eis auf dem Verdampfer Das Gerät abtauen
Kondensator verstaubt Reinigen Sie den Kondensator
Türen sind nicht richtig geschlossen Prüfen, ob die Türen geschlossen und die
Dichtungen intakt sind
Gerät befindet sich in der Nähe einer
Wärmequelle, oder der Luftstrom
zum Kondensator ist unterbrochen
Den Kühlschrank an einem geeigneteren
Ort aufstellen
Umgebungstemperatur ist zu hoch Belüftung intensivieren oder Gerät an
einem kühleren Ort aufstellen
Ungeeignete Nahrungsmittel werden
im Gerät aufbewahrt Einige heiße Nahrungsmittel herausnehmen
oder Produkte, die den Lüfter blockieren,
entfernen
Gerät ist überlastet Weniger Nahrungsmittel im Gerät lagern
Aus dem Gerät läuft
Wasser aus Das Gerät steht nicht gerade Die Schraubfüße so regulieren, dass das
Gerät eben steht (sofern zutreffend)
Der Ablauf ist verstopft Den Ablauf säubern
Wasser kann nicht ablaufen Den Boden des Geräts von Fremdstoffen
reinigen (sofern zutreffend)
Der Wasserbehälter ist beschädigt Konsultieren Sie einen qualifizierten
Techniker
Die Tropfschale fließt über Die Tropfschale leeren (sofern zutreffend)
Das Gerät ist
ungewöhnlich laut Der Sicherheitsriemen wurde nicht
entfernt Den Sicherheitsriemen entfernen
Muttern und/oder Schrauben sind
lose Alle Muttern und Schrauben überprüfen
und anziehen
Das Gerät steht nicht eben oder
stabil Position überprüfen und bei Bedarf ändern
G377-G379_G596-G600_GD873-GD874_DL914-DL917_GL182-GL184_ML_A5_v7_20230504.indb 31G377-G379_G596-G600_GD873-GD874_DL914-DL917_GL182-GL184_ML_A5_v7_20230504.indb 31 2023/5/4 15:072023/5/4 15:07

32
DE
Technische Spezifikationen
Hinweis: Aufgrund unseres kontinuierlichen Forschungs- und Entwicklungsprogramms können sich die
hier aufgeführten Spezifikationen ohne vorherige Ankündigung ändern.
Modell Spannung Leistung Strom-
stärke Temperatur-
bereich
Nutzinhalt
(Liter) Kühl-
mittel Abmessungen
h x b x t mm Gewicht
(kg)
G377 230V
50Hz 230W 1,6A -2°C bis 8°C 155 R600a
80g 850 x 1360 x
600 88
G378 230V
50Hz 230W 1,6A -2°C bis 8°C 231 R600a
80g 850 x 1795 x
600 125
G379 230V
50Hz 230W 1,6A -2°C bis 8°C 312 R600a
80g 860 x 2230 x
600 143
G596 230V
50Hz 350W 1,95A -2°C bis 10°C 190 R600a
95g 850 x 1360 x
700 98
G597 230V
50Hz 350W 1,95A -2°C bis 10°C 291 R600a
95g 850 x 1790 x
700 134
G598 230V
50Hz 350W 1,95A -2°C bis 10°C 393 R600a
95g 850 x 2230 x
700 153
GD873 230V
50Hz 350W 1,95A -2°C bis 10°C 142 R600a
95g 850 x 1360 x
700 98
GD874 230V
50Hz 350W 1,95A -2°C bis 10°C 242 R600a
95g 850 x 1790 x
700 134
DL914 230V
50Hz 350W 1,95A -2°C bis 10°C 190 R600a
95g 960 x 1360 x
700 98
DL915 230V
50Hz 350W 1,95A -2°C bis 10°C 291 R600a
95g 960 x 1790 x
700 134
GL182 230V
50Hz 350W 1,95A 2°C bis 10°C 406 R600a
95g 1000 x 2020
x 800 320
GL183 230V
50Hz 350W 1,95A 2°C bis 10°C 290 R600a
95g 860 x 1510 x
800 140
GL184 230V
50Hz 350W 1,95A 2°C bis 10°C 444 R600a
95g 860 x 2020 x
800 152
G599 230V
50Hz 750W 3,5A -10°C bis
-20°C 187 R290
90g 850 x 1360 x
700 103
G600 230V
50Hz 750W 3,5A -10°C bis
-20°C 280 R290
90g 850 x 1795 x
700 136,5
DL916 230V
50Hz 750W 3,5A -10°C bis
-20°C 187 R290
90g 960 x 1360 x
700 103
DL917 230V
50Hz 750W 3,5A -10°C bis
-20°C 280 R290
90g 960 x 1795 x
700 136,5
Hinweis: Um eine optimale Leistung und Effizienz des Geräts zu gewährleisten, achten Sie bitte beim
Befüllen auf die Nettonutzkapazität (Belastungsgrenze).
G377-G379_G596-G600_GD873-GD874_DL914-DL917_GL182-GL184_ML_A5_v7_20230504.indb 32G377-G379_G596-G600_GD873-GD874_DL914-DL917_GL182-GL184_ML_A5_v7_20230504.indb 32 2023/5/4 15:072023/5/4 15:07

33
DE
Elektroanschlüsse
Der Stecker muss in eine geeignete Steckdose gesteckt werden.
Das Gerät ist wie folgt verdrahtet:
• Stromführender Leiter (braun) an Klemme L
• Neutralleiter (blau) an Klemme N
• Erdleiter (grün/gelb) an Klemme E
Dieses Gerät muss geerdet sein.
Bei Fragen wenden Sie sich bitte an einen qualifizierten Elektriker.
Elektroisolierpunkte dürfen nicht blockiert werden. Bei einem Notstopp müssen diese Punkte jederzeit
sofort zugänglich sein.
Entsorgung
Gemäß EU-Vorschriften müssen Kühlprodukte von Fachunternehmen entsorgt werden, die alle Gase,
Metall- und Kunststoffbauteile entfernen oder recyceln.
Ihre Kommunalverwaltung kann Sie über die Entsorgung Ihres Geräts informieren. Kommunalbehörden
sind nicht verpflichtet, gewerbliche Kühlgeräte zu entsorgen. Sie können Sie jedoch über lokale
Annahmestellen informieren, die diese Geräte entsorgen.
Oder rufen Sie die POLAR-Helpline an. Wir verfügen über eine Liste nationaler Entsorger in den EU-
Staaten.
Konformität
Das WEEE-Logo an diesem Produkt oder in der Dokumentation weist darauf hin, dass
das Produkt nicht mit dem normalen Hausmüll entsorgt werden darf. Um potenziellen
Gesundheits- bzw. Umweltschäden vorzubeugen, muss das Produkt durch einen
zugelassenen und umweltverträglichen Recyclingprozess entsorgt werden. Ausführliche
Informationen zur korrekten Entsorgung dieses Produkts erhalten Sie von Ihrem
Produktlieferanten oder der für die Müllentsorgung in Ihrer Region zuständige Behörde.
Alle POLAR-Produkte werden strengen Tests unterzogen, um die Einhaltung von
Normen und Spezifikationen internationaler und nationaler Behörden und unabhängiger
Organisationen zu gewährleisten.
POLAR-Produkte dürfen durch folgendes Symbol gekennzeichnet werden:
Alle Rechte vorbehalten. Diese Anleitung darf ohne vorherige schriftliche Genehmigung von POLAR weder ganz noch
teilweise in irgendeiner Form oder auf irgendeinem Wege - einschließlich elektronischer, mechanischer Verfahren, durch
Fotokopieren, Aufnahme oder andere Verfahren - vervielfältigt oder übertragen werden.
Es werden alle Anstrengungen unternommen um sicherzustellen, dass alle Angaben bei der Drucklegung korrekt sind.
POLAR behält sich jedoch das Recht vor, Spezifikationen ohne Vorankündigung zu ändern.
G377-G379_G596-G600_GD873-GD874_DL914-DL917_GL182-GL184_ML_A5_v7_20230504.indb 33G377-G379_G596-G600_GD873-GD874_DL914-DL917_GL182-GL184_ML_A5_v7_20230504.indb 33 2023/5/4 15:072023/5/4 15:07

34
IT
Suggerimenti per la sicurezza
• Posizionare su una superficie piana e stabile.
• L’installazione e le eventuali riparazioni devono venire eseguite
da un agente/tecnico qualificato. Non rimuovere i componenti
o i pannelli di accesso dell’apparecchio.
• Verificare la conformità alle normative locali e nazionali di
quanto segue:
- Normativa antinfortunistica sul lavoro
- Linee guida BS EN
- Precauzioni antincendio
- Normativa IEE sui circuiti elettrici
- Norme di installazione
• NON utilizzare sistemi di lavaggio a getto o pressione per
pulire l’apparecchio.
• NON utilizzare l’apparecchio per conservare presidi medico-
sanitari.
• NON stare in piedi o in altro sostenersi alla base, ai cassetti o
ai portelli.
• NON mettere a contatto olio o grassi con i componenti
in plastica o con la guarnizione dei portelli. Pulire
immediatamente in caso di contatto.
• Per esclusivo uso in ambienti chiusi.
• Le bottiglie contenenti una elevata percentuale di alcool devono
venire sigillate e posizionate verticalmente nel frigorifero.
• Trasportare, immagazzinare e movimentare l’apparecchio sempre
in posizione verticale e spostarlo mantenendone la base.
• Spegnere e disconnettere l’alimentazione dell’unità prima di pulirla.
• Tenere lontano l’imballaggio dalla portata dei bambini. Smaltire
l’imballaggio in conformità alle normative locali.
• L’apparecchio non è destinato a essere utilizzato da persone (inclusi
i bambini) con ridotte capacità fisiche, sensoriali o mentali, o prive
della necessaria esperienza e conoscenza dell’apparecchio, che
non abbiano ricevuto supervisione o istruzioni relative all’utilizzo
dell’apparecchio dalle persone responsabili dello loro sicurezza.
G377-G379_G596-G600_GD873-GD874_DL914-DL917_GL182-GL184_ML_A5_v7_20230504.indb 34G377-G379_G596-G600_GD873-GD874_DL914-DL917_GL182-GL184_ML_A5_v7_20230504.indb 34 2023/5/4 15:072023/5/4 15:07

35
IT
• Se danneggiato, il cavo di alimentazione deve venire sostituito
da un agente POLAR o da un tecnico qualificato al fine di
prevenire eventuali rischi.
• POLAR raccomanda che questo apparecchio venga
periodicamente testato (almeno una volta all’anno) da una
persona competente. I test dovrebbero includere, ma non
solo: ispezione visiva, test di polarità, continuità di terra,
continuità di isolamento e test funzionale.
Attenzione: Rischio di incendio
• Non conservare sostanze esplosive, come bombolette spray
con propellente infiammabile in questo apparecchio.
Attenzione: Tenere libere tutte le aperture di
ventilazione. L’unità non deve essere installata
senza una ventilazione adeguata.
• Attenzione: non utilizzare dispositivi meccanici o altri
mezzi per accelerare il processo di sbrinamento, diversa dal
fabbricante raccomandato Quelli da.
• Attenzione: Non danneggiare il circuito refrigerante.
• Attenzione: Non usare apparecchi elettrici all’interno degli
scomparti per la conservazione degli alimenti.
Descrizione dei prodotti
G377 - Banco frigorifero a 2 portelli 228 litri POLAR
G378 - Banco frigorifero a 3 portelli 339 litri POLAR
G379 - Banco frigorifero a 4 portelli 449 litri POLAR
G596 - Banco frigorifero a 2 portelli 282 litri POLAR
G597 - Banco frigorifero a 3 portelli 417 litri POLAR
G598 - Banco frigorifero a 4 portelli 553 litri POLAR
GD873 - Banco frigorifero a 2 cassetti, 1 portello 282
litri POLAR
GD874 - Banco frigorifero a 2 cassetti, 2 portello 417
litri POLAR
DL914 - Banco frigorifero a 2 portelli con alzatina 282
litri POLAR
DL915 - Banco frigorifero a 3 portelli con alzatina 417
litri POLAR
GL182 - Frigorifero da banco POLAR 3 porte
con piano di lavoro in granito
GL183 - Banco frigorifero a 2 portelli
(Panetteria) POLAR
GL184 - Banco frigorifero a 3 portelli
(Panetteria) POLAR
G599 - POLAR 282 litro 2 Porta contatore
congelatore
G600 -POLAR 417 litro 3 Porta contatore
congelatore
DL916 - POLAR 282 litro 2 Porta contatore
Freezer con alzatina
DL917 - POLAR 417 litro 3 Porta contatore
Congelatore con alzatina
G377-G379_G596-G600_GD873-GD874_DL914-DL917_GL182-GL184_ML_A5_v7_20230504.indb 35G377-G379_G596-G600_GD873-GD874_DL914-DL917_GL182-GL184_ML_A5_v7_20230504.indb 35 2023/5/4 15:072023/5/4 15:07

36
IT
Introduzione
Leggere con attenzione il presente manuale.
La manutenzione e l’utilizzo corretti di questo
apparecchio consentiranno di ottenere le massime
prestazioni da questo prodotto POLAR.
Contenuto
dell’imballaggio
L’imballaggio contiene quanto segue:
• Frigorifero o congelatore POLAR
• Guide per ripiani (2 per portello) tranne GL182
(14 per portello)
• Manuale di istruzioni
• Ripiani (1 per portello) tranne GL182, GL183 e
GL184 (Non ci sono scaffali inclusi)
• Distanziatore (x2)
POLAR garantisce una qualità e un servizio
impeccabili e assicura che al momento
dell’imballaggio tutti i componenti forniti sono
integralmente funzionanti e privi di difetti.
Nel caso siano rilevati danni risultanti dal trasporto
del prodotto, rivolgersi immediatamente al
rivenditore POLAR locale.
Installazione
Nota: Non per l’uso in furgoni o rimorchi,
camion per il trasporto del cibo o veicoli
simili.
Nota: se l’apparecchio è stato immagazzinato
o spostato in posizione non verticale,
lasciarlo in posizione verticale per circa 12
ore prima di metterlo in funzione. In caso
di dubbio, osservare comunque questa
precauzione.
1. Rimuovere l’apparecchio dall’imballaggio.
Assicurarsi che la pellicola protettiva e
rivestimenti in plastica siano interamente
rimossi da tutte le superfici.
2. Per ottimizzare le prestazioni e la longevità,
assicurarsi che sia mantenuta una distanza
minima di 2,5 cm tra l’unità e le pareti e altri
oggetti, con una distanza minima di 20 cm
nella parte superiore. NON POSIZIONARE
MAI VICINO A UNA FONTE DI CALORE.
Nota: Per evitare di essere spinto contro
il muro accidentalmente e garantire
una buona ventilazione, sono previsti 2
distanziali per il montaggio sul retro.
3. Innestare i freni delle ruote a sfera per
mantenere l’apparecchio in posizione.
Nota: prima di utilizzare l’apparecchio per
la prima volta, pulire i ripiani e l’interno con
acqua saponata e asciugare bene.
Montaggio dei ripiani
1. Posizionare un set di guide su ogni lato
dell’armadio all’altezza desiderata.
2. Fare scivolare in posizione il ripiano.
3. Ripetere l’operazione per i ripiani rimanenti.
Montaggio del piano di lavoro
refrigerato G611 (solo GL182)
(Questo è opzionale)
1. Rimuovere l’apparecchio dall’imballaggio.
2. Inclinare l’apparecchio all’indietro e fissare
senza serrare le tre staffe al lato inferiore del
piano di lavoro del banco, utilizzando le viti
appropriate. Non serrare completamente in
questa fase.
Nota: assicurare che le due
staffe a L siano montate sui
bordi esterni.
3. Abbassare il piano di lavoro sui bordi di
marmo. Assicurarsi che le staffe laterali siano
posizionate all’interno del bordo in marmo.
4. Spingere le staffe laterali a filo con il marmo e
serrare le viti delle staffe.
Montaggio dei pannelli in vetro
G611 (solo GL182)
1. Avvitare i collari al bordo dell’apparecchio.
Note: assicurarsi che il foro nel
collare per il gambo filettato sia
rivolto verso l’interno.
G377-G379_G596-G600_GD873-GD874_DL914-DL917_GL182-GL184_ML_A5_v7_20230504.indb 36G377-G379_G596-G600_GD873-GD874_DL914-DL917_GL182-GL184_ML_A5_v7_20230504.indb 36 2023/5/4 15:072023/5/4 15:07

37
IT
2. Inserire i due pannelli laterali nei collari, con i
fori del vetro rivolti verso l’alto.
Nota: assicurarsi che il foro della
vite più lontano dal bordo del
pannello sia in corrispondenza
della parte posteriore
dell’apparecchio.
3. Avvitare un gambo filettato in ogni collare per
fissare i pannelli.
Nota: assicurarsi che l’estremità
morbida del gambo filettato
sia l’estremità a contatto con il
vetro.
Non stringere troppo i grani
poiché causano la rottura del
vetro.
4. Inserire il pannello posteriore nei collari, con i
fori del vetro rivolti verso l’alto.
5. Avvitare un gambo filettato in ogni collare per
fissare il pannello.
6. Inserire i tappi in plastica in ognuno dei fori.
7. Avvitare le staffe all’interno di ogni pannello
utilizzando i montaggi a bullone.
Nota: assicurarsi che l’estremità
breve del montaggio a bullone
si trovi sul lato esterno dei
pannelli.
8. Posizionare il pannello superiore sulle staffe,
assicurandosi che tutti i fori siano allineati.
9. Inserire i tappi e fissare il pannello superiore
alle staffe utilizzando i montaggi a bullone.
Staffa
Pannello di vetro
Montaggio a bullone
Tappo
Montaggio a bullone
Funzionamento
Conservazione dei cibi
Per ottenere i migliori risultati dall’apparecchio
POLAR, osservare le seguenti istruzioni:
• Conservare i cibi nell’apparecchio solo quando
esso ha raggiunto la corretta temperatura di
esercizio.
• Non collocare all’interno dell’apparecchio cibi
o liquidi caldi non coperti (ad esempio liquidi
acidi) (in quanto potrebbero danneggiare
l’evaporatore).
• Se possibile, avvolgere o coprire i cibi.
• Non ostruire le ventole all’interno dell’apparecchio.
• Evitare di aprire i portelli per periodi prolungati
di tempo.
Accensione
1. Assicurarsi che l’interruttore dell’alimentazione
sia impostato su [O] e acceso alla presa.
2. Accendere l’alimentazione [I]. Viene
visualizzata la temperatura corrente all’interno
dell’apparecchiatura.
Pannello di controllo
Impostazione della temperatura di
esercizio
1. Tenere premuto il pulsante SET per 3 secondi.
Verrà visualizzato il valore del setpoint corrente.
2. Premere i pulsanti o per visualizzare
la temperatura richiesta.
3. Premere il pulsante SET per memorizzare la
temperatura.
Sbrinamento manuale
Premere senza rilasciare il pulsante “aux” per
2 secondi per avviare lo sbrinamento. La spia di
sbrinamento si accende.
Il ciclo di sbrinamento si conclude
automaticamente.
G377-G379_G596-G600_GD873-GD874_DL914-DL917_GL182-GL184_ML_A5_v7_20230504.indb 37G377-G379_G596-G600_GD873-GD874_DL914-DL917_GL182-GL184_ML_A5_v7_20230504.indb 37 2023/5/4 15:072023/5/4 15:07

38
IT
Pulizia e manutenzione
Sbrinare elettrodomestici almeno ogni tre mesi, più spesso se necessario.
Prima di eseguire la pulizia, spegnere e scollegare l’alimentazione.
• Pulire l’interno dell’apparecchio quanto più spesso possibile.
• Non utilizzare detergenti abrasivi in quanto possono lasciare residui nocivi.
• Pulire la tenuta della porta con acqua tiepida calda.
• Asciugare sempre dopo la pulizia.
• Non permettere che l’acqua utilizzata per la pulizia penetri attraverso il foro di scarico nella vasca di
evaporazione.
• Prestare attenzione durante la pulizia della parte posteriore dell’apparecchio. Gli attrezzi con bordi
taglienti possono provocare tagli.
Consigli per la refrigerazione:
• Con l’apertura frequente e prolungata delle porte si formano condensa e ghiaccio.
• Anche il funzionamento al di fuori dell’intervallo di temperatura consigliato e la collocazione vicino a
una fonte di calore aumentano la formazione di ghiaccio e di condensa interna/esterna. In caso di
condensa esterna, pulire la superficie con un panno.
• L’eccesso di ghiaccio provoca tempi di funzionamento più lunghi che aumentano il consumo
energetico e il deterioramento dei componenti.
• Se la guarnizione o la tenuta sono danneggiate o deformate, il consumo energetico aumenta. Per
ripristinare l’efficienza, sostituire la guarnizione.
Istruzioni per la cura dell’acciaio inox
Per conservare l’aspetto esterno in acciaio inox del prodotto Polar, osservare le seguenti indicazioni:
• Non usare mai pagliette di metallo o pagliette abrasive.
• Non usare mai detergenti acidi o clorurati.
• Non lasciare cibi, sporcizia o detergenti chimici sulla superficie più a lungo del necessario: rimuoverli
immediatamente.
• Non lasciare la superficie bagnata o umida.
• Pulire frequentemente.
• Utilizzare panni morbidi o pagliette in plastica.
• Strofinare nel verso della satinatura e non al contrario.
• Utilizzare detergenti e lucidanti specifici per la pulizia dell’acciaio inox.
• Assicurarsi di sciacquare completamente i detergenti e che l’acciaio sia lasciato asciutto.
Pulizia del condensatore
• Il condensatore è un componente del sistema
di refrigerazione. Il condensatore richiede una
pulizia mensile.
• Scollegare sempre l’alimentazione prima di
eseguire la manutenzione ordinaria.
• La mancata pulizia del condensatore riduce le
prestazioni e la durata dell’unità Polar e può
invalidarne la garanzia.
• Il condensatore è posizionato dietro lo
sportello di servizio sul lato destro dell’armadio
refrigerante.
• I modelli sono dotati di un filtro rimovibile che è
possibile pulire con un aspirapolvere.
G377-G379_G596-G600_GD873-GD874_DL914-DL917_GL182-GL184_ML_A5_v7_20230504.indb 38G377-G379_G596-G600_GD873-GD874_DL914-DL917_GL182-GL184_ML_A5_v7_20230504.indb 38 2023/5/4 15:072023/5/4 15:07

39
IT
Risoluzione dei problemi
Se necessario, un tecnico qualificato deve eseguire le riparazioni.
Guasto Probabile causa Azione
L'apparecchio non
funziona
L'apparecchio non è acceso Controllare che l'apparecchio sia
correttamente collegato e acceso
La presa e il cavo sono danneggiati Sostituire la spina o il cavo
Guasto alimentazione di rete Controllare l’alimentazione di rete
L'apparecchi si accende
ma la temperatura è
troppo alta o troppo
bassa
Quantità eccessiva di ghiaccio
nell'evaporatore Sbrinare l'apparecchio
Il condensatore è bloccato dalla
polvere Pulire il condensatore
I portelli non sono chiusi in
maniera appropriata Controllare che i portelli siano chiusi e
che le guarnizioni di tenuta non siano
danneggiate
L'apparecchio è posizionato in
prossimità di una sorgente di
calore oppure il flusso di aria al
condensatore è interrotto
Spostare il frigorifero in una posizione più
appropriata
La temperatura ambientale è
troppo alta Aumentare la ventilazione oppure spostare
l'apparecchio in una posizione più fresca
Sono stati conservati
nell'apparecchio cibi non
appropriati
Rimuovere i cibi eccessivamente caldi o le
ostruzioni della ventola
L'apparecchio è sovraccarico Ridurre la quantità dei cibi presenti
nell'apparecchio
L'apparecchio perde
acqua L'apparecchio non è in posizione
piana Regolare i piedi al fine di mantenere in
piano l'apparecchio (se pertinente)
La bocca di scarico è bloccata Pulire la bocca di scarico
Il movimento dell'acqua verso lo
scarico è ostruito Pulire il pavimento dell'apparecchio (se
pertinente)
Il contenitore dell'acqua è
danneggiato Consultare un tecnico qualificato
La vaschetta di raccolta dell'acqua
di sbrinamento è troppo piena Svuotare la vaschetta di raccolta dell'acqua
di sbrinamento (se pertinente)
L'apparecchio presenta
una rumorosità
eccessiva
La fascia di sicurezza non è stata
rimossa Rimuovere la fascia di sicurezza
Dadi o viti allentati Controllare e serrare tutti i dadi e le viti
L'apparecchio non è stato installato
in una posizione in piano o stabile
Controllare la posizione di installazione e
modificarla se necessario
G377-G379_G596-G600_GD873-GD874_DL914-DL917_GL182-GL184_ML_A5_v7_20230504.indb 39G377-G379_G596-G600_GD873-GD874_DL914-DL917_GL182-GL184_ML_A5_v7_20230504.indb 39 2023/5/4 15:072023/5/4 15:07

40
IT
Specifiche tecniche
Nota: a causa del nostro continuo programma di ricerca e sviluppo, le specifiche qui riportate possono
essere soggette a modifiche senza preavviso.
Modello Tensione Alimentazio Corrente Intervallo
di tempera-
tura
Capacità
netta
(litri) Refrigerante Dimensioni
h x l x p
mm
Peso
(Kg)
G377 230V
50Hz 230W 1,6A Da -2°C a
8°C 155 R600a 80g 850 x 1360
x 600 88
G378 230V
50Hz 230W 1,6A Da -2°C a
8°C 231 R600a 80g 850 x 1795
x 600 125
G379 230V
50Hz 230W 1,6A Da -2°C a
8°C 312 R600a 80g 860 x 2230
x 600 143
G596 230V
50Hz 350W 1,95A Da -2°C a
10°C 190 R600a 95g 850 x 1360
x 700 98
G597 230V
50Hz 350W 1,95A Da -2°C a
10°C 291 R600a 95g 850 x 1790
x 700 134
G598 230V
50Hz 350W 1,95A Da -2°C a
10°C 393 R600a 95g 850 x 2230
x 700 153
GD873 230V
50Hz 350W 1,95A Da -2°C a
10°C 142 R600a 95g 850 x 1360
x 700 98
GD874 230V
50Hz 350W 1,95A Da -2°C a
10°C 242 R600a 95g 850 x 1790
x 700 134
DL914 230V
50Hz 350W 1,95A Da -2°C a
10°C 190 R600a 95g 960 x 1360
x 700 98
DL915 230V
50Hz 350W 1,95A Da -2°C a
10°C 291 R600a 95g 960 x 1790
x 700 134
GL182 230V
50Hz 350W 1,95A Da 2°C a
10°C 406 R600a 95g 1000 x
2020 x 800 320
GL183 230V
50Hz 350W 1,95A Da 2°C a
10°C 290 R600a 95g 860 x 1510
x 800 140
GL184 230V
50Hz 350W 1,95A Da 2°C a
10°C 444 R600a 95g 860 x 2020
x 800 152
G599 230V
50Hz 750W 3,5A Da -10°C a
-20°C 187 R290 90g 850 x 1360
x 700 103
G600 230V
50Hz 750W 3,5A Da -10°C a
-20°C 280 R290 90g 850 x 1795
x 700 136,5
DL916 230V
50Hz 750W 3,5A Da -10°C a
-20°C 187 R290 90g 960 x 1360
x 700 103
DL917 230V
50Hz 750W 3,5A Da -10°C a
-20°C 280 R290 90g 960 x 1795
x 700 136,5
Nota: per ottenere prestazioni ed efficienza ottimali del prodotto, durante il rifornimento tenere presente
la capacità utile netta (limite di carico).
G377-G379_G596-G600_GD873-GD874_DL914-DL917_GL182-GL184_ML_A5_v7_20230504.indb 40G377-G379_G596-G600_GD873-GD874_DL914-DL917_GL182-GL184_ML_A5_v7_20230504.indb 40 2023/5/4 15:072023/5/4 15:07

41
IT
Cablaggi elettrici
La spina deve venire collegata a una presa di rete appropriata.
L’apparecchio ha i seguenti cablaggi:
• Filo sotto tensione (colore marrone) a terminale L
• Filo del neutro (colore blu) a terminale N
• Filo di terra (colore verde/giallo) a terminale E
Questa apparecchiatura deve essere collegata a terra.
In caso di dubbi, consultare un elettricista qualificato.
I punti di isolamento elettrico devono essere liberi da ostruzioni. In caso di emergenza, i punti devono
essere facilmente raggiungibili qualora sia necessario scollegarli.
Smaltimento
Le normative UE prevedono che lo smaltimento dei prodotti di refrigerazione sia eseguito da aziende
specializzate nella rimozione o nel riciclaggio di tutti i gas e dei componenti in metallo e plastica.
Rivolgersi all’ente locale incaricato per informazioni sullo smaltimento di questo apparecchio. Gli enti locali
non hanno l’obbligo di procedere allo smaltimento di apparecchi di refrigerazione commerciali ma sono in
grado di fornire suggerimenti sulla modalità di smaltimento di tali apparecchi.
In alternativa, chiamare la helpline telefonica di POLAR per ricevere informazioni dettagliate sulle aziende
di smaltimento nella UE.
Conformità
Il logo WEEE riportato su questo prodotto o sulla relativa documentazione indica che il
prodotto non può essere smaltito come normale rifiuto domestico. Per evitare possibili
danni alla salute e/o all'ambiente, il prodotto deve venire smaltito utilizzando una
procedura di riciclaggio approvata e sicura per l'ambiente. Per ulteriori informazioni su
come smaltire in maniera corretta questo prodotto, contattare il fornitore del prodotto o
l'ente locale responsabile per lo smaltimento dei rifiuti.
I componenti POLAR sono stati sottoposti a un rigoroso collaudo ai fini della conformità
agli standard e alle specifiche normative previste dalle autorità internazionali,
indipendenti e federali.
I prodotti POLAR sono autorizzati a esporre il seguente simbolo:
Tutti i diritti riservati. È vietata la riproduzione o la trasmissione in alcuna forma, elettronica, meccanica, mediante
fotocopiatura o altro sistema di riproduzione, di qualsiasi parte delle presenti istruzioni senza la previa autorizzazione
scritta di POLAR.
Le informazioni contenute sono corrette e accurate al momento della stampa, tuttavia POLAR si riserva il diritto di
modificare le specifiche senza preavviso.
G377-G379_G596-G600_GD873-GD874_DL914-DL917_GL182-GL184_ML_A5_v7_20230504.indb 41G377-G379_G596-G600_GD873-GD874_DL914-DL917_GL182-GL184_ML_A5_v7_20230504.indb 41 2023/5/4 15:072023/5/4 15:07

42
ES
Consejos de Seguridad
• Colóquela sobre una superficie plana, estable.
• Un agente de servicio / técnico cualificado debería llevar a cabo
la instalación y cualquier reparación si se precisa. No retire
ningún componente ni panel de servicio de este producto.
• Consulte las Normas Locales y Nacionales correspondientes a
lo siguiente:
- Legislación de Seguridad e Higiene en el Trabajo
- Códigos de Práctica BS EN
- Precauciones contra Incendios
- Normativos de Cableado de la IEE
- Normativas de Construcción
• No utilice dispositivos de lavado de chorro / presión para
limpiar el aparato.
• NO utilice este aparato para almacenar existencias médicas.
• NO se ponga de pie ni se apoye sobre la base, los cajones o
las puertas.
• NO deje que el aceite o la grasa entren en contacto con los
componentes de plástico o la junta de la puerta. Limpie el
aparato inmediatamente si se produce contacto.
• Sólo adecuado para uso en interiores.
• Las botellas que contienen un alto porcentaje de alcohol
deben sellarse y colocarse verticalmente en el frigorífico.
• Siempre debe transportar, almacenar y manipular el aparato
verticalmente y moverlo cogiéndolo de la base.
• Desconecte la máquina y desenchúfela del suministro eléctrico
de la unidad siempre antes de llevar a cabo la limpieza.
• Mantenga el embalaje lejos del alcance de los niños.
Deshágase del embalaje de acuerdo con las normativas de las
autoridades locales.
• Este aparato no debe ser utilizado por personas (incluidos
los niños) que tengan sus capacidades físicas, sensoriales
o mentales reducidas o que no cuenten con experiencia y
conocimientos a menos que lo hagan bajo la supervisión o
siguiendo instrucciones relativas al uso del aparato a través de
una persona responsable de su seguridad.
G377-G379_G596-G600_GD873-GD874_DL914-DL917_GL182-GL184_ML_A5_v7_20230504.indb 42G377-G379_G596-G600_GD873-GD874_DL914-DL917_GL182-GL184_ML_A5_v7_20230504.indb 42 2023/5/4 15:072023/5/4 15:07

43
ES
• Si el cable eléctrico está dañado, debe ser reemplazado por un
agente de POLAR o un técnico cualificado recomendado para
evitar cualquier riesgo.
• POLAR recomienda que este aparato debe ser periódicamente
probado (al menos anualmente) por una Persona Competente.
La prueba debe incluir, pero no debe estar limitado a:
Inspección visual, Prueba de polaridad, Toma a tierra,
continuidad de aislamiento y prueba Funcional.
Precaución: Riesgo de Incendio
• No guarde sustancias explosivas, tales como latas de aerosol
con un propelente inflamable en este aparato.
Advertencia: Mantenga los orificios de ventilación
libres de obstrucciones. Asegúrese de que la
unidad disponga de una ventilación adecuada.
• Advertencia: No utilice dispositivos mecánicos u otros
medios para acelerar el proceso de descongelación, que no
sea el fabricante recomienda Aquellos por.
• Advertencia: No dañe el circuito refrigerante.
• Advertencia: No utilice aparatos eléctricos dentro de los
compartimentos de almacenamiento de alimentos del aparato.
Descripción del Producto
Frigorífico de Mostrador de 2 Puertas de 228 Litros G377 - POLAR
Frigorífico de Mostrador de 3 Puertas de 339 Litros G378 - POLAR
Frigorífico de Mostrador de 4 Puertas de 449 Litros G379 - POLAR
Frigorífico de Mostrador de 2 Puertas de 282 Litros G596 - POLAR
Frigorífico de Mostrador de 3 Puertas de 417 Litros G597 - POLAR
Frigorífico de Mostrador de 4 Puertas de 553 Litros G598 - POLAR
Frigorífico de Mostrador de 1 Puerta y 2 Cajones de 282 Litros GD873 - POLAR
Frigorífico de Mostrador de 2 Puerta y 2 Cajones de 417 Litros GD874 - POLAR
Frigorífico de Mostrador de 2 Puertas con el chapoteo detras de 282 Litros DL914 - POLAR
Frigorífico de Mostrador de 3 Puertas con el chapoteo detras de 417 Litros DL915 - POLAR
Frigorífico de 3 puertas para mostrador de panadería con encimera de granito GL182 - POLAR
Frigorífico de Mostrador de 2 Puertas (panadería) GL183 - POLAR
Frigorífico de Mostrador de 3 Puertas (panadería) GL184 - POLAR
G599- POLAR 282 litros 2 Puerta mostrador congelador
G600-POLAR 417 litros 3 Puerta mostrador congelador
DL916- POLAR 282 litros 2 Puerta Contador Congelador con alzatina
DL917- POLAR 417 litros 3 Puerta Contador Congelador con alzatina
G377-G379_G596-G600_GD873-GD874_DL914-DL917_GL182-GL184_ML_A5_v7_20230504.indb 43G377-G379_G596-G600_GD873-GD874_DL914-DL917_GL182-GL184_ML_A5_v7_20230504.indb 43 2023/5/4 15:072023/5/4 15:07

44
ES
Introducción
Tómese unos minutos para leer este manual. El
correcto mantenimiento y manejo de esta máquina
proporcionará el mejor funcionamiento posible de
su producto POLAR.
Contenido del Conjunto
Se incluye lo siguiente:
• Frigorífico o Congelador POLAR
• Guías de estante (2 por puerta), excepto
GL182 (14 por puerta)
• Estantes (1 por puerta), excepto GL182, GL183
y GL184 (No hay estantes incluidos)
• Manual de instrucciones
• Espaciador (x2)
POLAR se enorgullece de su calidad y servicio
y asegura que en el momento del embalaje, el
contenido se suministró con plena funcionalidad y
sin ningún defecto.
Si encontrara algún daño resultante del transporte,
póngase en contacto inmediatamente con su
distribuidor POLAR.
Instalación
Nota: No debe utilizarse en furgonetas
o remolques, camiones de alimentos o
vehículos similares.
Nota: Si el aparato no se ha almacenado o
transportado en posición vertical, déjelo en
posición vertical durante aproximadamente
12 horas antes del funcionamiento. Si tiene
alguna duda, deje el aparato en posición
vertical.
1. Desembale el aparato. Asegúrese de que todos
los revestimientos y las láminas de plástico
de protección se hayan quitado totalmente de
todas las superficies.
2. Para optimizar el rendimiento y la longevidad,
asegúrese de que se mantenga un espacio libre
mínimo de 2,5 cm entre la unidad y las paredes
y otros objetos, con un espacio mínimo de
20 cm en la parte superior. NUNCA UBICAR
AL LADO DE UNA FUENTE DE CALOR.
Nota: Para evitar que sea empujado contra
la pared accidentalmente y asegurar una
buena ventilación, se suministran 2 espacios
para el montaje en la parte trasera.
3. Coloque los frenos en las ruedecillas para
mantener el aparato en su posición.
Nota: Antes de utilizar el aparato por
primera vez, limpie los estantes y el interior
con agua jabonosa y luego séquelos bien.
Montaje de las Protecciones de
Suelo y los Estantes
1. Coloque un juego de guías de estante a cada
lado de la cabina a la altura deseada.
2. Deslice el estante hasta su lugar.
3. Repita el proceso con los estantes restantes.
Montaje de la frigorífico para
mostrador G611 (Sólo en los
modelos GL182) (Esto es opcional)
1. Desembale el aparato.
2. Incline el aparato hacia atrás y acople
ligeramente los tres soportes a la parte
inferior del mostrador, utilizando los tornillos
adecuados. No los apriete completamente en
esta etapa.
Nota: asegúrese de que los
dos soportes en forma de “L”
estén montados en los bordes
externos.
3. Baje la unidad de mostrador sobre los laterales
de mármol. Asegúrese de que los soportes
laterales se queden en la parte interior del
armazón de mármol.
4. Presione los soportes laterales hasta que estén
alineados con el mármol y apriete los tornillos
de soporte.
Montaje de los Paneles de Cristal
G611 (Sólo en los modelos GL182)
1. Enrosque los casquillos al armazón del aparato.
Nota: asegure el agujero en el casquillo de
modo que las superficies de los tornillos de
cabeza hendida miren hacia dentro.
G377-G379_G596-G600_GD873-GD874_DL914-DL917_GL182-GL184_ML_A5_v7_20230504.indb 44G377-G379_G596-G600_GD873-GD874_DL914-DL917_GL182-GL184_ML_A5_v7_20230504.indb 44 2023/5/4 15:072023/5/4 15:07

45
ES
2. Introduzca los dos paneles laterales en los
casquillos, con los agujeros en el cristal en la
parte superior.
Nota: asegúrese de que el
agujero del tornillo más allá
del borde del panel se desplace
hasta la parte trasera del
aparato.
3. Enrosque un tornillo de cabeza hendida en
cada uno de los collares para fijar los paneles.
Nota: Asegúrese de que el
extremo suave del tornillo de
cabeza hendida sea el extremo
de contacto con el cristal.
No apriete demasiado los
tornillos prisioneros, ya que
resultará en la rotura del vidrio.
4. Introduzca el panel trasero en los casquillos, con
los agujeros en el cristal en la parte superior.
5. Enrosque un tornillo de cabeza hendida en
cada uno de los collares para fijar el panel.
6. Introduzca las clavijas de plástico en cada uno
de los agujeros.
7. Enrosque los soportes en el interior de cada
una de las láminas de cristal mediante las
unidades de perno.
Nota: asegúrese de que el
extremo corto de la unidad de
perno esté en la parte exterior
de los paneles.
8. Coloque el panel superior sobre los soportes,
asegurándose de que todos los paneles estén
alineados.
9. Inserte las clavijas y acople el panel superior a
los soportes con las unidades de perno.
Soporte
Panel de Cristal
Unidad de Perno
Conector
Unidad de Perno
Funcionamiento
Almacenamiento de comida
Para obtener los mejores resultados de su aparato
POLAR, siga estas instrucciones:
• Guarde alimentos en el aparato sólo
cuando haya alcanzado la temperatura de
funcionamiento correcta.
• No coloque alimentos o líquidos calientes
descubiertos (como líquidos ácidos) dentro del
aparato (ya que puede dañar el evaporador).
• Envuelva o cubra la comida siempre que sea
posible.
• No obstruya los ventiladores en el interior del
aparato.
• Evite la apertura de las puertas durante
períodos de tiempo prolongados.
Activación
1. Asegúrese de que el interruptor de activación
esté ajustado en [O] y conéctelo a la toma.
2. 2. Conecte la Alimentación [I]. Se muestra la
temperatura actual en el aparato.
Panel de Control
Ajuste de la Temperatura de
Funcionamiento
1. Mantenga presionado el botón SET durante 3
segundos. Se mostrará el valor del punto de
ajuste actual.
2. Pulse el botón o los botones para
visualizar la temperatura deseada.
3. Pulse el botón SET para fijar la temperatura.
Descongelacion manual
Pulse y mantenga pulsado el boton “aux” durante
2 segundos para que empiece la descongelacion .
La luz de descongelacion se iluminare.
El ciclo de descongelación finalizará
automáticamente.
G377-G379_G596-G600_GD873-GD874_DL914-DL917_GL182-GL184_ML_A5_v7_20230504.indb 45G377-G379_G596-G600_GD873-GD874_DL914-DL917_GL182-GL184_ML_A5_v7_20230504.indb 45 2023/5/4 15:072023/5/4 15:07

46
ES
Limpieza, Cuidado y Mantenimiento
Descongele los aparatos por lo menos cada 3 meses, con más frecuencia si es necesario.
Desconecte la máquina y desenchúfela de la toma eléctrica antes de llevar a cabo la
limpieza.
• Limpie el interior del aparato con la mayor frecuencia posible.
• No utilice productos de limpieza abrasivos. Estos pueden dejar residuos nocivos.
• Limpie el sello de la puerta con agua tibia y jabonosa.
• Seque bien el aparato después de limpiarlo.
• No permita que el agua utilizada en la limpieza pase por el agujero de desagüe hacia el recipiente de
evaporación.
• Vaya con cuidado al limpiar la parte trasera del aparato. Los bordes afilados pueden cortar.
Consejos de refrigeración:
• La condensación y el hielo se formarán con la apertura frecuente y prolongada de las puertas.
• El funcionamiento fuera del rango de temperatura recomendado y la colocación junto a una fuente
de calor también aumentarán la cantidad de hielo y la condensación interna/externa. Si se produce
condensación externa, limpie la superficie con un paño.
• El exceso de hielo provocará tiempos de funcionamiento más largos que aumentarán el consumo de
energía y el deterioro de los componentes.
• Si la junta o el sello están dañados o deformados, aumentará el consumo de energía. Para restablecer
la eficiencia, sustituya la junta.
Cuidado del acero inoxidable
Para mantener el exterior del acero inoxidable de su unidad Polar, por favor, considere la siguiente
información:
Nunca:
• Utilice estropajos o esponjas de fregar abrasivas, etc.
• Utilice detergentes clorados o ácidos
• Deje nada, por ejemplo, sustancias químicas de limpieza, suciedad o comida sobre la superficie
durante más tiempo de lo necesario. Límpielos inmediatamente.
• Deje que la superficie permanezca húmeda.
Siempre:
• Limpie con frecuencia.
• Utilice paños suaves o estropajos plásticos.
• Frote con la textura granular del metal más que a través de la misma.
• Utilice detergentes y ceras diseñados para la limpieza de acero inoxidable.
• Asegúrese de que los productos de limpieza se quiten por completo lavando y que el acero quede
seco.
Limpieza del condensador
• El condensador es parte del sistema de
refrigeración. El condensador requiere limpieza
mensual.
• Desconecte siempre el suministro de alimentación
antes de llevar a cabo el mantenimiento de rutina.
• La falta de limpieza del condensador reducirá su
rendimiento y la vida útil de su unidad Polar y
puede invalidar su garantía
• El condensador está ubicado detrás de la
puerta de servicio a la derecha del gabinete de
refrigeración.
• Estos modelos tienen un filtro extraíble que puede
limpiarse con una aspiradora.
G377-G379_G596-G600_GD873-GD874_DL914-DL917_GL182-GL184_ML_A5_v7_20230504.indb 46G377-G379_G596-G600_GD873-GD874_DL914-DL917_GL182-GL184_ML_A5_v7_20230504.indb 46 2023/5/4 15:072023/5/4 15:07

47
ES
Resolución de problemas
Un técnico calificado debe realizar las reparaciones si es necesario.
Fallo Causa probable Acción
El aparato no funciona El aparato no está conectado Compruebe que el aparato esté enchufado
correctamente y conectado
El enchufe y el cable están dañados Reemplace el enchufe o el cable
Fallo de la fuente de alimentación de
red
Compruebe la fuente de alimentación de red
El aparato se activa,
pero la temperatura es
demasiado alta / baja
Hay demasiado hielo en el
evaporador Descongele el aparato
Condensador bloqueado con polvo Limpie el condensador
Las puertas no están bien
cerradas Compruebe que las puertas estén cerradas
y las juntas no estén dañadas
El aparato se encuentra cerca de
una fuente de calor o el caudal
de aire hacia el condensador está
siendo interrumpido
Traslade el frigorífico a un lugar más
adecuado
La temperatura ambiente es
demasiado alta Aumente la ventilación o traslade el
aparato a un lugar más fresco
Se guardan alimentos no
adecuados en el aparato Retire cualquier exceso de alimentos
calientes u obstrucciones del ventilador
El aparato está sobrecargado Reduzca la cantidad de alimentos
guardados en el aparato
Hay fugas de agua en
el aparato El aparato no está bien nivelado Ajuste las patas enroscadas para nivelar el
aparato (si es aplicable)
La salida de descarga está
bloqueada Limpie la salida de descarga
El movimiento del agua hacia el
desagüe está obstruido Limpie la base del aparato (si es aplicable)
El contenedor de agua está
dañado Consulte a un técnico cualificado
La bandeja de goteo está
rebosando Vacíe la bandeja de goteo (si es aplicable)
El aparato es
inusualmente ruidoso No se ha retirado la banda de
seguridad Retire la banda de seguridad
Tuerca / tornillo flojo Compruebe y apriete todos los tornillos y
las tuercas
El aparato no se ha instalado en
una posición estable o nivelada Compruebe la posición de la instalación y
cámbiela si es necesario
G377-G379_G596-G600_GD873-GD874_DL914-DL917_GL182-GL184_ML_A5_v7_20230504.indb 47G377-G379_G596-G600_GD873-GD874_DL914-DL917_GL182-GL184_ML_A5_v7_20230504.indb 47 2023/5/4 15:072023/5/4 15:07

48
ES
Especificaciones Técnicas
Nota: Debido a nuestro continuo programa de investigación y desarrollo, las especificaciones aquí
expuestas pueden estar sujetas a cambios sin previo aviso.
Modelo Tensión Potencia Potencia Margen de
Temperaturas
Capacidad
útil neta
(litros) Refrigerante Dimensiones
a x a x p mm Peso
(Kg)
G377 230V
50Hz 230W 1,6A De -2°C a 8°C 155 R600a 80g 850 x 1360 x
600 88
G378 230V
50Hz 230W 1,6A De -2°C a 8°C 231 R600a 80g 850 x 1795 x
600 125
G379 230V
50Hz 230W 1,6A De -2°C a 8°C 312 R600a 80g 860 x 2230 x
600 143
G596 230V
50Hz 350W 1,95A De -2°C a 10°C 190 R600a 95g 850 x 1360 x
700 98
G597 230V
50Hz 350W 1,95A De -2°C a 10°C 291 R600a 95g 850 x 1790 x
700 134
G598 230V
50Hz 350W 1,95A De -2°C a 10°C 393 R600a 95g 850 x 2230 x
700 153
GD873 230V
50Hz 350W 1,95A De -2°C a 10°C 142 R600a 95g 850 x 1360 x
700 98
GD874 230V
50Hz 350W 1,95A De -2°C a 10°C 242 R600a 95g 850 x 1790 x
700 134
DL914 230V
50Hz 350W 1,95A De -2°C a 10°C 190 R600a 95g 960 x 1360 x
700 98
DL915 230V
50Hz 350W 1,95A De -2°C a 10°C 291 R600a 95g 960 x 1790 x
700 134
GL182 230V
50Hz 350W 1,95A De 2°C a 10°C 406 R600a 95g 1000 x 2020
x 800 320
GL183 230V
50Hz 350W 1,95A De 2°C a 10°C 290 R600a 95g 860 x 1510 x
800 140
GL184 230V
50Hz 350W 1,95A De 2°C a 10°C 444 R600a 95g 860 x 2020 x
800 152
G599 230V
50Hz 750W 3,5A De -10°C a
-20°C 187 R290 90g 850 x 1360 x
700 103
G600 230V
50Hz 750W 3,5A De -10°C a
-20°C 280 R290 90g 850 x 1795 x
700 136,5
DL916 230V
50Hz 750W 3,5A De -10°C a
-20°C 187 R290 90g 960 x 1360 x
700 103
DL917 230V
50Hz 750W 3,5A De -10°C a
-20°C 280 R290 90g 960 x 1795 x
700 136,5
Nota: Para un rendimiento y una eficiencia óptimos del producto, asegúrese de tener en cuenta la
capacidad neta utilizable (límite de carga) al llenarlo.
G377-G379_G596-G600_GD873-GD874_DL914-DL917_GL182-GL184_ML_A5_v7_20230504.indb 48G377-G379_G596-G600_GD873-GD874_DL914-DL917_GL182-GL184_ML_A5_v7_20230504.indb 48 2023/5/4 15:072023/5/4 15:07

49
ES
Cableado Eléctrico
El enchufe tiene que conectarse a una toma eléctrica adecuada.
Este aparato está conectado de la forma siguiente:
• Cable cargado (de color marrón) al terminal marcado como L
• Cable neutro (de color azul) al terminal marcado como N
• Cable de tierra (de color verde / amarillo) al terminal marcado como E
Este aparato debe conectarse a una toma de tierra.
Si tiene alguna duda, consulte a un electricista cualificado.
Los puntos de aislamiento eléctrico deben mantenerse libres de cualquier obstrucción. En caso de
precisarse una desconexión de emergencia, deben estar disponibles de forma inmediata.
Desecho
Las normativas de la UE requieren que los productos de refrigeración sean desechados por compañías
especializadas que extraigan o reciclen todos los gases, componentes metálicos y de plástico.
Consulte a su autoridad local de recogida de residuos a la hora de desechar su aparato. Las autoridades
locales no están obligadas a eliminar los equipos de refrigeración comerciales pero pueden ofrecer
consejo sobre cómo desechar los equipos localmente.
Otra opción es llamar a la línea de asistencia de POLAR para pedir información sobre las compañías
nacionales de desechos de la UE.
Cumplimiento
El logotipo WEEE en este producto o su documentación indica que no debe eliminarse
como un residuo doméstico. Para ayudar a prevenir posibles daños a la salud humana y/
o el medio ambiente, el producto debe eliminarse en un proceso de reciclaje aprobado y
medioambientalmente seguro. Para obtener más información sobre cómo eliminar
correctamente este producto, póngase en contacto con el proveedor del mismo o la
autoridad local responsable de la eliminación de residuos en su zona.
Las piezas POLAR han pasado estrictas pruebas de productos para cumplir las
especificaciones y normas reguladoras establecidas por las autoridades internacionales,
independientes y federales.
Los productos POLAR han sido autorizados para llevar el símbolo siguiente:
Reservados todos los derechos. Puede estar prohibida la reproducción o transmisión en cualquier forma o por cualquier
medio electrónico, mecánico, de fotocopiado, registro o de otro tipo, de cualquier parte de estas instrucciones sin la
autorización previa y por escrito de POLAR.
Se ha hecho todo lo posible para garantizar que todos los datos son correctos en el momento de su publicación; sin
embargo,POLAR se reserva el derecho a modificar las especificaciones sin que medie notificación previa.
G377-G379_G596-G600_GD873-GD874_DL914-DL917_GL182-GL184_ML_A5_v7_20230504.indb 49G377-G379_G596-G600_GD873-GD874_DL914-DL917_GL182-GL184_ML_A5_v7_20230504.indb 49 2023/5/4 15:072023/5/4 15:07

DECLARATION OF CONFORMITY
• Conformiteitsverklaring • Déclaration de conformité • Konformitätserklärung • Dichiarazione di conformità •
• Declaración de conformidad
Equipment Type • Uitrustingstype • Type d'équipement • Gerätetyp
• Tipo di apparecchiatura • Tipo de equipo
Model • Modèle • Modell • Modello
• Modelo
U-Series:
1. Double Door Counter Fridge 228Ltr
2. Triple Door Counter Fridge 339Ltr
3. Four Door Counter Fridge 449Ltr
4. Double Door Counter Fridge 282Ltr
5. Triple Door Counter Fridge 417Ltr
6. Four Door Counter Fridge 553Ltr
7. Double Door Counter Freezer
282Ltr
8. Triple Door Counter Freezer 417Ltr
9. Double Drawer Counter Fridge
282Ltr
10. 2 Door and 2 Drawer Counter
Fridge 417Ltr
11. Double Door Counter Fridge with
Upstand 282Ltr
12. Triple Door Counter Fridge with Upstand
417Ltr
13. Double Door Counter Freezer with
Upstand 282Ltr
14. Triple Door Counter Freezer with
Upstand 417Ltr
15. 3 Door Counter with Euronorm Storage
& Granite Countertop
16. 2 Door Counter with Euronorm Storage
427Ltr
17. 3 Door Counter with Euronorm Storage
634Ltr
1. G377 (& -E)
2. G378 (& -E)
3. G379 (& -E)
4. G596 (& -E)
5. G597 (& -E)
6. G598 (& -E)
7. G599 (& -E)
8. G600 (& -E)
9. GD873 (& -E)
10. GD874 (& -E)
11. DL914 (& -E)
12. DL915 (& -E)
13. DL916 (& -E)
14. DL917 (& -E)
15. GL182 (& -E)
16. GL183-E
17. GL184-E
Application of Territory Legislation &
Council Directives(s)
Toepassing van Europese Richtlijn(en) •
Application de la/des directive(s) du
Conseil • Anwendbare EU-Richtlinie(n) •
Applicazione delle Direttive
• Aplicación de la(s) directiva(s) del
consejo
Machinery Directive 2006/42/EC
Supply of Machinery (Safety) Regulations 2008
EN 60335-1:2012 +A11:2014 +A13:2017 +A1:2019 +A14:2019 +A2:2019
EN 60335-2-89:2010 +A1:2016 +A2:2017
EN 62233:2008
Electro-Magnetic Compatibility (EMC) Directive 2014/30/EU - recast of 2004/108/EC
Electromagnetic Compatibility Regulations 2016 (S.I. 2016/1091)
EN 55014-1:2017
EN 55014-2:2015
EN 61000-3-2:2014
EN 61000-3-3:2013
Regulation (EU) 2015/1095 - Ecodesign professional refrigerators
EN 16825: 2016 +A1:2019
Restriction of Hazardous Substances Directive (RoHS) 2015/863 amending Annex II to
Directive 2011/65/EU
Restriction of the Use of Certain Hazardous Substances in Electrical and Electronic Equipment
Regulations 2012 (S.I. 2012/3032)
Producer Name • Naam fabrikant • Nom du producteur • Name des Herstellers
• Nome del produttore • Nombre del fabricante
Polar
I, the undersigned, hereby declare that the equipment specified above conforms to the above Territory Legislation, Directive(s) and
Standard(s).
Ik, de ondergetekende, verklaar hierbij dat de hierboven gespecificeerde uitrusting goedgekeurd is volgens de bovenstaande Richtlijn(en) en
Standaard(en).
Je soussigné, confirme la conformité de l'équipement cité dans la présente à la / aux Directive(s) et Norme(s) ci-dessus
Ich, der/die Unterzeichnende, erkläre hiermit, dass das oben angegebene Gerät der/den oben angeführten Richtlinie(n) und Norm(en) entspricht.
Il sottoscritto dichiara che l'apparecchiatura di sopra specificata è conforme alle Direttive e agli Standard sopra riportati.
El abajo firmante declara por la presente que el equipo arriba especificado está en conformidad con la(s) directiva(s) y estándar(es) arriba
mencionadas.
Date • Data • Date • Datum • Data •
Fecha
19th April 2022
Signature • Handtekening • Signature •
Unterschrift Firma • Firma
Full Name • Volledige naam • Nom et
prénom • Vollständiger Name • Nome
completo • Nombre completo
Ashley Hooper
Eoghan Donnellan
Position • Functie • Fonction • Position •
Qualifica • Posición
Technical & Quality Manager
Commercial Manager/ Importer
Producer Address • Adres fabrikant •
Adresse du producteur • Anschrift des
Herstellers • Indirizzo del produttore •
Dirección del fabricante
Fourth Way,
Avonmouth,
Bristol,
BS11 8TB
United Kingdom
Unit 9003,
Blarney Business Park,
Blarney,
Co. Cork
Ireland
DocuSign Envelope ID: 94FC1EB7-2F94-40AB-BD80-7155EBF4ACDF
G377-G379_G596-G600_GD873-GD874_DL914-DL917_GL182-GL184_ML_A5_v7_20230504.indb 50G377-G379_G596-G600_GD873-GD874_DL914-DL917_GL182-GL184_ML_A5_v7_20230504.indb 50 2023/5/4 15:072023/5/4 15:07

UK
+44 (0)845 146 2887
Eire
NL 040 – 2628080
FR 01 60 34 28 80
BE-NL 0800-29129
BE-FR 0800-29229
DE 0800 – 1860806
IT N/A
ES 901-100 133
G377-G379_G596-G600_GD873-GD874_DL914-DL917_GL182-GL184_ML_A5_v7_20230504.indb 51G377-G379_G596-G600_GD873-GD874_DL914-DL917_GL182-GL184_ML_A5_v7_20230504.indb 51 2023/5/4 15:072023/5/4 15:07

G377-G379_G596-G600_GD873-GD874_DL914-DL917_GL182-GL184_ML_A5_v7_2023/05/04
http://www.polar-refrigerator.com/
G377-G379_G596-G600_GD873-GD874_DL914-DL917_GL182-GL184_ML_A5_v7_20230504.indb 52G377-G379_G596-G600_GD873-GD874_DL914-DL917_GL182-GL184_ML_A5_v7_20230504.indb 52 2023/5/4 15:072023/5/4 15:07
-
 1
1
-
 2
2
-
 3
3
-
 4
4
-
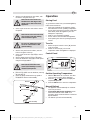 5
5
-
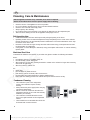 6
6
-
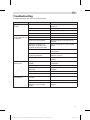 7
7
-
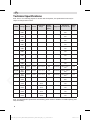 8
8
-
 9
9
-
 10
10
-
 11
11
-
 12
12
-
 13
13
-
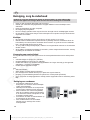 14
14
-
 15
15
-
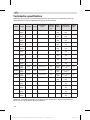 16
16
-
 17
17
-
 18
18
-
 19
19
-
 20
20
-
 21
21
-
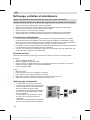 22
22
-
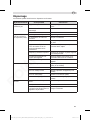 23
23
-
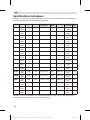 24
24
-
 25
25
-
 26
26
-
 27
27
-
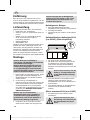 28
28
-
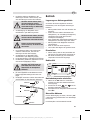 29
29
-
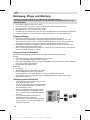 30
30
-
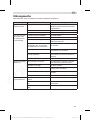 31
31
-
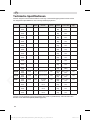 32
32
-
 33
33
-
 34
34
-
 35
35
-
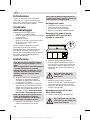 36
36
-
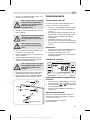 37
37
-
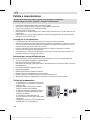 38
38
-
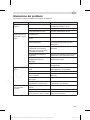 39
39
-
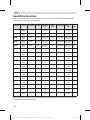 40
40
-
 41
41
-
 42
42
-
 43
43
-
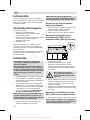 44
44
-
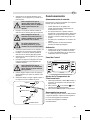 45
45
-
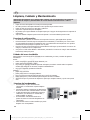 46
46
-
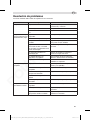 47
47
-
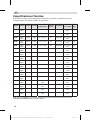 48
48
-
 49
49
-
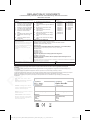 50
50
-
 51
51
-
 52
52


en otros idiomas
- français: Polar DL914 Manuel utilisateur
- italiano: Polar DL914 Manuale utente
- Deutsch: Polar DL914 Benutzerhandbuch
- Nederlands: Polar DL914 Handleiding

