NEOPERL 37.0127.98 Guía de instalación
- Categoría
- Artículos sanitarios
- Tipo
- Guía de instalación
Este manual también es adecuado para

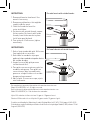
For male faucets with outside threads:INSTRUCTIONS:
1. Remove old aerator from faucet. Use
wrench if necessary.
2. Remove any old washers that might be
caught inside the spout.
3. Clean the threads on faucet for
easier installation.
4. For faucets with outside threads, remove
thicker washer. For faucets with inside
threads, leave thicker washer in place.
Install onto spout by hand.
5. Turn on faucet. If leak occurs, tighten
more rmly.
INSTRUCCIONES:
1. Quite el viejo aireador del grifo. Utilice una
llave inglesa de ser necesario.
2. Quite todas las arendelas viejas que
pudieran haber quedado atrapadas dentro
del surtidor de agua.
3. Limpie las roscas del grifo para una
instalación más fácil.
4. Para grifos con roscas externas, quite las
arandelas más gruesa. Para grifos con
roscas internas, deje la arandela más
gruesa en su lugar. Instale en el surtidor
de agua en forma manual.
5. Abrir el grifo. Si ocurre un escape, ajuste
más rmemente.
For female faucets with inside threads:
For manufacturer warranty information visit www.faucetaerator.com
©April 2014 NEOPERL, Inc. All rights reserved.
Para la información de garantia de fabricante visite www.faucetaerator.com
©Abril 2014 NEOPERL, Inc. Todo los derechos reservados.
1
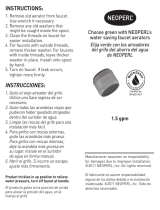
Up to 30% reduction in ow rate from 2.2 gpm to 1.5 gpm on faucet.
1
Hasta un 30% de reducción en el ujo de 2.2 gpm a uno de 1.5 gpm en el grifo.
*Lead free as dened by the Reduction of Lead in Drinking Water Act (S 3874, 111thCongress (2009-2010).
*Libre de plomo, según lo denido por la Reducción de Plomo en la Ley de Agua Potable (S 3874, número 111 del
Congreso (2009-2010).
Remove thicker
washer
Leave thicker
washer in place
Transcripción de documentos
INSTRUCTIONS: 1. Remove old aerator from faucet. Use wrench if necessary. 2. Remove any old washers that might be caught inside the spout. 3. Clean the threads on faucet for easier installation. 4. For faucets with outside threads, remove thicker washer. For faucets with inside threads, leave thicker washer in place. Install onto spout by hand. 5. Turn on faucet. If leak occurs, tighten more firmly. INSTRUCCIONES: 1. Quite el viejo aireador del grifo. Utilice una llave inglesa de ser necesario. 2. Quite todas las arendelas viejas que pudieran haber quedado atrapadas dentro del surtidor de agua. 3. Limpie las roscas del grifo para una instalación más fácil. 4. Para grifos con roscas externas, quite las arandelas más gruesa. Para grifos con roscas internas, deje la arandela más gruesa en su lugar. Instale en el surtidor de agua en forma manual. 5. Abrir el grifo. Si ocurre un escape, ajuste más firmemente. For male faucets with outside threads: Remove thicker washer For female faucets with inside threads: Leave thicker washer in place For manufacturer warranty information visit www.faucetaerator.com ©April 2014 NEOPERL, Inc. All rights reserved. Para la información de garantia de fabricante visite www.faucetaerator.com ©Abril 2014 NEOPERL, Inc. Todo los derechos reservados. Up to 30% reduction in flow rate from 2.2 gpm to 1.5 gpm on faucet. Hasta un 30% de reducción en el flujo de 2.2 gpm a uno de 1.5 gpm en el grifo. 1 1 *Lead free as defined by the Reduction of Lead in Drinking Water Act (S 3874, 111thCongress (2009-2010). *Libre de plomo, según lo definido por la Reducción de Plomo en la Ley de Agua Potable (S 3874, número 111 del Congreso (2009-2010).-
 1
1

NEOPERL 37.0127.98 Guía de instalación
- Categoría
- Artículos sanitarios
- Tipo
- Guía de instalación
- Este manual también es adecuado para
en otros idiomas
Artículos relacionados
-
NEOPERL 37.0093.98 Guía de instalación
-
-
 Bubble-Stream 97128.05 Guía de instalación
-
-
-
NEOPERL 37.0116.98 Guía de instalación
-
-
NEOPERL 37.0114.98 Guía de instalación
-
-

