* You may also manually pop out lid from the bottom and pull down to release the tabs.
* Tambien puede manualmente dislocar la tapa de la bisagras.
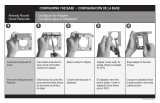
CONFIGURING THE BASE • CONFIGURACIÓN DE LA BASE
CONFIGURE FOR ROUND ADAPTER
Conguracion para el Adaptador Redondo
1 2 3 2
1 2 3 1
1
2
ML450_NS_REV-F
Comes pre-congured for GFCI. Choose
horizontal or vertical mount.
Viene pre-congurado para GFCI. Elija el monte
horizontal o vertical.
ALREADY GFCI
Viene GFCI
CONFIGURE FOR DUPLEX
Conguracion para Duplex
Snap in the duplex adapter to the back
of the base.
Instale con presion el adaptador duplex en el posterior
de la base.
Congured for duplex.
Conguracion para duplex.
Snap out the round pieces on both sides for
switch/round adapter.
Presione hacia afuera los pedazos redondos en ambos lados
para el adaptador redondo.
Congure the adapter, and then snap it to
the back of base.
Congure el adaptador y luego instale a presión en la parte
posterior de la base.
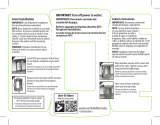
OPENING THE COVER
Abrir
CLOSING THE COVER
CERRAR LA TAPA
Open the cover by pulling on both latches,
and then plug cord into receptacle. (Use of
one 12-3 or 14-3 cord or two 16-3 cords is
recommended.)
Abre la tapa, jalando los dos ganchos y conecta el enchufe
en el receptor. (Uso de 12-3 o 14-3 cable o dos 16-3 cables
recomendados.)
While closing cover, align cord(s) with
cord port at the bottom corner of the
cover. The lid will pop out and expand as
the cover is closed.*
Cuando sierre la tapa, alinea el cable(s) con el hoyo de la
esquina de abajo. La tapa se expandera cuando sierres
la tapa.*
STEP 1: Remove cord and close cover; make
sure that both latches are engaged.
STEP 2: Insert the top two lid retaining tabs
into the cover.
The cover fully expands once both tabs are
disengaged. This product is intended
for continuous use.
La tapa se expandera cuando las bisagras esten sueltas.
Este producto esta diseñado para uso continuo.
PASO 1: Quite el cable y cierre la tapa, asegurate que bisagras enganchen.
PASO 2: Mete la parte superior de la tapa para que se sontenga en
bisagras que tiene la tapa.
STEP 3: Push the bottom of the lid back
into the cover until it snaps in place.
PASO 3: Empuja la parte de abajo de la tapa hasta que
enganche en su lugar.
Meets 2011 406.8(B)(1) NEC for
horizontal & vertical installation

TURN OFF POWER TO RECEPTACLE. Congure base as shown on other side. Back-out box screws. Gasket is
pre-attached. Using keyholes, place base over screws. Tighten screws. Do not over-tighten mounting hardware.
DESCONECTE LA ELECTRICIDAD AL RECEPTÁCULO. Congure la base como se ilustra al lado. La empaquetadura esta pegada. Coloque la
base sobre los tornillos y contra la empaquetadura. Apriete los tornillos. No apriete demasiado los accesorios de montaje.
NOTE: Base should be installed on a smooth at surface. To ensure a weatherproof seal on irregular
surfaces such as brick or cedar siding, a 1/4 inch bead of non-hardening silicone caulk (not included) must
be placed between the gasket and the mounting surface.
WARNING: Improper installation of any electrical device can cause serious injury or death.
NOTA: La base deberá instalarse en una supercie plana y lisa. Para asegurar un aislamiento contra intemperie en supercies
irregulares tales como ladrillo o revestimiento lateral de cedro, deberá colocarse un cordón de 1/4 in. (6,3 mm) de masilla de silicona
(no incluido) que no endurezca entre la empaquetadura y la supercie de montaje.
ADVERTENCIA: La instalación inadecuada de cualquier dispositivo eléctrico puede ocasionar lesiones serias o la muerte.
INSTALL UNIT • PARA INSTALAR LA UNIDAD
IMPORTANT: Turn o power to outlet.
IMPORTANTE: Desconecte el suministro eléctrico hacia el receptáculo
ML450
ML450_NS_REV-F
DIAGRAM: Vertical GFCI Installation
DIAGRAMA: Instalación Vertical de GFCI
Receptacle Box
Caja
Receptáculo
Gasket
Empaque
Base
Base
Keyholes
Hoyo de Tornillos
Screws
Tornillos
DIAGRAM: Horizontal GFCI Installation
DIAGRAMA: Instalación Horizontal de GFCI
Receptacle Box
Caja Receptáculo
Base
Base
Screws
Tornillos
Keyholes
Hoyo de Tornillos
Gasket
Empaque
ML450
INSTALLATION
INSTRUCTIONS
-
 1
1
-
 2
2
Hubbell TayMac ML450W Guía de instalación
- Tipo
- Guía de instalación
- Este manual también es adecuado para
en otros idiomas
Artículos relacionados
Otros documentos
-
TAYMAC ML500GB Instrucciones de operación
-
TAYMAC ML500GB Instrucciones de operación
-
Bell MX1050Z Guía de instalación
-
TAYMAC MX4280Z Instrucciones de operación
-
TAYMAC MM110C Guía de instalación
-
TAYMAC MX4280WH Guía de instalación
-
Bell MX3050S Guía de instalación
-
Bell 5839-7WRTR Instrucciones de operación
-
 Sigma Electric 14945 Guía de instalación


