
LED-LEUCHTPANEL MIT FARBTONSTEUERUNG / LED LIGHT PANEL WITH
ADJUSTABLE COLOUR TONE / PANNEAU LED AVEC VARIATEUR DE
BLANC
IAN 360045_2010
LED-LEUCHTPANEL MIT
FARBTONSTEUERUNG
Montage-, Bedienungs- und Sicherheitshinweise
LED LIGHT PANEL WITH
ADJUSTABLE COLOUR TONE
Assembly, operating and safety instructions
PANNEAU LED AVEC
VARIATEUR DE BLANC
Instructions de montage, d‘utilisation et consignes de sécurité
LED-LAMPENPANEEL MET
KLEURREGELING
Montage-, bedienings- en veiligheidsinstructies
LED SVÍTIDLO S NASTAVITELNÝM
TÓNEM BARVY
Pokyny k montáži, obsluze a bezpečnostní pokyny
PANEL ŚWIETLNY LED Z UKŁADEM
STEROWANIA KOLORAMI
Wskazówki montażu, obsługi i bezpieczeństwa
LED SVIETIDLO S NASTAVITEĽNÝM
TÓNOM FARBY
Pokyny pre montáž, obsluhu a bezpečnostné pokyny
PANEL LUMINOSO LED CON
REGULACIÓN DE COLOR
Instrucciones de montaje, de uso y de seguridad
LED-LYSPANEL MED JUSTERING
AF LYSNUANCE
Monterings-, betjenings- og sikkerhedshenvisninger

DE / AT / CH Montage-, Bedienungs- und Sicherheitshinweise Seite 5
GB / IE Assembly, operating and safety instructions Page 15
FR / BE Instructions de montage, d‘utilisation et consignes de sécurité Page 23
NL / BE Montage-, bedienings- en veiligheidsinstructies Pagina 33
PL Wskazówki montażu, obsługi i bezpieczeństwa Strona 41
CZ Pokyny k montáži, obsluze a bezpečnostní pokyny Strana 51
SK Pokyny pre montáž, obsluhu a bezpečnostné pokyny Strana 59
ES Instrucciones de montaje, de uso y de seguridad Página 67
DK Monterings-, betjenings- og sikkerhedshenvisninger Side 77
Klappen Sie vor dem Lesen die beiden Seiten mit den Abbildungen aus und machen Sie sich anschließend
mit allen Funktionen des Gerätes vertraut.
Before reading, unfold both pages containing illustrations and familiarise yourself with all functions of
the device.
Avant de lire le mode d‘emploi, ouvrez les deux pages contenant les illustrations et familiarisez-vous
ensuite avec toutes les fonctions de l‘appareil.
Vouw vóór het lezen de beide pagina‘s met de afbeeldingen open en maak u vertrouwd met alle functies
van het apparaat.
Przed przeczytaniem proszę rozłożyć obie strony z ilustracjami, a następnie proszę zapoznać się z
wszystkimi funkcjami urządzenia.
Před čtením si odklopte obě dvě strany s obrázky a potom se seznamte se všemi funkcemi přístroje.
Pred čítaním si odklopte obidve strany s obrázkami a potom sa oboznámte so všetkými funkciami prístroja.
Antes de empezar a leer abra las dos páginas que contienen las imágenes y, en seguida, familiarícese
con todas las funciones del dispositivo.
Før du læser, vend begge sidene med billeder frem og bliv bekendt med alle apparatets funktioner.

A B
C D
E
G H
14146606L
2
3
1
1
3
4
5
6
7
8
7 6
1
1
2
F
3
1

A B
C D
E
G
14154106L
2
3
1
1
3
45
8
7
6
7 6
1
H
1
2
F
3
1

5 DE/AT/CH
Legende der verwendeten Piktogramme ........................................................... Seite 6
Einleitung ......................................................................................................................................... Seite 6
Bestimmungsgemäße Verwendung ....................................................................................................Seite 7
Lieferumfang ........................................................................................................................................ Seite 7
Teilebeschreibung ...............................................................................................................................Seite 7
Technische Daten ................................................................................................................................Seite 7
Sicherheit ......................................................................................................................................... Seite 7
Sicherheitshinweise .............................................................................................................................Seite 7
Sicherheitshinweise für Batterien / Akkus ........................................................................................... Seite 9
Vorbereitung ................................................................................................................................Seite 10
Benötigtes Werkzeug und Material ...................................................................................................Seite 10
LED-Leuchtpanel montieren..............................................................................................Seite 10
Leuchte ein- / ausschalten / Lichtfarbe einstellen ............................................ Seite 10
LED-Leuchtpanel mit Fernbedienung bedienen ............................................... Seite 11
Batterien wechseln .................................................................................................................Seite 11
Wartung und Reinigung .....................................................................................................Seite 11
Entsorgung .....................................................................................................................................Seite 11
Informationen .............................................................................................................................Seite 12
Garantie ..............................................................................................................................................Seite 12
Konformitätserklärung .........................................................................................................................Seite 12
Hersteller / Service ..............................................................................................................................Seite 12
Inhaltsverzeichnis

6 DE/AT/CH
Einleitung / SicherheitEinleitung
Legende der verwendeten Piktogramme
Anweisungen lesen! Lebens- und Unfallgefahr für
Kleinkinder und Kinder!
Diese Leuchte ist ausschließlich für den
Betrieb im Innenbereich, in trockenen
und geschlossenen Räumen geeignet.
Diese Leuchte ist nicht geeignet für
externe Dimmer und elektronische
Schalter.
Volt 30000h Lebensdauer
Hertz (Frequenz) ON OFF Schaltzyklen
Watt (Wirkleistung) Explosionsgefahr!
Schutzleiter Schutzhandschuhe tragen!
Warn- und Sicherheitshinweise
beachten! Die Verpackung besteht aus
100 % recyceltem Papier.
Die Leuchte besitzt den Schutzgrad
„IP20“ und ist ausschließlich für den
Einsatz im Innenbereich von privaten
Haushalten vorgesehen.
b
a
Entsorgen Sie Verpackung
und Gerät umweltgerecht!
Ra Farbwiedergabewert
Warnung vor elektrischem Schlag!
Lebensgefahr! Umweltschäden durch falsche
Entsorgung der Batterien / Akkus!
So verhalten Sie sich richtig Wechselspannung
(Strom- und Spannungsart)
L
N
Polarität
LED-Leuchtpanel mit
Farbtonsteuerung
Einleitung
Wir beglückwünschen Sie zum Kauf Ihres
neuen Gerätes. Sie haben Sich damit für
ein hochwertiges Produkt entschieden.
Bitte lesen Sie diese Bedienungsanleitung vollständig
und sorgfältig durch. Klappen Sie die Seite mit den
Abbildungen aus. Diese Anleitung gehört zu diesem
Produkt und enthält wichtige Hinweise zur Inbetrieb-
nahme und Handhabung. Beachten Sie immer alle
Sicherheitshinweise. Prüfen Sie vor der Inbetrieb-
nahme, ob die korrekte Spannung vorhanden ist und
ob alle Teile richtig montiert sind. Sollten Sie Fragen
haben oder unsicher in Bezug auf die Handhabung
des Gerätes sein, setzen Sie sich bitte mit Ihrem Händ-
ler
oder der Servicestelle in Verbindung. Bewahren
Sie diese Anleitung bitte sorgfältig auf und geben
Sie sie ggf. an Dritte weiter.

7 DE/AT/CH
Einleitung / SicherheitEinleitung
Bestimmungsgemäße
Verwendung
Diese Leuchte ist für den Betrieb im In-
nenbereich geeignet. Dieses Gerät ist
nur für den Einsatz in privaten Haus-
halten vorgesehen. Dieses Produkt ist vorgesehen
für den normalen Betrieb.
Lieferumfang
Kontrollieren Sie unmittelbar nach dem Auspacken
immer den Lieferumfang auf Vollständigkeit sowie
den einwandfreien Zustand des Gerätes.
1 LED-Leuchtpanel (14146606L / 14154106L)
4 Schrauben (14154106L)
4 Dübel (14154106L)
2 Schrauben (14146606L)
2 Dübel (14146606L)
2 Batterien (AAA)
2 Schutzschläuche
1 Fernbedienung
1 Montage- und Bedienungsanleitung
Teilebeschreibung
1 LED-Leuchtpanel
2 Schraube für LED-Leuchtpanel
3 Montagewinkel
4 Dübel
5 Schraube für Montagewinkel
6 Lüsterklemme
7 Netzanschlusskabel (extern)
8 Schutzschlauch
9 Fernbedienung
10 Batteriefachabdeckung
Technische Daten
Modell-Nummer: 14146606L
Leuchte:
Betriebsspannung: 230–240 V~, 50 Hz
Nennleistung max: LED 24 W
Schutzklasse: | /
Schutzart: IP20
Maße: 45 x 45 cm
LED-Modul:
Nennleistung max.: LED, max. 20 W
Modell-Nummer: 14154106L
Leuchte:
Betriebsspannung: 230–240 V~, 50 Hz
Nennleistung max: LED 24 W
Schutzklasse: | /
Schutzart: IP20
Maße: 100 x 25 cm
LED-Modul:
Nennleistung max.: LED, max. 21 W
Fernbedienung:
Batterie: 2 x AAA 1,5 V
Frequenzband: 2,4 GHz ISM band
Max. Sendeleistung: < 10,0 dBm
Sicherheit
Sicherheitshinweise
Bei Schäden, die durch Nichtbeachtung dieser Be-
dienungsanleitung verursacht werden, erlischt der
Garantieanspruch! Für Folgeschäden wird keine
Haftung übernommen! Bei Sach- oder Personen-
schäden, die durch unsachgemäße Handhabung
oder Nichtbeachtung der Sicherheitshinweise verur-
sacht werden, wird keine Haftung übernommen!
LEBENS- UND
UNFALLGEFAHR FÜR KLEIN-
KINDER UND KINDER!
Lassen Sie Kinder niemals unbeaufsichtigt mit
dem Verpackungsmaterial. Es besteht Erstickungs-
gefahr durch Verpackungsmaterial. Kinder un-
terschätzen häufig die Gefahren.
Dieses Gerät kann von Kindern ab 8 Jahren
und darüber sowie von Personen mit verringer-
ten physischen, sensorischen oder mentalen
Fähigkeiten oder Mangel an Erfahrung und
Wissen benutzt werden, wenn sie beaufsichtigt

8 DE/AT/CH
Sicherheit Sicherheit
oder bezüglich des sicheren Gebrauchs des
Gerätes unterwiesen wurden und die daraus
resultierenden Gefahren verstehen. Kinder dür-
fen nicht mit dem Gerät spielen. Reinigung und
Benutzerwartung dürfen nicht von Kindern
ohne Beaufsichtigung durchgeführt werden.
ACHTUNG!
Bei Betrieb nicht aus kurzem Abstand in die
LED schauen.
Die Lichtquelle dieser Leuchte ist nicht ersetzbar;
wenn die Lichtquelle das Ende ihrer Lebens-
dauer erreicht hat, ist die gesamte Leuchte zu
ersetzen.
Die LED nicht mit einem optischen Instrument
(z. B. Lupe) betrachten.
Vermeiden Sie Lebensgefahr
durch elektrischen Schlag
Lassen Sie die Elektroinstallation durch einen
ausgebildeten Elektriker oder eine für Elektroin-
stallationen eingewiesene Person durchführen.
Bei Sach- oder Personenschäden, die durch
unsachgemäße Handhabung oder Nichtbe-
achtung der Sicherheitshinweise verursacht
werden, wird keine Haftung übernommen!
Benutzen Sie Ihre Leuchte niemals, wenn Sie
irgendwelche Beschädigungen feststellen.
Entfernen Sie vor der Montage die Sicherung
oder schalten Sie den Leitungsschutzschalter im
Sicherungskasten aus (0-Stellung).
Vermeiden Sie unbedingt die Berührung der
Leuchte mit Wasser oder anderen Flüssigkeiten.
Vergewissern Sie sich vor der Montage, dass die
vorhandene Netzspannung mit der benötigten
Betriebsspannung der Leuchte übereinstimmt
(siehe „Technische Daten“).
Stellen Sie sicher, dass bei der Montage keine
Leitungen beschädigt werden.
Diese Leuchte ist nicht geeignet für
externe Dimmer und elektronische
Schalter.
Vermeiden Sie Brand- und
Verletzungsgefahr
Stellen Sie sicher, dass die Leuchte ausgeschal-
tet und abgekühlt ist, bevor Sie diese berühren,
um Verbrennungen zu vermeiden.
Befestigen Sie die Leuchte nicht auf feuchtem
oder leitendem Untergrund.
Lassen Sie die Leuchte oder Verpackungsmate-
rial nicht achtlos liegen. Plastikfolien / -tüten,
Kunststoffteile etc. könnten für Kinder zu einem
gefährlichen Spielzeug werden.
Bei manchen Personen kann es zu epileptischen
Anfällen oder Bewusstseinsstörungen kommen,
wenn Sie bestimmten Blitzlichtern oder Licht-
effekten ausgesetzt werden. Suchen Sie bei
epileptischen Symptomen umgehend einen
Arzt auf.
Anforderungen für Radiofre-
quenzschnittstellen ‒ in Bezug
auf die europäische Installation
Hinweis: Dieses Gerät wurde getestet und für
konform mit den Grenzwerten gemäß EN 300
440 v2.1.1 Empfangsgerät Kategorie 3 befunden.
Diese Grenzwerte sind konzipiert, um angemessene
Sicherung vor schädlichen Störungen in privaten In-
stallationen zu gewährleisten. Dieses Gerät reagiert
empfindlich auf andere Geräte, die vorsätzlich Radio-
frequenzenergie in 2.4 Ghz erzeugen und damit
die Leistung der Fernbedienung beeinträchtigen. Es
kann jedoch keine Garantie dafür gegeben werden,
dass die Störung nicht in bestimmten Geräten vor-
kommt. Sollte dieses Gerät durch Störungen durch
andere Geräte beeinflusst sein, kann dieses durch
das Ein- und Abschalten des respektiven Geräts be-
endet werden. Der Benutzer wird dazu aufgefordert,
die Störung durch eine der folgenden Maßnahmen
zu beheben: Stellen Sie das störende Gerät aus
und verwenden Sie keine WiFi-Kamera mit hoher
Sendeleistung in der Nähe des Gerätes. Vergrößern
Sie den Abstand zum störenden Gerät. Befragen
Sie den Händler oder einen Fachmann für Radio-/
TV-Geräte bei Problemen. Der vollständige Text der
EU-Konformitätserklärung ist unter der folgenden

9 DE/AT/CH
Sicherheit Sicherheit
Internetadresse verfügbar:
https://www.briloner.com/de/service/
informationen-zu-leuchten/
eu-konformitaetserklaerung-fuer-funkanlagentyp.php
So verhalten Sie sich richtig
Montieren Sie die Leuchte so, dass sie vor
Feuchtigkeit, Verschmutzung und zu starker
Erwärmung geschützt ist.
Vergewissern Sie sich vor dem Bohren, dass sich
keine Gas-, Wasser- oder Stromleitungen an der
Bohrstelle befinden. Montage nur durch fach-
kundige Personen. Unbedingt auf die Wand-
beschaffenheit achten, da sich das beigefügte
Befestigungsmaterial nicht für alle Wandarten
eignet. Erkundigen Sie sich im Handel nach den
für die jeweilige Wandbeschaffenheit geeigneten
Schrauben und Dübel.
Für eine unsachgemäße Wand-Dübel-Verbindung
und dadurch entstandene Schäden übernimmt
der Hersteller keine Haftung.
Seien Sie stets aufmerksam! Achten Sie immer
darauf was Sie tun und gehen Sie stets mit Ver-
nunft vor. Verwenden Sie die Leuchte in keinem
Fall, wenn Sie unkonzentriert sind oder sich
unwohl fühlen.
Überprüfen Sie vor der Montage, ob der
Montageort für das Gewicht der Leuchte
geeignet ist.
Machen Sie sich vor der Verwendung mit allen
Anweisungen und Abbildungen in dieser Anlei-
tung sowie mit der Leuchte selbst vertraut.
Sicherheitshinweise für
Batterien / Akkus
LEBENSGEFAHR!
Halten Sie Batterien / Akkus außer Reichweite
von Kindern. Suchen Sie im Falle eines Ver-
schluckens sofort einen Arzt auf!
Verschlucken kann zu Verbrennungen, Perfora-
tion von Weichgewebe und Tod führen.
Schwere Verbrennungen können innerhalb von
2 Stunden nach dem Verschlucken auftreten.
EXPLOSIONSGEFAHR!
Laden Sie nicht aufladbare Batterien niemals
wieder auf. Schließen Sie Batterien / Akkus
nicht kurz und / oder öffnen Sie diese nicht.
Überhitzung, Brandgefahr oder Platzen können
die Folge sein.
Werfen Sie Batterien / Akkus niemals in Feuer
oder Wasser.
Setzen Sie Batterien / Akkus keiner mechani-
schen Belastung aus.
Risiko des Auslaufens von Batterien / Akkus
Vermeiden Sie extreme Bedingungen und Tem-
peraturen, die auf Batterien / Akkus einwirken
können, z. B. auf Heizkörpern / durch direkte
Sonneneinstrahlung.
Wenn Batterien / Akkus ausgelaufen sind, ver-
meiden Sie den Kontakt von Haut, Augen und
Schleimhäuten mit den Chemikalien! Spülen
Sie die betroffenen Stellen sofort mit klarem
Wasser und suchen Sie einen Arzt auf!
SCHUTZHANDSCHUHE
TRAGEN!
Ausgelaufene oder beschädigte Batterien /
Akkus können bei Berührung mit der Haut Ver-
ätzungen verursachen. Tragen Sie deshalb in
diesem Fall geeignete Schutzhandschuhe.
Im Falle eines Auslaufens der Batterien / Akkus
entfernen Sie diese sofort aus dem Produkt, um
Beschädigungen zu vermeiden.
Verwenden Sie nur Batterien / Akkus des glei-
chen Typs. Mischen Sie nicht alte Batterien /
Akkus mit neuen!
Entfernen Sie die Batterien / Akkus, wenn das
Produkt längere Zeit nicht verwendet wird.
Risiko der Beschädigung des Produkts
Verwenden Sie ausschließlich den angegebenen
Batterietyp / Akkutyp!
Setzen Sie Batterien / Akkus gemäß der Polari-
tätskennzeichnung (+) und (-) an Batterie /
Akku und des Produkts ein.

10 DE/AT/CH
... / LED-Leuchtpanel... / Batterien wechseln / Wartung und Reinigung / Entsorgung... / Vorbereitung / LED-Leuchtpanel montieren / Leuchte ein- / ausschalten ...
Reinigen Sie Kontakte an Batterie / Akku und
im Batteriefach vor dem Einlegen mit einem tro-
ckenen, fusselfreien Tuch oder Wattestäbchen!
Entfernen Sie erschöpfte Batterien / Akkus um-
gehend aus dem Produkt.
Die richtige Polarität wird im Batteriefach
angezeigt.
Vorbereitung
Benötigtes Werkzeug und
Material
Die genannten Werkzeuge und Materialien sind
nicht im Lieferumfang enthalten. Es handelt sich
hierbei um unverbindliche Angaben und Werte zur
Orientierung. Die Beschaffenheit des Materials
richtet sich nach den individuellen Gegebenheiten
vor Ort.
‒ Bleistift / Markierwerkzeug
‒ 2-poliger Spannungsprüfer
‒ Schraubendreher
‒ Bohrmaschine
‒ Bohrer (ca. ø 6 mm)
‒ Seitenschneider
‒ Leiter
LED-Leuchtpanel montieren
STROMSCHLAGGEFAHR!
Wichtig: Der elektrische Anschluss muss durch
einen ausgebildeten Elektriker oder eine für Elektro-
installationen eingewiesene Person erfolgen. Diese
muss Kenntnis über die Eigenschaften der Leuchte
und Anschlussbestimmungen haben. Entfernen Sie
hierfür die Sicherung oder schalten Sie den Leitungs-
schutzschalter im Sicherungskasten aus (0-Stellung)
(siehe Abb. A).
Legen Sie die Batterien unter Beachtung der
Polarität (+ und -) in das Batteriefach ein.
Entfernen Sie die seitlich am LED-Leuchtpanel
1
sichtbaren Schrauben des LED-Leuchtpanels 2
(siehe Abb. A) und nehmen Sie den Montage-
winkel 3 auf der Rückseite ab (siehe Abb. B).
Markieren Sie die Bohrlöcher mit Hilfe der im
Montagewinkel 3 für die Schrauben 5 vor-
gesehenen Löcher.
Bohren Sie nun die Befestigungslöcher. Stellen Sie
sicher, dass Sie die Zuleitung nicht beschädigen.
Führen Sie die Dübel 4 in die Bohrlöcher ein
(siehe Abb. C).
Befestigen Sie den Montagewinkel 3 mit den
mitgelieferten Schrauben 5 (siehe Abb. D).
Ziehen Sie die Schutzschläuche 8 über die
Kabel L und N des Netzanschlusskabels (extern)
7 (siehe Abb. E).
Verbinden Sie das Anschlusskabel des LED-
Leuchtpanels mittels der Lüsterklemme 6 mit
dem Netzanschlusskabel (extern) 7 (siehe
Abb. E).
Achten Sie darauf, dass Sie die einzelnen Leiter
des Netzanschlusskabels (extern) 7 jeweils
richtig anschließen: stromführende Leiter, schwarz
oder braun = Symbol L, Neutralleiter, blau =
Symbol N, Schutzleiter, grün-gelb = Symbol
(Erdungsanschluss).
Achten Sie auf den richtigen Sitz.
Verschrauben Sie nun das LED-Leuchtpanel 1
mittels der Schrauben 2 mit dem Montage-
winkel 3.
Hinweis: Achten Sie darauf, dass die Schrau-
ben 2 richtig einrasten (siehe Abb. F und G).
Setzen Sie die Sicherung wieder ein oder
schalten Sie den Leitungsschutzschalter am
Sicherungskasten ein (I-Stellung) (siehe Abb. H).
Ihr LED-Leuchtpanel ist nun betriebsbereit.
Dieses LED-Leuchtpanel ist auch als Einbauleuchte
zur Montage in abgehängten Decken geeignet.
Diese Montage sollte unbedingt von einem
Fachmann ausgeführt werden, da die genauen
Abmessungen des LED-Leuchtpanels in der De-
ckenkonstruktion berücksichtigt werden müssen.
Leuchte ein- / ausschalten /
Lichtfarbe einstellen
Betätigen Sie den Lichtschalter (Wandschalter),
um das LED-Leuchtpanel ein- / auszuschalten.

11 DE/AT/CH
... / LED-Leuchtpanel... / Batterien wechseln / Wartung und Reinigung / Entsorgung
Wenn Sie den Lichtschalter kurz hintereinander
betätigen, wechselt das LED-Leuchtpanel zwi-
schen Kalt-, Warm- und Neutralweiß.
LED-Leuchtpanel mit
Fernbedienung bedienen
Hinweis: Das LED-Leuchtpanel besitzt eine Memory-
Funktion.
Diese speichert die zuletzt eingestellte
Funktion.
Schalten Sie das LED-Leuchtpanel mit dem
Lichtschalter ein.
Alle weiteren Funktionen können nur mit Hilfe der
Fernbedienung 9 gesteuert werden (siehe Abb. I).
Einschalten
Ausschalten
Dimmen (heller)
Dimmen (dunkler)
Kaltweiß, stufenlos
Neutralweiß
Warmweiß stufenlos
Timerfunktion (30 Min.)
Kaltweiß / Neutralweiß / Warmweiß
Nachtlichtfunktion
Speicherplatz für individuelle Farbprogramme:
- Stellen Sie Ihre Leuchte wie gewünscht ein.
- Halten Sie M1 oder M2 gedrückt.
-
Wenn der Speichervorgang abgeschlossen
ist, blinkt Ihre Leuchte einmal auf.
Batterien wechseln
Wenn die Reichweite der Fernbedienung 9 nach-
lässt, müssen Sie die Batterien auswechseln (siehe
Abb. I).
Schieben Sie die Batteriefachabdeckung 10
auf der Rückseite der Fernbedienung 9 in
Pfeilrichtung aus der Fernbedienung 9 heraus.
Entnehmen sie die Batterien.
Legen Sie die neuen Batterien (AAA) in die
Fernbedienung 9 ein.
Hinweis: Die richtige Polarität wird im Batte-
riefach der Fernbedienung 9 angezeigt.
Schieben Sie die Batteriefachabdeckung 10
wieder auf die Fernbedienung 9.
Wartung und Reinigung
STROMSCHLAGGEFAHR!
Trennen Sie zur Reinigung die Leuchte zuerst vom
Stromnetz. Entfernen Sie hierfür die Sicherung oder
schalten Sie den Leitungsschutzschalter im Sicherungs-
kasten aus (0-Stellung) (siehe Abb. A).
Stellen Sie sicher, dass die Leuchte ausgeschal-
tet und abgekühlt ist, bevor Sie diese berühren,
um Verbrennungen zu vermeiden.
Benutzen Sie keine Lösungsmittel, Benzin o. Ä.
Die Leuchte würde hierbei Schaden nehmen.
Verwenden Sie zur Reinigung des LED-Leucht-
panels 1 ein trockenes, fusselfreies Tuch.
Setzen Sie die Sicherung wieder ein oder
schalten Sie den Leitungsschutzschalter am
Sicherungskasten ein (I-Stellung) (siehe Abb. H).
Entsorgung
Die Verpackung besteht aus umweltfreundlichen
Materialien, die Sie über die örtlichen Recycling-
stellen entsorgen können.
b
a
Beachten Sie die Kennzeichnung der
Verpackungsmaterialien bei der Abfall-
trennung, diese sind gekennzeichnet mit
Abkürzungen (a) und Nummern (b) mit
folgender Bedeutung: 1–7: Kunststoffe /
... / Vorbereitung / LED-Leuchtpanel montieren / Leuchte ein- / ausschalten ...

12 DE/AT/CH
InformationenEntsorgung / Informationen
20–22: Papier und Pappe / 80–98:
Verbundstoffe.
Das Produkt und die Verpackungsmate-
rialien sind recycelbar, entsorgen Sie
diese getrennt für eine bessere Abfallbe-
handlung. Das Triman-Logo gilt nur für
Frankreich.
Werfen Sie Ihr Produkt, wenn es ausge-
dient hat, im Interesse des Umweltschutzes
nicht in den Hausmüll, sondern führen Sie
es einer fachgerechten Entsorgung zu. Über
Sammelstellen und deren Öffnungs
zeiten
können Sie sich bei Ihrer zuständigen
Ver-
waltung informieren.
Defekte oder verbrauchte Batterien müssen gemäß
Richtlinie 2006/66/EG recycelt werden. Geben
Sie Batterien und / oder das Gerät über die ange-
botenen Sammeleinrichtungen zurück.
Umweltschäden durch falsche
Entsorgung der Batterien!
Batterien dürfen nicht über den Hausmüll entsorgt
werden. Sie können giftige Schwermetalle enthalten
und unterliegen der Sondermüllbehandlung. Die
chemischen Symbole der Schwermetalle sind wie
folgt: Cd = Cadmium, Hg = Quecksilber, Pb = Blei.
Geben Sie deshalb verbrauchte Batterien bei einer
kommunalen Sammelstelle ab.
Informationen
Garantie
Sie erhalten zum Zeitpunkt des Kaufs auf dieses
Gerät 36 Monate Garantie. Das Gerät wurde sorg-
fältig produziert und einer genauen Qualitätskontrolle
unterzogen. Innerhalb der Garantiezeit beheben
wir kostenlos alle Material- oder Herstellerfehler.
Sollten sich dennoch während der Garantiezeit
Mängel herausstellen, senden Sie das Gerät bitte
an die aufgeführte Service-Adresse unter Angabe
folgender Artikel-Nummer: 14146606L / 14154106L.
Von der Garantie ausgeschlossen sind Schäden
durch nicht sachgemäße Handhabung, Nichtbe-
achtung der Bedienungsanleitung oder Eingriff
durch
nicht autorisierte Personen sowie Verschleißteile (wie
z. B. Leuchtmittel). Durch die Garantieleistung wird
die Garantiezeit weder verlängert noch erneuert.
Konformitätserklärung
Dieses Produkt erfüllt die Anforderungen der gel-
tenden europäischen und nationalen Richtlinien
(
Richtlinie 2014/53/EU
, Niederspannungsrichtlinie
2014/35/EU, Ökodesign-Richtlinie 2009/125/EG,
RoHS-Richtlinie 2011/65/EU). Die Konformität
wurde nachgewiesen. Entsprechende Erklärungen
und Unterlagen sind beim Hersteller hinterlegt.
Hiermit erklärt Briloner Leuchten GmbH & Co. KG,
dass der Funkanlagentyp 14146606L / 14154106L
der Richtlinie 2014/53/EU entspricht.
Der vollständige Text der EU-Konformitätserklärung
ist unter der folgenden Internetadresse verfügbar:
https://www.briloner.com/de/service/
informationen-zu-leuchten/
eu-konformitaetserklaerung-fuer-funkanlagentyp.php
Hersteller / Service
Briloner Leuchten GmbH & Co. KG
Im Kissen 2
59929 Brilon
DEUTSCHLAND
Tel.: +49 29 61 / 97 12–800
Fax: +49 29 61 / 97 12–199
E-Mail: [email protected]
www.briloner.com
Kostenlose Servicenummer:
Tel.: 00800 / 27456637
IAN 360045_2010

13 DE/AT/CH
Informationen
Bitte halten Sie für alle Anfragen den Kassenbon und
die Artikelnummer (z. B. IAN 123456_7890) als
Nachweis für den Kauf bereit.
Entsorgung / Informationen

14
Table of contents

15 GB/IE
Table of contents
List of pictograms used ........................................................................................................Page 16
Introduction ................................................................................................................................... Page 16
Intended use ........................................................................................................................................ Page 17
Scope of delivery ................................................................................................................................Page 17
Parts description ..................................................................................................................................Page 17
Technical data ..................................................................................................................................... Page 17
Safety .................................................................................................................................................Page 17
Safety notices ......................................................................................................................................Page 17
Safety instructions for batteries / rechargeable batteries .................................................................Page 19
Preparation ...................................................................................................................................Page 19
Required tools and material ...............................................................................................................Page 19
Mounting the LED light panel .........................................................................................Page 20
Switching the light on and off / Adjusting the light colour .....................Page 20
Operating the LED light panel via remote control ........................................ Page 20
Replacing the batteries........................................................................................................Page 21
Maintenance and cleaning ............................................................................................... Page 21
Disposal ............................................................................................................................................Page 21
Information....................................................................................................................................Page 22
Warranty .............................................................................................................................................Page 22
Declaration of conformity ...................................................................................................................Page 22
Manufacturer / Service .......................................................................................................................Page 22

16 GB/IE
Introduction
List of pictograms used
Read the instructions! Danger to life and risk of accidents
for infants and children!
This lamp is only suitable for indoor use
in dry and enclosed spaces. This light is not suitable for external
dimmers and electronic switches.
Volt 30000h Operating life
Hertz (frequency) ON OFF Switching cycles
Watts (effective power) Danger of explosion!
Protective conductor Wear safety gloves!
Observe the warnings and safety notes! The packaging is made from 100 %
recycled paper.
This light is protection class “IP20” and
is only intended for residential indoor
use.
b
a
Dispose of the packaging and device
in an environmentally friendly manner!
Ra Colour rendering
Warning - risk of electric shock! Danger
to life!
Environmental damage due to
incorrect disposal of the batteries /
rechargeable batteries!
For your safety Alternating current (type of current
and voltage)
L
N
Polarity
LED light panel with adjustable
colour tone
Introduction
Congratulations on your new product.
You have selected a high quality product.
Please be sure to carefully read the com-
plete operating instructions. Fold out the page with
the illustrations. These instructions are part of the
product and contain important information on setup
and handling. Always follow all safety instructions.
Before using this product for the first time verify the
correct voltage and that all parts are properly in-
stalled. Should you have any questions or you are
unsure about operating the product, please contact
the dealer or service centre. Please keep these in-
structions in a safe place and pass them on to third
parties as applicable.
Introduction / Safety

17 GB/IE
Introduction Introduction / Safety
Intended use
This light is suitable for indoor use. This
product is intended for private household
use only. This product is an illuminated
decoration. Do not use this light as a night light.
This product is intended for normal operation.
Scope of delivery
Check immediately after unpacking that the parts are
complete and that the product is in proper condition.
1 LED light panel (14146606L / 14154106L)
4 Screws (14154106L)
4 Wall plugs (14154106L)
2 Screws (14146606L)
2 Wall plugs (14146606L)
2 Batteries (AAA)
2 Protective tubes
1 Remote control
1 Set of assembly instructions and instructions for use
Parts description
1 LED light panel
2 Screw for LED light panel
3 Mounting bracket
4 Wall plug
5 Screw for mounting bracket
6 Lustre terminal
7 Mains connection cable (external)
8 Protective tube
9 Remote control
10 Battery compartment cover
Technical data
Model number: 14146606L
Light:
Operating voltage: 230–240 V ~, 50 Hz
Max. rated power: LED 24 W
Protection class: | /
IP rating: IP20
Dimensions: 45 x 45 cm
LED module:
Max. rated power: LED, max. 20 W
Model number: 14154106L
Light:
Operating voltage: 230–240 V ~, 50 Hz
Max. rated power: LED 24 W
Protection class: | /
IP rating: IP20
Dimensions: 100 x 25 cm
LED module:
Max. rated power: LED, max. 21 W
Remote control:
Battery: 2 x AAA 1.5 V
Frequency band: 2.4 GHz ISM band
Max. transmitting
power: < 10.0 dBm
Safety
Safety notices
Damage due to failure to comply with these operat-
ing instructions will invalidate the warranty! We ass
ume
no liability for consequential damage! We assume
no liability for material damage or personal injury
due to improper handling or failure to comply with
the safety instructions!
DANGER TO
LIFE AND RISK OF ACCIDENTS
FOR INFANTS AND CHILDREN!
Never leave children unsupervised with the
packaging material. The packaging material
poses a suffocation hazard. Children frequently
underestimate the dangers.
This device may be used by children age 8 years
and up, as well as by persons with reduced phys-
ical, sensory or mental capacities, or lacking
experience and / or knowledge, so long as they
are supervised or instructed in the safe use of
the device and understand the associated risks.
Children should not be allowed to play with
the device. Cleaning and user maintenance

18 GB/IE
Safety
should not be performed by children without
supervision.
ATTENTION!
Do not look into the LED from a close distance
during operation.
The light‘s illuminant is not replaceable. The en-
tire light needs to be replaced if the illuminant
reaches the end of its service life.
Do not look at the LED with an optical instrument
(e.g. magnifier).
Avoid the risk of fatal injury
from electric shock
Ensure that a qualified electrician, or a person
trained to carry out electrical installations, per-
forms the electrical installation.
We assume no liability for property damage
or personal injury due to improper handling or
failure to observe the safety notices!
Never use the light if any defects have been
identified.
Prior to installation, remove the fuse or switch
off the circuit breaker 0 setting in the fuse box.
Ensure that the light does not come into contact
with water or other liquids under any circum-
stances.
Prior to installation verify the mains voltage
on site corresponds with the operating voltage
required for the light (see “Technical data“).
Be careful not to damage any lines during
installation.
This light is not suitable for external
dimmers or electronic switches.
Prevent fire and
injury hazards
To prevent burns, be sure the light is switched
off and cooled down before touching it.
Do not mount the light to a damp or conductive
surface.
Do not leave the light or packaging material ly-
ing unattended. Plastic film or bags, plastic parts
etc. can turn into dangerous toys for children.
Exposure to certain strobe lights or lighting ef-
fects can cause seizures or unconsciousness in
some people. If you experience symptoms of
a seizure, seek immediate medical attention.
Requirements for radio frequency
interfaces–with regard to instal-
lation in Europe
Note: This device has been tested for conformity
with the threshold values pursuant to EN 300 440
v2.1.1 receiver category 3. These threshold values
are intended to guarantee appropriate protection
from damaging disturbances where the device is in-
stalled in private locations. This device reacts sensi-
tively to other devices that purposely create radio
frequency energy at 2.4 Ghz and therefore impair
the performance of the remote control. However, no
guarantee can be given that the disturbance will
not occur in particular devices. Should this device
be influenced by disturbances from other devices,
this can be stopped by turning the respective device
on and off. The user is encouraged to rectify the
disturbance through one of the following measures:
turn off the device causing the disturbance and do
not use the WiFi camera with a high transmission
power near a device. Increase the distance from
the device causing the disturbance. If you have prob-
lems, consult the retailer or a specialist for radio /
TV devices. The full text of the EU declaration of
conformity is available at the following internet ad-
dress:
https://www.briloner.com/de/service/
informationen-zu-leuchten/
eu-konformitaetserklaerung-fuer-funkanlagentyp.php
Safe working
Install the light so it is protected from moisture,
dirt and extreme heating.
Before drilling, ensure that there are no gas or
water pipes or power cables where you intend
to drill. Installation may only be carried out by
experts. It is essential that you take note of how
the wall is constructed, as the included fittings
are not suitable for all types of wall. Ask the
Safety / Preparation

19 GB/IE
Safety Safety / Preparation
retailer about screws and wall plugs suitable
for the respective wall structure.
The manufacturer accepts no responsibility for
an inappropriate wall plug connection and any
resulting damage.
Always be attentive! Always pay attention to
what you are doing and use common sense.
Never use the light if you are having difficulty
concentrating or do not feel well.
Verify the installation site is suitable to bear the
weight of the lamp before installation.
Familiarise yourself with all instructions and
diagrams in this manual as well as with the light
itself before use.
Safety instructions for
batteries / rechargeable
batteries
DANGER TO LIFE!
Keep batteries / rechargeable batteries out of
reach of children. If accidentally swallowed
seek immediate medical attention.
Swallowing may lead to burns, perforation of
soft tissue, and death. Severe burns can occur
within 2 hours of ingestion.
DANGER OF EXPLOSION!
Never recharge non-rechargeable batteries.
Do not short-circuit batteries / rechargeable
batteries and / or open them. Overheating, fire
or bursting can be the result.
Never throw batteries / rechargeable batteries
into fire or water.
Do not exert mechanical loads to batteries /
rechargeable batteries.
Risk of leakage of batteries / rechargea-
ble batteries
Avoid extreme environmental conditions and
temperatures, which could affect batteries /
rechargeable batteries, e.g. radiators / direct
sunlight.
If batteries / rechargeable batteries have
leaked, avoid contact with skin, eyes and
mucous membranes with the chemicals! Flush
immediately the affected areas with fresh water
and seek medical attention!
WEAR PROTECTIVE GLOVES!
Leaked or damaged batteries / rechargeable
batteries can cause burns on contact with the
skin. Wear suitable protective gloves at all
times if such an event occurs.
In the event of a leakage of batteries / recharge-
able batteries, immediately remove them from
the product to prevent damage.
Only use the same type of batteries / recharge-
able batteries. Do not mix used and new bat-
teries / rechargeable batteries.
Remove batteries / rechargeable batteries if the
product will not be used for a longer period.
Risk of damage of the product
Only use the specified type of battery / recharge-
able
battery!
Insert batteries / rechargeable batteries accord-
ing to polarity marks (+) and (-) on the battery /
rechargeable battery and the product.
Use a dry lint-free cloth or cotton swab to clean
the contacts on the battery / rechargeable
battery and in the battery compartment before
inserting!
Remove exhausted batteries / rechargeable
batteries from the product immediately.
The correct polarity is indicated in the battery
compartment.
Preparation
Required tools and material
The tools and materials specified are not included.
This information and these values are non-binding
and are only provided as a reference. The nature
of the material is determined by the individual local
conditions.
‒ Pencil / marking tool
‒ 2-pole voltage tester

20 GB/IE
Preparation / Mounting... / Switching... / Adjusting... / Operating the LED light...
‒ Screwdriver
‒ Electric drill
‒ Drill (approx. ø 6 mm)
‒ Side cutting pliers
‒ Ladder
Mounting the LED light panel
DANGER OF ELECTRIC
SHOCK!
Important: The electrical connection must be
established by a qualified electrician or a person
trained to perform electrical installations. This per-
son must be familiar with the properties of the light
and the connection requirements. For this installation,
remove the fuse or switch off the circuit breaker in
the fuse box (position 0) (see Fig. A).
Insert the batteries into the battery compartment
while taking the polarity into account (+ and -).
Remove the screws for the LED light panel 2
visible at the side of the LED light panel 1
(see Fig. A) and remove the mounting bracket
3
on the back (see Fig. B).
Use the holes in the mounting bracket 3 in-
tended for the screws 5 to mark the drill holes.
Now drill the mounting holes. Be sure not to
damage the power cable.
Insert the wall plugs 4 into the drill holes (see
Fig. C).
Secure the mounting bracket
3
using the screws
5 provided (see Fig. D).
Pull the protective tubes 8 over cables L and
N of the mains connection cable (external) 7
(see Fig. E).
Connect the connection cable of the LED light
panel with the mains connection cable (exter-
nal) 7 using the lustre terminal 6 (see Fig. E).
Be sure to correctly connect each of the individ-
ual conductors of the mains connection cable
(external) 7: live conductor, black or brown =
symbol L, neutral conductor, blue = symbol N,
protective conductor, green-yellow = symbol
(earth connection). Make sure they are cor-
rectly positioned.
Now attach the LED light panel 1 to the
mounting bracket 3 using the screws 2.
Note: Make sure that the screws 2 are
properly engaged (see Fig. F and G).
Reinstall the fuse or switch on the circuit
breaker in the fuse box (I setting) (see Fig. H).
Your LED light panel is now ready to use.
This LED light panel is also suitable for installa-
tion as a recessed light in suspended ceilings.
Installation for this purpose must be carried out
by a professional, as the exact dimensions of
the LED light panel must be taken into account
in the ceiling construction.
Switching the light on and
off / Adjusting the light colour
Use the light switch (wall switch) to switch the
LED light panel on or off.
If you press the light switch in quick succession,
the LED light panel switches between cold,
warm and neutral white.
Operating the LED light panel
via remote control
Note: The LED light panel has a memory function.
This saves the last function that was set.
Switch the LED light panel on using the light
switch.
All other functions can only be controlled using the
remote control 9 (see Fig. I).
Switch on
Switch off
Brighten
Dim
Cold white, variable
Neutral white
... / Replacing the batteries / Maintenance and cleaning / Disposal

21 GB/IE
Preparation / Mounting... / Switching... / Adjusting... / Operating the LED light... ... / Replacing the batteries / Maintenance and cleaning / Disposal
Warm white, variable
Timer function (30 mins)
Cold white / Neutral white / Warm white
Night light function
Memory space for individual colour pro-
grams:
- Adjust your light as desired.
- Press and hold M1 or M2.
- When the save operation is complete,
your light will blink once.
Replacing the batteries
If the range of the remote control 9 reduces, the
batteries needs to be replaced (see Fig. I).
Slide the battery cover 10 on the reverse side of
the remote control 9 from the remote control
9 in the direction of the arrow.
Remove the batteries.
Insert the new batteries (AAA) into the remote
control 9.
Note: The correct polarity is indicated in the
battery compartment of the remote control 9.
Slide the battery cover 10 back onto the re-
mote control 9.
Maintenance and cleaning
RISK OF ELECTRIC SHOCK!
Disconnect the light from the power supply before
cleaning. To do so, remove the fuse or switch off the
circuit breaker in the fuse box 0 position (see Fig. A).
To prevent burns, be sure the light is switched
off and cooled down before touching it.
Do not use solvents, benzene or similar sub-
stances. They could damage the light.
Use a dry, lint-free cloth to clean the LED panel
light 1.
Replace the fuse or switch on the circuit breaker
(Position I) inside the fuse box (see Fig. H).
Disposal
The packaging is made entirely of recyclable mate-
rials, which you may dispose of at local recycling
facilities.
b
a
Observe the marking of the packaging
materials for waste separation, which
are marked with abbreviations (a) and
numbers (b) with following meaning:
1–7: plastics / 20–22: paper and fibre-
board / 80–98: composite materials.
The product and packaging materials
are recyclable, dispose of it separately
for better waste treatment. The Triman
logo is valid in France only.
To help protect the environment, please
dispose of the product properly when it
has reached the end of its useful life and
not in the household waste. Information
on collection points and their opening
hours can be obtained from your local
authority.
Defective or used batteries must be recycled in
accordance with Directive 2006/66/EC. Return
batteries and / or the device to the provided recy-
cling facilities.
Improper disposal of batteries
can harm the environment!
Never dispose of batteries in your household waste.
They may contain toxic heavy metals and are sub-
ject to hazardous waste regulations. The chemical
symbols of the heavy metals are: Cd = cadmium,
Hg = mercury, Pb = lead. Therefore dispose of used
batteries through your local collection site.

22
Information
Information
Warranty
You receive a 36 month warranty on this product,
valid from the date of purchase. The appliance has
been carefully produced under strict quality control.
Within the warranty period we shall rectify without
charge all material and manufacturing defects.
In the event of a defect arising during the warranty
period, please send the appliance to the listed Ser-
vice Centre address, making reference to the follow-
ing article number:
14146606L / 14154106L
.
Wear parts (such as bulbs) and damage caused by
improper handling, non-observance of the operating
instructions or unauthorised interference are excluded
from the warranty. The performance of services un-
der the warranty does not extend or renew the war-
ranty period.
Declaration of conformity
This product fulfils the requirements of the applicable
European and national directives. Conformity has
been demonstrated (Directive 2014/53/EU
, Low
Voltage Directive 2014/35/EU
, Ecodesign Directive
2009/125/EC, RoHS Directive 2011/65/EU).
The relevant declarations and documents are held
by the manufacturer.
Briloner Leuchten GmbH & Co. KG hereby declares
that the wireless system model 14146606L /
14154106L complies with Directive 2014/53/EU.
The full text of the EU declaration of conformity is
available at:
https://www.briloner.com/de/service/
informationen-zu-leuchten/
eu-konformitaetserklaerung-fuer-funkanlagentyp.php
Manufacturer / Service
Briloner Leuchten GmbH & Co. KG
Im Kissen 2
59929 Brilon
GERMANY
Tel.: +49 29 61 / 97 12–800
Fax: +49 29 61 / 97 12–199
E-Mail: [email protected]
www.briloner.com
Free service number:
Tel.: 00800 / 27456637
IAN 360045_2010
Please have your receipt and the item number (e.g.
IAN 123456_7890) ready as your proof of pur-
chase when enquiring about your product.
GB/IE
Table des matières

23 FR/BE
Information
Légende des pictogrammes utilisés ..........................................................................Page 24
Introduction ................................................................................................................................... Page 24
Utilisation conforme ............................................................................................................................Page 25
Contenu de la livraison .......................................................................................................................Page 25
Descriptif des pièces ...........................................................................................................................Page 25
Caractéristiques techniques ................................................................................................................Page 25
Sécurité .............................................................................................................................................Page 25
Indications de sécurité ........................................................................................................................Page 25
Consignes de sécurité relatives aux piles / aux piles rechargeables ...............................................Page 27
Préparation ...................................................................................................................................Page 28
Outils et matériel nécessaires ............................................................................................................. Page 28
Monter le panneau lumineux LED .............................................................................. Page 28
Allumer / éteindre la lampe / Ajuster la couleur de lumière.................Page 29
Maniement du panneau lumineux LED avec la télécommande ........Page 29
Remplacement des piles ..................................................................................................... Page 29
Entretien et nettoyage..........................................................................................................Page 29
Mise au rebut ............................................................................................................................... Page 30
Informations .................................................................................................................................Page 30
Garantie ..............................................................................................................................................Page 30
Déclaration de conformité .................................................................................................................. Page 31
Fabricant / SAV ...................................................................................................................................Page 31
Table des matières

24 FR/BE
Introduction
Légende des pictogrammes utilisés
Lire les instructions! Danger de mort et d'accident pour
les nourrissons et les enfants!
Cette lampe est exclusivement conçue
pour un usage en intérieur, dans des
locaux secs et fermés.
Cette lampe n'est adaptée ni
aux variateurs externes ni aux
interrupteurs électroniques.
Volt 30000h Durée de vie
Hertz (fréquence) ON OFF Cycles de commutation
Watt (puissance active) Risque d'explosion!
Conducteur de protection Porter des gants de protection!
Respecter les avertissements et les
consignes de sécurité! L'emballage est exclusivement
composé de papier recyclé.
Cette lampe possède l’indice de
protection «IP20» et est exclusivement
conçue pour un usage domestique en
intérieur.
b
a
Mettez l'emballage et l'appareil au
rebut dans le respect de l'environne-
ment!
Ra Valeur de restitution des couleurs
Attention au risque d'électrocution!
Danger de mort!
Pollution en cas de mise au rebut
incorrecte des piles / piles rechar-
geables !
Conduite à adopter Tension alternative (type de courant
et de tension)
L
N
Polarité
Panneau LED avec variateur de
blanc
Introduction
Nous vous félicitons pour l‘achat de votre
nouvel appareil. Vous avez opté pour un
produit de grande qualité. Veuillez lire
ce mode d‘emploi intégralement et attentivement.
Ouvrez la page contenant les illustrations. Ce mode
d‘emploi fait partie du produit et contient des instruc-
tions essentielles pour sa mise en service et sa ma-
nipulation. Respectez toujours toutes les consignes
de sécurité. Avant la mise en service, vérifiez si la
tension est correcte et si toutes les pièces sont cor-
rectement montées. Si vous avez des questions ou
des doutes concernant la manipulation de
Introduction / Sécurité

25 FR/BE
Introduction Introduction / Sécurité
l‘appareil, veuillez contacter votre revendeur ou le
service après-vente. Veuillez conserver soigneuse-
ment ce mode d‘emploi et remettez-le aux autres
utilisateurs.
Utilisation conforme
Cette lampe est adaptée à un usage à
l’intérieur. Cet appareil est uniquement
destiné à un usage domestique privé.
Cet article est une décoration lumineuse. N‘utilisez
pas cette lampe comme veilleuse. Ce produit est
conçu pour une utilisation normale.
Contenu de la livraison
Contrôlez toujours immédiatement après le débal-
lage du produit que le contenu de la livraison est
complet et que l’appareil se trouve en parfait état.
1 panneau lumineux LED (14146606L / 14154106L)
4 vis (14154106L)
4 cheville (14154106L)
2 vis (14146606L)
2 cheville (14146606L)
2 piles (AAA)
2 gaines de protection
1 télécommande
1 notice de montage et mode d’emploi
Descriptif des pièces
1 Panneau lumineux LED
2 Vis pour panneau lumineux LED
3 Équerre de montage
4 Cheville
5 Vis pour équerre de montage
6 Domino
7 Câble d‘alimentation électrique (externe)
8 Gaine de protection
9 Télécommande
10 Couvercle du compartiment à piles
Caractéristiques techniques
Numéro de modèle : 14146606L
Lampe:
Tension de service: 230–240 V~, 50 Hz
Puissance nominale max : LED 24 W
Classe de protection : | /
Indice de protection: IP20
Dimensions : 45 x 45 cm
Module LED:
Puissance nominale max. : LED, max. 20 W
Numéro de modèle : 14154106L
Lampe:
Tension de service: 230–240 V~, 50 Hz
Puissance nominale max : LED 24 W
Classe de protection : | /
Indice de protection: IP20
Dimensions : 100 x 25 cm
Module LED:
Puissance nominale max. : LED, max. 21 W
Télécommande:
Pile : 2 x AAA 1,5 V
Bande de fréquence : bande ISM 2,4 MHz
Puissance d‘émission max. : < 10,0 dBm
Sécurité
Indications de sécurité
Les droits de recours en garantie sont annulés en cas
de dommages résultant du non-respect du présent
mode d’emploi ! Toute responsabilité est déclinée
pour les dommages consécutifs ! Toute responsabi-
lité est déclinée pour les dommages matériels ou
corporels causés par une manipulation incorrecte
ou par le non-respect des consignes de sécurité !
DAN-
GER DE MORT ET D‘ACCIDENT
POUR LES NOURRISSONS ET
LES ENFANTS!

26 FR/BE
Sécurité
Ne laissez jamais les enfants manipuler les
emballages sans surveillance. Ils risquent de
s‘étouffer avec les emballages. Les enfants
sous-estiment souvent les dangers.
Cet appareil peut être utilisé par les enfants de
8 ans et plus ainsi que par des personnes ayant
des capacités physiques, psychiques ou senso-
rielles limitées ou manquant d‘expérience ou de
connaissances, s‘ils sont surveillés ou s‘ils ont
été informés de l‘utilisation de l‘appareil de
manière sûre et comprennent les risques liés à
son utilisation. Les enfants ne doivent pas jouer
avec cet appareil. Le nettoyage et la mainte-
nance domestique de l’appareil ne doivent pas
être effectués par un enfant sans surveillance.
ATTENTION !
Lorsque les LED sont allumées, évitez de les
regarder d‘une trop courte distance.
La source lumineuse de cette lampe n‘est pas
remplaçable, lorsque la source de lumière ar-
rive en fin de vie, l‘ensemble de la lampe doit
être remplacé.
Ne pas regarder les LED à l‘aide d‘un instrument
optique (par exemple une loupe).
Prévention de risques
mortels par électrocution
L‘installation électrique doit être effectuée par
un électricien ou par une personne dûment for-
mée à cet effet.
Nous déclinons toute responsabilité en cas de
dommages matériels ou corporels causés par
une manipulation incorrect ou le non-respect des
consignes de sécurité !
N’utilisez jamais votre lampe si vous constatez
le moindre endommagement.
Avant le montage, retirez le fusible ou coupez
le disjoncteur de la boîte à fusibles (position 0).
Évitez impérativement tout contact de la lampe
avec de l‘eau ou d‘autres liquides.
Avant le montage, vérifiez que la tension secteur
corresponde à la tension de service requise de
la lampe (voir «Caractéristiques techniques»).
Attention à n’abîmer aucun câble lors du
montage.
Cette lampe n‘est pas adaptée aux
variateurs externes ni aux interrup-
teurs électroniques.
Prévention de risque
d‘incendies et de blessures
Afin d‘éviter toute brûlure, vérifiez que la lampe
soit éteinte et suffisamment froide avant de la
manipuler.
Ne fixez pas la lampe sur un support humide
ou conducteur de courant.
Ne laissez pas la lampe ou le matériel d‘em-
ballage traîner sans surveillance. Les films et les
sachets en plastique, les éléments en matières
synthétiques, etc. peuvent devenir des jouets
dangereux dans les mains des enfants.
Certaines personnes peuvent être sujettes à
l’épilepsie ou à des pertes de conscience lors-
qu’elles sont soumises à des flashes de lumières
ou à des effets lumineux. En cas de symptômes
épileptiques, veuillez immédiatement appeler
un médecin.
Exigences pour les interfaces
radiofréquences - au sujet de
l‘installation européenne
Remarque : Cet appareil a été testé et certifié
conforme avec les valeurs limites selon EN 300 440
v2.1.1 appareil de réception catégorie 3. Les valeurs
limites sont conçues de manière à garantir une pro-
tection raisonnable contre les interférences nuisibles
dans les installations privées. Cet appareil réagit
sensiblement à d‘autres appareils qui émettent
in-
tentionnellement ce l‘énergie radiofréquence 2,4 GHz
et perturbent ainsi la puissance de la télécommande.
Aucune garantie ne peut toutefois être donnée que
la perturbation n´arrive dans certains appareils. Si
l‘appareil venait à être influencé par des perturba-
tions venant d‘autres appareils, ceci peut être stoppé
en allumant et éteignant l‘appareil respectif. L’utili-
sateur est sommé de remédier à la perturbation au
moyen d’une des mesures suivantes : éteignez l’ap-
pareil à l’origine des perturbations et n’utilisez pas
à proximité de l’appareil une caméra WiFi dotée
d’une puissance d’émission élevée. Augmentez la
Sécurité

27 FR/BE
Sécurité Sécurité
distance à l’appareil perturbant. Consultez un re-
vendeur ou un spécialiste des appareils radio/TV
en cas de problèmes. Le texte intégral de la décla-
ration de conformité UE est disponible à l‘adresse
internet suivante :
https://www.briloner.com/de/service/
informationen-zu-leuchten/
eu-konformitaets erklaerung-fuer-funkanlagentyp.php
Pour travailler en toute sécurité
Montez la lampe de telle sorte qu‘elle soit
protégée de l‘humidité, des saletés et d‘un
échauffement trop important.
Avant de percer, assurez-vous qu‘aucune ligne
de gaz, d‘eau ou électrique ne se trouve à l‘en-
droit souhaité. Confiez exclusivement le montage
à des personnes compétentes. Contrôlez impé-
rativement la consistance du mur étant donné
que le matériel de fixation fourni n‘est pas adapté
à tous les types de cloison. Renseignez-vous
dans le commerce pour trouver les chevilles et
vis adaptées en fonction du mur.
Le fabricant décline toute responsabilité en cas
de dommages dus à une fixation cheville-mur
non conforme.
Soyez toujours vigilant ! Faites toujours attention
à ce que vous faites et agissez raisonnablement.
N‘utilisez jamais cette lampe si vous n‘êtes pas
concentré ou si vous vous sentez mal.
Avant le montage, vérifiez que le lieu choisi peut
supporter le poids du luminaire.
Avant l’utilisation, prenez connaissance de
toutes les consignes et figures de ce mode
d’emploi et familiarisez-vous avec la lampe.
Consignes de sécurité
relatives aux piles / aux
piles rechargeables
DANGER DE MORT!
Rangez les piles / piles rechargeables hors de
la portée des enfants. En cas d’ingestion,
consultez immédiatement un médecin !
Une ingestion peut entraîner des brûlures, une
perforation des tissus mous et la mort. Des brû-
lures graves peuvent apparaitre dans les
2 heures suivant l‘ingestion.
RISQUE D‘EXPLOSION !
Ne rechargez jamais des piles non rechargeables.
Ne court-circuitez pas les piles / piles rechar-
geables et / ou ne les ouvrez pas ! Autrement,
vous risquez de provoquer une surchauffe, un
incendie ou une explosion.
Ne jetez jamais des piles / piles rechargeables
au feu ou dans l’eau.
Ne pas soumettre les piles / piles rechar-
geables à une charge mécanique.
Risque de fuite des piles / piles
rechargeables
Évitez d’exposer les piles / piles rechargeables
à des conditions et températures extrêmes sus-
ceptibles de les endommager, par ex. sur des
radiateurs / exposition directe aux rayons du
soleil.
Lorsque les piles / piles rechargeables fuient,
évitez tout contact du produit chimique avec la
peau, les yeux ou les muqueuses! Rincez les
zones touchées à l‘eau claire et consultez im-
médiatement un médecin !
PORTER DES GANTS DE
PROTECTION!
Les piles / piles rechargeables endommagées
ou sujettes à des fuites peuvent provoquer des
brûlures au contact de la peau. Vous devez
donc porter des gants adéquats pour les mani-
puler.
En cas de fuite des piles / piles rechargeables,
retirez-les aussitôt du produit pour éviter tout
endommagement.
Utilisez uniquement des piles / piles rechar-
geables du même type. Ne mélangez pas des
piles / piles rechargeables usées et neuves !
Retirez les piles / piles rechargeables, si vous
ne comptez pas utiliser le produit pendant une
période prolongée.

28 FR/BE
Sécurité / Préparation / Monter le panneau lumineux LED
Risque d‘endommagement du produit
Exclusivement utiliser le type de pile / pile
rechargeable spécifié.
Insérez les piles / piles rechargeables confor-
mément à l‘indication de polarité (+) et (-) indi-
quée sur la pile / pile rechargeable et sur le
produit.
Avant l‘insertion de la pile, nettoyez les contacts
de la pile / de la pile rechargeable ainsi que
ceux présents dans le compartiment à piles en
vous servant d‘un chiffon sec et non pelucheux
ou d‘un coton-tige!
Retirez immédiatement les piles / piles rechar-
geables usées du produit.
La polarité correcte est indiquée dans le com-
partiment à piles.
Préparation
Outils et matériel nécessaires
Les outils et matériels indiqués ne sont pas inclus dans
le contenu de la livraison. Il s‘agit là de données
et de valeurs indicatives vous permettant de vous
orienter. Les caractéristiques du matériel dépendent
des conditions spécifiques sur place.
‒ Crayon / outil marqueur
‒ Détecteur de tension à 2 pôles
‒ Tournevis
‒ Perceuse
‒ Foret (env. ø 6 mm)
‒ Pince coupante diagonale
‒ Escabeau
Monter le panneau lumineux LED
RISQUE D‘ÉLECTRO-
CUTION!
Important: L‘installation électrique doit être
effectuée par un électricien ou par une personne
dûment formée à cet effet. Celui-ci doit connaître
les caractéristiques des lampes et des conditions
de raccordement. Pour ce faire, retirez le fusible ou
coupez le disjoncteur de la boîte à fusible (position
0) (voir Fig. A).
Insérez correctement les piles dans le comparti-
ment à piles, en respectant la polarité (+ et -).
Retirez les vis du panneau lumineux LED 2
visibles sur le côté du panneau lumineux 1
(voir Fig. A) ainsi que l‘équerre de montage 3
sur la face arrière (voir Fig. B).
Marquez les trous de perçage à l‘aide des trous
dans l‘équerre de montage 3 prévus pour les
vis 5.
Percez à présent les trous de fixation. Assurez-vous
de ne pas endommager le câble d‘alimentation.
Insérez les chevilles 4 dans les trous de per-
çage (voir Fig. C).
Fixez l‘équerre de montage 3 avec les vis
fournies 5 (voir Fig. D).
Glissez les gaines de protection 8 sur les
câbles L et N du câble d‘alimentation électrique
(externe) 7 (voir Fig. E).
Reliez le câble d‘alimentation du panneau lu-
mineux LED au câble d‘alimentation électrique
(externe)
7
à l‘aide du domino
6
(voir Fig. E).
Veillez à ce que les fils du câble d‘alimentation
électrique (externe) 7 aient leur raccord res-
pectif: fil conducteur, noir ou brun = symbole
L, fil neutre, bleu = symbole N, conducteur de
protection, vert-jaune = symbole (prise de
terre). Assurez-vous que le positionnement est
correct.
À l‘aide des vis 2, fixez à présent le panneau
lumineux LED
1
avec l‘équerre de montage
3
.
Remarque : Veillez à ce que les vis 2 s‘en-
clenchent correctement (voir Fig. F et G).
Remettez le fusible en place ou remettez en
route le disjoncteur dans le boîtier à fusibles
(position I) (voir Fig. H).
Votre panneau lumineux LED est maintenant prêt
pour l‘utilisation.
Ce panneau lumineux LED sert également de
luminaire encastré pour un montage dans des
faux plafonds.
Ce montage doit être impérativement effectué
par un spécialiste étant donné que les
... / Allumer... / Maniement... / Remplacement... / Entretien et nettoyage

29 FR/BE
Sécurité / Préparation / Monter le panneau lumineux LED ... / Allumer... / Maniement... / Remplacement... / Entretien et nettoyage
dimensions exactes du panneau lumineux LED
dans la construction du plafond doivent être
prises en compte.
Allumer / éteindre la lampe /
Ajuster la couleur de lumière
Actionnez l‘interrupteur (interrupteur mural)
pour allumer / éteindre le panneau lumineux LED.
Si vous actionnez l‘interrupteur à intervalles
brefs, le panneau lumineux LED bascule entre
blanc froid, blanc chaud et blanc neutre.
Maniement du panneau
lumineux LED avec la
télécommande
Remarque : Le panneau lumineux LED possède
une fonction Mémoire. Elle mémorise la dernière
fonction paramétrée.
Allumez le panneau lumineux LED au moyen
de l‘interrupteur.
Toutes les autres fonctionnalités peuvent à présent
être effectuées à l‘aide la télécommande 9 (voir
Fig. I).
Allumer
Éteindre
Varier (augmenter l‘intensité)
Varier (baisser l‘intensité)
Blanc froid en continu
Blanc neutre
Blanc chaud en continu
Fonction de minuterie (30 min.)
Blanc froid / blanc neutre / blanc chaud
Fonction de veilleuse
Emplacement de mémoire pour programmes
de couleur individuels :
- Réglez votre lampe comme souhaité.
- Maintenez la touche M1 ou M2 enfoncée.
- Lorsque le processus de mémorisation est
achevé, votre lampe clignote une fois.
Remplacement des piles
Lorsque la portée de la télécommande 9 diminue,
vous devez changer les piles (voir Fig. I).
Faites glisser le couvercle du compartiment à
piles 10 dans le sens de la flèche à l‘arrière
de la télécommande 9 et le retirer de la télé-
commande 9.
Retirez les piles.
Insérez les nouvelles piles (AAA) dans la télé-
commande 9.
Remarque : La polarité correcte est indiquée
dans le compartiment à piles 9.
Replacez le couvercle du compartiment à piles
10 sur la télécommande 9.
Entretien et nettoyage
RISQUE D’ÉLECTRO-
CUTION !
Pour procéder au nettoyage, coupez tout d’abord
l’alimentation secteur de la lampe. Retirez à cet
effet le fusible ou coupez le disjoncteur de la boîte
à fusible (position 0) (voir Fig. A).
Afin d‘éviter toute brûlure, vérifiez que la lampe
soit éteinte et suffisamment froide avant de la
manipuler.
N‘utilisez ni solvants, ni benzine, ni autres pro-
duits similaires. Ceci endommagerait la lampe.
Pour le nettoyage du panneau lumineux LED 1,
veuillez utiliser un chiffon sec non pelucheux.
Remettez le fusible en place ou remettez en
route le disjoncteur dans le boîtier à fusibles
(positionI) (voir Fig. H).

30
Mise au rebut / Informations
Mise au rebut
L’emballage se compose de matières recyclables
pouvant être mises au rebut dans les déchetteries
locales.
b
a
Veuillez respecter l‘identification des ma-
tériaux d‘emballage pour le tri sélectif,
ils sont identifiés avec des abbréviations
(a) et des chiffres (b) ayant la significa-
tion suivante : 1–7 : plastiques / 20–22 :
papiers et cartons / 80–98 : matériaux
composite.
Le produit et les matériaux d’emballage
sont recyclables, mettez-les au rebut sé-
parément pour un meilleur traitement des
déchets. Le logo Triman n’est valable
qu’en France.
Afin de contribuer à la protection de
l’environnement, veuillez ne pas jeter
votre produit usagé dans les ordures
ménagères, mais éliminez-le de manière
appropriée. Pour obtenir des renseigne-
ments concernant les points de collecte
et leurs horaires d’ouverture, vous pou-
vez contacter votre municipalité.
Les piles défectueuses ou usagées doivent être recy-
clées conformément à la directive 2006/66/CE.
Les piles et / ou l‘appareil doivent être retournés dans
les centres de collecte.
Pollution de l’environnement
causée par une mise au rebut
incorrecte des piles !
Les piles ne doivent pas être mises au rebut dans
les ordures ménagères. Elles peuvent contenir des
métaux lourds toxiques et doivent être considérées
comme des déchets spéciaux. Les symboles chimiques
des métaux lourds sont les suivants : Cd = cadmium,
Hg = mercure, Pb = plomb. Pour cette raison, veuillez
t
oujours déposer les piles usagées dans les contene
urs
de recyclage de la commune.
Informations
Garantie
Article L217-16 du Code de la
consommation
Lorsque l‘acheteur demande au vendeur, pendant
le cours de la garantie commerciale qui lui a été
consentie lors de l‘acquisition ou de la réparation
d‘un bien meuble, une remise en état couverte par
la garantie, toute période d‘immobilisation d‘au
moins sept jours vient s‘ajouter à la durée de la
garantie qui restait à courir. Cette période court à
compter de la demande d‘intervention de l‘acheteur
ou de la mise à disposition pour réparation du bien
en cause, si cette mise à disposition est postérieure
à la demande d‘intervention.
Indépendamment de la garantie commerciale sous-
crite, le vendeur reste tenu des défauts de conformité
du bien et des vices rédhibitoires dans les conditions
prévues aux articles L217-4 à L217-13 du Code
de la consommation et aux articles 1641 à 1648
et 2232 du Code Civil.
Article L217-4 du Code de la consommation
Le vendeur livre un bien conforme au contrat et
répond des défauts de conformité existant lors de
la délivrance.
Il répond également des défauts de conformité ré-
sultant de l‘emballage, des instructions de montage
ou de l‘installation lorsque celle-ci a été mise à sa
charge par le contrat ou a été réalisée sous sa
responsabilité.
Article L217-5 du Code de la consommation
Le bien est conforme au contrat :
1° S´il est propre à l‘usage habituellement attendu
d‘un bien semblable et, le cas échéant :
- s‘il correspond à la description donnée par le
vendeur et posséder les qualités que celui-ci a
présentées à l‘acheteur sous forme d‘échantil-
lon ou de modèle ;
- s‘il présente les qualités qu‘un acheteur peut
légitimement attendre eu égard aux déclara-
tions publiques faites par le vendeur, par le
FR/BE
Informations

31 FR/BE
Mise au rebut / Informations Informations
producteur ou par son représentant, notam-
ment dans la publicité ou l‘étiquetage ;
2° Ou s‘il présente les caractéristiques définies d‘un
commun accord par les parties ou être propre
à tout usage spécial recherché par l‘acheteur,
porté à la connaissance du vendeur et que ce
dernier a accepté.
Article L217-12 du Code de la
consommation
L‘action résultant du défaut de conformité se prescrit
par deux ans à compter de la délivrance du bien.
Article 1641 du Code civil
Le vendeur est tenu de la garantie à raison des
défauts cachés de la chose vendue qui la rendent
impropre à l‘usage auquel on la destine, ou qui
diminuent tellement cet usage que l‘acheteur ne
l‘aurait pas acquise, ou n‘en aurait donné qu‘un
moindre prix, s‘il les avait connus.
Article 1648 1er alinéa du Code civil
L‘action résultant des vices rédhibitoires doit être
intentée par l‘acquéreur dans un délai de deux ans
à compter de la découverte du vice.
Les pièces détachées indispensables à l’utilisation
du produit sont disponibles pendant la durée de la
garantie du produit.
Vous bénéficiez d’une garantie de 36 mois à partir
de la date d’achat de l’appareil. Cet appareil a été
fabriqué avec soin et soumis à un contrôle qualité
minutieux. Pendant la durée de la garantie, nous
réparons gratuitement tous les défauts de matériaux
ou de fabrication. Cependant, si des défauts de-
vaient apparaître pendant la période de garantie,
veuillez expédier l‘appareil à l‘adresse SAV indiquée
en mentionnant la référence de modèle suivante:
14146606L / 14154106L.
La garantie exclut les dommages dus à une mani-
pulation incorrecte, au non-respect des instructions
du mode d’emploi ou à une intervention par une
personne non autorisée, ainsi que les pièces d’usure
(p. ex. les ampoules). La durée de garantie n’est
aucunement prolongée ou renouvelée par une
prestation de garantie.
Déclaration de conformité
Ce produit remplit les critères des réglementations
européennes et nationales. La conformité a été
attestée (Directive 2014/53/UE, directive lignes
basse tension 2014/35/UE, directive éco-concep-
tion 2009/125/CE, directive RoHS 2011/65/UE).
Les déclarations et documents respectifs sont en
possession du fabricant.
Par la présente, la société Briloner Leuchten GmbH
& Co. KG déclare que le type de matériel radio
14146606L / 14154106L est conforme à la
directive 2014/53/UE.
La déclaration de conformité européenne est
disponible en version complète à l‘adresse Internet
suivante :
https://www.briloner.com/de/service/
informationen-zu-leuchten/
eu-konformitaetserklaerung-fuer-funkanlagentyp.php
Fabricant / SAV
Briloner Leuchten GmbH & Co. KG
Im Kissen 2
59929 Brilon
ALLEMAGNE
Tél. : +49 29 61 / 97 12–800
Fax : +49 29 61 / 97 12–199
www.briloner.com
Numero de service gratuit :
Tél. : 00800 / 27456637
IAN 360045_2010
Veuillez conserver le ticket de caisse et la référence
de l’article (par ex. IAN 123456_7890) à titre de
preuve d’achat pour toute demande.

32
Inhoudsopgave

33 NL/BE
Inhoudsopgave
Legenda van de gebruikte pictogrammen ..................................................... Pagina 34
Inleiding ....................................................................................................................................... Pagina 34
Correct gebruik ............................................................................................................................... Pagina 35
Omvang van de levering ................................................................................................................ Pagina 35
Beschrijving van de onderdelen ..................................................................................................... Pagina 35
Technische gegevens ...................................................................................................................... Pagina 35
Veiligheid .................................................................................................................................... Pagina 35
Veiligheidsinstructies ....................................................................................................................... Pagina 35
Veiligheidsinstructies voor batterijen / accu‘s ................................................................................ Pagina 37
Voorbereiding ........................................................................................................................ Pagina 38
Benodigd gereedschap en materiaal ............................................................................................ Pagina 38
Led-lichtpaneel monteren .............................................................................................. Pagina 38
Lamp in- / uitschakelen / lichtkleur instellen ................................................... Pagina 38
Led-lichtpaneel met afstandsbediening bedienen ................................... Pagina 39
Batterijen vervangen ........................................................................................................ Pagina 39
Onderhoud en reiniging ................................................................................................. Pagina 39
Verwijdering ............................................................................................................................ Pagina 39
Informatie ................................................................................................................................... Pagina 40
Garantie .......................................................................................................................................... Pagina 40
Conformiteitsverklaring ................................................................................................................... Pagina 40
Fabrikant / Service .......................................................................................................................... Pagina 40

34 NL/BE
Inleiding
Legenda van de gebruikte pictogrammen
Lees de aanwijzingen! Levensgevaar en kans op ongevallen
voor kleuters en kinderen!
Deze lamp is uitsluitend geschikt voor
gebruik binnenshuis, in droge en
gesloten ruimtes.
Deze lamp is niet geschikt voor
externe dimmers en elektronische
schakelaars.
Volt 30000h Levensduur
Hertz (frequentie) ON OFF Schakelcycli
Watt (nuttig vermogen) Explosiegevaar!
Aardedraad Draag veiligheidshandschoenen!
Neem de waarschuwingen en
veiligheidsinstructies in acht! De verpakking bestaat uit 100 %
gerecycled papier.
De lamp heeft beschermingsgraad
‘IP20’ en is uitsluitend bestemd voor ge-
bruik binnenshuis in privé-huishoudens.
b
a
Voer de verpakking en het apparaat
op een milieuvriendelijke manier af!
Ra Kleurweergave-waarde
Waarschuwing voor elektrische schok-
ken! Levensgevaar! Milieuschade door onjuiste afvoer
van de batterijen / accu's!
Zo handelt u correct Wisselspanning (stroom- en
spanningstype)
L
N
Polariteit
LED-lampenpaneel met
kleurregeling
Inleiding
Gefeliciteerd met de aankoop van uw
nieuwe apparaat. U heeft gekozen voor
een hoogwaardig product. Lees deze
gebruiksaanwijzing volledig en zorgvuldig door.
Vouw de pagina met de afbeeldingen open. Deze
gebruiksaanwijzing hoort bij dit product en bevat
belangrijke aanwijzingen voor de ingebruikname en
bediening. Neem altijd de veiligheidsinstructies in
acht. Controleer vóór de ingebruikname of de juiste
spanning beschikbaar is en of alle onderdelen goed
gemonteerd zijn. Wanneer u vragen hebt of onzeker
bent in verband met de bediening van het apparaat,
Inleiding / Veiligheid

35 NL/BE
Inleiding Inleiding / Veiligheid
kunt u contact opnemen met uw leverancier of met
het servicepunt. Bewaar deze handleiding op een
veilige plaats en geef hem evt. aan derden door.
Correct gebruik
Deze lamp is uitsluitend bedoeld voor
gebruik binnenshuis. Dit product is uit-
sluitend bestemd voor het gebruik in
particuliere huishoudens. Dit product behoort tot de
decoratieve verlichting. Gebruik deze verlichting
niet als nachtlicht. Dit product is bestemd voor het
normale gebruik.
Omvang van de levering
Controleer de levering altijd direct na het uitpakken
op volledigheid en de optimale staat van het product.
1 Led-lichtpaneel (14146606L / 14154106L)
4 schroeven (14154106L)
4 pluggen (14154106L)
2 schroeven (14146606L)
2 pluggen (14146606L)
2 batterijen (AAA)
2 isolatiekousen
1 afstandsbediening
1 montagehandleiding en gebruiksaanwijzing
Beschrijving van de onderdelen
1 Led-lichtpaneel
2 Schroef voor led-lichtpaneel
3 Montagebeugel
4 Plug
5 Schroef voor montagebeugel
6 Kroonsteentje
7 Stroomkabel (extern)
8 Isolatiekous
9 Afstandsbediening
10 Afdekking van het batterijvak
Technische gegevens
Modelnummer: 14146606L
Lamp:
Bedrijfsspanning: 230–240 V~, 50 Hz
Nominaal vermogen max: LED 24 W
Beschermingsklasse: | /
Beschermingstype: IP20
Afmetingen: 45 x 45 cm
Led-module:
Nominaal vermogen max.: led, max. 20 W
Modelnummer: 14154106L
Lamp:
Bedrijfsspanning: 230–240 V~, 50 Hz
Nominaal vermogen max: LED 24 W
Beschermingsklasse: | /
Beschermingstype: IP20
Afmetingen: 100 x 25 cm
Led-module:
Nominaal vermogen max.: led, max. 21 W
Afstandsbediening:
Batterij: 2 x AAA 1,5 V
Frequentieband: 2,4 GHz ISM band
Max. zendvermogen: < 10,0 dBm
Veiligheid
Veiligheidsinstructies
Bij beschadigingen die worden veroorzaakt door
het niet in acht nemen van deze gebruiksaanwijzing
vervalt de garantie! Wij zijn niet aansprakelijk voor
gevolgschade! Bij materiële schade of persoonlijk
letsel die worden veroorzaakt door onjuist gebruik
of het niet in acht nemen van de veiligheidsinstructies
zijn wij niet aansprakelijk!
LEVENSGEVAAR EN KANS OP
ONGEVALLEN VOOR KLEU-
TERS EN KINDEREN!

36 NL/BE
Veiligheid
Laat kinderen nooit zonder toezicht bij het ver-
pakkingsmateriaal. Er bestaat verstikkingsgevaar
door het verpakkingsmateriaal. Kinderen on-
derschatten vaak de gevaren.
Dit apparaat kan door kinderen vanaf 8 alsook
personen met verminderde fysieke, sensorische
of mentale vaardigheden of een gebrek aan
ervaring en kennis worden gebruikt, als zij on-
der toezicht staan of geïnstrueerd werden met
betrekking tot het veilige gebruik van het appa-
raat en zij de hieruit voortvloeiende gevaren be-
grijpen. Kinderen mogen niet met het
apparaat spelen. Reiniging en onderhoud mag
niet door kinderen zonder toezicht worden uit-
gevoerd.
LET OP!
Tijdens gebruik niet van dichtbij in de LED kijken.
De lichtbron van deze lamp kan niet worden
vervangen; als de lichtbron het einde van zijn
levensduur heeft bereikt, dient de complete
lamp te worden vervangen.
De LED niet met een optisch instrument (bijv.
vergrootglas) bekijken.
Vermijd levensgevaar door
elektrische schok
Laat de elektronische installatie door een opge-
leide elektricien of een voor elektrische installa-
ties geïnstrueerde persoon uitvoeren.
Bij materiële schade of persoonlijk letsel dat
wordt veroorzaakt door onjuist gebruik of het
niet in acht nemen van de veiligheidsinstructies
zijn wij niet aansprakelijk!
Gebruik de lamp niet als u een beschadiging
hebt geconstateerd.
Verwijder voorafgaand aan de montage de
zekering of schakel de aardlekschakelaar in de
groepenkast uit (0-stand).
Vermijd dat de lamp in contact komt met water
of andere vloeistoffen.
Wees er voor de montage zeker van dat de
beschikbare netspanning overeenkomt met de
benodigde voedingsspanning van de lamp
(zie “Technische gegevens”).
Wees er zeker van dat er bij de montage geen
leidingen worden beschadigd.
Deze lamp is niet geschikt voor ex-
terne dimmers en elektronische scha-
kelaars.
Vermijd brand- en
letselgevaar
Zorg ervoor dat de lamp uitgeschakeld en afge-
koeld is voordat u deze aanraakt om brand-
wonden te vermijden.
Bevestig de lamp niet op een vochtige of gelei-
dende ondergrond.
Laat de verlichting of het verpakkingsmateriaal
niet achteloos slingeren. Plastic folie / -zakken,
kunststof delen etc. kunnen voor kinderen ge-
vaarlijk speelgoed zijn.
Bij sommige personen kunnen epileptische aan-
vallen of bewustzijnsstoringen plaatsvinden,
wanneer ze worden blootgesteld aan bepaalde
flitslichten of lichteffecten. Raadpleeg bij epi-
leptische symptomen direct een arts.
Eisen voor radiofrequentie-inter-
faces - met betrekking tot Euro-
pese installatie
Opmerking: dit apparaat is getest en conform
bevonden met de grenswaarden volgens EN 300
440 v2.1.1 ontvangstapparaat categorie 3. Deze
grenswaarden zijn opgesteld om adequate be-
scherming tegen schadelijke storingen in privé-in-
stallaties te waarborgen. Dit apparaat reageert
gevoelig op andere apparaten die opzettelijk ra-
diofrequentie-energie van 2.4 Ghz opwekken en
daarmee de prestaties van de afstandsbediening
beïnvloeden. Er kan echter niet worden gegaran-
deerd dat de storing niet in bepaalde apparaten
voorkomt. Mocht dit apparaat door storingen door
andere apparaten worden beïnvloed, kan dit door
het in- en uitschakelen van het desbetreffende ap-
paraat worden beëindigd. De gebruiker wordt aan-
geraden om de storing door een van de volgende
maatregelen op te heffen: zet het storende apparaat
uit en gebruik geen wifi-camera met een hoog
zendvermogen in de buurt van het apparaat.
Vergroot de afstand tot het storende apparaat.
Veiligheid

37 NL/BE
Veiligheid Veiligheid
Vraag advies bij de handelaar of een vakman voor
radio-/TV-apparatuur als er problemen zijn.
De volledige tekst van de EU-conformiteitsverklaring
staat via het volgende internetadres ter beschikking:
https://www.briloner.com/de/service/
informationen-zu-leuchten/
eu-konformitaetserklaerung-fuer-funkanlagentyp.php
Zo handelt u correct
Monteer de lamp zo, zodat hij beschermd is
tegen vocht, vuil en te hoge verwarming.
Controleer voor het boren of er zich geen gas-,
water- of stroomleidingen op de plek van het te
boren gat bevinden. Montage alleen door vak-
kundige personen. Let altijd op het soort muur,
aangezien het meegeleverde bevestigingsma-
teriaal niet geschikt is voor alle soorten muren.
Informeer in de vakhandel naar de voor de
desbetreffende wand geschikte schroeven en
pluggen.
Voor een onvakkundige wand-plug-verbinding
en de hierdoor ontstane schade is de fabrikant
niet aansprakelijk.
Wees altijd alert! Let er altijd op wat u doet en
ga steeds verstandig te werk. Gebruik de lamp
niet als u ongeconcentreerd bent of zich niet
lekker voelt.
Controleer voor de montage of de montage-
plek geschikt is voor het gewicht van de lamp.
Lees voor gebruik alle aanwijzingen en maak
uzelf met de afbeeldingen in deze gebrui-
kershandleiding alsmede met de verlichting
zelf vertrouwd.
Veiligheidsinstructies voor
batterijen / accu‘s
LEVENSGEVAAR!
Houd batterijen / accu‘s buiten het bereik van
kinderen. Raadpleeg bij inslikken onmiddellijk
een arts!
Inslikken kan leiden tot inwendige verbrandin-
gen, perforatie van zacht weefsel en tot de
dood. Ernstige inwendige verbrandingen kun-
nen binnen 2 uur na het inslikken optreden.
EXPLOSIEGEVAAR!
Laad niet oplaadbare batterijen nooit op. Sluit
de batterijen / accu‘s niet kort en / of open
deze niet. Daardoor kan de batterij oververhit
raken, in brand vliegen of exploderen.
Gooi batterijen / accu‘s nooit in het vuur of water.
Stel batterijen / accu‘s nooit bloot aan mecha-
nische belastingen.
Risico dat de batterijen / accu’s lekken
Vermijd extreme omstandigheden en tempera-
turen die invloed op de batterijen / accu‘s zou-
den kunnen hebben bijv. radiatoren / direct
zonlicht.
Bij lekkende batterijen / accu‘s het contact van
de chemicaliën met de huid, ogen en slijmvlie-
zen vermijden! Spoel de desbetreffende plek-
ken direct af met schoon water en raadpleeg
onmiddellijk een arts!
DRAAG VEILIGHEIDSHAND-
SCHOENEN!
Lekkende of beschadigde batterijen / accu‘s
kunnen in geval van huidcontact chemische
brandwonden veroorzaken. Draag daarom in
dit geval geschikte veiligheidshandschoenen.
Als de batterijen / accu‘s lekken, dient u deze
direct uit het product te halen om beschadigin-
gen te vermijden.
Gebruik alleen batterijen / accu‘s van hetzelfde
type. Gebruik nooit nieuwe en oude batterijen /
accu‘s door elkaar!
Verwijder de batterijen / accu‘s, als u het pro-
duct gedurende een langere periode niet ge-
bruikt.
Risico op beschadiging van het product
Gebruik uitsluitend het aangegeven type batte-
rij / accu!
Plaats de batterijen / accu‘s volgens de weer-
gegeven polariteit (+) en (-) op batterij / accu
en op product.

38 NL/BE
... / Voorbereiding / Led-lichtpaneel monteren / Lamp in- / uitschakelen...
Reinig de contacten van de batterij / accu en
in het batterijvak voor het plaatsen met een
droge, pluisvrije doek of wattenstaafje!
Verwijder verbruikte batterijen / accu‘s direct
uit het product.
De juiste polariteit wordt in het batterijvak aan-
gegeven.
Voorbereiding
Benodigd gereedschap en
materiaal
Het genoemde gereedschap en materiaal wordt niet
meegeleverd. Het gaat hierbij om niet-bindende in-
formatie en waarden ter oriëntatie. De hoedanigheid
van het materiaal is afhankelijk van de individuele
omstandigheden ter plekke.
‒ Potlood / markeergereedschap
‒ 2-polige spanningzoeker
‒ Schroevendraaier
‒ Boormachine
‒ Boor (ca. ø 6 mm)
‒ Zijkniptang
‒ Ladder
Led-lichtpaneel monteren
KANS OP EEN
ELEKTRISCHE SCHOK!
Belangrijk: laat de installatie uitvoeren door een
opgeleide elektricien
of een voor elektrische installa-
ties bevoegde persoon.
Deze moet op de hoogte
zijn van de eigenschappen van de lamp en van de
aansluitvoorwaarden. Verwijder hiervoor de zeke-
ring of schakel de betreffende installatie-automaat
in de groepenkast uit (0-stand) (zie afb. A).
Leg de batterijen met inachtneming van de
polariteit (+ en -) in het batterijvak.
Verwijder de aan de zijkant van het led-lichtpa-
neel 1 zichtbare schroeven van het led-licht-
paneel
2
(zie afb. A) en haal de montagebeugel
3
aan de achterkant eraf (zie afb. B).
Markeer de boorgaten met behulp van de in
de montagebeugel 3 voor de schroeven 5
bestemde gaten.
Boor vervolgens de bevestigingsgaten. Zorg
ervoor dat u de stroomkabel niet beschadigt.
Plaats de pluggen 4 in de boorgaten (zie
afb. C).
Bevestig de montagebeugel 3 met de meege-
leverde schroeven 5 (zie afb. D).
Trek de isolatiekousen 8 over de draden L en
N van de stroomkabel (extern) 7 (zie afb. E).
Verbind de aansluitkabel van het led-lichtpa-
neel met behulp van het kroonsteentje 6 met
de stroomkabel (extern) 7 (zie afb. E).
Let erop dat u de afzonderlijke draden van de
stroomkabel (extern) 7 steeds op de juiste
manier aansluit: fasedraad, zwart of bruin =
symbool L, nuldraad, blauw = symbool N,
aardedraad, groen-geel = symbool (aar-
de-aansluiting). Controleer of alles goed vast zit.
Schroef vervolgens het led-lichtpaneel 1 met
behulp van de schroeven 2 aan de montage-
beugel 3.
Opmerking: zorg ervoor dat de schroeven
2
goed in de uitsparingen vallen (zie afb. F en G).
Plaats de zekering weer terug of schakel de
installatie-automaat in de groepenkast weer in
(I-stand) (zie afb. H).
Het led-lichtpaneel is nu klaar voor gebruik.
Dit led-lichtpaneel is ook geschikt als inbouw-
lamp voor montage in verlaagde plafonds.
Deze montage moet beslist door een vakman
worden uitgevoerd omdat rekening gehouden
moet worden met de precieze afmetingen van
het led-lichtpaneel in de plafondconstructie.
Lamp in- / uitschakelen /
lichtkleur instellen
Bedien de lichtschakelaar (wandschakelaar)
om het led-lichtpaneel in / uit te schakelen.
Als u de lichtschakelaar snel achterelkaar be-
dient, wisselt het led-lichtpaneel tussen koud-,
warm- en neutraal-wit.
Led-lichtpaneel... / Batterijen vervangen / Onderhoud en reiniging / Verwijdering

39 NL/BE
... / Voorbereiding / Led-lichtpaneel monteren / Lamp in- / uitschakelen... Led-lichtpaneel... / Batterijen vervangen / Onderhoud en reiniging / Verwijdering
Led-lichtpaneel met
afstandsbediening bedienen
Opmerking: het led-lichtpaneel bezit een memo-
ry-functie. Deze slaat de laatst ingestelde functie op.
Schakel het led-lichtpaneel met de lichtschake-
laar in.
Alle andere functies kunnen alleen met behulp van
de afstandsbediening
9
worden bediend (zie afb. I).
Inschakelen
Uitschakelen
Dimmen (lichter)
Dimmen (donkerder)
Koud-wit, traploos
Neutraal-wit
Warm-wit traploos
Timerfunctie (30 min.)
Koud-wit / Neutraal-wit / Warm-wit
Nachtlicht-functie
Geheugenplaats voor persoonlijke kleuren-
programma’s:
- Stel uw lamp in zoals gewenst.
- Houd M1 of M2 ingedrukt.
- Als het opslaan is voltooid, licht uw lamp
één keer op.
Batterijen vervangen
Als de reikwijdte van de afstandsbediening 9
afneemt, moet u de batterijen vervangen (zie afb. I).
Schuif het batterijvakdeksel 10 aan de achter-
kant van de afstandsbediening 9 in de rich-
ting van de pijl uit de afstandsbediening 9.
Verwijder de batterijen.
Plaats de nieuwe batterijen (AAA) in de afstands-
bediening 9.
Opmerking: de juiste polariteit wordt in het
batterijvak van de afstandsbediening 9 weer-
gegeven.
Schuif het batterijvakdeksel 10 weer op de
afstandsbediening 9.
Onderhoud en reiniging
GEVAAR VOOR
ELEKTRISCHE SCHOK!
Verbreek voor de reiniging eerst de verbinding van de
lamp met het stroomnet.
Verwijder hiervoor de zeke-
ring of schakel het be
treffende stroomcircuit in de
groepenkast uit (0-stand
) (zie afb. A).
Zorg ervoor dat de lamp uitgeschakeld en afge-
koeld is voordat u deze aanraakt om brand-
wonden te vermijden.
Gebruik geen oplosmiddel, benzine e.d. De
lichten zullen hierdoor schade ondervinden.
Gebruik voor de reiniging van het LED-lichtpa-
neel 1 een droge, pluisvrije doek.
Plaats de zekering weer terug of schakel de
hoofdzekering in de zekeringskast weer aan
(I-stand) (zie afb. H).
Verwijdering
De verpakking bestaat uit milieuvriendelijke grond-
stoffen die u via de plaatselijke recyclingcontainers
kunt afvoeren.
b
a
Neem de aanduiding van de verpakkings-
materialen voor de afvalscheiding in acht.
Deze zijn gemarkeerd met de afkortingen
(a) en een cijfers (b) met de volgende
betekenis: 1–7: kunststoffen / 20–22:
papier en vezelplaten / 80–98: compo-
sietmaterialen.
Het product en de verpakkingsmaterialen
zijn recyclebaar; verwijder deze afzon-
derlijk voor een betere afvalbehande-

40
Verwijdering / Informatie
ling. Het Triman-logo geldt alleen voor
Frankrijk.
Gooi het afgedankte product omwille van
het milieu niet weg via het huisvuil, maar
geef het af bij het daarvoor bestemde
depot of het gemeentelijke milieupark.
Over afgifteplaatsen en hun openingstijden
kunt u zich bij uw aangewezen instantie
informeren.
Defecte of verbruikte batterijen moeten volgens de
richtlijn 2006/66/EG worden gerecycled. Geef
batterijen en / of het apparaat af bij de daarvoor
bestemde verzamelstations.
Milieuschade door verkeerde
afvoer van batterijen!
Batterijen mogen niet via het huisvuil worden weg-
gegooid. Ze kunnen giftig zwaar metaal bevatten
en vallen onder het chemisch afval. De chemische
symbolen van de zware metalen zijn als volgt: Cd =
cadmium, Hg = kwik, Pb = lood. Geef verbruikte bat-
terijen daarom af bij een gemeentelijk inzamelpunt.
Informatie
Garantie
Op dit product verlenen wij 36 maanden garantie
vanaf koopdatum. Het apparaat werd zorgvuldig
vervaardigd en aan een nauwkeurige kwaliteitscon-
trole onderworpen. Binnen de garantieperiode her-
s
tellen wij kosteloos alle materiaal- of pr
oductiefouten.
Mocht u desondanks tijdens de garantieperiode
mankementen aantreffen, stuur het apparaat dan
alstublieft naar het aangegeven serviceadres met
vermelding van het volgende artikelnummer:
14146606L / 14154106L.
Beschadigingen door ondeskundig gebruik, negeren
van de handleiding of ingrepen door niet-geautori-
seerde personen zijn van de garantieverlening
uitgesloten. Dit geldt eveneens voor aan slijtage
onderhevige delen (zoals bijv. gloeilampen). Door
de garantieservice wordt de garantieperiode noch
verlengd noch vernieuwd.
Conformiteitsverklaring
Dit product voldoet aan de eisen van de van toe-
passing zijnde Europese en nationale richtlijnen
(Richtlijn 2014/53/EU, laagspanningsrichtlijn
2014/35/EU, ecologische richtlijn 2009/125/EG,
RoHS-richtlijn 2011/65/EU). De conformiteit is
aangetoond. Desbetreffende verklaringen liggen
ter inzage bij de fabrikant.
Hiermee verklaart Briloner Leuchten GmbH & Co. KG
dat het type radiografische installatie 14146606L /
14154106L voldoet aan de richtlijn 2014/53/EU.
De volledige tekst van de EU-conformiteitsverkla-
ring is op het volgende internetadres beschikbaar:
https://www.briloner.com/de/service/
informationen-zu-leuchten/
eu-konformitaetserklaerung-fuer-funkanlagentyp.php
Fabrikant / Service
Briloner Leuchten GmbH & Co. KG
Im Kissen 2
59929 Brilon
DUITSLAND
Tel.: +49 29 61 / 97 12–800
Fax: +49 29 61 / 97 12–199
E-mail: [email protected]
www.briloner.com
Gratis servicenummer:
Tel.: 00800 / 27456637
IAN 360045_2010
Houd bij alle vragen alstublieft de kassabon en
het artikelnummer (bijv. IAN 123456_7890) als
bewijs van aankoop bij de hand.
NL/BE
Spis zawartości

41 PL
Verwijdering / Informatie Spis zawartości
Legenda zastosowanych piktogramów............................................................Strona 42
Instrukcja ......................................................................................................................................Strona 43
Zastosowanie zgodne z przeznaczeniem .....................................................................................Strona 43
Zawartość .........................................................................................................................................Strona 43
Opis części ....................................................................................................................................... Strona 43
Dane techniczne ..............................................................................................................................Strona 43
Bezpieczeństwo ......................................................................................................................Strona 44
Wskazówki bezpieczeństwa...........................................................................................................Strona 44
Wskazówki bezpieczeństwa dla baterii / akumulatorów ............................................................. Strona 45
Przygotowanie .......................................................................................................................Strona 46
Potrzebne narzędzia i materiały .....................................................................................................Strona 46
Montaż panelu świetlnego LED .................................................................................Strona 46
Włączanie / wyłączanie lampy / ustawianie koloru światła .......... Strona 47
Obsługa panelu świetlnego LED pilotem zdalnego sterowania ..Strona 47
Wymiana baterii ....................................................................................................................Strona 47
Konserwacja i czyszczenie............................................................................................Strona 48
Utylizacja .....................................................................................................................................Strona 48
Informacje ...................................................................................................................................Strona 48
Gwarancja .......................................................................................................................................Strona 48
Deklaracja zgodności ......................................................................................................................Strona 49
Producent / Serwis ............................................................................................................................Strona 49

42 PL
Legenda zastosowanych piktogramów
Legenda zastosowanych piktogramów
Należy przeczytać instrukcje! Niebezpieczeństwo utraty życia i
wypadku dla dzieci!
Ta lampa nadaje się wyłącznie do
pracy wewnątrz, w suchych i
zamkniętych pomieszczeniach.
Lampa ta nie nadaje się do użycia
w połączeniu z zewnętrznymi
regulatorami jasności światła i
wyłącznikami elektronicznymi.
Wolt 30000h Żywotność
Herc (częstotliwość) ON OFF Cykle włączania
Wat (moc czynna) Niebezpieczeństwo wybuchu!
Przewód ochronny Zakładać rękawice ochronne!
Przestrzegać wskazówek ostrzegaw-
czych i bezpieczeństwa! Opakowanie składa się w 100 %
ze zutylizowanego papieru.
Lampa posiada stopień ochrony „IP20“
i jest przeznaczona wyłącznie do
zastosowania w pomieszczeniach w
prywatnych gospodarstwach domowych.
b
a
Opakowanie i urządzenie
przekazać do utylizacji zgodnie z
przepisami o ochronie środowiska!
Ra Współczynnik oddawania barw
Ostrzeżenie o możliwości porażenia
prądem! Niebezpieczeństwo utraty
życia!
Niewłaściwa utylizacja baterii /
akumulatorów stwarza zagrożenie
dla środowiska naturalnego!
Prawidłowy sposób postępowania Napięcie przemienne (rodzaj prądu
i napięcia)
L
N
Biegunowość
Instrukcja

43 PL
Legenda zastosowanych piktogramów Instrukcja
Panel świetlny LED z układem
sterowania kolorami
Instrukcja
Gratulujemy Państwu zakupu nowego
urządzenia. Zdecydowali się Państwo
na zakup produktu najwyższej jakości.
Proszę dokładnie przeczytać całą niniejszą instruk-
cję obsługi. Proszę rozłożyć stronę z rysunkami.
Niniejsza instrukcja obsługi należy do produktu.
Zawiera ona ważne wskazówki dotyczące urucha-
miania i posługiwania się nim. Zawsze należy
przestrzegać wszystkich wskazówek dotyczących
bezpieczeństwa. Przed uruchomieniem proszę
sprawdzić, czy występuje prawidłowe napięcie i
czy wszystkie części są prawidłowo zamontowane.
W przypadku zapytań lub niepewności odnośnie
obchodzenia się z urządzeniem prosimy o kontakt
ze sprzedawcą lub punktem serwisowym. Proszę
starannie przechowywać niniejszą instrukcję ob-
sługi i ewentualnie przekazać ją osobom trzecim.
Zastosowanie zgodne z
przeznaczeniem
Niniejsza lampa nadaje się wyłącznie
do zastosowania w pomieszczeniach.
To urządzenie przewidziano wyłącznie
do użytku w prywatnym gospodarstwie domowym.
Produkt ten jest przeznaczony do normalnej pracy.
Zawartość
Bezpośrednio po wypakowaniu należy sprawdzić,
czy zestaw jest kompletny oraz czy urządzenie
znajduje się w nienagannym stanie.
1 panel świetlny LED (14146606L / 14154106L)
4 śruby (14154106L)
4 kołki (14154106L)
2 śruby (14146606L)
2 kołki (14146606L)
2 baterie (AAA)
2 wężyki ochronne
1 pilot zdalnego sterowania
1 instrukcja montażu i obsługi
Opis części
1 Panel świetlny LED
2 Śruba do panelu świetlnego LED
3 Kątownik montażowy
4 Kołki
5 Śruba do kątownika montażowego
6 Kostka zaciskowa
7 Przewód zasilający (zewnętrzny)
8 Wężyk ochronny
9 Pilot zdalnego sterowania
10 Pokrywa komory baterii
Dane techniczne
Numer modelu: 14146606L
Lampa:
Napięcie robocze: 230–240 V~, 50 Hz
Moc znamionowa maks.: LED 24 W
Klasa ochrony: | /
Rodzaj ochrony: IP20
Wymiary: 45 x 45 cm
Moduł LED:
Moc znamionowa maks.: LED, maks. 20 W
Numer modelu: 14154106L
Lampa:
Napięcie robocze: 230–240 V~, 50 Hz
Moc znamionowa maks.: LED 24 W
Klasa ochrony: | /
Rodzaj ochrony: IP20
Wymiary: 100 x 25 cm
Moduł LED:
Moc znamionowa maks.: LED, maks. 21 W
Pilot zdalnego sterowania:
Bateria: 2 x AAA 1,5 V
Pasmo częstotliwości: 2,4 MHz pasmo ISM
Maks. moc nadawcza: < 10,0 dBm

44 PL
Bezpieczeństwo
Bezpieczeństwo
Wskazówki
bezpieczeństwa
W przypadku szkód spowodowanych nieprzestrze-
ganiem niniejszej instrukcji obsługi wygasa prawo do
gwarancji! Za szkody pośrednie producent nie po-
nosi odpowiedzialności! W przypadku szkód ma-
terialnych lub osobowych, które powstały wskutek
niewłaściwego obchodzenia się lub nieprzestrze-
gania wskazówek dotyczących bezpieczeństwa,
nie ponosimy żadnej odpowiedzialności!
NIEBEZPIE-
CZEŃSTWO UTRATY ŻYCIA I
WYPADKU DLA DZIECI!
Nigdy nie pozostawiać dzieci bez nadzoru z
materiałem opakowania. Istnieje zagrożenie
uduszeniem spowodowane przez materiał
opakowaniowy. Dzieci często nie dostrzegają
niebezpieczeństwa.
Niniejsze urządzenie może być używane przez
dzieci od lat 8 oraz przez osoby z obniżonymi
zdolnościami fizycznymi, sensorycznymi lub
mentalnymi lub brakiem doświadczenia i/lub
wiedzy, jeśli pozostają pod nadzorem lub zo-
stały pouczone w kwestii bezpiecznego użycia
urządzenia i rozumieją wynikające z niego za-
grożenia. Dzieci nie mogą bawić się urządze-
niem. Czyszczenie i konserwacja użytkownika
nie mogą być wykonywane przez dzieci bez
nadzoru.
UWAGA!
Podczas uruchomienia nie patrzeć w diody
LED z bliskiej odległości.
Źródło światła tej lampy nie podlega wymianie;
jeśli czas działania źródła światła się zakończy,
należy wymienić całą lampę.
Diod LED nie należy oglądać za pomocą
optycznego instrumentu (np. lupy).
Porażenie prądem
elektrycznym grozi śmiercią
Wykonanie instalacji elektrycznej należy zlecić
wykwalifikowanemu elektrykowi lub osobie
przeszkolonej w zakresie wykonywania instala-
cji elektrycznych.
W przypadku szkód materialnych lub osobo-
wych, które powstały wskutek niewłaściwego
obchodzenia się lub nieprzestrzegania wskazó-
wek dotyczących bezpieczeństwa, nie ponosimy
żadnej odpowiedzialności!
Nigdy nie należy używać lampy w przypadku
stwierdzenia jakichkolwiek uszkodzeń.
Przed rozpoczęciem montażu wyjąć bezpiecznik
lub wyłączyć wyłącznik nadmiarowo-prądowy
w skrzynce bezpiecznikowej (położenie 0).
Bezwzględnie unikać kontaktu lampy z wodą
lub innymi cieczami.
Przed montażem należy upewnić się, że istnie-
jące napięcie sieci jest zgodne z wymaganym
napięciem roboczym oprawy oświetleniowej
(patrz „Dane techniczne“).
Należy się upewnić, że przy montażu nie
zostaną uszkodzone żadne przewody.
Lampa ta nie nadaje się do użycia
w połączeniu z zewnętrznymi regu-
latorami jasności światła i wyłączni-
kami elektronicznymi.
Jak uniknąć zagrożenia
pożarowego i obrażeń ciała
Aby uniknąć oparzenia, należy upewnić się
przed dotknięciem lampy, że jest ona wyłą-
czona i schłodzona.
Lampy nie należy mocować na wilgotnym lub
przewodzącym prąd podłożu.
Lampy i materiału opakowania nie pozostawiać
bez nadzoru. Folie / worki plastikowe, elementy
z tworzywa sztucznego itp. mogą zostać użyte
przez dzieci jako niebezpieczna zabawka.
U niektórych osób może dojść do napadów epi-
leptycznych lub utraty przytomności, jeśli będą
one narażone na określone błyski lub efekty
świetlne. W razie symptomów epilepsji należy
niezwłocznie skonsultować się z lekarzem.
Bezpieczeństwo

45 PL
Bezpieczeństwo Bezpieczeństwo
Wymagania dla interfejsów
radiowych–w odniesieniu do
instalacji europejskiej
Wskazówka: Niniejsze urządzenie zostało prze-
testowane i uznane za zgodne z wartościami gra-
nicznymi zgodnie z EN 300 440 v2.1.1 odbiornik
kategorii 3. Te wartości graniczne są zaprojektowane,
aby zapewnić odpowiednie zabezpieczenie przed
szkodliwymi zakłóceniami w instalacjach prywatnych.
To urządzenie reaguje w sposób czuły na inne
urządzenia, które zamierzenie wytwarzają energię
częstotliwości radiowych 2.4 Ghz i w ten sposób
ograniczają moc pilota zdalnego sterowania. Nie
można jednak zagwarantować, że zakłócenie nie
wystąpi w określonych urządzeniach. Jeśli inne
urządzenia będą miały wpływ na to urządzenie
poprzez zakłócenia, można to zakończyć przez
włączenie i wyłączenie danego urządzenia.
Użytkownikowi zaleca się w tym celu usunięcie za-
kłócenia przez zastosowanie jednego z następują-
cych środków: wyłączyć zakłócające urządzenie i
nie używać również aparatu z Wi-Fi o wysokiej
mocy przesyłania w pobliżu urządzenia. Zwiększyć
odległość od urządzenia zakłócającego. W przy-
padku problemów skonsultować się ze sprzedawcą
lub profesjonalistą w zakresie urządzeń radiowych /
TV. Pełna treść deklaracji zgodności UE jest dostępna
pod następującym adresem internetowym:
https://www.briloner.com/de/service/
informationen-zu-leuchten/
eu-konformitaetserklaerung-fuer-funkanlagentyp.php
Prawidłowy sposób
postępowania
Lampę zamontować w taki sposób, aby była
zabezpieczona przed wilgocią, zanieczysz-
czeniami i zbyt wysoką temperaturą.
Przed wierceniem należy upewnić się, że w
miejscu wiercenia nie znajdują się żadne rury
gazowe, wodne czy przewody elektromagne-
tyczne. Montażu powinna dokonać wyłącznie
osoba posiadająca odpowiednie kwalifikacje.
Koniecznie zwrócić uwagę na budowę ściany,
ponieważ dołączony materiał montażowy nie
nadaje się do wszystkich rodzajów ścian. W
specjalistycznym sklepie należy zasięgnąć po-
rady na temat kołków i śrub przeznaczonych
do danego rodzaju ściany.
Za nieprawidłowe połączenie kołka ze ścianą i
powstałe przez to szkody producent nie ponosi
odpowiedzialności.
Zachować ostrożność! Zawsze zwracać uwagę
na wykonywane czynności i kierować się roz-
sądkiem. Nie używać lampy w przypadku
braku koncentracji lub złego samopoczucia.
Przed rozpoczęciem montażu należy spraw-
dzić, czy miejsce przeznaczone na niego jest
przystosowane do ciężaru lampy.
Przed instalacją należy zapoznać się ze wszyst-
kimi instrukcjami i rysunkami zawartymi w niniej-
szej instrukcji oraz z samą lampą.
Wskazówki
bezpieczeństwa dla
baterii / akumulatorów
ZAGROŻENIE ŻYCIA!
Baterie / akumulatory należy trzymać poza
zasięgiem dzieci. W przypadku połknięcia
należy natychmiast udać się do lekarza!
Połknięcie może prowadzić do oparzeń, perfo-
racji tkanki miękkiej i śmierci. Ciężkie poparze-
nia mogą wystąpić w ciągu 2 godzin po
połknięciu.
NIEBEZPIECZEŃSTWO
WYBUCHU!
Baterii jednorazowego użytku nie wolno ładować
ponownie. Baterii / akumulatorów nie należy
zwierać i / lub otwierać. Może to doprowadzić
do przegrzania, pożaru lub wybuchu.
Nigdy nie należy wrzucać baterii / akumulato-
rów do ognia lub wody.
Nigdy nie należy narażać baterii / akumulato-
rów na obciążenia mechaniczne.
Ryzyko wycieku kwasu z baterii /
akumulatorów
Należy unikać ekstremalnych warunków i tem-
peratur, które mogą oddziaływać na baterie /

46 PL
Bezpieczeństwo / Przygotowanie / Montaż panelu świetlnego LED
akumulatory, np. kaloryferów / bezpośred-
niego działania promieniowania słonecznego.
Jeśli wyciekną baterie / akumulatory, należy
unikać kontaktu skóry, oczu i błon śluzowych z
chemikaliami! Dotknięte miejsca natychmiast
przepłukać czystą wodą i udać się do lekarza!
ZAKŁADAĆ RĘKAWICE
OCHRONNE!
Wylane lub uszkodzone baterie / akumulatory
po dotknięciu skóry mogą spowodować popa-
rzenia chemiczne. Dlatego należy w takim
przypadku nakładać odpowiednie rękawice
ochronne.
W przypadku wycieku baterii / akumulatorów
natychmiast usunąć je z produktu, aby uniknąć
uszkodzeń.
Używać wyłącznie baterii / akumulatorów tego
samego typu. Nie zakładać razem nowych
oraz zużytych baterii / akumulatorów!
Jeżeli produkt nie jest przez dłuższy czas uży-
wany, baterie / akumulatorynależy wyjąć.
Ryzyko uszkodzenia produktu
Używać wyłącznie zalecanego rodzaju bate-
rii / akumulatora!
Włożyć baterie / akumulatory zgodnie z ozna-
czeniem biegunów (+) i (-) na baterii / akumu-
latorze i produkcie.
Oczyścić styki baterii / akumulatora i w komorze
baterii przed włożeniem suchą, niestrzępiącą
się szmatką lub patyczkiem higienicznym!
Zużyte baterie / akumulatory wyjąć jak naj-
szybciej z produktu.
Poprawne ułożenie biegunów jest pokazane w
komorze na baterie.
Przygotowanie
Potrzebne narzędzia
i materiały
Wymienione narzędzia i materiały nie są częścią
zestawu. Są to jedynie niewiążące informacje i
wartości orientacyjne. Właściwości materiału zależą
od indywidualnych warunków w pomieszczeniu.
‒ ołówek / narzędzie do oznaczania
‒ 2-biegunowy wskaźnik napięcia
‒ śrubokręt
‒ wiertarka
‒ wiertło (ok. ø 6 mm)
‒ szczypce do cięcia drutu
‒ drabina
Montaż panelu świetlnego LED
NIEBEZPIECZEŃSTWO
PORAŻENIA PRĄDEM ELEKTRYCZNYM!
Ważne: wykonanie podłączenia elektrycznego
należy zlecić wykwalifikowanemu elektrykowi lub
osobie przeszkolonej w zakresie wykonywania
instalacji elektrycznych. Osoba ta musi posiadać
wiedzę na temat właściwości lampy i przepisów
dotyczących podłączania. W tym celu należy wy-
jąć bezpiecznik lub wyłączyć wyłącznik nadmiaro-
woprądowy w skrzynce bezpiecznikowej
(położenie 0) (patrz rys. A).
Baterie należy włożyć do komory baterii z
uwzględnieniem ułożenia biegunów (+ oraz –).
Usunąć śruby panelu świetlnego 2 widoczne
po bokach panelu świetlnego LED 1 (patrz
rys. A) i zdjąć kątownik montażowy 3 na od-
wrotnej stronie (patrz rys. B).
Zaznaczyć otwory do wiercenia za pomocą
otworów wzdłużnych w kątowniku montażo-
wych 3 przeznaczonych na śruby 5.
Następnie należy wywiercić otwory montażowe.
Uważać na to, aby nie uszkodzić przewodu
doprowadzającego.
Kołki 4 włożyć do wywierconych otworów
(patrz rys. C).
Zamocować kątownik montażowy 3 za po-
mocą dołączonych śrub 5 (patrz rys. D).
Naciągnąć wężyki ochronne 8 na kable L i
N przewodu zasilającego (zewnętrznego) 7
(patrz rys. E).
Za pomocą kostki zaciskowej 6 połączyć
kabel instalacyjny panelu świetlnego LED z
przewodem zasilającym (zewnętrznym) 7
(patrz rys. E).
Należy zwracać uwagę, aby prawidłowo
podłączyć poszczególne przewody kabla
Montaż panelu ... / Włączanie... / Obsługa panelu... / Wymiana baterii

47 PL
Bezpieczeństwo / Przygotowanie / Montaż panelu świetlnego LED Montaż panelu ... / Włączanie... / Obsługa panelu... / Wymiana baterii
zasilającego (zewnętrznego) 7: przewód
przewodzący prąd, czarny lub brązowy =
symbol L, przewód zerowy, niebieski = symbol
N, przewód ochronny zielono-żółty = symbol
(złącze uziemiające). Należy uważać na
właściwe ułożenie.
Następnie przykręcić panel świetlny LED 1
za pomocą śrub 2 do kątownika montażo-
wego 3.
Wskazówka: uważać na to, aby śruby 2
dobrze weszły (patrz rys. F i G).
Ponownie włożyć bezpiecznik lub włączyć
wyłącznik nadmiaroprądowy na skrzynce bez-
piecznikowej (pozycja I) (patrz rys. H).
Panel świetlny LED jest gotowy do użycia.
Ten panel świetlny LED nadaje się również jako
lampa do zabudowy do montażu w sufitach
podwieszanych.
Ten montaż powinien zostać koniecznie wyko-
nany przez fachowca, ponieważ należy
uwzględnić dokładne wymiary panelu świetl-
nego LED w konstrukcji sufitu.
Włączanie / wyłączanie lampy /
ustawianie koloru światła
Nacisnąć przełącznik (na ścianie), aby włączyć /
wyłączyć panel świetlny LED.
Jeśli naciśnie się kilka razy krótko po sobie
przełącznik, panel świetlny LED przechodzi
pomiędzy bielą zimną, ciepłą i neutralną.
Obsługa panelu świetlnego
LED pilotem zdalnego
sterowania
Wskazówka: panel świetlny LED posiada funkcję
pamięci (Memory). Zapisuje ona ostatnio ustawioną
funkcję.
Panel świetlny LED włączyć za pomocą prze-
łącznika światła.
Wszystkimi innymi funkcjami można sterować tylko
za pomocą pilota zdalnego sterowania 9 (patrz
rys. I).
Włączanie
Wyłączanie
Ściemnianie (jaśniej)
Ściemnianie (ciemniej)
Biel zimna, płynnie
Biel neutralna
Bezstopniowo ciepła biel
Funkcja minutnika (Timer) (30 min.)
Ciel zimna / neutralna / ciepła
Funkcja lampki nocnej
Pamięć na indywidualne programy kolorów:
- Lampę można ustawić wedle życzenia.
- Przytrzymać wciśnięty przycisk M1 lub
M2.
- Jeśli zakończono proces zapisywania,
lampa miga jeden raz.
Wymiana baterii
Jeśli zasięg pilota zdalnego sterowania 9 słabnie,
należy wymienić baterie (patrz rys. I).
Wysunąć osłonę komory na baterie 10
znajdu-
jącą
się z tyłu pilota
9
zgodnie z kierunkiem
strzałki.
Wyjąć baterie.
Włożyć nowe baterie (AAA) do pilota 9.
Wskazówka: Poprawna biegunowość po-
kazana jest w komorze na baterie 10 pilota 9.
Ponownie wsunąć pokrywę komory na baterie
do pilota 9.

48
Konserwacja i czyszczenie / Utylizacja / Informacje
Konserwacja i czyszczenie
NIEBEZPIECZEŃSTWO
PORAŻENIA PRĄDEM ELEKTRYCZNYM!
W celu czyszczenia najpierw odłączyć lampę od
sieci elektrycznej. W tym celu należy wyjąć bez-
piecznik lub wyłączyć wyłącznik instalacyjny w
skrzynce bezpiecznikowej (pozycja 0) (patrz rys. A).
Aby uniknąć oparzenia, należy upewnić się
przed dotknięciem lampy, że jest ona wyłą-
czona i schłodzona.
Nie używać rozpuszczalników, benzyny itp.
Mogłoby to spowodować uszkodzenie lampy.
Do czyszczenia panelu świetlnego LED 1 na-
leży używać suchej, niestrzępiącej się szmatki.
Ponownie włożyć bezpiecznik lub włączyć
wyłącznik nadmiarowo-prądowy na skrzynce
bezpiecznikowej (pozycja I) (patrz rys. H).
Utylizacja
Opakowanie wykonane jest z materiałów przyja-
znych dla środowiska, które można przekazać do
utylizacji w lokalnym punkcie przetwarzania surow-
ców wtórnych.
b
a
Przy segregowaniu odpadów prosimy
zwrócić uwagę na oznakowanie mate-
riałów opakowaniowych, oznaczone są
one skrótami (a) i numerami (b) o nastę-
pującym znaczeniu: 1–7: Tworzywa
sztuczne / 20–22: Papier i tektura /
80–98: Materiały kompozytowe.
Produkt i materiał opakowania nadają
się do ponownego przetworzenia, na-
leży je zutylizować osobno w celu lep-
szego przetworzenia odpadów. Logo
Triman jest ważne tylko dla Francji.
Z uwagi na ochronę środowiska nie
wyrzucać urządzenia po zakończeniu
eksploatacji do odpadów domowych,
lecz prawidłowo zutylizować. Informacji
o punktach zbiorczych i ich godzinach
otwarcia udziela odpowiedni urząd.
Uszkodzone lub zużyte baterie / akumulatory muszą
być poddane recyklingowi zgodnie z dyrektywą
2006/66/WE i jej zmianami. Oddać baterie /
akumulatory i / lub produkt w dostępnych punktach
zbiórki.
Niewłaściwa utylizacja baterii /
akumulatorów stwarza zagroże-
nie dla środowiska naturalnego!
Baterii / akumulatorów nie należy wyrzucać razem
z odpadami domowymi. Mogą one zawierać szko-
dliwe metale ciężkie i należy je traktować jak od-
pady specjalne. Symbole chemiczne metali
ciężkich są następujące: Cd = kadm, Hg = rtęć, Pb
= ołów. Dlatego też zużyte baterie / akumulatory
należy przekazywać do komunalnych punktów
gromadzenia odpadów niebezpiecznych.
Informacje
Gwarancja
W momencie zakupu otrzymują Państwo na to
urządzenie 36 miesięcy gwarancji. Urządzenie
wyprodukowano starannie i poddano dokładnej
kontroli jakości. W okresie gwarancji usuwamy bez-
płatnie wszystkie wady materiałowe lub fabryczne.
Jeśli mimo to w okresie gwarancji pojawią się usterki,
urządzenie należy przesłać na podany adres
serwisowy, podając następujący numer artykułu:
14146606L / 14154106L.
Gwarancji nie podlegają uszkodzenia spowodowane
przez nieprawidłowe użytkowanie, nieprzestrzega-
nie instrukcji obsługi lub ingerencję nieautoryzowa-
nych osób, a także części szybko zużywające się
(jak np. elementy świetlne). Usługa gwarancyjna
nie przedłuża ani nie odnawia okresu gwarancji.
Zgodnie z Kodeksem Cywilnym art. 581 §1 wraz
z wymianą urządzenia lub ważnej części czas
gwarancji rozpoczyna się na nowo.
PL
Informacje

49 PL
Konserwacja i czyszczenie / Utylizacja / Informacje Informacje
Deklaracja zgodności
Niniejszy produkt spełnia wymagania obowiązują-
cych dyrektyw europejskich i przepisów krajowych
(Dyrektywa 2014/53/UE, dyrektywa niskonapię-
ciowa 2014/35/UE, dyrektywa ws. ekoprojektu
2009/125/WE, dyrektywa RoHS 2011/65/UE).
Zgodność została wykazana. Odpowiednie dekla-
racje i dokumenty są przechowywane przez pro-
ducenta.
Niniejszym Briloner Leuchten GmbH & Co. KG
oświadcza, że typ urządzeń radiowych
14146606L / 14154106L odpowiada dyrektywie
2014/53/UE.
Pełna treść deklaracji zgodności UE jest dostępna
pod następującym adresem internetowym:
https://www.briloner.com/de/service/
informationen-zu-leuchten/
eu-konformitaetserklaerung-fuer-funkanlagentyp.php
Producent / Serwis
Briloner Leuchten GmbH & Co. KG
Im Kissen 2
59929 Brilon
NIEMCY
Tel.: +49 29 61 / 97 12–800
Faks: +49 29 61 / 97 12–199
E-mail: [email protected]
www.briloner.com
Bezpłatny numer serwisu:
Tel.: 00800 / 27456637
IAN 360045_2010
Przed skontaktowaniem się z działem serwisowym
należy przygotować paragon i numer artykułu
(np. IAN 123456_7890) jako dowód zakupu.

50
Seznam obsahu

51 CZ
Seznam obsahu
Legenda použitých piktogramů ...............................................................................Strana 52
Úvod .................................................................................................................................................Strana 52
Použití ke stanovenému účelu..........................................................................................................Strana 53
Obsah dodávky ............................................................................................................................... Strana 53
Popis dílů ..........................................................................................................................................Strana 53
Technická data .................................................................................................................................Strana 53
Bezpečnost ..................................................................................................................................Strana 53
Bezpečnostní pokyny .......................................................................................................................Strana 53
Bezpečnostní pokyny pro baterie a akumulátory .......................................................................... Strana 55
Příprava ........................................................................................................................................Strana 56
Potřebné nářadí a materiál ..............................................................................................................Strana 56
Montáž svítícího LED panelu ........................................................................................Strana 56
Zapínání a vypínání svítidla, nastavení barvy světla ...........................Strana 56
Řízení světelného LED panelu dálkovým ovladačem ............................Strana 56
Výměna baterií ....................................................................................................................... Strana 57
Údržba a čištění ......................................................................................................................Strana 57
Odstranění do odpadu .....................................................................................................Strana 57
Informace .....................................................................................................................................Strana 58
Garantie ...........................................................................................................................................Strana 58
Prohlášení o shodě ...........................................................................................................................Strana 58
Výrobce / Servis ...............................................................................................................................Strana 58

52 CZ
Úvod
Legenda použitých piktogramů
Přečtěte si pokyny! Nebezpečí ohrožení života a
nehody malých i velkých dětí!
Toto svítidlo je určeno výhradně k
používání vinteriérech, vsuchých a
uzavřených místnostech.
Toto svítidlo není vhodné kpoužívání
sexterními stmívači a elektronickými
spínači.
Volt 30000h Životnost
Hertz (frekvence) ON OFF Spínací cykly
W (příkon) Nebezpečí výbuchu!
Ochranný vodič Noste ochranné rukavice!
Respektujte výstražné a bezpečnostní
pokyny! Obal je vyroben ze 100 %
recyklovaného papíru.
Toto svítidlo má stupeň krytí „IP20“ a je
určeno jen ksoukromému použití ve
vnitřních prostorech.
b
a
Obal a přístroj odstraňujte do
odpadu ekologicky!
Ra Index podání barev
Varování před zásahem elektrickým
proudem! Nebezpečí ohrožení života!
Ekologické škody vdůsledku
nesprávného odstranění baterií
resp. akumulátorů do odpadu!
Takto postupujete správně Střídavé napětí (druh proudu a
napětí)
L
N
Polarita
LED svítidlo s nastavitelným
tónem barvy
Úvod
Blahopřejeme vám ke koupi nového vý-
robku. Rozhodli jste se pro vysoce kvalitní
výrobek. Přečtěte si laskavě kompletně
a pečlivě tento návod k obsluze. Rozevřete stránku
sobrázky. Tento návod je součástí tohoto výrobku
a obsahuje důležité informace ouvedení zařízení do
provozu a kzacházení sním. Řiďte se vždy bezpeč-
nostními pokyny. Před uvedením do provozu zkont-
rolujte, jestli je kdispozici správné napětí a jestli jsou
všechny díly správně namontované. Jestliže máte ještě
otázky nebo jste si nejistí při ovládání přístroje,
Úvod / Bezpečnost

53 CZ
Úvod Úvod / Bezpečnost
kontaktujte vašeho prodejce nebo servis. Návod
pečlivě uschovejte a případně jej předejte třetí
osobě.
Použití ke stanovenému účelu
Toto svítidlo je určeno k provozu ve vnitř-
ních prostorách. Tento přístroj je určen
pouze pro soukromé použití. U tohoto
artiklu se jedná o světelnou dekoraci. Nepoužívejte
toto svítidlo jako noční osvětlení. Tento výrobek je
určen pro normální provoz.
Obsah dodávky
Bezprostředně po vybalení vždy zkontrolujte úplnost
dodávky a bezvadný stav zařízení.
1 svítící LED panel (14146606L / 14154106L)
4 šrouby (14154106L)
4 hmoždinky (14154106L)
2 šrouby (14146606L)
2 hmoždinky (14146606L)
2 baterie (AAA)
2ochranné hadičky
1 dálkový ovladač
1 návod kmontáži a použití
Popis dílů
1 Světelný LED panel
2 Šrouby pro světelný LED panel
3 Montážní úhelník
4 Hmoždinky
5 Šrouby pro montážní úhelník
6 Lustrová svorka
7 Síťový připojovací kabel (externí)
8 Ochranná hadička
9 Dálkový ovladač
10 Kryt přihrádky na baterie
Technická data
Model č.: 14146606L
Svítidlo:
Provozní napětí: 230–240 V~, 50 Hz
Jmenovitý příkon
maximálně: LED 24 W
Třída ochrany: | /
Druh ochrany: IP20
Rozměry: 45 x 45 cm
LED modul:
Jmenovitý příkon
maximálně: LED, maximálně 20 W
Model č.: 14154106L
Svítidlo:
Provozní napětí: 230–240 V-2,5, 50 Hz
Jmenovitý příkon
maximálně: LED 24 W
Třída ochrany: | /
Druh ochrany: IP20
Rozměry: 100 x 25 cm
LED modul:
Jmenovitý příkon
maximálně: LED, maximálně 21 W
Dálkový ovladač:
Baterie: 2 x AAA 1,5 V
Frekvenční pásmo: 2,4 GHz ISM pásmo
Maximální vysílací
výkon: < 10,0 dBm
Bezpečnost
Bezpečnostní pokyny
Při škodách způsobených nedodržením tohoto ná-
vodu k obsluze zaniká záruka! Za následné škody
se neručí! Za věcné nebo osobní škody, způsobené
neodborným zacházením nebo nerespektováním
bezpečnostních pokynů, se neručí!

54 CZ
Bezpečnost
NEBEZPEČÍ
OHROŽENÍ ŽIVOTA A NEHODY
MALÝCH I VĚTŠÍCH DĚTÍ!
Nenechávejte děti nikdy bez dohledu sobalo-
vým materiálem. Hrozí nebezpečí udušení
obalovým materiálem. Děti často podceňují
nebezpečí.
Tento přístroj mohou používat děti starší osmi
let, osoby se sníženými fyzickými, smyslovými
nebo duševními schopnosti nebo s nedostateč-
nými zkušenostmi a znalostmi, jestliže budou
pod dohledem nebo byly poučeny o bezpečn
ém
používání přístroje a chápou nebezpečí, která z
jeho používání vyplývají. S přístrojem si nesmějí
hrát děti. Děti nesmějí bez dohledu provádět
čištění ani uživatelskou údržbu.
POZOR!
Nedívejte se za provozu zblízka do LED.
Osvětlovací prostředek tohoto svítidla nelze
vyměnit; jestliže je vadný, musí se celé svítidlo
vyměnit.
LED nelze vyměnit.
Zabraňte ohrožení života
v důsledku zásahu
elektrickým proudem
Elektrickou instalaci nechte provádět jen vyuče-
ného elektrikáře nebo osobu s odpovídajícími
zkušenostmi.
Za věcné nebo osobní škody, způsobené neod-
borným zacházením nebo nerespektováním
bezpečnostních pokynů, se neručí!
Nepoužívejte panel pokud jste zjistili že je
poškozený.
Před montáží odstraňte pojistku nebo vypněte
jistič v pojiskové skříni (poloha 0).
Bezpodmínečně zabraňte kontaktu lampy
svodou nebo jinými kapalinami.
Před montáží se přesvědčte, jestli se shoduje na-
pětí elektrického proudu, které máte k dispozici,
snapětím potřebným pro reflektor
(viz „Technické
údaje“)
.
Zajistěte, aby se při montáži nepoškodily žádné
vodiče.
Toto svítidlo není vhodné k používání
s externími stmívači a elektronickými
spínači.
Vyvarujte se nebezpečí
požáru a poranění
Před dotykem se ujistěte, že je svítidlo vypnuté
a vychladlé, aby jste se vyhnuli popáleninám.
Svítidlo nemontujte na vlhkých nebo vodivých
podkladech.
Nenechávejte svítidlo nebo obalový materiál
ležet bez dohledu. Plastové fólie / pytlíky, umě-
lohmotné díly atd., by mohly být pro děti nebez-
pečnou hračkou.
U některých osob může dojít k epileptickým
záchvatům nebo poruchám vědomí působením
blesků nebo jiných světelných efektů. Při epilep-
tických symtomech ihned vyhledejte lékařskou
pomoc.
Požadavky na rozhraní rádi-
ových frekvencí - v souvislosti
s evropskou instalací
Poznámka: Tento přístroj byl testován a uznán jako
konformní přijímač kategorie 3 s mezními hodnotami
podle EN 300 440 v2.1.1. Tyto mezní hodnoty
jsou koncipovány k zajištění přiměřené ochrany před
škodlivými poruchami při privátních instalacích. Tento
přístroj reaguje citlivě na jiné přístroje, které záměrně
vysílají rádiové frekvence 2.4 GHz a tím výkon dál-
kového ovládání omezují. Ale nelze zaručit, že se u
určitých přístrojů porucha nevyskytne. Jestliže je
tento přístroj ovlivněn jinými přístroji, pak je to možné
vyřešit zapnutím a vypnutím příslušného přístroje.
Doporučujeme uživateli, aby poruchu odstranil
některým znásledujících způsobů: vypněte přístroj,
který způsobuje rušení a nepoužívejte vblízkosti
přístroje kameru WiFi svysokým vysílacím výkonem.
Zvětšete vzdálenost od rušivého přístroje. Při pro-
blémech kontaktujte prodejce nebo odborníka pro
rádiové a televizní přístroje. Úplné znění textu EU
prohlášení o konformitě je kdispozici na následující
webové stránce:
Bezpečnost

55 CZ
Bezpečnost Bezpečnost
https://www.briloner.com/de/service/
informationen-zu-leuchten/
eu-konformitaets erklaerung-fuer-funkanlagentyp.php
Tak postupujete správně
Svítidlo instalujte tak, aby bylo chráněné před
vlhkostí, zahříváním a znečištěním.
Před vrtáním se ujistěte, jestli se na místě vrtání
pod povrchem nenachází vedení plynu, vody
nebo elektřiny. Montáž jen odborníkem. Dbejte
na to, že není dodaný montážní materiál vhodný
pro všechny druhy stěn. Informujte se vobchodě
o hmoždinkách a šroubech vhodných pro druh
materiálu stěny.
Za škody vzniklé neodborným použitím hmož-
dinek v souvislosti s materiálem stěny výrobce
neručí.
Buďte vždy pozorní! Dbejte vždy na to, co dě-
láte, a postupujte vždy srozumem. Nepoužívejte
světlo, nejste-li soustředění nebo necítíte-li se
dobře.
Před montáží zkontrolujte jestli je vybrané místo
vhodné pro váhu svítidla.
Před použitím se nejdříve seznamte se všemi
pokyny a zobrazeními uvedenými v tomto ná-
vodu a se světlem.
Bezpečnostní pokyny pro
baterie a akumulátory
NEBEZPEČÍ OHROŽENÍ ŽIVOTA!
Uchovávejte baterie a akumulátory mimo dosah
dětí. V případě spolknutí okamžitě vyhledejte
lékařskou pomoc!
Při požití může dojít kpopáleninám, perforaci
měkkých tkání a úmrtí. Kzávažným popáleni-
nám může dojít do 2hodin po požití.
NEBEZPEČÍ VÝBUCHU!
Nenabíjecí baterie nikdy znovu nenabíjejte.
Baterie nebo akumulátory nezkratujte ani je
neotevírejte. Hrozí přehřátí, nebezpečí požáru
nebo jejich prasknutí.
Nikdy neházejte baterie nebo akumulátory do
ohně ani do vody.
Nevystavujte baterie nebo akumulátory mecha-
nickému zatížení.
Nebezpečí vytečení baterií / akumulátorů
Zabraňte extrémním podmínkám a teplotám, např.
na topení anebo na slunci, které mohou nega-
tivně ovlivnit funkci baterií nebo akumulátorů.
Vpřípadě vytečení baterií / akumulátorů zabraňte
kontaktu chemikálií spokožkou, očima a slizni-
cemi! Omyjte ihned postižená místa dostatečným
množstvím čisté vody a vyhledejte lékařskou
pomoc!
NOSTE OCHRANNÉ
RUKAVICE!
Vyteklé i poškozené baterie nebo akumulátory
mohou při kontaktu s pokožkou způsobit její
poleptání. Noste proto vhodné rukavice.
V případě vytečení ihned odstraňte baterie
nebo akumulátory z výrobku, abyste zabránili
jeho poškození!
Používejte jen baterie nebo akumulátory stej-
ného typu. Nekombinujte staré baterie nebo
akumulátory s novými!
Odstraňte baterie nebo akumulátory při delším
nepoužívání z výrobku.
Nebezpečí poškození výrobku
Používejte jen udaný typ baterie nebo akumu-
látoru!
Nasazujte baterie nebo akumulátory podle
označení polarity (+) a (-) na bateriích nebo
akumulátorech a na výrobku.
Vyčistěte kontakty na baterii / akumulátoru a
vpřihrádce na baterie před jejich vložením su-
chou utěrkou, která nepouští vlákna, nebo vato-
vým tamponem!
Vybité baterie nebo akumulátory ihned vyjměte
z výrobku.
Správná polarita je znázorněná uvnitř přihrádky
na baterie.

56 CZ
Příprava / Montáž svítícího ... / Zapínání a vypínání... / Řízení světelného ...
Příprava
Potřebné nářadí a materiál
Uvedené nářadí a materiály nejsou součástí do-
dávky. Jedná se zde o nezávazné údaje a orien-
tační hodnoty. Vlastnosti materiálu jsou závislé na
individuálních podmínkách v místě.
‒ tužka / nástroj k označení
‒ 2pólová zkoušečka napětí
‒ šroubovák
‒ vrtačka
‒ vrták (ø cca 6 mm)
‒ kleště štípačky
‒ žebřík
Montáž svítícího LED panelu
NEBEZPEČÍ ZÁSAHU
ELEKTRICKÝM PROUDEM!
Důležité: Připojení kelektrické síti musí provést
kvalifikovaný elektrikář nebo osoba zaškolená pro
práce na elektrických rozvodech. Tato osoba musí
být seznámena svlastnostmi svítidla a spředpisy
pro připojení. Za tímto účelem vyjměte pojistku
nebo vypněte jistič vpojistkové skříni (poloha 0)
(viz obr. A ).
Vložte baterie do přihrádky na baterie, dodr-
žujte přitom správnou polaritu (+ a –).
Odšroubujte na straně světelného LED panelu
1 viditelné šrouby LED světelného panelu 2
(viz obr. A) a sejměte montážní úhelník 3 ze
zadní strany (viz obr. B).
Označte si pomocí montážního úhelníku 3
místa k vrtání otvorů pro šrouby 5.
Nyní vyvrtejte otvory. Dávejte pozor, abyste
nepoškodili vodiče přívodu elektrického proudu.
Nasaďte hmoždinky 4 do vyvrtaných otvorů
(viz obr. C).
Přišroubujte montážní úhelník 3 dodanými
šrouby 5 (viz obr. D).
Přetáhněte ochranné hadičky 8 přes vodiče L
a N síťového připojovacího kabelu (externího)
7 (viz obr. E).
Spojte připojovací kabel světelného LED panelu
pomocí lustrové svorky 6 se síťovým připojo-
vacím kabelem (externím) 7 (viz obr. E).
Dbejte na to, abyste správně připojili jednotlivé
vodiče síťového připojovacího kabelu (externího)
7: fáze, černý nebo hnědý vodič = písmeno
L, nulový vodič, modrý = písmeno N, ochranný
vodič, zeleno-žlutý = symbol (uzemnění).
Dbejte na správné usazení.
Nyní přišroubujte světelný LED panel 1
šrouby 2 na montážní úhelník 3.
Upozornění: Dbejte na to, aby šrouby 2
správně zaskočily (viz obr. F a G).
Nasaďte zase pojistku nebo zapněte jistič
vpojistkové skříni (do polohy I) (viz obr. H).
Váš světelný LED panel je provozuschopný.
Tento světelný LED panel je vhodný i k montáži
do zavěšených stropů jako vestavěné svítidlo.
Tuto montáž by měl provádět odborník, protože
se musí brát ohled na přesné rozměry světel-
ného LED panelu ve stropní konstrukci.
Zapínání a vypínání svítidla,
nastavení barvy světla
K zapínání a vypínání světelného LED panelu
používejte vypínač (nástěnný).
Při krátkém stisknutí vypínače několikrát po
sobě mění světelný LED panel barvu světla
mezi studenou, teplou a neutrální bílou barvou.
Řízení světelného LED panelu
dálkovým ovladačem
Poznámka: Světelný LED panel má funkci memory.
Ukládá do paměti naposledy nastavenou funkci.
Zapněte světelný LED panel nástěnným vypína-
čem.
Všechny další funkce lze řídit jen dálkovým ovlada-
čem 9 (viz obr. I).
Zapnout
Řízení světelného ... / Výměna baterií / Údržba a čištění / Odstranění do odpadu

57 CZ
Řízení světelného ... / Výměna baterií / Údržba a čištění / Odstranění do odpadu
Vypnout
Stmívat (jasněji)
Stmívat (tlumeněji)
Studená bílá, plynule
Neutrální bílá
Teplá bílá, plynule
Funkce časovače (30 minut)
Studená bílá / neutrální bílá / teplá bílá
Funkce nočního světla
Předvolba pro individuální barevné programy:
- Nastavte svítidlo podle svých před
stav.
- Přidržte tlačítko M1 nebo M2 stisknuté.
- Po dokončení uložení do paměti svítidlo
jednou blikne.
Výměna baterií
Jestliže se zkrátí dosah dálkového ovládání 9, je
třeba vyměnit jeho baterie (viz obr. A).
Vysuňte víčko přihrádky na baterie 10 na zadní
straně dálkového ovládání 9 ve směru šipky z
dálkového ovládání 9.
Vyjměte baterie.
Vložte do dálkového ovládání 9 nové baterie
(AAA).
Upozornění: Správná polarita je znázorněná
uvnitř přihrádky na baterie dálkového ovládání
9.
Nasuňte víčko přihrádky na baterie 10 zase
na dálkové ovládání 9.
Údržba a čištění
NEBEZPEČÍ ZÁSAHU
ELEKTRICKÝM PROUDEM!
Před čištěním nejprve výrobek odpojte od elektrické
sítě. Za tímto účelem vyjměte pojistku nebo vypněte
jistič vpojistkové skříni (poloha0) (viz obr. A).
Před dotykem se ujistěte, že je svítidlo vypnuté
a vychladlé, aby jste se vyhnuli popáleninám.
Nepoužívejte na čištění rozpouštědla, benzín
nebo podobné látky, lampu můžete poškodit.
Na čištění LED panelu 5 používejte suchý hadr,
který nepouští vlákna.
Nasaďte zase pojistku nebo zapněte jistič
vpojistkové skříni (do polohy I) (viz obr. H).
Odstranění do odpadu
Obal se skládá zekologických materiálů, které
můžete zlikvidovat prostřednictvím místních sběren
recyklovatelných materiálů.
b
a
Při třídění odpadu se řiďte podle označení
obalových materiálů zkratkami (a) a čísly
(
b), s následujícím významem: 1–7: um
ělé
hmoty / 20–22: papír a lepenka / 80–
98:
složené látky.
Výrobek a obalové materiály jsou recy-
klovatelné, zlikvidujte je odděleně pro
lepší odstranění odpadu. Logo Triman
platí jen pro Francii.
Vzájmu ochrany životního prostředí vy-
sloužilý výrobek nevyhazujte do domov-
ního odpadu, ale předejte k odborné
likvidaci. O sběrnách a jejich otevíracích
hodinách se můžete informovat u přísl
ušné
správy města nebo obce.
Vadné nebo vybité baterie se musí podle směrnice
2006/66/ES recyklovat. Baterie a / nebo zařízení
odevzdejte zpět do nabízených sběren.
Škody na životním prostředí
způsobené nesprávným odstra-
něním baterií do odpadu!
Baterie se nesmějí vyhazovat do domovního od
padu.
Mohou obsahovat jedovaté těžké kovy a musejí se
zpracovávat jako zvláštní odpad. Chemické symboly

58
Odstranění do odpadu / Informace
těžkých kovů: Cd = kadmium, Hg = rtuť, Pb = olovo.
Proto odevzdejte vybité baterie u komunální sběrny.
Informace
Garantie
Od okamžiku zakoupení dostáváte na výrobek zá-
ruku po dobu 36 měsíců. Přístroj byl svědomitě vy-
roben a podroben přesné kontrole kvality. Během
záruční doby odstraníme bezplatně všechny vady
materiálu a výrobní vady. Vpřípadě, že se během
záruční doby vyskytnou závady, zašlete laskavě
přístroj na uvedenou adresu servisu a uveďte násle-
dující číslo artiklu: 14146606L / 14154106L.
Ze záruky vyloučeny škody způsobené neodborným
zacházením, nerespektováním návodu kobsluze
nebo zásahem neautorizovanou osobou, jakož i
poškození rychleopotřebitelných dílů (např. svíticí
prostředky). Záručním výkonem se záruční doba
neprodlouží ani neobnoví.
Prohlášení o shodě
Tento výrobek splňuje požadavky platných evropských
a národních směrnic (Směrnice 2014/53/EU a
směrnice o bezpečnosti elektrického zařízení s
nízkým napětím 2014/35/EU, ekologický design
směrnice 2009/125/EG, směrnice RoHS
2011/65/EU). Shoda byla prokázána. Příslušná
prohlášení a dokumentace jsou uloženy uvýrobce.
Tímto prohlašuje firma Briloner Leuchten GmbH &
Co. KG, že rádiové zařízení, model 14146606L /
14154106L splňuje požadavky směrnice
2014/53/EU.
Úplný text EU prohlášení o konformitě je k dispo-
zici na následující webové stránce:
https://www.briloner.com/de/service/
informationen-zu-leuchten/
eu-konformitaetserklaerung-fuer-funkanlagentyp.php
Výrobce / Servis
Briloner Leuchten GmbH & Co. KG
Im Kissen 2
59929 Brilon
NĚMECKO
Telefon: +49 29 61 / 97 12–800
Fax: +49 29 61 / 97 12–199
E-mail: [email protected]
www.briloner.com
Servisní číslo zdarma:
Tel.: 00800 / 27456637
IAN 360045_2010
Pro všechny požadavky si připravte pokladní blok
a číslo výrobku (např. IAN 123456_7890) jako
doklad o nákupu.
CZ
Zoznam obsahu

59 SK
Odstranění do odpadu / Informace Zoznam obsahu
Legenda použitých piktogramov ............................................................................ Strana 60
Úvod .................................................................................................................................................Strana 60
Používanie v súlade s určeným účelom ..........................................................................................Strana 61
Obsah dodávky ............................................................................................................................... Strana 61
Popis častí .........................................................................................................................................Strana 61
Technické údaje ...............................................................................................................................Strana 61
Bezpečnosť ................................................................................................................................. Strana 61
Bezpečnostné upozornenia .............................................................................................................Strana 61
Bezpečnostné upozornenia týkajúce sa batérií / akumulátorových batérií .................................. Strana 63
Príprava ........................................................................................................................................Strana 64
Potrebné náradie a materiál ...........................................................................................................Strana 64
Montáž LED svetelného panela .................................................................................Strana 64
Zapnutie / vypnutie svietidla / nastavenie farby svetla .......................Strana 64
Ovládanie LED svetelného panela s diaľkovým ovládaním ............Strana 64
Výmena batérií ....................................................................................................................... Strana 65
Údržba a čistenie ...................................................................................................................Strana 65
Likvidácia .....................................................................................................................................Strana 65
Informácie ...................................................................................................................................Strana 66
Záruka ..............................................................................................................................................Strana 66
Konformitné vyhlásenie ....................................................................................................................Strana 66
Výrobca / Servis ............................................................................................................................... Strana 66

60 SK
Úvod
Legenda použitých piktogramov
Prečítajte si pokyny! Nebezpečenstvo ohrozenia života
a nebezpečenstvo nehody pre malé
i staršie deti!
Toto svietidlo je určené výhradne na
prevádzku v interiéri, v suchých a
uzatvorených priestoroch.
Toto svietidlo nie je vhodné pre
externé stmievače a elektronické
spínače.
Volt 30000h Životnosť
Hertz (frekvencia) ON OFF Spínacie cykly
Watt (efektívny výkon) Nebezpečenstvo explózie!
Ochranný vodič Noste ochranné rukavice!
Rešpektujte výstražné a bezpečnostné
upozornenia! Obal je vyrobený zo 100 % recyklo-
vaného papiera.
Svietidlo disponuje stupňom ochrany
„IP20“ a je určené výlučne pre nasade-
nie v interiéroch v súkromných domác-
nostiach.
b
a
Obal a zariadenie ekologicky
zlikvidujte!
Ra Hodnota farebného podania
Pozor na zásah elektrickým prúdom!
Nebezpečenstvo ohrozenia života!
Nesprávna likvidácia batérií /
akumulátorových batérií ničí životné
prostredie!
Takto postupujete správne Striedavé napätie (druh prúdu a
druh napätia)
L
N
Polarita
LED svietidlo s nastaviteľným
tónom farby
Úvod
Blahoželáme Vám ku kúpe Vášho nového
prístroja. Rozhodli ste sa tým pre veľmi
kvalitný výrobok. Dôkladne si prečítajte
celý tento návod na obsluhu. Otvorte stranu s obráz-
kami. Tento návod patrí k tomuto výrobku a obsahuje
dôležité upozornenia pre uvedenie do prevádzky a
manipuláciu. Dodržiavajte vždy všetky bezpečnostné
upozornenia. Pred uvedením do prevádzky prekon-
trolujte, či je k dispozícii správne napätie a či sú všetky
diely správne namontované. V prípade otázok alebo
neistoty ohľadom manipulácie s prístrojom sa pro-
sím spojte s Vaším predajcom alebo servisným
Úvod / Bezpečnosť

61 SK
Úvod Úvod / Bezpečnosť
pracoviskom. Tento návod si starostlivo uschovajte
a prípadne ho odovzdajte tretej osobe.
Používanie v súlade
s určeným účelom
Toto svietidlo je vhodné na používanie
vo vnútorných priestoroch. Tento prístroj
je určený len na používanie v súkromných
domácnostiach. Tento produkt je určený pre nor-
málnu prevádzku.
Obsah dodávky
Bezprostredne po vybalení vždy skontrolujte úpl-
nosť dodávky ako aj bezchybný stav zariadenia.
1 LED svetelný panel (14146606L / 14154106L)
4 skrutky (14154106L)
4 hmoždinky (14154106L)
2 skrutky (14146606L)
2 hmoždinky (14146606L)
2 batérie (AAA)
2 ochranné hadičky
1 diaľkové ovládanie
1 návod na montáž a používanie
Popis častí
1 LED svetelný panel
2 Skrutka pre LED svetelný panel
3 Montážny uhol
4 Hmoždinka
5 Skrutka pre montážny uhol
6 Svorka svietidla
7 Sieťový pripojovací kábel (externý)
8 Ochranná hadička
9 Diaľkové ovládanie
10 Kryt priečinka pre batérie
Technické údaje
Model číslo: 14146606L
Svietidlo:
Prevádzkové napätie: 230–240 V ~, 50 Hz
Menovitý výkon max.: LED 24 W
Trieda ochrany: | /
Druh ochrany: IP20
Rozmery: 45 x 45 cm
LED modul:
Menovitý výkon max.: LED, max. 20 W
Model číslo: 14154106L
Svietidlo:
Prevádzkové napätie: 230–240 V ~, 50 Hz
Menovitý výkon max: LED 24 W
Trieda ochrany: | /
Druh ochrany: IP20
Rozmery: 100 x 25 cm
LED modul:
Menovitý výkon max.: LED, max. 21 W
Diaľkové ovládanie:
Batéria: 2 x AAA 1,5 V
Frekvenčné pásmo: 2,4 MHz ISM pásmo
Max. vysielací výkon: < 10,0 dBm
Bezpečnosť
Bezpečnostné
upozornenia
V prípade škôd, ktoré vzniknú nedodržiavaním tohto
návodu na obsluhu, zaniká garančný nárok! Pri ná-
sledných škodách nepreberá výrobca ručenie! V
prípade vecných škôd alebo poranenia osôb, ktoré
boli zapríčinené neodbornou manipuláciou alebo
nedodržiavaním bezpečnostných pokynov, nepre-
berá výrobca ručenie!
NEBEZPE-
ČENSTVO OHROZENIA ŽI-
VOTA A NEBEZPEČENSTVO
NEHODY PRE MALÉ I STARŠIE DETI!

62 SK
Bezpečnosť
Nikdy nenechávajte deti bez dozoru s obalovým
materiálom. Existuje nebezpečenstvo zadusenia
obalovým materiálom. Deti často podceňujú
nebezpečenstvá.
Tento prístroj môžu používať deti od 8 rokov,
ako aj osoby so zníženými psychickými, senzo-
rickými alebo duševnými schopnosťami alebo
s
nedostatkom skúseností a vedomostí, ak sú p
od
dozorom, alebo ak boli poučené ohľadom
bezpečného používania prístroja, a ak porozu-
meli nebezpečenstvám spojeným s jeho použí-
vaním. Deti sa s prístrojom nesmú hrať. Čistenie
a údržbu nesmú vykonávať deti bez dozoru.
POZOR!
Počas prevádzky nepozerajte z krátkej vzdiale-
nosti do LED.
Svetelný zdroj tohto svietidla nie je možné vy-
meniť; keď dosiahne koniec svojej životnosti, je
potrebné vymeniť celé svietidlo.
Nepozerajte do LED pomocou optického
nástroja (napr. lupy).
Zabráňte ohrozeniu života
zásahom elektrickým prúdom
Elektrickú inštaláciu prenechajte kvalifikovanému
elektrikárovi alebo osobe zaškolenej pre elek-
troinštalácie.
V prípade vecných škôd alebo poranenia osôb,
ktoré bolo zapríčinené neodbornou manipulá-
ciou alebo nedodržiavaním bezpečnostných
pokynov, nepreberá výrobca ručenie!
Svietidlo nikdy nepoužívajte v prípade, že
zistíte akékoľvek poškodenia.
Pred montážou odstráňte poistku alebo vypnite
istič vedenia v poistkovej skrinke (poloha 0).
Bezpodmienečne zabráňte kontaktu svietidla
s vodou alebo inými kvapalinami.
Pred montážou sa uistite, že sa existujúce sie-
ťové napätie zhoduje s potrebným prevádzko-
vým napätím svietidla (pozri „Technické údaje“).
Zabezpečte, aby pri montáži neboli poškodené
žiadne vedenia.
Toto svietidlo nie je vhodné pre
externé stmievače a elektronické
spínače.
Zabráňte nebezpečenstvu
požiaru a poranení
Zabezpečte, aby bolo svietidlo vypnuté a vy-
chladnuté skôr, ako sa ho budete dotýkať, pre-
tože inak hrozí nebezpečenstvo popálenia.
Svietidlo neupevňujte na vlhký alebo vodivý
podklad.
Svietidlo alebo obalový materiál nenechávajte
voľne ležať bez povšimnutia. Plastové fólie /
vrecká, plastové diely atď. by mohli byť nebez-
pečnou hračkou pre deti.
Ak sú niektoré osoby vystavené určitým zábles-
kovým svetlám alebo svetelným efektom, môžu
dostať epileptický záchvat alebo utrpieť poruchy
vedomia. Pri epileptických príznakoch ihneď
vyhľadajte lekára.
Požiadavky na rádiové frekv
enčné
rozhrania–s ohľadom na európ-
sku inštaláciu
Poznámka: Tento prístroj bol testovaný a je kon-
formný s hraničnými hodnotami podľa EN 300 440
v2.1.1 prijímač kategórie 3. Tieto hraničné hodnoty
sú koncipované tak, aby poskytovali primeranú
ochranu proti škodlivému rušeniu v súkromných za-
riadeniach. Tento prístroj citlivo reaguje na iné za-
riadenia, ktoré zámerne generujú energiu rádiovej
frekvencie 2.4 Ghz, čo ovplyvňuje výkon diaľko-
vého ovládania. Nemožno však zaručiť, že sa po-
rucha nevyskytne v určitých prístrojoch. Ak je toto
zariadenie ovplyvňované rušením iných zariadení,
môže byť zastavené zapnutím a vypnutím prísluš-
ného zariadenia. Používateľ je vyzvaný vyriešiť
problém niektorým z nasledujúcich opatrení: Vypnite
rušiace zariadenie a nepoužívajte WiFi-kameru s
vysokým vysielacím výkonom v blízkosti zariadenia.
Zväčšite odstup od rušiaceho zariadenia. Zväčšite
odstup od rušiacich zariadení. V prípade problémov
sa obráťte na predajcu alebo špecialistu na rozhla-
sové a televízne prijímače. Úplný text EÚ konformit-
ného vyhlásenia je k dispozícii na nasledujúcej
internetovej adrese:
https://www.briloner.com/de/service/
informationen-zu-leuchten/
eu-konformitaets erklaerung-fuer-funkanlagentyp.php
Bezpečnosť

63 SK
Bezpečnosť Bezpečnosť
Takto postupujete správne
Svietidlo namontujte tak, aby bolo chránené pred
vlhkom, znečistením a príliš silným zahriatím.
Pred vŕtaním sa ubezpečte, že sa v oblasti vŕta-
nia nenachádzajú žiadne plynové, vodovodné
alebo prúdové vedenia. Montáž prenechajte
iba odborníkom. Bezpodmienečne zohľadnite
vlastnosti steny, pretože priložený upevňovací
materiál nie je vhodný pre všetky typy stien.
Všpecializovanej predajni sa informujte o vhod-
ných skrutkách a hmoždinkách pre príslušný
typ steny.
Výrobca nepreberá ručenie za škody vzniknuté
neodborným spojením steny a hmoždinky.
Buďte neustále opatrný! Dávajte vždy pozor
na to, čo robíte, a vždy konajte rozvážne. Svie-
tidlo v žiadnom prípade nepoužívajte, ak ste
práve nekoncentrovaný alebo sa necítite dobre.
Pred montážou prekontrolujte, či je miesto mon-
táže vhodné pre hmotnosť svietidla.
Pred používaním sa oboznámte so všetkými
pokynmi a obrázkami v tomto návode, ako
aj so samotným svietidlom.
Bezpečnostné upozornenia
týkajúce sa batérií /
akumulátorových batérií
NEBEZPEČENSTVO OHROZENIA ŽIVOTA!
Batérie / akumulátorové batérie držte mimo
dosahu detí. V prípade prehltnutia okamžite
vyhľadajte lekára!
Prehltnutie môže mať za následok popáleniny,
perforáciu mäkkých tkanív a smrť. Ťažké popá-
leniny môžu nastať do 2 hodín po prehltnutí.
NEBEZPEČENSTVO EXPLÓZIE!
Nenabíjateľné batérie nikdy znova nenabíjajte.
Batérie / akumulátorové batérie neskratujte
a / alebo neotvárajte. Následkom môže byť
prehriatie, požiar alebo explózia.
Batérie / akumulátorové batérie nikdy nehádžte
do ohňa alebo vody.
Nevystavujte batérie / akumulátorové batérie
mechanickej záťaži.
Riziko vytečenia batérií / akumulátoro-
vých batérií
Batérie / akumulátorové batérie nikdy nevysta-
vujte extrémnym podmienkam a teplotám, ktoré
by na ne mohli pôsobiť, napr. na vykurovacích
telesách / priamom slnečnom žiarení.
Ak batérie / akumulátorové batérie vytiekli, za-
bráňte kontaktu pokožky, očí a slizníc s chemi-
káliami! Ihneď vypláchnite postihnuté miesta
väčším množstvom čistej vody a okamžite vy-
hľadajte lekára!
NOSTE OCHRANNÉ
RUKAVICE!
Vytečené alebo poškodené batérie / akumulá-
torové batérie môžu pri kontakte s pokožkou
spôsobiť poleptanie. V takom prípade preto
noste vhodné ochranné rukavice.
V prípade vytečenia batérií / akumulátorových
batérií ich ihneď vyberte z výrobku, aby ste
predišli vzniku škôd.
Používajte iba batérie / akumulátorové batérie
rovnakého typu. Nekombinujte staré batérie /
akumulátorové batérie s novými!
Ak produkt dlhší čas nepoužívate, vyberte z
neho batérie / akumulátorové batérie.
Riziko poškodenia produktu
Používajte výhradne uvedený typ batérií /
akumulátorových batérií!
Vložte batérie / akumulátorové batérie podľa
označenia polarity (+) a (-) na batérii / akumu-
látorovej batérii a výrobku.
Pred vložením očistite kontakty na batérii /
akumulátorovej batérii a v priečinku pre batériu
suchou handričkou, ktorá nepúšťa vlákna,
alebo vatovou tyčinkou!
Vybité batérie / akumulátorové batérie ihneď
vyberte z produktu.
Správna polarita je znázornená v priečinku
pre batérie.

64 SK
Príprava / Montáž... / Zapnutie... / Ovládanie LED svetelného panela s diaľkovým...
Príprava
Potrebné náradie a materiál
Uvedené náradie / nástroje a materiál nie sú súčas-
ťou dodávky. Ide tu o nezáväzné údaje a hodnoty
pre orientáciu. Charakter materiálu sa riadi podľa
individuálnych daností na mieste.
‒ ceruzka / nástroj na označovanie
‒ 2-pólová skúšačka napätia
‒ skrutkovač
‒ vŕtačka
‒ vrták (cca ø 6 mm)
‒ bočné štípacie kliešte
‒ rebrík
Montáž LED svetelného panela
NEBEZPEČENSTVO ZÁ-
SAHU ELEKTRICKÝM PRÚDOM!
Dôležité: Elektrické pripojenie musí vykonať kvali-
fikovaný elektrikár alebo osoba zaškolená pre elek-
troinšta
lácie. Táto musí mať znalosti o vlastnostiach
svietidla
a predpisoch o pripojení. Odstráňte preto
poistku alebo vypnite istič vedenia v skrinke s poist-
kami (poloha 0) (pozri obr. A).
Vložte batérie do priečinka pre batérie a
dbajte pritom na polaritu (+ a –).
Odstráňte skrutky LED svetelného panelu 2
(pozri obr. A) zboku viditeľné na LED svetel-
nom paneli 1 a vyberte montážny uhol 3
na zadnej strane (pozri obr. B).
Označte otvory určené pre vŕtanie pomocou
dier v montážnom uhle 3 pre skrutky 5.
Teraz vyvŕtajte otvory na upevnenie. Zabez-
pečte, aby ste nepoškodili prívodové vedenie.
Umiestnite hmoždinky 4 do vyvŕtaných otvo-
rov (pozri obr. C).
Upevnite montážny uhol 3 pomocou prilože-
ných skrutiek 5 (pozri obr. D).
Natiahnite ochranné hadičky 8 na káble L a
N sieťového pripojovacieho kábla (externý)
7 (pozri obr. E).
Spojte pripojovací LED svetelný panel pomocou
svorky svietidla 6 so sieťovým pripojovacím
káblom (externý) 7 (pozri obr. E).
Dbajte na to, aby ste zakaždým správne pripo-
jili jednotlivé vodiče sieťového pripojovacieho
kábla (externý) 7: vodič vedúci prúd, čierny
alebo hnedý = symbol L, neutrálny vodič, modrý =
symbol N, ochranný vodič, zeleno-žltý = sym-
bol (Uzemňovacie pripojenie). Dbajte na
správne priliehanie.
Teraz zoskrutkujte LED svetelný panel 1 po-
mocou skrutiek 2 s montážnym uhlom 3.
Poznámka: Dbajte na to, aby skrutky 2
správne zapadli (pozri obr. F a G).
Opäť nasaďte poistku alebo zapnite istič vede-
nia v skrinke s poistkami (poloha I) (pozri obr. H).
Váš LED svetelný panel je teraz pripravený na pre-
vádzku.
Tento LED svetelný panel je vhodný aj ako vsta-
vané svietidlo pre montáž do znížených stropov.
Túto montáž by mal vždy vykonávať špecialista,
pretože presné rozmery LED svetelného panela
musia byť zohľadnené v stropnej konštrukcii.
Zapnutie / vypnutie svietidla /
nastavenie farby svetla
Stlačte svetelný spínač (nástenný spínač), aby
ste za- / vypli LED svetelný panel.
Ak svetelný spínač stláčate krátko za sebou,
strieda LED svetelný panel medzi studenou,
teplou a neutrálnou bielou.
Ovládanie LED svetelného
panela s diaľkovým ovládaním
Poznámka: LED svetelný panel disponuje funkciou
pamäte. Táto ukladá naposledy nastavenú funkciu.
Zapnite LED svetelný spínač pomocou svetel-
ného spínača.
Všetky ďalšie funkcie môžu byť ovládané iba po-
mocou diaľkového ovládania 9 (pozri obr. I).
Ovládanie LED svetelného... / Výmena batérií /Údržba a čistenie / Likvidácia

65 SK
Príprava / Montáž... / Zapnutie... / Ovládanie LED svetelného panela s diaľkovým... Ovládanie LED svetelného... / Výmena batérií /Údržba a čistenie / Likvidácia
Zapnutie
Vypnutie
Stlmovanie (jasnejšie)
Stlmovanie (tmavšie)
Studená biela, plynulo
Neutrálna biela
Teplá biela plynulo
Funkcia časovača (30 min.)
Studená biela / neutrálna biela / teplá biela
Funkcia nočného svetla
Pamäťové miesto pre individuálne farebné
programy:
- Nastavte Vaše svietidlo podľa želania.
- Podržte stlačené tlačidlo M1 alebo M2.
- Po dokončení procesu ukladania Vaše
svietidlo raz zabliká.
Výmena batérií
Keď dosah diaľkového ovládania 9 zoslabne, je
potrebné vymeniť batérie.
Vysuňte kryt priečinka pre batérie 10 na
zadnej strane diaľkového ovládania 9 v
smere šípky von z diaľkového ovládania 9.
Vyberte batérie.
Vložte nové batérie (AAA) do diaľkového
ovládania 9.
Poznámka: Správna polarita je znázornená
v priečinku pre batérie diaľkového ovládania
9
.
Opäť zasuňte kryt priečinka pre batérie 10 na
diaľkové ovládanie 9.
Údržba a čistenie
NEBEZPEČENSTVO
ZÁSAHU ELEKTRICKÝM PRÚDOM!
Pred čistením najskôr odpojte svietidlo od elektric-
kej siete. Z tohto dôvodu odstráňte poistku alebo
vypnite istič vedenia v skrinke na poistky (poloha 0)
(pozri obr. A)
.
Zabezpečte, aby bolo svietidlo vypnuté a vyc
hlad-
nuté skôr, ako sa ho budete dotýkať, pretože
inak hrozí nebezpečenstvo popálenia.
Nepoužívajte žiadne rozpúšťadlá, benzín a. i.
Svietidlo by sa pritom poškodilo.
Na čistenie LED svetelného panela 1 použí-
vajte čistú handričku, ktorá nepúšťa vlákna.
Opäť nasaďte poistku alebo zapnite istič vede-
nia v skrinke s poistkami (poloha I) (pozri obr. H).
Likvidácia
Obal pozostáva z ekologických materiálov, ktoré
môžete odovzdať na miestnych recyklačných zber-
ných miestach.
b
a
Všímajte si prosím označenie obalových
materiálov pre triedenie odpadu, sú
označené skratkami (a) a číslami (b) s
nasledujúcim významom: 1–7: Plasty /
20–22: Papier a kartón / 80–98: Spo-
jené látky.
Výrobok a obalové materiály sú recyklo-
vateľné, zlikvidujte ich oddelene pre lep-
šie spracovanie odpadu. Triman-Logo
platí iba pre Francúzsko.
Ak výrobok doslúžil, v záujme ochrany
životného prostredia ho neodhoďte do
domového odpadu, ale odovzdajte na
odbornú likvidáciu. Informácie o zber-
ných miestach a ich otváracích hodinách
získate na Vašej príslušnej správe.

66 SK
ÍndiceLikvidácia / Informácie
Defektné alebo použité batérie / akumulátorové
batérie musia byť odovzdané na recykláciu podľa
smernice 2006/66/ES a jej zmien. Batérie / aku-
mulátorové batérie a / alebo výrobok odovzdajte
prostredníctvom dostupných zberných stredísk.
Nesprávna likvidácia batérií /
akumulátorových batérií ničí
životné prostredie!
Batérie / akumulátorové batérie sa nesmú likvidovať
spolu s domovým odpadom. Môžu obsahovať jedo-
vaté ťažké kovy a je potrebné zaobchádzať s nimi
ako s nebezpečným odpadom. Chemické značky
ťažkých kovov sú nasledovné: Cd = kadmium, Hg =
ortuť, Pb = olovo. Opotrebované batérie / akumulá-
torové batérie preto odovzdajte v komunálnej zberni.
Informácie
Záruka
Na tento prístroj poskytujeme záruku 36 mesiacov
od dátumu kúpy. Prístroj bol starostlivo vyrobený
a podrobený dôkladnej kontrole kvality. Vrámci
záručnej doby bezplatne odstránime všetky chyby
materiálu a výrobné chyby. Ak by sa však počas
záručnej doby vyskytli nedostatky, odošlite prístroj
na uvedenú adresu servisu s uvedením nasledov-
ného čísla výrobku: 14146606L / 14154106L.
Zo záruky sú vylúčené škody spôsobené neodbor-
nou manipuláciou, nedodržaním návodu na obsluhu
alebo zásahom neautorizovanej osoby, ako aj diely
podliehajúce opotrebovaniu (napr. osvetľovacie
prostriedky). Poskytnutím záruky sa záručná doba
nepredlžuje ani neobnovuje.
Konformitné vyhlásenie
Tento výrobok spĺňa požiadavky platných európ-
skych a národných smerníc (Smernica 2014/53/EÚ,
Smernica o nízkom napätí 2014/35/EÚ, Smernica
o ekodizajne 2009/125/ES, Smernica RoHS
2011/65/EÚ). Konformita bola preukázaná. Prís-
lušné prehlásenia a podklady sú uložené u výrobcu.
Týmto spoločnosť Briloner Leuchten GmbH & Co.
KG prehlasuje, že typ rádiového zariadenia
14146606L / 14154106L zodpovedá smernici
2014/53/EÚ.
Úplný text EÚ konformitného vyhlásenia je k dispo-
zícii na nasledujúcej internetovej adrese:
https://www.briloner.com/de/service/
informationen-zu-leuchten/
eu-konformitaetserklaerung-fuer-funkanlagentyp.php
Výrobca / Servis
Briloner Leuchten GmbH & Co. KG
Im Kissen 2
59929 Brilon
NEMECKO
Tel.: +49 29 61 / 97 12–800
Fax: +49 29 61 / 97 12–199
E-mail: [email protected]
www.briloner.com
Bezplatné servisné číslo:
Tel.: 00800 / 27456637
IAN 360045_2010
Pre všetky otázky majte pripravený pokladničný
doklad a číslo výrobku (napr. IAN 123456_7890)
ako dôkaz o kúpe.

67 ES
Leyenda de pictogramas utilizados ..................................................................... Página 68
Introducción .............................................................................................................................. Página 68
Especificaciones de uso .................................................................................................................. Página 69
Contenido ........................................................................................................................................ Página 69
Descripción de los componentes ................................................................................................... Página 69
Características técnicas .................................................................................................................. Página 69
Seguridad ................................................................................................................................... Página 69
Advertencias de seguridad ............................................................................................................ Página 69
Indicaciones de seguridad sobre las pilas / baterías ................................................................... Página 71
Preparativos ............................................................................................................................. Página 72
Herramientas y materiales necesarios ........................................................................................... Página 72
Montar el panel de luz LED .......................................................................................... Página 72
Cómo encender / apagar la lámpara / Ajustar color de luz ............. Página 73
Utilizar el panel de luz LED con el mando a distancia ........................... Página 73
Cambiar las pilas .................................................................................................................. Página 73
Mantenimiento y limpieza............................................................................................ Página 73
Eliminación ................................................................................................................................. Página 73
Información ............................................................................................................................... Página 74
Garantía .......................................................................................................................................... Página 74
Declaración de conformidad ......................................................................................................... Página 74
Fabricante / Asistencia .................................................................................................................... Página 75
ÍndiceLikvidácia / Informácie

68 ES
Introducción / SeguridadIntroducción
Leyenda de pictogramas utilizados
¡Lea las instrucciones! ¡Peligro mortal y de accidentes para
bebés y niños!
Esta lámpara solo está indicada para
ser utilizada en espacios interiores,
secos y cerrados.
Esta lámpara no está diseñada para
utilizarse con interruptores electrónicos
ni con reguladores externos.
Voltio 30000h Vida útil
Hercio (frecuencia) ON OFF Ciclos de encendido
Vatio (potencia real) ¡Peligro de explosión!
Conexión de toma de tierra ¡Use guantes de seguridad!
¡Tenga en cuenta las advertencias e
indicaciones de seguridad! El embalaje está compuesto por
papel 100 % reciclado.
La lámpara cuenta con un grado de
protección «IP20» y únicamente se
recomienda su uso en espacios
domésticos interiores privados.
b
a
¡Deseche el embalaje y el aparato
de forma respetuosa con el
medioambiente!
Ra Índice de reproducción cromática
¡Precaución frente a descargas
eléctricas!
¡Peligro de muerte!
¡Daños medioambientales por un r
eciclaje indebido de las pilas /
baterías!
Cómo proceder de forma segura Corriente alterna (tipo de corriente y
de tensión)
L
N
Polaridad
Panel luminoso led con
regulación de color
Introducción
Le damos la enhorabuena por haber
adquirido este nuevo aparato. Ha elegido
un producto de alta calidad. Lea atenta
y completamente las siguientes instrucciones de uso.
Despliegue la página con las ilustraciones. Estas
instrucciones forman parte del producto y contienen
información importante sobre su puesta en funcio-
namiento y uso. Tenga siempre en cuenta todas las
advertencias de seguridad. Antes de poner el artí-
culo en funcionamiento, compruebe que la tensión
es la adecuada y que todas las piezas están bien
montadas. Si tiene dudas o no sabe cómo
utilizar el aparato, póngase en contacto con su

69 ES
Introducción / SeguridadIntroducción
distribuidor o el servicio técnico. Conserve estas
instrucciones en un lugar seguro y adjúntelas en
caso de entregar el producto a otra persona.
Especificaciones de uso
Esta lámpara está destinada exclusiva-
mente para el funcionamiento en espacios
interiores. Este aparato ha sido diseñado
exclusivamente para uso doméstico. Este producto
ha sido diseñado para un funcionamiento normal.
Contenido
Después de desembalar el aparato, compruebe
siempre que dispone de todo el contenido indi-
cado y que el aparato se encuentra en perfecto es-
tado.
1 panel de luz LED (14146606L / 14154106L)
4 tornillos (14154106L)
4 tacos (14154106L)
2 tornillos (14146606L)
2 tacos (14146606L)
2 pilas (AAA)
2 tubos de protección
1 mando a distancia
1 manual de instrucciones de montaje y manejo
Descripción de los
componentes
1 Panel de luz LED
2 Tornillos para el panel de luz LED
3 Soporte de montaje
4 Taco
5 Tornillos para soporte de montaje
6 Regleta
7 Cable de alimentación (externo)
8 Tubo de protección
9 Mando a distancia
10 Tapa del compartimento de las pilas
Características técnicas
Número de modelo: 14146606L
Lámpara:
Tensión de funcionamiento: 230–240 V~, 50 Hz
Potencia nominal máx.: LED 24 W
Clase de protección: I /
Tipo de protección: IP20
Medidas: 45 x 45 cm
Módulo LED:
Potencia nominal máx.: LED, máx. 20 W
Número de modelo: 14154106L
Lámpara:
Tensión de funcionamiento: 230–240 V~, 50 Hz
Potencia nominal máx.: LED 24 W
Clase de protección: I /
Tipo de protección: IP20
Medidas: 100 x 25 cm
Módulo LED:
Potencia nominal máx.: LED, máx. 21 W
Mando a distancia:
Pilas: 2 x AAA 1,5 V
Banda de frecuencia: 2,4 GHz banda ICM
Potencia de transmisión
máx.: < 10,0 dBm
Seguridad
Advertencias de seguridad
¡La garantía no cubre los daños provocados por el
incumplimiento de estas instrucciones de uso! ¡No
se asumirá ninguna responsabilidad por daños in-
directos! ¡No se asume ninguna responsabilidad
en caso de daños materiales o personales provo-
cados por un uso inadecuado o la inobservancia
de las instrucciones de seguridad!
¡PELIGRO
DE MUERTE Y DE ACCIDENTE
PARA BEBÉS Y NIÑOS!

70 ES
SeguridadSeguridad
No deje nunca a los niños sin vigilancia con el
material de embalaje. Existe peligro de asfixia
por el material de embalaje. Los niños no suelen
ser conscientes de los peligros.
Este aparato puede ser utilizado por niños
mayores de 8 años, así como por personas
con capacidades físicas, sensoriales o mentales
reducidas o que cuenten con poca experiencia
y/o falta de conocimientos, siempre y cuando
se les haya enseñado cómo utilizar el aparato
de forma segura y hayan comprendido los pe-
ligros que pueden resultar de un mal uso del
mismo. No permita que los niños jueguen con
el aparato. Las labores de limpieza y manteni-
miento no pueden ser efectuadas por niños sin
la supervisión de un adulto.
¡ATENCIÓN!
Cuando la luz esté encendida, no mire al LED
directamente a poca distancia.
El foco de luz de esta lámpara no puede cam-
biarse, por lo que, cuando llegue al final de su
vida útil, deberá desecharse toda la lámpara.
No observe el LED con un instrumento óptico
(por ej., una lupa).
Evite peligros mortales por
descarga eléctrica
La instalación eléctrica la debe realizar un
electricista formado o una persona instruida
en instalaciones eléctricas.
¡No se asume ninguna responsabilidad en caso
de daños materiales o personales provocados
por un uso inadecuado o la inobservancia de
las instrucciones de seguridad!
Nunca utilice la lámpara si ha detectado algún
tipo de daño.
Antes de instalar el producto, retire el fusible o
desconecte el correspondiente interruptor de
la caja de fusibles (posición 0).
Evite que la lámpara entre en contacto con
agua u otros líquidos.
Asegúrese antes del montaje de que la tensión
de red disponible coincida con la tensión de
funcionamiento necesaria de la lámpara (con-
sultar «Características técnicas»).
Asegúrese de que durante el montaje ningún
cable resulta dañado.
Esta lámpara no está diseñada para
utilizarse con interruptores electróni-
cos ni con reguladores externos.
Evite incendios y riesgos
de lesiones
Asegúrese de que la lámpara está apagada y
se ha enfriado antes de tocarla para evitar
quemaduras.
No fije la lámpara sobre suelos húmedos o
conductores.
No deje la lámpara ni el material de embalaje
sin supervisión. Las láminas y bolsas de plástico,
las piezas de plástico, etc. pueden convertirse
en juguetes peligrosos para los niños.
En algunas personas pueden producirse ataques
epilépticos o trastornos del estado de concien-
cia cuando están expuestas a luces relámpago
o a efectos de luz. Si detecta síntomas epilépti-
cos acuda inmediatamente a un médico.
Requisitos de la interfaz de
radiofrecuencia, en relación con
la instalación europea
Nota: este dispositivo ha sido testado y cumple
con los valores límites de dispositivo receptor según
EN 300 440 v2.1.1 categoría 3. Estos valores límites
han sido diseñados para proporcionar una protec-
ción razonable contra interferencias perjudiciales
en una instalación privada. Este dispositivo es sen-
sible a otros dispositivos que generen deliberada-
mente energía de radiofrecuencia de 2,4 GHz y,
por lo tanto, afectan el rendimiento del mando a
distancia. Por tanto, no puede garantizarse que la
interferencia no vaya a producirse en un dispositivo
en particular. En caso de que este dispositivo se
viera afectado por la interferencia de otros disposi-
tivos, esto puede solucionarse encendiendo y apa-
gando el dispositivo correspondiente. El usuario
podrá solventar la interferencia mediante una de
las siguientes medidas: apague el dispositivo cau-
sante de la interferencia y no utilice una cámara
WiFi con potencia de transmisión alta cerca del

71 ES
SeguridadSeguridad
dispositivo. Aumente la distancia con el dispositivo
perturbador. Consulte con el vendedor o un espe-
cialista en dispositivos de radio/TV en caso de surgir
problemas. Podrá acceder al texto completo de la
declaración de conformidad de la Unión Europea
en la siguiente dirección de Internet:
https://www.briloner.com/de/service/
informationen-zu-leuchten/
eu-konformitaetserklaerung-fuer-funkanlagentyp.php
Cómo proceder de forma segura
Monte la lámpara de modo que esté protegida
de la humedad, la suciedad y de temperaturas
demasiado elevadas.
Asegúrese antes de perforar de que en el lugar
elegido no haya tuberías de gas, agua o cables
de corriente. El montaje únicamente deberá
realizarse por personal especializado. Preste
atención a la calidad de la pared ya que el
material de fijación incluido no es apto para
todos los tipos de pared. Infórmese en un co-
mercio especializado sobre los tornillos y los
tacos más adecuados para la calidad de muro
correspondiente.
El fabricante no asume ninguna responsabilidad
por una fijación inadecuada de la pared con
los tacos y los daños ocasionados por la misma.
¡Proceda siempre con sumo cuidado! Preste
mucha atención a lo que hace y actúe siempre
con sentido común. Bajo ningún concepto utilice
la lámpara si está distraído o no se encuentra
bien.
Compruebe antes del montaje que el lugar es-
cogido sea apropiado para el peso de la lám-
para.
Familiarícese con la lámpara y con las indica-
ciones e ilustraciones de este manual antes de
utilizarla.
Indicaciones de seguridad
sobre las pilas / baterías
¡PELIGRO DE MUERTE!
Mantenga las pilas / baterías fuera del alcance
de los niños. ¡En caso de ingestión, acuda in-
mediatamente a un médico!
La ingestión puede provocar quemaduras, per-
foraciones de tejidos blandos y la muerte. Las
quemaduras graves pueden aparecer pasadas
2 horas tras la ingestión.
¡PELIGRO DE EXPLOSIÓN!
No recargue nunca pilas no recargables. No
ponga las pilas / baterías en cortocircuito ni
tampoco las abra. Estas podrían recalentarse,
explotar o provocar un incendio.
Nunca arroje pilas / baterías al fuego o al
agua.
No aplique cargas mecánicas sobre las pilas /
baterías.
Riesgo de sulfatación de las pilas / baterías
Evite condiciones y temperaturas extremas que
puedan influir en el funcionamiento de las pilas /
baterías, por ejemplo, acercarlas a un radiador
o exponerlas directamente a la luz solar.
¡Si las pilas / baterías se sulfatan, evite el
contacto de la piel, los ojos y las mucosas con
los productos químicos! ¡En caso de entrar en
contacto con el ácido, lave inmediatamente la
zona afectada con abundante agua y busque
atención médica!
¡UTILICE GUANTES DE SEGU-
RIDAD!
Las pilas / baterías sulfatadas o dañadas pue-
den provocar abrasiones al entrar en contacto
con la piel. Por tanto, es imprescindible el uso
de guantes de protección en estos casos.
En caso de sulfatación de las pilas / baterías,
retírelas inmediatamente del producto para
evitar daños.
Utilice únicamente pilas / baterías del mismo
tipo. ¡No mezcle pilas / baterías usadas con
nuevas!
Retire las pilas / baterías del producto si no va
a utilizarlo durante un período de tiempo pro-
longado.

72 ES
Cómo encender / apagar ... / Utilizar el panel de luz ... / Cambiar las pilas / ...Seguridad / Preparativos / Montar el panel de luz LED
Riesgo de daño del producto
¡Utilice exclusivamente el tipo de pila / batería
indicado!
Introduzca las pilas / baterías teniendo en cuenta
la polaridad marcada con (+) y (-) tanto en las
pilas / baterías como en el producto.
¡Limpie los contactos de la pila / batería y en
el compartimento de las pilas antes de la inser-
ción con un paño seco y libre de pelusas o un
bastoncillo de algodón!
Retire inmediatamente las pilas / baterías ago-
tadas del producto.
La polaridad correcta aparece indicada en el
compartimento de las pilas.
Preparativos
Herramientas y materiales
necesarios
Las herramientas y los materiales mencionados no
se incluyen con el producto. Los datos y valores in-
dicados son aproximados y meramente orientativos.
Los materiales necesarios dependerán de las cir-
cunstancias particulares de cada situación.
– Lápiz / marcador
‒ Detector de tensión de 2 polos
‒ Destornillador
‒ Taladro
‒ Broca (aprox. ø 6 mm)
‒ Alicates
‒ Escalera
Montar el panel de luz LED
¡PELIGRO DE DES-
CARGA ELÉCTRICA!
Importante: Encargue la instalación eléctrica a
un electricista o a una persona especialmente cua-
lificada para ello. Esta persona deberá conocer las
características de la lámpara y las normas de co-
nexión. Retire el fusible o desconecte el interruptor
automático de protección en la caja de fusibles
(posición 0) (ver fig. A).
Coloque las pilas en el compartimento de las
pilas teniendo en cuenta la polaridad correcta
(+ y -).
Retire los tornillos del panel de luz LED 2 visi-
bles situados en el lateral del panel de luz LED
1 (ver fig. A) y retire el soporte de montaje
3 de la parte posterior (ver fig. B).
Marque los agujeros para taladrar con ayuda
de los orificios previstos para los tornillos 5
en el soporte de montaje 3.
Perfore los agujeros de fijación con el taladro.
Asegúrese de no dañar el cable de alimentación.
Introduzca los tacos 4 en los orificios taladra-
dos (ver fig. C).
Fije el soporte de montaje 3 con los tornillos
incluidos 5 (ver fig. D).
Pase los tubos de protección 8 por los cables
L y N del cable de alimentación (externo) 7
(ver fig. E).
Conecte el cable de conexión del panel de luz
LED por medio de la regleta 6 al cable de
alimentación (externo) 7 (ver fig. E).
Asegúrese de que cada uno de los conductores
del cable de alimentación (externo) 7 están
correctamente conectados: conductor de co-
rriente, negro o marrón = símbolo L; conductor
neutro, azul = símbolo N, conexión de toma
de tierra, verde-amarillo = símbolo (conexión
a tierra).
Compruebe que esté correctamente colocada.
A continuación fije el panel de luz LED 1 me-
diante los tornillos 2 al soporte de montaje 3.
Nota: Asegúrese de que los tornillos 2 en-
cajan correctamente (ver fig. F y G).
Vuelva a colocar el fusible o conecte el inte-
rruptor automático de protección en la caja de
fusibles (posición I) (ver fig. H).
Su panel de luz LED está listo para funcionar.
Este panel de luz LED también puede instalarse
en falsos techos a modo de lámpara empo-
trada.
Este montaje ha de ser realizado por personal
especializado ya que deberán tenerse en cuenta
las dimensiones exactas del panel de luz LED
para su instalación en el techo.

73 ES
Cómo encender / apagar ... / Utilizar el panel de luz ... / Cambiar las pilas / ...Seguridad / Preparativos / Montar el panel de luz LED
Cómo encender / apagar la
lámpara / Ajustar color de luz
Presione el interruptor de luz (interruptor de
pared) para encender / apagar el panel de
luz LED.
Si presiona el interruptor de luz en sucesión rá-
pida, el panel de luz LED cambia entre blanco
frío, cálido y neutro.
Utilizar el panel de luz LED con
el mando a distancia
Nota: El panel de luz LED cuenta con función de
memoria. Esta almacena la última función seleccio-
nada.
Encienda el panel de luz LED con el interruptor.
El resto de funciones pueden controlarse únicamente
a través del mando a distancia 9 (ver fig. I).
Conexión
Desconexión
Regulador (luz más clara)
Regulador (luz más oscura)
Blanco frío, ajuste continuo
Blanco neutro
Blanco cálido, ajuste continuo
Temporizador (30 min.)
Blanco frío / blanco neutro / blanco cálido
Función de luz nocturna
Espacio de almacenamiento para progra-
mas de color personalizados:
- Ajuste su lámpara como desee.
- Mantenga pulsado el botón M1 o M2.
- Cuando el proceso de almacenamiento fi-
nalice, su lámpara parpadeará una vez.
Cambiar las pilas
Si el alcance del mando a distancia 9 disminuye,
cambie las pilas (ver fig. I).
Empuje la tapa del compartimento de las pilas
10 de la parte trasera del mando a distancia
9 en la dirección de la flecha del mando a
distancia 9.
Saque las pilas.
Introduzca las pilas nuevas (AAA) en el mando
a distancia 9.
Nota: La polaridad correcta aparece indicada
en el compartimento de las pilas del mando a
distancia 9.
Coloque de nuevo la tapa del compartimento
de las pilas 10 en el mando a distancia 9.
Mantenimiento y limpieza
¡PELIGRO DE DES-
CARGA ELÉCTRICA!
Antes de limpiar, desenchufe la lámpara de la red
eléctrica. Retire el fusible o desconecte el interrup-
tor automático de protección en la caja de fusibles
(posición 0) (ver fig. A).
Asegúrese de que la lámpara está apagada y
se ha enfriado antes de tocarla para evitar
quemaduras.
No utilice disolventes, gasolina ni similares. La
lámpara podría dañarse.
Limpie el panel de luz LED 1 con un paño
seco sin pelusas.
Vuelva a colocar el fusible o conecte el inte-
rruptor automático de protección en la caja de
fusibles (posición I) (ver fig. H).
Eliminación
El embalaje está compuesto por materiales no
contaminantes que pueden ser desechados en el
centro de reciclaje local.

74 ES
InformaciónEliminación / Información
b
a
Tenga en cuenta el distintivo del emba-
laje para la separación de residuos.
Está compuesto por abreviaturas (a) y
números (b) que significan lo siguiente:
1–7: plásticos / 20–22: papel y car-
tón / 80–98: materiales compuestos.
El producto y el material de embalaje
son reciclables. Separe los materiales
para un mejor tratamiento de los residuos.
El logotipo Triman se aplica solo para
Francia.
Para proteger el medio ambiente no tire
el producto junto con la basura domés-
tica cuando ya no le sea útil. Deséchelo
en un contenedor de reciclaje. Diríjase a
la administración competente para obte-
ner información sobre los puntos de
recogida de residuos y sus horarios.
Las pilas / baterías defectuosas o usadas deben
ser recicladas según lo indicado en la directiva
2006/66/CE y en sus modificaciones. Recicle las
pilas / baterías y / o el producto en los puntos de
recogida adecuados.
¡Daños en el medio ambiente
por un reciclaje indebido de las
pilas / baterías!
Las pilas / baterías no deben eliminarse junto con los
residuos domésticos. Estas pueden contener metales
pesados tóxicos que deben tratarse conforme a la
normativa aplicable a los residuos especiales. Los
símbolos químicos de los metales pesados son: Cd =
cadmio, Hg = mercurio, Pb = plomo. Las pilas / ba-
terías deben reciclarse en un punto de recolección
específico para ello.
Información
Garantía
Este aparato cuenta con una garantía de 36 meses
a partir de la fecha de compra. Este aparato ha
sido meticulosamente fabricado y ha sido sometido
a estrictos controles de calidad. Dentro del período
de garantía, reparamos gratuitamente todos los
defectos de los materiales o de fabricación.
En cualquier caso, si durante el periodo de garan-
tía se produjeran fallos de funcionamiento, envíe el
aparato a la dirección de atención al cliente indi-
cando la siguiente referencia: 14146606L /
14154106L.
Quedan excluidos de la garantía los daños produ-
cidos por un manejo incorrecto, por incumplimiento
del manual de instrucciones o en caso de manipu-
lación por parte de personas no autorizadas, así
como las piezas de desgaste (por ej. las bombillas).
Si se hace uso de la garantía, no se prolongará ni
renovará el período de garantía.
Declaración de conformidad
Este producto cumple las exigencias de las directivas
europeas y nacionales vigentes (directiva
2014/53/UE, directiva de baja tensión
2014/35/UE, directiva de diseño ecológico
2009/125/UE, directiva RoHS 2011/65/UE). Se
ha comprobado la conformidad. El fabricante posee
las declaraciones y documentos correspondientes.
Por la presente Briloner Leuchten GmbH & Co. KG
declara que el tipo de equipo de radio 14146606L /
14154106L cumple con la directiva 2014/53/UE.
Podrá acceder al texto completo de la declaración
de conformidad de la Unión Europea en la siguiente
dirección de Internet:
https://www.briloner.com/de/service/
informationen-zu-leuchten/
eu-konformitaetserklaerung-fuer-funkanlagentyp.php

75 ES
InformaciónEliminación / Información
Fabricante / Asistencia
Briloner Leuchten GmbH & Co. KG
Im Kissen 2
59929 Brilon
ALEMANIA
Tel.: +49 29 61 / 97 12–800
Fax: +49 29 61 / 97 12–199
Correo
electrónico: kundenser[email protected]
www.briloner.com
Gratuita número de servicio:
Tel.: 00800 / 27456637
IAN 360045_2010
Por favor, para cualquier consulta, tenga a mano
el tique de compra y el número del artículo (por ej.
IAN 123456_7890) como justificante de compra.

76
Indholdsfortegnelse

77 DK
De anvendte piktogrammers legende ....................................................................Side 78
Indledning .......................................................................................................................................Side 78
Formålsbestemt anvendelse ................................................................................................................Side 79
Leverede dele .......................................................................................................................................Side 79
Beskrivelse af de enkelte dele .............................................................................................................Side 79
Tekniske data........................................................................................................................................Side 79
Sikkerhed.........................................................................................................................................Side 79
Sikkerhedshenvisninger ........................................................................................................................Side 79
Sikkerhedshenvisninger for batterier / akkuer ....................................................................................Side 81
Forberedelse .................................................................................................................................Side 81
Nødvendigt værktøj og materiale .......................................................................................................Side 81
Montering af LED-lyspanel ................................................................................................Side 82
Tænd / sluk af lampen / indstilling af lysfarven ...............................................Side 82
Betjening af LED-lyspanelet med fjernbetjeningen .......................................Side 82
Skift af batterier .........................................................................................................................Side 83
Vedligeholdelse og rengøring .......................................................................................Side 83
Bortskaffelse .................................................................................................................................Side 83
Information.....................................................................................................................................Side 83
Garanti .................................................................................................................................................Side 83
Konformitetserklæring ..........................................................................................................................Side 84
Producent / service ...............................................................................................................................Side 84
Indholdsfortegnelse

78 DK
Indledning / SikkerhedIndledning
De anvendte piktogrammers legende
Læs anvisningerne! Livs- og ulykkesfare for småbørn og
børn!
Denne lampe er udelukkende egnet til
indendørs brug i tørre og lukkede rum. Denne lampe er ikke egnet til eksterne
lysdæmpere og elektroniske kontakter.
Volt 30000h Levetid
Hertz (frekvens) ON OFF Tænd-sluk-cyklusser
Watt (aktiv effekt) Eksplosionsfare!
Beskyttelsesleder Bær beskyttelseshandsker!
Overhold advarsels- og
sikkerhedshenvisninger! Emballagen består af 100 %
genbrugspapir.
Lampen har beskyttelsesgraden “IP20“
og er udelukkende beregnet til inden-
dørs brug i private hjem.
b
a
Bortskaf emballage og apparat
miljøvenligt!
Ra Farvegengivelsesværdi
Advarsel mod elektrisk stød!
Livsfare! Miljøskader pga. forkert bortskaffelse
af batterier / genopladelige batterier!
Sådan forholder du dig rigtigt Vekselspænding (strøm- og
spændingsart)
L
N
Polaritet
LED-lyspanel med justering af
lysnuance
Indledning
Vi ønsker dig tillykke med købet af dit
nye apparat. Med købet har du besluttet
dig for et førsteklasses produkt. Læs denne
betjeningsvejledning fuldstændigt og omhyggeligt
igennem. Fold siden med afbildningerne ud. Denne
vejledning hører til dette produkt og indeholder vig-
tige henvisninger om ibrugtagning og håndtering.
Overhold altid alle sikkerhedshenvisninger. Kontroller
inden ibrugtagningen, om den korrekte spænding
er tilstede, og om alle dele er rigtigt monteret. Skulle
du have spørgsmål eller være usikker med hensyn
til håndteringen af apparatet, så kontakt venligst
din forhandler eller servicestedet. Denne vejledning
skal opbevares omhyggeligt og i givet fald gives
videre til tredjemand.

79 DK
Indledning / SikkerhedIndledning
Formålsbestemt anvendelse
Denne lampe er egnet til indørs brug.
Dette apparat er kun bestemt til anven-
delse i private hjem. Dette produkt er
kun beregnet til den normale drift.
Leverede dele
Kontroller altid umiddelbart efter udpakningen, om
de leverede dele er komplette, samt om produktet
er i fejlfri stand.
1 LED-lyspanel (14146606L / 14154106L)
4 skruer (14154106L)
4 rawlplugs (14154106L)
2 skruer (14146606L)
2 rawlplugs (14146606L)
2 batterier (AAA)
2 beskyttelsesslanger
1 fjernbetjening
1 monterings- og betjeningsvejledning
Beskrivelse af de enkelte dele
1 LED-lyspanel
2 Skrue til LED-lyspanel
3 Monteringsbeslag
4 Rawlplugs
5 Skrue til monteringsbeslag
6 Samlemuffe
7 Nettilslutningsledning (ekstern)
8 Beskyttelsesslange
9 Fjernbetjening
10 Batterirumslåg
Tekniske data
Modelnummer: 14146606L
Lampe:
Driftspænding: 230–240 V~, 50 Hz
Nominel effekt maks.: LED 24 W
Beskyttelsesklasse: | /
Beskyttelsesart: IP20
Mål: 45 x 45 cm
LED-modul:
Nominel effekt maks.: LED, maks. 20 W
Modelnummer: 14154106L
Lampe:
Driftspænding: 230–240 V~, 50 Hz
Nominel effekt maks.: LED 24 W
Beskyttelsesklasse: | /
Beskyttelsesart: IP20
Mål: 100 x 25 cm
LED-modul:
Nominel effekt maks.: LED, maks. 21 W
Fjernbetjening:
Batteri: 2 x AAA 1,5 V
Frekvensbånd: 2,4 GHz ISM bånd
Maks. sendeeffekt: <10,0 dBm
Sikkerhed
Sikkerhedshenvisninger
Ved skader, som forårsages af ikke-overholdelse af
denne betjeningsvejledning, bortfalder garantikravet!
For følgeskader overtages ingen hæftelse! Ved ma-
terielle skader eller personskader, som forårsages
gennem uhensigtsmæssig håndtering eller ikke-
overholdelse af sikkerhedshenvisningerne, overtages
der ingen hæftelse!
LIVS- OG
ULYKKESFARE FOR SMÅBØRN
OG BØRN!
Lad aldrig børn være uden opsyn med embal-
lagen. Der er fare for kvælning gennem embal-
lagen. Børn undervurderer ofte farerne.
Dette apparat kan anvendes af børn fra 8 års-
alderen, samt af personer med nedsatte fysiske,
sensoriske og mentale evner eller mangel på
erfaring, hvis de er under opsyn eller er blevet
instrueret i sikker brug af apparatet og forstår
de deraf følgende farer. Børn må ikke lege med
produktet. Rengøring og brugervedligeholdelse
må ikke foretages af børn uden opsyn.

80 DK
Sikkerhed / ForberedelseSikkerhed
OBS!
Se ved drift aldrig ind i LED’en fra kort afstand.
Denne lampes lyskilde kan ikke erstattes; når
lyskilden har nået slutningen af sin levetid, skal
hele lampen udskiftes.
Betragt ikke LED’en med et optisk instrument
(f.eks. lup).
Undgå livsfare på grund
af elektrisk stød
Lad el-installationen blive udført af en faguddan-
net elektriker eller en person, der er instrueret i
udførelsen af elektriske installationer.
Ved materielle skader eller personskader, som
forårsages gennem uhensigtsmæssig håndtering
eller ikke-overholdelse af sikkerhedshenvisnin-
gerne, overtages der ikke nogen hæftelse!
Brug aldrig lampen, når du konstaterer nogle
beskadigelser.
Fjern sikringen inden montagen eller slå afbry-
deren til overstrømsbeskyttelsen i tavlen fra
(0-stilling).
Undgå absolut at lampen kommer i berøring
med vand eller andre væsker.
Kontroller inden monteringen, at den tilstede-
værende netspænding stemmer overens med
lampens nødvendige driftspænding (se
”Tekniske data”).
Sørg for at der ikke beskadiges nogle ledninger
ved montagen.
Denne lampe er ikke egnet til eks-
terne lysdæmpere og elektroniske
kontakter.
Undgå fare for brand
og tilskadekomst
Sørg for at lampen er slukket og afkølet, inden
du rører ved produktet for at undgå forbræn-
dinger.
Fastgør ikke lampen på fugtig eller ledende
undergrund.
Lad lampen eller emballagen ikke ligge rundt
omkring og flyde. Plastikfolier / -poser, kunst-
stofdele etc. kan blive til et farligt legetøj for
børn.
Hos nogle personer kan der opstå epileptiske
anfald eller bevidsthedsforstyrrelser, når de ud-
sættes for blitzlys eller lyseffekter. Opsøg ved
epileptiske symptomer omgående en læge.
Krav til radiofrekvensgrænsefla-
der i henhold til den europæiske
installation
Bemærk: Dette apparat blev kontrolleret og stem-
mer overens med grænseværdierne i henhold til EN
300 440 v2.1.1 modtager kategori 3. Disse græn-
seværdier er fastsat, for at give en sikkerhed mod
skadelige forstyrrelser i private installationer. Dette
apparat reagerer følsomt på andre apparater, som
forsætligt udsender radiofrekvensenergi i 2.4 Ghz
og dermed reducerer fjernbetjeningens effekt. Der
kan dog ikke gives en garanti på, at forstyrrelsen
ikke forekommer i visse apparater. Hvis dette appa-
rat bliver påvirket af forstyrrelser af andre apparater,
kan dette bringes til ophør ved at tænde og slukke
det respektive apparat. Brugeren opfordres til at
bringe forstyrrelserne til ophør ved at gøre brug af
en af de følgende foranstaltninger: sluk for det for-
styrrende apparat og anvend heller ikke WIFI-kame-
raet i nærheden af apparatet, som drives med en
frekvens i en høj sendeeffekt. Øg afstanden til det
forstyrrende apparat. Spørg forhandleren eller en
fagperson for radio-/ TV-apparater til råds ved pro-
blemer. EU-konformiteterklæringens fuldstændige
tekst kan ses på følgende internetadresse:
https://www.briloner.com/de/service/
informationen-zu-leuchten/
eu-konformitaetserklaerung-fuer-funkanlagentyp.php
Sådan forholder du dig rigtigt
Monter lampen sådan, at den er beskyttet mod
fugt, snavs og mod for kraftig opvarmning.
Kontroller inden boringen, at der ikke befinder
sig gas-, vand- eller strømledninger på boreste-
det. Montagen skal udføres af fagkyndige per-
soner. Vær absolut opmærksom på væggens
beskaffenhed, da det vedlagte fastgørelsesma-
teriale ikke er egnet til alle vægarter. Få oplysning

81 DK
Sikkerhed / ForberedelseSikkerhed
hos forhandleren omkring de egnede skruer og
rawlplugs til den enkelte vægs beskaffenhed.
For en uhensigtsmæssig væg-rawlplug-forbin-
delse og skader som er opstået derigennem
overtager producenten ikke nogen hæftelse.
Vær hele tiden koncentreret! Vær altid opmærk-
som på hvad du gør og brug din sunde fornuft.
Anvend lampen under ingen omstændighed,
når du er ukoncentreret eller føler dig utilpas.
Kontroller inden montagen, om montagestedet
er egnet til lampens vægt.
Gør dig fortrolig med alle anvisninger og af-
bildninger i denne vejledning samt med selve
lampen inden anvendelsen.
Sikkerhedshenvisninger
for batterier / akkuer
LIVSFARE!
Hold batterier / akkuer udenfor børns rækkevidde.
Opsøg i tilfælde af slugning straks lægehjælp!
Indtagelse kan forårsage forbrændinger, per-
forering af blødt væv og døden. Alvorlige for-
brændinger kan forekomme inden for 2 timer
efter indtagelse.
EKSPLOSIONSFARE!
Genoplad aldrig ikkeopladelige batterier igen.
Kortslut ikke batterier / akkuer og / eller åben
disse ikke. Der kan opstå overophedning, brand-
fare eller eksplosion.
Smid batterier / akkuer aldrig i ild eller vand.
Udsæt batterier / akkuer ikke for mekanisk be-
lastning.
Risiko for udsivning fra batteriene /
akkuerne
Undgå ekstreme betingelser og temperaturer,
som kan påvirke batterier / akkuer, f.eks. var-
melegemer / direkte sollys.
Hvis batterier / akkuer er lækket, skal du undgå
at få kemikalierne på huden, i øjnene og i
slimhinderne! Skyl de berørte steder med det
samme med klart vand og opsøg en læge!
BÆR BESKYTTELSESHAND-
SKER!
Udløbne eller beskadigede batterier / akkuer
kan forårsage ætsninger ved berøring med hu-
den. Bær i dette tilfælde derfor egnede beskyt-
telseshandsker.
I tilfælde af en lækage hos batterierne / akku-
erne, skal De fjerne disse med det samme fra
produktet for at undgå beskadigelser.
Anvend kun batterier / akkuer af samme type.
Bland ikke gamle batterier / akkuer med nye!
Fjern batterierne / akkuerne, når produktet ikke
anvendes i en længere periode.
Risiko for beskadigelse af produktet
Anvend udelukkende den angivne batteri- /
akkutype!
Indsæt batterier / akkuer iht. polaritetsmærknin-
gen (+) og (-) til batteri / akku og produktet.
Rengør kontakter ved batteriet / det genoplade-
lige batteri og i batterirummet før ilægningen
med en tør, fnugfri klud eller en vatpind!
Fjern brugte batterier / akkuer omgående fra
produktet.
Den rigtige polaritet vises i batterirummet.
Forberedelse
Nødvendigt værktøj og
materiale
Det angivne værktøj og materiale følger ikke med
leveringen. Der er tale om uforpligtende angivelser
og værdier til orientering. Materialets beskaffenhed
afhænger af de individuelle forhold på stedet.
– blyant / markeringsværktøj
– 2-polet spændingsmåler
– skruetrækker
– boremaskine
– bor (ca. ø 6 mm)
– skævbider
– stige

82 DK
... / Skift af batterier / Vedligeholdelse og rengøring / Bortskaffelse / InformationMontering af LED-lyspanel / Tænd / sluk af lampen / indstilling ... / Betjening ...
Montering af LED-lyspanel
RISIKO FOR ELEKTRISK
STØD!
Vigtigt: Den elektriske tilslutning skal foretages af
en uddannet elektriker eller en person der er instrueret
i elektriske installationer. Denne person skal have
kendskab til lampens egenskaber og bestemmelser
for tilslutningen. Fjern hertil sikringen eller slå afbry-
deren til overstrømsbeskyttelsen i tavlen fra (0-stilling)
(se afbildning A).
Isæt batterierne under overholdelse af polariteten
(+ og -) i batterirummet.
Fjern de synlige skruer af LED-lyspanelet 1
der befinder sig på siden af lyspanelet 2 (se
afbildning A) og tag monteringsbeslaget 3
på bagsiden af (se afbildning B).
Marker borehullerne med hjælp af de i monte-
ringsbeslaget 3 til skruerne 5 beregnede
huller.
Bor nu fastgørelseshullerne. Sørg for at tilfør-
selsledningen ikke beskadiges.
Sæt rawlpluggene 4 ind i borehullerne (se
afbildning C).
Fastgør monteringsbeslaget 3 med de leverede
skruer 5 (se afbildning D).
Træk beskyttelsesslangerne 8 over nettilslut-
ningens (ekstern) 7 ledninger L og N (se
afbildning E).
Forbind nu LED-lyspanelets tilslutningsledning
ved hjælp af samlemuffen 6 med nettilslut-
ningsledningen (ekstern) 7 (se afbildning E).
Sørg for at nettilslutningsledningens (ekstern) 7
enkelte ledere tilsluttes korrekt: strømførende
leder; sort eller brun = symbol L, nulleder, blå =
symbol N, beskyttelsesleder, grøn-gul m= sym-
bol (jordforbindelse).
Vær opmærksom på at den sidder rigtigt.
Skru nu LED-lyspanelet 1 ved hjælp af skruerne
2 sammen med monteringsbeslaget 3.
Bemærk: Vær opmærksom på at skruerne
2 falder i hak (se afbildning F und G).
Sæt sikringen i igen eller tænd for afbryderen
til overstrømsbeskyttelsen i tavlen (I-stilling) (se
afbildning H).
Dit LED-lyspanel er nu driftsklart.
LED lyspanelet er også egnet som indbygnings-
lampe til montage i sænkede lofter.
Denne montage bør ubetinget udføres af en
fagperson, da der skal tages hensyn til de
nøjagtige mål af LED-lyspanelet i loftskon-
struktionen.
Tænd / sluk af lampen /
indstilling af lysfarven
Tænd for lyskontakten (vægafbryderen), for at
tænde / slukke for LED-lyspanelet.
Hvis du gentagne gange trykker på lyskontakten,
skifter LED-lyspanelet mellem kold, varm og
neutral hvid.
Betjening af LED-lyspanelet
med fjernbetjeningen
Bemærk: LED-lyspanelet har en memory-funktion.
Denne funktion gemmer den funktion, som blev
valgt til sidst.
Tænd LED-lyspanelet ved hjælp af lyskontakten.
Alle andre funktioner styres udelukkende med fjern-
betjeningen 9 (se afbildning I).
Tænd
Sluk
Dæmpning (lysere)
Dæmpning (mørkere)
Kold hvid, trinløs
Neutral hvid
Varm hvid, trinløs
Timerfunktion (30 min.)
Kold hvid / neutral hvid / varm hvid

83 DK
... / Skift af batterier / Vedligeholdelse og rengøring / Bortskaffelse / InformationMontering af LED-lyspanel / Tænd / sluk af lampen / indstilling ... / Betjening ...
Natlys-funktion
Lagringsplads til individuelle farveprogrammer
:
- Indstil lampen som ønsket.
- Hold knappen M1 eller M2 trykket.
- Når lagringen er udført, blinker lampen
en gang.
Skift af batterier
Når fjernbetjeningens 9 rækkevidde aftager, skal
batterierne skiftes (se afbildning I).
Skub batterirumslåget 10 på bagsiden af fjern-
betjeningen 9 af i pilretningen. af fjernbetje-
ningen 9.
Fjern batterierne.
Isæt de nye batterier (AAA) i fjernbetjeningen 9.
Bemærk: Den rigtige polaritet vises i batteri-
rummet af fjernbetjeningen 9.
Skub batterirumslåget 10 igen på fjernbetjenin-
gen 9.
Vedligeholdelse og rengøring
RISIKO FOR ELEKTRISK
STØD!
Afbryd altid til rengøringen lampen fra strømnettet.
Fjern hertil sikringen eller slå afbryderen til overstrøms-
beskyttelsen i tavlen fra (0-stilling) (se afbildning A).
Sørg for at lampen er slukket og afkølet, inden
du rører ved produktet for at undgå forbræn-
dinger.
Brug ingen opløsningsmidler, benzin eller lig-
nende. Herved vil lampen kunne tage skade.
Anvend til rengøring af LED-lyspanelet 1 en
tør, fnugfri klud.
Sæt sikringen i igen eller tænd for afbryderen
til overstrømsbeskyttelsen i tavlen (I-stilling) (se
afbildning H).
Bortskaffelse
Indpakningen består af miljøvenlige materialer, som
De kan bortskaffe over de lokale genbrugssteder.
b
a
Bemærk forpakningsmaterialernes
mærkning til affaldssorteringen, disse er
mærket med forkortelser (a) og numre
(b) med følgende betydning: 1–7: kunst-
stoffer / 20–22: papir og pap / 80–98:
kompositmaterialer.
Produktet og indpakningsmaterialerne
kan genbruges; bortskaf disse særskilt til
en bedre affaldsbehandling. Triman-
logoet gælder kun for Frankrig.
For miljøets skyld, så må produktet aldrig
smides ud sammen med
husholdningsaf-
faldet, når det er udtjent, men skal afleveres
til en fagmæssig korrekt bortskaffelse. De
kan informere Dem vedrørende opsam-
lingssteder og deres åbningstider hos
deres ansvarlige forvaltning.
Defekte eller brugte batterier / akkuer skal genbruges
iht. retningslinje 2006/66/EF og dennes ændringer.
Aflevér batterier / akkuer og / eller produktet via et
af de tilbudte indsamlingssteder.
Miljøskader gennem forkert
bortskaffelse af batterierne /
akkuerne!
Batterier / akkuer må ikke bortskaffes via husholdnin
gs-
affaldet. De kan indeholde giftige tungmetaller og er
underlagt behandlingen for særaffald. De kemiske
symboler for tungmetaller er følgende: Cd = kadmiu
m,
Hg = kviksølv, Pb = bly. Aflverer derfor brugte bat-
terier / akkuer hos en kommunal genbrugsstation.
Information
Garanti
Du får 36 måneders garanti på dette apparat fra
købstidspunktet. Apparatet er blevet omhyggeligt
produceret og har gennemgået en grundig kvalitets-
kontrol. Indenfor garantitiden retter vi omkostnings-
frit alle materiale- eller produktionsfejl.

84 DK
Information
Skulle der alligevel vise sig mangler i løbet af ga-
rantitiden, så bedes du sende apparatet til den an-
givne service-adresse under angivelse af følgende
varenummer: 14146606L / 14154106L.
Garantien dækker ikke skader som følge af ikke-
fagkyndig håndtering, ikke-overholdelse af betjenings-
vejledningen eller indgreb foretaget af uautoriserede
personer samt sliddele (som f.eks. lyskilder). Garan-
titiden forlænges eller fornys ikke gennem garantiy-
delsen.
Konformitetserklæring
Dette produkt opfylder kravene iht. de gældende
europæiske og nationale retningslinjer (retningslinje
2014/53/EU, lavspændingsretningslinje
2014/35/EU, økodesign retningslinje
2009/125/EF, RoHS-retningslinje 2011/65/EU).
Overensstemmelsen er blevet dokumenteret. Tilsva-
rende erklæringer og bilag er deponeret hos pro-
ducenten.
Hermed erklærer Briloner Leuchten GmbH & Co. KG,
at radioudstyret type 14146606L / 14154106L
svarer til retningslinjen 2014/53/EU.
EU-konformiteterklæringens fuldstændige tekst kan
ses på følgende internetadresse:
https://www.briloner.com/de/service/
informationen-zu-leuchten/
eu-konformitaetserklaerung-fuer-funkanlagentyp.php
Producent / service
Briloner Leuchten GmbH & Co. KG
Im Kissen 2
59929 Brilon
TYSKLAND
Tel.: +49 29 61 / 97 12–800
Fax: +49 29 61 / 97 12–199
E-Mail: [email protected]
www.briloner.com
Gratis service-nummer:
Tel.: 00800 / 27456637
IAN 360045_2010
Hold kvitteringen og varenummeret (fx IAN
123456_7890) klar som dokumentation for købet
i forbindelse med alle forespørgsler.

I
910
14146606L / 14154106L

BRILONER LEUCHTEN GMBH & CO. KG
Im Kissen 2
59929 Brilon
GERMANY
Stand der Informationen · Last Information Update
Version des informations · Stand van de informatie
Stan informacji · Stav informací · Stav informácií
Estado de las informaciones · Tilstand af information: 03 / 2021
Ident.-No.: 14146606L / 14154106L032021-8
IAN 360045_2010
-
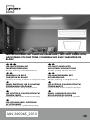 1
1
-
 2
2
-
 3
3
-
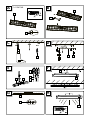 4
4
-
 5
5
-
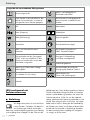 6
6
-
 7
7
-
 8
8
-
 9
9
-
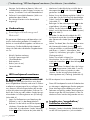 10
10
-
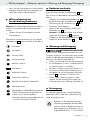 11
11
-
 12
12
-
 13
13
-
 14
14
-
 15
15
-
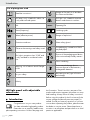 16
16
-
 17
17
-
 18
18
-
 19
19
-
 20
20
-
 21
21
-
 22
22
-
 23
23
-
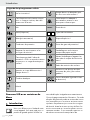 24
24
-
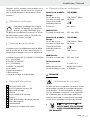 25
25
-
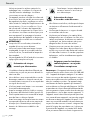 26
26
-
 27
27
-
 28
28
-
 29
29
-
 30
30
-
 31
31
-
 32
32
-
 33
33
-
 34
34
-
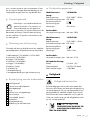 35
35
-
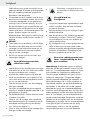 36
36
-
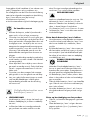 37
37
-
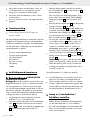 38
38
-
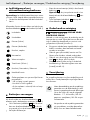 39
39
-
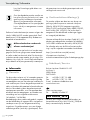 40
40
-
 41
41
-
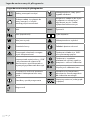 42
42
-
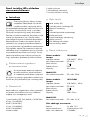 43
43
-
 44
44
-
 45
45
-
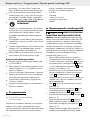 46
46
-
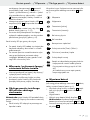 47
47
-
 48
48
-
 49
49
-
 50
50
-
 51
51
-
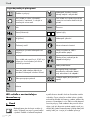 52
52
-
 53
53
-
 54
54
-
 55
55
-
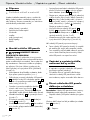 56
56
-
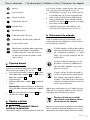 57
57
-
 58
58
-
 59
59
-
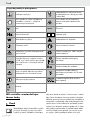 60
60
-
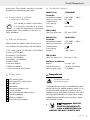 61
61
-
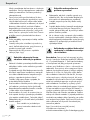 62
62
-
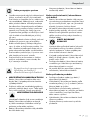 63
63
-
 64
64
-
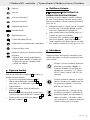 65
65
-
 66
66
-
 67
67
-
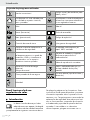 68
68
-
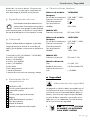 69
69
-
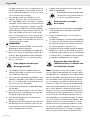 70
70
-
 71
71
-
 72
72
-
 73
73
-
 74
74
-
 75
75
-
 76
76
-
 77
77
-
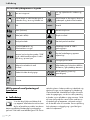 78
78
-
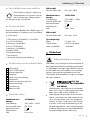 79
79
-
 80
80
-
 81
81
-
 82
82
-
 83
83
-
 84
84
-
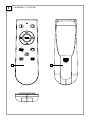 85
85
-
 86
86


en otros idiomas
- français: LIVARNO 360045 Le manuel du propriétaire
- Deutsch: LIVARNO 360045 Bedienungsanleitung
- Nederlands: LIVARNO 360045 de handleiding
- slovenčina: LIVARNO 360045 Návod na obsluhu
- dansk: LIVARNO 360045 Brugervejledning
- polski: LIVARNO 360045 Instrukcja obsługi
Artículos relacionados
-
LIVARNO 428255 El manual del propietario
-
-
-
-
-
-
-
-
-
